Up next in 10



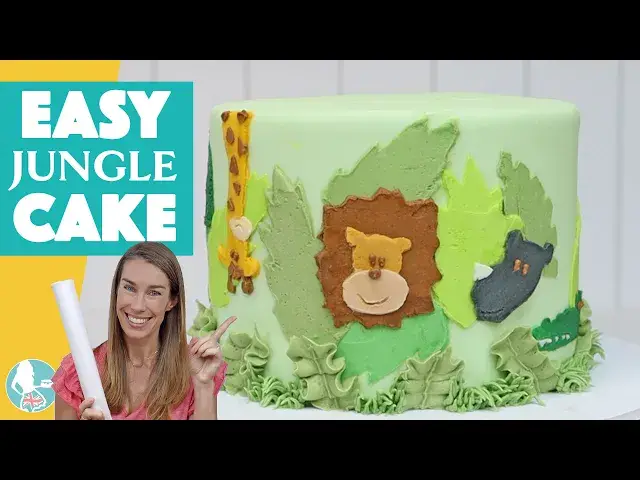
Make this adorable and easy jungle theme cake with just buttercream and parchment paper! In this tutorial I'll show you how to make your own stencils for leaves and animals and how to layer them to make a jungle cake design. The recipes for my 4 Minute Buttercream and Very Vanilla Cake, and my tutorial on 10 tips to make a cake, are linked below.
💫Start your FREE 7 day trial on my cake school
https://britishgirlbakes.teachable.com/p/all-you-can-cake/
🎂LEARN The Basics of Cake and The Basics of Buttercream in my most popular online courses!
https://britishgirlbakes.teachable.com/
👩🏼🍳My 4 Minute Buttercream recipe
https://www.britishgirlbakes.com/buttercream-frosting/
👩🏼🍳My Very Vanilla Cake recipe
https://www.britishgirlbakes.com/very-vanilla
🎥10 Steps to Make a Cake
https://youtu.be/UvNW-fzZp-8
📄READ a written version of this tutorial (with the template for the leaves and animals)
https://www.britishgirlbakes.com/easy-jungle-theme-cake/
Show More Show Less View Video Transcript
0:00
make this adorable jungle theme cake
0:02
with just buttercream and parchment
0:04
paper I'm using my very vanilla cake to
0:06
make four six inch layers for this
0:09
because I want a tall cake so there's
0:11
lots of room on the sides for
0:13
decorations this is one batch of my 4
0:15
minute buttercream and I'm scooping out
0:17
about two cups to use for the jungle
0:19
animals later and for the rest I'm
0:22
adding green food coloring to tint the
0:24
filling and frosting you'll need a
0:26
buttercream that sets like my 4minute
0:29
buttercream to be be able to create the
0:30
jungle theme cake design I'm layering
0:34
cake and filling to assemble my cake you
0:36
could do the design on the top of the
0:38
cake instead if you prefer to make a
0:40
larger shorter cake I'm chilling it
0:43
before giving it a crumb coat and then a
0:46
final coat of frosting if you need
0:48
step-by-step instructions for this part
0:51
check out my tutorial on how to make
0:53
your first cake and the link for that is
0:55
in the video description and at the top
0:57
of the screen put the cake in the fridge
0:59
for at least an hour before you decorate
1:01
it to chill and set the frosting for the
1:05
jungle decoration make your own cake
1:07
stencils with just parchment paper or
1:09
wax paper a pencil and scissors I've
1:12
drawn these leaves and jungle animals
1:15
and the link for the free template is in
1:16
the description below this video too
1:19
you'll need a separate piece of
1:20
parchment or wax paper for each leaf
1:23
with at least an inch or ideally two of
1:26
paper around the leaf trace the leaves
1:29
onto each piece of of paper with a
1:31
pencil which writes better than pens
1:33
onto the surface of the parchment or wax
1:35
paper if the paper comes from a roll it
1:38
will curve which makes it easier to use
1:40
as a stencil later cut out the leaves
1:43
leaving the paper around them intact to
1:46
make your own stencils now tint some
1:49
buttercream for your leaves since I used
1:52
light green for the frosting of the cake
1:54
I can start with that adding more colors
1:56
to make darker Shades adding yellow will
2:00
make the green brighter whereas adding
2:02
pink or orange or brown will make the
2:04
green duller you only need a small
2:07
amount of buttercream for each of these
2:09
shades of green this is plenty for my
2:11
tall 6-in cake I'd say a/4 of a cup of
2:14
each color would be fine to use your
2:17
stencils let the curve of the parchment
2:20
or wax paper stencil wrap around the
2:22
cake and then spread buttercream over
2:24
the leaf shape you'll need to press the
2:27
stencil against the cake on both sides
2:29
let left and right to hold it in place
2:32
as you spread and try not to pull your
2:34
spatula straight away from the cake
2:36
because that will pull the buttercream
2:38
and the stencil with it instead sort of
2:41
swipe it away diagonally and that way
2:43
you won't move the stencil scrape over
2:45
the buttercream a few times to take off
2:47
the excess to leave a thin smooth layer
2:50
behind the thinner the buttercream the
2:52
neater the edges of the leaf will be
2:54
when you pull the stencil off if the
2:56
stencil has moved during the process it
2:59
will SMUD smudge the outline of your
3:00
shape but that's easy to fix by scraping
3:03
off the smudge with a toothpick because
3:05
the stencil buttercream is still soft
3:07
but the frosting of the cake is cold and
3:10
hard so you won't damage that switch
3:13
between your colors for your leaves and
3:15
as you add more and more leaves be
3:17
careful when you're positioning each
3:18
stencil so that it's not touching any of
3:21
the leaves already on the cake because
3:23
the paper of the stencil will damage the
3:25
buttercream of those leaves when you
3:27
don't have space for more stencils put
3:29
the cake in the freezer for 5 minutes or
3:32
the fridge for about half an hour to set
3:34
these leaves and meanwhile you can
3:37
scrape the buttercream off your stencils
3:39
to reuse those stencils when the first
3:42
round of leaves have set in the fridge
3:44
or freezer add more leaves in the spaces
3:46
between them and now that the first
3:48
leaves have set it's fine to layer the
3:50
stencils on top of them because the
3:52
paper won't damage the cold firm
3:54
buttercream of the first leaves put the
3:57
cake back in the fridge or freezer and
3:59
now make your jungle animals just like
4:02
with the leaves use a separate piece of
4:04
parchment or wax paper for each animal
4:07
but also you'll need a separate stencil
4:09
for each color of every animal so for
4:11
example for this rhino I'm making one
4:13
stencil for the gray head and then
4:16
another stencil for the white Tusk
4:18
you'll see why in a minute tint the
4:20
colors you'll need for your animals for
4:23
small amounts of several colors I like
4:25
to use a cupcake pan to mix them so that
4:28
I only have one pan to wash at the end
4:29
end instead of lots of little bowls when
4:32
the leaves have chilled and set use the
4:34
animal stencils on the cake starting
4:37
with the largest stencil for each animal
4:39
so the main for this lion the neck and
4:42
head for this giraffe and so on just
4:45
like with the leaves make sure the
4:46
stencils don't touch any of the animals
4:48
on the cake otherwise the paper of the
4:51
stencil will damage those animals keep
4:53
your toothpick handy for any touchups
4:55
and it's best to do these straight away
4:58
as soon as you've peeled off the stance
5:00
so that the buttercream of the animal is
5:02
still soft and easy to scrape off put
5:04
the cake back into the freezer for 5
5:06
minutes or the fridge for 20 minutes
5:08
until the first parts of the animals
5:10
have chilled and set so they're firm and
5:13
not sticky then add the details of the
5:16
animals which are the stencils you made
5:17
for the different colors of each animal
5:20
the face for the lion the Tusk for the
5:22
Rhino the teeth for the crocodile you
5:25
can add more leaves if you want to now
5:27
that you've seen how much of your cake
5:29
your animals are going to cover up I'm
5:31
being lazy because this cake is for my
5:33
almost 2-year-old and he's only going to
5:35
see the front so I'm only putting
5:37
animals on the front but you could
5:39
easily fit 15 or 20 animals onto this
5:41
cake if you wanted to chill again before
5:44
adding the next round of details and by
5:46
doing this in stages your stencils won't
5:49
damage any of the details that are
5:50
already on the cake I mentioned that a
5:53
thin layer of buttercream is best for
5:55
stencils so that the edges will be neat
5:57
when you pull the stencil off but if
6:00
there's a dark color underneath your
6:02
stencil like the dark brown man of this
6:05
lion underneath the light brown muzzle
6:07
you'll need a thicker layer to cover up
6:09
the dark color underneath if you don't
6:12
like the way a detail turns out just
6:14
stencil again over the top for the eyes
6:17
I'm using the dark brown buttercream in
6:19
a Piping Bag with a small round piping
6:21
tip a number three to pipe little lines
6:25
and then I'm using a toothpick to draw
6:26
the facial expressions these smiles this
6:30
is a leaf tip like a number 352 with the
6:34
leftover leaf colored buttercream and to
6:36
make the buttercream ruffle like this
6:38
wiggle your wrist up and down slightly
6:41
as you squeeze the Piping Bag to push
6:42
the buttercream out and pull the bag
6:45
upwards to pipe a grass tip is the
6:48
quickest way to fill in the gaps around
6:50
the bottom Edge instead of piping each
6:52
blade of grass individually with a small
6:54
round tip rest the grass tip on the
6:57
cakeboard and squeeze the bag to push
6:59
the cream out and then pull upwards as
7:01
you keep squeezing to pipe Long Blades
7:03
of grass isn't this cute and it's so
7:06
easy and affordable to make by using
7:08
homemade stencils you can keep this in
7:11
the fridge for 3 days but take it out 2
7:13
hours before you serve it to let the
7:15
cake and buttercream warm up to room
7:17
temperature and that's when it will
7:19
taste the best thanks for watching visit
7:22
my cake school on British gb.com to
7:24
learn hundreds more cake decorating
7:26
techniques and designs
#Cooking & Recipes
#Desserts
#Special Occasions