Up next in 10


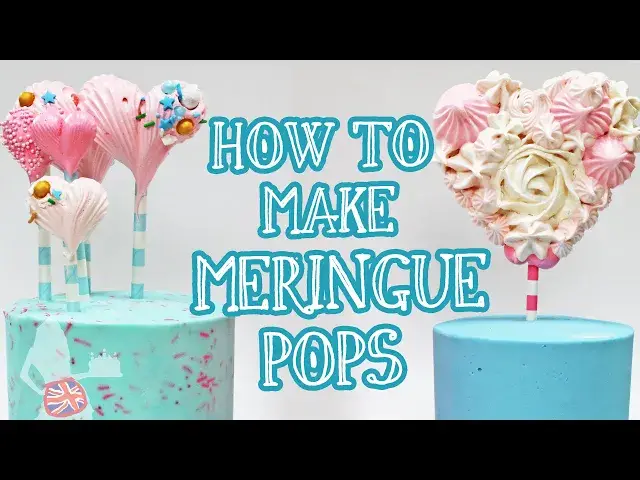
Meringue pops are easy to make and they make colourful and delicious cake toppers that add height to your cakes! This is one of the fifty techniques in my online course on 50 Easy Cake Decorating Techniques for ANY Skill Level. SIGN UP to take the course on my cake school here: https://www.britishgirlbakes.com/online-courses
To read a written version of this tutorial (with photos!) click here: http://www.britishgirlbakes.com/how-to-make-meringue-pops/
SUBSCRIBE to my channel for new cake decorating tutorials every week!
Show More Show Less View Video Transcript
0:00
Morang pops are my favorite cake topper because it's easy to pipe any shape and to create lots of colour and texture, and they're delicious
0:08
My recipe makes about 24 meringue pops depending on their size, but you can easily halve or double the recipe depending on how many you need
0:16
Start by separating four eggs by cracking the eggs and then passing the yolk back and forth between the eggshells, letting the whites fall down into a bowl underneath
0:25
Make sure you don't get any of the yolk into the egg whites. To be safe, you can transfer the eggshells
0:29
egg whites one at a time into the bowl of your mixer so that if you do spill any egg yolk into
0:34
the bowl you'll only be contaminating one egg white. You can use the yolks to make lemon curd
0:40
or any flavour of curd which makes a delicious filling for cakes or you can fold it into your frosting
0:44
for a strong fruity flavour. If you're weighing your egg whites maybe because you bought egg whites
0:49
in a carton you'll need about 160 grams or 5.5 ounces. Pour the egg whites into the
0:55
bowl of your mixer and add one cup of sugar which is 225 grams or
0:59
8 ounces and add a pinch of salt. Heat a small saucepan of water over high heat until it's boiling
1:07
Turn the heat off and place your mixing bowl on top of the saucepan. Whisk the egg white mixture
1:12
together for two minutes and then pinch some and rub your fingers together. And if you fail any
1:16
grains of sugar, whisk for another minute. If the mixture is smooth, move the bowl to your mixer
1:22
and you'll need a whisk attachment for this next part. Whisk on the highest speed until stiff peaks
1:27
form, which takes about seven minutes. While the egg whites are thickening, prepare your piping
1:32
bags by fitting them with whatever piping tips you'd like to use. I like using any star shapes
1:38
like the typical 1M tip, and open star tips like an 8b or 4B or number 32 or 199 work really
1:45
well too. Fold the tops of your piping bags over so that they'll be easier to fill
1:51
with less mess. Then check on your egg whites. This is the texture you're looking for
1:57
While the whisk is whisking, you'll see texture in the egg whites that stays there
2:01
It doesn't sink back into the egg whites by the time the whisk gets back around to that part of the bowl again
2:07
Lift the whisk out of the bowl and the whisk should leave a peak in the egg whites that stays upright even after removing the whisk It fine if the peak droops slightly
2:17
Now look at the egg white on the whisk. There should be a peak at the top of the whisk that might fold over slightly at the end
2:23
but if you hold the whisk upright the peak of the egg whites should hold its shape
2:28
The egg whites should look thick and glossy. Spoon the mixture into your piping bags or into bowls, which you can tint using gel colour
2:36
tint using gel colours. Try to fold the colour in gently instead of stirring aggressively
2:45
Spoon all of your colours of meringue into piping bags and now you're ready to pipe
2:52
Line a baking tray or two with parchment paper or a non-slip mat. Place a paper straw down and
2:58
hold it steady with one hand while you pipe with the piping bag in your other hand
3:03
I'm piping hearts with an 8b piping tiping tape. squeezing the piping bag and moving the bag slightly away from me to make a bulge at the top
3:11
and then pulling the bag back towards me and releasing my pressure on the bag as I swipe away to make the tip at the bottom of the heart
3:17
This is the same technique as for piping waveboarders on a cake using frosting from the previous module
3:23
You can use a toothpick to pull off any stray strands of meringue to tidy up the shape
3:28
If you want to, you can place sprinkles on the shape now and they'll bake into the meringue pops
3:33
You can pipe half of the pops upside down to fit more onto each tray
3:40
If you pipe a shape you don't like, like this heart I attempted with a 1M tip, you can wipe
3:44
it off with a paper towel and pipe something else instead. Toothpicks are really useful to pop any air bubbles in the meringue or to tidy up any imperfections
3:57
For a swirl, use any star tip, but a 1M or 2D are my favourites
4:03
Start piping at the top of a straw and as you spiral outwards you'll cover up more of the straw
4:08
which the meringue will attach to. If you don't want to hold the straw as you pipe, to stop it from moving
4:14
you can pipe a dot of meringue onto the baking tray first and push the straw into that to hold it steady and then pipe your swirl or whatever shape you piping I like to add sprinkles to match the colour scheme of my cake or if I going to use a certain sprinkle mix to make a sprinkle border around the bottom of a cake
4:33
I'll use that same sprinkle mix to decorate my meringue pops. It takes a bit of planning ahead
4:38
but I think it's worth the effort because it really brings everything on the cake together
4:42
This is one of the 50 techniques I teach in my online course on 50 easy cake decorating techniques for any skill level
4:48
and you can find out more and sign up by clicking the link in the top of the screen or it's in the video description
4:54
You can see that I can fit a lot more meringue pops on my tray by piping half of them upside down
4:58
to fit a meringue pop at the bottom in between two other meringue pops
5:03
If you use a round tip you won't create texture on the meringue, or if you overmix the meringue when you add colour, you'll make the meringue runny
5:10
and it won't hold the texture of the piping tip as well as meringue that isn't overmixed
5:15
If that happens, you can use the toothpick to flatten any unwanted texture, to make a smooth shape with no texture
5:20
You can make these on parchment paper instead of a silicon mat
5:24
and the process is exactly the same. To make a shape with lots of texture and as much colour as you like
5:30
draw or trace a shape onto the parchment paper and place a straw down
5:34
so that it stops at the midpoint of the shape. The pencil will transfer onto the back of your shape
5:39
so it's a good idea to flip the parchment paper over before you start piping
5:45
Use a variety of piping tips and techniques to fill the shape. piping swells and rosettes, and whatever other textures you like
5:53
I'm using a few shades of pale pink for this heart, but you can make it as colourful as you like
5:57
This would be a fun way to create numbers to use as cake topper's for a birthday cake
6:02
When I make meringue pops, I try to make them for several cakes at a time to make the most of the batch
6:07
since it takes a few minutes to prepare the meringue mixture, so I like to maximise that time spent
6:12
by sharing it amongst several cakes. You can also make these meringue pops as treats on their own, and you can skip the straws if you like
6:22
You can pipe little meringue kisses with a 1M tip or any other star tip, and press them into the frosting on top or on the side of a cake
6:29
or they work really well on top of number cakes to add a bit of colour After piping all of your marangs bake them at 200 degrees Fahrenheit or 90 degrees celsius for 90 minutes By cooking them at a low temperature you prevent the
6:41
meringue this colouring. Also at this temperature my paper straws don't burn and I've also
6:46
used cookie pop sticks and those don't burn either. If you don't have either of those you can even
6:51
use toothpicks or wooden skewers. After 90 minutes when you touch a meringue pop it should be
6:57
firm, not soft or sticky. If it's still sticky, cook them for another 15 minutes and then try again
7:04
When the meringue pops are cooked, turn the oven off but leave the meringue pops in the oven for
7:08
another two hours. After one hour of cooling, I crack the oven door open, so that the pops cool
7:14
completely. By letting the meringue pops cool this gradually, you're preventing them from cracking
7:20
When they're cool, you'll be able to lift them easily off the parchment paper or silicon mat
7:24
Most sprinkles stay shiny when you bake them, and the paper straws don't burn because the baking temperature is so low
7:33
After they cool, I store my meringue pops in a large tupperware, like a cake caddy, so that they stay crispy
7:40
I put a piece of parchment paper in between each layer of marangs to make sure they don't stick to each other
7:45
They'll be fine like this for a week. If you don't store them in an airtight container, they'll get soggy
7:51
I push the pops into the cake as close to serving and serving a few. possible so that they stay crispy. If the straws are too long you can cut them so that they
8:00
don't stick up as high out of the cake and it's really easy to cut paper straws so i like
8:05
using them instead of cookie pops. They also come in every color imaginable so you can match the
8:11
colour scheme of your cake. I like to vary the height of each of the meringue pops. These meringue
8:17
pops adds so much texture and color to cakes that they make even a very simple frosted cake look fancy
8:23
Take my free online course on 10 frosting techniques by going to British Girlbakes.com
8:27
and for more cake ideas and inspiration, join my club for access to all of the classes on my
8:32
online cake school, both current and future classes, as well as exclusive members-only live
8:36
demonstrations and Q&A sessions. The link for my online cake school is in the top of the screen
8:41
and in the video description, or you can go to British Girlbakes.com. Thanks for watching
#Cooking & Recipes
#Desserts
#Baked Goods