0:00
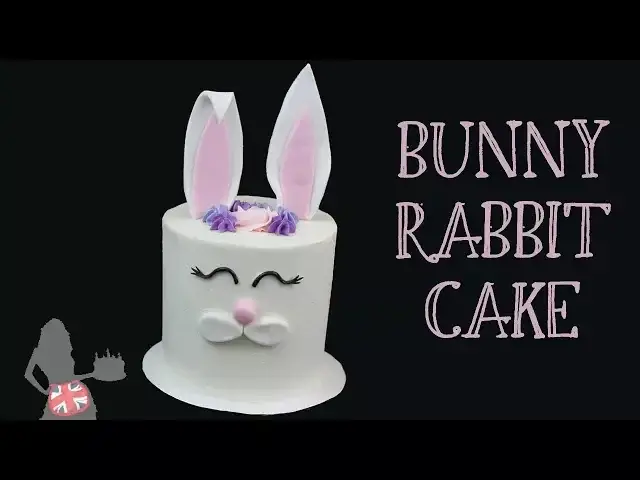
Hi! I'm Emily and I'm going to show you how to make this adorable bunny rabbit cake just in time for Easter
0:08
I'm going to start by making the fondant details of the bunny rabbit so they have time to set while I make my cake
0:14
I'm using a non-stick silicon mat and I'm mixing fondant with a bit of CMC or Tylos powder
0:20
This dries out the fondant and makes it set quicker and harder so the ears will be able to stand up straight
0:26
Need your fondant until it's soft and pliable and then roll it in the fondant and then roll it
0:30
out thin, about a quarter of an inch thick. Use a sharp knife or a pizza cutter to cut out an ear and then check the size against your cake
0:38
pan to make sure it's in proportion. Then place the air on top of the fondant and cut out another identical ear
0:48
Tint some fondant pale pink, adding a tiny bit of gel colour at a time so the fondant doesn't
0:53
get too bright. When you're happy with the colour, roll it out as thin as you can
0:58
Cut out a piece the same shape as your white ear, but then use your knife or your pizza cutter to trim it so that it's the same general shape but just a bit smaller
1:08
Trace it onto more pink fondant and now you have the pink centres of the bunny rabbit ears Stick a wooden skewer or kebab stick into the ear going about halfway up the air It doesn matter if you can see the skewer through the white fondant because you going
1:22
to cover it with pink fondant next. Use a paint brush with a little bit of water on it to stick the pinks of the ears onto
1:29
the whites. Gently run your finger along the edge of the pink fondant to smooth it into the white part
1:35
of the ear. You can shape your ears into a more realistic position, so I'm folding one ear over a little bit
1:41
at the top and curving the bases, using my tools to prop them up in these positions
1:50
Now make a nose out of the same pale pink fondant that you used for the ears, making it a thick
1:54
disc rather than a round ball, because if it's too heavy it will slide down the frosting when
1:59
you stick it into the cake. Roll two equal Pseised white balls to turn into cheeks, flattening them
2:04
and shaping them with your fingers. Look at how cute this is going to look
2:21
Okay, now for the eyes. I'm going to make them curved so the bunny rabbit looks like he's smiling
2:26
and I going to stick some eyelashes on to make this look whimsical Roll the fondant into a log and cut or break off a piece to curve into an eye I using dark brown fondant but you could use black instead Make another one to match
2:46
To make the eyelashes roll an even thinner log and cut it into six pieces
2:55
Roll the ends of each so you don't have those harsh angle, harsh angles of cut fondant
2:59
and then pinch three together at one end, and then pinch them onto the end of one eye
3:10
If they don't stick, you can brush them with a bit of water before attaching them
3:14
Grab your cake and frost it. I strongly recommend doing a crumb coat and then a final coat, so you don't get crumbs in your frosting
3:22
If you're new to cake decorating, check out my tutorials on how to build a cake and how to build a cake and how to
3:27
to frost a cake. My fondant decorations have firmed up a bit while I frosted my
3:32
cake so they're easier to apply now because they'll hold their shape better. I'm
3:37
pressing the cheeks gently into the frosting and now the nose. Now the eyes
3:42
with the pretty long eyelashes It important to do this immediately after frosting your cake so the frosting is still sticky And now the ears I sticking a wooden skewer or kebab stick
3:56
into the cake to measure the height, and now I'm marking that height on the skewers with
4:00
the ears. I'm using sharp scissors to cut where I made my mark. Push the skewer into both places
4:06
where the ears will go to pave the way through the ears. You can try sticking the ears straight
4:11
into the cake, but if they don't go in easily, as you push the final part in and you have to hold on to the fondant air, the fondant might crack
4:18
Now you can push the ears in on their skewers, pushing all the way down through the cake until the skewer hits the cakeboard and the base of the air is touching the frosting
4:27
I've tinted some buttercream in pastel shades of pink and purple and put some in a piping bag with a star tip
4:34
Now I'm piping on a frosting rose and a few little star blossoms
4:39
If you want to see how to pipe these flowers step by step, and a technique to pipe them and then place them on the cake so you don't make a mistake on the cake
4:47
watch my tutorial on how to make a flower cake. That's perfect! My bunny rabbit has a little crown of flowers
4:56
If you follow this tutorial, tag British Girl Bakes on your photos on social media
5:01
Check out British Girl Bakes and subscribe for new cake tutorials every week