Up next in 10


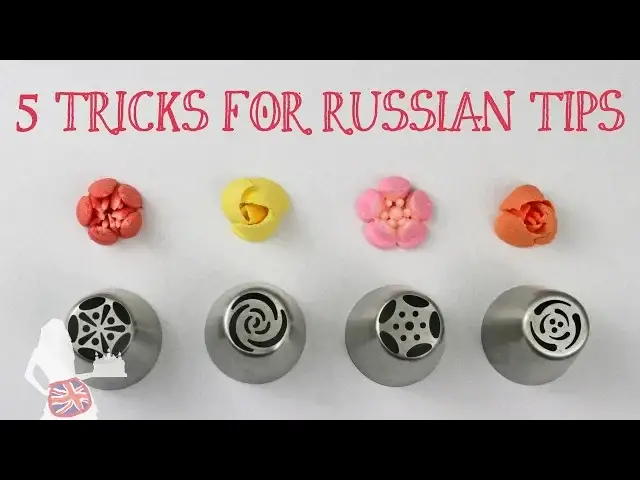
In this cake decorating tutorial I demonstrate 5 tricks for Russian tips (also called flower piping tips or flower nozzles), taking you through each stage of using them, from putting the tips in piping bags, preparing buttercream of the right consistency, different techniques to fill piping bags to make two tone and three tone coloured flowers, how to prepare your cake before piping the flowers, details of the piping technique and troubleshooting of why flowers "buckle" or why the petals break off as you pipe them, and different options for finishing touches. These are the tips I used for the cakes in this tutorial: https://amzn.to/2SCcZZG
To read this tutorial on my website click here: http://www.britishgirlbakes.com/5-tricks-for-russian-tips/
I use my 4 Minute Buttercream Frosting for this cake and you can watch the tutorial and get the recipe here: https://youtu.be/MFKfXbnU1Lw
To sign up for my online course on the BASICS of CAKE, click here: https://britishgirlbakes.teachable.com/courses/the-basics-of-cake
For my online course on 10 Cake Decorating Techniques click here: https://britishgirlbakes.teachable.com/courses/10-cake-decorating-techniques
SUBSCRIBE to my channel for new cake decorating tutorials every week!
British Girl Bakes is a participant in the Amazon Services LLC Associates Program, an affiliate advertising program designed to provide a means for sites to earn advertising fees by advertising and linking to products on www.amazon.com. If you buy any of the products I've linked out to, the price you pay won't be affected but I will make a small commission on anything you buy. Thank you for helping to keep the British Girl Bakes tutorials FREE!
Show More Show Less View Video Transcript
0:00
Hi, I'm Emily of British Girl Bakes and I'm going to show you how to use these elaborate-looking flower tips, which are also called Russian tips
0:07
With just one squeeze of a piping bag, you can create these intricate flowers that make stunning decorations for cakes
0:13
They look complicated, but they're actually very easy to use with just a few tricks, which I'm going to show you now
0:19
The first trick is how to get the buttercream consistency just right
0:24
If you're making a fresh batch of buttercream using my four-minute buttercream recipe, leave out the milk and the frost
0:29
will be the perfect consistency for these tips. If you've already added milk, because you're
0:35
going to use the buttercream to frost a cake, add a little bit more powdered sugar to
0:39
thicken it up. You'll get used to recognizing the consistency, but to start with
0:45
here are a few examples. This butter cream is too thick, and you can tell because it's
0:50
quite difficult to stir, and also when you lift your spatula, the peak of butter cream
0:54
it leaves behind is very rough and jagged because the frosting is too stiff
1:00
When the buttercream's too stiff, it will cling to your piping tip and not all of the petals will release when you squeeze the piping bag
1:07
So you'll get uneven rough edges on the petals and you can see that with these flowers here
1:13
If your buttercream's too stiff, add a bit of milk and if it's too soft so the flowers are coming out with their petals mush together and undefined
1:21
Just add a bit more sugar. Test the buttercream before you add your colours because otherwise you'll have to check and potentially change the consistency of every bowl of equal
1:30
separate colour. Here where the butter cream is too stiff, the details in the centre are clinging
1:35
to the tip and lifting right up out of the outer petals, leaving hollow petals. I definitely
1:41
need to add more milk to this before dividing it into different bowls and adding colour to each
1:45
one. This is what flowers look like when you get the consistency just right. The second trick is
1:52
how to prepare and fill your piping bags. These flower tips or Russian tips are bigger than
1:57
standard tips so they probably won't fit into the piping bags you already have
2:01
So what you can do to make them fit is drop them into a piping bag
2:05
use a pair of scissors to score around just above the tip of the tip
2:09
and then when you take the tip out you'll see a line scored behind
2:13
and you can cut along that and then when you drop the tip in it should go in
2:17
with just the tip of the tip sticking out. Now the bag's ready to use but you need to use but you need to
2:27
to fill it with buttercream first. Divide your butter cream into separate bowls and add
2:32
colour to each one. I like to use gel food colours because they're a lot thicker than liquid
2:36
colours so they won't affect the consistency of your buttercream. You don't have to mix your
2:41
colours in completely, they look quite nice when they're blended as well, like this yellow
2:45
and white frosting here. Part of the fun of these tips is that it's so easy to incorporate lots
2:51
of colours, so I'm going to show you how to do that now. There are a few methods to fill up the bags
2:56
and for this first one you're going to need a tall glass. Insert the piping bag into the glass with the tip at the bottom
3:03
and fold the top of the piping bag over the room of the glass and pull it down until the bag is quite tight inside the glass Spread the first color of butter cream around the outside of the bag and I like to use an offset spatula for this but you could also use a regular spatula or a spoon or even a knife
3:26
And if you want to, you can do a few different layers of colour with a different colour layered
3:30
on top of each one so that the colours blend gradually from a dark to a light colour
3:35
If you look at flowers, you'll notice that usually the colour on the outer petals is much darker
3:40
than on the inner petals or the little details on the inside of the flowers
3:44
So that's how I like to do my buttercream as well. Once you've got your layer of frosting all around the piping bag
3:51
you can spoon the next colour inside. But it's quite difficult to get all the way down to the bottom
3:56
You can use the end of a spatula for this, but you don't want to damage the frosting on the outside
4:02
So the inner frosting tends to sit a little bit higher in the bag, which means when you squeeze the bag
4:07
you might see only the outside color coming out for a while, but just wipe it off on one of your frosting bowls
4:13
and as soon as the inside color starts coming through, the bag is ready to go. To get the inside color further down in the bag
4:21
so that when you pipe, both colors come out straight away, after spreading the first color around the sides of the bag
4:28
you can use a piping bag without a tip to pipe the second color in, and just lower the piping bag as low as you can in the bag
4:35
before you start squeezing, and this way you should have both colours all the way down at the bottom of the bag
4:40
so when you squeeze it, both colours will come out right away. If this looks a bit fiddly, another technique is to use cling film or saran wrap to separate your colours
4:52
Spread the first colour in a rectangular block and this is going to be the colour on the outside of the flower
4:58
If you're enjoying this tutorial, please click the thumbs up button and if you want to learn more cake decorating techniques
5:04
click the link in the screen to find out more about my online courses, or I'll put the link in the video description below as well
5:11
Next, spread or pipe the next colour down the middle, and fold the butter cream over itself using the plastic wrap to help you roll it up
5:21
And then once you've made a roll of frosting, cut one of the ends off, and then push that end down into the bottom of one of your piping bags
5:32
You can mix as many colors as you want for this, so here I'm using two different shades of purple for the outside of the flower, and then I'm putting white down the middle, and here I haven't used enough frosting for the outside color, or I've used too much for the inside, so when I roll it up, I can see the inside color coming out onto the outside. And to fix this is really easy, I'm just opening it up, and then scraping off some of the inside color, and then re-rolling it. And this way the part
6:02
purple is wrapping all the way around the white. The easiest way to mix colours is to spoon them all randomly into the piping bag, or you
6:14
can put them in a bowl and stir them just a little bit to blend them slightly and then
6:18
spoon them into the bag. You don't have much control of how the colours come out this
6:23
way but for some flowers it looks really pretty when they a bit random like this I put two shades of orange together into this bag after stirring them in a bowl once or twice to mix them slightly and you see how that looks in a minute spags don look very full but this is enough to completely cover a very
6:40
tall four inch cake with flowers, and it's only just over one cup of butter cream, so you
6:45
don't need as much as you think for this. The third trick is how to prepare your cake so
6:50
that it's ready to be decorated with these flowers. When you frost your cake, choose a
6:54
complementary colour for the frosting, just in case any of the frosting is visible. So if you're
6:59
going to be piping leaves, you could choose green so that any frosting showing through in
7:04
between flowers just looks like more leaves. Or here I'm using pink because most of the flowers
7:09
have pinkish tones, so any visible frosting will hopefully look like it's just part of one of these
7:14
flowers. Optionally, you can chill your cake so that the frosting sets and becomes nice and hard
7:21
and the advantage of this is that you can do a test on the cake
7:25
to see how the flowers behave on that particular surface and if you don't like it you can scrape it off
7:31
and also as you're piping if you get any flowers that you don't like
7:34
and I'll go over a few reasons why later you can also scrape those off really easily
7:39
and because the frosting on the cake is hard it won't get indented or smudged
7:44
by the flower you're scraping off or by your offset spatula. If the flowers pull off the cake as you pipe them
7:50
It's either because your frosting consistency is too stiff, so the frosting doesn't want to leave the piping bag
7:59
Or it's because the surface you're piping onto isn't sticky enough, so the flour doesn't have anything to cling to
8:06
Frosting loses its stickiness when it sets, either when you put it in the fridge or just by sitting out for about 20 minutes
8:12
And if you're confident that the consistency of the frosting in the piping bag isn't the issue
8:17
so it's definitely the stickiness of the frosting on the cake that's flat. problem. You can spread a thin layer of frosting onto the cake on top of the frosting
8:24
that's already there and that way the flowers will have something to stick to. The
8:31
fourth trick is getting the right piping technique. You should always do a test first on
8:36
parchment paper or a paper towel or a baking tray or whatever you have handy before
8:41
you actually get started on the cake. Every batch of buttercream is going to have a
8:46
slightly different consistency and this is exaggerated by the temperature of the ingredients
8:50
you use and also the weather that day, so butter cream will pipe slightly differently
8:55
every time you do it. When you want the flower to end, you need to lift the piping
9:01
bag up and immediately after you start lifting, you have to release the pressure on the bag
9:05
and that will give your petals a nice, neat point. You'll find that some flowers look
9:12
better piped quite short and others look better with longer petals, so you can play
9:15
around with the height of the flowers too. The technique for piping against the
9:20
side of the cake is the same, it's just at a different angle, so it might take a little bit of getting
9:24
used to. Assuming your butter cream is at the right consistency, if the flower buckles at the bottom
9:31
so it has little ridges or waves at the base, you need to lift your wrist a bit faster because
9:37
what happening is the butter cream is coming out faster than your movement If your petals are breaking off early you need to apply more pressure to the piping bag because you lifting the bag faster than you piping the buttercream As you pipe your hands will warm up the butter cream in the piping bag so your petals might
9:55
start to lose their shape. That first orange flower was perfect, but for these ones the petals are blurring into each
10:01
other because the butter cream is too soft. And at this point, you can put the piping bag in the freezer for one minute, set a timer
10:08
so you don't forget about it and freeze the butter cream. and then squeeze out a practice flower or two to check the consistency and when you're happy with the flowers you can continue on your cake
10:18
The fifth trick is about taking your cake to the next level with some simple but effective finishing touches
10:35
Leaves are a fantastic finishing touch, adding some greenery to your flowers will mimic how they look
10:41
in nature. It adds more color to your cake. It fills in any gaps between flowers where you
10:47
can see the frosting of the cake underneath. And you can also use it to cover up any parts of a
10:52
flower you don't like, like if there's a ridge at the base of the flower. This is a leaf tip
10:57
and you should hold it this way, sideways, so that you can see a triangle on the side of the tip
11:03
And when you pipe, you are first creating the base of the leaf, and as you pull your wrist
11:08
away and release the pressure on the piping bag, you're creating the point of the leaf
11:13
You can pipe leaves after you finish each row or section of flowers, and that's a nice way to do it
11:19
because you have a very good view of the cake at that point, or you can continue piping more
11:24
flowers and then go in and fill in the gaps, which is good because you know where you need to pipe
11:29
the leaves, but it's a bit more difficult to see what's going on. You have to crouch down to see
11:33
where the gaps are. But leaves are especially great for the top edge of a cake in places where
11:38
a full flower won't fit because piping flowers onto that 90 degree angle at the corner of the top
11:44
of the cake is quite tricky. And so instead you can pipe a few leaves and that fills in the gap
11:49
and then you can pipe your next flower onto a flat surface instead of a corner
11:56
A fun idea to add some colour after you've decorated your cake is to add ribbon. And you can choose
12:02
a ribbon that adds more colour to the cake or one that matches the flowers you've already piped
12:06
And to do this, it's really important to chill your cake properly first, so you should put it in the fridge for at least an hour
12:12
so the frosting sets and gets hard, not just on the outer edge, but all of the frosting, so that it's very sturdy
12:20
And then just wrap your ribbon around the cake, and tie it in a bow as normal. And if you want to secure the ribbon onto the cake
12:27
you can put a little dab of buttercream in between the ribbon and the cake, and that will set the ribbon in the right place
12:33
These flower tips might look intimidating at first, but I hope this tutorial has given you some useful tricks and confidence to use them
12:42
I'd love to see your cakes. Please tag British Girl Bakes in your photos on Instagram and Facebook so I can see them
12:48
I'll be sharing a new cake decorating tutorial next week, and every week after that, so please click the subscribe button to make sure you don't miss them
12:56
Thanks for watching
#Cooking & Recipes
#Desserts
#Flowers