live_tv
Livestream Starting Soon
00
Hours
:
00
Minutes
:
00
Seconds
Up next in 10


Save or Splurge? Don't spend a fortune on cake decorating tools! In this tutorial I'll show you where you can save on cheap tools and where you should invest for better results, to improve your cake decorating with these tools!
*Take my FREE course on 10 Frosting Techniques on my ONLINE CAKE SCHOOL
https://www.britishgirlbakes.com/online-courses
*LEARN 50 Easy Cake Decorating Techniques in my online course
https://britishgirlbakes.teachable.com/p/50-easy-cake-decorating-techniques-for-any-skill-level/
*My 4 Minute Buttercream recipe
https://www.britishgirlbakes.com/recipes/buttercream-frosting/
*READ a written version of this tutorial (with photos!)
https://www.britishgirlbakes.com/cake-decorating-tools-to-splurge-on/
*SUBSCRIBE to my channel for a new cake decorating tutorial every week!
*SAY HI!
Website: https://www.britishgirlbakes.com
Instagram: https://www.instagram.com/britishgirlbakes
Show More Show Less View Video Transcript
0:00
Can you guess how much these cakes cost to decorate
0:02
Which one do you think was more expensive? Tell me in the comments before you watch the rest of the video
0:08
Starting with these two identical cakes, I'm going to show you which tools I use to frost and decorate each cake
0:14
and tell you where I think it's worth buying the cheapest option and where it's worth splurging for quality
0:20
Here are two cakes ready to be covered with frosting. I'll be using my four minute butter cream and the link is in the video description
0:26
Now let's look at the different options you have for colouring your frosting. The first option is liquid colour, which is water-based, and you can buy very cheaply at a supermarket or a grocery store
0:37
You need a generous square, maybe a quarter of the bottle, to achieve a bright colour of buttercream
0:42
For really bold colours, like red or black, you'll need the whole bottle, or maybe more than one bottle
0:47
which will affect the consistency of the buttercream, so I don't recommend using liquids for those colours
0:52
but for this blue, this liquid works perfectly. The next option, which I'll demonstrate in this bowl of buttercream, is to use gel colours
1:00
These are a bit more expensive, but they're much more concentrated than liquid colours
1:05
so with just a drop, I can make the same bright blue that I made using a quarter of a bottle of liquid colour
1:11
For red or black, I would definitely choose a gel rather than a liquid colour
1:15
since you need so much less gel to get a true black and red. Also, gels come in a huge range of colour options, whereas liquids usually come in little packs with just red, blue
1:25
yellow and green. But if you want one of those colours and a light shade of it, like this blue
1:31
the results are the same for liquid and gel, so saving money by buying liquids is smart
1:36
One of the very first tools to invest in when you start cake decorating is a turntable
1:41
but there are so many different options out there. I'm going to break down whether it's really
1:44
worth buying the fancy version Turn tables are also called spinning cake stands and they make it much quicker to spread frosting onto a cake and then quicker and easier to smooth the frosting The cheapest option is a plastic turntable which is about half the price of a metal turntable
2:02
Both spin, but let's take a look at the difference. Plastic turntables aren't super stable, so they spin jerkily, which means that the cake will vibrate or even wobble as it's spinning
2:13
Look at the difference between this and a metal turn table, which has a very strong
2:17
smooth spin with no shuddering motions at all, and when there's a cake on top, that cake spins
2:22
perfectly smoothly too. Why is that important? You'll see in a minute. Quick side note
2:27
for a turntable that doesn't come with a non-slip mat, you can buy drawliners on Amazon or at a
2:32
grocery or home store, and just cut a piece off and put that on the turntable to stop your
2:37
cake from sliding around. Before choosing whether to save or splurge on a turntable, let's see how
2:43
they work in practice. Getting super smooth resting on your cake is really important
2:47
for any cake design, and I'm going to show you two very different options for getting
2:51
that smooth frosting. This is a plastic cake comb and this is an acrylic cake comb, also called
2:57
frosting smoothers. After you spread the frosting all over your cake, you use your cake comb to scrape
3:02
the excess frosting off, leaving a smooth layer behind. Look at the result of the plastic cake comb and
3:09
the plastic turntable. Plastic cake combs have a very short life expectancy because they wear down
3:14
fast and these grooves you see around the top of the cake are caused by little dense in the
3:19
straight side of the plastic cake comb. The little dense you see going up and down the cake all the
3:24
way around are caused by the jerky movements of the plastic turntable, which make the cake
3:29
comb dig into the frosting instead of gliding smoothly over it. Let's compare this to an acrylic
3:34
cake comb and a metal turntable The acrylic cake comb is thicker and heavier and has a much sharper edge which make the frosting smoother than a plastic cake comb and it won create grooves unless you drop it and chip it so try not to do that Also the smoothness of the metal turntable is obvious here
3:51
because you don't see those same vertical dents in the frosting, since the spinner's constant rather than jerky
3:58
So, I definitely recommend splurging on a good quality acrylic cake comb over a plastic one
4:03
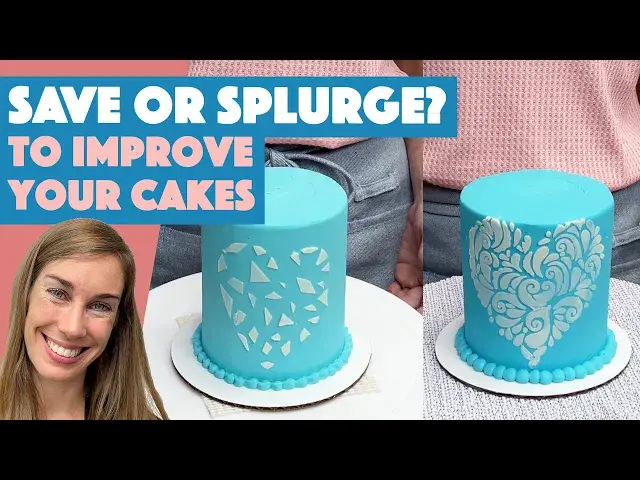
and a metal turntable over a plastic one. One of the quickest and easiest ways to decorate a cake is to use this stencil
4:11
but there are different options here as well. You can make your own incredibly cheaply, or you can buy lots of very impressive, intricate designs
4:19
To make your own stencil, cut a piece of parchment paper wide enough to wrap around at least half of your cake
4:25
and draw a shape onto it. Use scissors to cut out the whole shape or cut out a design within the shape
4:32
For example, I'm cutting out random triangles and diamonds within this heart, to make a little bit of the shape, hard to make a basic mosaic style design. This is very time-consuming but it's also very cheap
4:43
A more expensive alternative is a plastic or acrylic stencil with an intricate design
4:48
Starting with the homemade stencil, it wraps easily around the cake if you buy it in a roll
4:53
which makes applying it to the cake very easy. Spread frosting over it, scrape off the excess
4:58
and smooth it with your offset spatula or a cake comb and peel the stencil off and voila! You can make
5:03
make your stencil as detailed as you want it to be, and the result is neat and unique
5:08
For a pre-made stencil follow the same steps, wrapping the stencil around the cake and then spreading
5:13
frosting over it and scraping it off. I should mention that your cake needs to be cold before you do
5:19
this, so that the frosting has set and doesn't get damaged by the stencil. This pre-made stencil is
5:24
much more detailed than my homemade stencil, and if you can find a reasonably priced stencil
5:29
I think it worth buying one if you want to make your cake really impressive Now that I Let use up the leftover frosting from both cakes and look at two options for borders The very cheap option which is to spoon the frosting into a Ziploc bag seal it and cut a piece of one of the bottom corners to make a homemade piping bag
5:47
If you're enjoying all of this information and the way that I break everything down step by step into very manageable details
5:53
please check out my online cake school where I have hundreds of cake designs and techniques for you to learn
5:59
To pipe a border, start at the side of the cake and squeeze a dot out
6:03
pulling away sideways to leave a tail on the dot, and then squeeze out the next dot to cover that tail
6:09
The seam of the Ziploc bag will leave a line of texture on your dots, so hold the bag at the same angle all the way around the cake
6:15
so that seam is always facing the same way. Here's the splurge option
6:21
A piping bag with a medium-sized round piping tip, like a number 12 tip
6:25
Put the piping tip in the piping bag and spoon your left over for. frusting into the bag, push the frosting down to the top, and twist the end and then pipe a dot
6:34
onto the bottom of the cake, using the same technique of pulling away sideways and overlapping the tail
6:40
of each dot with the next dot. These dots are much rounder and smoother than the dots piped
6:45
with the Ziplock bag, but that's not necessarily a good thing. The texture from the seam on the
6:50
Ziploc bag dots looks nice, and so does the shape of the dots. For a beaded border like this
6:56
I don't think it's worth splurging on a piping bag and tips, but having piping bags and a variety of tips does give you a lot of options
7:04
for different types of borders and other piping. So if you're planning on decorating more cakes
7:08
then I would say it's worth the investment. And there you have it
7:12
The results of cheap versus expensive cake decorating. I hope this video helps you choose what to invest in
7:18
Tell me in the comments which cake decorating tool you're going to buy next. Thank you so much for watching. Happy caking
7:26
I'm
#Food & Drink
#Cooking & Recipes
#Desserts