0:00
There are so many ways to decorate cakes with wafer paper if you know how to use it. In this
0:04
video I'll show you how to shape wafer paper, how to colour it and how to attach it to cakes
0:14
You can shape wafer paper by folding it, using elaborate origami techniques or try a simple fan
0:20
by folding it back and forth in an accordion style. To attach the base of the fan use a little bit of
0:26
water to make the wafer paper sticky and then pinch it together. Leave it to dry for about an
0:30
hour. You can also cut wafer paper into whatever shape you like. I'm cutting out some simple leaves
0:36
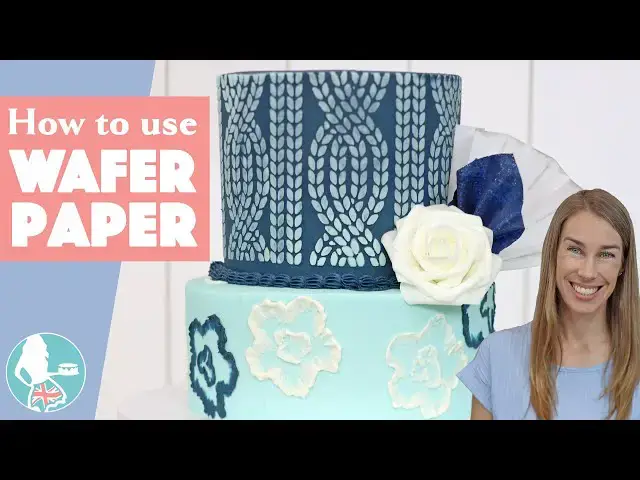
here or you can make all sorts of flowers by cutting out each petal individually. For really
0:42
fun artistic results you can mould or drape wafer paper into sails. Dip the paper into a tray of
0:48
water, letting it sit there for about 30 seconds to get very supple and then lift it up and put
0:53
it onto a non-stick surface like parchment paper or a silicon mat. You can manipulate it by twisting
0:59
it with your fingers to shape it. Leave it to dry overnight to set the shape. There are lots of
1:05
different ways to colour wafer paper using gel colours which are the ones that you would use to
1:09
tint your buttercream. If you're making a sail the quickest way to colour your paper is to add the gel
1:14
colour to the water before you dip the wafer paper into it. The colour will look a little bit different
1:19
when it's in the tray of water compared to the final colour on your wafer paper. The benefit of
1:24
colouring your wafer paper this way is that you'll get perfectly even coverage all over. You can also
1:30
paint colour onto your wafer paper. The most affordable way of doing this is by mixing a gel
1:35
with either water or alcohol but this is not ideal because the gel tends to clump within the water so
1:40
you don't get even coverage and the wafer paper will be brittle so it's very likely to snap while
1:45
you're painting it or when you move the shape later. To prevent snapping and to make a more even
1:50
colour, mix the gel with glycerin. This will make a much thicker paint which you can brush onto your
1:55
shapes but it won't absorb very well. You can see that this is sitting on top of the wafer paper
2:00
rather than sinking in. For the best results use both glycerin and either water or alcohol. This
2:06
will make the wafer paper very supple so it doesn't snap and you'll get a beautiful coverage of colour
2:11
The benefit of alcohol over water is that it evaporates more quickly so your shape will dry
2:16
more quickly. Instead of painting onto your shape after cutting it out, you can paint onto the wafer
2:21
paper before shaping it. This is navy gel colour with glycerin and vodka and I'm brushing back and
2:27
forth up and down over the wafer paper for fairly consistent coverage. You can brush onto both sides
2:33
of the wafer paper and if you notice it gets quite sticky you can use cornstarch to take that away
2:38
It's best to use a powder brush for this to spread the cornstarch evenly without leaving
2:42
big clumps on the wafer paper. If you want your wafer paper to be shimmery or glittery you can
2:47
use luster dust or disco dust or edible glitter. Brush it onto the sheet also using a wide powder
2:53
brush for even coverage. For metallics, mix a luster dust like gold or silver with alcohol
3:00
or a clear extract like lemon extract or clear vanilla extract. If you use too much liquid the
3:06
paint won't be bold so aim for a thin paste rather than a runny liquid. Use a thin paint brush to
3:12
dip into it and then paint onto your wafer paper, for example along creases or around the edges
3:18
Okay now how do you attach these decorations to cakes? If the frosting on your cake has set
3:23
push the wafer paper decorations firmly into the frosting. This works for flexible decorations
3:28
like ones that have been painted with glycerin, these leaves for example, but also for very firm
3:33
decorations that have been soaked in water and dried to become hard like the steam on this latte
3:39
If the decorations aren't sticking to the frosting because it's set you can use a bit of fresh
3:44
frosting as glue to attach them. To attach wafer paper decorations so that they stick out from a
3:49
cake for a gravity defying effect, poke a toothpick into the decoration while the wafer paper is
3:55
sticky, which if you're using water will be immediately after dipping the paper into the water
4:00
while it's still soft or if you're folding your decoration, use water to wet the wafer paper and
4:05
then fold it over the toothpick so that it dries and holds the toothpick in place
4:10
Then poke the toothpick into your cake to attach your decoration. I hope this tutorial has been
4:15
useful! Visit my cake school on britishgirlbakes.com to learn hundreds of cake decorating techniques
4:21
and designs. Thanks for watching