Up next in 10


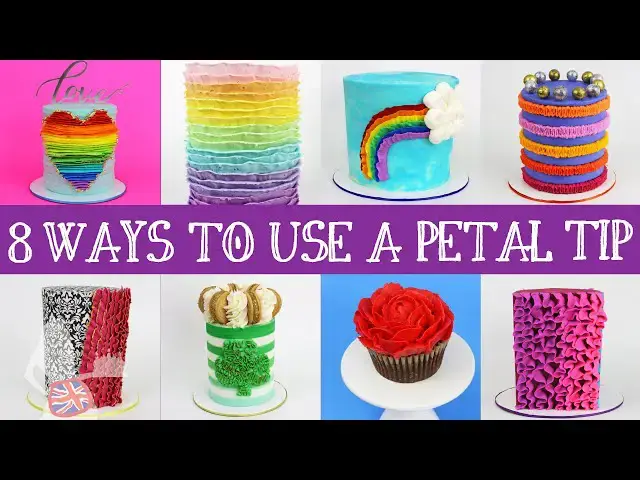
In this cake decorating tutorial I demonstrate 8 ways to use a petal tip to decorate cakes! I use my 4 Minute Buttercream frosting in all of these cakes and you can find the recipe and tutorial here: http://www.britishgirlbakes.com/recipes/buttercream-frosting
For my online cake school click here: https://britishgirlbakes.teachable.com
For my tutorial on the One Bag Piping Technique click here: https://youtu.be/Hufp5wxXt5Q
For my tutorial on the Mermaid Cake click here: https://youtu.be/od-QKqholKg
For my Ultimate Guide To Icing Sheets click here: https://youtu.be/Rgg6A_ccvQQ
SUBSCRIBE to my channel for new cake decorating tutorials every week!
Show More Show Less View Video Transcript
0:00
In this tutorial I'm going to show you eight ways to use a petal tip, like this number 125
0:06
By angling the tip differently, you can create different effects for all sorts of texture designs, like these
0:13
By holding the wide end of the tip against the cake, with the narrow end pointing outwards
0:18
you can pipe thin strips of buttercream to fill in any shape on the side of a cake
0:23
like this rainbow-coloured heart I'm piping here. If you pipe too far or the piping droops, you pipe too far, you'll put in the piping droops, you'll
0:29
You can take off excess buttercream or move the line higher or lower because the buttercream
0:34
is still soft and pliable. If you wait more than a few minutes, the buttercream will set and then you won't be able
0:39
to do this. I'm using my 4 minute butter cream for this cake and the link for the recipe and tutorial
0:45
is in the top of the screen and in the video description, but you could use ganache or whipped
0:49
cream instead. If you hold the piping tip the same way, with the wide end pressed against the cake and the
0:55
narrow end pointing outwards, but instead of piping horizontally you pipe up, you pipe up
0:59
the sides of the cake, moving the bag away from you slightly and then pulling it back towards
1:04
you, you can create these pretty vertical ribbons winding up the sides of the cake
1:10
If you're enjoying this tutorial, please click the thumbs up button to like it and subscribe
1:13
to my channel for a new cake decorating tutorial every week. If you let the frosting on the cake set before you do this, then if you pipe a ribbon you
1:22
don't like, you can use your frosting smoother or an offset spatula to scrape it off
1:27
And since the frosting on the cake has set, you won't damage it. it by scraping off the ribbon. pulp you've finished scraping you can pipe another ribbon over
1:35
the top. Here I'm trying to space the ribbons evenly around the cake to make sort of a pattern
1:42
but for this cake I'm wiggling the ribbons randomly up the sides of the cake, trying to cover
1:47
the whole surface of the cake with buttercream that folds back and forth over itself. I'm using
1:52
a one-bag piping technique for this cake to create the Ombray pink and purple ribbons, and I have a
1:57
full tutorial on using that technique for rainbow and ombray cakes with just one piping bag
2:01
and the link is in the top of the screen and in the video description By holding the tip with the wide end pressed against the cake and the narrow end pulled slightly away from the cake you can pipe these pretty ruffles up the cake By lifting the narrow end of the tip off the side of the cake the buttercream fans out
2:19
and if you move the piping bag slowly, the buttercream will wiggle a bit as it comes out of the tip
2:24
and that gives the ruffles some movement. If you apply pressure to the piping bag to squeeze buttercream out through the tip without moving it
2:32
the buttercream will fold over itself to make even more wavy ruffles
2:37
Here I'm overlapping each ruffle by about half to make sure I completely cover up the frosting underneath
2:43
so that this entire section of the cake is covered with rows of buttercream ruffles
2:48
This is going to be a mermaid cake with decorations made out of melted candy
2:52
and I've put the link for the full tutorial in the top of the screen and in the video description
3:00
For this cake I'm holding the tip the same way, with the narrow end lifted slightly off the cake
3:05
to pipe these buttercream ruffles going diagonally up the cake. This cake is covered in a sugar icing sheet
3:10
so I can press the wide end of the tip against the cake without damaging it
3:15
If the cake is frosted with buttercream, like the previous cakes, the frosting should be set before doing this
3:20
so that you don't scratch the cake with the edge of the tip. I like to set my buttercream by putting the cake in the fridge for about an hour
3:27
After piping these ruffles, I'm putting the cake in the fridge to set the ruffles
3:31
and then making an edible gold paint with luster dust and vodka to paint the edges of the ruffles
3:37
And because the buttercream has been chilled, it's hard, and it will hold its shape as I paint it
3:43
Holding the tip in the same way, you can pipe shapes. Here I'm piping a rainbow by curving the
3:49
butter cream in an arc, starting with red and then going through the colours of the rainbow as I
3:53
overlap each ruffle over the previous one. cover a cake completely with layered ruffles, first frost the top of the cake, and then
4:06
hold your piping tip with a narrow end pointing upwards, so that the tip is just above
4:10
the top edge of the cake, and pipe a ruffle of buttercream all around the top of the
4:14
size of the cake so that it sticking up slightly above the top of the cake Then move your piping bag down so that the next ruffle is layered over the bottom of the previous ruffle If you using several colours it helpful to have a coupler for your
4:27
piping bags so that you can change the tip from one bag of buttercream to another
4:31
without having to first empty the bag to get the piping tip out so that you can use it with the
4:36
next colour. Continue all the way down the cake like this to layer the ruffles
4:41
Changing colours along the way if you want to create an ombre gradient of colours
4:44
or a rainbow. As you move around the cake, the faster you pull the bag, the less the ruffles will wiggle
4:52
But the slower you move the bag as you squeeze out the buttercream, the more they'll wiggle to
4:56
create these pretty wavy edges. I like to start and finish each ruffle at the same point
5:02
and this will end up being the back of the cake. For zigzag raffles, hold the piping
5:09
bag horizontally, with the narrow end of the tip pointing away from the cake, and as you apply
5:14
pressure to the bag to squeeze out the butter cream, move the bag up and down as you spin the cake
5:20
on the turn table. It's helpful to score a line in the crumb coat before you do this, to guide you on
5:26
how far to pipe up the side of the cake so that your rose of zigzag ruffles are even
5:31
You can pipe rows of these ruffles on top of each other, or you can pipe them in stripes
5:35
And I have a class on my online cake school with all of the details for this design
5:39
with ruffled stripes and homemade metallic chocolates on top, and I've put the link for my online
5:44
cake school in the top of the screen and in the video description. Similar to the heart
5:48
shape filled with strips of buttercream on the first cake in this video, you can outline a
5:52
shape onto a cake and then fill it with squiggles using a petal tip. The narrow end of the
5:57
tip should be facing outwards from the cake and as you squeeze the buttercream out of the
6:01
bag, move the bag back and forth in random directions to fold the buttercream over itself and
6:06
create random squiggles to fill in the shape. It's easiest to start at the bottom of the
6:11
the cake so that you can reach the rest of the shape because if you start at the top
6:15
and work your way down it's difficult to angle your wrist to get into the bottom
6:19
sections of the shape Not surprisingly petal tips are great for piping the petals of buttercream flowers For a rose pipe a blob of buttercream onto the middle of a cupcake or if you want to put the rose on a cake you need a flower nail and a square of parchment paper or wax paper which you can
6:37
buy pre-cut or cut yourself out of a roll of paper. Pipe a dot of buttercream onto the flower nail
6:42
and then press a square of paper onto it to secure it in place, and then pipe your flower
6:47
on top. Hold the piping tip with the wider end pointing downwards and tap the top of
6:52
the tip slightly higher than the top of your blob, and apply pressure to the bag to squeeze
6:56
out the butter cream as you twist the cupcake between your fingers to spin it, so that the butter
7:00
cream wraps around the blob, and release your pressure on the bag and pull away after doing a
7:05
full loop to form your first petal. Only the top of this will be visible, so don't worry about the
7:10
sides. Now pipe a ring of petals, keeping the narrow end of the tip pointing upwards, piping little
7:16
arcs that rise up in the middle, and overlapping the previous petal by a third or a half, so that they
7:21
wrap over each other. Keep the tops of the petals as close as possible to the bud in the
7:26
middle because you don't want the petals to fan out until the end. Now pipe another ring of petals
7:31
starting each arc to the left or right of the arc in the inner ring, so that they don't line up
7:36
but instead they're all offset. Just like in the previous ring of petals, each petal
7:42
should overlap the previous petal. Continue with these rings of petals and as you get further out
7:47
you can angle your tip so that it's pointing a bit further away from the previous petals
7:51
to make the final petals fan out instead of curving closely against the previous rings of petals
7:56
When you get to your final ring of petals, pay attention to where you start each arc
8:01
to make sure you cover up the bottom of the previous ring of petals, since this will be the outer edge of the rose and it will be visible at the end
8:08
And there it is! Here I'm piping something similar to a pansy
8:13
and if you want to put the rose on a cake, pull the paper off the nail and put it on a board or plate in the freezer for about 30 minutes to chill
8:21
and then you can peel it off the paper and place it on a cupcake or attach it to a cake with a dot of fresh buttercream to act as glue
8:28
I hope I've given you some fun ideas of techniques to try with your petal tip
8:33
Thank you for watching. Please like this video and subscribe to my channel for a new cake decorating tutorial every week
#Desserts
#Other