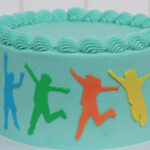
Whether you're decorating a birthday cake or creating a showstopper for a special occasion, DIY cake toppers are the perfect way to add height, colour and detail. And the best part? You don’t need to buy them! In this tutorial, I’m sharing 10 edible DIY cake toppers that are not only eye-catching but also surprisingly easy (and fun!) to make.
From quick chocolate shapes to dazzling rice paper sails, there’s something here for every skill level and time frame. These toppers use everyday ingredients like chocolate, candy, buttercream, rice paper and even ice cream cones. Let’s jump in!
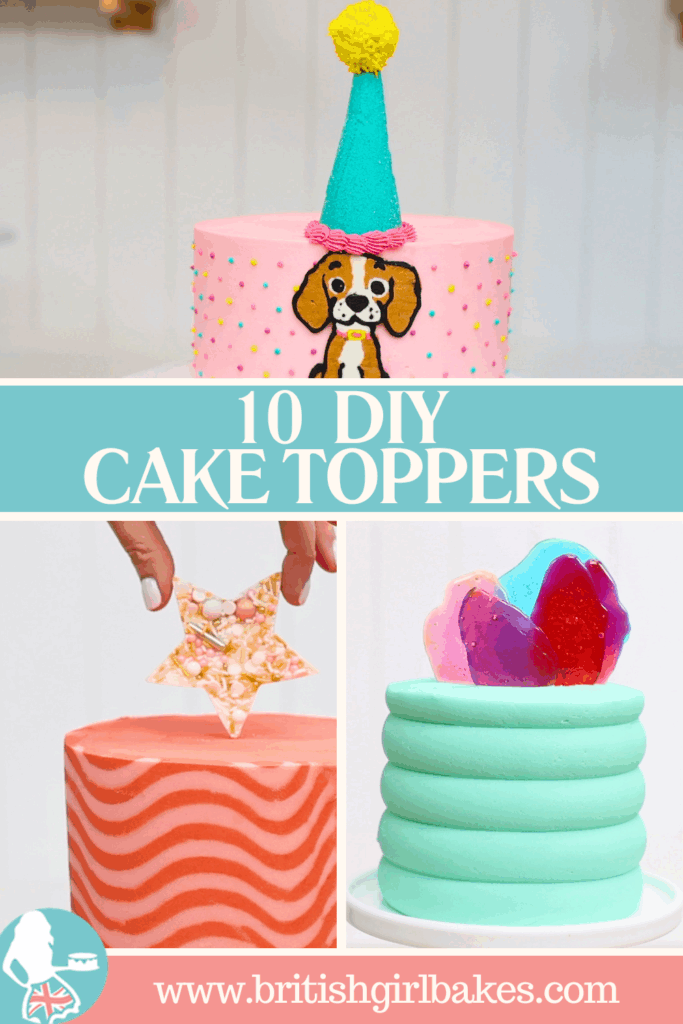
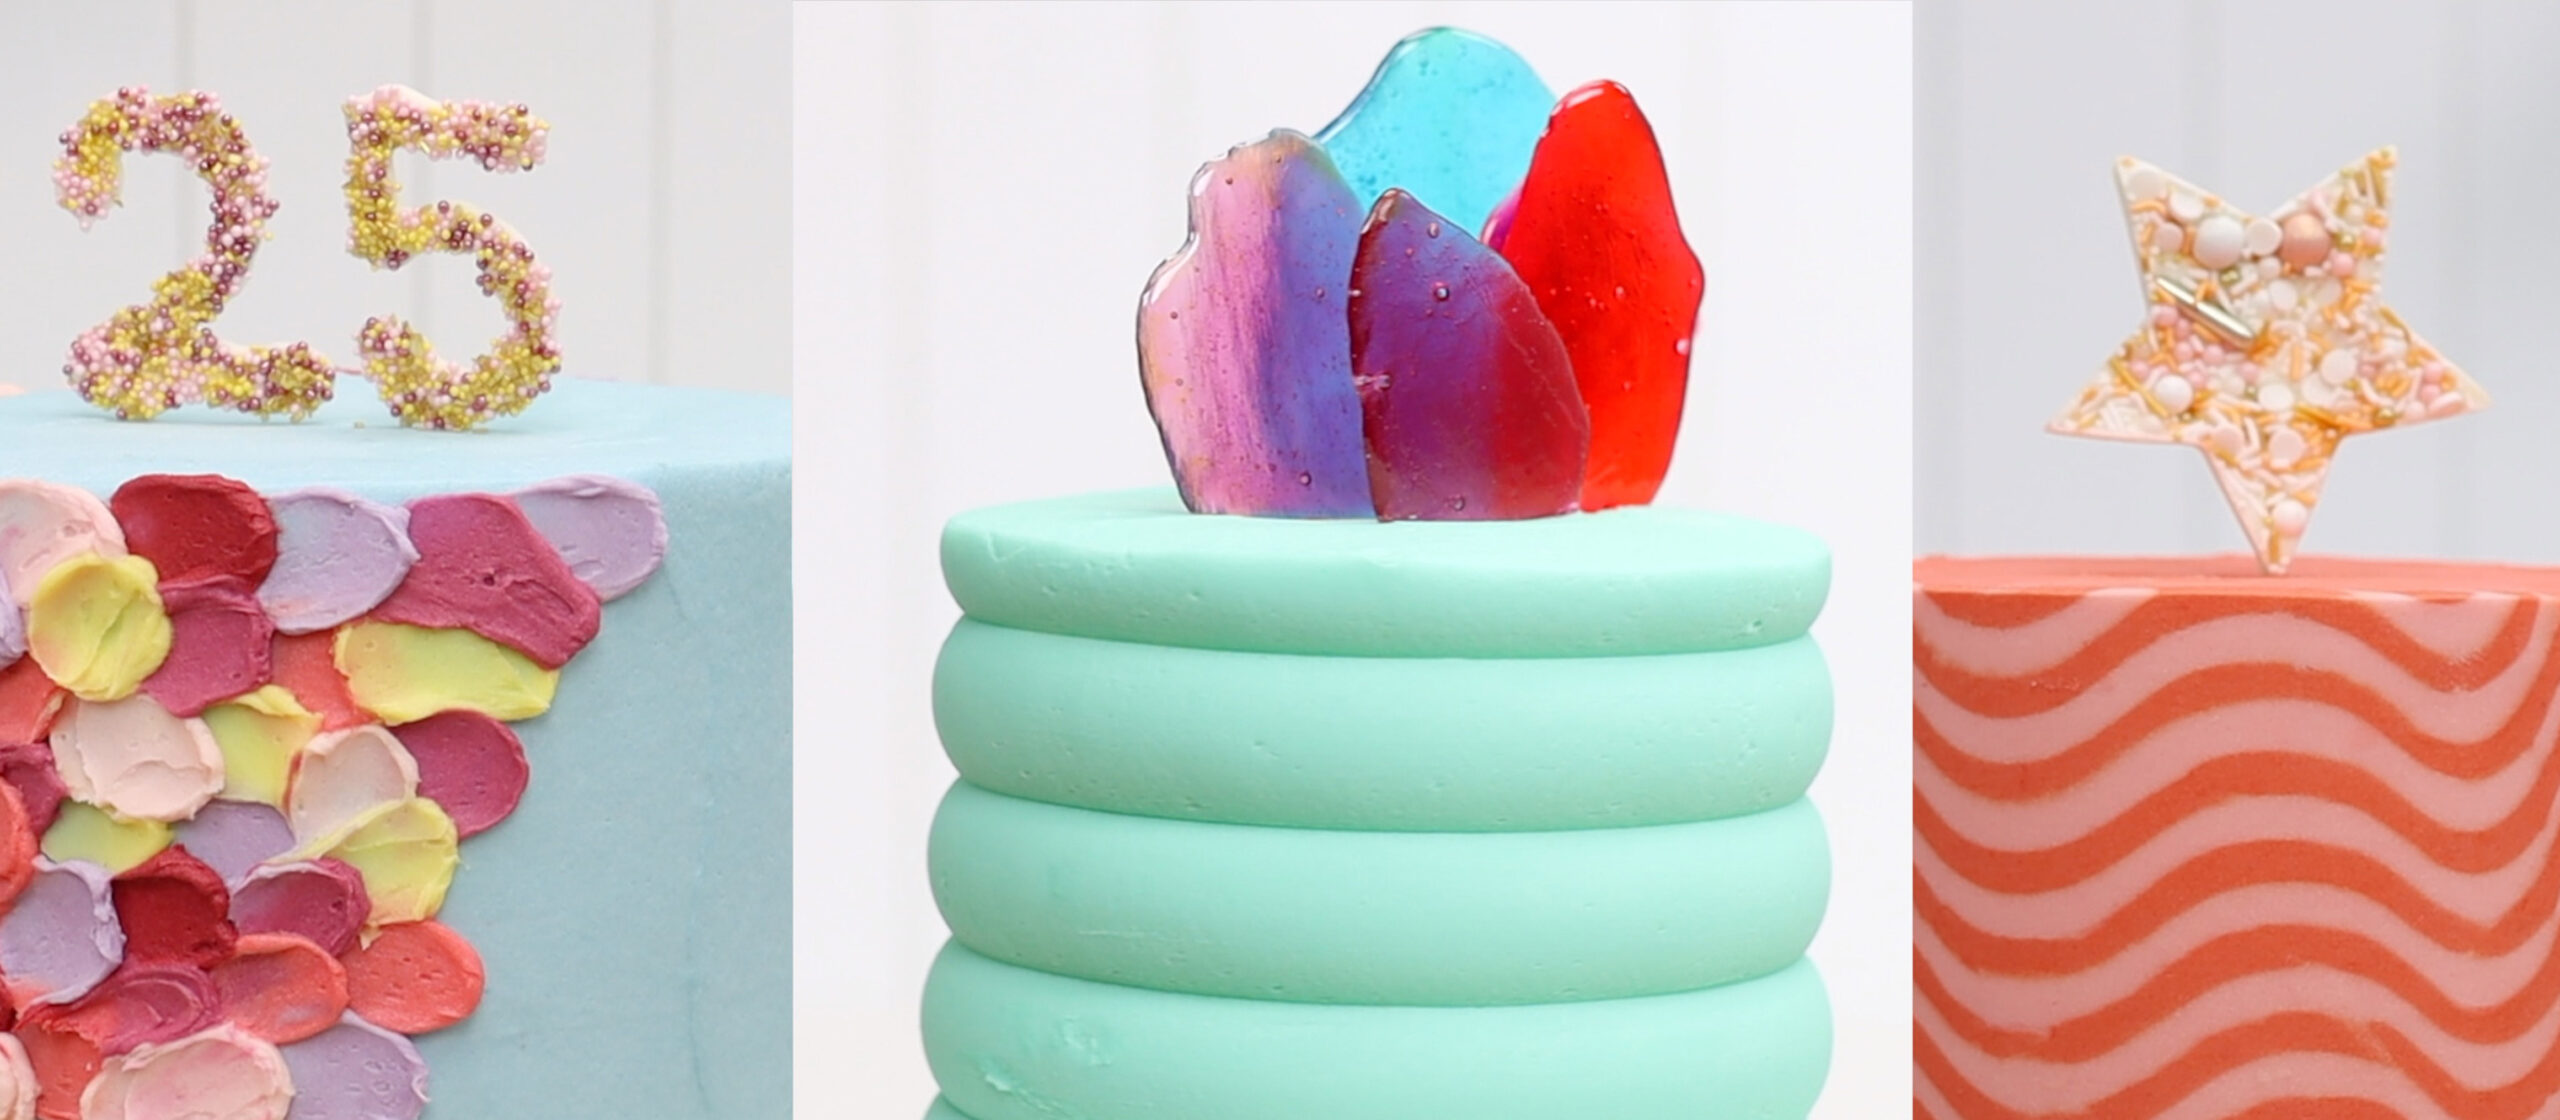
This is a brilliant cake topper for birthdays, especially if you want to personalize your cake with a name or age. All you need are chocolate chips, sprinkles, and a few toothpicks.
Start by melting your chocolate—either white or dark—in the microwave. To do this without burning, use 50% power and heat it for 30 seconds at a time, stirring between each interval until the chocolate is smooth and fully melted. Then transfer it into a Ziploc bag and push it down into one corner. Snip off just the tip of the bag to create a tiny piping hole.
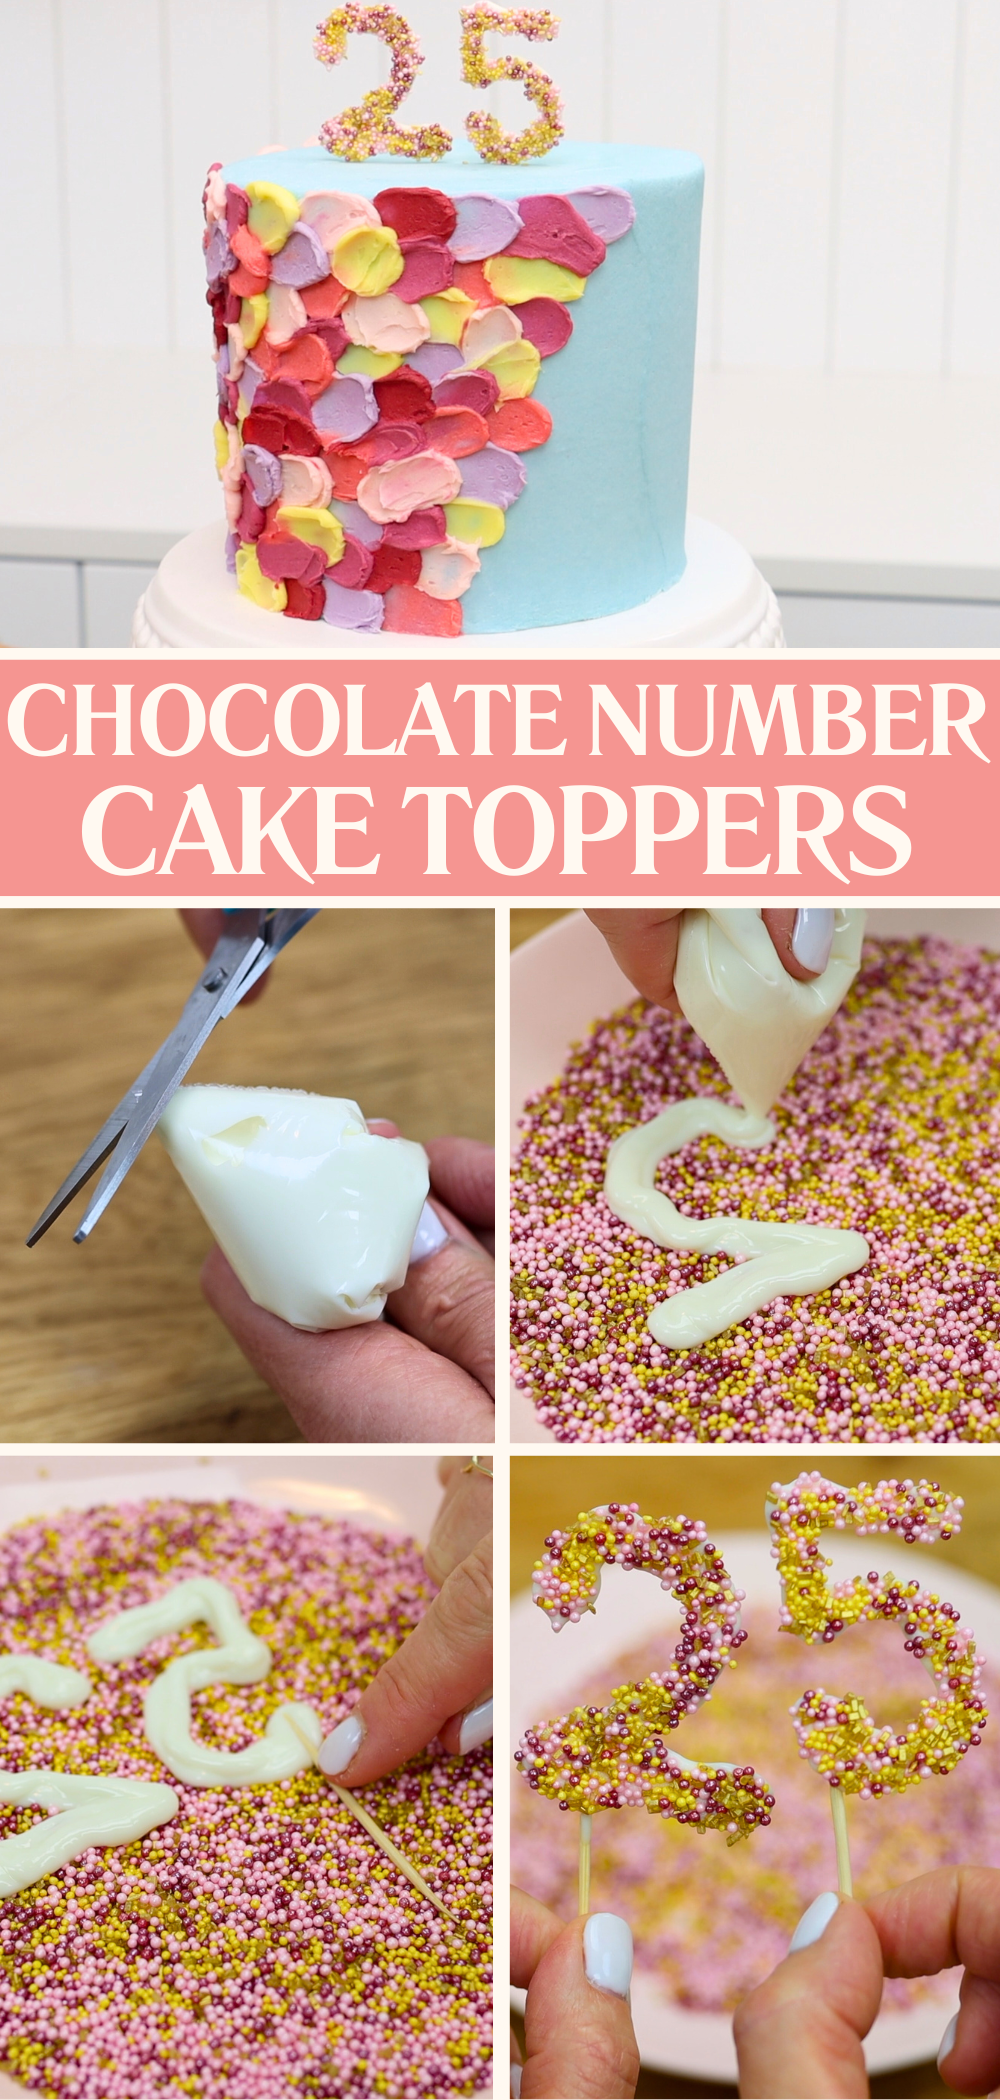
Now for the fun bit. Pour your sprinkles onto a plate and use a spoon or your fingers to level them into a flat layer. Pipe your letter, number or shape directly onto the sprinkles. You’ll need to do this in mirror image because you’re working from the back and will flip the chocolate once it sets. Start with a thin outline and then trace over it a few times to build it up. You want the chocolate thick enough to hold its shape without snapping.
Before it sets, press a toothpick gently into the base of the chocolate shape—this is how you’ll attach it to your cake. Let the topper sit at room temperature for an hour or chill it in the fridge or freezer for 15–30 minutes until it’s firm. Once set, gently pick it up and you’ve got a sprinkle-covered edible DIY cake topper ready to go!
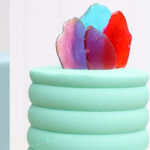
This is one of the quickest edible toppers you can make and the result is colourful and shiny. You’ll need some boiled sweets or hard candy—choose colours that match your cake or theme.
Place the sweets on a metal baking tray that’s lined with baking paper or a silicone mat. Preheat your oven to 180°C (350°F) and pop the tray in for about 2 minutes. Keep a close eye on them—you want them to melt into little puddles but not spread too thin. If they cook too long they’ll become brittle and crack easily.
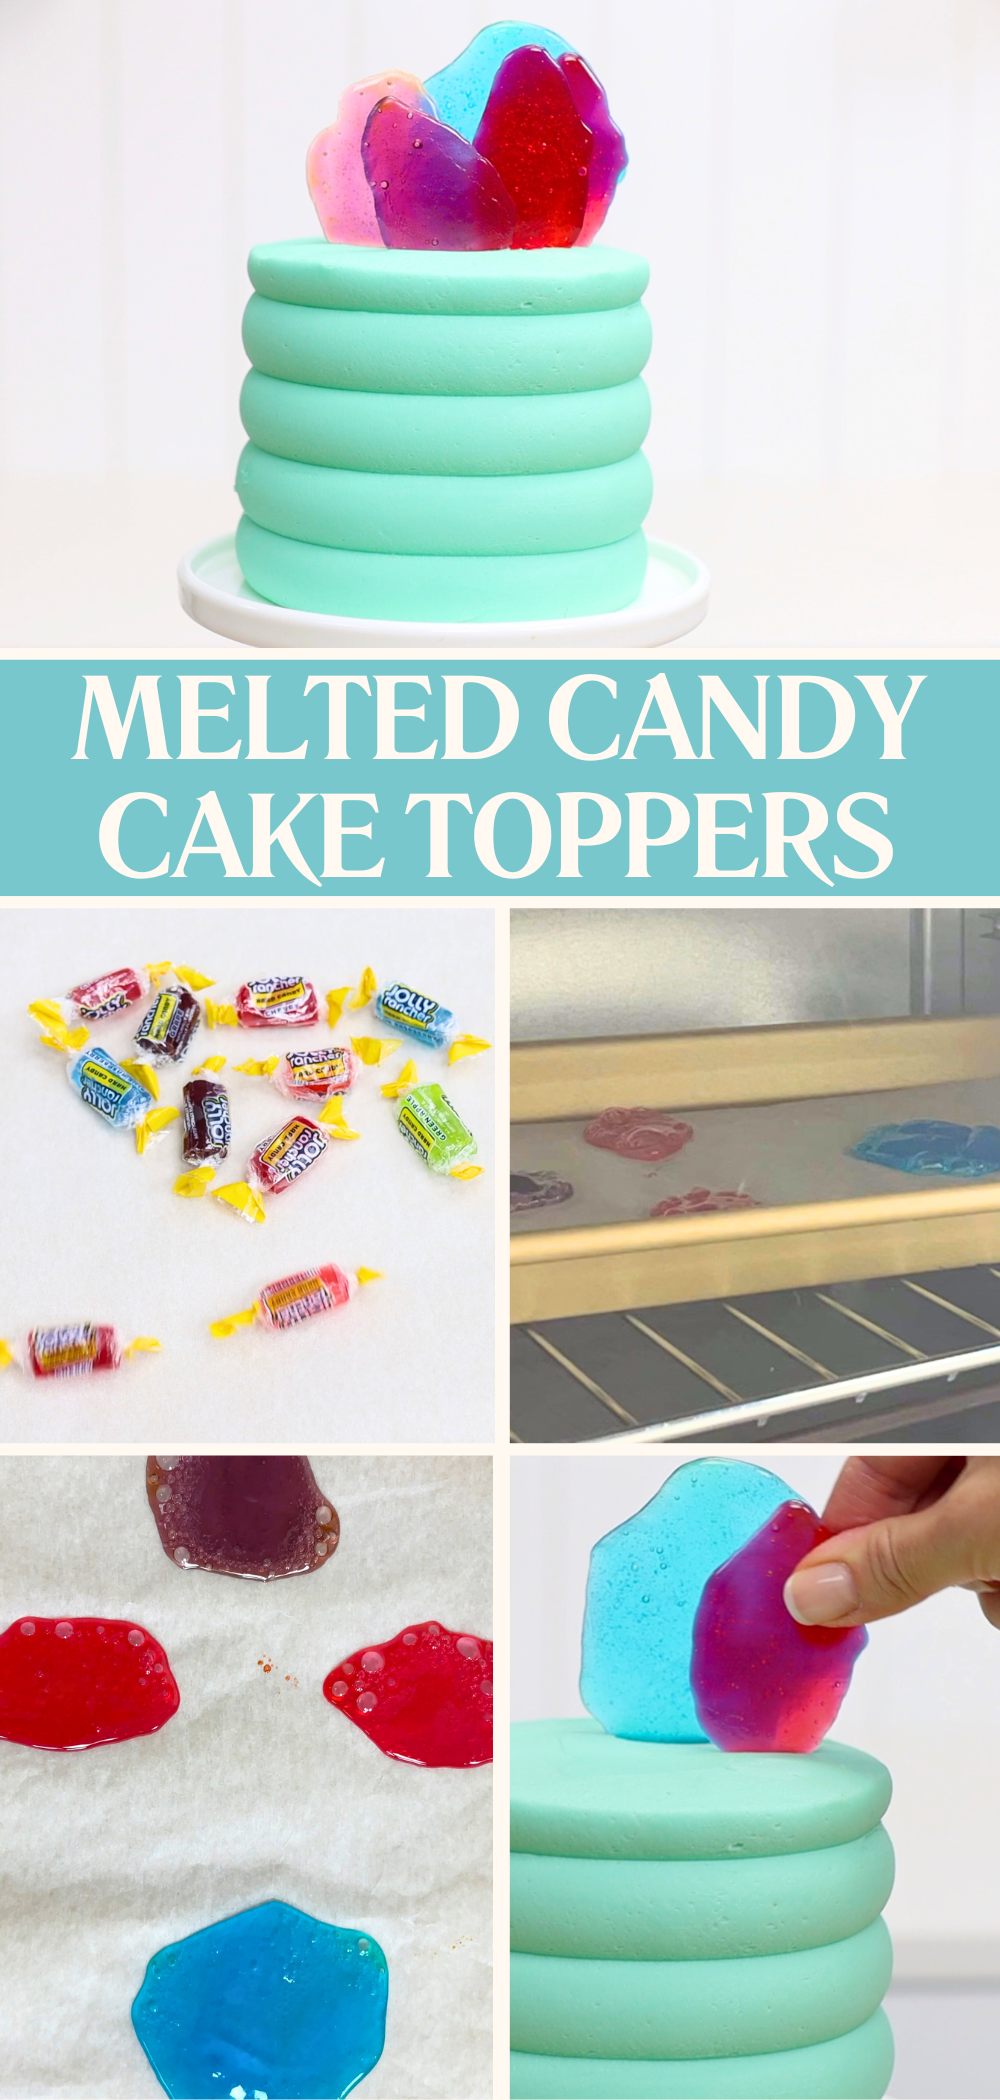
After about 15 minutes of cooling, the melted sugar will have settled into beautiful translucent discs or shards. You can snap them into abstract shapes or leave them whole. Push them firmly into your buttercream—don’t be shy here! Pressing them in properly is what will keep them upright.
They’re easy, inexpensive, and surprisingly impressive for something that takes one ingredient and just a few minutes to make.
These metallic toppers look fancy but are simple to create. They're a fun way to turn your regular buttercream into glamorous accents that really pop against a cake.
Start by piping your chosen shapes—hearts, stars, zigzags, pumpkins, or anything you like—onto a piece of parchment or wax paper. The buttercream needs to be stiff enough to hold its shape, so make sure to use the full amount of icing sugar in the recipe and add the milk or cream a spoonful at a time until the consistency is storable but not runny.
Once your shapes are piped, pop the parchment into the freezer for about 15 minutes. This makes the shapes firm up and makes them much easier to paint.
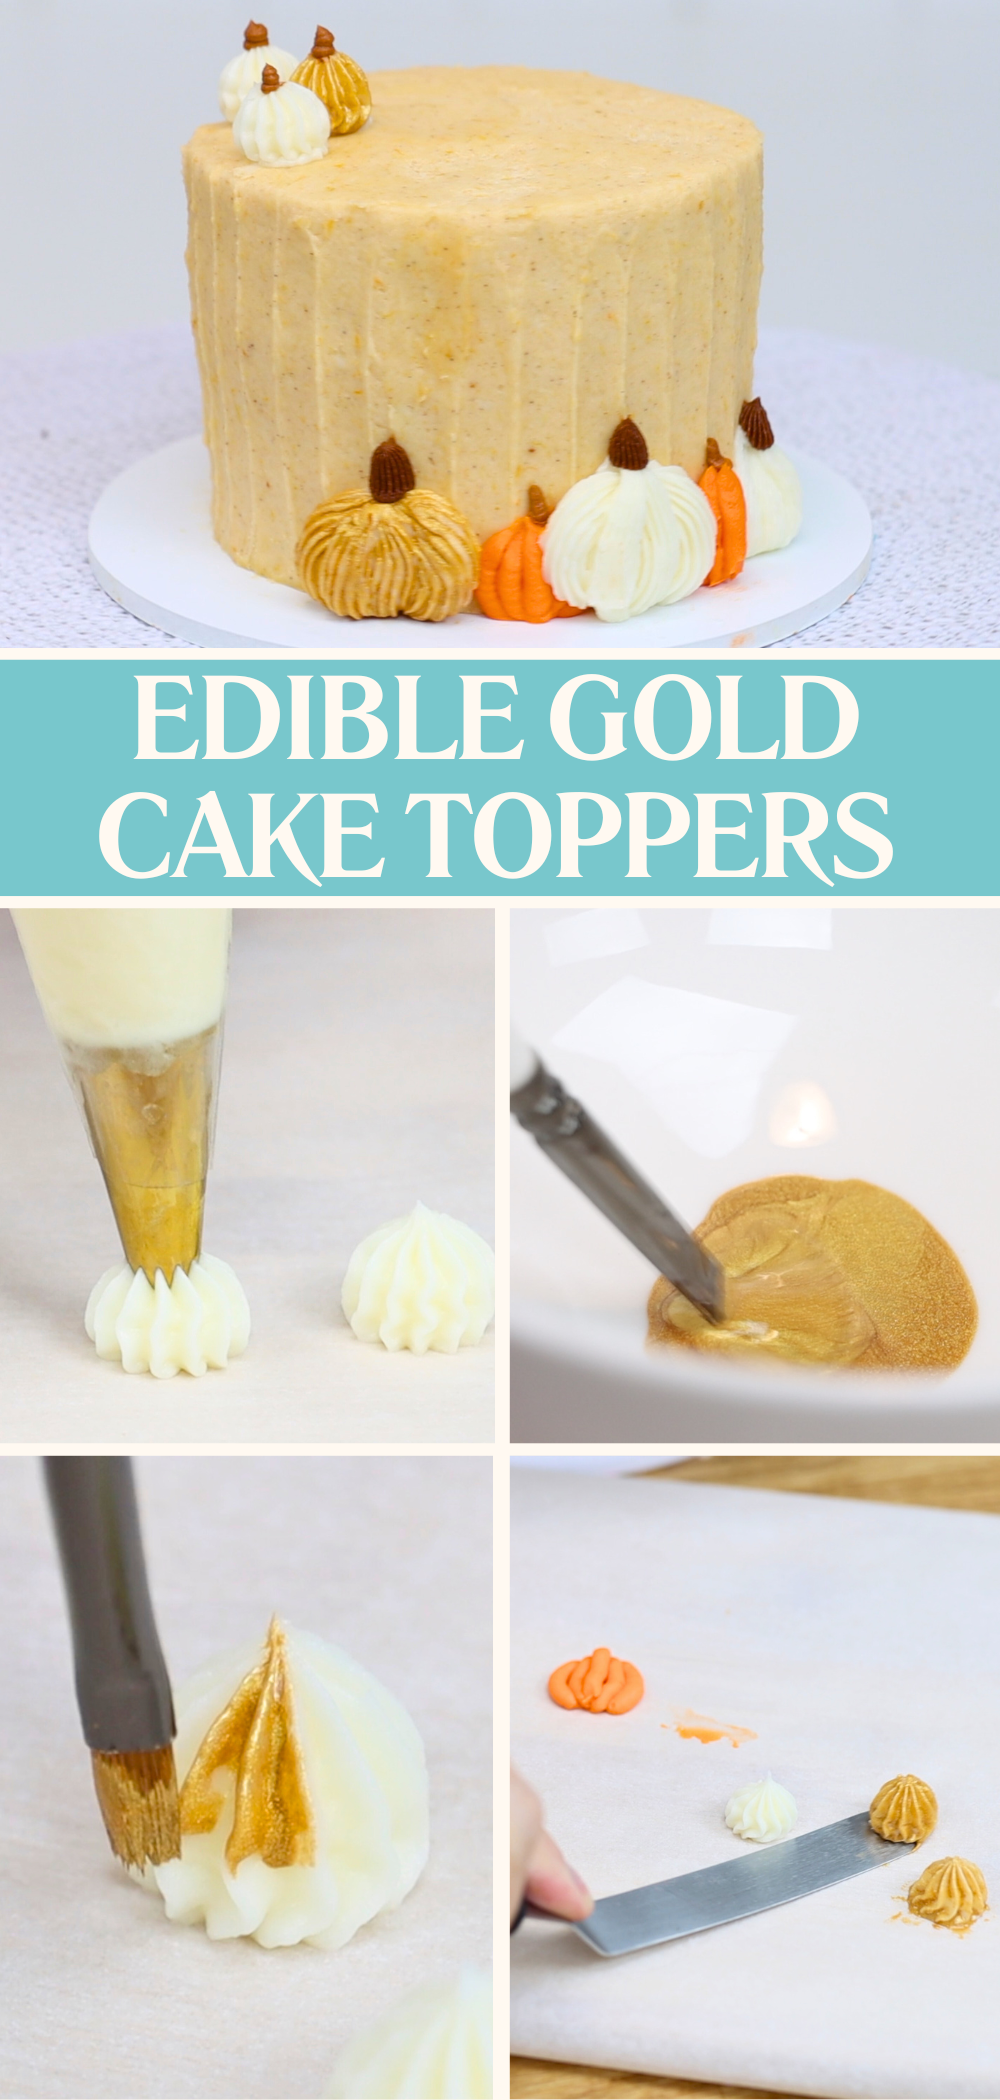
To make the buttercream metallic, use edible gold paint. You can buy this pre-mixed or create your own by combining a small amount of edible lustre dust with a few drops of clear alcohol like vodka or a clear extract such as vanilla or almond. Use a small paintbrush to lightly brush the gold over your frozen shapes. Dabbing works best! Work quickly and gently because as the shapes warm up they’ll begin to soften.
When the paint is dry, carefully peel the decorations off the parchment. If the shapes have softened, put them back into the freezer for 5 minutes first. If your cake frosting has already crusted over or firmed up, pipe a small dot of fresh buttercream to attach each metallic piece.
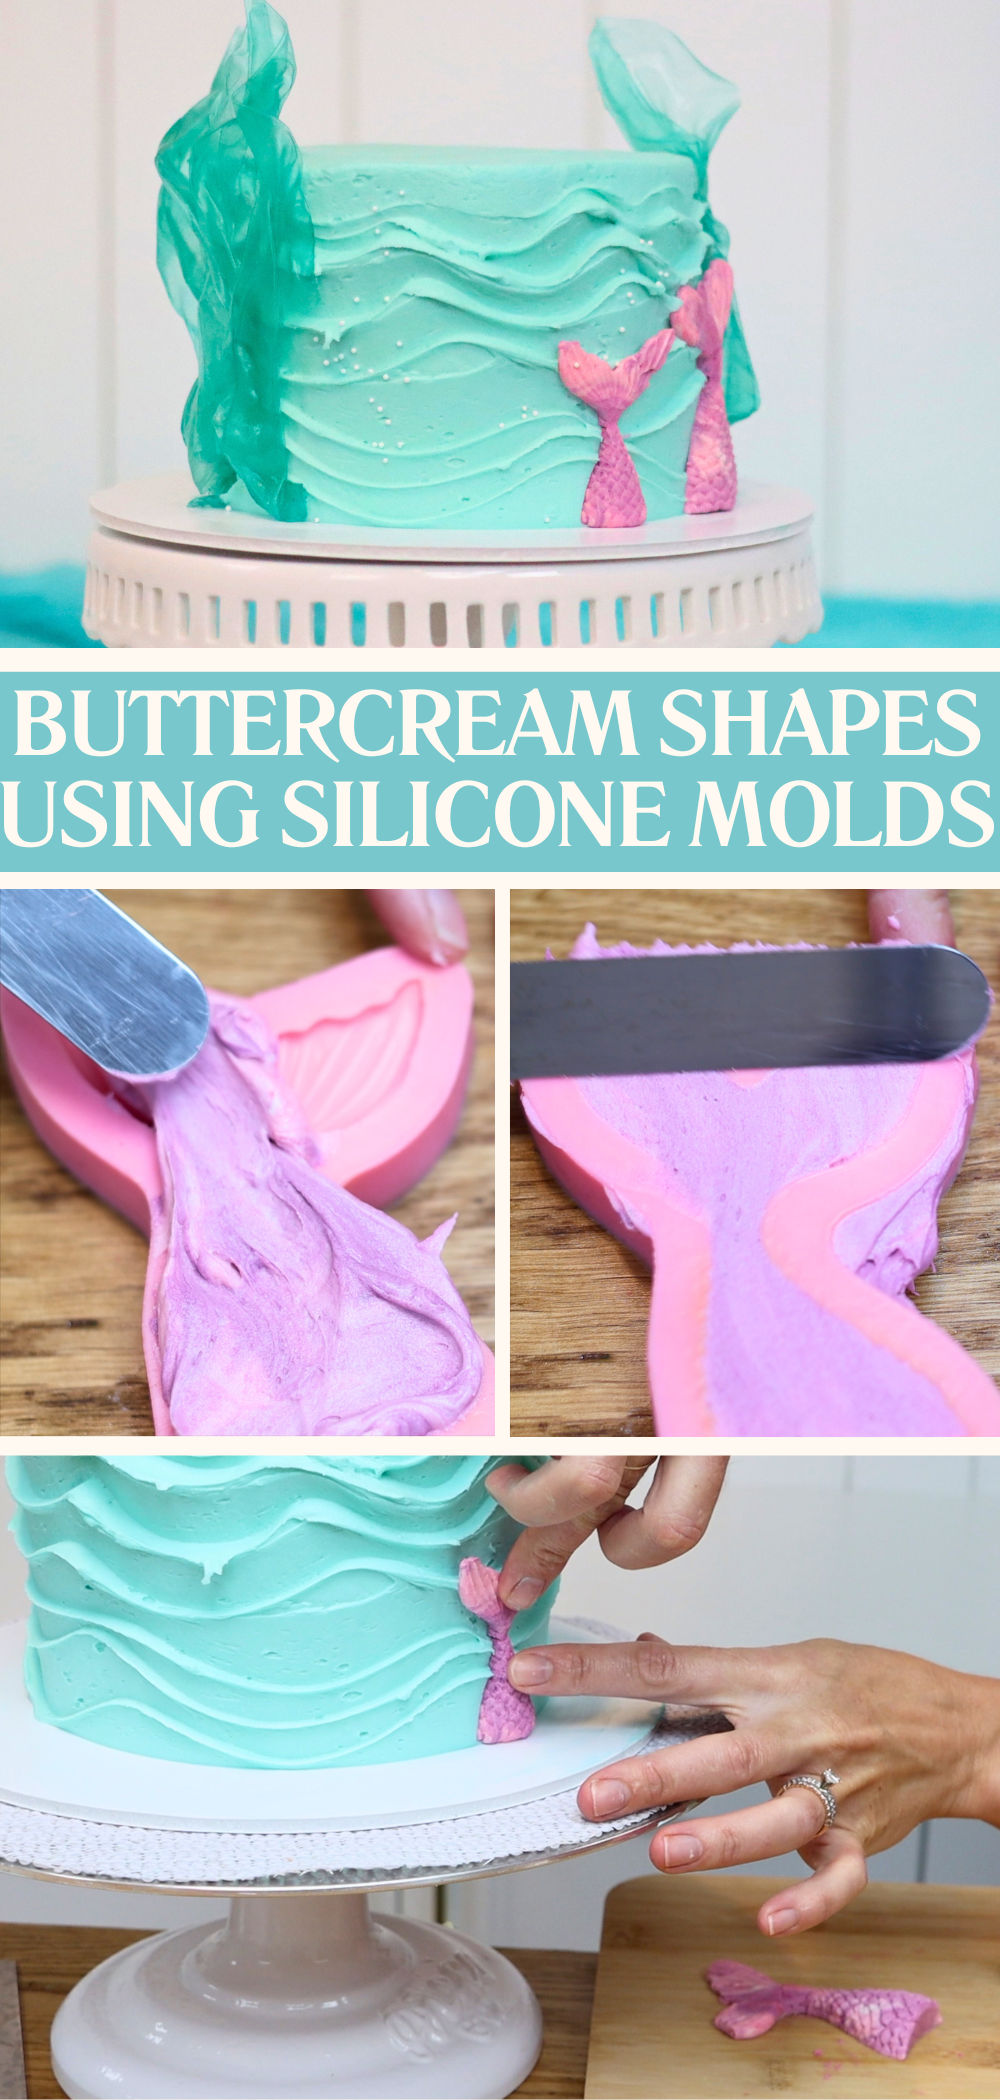
This is a brilliant way to add colour and texture to your cake with something softer than fondant and more colorful than chocolate. You’ll need some silicone molds in whatever shape you like.
Spoon buttercream into the molds, pressing it down with the back of a spoon or an
When they’re completely firm, gently peel back the silicone to release the shapes. Handle them quickly and carefully—they’ll start to soften fast. Press them onto the cake’s buttercream. If a piece snaps, just press the broken parts gently back together. As the buttercream softens slightly, it’ll stick back to itself. You can press these onto the top of a cake or against the sides.
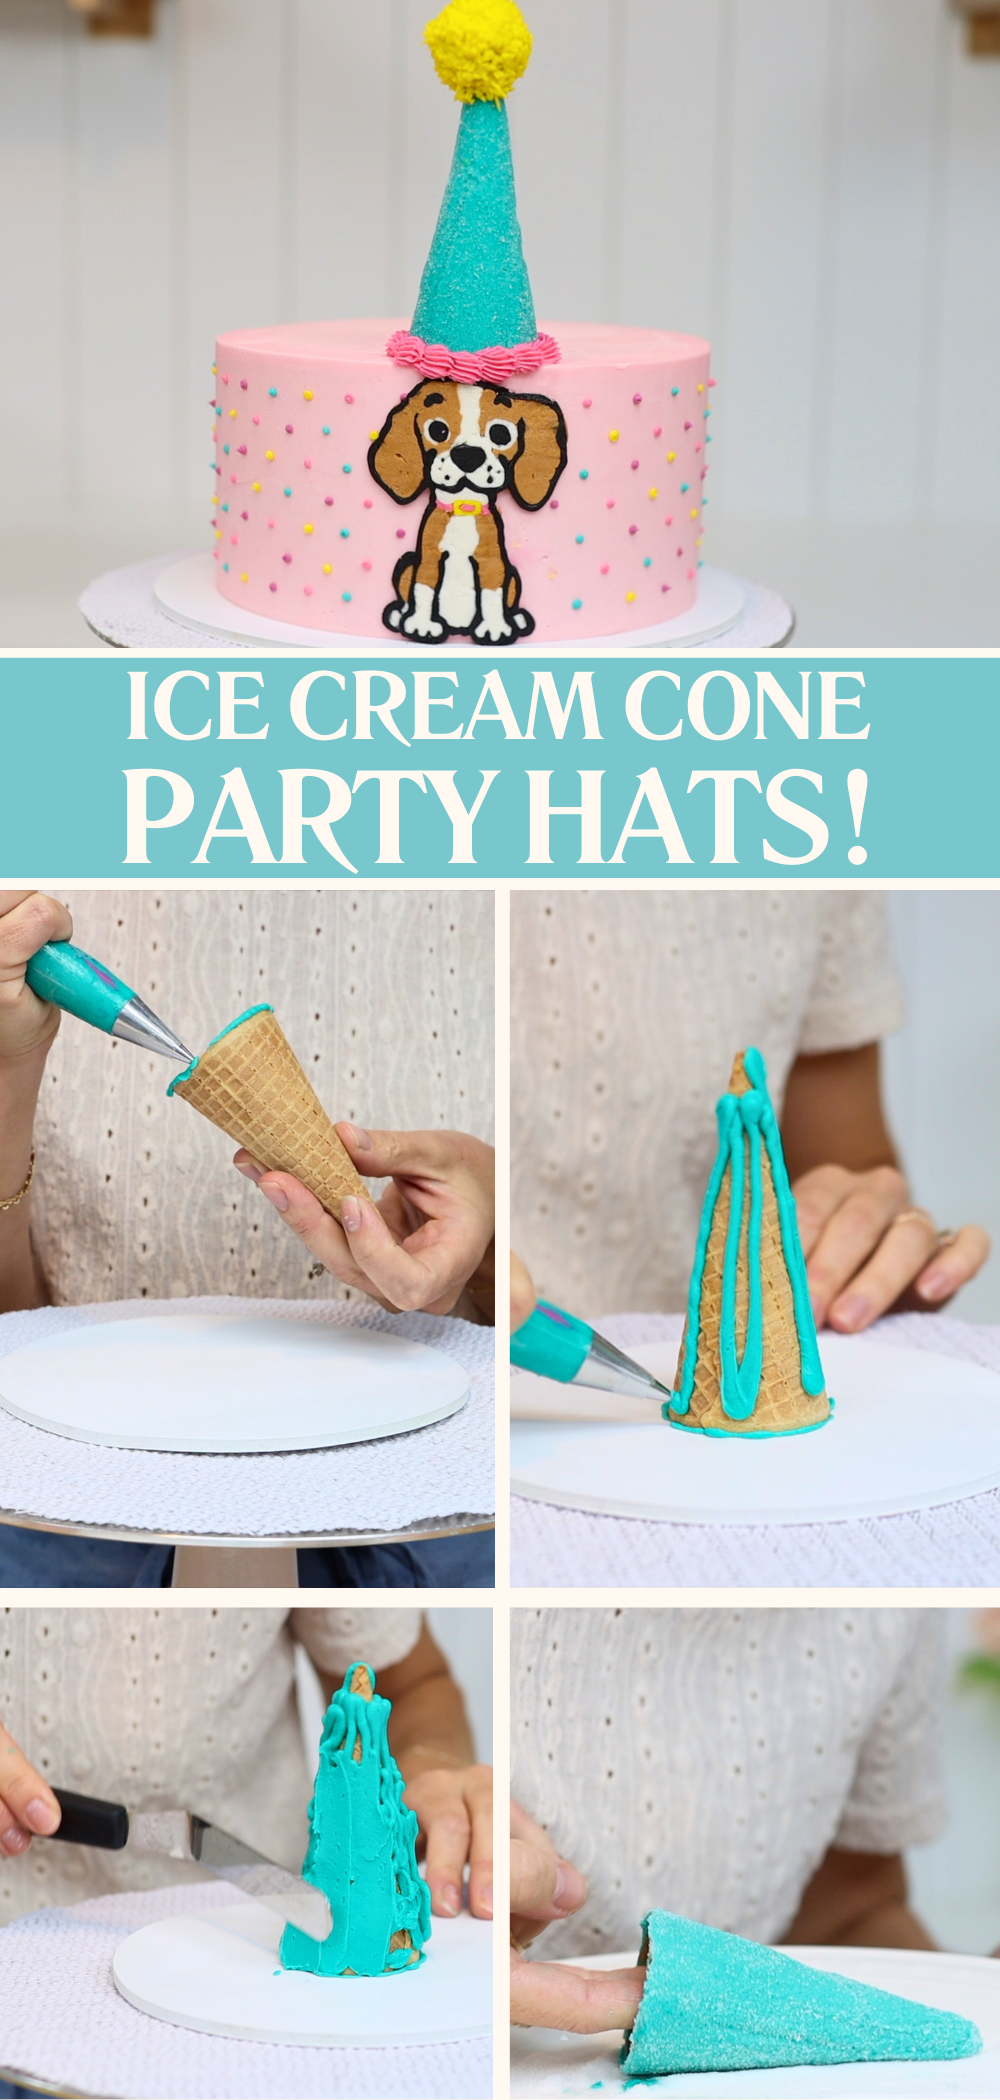
Ice cream cones are incredibly versatile for cake decorating. You can turn them into party hats, trees, or anything else with a conical shape.
For Christmas tree-style toppers, use green buttercream and a small round piping tip like a Wilton #8. Pipe little dots around the cone and pull your piping bag away after each one to leave a peak. These look like a pine tree's branches. While the buttercream is still sticky, add sprinkles for ornaments or dust with icing sugar for a snowy look. A touch of edible glitter looks magical dusted over them with a powder brush, too!

For party hats, cover the cone smoothly with buttercream. It can be tricky to get an even finish so here’s a trick: once it’s frosted, roll the cone in granulated sugar. This hides any imperfections and gives the hat a lovely sparkle.
Pipe a ring of buttercream onto the bottom of the cone and press it down onto your cake. This make a festive party hat for a character cake!
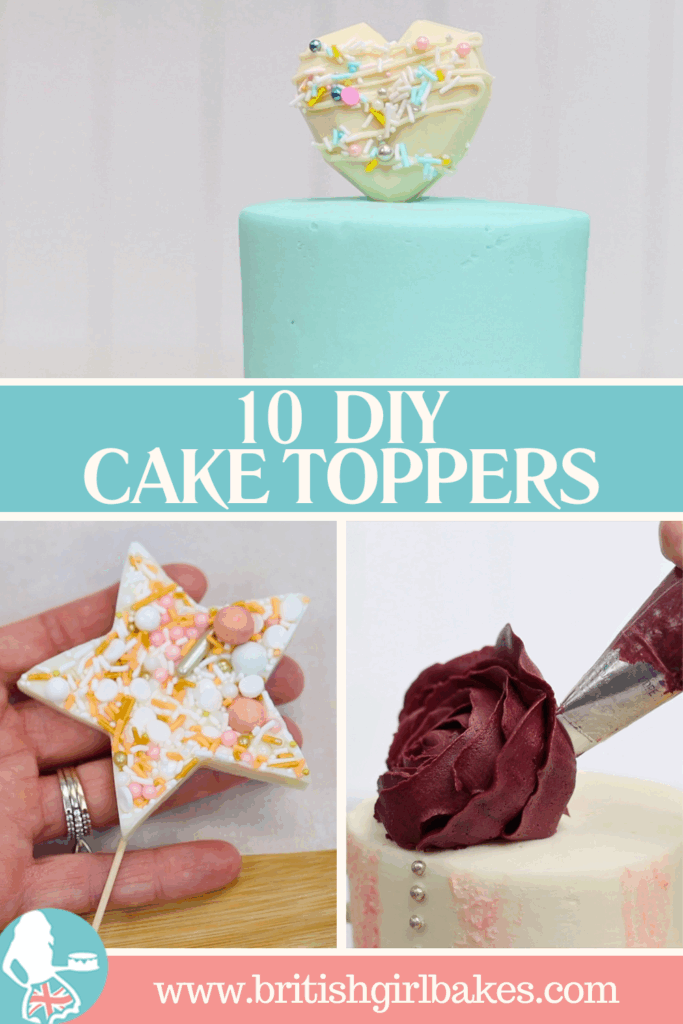
This method is ideal for clean, bold shapes. You’ll need cookie cutters, chocolate, sprinkles, and a toothpick.
Melt your chocolate and lay a piece of baking paper on a tray, placing your cookie cutter on top. Spoon the chocolate into the cutter and push it into the edges and corners.
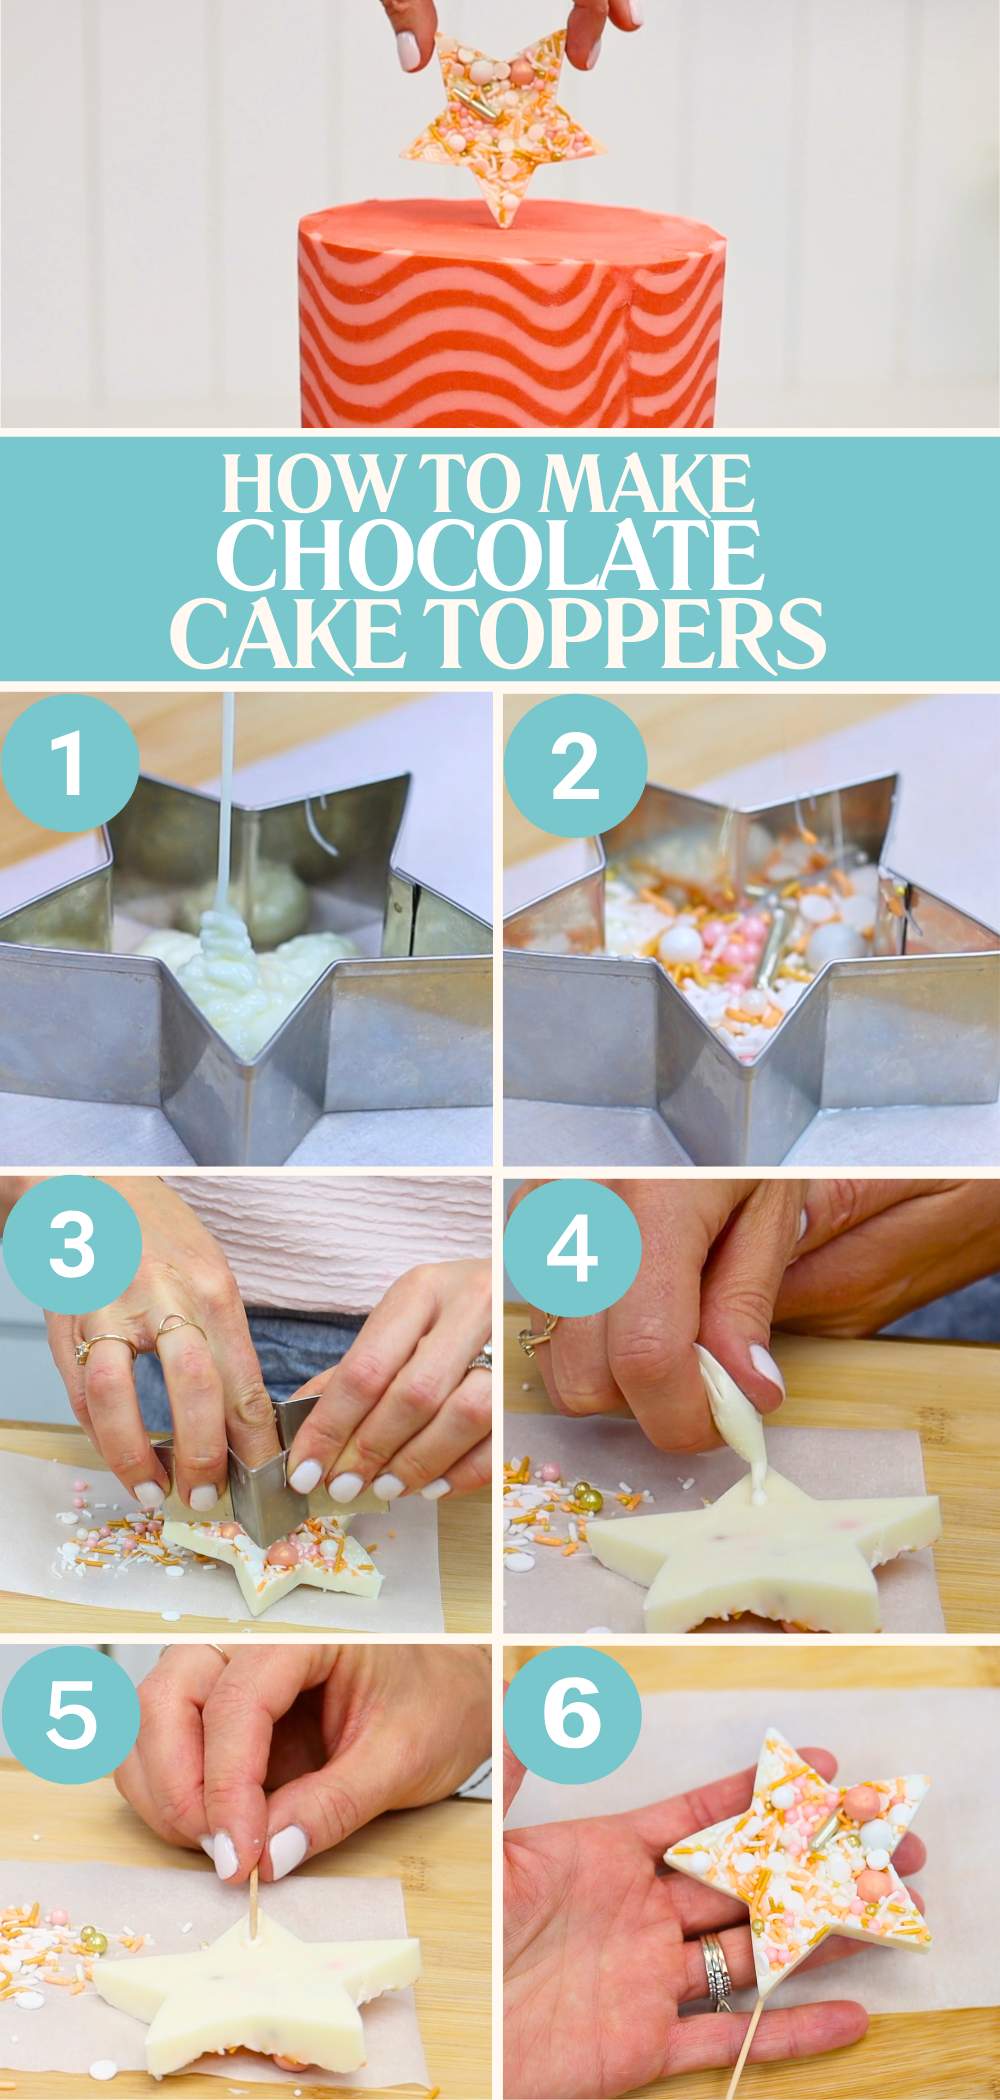
While the chocolate is still melted, pour some sprinkles on the top and press them down gently. Then place the tray in the freezer for about 15 minutes. Once it’s fully set, carefully push the chocolate out of the cutter.
To turn your shape into a DIY cake topper, reheat the leftover chocolate and spoon or pipe a little bit onto the back of your shape. Press in a toothpick and let it set before pushing it into your cake.
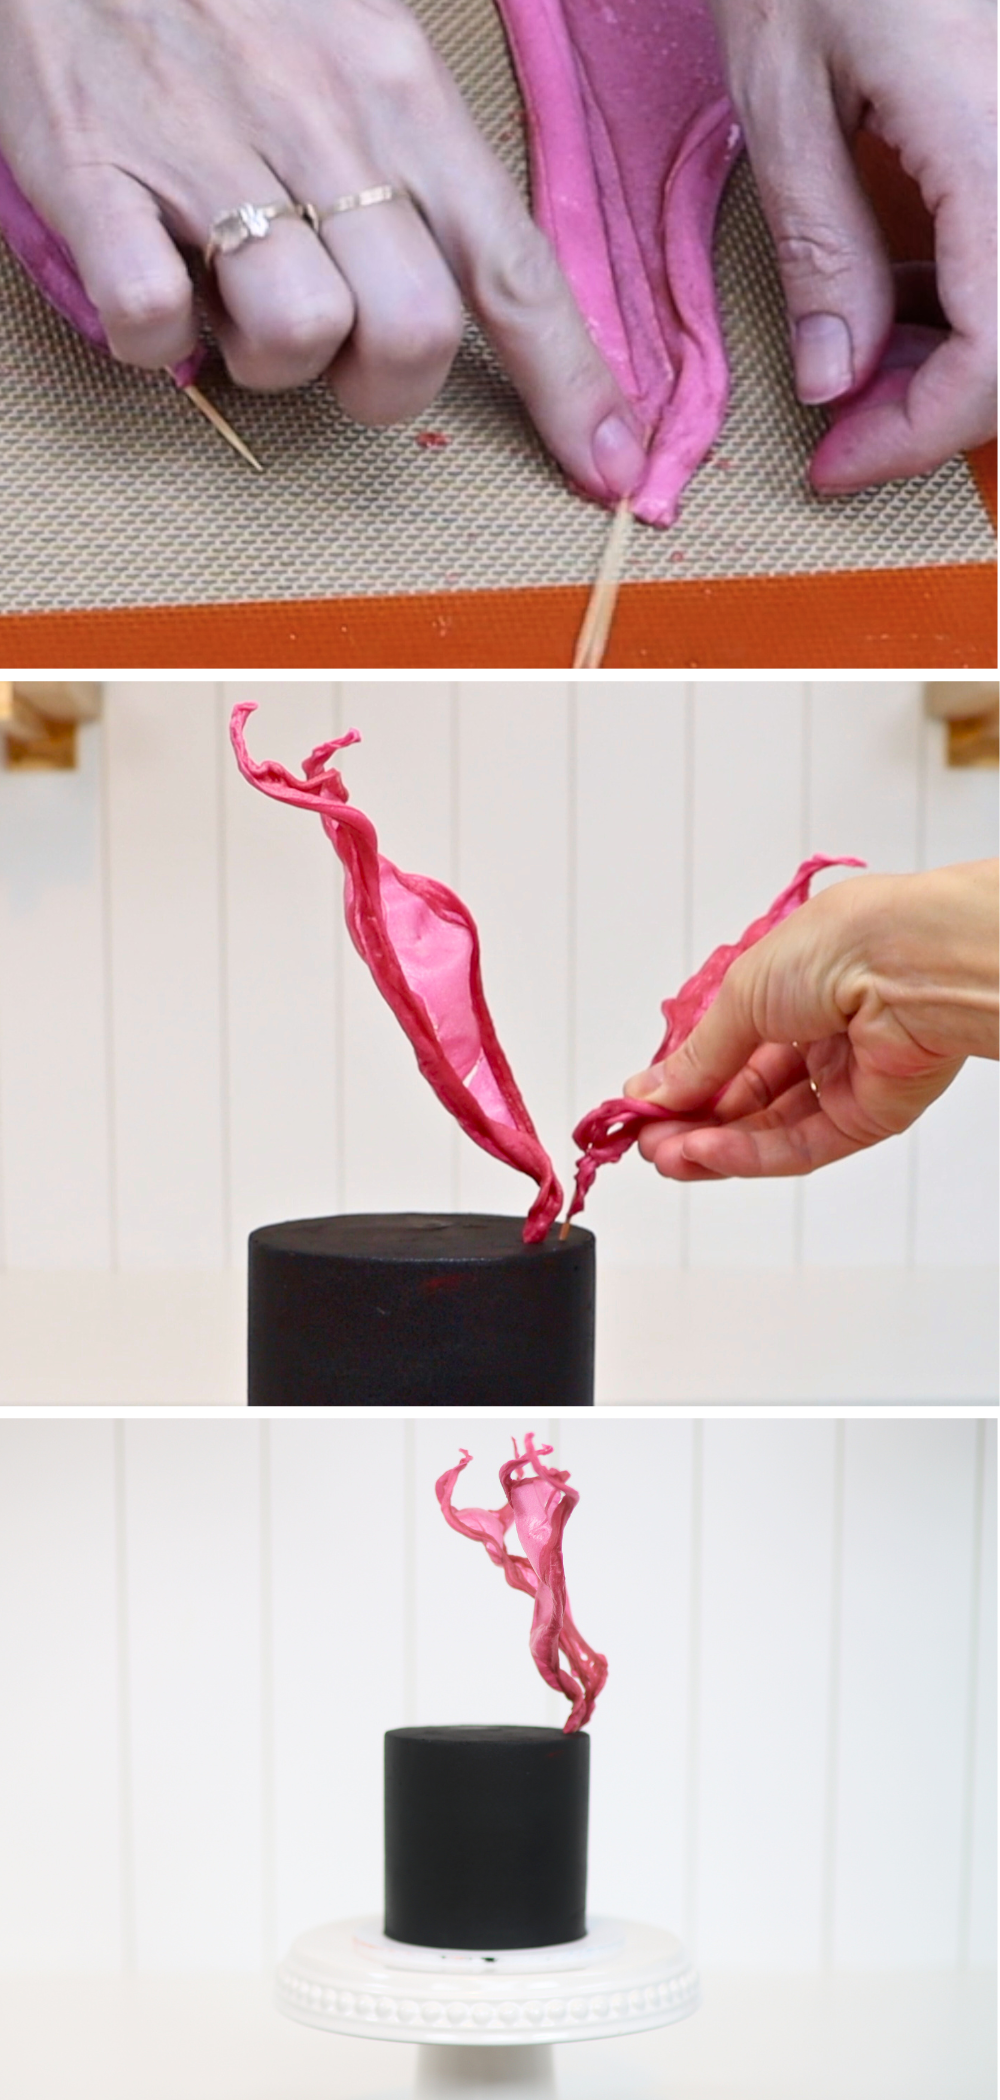
These are dramatic and delicate and they add colourful flair to any cake.
Mix warm water with a few drops of food colouring in a bowl or tray. Soak your rice paper sheet for about a minute until it softens. Then lift it out and shape it by draping it over scrunched up parchment or wax paper or baking paper.
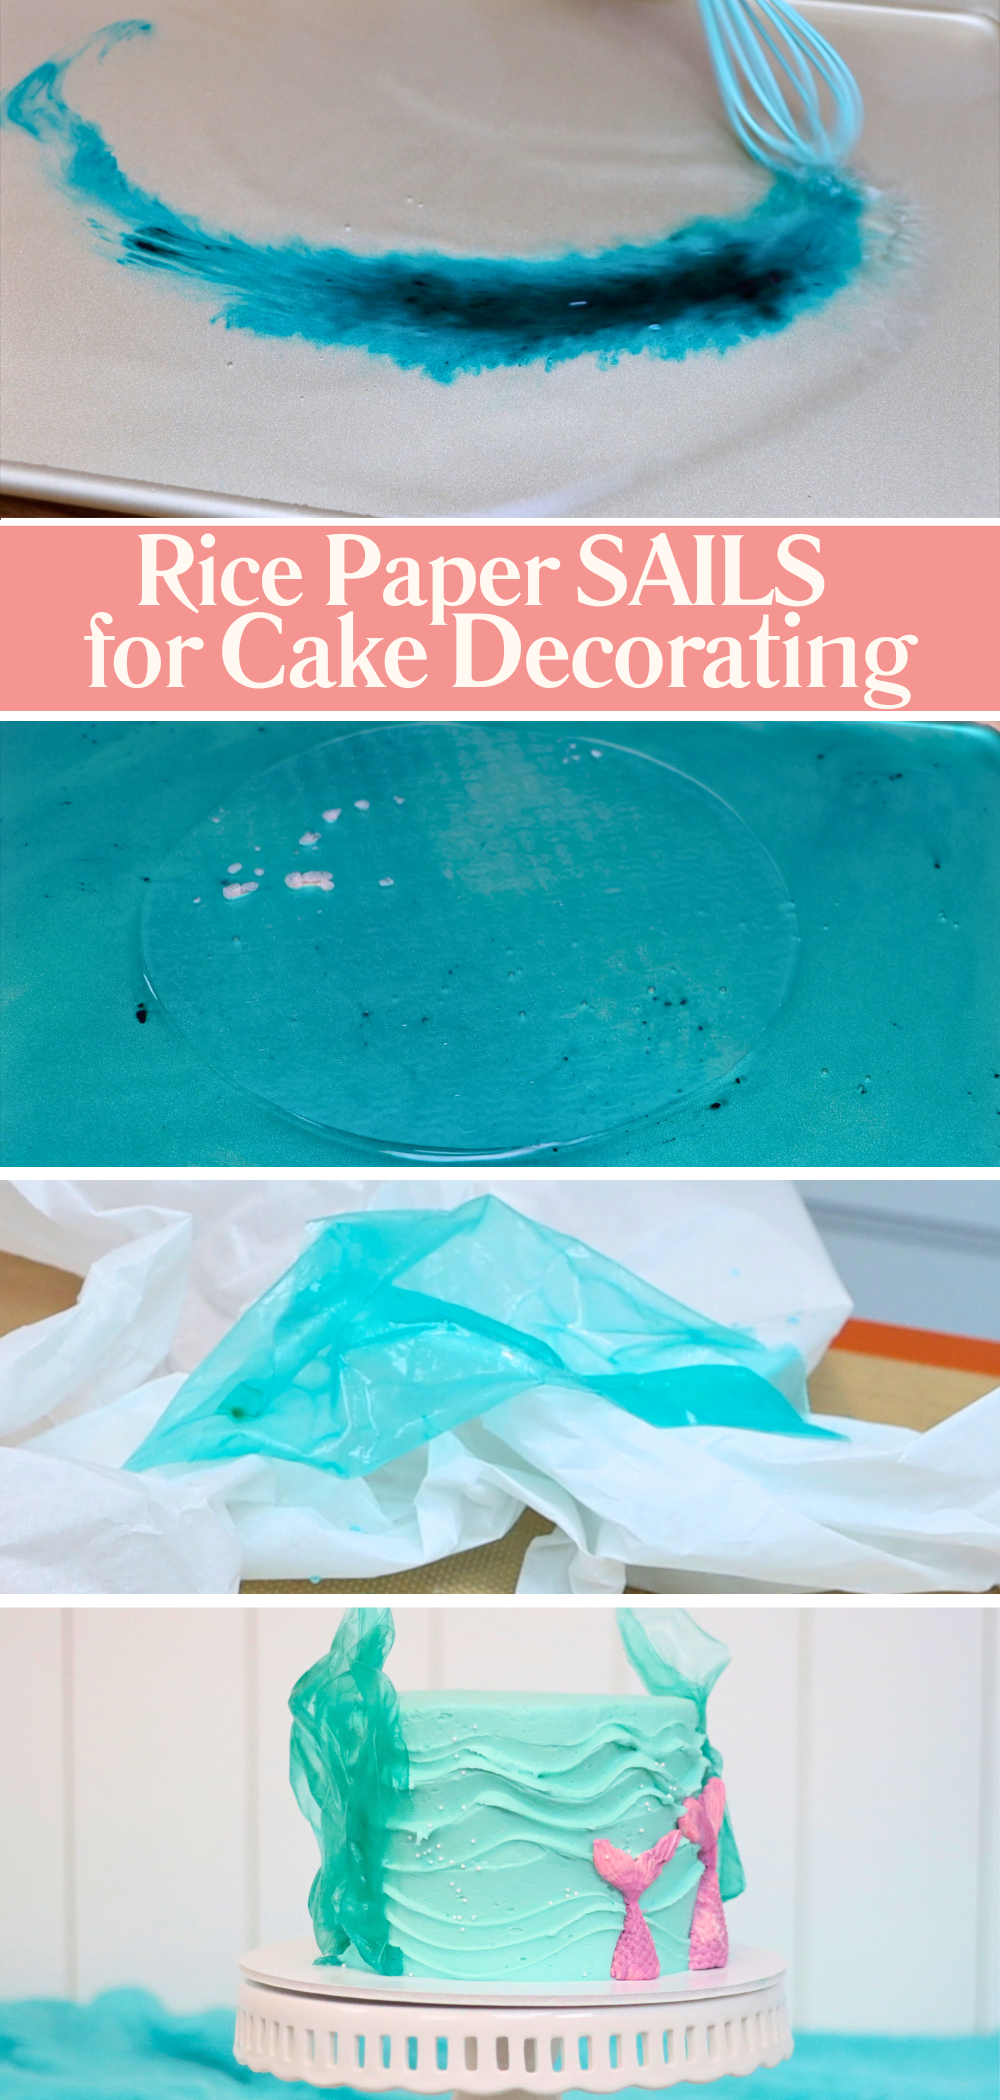
Wrap the bottom of the paper around a toothpick or skewer—this makes it easy to anchor into the cake.
Leave it to dry overnight. Once it’s dry and firm, press the toothpick into the cake. You’ll be amazed at how much impact this light, fluttery topper can have!
These take a little practice but are absolutely worth mastering. You’ll need stiff buttercream, parchment squares and a flower nail. You'll also need a piping bag and a petal shaped piping tip like a #125 or a #104.
Pipe a small dot of buttercream onto your flower nail and then press a parchment square on top. Use a petal tip to pipe a central cone and then begin layering petals around it. Each petal should overlap the previous one by about a third.
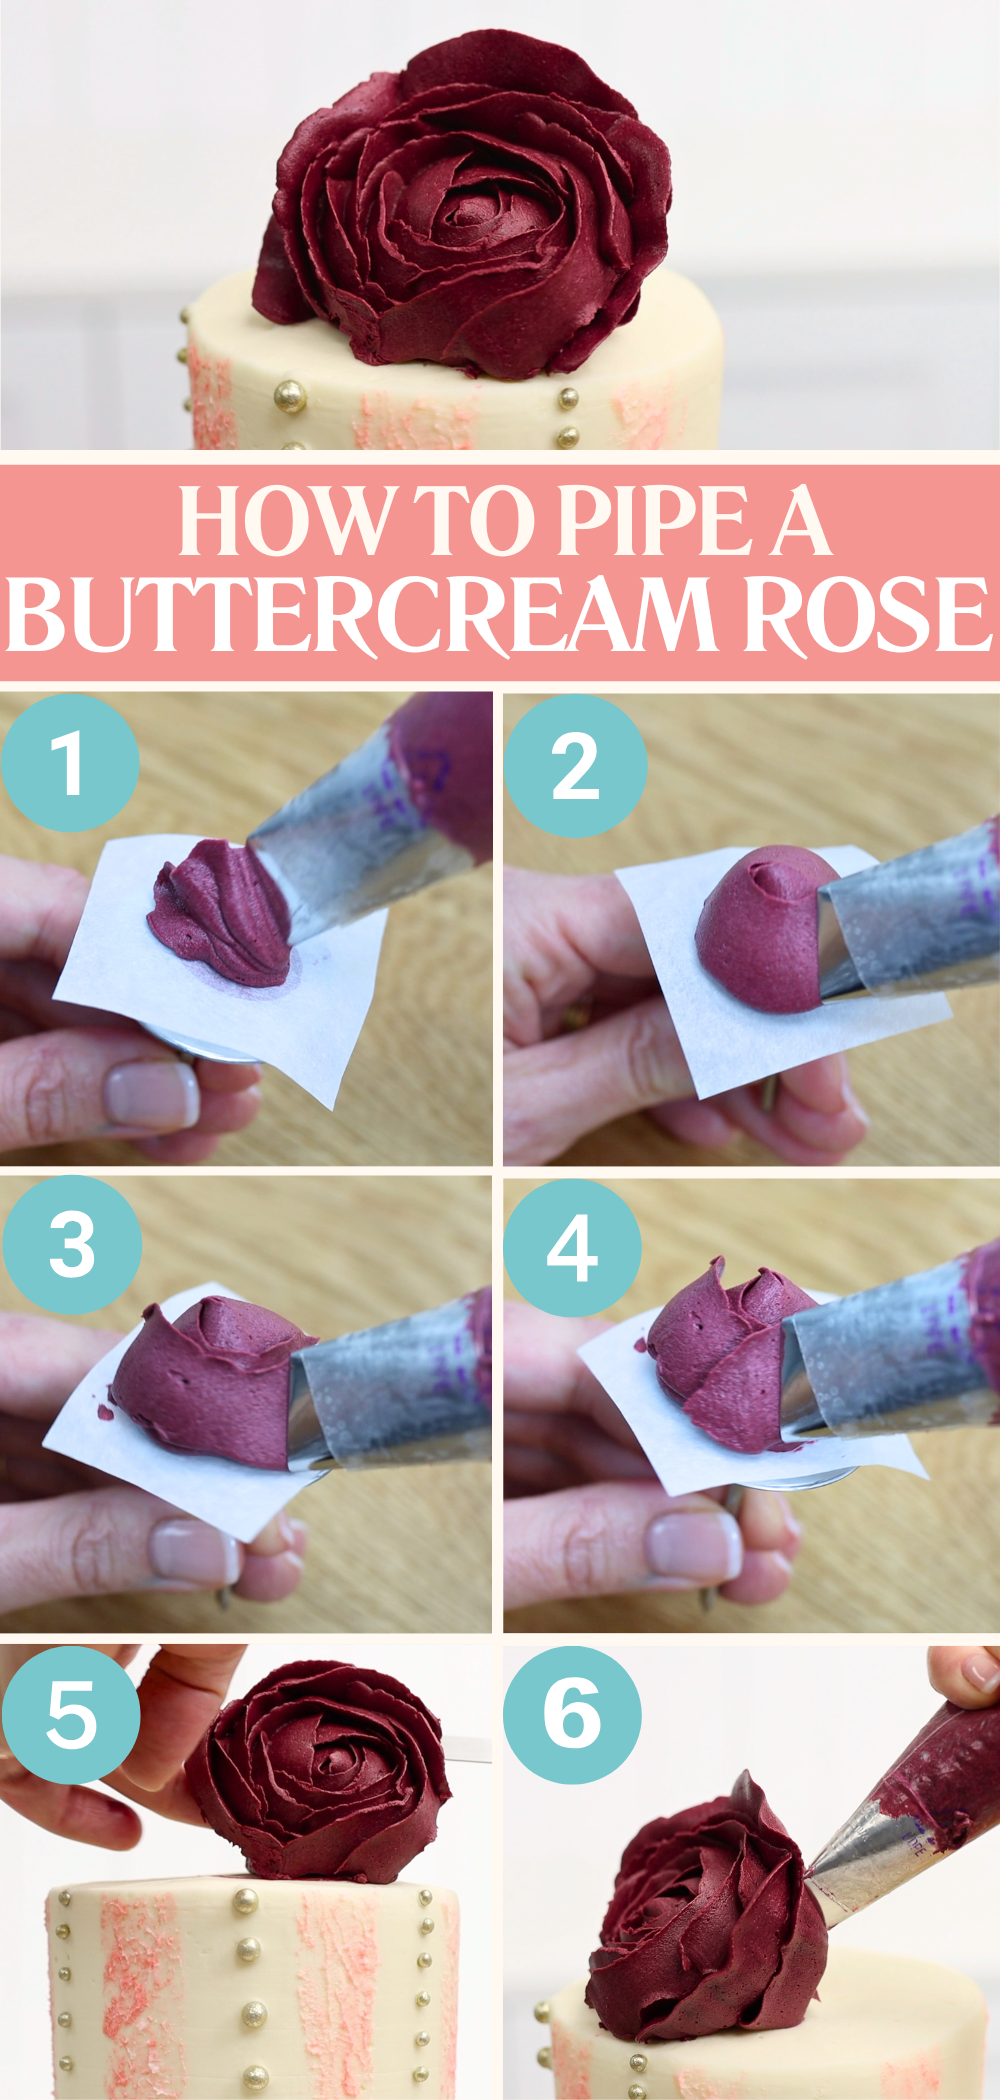
Continue until your rose is the desired size. Transfer the parchment to a tray and freeze for at least 30 minutes. To add the flower to your cake, peel it off the parchment and attach with a dot of buttercream. Or pipe a larger blob of buttercream to angle the rose upwards for a more natural look and pipe extra petals at the base to blend them in.
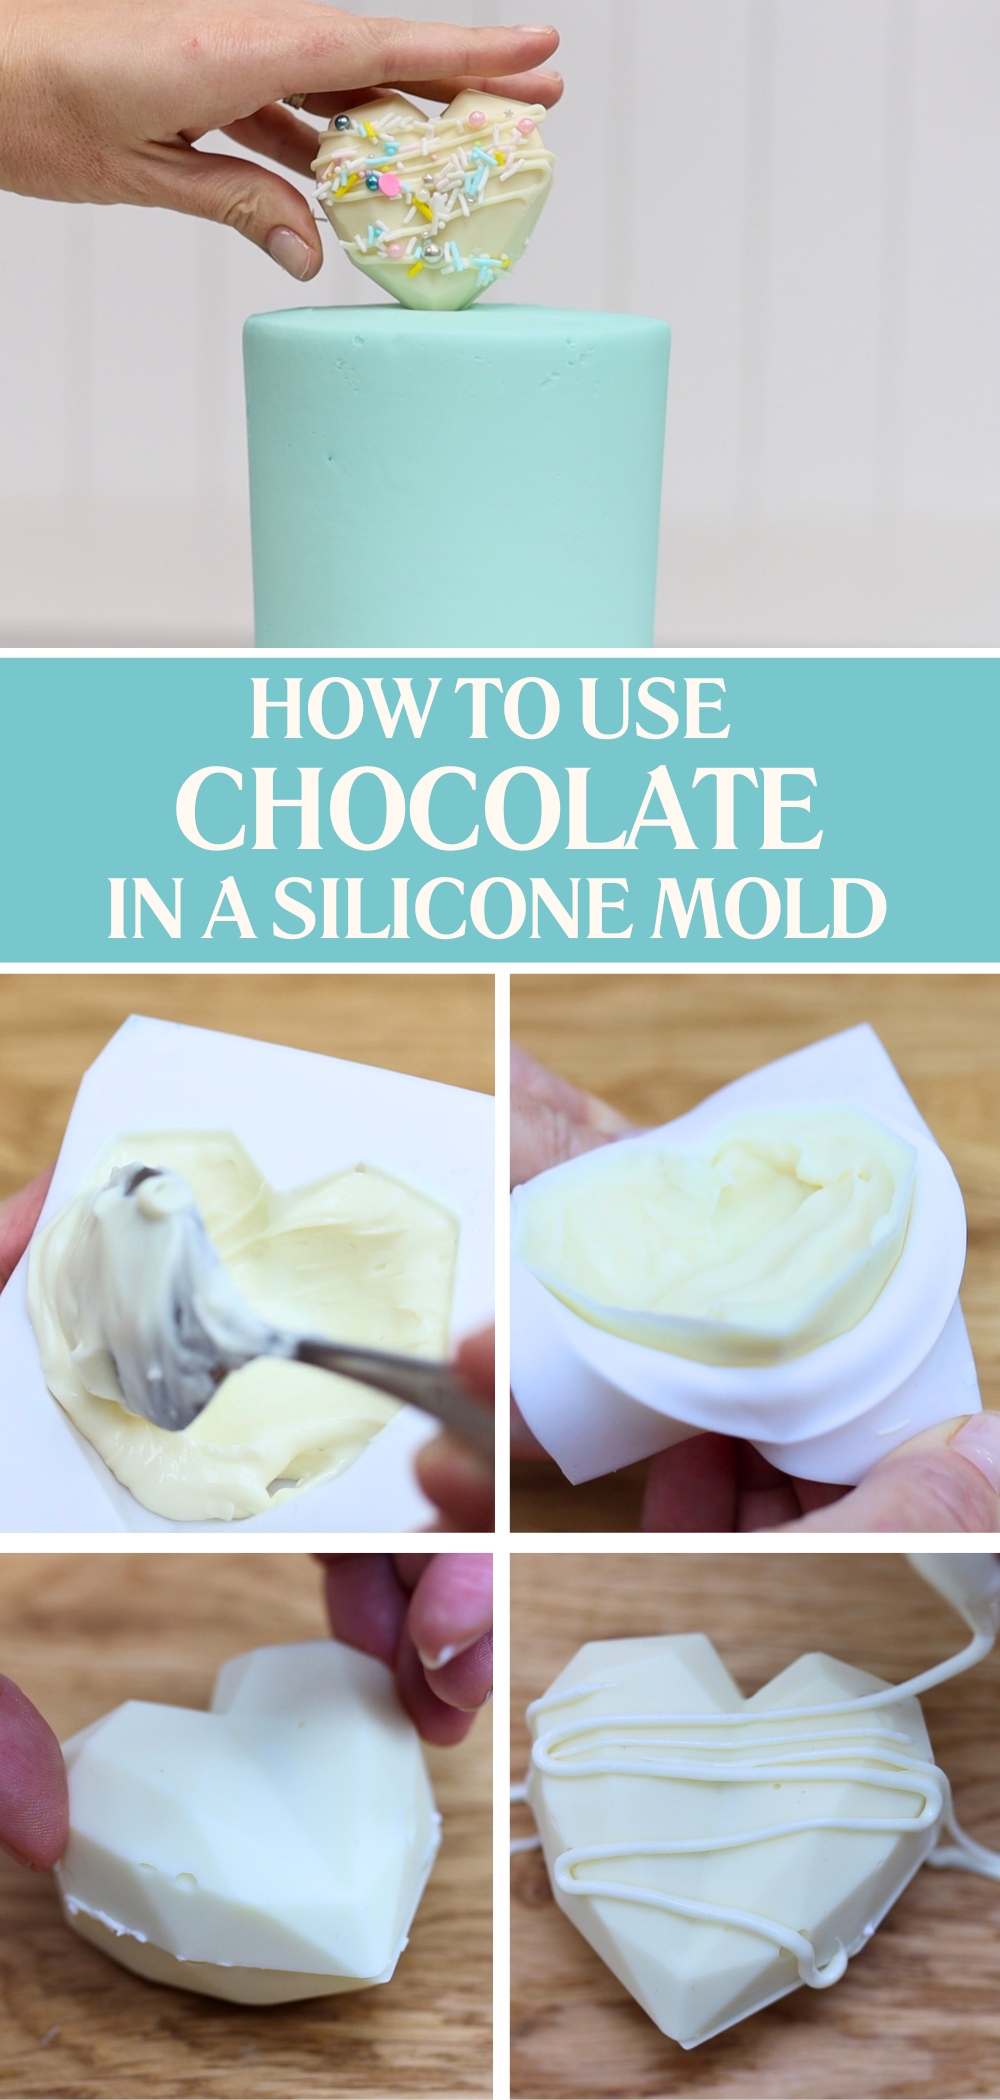
Just like with the buttercream DIY cake toppers in #4, silicone molds make polished, professional-looking toppers using chocolate.
Fill your mold with melted chocolate and tap it gently to release air bubbles. Let it set at room temperature or in the fridge or freezer. If you’re making 3D shapes like spheres, fill both halves and let them set. Then warm a plate with hot water, dry it, and press the flat edge of each half against it for a few seconds. This melts them slightly so you can stick the halves together.
To finish, drizzle more melted chocolate over the top and sprinkle with edible glitter, sugar pearls or sprinkles. These toppers look store-bought but are easily homemade!
DIY cake toppers give you complete creative freedom to customize your cake. They’re often more budget-friendly than buying pre-made decorations and they taste better, too! From simple, quick designs to more intricate toppers, there’s something here for every skill level and style.
Plus, there’s something so satisfying about people asking, “Where did you get that?” and being able to say, “I made it!”
For more cake decorating techniques and designs visit my cake school, where you'll find online courses and memberships and my FREE course on 10 Frosting Techniques!
You can also watch a video of this tutorial on 10 edible DIY cake toppers:
Save this tutorial on 10 DIY Cake Toppers to Pinterest for later with one of these Pins: