In this tutorial I’ll share an exclusive glimpse of professional cookie decorating behind the scenes in Sweet Spot Studio, where I met and shadowed an expert cookie decorator. I’ll show you the step by step process for decorating cookies (including Chef Jossie’s three tricks for perfect piping) and then demonstrate how to use cookies to decorate a cake. I’ll finish with my attempts at cookie decorating and some bloopers. If you prefer to watch a video of this tutorial, scroll to the bottom of the page.
On a cross-country hunt I found a professional cookie decorator who was willing to share her secrets on how to create her gorgeous cookies.

I spent an evening with Chef Jossie at Sweet Spot Studio in Charlotte in North Carolina learning all about how she decorates cookies with eye-catching colours, textures, and intricate details, which I’m now going to share with you!

To decorate cookies you’ll need cookies, of course, and royal icing, which you can buy or make yourself. When you’re not using it, cover it with a damp towel to stop it from drying out.

Tint small amounts with gel colours to use in piping bags next, and you’ll need a stiff and loose consistency of each colour for different parts of the cookies.

Start by outlining each colour of your design, using the piping bag with the thicker consistency of that colour of royal icing.

There are three tricks for outlining your cookies. The first two go together and they’re speed and pressure. When you find the right combination of the speed you move your piping bag and the pressure you squeeze your bag with, you’ll pipe a perfectly straight line.

If you move your bag too slowly or apply too much pressure to the bag, the icing will wiggle as you pipe and your line will be more of a zig zag, like the top line here.

If you move your bag too fast or don’t apply enough pressure to the bag, the icing won’t be able to keep up with you and your line will break, like the bottom line here.

The bigger the hole you cut in your piping bag, the faster you’ll have to move your bag and the less pressure you’ll need to apply compared to if you cut a small hole, and then you’ll need less pressure and can move the bag more slowly. So for the most control as you pipe, a small hole is easiest.

The third trick is the height that you hold the piping bag above the cookie. When you’re first learning, it feels natural to hold the bag just above the cookie and you’d imagine that your piping would be best when you’re close to the target.

But actually, you have the most control when your piping bag is higher up, and when you’re directing the royal icing from a bit of a distance you’ll get much neater, more accurate lines.

None of this matters if the consistency of your royal icing is too thin or too thick. If it’s too thick, your line will break as you’re piping and you’ll leave visible texture in your lines. If it’s too thin, it will spread out as you pipe so your line won’t be as sharp and any angles or curves will bleed into each other and might even slide off the side of the cookie.

When you’re outlining your cookies you need to outline every coloured section, so for this cookie there’s the beige coloured ice cream cone, this first layer of white ice cream and then some pink ice cream and then more white on the top.

These little cookie turntables are amazing by the way, but they’re definitely not essential. You can decorate on any flat surface, it’s just convenient being able to spin the cookie around like this. To buy a cookie

Immediately after outlining all of the coloured sections of the cookie, it’s time to flood them. Flooding is just filling in an outline with royal icing of a looser consistency, so as you squeeze it out of the piping bag it spreads out to cover the cookie all the way up to the outline.

You can use a pin like this, called a cookie scribe, to push the icing all the way to the outline and also to pop any air bubbles in the icing.

For sections of colour next to each other, you can either flood them straight after each other or you can wait for the first section to dry before you flood the next section. If you flood coloured sections next to each other so different colours of wet royal icing are touching each other, the colours will blur together where they meet instead of having a clear cut line.

That might be the effect you want, like for this popsicle where the colours don’t have a distinct division between them, it’s kind of blurry, because the pink and white and blue royal icing touched each other while it was still wet so the join is fluid.

The other option is to flood areas that aren’t touching each other and then let those dry before continuing. Royal icing takes several hours on its own to dry but you can speed up the process by putting the cookies in front of a fan or they’ll dry even faster in a dehydrator.

For this ice cream cookie, the beige cone and the pink section of ice cream were flooded first. The sections in between were left out so that no wet icing sections touched each other. After flooding these two sections, the cookies was dried in a dehydrator for about 5 minutes to set those colours of icing.

Then when white icing floods the adjacent section it goes right up to the edge of the pink icing but because the pink icing is dry and hard, the join between them is clear and solid, so the pink and white are separate sections of colour with distinct boundaries.

Compare the pink and white and blue popsicle cookie (where different colours of icing were piped side by side without drying in between) to the pink and white ice cream cookie (where wet icing was piped next to dry icing).

After drying the first round of flooding there are several techniques you can use for the next round of icing; flooding, adding detail lines, adding texture, layering shapes, and attaching decorations.
Flooding
You can use royal icing with a thin consistency to flood more areas, filling in other colour sections, like the stick on this popsicle. By drying the rest of the icing first, the division between the stick and the popsicle will be more distinct than if you’d piped the stick right next to the blue icing while it was still wet.

Add detail lines
Now that the sections you flooded first have dried and hardened, you can add detail lines like making the waffle texture on this cone, and the piping will sit on top of the layer of icing that’s dry.

You’ll need a stiff consistency of icing for this, the same stiffness as you used to outline. If you had piped these details on before letting the first layer dry, the details would sink into the wet base layer of icing.

Add texture
Using a stiff consistency of icing, the same as you’d use for outlining shapes, add texture to cookies. For example, these squiggly circles are holding their shape after being piped.

This texture is great for the rough part at the bottom of a scoop of ice cream. To make it look less neat you can smudge the lines by scratching them with a cookie scribe.

The same technique works well for the texture at the top of an ice cream cone, using zig zag lines instead of circular loops. If you used thinner icing, like you’d use for flooding shapes, the icing would sink down and spread out and lose its texture.

Layer shapes
By outlining another section of colour over one of the first sections of colour, and then filling it in. This is going to look like chocolate syrup on top of the pink ice cream. By piping this on top of another colour which has already dried, you’re adding thickness to the icing, which adds dimension and it really looks like syrup poured on top of the ice cream.

This icing is a combination of the stiffer icing used for outlining and the thinner icing using for flooding, so the consistency is somewhere in the middle and it works for outlining this syrup and also flooding it.

You can do this with all sorts of shapes, like these little lines for sprinkles. If you piped these onto wet icing, they would sink into the icing instead of sitting on top of it.

Attach decorations
You can use icing as glue to attach sprinkles to your cookies. After an area of icing has dried, pipe a little dot of icing with a stiff consistency and then press a sprinkle onto it. As the dot of icing dries, it will secure the sprinkle in place.

You could press the sprinkle into the base layer of icing on the cookie while it’s still wet, so that the sprinkle sticks onto it and you wouldn’t need to add the dot of icing as glue, but the pressure you use as you push the sprinkle in can make the layer of icing bulge.

By doing it this way, with a dot of icing as glue, you have more control because you can adjust the sprinkle after pressing it into the dot, shifting it a bit lower or higher before the dot dries and sets the sprinkle in place.

When you finish decorating your cookies, place them in front of a fan to dry completely. The time it takes depends on the humidity but it’s usually a few hours.

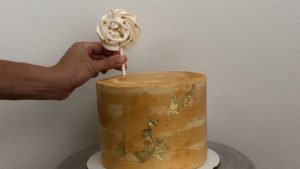
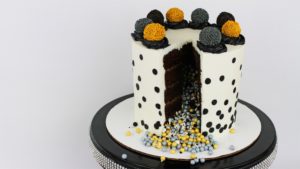
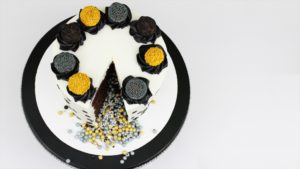
Now I’ll show you a way to use cookies to decorate a cake! While our cookies were drying, I made the most of being in such a beautiful studio kitchen and with this gorgeous mixer I made a batch of my 4 Minute Buttercream frosting.

I’m going to place cookies around the sides of the cake after frosting it. To do this, assemble your cake and apply a crumb coat, which is a thin layer of frosting to trap in any crumbs that might come off the cake so they don’t get into the final coat of frosting.

For my final coat I’m going to put sprinkles in the frosting, and after perusing the extensive sprinkle collection in the studio I’m choosing these simple pink and blue jimmies, which I’m pouring into the buttercream and then spreading onto the cake.

You can press cookies straight into the frosting while it’s still soft and sticky but that can make the frosting bulge around the sides of the cookies. Alternatively, you can chill the frosting to let it set and then use a little bit of plain buttercream to attach the cookies.

You can do this by spreading a bit onto the back of a cookie and then pressing it against the frosting, and that little bit of buttercream will set and secure the cookie against the side of the cake.

Or you can put the buttercream in a piping bag and pipe it onto the back of the cookie.

Chef Jossie gave me some cookies and piping bags of royal icing to take home with me, like you’d get if you had a subscription to Sweet Spot’s online cookie decorating classes.

The colours separated in the bags, like she told me they would, but you can squeeze and massage them for a while to get them back to normal. I had bags of thinner and thicker consistency for the different styles of piping and some cute little cookies ready to be decorated.

I’d love to tell you that my first attempt at cookies ended up being just as beautiful as hers, but I quickly gave up and gazed out at the pretty view instead. I think I’ll stick to cakes for the moment!

I hope these tips have been useful!
If you’re looking for creative ways to use your cookie cutters, check out my tutorial on 6 Ideas for Cake Decorating with Cookie Cutters.
Here’s the video version of this tutorial:
If you don’t have cake decorating tools or you’re away from home, don’t let that stop you from making a pretty cake! In this tutorial I share how to decorate a cake with no special tools and a hack to create a makeshift
For my cake I’m using my Perfect Chocolate Cake batter, dividing it equally between three 8″ pans. After baking and cooling the cake layers, chill them in the fridge for an hour or in the freezer for 30 minutes. Cold cake layers are much easier to work with because they’re firmer and less crumbly.

You can leave the cake layers in the fridge overnight if you don’t have time to bake and decorate the cake on the same day. To prevent the cake layers from drying out, wrap them in cling film or saran wrap before putting them in the fridge.

If you’re travelling somewhere with your cake layers to assemble and frost the cake there, check out my tutorial on How To Travel With A Cake In Your Suitcase!

While the cake layers are chilling, make your filling and frosting. I’m using my Best Chocolate Buttercream for this cake for both the filling and frosting but you can use whatever you like. Ganache, meringue buttercreams or even whipped cream will work for the frosting.

When you’re ready to assemble your cake, take the cold cake layers out of the fridge or freezer and if you wrapped them in cling film or saran wrap, unwrap them now. Don’t worry about any imperfections on the cake surface because they’re all going to be covered with frosting!

Attach the first one to a plate or platter using a dollop of buttercream spread onto the middle of the plate. This will act as glue to secure the cake so it doesn’t slide around when you frost it.

Spoon some buttercream onto the first layer and spread it around to cover the cake, using the back of your spoon. Since the cakes are cold they shouldn’t crumble as you spread the buttercream.

Spread it right up to the edges to completely cover the top of the cake layer, so that the filling on top will eventually meeting the frosting on the sides and lock the moisture into the cake.

Place another layer of cake on top and continue alternating cake layers and filling. After placing your top cake layer onto the cake, spread buttercream over that as well. This will be the frosting on the top of the cake.

Spread the frosting all the way to the edges of the cake and a little bit beyond, so that it sticks out over the sides of the cake, and this will give you nice sharp edges on your cake instead of a domed top that droops down onto the sides of the cake.

Move onto the sides next. This is a bit trickier because of the angle and also because the sides of the cake tend to have more crumbs than the top. It’s really important that the cake layers have been refrigerated so that they’re cold, because at room temperature cakes are even more crumbly.

Scoop up buttercream using the back of your spoon and then use that to spread it onto the cake.

By gliding your spoon from side to side like this, you’ll spread the frosting over the cake without pulling crumbs off. When you need to use your spoon to scoop up more buttercream, swipe the spoon off sideways instead of lifting it straight off the cake, which would pull cake crumbs off with it.

The more buttercream you spread onto the cake, the better, for two reasons. The first is that it’s easier to spread thick buttercream around on the cake, noise reduction and you can easily take some off with your spoon later. If you spread the buttercream on thinly, it’s more likely to pull crumbs off the cake.

The second reason for spreading the buttercream on thickly is that if you want to smooth the frosting, which I’ll show you how to do next, it’s much easier if the frosting starts out thick.

With the back of your spoon, spread the buttercream all the way down to the plate, not worrying around making a mess on the plate with buttercream smudges noise reduction because we’ll tidy that up later. Spread the buttercream all the way up to the top of the cake as well, beyond the top edge to prevent air pockets and to make nice sharp edges later.

When you’ve spread frosting all the way around the cake, spin it around one more time to check for any areas where the frosting is much thinner or if there are any parts where you can see cake crumbs, and spread some more buttercream over those.

This textured frosting looks pretty as it is, so you can stop at this point if you like and tidy up the plate by wrapping a paper towel around your finger and then wiping around the base of the cake to take off any smudges of buttercream.

If you like you can add more texture to the top of the cake, like these waves or random swirls or scatter on some sprinkles.

If you want the frosting on the cake to be smooth, you can do that without any special cake decorating tools! I’ll show you the process step by step and also share an easy hack for a

Press the spatula (or whatever object you’re using) against the side of the cake and pull it sideways, using the end of the spatula to scrape the frosting. You’re not pressing the entire surface of the spatula against the cake, just the edge.

Don’t worry about these strands of buttercream coming through the gaps in the spatula because they’ll come off later in the smoothing process. A spatula without these gaps would be even better to use but you’ve go to work with what you have!

To spin the cake more easily as you smooth the frosting, here’s an easy hack if you don’t have a

Place your cake plate or platter on top and although it won’t spin around effortlessly like it would on a cake decorating

Scrape around the cake a few times with your spatula or whatever tool you’re using. Wipe your tool off on a towel or paper towel after each scrape so that you don’t drag buttercream back onto your smooth frosting.

If the cake is taller than your tool you’ll have to go around the bottom section once and then lift the tool an inch or two higher and go around again to smooth the top section.

You can definitely do this without the

If your tool doesn’t glide around the cake in a smooth motion, and instead it jerks or jumps or stops and starts along the scrape, you’ll get dents in the frosting at those points and you’ll have to scrape over that section again to get it smooth.

As you go, check to see if the cake is showing through the frosting anywhere and spread a bit more buttercream over those areas and then scrape again and again until you’re happy with the sides.

For the top of the cake, lower your spatula down onto the cake starting just outside the cake and pull it towards the middle of the cake. Press down slightly on the frosting to create a 90 degree angle like a corner going over from the top of the cake down to the side.

If you spread buttercream up over the top of the sides of the cake, as you scrape over the top edge now you won’t have any air pockets. If you do see any air pockets, if they’re shallow you can scrape over it again to get rid of it but if it’s deep and stubborn and won’t disappear after a few scrapes you can spread more buttercream over the air pocket to fill it in and then scrape over it again.

Remember to wipe the underside of the spatula clean after every scrape so that you don’t drag any dregs of buttercream onto your nice sharp edges.

When you finish smoothing the frosting, wrap your finger in a paper towel to wipe any buttercream smudges off the plate. Try not to touch the frosting on the sides of the cake but if you do, don’t worry because we’re going to cover up the bottom inch or so of the frosting.

After cleaning the plate, pour sprinkles around the cake and use your hand or the back of your spoon to press the sprinkles into the frosting. This makes a colorful border around the bottom of the cake.

Because you’ve just frosted the cake, the buttercream will still be soft and sticky so the sprinkles will stick to the frosting easily. If you have extra sprinkles left on the plate you can leave them there or wait for the buttercream to set and then brush or tip the sprinkles off the plate.

To add some detail to the top of the cake, put some leftover buttercream into a ziplock bag and cut a corner off, which you’ll be squeezing the buttercream out of.

The line you cut across the corner should be about as wide as your thumb. If it’s much bigger or much smaller it will be difficult to pipe a neat dollop.

Hold the cut corner just above the cake, slightly in from the edge of the cake, and squeeze the buttercream out of the bag. It will bulge out to form a blob and then as you lift the bag up and away from the cake, release your pressure on the bag so that the buttercream makes a neat point.

These dollops of buttercream would be neater and more symmetrical if you used a piping bag and a round piping tip but this way works and you’ll hardly notice any imperfections when the cake is finished.

Add a few sprinkles to make the cake more festive and the cake is finished! No one will guess that this pretty cake was whipped up in just a few minutes, with no special tools!

You can store this cake at room temperature or in the fridge. If you refrigerate it, take it out of the fridge 2-4 hours before serving. This gives it enough time to come to room temperature (when it tastes best!) but it’s not so long that the frosting or decorations droop. When you serve the cake, wipe your knife clean after each cut for the neatest slices.

Of course, a delicious cake will be appreciated whatever it looks like, but I think cakes taste even more delicious when they look pretty, too! I’d love to see your cake decorating without tools and with this

Here’s the video version of this tutorial:
This buttercream is decadently chocolatey because it’s made with two different kinds of chocolate: melted chocolate and cocoa powder. It’s easy to make, stores well, and can be used for all sorts of frosting and decorating techniques!
This recipe makes 6 cups of buttercream, which is enough buttercream to fill and frost an 8″, 9″ or 10″ cake. If you halve the recipe you’ll have enough buttercream to fill and frost a 6″ cake.
Ingredients
1/3 cup (35g or 1 oz) unsweetened cocoa powder
1/4 cup (60ml) hot water
3/4 cup (175g or 6oz) semisweet chocolate
2 1/2 cups (565g or 20oz or 5x4oz sticks) unsalted butter*
907g or 2 lb (about 7 cups) powdered sugar
1/2 teaspoon salt
1/2 tablespoon vanilla extract
*If you use salted butter, omit the salt in the recipe
Method
Mix cocoa powder with hot water and stir until all of the cocoa powder has dissolved, to make a thin paste almost the consistency of melted chocolate. Leave it to cool.

In a small microwave-proof bowl, measure out chocolate. You can use chocolate chips or chop up a bar of chocolate into roughly the same sized pieces so they melt at the same speed. Melt the chocolate in the microwave at 50% power for 1 minute and stir it until it’s smooth.

After stirring it, if there are still pieces of solid chocolate in it, melt it for another 30 seconds. When it’s smooth, leave it to cool.

Make a batch of my 4 Minute Buttercream by mixing butter and powdered sugar in a mixer at the lowest speed setting until it’s smooth. The butter must be at room temperature and I like to add the sugar a quarter at a time, mixing for 1 minute before adding the next quarter, so that the sugar doesn’t spray out of the mixer when you turn it on. Add vanilla and salt and mix for a few more seconds to incorporate.
Add the cocoa powder mixture and melted chocolate to the buttercream and stir everything together.

The buttercream should be silky smooth and easily spreadable. If it’s too stiff and it pulls off the cake when you try to spread it on, add milk or cream a tablespoon at a time until it’s the right consistency. I have a very detailed tutorial on my 4 Minute Buttercream with tips on how to check the consistency.

You can use this chocolate buttercream to frost a cake and I’ll give you some fun variations on frosting techniques with this chocolate buttercream in a moment.

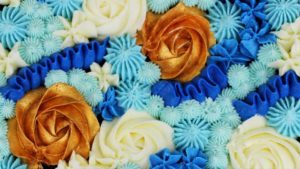
This chocolate buttercream also pipes well so you can use it with a 1M piping tip to pipe swirls or ruffles onto cakes or cupcakes to add texture and height to a cake like this:

I love piping filling when I make mini cakes, using textured designs to add detail to the filling to make pretty naked cakes that don’t need frosting:

You can pipe borders with this chocolate buttercream using a star tip like a 1M tip or an open star tip like a 4B tip:

It even works for buttercream carving and I have an entire online course on Buttercream Cake Carving.

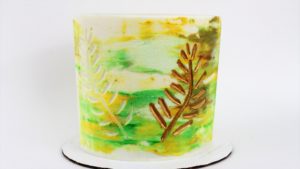
Brown buttercream might sound like a boring base for cake decorating but you can jazz it up by creating an ombre or watercolor effect. For a watercolor effect, don’t mix the chocolate into the buttercream completely. Mix the cocoa powder and water mixture in first, to give the frosting a pale brown colour, and then pour the melted chocolate into the bowl but only stir it a few times to create a marbled look.

Spread the frosting onto your cake and you’ll notice lots of different shades of brown in the frosting.

When you scrape the cake with a frosting smoother you’ll take away the texture on the frosting and when the frosting is smooth, the watercolor effect will be even more dramatic!

To change the shade of brown of your frosting, play around with the amount of chocolate you add to the buttercream. Divide your buttercream between bowls and add different amounts of melted chocolate and the cocoa powder mixture to each bowl.

You can use these different shades of brown to vary the colours of chocolate buttercream filling between cake layers, or create a pretty ombre design on a cake!

For ombre frosting, spread different shades of chocolate buttercream in layers around the sides of the cake so that the colour gets lighter or darker as you go up or down the cake. The bands of colour don’t have to be neat with a straight division between each colour. By overlapping the colours you’ll blend the shades of brown together, creating a more gradual gradient from light to dark brown.

After each time you scrape around the cake with a frosting smoother, wipe the buttercream off your frosting smoother and use it to fill in any air pockets around the cake. By using this mix of colours four your touch-ups, you’ll create less distinct divisions between the colours so that they blend together even more gradually.

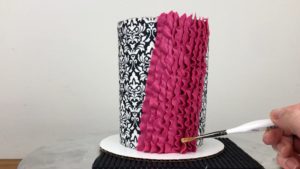
You can smooth the frosting with a frosting smoother or add texture with a textured cake comb like this pleated one, and the chocolate buttercream makes a cake that’s beautiful as well as delicious!

I store frosted cakes in the fridge until 2-4 hours before serving. To store just the chocolate buttercream, cover the bowl tightly with cling film or put the buttercream in an airtight container and leave it at room temperature for up to 3 days or in the fridge for a week or in the freezer for a month.

Take chocolate buttercream out of the fridge or freezer a few hours before you use it so that it can warm up to room temperature. Then stir it to get rid of any air bubbles. If there are any cold lumps of buttercream, leave it out for another hour and then stir it again. When it comes to room temperature, previously chilled chocolate buttercream will behave exactly the same way as freshly made buttercream!

Another option for chocolate frosting is chocolate ganache and I have a detailed tutorial on 4 Ways To Use Ganache.
If you’re looking for more information on how to make, troubleshoot, colour, store, and decorate with buttercream, check out my online course on The Basics of Buttercream.
I’d love to see the cakes you make with this chocolate buttercream frosting! Please tag @britishgirlbakes in your photos on instagram so I can see your creations!
Here’s the video version of this tutorial:
Mini cakes are perfect for mini celebrations! They’re also fun gifts if you want to give each person their favourite flavour or personalised decorations. In this tutorial I’m going to show you how to bake mini cake layers without special tools and how to assemble and frost such tricky little things, and then I’ll share a few ideas for decorating them. If you prefer to watch a video of this tutorial, scroll to the bottom of the page.
There are lots of ways to make mini cakes and I have tutorials on how to turn cupcakes into cake and how to make them in special mini cake pans but the quickest way is to bake a sheet cake.

This is a 9 x 13” pan and this is the 6” batch size of my perfect chocolate cake. You can use any cake recipe and any size or shape of pan and I’ll show you some examples of that later in this tutorial.

This is a 3” cookie cutter which is about the width of a cupcake, just to give you an idea of the size of these, but with three layers these mini cakes are going to be much taller than a cupcake.

To frost mini cakes it’s essential to use cold cake layers. You can put them in the fridge for about an hour to chill them or if you like you can put them in a ziploc bag and freeze them for up to a month before you make and decorate your cakes.

It’s easiest to add filling to your cakes by piping it onto the cake layers because the cakes are so tiny that it’s tricky to hold them still while you spread filling onto them. From my sheet cake I cut out 12 circles, which makes 4 mini cakes of 3 layers each.

Once your cakes are assembled they’re ready to be frosted! But first, you have to secure each one to a cake board. For these 3 inch cakes I use 4 inch cake boards, which are just big enough for the frosted cakes.

Spread or pipe a little dollop of buttercream onto the middle of the cake board and then press your mini cake down onto it. When the buttercream sets it will act as glue, sticking the cake to the board.

If you prefer, you can do this at the beginning, putting a dollop of buttercream on the cake board and then press your first layer of cake onto the board and assemble it there, alternating cake and filling right there on the board.

I want to show you another way to assemble mini cakes and decorate them at the same time! Attach your first layer of cake to a cake board with a dot of buttercream.

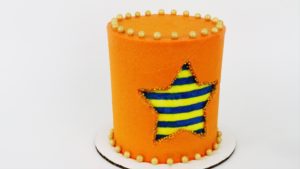
Put buttercream in a piping bag fitted with a piping tip and pipe the buttercream onto the cake, giving the filling a pretty shape and texture. I’m using a 1M star tip to pipe these little orange stars.

Place the next layer of cake on top and then pipe on the next layer of filling. Only the outer edge of the filling will be visible, so it’s a good idea to start there and work your way in so that you focus on the neatness of the piping on the outer edge.

If you start in the middle and work your way out, you’ll be guessing on how to space the piping so that you end up right at the edge of the cake, and that’s why it’s easier to start at the edge. This is a 199 open star tip.

I’m using a petal tip to pipe a flower on the top of the mini cake. By adding these piped details to the filling of the cake you’re adding a decorative touch now, while assembling the cake, which means you can present this as a naked cake and skip the frosting step if you want to.

You can use any shaped cookie cutter to cut shapes out cake layers of any shape or size. For example, I cut these mini cake layers out of 6″ vanilla cake rounds using star shaped cookie cutters.

Frosting such a small cake with this star shape with its many angles and sides would be tricky! Piping textured filling between the layers to make a naked mini cake is a quicker and easier alternative.

The challenge with frosting mini cakes is the size and weight of the cake. Because they’re so tiny and lightweight, you have to do something to prevent them sliding around on the

The first trick for frustration-free frosting is to use a non slip mat, which stops the cake from moving around on the

The second trick is to spread or pipe that dollop of buttercream onto the cake board. It sticks the cake to the cake board, so that that cake doesn’t slide around on the board.
This only works if the cake is cold, which is the third trick. Having a cold cake makes the buttercream dollop set so that it holds the cake firmly in place when you apply pressure to it as you frost it. Having cold cake layers also means that the filling will set quickly and hold the higher cake layers in place, so when you frost the cake the cake won’t fall over.
The fourth trick is to make sure your buttercream is the right consistency. If it’s too stiff, like this is, it will pull off the cake when you try to spread it on.

Add a bit of milk or cream to make it thinner and it will be much easier to spread onto your cake as you frost it.

Start with a crumb coat, which is a very thin layer of frosting to trap in any crumbs that come off the cake so that they don’t get into the final coat of frosting.

After you’ve crumb coated your mini cake you can freeze it for up to a month wrapped in 2 layers of cling film or Saran Wrap, or leave it in the fridge overnight, or you can move straight on to decorating it.

You can frost these mini cakes normally and the non-slip mat or ring of masking tape will hold them in place.

Or you can avoid smooth frosting and instead you can cover them with piping using a 1M star tip like roses or piped designs using a petal tip like ruffles.

Here’s the video version of this tutorial:
Cookie cutters are wonderfully versatile tools which can be used for much more than just cutting out cookies! In this tutorial I’m going to show you 6 ideas for cake decorating with cookie cutters, using them to cut shapes out of cake, chocolate, and candy melts as well as cookies. These techniques will change the shape of cakes, decorate the frosting, or create cake toppers. If you prefer to watch a video of this tutorial, scroll to the bottom of the page.
To make mini layer cakes, use cookie cutters to cut shapes out of larger sheet or round cakes. You can use round cookie cutters or shapes, like stars. Press your cookie cutter into a cake layer, arranging it to get as many shapes out of each layer as possible. The layers should be thinner than the height of your cookie cutter for the neatest shapes.

Attach the bottom layer to a cake board or a plate with a dollop of buttercream. When the buttercream sets it will act like glue, holding the cake in place even if you move it around.

You can spread or pipe filling onto each layer. Here I’m using a 4B tip to pipe little open stars of my 4 Minute Buttercream as filling between each layer of cake.

I’m leaving this cake naked, without frosting on the sides, so that the pretty piped filling is visible. A few sprinkles on top add a nice touch of colour and texture.

To prevent a naked cake from drying out, put it in the freezer for 30 minutes just until the frosting has set and will hold its shape and then wrap the whole cake in cling film. Put it in the fridge until 1 hour before serving and then take the cling film off as soon as you take it out of the fridge so that when the frosting softens, the cling film won’t damage it. It’s best to keep it in something airtight until serving it, like a Tupperware.

Smooth frosting is tricky on shaped cakes, especially when they’re this small so if you want to frost it, it’s easier to pipe the frosting on. If you’re looking for ideas, I have a tutorial on 8 Ways To Use A 1M Piping Tip and 8 Ways To Use A Petal Tip.

Another way to cut cakes with cookie cutters is to create a piñata or sprinkle explosion cake. After your cake layers are baked and cool, use a round cookie cutter to cut a circle out of the middle of all of your cake layers except the top one.

Attach your first layer of cake to a cake board or place using a dollop of buttercream to secure it. Spread or pipe your filling onto your first layer, going around the hole in the middle. Press you next layer of cake on top and repeat.

Before placing the final layer on top you’ll have an open chamber in the middle of the cake. Pour sprinkles or candy into it, going right up to the top to fill it, and then place the final layer of cake on top. This layer seals the chamber to provide a flat surface to frost over.

Frost the cake as normal and decorate it however you like. Pink or blue sprinkles are fun for a gender reveal or you can match the colours of your sprinkles to the colour scheme of the cake.

Use a sharp knife to cut into the cake, making sure your slice reaches all the to the middle of the cake. When you lift the first slice out the sprinkles will explode out of the cake.

You can make delicious chocolate shapes using cookie cutters and there are two ways of doing this. The first is to melt chocolate and you can tint it by adding gel colours. I melt chocolate at 50% power in the microwave for 1 minute at a time so that it doesn’t melt or seize.

Arrange your cookie cutters on a silicone mat or parchment paper and spoon the chocolate into the cutters, pushing the chocolate right up to the edges. The thicker the chocolate is, the less fragile the shapes will be when you push them out of the cookie cutters later.

To add some quick colourful detail to the chocolate shapes, scatter some sprinkles or edible glitter onto them straight away, before the chocolate sets. Leave them for a few hours to harden or put them in the fridge to set more quickly.

Push each chocolate shape out of the cutter, pressing all over the shape to ease it out little by little so that it doesn’t snap. It’s a good idea to make a few extras, just in case!

These thick chocolates make sturdy cake toppers and you can attach them to a cake by piping swirls onto the cake with buttercream. When the buttercream sets it will secure the toppers in place.

To decorate the sides of a cake with chocolate shapes it’s best to use thinner shapes which don’t weigh as much. You can use the same technique as for the stars in the example above but if the shapes are then thin they’re more likely to snap when you push them out of the cookie cutters.

Spread the melted chocolate or candy melts onto parchment paper or a silicone mat using an

If you dip your cookie cutters into hot water before cutting out the shapes you’ll need less pressure and you’ll get a smoother outline on your shapes.

Press a cookie cutter into the chocolate or candy melts once they’ve set and twist it to cut the shape out. The shapes might lift up with your cookie cutter and if that happens, just push them back out and set them aside. Cut out a few more shapes than you need in case any break and dip your cookie cutter in hot water before each cut.

If your shapes stay attached to the parchment paper or silicone mat, lift up the surrounding chocolate or candy melts to leave just the shapes behind. Then pick those up or slide an

Attach the shapes to your cake by piping or spreading dots of buttercream onto the frosting and pressing the shapes into them. You could use melted chocolate to attach them if you prefer. Once the buttercream or melted chocolate sets, the shapes will be secure on the cake while it’s chilled and for a few hours after coming out of the fridge.

To add some height to your cake you can make cookie toppers on sticks. I’m using sugar cookie dough for these but you can use whatever recipe you like, as long as it will hold its shape. I leave the baking powder out of my recipe so that they don’t spread out while they’re baking.

Roll out the dough and cut out shapes with cookie cutters. Arrange them on a baking tray lined with parchment paper, leaving about an inch between cookies in case they spread out while they’re baking.

Push a paper lollipop stick or cookie pop stick into each cookie, going in only about a centimeter or half an inch. I freeze the cookies before baking them and this also prevents them from spreading out as they bake.

Once the cookies are cool you can decorate them with royal icing or make a glaze with powdered sugar and a few drops of milk. You can tint this with gel food colours if you like.

For a fun sparkly effect, after spreading royal icing or a sugar glaze onto a cookie you can dip it in a bowl of edible glitter or sprinkles.

Another way to decorate the cookies is to use the same cookie cutters that you use to cut the cookies, to cut out thinly rolled fondant. Stick the shape to a cookie by brushing the back of the fondant with a paintbrush dipped in water.

The sticks you baked into the cookies will support the cookies if you push them into a cake, so that they stand upright without falling over.

To decorate your cake with the cookies, make sure the sticks are shorter than the height of the cake and push them straight down into the cake.

You don’t have to push the sticks all the way down to the bottom of the cake. Try varying the height of the cookie toppers so they’re all visible.

Use cookie cutters as guides for piping shapes onto cakes. After frosting your cake, press a cookie cutter into the frosting to leave an imprint. You can do this on the sides and the top of the cake.

I like to do this after chilling the cake so the frosting has set and you don’t accidentally damage it by smudging it with your finger. Also, the outline you leave when you pull the cookie cutter off will be neater if the frosting has set.

Pipe over the imprint of the cookie cutter, using it as a guide to trace over. This works best with buttercream that has been thinned out with a bit more milk or cream than normal. Use a piping bag fitted with a small round tip like a #2 or #4, depending on how thin and intricate you want the design to be.

For this design wiggled the piping bag slightly as I piped to give the impression of lace. You might choose to only pipe the outline of the shapes or you can fill it in with freehand patterns.

For this cake, after piping over the outline of the cookie cutters I’m using an

You can pipe onto the top and sides of the cake and even make shapes fold over the top edge of the cake to cover both the top and the sides. Try adding sprinkles or edible glitter for more detail!

With cookie cutters you can create stencils to make these perfectly neat coloured shapes or sprinkled shapes on cakes.

Trace around cookie cutters onto parchment paper or wax paper. If you trace more than one shape or size of cookie cutter, leave a few inches around each shape so that you can make separate stencils.

Cut the shape out, folding the shape down the middle so that you can make a small cut and then stick one of the blades of your scissors through that cut to reach the outer edges. Leaving the paper intact beyond the outline of the shape, which you’ll use as a stencil.

Chill your cake for at least an hour in the fridge so the frosting sets and holds its shape. When you take it out of the fridge, if the room you’re decorating in is warmer than the fridge you’ll get a tiny bit of condensation on the frosting which will allow the parchment stencils to stick to the sides of the cake. Use an

When you peel the parchment off you’ll leave behind perfect coloured shapes!

To make sprinkled shapes, spread frosting over the stencil and then scoop up handfuls of sprinkles to press onto the frosting so that they stick.

For sprinkled shapes on the top of the cake you don’t need to use parchment paper. Place a cookie cutter on top of the cake, pour some sprinkles into it and press the sprinkles down so that they stick to the frosting

Lift the cookie cutter up to leave the sprinkled shape behind!

I hope this tutorial has been helpful! If you use any of these techniques to decorate your cakes, please tag @britishgirlbakes in any photos you share on Instagram so I can see your creations! For more ways to decorate cakes check out my online course on 10 Cake Decorating Techniques.
Here’s the video version of this tutorial:
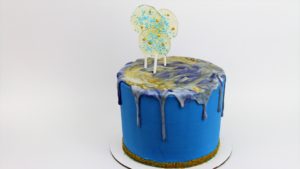
In this tutorial I’m going to show you how to decorate this cheerful striped rainbow cake with a rainbow drip! If you prefer to watch a video of this tutorial, scroll down to the bottom of the page.
Cover your cake with a crumb coat of frosting to trap in any crumbs that might come off the cake. It doesn’t need to be perfectly smooth and it’s fine if you can see the cake through the frosting because we’re going to completely cover it up.

Although it doesn’t need to be perfect, the crumb coat should give the cake the shape you want, with straight sides and a level top. Let the crumb coat set for at least an hour at room temperature. I put mine in the fridge for 30 minutes.

Press a striped cake comb against the side of the cake in a few places to imprint the grooves of the comb, so you know where the stripes will eventually be on the cake. Each little line indented in the cake will be a different colored stripe at the end.

Use these imprinted lines as a guide to spread your colours of buttercream around the cake, making sure you have a different colour going over each of the lines. I’m using my 4 Minute Buttercream and I used gel colours to tint small bowls to make 9 different rainbow shades.

You could pipe the buttercream on instead of spreading it, but since I have 9 colours I’d need 9 piping bags and that’s a lot of washing to do afterwards, so I’m using my

When you’ve covered the whole cake in bands of colored buttercream, smooth the frosting by scraping around the cake a few times with a frosting smoother. If you’re looking for variations on striped designs, check out my tutorial on 4 Secrets for Perfect Stripes on Cakes.

Wherever there are air pockets in the frosting, spread on some more buttercream of that colour to fill in the gap. This rainbow frosting doesn’t have to be perfectly smooth but the smoother it is, the fewer touch-ups you’ll have to do after using the striped cake comb.

Scrape around the cake again to smooth the frosting and when the frosting is not perfect but fairly smooth, switch to your striped cake comb. Rest the base of the comb on the cake board and press it gently against the side of the cake and then spin the

Scrape any buttercream off your cake comb into an empty bowl and save this for piping the 1M swirls on top of the cake later.

After scraping around the cake a few times with your striped cake comb you’ll probably have several air pockets in the stripes. Fill them in by spreading on some more buttercream of that colour.

Scrape again and again with your striped cake comb, touching up whenever you notice air pockets, until the stripe grooves are clear and smooth.

Tidy up the top edge of the frosting with an

Meanwhile, fit a piping bag with a star shaped tip like a Wilton 1M tip. Now we’re going to use up the rainbow buttercream you scraped off the cake with your frosting smoother and striped cake comb.

I’m filling half of my bag with plain white buttercream and then other half with the blended rainbow buttercream but you can use only the rainbow buttercream if you like. Set this aside for some finishing touches at the end.

When the frosting on the cake is chilled and firm, take the cake out of the fridge and spread white buttercream all over the cake to fill in the stripe grooves. You’ll spread it all over the rainbow stripes too but that’s fine, we’ll tidy everything up in a minute. Spread quite firmly to push the buttercream all the way into the grooves so there aren’t any air pockets.

Cover the top of the cake as well and now it’s time to reveal the rainbow stripes! Scrape around the cake with your frosting smoother, which will start to smooth the frosting and take off some of the excess white buttercream.

Keep scraping again and again, which will take off a little bit more buttercream with each scrape. The rainbow stripes will be very subtle to start with as they begin to show through the frosting, and they’ll have lots of white patches within them, but with each scrape they’ll get clearer and neater.

If you pressed your striped cake comb into the crumb coat before you started and used those indents to guide where you spread or piped the colored buttercream, you’ll end up with a different colour for each stripe but the colours will fade through each other like a rainbow, blending together nicely.

Tidy up the top edge with an

If you want to give the cake a sprinkled border around the bottom, it’s easiest to do this now before the frosting sets completely. Place the cake on a baking tray or hold it above a large cake pan and pick up handfuls of sprinkles, pressing them into the bottom inch or so of the cake.

The white frosting will be sticky because it’s still fresh and soft, but the coloured buttercream has been chilled so it won’t be sticky anymore so you’ll have to press quite firmly for the sprinkles to stick to it. Now put the cake back in the fridge to set the frosting again.

For the drip you’ll need lots of bowls. You can use candy melts or white chocolate for this. If you’re using candy melts, place a few coloured candy melts in each bowl, combining colours to make any shades you don’t have, like pink and blue to make purple.

Now you can either warm heavy whipping cream or double cream until bubbles form around the edges and then pour the cream into each bowl, or spoon cold cream into the bowls and put them in the microwave one by one. For drips made with candy melts you need 4 times the candy melts compared to cream, for example 40g of candy melts and 10g of cream.

After melting the drips and letting them come to room temperature, do a test drip on the side of the bowl before you move on to your cake. If you’re using white chocolate instead of candy melts, melt 3 parts of white chocolate with 1 part of cream, for example 300g chocolate with 100g cream, and then divide the drip between bowls and add a tiny bit of gel colour on a toothpick to each bowl.

Take your cake out of the fridge and apply the drips with a spoon, scooping up some of the drip and then holding your spoon above the edge fo the cake and angling it to let the drip spill out slowly, moving your spoon around the edge of the cake and pausing wherever you want there to be a drip.

Your cake needs to be cold for this because the coldness of the cake stops the drip from running all the way down to the bottom of the cake. Change colours as you work your way around the cake and ideally all of your drips will be made with the same ratio of cream to chocolate or candy melts, so they’ll all be the same consistency and you’ll get the same drip effect but in lots of different colours.

Don’t worry about how neat the edge of the drip is around the edge of the top of the cake because you’re going to cover that up in a moment.

When you finish the drip, pipe swirls or ruffles around the top of the cake with the leftover rainbow buttercream in a piping bag fitted with a Wilton 1M star piping tip. To pipe these ruffles I’m wiggling my bag back and forth so that the buttercream folds over itself.

Because I filled one side of the bag with white buttercream and the other half with rainbow buttercream, the ruffles are white on one side and rainbow on the other side. Hold your bag in the same position as you work your way around the cake so that the colours line themselves up the same way for each ruffle.

Scatter a few sprinkles on the top of the cake and press a few into the sides in random places, or if you have any smudges on your stripes you can be strategic about where you place the stars so that you cover those up.

Tadaa! If you’re looking for more rainbow cake designs, check out my tutorial on 10 EPIC Rainbow Cakes.

If you make this cake, please tag @britishgirlbakes in your photos on instagram so I can see your creations!
Here’s the video version of this tutorial:
Gold cakes are eye-catching and elegant and in this tutorial I’m going to use three edible gold materials to show you 20 ways to decorate gold cakes! I’ll use 20 different cakes in this tutorial and I have a more detailed tutorial for each one so if you see something you like, click the photo to see that tutorial. If you prefer to watch a video of this tutorial, scroll to the bottom of the page.
I’ll start with some designs using gold luster dust, which is an edible powder that you can use alone or use it to make paint. To make paint, add a few drops of vodka to make quite a thick paint, almost a paste.

When you lift your paintbrush out of the gold paint you should leave some texture in the paint, otherwise it’s too thin and won’t give you a nice bold colour. You can use a clear extract like lemon extract if you don’t want to use vodka, but it won’t be quite as shiny.

#1 Use gold paint on buttercream frosting by chilling the cake after frosting it, to set the frosting. For this cake I’ve carved a leaf design which I’m painting with a thin paintbrush dipped in edible gold paint made with luster dust and vodka.

I love painting onto carved buttercream designs because the carved shapes guide your paintbrush so even if you have shaky hands (like me!) you’ll find it easy to stay within the lines.
You can paint freestyle onto a cake or trace around a shape with a toothpick to guide you as you paint. I use my 4 Minute Buttercream to frost all of my cakes but for this technique you can use any frosting that set firm, like ganache.

You can apply several coats of gold paint until you get the colour you want. Let each coat dry before you paint the next one so that you layer the gold for the boldest colour. Gold paint dries really quickly as the alcohol evaporates – usually in just a few minutes.

When the gold paint dries you can add whatever details you like, like these pretty flowers piped with Russian tips!
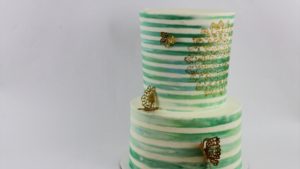
#2 As well as smooth frosting, gold paint works well on textured edges like these piped ruffles on an icing sheet cake. Chill the cake to set the buttercream, which takes about an hour in the fridge, and then use dabbing motions with a paintbrush to create a pretty gold edge. For delicate ruffles like this it’s best to use a thin paintbrush.
#3 You can also paint the uneven top edge of frosting on a cake. For a wider surface like this top edge, a thicker paintbrush will be much quicker to cover this larger area.

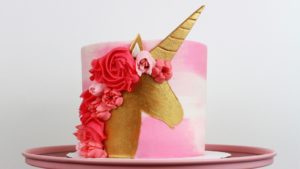
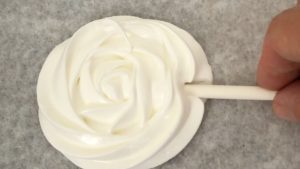
#4 With this technique, everyone will ask you how you made gold buttercream and the answer is surprisingly simple! All you need is a piping bag, a piping tip, and some parchment or wax paper.
Pipe whatever shape you want onto parchment or wax paper and then freeze it for a few minutes to set the buttercream.

Paint it gold, checking it from every angle to make sure you’ve got into all of the nooks and crannies of the shape. This is quite a slow process but definitely worth it! Chill the buttercream again if it warms up while you’re painting because it needs to be very firm.

Now pipe a dot of fresh buttercream onto your cake to act as glue. Lift the frozen gold shape off the paper with an

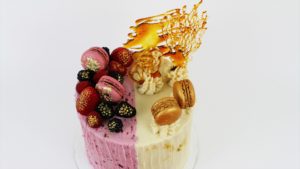
#5 Paint gold onto fresh fruit to add some bling to an otherwise simple cake topper! Dry the fruit completely with a paper towel for the boldest gold results. If the frosting on your cake has set, attach the fruit to your cake with dots of buttercream to act as glue.

Brush the fruit with gold paint, painting the entire fruit or just parts of it. The gold looks especially nice on textured fruit like berries.

#6 Macarons have been trendy for a while and come in every colour imaginable but a gold macaron on your cake will grab everyone’s attention. Making one is easy – just spin the macaron between your fingers as you paint the sides and the tops of the shells.

You can also do this before adding filling and pressing the two shells together, just wait until the gold paint dries before you touch it. Painting over a white, yellow or brown macaron is easier than a colour like fuschia or blue.

For this cake I combined painted gold with gold leaf, which I’ll cover later in this tutorial, and I think using both types of gold together works really well!
#7 For perfect gold writing on cakes, imprint letters into your cake to spell out your words. This is buttercream frosting, which I chilled for an hour in the fridge so that it was very firm it before doing this.

Then use a very thin paintbrush to paint the letters gold. The indented letters help guide your paintbrush to keep the gold within the letters but if you get any smudges outside of the letters, use a clean paintbrush dipped in vodka to brush the smudges off the cake.

If you’re going to place any other decorations on the cake, like these piped buttercream flowers, I’d suggest doing your lettering first so that you know exactly how much space the writing will take up and then you can use the writing to center your decorations around.
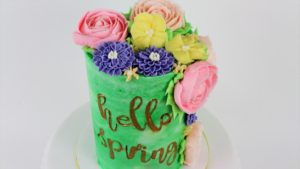
This lettering technique works on smooth frosting but also lightly textured frosting, like this bear which I stenciled onto the cake and then used a spatula to add some random grooves into the frosting like fur.

These are Sweet Stamp letters and I like to pick them up by wrapping a piece of tape around my fingers with the sticky side facing outwards.

You have to press the letters very firmly into buttercream for this to work. If the buttercream is soft you won’t get neat imprints of the letter so you’ll have to leave it to set for longer.

#8 Create gold drips by making ganache using any chocolate – white, milk, or semisweet. If I’m using white chocolate I like to add a tiny amount of brown gel colour to make the drip closer to gold before I start, because you need less gold paint to cover up brown than white.
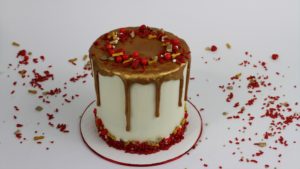
You can apply your drip with a spoon, a condiment bottle, or put it in a ziplock bag and cut off a corner like this.

Apply your drip to a cold cake that’s been in the fridge and the coldness will help the drips stop before they go all the way down to the bottom of the cake.

After applying the drip, put the cake back in the fridge to set the ganache drip and when it’s firm, paint it with gold paint. You might need to paint a few layers in some areas to cover the drip completely.When you’ve finished, it will look like you poured something gold straight over the cake!

#9 For an unusual drip effect try a marble drip with different colours of ganache swirled with edible gold paint, stirring them together just once or twice so that they don’t blend together. Spoon the drip over the cake, letting it run down the sides.

For the top of the cake, drizzle your colours on with a spoon and then spread them as little as possible to cover the top of the cake without blending them together a lot. You’ll be able to see all of the ganache colours in each drip with pretty gold veining from the gold paint.

#10 Gold paint works really well for stenciling as long as you secure your stencil to the cake, wrapping it tightly and pinning it in place. If you don’t do this, your design will smudge.

Dab gold paint into the stencil design with a paintbrush or a sponge. Your cake needs to be refrigerated before using a stencil so that the pressure from the stencil doesn’t damage the frosting.

When you peel the stencil off, your gold design will make any frosting classier.
You can use stencils with just luster dust too, without mixing the powder with alcohol to make paint. Brush the dust onto your stencil with a wide powder brush for even coverage (and because it’s quicker than using a small paintbrush!)

The shimmery gold patterns you create with stencils using gold luster dust are more subtle than when you use edible gold paint but they’re just as eye-catching!

#11 With luster dust you can make golden chocolate spheres to use as toppers to decorate cakes.

Pour some luster dust into a ziplock bag with any chocolates, like chocolate covered malt balls or truffles with a chocolate coating like Lindt balls, and then shake them around in the bag to coat them with the gold dust.

Pick the gold chocolate balls up with gloves to place on your cake so that you don’t wipe the gold dust off with the warmth and natural oiliness of your fingers.

Next, we’ll look at some cakes decorated with edible gold leaf. Gold leaf comes within backing sheets that you peel apart to reveal the edible gold. Make sure you buy edible gold leaf, since you can get gold leaf for decorating all sorts of non-edible art projects too.

#12 To attach random shaped pieces of gold leaf onto a smooth cake, peel back one of the backing sheets and then press the gold leaf against the cake. It should stick easily but you can press against the other backing sheet to make sure it does.

The frosting on your cake needs to have set to do this, because if it’s soft and sticky you’ll almost definitely damage the frosting when you press the gold leaf onto it. Gold leaf makes a simple frosted cake look instantly glamorous!

To apply gold leaf to textured frosting you need a bit more control over how much you apply and where you apply it. Instead of transferring it from the backing sheet straight onto the cake, it’s easier to use a paintbrush to pick it up. Because gold leaf is so thin, it’ll stick to your finger if you try to lift it up and then it will be almost impossible to get off your finger to transfer onto the cake.

#13 You can apply gold leaf to textured frosting immediately after piping it, touching the frosting gently with the tip of your paintbrush to transfer the gold leaf from the paintbrush onto the frosting. I piped these ruffles with a 1M tip and it’s part of my tutorial on 8 Ways To Use A 1M Piping Tip.

Because the frosting is still sticky, the gold leaf will stick to it easily. You won’t be able to apply any pressure to press it flat against the frosting because you’ll damage the piped frosting by smudging it or it will pull away with your paintbrush.

I like to let textured frosting set before adding gold leaf, leaving it in the fridge for about an hour, because when the frosting is hard I can press the gold leaf onto it quite firmly with my paintbrush so that it molds to the texture and lies flat against it.

Gold leaf can accentuate or outline any textured frosting. I piped these rainbow ruffles with a petal tip and I share more ways to add texture in 8 Ways To Use A Petal Tip.

Now for some edible gold cakes decorated with gold sprinkles. Sprinkles add texture and detail to a cake and who doesn’t love a bit of gold bling?

#14 You can press sprinkles into the frosting on a cake individually or in clusters. To attach several at a time, dip your finger into water and shake or tap off the excess so that your finger is damp. Pressing your finger into a bowl of sprinkles and the sprinkles will stick to your finger.

Now press your sprinkled finger into the frosting on your cake. You can do this straight after frosting the cake, while the frosting is still soft and sticky, but you have to be careful you don’t press too hard or knock the cake with a stray finger because you’ll damage the smooth finish.

If the frosting has set, like on this cake where the design was made with wrapping paper and for that technique I had to chill the frosting, you can use the same technique with water.

Because the frosting has set and isn’t sticky anymore, you’ll have to use quite a bit of pressure to push the sprinkles into the frosting.

#15 Sprinkles are great for outlining shapes, like this star which I’ve carved out of buttercream frosting on this cake. The frosting has set so I’m brushing the edge of the star with some water to make it sticky.

Then you can press some gold sprinkles onto it. You can use your finger after dipping it in water and shaking off the excess water or you can dip a damp paintbrush into sprinkles and then press them onto the cake.

Some larger gold sprinkles make a nice top and bottom border for this cake too!
#16 These fancy gold cookies are a unique topper for cakes and they’re so simple to make!
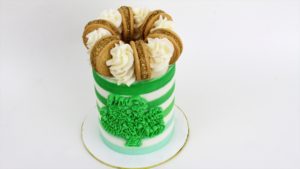
Pull apart cookie sandwiches like Oreos, leaving the filling wherever it ends up because you’re going to cover it up in a minute.

Use a piping bag with a round piping tip and pipe some buttercream onto one half, going around the edges of the filling to cover it up. This is a Wilton #1A but a smaller tip would work as well.

Reattach the cookies and then roll them in edible glitter. The glitter will stick to the frosting you’ve just piped on.

As well as being delicious toppers, the glitter makes these cookies look beautiful, too!

#17 Meringue pops are another delicious cake topper! Get my recipe for them here. Pipe the meringues onto parchment paper and immediately scatter some sprinkles or edible glitter over them, while the meringue is soft and sticky.
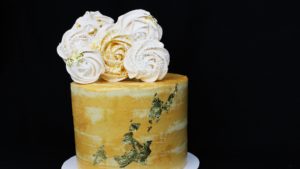
Push cookie sticks into the meringues before you bake them or you can pipe a dot of meringue onto the parchment paper and push a stick into it before piping your meringue swirls over the top of the stick.
After the meringue pops have baked and cool, push the sticks into your cake! Adding gold leaf to these is a nice touch as well.
#18 Follow my recipe to make homemade sugar lollipops and pour the cooked sugar mixture onto parchment paper.
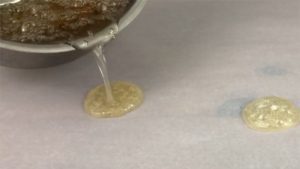
Straight away, before the sugar sets, pour sprinkles on top and push a cookie stick into the sugar.
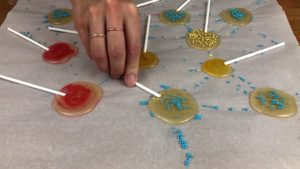
Leave the lollipops for about 30 minutes to cool and harden. Push the sticks into your cake to add height and metallic texture!
#19 To make gold sprinkled balls, start by coating a chocolate malt ball in melted chocolate to make it sticky.

Roll the balls in a bowl of gold sprinkles, moving them around with a spoon to cover them completely. These are tiny nonpareil sprinkles.

Place them on parchment or wax paper to set and then pipe some swirls of frosting onto your cake and push the sprinkle balls into them to attach them to the cake.

#20 Finally, a gold sprinkle explosion! When you assemble your cake, cut a circle out of the middle of every layer except the top layer. You can use these cut out circles to make mini cakes if you don’t want to waste them.

After building your cake except for the final layer, pour sprinkles into the hole in the middle, going right up to the top of the cake, and then place the final layer on top.

Frost and decorate your cake and when you cut into it, the sprinkles will explode out!
I hope I’ve given your some fun ideas for how to decorate gold cakes and if you try any of these, please tag me @britishgirlbakes in your photos on Instagram so I can see your creations!
If there are any other ways you’d like to see me use gold on cakes, please tell me in the comments below!
Here’s the video version of this tutorial:
These sugar lollipops are very easy to make and with a scattering of sprinkles they’ll add some fun, colourful height to your cakes!
Prepare your work surface by taping parchment paper or a silicone mat tightly down, so that it’s completely flat with no creases. Gather any decorating ingredients like sprinkles or gel food colours because you’ll need to use them quickly, as soon as the lollipops are cooked.

In a saucepan over medium high heat, mix together sugar, water, and light corn syrup, stirring occasionally. Once the mixture starts to simmer, stop stirring. You can brush down the sides of the pan with a silicone pastry brush but don’t put a spoon, spatula, whisk etc into the saucepan because it can cause the mixture to crystallize.

Place a candy thermometer inside the saucepan and watch the mixture closely until it gets to 310F. Meanwhile, fill a larger saucepan or heatproof bowl with water and ice and set aside.

When the mixture reaches 310F, immediately plunge the saucepan into the iced water to stop the cooking process.

Pour the cooked sugar onto the parchment paper or silicon mat, adjusting the amount you pour depending on how big you want the pops to be. If the sugar spreads out you can shape it by nudging it with a round cookie cutter or a metal spatula. Be careful – it will be hot!

Immediately press a cookie stick into each pop and pour sprinkles on top immedaitely so that they stick. For a quick way to add colour, dip a toothpick in gel food colour and swirl it around the lollipop sugar.

Leave to cool before lifting off the parchment paper or silicone mat. Insert the pops into a cake as cake toppers or store them in an airtight container.
Leave a rating on the recipe below and tell me in the comments what you think!

These sugar lollipops are very easy to make and with a scattering of sprinkles they’ll add some fun, colourful height to your cakes! Prep Time: 2 mins | Active Time: 10 mins | Cooling Time: 15 mins | Total Time: 27 mins | Yield: 12 lollipops
I’m excited to shared this adorable and easy sloth cake with you! It looks like it would be difficult and time consuming to make but it’s actually very simple, requiring basic tools and it’s surprisingly quick to assemble, frost and decorate!
Start by assembling your cake on a cake board a few inches bigger than the cake. Use a generous dollop of buttercream to secure your first layer of cake to the cake board.

Alternate cake and fillings to assemble your cake. I’m using my Perfect Chocolate Cake and my 4 Minute Buttercream mixed with melted chocolate. I freeze my cake layers before I start and I’ll explain why in a moment.

I’m using nine 6″ cake layers for this and they’re each about an inch and a half tall. You can make this much smaller by using smaller cake layers or even turn cupcakes into cake by cutting them half horizontally!

You’ll need support for every 6 inches of height. You can use straws (boba straws work best because they’re wider and stronger than regular straws) or dowels. Push one down into the cake, all the way down until it hits the cake board.

Pinch the point where the straw or dowel reaches the top of the cake, pulling it out and cutting it at that point. This way it’s the same height as the cake.

Hold that first straw or dowel against 3 more straws or dowels to measure them to be exactly the same height. If your cake is going to be less than 6 inches tall you can skip the support straws or dowels or use one cake board in the middle of the cake and use a tripod structure of just 3 supports.

Cut all of your straws or dowels and then push them into the cake to make support beams for the cakes that will sit on top. I use 4 supports for a 6” cake, which will easily serve 30-40 people, but for larger cakes I’d use a more secure system.

When you place these straws or dowels in the cake, you’ll need them to be about 2 inches in from the edge of the cake so that they’re anchored securely in the cake and so that you can trim the cakes you place on top but they’ll still be sitting on these straws.

Place another cake board on top of the cake you’ve assembled so far and spread on some buttercream to attach your next layer of cake. This board should be an inch or two smaller than the cakes because you’re going to trim the cakes in a minute.

The cake board will rest on top of the straws or dowels so that any weight you put on top with these next cake layers will be supported by the straws or dowels, so they won’t press down on the cake below the board and those cakes won’t sink down.

Continue layering your cake and filling, making sure that each layer is sitting straight on top of the previous layer so that the cake doesn’t tilt to one side. When you’re finished, it’s time to shape the cake!

Use a serrated knife to carve the top section into a sphere, which will be the head of the sloth. It’s easiest to carve cakes when they’re cold because they’re firmer and less crumbly, which is why I’m using frozen cake layers.

By the time you’ve assembled your cake and you’re ready to carve it, the layers will have started to thaw so they won’t be so frozen that they’re difficult to cut, but they’ll still be nice and cold to make for easy carving. If you have space in a fridge or freezer big enough to chill the cake after assembling it but before carving it, that’s perfect, you don’t have to use frozen cake layers then, but I’m assuming you don’t have that much space!

To carve a sphere I start by cutting at diagonals to trim off large sections of the cake to make a very angular round shape, and then use smaller cutting motions to trim those down to round them out and make a curved surface of cake.

Even with hundreds of these back and forth carving motions, the cake might wobble but the top section is staying securely on top of the bottom section because of the support straws, so it’s not going to lean over to one side even with this pressure against it.

Now mark where the arms are going to be, choosing where the inner edge of each arm will be and scoring a line downwards as a guide and then carving out a bit of cake there to make an indent.

Take your final layer of cake and cut it in half to make two semi circles and these will be the sloth’s legs. Trim the flat edge to make it curved so that it will sit right up against the body.

Spread some buttercream onto the bottom of the cake and on the side you’ve just trimmed to act as glue to attach it to the side of the cake and to stick down onto the cake board.

Trim the cake “legs” so that they’re not hanging over the edge of the cake board and use the offcuts to make the hands, resting on top of the feet, attaching them with a bit more buttercream. Don’t worry about carving these to be smooth because you’re going to cover this all up with buttercream fur later, which will give the legs the shape you want.

You’ll need more buttercream for the frosting, a little bit of plain white but mostly brown. I’m using chocolate to make my buttercream brown for the fur but you can use brown coloring instead. I’ll talk about options for your cake board in a moment.

Spread white buttercream onto the middle of the sloth’s face, just a thin layer as a crumb coat to trap in any crumbs that come off the cake so that they don’t get into your final coat of frosting.

Spread brown buttercream over the rest of the cake except for the hands and feet, which we’re going to make white as well. Since the cake should still be cold, it should be easy to spread buttercream onto it without pulling crumbs off but if you’re struggling, add some milk or cream to your buttercream to thin it out and then it should be easier to spread.

Spread the buttercream side to side over the cake, lifting your spatula the fewest times possible and when you do have to lift the spatula off to get more buttercream, swipe it off sideways instead of lifting it straight off the cake because that might pull crumbs or chunks of cake off with it.

Now, about the cake board. The board needs to be big enough to fit the original cake layers, so 6” wide for my cake, but also a few inches bigger so fit the legs that you add on afterwards. You’ll want it to be a few inches bigger than that so that there’s a boarder around the cake where you can add grass or a message.

So for my cake, made with 6” cake layers, I’m placing the cake on a 12” cake board. If you have a cake drum, which is thicker and stronger, that’s best so that it supports the weight of the cake but if you don’t, you can build the cake on one cake board and attach that to another cake board with a little roll of masking tape, so that it’s thicker and stronger.

After covering your cake completely with the first layer of buttercream, let the buttercream set for about 30 minutes and meanwhile, making the facial details of the sloth. Put some black buttercream in a ziploc bag with a corner cut off or a piping bag fitted with a small round tip.

Squeeze some buttercream out of the bag into a circle on a piece of wax paper, or you can use parchment paper instead. You’ll need 3 circles: a big one for the nose and two slightly smaller ones for the eyes.

Chill these in the fridge or freezer for a few minutes until they start to set and then use a piece of parchment or wax paper to flatten and smooth the top surface of each circle.

Use the end of a paintbrush or another round pointed object to imprint two nostrils into the sloth’s nose.

Then use white buttercream in a ziplock bag with the corner cut off to pipe little white reflections on the eyes, or your can use a piping bag with a small round tip instead.

Then use white buttercream in a ziplock bag with the corner cut off to pipe little white reflections on the eyes, or your can use a piping bag with a small round tip instead. Put them back in the fridge or freezer when you’ve finished.
When the crumb coat on the sloth has set, which means any crumbs that have come off the cake will be trapped in that coat of frosting, spread another layer of buttercream over the top.

Do this a section at a time so that the buttercream doesn’t set before you imprint fur into it. I’m starting with the head, using brown buttercream everywhere except on the front of the face

Now use a zig zag textured cake comb to imprint fur into the buttercream, scraping from the white part of the face out towards the brown to blend the colours together gradually.

Use the textured cake comb all over the white part of the face and the rest of the brown head. If you don’t have a zig zag cake comb like this you can use a fork instead.

As you’re using the comb, if you scrape through the buttercream to expose the cake underneath just spread on a bit more buttercream and then use the textured comb over that area again.

Before I continue with the body I’m going to add the details to the face, starting by using this chocolate buttercream that I’ve added a LOT more melted chocolate to, to make it a darker shade of brown. You could do this at the end but I’m excited to see how the face will turn out!

Pipe the dark brown buttercream onto the face to make brown patches around the eye. I’m using a ziplock bag for this to show you how to do this with minimal tools but you could use a piping bag and round tip instead.

Spread the buttercream with an

Add a big patch of dark brown for the snout of the sloth, either squeezing a bib dollop of buttercream out of the bag or piping several rings to fill in the shape.

Immediately after piping the eye markings and the nose, while this buttercream is still fresh and sticky, take the eyes and nose out of the fridge or freezer and peel them off the paper and press them into the buttercream.

Make sure the white dots in the eyes are pointing in the same direction, unless you want your sloth to look cross eyed or confused!

Now move down to the body of the sloth. I’m doing the white parts first, the hands and feet, spreading the buttercream fairly smoothly with my offsets spatula and then imprinting the fingers or toes with a chopstick.

You could use the edge of your

Spread brown buttercream onto the rest of the body to completely cover it, spreading quite thickly but not worrying about getting it smooth at all because you’re going to use your textured cake comb over the top to make it look like fur.

I love this technique for making fur because it’s super easy but also so intentionally messy that you can’t really mess it up – if you don’t scrape deep enough into the frosting with your comb you can just scrape over the area again more deeply and if you scrape too deeply, just spread on some more buttercream to cover the area and then scrape again!

For the section of the body in between the feet, it’s too narrow to fit my cake comb comfortably so I’m using the end of a paintbrush (or you could use a chopstick) to scratch grooves for the fur instead.

To cover up the cake board, spread green buttercream all over the cake board with an

Use your

The final detail for this cake is to make the arms more obvious. Although you carved them out of the cake body, with all of the frosting on top they’ve probably got a bit lost in the rest of the sloth’s body. Use the very dark brown buttercream that you used for the face, piping a thin line of it down each side of each arm.

Use the end of a paintbrush or a chopstick or

And there he is! My adorable sloth cake, made entirely of cake and buttercream frosting! I’d recommend keeping this in the fridge
until two to four hours before you eat it and if you’re going to transport it, keep it in the fridge until you go.

Here’s the video version of this tutorial:
In this tutorial I’m going to show you a few ways to make and decorate with marble drips! I’ll cover how to prepare drips, how to apply marbled drips onto the sides of the cakes, and how to apply them to the top using a few different techniques so you can choose your favourite. If you prefer to watch a video of this tutorial, scroll to the bottom of the page.
PREPARE YOUR DRIP
Make a ganache by mixing heavy whipping cream (double cream in the UK) with either chocolate or candy melts. For candy melts the ratio is 4 parts of candy melts to 1 part of cream, so here I’m using 40g of candy melts and 10g of cream.

Heat this in the microwave for 1 minute at 50% power and stir until it’s smooth. If you prefer you can use white chocolate and the ratio for that is 3 parts of white chocolate to 1 part of cream. For white chocolate ganache, heat the cream first until tiny bubbles start to form around the edges and then add the chocolate and stir until it melts.

To make the white chocolate ganache really white you can add white icing colour. The one I used here is called White White Icing by Wilton.

Marble the drip
with two colours of ganache
The first way to create a marble drip is to mix two colours of ganache together. You can use equal amounts of each colour or use more of the colour you want to stand out.

Pour one colour into the other and stir it just once to blend it slightly to make it marbled. It will marble more when you apply it to a cake later.

with ganache and gel colour
Instead of marbling two colours of ganache, you can use one color of ganache and add a few drops of gel food colour, swirling it slightly with a toothpick or a spoon. In a minute I’ll show you how different these two options of drips look on cakes.

APPLY YOUR DRIP
Frost your cake and then refrigerate it before applying the drip. The coldness helps to stop the drips as they go down the sides of the cake. Your drip needs to be the right consistency as well and I cover all of this and more in lots detail in my online course on 10 Cake Decorating Techniques.

Now I’ll show you a few ways to apply your drip, starting with the sides of the cake and then moving on to the top of the cake.

How to apply a marble drip to the sides of your cake
With a spoon
One way to apply a marbled drip is to spoon it onto your cake. This is an example of using a marble drip made with two colours of ganache (white and yellow) and you can see that the colours blend together a lot as I apply the drip.

For this cake I’m using the drip I made with one colour of ganache swirled with teal gel. The marbled effect is much more dramatic because the gel colour varies in darkness depending on its concentration and the marbling lines are more defined with gel than they are with ganache.

A fun way to jazz up a marble drip is to incorporate metallics. For this next cake I’m using white and navy ganache with gold edible paint, which you can buy or you can make your own with vodka and gold luster dust.

Put all of the colours in a bowl and swirl them together slightly with a toothpick or spoon. This mixes them very subtly but they’ll marble more as you apply the drip.

Scoop up spoonfuls of the marbled ganache and move your spoon slowly around the edge of the cake, pausing wherever you want there to be a drip to let more ganache spill off the spoon.

With a bottle
I normally prefer applying drips with a condiment bottle instead of a spoon because it’s quicker. However, you have more control over how much you blend the colours together when you do it with a spoon.

Using two toothpicks, I added a tiny amount of pink and blue gel to white chocolate ganache. Without mixing them together at all, I’m pouring them into a bottle and already, the colours are blending together more than I would like.

With the pouring motion and then tipping the bottle upside down, everything has blended together more than I wanted. Instead of a white drip with pink and blue marbling, the pink seems to have been swallowed by the blue.

So for marbled drips I definitely recommend using a spoon instead of a bottle!

With a jug
Finally, another option to consider is to pour the marbled ganache onto your cake. Here I’m using a measuring jug with orange ganache. For pouring from a jug, the ganache needs to be a bit runnier than you might use for spooning it onto a cake,

Using a spoon, drizzle a bit of your second colour of ganache over the first colour. Don’t stir it together at all because you risk over-mixing the colours and blending them together.

Move the jug to the edge of the cake and tilt it to pour some ganache out onto the edge of the cake, letting it spill over the side to make a drip.

Move the jug around the top edge of the cake to continue making drips. The colours will marble together a bit less than if you spoon the ganache onto the cake. You’ll have less control over the drips than you would if you used a spoon, but the marbling looks great!

How to apply a marble drip to the top of your cake
With a spoon
Here, I scooped up ganache with a spoon and then wiggled the spoon randomly above the cake to drizzle the colour to help with marbling.

But spreading it around blends the colours together so it reduces the marbled effect. (Of course, if you’re going to put something on top of the cake, like a chocolate sail, it doesn’t matter if the marbling isn’t obvious.)

To make the marbling more obvious, after drizzling and spreading all of your colours of ganache you can drizzle one of the colours on again with a spoon.

Spread it lightly over the top of the existing marbling to blend it slightly and this will accentuate that colour within the marble drip.

By drizzling and then spreading the colours of ganache, the effect is more marbled than mixing the colours in the bowl first and then pouring and spreading them onto the cake. However, it’s still not as marbled as the drips on the sides of the cake.

With a jug
To make the top even more marbled you can pour the lightly marbled ganache onto the top of the cake, spiraling your jug to cover the entire surface. The marbling is preserved instead of being blended by spreading with a spatula.

If you want to create more veining you can use a toothpick to blend the colours a bit more after pouring them. Swirl it randomly through the ganache on top of the cake, not pushing down deep enough to go through the ganache and into the frosting.

In summary, for the most effective marble drips I recommend:
1. Using a base colour of ganache and swirling it with gel colours instead of marbling two colours of ganache
2. Applying the drip to the sides of the cake with a spoon
3. Pouring the rest of the ganache with a jug onto the top of the cake.
I hope this tutorial was helpful! When you try out a marble drip please comment below to tell me which method you like best and if you share any photos of it on instagram, please tag me @britishgirlbakes so I can see it!

Here’s the video version of this tutorial:
