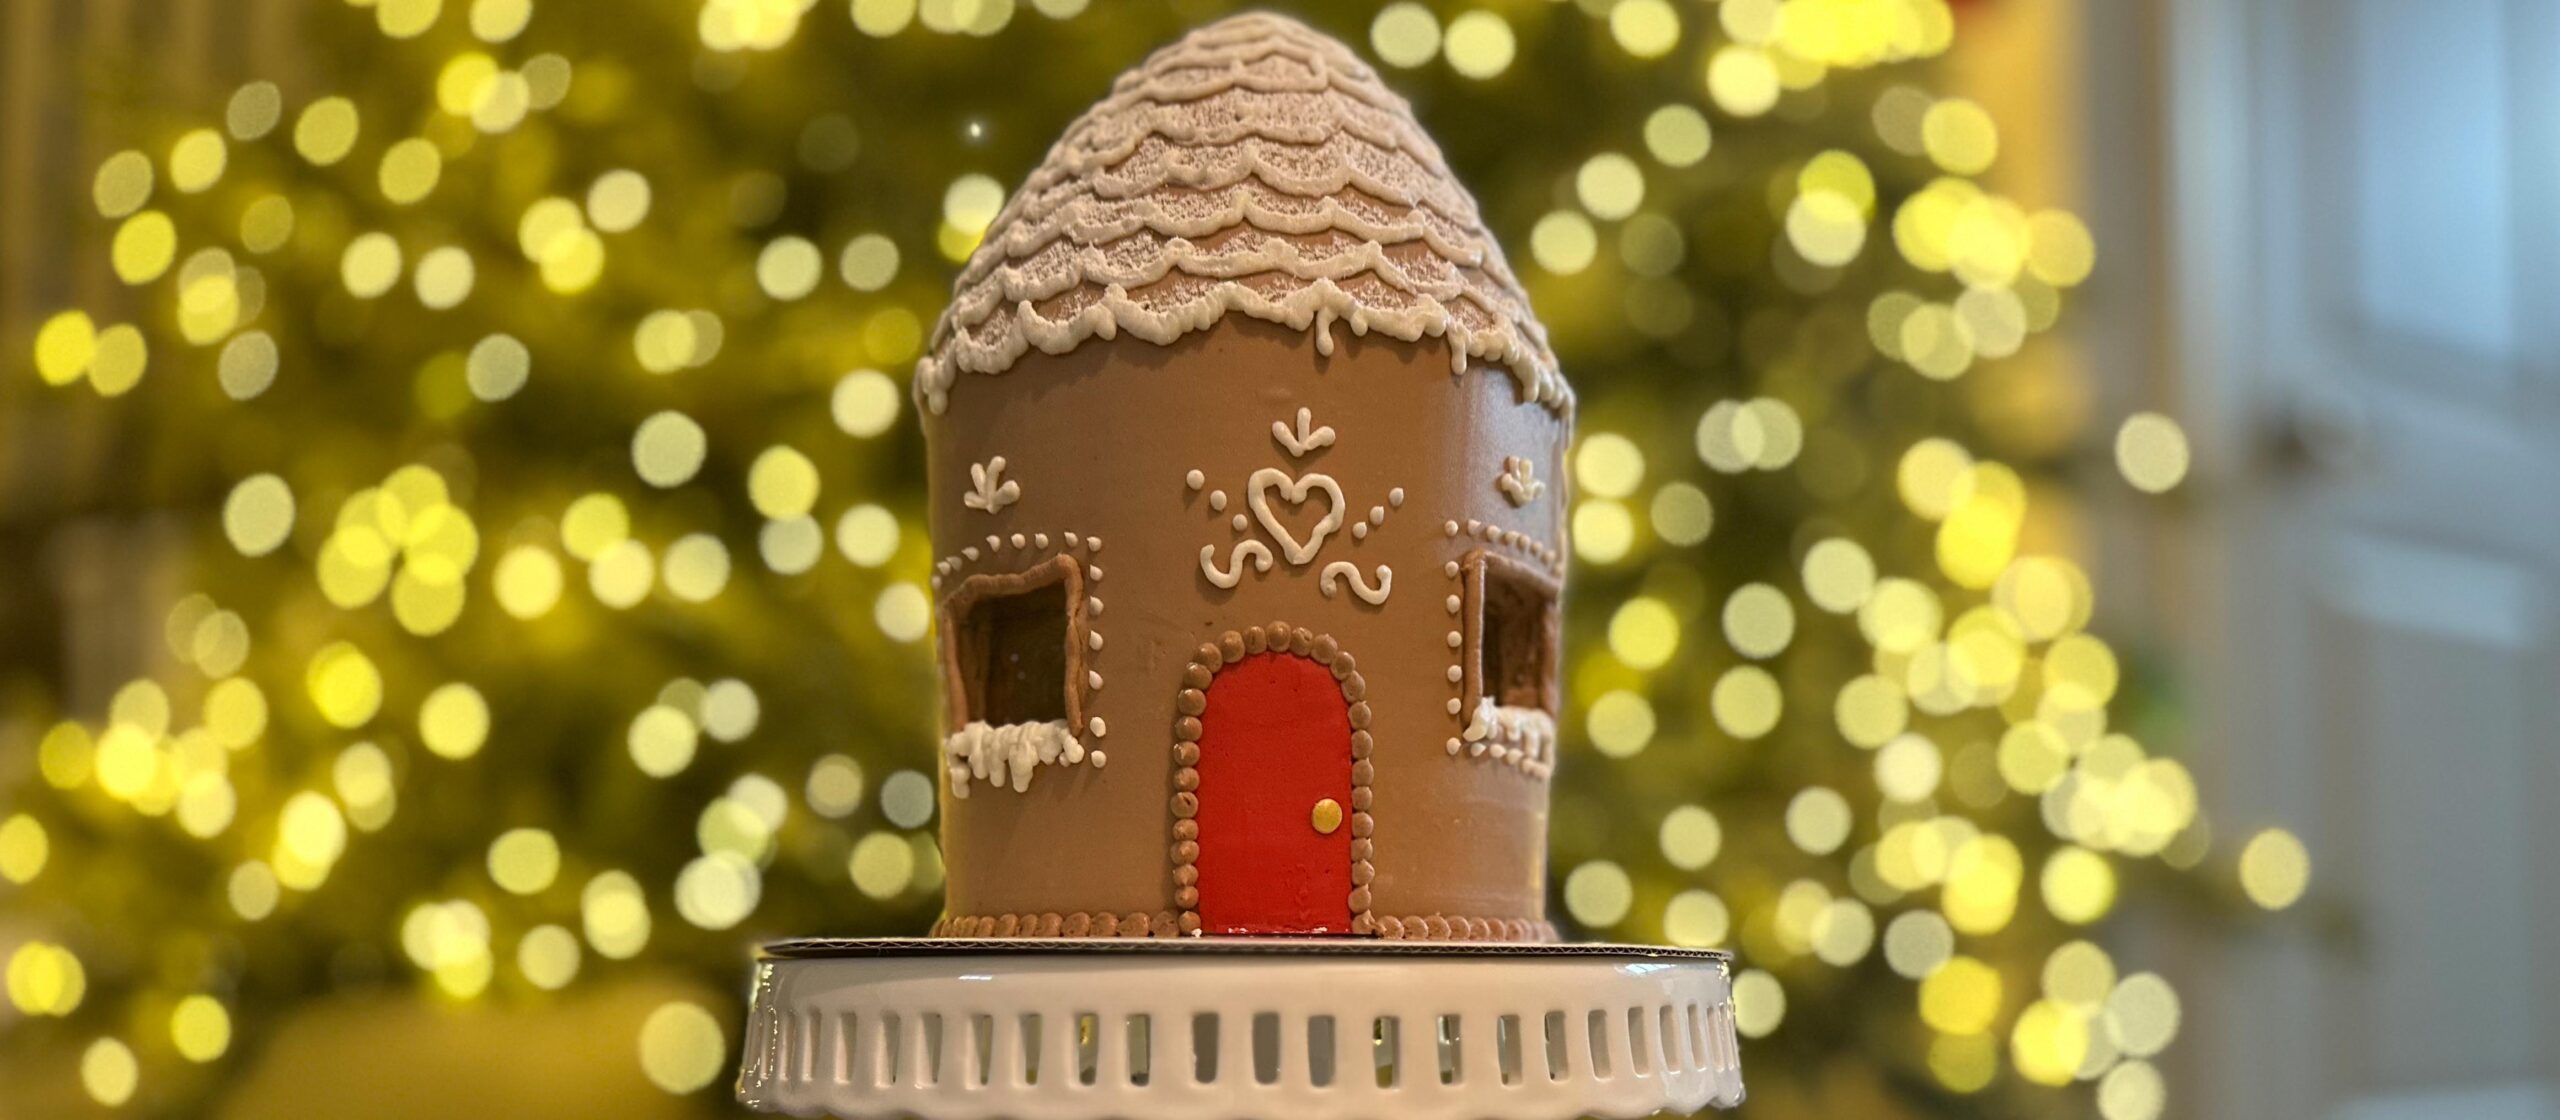
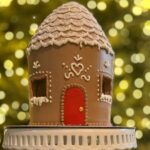
This cake gingerbread house is surprisingly simple to make, with a clever trick that makes the edible glass windows glow like real candlelight. It’s built from round cake layers that are easy to bake and frost, finished with a snowy roof and edible glass windows that look magical once the cake is assembled.
This step-by-step tutorial will show you exactly how to bake, assemble, frost and decorate a cake gingerbread house. It’s a fun Christmas cake idea whether you're an expert or a beginner cake decorator!
Preparing the Cake Layers for the Cake Gingerbread House
For the cake layers I'm using my Very Vanilla Cake recipe baked in four 6 inch pans. Once they're cool, cut out the middle of three of them using a 2 inch cookie cutter. This will make just enough space to put an electric candle or tealight in the middle eventually.
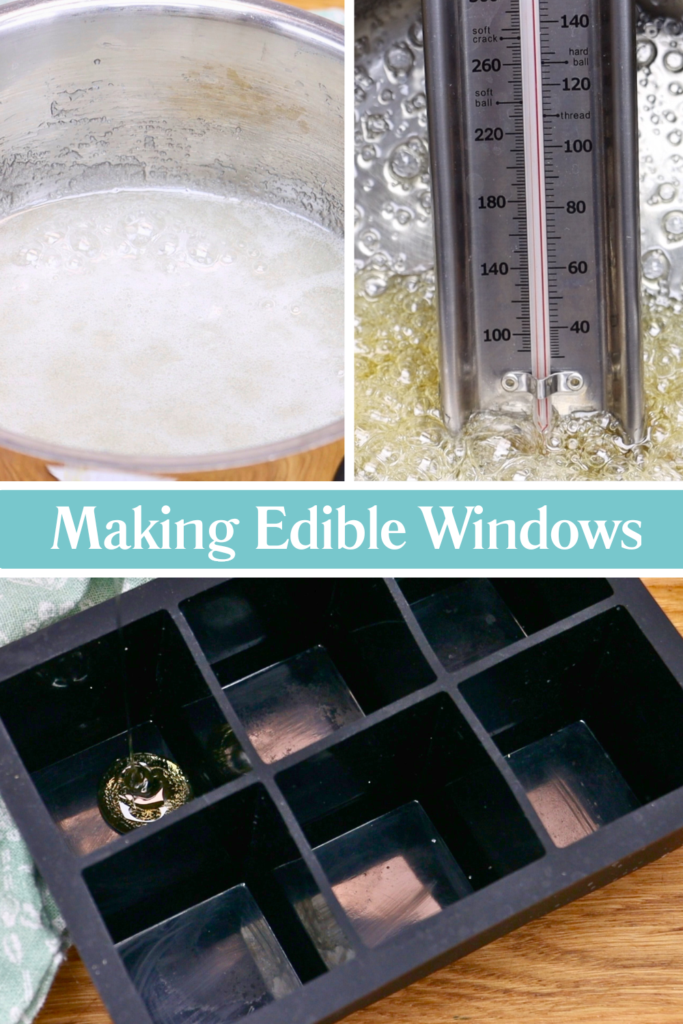
Making the Edible Glass Windows
To make edible glass, pour sugar and water and corn syrup into a stainless steel pan and heat over medium. If you can't find corn syrup you can use glucose but it will make the glass a bit foggy. The corn syrup or glucose will keep the glass hard so it doesn't melt.
Place a candy thermometer in the sugar mixture and watch the temperature as it cooks. When it gets to 310° F, plunge the pan into a pot of iced water to stop the cooking process. Then pour the mixture into a square silicon mold. I used an ice cube tray for those big square ice cubes that are so trendy in cocktails. They're the perfect size for the windows on this cake gingerbread house! Make four squares, or five to have an extra just in case.
Quick tip: don't wait more than a few seconds to move the sugar from the iced water to the mold! The sugar will thicken fast and then it won't pour easily into the mold.
When these cool after about 30 minutes you can pop them out of the mold easily. They'll be about the same height as each of your cake layers, which makes making the windows really easy later.
Starting the Assembly
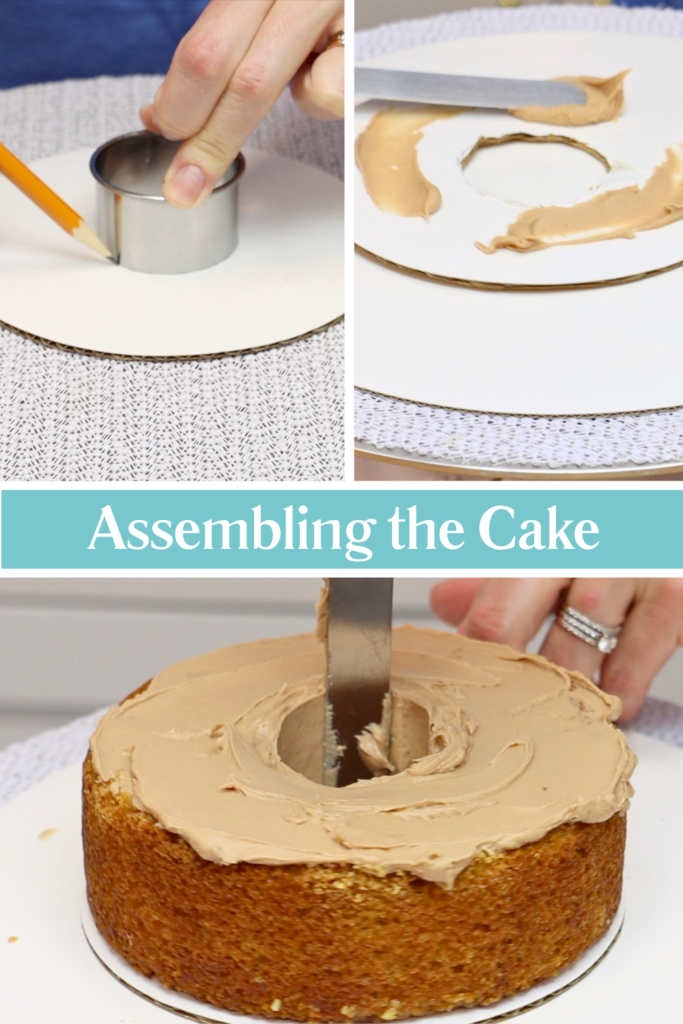
Make chocolate buttercream by melting chocolate chips and then after they cool, add them to butter, powdered sugar or icing sugar, salt, and vanilla. Set aside about a cup of white buttercream first for decorations on the gingerbread house later. You'll find the recipe for this cake at the bottom of the page!
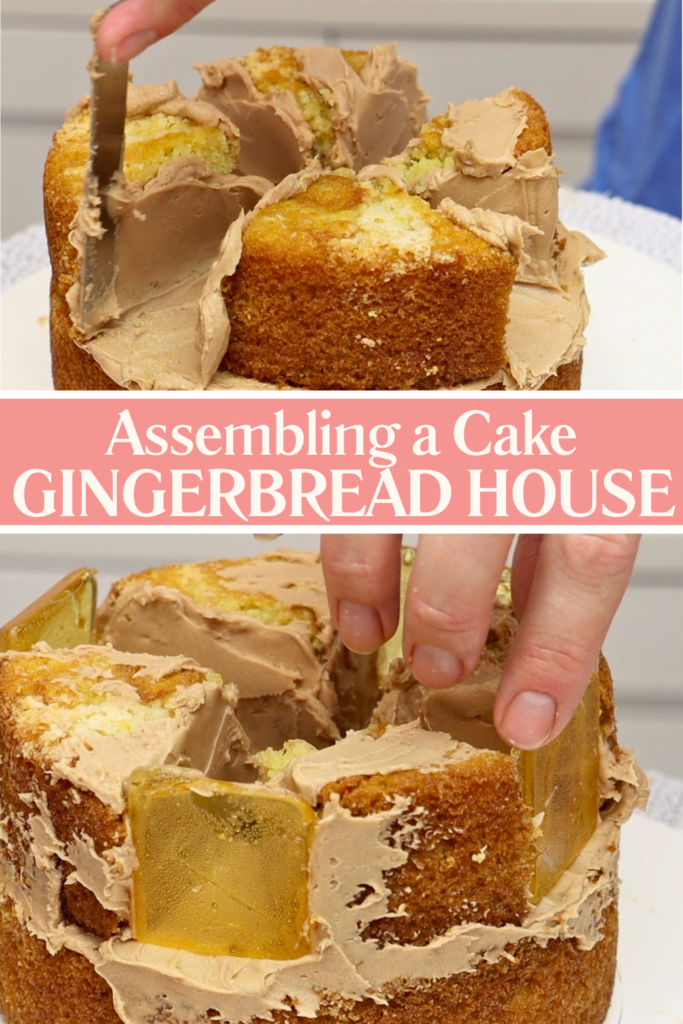
Trace around your cookie cutter onto the middle of a 6 inch cake board and cut out that little circle. Spread some buttercream onto the cake board and press your first cake layer down onto it, one of the ones with a hole in the middle. Put this onto a bigger cake board - mine is 10 inches wide.
Spread chocolate buttercream on top of this cake layer and into the hole, too. You want to cover all of the surfaces, which will stop the cake from drying out because the buttercream will lock the moisture into the cake.
Building the House Structure and Adding Internal Supports
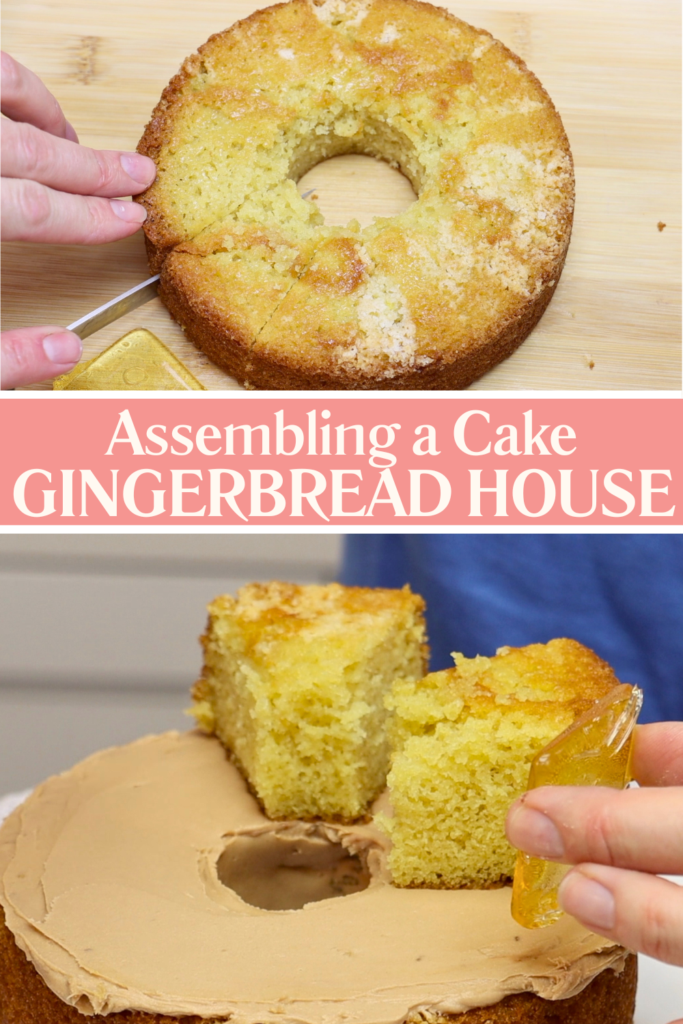
Hold one square of edible glass against the edge of another cake layer. Cut the cake on either side of the square and remove this piece to make space for a window. Save the removed cake for later! Do this three more times to make space for 4 windows. Leave one section of cake bigger than the others to leave space on that section for a door.
Before you continue, trace around a window onto parchment paper or wax paper. Fold that paper in half twice and then cut out the square, which will make four square pieces of paper. You'll use these for the windows later.
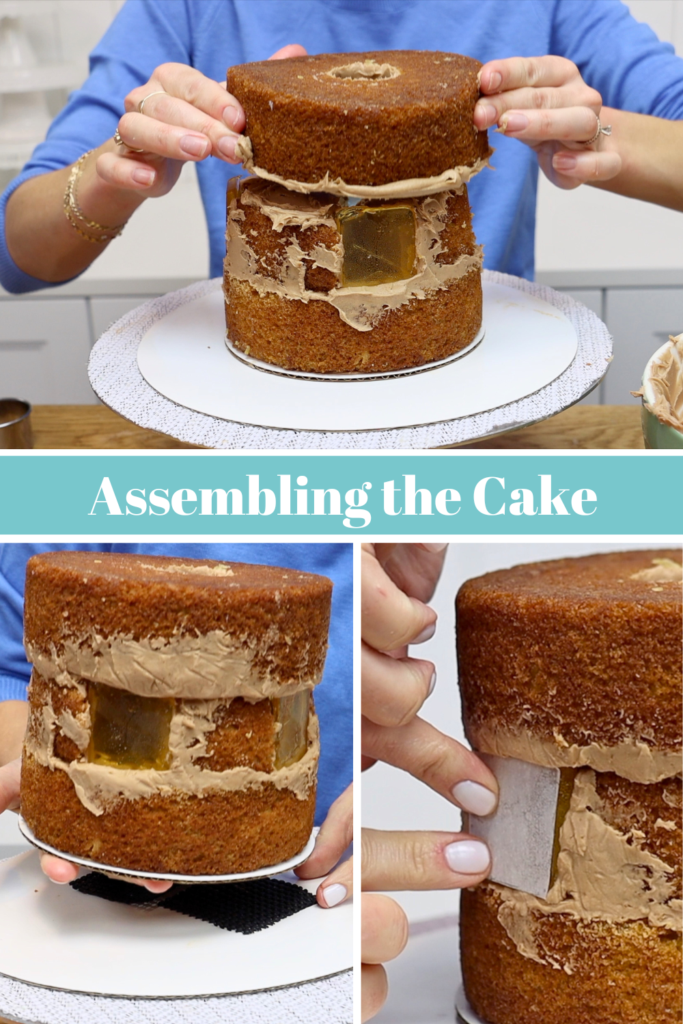
Press one section of cake down onto the chocolate buttercream and hold a window up next to it to measure where to place the next piece of cake. Repeat for the other two windows.
Spread chocolate buttercream in between the sections of cake to cover the sides where you cut. Then slide the windows into the gaps you left so that they're as close as possible to the outer edge of the cake.
Spread chocolate buttercream onto the top of this cake layer and also onto the top of the third cake layer with a hole in the middle. Spread it around the hole in the middle too, and flip this over to go on top of the cake.
Wrap the cake in cling film or saran wrap and put it into the fridge for 30 minutes or the freezer for 15 minutes. This will chill the cake so it firms up. Next, use a piece of non-slip mat or a ring of tape to hold the cake in place on its smaller cake board on top of the larger cake board.
Then you'll need the four pieces of parchment paper you traced and cut out earlier. Press one onto each window to cover and protect the edible glass and keep it shiny.
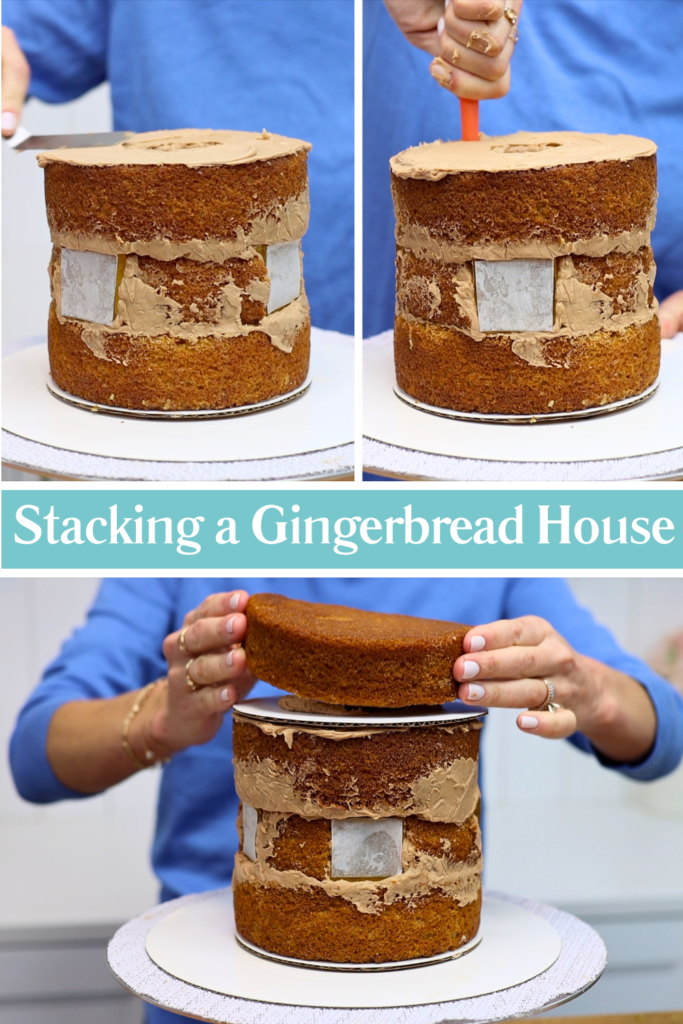
Now spread a layer of buttercream onto the top of the cake and push four boba straws or wooden dowels into the cake. This is necessary to support the weight of the roof, so it doesn't sink down into the bottom of the house. Cut the straws or dowels to be the same height as the cake.
Place a cake board on top, pushing it down to stick it to the chocolate buttercream. This board should be the same width as the cake so it will be invisible later. The board, resting on the support straws or dowels, will hold up the roof.
Adding the Roof to the Cake Gingerbread House
Use more buttercream to attach the final cake layer on top. This is the cake layer without a hole in the middle. Then arrange the cake scraps on top to form the roof. These are the parts you cut out to make space for the windows and also the round pieces from the middle of the other cake layers. Attach them to each other by spreading on buttercream as glue to make a pile on top of the cake.
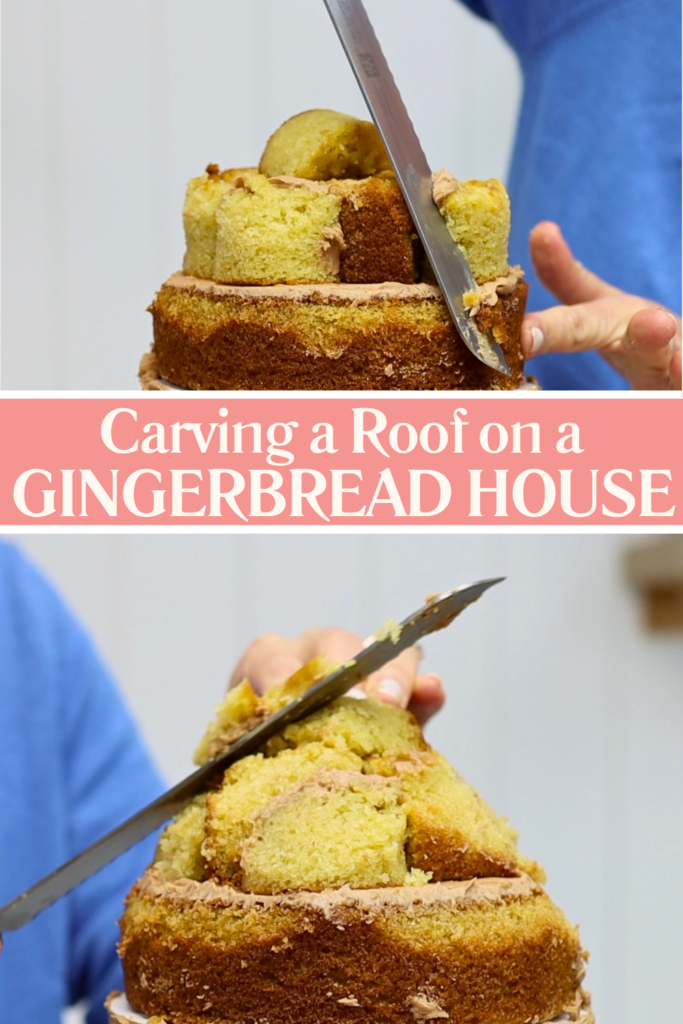
Put the whole cake into the fridge for another 30 minutes or the freezer for 15 minutes to chill. Then use a serrated knife to trim around the pieces of cake to make a cone shape for the roof.
Frosting and Decorating the Gingerbread House Cake
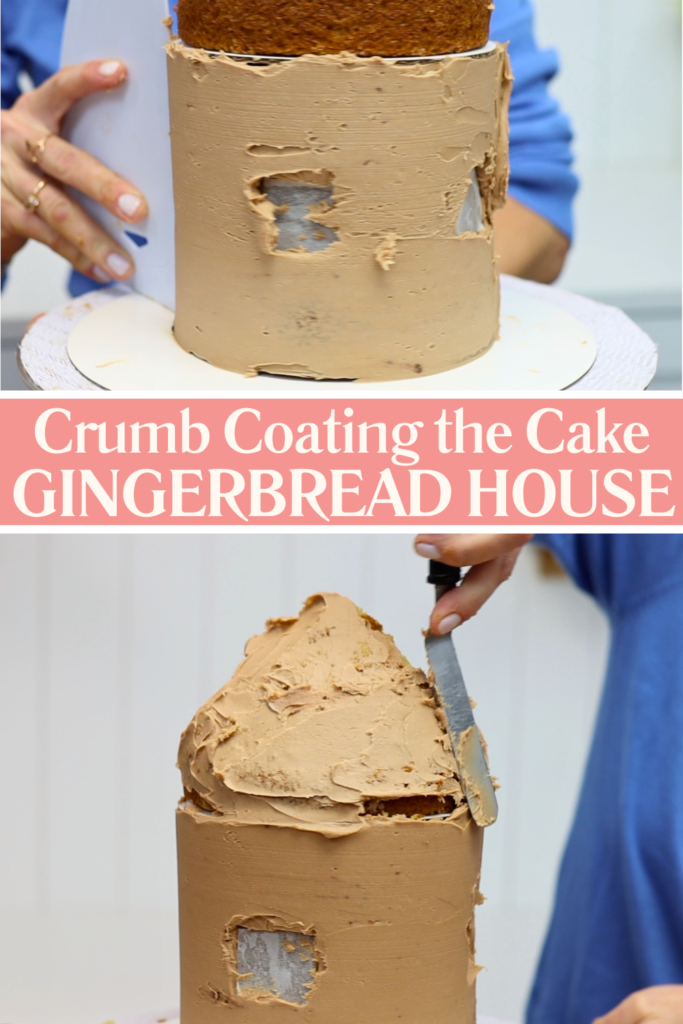
Crumb coat the outside of the cake by spreading a thin layer of buttercream over it. This traps any crumbs that come off the cake. It doesn't need to be neat because it's going to be covered up soon.
Put the cake back into the fridge for 30 minutes to set the crumb coat. Then spread another layer of buttercream over the roof and the walls of the house. Since the roof is cone-shaped, a cake comb isn't the best way to get it smooth. A piece of acetate is ideal since it can curve around easily and leaves the surface smoother. A cake comb is fine for the bottom of the house, though. Don't worry too much about the join between the walls and the roof because it's going to be covered up soon.
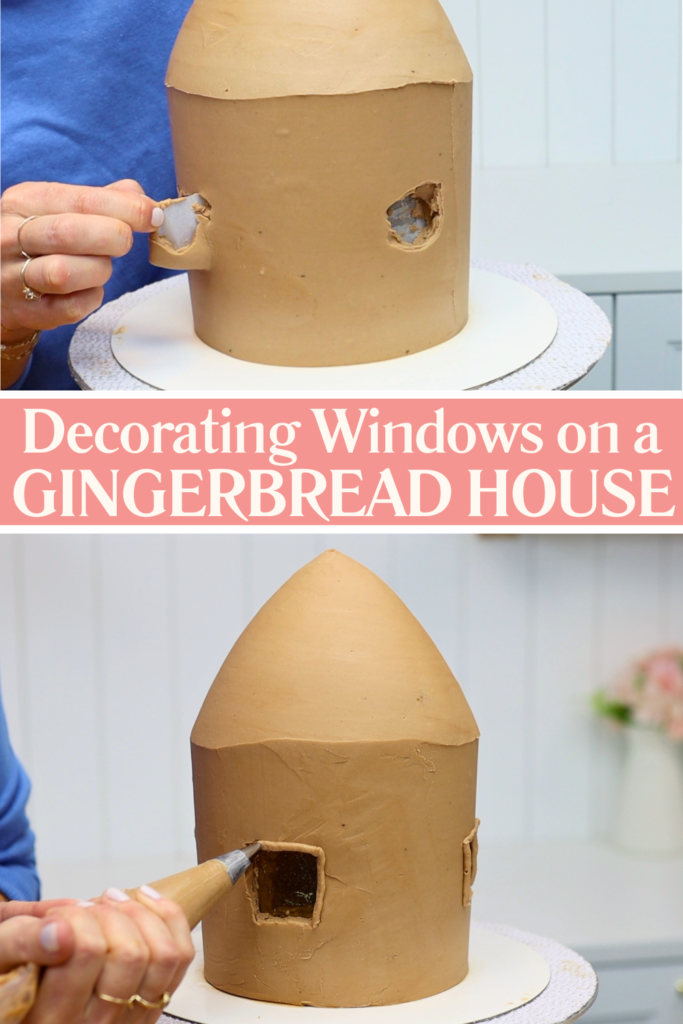
To peel the parchment off the windows, press gently with a toothpick until you find the edge and then peel it off. The windows underneath will be clean instead of smeared and smudged with buttercream.
You can decorate the house however you like. I put the leftover chocolate buttercream into a piping bag with a #8 medium round piping tip to pipe a frame around each window. Pipe along the top and the sides but not the bottom edge if you want to add buttercream snow like I did!
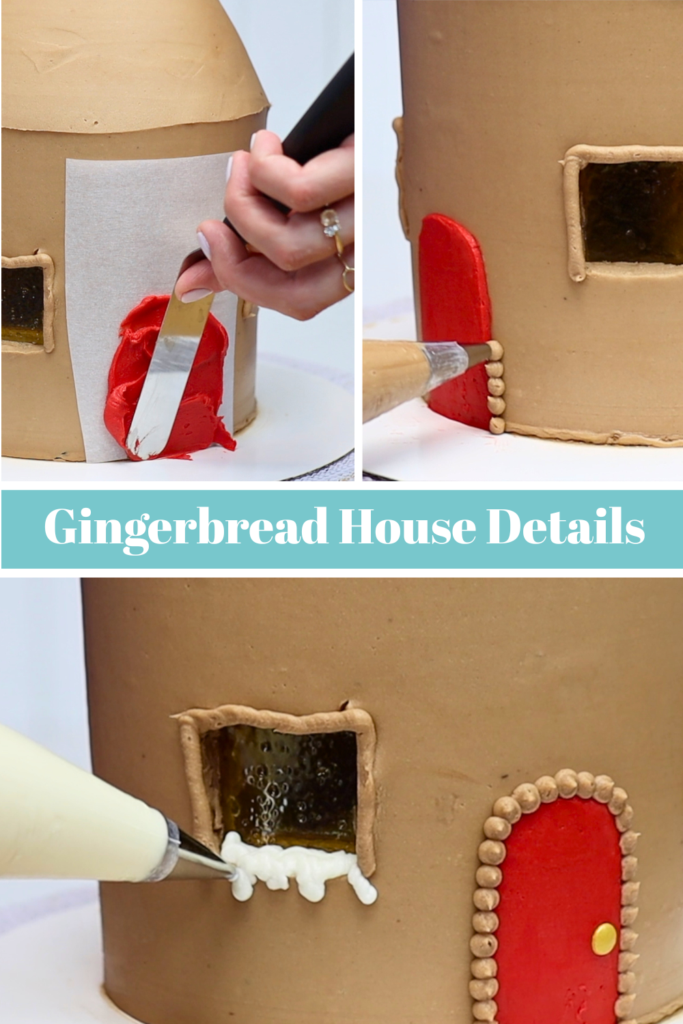
Tinted about 2 tablespoons of the buttercream to make a door. I chose red but darker brown or green would also look nice! Cut a door shape out of parchment paper to make a stencil and press it against the frosted cake. Then spread the red buttercream over it and peel the stencil off. Piping little dots of chocolate buttercream around the door gives it a nice trim. For a doorknob I used a flat round gold sprinkle.
Adding Snow and Decorative Details
Add some milk to the rest of the white buttercream so that it's soft and smooth and easy to stir. Use a small round piping tip to pipe this buttercream along the bottom edge of each window. Piping blobs and drips will make it looks like snow that's starting to melt.
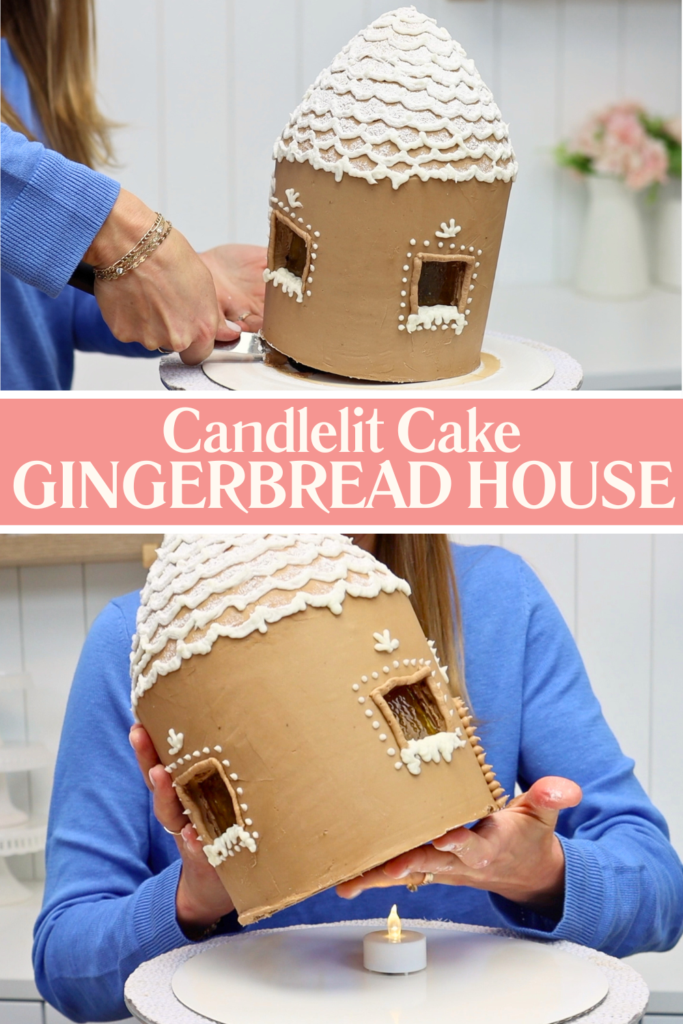
I used a piping tip to score semicircles or scallops onto the roof to give it a tiled look. Then I piped buttercream snow over the lines with a small round piping tip, wiggling the lines and piping some drips to make it look like snow. I added a few simple details to the walls of the cake gingerbread house like dots around the windows.
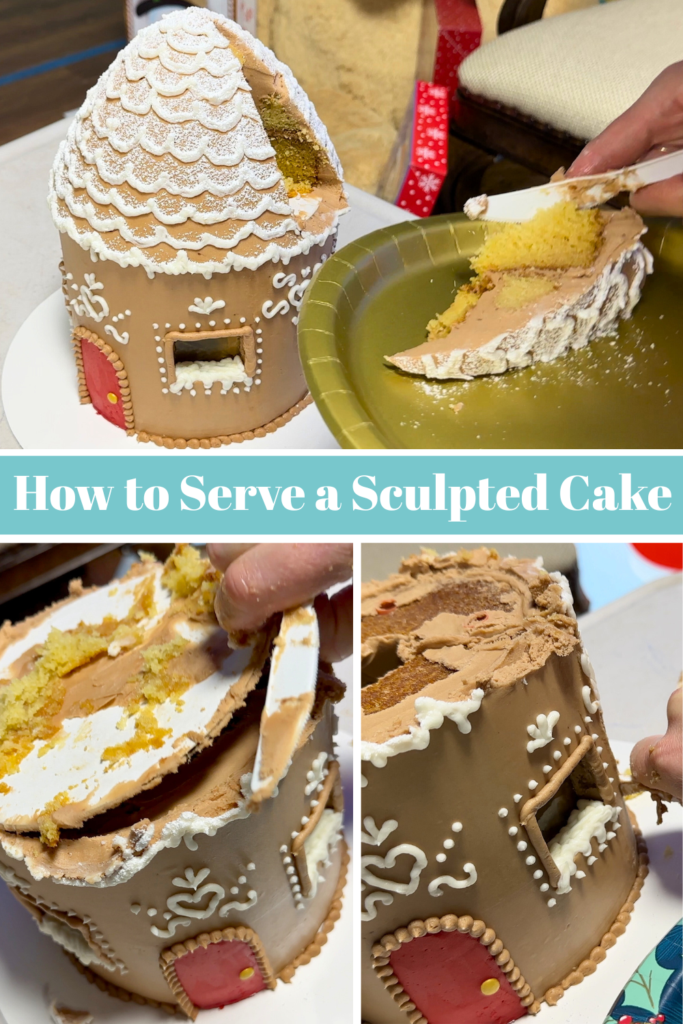
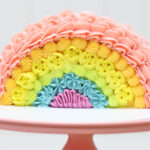
Finishing the Cake Gingerbread House and Serving
As a finishing touch, put a spoonful of powdered sugar into a sieve and tap it over the cake. This will dust it with what looks like snow. Put the cake into the fridge to chill and set and then it's time to add the candle light.
Slide an offset spatula or palette knife underneath the cake and pick it up on its little cake board. Put a battery operated tealight or electric candle onto the middle of the big board and then lower the cake down over it. Attach the boards together with some buttercream so the cake doesn't slide around when you carry it.
I piped some of the leftover chocolate buttercream around the bottom of the cake to cover up the join of the cake on its little cake board. I love the flickering candle light you can see through the windows. And you can eat every part of the cake, including the windows.
To serve the cake, cut down into the roof until you feel the knife hit the cake board in the middle and slice up the roof. And then lift up the cake board in the middle and slice the bottom part of the house.
FAQs
How do you make edible glass windows for a cake? Heat sugar, water, and corn syrup to 310°F. Lower the pan into a pot or bowl of ice water and pour into a silicone mold. Once cooled, the sugar becomes clear, hard windowpanes perfect for a cake gingerbread house.
Can I make this cake gingerbread house ahead of time? Yes! The cake layers can be baked in advance and frozen for up to a month, or kept in the fridge for 2-3 days. You can also assemble the cake before freezing or refrigerating it. Wrap the cake in two layers of cling film or Saran Wrap to protect it while it's chilling. If you bake, assemble, frost and decorate the cake all in one day, put the cake into the fridge and it will stay perfectly fresh for 2-3 days. Add the powdered sugar snow just before serving.
What cake flavour works best for a gingerbread house cake? Any sturdy cake works well. Vanilla, chocolate, and gingerbread cake are all great choices. Avoid very soft or fluffy cakes since they’re harder to carve.
What buttercream is best for frosting a gingerbread house cake? My 4 Minute Buttercream is ideal because it's stable at room temperature and easy to smooth over carved cake shapes. The door stencil will only work on a crusting buttercream like this, because peeling the stencil away will damage soft and sticky frostings like whipped cream.
How do you get the candlelit effect inside a cake? Create a hollow core by cutting circles from three of the cake layers. When stacked, this forms a cavity where you can place a battery-powered candle or tealight. The edible glass windows allow the candlelight to shine through beautifully.
This cake gingerbread house is surprisingly simple to make, with a clever trick that makes the windows glow like real candlelight.
Ingredients
UnitsScale
For the cake:
1 1/2cupsunsalted butter*
2cupswhite sugar (granulated sugar)
6 eggs
1 tablespoon vanilla extract
3/4cupbuttermilk
3 tablespoons vegetable oil
3 1/2cupsplain flour (all-purpose flour)
1 tablespoon baking powder
1/2 tablespoon baking soda
1/2 teaspoon salt*
For the buttercream:
2 1/2cupsunsalted butter at room temperature*
2lbpowdered sugar
1/2 teaspoon salt*
1/2 tablespoon vanilla extract
3 tablespoons cream or milk
3/4cupsemi-sweet chocolate chips
For the windows:
1/2 cup sugar
3 tablespoons light corn syrup or glucose
1 tablespoon water
For the decorations:
1 tablespoon powdered sugar (icing sugar)
a few drops of red food colouring
1 gold or silver sprinkle for the doorknob
Instructions
To make the cake layers:
Using a mixer with a beater/paddle attachment (not a whisk), beat room temperature butter and sugar on medium speed until pale and creamy, about 2 minutes. Scrape down to the bottom of the bowl once during mixing to make sure no butter or sugar is stuck at the bottom.
Add eggs one at a time, mixing on the lowest speed after each addition for 30 seconds. Scrape down to the bottom of the bowl to make sure everything is incorporated before adding the next egg.
Add vanilla and mix for about 30 seconds to combine.
In a small bowl or measuring jug, mix room temperature buttermilk and oil. Add half to the butter mixture and mix on lowest speed to incorporate.
In a bowl, sift flour, baking soda, baking powder and salt. Add half of the flour mixture to the mixing bowl and mix on lowest speed to incorporate, scraping down to the bottom of the mixing bowl to check that batter is evenly mixed. Repeat with the remaining buttermilk mixture and then finish with the remaining flour mixture.
Grease four 6" baking pans with non-stick oil spray or butter. Divide batter equally between the cake pans.
Bake at 160ºC or 325ºF for 38 minutes, or until a toothpick inserted into the middle of the cake comes out clean.
Leave cakes to cool in their pans for 10 minutes. Use a spatula to loosen the cakes from the edges of the pans and then turn onto a wire cooling rack. Leave to cool completely.
To make the buttercream:
Sift the sugar to remove any lumps and check that the butter is at room temperature - you should be able to slice through it easily with a spatula.
In a mixer with a beater (paddle) attachment, mix butter for a few seconds until smooth. Add a quarterof the powdered sugar and salt (if using) and mix on the lowest speed until incorporated, about one minute.
Scrape down to the bottom of the mixing bowl with a spatula to loosen any butter and sugar and add the next quarter of powdered sugar and mix for another minute on low.
Scrape down to the bottom of the bowl, add another quarter of the powdered sugar, mix for one minute on low, scrape, and add the final quarter of the powdered sugar. Mix for one more minute on low, adding the vanilla once everything is mixed together and continuing to mix until it's incorporated.
Add the milk or cream and mix for about 30 seconds until it's combined with the buttercream.
Scoop up about 1 cup of buttercream and set aside in an airtight container or cover a bowl tightly with plastic wrap.
Melt chocolate chips in a heatproof bowl in the microwave at 70% power for 30 second intervals, stirring after each interval until smooth. Let it cool to room temperature and the stir into your main bowl of buttercream to make chocolate buttercream. Check the consistency and add more milk or cream a tablespoon at a time until the buttercream is smooth and easily stirred.
To make the windows:
Mix the window ingredients in a small pan over medium heat. When it starts to simmer, stop stirring and place a candy thermometer in the pan.
While the sugar mixture is cooking, fill a larger pan with water and ice.
When the sugar mixture reaches 310F, immediately plunge the pan into the iced water to stop the cooking process. (Don't wait longer than a few seconds because the sugar will thicken and harden fast!) Poor the cooked sugar into a cubed silicone mold to make 4-5 square windows. Be careful - it will still be very hot! Set aside to cool.
To assemble the cake gingerbread house:
Follow the step by step instructions with photos in the blog post 🙂
Notes
*If you use salted butter instead, omit the salt in the recipe
Looking for more cake decorating ideas?
Want more Christmas cake designs and step-by-step decorating techniques? Visit my cake school to learn hundreds of cake decorating skills with my online courses and memberships. See you there!
I'm so glad you're signing up for my newsletter! You're sure to find loads of caking inspiration and learn from the tips and tricks I've discovered throughout my career!
Want to learn more?
Get immediate access to my FREE course on 10 Frosting Techniques and my newsletter with loads of caking inspiration, tips and tricks!