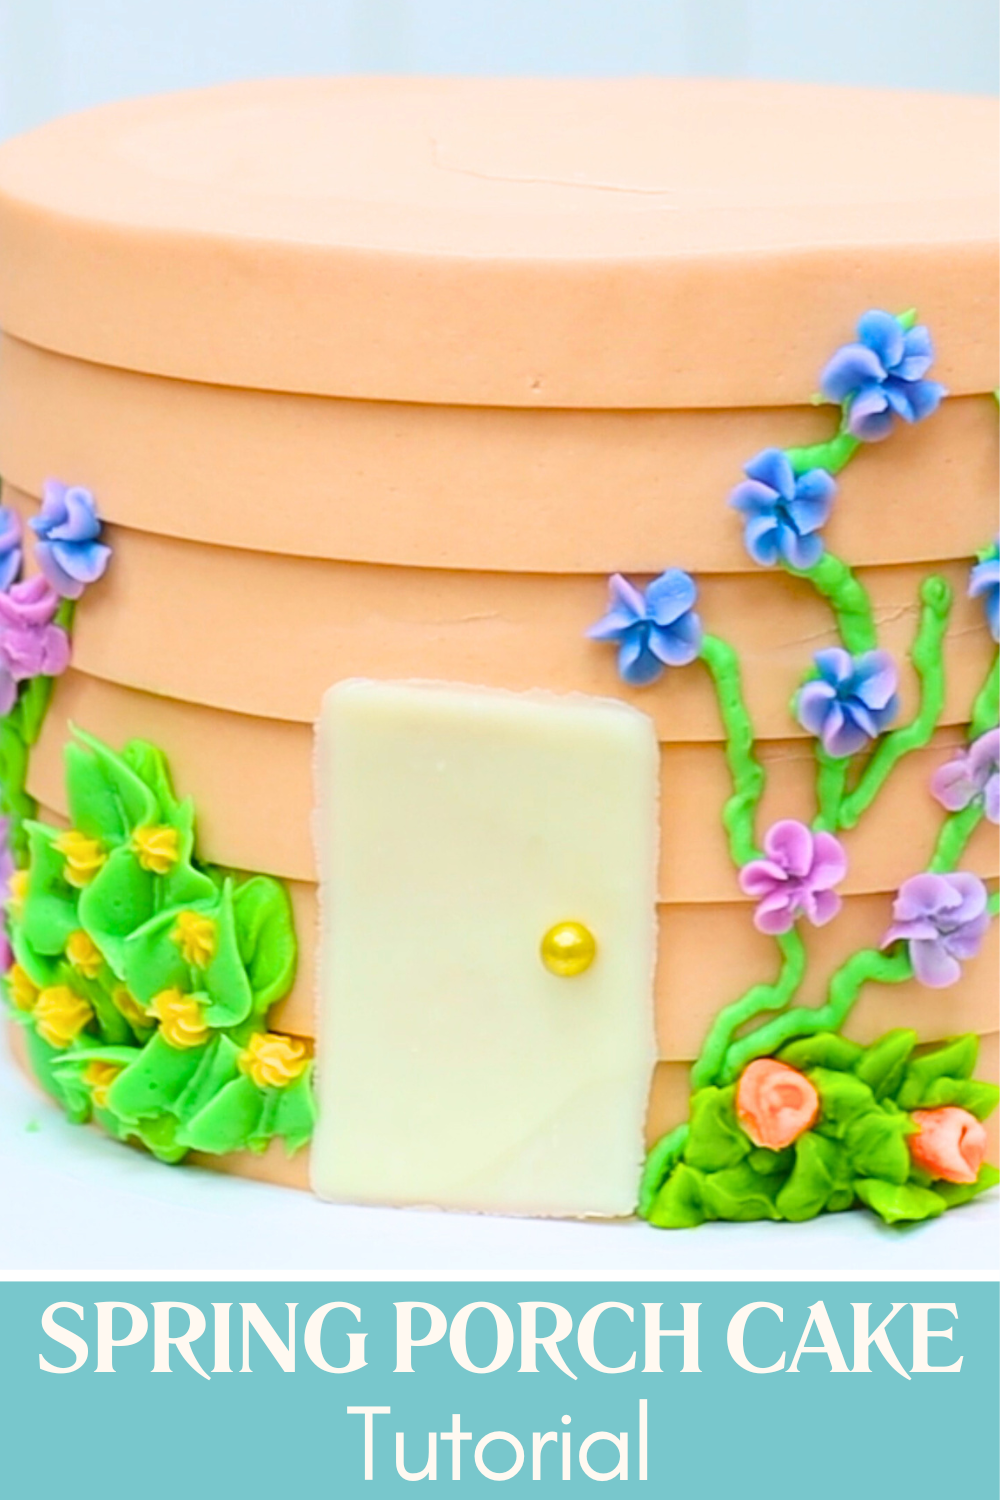
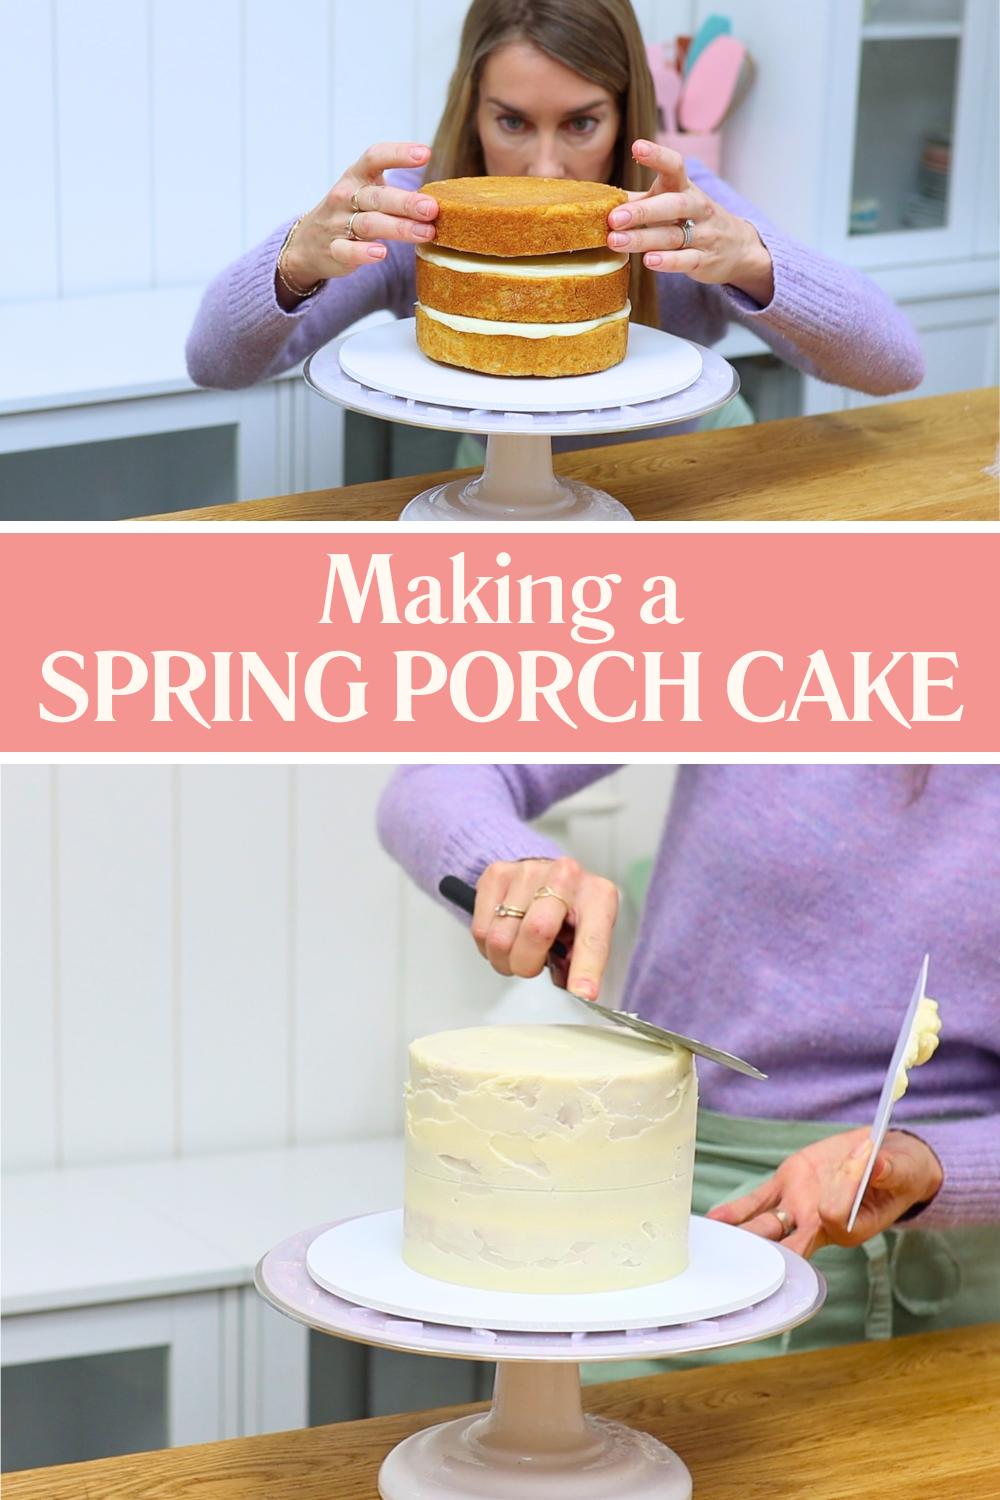
This spring porch cake looks like a colourful house decorated with beautiful buttercream flowers. It's seasonal and fun but it’s secretly really easy to make!
I’m using my Very Vanilla cake recipe baked in 6 inch pans and my 4 Minute Buttercream for both the filling and the frosting. Those two recipes are my go-to combination because the cake is sturdy enough for decorating and the buttercream is quick to make and really easy to work with.
Start by assembling your cake and applying a crumb coat. If you’re new to cake decorating, a crumb coat is just a very thin layer of frosting that traps any loose crumbs so they don’t show up in the final layer of frosting. Stack and fill your cake layers with buttercream, spread a thin layer over the top and sides, and smooth it roughly. Don’t worry about making it perfect because this layer is only there to catch crumbs. Once the crumb coat is done, put the cake into the fridge for about 30 minutes so the buttercream can firm up before you add the final coat.
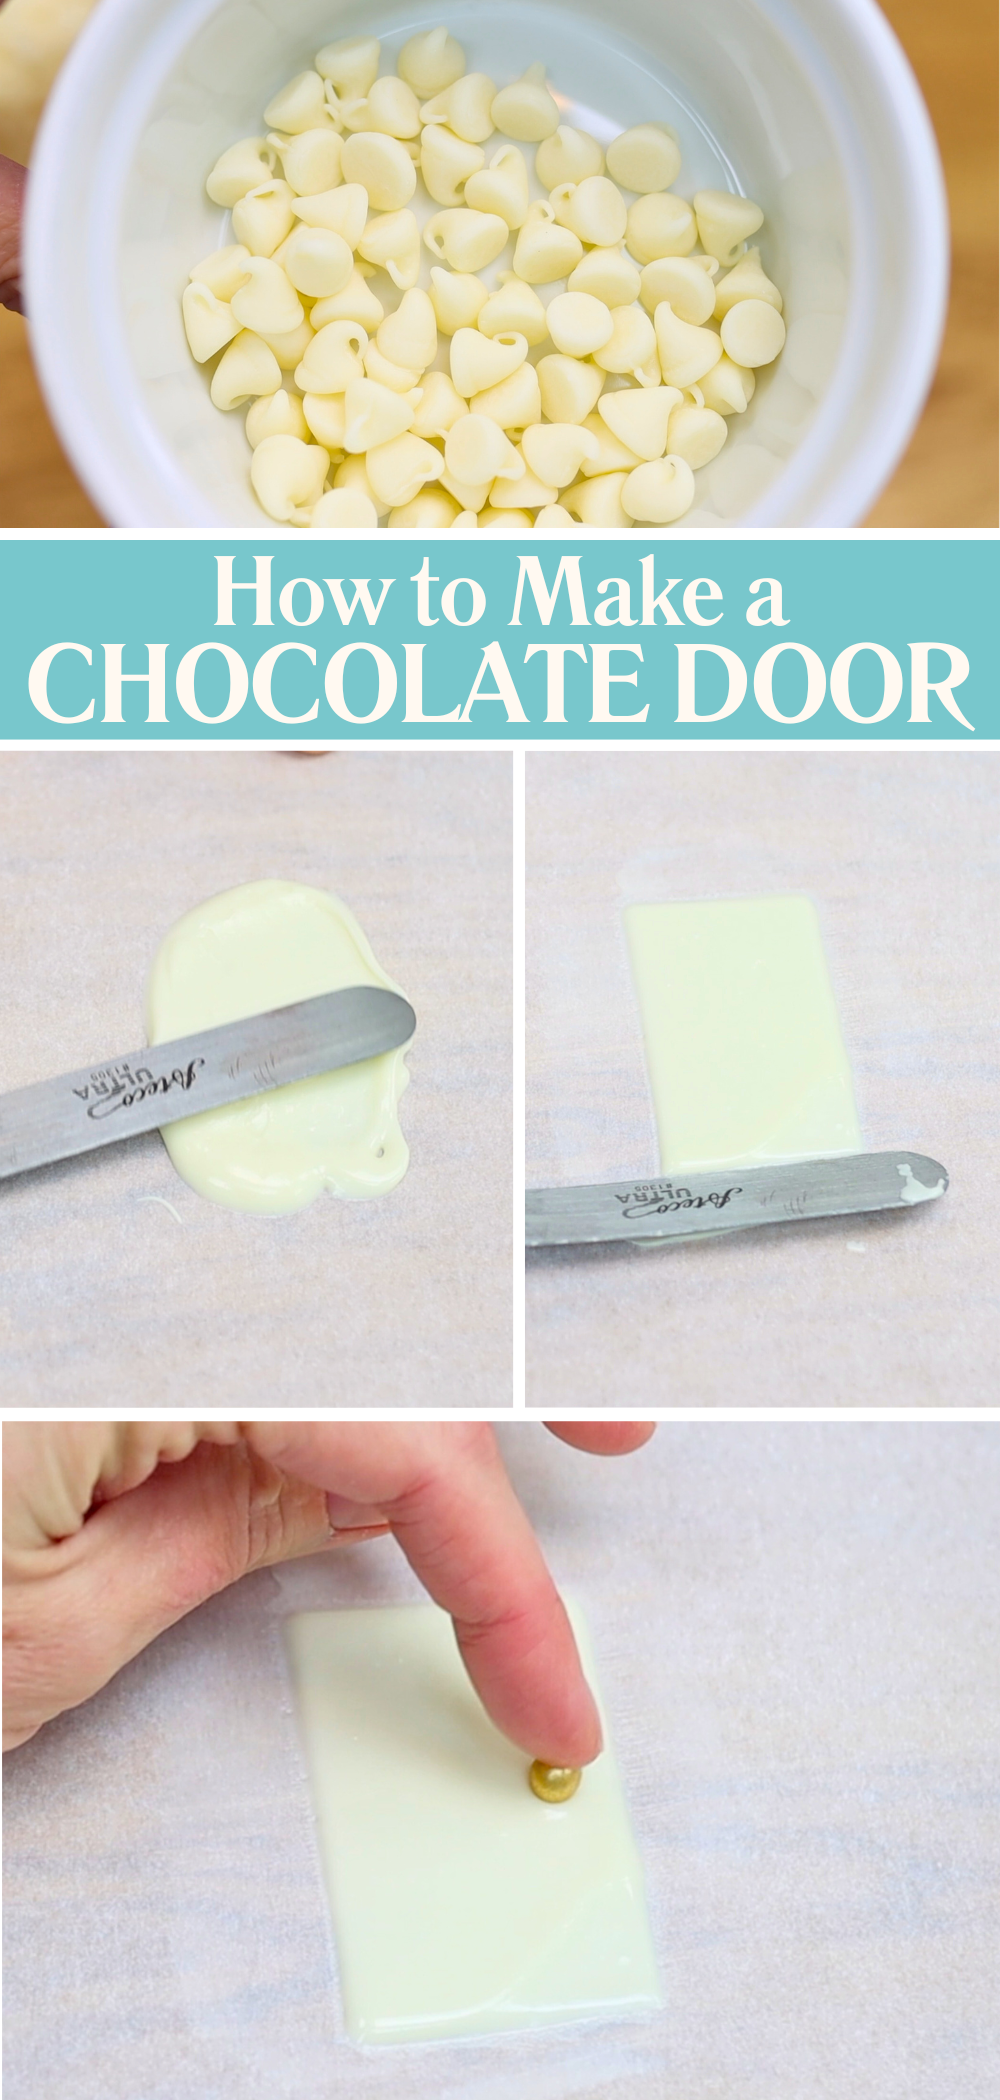
While the cake is chilling, make the little door for your spring porch cake. I’m using white chocolate chips for this because they melt easily and set firm in the fridge. Put the chocolate chips into a microwave-safe bowl and microwave them at 50% power for 30 seconds. Stir well and repeat until the chocolate is smooth. Heating chocolate at lower power is the best way to prevent it from burning.
Spoon the melted chocolate onto a piece of parchment paper or wax paper and spread it out into a rectangle using the edge of an
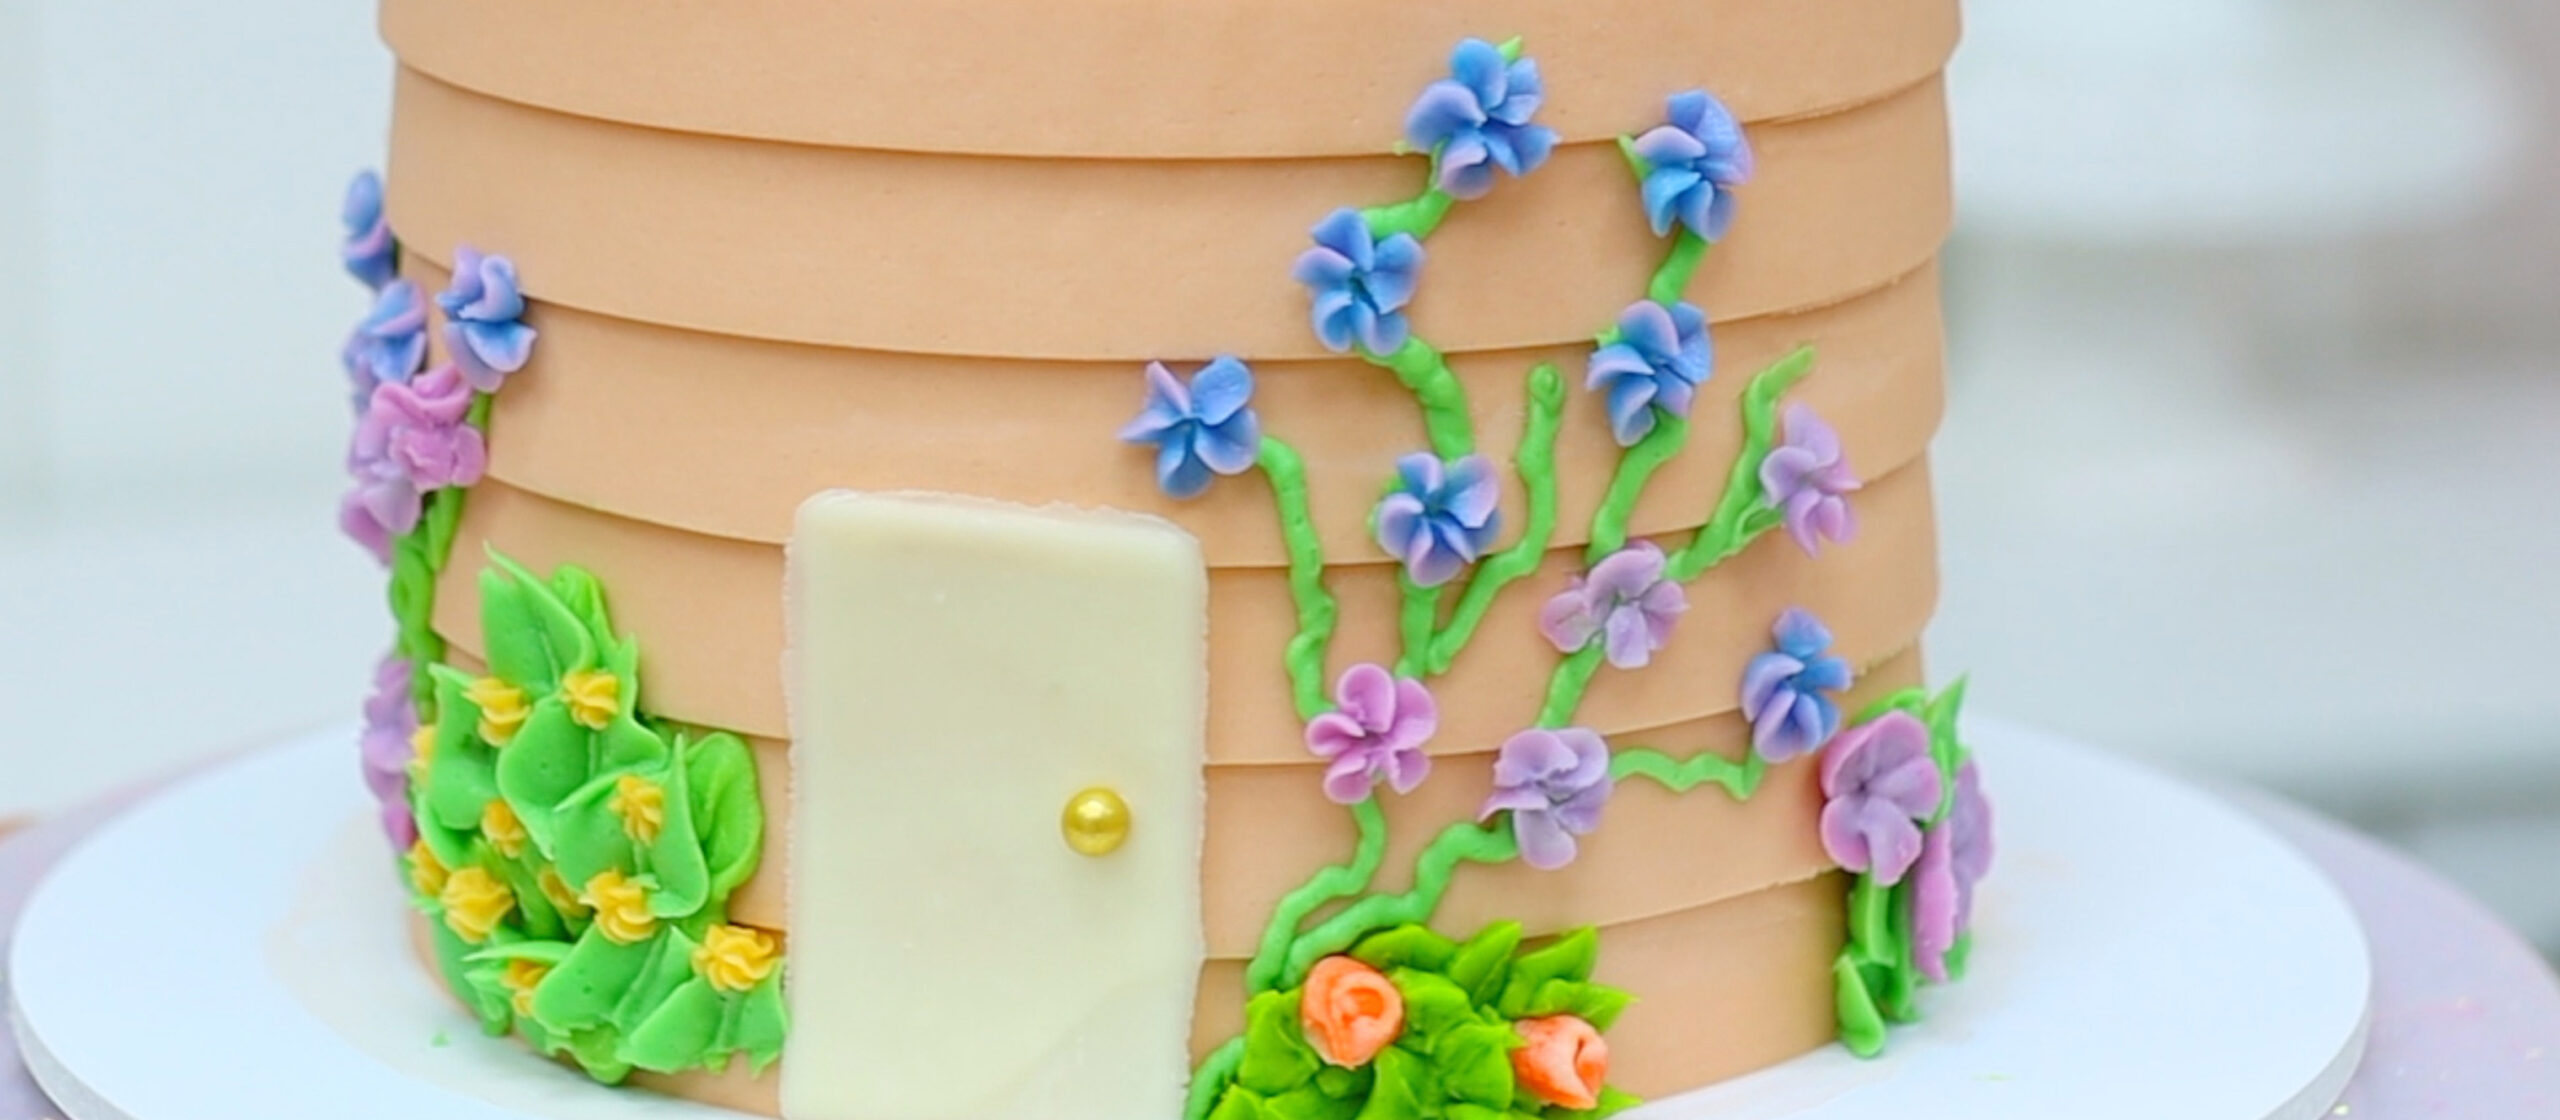
Tint your buttercream for the house. You can make this spring porch cake any colour you like but I’m adding just a drop of brown food colouring to create a peachy shade. I considered making the cake grey to look like painted wood siding but a grey cake didn't sound very appetizing.
Spread the buttercream over the top of the cake and then cover the sides. Instead of smoothing the frosting, use a textured cake comb to create the look of wooden siding on a house. I love this style because it instantly makes the cake look like a little building instead of just a frosted cylinder.
Use the textured cake comb in the same way you would use a regular cake scraper. Hold the comb against the side of the cake with the base resting on the cake board. Spin the
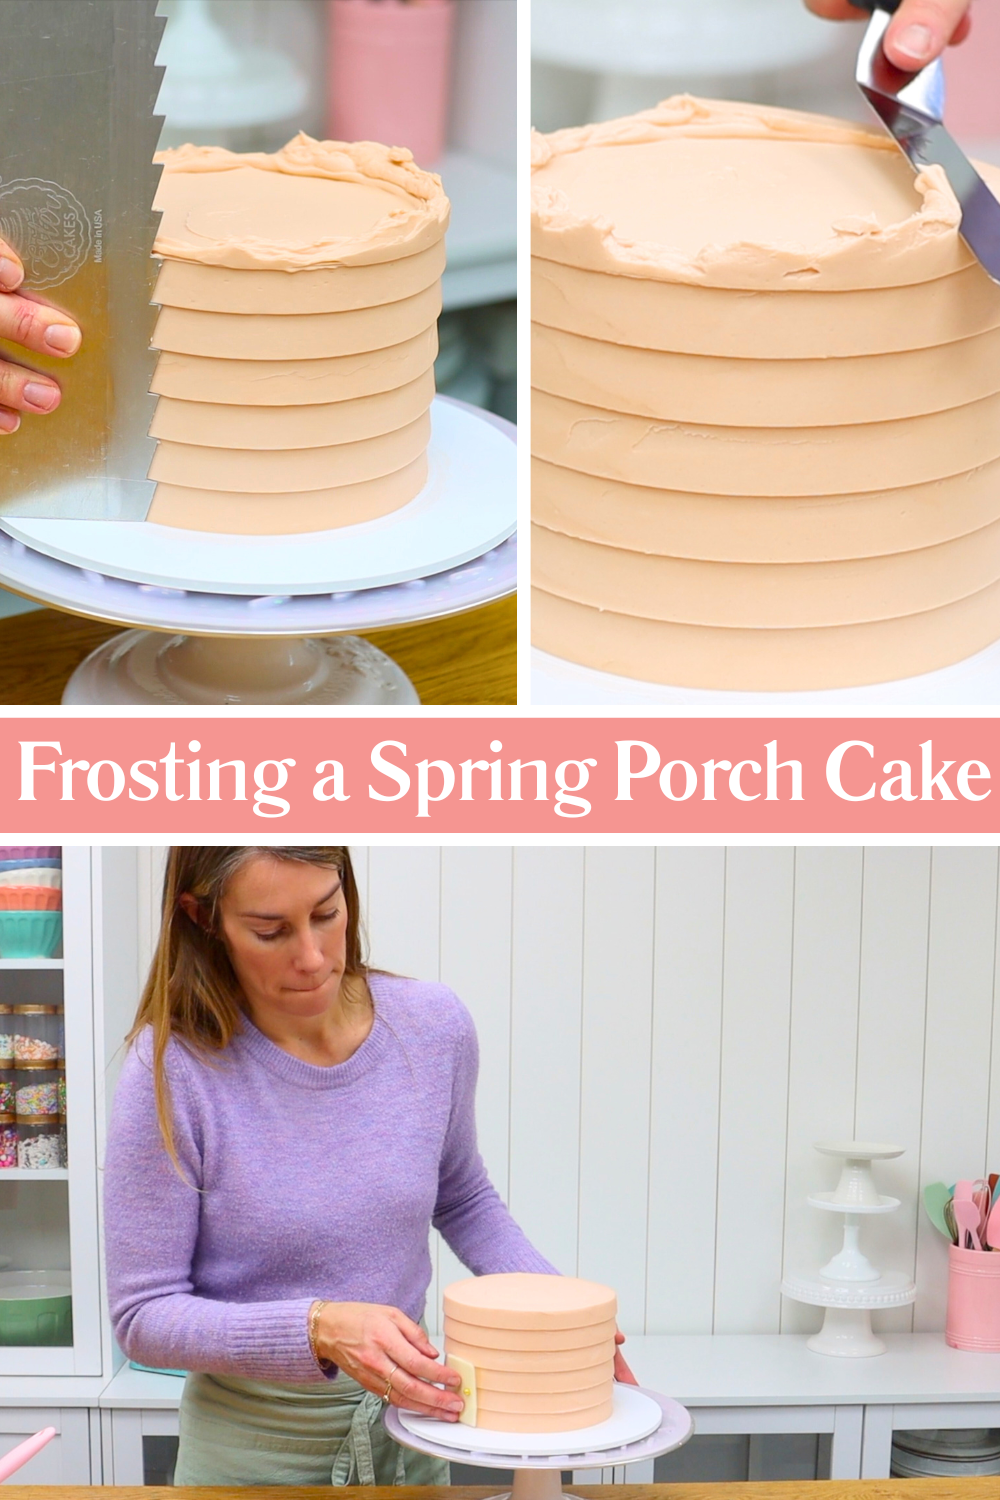
If you’re using a metal cake comb, you can make the texture even neater by gently heating the edge of the comb. A hair dryer, hot water, or even a blowtorch works for this. Warm metal glides across buttercream and leaves a really smooth surface on the texture.
To tidy the top edge of your spring porch cake, swipe sideways across the top edge with your
Now attach the door while the frosting is still soft and sticky. Take the chilled chocolate rectangle out of the fridge or freezer, peel it off the parchment paper, and press it gently into the frosting. This immediately turns the cake into a little house. Put the cake back into the fridge while you prepare the buttercream flowers.
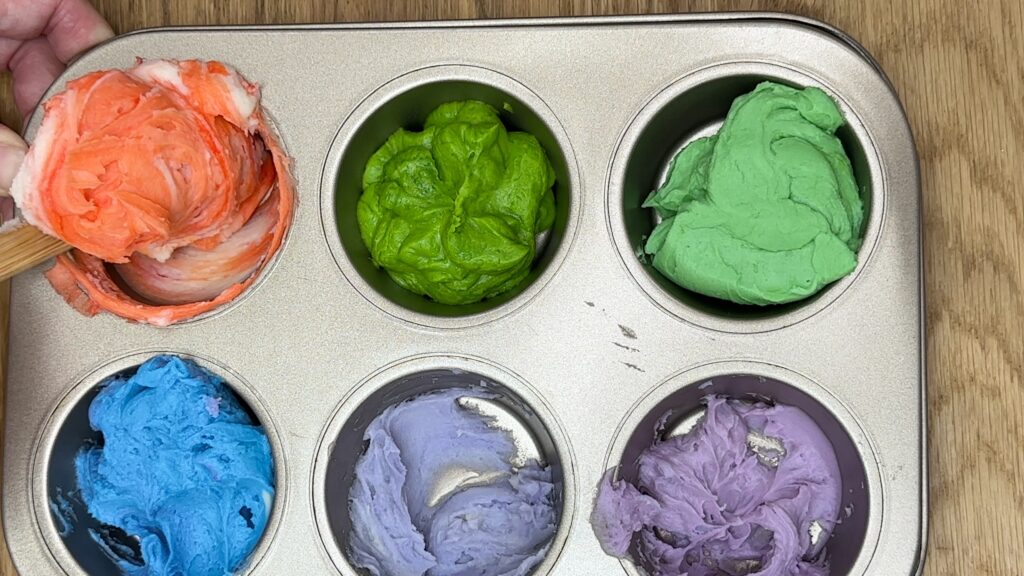
I like to mix my buttercream colours for the flowers in a cupcake pan instead of lots of small bowls. This trick is perfect when you only need a small amount of several colours. It keeps everything organized and at the end you only have one pan to wash.
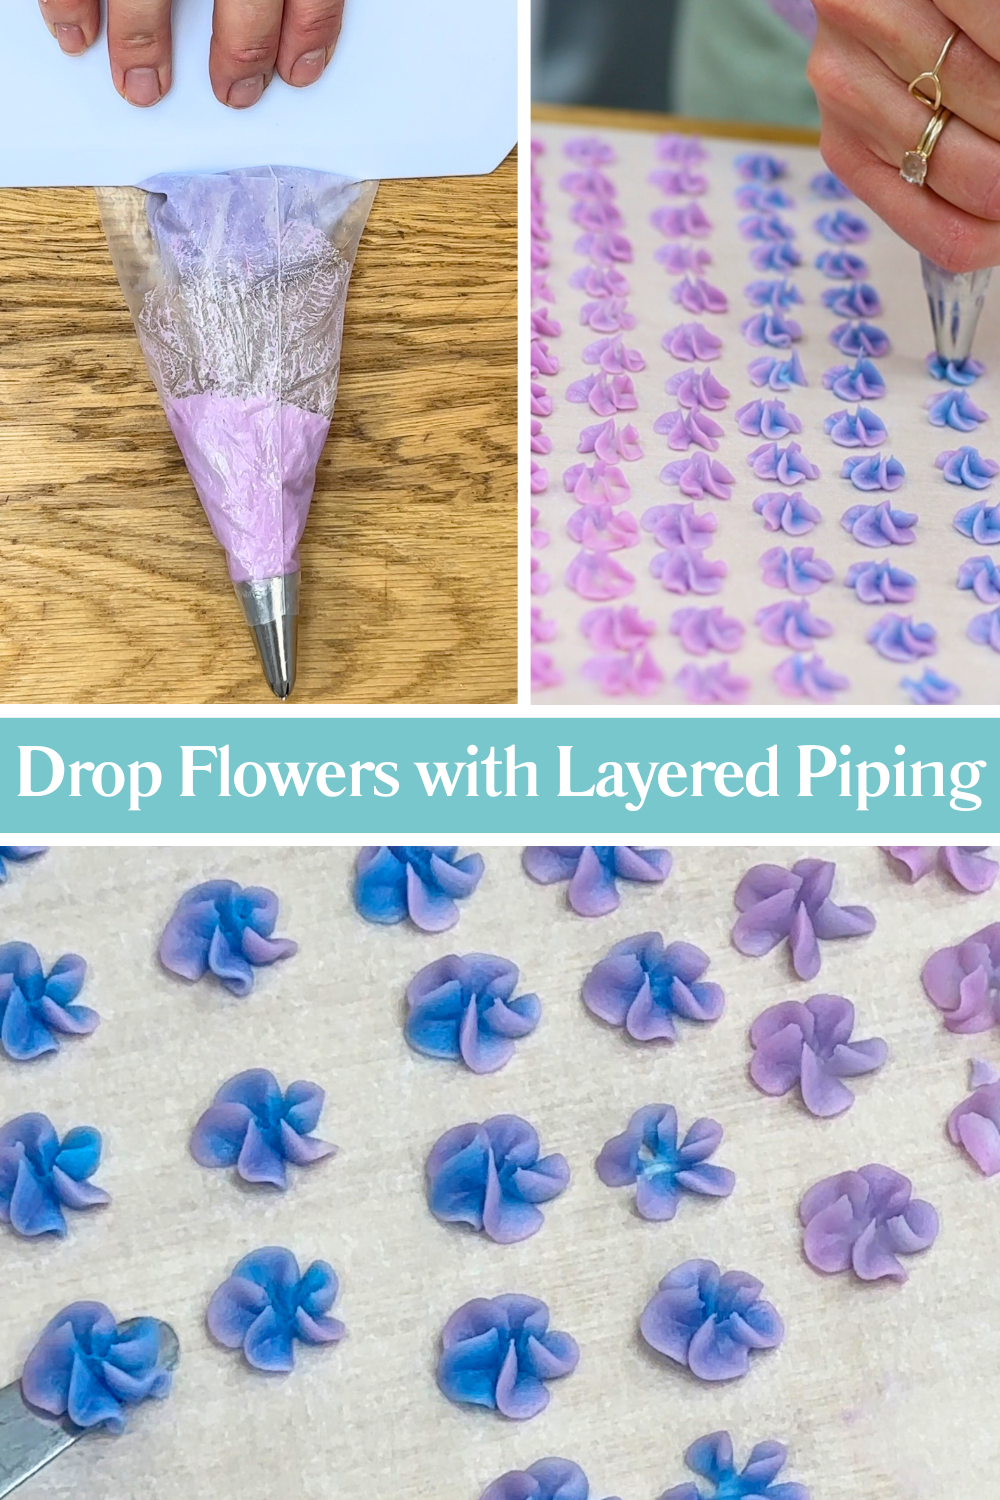
The first flowers for this spring porch cake are piped using layered piping, sometimes called lazy piping. To do this, spread stripes of different coloured buttercream inside a piping bag fitted with a drop flower tip. I’m piping these onto parchment paper wrapped around a cutting board. Piping onto parchment makes it much easier to arrange flowers later because you can move them around before placing them on the cake.
Rest the tip of the piping bag on the parchment paper. Twist your wrist so that your thumb is close to your forearm. Squeeze the piping bag and slowly twist your wrist away from yourself so the petals fan outward. As you pipe more flowers, the colours layered higher in the piping bag will gradually push through the lower colour, creating a beautiful ombre effect. This is one of my favourite cake decorating techniques because it creates such pretty flowers with almost no effort.
Lift the cutting board and place it into the freezer so the flowers can firm up. You'll pick them up and attach them to your cake later.
The next flowers are piped on a flower nail. Attach a small square of parchment paper or wax paper to the flower nail with a dot of buttercream. Fit a piping bag with a petal-shaped tip. Hold the tip so the wide end of the teardrop shape touches the centre of the flower and the narrow end points outward. I'm using a Wilton #104.
Squeeze the piping bag while turning the flower nail and moving the piping tip slightly away from the centre. This creates a petal shape. Pipe five petals to form each flower. When the flower is finished, lift the parchment square off the nail and place it on a tray or cutting board. Once you’ve piped several flowers, put the tray into the freezer.
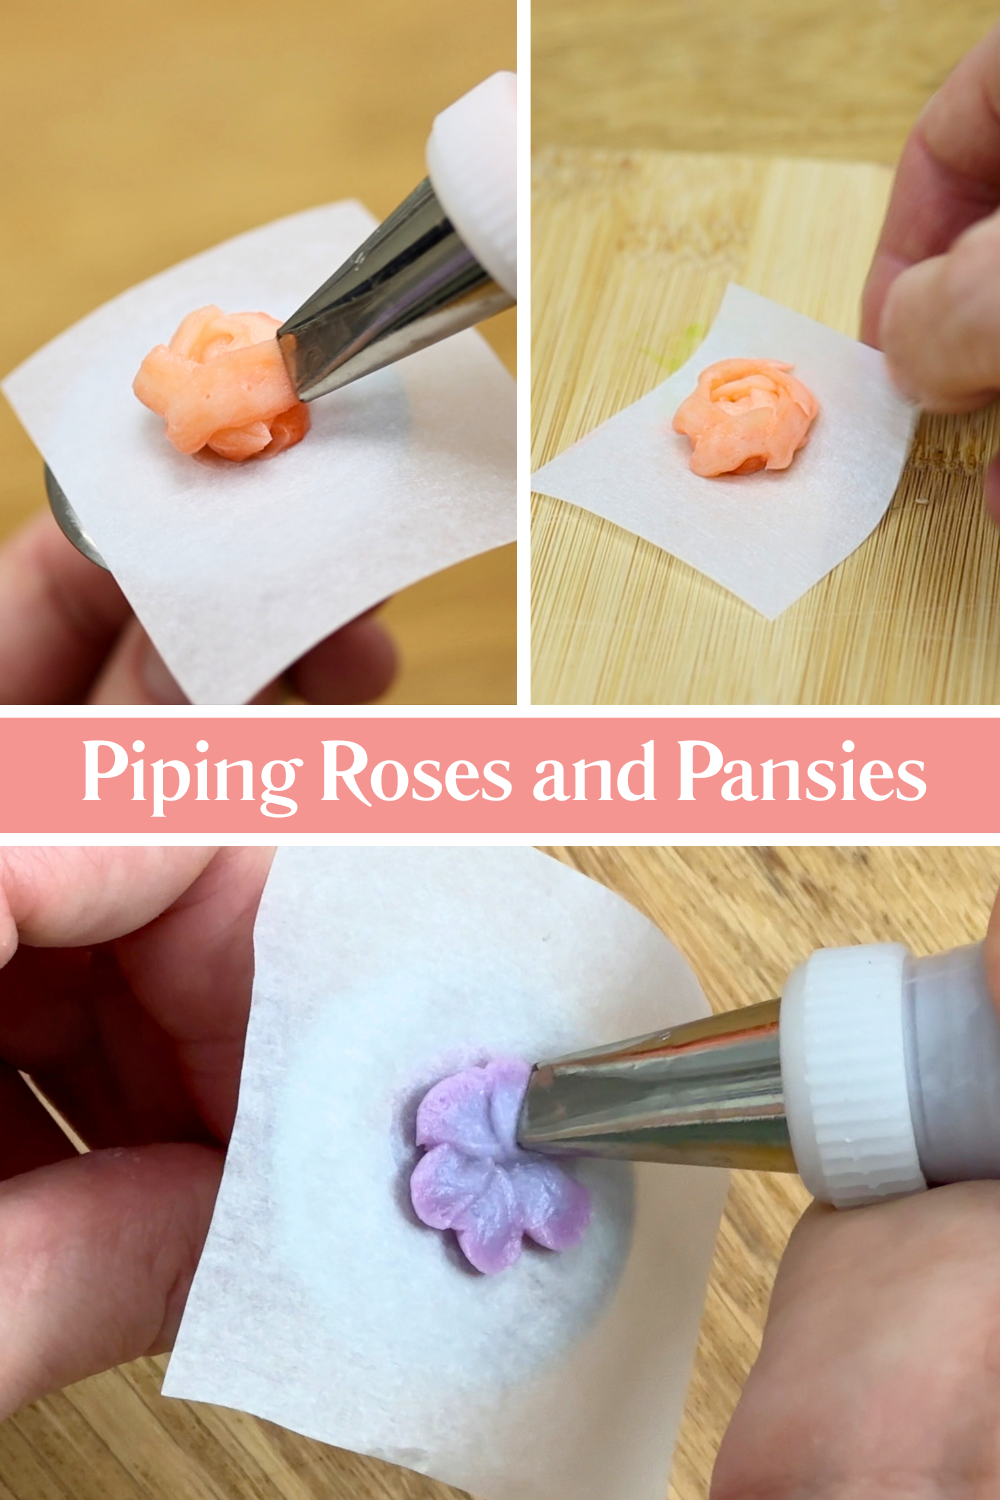
Roses are piped on a flower nail as well. Start by squeezing a small mound of buttercream onto the centre of the parchment square to create height for the rose. Hold the petal tip with the narrow end pointing upward and angled slightly inward. Squeeze the buttercream while spinning the flower nail to create a spiral around the centre, forming a rose bud.
After the bud, pipe arcs around it to create petals. Start with three or four petals and add more in each outer ring. As you pipe each arc, lift the piping tip slightly at the middle of the arc and lower it again at the end. This creates the curved petal shape. Overlap each petal about halfway over the previous one so the rose looks full and layered. For this spring porch cake I’m keeping the roses small so they don't look giant!
Transfer each roses to the tray on its little square of paper and freeze them along with the other flowers.
Once your flowers are frozen, it’s time to decorate the cake. Start with a small round piping tip and green buttercream to pipe vines onto the sides of the cake. These vines act as both decoration and glue for attaching the flowers.
Take the flowers out of the freezer and press them onto the cake along the vines. Because they’re frozen they’ll hold their shape and be easy to handle. They will soften within a few minutes so work fairly quickly. If they start to soften too much, put them back into the freezer for a few minutes.
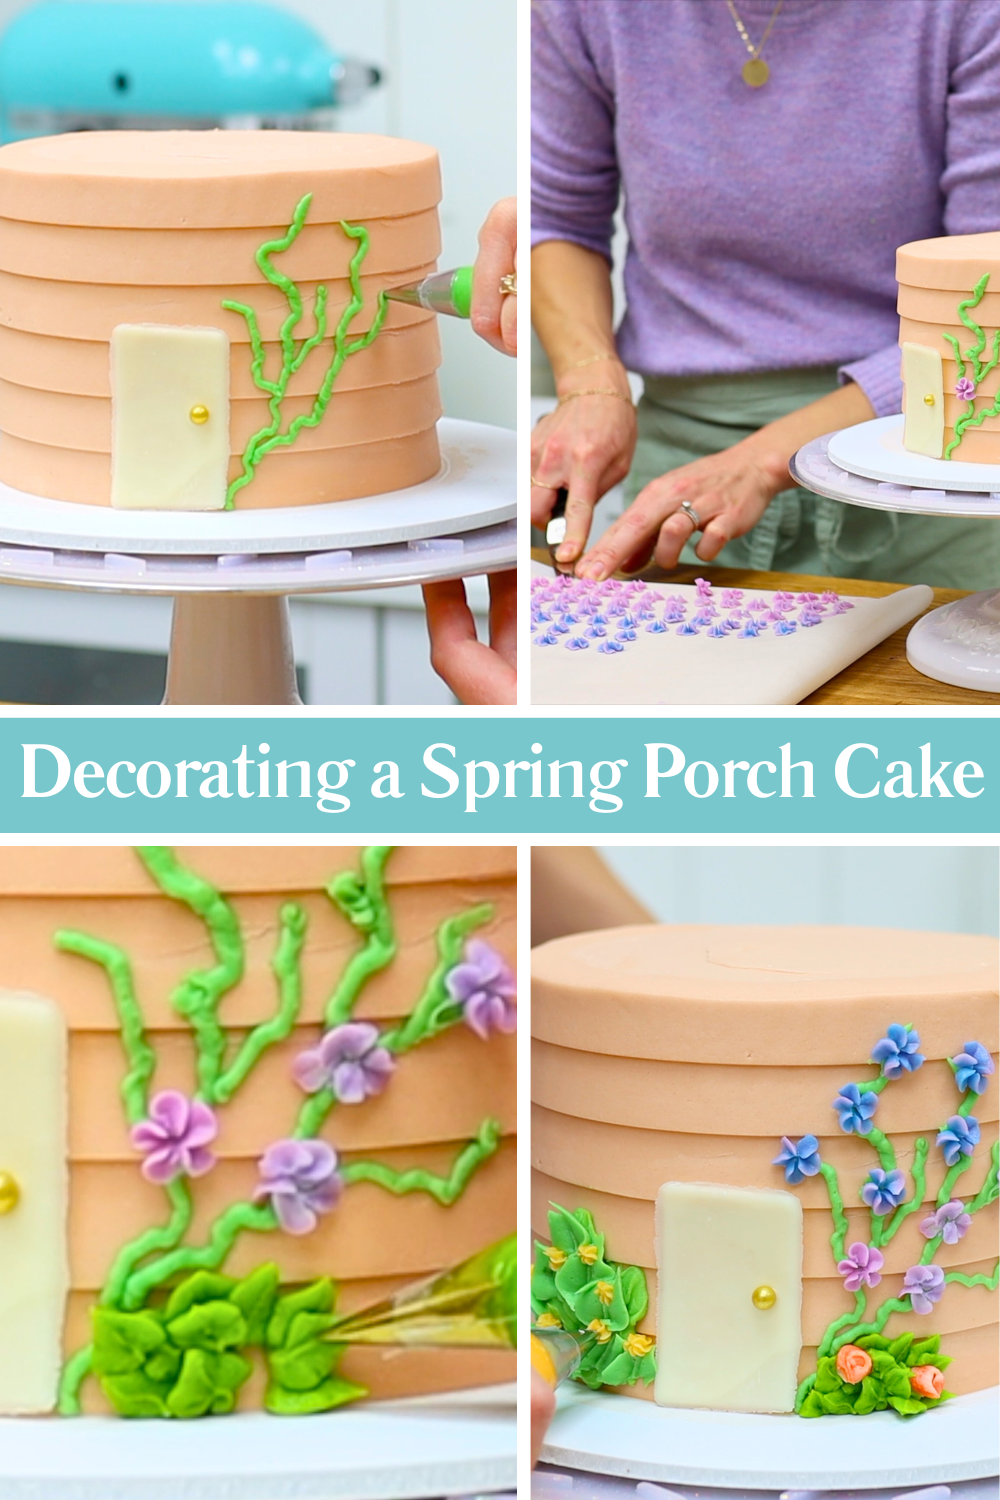
To add leaves, use a leaf piping tip such as the Wilton #352. When you look at this tip sideways it looks like Pac-Man jaws. Squeeze the piping bag and then release the pressure as you pull away so each leaf ends in a pointed tip. Pipe clusters of leaves to make bushes and press frozen flowers into the bushes while the buttercream is still soft and sticky.
If you want to vary the colour of the greenery on your spring porch cake, you can mix different shades of green buttercream. Adding a tiny bit of orange gel colour dulls the green for a more natural leafy shade, while yellow gel brightens it.
For tiny flowers, switch to a small star tip like a number 18. I pipe little star-shaped blossoms onto clusters of piped leaves that looked like bushes. These are a quick and easy flower to use as filler flowers in any empty areas!
This cheerful spring porch cake looks like a tiny house covered in blooming flowers. It’s a perfect cake for spring celebrations or for welcoming someone into a new home.
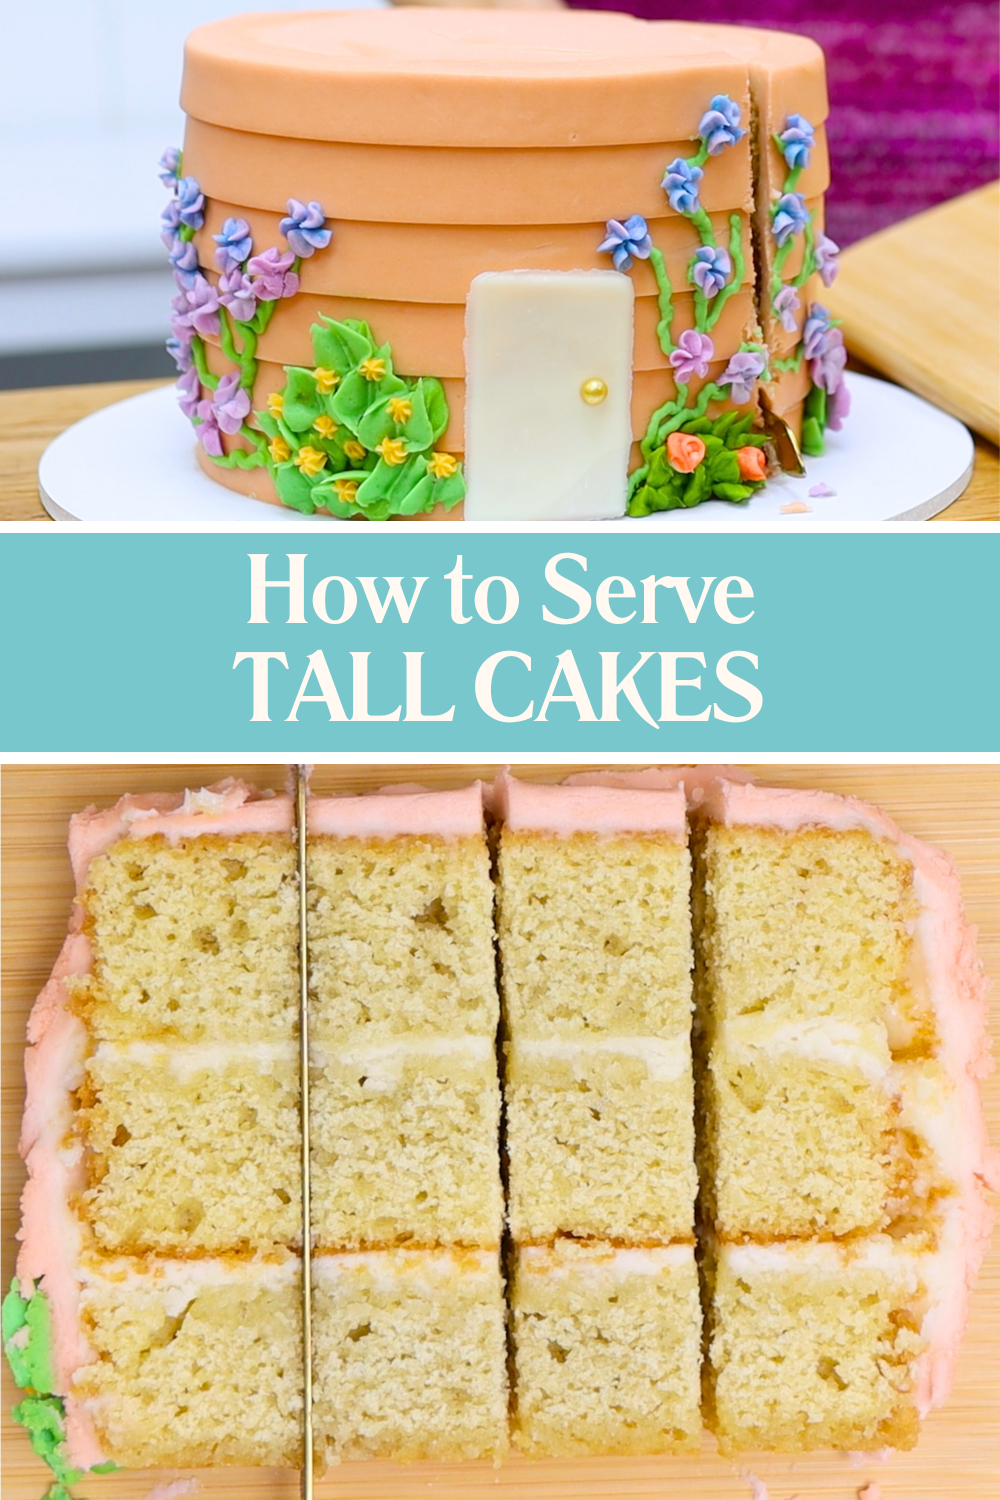
When it’s time to serve the cake, I like to use the cutting board method for slicing. Start by cutting about an inch from the edge of the cake and slice straight across from one side to the other. Push the slice away from the rest of the cake to flip it over onto a cutting board. Cut it into long narrow slices.
Then make another cut about an inch further in and repeat the process. This method creates neat slices that are a really reasonable portion size. When cakes are cut into large wedge-shaped slices there are almost always leftovers on every plate!
Another advantage of this slicing method is that guests can choose the piece they want. Someone who prefers less sweetness can choose a middle piece with less frosting, while frosting lovers can pick the outer slices. Tell me in the comments which piece you would choose!
I hope this spring porch cake tutorial was helpful. If you have any questions about the techniques, ask me in the comments. Visit my cake school to learn hundreds more cake decorating techniques and designs 🙂 See you there!
You can also watch a video of this spring porch cake tutorial:
Save this tutorial to Pinterest for later!