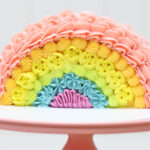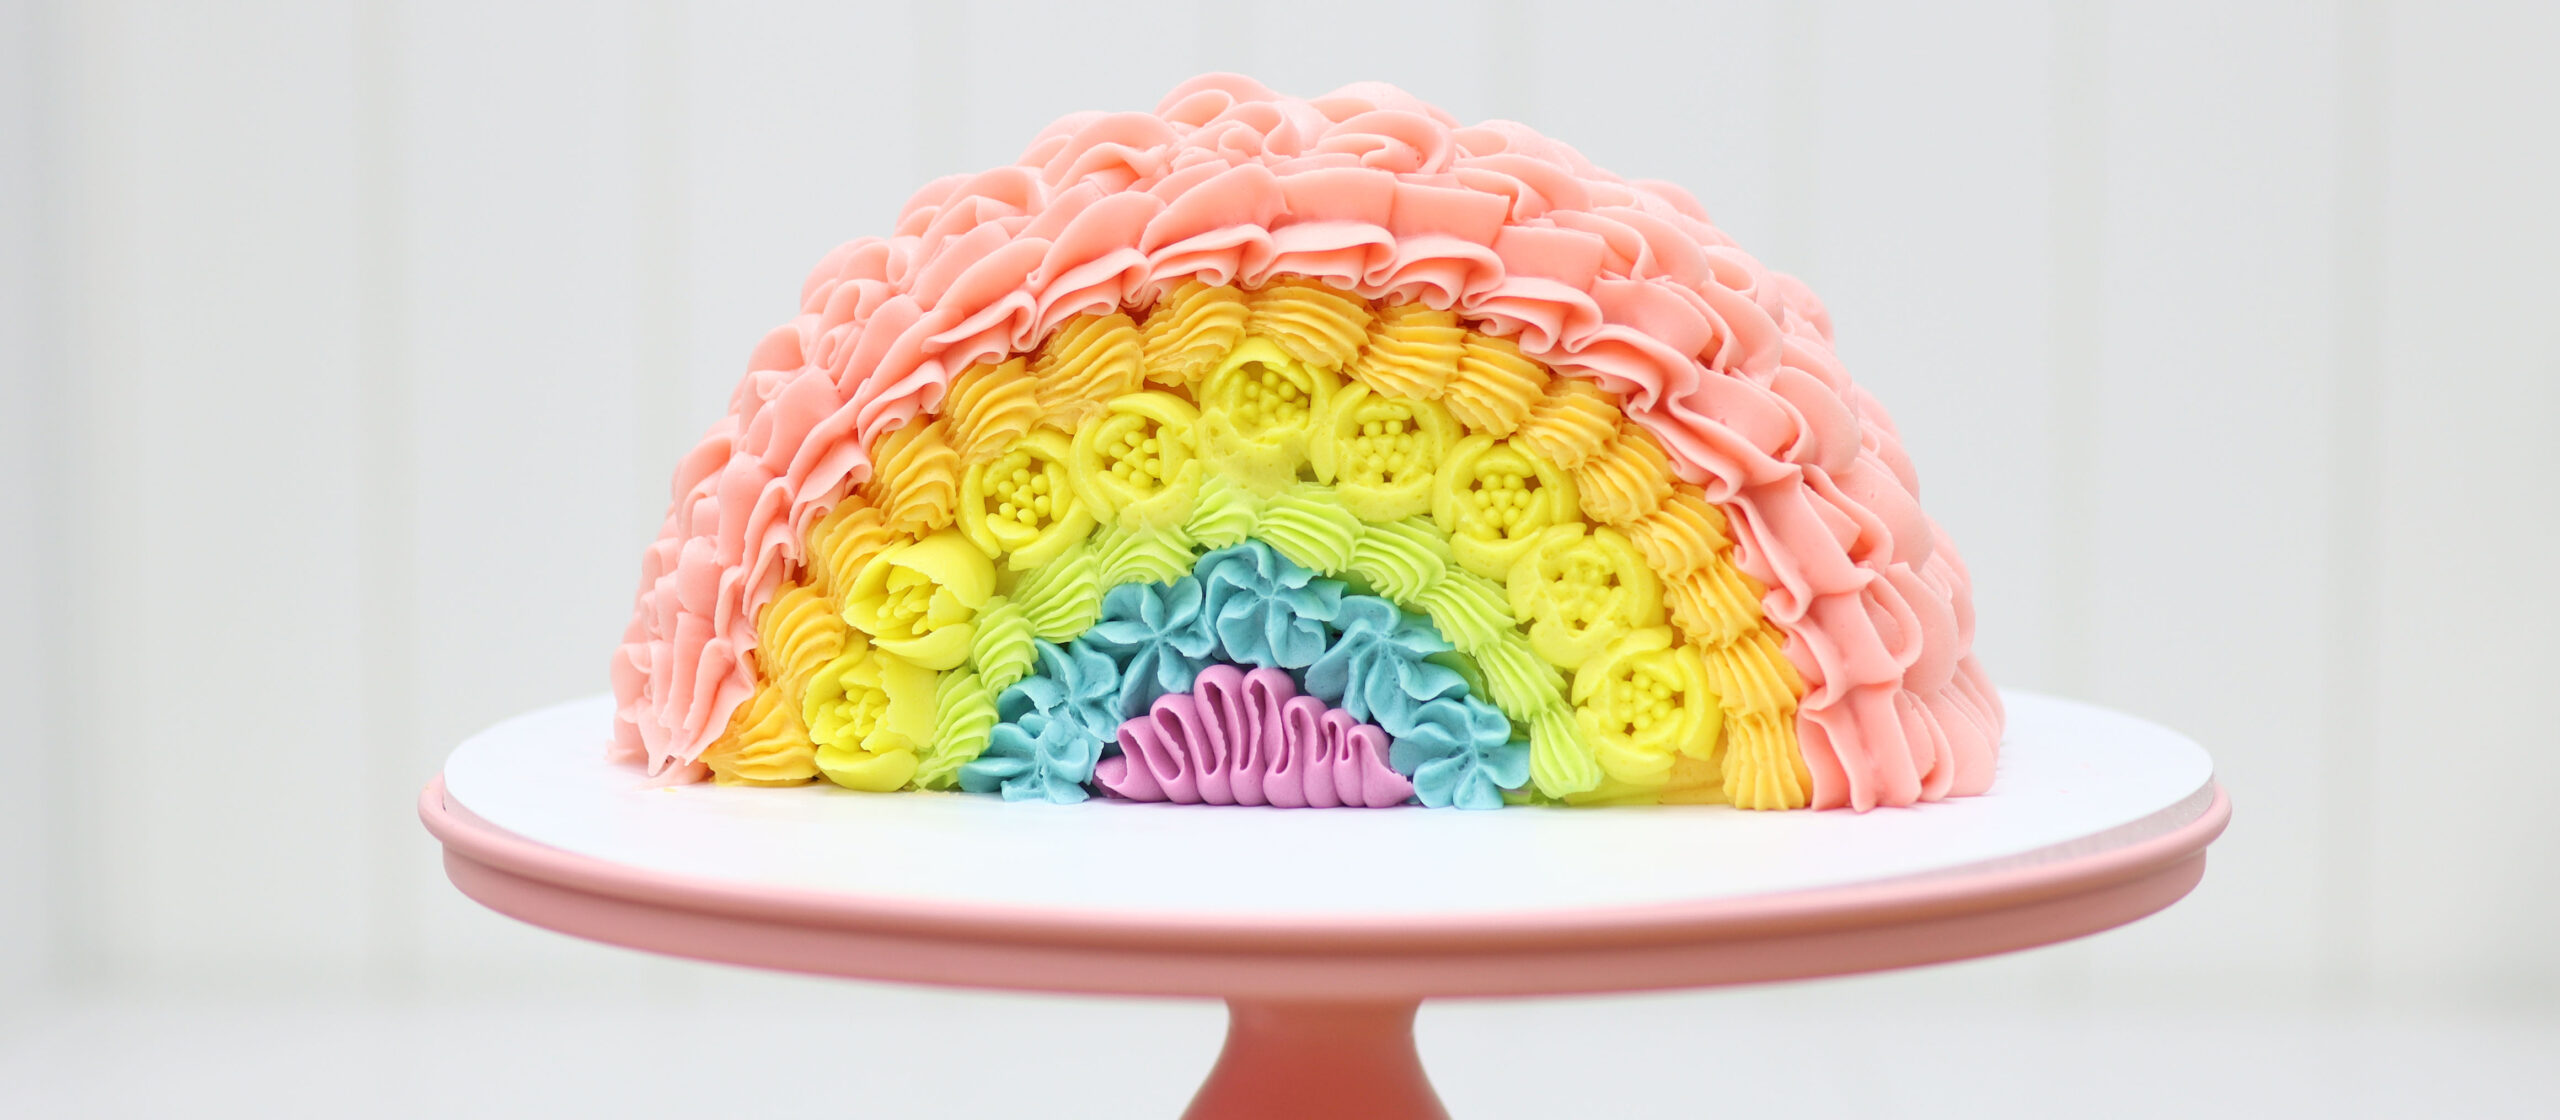
Make a stand up rainbow cake using different piping tips, rainbow colours mixed in just one bowl, and only one layer of cake.
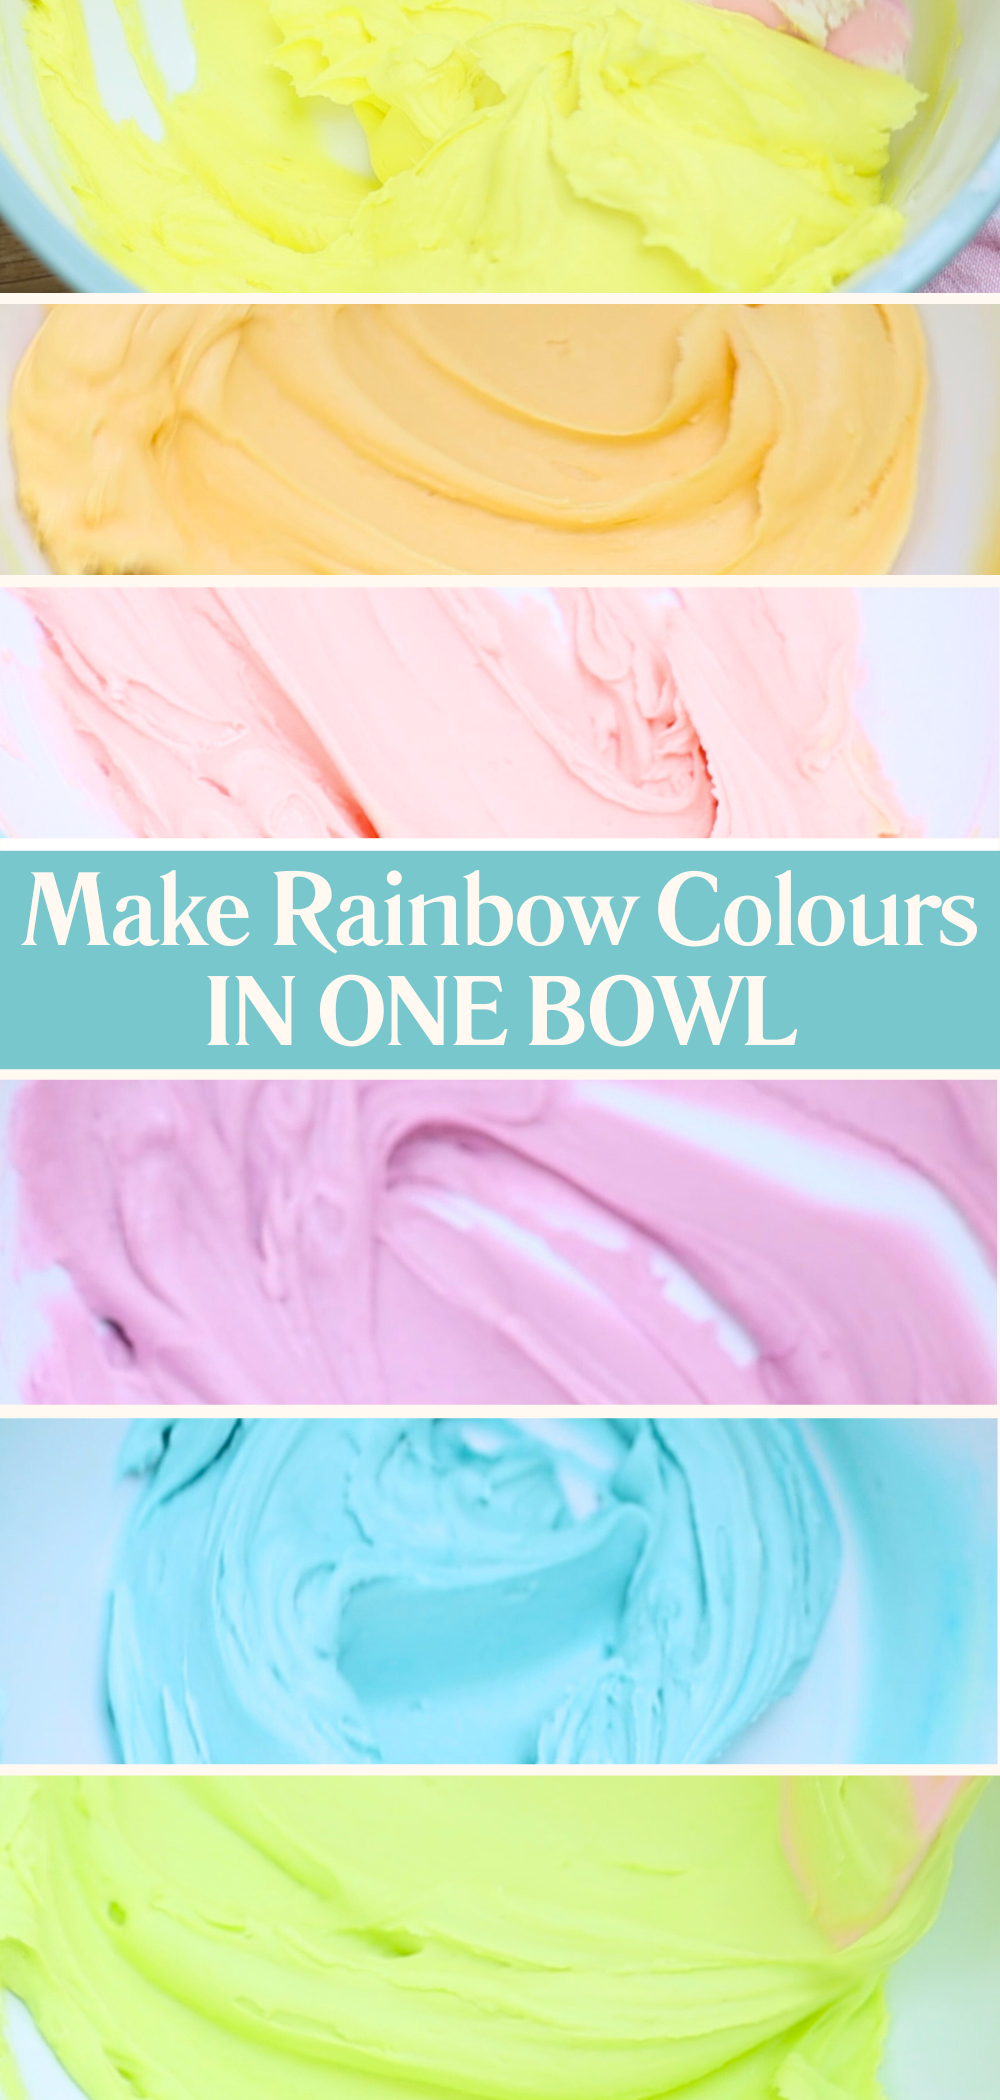
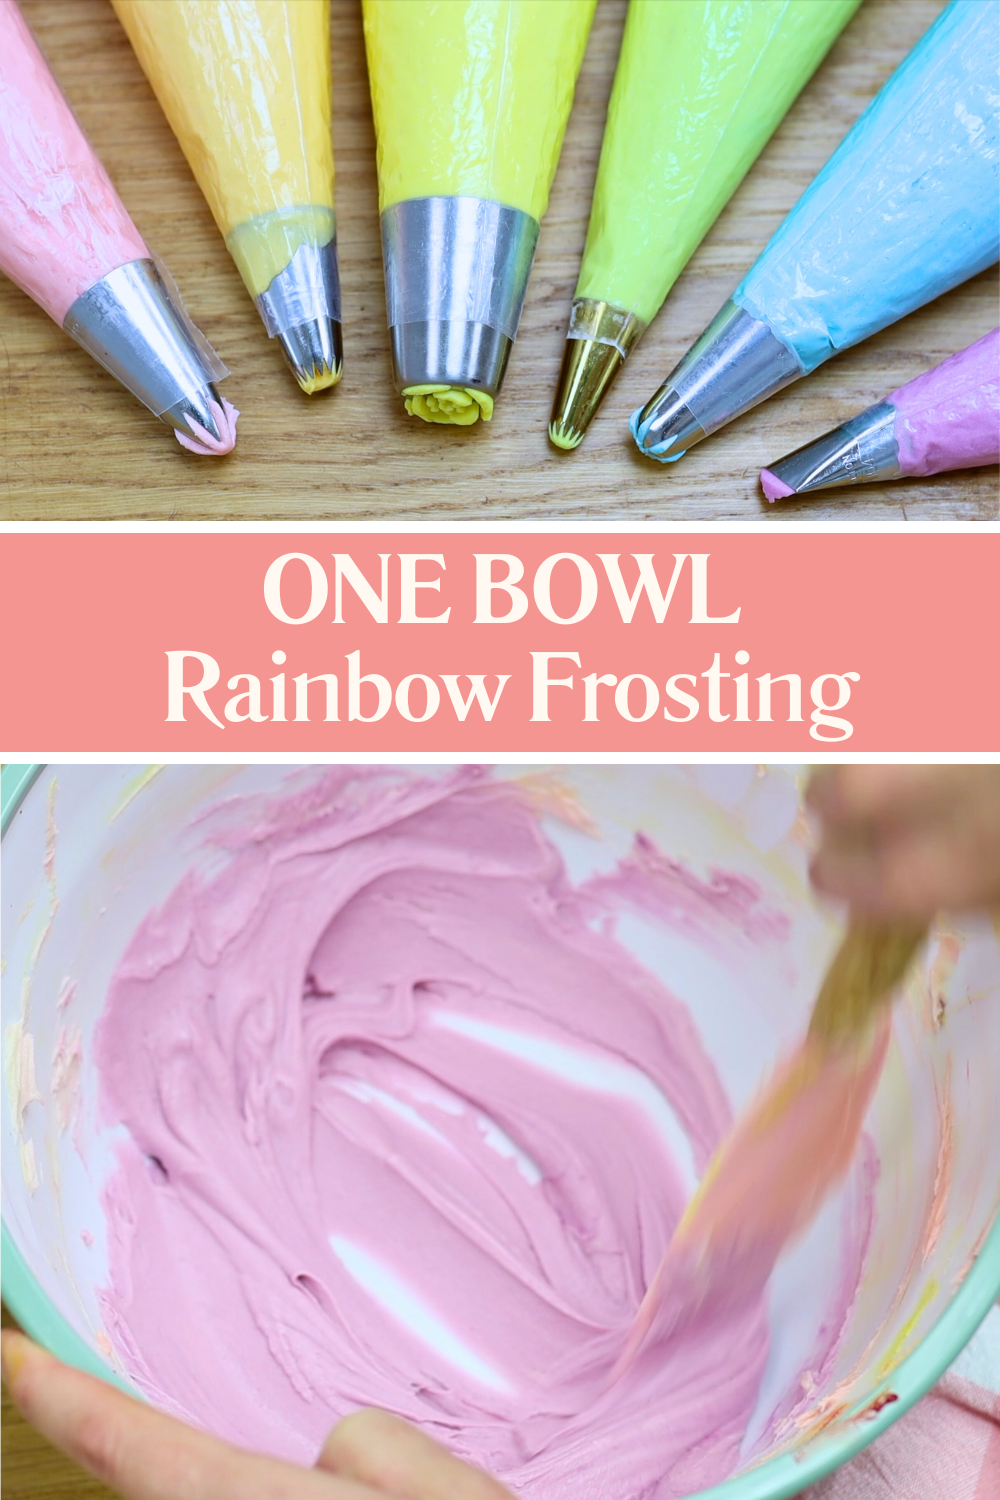
Start by mixing your colours for the filling and frosting of this cake. To mix them using one bowl without washing in between colours, follow an order you probably wouldn't expect. I'm using one batch of my 4 Minute Buttercream for this cake. Start with a bit less than a cup of buttercream in the bowl. Add yellow food colouring, mix it in, and scoop it up. Then add a bit less than a cup of plain white buttercream to the bowl and tint it orange. Mix it, scoop it up, and add more white buttercream. Continue with pink or red next (which should be about twice the amount of buttercream than the other colours), then purple, blue, and finally green. For each colour, scrape around the bowl to mix in all of the previous colour into this new colour. That's the reason for mixing the colours in this order - the colours naturally blend into each other.
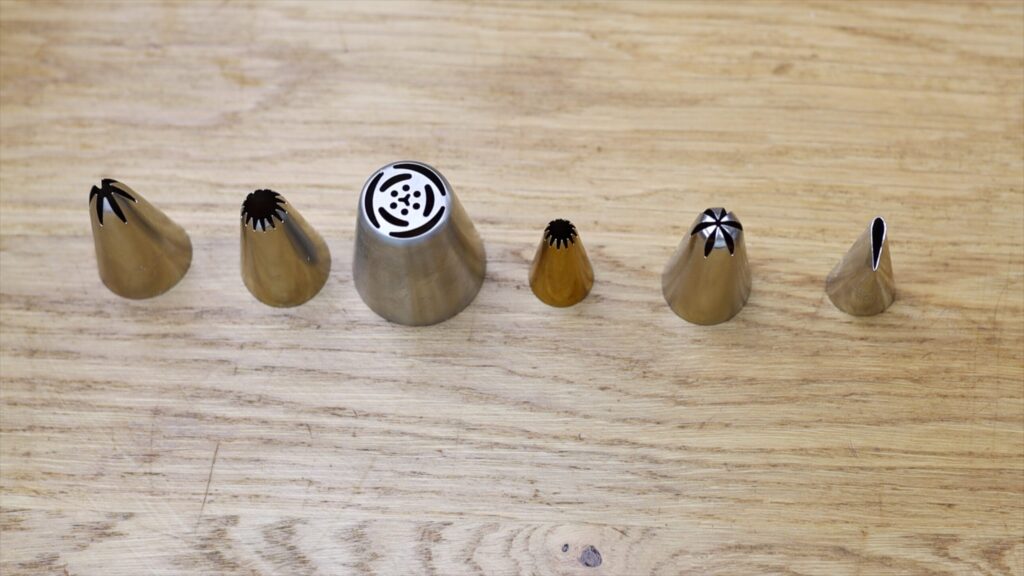
Prepare six piping bags with different piping tips to create texture for this buttercream rainbow cake. Petal tips, star tips, and flower tips all create different effects, so using a variety of tips makes each colour look different even if you repeat the same technique. For example, use a 104 petal tip for ruffles, a 2D closed star tip for flowers, a 32 open star tip for shells, a Russian flower tip for detailed flowers, a 4B larger open star tip for bigger shells, and a 1M star tip for a different texture of shells.
Fill each piping bag with one of the rainbow buttercream colours you mixed earlier and twist the tops closed so they’re ready to use.
You'll need a single round cake layer to make this stand up rainbow cake. I used an 8 inch layer of my Perfect Chocolate Cake, drizzled with simple syrup to keep it extra moist for serving the next day.
Slice the cake layer in half to create two semicircles. Pipe the buttercream filling between the cake halves in rainbow order, starting with red or pink on the outside. Continuing with orange, yellow, green, blue and purple. Piping the filling instead of spreading it is a great way to practice using each piping tip and to get comfortable with the consistency of your buttercream before decorating the outside of the cake.
Place the second semicircle of cake on top of the filling to complete the cake shape.
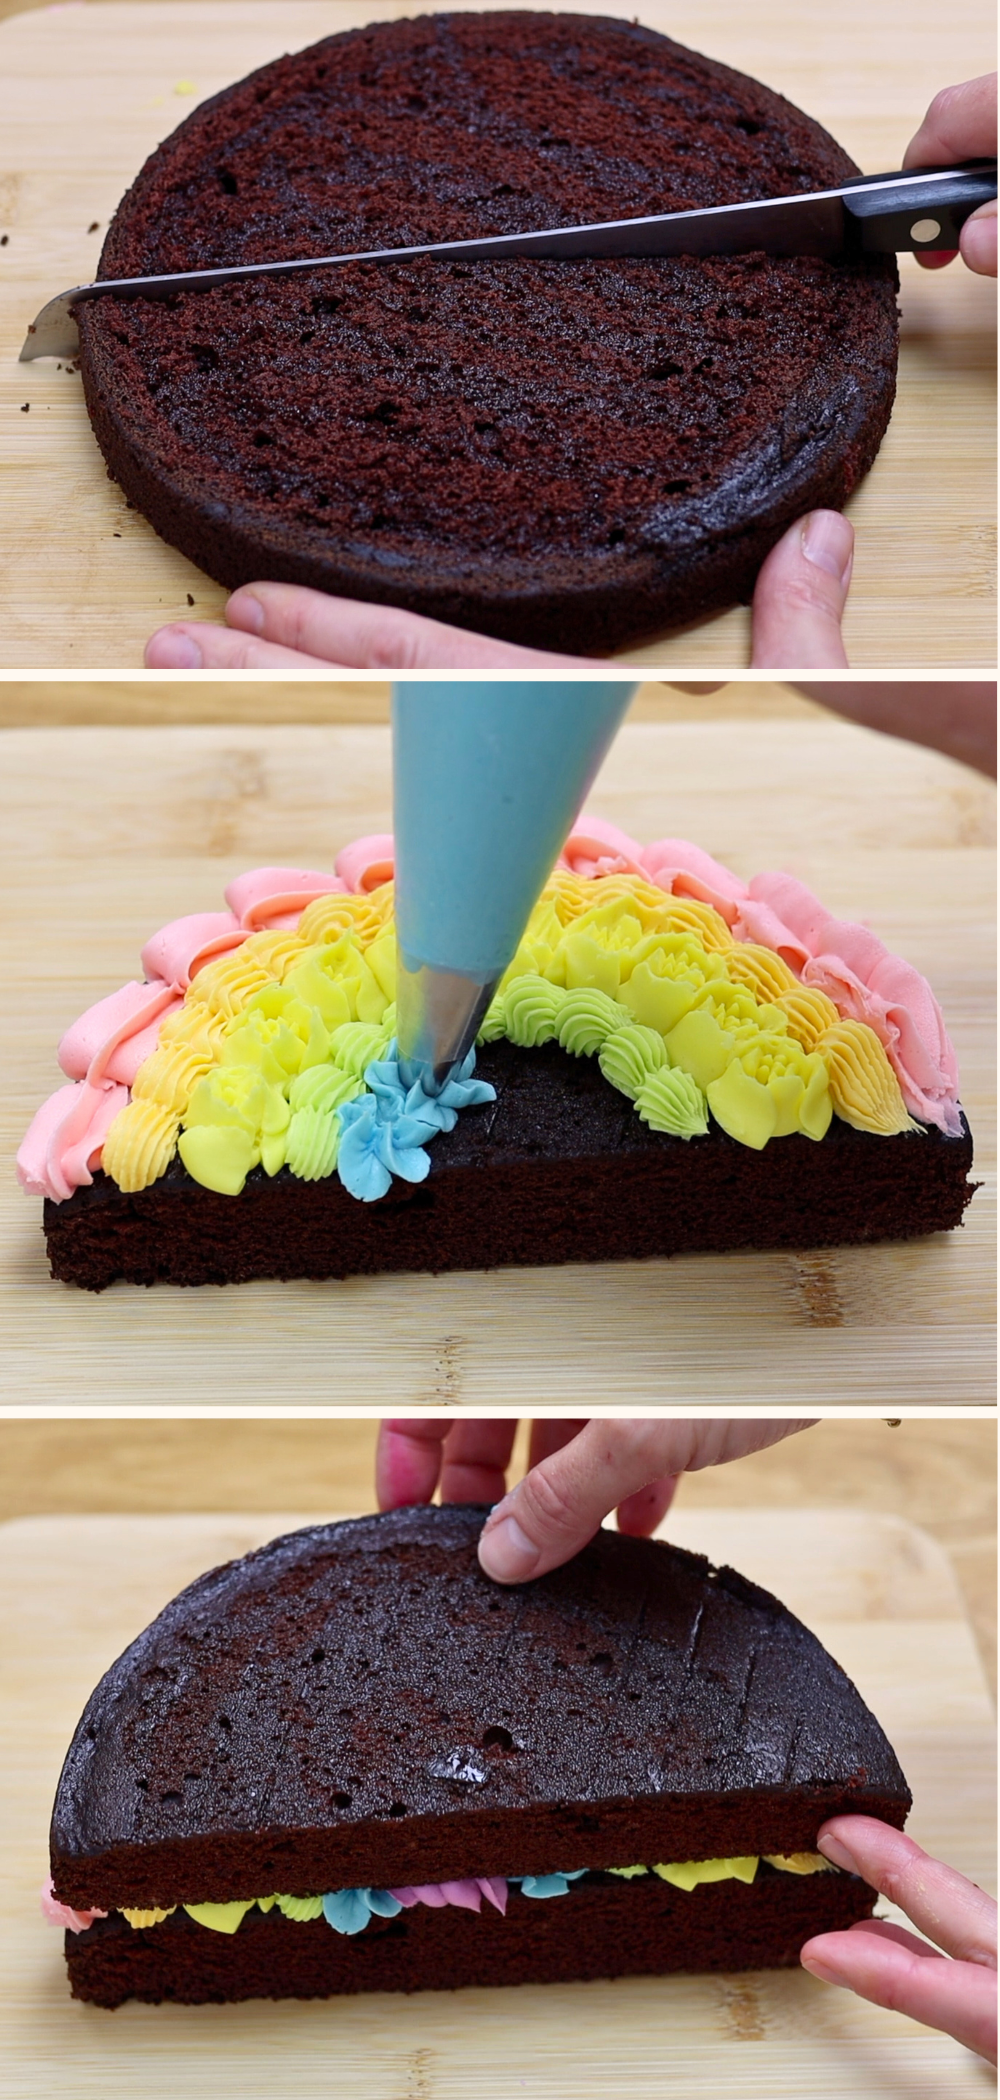
Pipe a line of buttercream onto a cake board and flip the cake over so the flat cut side of the cake sits on that line. Press the cake gently into the buttercream so it sticks securely. This creates the upright structure that gives the stand up rainbow cake its shape.
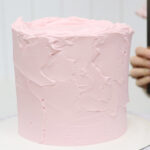
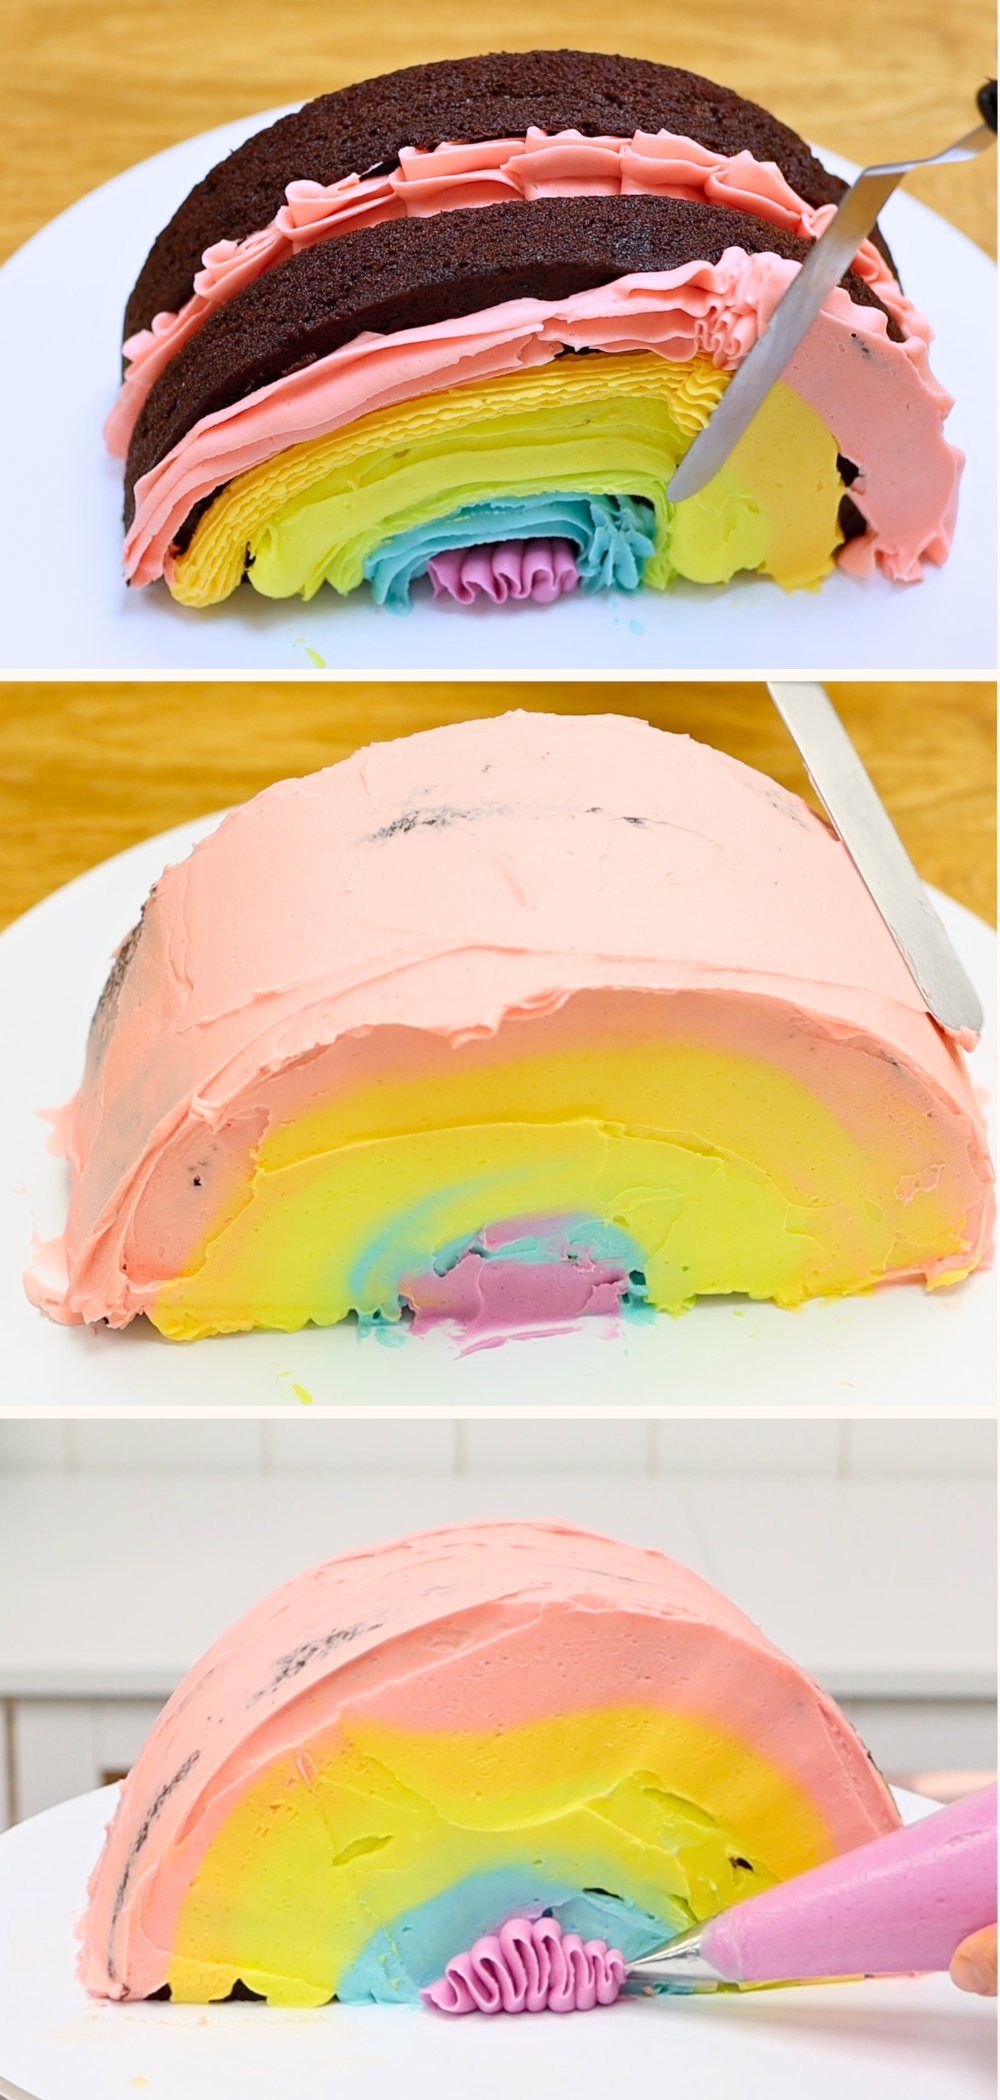
Apply a crumb coat to the stand up rainbow cake using the same piping bags you used for the filling. Instead of piping neatly, simply squeeze the buttercream onto the cake in rainbow arcs that match the colours you’ll pipe later. Matching the crumb coat colours to the final decoration helps hide any small gaps in the piping.
Use an
Put the cake into the fridge for 30 minutes to set this crumb coat before piping on it. By setting the crumb coat, you'll trap any crumbs that have come off the cake. Now they won't get into your piping.
It's easiest to begin decorating the stand up rainbow cake with the purple buttercream using the petal tip. Starting in the middle of the cake gives you the most space to angle the piping bag to pipe ruffles. Hold the piping bag so the narrow edge of the petal tip faces outward away from the cake. Move the piping bag slightly back and forth as you squeeze to create ruffled buttercream texture. Pipe these ruffles along the centre of the cake on both sides.
For the rest of your colours, use these techniques in any order.
To pipe flowers onto your stand up rainbow cake, use a closed star tip like a 2D. Hold the piping bag with your wrist twisted so your thumb is close to your forearm. Then squeeze while twisting your wrist upwards to spin the bag clockwise. This motion allows the petals to fan out from the centre of the flower. You might notice small gaps between the flowers and the rainbow crumb coat underneath helps hide those spaces.

I think shells borders are one of the easiest buttercream piping techniques. Using an open star tip like the #32 tip I'm using with my green buttercream, squeeze the piping bag and pause briefly so the buttercream attaches tot he cake and rises up. Then release pressure and swipe down and away to create the tail of the shell. Pipe the next shell over the tail of the previous one to continue the pattern along the cake.
Russian piping tips (also called 'flower nozzles') add detailed flowers with each squeeze. Russian tips can take a little practice, so the piping you did for the filling earlier helps you get used to them. If the buttercream at the end of the piping bag has crusted slightly and won’t stick to the cake, squeeze a small amount out first to expose fresh buttercream before piping onto the cake.
Using both large and small open star tips (like the #32 I used for green and a 4B for orange) creates differed sized shells on your cake. Using the same piping technique with different tip sizes is an easy way to create variety without needing to learn a new technique.
Another way to add variety is to use a different piping tip shape with the same shell technique. For the pink buttercream I'm using a 1M tip to pipe a shell border with a different texture to the shells piped with open star tips.
Use the pink or red buttercream from the top section of the rainbow for the entire top of the cake as well. I think piping onto the top of the cake is the quickest and easiest part because you’re piping downward instead of sideways, so the piping feels more comfortable and goes quickly.
Store the stand up rainbow cake in the fridge until a few hours before serving. Chilling the cake keeps the buttercream decorations firm and protects the texture of the piping. Take the cake out of the fridge about 3 hours before serving so the cake and buttercream can come to room temperature. This is when both the flavour and texture taste their best!
Slice the stand up rainbow cake diagonally to reveal the colourful buttercream filling and piping inside each slice.
I hope this tutorial has been useful! Ask me any questions in the comments and visit my cake school to learn hundreds more cake decorating techniques and designs. You can also watch a video of this tutorial: