Even if you’re just beginning to decorate cakes, you’re probably familiar with a 1M star tip, most often used to pipe cupcakes swirls. In this tutorial I’m going to show you 8 ways to use a 1M piping tip, which is my favourite piping tip. If you prefer to watch a video of this tutorial, scroll to the bottom of the page.
I’ll start with probably my favourite way to use a 1M tip, by piping easy roses onto a cake. You need a thin coat of frosting on the cake first, partly because it provides a flat, not-crumbly surface for your roses to stick to, but also because if there are any gaps between your roses it won’t be as noticeable when there’s frosting underneath instead of naked cake.

For each rose, hold your tip against the side of the cake and pipe a tight spiral, working your way out, and then releasing your pressure on the piping bag as you pull the bag away from the cake. Start at the bottom and pipe a row of roses around the cake, and then another row on top, and then another row. I like to pipe each rose in between the 2 below, so that they’re slightly offset.

This is a really quick and easy way to cover a cake with decorative frosting and the color possibilities are endless.. you can use just one color, or pipe the roses on by alternating colors, or make it ombre by using a light shade of the color for the first row, and then get darker as you work your way up or down the cake.

When you’ve finished the sides you can leave the top as it is, or you can pipe roses on top as well.

Then if there are any gaps between roses you can squeeze a bit of frosting out of the piping bag, still using the 1M tip, to pipe little star blossoms.

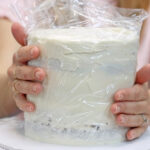
For this next technique you’ll need piping bags for every colour of frosting, unless you want to wash the bag in between each colour. Build your cake and give it a crumb coat.

I like to start at the top of the cake and work my way down for this one, to make sure the join between the top and the sides is neat. Pipe a rose onto the top by starting in the middle and spiralling outwards until you’ve covered the entire top surface of the cake.

Around the sides, hold your tip against the cake and spin the cake, holding your hand still, which will ensure your frosting is piped in a straight line.

You can change colours as you go down the cake if you want, or use the same colour for the whole cake.

You can either start piping in the same place for each row, and where the frosting row starts and ends will cause a little seam which can then be the back of your cake, or you can start in a different place for each row and by the time you’ve piped all of the rows of frosting, the seams in different places around the cake won’t be noticeable anymore.

The 1M tip is a useful one to use for texture, like the fur or hair on an animal cake. For this dog cake I’ve carved my Perfect Chocolate Cake using a sketch to guide me as I trim the cakes with a serrated knife.

I’m covering the cake with a crumb coat, which is easiest after chilling the cake so that it’s less crumbly.

Before adding fur to the cake, I’ve piped the collar onto the neck and added eyes and a nose, so that the fur sticks out around those details.

With my 1M tip I’m squeezing just enough frosting out of the bag to make a little star of frosting

I’m doing this all over the cake, changing colours to make some of the fur white and some brown.

On its own, a single squeeze of frosting through the 1M tip looks like a star bu when you cover a cake with it, it looks like shaggy fur or hair, which is perfect for dog cakes or any other animal with slightly shaggy fur.

A fun way to add some detail to the top of your cake is to pipe frosting around the top. These are wiggles or ruffles of frosting using a 1M tip.

To make the wiggles or ruffles, hold the tip just above the cake and as you lift the bag up slowly, wiggle your wrist back and forth slightly to make the frosting fold over itself to make these pretty ruffles.

You can place things in between the ruffles, like macarons or cookies or truffles or candies. To space them out evenly it’s easiest to place the macarons or other decorations first.

Then pipe in between them afterwards, wiggling the piping bag left and right until it touches a macaron so that the buttercream fills the gaps between the macarons.

Another way to pipe frosting on top of a cake is to pipe little swirls, the same as you would pipe onto a cupcake. Hold your 1M tip in the center of wherever you want the swirl to be and pipe spiral, lifting your bag slowly as you pipe so that the spiral layers on top of itself.

I’m spacing the swirls around the cake by imagining that the cake is a clock and piping the swirls at opposites, so 12 o’clock and 6 o’clock, 9 o’clock and 3 o’clock, and then another swirl in the middle of each.

You can use a single colour, or alternate bags with different colours of frosting inside, or blend a few colours together inside the piping bag. I go over this in a lot more detail in my online course on The Basics Of Cake.

A final fun border for the top of your cake is a rope border, which you pipe with little overlapping circles of frosting. Go around the outer edge of the cake and when you get to the end of each circle, immediately start the next circle.

Each circle of frosting will overlap half of the previous circle. Continue all the way around the cake, finishing with a complete circle and then if you like you can add some sprinkles on top.

For the base of the cake, you can use your 1M tip to pipe this wave-like border to cover up the join of the cake and the cake board. Hold your piping bag vertically and squeeze the frosting out as you move your wrist away from you, and then pull it back towards you to finish the wave.

Release your pressure on the bag for a moment and then as you pipe the next wave, moving the bag away from you, start squeezing the bag again to push out more frosting. This is a nice way to add some detail at the bottom of the cake.

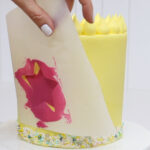
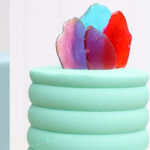
If you’re going to put something on top of your cake, like macarons or sugar art or chocolate shapes or other decorations, a fun way to attach them is to pipe frosting onto the top with your 1M tip and then, while the frosting is still sticky, press the decorations into it.

When the frosting sets after about 30 minutes at room temperature or 15 minutes in the fridge, it will secure the decorations in place on top of your cake so you can move it around without worrying about the decorations fall over or falling off the cake.

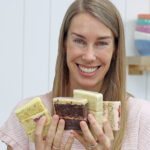
I hope you’ve seen a fun new technique to try – please tag @britishgirlbakes in your photos on Instagram if you try any of these so I can see what you make!
Here’s the video version of this tutorial: