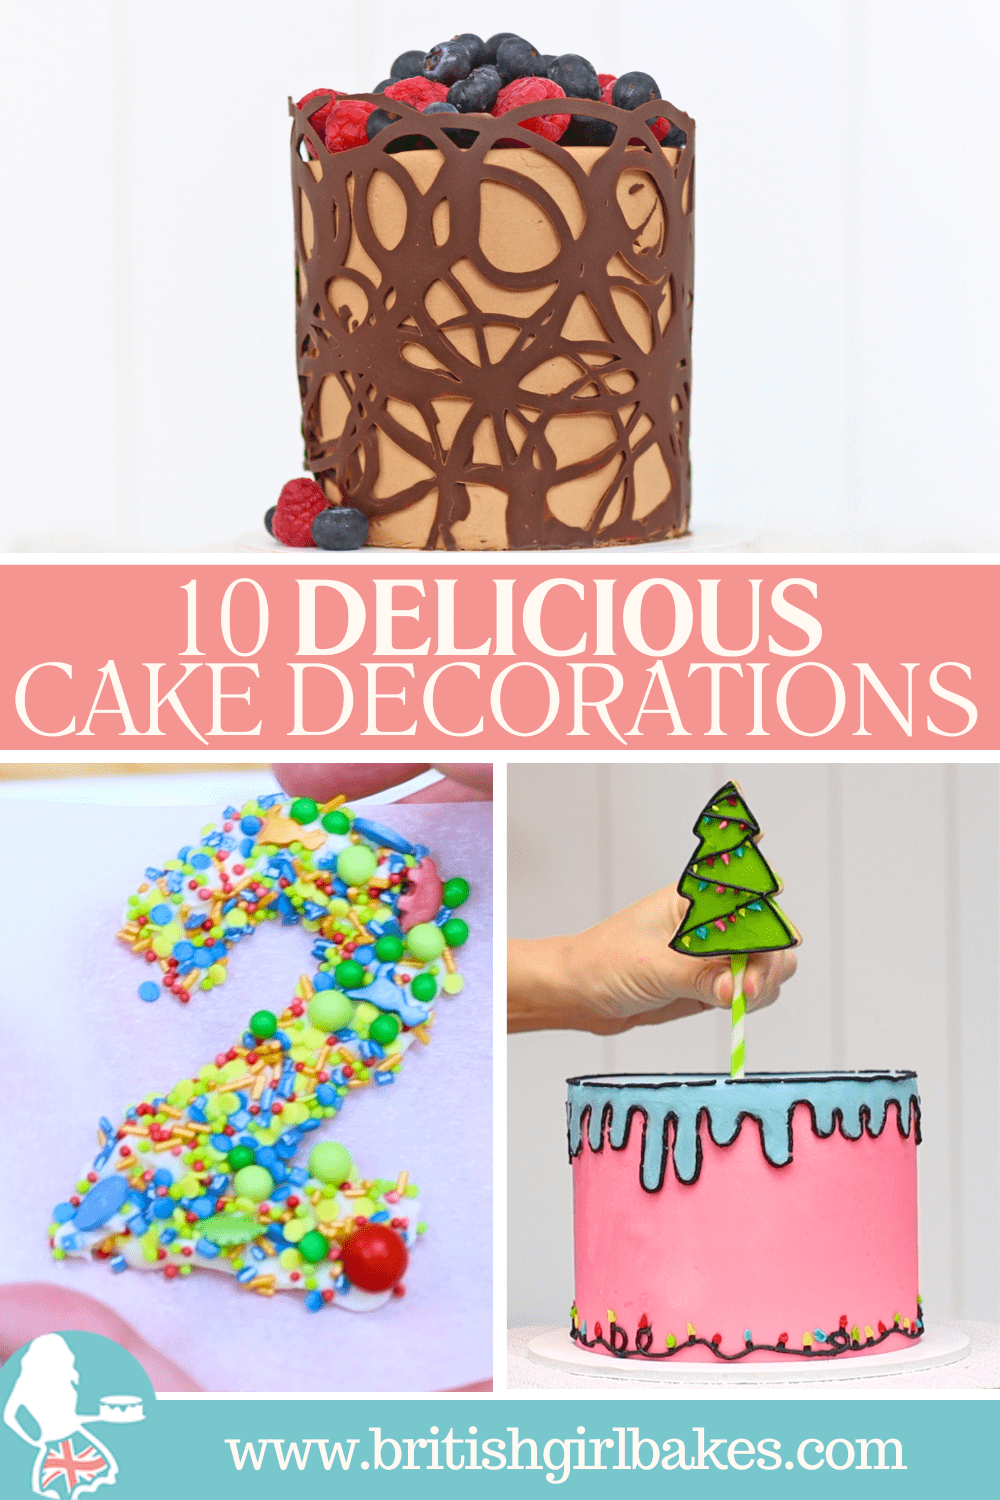
10 delicious cake decorations that taste as good as they look! Use buttercream, chocolate, fruit, cookies and marshmallows to make these.
First of all, buttercream makes delicious cake decorations. This is one of the easiest decorations because you can just use what’s leftover after frosting your cake. I always use my 4 Minute Buttercream because it's quick, easy, and delicious!
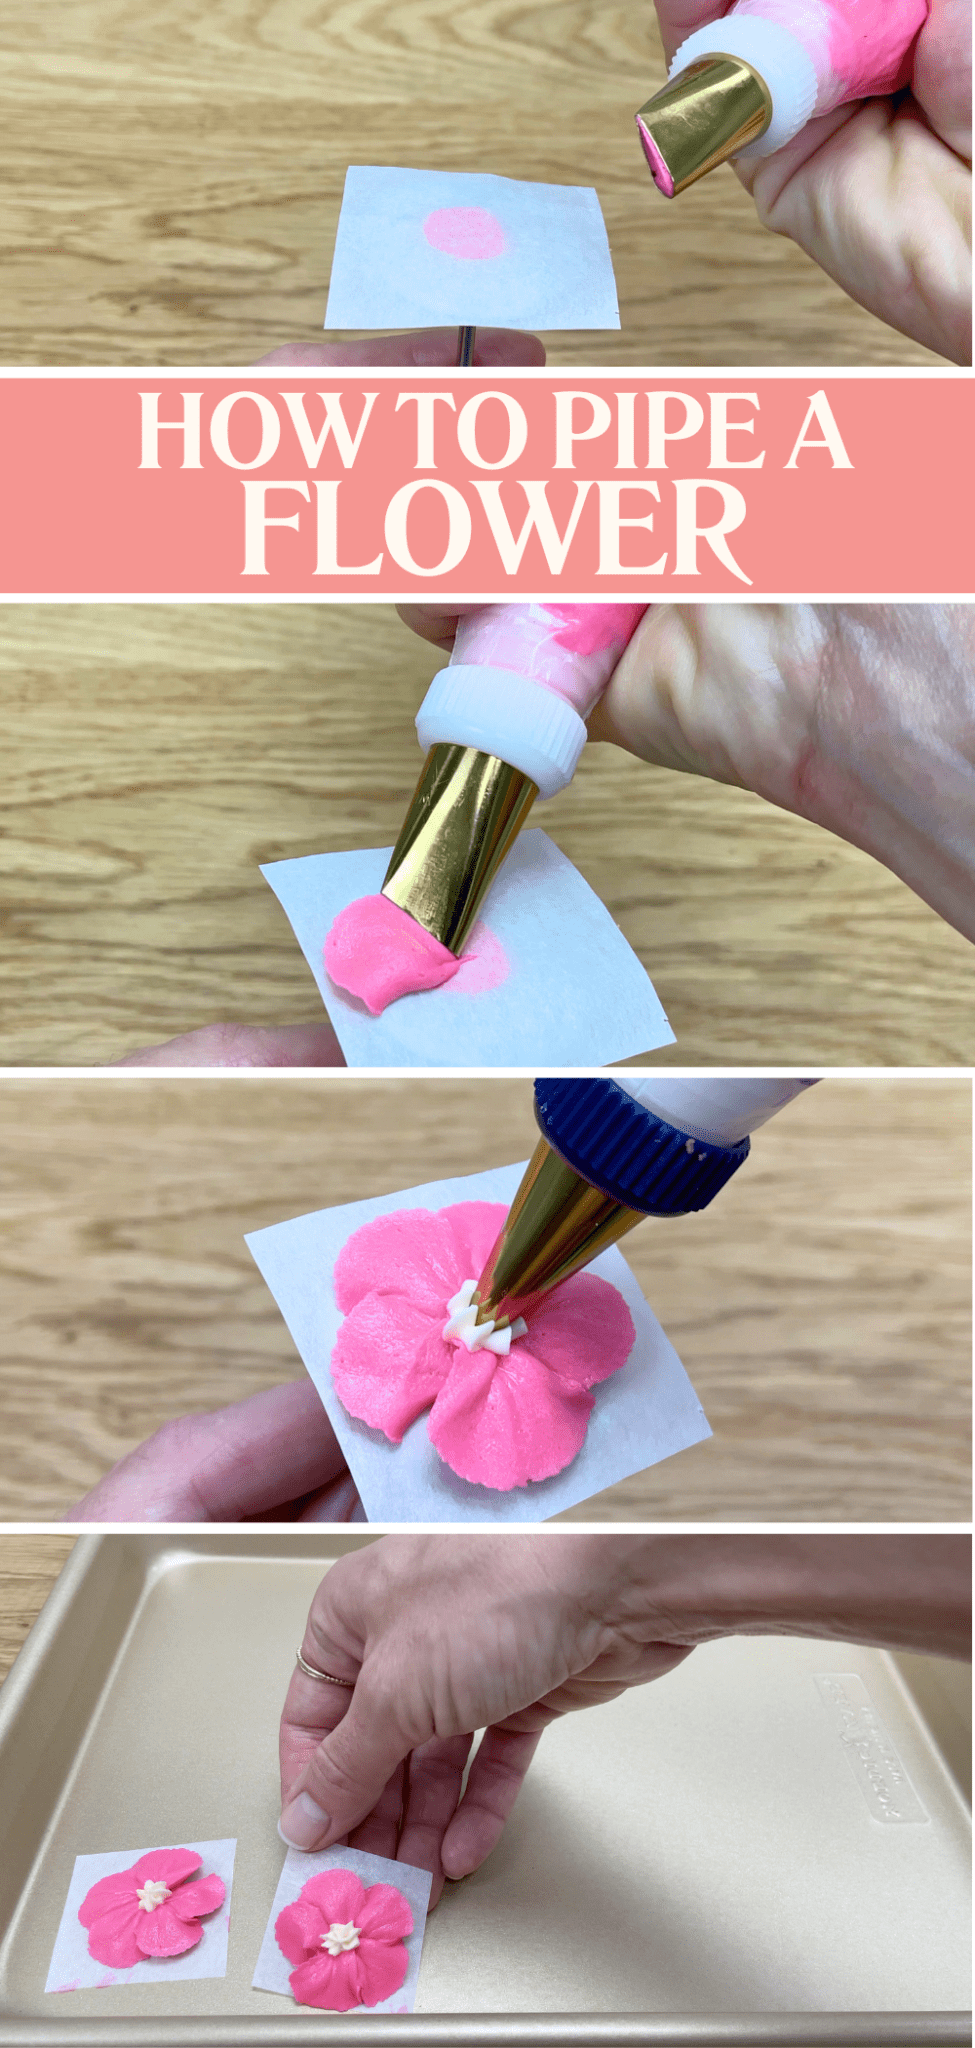
Make buttercream flowers by piping them onto parchment or wax paper before attaching them to your cake. You'll need a flower nail for this, which you can spine between your fingers as you pipe. To use a flower nail, pipe a dot of buttercream to attach a square of parchment or wax paper. The paper square should be about the same width as the flower nail.

To pipe a simple flower use a petal tip like a # 104 or a #125 for bigger flowers. Hold the piping tip with the narrow end facing outwards and squeeze the piping bag to pipe a petal. While you're piping, spin the flower nail between your finger and thumb as you work your way around the flower.
Pipe a dot or a star in the middle with a small round piping tip or a star shaped tip. You could use sprinkles instead but they’re crunchy to bite into!
Carefully slide the paper off the nail and place it on a tray or plate. Put the tray into the freezer for 5 minutes to set the flowers so that they're very firm. Then lift them up, peel them off the paper, and press them onto your cake.
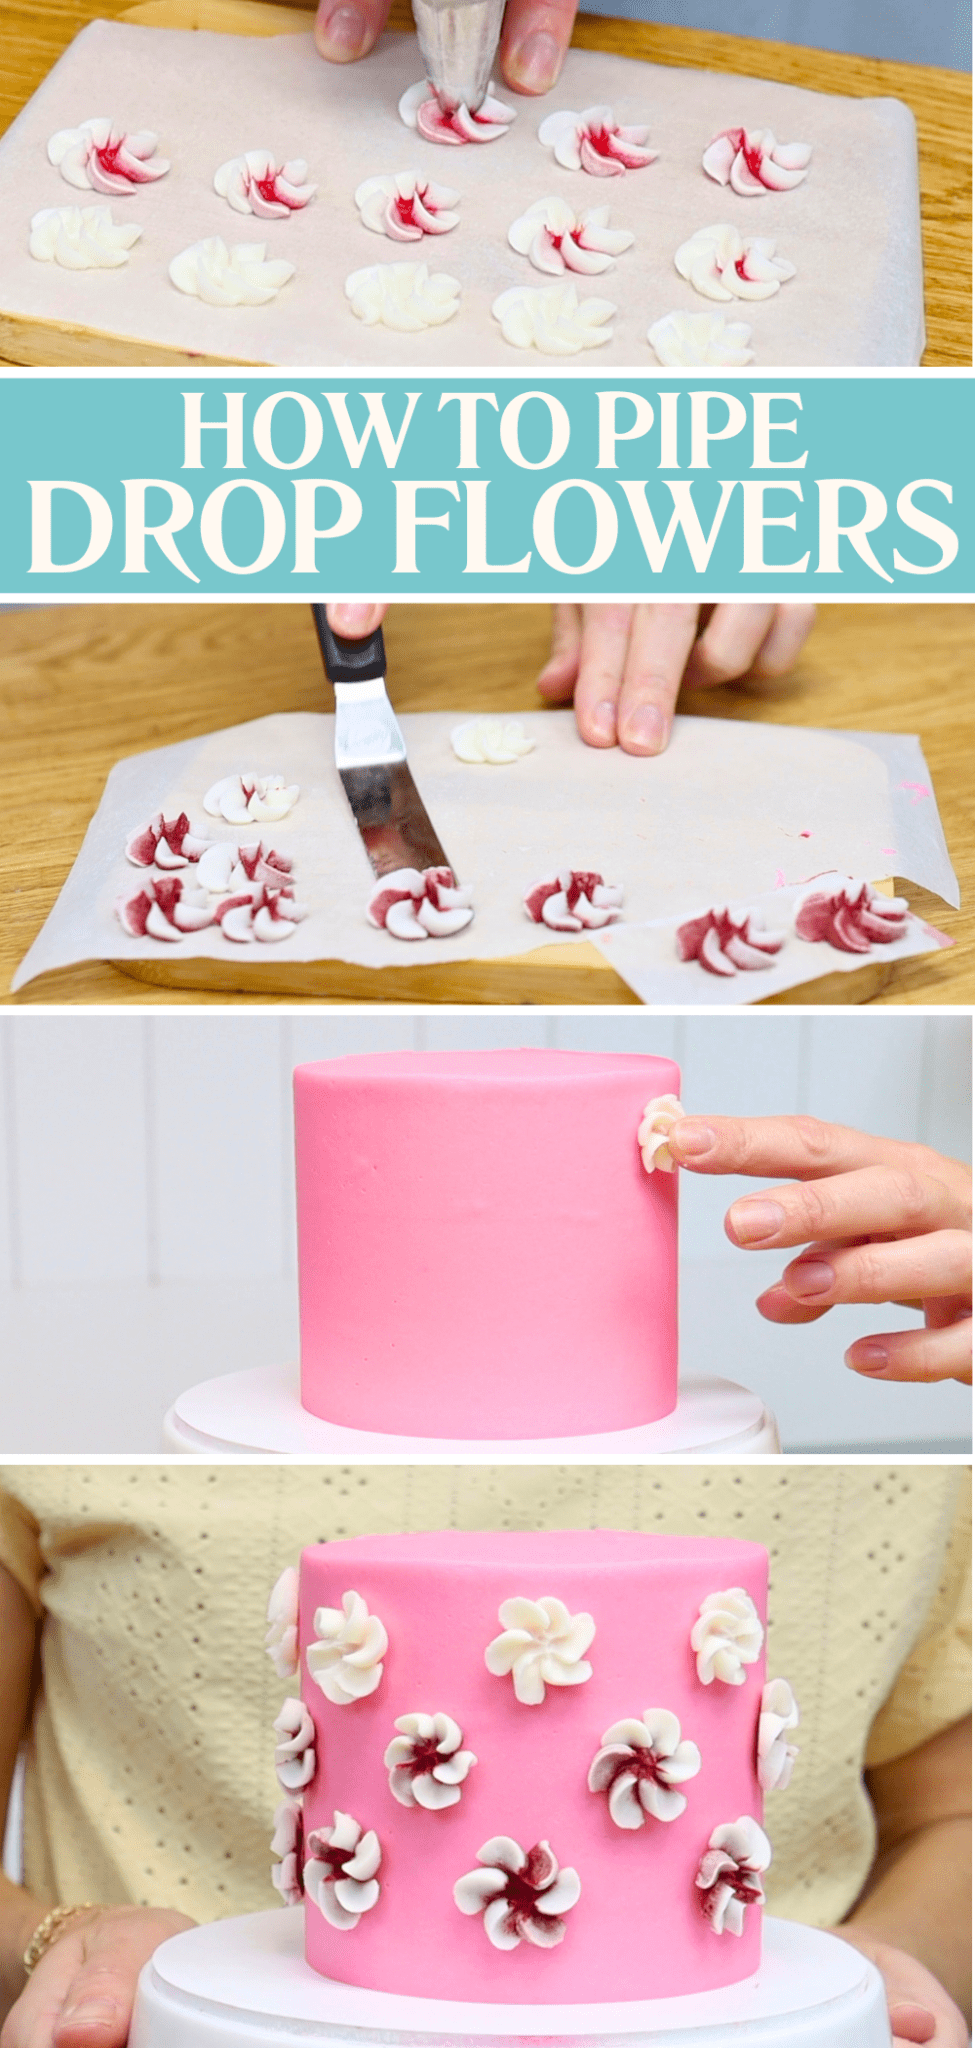
For even easier flowers, use a rounded star tip like a 2D. Rest the tip down on parchment or wax paper and twist your wrist as you pipe. The petals will fan out sideways from the piping tip, all at the same time. Chill these in the freezer before picking them up and pressing them against a cake. If the frosting on the cake has set and isn’t sticky anymore, you'll need some edible glue. Buttercream is perfect for this! Pipe or spread some fresh buttercream onto the cake and push a flower into that. These flowers are gorgeous and will be delicious to eat with the cake!
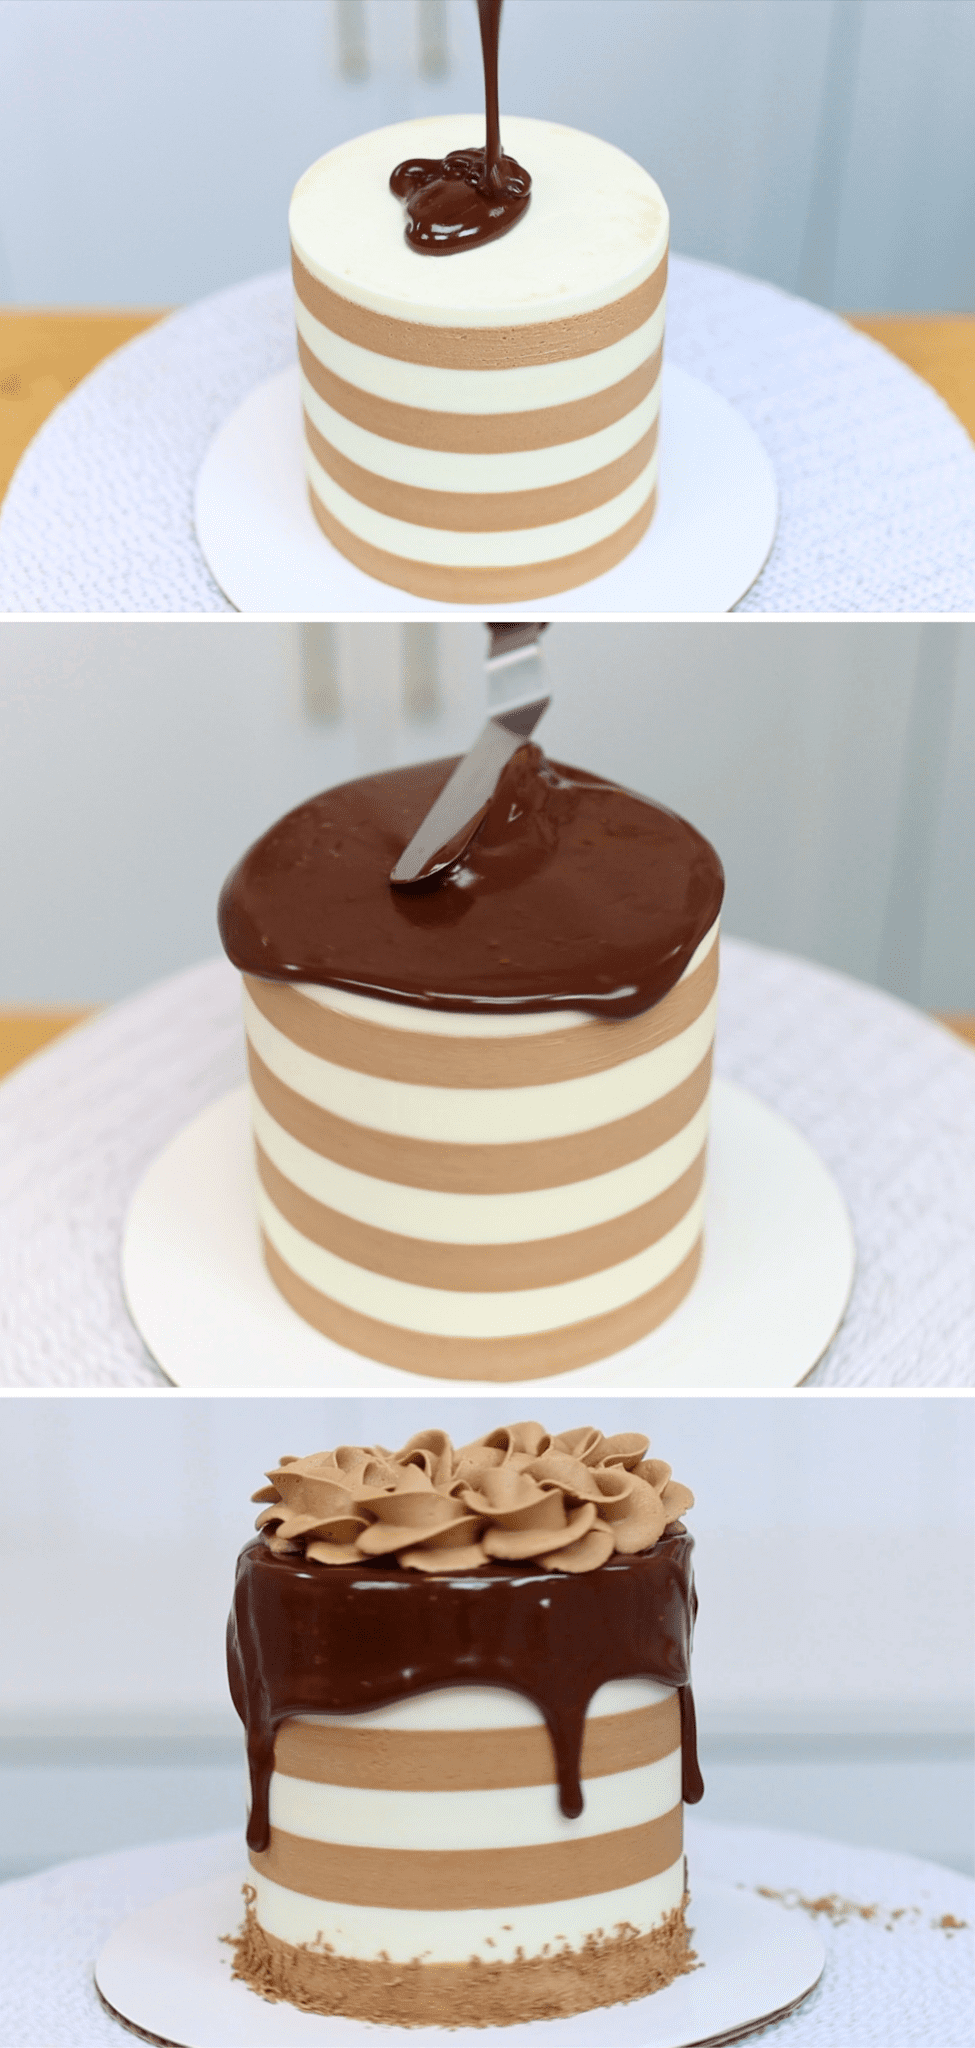
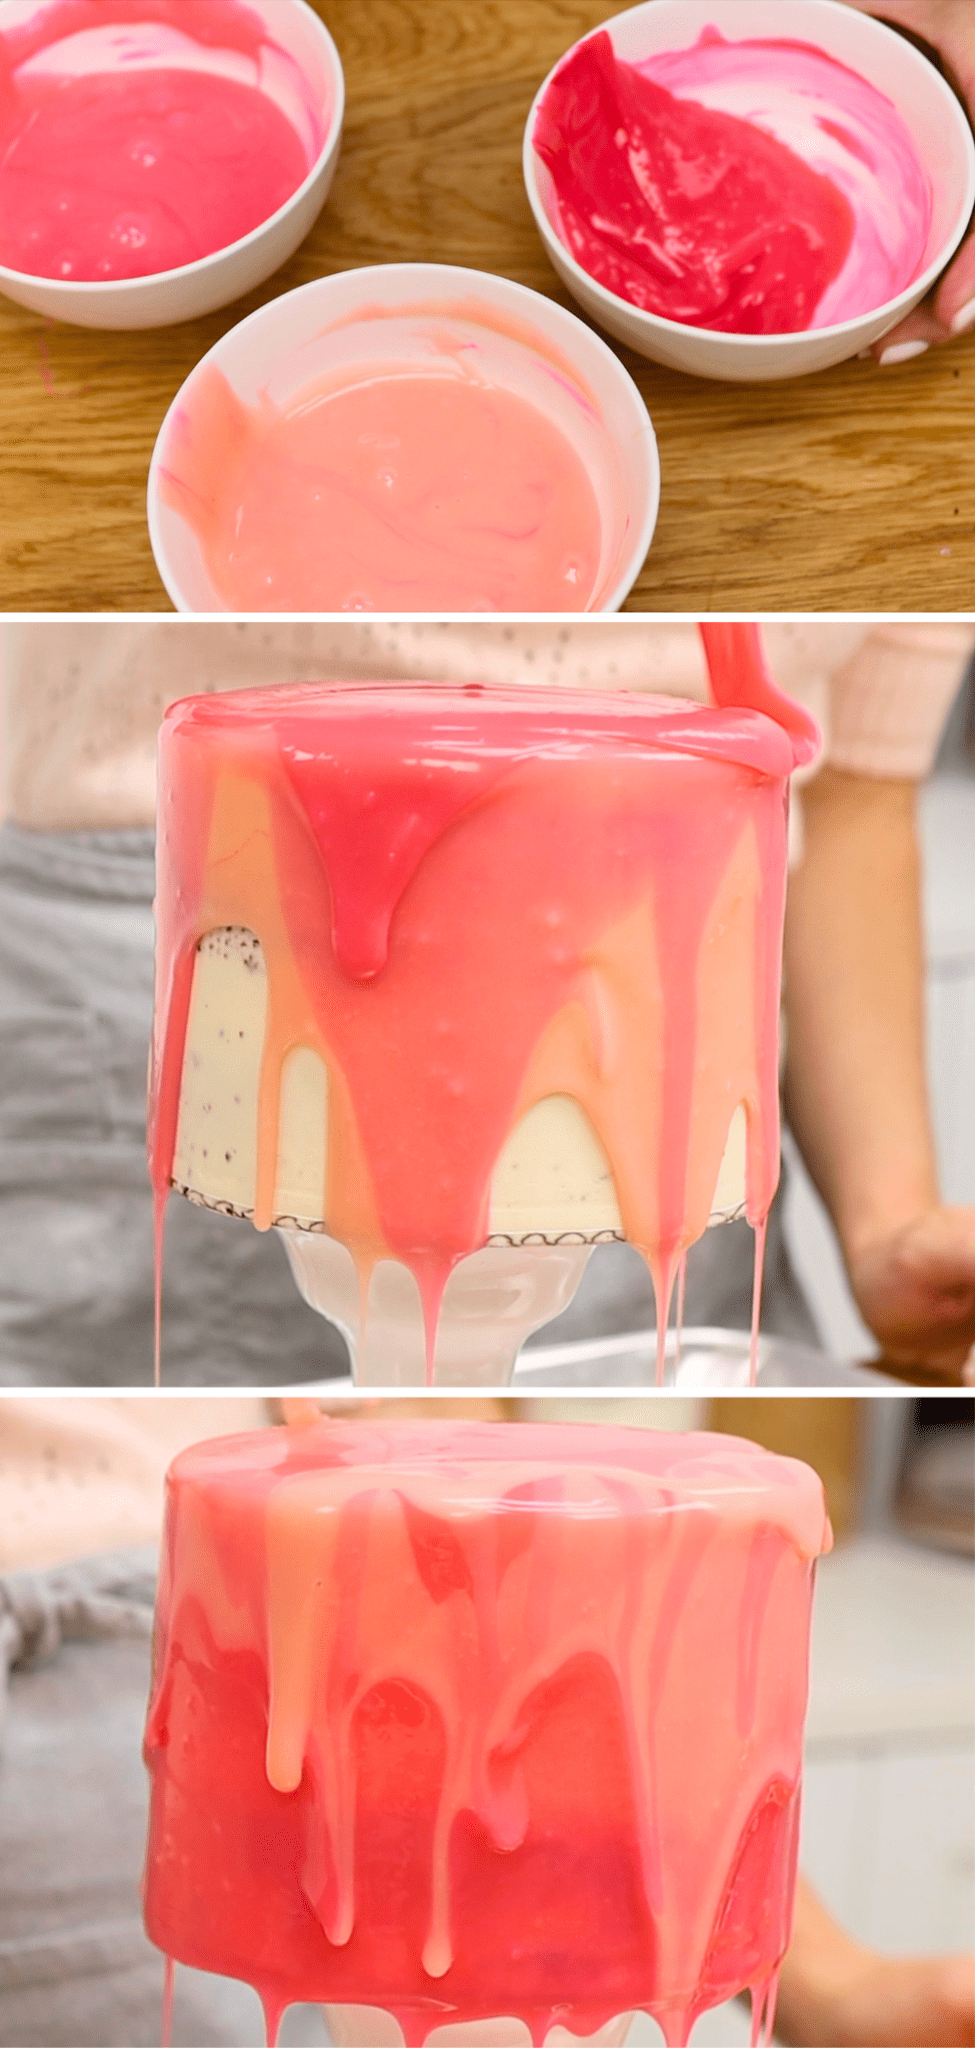
Drips and mirror glazes made with melted chocolate and cream are eye catching and colourful and also delicious! You’ll need cream and white chocolate to make ganache and the cream should be hot but not bubbling. Pour the hot cream over the chocolate chips and leave for five minutes before stirring until smooth. To make ganache for the drip or glaze, use a ratio of 3 parts chocolate to 1 part cream. This means you'll need 3 times as much white chocolate as cream. Add gel colours if you want to tint the chocolate because liquid colours can make it too watery.
To make a drip with dark or semi-sweet chocolate use a ratio of 2:1. Weighing the chocolate and cream is the most accurate way to get the correct ratio.
When the ganache has cooled almost to room temperature, spoon it onto a cake. Nudge it over the sides with a spoon or
Instead of drips, use ganache to make an easy mirror glaze. Divide the ganache between small bowls and add colouring to each bowl. Then pour the coloured ganache over a cake, alternating between colours and letting them run down the sides. Mirror glaze is a fun, colourful effect that also tastes incredible!
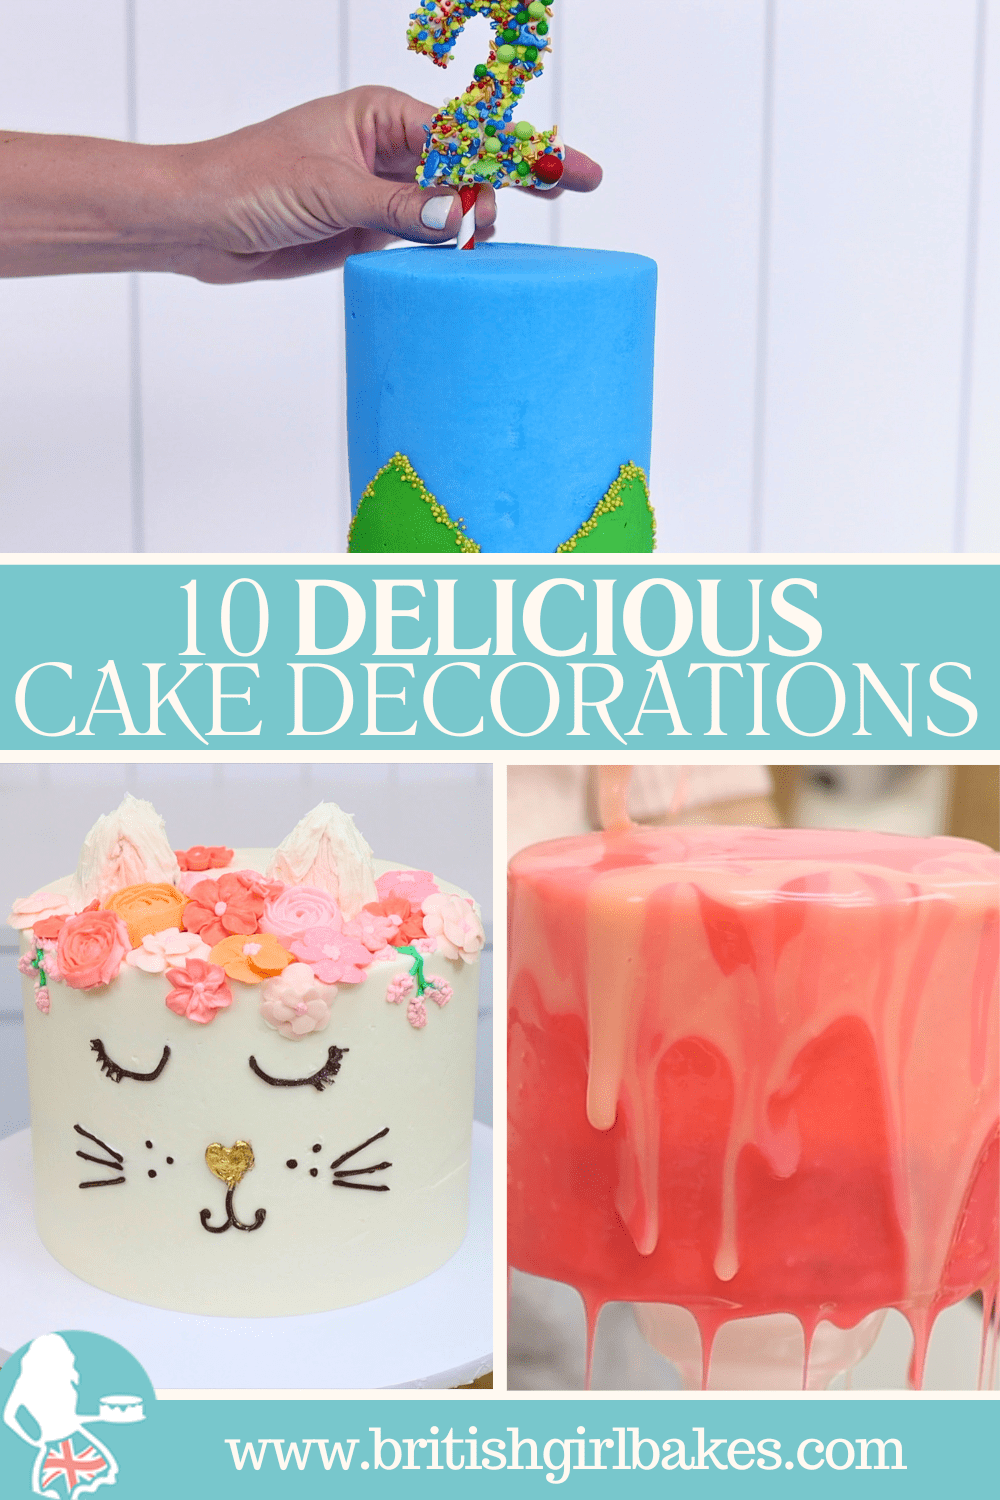
Another chocolate cake decoration you can make is a number topper. Melt chocolate at 50% power in the microwave for 30 seconds at a time. Stir it until it's smooth and then spoon it into a sandwich bag and cut off a corner. Write or trace a number onto parchment or wax paper, fill it in and then pour sprinkles on top. They’ll stick to the chocolate.
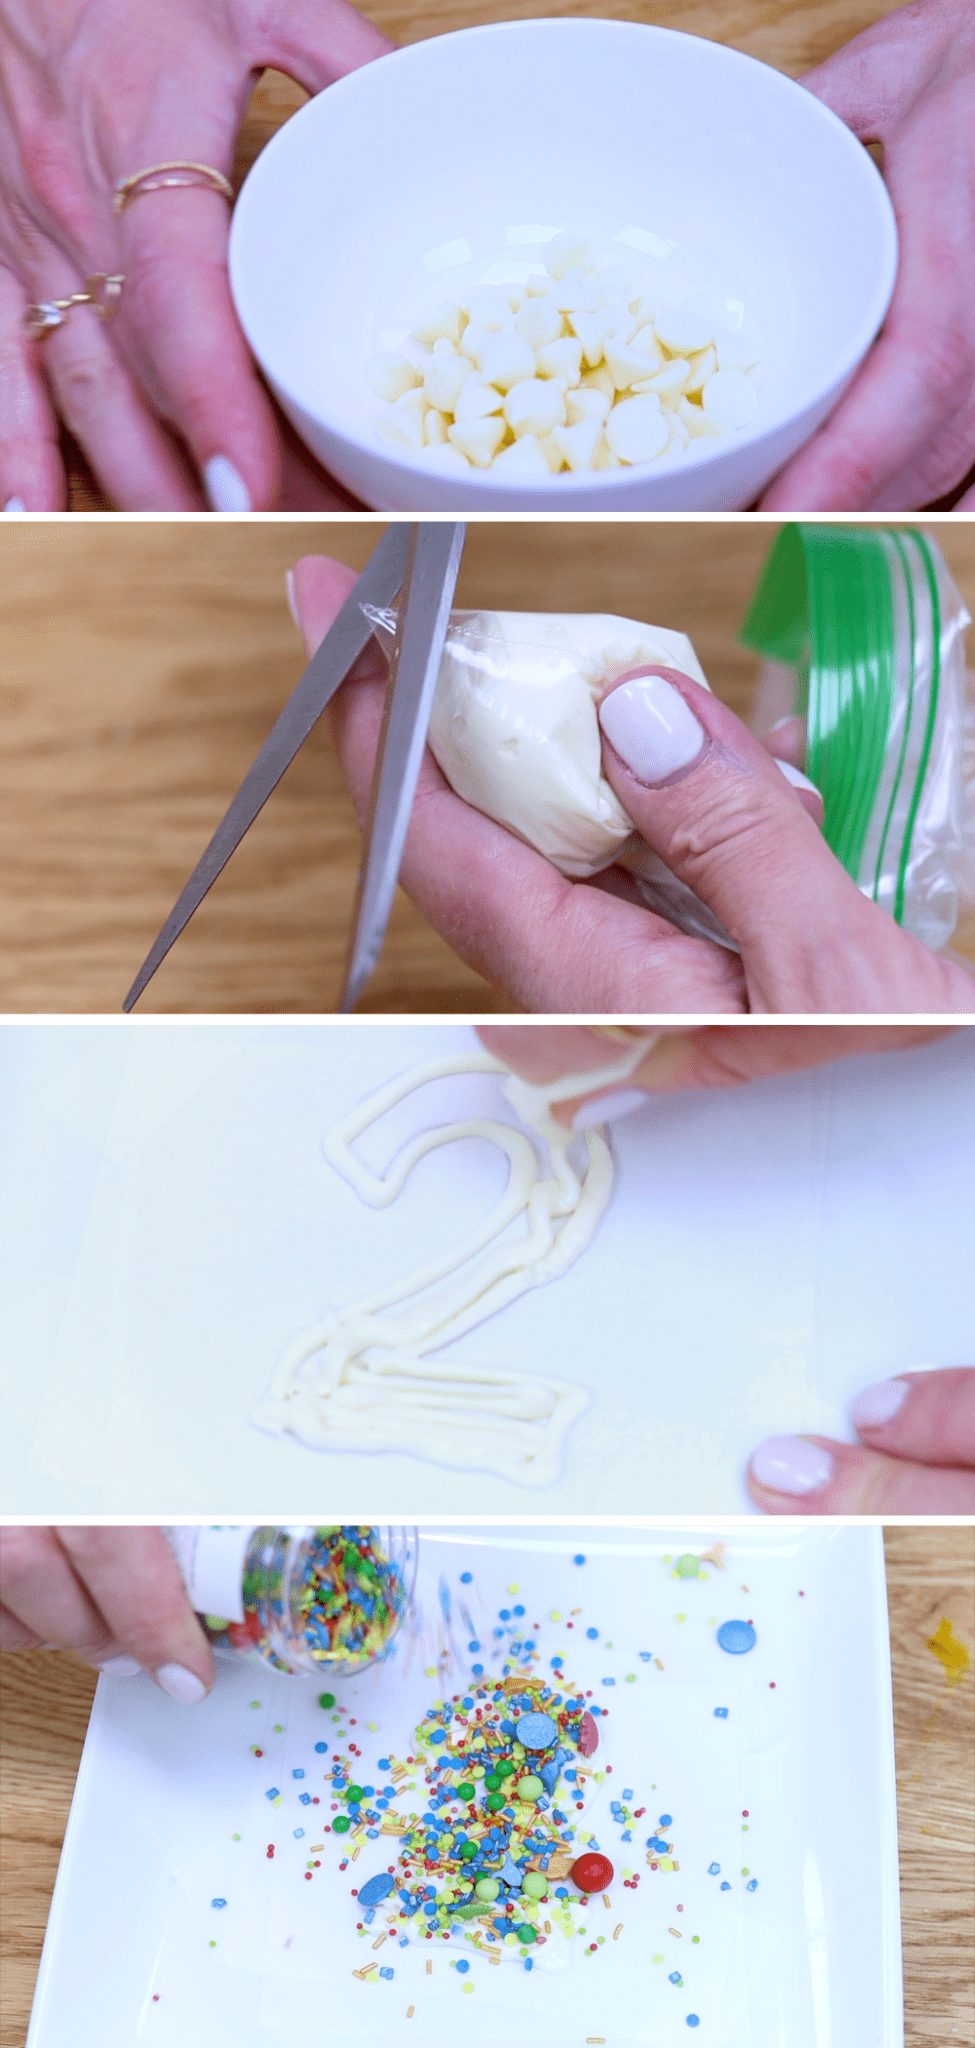
The chocolate will set after about 10 minutes in the freezer or 20 minutes in the fridge. Now you'll be able to pick the chocolate number up. Flip it over, squeeze some more melted chocolate onto the back and press a paper straw against it. Chill and set this in the fridge or freezer and then push it into a cake.
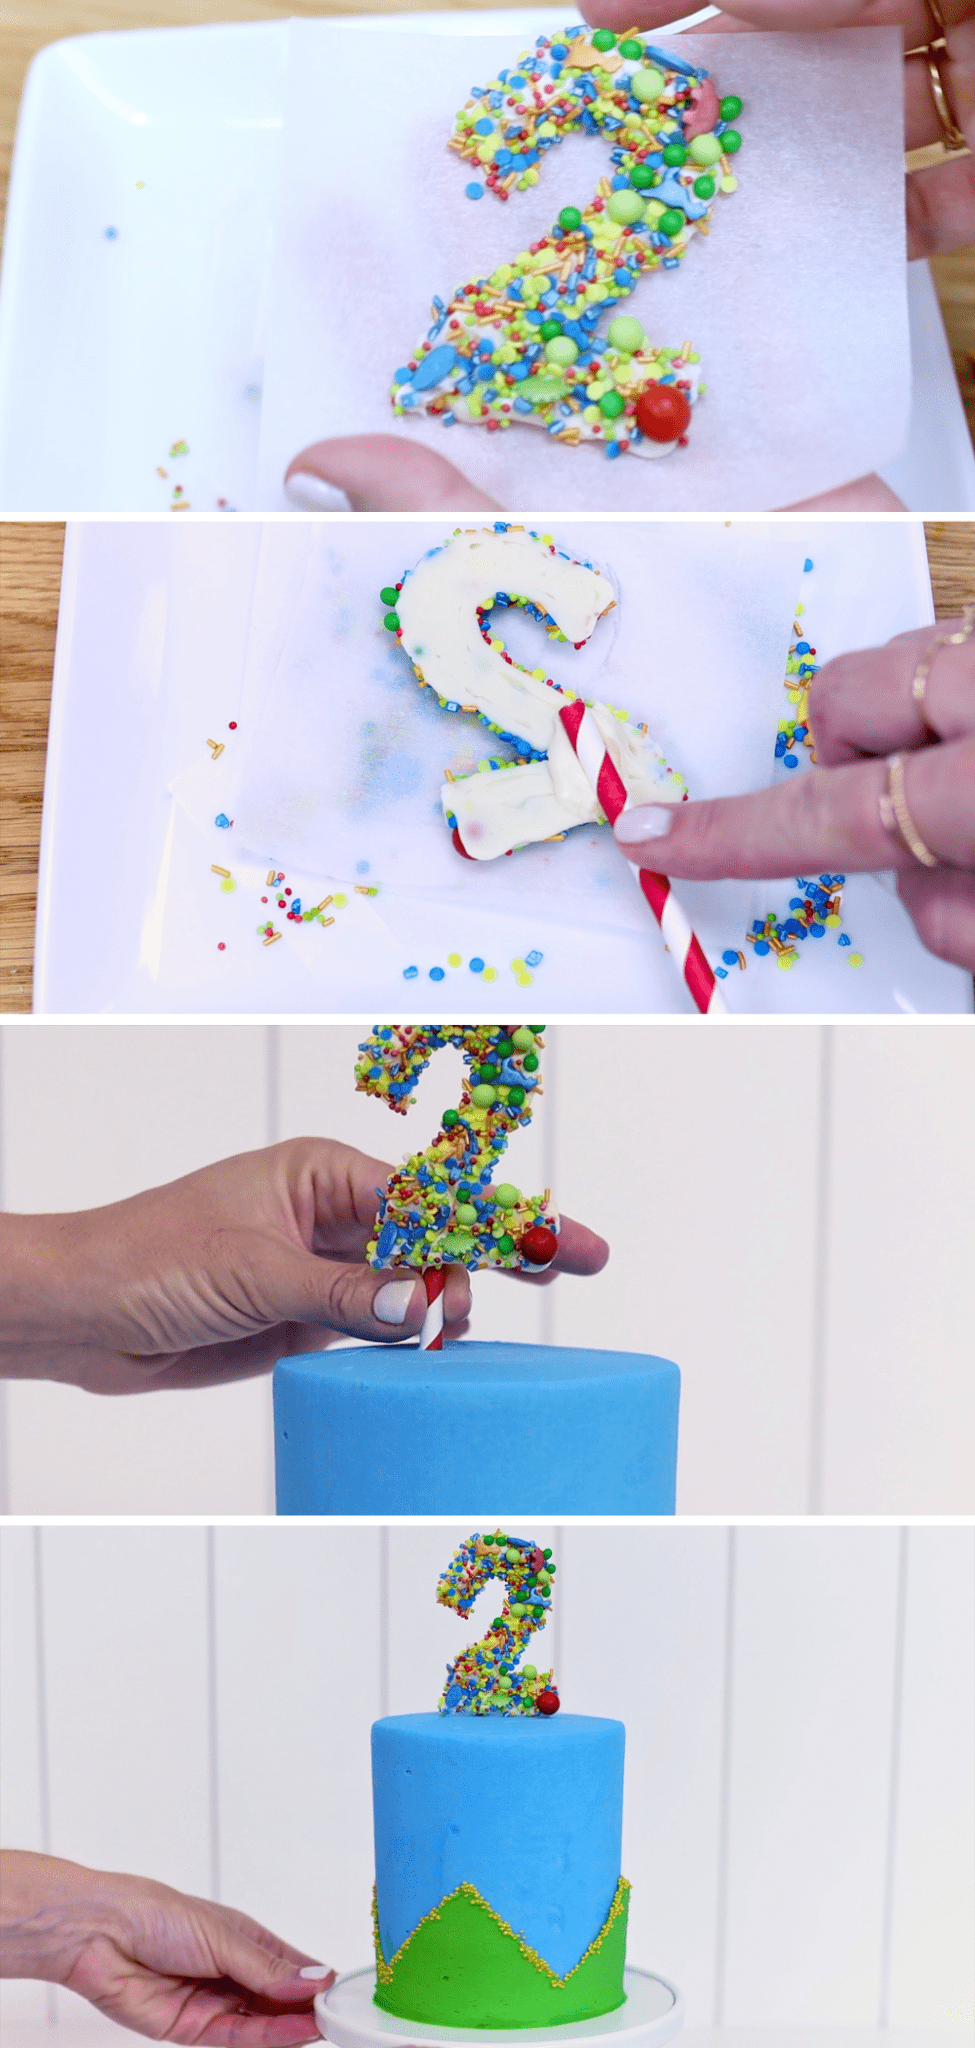
Sprinkled chocolate number toppers are colourful, fun and delicious cake toppers!
Here’s a much quicker and easier idea: fresh fruit looks beautiful on cakes and tastes great, too. Fresh berries are my favourite for two reasons. Firstly, since they’re so small and light they’re easy to attach to a cake with a dot of fresh buttercream. Secondly, they stay fresh-looking overnight so you can decorate your cake in advance.
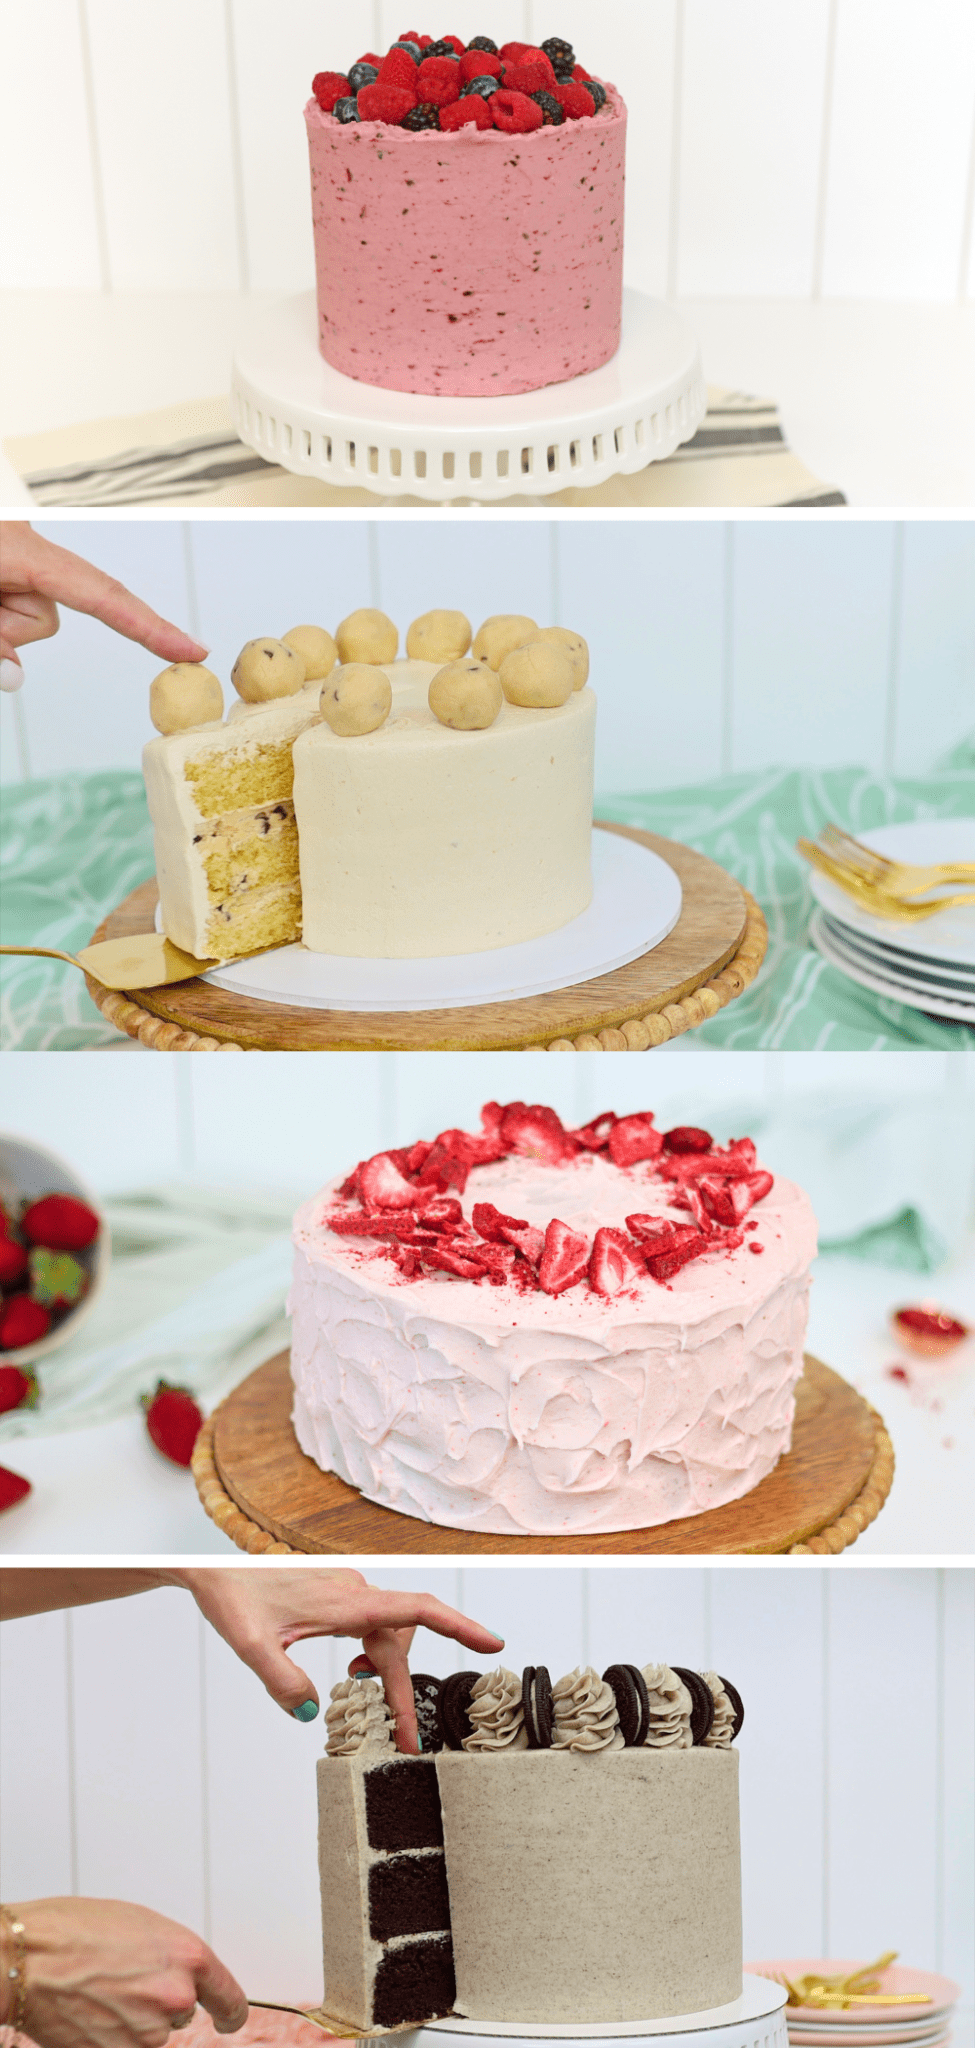
Another easy way to make delicious cake decorations is to use an ingredient for the cake. For example, the cookie dough filling in my Cookie Dough Cake can be rolled into balls to decorate the cake. Freeze dried strawberries are a bright decoration on my Strawberry Cake and Oreo cookies look delicious on an Oreo cake. As well as making cakes look pretty, using ingredients as decorations gives you a clue of what the flavour is!
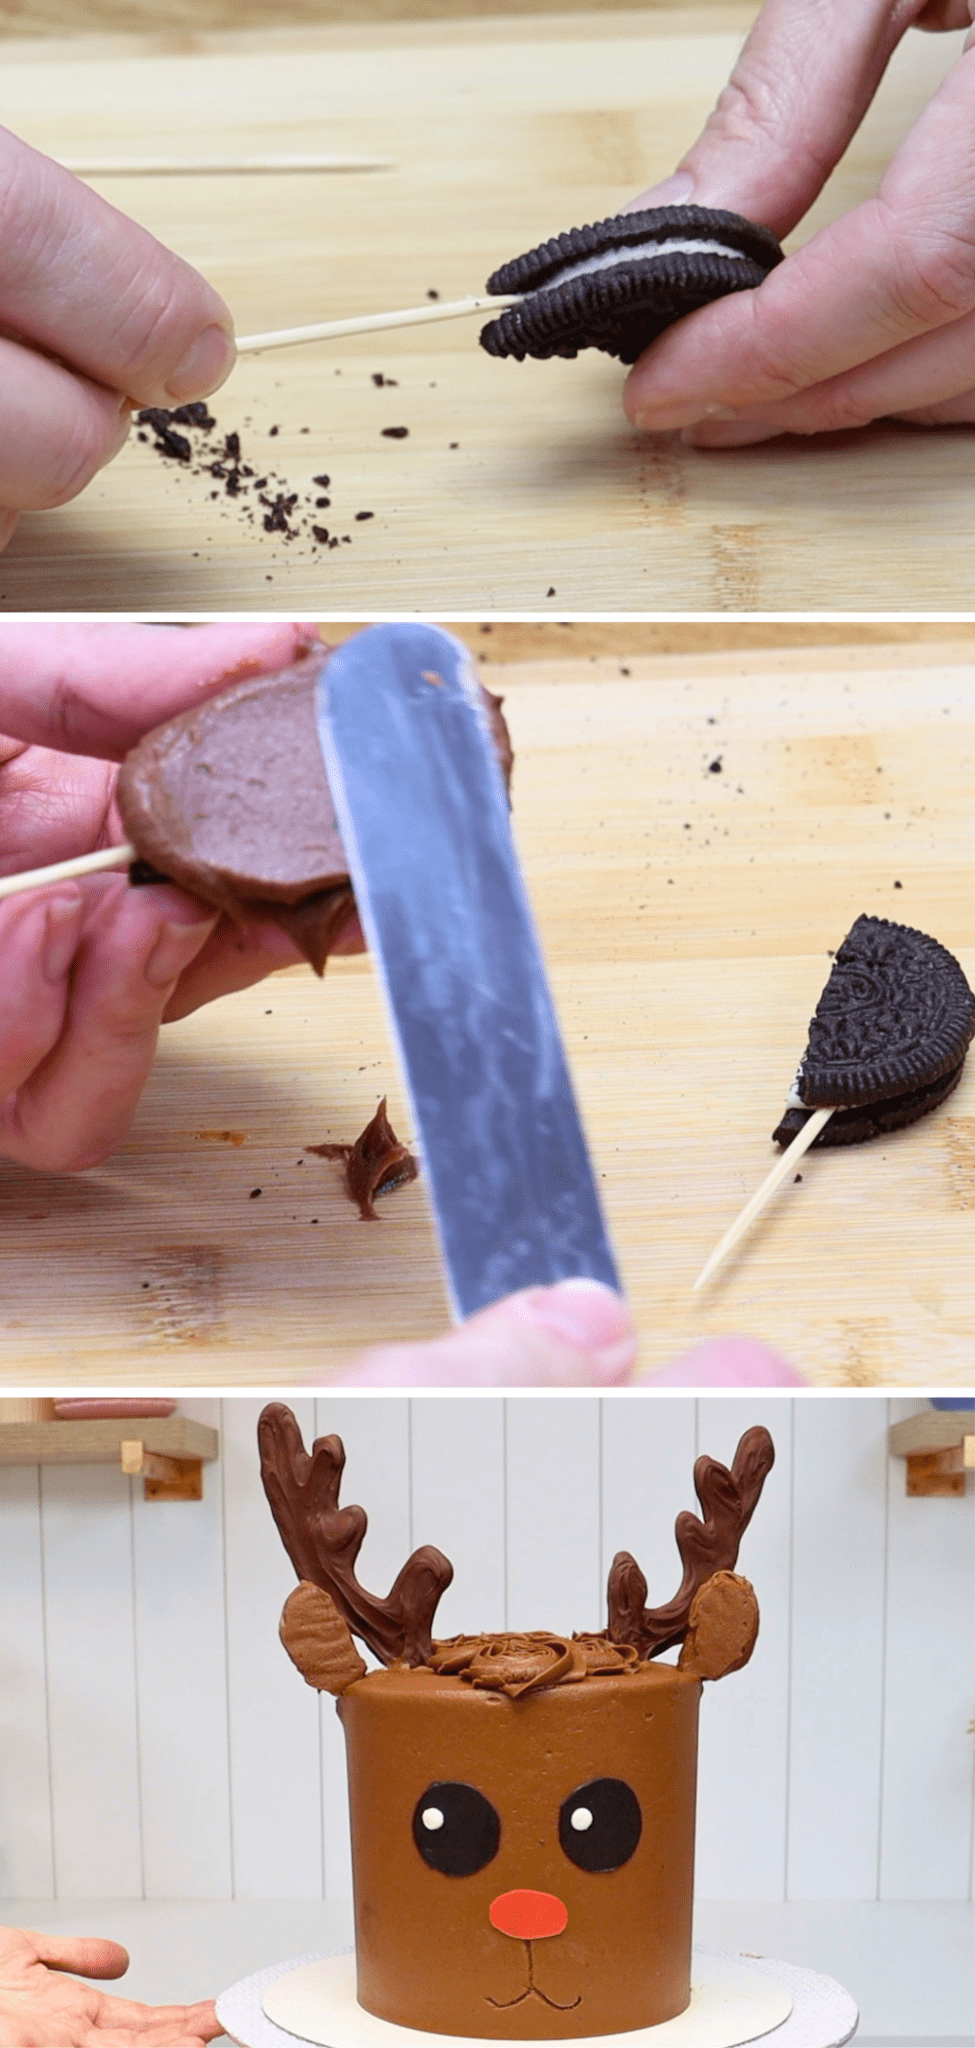
Cookies can make perfect ears on cakes. I know this sounds strange out of context because of course cakes don’t have ears! But for animal cakes you usually need ears like on the cat and reindeer cakes below.
Cut Oreos into triangles for cat ears, covering them with buttercream by spreading or piping the buttercream on. Scrape the buttercream with a toothpick to make fur texture.

Or for more rounded ears cut Oreos in half before covering with buttercream. Poke a toothpick into the Oreo filling to make these ears easy to attach to the cake. The toothpicks will keep them standing upright.
Marshmallows are also great for ears! Cut each marshmallow diagonally to make an ear shape. Then press the sticky, cut side into sugar tinted with pink colouring.
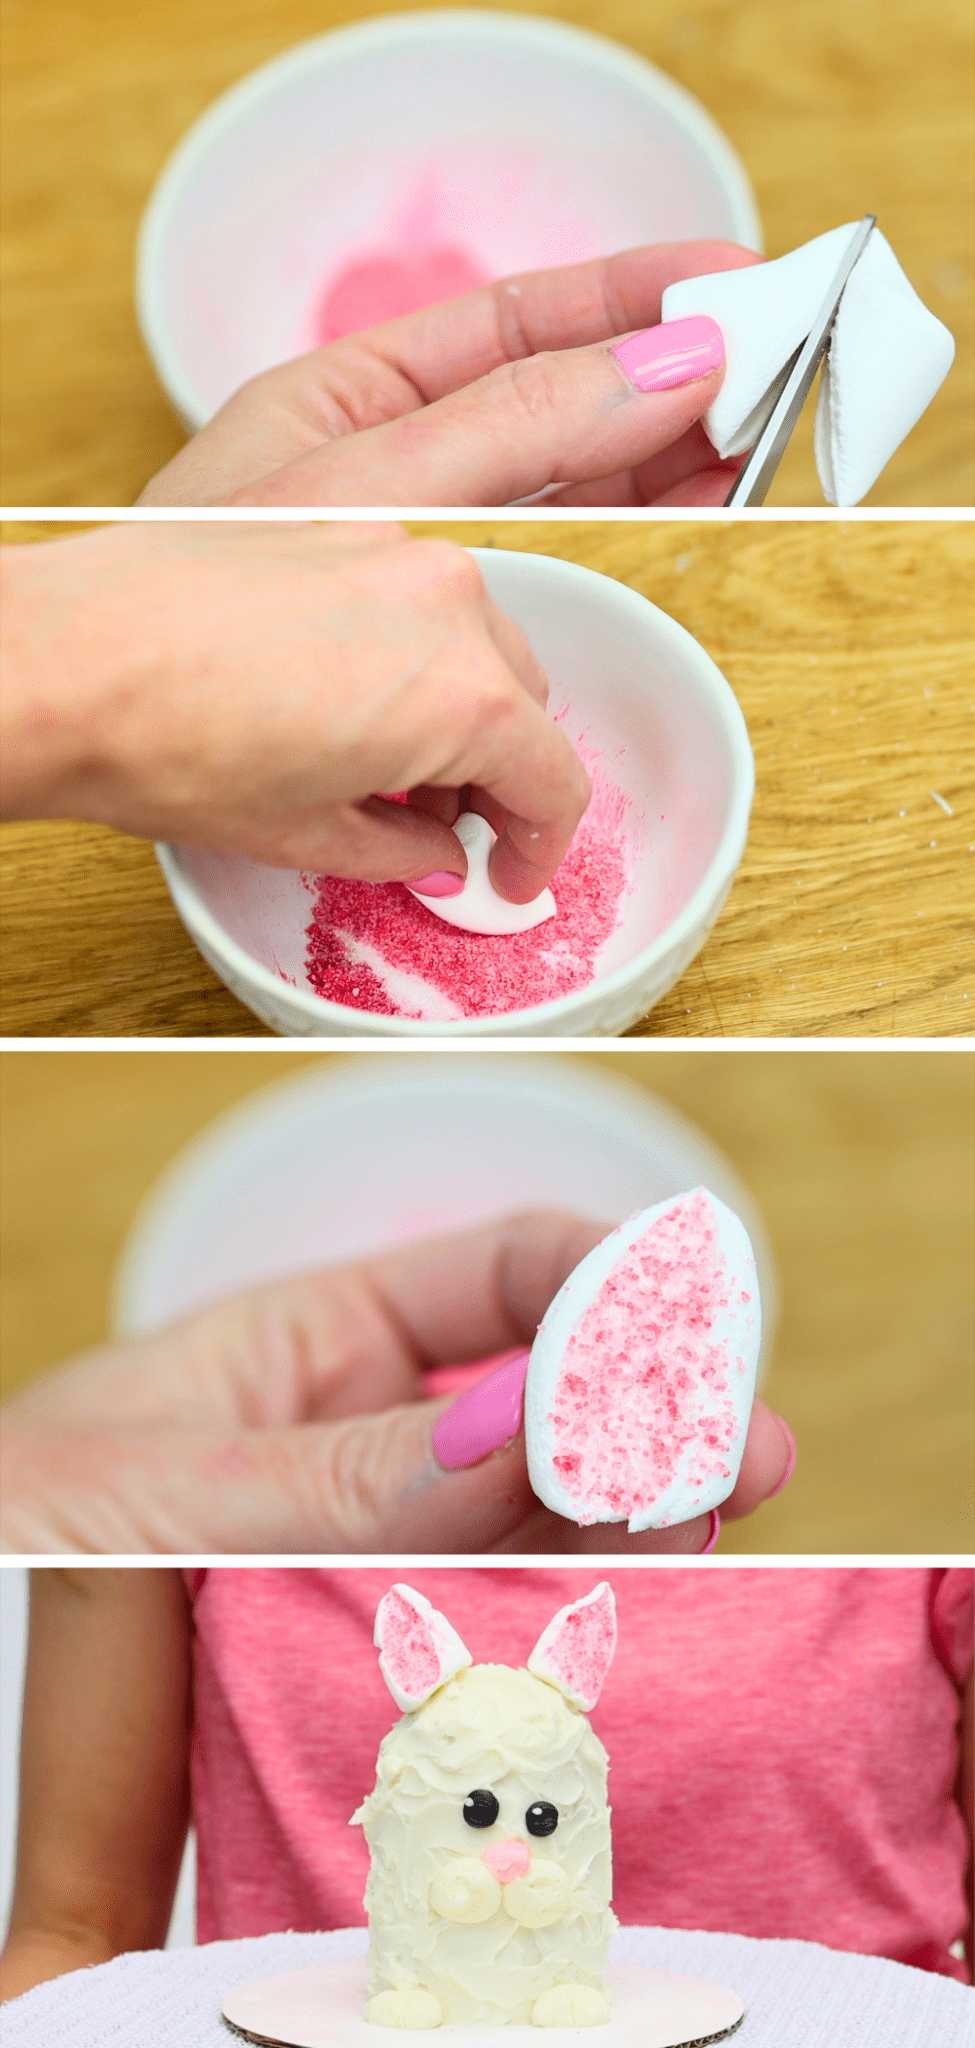
Poke a toothpick into the bottom of the ear and then push that into a cake. The marshmallow ears will stand upright, making cute and delicious ears!
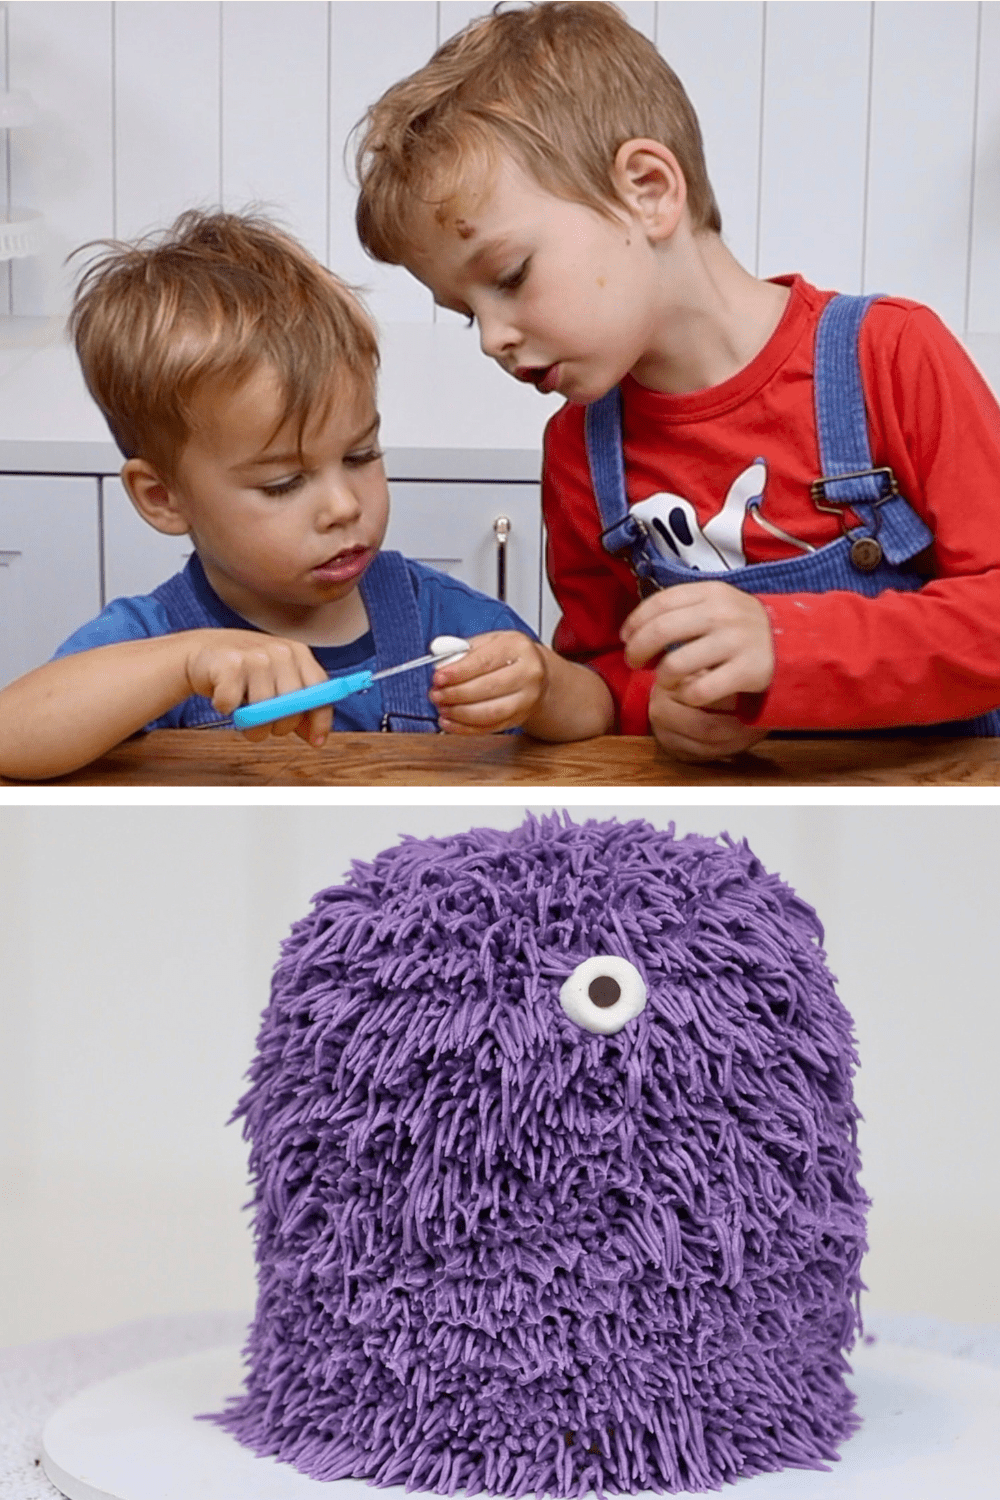
Marshmallows can also be eyes for animal cakes. Cut a marshmallow or mini marshmallow in half to make two round pieces. Then poke a chocolate chip into the middle of the sticky side. Press this against sticky buttercream frosting to attach it to a cake. Kids can do this one too - they’re fun and delicious cake decorations for a kid-friendly project.
To create delicious characters on cakes, make your own stencils on parchment paper or wax paper. Trace each colour onto a different stencil until you can layer the stencils to see the complete character. Cut the shapes out to leave the surrounding paper intact and these pieces of paper will be your stencils.
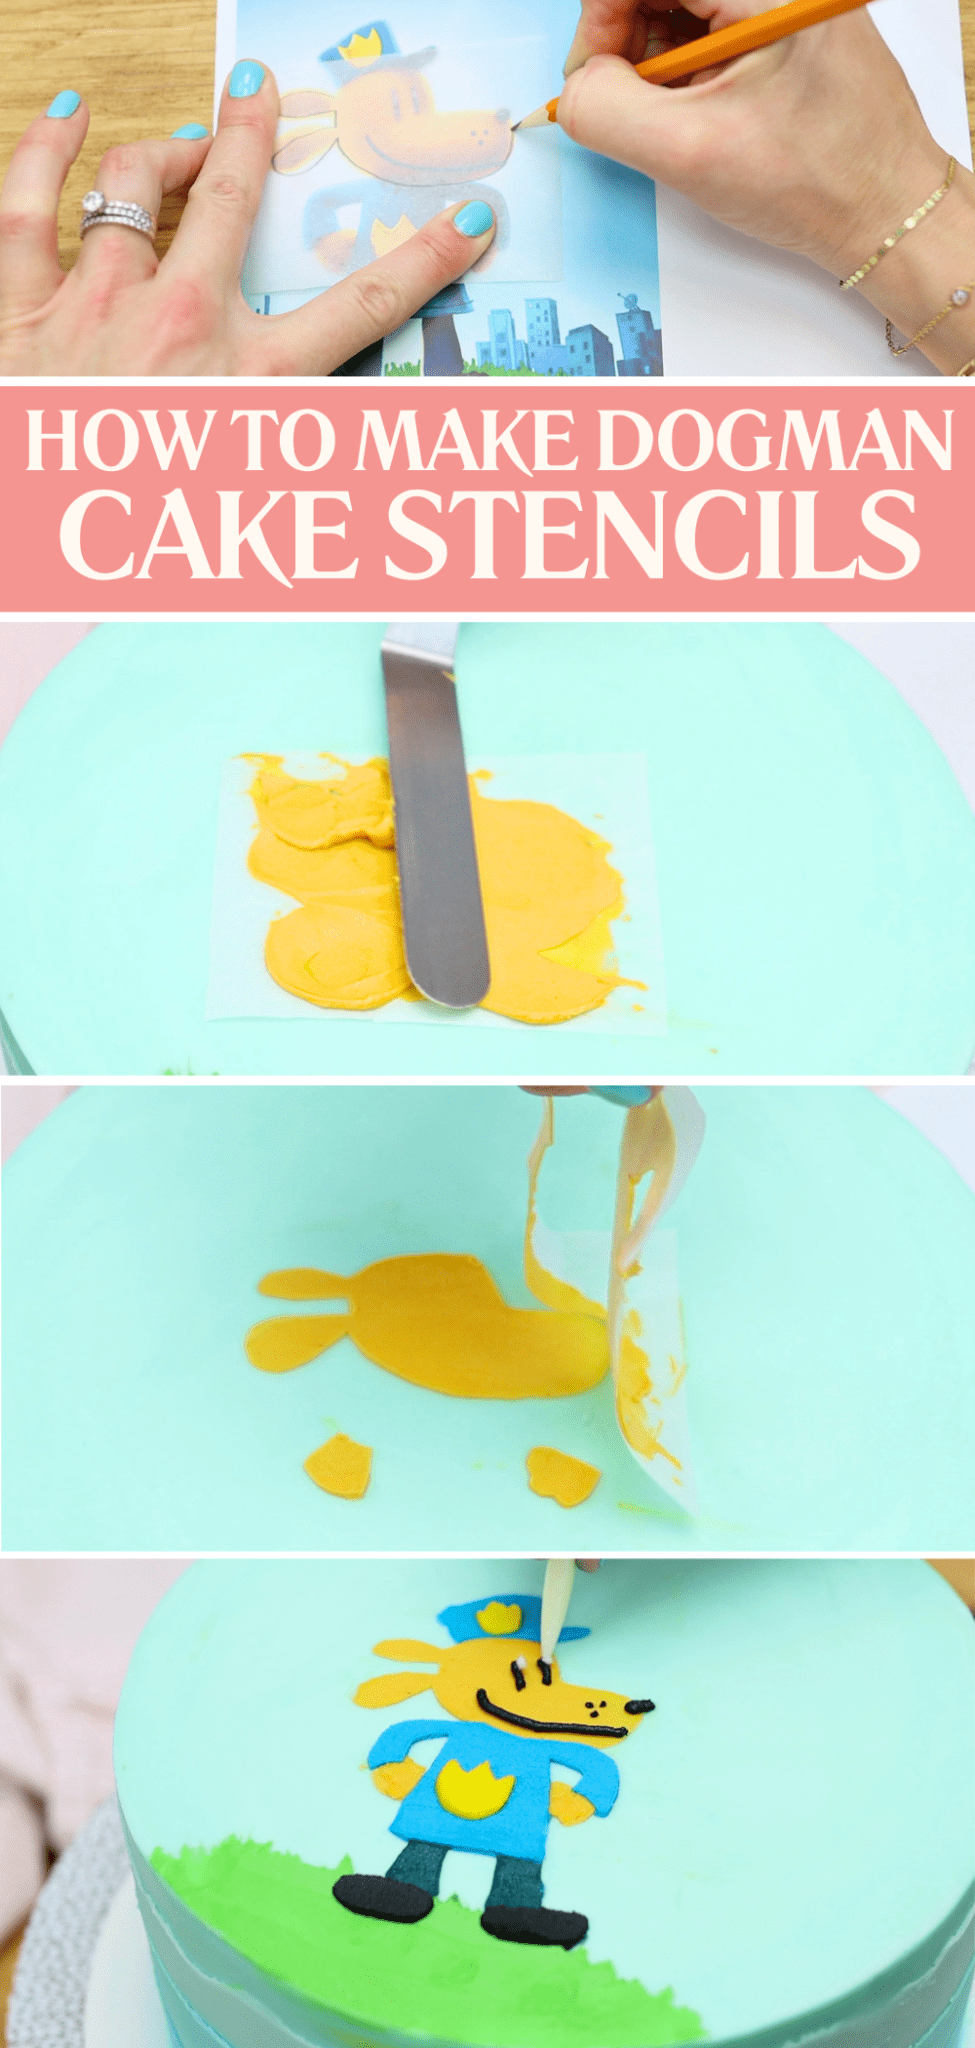
Start with one of the colours at the back of the character. In the cake above, that means the grass. Other parts will be layered on top of this, which will be more in the foreground. Let this chill in the fridge for 10 minutes to set and then position the next stencil on top. Spread buttercream over it and scrape off the excess to leave a thin, smooth layer behind. And repeat! You can add outlines and small details like the eyes at the end.
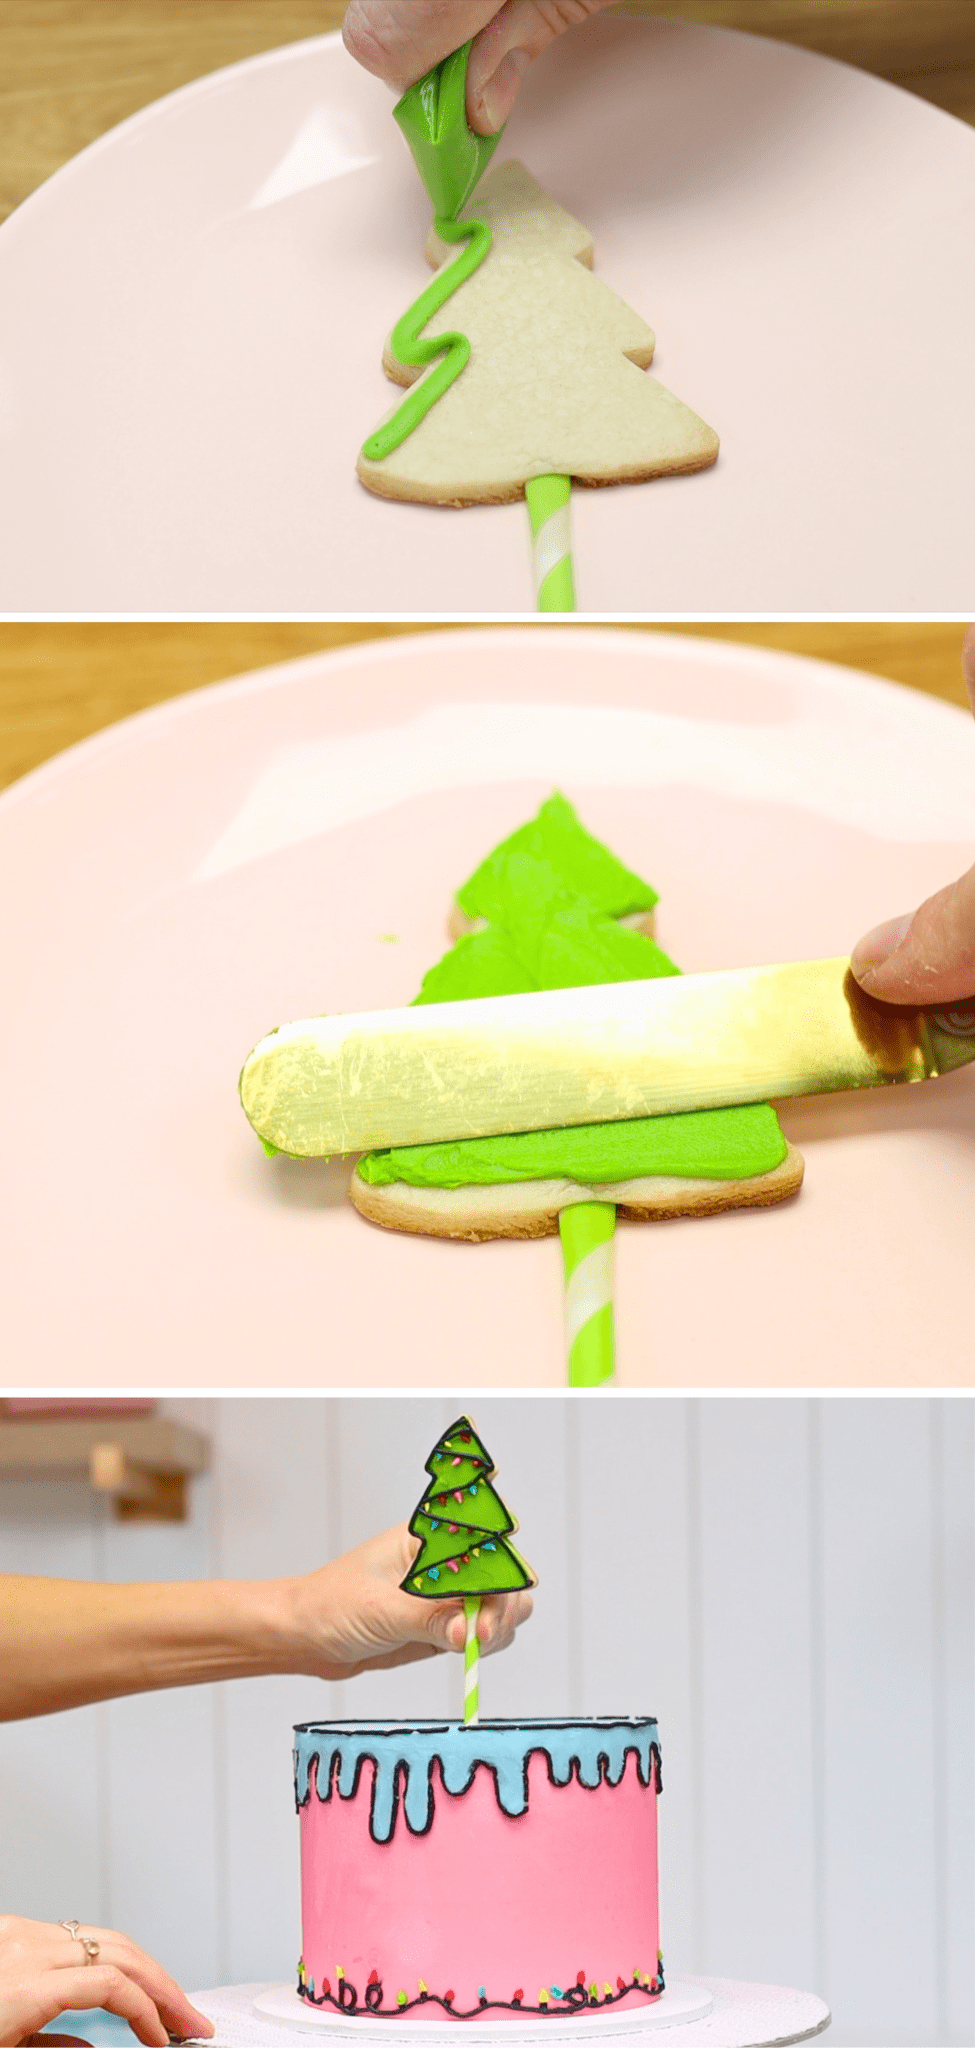
Add height to your cake with this next delicious cake decorating idea. Cut a shape out of sugar cookie dough and push a paper straw into it before you bake it. When it cools, decorate it with buttercream or whatever icing you like. I like buttercream because it’s so creamy and easy! When I make buttercream to frost my cake I just set aside a little bit to decorate my cookie. Push the straw into your cake and you have a cookie cake topper!
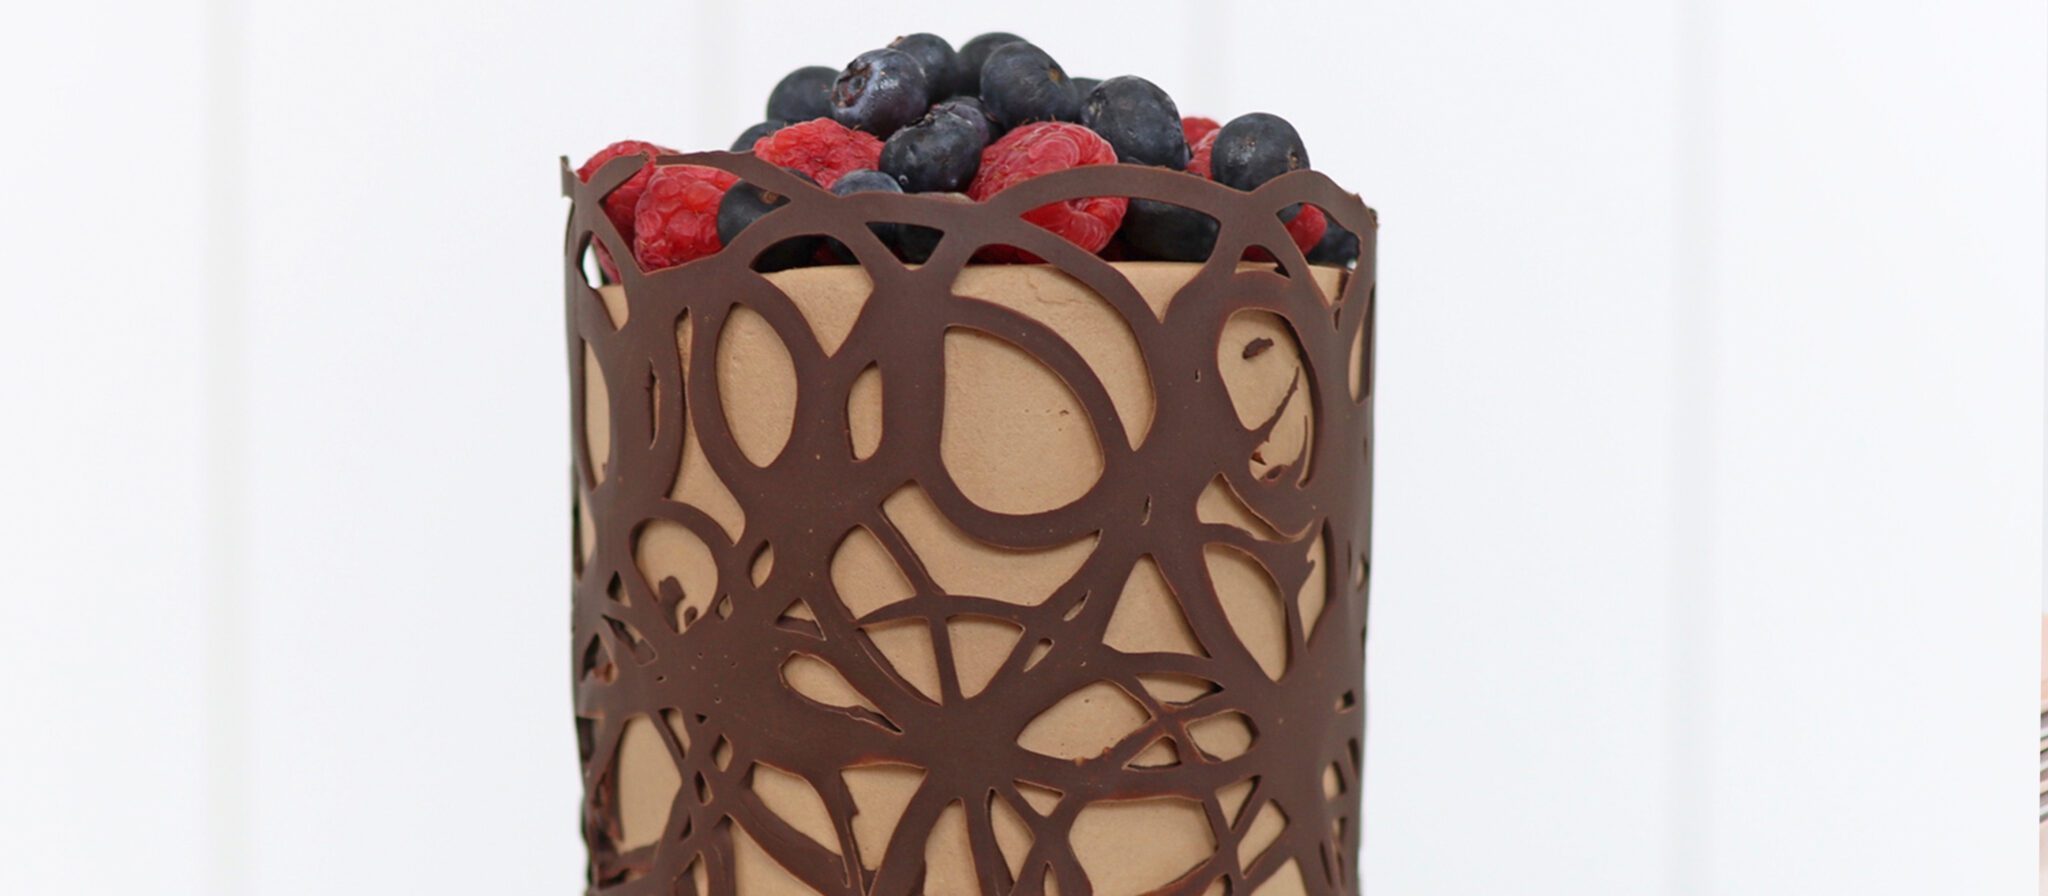
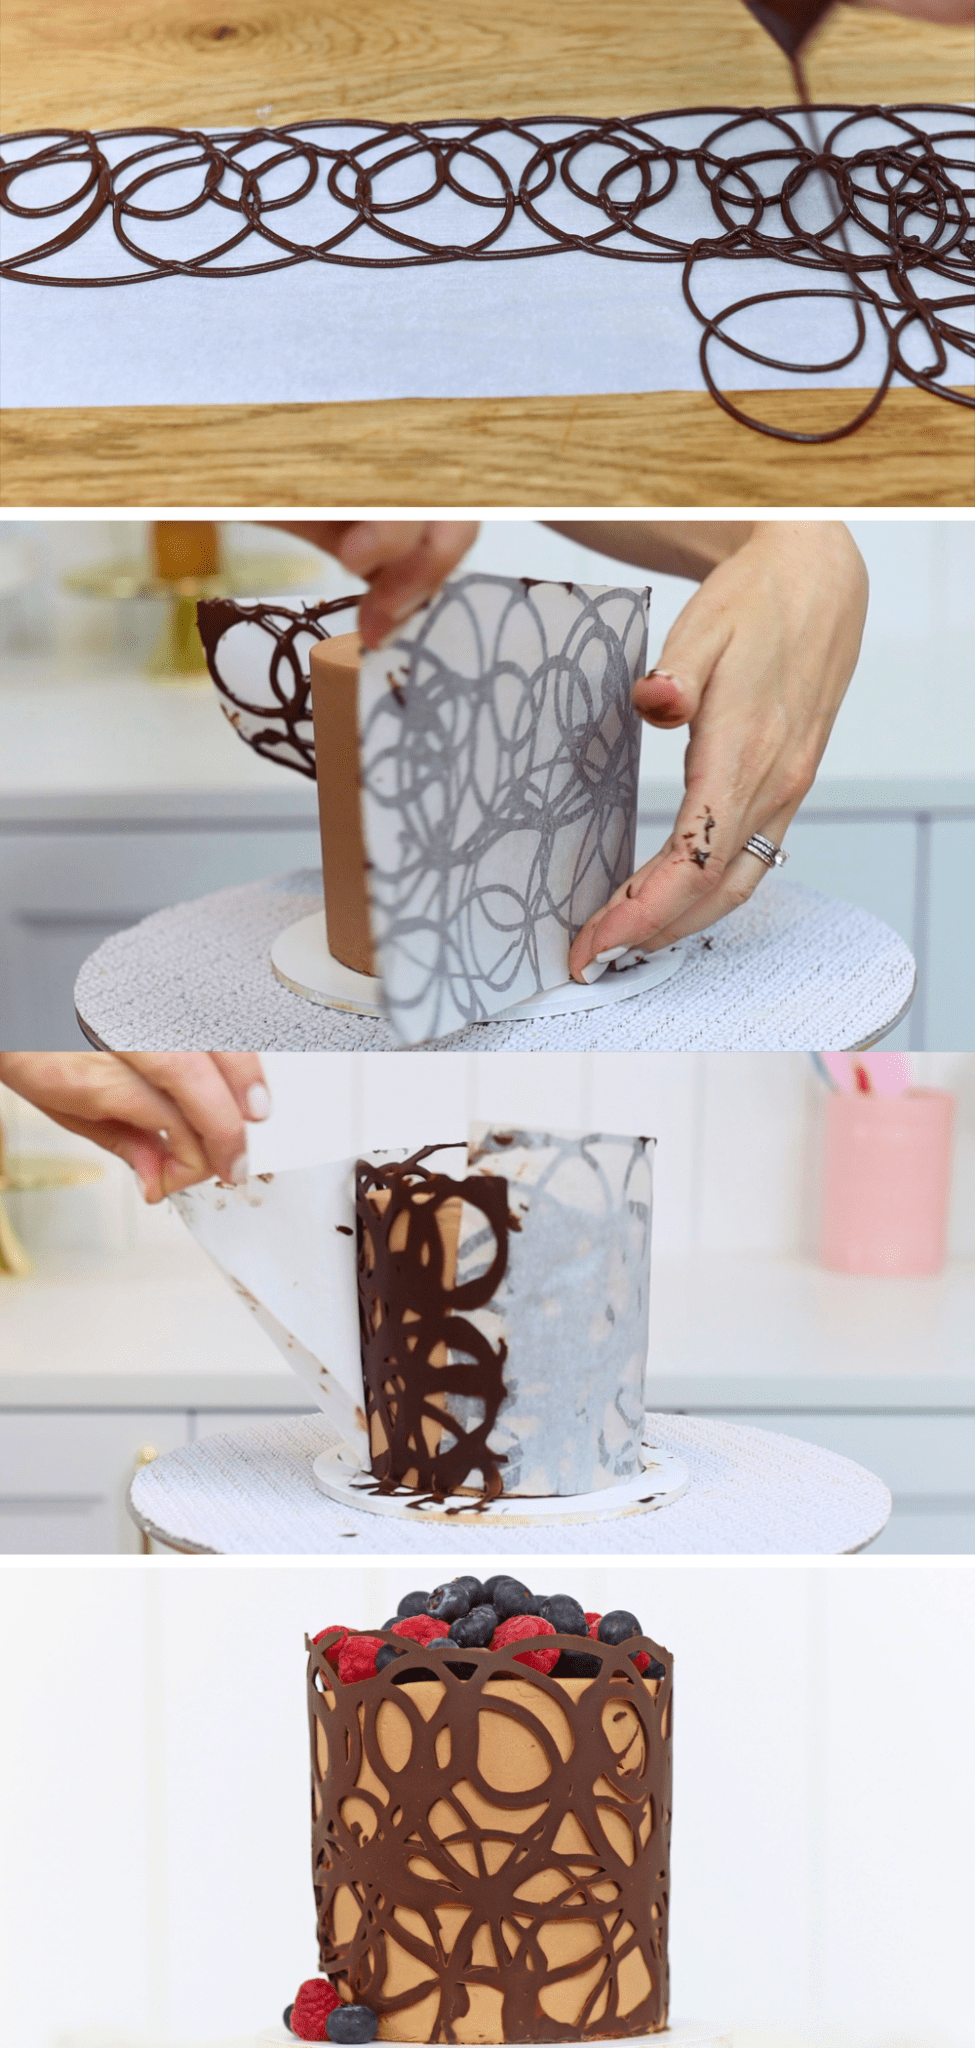
Wrap chocolate around a cake to decorate it with this decadent, gravity-defying technique. Start by drizzling or spreading melted chocolate onto a piece of parchment or wax paper. The paper needs to be wide enough to wrap around your cake. Lift the paper up and push it gently to flatten it against the cake all the way around. Then put the cake into the fridge for 30 minutes or the freezer for 15 minutes to chill and set the chocolate. Peel the paper off to reveal your chocolate collar, also called a chocolate cage or chocolate wrap. Everyone will ask how you piped chocolate onto the sides of the cake and how you got it to stand up! Run a knife under warm water before serving this for the neatest slices.
I hope you’ve seen some ideas you’d like to try. Visit my cake school to learn hundreds more cake decorating techniques and designs with my online courses. Start a FREE trial of my All You Can Cake membership for access to all of my courses so you can try them out risk free! See you there!
You can also watch a video of this tutorial on 10 delicious cake decorations:
Save this tutorial to Pinterest for later with one of these pins:


Great information!
I’m happy you like it!