Use these smart cake decorating hacks for smooth frosting and neat decorations. Colour theory for white buttercream, pi for wrapped designs, multiplications to convert recipes and more!
Conversions are useful if you want to bake a cake that's bigger or smaller than your recipe. Did you know that you can halve an 8 inch cake recipe to make a 6 inch cake? And if you divide a 6 inch recipe by three to make a third of the batter you can make a mini cake with 4 inch pans.

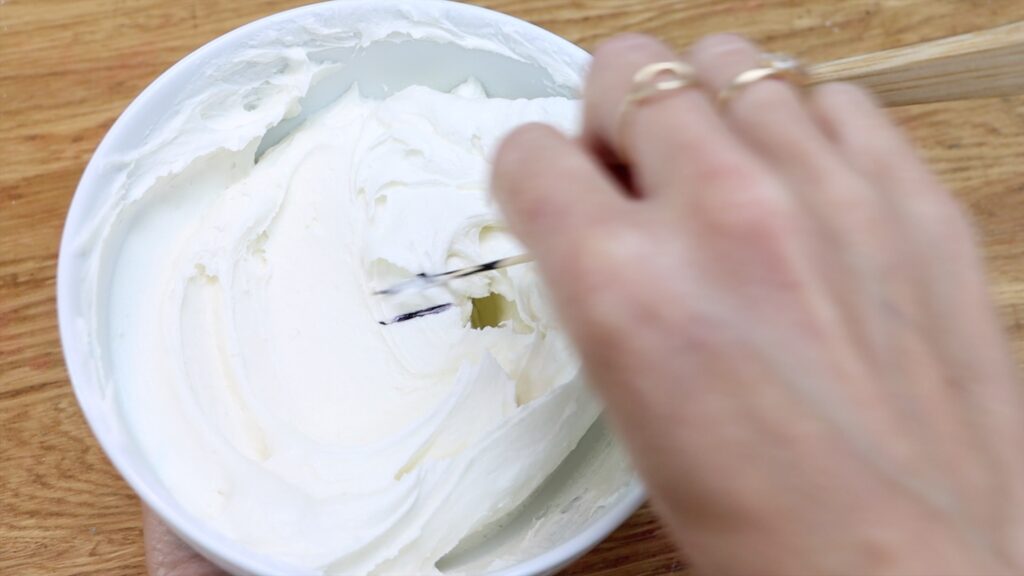
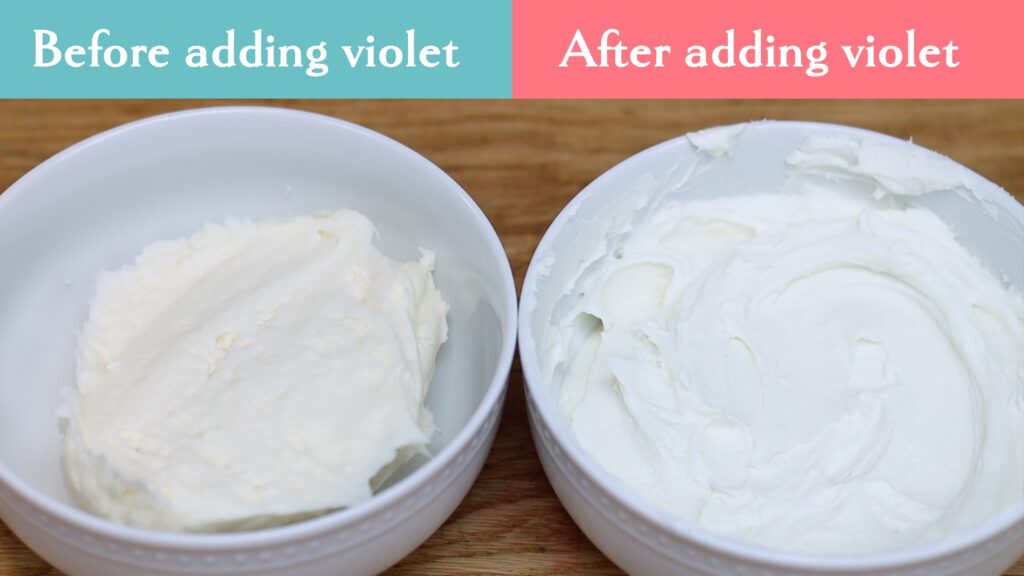
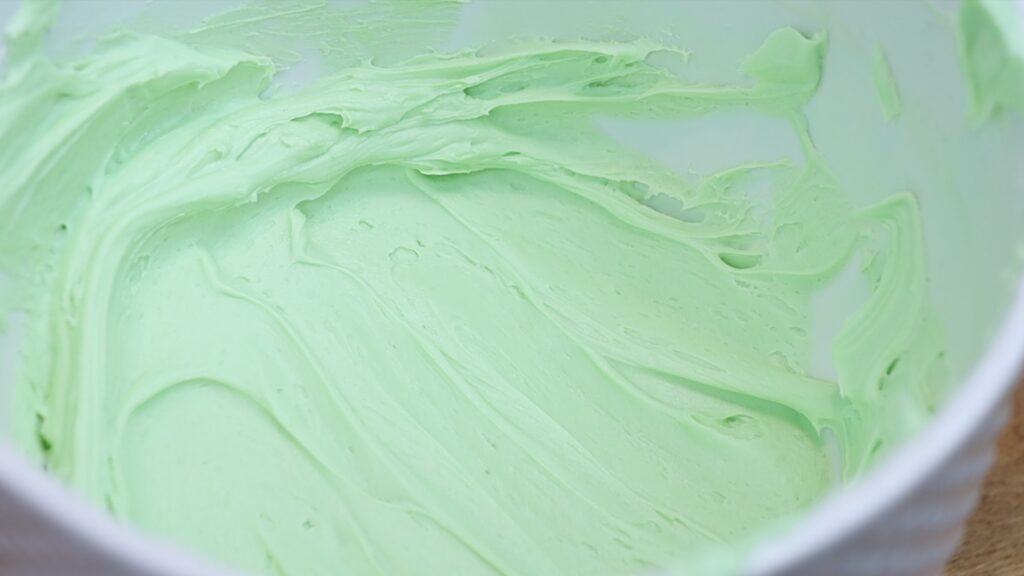
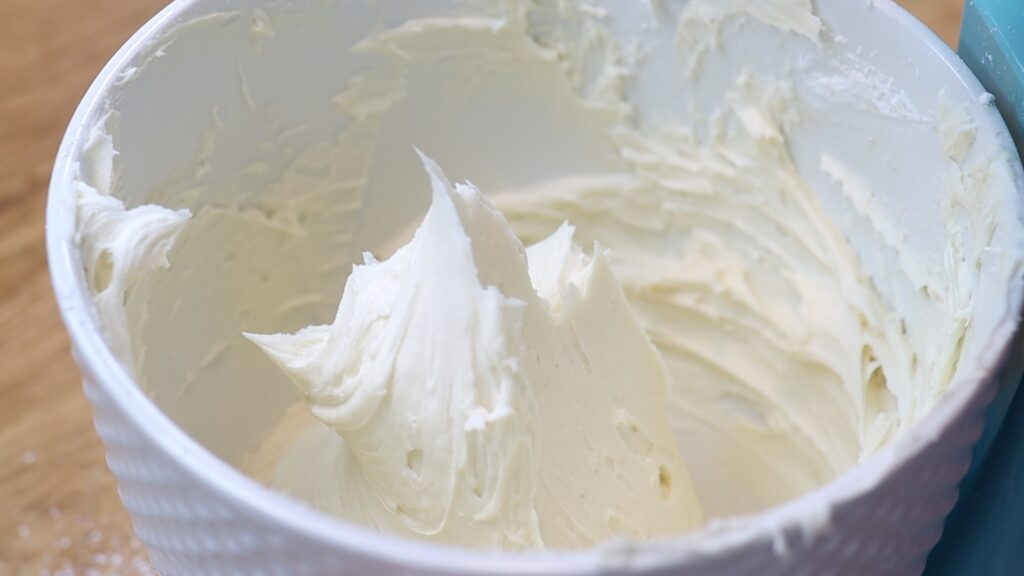
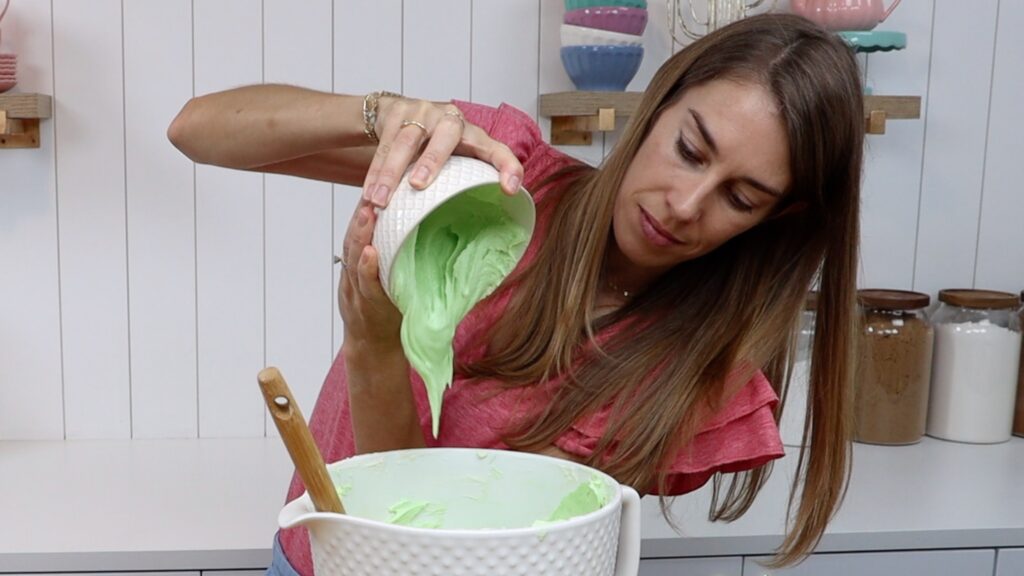
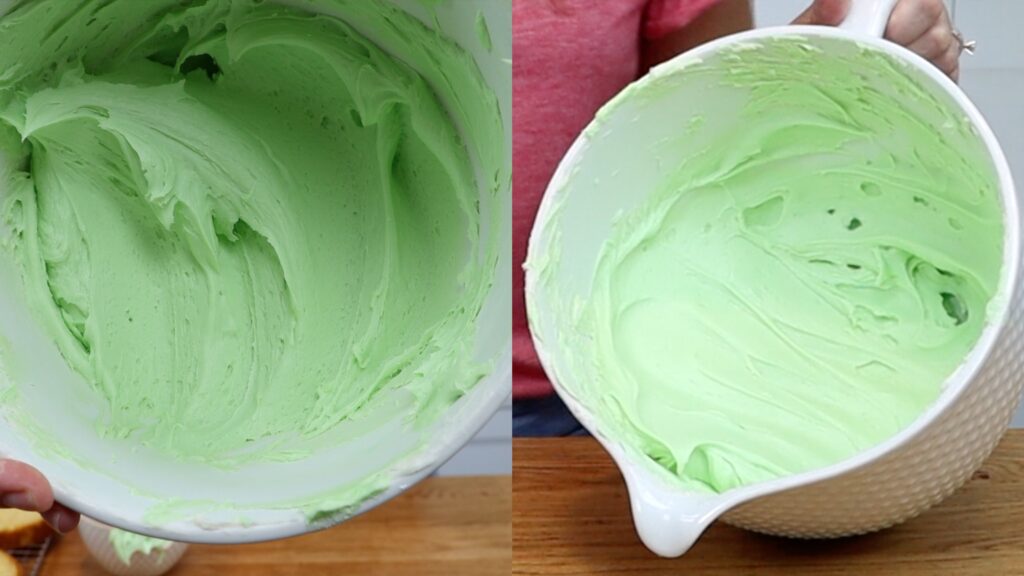
Now for some colour theory. The colours opposite each other on a colour wheel are complimentary colours and they cancel each other out. This means that yellow buttercream can be made whiter by adding violet!

Only add a a tiny amount, which is easiest to do by dipping a toothpick into violet gel and then dragging the toothpick through your buttercream.
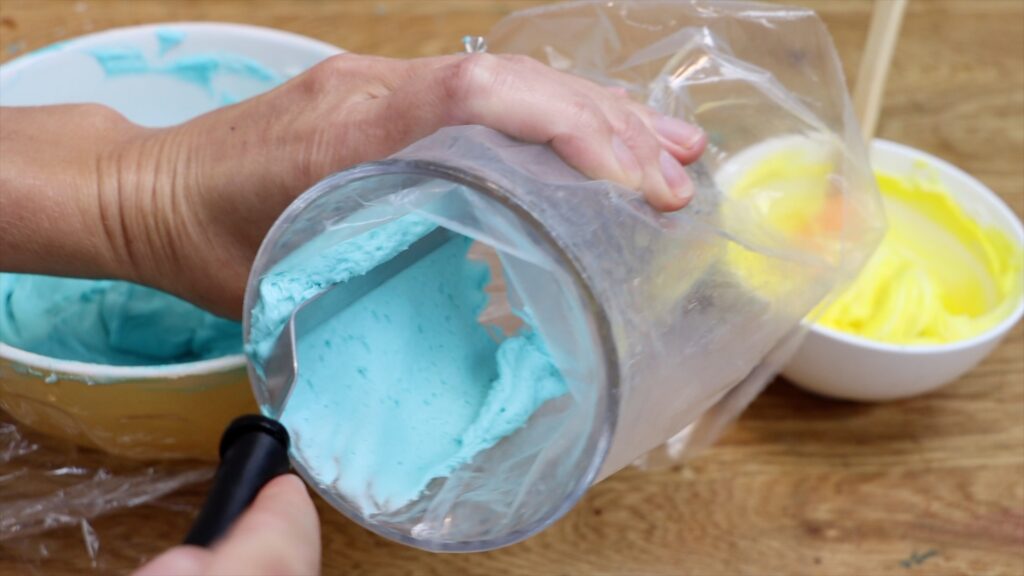
Look at the difference in this buttercream before and after adding violet:
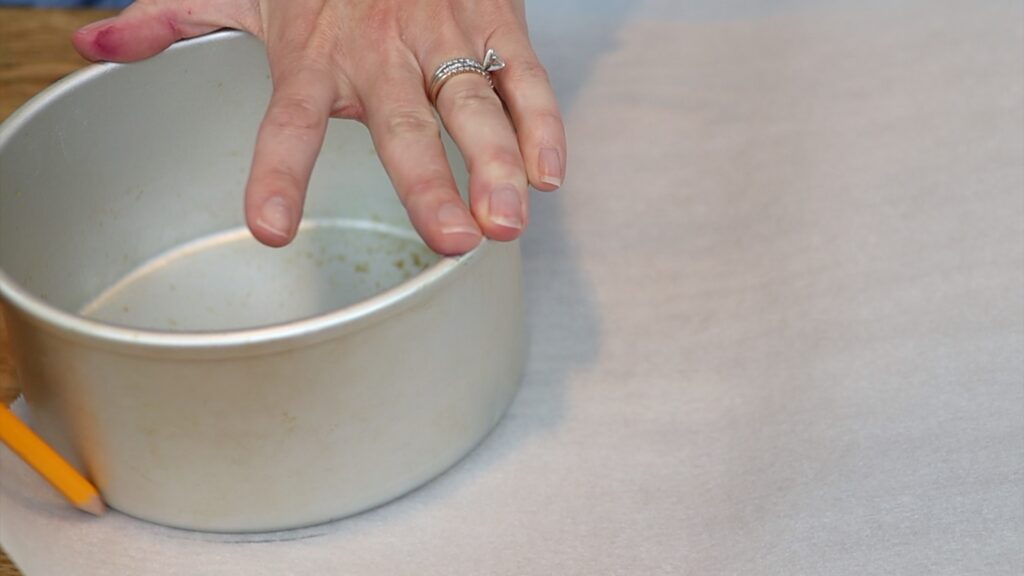
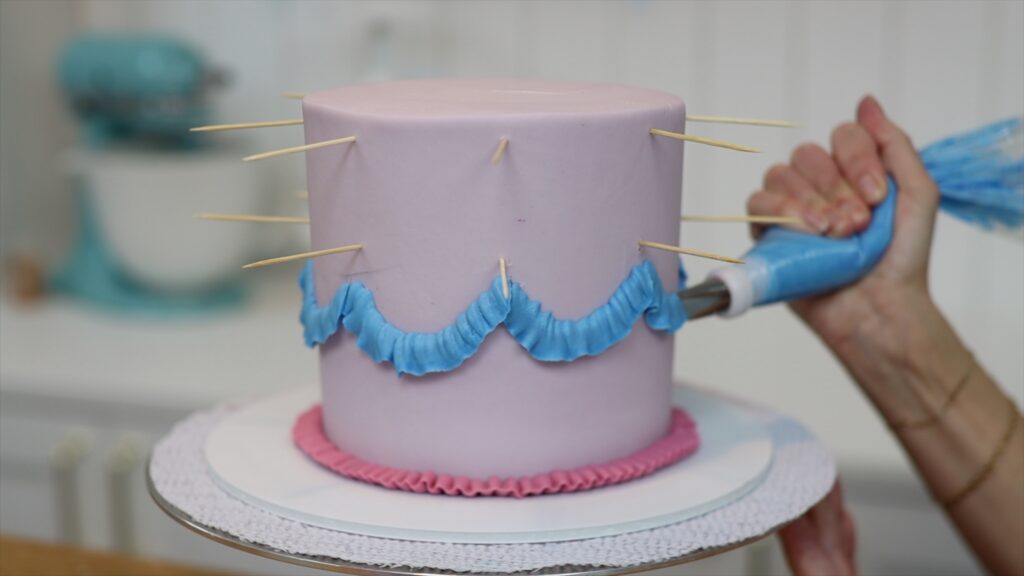
Another use for toothpicks is to make yourself a guide for piping. Trace around your cake pan onto a piece of paper and cut out that circle.
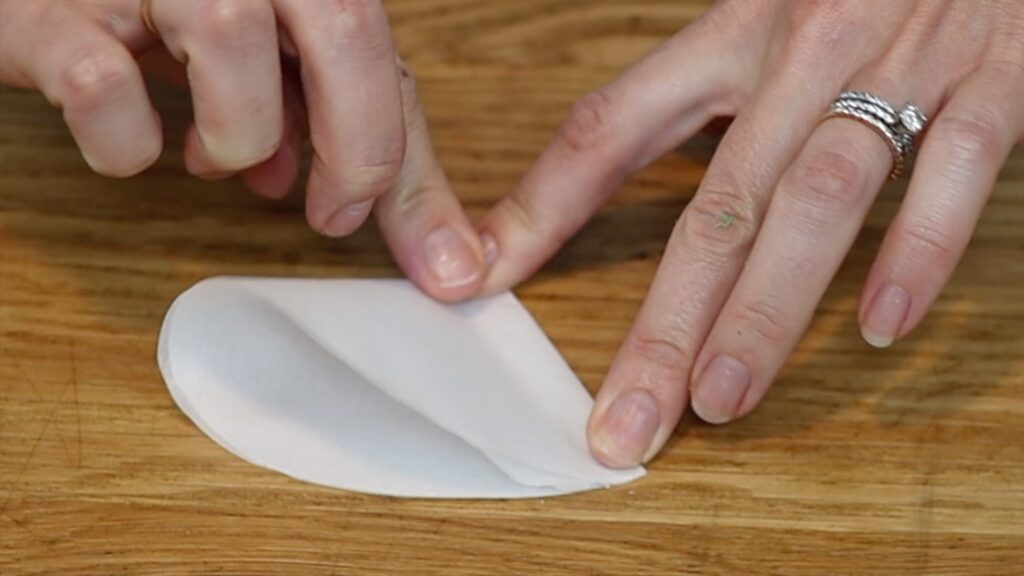
Fold it in half and in half again and again and then unfold it. Place it on top of a frosted cake after chilling the cake so that the frosting is cold and firm. Poke a toothpick into the frosting below each crease.
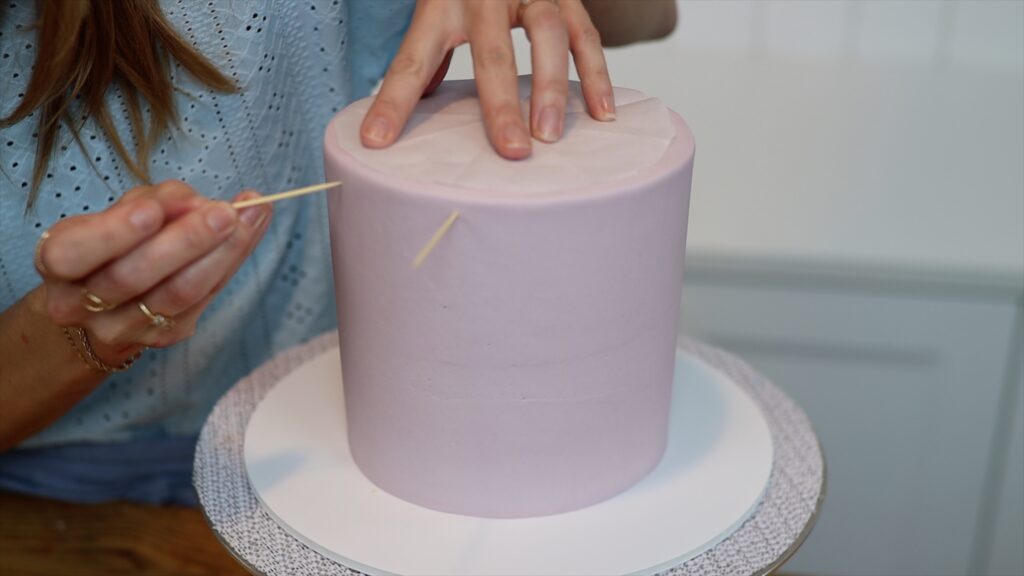
Use this to guide you as you pipe so that the decorations are evenly spaced around the cake.
Decorations that wrap around a cake sometimes need to fit perfectly. These could be stencil patterns, chocolate collars or cages, or buttercream wraps. To measure these, save time by using pi to find the length that will wrap around the cake. Measure the width of the cake (the diameter) and multiply by pi, which is 3.14.
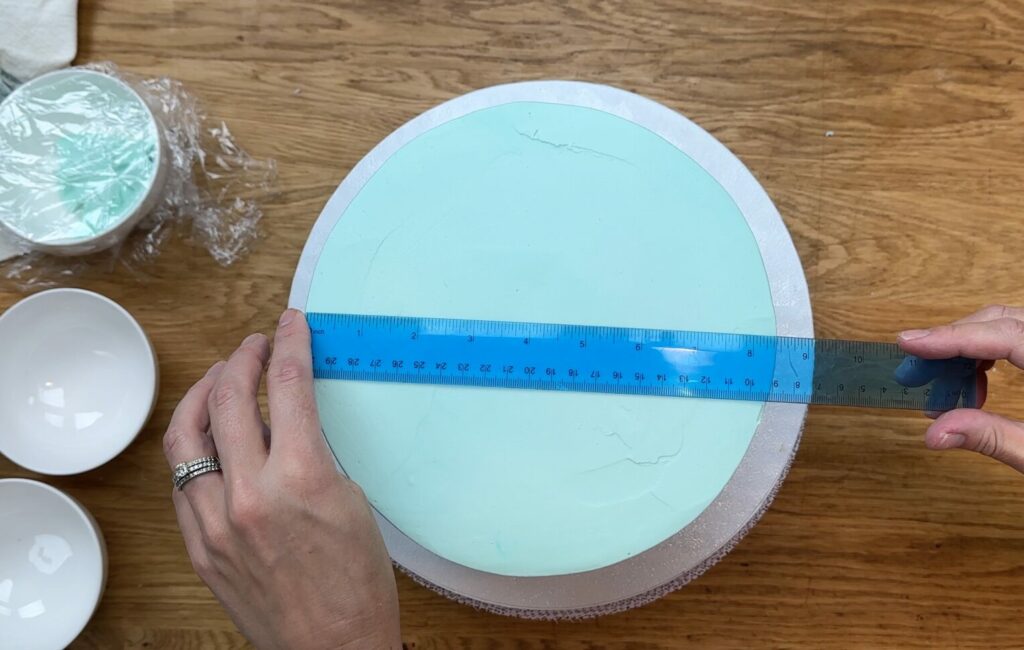
Cut a piece of parchment or wax paper so it's that length, which will wrap snugly around the cake.
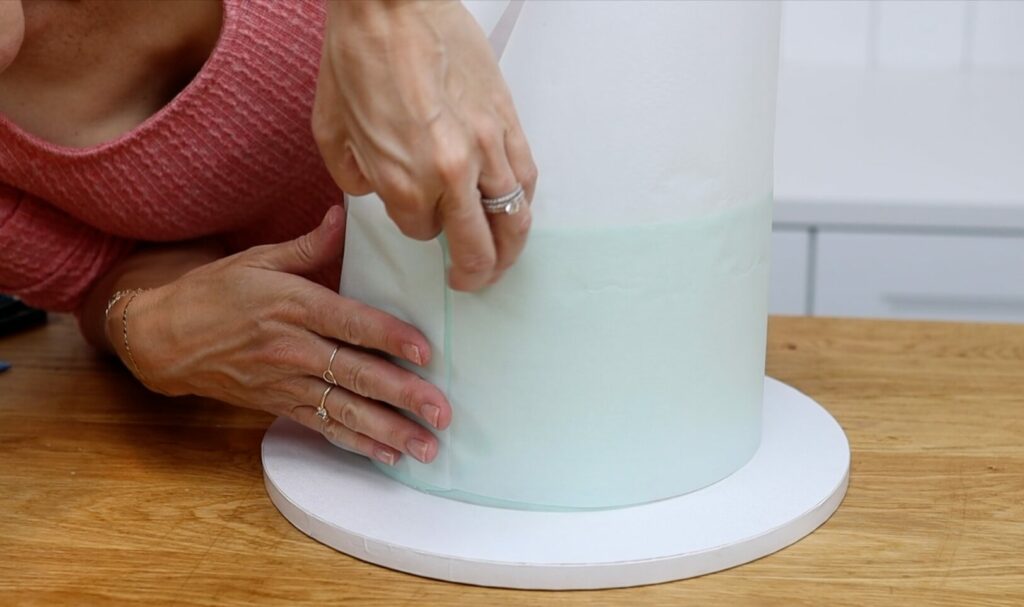
This is perfect for stencils, so that a pattern lines up neatly.
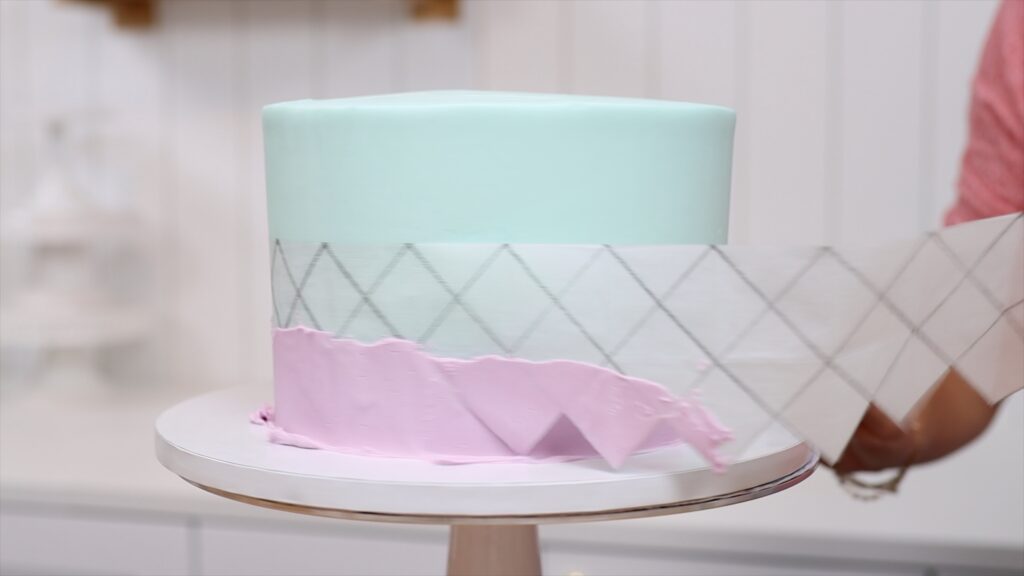
If you're going to pipe or spread buttercream onto the paper and then wrap it around the cake, add about an inch to make room for that layer of buttercream.
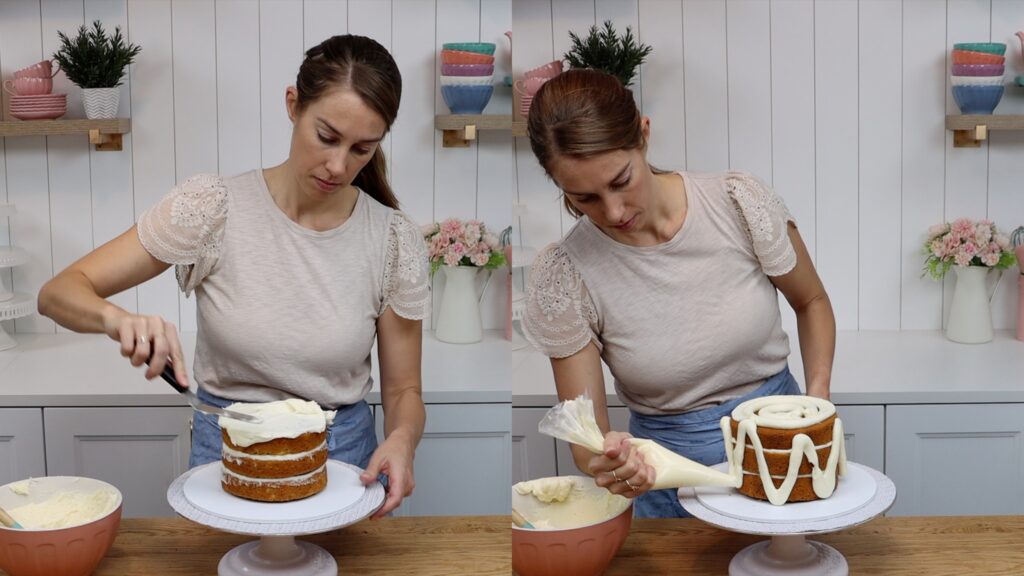
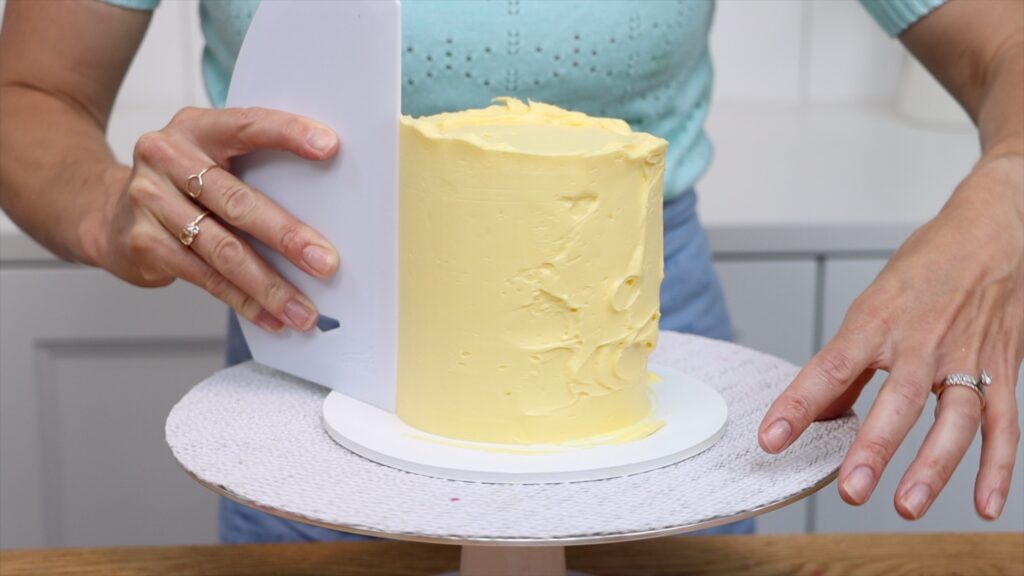
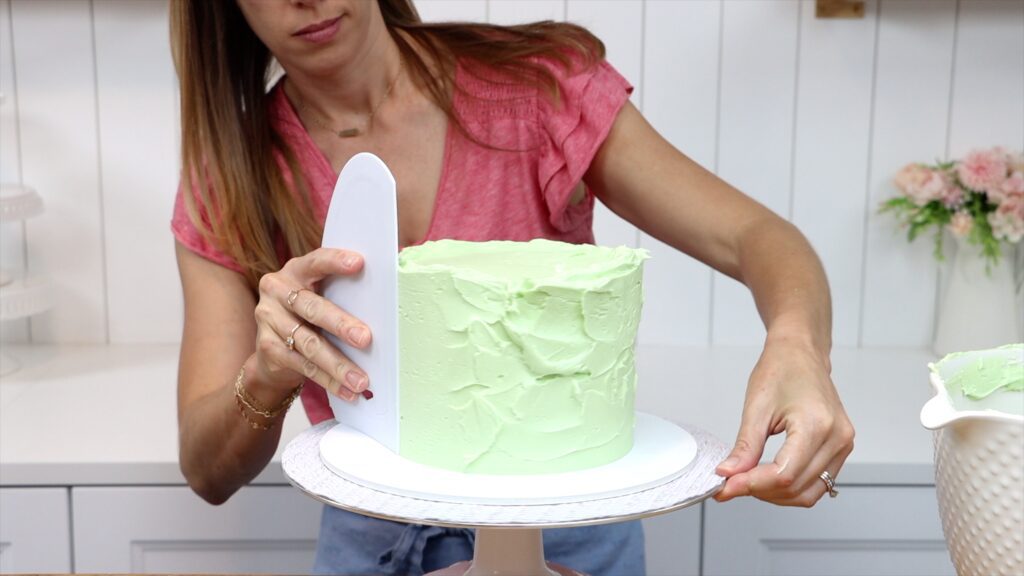
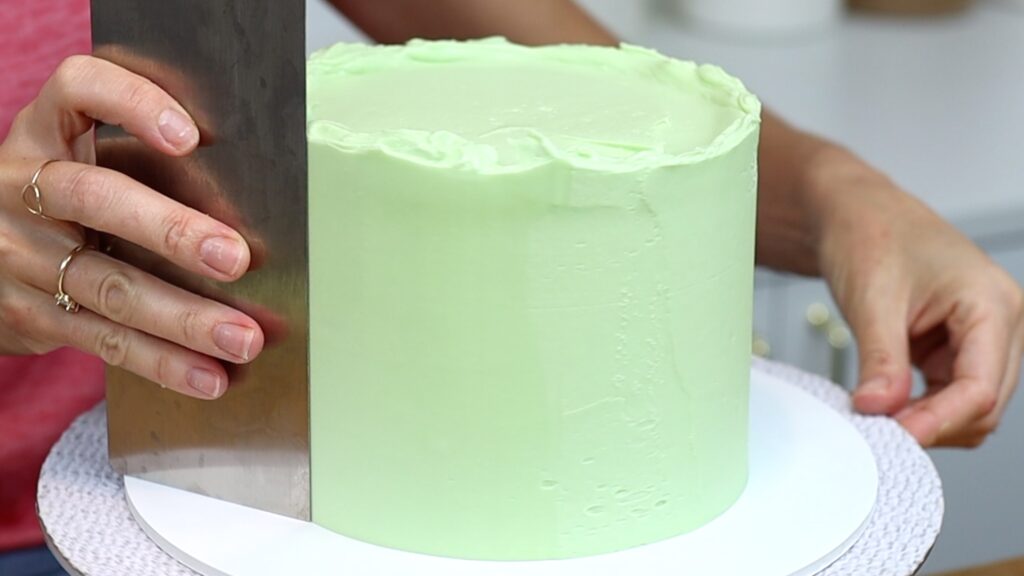
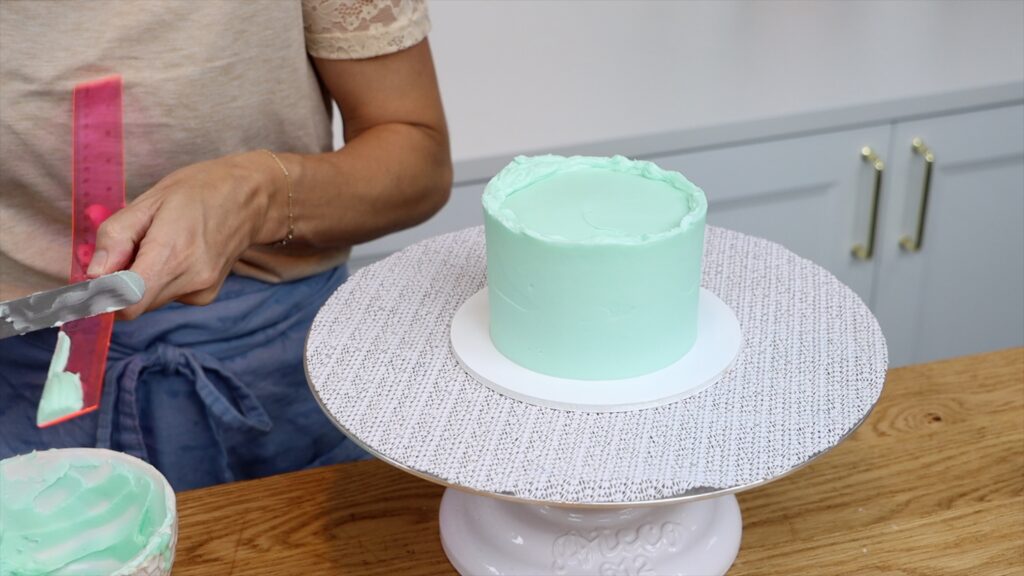
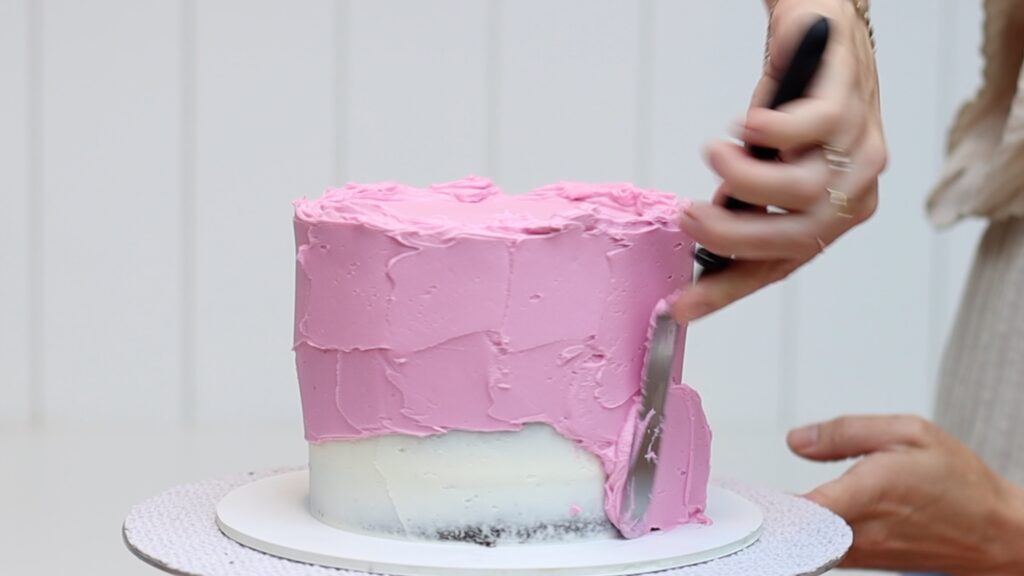
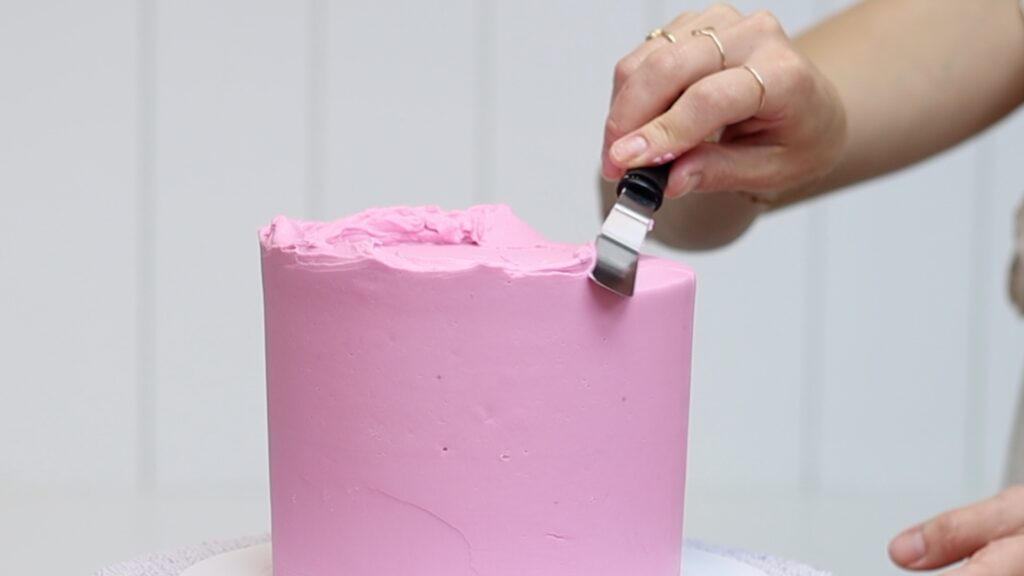
Keep your pencil case out because a ruler can also be used to frost a cake. Start by spreading buttercream or any other frosting onto your cake to cover the top and sides.
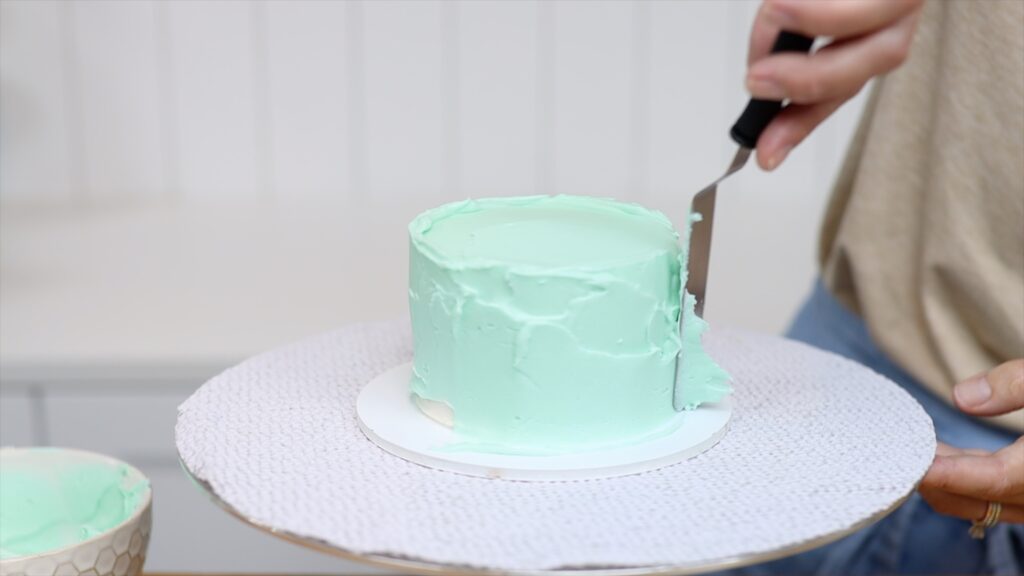
Then press the base of a clean ruler down on the cake board to line it up straight. Push the edge very gently into the frosting as you spin the
You'll need to do this two or three times to smooth any air pockets and imperfections. You'd never know it was a ruler (not a cake comb) that made this frosting so smooth!
Here's another tool you can use for cake decorating. You probably didn't expect to need your toolbox to make a cake! But a spirit level is an excellent tool to make sure your cakes are level on top. This is especially important for tier cakes.
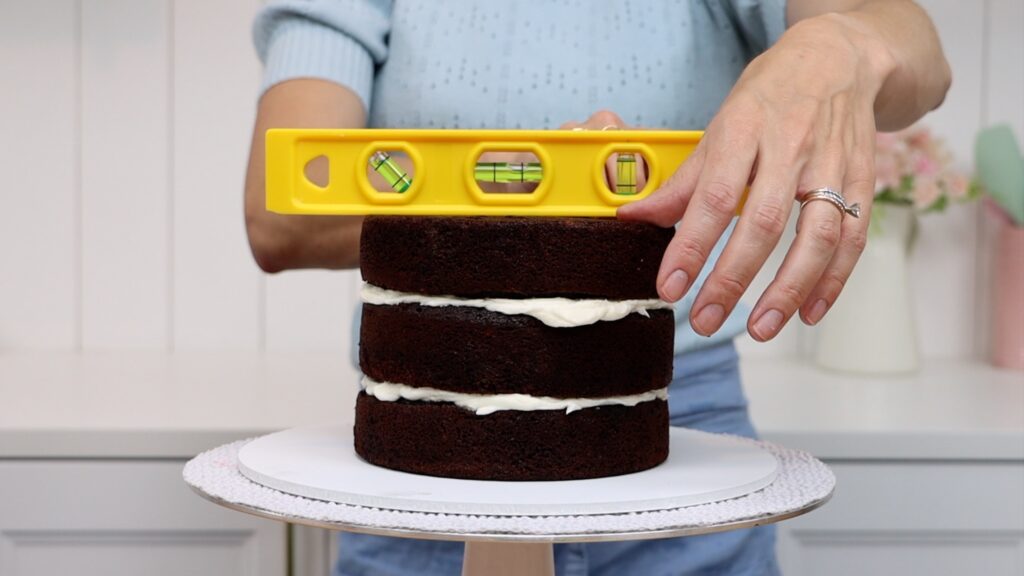
If the little bubble isn't in the center, push down on one side of the cake before you frost it. That side of the cake layers will push down into the filling to straighten and level the cake. Then chill to set the cake before you frost it.
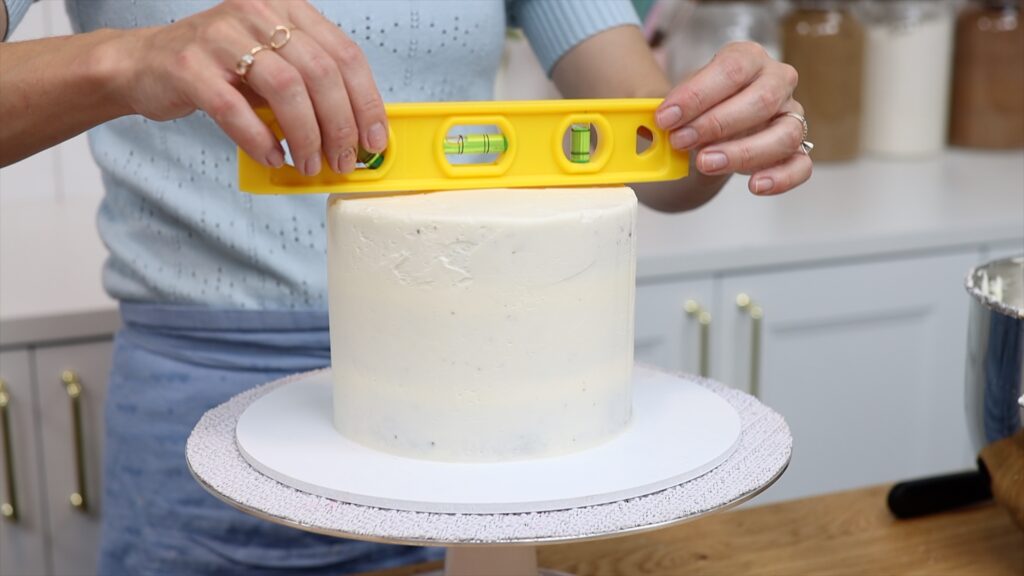
Check the top again with a spirit level and now it's ready to decorate to make a neat, straight cake.
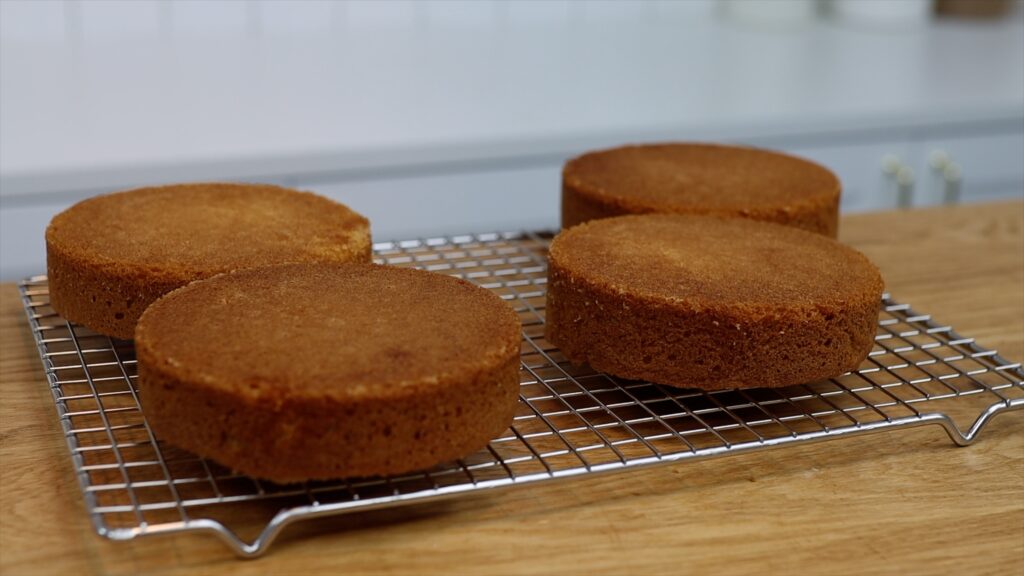
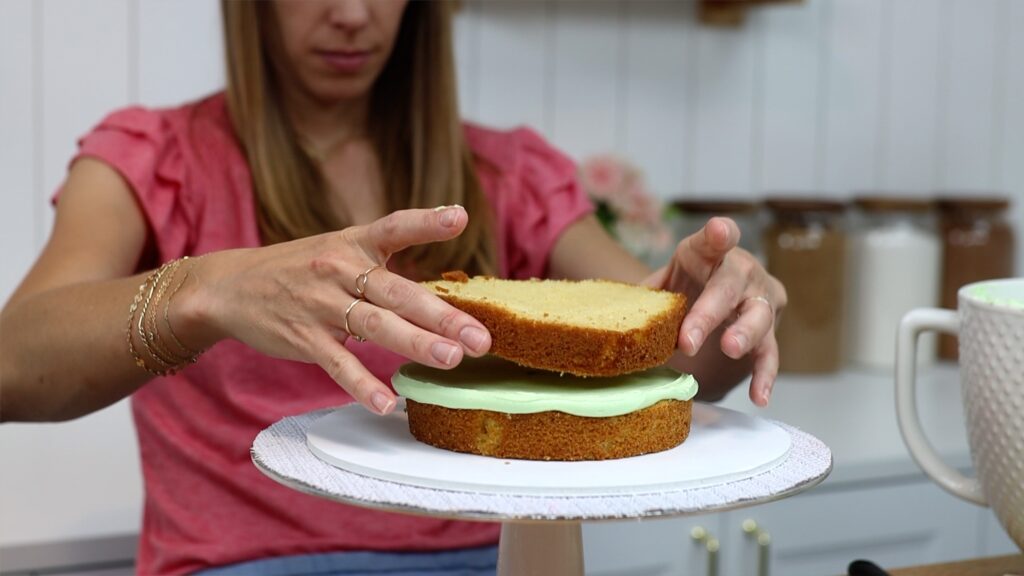
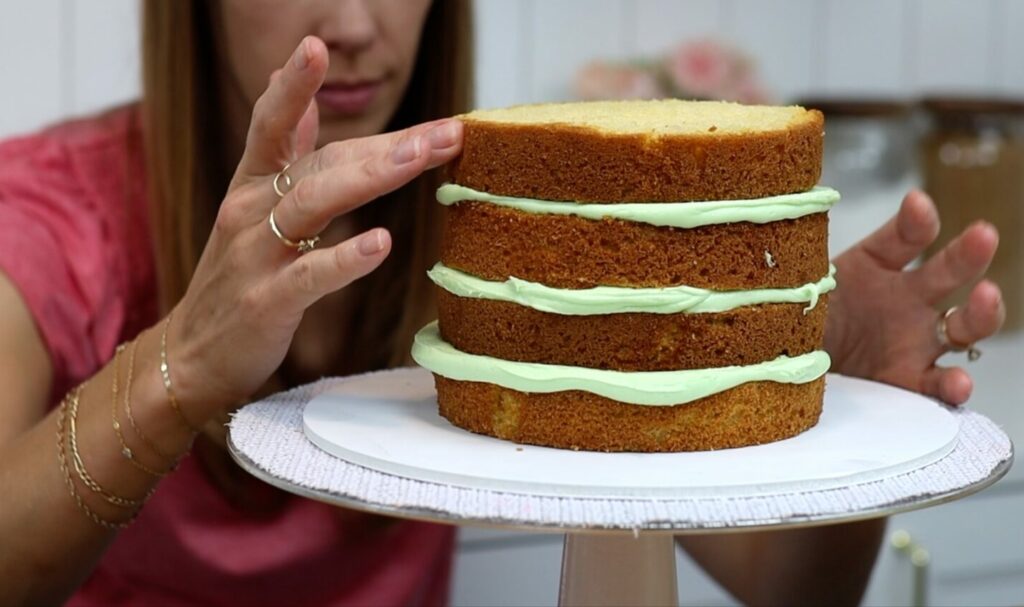
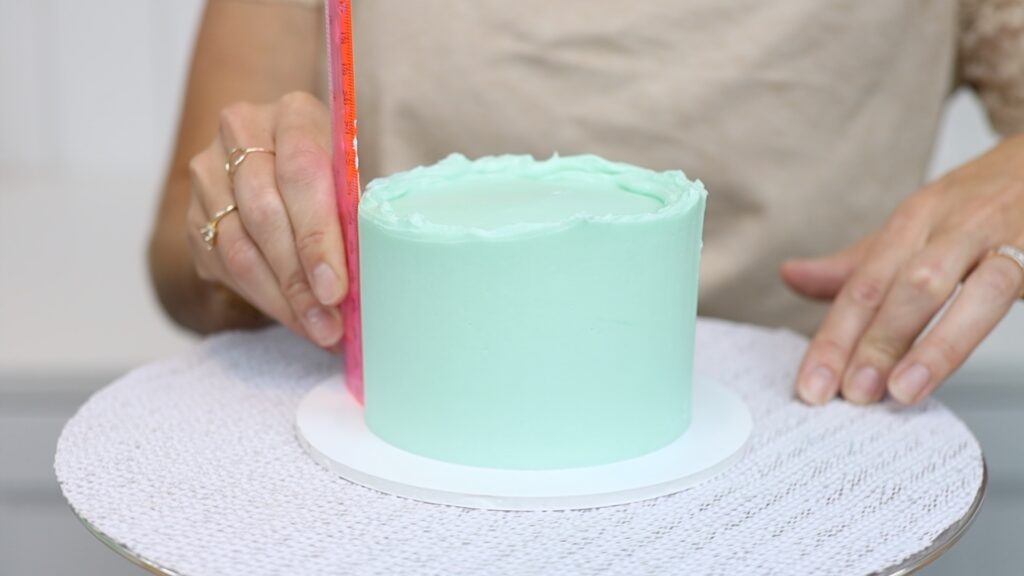
As well as straight cake layers, you'll also want them to be the same height as each other. This will give you the most beautiful slices. To make the most even cake layers, weigh the batter.
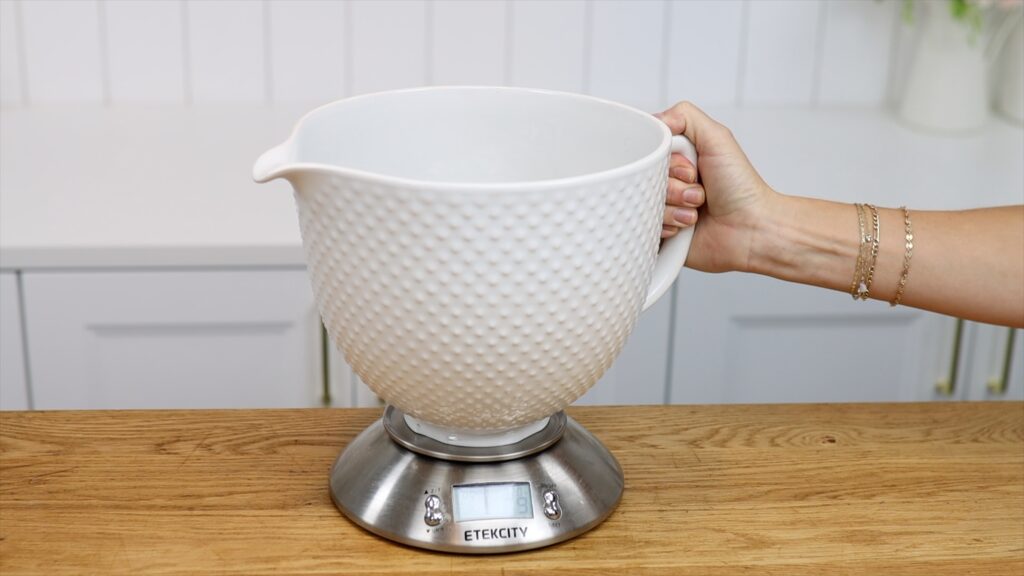
First, weigh your mixing bowl alone before you prepare your cake batter. Then weigh it again with the batter inside. Subtract the weight of the bowl and divide by the number of pans.
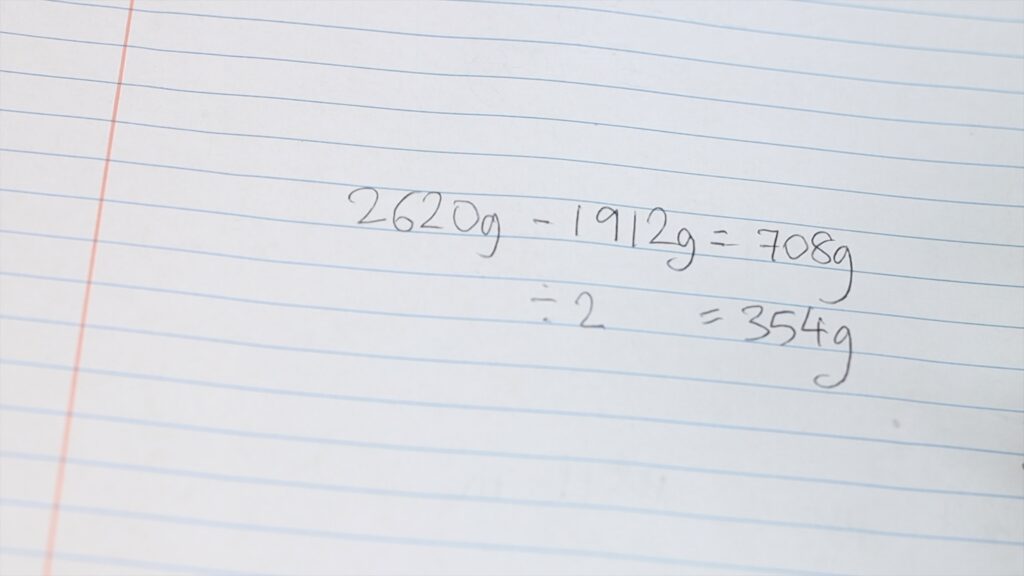
Now put a pan on your scale and zero the scale. Scoop the batter in until you get to that number you just calculated. Repeat for the rest of your pans.
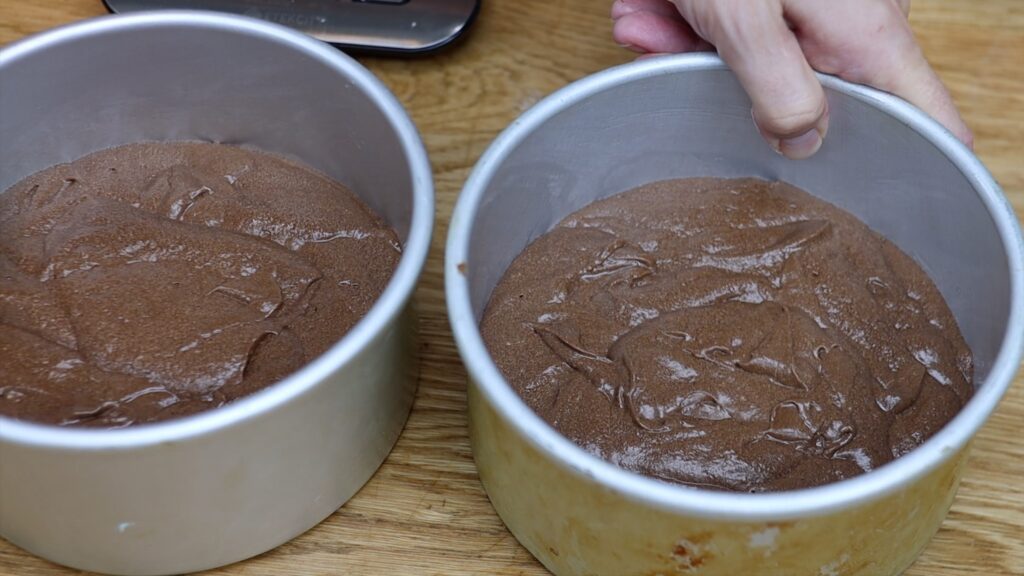
This way you'll have exactly the same amount of batter in each pan. Cake slices look extra pretty with even layers, don't they?
I did a geeky experiment on the fastest way to make a cake, testing which methods will save you the most time when you assemble and frost a cake. Spoiler alert! Piping the filling and frosting is much faster than spreading it straight onto the cake. Also, using cold cake layers will make the process much quicker, too. I like to put layers in the fridge for 30 minutes or the freezer for 15 before assembling and frosting.
Are there smart cake decorating hacks to tackle condensation? Absolutely! Avoid these moisture droplets and running colours on your cakes by paying attention to temperatures.
Condensation happens when a cake goes through a big difference in temperature, fast. For example, from a freezer of 0° Fahrenheit moving to room temperature of about 72°. The difference between the warm room outside of the cake to the cold inside of the cake is a big difference. This will cause condensation or cake sweat.
Instead, if your cake is frozen move it to the fridge for 24 hours to thaw. Then move it room temperature. By changing the temperature gradually you'll minimize condensation. Even if you don't use a freezer, if the room is hot your cake might sweat while you're decorating it. If you can't lower the temperature of the room, dab the cake with a paper towel. It will absorb the moisture droplets, which will disappear once the cake warms up to the temperature of the room.
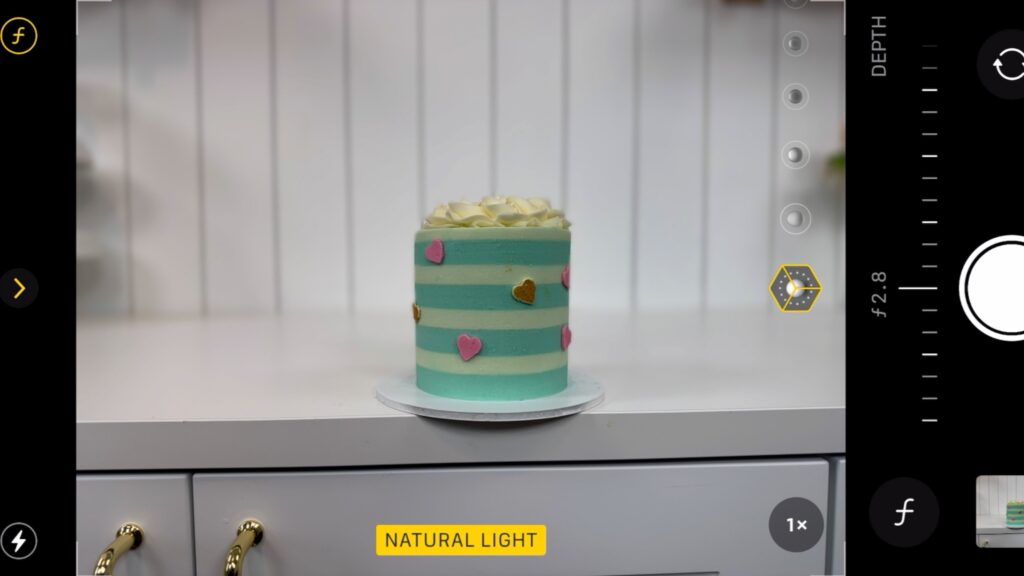
For great cake photos I think the best trick is to make the background blurry or out of focus. This will really draw attention to your cake. You can do this on a camera or a phone by adjusting the F stop or F number. For the best results move your cake as far away from the background as possible.
I like to use F2 or F3, which makes the background really blurry or out of focus. On an iPhone choose Portrait mode and tap the F at the top of the screen, which will display a sliding bar to choose the F number.
Look at the difference between these two photos. The first is taken with F11 for an in-focus background. The lines on the wall look obnoxious. The second photo is taken with F2.8 and the blurry lines in the background look more interesting than distracting.

So even though cake decorating seems creative, using your brain and these smart cake decorating hacks can help you make more practical and beautiful cakes. To learn more cake decorating techniques visit my cake school.
You can also watch a video of this tutorial on 10 Smart Cake Decorating Hacks:
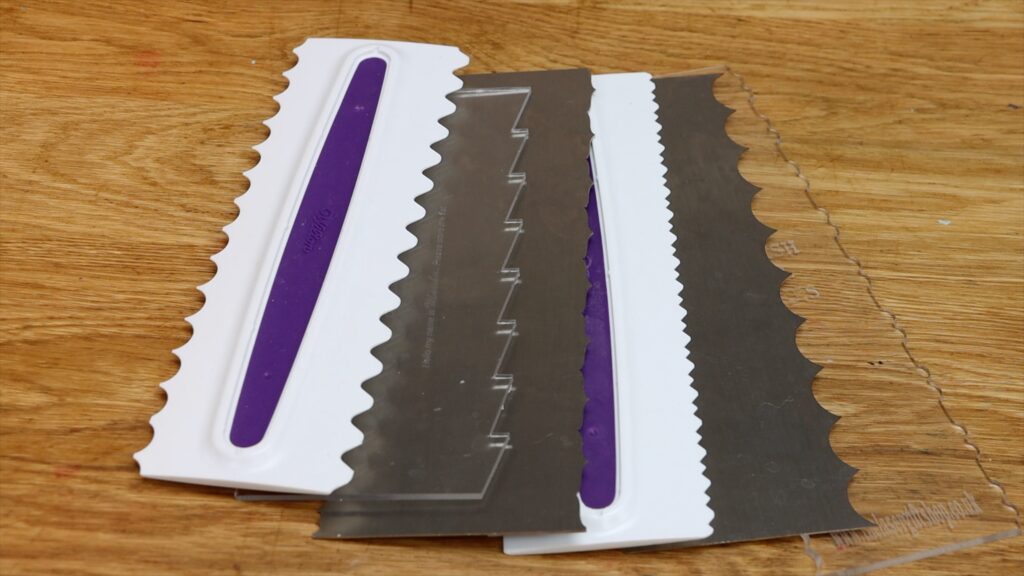
Which cake comb is best? From a secret tool to get your frosting super smooth, to cake combs that make gorgeous texture and patterns on cakes, you’ll definitely want to try these 4 trending cake combs!
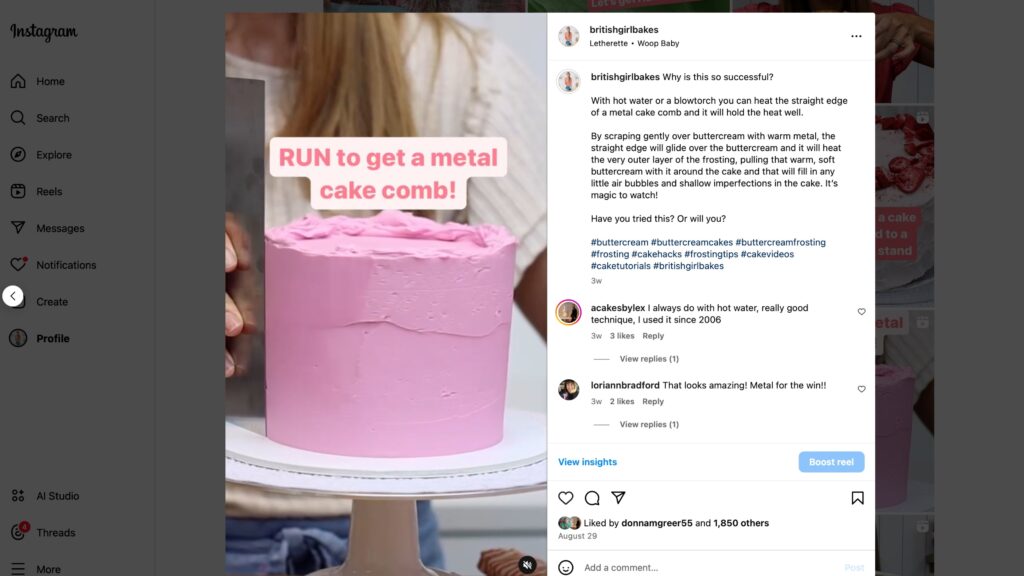
This first cake comb has become trendy as people find out about the hack that will completely transform their frosting. Go from air bubbly, uneven frosting to smooth perfection with a warm metal cake comb.
Hold the edge under hot water or run a blowtorch flame along it a few times to warm it up. If your tap water takes forever to warm up and how don't have a blowtorch, use a hair dryer!
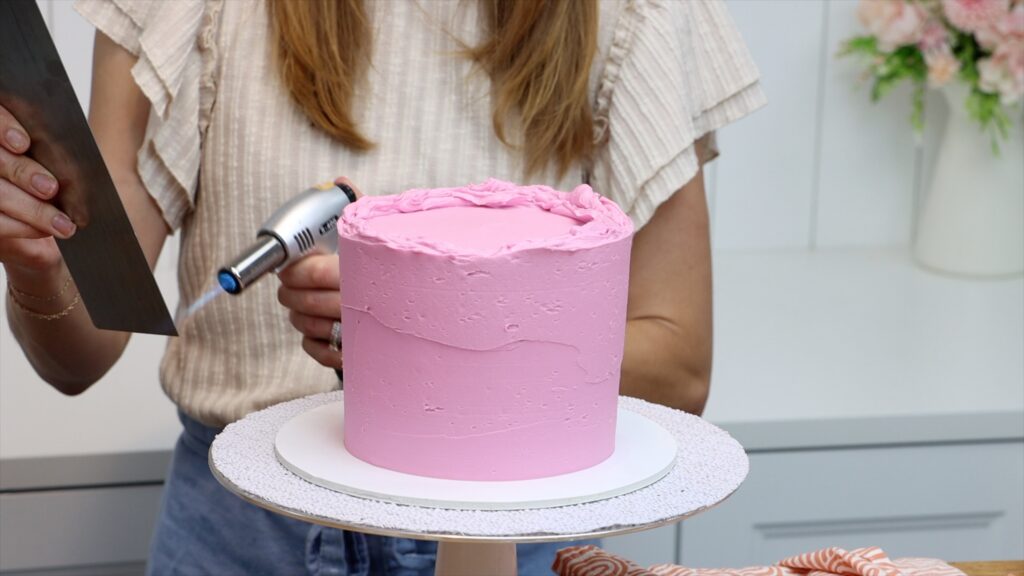
Once the metal is warm, use the comb or scraper as normal on any kind of buttercream or ganache frosting. I'm using my 4 Minute Buttercream. The warm metal will glide over the frosting, filling in any air bubbles and shallow imperfections along the way. It will leave the surface of the frosting impossibly smooth. This is my favourite metal cake comb and you can use the code BGB10 for 10% off! Look at the difference in the frosting after being scraped with warm metal:

Once you can use a cake comb to smooth frosting, you can use any comb with a patterned edge because the process is exactly the same.
Before starting, smooth the frosting on the top of the cake. The sides need to be straight but not smooth, so scrape around them a few times.
Then press the bottom of a textured cake comb down on the cakeboard to line it up straight. Scrape around the cake with it but don't panic! It will leave the textured pattern in the frosting but it won't be neat… yet. Scrape the frosting off your comb to clean it before using it again.
Then scrape again two or three times with your textured car cob. Spread the frosting you've scraped off to cover any gaps or indents and then use the comb again. You'll see the textured pattern get neater and neater until it's perfect. Then just tidy up the top edge and voila!
This cake is from my free course on 10 Frosting Techniques. To dive deeper, my Layer Up program takes your cake decorating skills from beginner to professional with 14 and a half hours of easy to follow video modules!
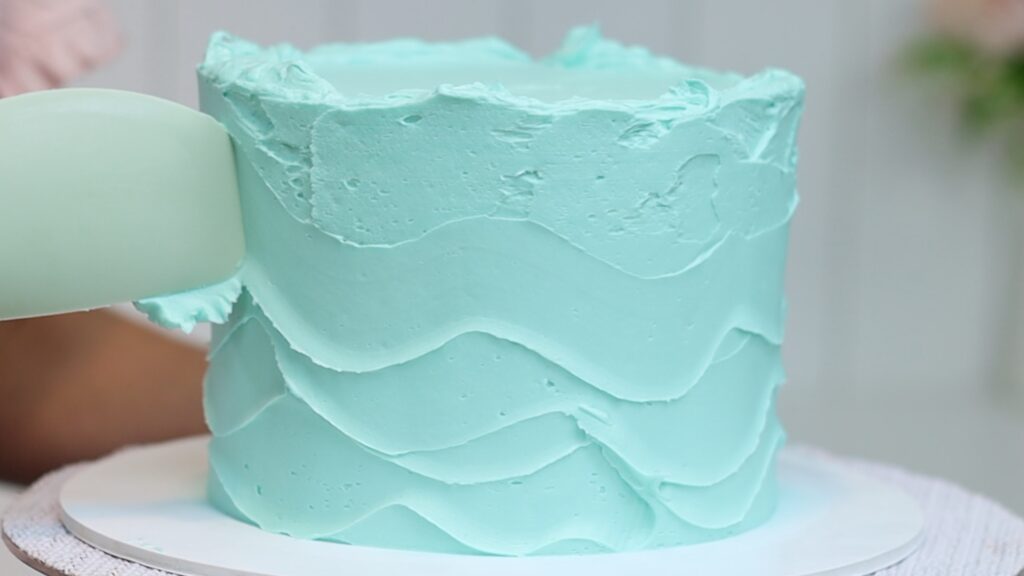
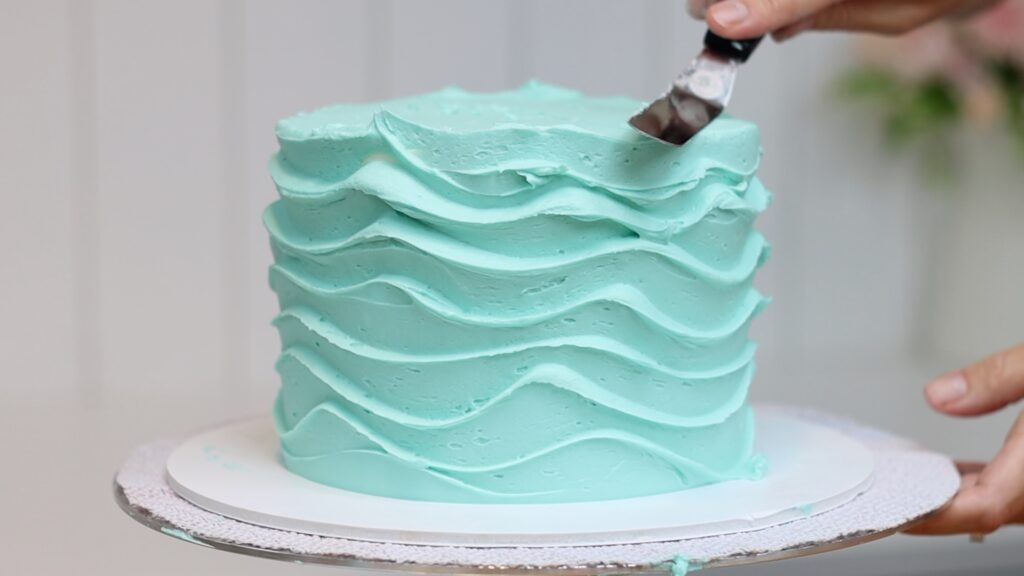
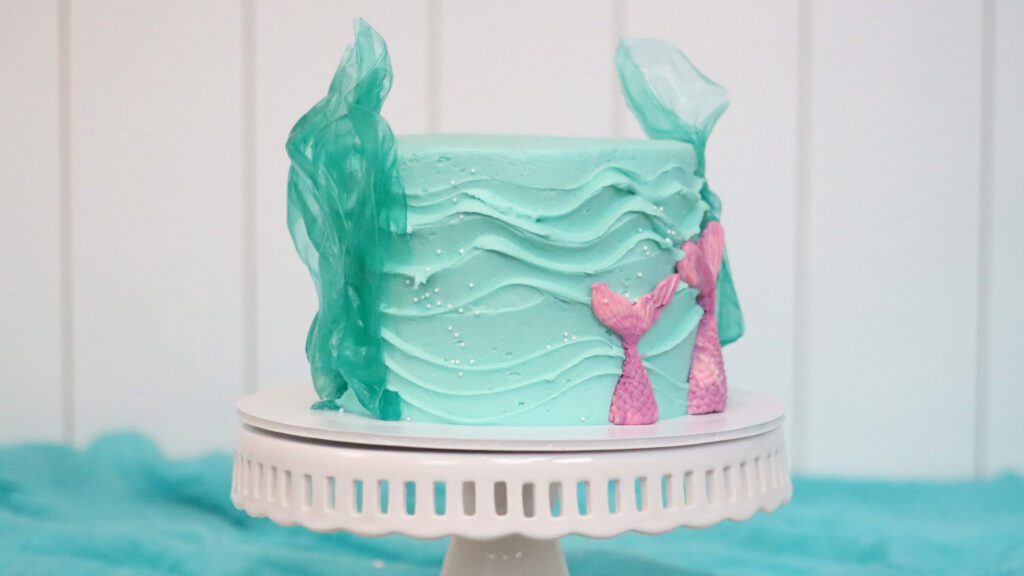
Use the short end of any cake comb to make this gorgeous wavy frosting. After covering the cake with frosting, smooth it just once or twice. Then, instead of holding the cake comb normally, flip it sideways. The short end should be facing the sides of the cake.
Push the bottom corner slightly closer to the frosting as you spin the
By pointing the bottom corner closer, you'll keep the sides straight instead of digging deeper and deeper into the frosting as you work your way upwards. Add mermaid or ocean decorations and you have a simple but stunning design.

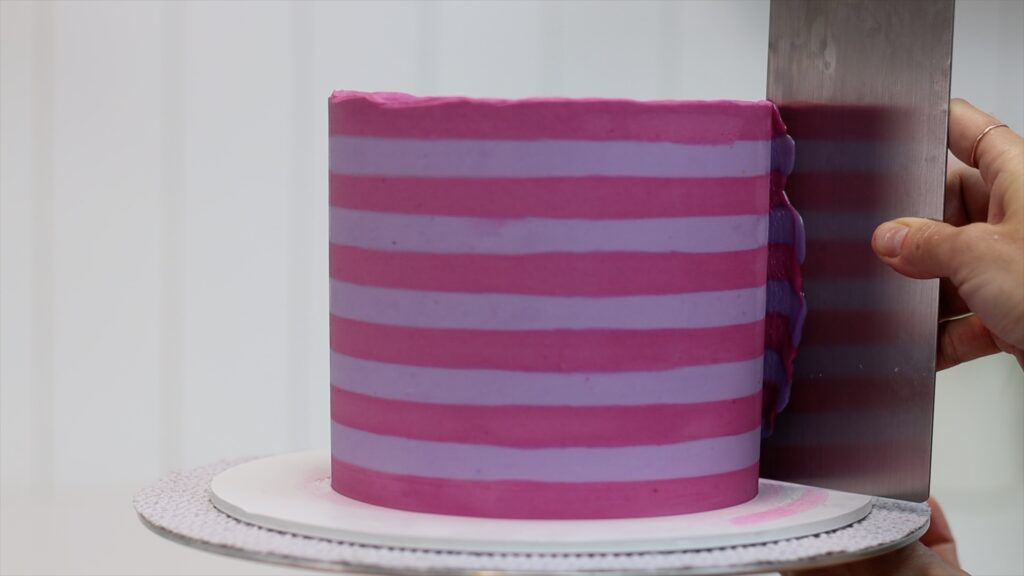
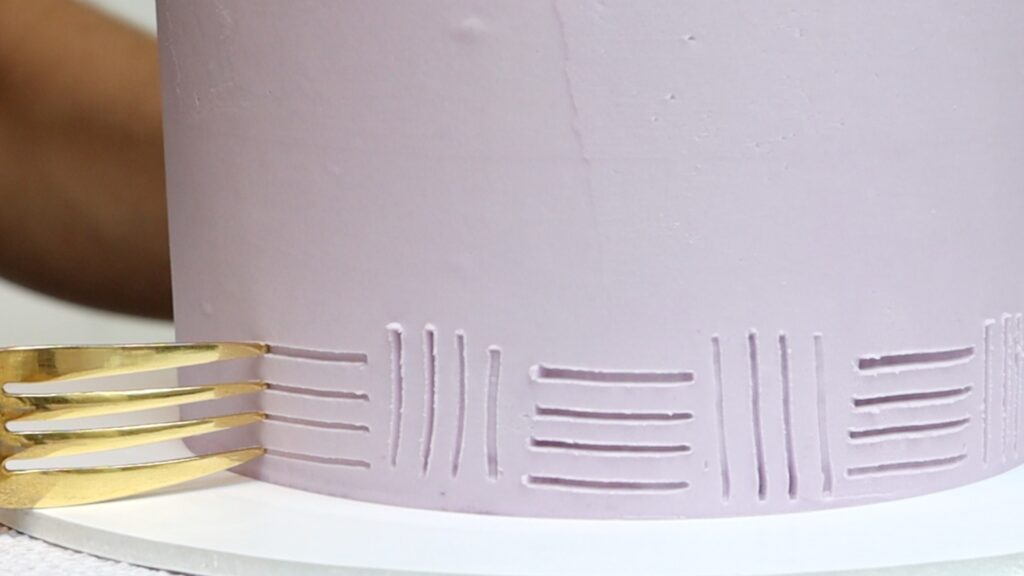
If you've seen perfectly neat striped buttercream and wondered how it's done, here's the trendy tool. It's this strangely shaped cake comb:
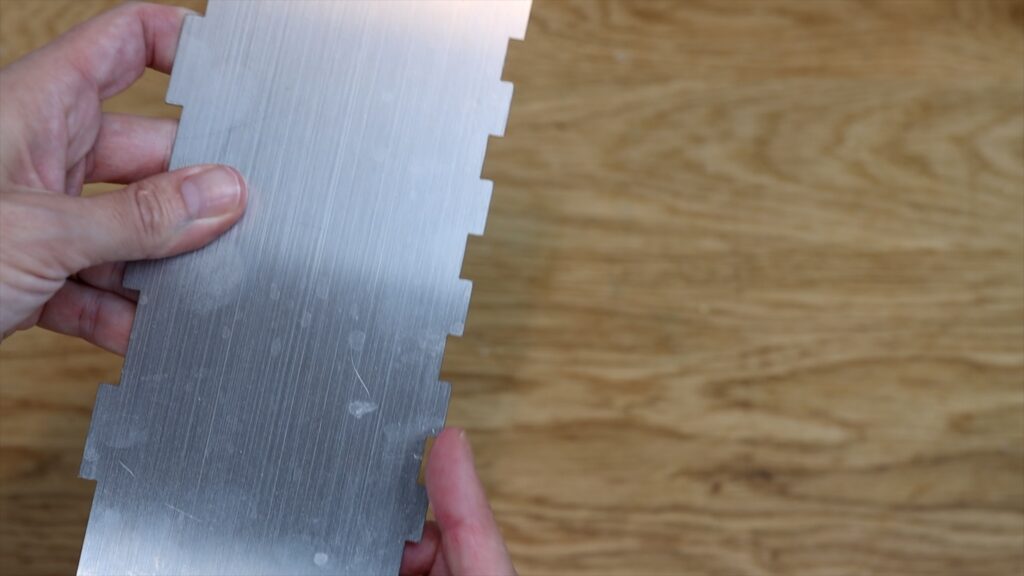
But before using this, use a straight edged cake comb to get the sides of your cake really straight. Then use the striped comb to imprint grooves like this:
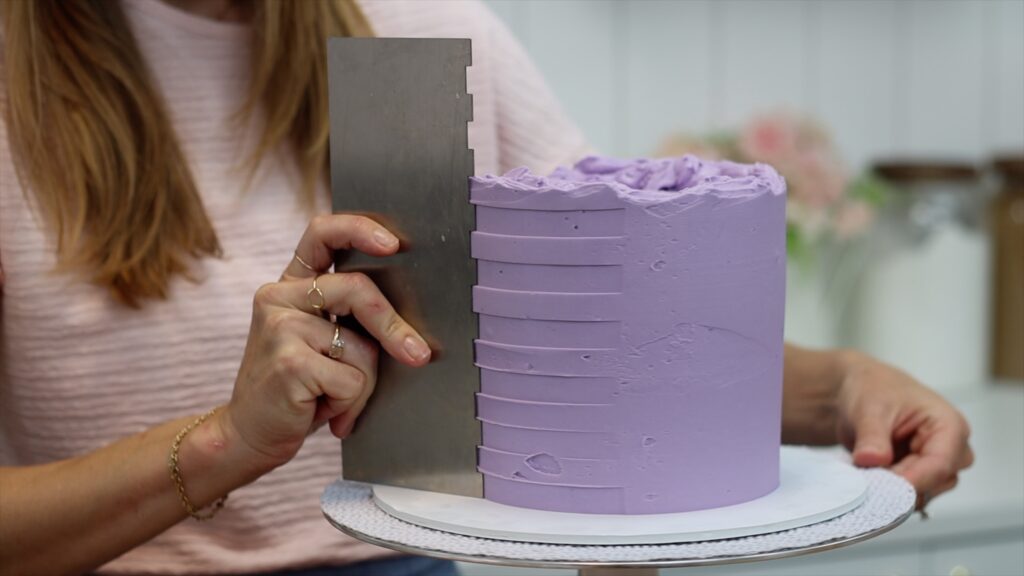
Press the base of the comb down on the cakeboard so the stripes are in the same position every scrape. Repeat again and again, scraping the comb clean after each time you use it. As the grooves get neater, use a towel or paper towel to wipe off any buttercream left on the comb. You want the texture to be really clean when you press it against the cake again.
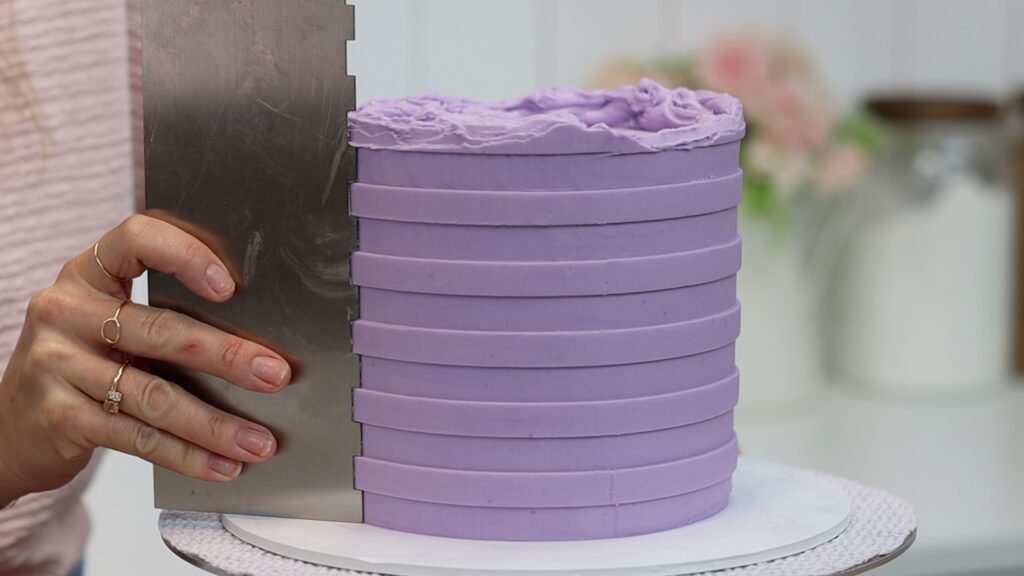
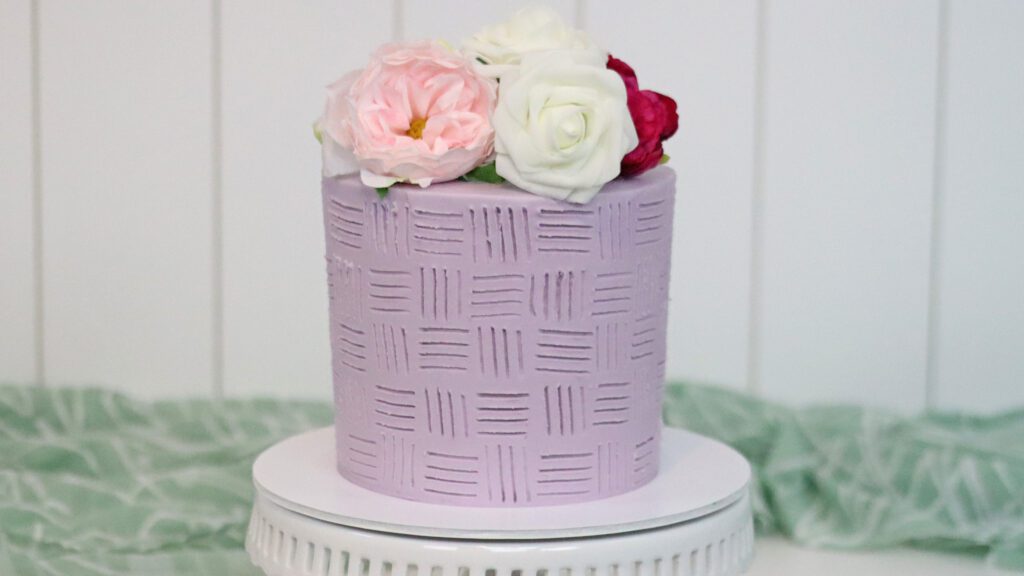
Tidy up the top edge and then put the cake into the freezer for exactly 15 minutes. You need to set these stripe grooves so that they firm up and hold their shape. Then pipe another colour into the gaps and smooth again straight away using your straight edged cake comb.
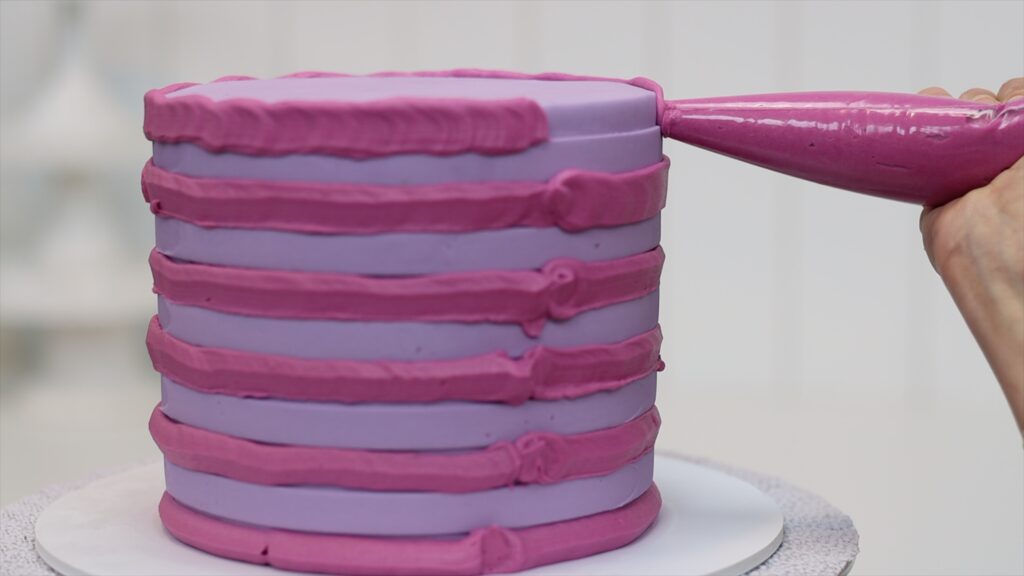
You'll smear the second colour of buttercream all over the cake! But keep scraping and the stripes will appear.
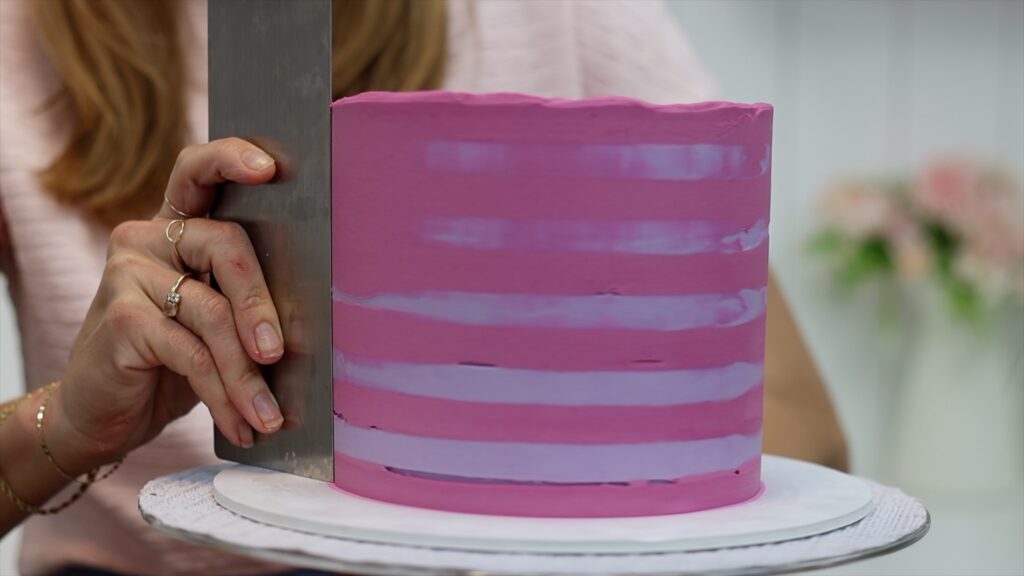
The stripes will get neater and neater as you take off all of the excess buttercream. For more in-depth instructions, check out this striped cake tutorial.
What's your favourite cake comb? Tell me in the comments and to learn more cake decorating techniques visit my cake school!
You can also watch a video of this tutorial on 4 trending cake combs to try:
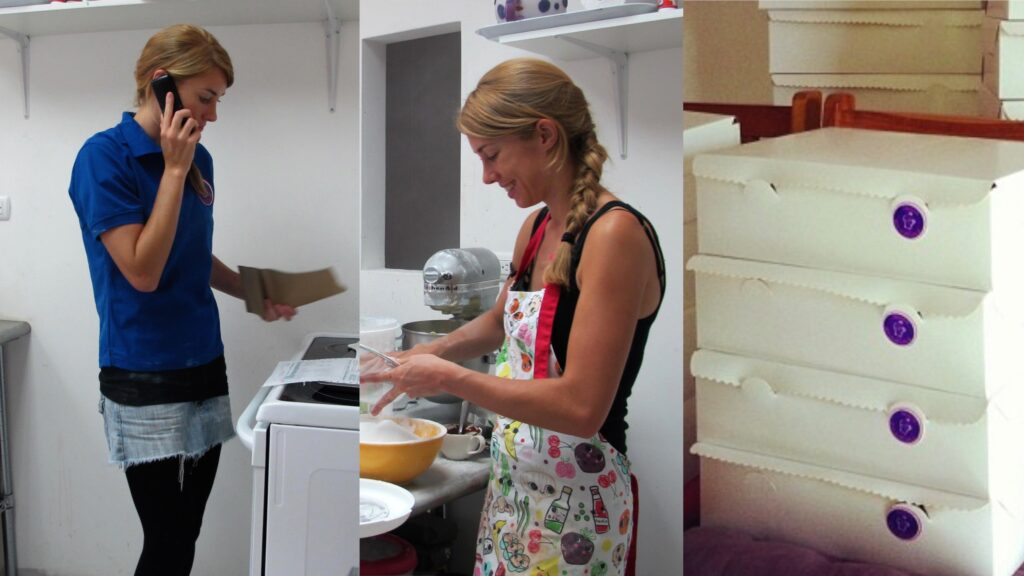
How to price cakes is a tricky topic. It's difficult to choose a number that we feel represents our time and effort. But it’s important to take the time to price cakes accurately to make sure you’re not losing money! In this tutorial I’ll walk you through 4 steps to calculate your cake prices.
The first step when you think about how to price cakes is to calculate your direct costs.
These are the costs of whatever you’re selling. The ingredients of your cake, filling, frosting, and any garnishes, and also any packaging materials.
For the ingredients, refer to your recipes and take out each ingredient. You’ll also need receipts showing the cost of each ingredient. If your supermarket or grocery store has their prices online, you can use their websites instead. This is a bit time consuming for your first recipe but gets much quicker after that!
There are three ways to work out the cost of each ingredient. I’ll show you how to do it for ingredients measured in grams, and also in cups or teaspoons, and in units, for example 2 eggs.
First, in units or items, for example eggs. Find the cost of the carton of eggs that you buy. Then divide that cost by the number of eggs in that carton. That’s the cost of one egg. If your recipe says 2 eggs, just multiply the cost of 1 egg, by two! Write down that cost on a piece of paper.
I’ll show you how to use my free recipe cost calculator spreadsheet in a minute, which makes this process really fast for all of your other recipes!
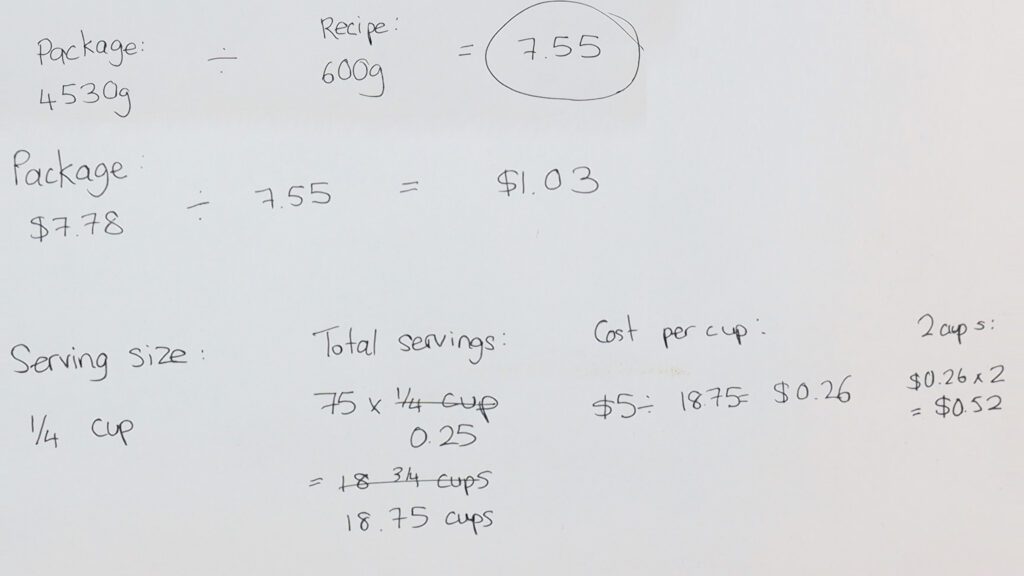
For any ingredients in your recipe that are measured in grams, check the packaging. Find out how many grams are in the package and write that down. Then look at your recipe and see how many grams you need and write that down.
Divide the total weight by the weight that you need and write down that number too and circle it. Now write the cost of the whole package and divide that by the number you circled. This is the cost of the amount of ingredient you need for your recipe:

For any ingredient measured in cups or tablespoons or teaspoons, look at the nutritional label. Look at what the serving size is, and how many servings are in the package.
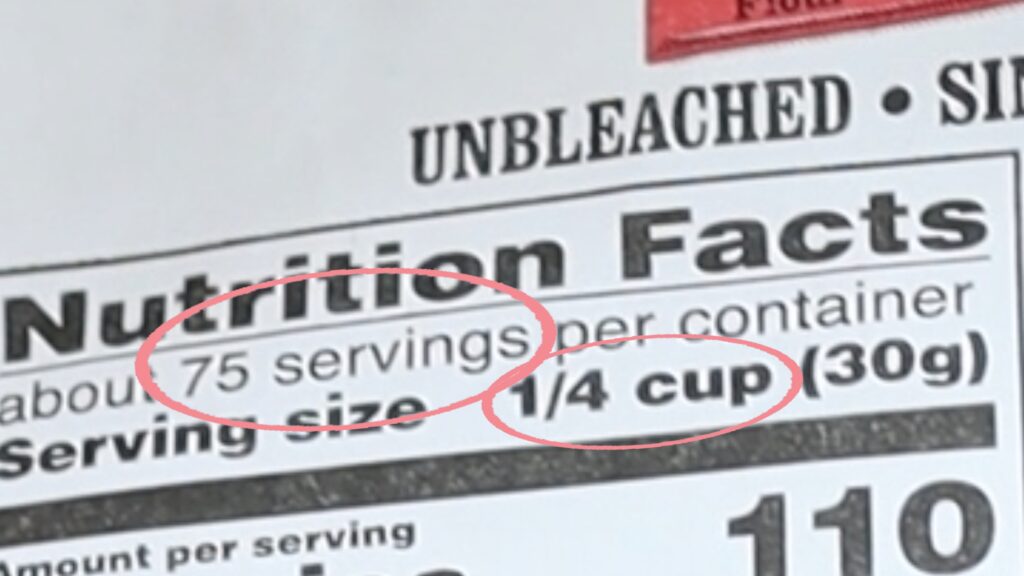
If the serving size is 1/4 of a cup and there are 75 servings in the bag, that means the bag has 75 1/4 cups in it. Multiply by 4 to get the full cups and you'll see there are 18 3/4 cups of flour in this bag. If the bag of flour costs $5, each cup of flour is going to cost 5/18.75 = 0.26 (26 cents). If your recipe uses 2 cups of flour, that will cost you 26 x 2 which is 52 cents.
Use these methods to calculate the cost of all of the ingredients in your recipe.
You might be shocked to see how much your ingredients cost per cake. Perhaps they add up to more than the price of a huge sheet cake at a grocery store or supermarket! We’ll talk about why that’s important in a minute.
If you use my free recipe cost calculator spreadsheet instead of just writing these numbers down, you can calculate the cost of all of your recipes in minutes.
The other direct costs to include are the costs or packaging. This includes the cake board, the cake box, and any ribbons or stickers. I’ll share more details for custom cakes and deliveries in a moment.
You might be thinking there are a lot more costs to making a cake, and you’re right! Those are coming up next, starting with your indirect costs.
Indirect costs are the things that aren’t going to be boxed up and given to your customer but still play a part in making it possible to make your cake. For example:
We’ll come back to the mixer and any other investments you make to be able to make cakes.
Make a list of all of the other indirect costs that are necessary to make your cakes. Include how much each one costs per month or per year. Then work out how many cakes you sell each month. This could be an average of how many cakes you sold in the last six months.
Now it’s time to spread out your indirect costs between your cakes so that you include them in your prices. For example, maybe you need to drive to Costco once a month to buy your baking supplies. If you estimate that the fuel for your car is going to cost $5 and you make 5 cakes a month, that’s a $1 cost added to each cake you make.
Maybe your gas or electricity or water costs are $20 higher on the months you make cakes. Again, let’s say you make 5 cakes a month so that’s $20/5 = a $4 cost added to each cake. This sounds trivial because the numbers are small but everything adds up!
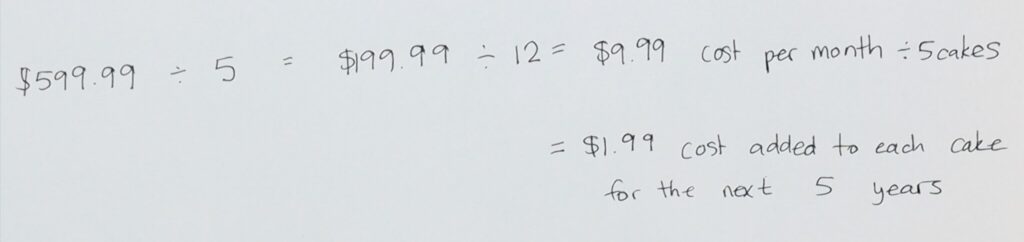
For investments like a bigger mixer, first think about how long you’re planning on using it for. If it’s 5 years, divide the cost of the mixer by 5 years. Then divide that number by 12 to calculate the cost of one month. Divide that by however many cakes you sell in a month. Now you’ve spread out the cost of that mixer between every cake you sell for the next 5 years. Approximately at least!
The next thing to include when you price you cakes is the cost of your time. You might think you don’t have to charge for your time because you enjoy making cakes. Or because you’re at home anyway. But if you weren’t making a cake for someone else you could be doing anything else that day! When you dedicate time to make a cake you need to include that as a cost of that cake.
You might start by charging the minimum wage in your area, say $10 an hour. If you spend 4 hours baking and frosting and decorating you’ll add $40 to the price of your cake. But as your skills improve you might increase your hourly rate and increase the price of your cakes.
Before moving onto the final part of the price (profit!) let’s talk about how to price custom cakes.
For custom cakes you have to consider the additional cost and time of any custom details of that cake. If someone wants a particular cake topper, the topper and shipping are a direct cost. These should be included in your price. If someone wants a time-consuming design like layered stencil character, estimate how much time that custom design will take. Then multiply that by your hourly rate.
When I had a cake shop I had set prices for simple, more elaborate and very elaborate decorations. The prices were based on how much time I thought the decorations would take me to make. This saved me a lot of time pricing out the decorations individually for each cake order. I would add on the cost of any special materials like an icing sheet, for example. It was a quick and simple way of pricing custom cakes.
I’ve also worked at bakeries where they have set prices for every single detail. For example they charged for each colour and for the percentage of the cake that would be covered with decorations. Charging for each detail added to a cake will give you the most consistent and accurate pricing. But it’s also very time consuming to prepare a cake quote with that method. Especially if the customer wants quotes for a few different designs!
Now, back to my comment earlier about cakes from supermarkets or grocery stores. A custom cake is obviously very different because the ingredients are better quality and the style of decorations is very different. So don’t panic when you see that your costs are going way beyond the price of one of those cakes. You’re making and selling something completely different and the price will reflect that. People know (or should know!) that prices will be higher for cakes that are homemade or from a small business or high-end bakery.
For deliveries you’ll also need to incorporate your costs. These are your gas or petrol and the wear and tear on your car. If you’re in the US there’s an IRS standard mileage cost for employees to cover both of these. Then you’ll need to include your time. This is your hourly rate multiplied by your estimate of how long the delivery will take, including setup if necessary.
The final thing to add to your price is profit! Your price so far covers the costs of making a cake: the direct costs, indirect costs, and labor. But adding on a percentage of profit is essential to be able to grow your cake business. Then you can invest in new tools, cake decorating courses, marketing like social media posts or hiring help. You might also want to save up to rent a commercial kitchen or a storefront.
It sounds like a great idea, but how do you know how much profit you should make on each cake? This might be somewhere between 20% and 40%, depending on your experience and your location. And this is where your competition comes in to play. Look around and see what your competitors are charging for similar cakes in your area. Obviously, a supermarket or grocery store cake isn’t going to be the same price as a custom cake. And a buttercream cake probably isn’t going to be the same price as a fondant cake. And a cake in New York City is going to be more expensive than the same cake in a small town because costs in those cities are so much higher. So look around to find local cakes that really are similar to yours and compare your prices to those. Then see what percentage you can add to your prices to be similar to those.
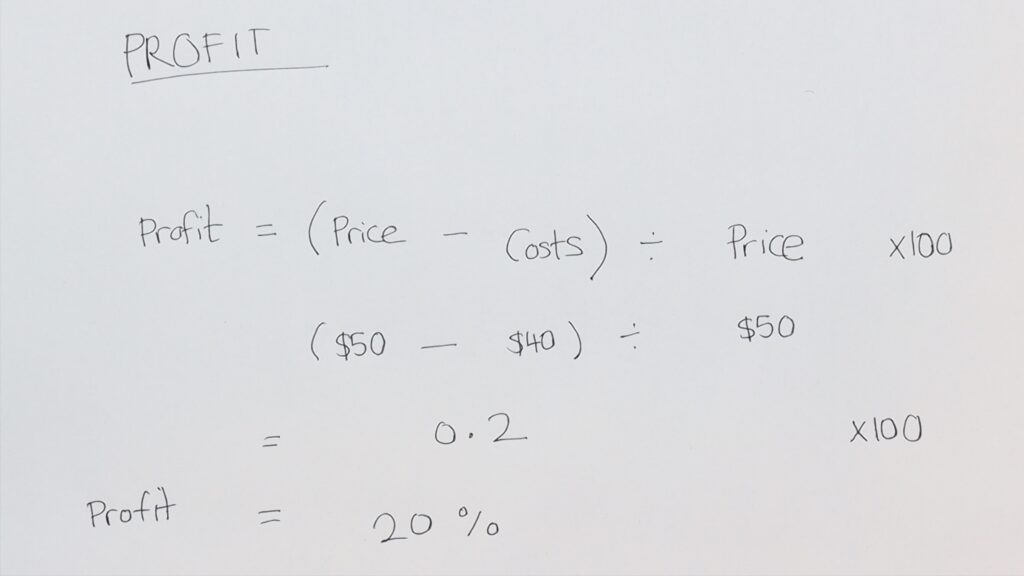
You can find your current profit margin is by using the costs you’ve calculated and the prices you’ve set. Your profit is the price you sell your cake for minus your cakes to make it, divided by the price. Multiply this number by 100 to make it a percentage. If your cake price is $50 and it costs you $40 to make, your profit is 50-40 = 10 divided by your price ($50) = 0.2. Multiply this by 100 to make a percentage: 20% profit.
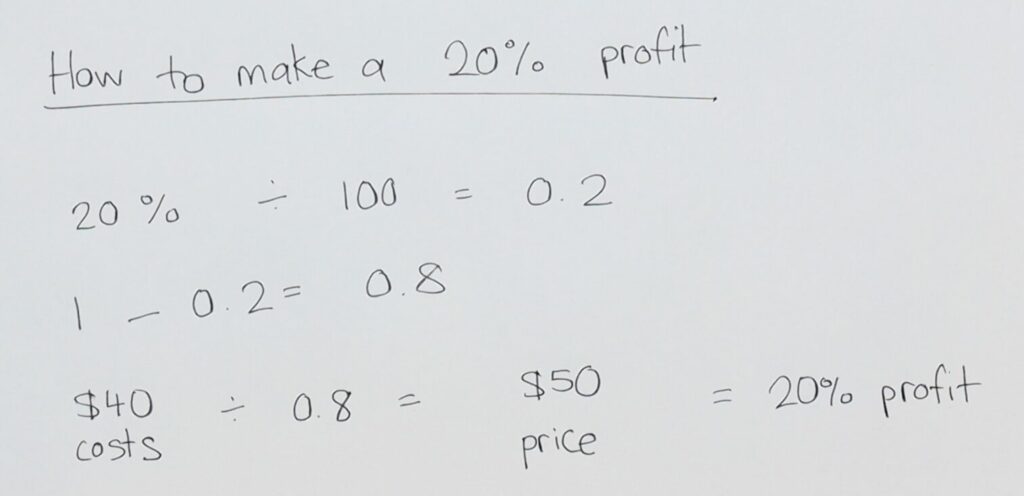
You can do this the other way around by choosing your profit margin first. If you know your costs are $40 and you want to make a 20% profit, flip the formula around:
Start with your desired profit and divide by 100: 20% / 100 = 0.2. Take that away from 1, which here is 0.8. Then take your costs, $40 for this example, and divide by 0.8. This gives you the price you should charge ($50) to get a 20% profit.
I really hope this is helpful! I think the key points to remember when you’re pricing your cakes are:
Please use the comments section to ask me any questions you have about this! Or tell me about your cake business - a success, a struggle, or what stage you’re at!
And if you want to improve your cake decorating skills, visit my cake school to learn hundreds of cake decorating techniques and designs!
You can also watch a video of this tutorial on How to Price Cakes:
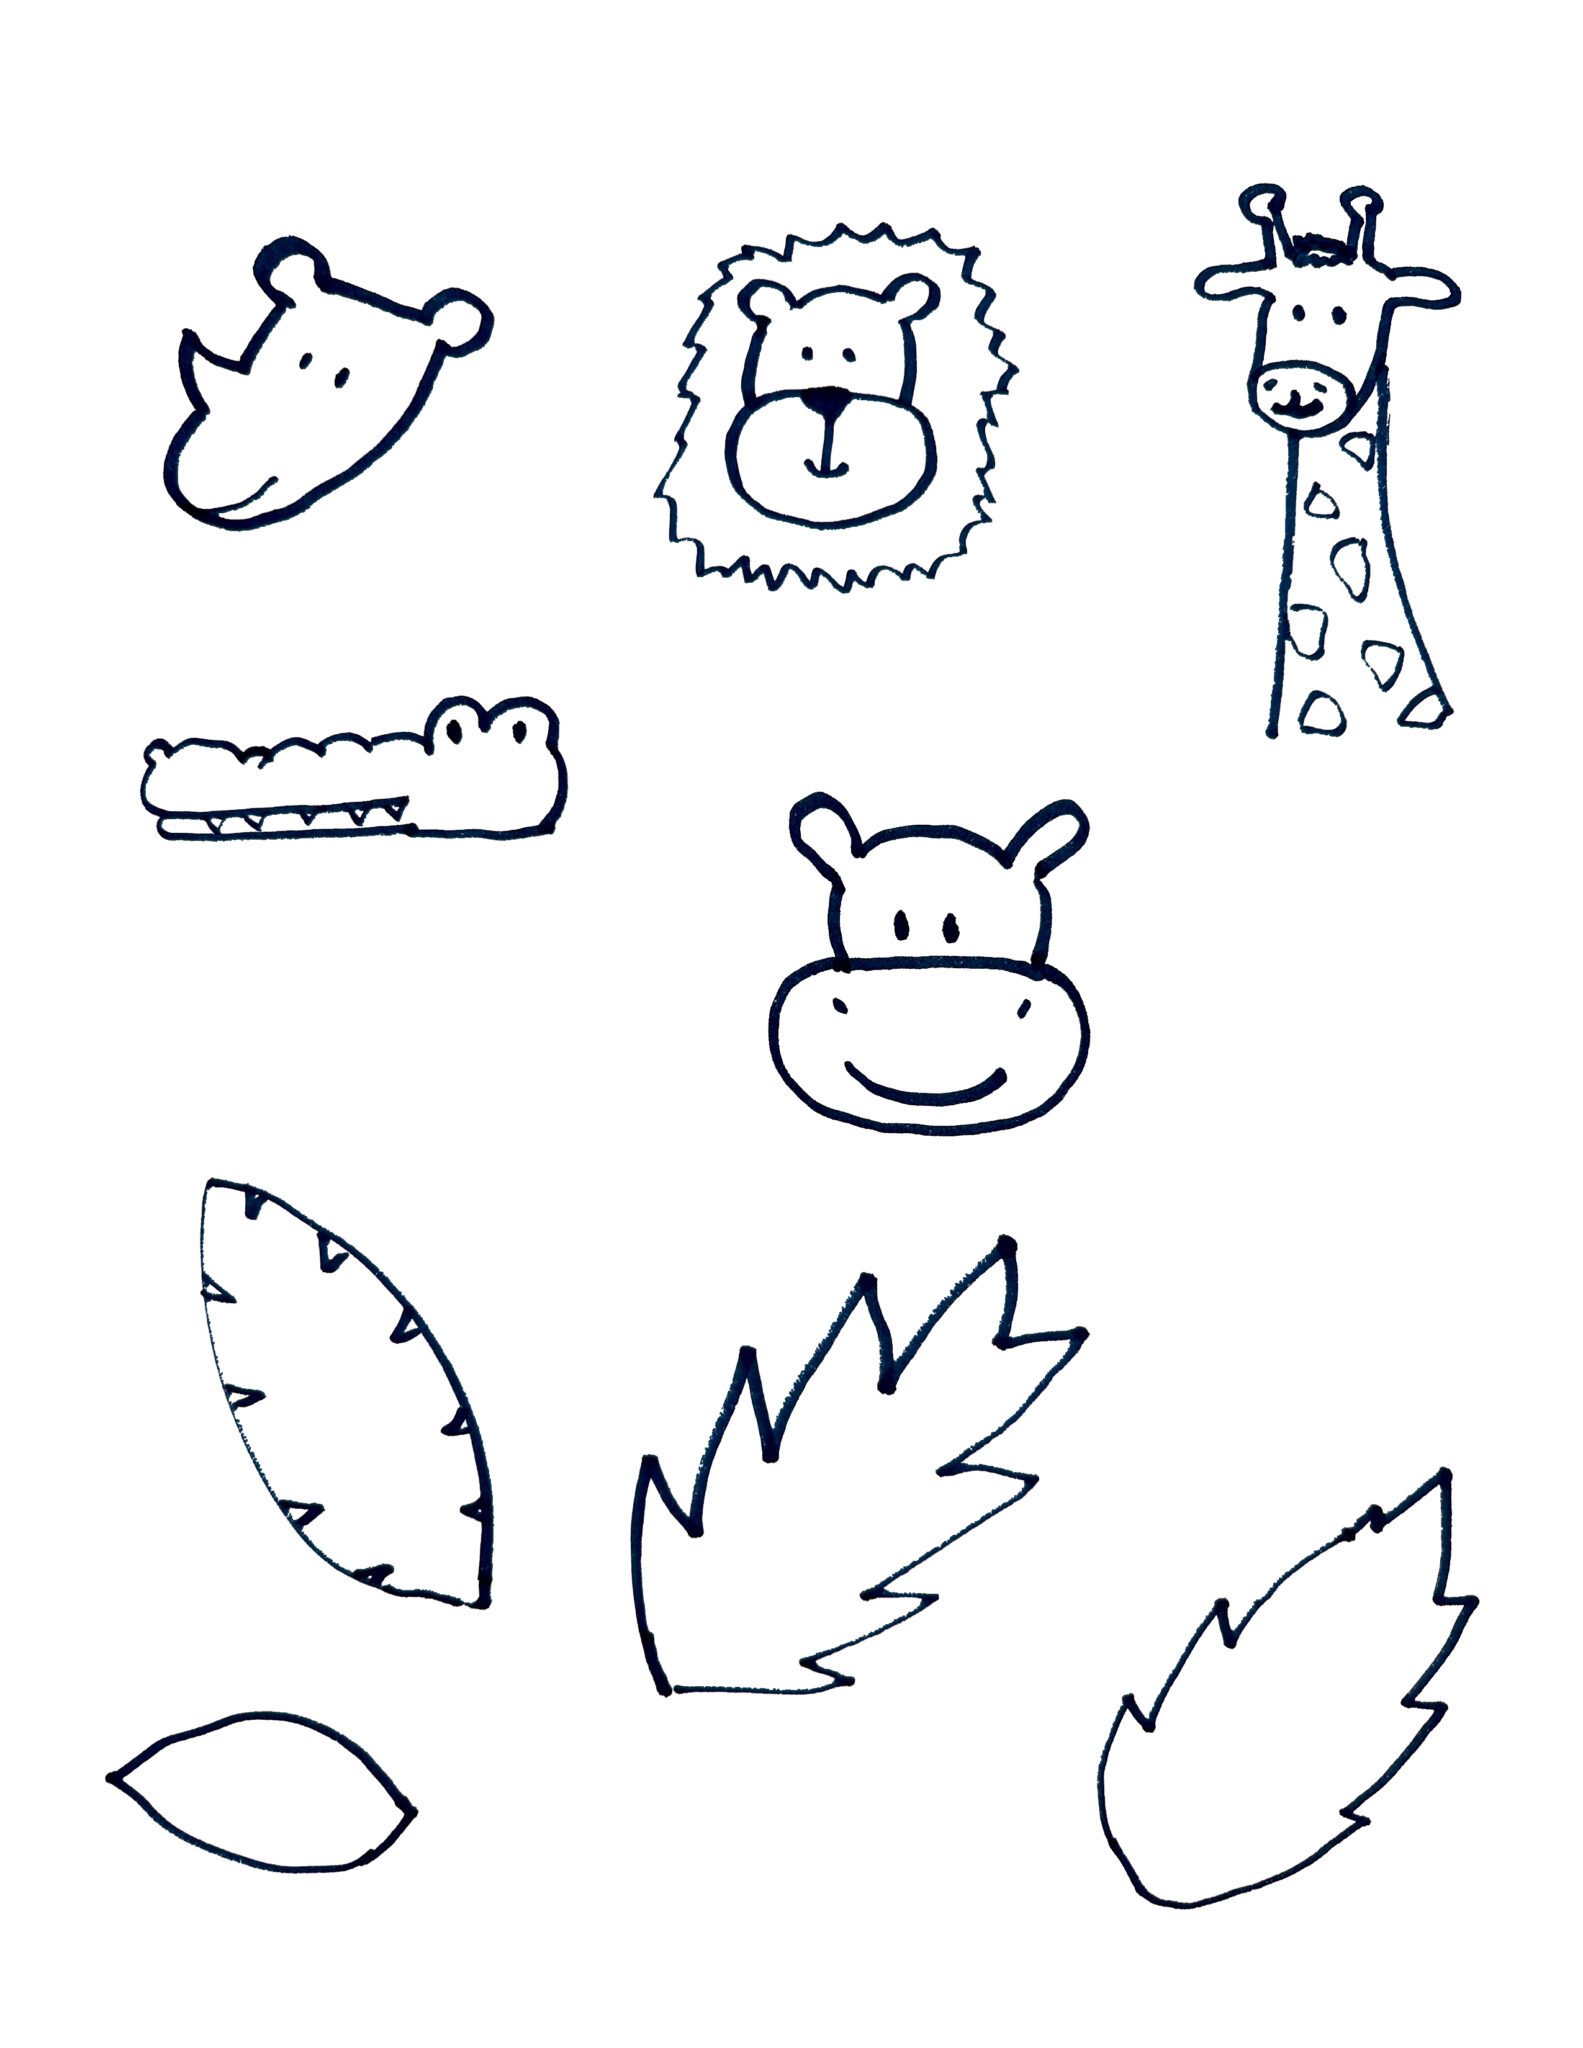
Make this adorable and easy jungle theme cake with just buttercream and parchment paper!
I’m using my Very Vanilla cake to make four 6 inch layers for this jungle theme cake. I prefer a tall cake for this design so there’s lots of room on the sides for decorations. You could do the decorations on the top instead if you make a larger, shorter cake.
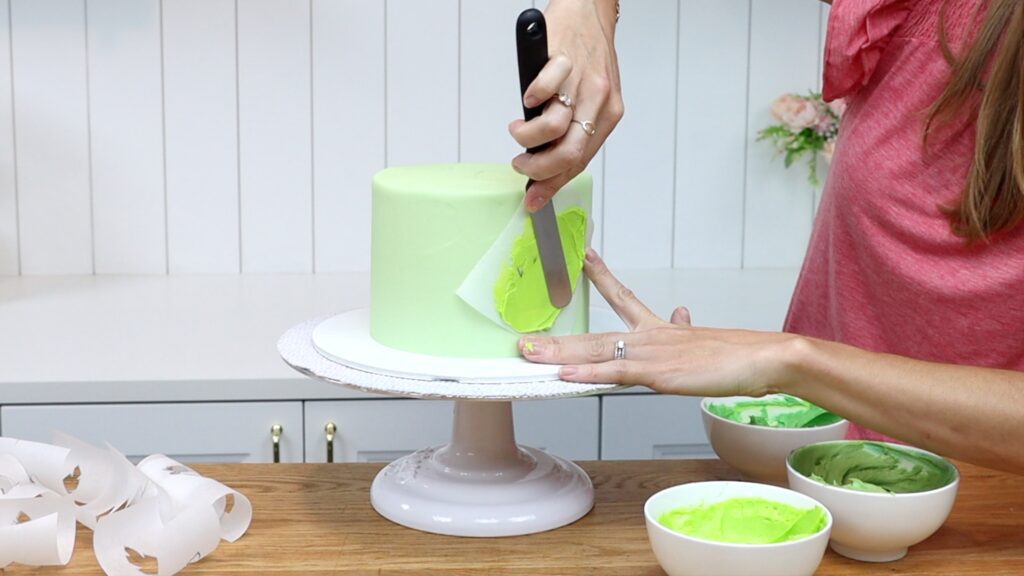
Make one batch of my 4 Minute Buttercream for a four-layer 6 inch cake or a two-layer 8 inch cake. Scoop out about 2 cups to use for the jungle animals later, covering that bowl so it doesn't crust. To the rest of the buttercream add green gel to tint the filling and frosting. You can use any buttercream recipe as long as it crusts when it sets, which is necessary for the jungle theme cake design.
Layer your cake and filling to assemble your cake. Then chill it before giving it a crumb coat and then a final coat of frosting. If you need step by step instructions for this part, read my tutorial on 10 Steps to Make a Cake. Put the cake in the fridge for at least an hour before you decorate it to set the frosting.
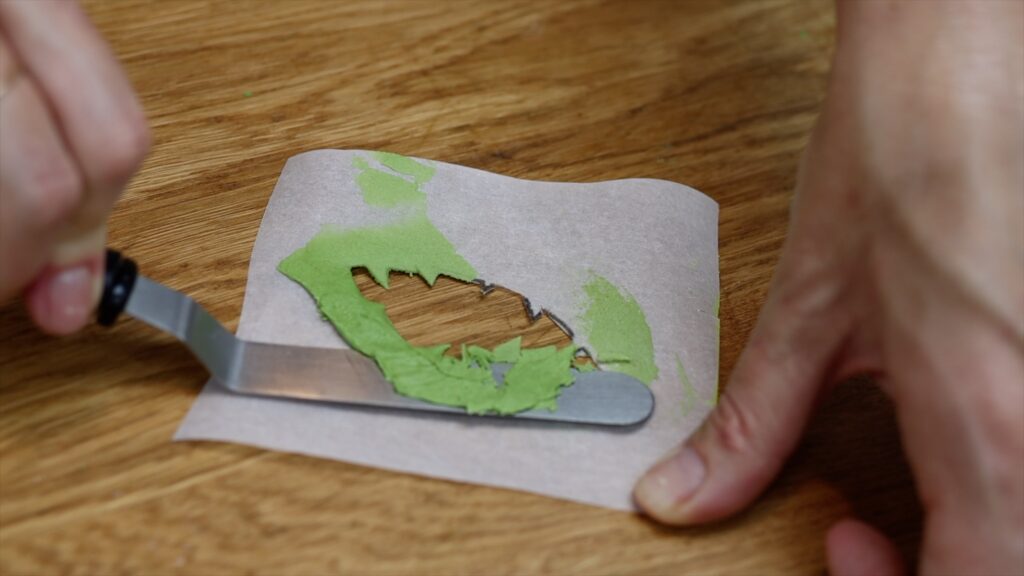
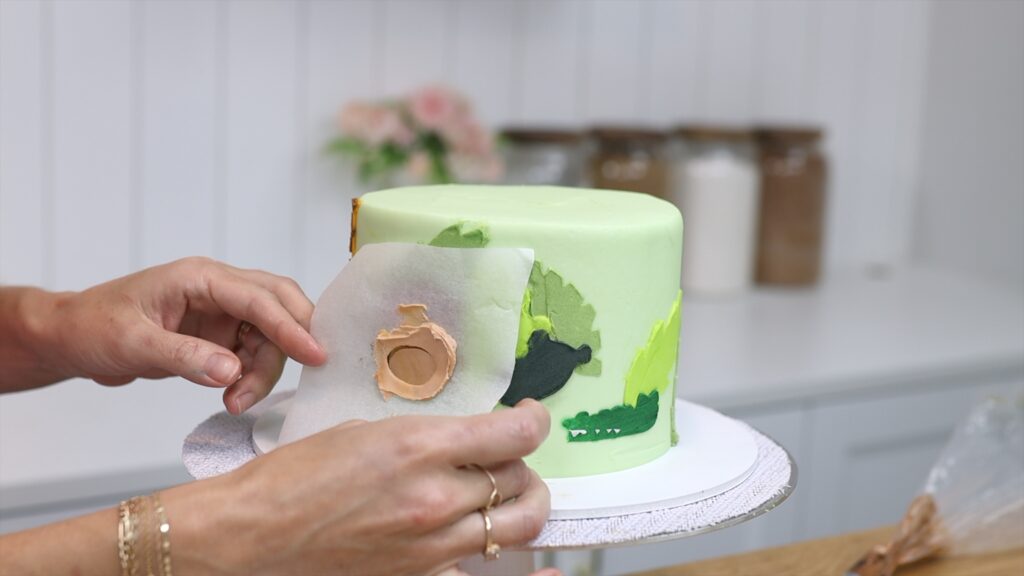
For the jungle decorations, make your own cake stencils with just parchment paper or wax paper, a pencil, and scissors.
Draw jungle leaves and jungle animals or print ones you like or use my free template. Choose line drawings rather than more detailed designs.
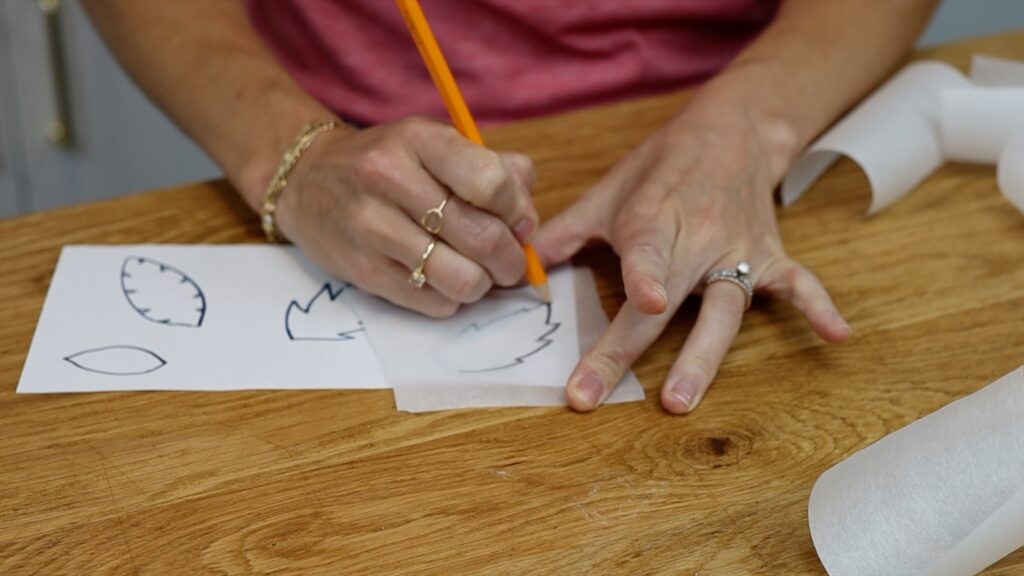
Cut out several pieces of of parchment paper or wax paper. If the paper comes from a roll it will curve, which makes it easer to use for stencils. You’ll need a separate piece for each leaf and animal with at least an inch of paper around the outline. Trace the outline of each leaf and animal onto its own piece of paper. Use a pencil, which works better than a pen on the surface of parchment or wax paper.
You'll need multiple stencils for each leaf you've drawn or printed so that you can cover your cake with leaves. For the animals, you’ll need a separate stencil for each colour of every animal. For example, for this rhino I’m making one stencil for the grey head and then another for the white tusk. You’ll see why in a minute!
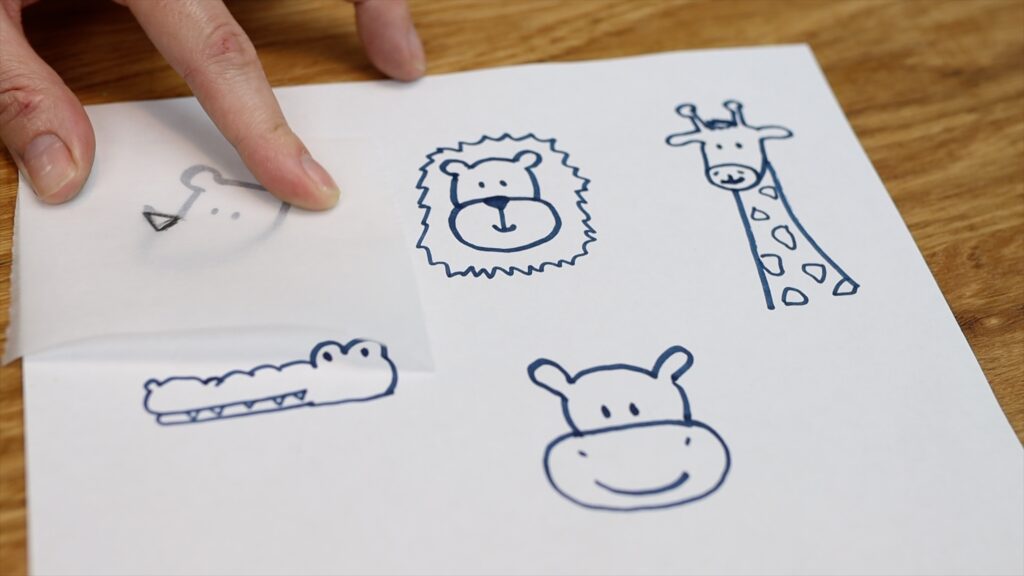
Cut out the leaves and animals, leaving the paper around them intact, to make your own stencils.
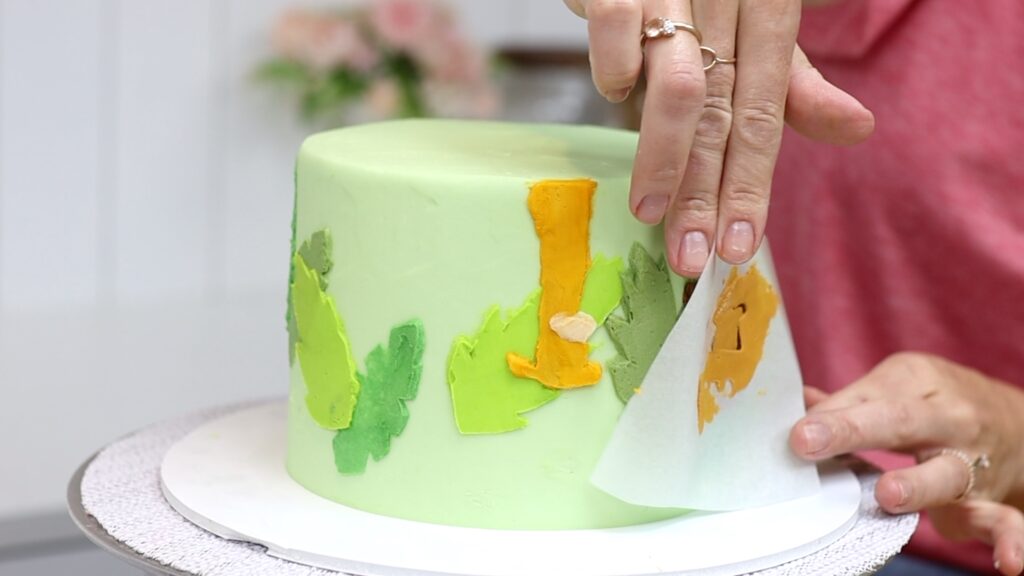
To make buttercream leaves on your jungle theme cake, start by tinting some green buttercream. Since I used light green for the frosting of the cake, I started with that. Add different amounts of green to make some darker than others and play around with other colours, too. Adding yellow will make the green brighter whereas adding pink or orange or brown will make the green duller.
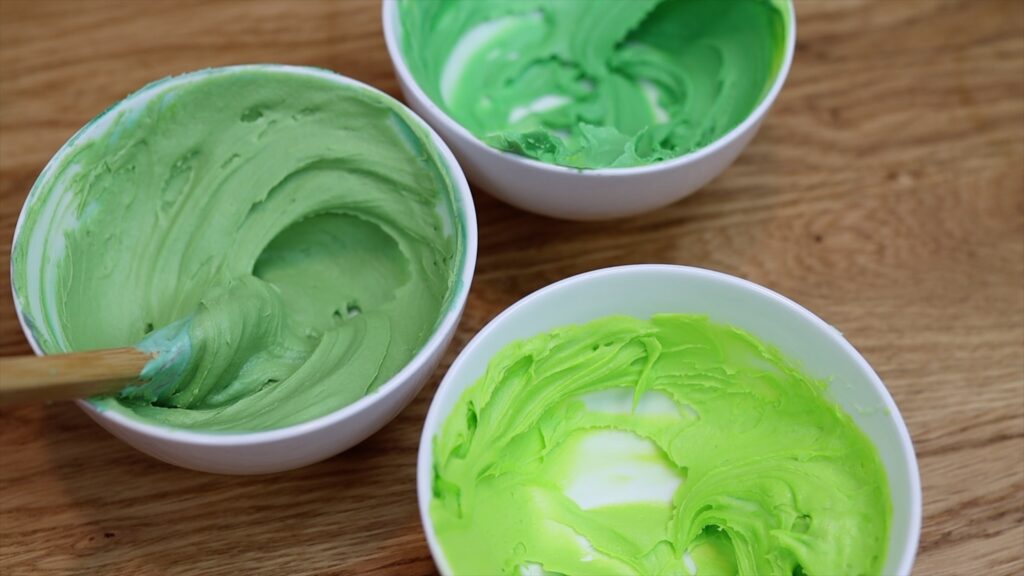
You only need a small amount of buttercream for each of your shades of green. This is plenty for my tall, 6 inch cake. I’d say 1/4 of a cup of each colour would be fine.
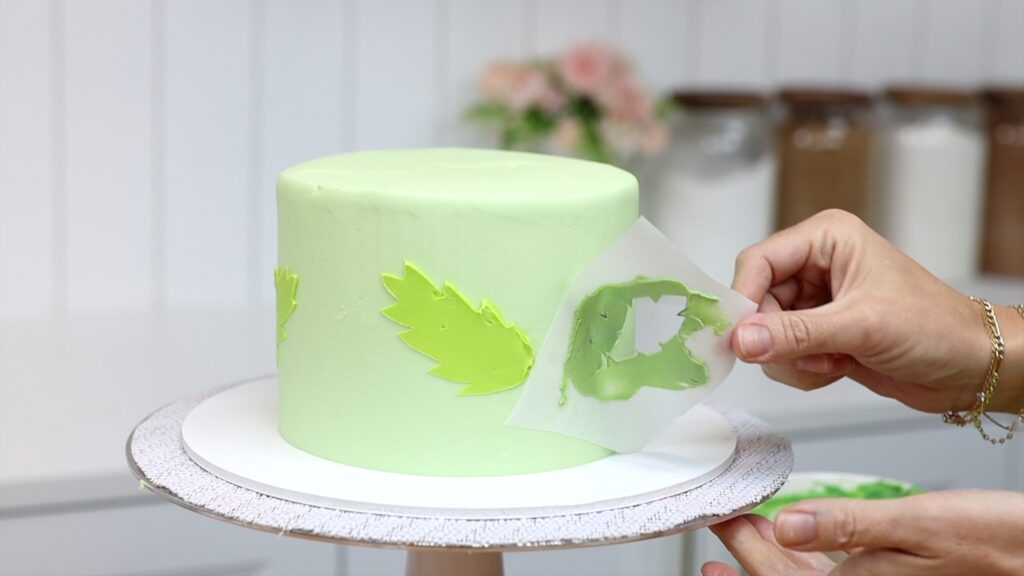
To use your stencils, let the curve of the parchment or wax paper stencil wrap around the cake. Then spread buttercream over the leaf shape. You’ll need to press the stencil against the cake on both sides to hold it in place as you spread. Try not to pull your spatula straight away from the cake because that will pull up the buttercream and stencil. Instead, swipe it away diagonally and that way you won’t move the stencil.
Scrape over the buttercream a few times to take off the excess to leave a thin, smooth layer behind. The thinner the buttercream, the neater the edges of the leaf will be. Peel the stencil off carefully, from one side to the other. If the stencil has moved during the process it will smudge the outline of your shape. That’s easy to fix by scraping off the smudge with a toothpick or other small, sharp edged object. It works because the stencil buttercream is still soft so easily removed. In contrast, the frosting on the cake is cold and hard so you won’t damage that.
Switch between colours for your leaves as you work your way around the cake. Be careful that each stencil doesn't touch any the leaves already on the cake because the paper will damage the buttercream of those leaves.
When you run out of space for leaves, put the cake in the fridge for 30 minutes or the freezer for 5 minutes. This will set the leaves and meanwhile, you can scrape the buttercream off your stencils to re-use those stencils.
When the first round of leaves have set in the fridge or freezer, add more leaves in the spaces between them. Now that the first leaves have set, it’s fine to layer the stencils on top of them because the paper won’t damage the cold, firm buttercream of the first leaves.
Then put the cake back in the fridge or freezer while you prepare to make your jungle theme cake animals!
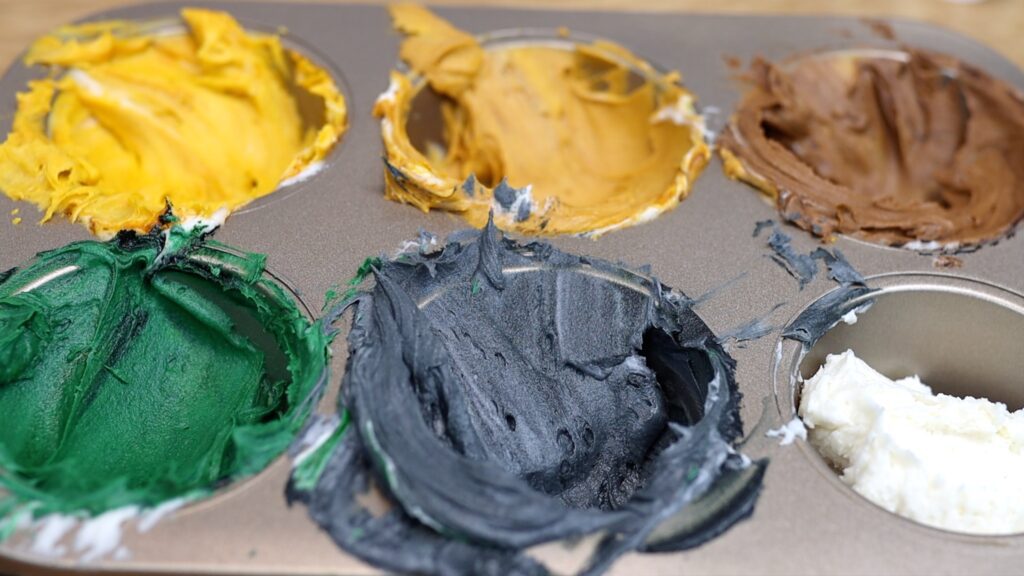
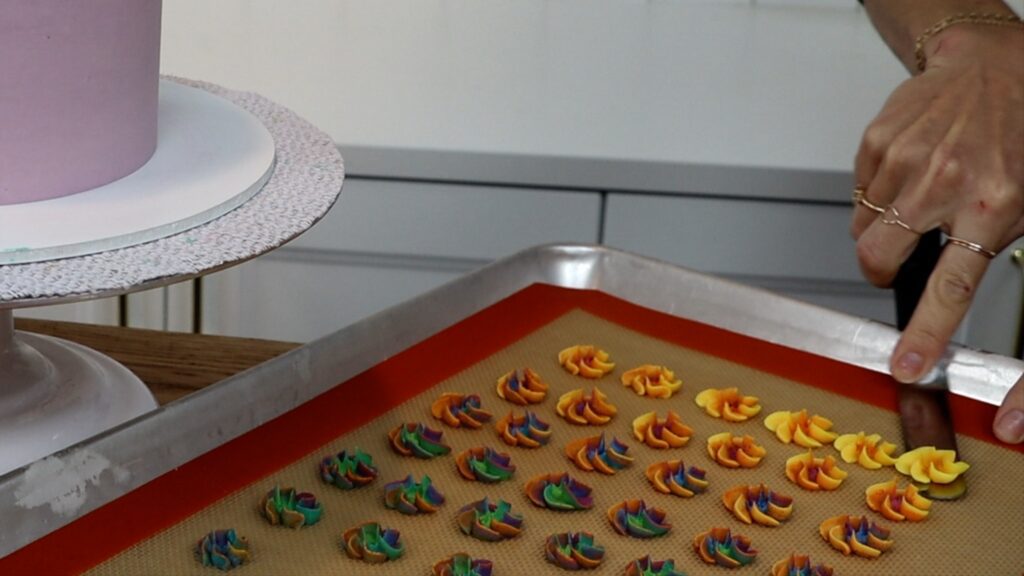
Tint the colours you’ll need for your animals. For small amounts of colours I like to use a cupcake pan to mix them so that I only have one pan to wash at the end instead of lots of little bowls!
When the leaves on the cake have chilled and set, use the animal stencils on the cake. Start with the largest stencil for each animal. For my cake, that's the mane for the lion, the neck and head for the giraffe, and so on.
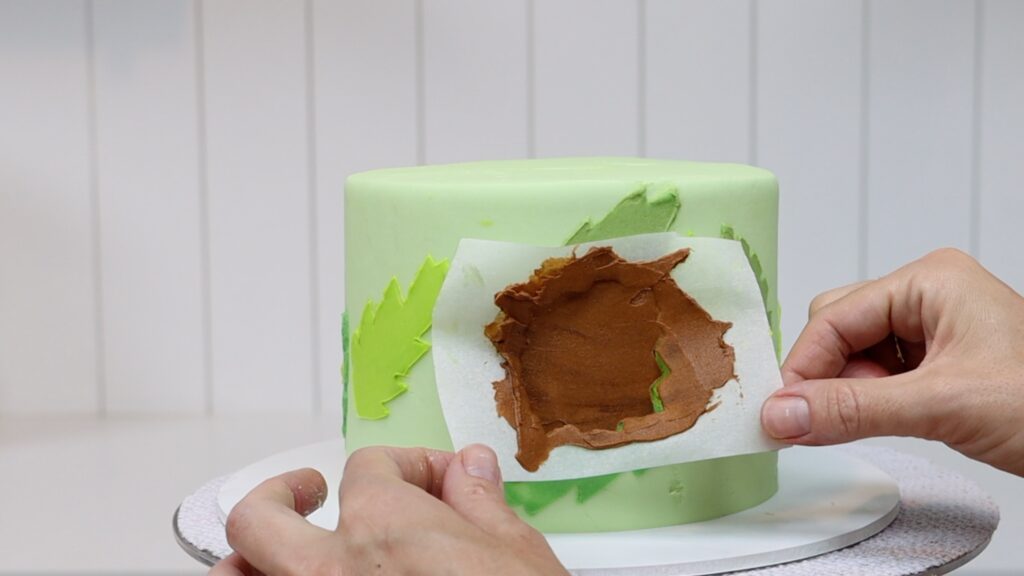
Just like with the leaves, make sure each stencil doesn’t touch any animal already on the cake. Since all of the animals are still soft, the paper of a stencil will damage them. Keep your toothpick handy to scrape off any smudges straight away. It's best to do these touch-ups as soon as you peeled off a stencil, while the buttercream of the animal is still soft and easy to scrape off.
Put the cake back into the freezer for 5 minutes or the fridge for 20 minutes. The first part of each animal needs to chill and set, so it's firm and not sticky. Then add the next detail to each animal. These are the stencils you made for the different colours of each animal: the top part of the face for the lion, the tusk for the rhino, the teeth for the crocodile etc.
Start with the largest section of each animal and then add the details one colour at a time. Chill the cake after each round of details, so after adding one detail to each animal. By doing this in stages, your stencils won’t damage any of the details that are already on the cake.
I mentioned that a thin layer of buttercream is best for stencils so that the edges will be neat when you pull the stencil off. But if there’s a dark colour underneath your stencil, like the dark brown mane of this lion underneath the light brown muzzle, you’ll need a thicker layer to cover up the dark colour underneath.
For the eyes, I’m using my dark brown buttercream in a piping bag. I've chosen a #3 piping tip, which has a small round shape. I'm piping little lines or dots for each eye.
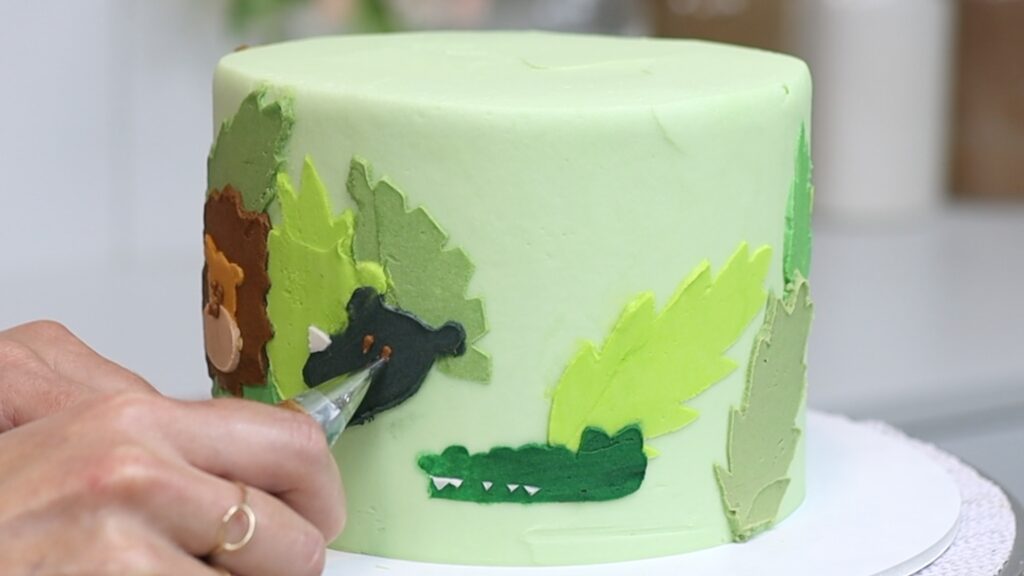
Then I’m using a toothpick to draw facial expressions like the crocodile's smile.

To add some texture to the cake, use a leaf tip like a # 352. Mix together your remaining green buttercream from the leaves and spoon it into the piping bag. To make the buttercream ruffle, wiggle your wrist up and down slightly as you squeeze the piping bag to push the buttercream out.
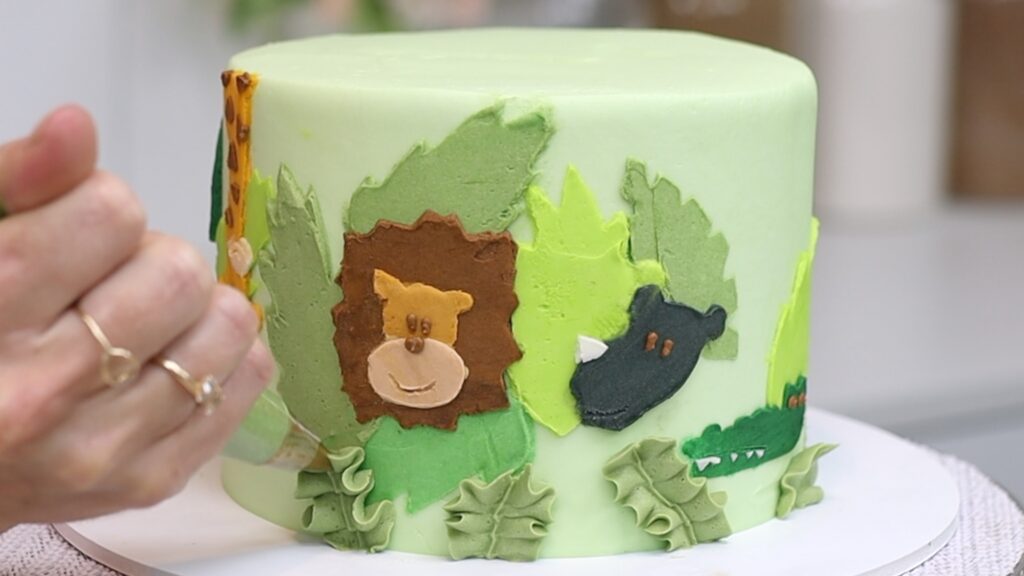
A grass tip is the quickest way to fill in the gaps around the bottom edge, instead of piping each blade of grass individually with a small round tip. Rest the tip on the cake board and squeeze the bag to push the buttercream out. Then pull upwards as you keep squeezing, to pipe long blades of grass.
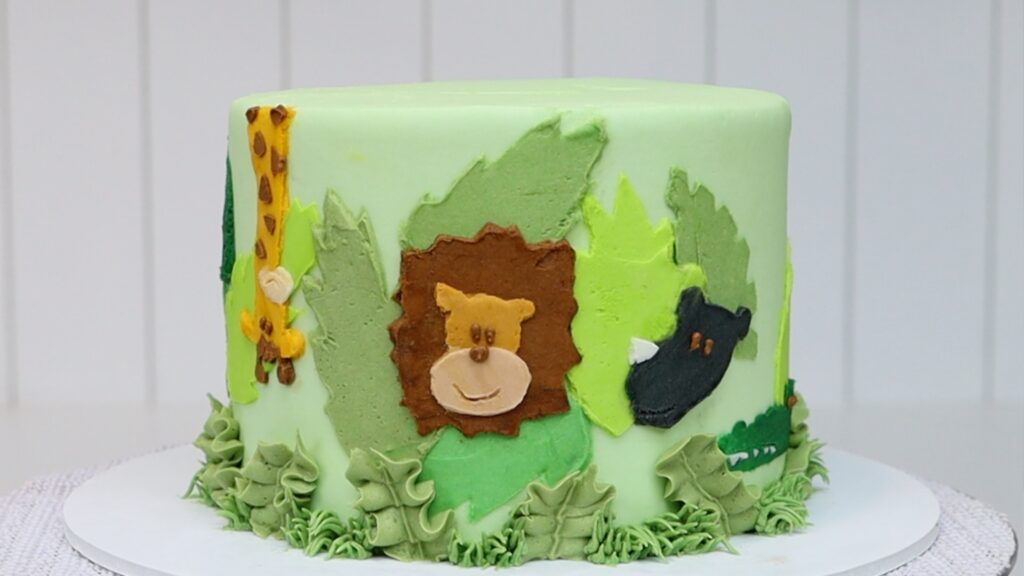
Isn’t this cute? And so easy and affordable to make by using homemade stencils.
You can keep this in the fridge for three days after you make it. Take it out two hours before you serve it, to let the cake and buttercream warm up to room temperature. That’s when it will taste the best!
You can watch a video of my tutorial on this jungle theme cake below. Ask me any questions in the comments section below and visit my cake school to learn hundreds more cake decorating techniques and designs!
Make a cake that's delicious and beautiful by following these 10 steps! If you struggle with leaning cakes, uneven frosting, dry cakes or air bubbles or bulges in your frosting, these tips will be really useful for you too.
Before you start baking all of your ingredients should be at room temperature. Take refrigerated ingredients like eggs, butter and milk out of the fridge at least 2 hours before.
If you forget, put eggs in a bowl of warm water for a few minutes to take off the chill. Microwave ingredients like milk or butter for 10 seconds to warm them up slightly. Room temperature ingredients mix together the best and this will result in a light, moist cake.
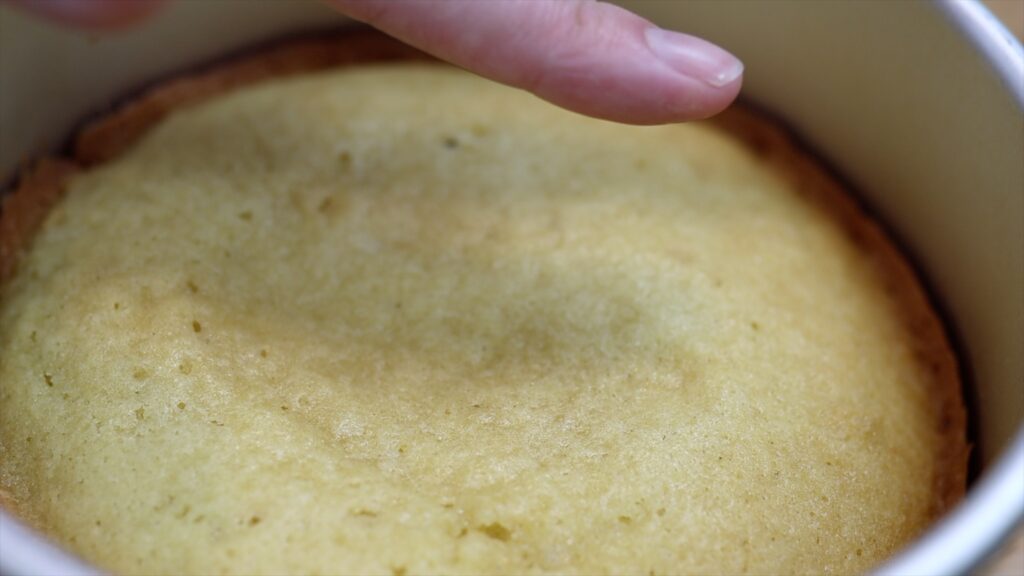
Dry cakes are the worst and to avoid that happening, check your cakes 5 minutes before the recipe's baking time. Poke them gently with your finger and if you leave a fingerprint behind, bake them for a few more minutes.

If cakes spring back up like in the photo below, they're done.
Leave the cakes in their pans for about 10 minutes to cool slightly. Then turn them out onto a wire rack and leave them to cool, which takes an hour or two. Meanwhile make your filling and frosting. This is my 4 Minute Buttercream and I love it because it's easy to make, it's delicious and you can use it as a filling and frosting.
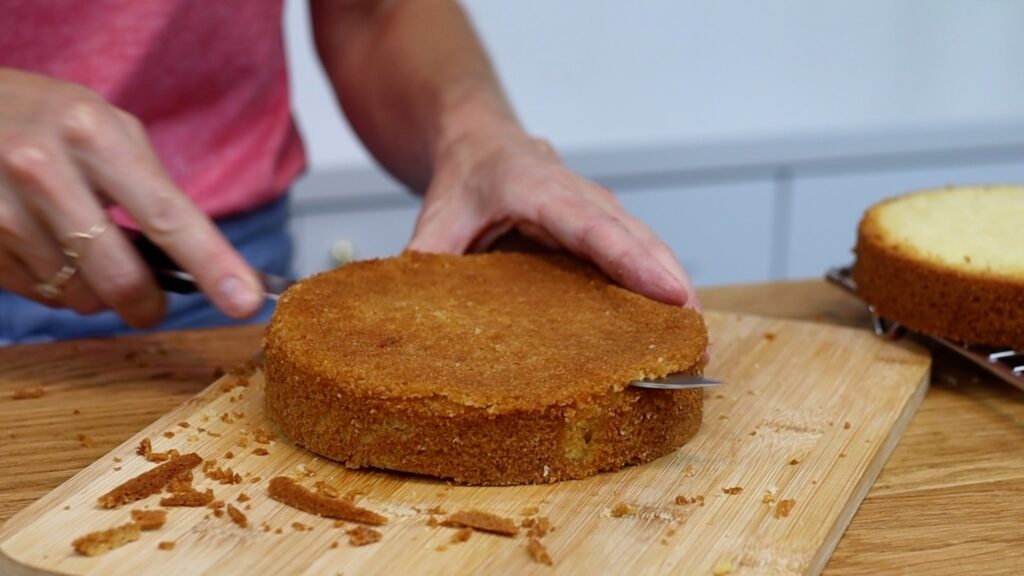
Now, back to how to make a cake. For the neatest slices and to avoid leaning cakes, level each layer after it cools. Use little sawing motions with a serrated knife like a bread knife.
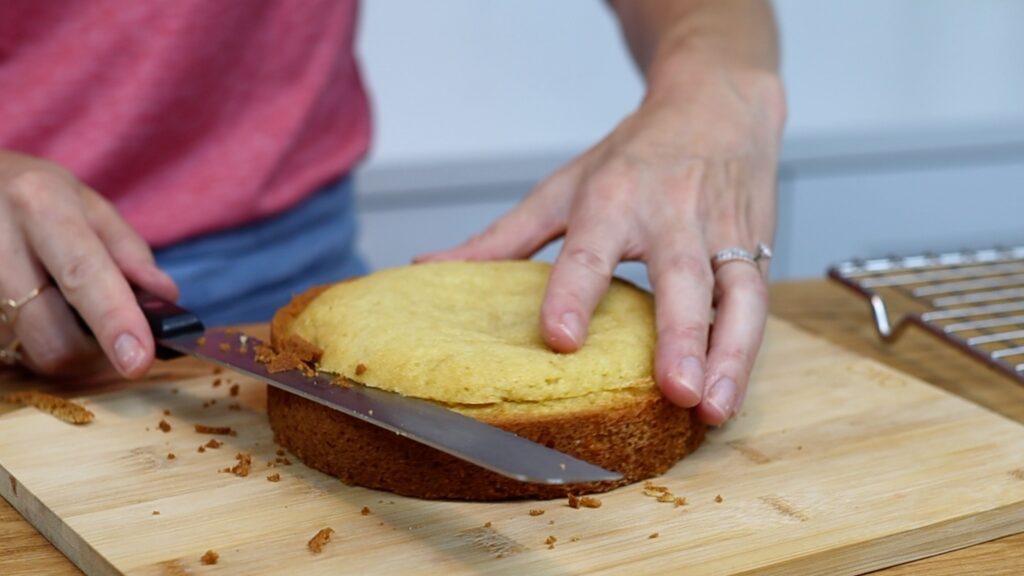
Optionally you can trim the bottom off too. This is the part that was touching the baking pan so it's caramelized and has a darker colour.
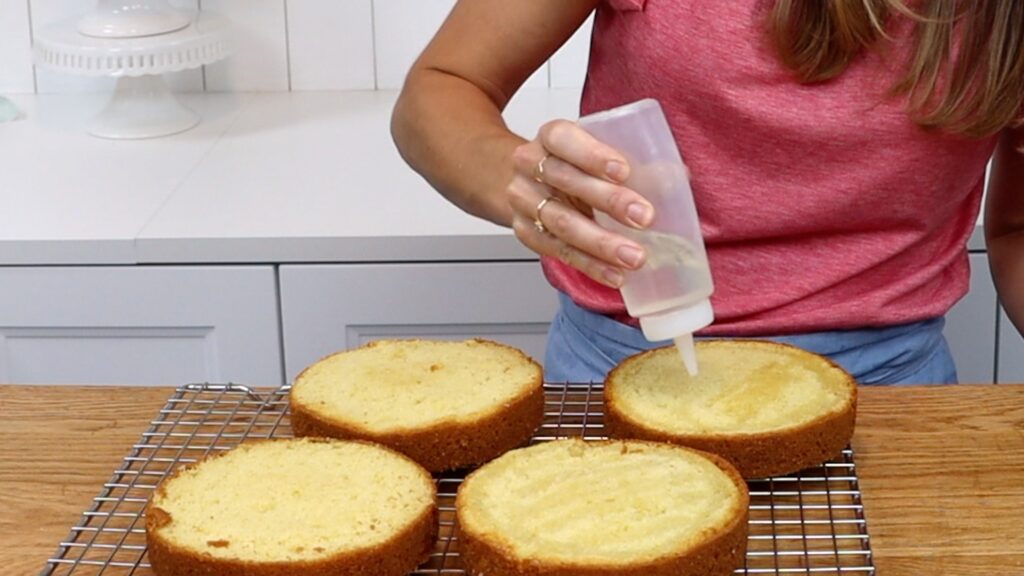
If you're not going to eat cakes on the same day, keep them moist with simple syrup. This is just equal parts of water and sugar. Half a cup of each is enough for most cakes. Cook in a pan on the stove top over medium heat or microwave for 30 seconds at a time. As soon as you see bubbles, turn the heat off or take out of the microwave. Let the syrup cool and then drizzle over cakes with a squeezy bottle or brush with a pastry brush. Pay special attention to the edges, which dry out the fastest.
To make a cake stable, the layers need to be level but so does the filling. Spread your filling flat in between each layer, ideally using an

Instead of piping you can scoop your filling with a spatula or spoon and spread it straight onto the layers.
Get down to eye level with your cake and check that each layer is centered on the one below. This will make a straight cake instead on one that leans to one side.
Buttercream is the easiest filling to use because it gets firm when it sets. This will help hold your layers in place when you move or frost cakes. For other fillings, use a buttercream dam for stability.
If your filling is sticking out, spread it flat with a spatula. If you don't, it will set like this and can get in the way when you frost the cake.
Chilling cakes at this point is essential. You can do this in the fridge for 30 minutes or in the freezer for 15 minutes. Filling sets and the cake layers don't slide around when you frost them next.
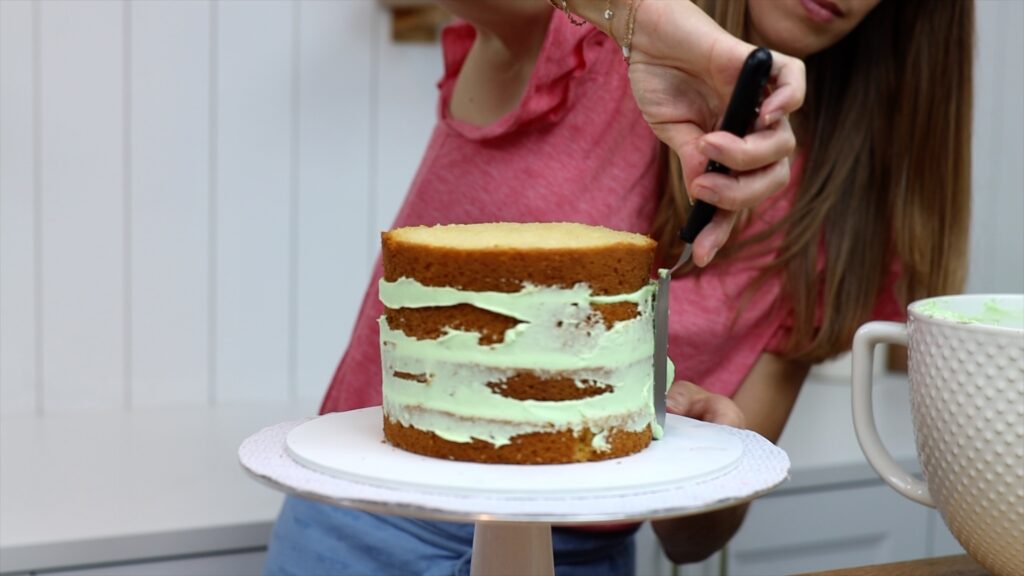
A crumb coat is the first layer of frosting. Don't skip it when you make a cake! It traps any crumbs that come off so that they don't get into your final layer of frosting. This way you won't see any crumbs on the finished cake.
The goal is to cover the cake completely with frosting. Spread it all the way down to the board so you can't see the cake underneath anywhere. The frosting doesn't need to be perfectly smooth because you're going to cover it up soon. But first, the crumb coat needs to set. Put the cake back into the fridge for 30 minutes or the freezer for 15 minutes. When you take it out, the frosting should be cold and firm.
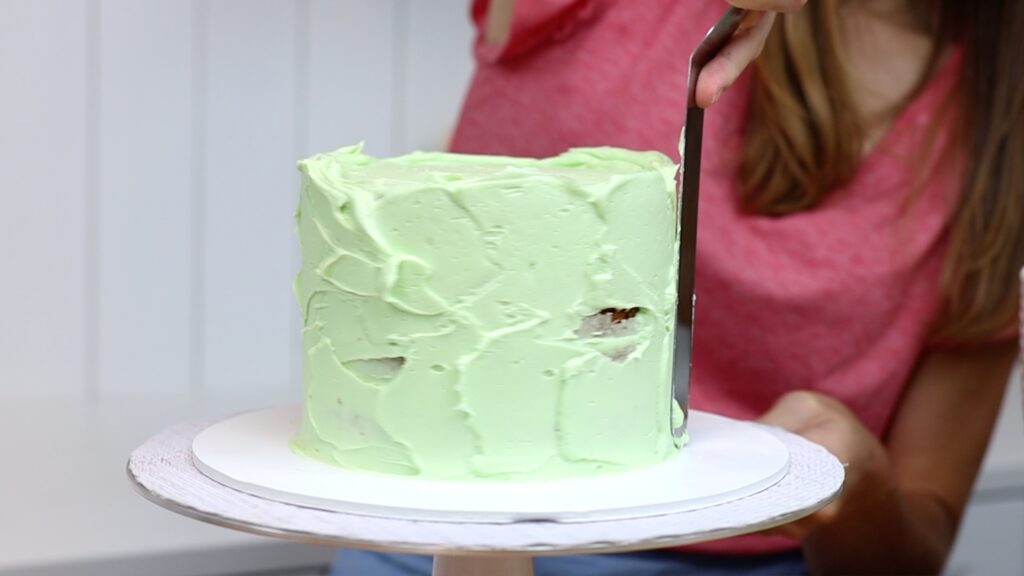
There are two tricks for smooth frosting and the first is to have the right consistency of buttercream. Add milk a spoonful at a time to thin out your buttercream. It needs to be smooth but also just stiff enough to hold its position on the cake. If it's not stiff enough, it will slide down the sides of the cake. If it's too stiff it will be difficult to spread. You're looking for a peak that droops over slightly, like in the photo below. For more details, check out my tutorial on the perfect buttercream consistency.
The second trick for smooth frosting is the technique you use. Spread buttercream up above the top edge of the cake to get sharp edges there later.
Push your cake comb down on the cake board to line it up straight against the side of the cake. Scrape around the cake a few times to start to smooth the frosting.
Then fill in any indents or air pockets by spreading on more frosting and then scrape again.
If you have air bubbles in your frosting like in the photo below, here's a trick! A plastic cake comb won't get rid of them no matter how many times you scrape. Switch to a metal cake comb instead. Heat the edge of the blade with hot water or a blow torch and then scrape again and tadaa! No more air bubbles!

For the top edge, swipe sideways without pushing down at all to prevent bulges in the sides of the cake. Wipe your spatula clean after every swipe! If you don't, any frosting on the spatula will transfer back onto the top edge. It will leave texture behind instead of a smooth edge.
I recommend chilling cakes in the fridge before decorating. If you decorate it before the frosting sets you'll damage it. When frosting gets cold it sets, meaning it loses its stickiness and gets firm. Now it can support the weight or pressure of any decorations like stencils or piping.
Cake and frosting taste best at room temperature. If you’ve stored your cake in the fridge, take it out two hours before you slice it. This way, the cake and filling and frosting will warm up to room temperature. Cold cake tastes dry and cold buttercream is rock hard! It will be easier to cut into a cake at room temperature and it will also taste much better!
To learn all about how to decorate cakes with buttercream check out my online courses and my free course on 10 frosting techniques. See you there!
You can also watch a video of this tutorial on 10 steps to make a cake:
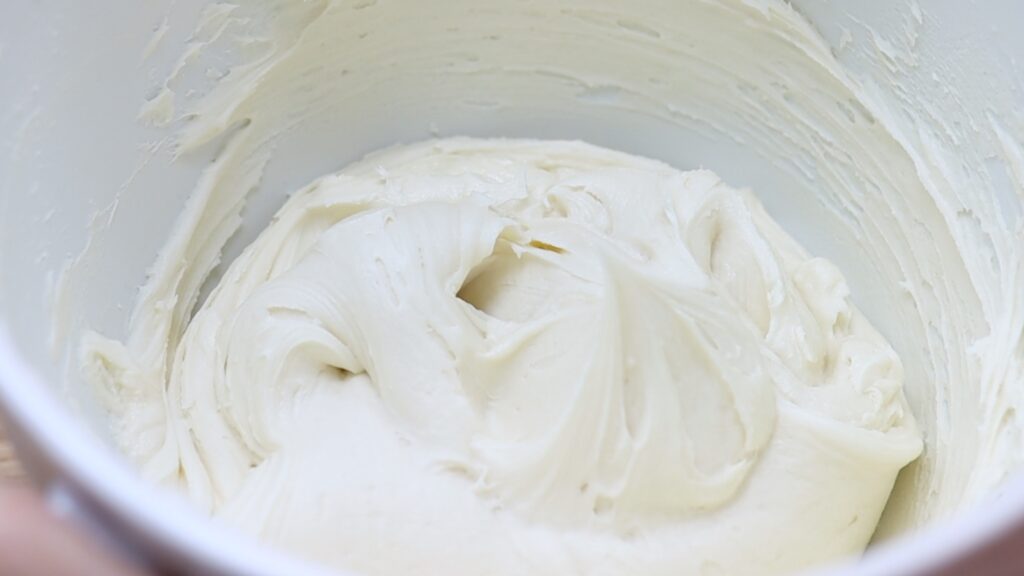
With the right buttercream consistency you can achieve smooth frosting and neat piping on cakes and cupcakes. The perfect buttercream consistency really is the key to cake decorating so here are all of the dos and don'ts!
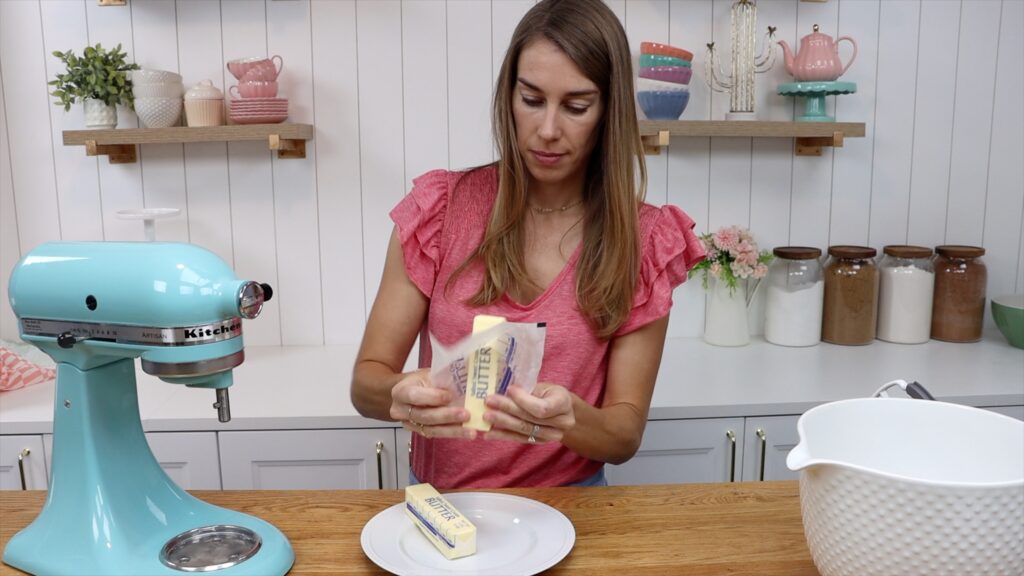
You'll need butter to be at room temperature before you start making buttercream. For the best results, take it out of the fridge at least two hours before you use it. If you forget you can unwrap the butter and microwave it for 10 seconds to take the chill off. Flip it over and microwave another 5 to 10 seconds until it's soft. Beat it for a few minutes until it's smooth, to check that it's not still cold in the middle. Starting with smooth butter can help prevent lumps.
You'll need a paddle or beater attachment to make buttercream, not a whisk. Either a stand mixer or a hand mixer is fine. You can use just a bowl and a spatula if you're very strong and very patient!
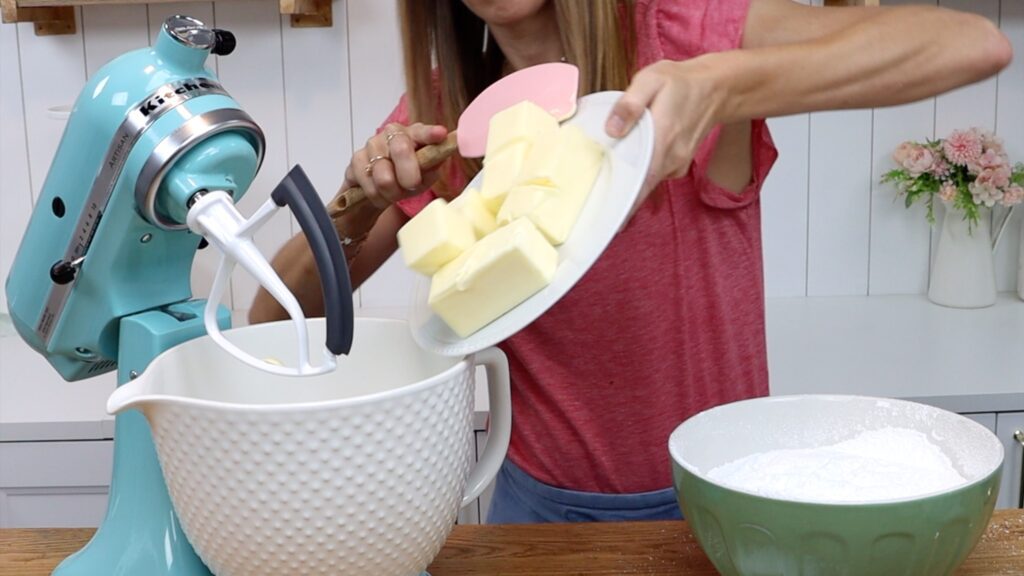
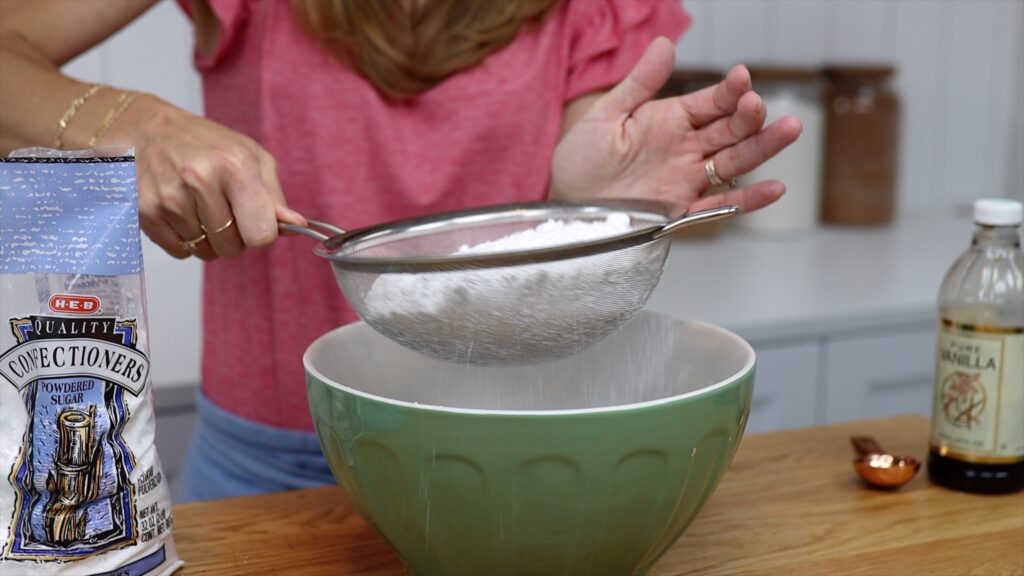
Follow your buttercream recipe - I'm using my 4 Minute Buttercream. Add the icing sugar or powdered sugar, sifted to prevent lumps and graininess. If it feels like it's taking forever to sift and your arm gets tired, try this! Use the handle of a spatula or wooden spoon to stir the sugar around in the sieve.
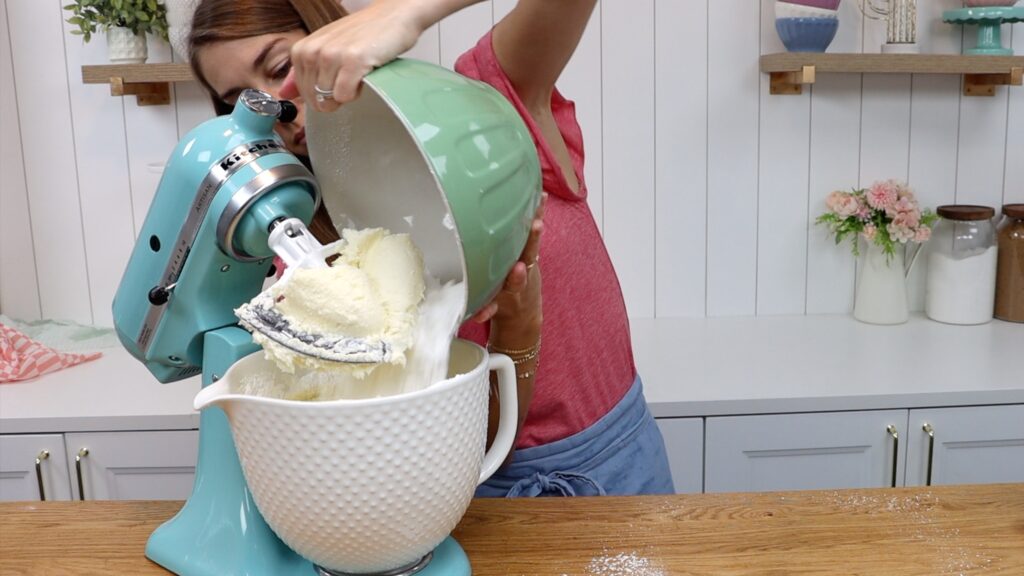
I add only half of the sugar to the mixer so it doesn't explode out of my mixer when I turn it on. Also, I cover my bowl with a towel to prevent a big cloud of sugary dust. Once the first half of the sugar is mixed in, add the rest and mix again.
Always mix at the lowest speed because using a low speed prevents air bubbles in the buttercream. If you use a whisk or a high speed you'll aerate the buttercream, creating lots of air bubbles.
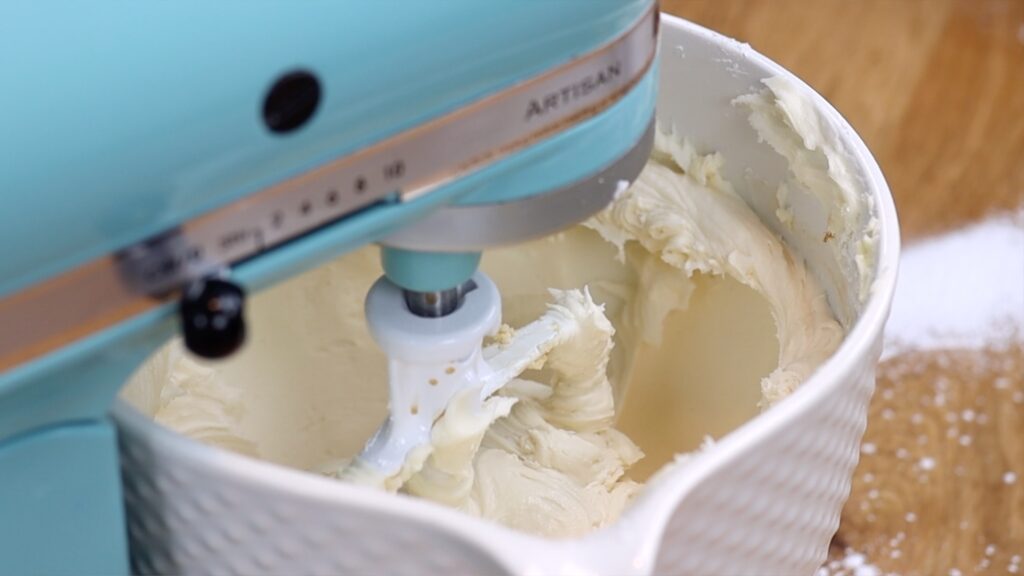
After adding salt and vanilla for flavour, add a few tablespoons of milk or cream. This will make the buttercream richer and thin it out slightly. Add milk or cream one spoonful at a time, checking the consistency after mixing in each spoonful. If you add too much, to thicken the buttercream you'll need to add more sugar.
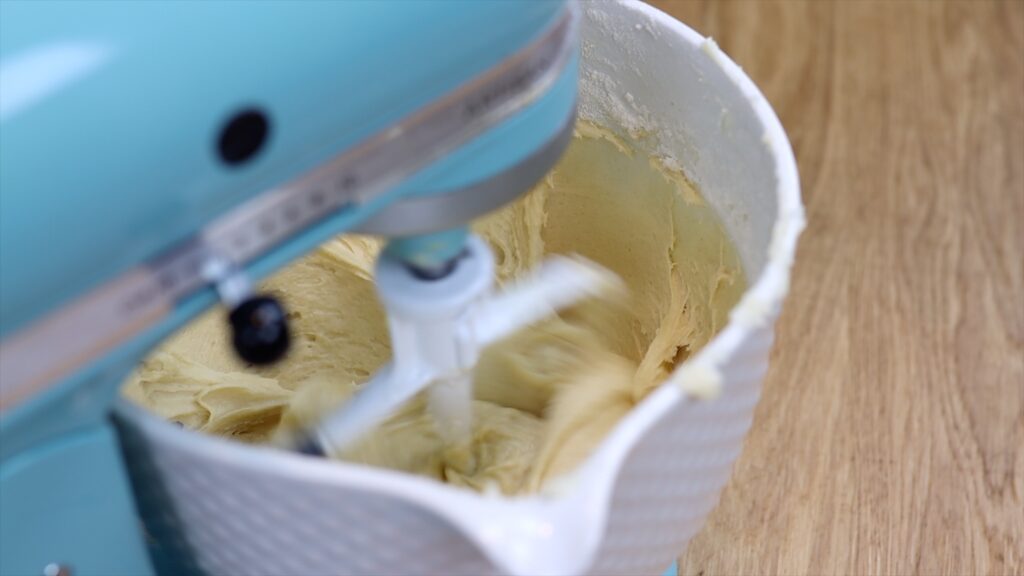
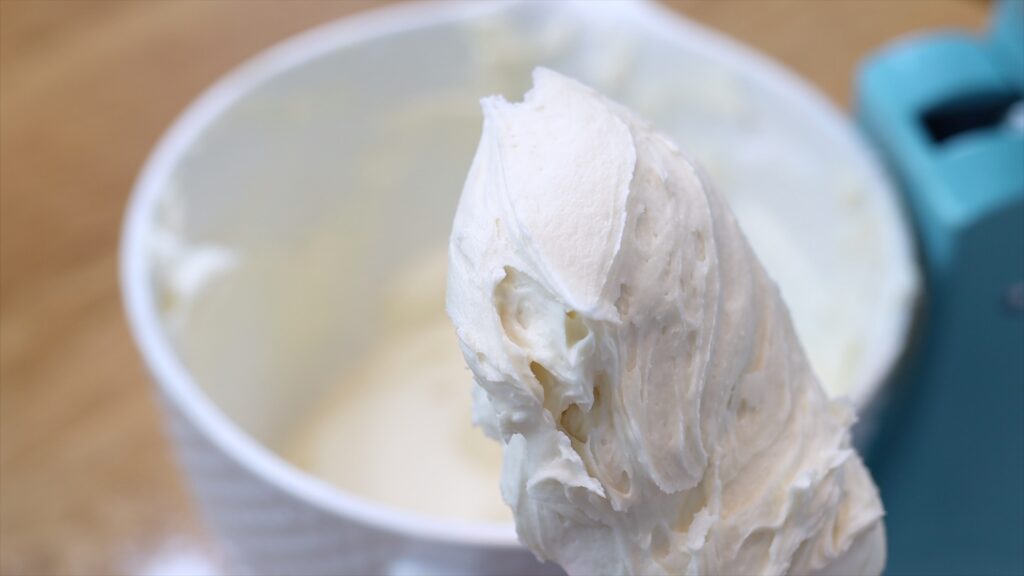
The buttercream in the photo below has stiff peaks that stand up when you pull a spatula out of the bowl. You'll notice very distinct texture in the buttercream wherever you've pulled a spatula through it. This buttercream has a stiff consistency. A stiff consistency is great for piping that needs to hold its shape, like petals on a flower.
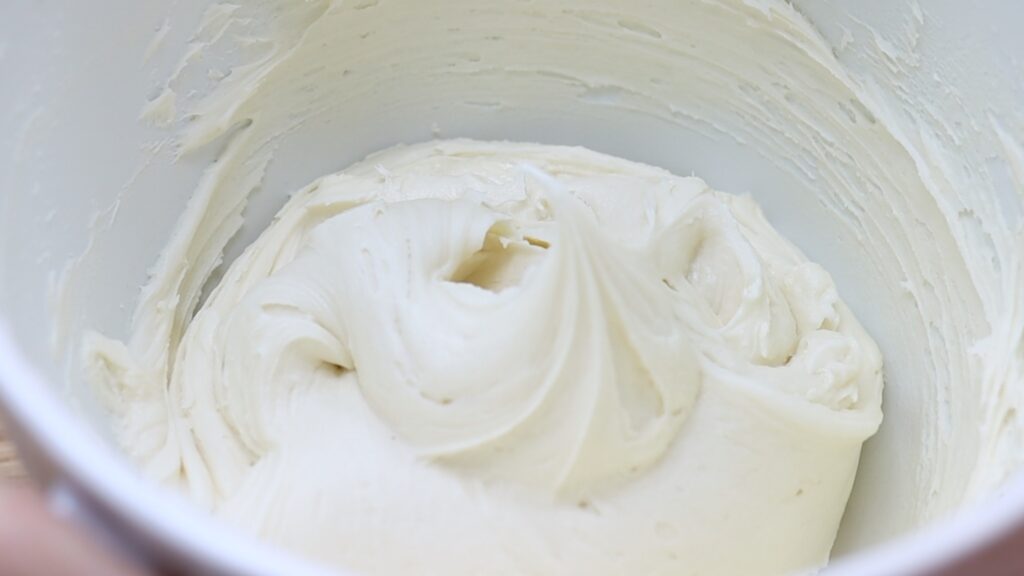
To ice or frost a cake you need the buttercream to have a looser consistency. This means it is less stiff, with peaks that droop over. You'll notice your spatula leaving behind less texture in the buttercream as you stir it. To make the buttercream consistency less stiff, like in the photo below, simply add more milk or cream.
If you see any grains of sugar or tiny lumps in your buttercream, don't throw it away and start again! Instead, use an immersion blender to blitz it to remove any icing sugar lumps.
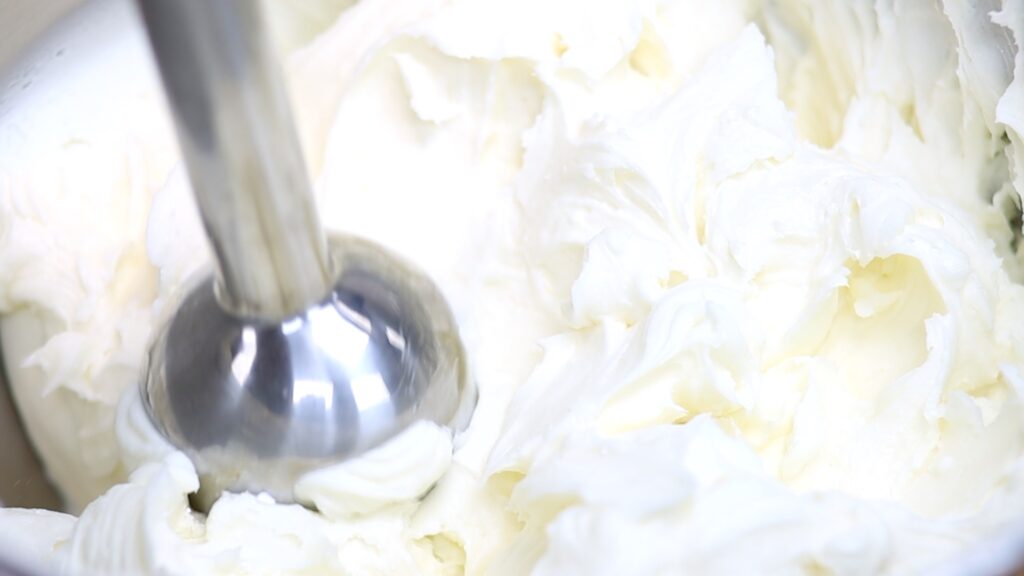
Any liquid you add to the buttercream will affect the consistency. Add liquid colours and flavours before doing a final buttercream consistency check. Stir the buttercream quite aggressively to knock out any air bubbles.
If the buttercream is still too stiff or has air bubbles, use this microwave hack. Scoop a third of the buttercream into a microwave safe bowl and microwave it for 10 seconds. Then pour this back into the main bowl of frosting and stir it all together.
Your buttercream will be silky smooth, the perfect consistency for frosting a cake and with no air bubbles. Look at this buttercream consistency and number of air bubbles before and after using the microwave hack:
Ask me any questions you have about buttercream consistency in the comments! To learn hundreds of cake decorating techniques and designs visit my cake school.
You can also watch a video of this tutorial on 6 tricks for the perfect buttercream consistency:
Wondering how to decorate a cake without tools? I'm going to show you five items you already have in your kitchen and how to use them to decorate stunning cakes instead of buying expensive cake decorating tools.
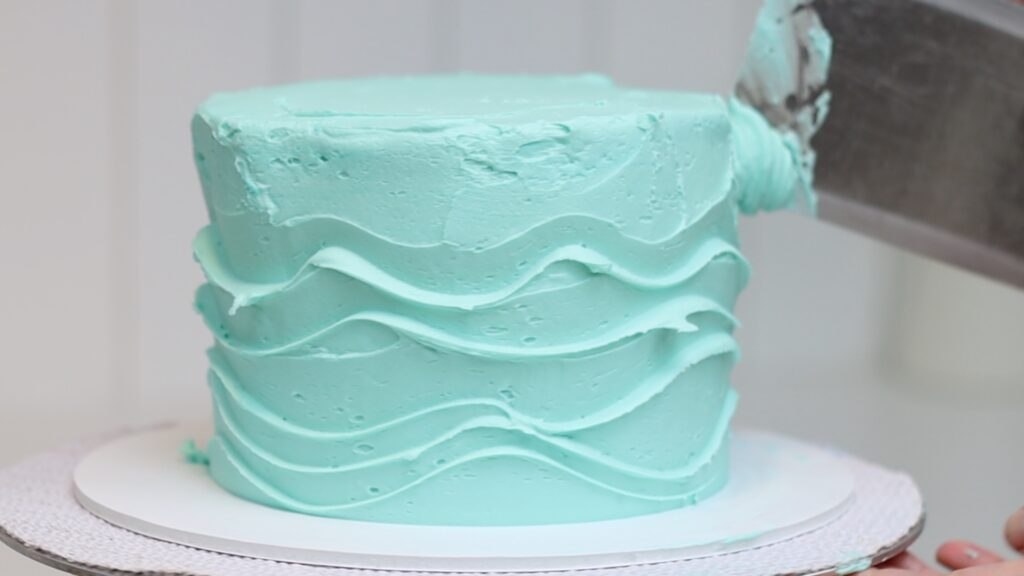
With one of these rubber or silicon spatulas you can make trendy wave frosting. Hold sideways so the top edge is pressed into the frosting as you spin the cake. Move the spatula up and down to create these beautiful waves giving the frosting lots of movement.
Bonus: if you struggle with getting your frosting smooth, it doesn't matter! While the spatula creates this wave texture it's also smoothing the frosting within the waves.
This effect is stunning for an ocean or under the sea or mermaid theme.
To add lots of detail without taking lots of time, use a fork with just two movements: up and sideways. The prongs of the fork will drag evenly spaced lines across the frosting. When the lines have made a square, pull the fork out and change direction.
For vertical lines, pulling the fork up rather than down will let you see what you're doing! Here's my top tip for this technique: dip your fork into warm water for the best results. The warm metal will drag much more easily through the frosting. Offset the design for each row so that the sideways lines are above the up and down lines. This will create a simple patchwork design.
The fork texture makes the cake much more detailed and interesting than just plain smooth frosting.
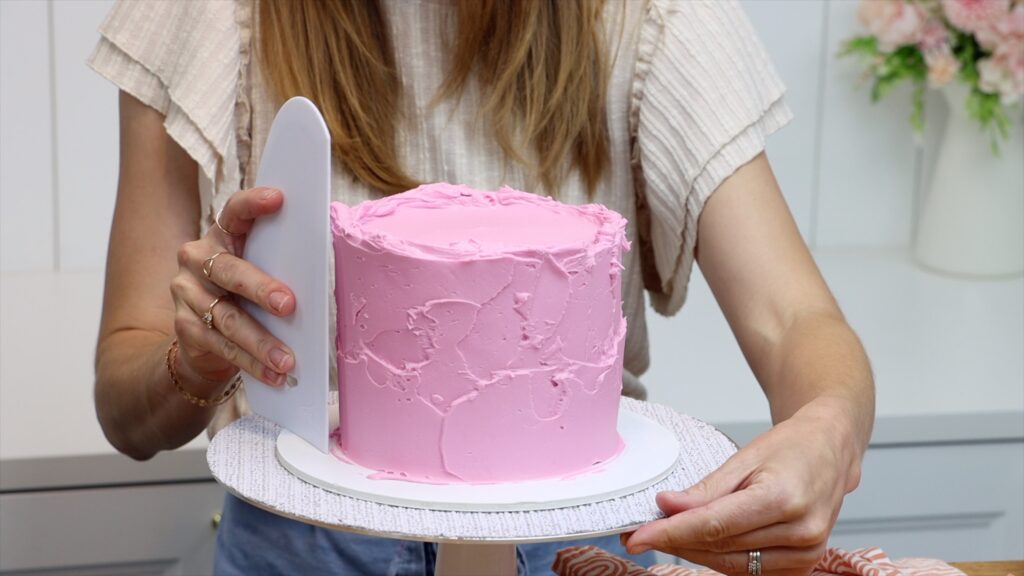
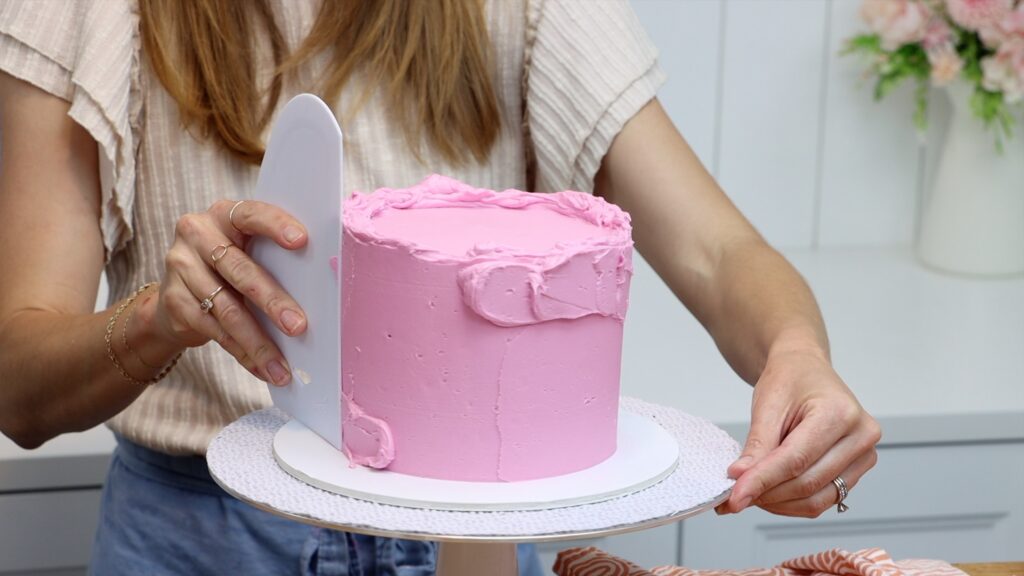
Speaking of smooth frosting, you can do that without a cake comb, using a ruler instead. Press one of the ends down on the cake board against the side of the cake. Then spin the cake on a
Do this again and again to get the frosting smoother and smoother. After each spin, pull the ruler away from the cake and wipe the buttercream off it into your bowl.
If you don't have a
For the top edge, swipe sideways with your ruler. You'll push that buttercream that's sticking up over the top edge and lift it away on your ruler.
This is a pastry brush or a basting brush and it's another way to create unusual texture on cakes. Hold the brush at the bottom of the cake and press it against the cake. Pull it upwards to leave these pretty lines in the frosting.
For the best results, dip the brush in water so it will slide more easily through the frosting. Also, the frosting should still be soft so do this straight away, not after it sets.
Pastry brushes are useful for floral cakes because they create stems on green frosting. Make a bouquet of flowers on top of the cake with fresh or artificial flowers or pipe them. Or make wafer paper flowers, which I teach in my Layer Up program on my cake school. Start a free 7-Day trial to try it risk-free!
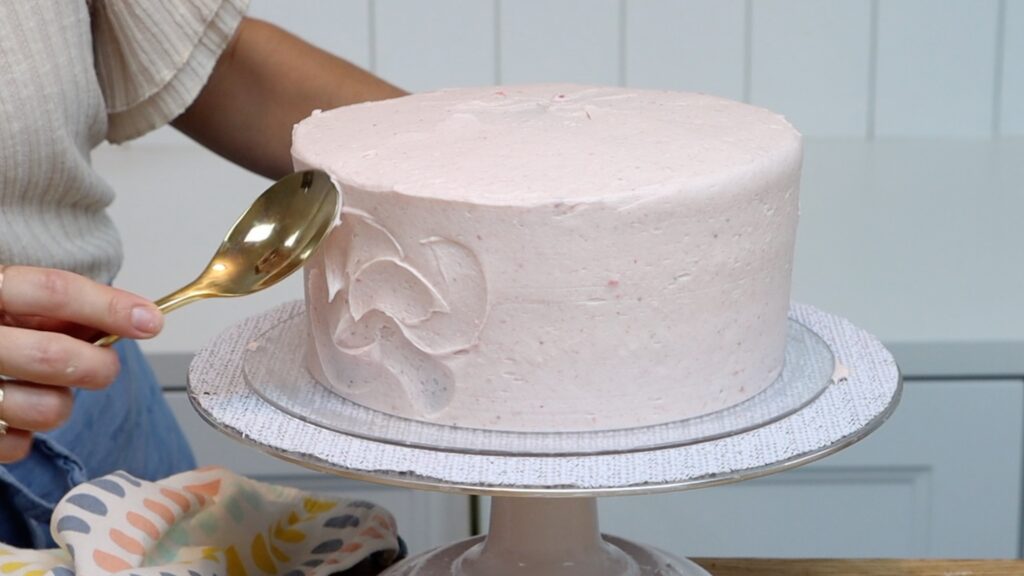
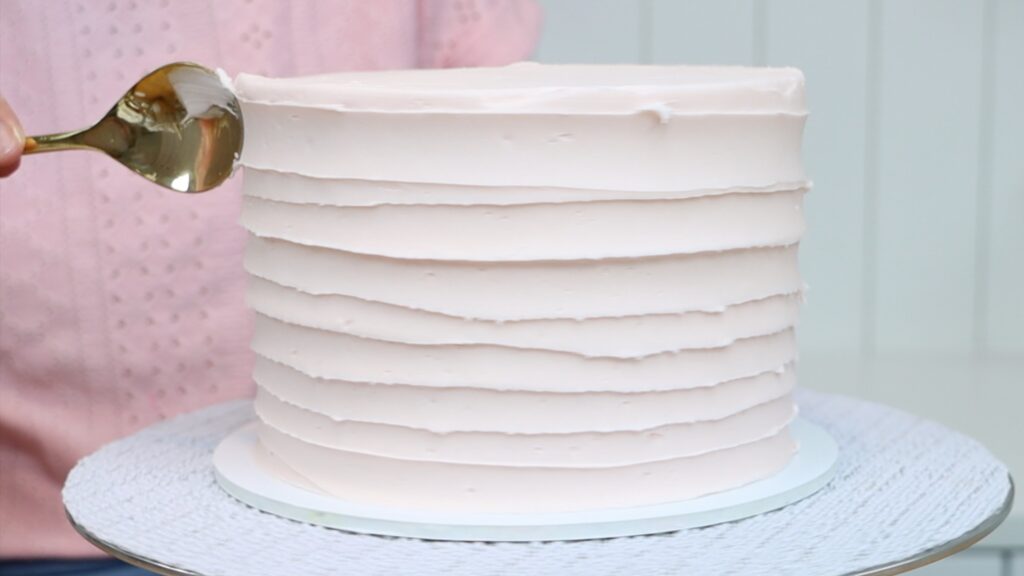
Next up, a spoon? Yes! Ditch the textured cake combs and instead hold the back of a spoon against the frosting on your cake. Press it gently into it and then drag it in an arc to make curves or swirls in the frosting. You can do this on the sides and also on the top of the cake. This is my strawberry cake with strawberry buttercream:
Another way to use a spoon is to create grooves in the cake. Drag the spoon slowly upwards to pull the texture all the way up the cake. Let the grooves overlap each other so there aren't any gaps.
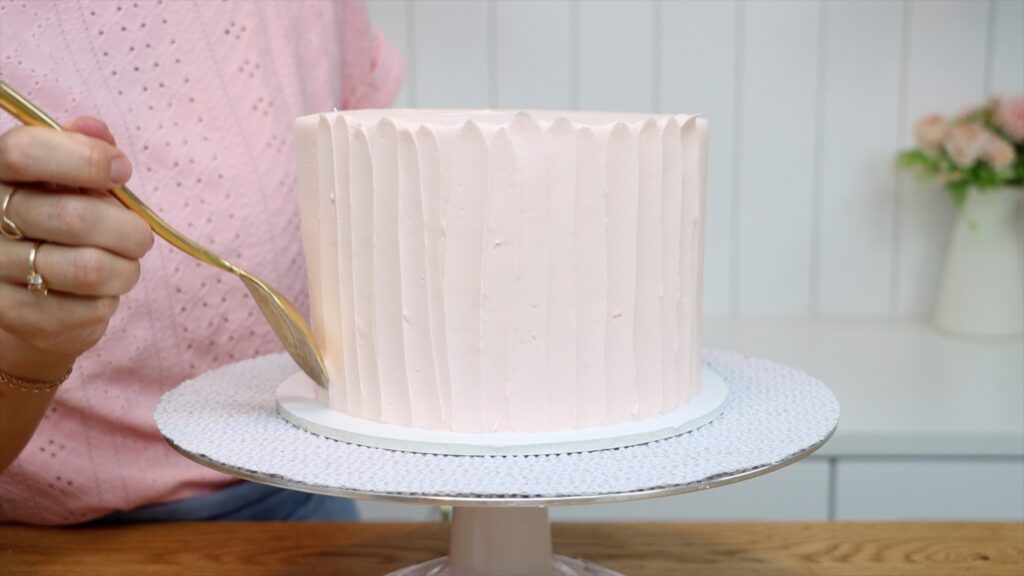
You can do this horizontally as well, holding the spoon sideways. Press against the frosting as you spin the cake, pulling the spoon slowly upwards to pull the texture all the way up the sides of the cake.
So, five ways to decorate cakes using items you already have at home: a spoon, a fork, pastry brush or basting brush, a spatula and a ruler! Which of these will you try first?
Visit my cake school for hundreds of cake decorating techniques and designs and start a free 7-Day trial of my All You Can Cake membership, which gives you access to everything on my cake school!
You can also watch a video of this tutorial on 5 ways to decorate a cake without tools:
Use homemade layered stencils to make edible versions of your favourite characters with this easy, inexpensive cake decorating technique!
Stencils allow you to create almost flat patterns and designs on cakes. For characters, by layering stencils you can create all of the details to scale. The technique is cheap because you can make the stencils yourself using parchment paper or wax paper. The steps are easy to follow and can be used for any character design! The cake does need to be chilled in between stencils, which adds to the total time required.
Buttercream transfers can be used for character cakes too. The details tend to warp when you press the transfer against a cake, whereas stenciling is more accurate. Also, with buttercream transfers small air bubbles are common on the surface of the character.
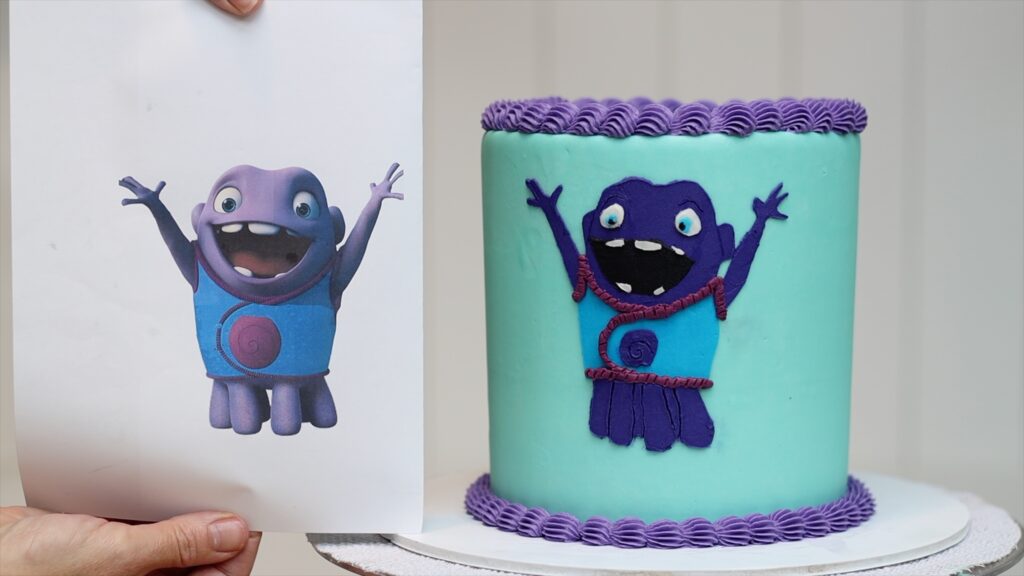
I’ll use the alien Oh for this tutorial, from the movie Home. Print your character out whatever size you want for your cake. This is a tall 6 inch cake and my character is about 5 inches tall. Spoiler alert: here's the finished cake!
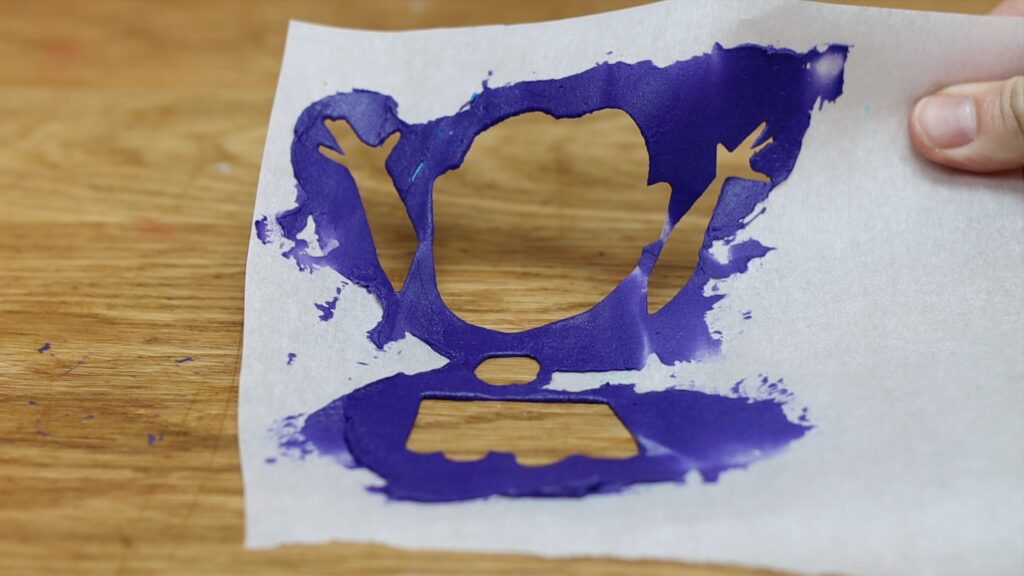
To replicate the character on the cake, you’ll need stencils for each colour of the character. I’m starting with the blue vest, outlining it with a pencil onto parchment paper. You can use wax paper instead - anything non-stick that you can see through.
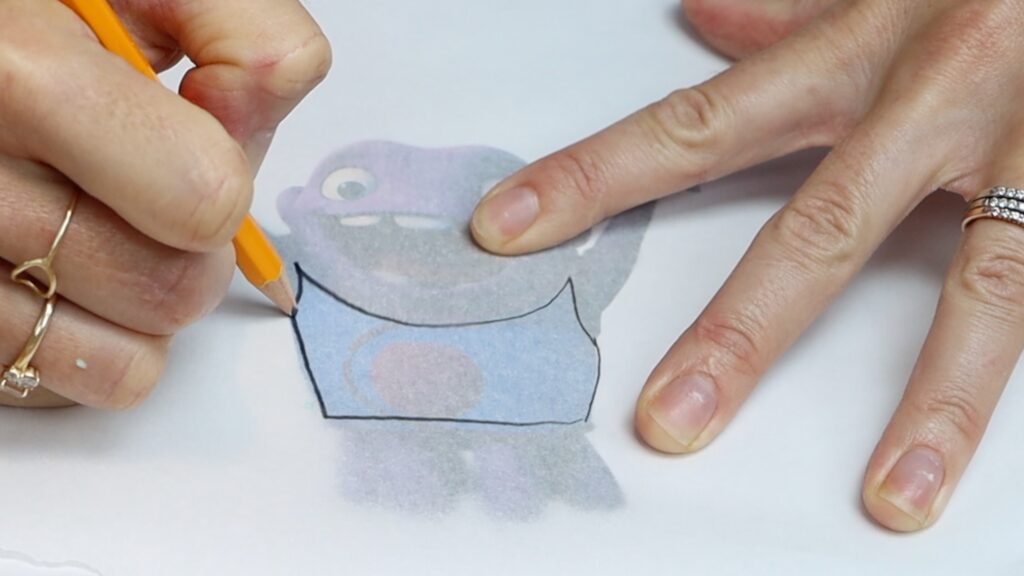
On another piece of paper, or a different part of it, outline all the parts of the next colour. I'm outing the purple parts: the legs, arms, head, and circle on the vest. You only need to draw around the outer edge of each part, ignoring any details within it.
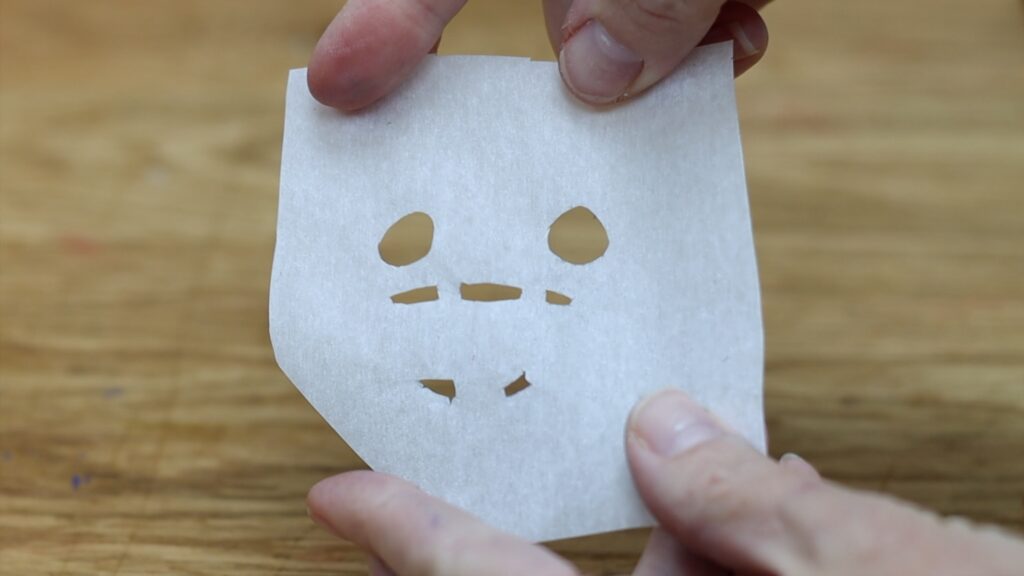
Continue with the rest of the details, making a separate stencil for the details of each colour. For my character, the grey mouth is one stencil and the white eyes and teeth are another.
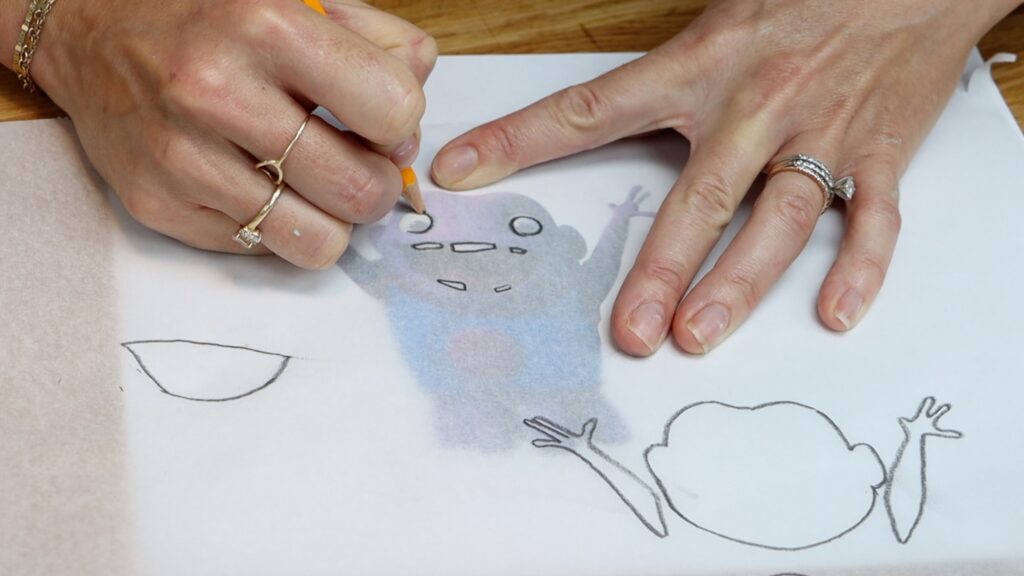
When you finish, you'll have a different stencil for each of the colours. If you’ve traced everything onto the same piece of paper, cut them into separate stencils now. Leave at least an inch of paper around the details of each stencil so that you have room to spread your buttercream without going over the edges of the stencil.
Cut all of the details out, leaving the surrounding paper intact. I snip the middle of each shape and push one scissor blade through that and then cut around the outline.
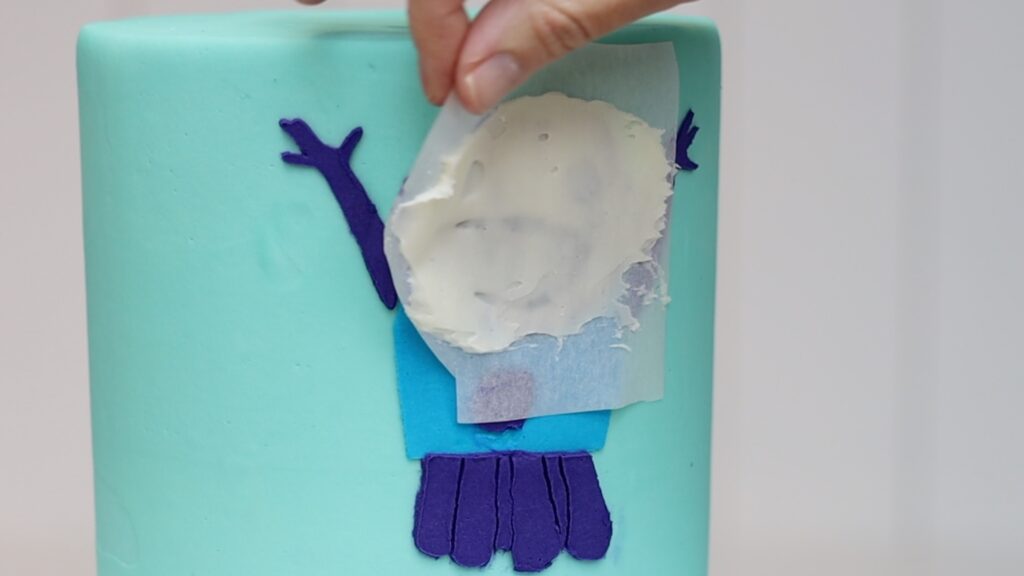
Your cake needs to be in the fridge for at least an hour before the next step. The frosting should be cold a firm. This technique only works with frosting that sets when it gets cold, like my 4 Minute Buttercream. Your first stencil should be one of the background colours that’s going to have smaller details on top of it.
For simple stencils with just one shape, press the stencil against the cake with your fingers. Hold it in place while you spread frosting over it. The frosting you spread will hold the stencil in place while you cover the shape.
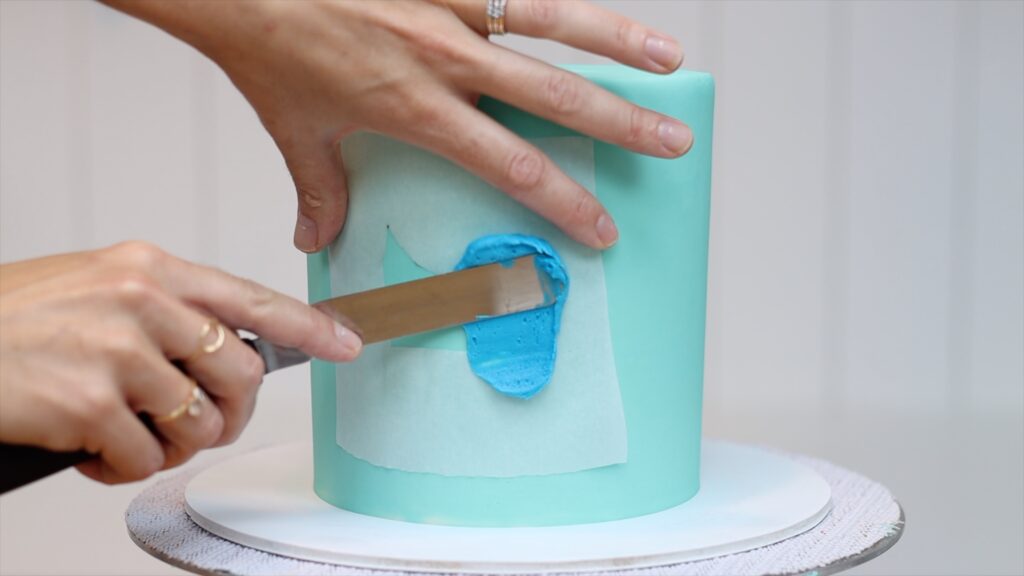
Then scrape sideways to take off the excess frosting to leave a thin, smooth layer behind.
Peel the stencil off straight away and you’ll have that shape on your cake! Now put the cake in the fridge for about 15 minutes to set this shape. Then wrap your next stencil around the cake, lining it up over the details already on the cake.
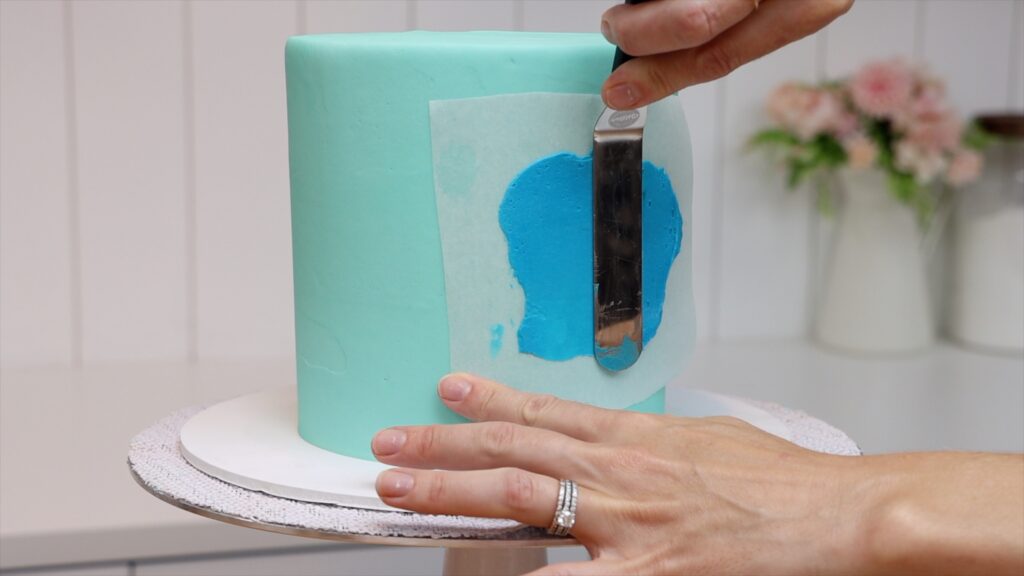
For stencils with several shapes, it’s best to pin the corners of the stencil against the cake. It will take longer to spread buttercream over multiple details and using pins gives you more time to do this. If you press the stencil with your fingers instead, the warmth of your fingers will melt the frosting and you'll leave fingerprints behind.
The stencil needs to be pulled tight so that it’s pressed flat against the frosted cake. It it's loose, it will move around as you spreading frosting over it. Those movements will cause smudges of colour on your cake.
Scrape over the stencil a few times with a spatula to smooth and flatten the frosting you spread on. Spread more frosting over any indents or shallower areas and then scrape again. For the best results, you need the frosted details to be really smooth.
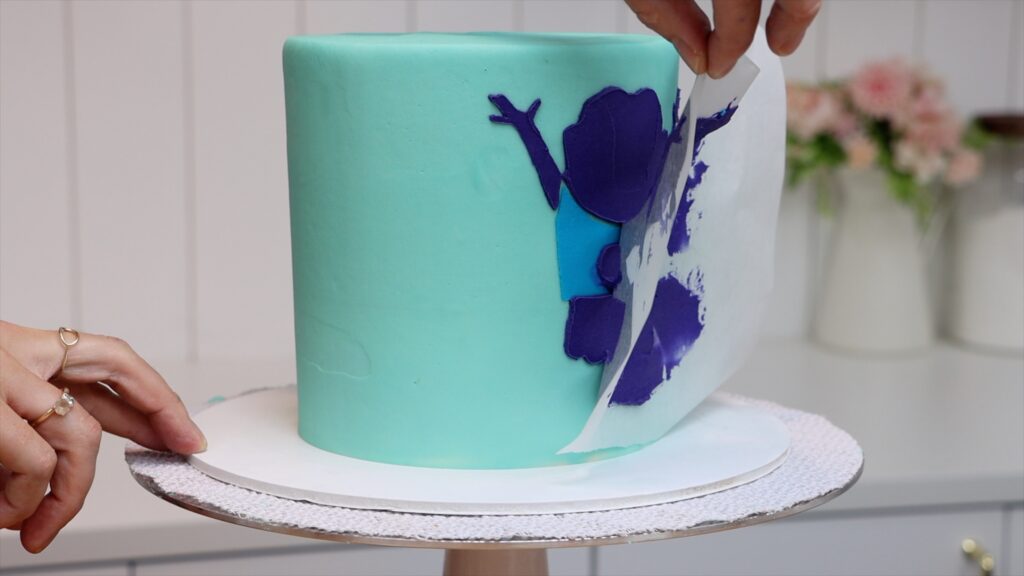
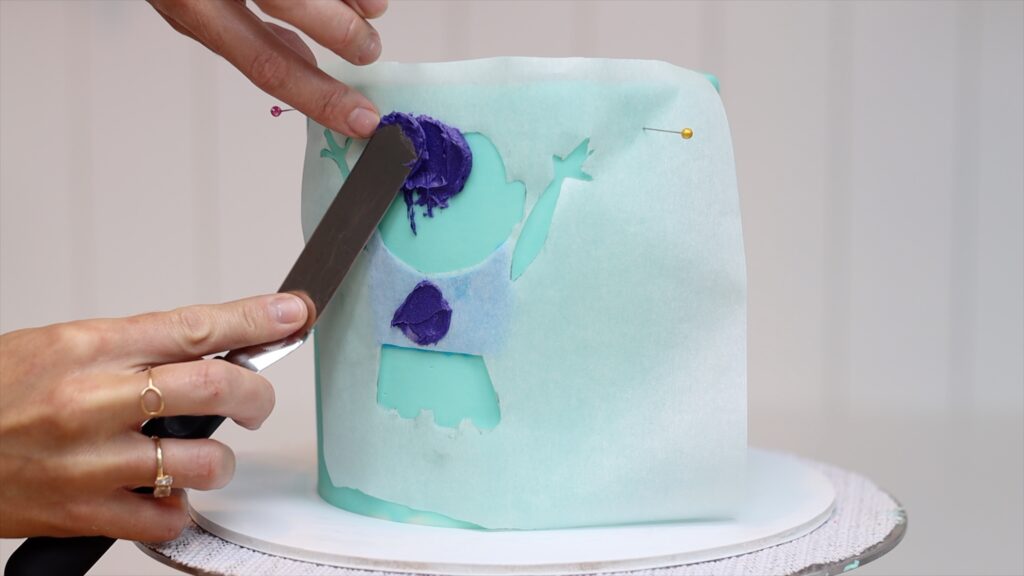
When you peel the stencil off you’ll have another layer of details of the character on your cake. The stencils look quite fun after using them! You could wipe the buttercream off and re-use the stencils if you wanted to make this character again.
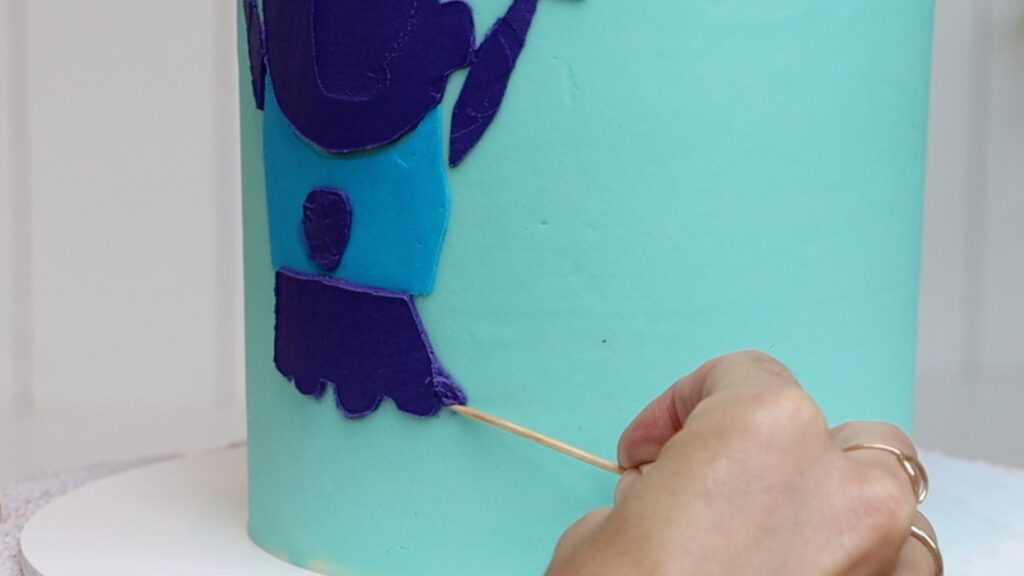
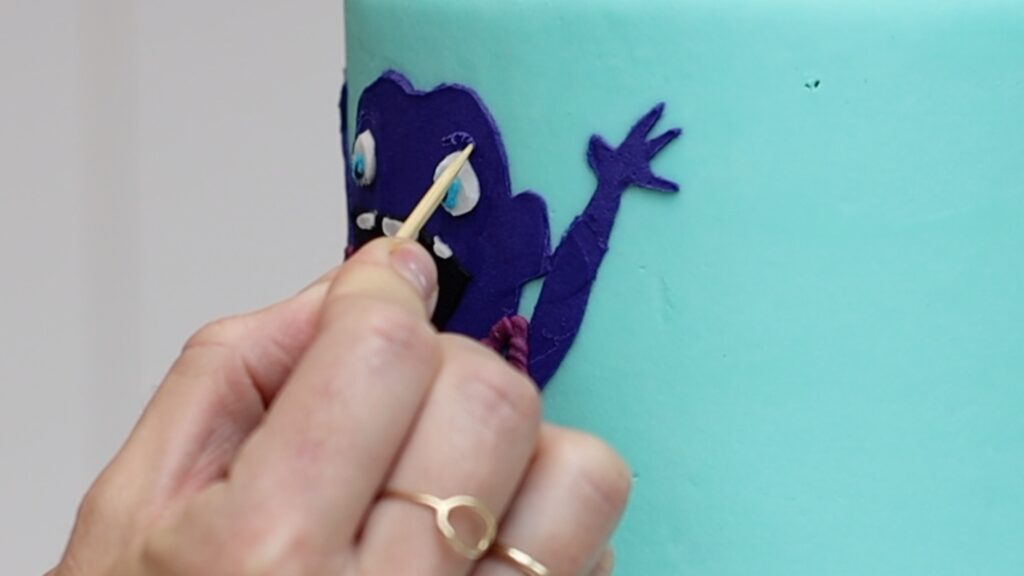
If any of the layered stencils move while you're spreading frosting over it, it will smudge onto the cake. The circle on the alien's blue vest has smudged on my cake and so has one of the legs. These smudges are easy to touch up with a toothpick by scraping off the smudged colour.
The thinner the layer of frosting you leave behind on the stencil, the neater it will be. Peeling the stencil away from a thick layer of frosting is almost always messy! Thick buttercream will pull away with the stencil and leave uneven texture around the edges of each shape.
It can be tricky to cut out small shapes like these eyes and teeth. It’s useful to have a really small pair of scissors, like sewing scissors, to angle the blades around the curves. If curved shapes like circles are cut with little jagged lines, that jagged shape will transfer onto your cake. Taking your time to cut the shapes out neatly is really worth it for this technique.
For white shapes, the frosting might need to be thicker than normal. You’ll see any darker colours underneath through a thin layer of white frosting. If the thick buttercream pulls away with the stencil, use a toothpick to smooth those edges.
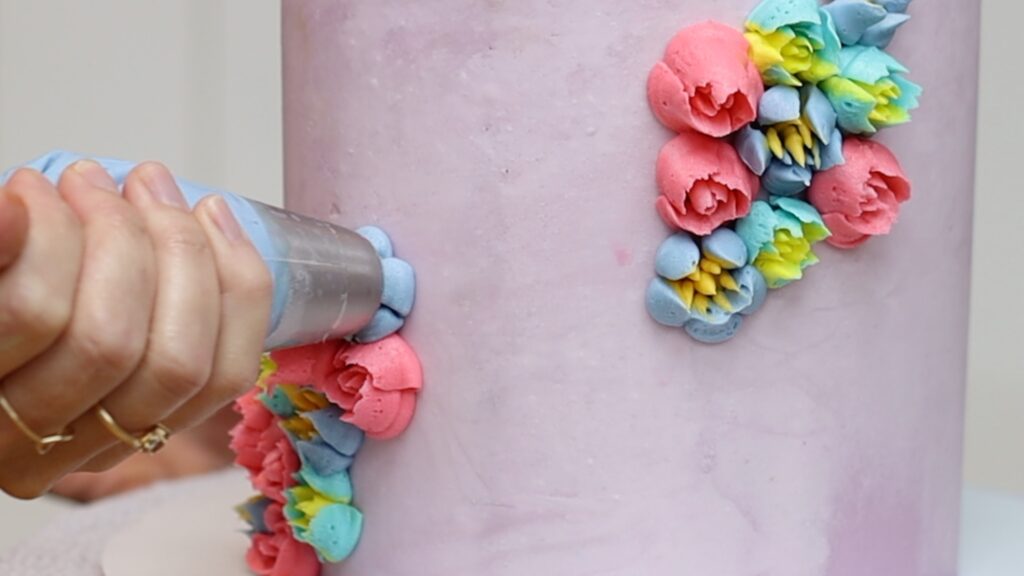
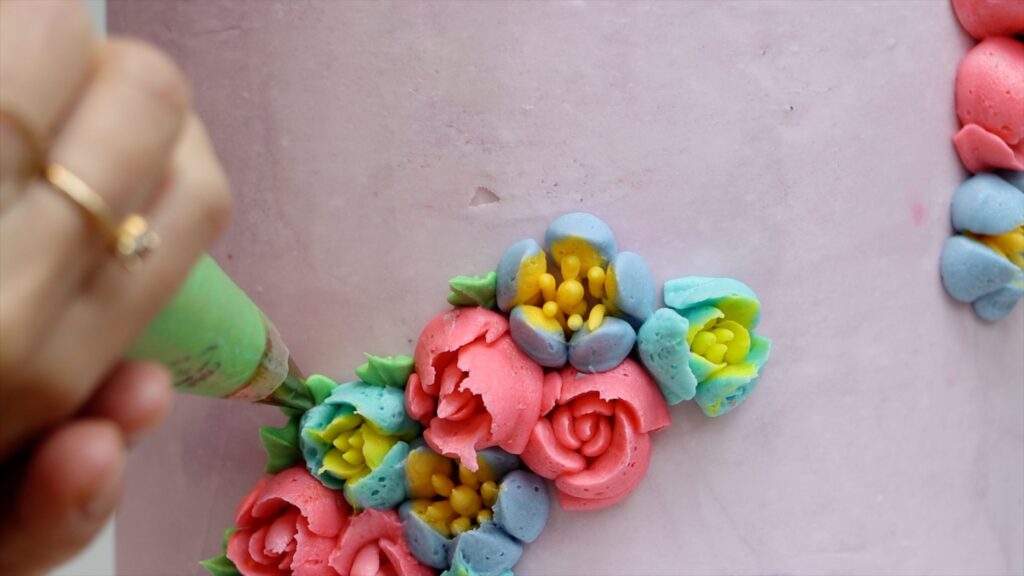
Layered stencils are excellent for creating smooth, flat details. For texture and dimension, pipe some details onto the cake too. This works well for fabrics like the ribbing around this vest.
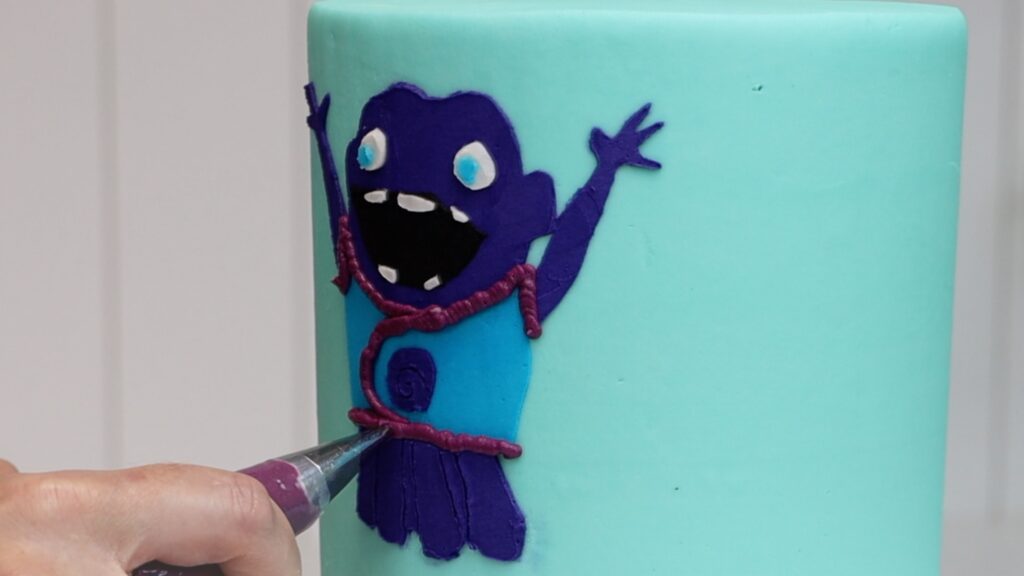
I don’t recommend piping on details like the eyes or teeth. Those look better when they lie flat against the cake.
For very thin details like eyebrows, use a toothpick to scratch them into the buttercream. You can also use toothpick to add texture to buttercream, like on the purple ribbing on the vest.
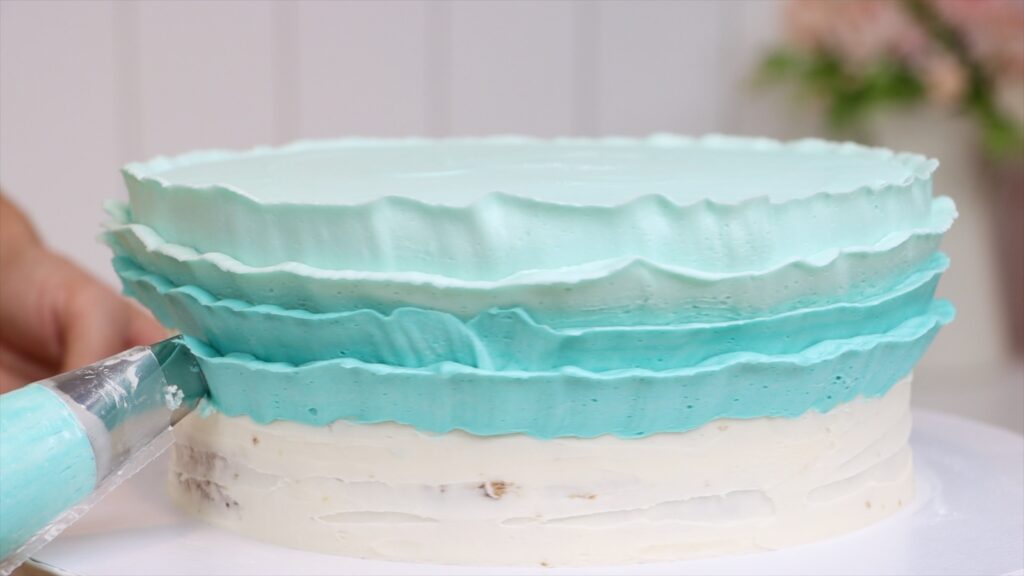
Add characters made with layered stencils on top of any flat frosting, for example ombre frosting or buttercream stripes.
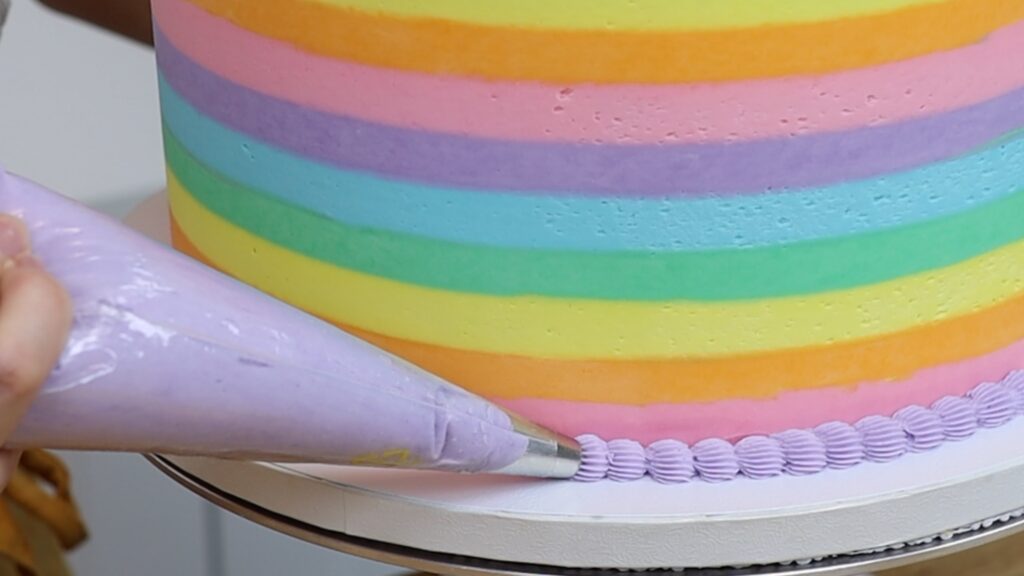
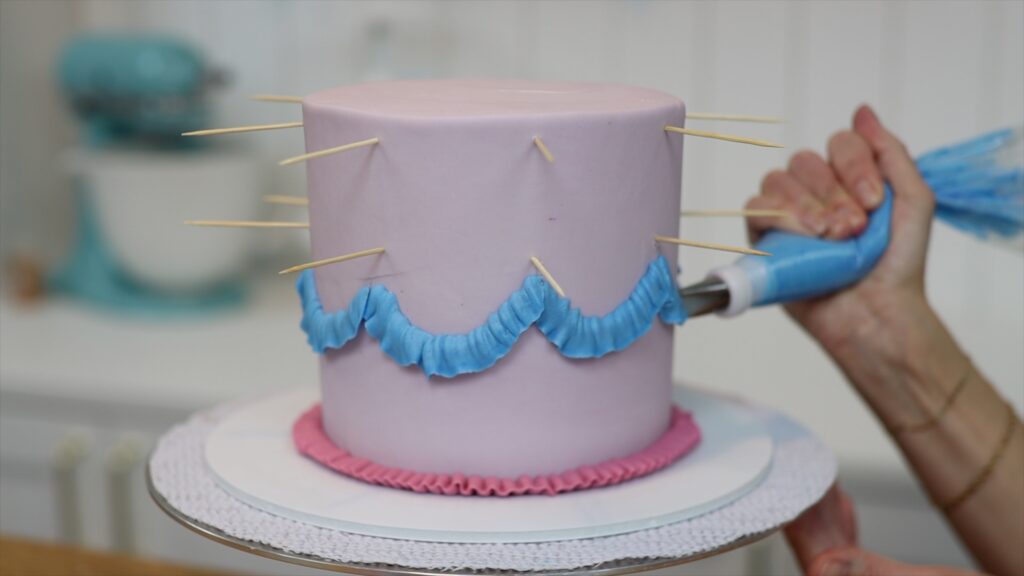
If you plan on piping onto the cake, for example a buttercream border, do that after creating the character. If you pipe first, you might knock the piping with your stencils and damage it.
I used a 4B open star piping tip to pipe the borders on this cake:
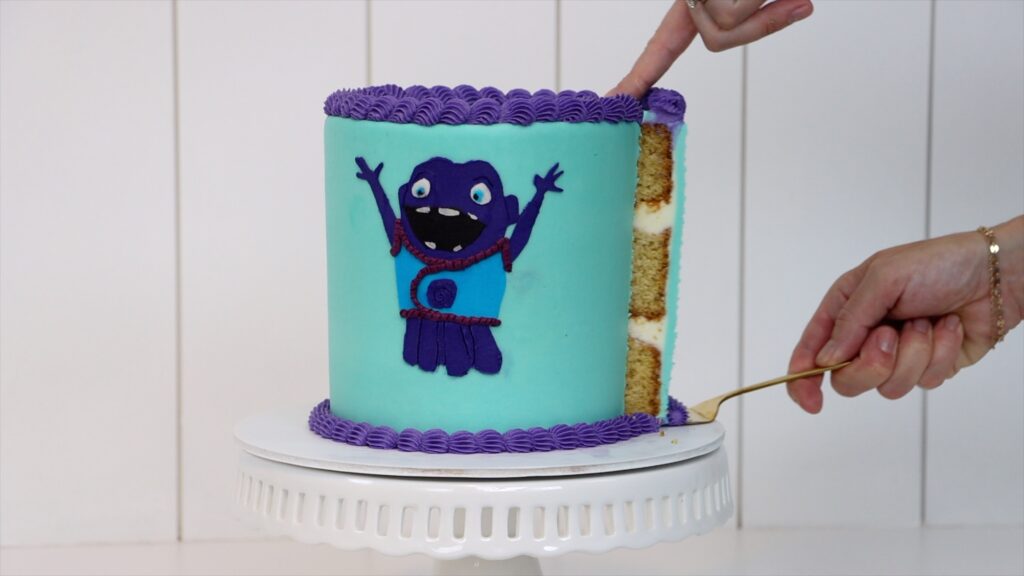
By using layered stencils you'll have a delicious edible character that looks exactly like the original!
Tell me in the comments which character you’d like me to do next!
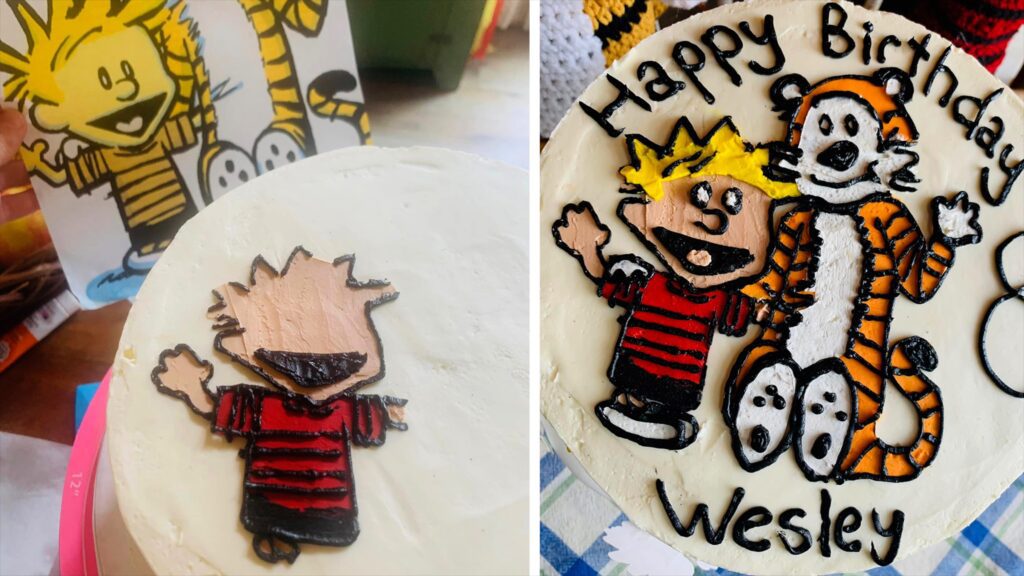
Here’s a Calvin and Hobbes cake made by Chelsea of Generation Bakes, one of my cake school members, using this same layered stencil technique. This is one of the many techniques in my online program called Layer Up, where you work through three layers (or levels) of video modules to take your cake decorating skills from beginner to professional. Start your 7 day FREE trial of my All You Can Cake membership, which includes access to everything on my cake school, to try it out with no risk!
You can also watch a video of this tutorial on how to make character cakes with layered stencils:
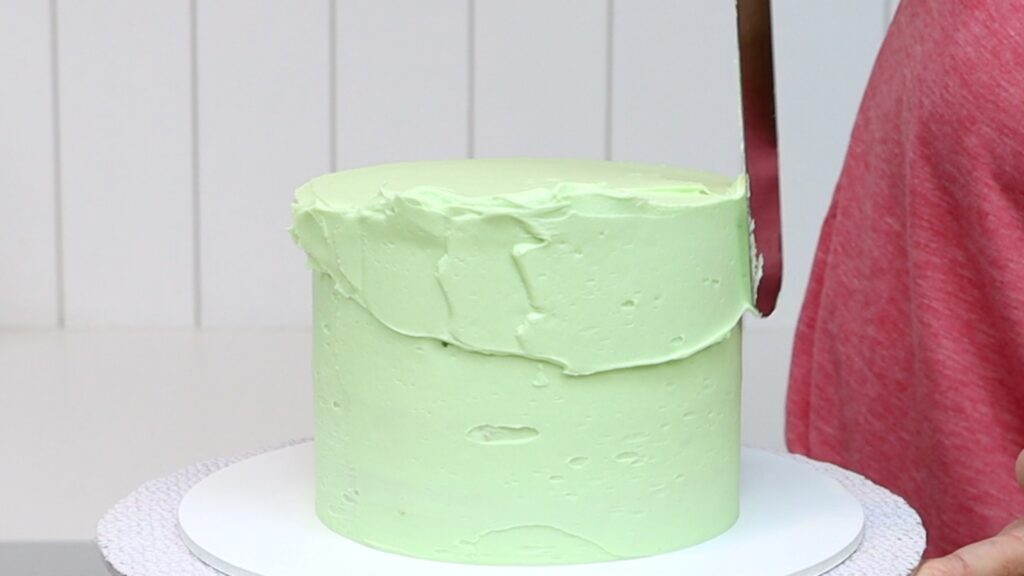
Every cake design looks better with smooth frosting so in this tutorial I'll show you five hacks to get super smooth frosting on your cakes.
Ideally, you'll need a
First, generously spooning frosting onto the top of the cake. Spread it to push it out over the edges of the cake. This will give you sharp angles later from the top to the sides of the cake.
Now here's the hack: hold your offset spatula at a 45° angle as you spin the cake on the
For the sides, the most important hack is to build a wall or lip around the top edge. If your frosting is already sticking out sideways this will naturally push upwards as you spread from side to side.
If not, you'll need to push diagonally upwards as you spread the frosting. You need it to stick up above the top of the cake all the way around. Without this wall or lip you'll get gaps or air pockets or indents around the top edge.
The white frosting you can see already on the cake is the crumb coat. If you're not sure how to get up to this point, see my tutorial on How to Crumb Coat a Cake. Spread the frosting all the way down the sides of the cake to the cake board.
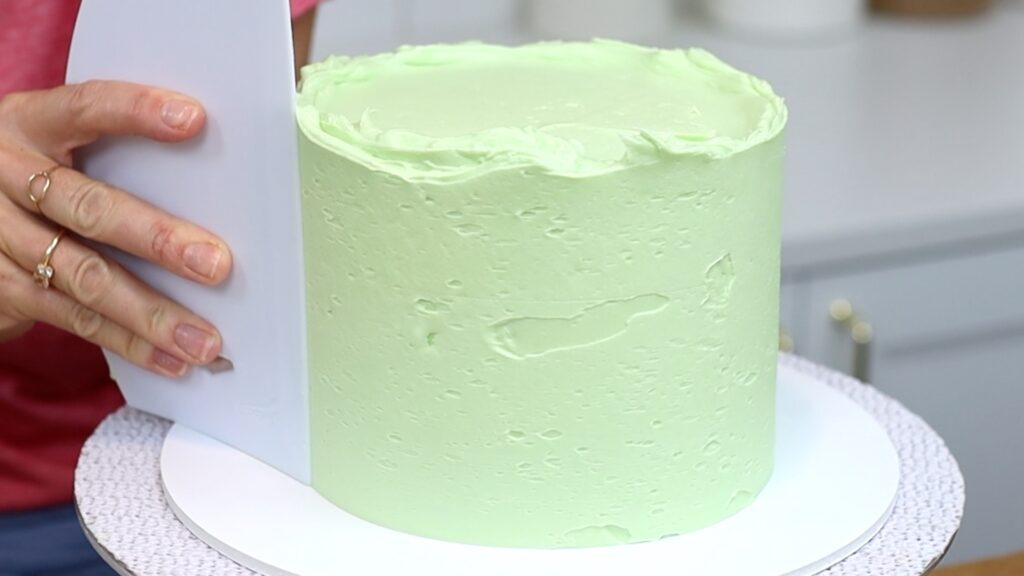
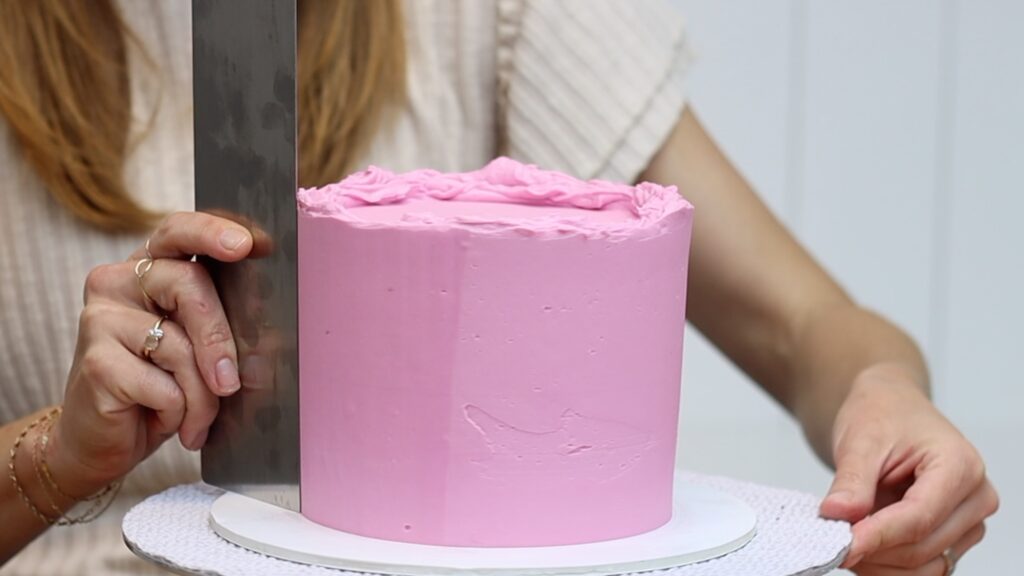
When the frosting covers the cake from top to bottom, you shouldn't be able to see the crumb coat anywhere. Now switch to a cake comb to scrape around the cake to smooth the frosting. The hack here is how to hold the cake comb. Push down on the cake board with your cake comb to line it up straight against the sides of the cake. This will give you straight sides instead of sloping or slanting or leaning sides. Notice that I'm holding the cake comb at an angle against the cake. The edge of the comb isn't pointing directly towards it.
After each scrape, use your

Then scrape around the cake again with a cake comb to smooth those parts. Do this a few times until the frosting is not perfect but fairly level and straight.
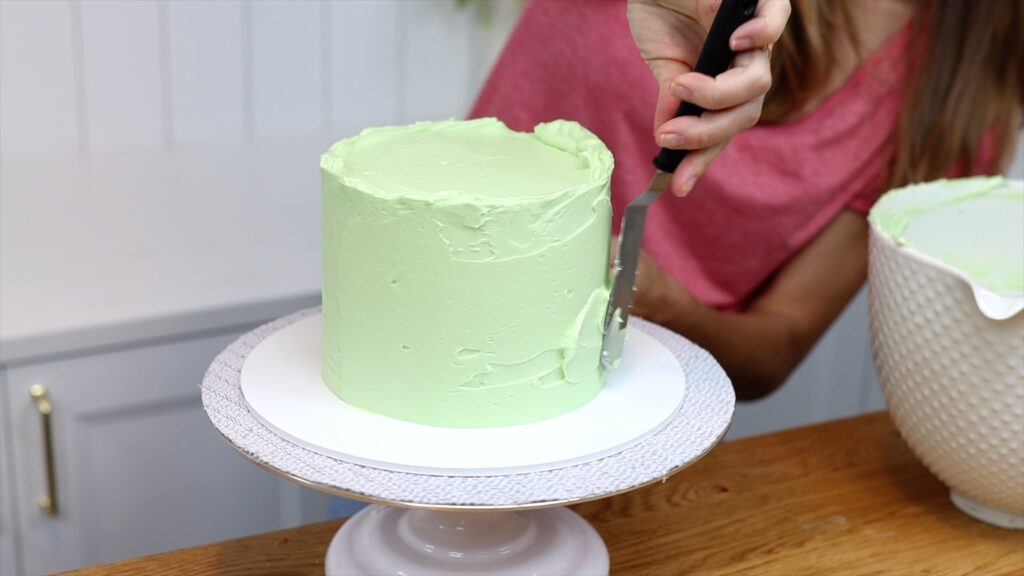
Once you have almost smooth frosting, with only shallow imperfections, you're ready for the fourth hack. Use a warm metal cake comb. You can dip it into a pan of hot water or hold it under hot running water. Or run a blowtorch along the edge, which is my favourite method. Rub the comb with a towel to dry it off and cool it down slightly. You want it to be warm, not hot.

Then scrape around the cake with it. The warm metal will glide over the frosting, dragging it around the cake to fill in any tiny air bubbles in the frosting. Do this a few times, making sure the metal is never hot because heat changes the colour of the frosting. The warm metal cake comb will leave a perfectly smooth surface behind.
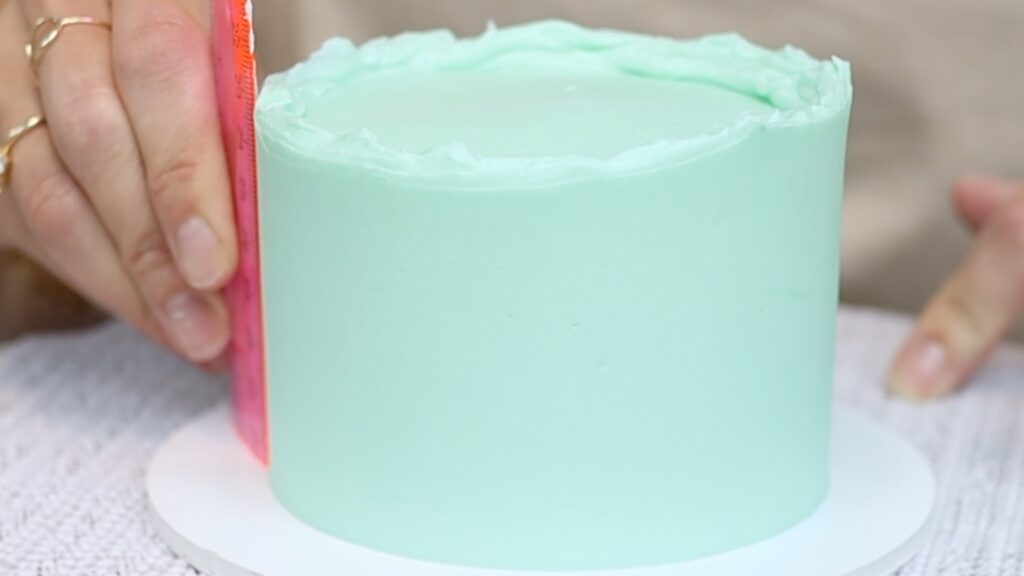
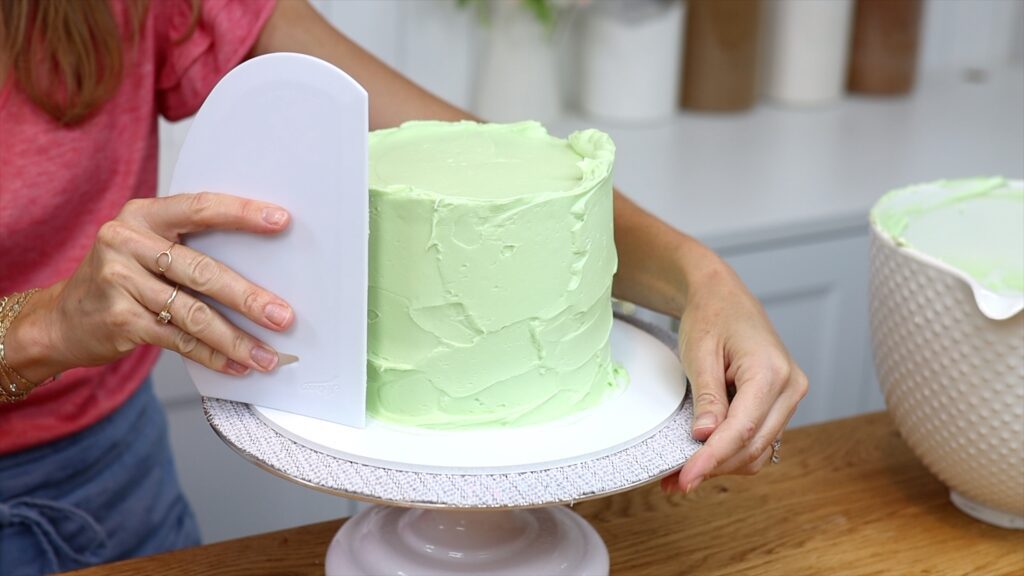
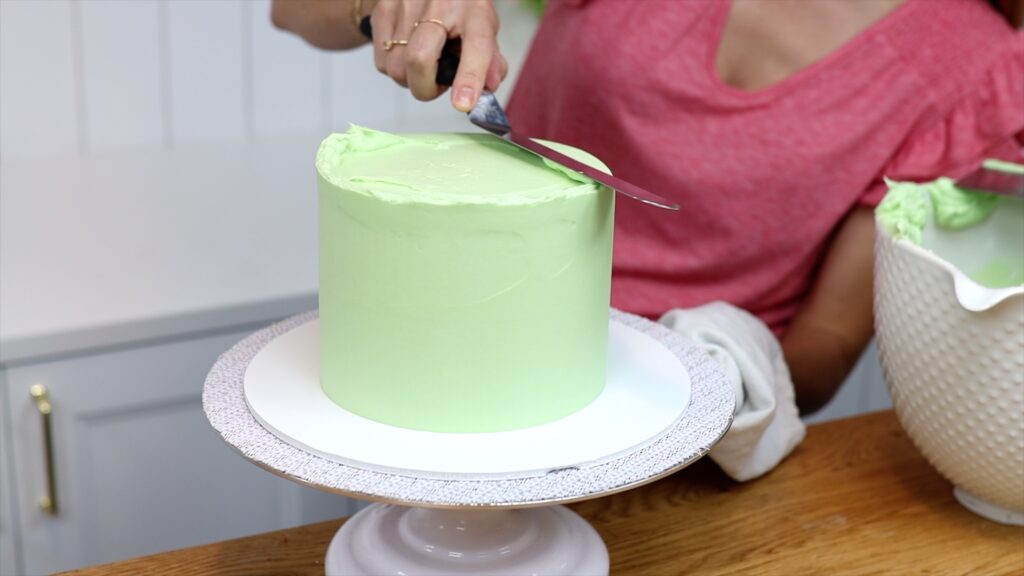
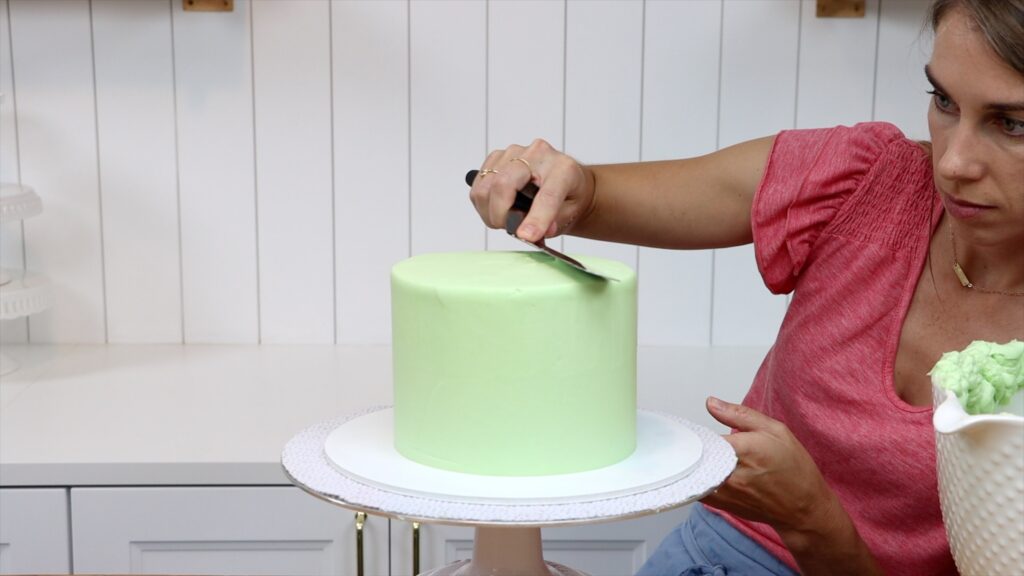
Lastly, it's time to level the top edge, where the buttercream wall or lip is sticking up. I like to do this with my
Afterwards, scrape the frosting from your
The natural reaction is to push down to get rid of this buttercream that's sticking up but don't do it! Push sideways because if you push down you'll cause a bulge in the frosting on the sides of the cake.
Work your way around the top edge of the cake, swiping and wiping, to flatten and level the frosting. With these motions against a frosting lip or wall, you'll create sharp angles from the side to the top of the cake.
So, here are the five hacks for smooth frosting on cakes:
I hope this has been useful! Ask me any questions in the comments and if you want to dive deeper into how to make and frost and decorate cakes using buttercream, visit my cake school to start your 7-Day FREE trial of my All You Can Cake membership, which gives you access to everything on my cake school. You can start wherever you need to and learn the skills and techniques to take your cakes to the next level. I hope to see you there!
You can also watch a video on this tutorial on 5 hacks for smooth frosting on cakes:
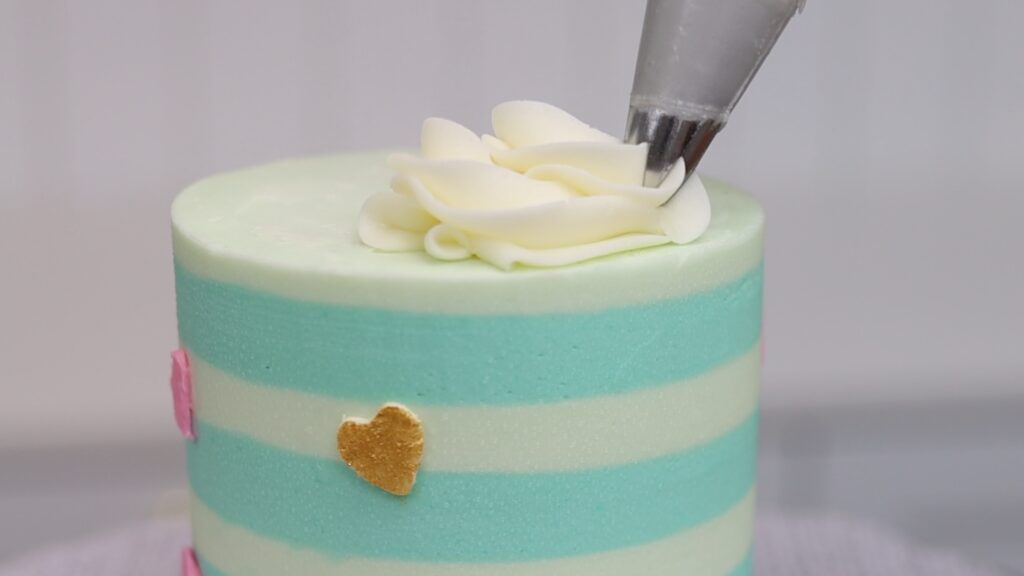
Which are the best piping tips to buy? There are so many piping tips available but some are more useful and more versatile than others. In this tutorial I’ll show you my best 10 piping tips and also how to use them!
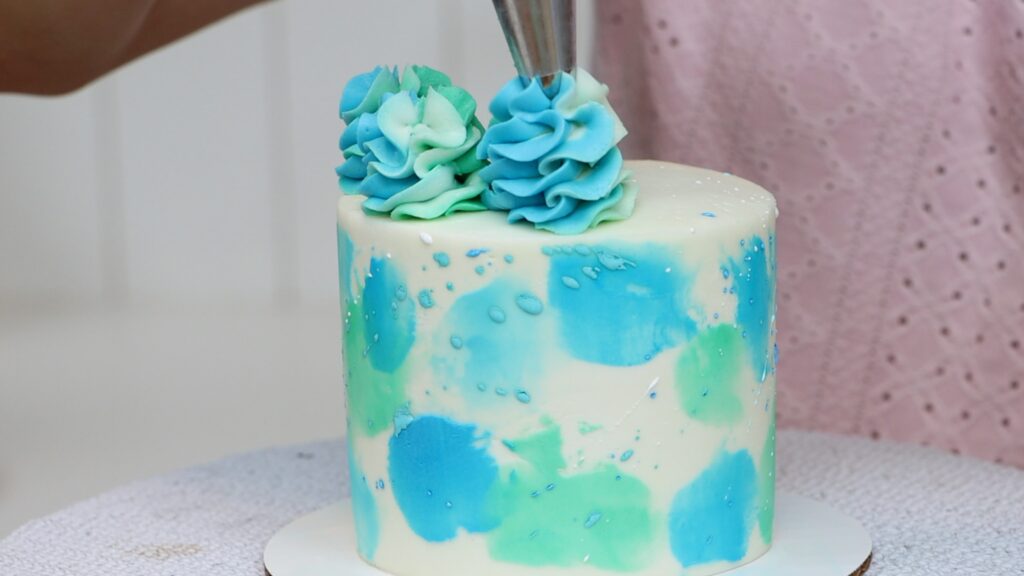
A 1M tip is usually the first one you buy, to pipe swirls onto cupcakes. It has long prongs that come together to make a star shape at the end. You can pipe these same cupcake-style swirls onto the top of cakes, too.
Instead of these tall swirls, try piping two circles, spiraling upwards so that one is on top of the other. Pull your piping tip away from the swirl in the same direction, at the same point for each swirl.
These short swirls work really well on naked cakes like number cakes too. The pretty texture is visible around the sides since there is no frosting to cover them up. And short swirls hold their shape well under the weight of the cake layer on top.
You can use the swirl technique in reverse to pipe rosettes on cakes. Start in the middle and spiral outwards, swiping away when your rosette is as big as you'd like it. This is a quick but pretty way to cover a cake using piping tips. Fill in any gaps with a little squeeze through the same 1M piping tip to make pretty star blossoms.
For a unique effect, freeze these piped rosettes and then scrape around the cake with a hot metal cake comb. You'll reveal a cross section of the piping that looks like fondant or a printed icing sheet.
Pipe rope borders with a 1M tip, making links of buttercream with overlapping circles around the top of a cake. Rope borders are a quick way to add height and texture.

If you already have a 1M tip but want to branch out, I recommend a 2D tip. It pipes a softer swirl than a 1M tip, with more wavy folds. This is considered a closed star tip because of the way the prongs close in around the tip.
You can also use a 2D tip for drop flowers. Squeeze the bag to push the buttercream out and then twist your wrist to let the petals fan out sideways.
You can pipe these straight onto a cake or onto a silicon mat or parchment paper. After piping them you’ll need to chill them in the freezer for 10 minutes so that they firm up.
Pick them up and press them onto a frosted cake. These are beautiful and so easy to pipe, with just a single squeeze through a 2D piping tip! You might also like my tutorial on 15 piping hacks for cake decorating.
Continuing with star shapes, do you see how there are more, shorter prongs on this star tip than the 1M?
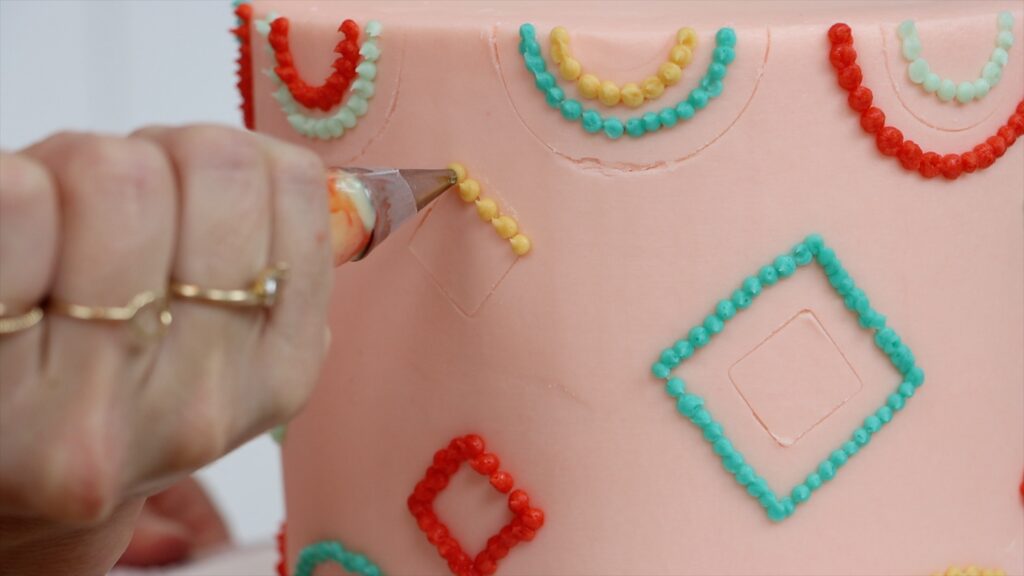
Small star tips like this #32 or a #199 are great for borders. They cover up the join between the cake and the cake board, and also add texture. Squeeze, let the frosting bulge out to form a dot, and then pull away, leaving a tail on the bead.
Repeat to overlap the tail of the previous bead, continuing all around the cake to make a textured beaded border. You can do this around the bottom or the top of a cake, or both!
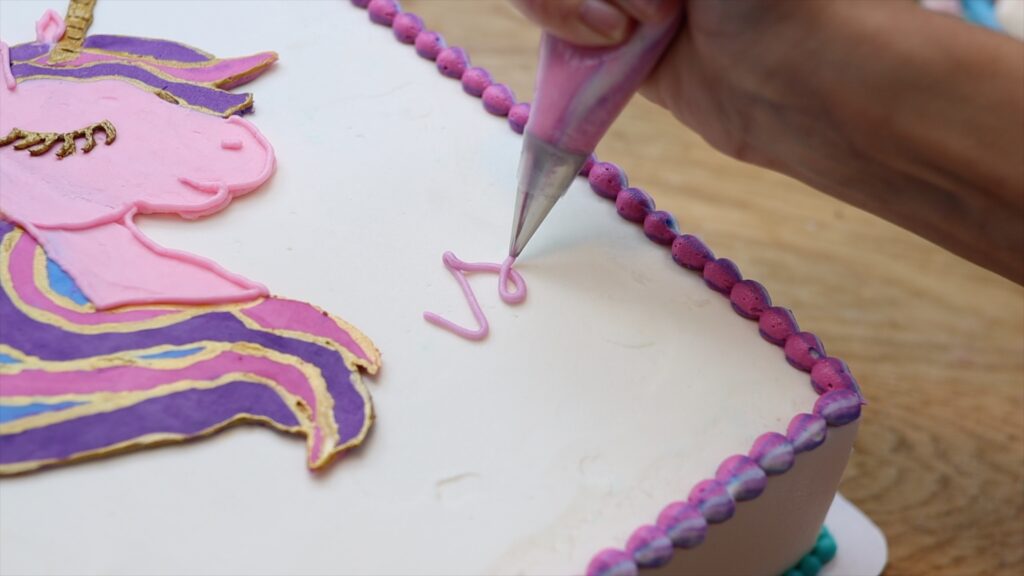
You can also use star piping tips for writing messages. The texture in these letters makes piping them much more forgiving than using a round tip, where every little wobble of your wrist will cause a wiggle in the line that’s really noticeable when the line is smooth instead of textured.
Large star tips like a 4B or 6B are great for piping accents and borders on top of a cake. With just a squeeze and pull-away you’ll create quite dramatic texture. The right consistency of buttercream will help make the peaks of these neat. For tips on consistency, check out my 4 Minute Buttercream recipe.
These work well to add detail to the side of a cake, too!
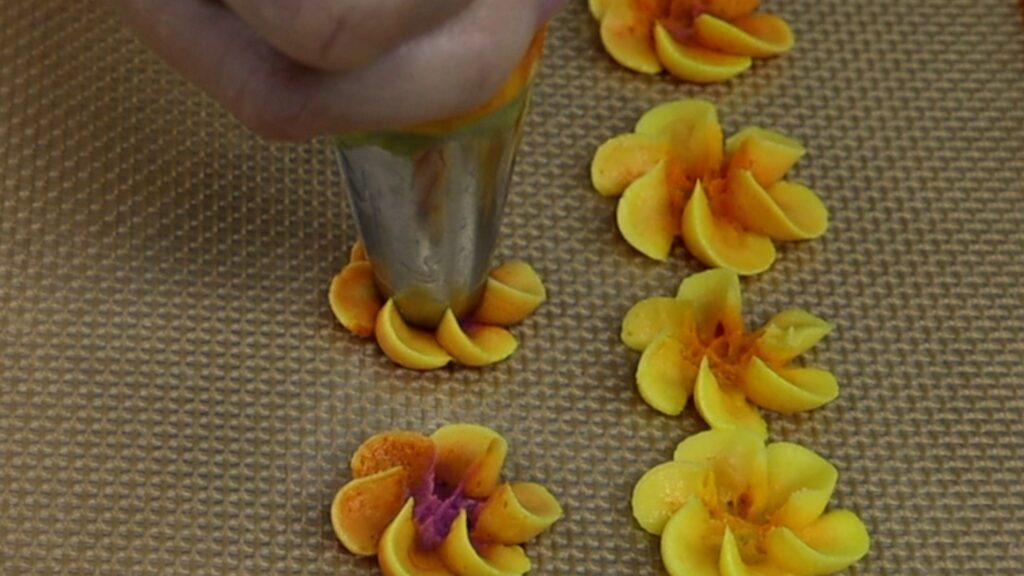
Russian tips or flower nozzles are very different to the tips you’ve seen so far. Each tip will pipe several different shapes and different colours, too!
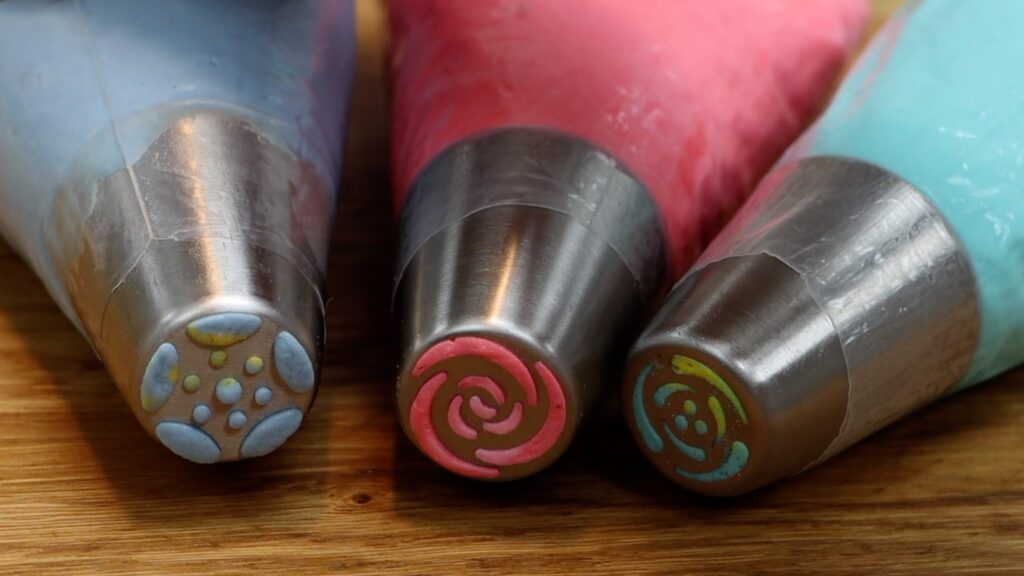
Layer different colours within a piping bag, using a different colour around the middle and the outer edge. I like to put the piping bag in a glass, folding it over the rim to hold it open.
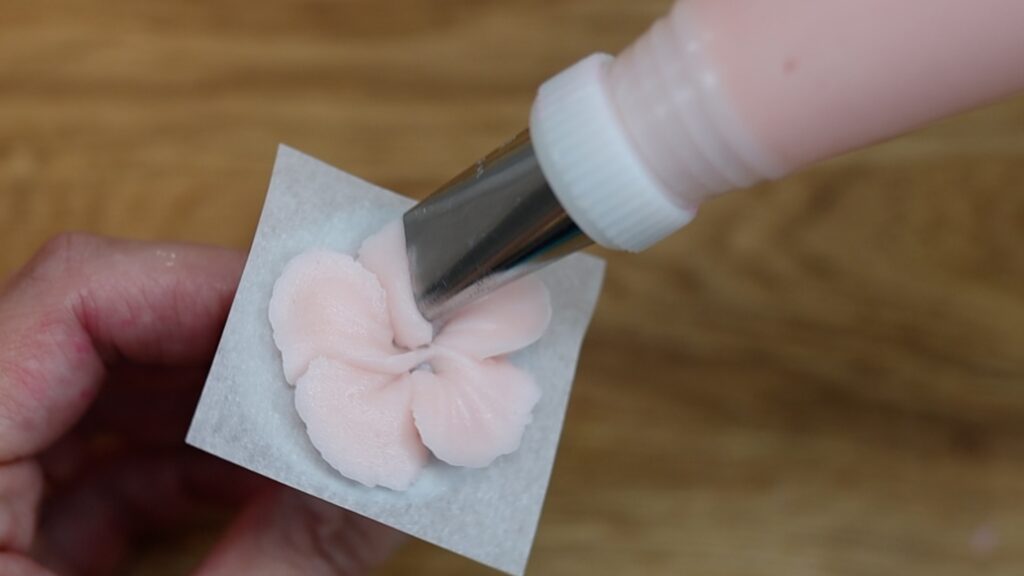
As you push the frosting through the tip you’ll create every part of the flower with just a single squeeze! Russian piping tips with several curved lines will make petals that wrap around like on a rose. Any dots in the center will make stamens, which will be the colour in the middle of your piping bag.
The only part of the flower these tips don't make are the leaves. Don’t worry, coming up next there’s a tip for those, too!
A leaf piping tip looks like jaws from the side. As you squeeze the piping bag you’ll push the frosting out sideways to make a leaf. Then when you stop squeezing and pull away you’ll leave a point on the leaf.
You can use this same technique for succulents, piping a ring of these leaves that point outwards. Then pipe another ring overlapping them, adding a few more little leaves in the middle. Squeezing for less time will make shorter leaves.
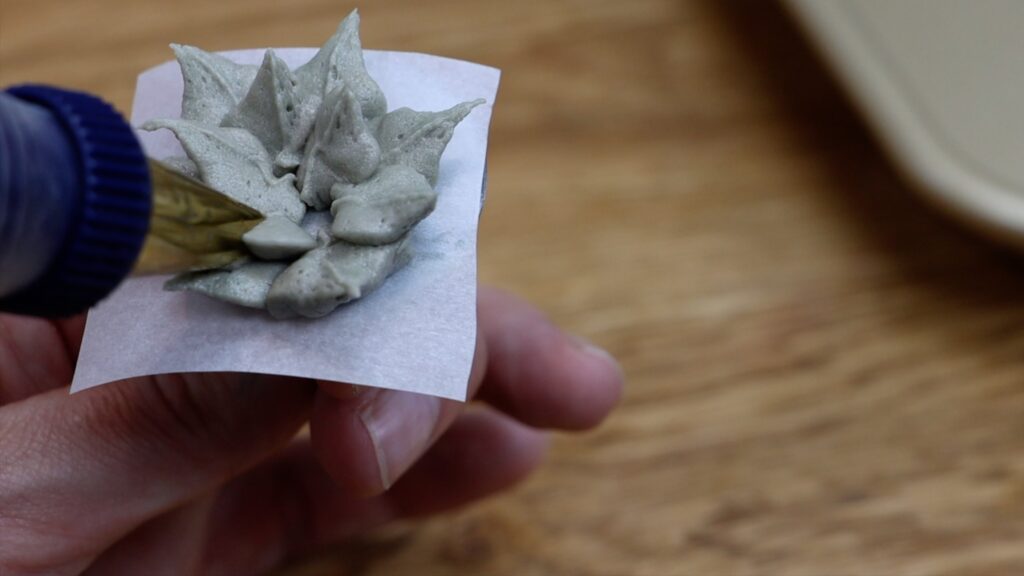
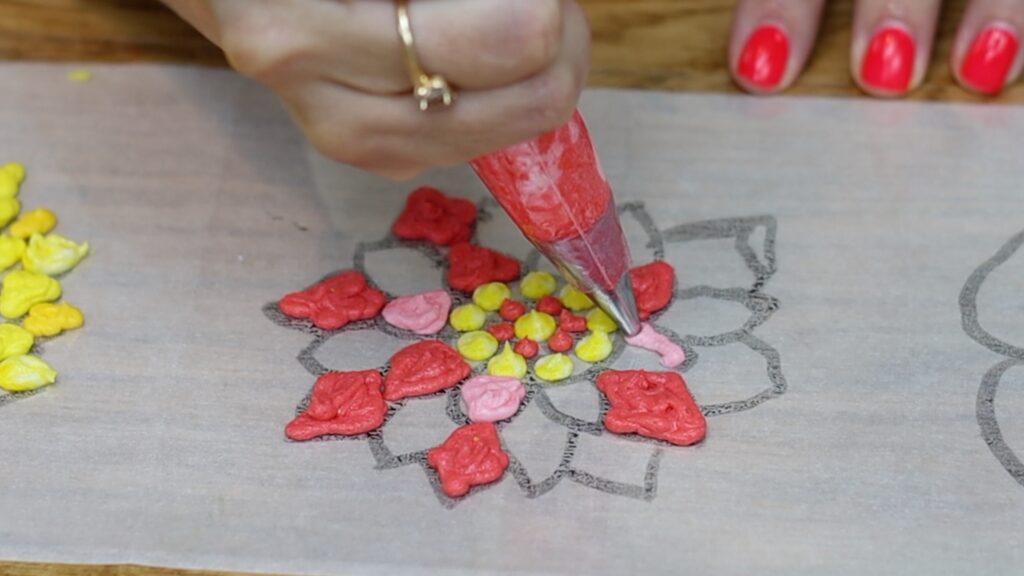
Small round tips include a #1, #2, #3 or #4. These can be used for pointillist designs, where you make shapes with hundreds or thousands of tiny piped dots. Even simple shapes, marked on the cake with cookie cutters or a toothpick, look elaborate when covered with tiny dots.
You can use tiny dots to make messages too, which is great if your handwriting is terrible like mine is! Scoring the letters into the frosting with a toothpick first will help keep your letters the same size and the words straight.

You can write messages with lines too, by squeezing and pulling the piping bag to make letters and numbers.
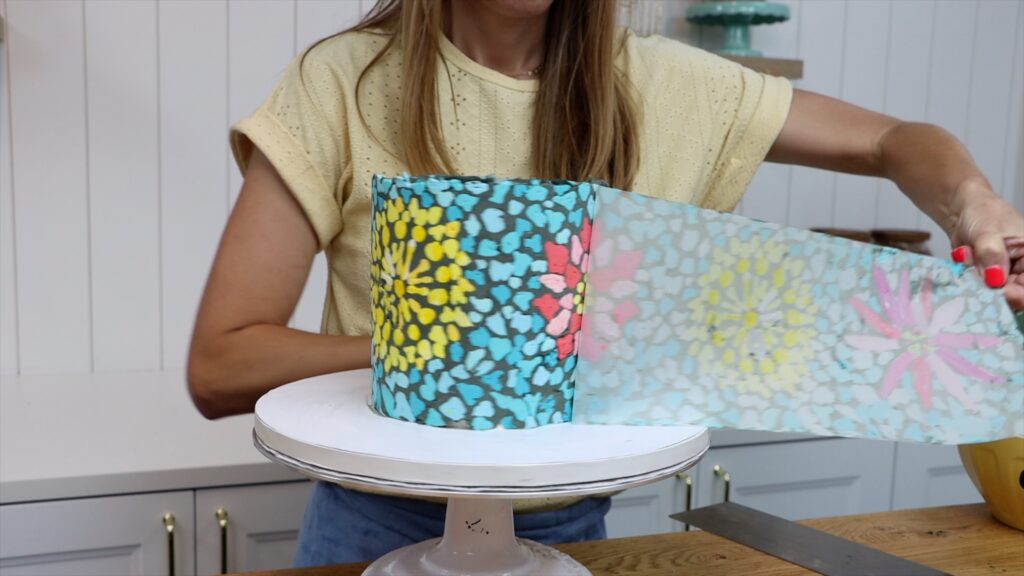
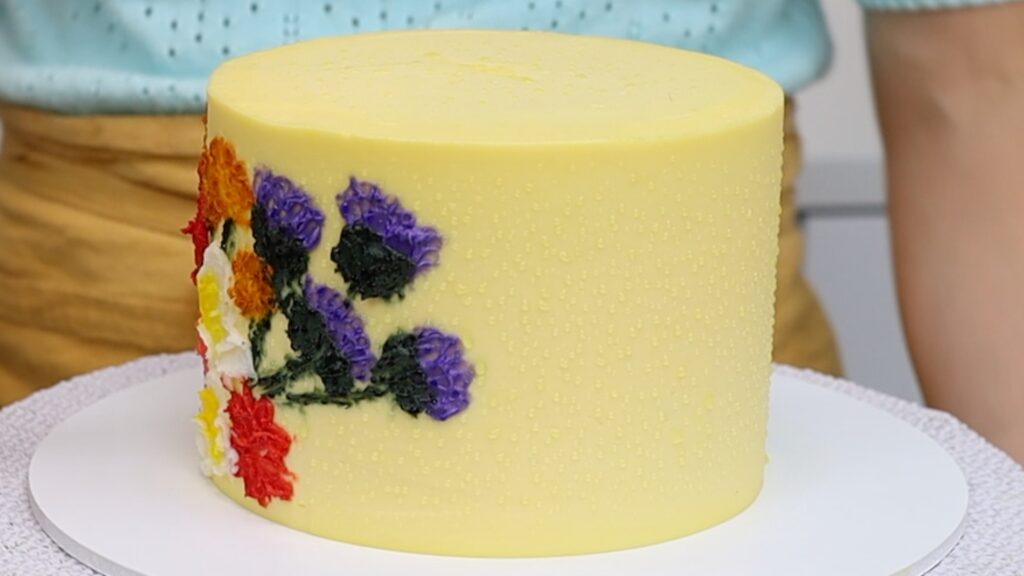
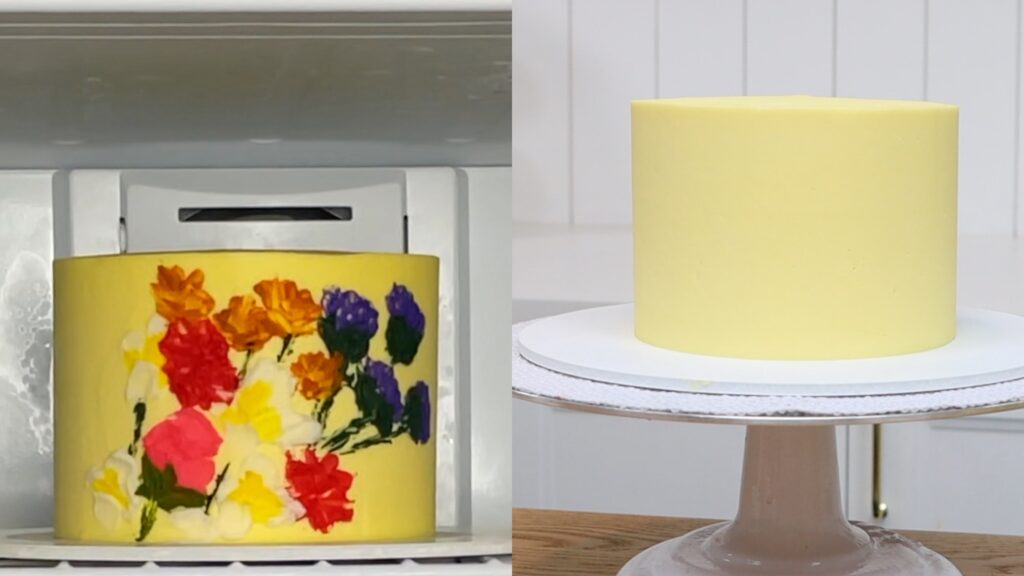
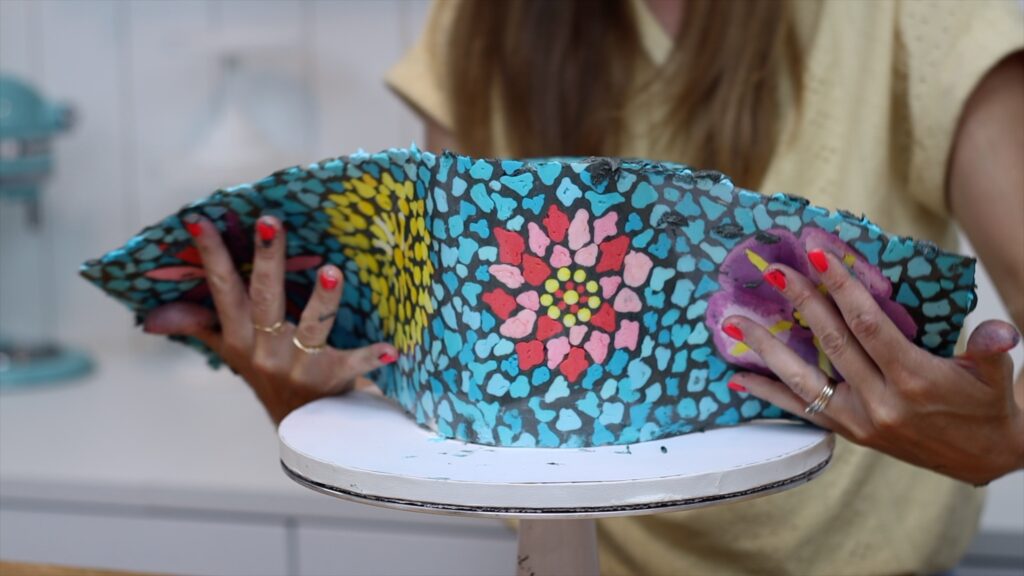
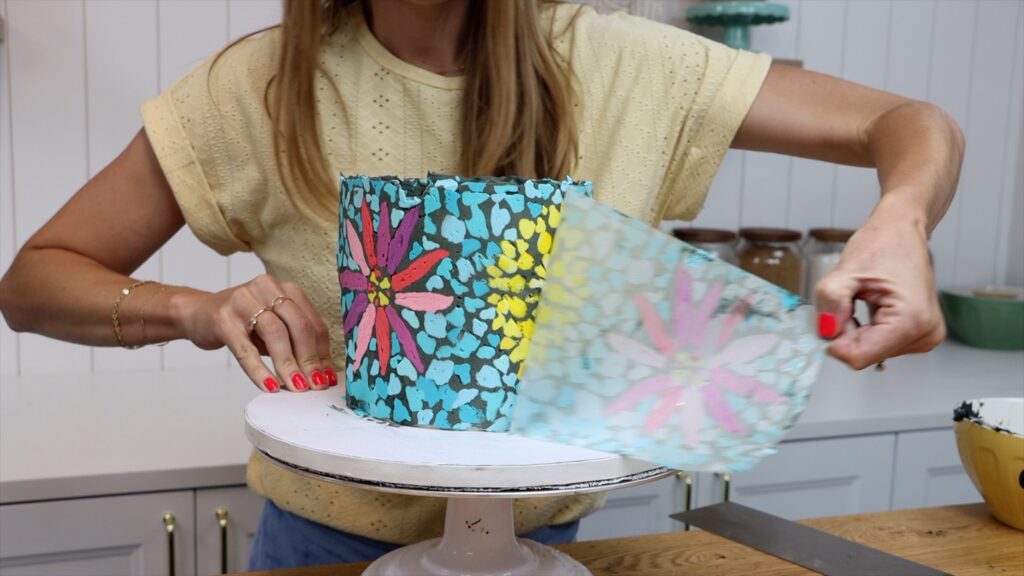
Small round piping tips can create stunning designs by tracing an image using buttercream onto acetate or parchment paper. Then lift it up and wrap it around a cake.
Chill the cake and then unwrap it to reveal a gorgeous design frosted onto the cake! I have a full tutorial on this mosaic cake using piping tips or, alternatively, ziploc bags!
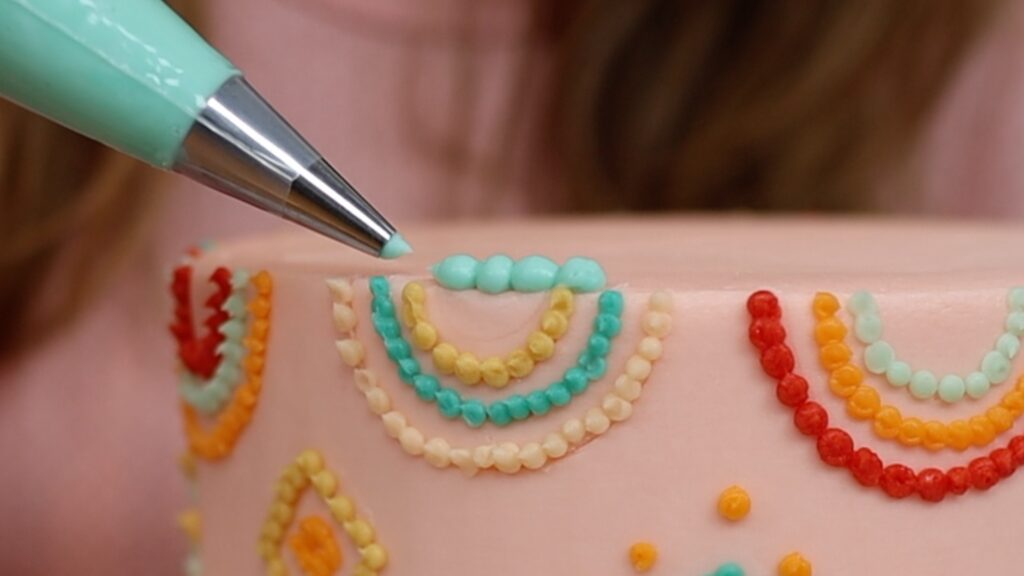
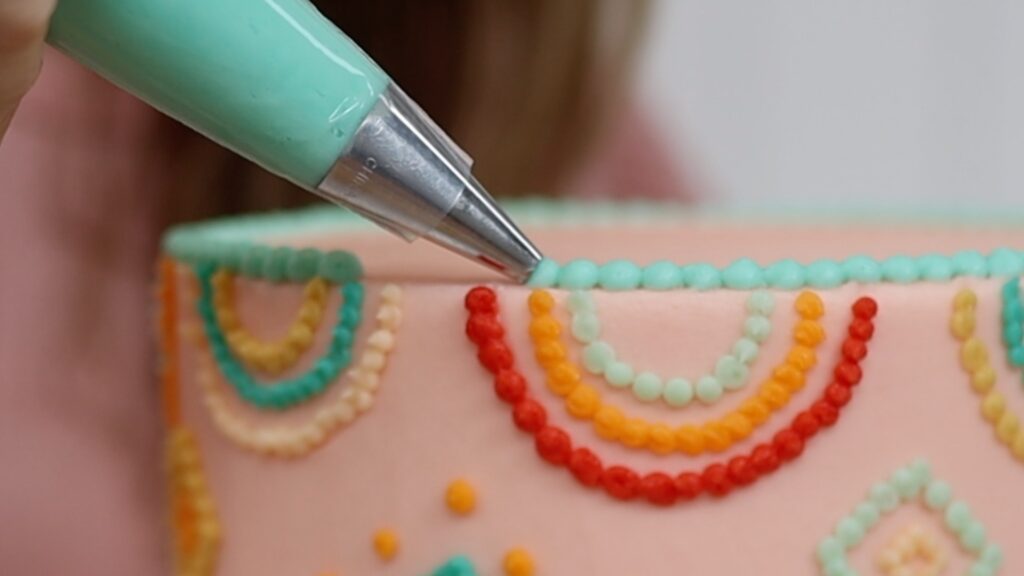
With a medium round tip you can pipe beaded borders using the same technique as with the star tip shown earlier. Squeeze, hold for a moment and then pull away as you stop squeezing the bag. You'll leave a tail on the dot. Cover up that tail with the next dot, continuing around the cake to make this pretty, dainty border!
A large round tip like a 1A can also be used for borders on top of a cake. Pipe a dot and then release your pressure on the piping bag as you pull upwards. This will leave a peak on each dot.
A large round tip can be used to pipe scallops on a cake, too. Pipe a dot and then swoosh it sideways with an
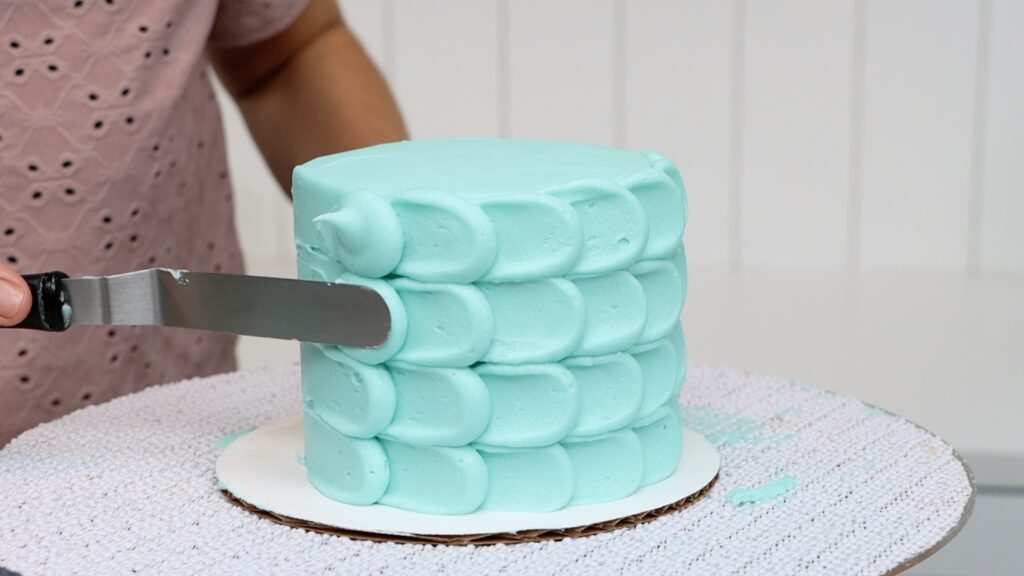
Petal piping tips are (of course!) great for piping petals, for example pansies and roses. The narrow end of the teardrop shape creates movement around the outer edge of each petal.
Petal piping tips are also used for piping ruffled frosting in layers going up or down a cake. This is another way to avoid smooth frosting on cakes!
Vintage cakes or Lambeth cakes are covered with layered piping and usually rely heavily on petal piping tips. They can be used for swags or drapes and also for ruffling ribbons.
Tell me in the comments which piping tips you’re going to buy next! Learn hundreds of ways to use piping tips to decorate cakes on my cake school, where you’ll find online courses and memberships to take your cake decorating skills to the next level. You’ll find a free course on 10 frosting techniques there, too!
You can also watch a video of this tutorial on the 10 best piping tips for cake decorating:
