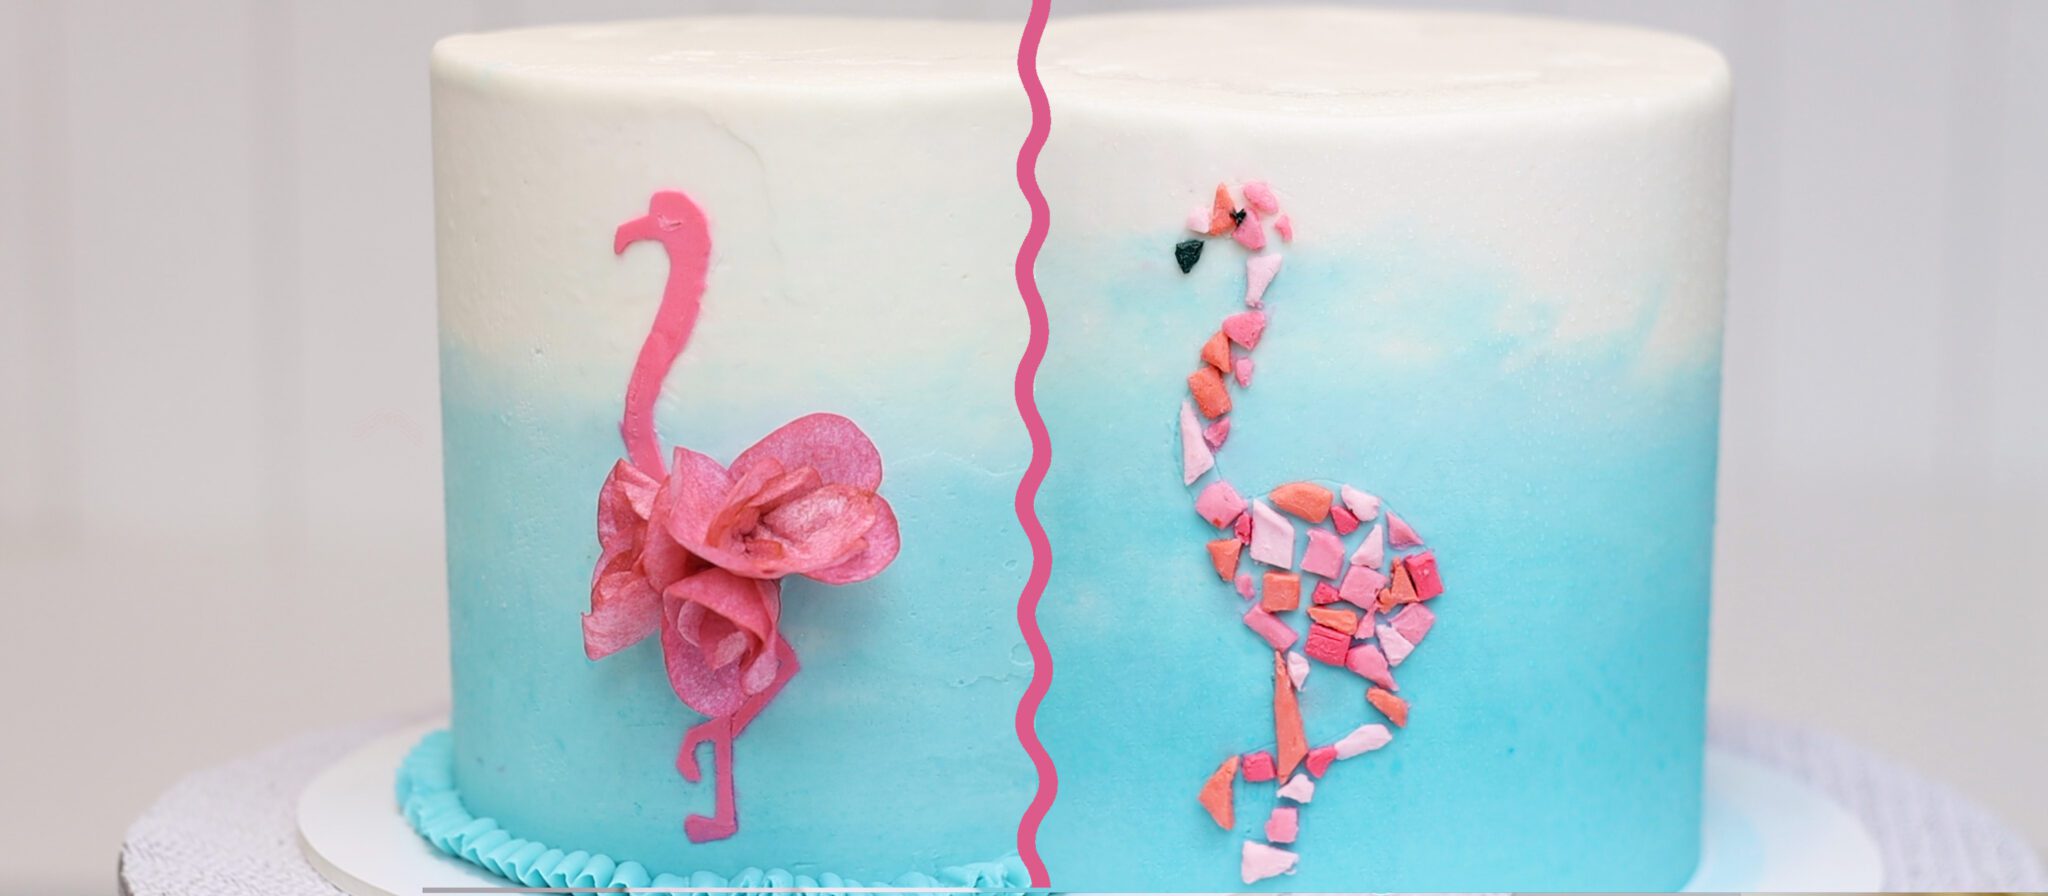
Flamingos are trending and in this tutorial I’ll show you two simple techniques to make stunning, unique flamingo cakes!
I’m using my strawberry cake recipe so that the insidewill be pink just like the flamingos on the outside. For the maximum strawberry flavour I’m using the strawberry buttercream from the recipe as my crumb coat. After refrigerating it for 30 minutes it’s firm and I can add a gorgeous ombre frosting on top.
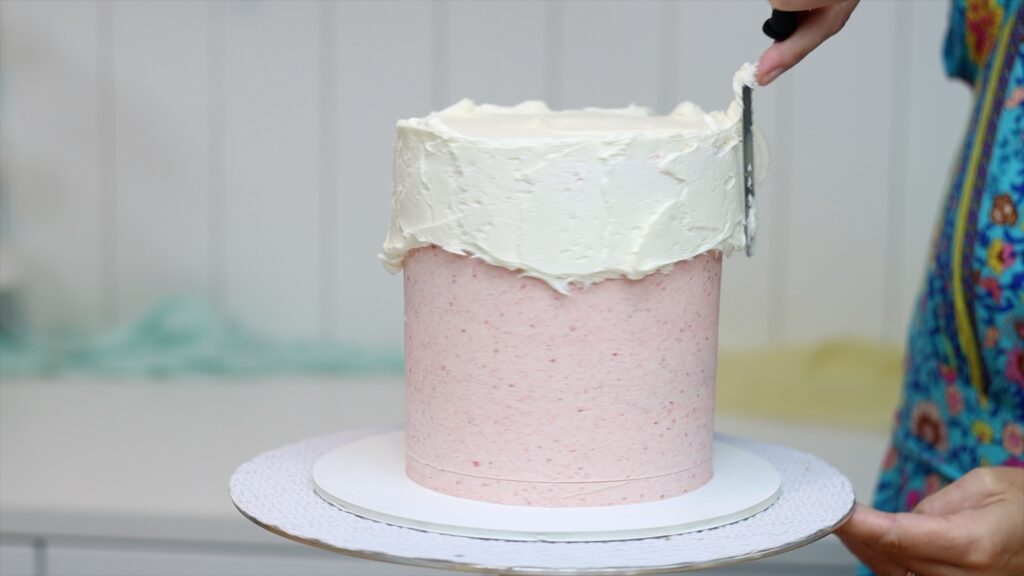
Ombre is secretly very easy to do. Use the lightest colour on top of the cake, spreading it around the top of the sides, too. Then use the darkest colour at the very bottom of the cake, spreading it right down to the cake board. Of course, you can do the opposite instead, with the darkest colour at the top and the lightest at the bottom. Now mix the lightest and darkest colour together to make a middle shade. Spread this around the middle of the cake, between the other two.
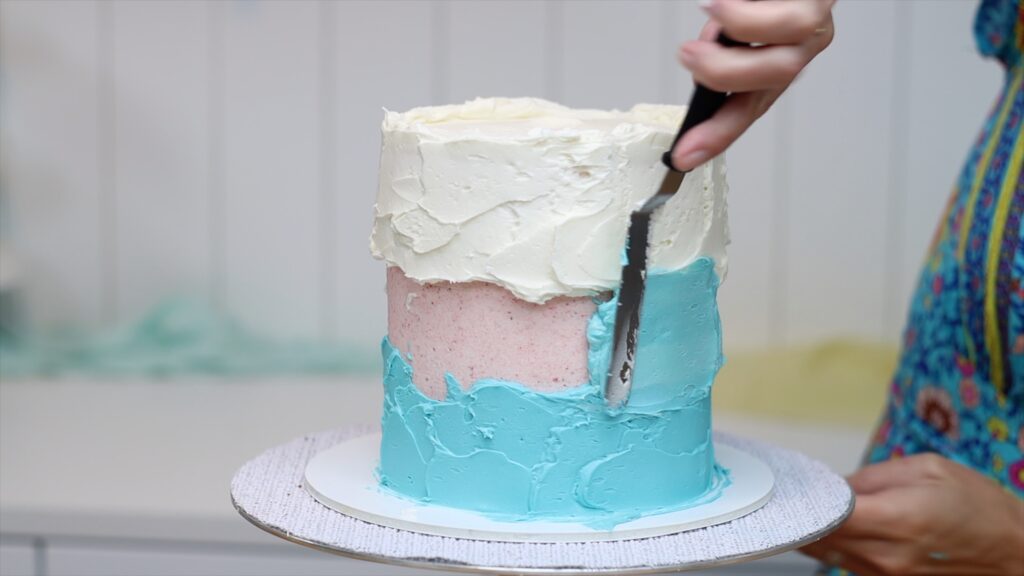
Wiggle your spatula up and down in zig zags around the cake to blend all of the shades together slightly. This will make a gradual gradient of the colours.
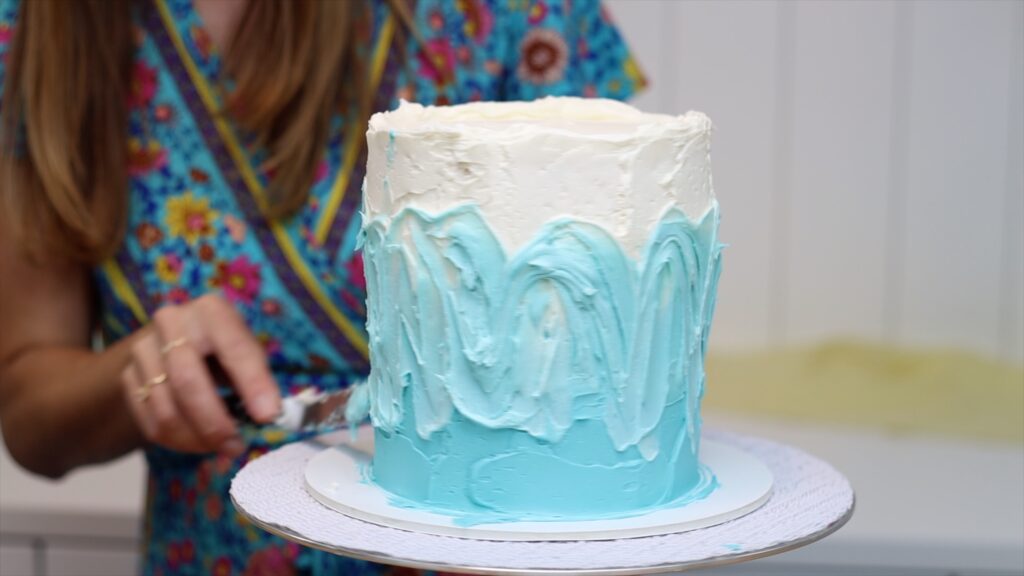
Then scrape around the cake with a cake comb to smooth the frosting. It’s simple but such a stunning background to make any cake design a bit more detailed and interesting.
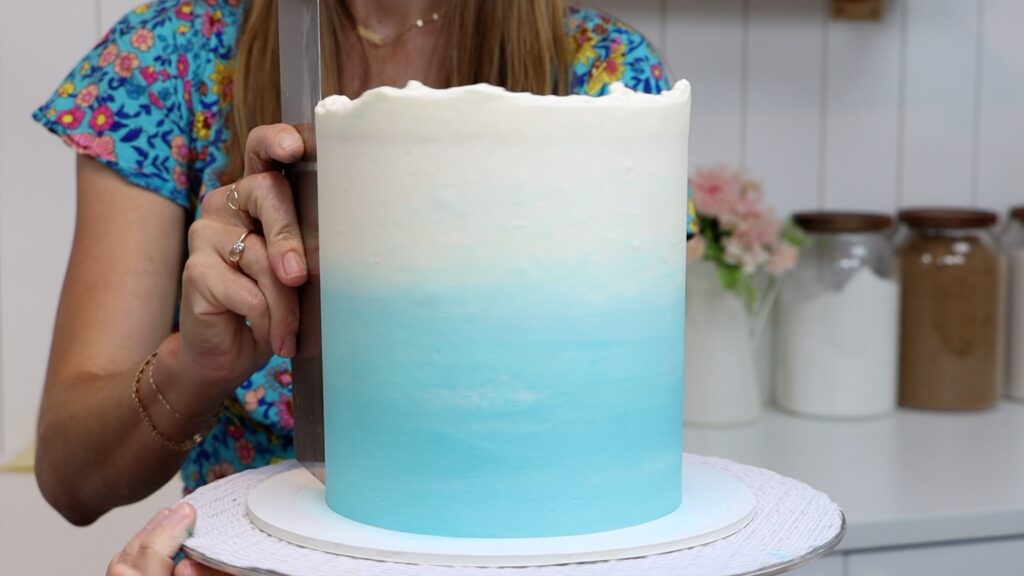
Tidy up the top edge and then put the cake into the fridge to chill and set the frosting. Both of the flamingo techniques in this tutorial need the frosting to be firm before you decorate it.
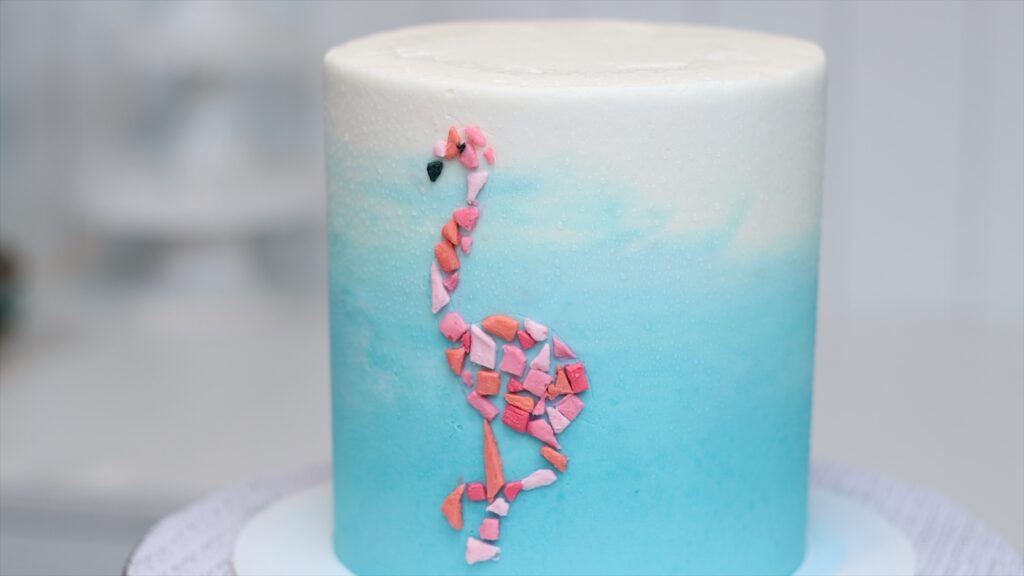
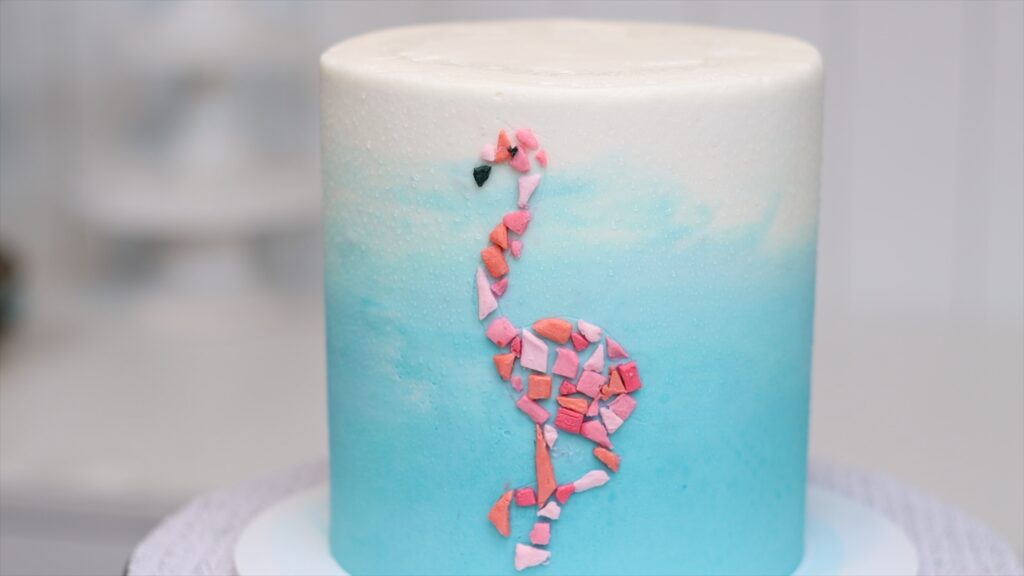
For the first technique, which is my favorite, we’re going to make a flamingo mosaic. Spread coloured buttercream onto parchment paper on top of a small, flat surface. This could be a cutting board, cake board, upside down tray or a baking sheet. You need to be able to fit it in your freezer later.
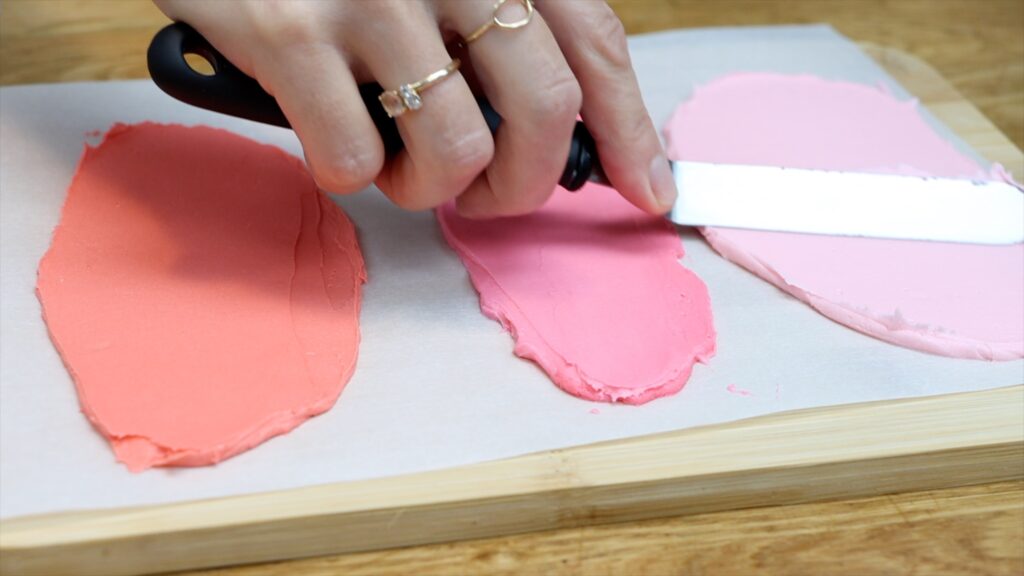
You’re aiming for thin, smooth patches of colour. Ideally, all of the colours will be the same thickness. It’s best to do this on at least two separate pieces of paper so that you can chill them separately. You’ll see why later.
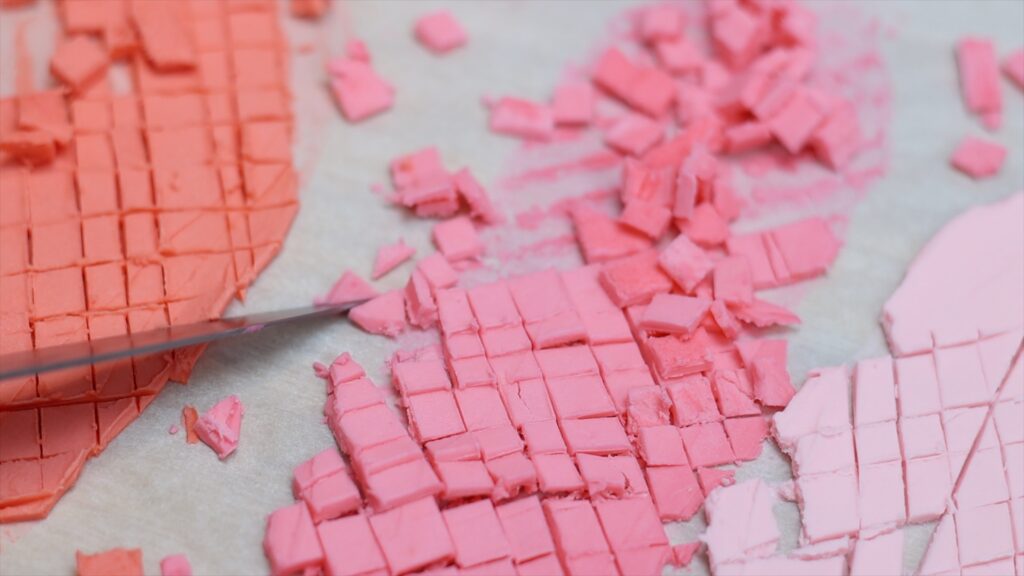
Put the coloured buttercream into the freezer for about 15 minutes to chill and firm up. Then use a sharp knife dipped in warm water to slice through the frozen buttercream, cutting it into little tiles of different shapes and sizes.
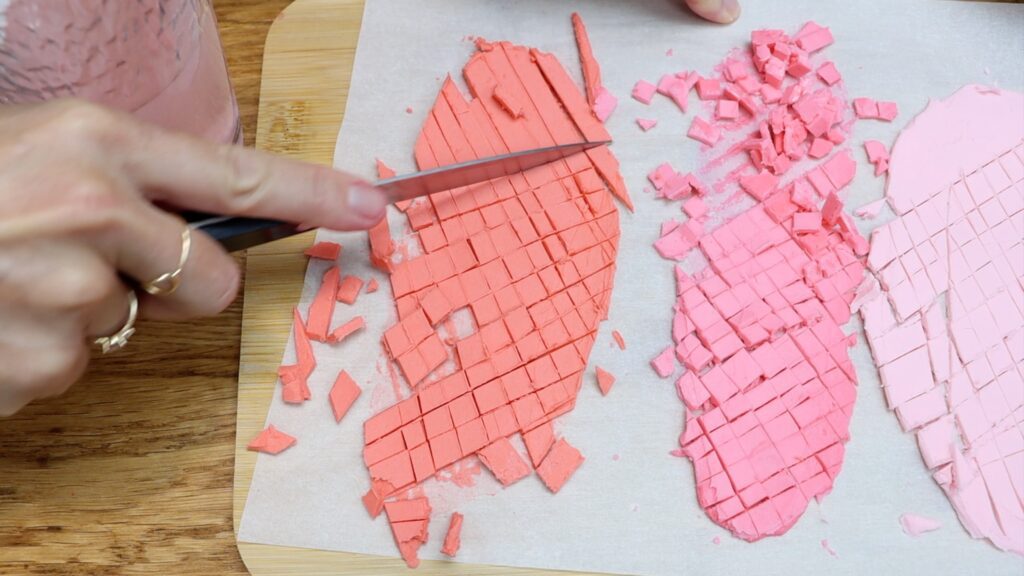
After a few minutes at room temperature the buttercream will soften and get sticky. You need it to stay firm so work quickly to slice it. Dip your knife into the warm water in between cuts to clean it and then wipe it dry on a towel or paper towel before you cut again. This will give you the neatest edges on your tiles.
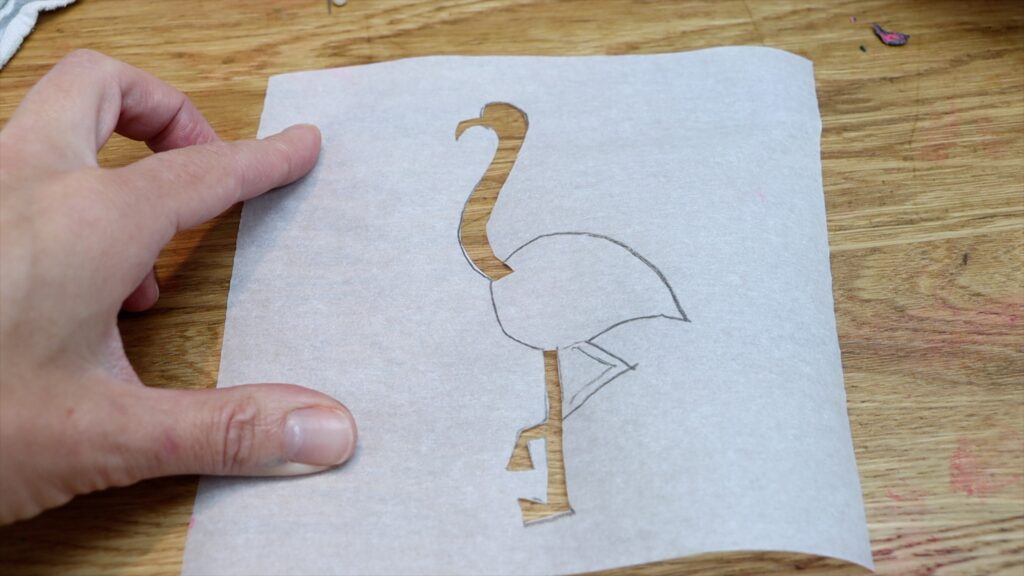
Draw a flamingo or trace one, making sure it will fit on your cake. I used four 6 inch layers to make my cake so it's tall! I used my strawberry cake recipe which can also be used for a three layer 8 inch cake but by making 4 smaller layers I have a taller cake with more space on the sides for my flamingo. Of course, you could do this on the top of the cake instead. However, since the sides of a cake are more visible, I like to put my decorations there.
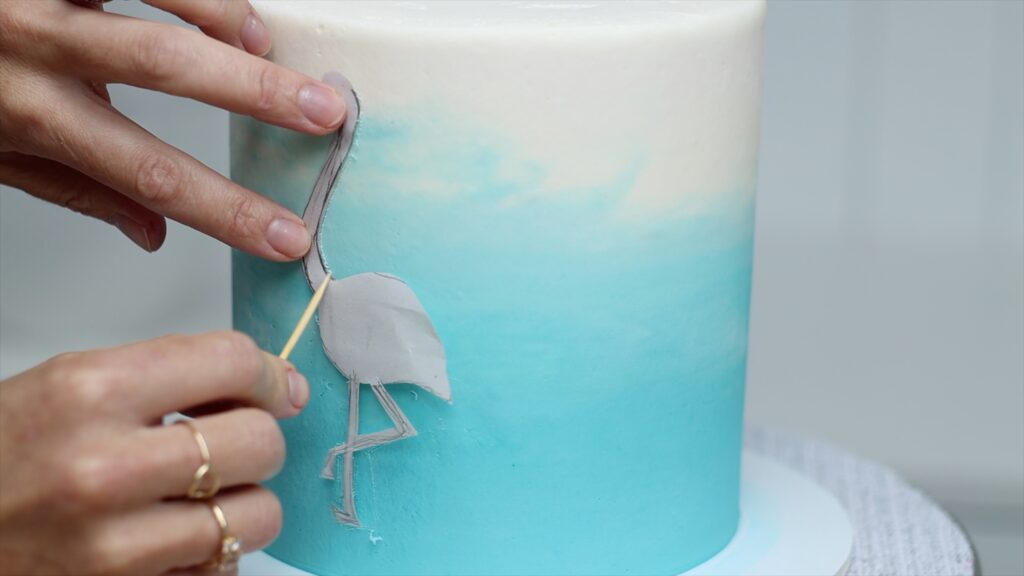
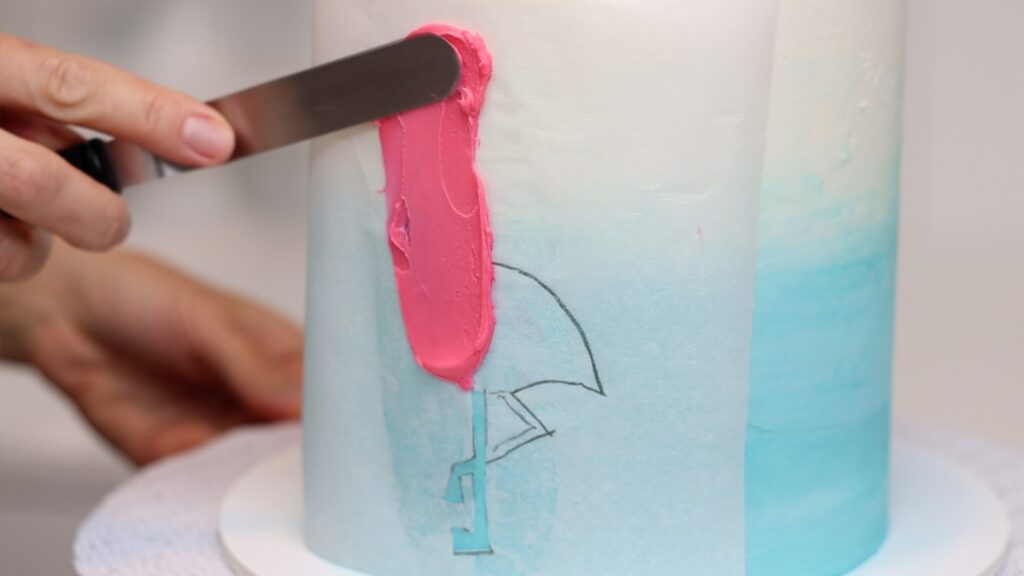
Cut the flamingo out and then take your cold cake out of the fridge and position the paper flamingo on it. Trace around it using a toothpick to draw a very faint outline. Since the frosting on the cake has set, it’s firm and won’t get damaged by the paper. Brush off any buttercream crumbs along the outline using a paintbrush.
Brush the entire flamingo shape with a paintbrush dipped in water and then blotted on a towel or paper towel. You want it to be damp, not dripping wet. The moisture will help the frozen buttercream stick to the frosting.
Take your buttercream tiles out of the freezer and pick one up. Press it against the cake, within the outline you scored with your toothpick. Continue with more tiles, using different colours and shapes and sizes for lots of variety. Make sure you’re going right up to the outline so that your shape is recognizable.
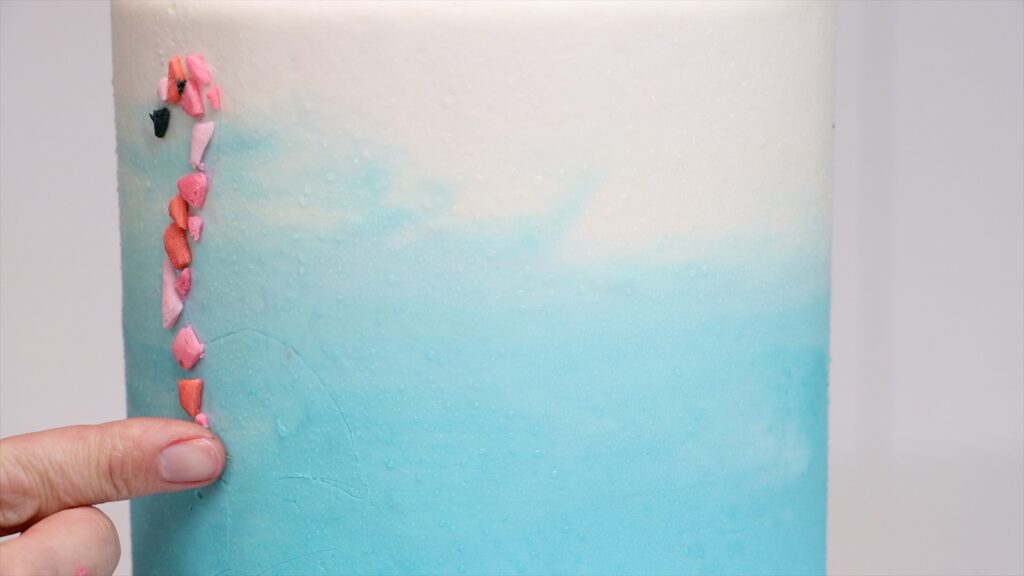
I used a little black buttercream triangle for the beak and a tiny black triangle for the eye. You can cut the tiles now into smaller pieces or different shapes to fit into little spaces between other tiles.
The buttercream tiles will get soft as they warm up to room temperature. You’ll notice because they’ll start to stick to your finger instead of the cake. The tiles will also warp and droop because the buttercream isn’t firm anymore. When that happens, put these colours back into the freezer to chill and firm up again. Take out another colour and use those tiles instead. That’s why it’s a good idea to spread the colours onto at least two different pieces of paper. You can move them around separately and don't waste time waiting for any buttercream to chill.
Since the cake has been in the fridge it will be cold. If the room is warm, you might notice beads of condensation forming on the cake. It’s important to dab those with a paper towel to absorb them and leave the frosting dry. If you don’t, the colours of the buttercream tiles can run, especially dark colours like the beak and the eye. I recommend adding the beak and eye last for that reason, so that the back colour doesn’t run. If the room is warm, blot the condensation droplets and then put the cake in the fridge for 15 minutes before continuing.

The mosaic flamingo is the first technique of this tutorial and I’ll show you the end result in a minute. Keep reading for the second technique!
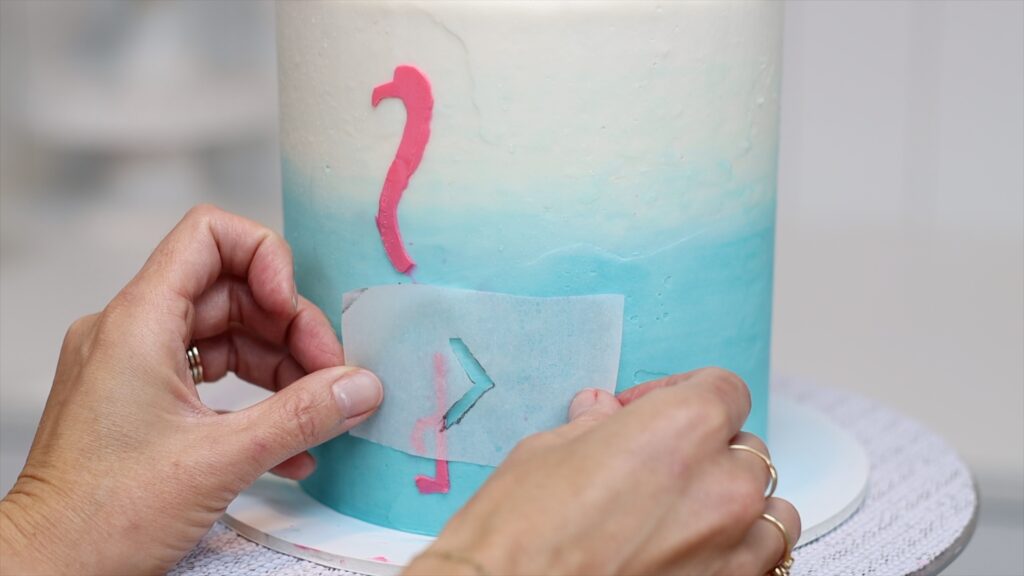
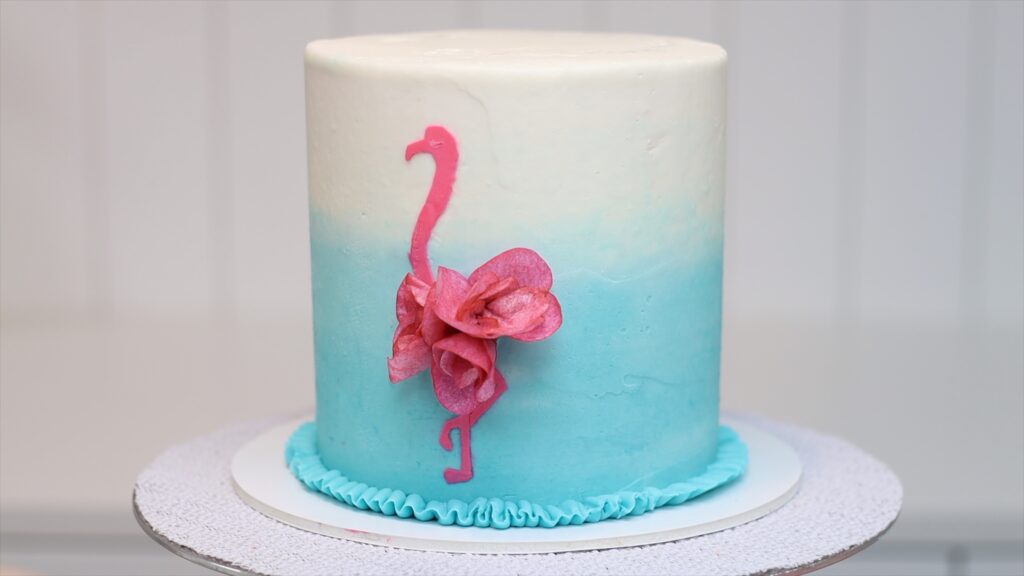
For the second technique, make your own flamingo stencil. Trace your drawing or an image of a flamingo onto parchment paper or wax paper and then cut it out. Leave the paper around the shape intact to use as your stencil.
I’m going to cut a separate stencil for the other leg because if I cut the second legs out now, I'd have a big triangle instead of two dainty legs!
Wrap your stencil tightly around the cake and use pins to attach it so it doesn’t move. Spread frosting over it to cover the parts you cut out of the paper.
Then use an
For the bent leg, put the cake back into the fridge for 30 minutes. You need to set the first part of the design so that it's firm. Then press on another piece of paper with just the bent leg. Spread buttercream over it, smooth it, and peel the stencil off.
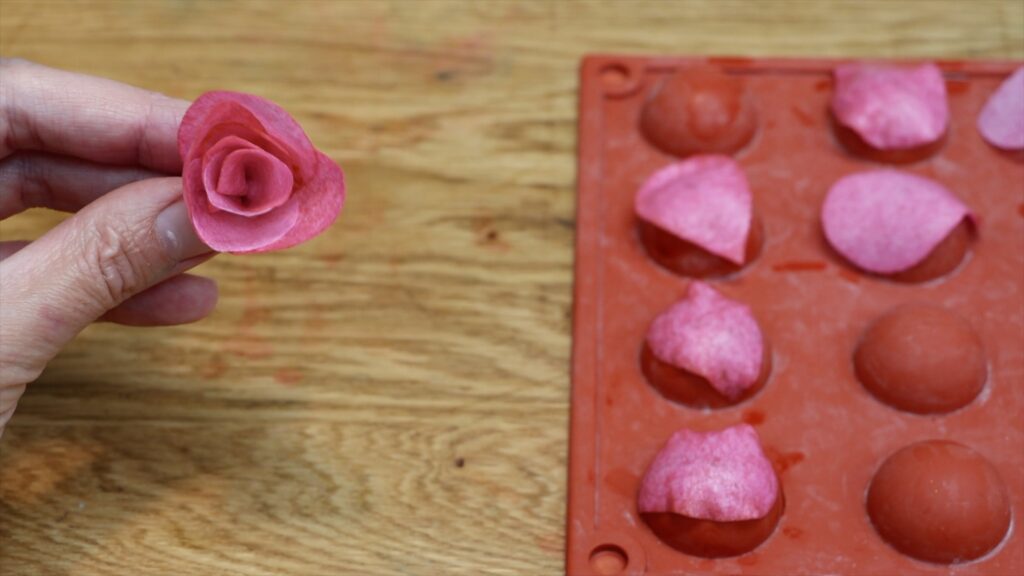
Now, what about the body? To give it some texture and depth I’m making pink wafer paper flowers. I teach how to do this in my Layer Up program on my cake school. You could use real or artificial flowers instead or pipe rosettes with a 1M tip and pink buttercream.
I’m adding a wave border around the bottom of the cake with the leftover turquoise frosting from the ombre. This is a #104 petal piping tip and the way you hold it is important. The narrow end of the teardrop shape of the petal is pointing away from the cake to make the thin edge of the piping:
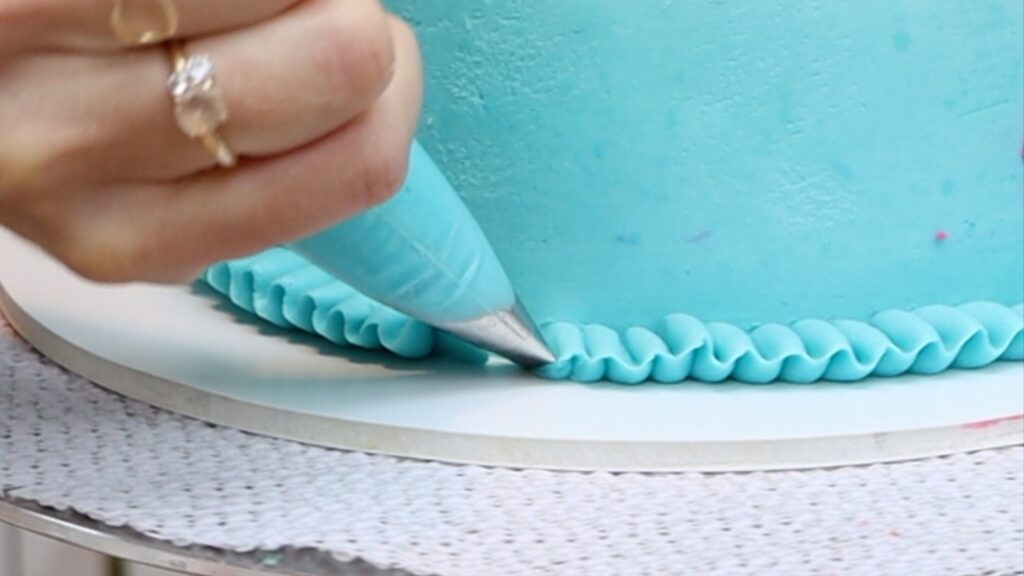
Meanwhile, the wider end of the tip is pressed against the cake to make a thicker edge. This thick edge will attach to the cake to secure the piped border.
So, which flamingo do you prefer? Stenciled with a floral body or a mosaic version? Tell me in the comments!
Visit my cake school to learn hundreds of other cake decorating techniques and designs with my online courses and memberships. Start a FREE 7 day trial of my All You Can Cake membership today, which gives you access to everything on my cake school!
You can also watch a video of this tutorial on a Flamingo Cake 2 Ways: