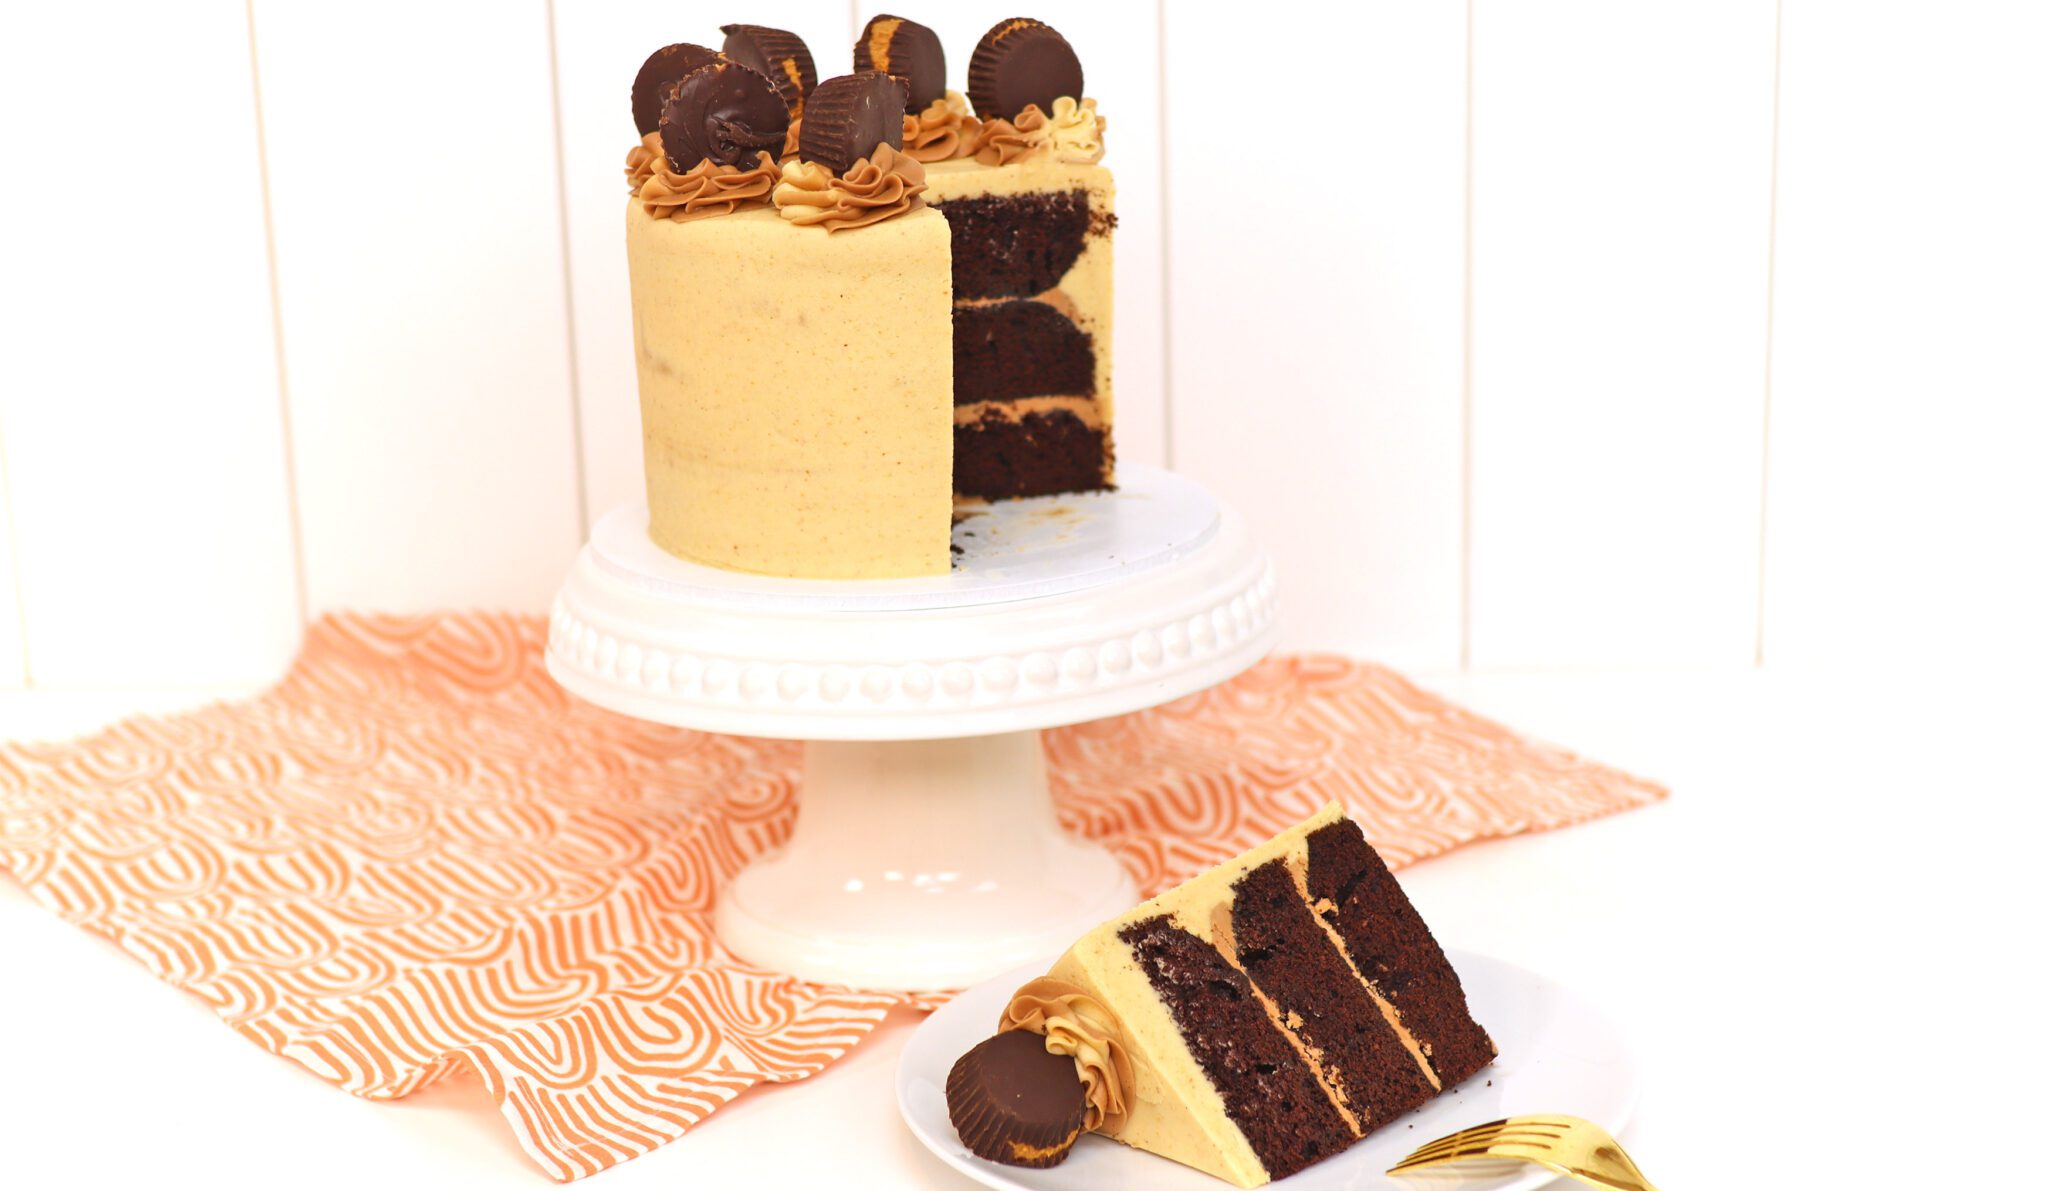
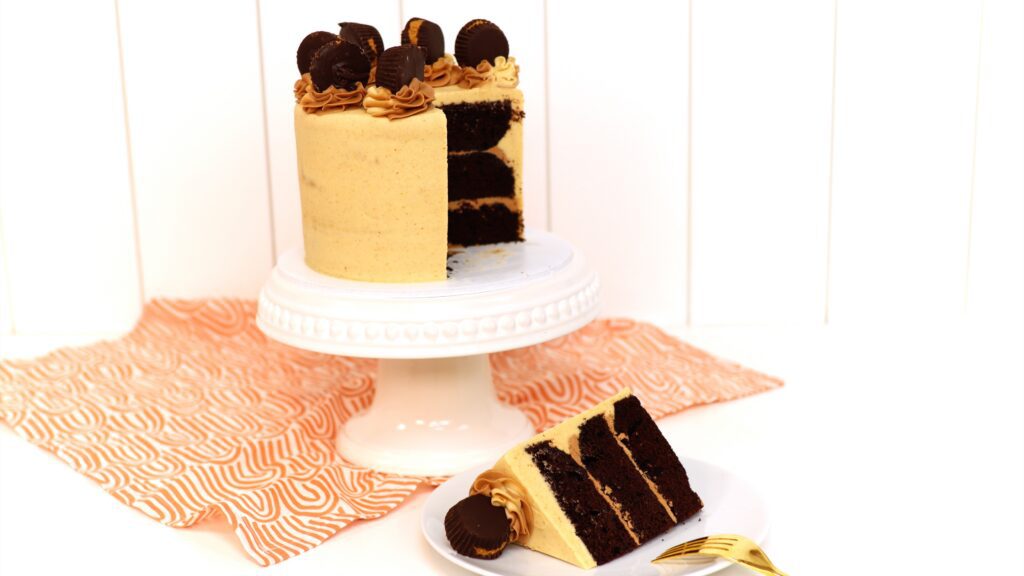
Chocolate and peanut butter are a perfect pair. If you love peanut butter cups, you'll love this cake! Rich chocolate buttercream is sandwiched between three layers of moist, not-too-sweet chocolate cake. It's covered with creamy peanut butter frosting and topped with chocolate peanut butter swirls and homemade chocolate peanut butter cups.
This recipe has several parts but if you follow this order, you won't spend all day in the kitchen!
Bake the cake
Make the peanut butter cups
Prepare the buttercream filling and frosting
Assemble, frost and decorate the cake!
First, bake the chocolate cake
This cake uses my Perfect Chocolate Cake batter, which is my absolute favourite chocolate cake! It's moist, not too sweet, and easy to make. For the best results, take the butter and eggs out of the fridge four hours before baking so that they come to room temperature. After adding the flour to the batter, only mix until the flour is just incorporated and you can no longer see any loose flour in the batter.
Divide the cake batter between three 6" cake pans or convert the recipe to a different size using the printable recipe below. Bake until the cakes don't wobble when you shake the pans. If you stick a toothpick down into the middle of the cake, it should come out clean with no streaks of cake batter.
Leave the cake layers in the pans for 10 minutes to cool and firm up slightly. Then turn the cakes out onto a wire cooling rack. Let them cool completely before assembling your cake, which will take about three hours.
Make the peanut butter cups
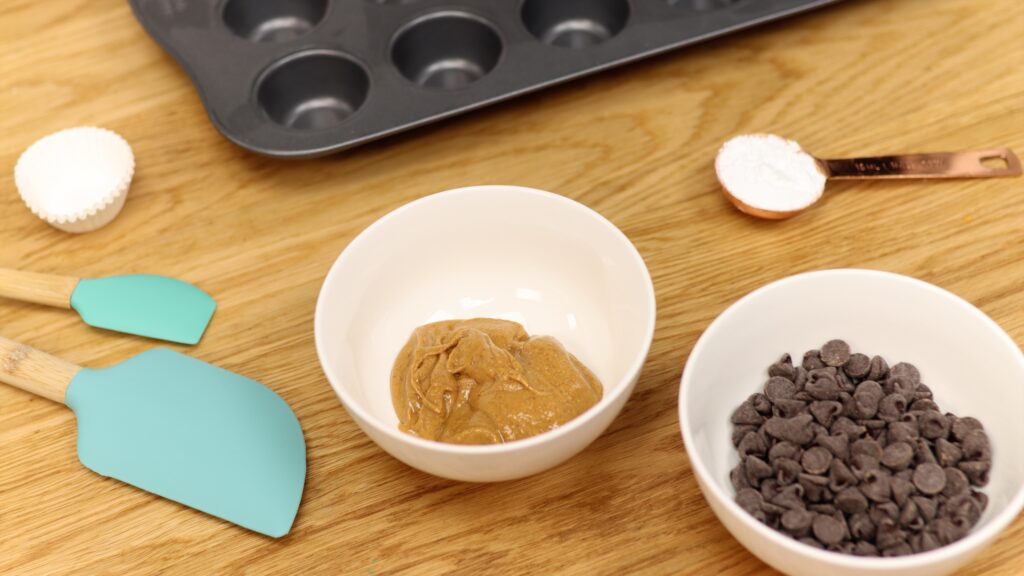
While the cake layers are cooling, make your peanut butter cups. The only ingredients for these are chocolate chips, peanut butter, and powdered sugar. You'll need a mini cupcake pan and mini cupcake wrappers, too.
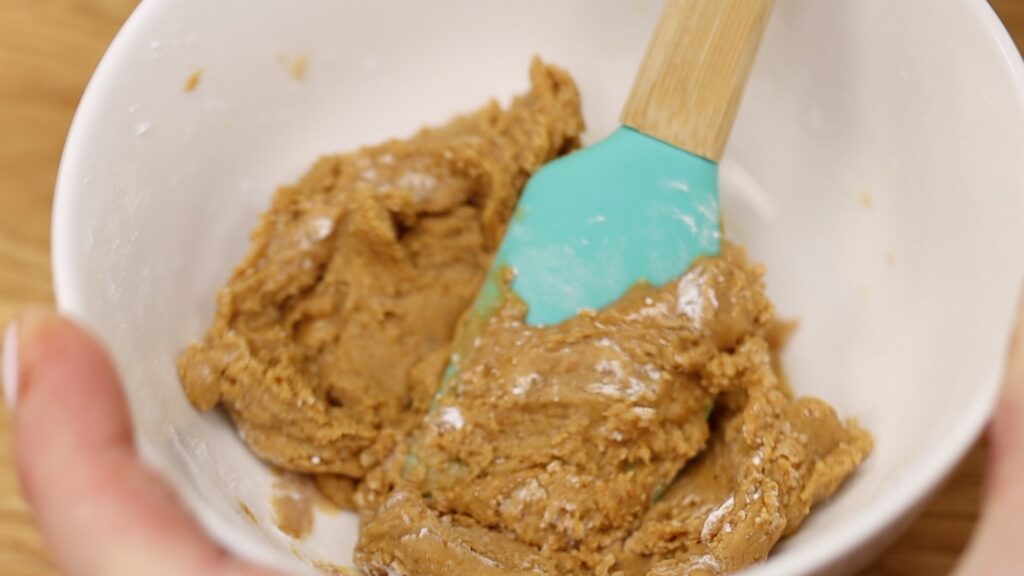
To sweeten the peanut butter stir in one tablespoon of powdered sugar. You can skip this if you want your peanut butter cups to be less sweet but if you're using semi-sweet or bittersweet chocolate, the slightly sweet peanut butter filling works really well.
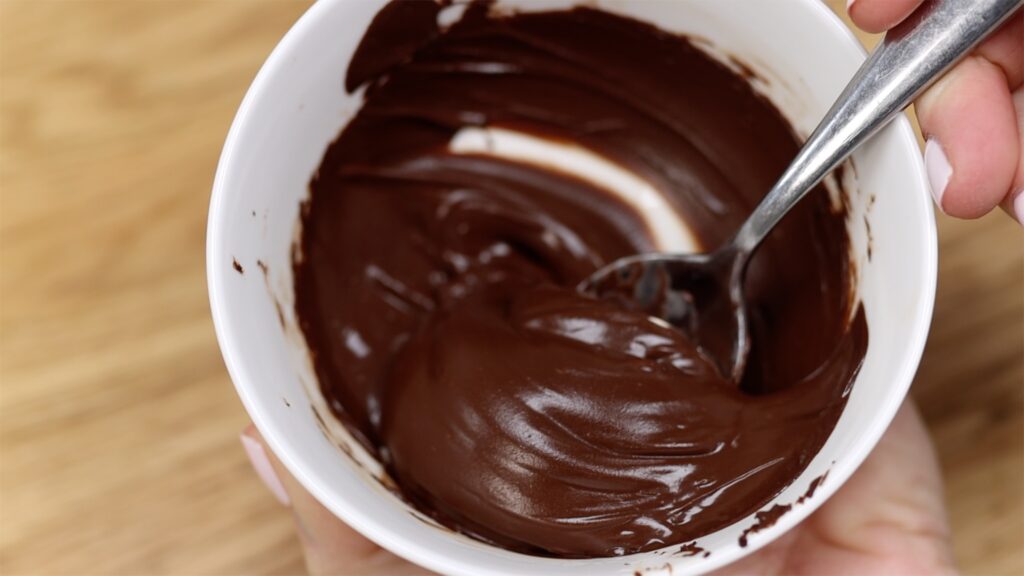
To melt the chocolate chips use short intervals of 30 seconds at a time in the microwave. Choose 70% power to prevent overheating the chocolate. Stir the chocolate and if it's still lumpy, put it back in the microwave at 70% power for another 30 seconds. Stir the chocolate until it's smooth.
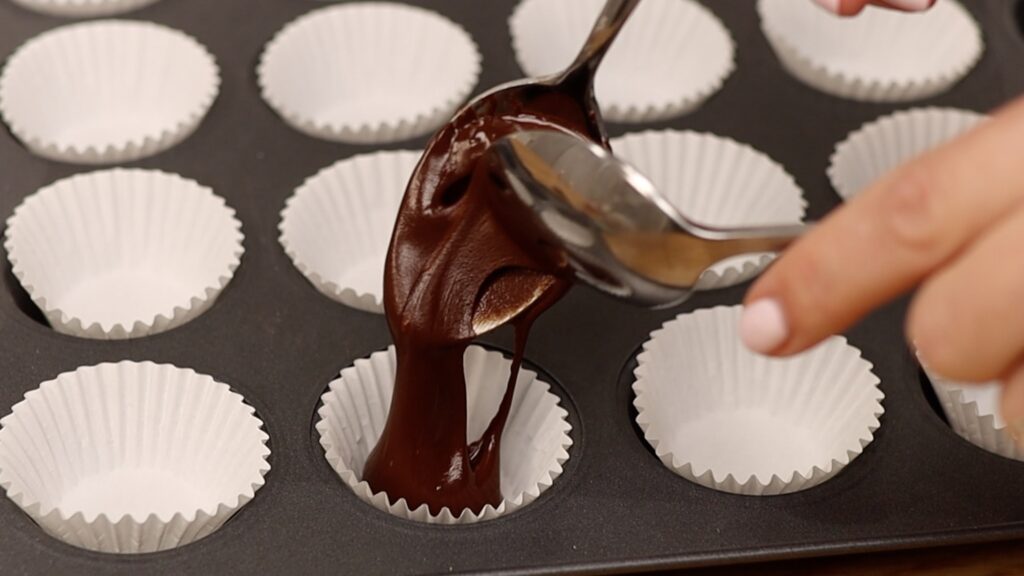
Line a mini cupcake pan with mini cupcake wrappers, which will make the peanut butter cups easiest to remove from the pan after they set. You'll probably want between 8 and 12 wrappers, depending on how many swirls you plan on piping around the cake. I like to make a few extra to snack on while I'm decorating! Use two spoons to fill the cupcake wrappers about a quarter full with melted chocolate. You want a thin layer of chocolate that covers the base of the wrappers. If the chocolate is very thick it will be difficult to bite into.
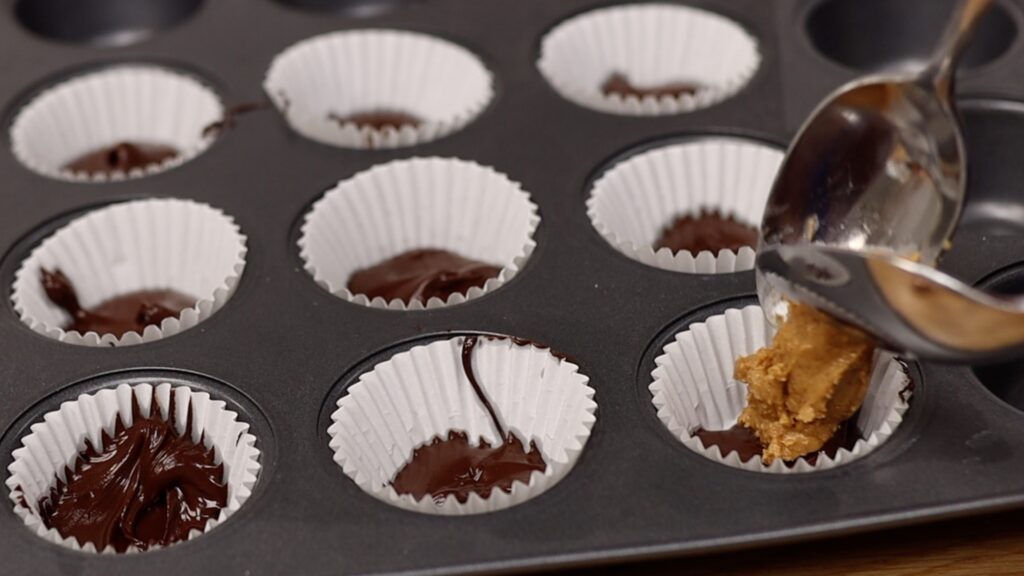
Now spoon the peanut butter mixture into each cup. Using two spoons will make this easier because peanut butter is sticky!
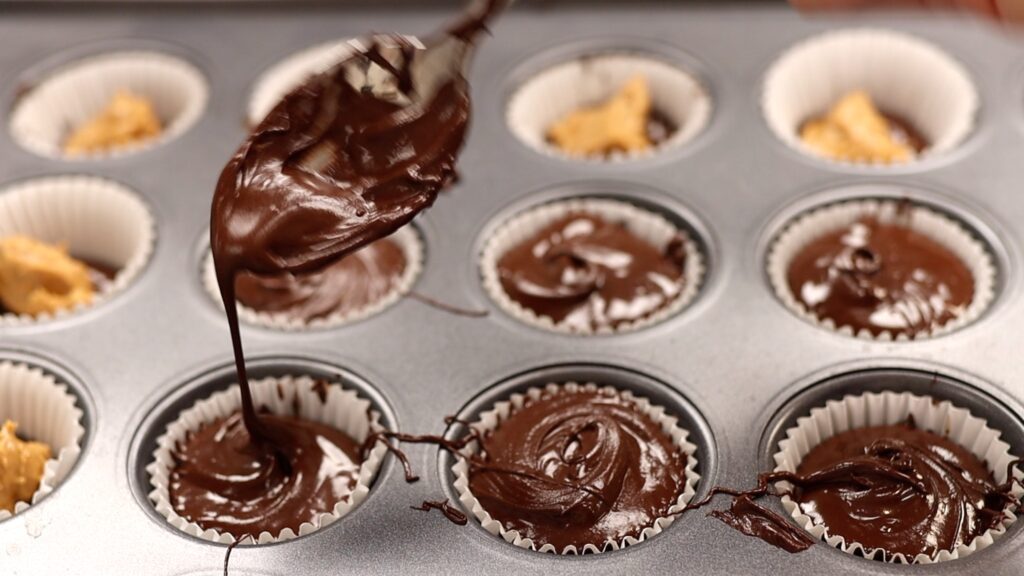
Cover the peanut butter with chocolate, filing each mini cupcake wrapper to approximately the same level.
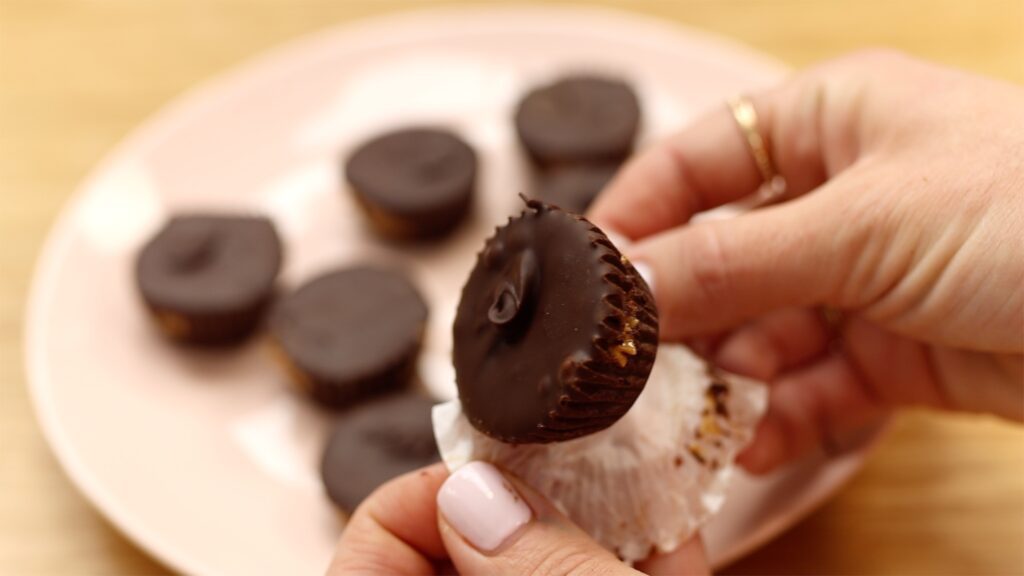
Refrigerate the pan of peanut butter cups for about 30 minutes, until the chocolate sets. Pinch the wrappers or push down on one side to pop them out of the pan. Then peel apart the wrappers to release the peanut butter cups. Set them aside until later.
Prepare the chocolate peanut butter filling and frosting
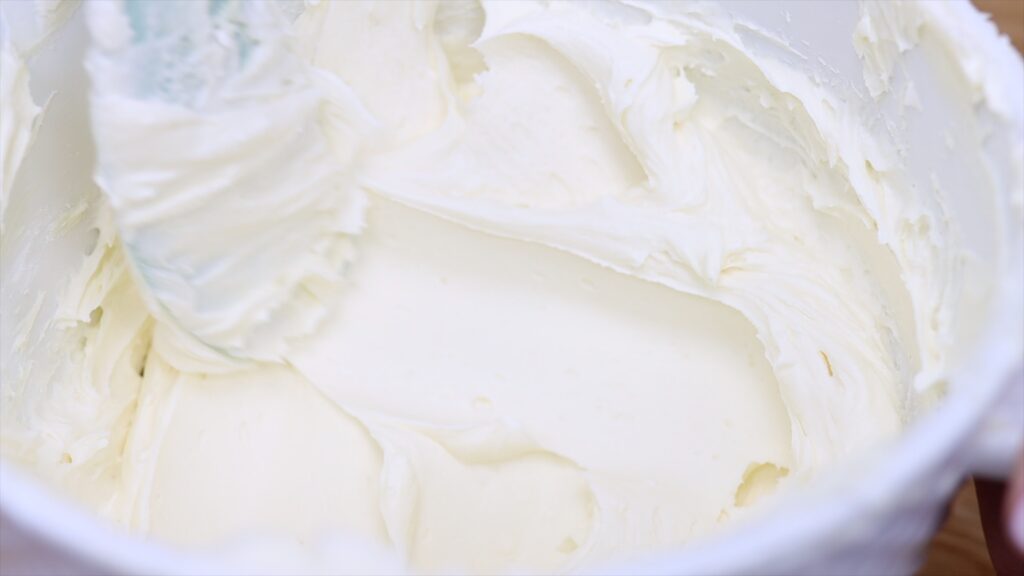
The filling and frosting for this cake starts with my 4 Minute Buttercream. To make silky smooth buttercream, make sure all of your ingredients are at room temperature by taking the butter and milk out of the fridge 4 hours before starting. Put the butter in your mixing bowl and add the sugar in four parts, mixing at the lowest speed for a minute after each addition. Scrape down to the bottom of the mixing bowl with your spatula to loosen any ingredients stuck to the bottom. Add the vanilla, salt and milk and mix to combine. The buttercream should be easy to stir and when you drag a spatula through it, it should leave a smooth trail behind. If the buttercream breaks apart from itself and the spatula leaves air bubbles behind, add another tablespoon of milk to make the consistency thinner.
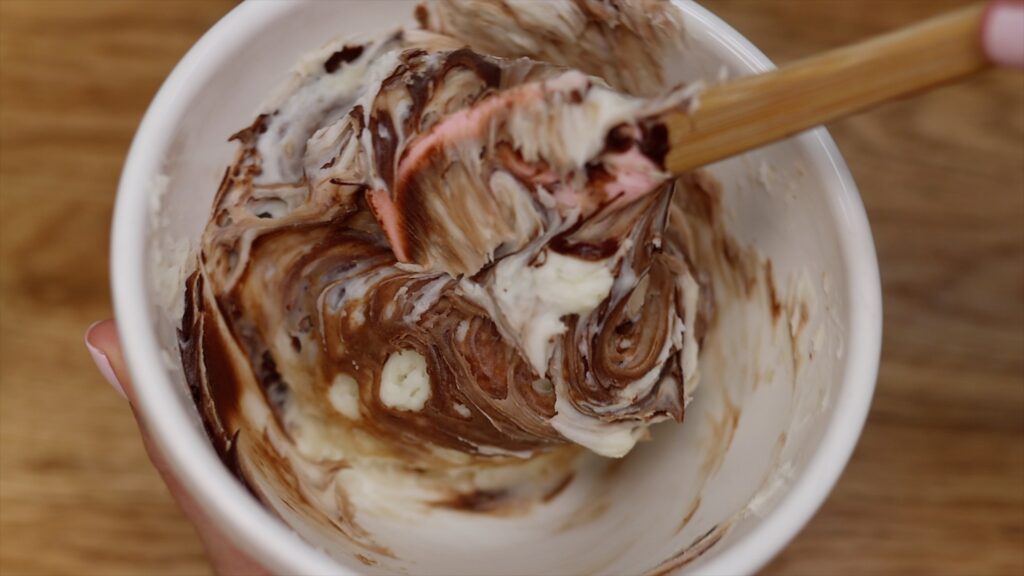
In a small bowl, melt 2 tablespoons of chocolate chips in the microwave at 70% power for 30 seconds. Stir the chocolate until it's smooth. Leave it to cool to room temperature, which takes about 10 minutes. Then scoop up one cup of buttercream from the mixing bowl and stir it into the melted chocolate in the small bowl.
Add 3/4 cup peanut butter to the buttercream in the mixing bowl. Stir it or use your mixer to mix it until you don't see any streaks of peanut butter in the buttercream.
Put it all together: assemble, frost and decorate the cake
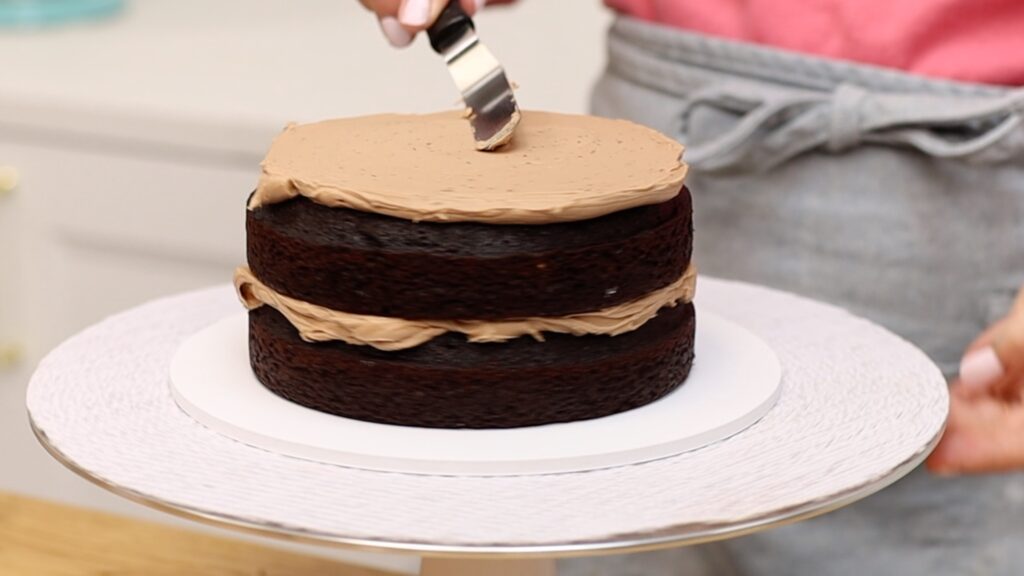
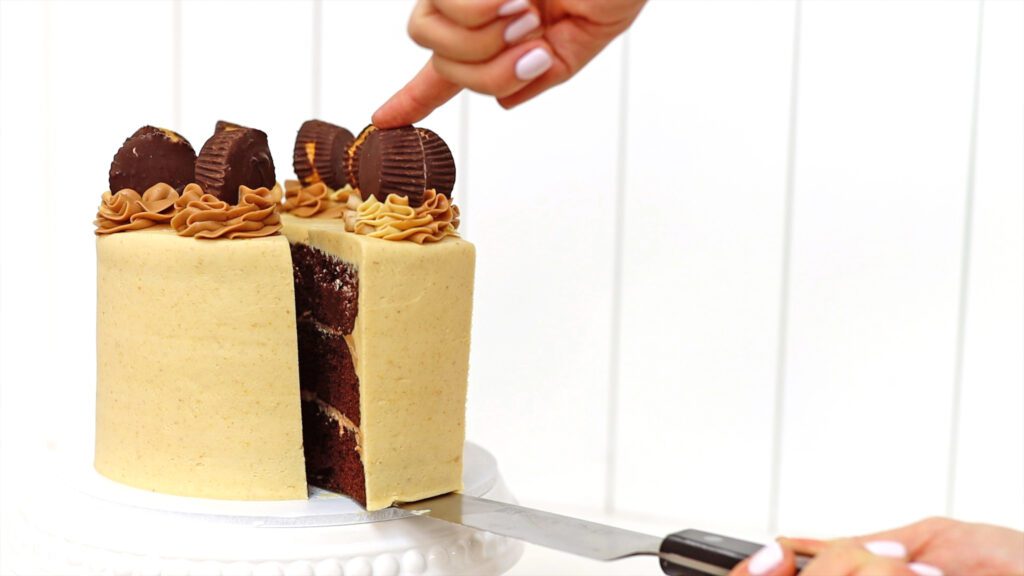
To assemble your cake, alternate cake layers and the chocolate buttercream. Use about a third of a cup of chocolate buttercream as the filling between each cake layer. Save the remaining third of a cup for later.
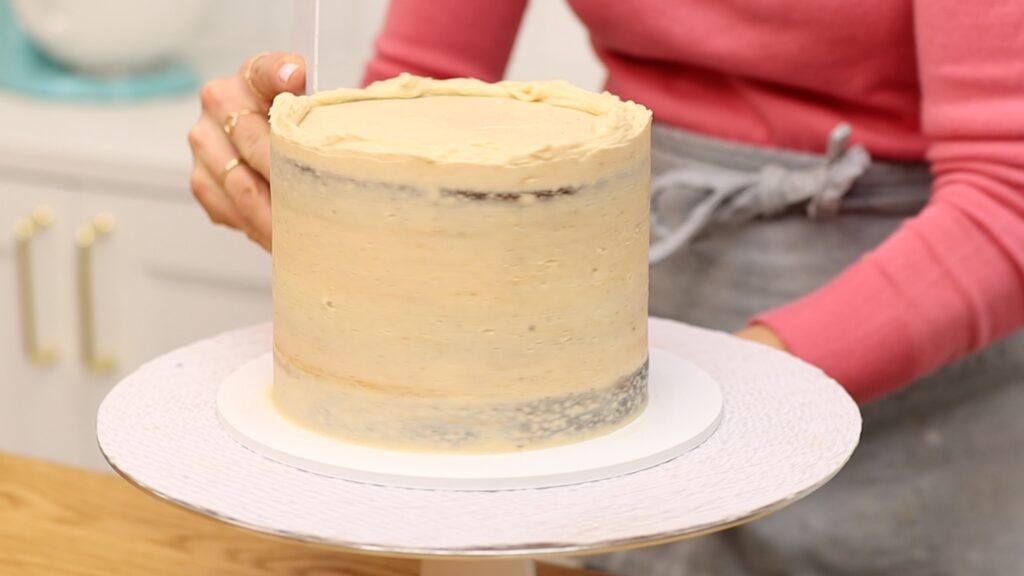
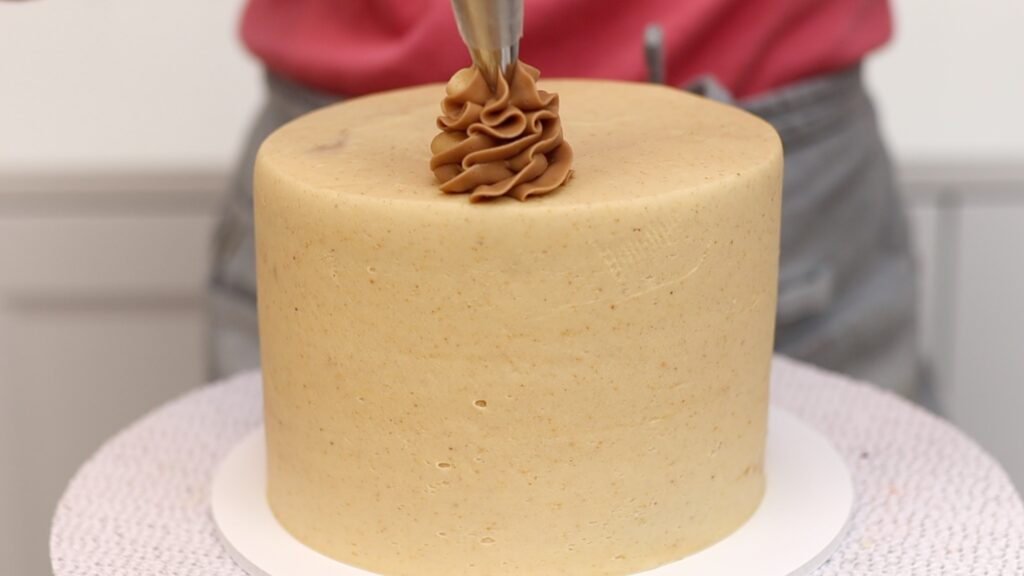
Using peanut butter buttercream, cover the cake with a crumb coat to trap any crumbs that come off the cake.
Let the crumb coat set, which takes about an hour at room temperature. Speed this up by putting the cake in the fridge for 30 minutes or in the freezer for 15 minutes. Then apply a final layer of peanut butter frosting, smoothing it with a cake comb.
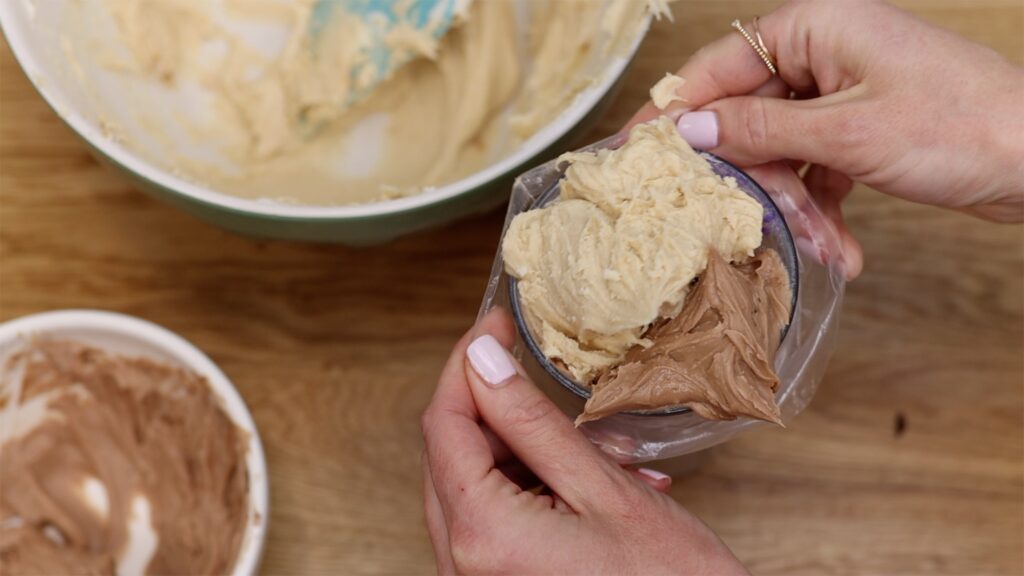
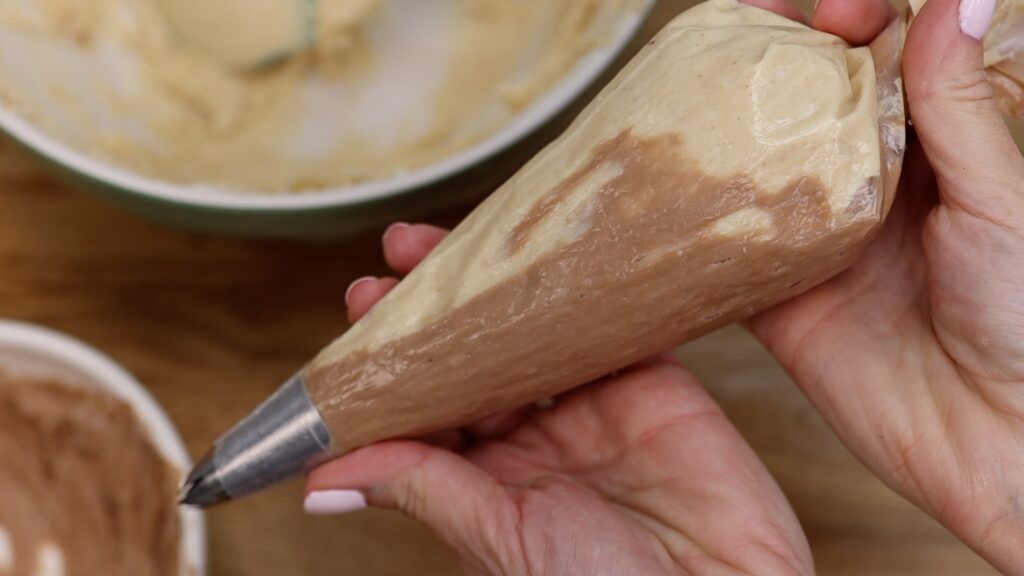
Fit a piping bag with a star shaped piping tip like a 1M tip. Spoon the remaining chocolate buttercream down one side of the piping bag. Fill the other side with peanut butter buttercream. I find it easiest to do this by dropping the piping bag (with the tip already inside) into a glass and folding the top of the bag over the rim of the glass to hold it open. After filling it, unfold the piping bag and lift it up.
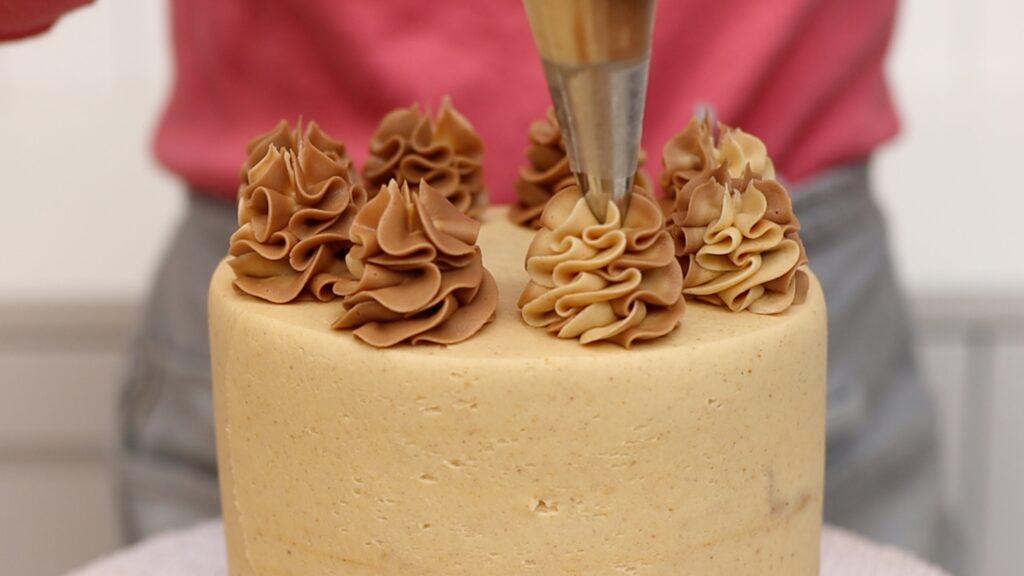
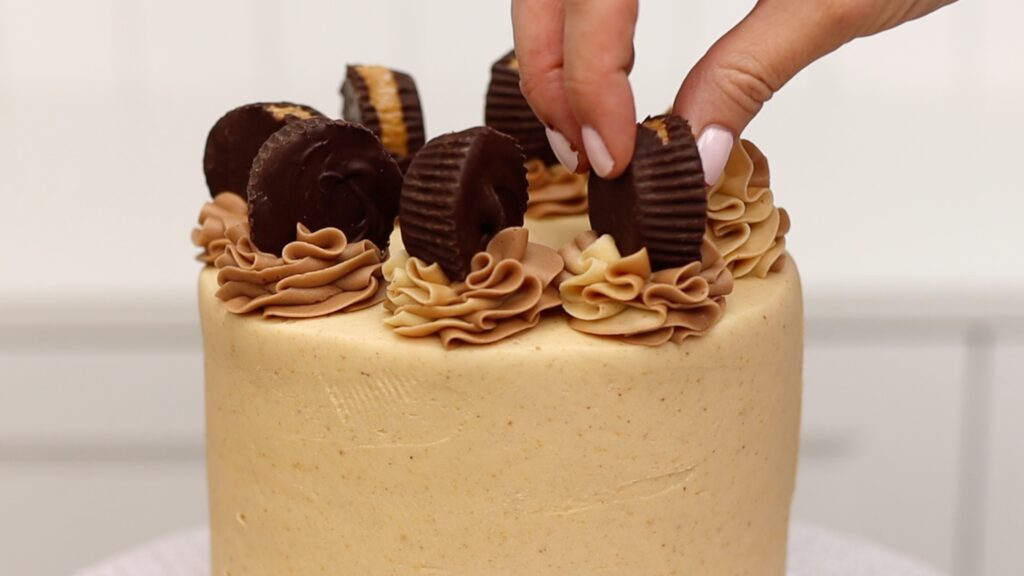
Twist the end of the piping bag and pipe swirls of frosting around the top of the cake. You'll notice that one side of each swirl will be peanut butter buttercream and the other side will be chocolate.
Press a peanut butter cup into each swirl. The weight of the peanut butter cups will push the swirls down but you'll still be able to see the two-tone frosting.
You can serve this cake immediately or refrigerate it for up to 2 days. This cake tastes best when it's at room temperature so if you do refrigerate it, take it out of the fridge at least 2 hours before serving it so that it isn't cold when you eat it.
How to make this Chocolate Peanut Butter Cake in advance
Every element of this cake can be made ahead of time, which is useful if you don't have much time to put it all together for an event or occasion.
You can make the peanut butter cups a week in advance and store them in an airtight container in the fridge.
The cake layers can be baked up to a month in advance and after cooling, wrap the layers in plastic wrap (like cling film or saran wrap) and freeze them. Move them to the fridge the night before assembling the cake to give them time to thaw.
The buttercream can also be made a month in advance and frozen in a sealed container or a large ziplock bag. Take it out of the freezer the night before you use it and leave it on the counter to come to room temperature. Stir it for a minute to knock out any air bubbles.
Rich chocolate buttercream is sandwiched between moist, not-too-sweet chocolate cake and covered with creamy peanut butter frosting, topped with chocolate peanut butter swirls and homemade chocolate peanut butter cups. Yum!
Ingredients
UnitsScale
For the cake:
1/2cupcocoa powder
1cup hot water
1/2cupbutter
1cupsugar
2 eggs
1 teaspoon vanilla
1 1/2cupsflour
1/2 teaspoon baking soda
1/4 teaspoon baking powder
1/4 teaspoon salt
For the peanut butter cups:
1/4cupsmooth (creamy) peanutbutter
1 tablespoon powdered sugar (icing sugar)
1 1/4cupschocolate chips
For the buttercream:
1 1/2cupsbutter
4 1/2cupspowdered sugar (icing sugar)
1 teaspoon vanilla
1/4 teaspoon salt
2 tablespoons milk or cream
2 tablespoons chocolate chips
3/4cupspeanut butter
Instructions
To make the cake:
Whisk cocoa powder and hot water together in a bowl and set aside to cool. In another bowl, whisk together the dry ingredients (flour, baking powder, baking soda, salt).
Mix room temperature butter and sugar together at medium speed until creamy, about two minutes. Add eggs one by one, beating on low speed for about 30 seconds after each addition. Add vanilla and mix to combine.
Add a third of the dry ingredients to the mixing bowl, mixing on the lowest speed until you don't see any flour in the batter.
Add half of the cocoa powder, mixing on the lowest speed to combine. Repeat with another third of the dry ingredients, then the remaining cocoa powder mixture, then the remaining dry ingredients.
Grease three 6" pans and divide the cake batter between them. Bake at 175ºC or 350ºF for 22 minutes or until a toothpick inserted into the middle comes out clean.
Leave cake layers in the pans for 10 minutes before turning out onto a wire rack to cool.
To make the peanut butter cups:
In a small bowl, melt chocolate in the microwave at 70% power for 30 seconds. Stir and microwave at 70% power for another 30 seconds. Stir until smooth.
Line a mini cupcake pan with 8-12 mini cupcake wrappers (depending on how many swirls you want to pipe onto your cake).
Spoon melted chocolate into each mini cupcake wrapper to cover the bottom. Use two spoons to add the peanut butter mixture on top and then cover with the remaining melted chocolate.
Refrigerate for at least 30 minutes to set the chocolate and then peel the wrappers off the peanut butter cups and refrigerate.
To make the buttercream filling and frosting:
In a mixer with a beater (paddle) attachment, mix room temperature butter with a quarter of the powdered sugar and salt on the lowest speed until incorporated, about one minute.
Scrape down to the bottom of the mixing bowl with a spatula to loosen any butter and sugar and add the next quarter of powdered sugar and mix for another minute on low. Repeat with the next quarter of sugar and then the final quarter.
Add the vanilla once everything is mixed together and continuing to mix until it's incorporated.
Add the milk or cream and mix for about 30 seconds until it's combined with the buttercream. Check the consistency and add more milk or cream a tablespoon at a time until the buttercream is smooth and easily stirred.
To put it all together:
Attach the first layer of cake to a cake board with a dot of buttercream. Spread 1/3 cup of chocolate buttercream on top of that layer and then place another cake layer on top. Spread another 1/3 cup of chocolate buttercream as filling and place the final cake layer on top.
Cover the cake with a thin layer of peanut butter buttercream (a "crumb coat") and then let this set, which will take one hour at room temperature or 30 minutes the fridge or 15 minutes in the freezer.
Frost the cake with peanut butter buttercream, smoothing the frosting with a cake comb.
In a piping bag fitted with a star shaped piping tip, spread the remaining 1/3 cup of chocolate buttercream in a line from the bottom of the bag to the top. Fill the rest of the bag with peanut butter buttercream. Pipe swirls of the two-tone buttercream onto the top of the cake and push a peanut butter cup into each one.
Refrigerate for up to two days. Take the cake out of the fridge at least 2 hours before serving so that it has time to come to room temperature, when it tastes best.
Notes
This recipe makes a three-layer 6" cake. Click "X2" at the top of this recipe to double it to make a three-layer 8" or 9" cake.
I’ve started the baking process for this cake yesterday. I made the peanut butter cups and my husband said they were delicious. I also baked your vanilla cake yesterday as well as the chocolate and peanut butter frostings. Today I will bake the chocolate cake and will assemble the cake this coming Saturday. I am alternating the layers with chocolate and vanilla cake. I will provide an update once I assemble the entire cake.
I baked this cake and the peanut butter cups for my family and it was an instant hit! Your chocolate cake and vanilla cake recipes are amazing! I alternated the cake layers using your chocolate cake recipe and your vanilla cake recipe. I did have issues with the peanut butter buttercream consistency but I think it was primarily due to the temperature in my home. I'm definitely adding this to my list of favorite cakes.
Alternating vanilla and chocolate layers sounds delicious! And yes, it's surprisingly what a big difference the temperature makes to the consistency of buttercream
I'm so glad you're signing up for my newsletter! You're sure to find loads of caking inspiration and learn from the tips and tricks I've discovered throughout my career!
Want to learn more?
Get immediate access to my FREE course on 10 Frosting Techniques and my newsletter with loads of caking inspiration, tips and tricks!


I love you recipes, but I sure wish the "print" for them was bigger!! I even chose the 3X option but it still prints out so small!
Thanks...
Hi! After you click PRINT RECIPE in the turquoise recipe box, click OPTIONS at the top and then for the text size choose LARGE. I hope that helps 🙂
Would I have to double or triple the frosting and butter cups for a 3 layer 9 inch cake? Thank you!
I would double it!
I’ve started the baking process for this cake yesterday. I made the peanut butter cups and my husband said they were delicious. I also baked your vanilla cake yesterday as well as the chocolate and peanut butter frostings. Today I will bake the chocolate cake and will assemble the cake this coming Saturday. I am alternating the layers with chocolate and vanilla cake. I will provide an update once I assemble the entire cake.
I baked this cake and the peanut butter cups for my family and it was an instant hit! Your chocolate cake and vanilla cake recipes are amazing! I alternated the cake layers using your chocolate cake recipe and your vanilla cake recipe. I did have issues with the peanut butter buttercream consistency but I think it was primarily due to the temperature in my home. I'm definitely adding this to my list of favorite cakes.
Alternating vanilla and chocolate layers sounds delicious! And yes, it's surprisingly what a big difference the temperature makes to the consistency of buttercream