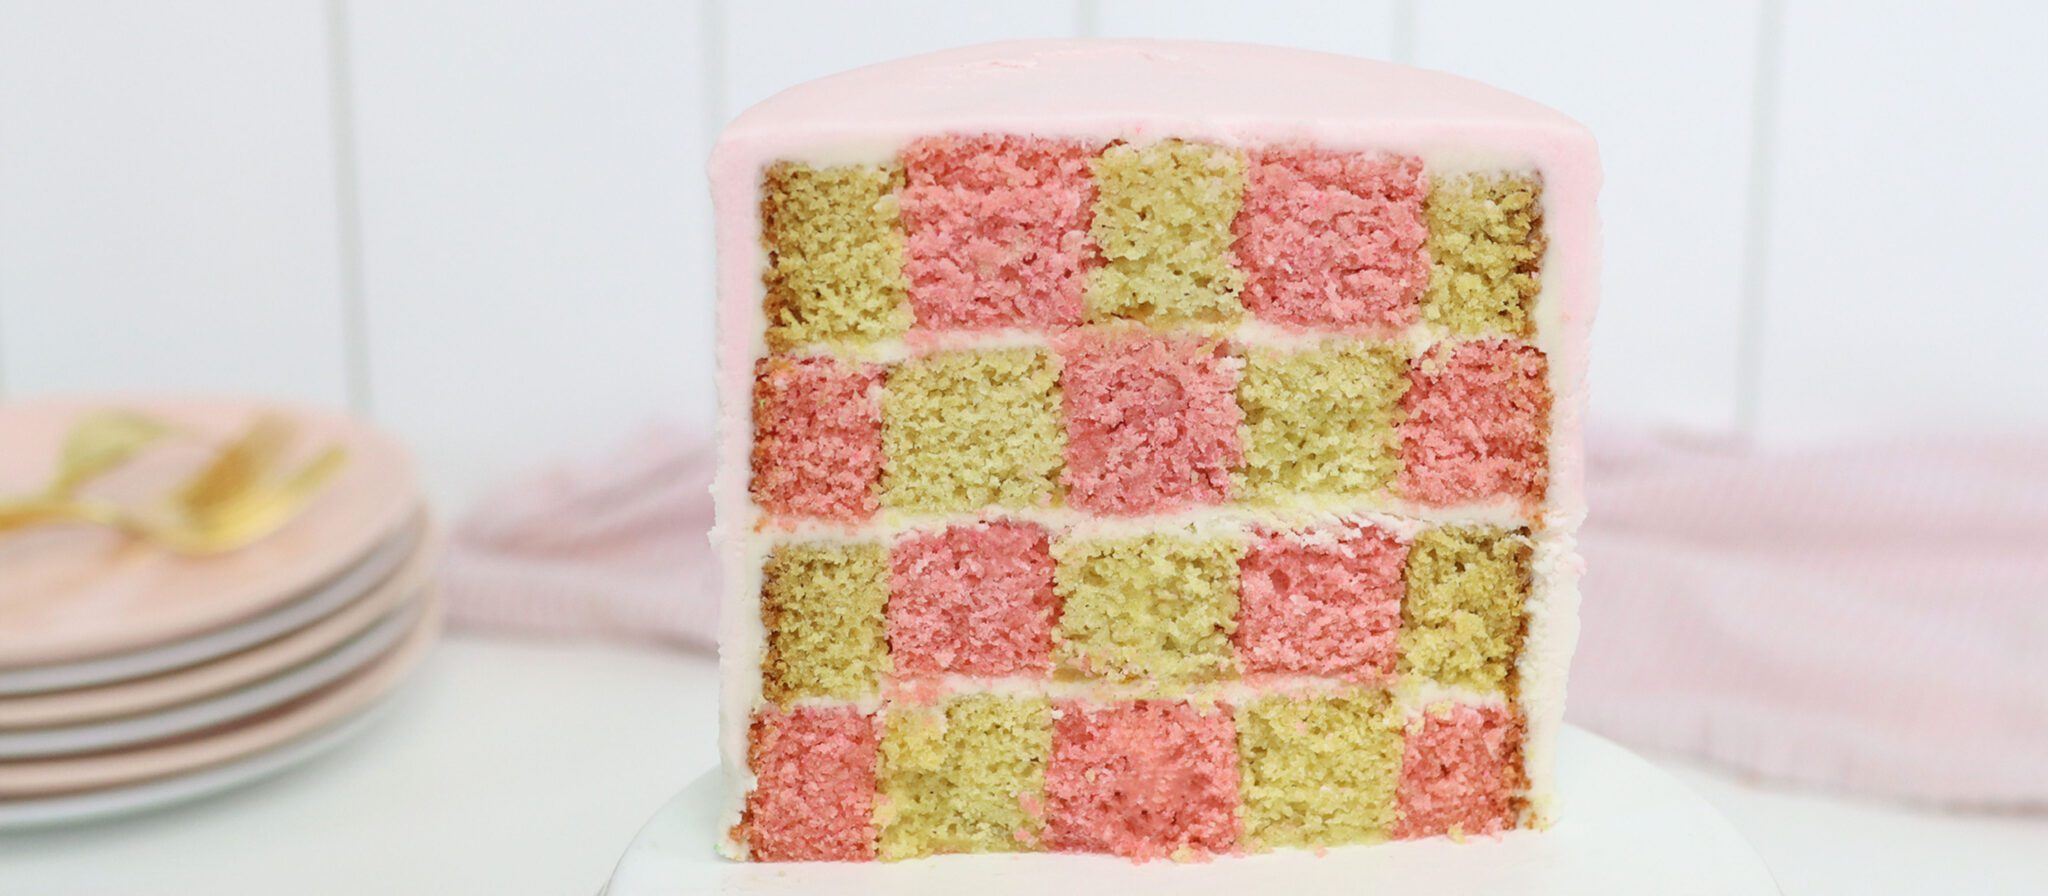
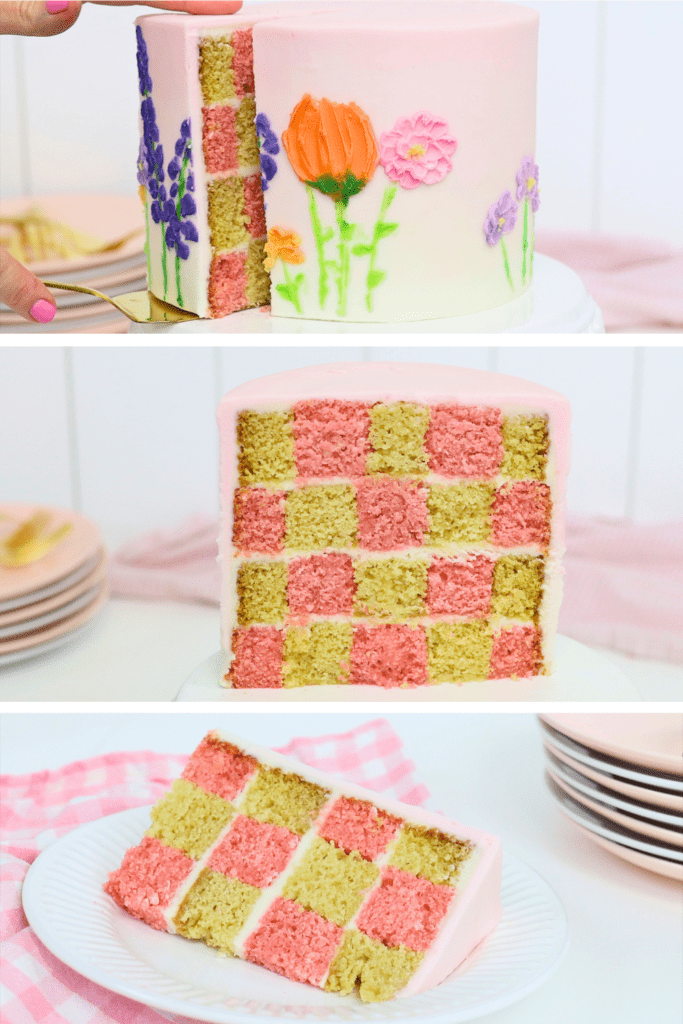
A checkerboard cake is the most fun to cut into! I'll show you how to make the square pattern along with every other step to make the cake.
Bake the checkerboard cake layers
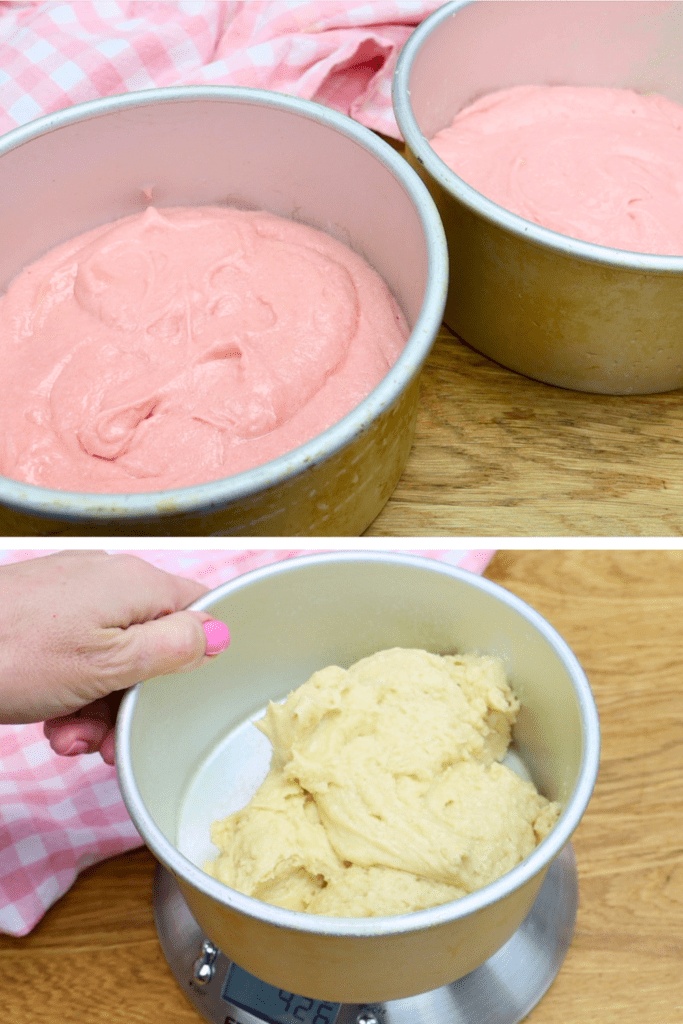
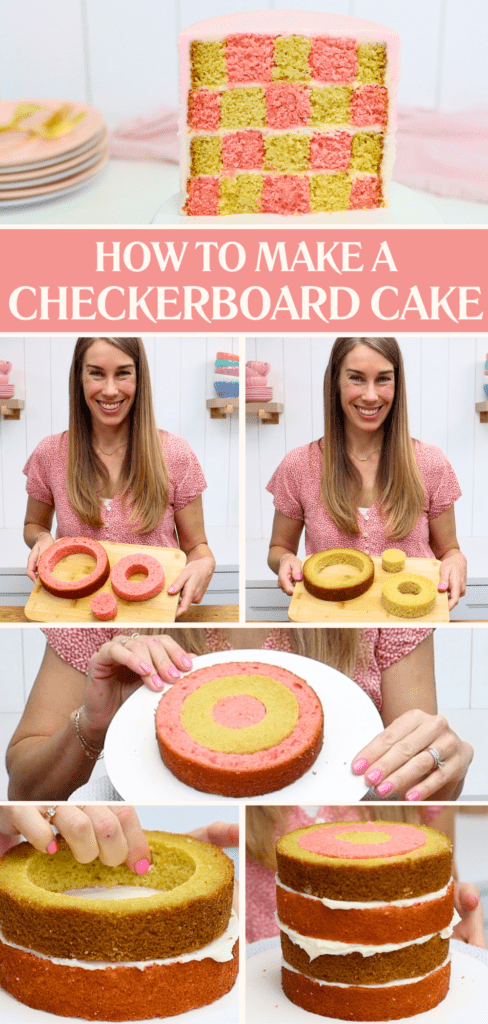
Start by making the cake batter, following gate intrusions in the recipe at the end of this tutorial. Divide the batter in half and add a few drops of food colouring to tint one or both halves. Then bake the batter in four 6 inch pans. It's best to weigh each pan as you scoop the batter in so that the layers are all the same height. If you don't have a scale, use the same number of scoops of batter in each pan. Bake the layers and let them cool for ten minutes before turning them out of the pans.
Prepare the checkerboard cake layers
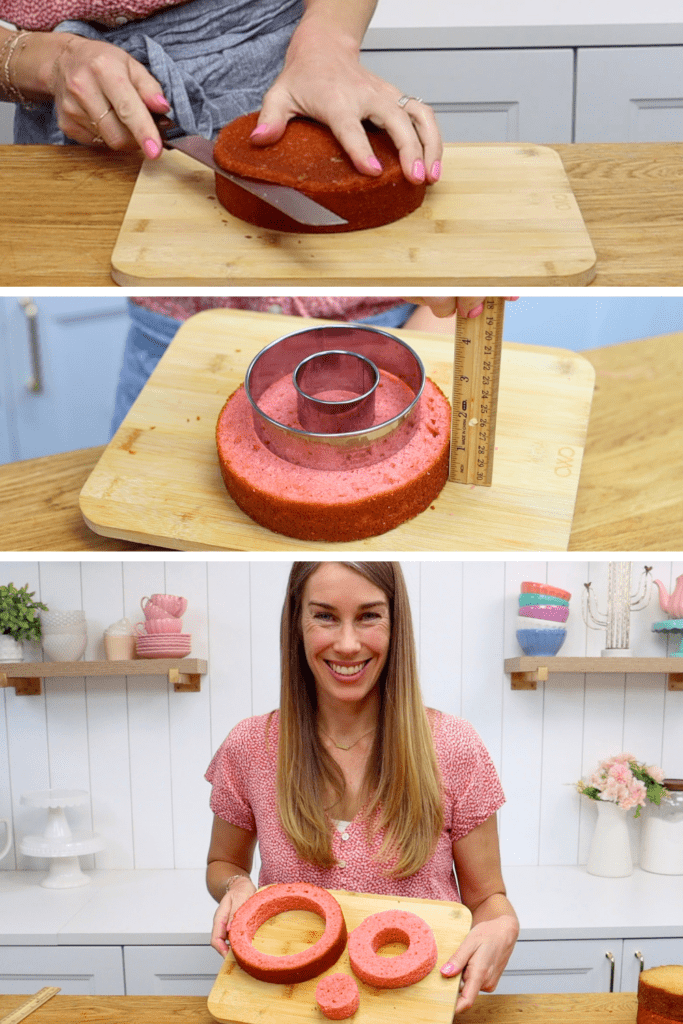
When the cakes have cooled, use a serrated knife to trim the tops off to level them. Use little sawing motions as you spin the cake to score a line around the cake. When you've gone all the way around the cake, slice through it, following along the line you scored. I like to flip the cakes over and do the same for the bottom. The cake is darker there, where it touched the bottom of the cake pan. By trimming the darker edge off, the cake slices will look neater when you cut them.
Next you'll cut the cake into rings that are one inch wide. For a neat checkerboard design you want the width of each square to be the same as the height. That means the cake should be about one inch tall as well. If they're taller, trim a little bit more off the top or bottom.
To cut the cake into rings it's best to use round cookie cutters. For a 6 inch cake you'll need two and they should be two and four inches wide. If you make an 8 inch cake you'll need a 6 inch cookie cutter as well.
For each cake layer, start with the biggest cookie cutter to cut the outer ring. Position it so there's the same amount of cake all around it and then push down. Do the same with the smaller cookie cutter. You'll end up with two rings of cake and also a round piece that's two inches wide.
Repeat this with the cookie cutters for all of the cake layers. Next we'll alternate between the two colours to make the checkerboard cake pattern.
Assemble the checkerboard cake
You don't have to have a turntable for the next part but it makes it a bit easier. You will need a cake board which is at least 2 inches bigger than your cake. My cake is 6 inches and the cake board is 10 inches.
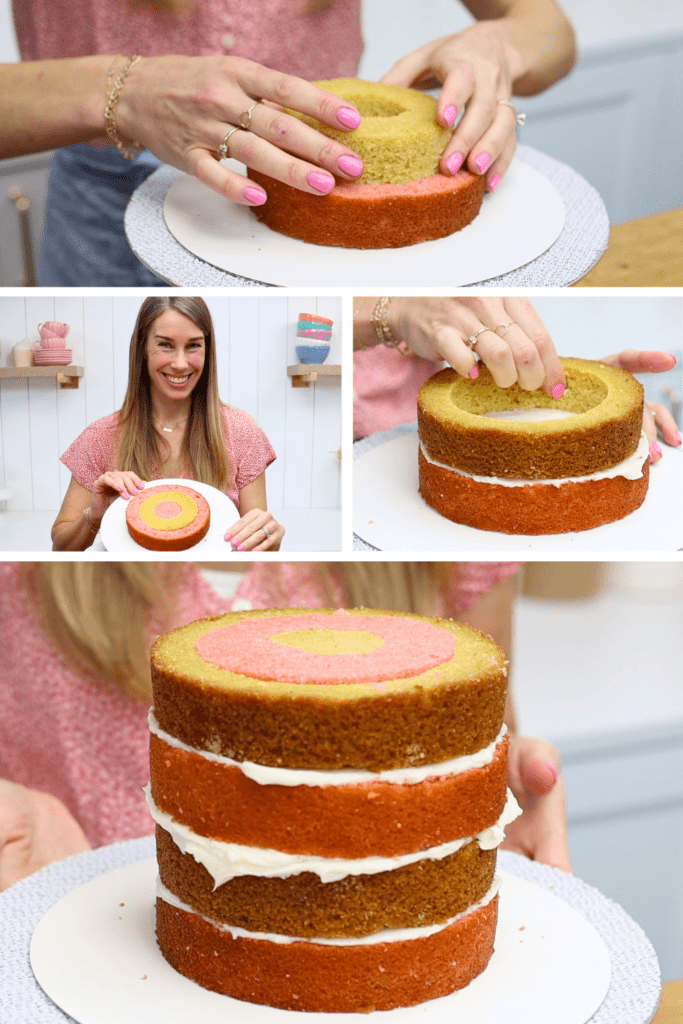
Spread some buttercream across the cake board where the cake is going to sit. Then place one of the outer rings of cake on the board, pressing down to attach it to the buttercream. Now use the other colour of cake for the next ring, pushing it down inside the outer ring. Switch back to the first colour for the middle piece of cake. It will look like target rings at the moment.
Spread your filling on top of this first layer of cake. I'm using my 4 Minute Buttercream as the filling as well as the frosting because it's delicious but also plain white, so it doesn't distract from the checkerboard cake pattern.
Repeat with the rest of your cake. As you position the outer ring of each layer, adjust it to sit directly on top of the cake below. Spin the cake to check it's straight and then alternate colours as you work your way in to the middle.
Take your time to make sure each outer ring is centered. If it sticks out on any side, the inner rings won't line up above the ones below. This will make your checkerboard cake pattern lopsided. Also, the sides of your cake won't be straight and the cake will lean to one side.
If the filling is sticking out anywhere smooth that now with your offset spatula or palette knife. Before the next step I recommend chilling the cake. Put it into the fridge for 30 minutes or the freezer for 15 minutes to set the buttercream between the layers. This will stop the cake layers from sliding as you frost it. It will also set the buttercream you spread onto the cake board below the cake. This will stop the whole cake from moving around on the cake board.
Frost the cake
It's best to start with a crumb coat as a first layer of frosting. This is just a thin layer to trap any crumbs that come off the cake. Let that set in the fridge for 15 to 30 minutes before spreading a final layer of frosting on top.
I uses different shades of pink to make ombre frosting. Use a cake comb to smooth the frosting and add any decorations you like. This will be such a fun cake to cut into!
Store and serve
If you make this cake in advance, keep it in the fridge for up to 3 days. Take it out of the fridge at least 2 hours before you serve it. It will taste best at room temperature when the cake and buttercream are soft.
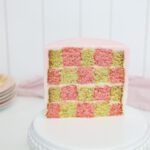
This tall 6 inch cake will serve 12 to 20 people depending on how you slice it. The recipe is below. Look at this gorgeous checkerboard pattern!
Choose any two colours or flavours to make this checkerboard cake pattern, which is so much fun to cut into!
Ingredients
UnitsScale
For the cake:
1 1/2cupsunsalted butter
2cupswhite sugar (granulated sugar)
6 eggs
1 tablespoon vanilla extract
3/4cupbuttermilk
3 tablespoons vegetable oil
3 1/2cupsplain flour (all-purpose flour)
1 tablespoon baking powder
1/2 tablespoon baking soda
1/2 teaspoon salt
a few drops of food colouring
For the buttercream:
2 1/2cupsunsalted butter at room temperature
2lbpowdered sugar
1/2 teaspoon salt
1/2 tablespoon vanilla extract
3 tablespoons cream or milk
Instructions
Make the cake layers:
Using a mixer with a beater/paddle attachment (not a whisk), beat room temperature butter and sugar on medium speed until pale and creamy, about 2 minutes. Scrape down to the bottom of the bowl once during mixing to make sure no butter or sugar is stuck at the bottom.
Add eggs one at a time, mixing on the lowest speed after each addition for 30 seconds. Scrape down to the bottom of the bowl to make sure everything is incorporated before adding the next egg.
Add vanilla and mix for about 30 seconds to combine.
In a small bowl or measuring jug, mix room temperature buttermilk and oil. Add half to the butter mixture and mix on lowest speed to incorporate.
In a bowl, sift flour, baking soda, baking powder and salt. Add half of the flour mixture to the mixing bowl and mix on lowest speed to incorporate, scraping down to the bottom of the mixing bowl to check that batter is evenly mixed. Repeat with the remaining buttermilk mixture and then finish with the remaining flour mixture.
Pour half of the batter into another bowl and add a few drops of food colouring, folding it in gently with a spatula. Optionally, add a different colour to the other half of the batter or just leave it plain.
Grease four 6" baking pans with non-stick oil spray or butter. Divide each colour of the batter equally between two cake pans to make two cake layers of each colour.
Bake at 160ºC or 325ºF for 38 minutes, or until a toothpick inserted into the middle of the cake comes out clean.
Leave cakes to cool in their pans for 10 minutes. Use a spatula to loosen the cakes from the edges of the pans and then turn onto a wire cooling rack. Leave to cool completely.
Make the buttercream:
Sift the sugar to remove any lumps and check that the butter is at room temperature - you should be able to slice through it easily with a spatula.
In a mixer with a beater (paddle) attachment, mix butter for a few seconds until smooth. Add a quarterof the powdered sugar and salt (if using) and mix on the lowest speed until incorporated, about one minute.
Scrape down to the bottom of the mixing bowl with a spatula to loosen any butter and sugar and add the next quarter of powdered sugar and mix for another minute on low.
Scrape down to the bottom of the bowl, add another quarter of the powdered sugar, mix for one minute on low, scrape, and add the final quarter of the powdered sugar. Mix for one more minute on low, adding the vanilla once everything is mixed together and continuing to mix until it's incorporated.
Add the milk or cream and mix for about 30 seconds until it's combined with the buttercream. Check the consistency and add more milk or cream a tablespoon at a time until the buttercream is smooth and easily stirred.
Assemble the cake:
When the cake layers are cool, trim the tops and bottoms to make layers that are one inch tall/high. Use a two and four inch cookie cutter to cut each layer into three rings.
Spread some buttercream across the middle of the cake board. Position an outer ring of cake on the board, centering it and attaching it to the buttercream you spread. Alternate colours of cake rings to work your way in to the middle, for example pink, yellow, pink.
Spread a thin layer of buttercream on top of the cake as filling. Arrange the opposite colours of cake rings on top, for example yellow, pink, yellow.
Add another layer of filling, another layer of alternating coloured cake rings, another layer of filling, and a final layer of alternating coloured cake rings.
Chill the cake in the fridge for 30 minutes to set the filling and then spread a thin layer of buttercream over the cake as a crumb coat of frosting. Put the cake back into the fridge for 30 minutes to set this.
Frost and decorate the cake however you like!
Notes
You can keep this cake in the fridge for 3 days. Take it out of the fridge 2 hours before serving to let the cake and buttercream come to room temperature, when it tastes the best!
I'm so glad you're signing up for my newsletter! You're sure to find loads of caking inspiration and learn from the tips and tricks I've discovered throughout my career!
Want to learn more?
Get immediate access to my FREE course on 10 Frosting Techniques and my newsletter with loads of caking inspiration, tips and tricks!


So beautiful, you've just inspired me. I will try it you really made it simple,thank you so much.
I'm excited you're trying it! Good luck!
Hi
If i want make this cake but vanilla and chocolate , how much cocoa powder must i put?
Thank you.