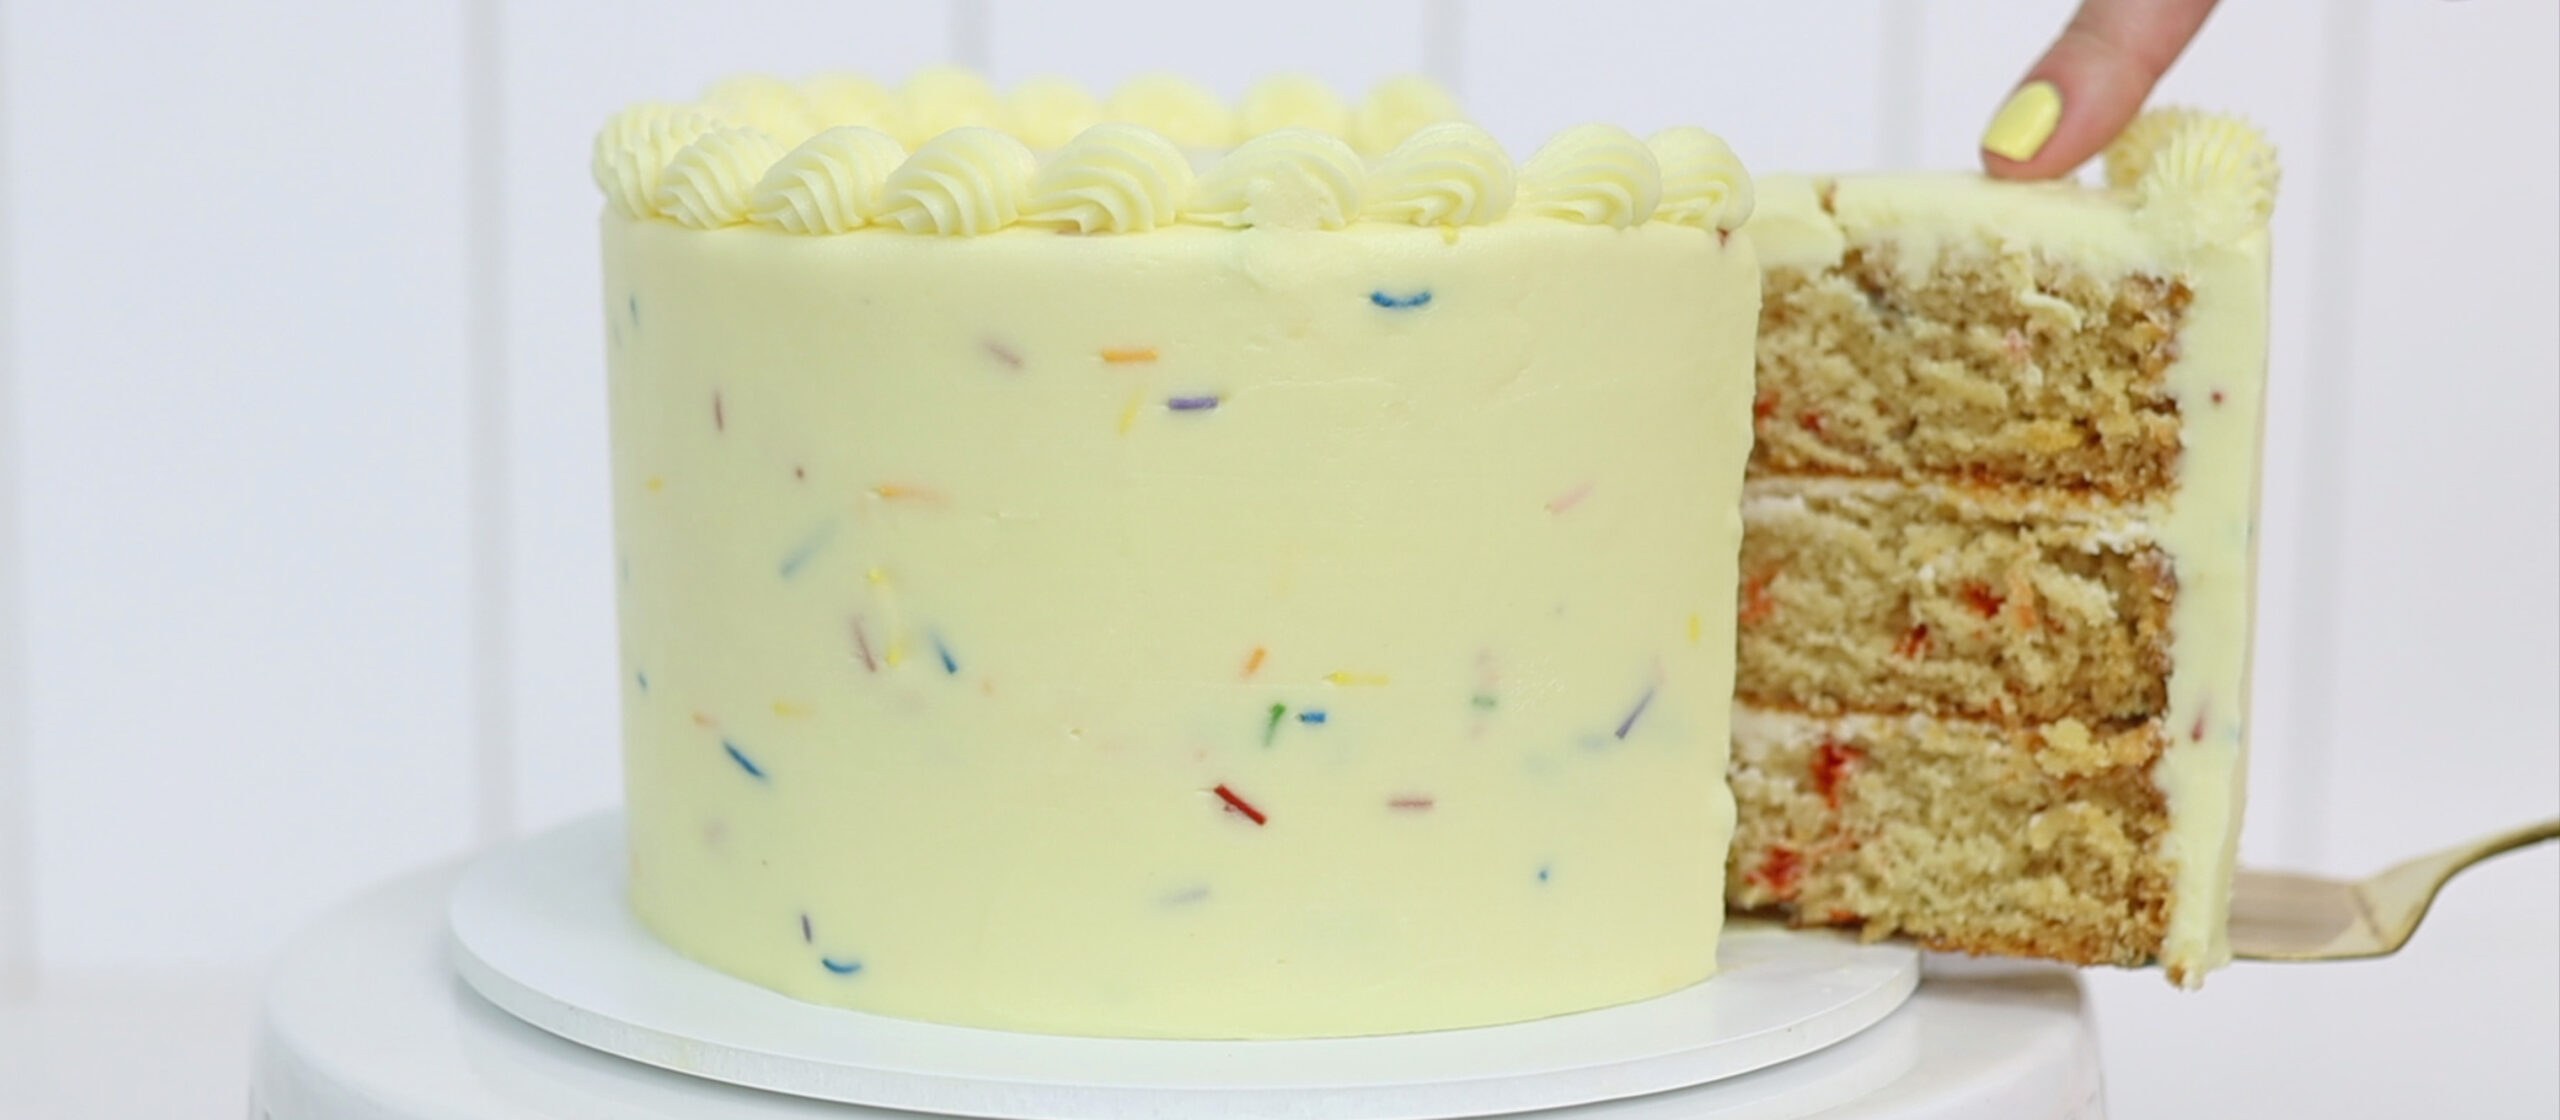
Sprinkles are fun, nostalgic, and instantly make anything feel like a celebration. In this sprinkle cake tutorial I'll show you how to bake sprinkles into your cake and swirl them through your frosting for a colourful effect. Whether you call it a sprinkle cake or a funfetti cake, this one’s guaranteed to get smiles.
This step-by-step guide is perfect for beginner to intermediate bakers, so if you’ve ever wondered how to make a sprinkle cake that actually looks as good as it tastes, keep reading – you’re in exactly the right place.
Baking the Sprinkle Cake Layers
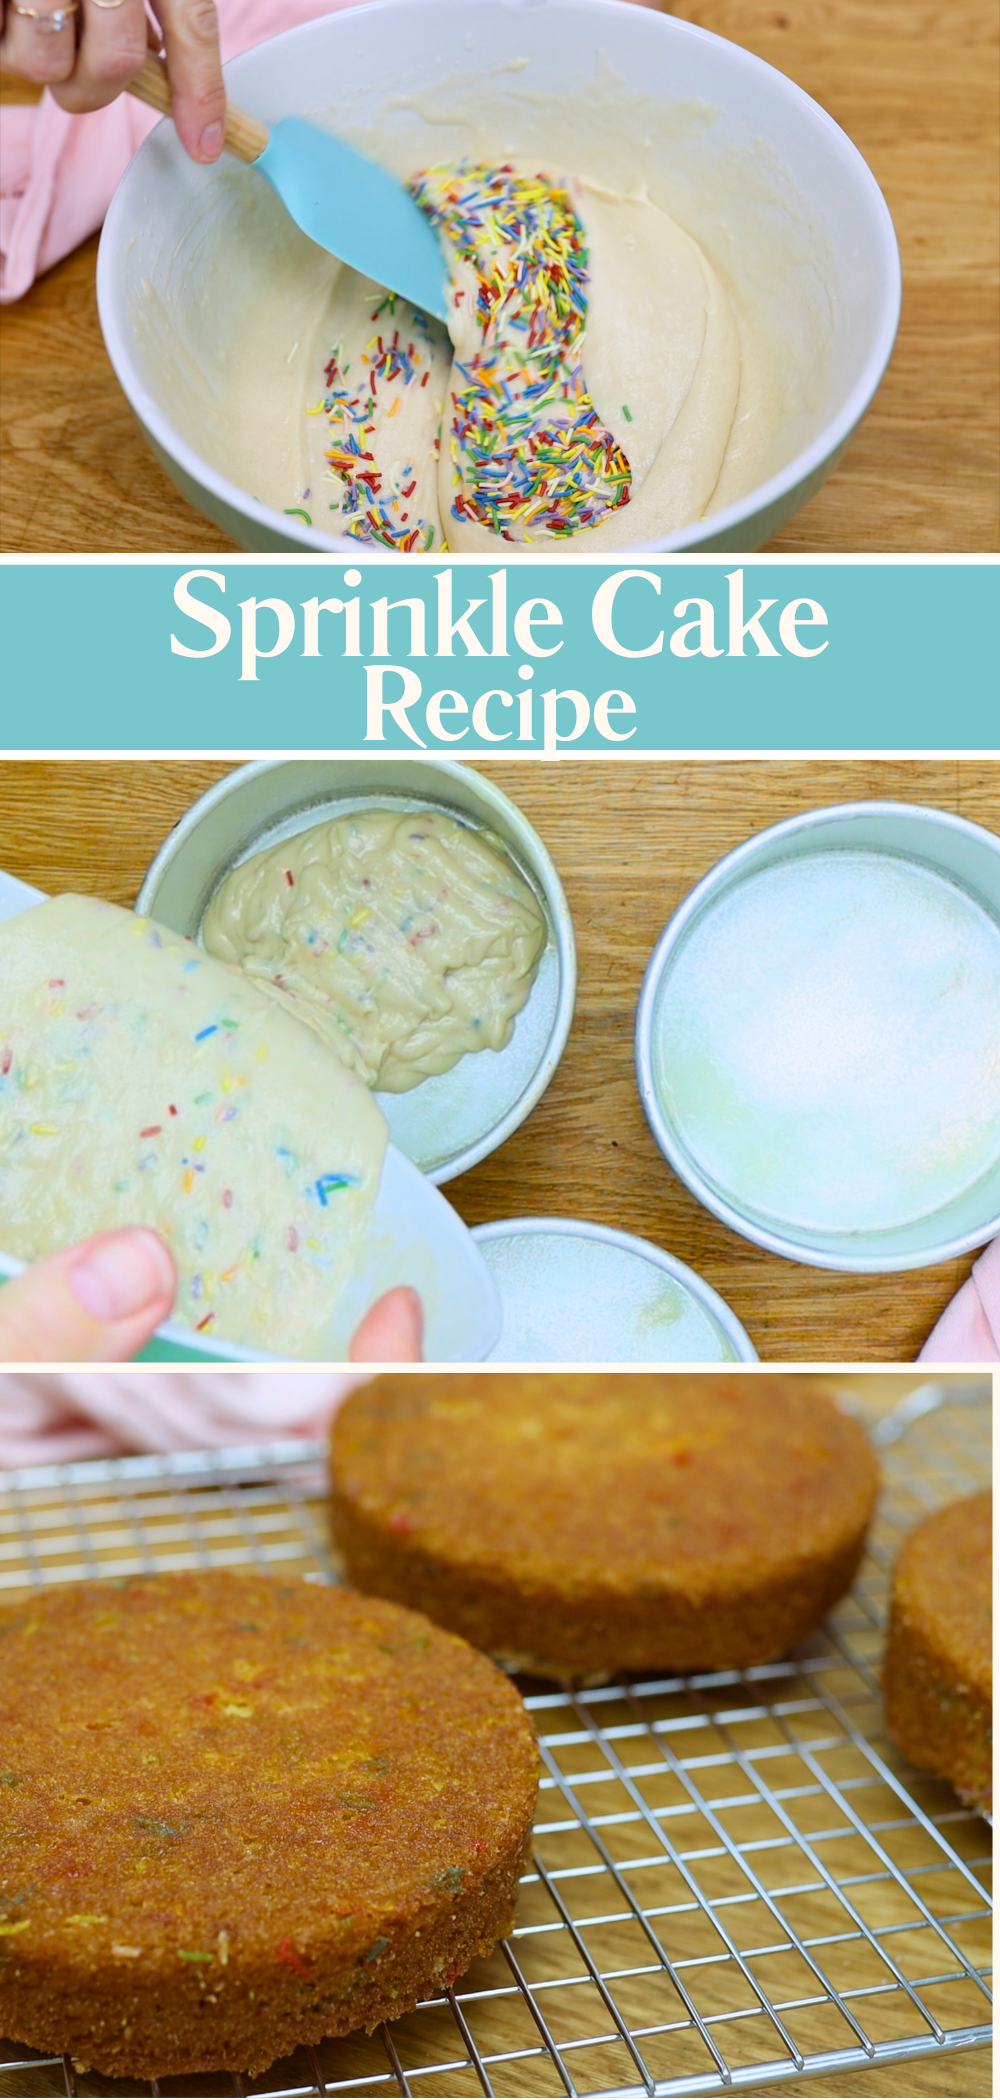
Start with your favourite vanilla cake batter and rainbow sprinkles. I like to use rods or jimmies instead of tiny nonpareils for the biggest bursts of colour. I'm using Supernatural sprinkles with no artificial dyes 🙂 And although I love chocolate cake, using a pale batter will make the sprinkles really pop. Try my favourite buttery 8inch Very Vanilla Cake or the 6 inch version at the bottom of this sprinkle cake tutorial!
Once your batter is mixed, it’s time to add the sprinkles. About a quarter cup is perfect for a 6 or 8 inch cake. Fold them in gently with a spatula – don’t stir too hard or you’ll over-mix the batter which can make the cake taste dense.
Now divide your batter evenly between two or three cake pans and bake according to your recipe instructions.
Once the cakes are out of the oven, leave them in the pans for around 10 minutes – just until you can handle them without burning your fingers. Then turn them out and let them cool completely on a wire rack.
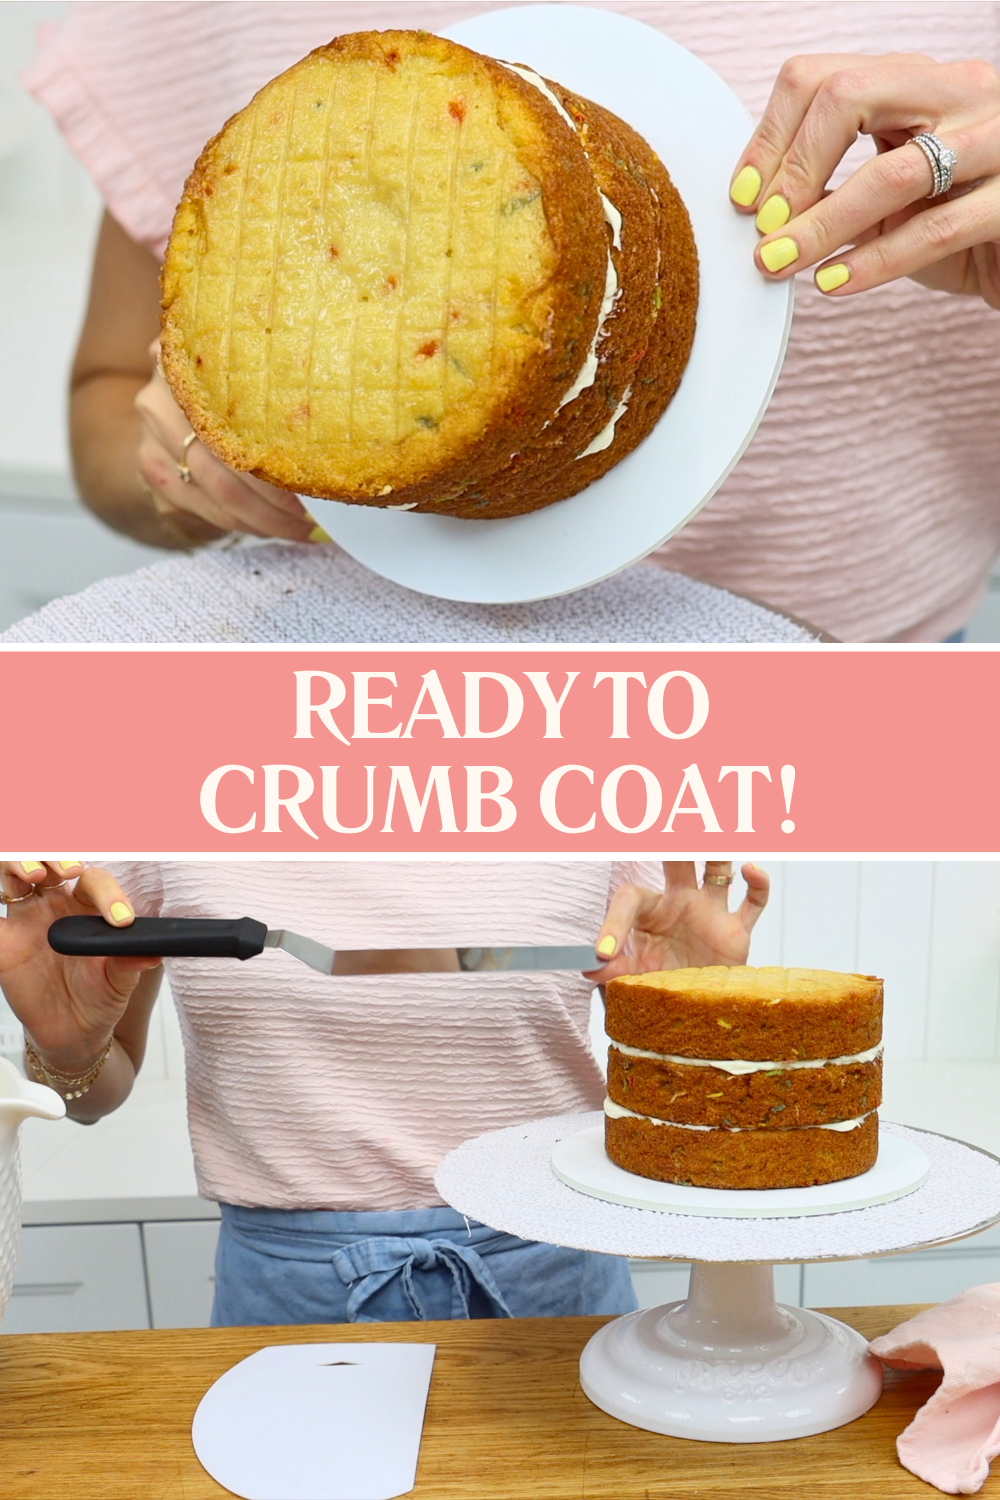
If your cake layers have domed while baking, level them first for a neater and more stable cake. Use a serrated knife to slice back and forth in a sawing motion across each cake.
Filling and Stacking the Cake
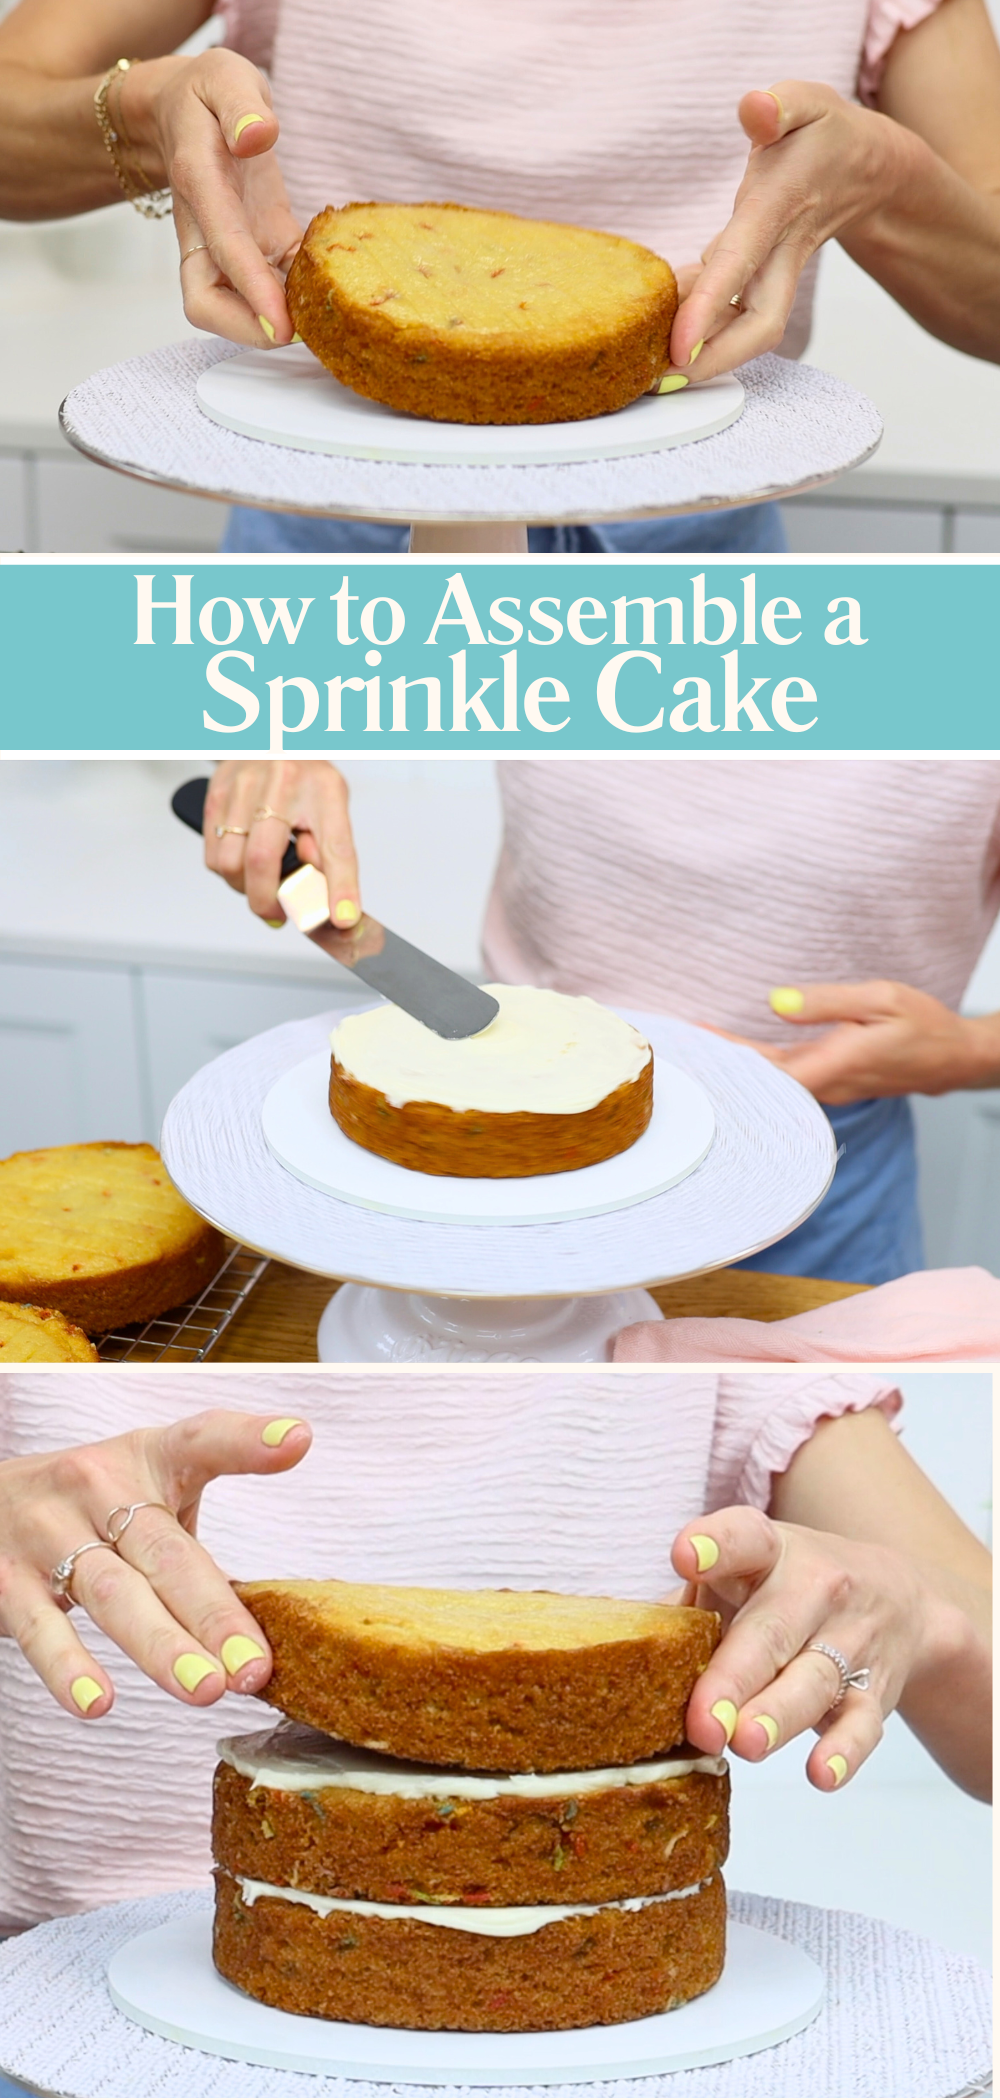
Time to make your filling and frosting! I’m using my 4 Minute Buttercream – it’s sweet and creamy and it smooths and pipes like a dream. It also takes food colouring really well, so you can tint it whatever shade you like.
To assemble the cake, choose a cake board that’s at least 2 inches wider than your cake. I’m using an 8 inch board for my 6 inch cake. Dab a bit of buttercream onto the middle of the board to hold your cake in place like edible glue. Place your first cake layer on top and spread a layer of buttercream over it using an offset spatula. If you’ve got a turntable, now’s the time to use it – it makes this part so much easier.
Stack the rest of your layers, adding buttercream in between. Then put your cake in the fridge for at least 30 minutes (or 15 minutes in the freezer) so it firms up. This makes frosting much easier and neater.
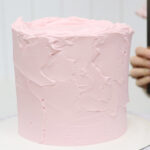
Crumb Coating the Cake
While your cake is chilling, tint your remaining buttercream any colour you like. I chose a soft yellow to match my nails!
To check if your cake is ready for the crumb coat, take it out of the fridge and hold the cake board at an angle - almost sideways! If the cake stays in position on the cake board, the buttercream has set and it's ready to frost.
Once your cake is cold and firm, you'll need your frosting tools. An offset spatula or angled palette knife is ideal for spreading buttercream onto the cake, preferably a large offset spatula that's about 13 inches long (including the handle). You'll need a cake comb (also called a frosting smoother or icing scraper) and a turntable. You'll find a list of all of my favourite tools here!
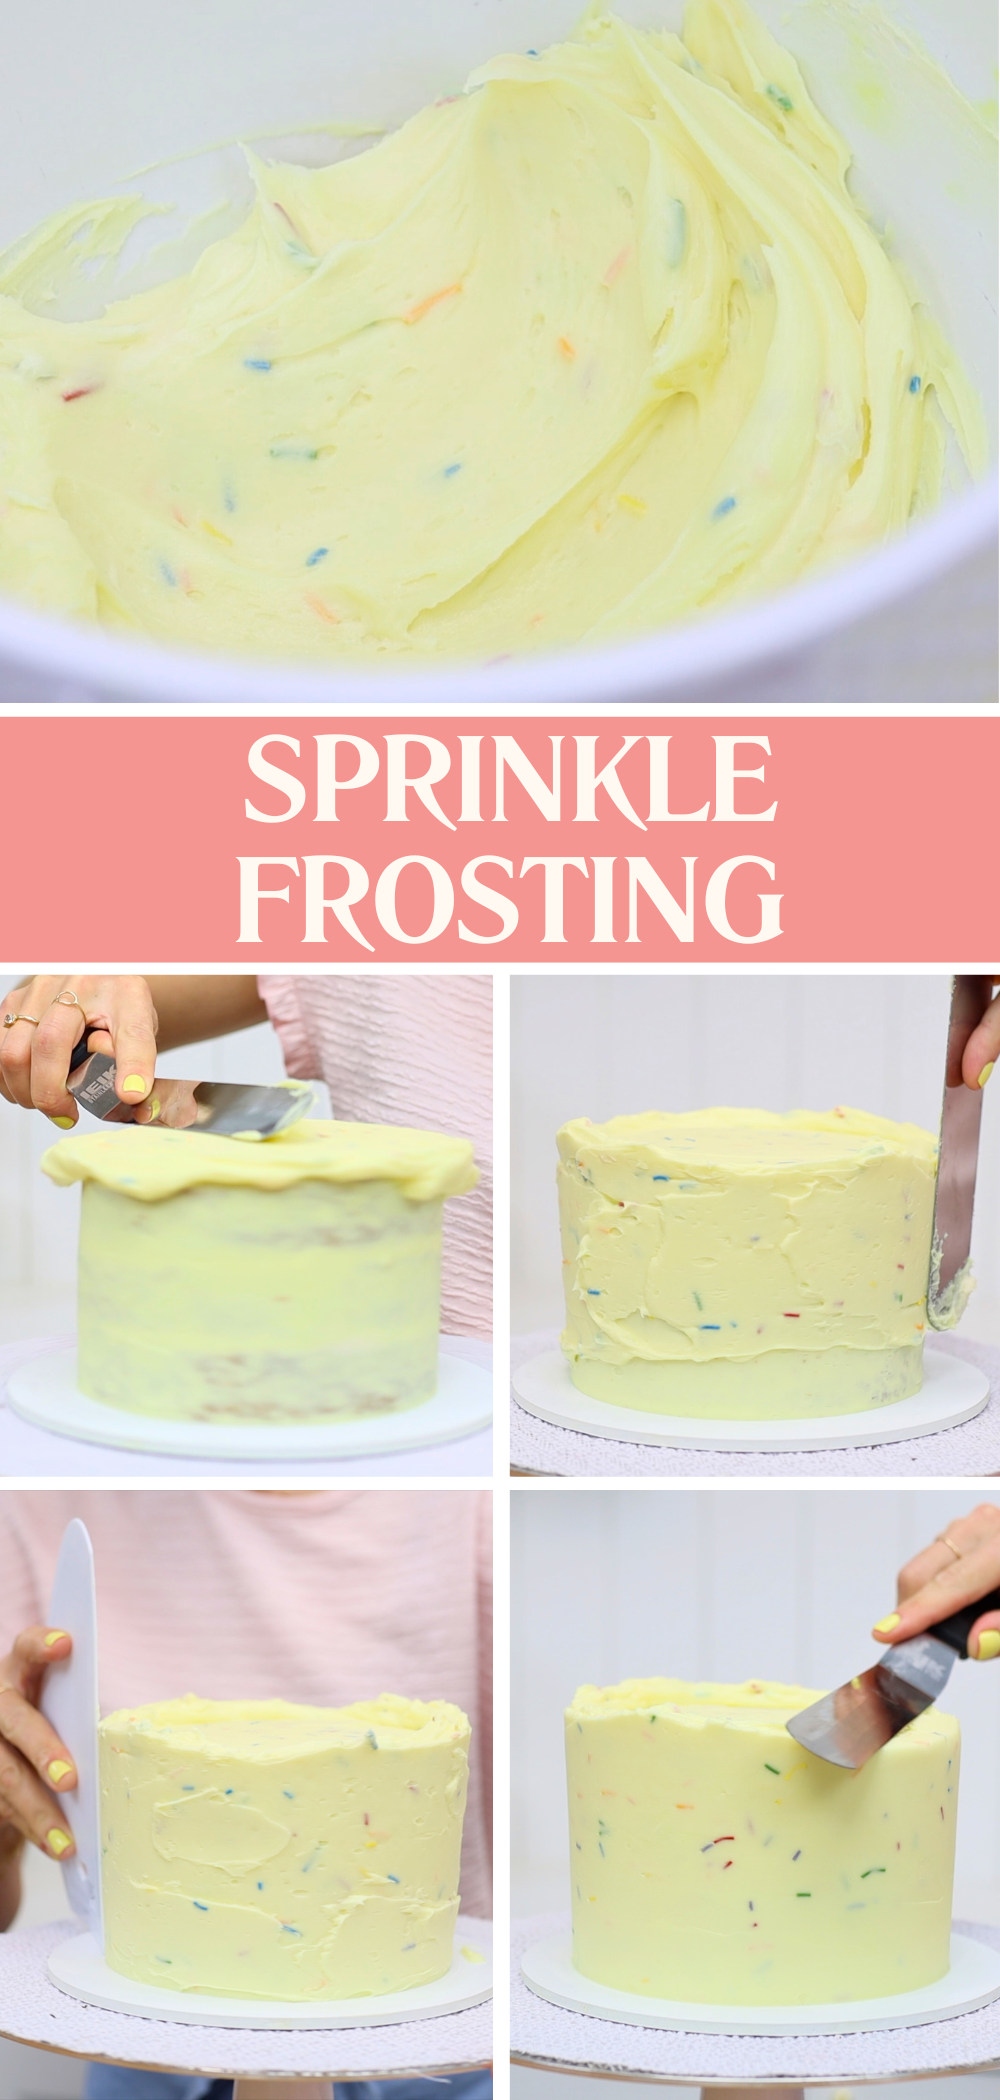
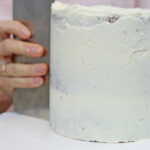
What is a crumb coat? It's a base layer of frosting that traps crumbs and gives your cake a smooth outline. Start by spreading buttercream over the top, pushing it over the edges to completely cover the top. Then hold your offset spatula at a 45 degree angle as you spin the cake to flatten the top.
Next, work your way down the sides. I like to spread the frosting up past the top edge of the cake slightly to form a lip – this helps you get sharp corners later on.
Use a cake comb or frosting scraped to smooth the sides of the cake. It doesn’t have to be perfect because it's about to be covered up with another layer. Use your offset spatula to swipe sideways across the top to level the frosting there. Chill the cake again for 30 minutes so the crumb coat sets.
Decorating with Sprinkle Buttercream
Here’s where the real fun begins. This is the part sometimes called funfetti cake decorating. First, scoop out about half a cup of buttercream and set it aside. You’ll use that later for piping and it needs to stay sprinkle-free or it’ll clog the piping tip.
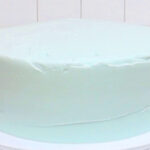
Now fold sprinkles into the rest of your buttercream, stirring until the they're mixed through evenly. Then spread this sprinkle frosting over the crumb coat – top first, then down the sides. Use a slightly thicker layer than the crumb coat so you’ve got enough to smooth and shape.
Scrape around it with your cake comb again, smoothing it out and filling in any gaps. Your cake comb might drag sprinkled around the cake, leaving a trail behind in the frosting, but as you scrape again and again those trails will disappear.
For the top edge, use your offset spatula to swipe inwards from the outer edge to the middle. Clean your spatula between swipes so that you don't drag smears of buttercream back onto the neat top edge. Chill the cake again for 15 to 30 minutes to set the buttercream before piping onto it.
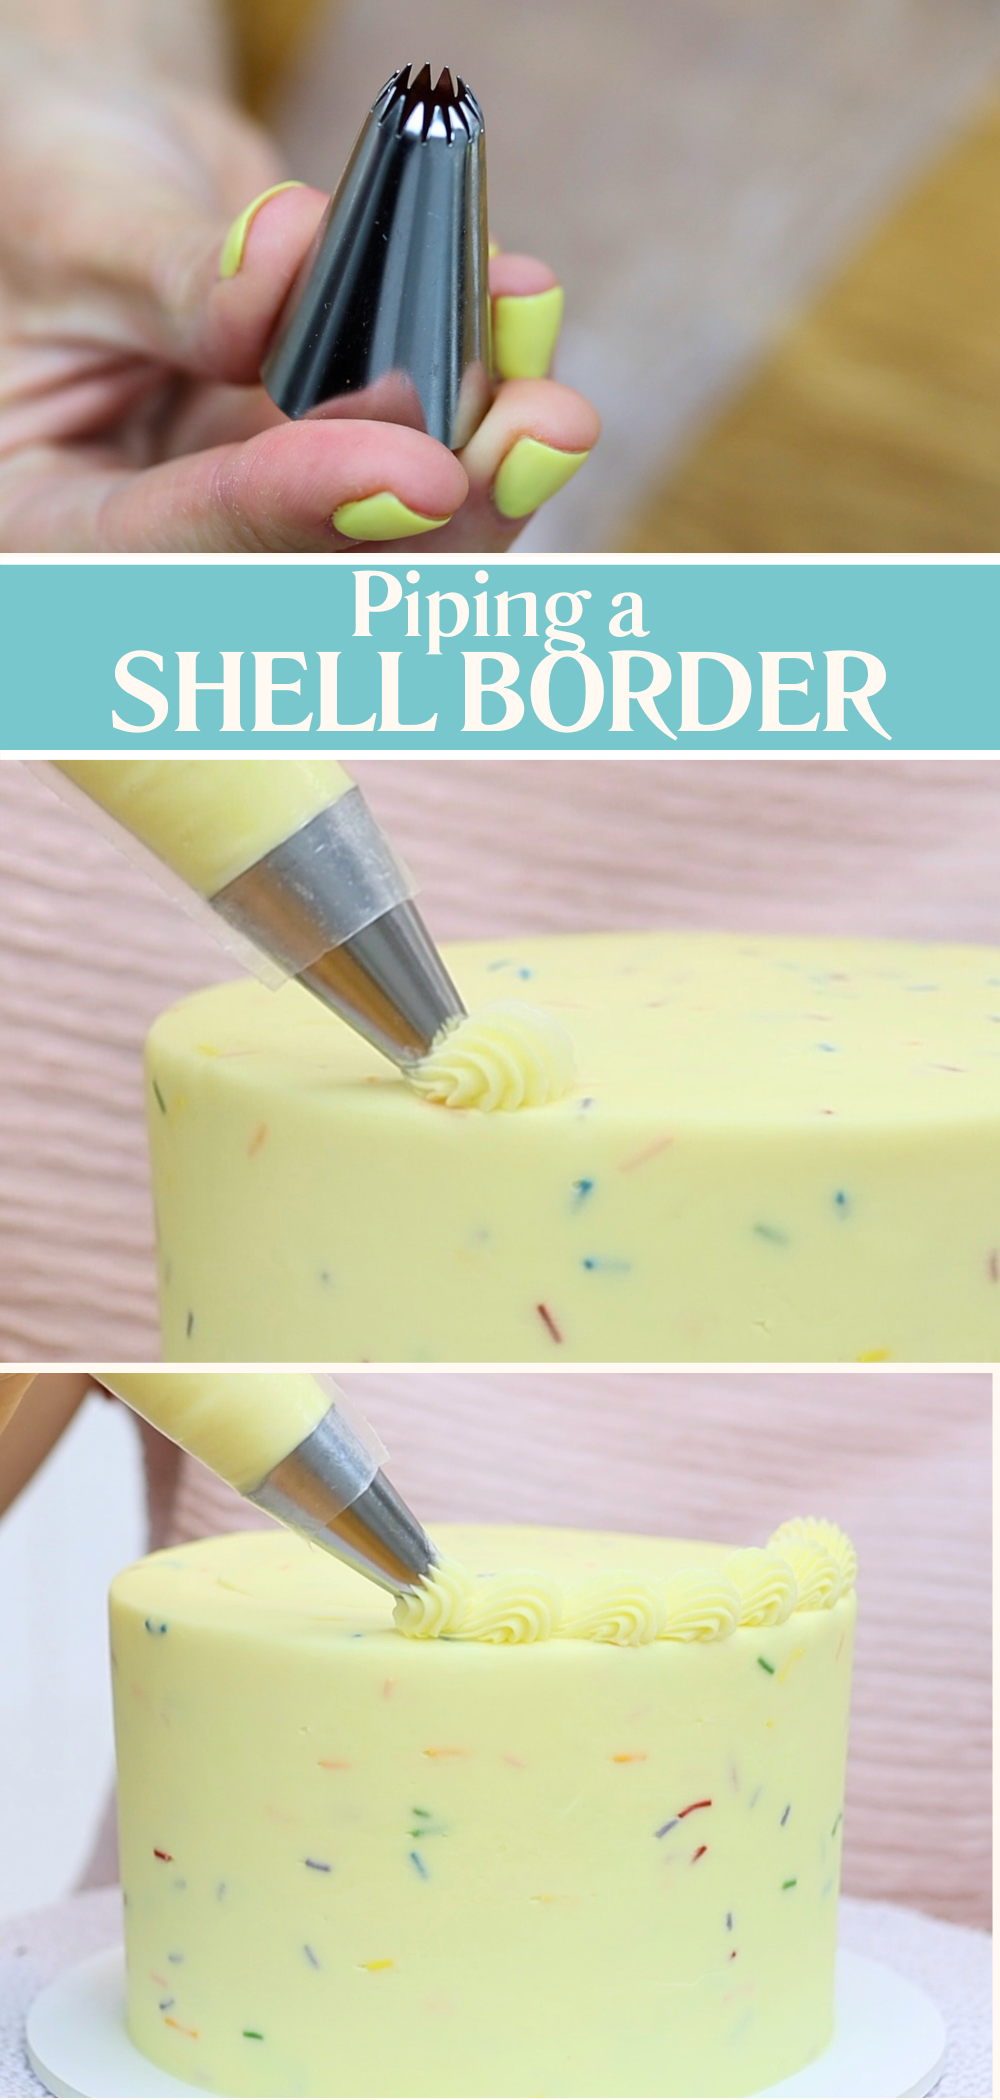
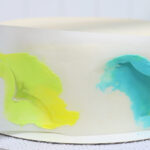
Piping the Finishing Touches
Now it’s time for the finishing touches. Drop a star shaped tip into a piping bag and spoon in the buttercream you set aside without sprinkles. I'm using a 4B piping tip. Choose the front of your cake – where the sprinkle frosting looks its best – and start piping your border a quarter of the way around the cake to the left or right. This way, the join of the beginning and end of the border will be tucked away at the side.
Hold the piping bag just above the cake and squeeze while pushing away slightly, then pull back and away to form a wave. Repeat all the way around the cake, overlapping the 'tail' of each wave with the next one. The last one won't look quite the same because there's no room for a tail and nothing to overlap it. That's why you started the border in the least visible place on the cake! Use a toothpick to neaten the last wave and gently press the end into the first wave.
If you’ve got leftover buttercream, you can pipe a border around the base too. Or store leftover buttercream in a ziplock bag in the freezer for a month!
How to Store Your Sprinkle Cake
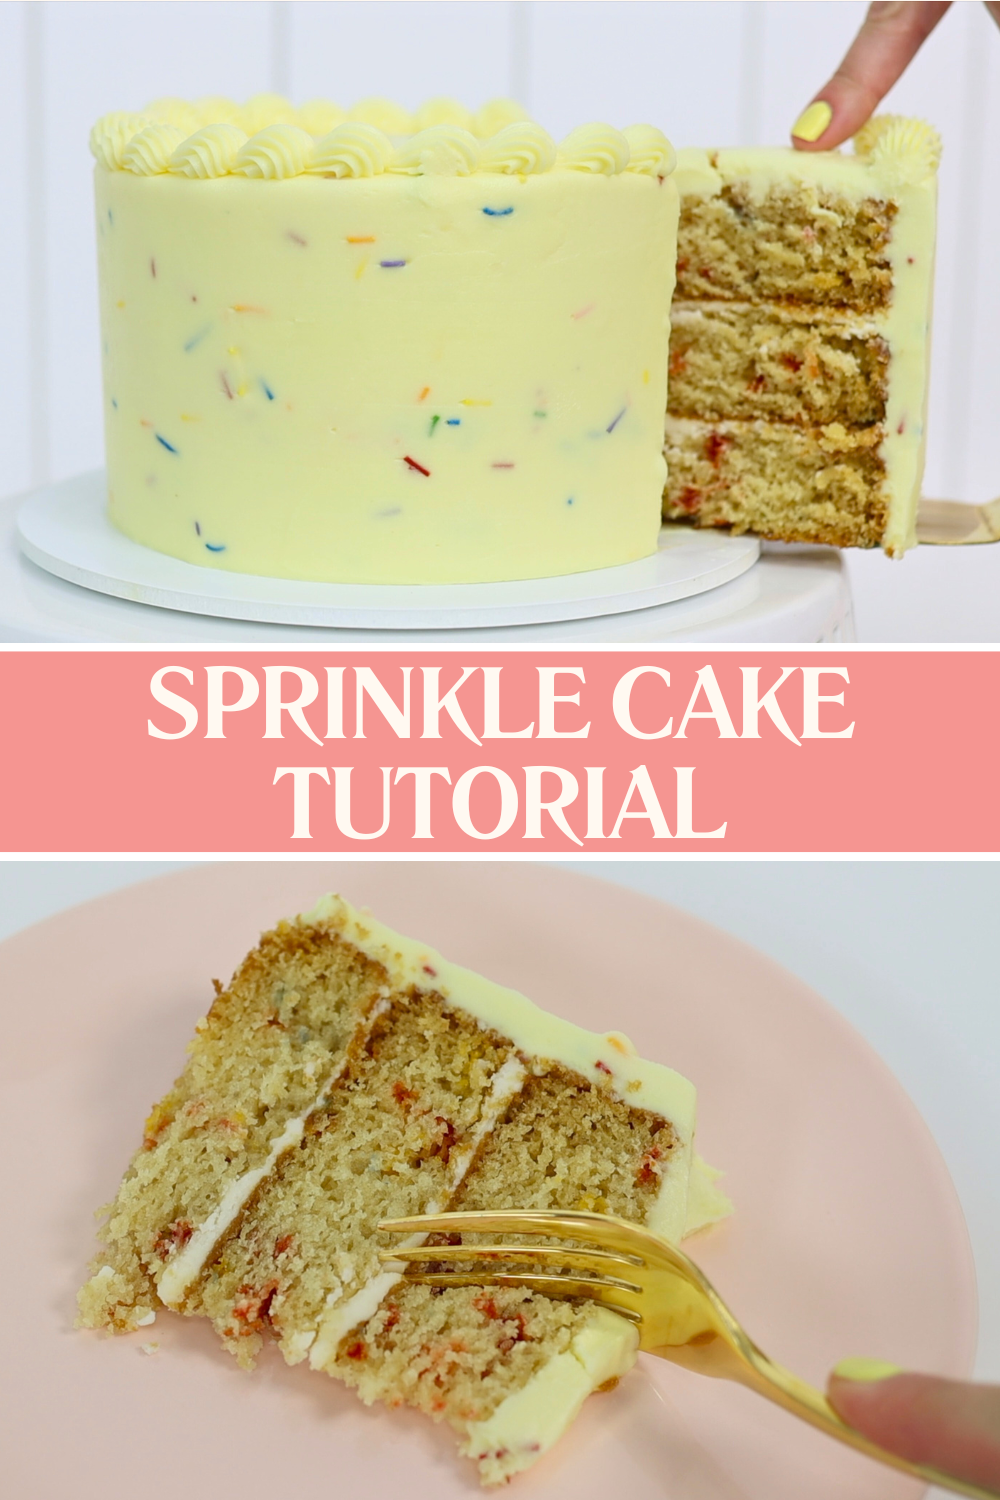
Your finished sprinkle cake can be stored in the fridge for two to three days without drying out. The buttercream frosting seal in the moisture and keeps it tasting fresh. But don't serve this cake cold! Take it out of the fridge about 2 hours before serving so the buttercream and cake warm up and soften. That's when they'll taste the best!
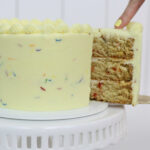
This cake is perfect for birthdays, celebrations, or honestly just a Tuesday that needs a bit of sparkle. I hope this sprinkle cake tutorial has given you all the information you need to create a colourful, joyful sprinkle cake!
This is a rich, buttery cake with sprinkles baked into the cake batter and inside the frosting!
Ingredients
Scale
For the cake:
3/4 cup unsalted butter 1 cup white sugar (granulated sugar) 3 eggs 1 1/2 teaspoons vanilla extract 6 tablespoons buttermilk 1 1/2 tablespoons vegetable oil 1 3/4 cups plain flour (all-purpose flour) 1/2 teaspoons baking powder 3/4 teaspoon baking soda 1/4 teaspoon salt 1/4 cup rainbow jimmies or sprinkle rods
For the buttercream:
1 1/2 cups unsalted butter 4 1/2 cups powdered sugar (icing sugar) 1/2 teaspoon salt 1 teaspoon vanilla 1-2 tablespoons whole milk (full fat) gel food colouring (optional) 1/4 cup rainbow jimmies or sprinkle rods
Instructions
To bake the cake:
Using a mixer with a beater/paddle attachment (not a whisk), beat room temperature butter and sugar on medium speed until pale and creamy, about 2 minutes. Scrape down to the bottom of the bowl once during mixing to make sure no butter or sugar is stuck at the bottom.
Add eggs one at a time, mixing on the lowest speed after each addition for 30 seconds. Scrape down to the bottom of the bowl to make sure everything is incorporated before adding the next egg.
Add vanilla and mix for about 30 seconds to combine.
Add room temperature buttermilk and oil and mix on lowest speed to incorporate.
In a bowl, sift flour, baking soda, baking powder and salt. Add to the mixing bowl and mix on lowest speed to incorporate, scraping down to the bottom of the mixing bowl to check that batter is evenly mixed.
Pour sprinkles into the batter and fold in gently with a spatula.
Grease three 6 inch baking pans with non-stick oil spray or butter. Divide batter equally between the cake pans.
Bake at 160ºC or 325ºF for 30 minutes, or until a toothpick inserted into the middle of the cake comes out clean.
Leave cakes to cool in their pans for 10 minutes. Use a spatula to loosen the cakes from the edges of the pans and then turn onto a wire cooling rack. Leave to cool completely.
To make the buttercream:
Mix butter and sugar together at low speed for 4 minutes, scraping down to the bottom of a the mixing bowl a few times, until smooth. Add vanilla and salt and mix to combine.
Add milk 1 tablespoon at a time until the buttercream is the consistency of peanut butter or stiff whipped cream.
Optionally, tint the buttercream using food colouring.
To put the cake together:
Spread a bit of buttercream onto the middle of a cake board or flat plate or platter. Press the first cake layer onto the buttercream to secure it in place.
Spread about 1/3 cup buttercream to cover the top of the cake layer and then place the next cake layer on top. Spread another 1/3 cup buttercream on top and then add the final cake layer. If you have time, put the cake into the fridge for 30 minutes or the freezer for 15 minutes before frosting it.
Spread half of the remaining buttercream to cover the cake with a crumb coat. Smooth with a cake comb or offset spatula. Let this set in the fridge or freezer for 15-30 minutes.
Set aside about 1/2 a cup of the remaining buttercream and cover with plastic wrap for piping later. Stir sprinkles gently into the rest of the buttercream.
When the crumb coat has set, spread sprinkled buttercream over the cake and scrape around a few times with a cake comb. Spread more buttercream over any indents or shallow areas or trails caused by the sprinkles and scrape around the cake with your cake comb again. Repeat until the frosting is smooth. Flatten the top edge by swiping sideways with an offset spatula or angles palette knife.
Chill the cake for 15-30 minutes in the fridge or freezer before piping a border onto the top. This prevents the weight of the piping causing bulging or drooping frosting.
Serve this cake at room temperature. You can refrigerate it for 2-3 days but take it out of the fridge at least 2 hours before serving.
I'm so glad you're signing up for my newsletter! You're sure to find loads of caking inspiration and learn from the tips and tricks I've discovered throughout my career!
Want to learn more?
Get immediate access to my FREE course on 10 Frosting Techniques and my newsletter with loads of caking inspiration, tips and tricks!


Could you please give this recipe in metric measurements. I see you have in other recpies and I do find to very helpful.
Thank you.