Breaking down the hot chocolate bomb trend… How do you get the marshmallows inside the chocolate? Do you have to use expensive, high quality chocolate? How do you get it so shiny and how thick does it need to be? What are some fun ways to decorate the bombs? How do you get the most dramatic explosion? How can you gift wrap these? I’ll be answering these questions and showing every step of how to make them, in this tutorial! If you prefer to watch a video of this tutorial, scroll to the bottom of the page.
First, let’s fly through the basic technique. Melt chocolate, spread it over a mold, pop it out, fill it with treats, stick two halves together, add some decorations and then create an explosion! Now I’ll go step by step in a bit more detail and then show you the drastically different results with different kinds of chocolate.

The first step is to melt your chocolate and how you do this is THE most important part of the process. If you’re using a bar of chocolate you should break or chop it into small pieces that are all around the same size because it will melt quicker and more evenly than if you use large blocks of chocolate like this.

A 4oz bar of chocolate or 113g is enough to make 3 bombs, by filling the mold to make 6 halves. Put the chocolate in a bowl and put the bowl in the microwave for 30 seconds at 80% power and then stir the chocolate around to spread the heat and to melt it a bit more as it touches the warm bowl.

Put the chocolate back in the microwave for another 30 seconds at 80% power and then stir again. If you overheat the chocolate you’ll get a dull finish or patchy stains all over your hot chocolate bombs and if that happens I’ll show you how to fix it later in this tutorial.

As you stir, any lumps will melt a bit more. How many times you do this depends on how much chocolate you’re using, how big the pieces are, and how hot your bowl gets in the microwave, but for me a bar of chocolate took 3 sessions in the microwave. Once the chocolate is completely smooth, it’s ready.

The process for white chocolate is exactly the same – melt the chocolate gently by using short intervals and 80% power in the microwave so you don’t overheat the chocolate. You can add sprinkles to the chocolate but I’d recommend using these tiny non-pareils instead of larger sprinkles because the fun variations of shapes and sizes in a sprinkle mix and any metallic colours won’t be noticeable once you’ve mixed them into the chocolate.

Now you’ll need a silicon hot chocolate bomb mold. Spoon some chocolate into one of the holes and use the back of your spoon to push it up the sides of the mold, all the way up to the top so you have a complete hemisphere. Pay special attention to the rim of the mold because if it’s too thin there it will snap when you take it out of the mold or when you attach the two halves later.

Make sure you don’t see the mold through the chocolate in any places because that will create holes or lighter coloured patches. I’ll explain more about the importance of the kind of chocolate you use later but for now, just note that for a semisweet chocolate with less than 60% cocoa solids you only need to do one layer of chocolate because even when it’s melted, it’s quite thick.

If you’re using very good quality chocolate with a high cocoa solids percentage of over 60%, like this 70% bar, the melted chocolate will be very runny so the coating will be thin so I recommend doing one layer, then putting it in the fridge for about 10 minutes until it’s set, and then repeating the process to add another layer to make the chocolate slightly thicker.

Use the same method to spread white chocolate into the molds, with or without sprinkles mixed into the chocolate.

Put the molds in the fridge for at least 10 minutes to set the chocolate and then hold the mold on two opposite sides of a hemisphere, and gently peel back the mold from the chocolate with both thumbs while pushing upwards on the bottom of the mold with your fingers.

The chocolate should pop out easily. It’s best to wear gloves while you do this so you don’t leave fingerprints on the chocolate. If you didn’t overheat your chocolate, it should be beautifully shiny.

Look at the difference between properly melted chocolate and overheated chocolate! I’ll show you how to fix overheated chocolate later.

Now we’re going to fill the bombs and then attach the two halves together. To fill the bombs, place one half of chocolate facing upwards, like a bowl, and pour some hot chocolate into it. I use between 1 and 2 tablespoons of powder.

Then sprinkle some marshmallows on top and add anything else you want in your hot chocolate, like brownie pieces or sprinkles. Make sure everything is within the edges of the chocolate so your next half will fit neatly on top.

I made some little chocolate dinosaurs for fun, pouring melted chocolate into silicon dinosaur molds and then adding those to the sprinkled white chocolate bombs.

Although the idea was cute, they melted in the hot chocolate so you didn’t notice the shapes in the end. I’ll show you a more effective way to use chocolate shapes like these in a minute.

Place a pan on the stove on high for a few seconds until the base warms up and then take it off the heat and place the other half of your bomb in the pan so that the edge starts to melt. As soon as you see the melted chocolate around the base of the bomb, lift it up, otherwise you’ll melt too much and you’ll have a lopsided sphere.

Press the melted edge down onto the other half, pushing gently to attach the edges together. Tadaa!

The process is the same for white chocolate hot chocolate bombs. You’ll notice that the hot chocolate is much sweeter when the bomb is made with white chocolate instead of semisweet or dark chocolate.

Another way to do this which I find trickier and messier is to put some melted chocolate in a ziplock bag and squeeze it around the rim on one of the halves of the bomb and then press the two halves together. You can try both and choose which way you prefer!

To disguise the seam between the two halves you can add decorations. Start with a chocolate drizzle, putting some melted chocolate in to a ziplock bag and snipping a corner off to squeeze the chocolate through.

Move your hand quickly back and forth over the bomb to drizzle the chocolate and you can leave it like that, which looks simple and classy, or add sprinkles! Use my code BRITISHGIRL15 to get 15% off your Fancy Sprinkles order ????

If you want to make chocolate shapes like the dinosaurs I showed you earlier, I suggest using them as decorations on the outside of the hot chocolate bomb instead of putting them inside, since they’re much more noticeable this way!

Now for the exciting part, the explosion! Warm milk until little bubbles form around the edges and it’s hot but not boiling. If it’s too hot, the bomb with melt immediately and there won’t be a dramatic explosion of the marshmallows and if it’s too warm, the bomb won’t melt and explode.

Pour the hot milk over the chocolate bomb and after a few seconds the chocolate will collapse and melt away and the marshmallows will bubble up dramatically to the surface!
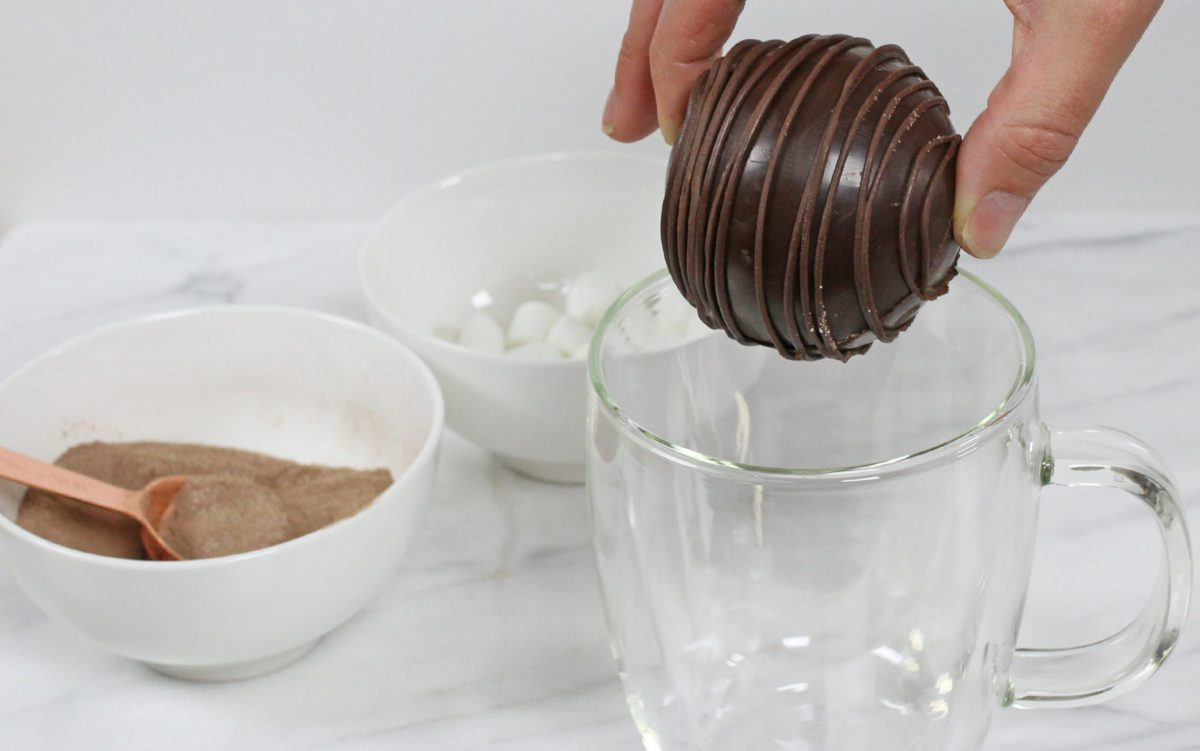
I like to use a paper straw or a spoon placed in the mug to slowly lower a hot chocolate bomb into the mug, since it can be a bit tricky to lower in down into the mug with your fingers for these large bombs that are almost as wide as the mug.

You can gift wrap these for a thoughtful, unique present and I’ll show you how in a moment but first, the burning question: Which chocolate should you use? Whenever I read that you need good quality chocolate for a recipe, I roll my eyes and reach for a bag of chocolate chips. But for these hot chocolate bombs, there really is some truth to this as far as the shininess of the bomb and how dramatic the explosion is at the end.

I tested 3 types of chocolate: semisweet chocolate chips, a semisweet bar with 55% cocoa solids, and ghirardelli 70% chocolate and here are the results:
1) Semisweet chocolate with 55% cocoa solids was super shiny and beautiful but I did notice it melted quite quickly with any touch, especially if I tried to tidy up the join of the two halves of the bomb after attaching them together.

2) Dark chocolate with 70% cocoa solids (I used Ghirardelli) was the shiniest by just a little bit compared to the 55% chocolate but it was the most stable as far as staying solid when I pressed the halves together or picked it up.

3) Semisweet chocolate chips gave the least shiny result and were the most difficult to work with because even after setting, the chocolate melted as soon as I touched it so I left fingerprints all over it.

What should I do if my chocolate is stained? If you overheat your chocolate when you melt it at the beginning, you’ll get these stains or splotches on the surface or a dull finish instead of that nice shininess you saw on the chocolate that was melted properly, but don’t panic, you can fix it!

Break up the chocolate and put it back in the microwave at 80% power for 30 seconds at a time, spread it back into the molds, let it set and you’ll have nice shiny chocolate bombs!

Ok, a few ideas for displaying or serving these, or wrapping them up to give as gifts. First, if you want to give someone the mold as a gift so they can make their own, I’ve made a “how to” sheet you can print off and give them with the mold!

If you want to display a hot chocolate bomb on a plate or platter, cupcake wrappers hold them in place nicely and they’re just the right size for these large bombs – they fit perfectly!

For a gift, place a bomb in the middle of a square piece of cellophane and pull the corners up and tie them with a piece of string or ribbon. You can put the wrapped up bomb inside a mug and give both as a gift. Add a spoon or a paper straw or two for a nice touch.

These are a fun gift to unwrap and even more fun to drink! This was my three-year-old enjoying his first ever hot chocolate bomb!

Here’s the video version of this tutorial:


It is in reality a great and useful piece of information. I am happy that you just shared this helpful information with us. Please stay us up to date like this. Thank you for sharing.| Sonja Gilles Thalia
массаж подарочный сертификат москва
Адвокат по уголовным делам
Адвокат по уголовным делам