In this tutorial I’m going to show you 10 ways to decorate cakes with chocolate chips! At the end of the tutorial I’ll share tips on melting chocolate properly and making ganache and colouring it. If you prefer to watch a video of this tutorial, scroll to the bottom of the page.
#1 Chocolate stencil cake toppers
To make stenciled chocolates to use as cake toppers, melt chocolate chips and spread them over parchment paper or wax paper. Score lines with the edge fo your

Leave to set at room temperature for about an hour or in the fridge for about 30 minutes. Then place a stencil over the top, pour more melted chocolate on top and smooth the chocolate with a frosting smoother or

Peel the stencil back to reveal the design! use a sharp knife to cut the chocolate where you made the lines earlier and the shapes should break off neatly. Dipping the knife into hot water before you cut might make it easier.

You can paint these with chocolate cake toppers with luster dusts if you like, either brushing the dust straight onto the chocolate or mixing it with vodka to make an edible paint. Press the chocolate cake toppers into a cake to add some height! For more ways to use your stencils, check out my tutorial on 16 ways to decorate cakes with stencils.

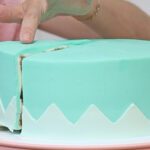
#2 Chocolate wrapped cakes
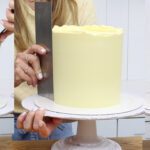
To wrap a cake in chocolate, assemble your cake and cover it in a thin coat of frosting, which needs to cover up the whole cake so it doesn’t dry out but it doesn’t need to be neat.

Put the cake in the fridge to set the frosting and then wrap a piece of parchment paper around your cake and trim it so it’s just a little bit longer and at least as tall as the cake. Melt chocolate chips and pour the melted chocolate onto the parchment, spreading the chocolate all the way over the edges.

Lift it up before it sets and wrap it around the cake, pressing it against the sides, and then put the cake back in the fridge for an hour to set the chocolate.

Pinch one end of the parchment and peel it off slowly so that you don’t break off any chocolate. Wipe off any smudges of chocolate from the cake board using a paper towel wrapped around your finger. If you use greaseproof cake boards this is really easy!

Decorate the cake with chocolates, fruit, flowers or tie a ribbon around it! Looking at the cake, you would never guess it was decorated with something as simple as parchment paper. For the neatest slices, dip a knife into hot water before you cut into this cake.

#3 Sprinkled chocolate dipped marshmallows
To make gorgeous sparkly cake toppers, poke a lollipop stick into a marshmallow, twisting to to make it stick. Melt chocolate chips and dip the marshmallow into it, tilting the bowl and spinning the marshmallow to coat it in chocolate.

Tap off any excess chocolate. Now straight away, while the chocolate is still sticky, press the marshmallow into a bowl of sprinkles, twisting it to cover the entire marshmallow.

You can push these sticks into a cake for a quick and colorful cake topper!

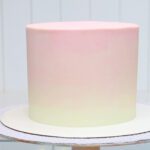
#4 Ombre chocolate frosting
Mix different amounts of melted chocolate chips into buttercream to create different shades of brown, which you can then use to create ombre frosting.

After crumb coating your cake with a thin layer of frosting, spread the different colours of chocolate buttercream in bands around the cake so that the colours get darker or lighter as you go down the sides of the cake. The recipe for my chocolate buttercream and how to use it for different cake decorating techniques is here.

Smooth the frosting or use a textured cake comb, filling in any air pockets in the frosting as you go by spreading more frosting of that same shade of brown over the top and then scraping with your frosting smoother or cake comb again.

#5 Chocolate shapes
To make chocolate shapes to use as cake toppers, melt chocolate chips and lay out a silicon mat or parchment paper and arrange some cookie cutters on top.

Spoon the melted chocolate into them, pushing the chocolate right up to the edges and corners of the cookie cutters. You can add gel colours to the melted chocolate first if you want to tint them. For black shapes, if you start with semisweet chocolate you won’t need to add much gel to turn the brown chocolate black. If you like you can pour sprinkles on top of the chocolate now, while the chocolate is still melted and sticky.

Leave the shapes in the cookie cutters to set or slide a cutting board underneath so that you can lift them easily and chill them in the fridge for about 30 minutes so that they set more quickly.

Lift the cookie cutters up and push the chocolate out, pushing gently all over the shape to ease it out gradually so that it doesn’t crack or snap. Attach these to a cake by piping a swirl of chocolate and pressing the shape into it to secure it.

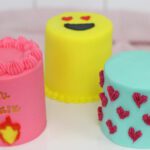
#6 Mini chocolate chip cookies
Use chocolate chips to make chocolate chip cookie cake layers or mini chocolate chip cookies, which you can use to decorate a cake.

Pipe frosting onto the top of the cake to attach the mini cookies, using a star tip like a 1M piping tip or an open star tip like the 8B tip I used for the rosettes on this cake.

#7 Chocolate sails
For a dramatic chocolate sail, melt chocolate chips and spread them onto parchment paper. Drape the paper over a bottle or an upside down bowl and leave it to set for about an hour, or in the fridge for 30 minutes.

Gently peel the parchment paper away from the chocolate and then press the sail into the frosting on a cake or you can pipe some rosettes or swirls and push the sail into the frosting to attach it.

I have a detailed tutorial on 5 types of chocolate sails in case you’re looking for more detailed instructions. For these next 3 ideas, use chocolate chips to make ganache, which I explain in detail how to do at the end of this tutorial, with the ingredient amounts for each decorating technique.

#8 Chocolate truffles
To make truffles, after you make your ganache let it rest until it thickens, or you can speed this process up by putting the bowl in the fridge for 10 minutes at a time, stirring it to make sure lumps don’t form. Scoop the ganache up with a spoon and roll it between your hands to shape it into a ball.

You can use a tablespoon or one of these little melon ball scoopers if you want to make sure every truffle is exactly the same size. Roll the truffles in a bowl of cocoa powder or powdered sugar or sprinkles for an extra special touch.

Place the truffles on top of your cake, onto a drip that hasn’t set yet so that the truffles stick to it, or you can pipe swirls of frosting and press the truffles into those.

#9 Chocolate donut glaze
You can make donuts with cake batter using a silicon mold and use chocolate chips to make a decadent ganache glaze for them. After baking the donuts, let them cool before you glaze them.

Dip each donut in the ganache, flipping it back over onto a rack to let the ganache settle. If there’s a bubble of ganache in the hole of the donut you can tap the donuts a few times on the rack to pop the bubble, or tap the rack itself on the counter.

You can make coloured ganache for this and I’ll show you how at the end of this video. Decorate the donuts with sprinkles or crushed nuts, or drizzle them with another colour of ganache!

#10 Chocolate drips
For a chocolate ganache drip, use a squeezey bottle or a spoon to drizzle the drip around the edge of the top of the cake. Move it just over the edge of the cake wherever you want to make a drip and pause for a moment before pulling it back inwards and continuing around the cake until you want to make the next drip.

Depending on how far you pull your spoon or bottle back in off the edge of the cake after each drip, you can vary the style of drips. If you leave the bottle slightly over the edge the whole time you’ll create more of a flowing drip or if you pull it back in, onto the top of the cake, you’ll create individual strands.

I like using a bottle for more control, and it’s quicker, but a spoon works too! The ganache has to be at room temperature before you apply the drip and the cake needs to be chilled in the fridge first to stop the drips running all the way down to the bottom of the cake.

I hope you’ve seen some decorating ideas you like! Now for some tips on melting chocolate and making ganache. To melt chocolate without burning it, put it in a bowl in the microwave for 1 minute at a time at 50% power, then stir it and repeat until the chocolate is nice and smooth.

You can do this for milk chocolate, semisweet chocolate, or white chocolate chips – the process is the same. 50% power and short intervals of heating are key! If you heat it on a high heat for too long, you’ll burn the chocolate and it will seize up and become grainy, like this.

Another result of heating your chocolate for too long or at a temperature too high is that after melting, when it sets it will be discoloured, like this.

For ganache, pour out your chocolate chips, using a scale to weigh them or cups to measure them. These are the ratios for semisweet chocolate and white chocolate, to make truffles, drips, or donut glaze. For example, for truffles made with semisweet chocolate, use 2 parts of chocolate to 1 part of cream, for example 200g chocolate and 100g cream.

You can make ganache in the microwave by adding heavy whipping cream or double cream and putting the bowl in the microwave for 30 seconds. Stir it and then microwave for another 30 seconds, using these short intervals to make sure you don’t burn the ganache.

Stir the ganache after each session in the microwave, repeating until the ganache is smooth with no lumps of chocolate.

You can also make ganache on the stove. Measure your chocolate but don’t add it to the cream yet. Pour the cream into a saucepan and heat it on the stove over a medium low heat.

Wait until bubbles form around the edges of the pan but don’t let it boil! You’ll scald the cream. Take the pan off the stove and add the chocolate chips, pushing them around to cover them with the cream. Leave it like this (not on the stovetop!) for 5 minutes.

Stir the ganache until it’s smooth. If you have any lumps in your ganache, put the pan back on the stove over a low heat and stir or whisk until the ganache is smooth.

The process is the same for white chocolate. You can add white icing colour to white chocolate ganache to make it a brighter white, or add any colour. I use gel colours, the same ones I use for my buttercream. They work perfectly as long as you don’t add huge amounts of gel or stir too much after adding them, because that can cause the ganache to seize and become thick and grainy.

Coloured ganache can be used for drips or donut glaze and it looks beautiful as well as tasting delicious!

I hope this tutorial has been useful! If you prefer to watch a video version, my YouTube tutorial is below.