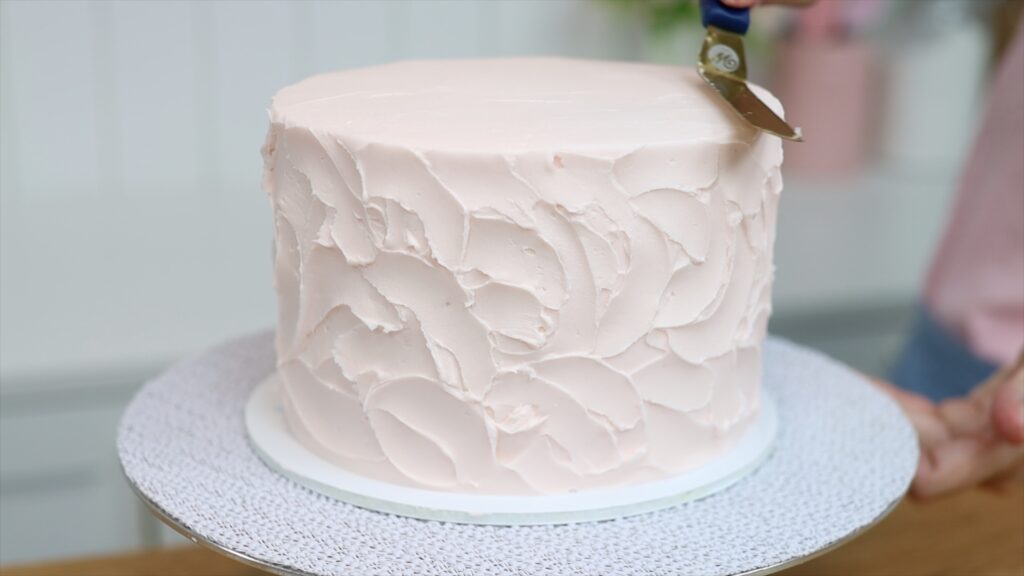
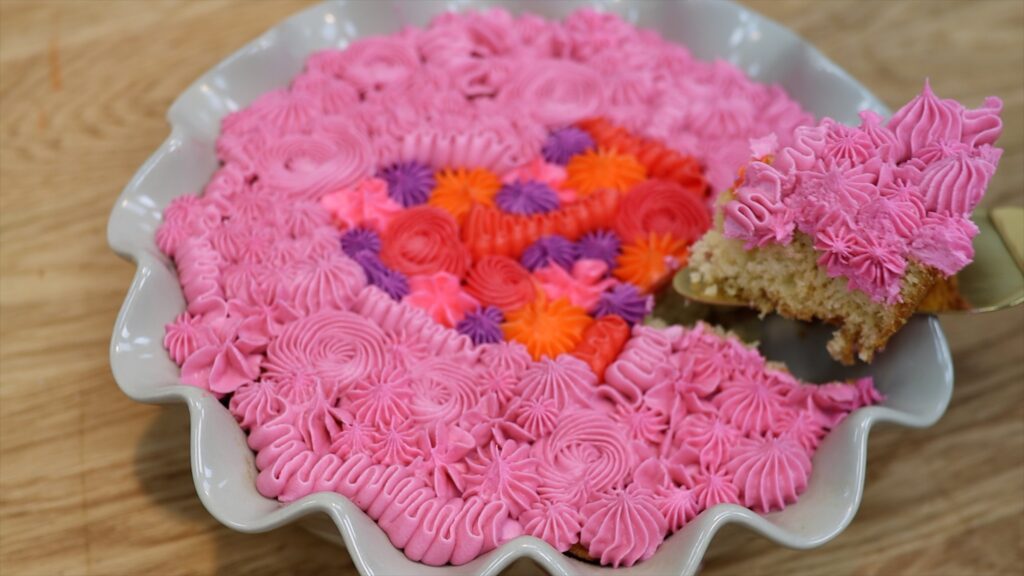
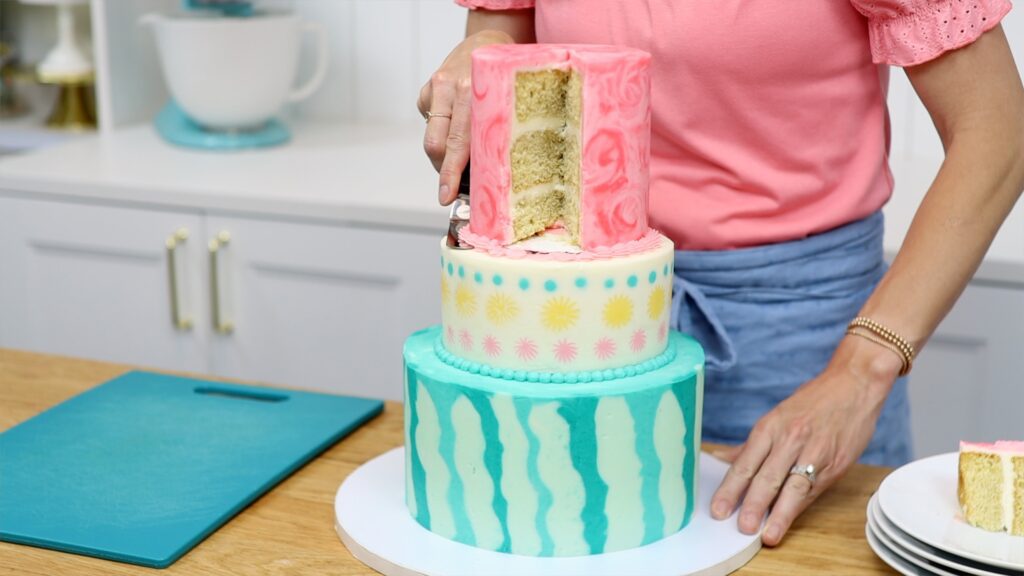
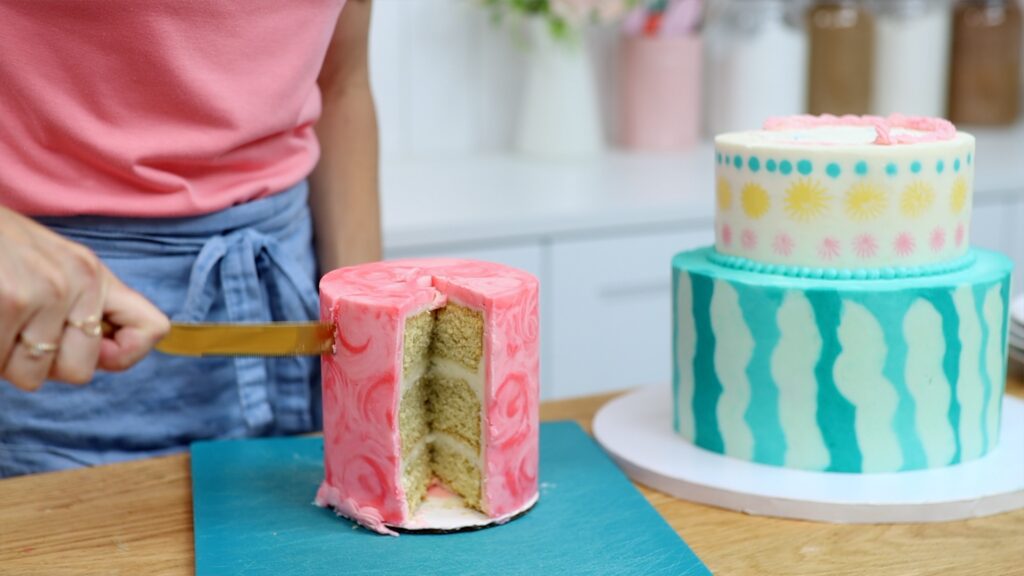
Learn how to turn ugly cakes into stunning beauties! Use these ugly cakes to boost your confidence if you're struggling to frost or decorate a cake because even cakes that look like train wrecks in their early stages can transform!
Let’s start with a buttercream transfer. Trace an image onto parchment paper or wax paper, something non-stick that you can see through. Then pipe over it. Start with the smallest details and put this into the freezer for 5 minutes between each addition. That way when you pipe on the next detail, you won’t blend the colours or damage what you’ve already made.
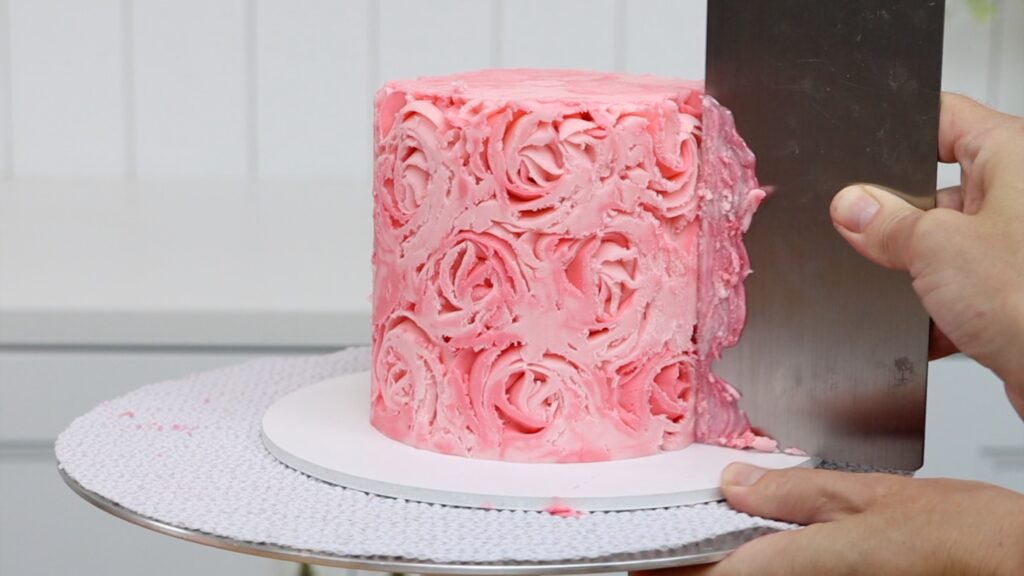
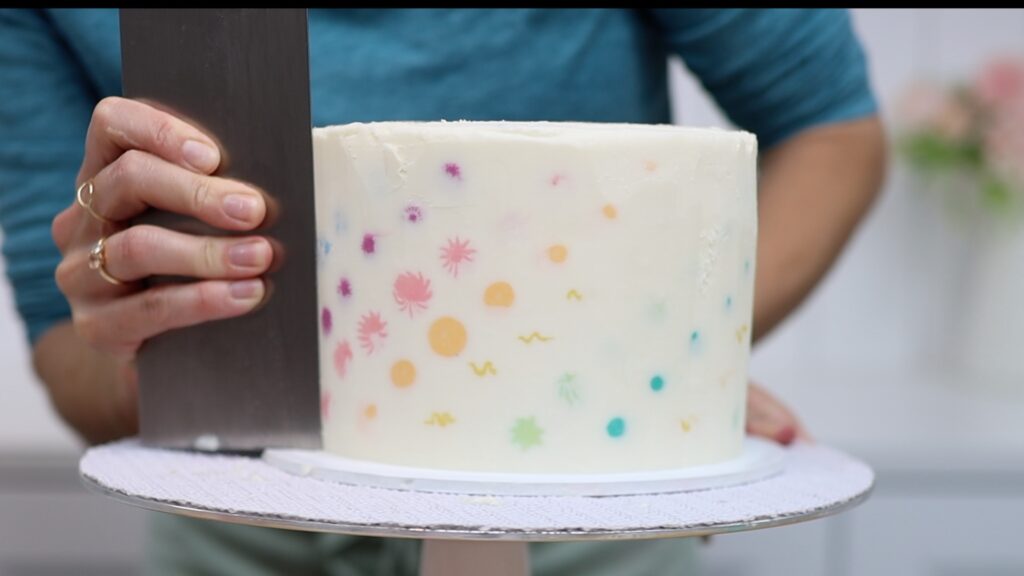
It will look messy and ugly or in this particular case, demonic! But this side is going to be hidden eventually. It’s the bottom side that’s pressed down against the parchment that you’ll see. Finish with the largest area, the background colour, outlining it and then zigzagging to fill it in. Spread it all over to flatten it and to make the rest of the design, the frozen parts, sticky.

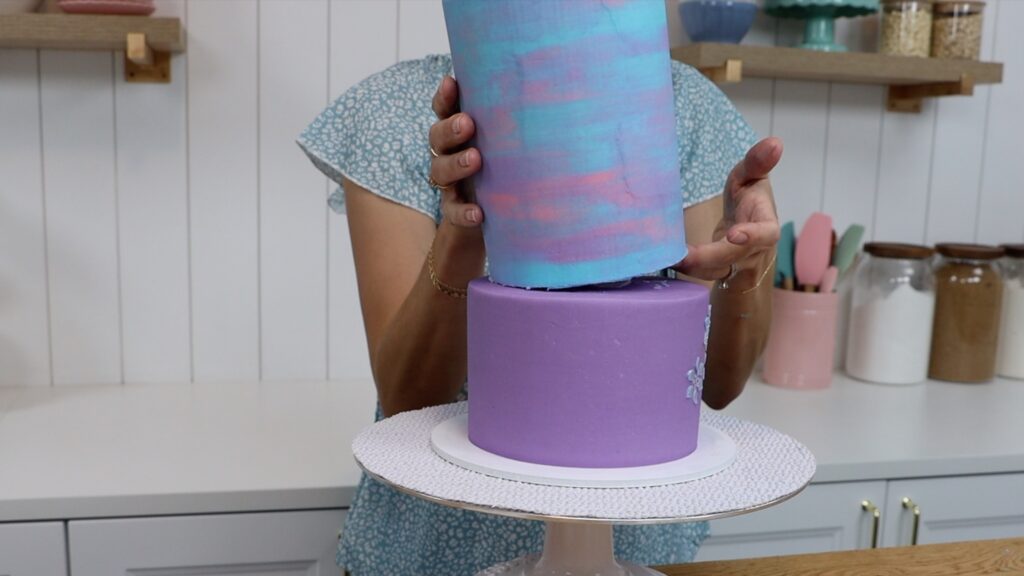
Then flip this over onto a cake and put it in the freezer for 10 minutes. If you don't have space in your freezer you can put it in the fridge for 30 minutes. This will set the buttercream. Peel the parchment off and voila!
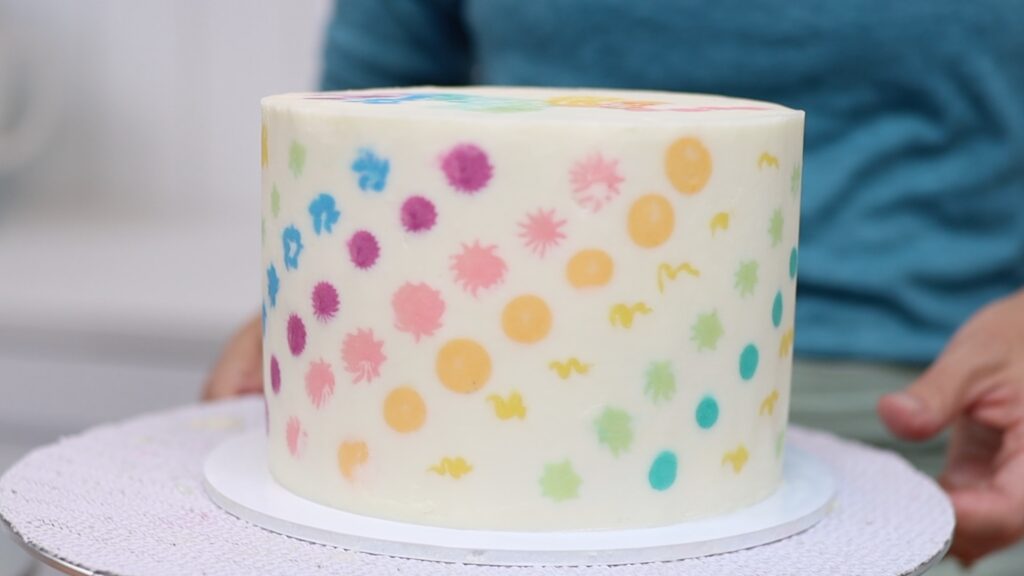
Still ugly? If there are gaps or indents in the design, spread some more buttercream over them and scrape off the excess. This will leave your design flawless underneath!
You'll find more techniques for character cakes in my tutorial on 3 ways to make character cakes with no fondant.
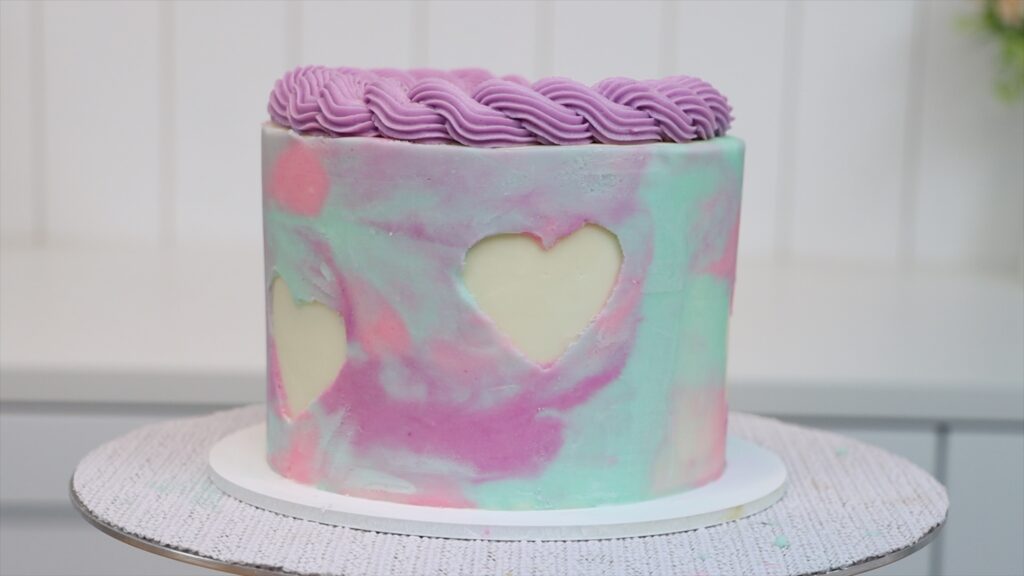
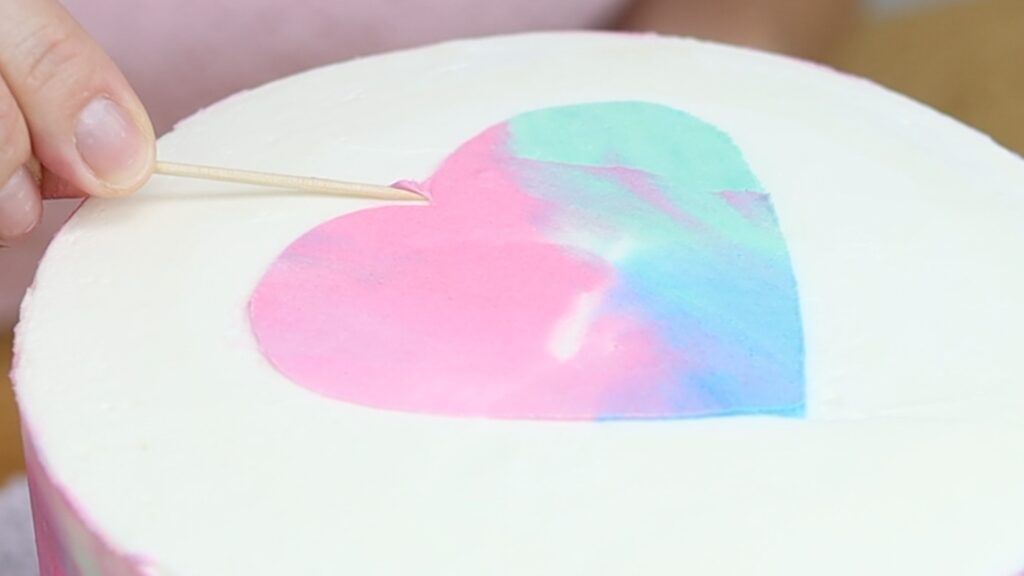
This next one looks really questionable until it’s finished! Cut out hearts or any other simple shape out of parchment paper or wax paper. Then cut a slit in the middle of each one.
Press your hearts onto a frosted cake after chilling the cake to set the frosting. Then pipe coloured buttercream to attach the hearts to the cake. Do this for all of your hearts and if you think the random piping looks ugly now, wait for it to get a LOT worse!
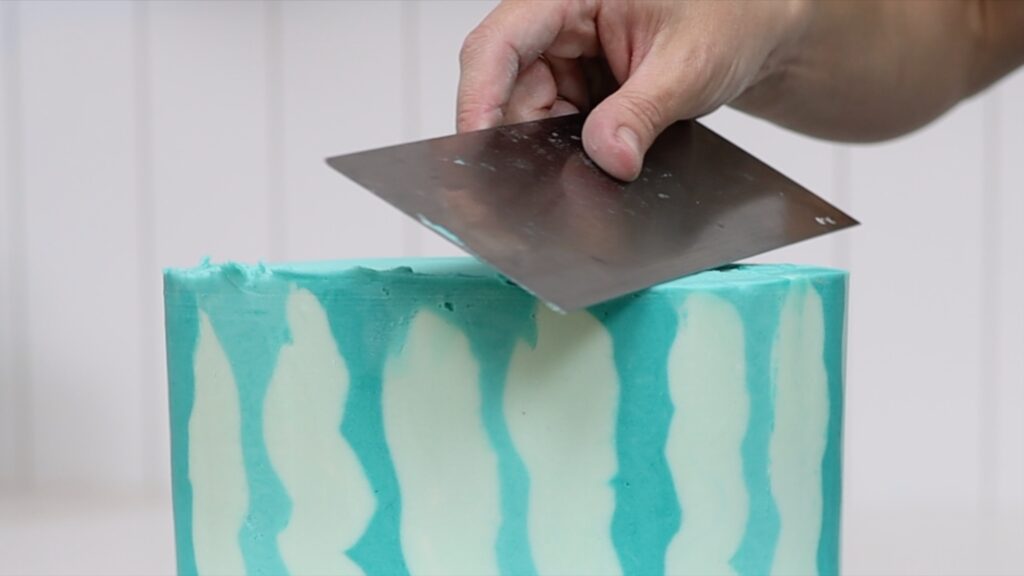
Spread the buttercream to cover the whole cake, trying to avoid the middle of each heart. You want to be able to see those slits you cut earlier. My kids were watching me do this and they were NOT impressed at this point. Scrape around the cake with your cake comb a few times until you have a smooth watercolour effect.
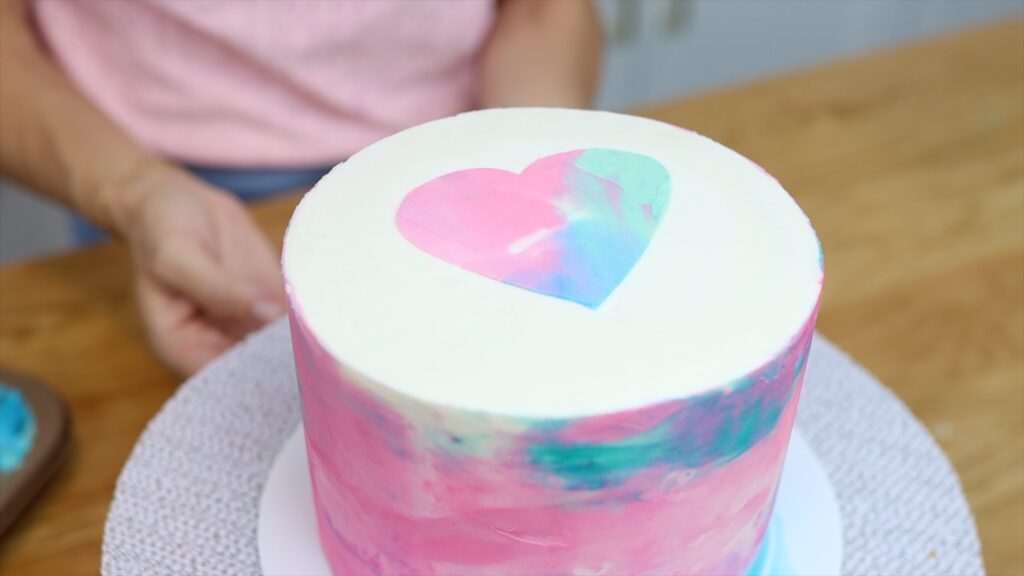
Poke a toothpick into the slit in the middle of a heart and peel the heart off. Now it all makes sense! Peel off all of the hearts to reveal the shapes within the watercolor.
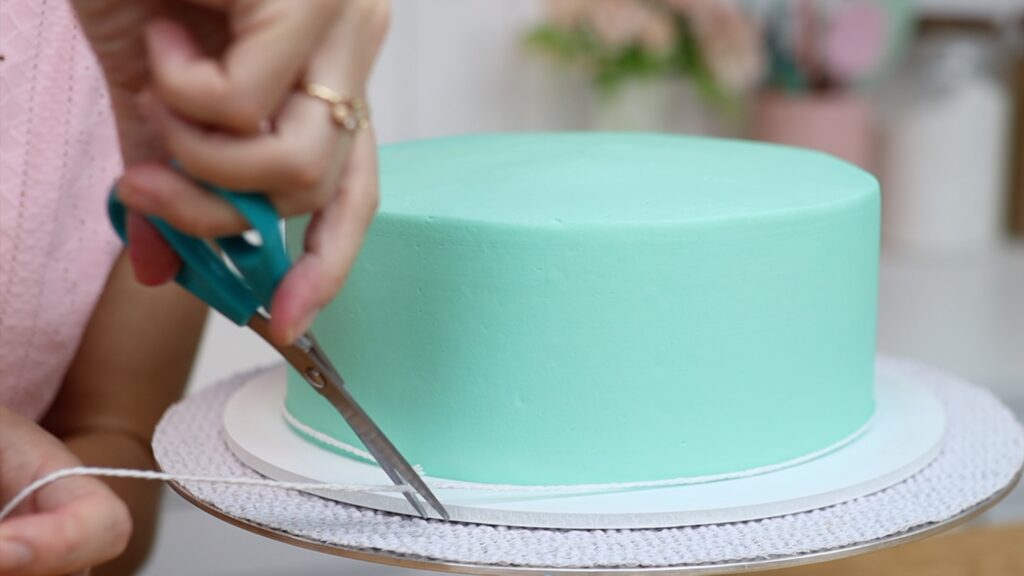
Tidy up the top edge of the frosting on the cake and add a border on top if you like. And voila!
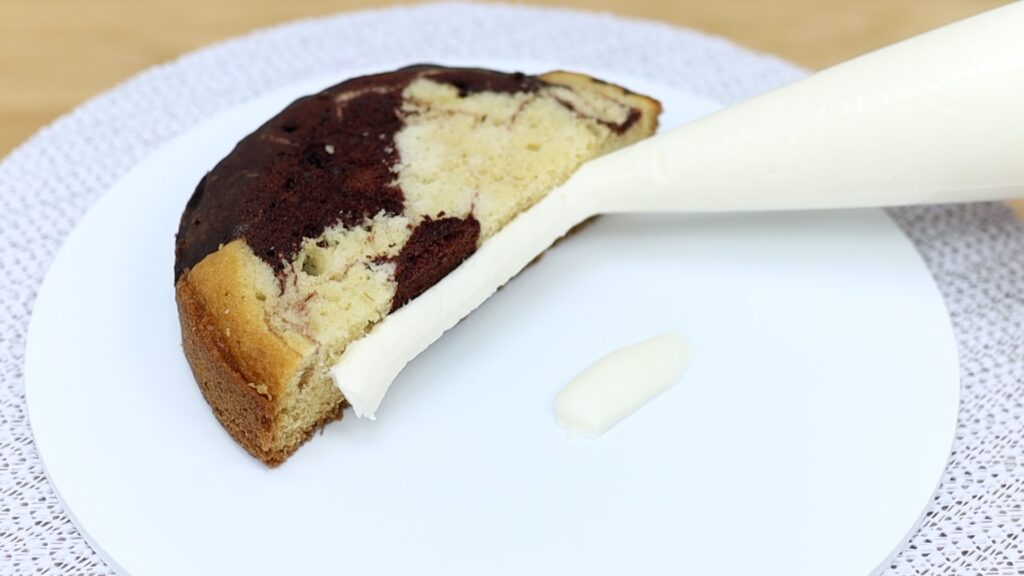
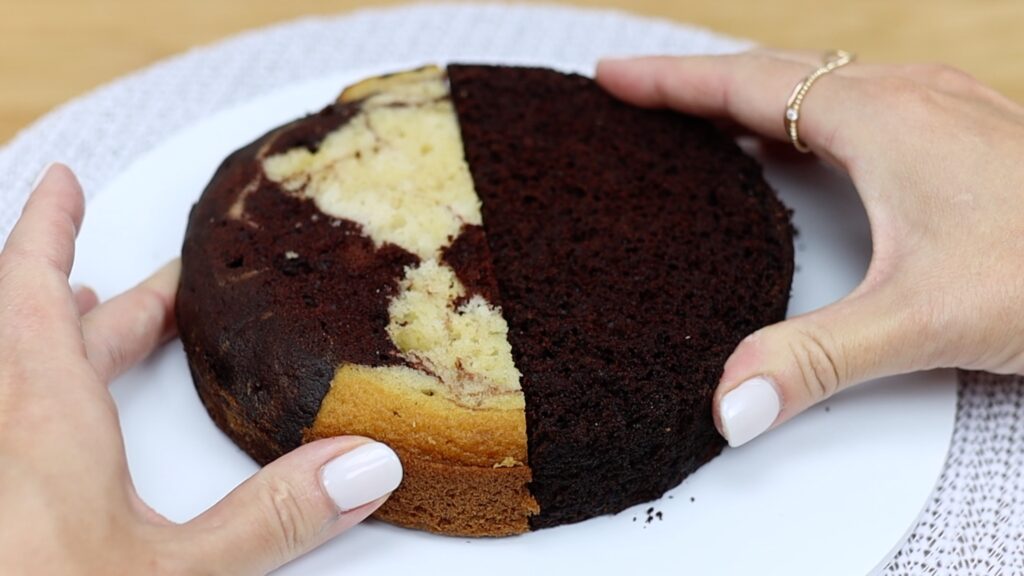
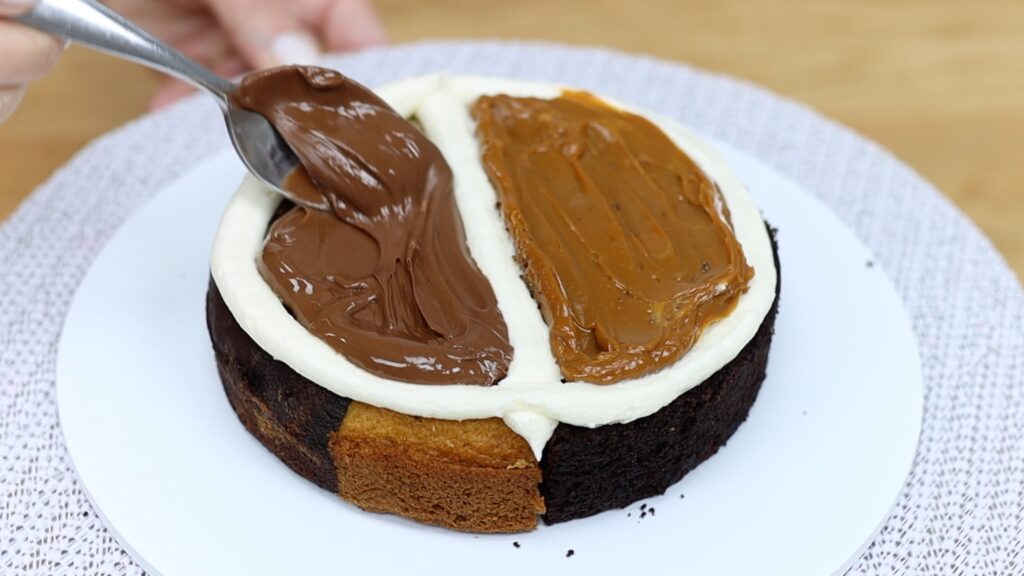
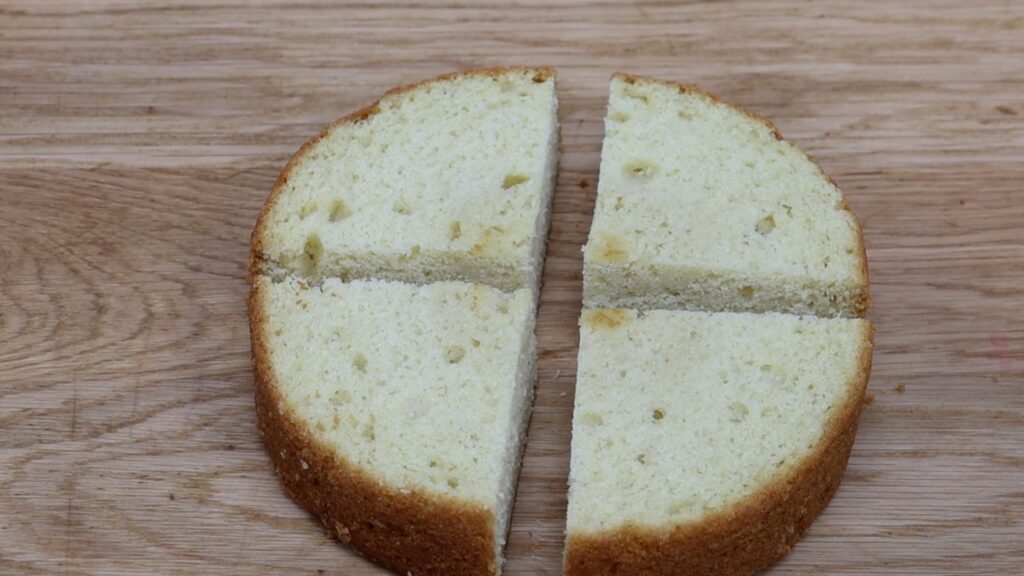
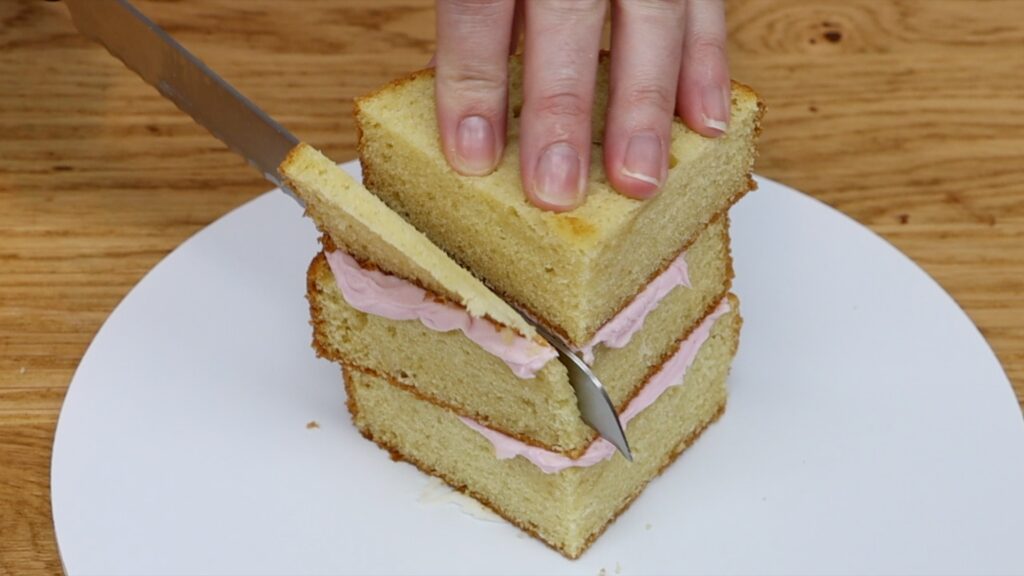
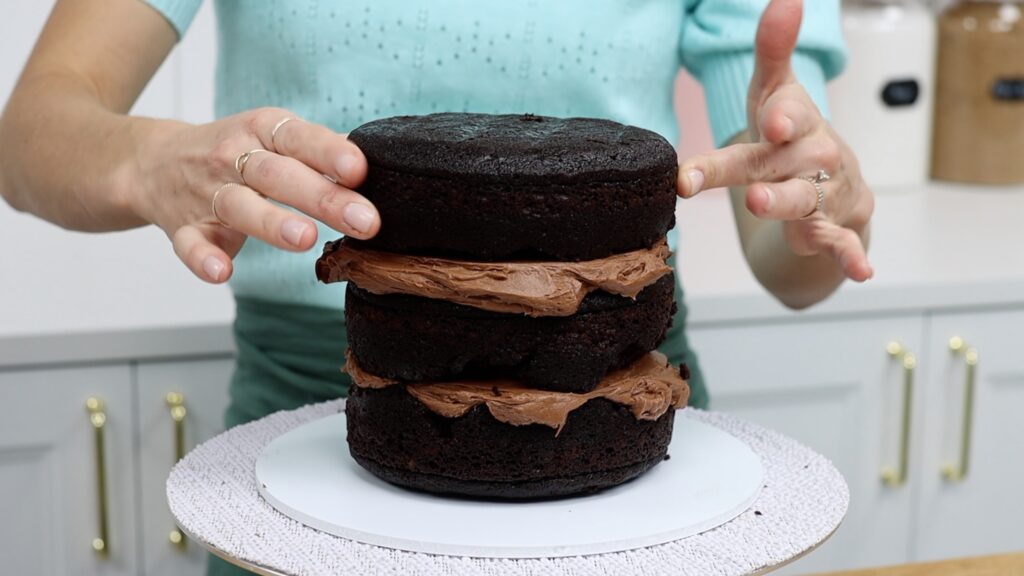
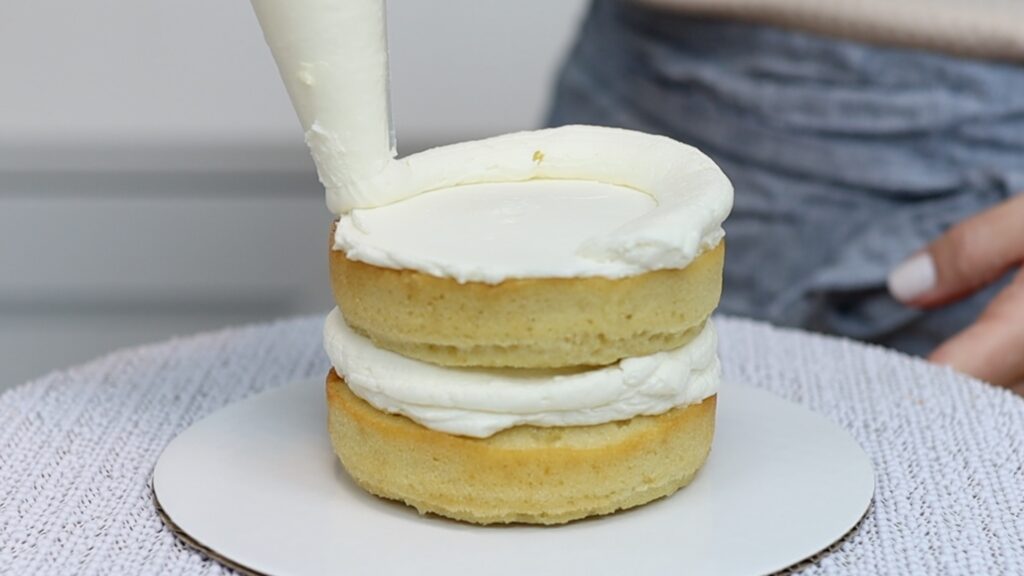
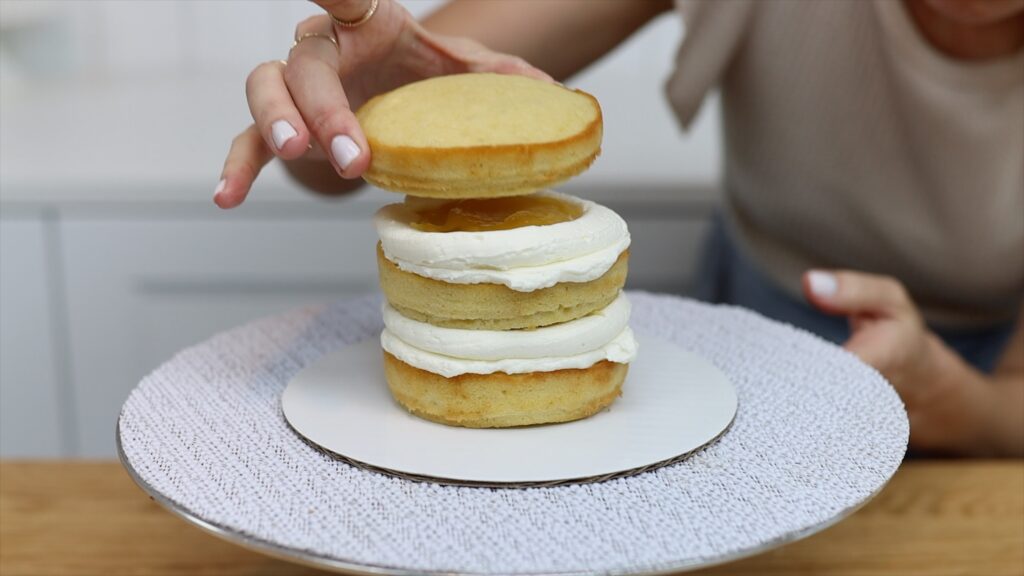
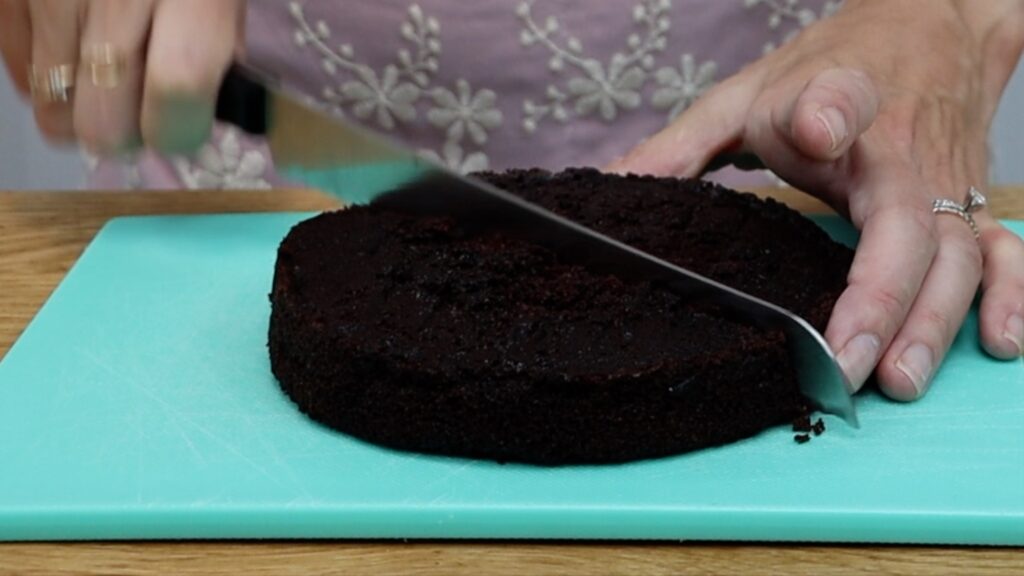
A half and half cake sounds like a genius idea to include two different flavours for a shared birthday celebration or any occasion worthy of cake. If you decide to make one you'll find the journey bumpy until you get to the finish line! You start by cutting your cake layers in half and attaching half of each flavour together with a line of buttercream.
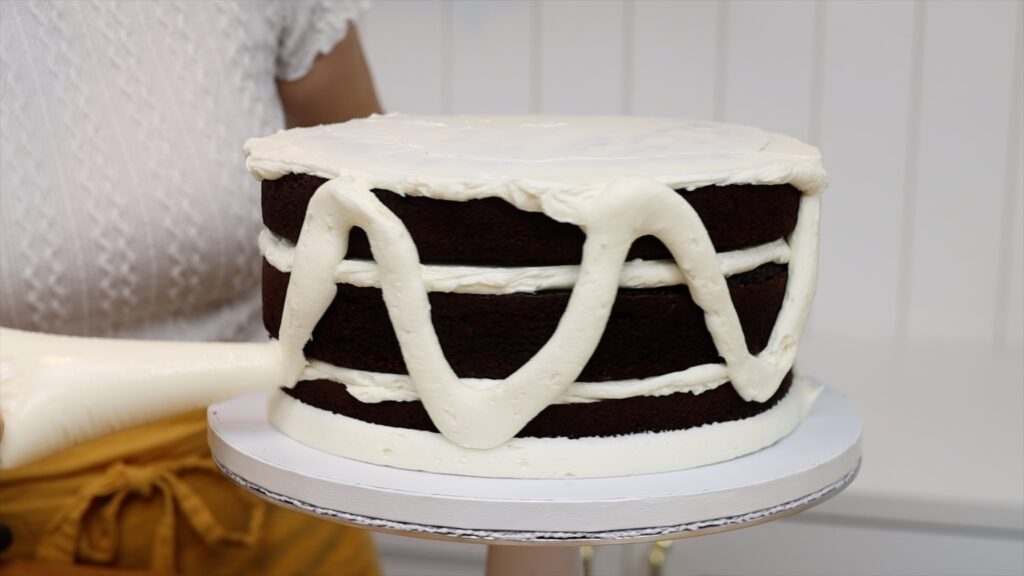
Then pipe along the middle and around the edge to make walls or dams to hold in two separate fillings. I'm using caramel and Nutella for this cake.
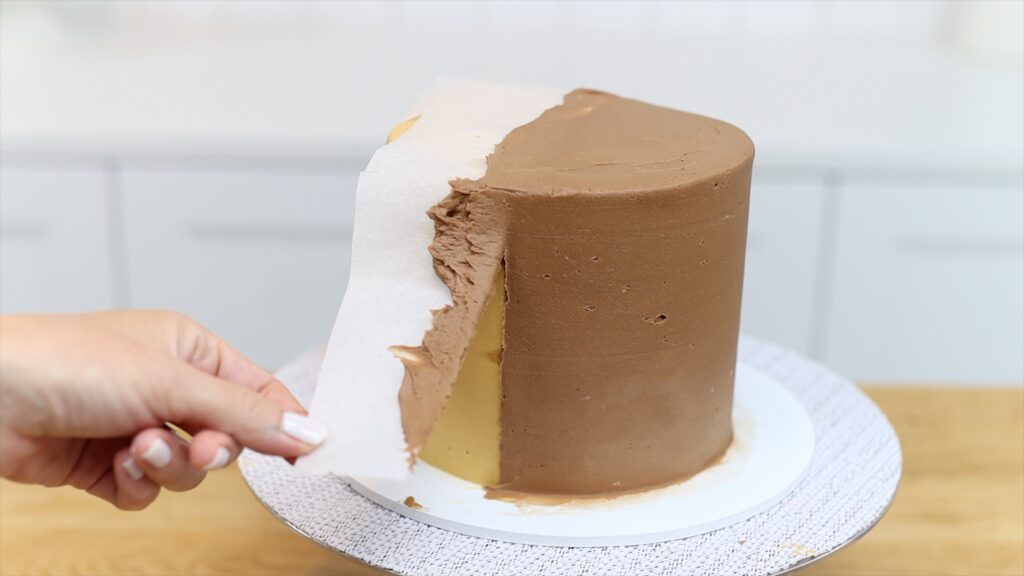
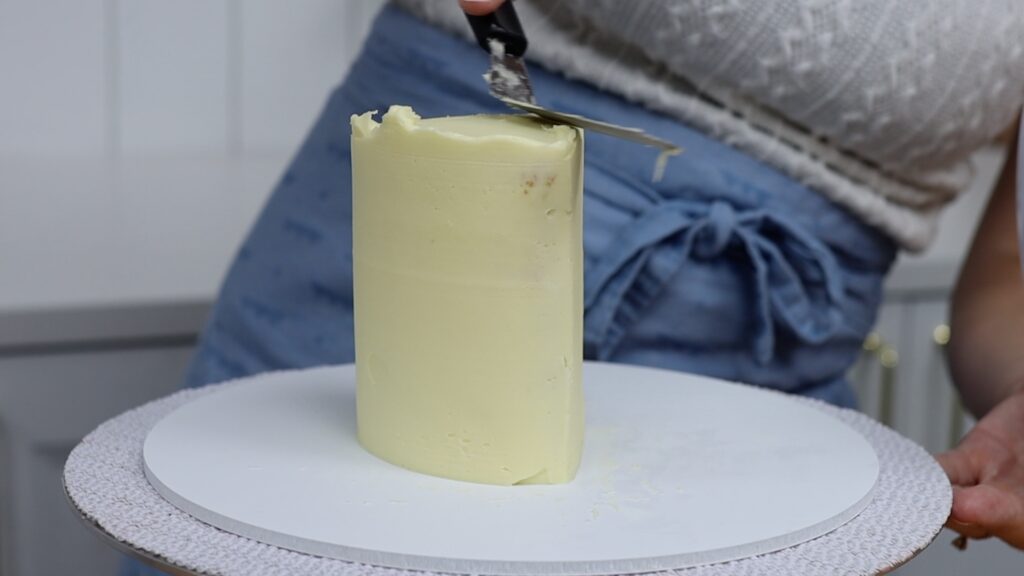
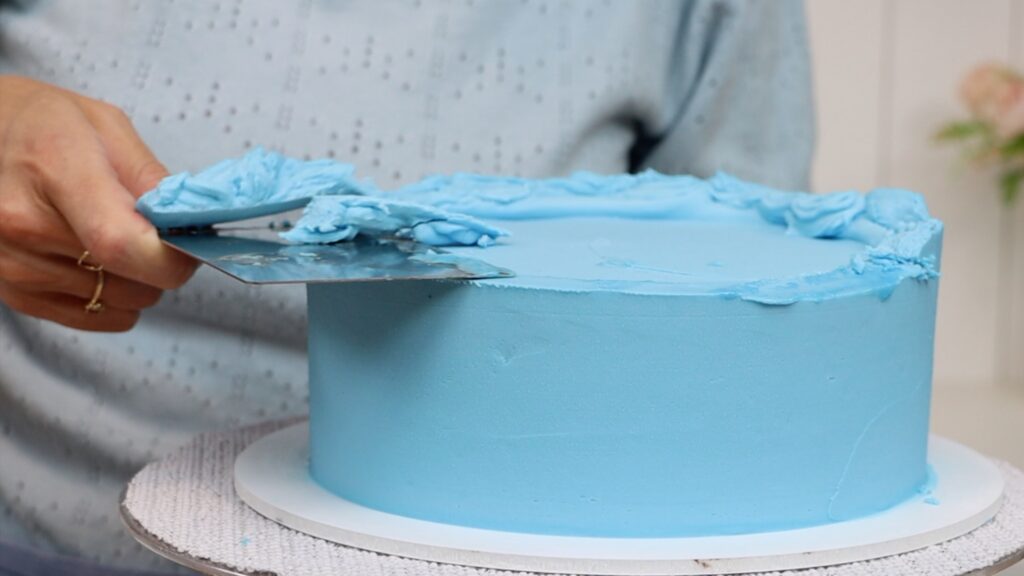
Add another two halves of cake with some buttercream glue to attach them together. So far so good. Chill and then wrap half of the cake in parchment paper, attaching it to the cake with a dab of buttercream. Spread frosting over the exposed half of the cake. This is a crumb coat so it’s going to be… crumbly.
Peel the parchment off and chill the cake to set the first half. Then wrap that half in parchment while you frost the other half. Don't forget the top of the cake!
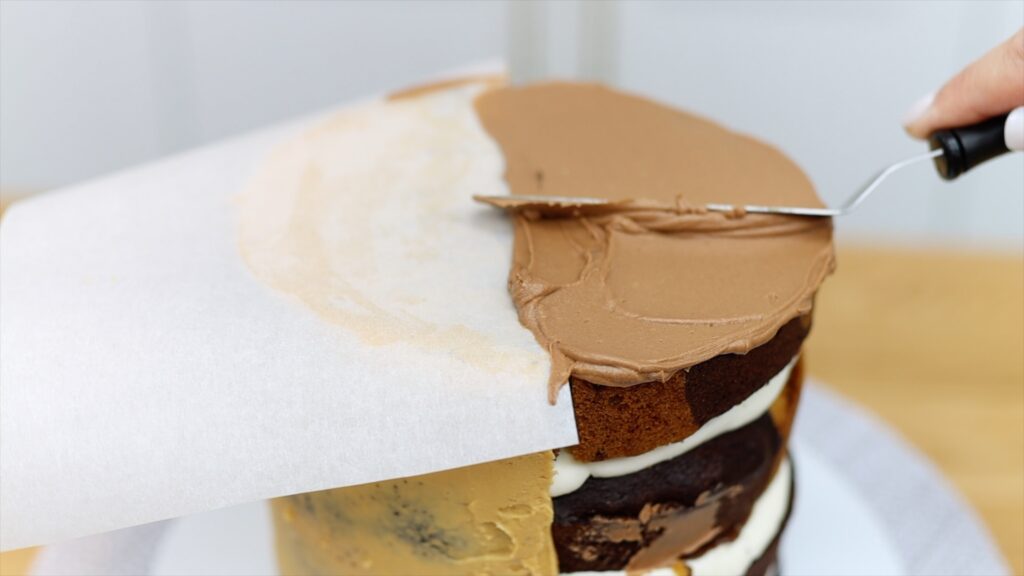
Peel the parchment off, chill the cake, and repeat for the final layer of frosting, which you’ll make more of an effort with since it’s going to be visible.
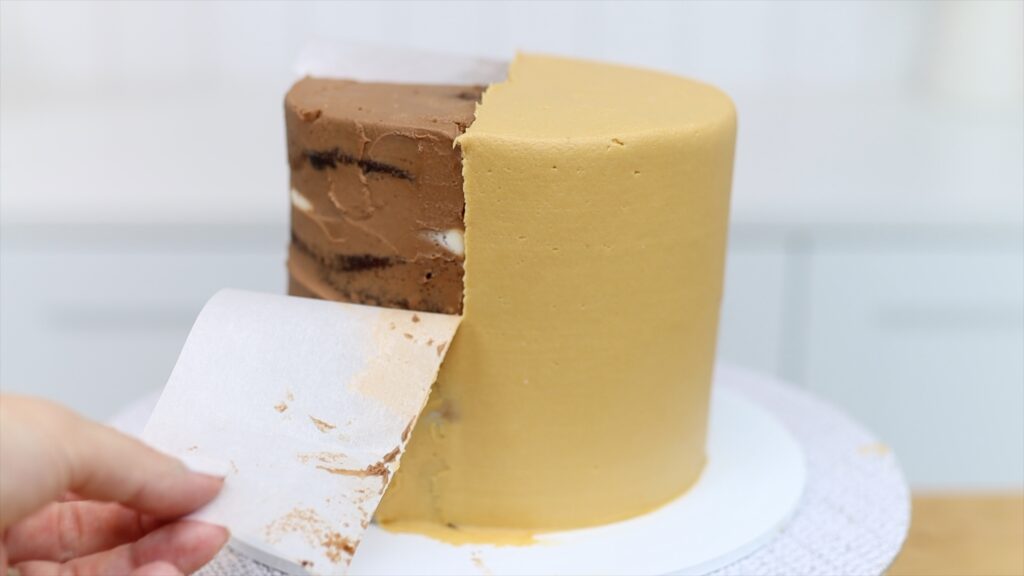
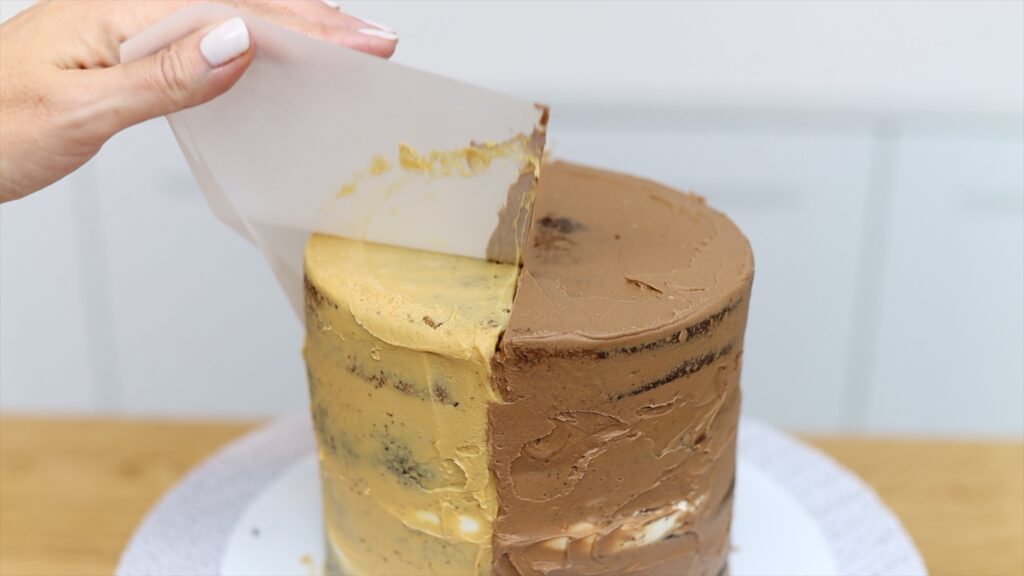
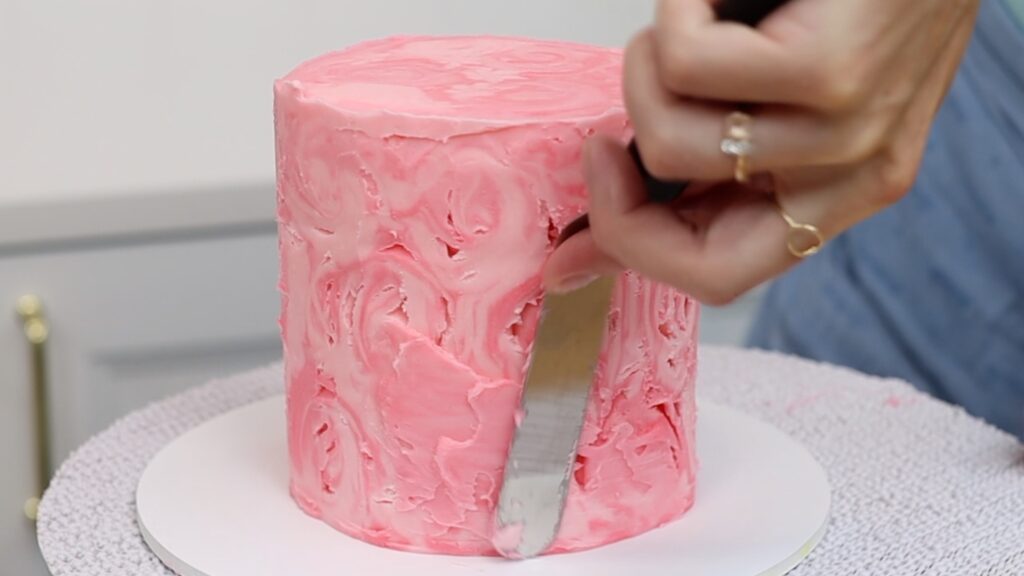
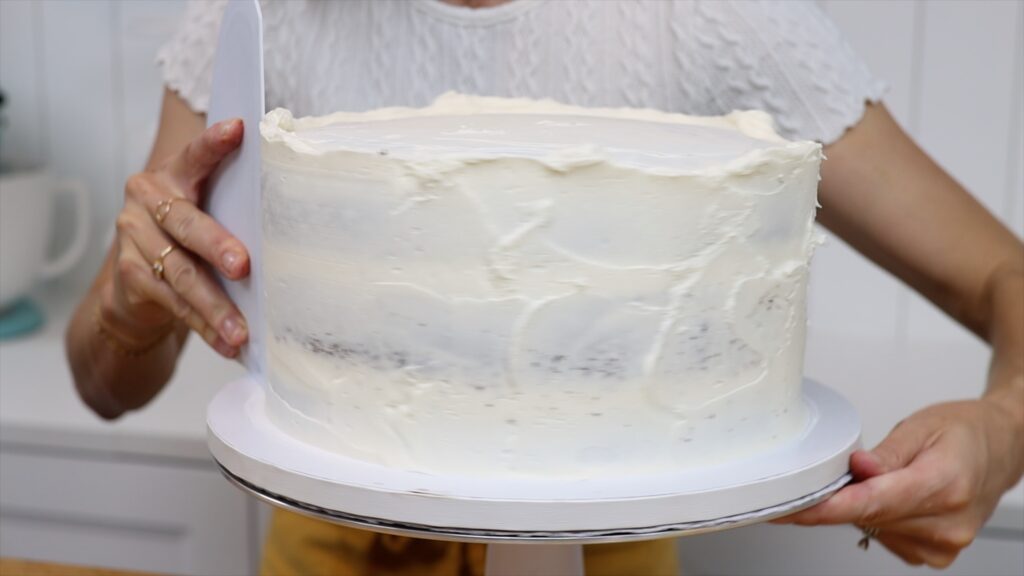
Chill again and frost the other half. When you peel this last piece of parchment off you’ll expect it to look great but it’s still… ugly. I think it’s reassuring to know that the beautiful cakes you see on social media often start out looking like this!
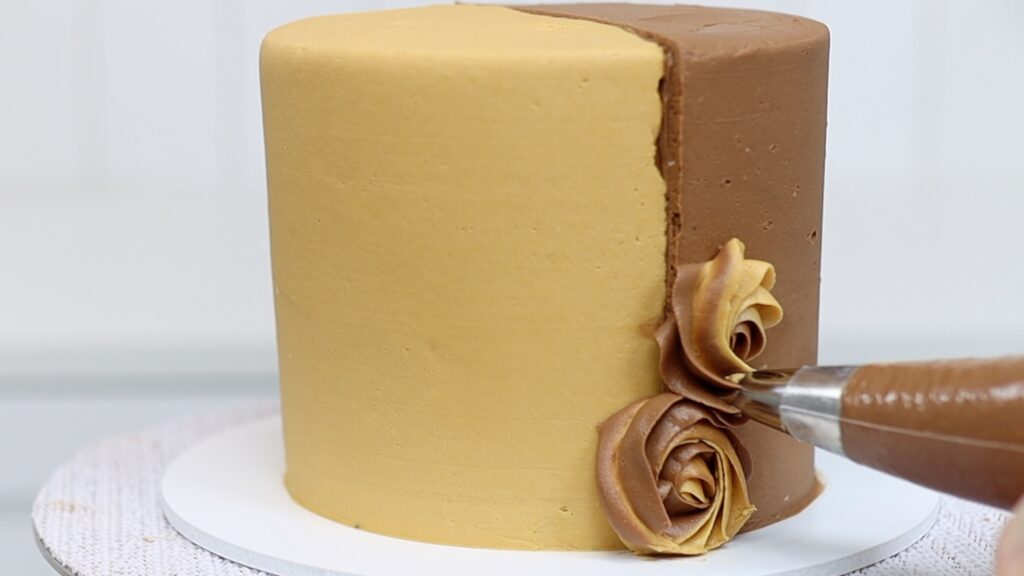
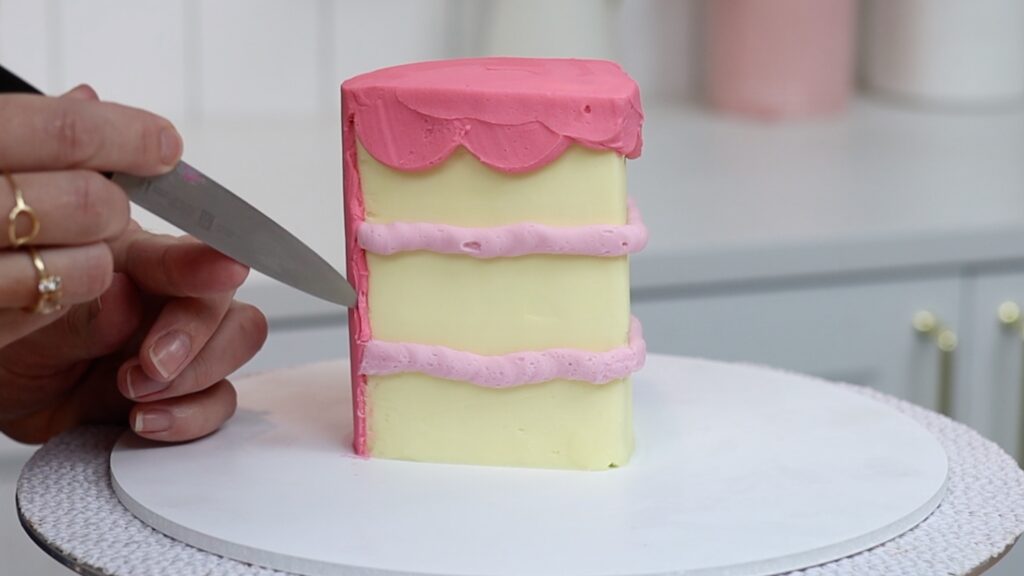
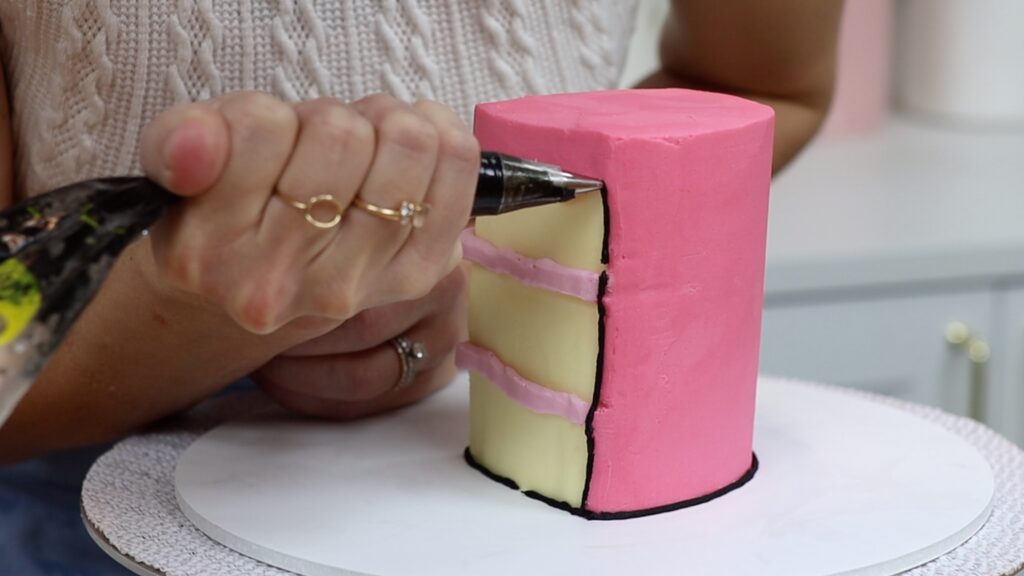
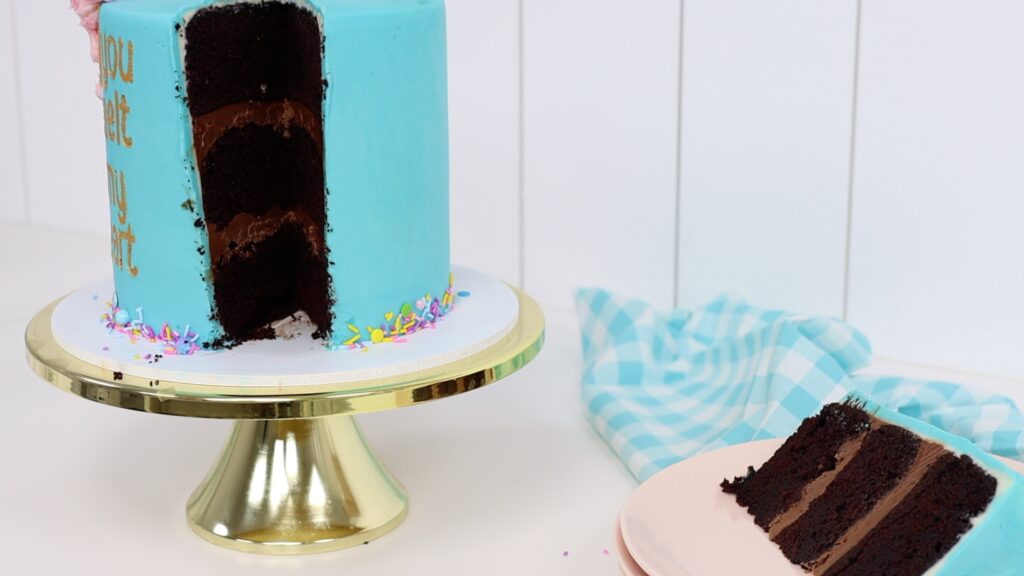
The join between the two halves isn’t ideal so add some piping to cover it up. This is two tone to incorporate both flavors of the cake, the chocolate frosting and the caramel frosting.
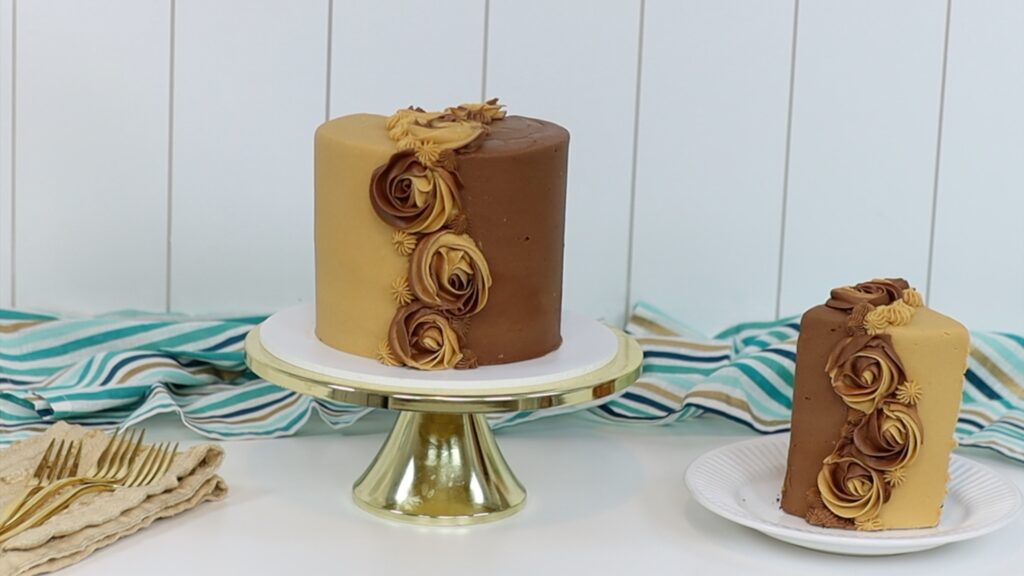
When it’s finished the cake looks stunning! Even more important, there are two flavours to choose between so everyone will be happy. For more details you can read or watch the full tutorial for half and half cakes.
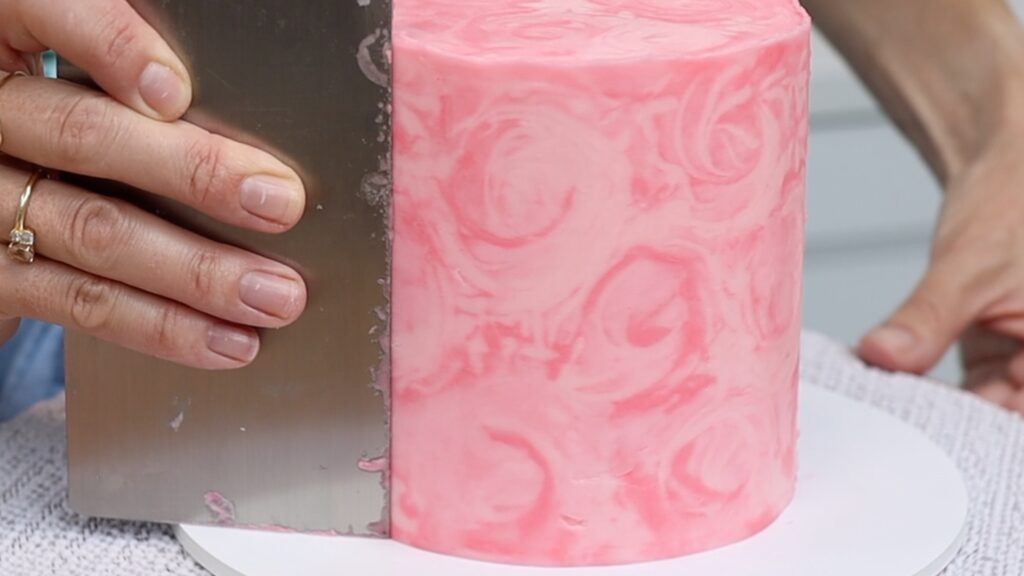
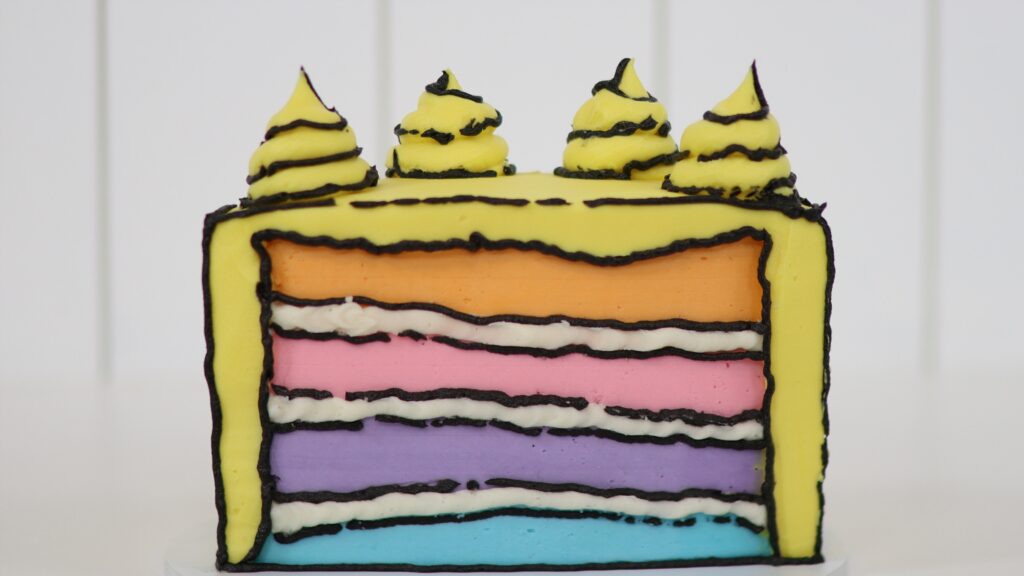
I’m sure you’ve seen the trending cartoon style cakes. If you haven’t made one yourself you might be surprised at how ugly they are until they’re finished. A lot of the cake is going to be covered with buttercream details like piped filling and frosting drips so the first colour of frosting might have shadowing and other imperfections that will eventually be covered up.
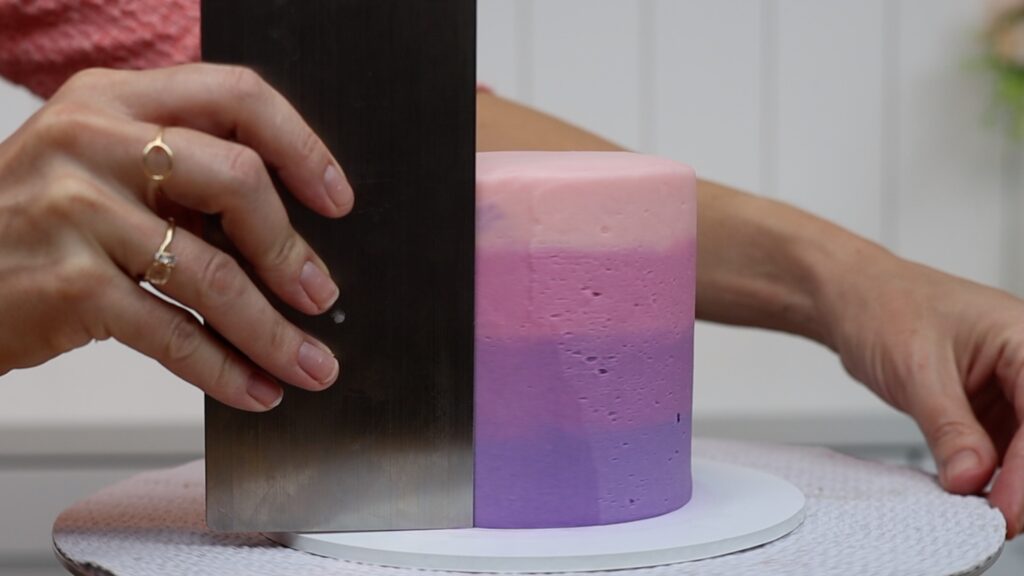
Since this cake is meant to look like a cartoon, everything is supposed to look flat. This is really tricky to achieve with buttercream! To create straight edges on buttercream you chill the cake to set the buttercream and then cut neat lines. The excess buttercream will break off neatly because it is cold and firm.
For smooth frosting that’s shaped as filling or waves drips, use a hot metal cake comb to gently scrape off the outer layer of buttercream.

Next you add black lines around each section to outline it. At first the black looks awful against the pretty colours of the cake and the first broken line will look like a mistake.
But the design comes together as you pipe more and more lines, add some unfinished circles and pipe a swirl of frosting on top, which you also outline.
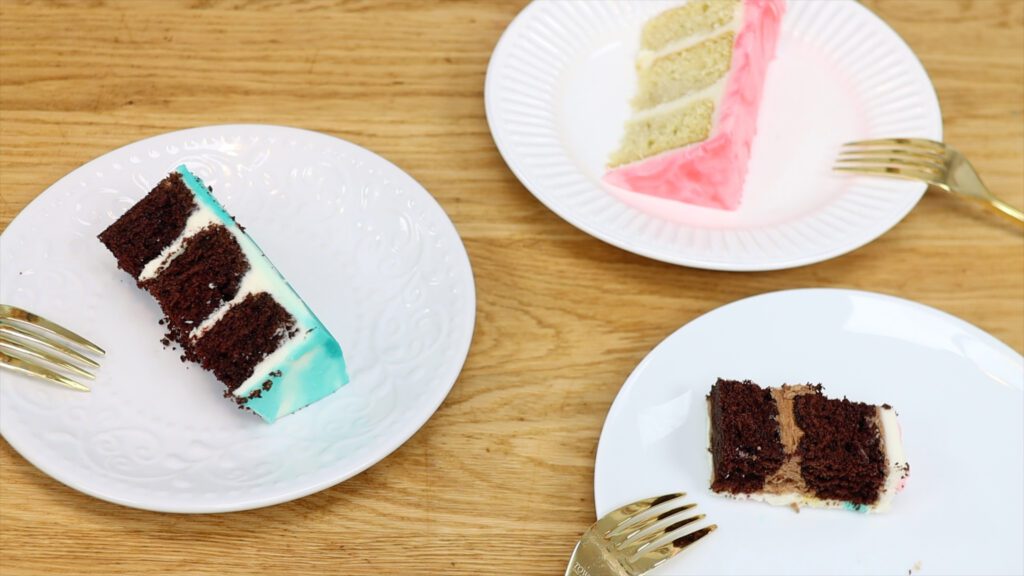
And the finished result looks pretty awesome, like an optical illusion or superimposed image rather than actual, edible, cake!
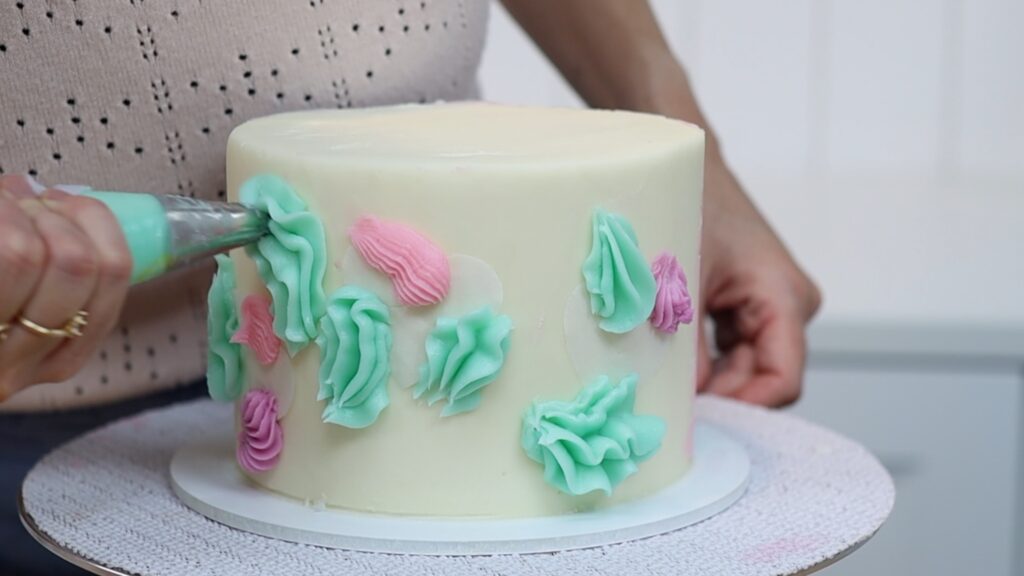
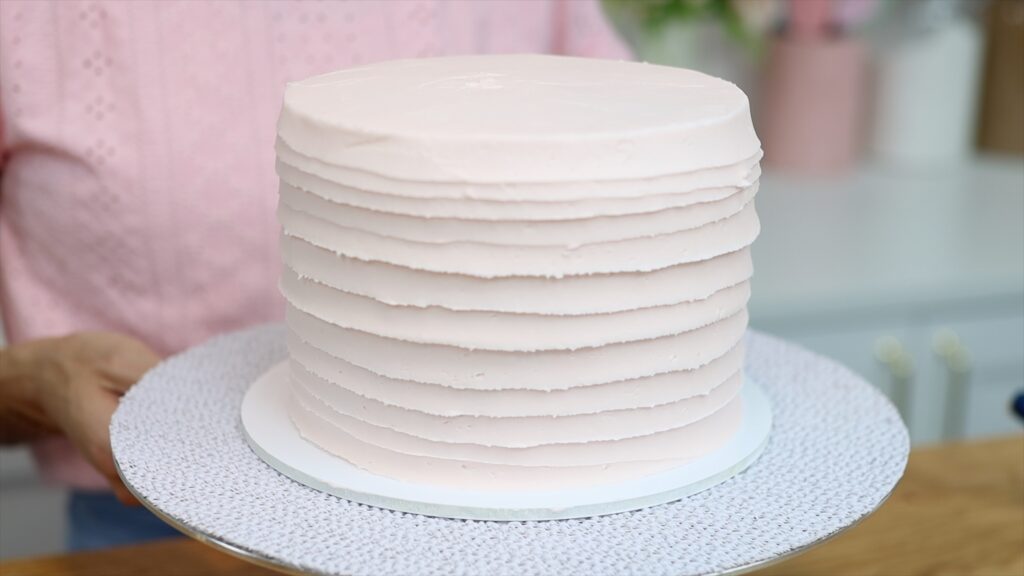
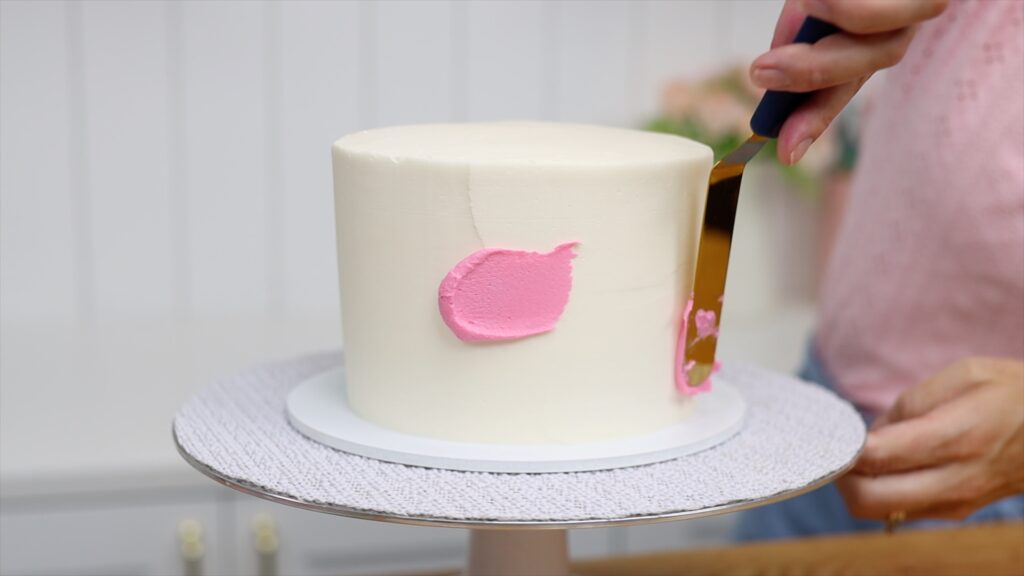
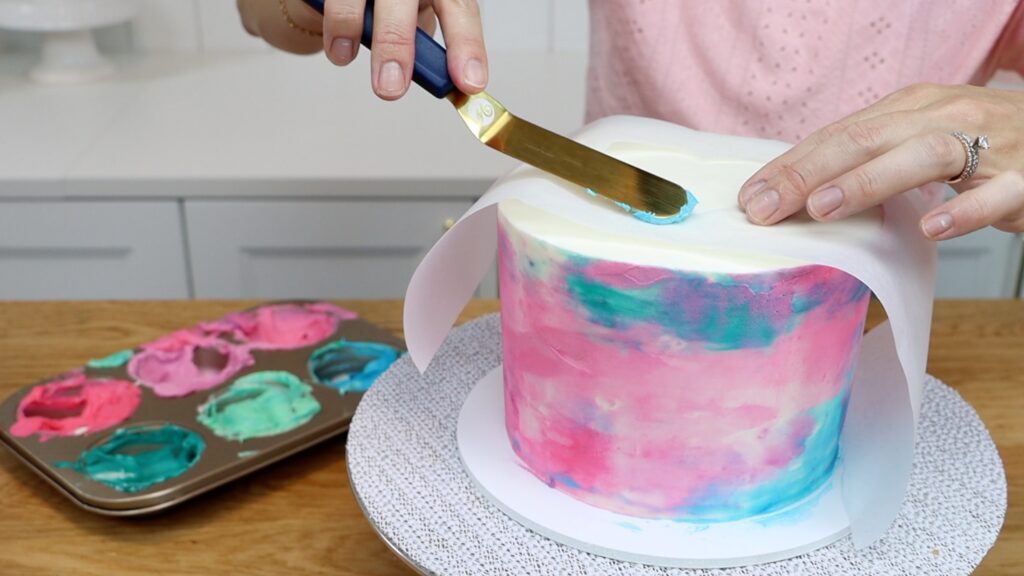
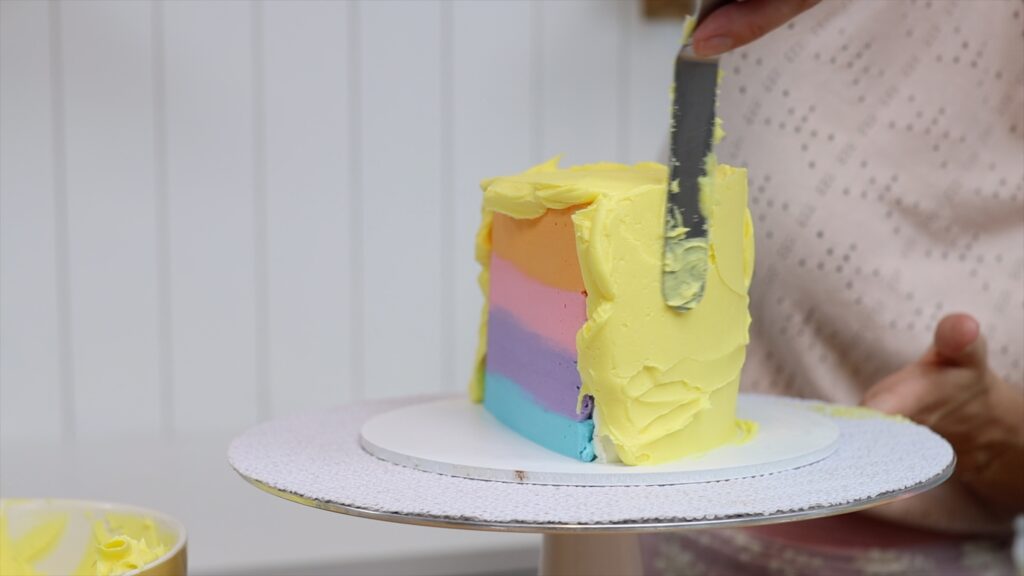
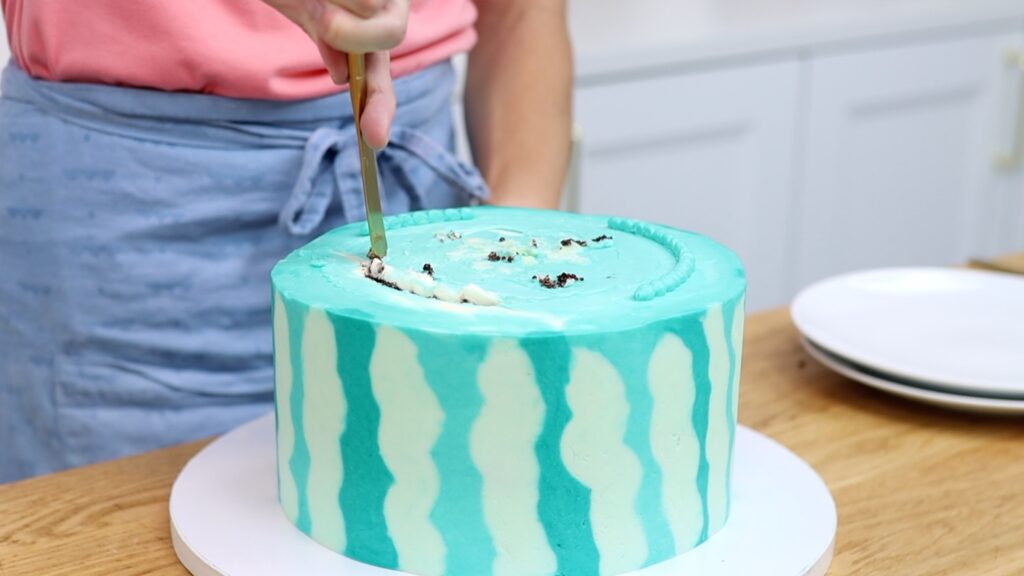
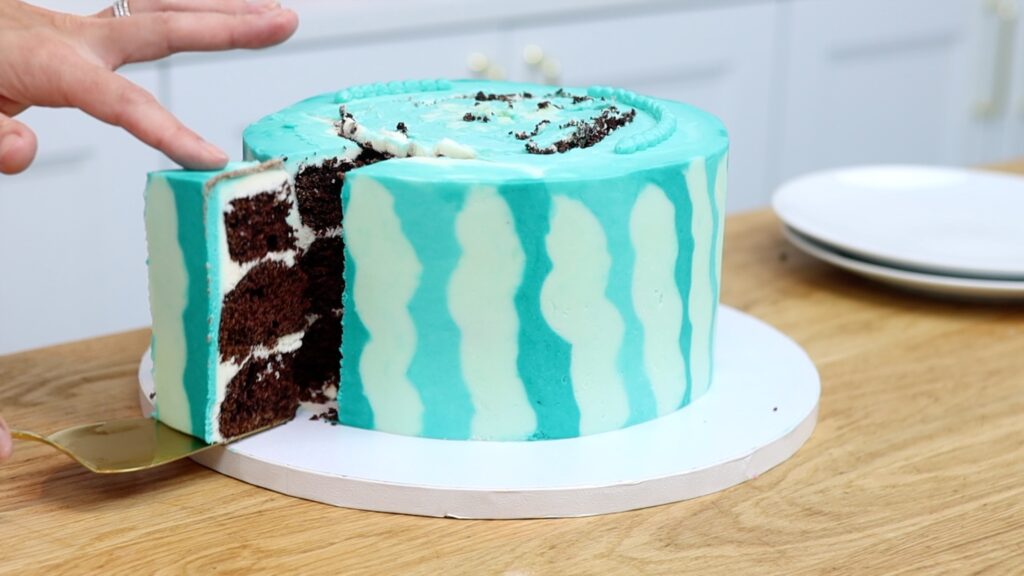
You’ve probably had moments when you’re decorating a cake and you panic because in the early stages, everything looks messy and it’s difficult to imagine it turning out the way you’d envisioned. This is definitely one of those! First you pipe onto a cake using at least two colours. When you choose your design just keep in mind that all of the texture is going to disappear and the final design will be completely flat.
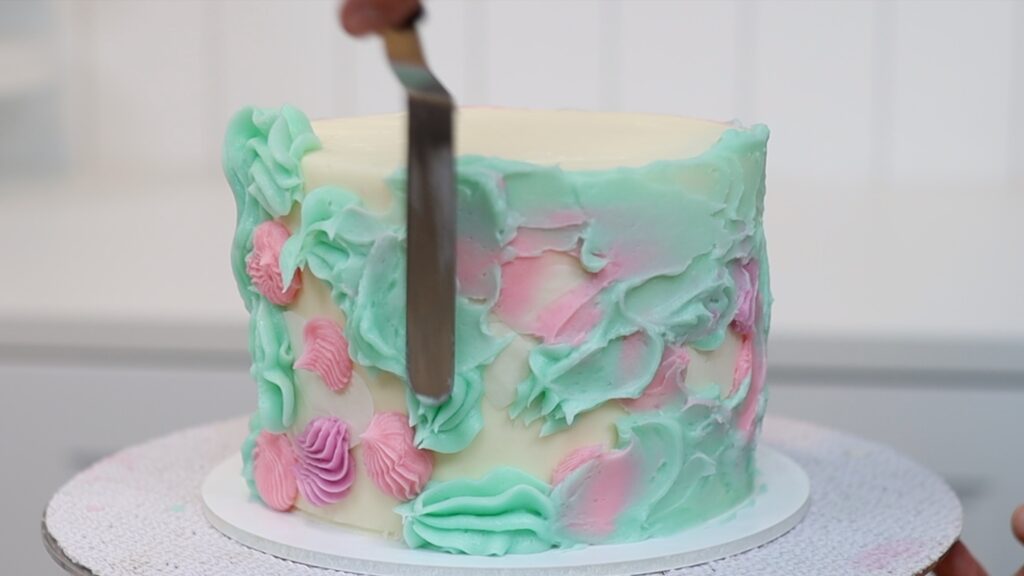
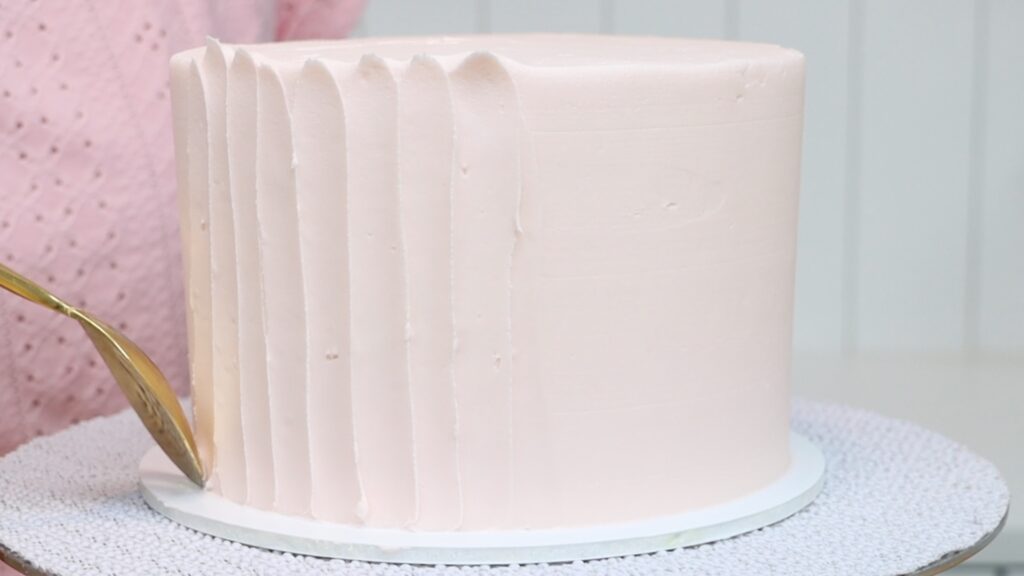
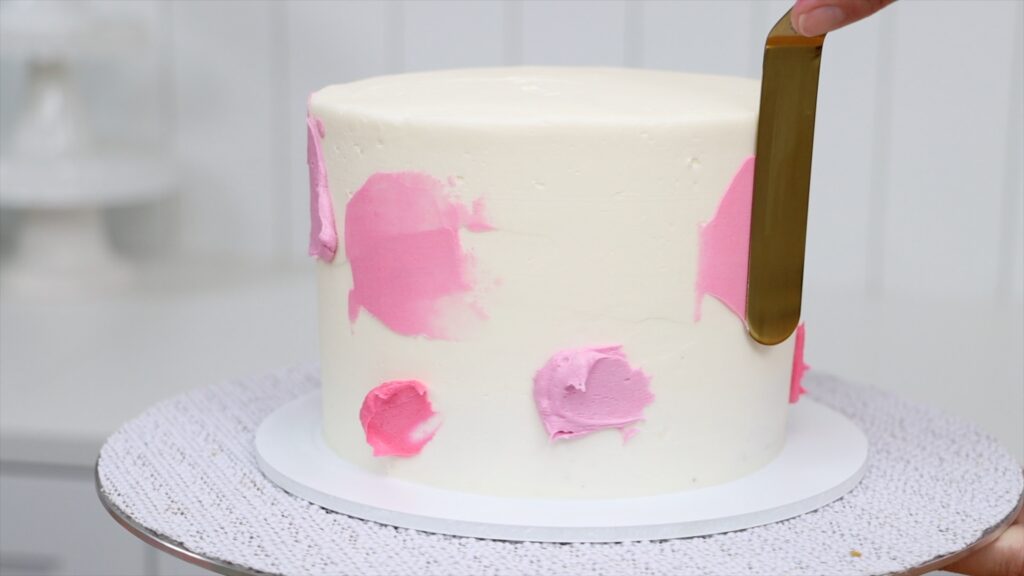
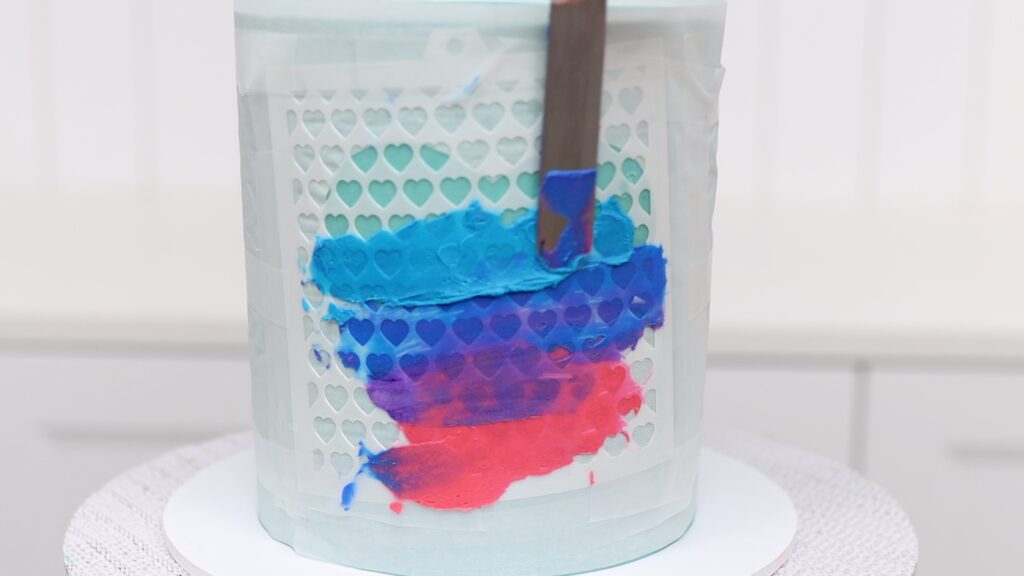
After piping, put the cake in the freezer for 20 minutes. Boil some water and dip a metal cake comb into it. Dry it off, take your cake out of the freezer and scrape around the cake, destroying your piping… for now.
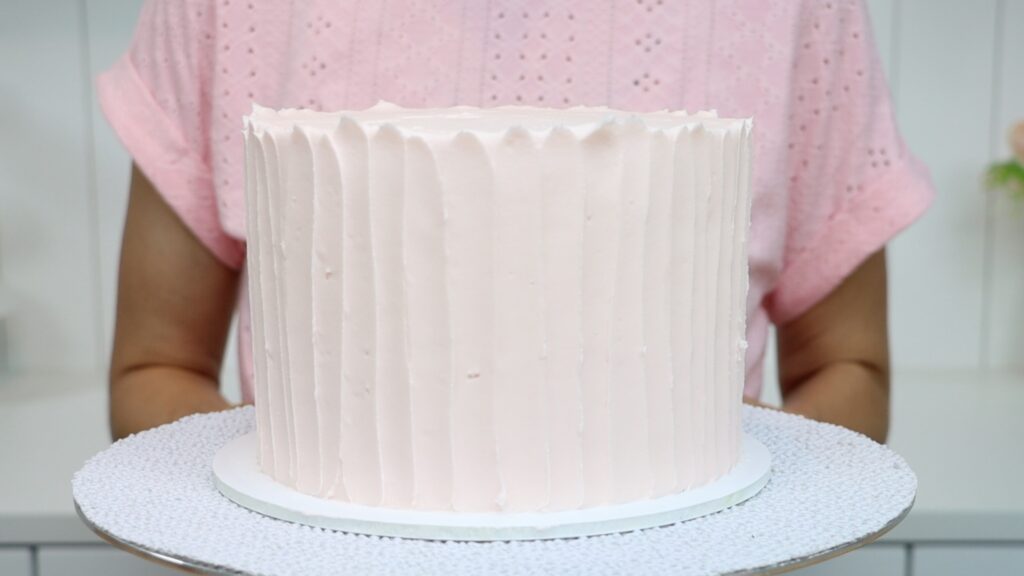
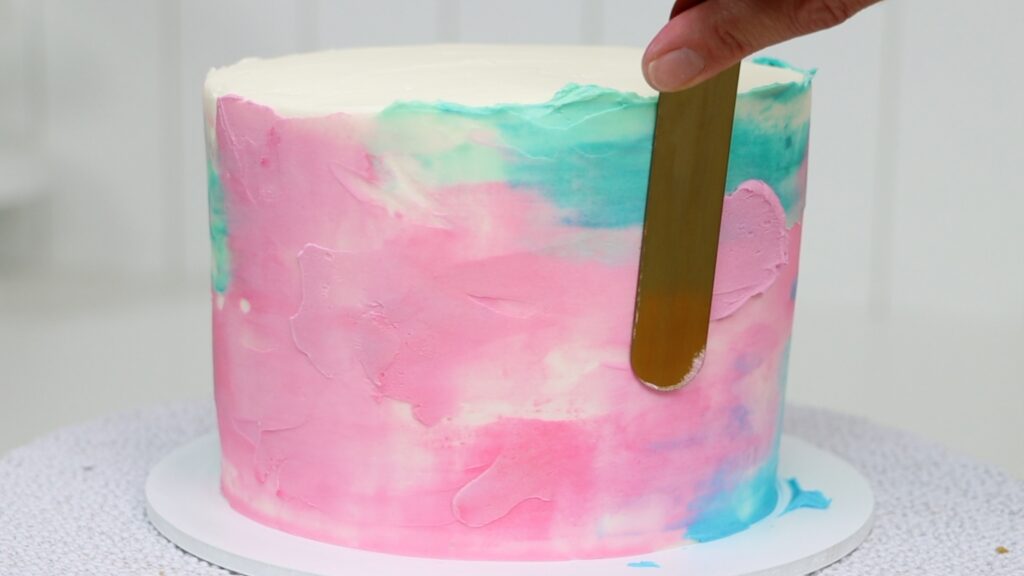
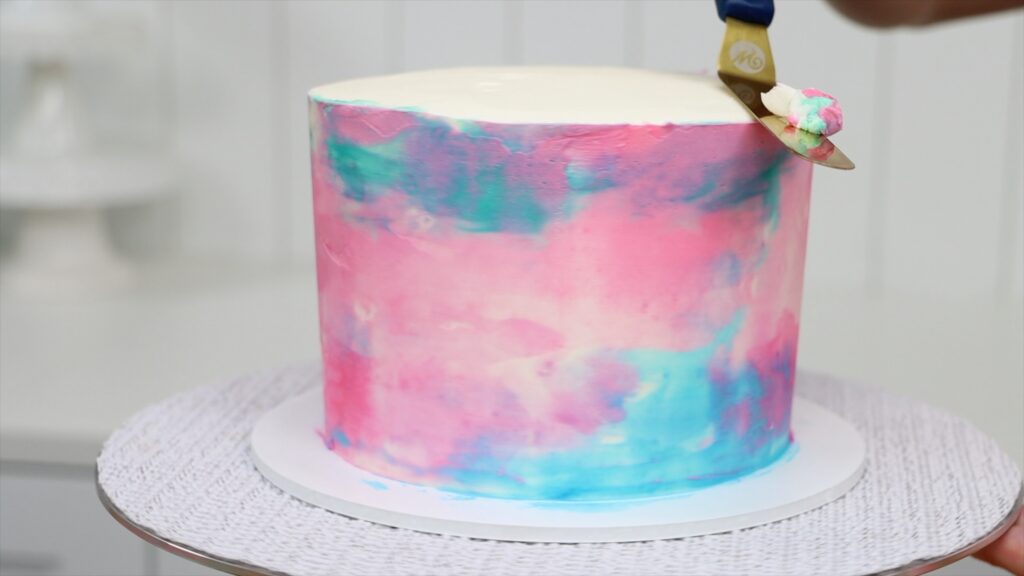
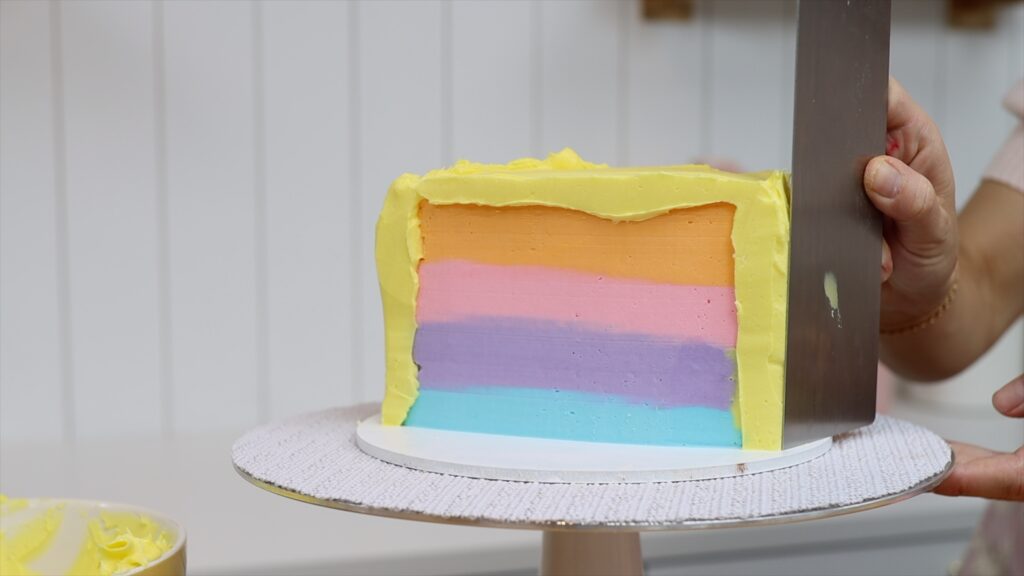
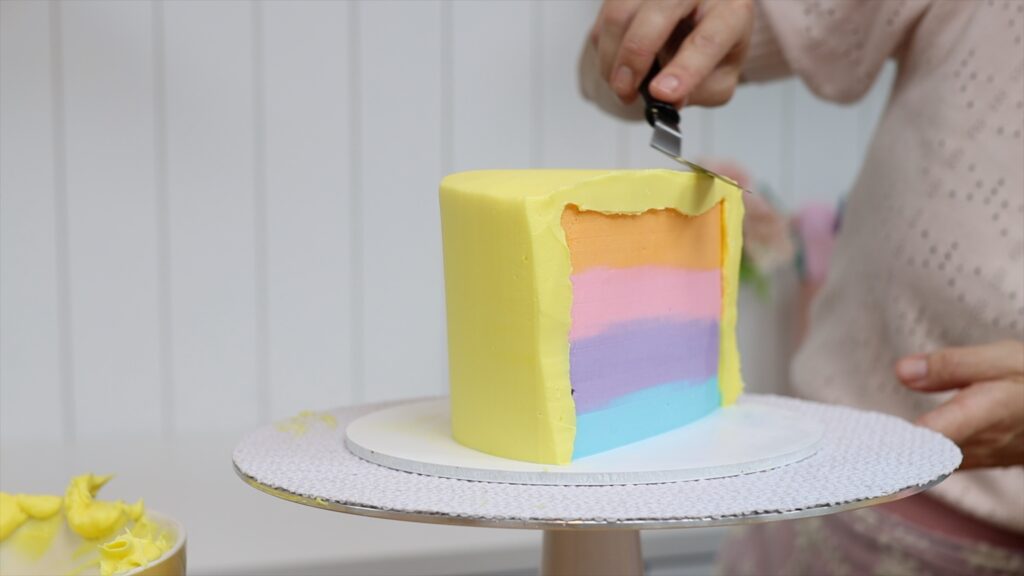
It will get messy and ugly and you’ll panic but hang in there! It’s all part of the process. When the frosting is fairly smooth but still has lots of gaps inside the texture, use the frosting you scraped off to fill in those gaps. Then scrape again to take off the excess.
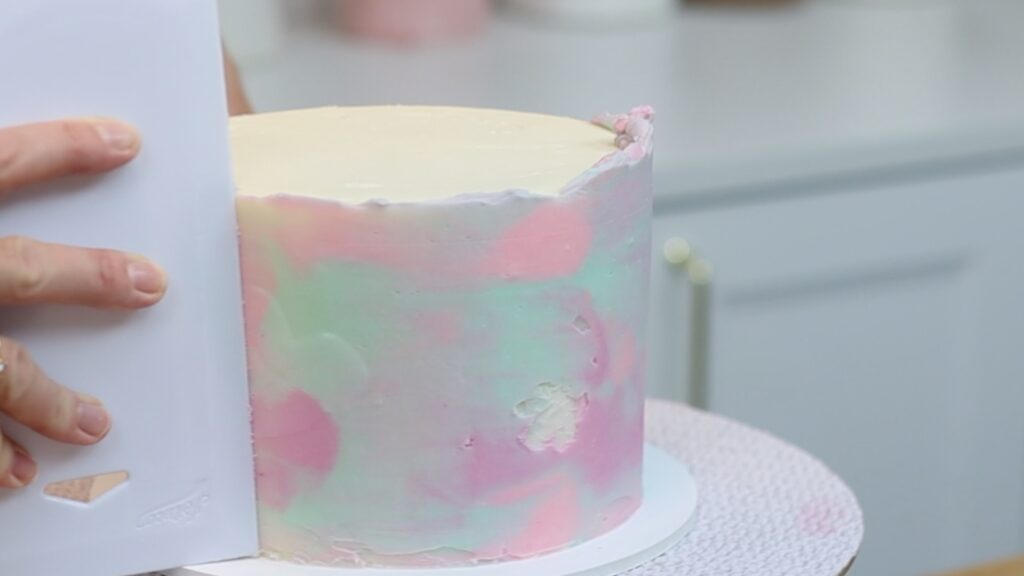
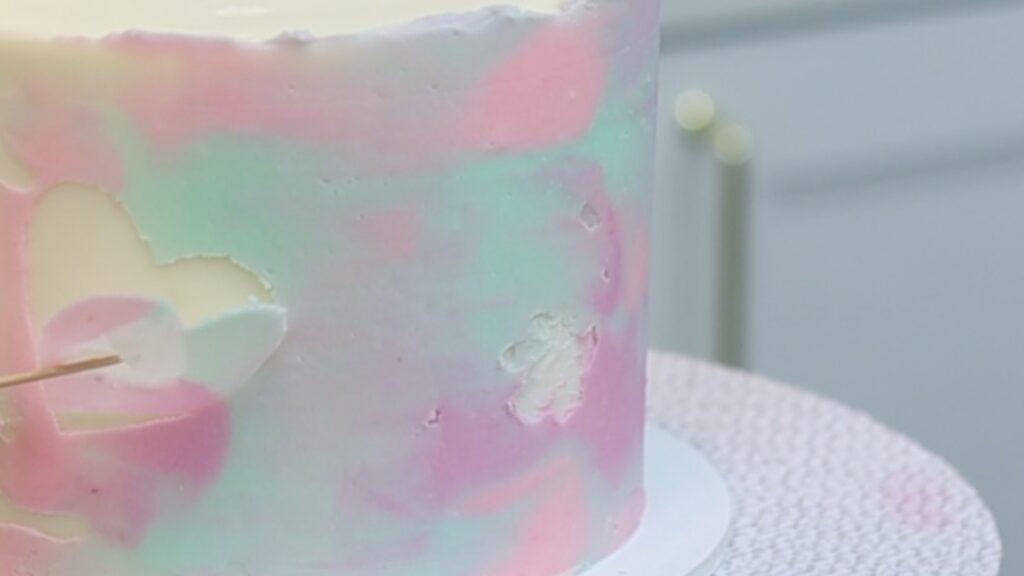
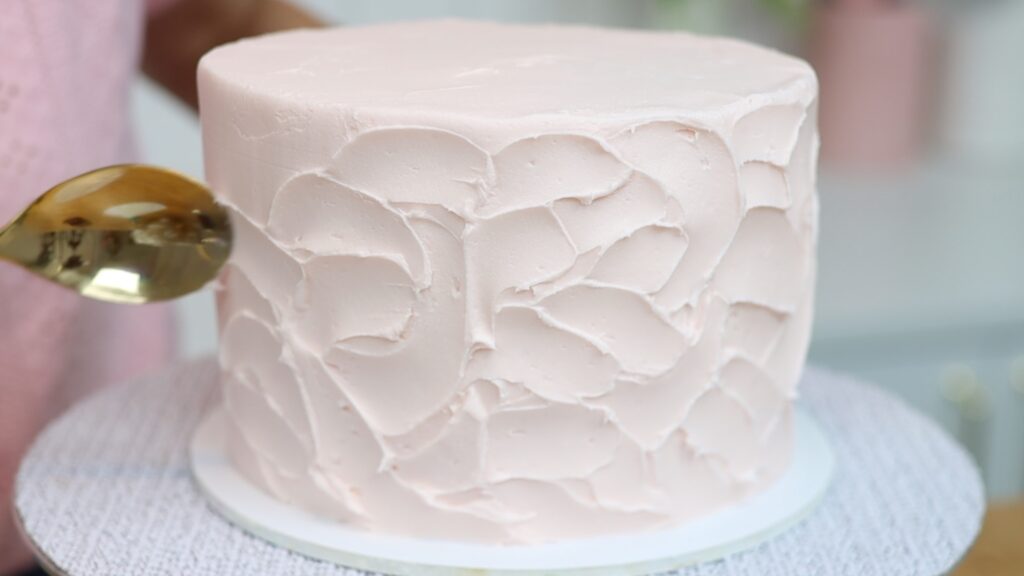
Keep your cake comb hot by dipping it into the hot water every few scrapes. You’ll give your frosting a facelift, as if you’ve sliced right through the middle of it to reveal a cross-section. It's a really unique effect IF you’re brave and patient enough to keep going until the end. For more details, check out my tutorial on how to achieve flat patterns using Facelift Frosting.
I hope these example have given you the confidence to try new techniques and to push past the ugly cakes stages! Visit my cake school to learn hundreds of cake decorating techniques and designs with my online courses and membership options!
You can also watch a video of this tutorial on ugly cakes that become beautiful:
You don’t need lots of fancy tools to be able to create stunning cakes. I’m going to show you how to decorate a cake without tools in 8 different ways, using things you already have at home like spoons and baking paper. The techniques are simple but the results will look professional!
You can make homemade versions of most tools, like cake stencils, which I’ll make and use on this first cake.
To make your own stencil for cake borders first measure the circumference of the cake. The easiest way to do this is to wrap a piece of string or ribbon around the cake. Cut it so that it's the length of the diameter of the cake.
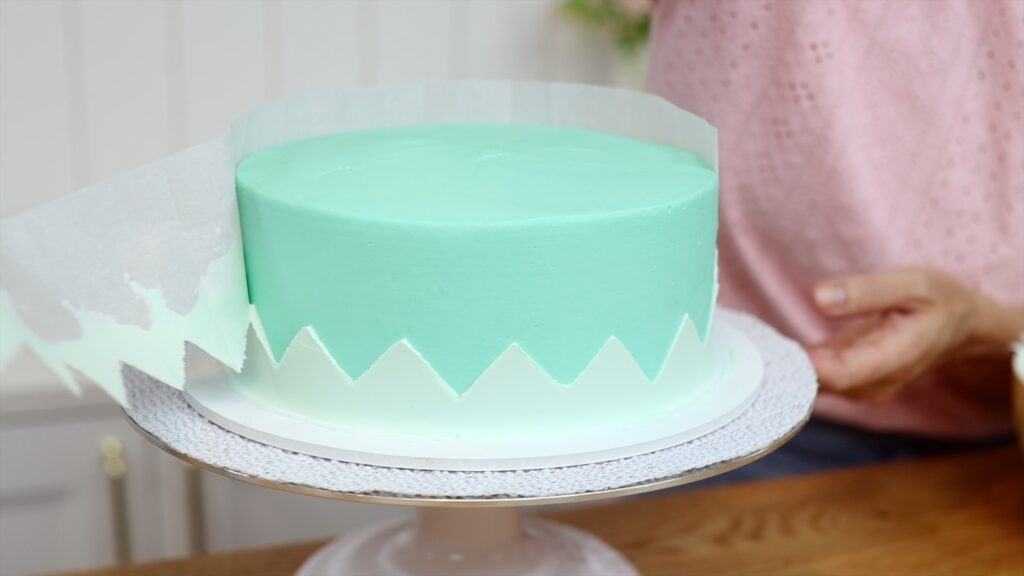
Now you’ll need baking paper or parchment paper or wax paper. Use the string to measure a piece just long enough to wrap around the cake. Cut it so that it’s about the same height as the cake, too. I’m going to make a zig zag pattern for a border around the bottom of the cake but you can use this technique for any pattern. To space the zig zags evenly fold the strip of paper in half and then in half again and again and again until it’s the size that you want the zig zags to be.
Cut diagonally up from one of the bottom corners, unfold the paper and voila! A zig zag stencil! Wrap it around your cake, lifting it up as high as you want the border to go. Press it gently against the cake to attach it. You need to put the cake in the fridge for at least an hour before doing this so that it gets cold and firm. That way you won’t damage the buttercream icing or frosting when you press the stencil against it. Tiny condensation droplets will form on the frosting when you take the cake out of the fridge, which make the stencil stick to it.
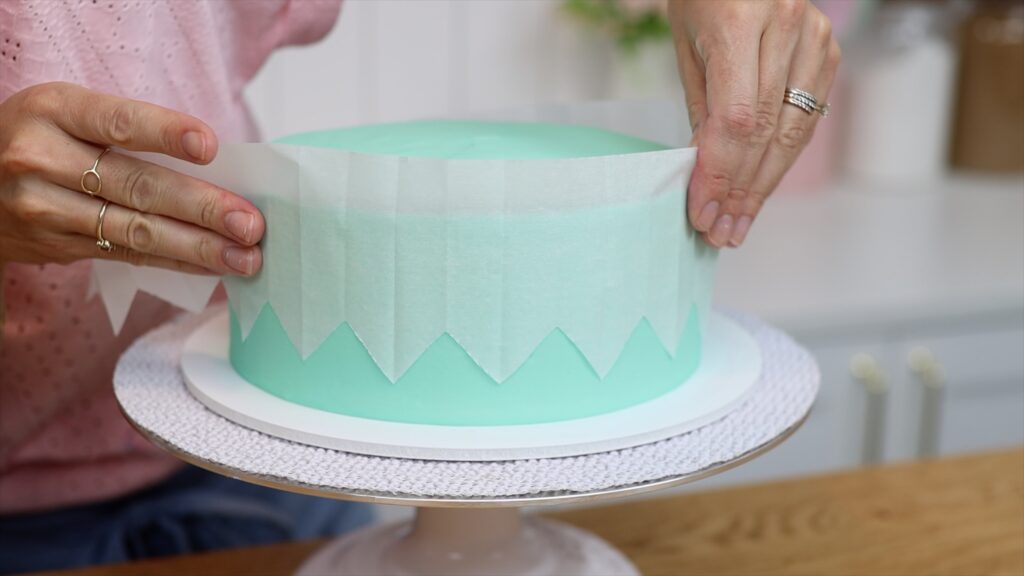
I'm using my 4 Minute Buttercream for this cake and all of the others in this tutorial. Spread another colour of buttercream below the stencil to cover up the exposed part of the cake. It’s fine if you get the buttercream all over the stencil and that’s why it’s a good idea to cut the paper so it’s about the same height as the cake. The stencil protects the higher parts of the sides of the cake from any unwanted streaks and smudges.
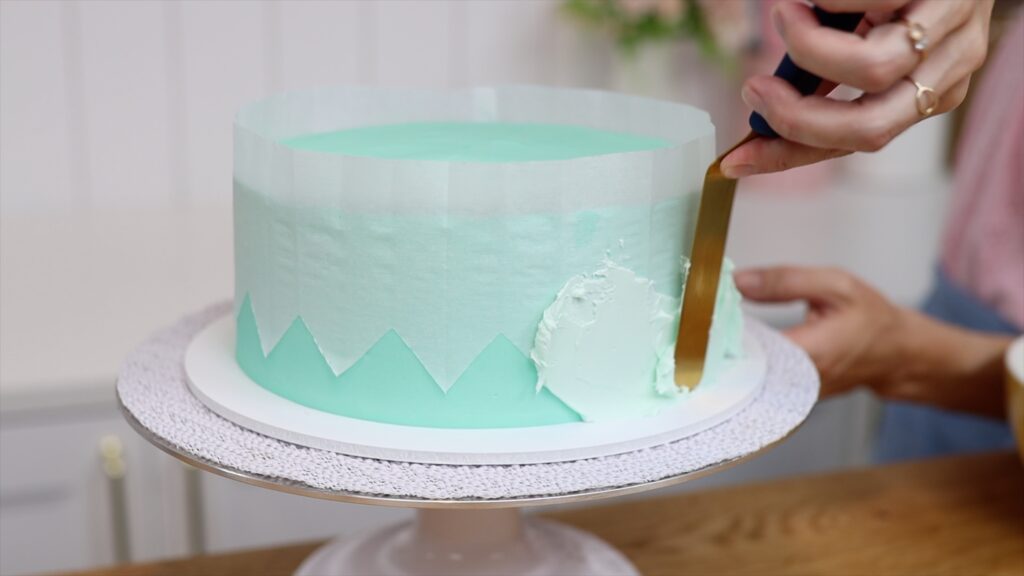
When you’ve worked your way around the whole cake, use the edge of your spatula or palette knife to smooth the buttercream you’ve just spread on. Spin your
Scrape your spatula around the cake board to wipe off any buttercream smudges. This pretty border adds colour and detail to your cake. It's a simple method of how to decorate a cake without tools like expensive stencils that you only use once!
I share more ideas for cake decorating using parchment paper in this tutorial.
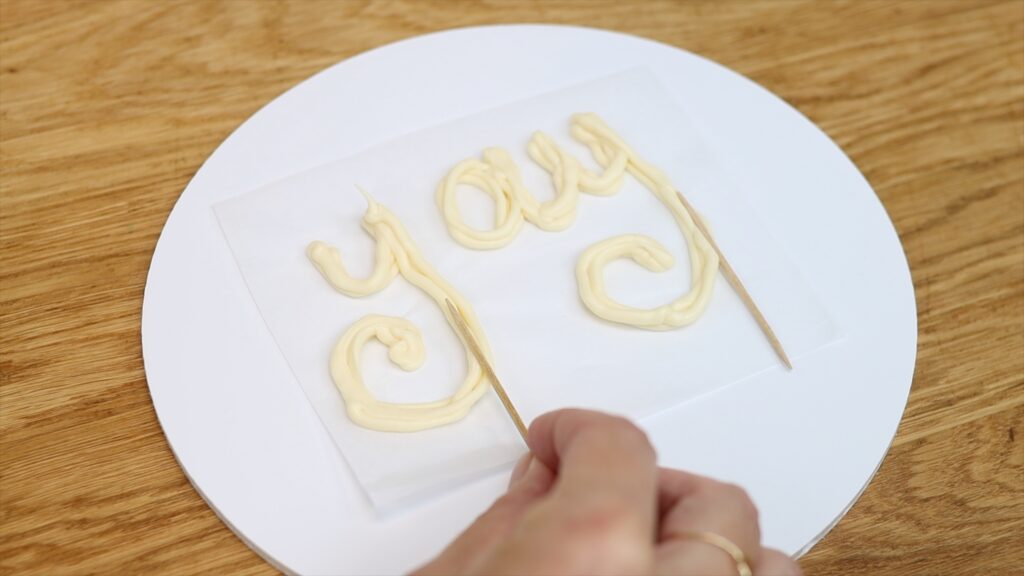
Now let’s use chocolate to make a sparkly cake topper. You can use any kind of chocolate chips or a chopped up chocolate bar for this. I'm using white chocolate chips. Melt the chocolate in the microwave at 70% power for 30 seconds at a time. By using low power and short intervals you won't burn the chocolate. Stir it until it’s smooth and then spoon the chocolate into a sandwich bag. Cut a tiny piece off one of the bottom corners of the bag to make your own piping bag. Then squeeze the chocolate through the hole to write onto a piece of baking paper, parchment paper or wax paper.
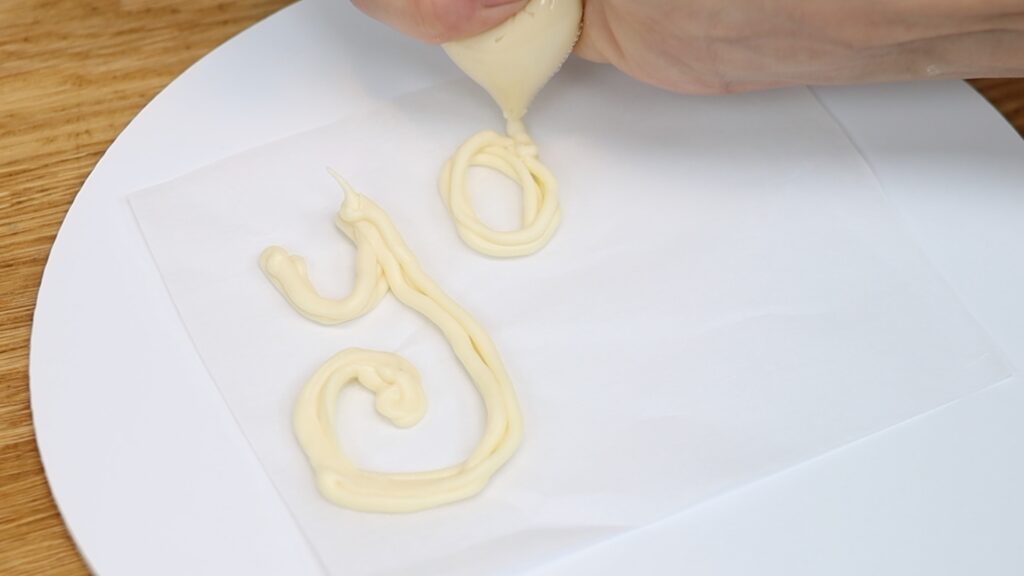
Make the lines as thick as you can, while still being legible, so that they’re strong and less likely to snap than if they’re thin. The lines don’t need to be neat or smooth because you'll cover them up soon. Push a toothpick into the bottom of each section and pipe more chocolate on top.
Next, pour sprinkles or coloured sugar over the chocolate, pressing down gently to attach them. It’s a good idea to do this on a cake board or a small tray so that you can lift it up.
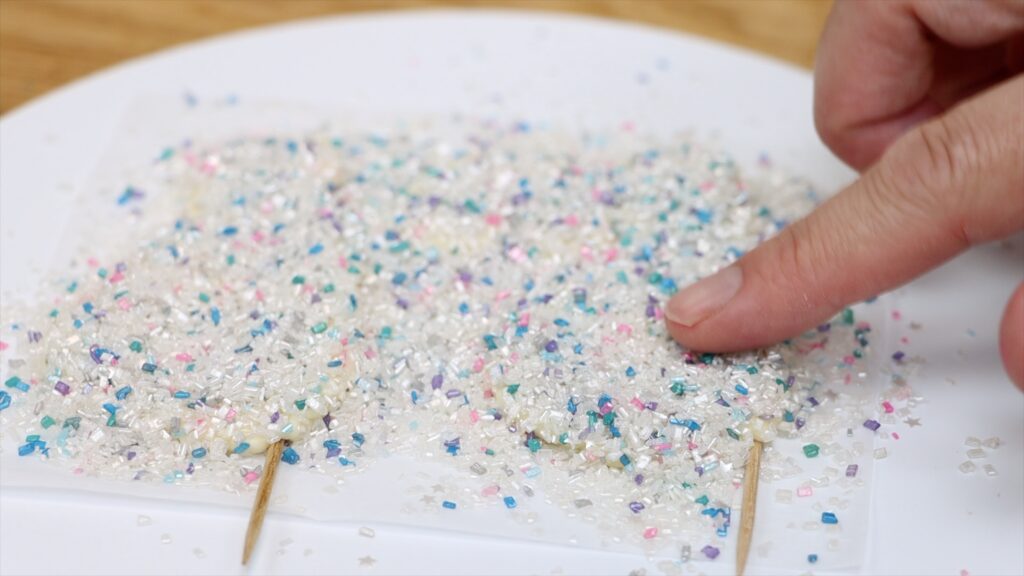
Put the chocolate into the freezer to set, which takes about five minutes. The chocolate will be strongest when it’s cold so when you take the toppers out of the freezer, use them straight away. Pick up the toothpicks to lift up the chocolate and push them into the cake. The toothpicks will secure the letters so that they stands up straight.
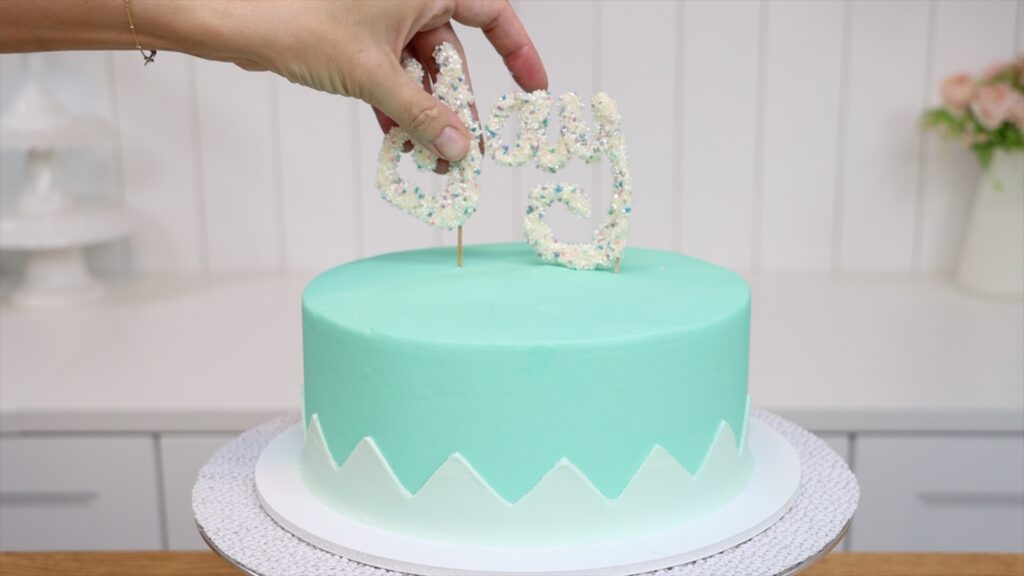
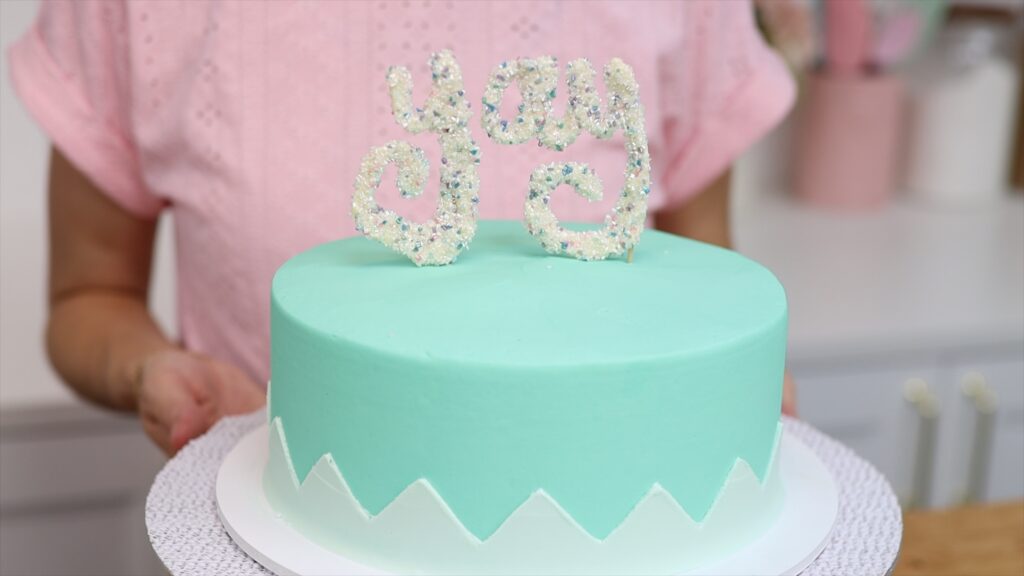
If you're looking for how to decorate a cake without tools and materials like custom cake toppers, this is a fun option. It's an easy way to make colourful and delicious decorations that add height and detail to your cakes.
With just a simple spoon you can create lots of interesting textures and I’ll show you how to decorate a cake without tools other than a spoon on this next cake.
If you struggle to get your buttercream smooth, texturing it is a great option! Use a cake comb or icing scraper to get the sides of the cake straight and the top level. Don’t worry about indents or any imperfections on the surface of the buttercream beaus those will be smoothed out next. Hold a spoon sideways and press the back of the spoon gently into the side as you spin the cake on the
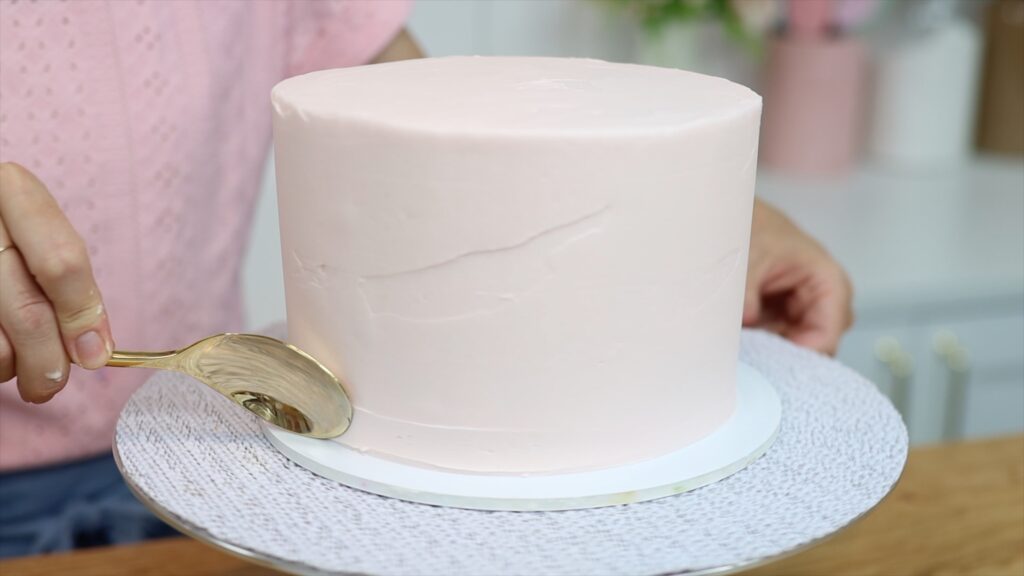
Do this as soon as you finish frosting the cake so that the frosting is still soft. Drag the spoon slowly up the sides of the cake as you finish each lap so that the texture continues all the way up. If buttercream builds up on the spoon just swipe away, clean the spoon, and then start again.
You’ll get the neatest results if you dip your spoon into a cup of hot water and then dry it before pressing it against the cake. The hot metal will glide easily across the buttercream and leave a smooth surface behind. You can leave the top edge unfinished or push sideways with a spatula to flatten and smooth it.

This is a fun technique to do because it’s not precise and the result is pretty and rustic.
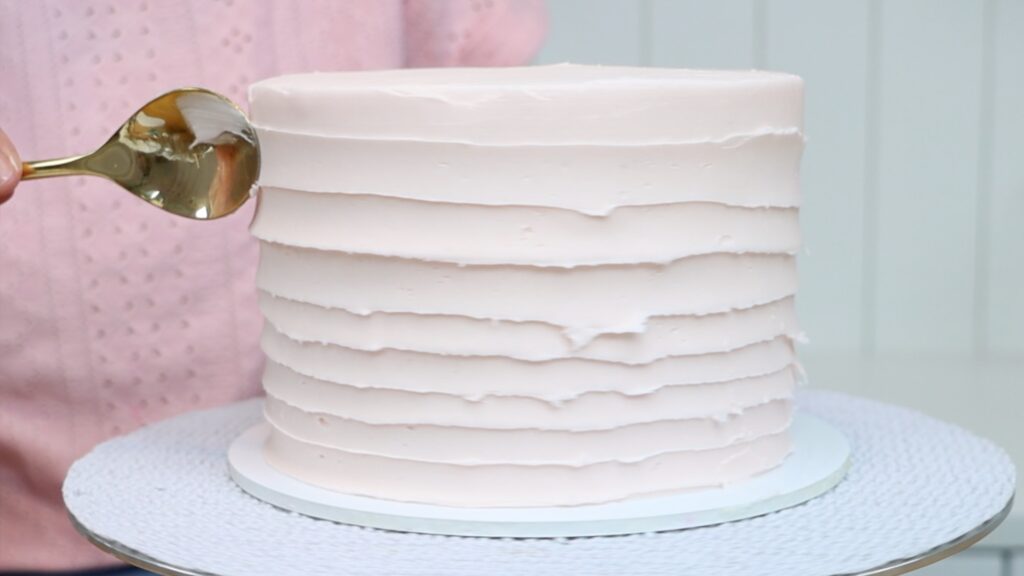
Here's a similar technique but in a different direction. Press the back of the spoon into the cake and drag upwards. Push gently against the buttercream to leave a trail going up the sides of the cake. Keep pulling all the way up above the top of the cake to leave a peak at the top.
Start each one right beside the previous one, overlapping slightly so that there aren’t any gaps in between the texture. This also works best with a spoon that’s been dipped into hot water and dried. If you skip that step you might get little air pockets in the buttercream where the spoon pulls and tears it.
You can leave the peaks at the top as they are or tidy them up with your spatula like I did with the last texture. This is another simple design that’s a great base for other decorations like cake toppers.
For this third texture using a spoon, use your spoon in every direction to make little arc shapes in the buttercream. Curve up and down and side to side to completely cover the cake with random “swooshes” of texture. Just like the other two textures, you’ll get the neatest results with a hot spoon because the hot metal will melt the very outer layer of buttercream and leave it smooth with no air pockets or unwanted texture.
I often say less is more, but that’s not the case here! I think this texture looks best all over the cake rather than having a few scattered arcs around the cake. At the top of the cake, as you curve your spoon around you’ll push the buttercream up above the top edge. You can leave it like that or level it with your spatula to make a straight top edge.
For any of these textures created with spoon, cake toppers will turn a simple cake into something much more eye-catching.

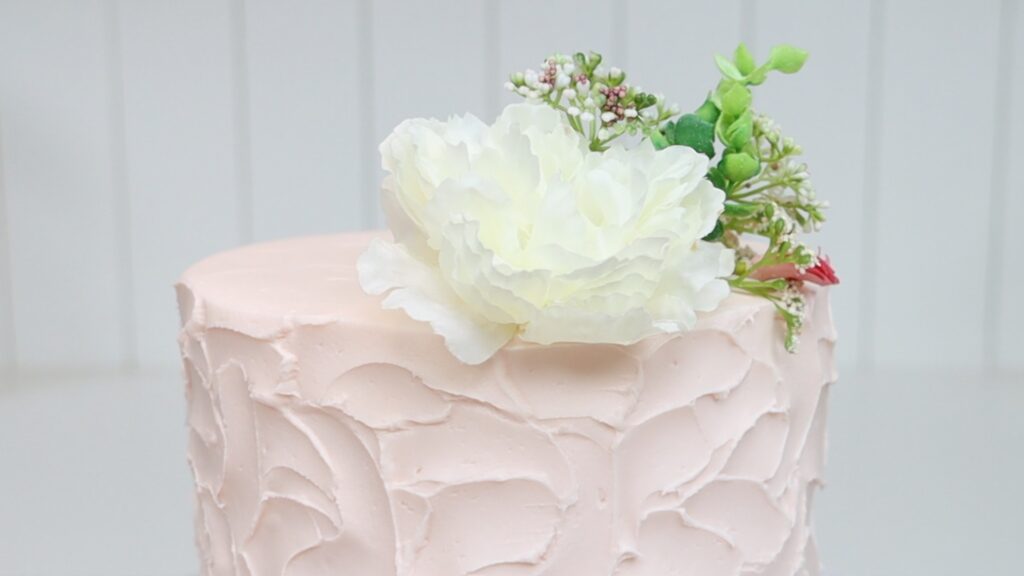
A very quick way to add detail to any cake is with fresh or artificial flowers. Wash them and let them dry and then wrap the stems in cling film or plastic wrap. This way they won’t come into contact with the cake. Wrap large flowers on their own or group little bunches of flowers together.
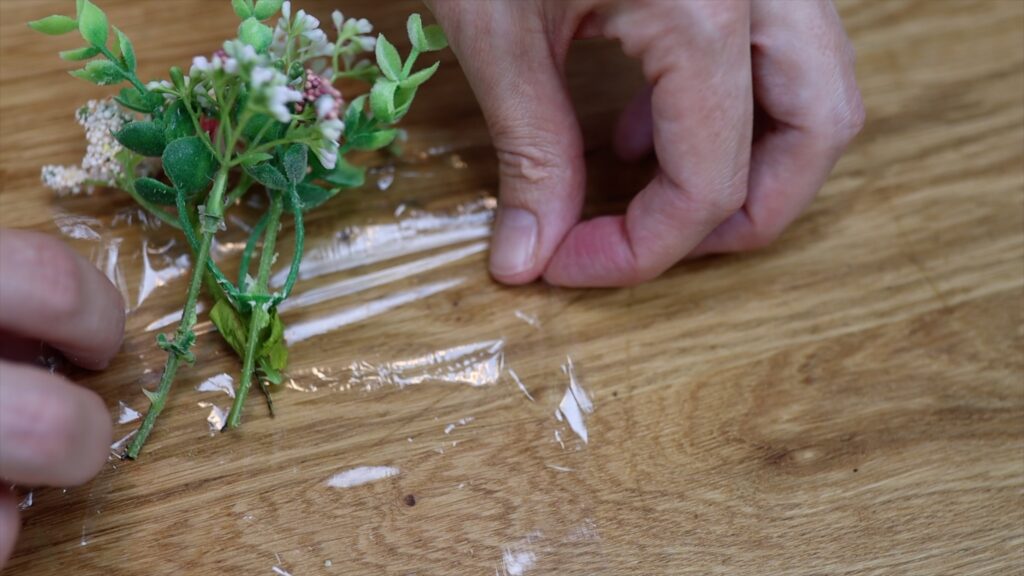
Fresh flowers are beautiful but if you want to decorate the cake a day or two in advance, artificial flowers are great because they won’t wilt or discolour. Push the wrapped stems into the cake and tadaa! Now you know how to decorate a cake without tools in seconds for a beautiful result!

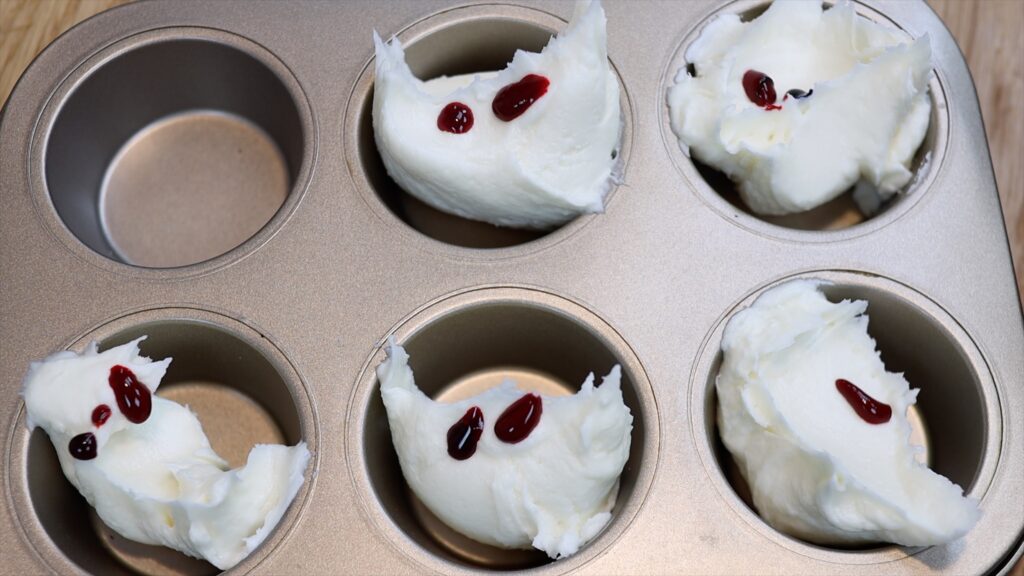
For this next cake I’ll use a cupcake pan to mix my buttercream colours. It’s more convenient than using lots of little bowls because it’s quicker to wash up afterwards compared to using a different bowl for each colour. Put a small amount of buttercream in each hole because you don't need much for this technique. To make a buttercream palette add some colour to each hole and stir to mix it in.
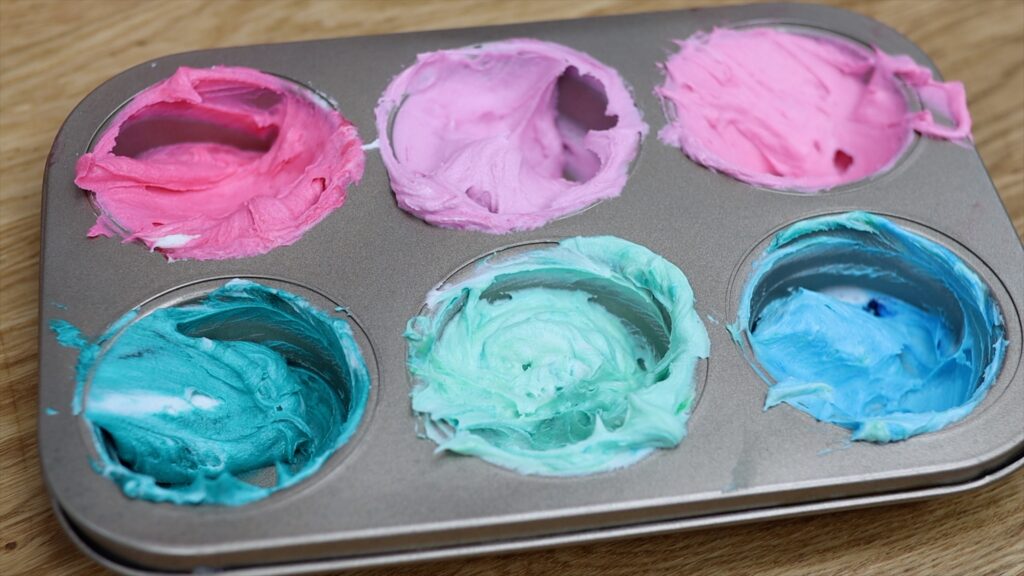
For this technique you’ll need the buttercream on your cake to set so it’s firm. The best way to do this is to chill the cake in the fridge for about an hour. Then scoop up a colour and spread it onto the cake. Since the icing or frosting has set, the colours won’t blend into it. Instead, they’ll sit on top.
The coloured buttercream will chill quite quickly after you’ve spread it on so the different colours won't blend together.
Continue to add colours all over the cake, scraping off the excess to leave a thin layer of each colour on the cake. By adding the colours one by one to a cold cake you’ll end up with a bold, oil painted effect rather than a blended, watercolour effect.
You might choose to leave the top of the frosting uneven, sticking up above the edge of the cake, to match the uneven effect of the colours. If you want to smooth and flatten the top you can do that with an
Now let’s add a stencil design to the top of the cake. Just like the stencil border for the first cake, this method for how to decorate a cake without tools will save you a lot of money on pre-made stencils! Draw a shape like this heart onto baking paper or parchment paper or wax paper and cut it out. Position it on your cake after the cake has been in the fridge for at least an hour so that the frosting is firm. Now spread buttercream onto the stencil to cover up the shape you’ve cut out.
You can use one colour or several colours. If you're using several colours, keep in mind that they will blend together and create new colours!
Scrape and smooth the coloured buttercream with a spatula or cake comb to leave just a thin layer behind.
Then peel off the stencil. It’s important to take the stencil off as soon as you’ve finished spreading the colours onto it because while that frosting is still soft and sticky you’ll get the neatest edge to your design.
Use a toothpick to touch up any smudges, which happen if the stencil moves while you’re spreading the colours on.
This is such a quick and cheap and easy way to add an interesting detail to your cake.
And there they are! 8 different techniques for how to decorate a cake without tools. If you try any of these at home please tag @britishgirlbakes so I can see what you come up with! If you’re looking for more tutorials, visit my online cake school.
Tell me in the comments below which technique is your favourite!
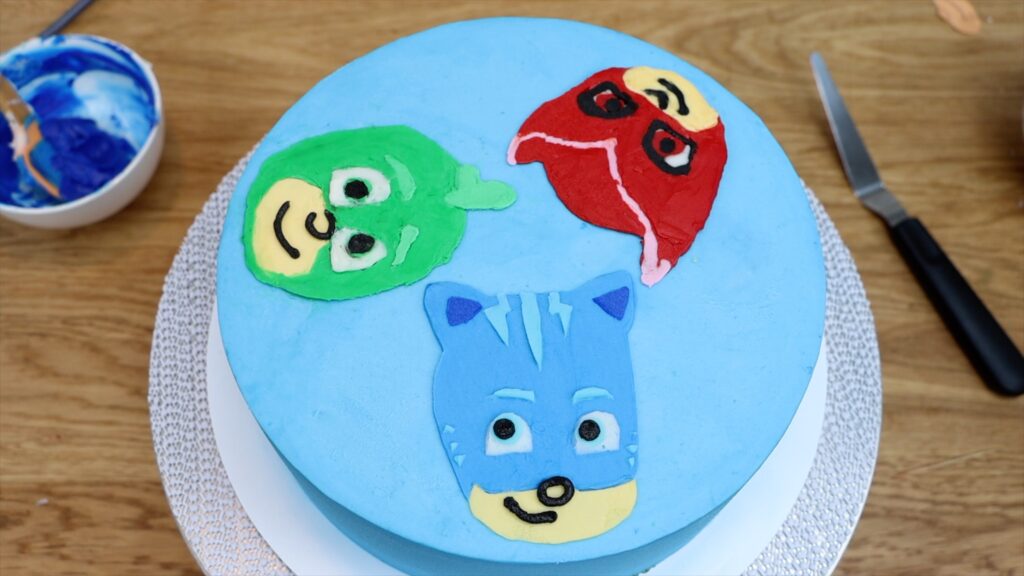
I’m going to show you three techniques to make character cakes with buttercream, without fondant, to make detailed and delicious cakes!
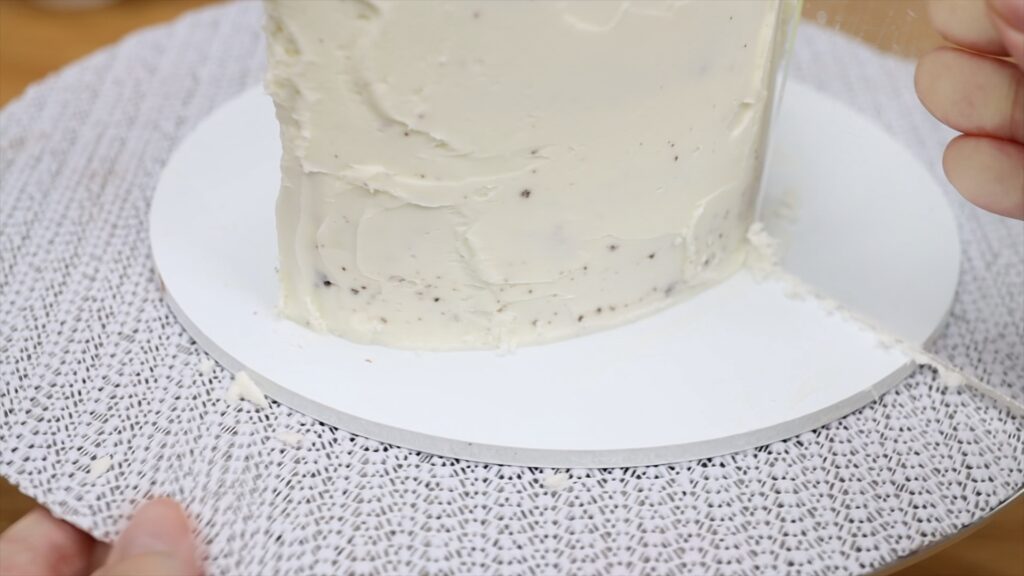
For all of these techniques you’ll need the frosting on your cake to set so it’s firm. This way it won't get damaged when you add the characters. After layering your cake and filling and giving it a crumb coat, frost your cake and put it into the fridge for at least an hour.
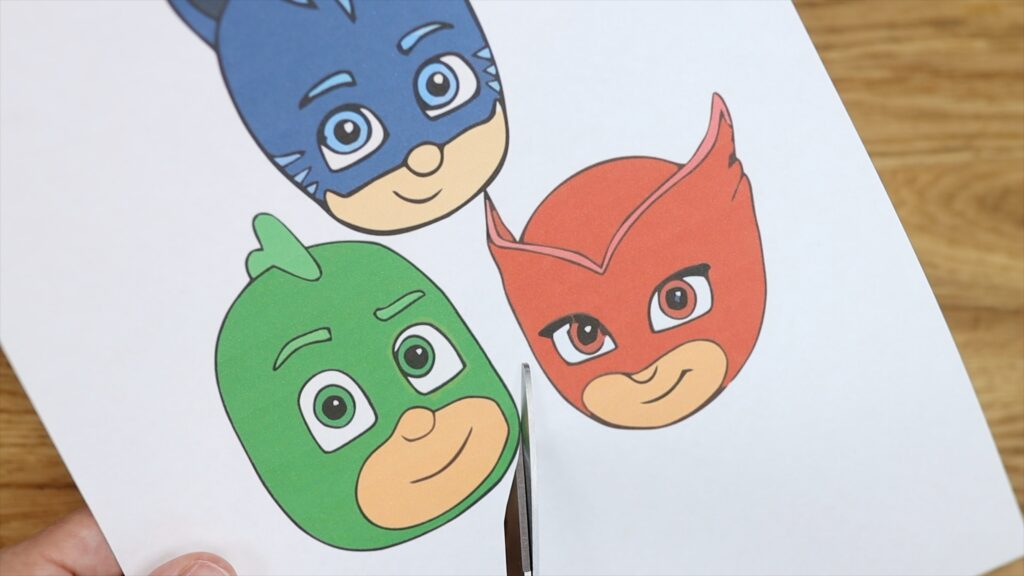
Find a picture of your character or characters. I like to use Google Images for this. The bigger the images, the easier it is to recreate the details on the cake so print the image as large as possible. I enlarged mine to almost fill a piece of A4 or Letter sized paper. This way, they will cover almost the entire surface of my 8 inch cake.
Next I'll show you the three techniques I like to use for character cakes. We’ll do "pipe and spread" for Gecko, a homemade stencil technique for Catboy, and a buttercream transfer for Owlette.
Cut your printed character out of the paper by following the outline exactly. Then trace around the edge with a toothpick to make an outline on the cake. Cut out the individual features of the character like the face and eyes and position them within the outline on the cake. Trace around those with your toothpick too. These outlines will guide you when you fill in the colours.
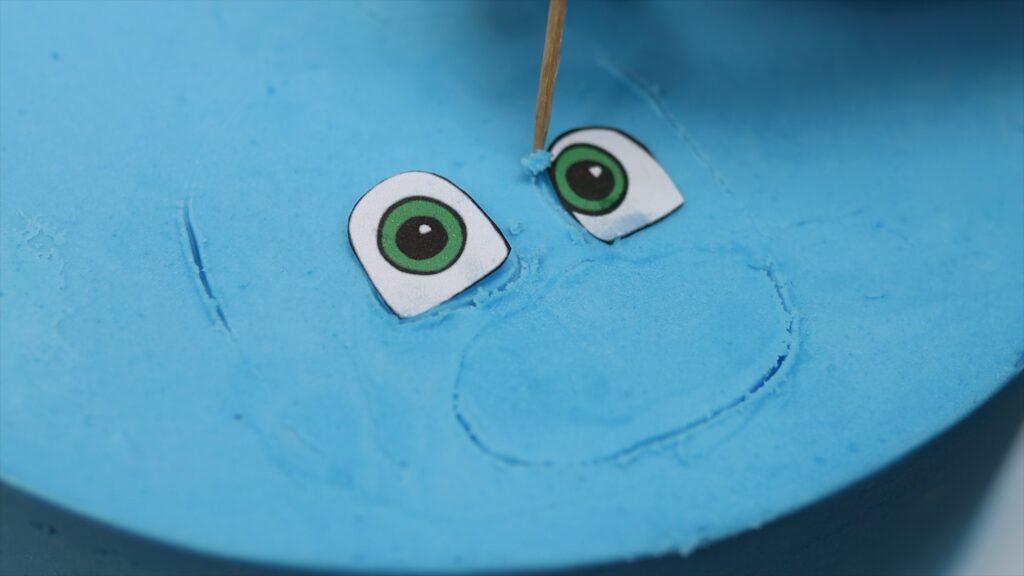
Cutting these parts out and tracing around them is the most accurate way to add details to your character. If you prefer you can simply refer to your image and draw the features on with your toothpick.
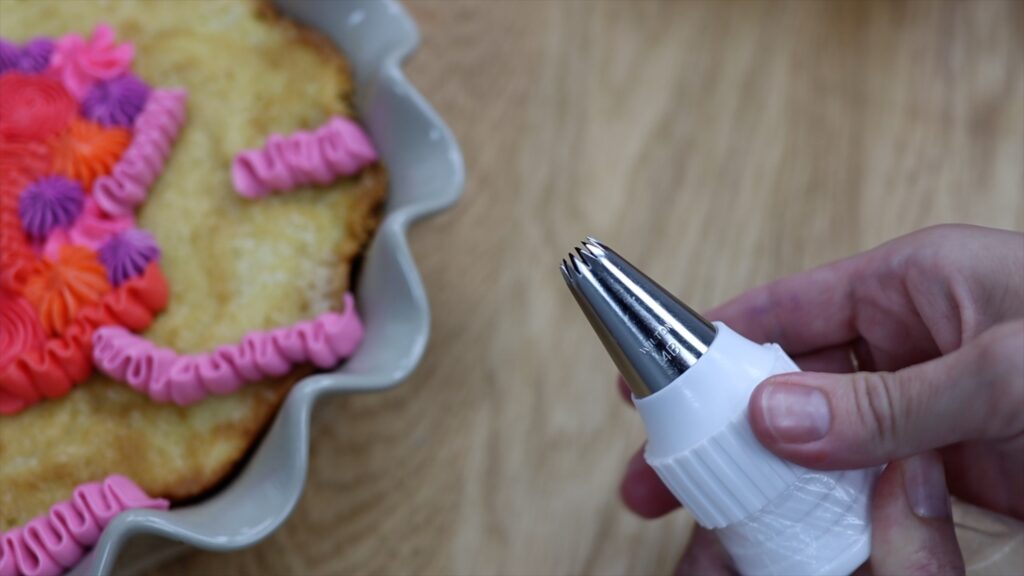
Now mix your colours of buttercream. This is my 4 Minute Buttercream, which I use for character cakes and almost every other cake I make! Put your colours in piping bags fitted with small round piping tips. I'm using a #3 by Wilton. I’ll show you how to do this without piping tips in a moment.
Choose one of the large areas of the design to start with. Outline it and then fill it in by zig zagging with your buttercream.
Spread this with a tapered
You don’t have to outline every single detail on the character before you pipe it. For example, I piped the black circles into the eyes just by looking at the image to see where and how big to make them.
It’s also not necessary to draw lines like the nose and mouth before piping. They’re simple details that are easy to freestyle by looking at your image.
If you don’t have small round piping tips you can use a piping bag with a tiny piece cut off the end. Then pipe through the very small hole you cut. Your lines won’t be as neat as if you use a round piping tip but you can using a toothpick to make them neater. Straight after piping, the buttercream is soft so you can nudge a line sideways or smooth out an edge.
I recommend leaving the white details until last, and I’ll show you why after this. For the face, outline the details that will eventually go onto it - the eyes and eyebrows, and then fill in the rest of it with zigzags.

Smooth the frosting with your spatula or palette knife. The narrower the tip, the easier this is for detailed characters, especially if they’re small.
It's best to do this technique on a cold cake because the buttercream you pipe and spread will chill quickly and become smoother than when it’s at room temperature. If you’re struggling to get a smooth surface you can heat your spatula or palette knife by dipping it in hot water and drying it off. The hot metal will work well to smooth the buttercream.
You can do all of your details straight after each other if your cake is cold because the buttercream of each detail will chill on the surface of the cold cake. When butterceam gets cold it gets firm so it won’t blend into the next colour you add. If your cake isn’t already cold you’ll need to put it in the fridge or freezer for 5-10 minutes between each detail you add.
Always chill the cake before adding any white details because white picks up other colours so easily. If the other colours haven’t chilled and set they’ll make visible smudges within the white details.
I used a #8 piping tip for the white parts of the eyes and you can see it’s way too big! A #3 or #4 tip is ideal for little details like this. I only suggest using a larger round piping tip for very large areas of colour. But here’s another example of where a toothpick comes in handy to tidy up piped buttercream!
So, that’s the first technique. It’s the fastest BUT I’d also say the trickiest to do and the messiest result of the three techniques I’m going to show you.
Tint your buttercream colours and put them into piping bags fitted with small round piping tips. If you don't have enough, cut a small piece off the end of each bag to pipe through. Just like with the previous technique, a #3 or #4 will give you the neatest results.
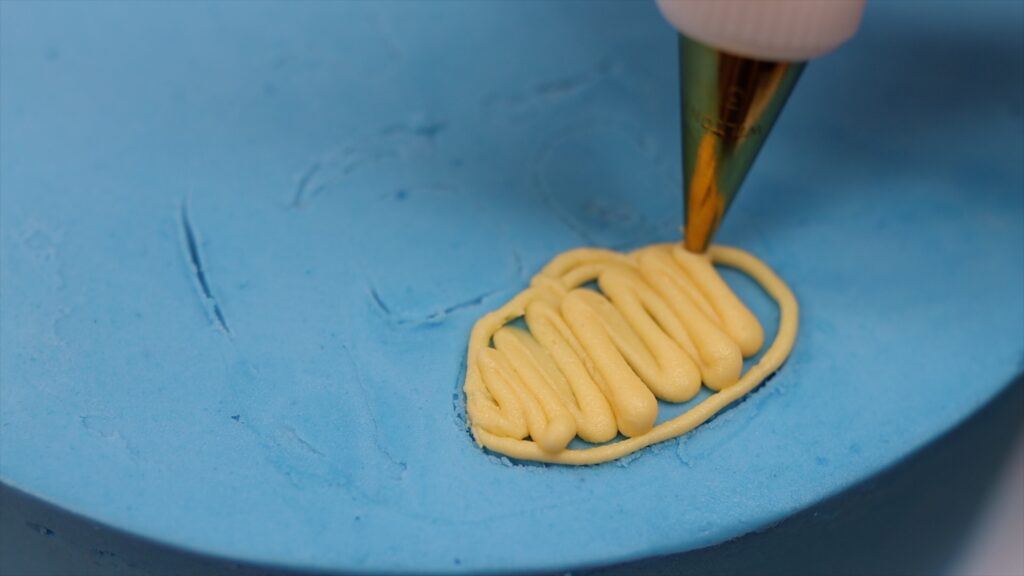
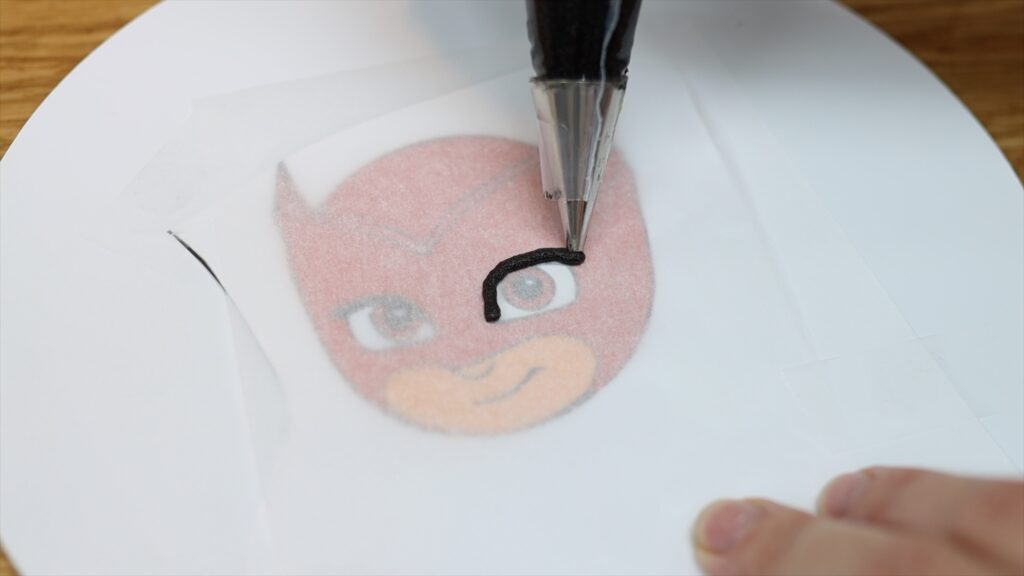
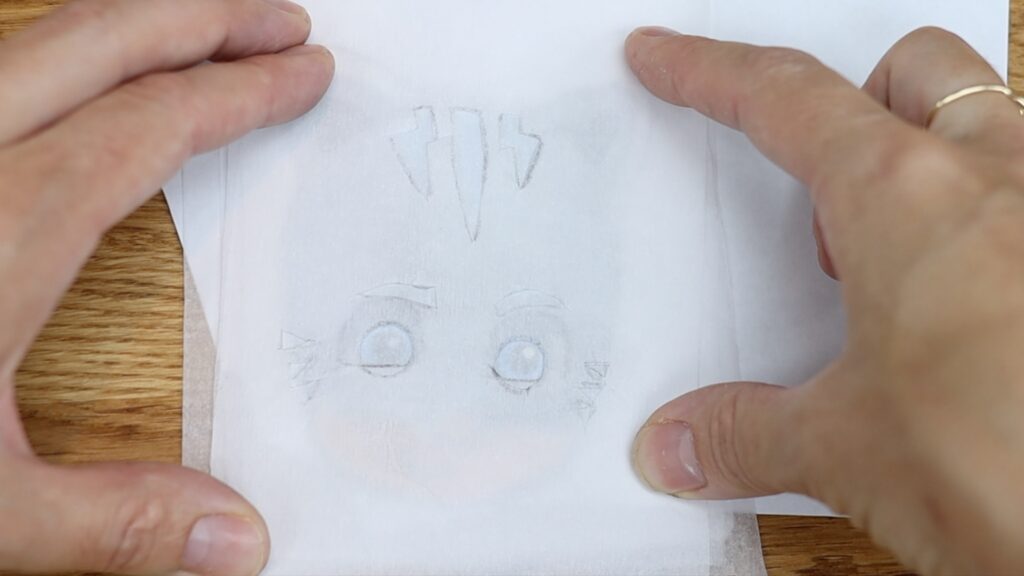
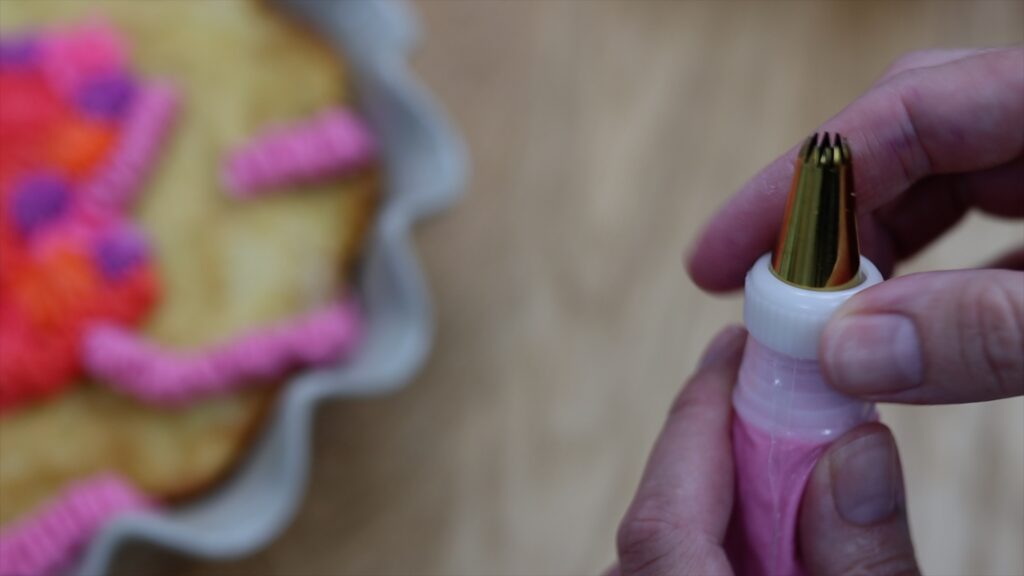
You’ll need a small flat surface like a cake board or a cutting board. Place your image on this with a piece of parchment paper on top so you can see the image underneath. Tape it in place and then pipe the smaller details onto it first.
Piping one detail straight after the other is fine for any details that don’t touch each other. Then put the board with the image into the freezer for 5 minutes before adding the next details on top.
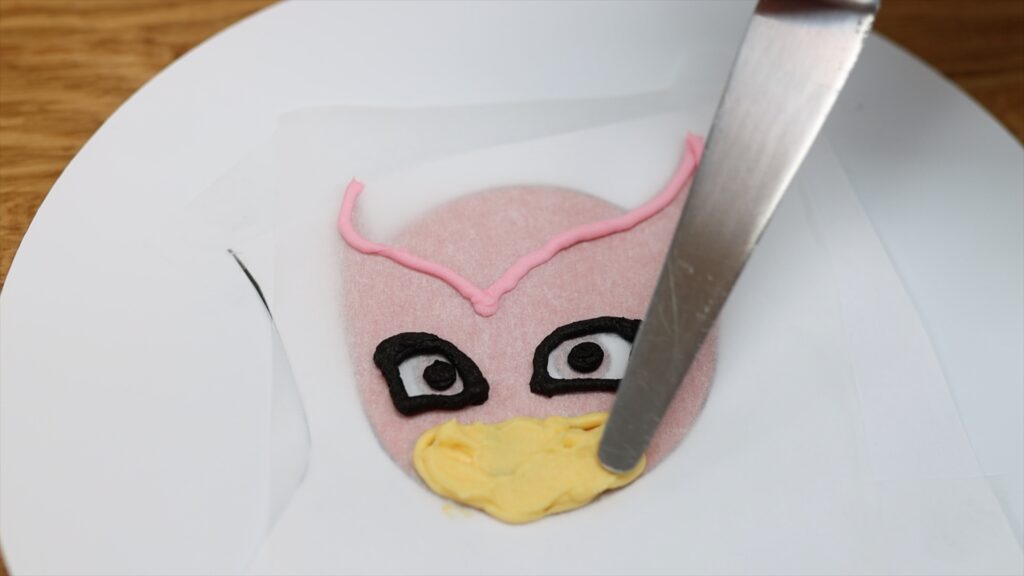
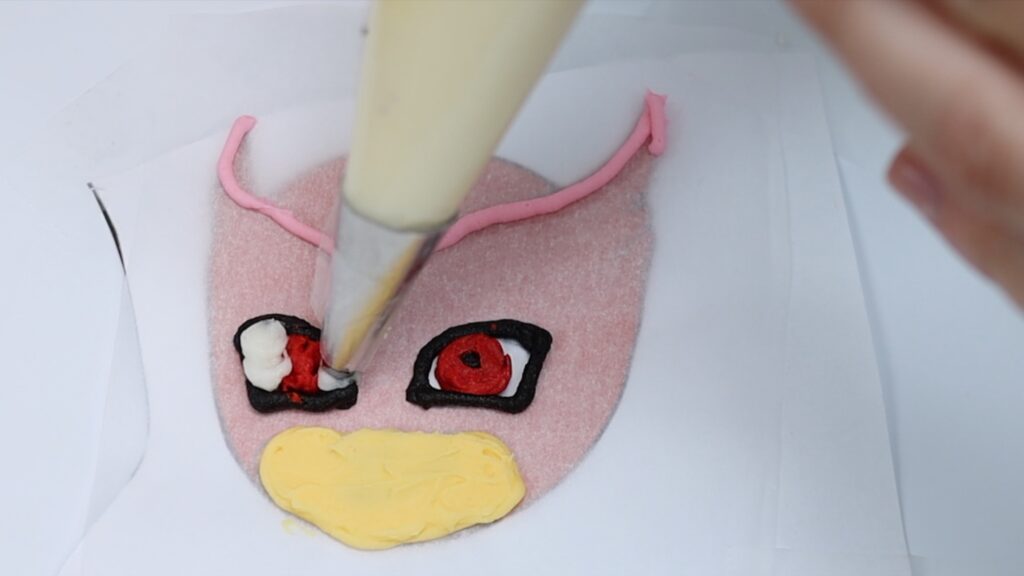
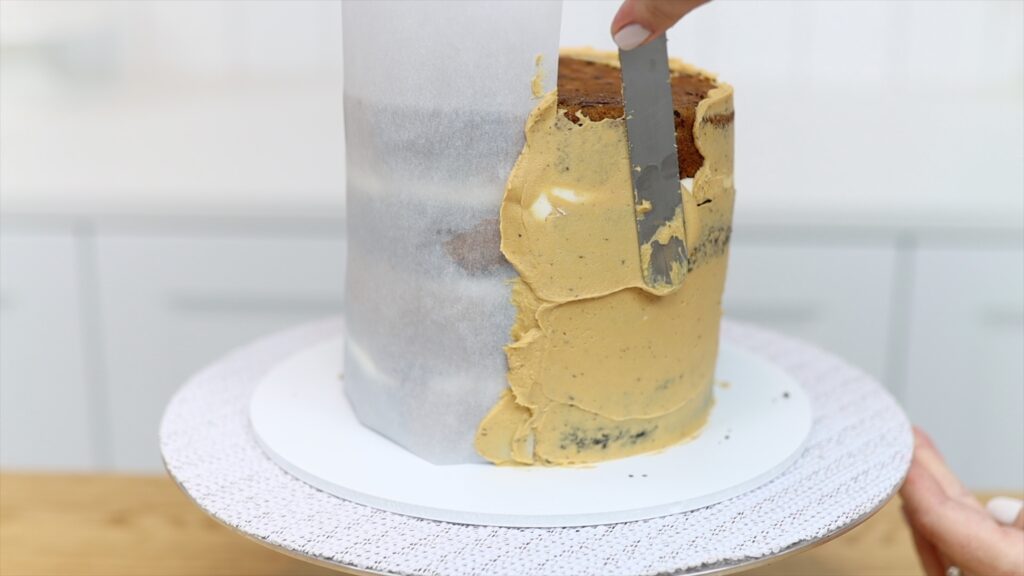
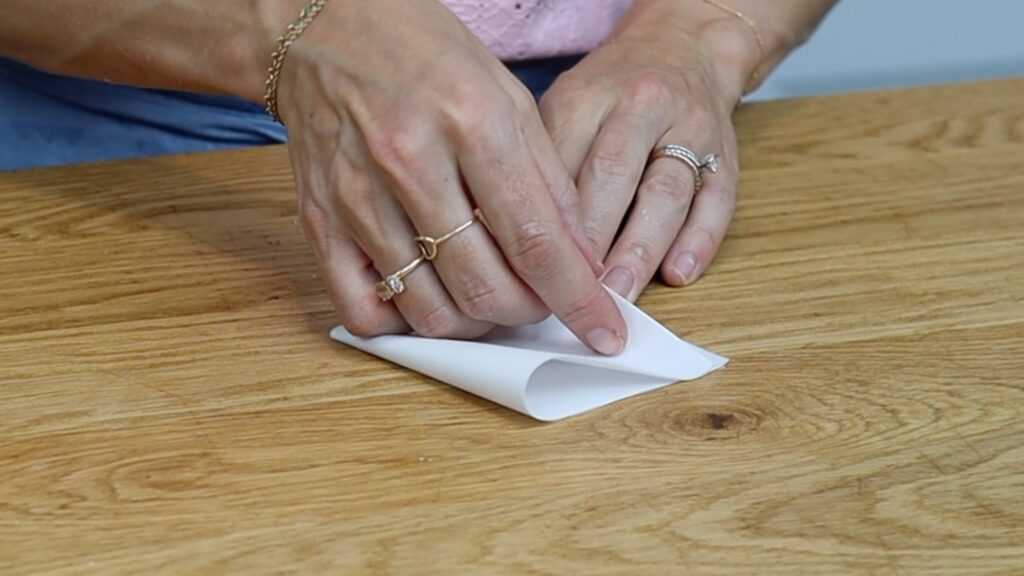
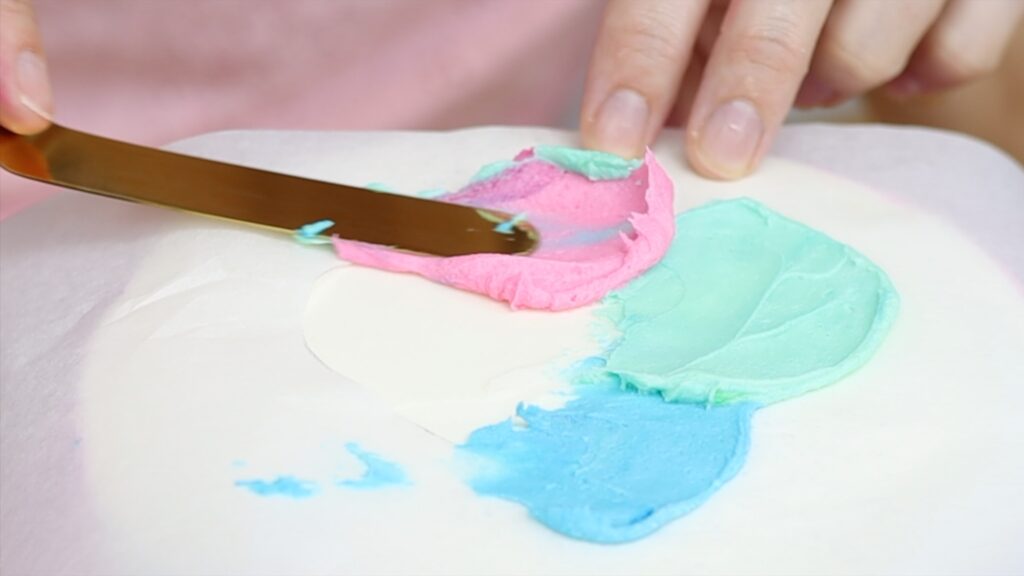
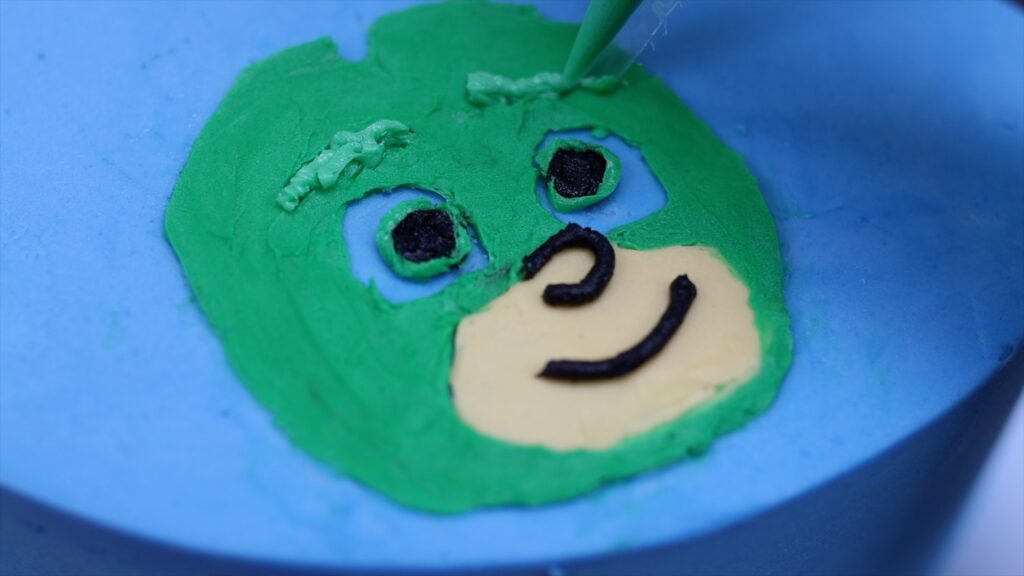
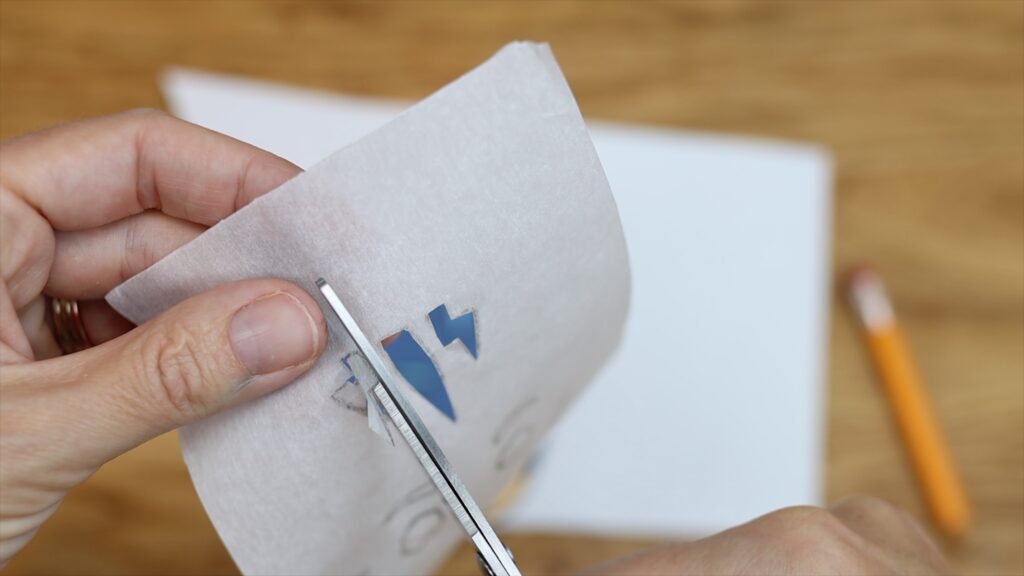
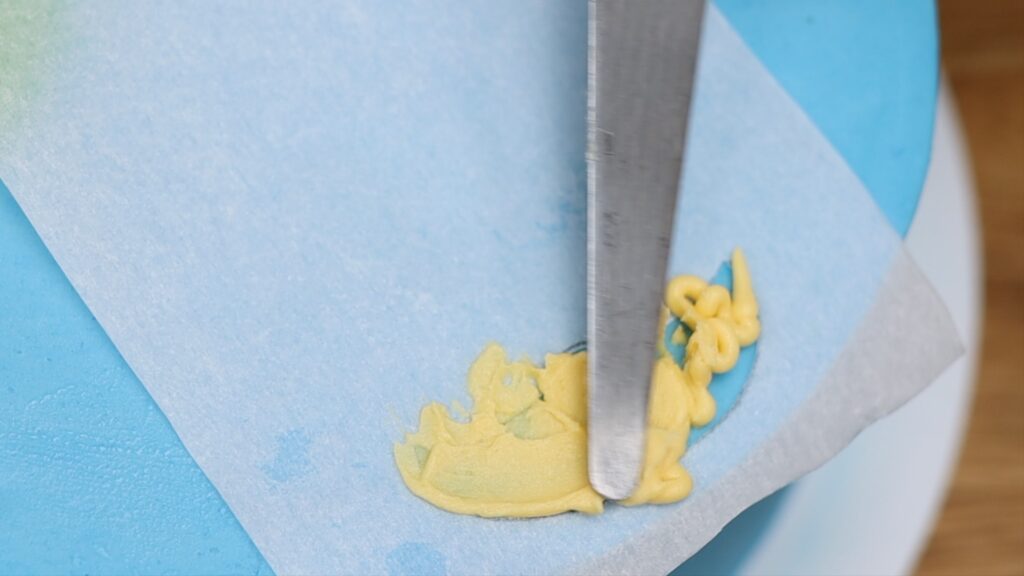
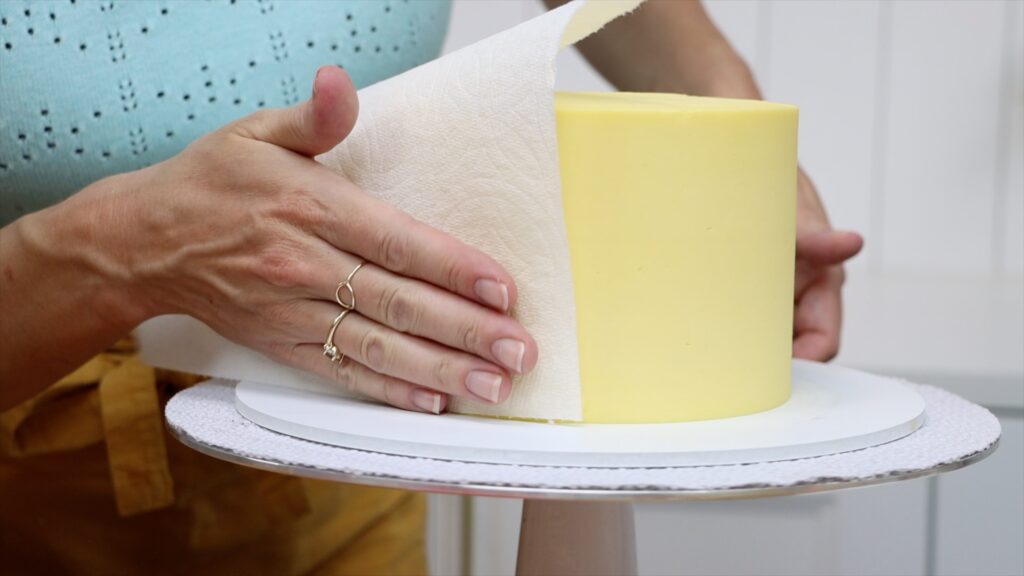
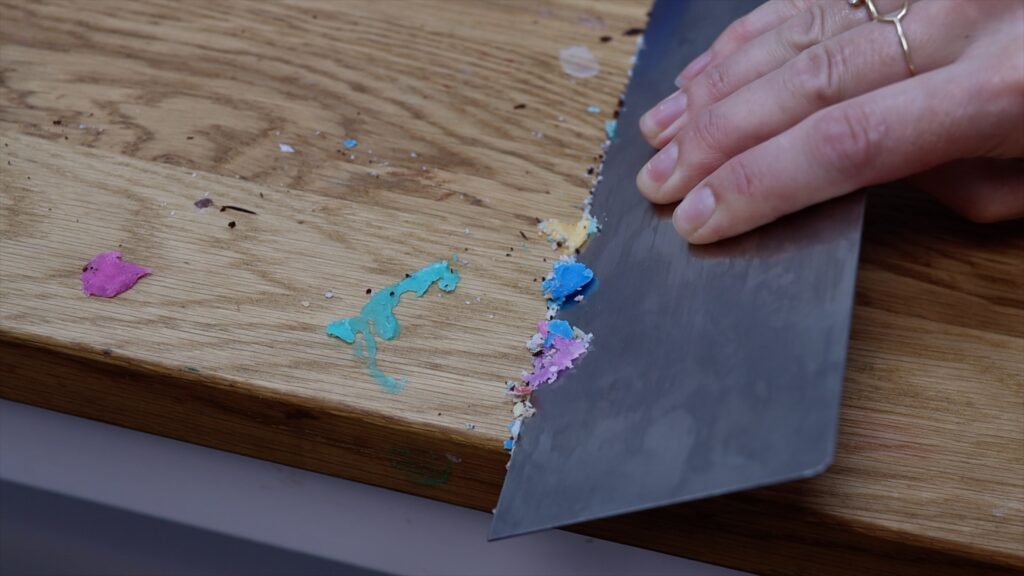
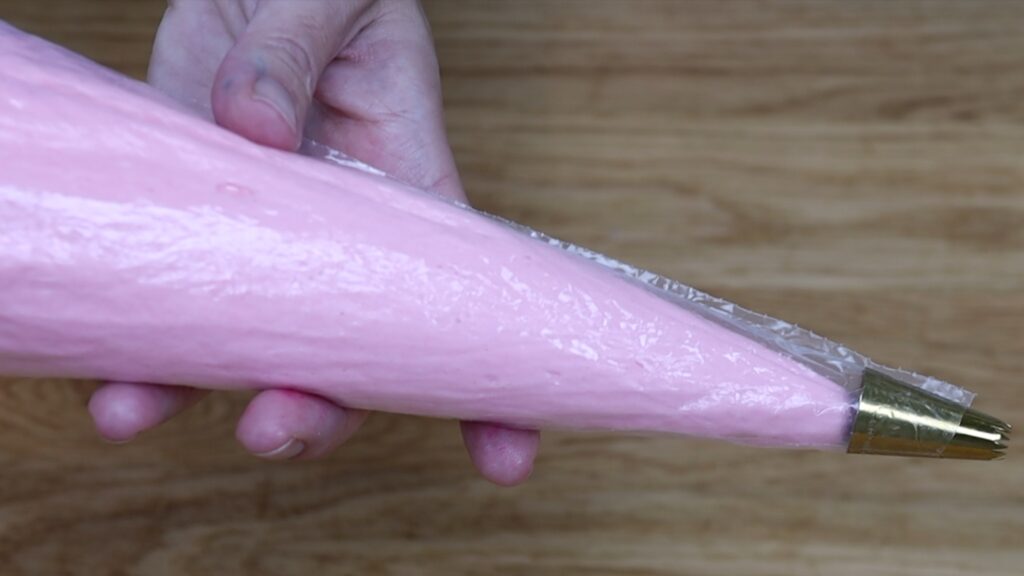
To fill in an area, spread the piping with a spatula or palette knife to push the buttercream down to the parchment paper. This side is not going to be visible because it's going to be pressed against the cake. The side facing down against the parchment is the side you'll see.
Don’t worry about making this upward facing side smooth or neat. I know these eyes look demonic but from the other side, the side we’ll see when its on the cake, it won’t look so creepy!

Before adding any details that touch these colours you’ve just piped, put the board back into the freezer for 5 minutes. This will chill and set the buttercream so it doesn't smudge. Then add the next details, leaving the background colour until last.
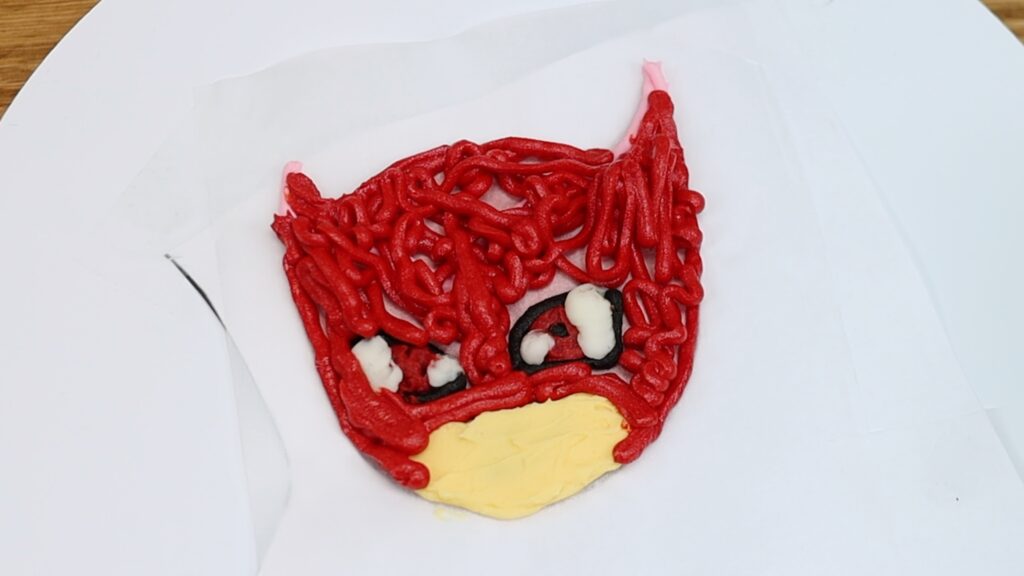
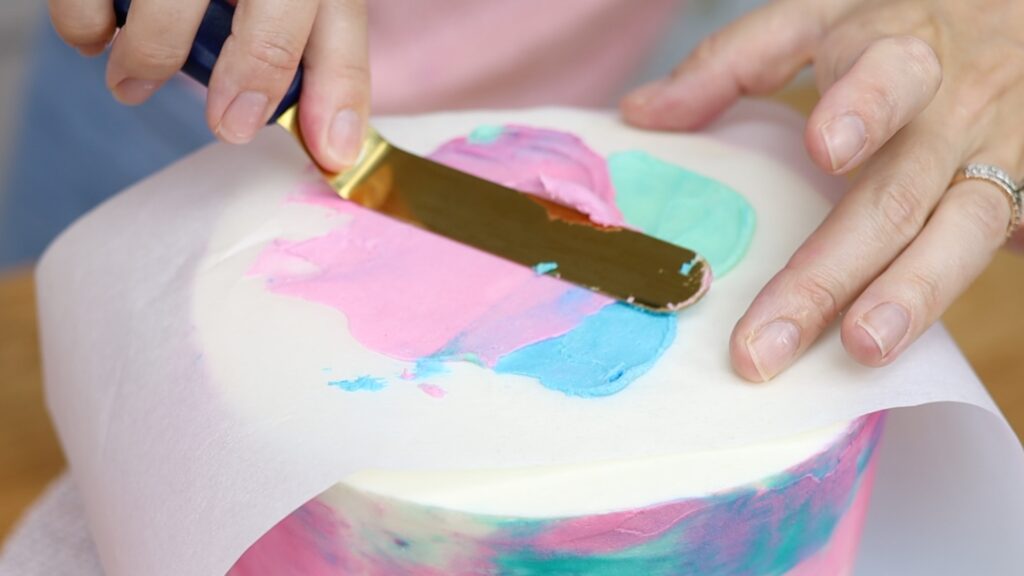
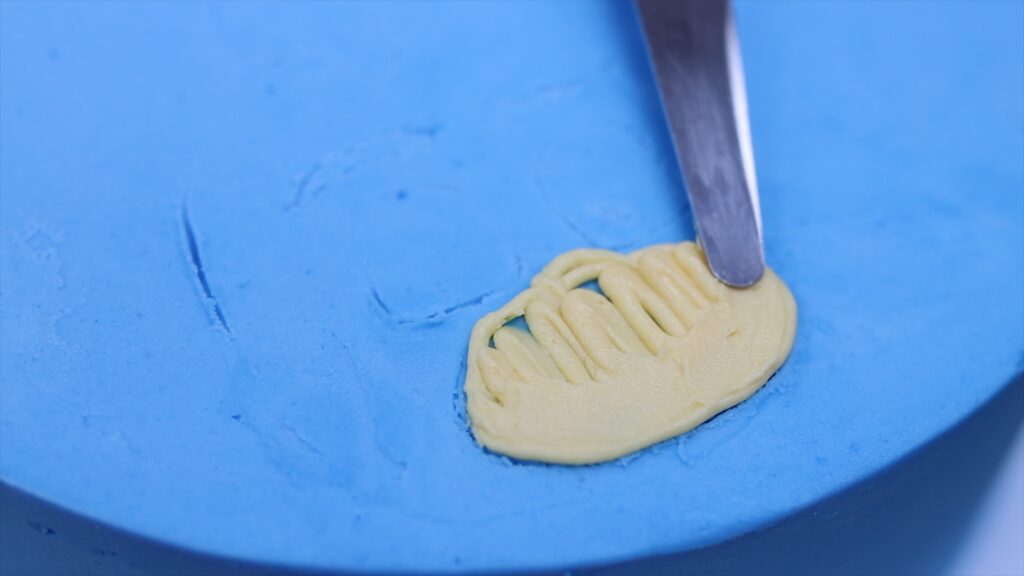
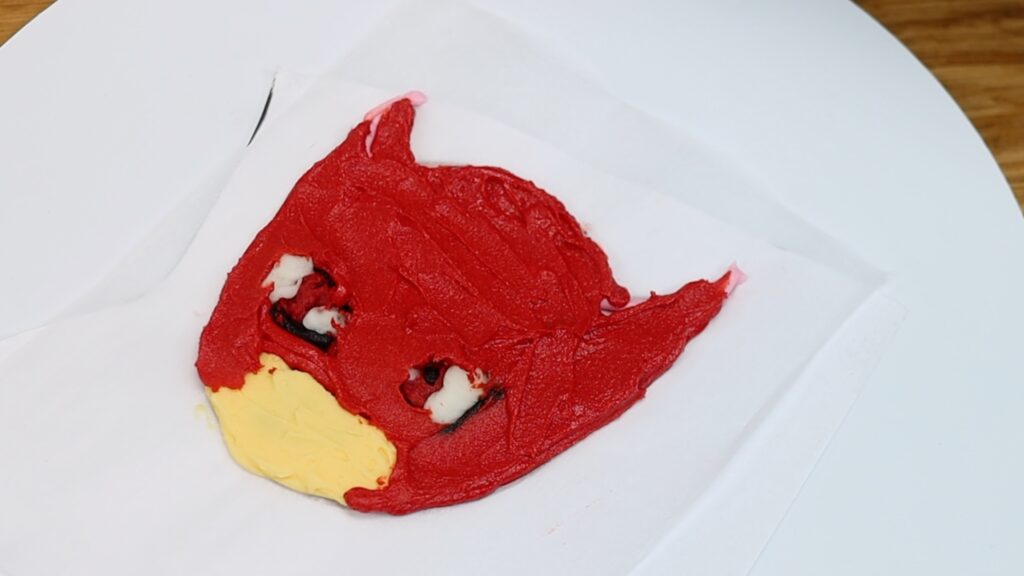
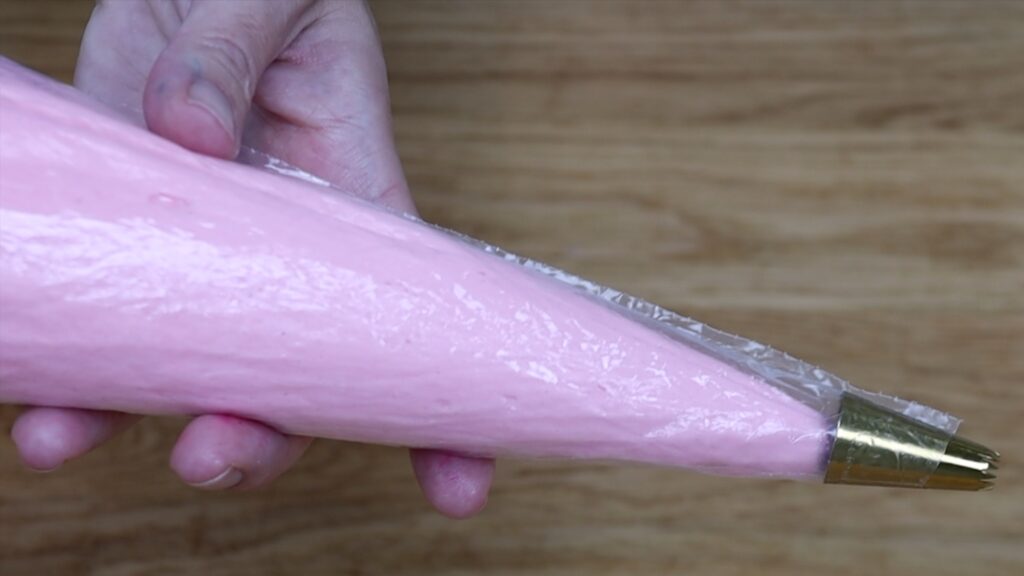
Chill the final details for 5 minutes in the freezer. Then outline and fill the rest of the design. It's fine to spread over all of the details for two reasons. First, it’s quicker than trying to pipe and spread around them. Second, the chilled buttercream has set so it’s not sticky anymore and you want to make the entire design sticky so that it attach to the cake. Scrape across to flatten and level the buttercream design.
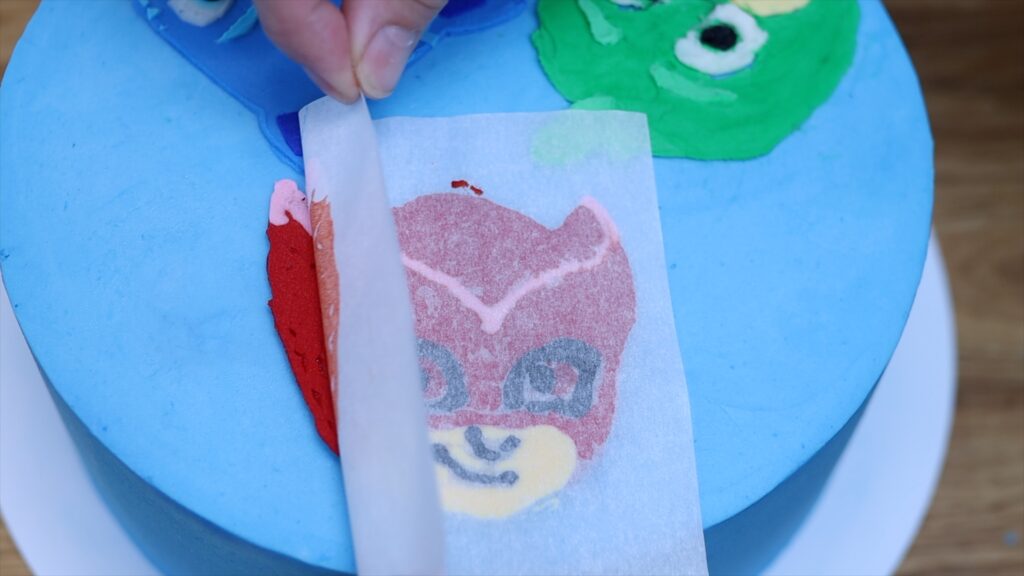
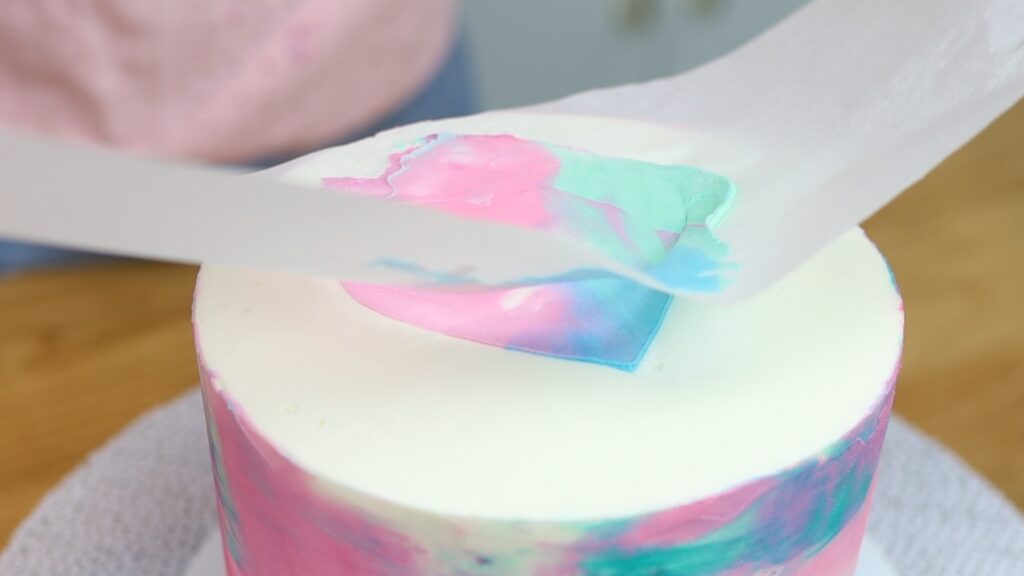
Straight after piping and spreading your character design, while the buttercream is still sticky, peel off the tape attaching the parchment to the board. Pick up the parchment and flip it over onto your cake. Press it down very gently to attach it to the cake. If you push too hard you’ll make the buttercream warp and bulge and you’ll change the shape of the details.
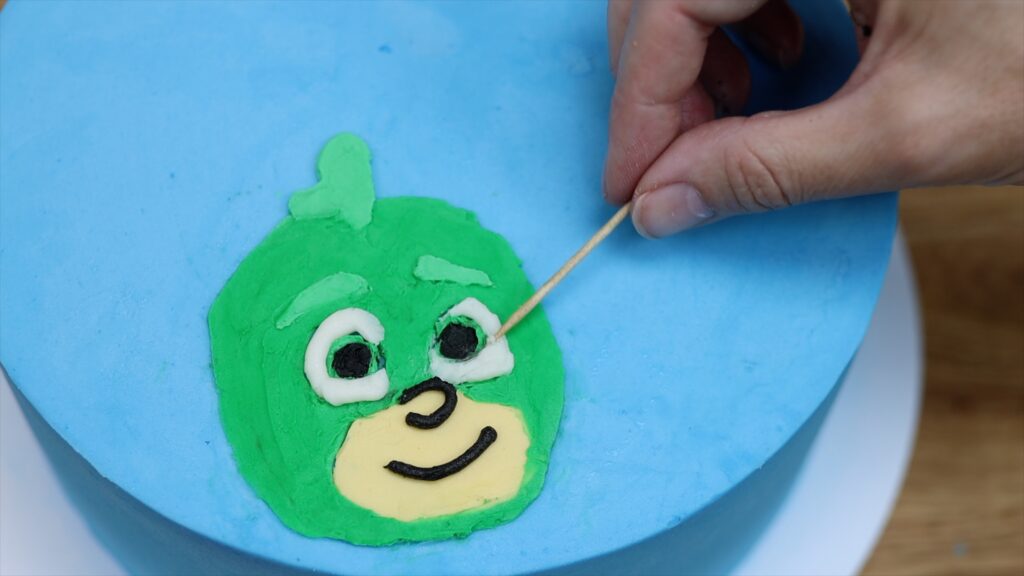
Now put the whole cake in the fridge for 30 minutes or the freezer for 10 minutes and then peel the parchment off to reveal your character!
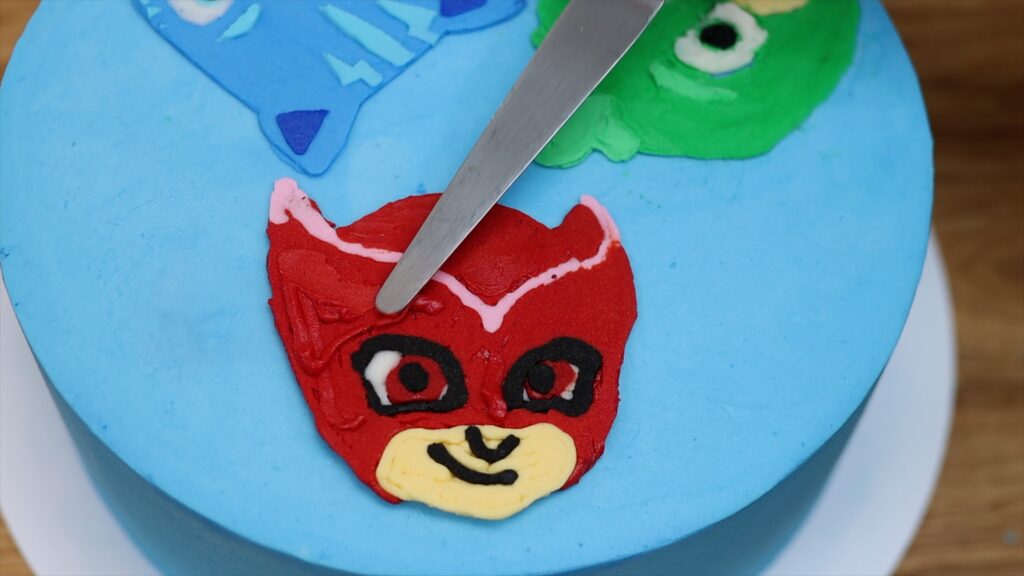
You’ll have lots of little indents where the buttercream didn’t push all the way down to the parchment. Fill those in now by piping more buttercream of that colour over the gaps. Spread it to push it down into the indents. Then scrape off any excess so that it doesn’t cover up any of the other details. Since the rest of the design is cold and hard, spreading this fresh buttercream over it won’t blend with or stain those other colours.


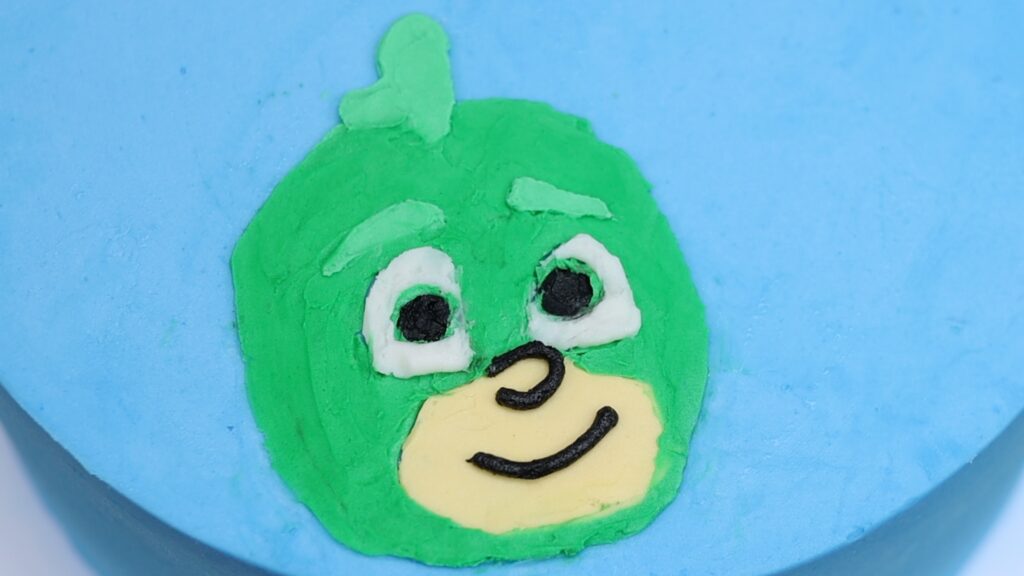
And that’s the second technique: a buttercream transfer. It’s an easy way to trace a very detailed character design but it’s not as neat as the next technique I’ll show you.
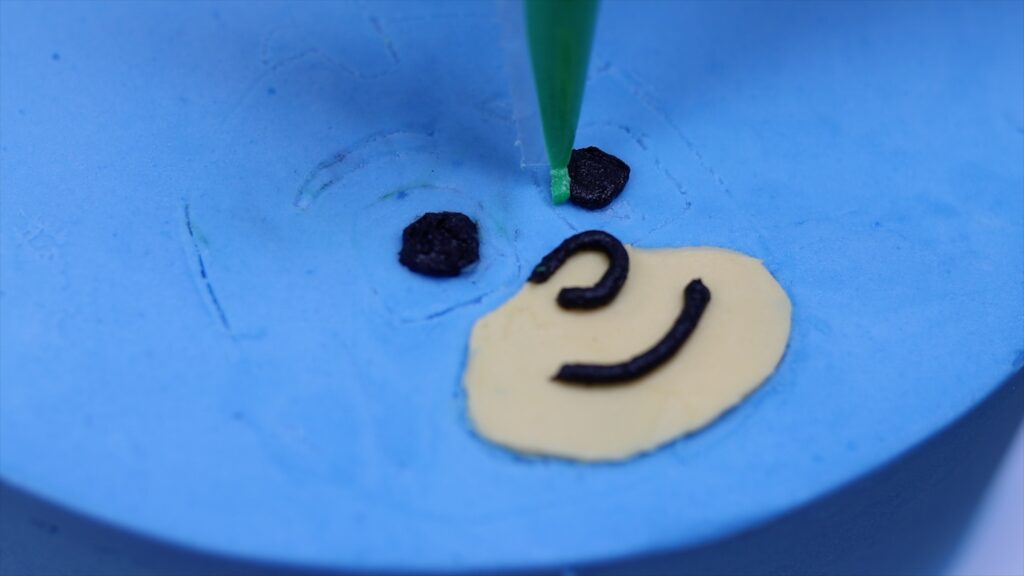
For Catboy I’ll use my favourite technique: layered homemade stencils. All you need for this is parchment paper or wax paper. Cut several pieces of parchment the same size as your character, one piece for every colour of details. I’m cutting 5 pieces for 5 colours. Place one over the image and trace the outline of one colour. I'm starting with the blue mask.
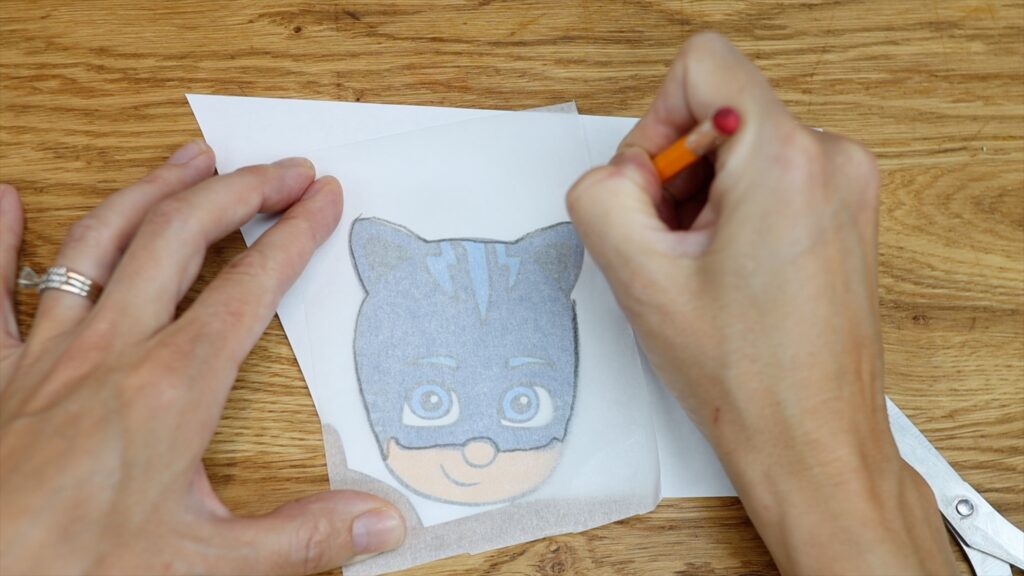
Then on the next piece of parchment trace the next colour. I'm doing the mouth and nose under the mask. Draw the outline only, none of the details within it. Continue with one piece of parchment for each colour. It’s fine to have several details on one piece of parchment as long as they’re all the same colour. I'm doing the dark blue inner parts of the ear on one piece and then the light blue (eyes, eyebrows, mask details) on another piece and the whites of the eyes on another piece.
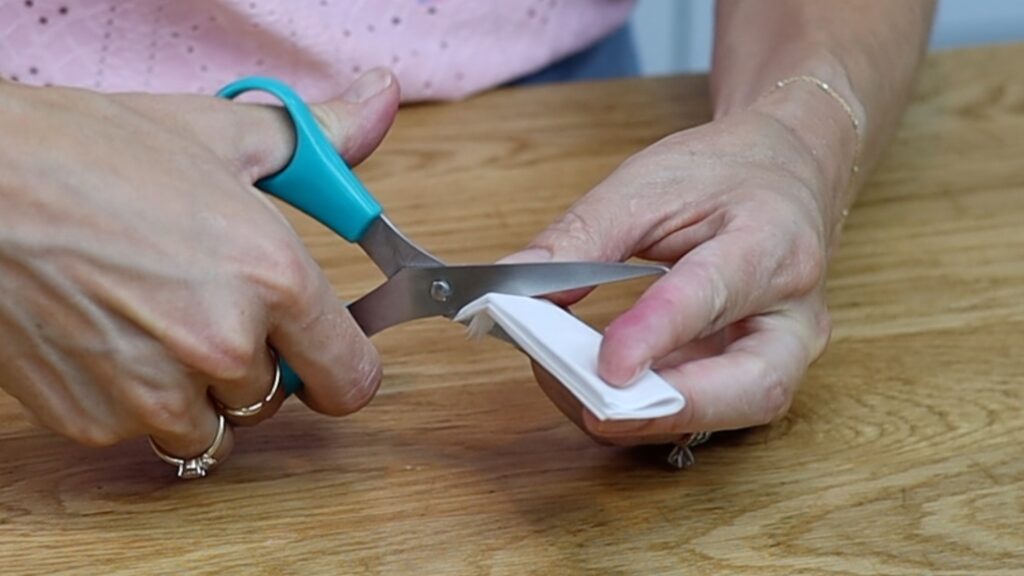
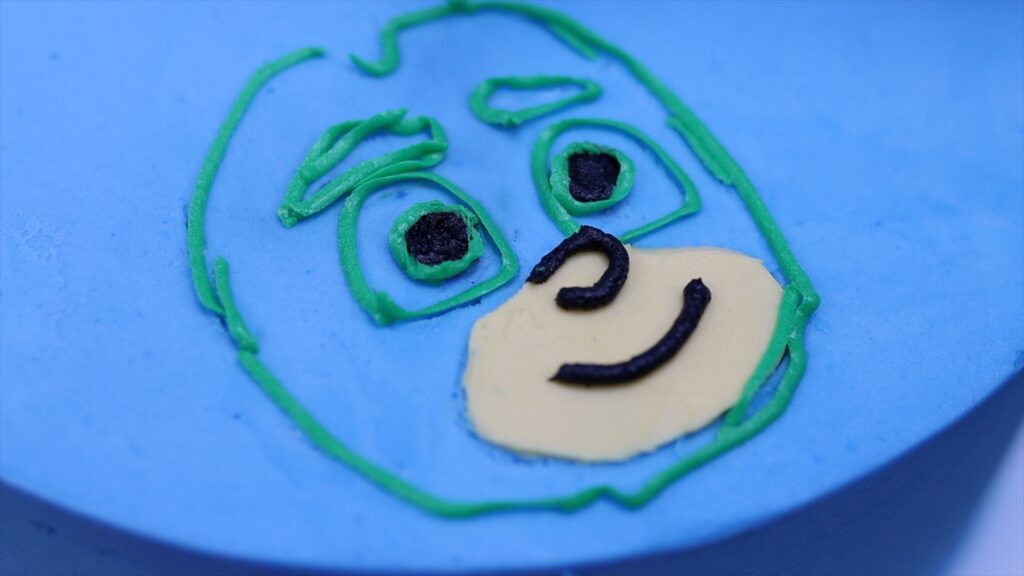
Cut out all of the details, leaving the parchment paper around them intact. These will be your stencils. Small scissors are ideal for cutting out the very small details like the markings on the mask. When you layer the stencils on top of the image, you should have all of the details of the character.
Now layer these stencils on the cake to re-create the entire character. Start with the background colour and position your first stencil on the cake. Spread coloured buttercream over it and scrape off the excess to flatten and smooth it. Leave a thin layer of buttercream and then peel off the parchment stencil.
Put the cake in the freezer for 5 minutes or the fridge for 15 minutes to set this colour. Then take the cake out and line up your next stencil on top of the chilled buttercream. Spread the next colour over it.

Since you’re layering details one over the other, start with the background colours and then add the smaller details on top, getting smaller as you go.
The cake needs to be chilled before doing this so that your stencils don’t damage the frosting on the cake. Since the cake is cold, the buttercream details will chill and set in just 5 minutes in the freezer, so this is quite a quick technique.

A toothpick is useful to smooth any uneven edges, where the buttercream pulls up slightly as you peel the stencil off.
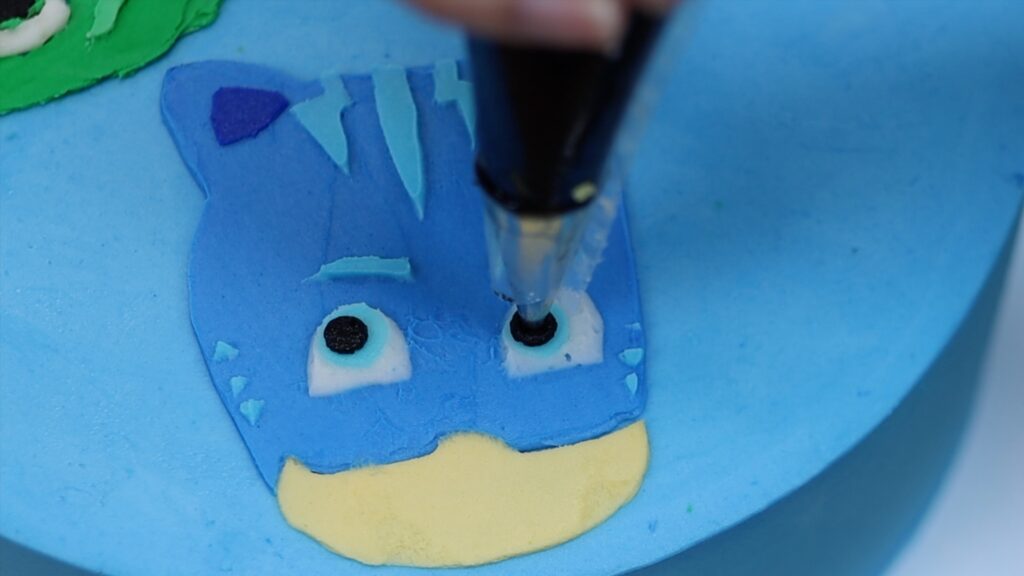
Even though this is relatively detailed design, I only need 5 stencils to create all of the features. I’m piping the black eyeballs since I happen to have black buttercream in a piping bag with a small round piping tip. A stencil would work just as well if not better because piping creates an eye that sticks out quite a bit, whereas stenciling it would make it lie flat against the cake.
You can pipe the smile and nose or draw them with a toothpick. In hindsight I think drawing them with a toothpick would have looked better because the lines would be more subtle.
This last technique of layered parchment stencils is my favourite. I think it creates the flattest, smoothest, most accurate details and looks the neatest.
And those are the three techniques for character cakes! I hope this tutorial has been useful! Subscribe to my YouTube channel below for a new cake decorating video every week and visit my cake school for online courses on baking and cake decorating!
You can also watch a video on this tutorial for 3 techniques for character cakes:
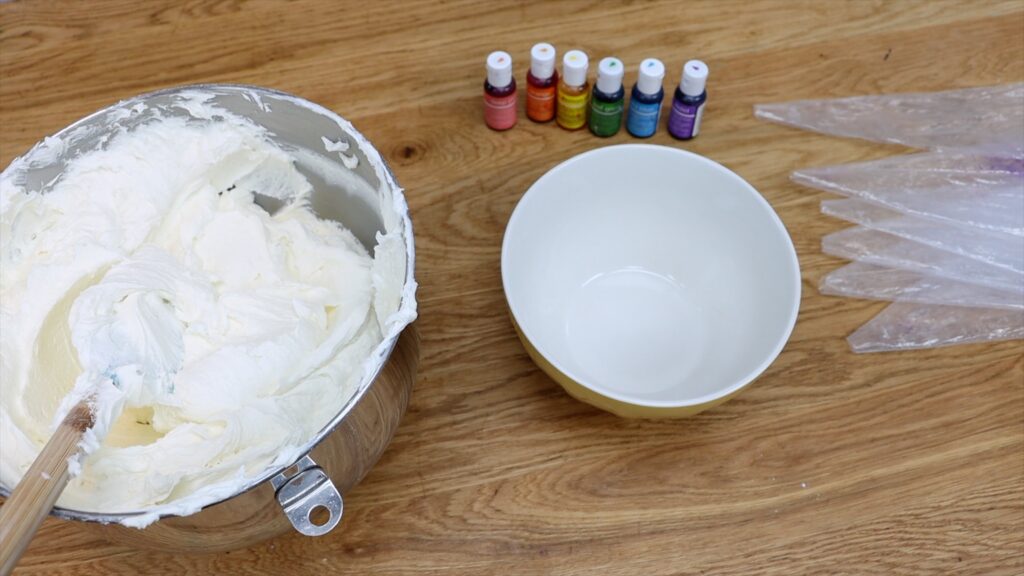
With these 10 tips for buttercream colouring you’ll make bright white buttercream, bold buttercream colours, stunning effects like ombre with one drop of color, and rainbow colors using just one bowl! I'm using my 4 Minute Buttercream for all of the examples in this tutorial.
To mix rainbow colours in just one bowl you’ll need food colours but NOT in the traditional rainbow order.
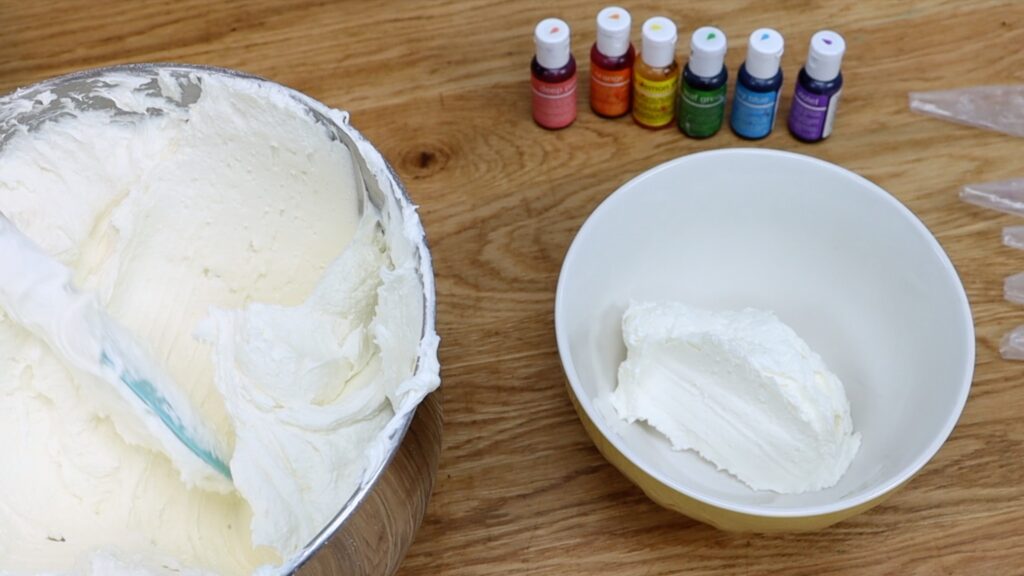
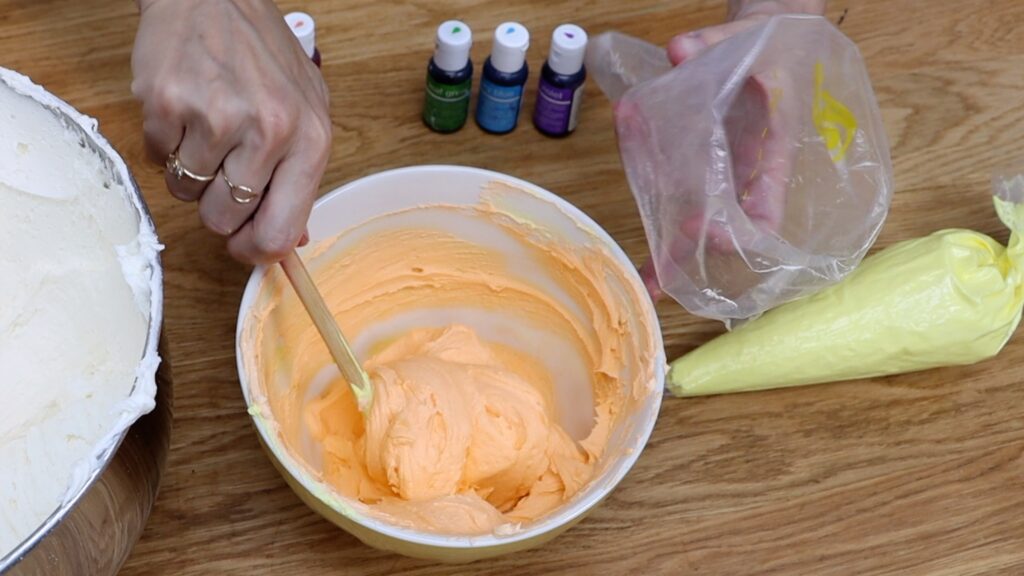
Spoon some plain white buttercream into a bowl and add yellow gel. Mix it in and take out however much yellow buttercream you need. You can put it into a piping bag or use it for whatever frosting or cake decorating technique you like. Then mix orange in the same bowl, incorporating any of the leftover yellow. Take out what you need and then mix pink in the same bowl. Continue with purple, then blue, and finally green.

The reason for this order is that each colour will blend nicely with the next colour. This wouldn't work if you used one bowl without cleaning it and mixed the colours in a different order. For example, mixing yellow after purple would turn the yellow into brown.
For bright and bold colours, use buttercream colouring gels instead of liquids. Look at the difference between these two identical bowls of buttercream. The bowl on the left was coloured with a squirt of blue liquid colour. The bowl on the right has the same amount of blue gel colour.
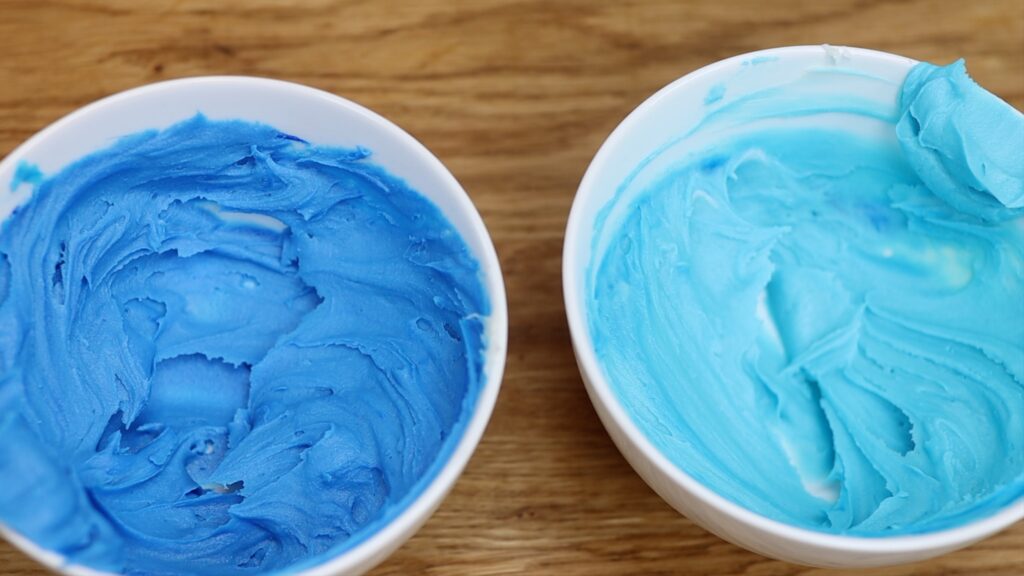
Liquid colouring doesn’t make a strong colour even if you use a lot. Adding too much will water the buttercream down to make the consistency too runny to pipe with. Gel colouring makes bold colours and doesn't affect the consistency of the buttercream.
My favourite hack is using a cupcake tray to mix colours of buttercream. This is really useful if you need a small amount of lots of different colours because instead of washing several bowls at the end, you only wash this one pan.
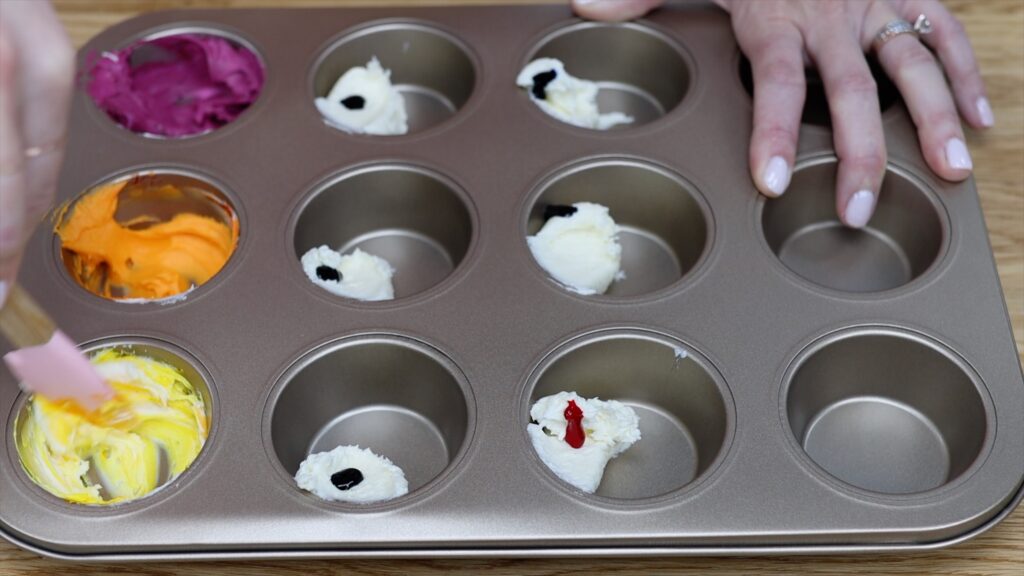
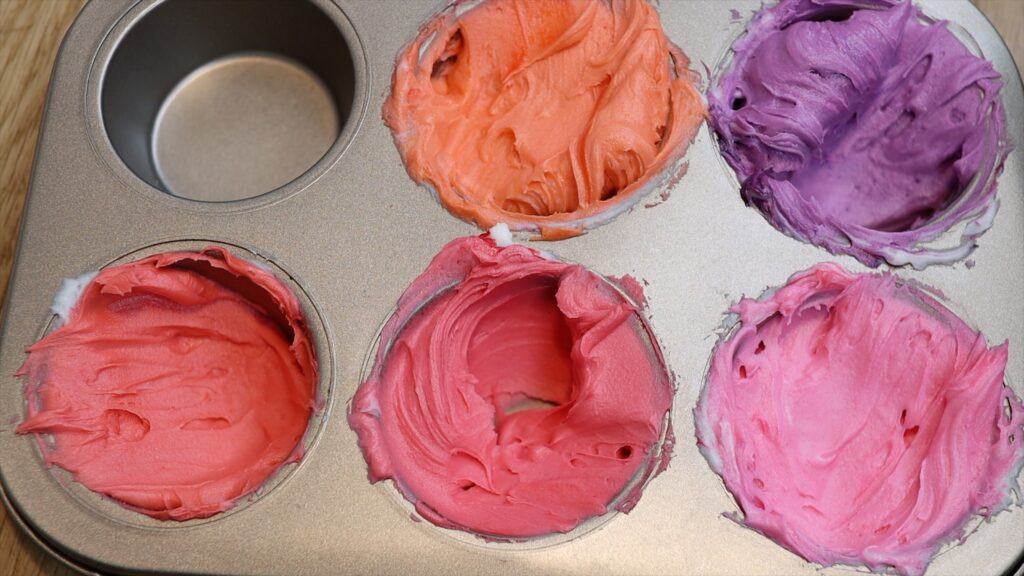
To make a colour palette where all of the colours go well together, start by tinting several bowls of buttercream the same colour. I love using a cupcake pan for this, too! Now add a different colour to each of these. I'm starting with pink and adding purple, orange or red.
By starting with the same base colour, the colours will have that in common and will look great together on your cake.

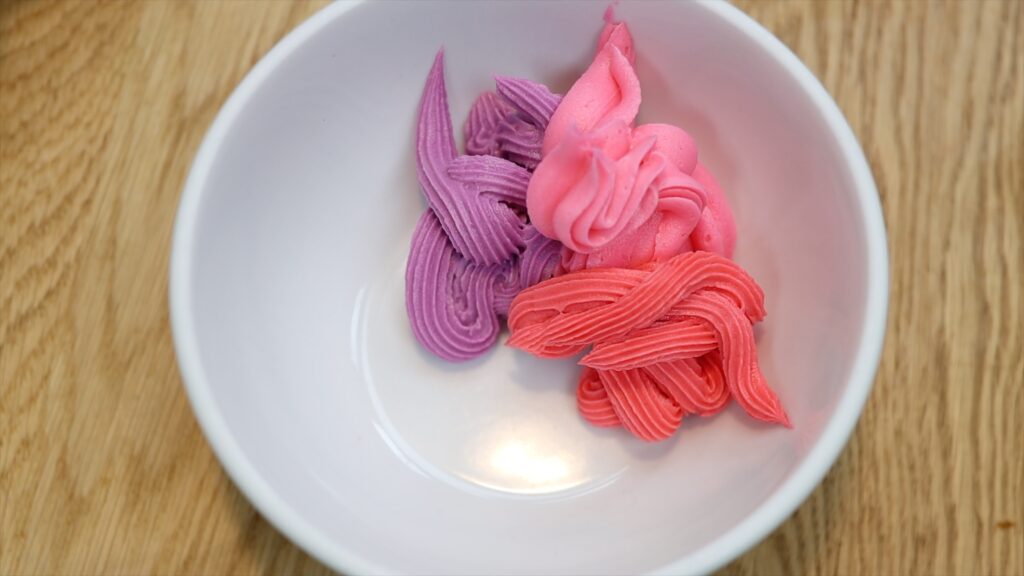
Another way to use this idea is to mix together multiple colours you’re using on your cake. You'll make another colour that will work with your colour scheme.

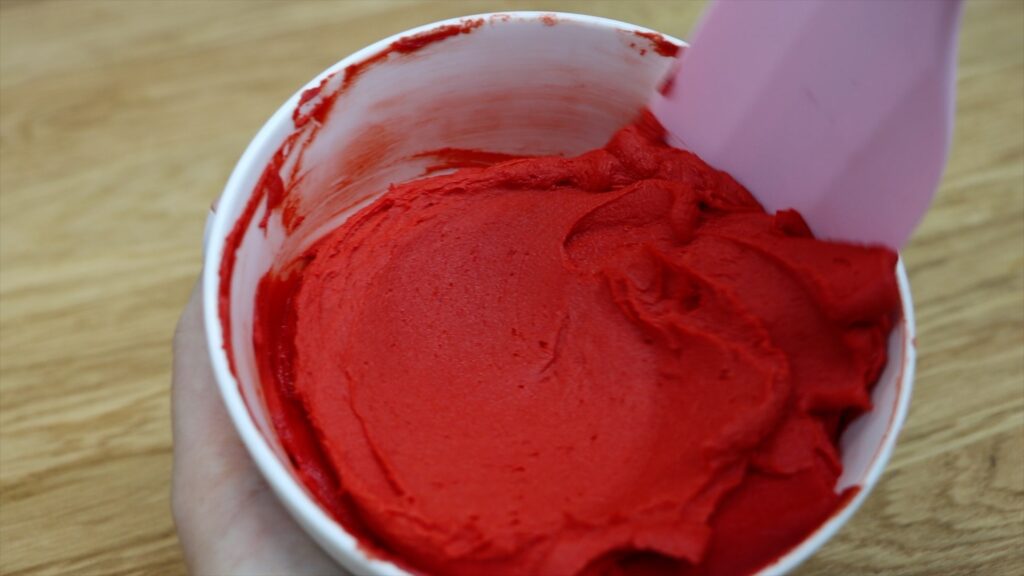
To make black or red or any other dark colour of buttercream, use gel colours. They're more concentrated than liquids so you'll need less of them. You'll need to use quite a lot but stop when you've made a shade lighter than you need. Then cover the bowl and leave it for an hour. You can chill it in the freezer for even better results and then let it thaw to room temperature. The gel will develop and darken and you’ll end up with frosting several shades darker than you had originally!
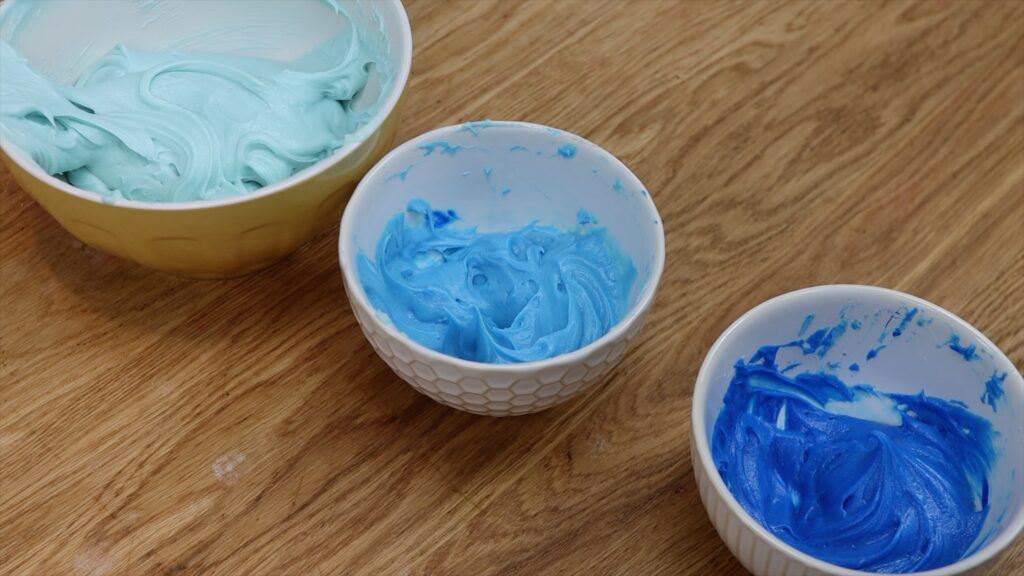
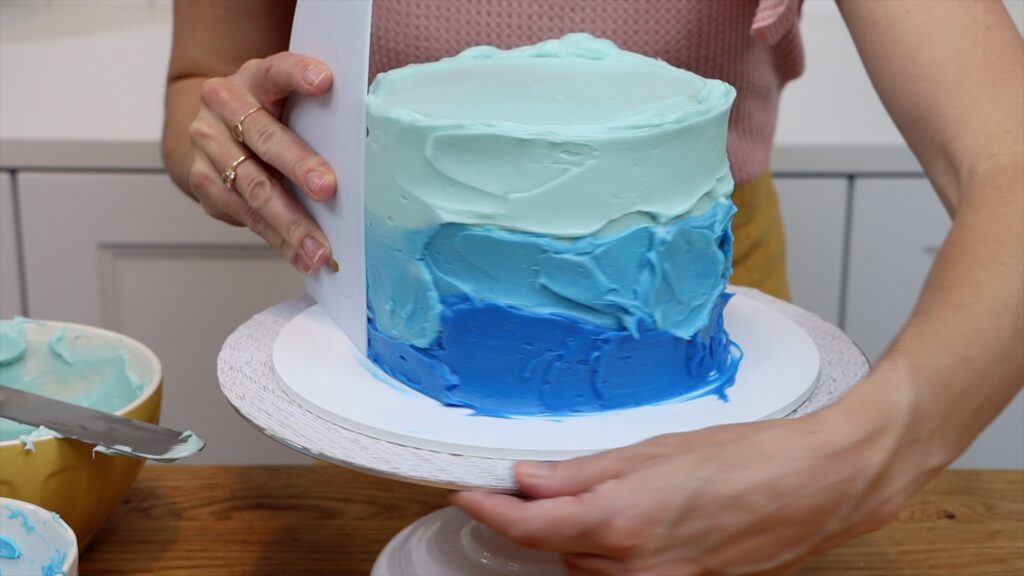
To make ombre frosting with just one squirt of color, make your darkest shade first. Then spoon a little bit of that into another bowl of plain white buttercream to make a lighter shade. Spoon a little bit of that into another bowl of plain white buttercream to make an even lighter shade. You’ll need the most buttercream for whichever colour is going to go on the top of the cake.
Now you have three shades of the same colour to spread onto your cake. Smooth the frosting and then zig zag to mix it up a bit to make the gradient more gradual. I teach this in a lot more detail in my free online course on 10 Frosting Techniques. Smooth again and tadaa! Super easy but stunning ombre frosting!
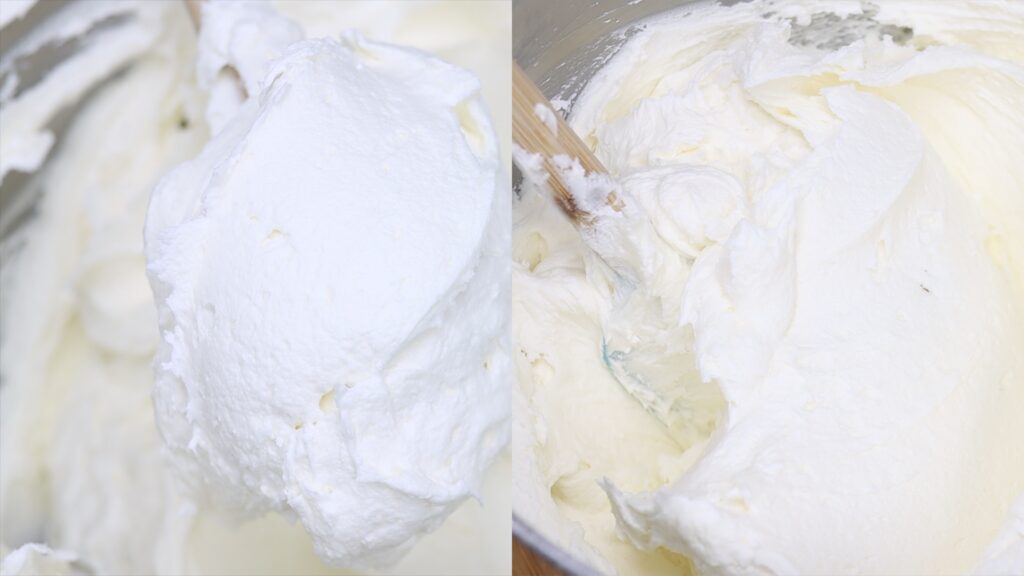
Now a hack for that elusive white buttercream. Butter is yellow so buttercream will naturally have a yellow tinge. Violet will cancel that out but only a tiny amount, much less than a full drop. Use a toothpick to poke into the bottle of buttercream colouring and smear that into the buttercream. Remember that you can always add more if you need it!
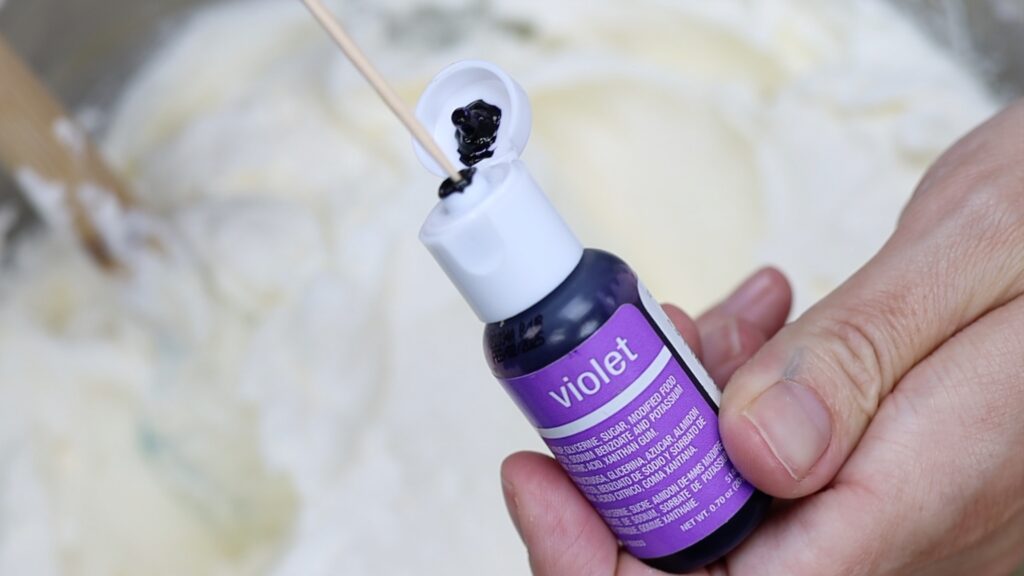
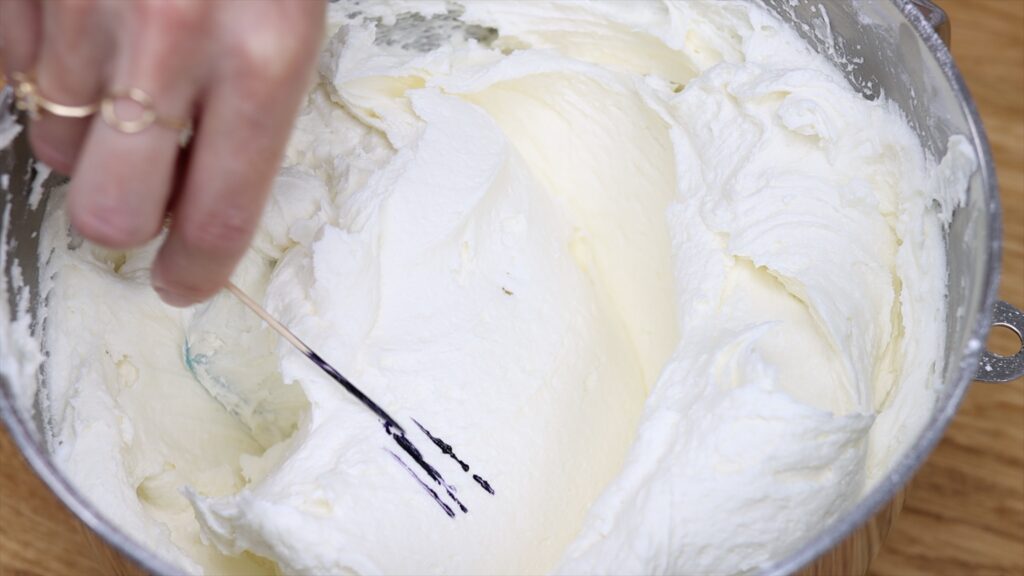
Mix it in well to make bright white buttercream. Look at the difference between before and after adding violet to this batch of buttercream:
If you don’t use all of your buttercream, don't throw away the leftovers! This works for buttercream scraped off while making striped frosting or facelift frosting, for example. You can cover leftover buttercream with plastic wrap and leave it at room temperature for 2 days. To freeze it, spoon it into a ziplock bag and it will last 2 months without changing flavour! Take it out the night before you use it to thaw.
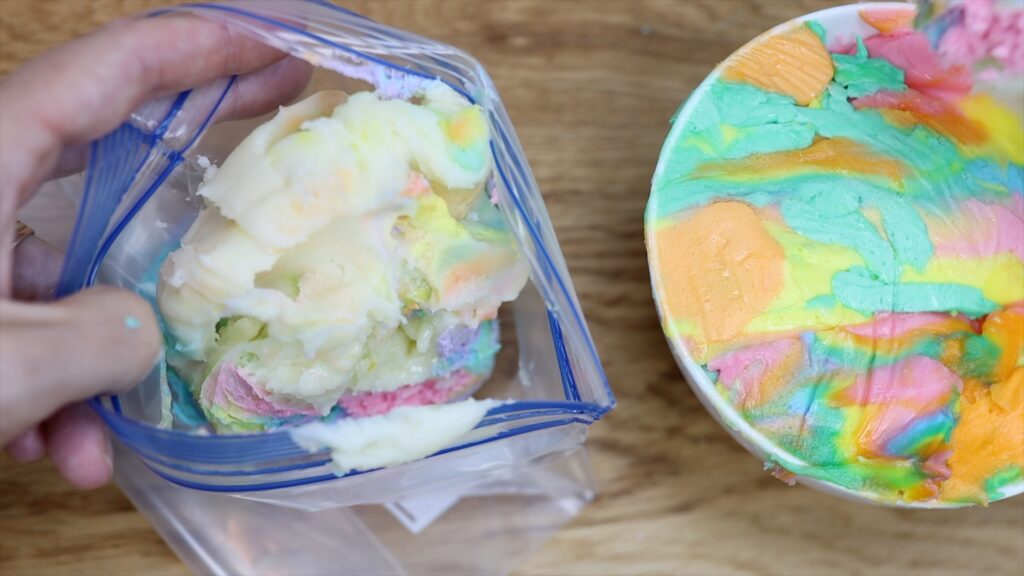
To re-use leftover buttercream, stir it until it’s nice and smooth. Then add another colour if you like before using it on another cake!
If you’re piping a design with multiple piping tips, couplers are a huge time saver. As you finish with each tip, unscrew the coupler ring and take the piping tip off from the outside of the bag. Then put another piping tip on and screw it on and you’re ready to pipe! This way you don’t have to prepare lots of piping bags with lots of piping tips.
Couplers come in different sizes so make sure you choose the right ones for the sizes of your piping tips!
If you don’t have couplers, skip them with this hack! Use buttercream colouring to make the shades you need and spoon them into piping bags. Don't use any piping tips in these piping bags. Then take an empty piping bag and drop a piping tip into it. Now lower your first coloured piping bag into the one with the tip. When you squeeze the piping bag, you’ll push the coloured buttercream straight through the piping tip.
When you finish with this colour, pull it out and lower the next coloured piping bag in. Squeeze out that last little bit of the previous colour into a bowl, until you see this next colour come through on its own.
After piping with each colour, take that bag out of the outer piping bag and put the next bag in. Always squeeze the leftover colour into a bowl before piping with the next colour. By using an outer piping bag for the piping tip you can quickly switch between as many colours as you like without couplers.
I hope you’ve seen some hacks that will make your buttercream colours really POP! Click below to subscribe to my YouTube channel for a new tutorial every week and visit my cake school to learn hundreds of cake decorating techniques and designs with my online courses and membership options!
You can also watch a video on this tutorial for buttercream colouring hacks:
From fixing broken cake layers and preventing leaning cakes, to achieving impossibly smooth frosting, you’ll WISH you knew these 10 cake hacks sooner!
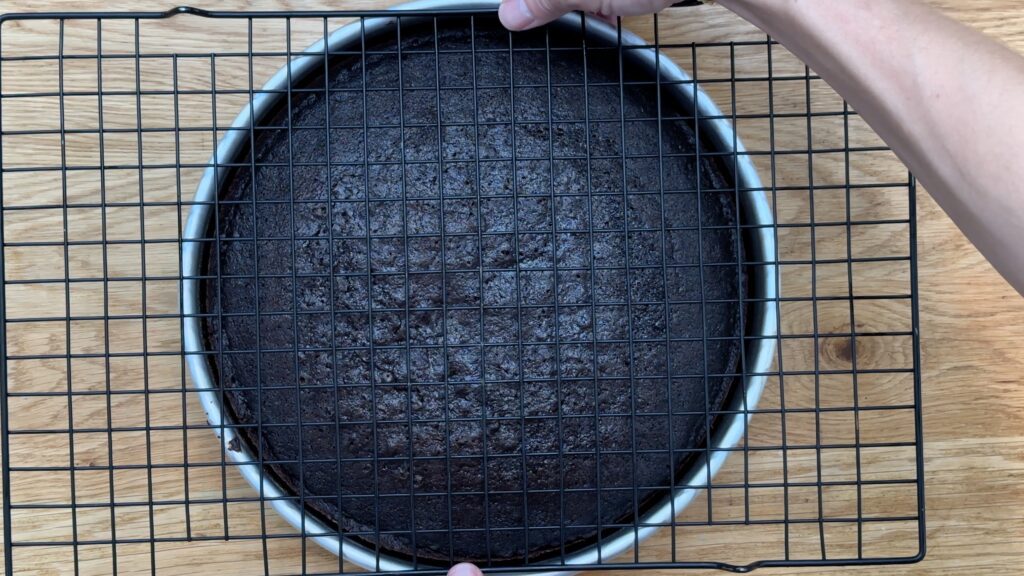
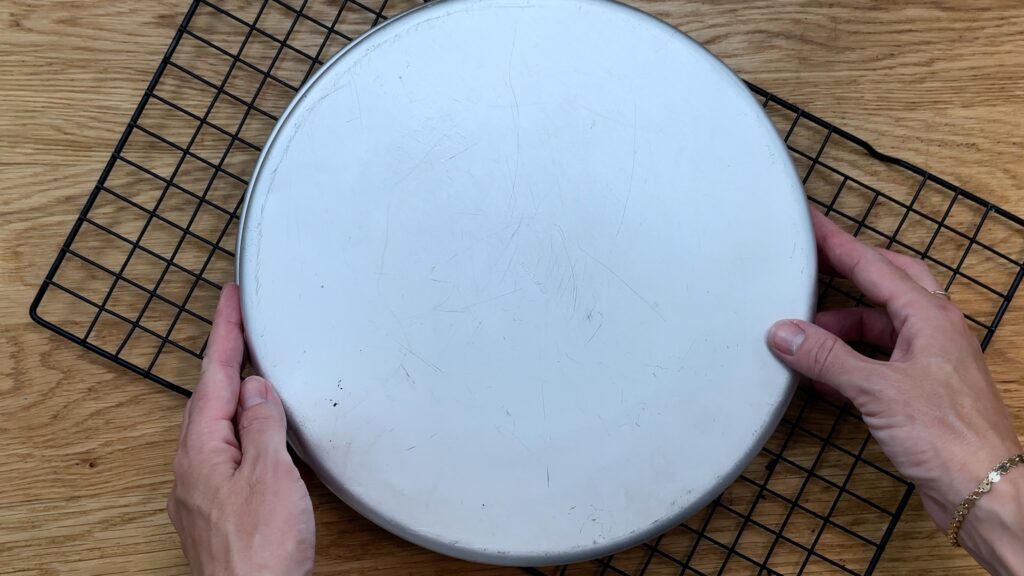
Prevent cakes from cracking or crumbling by turning them out of their pans this way! After taking a cake out of the oven, place a cooling rack on top of the cake pan. Then grip both the rack and the pan and flip them both over together. Lift the cake pan up and voila! Intact cake layers every time!
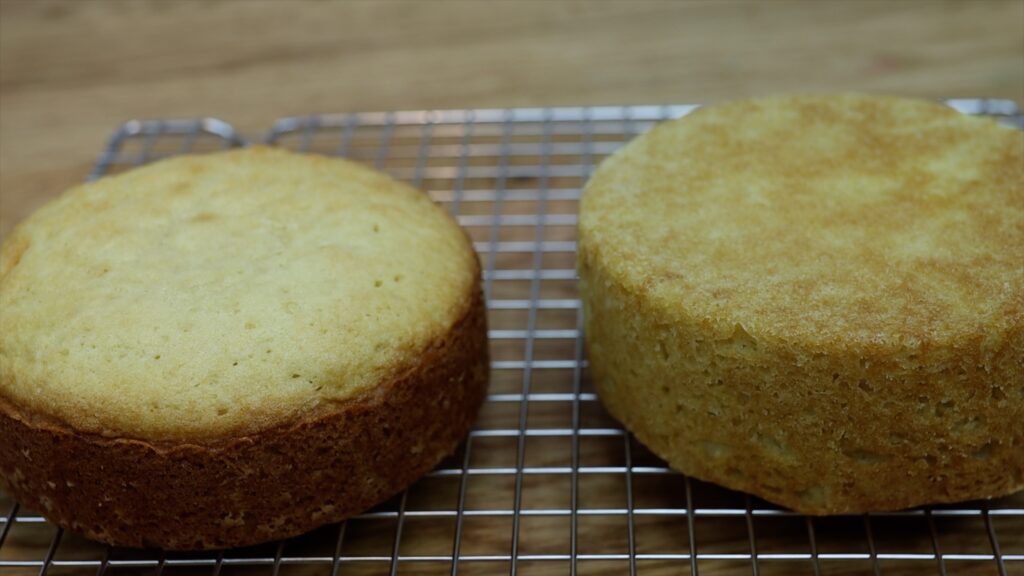
For evenly baked cakes with level tops (no domes) and no burnt edges, the secret is cake strips! I resisted buying these for a long time but they really aren’t a gimmick. You could soak oil towels or cloths in water instead to make your own DIY version of them.

Look at the difference between the same cake batter baked in cake pans with and without baking strips!
Cakes sometimes break or crumble or crack or fall apart as you’re turning them out of their pans. Theis may be because you didn't grease the pan before pouring your batter in. Most commonly, it happens when you turn the cakes out immediately after taking them out of the oven. Instead, wait 5 minutes for the cake to cool and firm up slightly.
If your cake does break, don’t throw it away! Wait for it to cool and wrap it in plastic wrap. Put it in the freezer and when it freezes, the pieces of cake will stick together. Now use them as normal, layering them with buttercream as your filling. When this buttercream sets it will hold the crumbled cakes together like glue! You can even spread it on to attach a piece that’s fallen off completely.
Chill the cake again to set the buttercream and then frost it with buttercream. Then this buttercream sets it will also hold the cake together. Decorate the cake and when you serve it, no one will know how ugly those cake layers were to begin with!
Air bubbles in your frosting? Or dents or gaps or uneven parts? Here’s a hack for those! Heat a metal cake comb by dipping it into hot water or using a blowtorch along the edge. Then scrape around your cake. The hot metal will melt the very outer layer of frosting, pulling that melted frosting around the cake. It will fill in imperfections in the frosting to create a super smooth surface.

Bulges in the sides of your frosting? You won’t have any if you use this method of assembling your cake. For runny fillings like caramel or lemon curd, pipe a ring of buttercream around the edge of the cake before spooning in your filling. This ring of buttercream is called a dam. It will hold the filling in so it doesn’t ooze out, which is what causes a bulge in between cake layers, underneath the frosting.
After assembling your cake, scrape around the sides to flatten the buttercream sticking out from between the layers. Then frost and decorate and your sides will be straight without bulges!
Basic cake hacks like these ensure a strong, stable foundation so every frosting and decorating technique will look its best. To perfect your caking skills, take my Basics of Cake online course.
If your cake looks like it’s leaning sideways, your layers aren’t placed directly on top of each other. Even if you’ve already started frosting your cake, it’s not too late to fix this! Spread some more frosting to fill in the lean on each side of the cake. This means the bottom of one side of the cake and the top of the other.
Then when you scrape around the cake, press your comb down on the cake board to line it up straight. You’ll smooth this frosting you’ve spread on to create straight sides on the cake. Add your final layer of frosting and you’ve got rid of the leaning or tilting effect!
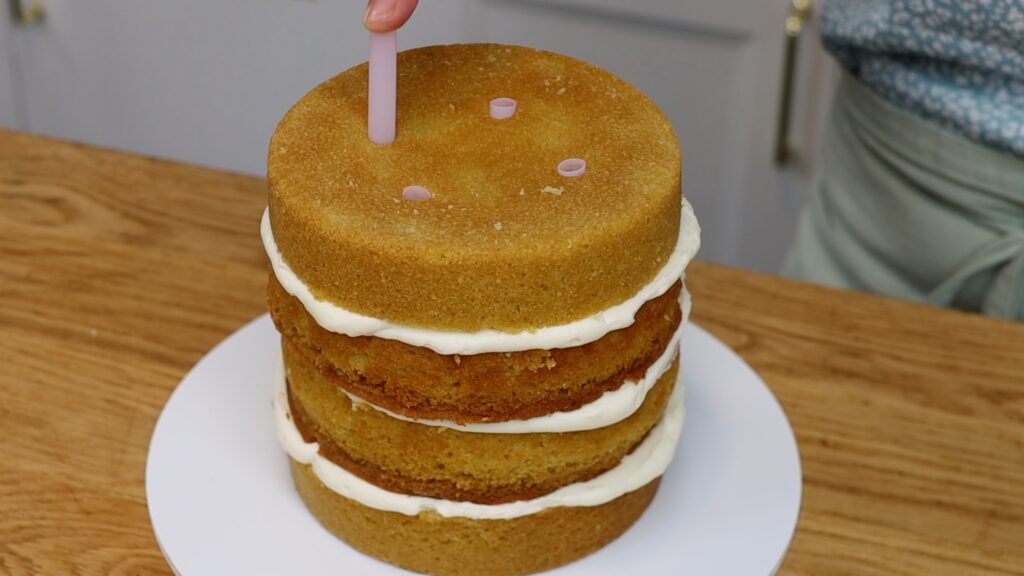
For super tall cakes that won’t collapse or topple over you'll need an internal support structure. This isn't as complicated as it sounds! Alternate cake layers and filling but stop after your first three or four cake layers. Then push a boba straw or wooden dowel down to the bottom of the cake. Pinch it where it sticks out above the cake and cut it there so it’s the same height as the cake so far. Measure another three straws to be the same height. Then push them all into the cake, spacing them about 2 inches apart from each other.
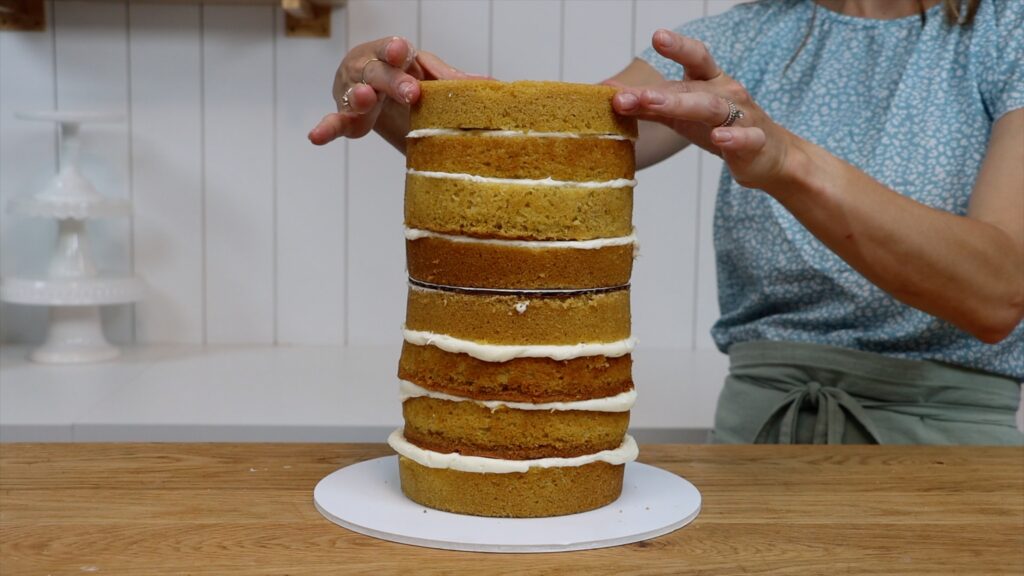
Spread some frosting on top to act as glue and then push another cake board on top. The cake board should be as wide as the cake so that it doesn't stick out beyond the sides. Warning: a six inch board might be bigger than a cake baked in six inch pans! This happens because some cake recipes shrink after baking as they're cooling. In this case you can use a board an inch smaller or trim the cake board.
Use some buttercream to attach your next cake layer to the bottom part of the cake. Continue assembling your cake with the next three or four layers.
The final step is to take a long wooden dowel and push it down through the middle of the cake. It will poke straight through that cardboard cake board in the middle. When it hits the cake board at the very bottom, mark the dowel with a pencil where it sticks out of the cake.
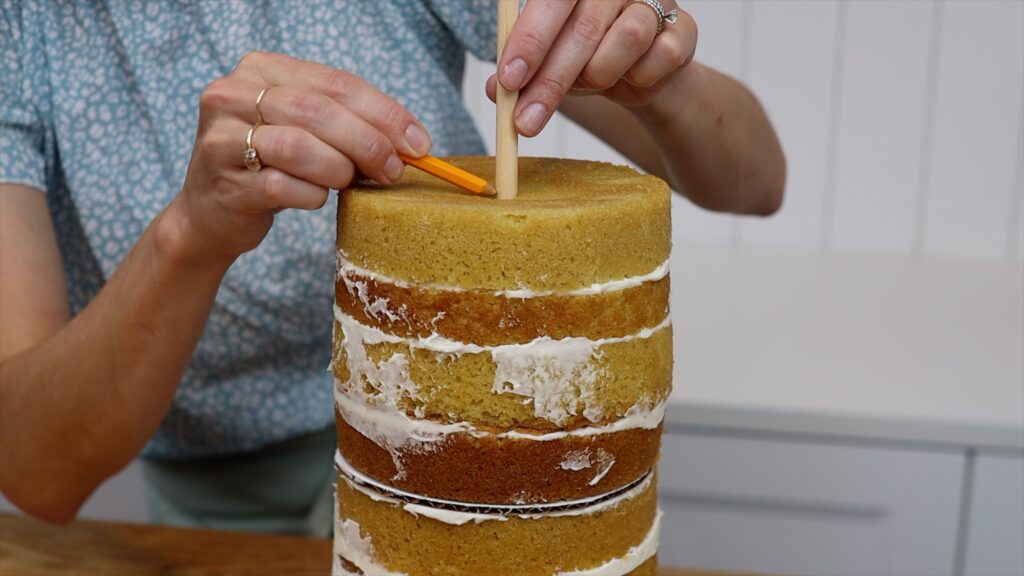
Pull the dowel back out and cut it on the pencil line with wire cutters or a sharp knife. Then push it back down into the cake. I haven’t finished frosting and decorating this cake yet but when I do, I know it will be stable enough to display and transport without problems!
There are two parts to this hack for perfectly neat cake slices. First, let your frosting set before cutting the cake. You can set the frosting quickly by putting the cake in the fridge or freezer for 30 minutes. Next, dip your knife in a glass of warm water and dry it before cutting. Now your knife will slice cleanly through the frosting and cake. The set frosting will be firm enough that you can balance the slice as you place it on a cake.

To transfer your cake from its cake board onto a cake stand the hack is to chill the cake first. The frosting will get cold and firm to the touch. Then slide an
Lift the cake up and lower it down onto a cake stand. You can adjust and center it on the stand because the frosting is firm enough to push against without damaging it.
Need a hack for condensation on cakes? Condensation is caused by two things. The first cause is moisture in the fridge or freezer so your cake needs to be sealed before refrigerating or freezing. You can wrap it in two layers of plastic or store it inside a cake caddy or any other airtight container.
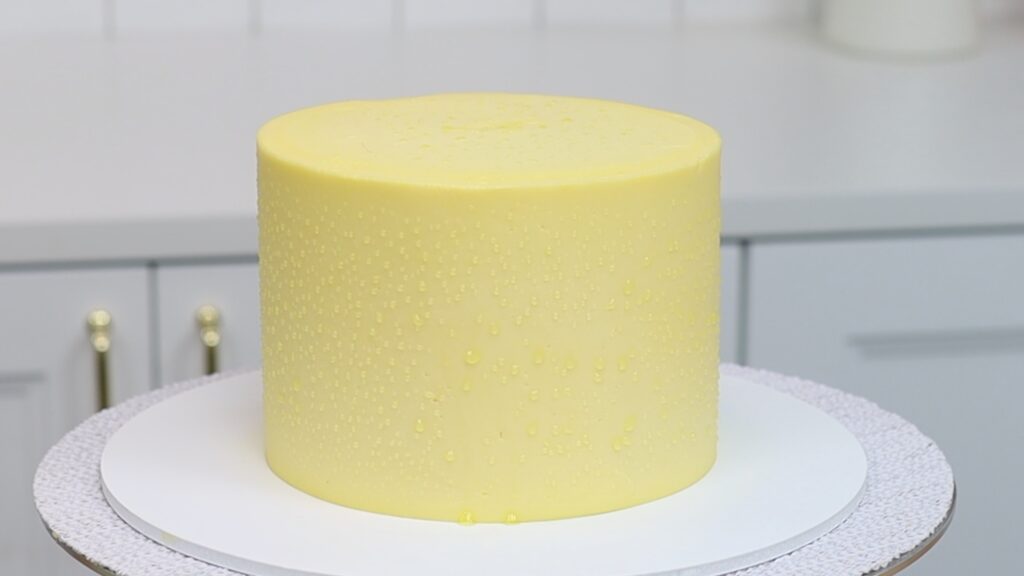
The second cause, which is more common, is a big change in temperature. Avoid moving a cake from the freezer straight to room temperature or from the fridge to a hot room. If you need to refrigerate your cake, when you take it out move it to a cool room. In summer this usually means using air conditioning or a fan. If you do get condensation droplets on your cake, dab them with a paper towel to absorb the liquid.
If you want to take your cake skills to the next level and learn hundreds of cake decorating techniques and designs, visit my cake school to learn hundreds of cake decorating techniques and designs with my online courses. Join my ClubPLUS membership for access to every MasterCourse, MiniCourse, Live Workshop, and 5 Minute Fridays. I hope to see you there!
You can also watch a video tutorial for 10 Cake Hacks You'll Wish You Knew Sooner:
Cake dummies or fake cakes are a great way to save money and avoid waste while creating extra tiers on cakes or practicing new techniques!
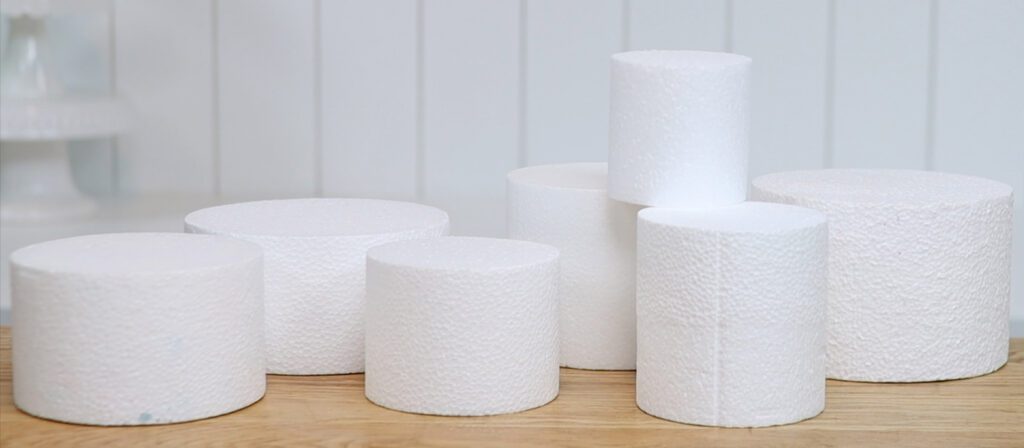
You can use cake dummies to practice techniques without wasting any actual cake. Businesses often use them for display cakes that don’t need to be eaten. They're also a popular option to add an extra tier to a wedding cake for height. I love my Perfect Chocolate Cake and all of my other cake recipes but a cake dummy is ideal when you don't need any servings from a cake. Once the cake is frosted and decorated, you'd never know it was styrofoam on the inside!
Cake dummies come in different widths and also different heights. I like to buy a variety of sizes so that I can stack them into a tier cake. If you buy short dummies but want to decorate a tall cake you can stack two of them together. Spread buttercream or royal icing on top of the first dummy and press the next one on top. When the buttercream or royal icing sets it will attach the dummies together like glue.
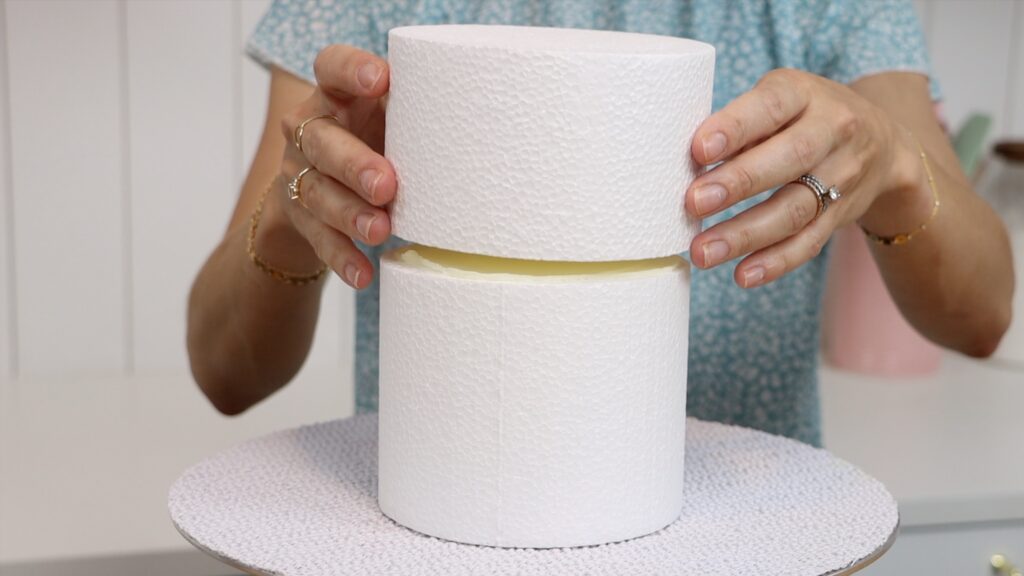
Cake dummies are styrofoam and they’re easily damaged so be gentle with them and store them carefully.
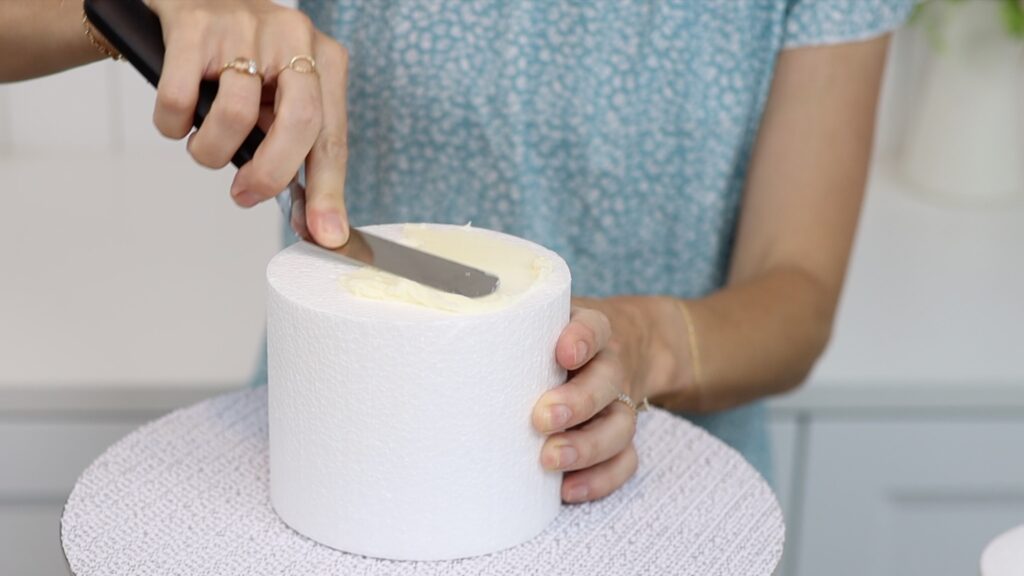
Being lightweight makes frosting cake dummies tricky so here are tips for that! Start with a bit of buttercream on the middle of your cake board. Press your cake dummy firmly down onto it, centering it on the board. Then put the cake on the board in the freezer for 10 minutes or the fridge for 30 minutes. This will chill and set that buttercream. I use my 4 Minute Buttercream to frost and decorate almost all of my cakes.

Now you can frost the cake dummy. The dot will hold the cake in place on the board while you spread and scrape the frosting. However, since cake dummies are so light you'll push the cake on its board all over the
One of the advantages of cake dummies is that you can skip the crumb coat! There are no crumbs to get into your frosting so just a single layer of frosting is enough, which is a nice time saver.
To make tier cakes you can stack cake dummies or combine them with real cake tiers. Since they are more sturdy than real cakes, you don’t need a support structure within them. You don’t need a cake board underneath them on the top tiers either.
To use a cake dummy for a tier cake, slice underneath the cake dummy to separate it from its cake board. Then spread a bit of buttercream on the cake that will be below it. After placing the cake dummy on top, the buttercream will set and secure it in place. Then you can move or transport the cake safely.
Just like with real cakes, I recommend chilling a cake dummy after frosting it, before stacking a tier cake. When the frosting is cold you can touch it to balance or adjust the tiers with damaging it.
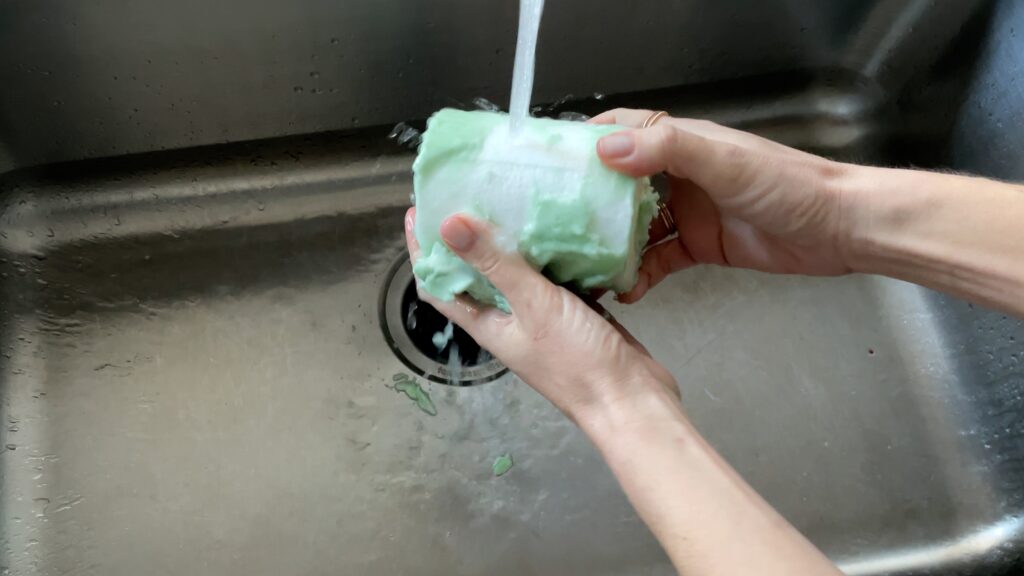
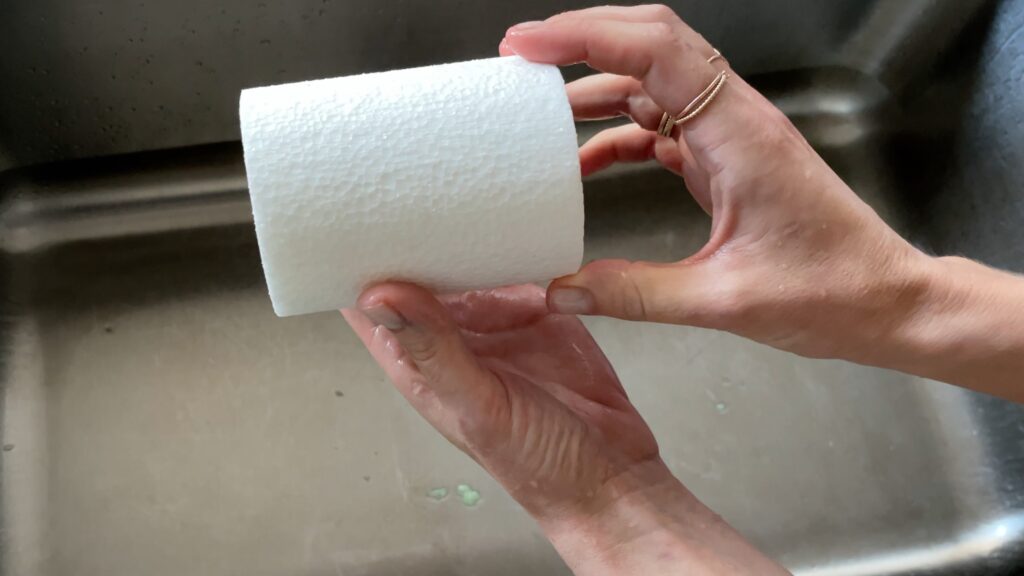
A huge benefit of cake dummies is that they’re reusable! When you’ve finished with a decorated dummy, rinse it under hot water to take off the frosting. Leave it to dry and then frost and decorate it again!
Cake dummies are a time saving and cost saving way to improve your cake decorating skills. You can practice techniques like smooth frosting, sharp edges, stenciling, piping, and more!
Visit my cake school to learn hundreds of cake decorating techniques and designs with my online courses and membership options!
You can also watch a video of this tutorial:
If you're celebrating a half birthday this trendy cartoon birthday cake is the most fun cake you can make!
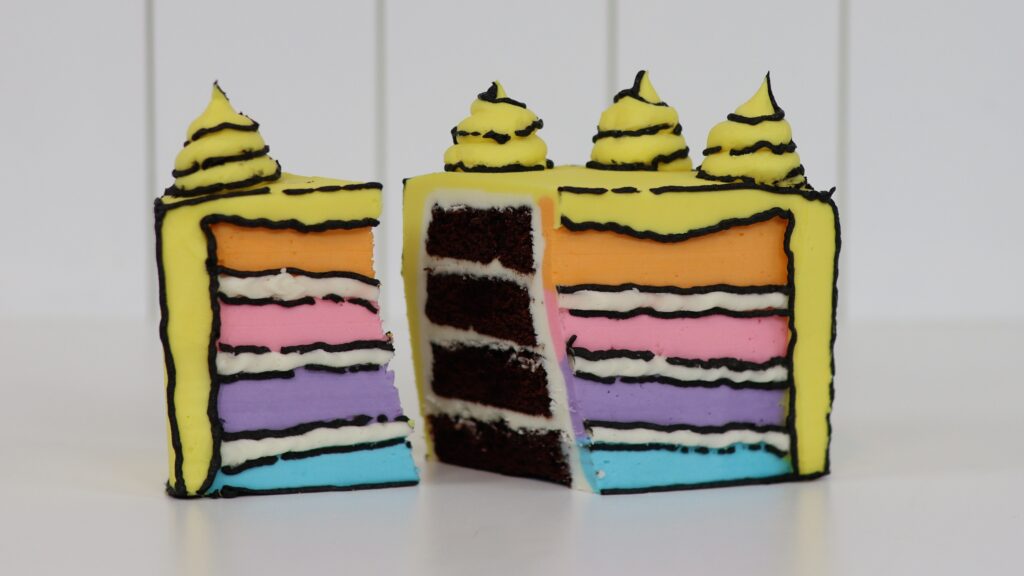
You'll need two layers of cake if you want to make a four layer cake. This is my Perfect Chocolate Cake recipe. Cut each cake layer down the middle to make two semi-circle cakes, making four in total.
Attach the first cake layer to a cake board with a bit of buttercream on the cake board. When you push the first layer of cake down onto it you'll attach it, like glue. Spread or pipe your filling onto that layer. I'm using my 4 Minute Buttercream to fill and frost this cake.
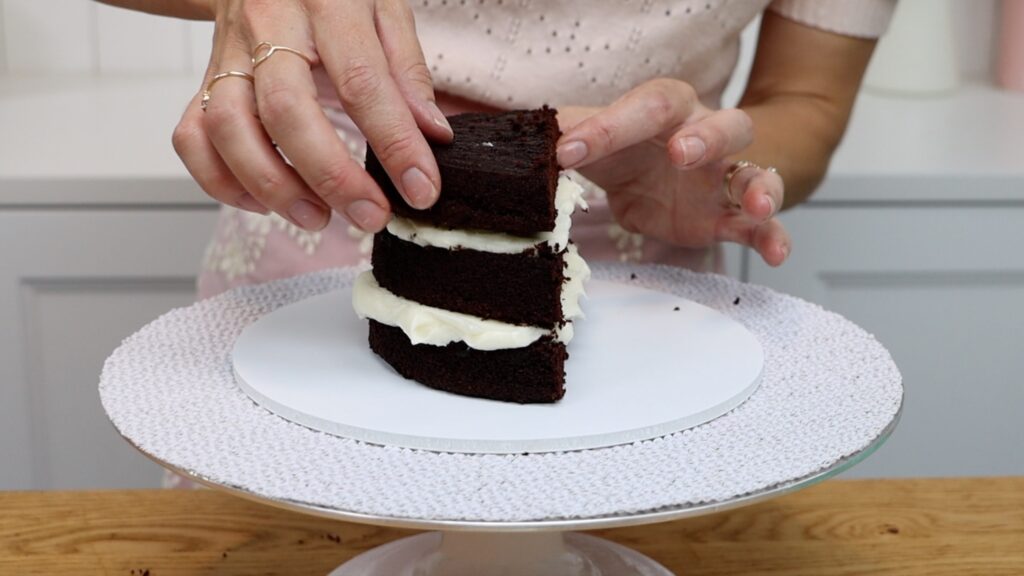
Place the next layer on top and continue alternating cake and filling to assemble your half cake. I recommend chilling this before frosting it for two reasons. Firstly, because room temperature cake layers are very crumbly but cold cakes are firmer. Secondly, because room temperature cakes are very soft so it will wobble if you try to frost it now. Put it into the freezer for 15 minutes or the fridge for half an hour to firm up.
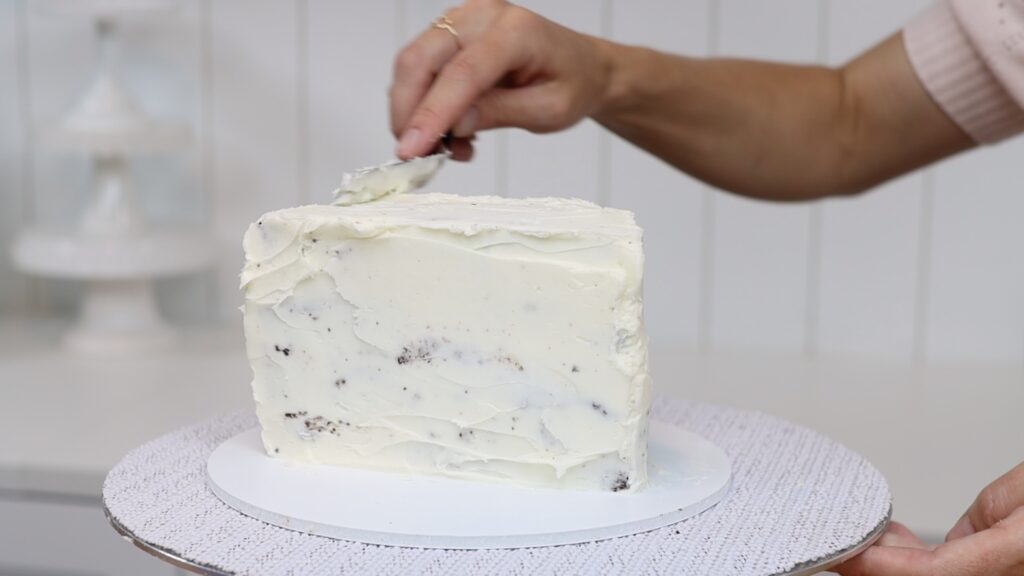
Then cover it in a thin layer of frosting. This is a crumb coat, which traps any crumbs that come off the cake. The crumbs get stuck in this layer of frosting so they won't get into your final layer later. Spread the frosting all over the top and the sides of the cake and then smooth it. This doesn't need to be neat, it just needs to trap the crumbs so you shouldn't see any exposed cake. Now put this back into the freezer for 15 minutes or in the fridge for half an hour to set the crumb coat. Meanwhile, prepare coloured buttercream to frost and decorate the cake.
I'm going to pipe very colourful layers onto the cut side of the cake. The quickest way to do this is to put the frosting into piping bags. Instead of using piping tips you can just cut the ends off the piping bags to pipe through. As you're piping on the colourful frosting you'll be able to see the layers of cake underneath the crumb coat. If you follow those then when you cut into the cake, the colourful layers that you've created on the outside will match the actual cake layers on the inside!
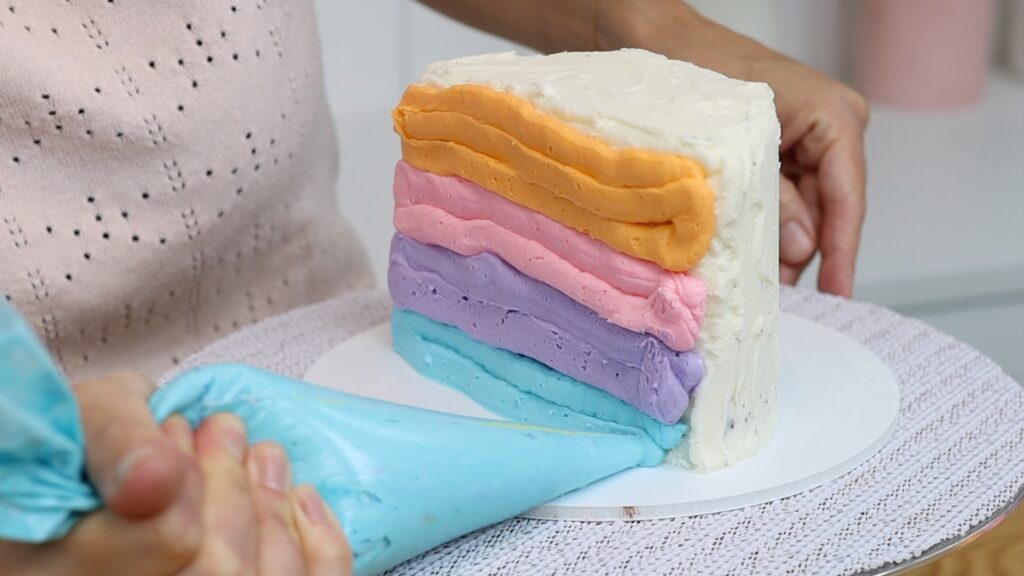
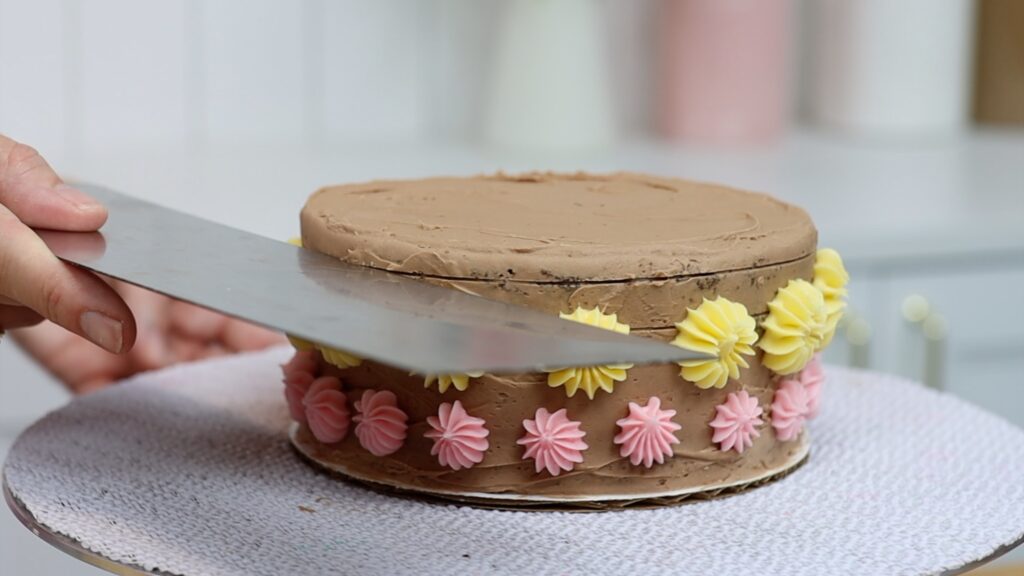
Smooth the piping with a cake comb, scraping from side to side to take off the excess. Then tidy up the edges with your

Put the cake back into the freezer for a few minutes while you prepare the frosting for the rest of the cake. I recommend using gel colours because they're much more concentrated than liquid colours. With just a few drops you'll get really bold colours and that means you won't affect the buttercream consistency.
I like to frost the top of the cake first. Spoon some frosting on and spread it around so that it sticks out over the edges of the cake. This will help you get really nice sharp edges later.
After a few minutes in the freezer, the colourful striped frosting on the cake will have chilled and set. As you spread more frosting onto the cake, you won't damaged that chilled frosting.
Where the yellow frosting meets the colourful stripes, don't worry about the edges being perfectly straight. This is a cartoon style cake so it's for lines to be wavy instead of straight. Also, you're going to add an outline later which will cover up any small imperfections along the edges.
Something a little bit tricky about half cakes is that you'll have to use your cake comb in the opposite direction to the way that you're used to using it. Scrape from one side of the curve to the other and then back the other way.
When you finish smoothing you should have a lip of frosting sticking up. Now with your
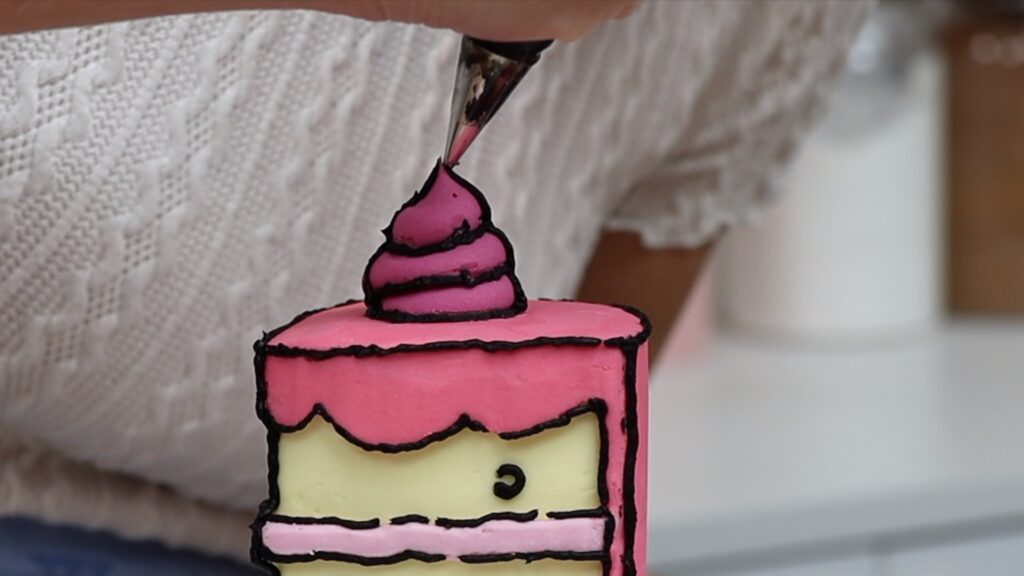
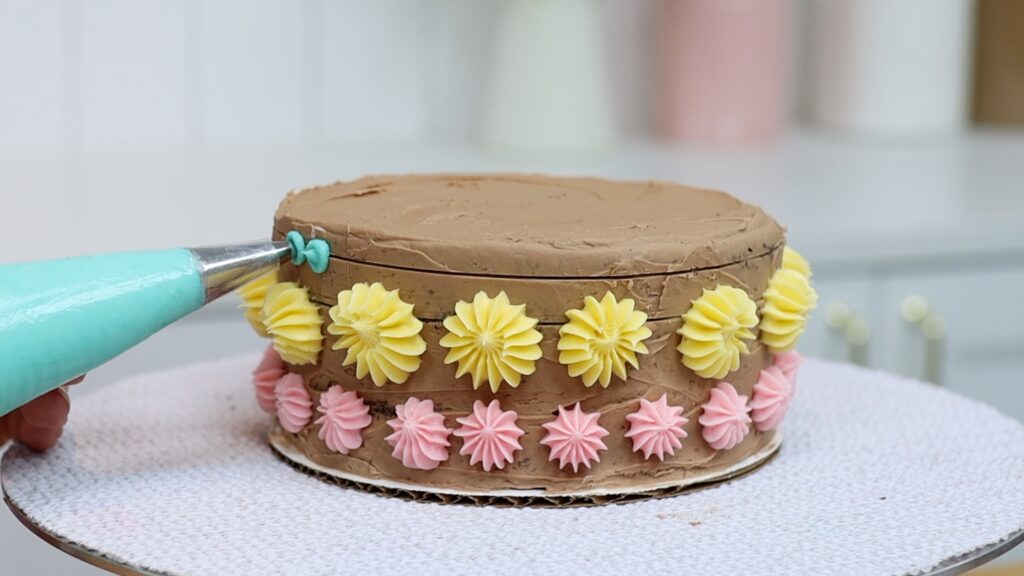
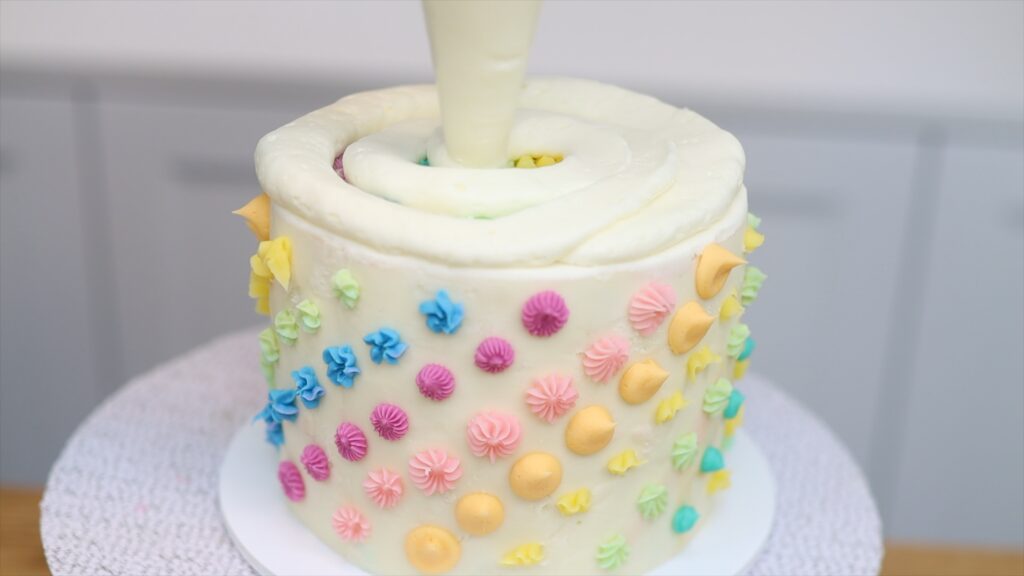
Next, pipe some swirls onto the top of the cake. I'm using a piping bag with the end cut off without a piping tip. If you have a 1A piping tip, which is a large round piping tip, you'll get even neater results. I don't recommend using a star-shaped piping tip because the outline will be even trickier to do than with a round hole.
Use a small round piping tip to pipe the filling between the colourful cake layers. This is a #8 with some plain white buttercream in the piping bag. You'll notice that the coloured layers blend slightly where meet, which happens when you smooth the frosting you piped on. Pipe the filling between the different colours to cover that blending so that there's a clear divide between each colour.
You could stop now and leave the cake like this and I think it looks gorgeous! The pastel colour are pretty but to create the iconic cartoon style cake you'll need to add an outline.
Before doing the outline I really recommend chilling your cake to set this frosting. Put it back in the freezer for 10 to 15 minutes while you tint your black frosting.
A lot of people struggle with black buttercream but here are two tips. Firstly, use a lot of black gel! If your buttercream is grey instead of black, you need more gel. Secondly, after adding gel, let the the buttercream sit for about an hour. Cover the bowl with a lid or plastic wrap to keep it soft. The gel will develop and the colour will darken all by itself.
Put the buttercream into a piping bag fitted with a small round piping tip like a #3 or a #4. Now it's time to pipe the outlines. For me this is probably the trickiest thing I've ever done with cake decorating because I have incredibly shaky hands. Luckily, this cartoon style doesn't require perfectly straight lines so it's okay for your lines to wobble. Even better, it'sf ine for them to break apart because the little gaps in between the lines are actually part of the style.
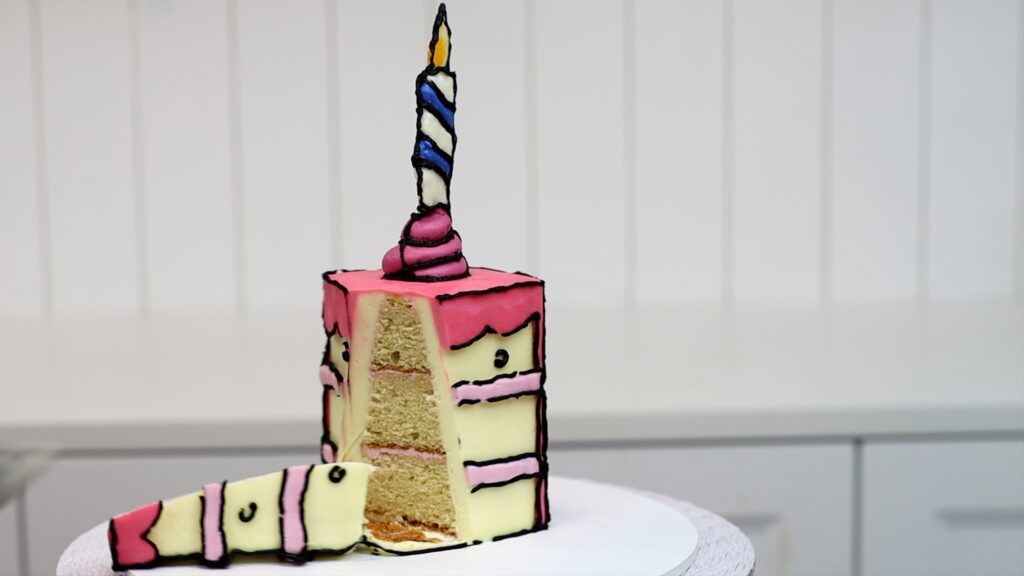
Work your way up or down or around the cake, piping every line which represents an edge or an outline. That means going above and below each layer of filling, around the edges of the sides of the cake and also the edges at the top.
The trickiest part is outlining the piped swirls. If I did this again I would do it a little bit differently. I would pipe these swirls onto a piece of parchment paper on top of a tray or a cutting board or a cake board. After piping the swirls, I would put that board into the freezer to set them. Then I would outline them on that tray because once they're on the cake it's quite difficult to angle your hand all the way around each swirl to follow the outline of the piping because other swirls are going to get into the way of your piping hand. Finally, I would lift the frozen swirls and place them on the cake.
Follow any edges or outlines you can see including the little peak at the top of each of the swirls. Before doing any touch-ups, put the cake back into the freezer for a few minutes to set the black frosting. It's very easy to scrape off any piping you don't like when it's set. use a sharp knife and you'll lift the black frosting off without smudging it.
Now take a hundred photos of your cake! It's fun to try to angle it so that it really looks like a cartoon and that will make people stop and look twice to figure out if it's actually a real cake or not.
And of course cutting into a cartoon cake is like an optical illusion. This cartoon style is so much fun!
I hope you've enjoyed this tutorial. Visit my cake school to learn hundreds of cake decorating techniques and designs and subscribe to my YouTube channel for a new cake decorating tutorial every Tuesday.
You can also watch a video of this tutorial on how to make a cartoon birthday cake for a half birthday:
In this tutorial I’m going to show you how to use a cake comb for 8 different cake decorating techniques. Of course, you can use a cake comb to smooth frosting but also for so much more!
Before piping onto a cake, it’s a good idea to mark where you’re going to pipe. This will keep your piping straight and level and also the same width or height. Cake combs are great for this because they're thin and sharp so they'll easily score the frosting.
Then just pipe along these lines for the neatest results! I decorated this cake with my new Facelift Frosting technique. I’ll show you how to do this later in this tutorial!
When you’ve smoothed the frosting on the sides of a cake, you’ll have frosting sticking up around the top edge. Use your cake comb to smooth that, pushing sideways to swipe it off. Clean your comb after each scrape for the sharpest edges. As you can see, I use lots of different cake combs: plastic, metal and acrylic. Check out this tutorial on which cake scraped is best. Spoiler alert: they’re all great for different stages and different techniques!
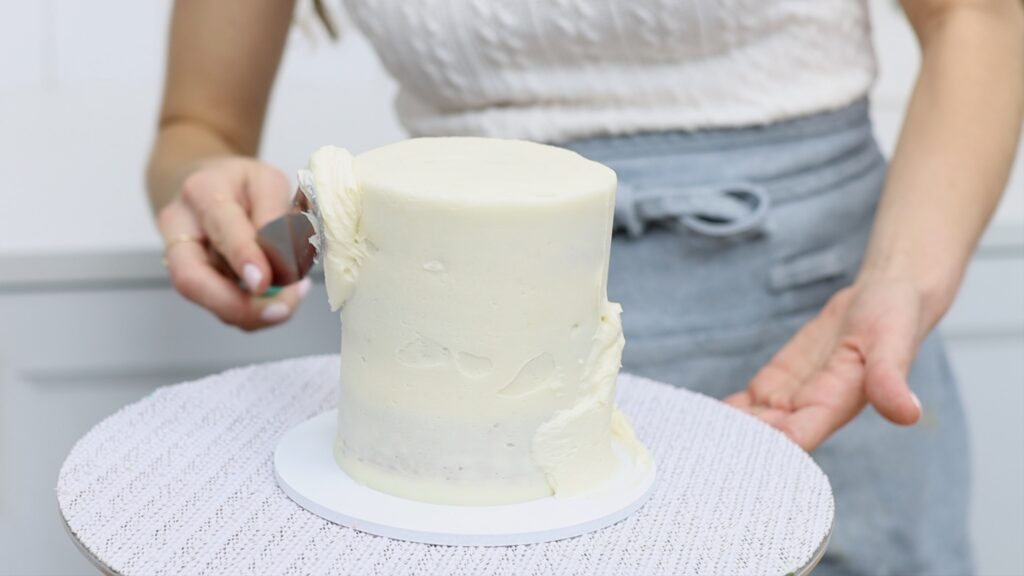
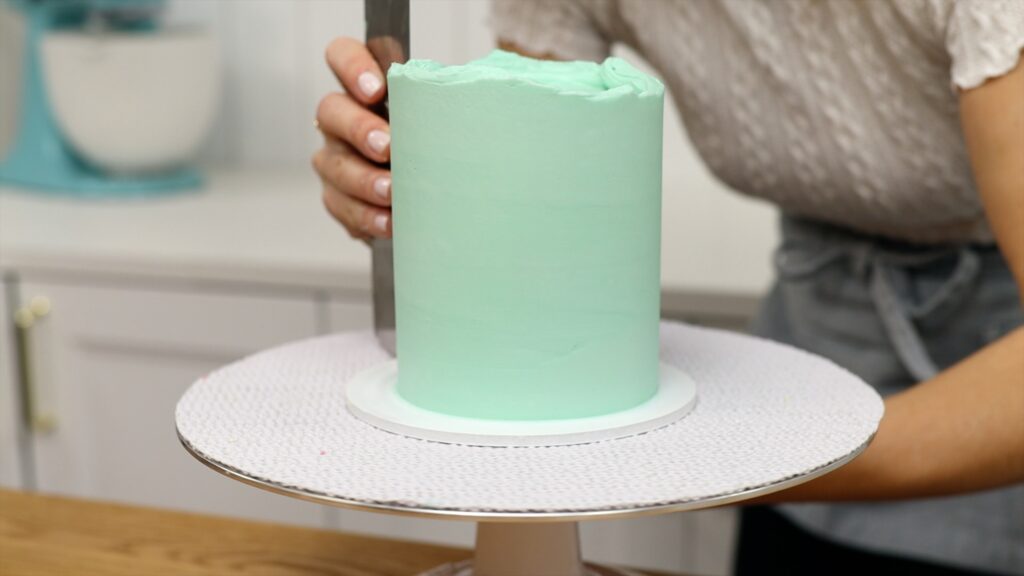
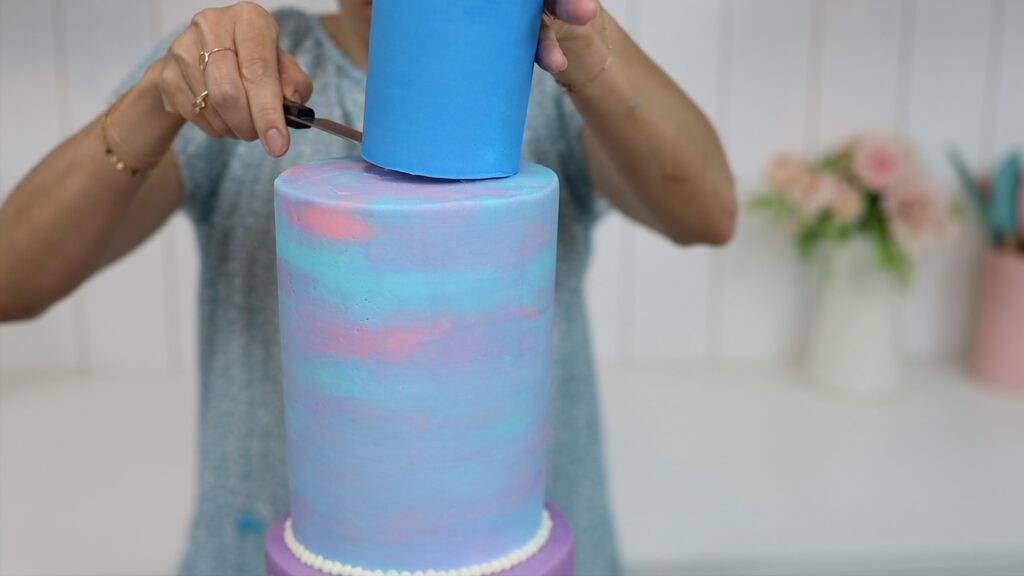
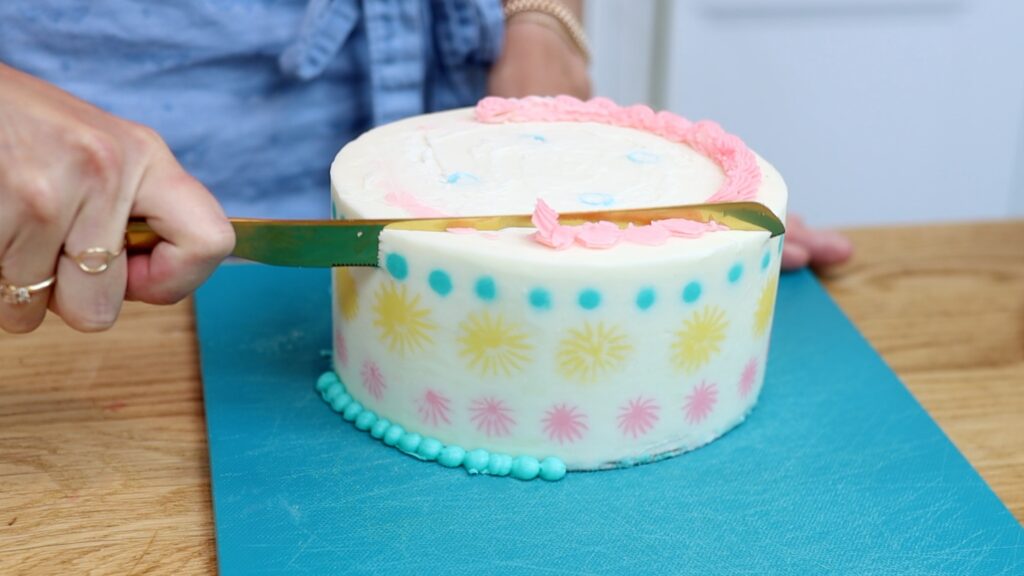
For an even sharper edge, cut the frosting! Put the cake in the freezer for 30 minutes to chill and set the frosting first. Then dip a metal cake comb in hot water to heat it. Dry it off on a towel or paper towel and then use the edge to slice through the frosting. Work your way around the cake, dipping the comb back into the hot water if it cools down. You’ll create a neat, razor sharp edge around the top of your cake!
The hot metal cake comb method works for the frosting on the sides of the cake, too! Use hot water or even a blowtorch to heat the comb. Then use it to get rid of any air bubbles or indents or unwanted texture in the frosting. Scrape the frosting and the hot metal will melt the other layer of frosting, dragging it to fill in any gaps in the frosting and leaving it super smooth.
If you have a metal cake comb you can use it for the facelift frosting technique. Pipe details onto the cake and then set them in the freezer for 20 minutes. Next, frost over them to cover them up completely.
Chill the cake for another 20 minutes and meanwhile, heat a metal cake comb. Scrape around the cake again and again, taking off layer after layer of frosting. You'll reveal a cross-section of the piping, creating a colourful design or pattern that’s completely flat on the cake. It will look as if it’s been printed or painted onto the cake but it’s just frosting!
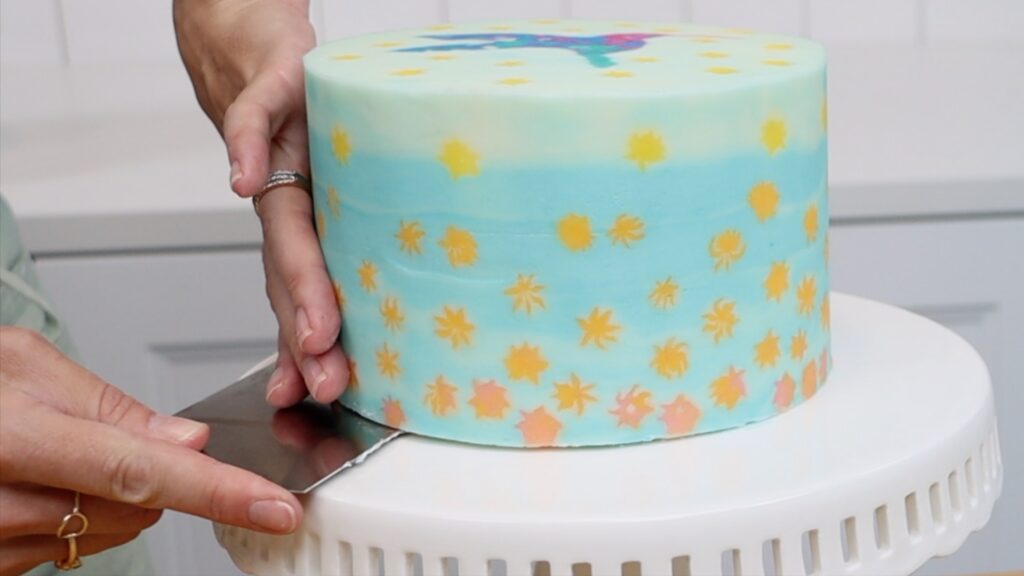
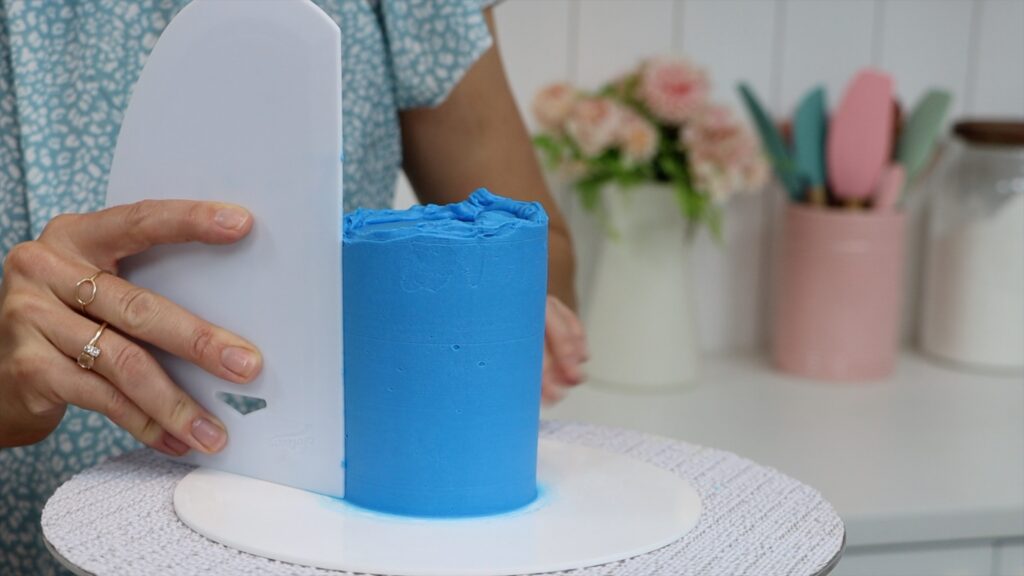
After frosting and decorating a cake on a cake board you can transfer it onto a cake stand. This makes for prettier photos or a classier way to display the cake on a dessert table. A cake comb is a great tool for this because it’s thin so it's easy to slide between the cake and the cake board. Also, it’s wide so it’s easy to balance the cake on it as you move it. The cake needs to be refrigerated for at least an hour before doing this to chill the frosting. When it's cold, it gets very firm so you can touch it without damaging it.
Frosting, chocolate and cake crumbs can be a pain to clean off your work surface. If you wipe them off straight away they’ll smear and smudge and make a mess. Instead, wait an hour or so for them to dry out and set. Then you can clean them with hardly any effort using a cake comb! Scrape across the table or counter and your comb will dislodge any ingredients, leaving a clean surface behind.
After spreading frosting onto your cake, you probably use a cake comb to smooth that frosting. That's what it's intended for but it's also a useful tool to scrape off frosting smudges from your cake board. It will leave the board smooth and clean and pretty. A comb is especially useful if the frosting has already set after chilling the cake. With a solid tool like this you don’t need much pressure at all to loosen and remove the hard frosting.
Visit my cake school to learn hundreds of cake decorating techniques and designs and join my ClubPLUS membership for access to every MasterCourse, MiniCourse, Live Workshop and 5 Minute Fridays.
You can also watch a video of this tutorial on how to use a cake comb 8 different ways:
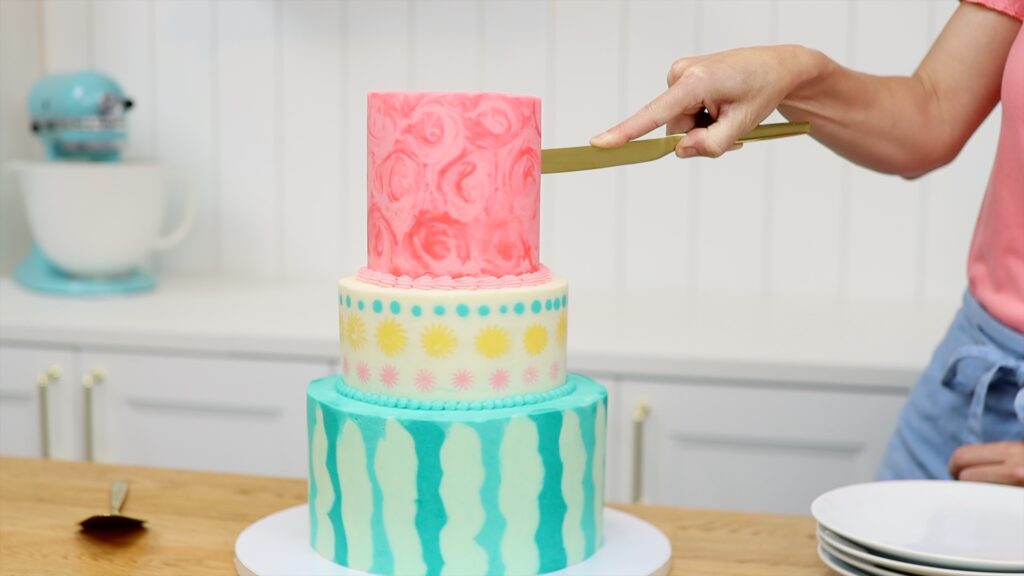
I’m going to show you how to cut a tier cake in three different ways. By using different techniques you can vary the size and type of portions.
The first way, which I’m sure you’re familiar with, is to cut wedge shaped slices. Slice from the middle of the cake to the outer edge and then pull out your knife. Then rotate to cut from the middle to a little bit further around the outer edge.
Slide your knife or a cake lifter underneath the cake and wiggle it to loosen the slice from the cake. Pull it out, using a finger to balance it if you need to, and lower it onto a plate.
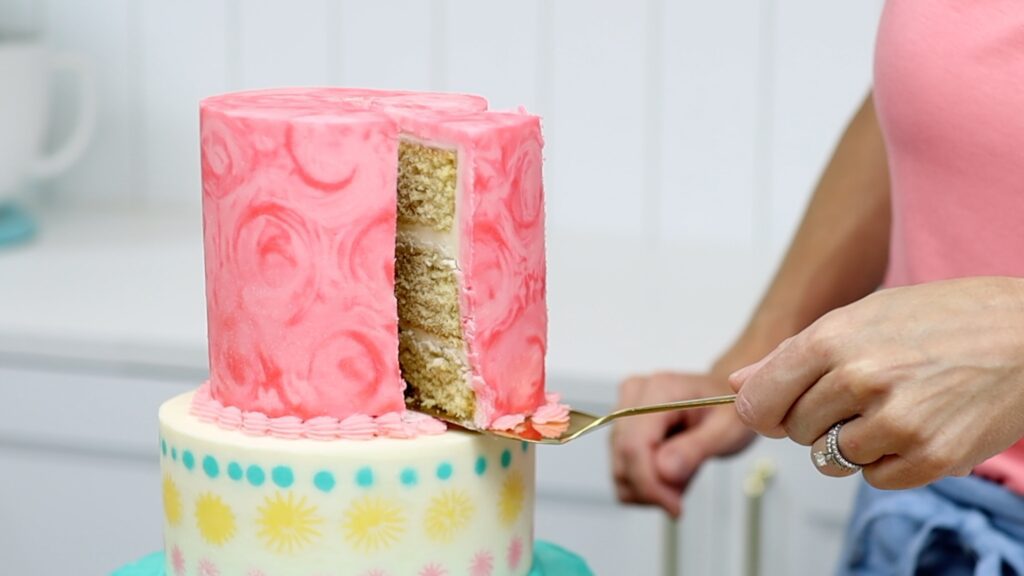
This wedged shaped cake slice is the quickest way to cut a cake. Each slice is a generous portion of layers of cake and filling surrounded on two sides by frosting.
As you can see, it's possible to serve the top cake while it's still on top of the tier cake. Your knife won't push the cake down into the lower tiers because of the internal support structure inside the tier cake. If this is new to you, learn all about it in my tutorial on How to Make a Tiered Cake. If you prefer, you can take this cake off the tier cake before cutting it. You'll need an
Lift up the cake on its board and lower it onto the table or counter, where you can then slice it. To balance the cake as you move it, you can touch the frosting if it has set. This is one of the reasons that the ideal time to cut a cake is after the frosting has set. You'll find that the frosting is firm and less messy than immediately after frosting a cake. The cake shouldn't be cold so if it has been refrigerated, wait at least 2 hours after taking it out of the fridge.
This wedge-shaped slice is a quick and easy way to cut a tier cake. It's great if you have plenty of cake for the number of people you're serving.
If you need to get more portions out of a cake, you'll need smaller portions. This is typical for wedding cakes and events where there are several desserts being served. Next, I'll show you how to cut a tier cake in two other ways that are better suited for that.
For this method you use a cutting board to cut a cake into strips and then divide those strips into smaller portions.
To remove the tier of the cake you're going to serve, slide an
Cut across the cake an inch or two in. When your knife gets to the bottom, angle it to push the slice over onto the cutting board. Then cut this into pieces. I usually cut the first slice into 3 pieces and the rest of the slices into 4 pieces. The portions of this end slice are perfect for frosting lovers!
Cut the next slice another inch or two over, tipping it over onto the cutting board. To make four portions, cut the slice down the middle and each piece in half again. If the cake is really tall you can cut the piece in half the other way too, making twice as many portions. This is useful for a wedding or any occasion where you have lots of other food and desserts so you don’t need very big servings of cake.
Assuming your tier cake has a support structure inside, you’ll need to remove that before cutting your slices. I have a tutorial on how to make a tiered cake that has a lot more information on that. Tweezers are useful to grip onto support straws and pull them out.
For large cakes that are wider then a cutting board, another way to serve them is the ring method. Cut a ring a few inches within the outer edge to make an inner circle. Use sawing motions with your knife to cut all the way down to the bottom of the cake around the whole circle.
Then slice this ring of cake into portions. You can cut wide pieces if you want large portions or make the cuts closer together for narrower pieces. By cutting the circle within the cake, instead of having really long wedges you’ll be able to cut another round of slices out of the inner part of the cake, so you’ll get a lot more portions this way.
So, there are three very different ways to cut a tier cake.
Which one would you choose? Tell me in the comments!
If you prefer, you can watch a video of this tutorial on how to cut a tier cake:
In this tutorial I'm going to show you how to mix rainbow colours using just one bowl, how to create a completely flat rainbow heart design on top of the cake and how to make perfectly neat rainbow striped frosting.
Start by assembling your cake. Alternate cake layers and filling using any recipe you like. I'm using my Perfect Chocolate Cake and these are huge 10 inch cake layers. I'm filling and frosting the cake with my 4 Minute Buttercream. Cover the cake in a crumb coat, which is a thin layer of frosting to give the cake a neat shape and trap any crumbs. I like to pipe it on because it pulls off fewer crumbs but you can spread it straight on instead if you like.
The important thing here is to cover up the entire cake. This crumb coat doesn't have to be super smooth but you don't want there to be any exposed cake. Put the cake into the fridge for 30 minutes or the freezer for 15 minutes to set this crumb coat.
Now let's tint the colours for the rainbow design. You'll need a different piping bag for every colour that you use. The easiest and quickest way to do this is using just one bowl. Put some plain white buttercream into your bowl and add yellow first. I know we're not going in rainbow order but you'll see why in a second.
Mix your yellow buttercream and spoon it into a piping bag with no piping tip. I like to fold over the top of the piping bag as I'm spooning the buttercream in so it's doesn't get all over my hands when I'm piping later. Now mix orange in the same bowl, stirring to incorporate all of the leftover yellow frosting. This is much quicker than washing and drying the bowl first. Scoop up the orange buttercream and put that into another piping bag with no piping tip.
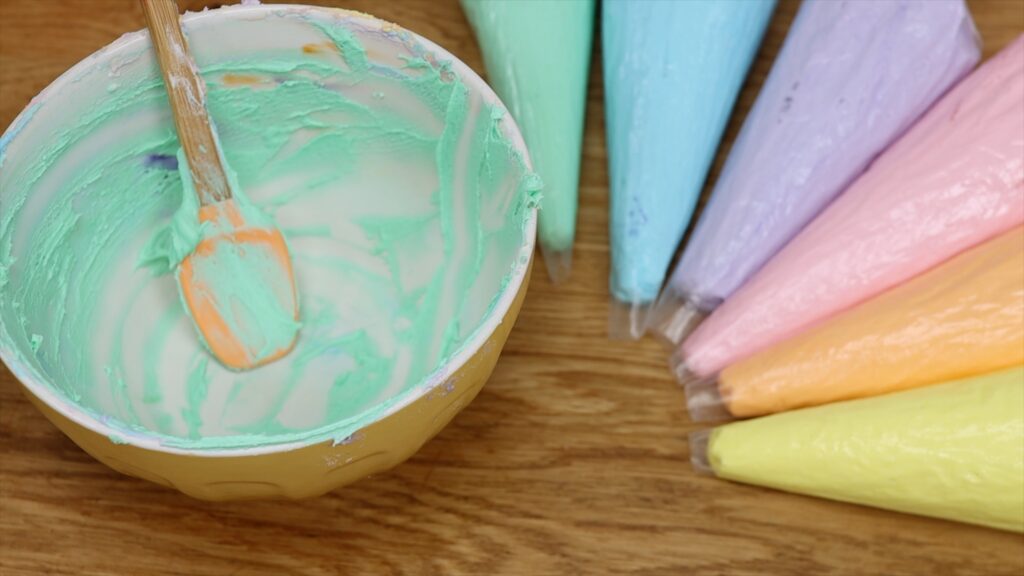
Now mix pink in the same bowl again, incorporating any leftover orange buttercream. Next do purple and then blue and finally green. The reason for doing it in this order is that each of the previous colours blends really nicely with the next colour so it won't dirty or muddy your colours. I'm making pastel colours but this works the same way for bright rainbow colours.
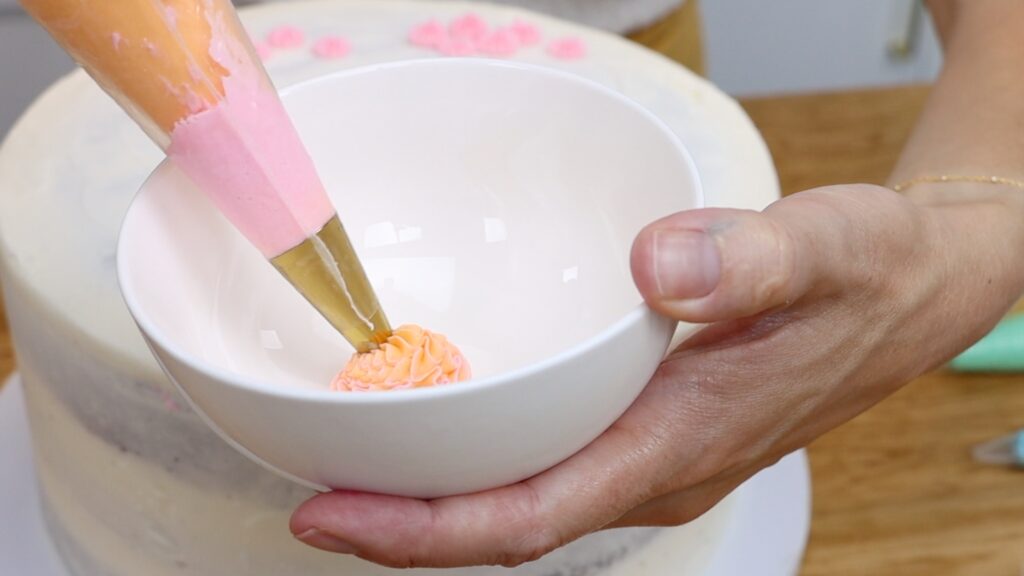
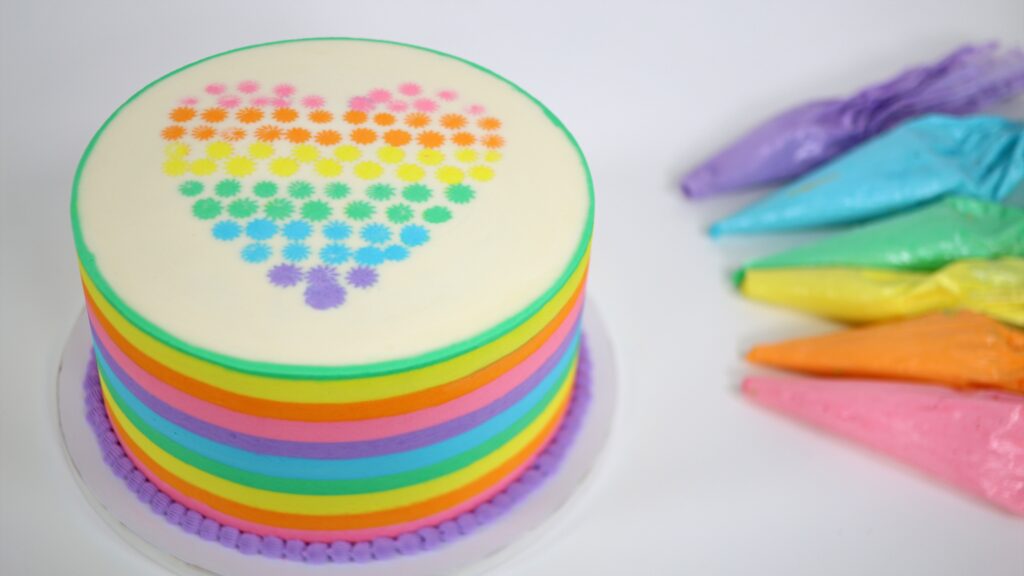
Make the rainbow heart design on the top of the cake before doing the stripes. You'll need an open star piping tip for this, for example a #32. To avoid using couplers or multiple piping tips, drop this tip into another piping bag. Then one by one you'll use the colours that you prepared inside this piping bag.
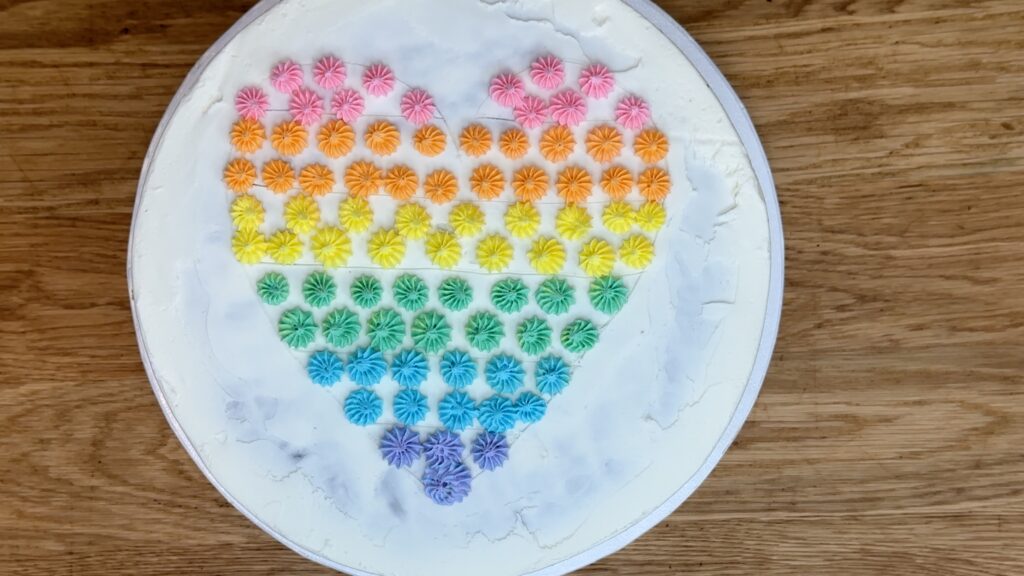
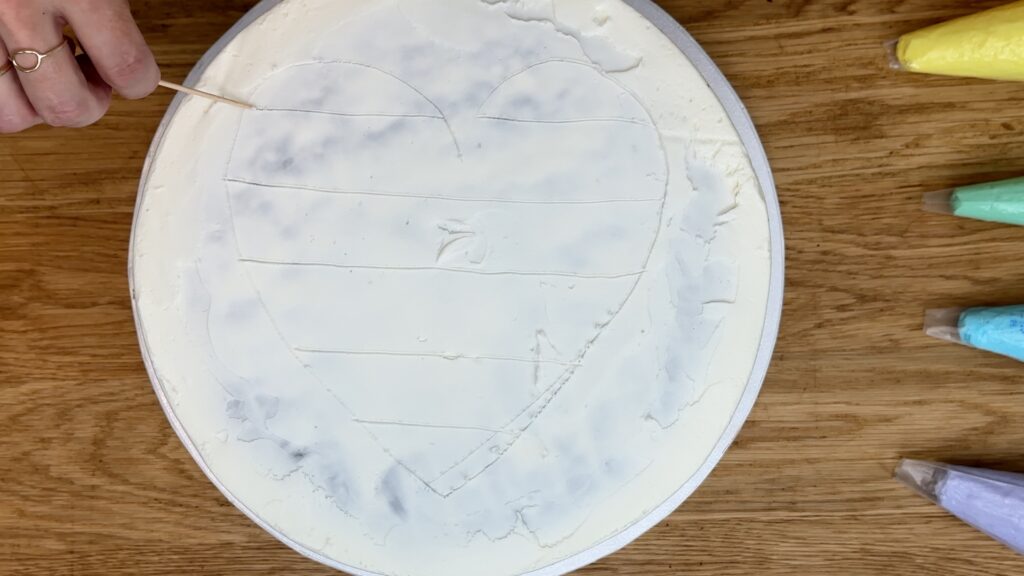
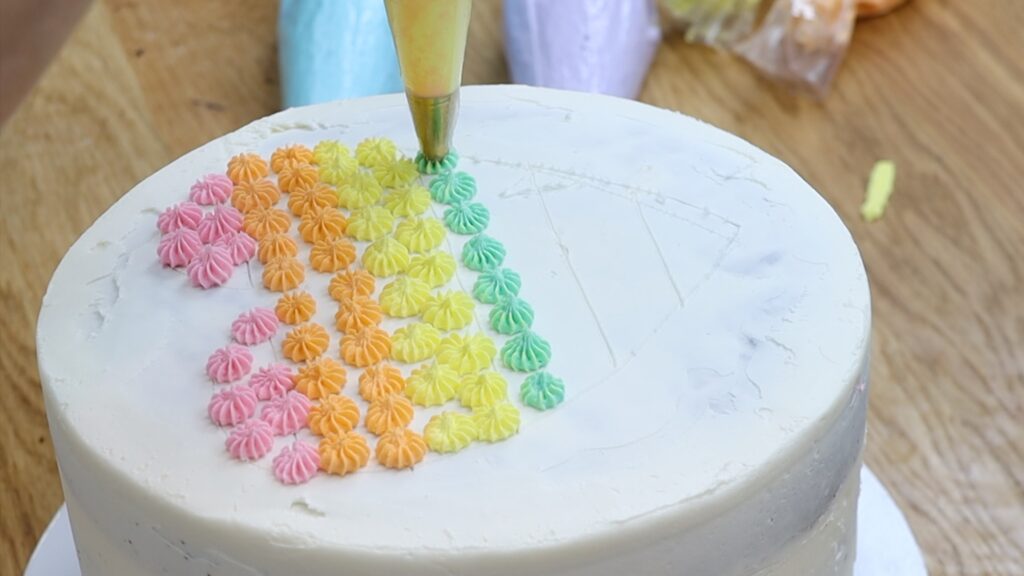
Take your cake out of the fridge or freezer when the crumb coat has set. The frosting should be very firm and that means you won't damage it during this process. Use a toothpick to draw a heart onto the top of the cake. Divide it into sections to match the number of colours you're using. I've made six rainbow colours so I'm dividing my heart into six equal sections. The sections will guide you as you pipe.
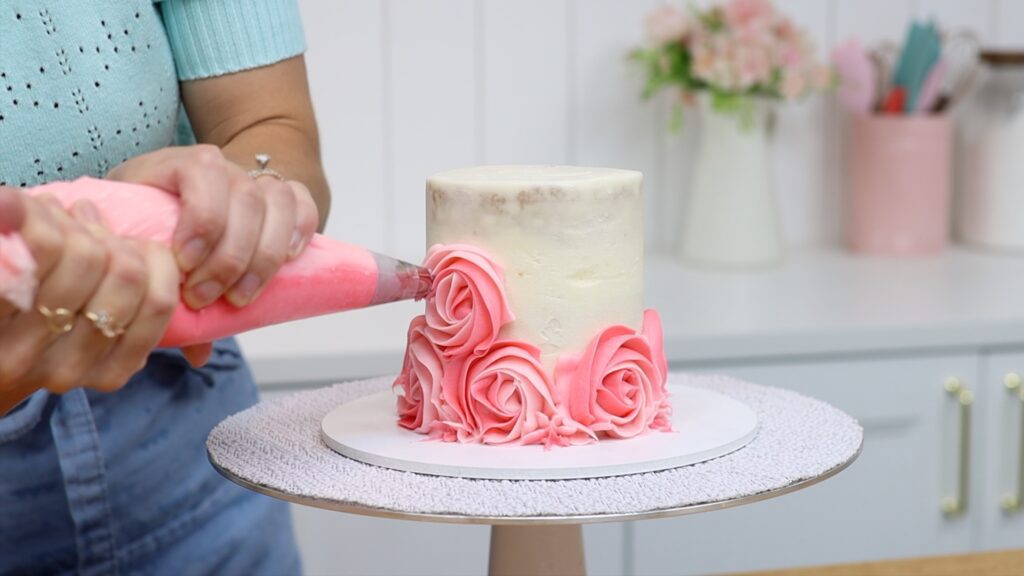
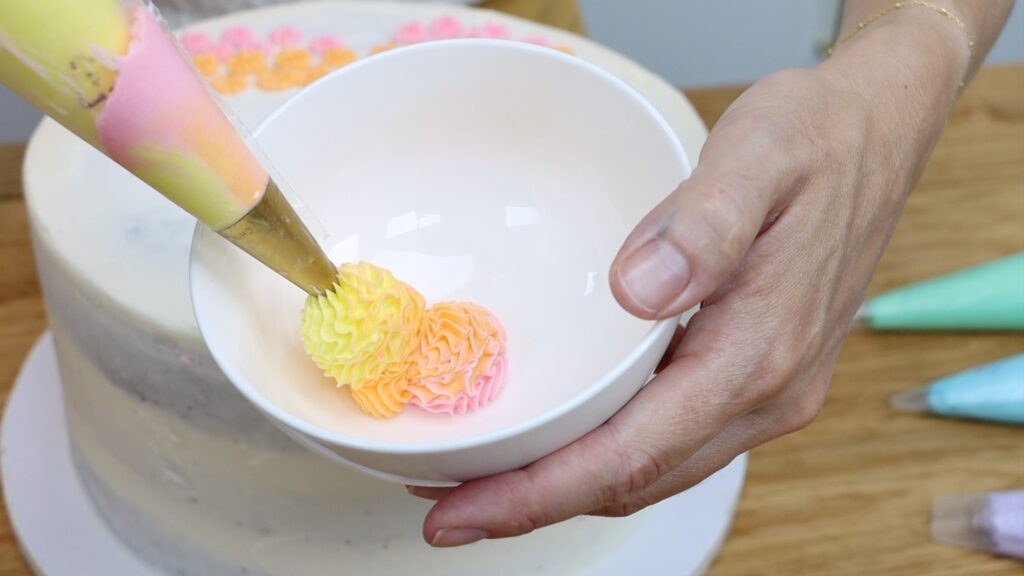
Starting at the top of the heart, pipe rosettes to fill in that first section. Try to space them evenly apart. Pipe right up to the edges of the section outline so that the shape is really clear.
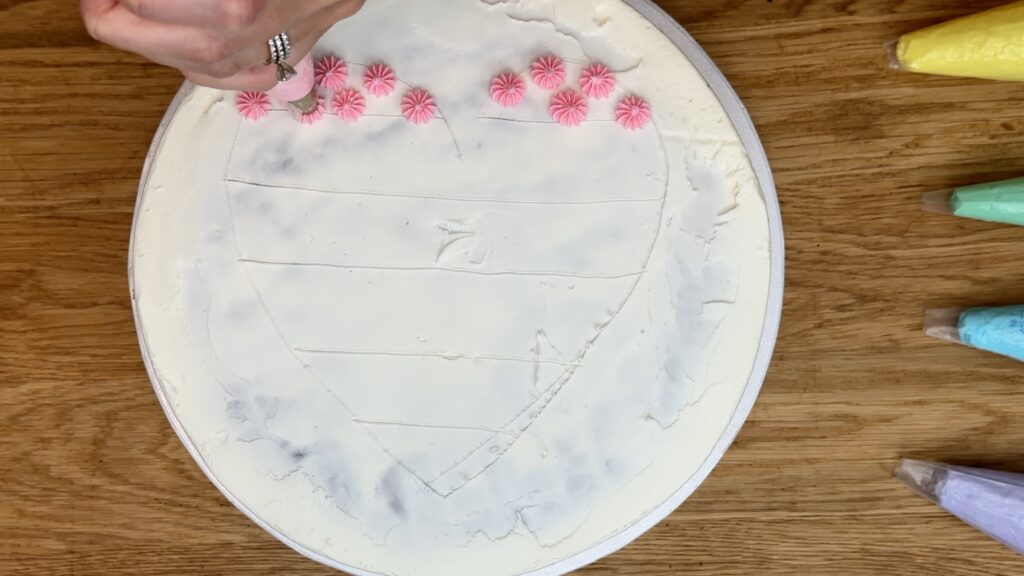
When you finish with the first colour, pull it out of the piping bag. Put the next piping bag in and squeeze a little bit of buttercream out into a bowl. This gets rid of the very last bit of the previous colours. When you see the next colour coming out, it's ready to use!
Now pipe onto the next section of the cake. Take the orange out, put the yellow in and squeeze a little bit of buttercream out until you see the yellow coming through. Repeat this process to complete the heart.
Of course, if you have lots of different piping tips you want to use that's fine. You could use couplers in the original piping bags but this is an easy way to do this using minimal tools.
Next, put the cake in the freezer for 15 minutes. The reason for this is to set the heart design you've just piped. You need the rosettes to hold their shape for the next step. Take the cake out of the freezer and pipe buttercream to cover the top of the cake. Piping it is ideal so that you don't damage those piped colourful details.
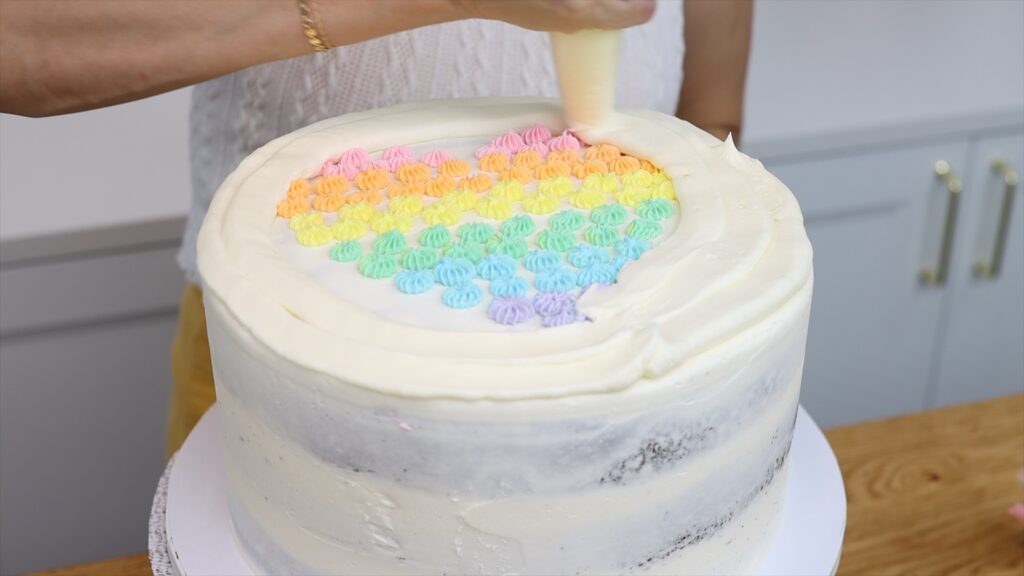
Spread the frosting very gently and then put this cake back into the freezer for 20 minutes. I know there's a lot of back and forth at this point but the result really is worth it!
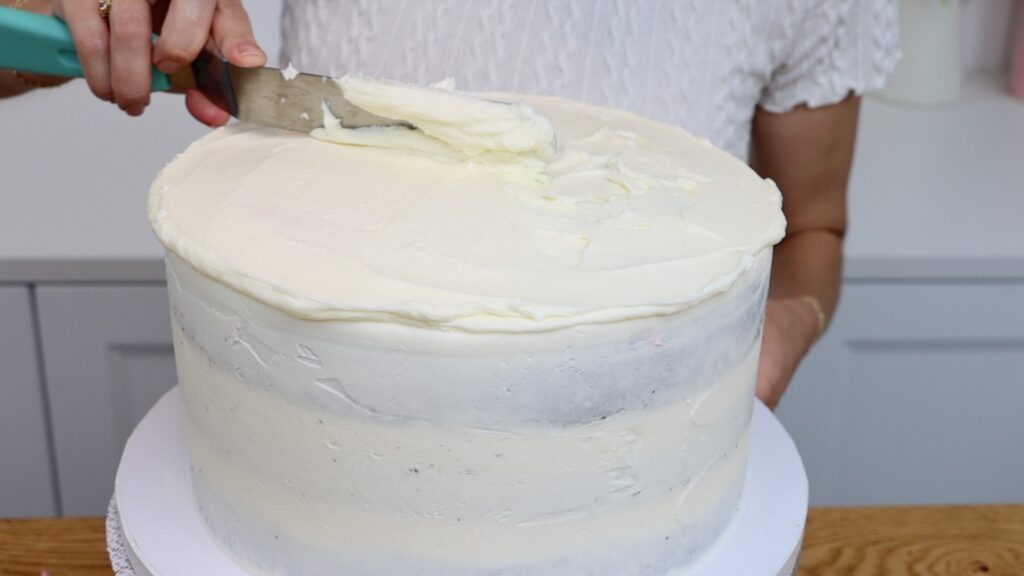
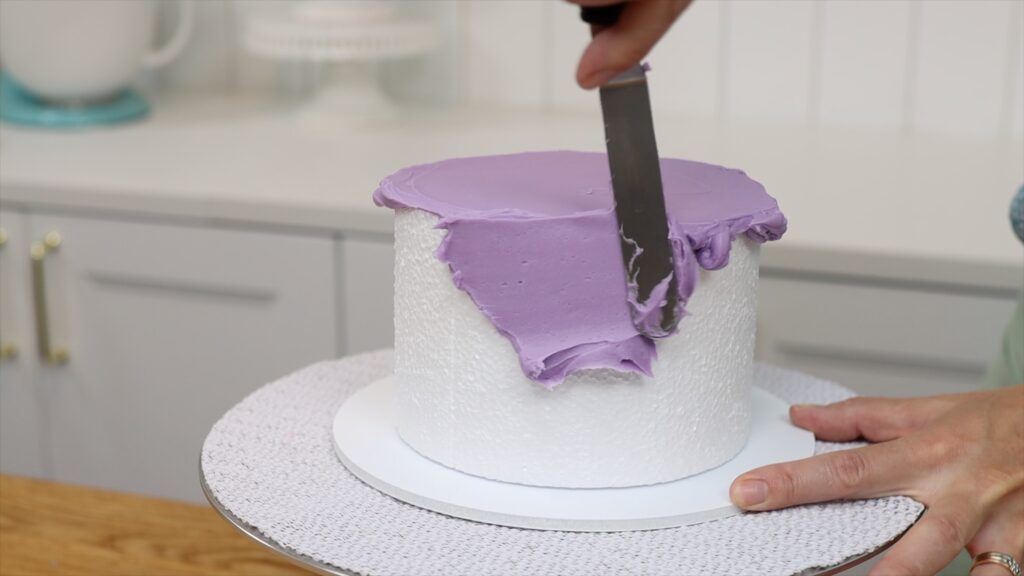
When you take the cake out of the freezer, all of that frosting will have set. Now you need to take off the top layer of frosting to reveal the design underneath. Pour some boiling water into a cake pan that is as big as your metal cake comb. Dip your cake comb in to heat it and then dry it off. Scrape over the top of the cake to take off the top layers. I call this Facelift Frosting because you're giving the frosting a facelift!
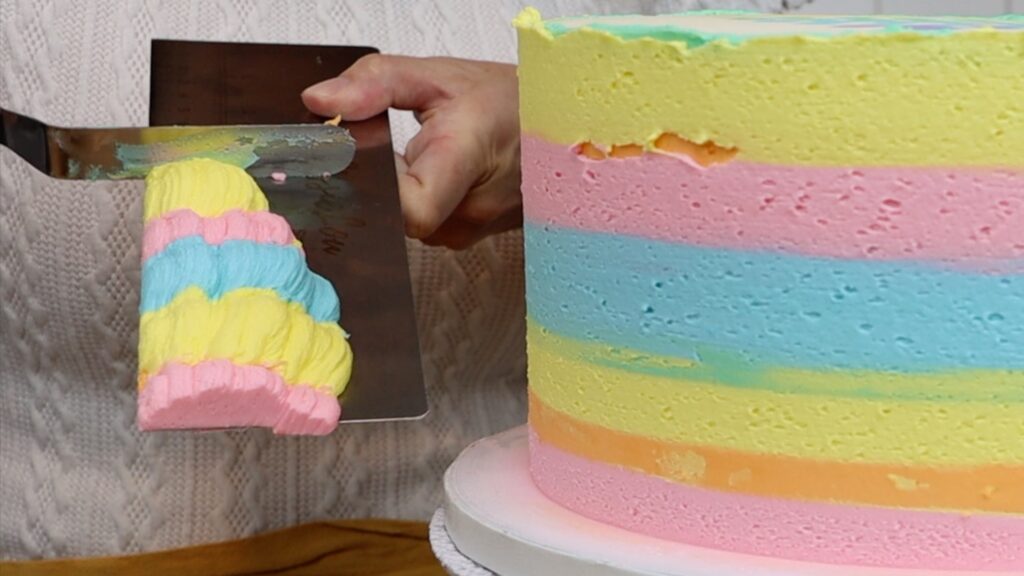
You'll need to scrape several times to take off all of the excess buttercream but this frosting won't be wasted. You can save it for your stripes or freeze it in a ziplock bag for another project later. For now, scrape the excess off your cake comb into a bowl.
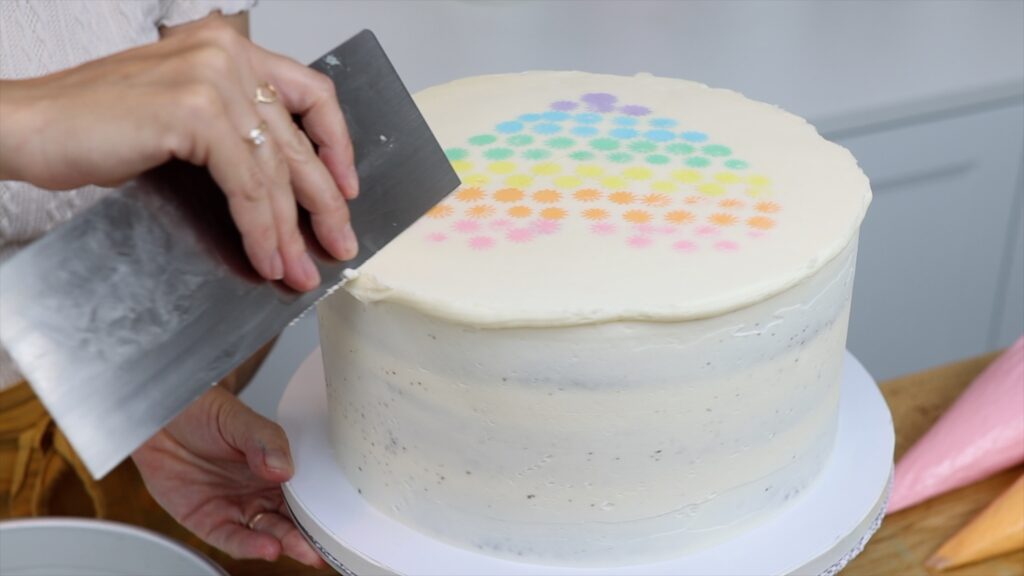
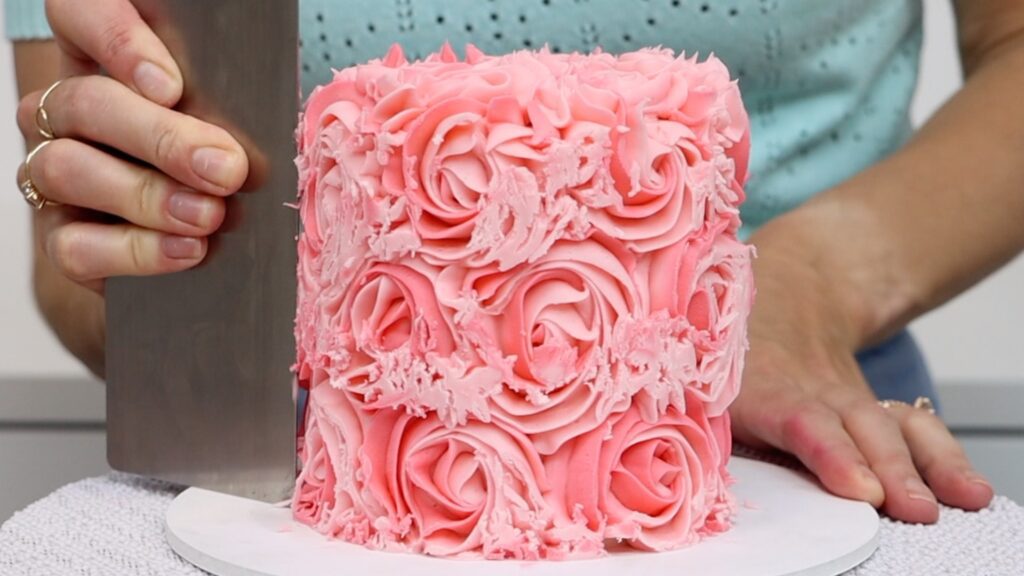
Keep dipping your metal cake comb into the hot water to keep it hot, which will make it the easiest to take off these layers of buttercream from the top of the cake. Once your entire design has been revealed, scrape around the sides of the cake to flatten any frosting sticking out. Use your
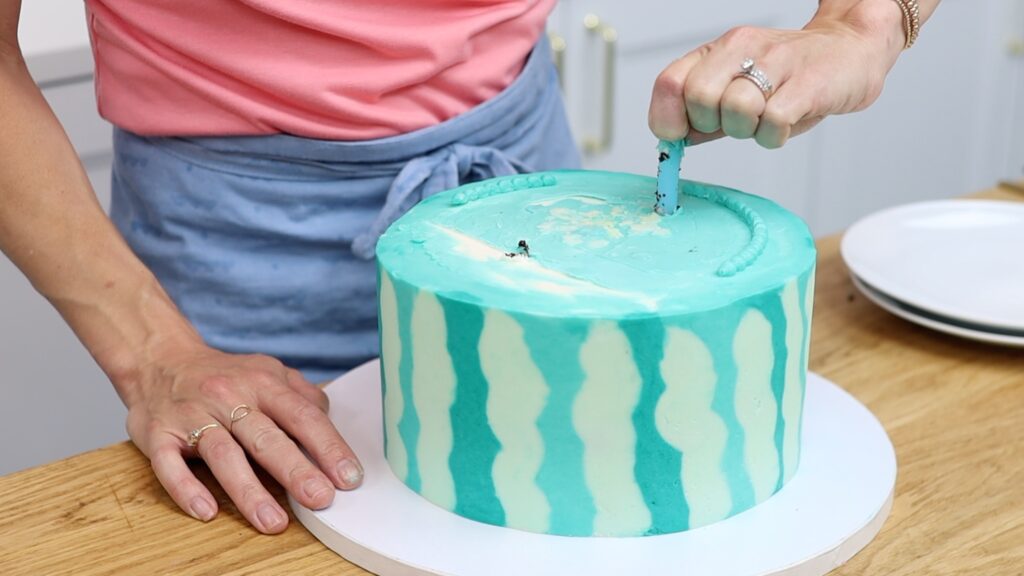
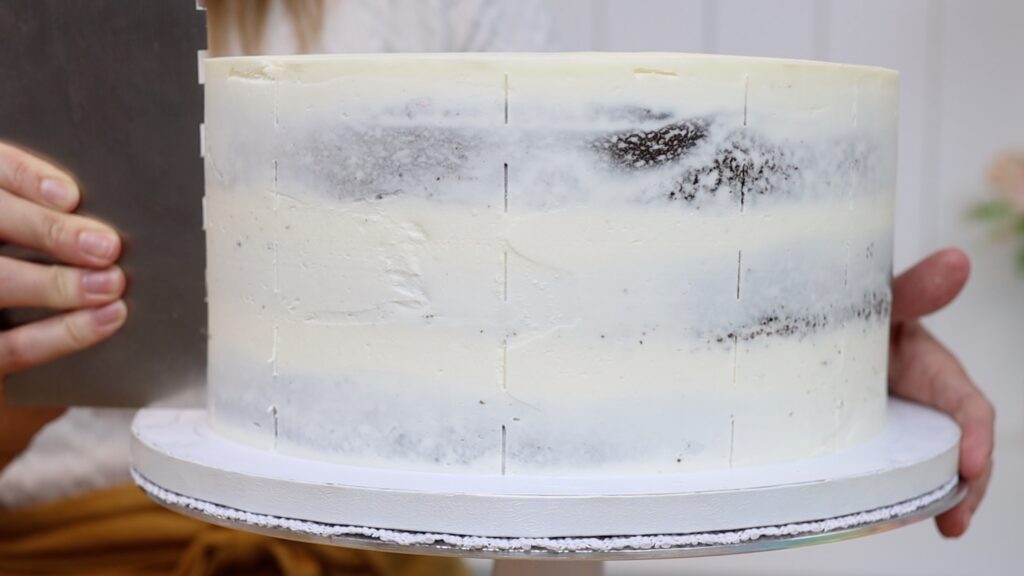
Now it's time to make the rainbow stripes. You'll need a striped cake comb and these come in lots of different shapes and sizes. When you choose one, keep in mind that the smaller the grooves are, the trickier the comb is to use.
Push your cake comb into the side of the cake to indent the stripe grooves as a guideline. Do this periodically so that you have lots of guidelines all around the cake.
Choose the order that you want to pipe your colours. Pipe only the colours that go into the areas where you don't see any markings on the cake. I'm skipping pink at the very bottom because there is a marked groove there. Instead, I'm starting with the next colour, which is orange. Use the guidelines to pipe a straight band all the way around the cake.
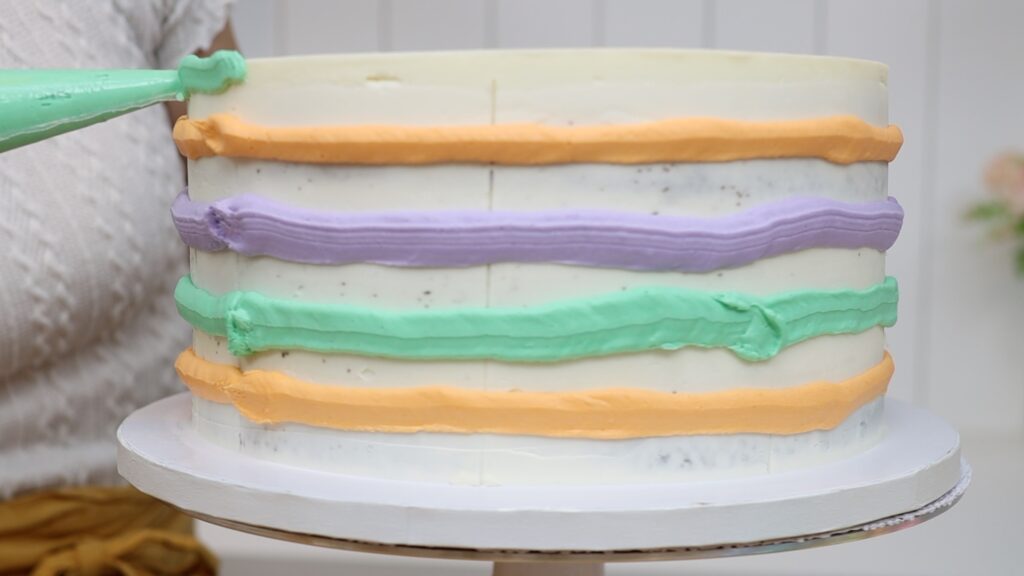
Let's go back to the beginning when you cut your piping bags for these rainbow colours of buttercream. It's a good idea to refer to your striped cake comb to see how wide the grooves are and then cut the piping bags so that they match that size. That way you only have to go once around the cake to fill in the entire width of the stripe.
Skip the next colour, which is yellow for me, and then pipe the next colour, which is green. Continue to pipe only where there are gaps in the grooves marked on the cake. Don't worry if your buttercream sticks up above the top edge of the cake because that will make a nice sharp edge later.
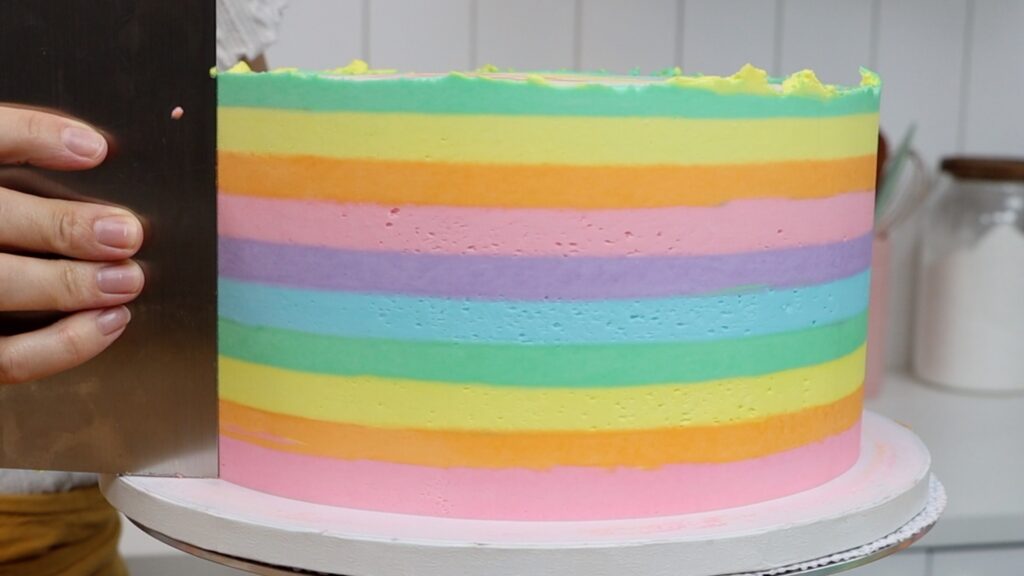
Now take your striped cake comb and scrape around the cake. Push the base down on the cake board so it's lined up straight. Use your left hand to spin the
After one or two scrapes, check that each colour fills in the entire stripe groove from the cake comb. If there are any edges that aren't straight, those indents need to be filled. Use the piping bag of that colour to pipe over it. Scrape again after your touch-ups to smooth the piping. Don't worry about these stripes being perfectly neat on the surface because you're going to scrape a little bit off them later. However, you do want the top and bottom edge of each stripe to be perfectly straight. If there are gaps, other colours will fill them and you'll have random dots of different colours within the stripes.
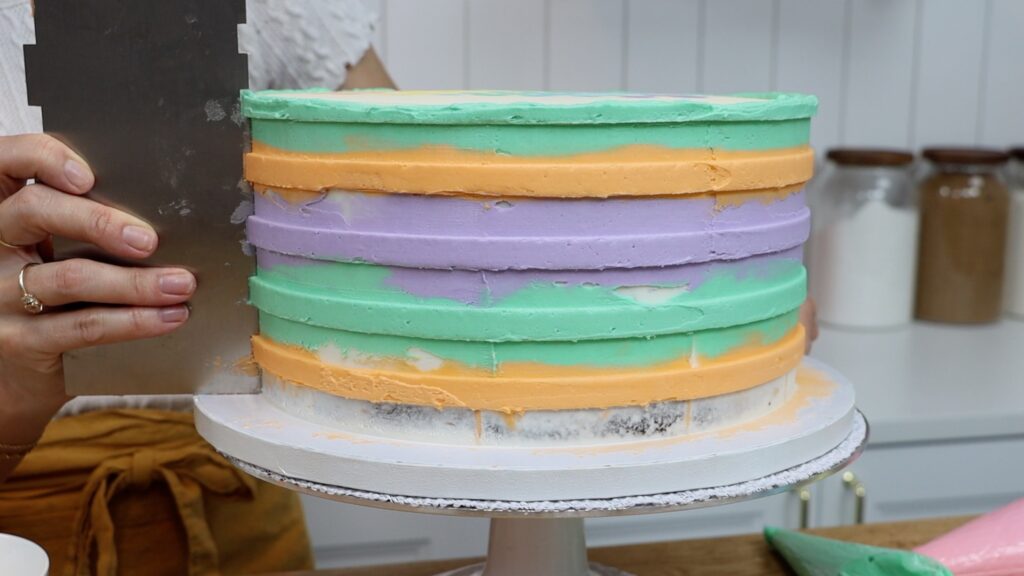
When you're happy with these stripes, put the cake in the freezer for 15 minutes. Set a timer because if you leave it in longer, it will be difficult to do the next step.
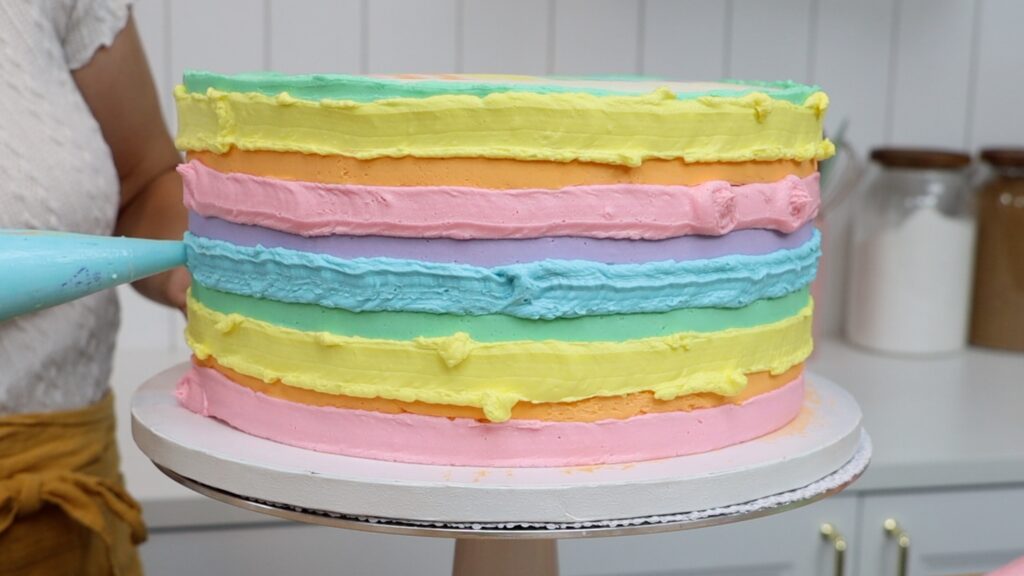
When you take the cake out of the freezer, pipe on the missing stripes. Then scrape off the excess, which will look really messy at first. Be patient and trust the process because this is going to be beautiful in the end! With the first few scrapes you'll smudge all of this excess frosting all over the cake. You'll cover up the first stripes that you made but that's the reason for chilling this cake before piping in the second round of colours. Now those first colours you piped are cold and firm and they won't lose their shape. Even as you scrape off the excess of the second round of colours, you won't damage the stripes underneath.
Keep scraping, taking off all of that excess. Your stripes are going to get more and more defined with each scrape. If the frosting starts to chill against the cold cake you might notice air bubbles in the frosting near the end. A quick hack is to heat your metal cake comb, which makes it glide very smoothly over the frosting, melting the very outer layer of frosting. This will fill in any air pockets and leave perfectly smooth frosting.
I don't recommend tidying up the top edge yet because you will spread that colour over on top of your heart design. Instead, put the cake back into the freezer for 15 minutes to set the frosting.Then use a sharp knife to cut off that frosting that's sticking up around the top edge. You'll leave a perfectly even edge underneath. You'll get the best result if your knife is hot so dip it into hot water in between cuts. You can use a glass or the pan from earlier, with new hot water course because the old water will have cooled down.
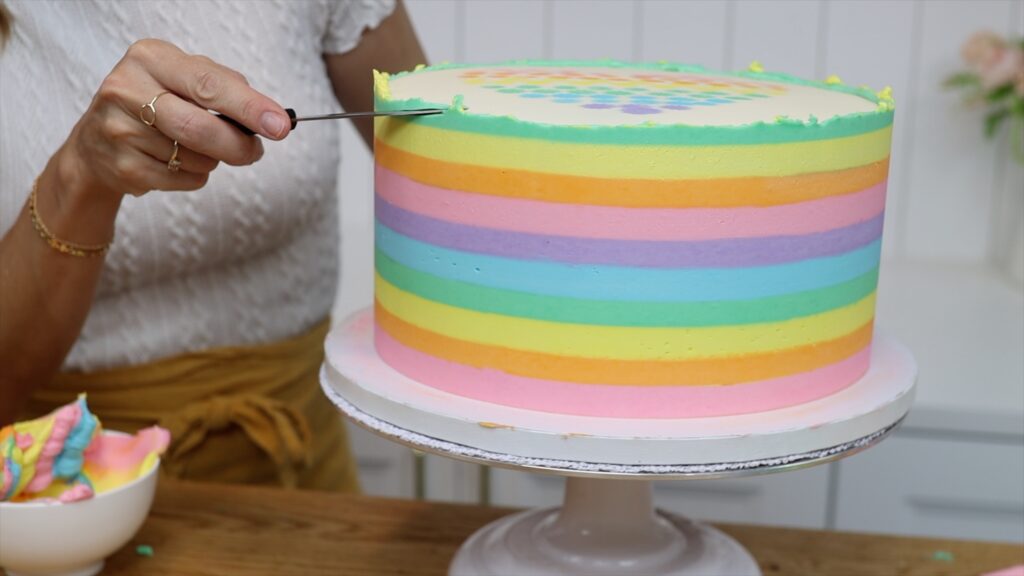
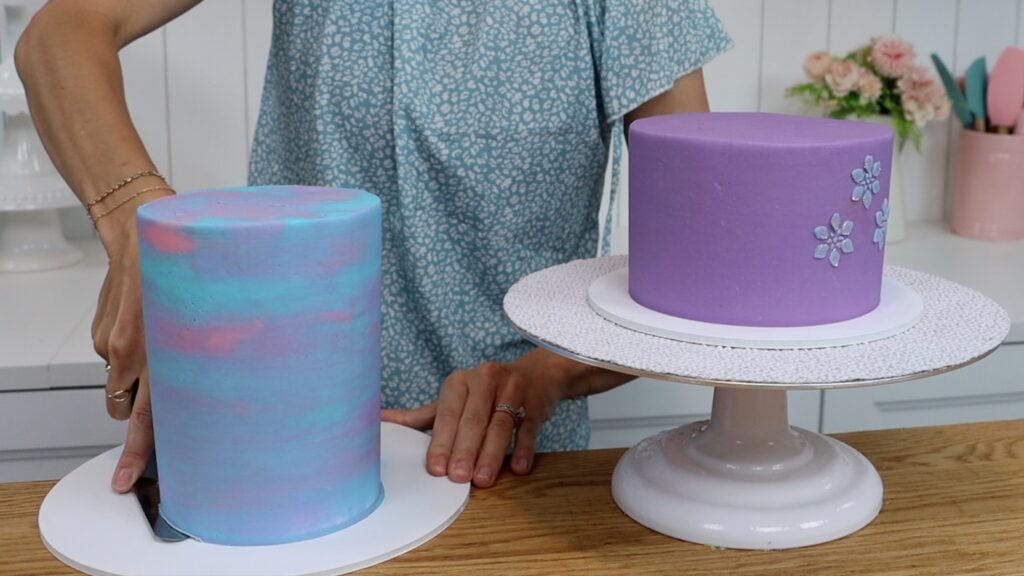
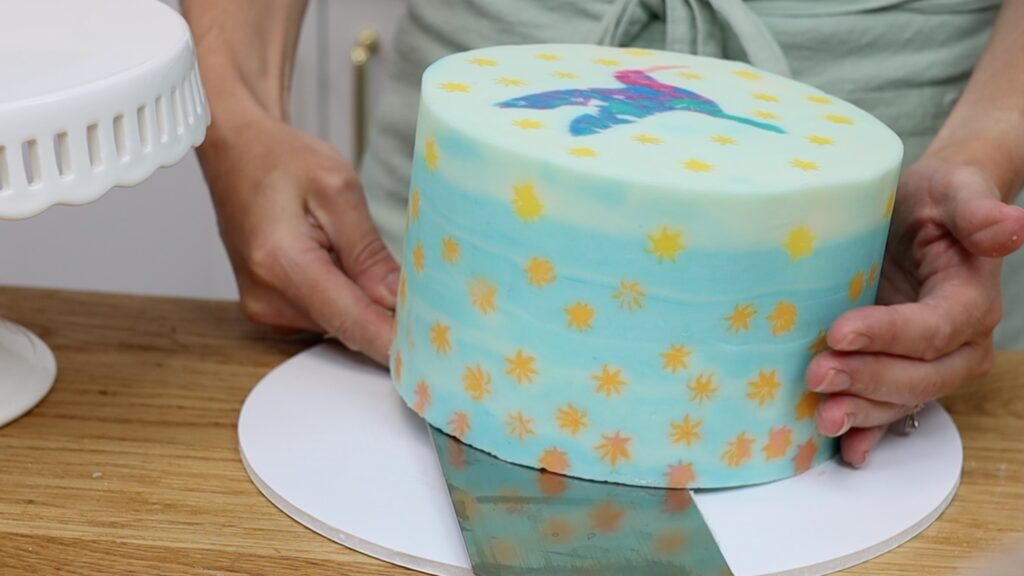
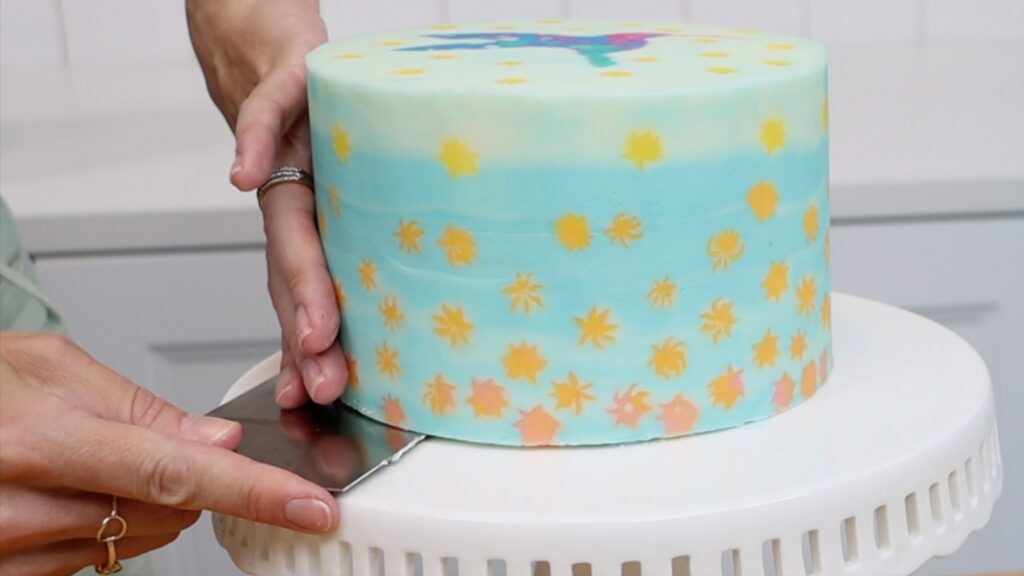
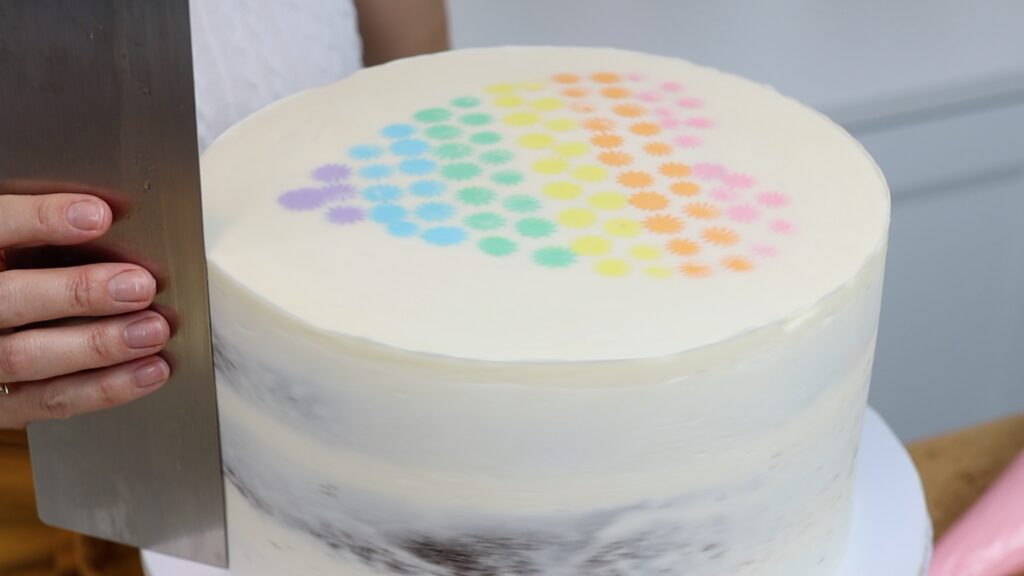
Now you have perfectly neat rainbow stripes around the sides of the cake and a sharp top edge. The rainbow heart design looks like it's been painted or printed onto the cake because it's totally flat, which is really unusual for designs done with buttercream.
I hope you've enjoyed this tutorial! Visit my cake school to learn hundreds of cake decorating techniques and designs and join my ClubPLUS Membership for access to every MasterCourse, MiniCourse, 5 Minute Fridays and Live Workshops.
You can also watch a video of this tutorial on how to make a rainbow striped cake:
