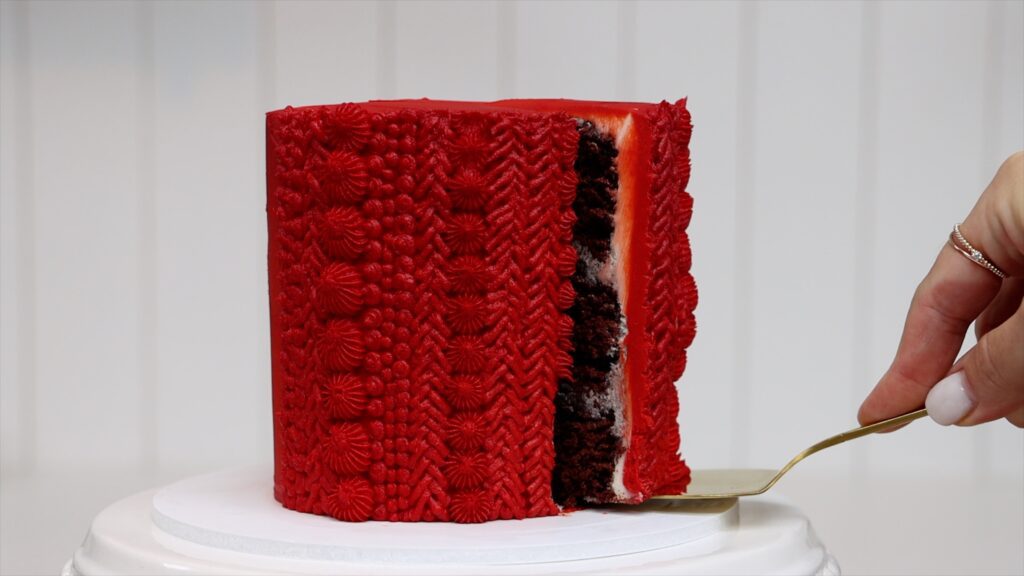
Make a quick cake with these tips and tricks! Should you pipe or spread cake filling and frosting? Should your cake layers been chilled or at room temperature? What kind of cake comb is the best? In this tutorial I'll answer all of these questions!
The basics of making a cake
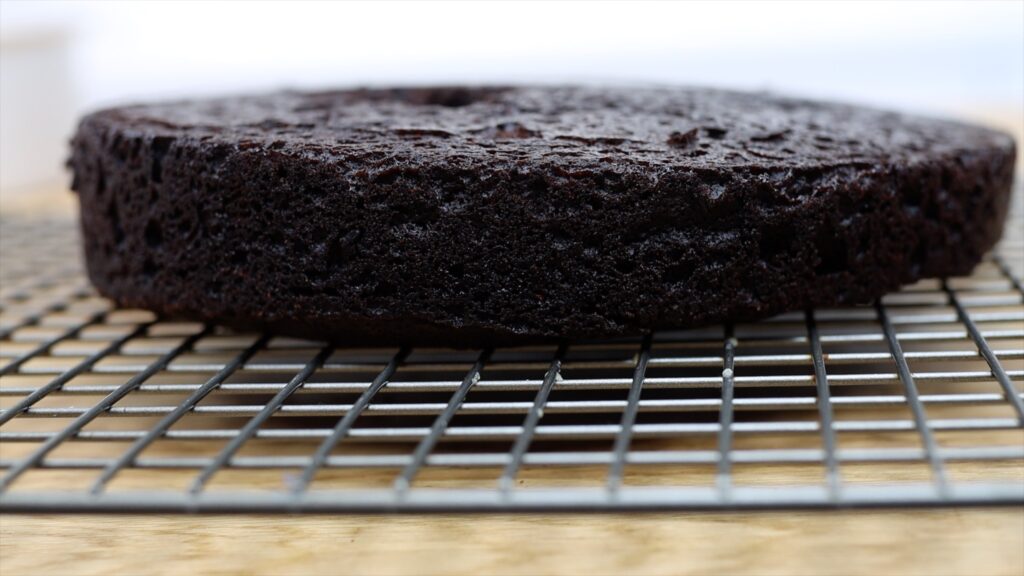
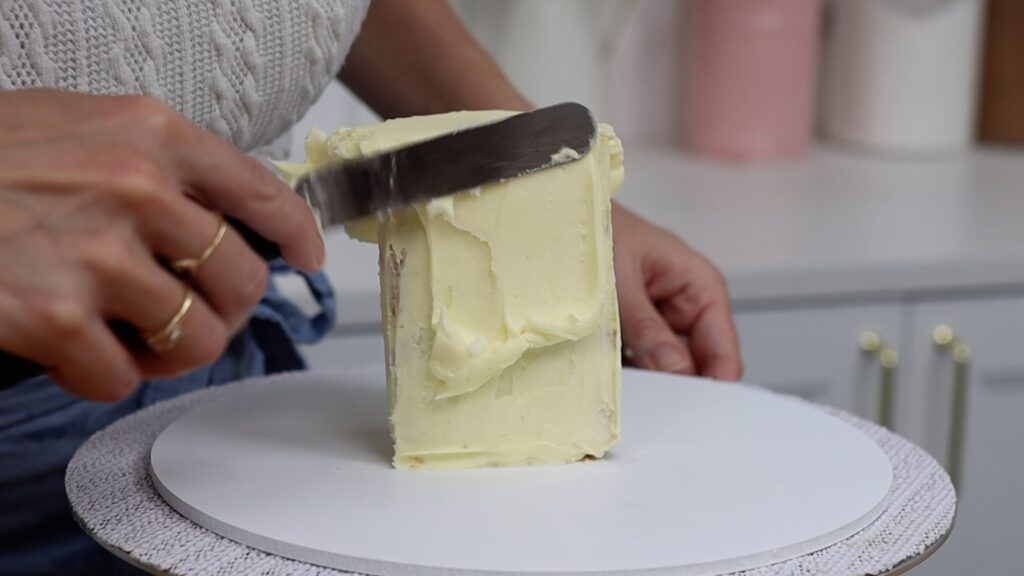
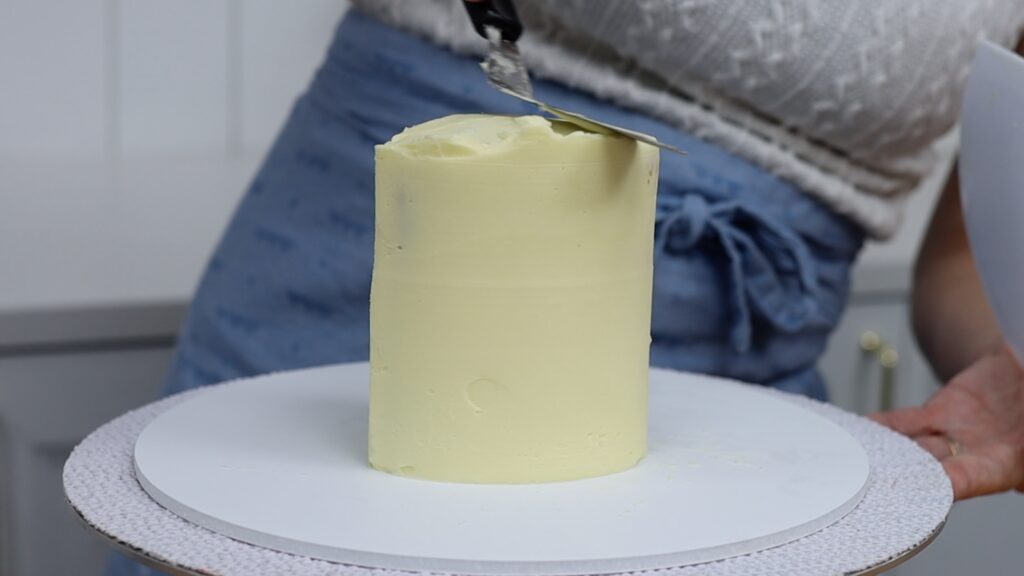
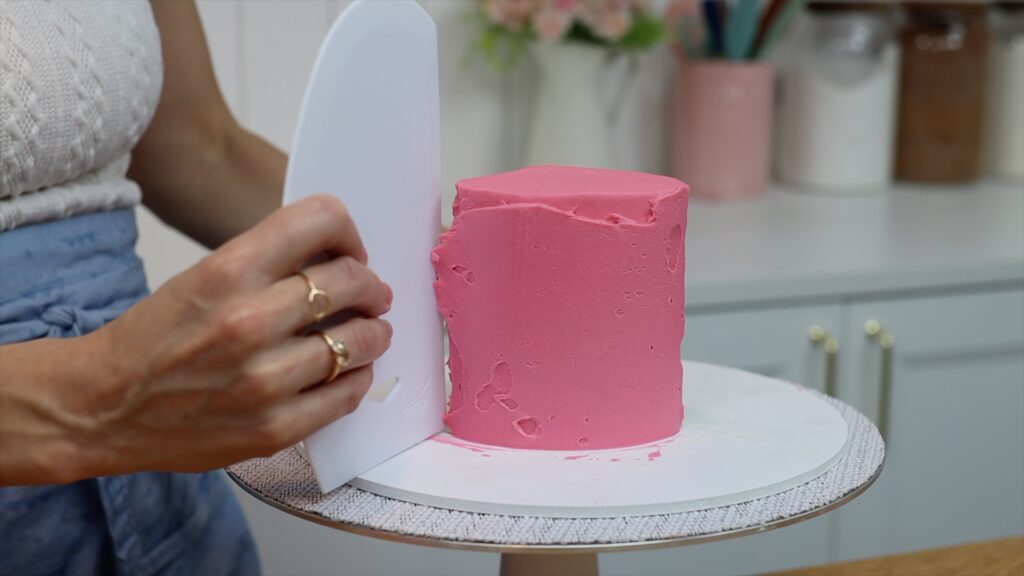
Let's start with the basics of making a cake. After baking and cooling your layers, put a bit of frosting on the cake board. This will attach your first layer of cake to the board. Then alternate filling and cake layers. Cover the cake in a this layer of frosting, called a crumb coat, before spreading on the final coat. Then add decorations! But let's rewind to see the best way to do each stage to make a quick cake.
Should you spread or pipe filling onto a cake?
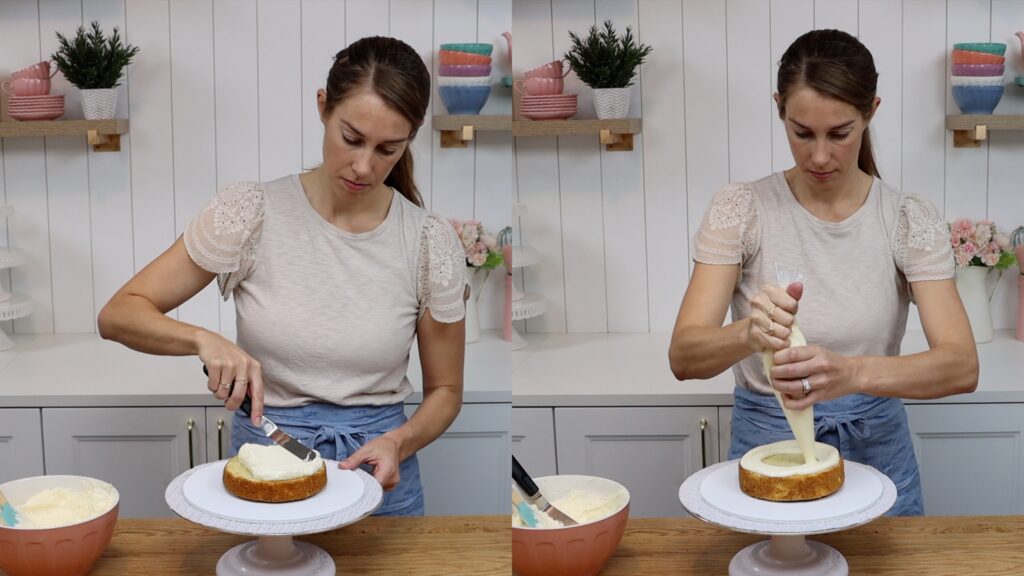
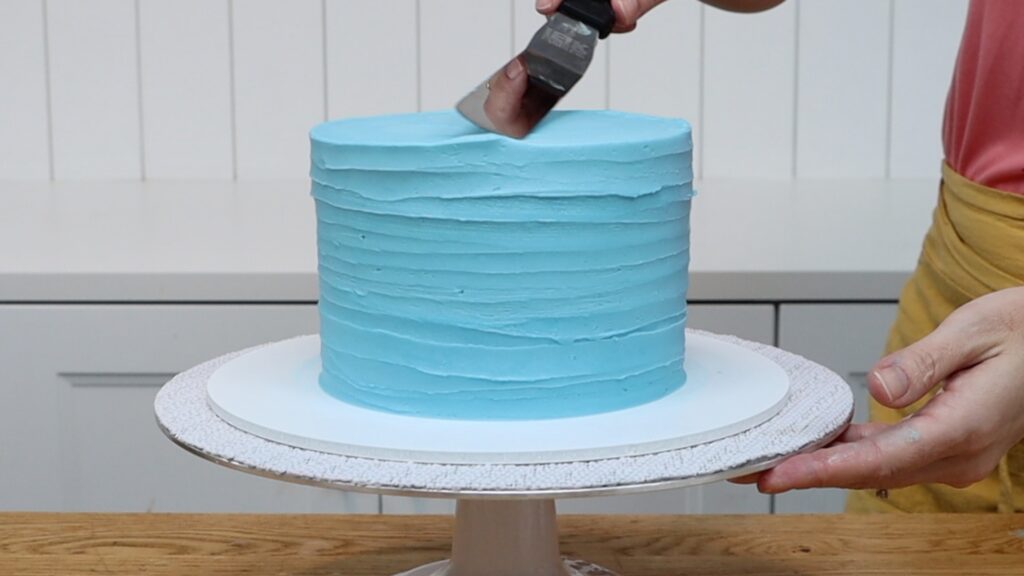
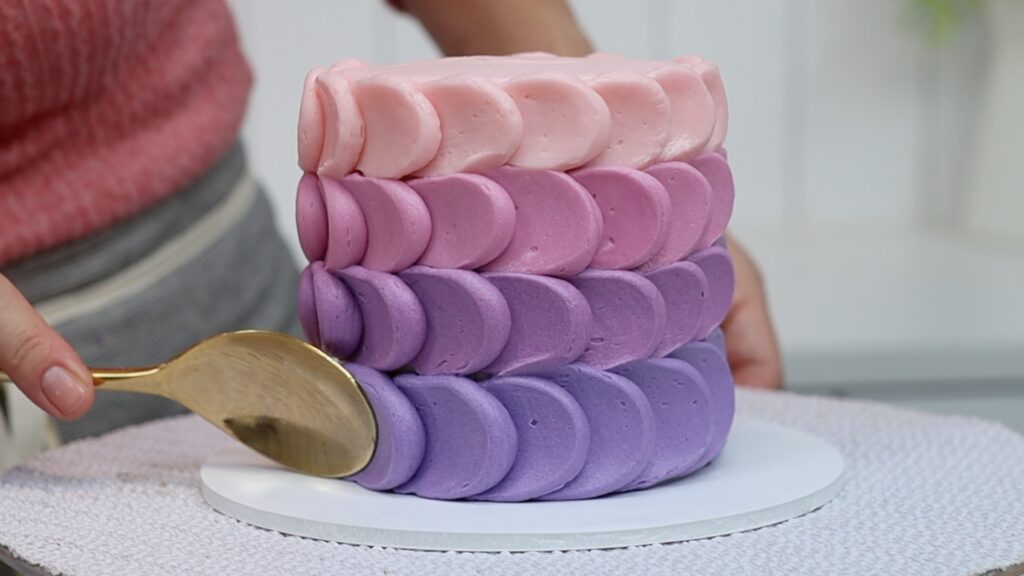
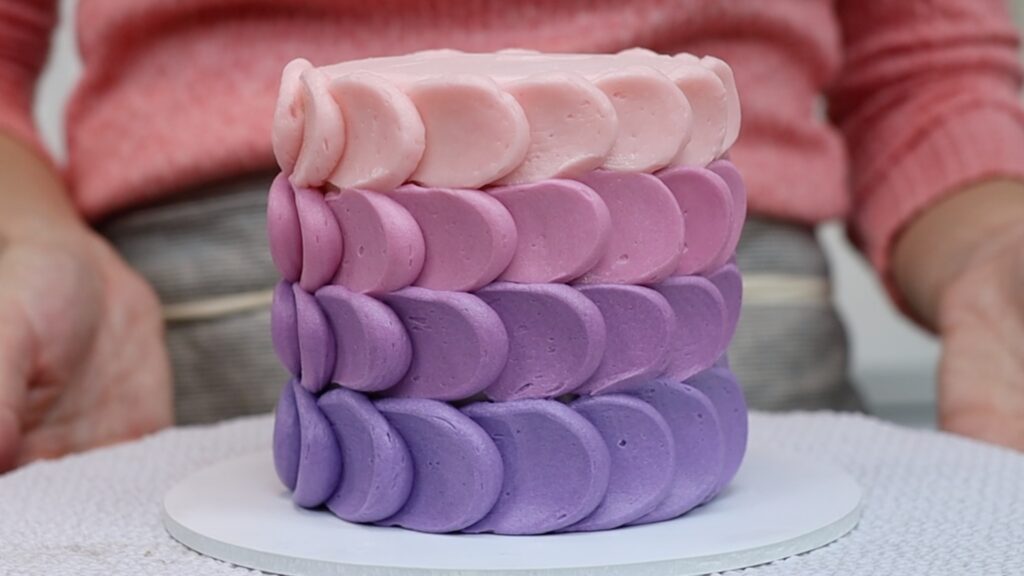
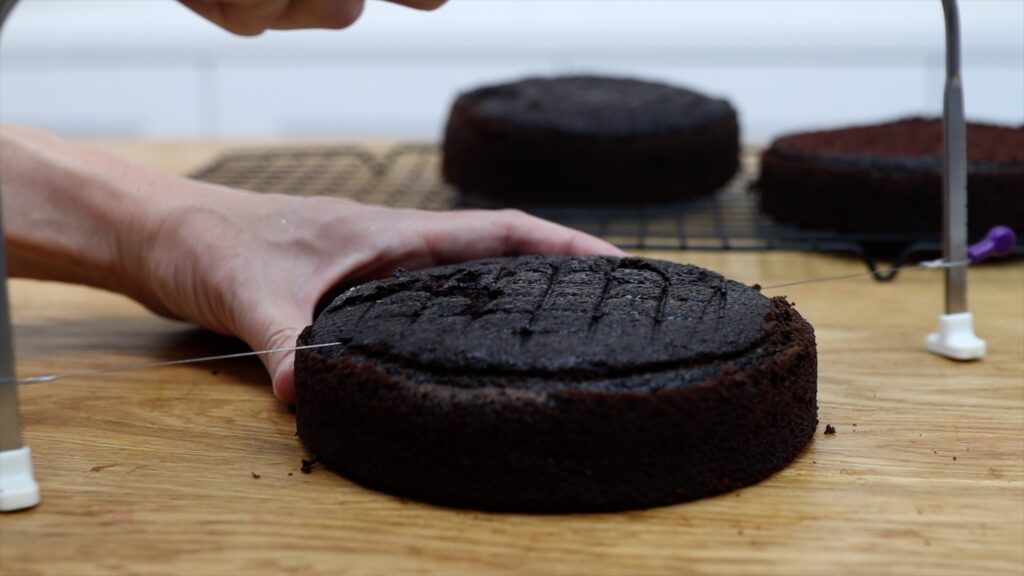
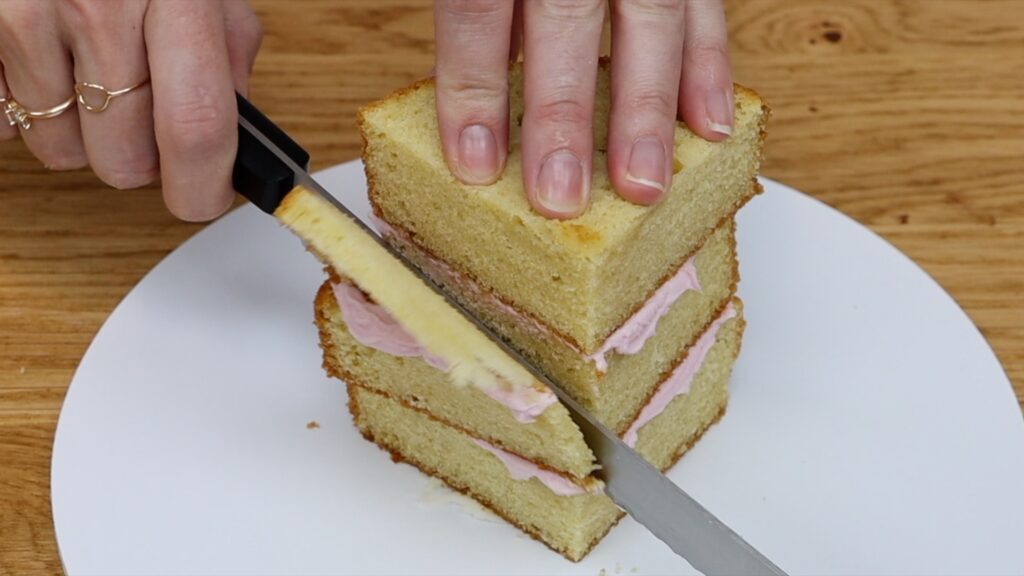
I'm going to use two cakes to spread and pipe my 4 Minute Buttercream as the filling.
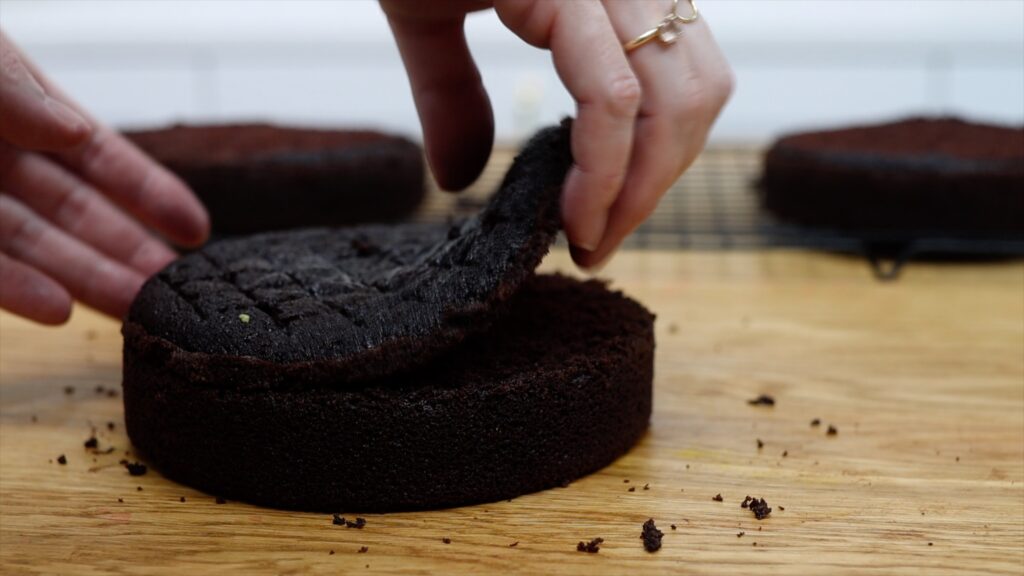
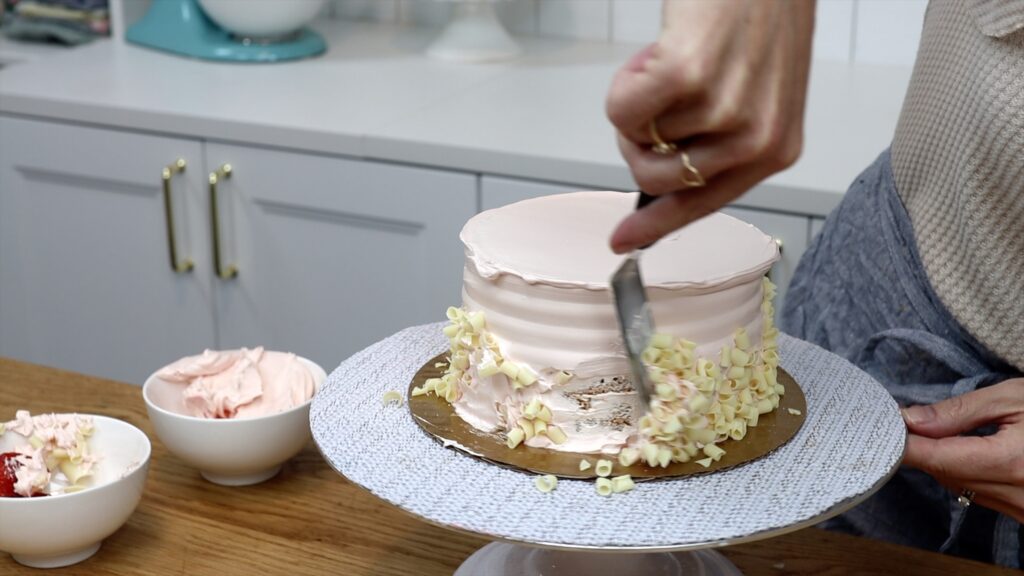
To spread filling onto a cake,use an offset spatula to cover the whole top of the cake layer. Then smooth it so it’s flat and level, ready for the next cake layer.
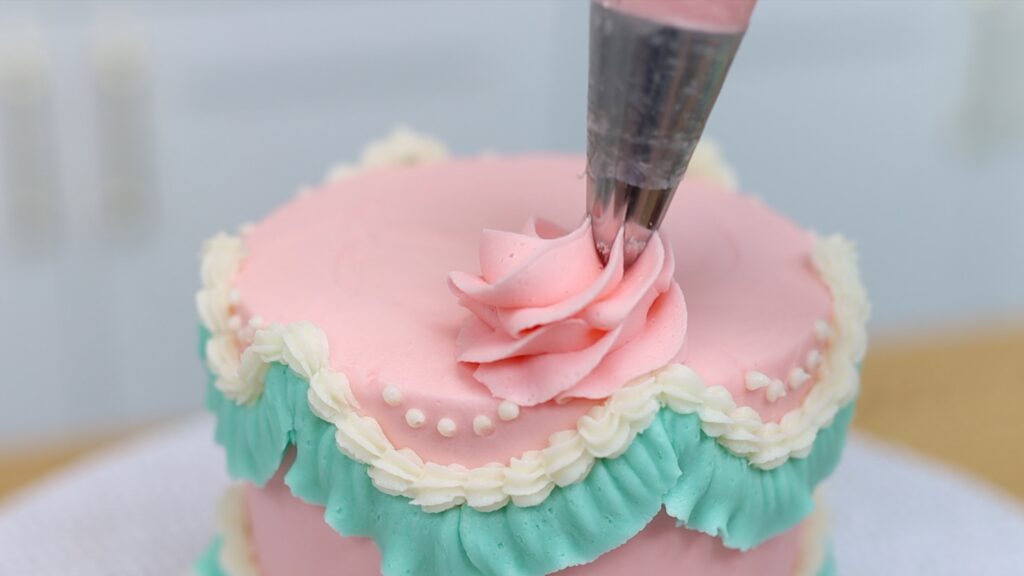
To pipe filling, spoon it into a piping bag with the end cut off or use a round piping tip. Pipe a spiral onto the cake and then optionally, spread that to flatten and level it.
Which is faster? Piping the filling gives it a neater edge than spreading it and piping also takes less time than spreading. However, if you choose to spread and smooth piped filling you’ll add some time to the process. This makes piping just a tiny bit faster than spreading the filling straight on.
PRO TIP for a straight cake: get down to eye level several times as you assemble the cake. At eye level you can make sure you place each layer of cake directly over the layer below it. This way, the cake will have straight sides and won't lean to one side.
Should you spread or pipe frosting onto a cake?
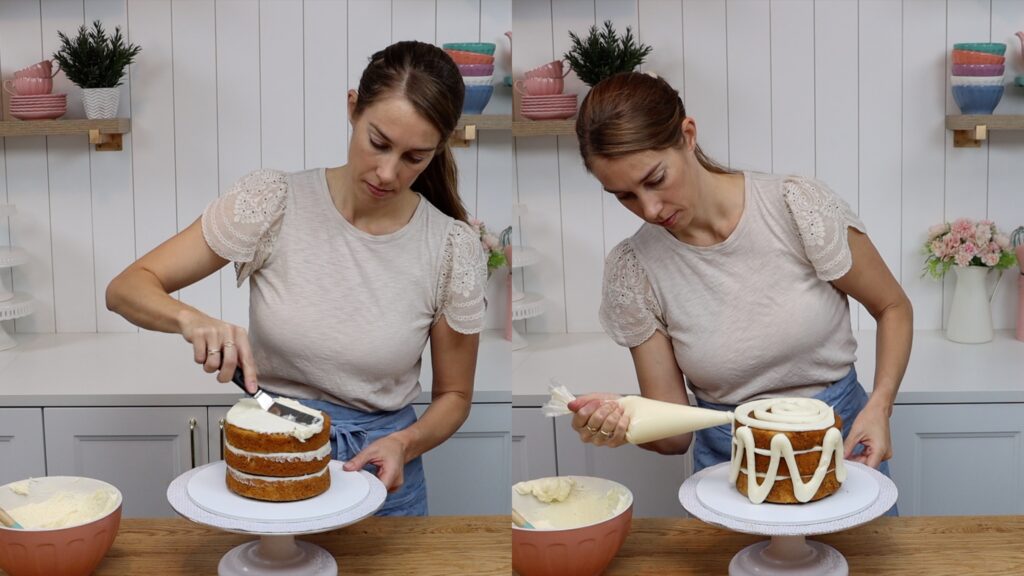
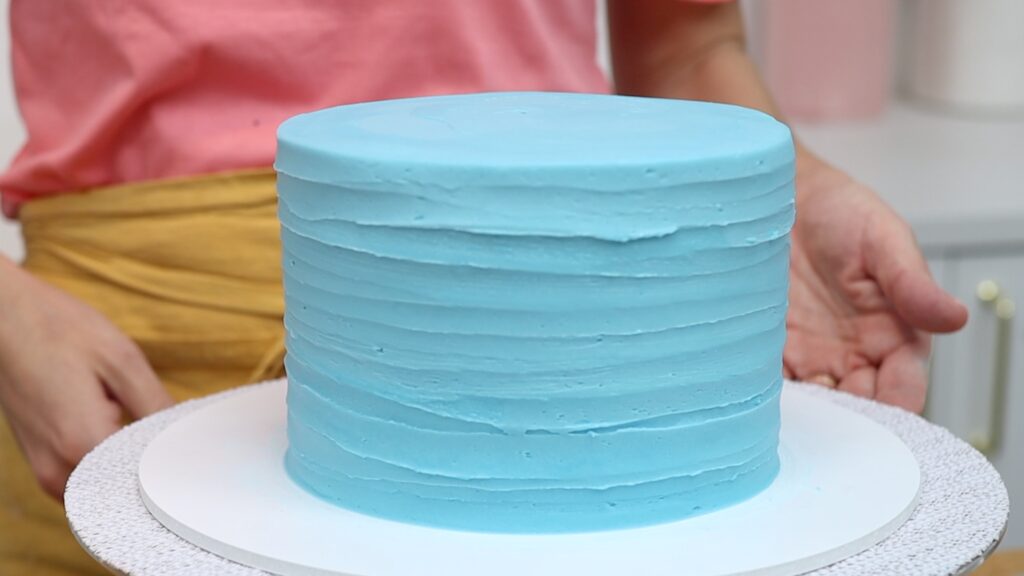
Spreading frosting onto the top of the cake is the same process as for the filling. Spread the frosting to cover the cake and then smooth it to flatten it. For the sides, side to side motions are the quickest way to spread the frosting all over the cake.
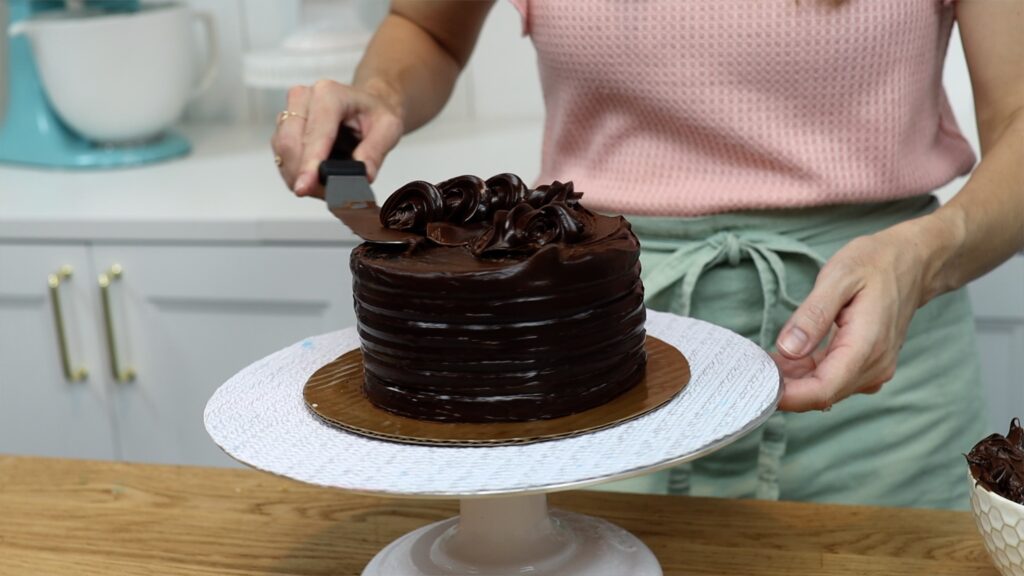
Piping frosting onto the top of the cake is also the same process as for the filling. For the sides of the cake I like to pipe zig zags all the way around. This evenly spreads the frosting over the cake without ending up with too much frosting. I like to pipe a ring around the bottom of the cake too, since that’s the trickiest part to reach with an offset spatula. Then spread the piped frosting all over the cake.
Which is faster: spreading or piping? Definitely piping! Although it’s an extra step to fill a piping bag with frosting, you’ll see that it takes a lot less time to spread frosting that's piped evenly over the cake compared to scooping up dollop after dollop of frosting from a bowl and spreading that straight onto the cake. To frost a quick cake, pipe your frosting before spreading it.
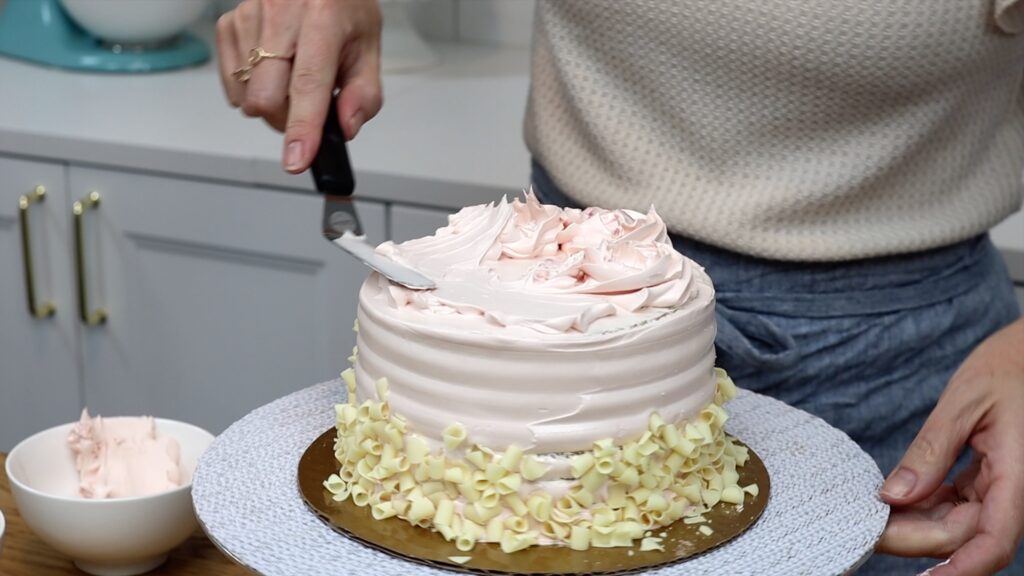
What’s key with either the spreading or piping method is to completely cover the cake with frosting. This first layer of frosting is called a crumb coat. Its purpose is to trap any crumbs that come off the cake so they don’t get into the final layer of frosting. To prevent crumbs you need to be sure not to leave any cake exposed.
What kind of cake comb is the fastest to use?
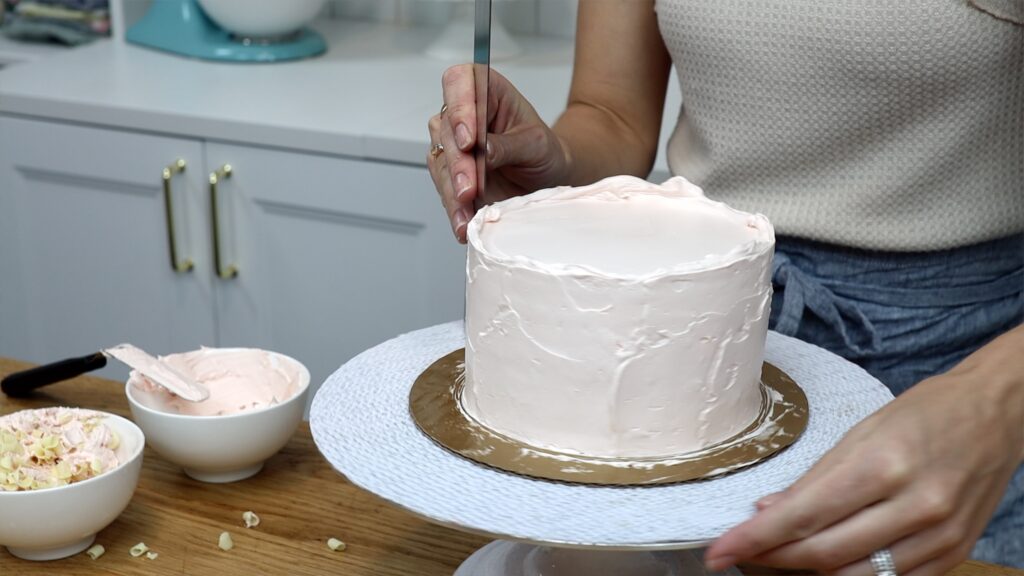
Let’s compare the two most common materials, plastic and acrylic. Plastic is quicker to clean off after each scrape around the cake. Acrylic is much thicker so you have two surfaces to wipe off each time, which takes longer.
I should mention that I find that the frosting is much smoother if I use acrylic rather than plastic. However, for the crumb coat I use a plastic cake comb because making a quick cake is my goal, rather than appearance. Since the crumb coat is going to be covered up with another layer of frosting, it doesn’t matter what it looks like. For the final coat of frosting I choose acrylic over plastic because I want that frosting to be as smooth as possible.
What temperature should the cake layers be?
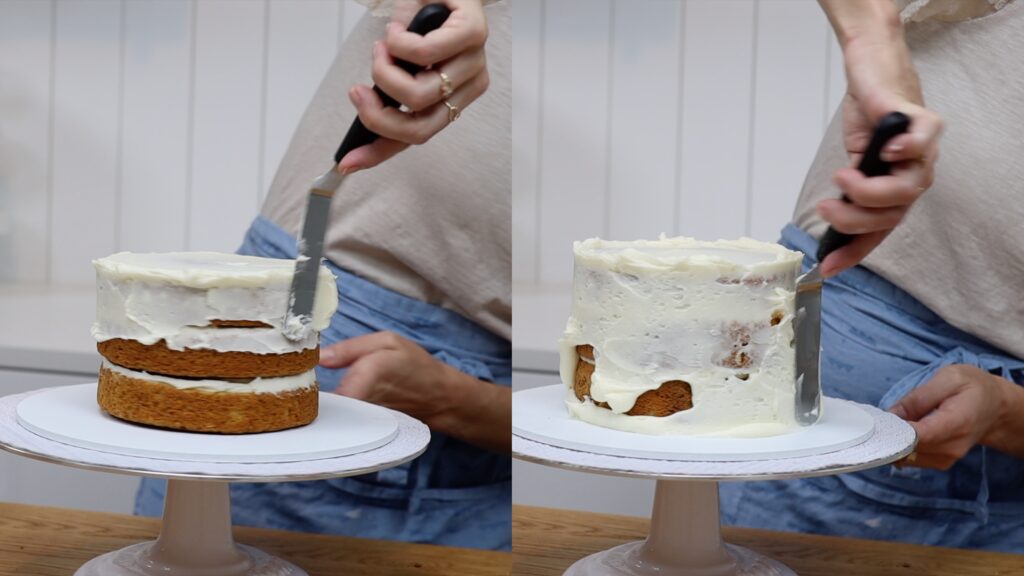
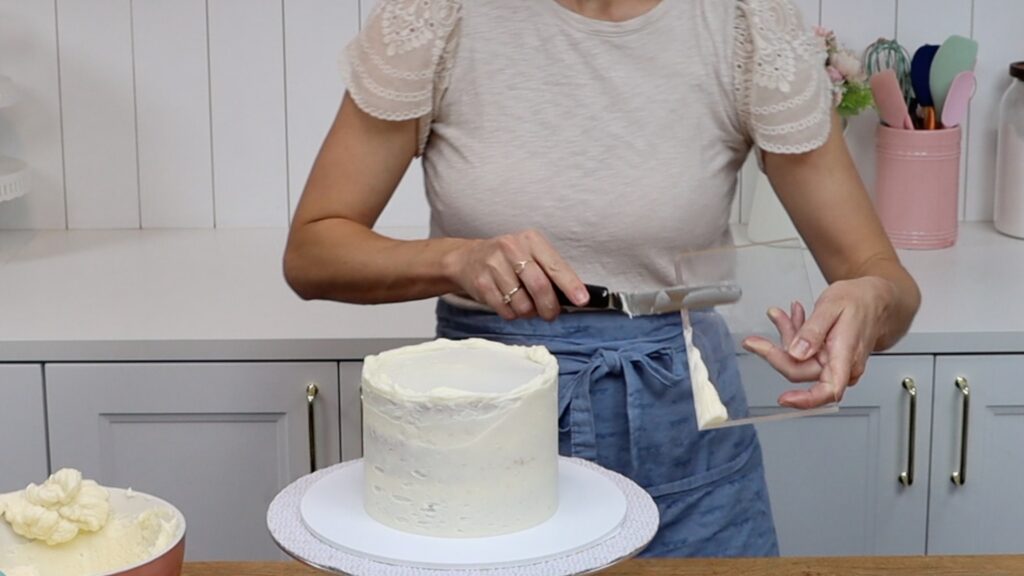
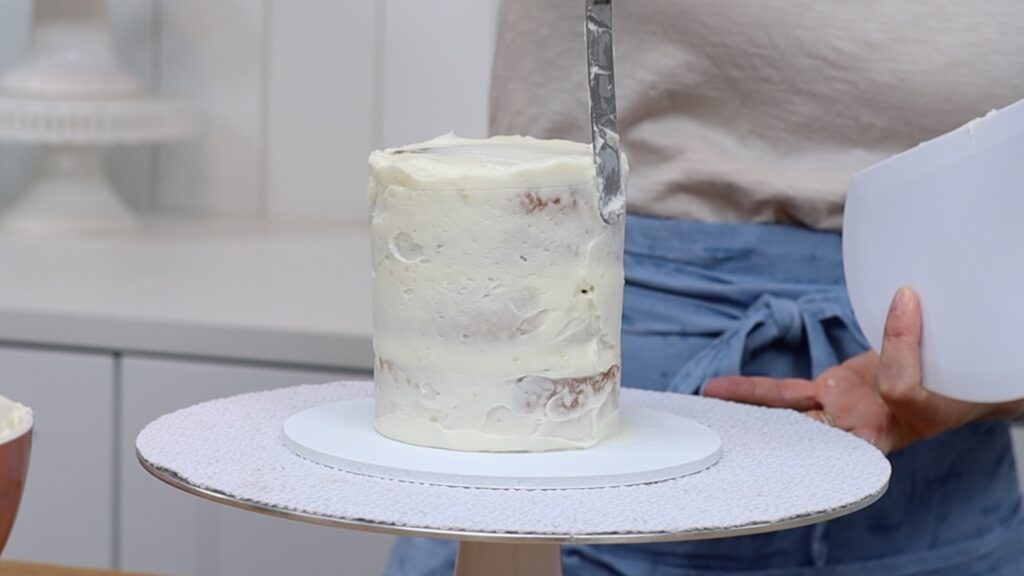
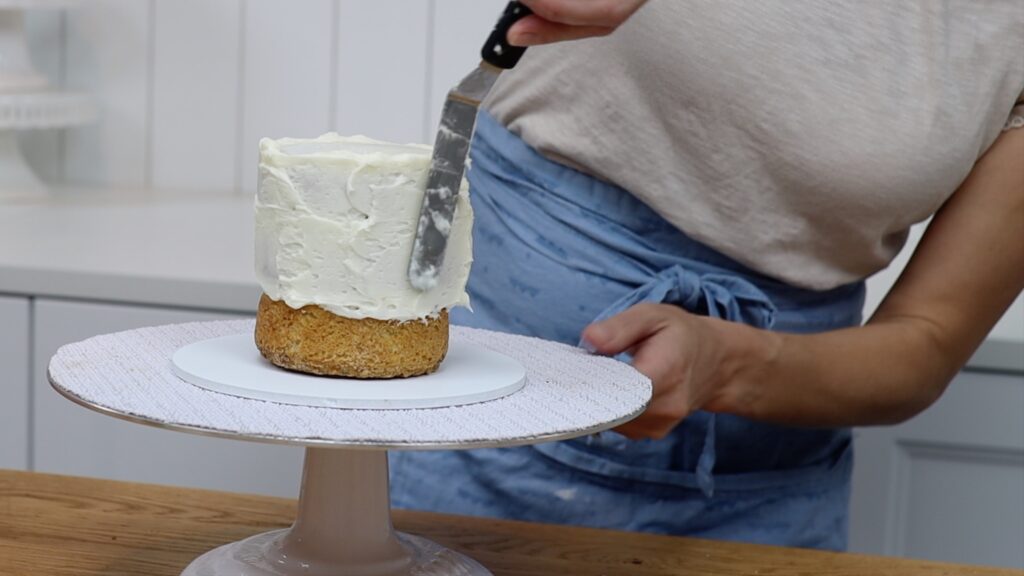
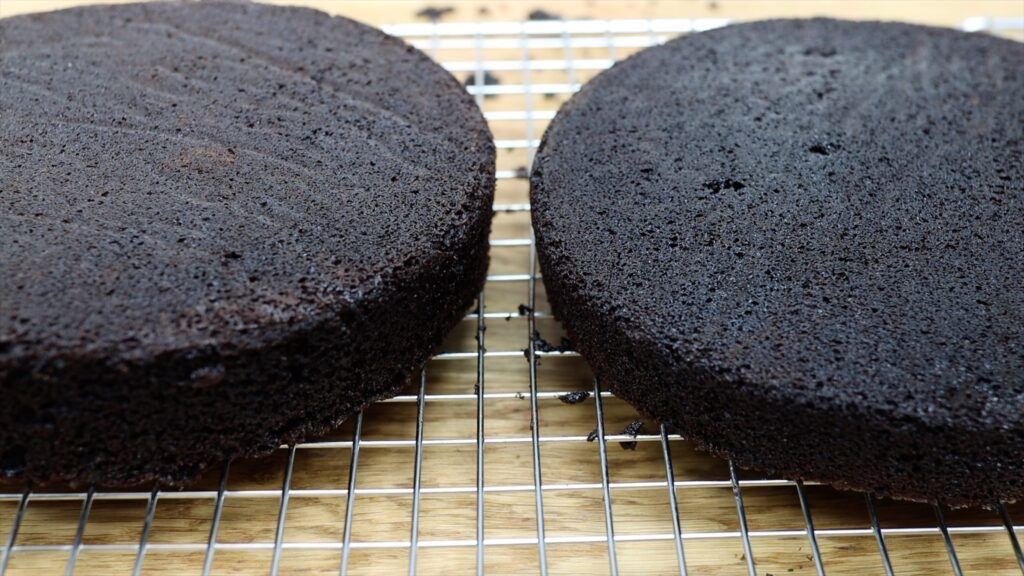
Probably the most important factor in assembling a cake is the temperature of the cake layers. Cakes that have cooled to room temperature after baking are the most difficult and time consuming to frost. Even light pressure from an offset spatula or cake comb will cause the cake to wobble. Room temperature cakes slide easily on the cake board because the dot of buttercream on the board hasn't set so doesn't secure it. Also, even if you assemble the layers straight on top of each other, spreading and smoothing the frosting can push the layers sideways and make the cake lean. I had to push this cake back into the middle of the cake board after it started to lean and slide:
These cake layers have been in the freezer for an hour so they’re cold and firm. This makes the cake much sturdier. The dot of buttercream on the cake board sets after about a minute because the cold cake chills the buttercream and it attaches the cake very securely to the cake board. I can spread the frosting with my offset spatula without making the cake wobble or slide or lean.
With the room temperature cake layers I have to stop and start several times as I adjust the cake when it moves. But with the cold cake layers, the cake stays still as spread and smooth the frosting. Frosting chilled cake layers is much quicker than room temperature cake layers.
So, now you know how to make a quick cake! Learn all of my tips for cake decorating on my online cake school with hundreds of cake designs and decorating techniques.
Try these four ideas for cake decorating with a spoon! You'll create quick and easy texture without any special tools. Bonus: you don't need to get your frosting perfectly smooth for any of these techniques!
#1 Vertical "swooshes"
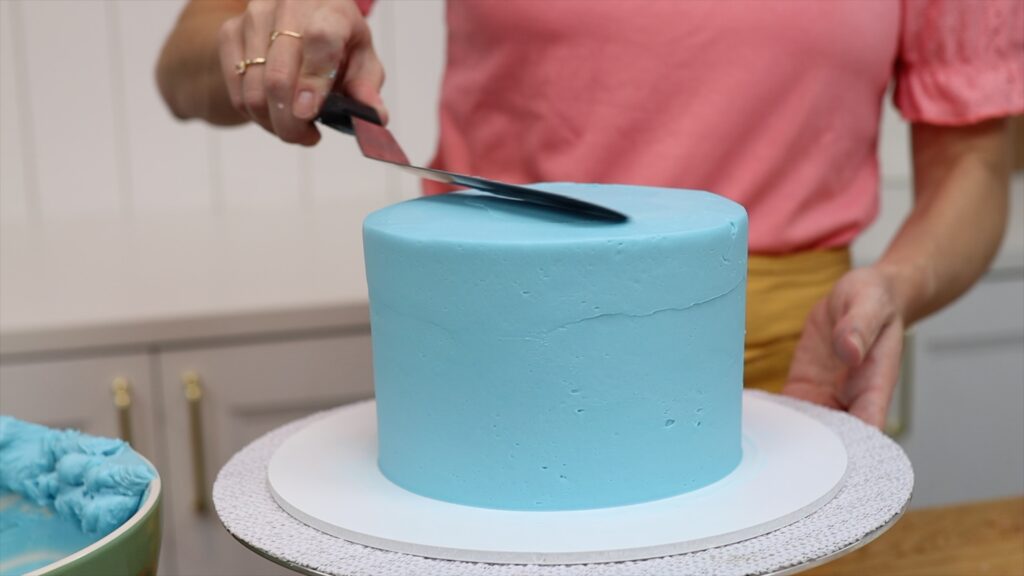
This first technique is great if you struggle with getting your frosting super smooth. Spread frosting onto your cake and scrape around the cake a few times with a straight cake comb. Don’t worry about indents or air pockets or imperfections because you'll cover those up next. Instead, focus on getting straight sides on the cake as you scrape. To do that, press your cake comb down on the cake board to line it up straight against the cake. Tidy up the top edge but again, don’t worry about getting it perfect.
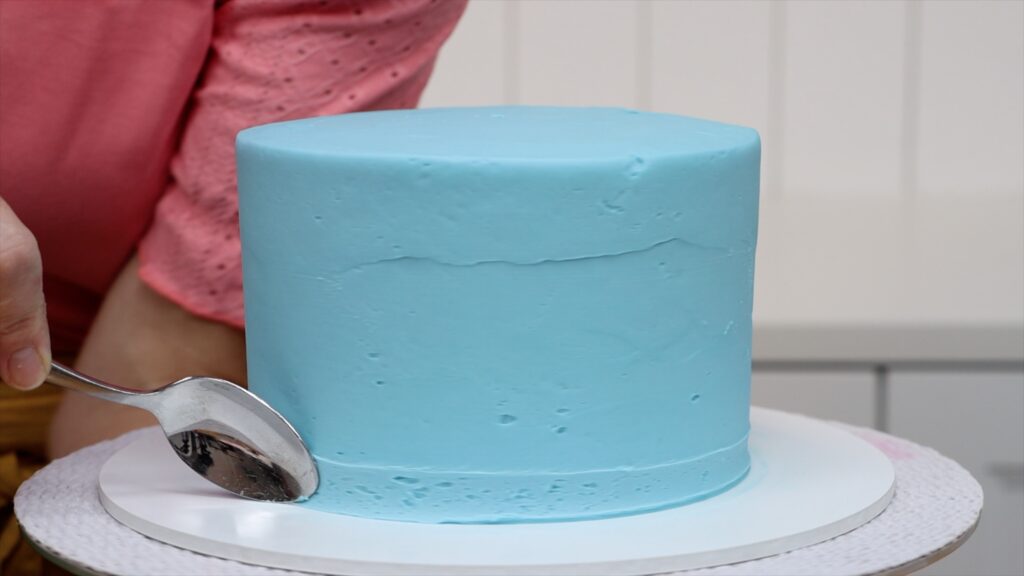
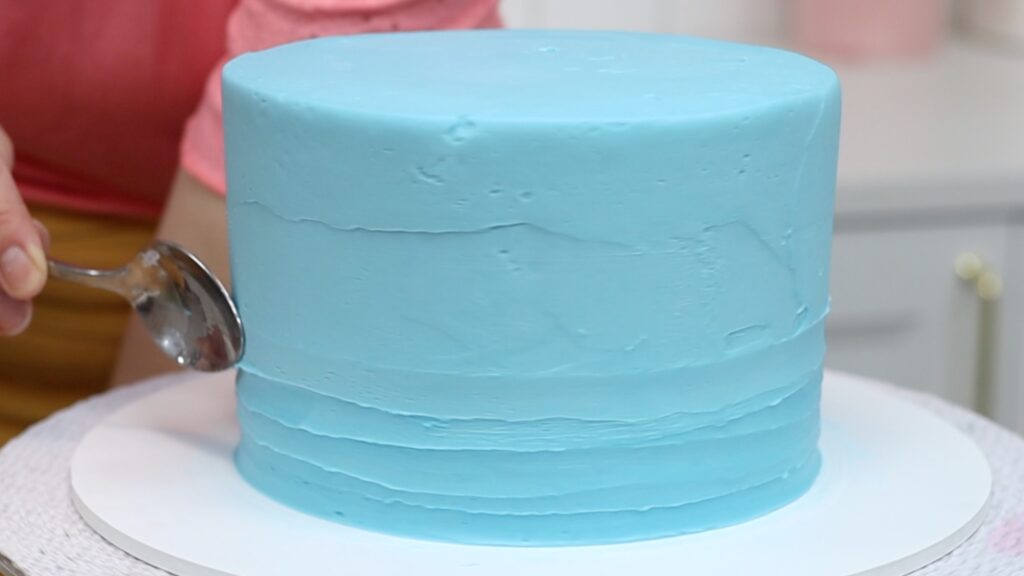
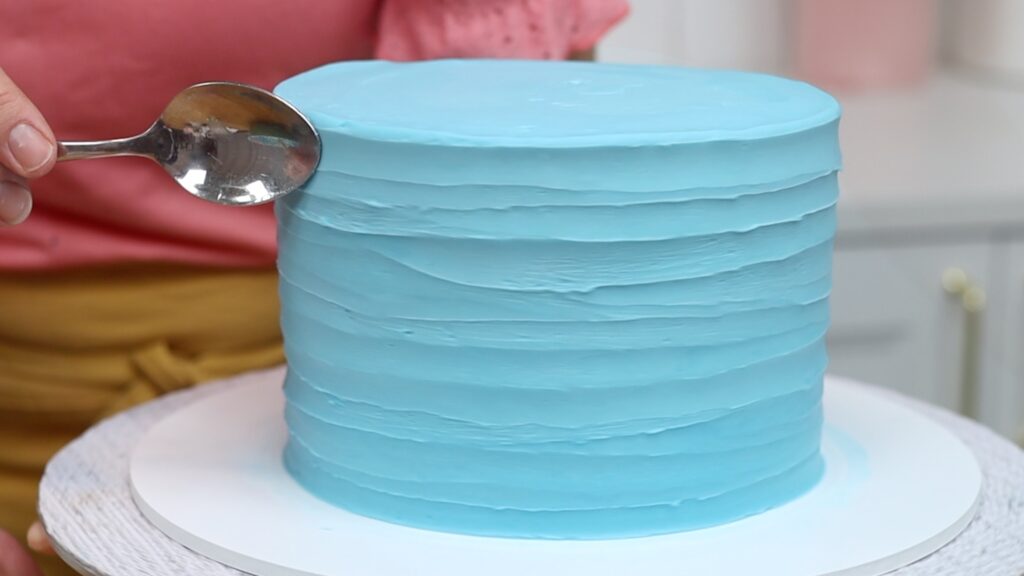
Now add texture with a spoon! Press the back of the spoon lightly against the frosting as you drag the spoon up the side. The spoon will cover up imperfections like this seam in the frosting! The spoon will pull the frosting into a peak up above the top edge of the cake. This gorgeous texture creates a new top edge, which is why you don't need to make it perfectly straight at the beginning.
Here’s a secret for all of these techniques: heat your spoon! Dip the spoon into a glass of hot water every minute or so, which keeps the spoon hot. That will help smooth the frosting and prevent air bubbles in the frosting. Dry the spoon after dipping it in the water so it doesn’t drip onto the frosting. With a hot spoon you can create neat texture AND perfect the frosting at the same time!
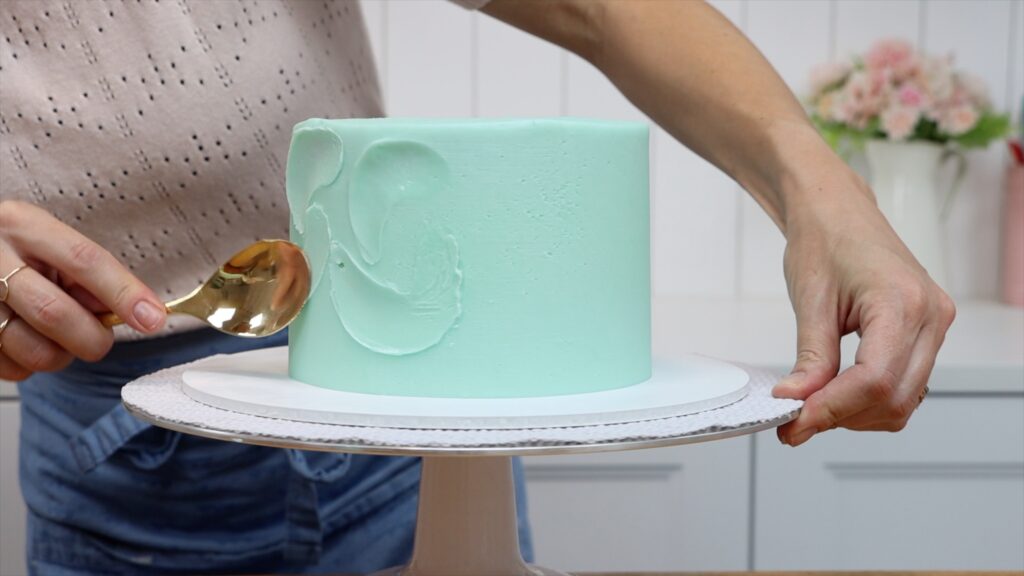
#2 Rustic horizontal grooves
Here’s another idea for cake decorating with a spoon to create texture. Start immediately after frosting your cake, while the frosting is still soft. Just like with the last technique, don’t worry about getting perfectly smooth frosting. This texture is going to cover all of that up. Use a cake comb a few times to make sure you have straight sides on the cake. Scrape over the top edge of the cake but don't take the time to get it straight and sharp and neat. Instead, just remove excess frosting for now.
Rest your spoon on the cake board, hold it sideways. Press it lightly against the frosting as you spin the cake on a turntable. Now that you know the hot spoon trick, this won’t be a surprise but look at the difference if you don’t heat the spoon!
For these first grooves around the bottom of the cake, the spoon sticks to the frosting and pulls it. This creates little tears or air bubbles or air pockets in the frosting. After dipping the spoon into a glass of hot water, the hot metal glides over the frosting instead of sticking to it. The spoon doesn't tear the frosting and the textured frosting is much neater now:
I love this technique because it's very forgiving. If you don't like a section you can go over it again to create new texture over the top. The technique is also very versatile. For example, here I've used the tip of the spoon to make narrow, shallow grooves. You can use the widest part of the back of the spoon to create wider and deeper grooves instead. Spin the cake continuously as you gradually pull the spoon up the sides of the cake to overlap the texture and create this pretty rustic effect.
At the top of the cake you’ll create a lip of frosting that bulges up above the cake. You can stop here or tidy it up with an offset spatula by swiping sideways. This pushes the lip across the top of the cake and you'll lift it off on your offset spatula. You'll create a neat, straight edge around the top of the cake.
Remember to wipe your offset spatula on a towel or paper towel after each time you swipe so that you don’t drag dregs of frosting back onto your neat edge. This rustic technique for cake decorating with a spoon is so pretty!
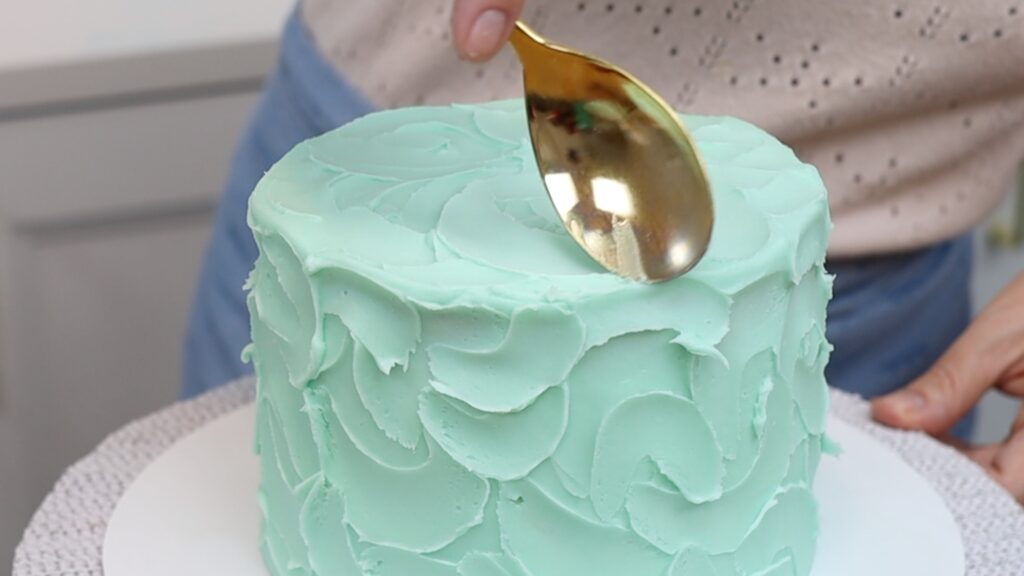
#3 Curved texture
I love the variety of textures you can create by cake decorating with a spoon. Here’s another technique to try straight after frosting your cake. Same as for the previous two technqiues, you don’t need to have perfected smooth frosting for this to look amazing.
Press your spoon gently against the cake and twist in in a curve to make a C shape. Or, depending on the direction you choose, a U or an N. A hot spoon will smooth the frosting within the shape, making this much neater than if you skip heating it. I think overlapping the texture looks the best because it makes the entire frosting textured. Spacing the shapes out around the frosting can look a bit strange.
Keep going right up to the top of the cake so that the texture covers the entire cake. You can create texture on the top of the cake too, using the same curving motion. Around the edges of the top it’s best to curve the spoon from the outer edge towards the middle of the cake. This drags the frosting inwards instead of pushing it out, which would create bulges around the top edge of the cake.
This is a quick way to cover a cake completely with texture, without needing a fancy textured cake comb.
#4 Scalloped texture
This final technique is my favourite method of cake decorating with a spoon. After covering your cake with a crumb coat, frost only the top of the cake. Smooth that frosting and then scrape around the sides of the cake to take off any frosting that’s sticking out. This leaves the sides of the cake straight with no frosting bulges.
A glass of hot water will give you the best results for this technique. You’ll also need a piping bag, ideally with a round piping tip. If you don’t have a round piping tip you can use a piping bag without a piping tip. Cut the end of your piping bag to be the size you want and you'll pipe through that hole. If you're using multiple colours and piping bags, cut all of the holes the same size.
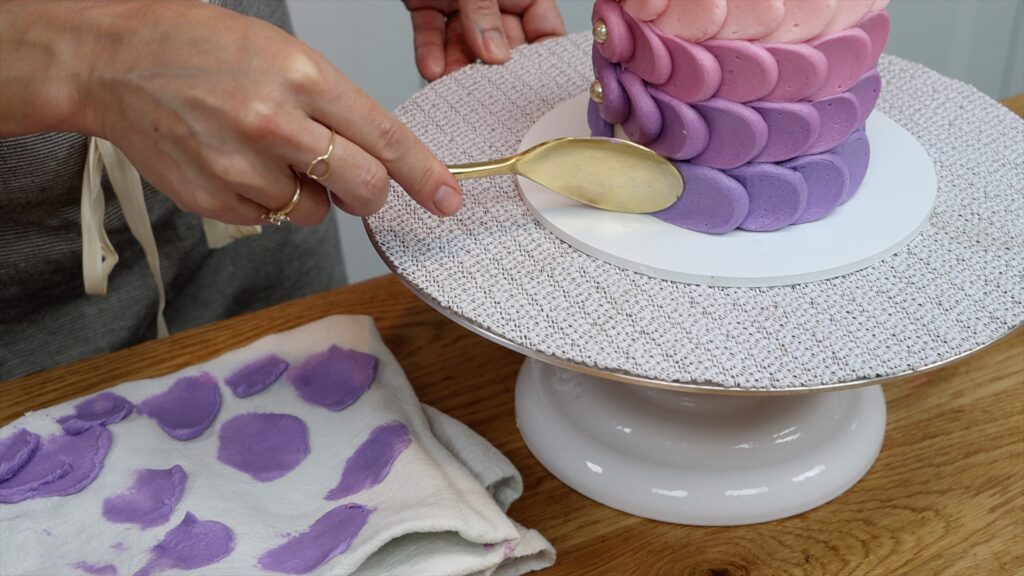
Squeeze a dot of frosting onto the cake. I started at the top of the cake but I recommend starting at the bottom. I'll show you why in a moment. Straight after piping the dot, dip your spoon into the hot water and dry it. Then press the back of your hot spoon into the dot and drag sideways. You'll create what looks like a tail on the dot. You’ll get used to the pressure you need after the first dot or two. You need enough pressure to flatten the dot and to pull some of the frosting across the cake but you don’t want to push so hard that you expose the crumb coat underneath the dot.
Continue around the cake, squeezing each dot of frosting over the top of the tail of the previous dot. By overlapping them, each new dot will cover up any exposed frosting around the tail of the previous dot.
At the end of each row you can’t drag the dot sideways with your spoon because the next dot is in the way. Instead, leave it as a dot rather than a scallop. I would display this cake on a dessert table so that the final dots in the design were at the back of the cake so they wouldn’t be visible. I like to press a sprinkle into the middle of each dot.
You can use the same colour of frosting for this texture all over the cake or change every row. I started with pale pink and now I’m adding some more gel to make a darker pinky purple. That way I can use the leftover frosting from the first row of scallops. I do the same for each row to always use up the leftovers by turning them into my next colour.
If you’re using more than one colour, couplers make this technique much quicker. Without couplers you have to squeeze leftover frosting out of the piping bag to then push the tip out through the top of the bag. With a coupler you attach the piping tip to the outside of the bag. This way, after using the tip with one colour of frosting you just unscrew the piping tip and move it onto another bag with another colour of frosting. Squeeze the bag so the last little bit of the previous colour comes through the piping tip and it’s ready to go!
The trickiest part of this texture is spacing it so that it covers the whole cake from top to bottom. It's common to have to squish in the final row or pipe the last row of dots bigger so that you can fill the remaining space on the cake. For this reason, I suggest starting at the bottom of the cake and working your way up. By doing this you have a bit more leeway around the top of the cake than at the bottom, since the cake board provides a very definitely end point to the cake at the bottom but at the top, it’s not really noticeable if the scallops finish just above or just below that layer of frosting you spread onto the top of the cake.
Keeping your spoon hot makes for the smoothest frosting on the scallops. Also, it’s important to wipe the back of the spoon off on a towel or paper towel so that it stays clean. After pressing the spoon against a few dots you’ll notice frosting start to build up on the back of the spoon and if you then press the spoon onto another dot, you’ll drag that built-up frosting across the dot. You’ll see that texture sitting on the surface of the scallop.
I love the look of this scallop shaped texture! Even the back of the cake looks pretty with the final dots decorated with sprinkles:
I hope you enjoyed these techniques for cake decorating with a spoon! Visit my cake school to learn hundreds of cake decorating techniques and designs and join my ClubPLUS for access to every MiniCourse, MasterCourse, Live Workshop AND 5 Minute Fridays!
Writing on cakes can be tricky but with these 12 tips, use frosting or icing to write beautiful messages every time!
#1 Get the right consistency for your buttercream
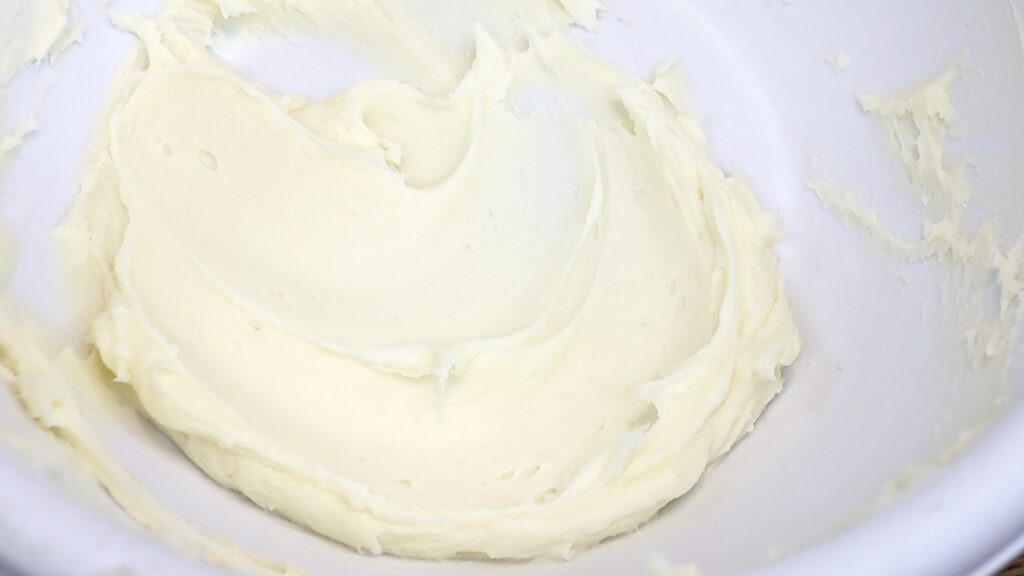
This is the most important tip! If the buttercream is too stiff, the lines of your letters will break apart as you pipe. What is the right consistency for buttercream for writing? Buttercream should be easy to stir and smooth, without jagged texture when you pull a spatula through it.
If you make buttercream in advance, check the consistency just before using it. Buttercream consistency changes with temperature so if you make it on a warm day and use it on a cold day, you might find that it’s become too stiff to pipe with.
#2 Support your piping hand
The biggest challenge with piping is that unlike writing on paper, you have nothing to rest your hand on. Piping mid-air is difficult because instead of being steady, your hand is wobbling all over the place. To help with this, use your other hand to support your upper arm to hold it still. This way, your piping wrist can do the tiny movements required to shape the letters of your piping without also needing to hold itself steady.
#3: Use the right sized piping tip
For a small space, use a small tip. For larger spaces, you can use larger tips. This is a #3 and the cake is 4 inches wide. For small cakes or long messages a #2 and #4 work well too. If your piping tip is bigger you’ll need to pipe very large letters to make them legible. If you try to write small letters with a large piping tip, the holes in letters like 'e' and 'g' get covered up. This makes it difficult to read what the message is supposed to say.
#4 Start with printed letters
If you’re new to writing on cakes, start off with printed letters. Cursive or joined up writing is much more challenging, especially if you can’t write neatly like that on paper! Printed letters are easier because you can take your time, pausing after each line or serve to adjust your position. This makes your writing the most legible.
#5 Write on a cold cake
Before you write on a cake, chill it in the fridge or freezer. The timing for this varies but wait until the frosting has set, so it’s firm. Then after you write a letter or word, if you don’t like it you can scrape it off easily. You won't damage the frosting on the cake because it will hold its shape.
#6 Use the right font
If you have very shaky hands or struggle with piping lines, try dots instead! Pointillism is a technique that uses piped dots to make shapes, and it can be used for writing, too! Choose a small round piping tip like a #2, #3 or #4. Try it - you might find it easier than piping letters the way you’d normally write them with lines and curves.
#7 Fill your piping bag
You only need a tiny bit of buttercream for each word you pipe. However, it’s easier to pipe with more buttercream in the bag. When there is only just enough buttercream in the bag to write a message, you’ll need to use your finger or thumb to push the buttercream down into the piping tip to squeeze it out.
Your piping will be much neater if you have a little bit more buttercream in the bag. Ideally, keep your piping bag about half full.
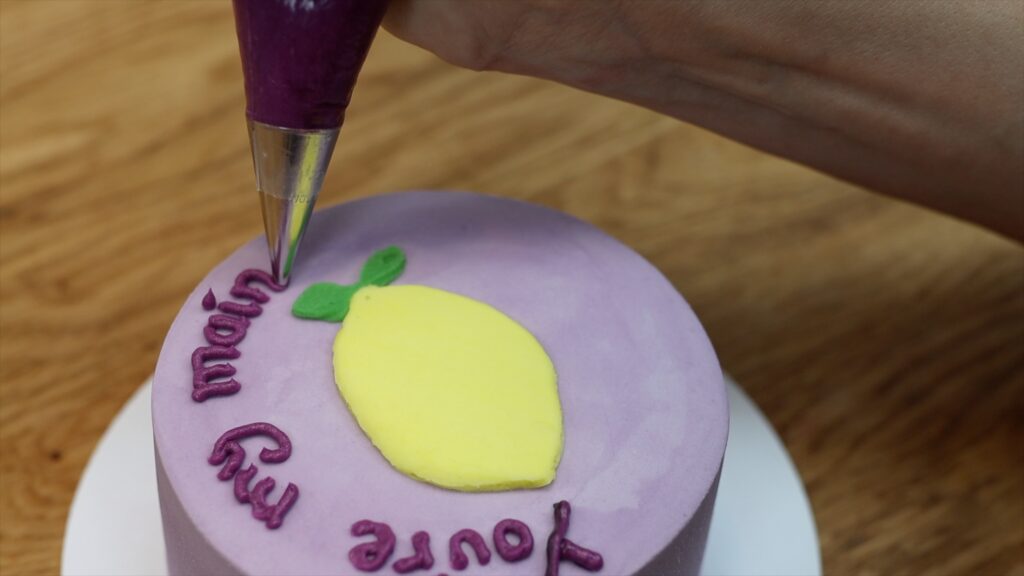
#8 Center your message
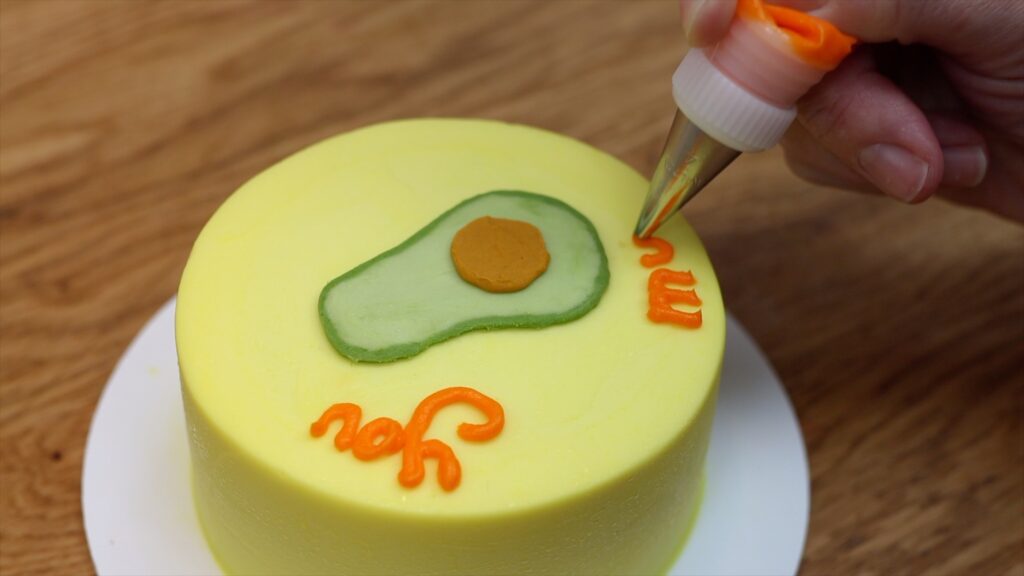
To center writing or space it evenly on a cake, start with middle word or middle letter. Then work your way out. There are 7 letters in the word "squeeze" and I’m starting with the fourth, which is the middle letter. I can then fit three letters after and three letters before. By starting in the middle, the word will be perfectly centered on the cake.
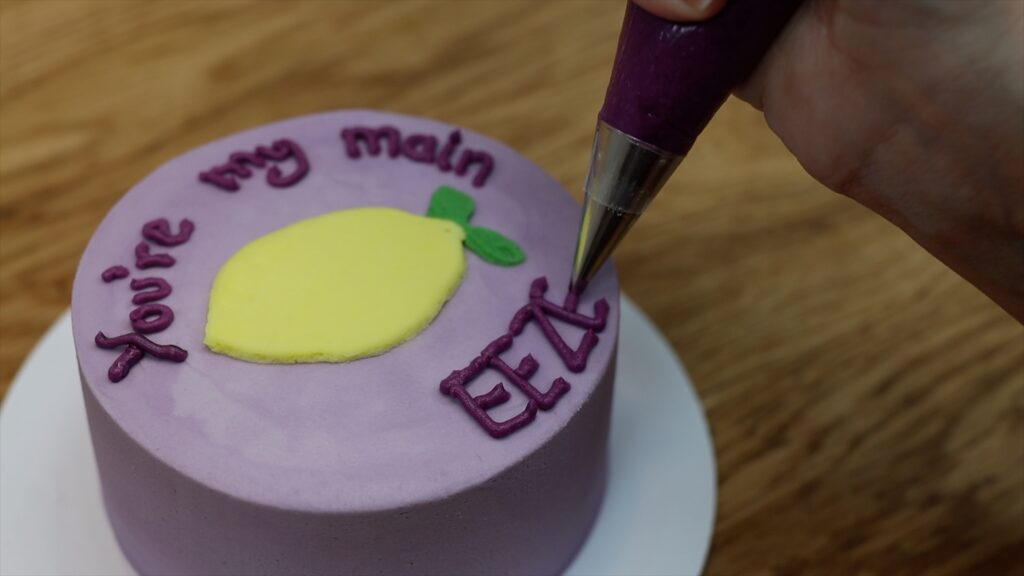
#9 Fit your message in
Sometimes, writing backwards makes the most sense! If you decorate a cake before writing a message, your message may need to fit within a certain space. If the decoration that's blocking your writing is to the right of the space, start with the last word. Then work your way to the beginning. This way you'll make sure the message fits.
You can even start with the last letter of a word and write backwards! By doing this, you won't be trying to squeeze the last letter into a tiny space, making it smaller or narrower than all of the other letters.
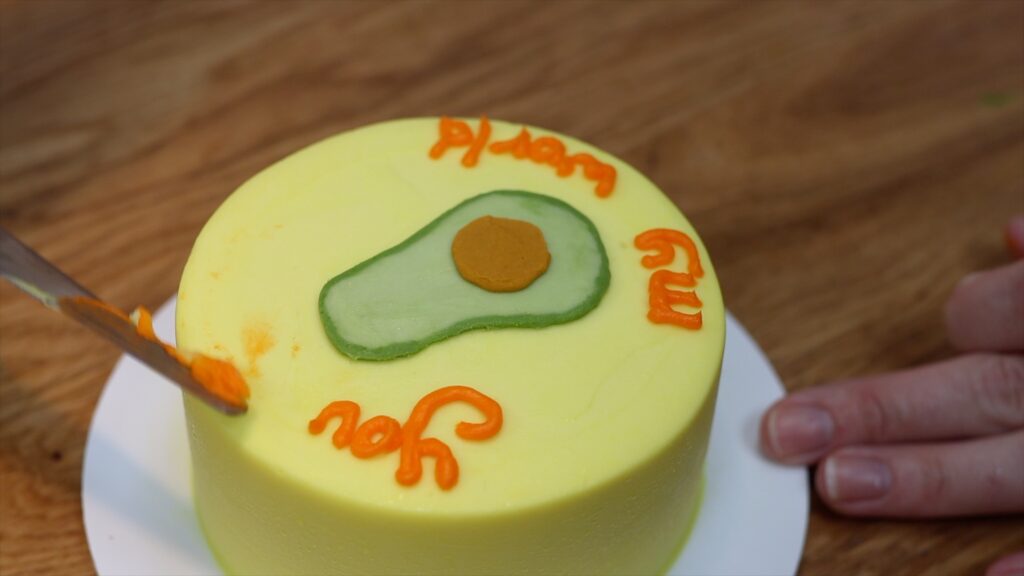
#10 Use shapes and details
Even with the neatest letters, it can be confusing how to read a message on a cake. Messages spaced around a decoration could be read from left to right or up and down. To help guide people to read in the right direction you can use shapes or other details.
Here, the hearts block the cake off across the middle. This shows that the words at the top should be read first and then the words at the bottom.
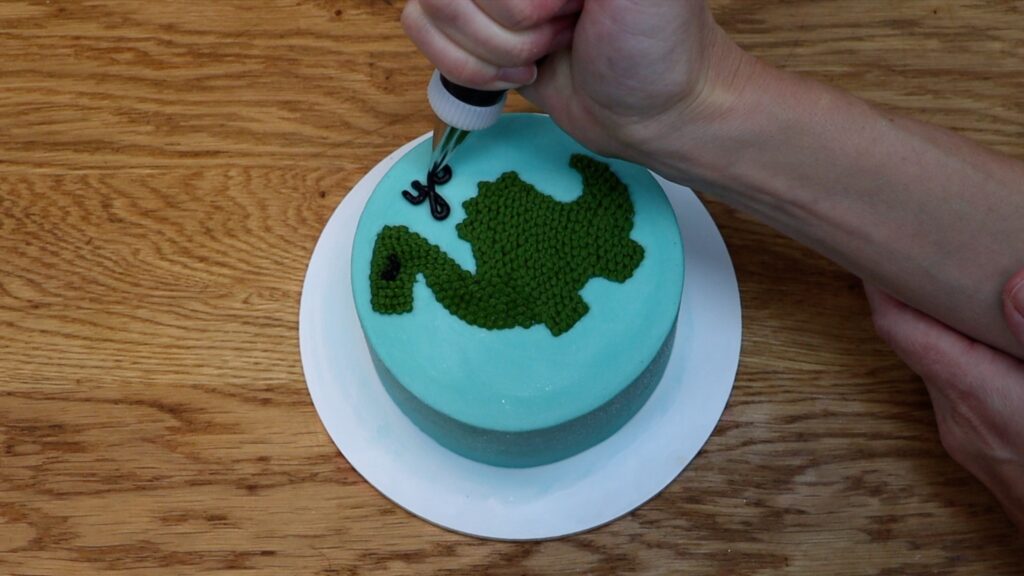
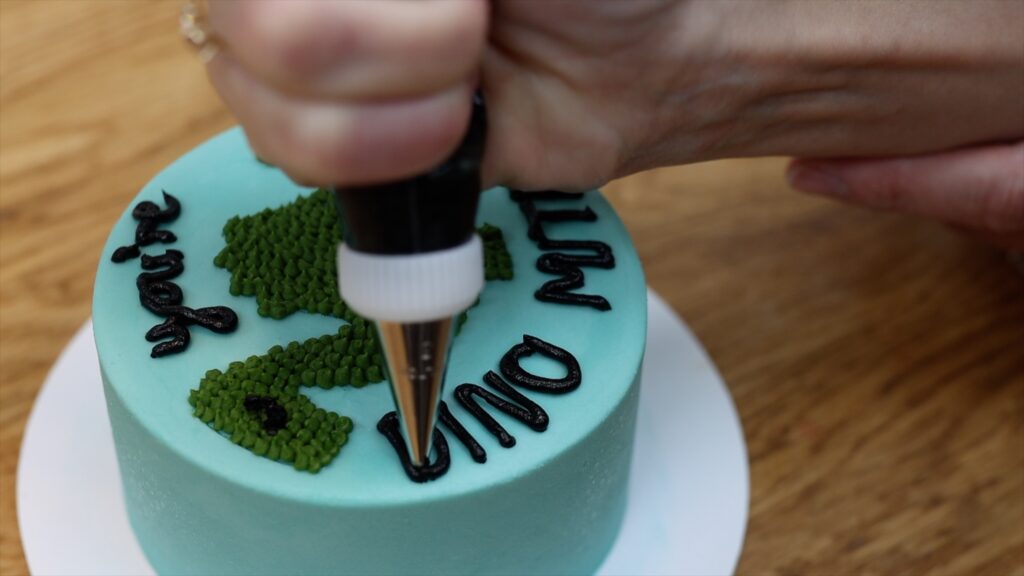
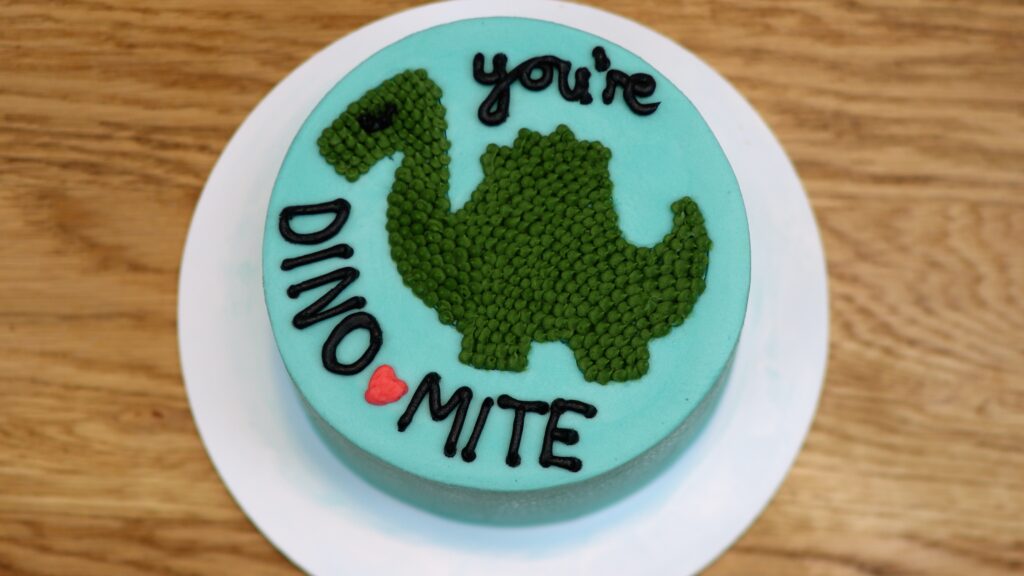
#11 Vary your lettering
Vary your lettering to make the message more interesting. You can do this by using two fonts, like the cursive and print on this dinosaur cake or the printed letters and pointillism on this cake:
Another option is to use lower case and caps to add variety, like this:
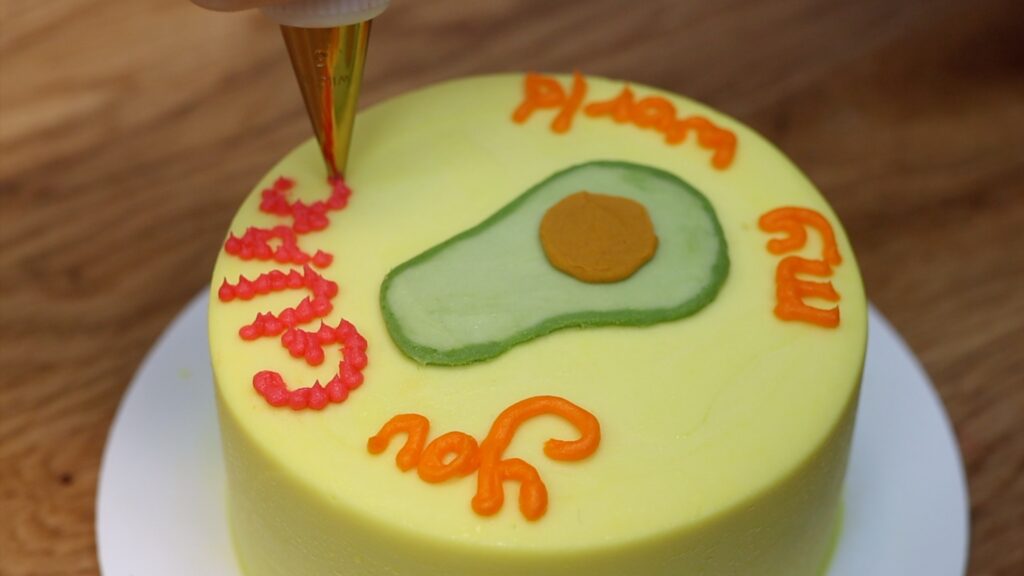
#12 Vary the colours of your writing on cakes
Another way to add detail to messages is to use more than one colour. For that, I recommend using couplers. This way, you can attach a piping tip to the outside of a piping bag. Then after finishing writing part of your message with this colour, unscrew the coupler ring and lift the tip off. Put the tip onto another piping bag with another colour of buttercream to use next. Screw the coupler ring on to secure the piping tip and now you're ready to write with this colour!
Let’s make these beautiful, soft and moist vanilla mini bundt cakes! They’re perfectly sized individual desserts that can be iced or glazed to look elegant and to satisfying any sweet cravings. There's a video of how to make these vanilla mini bundt cakes at the end!
How to mix vanilla cake batter
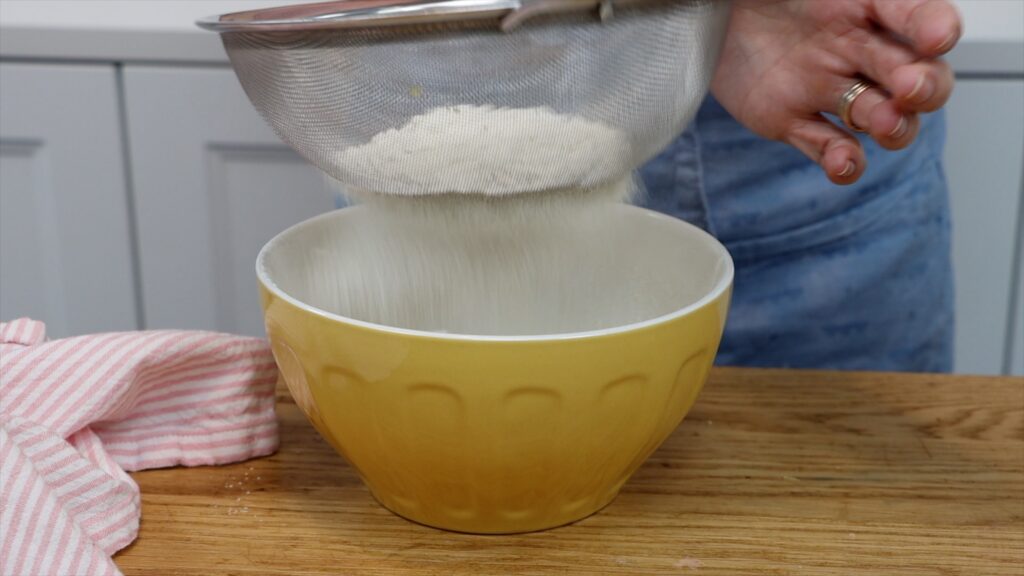
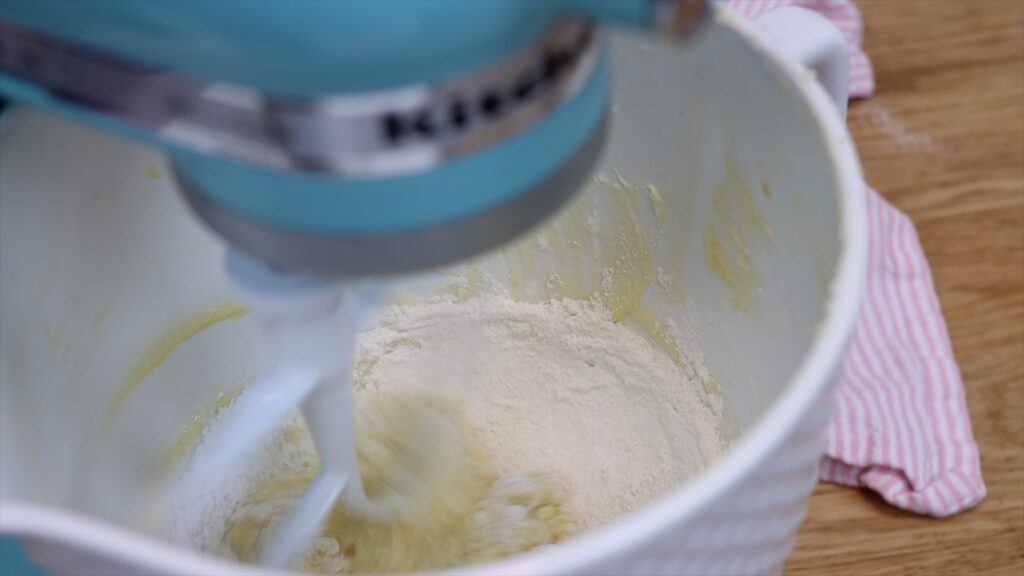
Your ingredients should all be at room temperature before mixing the batter for these mini bundt cakes so take any refrigerated items out of the fridge a few hours before baking. Sift your dry ingredients: flour, baking powder and bicarbonate of soda (or baking soda if you’re in the US). Sifting makes the cake lighter, instead of dense.
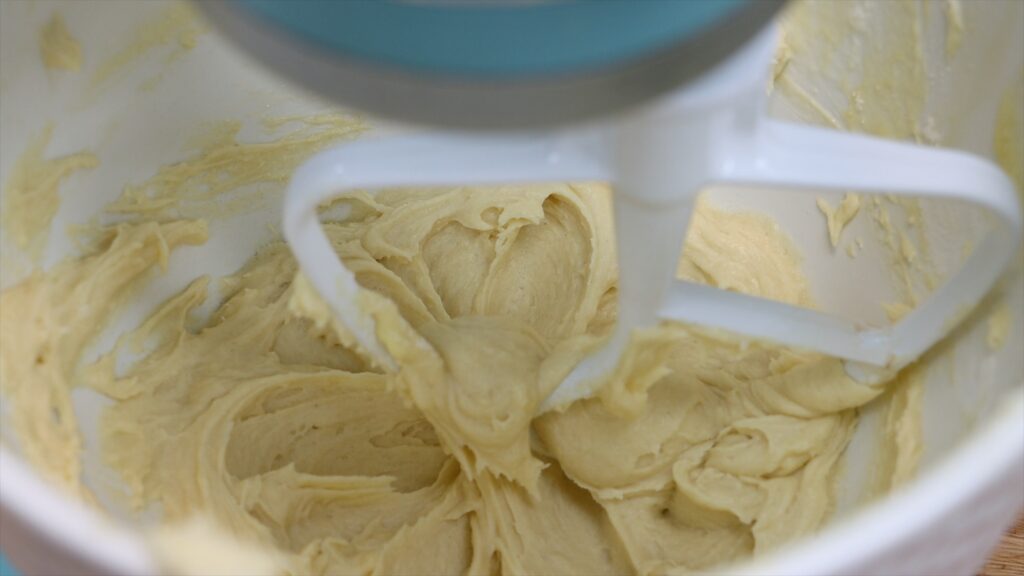
Beat butter and sugar with an electric mixer at medium speed until creamy. This takes about five minutes. The butter will become pale and the mixture will start to look fluffy.
Add vanilla and egg and mix together. You’ll notice that since this is a tiny batch of cake batter, your mixer will struggle to reach ingredients on the sides of the bowl. To pull those ingredients into the batter use a spatula to scrape around the edges of the bowl.
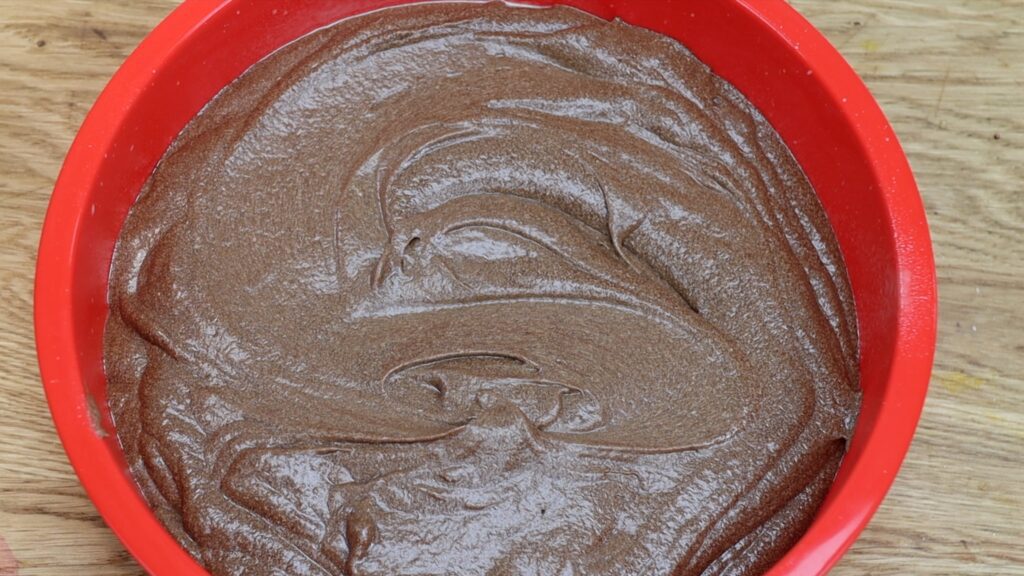
Add buttermilk and oil and mix those in and then add the dry ingredients you sifted. Mix on the lowest speed until you don’t see any flour in the batter. The batter will be smooth and golden and quite thick:
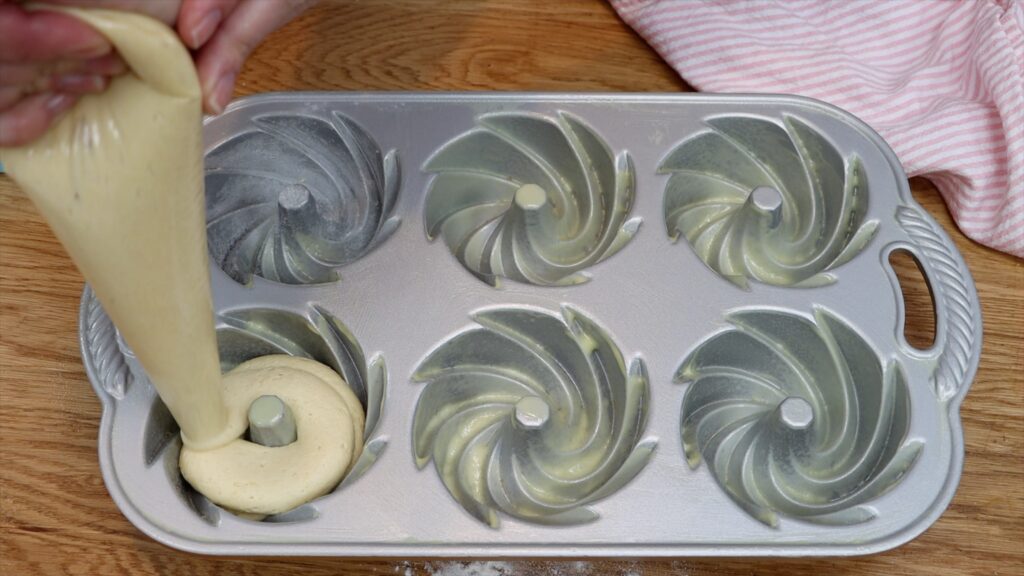
How to fill a mini bundt cake pan
It's important to grease mini bundt cake pans to make sure the cakes don't stick. Rub each ring or cavity with the wrapper from your butter or spray the pan with a non-stick spray. I like to use a tiny but of flour to make the pan extra non-stick. This ensures that every part of the pattern comes out neatly when you turn the mini bundt cakes out. If you have it, a non-stick baking spray with flour in it is of course a much quicker option!
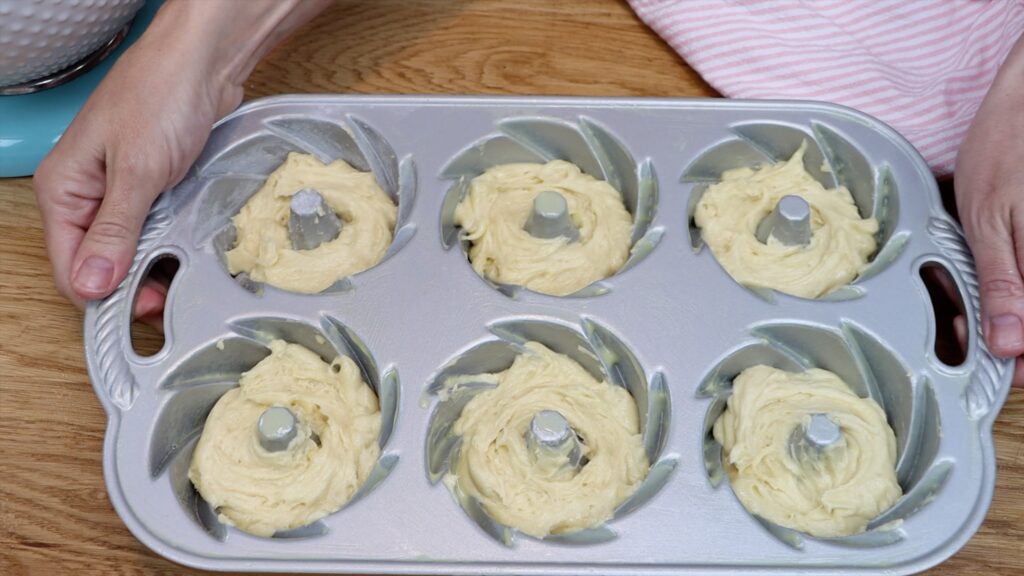
I like to use a piping bag to pipe the batter in to the pan. An ice cream scoop is another good option for getting the batter into the pan neatly. After dividing the batter between six mini bundt cakes it will seem like you don’t have enough batter. Only fill each ring or cavity half full because these cakes rise a lot during baking. Using this quantity of batter for six mini bundt cakes will create flat tops, which will eventually be flat bottoms! Use a toothpick or a spatula to jiggle and spread the batter so it’s level. Now let’s put these into the oven.
How to bake mini bundt cakes
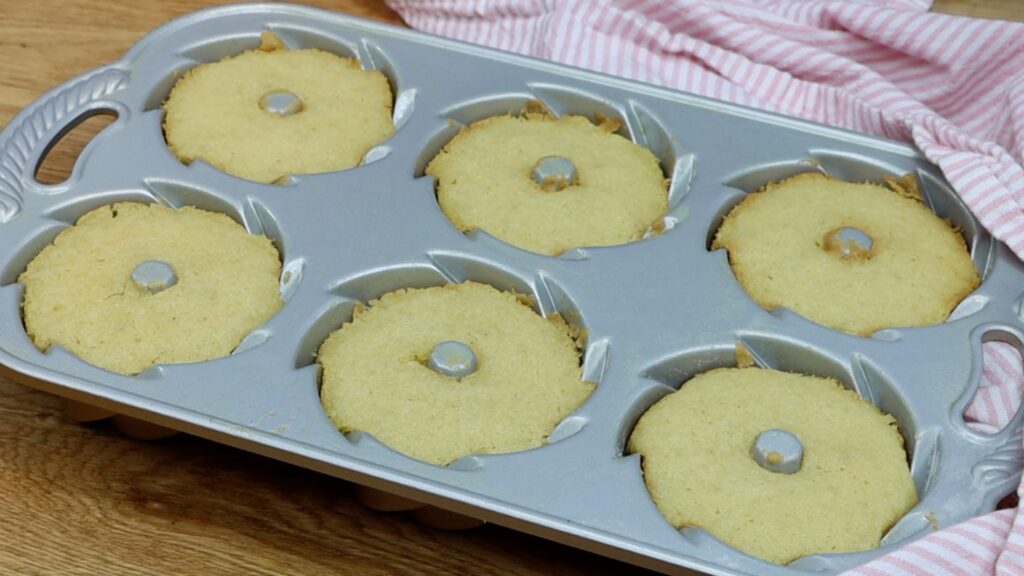
Bake these mini bundt cakes at 325F for 15 minutes. To test that they’re baked, press lightly on one and it should rise back up slowly. Your finger should leave a faint imprint in the batter, showing that they are very nearly baked. These will continue baking for a moment after taking them out of the oven since the pan is so hot. If you bake them until the cakes spring back up, they’ll be overbaked and dry.
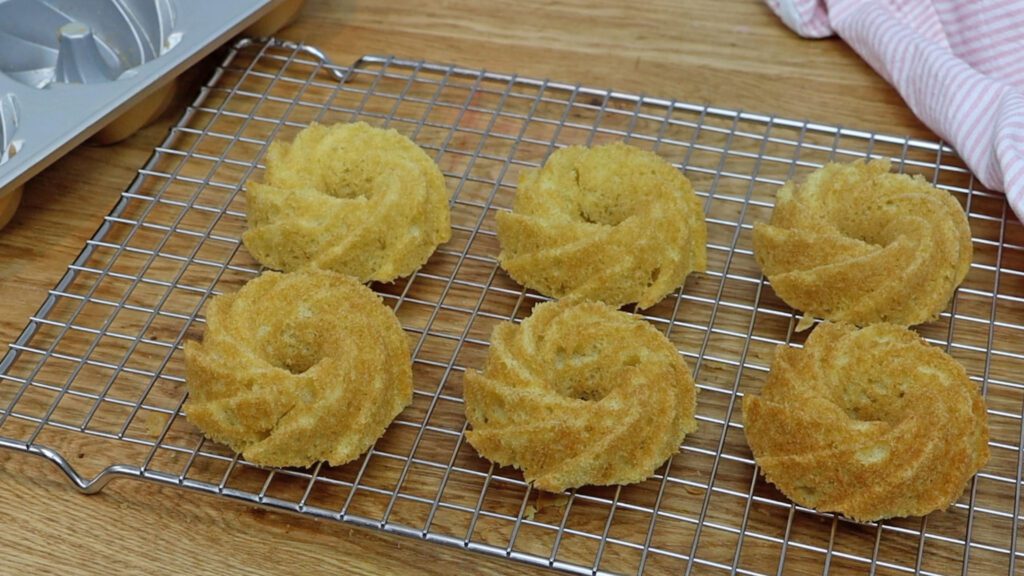
Wait five minutes for the mini bundt cakes to cool slightly, which makes the cakes less delicate. Then turn the pan upside down onto a wire rack. Holding onto the pan and the rack, tap a few times on the counter so that the mini bundt cakes come out. Look at these beauties!
Leave them to cool completely and while you’re waiting, make the topping.
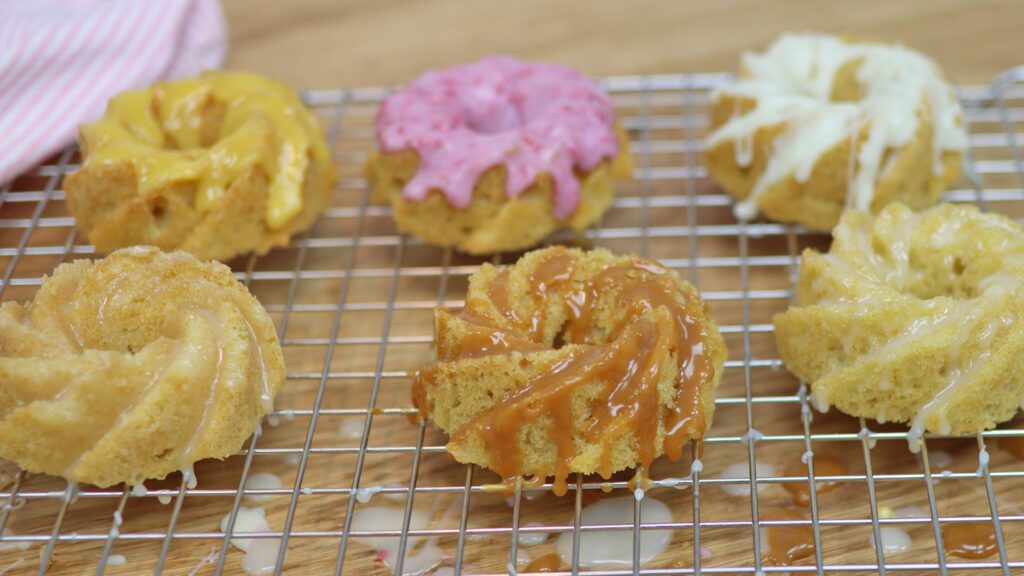
Toppings for vanilla mini bundt cakes
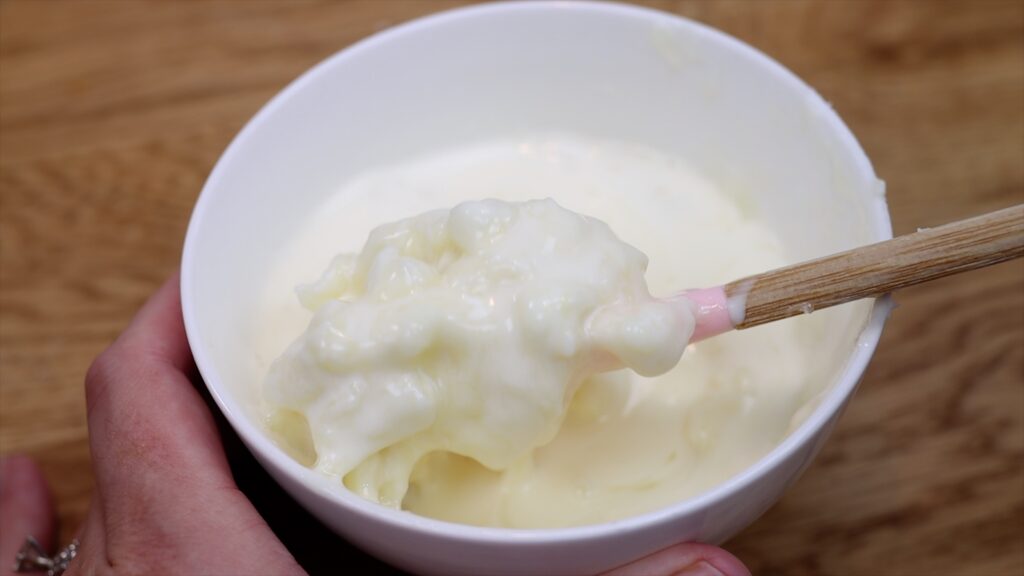
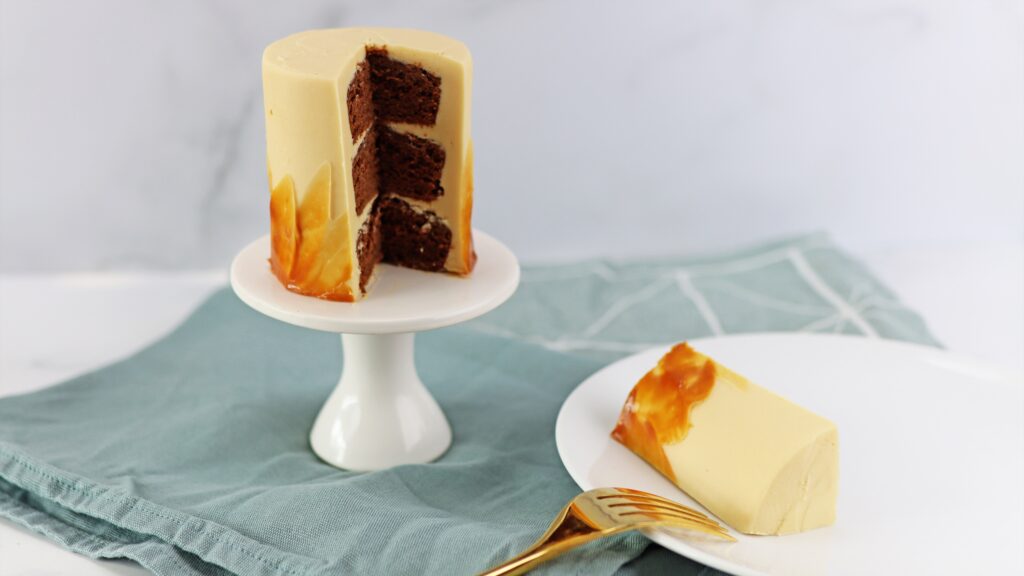
My favourite topping for these vanilla mini bundt cakes is white chocolate ganache. It's really easy to make with just two ingredients! It's also very versatile, meaning that you can add endless ingredients to flavour it.
The first ingredient is cream, which needs to have a fat content of at least 35%. In the UK this is called double cream and in the US it's called heavy cream or heavy whipping cream. Heat the cream in the microwave for 20 seconds until there are bubbles around the edges of the bowl. Add white chocolate chips or a bar of white chocolate chopped into pieces. Push the chocolate under the cream to cover it and leave it for five minutes. The cream will gently melt the chocolate while it sits. Stir it until it's smooth, which will take about a minute. You can put the bowl back into the microwave for 10 seconds if there are still lumps.
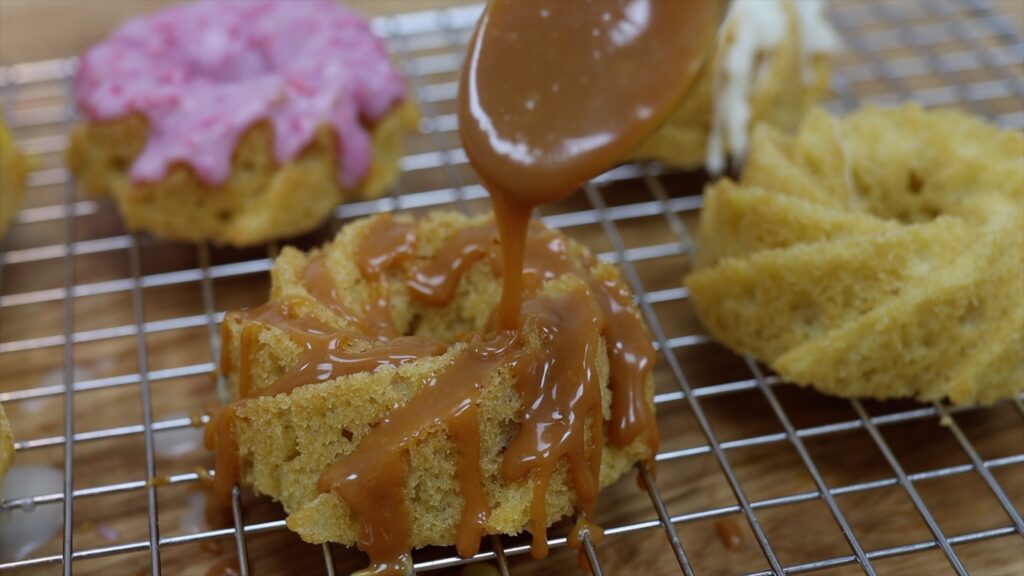
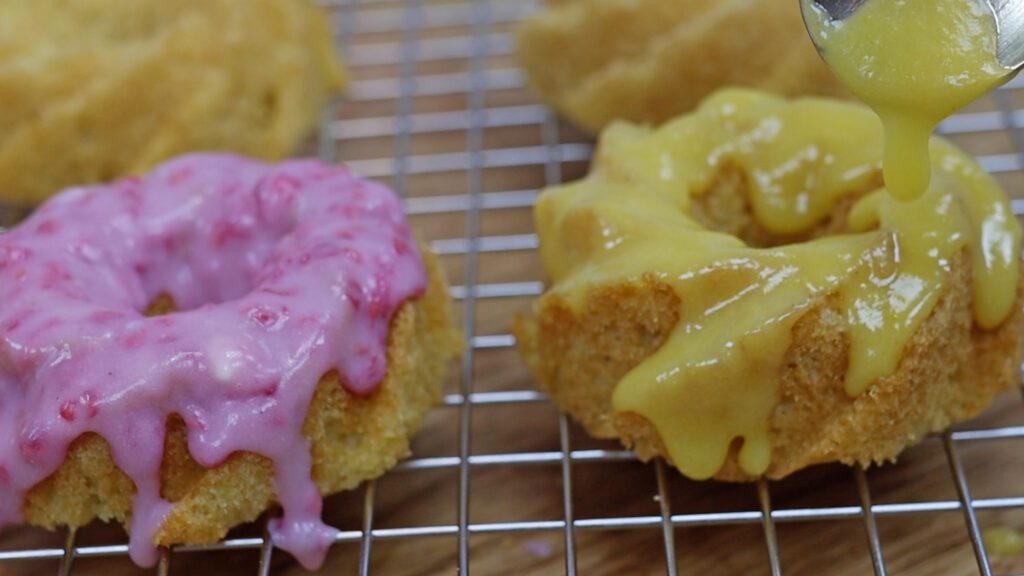
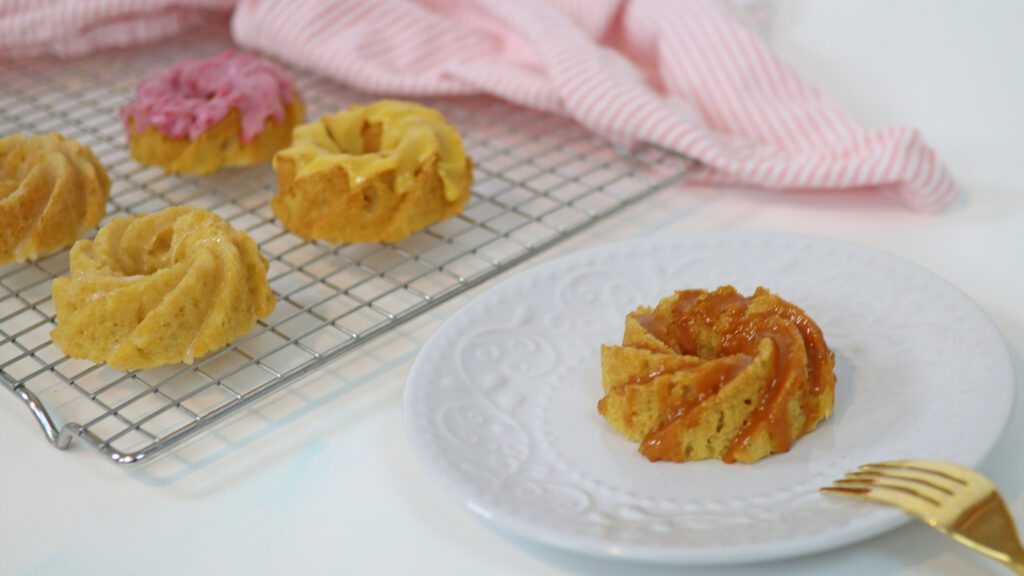
You can add all sorts of ingredients to this to change the flavour of this ganache. For fruity toppings, mash raspberries or blend mango and stir that into the ganache. Or add dulce de leche or caramel, Nutella, jam or lemon curd.
Use a spoon to scoop up some ganache and drizzle it over the mini bundt cakes after they cool. You might notice that it varies from a thick drip to being almost invisible. This is because of temperature. If you wait for the ganache to cool to room temperature, it will have thickened a lot. It will form a defined drizzle or drips on the mini bundt cakes. If you spoon the ganache over a cake while it’s still warm, it’s much thinner and runnier. A lot of it will absorb into the cake, which still adds flavour but after it cools it will look like a glaze instead, shiny but with less noticeable drips.
How to store and serve mini bundt cakes
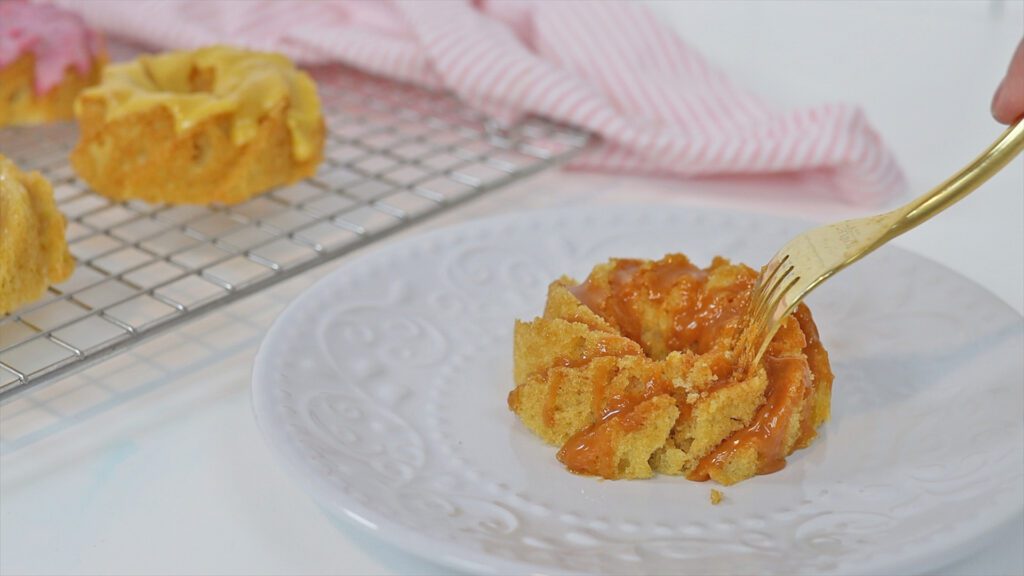
Now for the most important part: the taste test!
These vanilla mini bundt cakes are soft and light and moist and rich and buttery. They're everything you’d want in a vanilla cake! The ganache topping is rich and delicious on its own but also makes it easy to add different flavours with very little effort. You can flavour the entire batch of ganache or divide it between bowls and add different ingredients to each bowl, like I did.
These vanilla mini bundt cakes taste best on the day they're baked. If you want to make them in advance, store them in an airtight container at room temperature or in the fridge for up to 3 days. If you refrigerate them, take them out at least an hour before serving so that they come to room temperature.
Tell me in the comments if you’re going to make these and please leave a review when you do!
These vanilla mini bundt cakes are soft and moist and rich and buttery and everything you’d want in a vanilla cake! The ganache topping makes it easy to top them with lots of different flavours.
Ingredients
UnitsScale
For the vanilla mini bundt cakes:
1/4cup unsalted butter
1/3cup white sugar
1 egg
1/2 teaspoon vanilla extract
2 tablespoons buttermilk
1/2 tablespoon vegetable oil
1/2cup and 2tablespoons plain flour (all-purpose flour)
1/2 teaspoon baking powder
1/4 teaspoon baking soda
1/8 teaspoon salt
For the ganache topping:
1/4cup heavy whipping cream or double cream
3/4cup white chocolate chips
Optional: 1/4cup of any other ingredient to flavour the ganache
Instructions
Using a mixer with a beater/paddle attachment, beat room temperature butter and sugar on medium speed until pale and creamy, about 5 minutes. Scrape down to the bottom of the bowl a few times to make sure no butter or sugar is stuck at the bottom.
Add the vanilla and egg, mixing on the lowest speed to combine.
Add buttermilk and oil and mix on lowest speed until incorporated.
In a bowl, sift flour, baking soda, baking powder and salt. Add the flour mixture to the mixing bowl and mix on lowest speed to incorporate, scraping down to the bottom of the mixing bowl to check that batter is evenly mixed.
Grease a mini bundt cake pan with non-stick oil spray or butter. Divide batter equally between the cake pans using a ice cream scoop or piping bag.
Bake at 160ºC or 325ºF for 15 minutes, or until your finger leaves a light imprint when you poke a cake and the cake rises back up slowly.
Leave mini bundt cakes to cool in the pans for 5 minutes before turning onto a wire cooling rack. Leave to cool completely.
To make the ganache topping, heat the cream in a bowl in the microwave for 20 seconds until bubbles form around the edges of the bowl. Add chocolate chips and leave for 5 minutes. Stir until smooth and leave to cool to room temperature.
Use a spoon to drizzle the ganache over cooled mini bundt cakes. You can flavour the ganache by mixing in up to 1/4 cup of another ingredient like mashed raspberries, blended mango, dulce de leche or caramel.
Notes
You can use salted instead of unsalted butter but if you do, omit the salt.
These mini bundt cakes taste best on the same day they're baked but you can store them in an airtight container at room temperature for 3 days.
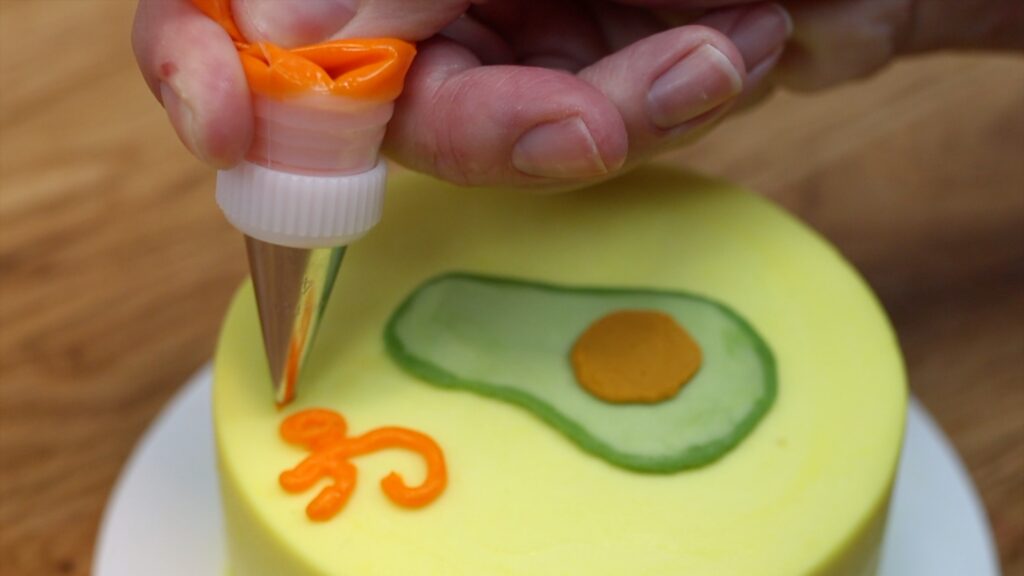
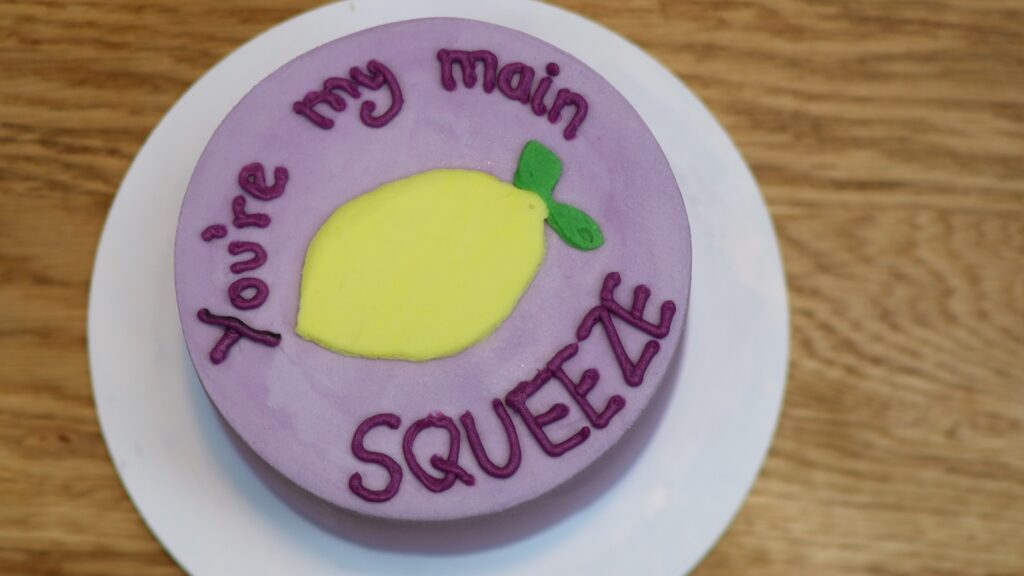
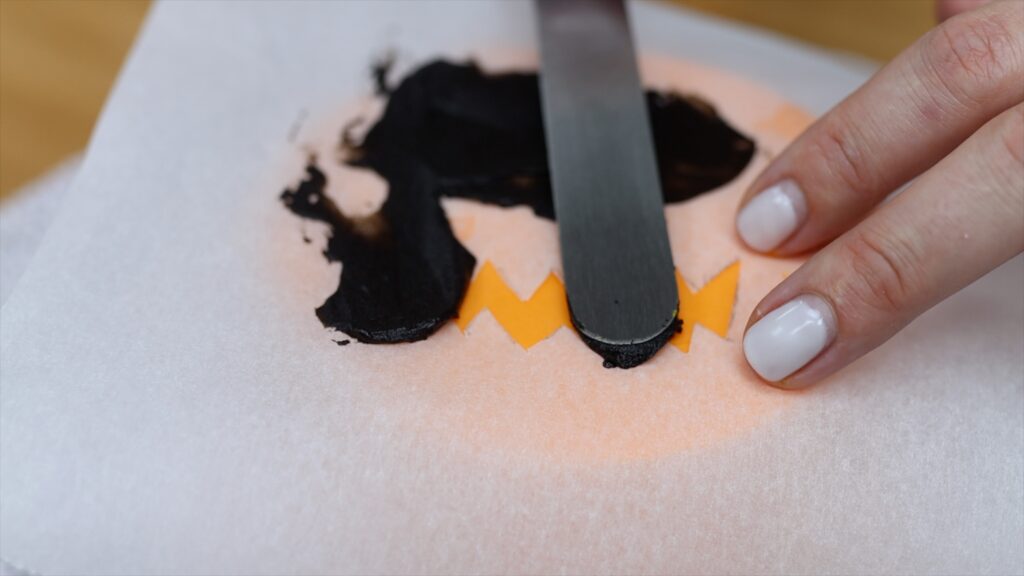
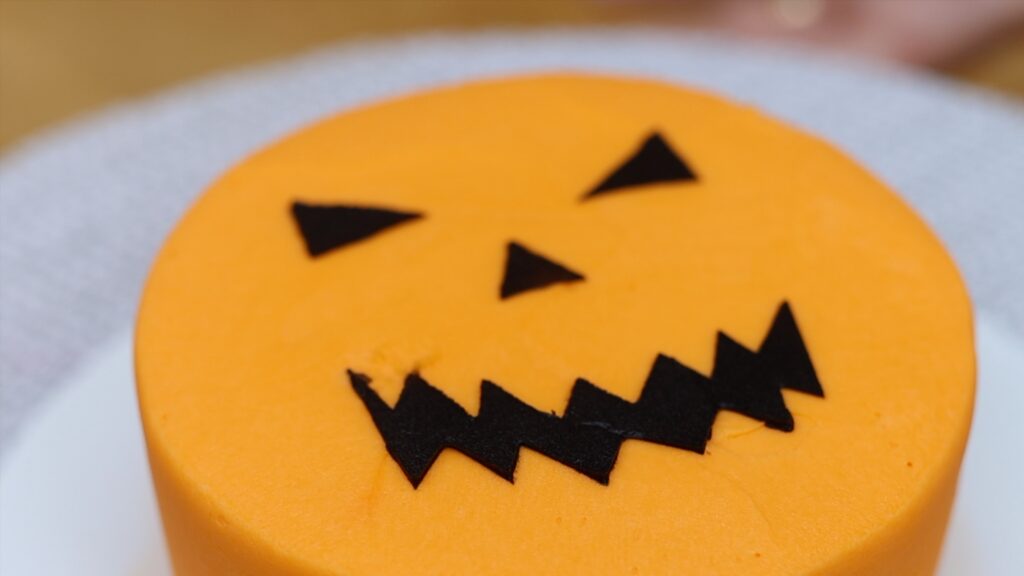
Looking for ways to create detailed designs on cakes without using fondant? You’re in the right place! I’m going to show you 5 buttercream techniques better than fondant for creating designs that are easy, beautiful, and delicious! And if you're just getting into cake decorating, good news: no fancy tools are necessary for these techniques 🙂 For all of these techniques I'm using my 4 Minute Buttercream.
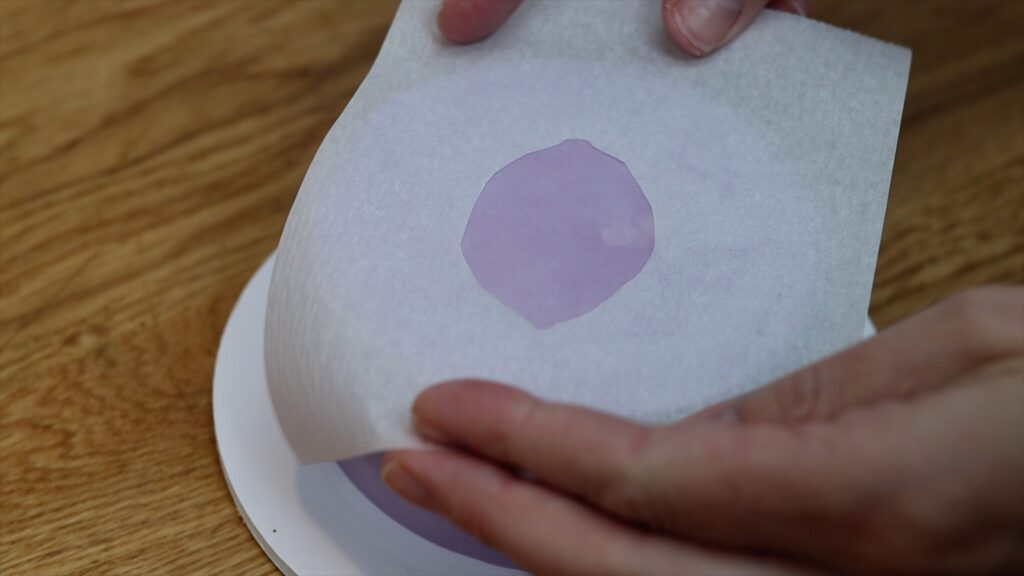
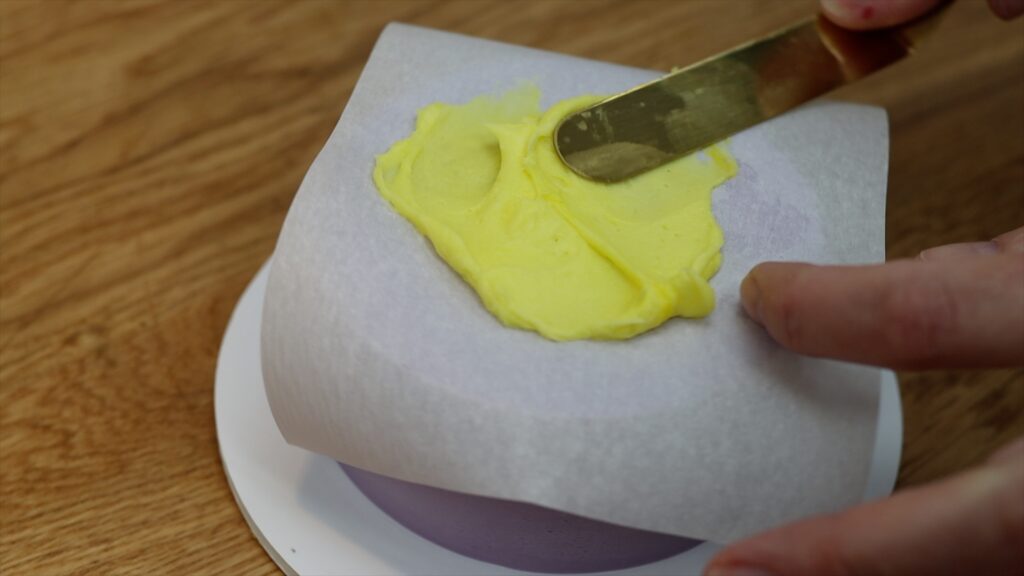
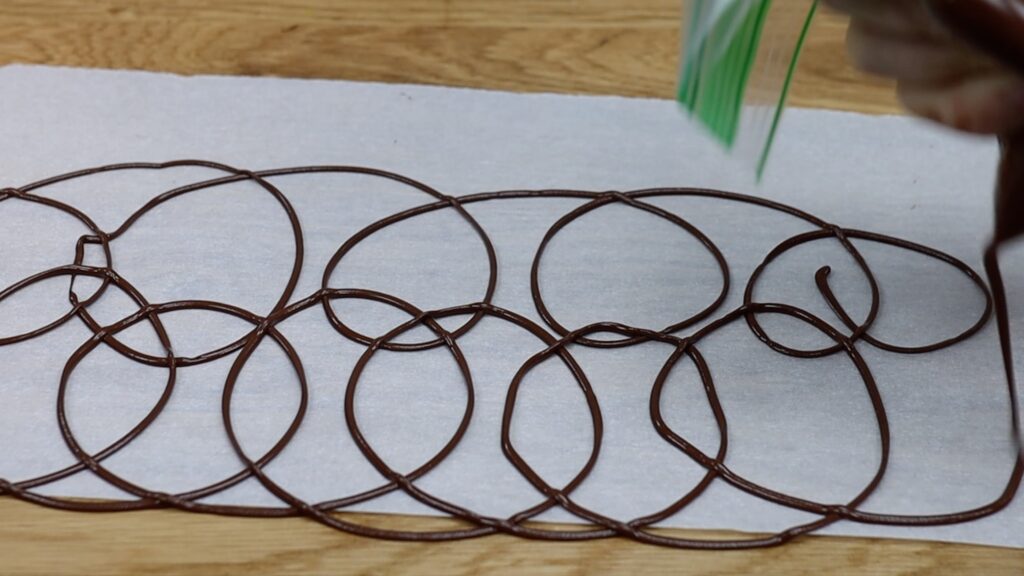
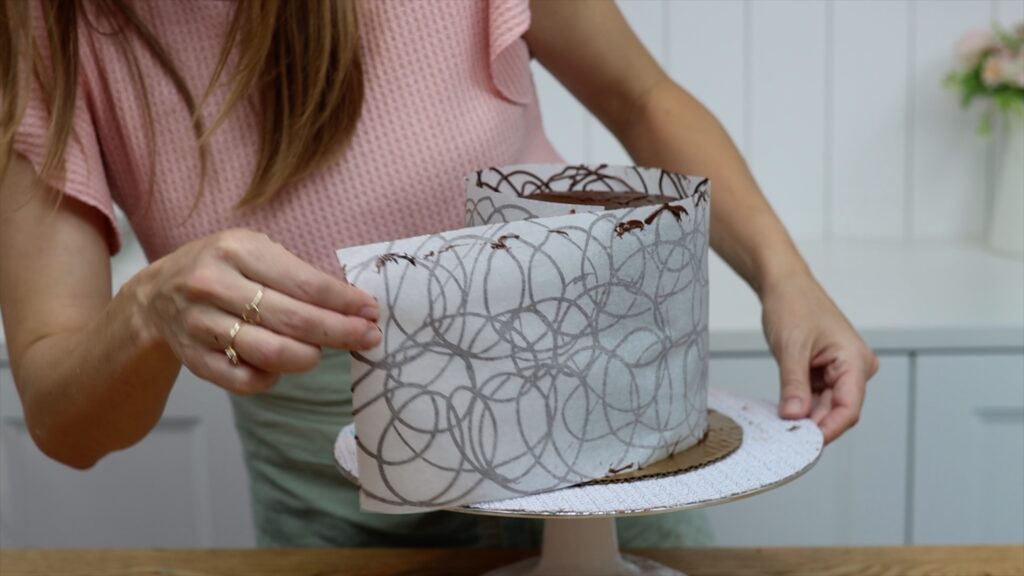
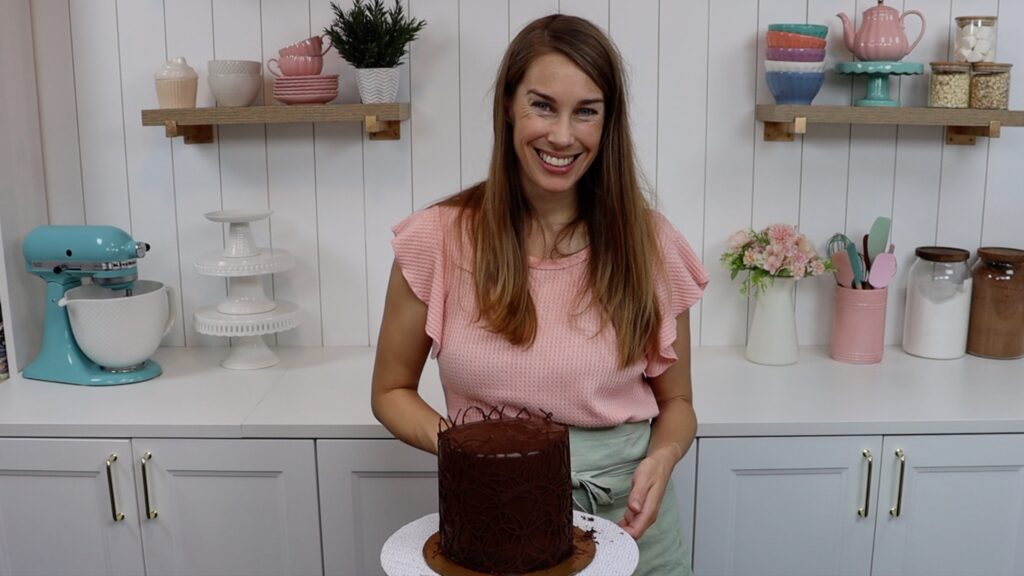
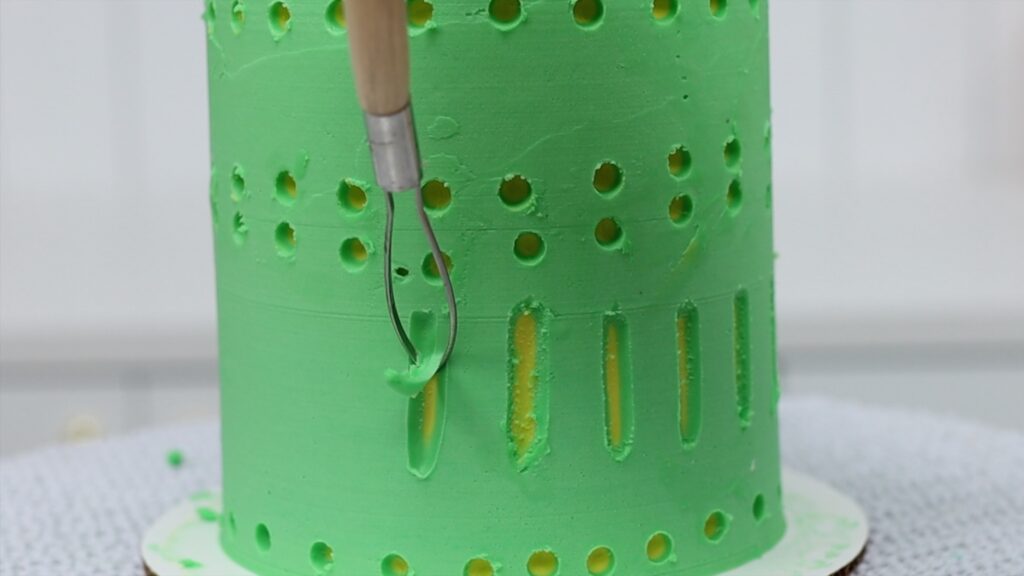
#1 Layered homemade stencils
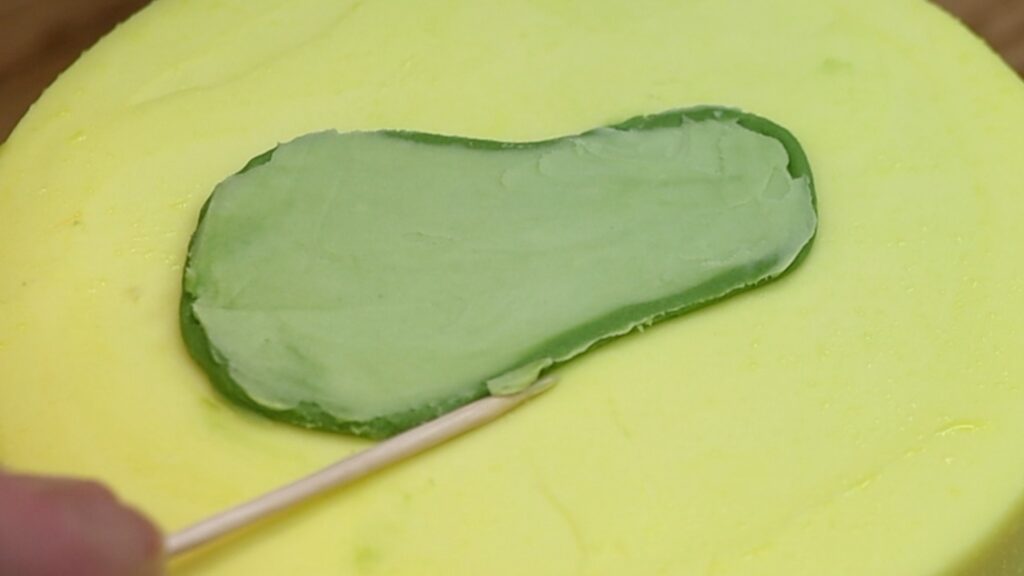
To create a perfectly flat design, make your own stencils using parchment paper. Parchment is one of the cheapest buttercream techniques and can be used to create infinite designs on cakes, in seconds! Draw or trace the outline of your image and cut that out, leaving the surrounding parchment intact. Place this homemade stencil onto a chilled cake, after the frosting has set.
You can position it on the top or the side of the cake. Since the frosting on the cake is cold and film, the stencil won't damage it. Spread buttercream over the stencil to cover the shape you cut out. Spread towards the middle of the shape rather than outwards so that you don't accidentally push buttercream underneath the stencil.
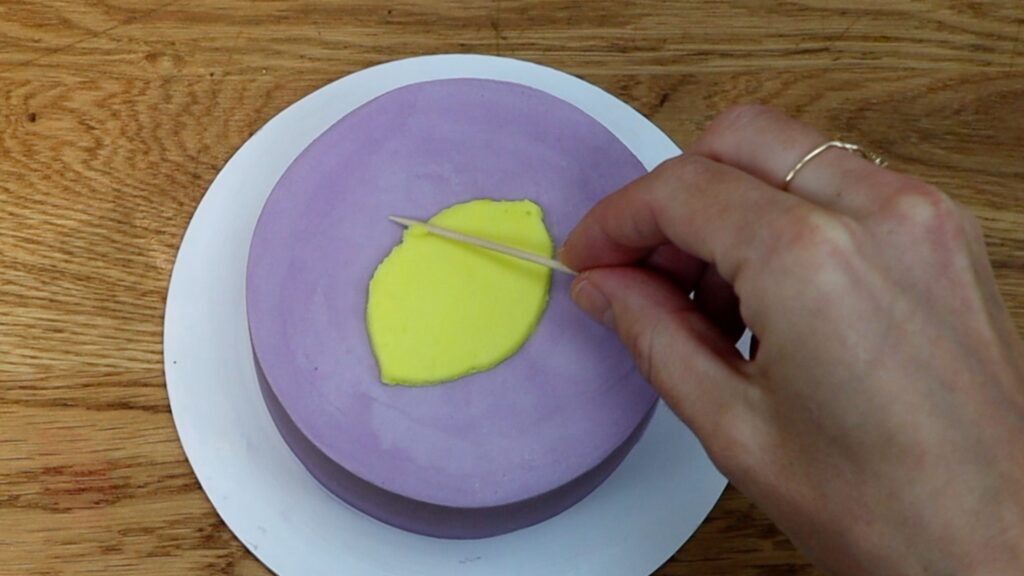
Scrape the excess buttercream off the stencil with your offset spatula or a cake comb. This will smooth the buttercream and leave a thin, flat layer on the parchment. Peel the paper off and voila! A design as flat and smooth as if you’d used fondant! You can tidy up the edges using a toothpick, scraping gently over any uneven parts. Toothpicks are probably my favourite cake decorating tool for buttercream techniques because they're useful for SO many things!
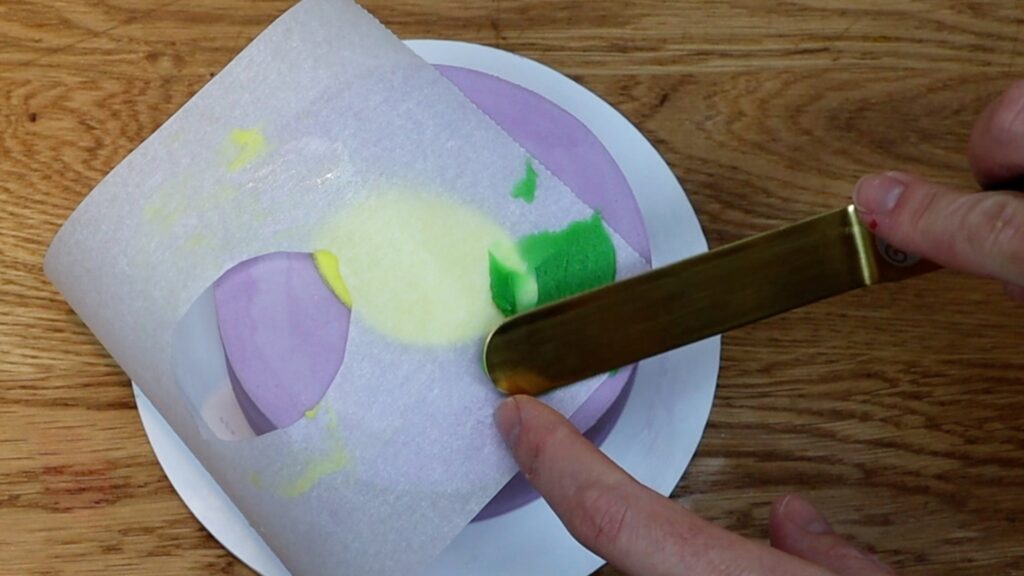
To add more details and colours you can layer stencils. Chill the cake for 5 minutes in the freezer or 15 minutes in the fridge to set the first part of the design. Once it’s firm, place another parchment stencil on top. Spread buttercream over it, scraping off the excess before peeling the parchment off.
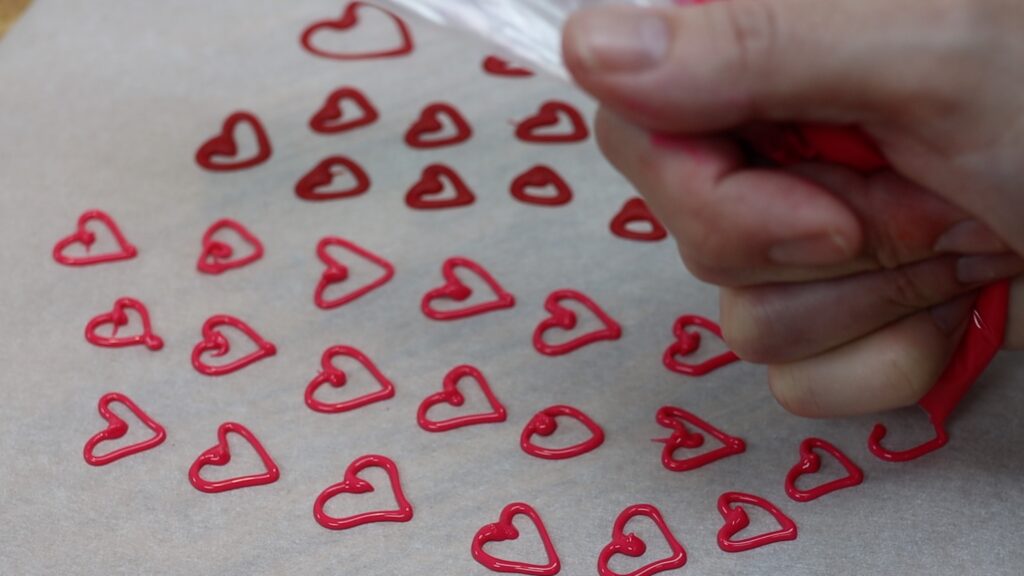
#2 Pipe and spread flat designs
Another way to create a flat design on a cake is by piping and spreading buttercream. The trick here is to chill the cake after each colour you add to your design. That way, you can pipe the next colour onto the design without smudging or blending into the first colour. Outline your shape and then pipe back and forth to fill in the outline.
Spread the buttercream to flatten and smooth it. Use a toothpick to take off any buttercream that got outside of the outline. This is the beauty of cold buttercream - you can touch it up by scraping without damaging either the frosted cake or the rest of the design because buttercream gets so firm when it’s cold that it holds its shape.
After each colour, chill the cake in the freezer for 5 minutes or in the fridge for 30 minutes. Then outline, fill and spread the next colour onto your design. By chilling each colour, you can create a neat, flat buttercream design on a cake.
#3 Piped texture
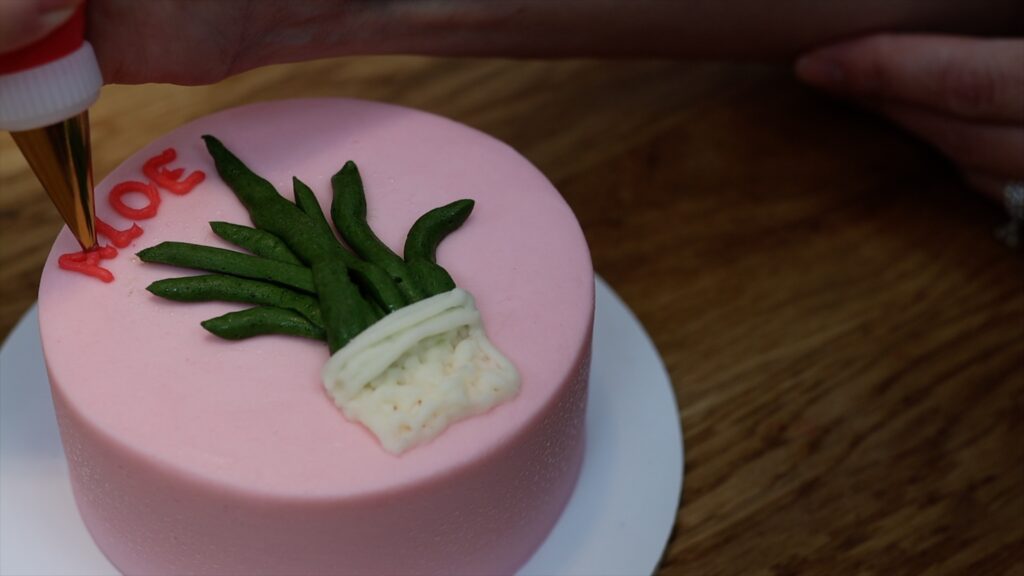
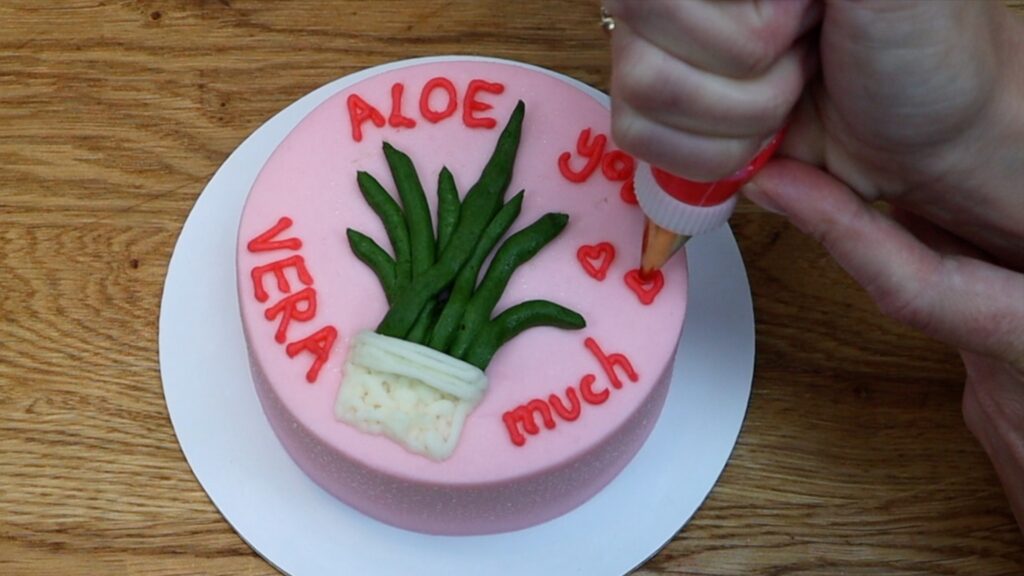
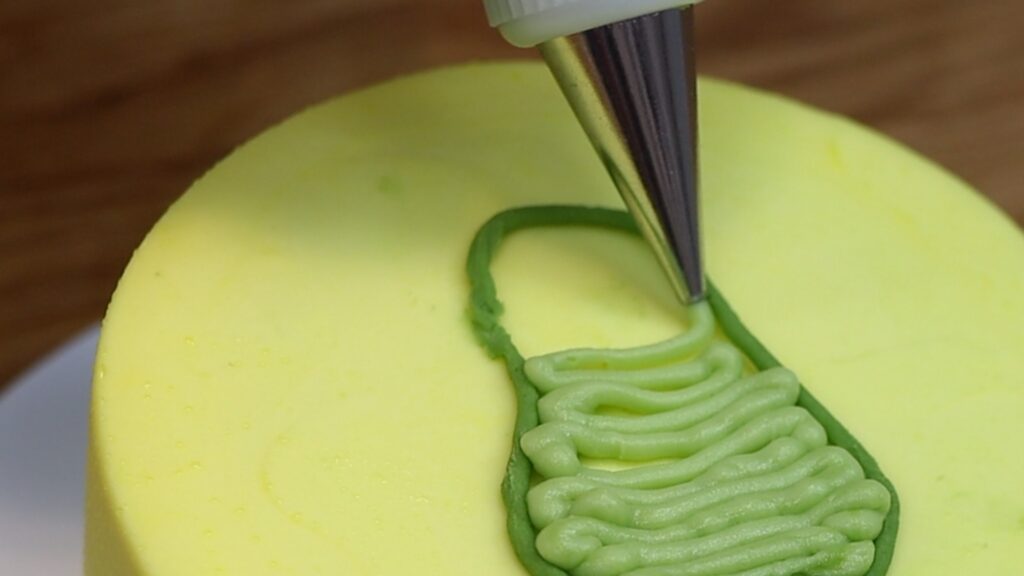
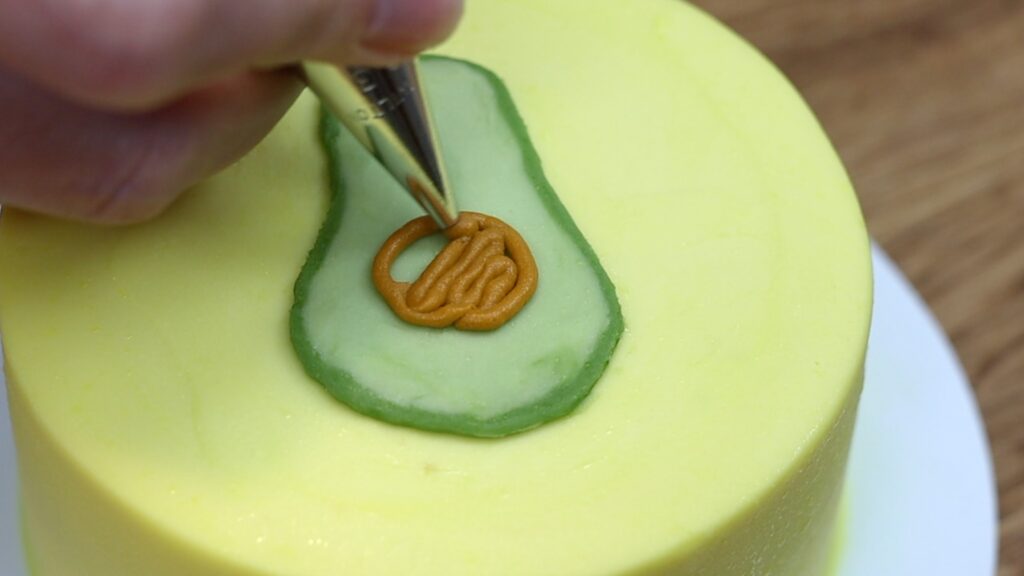
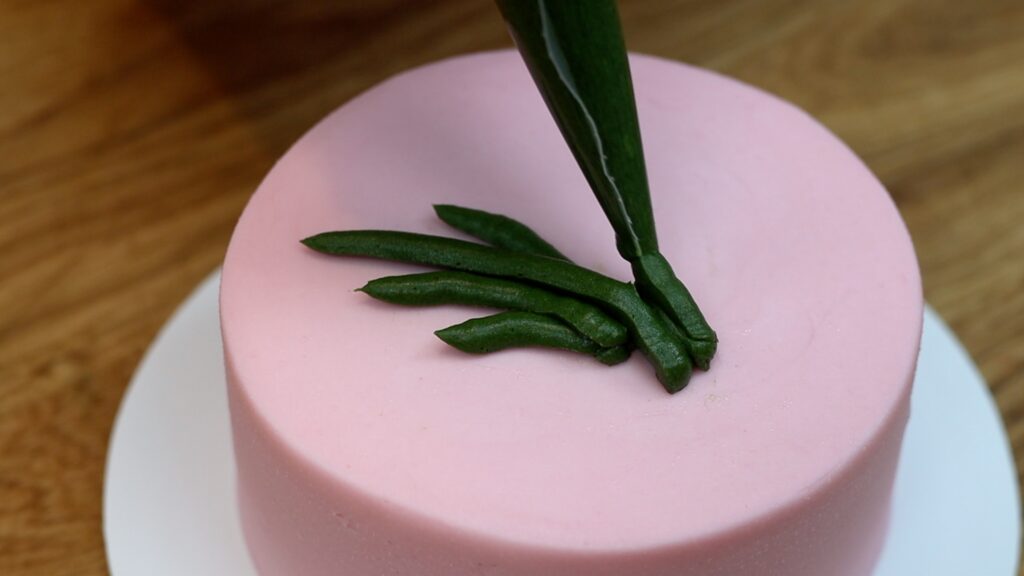
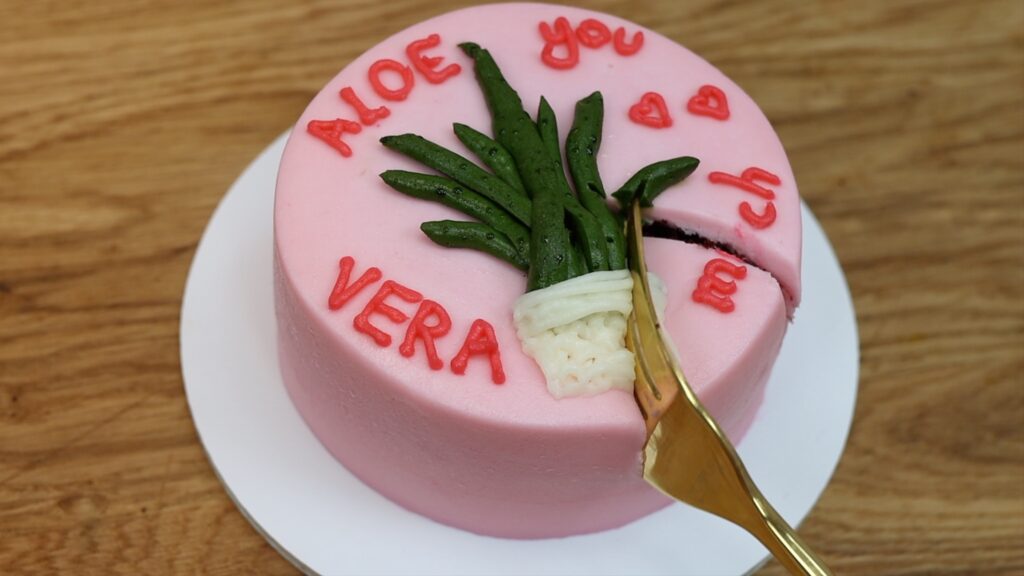
To create 3D designs you can pipe shapes onto your cake. There are lots of buttercream techniques that use piping tips but you can also pipe without piping tips! Just cut the end off the piping bag to make a hole to pipe through. Piping creates depth and texture but of course, buttercream doesn’t harden to the extent fondant can. This means your texture can’t stand up or come too far away from the cake or it will droop. However, you can still create 3D designs that stick out from the cake like this aloe vera plant:
You can also pipe all sorts of textured patterns like this woven basket. Do this with a small round piping tip or cut a tiny hole off the end of a piping bag.
The best bit about piping 3D designs is that instead of hard and super sweet fondant, which you typically pick off your slice of cake, you have a deliciously soft buttercream accent to enjoy!
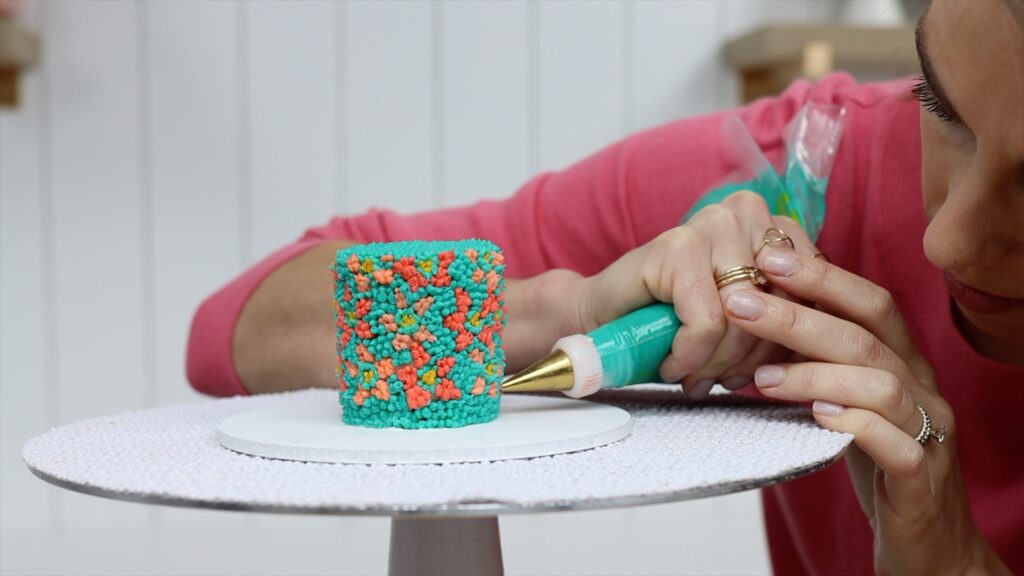
#4 Pointillism
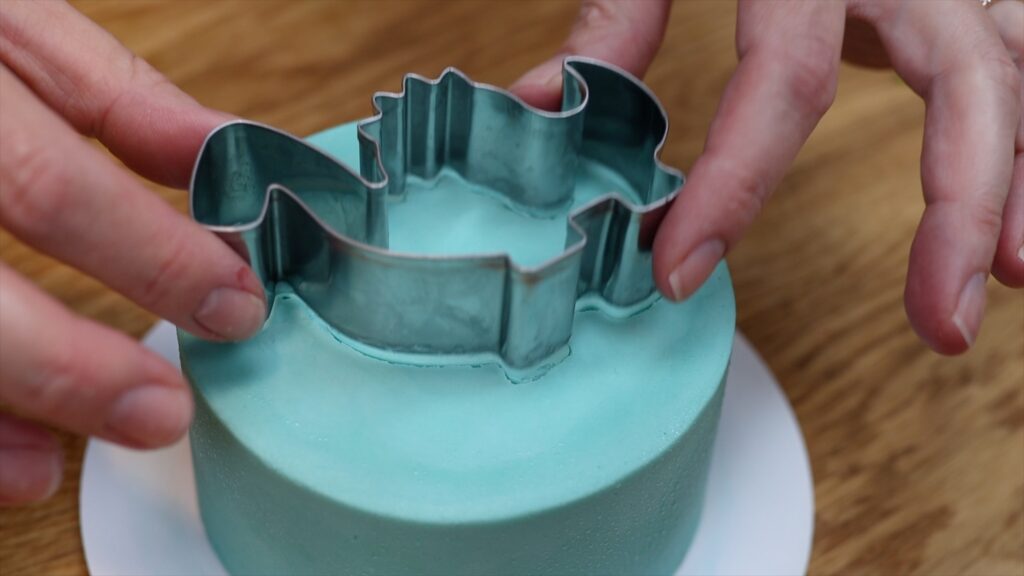
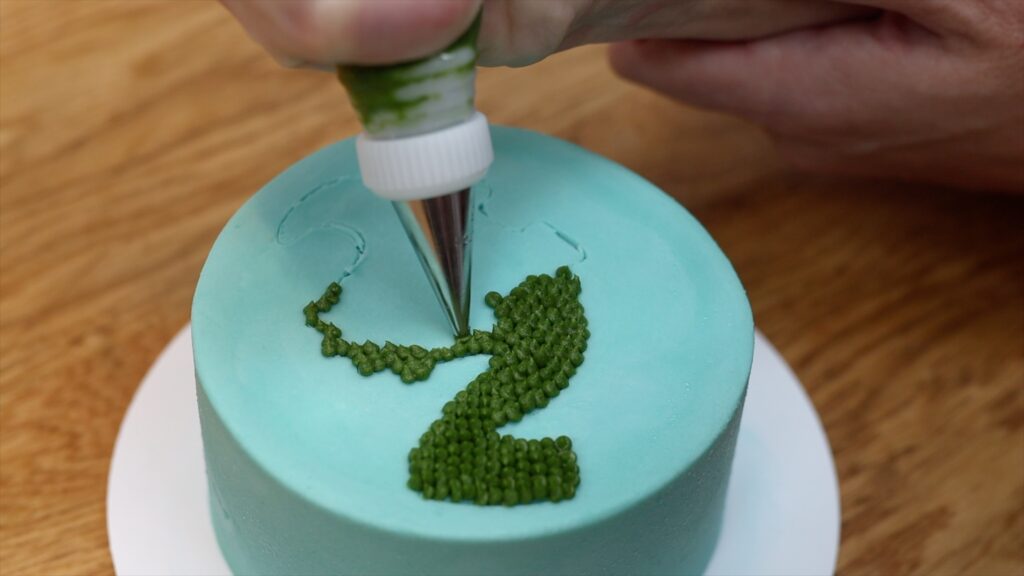
For this next technique, start by outlining your design onto a frosted cake. You can do this by drawing or tracing the outline with a toothpick or press a cookie cutter into the frosting. Cookie cutters are another tool that is useful for all sorts of buttercream techniques!
For the neatest pointillist design, use a piping bag with a small round tip like a #2, #3 or #4. This is a #3. Pipe tiny dots to fill in the outline of the shape, creating a textured silhouette. For each dot, squeeze the piping bag to let the buttercream bulge out. Then release your pressure on the bag as you lift it up to leave a neat peak on each dot.
I have few tips for pointillist designs on cakes. Make sure your buttercream is a nice soft consistency because it’s difficult to pipe if it’s too stiff. Also, piping in rows makes the neatest coverage but for intricate parts like these spikes, it’s best to outline the area first to make sure the details are clear.
Holding the piping bag at the same angle for the whole shape will make the peaks of the dots all point in the same direction, which also makes the design neater. You canuse more colours and add details like eyes by piping more dots on top of the base colour.
This is such a simple way to fill in a shape, using just one piping tip and one colour, but the texture of the dots makes the design really eye-catching! You could cut a shape out of fondant using this cookie cutter but then you wouldn’t have any of this fabulous texture.
#5 Buttercream transfers
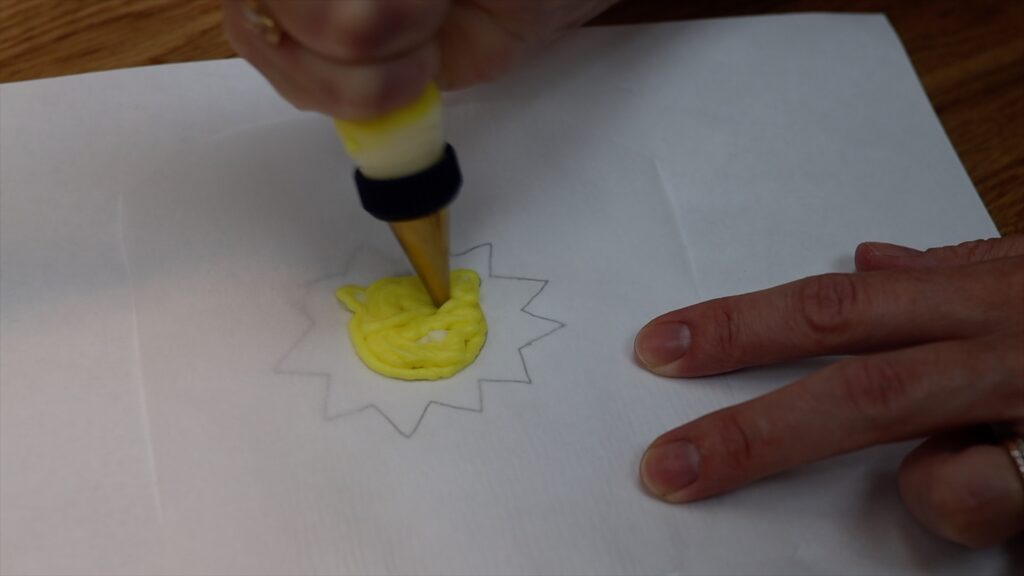
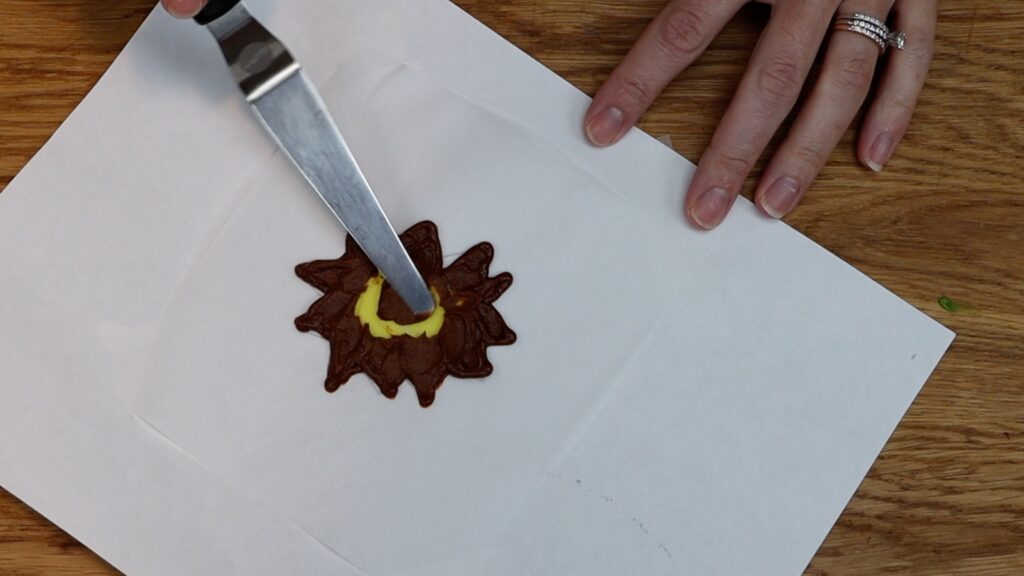
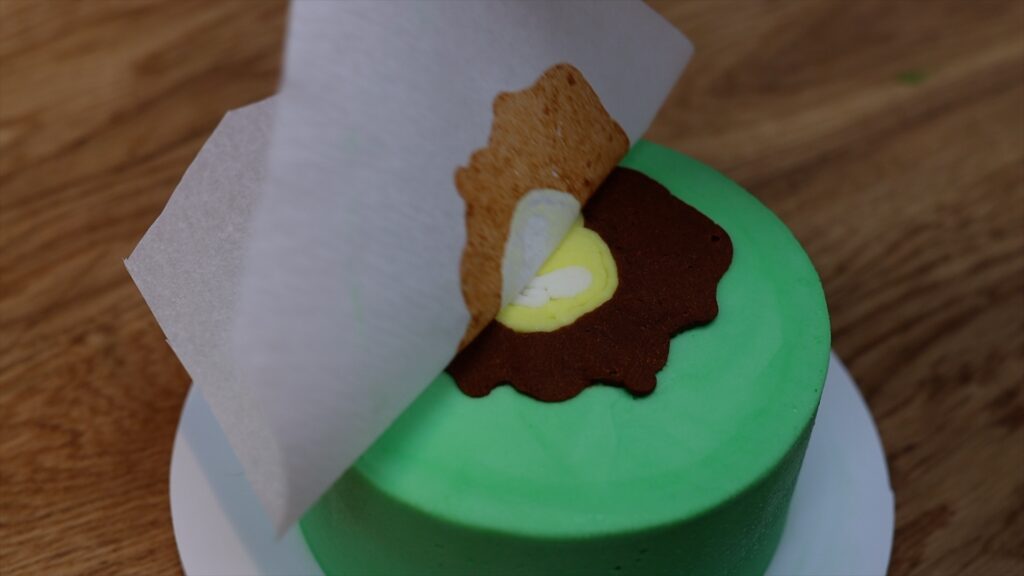
This is one of the easiest buttercream techniques for creating character cakes. For a buttercream transfer, trace detailed designs with buttercream and transfer them onto your cake. Parchment paper is ideal for this because it’s nonstick and you can see the design through it while you trace.
Pipe and spread one colour at a time, freeze for five minutes, and then repeat. By chilling the design you’ll set each colour so that you don’t damage it with the next colour.
For each colour, outline the area and then fill it in with squiggles of buttercream. I like to use a small round piping tip like a #3. You can use a piping bag without a tip if you cut a small hole at the end instead. Spread the buttercream to push it down against the parchment. This prevents air pockets and also flattens the buttercream to level it so that your entire design will be the same thickness. Save the biggest block of colour until the end, piping the buttercream to outline and then fill that section. Spread this last colour over the rest of the design too. This makes it sticky, which is important because it will have set in the freezer and lost its stickiness.
As soon as you finish piping and spreading your last colour, flip the design over and press it onto your cake. Chill it in the fridge or freezer to set the design and then peel the parchment off and voila!
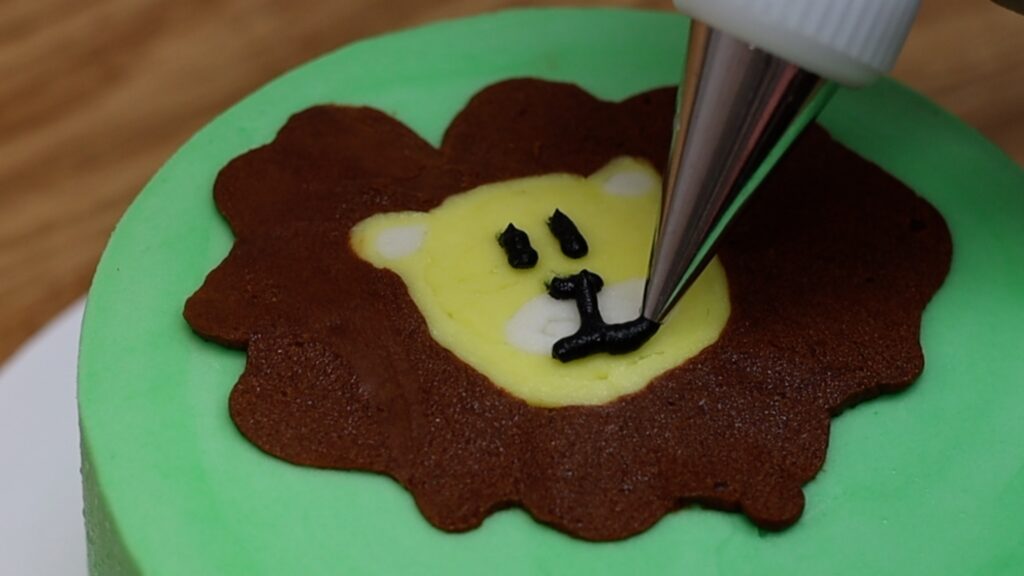
You can fill in any air pockets with more buttercream. I suggest saving the tiny details like facial expression until now, piping them straight onto the design so that they don’t warp and change shape at all during the transfer process.
With this transfer method you can trace super detailed images like characters to create precise and recognizable designs on cakes.
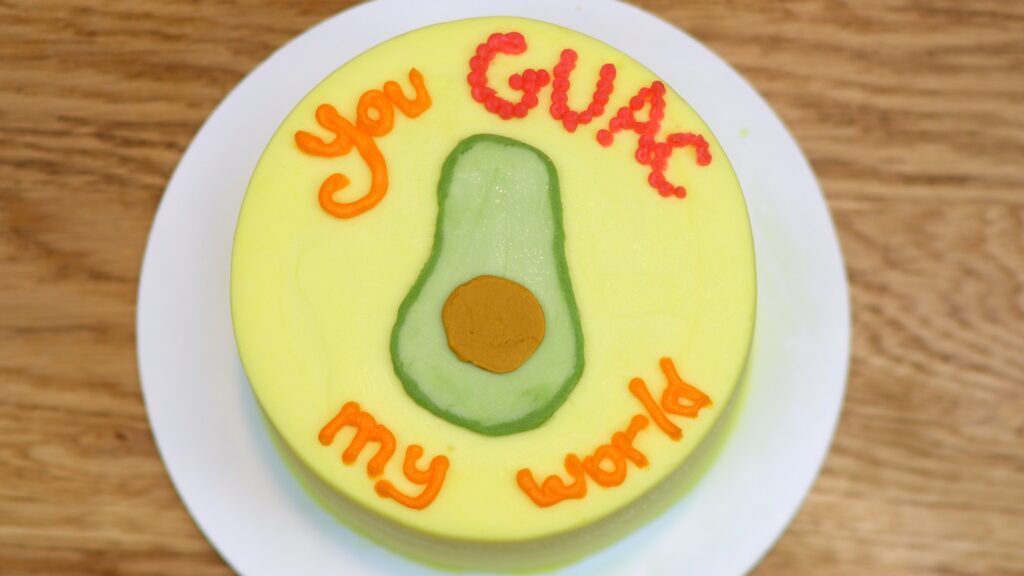
If you've noticed the Valentine's Day puns on these cakes, tell me in the comments which is your favourite! Or which is your favourite of these buttercream techniques. And if you struggle with writing messages on cakes, check out my tutorial on 12 Tips for Writing on Cakes.
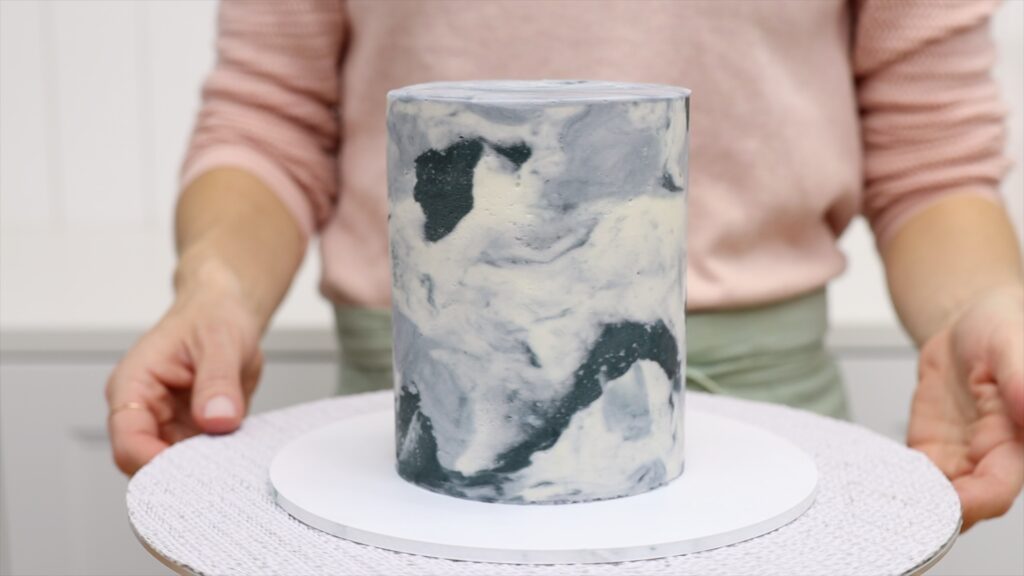
Full disclosure: when I first started decorating cakes I used fondant almost exclusively. I loved making figures with it and there are definitely things you can do with fondant that you can’t do with buttercream. But as I started to experiment with buttercream, I loved the challenge of finding ways to use buttercream to do things that are usually done with fondant. Marbled frosting, perfect stripes, mosaics, animal cakes, cartoon cakes… you’ll find these and hundreds of other cake decorating techniques and designs on my online cake school. You can take individual courses or join my ClubPLUS membership for access to every MiniCourse, MasterCourse, Live Workshop and 5 Minute Fridays. I hope to see you there!
I’m going to test 10 cake decorating tools I bought on Amazon: seven tools that work and three to stay away from!
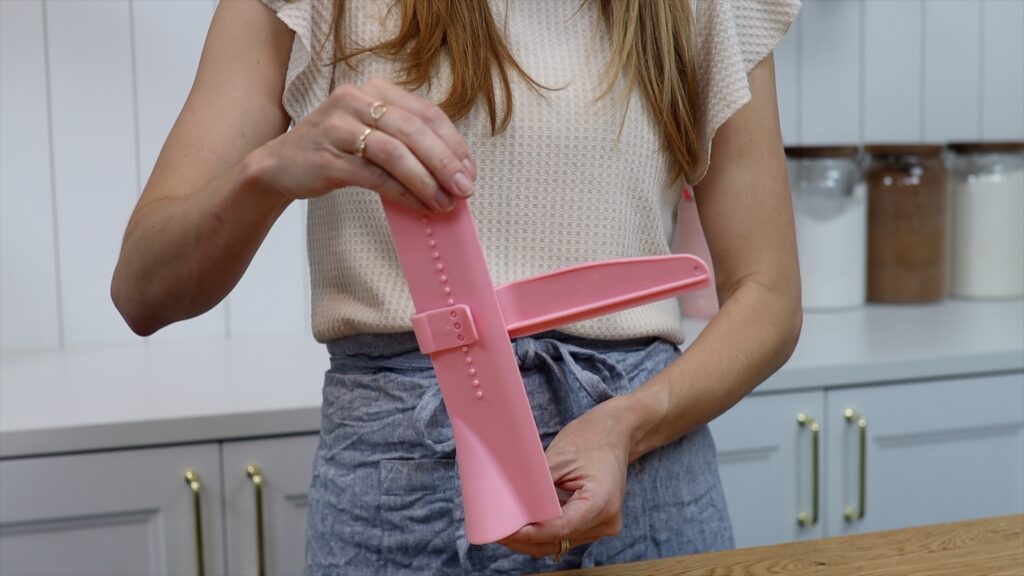
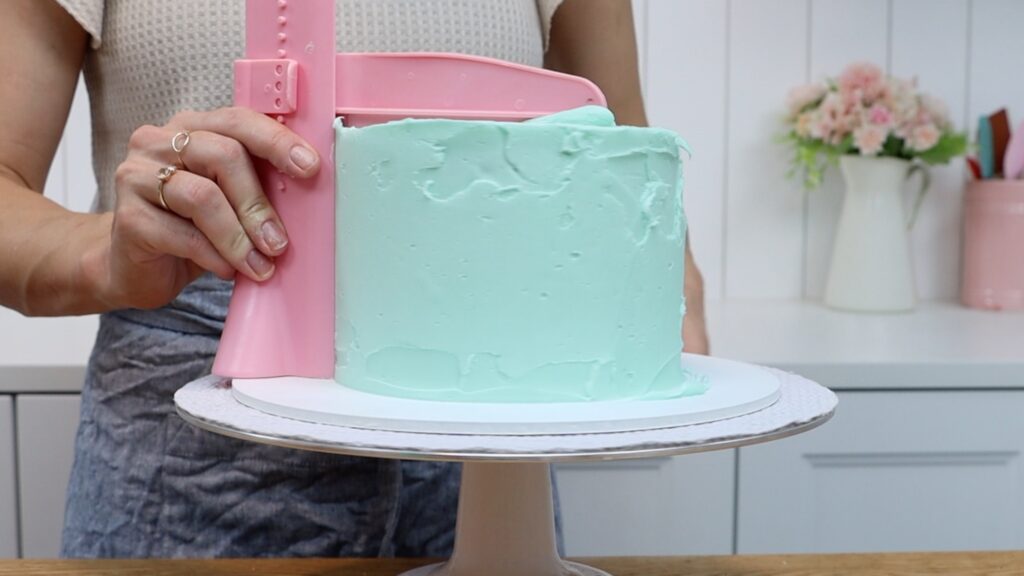
#1 Adjustable Frosting Smoother
I’m testing this adjustable cake smoother first because I’m the most excited about it. If it gets results as good as I hope, then surely everyone would be using one, right? It’s easy to set up by adjusting the horizontal bar to fit into the notches on the vertical bar.
But the height notches are more spaced out than I’d like so I can’t get the exact height I need. It either leaves a very thick layer of frosting on top of the cake or scrapes off too much and exposes the crumb coat.
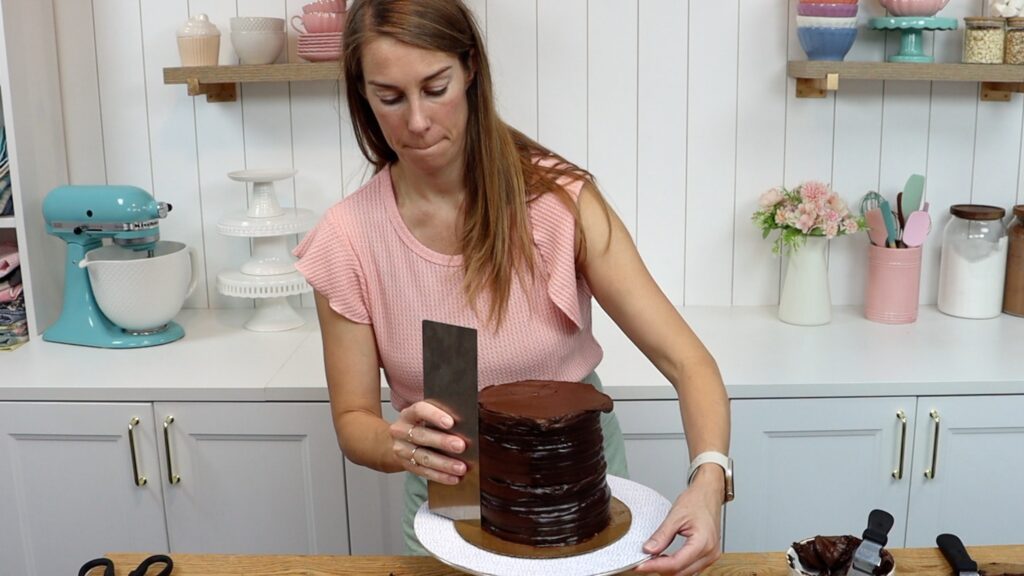
The results aren’t great so far but let's move on to the sides of the cake. I scrape around again and again, maybe 20 times, touching up in between, and the frosting still isn’t smooth.
Also, there’s a wide base on this smoother so it should be easy to hold it straight. But the sides of the cake are sloped and it looks like the cake is leaning. I could do a better job of getting straight sides with a basic cake comb. So eventually, I give up. The adjustable frosting smoother is a big disappointment.
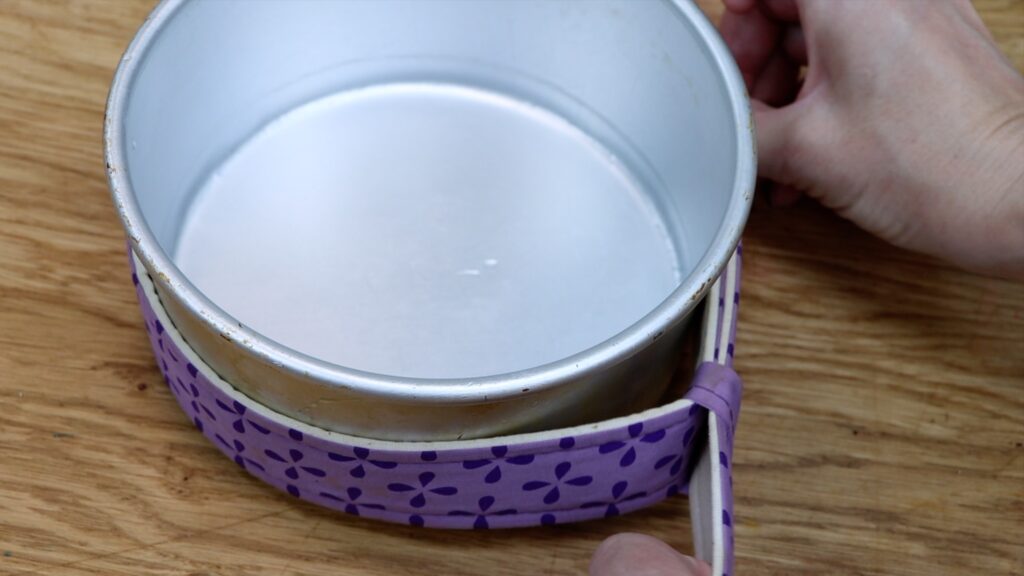
#2 Bake-Even Cake Strips
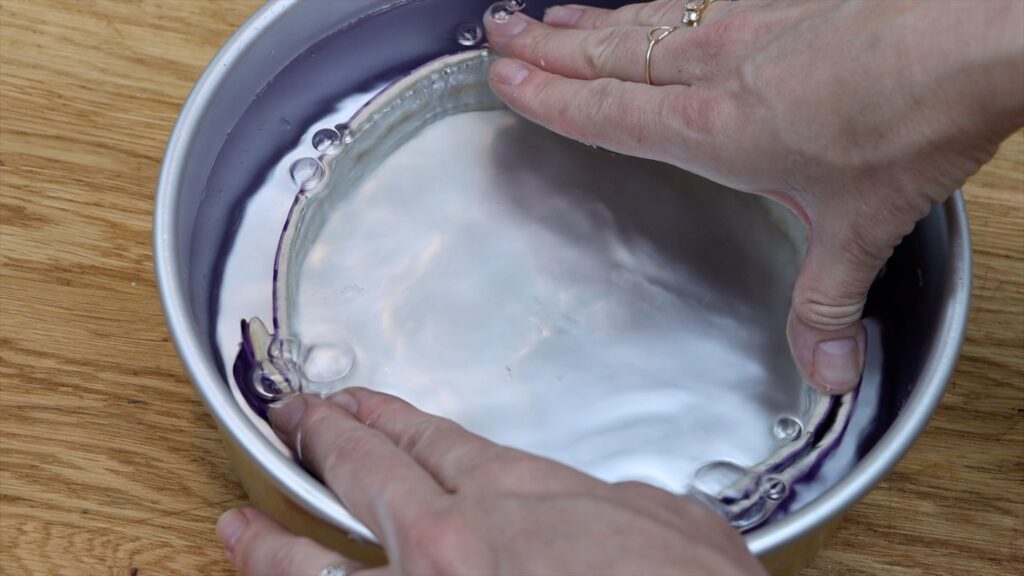
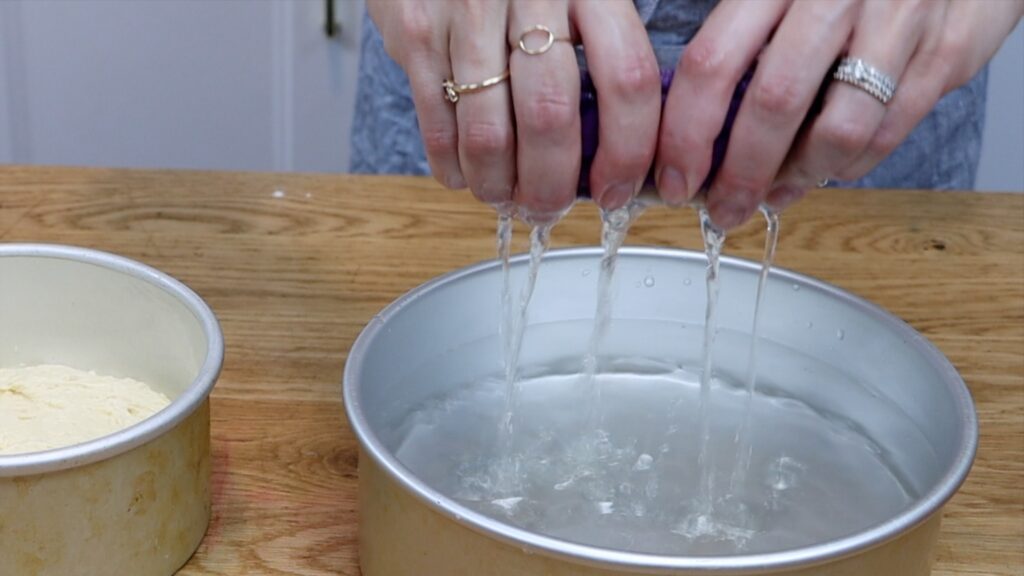
Before getting to the cake decorating tools, let's test another baking tool. This is another one I’ve wanted to try for a while. You wrap a strip around a cake pan and tighten it to fit snugly. Then take it off and soak it in water for 5 minutes. Squeeze out most of the excess and put the strip back around the pan.
After wrapping the pan with a wet bake-even strip, bake as normal. I’m going to test my Very Vanilla Cake and my Perfect Chocolate Cake with and without the strips. I found that the cakes I baked with the bake-even strips took about 15 minutes longer to bake than the pans without the strips.
Now for the results.
My chocolate cake baked with the bake-even strip rose higher than the cake in the pan without a strip. Both layers baked flat, without domes, and the colouring was even.
There was a bigger difference for my vanilla cake. The cake baked with a bake-even strip really did bake more evenly. It didn't have the typical dark golden edges and it had a flat top.
The strips take a bit of time to prepare and make baking time longer but if your schedule can accommodate that, I think the baking strips are worth it. I used these bake-even strips (affiliate link - as an Amazon Associate I earn from qualifying purchases.)
#3 Mixer Paddle with a Scraper
This is another tool I’m really excited about. When you’re mixing cake batter or frosting, ingredients always get stuck on the sides of the mixing bowl. They don’t incorporate properly so you have to constantly turn off the mixer and scrape around the bowl.
A paddle with a scraper goes right up to the edge of the bowl so it catches every little bit of each ingredient and mixes it all together. That way, you don’t have to stop mixing every few minutes to scrape the bowl. This tool is a big time saver and gets a thumbs up from me!
#4 Silicone pans
Are silicone pans really worth it? I understand the appeal: they’re lightweight, won’t get scratched or dented, and should be non-stick. I sprayed mine with oil just in case, to make sure the cake didn't stick.
After pouring my batter in, I tapped the pan to spread the batter evenly. I found it was much trickier to tap a silicone pan than a metal pan. After baking I saw that the batter wasn’t level because the cake was lopsided.
Also, the pans weren't as non-stick as I’d hoped because some chunks of cake stuck to the bottom.
Compared to the same cake batter baked in a metal pan, the silicone pan cake didn’t bake nearly as well. I don’t think silicone pans are worth buying so I’ll stick to metal pans.
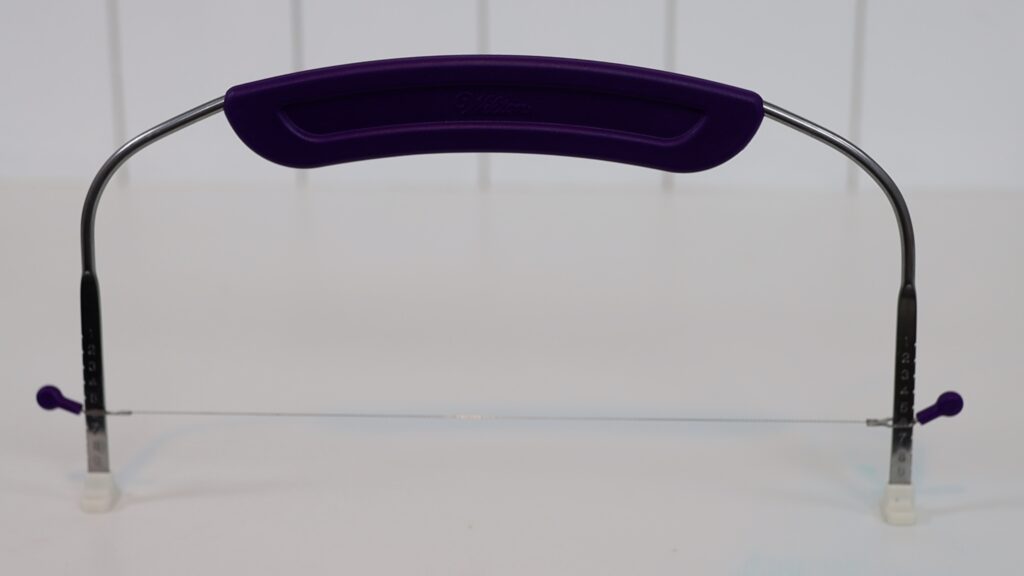
#5 Wire Leveller
This adjustable cake leveler is supposed to create perfectly flat layers but it looks a bit tricky to use. Let’s try it! This comes up early in any online searches for baking and cake decorating tools so I'm curious about how useful it is.
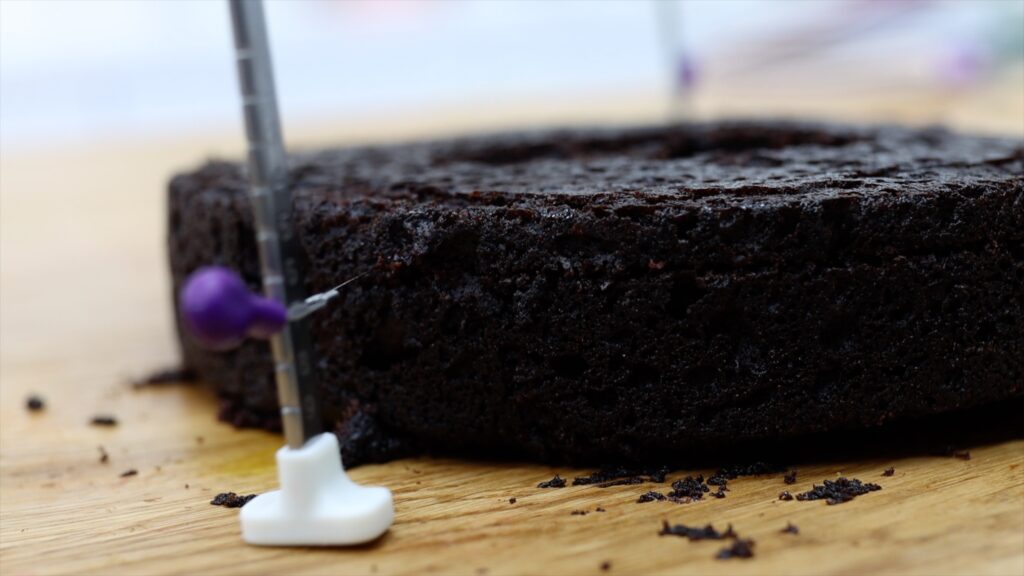
If your cakes are domed or lopsided you can level the tops to make them flat. This ensures a straight cake with a neat cross section when you slice it. The wire can be adjusted to different heights and it cuts surprisingly easily through a cake, until the end.
It’s tricky to get through the last part of the cake without a chunk of cake crumbling off. The most effective way to use a leveller is to go from one side to the middle of the cake and then from the other side to the middle. Alternatively, you can spin the cake as you slice.
The levelermakes cake layers perfectly flat BUT does it do a better job than using a serrated knife? It’s quicker to use a knife but the results aren't quite as level as with the wire. If you bake cakes professionally and level several in a day, using a serrated knife to do this is second nature and you’ll save time by not needing to adjust the wire, which can take a while. I’m impatient so I’ll reach for my knife first but if you struggle to get level cake layers, this is a must have.
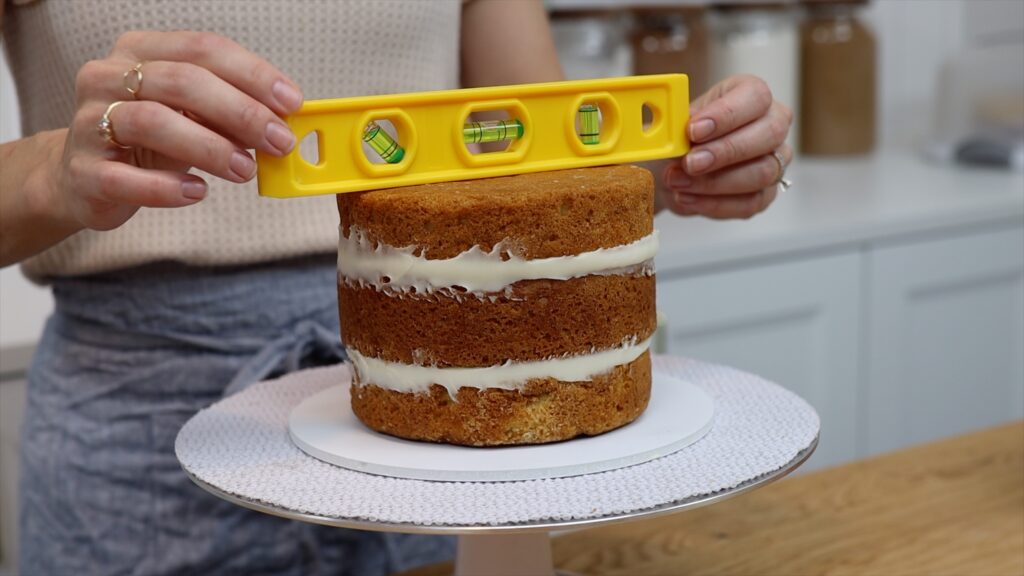
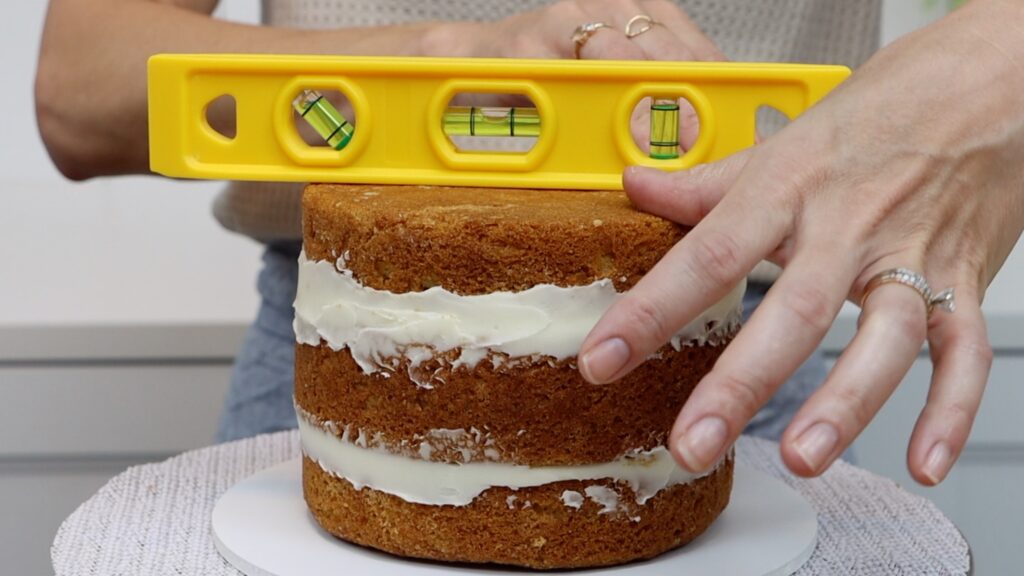
#6 Spirit Level
I know this looks like it belongs in a toolbox but could it become part of your collection of essential baking and cake decorating tools? Let’s use this spirit level to assemble a straight cake! You can use this after placing each layer or after assembling your cake. If the bubble isn’t in the middle, between the two lines, your cake top is sloping.
You can trim the top of the cake or just push down on whichever side is higher, which will push that side lower into the filling and level out the top of the cake.
Unless you have a huge slope across the top of a cake, it’s typically not a problem. With most cakes you can use frosting to fill in any imperfections and even to level the top. That's not an option if the frosting on top needs to be a very thin layer, like for semi-naked cakes, or the actual cake itself needs to be perfectly level for support, like for tier cakes, when I’ll definitely be using a spiral level from now on.
#7 Blow Torch
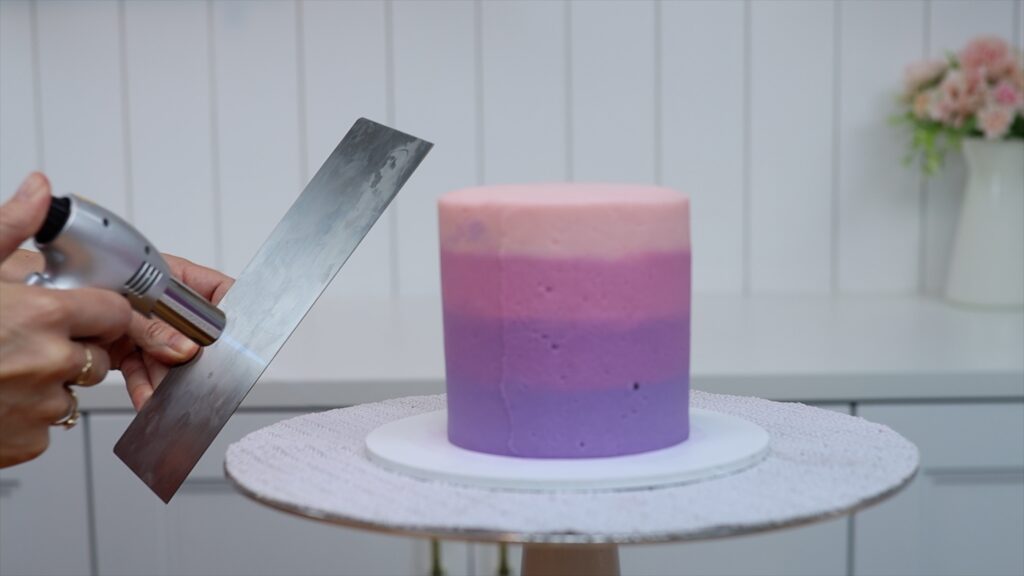
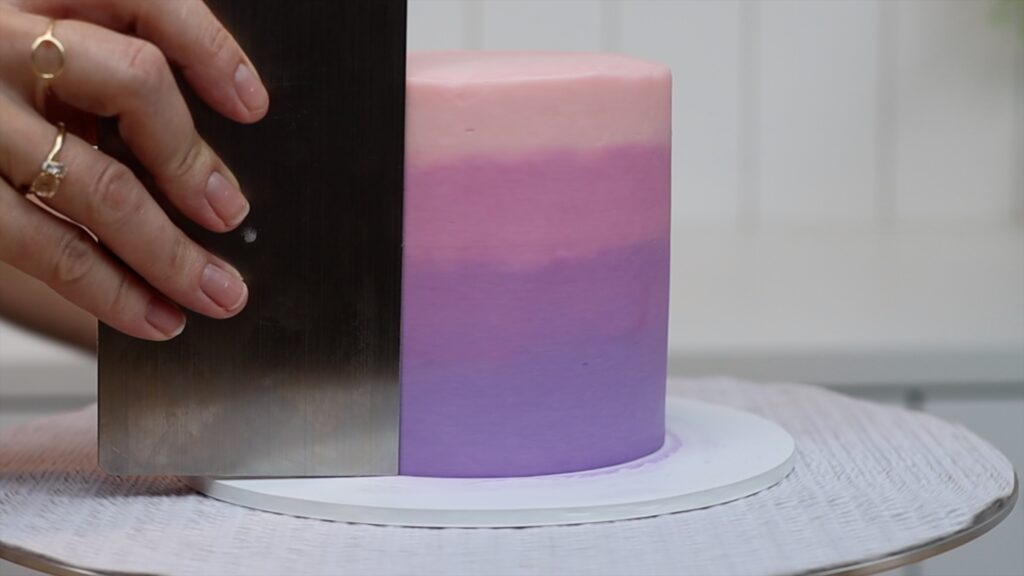
A blow torch is another tool that seems better suited to DIY than cake decorating. Wondering what this could be for? It can make your frosting super duper smooth! Air pockets are usually caused because the frosting has started to set while you’re still smoothing it but a hot metal cake comb can fix that. You can run the cake comb under very hot water or, much easier, use a blowtorch to heat the edge of the comb. The hot metal will melt the very outer layer of frosting and then the comb will drag it around the cake. It will fill in any tiny air pockets or air bubbles, smoothing the frosting. A blow torch might be my favourite addition to my cake decorating tools because smooth frosting makes every cake look better!
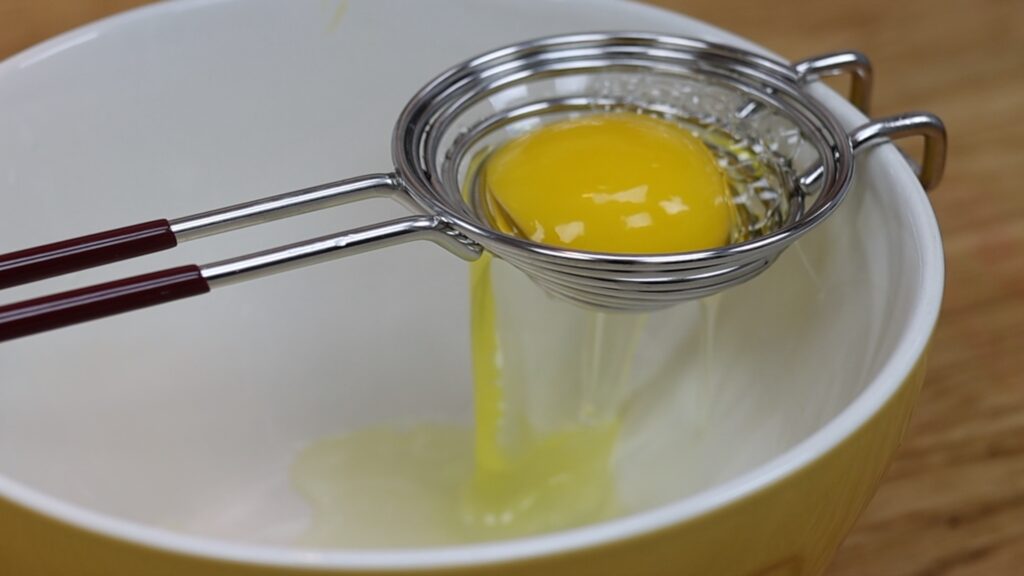
#8 Egg Separator
For recipes using only egg whites or egg yolks or using them both but separately, this egg separator seems like a good idea. Most of the egg white slips through it quickly, leaving the yolk behind. But there’s still quite a lot of sticky egg white that just won’t go through this.
I thought it might be a particularly stubborn egg but I had the same problem with the next egg. Also, a drop of yolk got through which ruins egg whites for meringues. It takes longer to use this gadget than passing the yolk from egg shell to egg shell to separate it the traditional way and it’s not even a reliable way to keep the yolk and egg white separate. I give this cake tool a thumbs down.
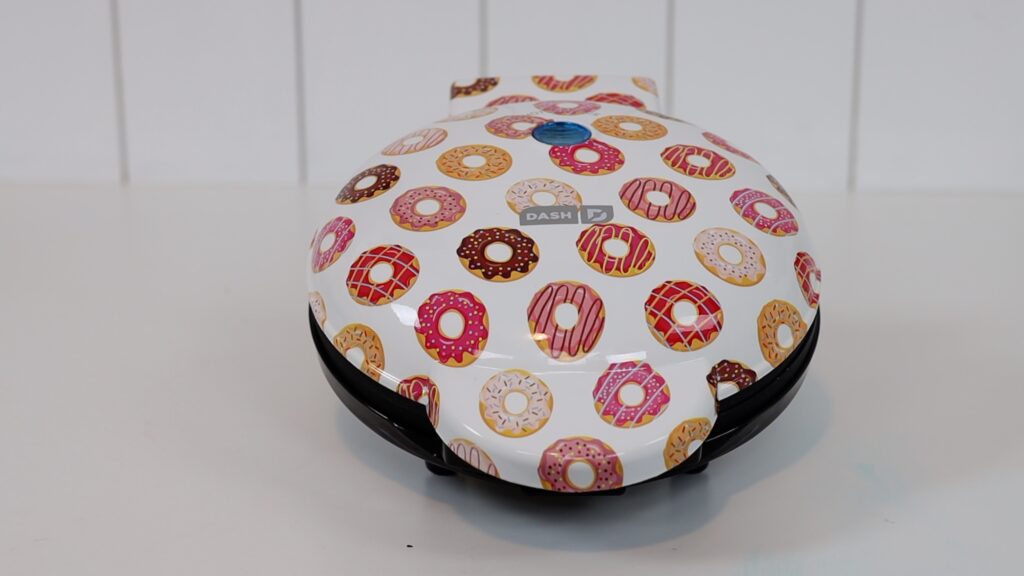
#9 Mini Donut Maker
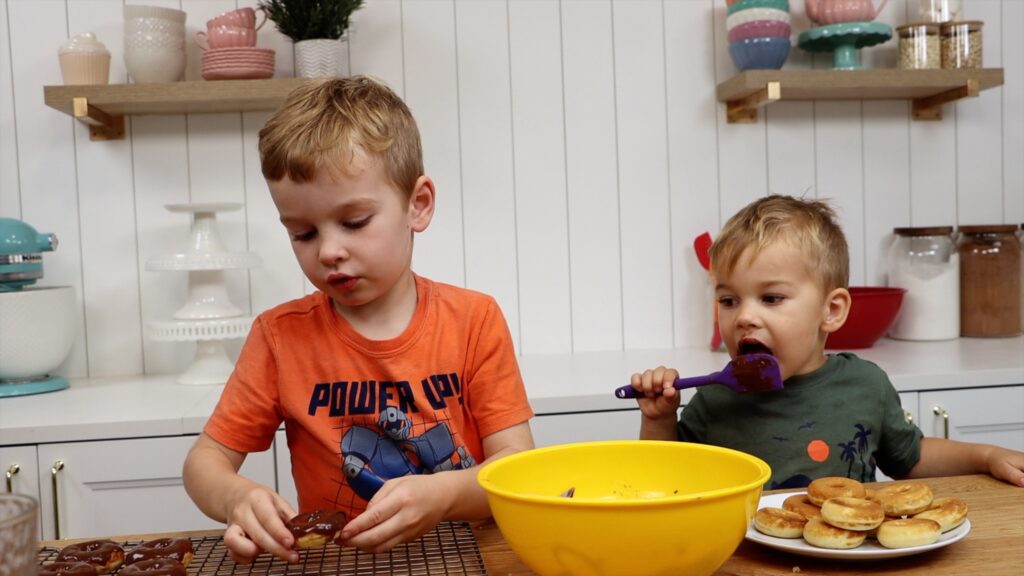
Donuts are a fun cake decoration but they’re a hassle to make. This mini donut maker makes the process much easier. You can make donut batter or use leftover cake batter instead. For the neatest results, spoon the batter into a piping bag and pipe it into the mini donut maker. If you won't have a piping bag, use a sandwich bag with one of the bottom corners cut off. Close the donut maker lid, wait two minutes and then flip the donuts out with a toothpick. This was easy to use and my two and four year old loved helping me decorate the donuts.
You can use these mini donut to decorate a cake, poking toothpicks or wooden skewers into them so that you can stand them upright on top of the cake.
Although I’m a classic fried donut fan, I do love the look of these perfectly rounded donuts on a cake so I’m giving the donut maker a thumbs up! I used this one by Dash:
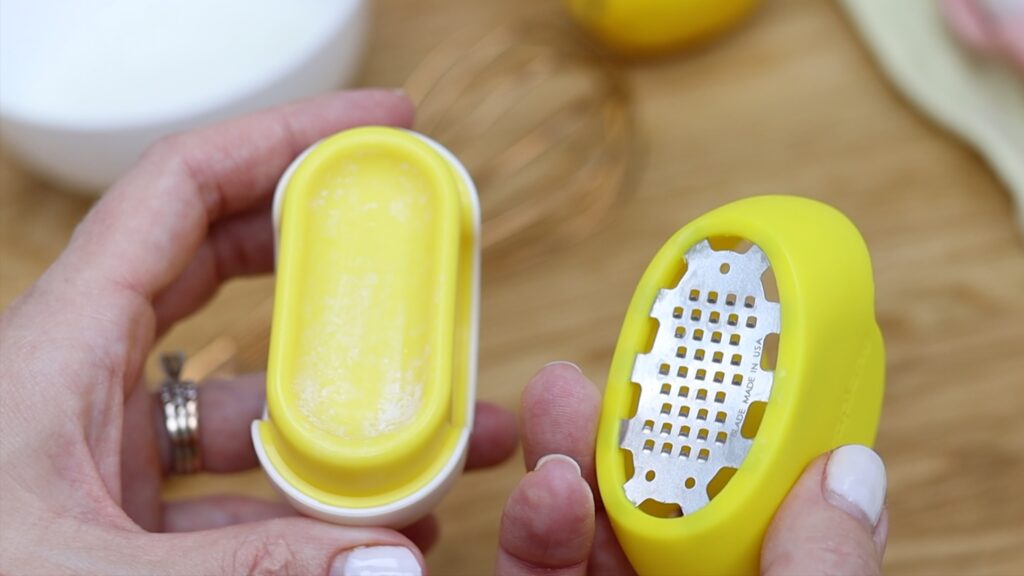
#10 Zester
This mysterious gadget is a lemon zester or chocolate grater. The grater blade is attached to the lid of a little container, which catches the zest.
It can take a really long time to zest a lemon using a traditional grater. Also, it’s awkward to hold the grater so that the zest falls onto a plate or into a bowl. This zester is easy to grip, quick to use, and it catches every piece of zest in its handy compartment. It's a game changer if you need a lot of lemon zest, like for this Lemon and Raspberry Cake.
So, there are 10 cake decorating tools: seven that work and three to stay away from. Which of these tools are you going to try? Tell me in the comments!
Check out my cake school for hundreds of cake decorating techniques and designs and join my ClubPLUS membership for access to every MiniCourse, MasterCourse, Live Workshop and 5 Minute Fridays!
I’m going to show you how to give a store bought cake a makeover! Turn a grocery store cake into a glamorous, custom dessert in a few simple steps.
Why do people do cake makeovers?
There are three reasons why you might choose to re-decorate a grocery store cake:
By decorating a store-bought cake you can save a lot of time, skipping several steps of making a cake: the mixing, baking, cooling and assembly.
If you love a cake flavour from Costco, Walmart, Tesco or any other supermarket or grocery store, you can use that flavour but personalize the decorations.
If you have a cake fail just before an event, re-decorating a grocery store cake is a quick replacement option.
How do you do a cake makeover?
First of all, choose your cake! Most supermarkets or grocery stores have their own bakery departments where they make different flavours and sizes of cakes. When you get home, leave the cake at room temperature to keep the frosting soft, which makes the next steps easiest!
How to scrape a grocery store cake for a cake makeover
First of all, take off any decorations from the cake. Depending on how you want to decorate the cake, you’ll probably have to remove any garnishes like chocolate shavings or fruit. Do this before you scrape off the frosting so that you don’t end up with chunky ingredients in any frosting that you want to re-use.
Large garnishes like strawberries are easy to take off but the smaller the garnishes are, the trickier they are. If you miss any and then try to smooth the frosting or decorate with it, chunks of ingredients will make it lumpy.
Frosting swirls are easy to remove by scraping over the top of the cake a few times. They are useful for a cake makeover because you can use that frosting to re-frost or re-decorate the cake.
It’s a good idea to have two bowls next to you as you scrape the cake. Use one for garnishes and another one for extra frosting. You probably won’t re-use the garnishes because they’ll be covered with smears of frosting. However, you might choose to re-use the frosting so save that bowl for later!
How to re-frost a grocery store cake
Why would you re-frost a grocery store cake? After taking off the decorations you don’t want, the frosting will probably be messy. You can use any frosting swirls you scraped off to touch up the frosting where you removed any garnishes. Or you can cover the cake with another layer of frosting, for example to replace textured frosting with smooth frosting.
Alternatively, you can let this first layer set as a crumb coat and then use another frosting like my 4 Minute Buttercream for the final layer. You might do this if you prefer the taste of another frosting or if you want to decorate the cake using a technique that works better with buttercream, like stenciling or carving. I'll share two ideas for decorating grocery store cakes below, and for hundreds of cake decorating designs and techniques, visit my online cake school!
How do you stack grocery store cakes to make a tall cake?
Cakes from supermarkets or grocery stores are usually two layers so they’re quite short. It’s easy to turn them into a tall cake for your makeover. I love tall cakes because it gives you much more space for decorations on the sides of the cake.
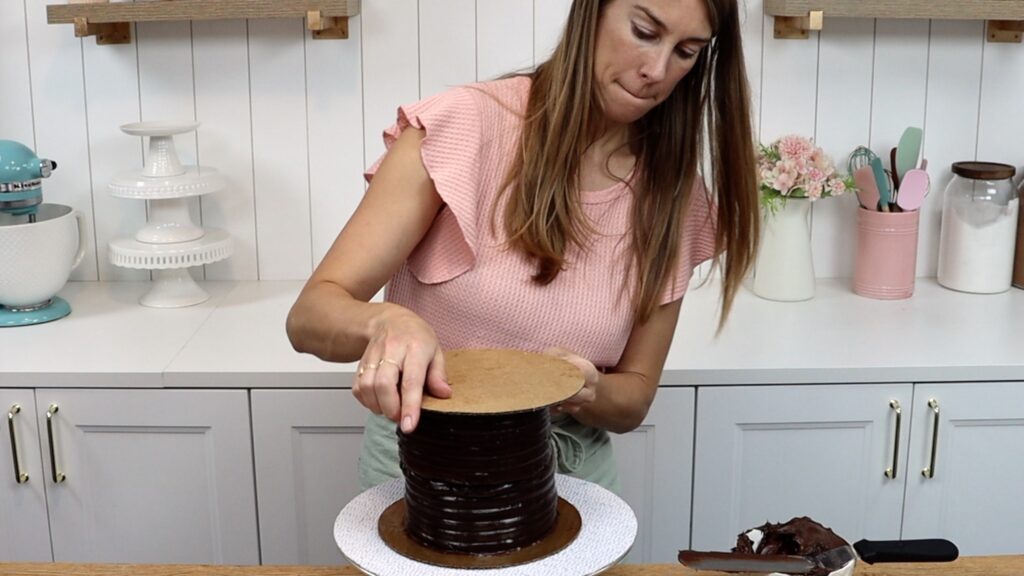
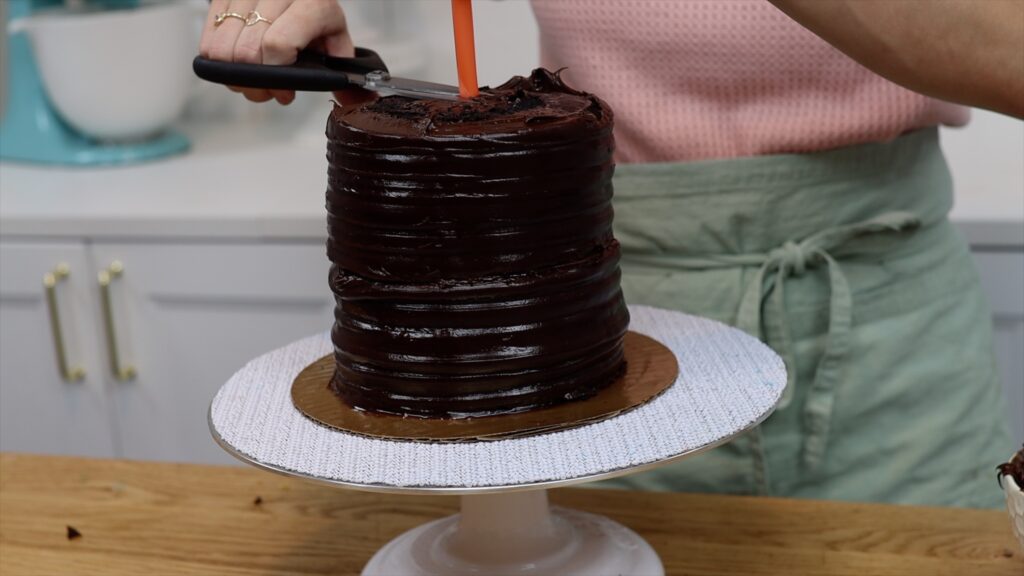
To make a tall cake, start by scraping off the garnishes and frosting. Then flip one cake upside down onto another one. Use an offset spatula to loosen the cake board from the top of the cake and remove it.
Then stick a boba straw down through the middle of the cake to keep in straight. This way it won't lean to one side. You could use a support structure in the cake with a center cake board but if it’s going to be stored in the fridge and taken out to room temperature just a few hours before serving, it will be stable enough with just this straw. Cut the straw at the top of the cake so it’s invisible and then re-frost and re-decorate your cake.
How to decorate a grocery store cake with a cake makeover
Now for the fun part: give the cake a makeover by decorating it! There are endless ways you can do this and here are two easy but eye-catching ideas. Using store-bought cakes is a great way to practice cake decorating techniques like these without spending all day baking the cakes first.
Chocolate collar cake
On this tall chocolate cake I’ll show you how to do a chocolate wrap, also called a chocolate collar. Start by melting chocolate chips. If you do this in the microwave, use 70% power for 30 seconds at a time. Then stir until smooth. Spoon the melted chocolate into a sandwich bag and cut a tiny piece off the corner.
Cut a piece of parchment so that it’s a little bit taller than the cake and long enough to wrap all the way around, plus about an inch. Lay it on the counter so that the ends curl upwards, and that way it will wrap easily around the cake later. Then drizzle the melted chocolate over the parchment paper, or you can use baking paper or wax paper.
Lift the paper up, lower the bottom edge onto the cake board and press it against the cake. Then wrap it around the cake, so that the chocolate sticks to the frosting. It’s easiest to do this after chilling the cake in the fridge so the frosting is cold and firm. Overlap the parchment by about an inch and then trim off any excess parchment paper from the end.
Put the cake in the fridge for 30 minutes to set this chocolate. Peel the parchment off and you’ll leave a beautiful design behind on the cake!
Sprinkle cake
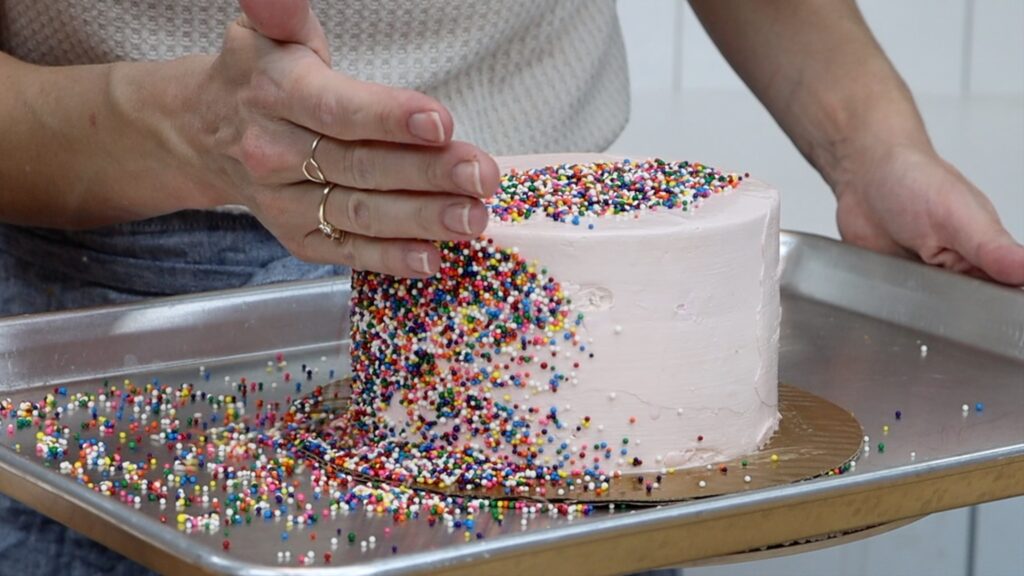
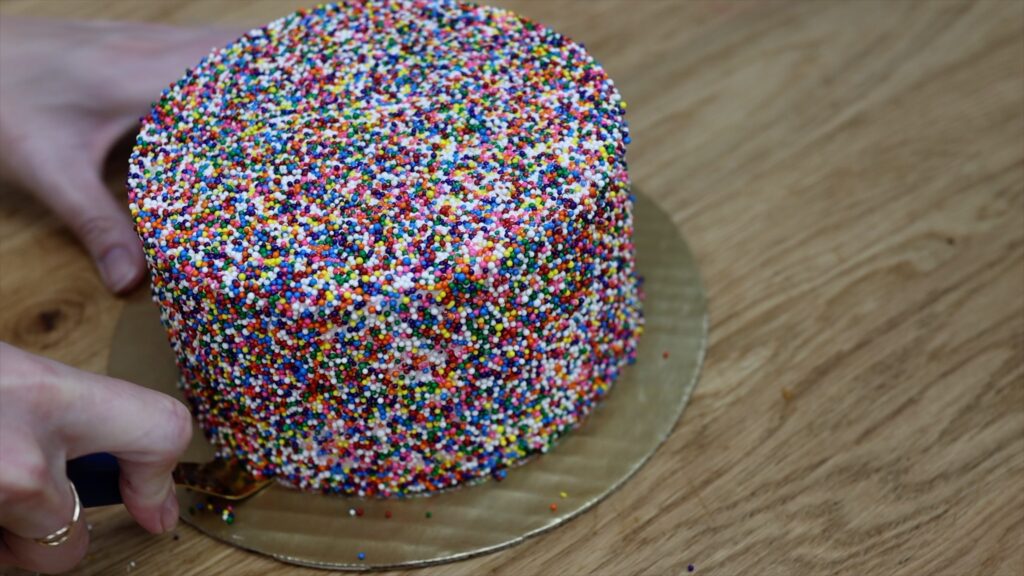
Here’s another fun way to re-decorate a cake. Brush the frosting lightly with water after the frosting has been chilled in the fridge. This way, the frosting will be firm and will hold its shape. Then pour sprinkles into a bowl. Non-pareils work best for this because they’re tiny so don’t add a lot of texture to the cake.
Put the cake on a tray or baking sheet and then press the sprinkles into the frosting. Even though the frosting has set in the fridge, the sprinkles will stick because of the water.
You could do this straight after buying or frosting a cake, when it’s at room temperature, but the pressure from your hands will leave impressions in the frosting. By doing this after chilling the cake you'll keep the sides straight and the top level. The tray will catch all of the bouncing sprinkles so they don’t spill all over the room.
How to transfer a cake from a cake board to a cake stand
To complete the grocery store cake makeover, slide an offset spatula underneath the cake. Spin it around to separate it completely from the cake board. You should do this after chilling the cake to set the frosting.
Then lift the cake up and place it on a cake stand. Since the cake has been chilled, you won't damage the frosting with your hands.
What do you do with a cake makeover cake?
Back to the original question: why do a cake makeover? By decorating a store-bought cake you've saved time because you didn't have to bake and assemble the cake. You've either practiced a cake decorating technique or prepared a cake to serve. If it was a practice, you can scrape it and decorate it again to practice another technique. If you serve it, no one will guess this gorgeously decorated cake started its life in a grocery store!
What do you think? Would you try this? Tell me in the comments! Thanks for watching!
Decorating show-stopping cakes on a budget with these ten techniques that won't break the bank.
#1 Choose basic cake decorating tools
When you first start decorating cakes, the number of tools available can be overwhelming! You don't need every single at the beginning. For example, if you make cakes professionally I think it’s worth investing in metal turntables and cake scrapers to get super smooth frosting. However, if it’s a hobby or while you’re in the early stages of practicing getting your frosting smooth, a plastic cake scraper and plastic turntable work just fine.
#2 Create texture with piping tips
Textured cakes are one of the trending styles of this year. Creating texture with wafer paper is an eye-catching option but it's also expensive. Wafer paper comes in packets of 50 or 100 sheets, which is a big investment for just one cake.
A much more affordable alternative is to buy a few piping tips and piping bags and create texture that way. You can reuse the piping tips and the piping bags for different piping styles to create endless textured designs on cakes on a budget.
#3 Sprinkle mixes
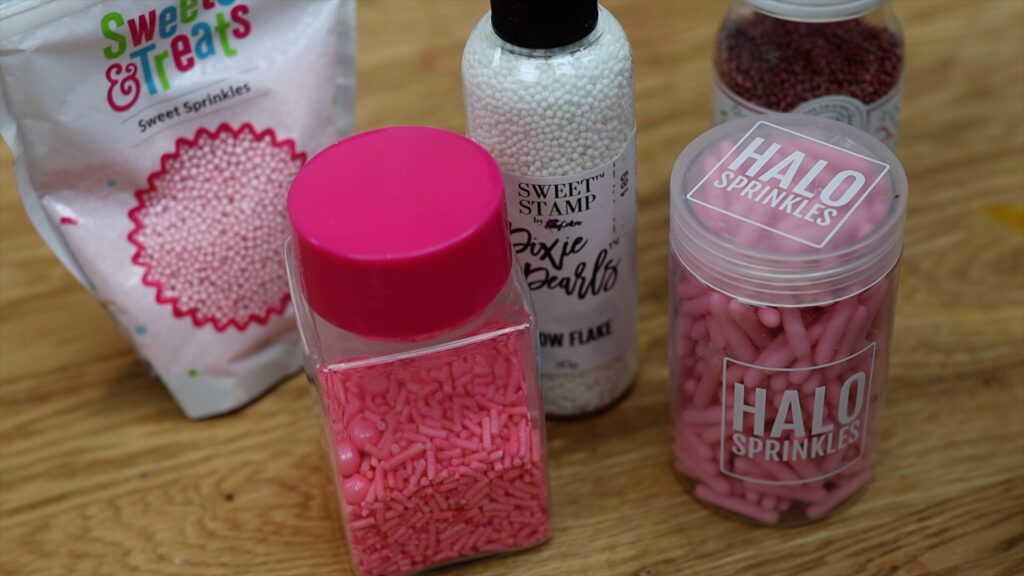
I think fancy sprinkle mixes will always be popular but they’re expensive too. Good news: you can make your own mixes for a fraction of the price! Buy packets of jimmies, nonpareils, or whatever affordable packets you can find and then combine them, choosing different colours and sizes for the most dramatic results.
Use sprinkles for borders around cakes, to create shapes or patterns, or just sprinkle them on top of a cake. With homemade sprinkle mixes you can still make your cakes look fancy!
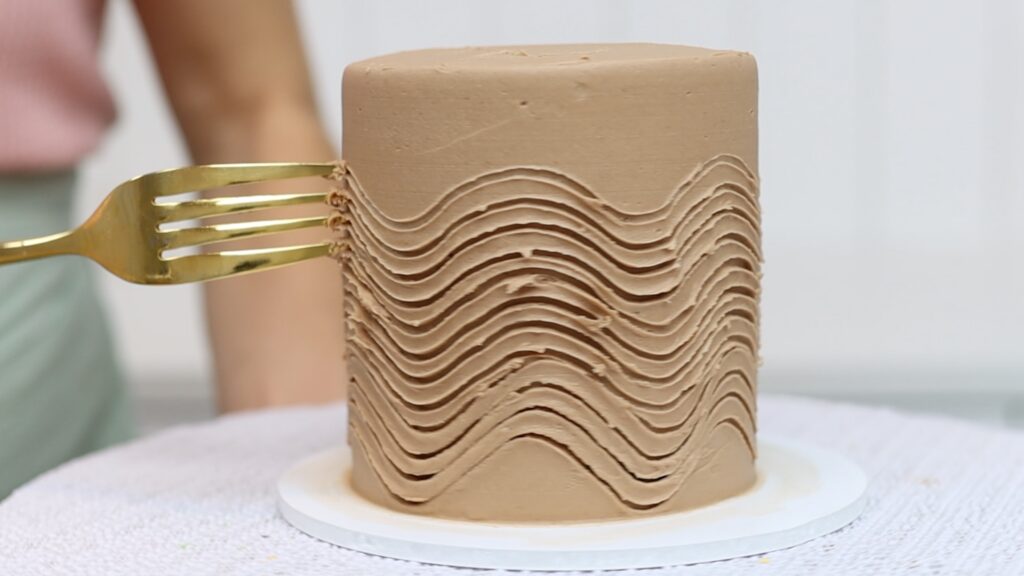
#4 Decorate cakes on a budget with household objects
Another way to save money on cake decorating tools is to use household objects instead. Make fun cake toppers with bubble wrap or texture your frosting a spoon or a fork! If you're interested in decorating cakes with tools you already have, check out this tutorial on 12 secret tools for cake decorating.
#5 Make your own cake stencils
Did you know that you can make your own cake stencils with parchment paper? They’re cheap and infinite designs are possible. To make a cake stencil, draw or trace your design and cut it out, leaving the surrounding paper intact.
Press it onto a cake after chilling it in the fridge for at least an hour, so the frosting is cold and firm. Spread frosting over the top and scrape off the excess to leave a smooth, thin layer. When you peel the parchment off you’ll leave a neat design on the cake.
Homemade parchment paper stencils are an excellent way to create elaborate designs on cakes on a budget.
#6 Bake in bulk
Save time and money by baking cakes in bulk. Make the biggest batch of cake that your mixer can hold and bake several cake layers. For any that you won’t use immediately, wrap them in two layers of plastic like cling film or Saran Wrap. Then freeze the wrapped layers for up to 2 months.
Move the layers to the fridge 24 hours before you use them to assemble and frost your next cake! This way you’ll lower your costs by buying ingredients in bulk. You'll also use less energy or power for mixing and baking, and save a LOT of time!
#7 Use white chocolate
Candy melts are coloured confectionary chocolate that are great for drips, decorations, and cake toppers. They’re expensive though, and with white chocolate you can make your own. The tricks to melting chocolate without it overheating and seizing are simple. Use a microwave safe bowl, use 70% power and only heat at 30 second intervals.
If you want to colour it you’ll need oil based colours, and a tiny amount goes a looooong way. By using oil baes colors you can add as much colour as you like, to make really bold and bright colours without causing the chocolate to seize. Use the coloured chocolate for drips, decorations or cake toppers just as you’d use candy melts, but for a fraction of the price!
#8 Re-use leftover frosting
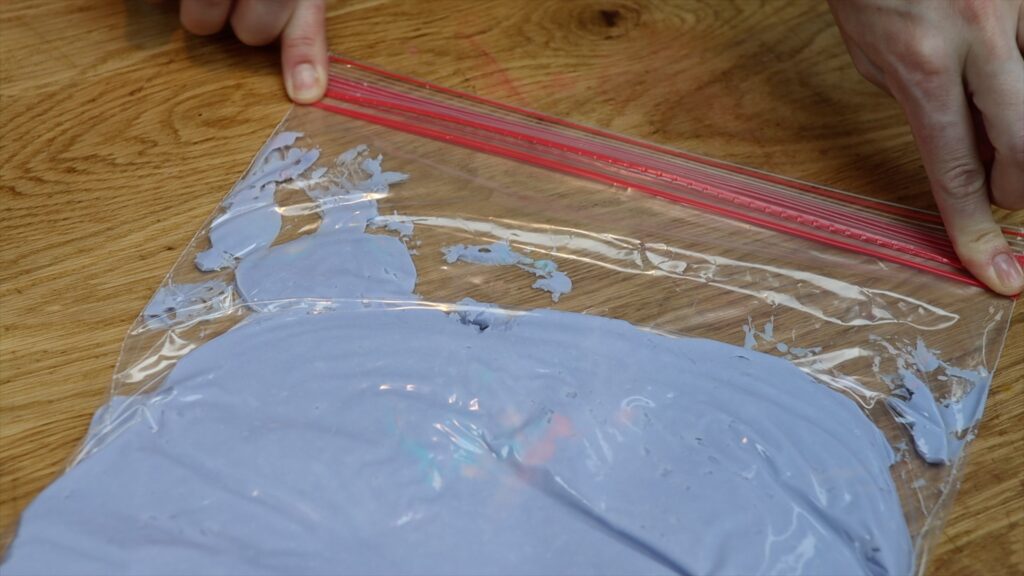
It’s almost impossible to make exactly the right amount of frosting for a cake. It doesn't really matter though because leftover frosting doesn't have to go to waste. Stretch your budget by re-using leftover frosting to frost or decorate your next cake. For example, add plain white buttercream to lighten a colour or mix colours to make new colours. You can store buttercream in a ziplock bag in the fridge for 2 weeks or in the freezer for 2 months until you’re ready to use it.
#9 Make your own cake toppers
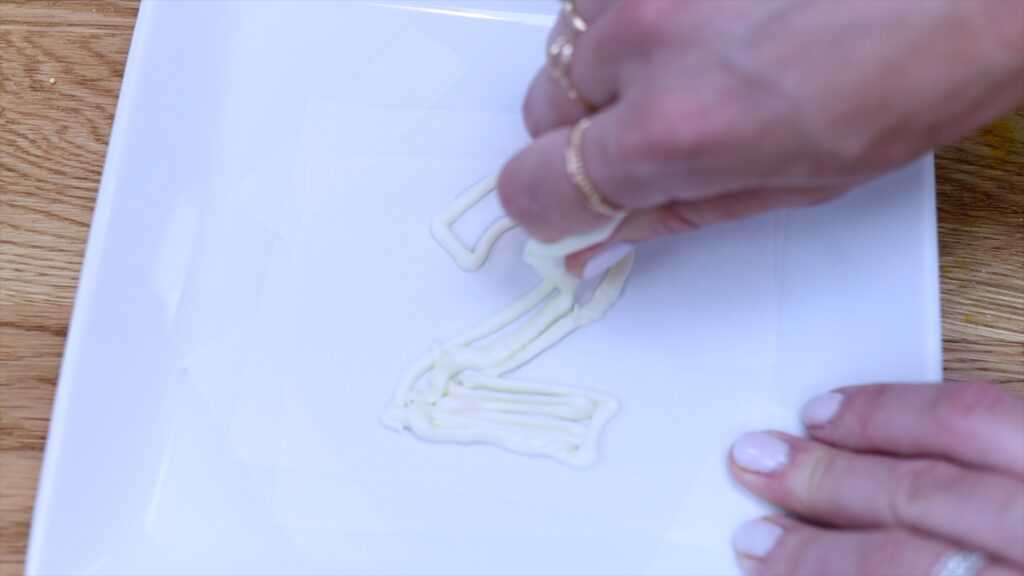
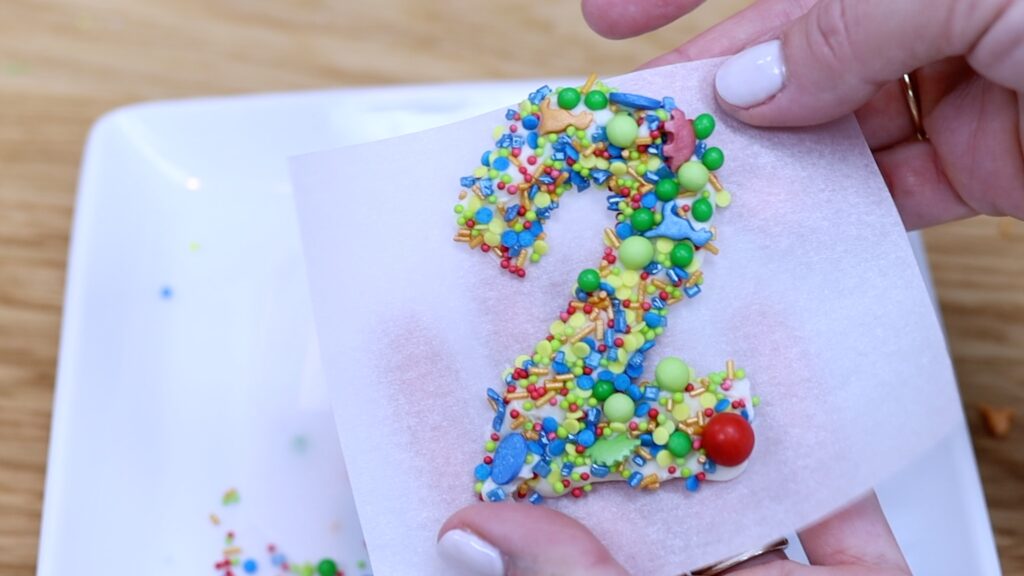
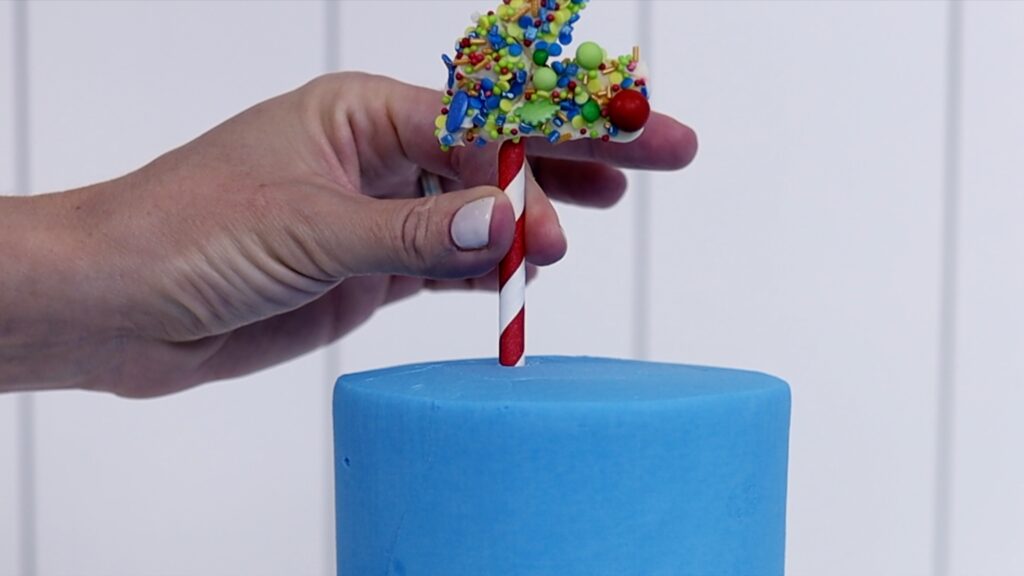
Cut the cost of decorating a cake by making your own cake toppers instead of buying them. For number toppers for birthday cakes, outline a number and place a piece of parchment paper on top.
Trace the number with melted chocolate, fill it in, and pour sprinkles on top. When it sets you can stick a straw to it for with more melted chocolate and voila! A fun, colourful number topper for a cake!
#10 Make smaller cakes
If you’re trying to lower costs for your cakes, try making smaller cakes! Did you know a 6” cake can serve 10 people with huge slices or 20 people with thinner slices? And that a 6” cake uses half the batter and frosting of an 8” cake?
I teach how to cut and serve tall cakes on my online cake school, as part of my 5 minute Friday series, where I share a new cake tip or technique every Friday which you can watch and learn in just 5 minutes! Join my ClubPLUS membership for access to 5 Minute Fridays and EVERY MiniCourse, MasterCourse and Live Workshop on my cake school.
Here are 10 cake trends to try in 2023! This year we’re going to see some really fun cake trends and luckily for cake decorators, they’re not too complicated to create yourself.
1. Buttercream cakes
First of all, I think buttercream cakes will continue to increase in popularity. All sorts of designs can be tweaked from their original fondant versions to use buttercream instead. This way they're less time consuming, more affordable and, arguably, more delicious!
Comic style cartoon cakes havestarted to pop up everywhere and I think this style will explode in 2023. The trend will go beyond the basic cake design to incorporate all sorts of themes and I think we’ll see both fondant and buttercream variations. I have a very detailed tutorial on this trending cartoon style using buttercream and chocolate.
3. Buttercream carving
Buttercream carving made a brief appearance a few years ago and it’s starting to re-appear. For this cake trend, frost a cake and then cover it with another colour of buttercream. Carve the buttercream using clay modeling tools or even piping tips, revealing the colour underneath.
This is an eye-catching way to add lots of colour and texture and detail to cakes. You can expect to see lots interesting carved designs in 2023! I have a course on buttercream carving on my online cake school in case you want to dive in to this fun technique.
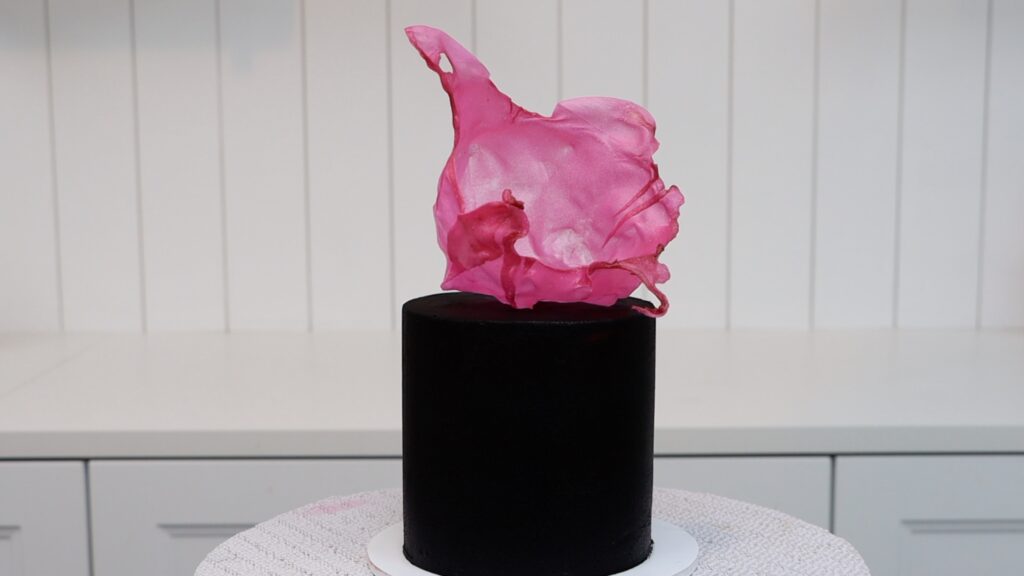
4. Wafer paper
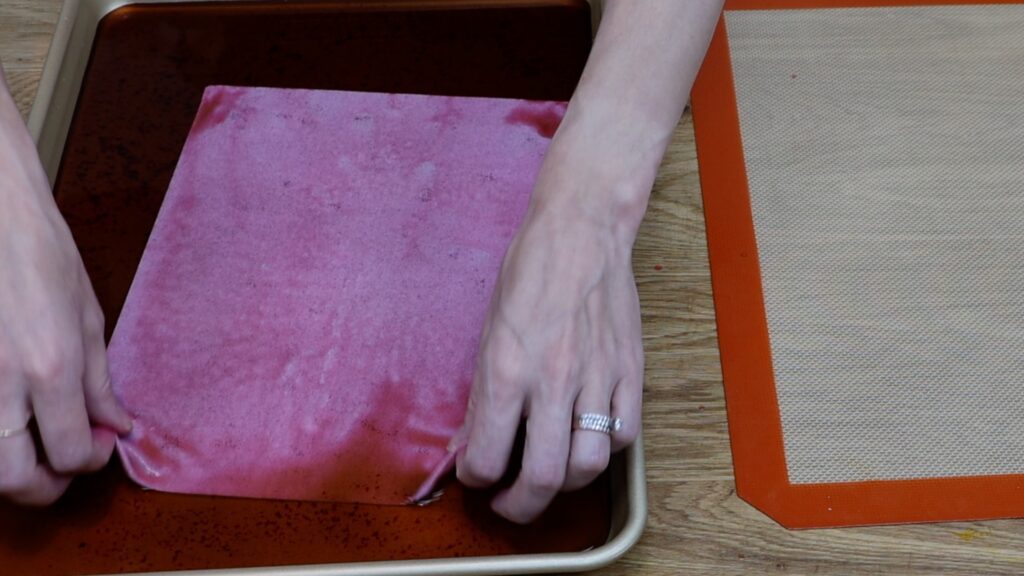
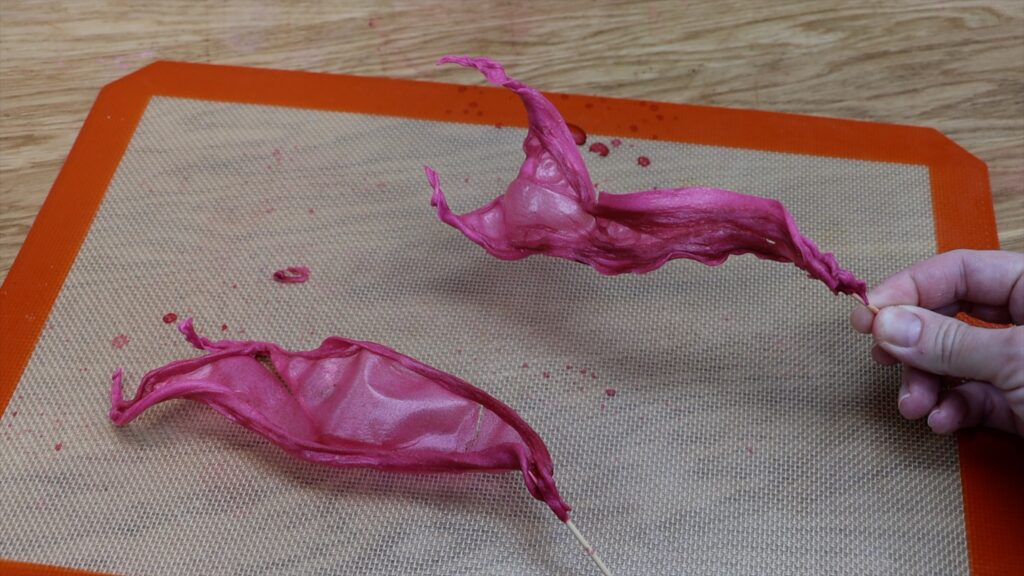
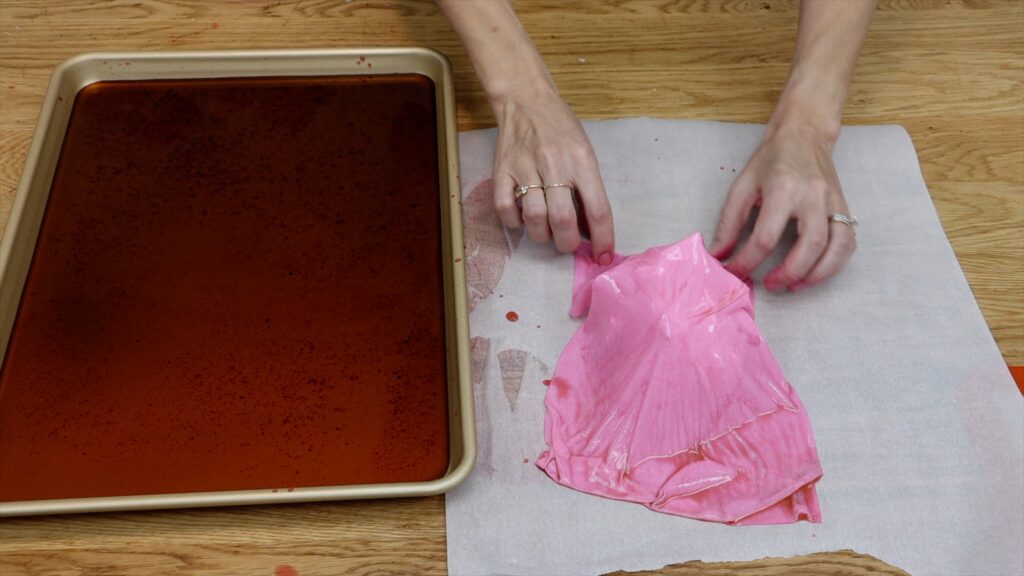
With wafer paper you can make dramatic sails on cake and it’s fairly easy to do. Just pour some water into a tray, add some gel colour and mix it in. Wafer paper is stiff to start with but water will make it very soft and flexible. Place it in water for five seconds on each side and then transfer it to a silicone mat or parchment paper. I like to wrap one end around a toothpick to make it easier to attach to a cake. Leave it overnight to dry and it will get hard and slightly shiny.
To make a bowl shape, scrunch up some parchment paper or cover a round object with parchment paper to make it non-stick, and then drape the wet wafer paper over it. After it dries you can lift it up and it will hold its shape. These look stunning on cakes and add height and texture and colour!
5. Vintage Cakes
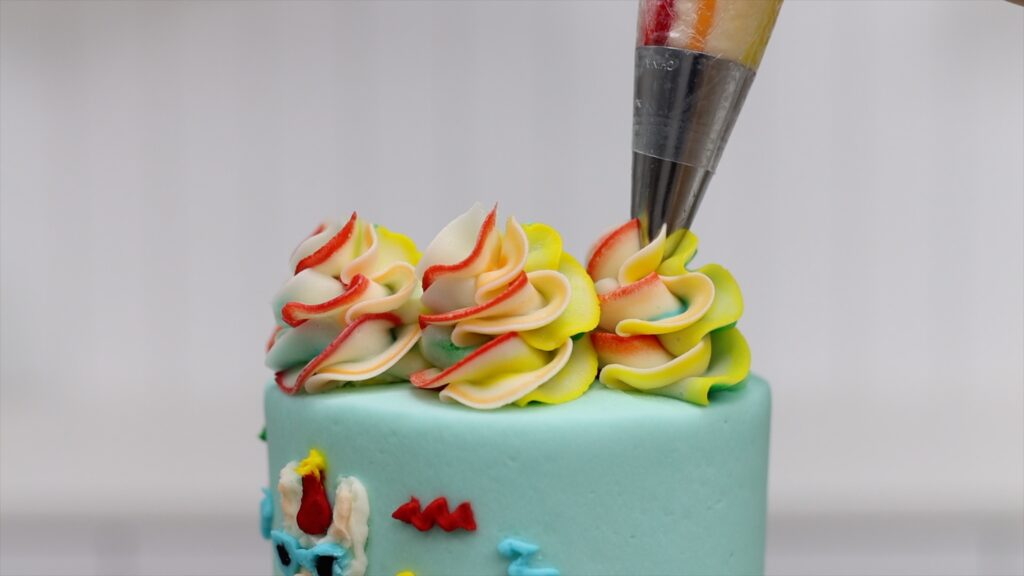
This next one is surprising because it goes back to the 1700s in France. This style, known as Lambeth or vintage, is elaborate with over the top piping. Designs feature lot of texture and usually lots of colour, too.
You can use several piping tips or just one or two to achieve lots of different effects. Top the cake with swirls or decorations like glittery cherries or piped roses.
These are fun for any occasion, from formal weddings to 4th of July or valentines day!
6. Striped Frosting
I’m expecting stripes to make a comeback this year, based on fashion trends which are often mimicked by cake designs. Fun fact: my first viral YouTube video back in 2018 was a tutorial on 4 Secrets for Perfect Stripes on Cakes.
7. Textured Frosting
Another fashion-based trend is texture, which we’ll see with a surge in popularity of piped cake designs. This could include textured fillings on naked cakes, or frosting designs like knitted cakes.
8. Mini Cakes
After a few years of limited socializing around the world, smaller sized desserts are popular and mini cakes have become very trendy. This gives bakers lots of opportunities to practice baking and cake decorating without wasting a lot of ingredients.
It’s also much quicker to do certain designs on mini cakes, like pointillism without needing to pipe millions of dots! Mini cakes make thoughtful gifts, romantic desserts for couples, or a fun way to serve several flavours without huge quantities.
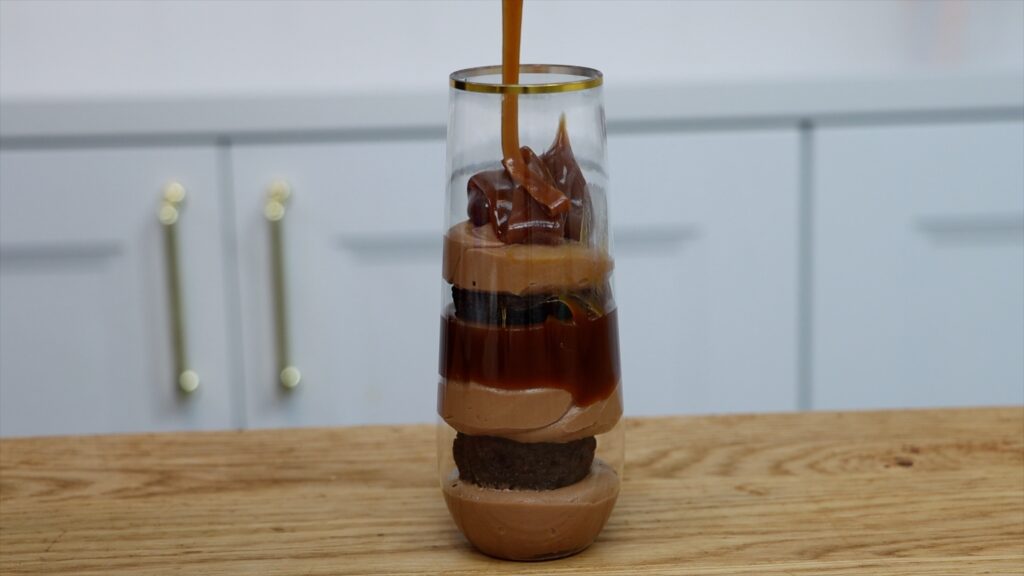
9. Cake shooters
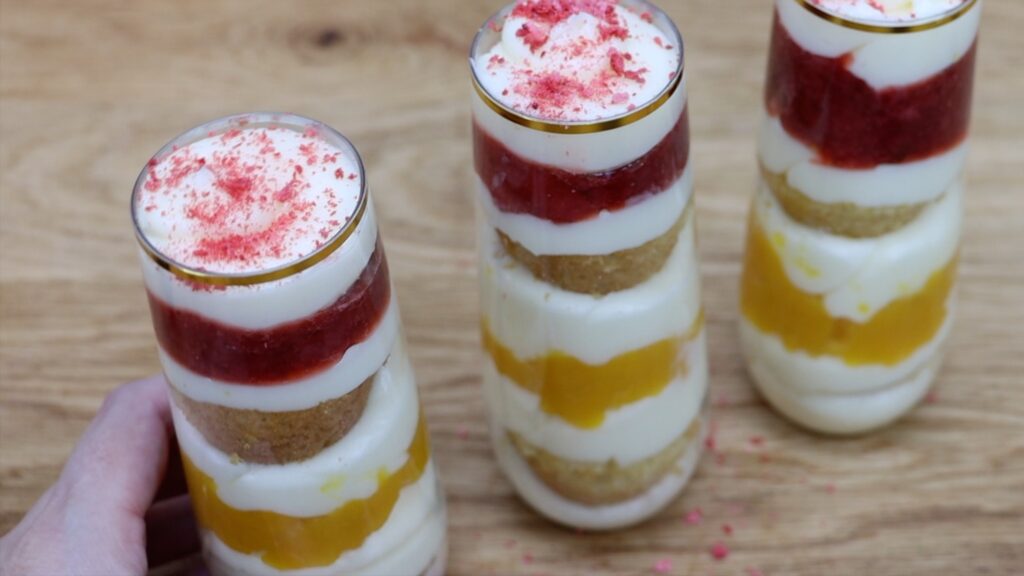
Spinning off from mini cakes, here's another way to create smaller portions. Cake shooters are layered cake, fillings and frosting in shot glasses or champagne flutes. Display them on a table and with spoons for easy serving and cleanup! These are really easy to travel with and for some gatherings they can be more practical than a full-size cake.
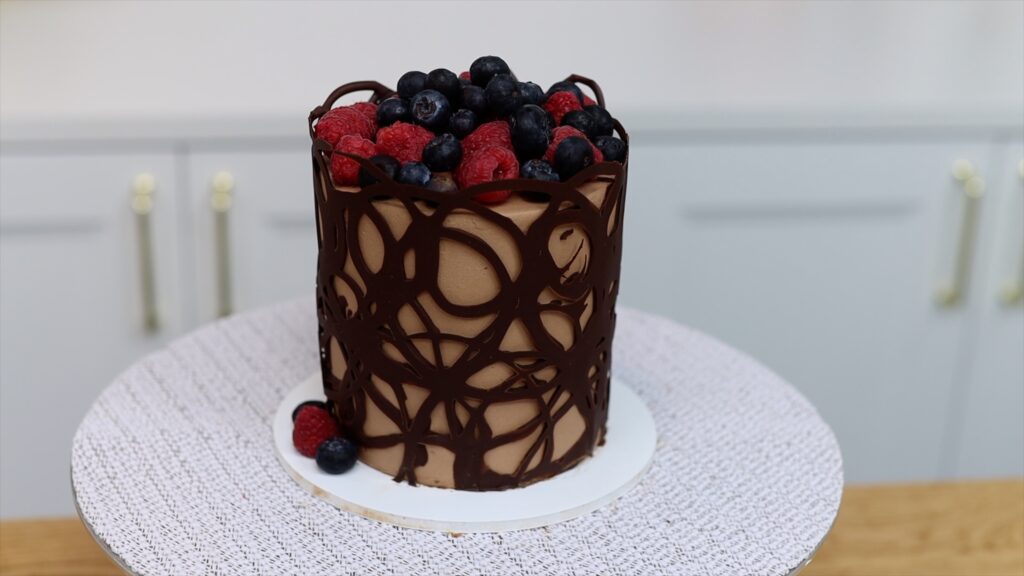
10. Chocolate decorations on cakes
Finally, as buttercream cakes continue to grow in popularity over fondant cakes, I think we’ll see an increase in chocolate decorations replacing fondant. Think number toppers, decorations, details, and styles like chocolate collars or chocolate wraps. If buttercream comic style cartoon cakes trend the way I anticipate, chocolate cake toppers will almost certainly trend with them.
What do YOU think will trend in the world of cakes this year? Tell me in the comments!
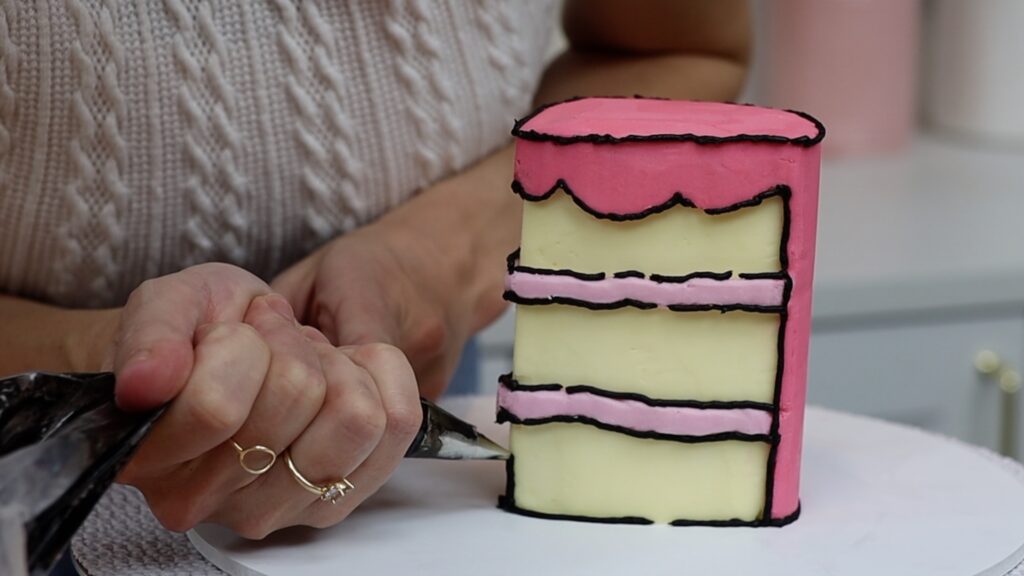
This comic or cartoon cake style is trending and if you don’t like fondant you’ll LOVE this method for a buttercream version!
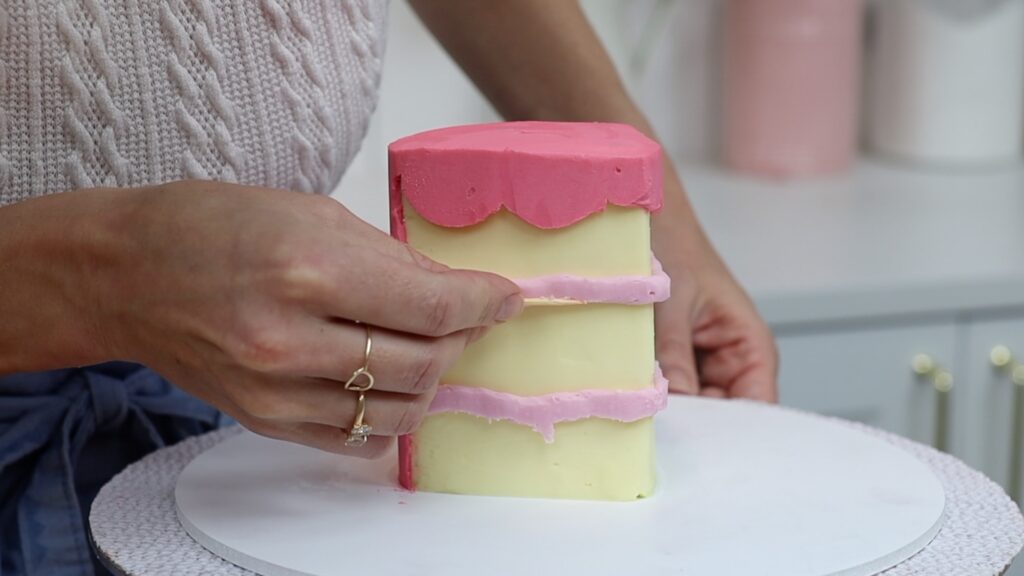
How to assemble a cartoon cake slice
You’ll need one round cake layer of any size, cut into quarters, and buttercream frosting. I'm using my 4 minute buttercream and you’ll see soon why it works so well for this design.
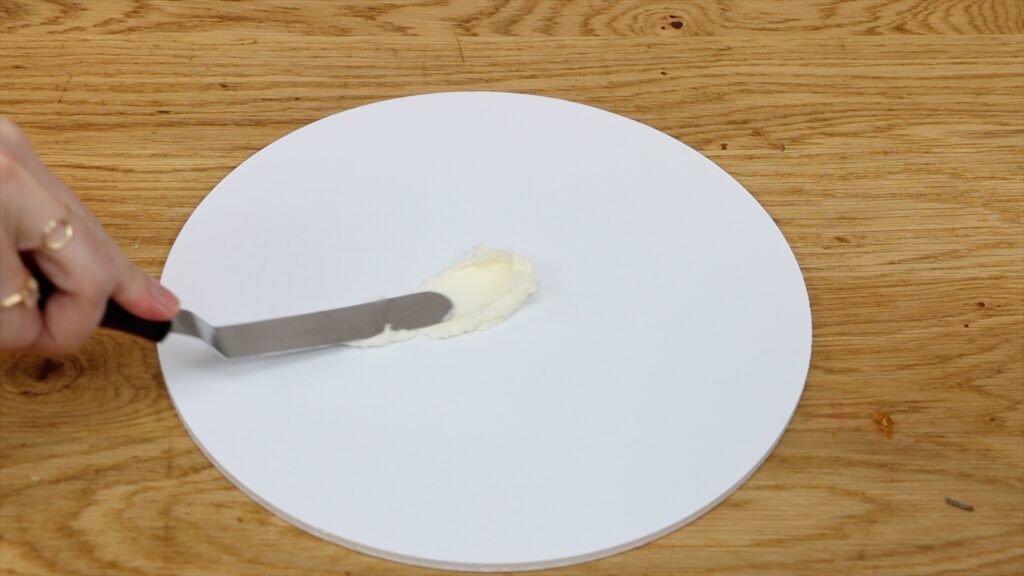
Spread a bit of buttercream onto the middle of a cake board to attach your first quarter of cake.
For the filling I’ve tinted buttercream pale purple but you can use whatever you like. I like to match the filling I’m going to put on the outside of the cake.
Layer your cake, pushing each layer down to attach it to the filling. I’m only using three layers of cake for this but you might use all four if your cake is wider. This layer was only 6 inches wide so it already looks very tall with just three layers.
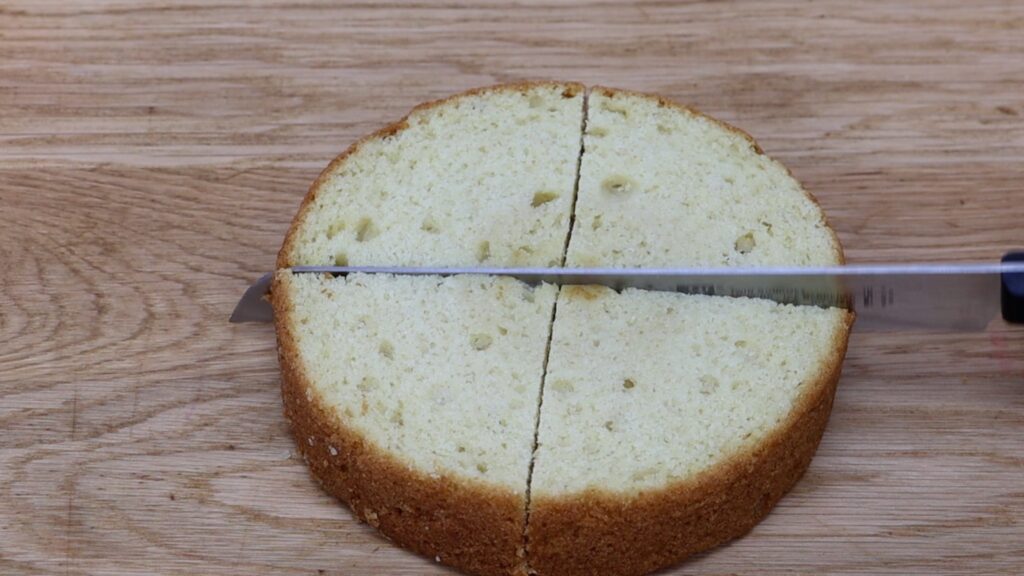
Your layers won’t line up perfectly so trim them with a serrated knife like a bread knife. If you like you can trim the back side of the cake too so it’s straight instead of curved. This means a bit less cake but it does make the slice look a bit more like a cartoon cake.
Now put the cake in the freezer for about 30 minutes so it firms up. This makes it much easier to frost.
How to frost a cartoon cake slice
Tint some buttercream pale yellow and cover the cake with a thin layer of frosting. This is called a crumb coat and it traps any crumbs that come off the cake. Smooth the frosting to give the cake a nice shape. Don’t worry about getting it super neat because you're going to cover this up with another layer. This final layer will be visible so take your time to get it nice and smooth.
I think this is the trickiest part of this cake. Getting the sides smooth on a round cake is fairly simple because you just hold your cake comb still as you spin the cake. With edges like on this wedge shaped cake you have to be much more intentional. Scrape from one corner to get that corner sharp but stop before you get to the next corner. This way you won’t pull the frosting off or make the corner rounded. I teach how to get super smooth frosting on round and square cakes in my online course, The Basics of Buttercream, as well as how to make, troubleshoot, flavour, colour and store buttercream and how to use it for lots of unique cake decorating techniques!
Once you’re happy with the sides, tidy up the top edge of the cake. Swipe sideways with your offset spatula to make sharp edges from the sides onto the top of the cake.
How to decorate a comic cartoon cake
Chill the cake again for about 15 minutes to set the frosting. Then fill a piping bag with the leftover buttercream from the filling of the cake, so it’s the same colour. Use a medium sized round tip like a #12 to pipe two lines along the straight sides of the cake. This will be the "filling".
Hold the tip quite close to the cake as you pipe to make the filling flat rather than rounded. That way it will look more cartoony. You can use a toothpick to flatten any bulges or tidy up any messy parts.
Then use another colour for the frosting on the cake. I’ve added pink to the purple that I used for the filling so that I can re-purpose the leftovers. I have a full tutorial on 9 ways to use leftover frosting that has more ideas to reduce buttercream waste.
Pipe the frosting onto the top of the cake and then smooth it with your offset spatula. Pipe it onto the two straight sides in a wavy line as if the frosting is dripping down. Spread this with your offset spatula to fill in any gaps. You can smooth it slightly but I’ll show you a more effective way to get it really smooth next.
Tidy up the top edge, wiping your offset spatula on a towel or paper towel after each swipe so that it’s clean when you use it again. That will give you the sharpest, neatest edges. Remember the back of the cake! Spread frosting over it and sto smooth it, scrape with a cake comb from one side towards you. Scrape almost to the edge but stop just before and then scrape back in the opposite direction. This will give you the smoothest frosting. Don’t worry about the edges, where this frosting ends where it meets the yellow cake. I’ll show you a quick way to tidy that up next.
How to get smooth frosting on a comic cartoon cake
Put the cake back into the freezer for 15 minutes to chill the frosting. Then use a sharp knife to trim off the edges of the frosting to make a straight line down the cake. It’s much easier to do this now, once the frosting has set, because it won’t smudge or stain.
To get the frosting super smooth, run a metal cake comb under hot water and dry it off. Then scrape gently over the frosting and you’ll see the texture disappear, leaving a smooth surface instead. You can do this along the filling too, to make it a bit flatter for this cartoon cake design.
Again, toothpicks are a great way to fix any imperfections!
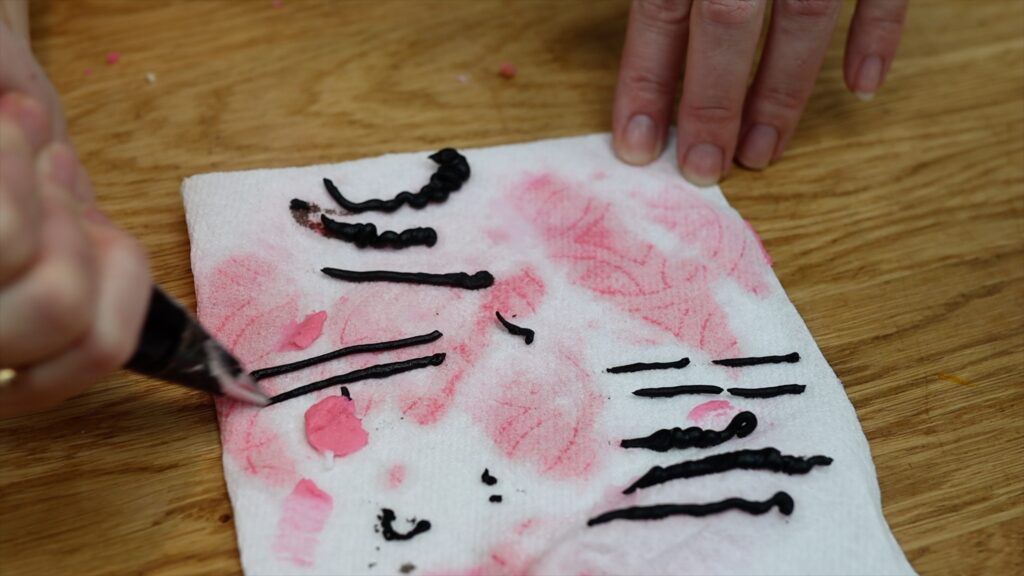
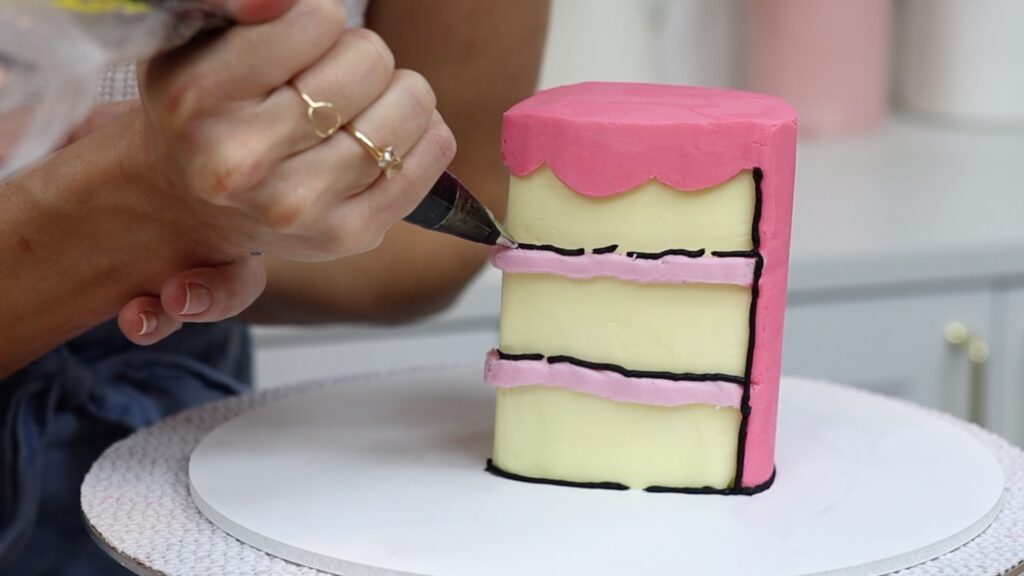
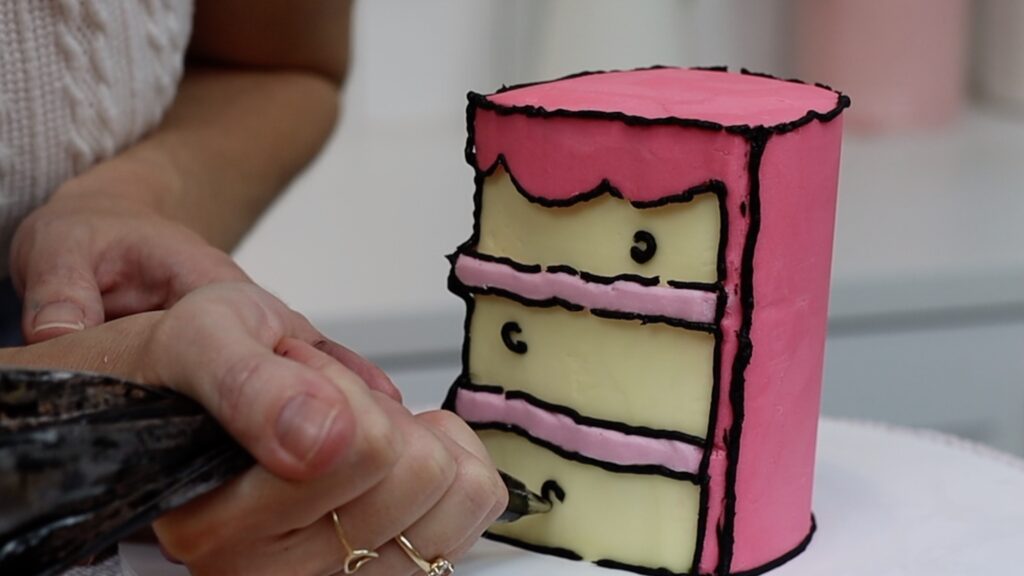
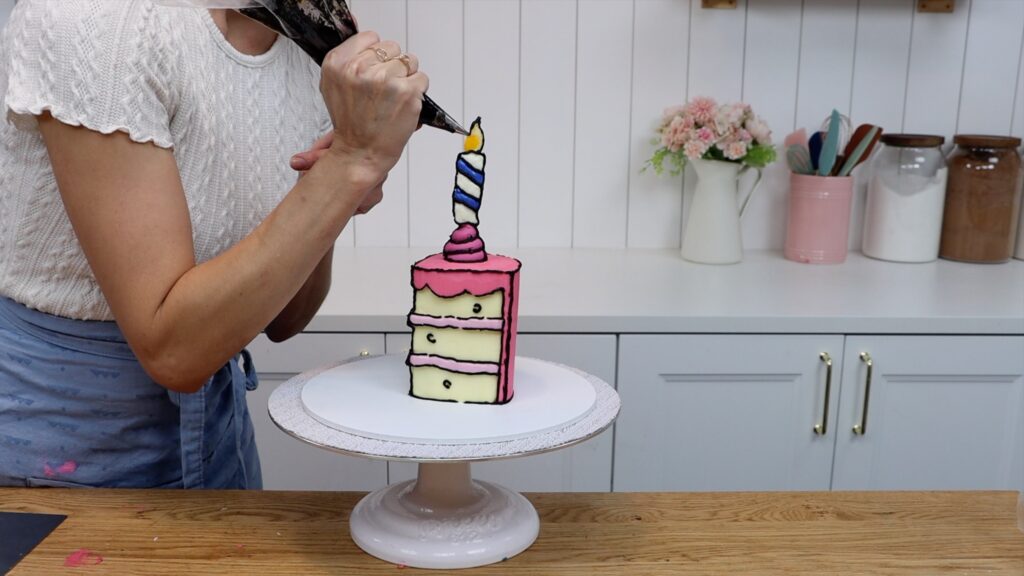
How to add black lines to a cartoon cake slice
Now for the signature part of this design: the black lines. Check out this tutorial for my tips on how to make black buttercream. Use a piping bag with a small round tip like a #3. Practice a few times on a towel or plate to get used to the consistency of the buttercream so you know how hard you need to squeeze and how fast you need to move the bag as you pipe.
The bottom of the cake is the easiest because you can rest the tip on the cake board to hold it steady. That's a good place to start to get comfortable with piping these black lines. If the buttercream breaks as you pipe that’s perfect! Broken lines are part of this cartoon cake style, which is very convenient because it makes this style very forgiving!
You’re going to outline every section of this cake. That means piping where each colour meets, as well as along any edges. It really helps to chill the cake before piping because the frosting sets so it’s firm. This means you can rest the piping tip on it as you pipe and that will help you hold your hand steady. Your lines will be less wobbly but also, the lines will lie flat against the cake. My hands are SUPER shaky so if I can pipe these lines, you definitely can! Toothpicks will be your best friend, since they’re so useful to tidy up the lines. You can use the edge of an offset spatula too, to nudge a line upwards or downwards.
Piping along the top of the filling is the easiest because you can see what you’re doing. Piping underneath the filling is easier if you raise the cake up so you can see what you’re doing. If the line breaks, remember that that’s perfect for this design!
You’ll also need to outline the front edge of the cake, the pointed part of the slice. Pipe over the filling to highlight that it’s bulging out of the cake, cartoon cake style. Also outline the edges of each side of the cake. To make this easier you can use a cake comb to score a line as a guide. You can even hold the cake comb there to pipe along, to help get your line straight.
Tidy up any wiggly parts of you lines with a toothpicks. Toothpicks really are the MVPs of this design!
Pipe a few circles that don’t quite join up. There obviously aren't big holes in cake slices but this is part of the cartoon cake style!
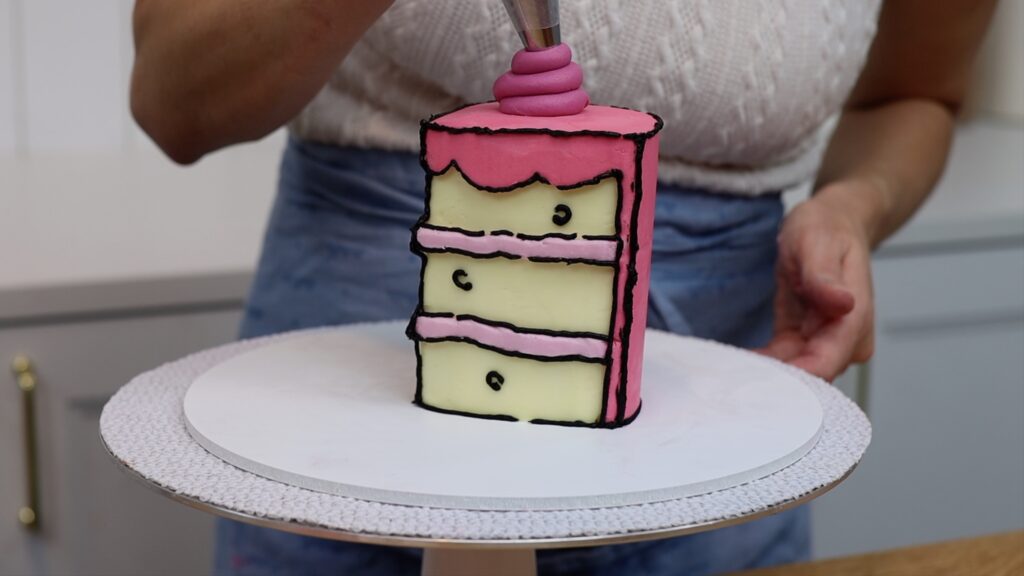
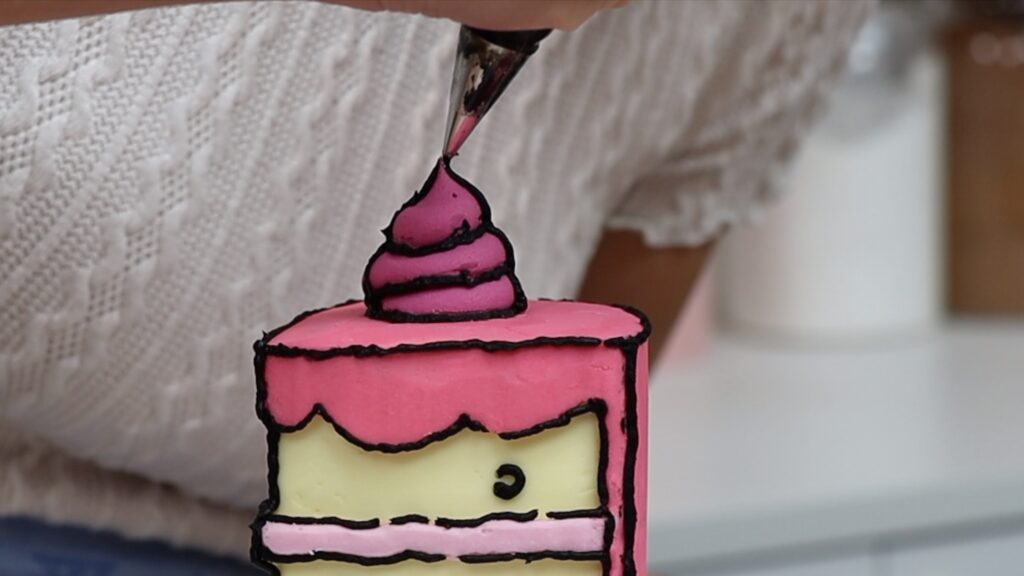
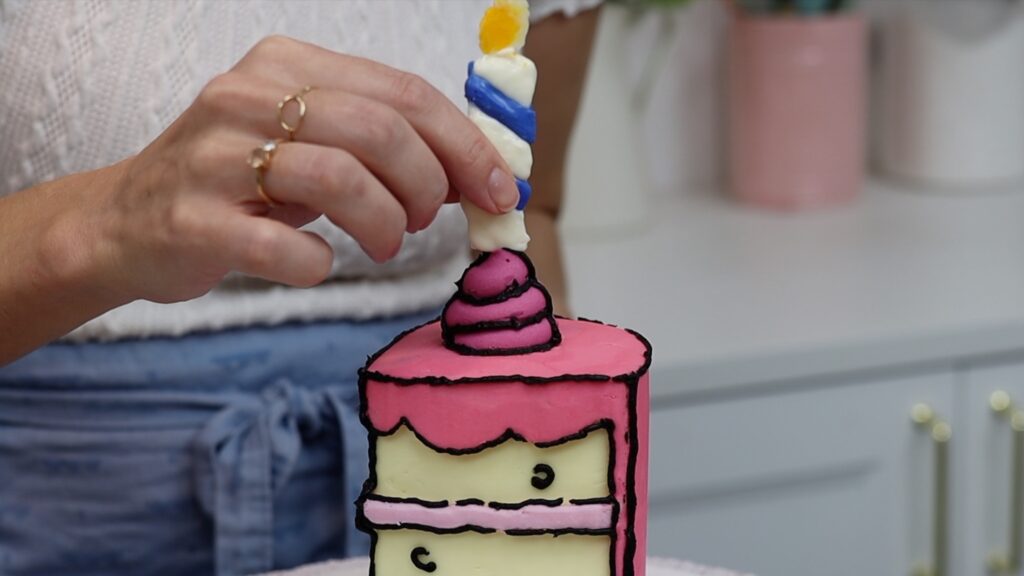
How to add a swirl and chocolate candle to a cartoon cake slice
To add some detail to the top of the cake pipe a swirl and make a chocolate candle. It’s easiest to outline a swirl piped with a round tip rather than a star tip.
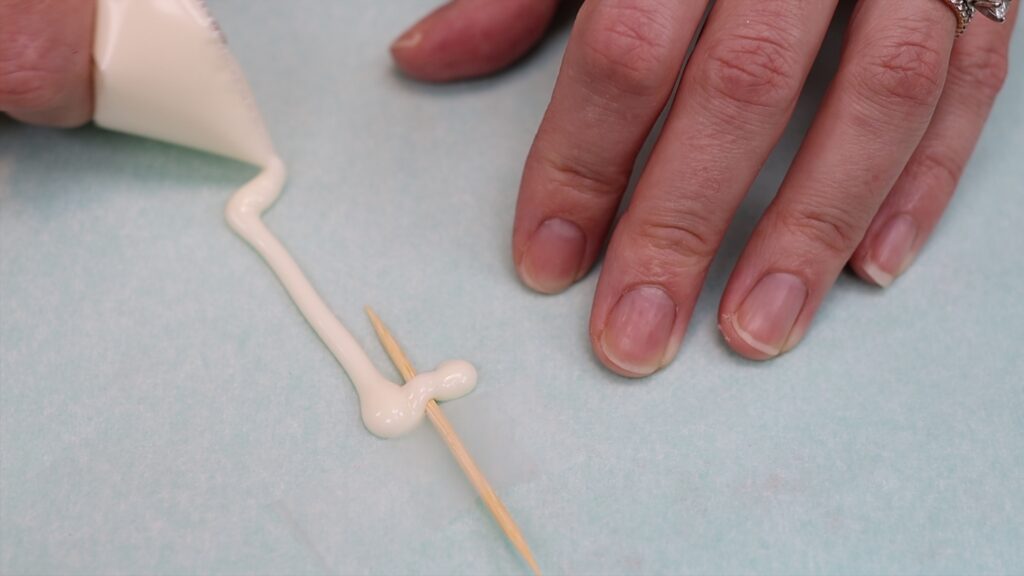
Put the cake back in the freezer to set the swirl on top and meanwhile, make a candle with chocolate. I’m using white chocolate chips, nothing fancy, and here are my secrets to working with chocolate successfully. First, use a microwave safe bowl so it doesn’t overheat and burn the chocolate. Then, use 70% power and 30 second intervals in the microwave to melt the chocolate slowly. This way it won't seize and become grainy. Stir it until it’s smooth and spoon it into a sandwich bag. Push it down to a corner and cut a tiny piece off that corner to pipe through.
Tape a toothpick onto parchment paper to hold it still and pipe a rectangle over it, to make a candle. The toothpick will let you poke it into the cake so it stands upright. It’s easiest to do this on a cutting board or tray so you can move it into the freezer. It’ll take less than 5 minutes to set in the freezer.
Meanwhile, melt some more chocolate chips and tint the chocolate using oil based colours, which won’t make the chocolate seize. Spoon this coloured chocolate into another sandwich bag and cut a tiny piece off a corner so you can pipe with precision.
When the candle has set, pipe diagonal lines along it. Flip the candle over and pipe the same diagonals on the other side. The side of the candle lying face down on the parchment will set flat because it’s pressed against the parchment. Just don’t try to move it before it sets!
put the first sandwich bag back in the microwave for 10 seconds to re-melt it. Then pipe over the white chocolate on this side of the candle, to cover up the toothpick that’s showing. And tidy it up with - you guessed it - another toothpick!
You’ll need a tiny bit of chocolate for the flame on the candle. I used the leftover white chocolate in the sandwich bag, squeezing it into a bowl. I don’t have yellow oil based gel so I used regular gels for buttercream, which really don’t work well with chocolate. If you use regular gels, you can only stir the chocolate only or twice before it seizes. Stir the chocolate as little as possible and then spoon it onto the top of the candle. Then shape it into a flame using a toothpick.
The candle will set in about ten minutes at room temperature or five in the freezer. Meanwhile, outline the swirl on top of the cake, which will have chilled and set by now. It’s much easier to outline this than a swirl piped with a star shaped tip, which has lots of texture and lines. Choose which will be the front of your cake and draw lines along the left and right sides of the swirl, from the point of view of someone looking at the front of the cake.
You can put your candle anywhere on the cake - I’m putting mine on top of the swirl. It’s easiest to poke another toothpick into the cake first, to forge a pathway. Then once the candle has set, push it into that pathway. This way you’re not putting any pressure on the candle, which might snap it.
Use your black buttercream to outline the candle. I considered using black chocolate but this way, the black lines on the whole cake are consistent. I outlined the back of the candle too. This is probably obvious but choose the neatest side of the candle to face whichever side will be the front.
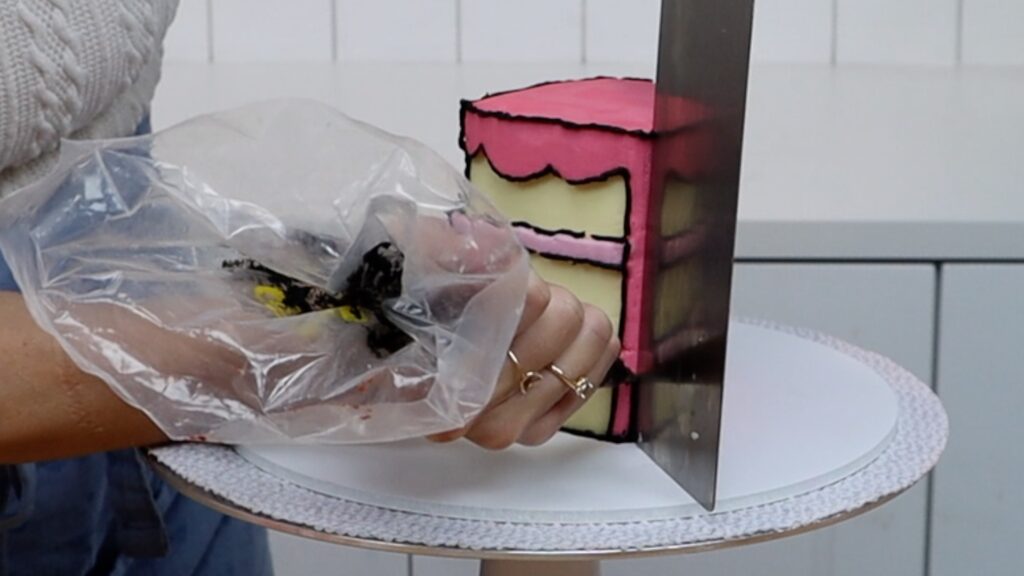
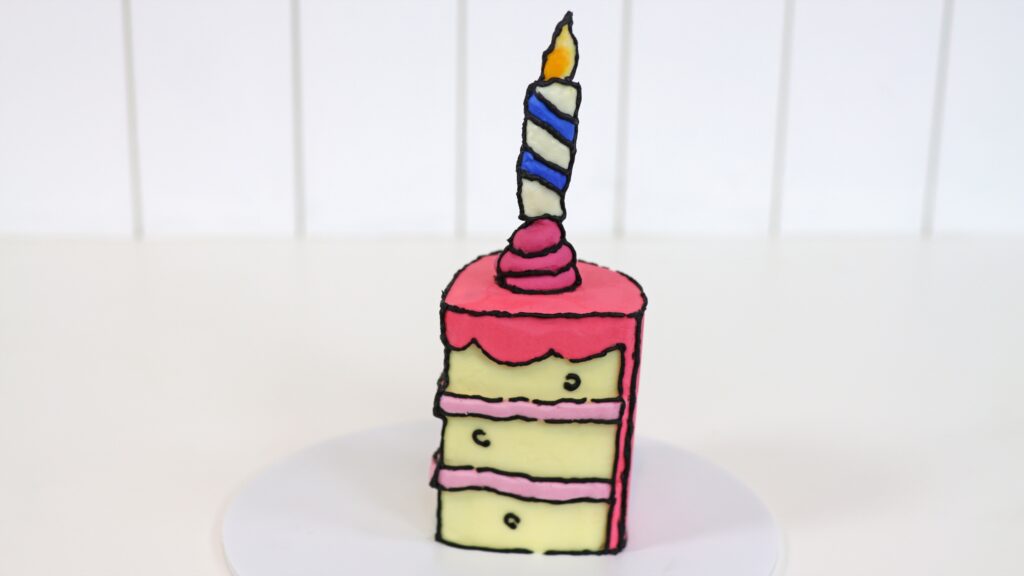
Tadaa! A comic style cake slice made out of buttercream, with no fondant! I love how this cake looks superimposed in a photo. With the black lines it really does look flat, or 2D. When you take photos of your cartoon cake, make sure you position it so the outlines are on the sides.