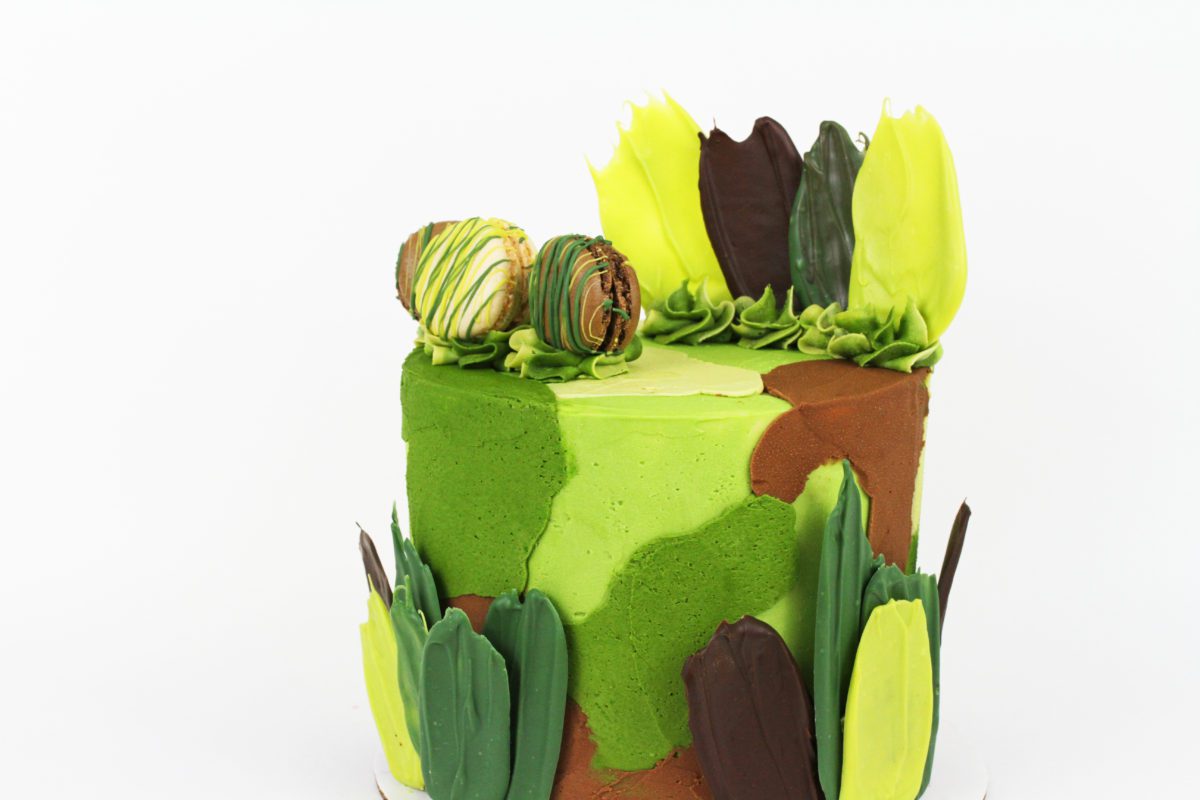
In this tutorial I’m going to show you how to create camouflage buttercream and how to make camouflage cake toppers with chocolate!
To tint buttercream for camouflage, you’ll need more than just green food colouring because that will make only bright shades of green. To create duller shades of green, add a tiny bit or orange or red or brown with a toothpick.

You can see how this changes the color from grass or leaf green to more of an olive or khaki colour.

Frost your cake with any of the colours you’re going to use for the camouflage design, but I recommend choosing one of the lighter colours because if you use a darker colour, you’ll need very thick frosting for the lighter colours to cover up that dark base colour of frosting. I have a detailed tutorial on how to get perfectly smooth buttercream with sharp edges.

You’re going to cover all of this base frosting with patches of different shades of green and brown, so it’s okay if you have a few irregularities in it, but this coat of frosting gives the cake its final shape so you want the sides to be straight and the top edge to be sharp. When you’re happy with the frosting, put the cake in the fridge to chill the frosting so that it hardens for the next step.

Meanwhile, prepare the rest of your colours. To make brown I’m using melted chocolate, which I’ve let cool for a few minutes before mixing it into my buttercream so that it doesn’t melt the buttercream.

The more chocolate you add, the darker the colour, and if you find that the chocolate makes the buttercream too stiff, just add a bit of milk or cream to thin out the consistency. You could of course use brown colouring instead for this.

For my greens, I’m setting aside some of the frosting that I used for my base frosting on the cake, and adding more leaf green and orange gel colours to the rest to make another two shades of darker green.

Put your buttercream colours into piping bags with the ends snipped off so there’s a small hole for the buttercream to come out of. If you only have one piping bag you can do this one colour at a time, emptying and washing and drying the bag between colours.

Once your cake is cold and the frosting is firm, create the first patch of colour on your cake. You’ll need an

After covering the area you want with buttercream, use your

Then use your frosting smoother to scrape over it a few times to smooth it out and also make the frosting thinner so that it doesn’t stick out so much from the frosting on the cake.

If you alternate the direction you scrape, pulling the frosting smoother towards you once and then pushing it away from you the next time, you’ll keep the patch of buttercream closer to the original shape you piped or spread. If you pull the frosting smoother towards you every time, you’ll drag the buttercream closer to you and make the patch wider.

You can pipe or spread several patches at a time and then switch to your frosting smoother to scrape them all, but keep in mind that the longer you leave the piped or spread buttercream sitting on top of the frosting, the colder it will get as it starts to stick to the cold frosting on the cake, and then it won’t spread as easily when you use your frosting smoother.

This means that if you pipe several patches at once, your patches will end up very similar to the original shape you piped or spread.

For example, look at how intentional the patch of colour above is, which I scraped after piping several patches at once, compared to this patch, which I piped and then scraped immediately.

If you scrape too much buttercream off, revealing the frosting underneath, just spread or pipe a bit more on and scrape over it again with your frosting smoother.

You don’t have to stick to the sides of your cake, you can do the top as well. Wipe your frosting smoother off after each time you use it so that you don’t drag buttercream back onto the cake, which will mess up any smoothing you’ve already done.

To make a patch go over the top of the cake and down onto the sides, follow exactly the same technique, starting by spreading or piping on the buttercream.

Scrape off any excess with your

Chill the cake when you finish the first colour and when the frosting has set you can do the next colour. Repeat the process: pipe, spread, and scrape to smooth.

I’m doing my lightest colour next, which is the buttercream leftover from frosting my cake. You could just leave some areas without frosting to leave the base coat exposed, but I want the frosting to be smooth so I’m covering up the base coat with a bit of that colour of frosting so that it’s sitting level with the rest of the patches of frosting on the cake.

Finally, my darkest colour of buttercream. You can imagine that if I’d chosen this colour for the base frosting on the cake, since it’s such a dark colour, when I spread the lightest colour of buttercream over it to make light green patches I’d have to spread it really thickly to cover up this dark colour. That’s why it’s best to use the lightest colour or even which for the base frosting.

You don’t have to do this one colour at a time – you can switch back and forth between colours if you like – but you should space the patches out around the cake so that they don’t touch each other until you’ve chilled the cake to set the patches, because if you make two patches of different colours right next to each other, the buttercream will blend together where it meets as you scrape to smooth one colour, instead of being distinct coloured patches.

When you’ve covered the whole cake with buttercream patches, put it back in the fridge to set the frosting and meanwhile, make some camouflage decorations!

Melt chocolate or candy melts in the microwave at 50% power for a minute at a time so that they don’t burn and seize.

This is parchment paper or you can use wax paper, and I’m spooning the melted chocolate onto the paper and then using the back of the spoon to swipe it upwards to make some chocolate foliage for the cake.

Put them in the fridge to set when you finish, which will take about 30 minutes, or you can leave them at room temperature for about an hour. Since the cake has been chilled in between colours of patches to set the buttercream, these won’t stick onto the frosting on the cake but I’ll show you how to attach them in a minute.

You can use melted chocolate to decorate anything you want to use on top of the cake, like these macarons. I’m shaking my spoonful of melted chocolate back and forth over them to drizzle them with two shades of green.

Candy melts are easy to use because they’re already coloured and they melt easily but if you prefer you can use white chocolate and after melting it, add a drop of gel color.

Use your leftover buttercream to attach your camouflage decorations to the cake. I’m using a piping bag fitted with a 1M star tip and I’ve filled it with all of my leftover buttercream colours to make blended coloured buttercream.

Once your chocolate foliage has set, pipe swirls of buttercream onto the top of the cake.

Immediately after piping, while the buttercream is still soft and sticky, lift the pieces of chocolate foliage up from the paper and push them into the buttercream swirls.

If you chill the cake again when you’ve finished, that will set the buttercream swirls and hold the foliage securely in place.

For the sides of the cake, pipe or spread little dots of buttercream wherever you want the chocolate foliage to go.

Then push the foliage into them to attach them to the side of the cake.

If you want to overlap them, pipe buttercream onto the chocolate and then press another piece firmly against it.

I’m piping some more swirls on top to attach the macarons but you could use lollipops or candy in different shades of green and brown for this, or macarons in those colours instead of drizzling them with green and brown chocolate.

I added some more foliage to the side of the cake to finish it and here’s the finished result!

Here’s the video version of this tutorial: