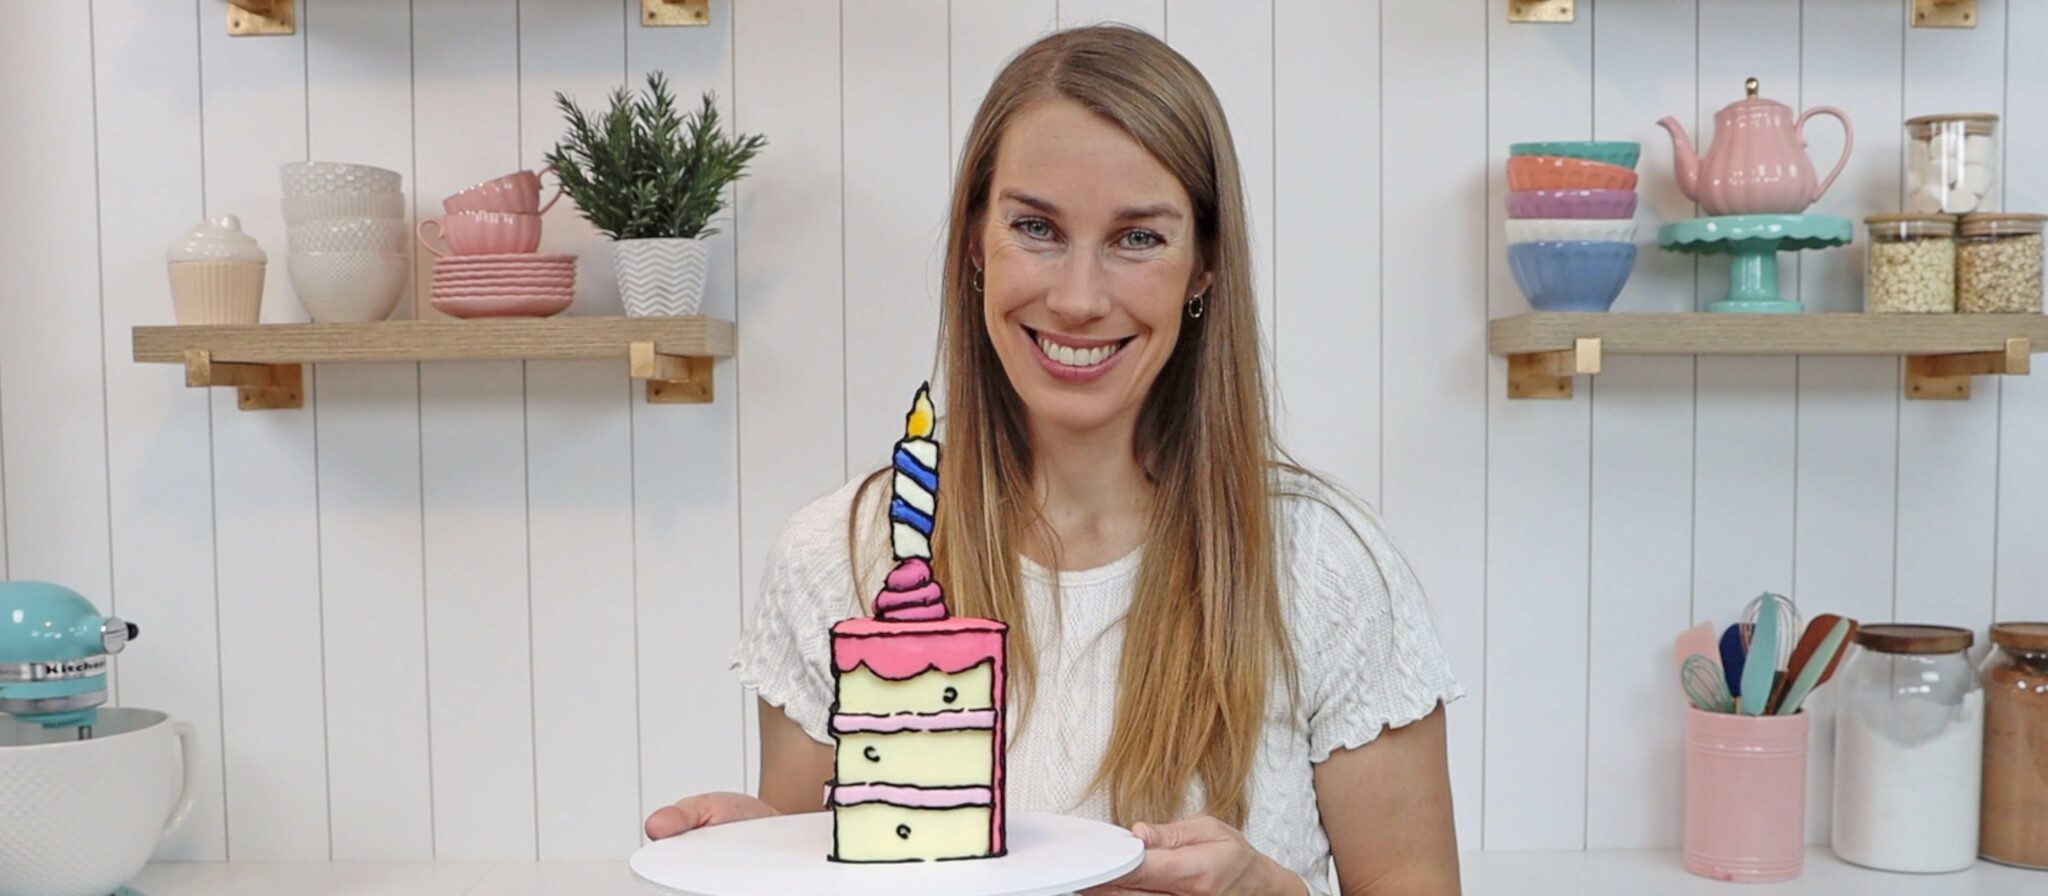
This comic or cartoon cake style is trending and if you don’t like fondant you’ll LOVE this method for a buttercream version!
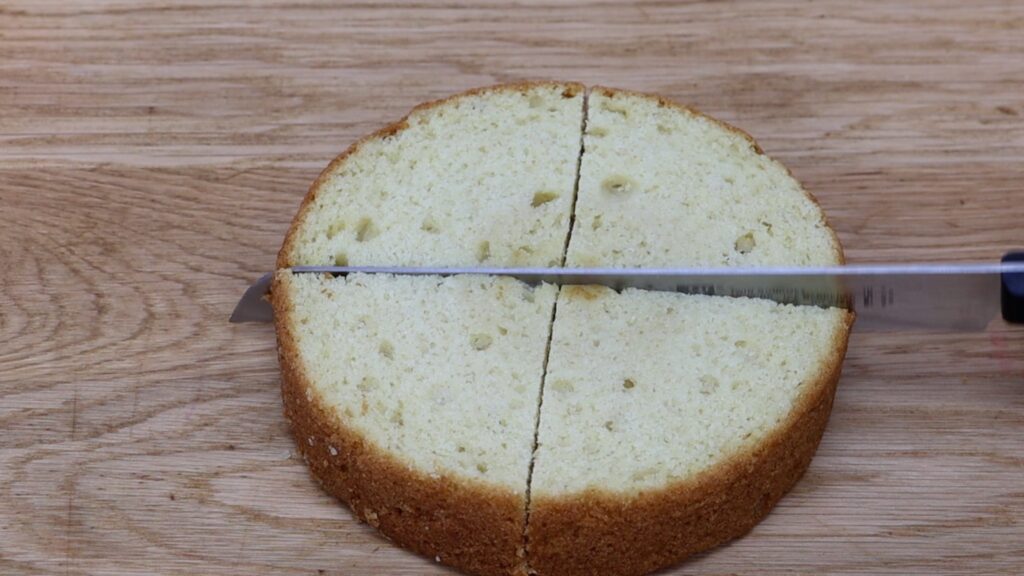
You’ll need one round cake layer of any size, cut into quarters, and buttercream frosting. I'm using my 4 minute buttercream and you’ll see soon why it works so well for this design.
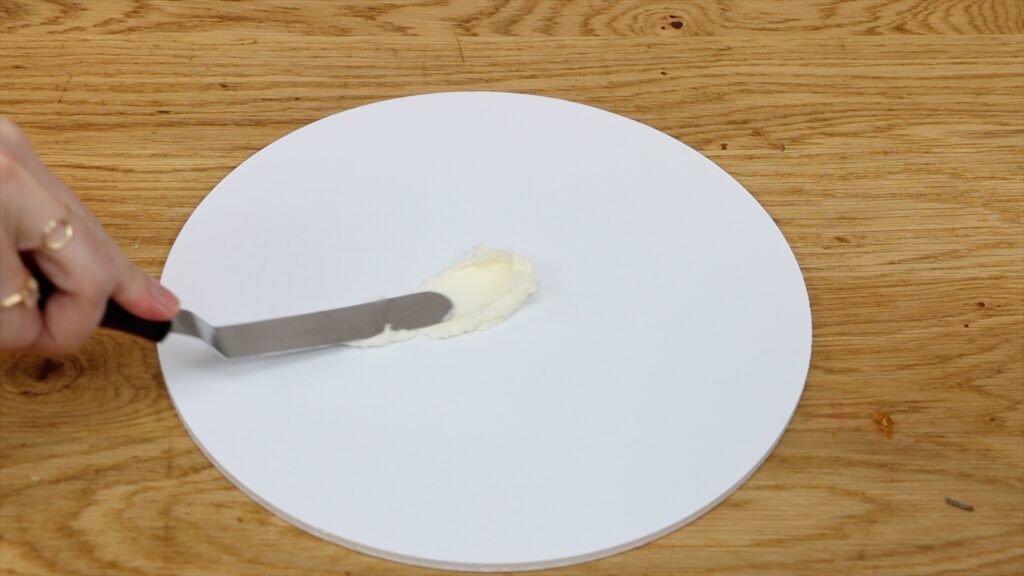
Spread a bit of buttercream onto the middle of a cake board to attach your first quarter of cake.
For the filling I’ve tinted buttercream pale purple but you can use whatever you like. I like to match the filling I’m going to put on the outside of the cake.
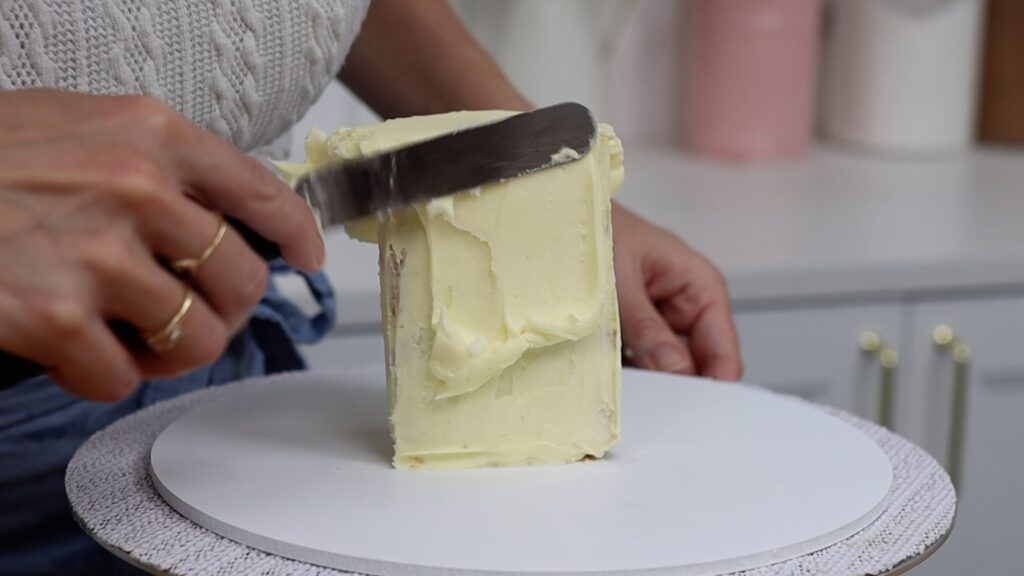
Layer your cake, pushing each layer down to attach it to the filling. I’m only using three layers of cake for this but you might use all four if your cake is wider. This layer was only 6 inches wide so it already looks very tall with just three layers.
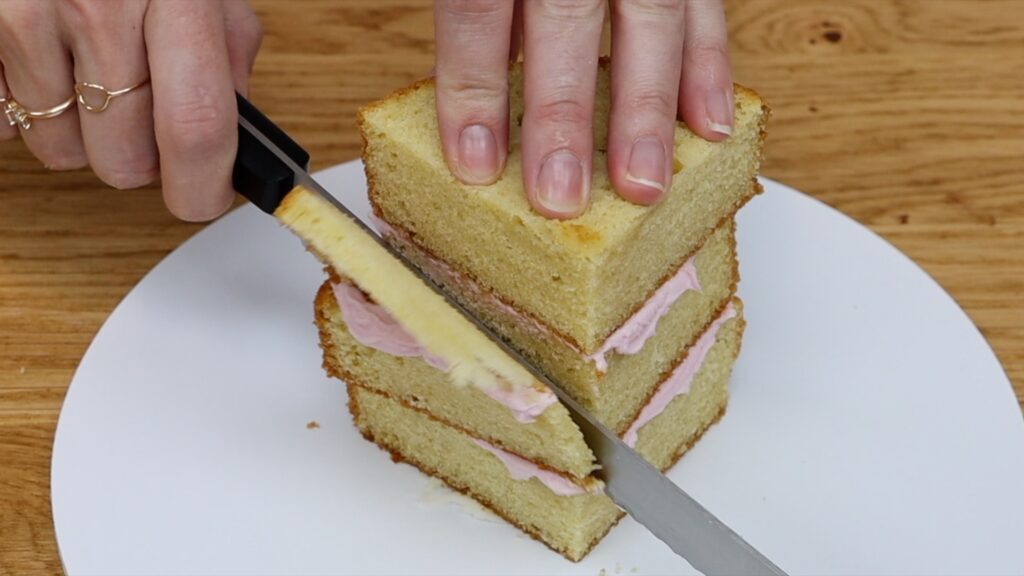
Your layers won’t line up perfectly so trim them with a serrated knife like a bread knife. If you like you can trim the back side of the cake too so it’s straight instead of curved. This means a bit less cake but it does make the slice look a bit more like a cartoon cake.
Now put the cake in the freezer for about 30 minutes so it firms up. This makes it much easier to frost.
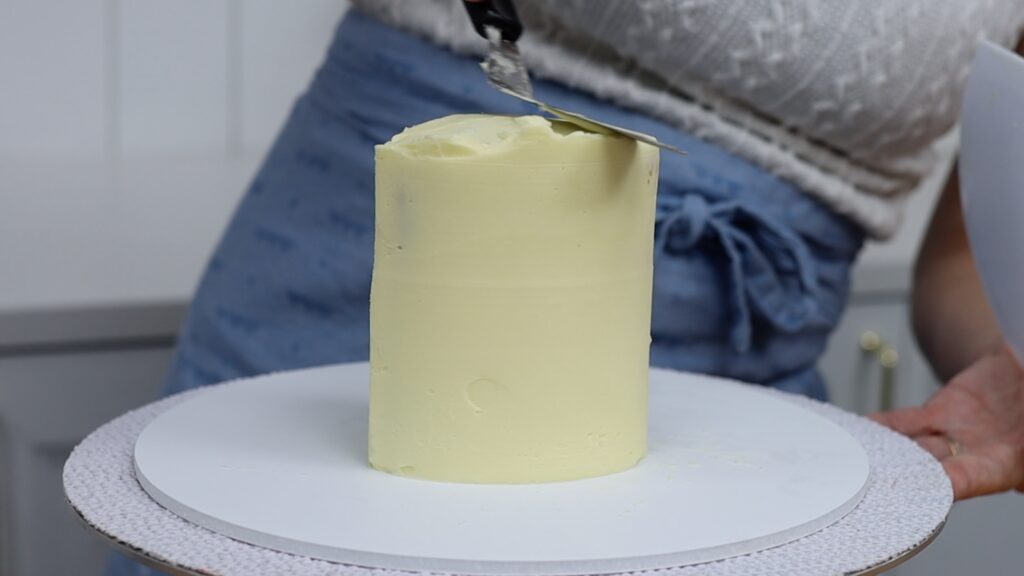
Tint some buttercream pale yellow and cover the cake with a thin layer of frosting. This is called a crumb coat and it traps any crumbs that come off the cake. Smooth the frosting to give the cake a nice shape. Don’t worry about getting it super neat because you're going to cover this up with another layer. This final layer will be visible so take your time to get it nice and smooth.
I think this is the trickiest part of this cake. Getting the sides smooth on a round cake is fairly simple because you just hold your cake comb still as you spin the cake. With edges like on this wedge shaped cake you have to be much more intentional. Scrape from one corner to get that corner sharp but stop before you get to the next corner. This way you won’t pull the frosting off or make the corner rounded. I teach how to get super smooth frosting on round and square cakes in my online course, The Basics of Buttercream, as well as how to make, troubleshoot, flavour, colour and store buttercream and how to use it for lots of unique cake decorating techniques!
Once you’re happy with the sides, tidy up the top edge of the cake. Swipe sideways with your
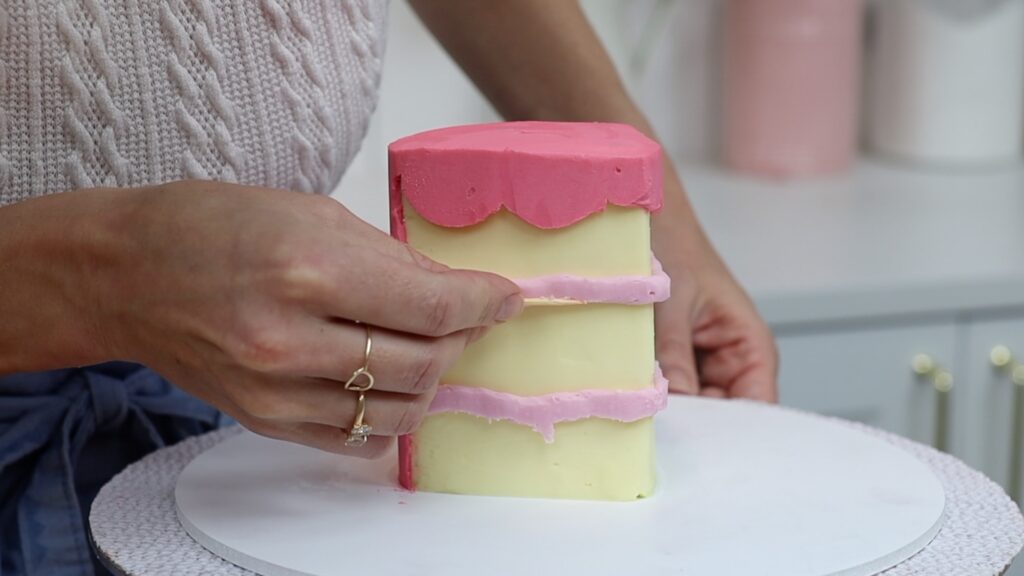
Chill the cake again for about 15 minutes to set the frosting. Then fill a piping bag with the leftover buttercream from the filling of the cake, so it’s the same colour. Use a medium sized round tip like a #12 to pipe two lines along the straight sides of the cake. This will be the "filling".

Hold the tip quite close to the cake as you pipe to make the filling flat rather than rounded. That way it will look more cartoony. You can use a toothpick to flatten any bulges or tidy up any messy parts.
Then use another colour for the frosting on the cake. I’ve added pink to the purple that I used for the filling so that I can re-purpose the leftovers. I have a full tutorial on 9 ways to use leftover frosting that has more ideas to reduce buttercream waste.
Pipe the frosting onto the top of the cake and then smooth it with your
Tidy up the top edge, wiping your
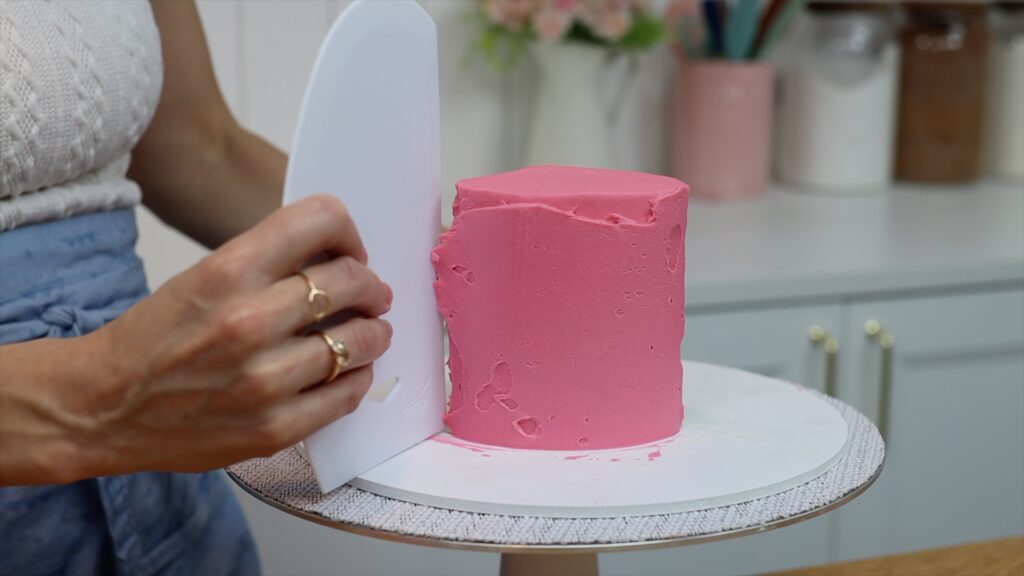
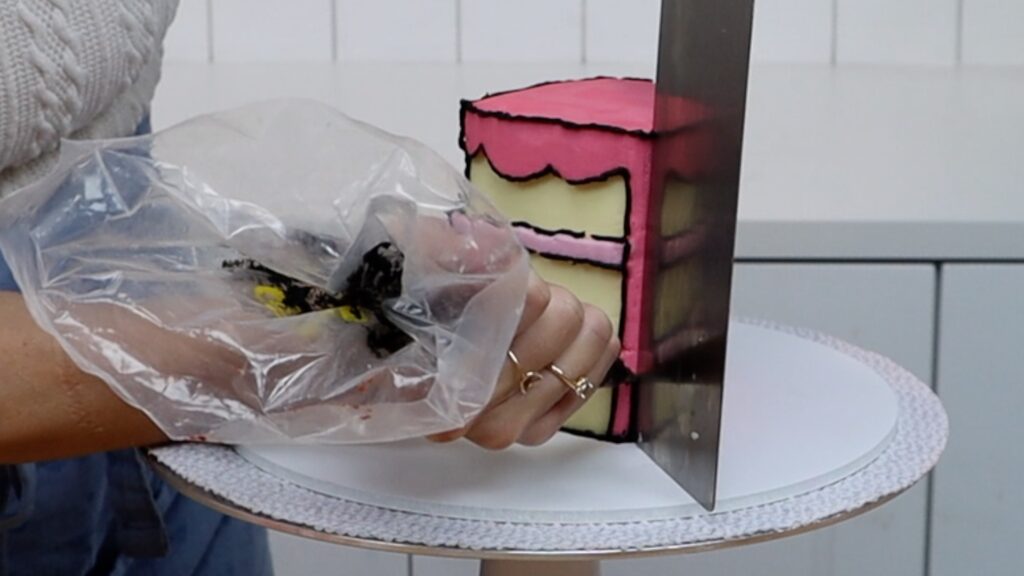
Put the cake back into the freezer for 15 minutes to chill the frosting. Then use a sharp knife to trim off the edges of the frosting to make a straight line down the cake. It’s much easier to do this now, once the frosting has set, because it won’t smudge or stain.

To get the frosting super smooth, run a metal cake comb under hot water and dry it off. Then scrape gently over the frosting and you’ll see the texture disappear, leaving a smooth surface instead. You can do this along the filling too, to make it a bit flatter for this cartoon cake design.

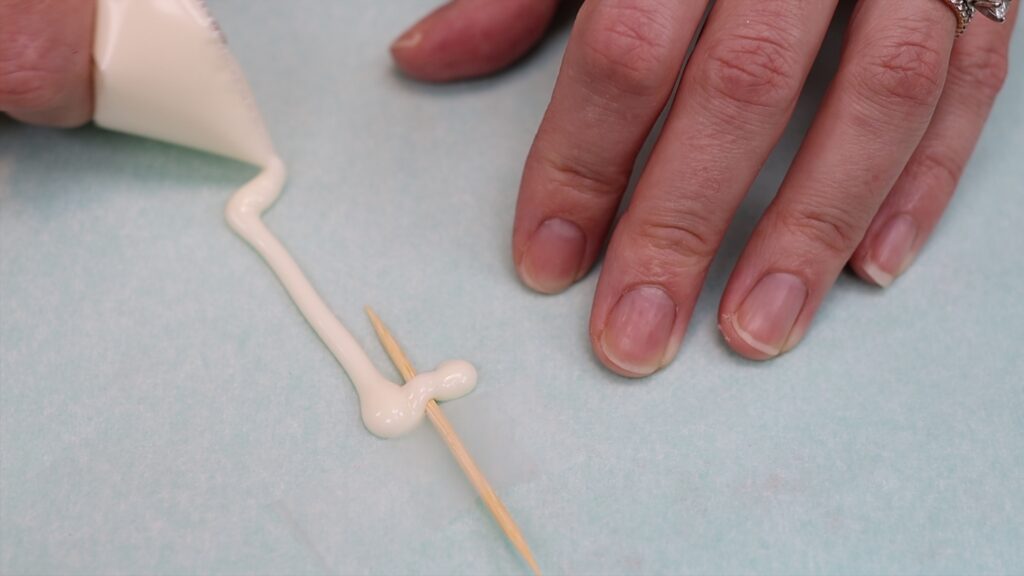
Again, toothpicks are a great way to fix any imperfections!
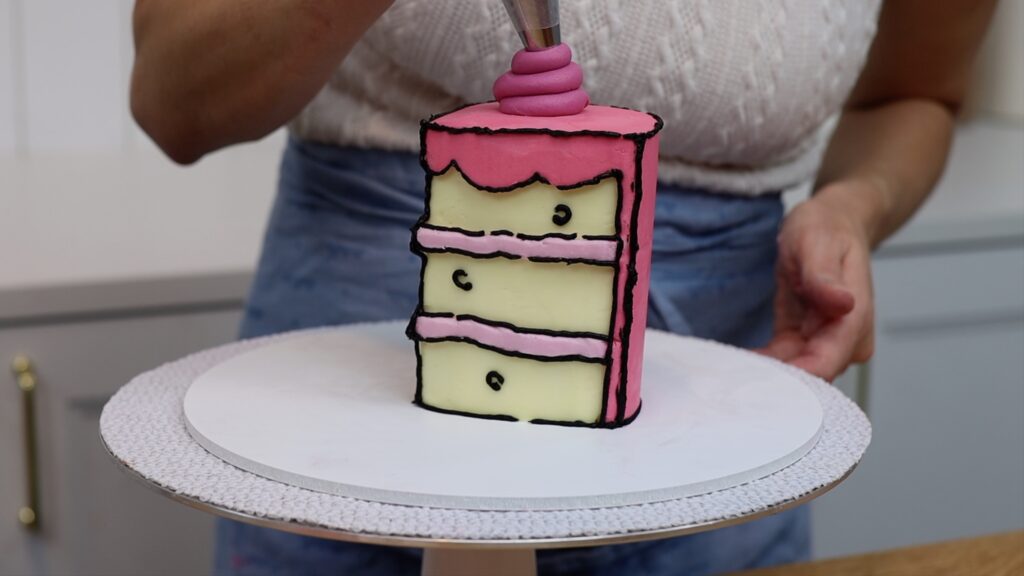
Now for the signature part of this design: the black lines. Check out this tutorial for my tips on how to make black buttercream. Use a piping bag with a small round tip like a #3. Practice a few times on a towel or plate to get used to the consistency of the buttercream so you know how hard you need to squeeze and how fast you need to move the bag as you pipe.
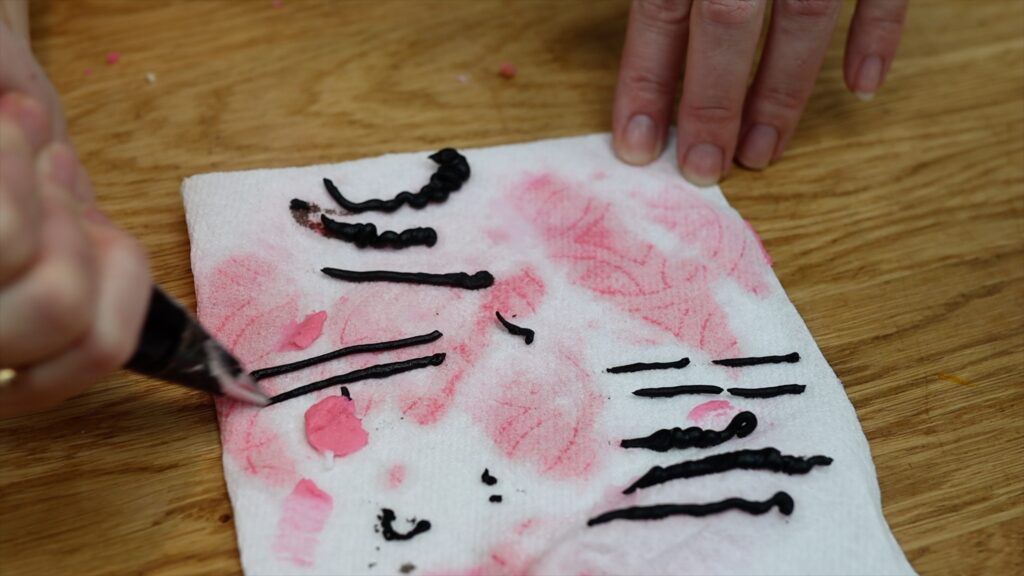
The bottom of the cake is the easiest because you can rest the tip on the cake board to hold it steady. That's a good place to start to get comfortable with piping these black lines. If the buttercream breaks as you pipe that’s perfect! Broken lines are part of this cartoon cake style, which is very convenient because it makes this style very forgiving!
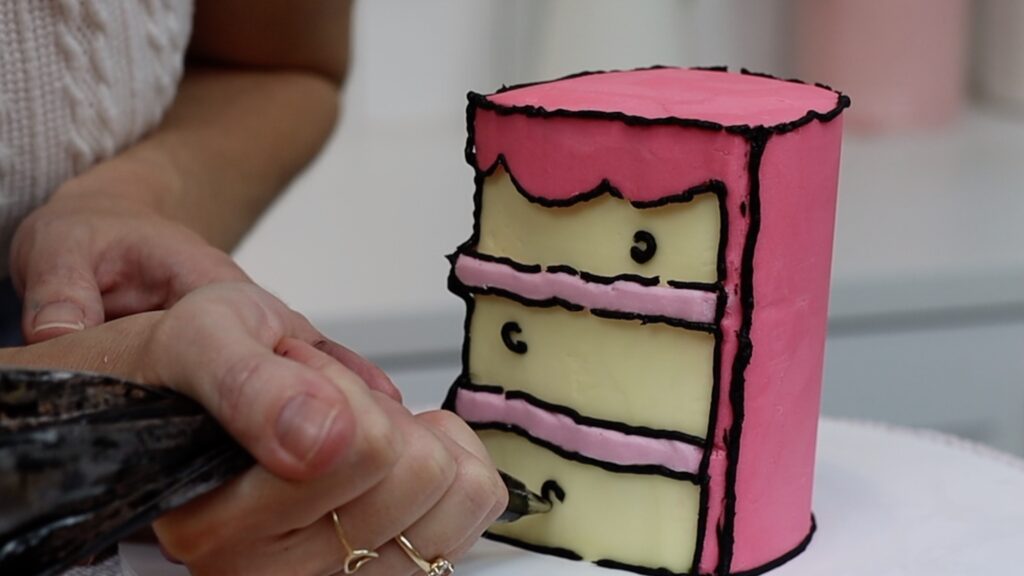
You’re going to outline every section of this cake. That means piping where each colour meets, as well as along any edges. It really helps to chill the cake before piping because the frosting sets so it’s firm. This means you can rest the piping tip on it as you pipe and that will help you hold your hand steady. Your lines will be less wobbly but also, the lines will lie flat against the cake. My hands are SUPER shaky so if I can pipe these lines, you definitely can! Toothpicks will be your best friend, since they’re so useful to tidy up the lines. You can use the edge of an
Piping along the top of the filling is the easiest because you can see what you’re doing. Piping underneath the filling is easier if you raise the cake up so you can see what you’re doing. If the line breaks, remember that that’s perfect for this design!
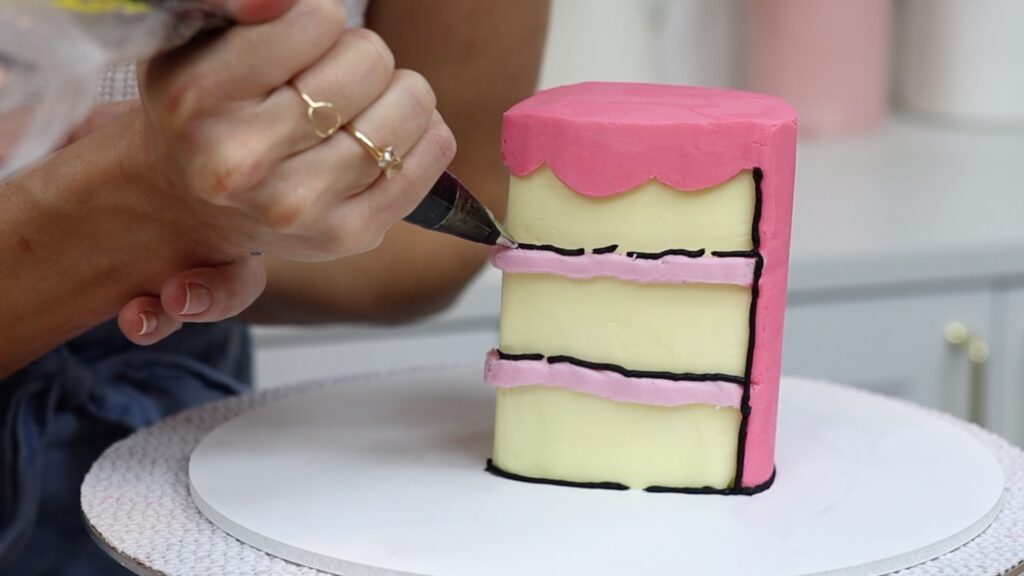
You’ll also need to outline the front edge of the cake, the pointed part of the slice. Pipe over the filling to highlight that it’s bulging out of the cake, cartoon cake style. Also outline the edges of each side of the cake. To make this easier you can use a cake comb to score a line as a guide. You can even hold the cake comb there to pipe along, to help get your line straight.
Tidy up any wiggly parts of you lines with a toothpicks. Toothpicks really are the MVPs of this design!
Pipe a few circles that don’t quite join up. There obviously aren't big holes in cake slices but this is part of the cartoon cake style!
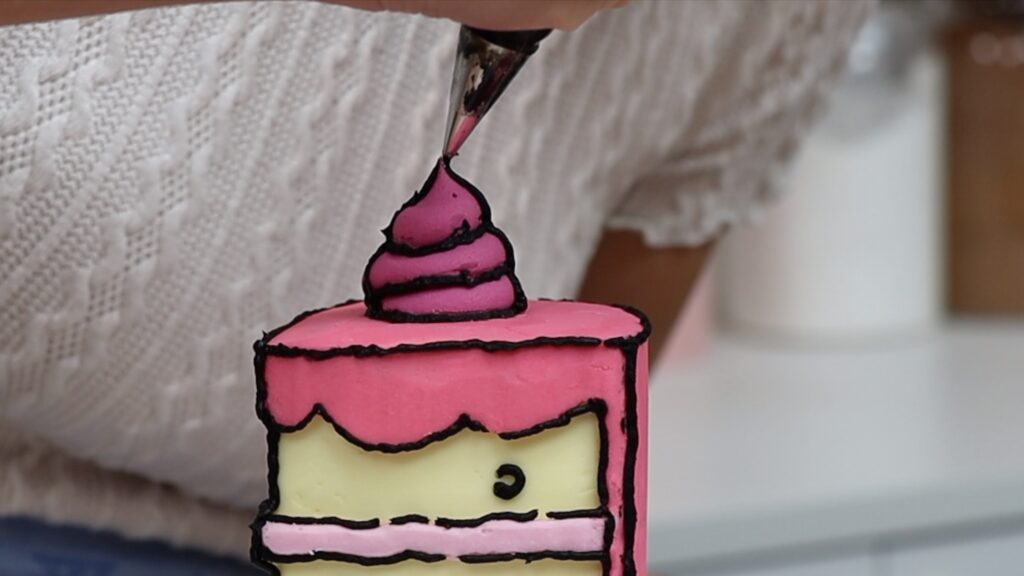
To add some detail to the top of the cake pipe a swirl and make a chocolate candle. It’s easiest to outline a swirl piped with a round tip rather than a star tip.
Put the cake back in the freezer to set the swirl on top and meanwhile, make a candle with chocolate. I’m using white chocolate chips, nothing fancy, and here are my secrets to working with chocolate successfully. First, use a microwave safe bowl so it doesn’t overheat and burn the chocolate. Then, use 70% power and 30 second intervals in the microwave to melt the chocolate slowly. This way it won't seize and become grainy. Stir it until it’s smooth and spoon it into a sandwich bag. Push it down to a corner and cut a tiny piece off that corner to pipe through.
Tape a toothpick onto parchment paper to hold it still and pipe a rectangle over it, to make a candle. The toothpick will let you poke it into the cake so it stands upright. It’s easiest to do this on a cutting board or tray so you can move it into the freezer. It’ll take less than 5 minutes to set in the freezer.
Meanwhile, melt some more chocolate chips and tint the chocolate using oil based colours, which won’t make the chocolate seize. Spoon this coloured chocolate into another sandwich bag and cut a tiny piece off a corner so you can pipe with precision.
When the candle has set, pipe diagonal lines along it. Flip the candle over and pipe the same diagonals on the other side. The side of the candle lying face down on the parchment will set flat because it’s pressed against the parchment. Just don’t try to move it before it sets!

put the first sandwich bag back in the microwave for 10 seconds to re-melt it. Then pipe over the white chocolate on this side of the candle, to cover up the toothpick that’s showing. And tidy it up with - you guessed it - another toothpick!
You’ll need a tiny bit of chocolate for the flame on the candle. I used the leftover white chocolate in the sandwich bag, squeezing it into a bowl. I don’t have yellow oil based gel so I used regular gels for buttercream, which really don’t work well with chocolate. If you use regular gels, you can only stir the chocolate only or twice before it seizes. Stir the chocolate as little as possible and then spoon it onto the top of the candle. Then shape it into a flame using a toothpick.
The candle will set in about ten minutes at room temperature or five in the freezer. Meanwhile, outline the swirl on top of the cake, which will have chilled and set by now. It’s much easier to outline this than a swirl piped with a star shaped tip, which has lots of texture and lines. Choose which will be the front of your cake and draw lines along the left and right sides of the swirl, from the point of view of someone looking at the front of the cake.
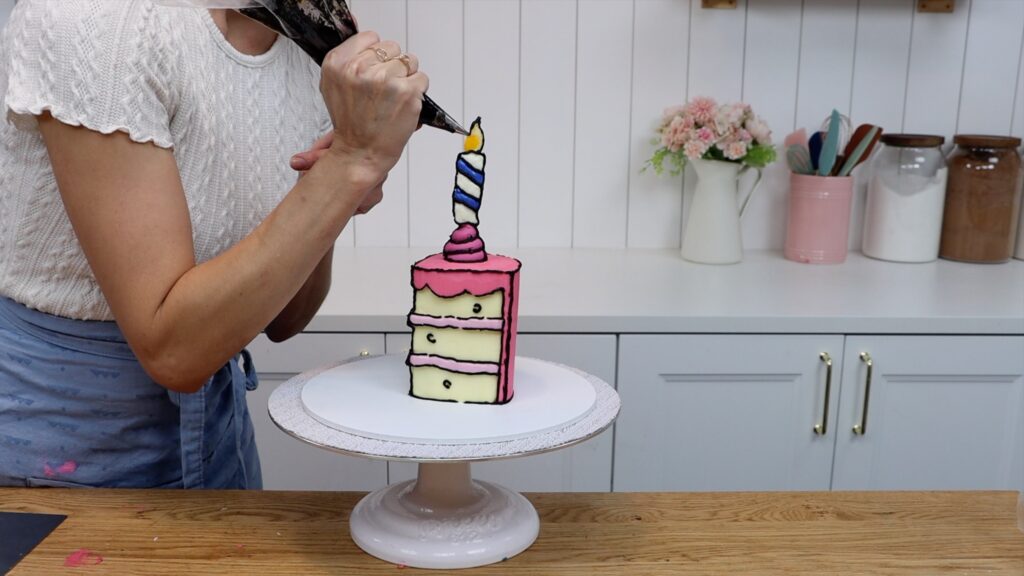
You can put your candle anywhere on the cake - I’m putting mine on top of the swirl. It’s easiest to poke another toothpick into the cake first, to forge a pathway. Then once the candle has set, push it into that pathway. This way you’re not putting any pressure on the candle, which might snap it.
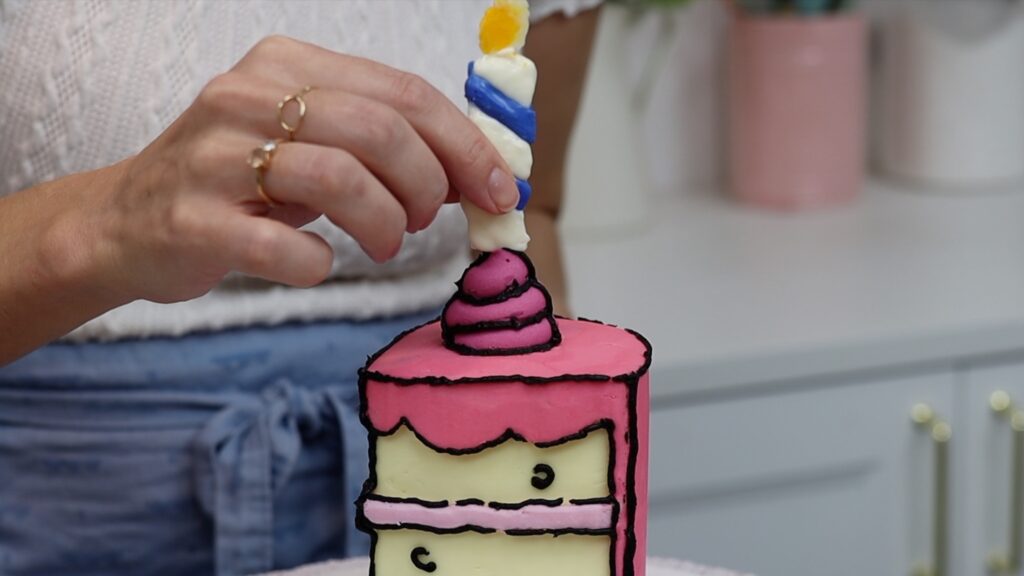
Use your black buttercream to outline the candle. I considered using black chocolate but this way, the black lines on the whole cake are consistent. I outlined the back of the candle too. This is probably obvious but choose the neatest side of the candle to face whichever side will be the front.
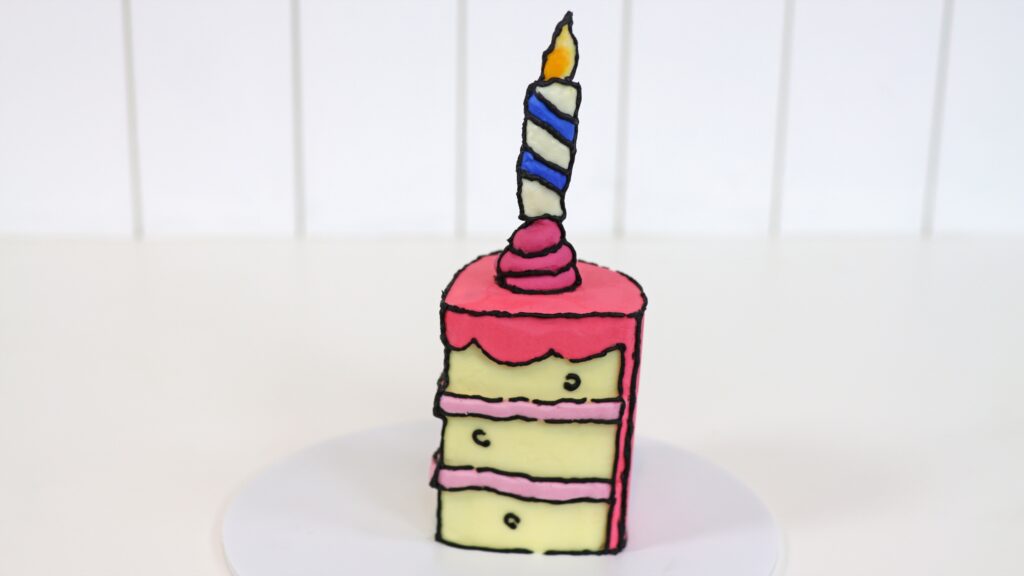
Tadaa! A comic style cake slice made out of buttercream, with no fondant! I love how this cake looks superimposed in a photo. With the black lines it really does look flat, or 2D. When you take photos of your cartoon cake, make sure you position it so the outlines are on the sides.
You can watch a video of this tutorial on comic cartoon cakes below!


Thanks for your excellent guide. It has been very helpful.
I'm so glad!
Hi wanting to do this cake
For daughters party. Can you please tell me how many people this cake serves? Have 10 children total to feed.
Thanks
With half a tall 6” cake like this you’ll be able to feed 10 children. I hope they love it!
Absolutely love this tutorial—thank you! Could I please have the recipe for the comic cake? Also, is it okay to use spreadable (Stork) for the Cakes and frosting?thanks