In this tutorial I’ll show you how to make jet black frosting and how to add colourful galactic details, sparkling constellations, and a gravity defying cake topper! If you prefer to watch a video of this tutorial, scroll to the bottom of the page.
Start by making black frosting. I like to start with a dark brown buttercream made with melted chocolate a cocoa powder so that you need a minimal amount of black gel colour. Click here for my recipe for black buttercream that won’t stain your teeth. It is possible to make plain vanilla buttercream black, like my 4 Minute Buttercream, and that’s what I’m using for this cake.

The colour will develop as it sits so after mixing it in, cover the bowl with a lid or with cling film or Saran Wrap and after an hour it will be several shades darker. You can add even more colour if you want, and then cover it again and wait another hour.

Frost your cake as normal with the black buttercream and scrape around the cake a few times with a frosting smoother until it’s fairly smooth, but don’t worry about getting it perfect yet.

Now spread on a few dabs of brightly coloured buttercream, like pink and teal and purple and blue. I made these bright colours using gel colours because they’re very concentrated so you only need a few drops to get really bright and bold colours.

Scrape around the cake once to start to blend the colours. Then touch up any indents in the frosting by spreading on more frosting, either the bright colours or black, depending on how subtle you want the bright colours to be.

Scrape around the cake again and the purpose of this is twofold: to blend the bright colours into the black and also to finish smoothing the frosting.

After each scrape, touch up any indents. If you do the touch-ups with black you’ll dull the colours or if you choose to add more of the bright colours you’ll make the bright galactic patches more intense.

Work as quickly as you can because as the frosting starts to set, which will happen within about 10 minutes if your cake layers are chilled, any coloured frosting you add won’t blend as well with the black frosting so the patches of colour will be more obvious.

When you’re happy with the sides of the cake, tidy up the top edge by scraping any overhanging frosting into the middle of the cake and then swipe it off the cake on your

Now it’s time to add some constellations! I’m using silver luster dust for this, mixing it with a few drops of vodka. Any other clear alcohol will work or a clear extract like lemon extract or artificial vanilla extract. Mix it to make a thick paint.

Then flick your paintbrush towards the cake, stopping it just before the cake to let the silver paint spray out over the cake. I like to tap the paintbrush against a finger to stop it suddenly and create the spray. If you don’t use that extra finger, the motion you’re using is a quick flick, how you would cast a spell with a magic wand! You can use white icing color for this instead of silver paint. Remember to do this on the top of the cake as well.

Wipe any smudges of frosting or silver paint off the cake board using a paper towel wrapped around your finger.

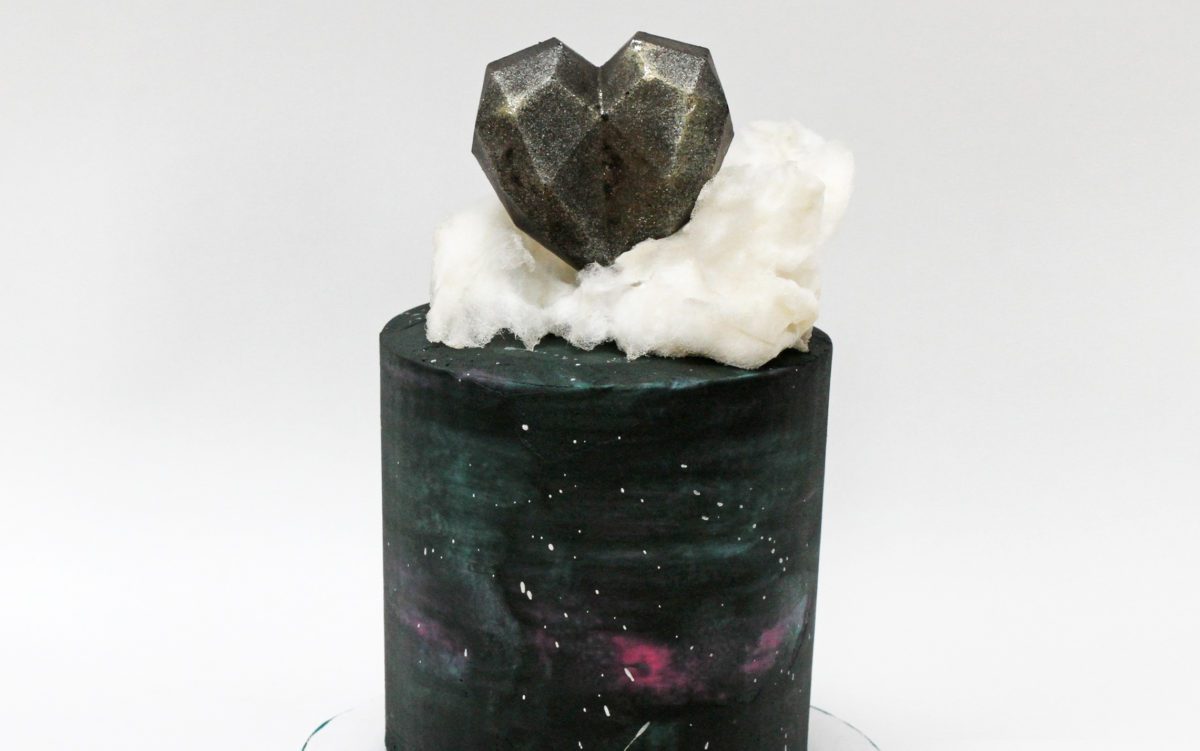
I show how to make this gorgeous black heart topper out of chocolate in my tutorial on geometric hearts. Poke a toothpick or a wooden skewer into the bottom of the heart for support.

Before adding the heart topper to the cake, pull apart come candy floss or cotton candy to make it nice and fluffy and cloud-like and then place that on top of the cake.

Push the heart on its stick into the middle of the cotton candy to skewer that in place and to conceal the stick so that it looks like the cotton candy and the heart are floating above the galaxy cake. Rearrange it by pinching it and pulling it apart to make it fluffier.

And there it is! A stunning galaxy cake with a gravity defying cake topper! For cake inspiration and to learn all sorts of techniques and designs, join my Club for access to ALL of my online classes from just $5 a month!

Here’s the video version of this tutorial:


