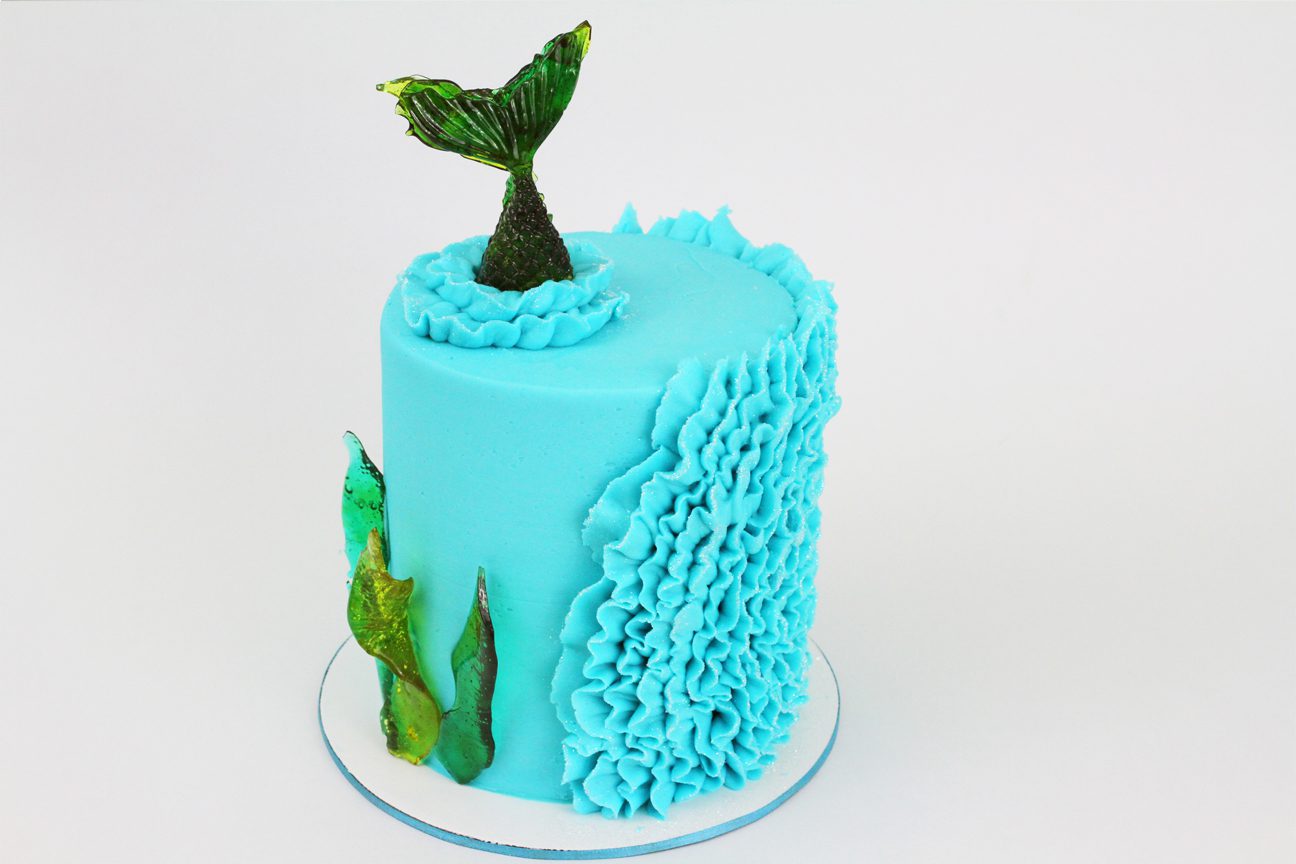
In this tutorial I’m going to show you how to decorate a cake with these gorgeous wavy buttercream ruffles and very easy mermaid tail and seaweed made with sugar! If you prefer to watch a video of this tutorial, scroll to the bottom of the page.
Start by preparing the sugar decorations. You can use any hard candy or boiled sweets for these – I’m using green and blue Jolly Ranchers.

Put them in bowls and microwave them for 30 seconds at a time until they become a liquid that moves around like maple syrup would when you tilt the bowls. These aren’t cooked enough yet – they’re not completely solid but they’re moving very slowly, more like a thick honey than maple syrup, so when I push the green sugar into my mold with a spatula, it sticks to my spatula instead of pouring easily into the mold.

After microwaving them for another 30 seconds the consistency is perfect!

The melted sugar pours easily into the mold, spreading to fill it. This is a silicone mold so its fine to use a liquid this hot, and sugar gets VERY hot when you melt it so be careful not to touch it.

Leave it to set and harden for about 30 minutes and then carefully push it out of the mold. Because the middle of the tail is so thin and narrow, it’s easy to snap it as you push it out and if that happens you can just put the whole thing – the mold with the sugar inside – back into the microwave to melt the sugar again and then leave it to set and try again to take it out.

If you do this too soon, before the sugar has set, the sugar will stick to the mold so you’ll know if needs more time. 15 minutes later and the tail has set so some out of the mold easily. If there are any pieces of sugar around the tail shape you can snap them off now.

Now repeat the process, heating up the rest of the coloured sugar in the microwave and pouring it into the mold, and I like to use two colours for this but you don’t have to. You can try to tidy up the edges now with a knife but sugar I really sticky so it’s a bit tricky, so it’s easier to snap these extra bits off later, when the sugar has set.

Now immediately push the other tail gently onto the top of this one, so that it sticks to the melted sugar and they’ll merge together as the melted half sets.

Leave it for about 30 minutes and then push it out of the mold, pulling back the silicon and using your fingers to push from behind to gently push out the tail.

Now for some seaweed! Use some more candy, melting it the same way and then pouring it in strips onto a piece of parchment paper, or you could use a silicon baking mat. I’m using green and blue again, and after reheating the blue a few times it becomes this dark emerald green colour which is perfect for seaweed.

Leave them to set for a few minutes and as soon as they’re cool enough to touch and hard enough to be able to lift up from the paper, peel them off and gently twist the two ends between your hands.

This light green one is the perfect temperature for this, just set but still flexible enough to be able to twist easily, but the darker ones have sat here for a bit too long so I can’t twist them much.

Now you’ll need your cake, which should be covered in smooth frosting. Use a piping bag fitted with a petal tip and hold it with the narrow end of the tip to point outwards, with the wide end pressed against the cake. Squeeze the buttercream out and lift the bag slowly, keeping the wide end of the tip pressed gently against the side of the cake and wiggling your hand to create wavy ruffles going up the cake.

I’m overlapping each ruffle by about half so that you can’t see any of the frosted cake in between them. The more slowly you move your piping bag up the side of the cake as you squeeze the buttercream out, the more your ruffles will wiggle and become wavy, and you can exaggerate this to give the ruffles even more movement by wiggling your hand slightly as well.

You can do this immediately after frosting your cake, you just have to be very careful that you don’t knock the frosting with the piping tip because you’ll damage it. I like to let the frosting set before piping ruffles because then I can’t damage it and also because it get firmer so it holds its shape, so the weight of the ruffles won’t drag the frosting down which can make your edges around the top of the cake less sharp.

You can use any petal shaped tip for this and with the Wilton petal tips, the higher the number, the longer the petal so the wider your ruffles will be. This is a 104 which I love for this little 4” cake but for an 8 or 10” cake I would use a #125 so that the ruffles would be wider and I think in better proportion to the size of the cake, and I wouldn’t need to pipe as many to cover the surface of the cake.

Now make a little splash for the mermaid tail to stick out of, using the same piping tip with the narrow end facing outwards as you spin the cake on the

Straight away, before the buttercream sets, push the tail into the middle, pushing down until you feel the resistance of the cake so you know the tail is wedged firmly into the frosting.

To add the seaweed, just choose where you want it to go and press it into the side of the cake. If your frosting has set you’ll have to use a bit more pressure to attach the seaweed, than if you’ve just frosted your cake, but if you have only just frosted the cake and the frosting is still soft and sticky, you’re more likely to create a bulge in the frosting when you push the seaweed in, so I like to let the frosting set before doing this.

Now refrigerate the cake to chill the ruffles so that they set and hold their shape before adding some sparkle. I’m using disco dust on a paintbrush for this.

Gently dab the edges of the ruffles and because they’ve been chilled you can brush along them without damaging them. If they start to soften as the buttercream warms up you can put the cake back in the fridge for 15 minutes to chill it again.

I recommend refrigerating the cake until 2-4 hours before serving it, so that the ruffles hold their shape perfectly without dropping and after a few hours at room temperature the cake and frosting will have warmed up and will soft and delicious!

Here’s the video version of this tutorial: