
In this cake decorating tutorial I share 10 hacks for decorating cakes like a pro, used by professional cake decorators to make cakes look and taste amazing! I opened and ran my own cake shop and have managed several others and these are tricks I’ve picked up along the way. I hope you find them useful!
Hack #1: Bake even layers
This first hack is a bit mathematical, but none of the rest are. When you’ve made your cake batter, prepare even cake layers by weighing your batter as you divide it between pans. Place each pan on your scale, reset the weight to zero, and then weigh the batter as you spoon it into the pan.
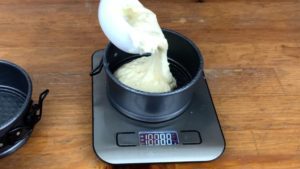
My recipes include the total batter weight, which you can divide by the number of pans you’re using, or if your recipe doesn’t include a weight you can weigh the mixing bowl before you start and then subtract that number from the weight of the bowl with the batter, to get the weight of just the batter, and divide that by the number of pans you’re using. Here, I’m making 6 layers of 80 grams each, so I keep spooning batter into the pans until I reach that weight, or take out a bit if I go over that weight. A few grams on each side of your target weight is fine. Then spread your batter flat in the pans, tap them a few times on the counter to get rid of air bubbles, and bake them. You’ll probably need to level your layers after baking, and optionally divide them, and I cover those techniques in my online course on The Basics Of Cake.
Hack #2: Keep cakes moist
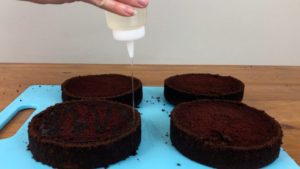
After baking your layers but before assembling your cake, you can drizzle them with simple syrup to keep them moist. Simple syrup is ridiculously easy to make… just put equal amounts of water and sugar into a saucepan – I usually do 1 cup of each – and turn the heat to medium and stir occasionally until all of the sugar has dissolved, which will happen by the time the mixture starts bubbling.
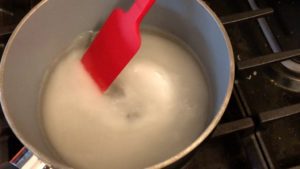
Let it cool and then drizzle your cake layers, going right up to the edges because that’s where they’re most likely to dry out.
Hack #3: Fill piping bags neatly and without “squirting”
If you pipe buttercream onto your cake, either as a filling or for the frosting on the outside of the cake, you’ll need to put your buttercream into a piping bag. An easy way to do this that avoids mess is to fold the top of your piping bag over a glass and then spoon the buttercream into the bag, pushing it all the way down to the bottom.
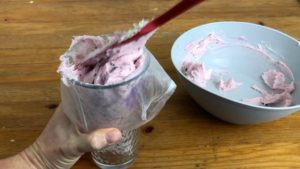
Then you can unfold the piping bag and you’ll have space to twist the bag, to stop the buttercream oozing out of the top of the bag and making a mess on the bag and your hands. If you need to refill the bag, you’ll get air pockets between the old buttercream at the bottom of the bag and the new buttercream at the top of the bag, so before you start piping, squeeze the bag into a bowl, pushing the old buttercream out and wait for the squirt of air, which will spray out some buttercream with it, before you use the piping bag again.
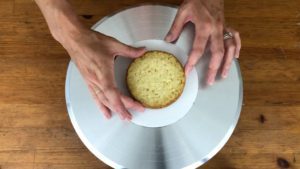
Hack #4: Stop cakes sliding on their cake boards
When you assemble your cake on a cake board, start by spreading or piping a dollop of buttercream onto the middle of the cake board to secure the first layer of cake, pressing the cake firmly down so it sticks onto the buttercream.
This will prevent the cake from sliding around while you assemble it, but before you frost it you should chill the cake in the fridge for 30 minutes or in the freezer for 15 minutes, which will chill and set the buttercream dollop on the cake board, causing it to stick more securely to that first layer of cake so it doesn’t move when you spread frosting onto the outside of the cake.
Hack #5: Prevent bulges in the sides of your frosting
If your fillings are more liquid than buttercream, like fruit sauces or dulce de leche, you should use a buttercream dam on each layer of cake to contain the filling. This is just a ring of buttercream piped around the outer edge of the cake, and then you can spoon the filling into the middle and spread it right up to the dam.
The filling shouldn’t go any higher than the dam. Place your next layer on top and push down to make sure that the filling doesn’t ooze out. This will prevent a bulge in the frosting on the side of your cake, where filling oozes out under the weight of the cake and fillings and frosting on top of it.
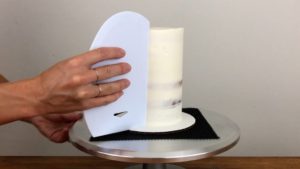
Hack #6: Keep cakes steady on the
Before placing your cake board onto a
You can see that even though this cake is really tall, with a non-clip mat underneath the cake board and a dollop of buttercream securing the bottom layer of cake to the cake board, it isn’t wobbling around as I frost it.

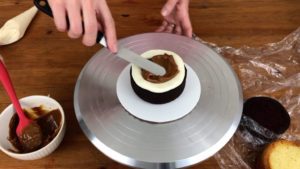
Hack #7: Prevent crumbs in your frosting
This frosting is called a crumb coat and it’s a thin layer of frosting that completely covers the cake, from the very tp of the sides all the way down to the cake board at the bottom, and the top surface of the cake as well.
Its purpose is exactly what the name suggests – a crumb coat is a coat of frosting to trap any crumbs that come off the cake. It doesn’t need to be pretty – it’s fine if you can see the cake layers through it and it will probably have visible crumbs in it, but you’re going to let it set before applying the final coat of frosting, which will sit on top of this, and the crumb coat will act as a barrier between the cake and the final coat so that crumbs can’t get into the final coat of frosting. Click here for my tutorial on how to get perfectly smooth frosting with sharp edges.
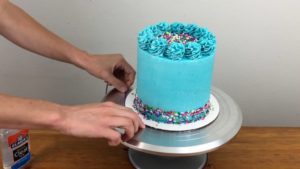
Hack #8: Create neat, even borders
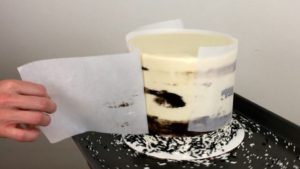
A quick, easy, and therefore popular way to add a border to the bottom of a cake is to use sprinkles. Place your cake on a tray for this, to catch any falling sprinkles so they don’t go all over your kitchen, and you’ll need parchment paper for this hack. Fold a piece of parchment paper in half and cut along the seam to make 2 strips of parchment paper and tape them together to make one long strip. Wrap the strip around a chilled cake, covering up the top section of cake but leaving the bottom exposed where you want the sprinkles to go. It’s fine if the parchment strip doesn’t go all the way up to the top of the cake – just a few inches above the exposed area where you’re going to press the sprinkles is fine. The cake needs to be chilled so that the frosting sets and gets cold and hard, so it holds its shape and doesn’t get damaged by the parchment paper wrapped around it.
Now just press your sprinkles into the exposed frosting below the parchment strip, using an
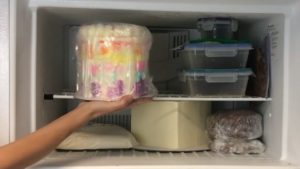
Hack #9: Decorate cakes a month in advance!
After you frost and decorate your cake, you can refrigerate it until the next day or if you want to store it for longer, you can freeze it, fully decorated! To do this, place your cake in the freezer for 30 minutes to an hour to set the frosting and decorations, so that they get hard and hold their shape for the next step. Then take the cake out and wrap the whole thing – the cake and the cake board and any decorations on top – in cling film or Saran Wrap. You’ll need at least 2 layers to completely cover the cake and the point of this is to prevent any condensation in the freezer getting to the cake, because any droplets of condensation will stick to the outside of the cake and can damage the decorations.
Then put the wrapped cake back in the freezer for up to a month, moving it to the fridge 24 hours before serving to defrost gradually. Unwrap the cake as soon as you take it out of the fridge, while the frosting is still cold and hard and won’t get damaged while unwrapping it.
Hack #10: Beautify cardboard cake boards
A quick hack to make even these cheap cardboard cake boards look pretty is to wrap them in fabric ribbon. Squeeze clear craft glue all around the edge of the cake board, and the easiest way to do this is to hold your hand still with the tip of the glue bottle against the side of the cake board and then spin the
Fabric ribbon works best for this because it’s flexible and sticks easily and it also looks pretty, especially if you choose a colour that matches or complements the colours of the frosting or decorations on the cake. Make sure the width the ribbon is the same as the height of the cake board, so that it completely covers the cardboard edging but doesn’t stick up above the top of the cake board. When you get to the end, cut the ribbon so that it will overlap the beginning of the ribbon by a little bit, maybe half a centimeter, and then squeeze a dot of glue onto the beginning of the ribbon and press the end against it. Don’t move the cake from the surface you did this on for about half an hour, until the glue has dried and the ribbon has stuck to the cake board, so if the cake is on a
If you prefer to watch the video of this tutorial you can do that here:


Fondant icing recipes
I'm so happy you like it!
Hi, I love your tall, round cakes you showed how to frost in your video "Ten Frosting Techniques. What size pans do you use and how many pans do you need for a tall cake like those? Also, what is the depth of the pan? It looks like the depth is more than the usual 2".
Thank you so much! You are so creative. I love it!
Lori
Hi Lori! I used 6" pans for the cakes in my free course on 10 Frosting Techniques and you're right, they're quite tall - 3" tall. I bake 2 tall layers and cut them in half horizontally to make 4 layers in total. My recipes measurements and batter weights are listed like this on the website