I’m going to show you 7 Mother's Day cake ideas and how to decorate each one. They're pretty, delicious, and fun to make!
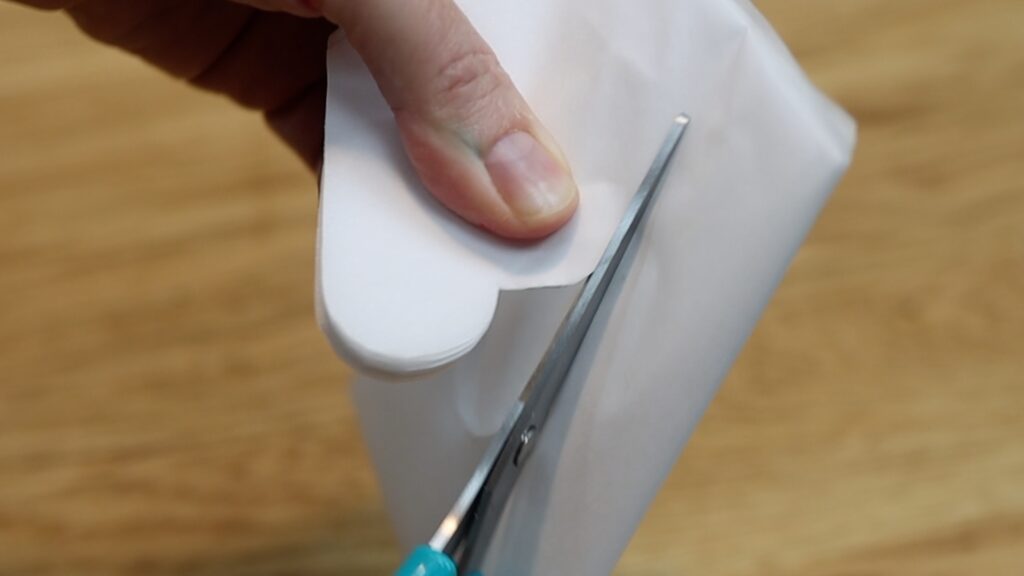
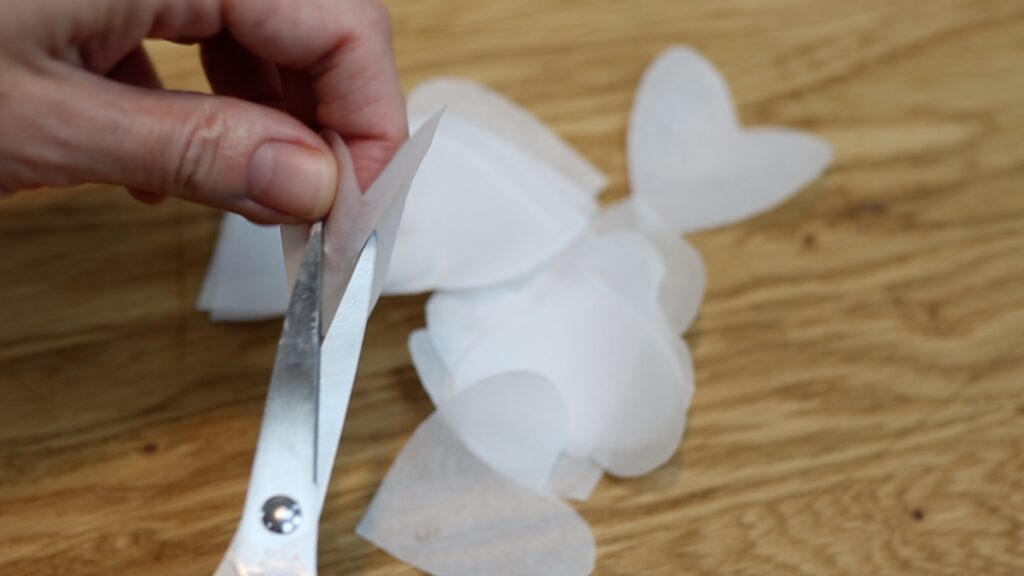
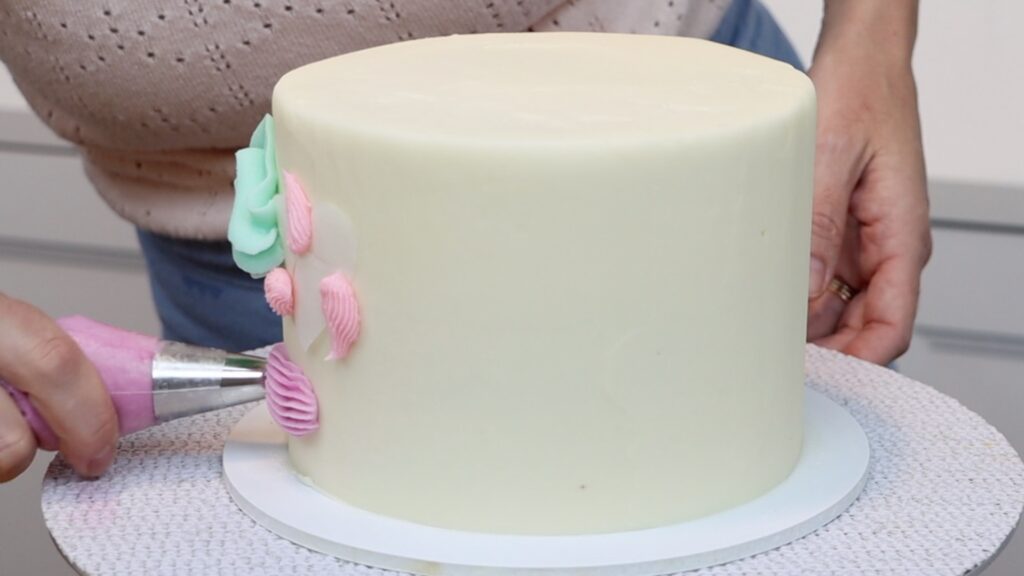
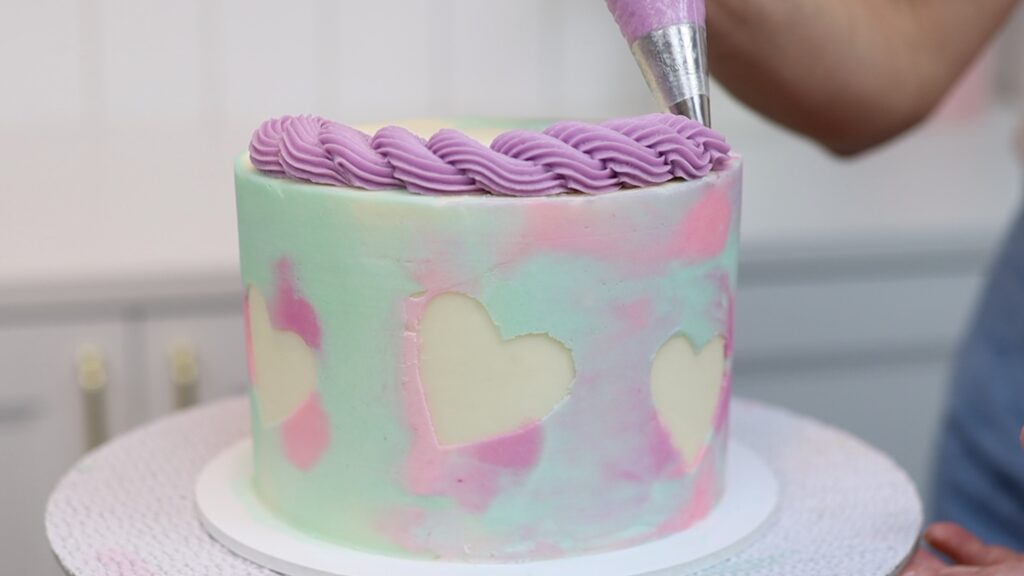
Let’s start with a watercolour cake with a peekaboo effect, which is one of my favourites. To make several identical shapes, fold a piece of parchment paper or baking paper in half a few times. Then cut out a heart or any other shape. Snip the middle of each heart to make it easier to peel these off the cake later.
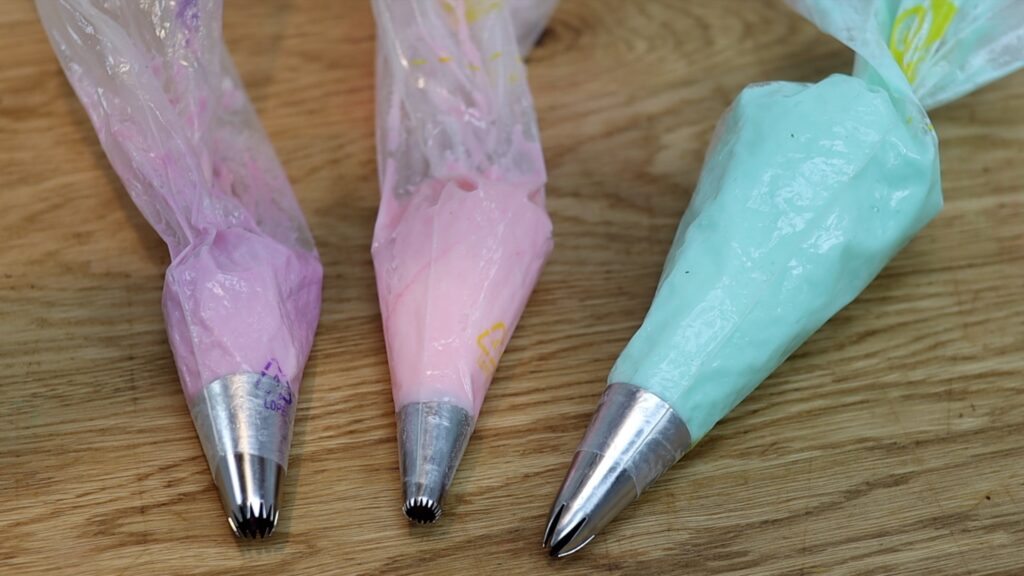
Tint your frosting whatever colours you want to use for the watercolor design. It's best to choose colours that blend together to make colours you like, too. I'm using my 4 Minute Buttercream for all of these cakes. I like to put the colours into piping bags or even use piping bags leftover from another cake. Any piping tip will work because all of the texture will be flattened out soon anyway.
Your cake will need to be frosted and chilled before beginning this technique. When the frosting is chilled it will become firm, which means it won't get damaged while you're decorating. Press a heart onto the frosting and then pipe or spread your coloured frosting around it. Cover the edges of the heart, which will attach the heart to the cake. Don't cover the middle of the heart because it’s easiest if the slit you made is still visible.
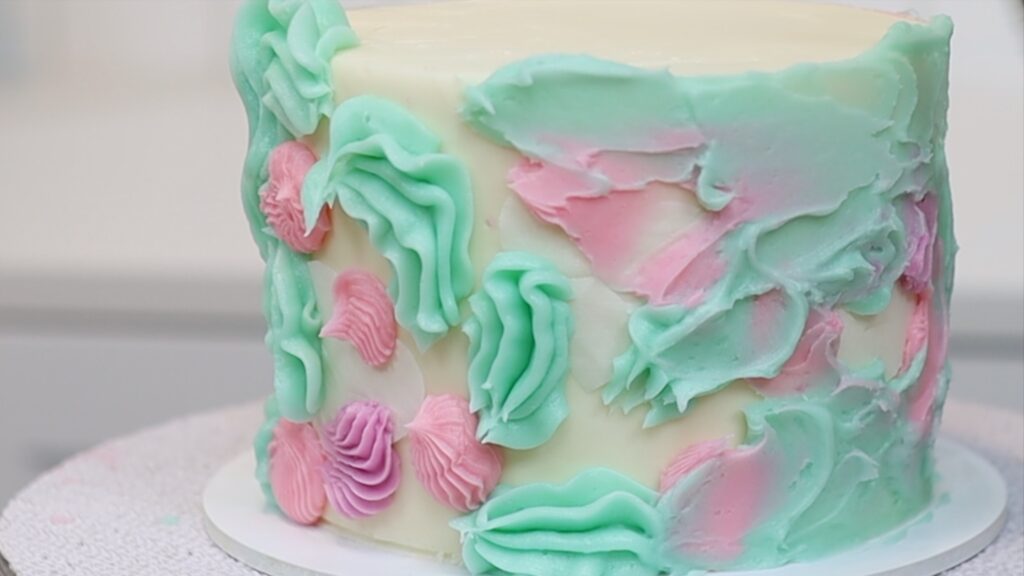
When you've attached all of the hearts to the cake, spread the buttercream to cover up most of the cake. Try to avoid the centers of the hearts. Don’t worry about covering up the entire cake because when you smooth the frosting you’ll spread it to fill in any gaps. Since the white frosting has set, these colours of buttercream sit on top instead of blending with it.
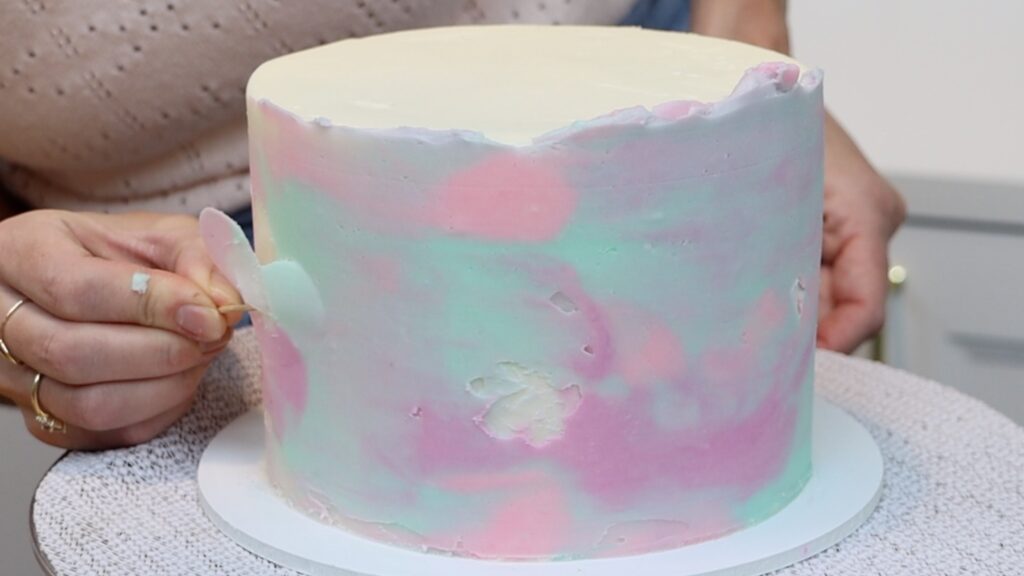
Now it’s time to peel off the hearts. I like to use a toothpick, sliding it into the slit you cut in the middle of the heart. Pull away from the cake to peel the heart off.
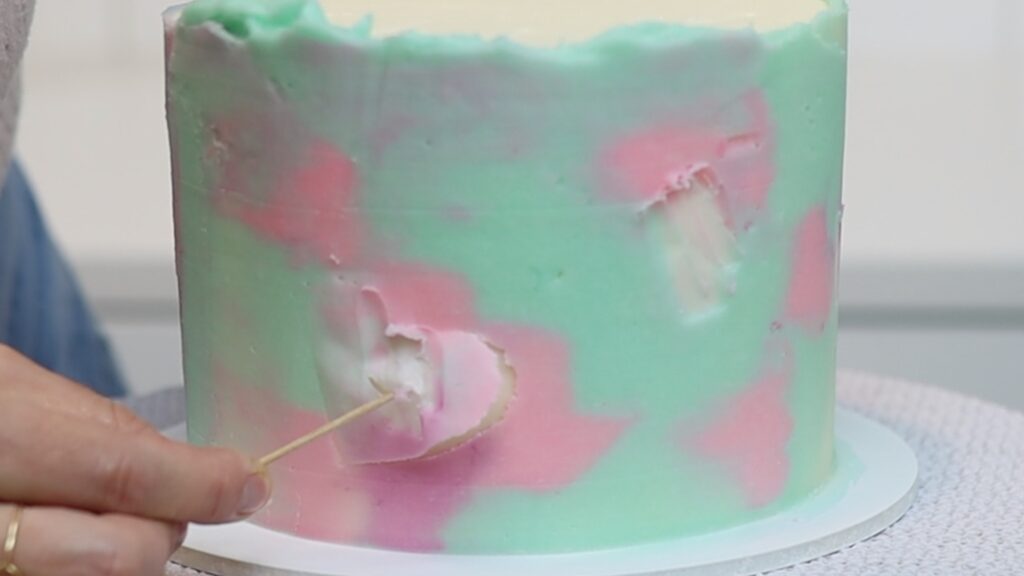
If any hearts are buried under frosting, you’ll still be able to see the outline of the heart. Use your
If you’re making this for your own Mother’s Day cake, it’s a fun one to decorate with your kids. They can squeeze the piping bags to get the frosting onto the cake and then they can watch you smooth it and peel the hearts off. Add a border on top if like and then you can all eat it together!
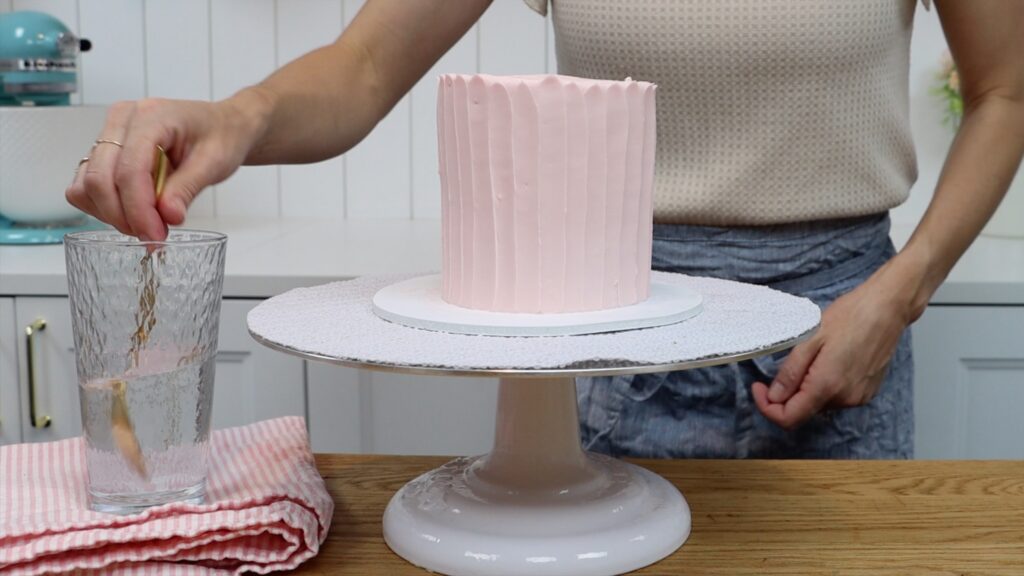
This next design is great if you struggle to smooth your frosting. Spread frosting onto your cake and scrape around it a few times with a cake comb. Don’t worry about indents or air pockets or imperfections because you'll smooth those out in a moment. Focus on pressing your cake comb down on the cake board to line it up straight against the cake so that the sides of the cake are straight.
When you're happy with the shape of the cake, use a spoon to add gorgeous texture. Press the back of the spoon lightly against the frosting and pull it up the side. Lift up and away from the cake to leave a neat peak at the top. Overlap the previous groove slightly to cover the whole cake with texture.
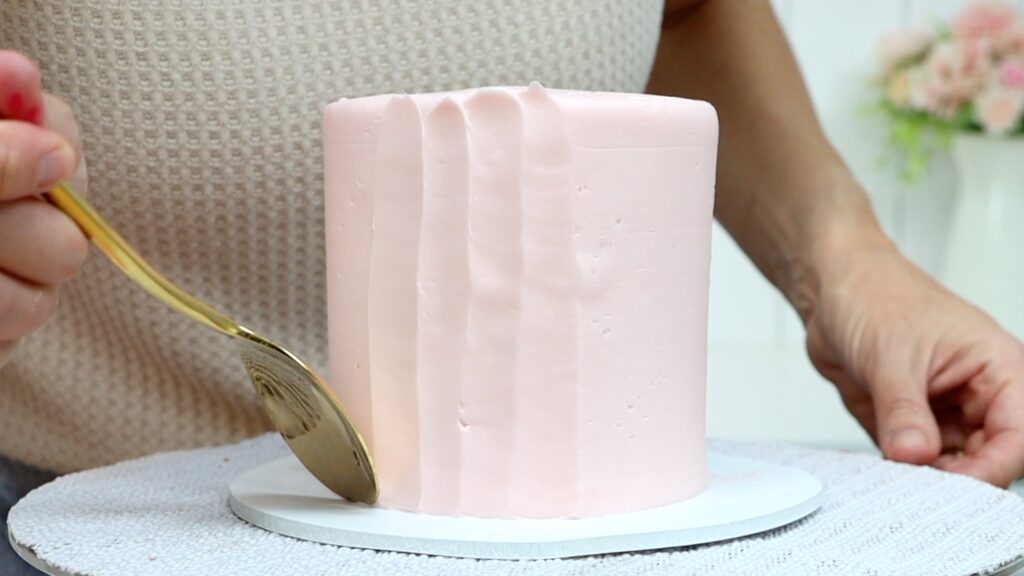
A hot spoon works best for this. Dip it into a cup or bowl of hot water every minute or so and then dry it off before pressing it into the frosting. The hot metal will smooth the frosting as you pull it and create these “swooshes”.
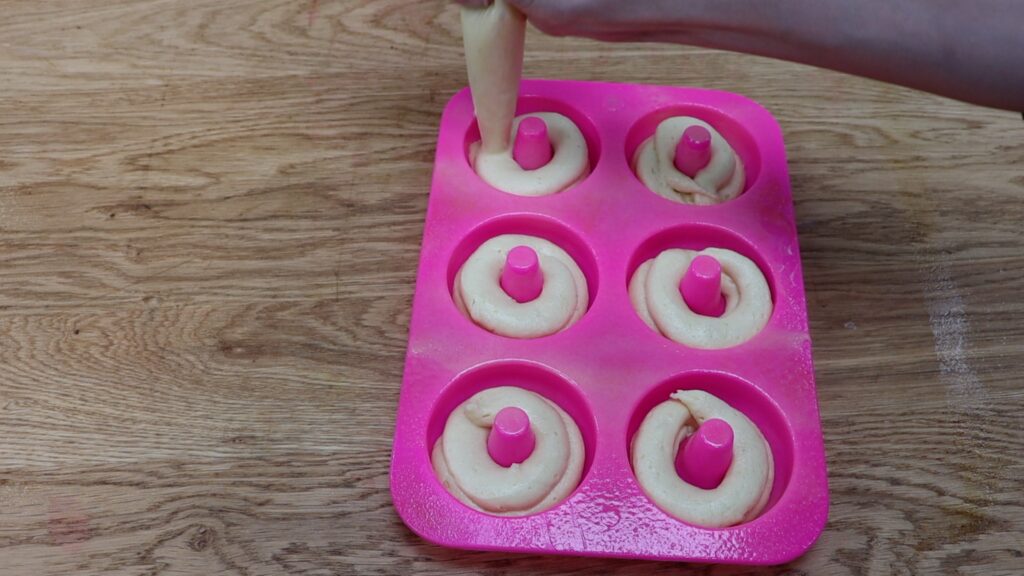
Add a Mother's Day cake topper or decorate the cake with cake donuts. These are shockingly easy to make! Just squeeze a little bit of your cake batter until a silicon donut mold using a piping bag to get it neatly into the rings. Bake for the same time as you would for cupcakes, about 15 minutes.
When the donuts cool, dip them in ganache. To make ganache, use 3 parts white chocolate chips and 1 part heavy whipping cream or double cream. Heat the cream in the microwave until bubbles form around the edges of the bowl, which takes about 30 seconds. Pour the chocolate chips into the hot cream, pushing them under the surface. Leave them for 5 minutes and then stir until smooth. Add oil based colours if you like.
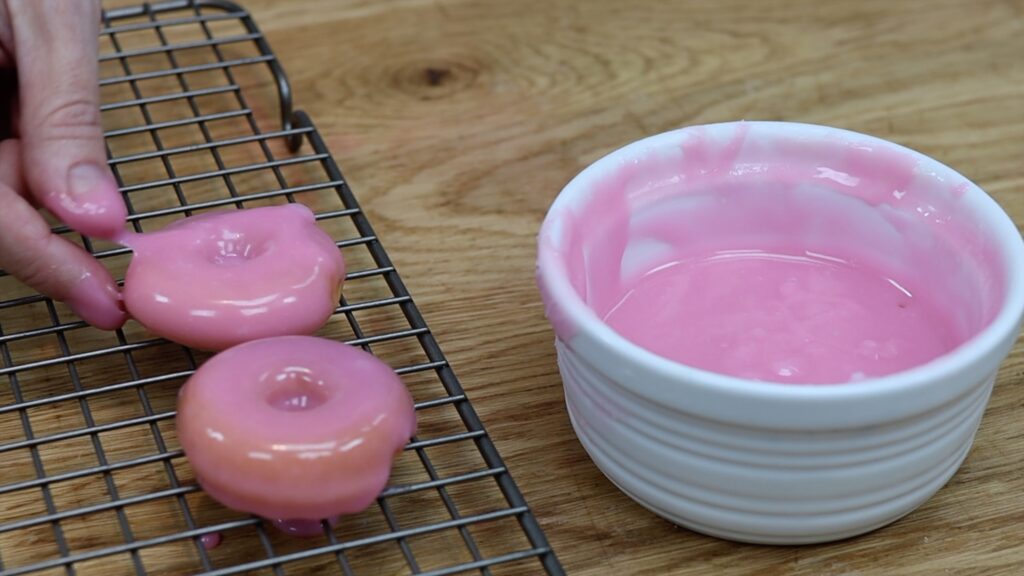
Add some sprinkles while the ganache is still sticky, before it sets. Then poke toothpicks into the donuts and push them into the cake to hold them upright as cake toppers.
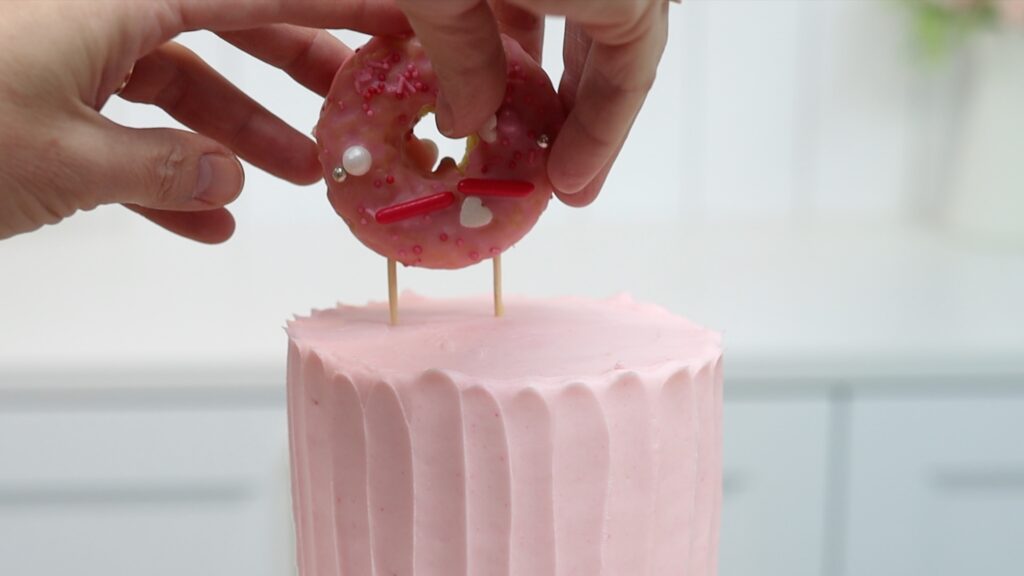
To attach donuts to the sides of the cake, spread a bit of frosting wherever you want to put one and press the donut into it.

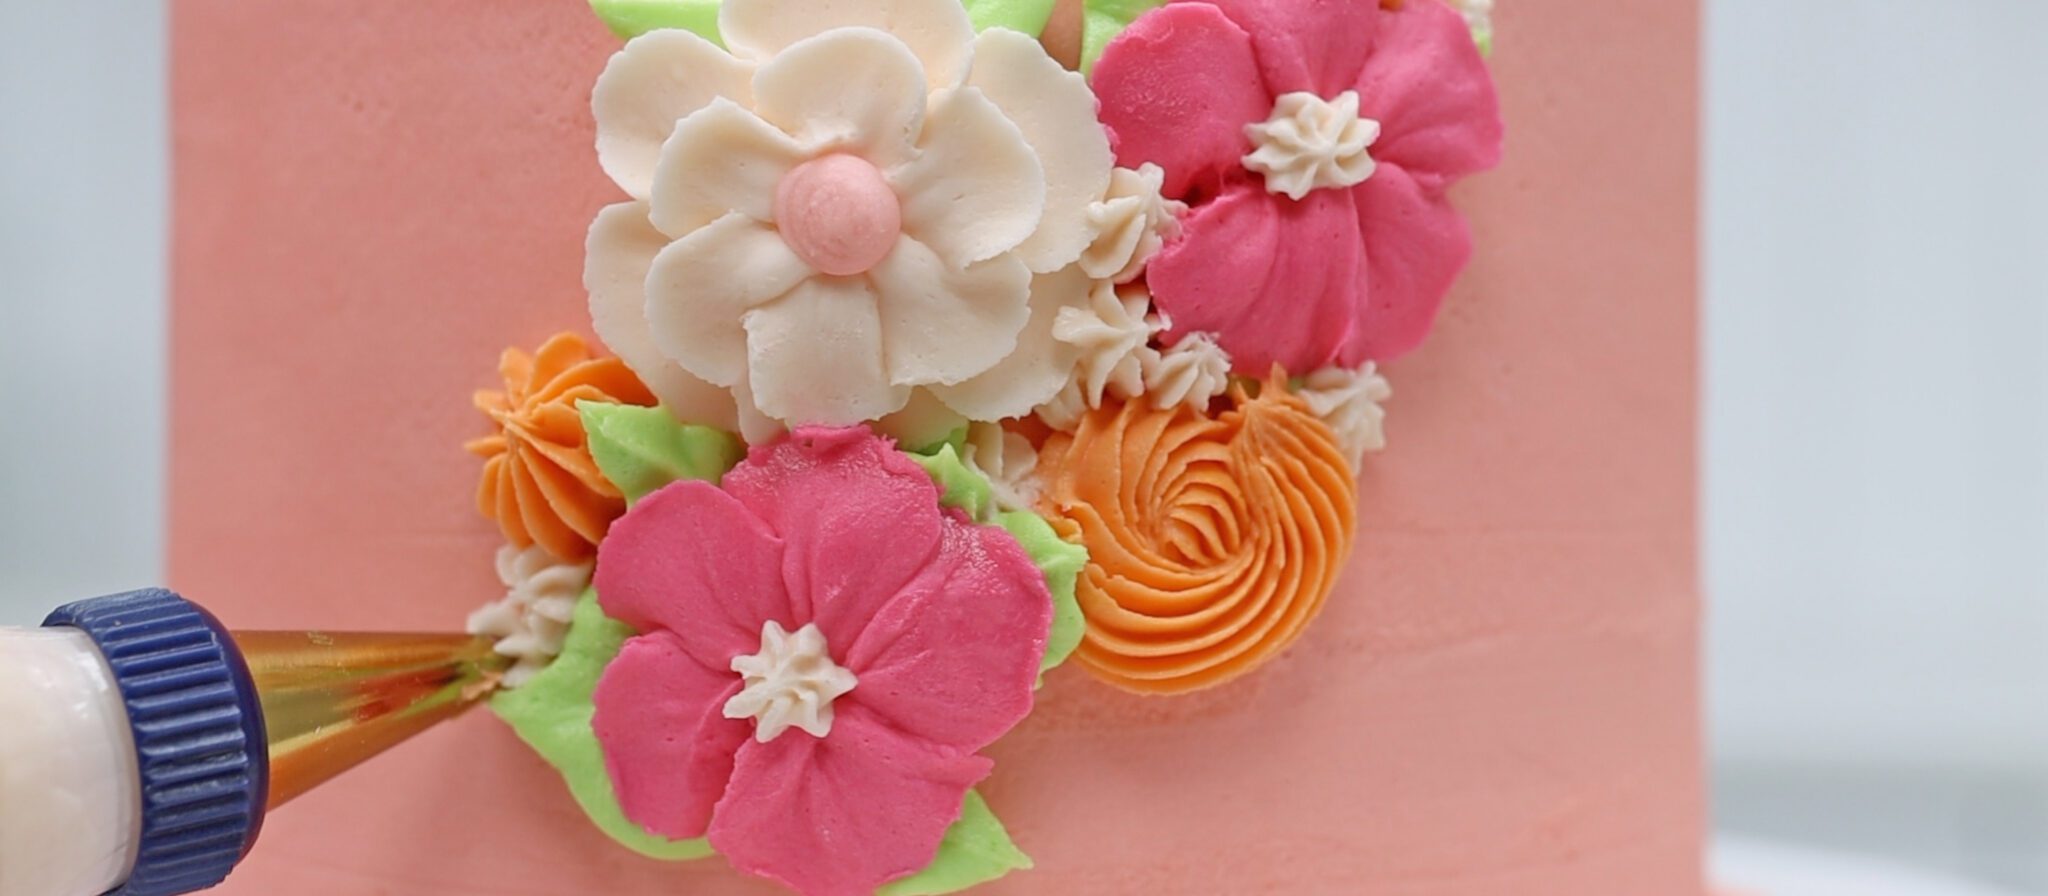
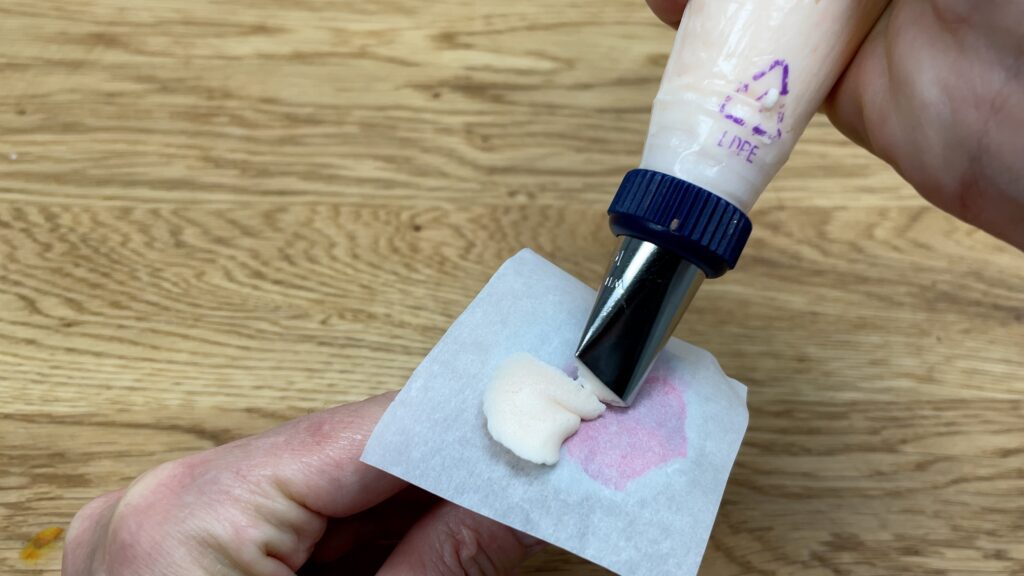
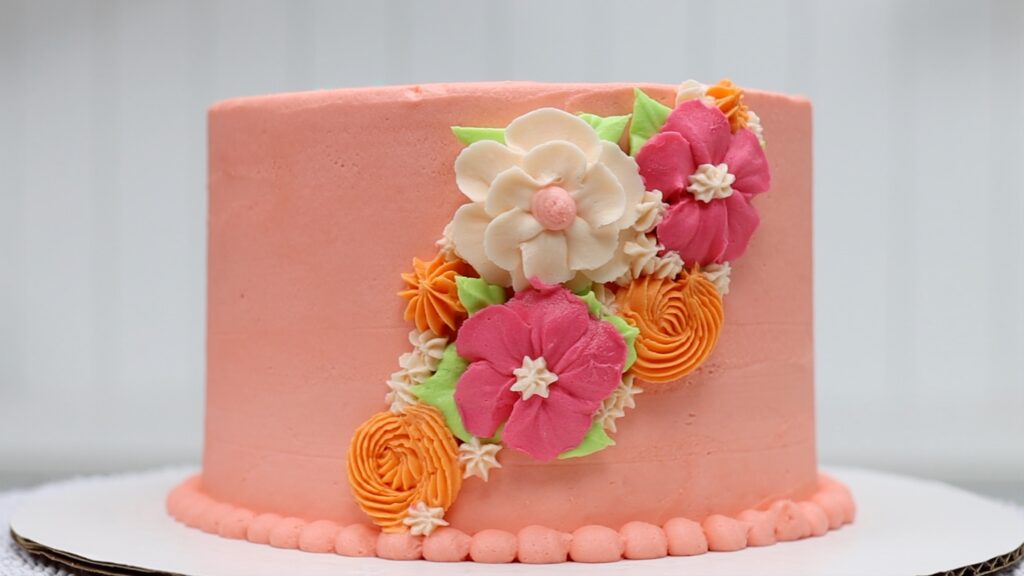
Create a delicious floral beauty with a few colours of buttercream or any other frosting and a few piping tips. You’ll also need a flower nail and parchment paper or wax paper. Cut the paper into squares as wide as the flat head of the flower nail.
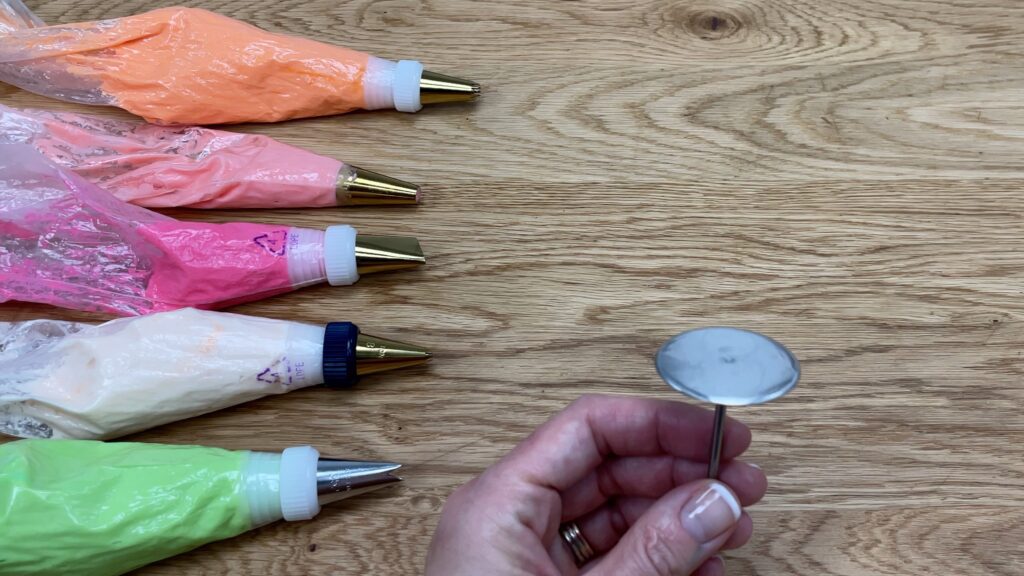
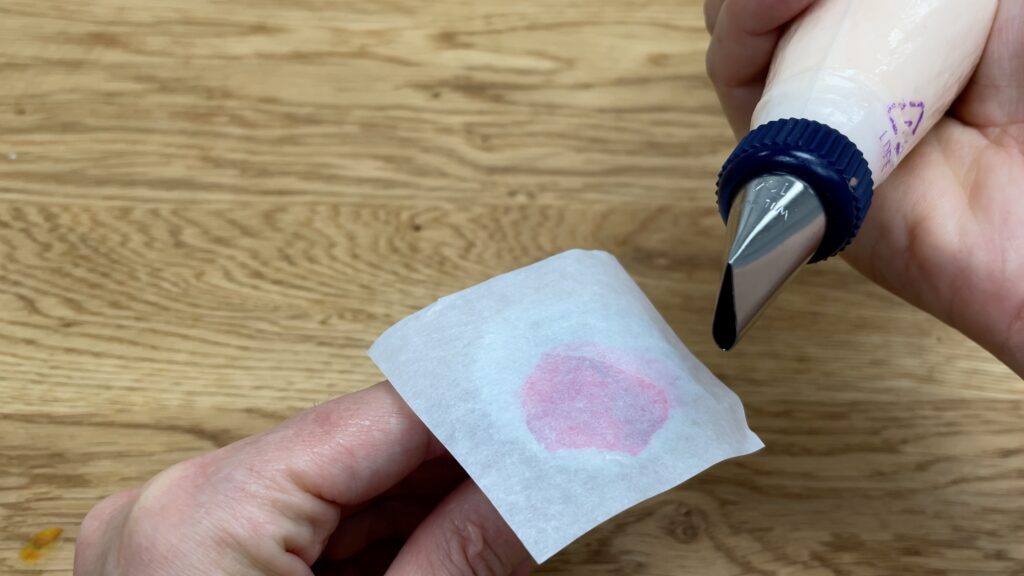
Piping the flowers onto parchment or wax paper makes it easy to move the flowers onto your cake later. Pipe a dot of buttercream onto the nail and then cover it with one of your little squares of paper. For pretty, simple flowers use any petal shaped piping tip like this #104.
Hold it so that the wider end of the teardrop shape is pressed down against the middle of the nail and the narrow part points outwards. Pipe petals by squeezing the bag and pushing the tip slightly away and then pulling back towards you. Stop squeezing the bag and pull it away to finish the petal. Then spin the nail between your thumb and finger to rotate it before piping the next petal.
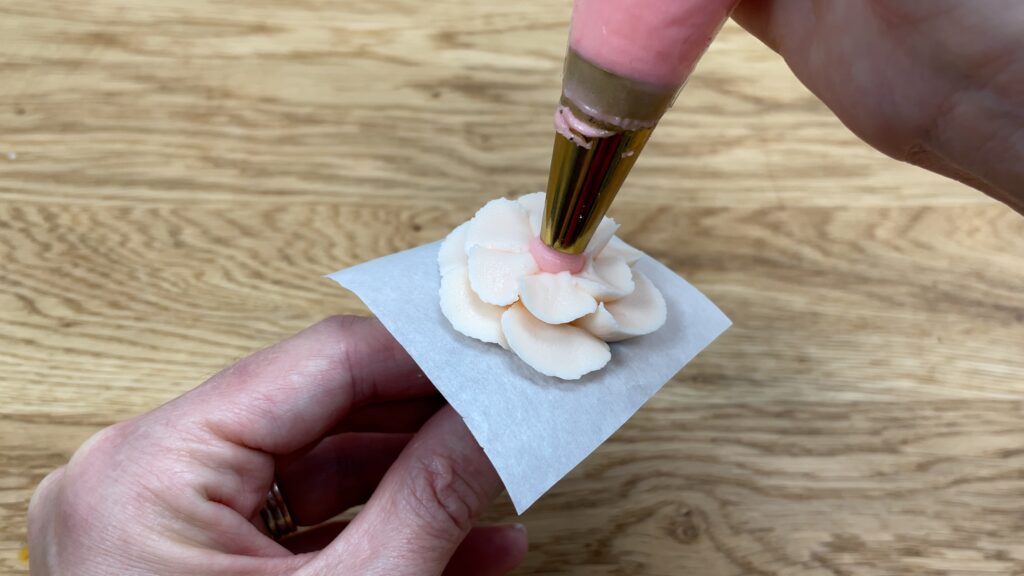
These pansy type flowers are the quickest and easiest flowers to pipe. Use a round tip or a star shaped tip with a different colour of buttercream to pipe a center onto each flower. Then carefully pull the paper sideways off the flower nail and lower it down onto a tray or baking sheet. Repeat the process to pipe as many flowers as you want for your cake.
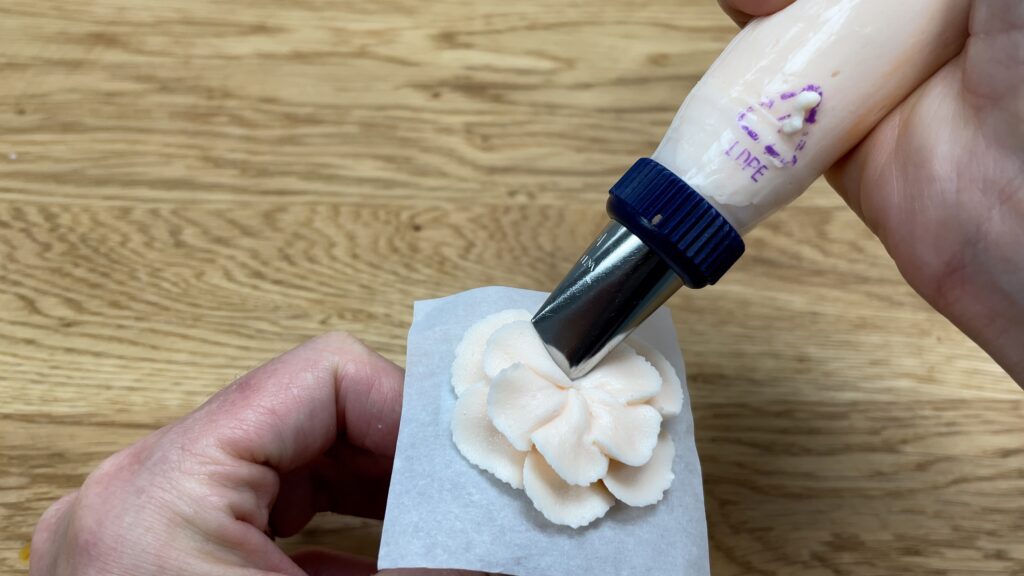
Add variety to your cake design by changing colours, using different sizes of petal tips, piping a second layer of petals on top of the first, or changing the colour or piping tip you use to pipe the centers of each flower.
Pipe all of your flowers, placing each one on the tray, and put the tray in the freezer for 10 minutes. This chills the flowers so that they set and you'll be able to touch them without damaging them.
To attach the flowers to the cake, pipe leaves onto the cake using a leaf tip like a #352. Then lift a flower up, peel it off the paper and press it onto those sticky buttercream leaves.
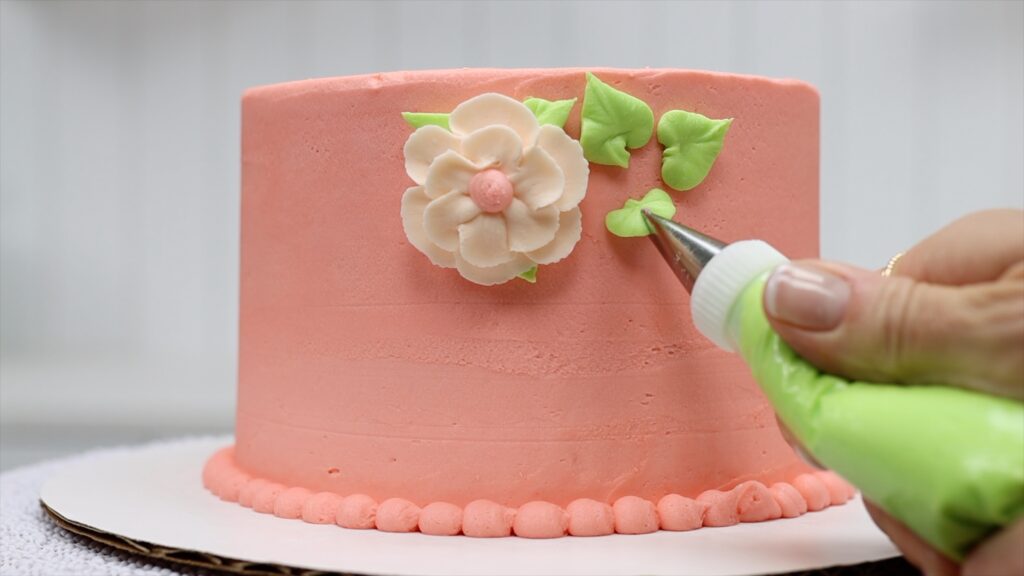
You could use only flowers to decorate the cake or add some piped details too. I'm using a #32 open star tip and a tiny #18 tip for pipe swirls and blossoms. This Mother's Day cake design is pretty and feminine and, best of all, it’s entirely edible!
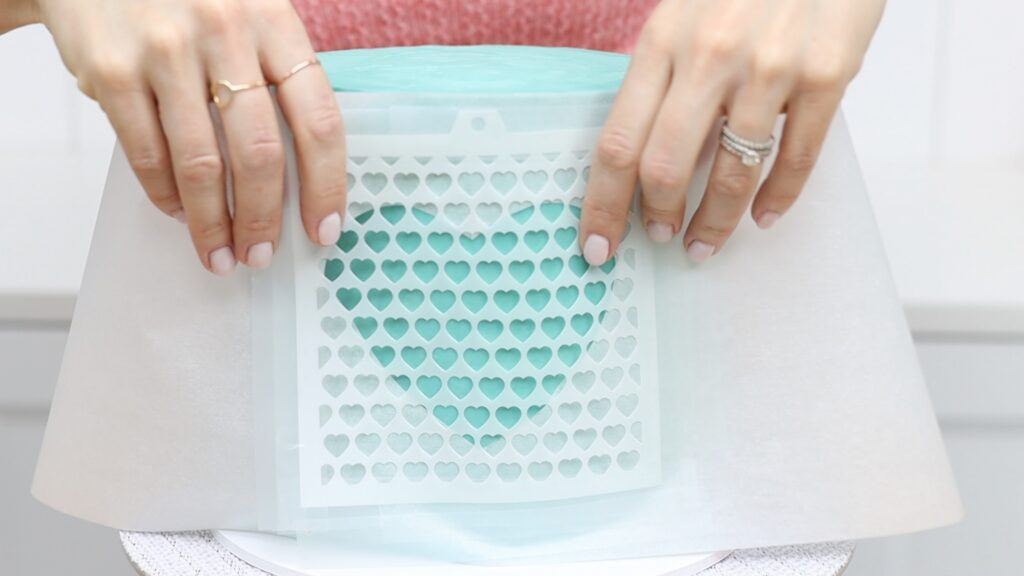
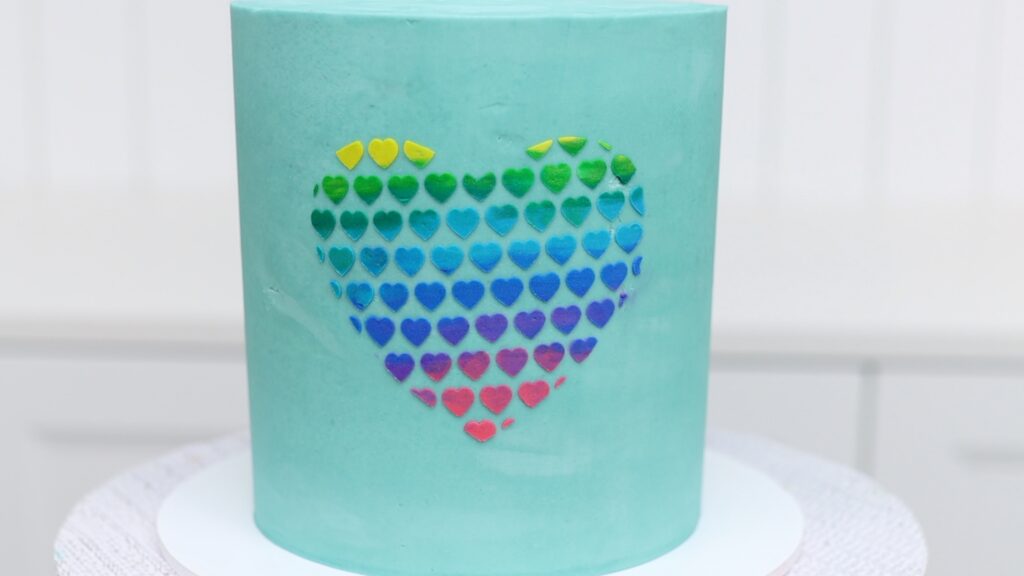
Make a beautiful rainbow heart with a homemade stencil for this next cake. Draw a heart onto parchment paper and cut it out, leaving the parchment around the shape intact. The heart should fit onto the side or top of your cake. This will be part of your stencil. Now use a more detailed stencil to add a design within your parchment stencil shape. Tape them together and wrap the stencils around your cake, taping or pinning the double stencil in place.
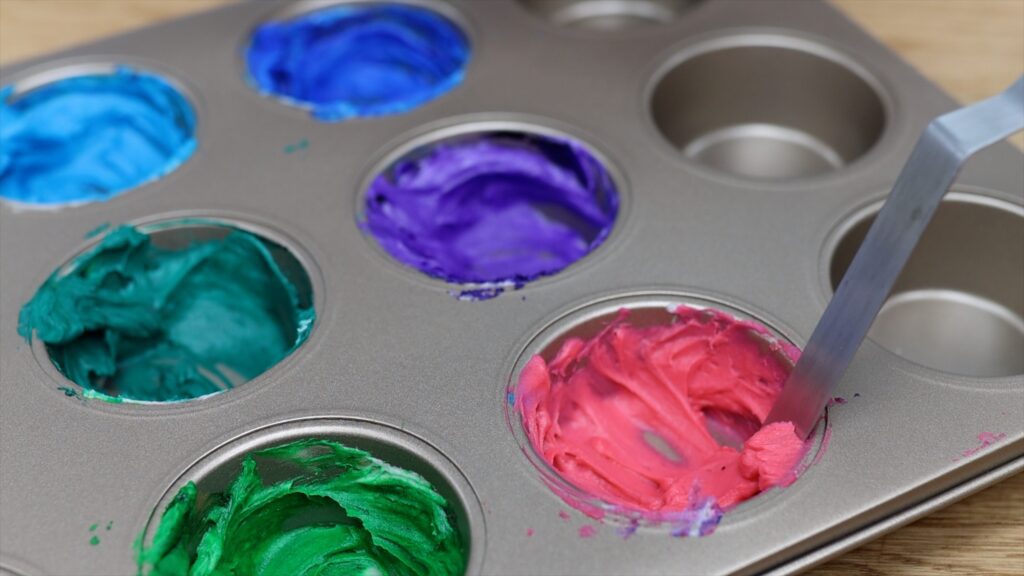
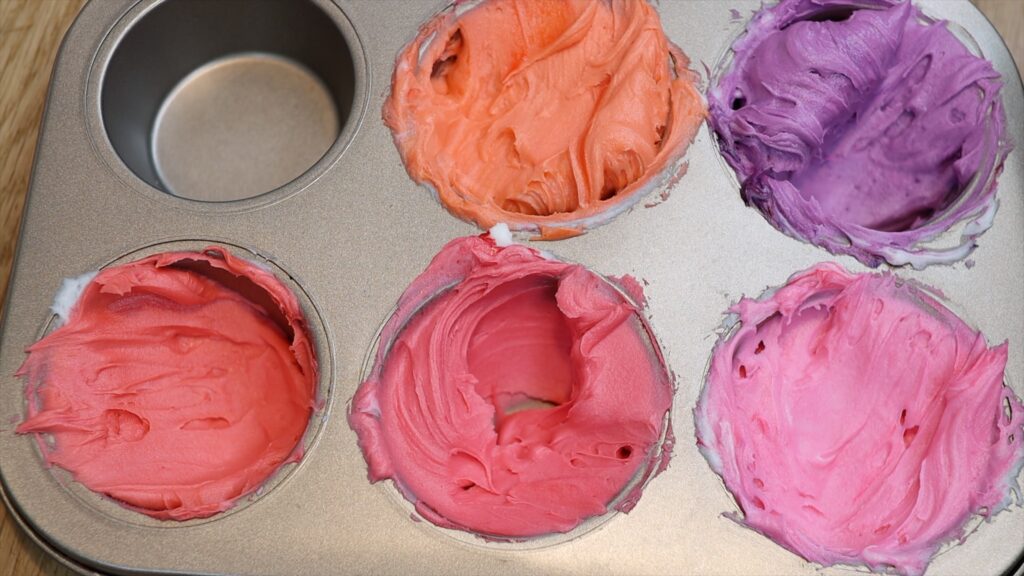
Tint rainbow colours of buttercream, using a very small amount of each colour. I like to mix these in a cupcake pan since you'll only have to wash one pan instead of lots of bowls.
Spread the coloured buttercream over the double stencil. Use an

Take as much frosting off as possible, leaving a thin, smooth layer behind. Then carefully peel the stencil off the cake to leave the design behind!
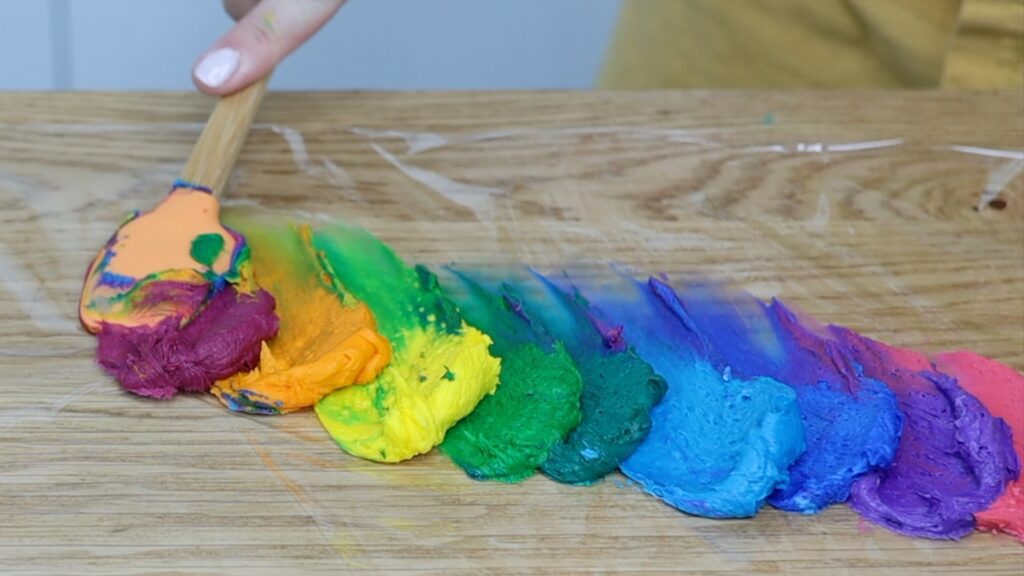
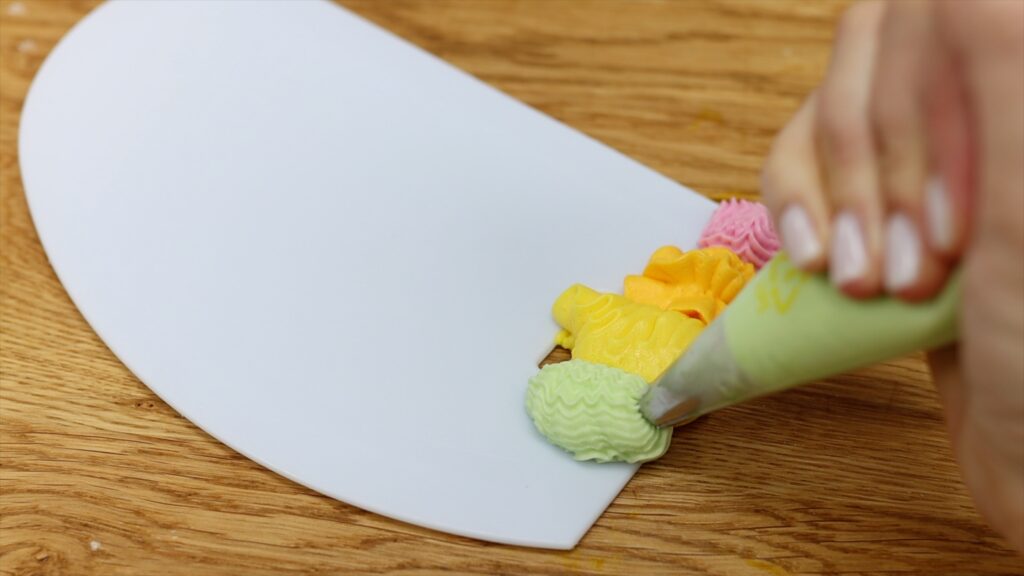
You can use the leftover frosting to add a border the cake. Spread the colours side by side onto a piece of plastic wrap and then roll it up into a log. Cut off the end with the colour that you'll start piping with.
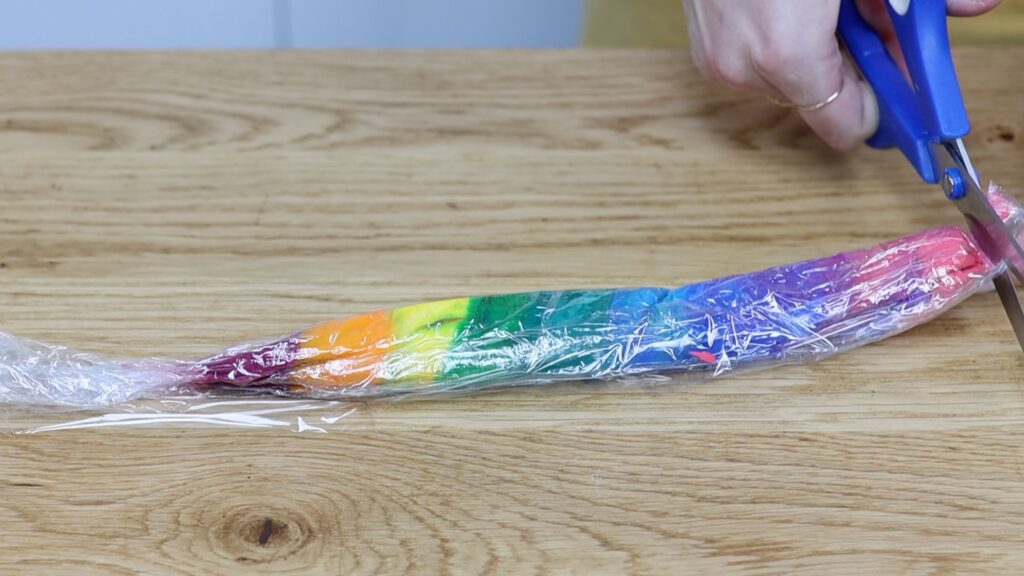
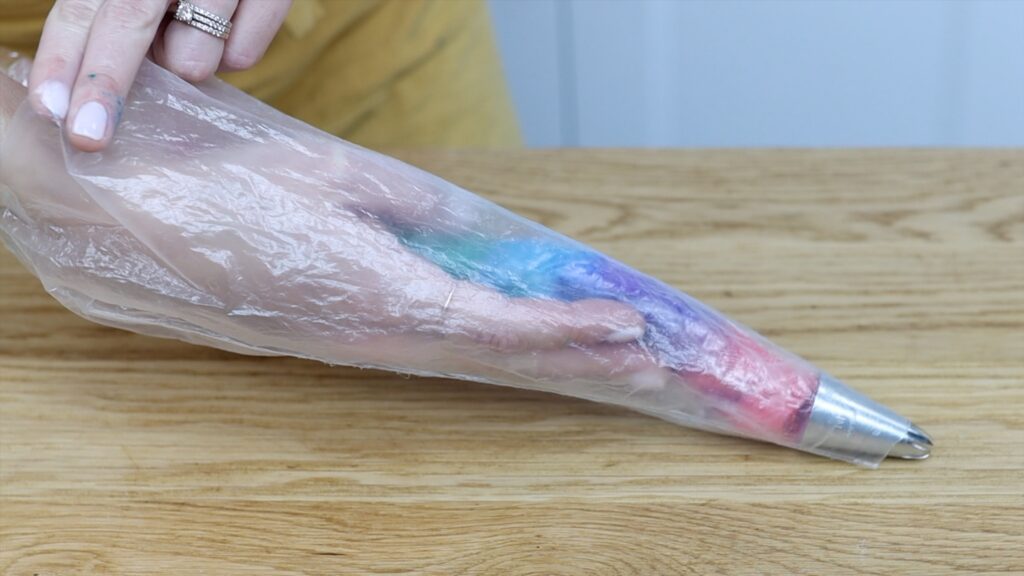
Put the log into a piping bag fitted with a 1M star tip, pushing the cut end down into the piping tip at the bottom of the bag.
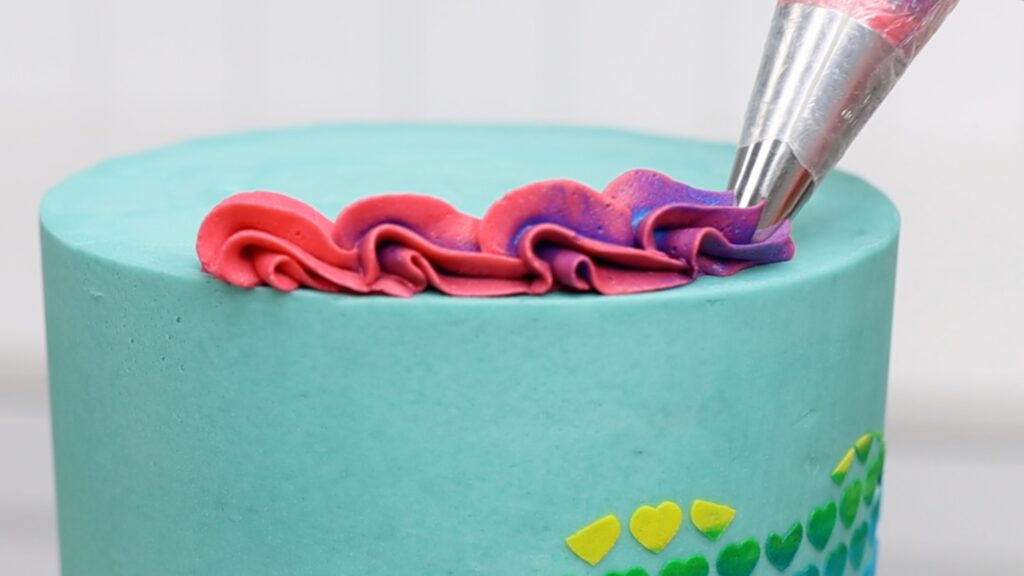
To pipe a wave or shell border, squeeze the bag to let the buttercream bulge out and then pull away. Overlap the tail of each one to make a colourful border to match the stencil design.
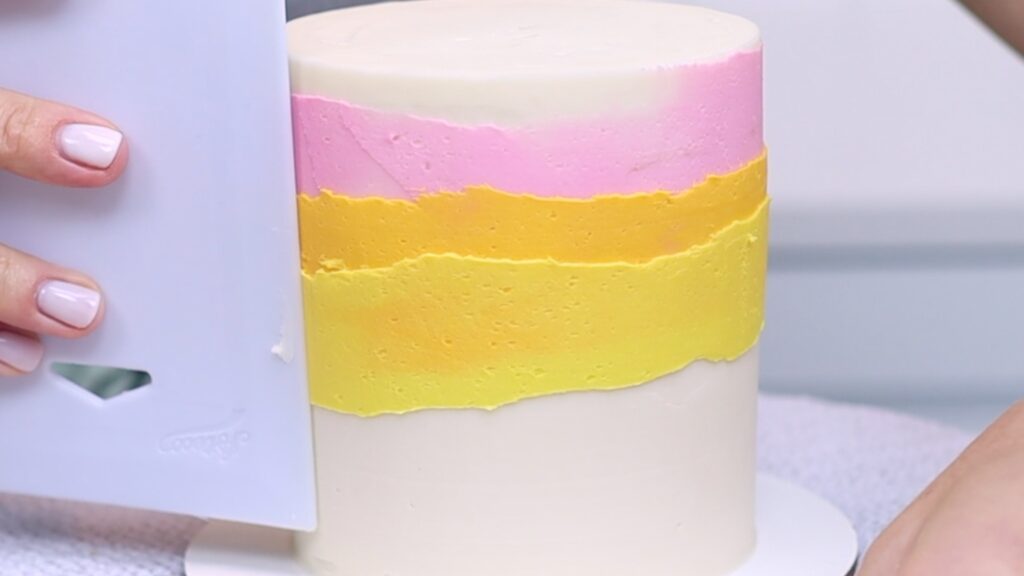
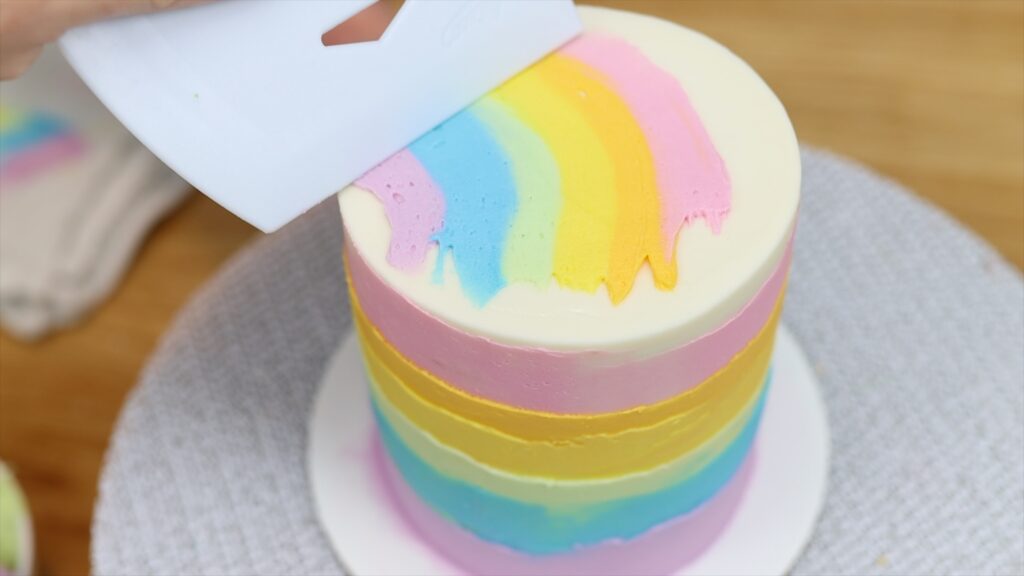
Here’s another fun rainbow design for a Mother's Day cake that’s even easier to create. Spread or pipe coloured buttercream onto a cake, starting at the top of the cake. Scrape around the cake gently with a cake comb a few times to take off the excess. You'll leave a thin, smooth layer of colour on the cake.
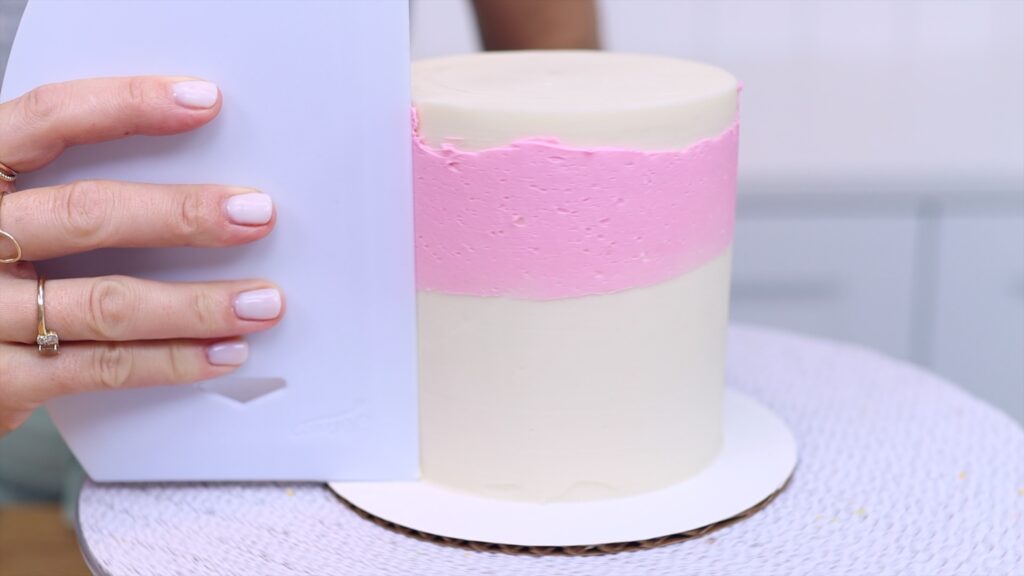
After each time you go around the cake, scrape the excess frosting off your cake comb into a bowl. If you take off more frosting than you want and the band of colour is too thin, spread some of that frosting you scrape off, back onto the cake and then smooth it again.
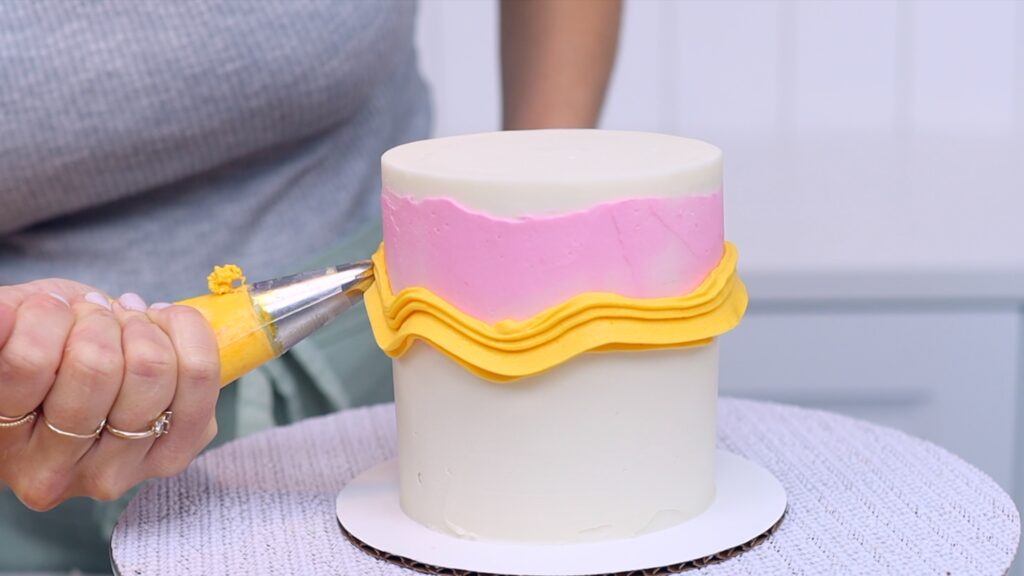
Pipe or spread your next colour underneath the first colour. Overlap the first colour so that there’s no gap in between the two colours.
There are three tricks to this design. First, use a crusting buttercream like my 4 Minute Buttercream because it gets really firm when it sets. That makes it possible to layer the colours instead of blending them together.
Second, take your time to get the frosting on the cake really smooth before doing this. These colours won’t completely cover the cake and they won’t disguise messy frosting. For tips on this, check out my tutorial on 15 Frosting Mistakes and How to Fix Them!
The third trick is to chill the cake in the fridge for at least two hours before you do this. That way, the frosting will be very firm and you can add and scrape these colours without damaging it.
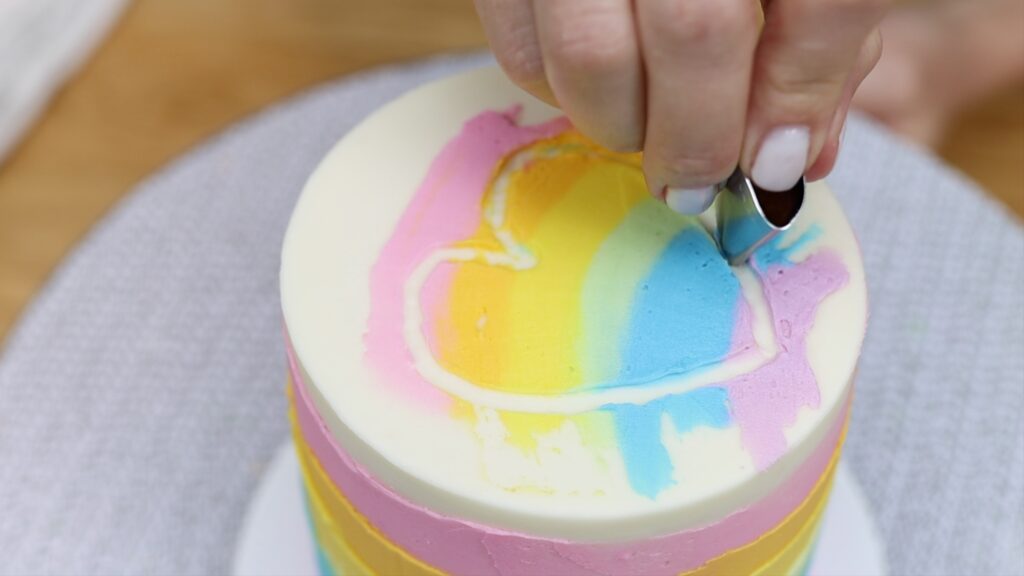
To add some detail to the top of this cake, squeeze some of each colour onto a cake comb.
Lower the comb onto the top of the cake. Pull it in a curved, arc shape over the top surface of the cake to leave a rainbow behind. You might need to spread more of some of the colours and scrape again to get good coverage.
You can use a piping tip or a toothpick to draw a design in the rainbow if you like:
To learn hundreds of cake decorating techniques and designs, visit my online cake school. You can take individual courses or join my ClubPLUS for access to every MasterCourse, MiniCourse, Live Workshop and 5 Minute Fridays. I hope to see you there!
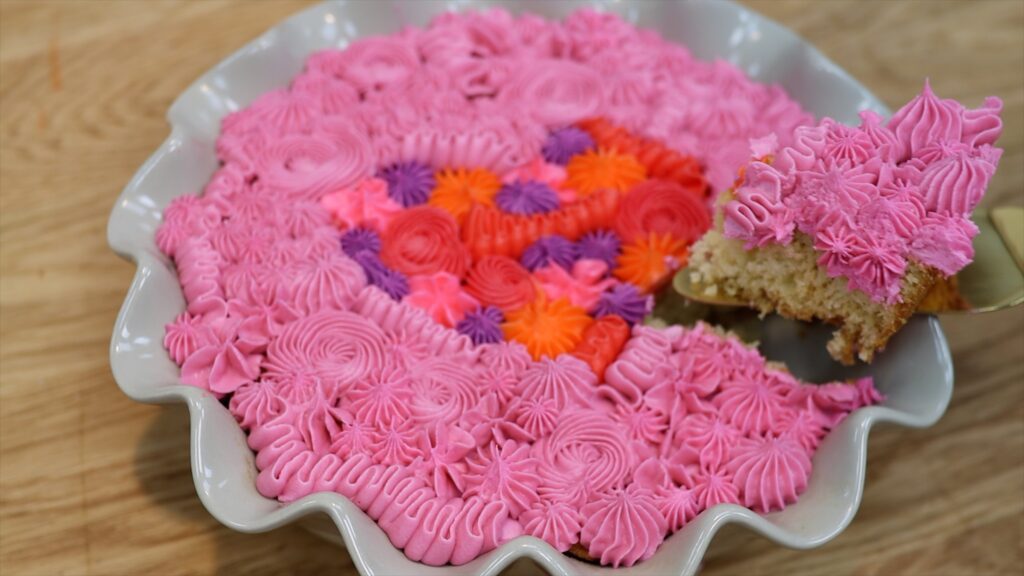
The easiest kind of cake to make is a tray bake cake. You bake, decorate and serve these cakes in the same dish! Use a few different piping tips and a variety of colours of frosting to create different textures.

To pipe a design, score the outline with a toothpick and then piping within that outline. Save one colour to pipe outside the outline, which will be the background colour.
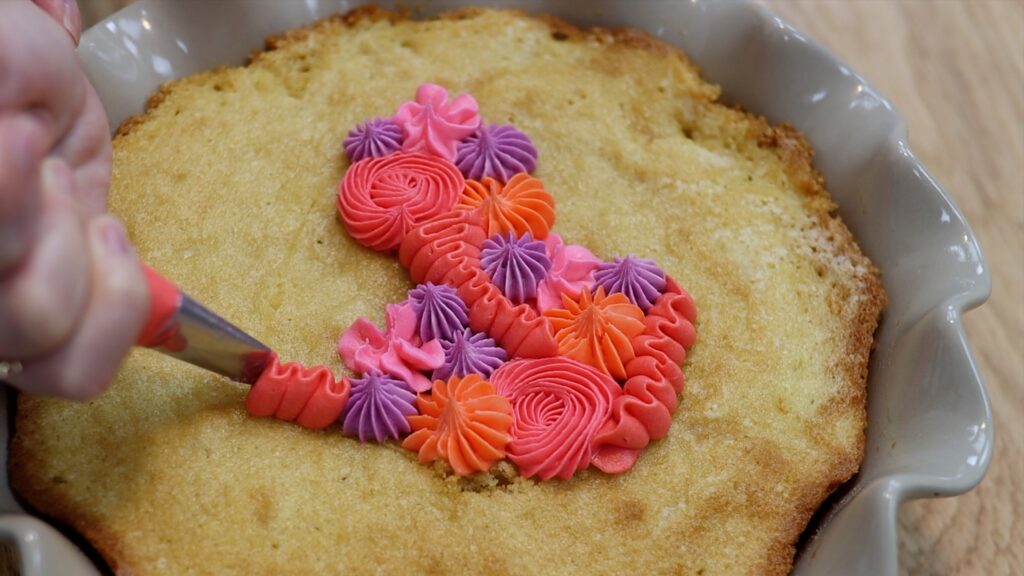
I’m using my 4 Minute Buttercream but you can do this with ganache, whipped cream or meringue buttercream instead. And this is my Very Vanilla Cake but you can even do this with brownies or chocolate chip cookie dough!
Tray bakes are easy to make and decorate and also easy to transport and serve!
If you don’t feel like decorating a Mother’s Day cake for yourself or you can’t choose a style or design, let your kids decorate a cake for you! It’s a fun activity that they’ll love and even if it’s not beautiful, it will be delicious and a wonderful memory.
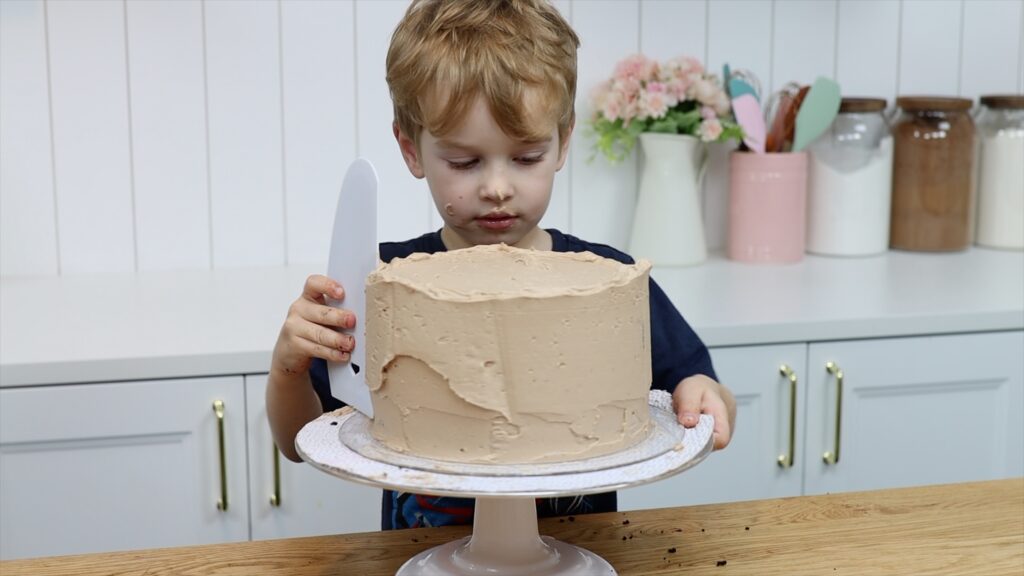
These are two of my kids, James and Max. They wanted to make their own baking videos and you can watch this one and all of their other videos on their YouTube channel, British Boys Bake! They would LOVE it if you subscribed!
I hope you’ve seen some ideas you’d like to try for your next Mother’s Day cake! You can also watch a video of this tutorial on 7 Mother's Day Cake Ideas:


Well understood