How to write Happy Birthday on a cake neatly can feel surprisingly difficult once you actually try it. Letters often come out shaky, off-center, sloping up or down, or with the last few letters squished so that they fit. But with the right techniques it becomes much easier to control your piping and get beautiful results.
Simple printing for how to write Happy Birthday on a cake
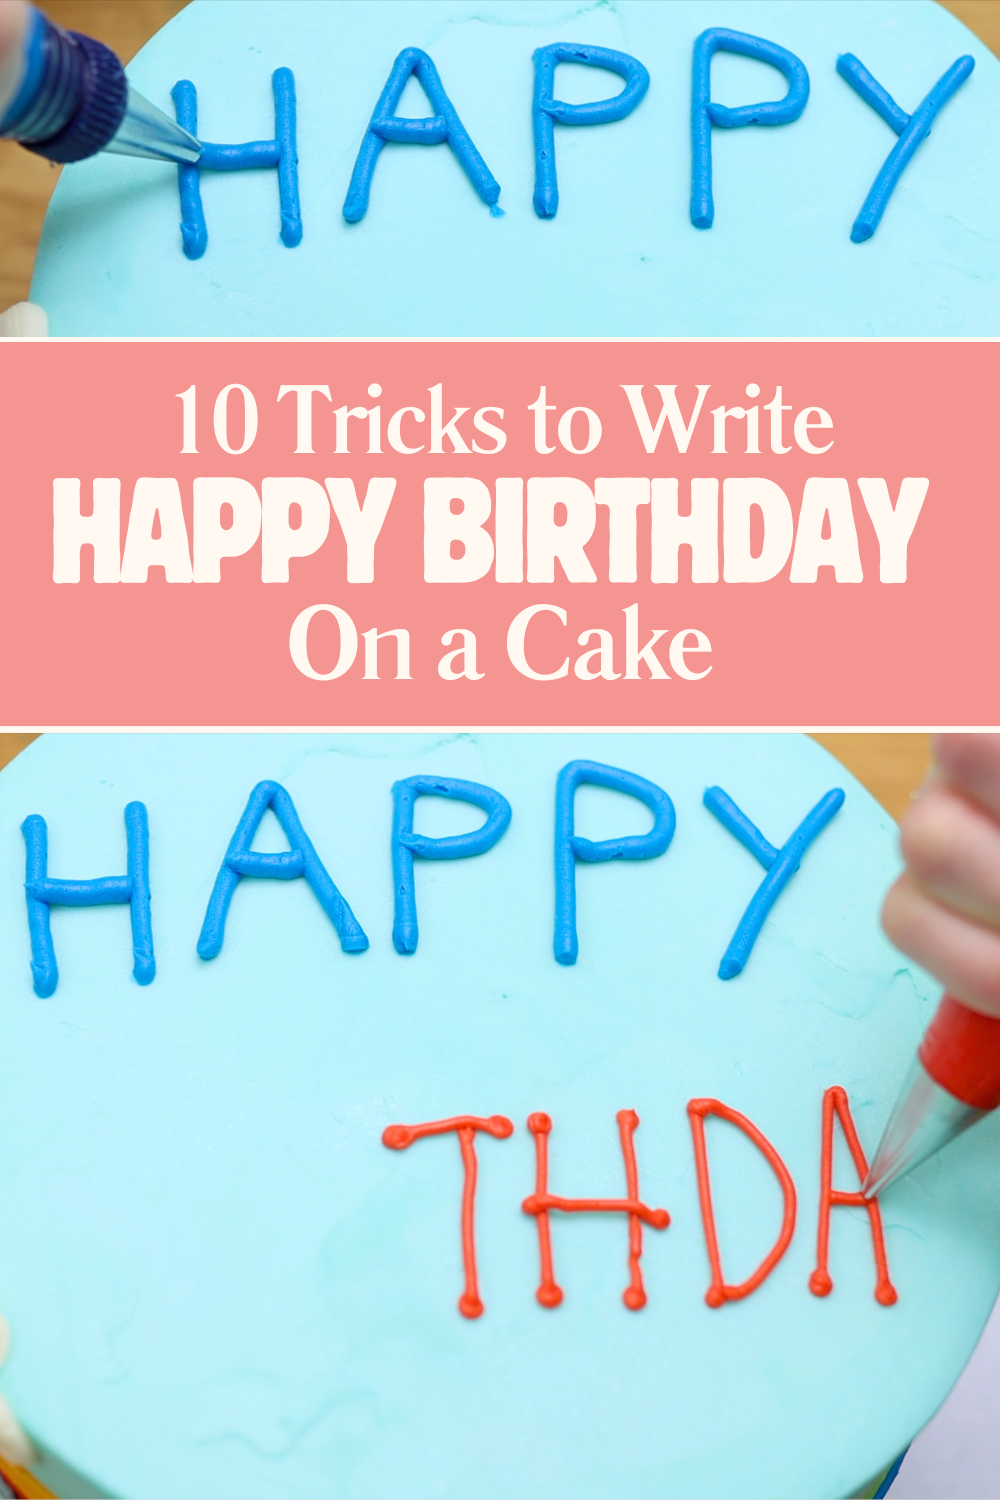
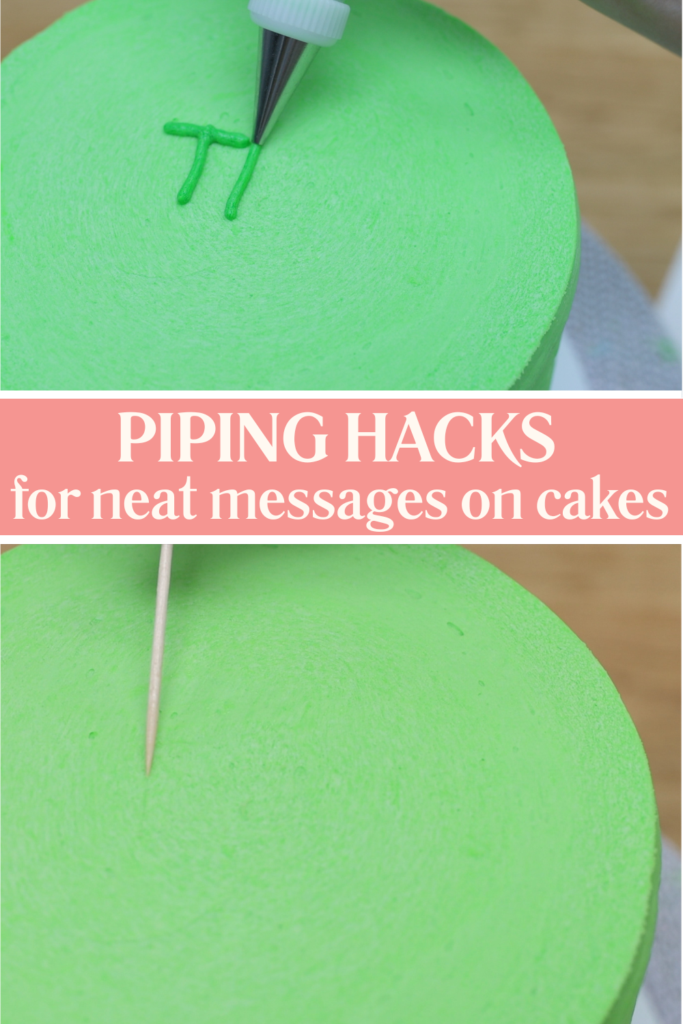
One of the easiest ways to start is by printing your letters using straight lines and all capital letters. This gives you much more control as you pipe one line at a time. To center your message, begin with the letter in the middle of the cake and work your way outwards, adding letters on each side.
Choosing the right piping tip for how to write Happy Birthday on a cake
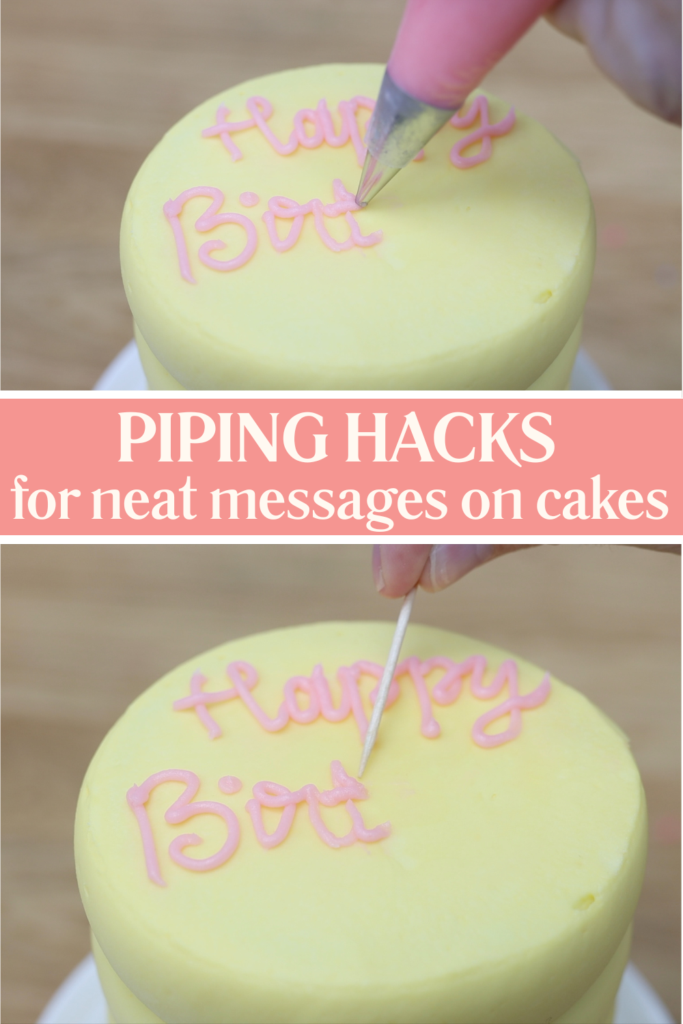
The piping tip you use makes a big difference when learning how to write Happy Birthday on a cake. For an 8 inch cake, a number 8 round piping tip works well, like I used for 'HAPPY' on the cake above. For smaller cakes, choose a smaller tip so the letters don’t look crammed together.
Larger tips are generally easier to use because the thicker lines absorb small, jerky wrist movements, while smaller tips show every tiny movement and require much steadier hands.
Using dots to anchor your letters
A great beginner technique is to print your letters using dots at the beginning and end of each line. Piping dots helps you position where each line starts and finishes so your letters look neater, even with a small piping tip. See the cake photo above for an example of this font, used to write 'BIRTHDAY'.
Chilling the cake before writing Happy Birthday on a cake
One of the most important tips for how to write happy birthday on a cake is to chill your cake before adding your message. When the cake is cold, the buttercream is firm, which means you can scrape off mistakes with a toothpick, knife, or offset spatula and then pipe again without damaging the frosting underneath.
Getting the buttercream consistency right
Buttercream consistency is crucial for writing. If it’s too stiff, the lines will break apart as you pipe. If it’s too soft, it will flow out of the piping bag without you squeezing, making it very difficult to control. I love using my 4 Minute Buttercream because it's easy to adjust the consistency by simple adding more or less milk and sugar. Since buttercream can vary slightly each time depending on temperature, humidity, and ingredient quantities, it’s always worth checking before you start with some test piping.
Practice before you write Happy Birthday on a cake
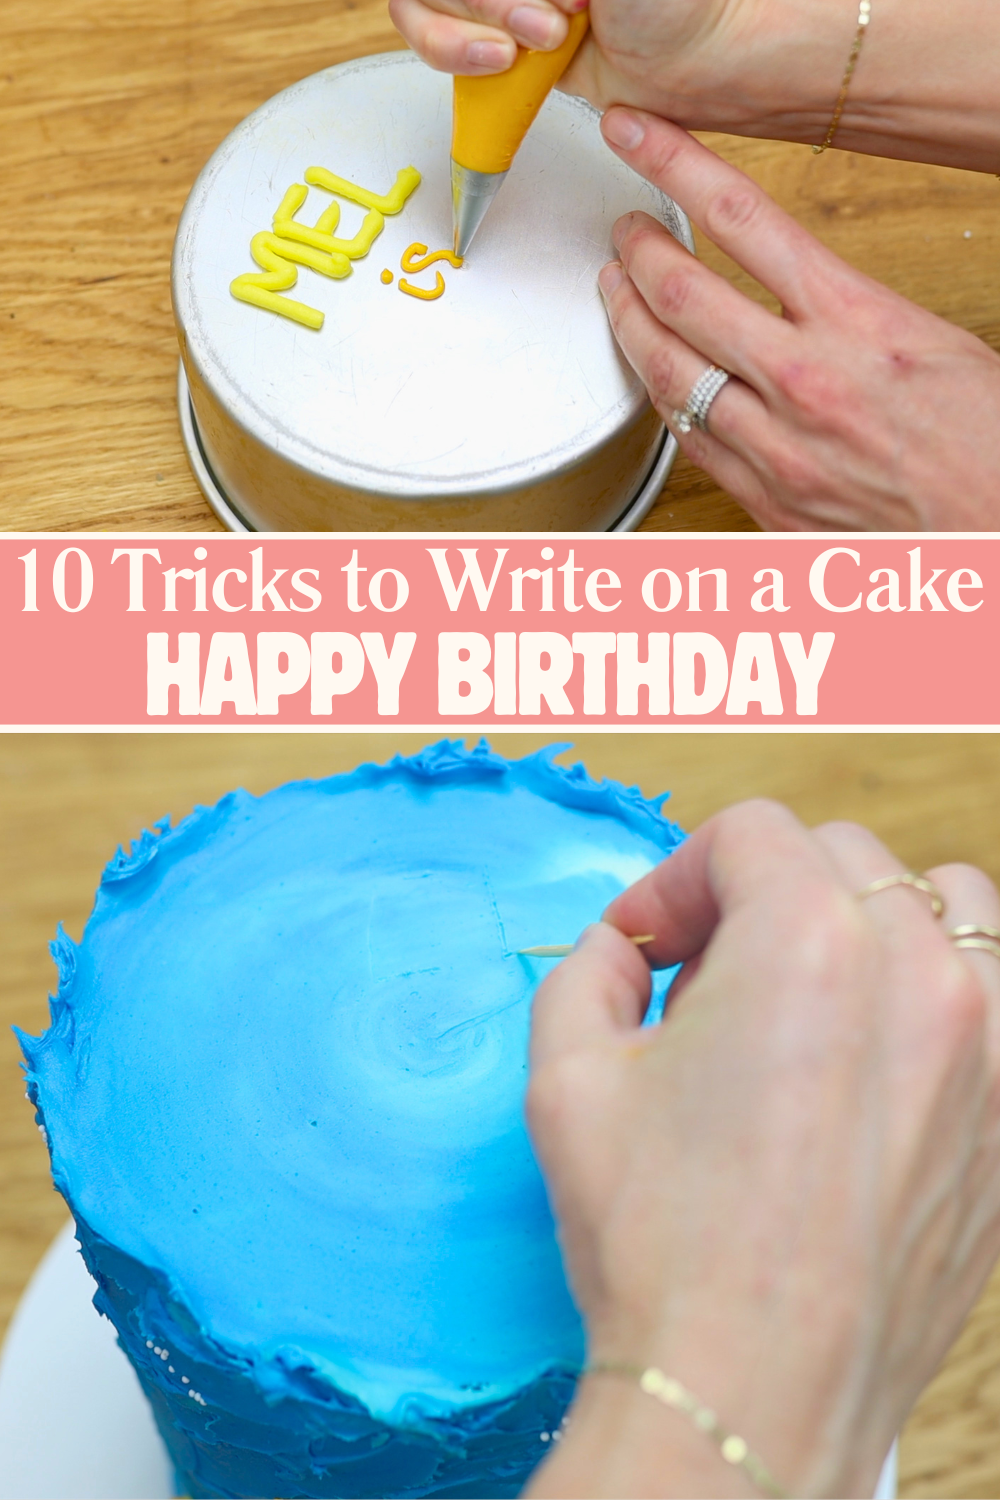
A simple way to practice is by using the cake pan you baked your cake in. This allows you to test the size and spacing of your letters and get used to your buttercream consistency. You can also use a toothpick to lightly score your message onto the cake first, which helps you check spacing and placement before piping.
Using pointillism for shaky hands when writing Happy Birthday on a cake
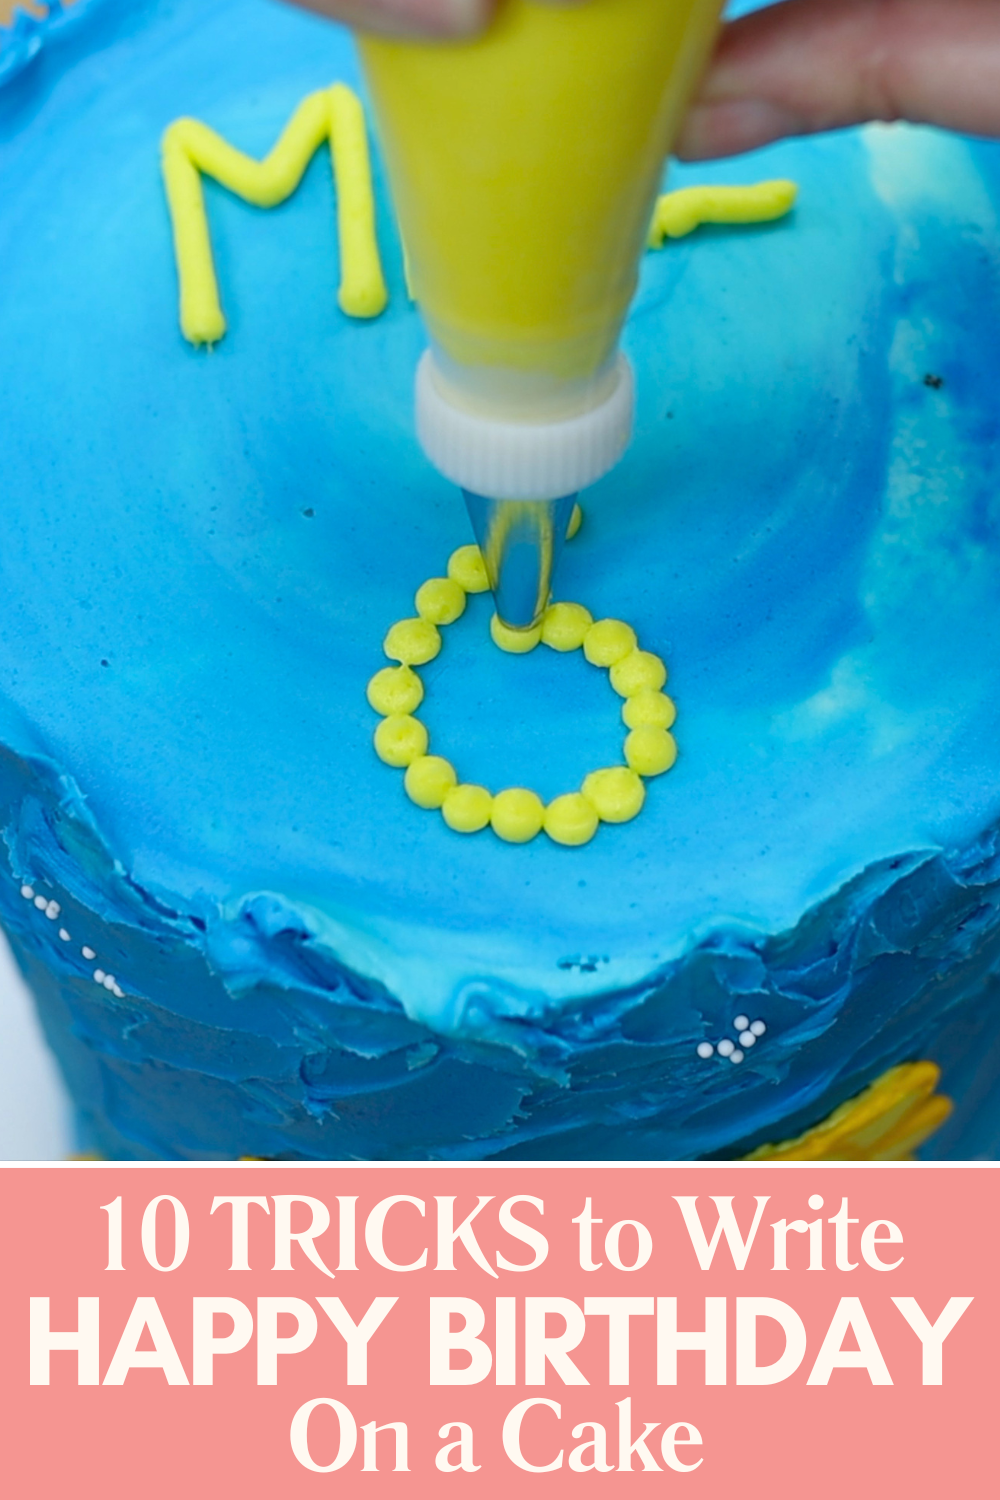
If you find it difficult to pipe continuous lines, try the pointillism technique. This involves piping lots of small dots in the shape of each letter or number. Just like with lines, using a larger tip like a number 8 makes it easier to pipe neatly than using a smaller tip.
Piping onto parchment for more control
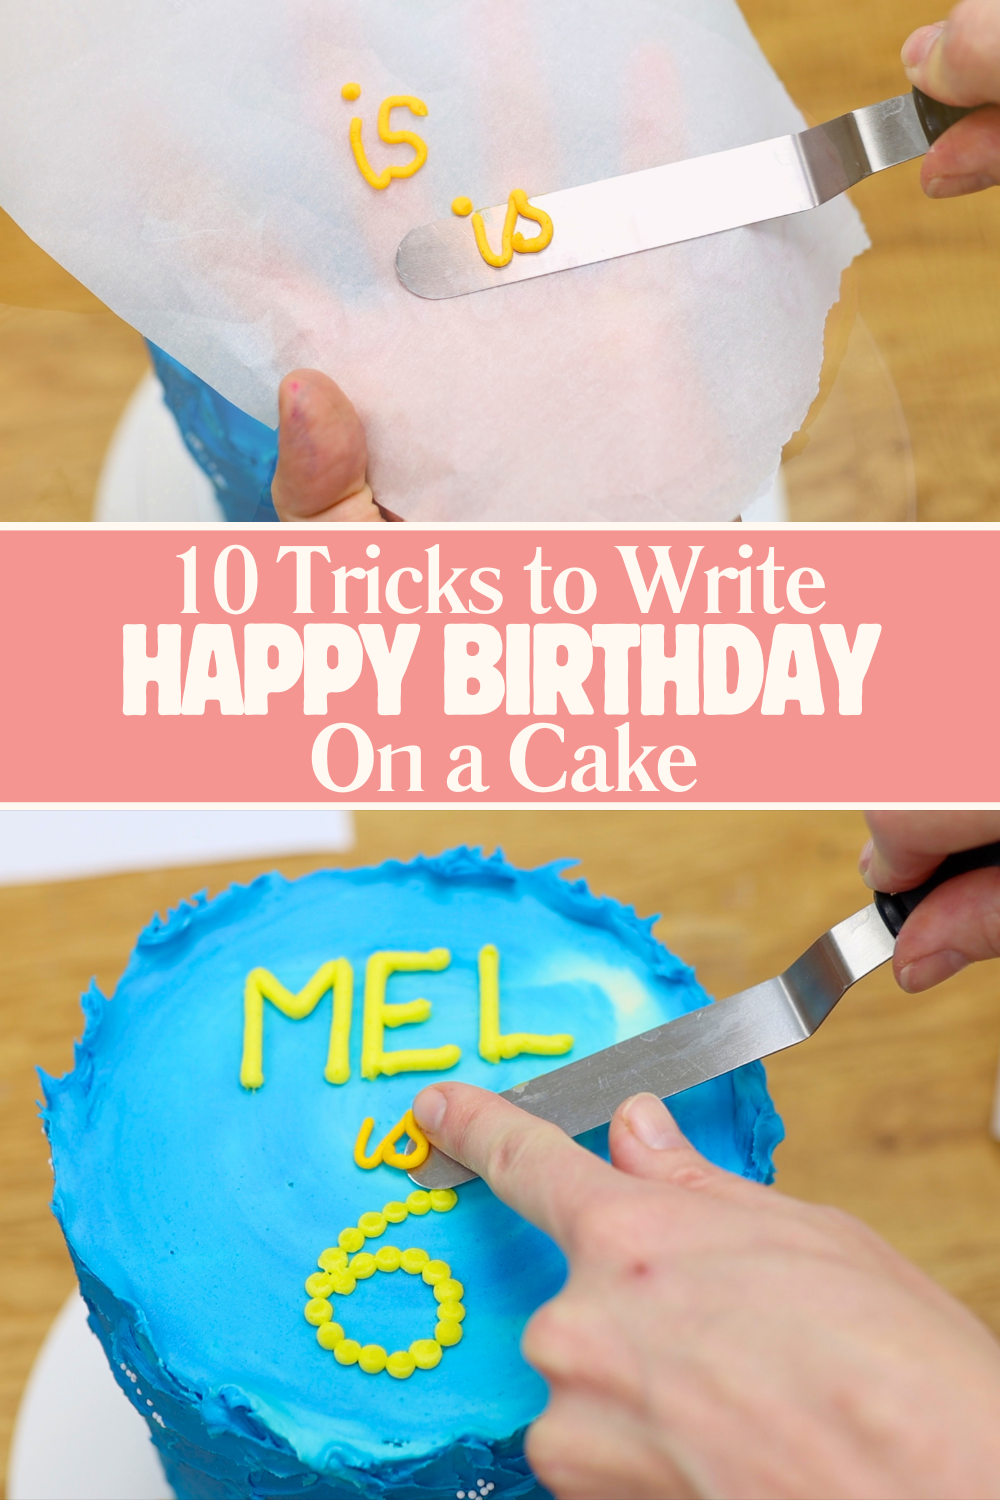
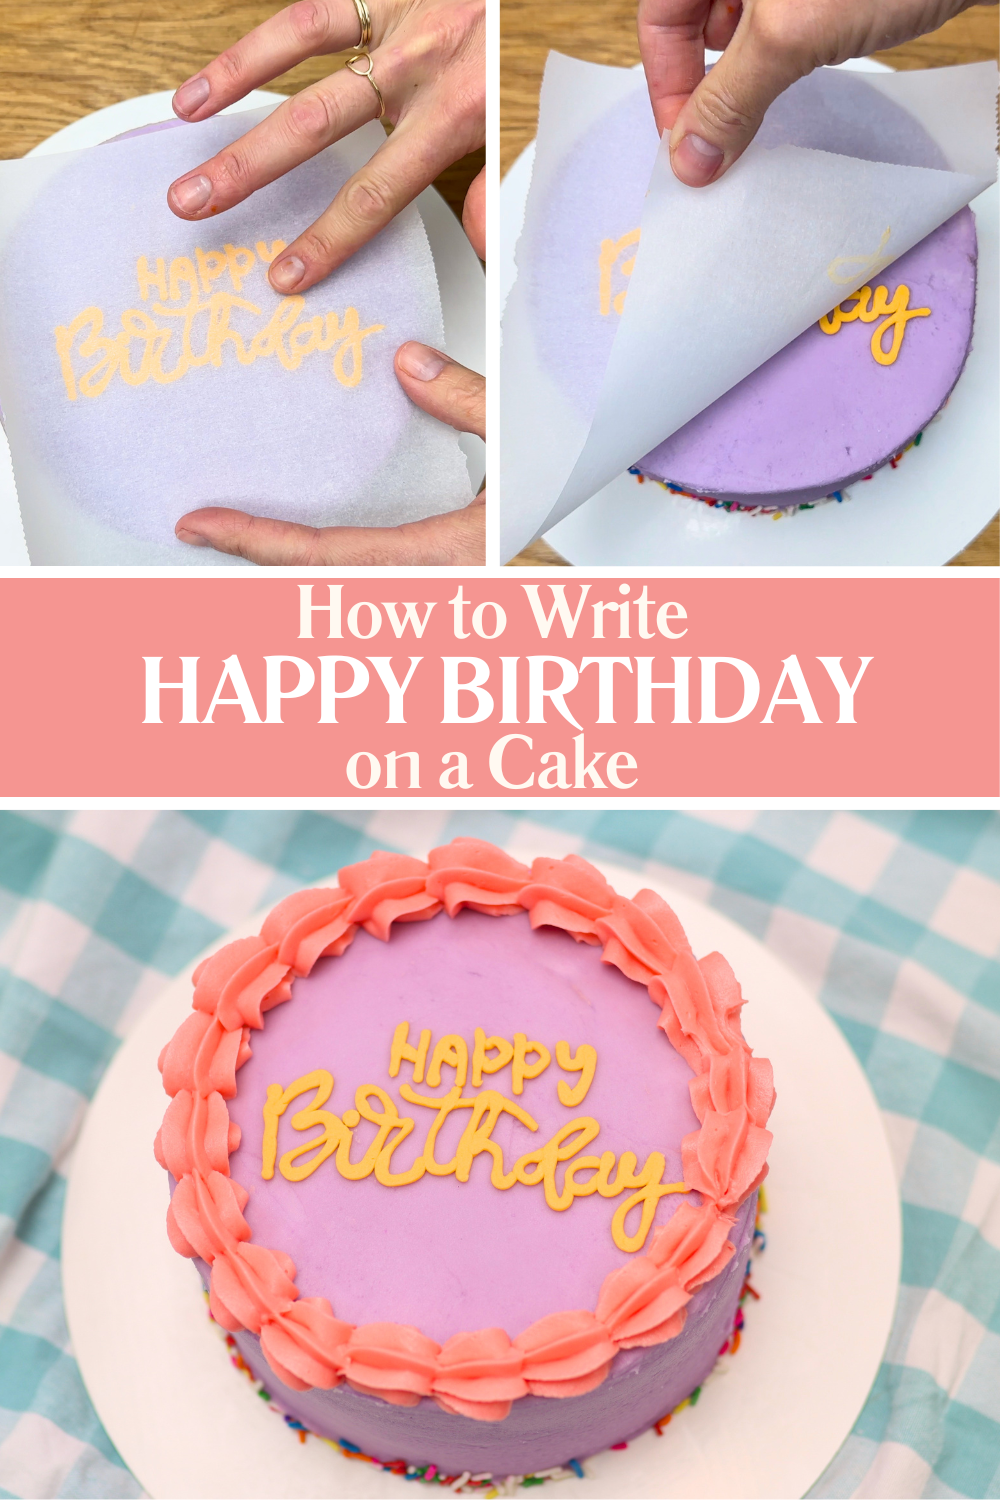
If your hands are shaky or you want more control, pipe your message onto parchment or wax paper instead of directly onto the cake. You can rest your hand on the work surface while piping, which makes it much easier to keep your lines steady. Pipe your message a few times so that you can choose your favorite version.
Freeze the message on the paper for about 10 minutes. Once it’s firm, slide an offset spatula underneath, lift it up, and transfer it onto your cake. This method gives much neater results than piping directly onto the cake.
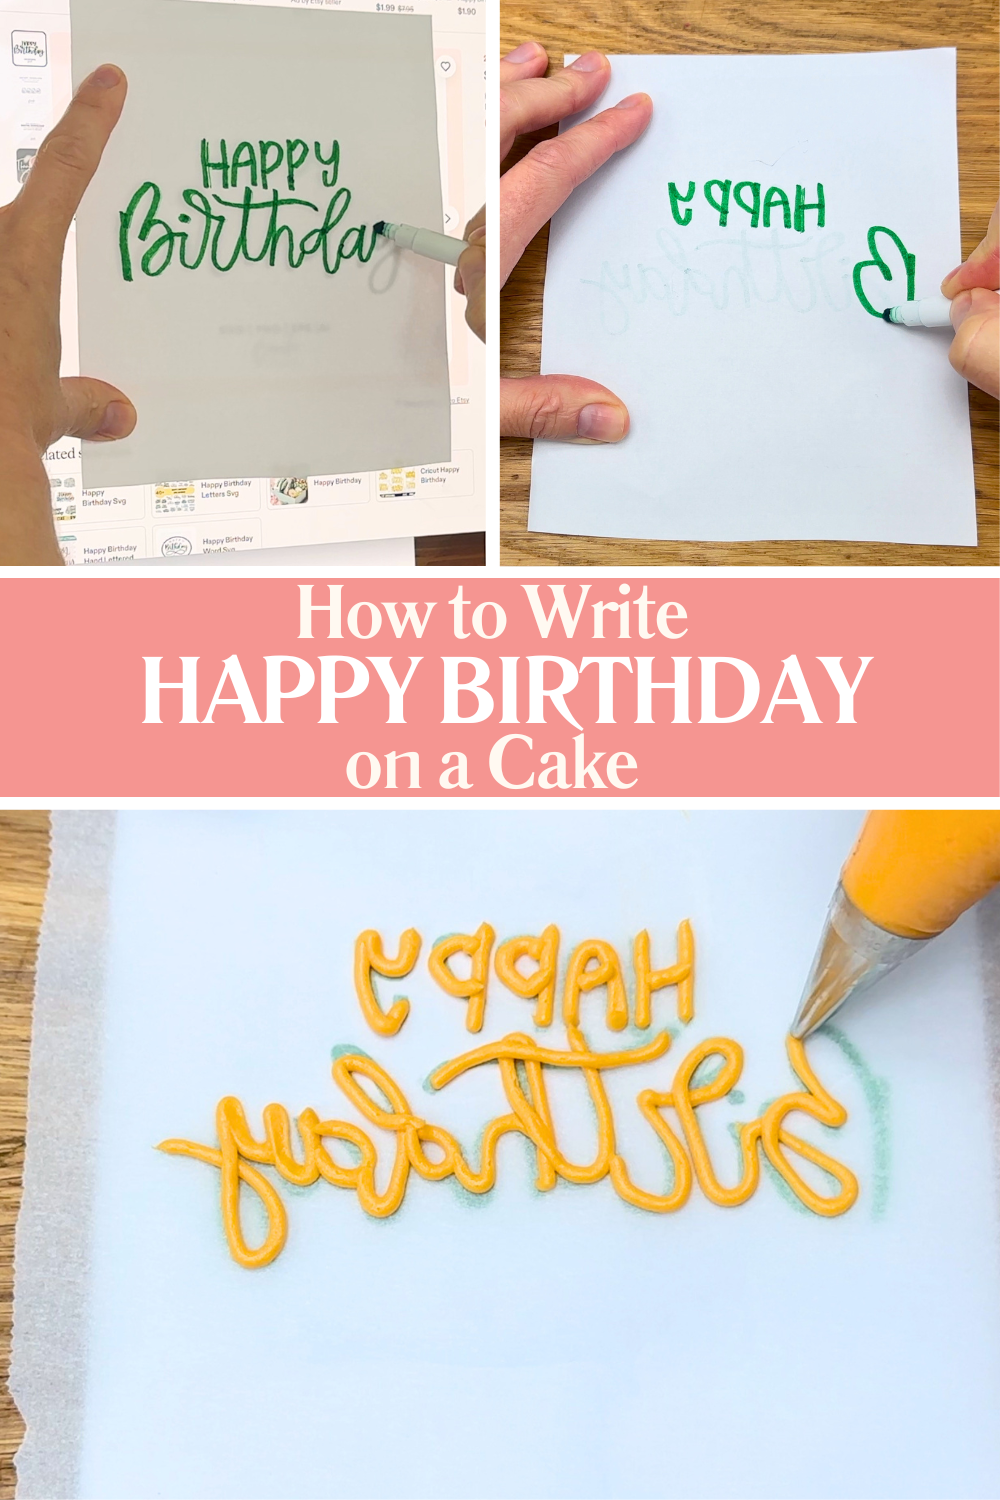
Tracing your message when writing Happy Birthday on a cake
For even more guidance, you can trace your message. Write your text in a font you like on paper or trace it from an image on your phone or computer. Then flip the paper over and trace from the back to create a mirror image.
Place parchment or wax paper on top and pipe over the mirrored letters using buttercream and a small round tip like a number 4. It can feel slightly awkward writing in reverse but having a guide makes it much easier to get neat, consistent letters. Once piped, lift the parchment, flip it over, and press it buttercream side down onto your cake. Chill the cake in the freezer for about 10 minutes before peeling off the parchment to reveal the message.
Skipping piping when you write Happy Birthday on a cake
If you’d rather avoid piping altogether, you can use letter stamps to imprint your message into the buttercream. Chill your cake until the frosting is firm, then let it sit at room temperature for about an hour so the buttercream softens slightly. This prevents cracking when you press in the letters. Arrange the letters, press gently to imprint them, and lift them off. You can leave the imprint as it is or paint over it using edible paint or a mixture of luster dust with a clear liquid like vodka or a clear extract such as lemon, vanilla, or almond.
How to write Happy Birthday on a cake
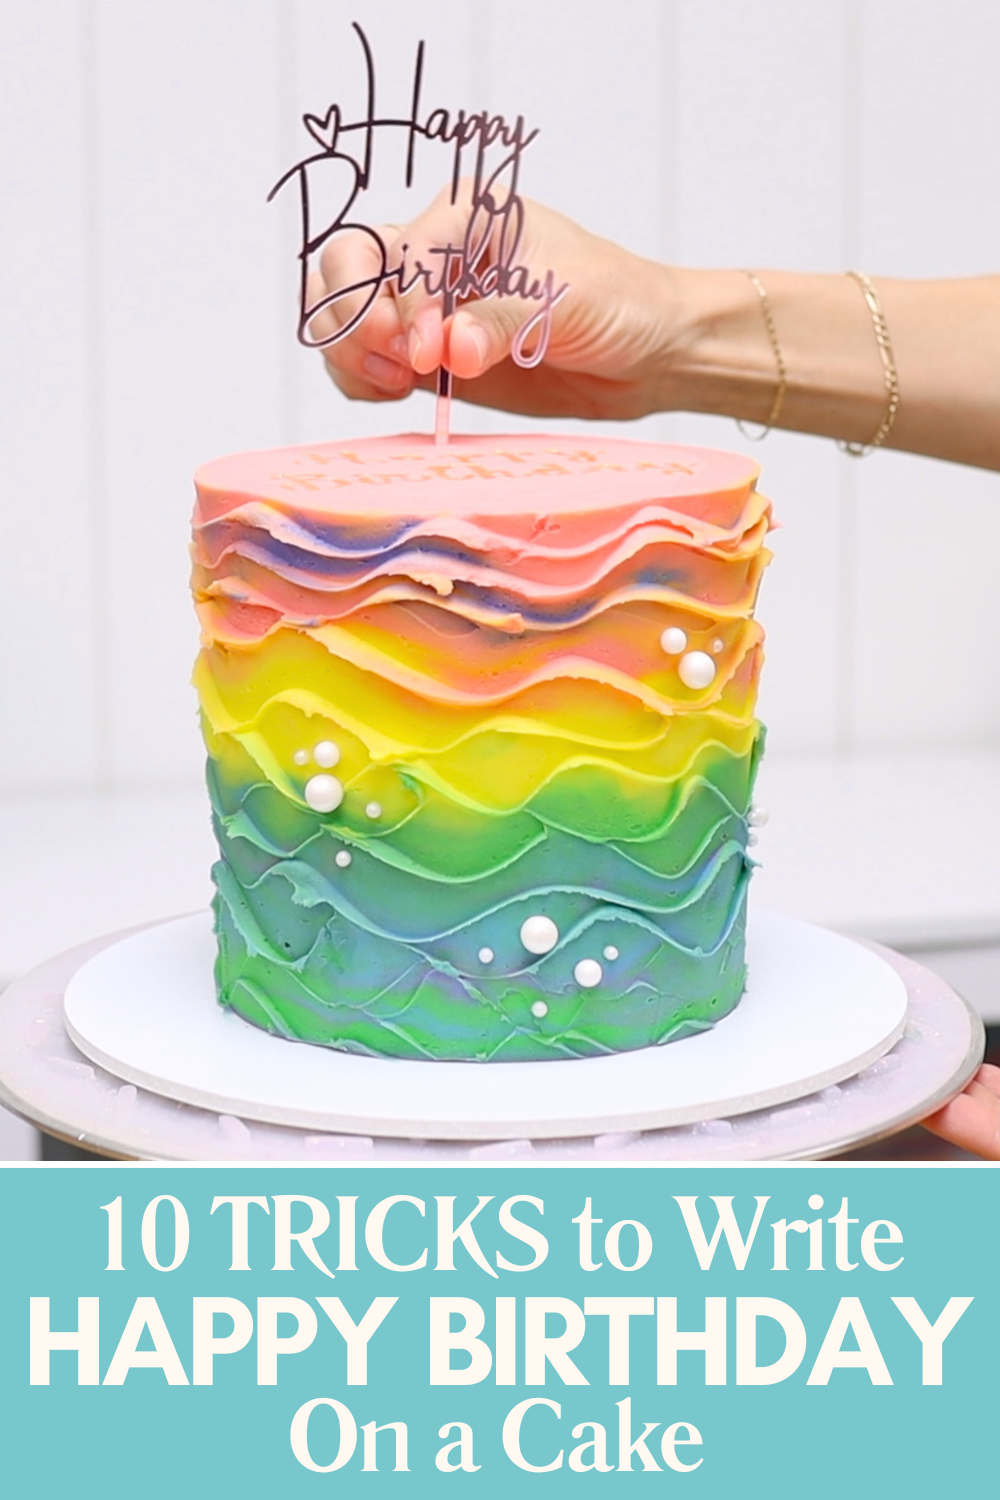
Learning how to write happy birthday on a cake takes practice. I hope these techniques make it easy to find a method that works for you and you'll get neat, professional-looking results every time. And if you're not ready to try any of these yet, or need more time to practice, use a cake topper for now instead!
Visit my cake school to learn hundreds more cake decorating techniques and designs! You can also watch a video of this tutorial on how to write Happy Birthday on a cake:
https://youtu.be/drAKe3vtUuk
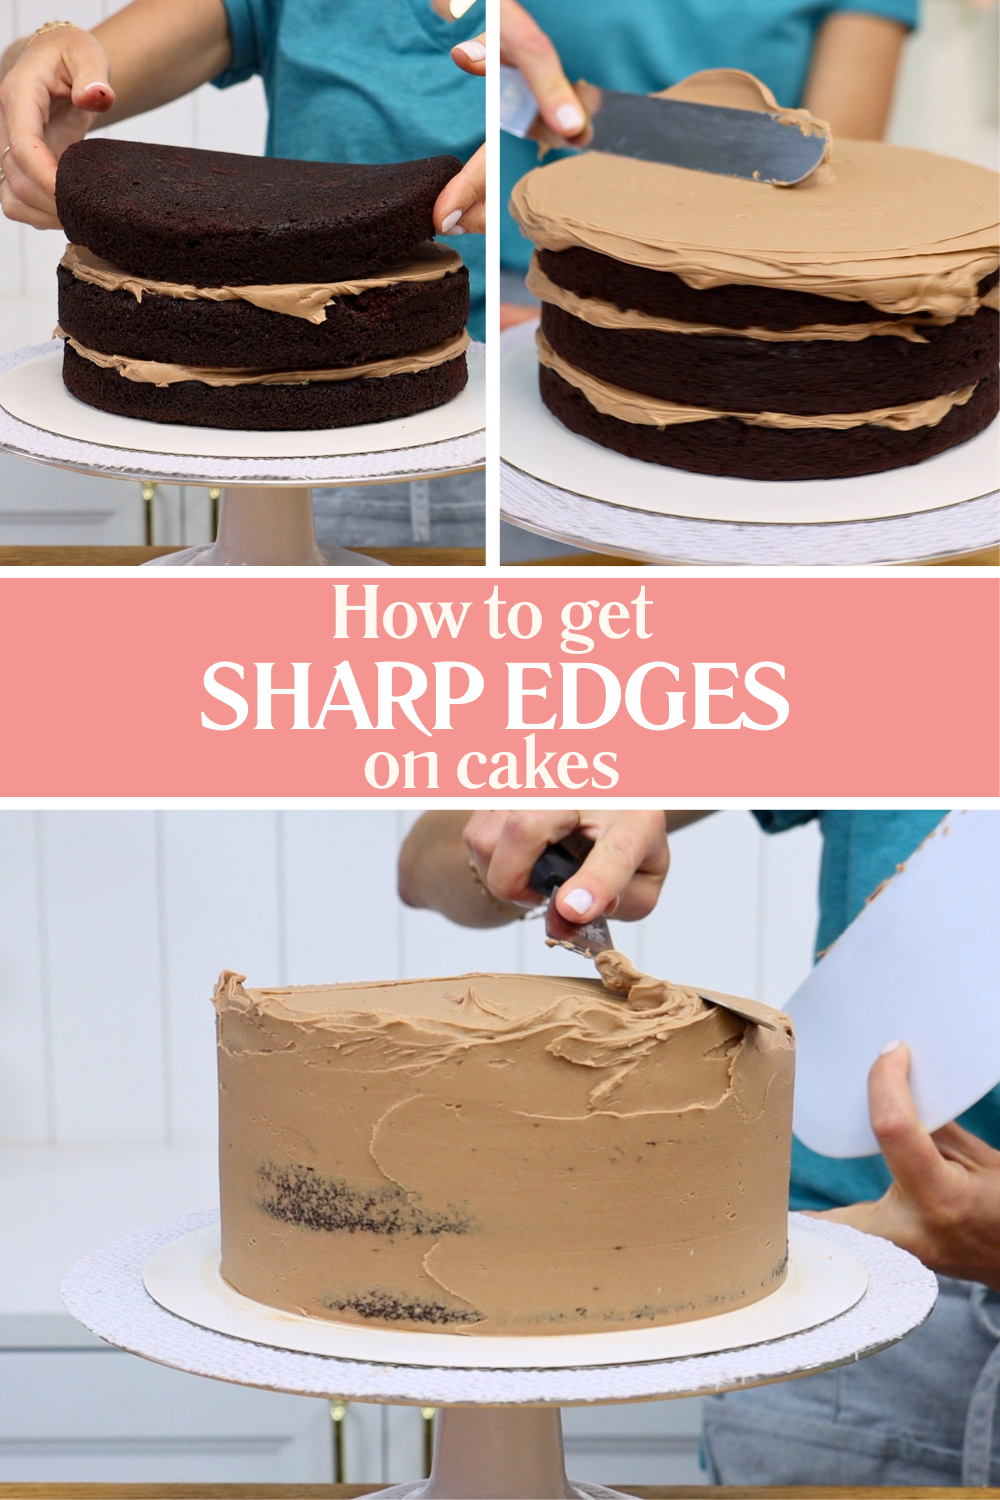
Sharp edges on a cake make any cake look instantly more professional, with clean lines from the sides up onto the top. In this tutorial I’ll walk you through exactly how to get sharp edges on a cake using simple techniques and tools, with all of my tips and tricks to make it easier.
How to prepare a cake for sharp edges on a cake
Start with a cold cake. Wrap your cake and leave it in the fridge for an hour or overnight or place it unwrapped in the freezer for about 15 minutes. This makes the cake much firmer and less crumbly, which makes the process easier and neater. Assemble your cake by attaching the first layer to a cake board with a small amount of buttercream. This acts as glue so it doesn’t move around. Spread on a layer of filling next. I’m using my 4 Minute Buttercream with Nutella mixed in and it's delicious! Then place your next layer on top, making sure it’s centered so the cake is straight, not leaning.
Repeat with more filling and cake layers. You’ll notice that assembling a cold cake is much easier than working with a room temperature cake, which tends to crumble and slide around as you spread the buttercream on.
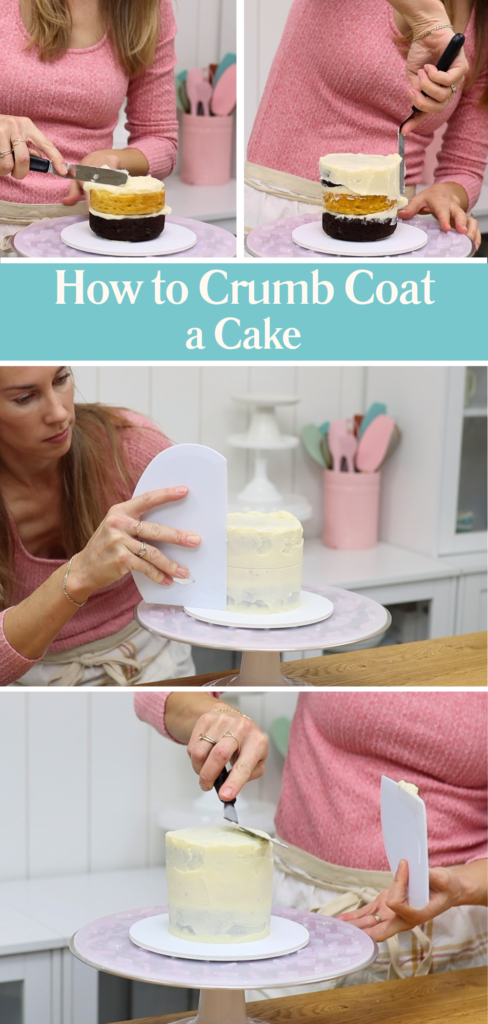
How to apply a crumb coat
Next, it’s time for a crumb coat. Before you start, chill the assembled cake for about 20 minutes in the fridge or 10 minutes in the freezer. This sets the buttercream 'glue' and holds the cake securely in place while you frost it. A cold cake is also much firmer so it won't lean as you spread and scrape around it.
Apply a thin layer of buttercream over the entire cake. I like to start with the top and then move down to the sides. This layer doesn’t need to be perfectly neat, but it’s important to avoid any bulges of buttercream sticking out sideways or above the top edge. Those will harden when chilled and can stick through your final coat of frosting. It's fine to be able to see the colour of the cake through the frosting in places, as long as there is at least a thin layer of frosting covering it. If the cake is completely exposed, those crumbs will get into your final layer of frosting, which you don't want.
Once the crumb coat is finished, chill the cake again for 20 minutes in the fridge or 10 minutes in the freezer.
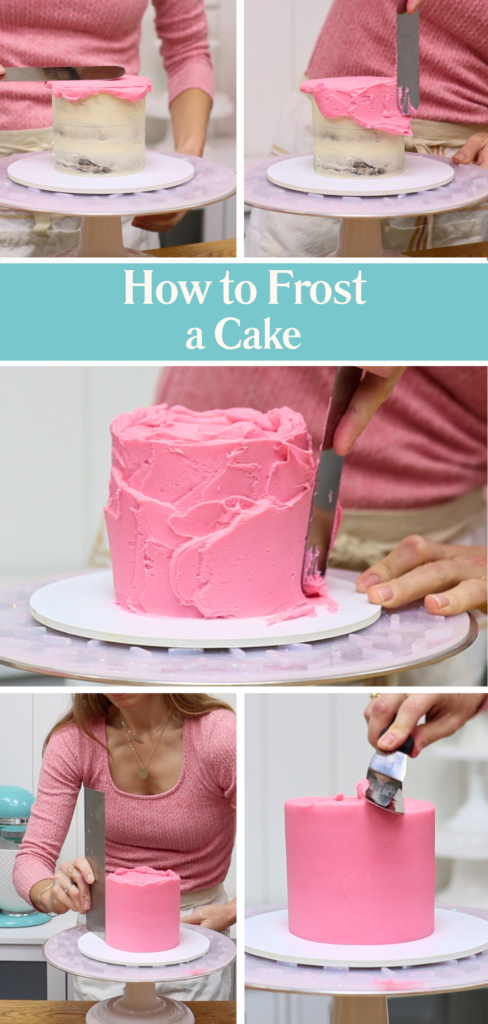
How to apply the final coat for sharp edges on a cake
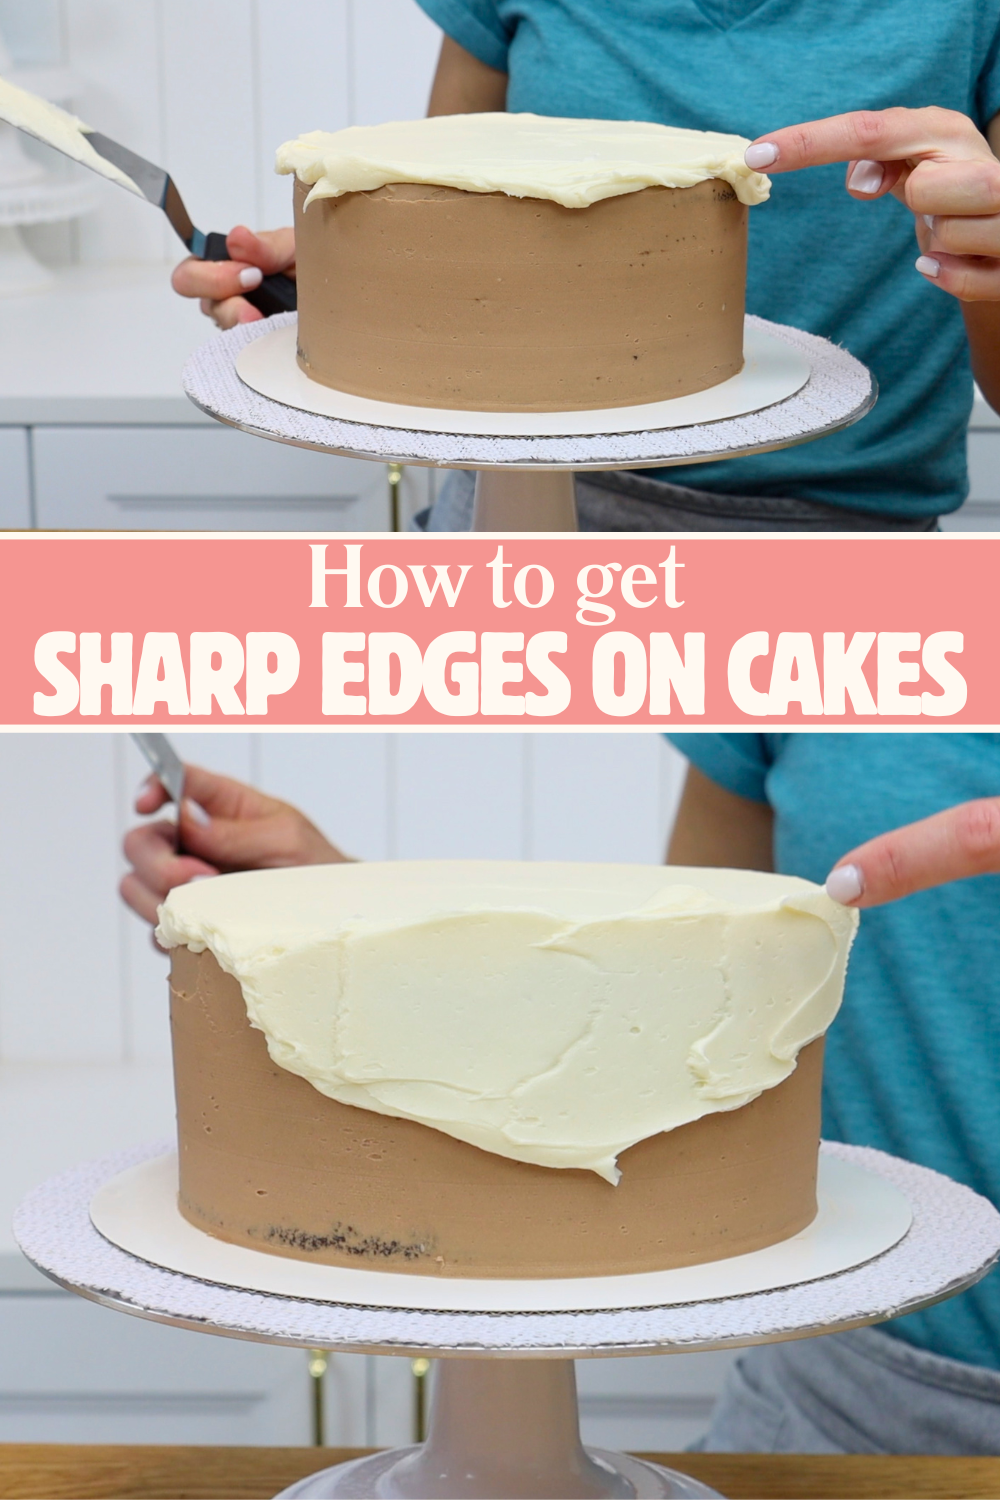
Now the cake is ready for its final coat, which is where sharp edges on a cake are created. First, wipe the cake board clean with a towel or paper towel. If there are any hardened smudges of buttercream, your cake scraper will bump into them as you smooth the sides, creating dents in the frosting.
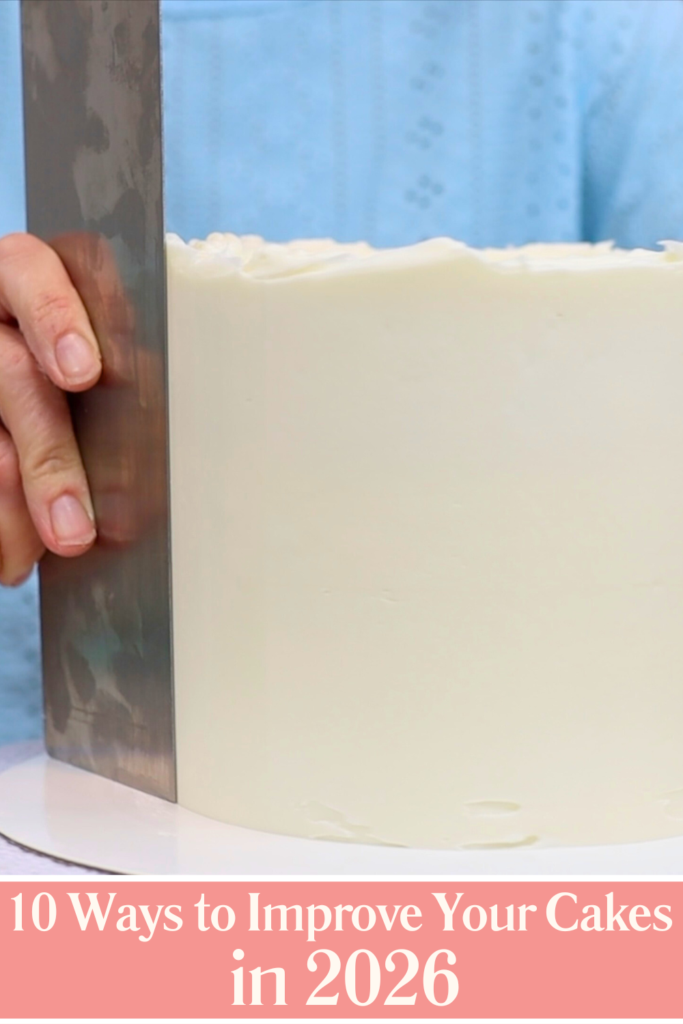
Spread buttercream onto the top of the cake and push it outwards so it extends over the edges. This prevents gaps around the top edge. Then spread buttercream around the sides of the cake, making sure it sticks up above the top edge. This is crucial because it prevents a domed top and instead creates a wall or lip of buttercream all the way around the cake. See the image below for a visual on the two places the buttercream should be sticking out. Continue spreading down to the bottom so the cake is fully covered.
How to smooth the sides for sharp edges on a cake
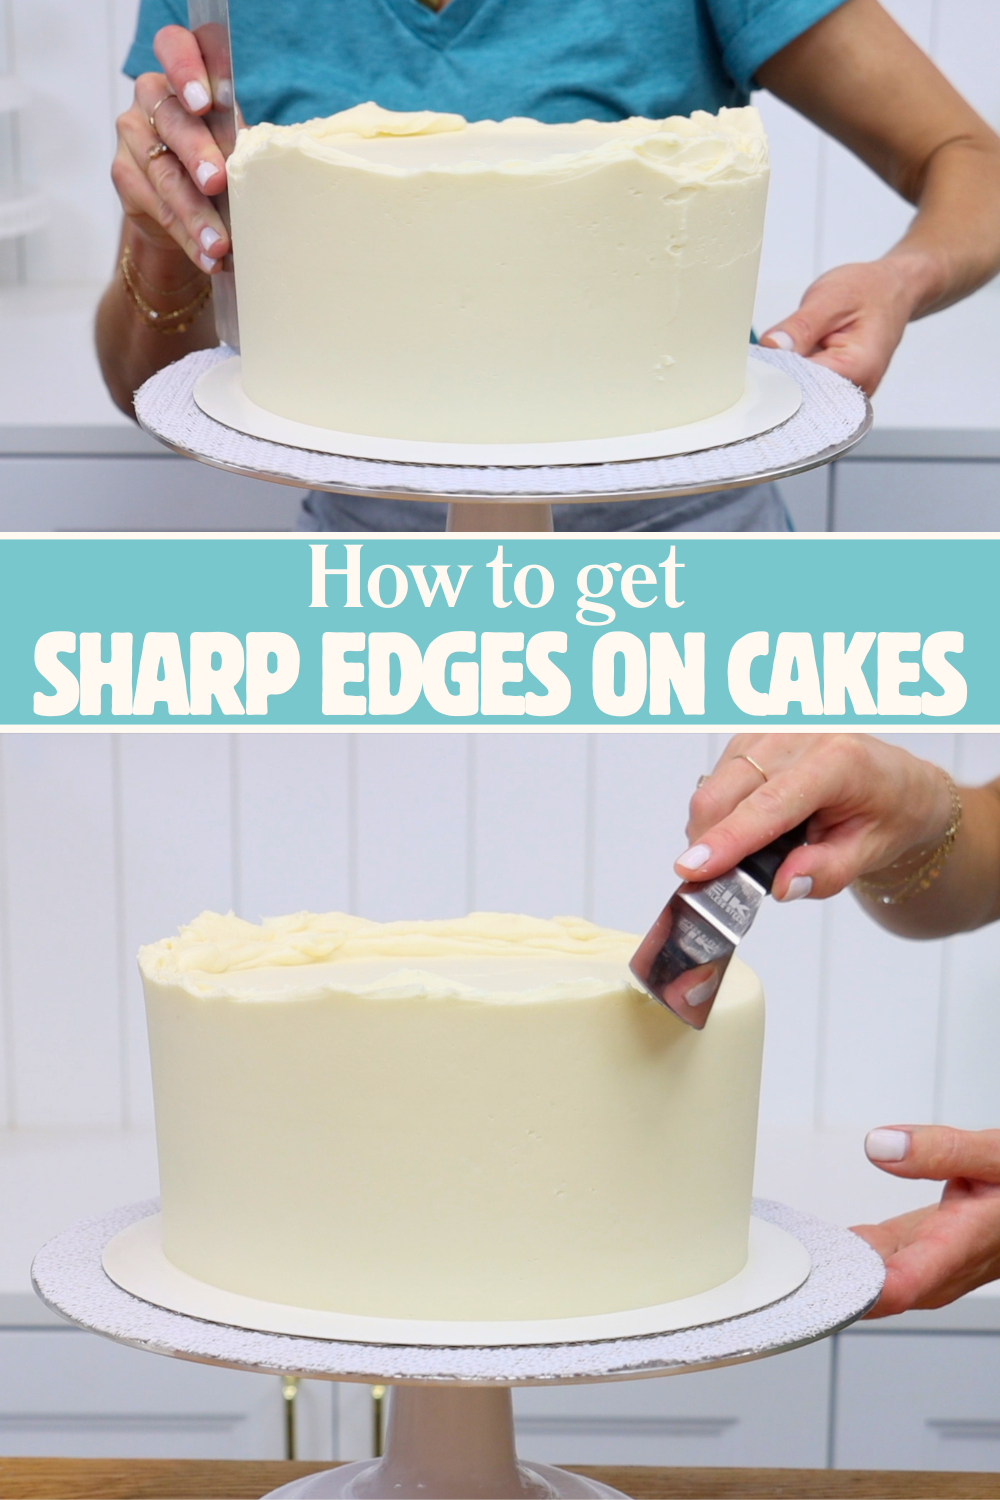
To smooth the sides, press the base of your cake comb or scraper flat against the cake board to line it up straight. This helps create straight sides, instead of a cake that's wider at the top than the bottom (or wider at the bottom than the top). Spin your turntable and scrape around the cake in long, smooth motions. After a few scrapes, fill in any gaps or indents with more buttercream and scrape again. Repeat this process until the sides are smooth and even.
How to create sharp edges on a cake with a spatula
Now for the part you've been waiting for: the top edge. Use an offset spatula, angled palette knife, or cake scraper and swipe sideways, pushing the lip of buttercream towards the center of the cake. Then lift your tool up and away to remove the excess frosting. Wipe your blade clean after each swipe so you don’t drag buttercream back onto the surface and create texture.
Here are the three things to focus on:
It’s important to push sideways rather than down, because pushing down will create a bulge underneath the top edge.
Don’t swipe more than halfway across the cake before lifting your spatula. If you swipe too far you'll drag buttercream over the opposite edge.
For your first swipe, swipe slightly higher than you think you need to. You can always go back and swipe lower, but starting too low can expose the crumb coat or even the cake itself. Trying to fix that with an upward diagonal swipe will create a domed top instead of a sharp 90° angle.
Work your way all the way around the cake and then get down to eye level and spin the cake to check that the top edge is flat and level. If you see any areas where the edge rises, go back and swipe those sections again until the entire top edge is even.
Why chilling is essential for sharp edges on a cake
The final step is to chill the cake again so the buttercream sets and becomes firm. This is essential for maintaining sharp edges on a cake. If you try to decorate the cake while the frosting is still soft, you’ll damage the smooth sides. If you pipe onto the top before chilling, the weight of the buttercream can push down and cause the edges to droop or bulge. Chilling locks everything in place so your edges stay crisp.
I hope this tutorial helps you achieve sharp edges on a cake with confidence. For more cake decorating techniques and designs, visit my cake school!
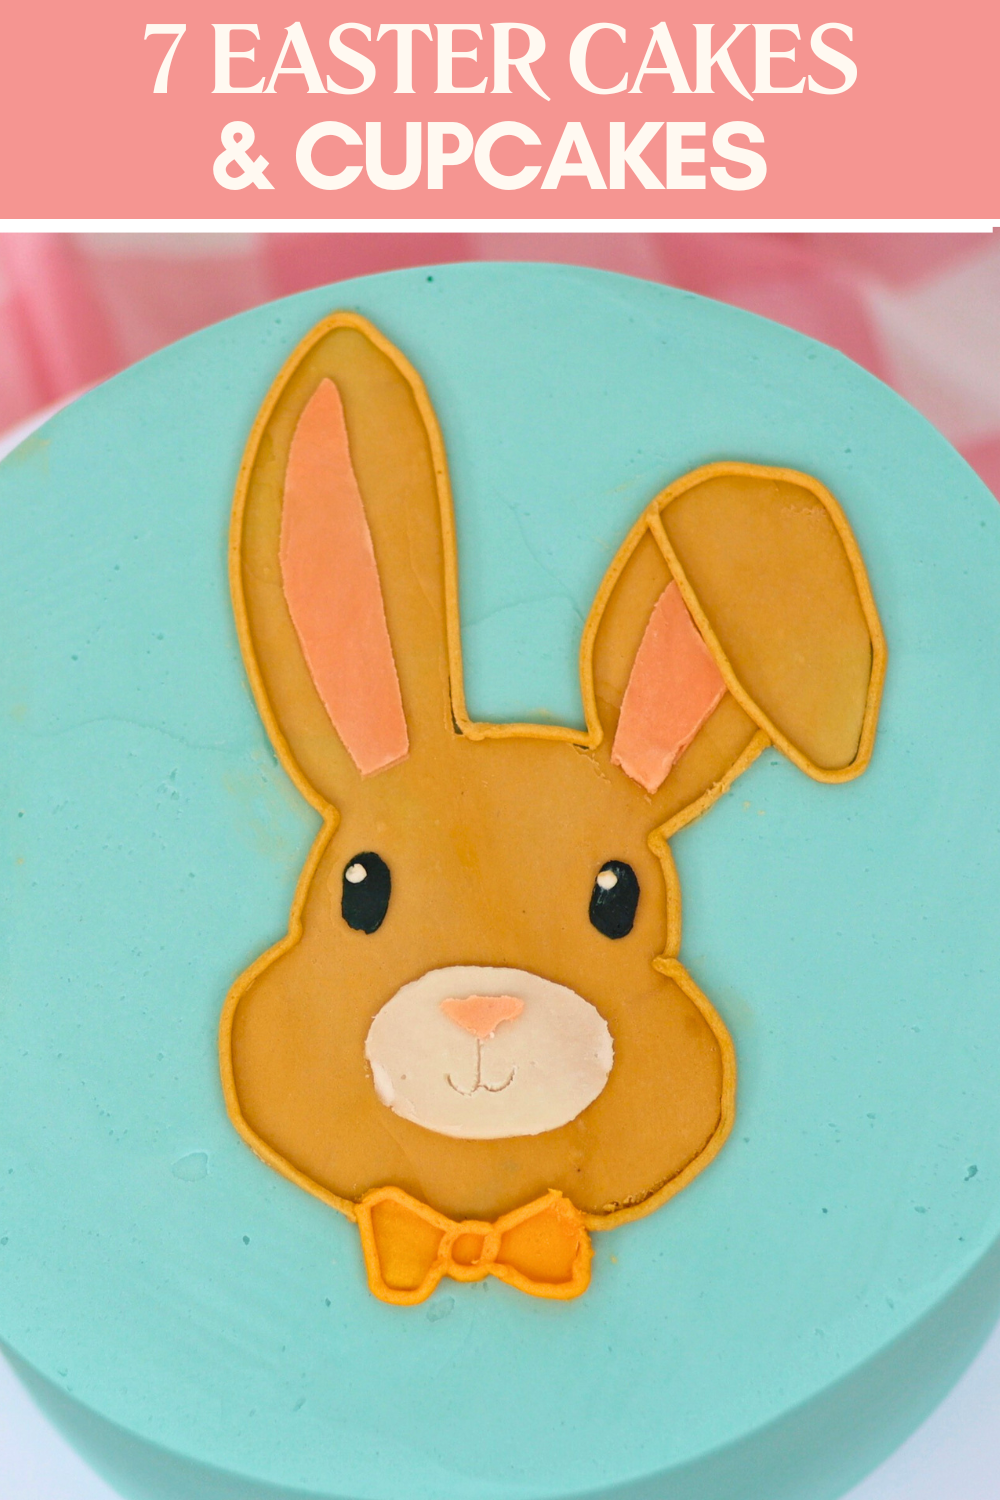
Looking for ideas for ideas for Easter cakes and cupcakes? These designs are cute, colourful, and surprisingly simple to decorate. In this tutorial you’ll learn how to create seven designs using buttercream, including a stencil Easter bunny cake, a speckled egg cake, carrot cake decorations, piped rose cupcakes, carved buttercream, and a technique that reveals a hidden design inside the frosting. Most of these use basic tools and simple techniques but still give really impressive results.
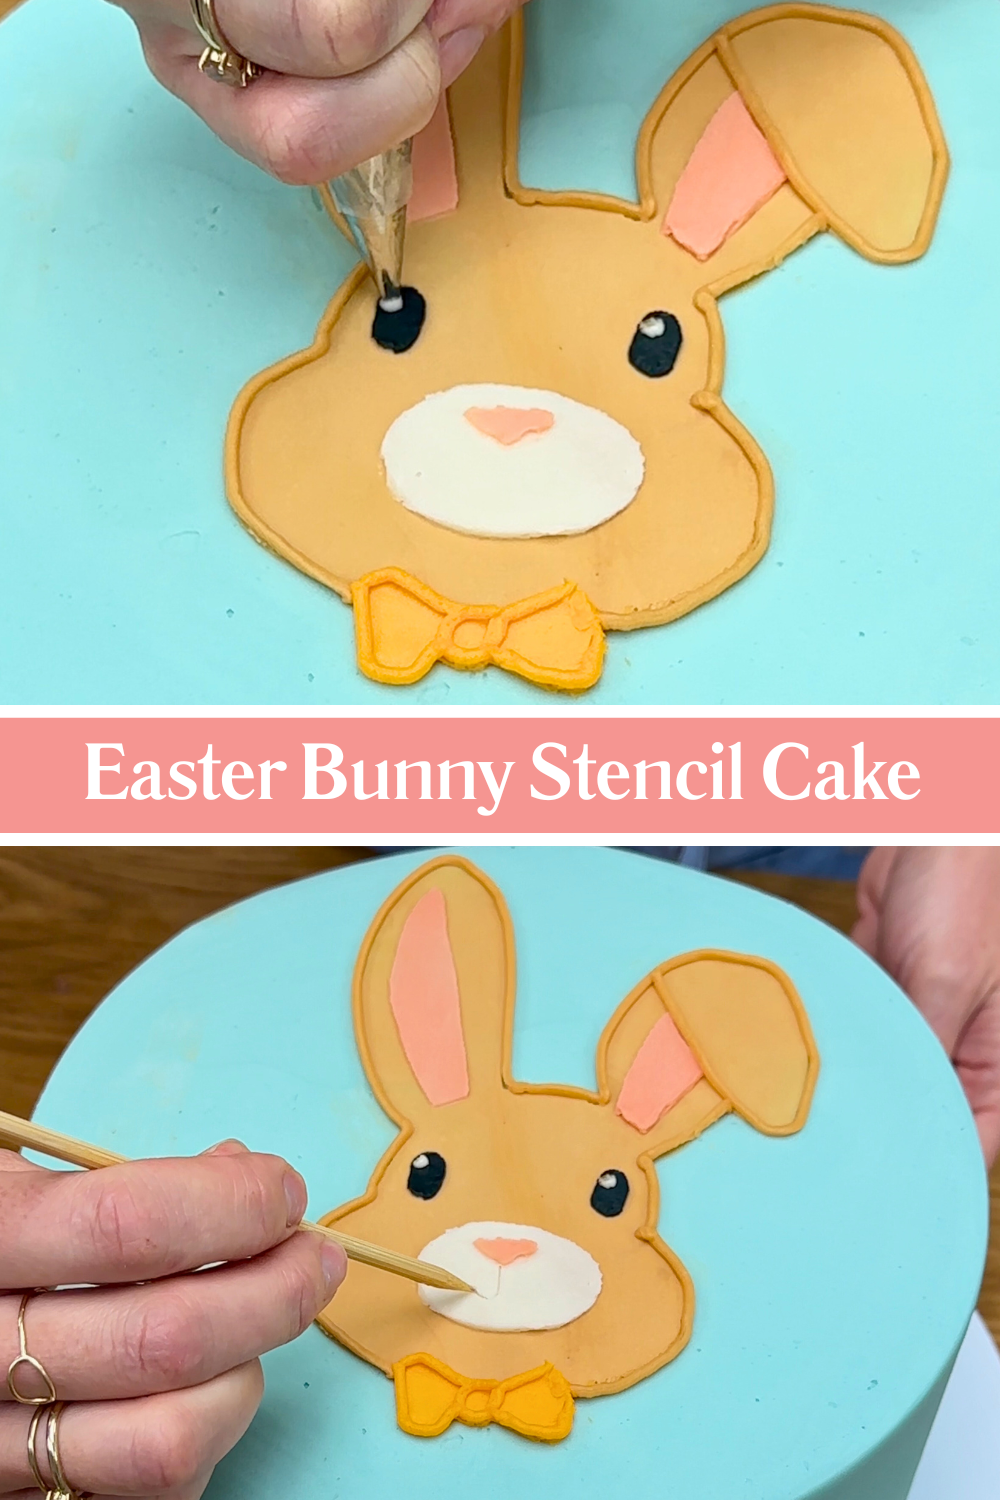
Easter Bunny Cake
This Easter bunny cake is decorated using homemade stencils, which makes it much easier than it looks. Start by drawing or tracing your design. I traced a bunny with a bowtie from my computer screen onto paper. Then place parchment paper or wax paper over the sketch and trace the background shape first, which will be your first stencil and your base colour. Next, trace the details onto separate pieces of parchment or wax paper, using a new piece for each colour. Once everything is drawn, cut out the shapes.
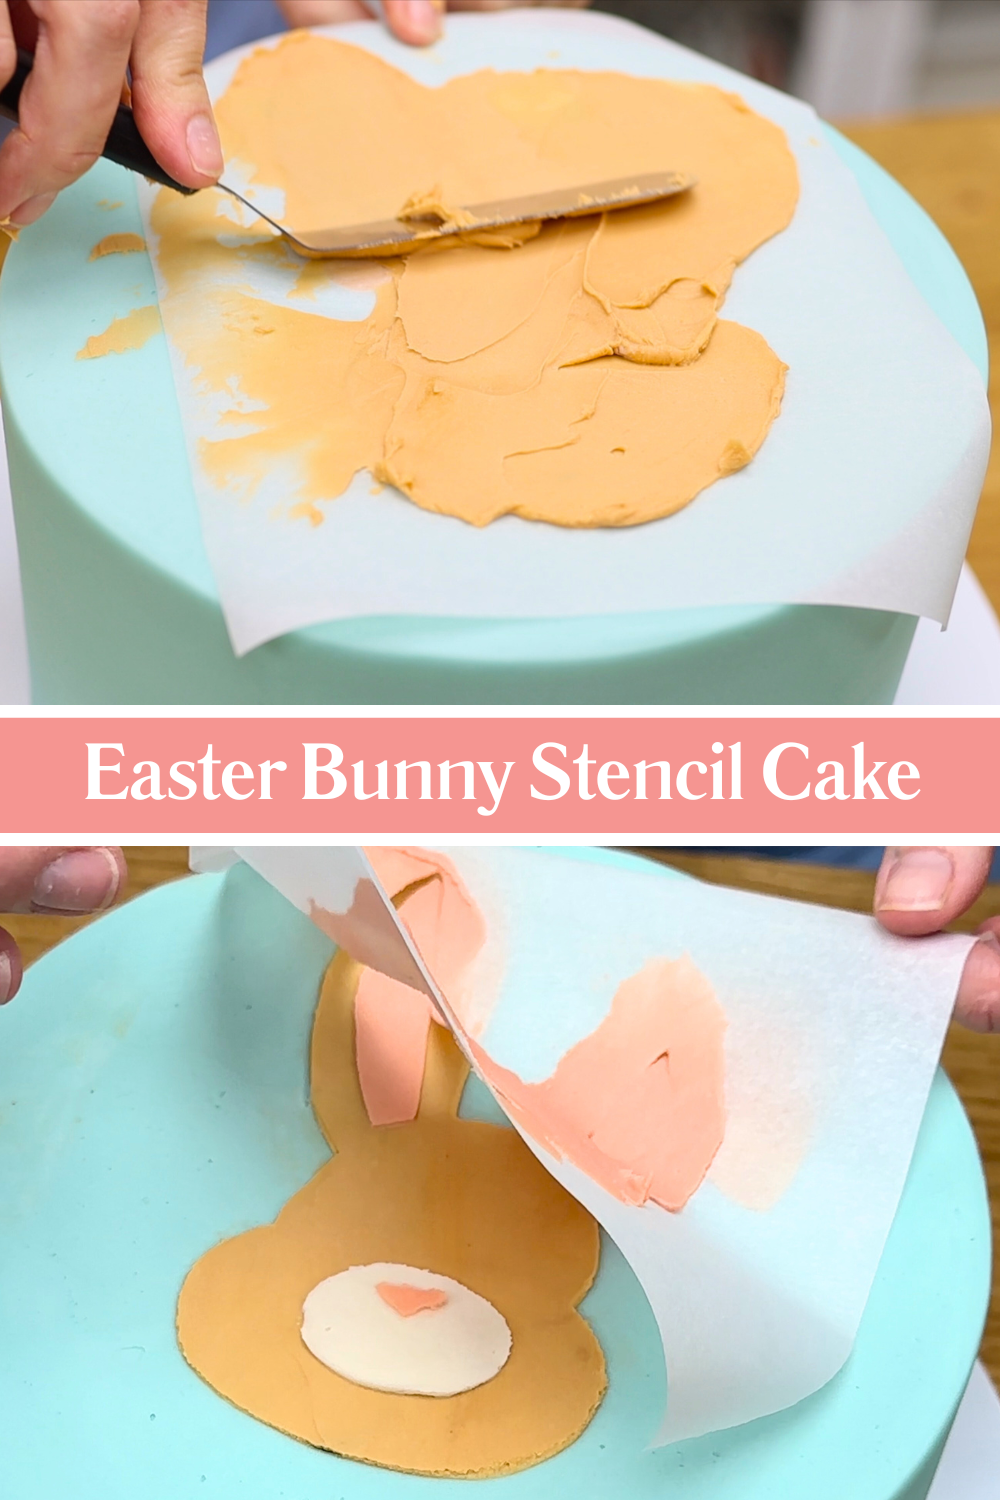
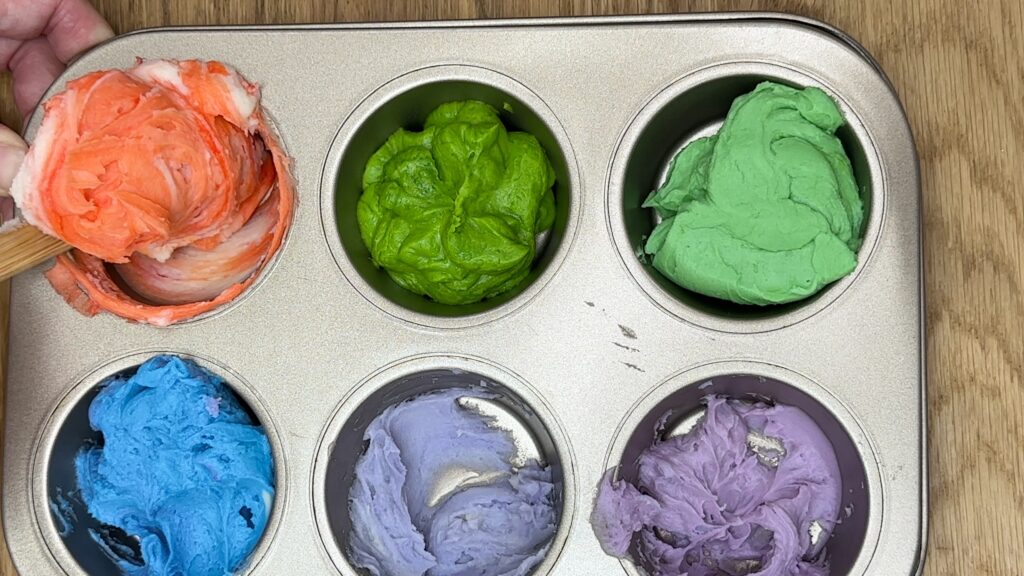
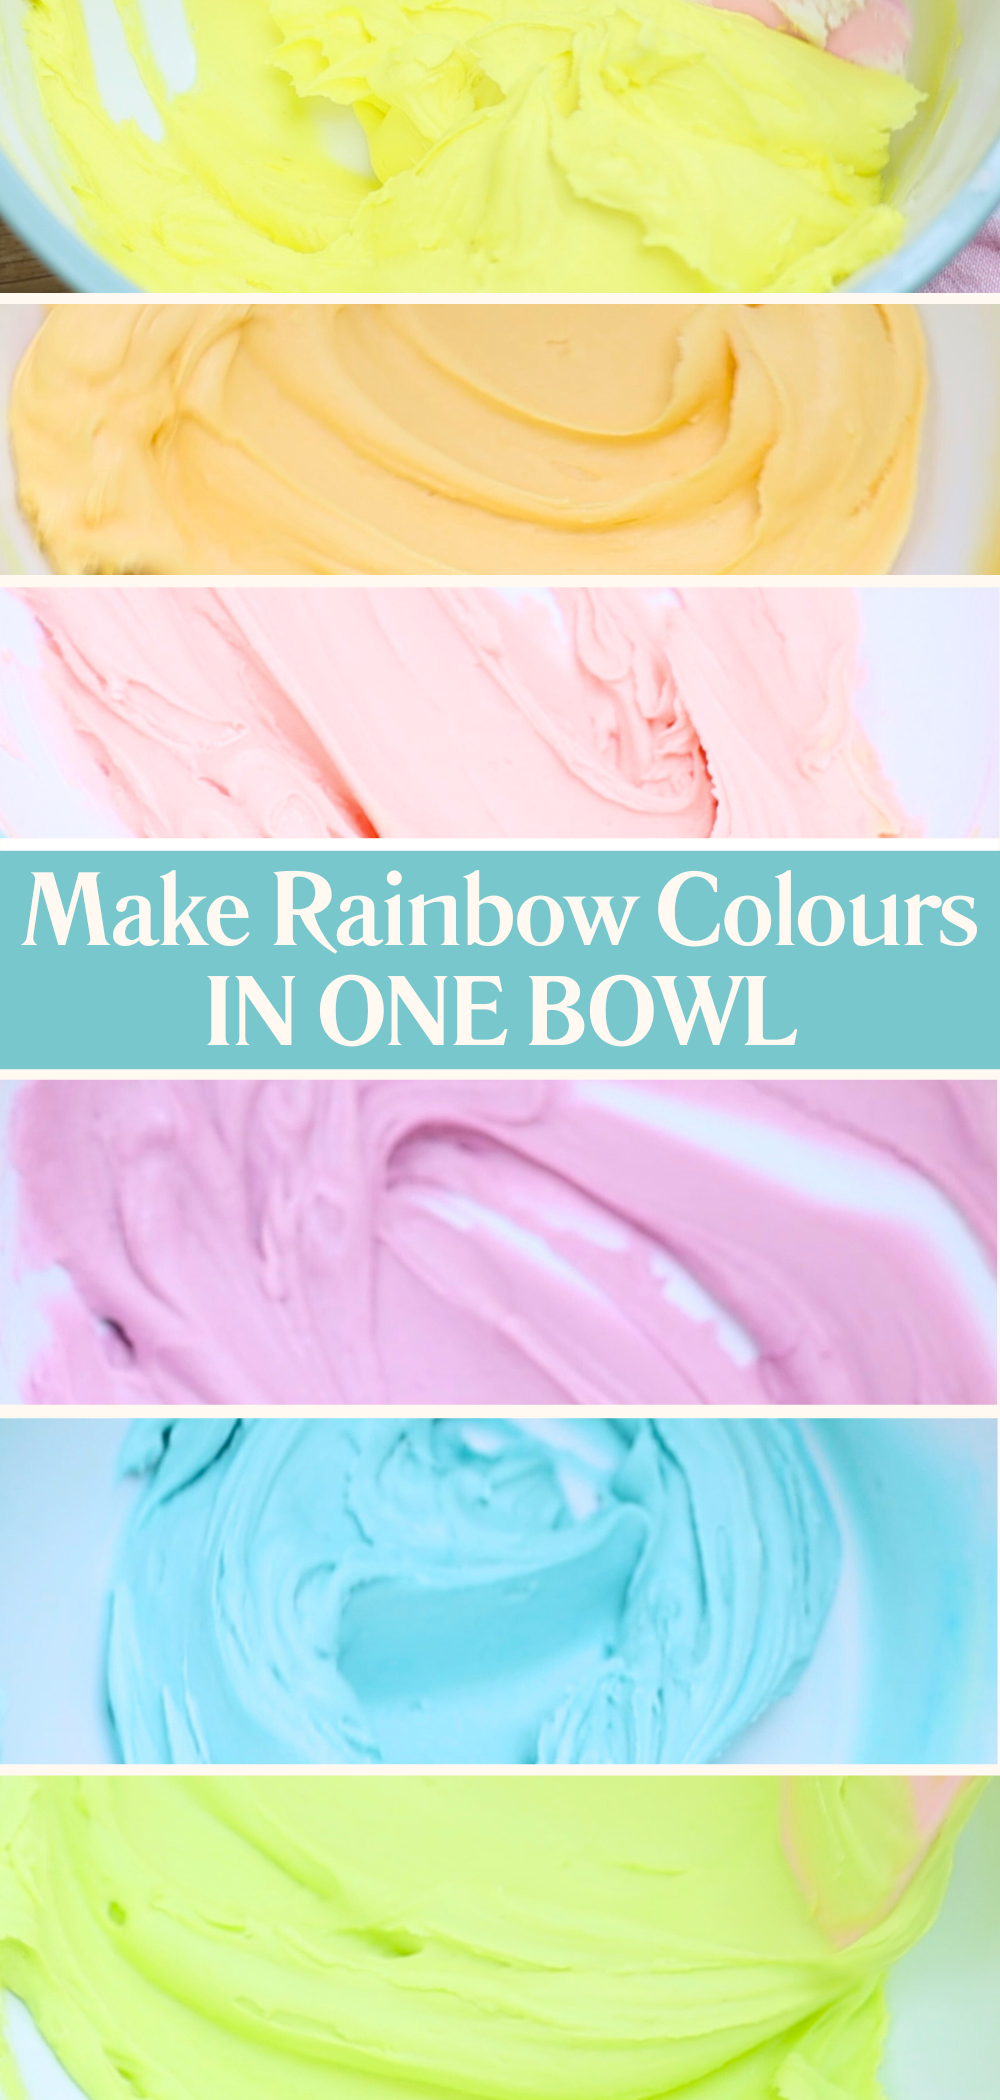
After frosting your cake, chill it until the buttercream is firm. Meanwhile, mix your buttercream colours. A time-saving tip is to use a cupcake pan as a palette by putting a spoonful of buttercream into each hole. Then add a few drops of food colouring to each one and mix. A cupcake pan is the perfect size for techniques like stencilling and it's quicker to cleanup than lots of little bowls.
Press the background stencil onto the cake and spread buttercream over the top. Smooth it a few times so that only a thin layer remains, then carefully peel the stencil away. If there are any smudges, you can tidy them up with a toothpick.
Put the cake back into the fridge or freezer for about 10 minutes to set the buttercream before adding the next stencil. Continue layering the stencils from the back of the design to the front.
At the end, you can optionally pipe around the coloured sections to make the design stand out. I find it easier and neater to pipe small details, like dots within the eyes, instead of using a stencil. For the mouth I like to score a smile with a toothpick because unless your cake and design are huge, piped lines always seem too thick.
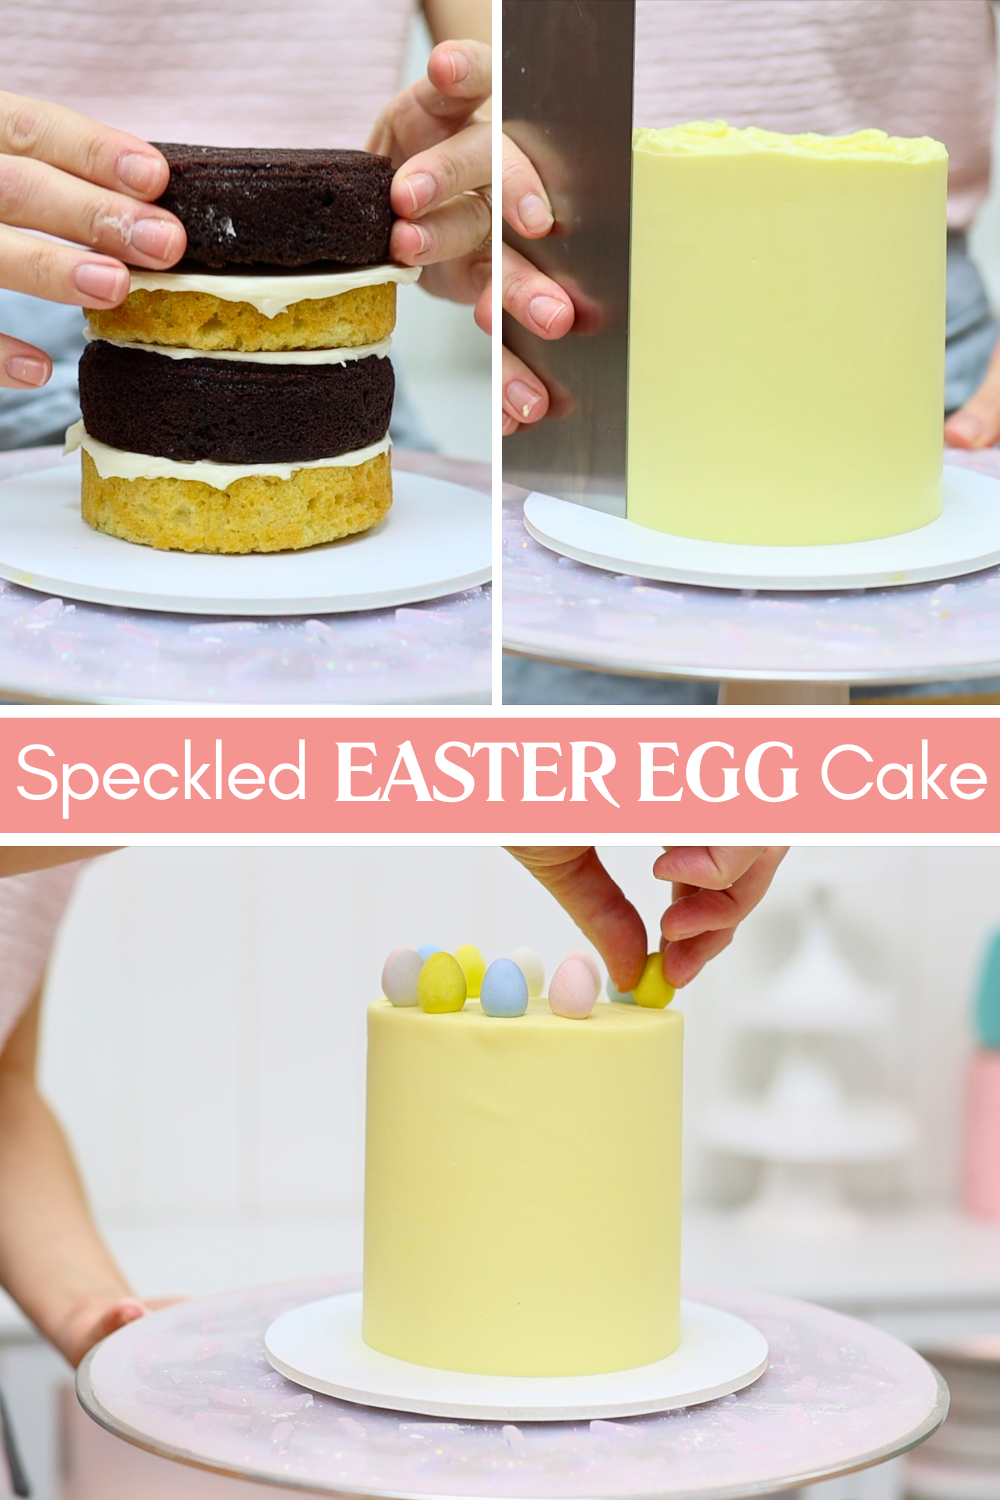
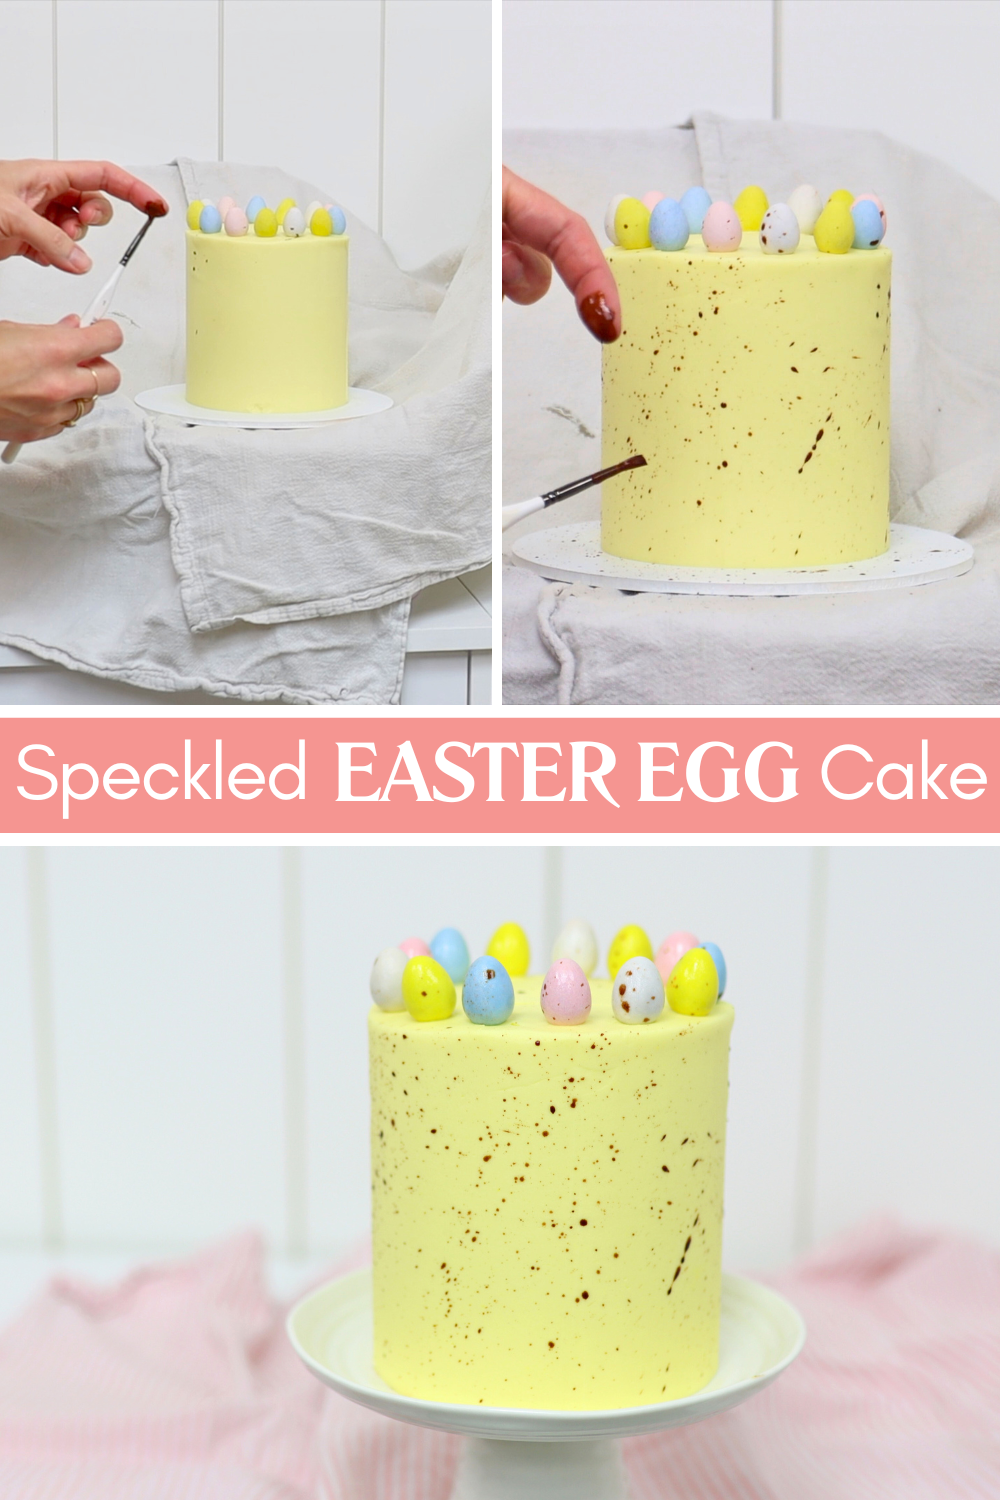
Speckled Egg Cake with Mini Eggs
This cake is inspired by speckled chocolate eggs and is one of the easiest ideas for Easter cakes and cupcakes. After assembling your cake layers with filling and frosting, take your time smoothing the frosting because there won’t be many decorations covering the sides.
While the frosting is still soft and sticky, press colourful mini eggs onto the top in a ring.
For the speckled effect, mix one teaspoon of cocoa powder with one and a half teaspoons of hot water. Before splattering, protect your work surfaces with cloths or towels because this can get messy. Dip a paintbrush into the cocoa mixture, pull the bristles back with your finger, and let go so they snap forward and splatter onto the cake. This creates a realistic speckled egg effect. It’s fine if some of the splatter lands on the eggs because it helps bring the whole design together.
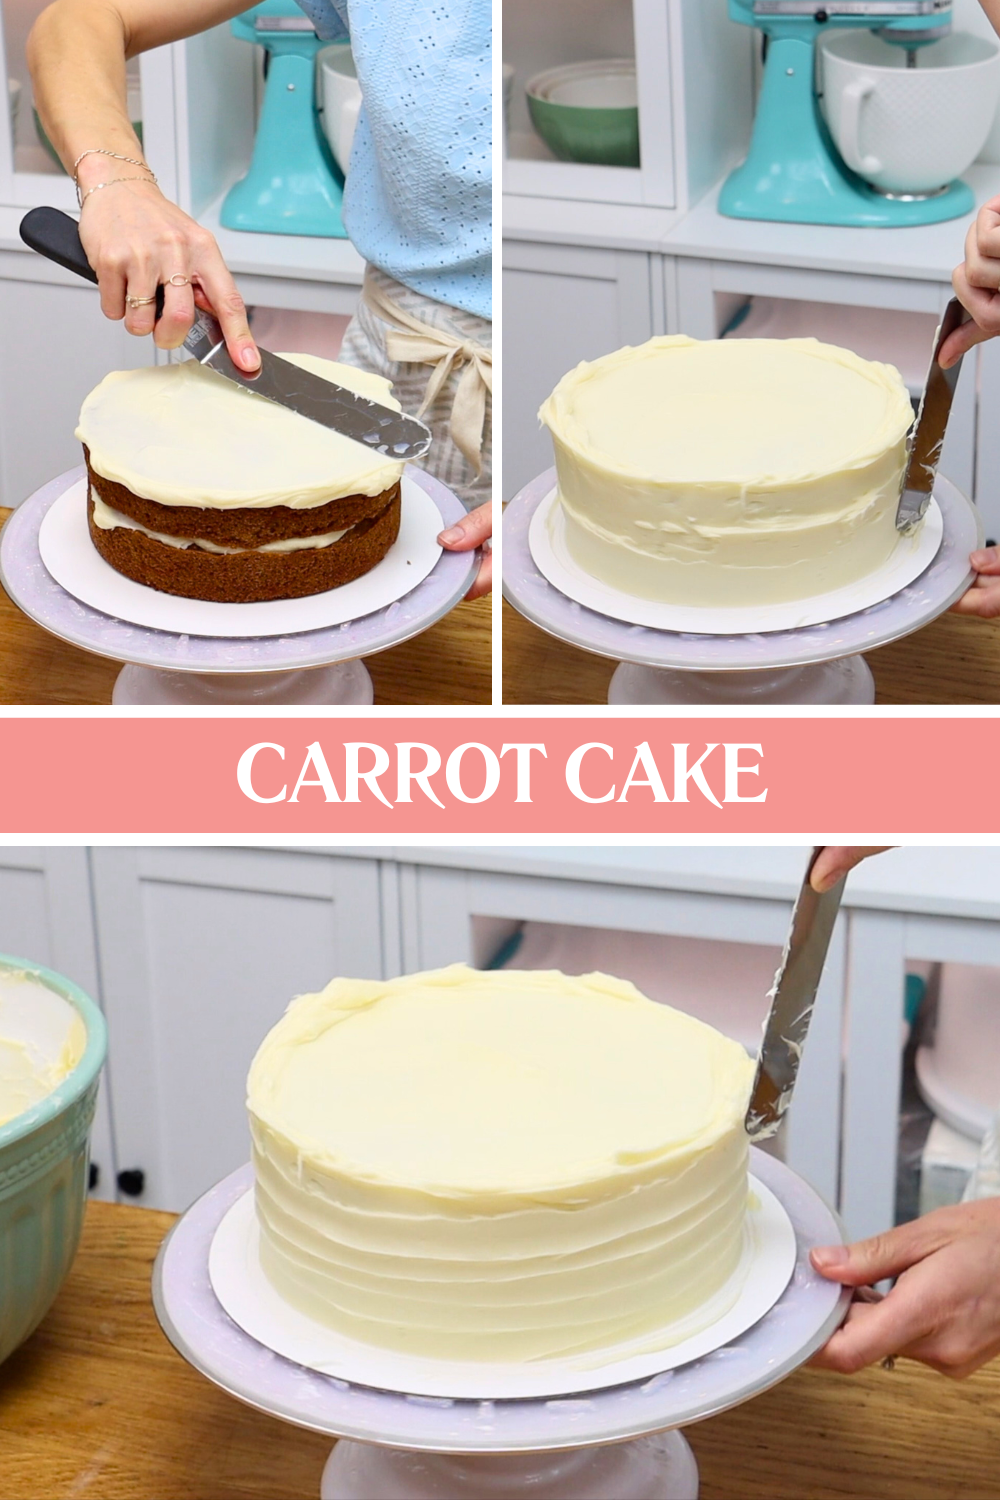
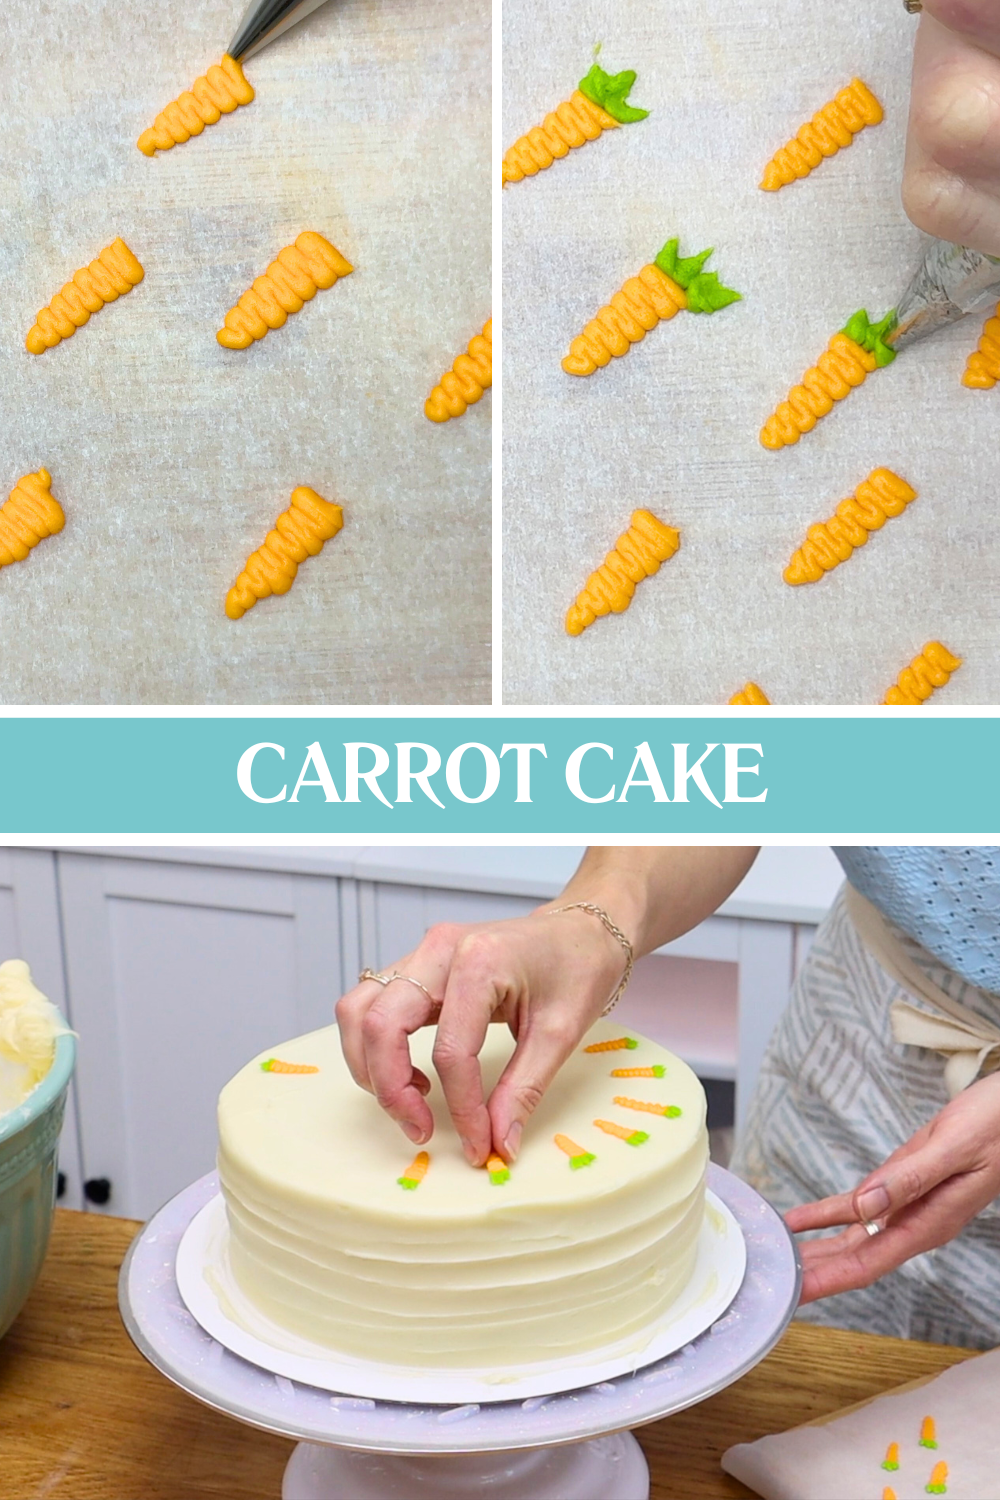
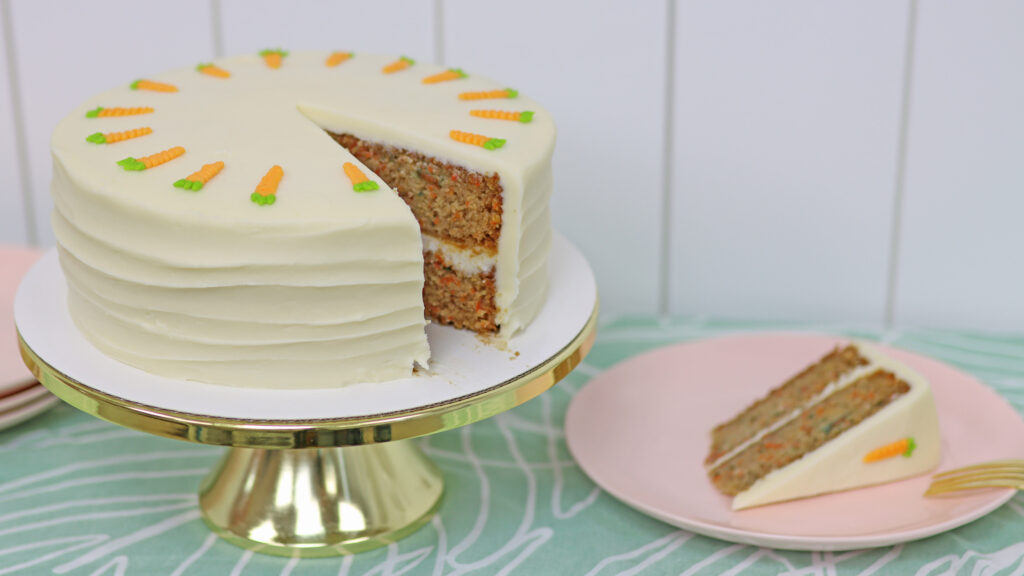
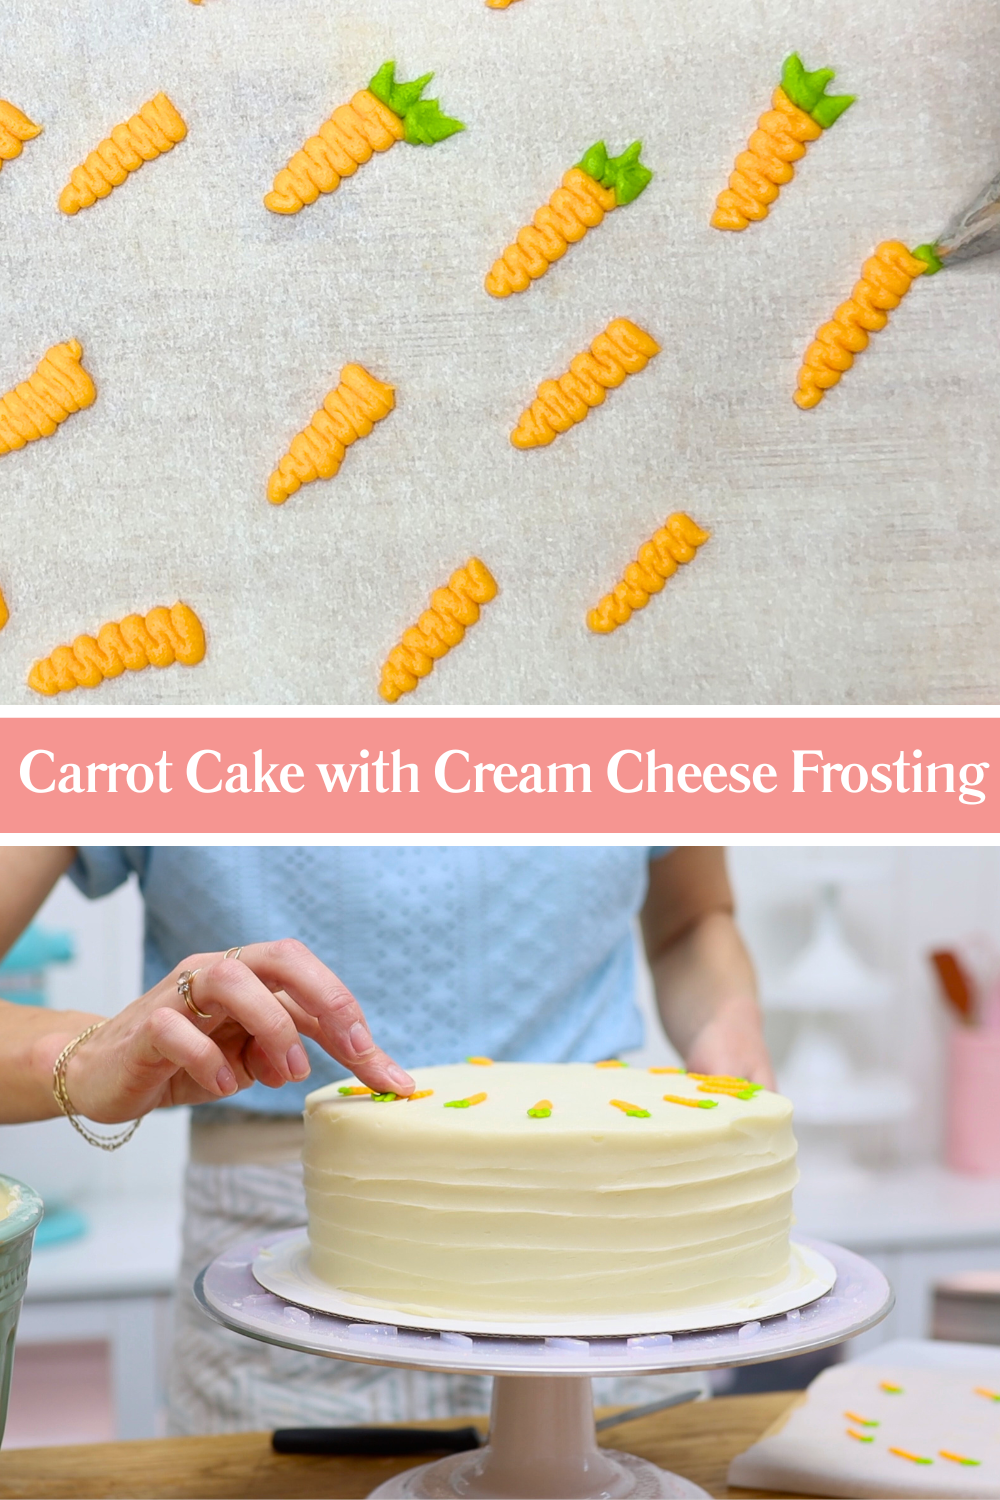
Carrot Cake with Buttercream Carrots
Carrot cake is perfect for Easter, and these buttercream carrots are simple and cute decorations. My carrot cake recipe pairs lightly spiced carrot cake layers with not-too-sweet cream cheese filling and frosting. Using a buttercream base for the frosting makes it easy to spread and smooth, and also works really well for these carrot decorations!
Before adding cream cheese to your frosting, set aside a few spoonfuls of the buttercream base because it’s stiffer and easier to pipe. Tint most of it orange and pipe zigzag shapes onto parchment paper to create the carrots.
Add green food colouring to the remaining buttercream. The leftover orange in the bowl will slightly mute the green, which actually works well for carrot tops. Put this into a piping bag fitted with a small round tip, like a number 4, and pipe three small spikes at the top of each carrot. Freeze these for about 10 minutes so they firm up.
While they chill, assemble your carrot cake with cream cheese frosting. Smooth the frosting or add texture using the back of a spoon or an offset spatula or palette knife. Then lift the frozen carrots off the parchment and arrange them on the cake. I like toplace them where I plan to cut the cake to mark out portions. This decoration only takes a few minutes but looks really effective.
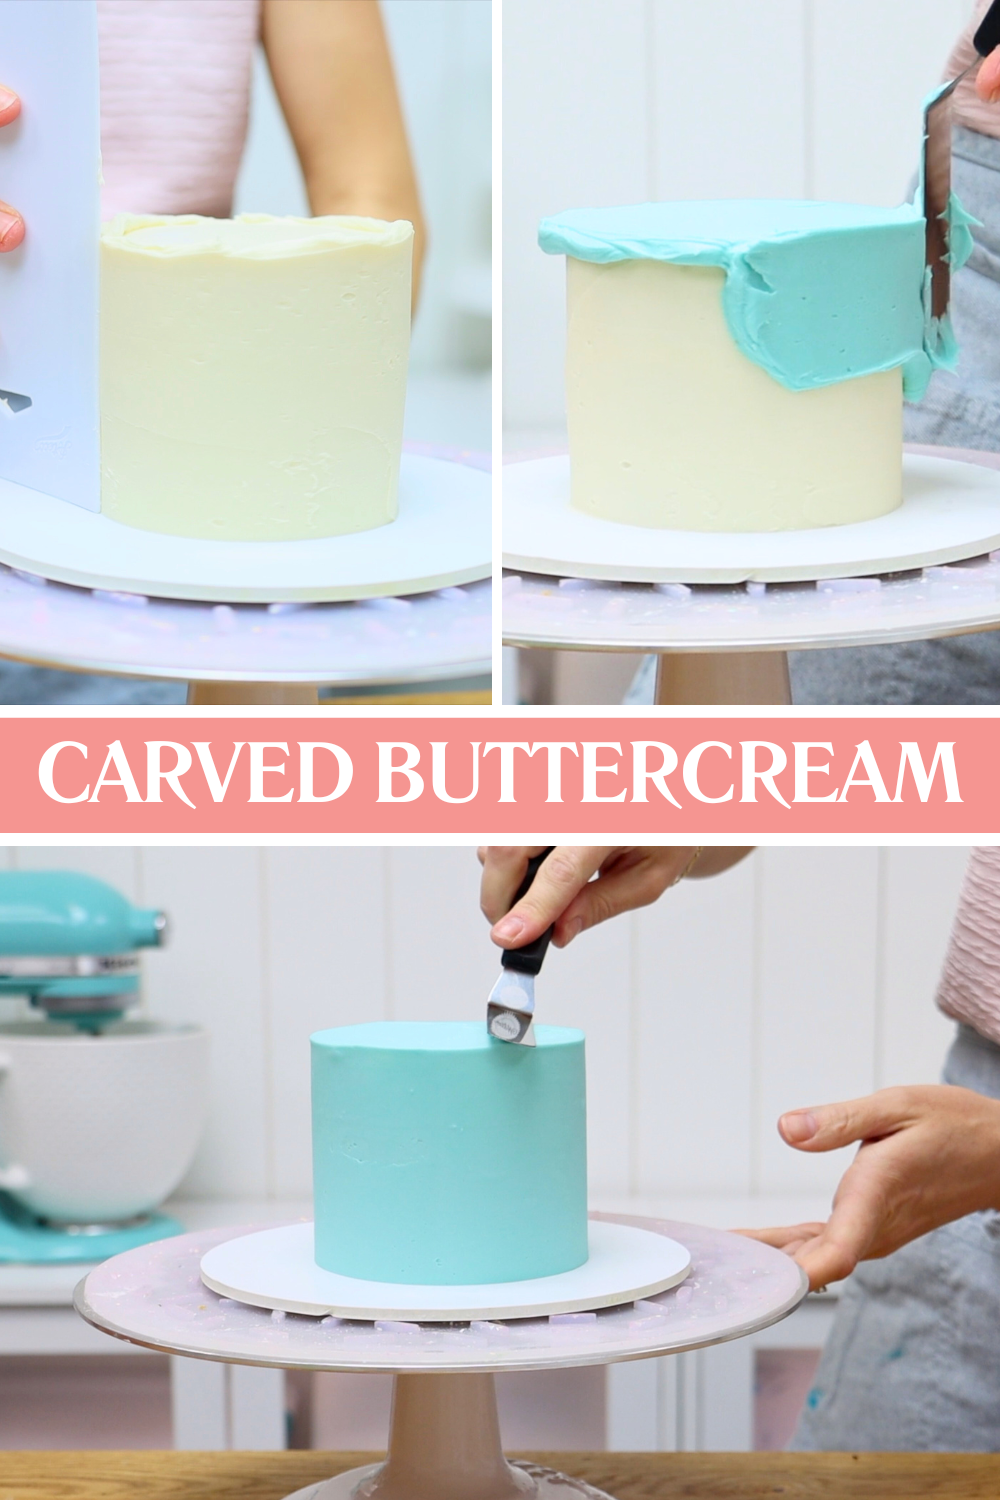
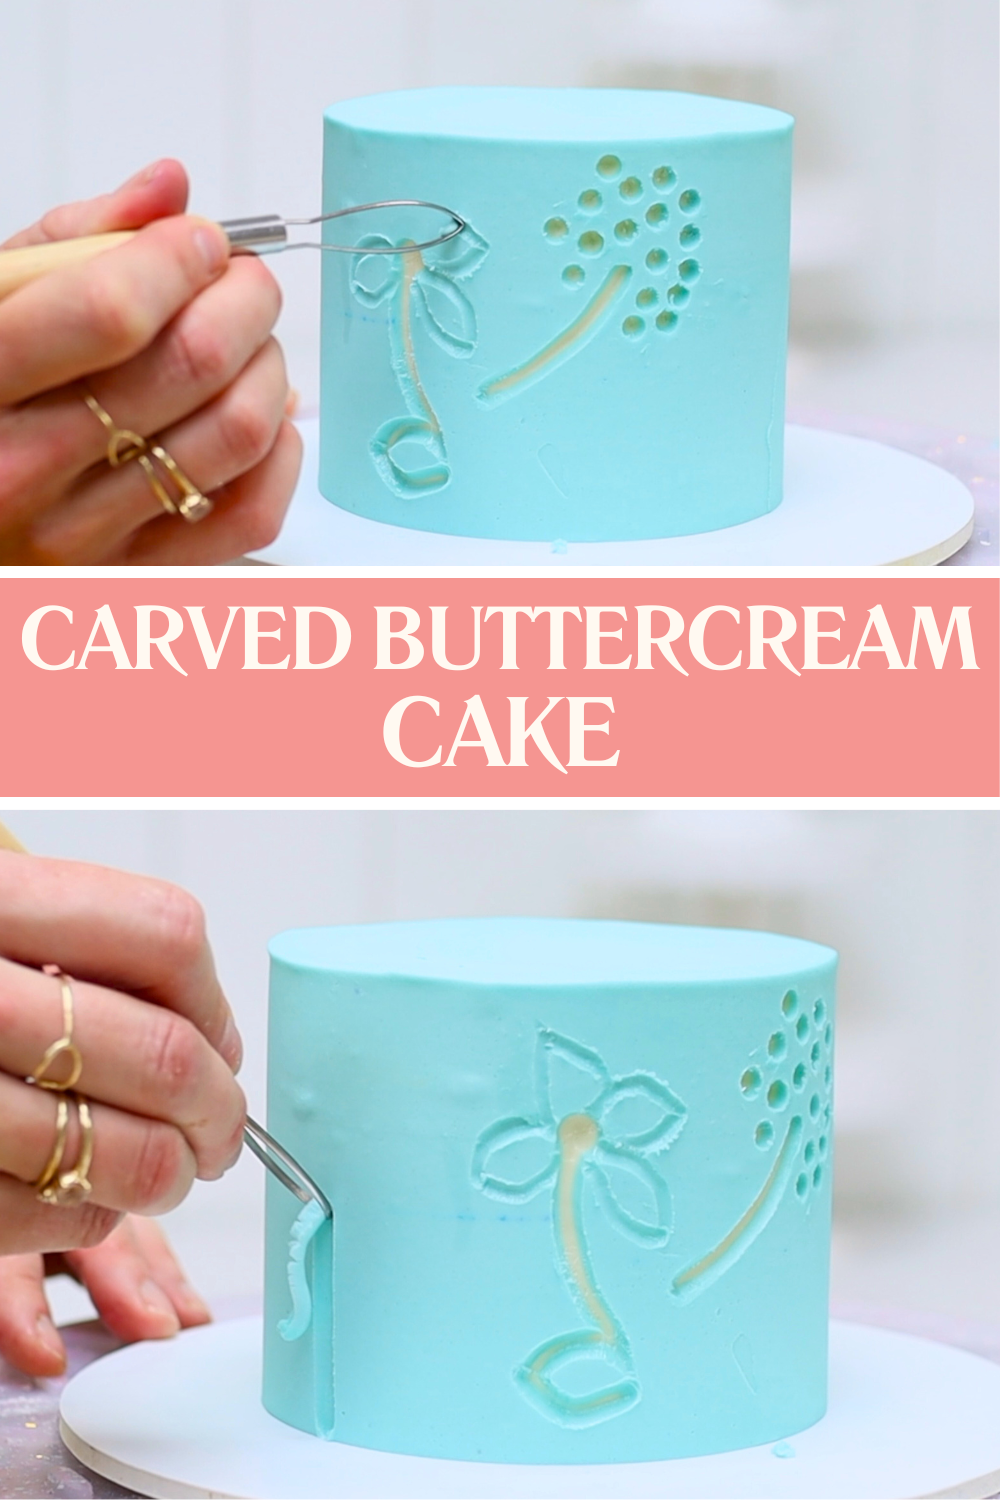
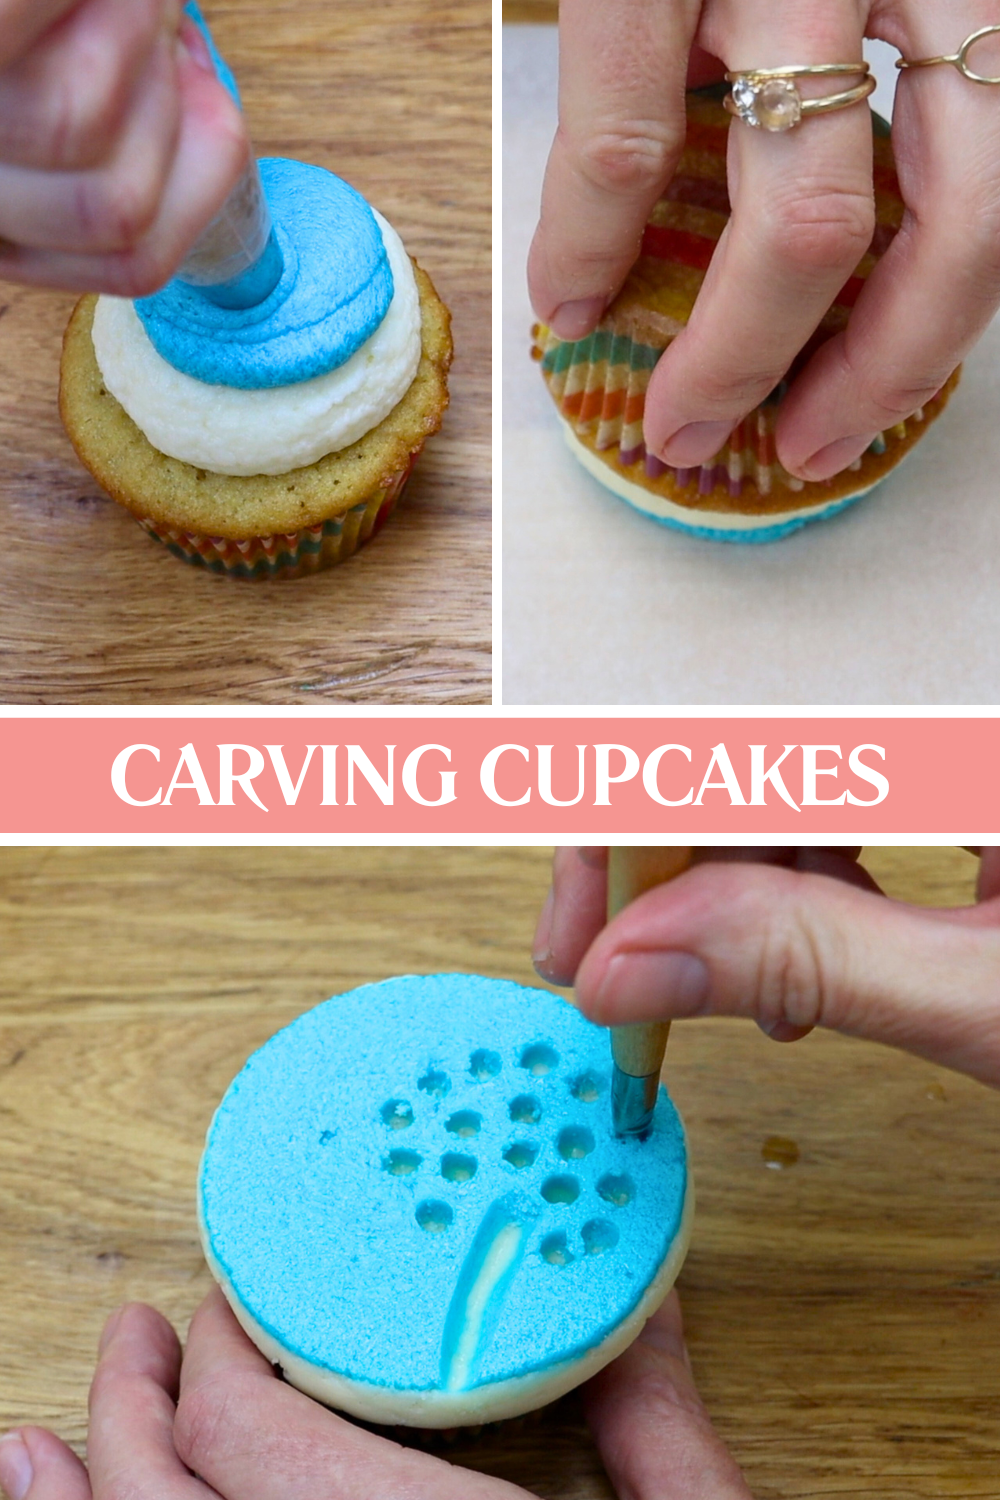
Ideas for Easter Cakes and Cupcakes With Carved Buttercream
This carved buttercream technique creates a textured design using simple tools. Start by crumb coating your cake, then spread on a smooth layer of frosting and freeze it for about 15 minutes. Next, add a final layer of frosting in a different colour. Both layers should be smooth, and the top layer should be as thin as possible without exposing the colour underneath. Chill the cake again until the buttercream is firm.
Dip a clay modelling tool into warm water and start carving into the frosting. A hook-shaped tool works well for fine details like dandelion seeds, a round tool is useful for larger circular shapes, and a pointed tool is ideal for stems, leaves, or outlining petals. After each carve, dip the tool back into warm water to remove buttercream and keep it warm so it glides smoothly.
You can use this technique on cupcakes as well. Pipe two blobs of different coloured buttercream onto a cupcake using a large round tip, like a 1A. Flip the cupcake over onto parchment or wax paper and press down to flatten it, then freeze for about 30 minutes. Once firm, carve your design using modelling tools or even the pointed end of a petal piping tip.
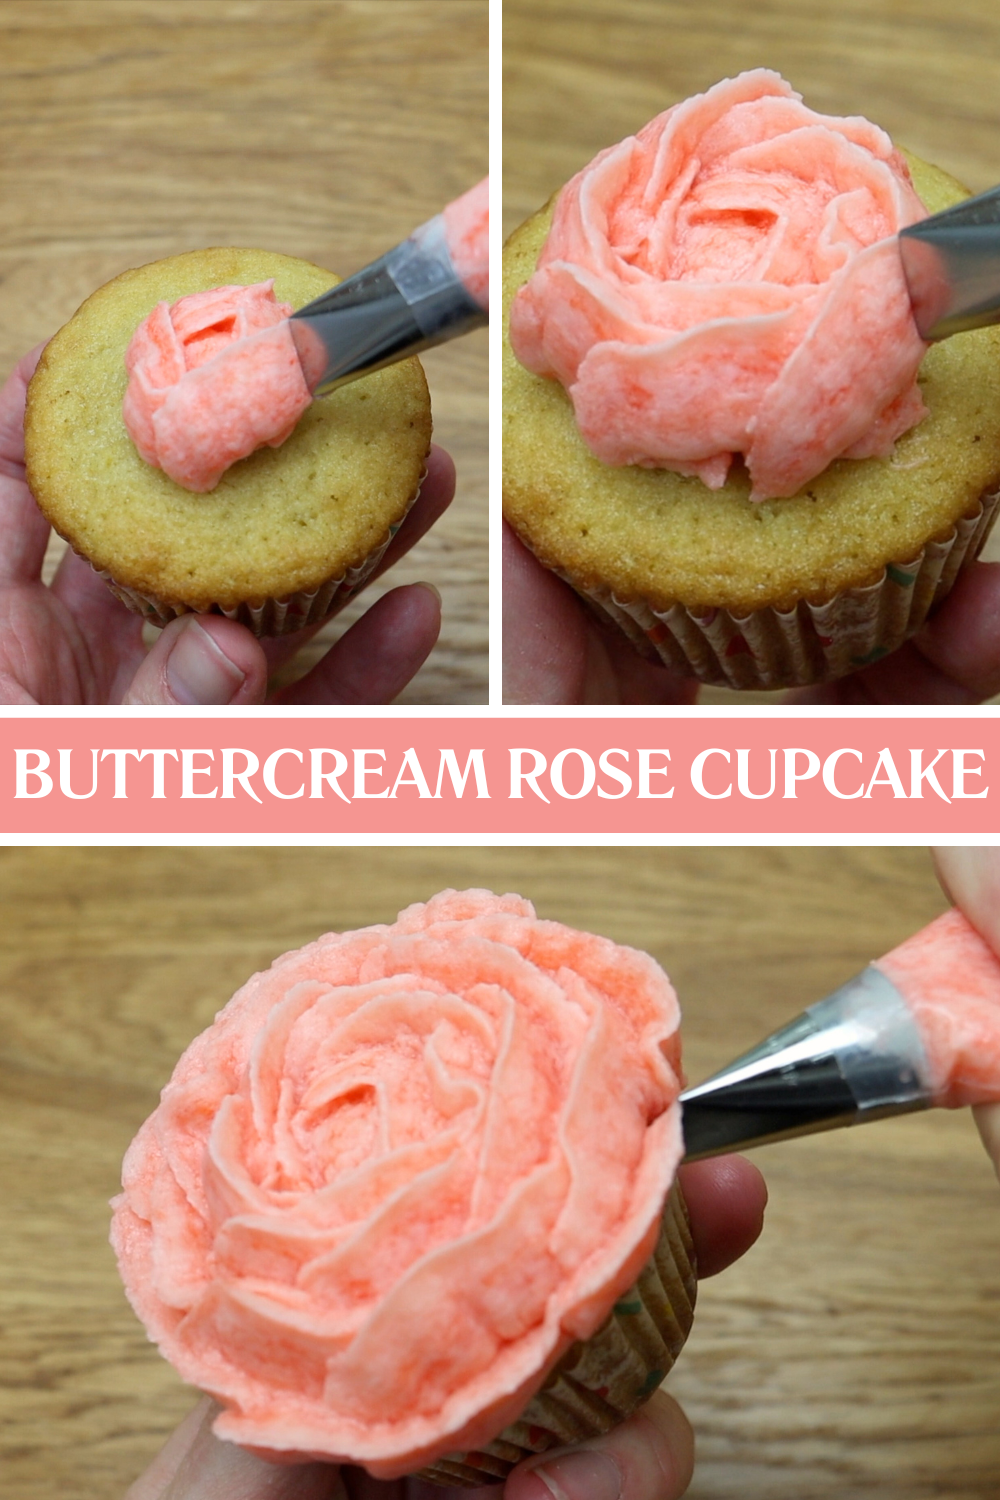
Buttercream Rose Cupcakes
These buttercream rose cupcakes look elegant but are simple to pipe. Use a petal tip, like a number 104, and start by piping a blob of buttercream in the centre of the cupcake to give the rose height. Hold the piping tip with the narrow end pointing upwards and pipe a spiral around the centre while spinning the cupcake to form a rosebud.
Next, pipe arcs around the rosebud, overlapping each one by about halfway. Angle the piping tip slightly inward at first so the petals wrap tightly, then gradually angle it outward as you move to the outer layers so the petals open up. This technique works beautifully for single cupcakes or grouped together as a bouquet.
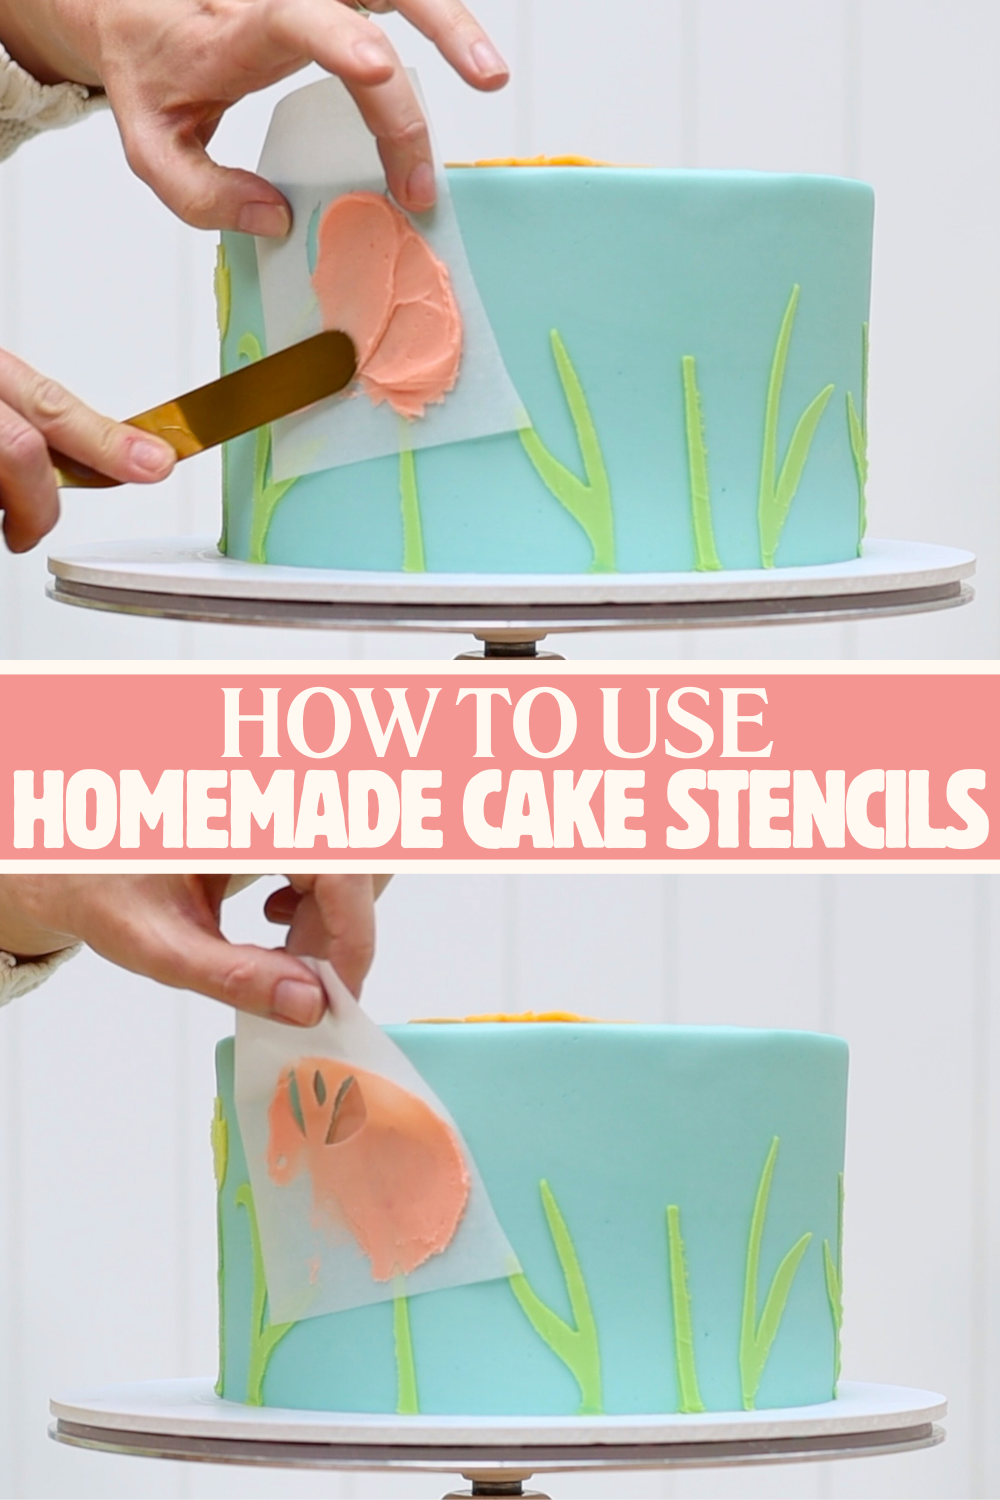
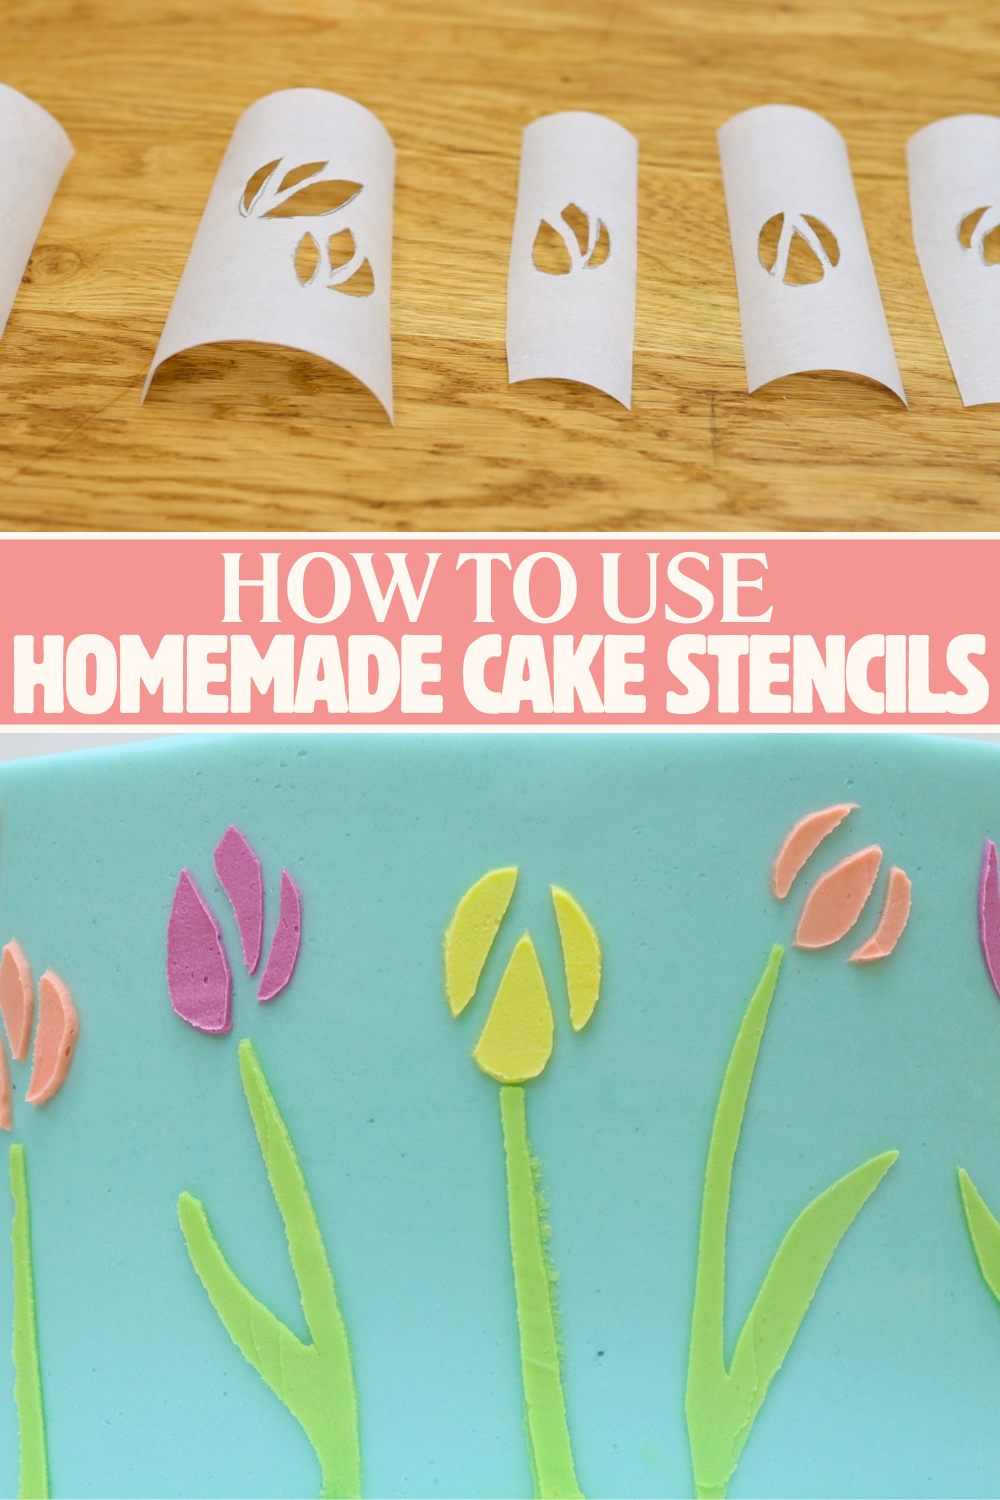
Stencil Ideas for Easter Cakes and Cupcakes
Instead of using stencils on top of a cake, like in the first cake design with the Easter bunny, you create stencil designs around the sides of a cake. Cut parchment or wax paper to be the same height as your cake and draw or trace your design onto it. Cut out the shapes while leaving the surrounding paper intact to use as a stencil.
Wrap the stencil around the cake and spread buttercream over the cutouts. For narrow shapes like stems, spread the frosting up and down rather than sideways to avoid pulling the stencil away. For larger shapes that are fully surrounded by paper, spread inward toward the centre for the same reason.
Peel the stencil away and clean up any smudges with a toothpick. Chill the cake before adding the next stencil so each section sets. If your design has elements close together, using separate stencils can prevent colours from smudging. Ideally, leave about an inch around each shape on the stencil to avoid spreading buttercream beyond the edges.
Place each stencil onto a cold cake, spread buttercream over it, scrape away the excess to leave a thin layer, and then peel it away. As long as your cake is cold, this technique is very forgiving. It allows you to replicate anything you can draw or trace, onto a cake!
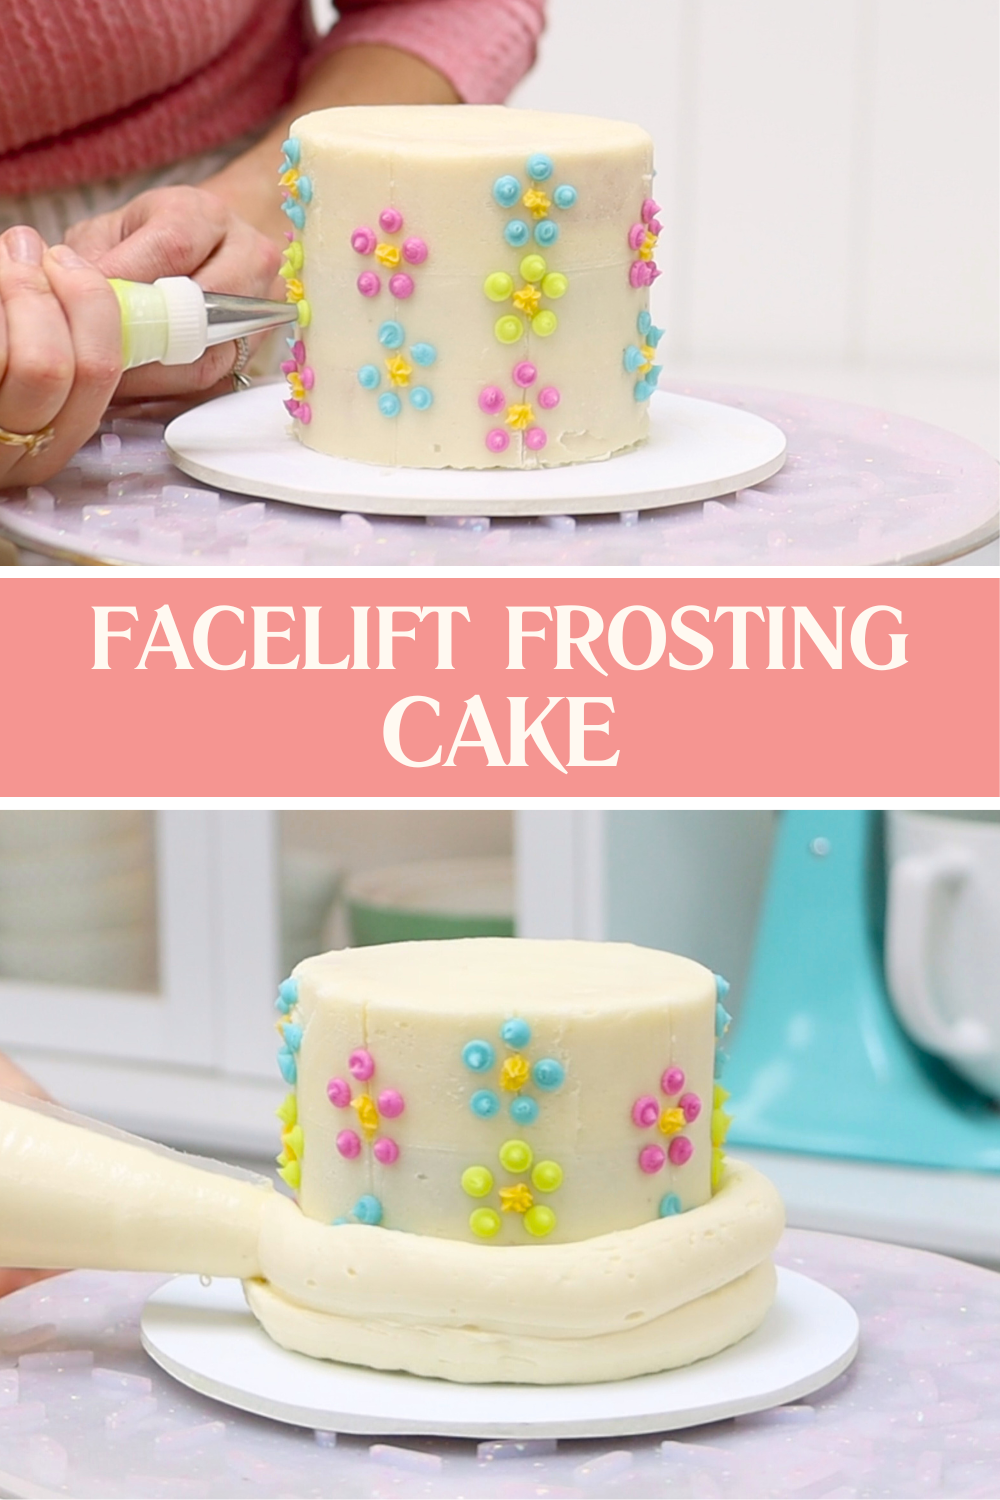
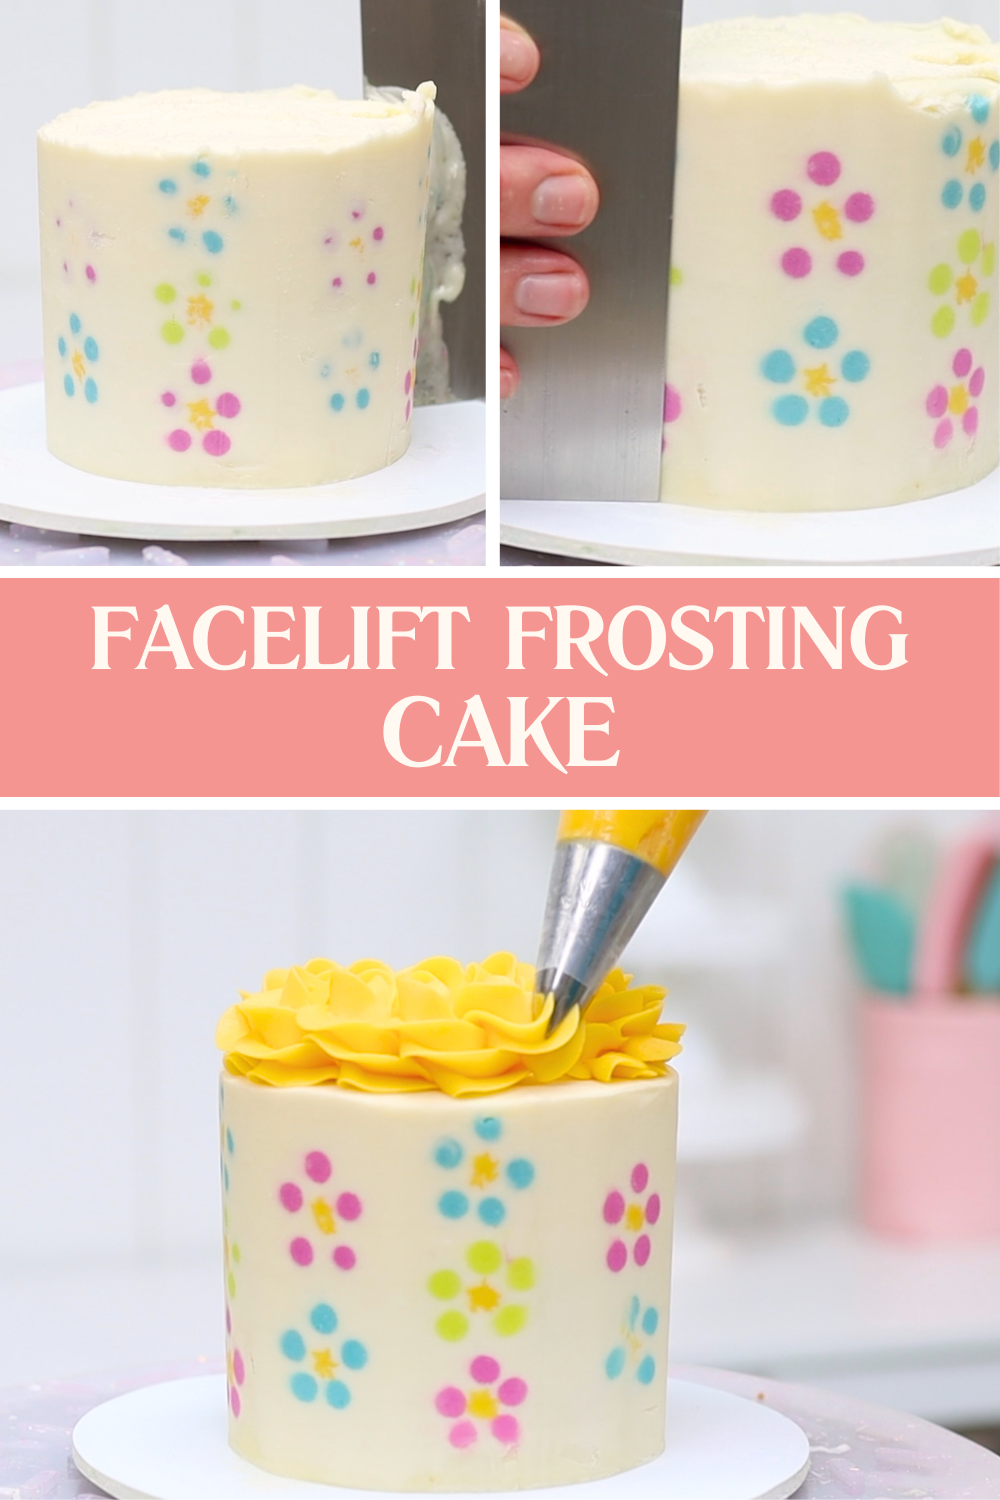
Facelift Frosting Cake
This technique creates a completely flat cake with a hidden design revealed underneath. Pipe your design directly onto the cake and freeze it for about 20 minutes. Then cover the entire cake with buttercream so the design is fully hidden and freeze again for another 20 minutes.
Warm a cake scraper by dipping it into hot water, running it under a hot tap, or warming it with a hair dryer or blowtorch. Then begin scraping around the cake. At first, it will feel like you’re removing frosting you just added, but as you continue, the hidden design will start to appear. The final result is a perfectly smooth cake with an embedded buttercream design.
Tips for Displaying Easter Cakes
As the weather gets warmer, remember that butter melts and so does buttercream. If you’re displaying your cakes outside for an Easter party or spring celebration, keep them in the shade rather than in direct sunlight, otherwise the buttercream can start melting very quickly.
Which Ideas for Easter Cakes and Cupcakes Will You Try?
Now you have seven ideas for Easter cakes and cupcakes, from simple designs to more detailed techniques. Tell me in the comments which one you’re going to try and for more cake decorating tutorials, visit my cake school to learn hundreds more techniques and designs.
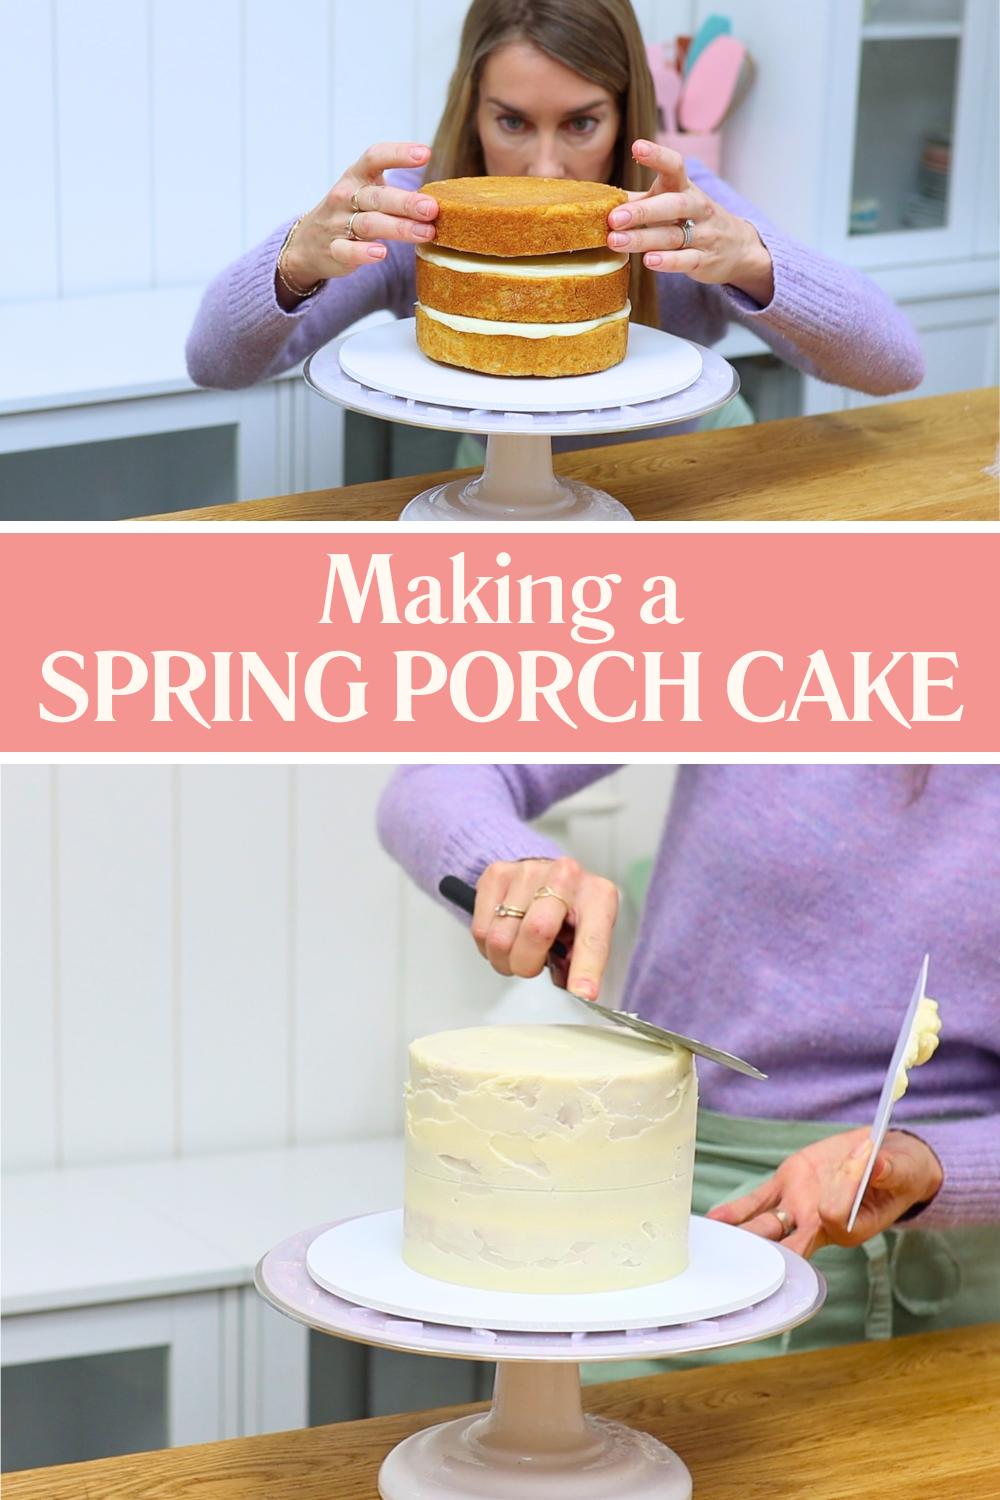
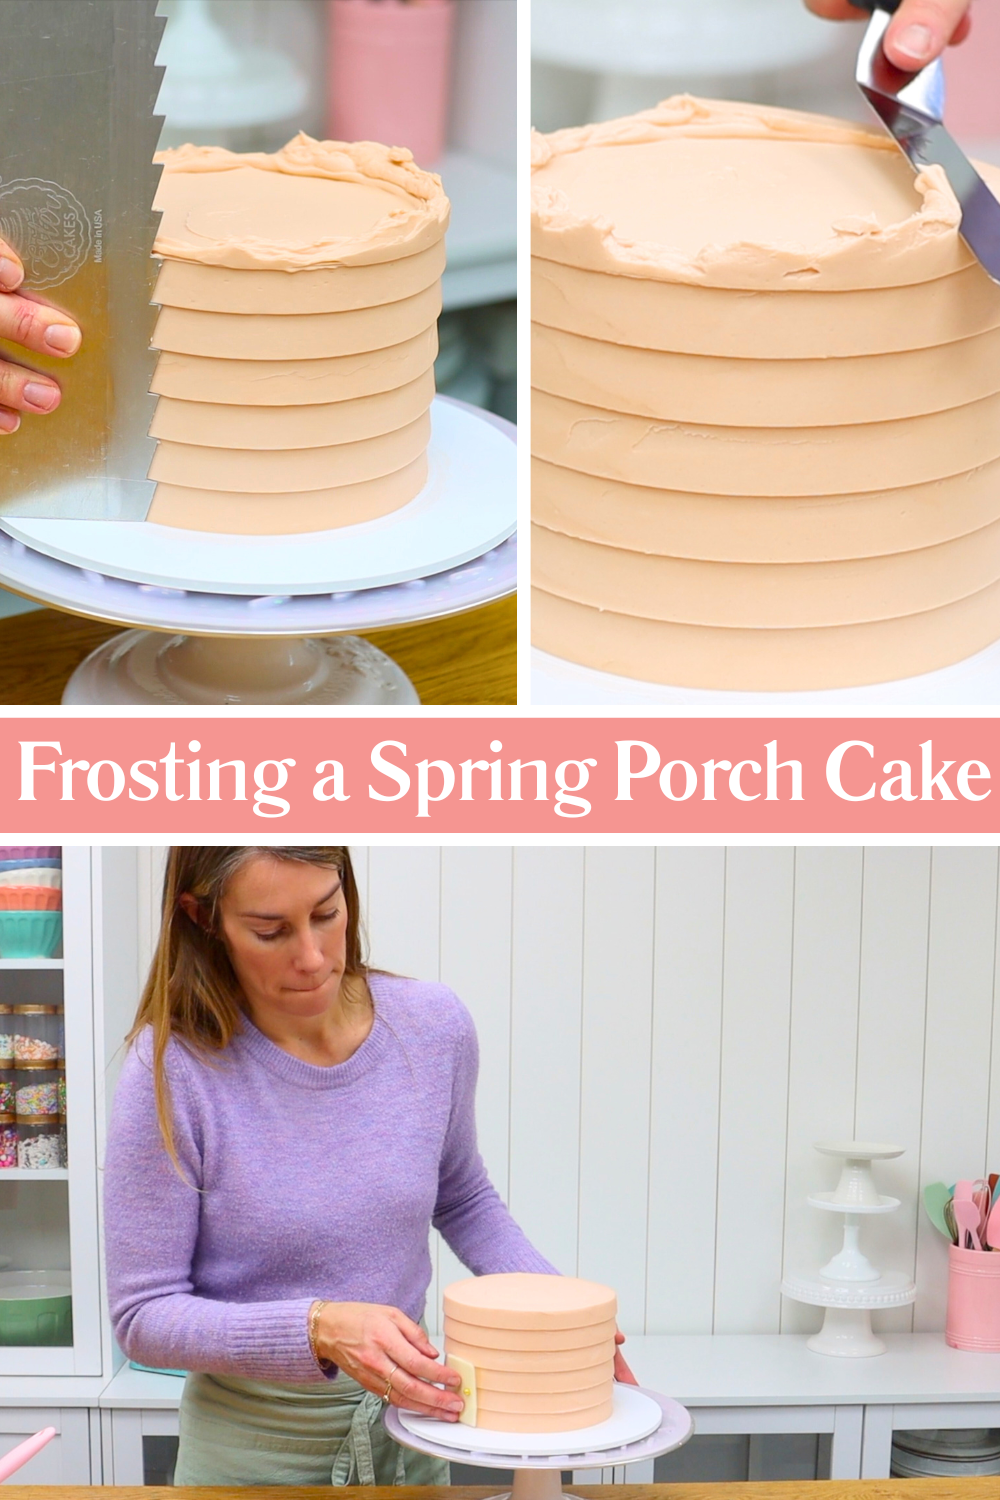
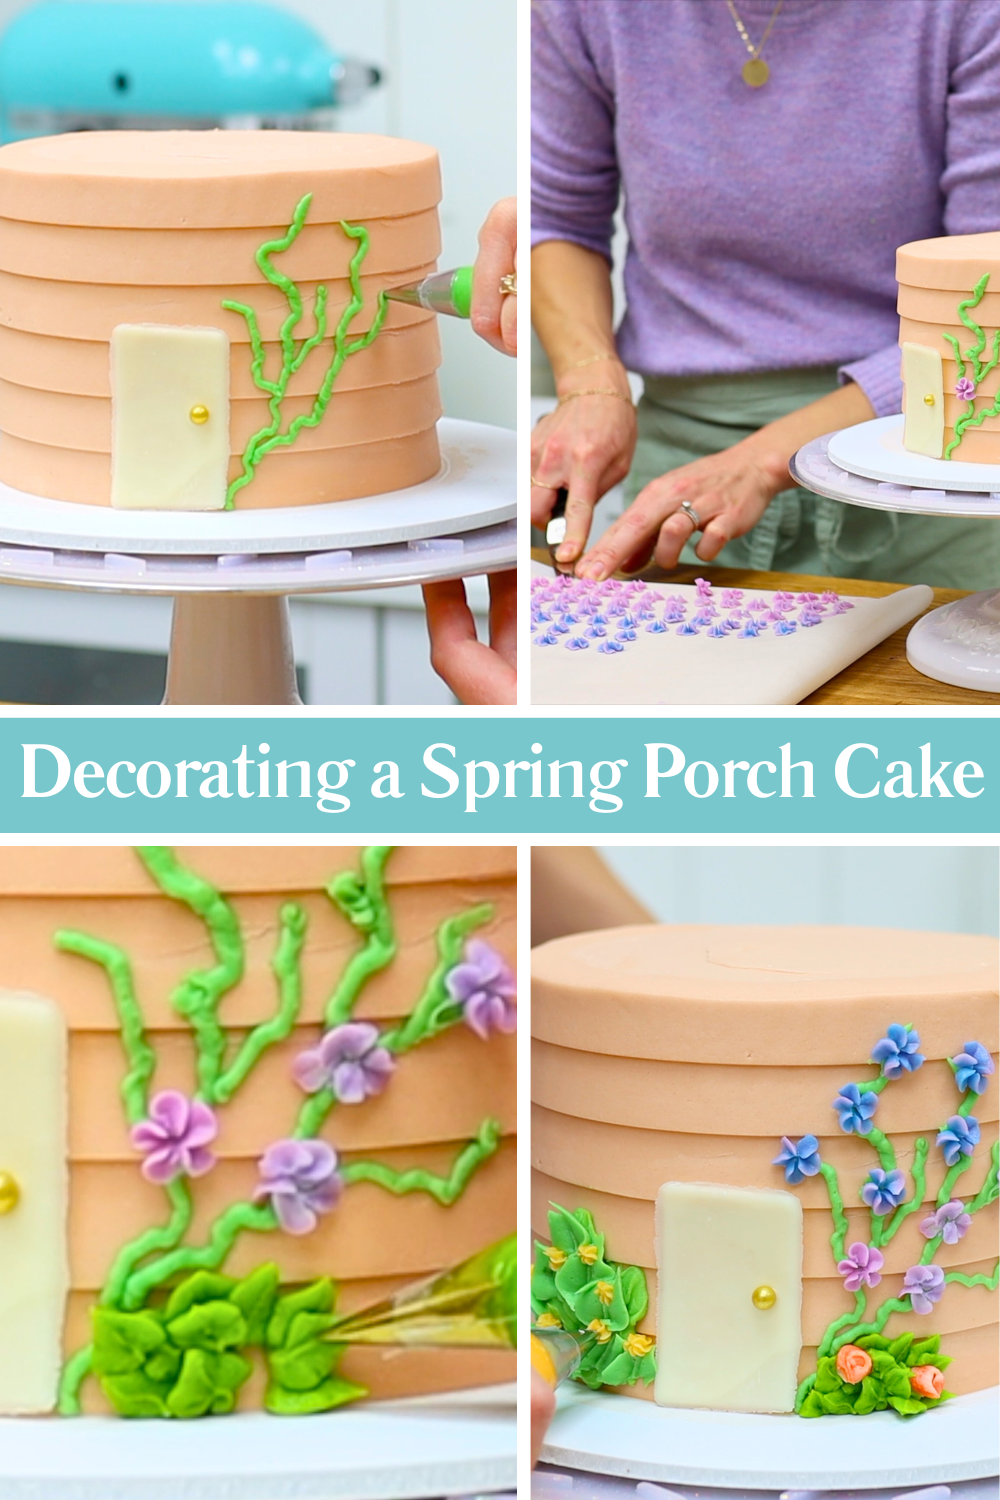
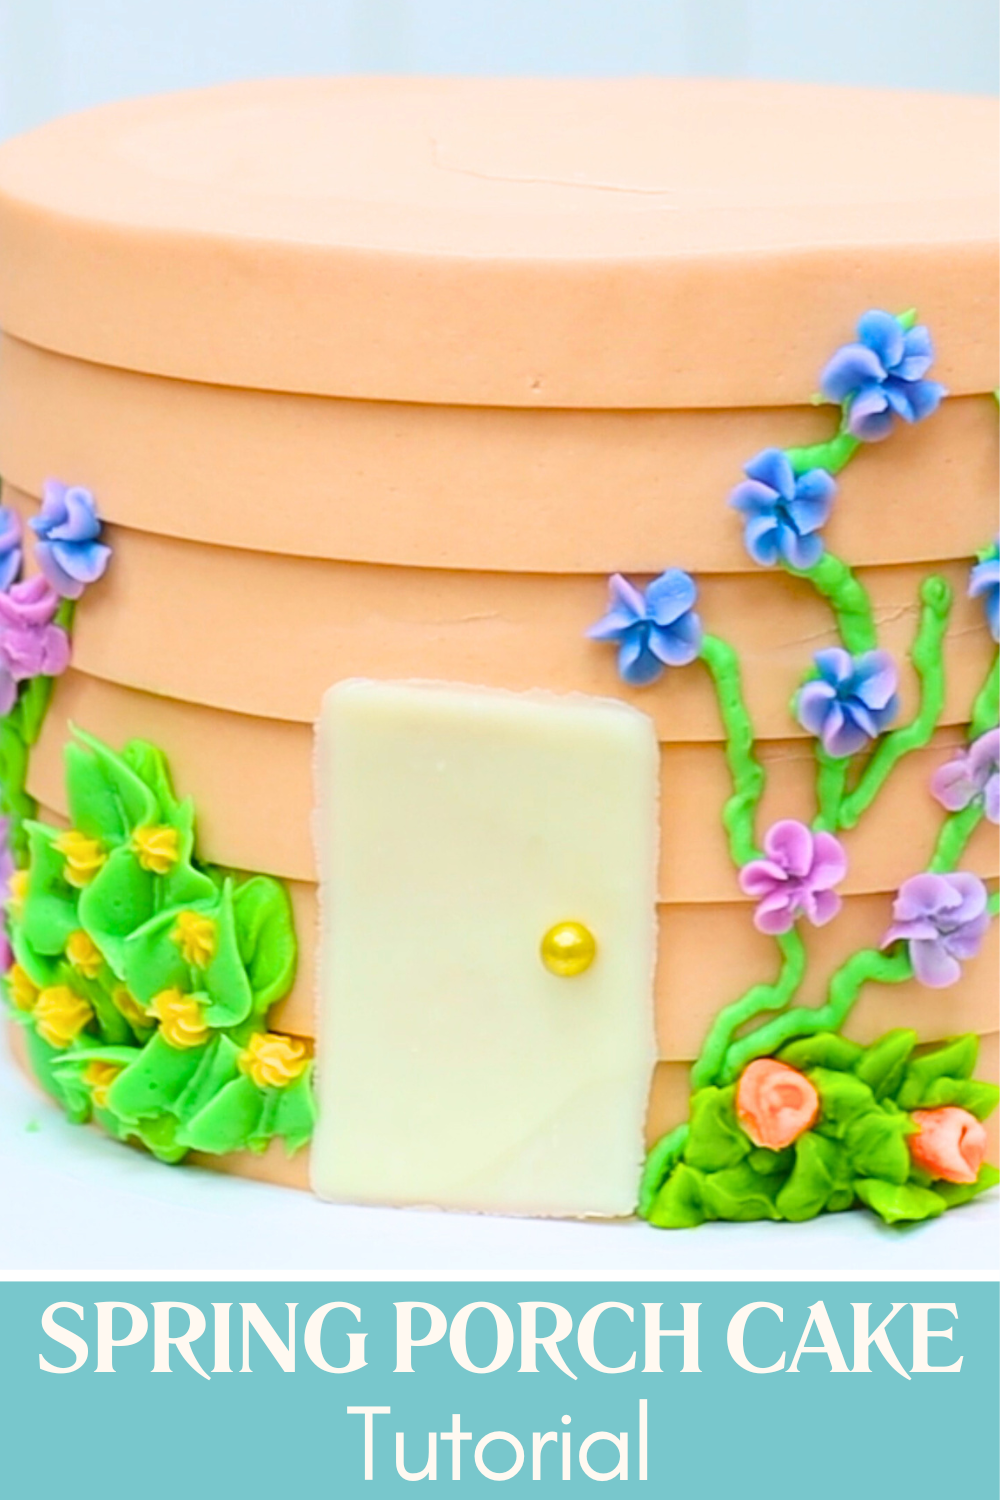
This spring porch cake looks like a colourful house decorated with beautiful buttercream flowers. It's seasonal and fun but it’s secretly really easy to make!
How to Start Your Spring Porch Cake
I’m using my Very Vanilla cake recipe baked in 6 inch pans and my 4 Minute Buttercream for both the filling and the frosting. Those two recipes are my go-to combination because the cake is sturdy enough for decorating and the buttercream is quick to make and really easy to work with.
Start by assembling your cake and applying a crumb coat. If you’re new to cake decorating, a crumb coat is just a very thin layer of frosting that traps any loose crumbs so they don’t show up in the final layer of frosting. Stack and fill your cake layers with buttercream, spread a thin layer over the top and sides, and smooth it roughly. Don’t worry about making it perfect because this layer is only there to catch crumbs. Once the crumb coat is done, put the cake into the fridge for about 30 minutes so the buttercream can firm up before you add the final coat.
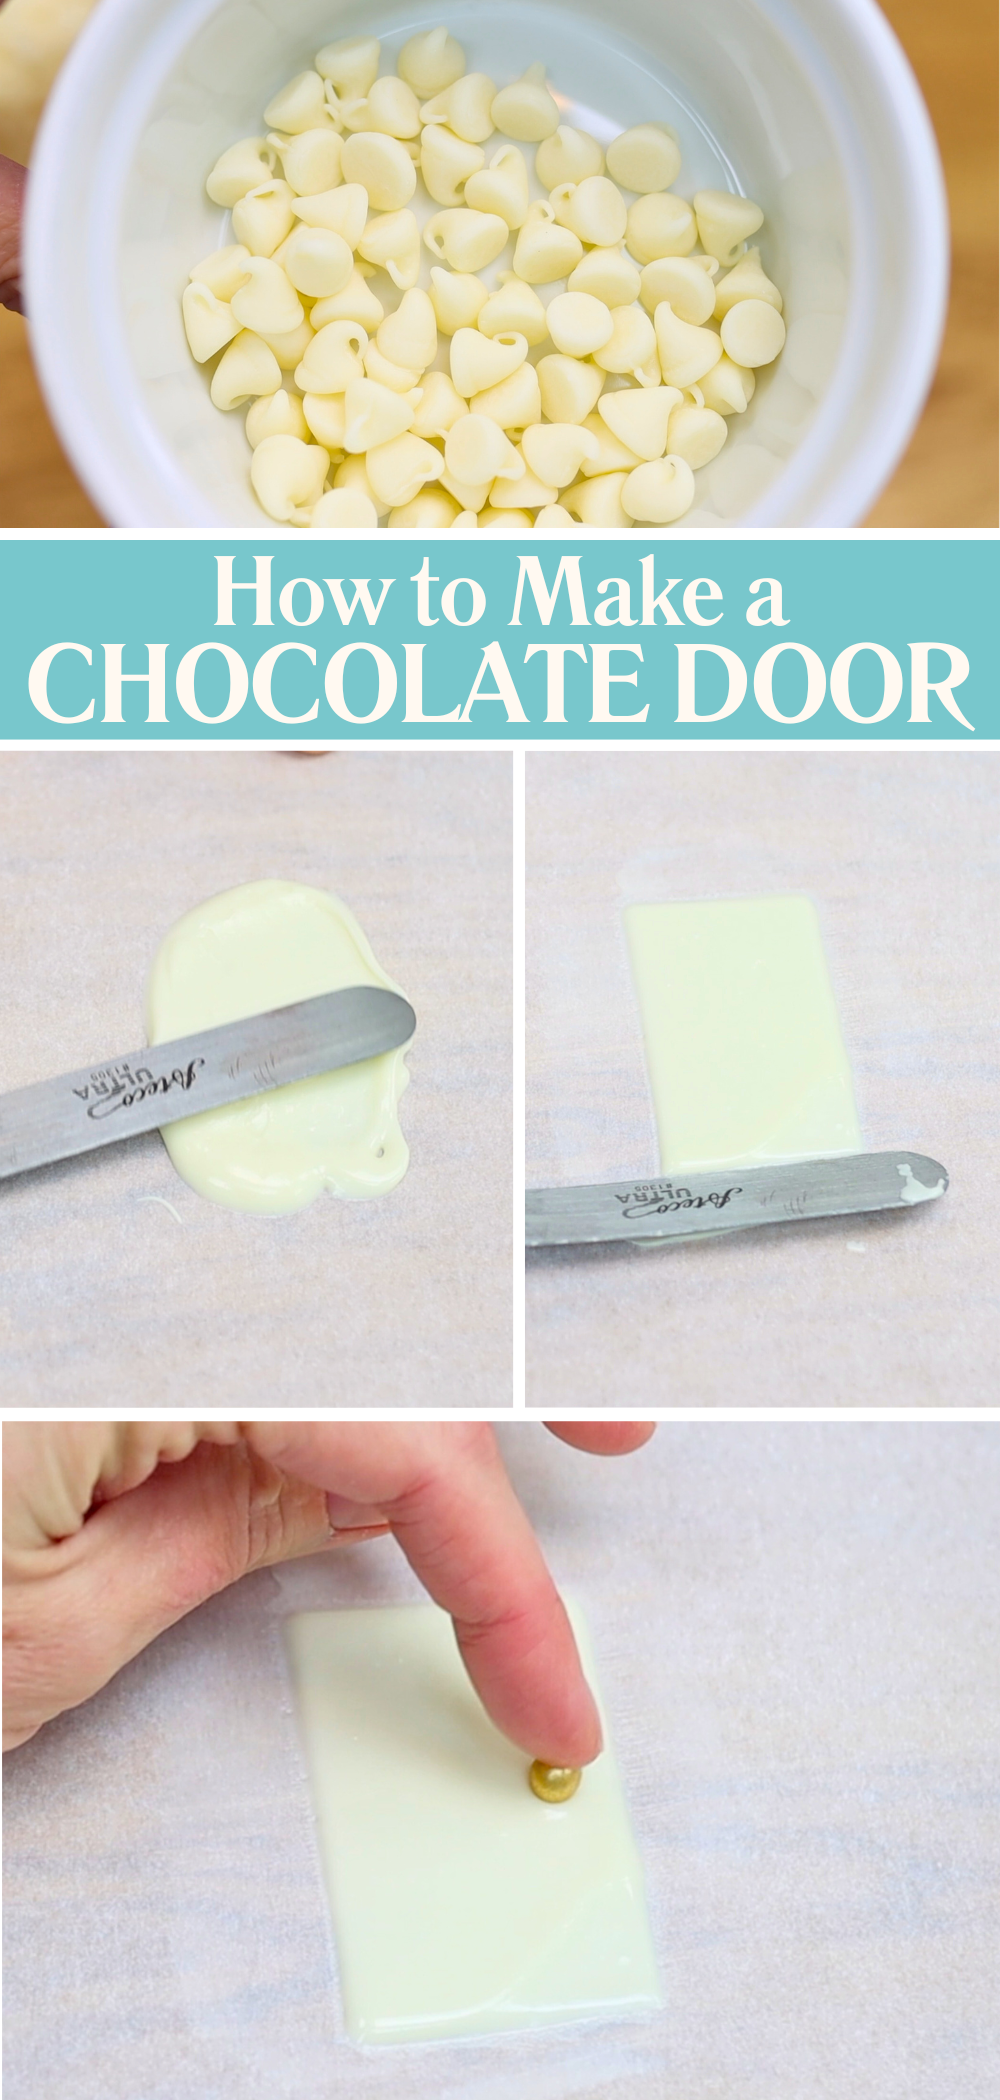
While the cake is chilling, make the little door for your spring porch cake. I’m using white chocolate chips for this because they melt easily and set firm in the fridge. Put the chocolate chips into a microwave-safe bowl and microwave them at 50% power for 30 seconds. Stir well and repeat until the chocolate is smooth. Heating chocolate at lower power is the best way to prevent it from burning.
Spoon the melted chocolate onto a piece of parchment paper or wax paper and spread it out into a rectangle using the edge of an offset spatula or angled palette knife. This rectangle will become the door of your cake house. Add a large gold sprinkle to act as the doorknob and then put the parchment paper into the fridge or freezer so the chocolate can set while you frost the cake.
Frosting the Spring Porch Cake to Look Like a House
Tint your buttercream for the house. You can make this spring porch cake any colour you like but I’m adding just a drop of brown food colouring to create a peachy shade. I considered making the cake grey to look like painted wood siding but a grey cake didn't sound very appetizing.
Spread the buttercream over the top of the cake and then cover the sides. Instead of smoothing the frosting, use a textured cake comb to create the look of wooden siding on a house. I love this style because it instantly makes the cake look like a little building instead of just a frosted cylinder.
Use the textured cake comb in the same way you would use a regular cake scraper. Hold the comb against the side of the cake with the base resting on the cake board. Spin the turntable so the comb scrapes all the way around the cake, imprinting its pattern into the frosting. After the first scrape you’ll probably see some areas where the grooves are shallow or missing. Spread a bit more buttercream onto those spots with your spatula and scrape around again. Repeat this process until the texture looks even all the way around.
If you’re using a metal cake comb, you can make the texture even neater by gently heating the edge of the comb. A hair dryer, hot water, or even a blowtorch works for this. Warm metal glides across buttercream and leaves a really smooth surface on the texture.
To tidy the top edge of your spring porch cake, swipe sideways across the top edge with your offset spatula or a cake scraper. This pulls the excess buttercream inward so the top edge looks sharp and neat.
Now attach the door while the frosting is still soft and sticky. Take the chilled chocolate rectangle out of the fridge or freezer, peel it off the parchment paper, and press it gently into the frosting. This immediately turns the cake into a little house. Put the cake back into the fridge while you prepare the buttercream flowers.
How to Pipe Flowers for a Spring Porch Cake
I like to mix my buttercream colours for the flowers in a cupcake pan instead of lots of small bowls. This trick is perfect when you only need a small amount of several colours. It keeps everything organized and at the end you only have one pan to wash.
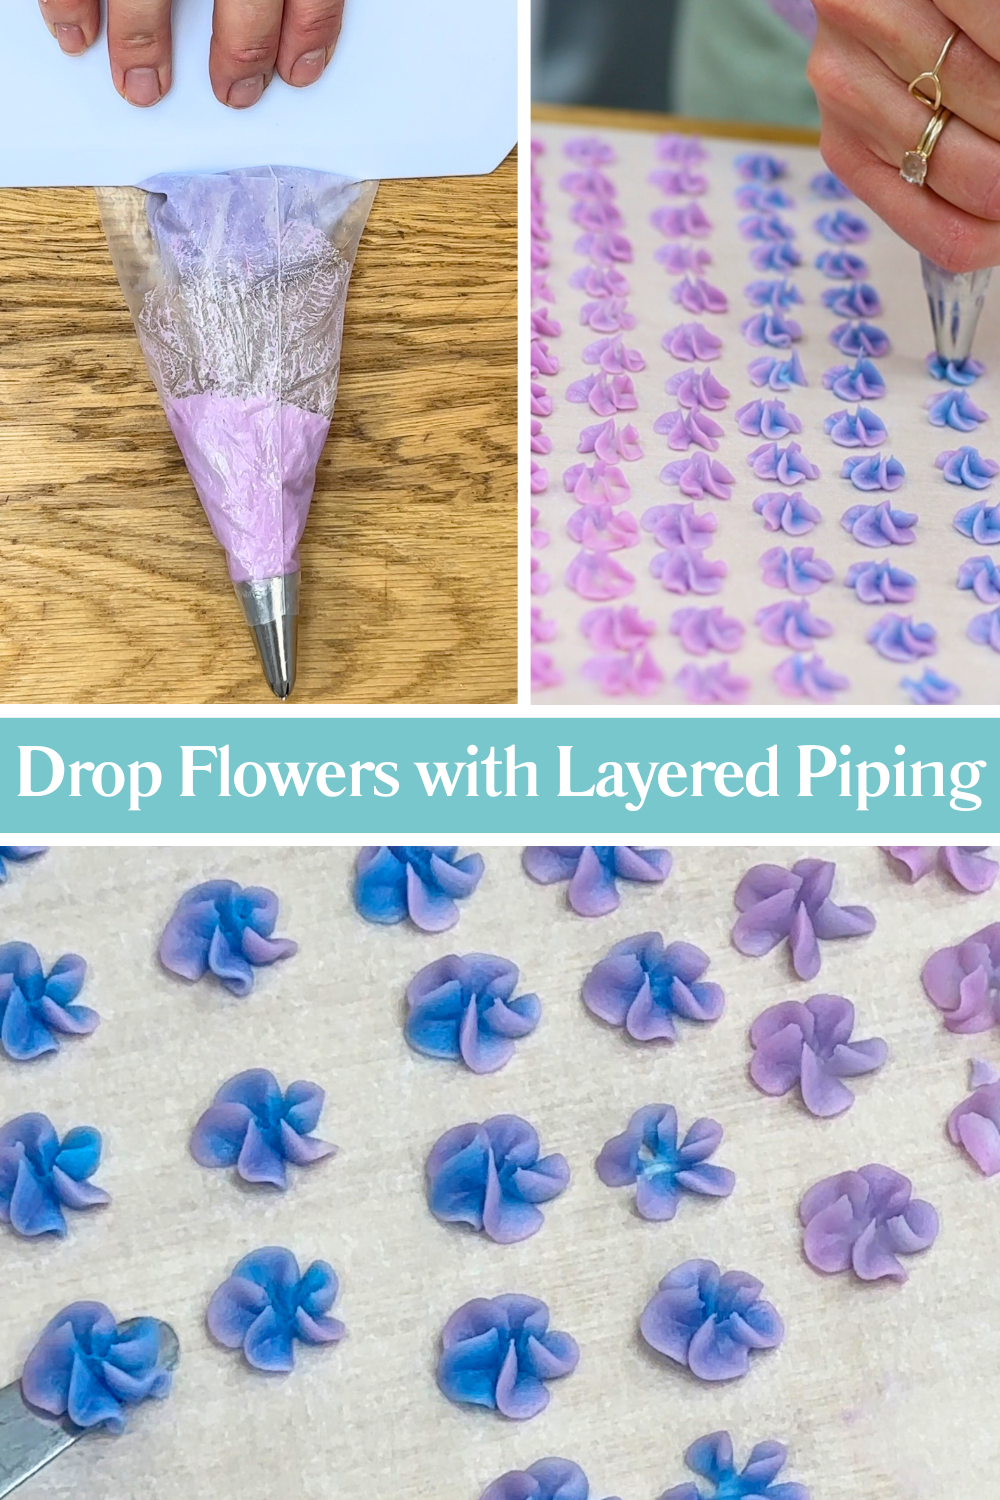
Ombre flowers
The first flowers for this spring porch cake are piped using layered piping, sometimes called lazy piping. To do this, spread stripes of different coloured buttercream inside a piping bag fitted with a drop flower tip. I’m piping these onto parchment paper wrapped around a cutting board. Piping onto parchment makes it much easier to arrange flowers later because you can move them around before placing them on the cake.
Rest the tip of the piping bag on the parchment paper. Twist your wrist so that your thumb is close to your forearm. Squeeze the piping bag and slowly twist your wrist away from yourself so the petals fan outward. As you pipe more flowers, the colours layered higher in the piping bag will gradually push through the lower colour, creating a beautiful ombre effect. This is one of my favourite cake decorating techniques because it creates such pretty flowers with almost no effort.
Lift the cutting board and place it into the freezer so the flowers can firm up. You'll pick them up and attach them to your cake later.
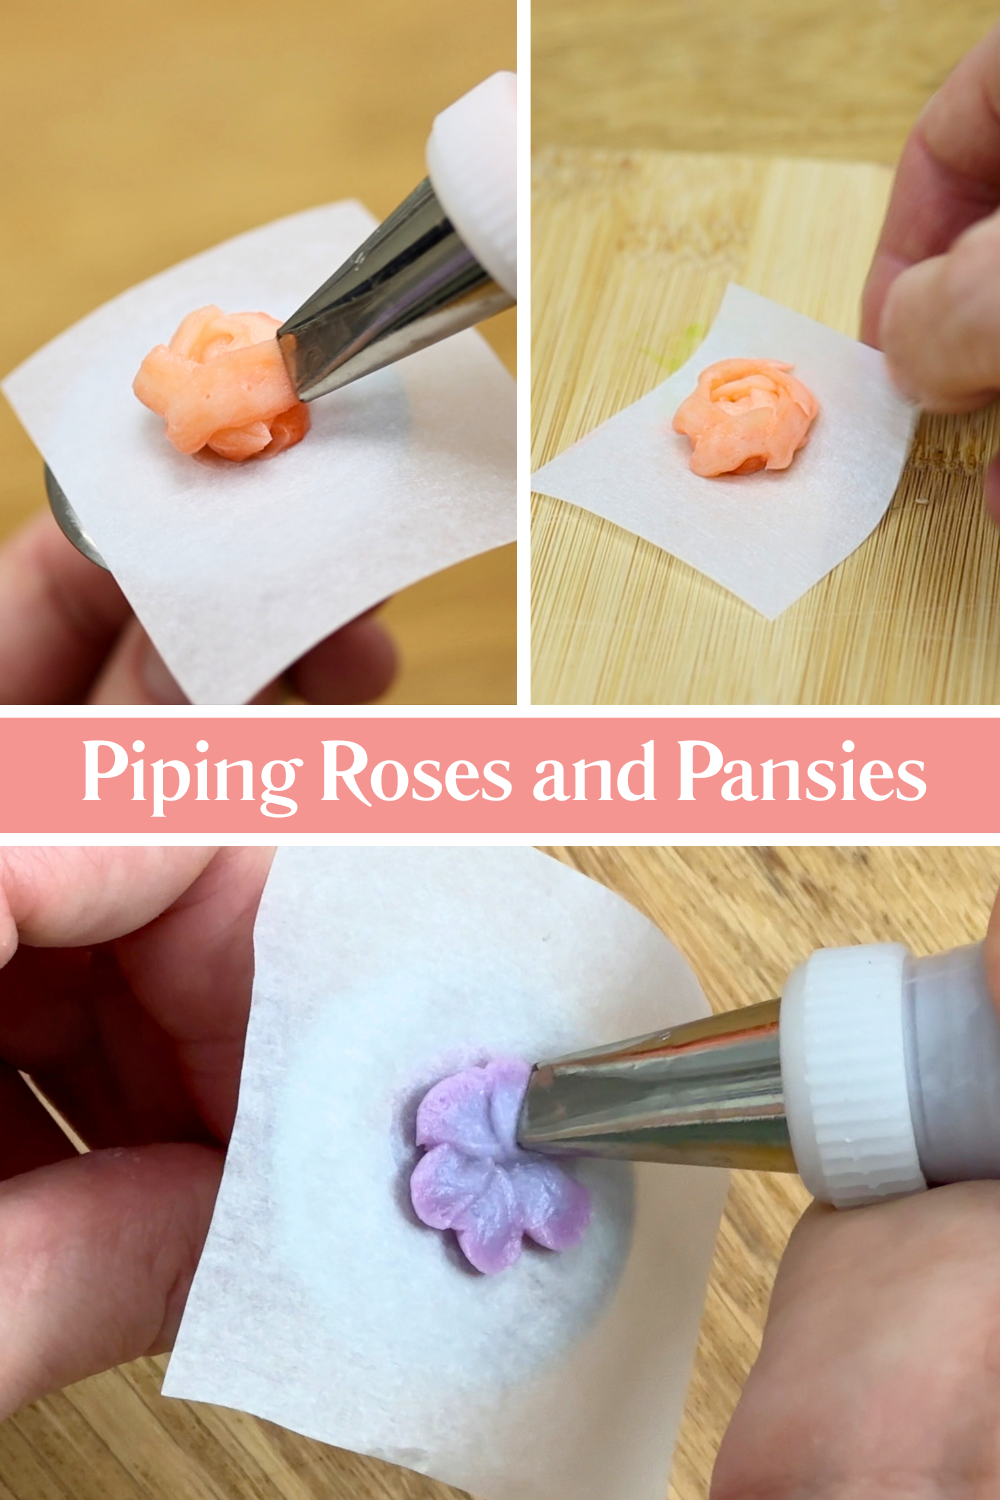
Pansies
The next flowers are piped on a flower nail. Attach a small square of parchment paper or wax paper to the flower nail with a dot of buttercream. Fit a piping bag with a petal-shaped tip. Hold the tip so the wide end of the teardrop shape touches the centre of the flower and the narrow end points outward. I'm using a Wilton #104.
Squeeze the piping bag while turning the flower nail and moving the piping tip slightly away from the centre. This creates a petal shape. Pipe five petals to form each flower. When the flower is finished, lift the parchment square off the nail and place it on a tray or cutting board. Once you’ve piped several flowers, put the tray into the freezer.
Buttercream roses
Roses are piped on a flower nail as well. Start by squeezing a small mound of buttercream onto the centre of the parchment square to create height for the rose. Hold the petal tip with the narrow end pointing upward and angled slightly inward. Squeeze the buttercream while spinning the flower nail to create a spiral around the centre, forming a rose bud.
After the bud, pipe arcs around it to create petals. Start with three or four petals and add more in each outer ring. As you pipe each arc, lift the piping tip slightly at the middle of the arc and lower it again at the end. This creates the curved petal shape. Overlap each petal about halfway over the previous one so the rose looks full and layered. For this spring porch cake I’m keeping the roses small so they don't look giant!
Transfer each roses to the tray on its little square of paper and freeze them along with the other flowers.
Decorating the Spring Porch Cake with Flowers
Once your flowers are frozen, it’s time to decorate the cake. Start with a small round piping tip and green buttercream to pipe vines onto the sides of the cake. These vines act as both decoration and glue for attaching the flowers.
Take the flowers out of the freezer and press them onto the cake along the vines. Because they’re frozen they’ll hold their shape and be easy to handle. They will soften within a few minutes so work fairly quickly. If they start to soften too much, put them back into the freezer for a few minutes.
To add leaves, use a leaf piping tip such as the Wilton #352. When you look at this tip sideways it looks like Pac-Man jaws. Squeeze the piping bag and then release the pressure as you pull away so each leaf ends in a pointed tip. Pipe clusters of leaves to make bushes and press frozen flowers into the bushes while the buttercream is still soft and sticky.
If you want to vary the colour of the greenery on your spring porch cake, you can mix different shades of green buttercream. Adding a tiny bit of orange gel colour dulls the green for a more natural leafy shade, while yellow gel brightens it.
For tiny flowers, switch to a small star tip like a number 18. I pipe little star-shaped blossoms onto clusters of piped leaves that looked like bushes. These are a quick and easy flower to use as filler flowers in any empty areas!
This cheerful spring porch cake looks like a tiny house covered in blooming flowers. It’s a perfect cake for spring celebrations or for welcoming someone into a new home.
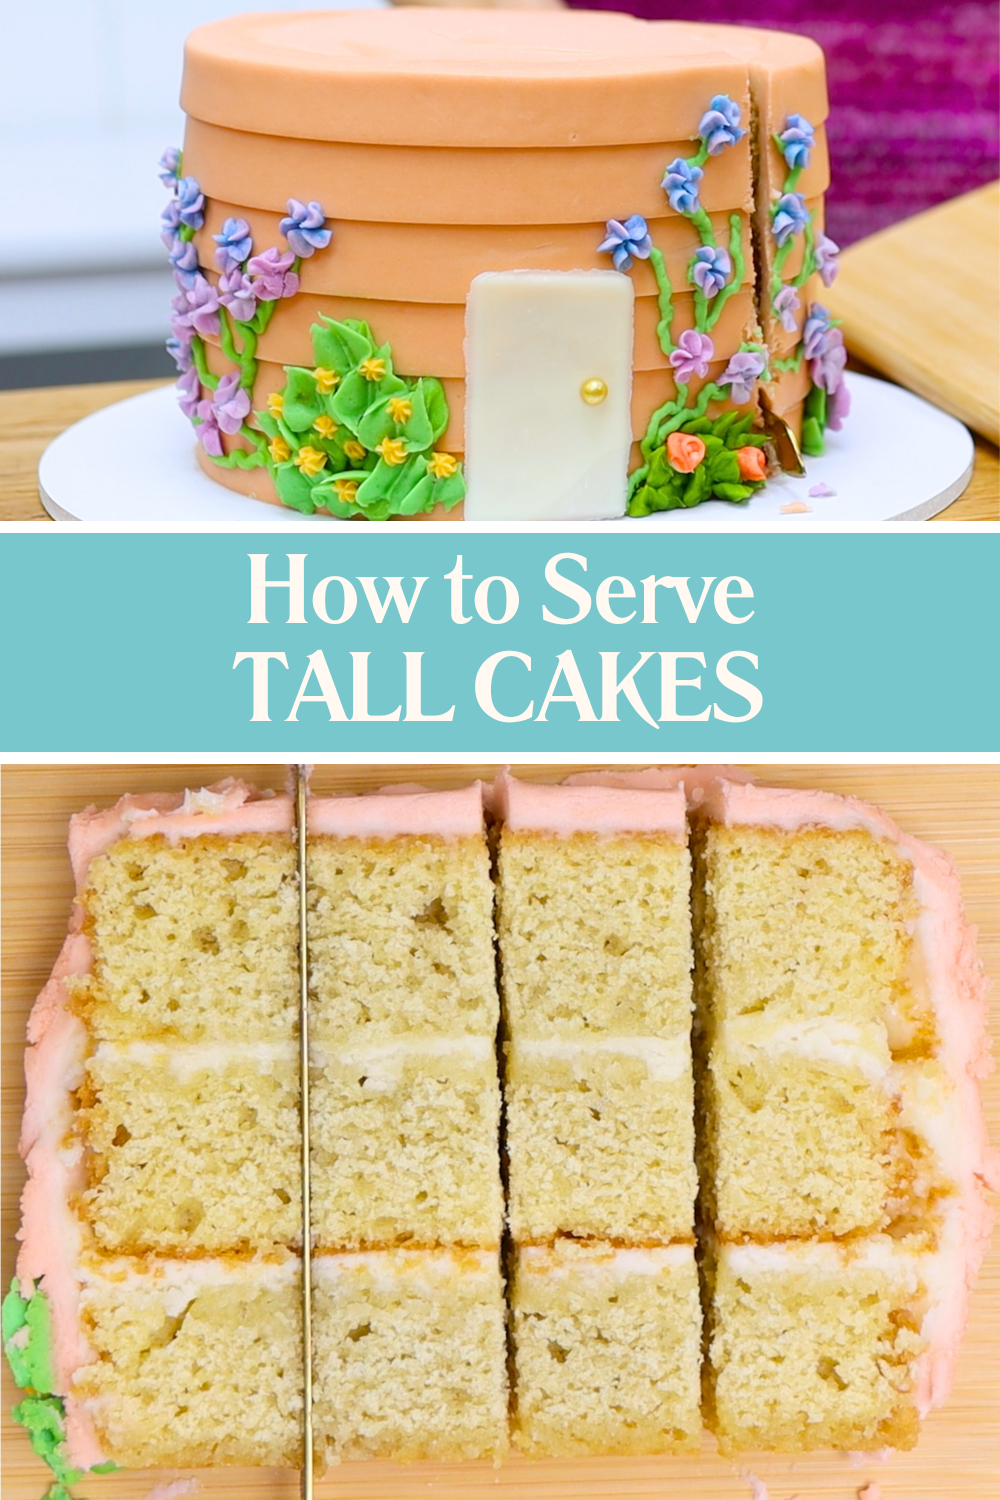
How to Slice a Spring Porch Cake
When it’s time to serve the cake, I like to use the cutting board method for slicing. Start by cutting about an inch from the edge of the cake and slice straight across from one side to the other. Push the slice away from the rest of the cake to flip it over onto a cutting board. Cut it into long narrow slices.
Then make another cut about an inch further in and repeat the process. This method creates neat slices that are a really reasonable portion size. When cakes are cut into large wedge-shaped slices there are almost always leftovers on every plate!
Another advantage of this slicing method is that guests can choose the piece they want. Someone who prefers less sweetness can choose a middle piece with less frosting, while frosting lovers can pick the outer slices. Tell me in the comments which piece you would choose!
I hope this spring porch cake tutorial was helpful. If you have any questions about the techniques, ask me in the comments. Visit my cake school to learn hundreds more cake decorating techniques and designs 🙂 See you there!
You can also watch a video of this spring porch cake tutorial:
Save this tutorial to Pinterest for later!
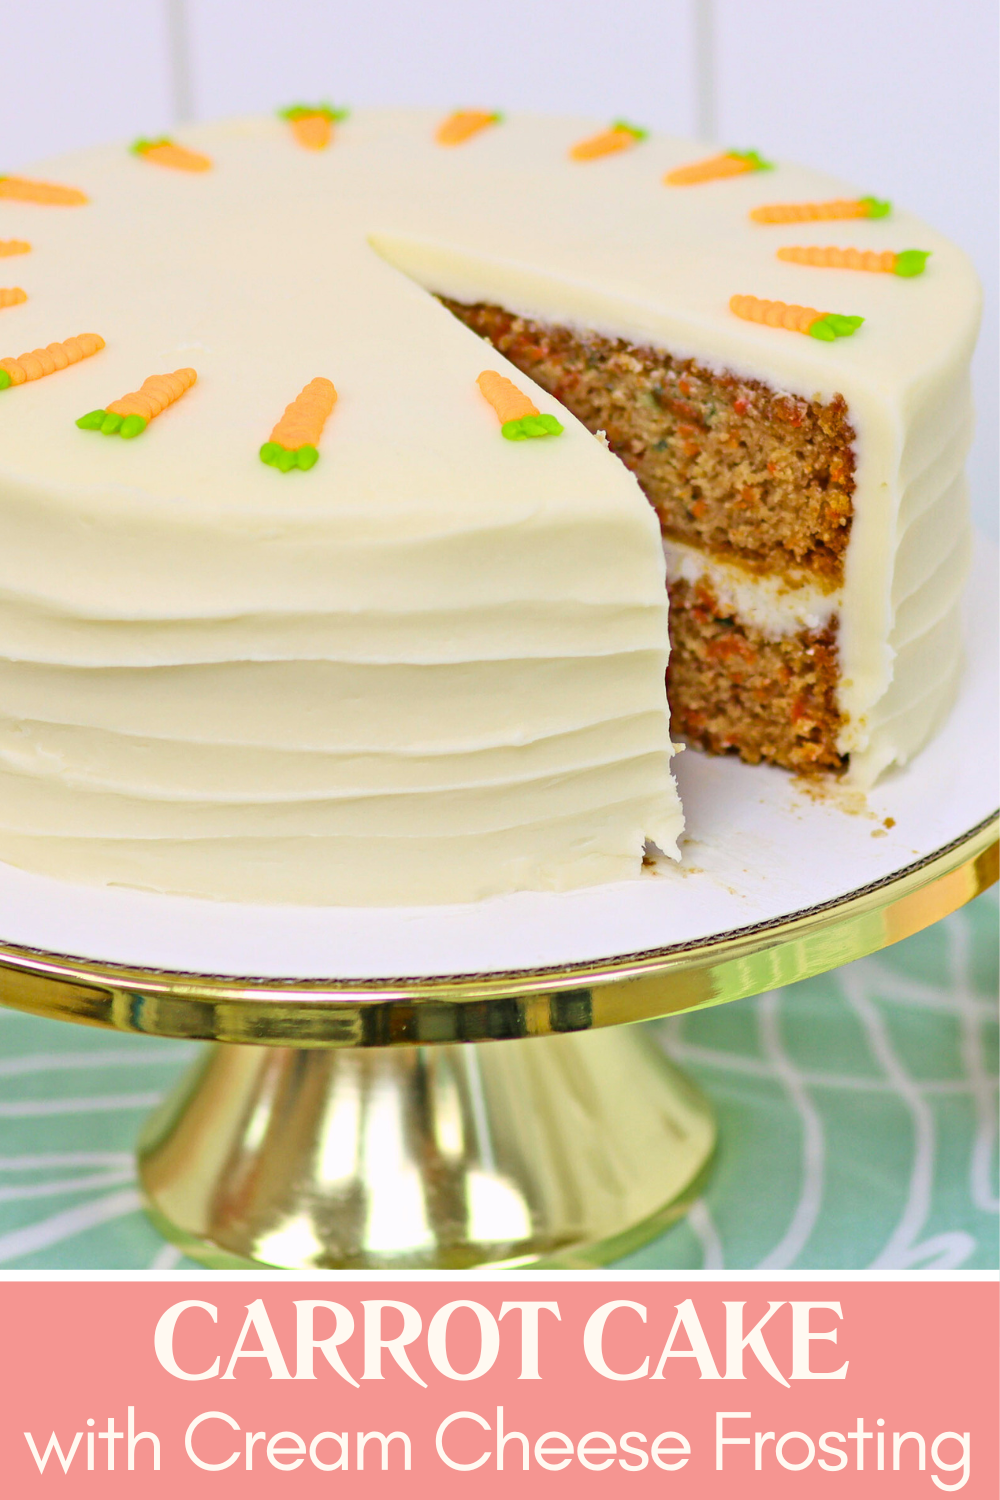
This carrot cake with cream cheese frosting is amazingly flavourful without being overly sweet. You won't able to stop eating it! It's quick and easy to make and you don’t even need a mixer for the batter because it comes together in bowls using a whisk and a spatula. The frosting smooths beautifully and can be decorated just like buttercream!
Why This Carrot Cake Recipe Is So Easy
One of the things I love about this carrot cake recipe is that it’s mixed by hand. There’s no need to pull out a mixer, which makes the process faster and the cleanup easier.
Instead of creaming butter and sugar, you’ll simply mix the ingredients in two bowls: one for the wet ingredients and one for the dry ingredients. Once both are prepared, the dry ingredients are stirred into the wet ingredients to form the batter. This method keeps the cake tender and moist without requiring any special equipment. You will need a cheese grater to grate the carrots, or a food processor if you have one!
This carrot cake with cream cheese frosting is a very flexible recipe when it comes to cake size. The same batter works perfectly for either a two-layer 8-inch cake or a three-layer 6-inch cake, and the same amount of frosting will fill and frost either size.
How to Mix the Carrot Cake Batter
Start by preparing your cake pans. Grease the pans well so the cakes release easily after baking. (If you want to make cupcakes instead, try my one bowl carrot cupcakes!)
In your first bowl, mix the wet ingredients together. Use a whisk to combine everything until smooth and evenly blended. Because this cake is mixed by hand, you don’t need to worry about overmixing at this stage.
In a second bowl, combine the dry ingredients. Stir these together so the spices and leavening are evenly distributed throughout the flour.
Next, add the dry ingredients to the bowl of wet ingredients. Fold the ingredients into each other gently with a spatula or spoon just until everything is combined. The batter should look thick and smooth.
When you can't see the flour anymore, add the grated carrots. Freshly grated carrots work best because they add moisture and a natural sweetness to the cake. If you like a bit of crunch in your carrot cake, you can also add chopped nuts like walnuts or pecans at this stage.
Once everything is mixed, divide the batter evenly between your prepared cake pans.
Baking Your Carrot Cake Layers
This recipe works beautifully for two different cake sizes. If you’re making an 8-inch cake, divide the batter between two pans for a classic two-layer cake. If you prefer a taller cake, divide the batter between three 6-inch pans.
Spread the batter evenly in the pans and bake until the cakes are set in the middle and a toothpick inserted into the centre comes out clean. Let the cakes cool in their pans for a few minutes before turning them out onto a wire rack to cool completely.
Cooling the cakes fully before frosting is important so the frosting doesn’t melt when it touches the cake.
Why This Cream Cheese Frosting Works So Well
Carrot cake with cream cheese frosting is a classic flavour combination because the tanginess of the cream cheese balances the sweetness of the cake beautifully.
However, traditional cream cheese frosting can sometimes be quite soft, which can make it tricky to spread smoothly onto a cake or to use for decorating.
My favourite solution is to start with a stiff buttercream base and then fold cream cheese into it at the end. This method creates a frosting that still has the rich tangy flavour of cream cheese but with a much more stable consistency.
How to Make Stable Cream Cheese Frosting
Begin by making a thick buttercream base. Beat the butter and powdered sugar together until the frosting becomes smooth. It will be very stiff because you'd normally add milk at this stage to thin it out, but don't! You'll need it to be stiff.
Now add the cream cheese. Instead of beating it in aggressively, gently fold the cream cheese into the buttercream until it’s fully incorporated. Folding rather than whipping helps keep the frosting smooth and prevents it from becoming too soft.
The result is a beautifully creamy frosting that spreads easily onto the cake while still holding its shape.
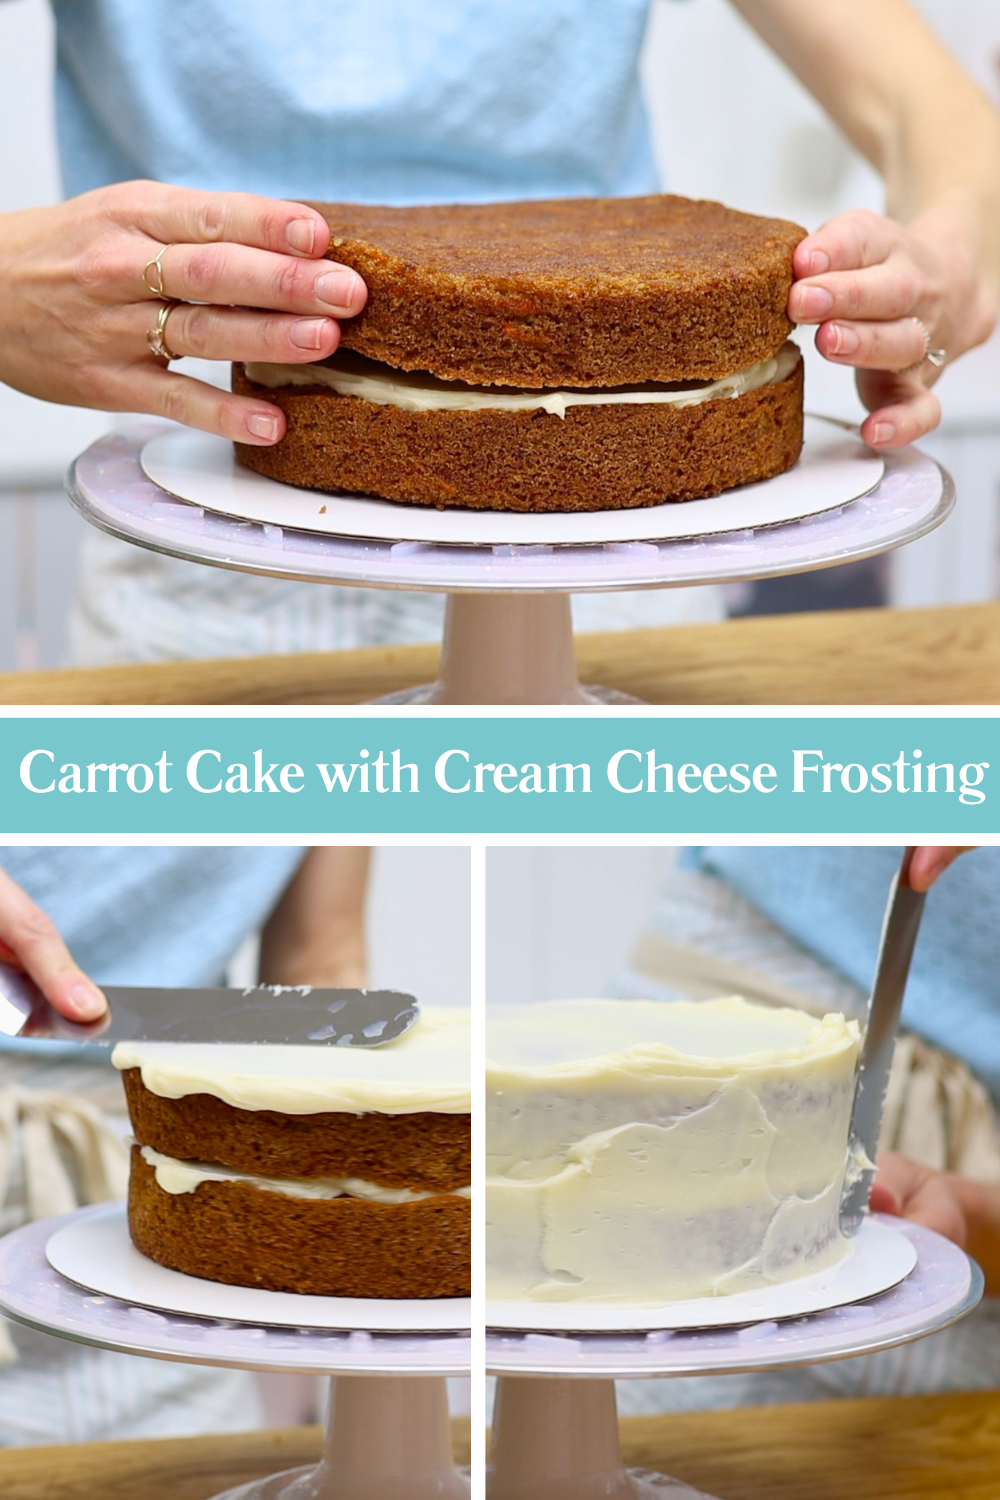
Assembling the Carrot Cake with Cream Cheese Frosting
Once your carrot cake layers are completely cool, it’s time to assemble the cake.
Place the first cake layer onto your cake board or serving plate. If you're going to drive anywhere with the cake, I recommend spreading some frosting onto the board or plate first. This will act as glue to attach to the cake and hold it in place.
Spread a layer of cream cheese frosting over the top of the first cake layer. Add the next cake layer and if you’re making a three-layer cake, continue with another layer of frosting and the final layer of cake.
Put the cake into the fridge for 30 minutes or the freezer for 15 minutes before frosting it. Cold cake is firmer and less crumbly so it will be easier to frost afterwards.
How to Frost a Carrot Cake with Cream Cheese Frosting
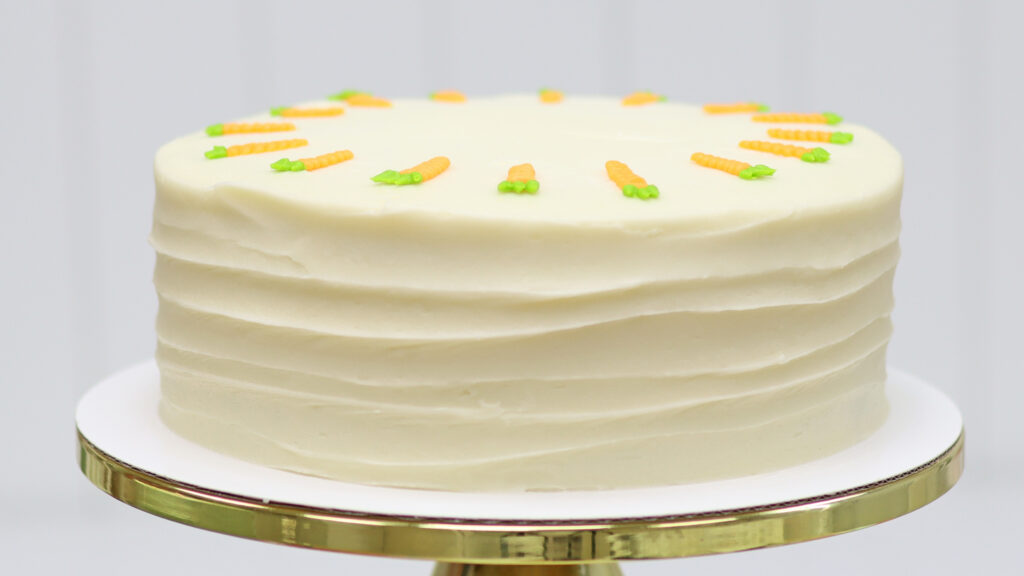
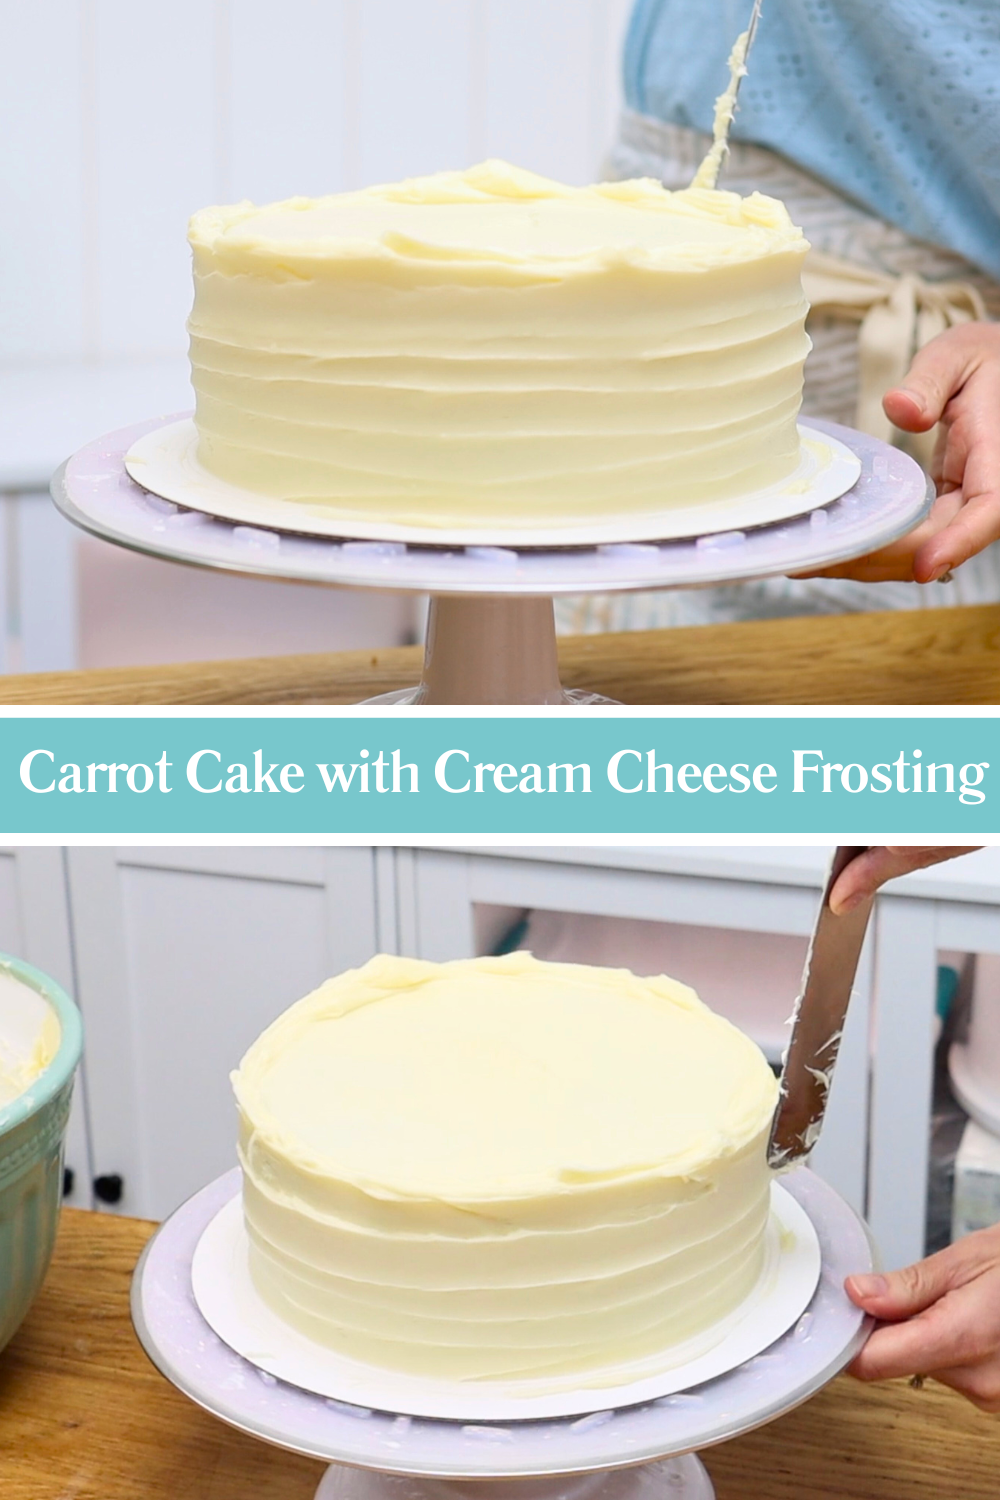
Finish by spreading frosting over the top and around the sides of the cake. Because this frosting has a buttercream base, it’s much easier to smooth neatly compared to traditional cream cheese frosting.
If you struggle with smooth frosting, add texture instead by dragging a spatula or the back of a spoon around the cake. It's easier to make this look neat compared to smooth frosting, and it looks just as pretty!
Decorating a Carrot Cake with Cream Cheese Frosting
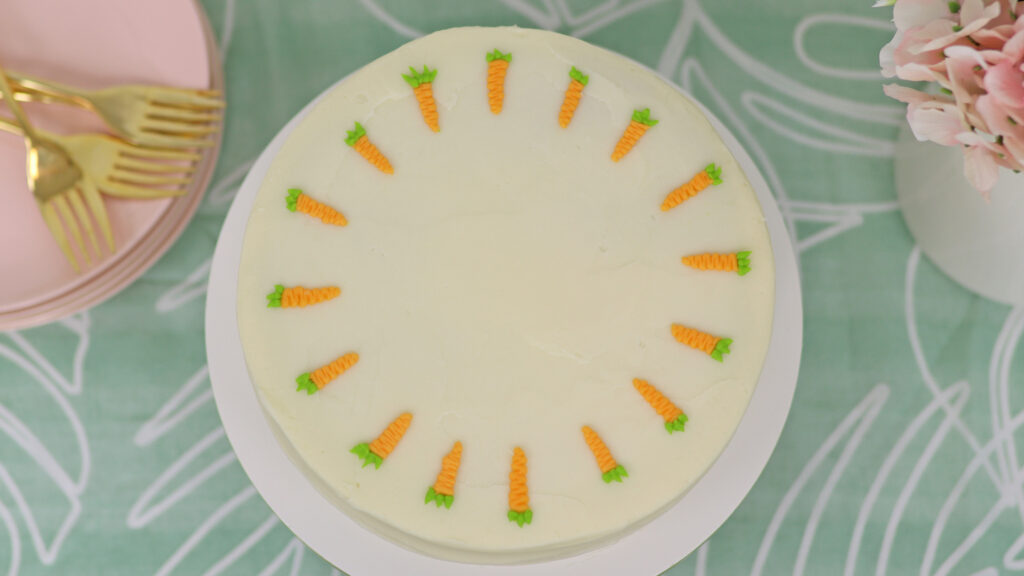
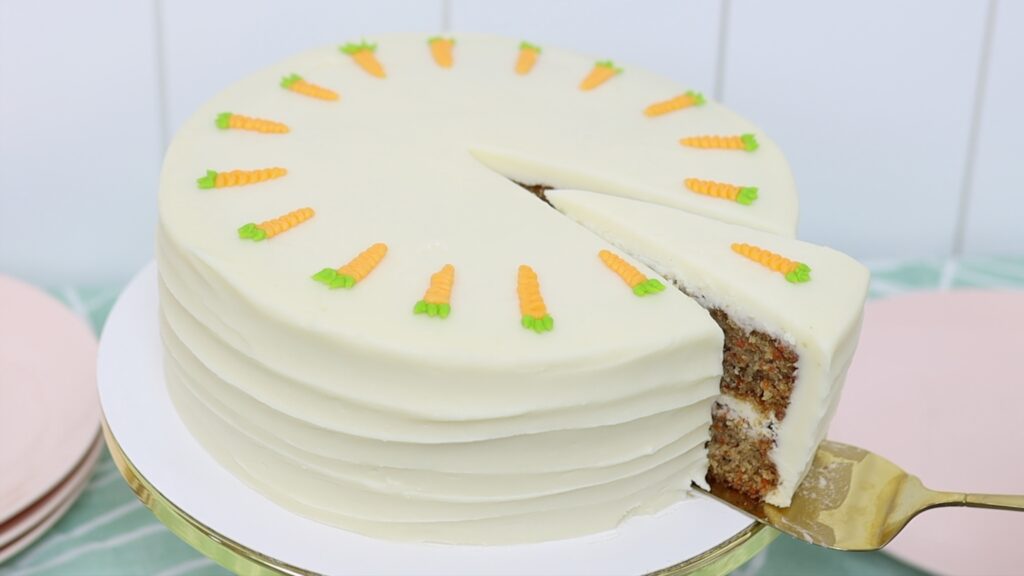
Decorating options are endless for this carrot cake with cream cheese frosting. Add sprinkles, flowers, a cake topper... Or pipe tiny carrots to divide the cake into portions! I used a small (#4) round piping tip for these and I scooped out a few spoonfuls of the buttercream before adding cream cheese. This consistency is much easier to pipe with than after adding the cream cheese.
Pipe zigzags of orange buttercream onto a piece of parchment or wax paper, which is much easier than piping straight onto the top of the cake. Pipe a few green spikes at the top of each carrot and then put them into the freezer for 10 minutes to chill and harden. Now you can pick them up and place them onto your cake!
This cake is always a crowd favourite. If you want to make cupcakes instead, try my one bowl carrot cupcakes! You'll find the recipe below and you can toggle the ingredients between Metric measurements (grams) and US (measuring cups and spoons).
Keep the cake in the fridge for up to 3 days and take it out 3 hours before serving, to allow it to warm up to room temperature. Enjoy!
This lightly spiced carrot cake with tangy cream cheese frosting is amazingly flavourful, not too sweet, and easy to frost! Use this recipe to make a two-layer 8 inch cake or a 3-layer 6 inch cake.
Ingredients
UnitsScale
For the cake:
1 1/3cupvegetable oil
1cupwhite sugar
1cupbrown sugar
4 eggs
2 teaspoons vanilla extract
2cupsall-purpose flour
1 teaspoon baking soda
1 teaspoon salt
1 teaspoon cinnamon
3cupscarrot, grated
1cupwalnuts or pecans, chopped (optional!)
For the cream cheese frosting:
2 cupsunsalted butter, softened
8 cups powdered sugar
2 teaspoons vanilla
1/2 teaspoon salt*
1cupcream cheese, softened
Instructions
Make the cake:
Stir the oil and sugars together. Add the eggs and vanilla and stir to combine.
Add the dry ingredients: flour, baking soda, salt and cinnamon. Stir as few times as possible, just until you can’t see the flour in the batter anymore.
Add carrot and nuts if you're using them, and fold into the batter with no more than 5 strokes of your spatula.
Divide the batter between two greased 8 inch pans or three greased 6 inch pans.
Bake at 325F or 160C for 30 minutes, until the cakes spring back slowly when you poke them or a toothpick poked into the middle of a cupcake comes out clean. Let the cakes sit in their pans for 5 minutes before turning out onto a wire rack to cool.
Make the cream cheese frosting:
Take butter and cream cheese out of the fridge a few hours before using to allow them to soften.
Using a mixer on the lowest speed, mix the butter and powdered sugar until smooth.
Mix in vanilla and salt.
Add cream cheese and fold in using a spatula.
Put it all together:
Spread some frosting onto the middle of a cake board or plate and press your first layer of cake down onto it, to attach it.
Spread frosting to cover the top of the cake layer, as filling. Lower your next cake layer on top. If you're making a three layer cake, repeat with another layer of filling and the final cake layer.
Put the cake into the fridge for 30 minutes or the freezer for 15 minutes to chill. Then spread cream cheese frosting over the top and sides of the cake. Smooth with a cake scraper or add texture by dragging an offset spatula (palette knife) or the back of a spoon around the cake.
Store this cake in the fridge for up to 3 days but serve at room temperature by taking it out of the fridge 2-4 hours before slicing.
Notes
*If you use salted butter, leave out the salt from the frosting.
Save this carrot cake with cream cheese frosting recipe to Pinterest for later:
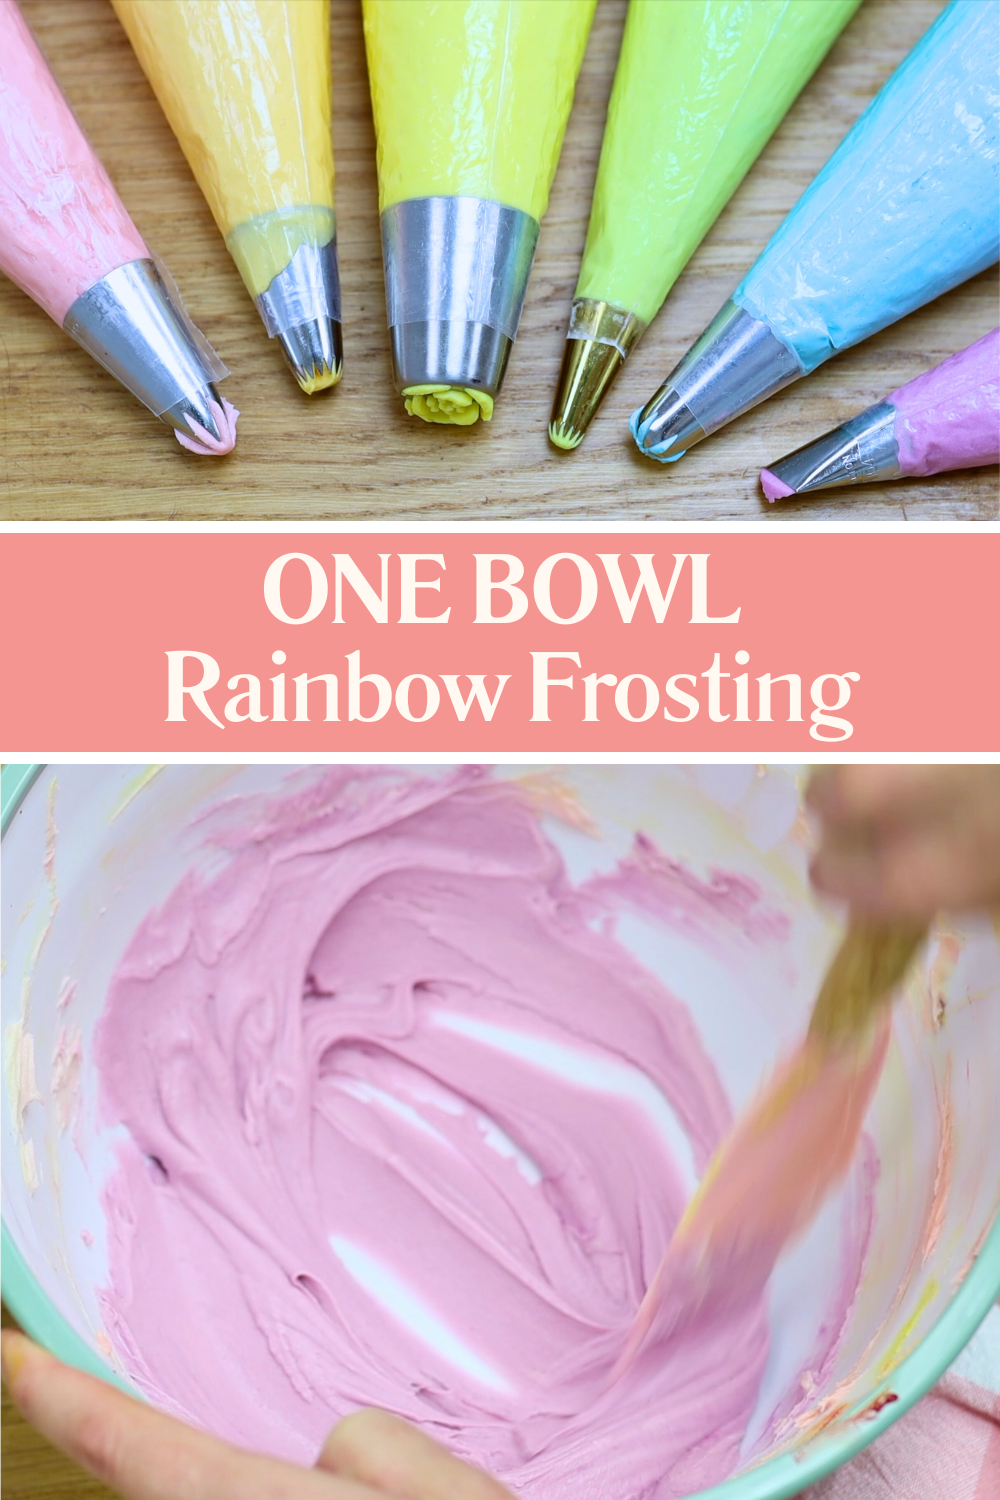
Make a stand up rainbow cake using different piping tips, rainbow colours mixed in just one bowl, and only one layer of cake.
Prepare piping bags for the stand up rainbow cake
Start by mixing your colours for the filling and frosting of this cake. To mix them using one bowl without washing in between colours, follow an order you probably wouldn't expect. I'm using one batch of my 4 Minute Buttercream for this cake. Start with a bit less than a cup of buttercream in the bowl. Add yellow food colouring, mix it in, and scoop it up. Then add a bit less than a cup of plain white buttercream to the bowl and tint it orange. Mix it, scoop it up, and add more white buttercream. Continue with pink or red next (which should be about twice the amount of buttercream than the other colours), then purple, blue, and finally green. For each colour, scrape around the bowl to mix in all of the previous colour into this new colour. That's the reason for mixing the colours in this order - the colours naturally blend into each other.
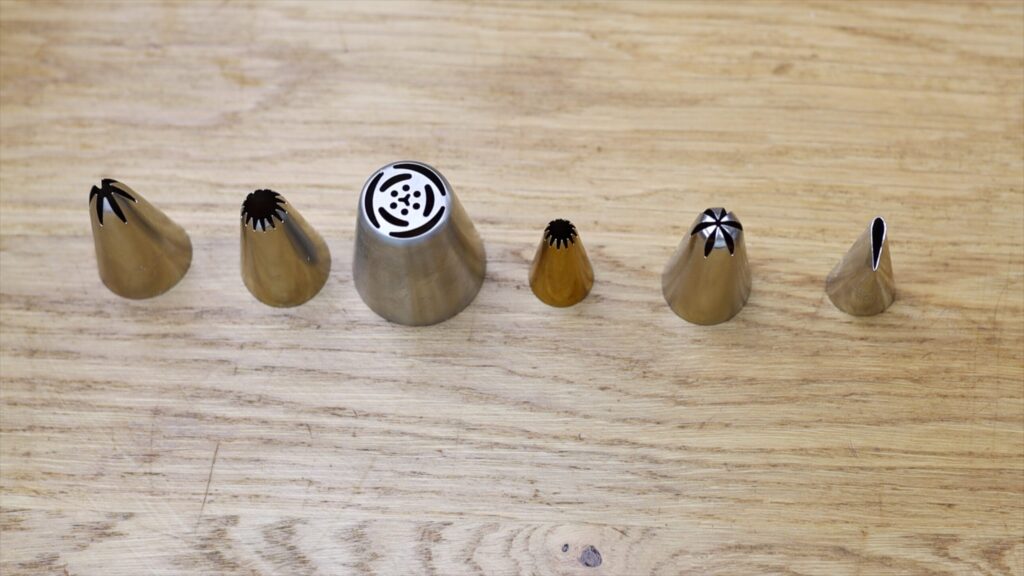
Prepare six piping bags with different piping tips to create texture for this buttercream rainbow cake. Petal tips, star tips, and flower tips all create different effects, so using a variety of tips makes each colour look different even if you repeat the same technique. For example, use a 104 petal tip for ruffles, a 2D closed star tip for flowers, a 32 open star tip for shells, a Russian flower tip for detailed flowers, a 4B larger open star tip for bigger shells, and a 1M star tip for a different texture of shells.
Fill each piping bag with one of the rainbow buttercream colours you mixed earlier and twist the tops closed so they’re ready to use.
Fill the stand up rainbow cake with colourful buttercream piping
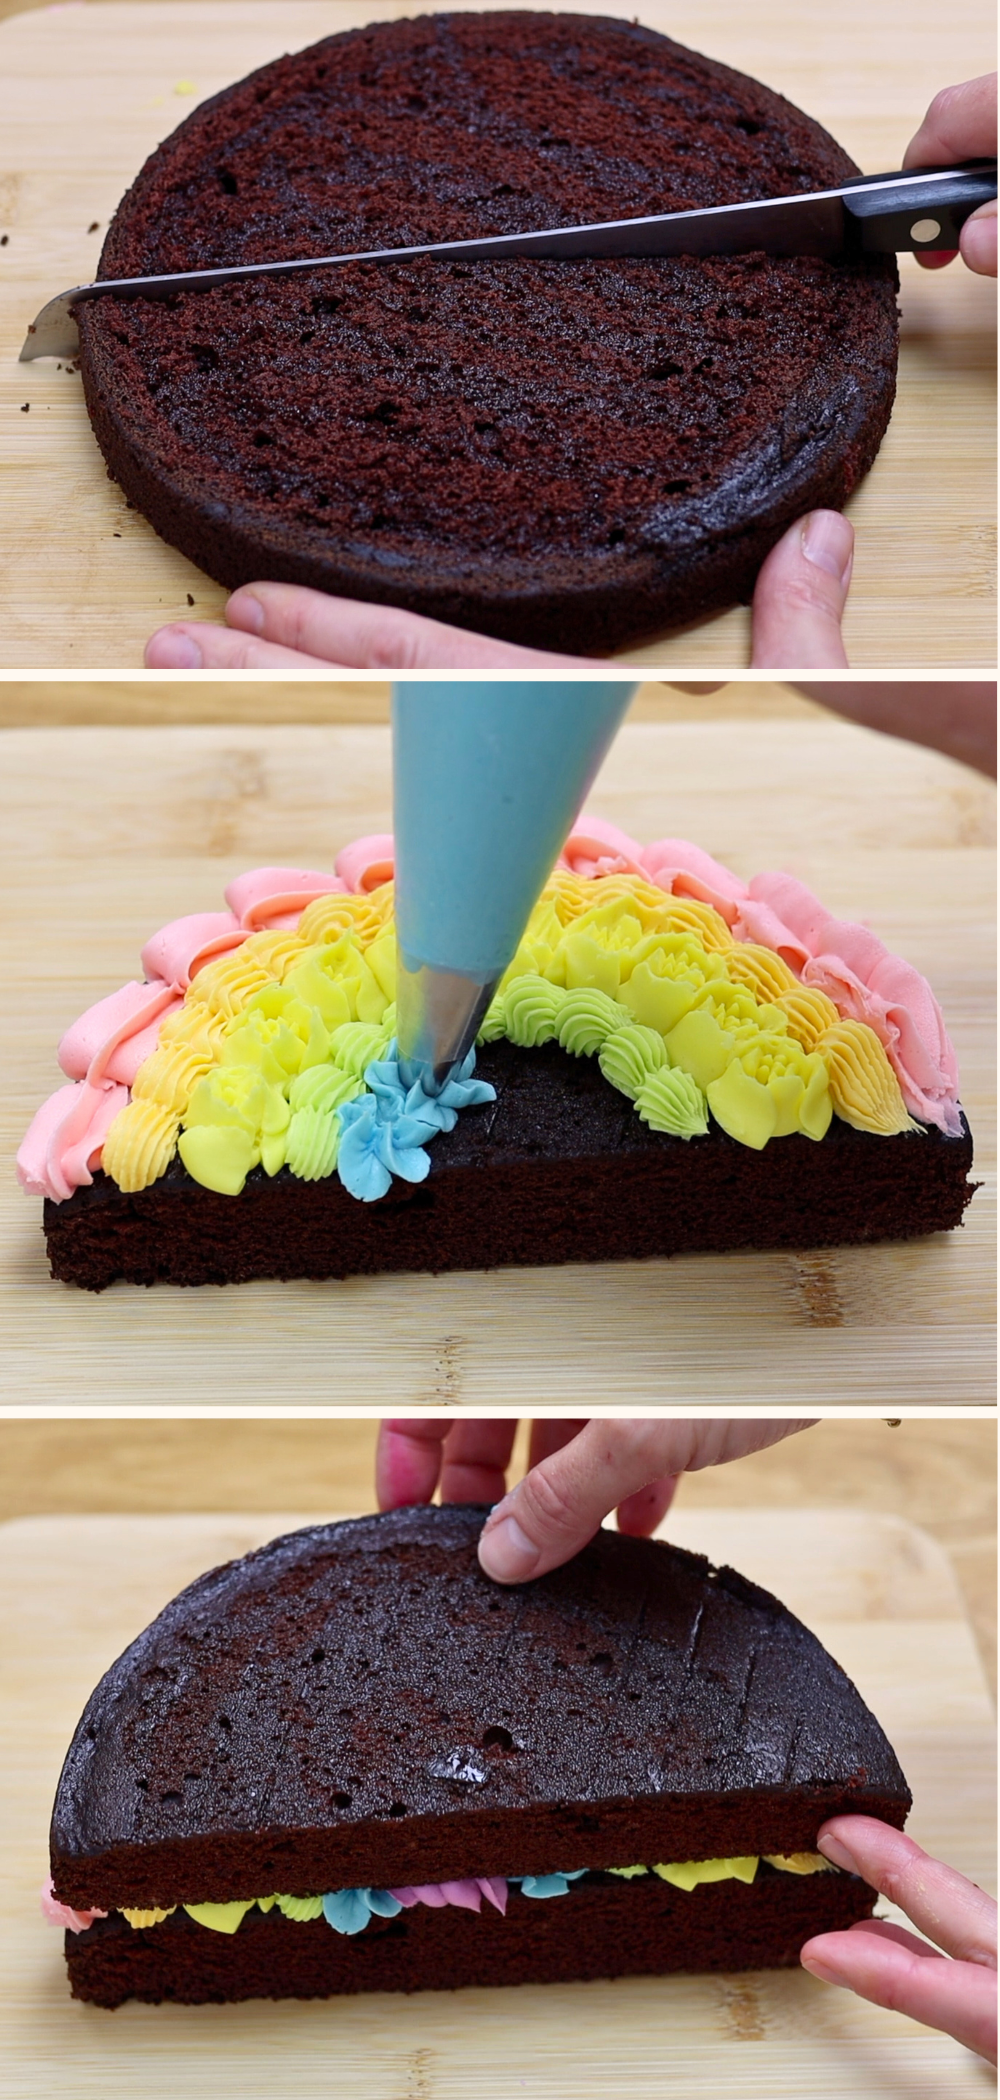
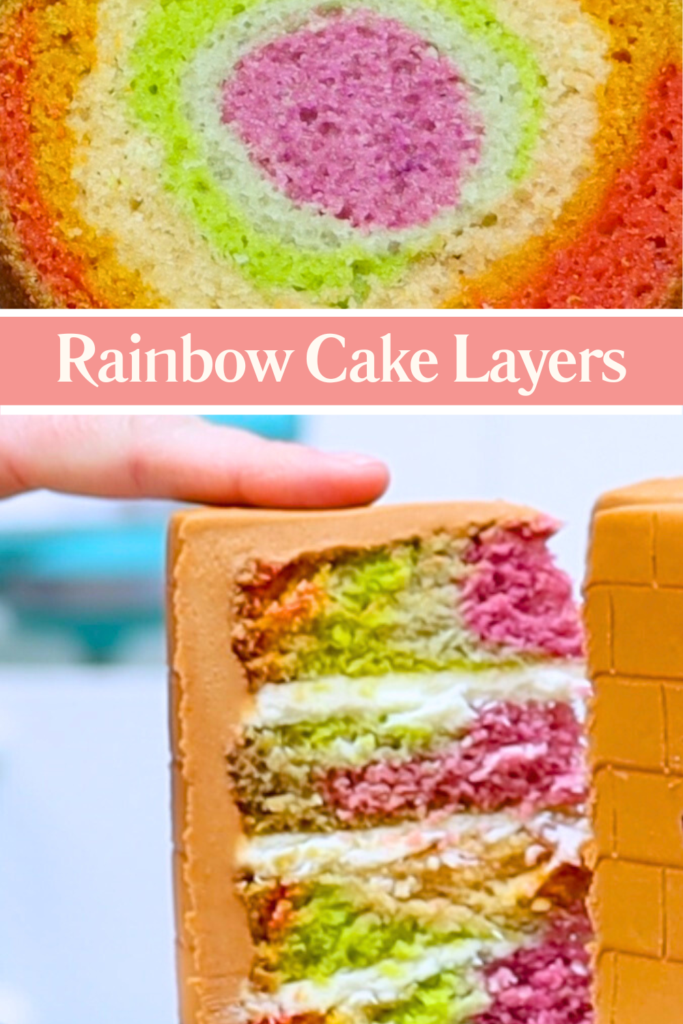
You'll need a single round cake layer to make this stand up rainbow cake. I used an 8 inch layer of my Perfect Chocolate Cake, drizzled with simple syrup to keep it extra moist for serving the next day.
Slice the cake layer in half to create two semicircles. Pipe the buttercream filling between the cake halves in rainbow order, starting with red or pink on the outside. Continuing with orange, yellow, green, blue and purple. Piping the filling instead of spreading it is a great way to practice using each piping tip and to get comfortable with the consistency of your buttercream before decorating the outside of the cake.
Place the second semicircle of cake on top of the filling to complete the cake shape.
Make the rainbow cake stand up
Pipe a line of buttercream onto a cake board and flip the cake over so the flat cut side of the cake sits on that line. Press the cake gently into the buttercream so it sticks securely. This creates the upright structure that gives the stand up rainbow cake its shape.
Add a rainbow crumb coat
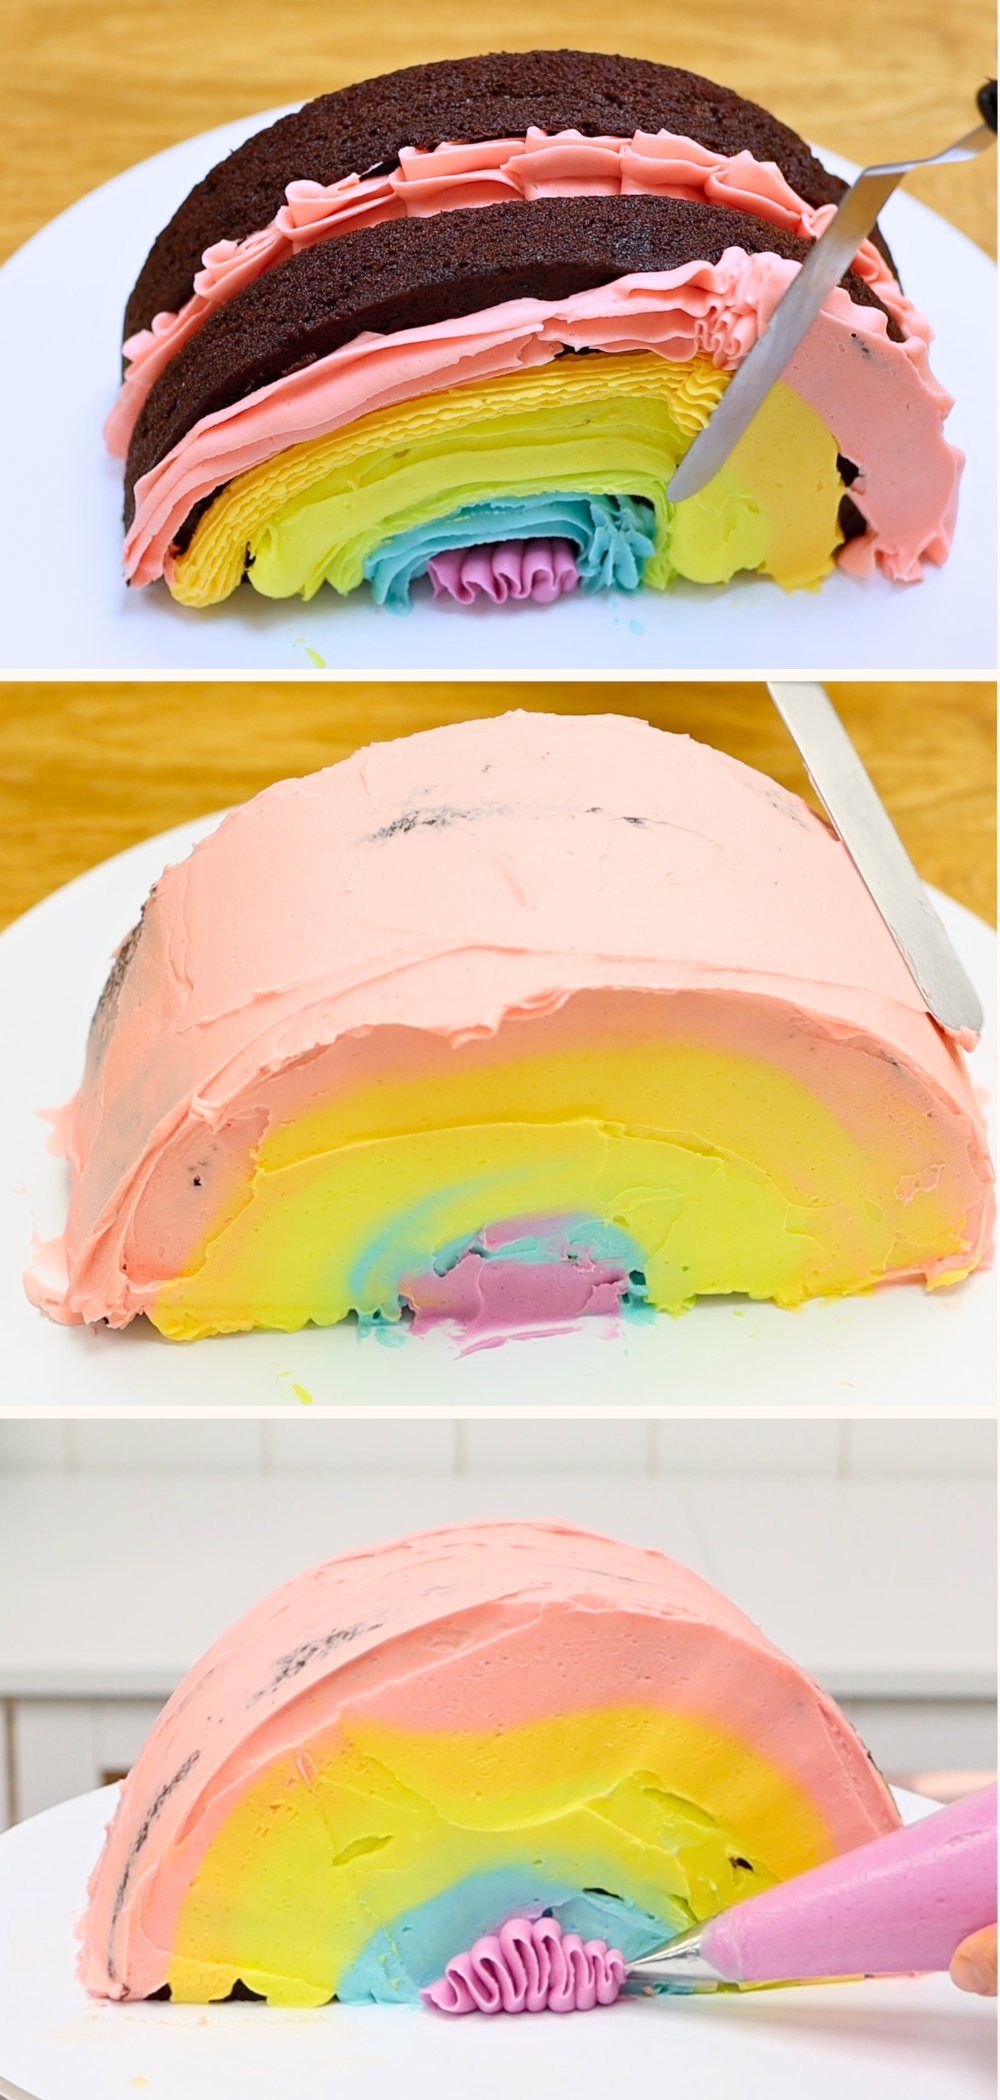
Apply a crumb coat to the stand up rainbow cake using the same piping bags you used for the filling. Instead of piping neatly, simply squeeze the buttercream onto the cake in rainbow arcs that match the colours you’ll pipe later. Matching the crumb coat colours to the final decoration helps hide any small gaps in the piping.
Use an offset spatula (angled palette knife) or a cake scraper to smooth the buttercream across the front, back, and top of the cake.
Decorate the stand up rainbow cake with piping
Put the cake into the fridge for 30 minutes to set this crumb coat before piping on it. By setting the crumb coat, you'll trap any crumbs that have come off the cake. Now they won't get into your piping.
Pipe purple buttercream ruffles
It's easiest to begin decorating the stand up rainbow cake with the purple buttercream using the petal tip. Starting in the middle of the cake gives you the most space to angle the piping bag to pipe ruffles. Hold the piping bag so the narrow edge of the petal tip faces outward away from the cake. Move the piping bag slightly back and forth as you squeeze to create ruffled buttercream texture. Pipe these ruffles along the centre of the cake on both sides.
For the rest of your colours, use these techniques in any order.
Pipe buttercream flowers
To pipe flowers onto your stand up rainbow cake, use a closed star tip like a 2D. Hold the piping bag with your wrist twisted so your thumb is close to your forearm. Then squeeze while twisting your wrist upwards to spin the bag clockwise. This motion allows the petals to fan out from the centre of the flower. You might notice small gaps between the flowers and the rainbow crumb coat underneath helps hide those spaces.
Add shell borders for the easiest texture on the stand up rainbow cake
I think shells borders are one of the easiest buttercream piping techniques. Using an open star tip like the #32 tip I'm using with my green buttercream, squeeze the piping bag and pause briefly so the buttercream attaches tot he cake and rises up. Then release pressure and swipe down and away to create the tail of the shell. Pipe the next shell over the tail of the previous one to continue the pattern along the cake.
Pipe flower details with a Russian piping tip
Russian piping tips (also called 'flower nozzles') add detailed flowers with each squeeze. Russian tips can take a little practice, so the piping you did for the filling earlier helps you get used to them. If the buttercream at the end of the piping bag has crusted slightly and won’t stick to the cake, squeeze a small amount out first to expose fresh buttercream before piping onto the cake.
Use different piping tip sizes and shapes for variety on the rainbow cake
Using both large and small open star tips (like the #32 I used for green and a 4B for orange) creates differed sized shells on your cake. Using the same piping technique with different tip sizes is an easy way to create variety without needing to learn a new technique.
Another way to add variety is to use a different piping tip shape with the same shell technique. For the pink buttercream I'm using a 1M tip to pipe a shell border with a different texture to the shells piped with open star tips.
Finish the stand up rainbow cake with piping on top
Use the pink or red buttercream from the top section of the rainbow for the entire top of the cake as well. I think piping onto the top of the cake is the quickest and easiest part because you’re piping downward instead of sideways, so the piping feels more comfortable and goes quickly.
How to store and serve a stand up rainbow cake
Store the stand up rainbow cake in the fridge until a few hours before serving. Chilling the cake keeps the buttercream decorations firm and protects the texture of the piping. Take the cake out of the fridge about 3 hours before serving so the cake and buttercream can come to room temperature. This is when both the flavour and texture taste their best!
Slice the stand up rainbow cake diagonally to reveal the colourful buttercream filling and piping inside each slice.
I hope this tutorial has been useful! Ask me any questions in the comments and visit my cake school to learn hundreds more cake decorating techniques and designs. You can also watch a video of this tutorial:
The batter of this rainbow cake recipe is the perfect consistency to make easy rainbow rings in each cake layer. It has a beautiful vanilla flavour and it's light and fluffy and absolutely delicious! It's also egg free, which is perfect for egg allergies or if you've run out of eggs.
Making the cake is insanely easy. You'll find the ingredients in the teal box below and you can toggle the measurements between metric (grams) and US (measuring cups). Whisk together the dry ingredients in one bowl and the wet ingredients in another bowl, and then whisk them all together.
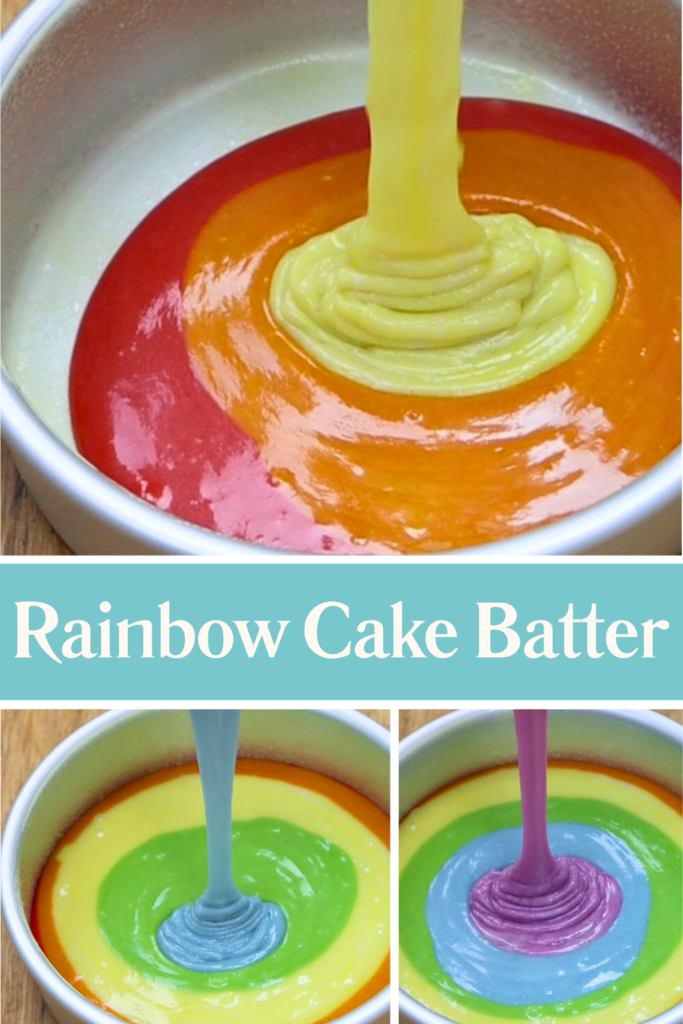
For this rainbow cake recipe's layers, divide the batter into six bowls and add food colouring to each one, folding it in gently. Over-mixing will make the cake layers taste dense. I love these gel food colouring sets because they make such bright and bold colours in cake batter and also in buttercream!
Grease 3 or 4 6" cake pans and pour the bowls of batter into the middle of each pan, starting with red and following with orange, yellow, green, blue and purple.
Bake at 325F (160C) for 30 minutes. To check that they're baked, poke the middle of each cake gently and if the cake slowly springs back up, it's ready!
Turn the cakes out onto a wire rack and leave to cool completely, about an hour.
Layer with your favourite filling and frosting (I love my 4 Minute Buttercream), decorate, and enjoy! Visit my cake school to learn hundreds of cake decorating techniques and designs 🙂
This rainbow cake is so much fun to cut into! It has a beautiful vanilla flavour and it's light and fluffy and absolutely delicious! It's also egg free, which is perfect for egg allergies or if you've run out of eggs.
Ingredients
UnitsScale
3 1/2cupsall purpose flour
2cupswhite sugar
2 teaspoons baking soda
1 teaspoon salt
2cups whole milk*
1 tablespoon vanilla extract
2/3cupvegetable oil
2 tablespoons white vinegar
Instructions
1. In a large bowl, whisk dry ingredients together (flour, sugar, baking soda, and salt).
2. In another bowl, whisk wet ingredients together (milk, vanilla, oil, and vinegar)
3. Pour the wet ingredients into the dry ingredients and whisk together until combined.
4. Divide the batter between 8 small bowls and add a few drops of food colouring to each bowl (red, orange, yellow, green, blue, and purple), folding the colour gently into the cake batter with a spatula and avoiding over-mixing.
5. Grease 4 six inch cake pans. Starting with red, pour 1/4 of the bowl of batter into the middle of the cake pan. Continue with the rest of the colours, pouring 1/4 of each into the middle of the cake pan. Repeat with the rest of the cake batter for the remaining cake pans.
6. Bake at 325F (160C) for 30 minutes. To check whether cakes are baked, poke each one gently in the middle and if the cake springs back up slowly, it's baked!
7. Turn the cakes out onto a wire rack and leave to cool for about an hour. Optionally, trim the top and bottom off each cake to remove any caramelization. Layer with your favourite filling and then frost and decorate!
Notes
I recommend storing your finished cake in the fridge for up to 3 days. Move it from the fridge to room temperature about 3 hours before serving, to let the cake, filling and frosting warm up and soften and that's when the cake will taste its best!
*To make this cake vegan, use almond milk or soy milk instead
You can also watch a video of this rainbow cake recipe here:
Valentine’s Day cake ideas don’t need to be complicated to look impressive. In this tutorial I’m sharing three fun cake designs using simple techniques and everyday tools. I’ll walk you through each design step by step, starting with how to frost a cake properly.
How to frost a cake for Valentine’s Day cake ideas
To start, pipe or spread a small dot of buttercream onto the middle of your cake board. I use my 4 Minute Buttercream for all of my cakes! Place your first cake layer on top. This anchors the cake so it doesn’t slide around while you work. Alternate cake layers with your filling and then chill the cake in the freezer for 15 minutes or the fridge for 30 minutes. This firms up the cake before frosting.
Next, add a crumb coat, which is a thin layer of buttercream that traps any crumbs coming off the cake.
Chill the cake again before spreading on the final layer of frosting. Because the crumb coat has set, no crumbs will get into this layer.
Spread the frosting on fairly thickly and make sure it rises above the top edge of the cake. This extra height will help you create sharp angles at the top later. Reach as far as you can around the cake and pull long, smooth spins of the turntable to smooth the sides.
Warming your cake scraper with hot water, a hair dryer, or a blowtorch will make the frosting even smoother.
To level the top edge, swipe sideways without pushing down. This will flatten the buttercream, without creating bulges. Then put the cake in the fridge for 30 minutes to set the frosting before decorating.
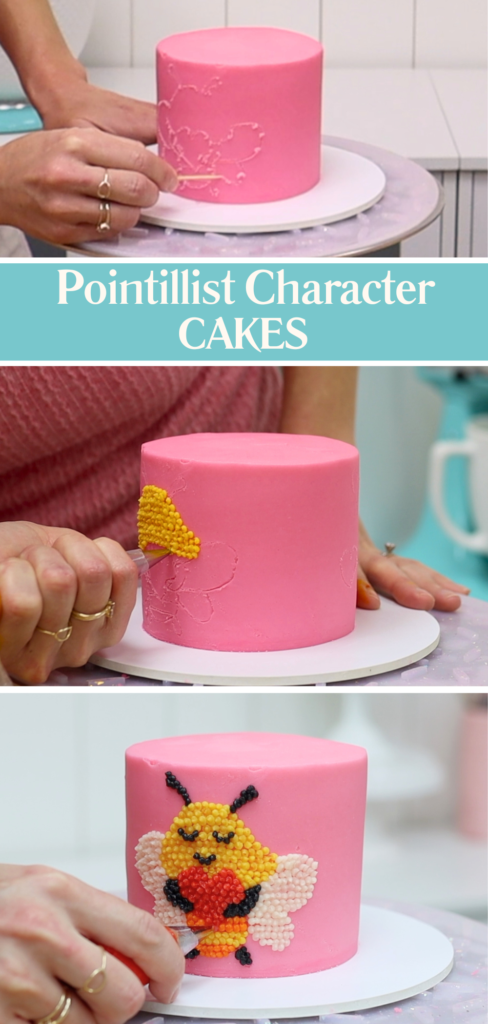
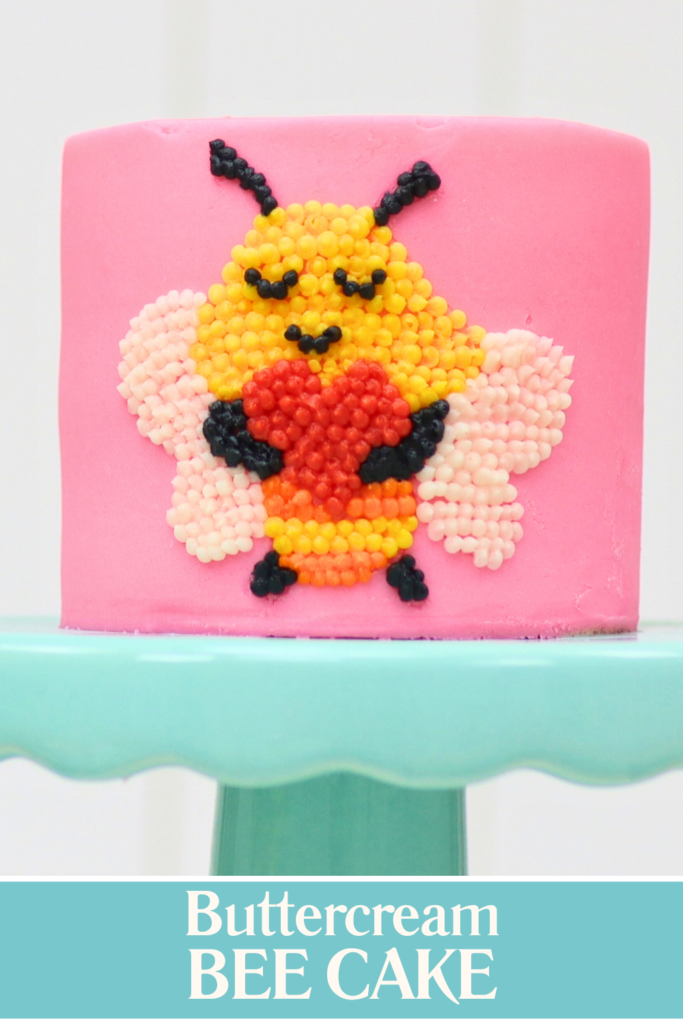
#1 Cute character Valentine’s Day cake ideas using pointillism
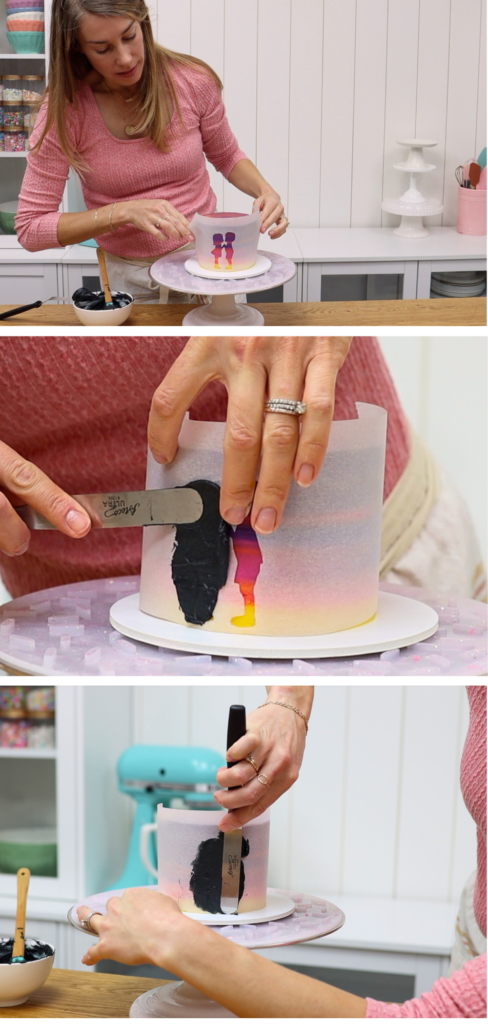
Let’s start by turning an image into a cute edible character on a cake. For this technique you’ll need a toothpick and a piping bag. If you have a small round piping tip, great, but if not, you can cut a tiny hole in the end of a piping bag or even use a sandwich bag.
After chilling the cake so the frosting is firm, lightly score your design onto the surface using a toothpick. You can draw freehand while looking at your image or print it out, cut it out, and trace around it. Gently brush off any buttercream crumbs with a paintbrush or kitchen towel.
Tint a small amount of buttercream for each colour in your design. I like using gel food colouring because it’s concentrated and creates bold colours. A cupcake pan is perfect for tinting small amounts of buttercream quickly and make cleaning up a breeze! Small bowls work just as well but take a bit longer to clean afterwards.
To make black buttercream, add a small amount of black gel colouring to any colour of buttercream. Microwave it for 5–10 seconds to darken it, then chill it back to room temperature. Stir until smooth and it’s ready to use.
Pipe dots using a small round tip (or a cut piping bag). Hold the tip slightly away from the cake, squeeze to let the buttercream attach, then release pressure as you pull away. This dotting technique is called pointillism and it’s a great way to create detailed, multicoloured Valentine’s Day cake ideas without stencils, fondant, or transfers.
Pipe one colour at a time, switching colours as needed. If you don’t have multiple tips or couplers, simply wash and reuse your piping bag and tip. Try to pipe the dots at the same angle for the whole cake, so that the peaks or points on the dots all point in the same direction.
This technique is incredibly forgiving and very effective.
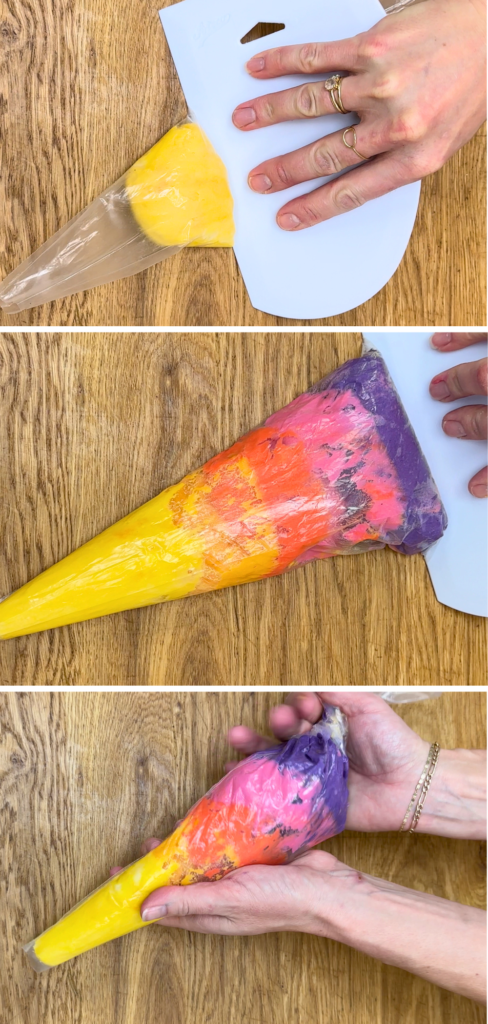
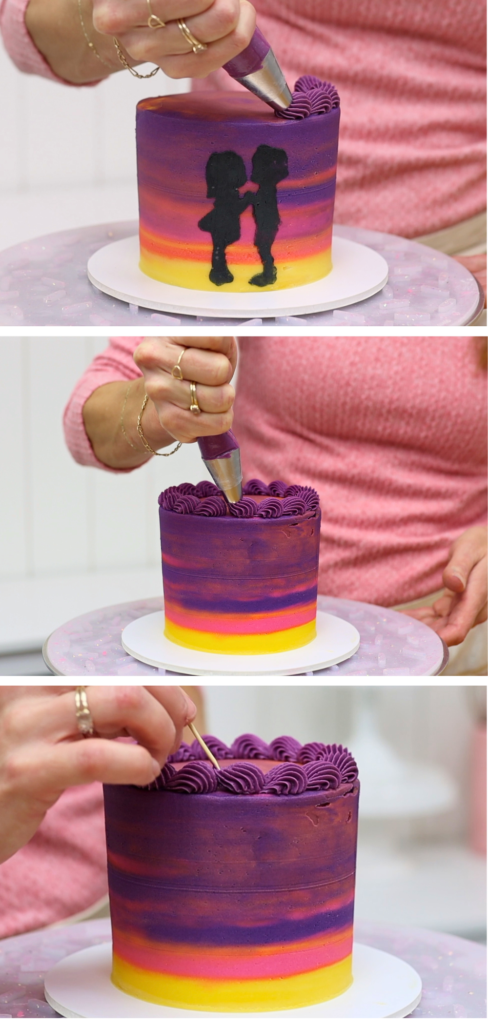
#2 Valentine’s Day cake with stencils
For this next design, all you need is a piping bag without a tip and a piece of parchment or wax paper. Start by frosting your cake using a layered piping technique. I like to call this 'lazy piping' because it's so quick and easy! Layer different buttercream colours into one piping bag, pushing each colour down to the end with a cake scraper.
Pipe rings around a crumb coated cake from the bottom of the cake upwards. After each colour, the next colour will come through to create a gradient effect.
Smooth the top with an offset spatula and then use a cake scraper around the sides. To blend the colours more gradually, wiggle a spatula or spoon between them and then scrape until smooth. Chill the cake while you prepare a stencil.
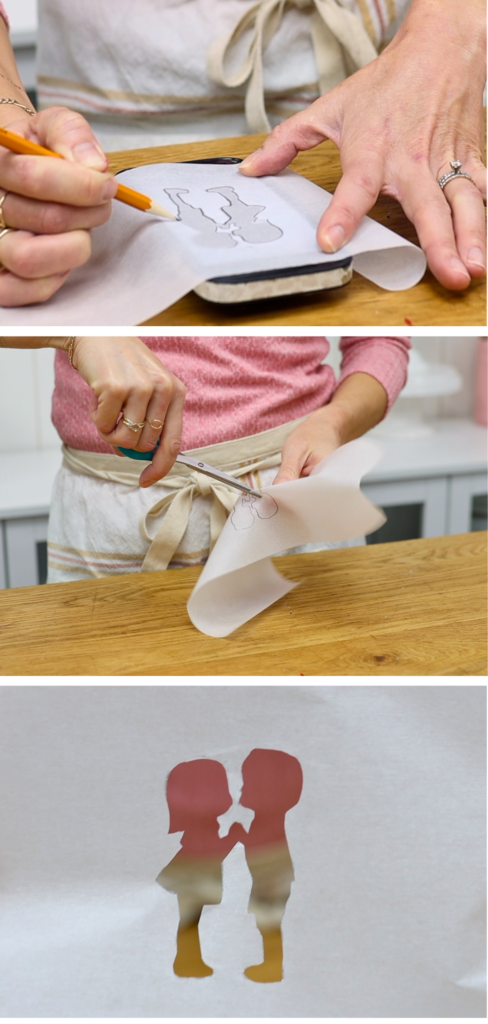
Trace a clip art image onto parchment paper and cut it out to create a stencil.
Wrap this tightly against your chilled cake and the cold frosting will prevent it from sticking. Spread buttercream over the stencil and scrape away the excess, then peel it off to reveal the design. Clean up any smudges with a toothpick.
To finish, pipe a simple border on top using a star tip. Starting and ending the border at the back of the cake helps hide the seam. I love fun Valentine’s Day cake ideas like this that don't rely on using pink and red.
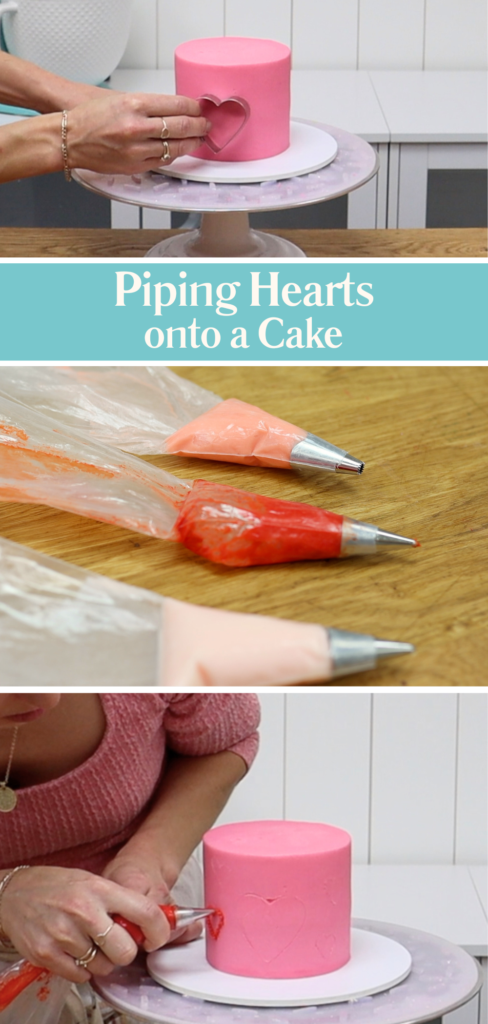
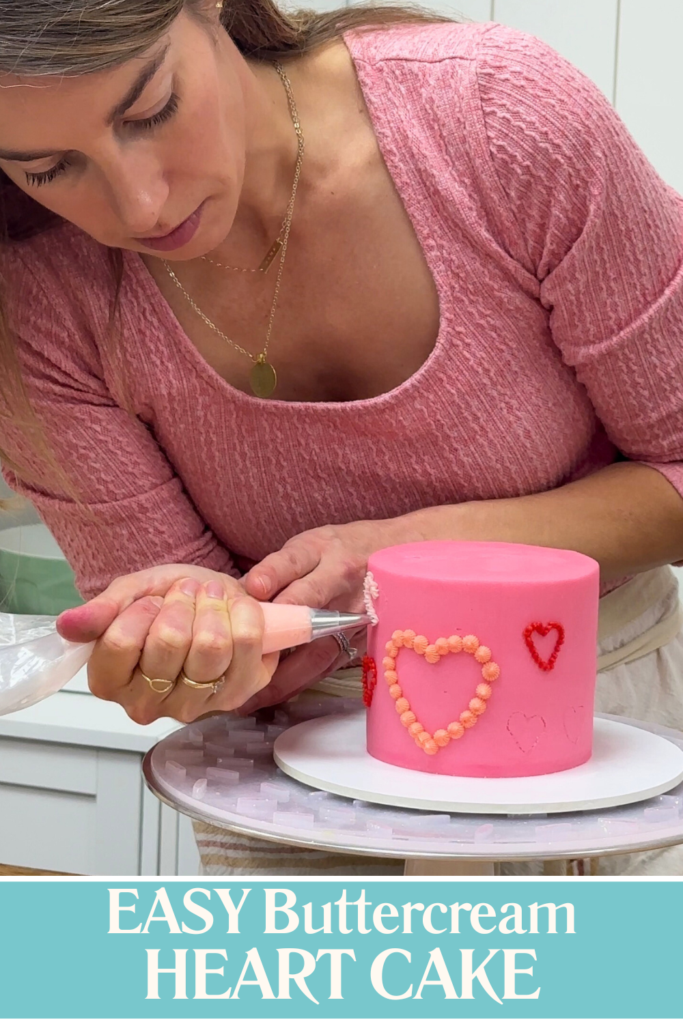
#3 Valentine’s Day cake with piped hearts
For a more traditional Valentine’s look, outline hearts on a chilled cake using cookie cutters, paper cutouts, or a toothpick.
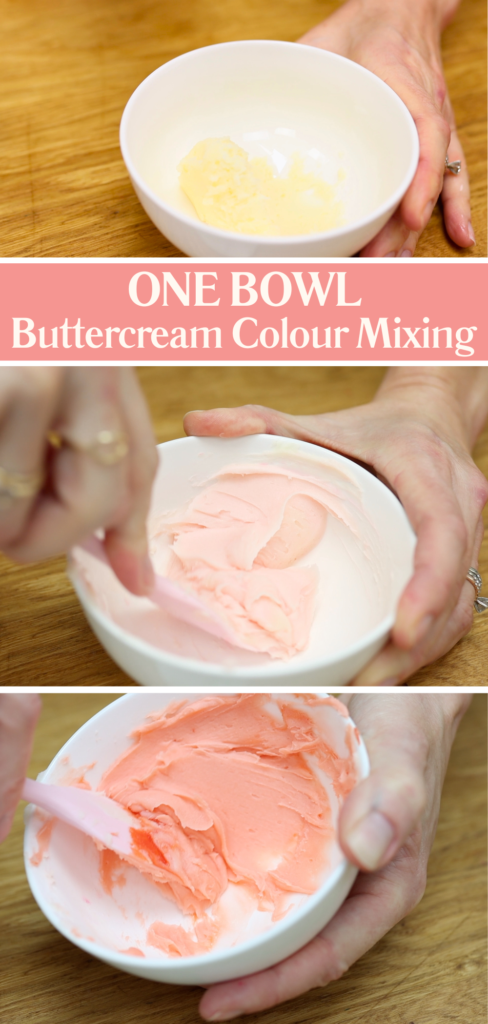
Tint buttercream in several shades, starting with the lightest colour and working darker so you can mix everything in one bowl.
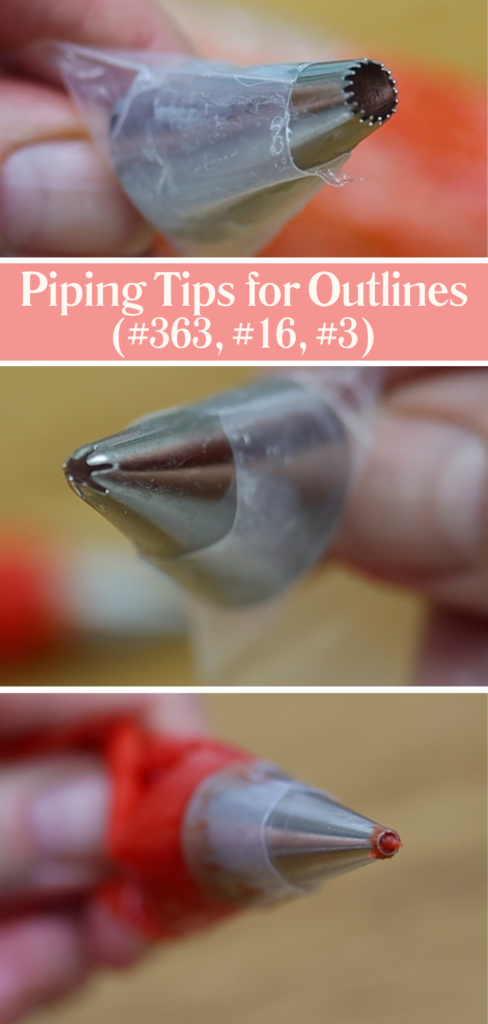
Pipe around the heart outlines using round or star tips. My favourites are #363 for rosettes, #16 for tiny stars, and #3 for tiny dots.
For neat piping, keep your bag about ¼ to ¾ full. Make sure the buttercream is stiff enough to hold its shape but soft enough to pipe easily. In colder weather, microwaving buttercream for a few seconds can make piping easier.
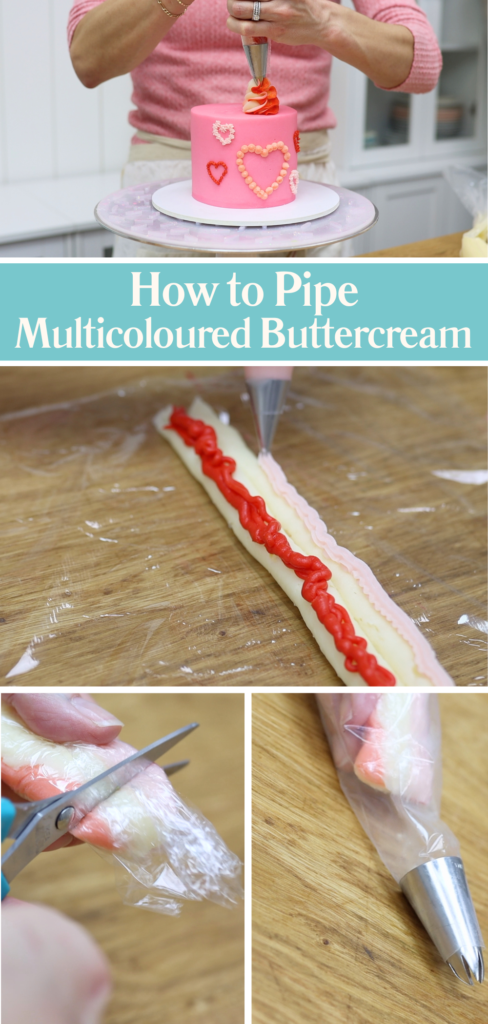
To add height and colour, pipe leftover buttercream onto cling film, roll it into a log, and place it into a piping bag fitted with a large star tip. Pipe multicoloured swirls around the top of the cake to tie the whole design together.
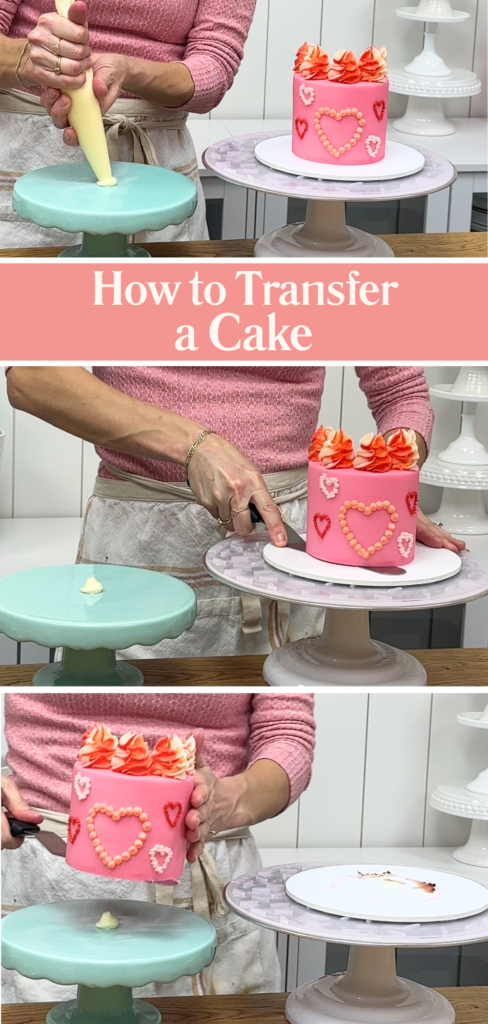
How to transfer and display your Valentine’s Day cakes
To move any of these Valentine’s Day cake ideas onto a cake stand or platter, chill the cake first. Add a small amount of buttercream to the middle of the stand, which will act as glue. Then slide an offset spatula under the cake to lift it off the board and lower it onto the stand.
Final thoughts on Valentine’s Day cake ideas
I hope you’ve seen some Valentine’s Day cake ideas that you’d like to try. These designs are all about using simple techniques to create cakes that look detailed and festive.
To learn hundreds more cake designs and techniques, visit my cake school where you'll find online courses and memberships to take your cake decorating skills to the next level!
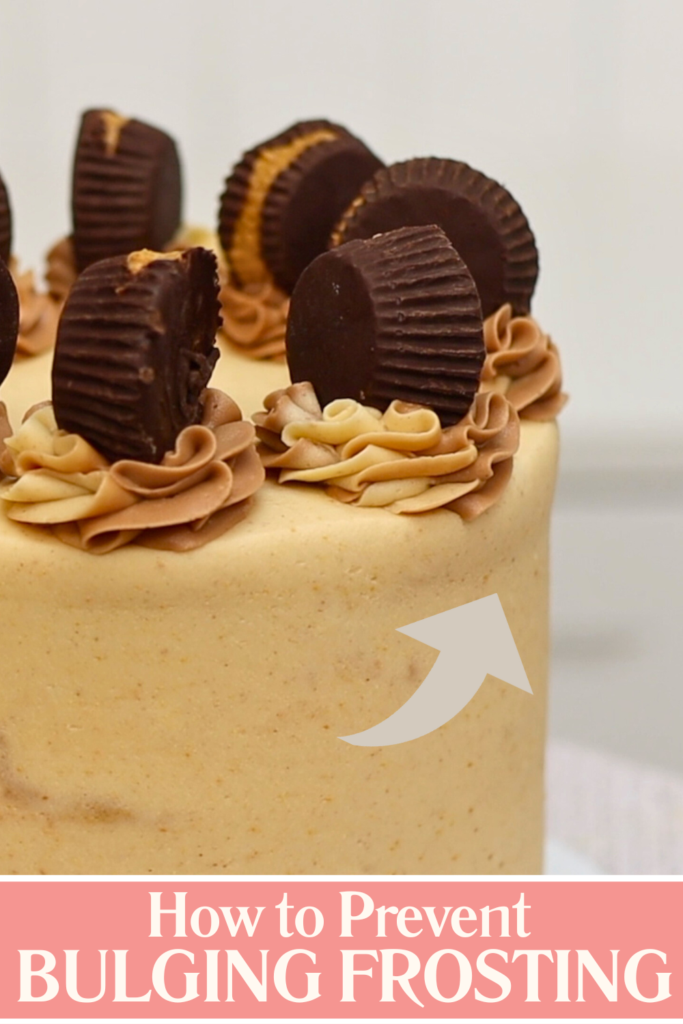
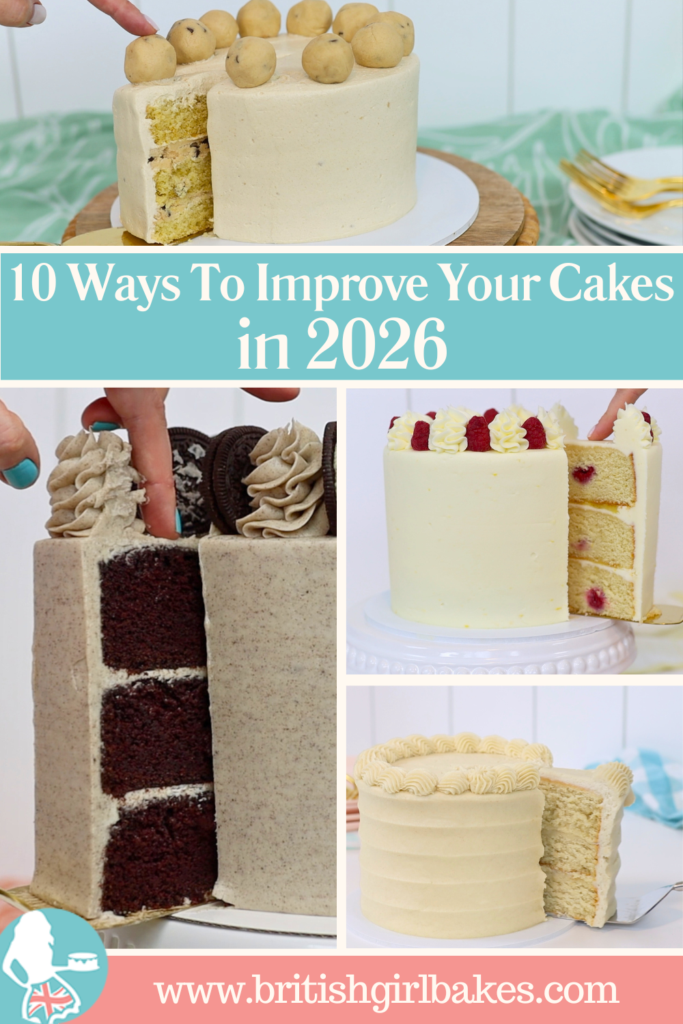
If you want to improve your cake decorating skills in 2026, you’re in the right place. Whether you struggle with smooth frosting, bulging cakes, piping that loses its shape, or colours that never look quite right, these are some of the most common cake decorating problems and they all have simple solutions.
In this tutorial I’m sharing 10 practical ways to improve your cake decorating skills using techniques I rely on every day. These tips will help you create cleaner, neater, more professional-looking cakes without fancy tools or complicated methods.
Cake Decorating Skills for Straighter Cakes: Chill Before You Pipe
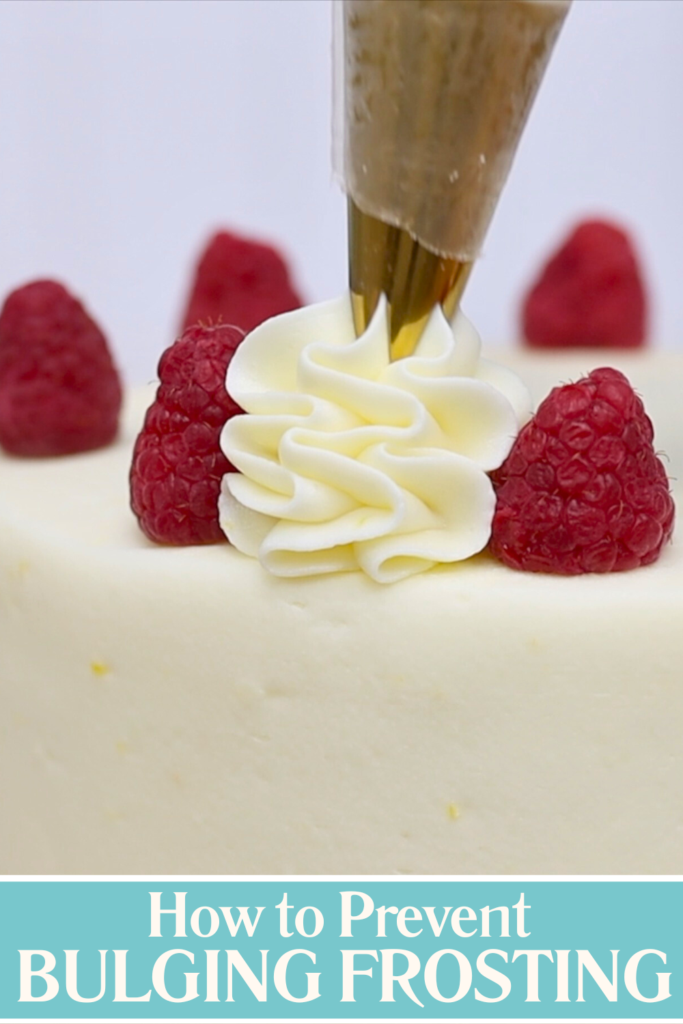
Piping onto cakes adds height and texture, but it can also cause bulges. This can be filling bulging out between cake layers, or frosting bulging around the top of the cake under the weight of piping.
To improve your cake decorating skills and avoid this, chill your cake in the fridge for 30 minutes before piping. Chilling firms up the frosting so it can support the extra weight. This keeps the sides of your cake straight and smooth instead of bulging or sagging.
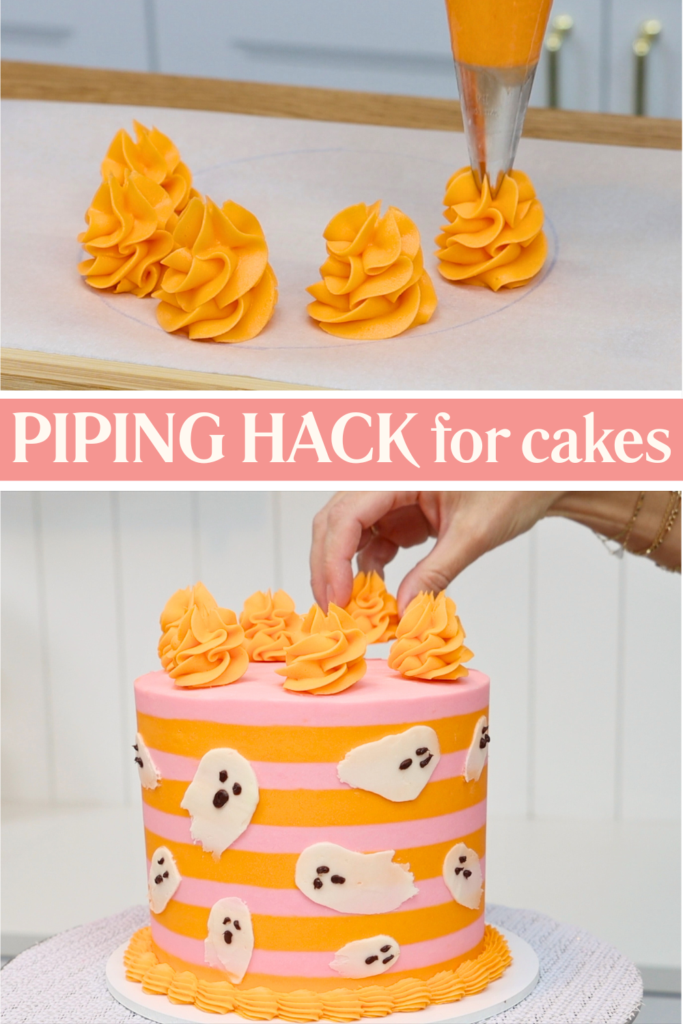
Build Cake Decorating Skills Without Pressure by Piping Off the Cake
If piping is a challenge, don’t pipe straight onto the cake and risk scraping it all off. Instead, trace around your cake pan onto parchment or wax paper and pipe into that ring. Put the piping into the freezer for about 10 minutes to chill and set.
Once chilled, lift the piping and press it onto your cake. Use a small dot of fresh buttercream as glue if needed. This is a great way to improve your cake decorating skills because you can choose only your best piping results and avoid mistakes on the cake itself.
Expand Your Cake Decorating Skills by Improving Flavour, Not Just Design
Improving your cake decorating skills isn’t just about how cakes look. Flavour matters too! If you usually stick to chocolate or vanilla, try something new like chocolate chip cookie dough cake, coconut milk cake, or flavoured buttercream. You can add lemon curd, freeze-dried strawberries, caramel, or crushed Oreo cookies to buttercream for easy flavour upgrades.
Experimenting with flavours helps you grow your confidence and creativity as a cake decorator. You’ll find all of these recipes here on my website!
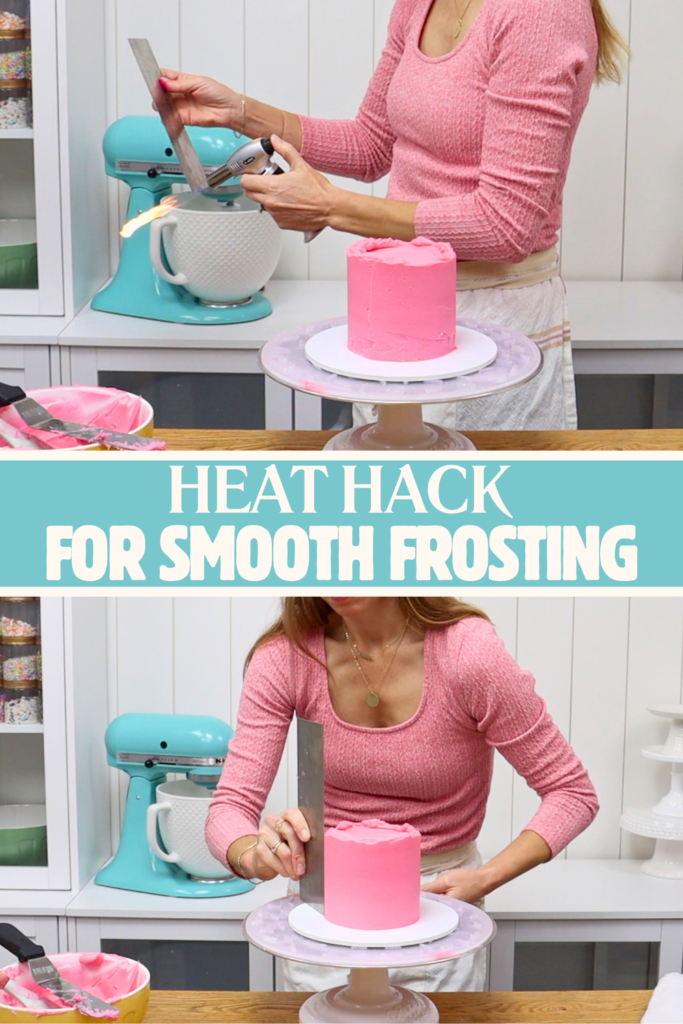
One Cake Decorating Skill That Changes Everything: Smooth Frosting
Smooth frosting is the number one cake decorating skill people ask me about. To get rid of air bubbles and make frosting incredibly smooth, use heat to warm a metal cake scraper. You can use a hair dryer, a blow torch, or hot water. The warm metal will leave buttercream impossibly smooth!
Improving your cake decorating skills often comes down to technique, for example changing the angle of your cake scraper or how high you spread frosting up the sides of the cake. For a full breakdown of these techniques, join my YouTube membership for exclusive access to my Perfectly Smooth Frosting course.
Cake Decorating Skills for Neat Cake Messages
Neat messages instantly improve your cake decorating skills. Before piping, outline your message lightly with a toothpick so you can adjust spacing and alignment.
Chilling the cake also helps. When the frosting is cold and firm, you can touch up letters with a toothpick without damaging the surface of the cake.
Time-Saving Cake Decorating Skills: Freeze Cakes Between Steps
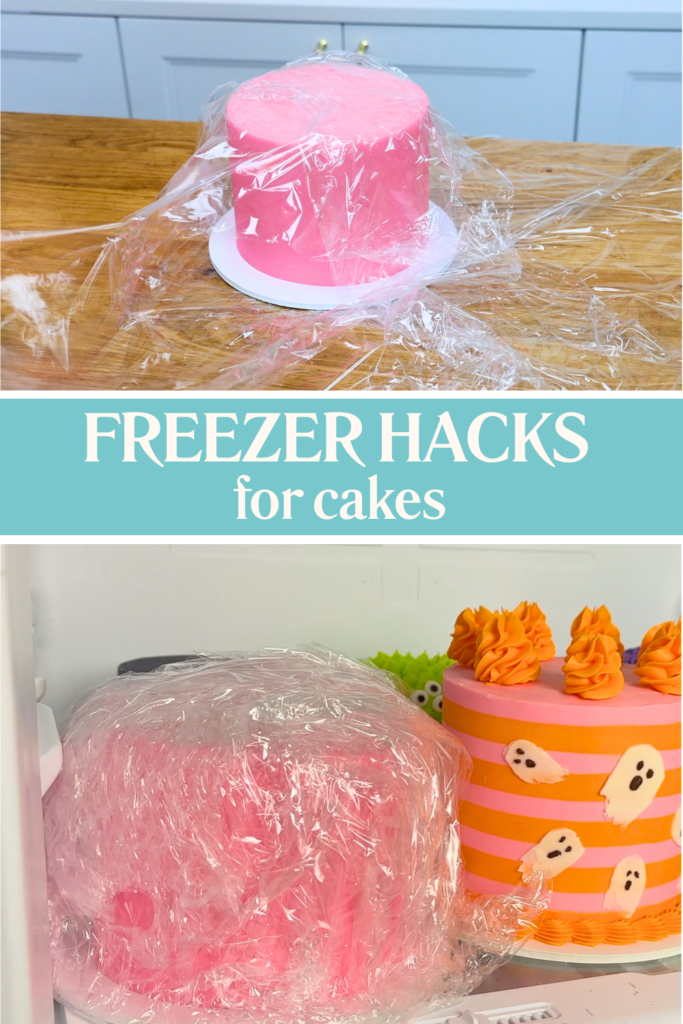
Running out of time is one of the biggest cake decorating challenges for most bakers. The solution is freezing cakes between steps so you can spread the work out over days or even weeks.
After baking and cooling cakes, wrap them twice in cling film or plastic wrap and freeze them. You can also assemble and frost cakes before freezing. Freeze them uncovered for one hour to set the frosting, then wrap in two layers of plastic wrap and return to the freezer for up to two months.
Move cakes to the fridge the night before decorating so they thaw gradually. Always let cakes come to room temperature before serving for the best flavour and texture. When properly wrapped and thawed, previously frozen cakes taste just as good as freshly made ones.
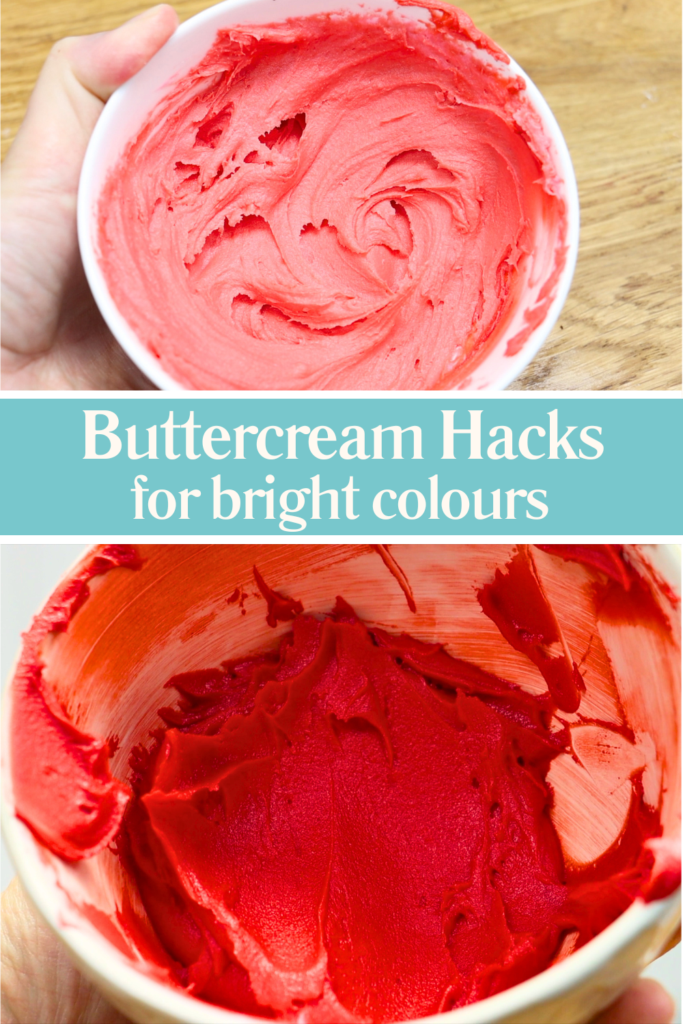
Dark Buttercream Colours Without the Bitter Taste
If you’re trying to achieve deep colours like red or navy, use these tricks instead of more food colouring.
Tint buttercream lighter than your target colour, then microwave it for 5-10 seconds. Melting the butter deepens the colour instantly. Chill the buttercream in the freezer for 5 minutes to bring it back to the right consistency. Letting it rest (covered) for an hour or two will deepen the colour even more. These tricks will darken your buttercream without affecting the taste.
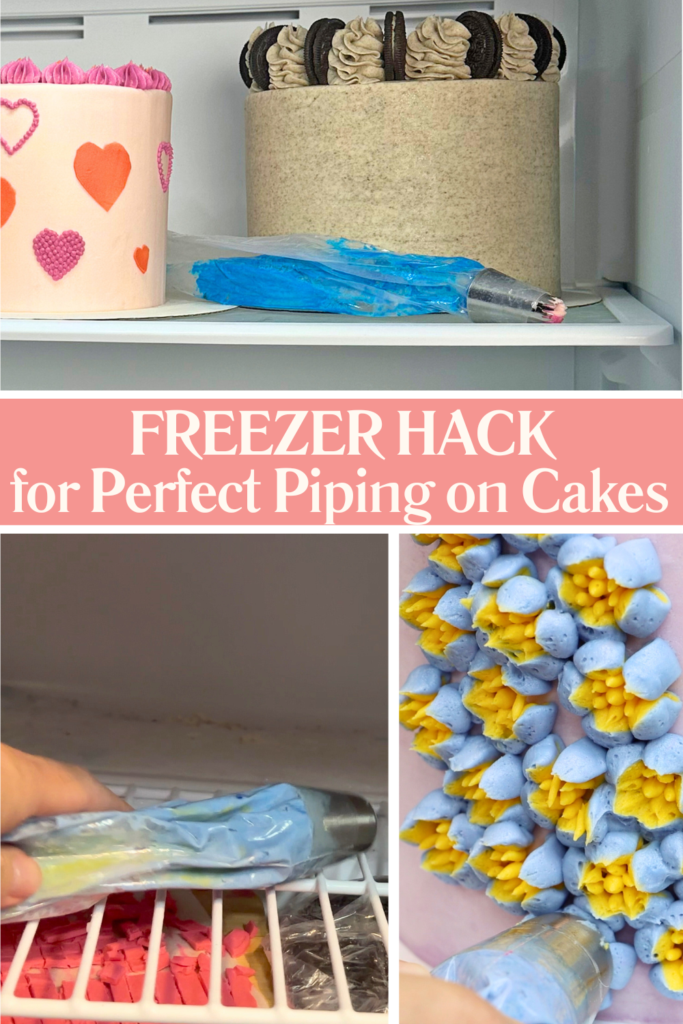
Temperature Control for Better Piping
If your piping starts neat but becomes soft and blobby, the warmth of your hands is melting the buttercream. This affects many cake decorating skills, from dotted designs and borders to messages and flowers.
Put your piping bag into the freezer for one minute, then continue piping. Colder buttercream is stiffer and holds its shape much better, giving you neater results.
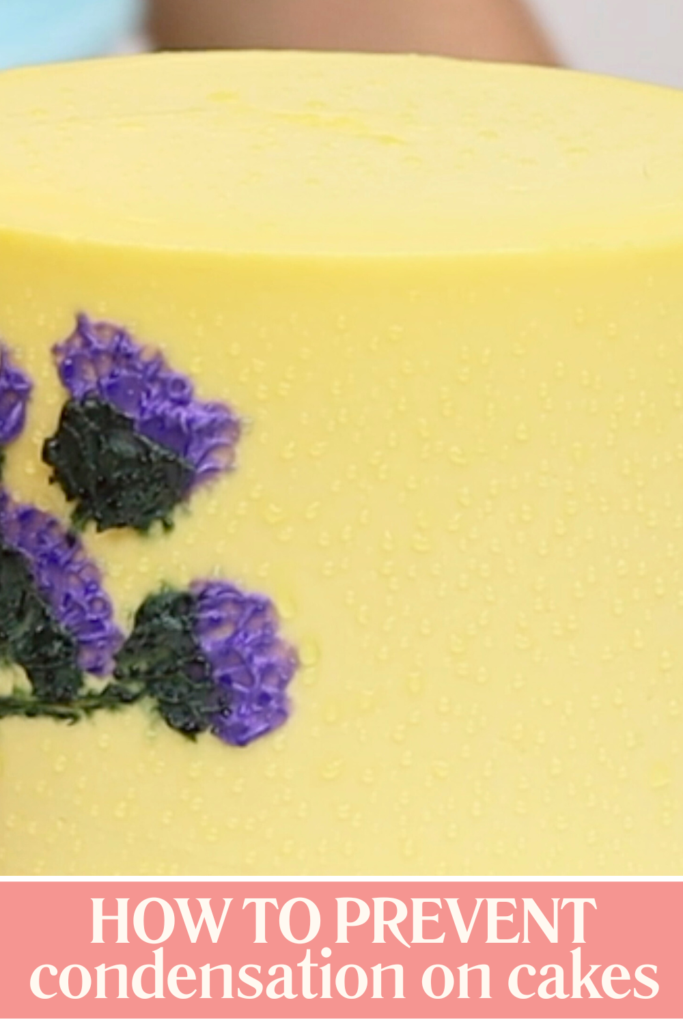
Prevent Condensation and Bleeding Colours
Many cake decorating skills, like stencilling or detailed piping, require cold, firm buttercream. However, condensation can form when there’s a big temperature difference between the cake and the room.
Work in a cool room whenever possible and avoid moving cakes from the fridge into a warm environment. Condensation droplets can cause colours to run and stain the frosting, undoing your hard work.
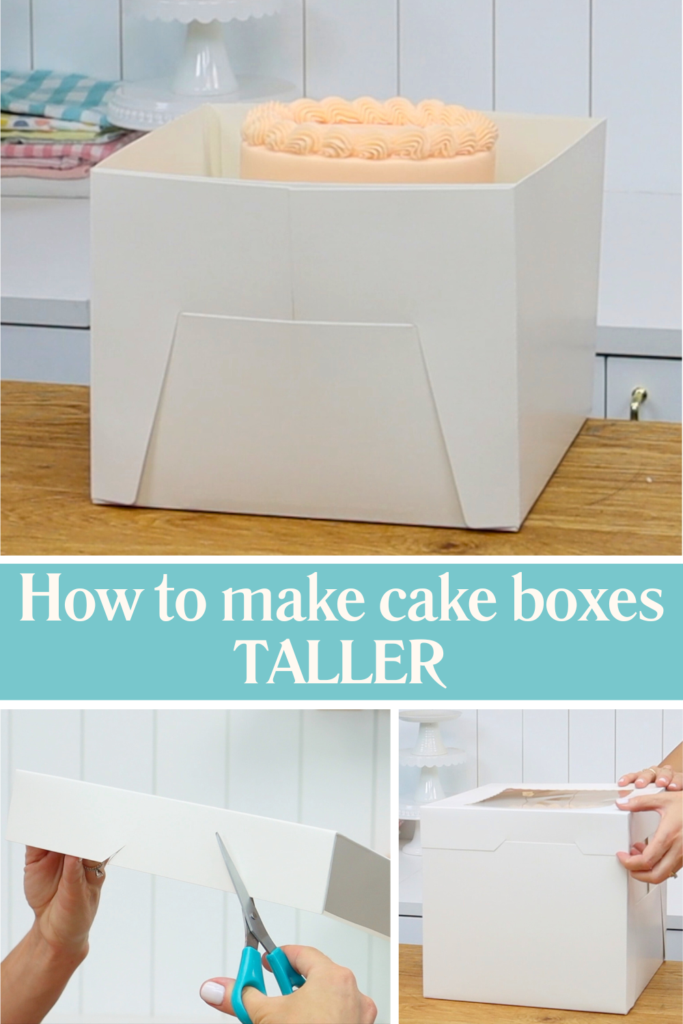
Improve the Presentation of Your Cakes
Presentation is usually the first impression of your cake so the cake boards and boxes you choose are important.
Affordable cake boxes can be bought in packs online. To use your standard boxes for tall and tiered cakes as well, use this hack. Cut two short diagonal slits into opposite sides of the lid. Push the center flap inside the box while leaving the sides outside. This raises the lid so it fits neatly over taller cakes without crushing decorations.
Final Thoughts on Improving Your Cake Decorating Skills
Improving your cake decorating skills doesn’t require expensive tools or complicated techniques. Small adjustments like chilling cakes, controlling buttercream temperature, and planning ahead can make a huge difference.
To learn more cake decorating tips, techniques, and designs, visit my cake school for online courses and memberships!
This cake gingerbread house is surprisingly simple to make, with a clever trick that makes the edible glass windows glow like real candlelight. It’s built from round cake layers that are easy to bake and frost, finished with a snowy roof and edible glass windows that look magical once the cake is assembled.
This step-by-step tutorial will show you exactly how to bake, assemble, frost and decorate a cake gingerbread house. It’s a fun Christmas cake idea whether you're an expert or a beginner cake decorator!
Preparing the Cake Layers for the Cake Gingerbread House
For the cake layers I'm using my Very Vanilla Cake recipe baked in four 6 inch pans. Once they're cool, cut out the middle of three of them using a 2 inch cookie cutter. This will make just enough space to put an electric candle or tealight in the middle eventually.
Making the Edible Glass Windows
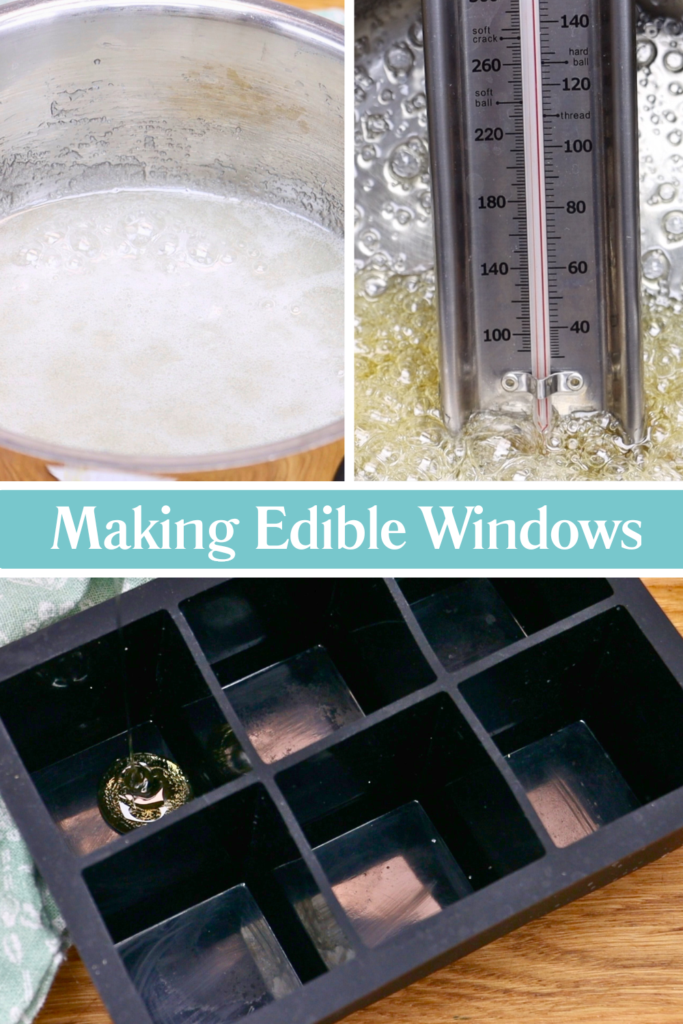
To make edible glass, pour sugar and water and corn syrup into a stainless steel pan and heat over medium. If you can't find corn syrup you can use glucose but it will make the glass a bit foggy. The corn syrup or glucose will keep the glass hard so it doesn't melt.
Place a candy thermometer in the sugar mixture and watch the temperature as it cooks. When it gets to 310° F, plunge the pan into a pot of iced water to stop the cooking process. Then pour the mixture into a square silicon mold. I used an ice cube tray for those big square ice cubes that are so trendy in cocktails. They're the perfect size for the windows on this cake gingerbread house! Make four squares, or five to have an extra just in case.
Quick tip: don't wait more than a few seconds to move the sugar from the iced water to the mold! The sugar will thicken fast and then it won't pour easily into the mold.
When these cool after about 30 minutes you can pop them out of the mold easily. They'll be about the same height as each of your cake layers, which makes making the windows really easy later.
Starting the Assembly
Make chocolate buttercream by melting chocolate chips and then after they cool, add them to butter, powdered sugar or icing sugar, salt, and vanilla. Set aside about a cup of white buttercream first for decorations on the gingerbread house later. You'll find the recipe for this cake at the bottom of the page!
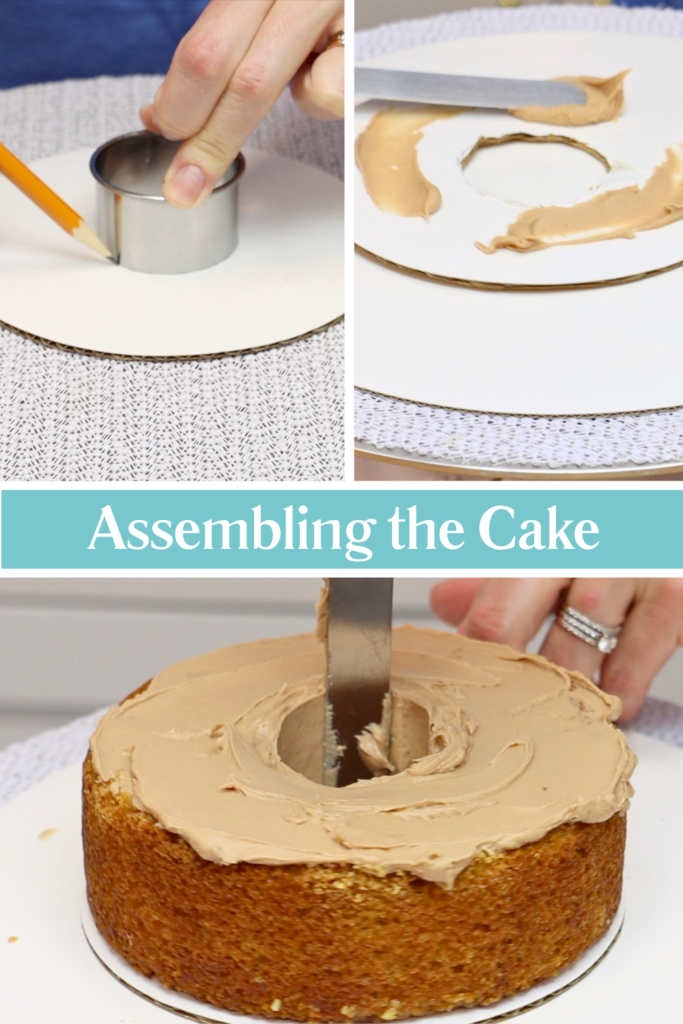
Trace around your cookie cutter onto the middle of a 6 inch cake board and cut out that little circle. Spread some buttercream onto the cake board and press your first cake layer down onto it, one of the ones with a hole in the middle. Put this onto a bigger cake board - mine is 10 inches wide.
Spread chocolate buttercream on top of this cake layer and into the hole, too. You want to cover all of the surfaces, which will stop the cake from drying out because the buttercream will lock the moisture into the cake.
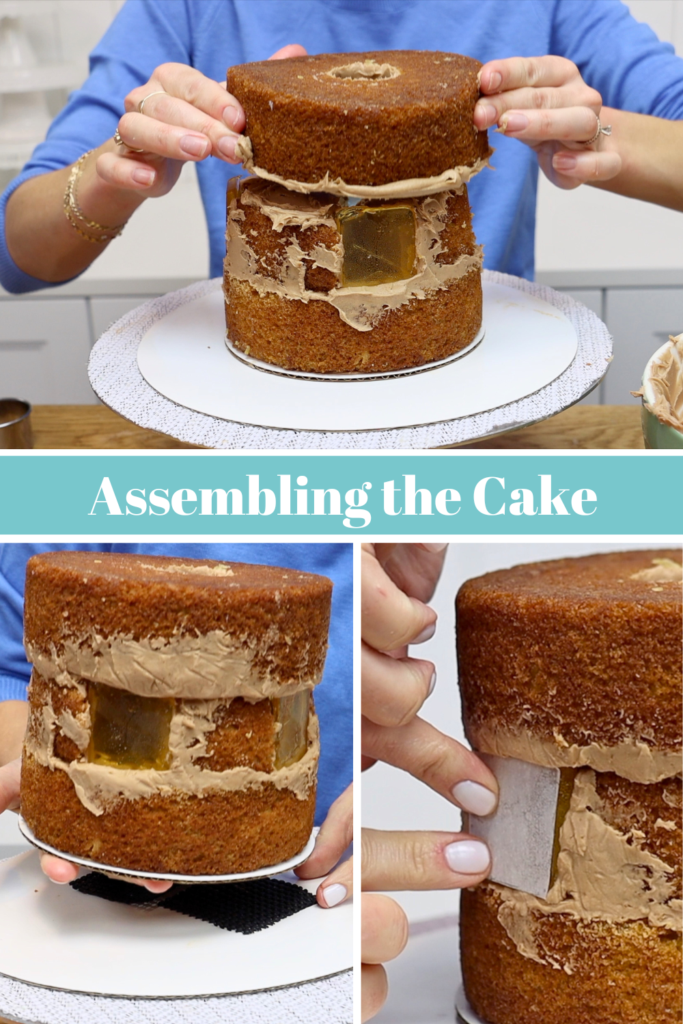
Building the House Structure and Adding Internal Supports
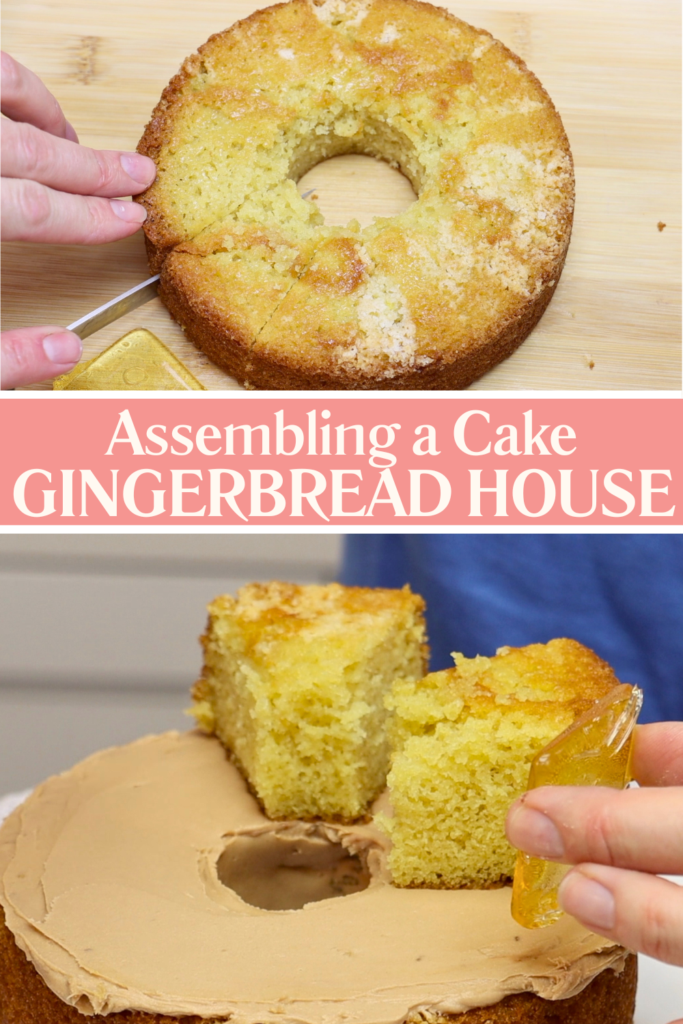
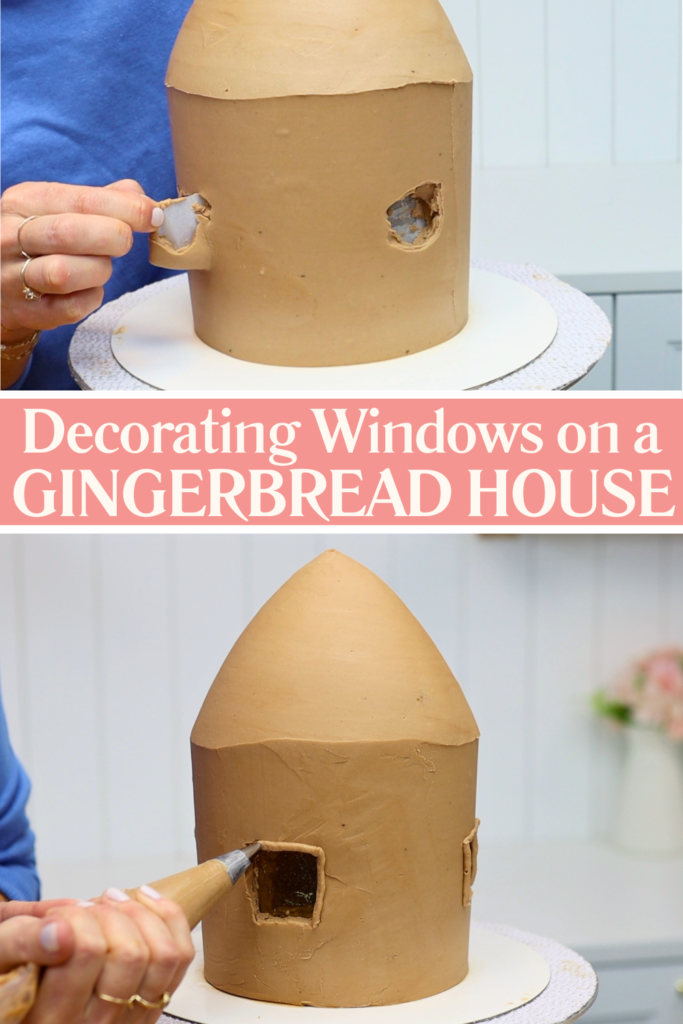
Hold one square of edible glass against the edge of another cake layer. Cut the cake on either side of the square and remove this piece to make space for a window. Save the removed cake for later! Do this three more times to make space for 4 windows. Leave one section of cake bigger than the others to leave space on that section for a door.
Before you continue, trace around a window onto parchment paper or wax paper. Fold that paper in half twice and then cut out the square, which will make four square pieces of paper. You'll use these for the windows later.
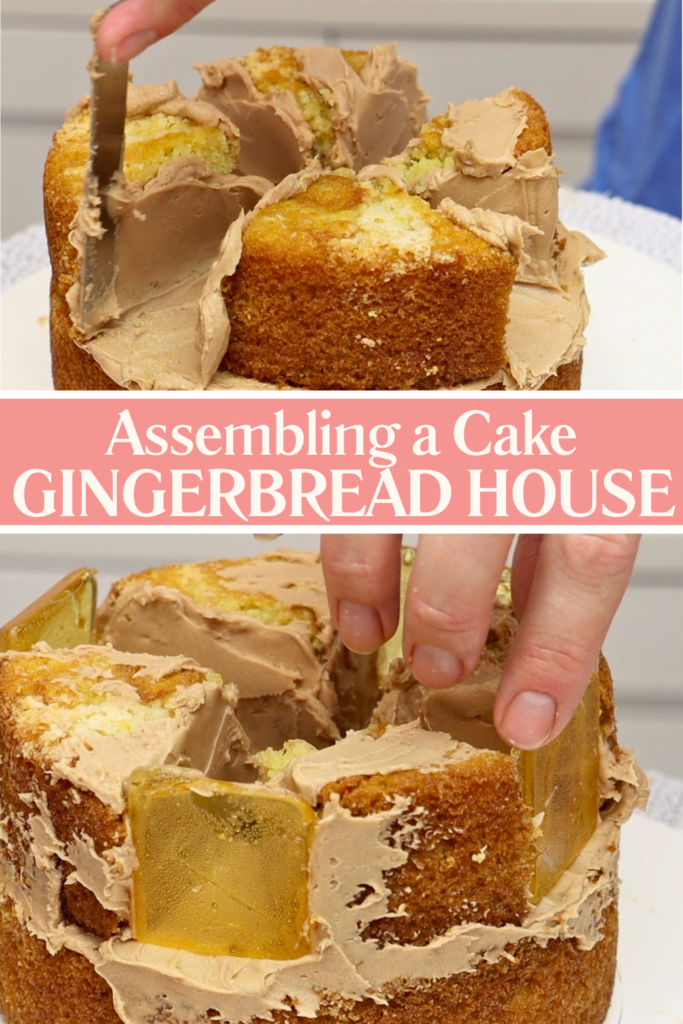
Press one section of cake down onto the chocolate buttercream and hold a window up next to it to measure where to place the next piece of cake. Repeat for the other two windows.
Spread chocolate buttercream in between the sections of cake to cover the sides where you cut. Then slide the windows into the gaps you left so that they're as close as possible to the outer edge of the cake.
Spread chocolate buttercream onto the top of this cake layer and also onto the top of the third cake layer with a hole in the middle. Spread it around the hole in the middle too, and flip this over to go on top of the cake.
Wrap the cake in cling film or saran wrap and put it into the fridge for 30 minutes or the freezer for 15 minutes. This will chill the cake so it firms up. Next, use a piece of non-slip mat or a ring of tape to hold the cake in place on its smaller cake board on top of the larger cake board.
Then you'll need the four pieces of parchment paper you traced and cut out earlier. Press one onto each window to cover and protect the edible glass and keep it shiny.
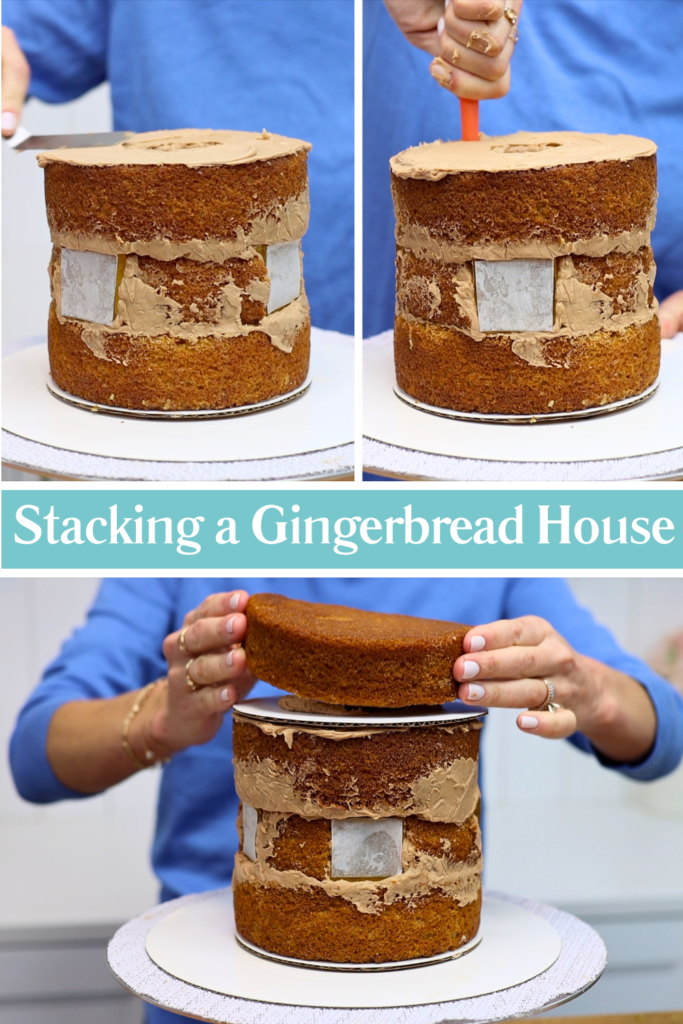
Now spread a layer of buttercream onto the top of the cake and push four boba straws or wooden dowels into the cake. This is necessary to support the weight of the roof, so it doesn't sink down into the bottom of the house. Cut the straws or dowels to be the same height as the cake.
Place a cake board on top, pushing it down to stick it to the chocolate buttercream. This board should be the same width as the cake so it will be invisible later. The board, resting on the support straws or dowels, will hold up the roof.
Adding the Roof to the Cake Gingerbread House
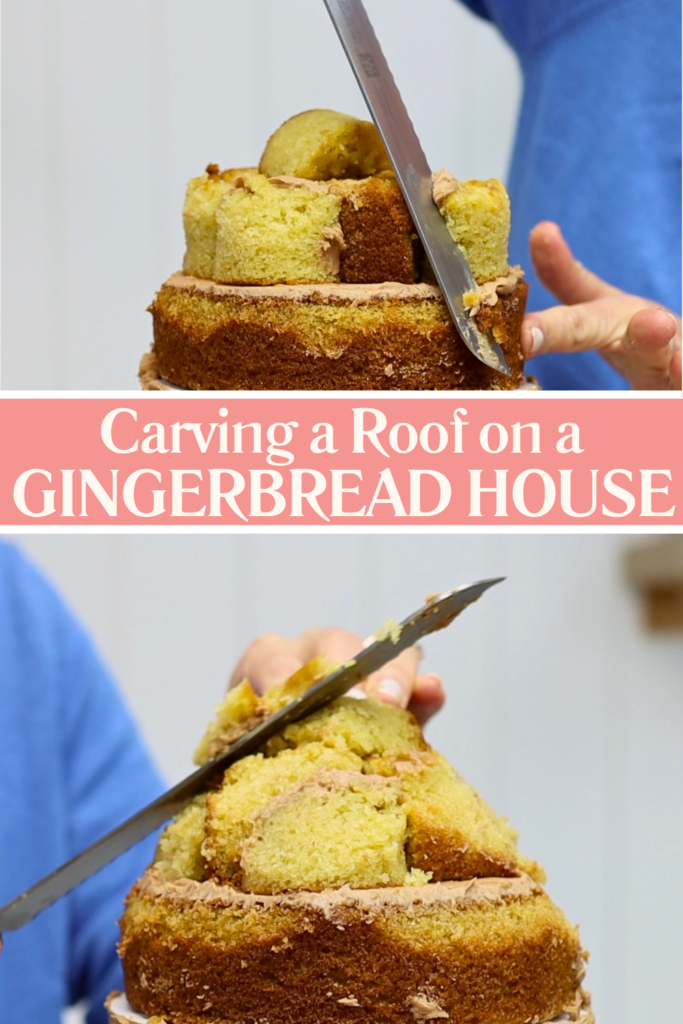
Use more buttercream to attach the final cake layer on top. This is the cake layer without a hole in the middle. Then arrange the cake scraps on top to form the roof. These are the parts you cut out to make space for the windows and also the round pieces from the middle of the other cake layers. Attach them to each other by spreading on buttercream as glue to make a pile on top of the cake.
Put the whole cake into the fridge for another 30 minutes or the freezer for 15 minutes to chill. Then use a serrated knife to trim around the pieces of cake to make a cone shape for the roof.
Frosting and Decorating the Gingerbread House Cake
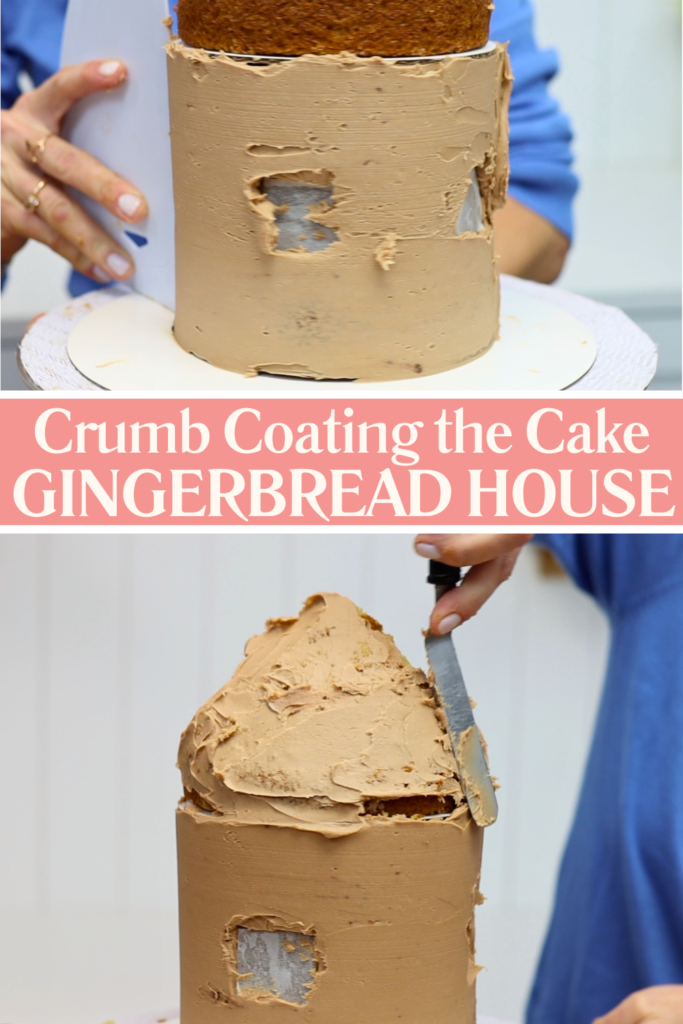
Crumb coat the outside of the cake by spreading a thin layer of buttercream over it. This traps any crumbs that come off the cake. It doesn't need to be neat because it's going to be covered up soon.
Put the cake back into the fridge for 30 minutes to set the crumb coat. Then spread another layer of buttercream over the roof and the walls of the house. Since the roof is cone-shaped, a cake comb isn't the best way to get it smooth. A piece of acetate is ideal since it can curve around easily and leaves the surface smoother. A cake comb is fine for the bottom of the house, though. Don't worry too much about the join between the walls and the roof because it's going to be covered up soon.
To peel the parchment off the windows, press gently with a toothpick until you find the edge and then peel it off. The windows underneath will be clean instead of smeared and smudged with buttercream.
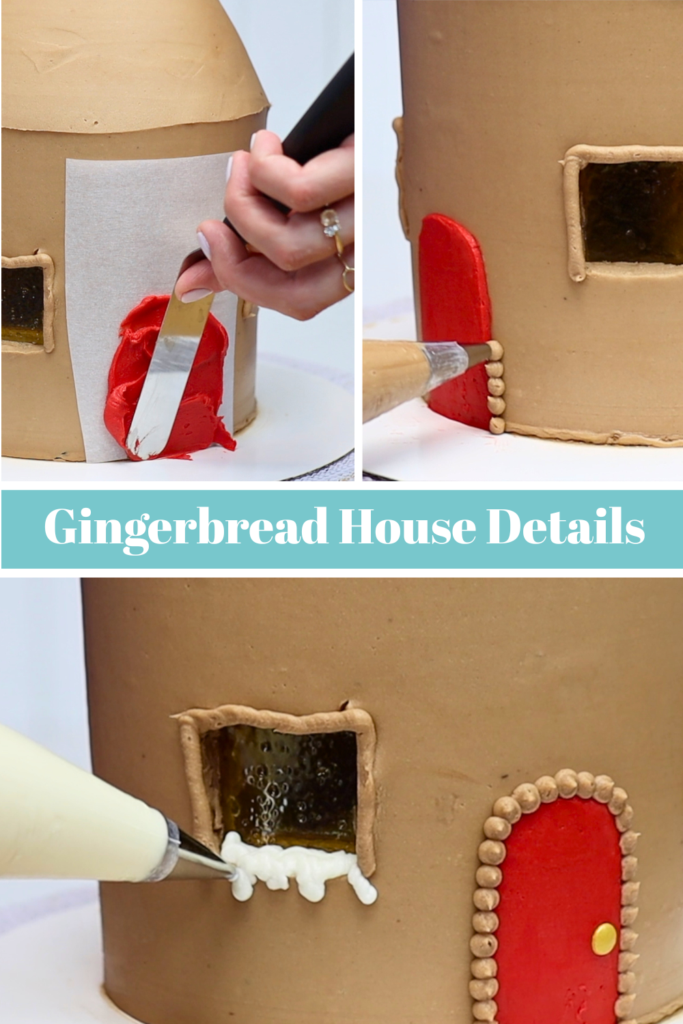
You can decorate the house however you like. I put the leftover chocolate buttercream into a piping bag with a #8 medium round piping tip to pipe a frame around each window. Pipe along the top and the sides but not the bottom edge if you want to add buttercream snow like I did!
Tinted about 2 tablespoons of the buttercream to make a door. I chose red but darker brown or green would also look nice! Cut a door shape out of parchment paper to make a stencil and press it against the frosted cake. Then spread the red buttercream over it and peel the stencil off. Piping little dots of chocolate buttercream around the door gives it a nice trim. For a doorknob I used a flat round gold sprinkle.
Adding Snow and Decorative Details
Add some milk to the rest of the white buttercream so that it's soft and smooth and easy to stir. Use a small round piping tip to pipe this buttercream along the bottom edge of each window. Piping blobs and drips will make it looks like snow that's starting to melt.
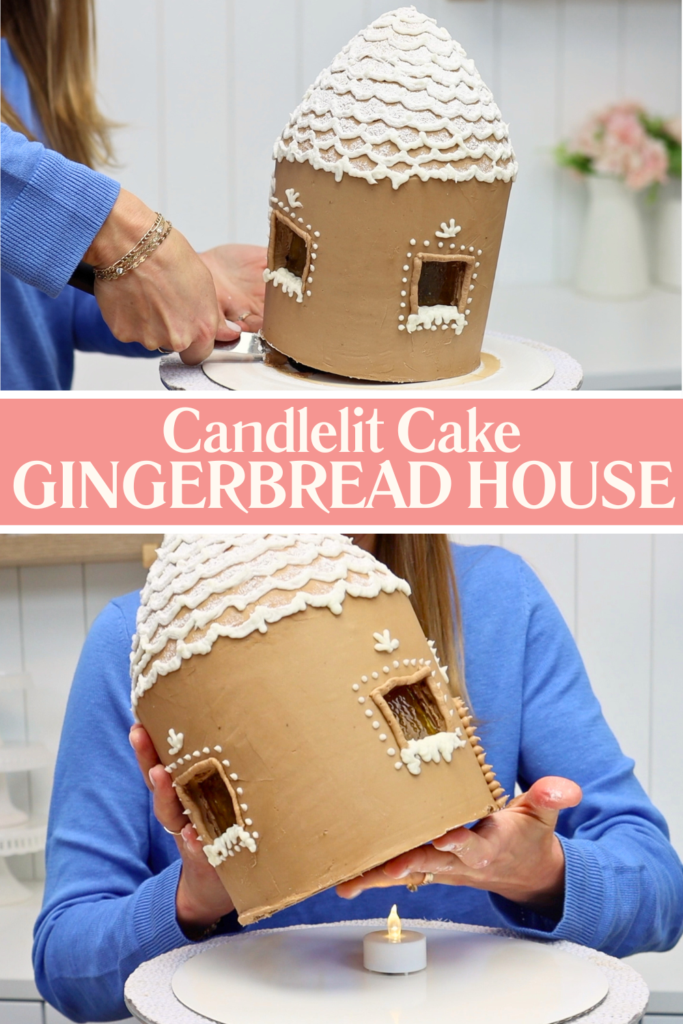
I used a piping tip to score semicircles or scallops onto the roof to give it a tiled look. Then I piped buttercream snow over the lines with a small round piping tip, wiggling the lines and piping some drips to make it look like snow. I added a few simple details to the walls of the cake gingerbread house like dots around the windows.
Finishing the Cake Gingerbread House and Serving
As a finishing touch, put a spoonful of powdered sugar into a sieve and tap it over the cake. This will dust it with what looks like snow. Put the cake into the fridge to chill and set and then it's time to add the candle light.
Slide an offset spatula or palette knife underneath the cake and pick it up on its little cake board. Put a battery operated tealight or electric candle onto the middle of the big board and then lower the cake down over it. Attach the boards together with some buttercream so the cake doesn't slide around when you carry it.
I piped some of the leftover chocolate buttercream around the bottom of the cake to cover up the join of the cake on its little cake board. I love the flickering candle light you can see through the windows. And you can eat every part of the cake, including the windows.
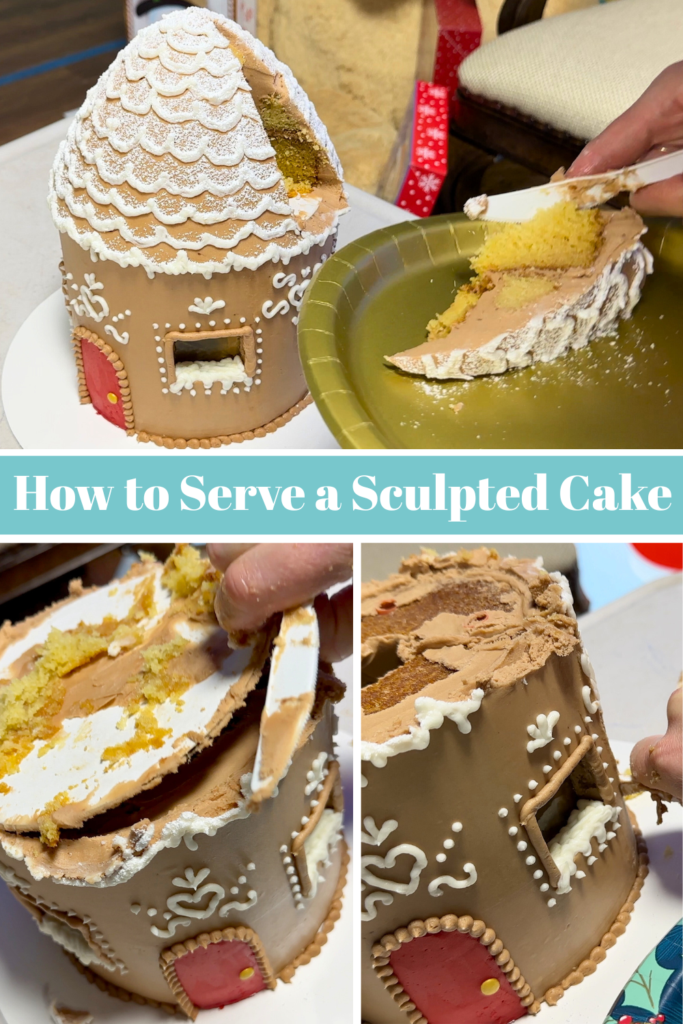
To serve the cake, cut down into the roof until you feel the knife hit the cake board in the middle and slice up the roof. And then lift up the cake board in the middle and slice the bottom part of the house.
FAQs
How do you make edible glass windows for a cake? Heat sugar, water, and corn syrup to 310°F. Lower the pan into a pot or bowl of ice water and pour into a silicone mold. Once cooled, the sugar becomes clear, hard windowpanes perfect for a cake gingerbread house.
Can I make this cake gingerbread house ahead of time? Yes! The cake layers can be baked in advance and frozen for up to a month, or kept in the fridge for 2-3 days. You can also assemble the cake before freezing or refrigerating it. Wrap the cake in two layers of cling film or Saran Wrap to protect it while it's chilling. If you bake, assemble, frost and decorate the cake all in one day, put the cake into the fridge and it will stay perfectly fresh for 2-3 days. Add the powdered sugar snow just before serving.
What cake flavour works best for a gingerbread house cake? Any sturdy cake works well. Vanilla, chocolate, and gingerbread cake are all great choices. Avoid very soft or fluffy cakes since they’re harder to carve.
What buttercream is best for frosting a gingerbread house cake? My 4 Minute Buttercream is ideal because it's stable at room temperature and easy to smooth over carved cake shapes. The door stencil will only work on a crusting buttercream like this, because peeling the stencil away will damage soft and sticky frostings like whipped cream.
How do you get the candlelit effect inside a cake? Create a hollow core by cutting circles from three of the cake layers. When stacked, this forms a cavity where you can place a battery-powered candle or tealight. The edible glass windows allow the candlelight to shine through beautifully.
This cake gingerbread house is surprisingly simple to make, with a clever trick that makes the windows glow like real candlelight.
Ingredients
UnitsScale
For the cake:
1 1/2cupsunsalted butter*
2cupswhite sugar (granulated sugar)
6 eggs
1 tablespoon vanilla extract
3/4cupbuttermilk
3 tablespoons vegetable oil
3 1/2cupsplain flour (all-purpose flour)
1 tablespoon baking powder
1/2 tablespoon baking soda
1/2 teaspoon salt*
For the buttercream:
2 1/2cupsunsalted butter at room temperature*
2lbpowdered sugar
1/2 teaspoon salt*
1/2 tablespoon vanilla extract
3 tablespoons cream or milk
3/4cupsemi-sweet chocolate chips
For the windows:
1/2 cup sugar
3 tablespoons light corn syrup or glucose
1 tablespoon water
For the decorations:
1 tablespoon powdered sugar (icing sugar)
a few drops of red food colouring
1 gold or silver sprinkle for the doorknob
Instructions
To make the cake layers:
Using a mixer with a beater/paddle attachment (not a whisk), beat room temperature butter and sugar on medium speed until pale and creamy, about 2 minutes. Scrape down to the bottom of the bowl once during mixing to make sure no butter or sugar is stuck at the bottom.
Add eggs one at a time, mixing on the lowest speed after each addition for 30 seconds. Scrape down to the bottom of the bowl to make sure everything is incorporated before adding the next egg.
Add vanilla and mix for about 30 seconds to combine.
In a small bowl or measuring jug, mix room temperature buttermilk and oil. Add half to the butter mixture and mix on lowest speed to incorporate.
In a bowl, sift flour, baking soda, baking powder and salt. Add half of the flour mixture to the mixing bowl and mix on lowest speed to incorporate, scraping down to the bottom of the mixing bowl to check that batter is evenly mixed. Repeat with the remaining buttermilk mixture and then finish with the remaining flour mixture.
Grease four 6" baking pans with non-stick oil spray or butter. Divide batter equally between the cake pans.
Bake at 160ºC or 325ºF for 38 minutes, or until a toothpick inserted into the middle of the cake comes out clean.
Leave cakes to cool in their pans for 10 minutes. Use a spatula to loosen the cakes from the edges of the pans and then turn onto a wire cooling rack. Leave to cool completely.
To make the buttercream:
Sift the sugar to remove any lumps and check that the butter is at room temperature - you should be able to slice through it easily with a spatula.
In a mixer with a beater (paddle) attachment, mix butter for a few seconds until smooth. Add a quarterof the powdered sugar and salt (if using) and mix on the lowest speed until incorporated, about one minute.
Scrape down to the bottom of the mixing bowl with a spatula to loosen any butter and sugar and add the next quarter of powdered sugar and mix for another minute on low.
Scrape down to the bottom of the bowl, add another quarter of the powdered sugar, mix for one minute on low, scrape, and add the final quarter of the powdered sugar. Mix for one more minute on low, adding the vanilla once everything is mixed together and continuing to mix until it's incorporated.
Add the milk or cream and mix for about 30 seconds until it's combined with the buttercream.
Scoop up about 1 cup of buttercream and set aside in an airtight container or cover a bowl tightly with plastic wrap.
Melt chocolate chips in a heatproof bowl in the microwave at 70% power for 30 second intervals, stirring after each interval until smooth. Let it cool to room temperature and the stir into your main bowl of buttercream to make chocolate buttercream. Check the consistency and add more milk or cream a tablespoon at a time until the buttercream is smooth and easily stirred.
To make the windows:
Mix the window ingredients in a small pan over medium heat. When it starts to simmer, stop stirring and place a candy thermometer in the pan.
While the sugar mixture is cooking, fill a larger pan with water and ice.
When the sugar mixture reaches 310F, immediately plunge the pan into the iced water to stop the cooking process. (Don't wait longer than a few seconds because the sugar will thicken and harden fast!) Poor the cooked sugar into a cubed silicone mold to make 4-5 square windows. Be careful - it will still be very hot! Set aside to cool.
To assemble the cake gingerbread house:
Follow the step by step instructions with photos in the blog post 🙂
Notes
*If you use salted butter instead, omit the salt in the recipe
Looking for more cake decorating ideas?
Want more Christmas cake designs and step-by-step decorating techniques? Visit my cake school to learn hundreds of cake decorating skills with my online courses and memberships. See you there!