Which tools to decorate a cake should you buy first? In this tutorial I'll show you which 10 tools to buy first and how to use them for cake decorating!
A
A plastic
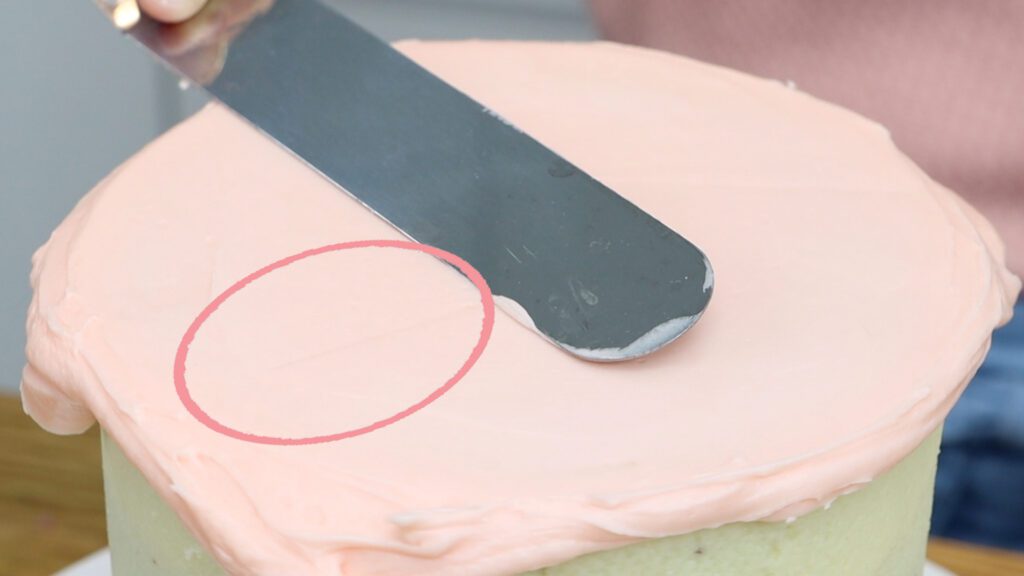
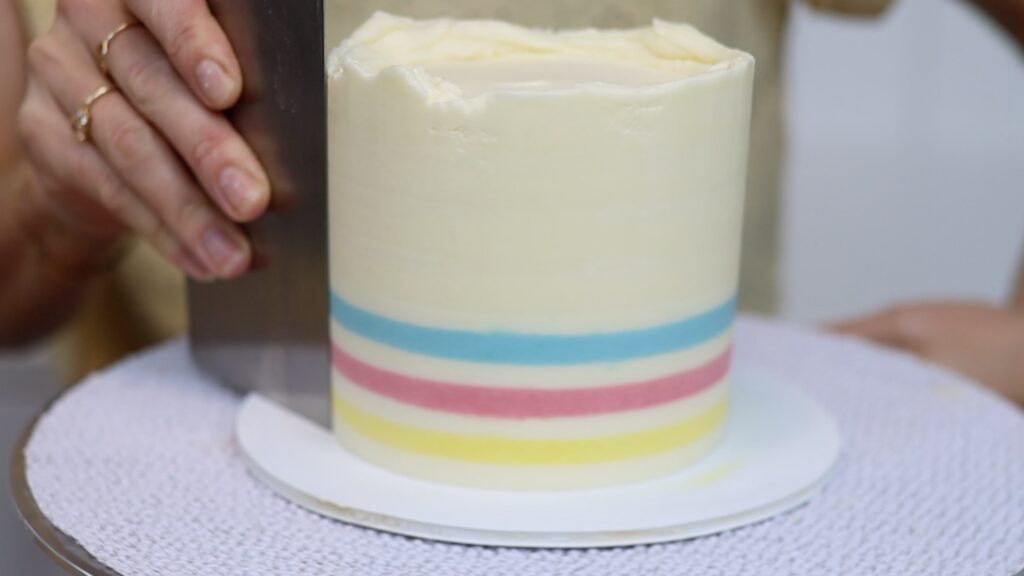
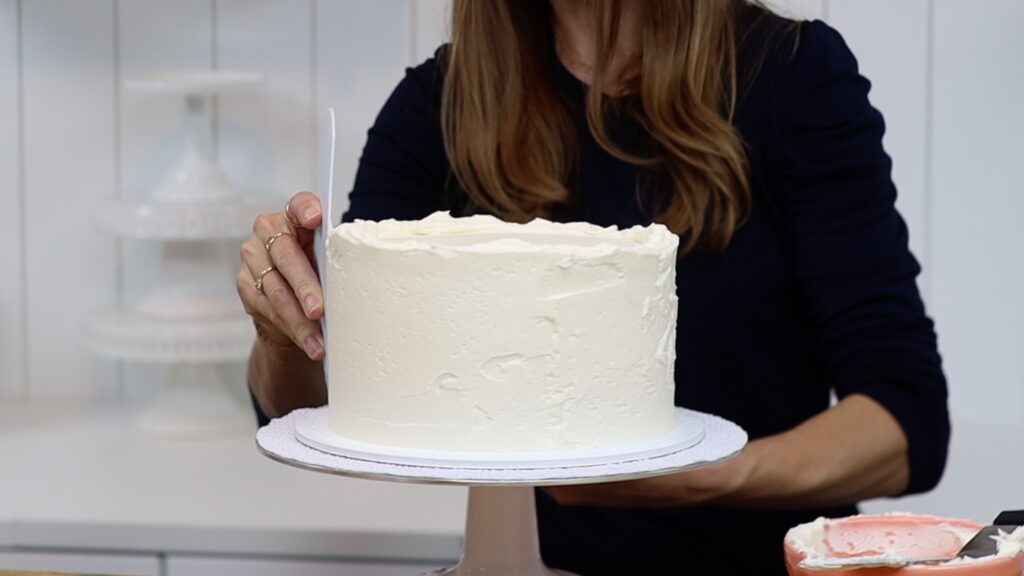
If you want to get serious about cake decorating and want to get your frosting really smooth, choose a metal
The second cake decorating tool to buy is an
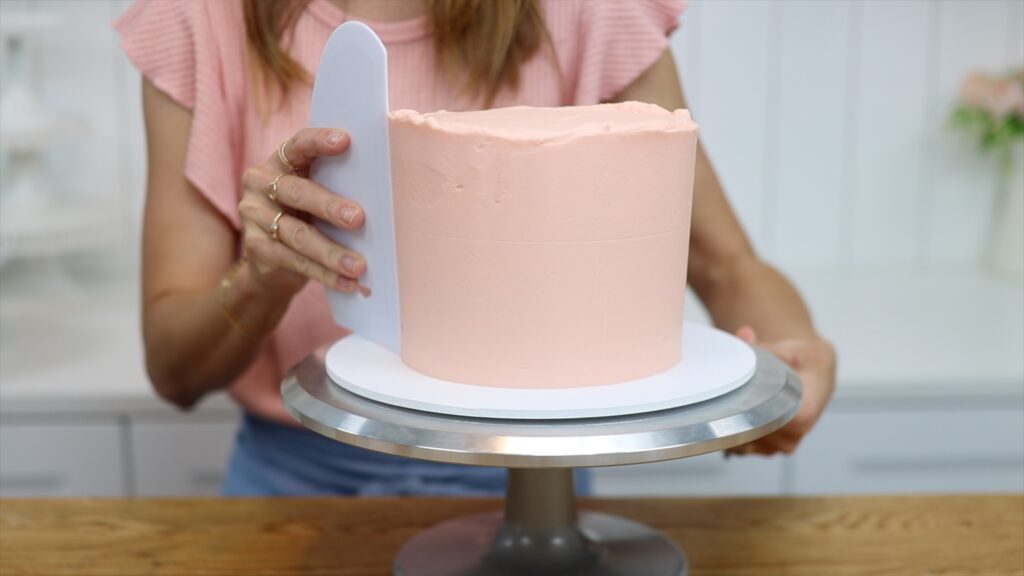
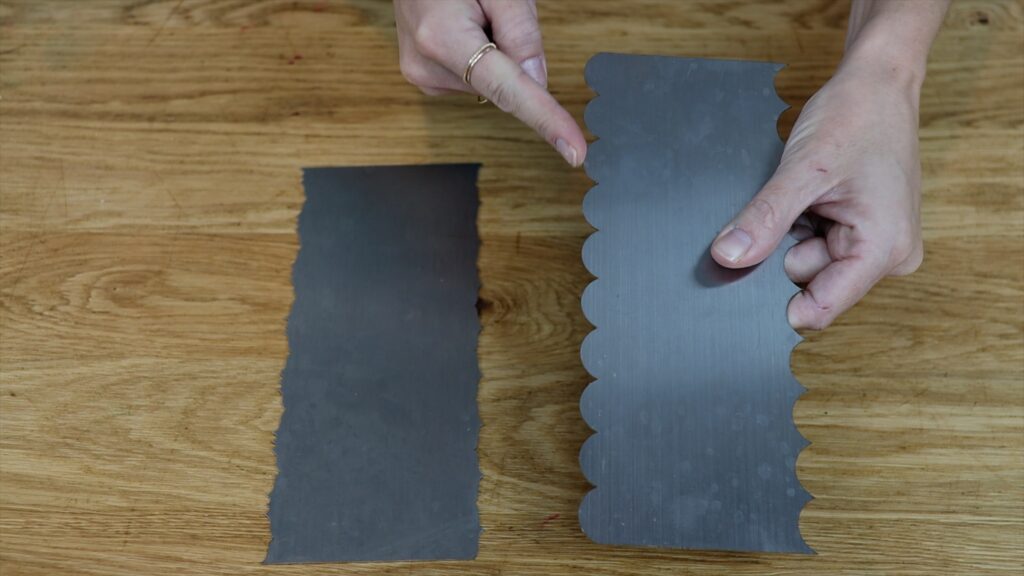
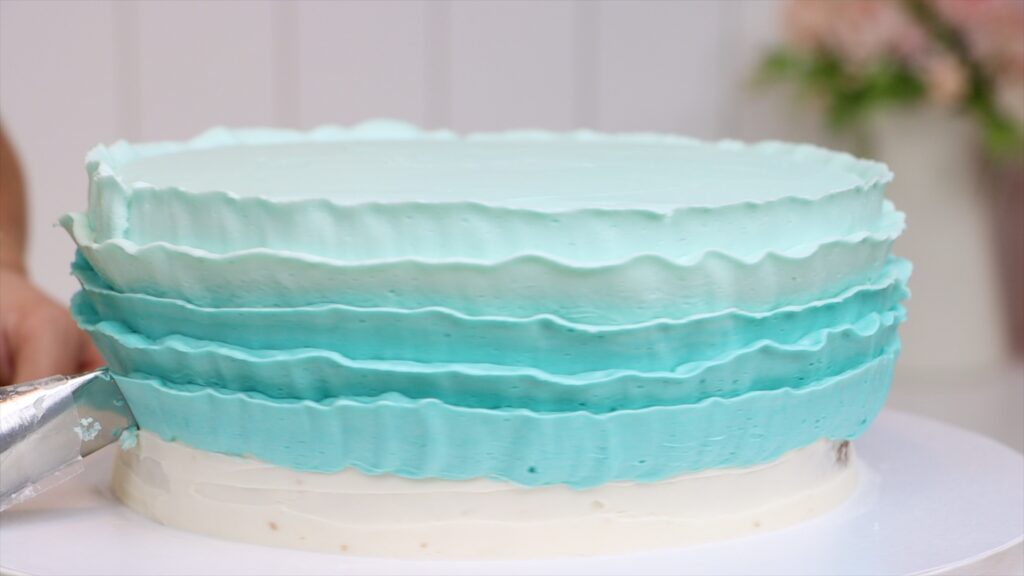
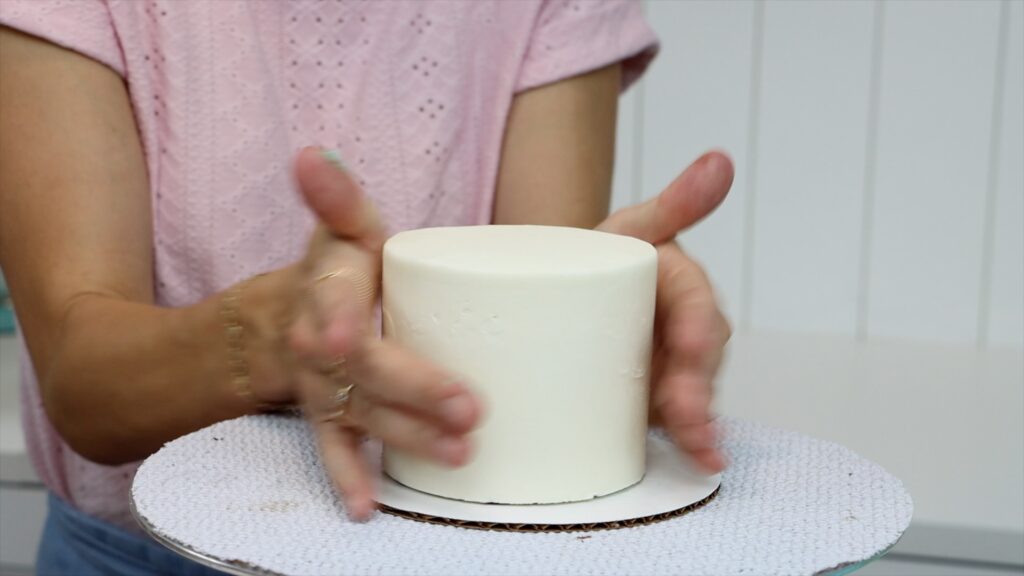
Frosting smoothers, cake combs, and icing scrapers are all the same tools to decorate a cake. They scrape off excess frosting and leave a smooth surface behind. Choose plastic for the cheapest option or acrylic or metal for even smoother frosting. Make sure your cake comb is at least as tall as the cakes you make!
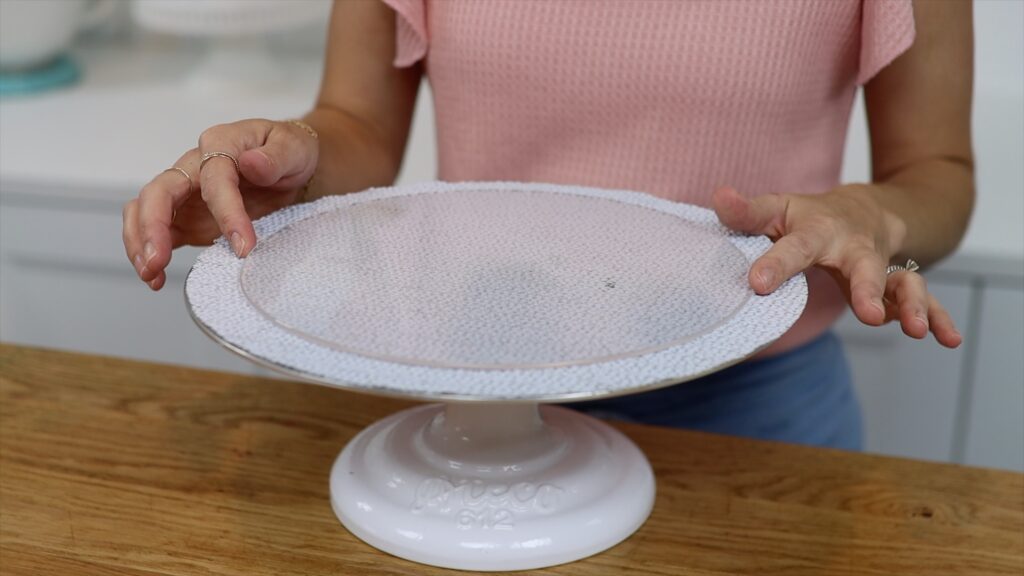
For the neatest results, frost and decorate your cake on a cake board. The cake board should be at least 2 inches wider than your cake. Cardboard cake boards are the cheapest but the corrugated cardboard edge isn’t very pretty. If you choose cardboard, make sure it has a greaseproof lining on top so that your frosting doesn't stain it.
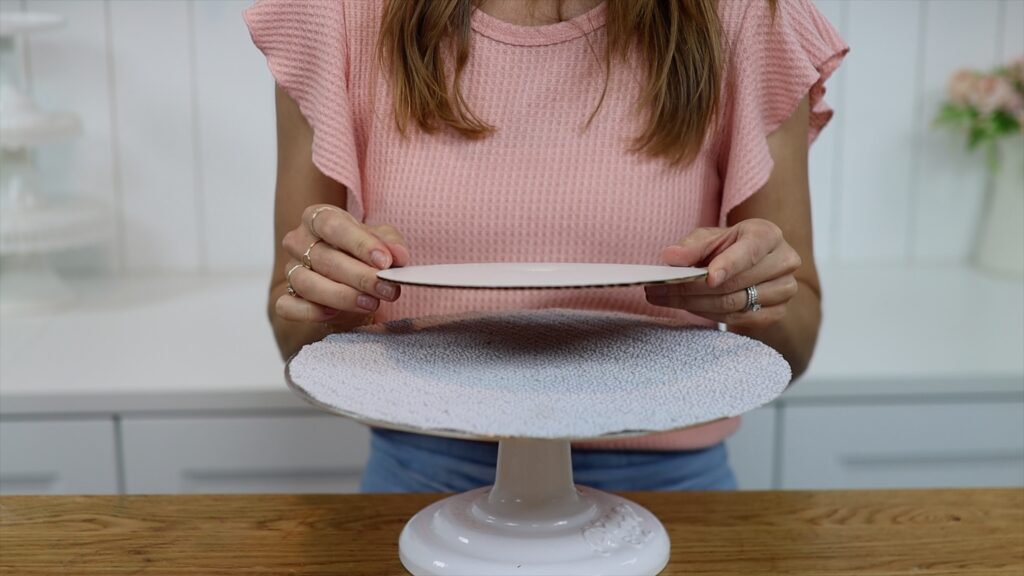
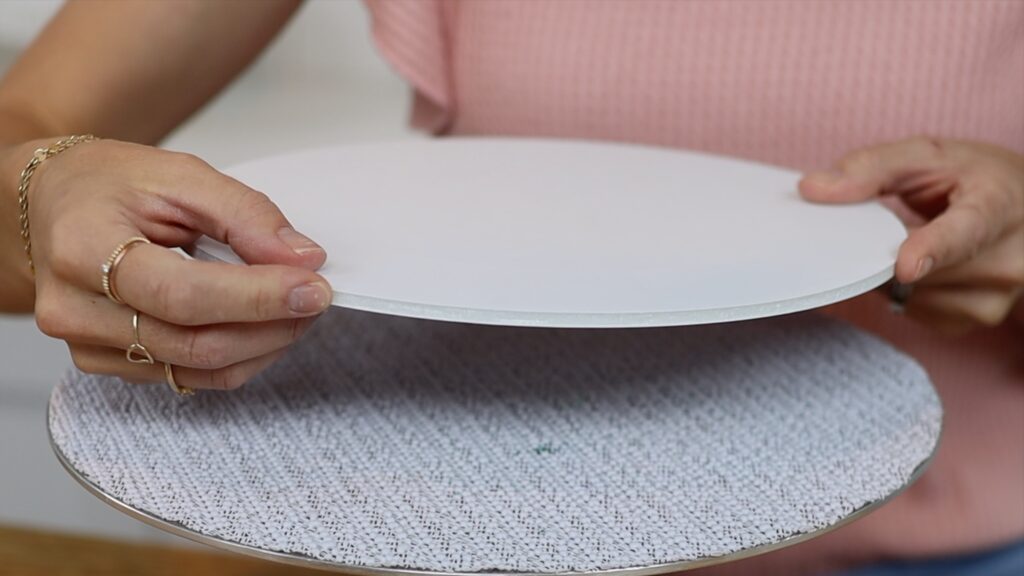
Foam core cake boards are more expensive but have a nicer edge than the corrugated cardboard. Foam core is reusable and can even be cleaned in the dishwasher!
Acrylic is the most expensive option but it's also more durable and longer lasting. Of course, if you’re giving cakes away or selling them, you probably won’t get the cake board back so you might not choose acrylic.
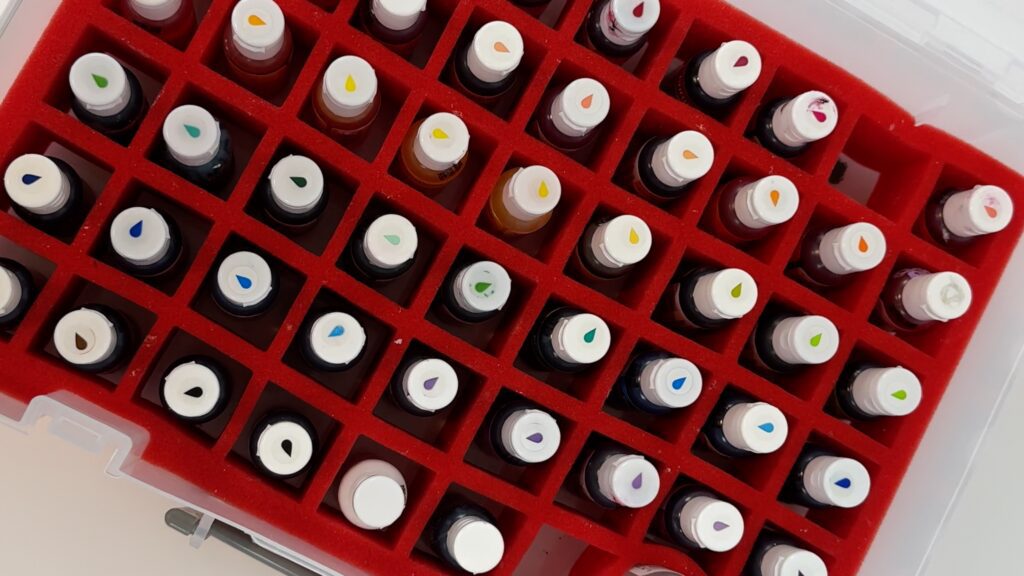
To make colourful cakes, buy some gel colours. Choose a student or starter kit that includes all of the basic colours, which you can mix to make every other colour you need. Use black and blue to make navy or green and orange to make an avocado green, for example. Gels are better than liquids because they’re more concentrated you can make really bright and bold colours with just a few drops, without making your frosting too runny or watery. I use this case to store my gel bottles, which is intended for nail polist but works perfectly to keep them all upright and prevent leaking:
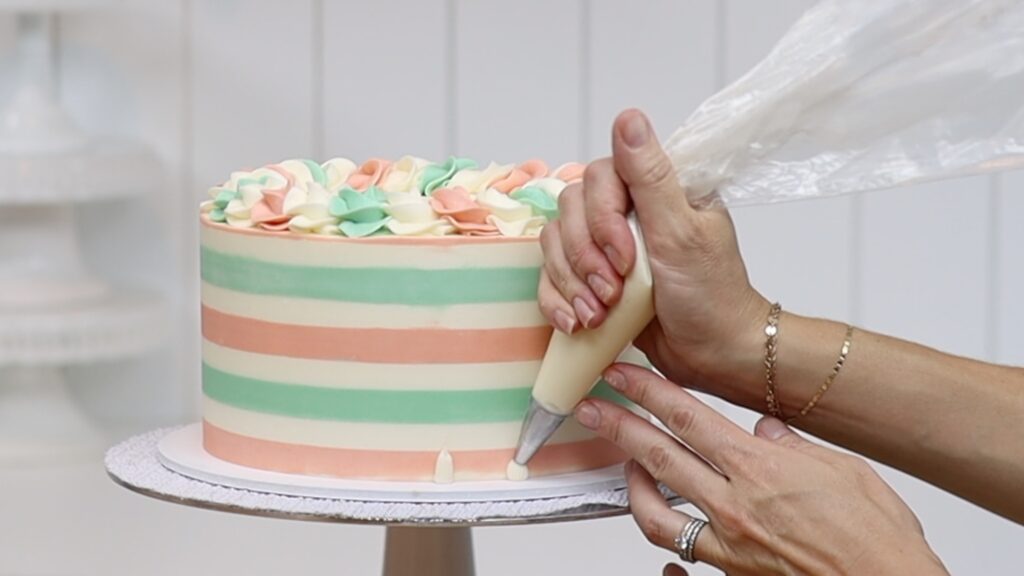
A list of tools to decorate a cake has to include piping bags! Use these for quicker filling and frosting of cakes, to save yourself time. By piping frosting onto the cake before spreading and smoothing it, you'll also pull fewer crumbs off the cake.
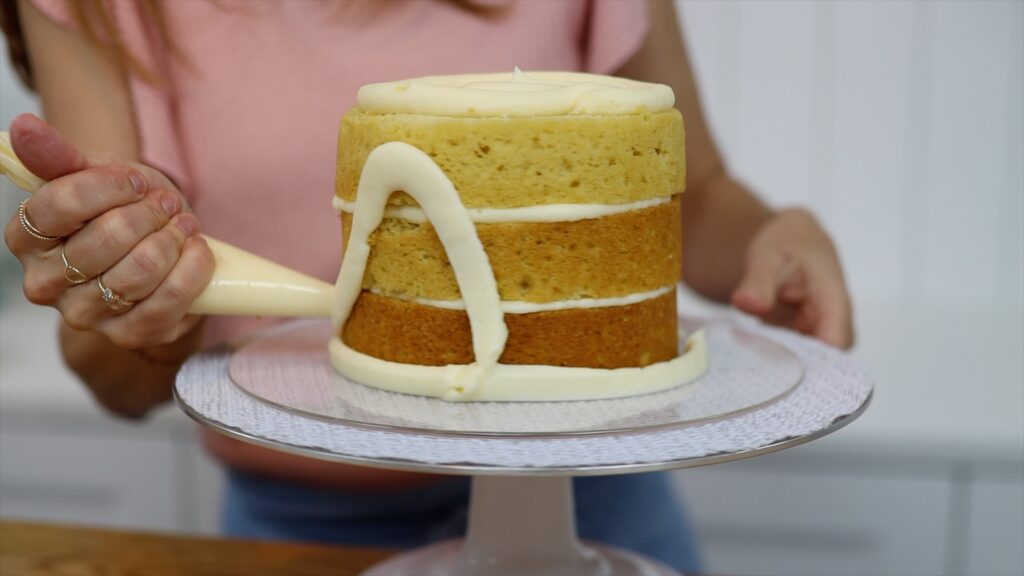
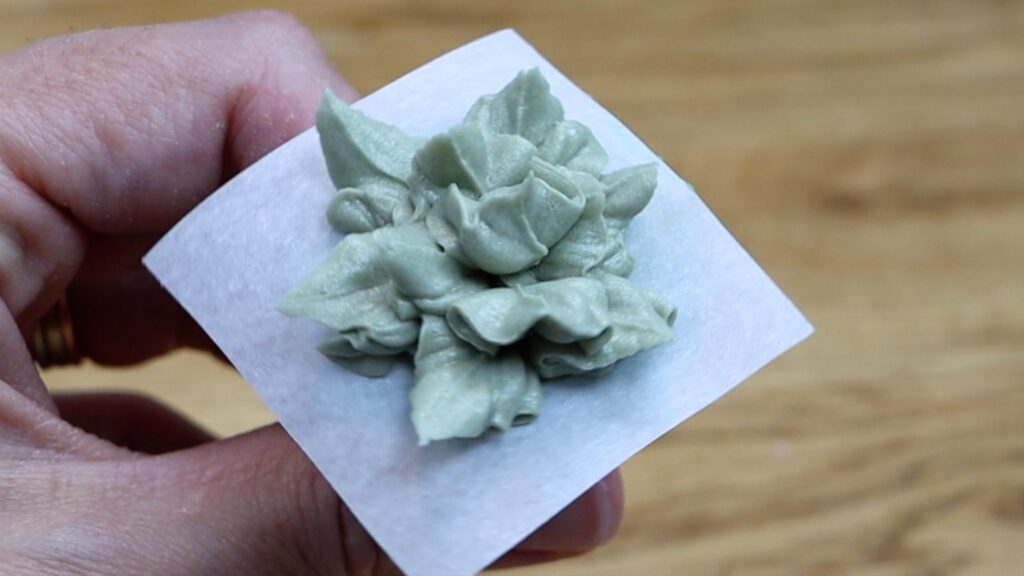
Piping bags can also be used for, or course, piping! Even without piping tips! For example, cut a V into the end to pipe succulents:
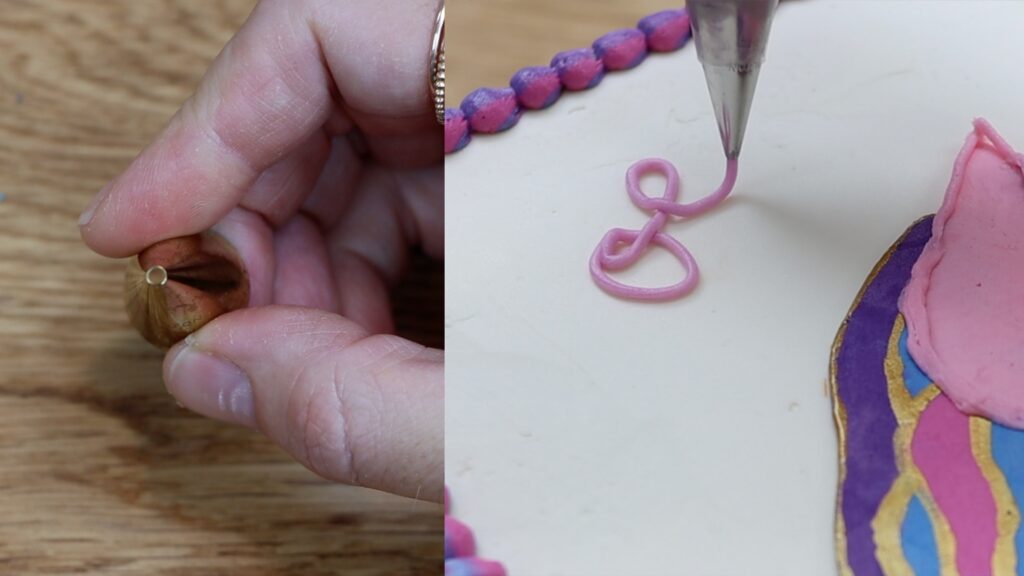
Or cut a tiny hole off the end to pipe dots or lines or to write messages.
For more detailed piping you’ll need piping tips. You can buy them individually but sets are usually more affordable.
For piping swirls choose a star tip, which you can also use for rope borders and wave or shell borders.
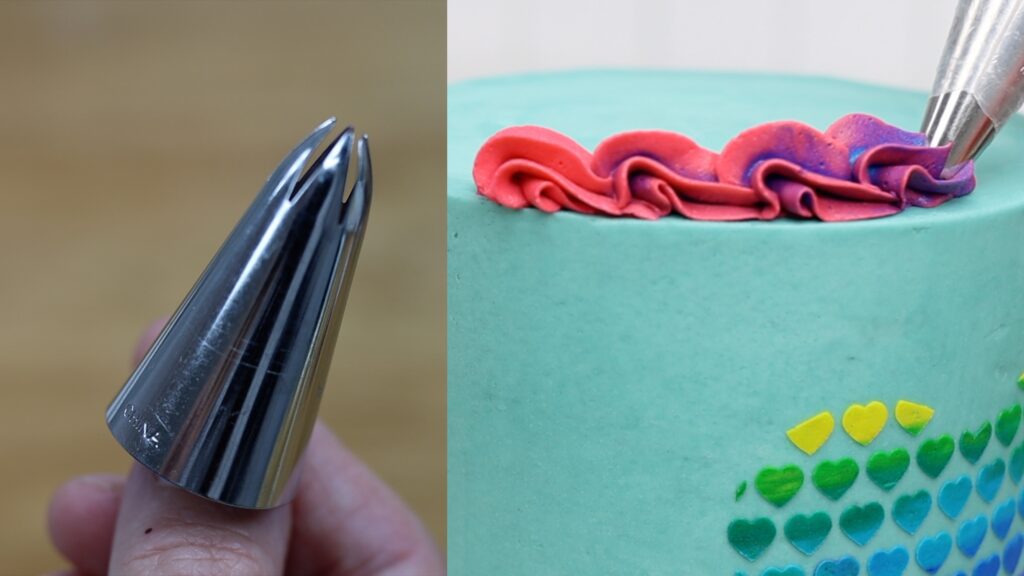
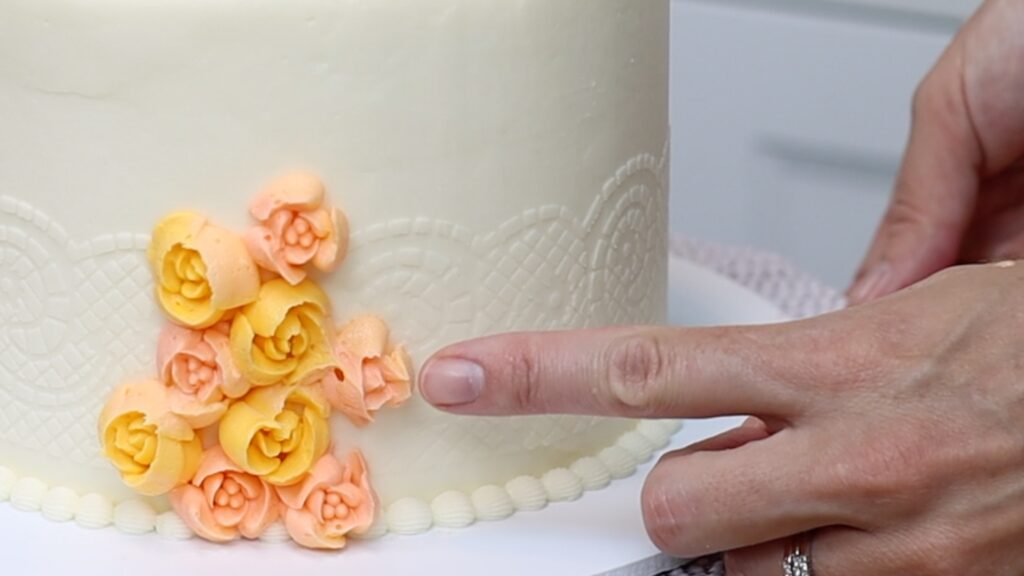
I love smaller open star tips like a #32 or #199 for textured beaded borders like this:
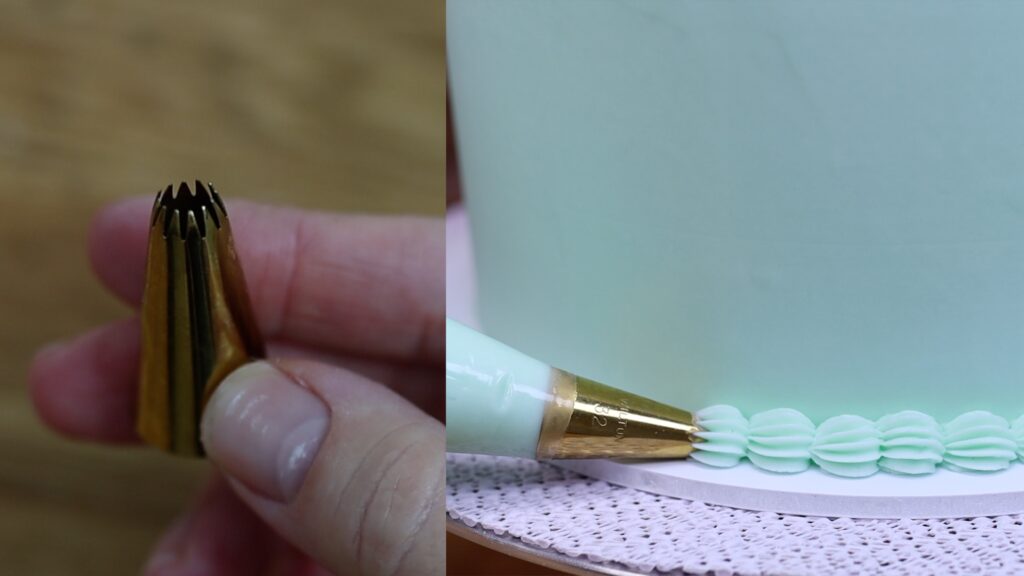
For neat lines and dots and writing, choose a small round tip like a #3 or a #4.
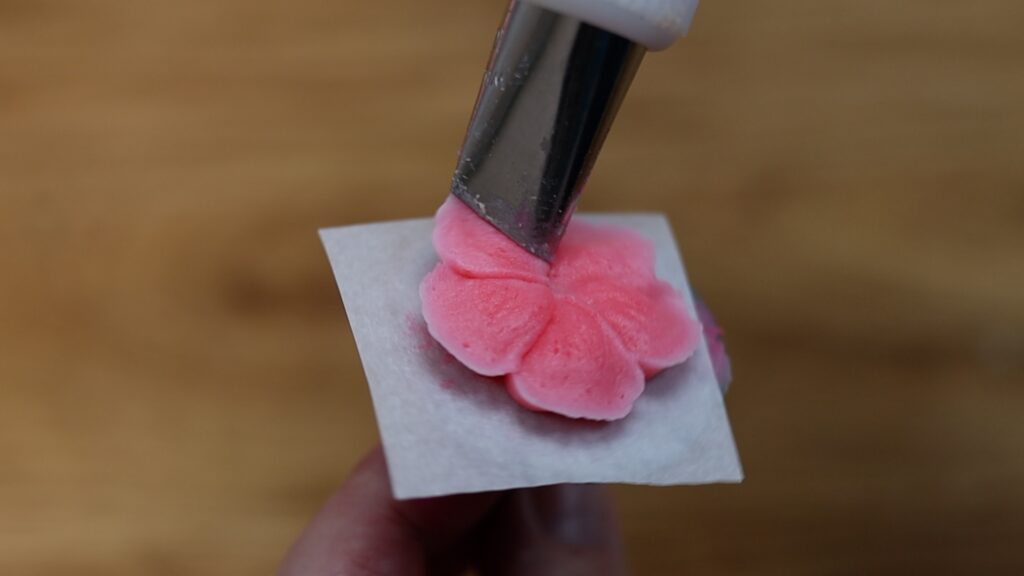
Petal tips are great for piping flower petal and also vintage piping and ruffles.
Check out this tutorial on 15 piping hacks for cake decorating!
For a digital tool to take your cake decorating skills from beginner to professional, join my online course the Layer Up program. It takes you through three Layers of cake decorating skills and techniques and also gives you access to live sessions AND a members-only community group. Save yourself time and money by learning everything that I’ve learned in 12 years, in just 3-6 months instead!
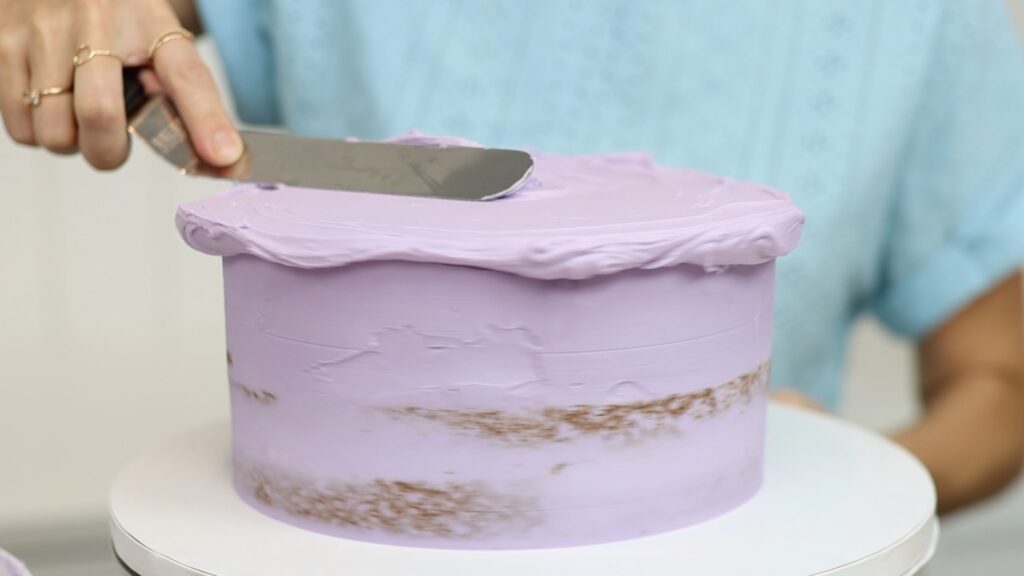
Once you’ve mastered smooth frosting, use the exact same technique with a textured cake comb. You'll add lots of detail to the frosting without learning any new techniques or skills. All you need is a cake comb with a pattern along one side.
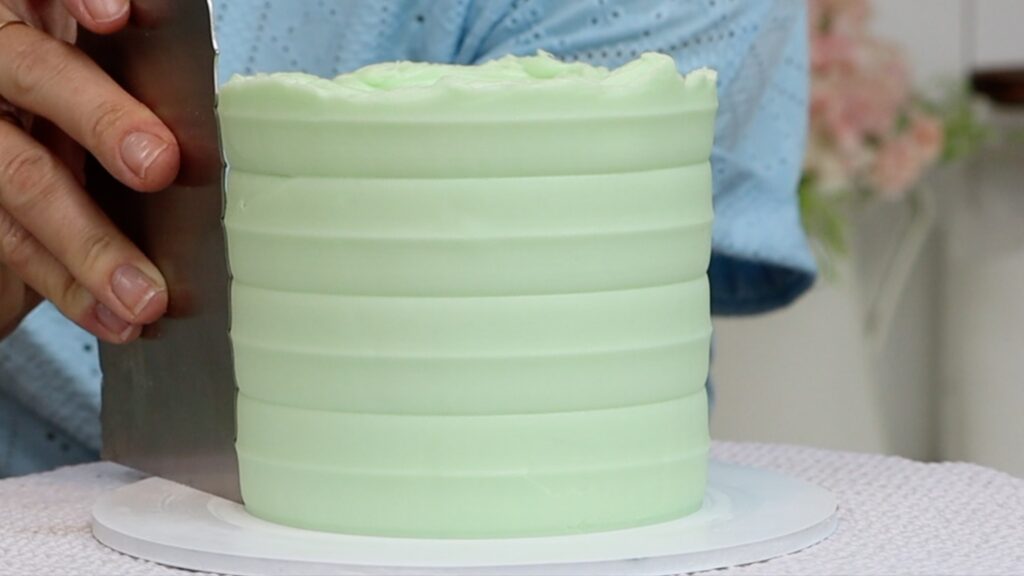
Quick tip: the shallower the pattern is, the easier it will be to use. If the pattern is very deep and dramatic like in the photo below, your frosting will need to be very thick to imprint the patterned texture. It’s much trickier to get the frosting neat than with a shallower texture.
With textured frosting, a simple and quickly frosted cake looks stunning!
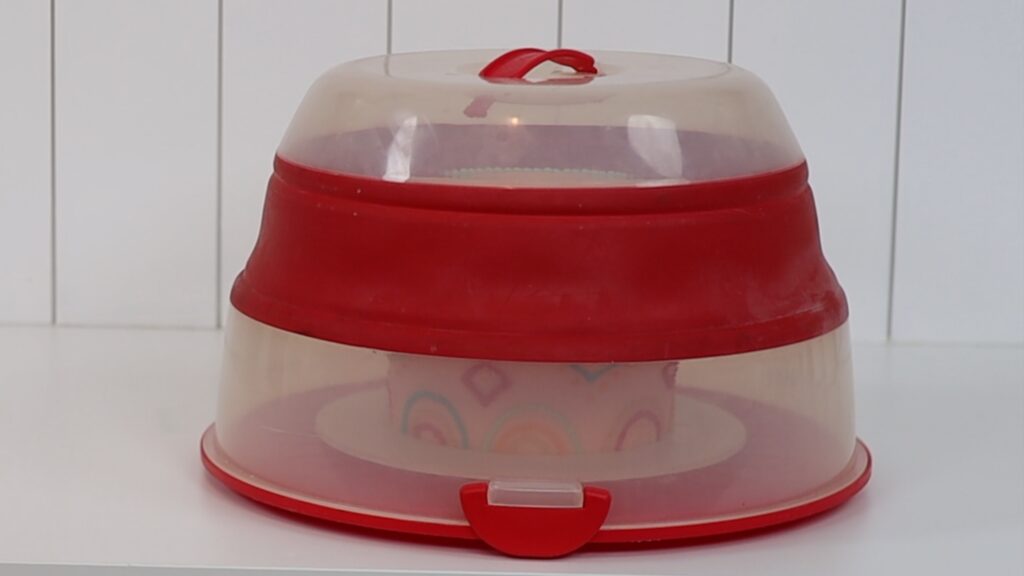
To take your cakes anywhere you’ll need a cake caddy or a cake box. A caddy is reusable so great if you’re taking by a cake to a friend or an event you’re going to and you’ll be able to bring back home afterwards. Choose a tall one if you make tall cakes! I like this cake and cupcake caddy that collapses for compact storage but extends to fit my extra tall cakes inside.
For gifting or selling cakes you’ll need boxes that you can give away and not get back. Choose boxes that are tall enough for your cakes and ideally the same width as your cake boards so that the cake doesn’t move around inside.
I hope this tutorial has been useful! You can also watch a video of this tutorial on your first 10 tools to decorate a cake:
Making a square cake can be tricky but these six hacks will make it easier!
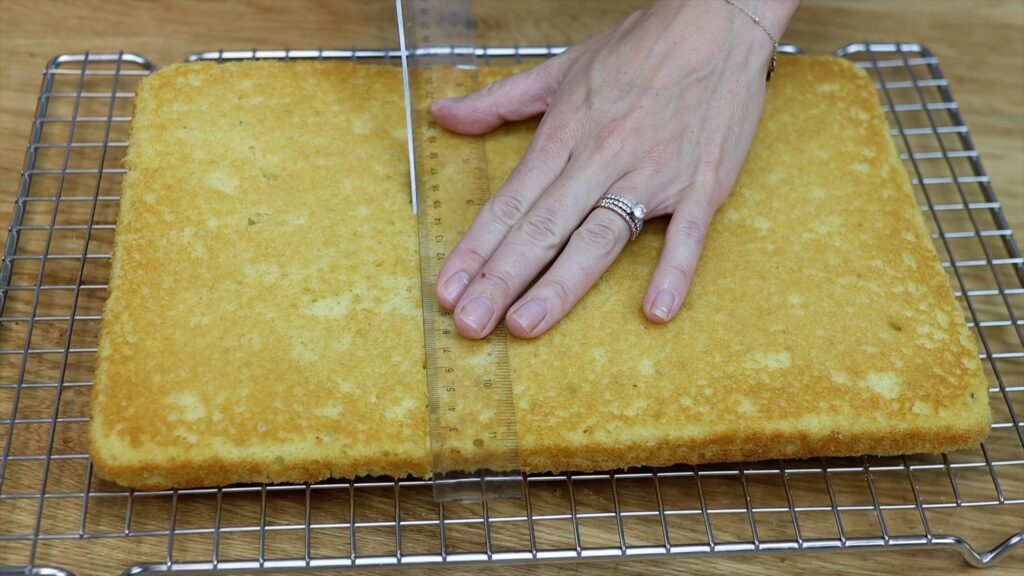
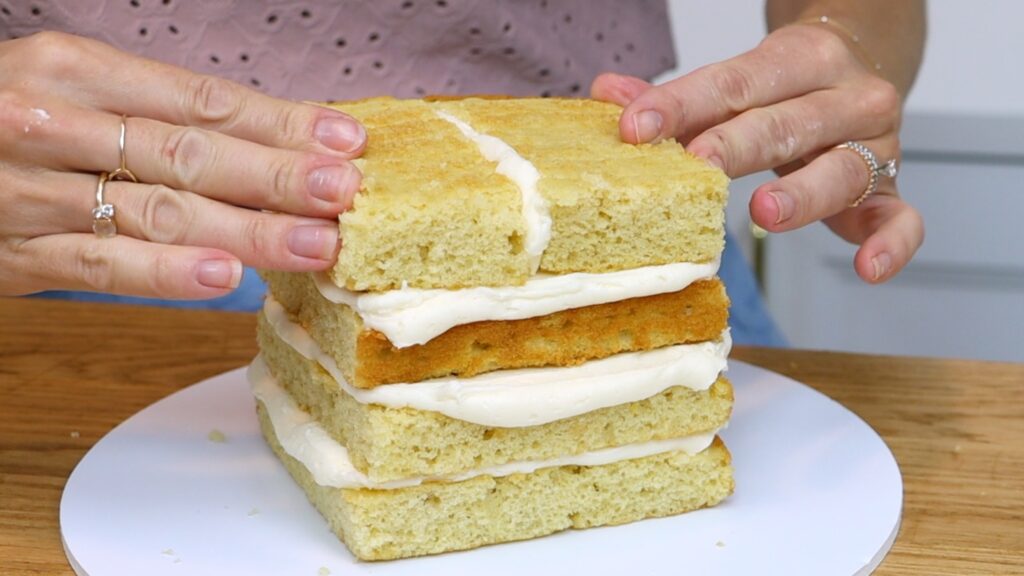
First, if you don't have a square cake pan don't run out and buy one! Save the money and bake a rectangular or sheet cake instead, assuming you already have one of those pans. Cut it into squares and stack them to make a layer cake. This 9x13 inch Very Vanilla sheet will make a tall 4 inch square cake:
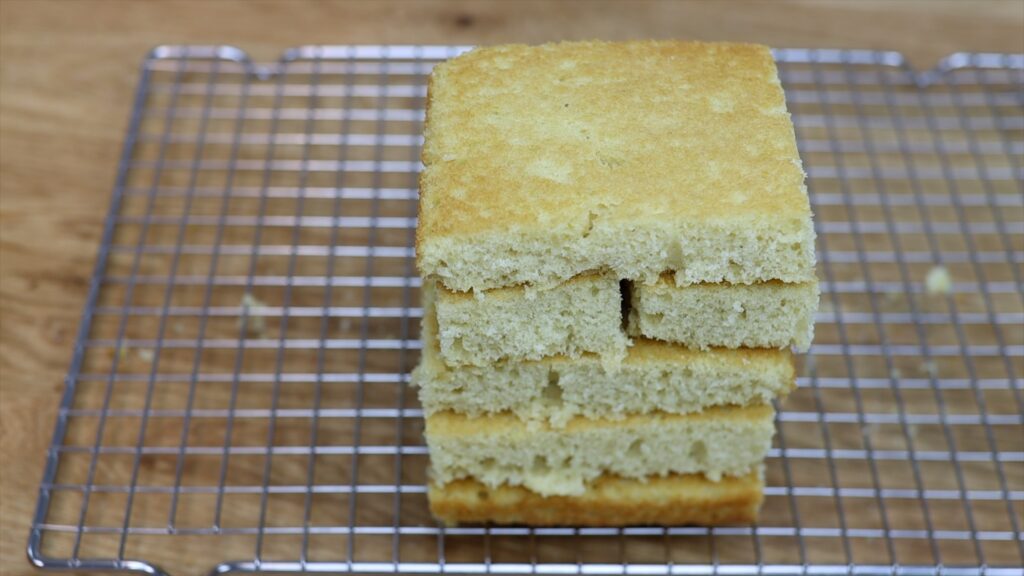
You'll have some narrow extra pieces at the edge of the cake. Glue these together with a bit of buttercream to make an extra layer. This way you'll use up all of the cake you baked and make a taller cake.
To bake a square or rectangular cake that doesn't stick to the pan, line the pan with parchment paper. Cut a piece the size of the pan plus whatever the height of the pan is. This pan is 2 inches high so I'm adding 2 inches on each side of the pan.
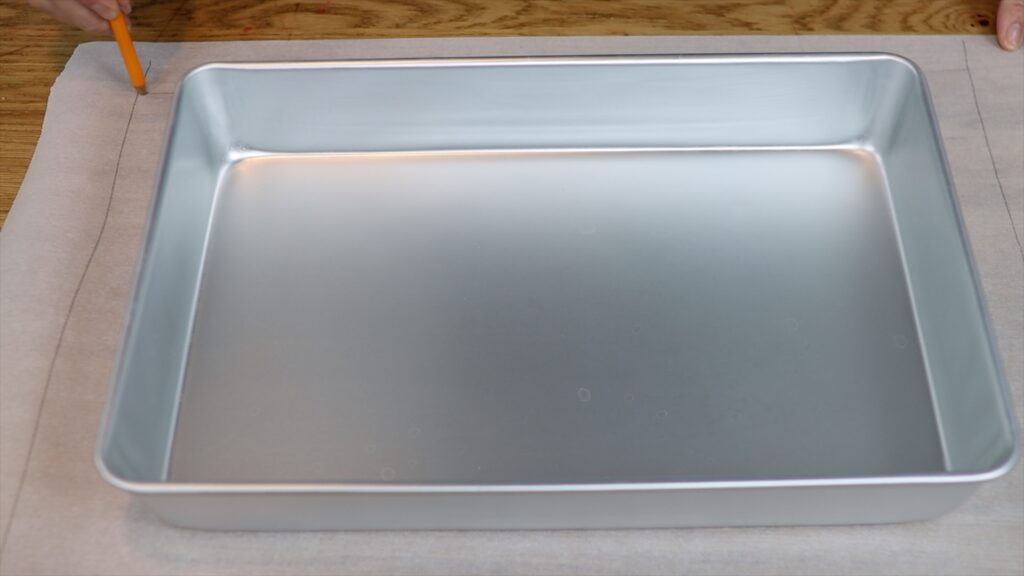
Cut a slit about that same height - 2 inches for this pan - into each edge of the paper.
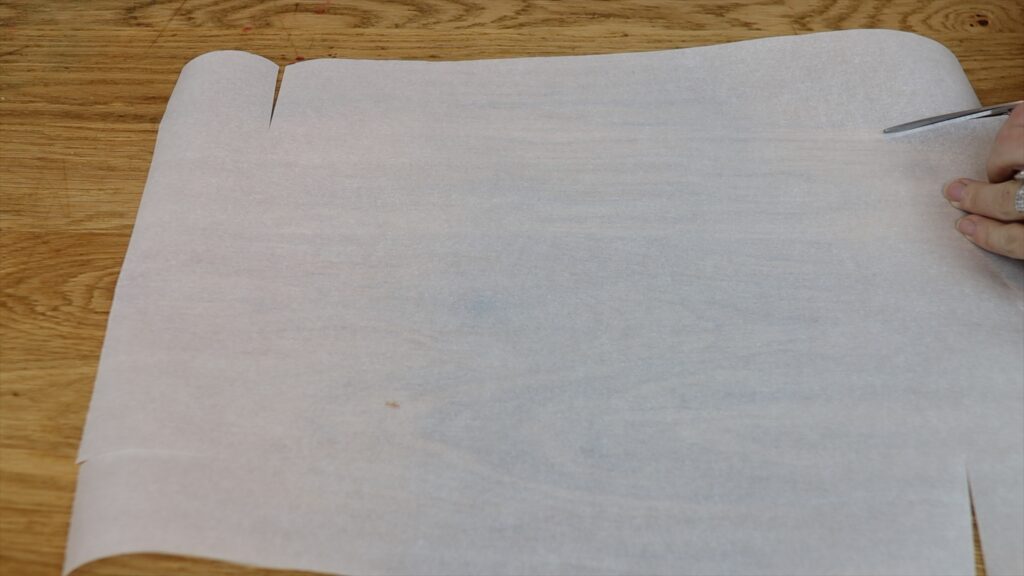
Now when you push the parchment paper into the cake pan, the sides will fold up easily to line the pan completely. Check out this tutorial on using parchment paper for cake decorating!

Unless you make square cakes regularly you probably won't have square cake boards. Instead of buying them just for this, use a round cake board instead. Choose one that's at least 4 inches wider than the cake.
For this 6 inch square cake I'm using a 10 inch round board. The extra inches will give you space to frost and decorate your cake without buying any new cake boards.
I think the most important hack for square cakes is to chill the cake before frosting it. After 30 minutes in the fridge, cake gets cold and firm so it won't crumble as you spread buttercream onto it. I use this 4 Minute Buttercream for all of my cakes! Cold cake holds its shape so you'll create straight sides around it. Room temperature cakes are much more delicate so as you spread on your frosting you can pull off chunks, which makes it more difficult to get a neat square shape with your frosting.

If you've made several cakes before you'll definitely know that a crumb coat is essential for preventing any crumbs getting into your final layer of frosting. Definitely don't skip the crumb coat! When the crumb coat sets, which takes about 15 or 30 minutes in the fridge, any crumbs that came off the cake will be stuck into it so they won't get into the final layer of frosting.
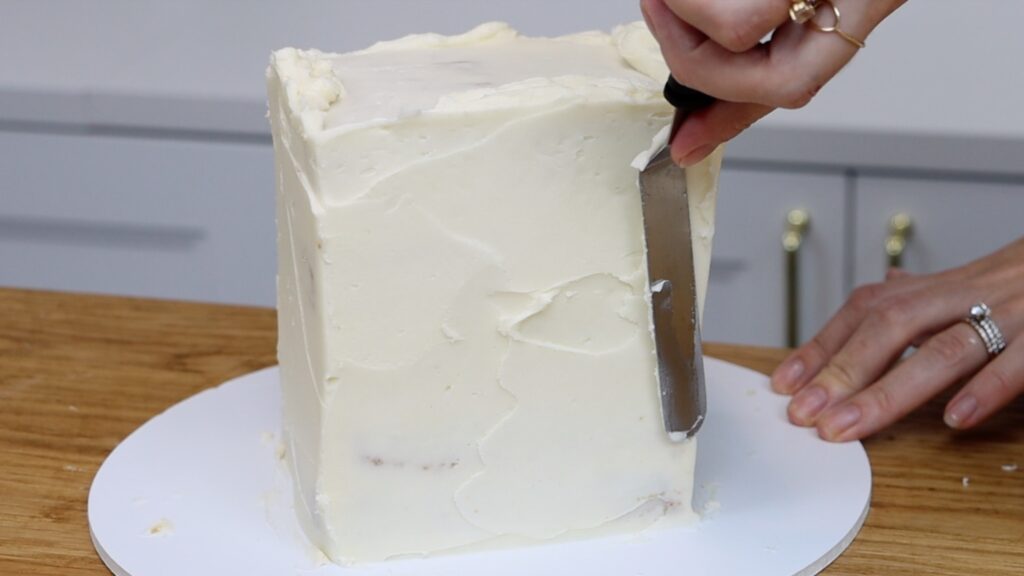
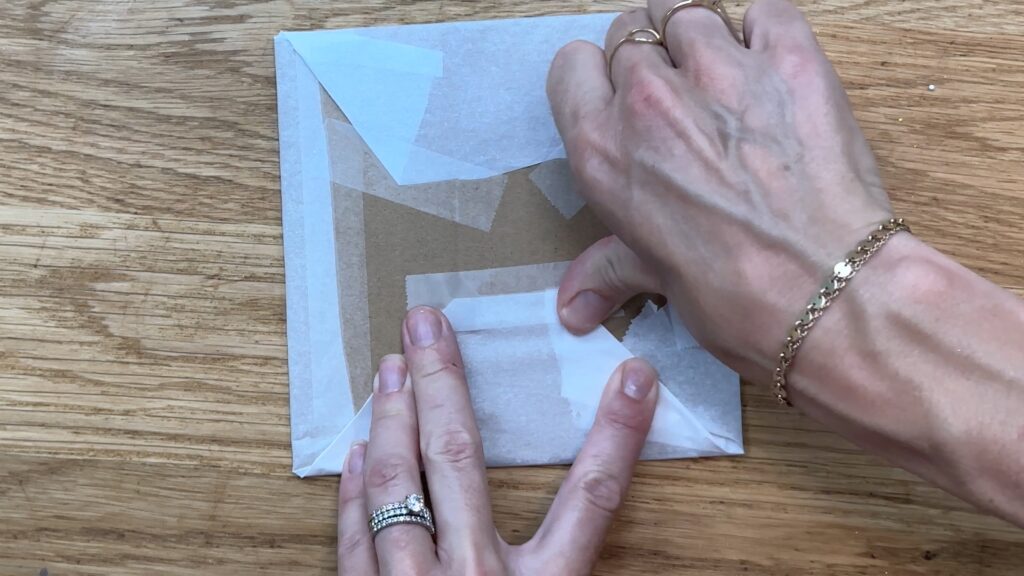
My hack for sharp angles on a square cake is a simple cardboard box. Cut out a square of cardboard that's half an inch bigger than the cake. Wrap this in parchment paper to make it food safe and non-stick.
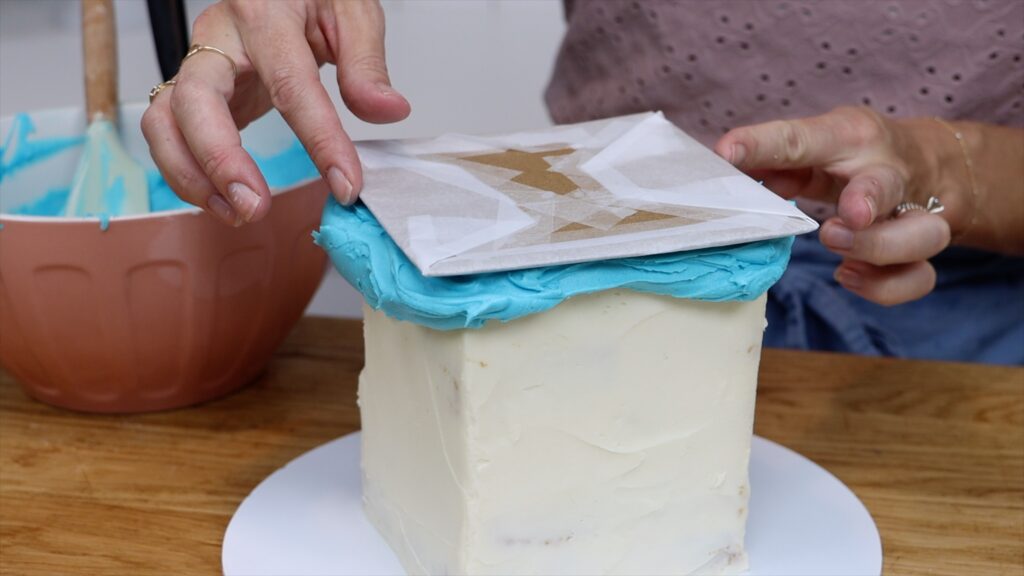
Now spread frosting onto the top of the cake only. Push the wrapped cardboard square down onto it, adjusting it so it's centered on the cake.
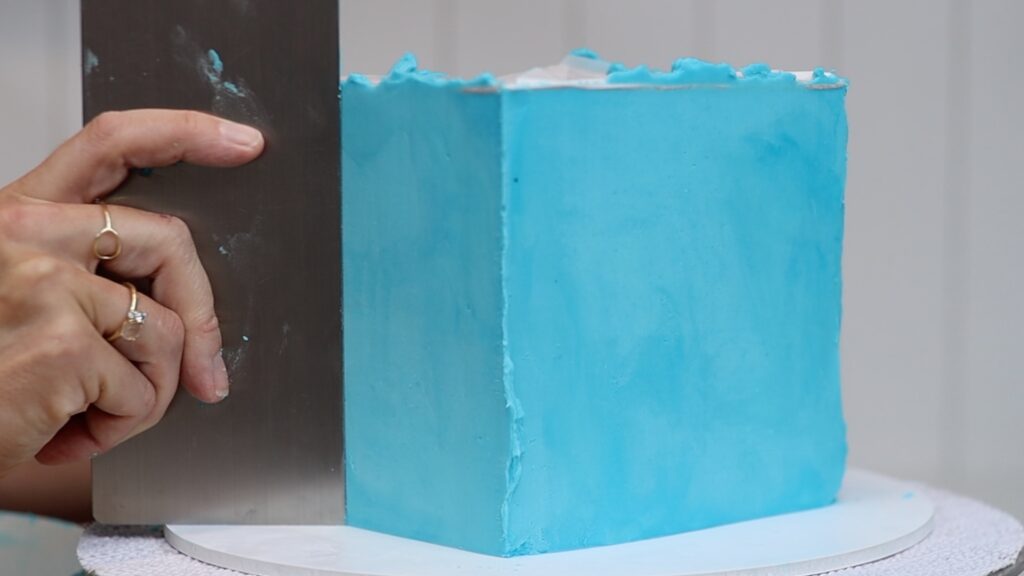
Next, spread frosting around the sides of the cake. It needs to be at least as thick as the edges of the cardboard square. When you smooth the frosting, your cake comb will scrape along the edge of the cardboard, making the frosting mimic the perfectly straight edges and sharp angles of the cardboard square.
Put the cake in the freezer for 15 minutes or the fridge for 30 minutes to set the frosting. Then slice underneath the parchment with a knife to lift up the wrapped cardboard square.

Spread more frosting over the top to fill in any gaps, scrape off the excess and voila!

To learn hundreds of ways to decorate cakes visit my cake school!
I hope this tutorial has been helpful and I can't wait to see your square cakes. Please tag @britishgirlbakes so I can see them!
You can also watch a video of this tutorial on 6 hacks for square cakes:
Smooth frosting is the number one challenge of most cake decorators. Avoid it with these seven ideas for cake decorations without smooth frosting!
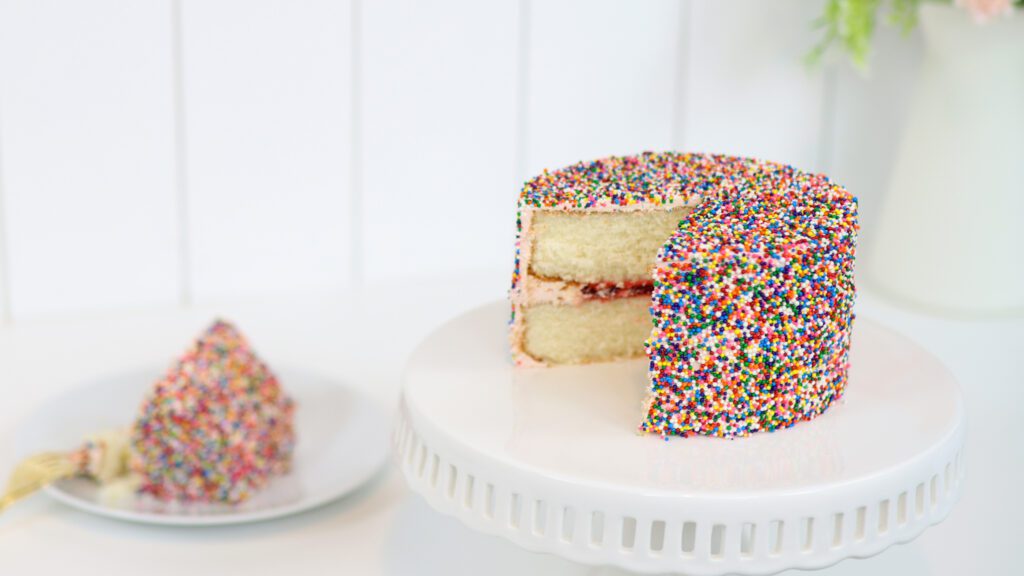
For this first technique, spread some frosting onto your cake but don't worry about making it perfectly smooth. Put your cake in the fridge for 15 minutes so that it firms up a bit. Then put it on a tray or a baking sheet. Scoop up some sprinkles and press them into the cake and they'll stick to the frosting.
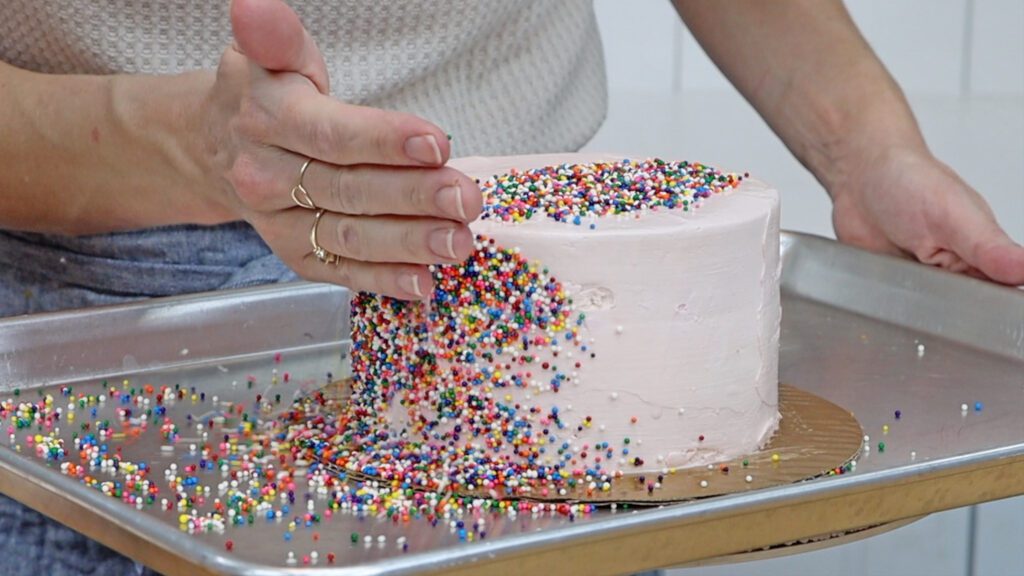
Since the frosting has chilled and started to set in the fridge, it won't be super soft so the sprinkles won't sink into it and get buried and hidden. The tray will catch any bouncing sprinkles so you don't have a huge mess to clean up afterwards. The cake will look so neat and pretty without needing to make the frosting perfectly smooth. I find that non pareils or hundreds and thousands work best for this technique because they're so tiny that they don't add a lot of texture to the cake when you bite into it.
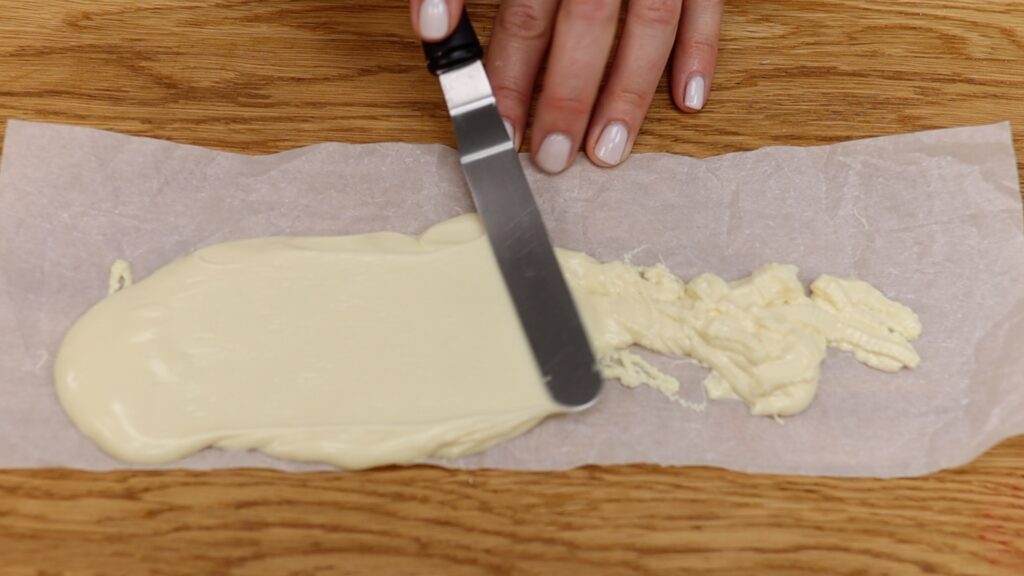
Chocolate collars or wraps conceal frosting completely so it doesn't matter if there are lots of imperfections in it. You can do this with parchment paper or wax paper or baking paper. Cut the paper into a strip that's long enough to wrap around the cake and as tall as the cake. You can use the paper as it is or scrunch it up to create some texture. Melt chocolate in the microwave using 50% power for 30 seconds at a time and stir until it's smooth. Spread it to cover the paper completely.
Slide your hands underneath the paper to pick it up while it's still melted and wrap it around the cake. The cake should have a thin layer of frosting to cover it to seal in the moisture but it doesn't need to be neat.
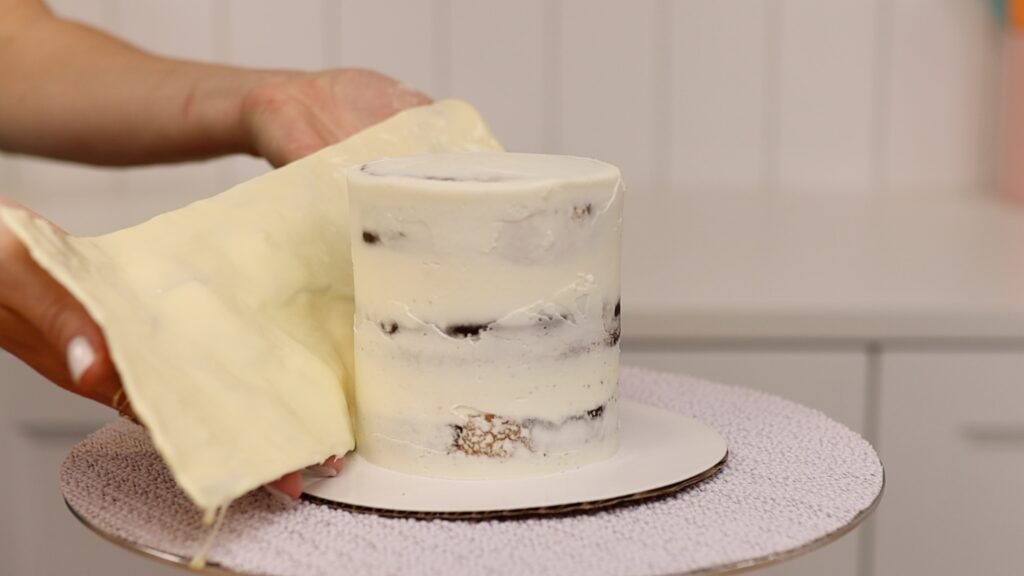
Press the melted chocolate against the cake to attach it. Then put the cake in the fridge for about 30 minutes to set the chocolate.
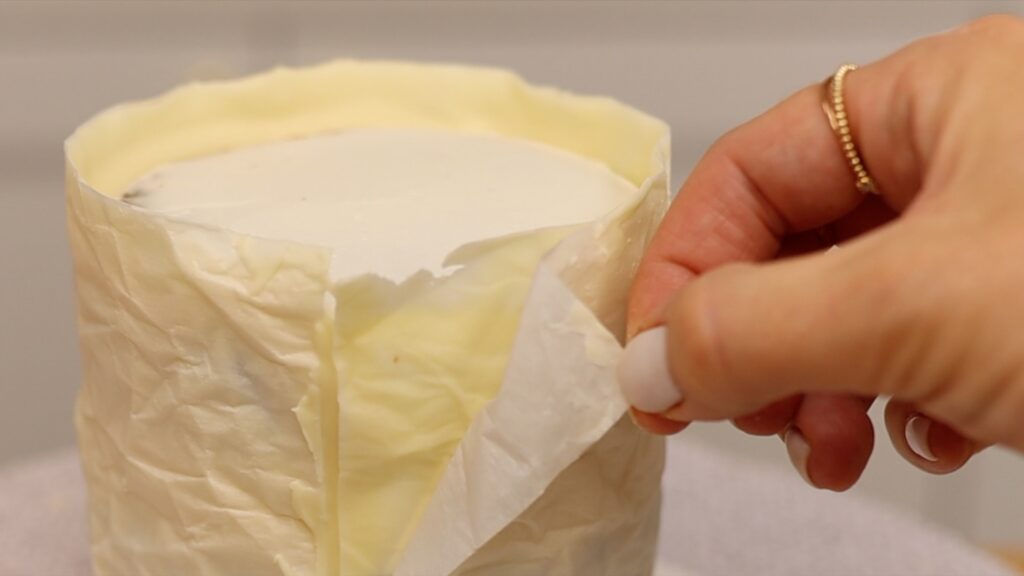
Pinch a corner of the paper and peel it away to leave the pretty chocolate wrap behind! You can decorate this with chocolates or flowers on top and a ribbon tied around it if you like.

Instead of hiding the frosting on a cake because it's not smooth, add texture to it so that it doesn't need to be smooth! You can do this using the back of a spoon or an
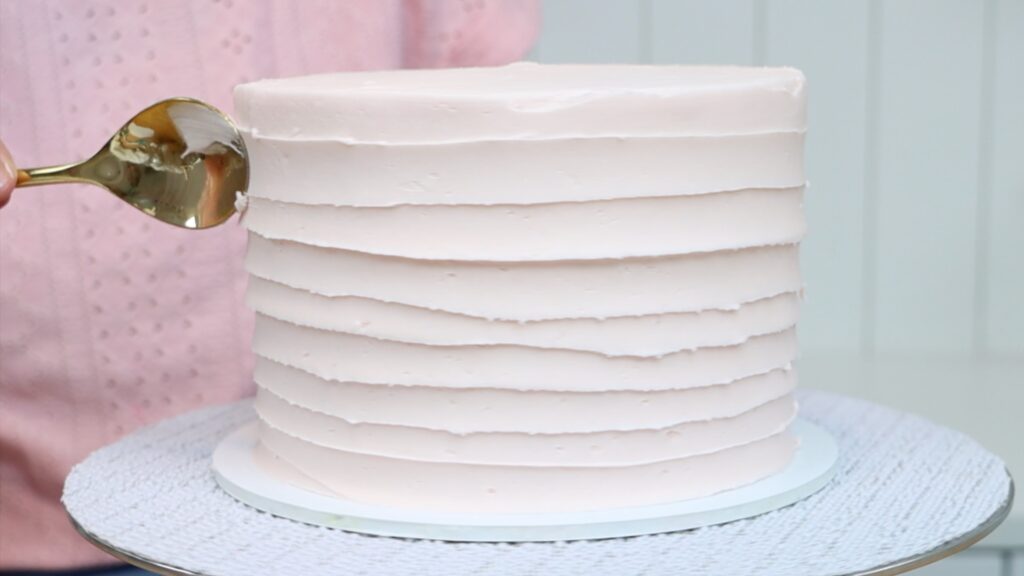
Pull up slowly to drag those grooves all the way up the cake. You can do this vertically instead, pulling upwards. This is a good choice if you don't have a
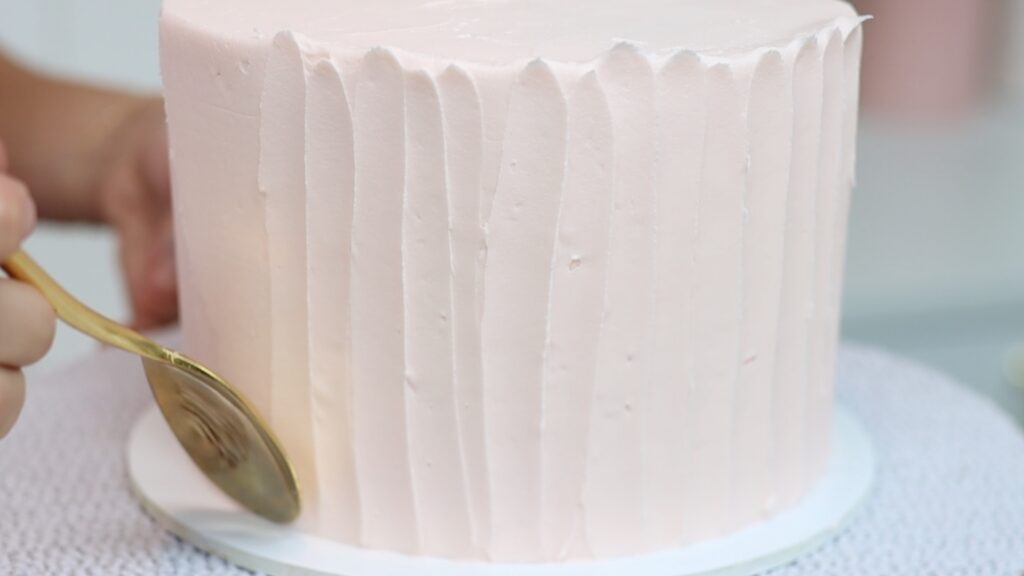
Use random movements instead to create beautiful rustic texture with these little arcs. Any of these textures not only avoids smooth frosting, it also creates a stunning base for any other decorations you add to your cake.

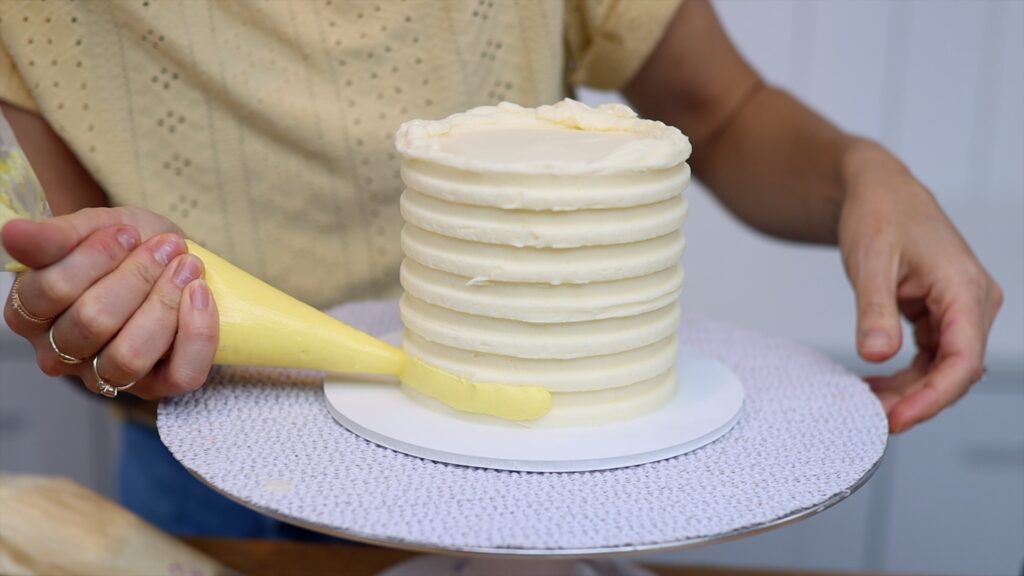
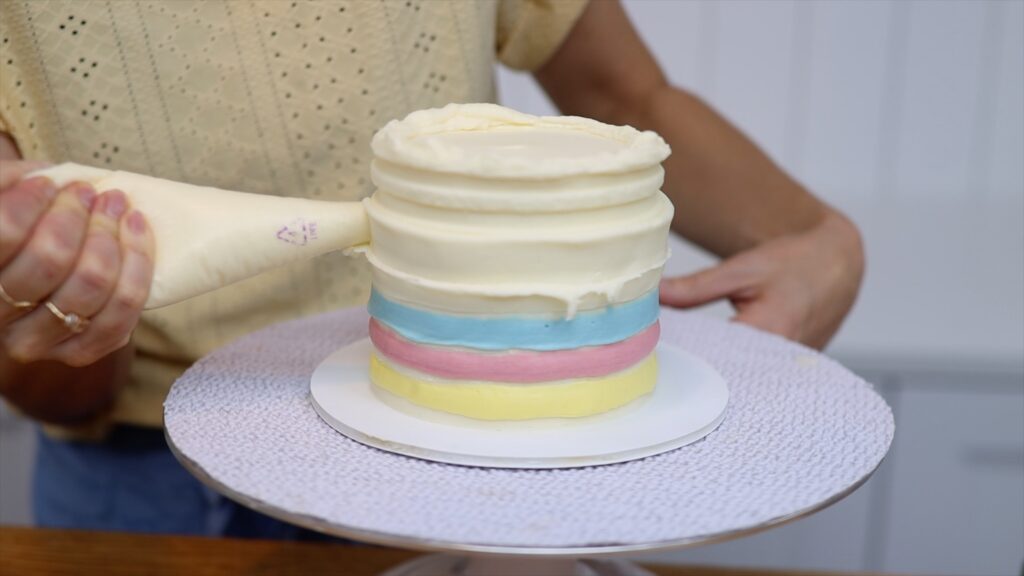
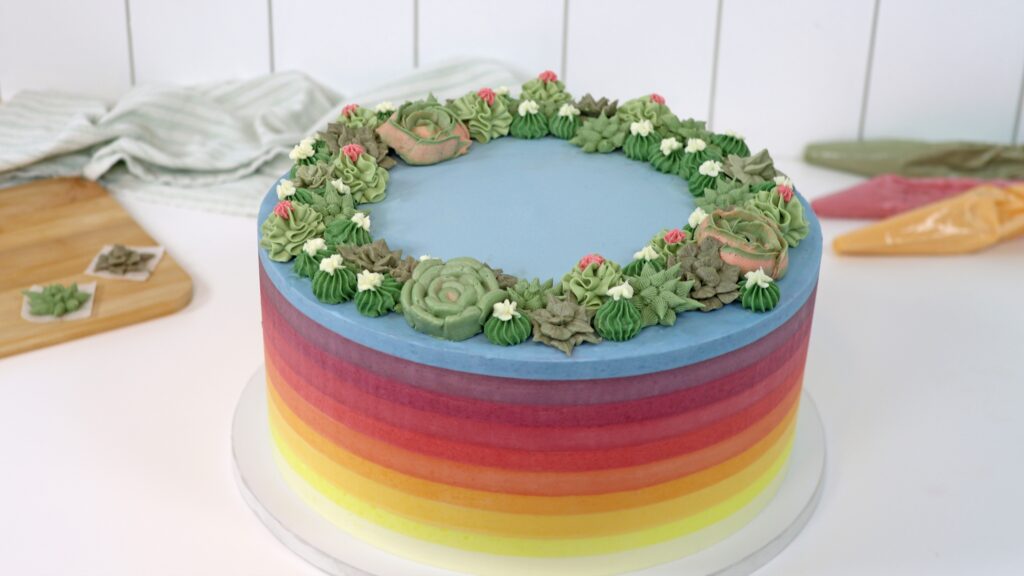
For more defined texture use piping bags and piping tips and as many colours as you like. For the best results, spread a thin layer of frosting over the cake first. This seals it to prevent it from drying out even if there are gaps between the texture you pipe.
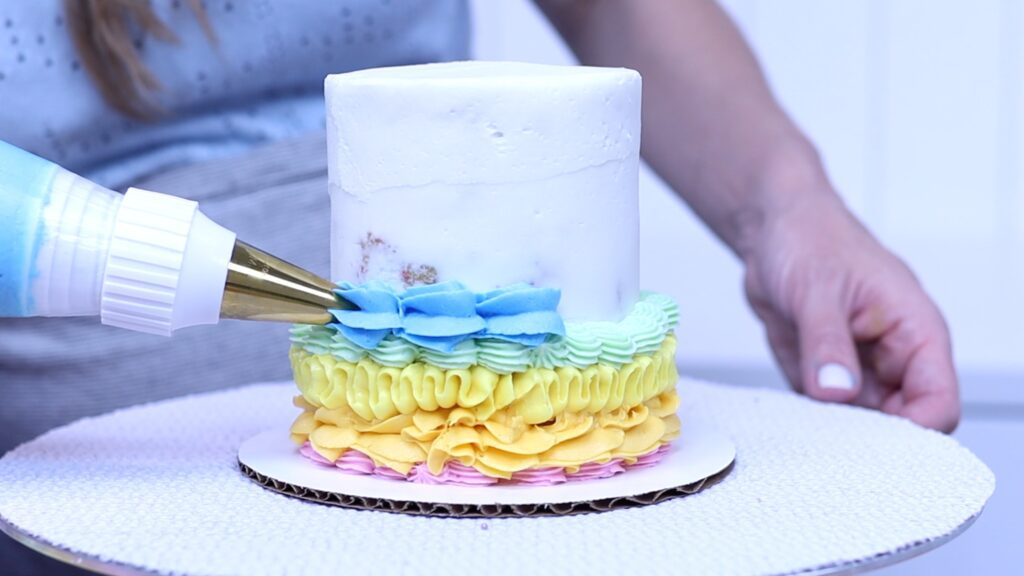
I'm using pastel rainbow colours for this cake with a different texture for each row. This adds lots of colour and texture and variety but using the same piping tip for the whole cake can look gorgeous too.
This is a petal tip with the narrow end of the tip pointing upwards to make these wavy ruffles. Check out my tutorial on 15 piping hacks for cake decorations!
Cover your frosting completely with fruit or chocolates or candies. Choose cake decorations that are all the same size and that don't stick out too much from the cake, otherwise their weight might cause them to slide down the sides of the cake. If you've just frosted the cake and the frosting is still soft the decorations will stick to that frosting easily.
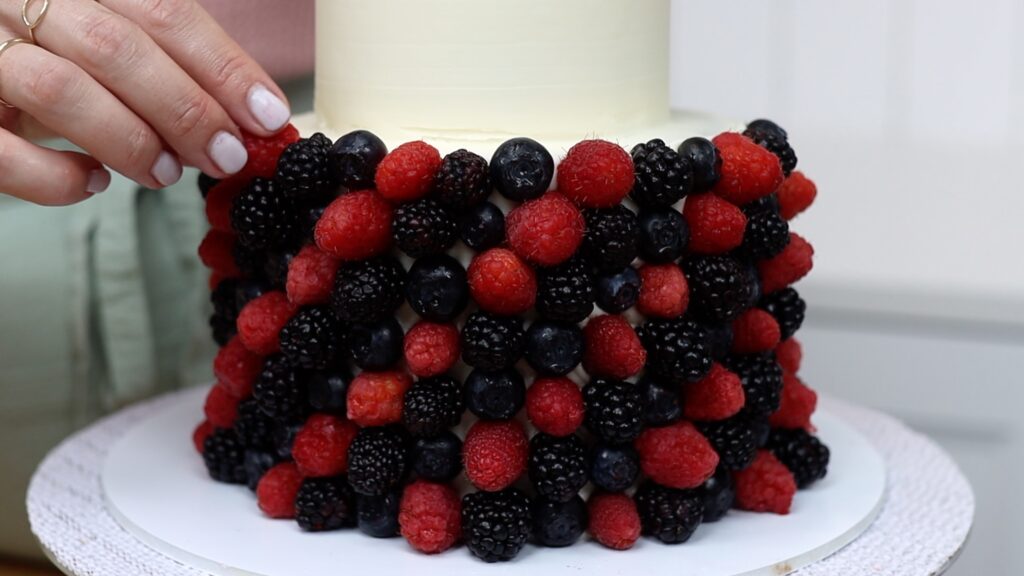
Arrange them in diagonal rows to completely cover the cake. The neatest way to do this is to choose an order, for example: raspberry, blueberry, blackberry. With so much fruit on this cake, it's almost healthy!

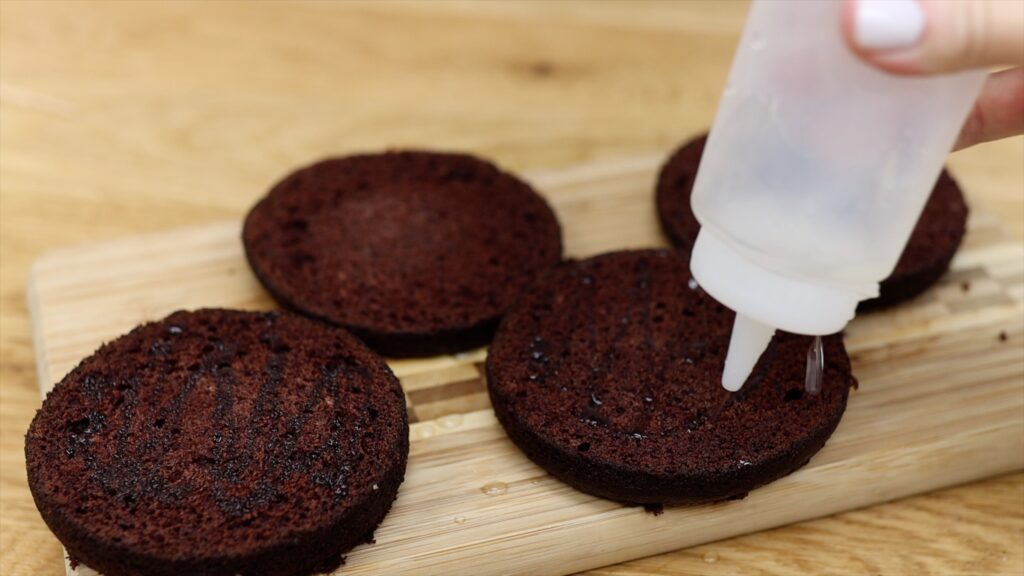
Skip the frosting on your cake completely with a naked cake. Make sure this doesn't dry out by drizzling the layers with simple syrup to keep them moist. Make simple syrup by putting half a cup of water and half a cup of sugar in a pan and bring to a simmer over medium heat until the sugar dissolves. Then let it cool.
You can spread or pipe your filling but piping it will give you the neatest results. This is my 4 Minute Buttercream and a 1M star tip:
After the cake is assembled you'll see the colourful texture showing through between the layers. The cake will be beautiful as well as delicious! Even better, you've saved yourself the time of frosting the outside of the cake.
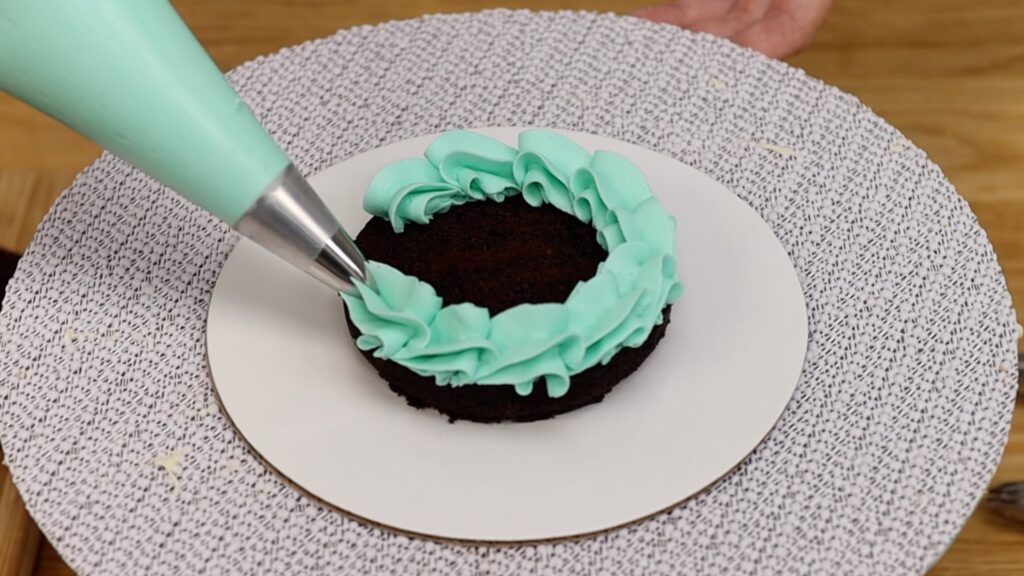
Here's another design that doesn't need any frosting to be spread or smoothed. Bake your cake in a pretty dish and choose some piping tips and colours of frosting. I like to tint small amounts in a cupcake pan because it's much easier to wash this than lots of little bowls.
Pipe randomly onto the cake or outline a design with a toothpick and then pipe within that.
The piped details make this cake design pretty and intricate without taking much time and without needing to get any frosting smooth.
I hope you've seen some ideas you like! Tell me in the comments which is your favourite idea and visit my cake school to learn hundreds of cake decorating techniques and designs.
You can also watch a video of this tutorial on 7 cake decorations without smooth frosting:
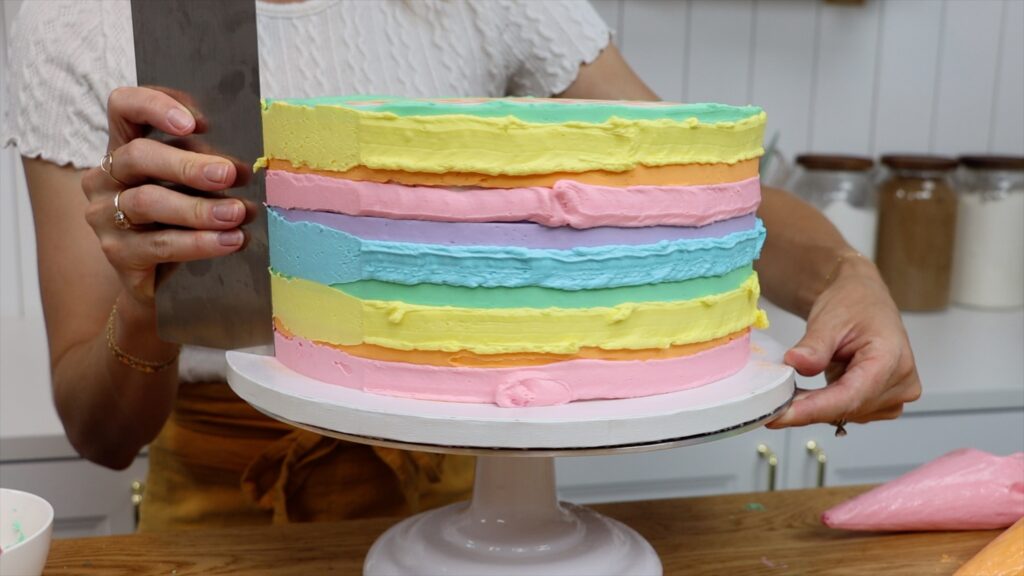
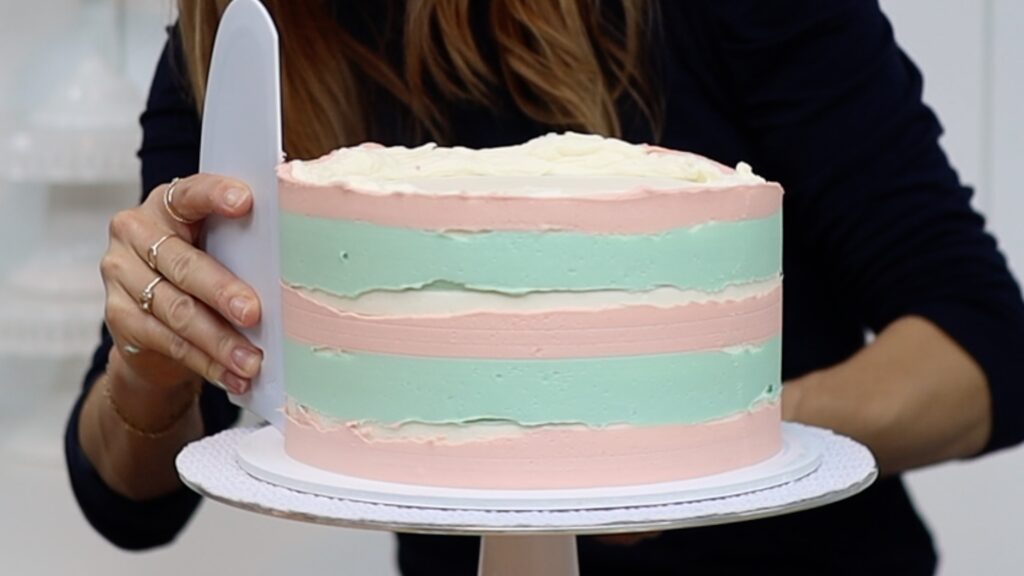
So, you bought a striped cake comb to make striped frosting… What else can you use that comb for? In this tutorial I'll show you five other ways.
You don't have to cover your entire cake in stripes! Try adding them just around the bottom of the cake as a border or accent. Use your striped cake comb as normal at first, imprinting grooves all over the cake.
After chilling the cake in the freezer for 15 minutes, pipe coloured buttercream into some of the grooves. Use the original colour to fill in the rest of the grooves.
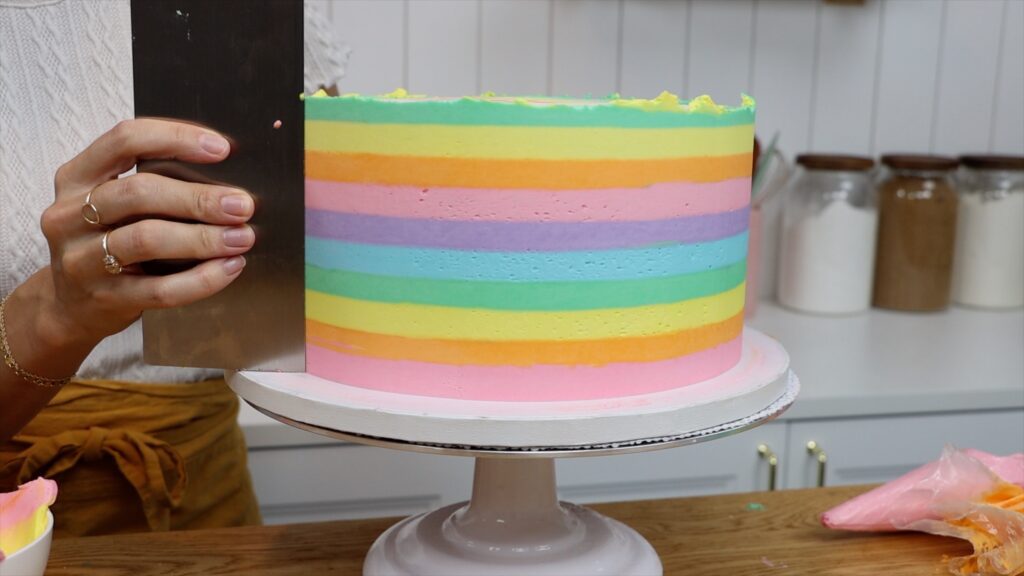
After you scrape around the cake a few times, the colorful stripes will start to appear. On the rest of the cake, the piped frosting will blend into the stripe grooves. These stripes will disappear and create a plain, flat, smooth background colour instead.
As with any striped cake, the stripes will get neater and neater as you scrape. Try this hot metal cake comb hack and 9 other ways to improve your cakes in 2024.
Instead of filling in the striped grooves with another colour of buttercream, leave them empty! This creates a unique textured cake. Alternatively, fill them in with interesting piping. This is one of the first cakes I made for my cake school back in 2019 but I still love the technique:
For ruffles like this, use a petal piping tip like a #102. Hold it with the narrow end of the piping tip pointing outwards. This way, the outer edge of the piping will be thin and delicate. The wider side of the piping will make thicker piping, which will attach to the cake more easily.
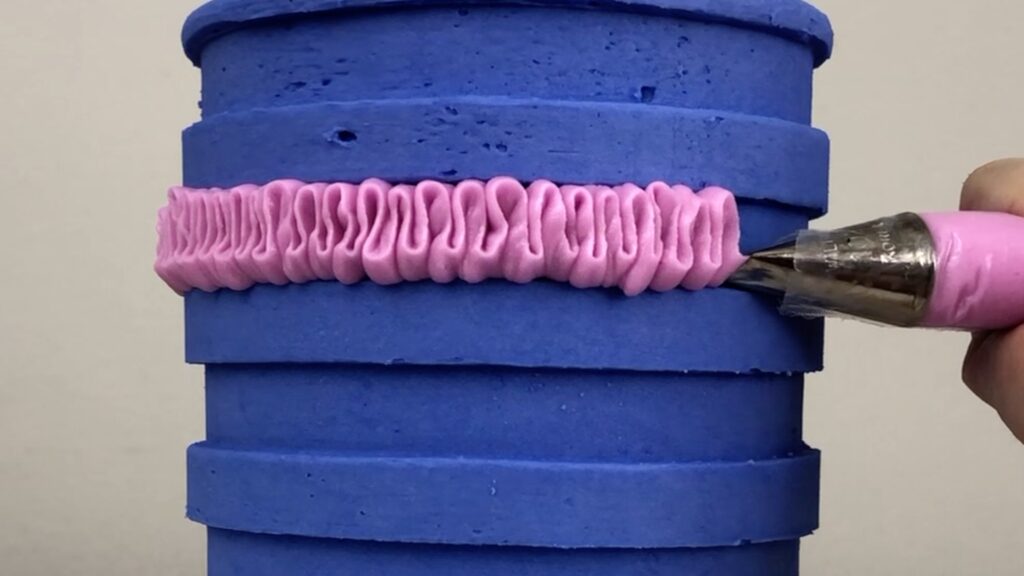
Pause for a moment at the top of each ruffle and again at the bottom. That pause will let the buttercream fold gently over itself to make these smooth curves. This is a #102 piping tip which makes the ruffles the ideal width for most striped cake combs. Larger petal tips like a #104 or #125 make ruffles that stick out beyond the frosting, which doesn't look as neat. They'd also be more likely to droop when the cake sits out at room temperature for a while.
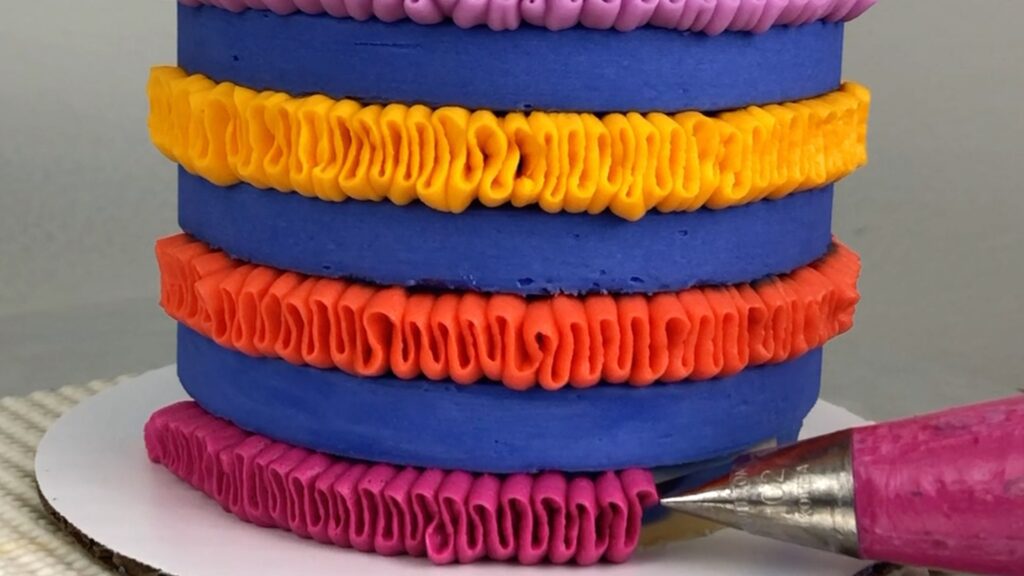
You could fill the striped grooves with sprinkles or piped flowers. There are lots of possibilities to get creative with this design!
Use your striped cake comb to make multicoloured stripes, where every stripe is a different colour. First, push the comb into a crumb coated cake to show you where each stripe will eventually be. Then pipe a different colour in between each line scored on the cake.
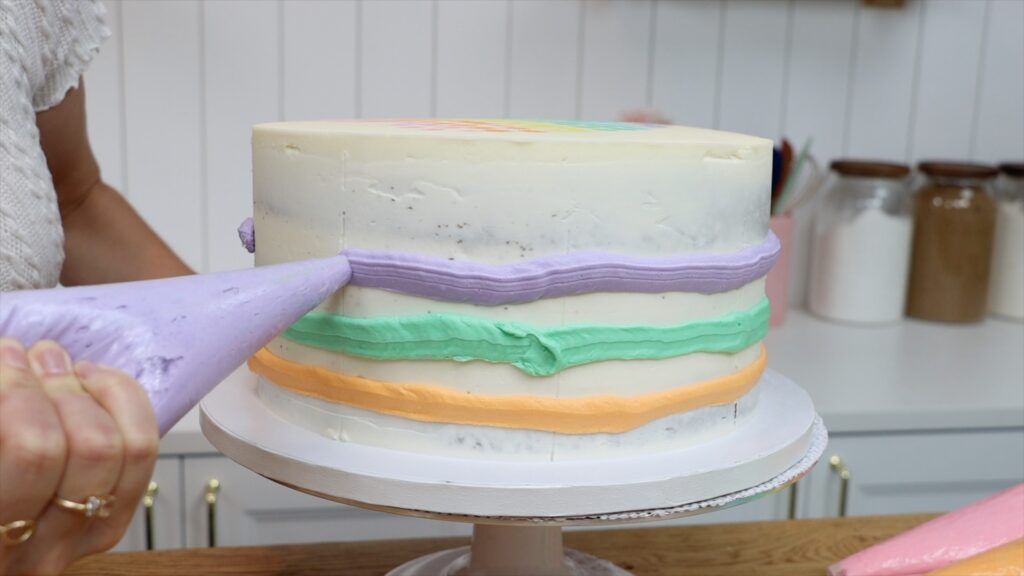
Use your striped cake comb and you'll create multicoloured stripes with a gap in between each one. Scrape with your striped cake comb until these stripes are smooth. Then put the cake into the freezer for 15 minutes to set these first stripes.
Next, pipe colours into the gaps. The first stripes will be cold and firm so you won't damage them.
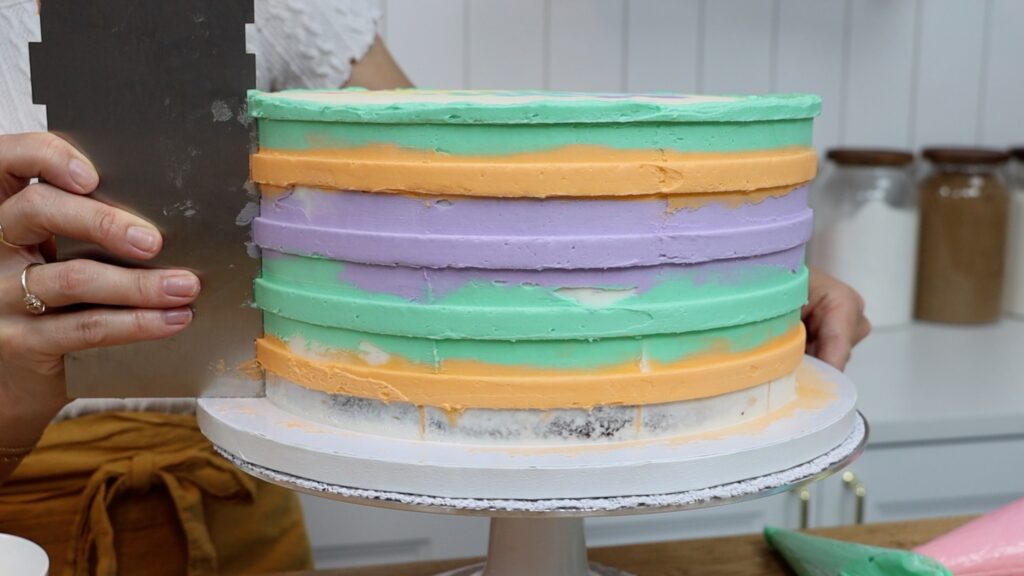
Scrape, scrape, scrape with a straight edged cake comb until all of the stripes are smooth and flat. They'll look printed onto the cake, not piped with buttercream!
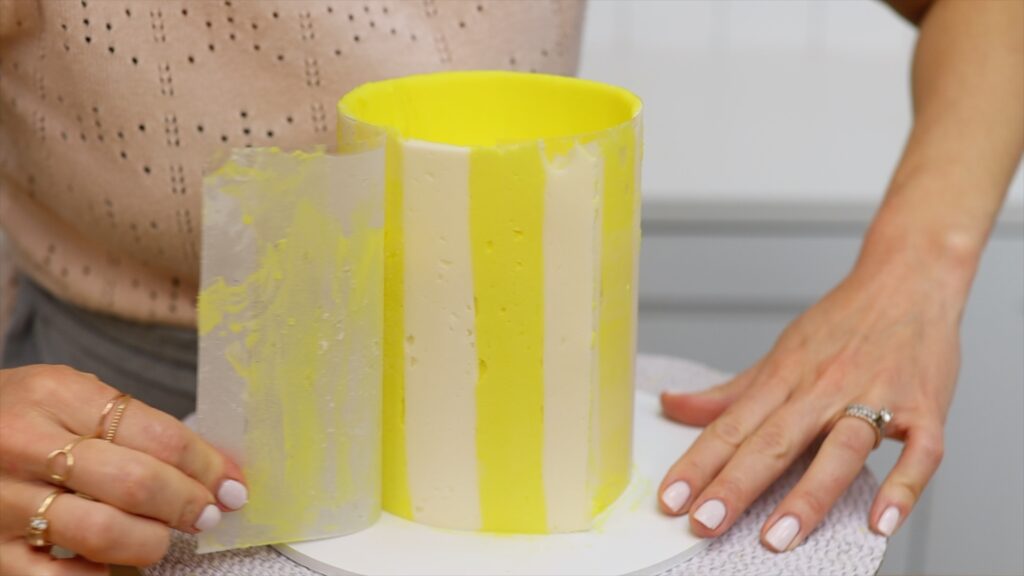
Make your stripes go vertically up a cake instead of around it! Cover a piece of acetate with buttercream and use your striped cake comb on that, instead of directly onto a cake. Freeze for 15 minutes to set this frosting.
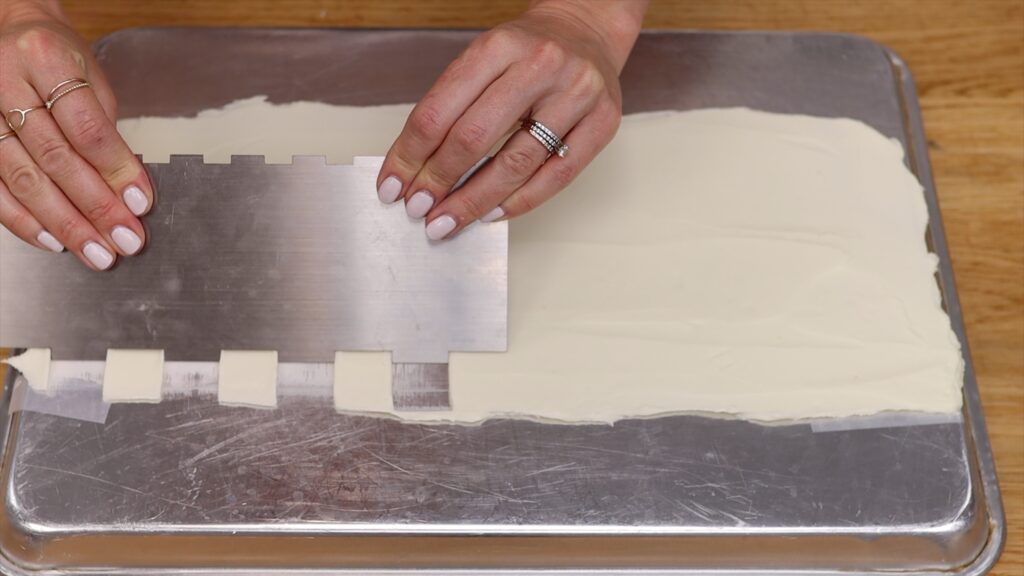
Then add your next colour, spreading to fill in the grooves between the first colour of stripes. Scrape off the excess to leave a flat layer of buttercream on the acetate. Then pick the acetate up and wrap it around a cake.
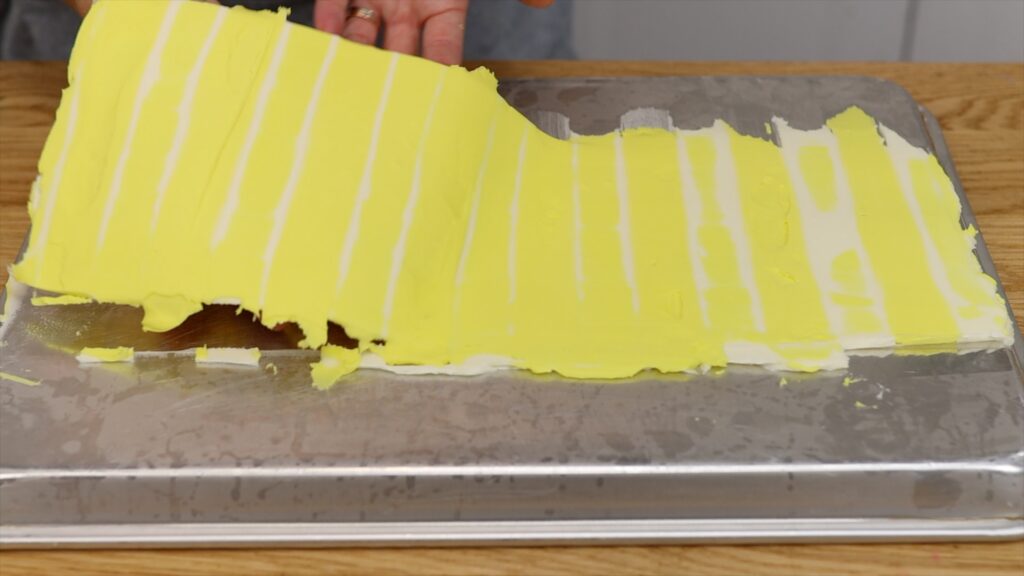
Chill the cake, peel the acetate off and do touch-ups.
I teach how to do this in my Layer Up program along with several other ways to use acetate and parchment paper for cake decorating. The Layer Up program takes you through three Layers to learn cake decorating techniques and also skills like stacking tier cakes and transporting cakes and frosting square cakes, as well as skills to start or grow a cake business like taking custom cake orders and using social media for your cakes and scheduling cakes. Join the Layer Up program to take your cake decorating skills from beginner to professional in 3-6 months!
To create a diagonal division between plain and striped frosting, start by using your striped cake comb as normal. After imprinting grooves around the whole cake, score a diagonal line by pressing a straight edged cake comb or a ruler gently against the frosting. Chill the cake in the freezer for 15 minutes to set the stripe grooves.
Then fill in one side of the cake with the same colour and scrape off the excess with a striaght edged cake comb. This will make those parts of the stripes disappear. Chill again to set this half of the cake and then use another colour in the grooves on the other side of the cake.
Scrape until the frosting is smooth. Then add pretty piping to cover up the edges of the stripes along the diagonal.
I hope you've seen a technique you'd like to try! Ask me any questions in the comments and visit my cake school to learn hundreds of cake decorating techniques with online courses and memberships to take your cake decorating to the next level. Thanks for watching!
You can also watch a video of this tutorial on 5 ways to use a striped cake comb:
Here are 10 ways to improve your cakes in 2024!
Let's start with a two-in-one hack using a microwave for silky smooth and bright and bold buttercream. After tinting your buttercream scoop out about a third and microwave it for 10 seconds. It will melt and the colour will get much darker.
Pour this into your main bowl of buttercream and stir it to mix it in. Within a few minutes as it cools back to room temperature the consistency will be perfect! The colour will be much deeper and any air bubbles will have disappeared as well!
This hack will help smooth your frosting and it's also amazing for textured frosting.
Here's another way to improve your cakes by achieving super smooth frosting. Although the aim of British Girl Bakes is to share techniques that anyone can achieve without needing to buy expensive cake decorating tools, I do recommend buying a metal cake comb for this hack, especially if you struggle with air bubbles or gaps or indents on smooth frosting.
Heat the straight edge of your cake comb by running it under hot water or using a blowtorch. Then scrape around your cake to smooth the frosting. You'll heat the very outer layer of the frosting, pulling it around the cake to fill in any imperfections. The hot metal will leave an impossibly smooth surface behind on your frosting!
Note that you want the metal to be warm rather than really hot. High heat will melt the frosting and can cause changes in the colour of the frosting.
This hack works particularly well with striped frosting, taking off the messy layers of colour and revealing perfectly neat stripes underneath.
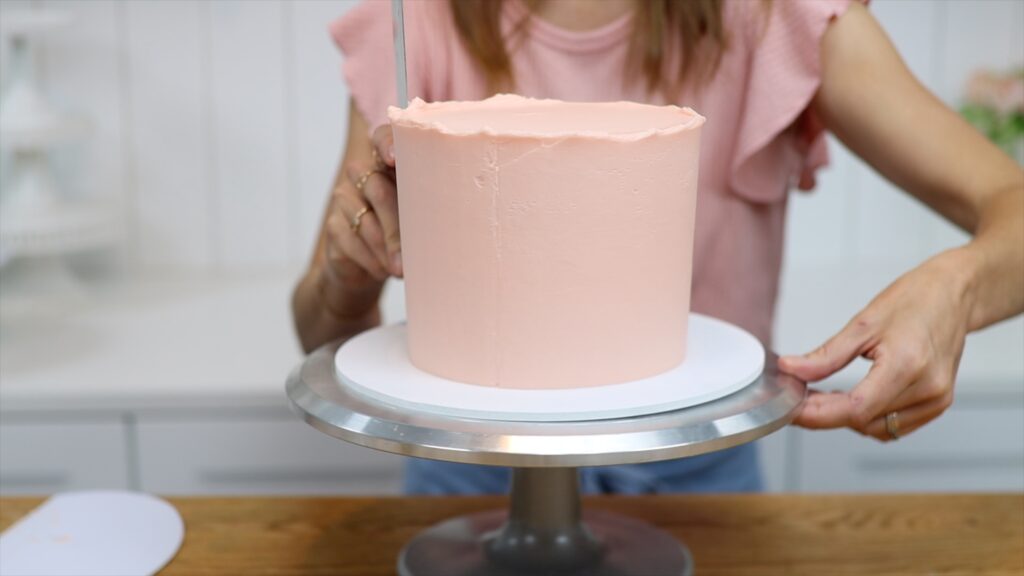
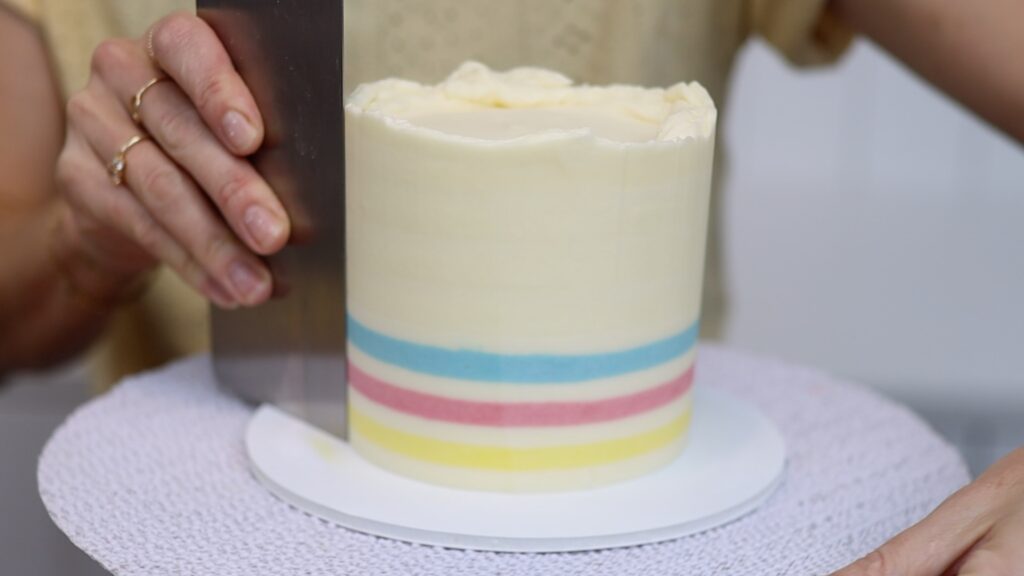
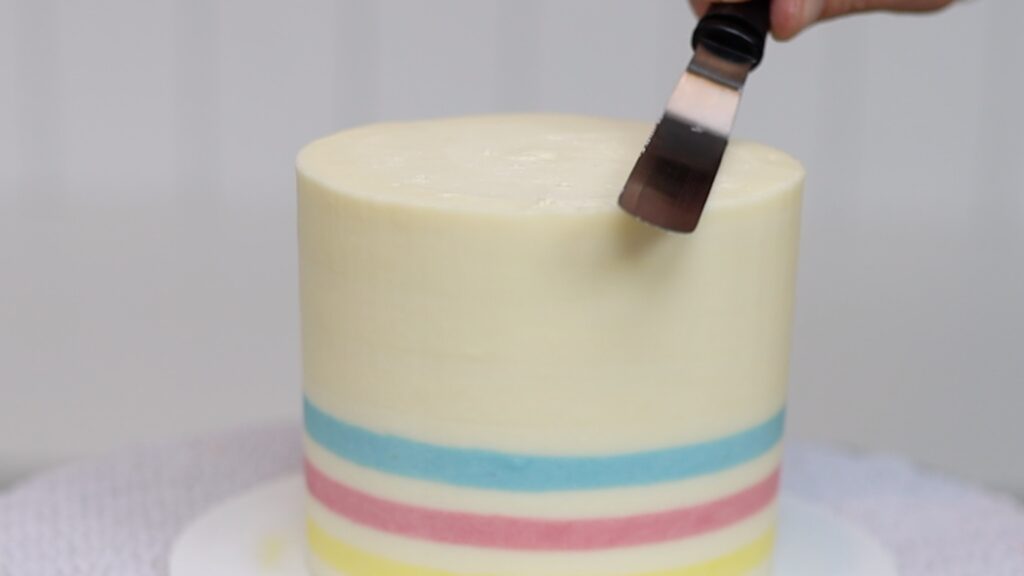
After smoothing the sides of a cake, frosting will be sticking up unevenly around the top edge. You can use your
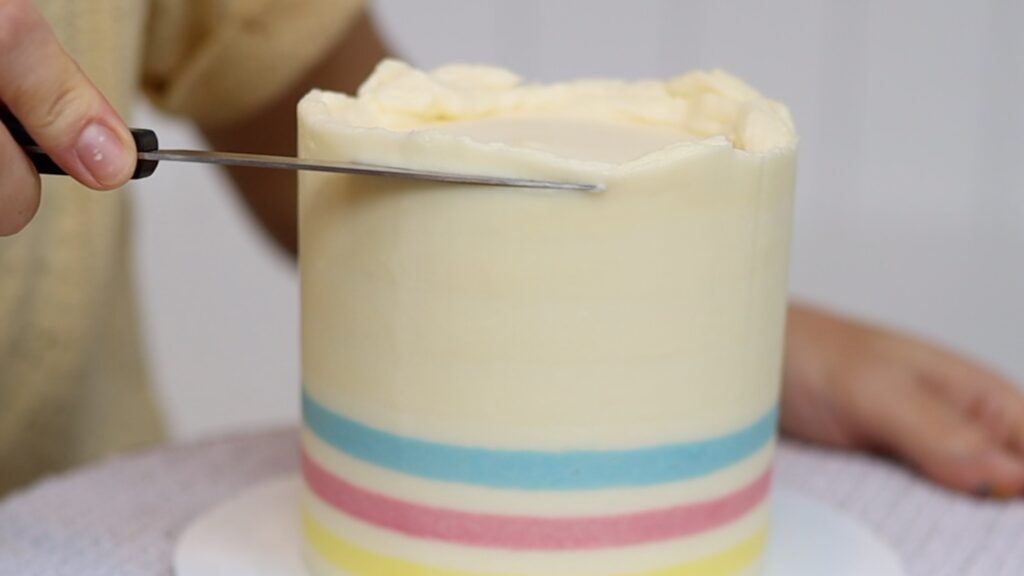
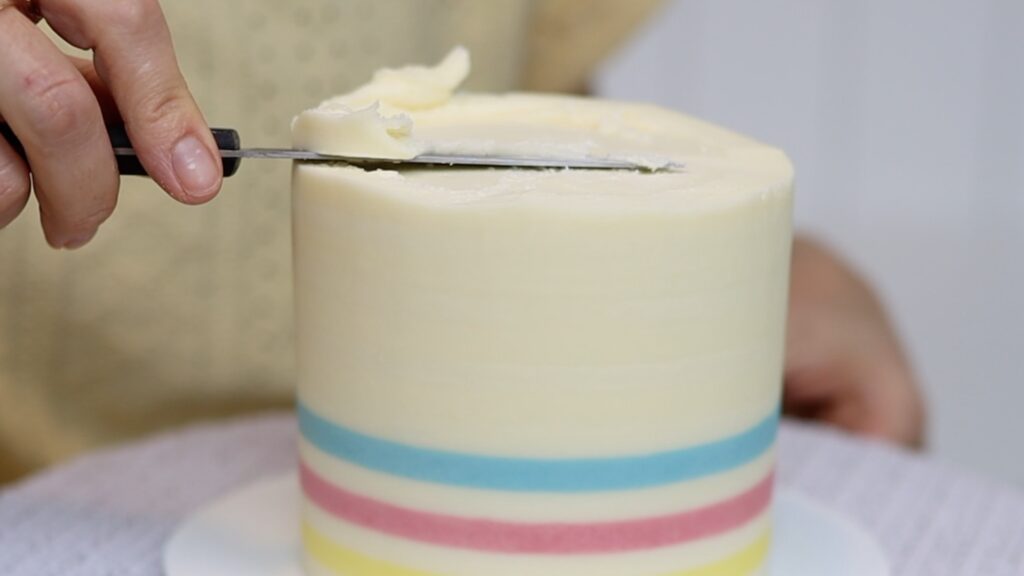
Then skim around the cake to level the final bumps. Gently swipe away any buttercream crumbs with an
Piped details like flowers, rosettes and borders can be time consuming and tend to get sloppy by the end. Details become less defined, like blobby petals and thicker, shapeless ruffles. Your hands warm up the buttercream in the piping bag as you pipe, making it softer with time. Warm buttercream doesn't hold its shape as well when you're piping.
Put the piping bag in the freezer set a timer for one minute. That short time in the cold will chill and stiffen the buttercream. Now it will be the right consistency to finish your piping. You'll notice that with the right consistency, petals will ruffle around the edges now. Even Russian tips will be easy to use!
Instead of sticking to the same old flavours for your cakes, try something new this year! Developing new cake recipes is complicated and time consuming but it's much easier to develop recipes for fillings and frostings. Start with your favourite buttercream (mine is my 4 Minute Buttercream). Now mix in ingredients like blended Oreo cookies or freeze-dried strawberries. They'll add lots of flavour to your fillings and frostings without changing the consistency of the buttercream, so it will be just as easy to work with as your normal plain vanilla buttercream.

This next thing feels like a small detail but it makes a huge difference to the presentation of your cake. Make sure cakes are centered on their cake boards. Sometimes they start off in the middle but as you spread the frosting on and then smooth it, you nudge it over on the cake board. It ends up off-center, which looks messy.
You can reposition the cake by chilling it in the fridge for at least an hour to set the frosting. Then slide an
Give yourself more time to decorate your cakes by making them in advance! Do this by freezing them properly to maintain their freshness. Now instead of baking, assembling, frosting and decorating your cake all in one day, you can spend that time just decorating! I have a full tutorial on how to make cakes in advance by freezing them properly.
Take your cake decorating skills from beginner to professional by progressing through three layers in my Layer Up program! You'll learn hundreds of skills and techniques and ways to improve your cake business like scheduling and taking custom cake orders, making cakes in bulk, transporting and serving cakes and making cake videos for social media. Instead of learning everything in 12 years like I did, do it in 3 to 6 months with this program.
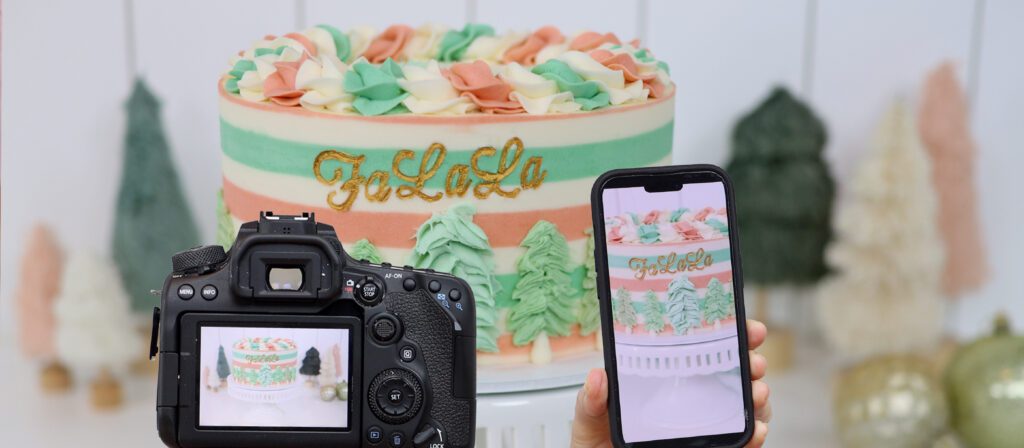
A few weeks ago I shared a tutorial on 10 ways to make your cake photos better, showing how to adjust the lighting, how to make the background out of focus on a camera and a phone, setting up props, and more. Check out that tutorial to improve your photos to make your cakes really look their best.
You can also watch a video of this tutorial on 10 ways to improve your cakes in 2024:
From improving the background and lighting, to adding props and more, here are 10 ways to take better cake photos!
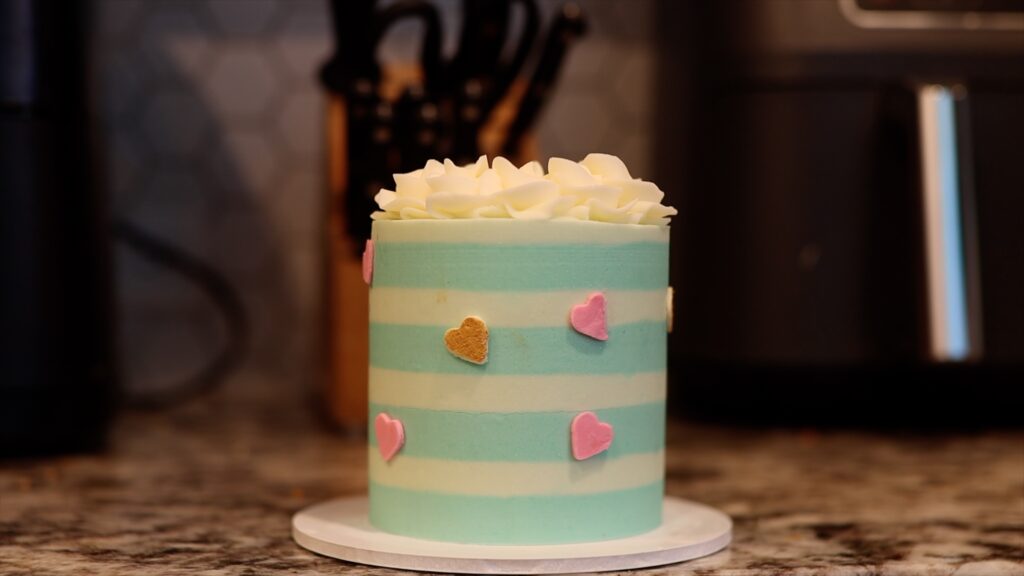
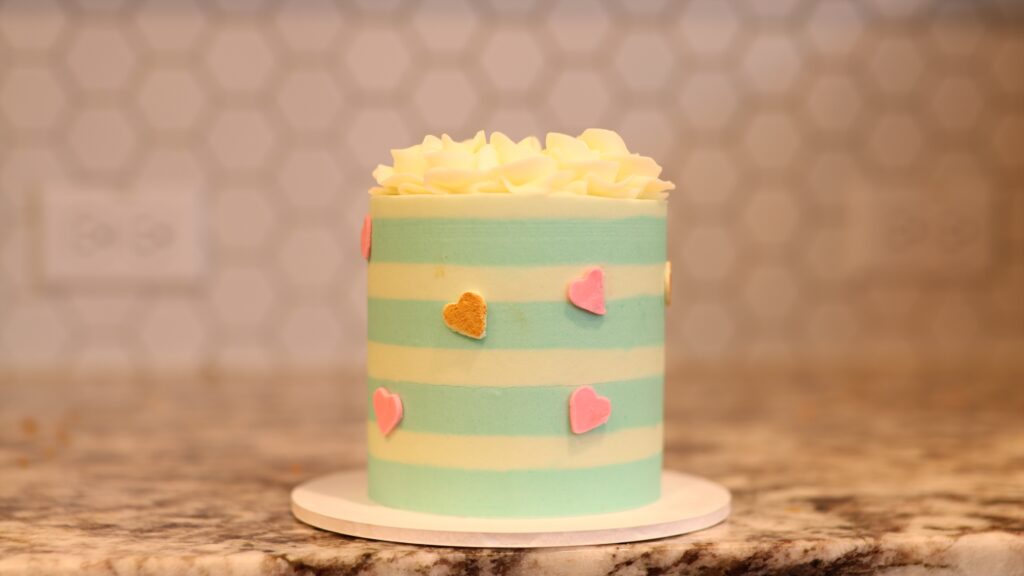
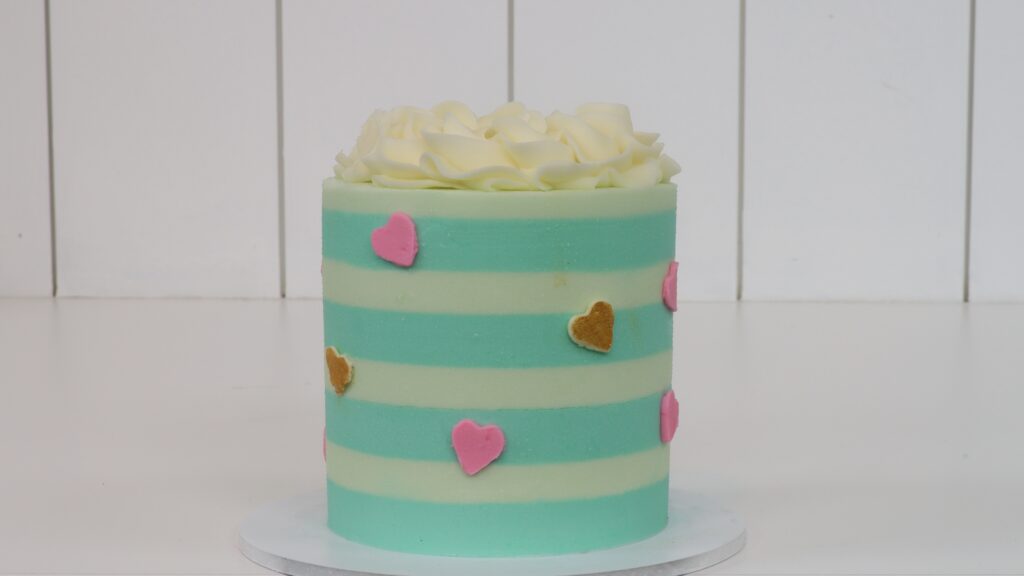
Typically, a plain background is preferable to a very busy background. It makes sure that all of the attention is on your cake. Don't let clutter distract from your cake! To take cake photos in the kitchen, move appliances so that there’s a plain background behind the cake. Look at the difference ths simple step makes:
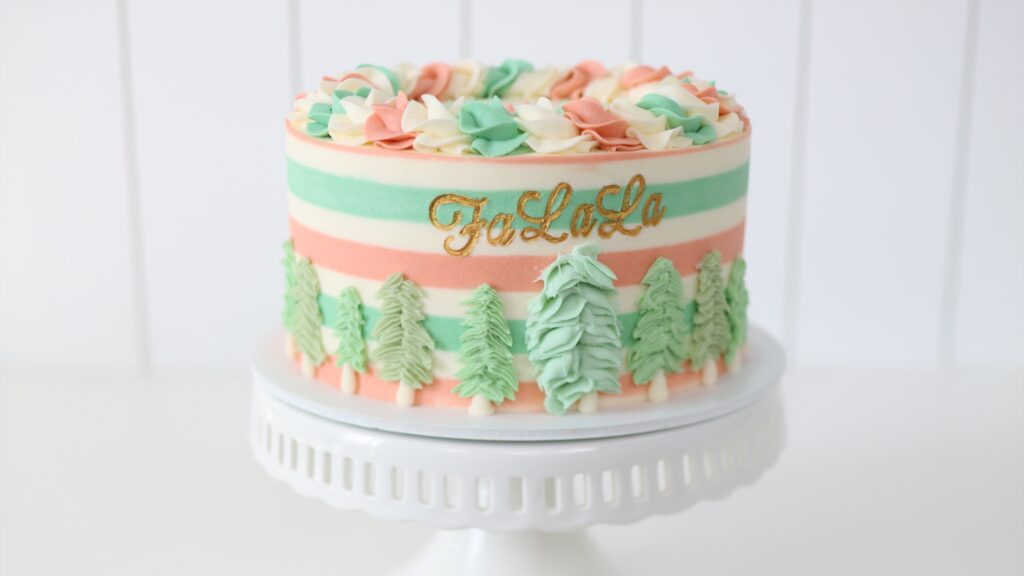
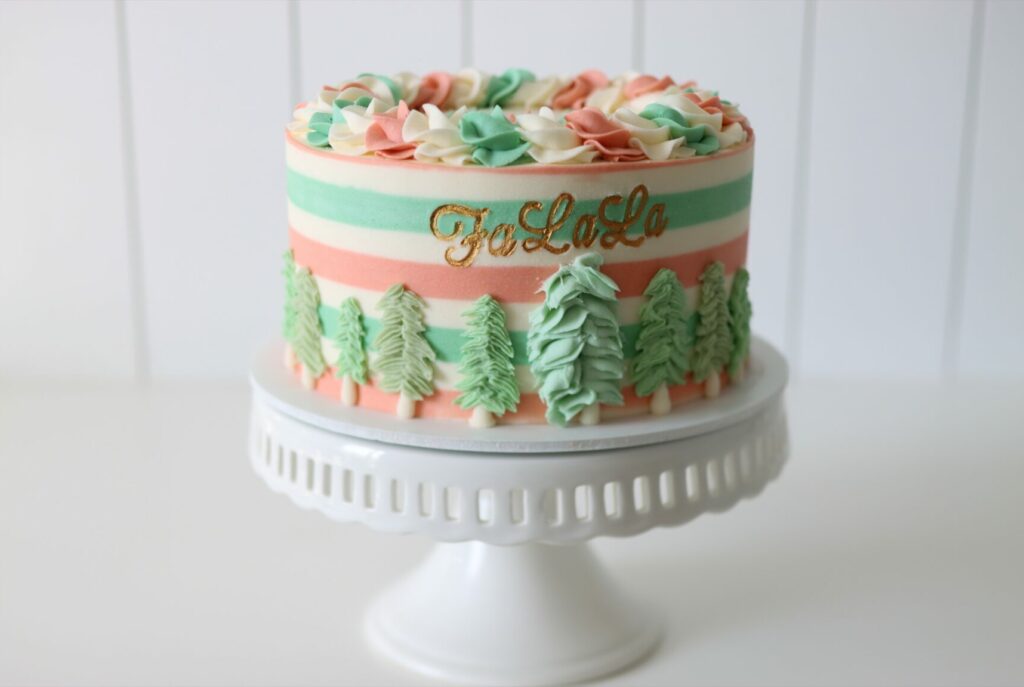
You may choose not to use a plain background if you're setting a scene for your cake photos. For example, this striped Christmas cake photo with the tree in the background. The Christmas tree background creates a very different effect to a simple white background:

Lighting is one of the most important things to get right when you’re taking cake photos of a cake. There are three types of lighting you can choose between. Natural light is beautifully soft at some times of day and when it’s not hitting the cake directly:
Artificial light usually has a yellow tinge and very harsh downwards shadows:
Studio lighting for photography and video provides soft shadows and even brightness everywhere:
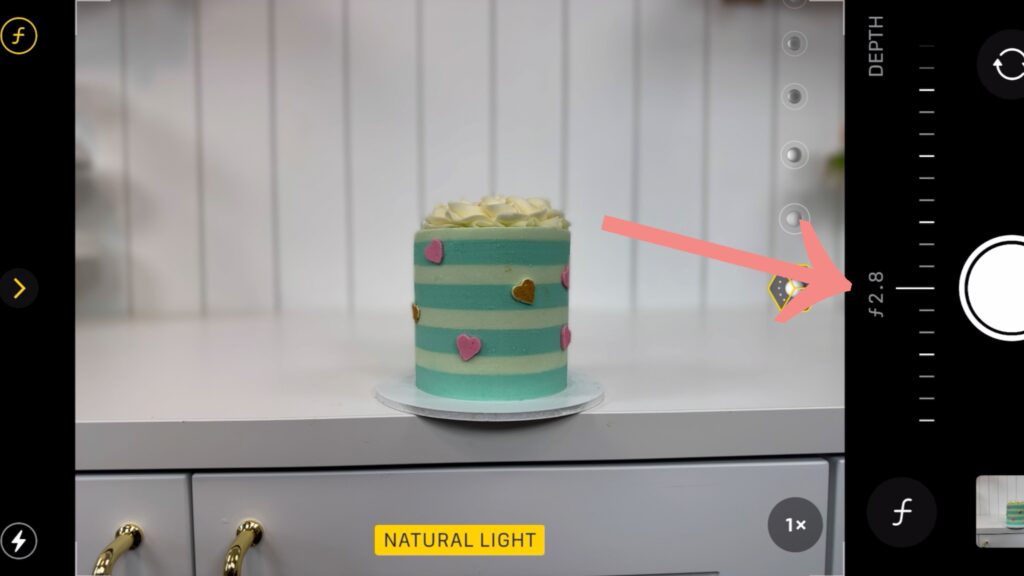
I think the best trick for great cake photos is to make the background blurry, or out of focus. This minimizes distractions to really draw attention to your cake. You can do this on both a camera and on a phone.
On a camera, change the focus by adjusting the F-stop or F number. For the best results, move your cake as far away from the background as possible. I like to use F2, which makes the background really blurry or out of focus:
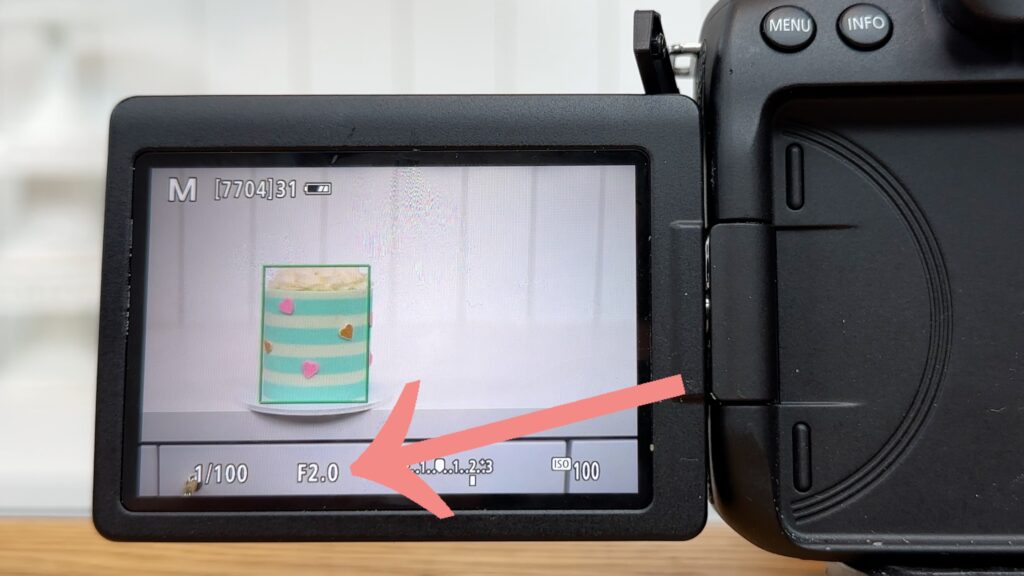
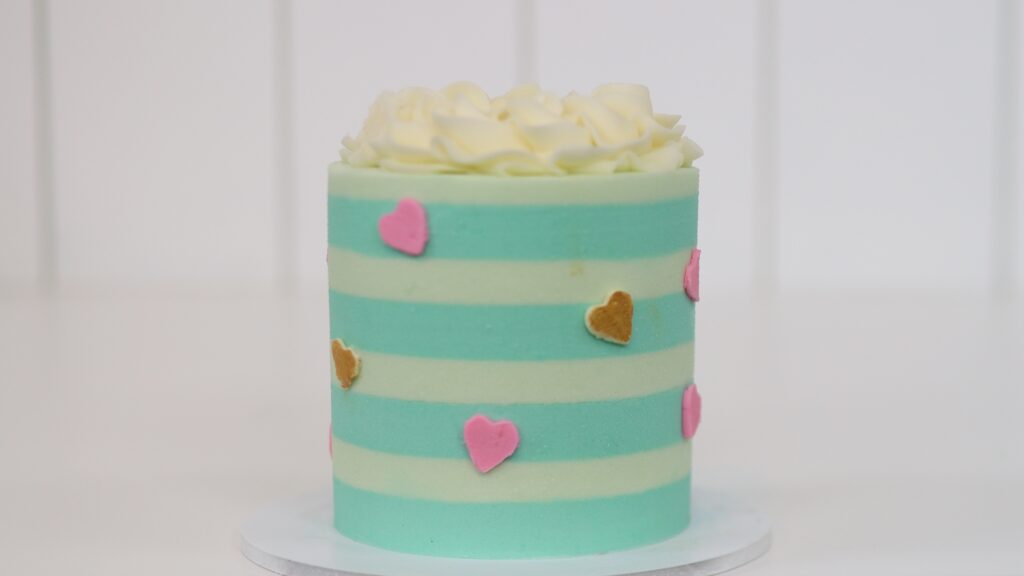
Compare this to F11, which makes the background much sharper or in focus:
The lines on the wall are really obnoxious here. With an out of focus background, they were blurry and looked more interesting than distracting.
On an iPhone, choose portrait mode and tap the F at the top of the screen. This will display a bar with the F numbers. Scroll anywhere up to 16 or anywhere down to 1.4.
Adding fabric like a kitchen towel can complement the colour scheme of the cake. It can also hide the join between the counter or table and the wall. And it makes the photo a bit more interesting!
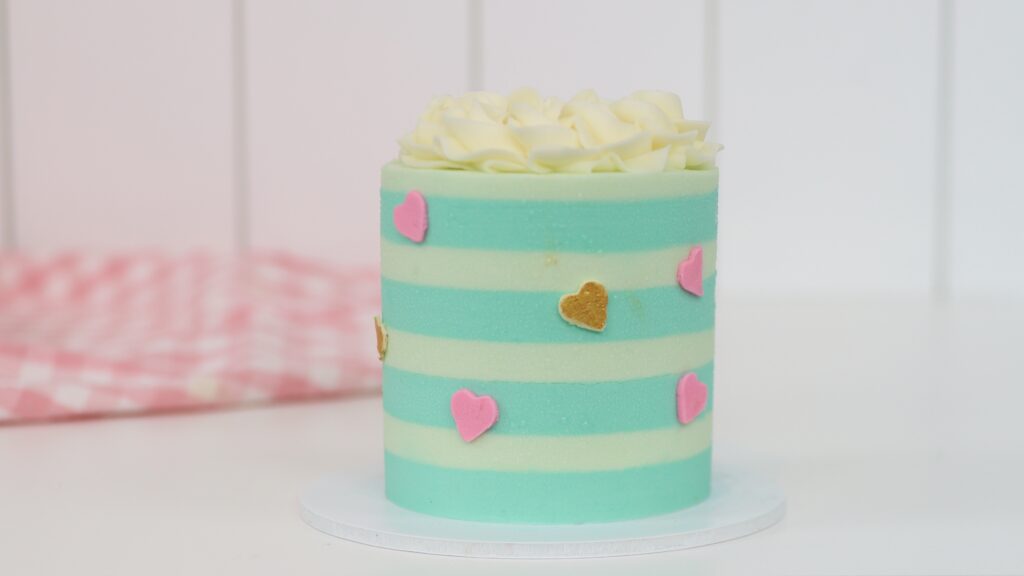
Pull the fabric towards the camera to cover up more of the background or leave it against the wall for a splash of colour.
Next, look at the difference between the previous photo of a cake on the counter and this next photo of the cake on a cake stand:
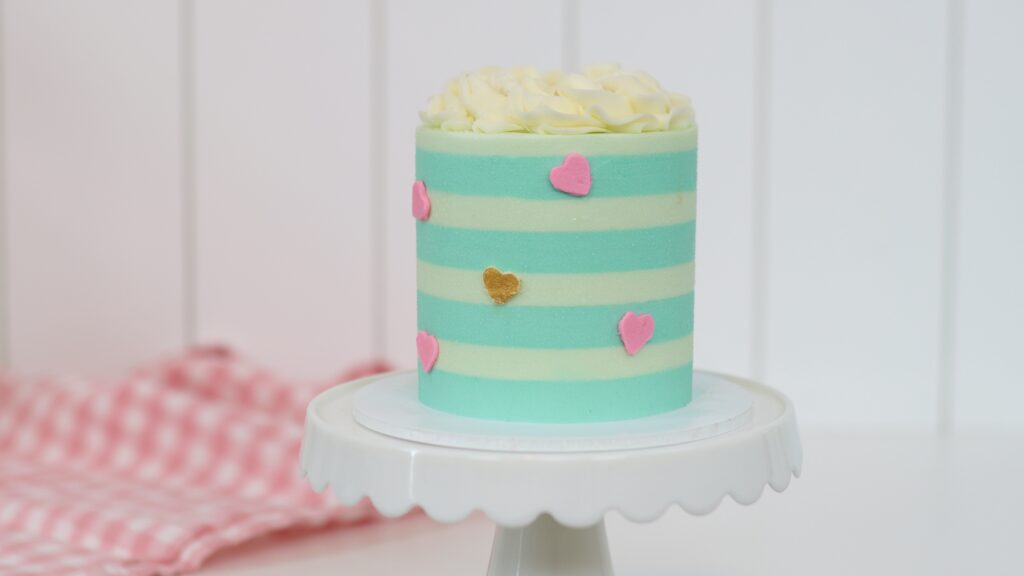
The cake stand makes the photo more interesting and makes the cake look more elegant.
For bonus points, instead of putting the cake on its cake board onto a cake stand, lift it off the cake board first!
Chill the cake in the fridge for a few hours and then slice underneath it with an
You won’t damage the frosting because it’s cold and firm.
Doesn’t this look much better now, than with the cake board in the photo, too?
Every cake has a front and a back. Sometimes it’s obvious, for example on a cake with a message or decorations on the front side only. But often, you choose the front and back when you decorate a cake and take photos of it. The back is your least favourite side, with any imperfections, and the front is your favourite side! Make sure the front is facing the camera, and lined up straight, when you’re taking your photos.
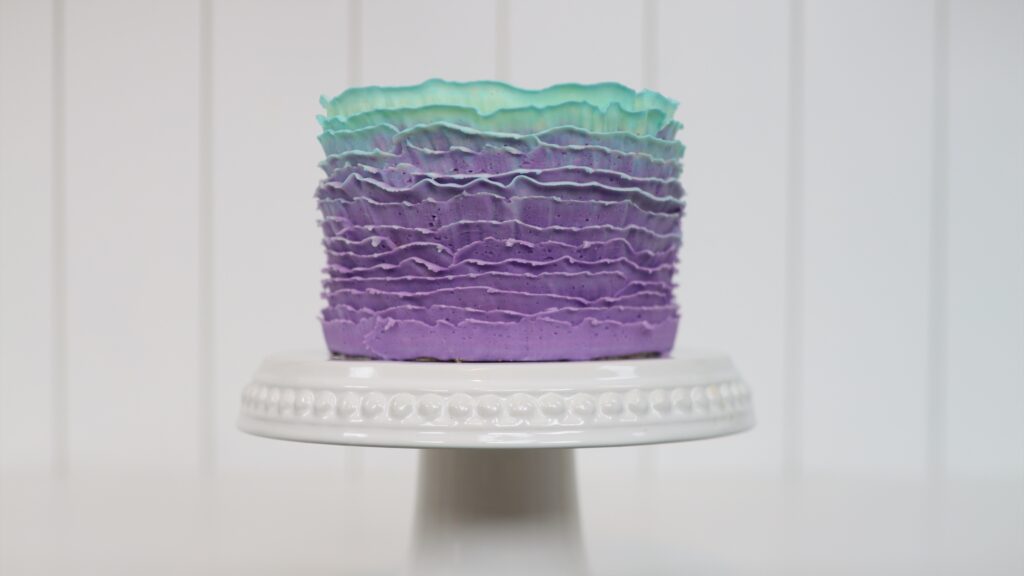
Photo props sound fancier than they are. Whatever you used to decorate the cake can be a prop, like piping bags! If they’re just enough in focus to know what they are, they can make the photo more interesting without distracting from the cake. On this cake, which I teach how to frost and decorate in my Layer Up program, I've placed piping bags and some extra piped succulents behind the cake:
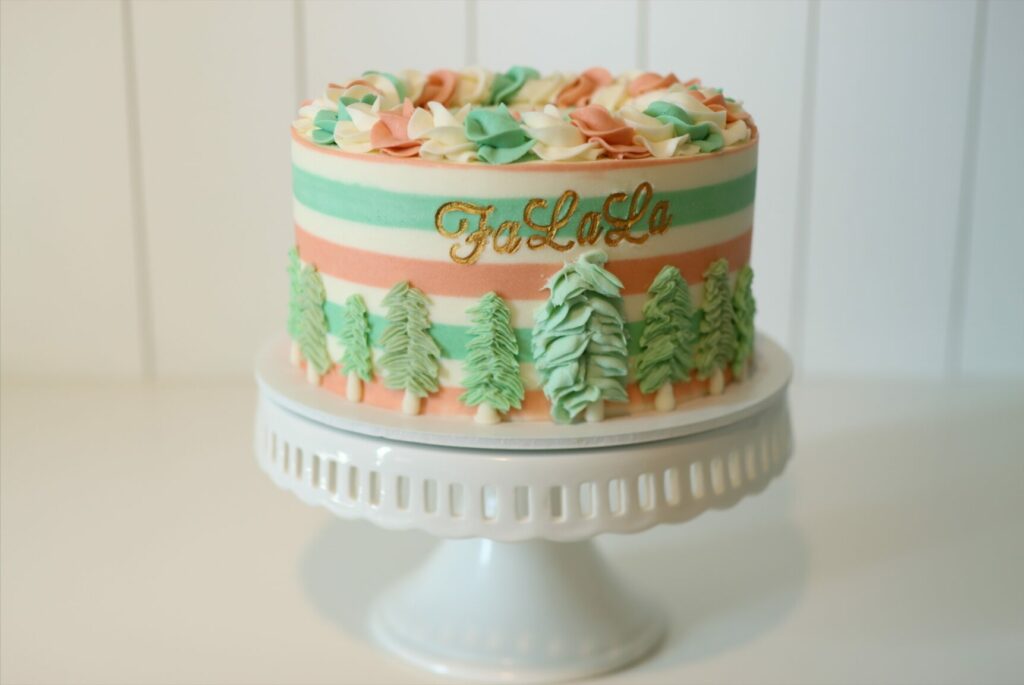
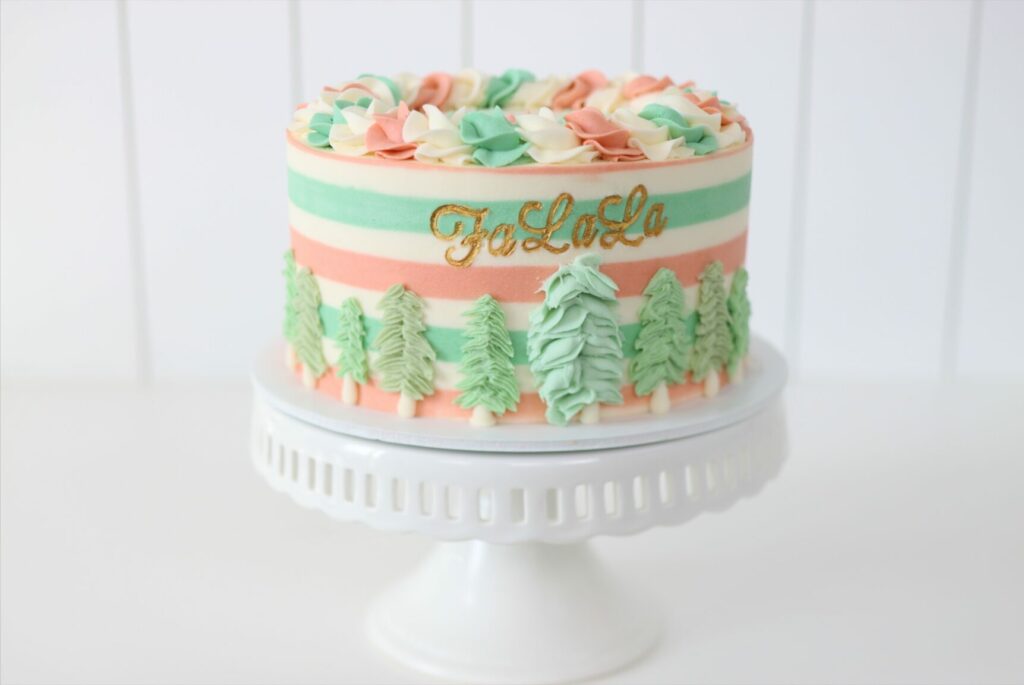
Instead of decorating tools you can use things you have that match the colour scheme or theme. These cute Christmas trees from Target actually inspired this cake:
It takes a lot of time to set up your cake and lighting and props and camera or phone. Now take the time to take photos from different angles and distances and positions so that you have a variety of shots. You can choose your favourite photo angle or use them all to show off different parts of the cake. On social media you could use photos taken at different angles on different days. For your website, you might use photos of the same cake taken from different positions for different pages.
It’s also a good idea to take both landscape and portrait photos. Alternatively, zoom out so that you can crop the same photo into a landscape and portrait version. You can use landscape photos on Facebook, square photos on Instagram and vertical photos for Instagram reels, YouTube shorts or TikToks.
I hope these 10 tips will make your cake photos better! Tell me in the comments which tip you're going to try for your next cake photos. Learn hundreds of cake decorating techniques on my online cake school, where you’ll find individual courses and also membership programs to take your cake decorating from beginner to professional! I hope to see you there!
You can also watch a video of this tutorial on how to take better cake photos:
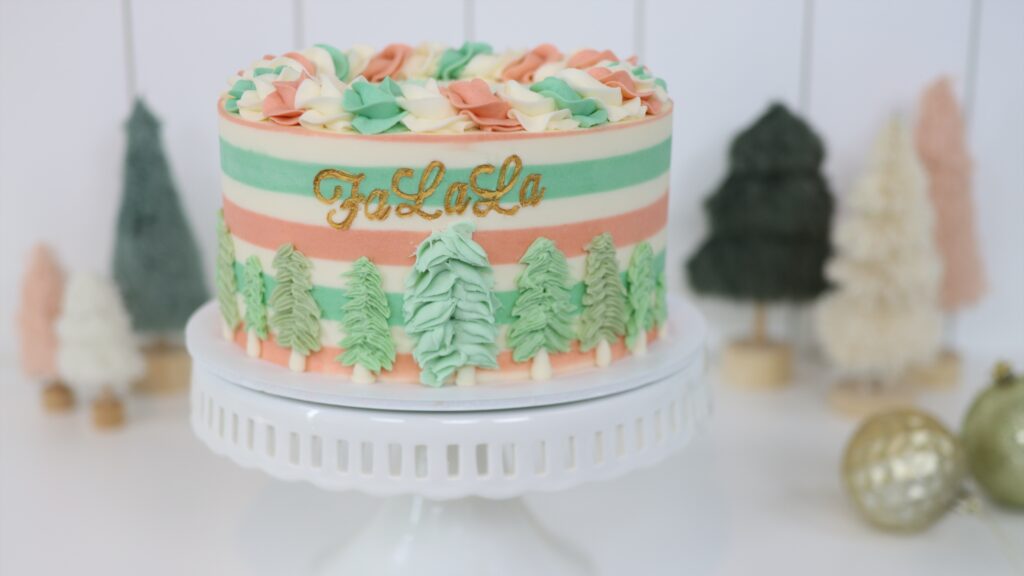
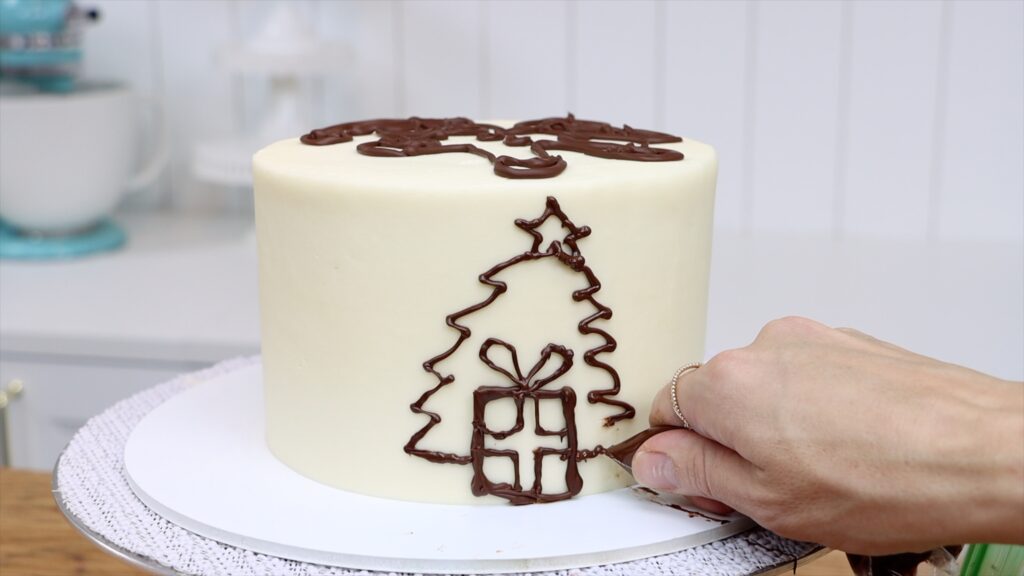
Let's make a striped Christmas cake by covering a cake with buttercream stripes and piped Christmas trees! I'm using pink and mint green buttercream but of course, you can use bright red and green if you want something more traditional. Ask me any questions below in the comments and you can watch a video of this tutorial below as well.
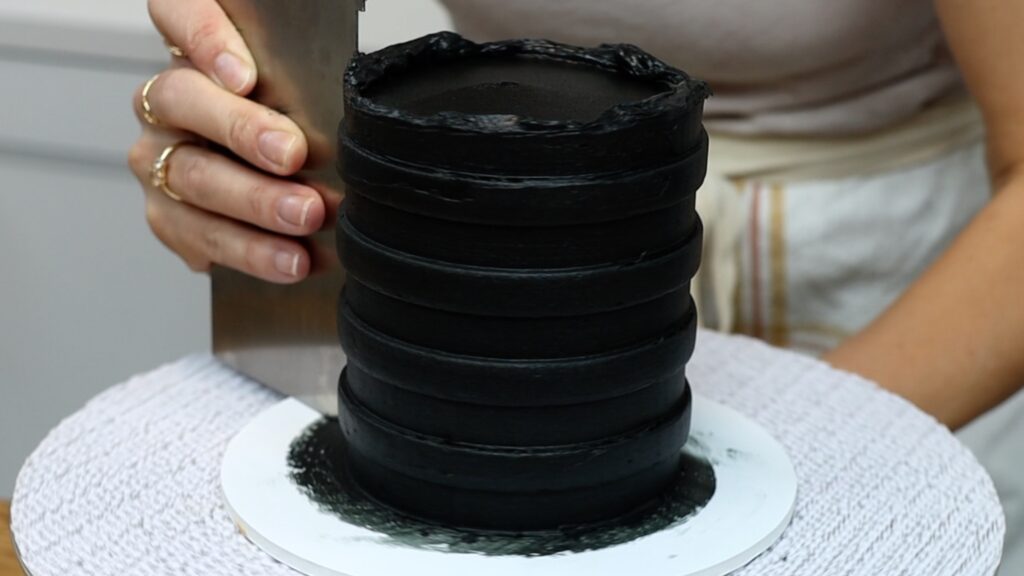
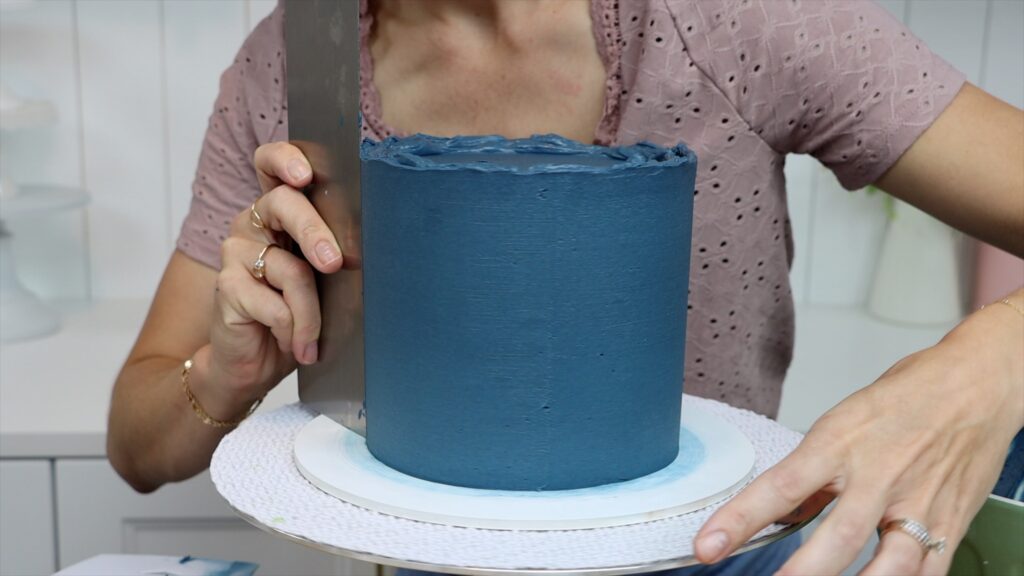
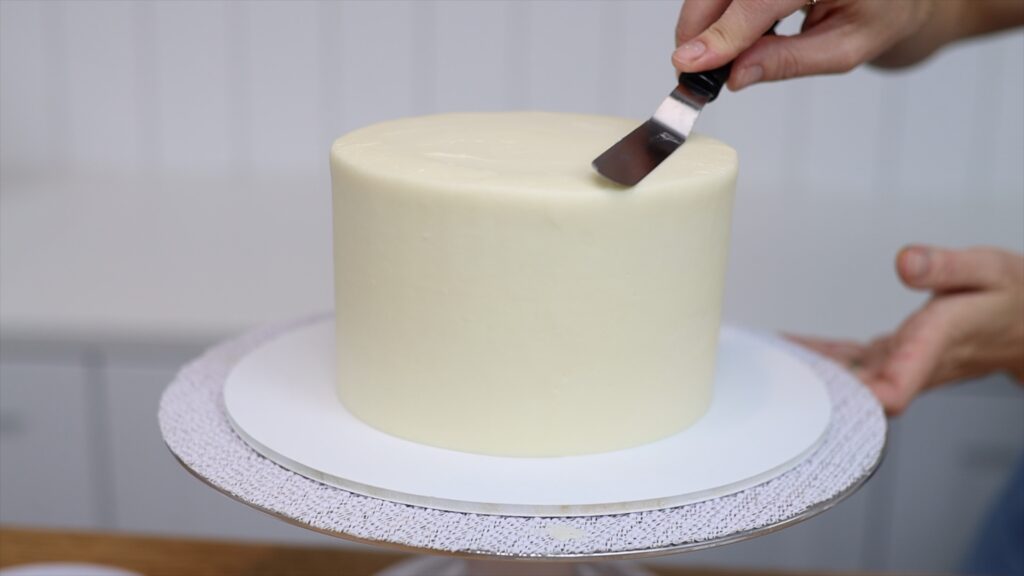
To make a striped Christmas cake, start by making the stripes! First, smooth the frosting on your cake with a straight edged cake comb. I'm using my 4 Minute Buttercream for this cake and for all of my cakes! This doesn't have to be perfectly neat but the sides need to be straight and the top should be level. The frosting needs to be thick enough that the grooves on your striped cake comb can go through it without reaching the crumb coat underneath.
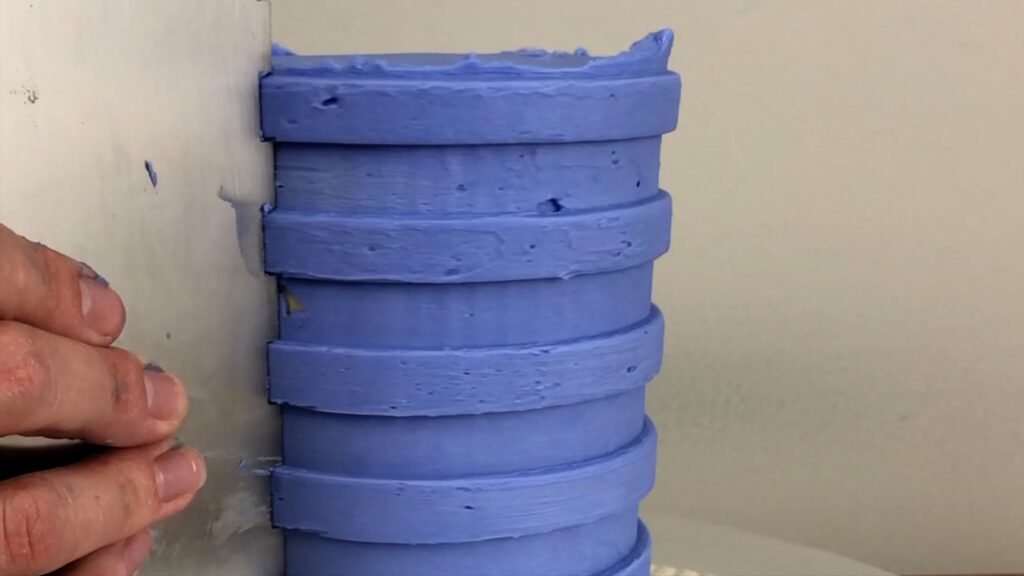
It's easiest to touch up any indents in the frosting now, rather than after using the striped cake comb. Spread more frosting over the indents and scrape again with your straight cake comb until fairly smooth. Then switch to a striped cake comb. These can be made of plastic, acrylic or metal and I find that metal works best for me.
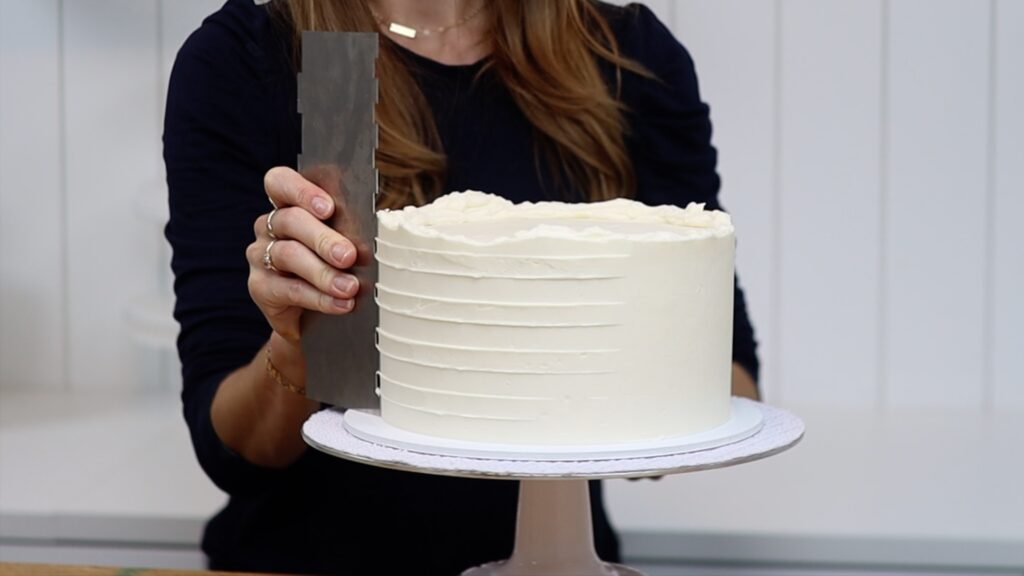
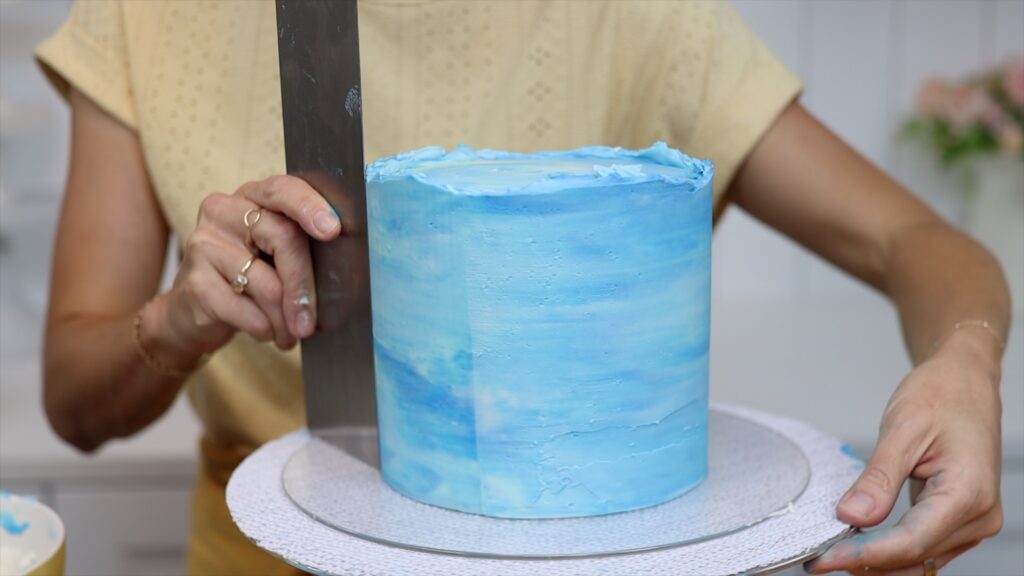
The first few scrapes will look terrible! You'll see messy texture in the stripes and the grooves. Keep scraping and you'll imprint the grooves of the cake comb into the frosting on the cake.
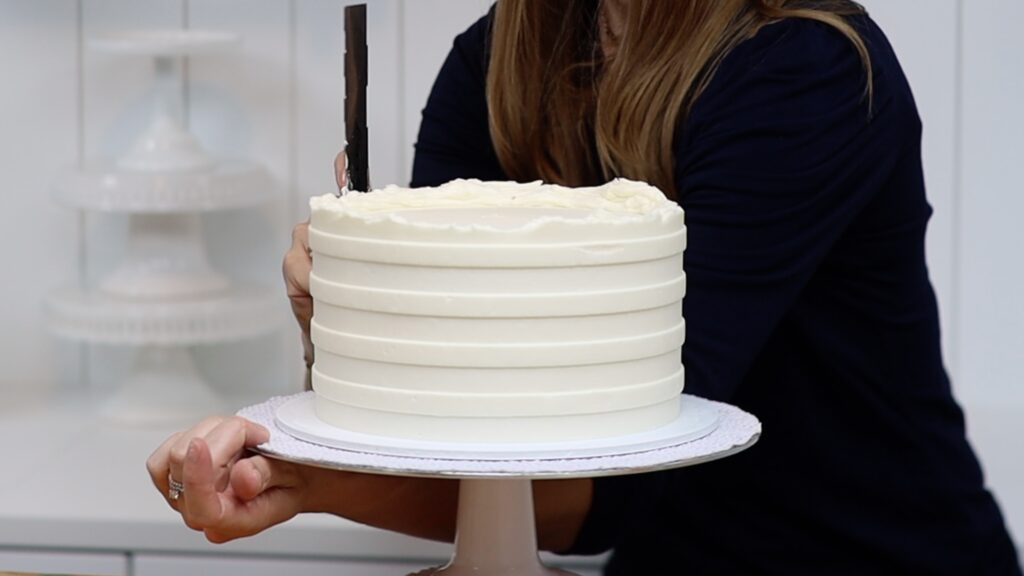
These grooves need to set before adding another colour so put the cake in the freezer for 15 minutes. Meanwhile, prepare piping bags with the other colours you're going to use for your stripes. You'll use an
After 15 minutes in the freezer the frosting will be cold and firm. Pipe the next colours into the striped grooves using the piping bags you prepared. Hold the piping bag very close to the surface of the frosting within the grooves, squeezing until you see the frosting bulging out to fill in the stripe groove. Spin the
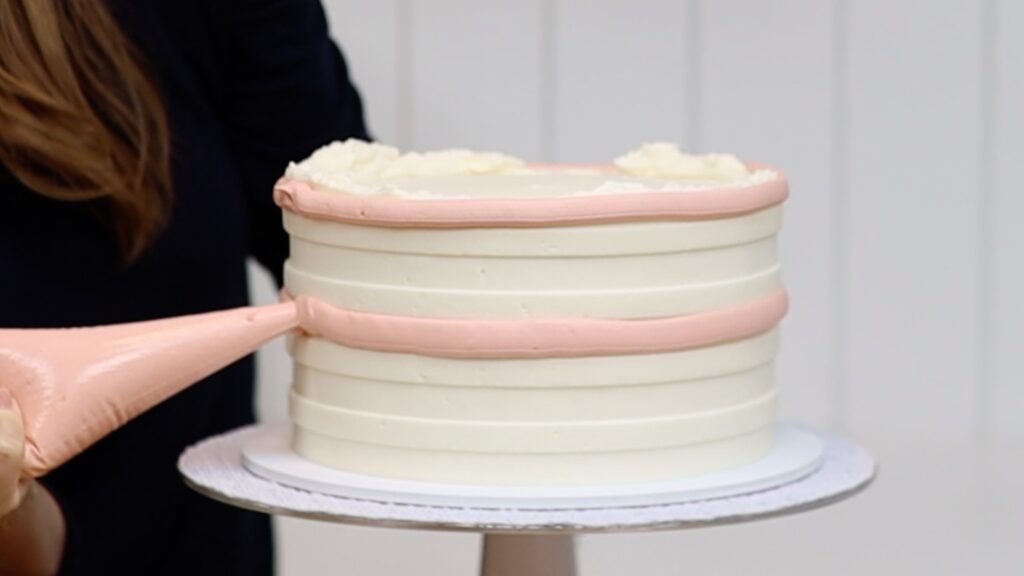
There are two things that can go wrong with striped cakes. The first is not completely filling these grooves with these colours. When you scrape next, the wrong colour can get into the groove and cause random flecks within that stripe.
The other thing is not getting the frosting smooth with the striped cake comb before adding these colours. These colours will then get into any air pockets or indents or air bubbles in that first colour of frosting. You'll see random pink or green specks within the white stripes.
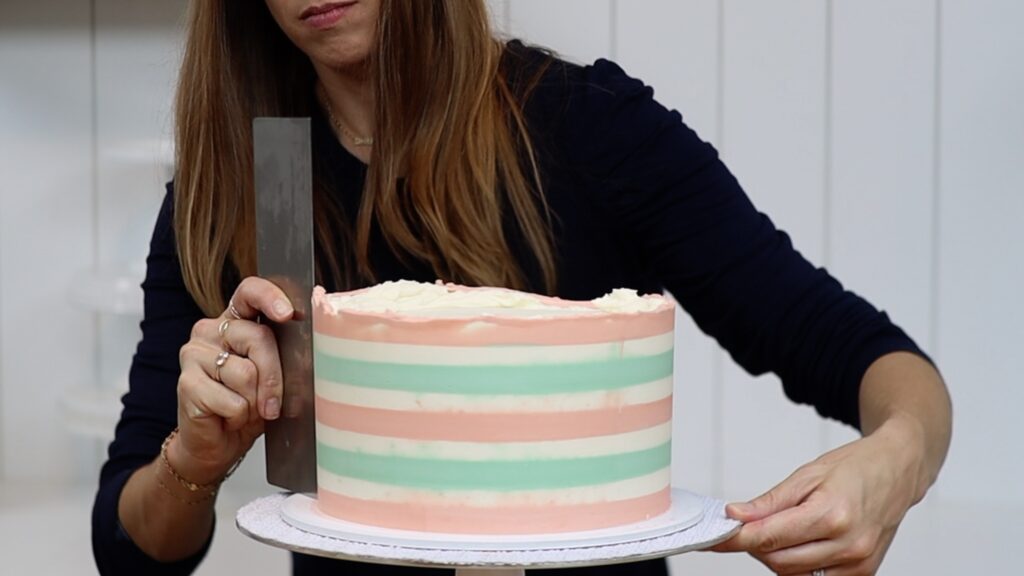
After filling in the grooves, switch to a straight-edged cake comb and scrape around the cake. With each scrape you'll push the colours into the grooves and you'll also take off the excess. You'll flatten the coloured frosting until it's level with the striped grooves of the first colour. This makes all of the stripes perfectly flat! It's a long process though, so keep scraping again and again.
After each scrape, wipe off the frosting from your cake comb into that little bowl. I like to start with a plastic cake comb because it's the quickest to use but once the frosting starts to get smooth, I switch to a metal cake comb. This gives me the smoothest frosting. The other benefit of a metal cake comb is that you can heat it with hot water or a blowtorch. The hot metal will melt the very outer layer of the frosting so it comes very easily off the cake, leaving a super smooth surface underneath.
Okay, let's talk about all of these imperfections: why they happen and how to fix them. These flecks of green and pink within the white stripes happen because there were little indents in the white stripes. Those were then filled in when I scraped the colours around the cake with my straight edged cake comb. Keep scraping a few times to try to scrape the flecks off. Very deep flecks can be scooped out with an
By now the striped frosting will probably have set since the cake was in the freezer so it's very cold. Using a hot metal cake comb is the easiest way to scrape around the cake when this happens.
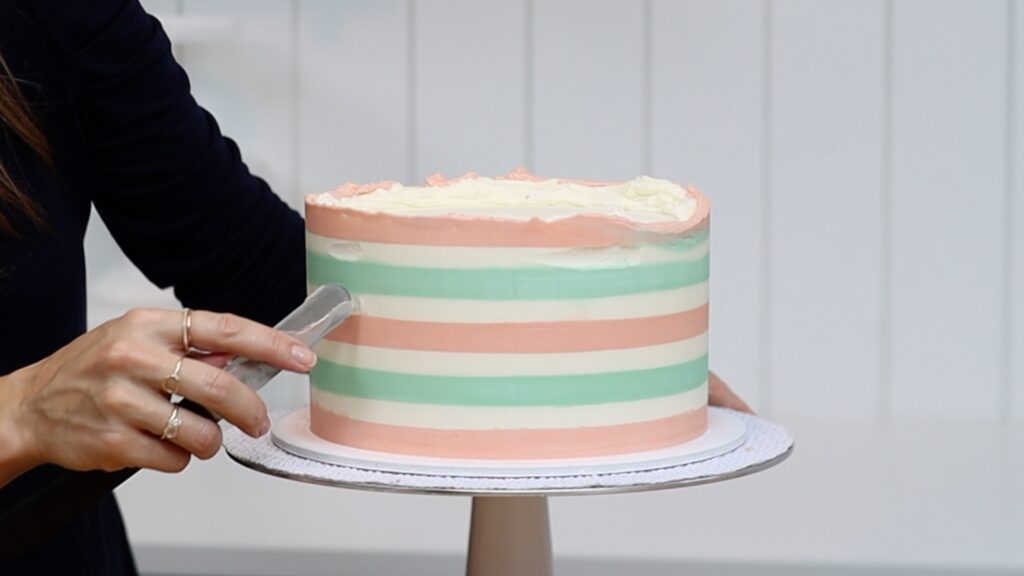
Before levelling the uneven top edge, put the cake in the fridge for 15 minutes to set that frosting. When it's cold and firm you can slice it off the cake with a knife. This will give you a very sharp top edge around the cake and prevent smudges or stains of coloured frosting on the top of your striped Christmas cake.

Now let's add some details. For a colourful border put your leftover frosting into piping bags fitted with a star-shaped tip. I'm using a 1M piping tip in each of three piping bags. Pipe a little dot and then pipe a circle, swiping away at the end to leave a C shape. Switch to the next colour and pipe another C to overlap it.
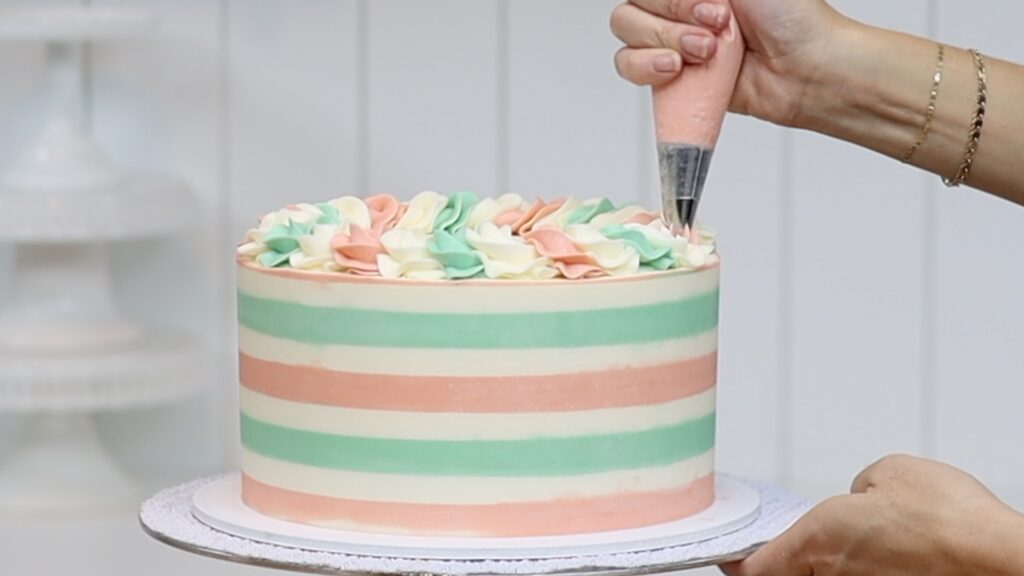
If you only have one piping tip just use only one colour for all of this piping. The dot at the beginning raises the first C so that it sits at the same angle as the rest of the piping. This is called a rope border. It's a great way to use up leftover frosting and also adds height and colour and detail to the top of a cake.
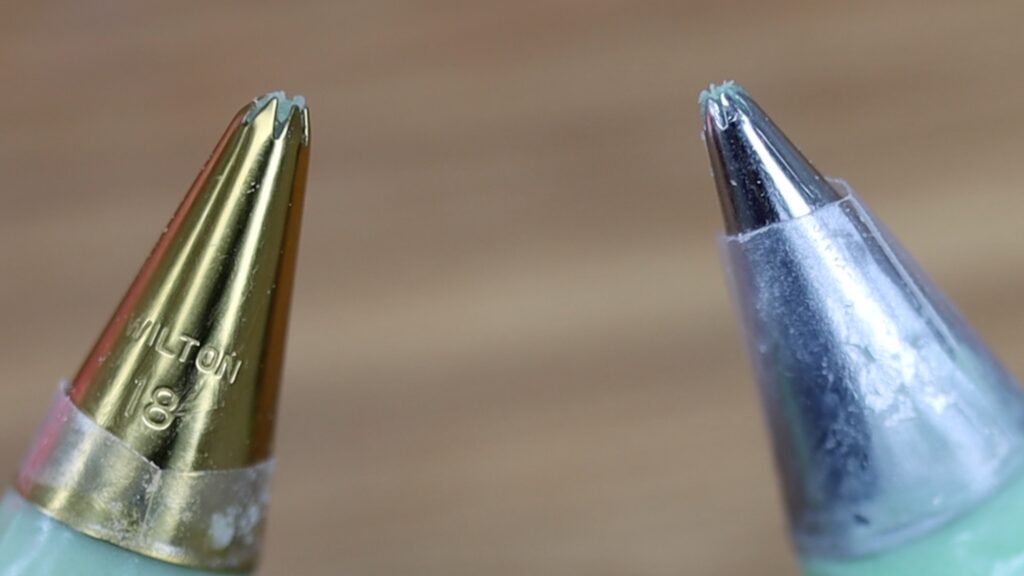
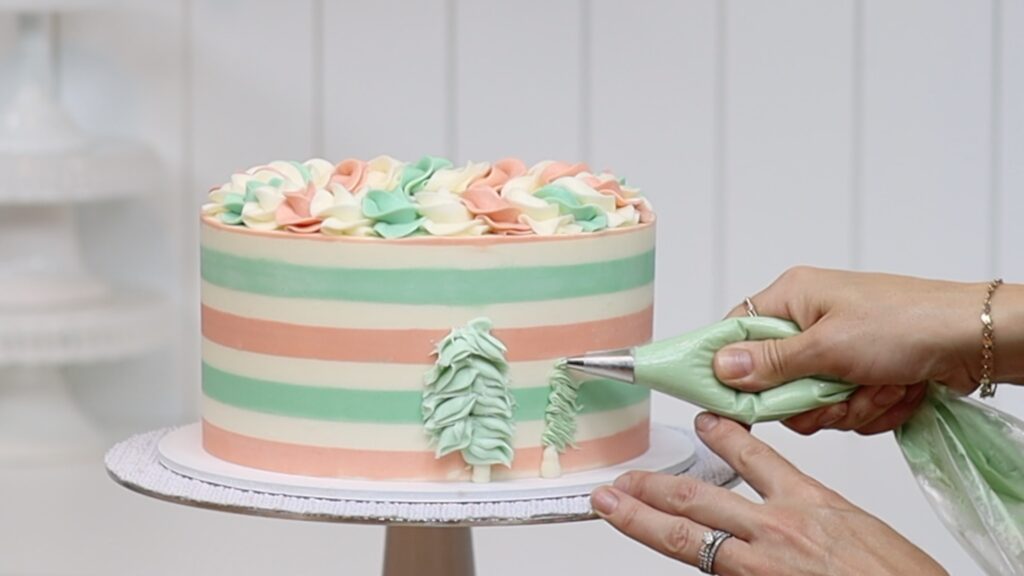
To add Christmas trees you can use any star-shaped piping tips. To pipe the trunks I recommend using one with short prongs very close together, like a #363.
For the green parts of the trees I recommend using star tips with longer prongs more spaced apart from each other. These are a #18 and #16:
The technique for these trees is very simple and very forgiving. Pipe from the middle of the tree, above the trunk, going outwards and downwards. Start with the longest line and then work your way up. Each line should be shorter and shorter so that the trees get narrower towards the top.
To learn all about how to pipe stripes and more advanced stripe techniques like multi-coloured stripes and peek-a-boo designs, check out my Layer Up program, which takes you through three layers of skills and techniques to go from a beginner to a professional cake decorator or join my All You Can Cake membership for access to everything on my cake school!
You can watch a vide of this tutorial on a Striped Christmas Tree Cake:
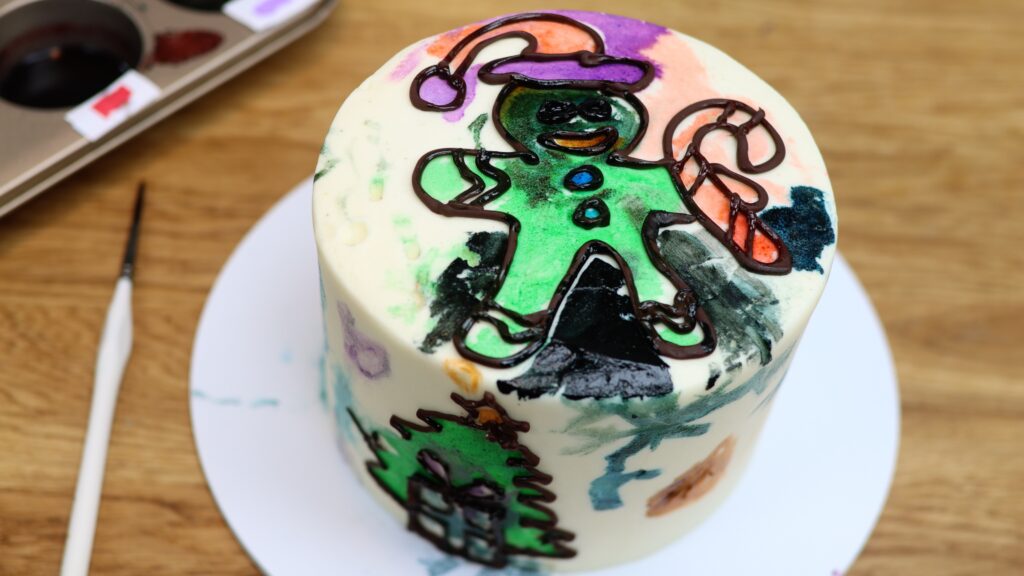
A colouring book cake is an entertaining activity and it can also be calming and therapeutic! This is a fun project for kids and adults alike.
The frosting on your cake needs to be very firm so that you don't damage it as you colour. After you've smoothed the frosting, put the cake into the fridge for a few hours or even overnight. This will chill it so that the frosting sets. I'm using my 4 Minute Buttercream for this cake (and all of my cakes!) but any crusting buttercream will work.
Find a picture you'd like to create on your cake or draw one to refer to. Or just go freestyle straight onto the cake if you're feeling confident! I like to use melted semi-sweet chocolate chips for drawing onto cakes. The chocolate gets firm when it sets so you won't damage it later as you colour. Melt them in the microwave for 30 seconds at a time using 50% power so that the chocolate doesn't burn or seize. Stir until any lumps of chocolate have melted and the chocolate is smooth. Then spoon the chocolate into a sandwich bag and push it down to one of the bottom corners.
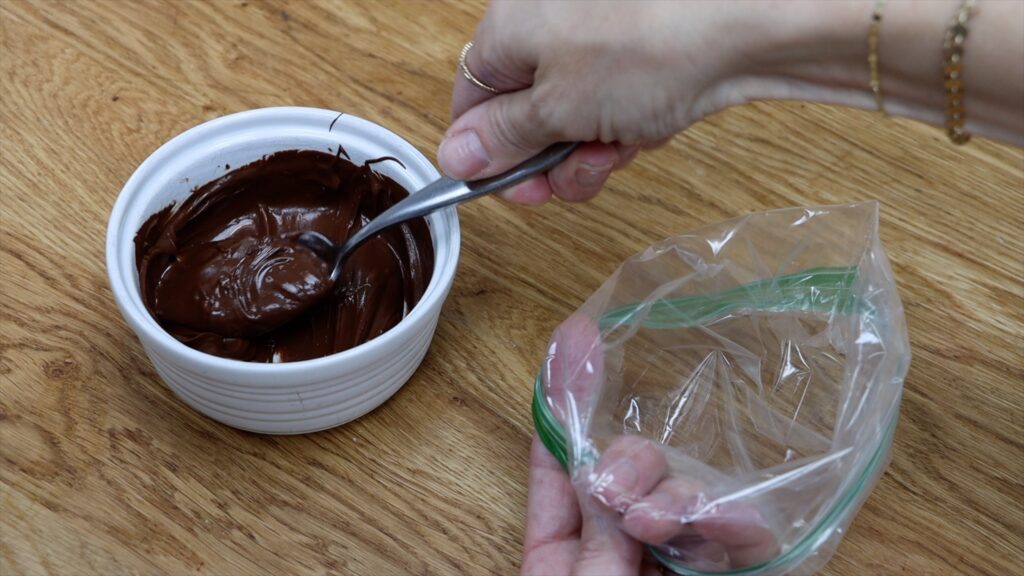
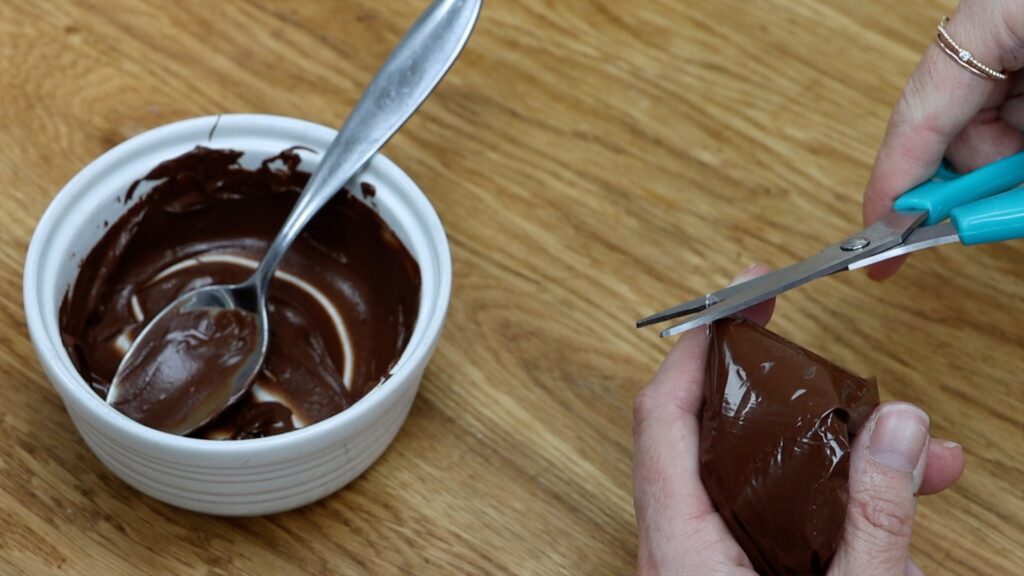
I know in some countries Ziploc bags are harder to find or more expensive than piping bags. If that's the case, you can use a piping bag instead. Cut a tiny piece off the corner of the sandwich bag or the end of the piping bag.
Now outline your design, which can be just on top of the cake or around the sides as well. Piping with chocolate is easier than with buttercream because chocolate flows so easily through the hole in the bag. You could choose a theme like a Christmas scene for your kids to colour during the holidays or whatever else they're interested in! Pause at each corner before piping the next line so that the chocolate pools and attaches to the cake. If you pull away too soon you'll pull the chocolate with you and leave rounded corners instead of sharp ones.

Adjust or tidy up the chocolate by nudging it with a toothpick straight away, while the chocolate is still soft. You can scrape off any mistakes without damaging the frosting, since it has been chilled and the buttercream has set.

It's much trickier to pipe onto the sides of the cake than the top for two reasons. First, because you can't see as well what you're doing! And second, because gravity pulls the chocolate down so unless you keep the tip of the piping bag pressed against the cake, your chocolate lines will fall down to the cake board.
If your lines are too thick you won't be able to pipe smaller details. If that happens, push the melted chocolate to the other corner of the sandwich bag. Now cut a smaller piece off of this corner so that your lines will be thinner. Even for small details you'll need space inside the shape so that you'll have something to colour in later.
After piping the design, put the cake back in the fridge for about 30 minutes to set the chocolate.
While the cake is in the fridge, prepare your colours. There are a few options for this. You can can buy edible markers but they don't work as well on buttercream as they do on fondant. The ink doesn't work for very long, I think because of the oiliness from the butter in the buttercream. Also, if you press too hard you'll poke through the firm outer layer of the buttercream. The soft buttercream underneath will cover up the tip of the pen and it won't work anymore.
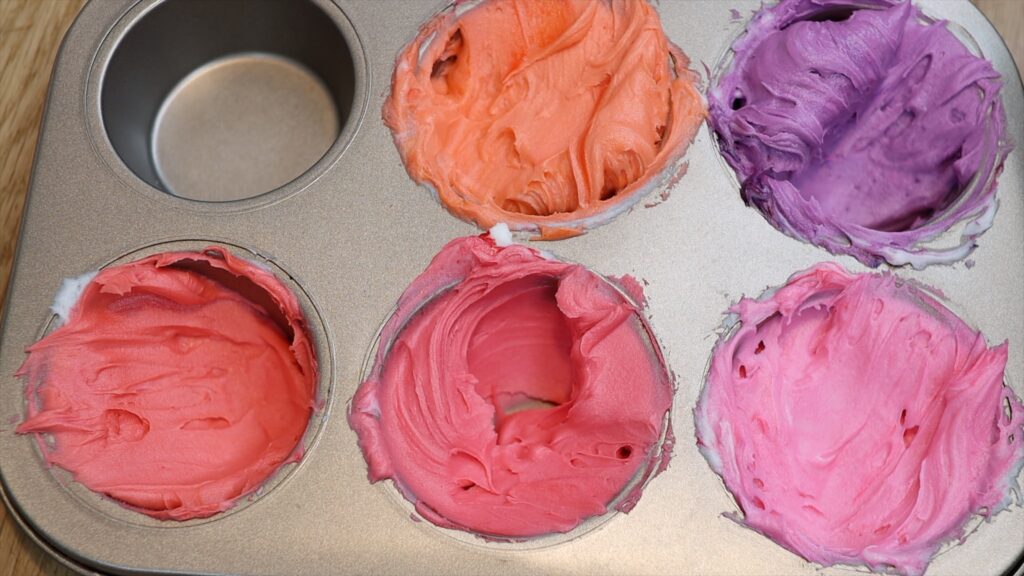
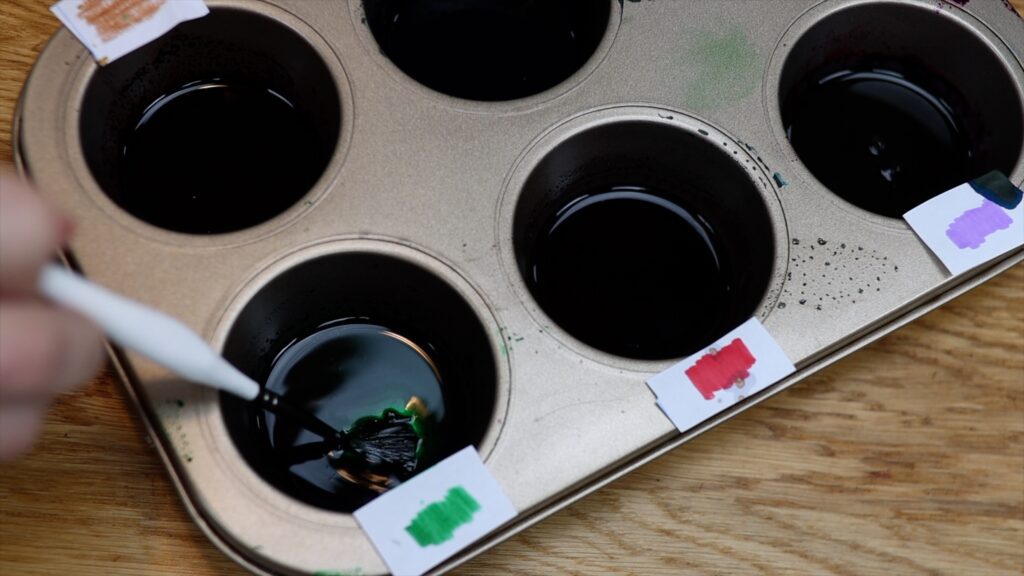
You can use piping gel, which you can buy from cake decorating supply shops in lots of colours. Or, if you want a quick option that you can make yourself, just use your buttercream colours! You can make a colour palette in a cupcake pan or mini cupcake pan or use a few bowls. I like to use a cupcake pan because it's much quicker to wash than lots of little bowls.
I drew the colours I was going to use and taped them to the cupcake pan because I wasn't sure how easily you'd be able to see the colours in the pan.

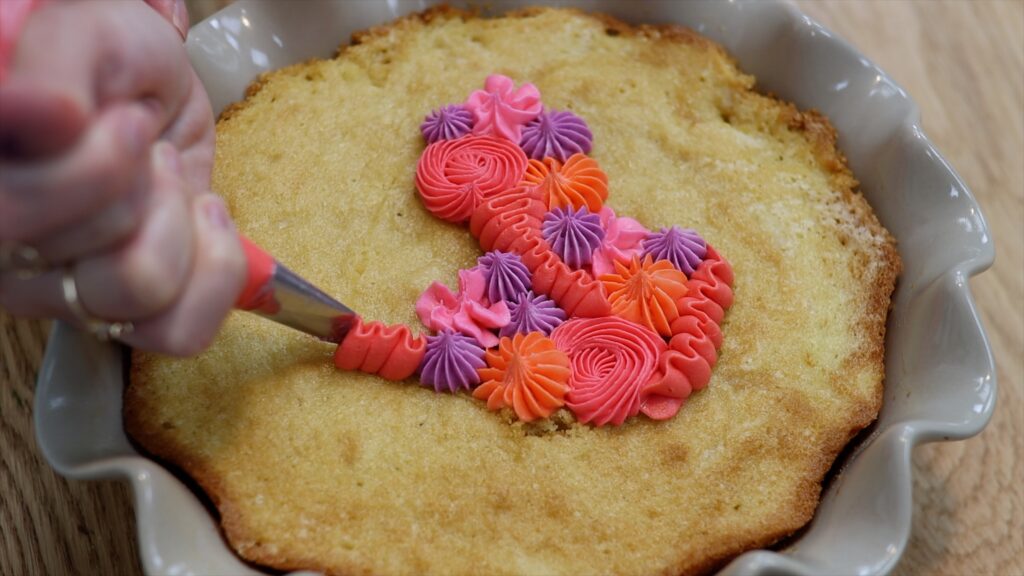
Squeeze a drop of liquid or gel colour into each cavity of the pan. To dilute the paint to make it easier to paint with, you'll need to add a clear liquid. Gels tend to clump in water so instead, add a few drops of clear alcohol like vodka or a clear flavour extract. I'm using peppermint extract for my Christmas colouring book cake.
If you're you're not going to use your colours immediately, cover the pan with plastic wrap so that the liquid doesn't evaporate.
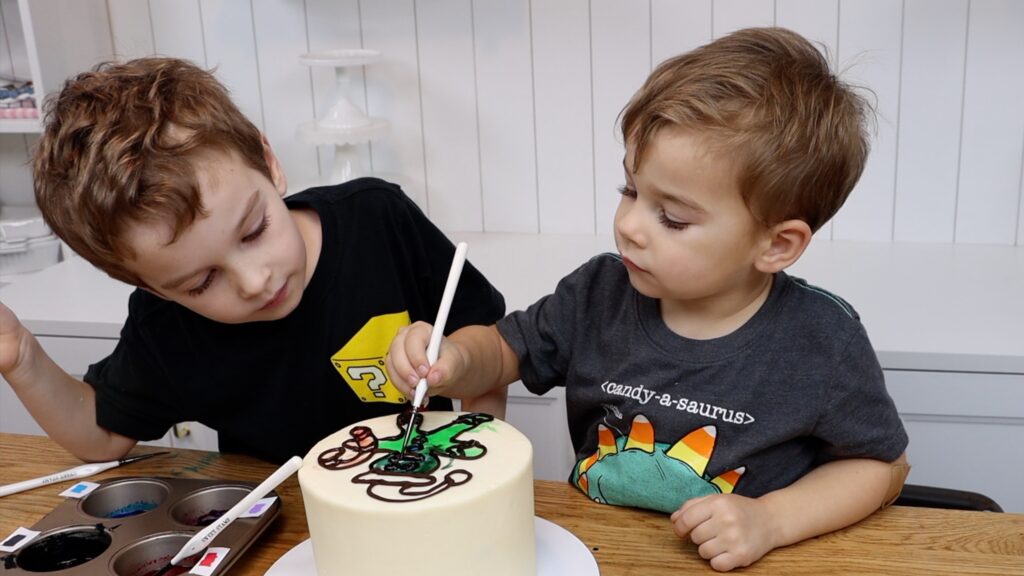
When you take your cake out of the fridge, the frosting and chocolate will stay firm for about 30 minutes. This gives you lots of time to colour in the design. Using a different paintbrush for each colour is ideal but if you don't have that many paintbrushes, keep a glass of water and a towel or paper towel handy to clean the paintbrush after each colour. The smaller and thinner the brushes, the better, so that you can reach into the small parts of the design.
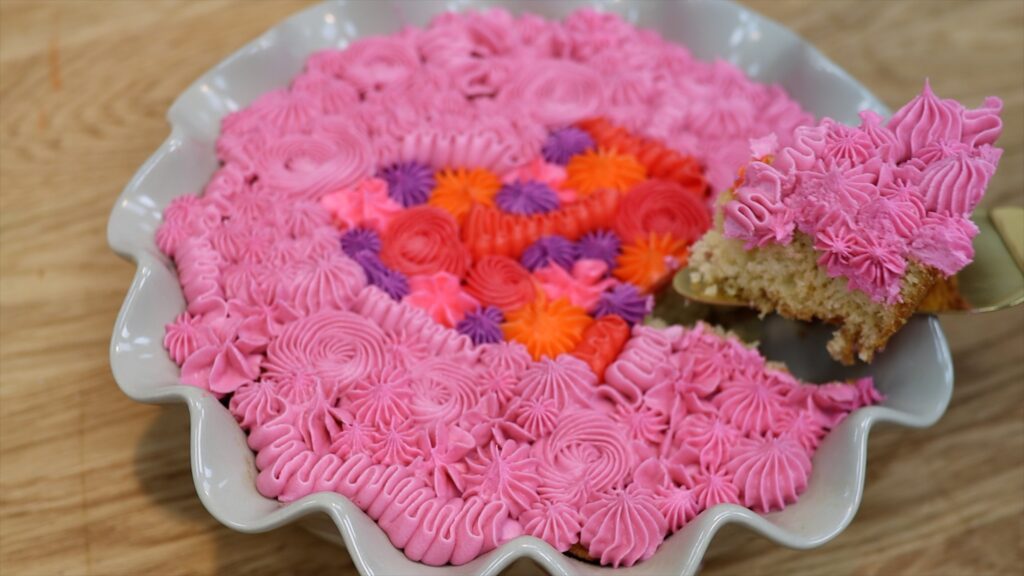
This is a fun activity for children but also a very calming, therapeutic activity for anyone! I persuaded my husband to test it out with me as a date night activity and we really enjoyed it. And if you want to do this activity with kids but don't have much prep time, skip the chocolate outline! Let them paint straight onto the cake to make their own masterpiece.
I hope you've enjoyed this tutorial! Tell me in the comments who you're going to make this with or for! For more cake decorating ideas and courses and memberships visit my online cake school 🙂
You can also watch a video of this tutorial on how to make a colouring book cake:
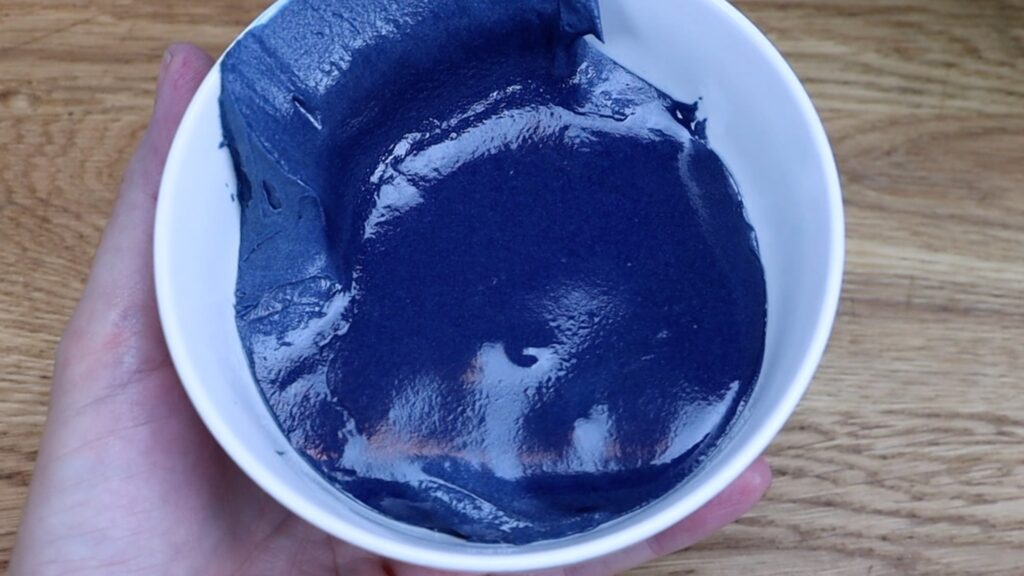
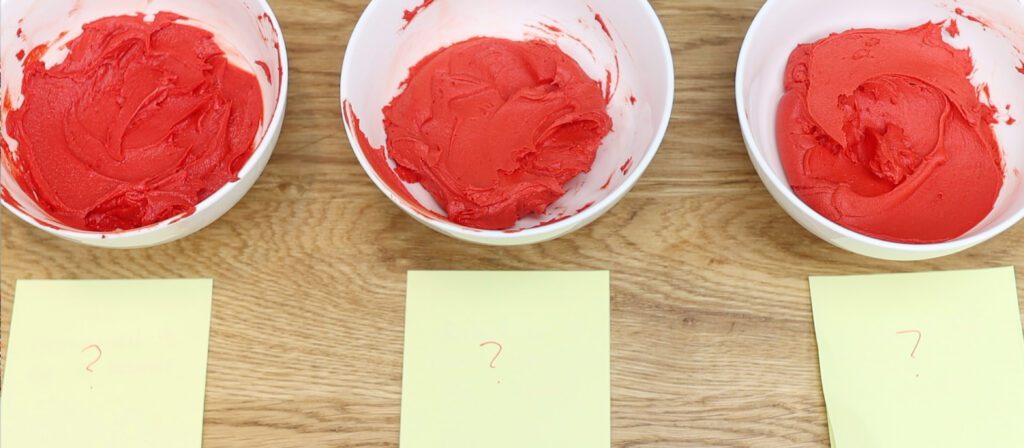
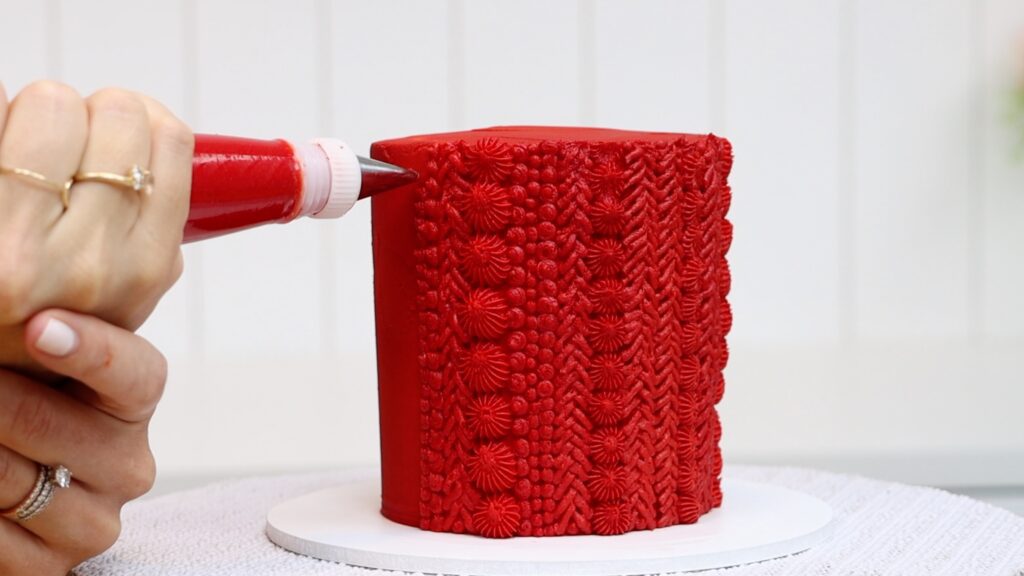
Here are three tricks to make super bold and bright red frosting!
To make red frosting you'll need red food colouring. Use gel colour rather than the liquids you buy in the supermarket or grocery store because gels are much more concentrated. This means brighter colours without watering down your frosting and making it too runny. I like to buy red gel in larger bottles than other colours because it's the colour that requires the most gel.

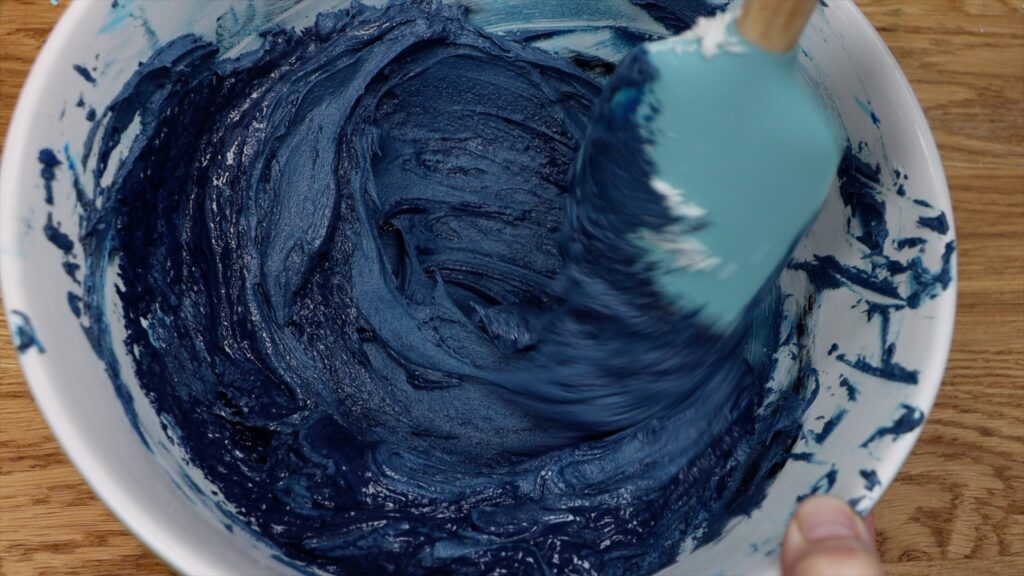
Start with a generous squirt and mix it into your frosting. I'm using my 4 Minute Buttercream in this tutorial and I use it for all of my cakes. Aim for a light shade of red to start with, not a true red. For a bright red there are three tricks to develop the colour without using more gel.
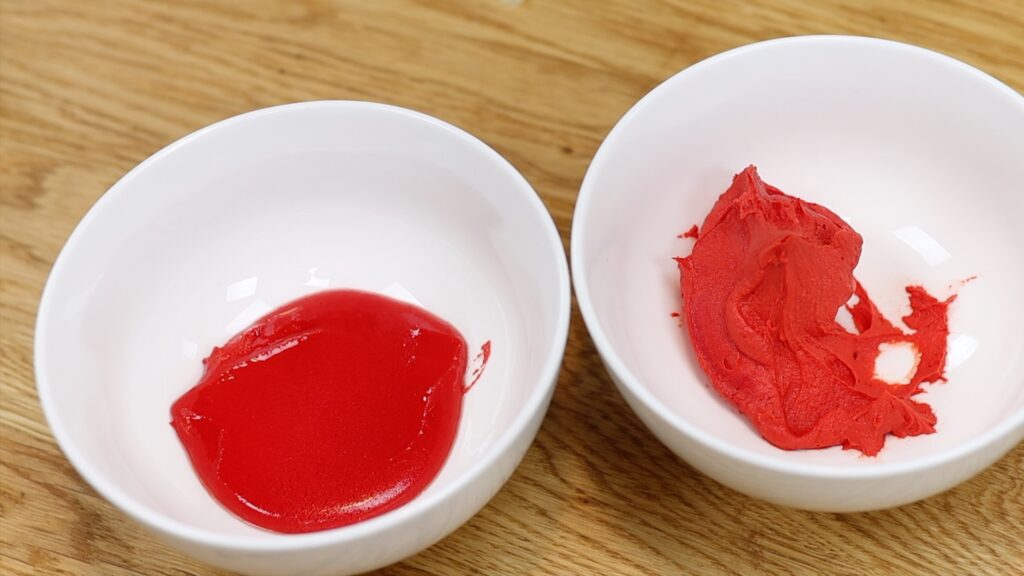
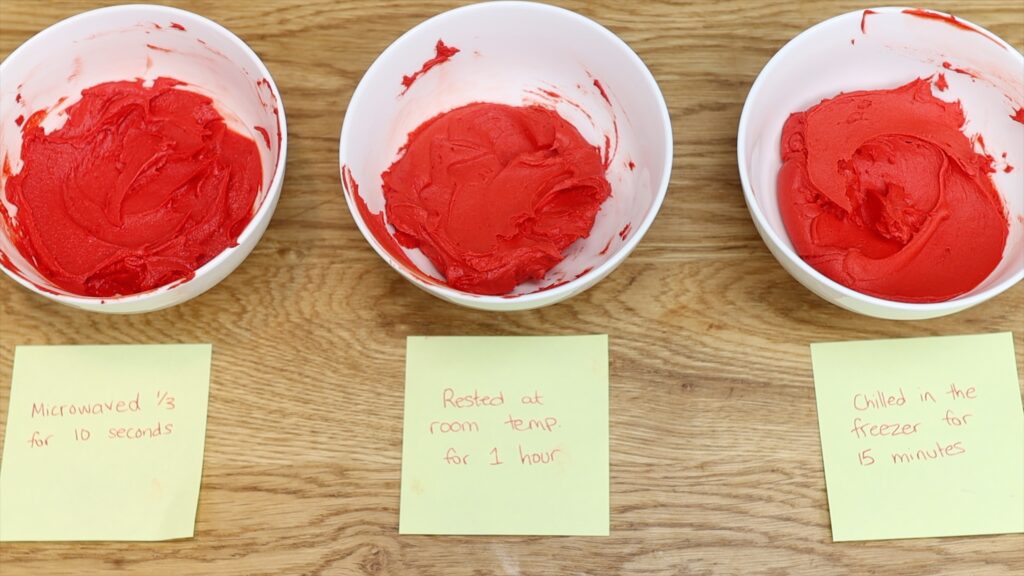
Let's divide this frosting into three bowls to compare the three methods. Here's a sneak preview of the final results for those three bowls! Now I'll show you the method for each bowl.
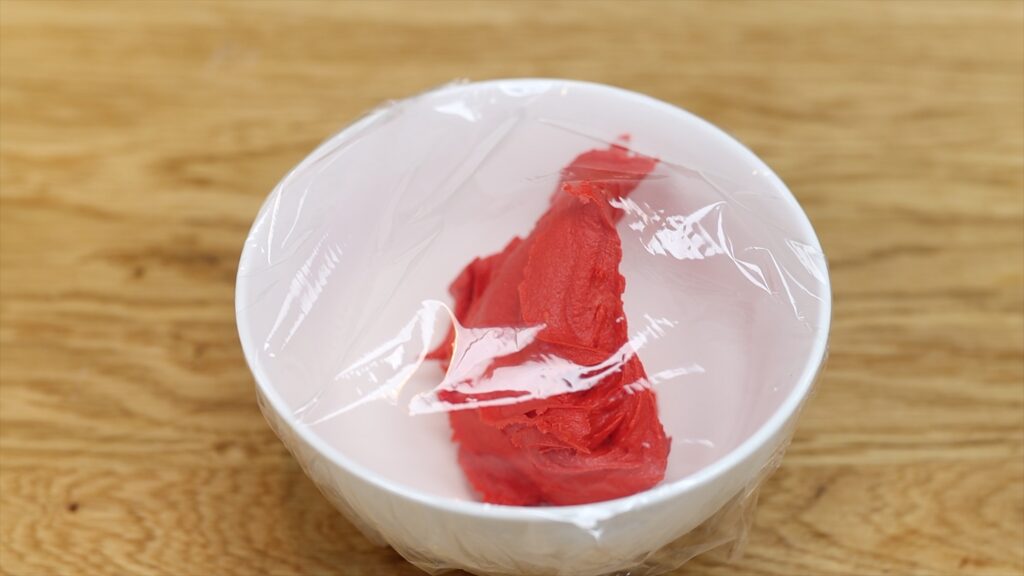
The first way to make a brighter red is the resting method. Cover the bowl with plastic wrap and leave it for at least an hour to give the colour a chance to develop. The colour will darker a few shades in this time. Depending on how dark the colour was to begin with, It might not be a true deep red yet.
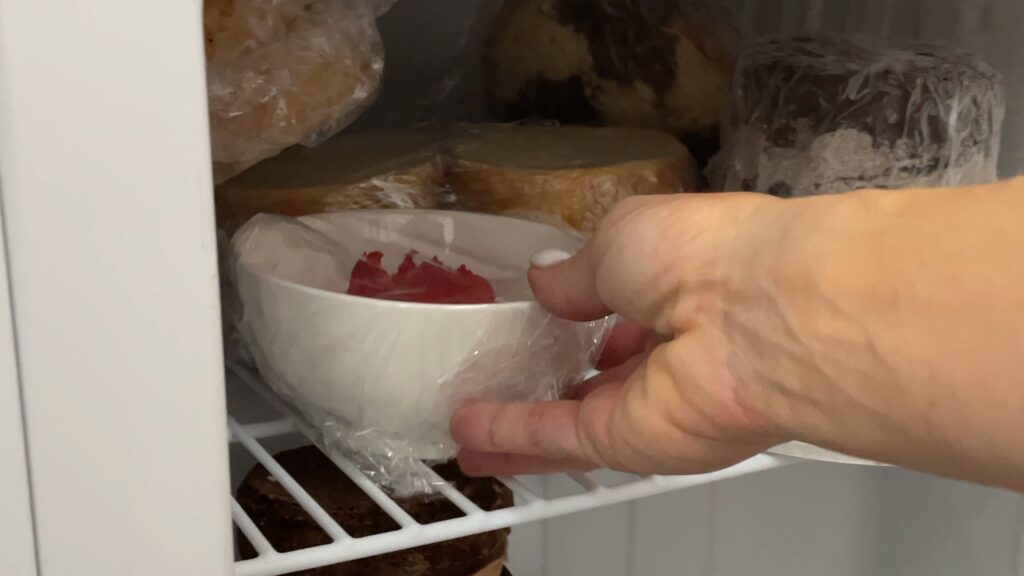
The second method is the chilling method. Cover the bowl with plastic wrap and put it into the freezer for 15 minutes. This frosting develops just as much in 15 minutes as the red frosting that was at room temperature for an hour! Chilling the frosting speeds up the darkening process significantly.
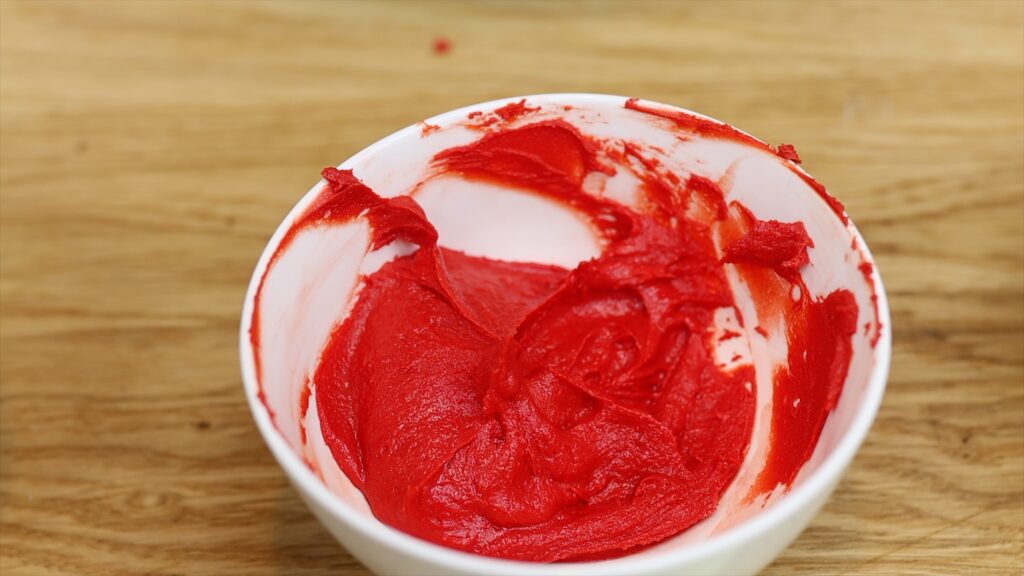
The third method is the microwave method. Scoop out a third of the frosting and microwave it for just 10 seconds. The butter in the buttercream will melt and the frosting will become very runny. It will also become much brighter and darker! Mix it into the rest of the red buttercream and the consistency will be runny at first. Let it come to room temperature and you'll be shocked at what happens.
The colour of the red frosting has become much darker and brighter. After 10 minutes on the counter, the frosting comes back to room temperature and the consistency is perfect! It's smooth and silky like it should be. This can now be used for frosting a cake or piping.
As you've seen, chilling red frosting in the freezer for 15 minutes and resting on the counter for an hour have the same effect of slightly darkening the red colour. To take your buttercream from a medium shade of red all the way to a truly bright and bold red, use the microwave method.
The final trick to share is how to avoid the bitter taste that gel colours create. Since you need to use a lot of gel for red frosting, it typically does have a noticeable flavour. Add some clear vanilla or almond extract and you'll disguise any bitterness without changing the colour!
I hope this tutorial has been useful. Visit my cake school for hundreds of cake decorating techniques and designs. Thanks for watching!
You can also watch a video of this tutorial on how to make red frosting:
After six years of filming and editing cake videos for Youtube, Instagram, Facebook and TikTok, I'm sharing my filming and editing tricks for 3 styles of cake video. I can't wait for you to use them for your own cakes!
The rest of this tutorial will be up soon! I'm finishing up my Layer Up program, which will be ready for signups this week. Check it out and join the waitlist!
For now, you can watch a video of this tutorial on how to make cake videos for social media:
