Give someone the gift of making their own hot chocolate bombs with this unique, thoughtful gift idea! Wrap up a silicone hot chocolate bomb mold and include this printout of how to make hot chocolate bombs, which will guide them step by step through the process!
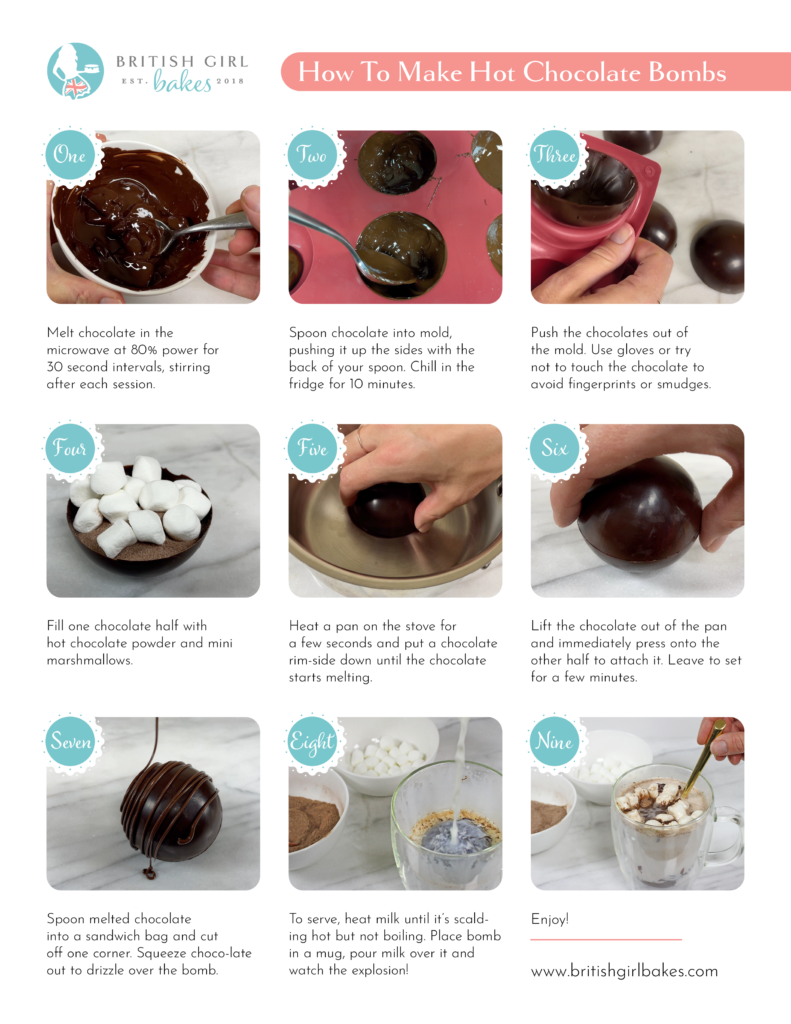
For a more detailed tutorial on every step of the process of making, exploding and gift wrapping hot chocolate bombs, click here!
In this tutorial I’ll show you how to make an under the sea cake with jelly! I’ll show you a few variations as well as tips and tricks for the easiest and most successful way to create one of these eye-catching and delicious cakes. If you prefer to watch a video of this tutorial, scroll to the bottom of the page.
First, let’s make the cake part of the cake! You’ll need a springform pan for this, which is usually used for cheesecakes and they’re the ones you can clip and unclip to separate the base and the outer ring.

Take a few layers of whatever flavor cake you like and chill them in the fridge for an hour so they’re cold and film. Place your first cake layer on the base of the springform pan and level the cake with a serrated knife if necessary, so that the next layer of cake will sit flat on top of it.

Pipe or spread your filling onto the first layer of cake. I’m using my 4 Minute Buttercream to fill and frost my cake but you can use whatever you like. It’s easiest to use a firm filling rather than something runny like lemon curd or a fruit puree because even if you pipe a buttercream dam around the filling to hold it in place, when you carve the cake if you carve off that dam your filling will ooze out of the cake.

Now carve your cake into some form of a dome by trimming the top edge off with a serrated knife so that the cake is curved around the top. It can be simple, like this, with just a few cuts to create the dome, or you can be much more elaborate, carving nooks and crannies into the top and sides of your cake.

Three things are really important when you’re carving your cake. First, keep in mind that if you want the maximum amount of cake and filling, a domed shape is best because then the cake layers will fill the middle of the cake, with a thin layer of jelly completely covering it on top and around the sides to create the effect of being under the sea.

Secondly, cakes are easiest to carve when they’re cold because they’re less crumbly so they won’t fall apart when you cut into them. You can even freeze the cake for an hour if it’s falling apart as you carve it.

Thirdly, the MOST important thing when you’re carving the cake is that the sides of the cake are at least a centimeter or 1/2 an inch within the edge fo the base of the springform pan, so that there’s room for frosting and then for the jelly to fill in the space around the outside of the cake.

If you want to, you can frost the bottom part of the cake all the way up to the edge of the base of the pan so it looks like sand at the bottom of the sea, but you’ll still need to carve the cake smaller than the pan now, so there’s room for that frosting.

It’s fine for the cake to look messy as you carve it because this is just the beginning of the process! To make the shape of your cake more interesting you can use any cake you’ve cut off to build onto it. To do this, spread some buttercream wherever you want to attach another piece of cake.

Then press the section that you carved off the cake onto the fresh buttercream and push gently to secure it. You can carve it to make a smooth join onto the existing cake but you don’t have to because you’ll be covering it with frosting, so you can use that to fill in any gaps.

Cover the cake with a thin layer of frosting. This is called a crumb coat because if any crumbs come off the cake and get into the frosting, they’ll be trapped in this layer of frosting so when you spread more frosting on later, the crumbs won’t get into that layer. Put the cake in the fridge for about 30 minutes to set this crumb coat and now I’ll show you one of the ways to make fish to swim in the jelly part of this cake.

You’ll need a silicone mold for this and some white chocolate chips. Microwave the chocolate at 50% power in the microwave for a minute to melt it without burning it and stir it until it’s smooth. You can microwave it again it there are still lumps in the chocolate.

Once the chocolate is smooth, divide it into a few bowls and add a drop of gel color to each one. You can use oil based colours if you have them but the gels you use for frosting are fine if you don’t add a huge amount and don’t overstir the chocolate.

For this bowl I added a big drop of gel and there’s just a tiny bit of chocolate in the bowl so it seized up but for these other colours, with a smaller drop of colour and more chocolate in the bowl, the gels work perfectly.

Use a paintbrush to brush the coloured chocolate into the fish mold, using more than one colour within the same fish to make it look a bit more interesting and realistic. I’m using the purple chocolate that seized and since the fish is going to be within jelly on the cake, if there’s any texture or graininess in the chocolate you won’t be able to see it.

Wipe off any chocolate around the edges of the fish with an

Put the fish in the fridge for about 30 minutes to set and then flip them out of the mold and admire how pretty they look! The jelly will give them a shimmery, wet effect later. If some snap as you take them out of the mold, don’t throw them away, you can easily attach a broken tail or fin when you put the fish on the cake.

Now we’re going to frost the cake with sand. Make the colour of buttercream you want with yellow and brown gels and you can mix a few different shades if you want to create some variation. I’m going to use plain white buttercream and yellow. Spread the colours in patches onto the cake or scoop up a few colours at a time with your

You can use ganache if you prefer – it doesn’t have to be buttercream. Spread it all over the cake and smooth it a bit with your

If you’re using chocolate fish, press those into the frosting now, while the frosting is still sticky. If any of the fish broke when you took then out of the mold, just press both parts into the frosting to piece the fish back together. When you position your fish, choose the outermost parts of the cake because then the fish will be the most visible through the jelly.

The further in from the edges fo the cake, the more blurry the fish will be. They’ll look more like subtle blobs of colour than actual fish. You’ll hardly notice this fish up here because it’s so far in from the edge fo the cake.

If you’re going to leave the bottom part of the frosting visible, like this, after you frost the cake put it in the fridge for an hour to set the frosting and then scrunch up a piece of foil and wrap it around the cake, pressing to imprint some random texture in the frosting so it looks like grains of sand.

I pressed the crushed foil into the frosting all over this cake but when the cake is finished you really don’t notice the texture if there’s jelly over it, so it’s only worth doing the section of frosting that’s going to be exposed.

Now we’re going to make the jelly! You’ll need 3oz or 85g of gelatin and 1 cup of water and just to prepare you, if you’re using little packets of gelatine you’ll need a LOT of them!

Pour the gelatin and water into a bowl and leave it for 5 minutes for the gelatin to bloom, which make the jelly smooth and firm.

Put 1/2 a cup (or 100g) of sugar into a pan with 2 cups of water and bring it to a boil over a medium heat, so that all of the sugar dissolves. Take the pan off the stove or just turn the heat off and add the gelatin mixture to the pan, stirring until it’s all melted.

If there are any clumps of gelatin left, lift them out with a spoon. Add a teaspoon of whatever flavor you like. I’m using almond for this since I think it will pair nicely with a banana chocolate cake, but fruity flavors like lemon or any berry are maybe more… expected!

The second way to make fish for this cake is to use jelly instead of white chocolate. To do this, set aside a little bit of the jelly now and tint the rest blue with just a drop or two of blue gel. You can mix the colour in completely or leave it marbled for a different effect.

Use another colour to tint the little bowl of gelatin. Choose something that will show through the blue jelly so pink is a great option, or you can do a few bowls of different colours.

Use a measuring spoon or a dropper (a tiny turkey baster!) to fill in the fish shapes. If the gelatin overflows, dip a paper towel into it to mop it up. Put the mold in the fridge for an hour and then push the fish out!

The pros of gelatine fish are that they’re easier to cut through when you serve the cake than white chocolate fish, and you can use the gelatin you’re making anyway instead of needing another ingredient for the white chocolate fish.

The downside of gelatine fish is that the colours and texture aren’t as visible through the jelly ocean on the cake as on the white chocolate fish. When you see the finished cakes you can choose which ones you prefer.

Finally, we’re going to create the jelly ocean! Cut a piece of acetate so it’s long enough to wrap around your cake, and at least as high as you want the cake to be.

Spray the acetate with oil and wipe the oil with a paper towel so that there’s a thin coating all over the acetate. If you’re using a roll of acetate, spray the side that curves upwards, the side of the acetate that will touch the cake when the acetate wraps around it.

If you haven’t already, take the ring off your springform pan and place your cake on the base. The cake needs to be cold for this so that the frosting is firm and doesn’t get damaged when you move the cake around and wrap it with the acetate.

Make sure the cake is in the middle of the pan, with at least 1/2 a cm of a 1/4 of an inch all the way around if you want the entire sides of the cake to be jelly. I’ll show you the alternative next.

Wrap the acetate around the cake, around the base of the springform pan. Pull it tight and then tape the end of the acetate to make a tight seam from the top to the bottom, so that the jelly doesn’t leak out of the join of the two ends of the acetate.

Place the cake on the base onto a piece of cling film or Saran Wrap and lift the plastic up to wrap it around the acetate. Secure it tightly with a few pieces of tape. This will stop the jelly leaking out of the bottom of the acetate.

Then lower the ring of the springform pan down over the acetate and connect it to the base. The purpose of the cling film and tape is to make sure the jelly doesn’t leak out of the acetate but you can place your cake in a bowl just in case.

Once the jelly has cooled but before it sets, pour it slowly over the cake. Aim to hit the cake somewhere there isn’t a fish, so you don’t risk knocking it off the frosting where you placed it. If the jelly has cooled and the cake is chilled so the frosting is firm, the jelly won’t melt the frosting or blend with it, it will just sit on top of it.

You can see a bit of jelly leaking out here, so the bowl is a good idea just in case. If you wrap the acetate with cling film before you clip on the ring fo the springform pan and you tape it tightly enough, you shouldn’t have any leaking jelly.

For this cake, you can see that at the bottom of the dome, the frosting on the cake goes right up to the acetate wrapped around it, so there’s no room for jelly, so the sand frosting will on the outside of the cake at the bottom.

Place gelatin fish around the cake, keeping the fish on the edges of the cake so they’ll be the most visible. Pour the gelatine over the cake to fill in the area around the cake up to the acetate,

Put the cake in the fridge for an hour to set the jelly. Then take it out of the fridge and unclip the springform pan, lifting it up over the top of the acetate.

Peel the tape off the acetate and unwrap the acetate. If the jelly has set and the acetate was greased with oil, the acetate will peel off easily and the jelly will stay behind, creating a smooth coating all around the cake.

If the frosting on the cake went all the way up to the acetate at the bottom of the cake, that frosting will be exposed when you peel off the acetate and the jelly ocean will start higher up on the cake. If any jelly seeped below when you want the ocean to start you can carefully peel off those thin patches of jelly.

Lift the cake off the springform base and spread some buttercream on a cake board or a plate to secure the cake on it.

If there’s any stray gelatin at the top of the cake, above the top edge, you can trim it off with scissors. This happens when some jelly leaks out of the cling film and the jelly part of the cake sinks a little bit lower, leaving some residue behind, higher up on the acetate where the top level of the jelly used to be.

If you want to add some edible sand around the bottom of the cake, pipe frosting around the base and straight away pour some brown sugar or crushed graham crackers onto the cake board and push them gently into the frosting, up against the cake.

You can use any piping tip, it doesn’t have to be round, or just squeeze the frosting out of the hole at the end of the bag without a piping tip. You can flatten the piped frosting with an

Cut into the cake just like you’d cut into any other cake! You’ll have to use a bit of pressure to cut through white chocolate fish. It’s fun having two very different flavours and textures in the same slice of cake, and the cross section of the cake looks stunning!

Whether you completely cover the cake in jelly or leave some frosting “sand” exposed, and whether you use jelly or white chocolate fish, this cake will be both delicious AND beautiful!

If you aren’t happy with your cake after removing the acetate, pull the jelly parts away from the frosted cake and put them in the microwave at 50% power for 30 seconds at a time to melt the jelly again.

Make any changes you want to your cake and then wrap it in acetate again, tape it with cling film, re-attach the springform pan and once the jelly is cool, pour it over the cake!

I hope this video has given you the tips and confidence to make your own under the sea jelly cake! Please tag me (@britishgirlbakes) in your photos on instagram so I can see your creation!

Here’s the video version of this tutorial:
Square cakes are so time consuming to frost that I hardly ever used to make them, but with this simple technique using any cardboard box you can frost square cakes quickly and neatly, with super sharp edges and corners, with no special tools! If you prefer to watch a video of this tutorial, scroll to the bottom of the page.
1. Bake your cake
Bake your cake layers in square pans or if you don’t have those you can use a sheet pan and cut the rectangular cake into squares, like this. I used an 8″ x 12″ pan and divided the cake in half down the short side and in 3 along the long side.

The square cake layers don’t have to be exactly the same size – a difference of a few millimeters is fine because it will be filled in with frosting later. Measure the squares of cake, choosing the largest one if there’s a bit of a variation. Mine are 4 inches by 4 inches.

2. Choose a box
Any box will work for this as long as it’s made of cardboard so it doesn’t bend or droop because it needs to stay flat. Stickers or writing or packing tape on the box are fine because we’re going to wrap it up so it’s safe to use next to food.

You can use any part of the box but I like to side flaps because you have to do a minimal amount cutting. You’ll need to cut out three squares from the box and I’ll show you next how to measure them.

3. Measure and wrap your cardboard box squares
You’ll need to measure and cut three squares out of your cardboard box. Position a ruler so that the base is pressed against any straight edge of the box, which is any edge you haven’t yet cut. This will make sure the ruler is at right angles to that edge. Draw along the ruler to mark out the first edge of your square.

Now draw a line in the opposite direction for the next edge. If you have one of those triangular rulers to measure right angles, that will help you draw out a perfect square but if you don’t have one, a regular ruler is fine. The ridges along this cardboard are a helpful guide to make sure this line is at right angles to the first line.

Measure from one line the exact width of the cake layer (so 4” for this cake) and mark a little line on the cardboard. Move the ruler a bit further up and do the same again, and this will make sure the next line is at rightangles to make a perfect square. Draw a line connecting the two little lines.

For the last line, measure the same distance, drawing another two lines, and connect those to finish the square. Cut the square out carefully, making sure the sides are smooth and the corners are sharp, not rounded.

Follow the same steps to draw two more squares, and these both need to be the same size, which can be whatever you choose as long as it’s between 1/2 an inch and an inch bigger than the width of your cake. I recommend 3/4 of an inch and I’ll show you why when I frost the cake.

To make these cardboard box squares food safe and to give them even smoother edges we’re going to wrap them very tightly with parchment paper. Fold two opposite sides over the square and tape them down, pulling the parchment as tightly as you can so the snuggest fit so there are no wrinkles and that will give you the straightest sides and sharpest corners on your cake.

Trim the ends off the parchment if they’re really long, like mine are.

and then wrap up the square the same way as you’d wrap a present in a box, folding triangles at each side and then flipping the end section over the square, making sure the corners line up to make a sharp point, and tape them down. Now you’ll have a perfect square, wrapped up neatly so it’s clean and smooth.

Wrap all three cardboard box squares up like this, so you’ll have a square the same size as the cake, which the cake will sit on, and two slightly bigger squares which will be your guides around the edge of the cake of how much frosting you need, and will also guide your frosting smoother to get smooth sides on the frosting. The gap in between the cardboard box squares in the this photo is where the cake will go.

If you hold a cake layer up against one of the larger cardboard box squares, there should be at least 1/2 an inch of board visible all around the edge of the cake or ideally 3/4 of an inch. This will be filling in with frosting after you assemble your cake.

4. Assemble your cake
Starting with just the small square, spread or pipe a little bit of buttercream onto the square and press your first layer of cake onto it. The dot of buttercream on the cake board at the bottom of the cake is really important because it holds the entire cake in place while you frost it.

Spread or pipe buttercream (or whatever filling you’re using) on top of the first layer of cake and then continue layering cake and filling to assemble your cake. Line your cake layers up directly over each other so that the cake is straight and not leaning over sideways.

5. Frost your cake with a crumb coat
Chill the cake in the fridge for about an hour so that the cake firms up and is less crumbly, and then spread frosting all over it. This layer of frosting is called a crumb coat and it’s going to cover the cake completely to trap any crumbs that come off the cake now, so that they don’t get into the final coat of frosting.

I like to frost the cake on a larger cake board and I use a ring of tape or a non-slip mat to attach the cake on it’s smaller cake board to this larger cake board.

The frosting doesn’t need to be neat but it does need to cover the top of the cake and the sides all the way from the top down to the bottom where the cake is sitting on the cake board. There should be no exposed cake because that will allow crumbs to get into the final coat of frosting.

Smooth the crumb coat of frosting, scraping with your frosting smoother from one side to the middle and then from the other side to the middle, because if you scrape all the way across a side your frosting smoother can pull off the frosting off the second edge with it.

The crumb coat needs to be quite thin and without any lumps of frosting sticking out, because those might poke through the final coat of frosting later. Let the crumb coat set for 30 minutes in the fridge before you apply your final coat of frosting.

When the cake is cold and the frosting has set, take the cake out of the fridge and slide an

You’ll be able to touch the frosting on the cake because it will be firm, so if you need to you can press a finger or thumb against the side of the cake to balance it as you lift it up. Set the cake aside for a moment.

6. Attach cardboard box squares to the cake
Put one of the large squares down on the

Press the cake on its small square down onto the large cardboard box square at it will stick to the tape you placed there. Center the cake in the middle of the larger cardboard box square. If you’re going to use a different colour for the final coat of frosting, mix that now.

To frost the cake, start with the top and spread on a generous amount of frosting, making sure it goes all the way over the edges of the cake to prevent air bubbles later. Add some extra frosting to the corners since those are the areas where the frosting typically droops.

Don’t worry about getting this frosting smooth. Place your other large square on top of the frosting, lining it up as well as you can over the bottom square so that each corner of the cardboard box square on top of the cake is directly on top of the corner of the cardboard box square below the cake.

Use your frosting smoother to make sure the cardboard box squares are lined up by resting the base of the frosting smoother down on the cake board and then pushing it gently towards the cake so that it touches the edges of both the top and bottom square. Adjust the top square by pushing it slightly if necessary.

When you’re happy with the position of the square, push down firmly to secure the square to the frosting on the cake. There will probably be gaps of air around the corners and that’s fine for now.

Use the edge of your frosting smoother to press against the sides of the cardboard box square to check it’s still lined up over the bottom square.
Then do a double check that it is by scraping once around the cake. What you’re checking for here is that when your frosting smoother glides around the cake pressed against the edges of the cardboard squares, it isn’t knocking against the crumb coat of the cake, it’s only touching the cardboard squares. Adjust the top square if you need to.

7. Frost your cake
Now cover the sides of the cake with frosting. Be generous with the frosting – you want it to fill in the gap all the way from the sides the cake to the outer edge of the cardboard box squares.

Start smoothing the frosting the same way you did for the crumb coat, scraping from one edge of the cake towards the middle and then swiping your frosting smoother away instead of going all the way to the other edge of the cake. Scrape back in the opposite direction from the other edge, back into the middle.

We’re going to do a second round of frosting so this doesn’t need to be perfect but you don’t want any lumps of frosting sticking out. We’re going to chill this first round of frosting and those lumps will get hard and if they stick out beyond the cardboard box squares, your frosting smoother will bump against them and you’ll get bulges in your final coat of frosting.

You can see the white crumb coat through the blue frosting here and that means I haven’t spread enough blue frosting onto the cake. It’s fine for now because we’re going to add more frosting next, after chilling the cake for about 30 minutes.

Chilling the cake sets the frosting that’s on the cake, so when you spread more frosting on it will build on top of what’s already there, instead of weighing down on the existing frosting and dragging it down. This is especially important for large cakes, where the amount of frosting on the sides of the cake is quite heavy.

When you’ve already got a smoothish base of frosting on the cake, this final round is much easier to apply thickly enough and to get really smooth. Completely cover up the sides of the cake and then smooth with your frosting smoother, going from one edge to the middle and then the other edge to the middle.

I’m using my acrylic smoother for this final coat because it gives a smoother finish to buttercream than my thin, plastic smoother. Always go from one edge to the middle and then back the other way, never all the way over because if you go past the second edge, your frosting smoother might pull frosting off that corner.

The squares of the cardboard box that I’m using for this cake are 4 1/2 inches wide and the cake layers are 4 inches, so the cardboard is 1/2 inch bigger than the cake. I recommend cutting your squares 3/4 inch bigger than the cake because any less than that, if your cake layers aren’t exactly the same size and perfectly lined up the crumb coat might show through the frosting in areas. If you cut the squares much bigger, like a full inch bigger than the cake, you’ll have a LOT of frosting on your cake.

As you smooth, if you see any air pockets or bubbles in the frosting or you expose the crumb coat anywhere, just spread on some more frosting and smooth over that side again. Do as many touch ups as you need, spreading more frosting over any imperfections and scraping over them again until you’re happy with the sides. Pay special attention to the corners because I think sharp corners are what make square cakes look so impressive.

8. Remove cardboard box squares
When you’re happy with the sides, don’t lift the top square off yet! The frosting needs to be really cold and hard before you do, otherwise the square will pull up any soft frosting with it and ruin the smoothness. Put the cake back in the fridge one more time for about 30 minutes and then use a sharp knife to separate the top cardboard box square.

Push the tip of the knife just under the square and work your way around the whole cake to slice it free. Lift it up and the frosting won’t be perfect yet, but it will be very smooth except for maybe a few air pockets and some extra buttercream sticking up over the top edge.

You can trim any uneven buttercream sticking up with your knife and smooth over the top edges with your frosting smoother or

You can see the cardboard box square at the bottom of the cake, because its purpose is to be a guide for your frosting smoother so you scrape the frosting off right up to it and that leaves it visible. If you’re going to cover the bottom part cake with decorations, like a border piped with buttercream or pressing sprinkles into the frosting, you can leave the cake on the bottom square.

But if you’re not going to cover it up, you can take it off the same way you took off the square on top of the cake. Slide a knife under the visible square and cut all the way around the cake. Your knife will be in between the big square and the little square, which the cake is sitting on and because of that dot of buttercream you spread on right at the beginning, the cake is still attached to that little square.

Angle your knife sideways to lift the cake up so that you can reach underneath it and pull off the piece of tape that was sticking the small square to the large square. Then use your knife (or an

Slip your other hand underneath to cake to lift the cake off the cake board. Place a ring of tape on your final cake board that the cake is going to be served on, and lower the cake down onto that. The frosting will still be cold and hard from the fridge so it’s okay if you touch the sides of the cake while you’re doing this.

Tidy up the bottom edge by smoothing over it with your

You can save the cardboard box squares to use for another cake – just unwrap them and re-wrap them with clean parchment.

9. Tidy up any imperfections
If there are any air pockets in the frosting on top or your cake, probably near the corners, spread on a bit more frosting to fill the holes it and smooth over it with your

Now I’ll point out a few imperfections on this cake and how you can avoid or fix them. First of all, this little dot of dark blue here is gel food colour that I didn’t mix properly into the frosting.

Here there’s a dent in the frosting on the top right, an air pocket, where the frosting on the cake wasn’t as thick as it was over the rest of the cake. There are some little air bubbles on the bottom left, too. You can spread some more frosting over these parts and smooth over just that section again.

This white part here is where the crumb coat is showing through, so I probably could have used slightly bigger squares than I did. And the ridges you see in the frosting on this side, the faint lines, are caused by ridges in the cardboard cake board because it’s corrugated under the top lining, and to avoid this you can frost a cake on a smoother surface like an acrylic disc.

So you can avoid or fix all of these imperfection but even with them, I think this square cake looks stunning and I love the smooth sides and the sharpness of the angles at the edges and corners. Once you add decorations you won’t notice these little details and no one will know you use something as simple as a cardboard box to frost your cake!

I hope you’ve found this tutorial useful! I’d love to hear what you think in the comments below. If you want to try frosting a square cake without cardboard box squares, click here to watch how to do that!
Here’s the video version of this tutorial:
Can’t choose between a cookie or a cake? Enjoy both with this layered chocolate chip cookie cake!
This recipe makes a 6″ cake but you can easily double it for an 8″ or 9″ cake, or halve it for a 4″ cake
Ingredients
1 cup (2 sticks of 113g or 4oz each) butter
1/2 cup sugar
1 1/2 cups brown sugar
2 eggs
1 teaspoon vanilla extract
3 cups all-purpose flour
1 teaspoon baking soda
1/2 teaspoon salt (omit if using salted butter)
2 cups chocolate chips
1 cup 4 minute buttercream frosting
1/2 cup chocolate ganache (or use more buttercream)
Method
In a mixer, beat the butter and both kinds of sugar until the mixture is pale and creamy. Add the eggs and vanilla and mix on low until everything’s incorporated, which will take about 1 minute.

In a bowl, stir or whisk the dry ingredients (flour, baking soda and salt) together. Add them to the butter mixture and mix until just incorporated.

Add the chocolate chips and fold them into the dough with a spoon. Preheat oven to 325F (160C). Line three or four 6″ pans with circles of parchment paper but don’t grease them. Set aside 1/4 cup of dough and divide the remaining dough evenly between the pans, pressing the dough gently into the base of the pans and pushing it up to the edges of the pans.

Bake the chocolate chip cookie cake layers for about 45 minutes, checking regularly after 30 minutes. Cookies are ready when the centers don’t wobble when you shake the pans, and the edges are slightly darker but not burnt. Take them out of the oven but leave the oven on.
Run a knife or spatula around the sides of the pan to loosen the cookie layers and then turn them cookie layers onto a wire rack. Leave them to cool.

Line a baking tray with parchment paper. Use a 1/2 tablespoon measuring spoon to scoop the remaining 1/4 cup of dough into balls and place them on the baking tray to make 8 mini cookies. Bake at 350F (175C) for 8 minutes. (Please excuse my ancient baking tray!)

Prepare a batch of my 4 Minute Buttercream or for an even richer dessert try chocolate ganache. This will be the filling for your cake. Spoon the buttercream or ganache into a piping bag with whatever tip you like, or you can spread it onto the cake layers instead.

Now it’s time to assemble your cake! Pipe or spread a bit of buttercream or ganache onto th eplate or cake board you’re going to use. This will act as glue to secure your cake. Place the first cookie on top with the flat side facing down, which is the side that was on the bottom when you baked it. The flat base will make the cake more stable. Spread or pipe a layer of buttercream on top and then place the next cookie on top. Add another layer of buttercream filling and finish with the final cookie. You can turn this cookie upside down (so that the side that was on the bottom when you baked it, is now facing up) if you want the top of the cake to be flat.

Pipe swirls rosettes of frosting around the top of the cake. I used an 8B open star tip for my rosettes but any star shaped piping tip will look pretty. Straight away, while the frosting is still sticky, press a mini chocolate chip cookie into each one.

Store at room temperature for up to 3 days. Serve by slicing with a sharp knife and enoy!

If you’re looking for more ways to use chocolate chips to decorate cakes, click here!
I’d love to see your versions of this chocolate chip cookie cake! If you share any photos of them on instagram, please tag @britishgirlbakes so I can see your creations!
Here’s the video version of this tutorial:
In this tutorial I’m going to show you 10 ways to decorate cakes with chocolate chips! At the end of the tutorial I’ll share tips on melting chocolate properly and making ganache and colouring it. If you prefer to watch a video of this tutorial, scroll to the bottom of the page.
#1 Chocolate stencil cake toppers
To make stenciled chocolates to use as cake toppers, melt chocolate chips and spread them over parchment paper or wax paper. Score lines with the edge fo your

Leave to set at room temperature for about an hour or in the fridge for about 30 minutes. Then place a stencil over the top, pour more melted chocolate on top and smooth the chocolate with a frosting smoother or

Peel the stencil back to reveal the design! use a sharp knife to cut the chocolate where you made the lines earlier and the shapes should break off neatly. Dipping the knife into hot water before you cut might make it easier.

You can paint these with chocolate cake toppers with luster dusts if you like, either brushing the dust straight onto the chocolate or mixing it with vodka to make an edible paint. Press the chocolate cake toppers into a cake to add some height! For more ways to use your stencils, check out my tutorial on 16 ways to decorate cakes with stencils.

#2 Chocolate wrapped cakes
To wrap a cake in chocolate, assemble your cake and cover it in a thin coat of frosting, which needs to cover up the whole cake so it doesn’t dry out but it doesn’t need to be neat.

Put the cake in the fridge to set the frosting and then wrap a piece of parchment paper around your cake and trim it so it’s just a little bit longer and at least as tall as the cake. Melt chocolate chips and pour the melted chocolate onto the parchment, spreading the chocolate all the way over the edges.

Lift it up before it sets and wrap it around the cake, pressing it against the sides, and then put the cake back in the fridge for an hour to set the chocolate.

Pinch one end of the parchment and peel it off slowly so that you don’t break off any chocolate. Wipe off any smudges of chocolate from the cake board using a paper towel wrapped around your finger. If you use greaseproof cake boards this is really easy!

Decorate the cake with chocolates, fruit, flowers or tie a ribbon around it! Looking at the cake, you would never guess it was decorated with something as simple as parchment paper. For the neatest slices, dip a knife into hot water before you cut into this cake.

#3 Sprinkled chocolate dipped marshmallows
To make gorgeous sparkly cake toppers, poke a lollipop stick into a marshmallow, twisting to to make it stick. Melt chocolate chips and dip the marshmallow into it, tilting the bowl and spinning the marshmallow to coat it in chocolate.

Tap off any excess chocolate. Now straight away, while the chocolate is still sticky, press the marshmallow into a bowl of sprinkles, twisting it to cover the entire marshmallow.

You can push these sticks into a cake for a quick and colorful cake topper!

#4 Ombre chocolate frosting
Mix different amounts of melted chocolate chips into buttercream to create different shades of brown, which you can then use to create ombre frosting.

After crumb coating your cake with a thin layer of frosting, spread the different colours of chocolate buttercream in bands around the cake so that the colours get darker or lighter as you go down the sides of the cake. The recipe for my chocolate buttercream and how to use it for different cake decorating techniques is here.

Smooth the frosting or use a textured cake comb, filling in any air pockets in the frosting as you go by spreading more frosting of that same shade of brown over the top and then scraping with your frosting smoother or cake comb again.

#5 Chocolate shapes
To make chocolate shapes to use as cake toppers, melt chocolate chips and lay out a silicon mat or parchment paper and arrange some cookie cutters on top.

Spoon the melted chocolate into them, pushing the chocolate right up to the edges and corners of the cookie cutters. You can add gel colours to the melted chocolate first if you want to tint them. For black shapes, if you start with semisweet chocolate you won’t need to add much gel to turn the brown chocolate black. If you like you can pour sprinkles on top of the chocolate now, while the chocolate is still melted and sticky.

Leave the shapes in the cookie cutters to set or slide a cutting board underneath so that you can lift them easily and chill them in the fridge for about 30 minutes so that they set more quickly.

Lift the cookie cutters up and push the chocolate out, pushing gently all over the shape to ease it out gradually so that it doesn’t crack or snap. Attach these to a cake by piping a swirl of chocolate and pressing the shape into it to secure it.

#6 Mini chocolate chip cookies
Use chocolate chips to make chocolate chip cookie cake layers or mini chocolate chip cookies, which you can use to decorate a cake.

Pipe frosting onto the top of the cake to attach the mini cookies, using a star tip like a 1M piping tip or an open star tip like the 8B tip I used for the rosettes on this cake.

#7 Chocolate sails
For a dramatic chocolate sail, melt chocolate chips and spread them onto parchment paper. Drape the paper over a bottle or an upside down bowl and leave it to set for about an hour, or in the fridge for 30 minutes.

Gently peel the parchment paper away from the chocolate and then press the sail into the frosting on a cake or you can pipe some rosettes or swirls and push the sail into the frosting to attach it.

I have a detailed tutorial on 5 types of chocolate sails in case you’re looking for more detailed instructions. For these next 3 ideas, use chocolate chips to make ganache, which I explain in detail how to do at the end of this tutorial, with the ingredient amounts for each decorating technique.

#8 Chocolate truffles
To make truffles, after you make your ganache let it rest until it thickens, or you can speed this process up by putting the bowl in the fridge for 10 minutes at a time, stirring it to make sure lumps don’t form. Scoop the ganache up with a spoon and roll it between your hands to shape it into a ball.

You can use a tablespoon or one of these little melon ball scoopers if you want to make sure every truffle is exactly the same size. Roll the truffles in a bowl of cocoa powder or powdered sugar or sprinkles for an extra special touch.

Place the truffles on top of your cake, onto a drip that hasn’t set yet so that the truffles stick to it, or you can pipe swirls of frosting and press the truffles into those.

#9 Chocolate donut glaze
You can make donuts with cake batter using a silicon mold and use chocolate chips to make a decadent ganache glaze for them. After baking the donuts, let them cool before you glaze them.

Dip each donut in the ganache, flipping it back over onto a rack to let the ganache settle. If there’s a bubble of ganache in the hole of the donut you can tap the donuts a few times on the rack to pop the bubble, or tap the rack itself on the counter.

You can make coloured ganache for this and I’ll show you how at the end of this video. Decorate the donuts with sprinkles or crushed nuts, or drizzle them with another colour of ganache!

#10 Chocolate drips
For a chocolate ganache drip, use a squeezey bottle or a spoon to drizzle the drip around the edge of the top of the cake. Move it just over the edge of the cake wherever you want to make a drip and pause for a moment before pulling it back inwards and continuing around the cake until you want to make the next drip.

Depending on how far you pull your spoon or bottle back in off the edge of the cake after each drip, you can vary the style of drips. If you leave the bottle slightly over the edge the whole time you’ll create more of a flowing drip or if you pull it back in, onto the top of the cake, you’ll create individual strands.

I like using a bottle for more control, and it’s quicker, but a spoon works too! The ganache has to be at room temperature before you apply the drip and the cake needs to be chilled in the fridge first to stop the drips running all the way down to the bottom of the cake.

I hope you’ve seen some decorating ideas you like! Now for some tips on melting chocolate and making ganache. To melt chocolate without burning it, put it in a bowl in the microwave for 1 minute at a time at 50% power, then stir it and repeat until the chocolate is nice and smooth.

You can do this for milk chocolate, semisweet chocolate, or white chocolate chips – the process is the same. 50% power and short intervals of heating are key! If you heat it on a high heat for too long, you’ll burn the chocolate and it will seize up and become grainy, like this.

Another result of heating your chocolate for too long or at a temperature too high is that after melting, when it sets it will be discoloured, like this.

For ganache, pour out your chocolate chips, using a scale to weigh them or cups to measure them. These are the ratios for semisweet chocolate and white chocolate, to make truffles, drips, or donut glaze. For example, for truffles made with semisweet chocolate, use 2 parts of chocolate to 1 part of cream, for example 200g chocolate and 100g cream.

You can make ganache in the microwave by adding heavy whipping cream or double cream and putting the bowl in the microwave for 30 seconds. Stir it and then microwave for another 30 seconds, using these short intervals to make sure you don’t burn the ganache.

Stir the ganache after each session in the microwave, repeating until the ganache is smooth with no lumps of chocolate.

You can also make ganache on the stove. Measure your chocolate but don’t add it to the cream yet. Pour the cream into a saucepan and heat it on the stove over a medium low heat.

Wait until bubbles form around the edges of the pan but don’t let it boil! You’ll scald the cream. Take the pan off the stove and add the chocolate chips, pushing them around to cover them with the cream. Leave it like this (not on the stovetop!) for 5 minutes.

Stir the ganache until it’s smooth. If you have any lumps in your ganache, put the pan back on the stove over a low heat and stir or whisk until the ganache is smooth.

The process is the same for white chocolate. You can add white icing colour to white chocolate ganache to make it a brighter white, or add any colour. I use gel colours, the same ones I use for my buttercream. They work perfectly as long as you don’t add huge amounts of gel or stir too much after adding them, because that can cause the ganache to seize and become thick and grainy.

Coloured ganache can be used for drips or donut glaze and it looks beautiful as well as tasting delicious!

I hope this tutorial has been useful! If you prefer to watch a video version, my YouTube tutorial is below.
In this tutorial I’ll show you how to make these adorable little monster cakes in less than 10 minutes with just 4 ingredients! You don’t need any cake decorating experience for these, or any special tools – I’ll show you two techniques with a piping bag and one without. If you prefer to watch a video of this tutorial, scroll to the bottom of the page.
You’ll need 2 cupcakes for each cake. Peel the wrappers off the cupcakes and you can use the cupcakes as they are or if you want more layers inside your cake, cut them in half horizontally with a serrated knife like a bread knife. That way you’ll have 4 layers.

You can assemble your cake on a cake board like this little cardboard disc, or on a plate. (You definitely don’t need a

This attaches it and holds the cake in place. Check that it’s in the middle of the board and spread or pipe some buttercream on top, or any other filling you want to use.

Press the next cupcake down onto the filling, checking it from all sides to make sure it’s lined up straight on top of the previous layer so that the cake isn’t leaning to one side.

To assemble your cake on a plate or cake stand or cupcake pedestal, follow the same steps: secure the first cupcake with a dot of buttercream, center it, pipe filling on top and press the next cupcake layer onto it.

If you choose to cut your cupcakes in half to create more layers, continue layering cupcake and filling to assemble your cake. I’m only using 3 of the 4 cupcake halves for this monster because it’s tall enough like this. Spin the cake around and adjust it so it’s straight, and this is really important if you don’t want your cake to topple over later!

I really recommend putting your cake in the fridge or freezer for 30 minutes to chill this before continuing, and I’ll show you why in a minute. Meanwhile, make the eyes. All you’ll need is 1 marshmallow and 2 chocolate chips and a pair of scissors.

Cut off both ends of the marshmallow, thin enough so the eyes won’t bulge out of the monster but thick enough so that you can lift it up and work with it.

Use the end of a scissor blade or you can use a sharp knife to poke a hole in the middle of the marshmallow circles, or wherever you want the eyeball to be. Then poke the tip of a chocolate chip into the hole so that the flat base of the chocolate chip becomes the eyeball.

The chocolate chips will stick out now because they has nothing to grip onto but when you attach the eyes to the cake later, you’ll press the chocolate chips into the frosting and they’ll stick to it and the eyeballs will flatten against the marshmallows.

If you want the eyes to be smaller you can use mini marshmallows or use the end of a piping tip like a cookie cutter, cutting a smaller circle out. Poke a hole in each marshmallow and press a chocolate chip into it.

Colour some frosting, about a cup for each monster, and I use gel food colours to get really bright colours because they’re much more concentrated than liquid colours so they won’t make your frosting too runny.

Once your cake layers are cold, cover the cake in a thin layer of frosting. This is called a crumb coat and its purpose is to trap any crumbs that come off the cake, so that they stay in this layer of frosting and don’t get into the final layer of frosting.

The other purpose is to lock the moisture into the cake, so you need to completely cover the cake up with this layer of frosting, all the way down to the very bottom of the cake. This is especially important if you’re piping on your final layer of frosting, which we’re going to do for two of these these monsters.

That’s because piped frosting doesn’t completely cover up the cake so if you don’t do a crumb coat, the cake cake will be exposed and it will dry out. Smooth the frosting as much as you like – we’re going to frost over it so it doesn’t need to be very neat.

If you don’t chill your cake before you frost it, when you spread frosting onto the cake it will wobble from side to side and you’ll have to hold it in place so it doesn’t fall over. Cakes are much softer at room temperature than when they’re cold, so the pressure from the spatula pushes the cake sideways.

Also, the dot of buttercream at the bottom of the cake and the filling in between the layers is at room temperature for this cake, which means it’s soft and slippery. If you chill the cake, the buttercream sets and holds the cake layers still, so they won’t slide around.

When you finish frosting the cake, wipe and smudges of frosting off the cake board or plate or cake stand, using a paper towel wrapped around your finger. I like to put my cake in the fridge or freezer while I prepare my piping bag, to set the crumb coat to make frosting over it easier and neater.

I’m going to decorate two of these monsters with piping bags and one without. I’ll be using this #102 petal tip for my orange monster.

Drop the piping tip into a piping bag and drop the piping bag into a glass, folding it over the rim of the glass before you fill it with buttercream. This keeps the top fo the piping bag clean so you won’t get frosting all over your hands.

Spoon the frosting into the bag and then unfold the bag from the glass and push the frosting down to the end of the bag. There’s a wide end and a narrow end on this tip and you need to keep the wider end pressed against the cake as you pipe.

Start at the bottom of the cake and apply pressure to the piping bag to squeeze out the frosting, and wiggle the bag from side to side or up and down to pipe random ruffles of frosting. Work your way up the cake, piping a section at a time and then pulling the piping bag away to re-position it.

It doesn’t matter whether you pipe in rings around the cake or sections going up the sides but what’s important is that you always start at the bottom of the cake. If you pipe from the top to the bottom, when you get to the bottom it will be really difficult to angle the piping bag to pipe ruffles over the bottom section of the cake because the cake board or plate will be in the way.

You might see the crumb coat through the piping in places and because of that, it’s best to use the same colour of frosting for your crumb coat as you use for this piped frosting. You can use any kind of frosting for this – whipped cream, a meringue buttercream, ganache, or my 4 Minute Buttercream, which is what I’m using.

Continue onto the top of the cake, piping from one side of the top to the other. Don’t pipe all around the edge and work your way in because it will be difficult to pipe over the middle section of the cupcake without damaging the ruffles you’ve already piped around the edges.

When you’ve piped ruffles all over the cake, press the eyes into the side of the cake, pushing firmly to wedge the chocolate chips into the frosting on the cake so that they don’t poke out of the marshmallow.

For the next little monster I’m using a grass tip to make fur. Before you start piping, twist the end of the bag and that will stop the frosting oozing out of the top of the bag and it will save your wrist because you’ll need a lot less pressure to squeeze the buttercream out, than if you’re squeezing a squishy bag and pushing the buttercream back out of the top of the bag as well as down towards the piping tip.

Do a quick test to make sure the buttercream comes out of all of the holes in the tip and if it doesn’t, your frosting is either too stiff or it has lumps in it. I have a tutorial troubleshooting 25 questions about buttercream like lumps and consistency.

Start just above at the bottom of the cake, squeezing the frosting out and after it attaches to the cake, flick your wrist downwards to pull the strings of buttercream down and release your pressure on the back as you pull it away from the cake to leave neat ends to the strings.

It’s okay if the top part of each section is wiggly and messy because we’re going to cover that up with more piping. When you’ve gone all around the cake, move your piping bag up to start the next row just above the top of the previous row. You should cover up the top of the previous row, overlapping the frosting to make it look like shaggy fur.

If the top of the piping sticks out a lot from the cake, or if you’re worried about it sliding down the cake because it’s hot outside, it’s a good idea to press it gently into the cake, using the back of a spoon or an

I love both of the piping techniques for these monsters because you can’t mess it up – the styles are whimsical and messy so you can have fun with them instead of concentrating on lining things up perfectly or replicating a precise motion.

Pipe all the way up the sides of the cake and continue onto the top of the cake, piping all the way to the center of the top. Press the eyes into the frosting straight away, while the frosting is still soft so the eyes will stick to it.

And there they are! Cute little monster cakes using only 4 ingredients: cupcakes, frosting, a marshmallow and chocolate chips. Fun sidenote – I made these monsters for my son’s first birthday… Monster Max!

I like to keep my cakes in the fridge so that the frosting and decorations hold their shape. I take these tiny cakes out about an hour before serving them, which is enough time for the cake and frosting to come to room temperature and get nice and soft and delicious, but it’s not so much time that the frosting will start to droop or melt if it’s hot.

Here’s the video version of this tutorial:
In this tutorial I’m going to show you 4 ways to use cookie dough to make delicious desserts! For my recipe for cookie dough that you can safely eat straight out of the bowl, click here. For a video of this tutorial, scroll to the bottom of the page.
#1: Incorporate cookie dough in cupcakes by baking a batch of cupcakes as normal and once they’re cool, scoop a hole out of the middle of each one. Hold a knife at an angle as you cut in a circle to cut a cone shape.

You can make the hole as wide and deep as you like, depending on how much cookie dough you want to use. The idea is for the cookie dough to be a filling in the middle of the cupcake, so make sure you don’t cut all the way down to the bottom of the cupcake.

Take a spoonful of cookie dough and roll it between your hands into a ball, however big you want it to be. Now push it into the hole, pressing it down gently. It’s fine if it sticks up above the top of the cupcake like this. As you can see, I like a LOT of cookie dough!

Now pipe frosting onto the cupcake as normal. If your cookie dough is sticking up, pipe a ring of frosting around it and then spiral up over the top of it to cover it up.

I used my 4 Minute Buttercream and a 1M star tip for this swirl. When you bite or cut into the cupcake you’ll find a ball of deliciousness right in the middle!

#2: Turn cookie dough into frosting by mixing equal parts of cookie dough and frosting. You’ll need plain cookie dough without any chunks of chocolate or candy, so if you like you can set aside some for this before adding those treats to the rest of your batch. I’m using my 4 Minute Buttercream for this, too.

When you mix this together it will be silky smooth and you’ll be able to pipe it beautifully. If you had chocolate chips in the cookie dough, those would get wedged in the piping tip and block the frosting as you pipe.

This frosting tastes just like cookie dough scooped out of the bowl, but with the addition of buttercream it’s even creamier and since it’s smooth enough to pipe, it looks beautiful, too!

#3: Make cookie dough balls to serve as they are or to decorate a cake! Scoop up some cookie dough with a tablespoon and level it off with a spatula or knife so that every ball is the same size.

Roll the spoonful of cookie dough into a ball between your hands. I’ve put sprinkles in this batch of cookie dough but this would work with chocolate chips, candy, or whatever you want to use. After rolling all of your balls, put them in the fridge until you’re ready to serve them or decorate with them so that they firm up and hold their shape.

To decorate a cake with these cookie dough balls, pipe some swirls of buttercream on top of your cake and straight away, while the buttercream swirls are still soft and sticky, press a ball down into each one to attach it.

#4: Use cookie dough as a filling in cakes and the easiest way to do this is to make discs of cookie dough which you can stack between layers of cake.

Use a piece of cling film or Saran Wrap to line the pan you used to bake your cake, pushing it down to cover the bottom of the pan and drape up over the sides of the pan. Grab a handful of cookie dough and push it down into the pan.

Push the cookie dough right up to the edges of the pan so that when you use this disc later as cookie dough filling in your cake, the disc will be the same size as the layers of cake you baked. Try to get the top flat so you’ll have an even surface at the end.

Fold the plastic wrap over the cookie dough so it doesn’t dry out. You can make several of these at the same time using several pans or by making the next one on top of this one. Put the pan with the cookie dough inside it, into the fridge or freezer for about 30 minutes to harden.

When you’re ready to assemble your cake, take the pan out and lift up the wrapped cookie dough and unwrap it and it will be a firm disc that you can move around easily. Spread some buttercream on your first layer of cake to act as glue.

Now press your cookie dough disc down onto it. This cookie dough has chocolate chips in it – you can make it with anything you like and you can use any flavour of cake and frosting too.

Spread some more buttercream on top of the cookie dough to attach the next cake layer and repeat to assemble your cake. For this cake I added sprinkles to the cake batter to get these colourful dots in the cake. For the filling I’ve made Halloween candy cookie dough, using M&Ms and chopped up pieces of chocolate bars.

It’s best to store this in the fridge because of the butter and milk in the cookie dough but I recommend taking the cake out of the fridge 2-4 hours before you cut into it, so that the cookie dough and cake and frosting come to room temperature, when it tastes best.

It’s also easier to slice it then, instead of when it’s cold and hard. When you cut a slice, the layers look pretty and delicious – this is almost everyone’s favourite flavour!

I hope you enjoy this cookie dough, whether you eat it straight out of the bowl or use it in a dessert. I’d love to see what you make so please tag @britishgirlbakes in your photos on instagram so I can see!

Here’s the video version of this tutorial:
In this tutorial I’m going to show you five very easy ideas to decorate Halloween cakes! If you prefer to watch a video of this tutorial, scroll to the bottom of the page.
Spider web cake
This first technique is messy but fun! Melt marshmallows for 30 seconds in the microwave and then pinch the warm gloopy marshmallows and stretch them to make thin strands, which you can then wrap around your cake.

Your cake needs to be cold for this so that the strands of marshmallow don’t cut into the frosting. If you dip your fingers in water first, the marshmallows won’t stick to your hands as much, but it’s quite fun to get messy for this!

Wrap the marshmallows randomly around the cake, playing around with the height of each hand to change the angle that the marshmallows go onto your cake so they all overlap and tangle up like a spiderweb. You can go over the top of the cake the same way, stretching the marshmallows to make strings, or push all of your fingers together and then slowly spread them out to stretch the marshmallow out and then drape that over the top of the cake.

This covers more of the cake so it’s quicker and by doing it this way, with the marshmallows spread out into more of a sheet instead of strings, the marshmallows won’t cut into the frosting on the top edge of your cake.

You can’t go wrong with this cake design because you’re aiming for a mess so you can have a lot of fun in the process! Now we’ll take a very unfestive cake and make it Halloweeny with two different techniques.

Stencil cake
This design uses homemade stencils and a pre-made stencil. To make an eery full moon stencil, cut two circles out of parchment paper, one circle slightly bigger than the other. The bigger circle will be the glowing ring around the moon.

Press the bigger circle against the cake and spread white buttercream over it, carefully spreading from the outside of the circle towards to middle so you don’t wrinkle the stencil or push buttercream underneath the outer edge of the circle. The frosting on your cake needs to have set to do this, so this cake has been in the fridge for a few hours for the frosting to firm up.

Smooth the white buttercream with your

Use an

Press the smaller circle stencil against the cake, lining it up so that it’s in the middle of the larger circle you’ve already stencilled onto the cake. You’ll smudge some of the previous white circle with your stencil but that’s fine because we’re going for a glowing, blurry effect anyway.

Spread buttercream over the stencil to create the moon within the glow. Again, spread from just outside the edge of the circle towards the middle of the circle to keep the stencil in place.

Smooth the buttercream with your frosting smoother. You can aim for a perfectly smooth moon or leave it uneven with bumps to resemble the craters in the moon so that you don’t worry about smoothing it!

Peel your stencil off and voila! An eery full moon!

Now I’m going to use a bat stencil and you can use the whole stencil, or block off parts of the stencil using parchment paper so that only a smaller section transfers onto the cake, like this, or I’m about to use a different technique. I have a tutorial on 16 Ways To Use Stencils if you’re looking for ideas!

I just want one bat and instead of risking smudging my moon or messing up the stencil and staining my white moon with black frosting, I’m taping parchment paper onto a cutting board and then stenciling onto the parchment paper, doing 3 bats so that I have extras if my first one doesn’t work.

Peel the stencil off to reveal your bats, which are much easier to stencil onto a flat surface than onto the side of a cake! Put the bat (on the parchment paper on the board) in the freezer for 15 minutes.

If the frosting on the cake has set, it won’t be sticky anymore so the bat won’t stick to it. Spread a little bit of buttercream onto the moon to make it sticky or pipe a tiny dot where you’re going to place the bat, to act as glue.

Slide a knife underneath the bat to lift it up off the parchment paper. You can try using an

Twist the knife upwards and press it against the cake. The bat will stick to the buttercream you’ve just spread on the cake, attaching to the side of the cake.

There are endless way to use stencils to decorate cakes! Experiment with homemade parchment paper stencils and if you’re using a pre-made stencil, don’t limit yourself to applying an entire patterned stencil design to your cake!

Homemade sugar lollipops
A simple way to decorate a Halloween cake is to add some candy. I’m matching the colour scheme with these purple and black sprinkles which I’m going to turn into lollipops to add to the top of the cake.

I’m using a lollipop mold but you can pour this sugar mixture straight onto parchment paper for round (but not perfectly circular) lollipops, and then press lollipop sticks into them straight away. You can find my recipe and tutorial for homemade sugar lollipops here.

You could use Halloween candy within the lollipops instead of sprinkles, like orange and black M&Ms or candy corn. When the lollipops are cool, after about 30 minutes, lift them up and push them into your cake!

I love these lollipops because they add height and detail to cakes but they’re quick and easy to make. You can match a colour scheme or theme with the sprinkles or candy you choose to use inside the pops and you can also you molds to create them in different shapes!

Gold buttercream pumpkins
To make elegant gold pumpkins, pipe buttercream with a small star tip like a #199 to make a stem. For the body of the pumpkin you’ll need a 1M star tip.

Pipe four curved lines around each other to make the pumpkin. This is parchment paper or you can use wax paper and the reason for piping onto this instead of straight onto the cake is so that you can paint the pumpkins gold.

Put the pumpkins on the paper into the freezer for at least an hour to set and meanwhile, make some gold paint using gust luster dust and a few drops of clear alcohol like vodka, or this is almond extract and any clear coloured, alcohol based flavor extract will work.

Take your pumpkins out of the freezer and brush them with the gold paint, getting into all of the cracks and crevices with your paintbrush. Put them back in the freezer for about 30 minutes so that the paint dries.

If the frosting on your cake has set, so it’s no longer sticky, pipe or spread a bit of buttercream onto the frosting on your cake to act as glue wherever you want a pumpkin to go. Take the pumpkins out of the freezer and lift one up from the parchment paper with an

Press the pumpkin into the buttercream you’ve just piped or spread onto the side of the cake.

If you wipe off any gold paint as you push the pumpkins against the cake, you can touch them up by painting on a bit more gold paint, and you can also use your paintbrush to push the pumpkins around gently to wrap them more closely around the sides of the cake.

I have a tutorial on how to decorate this striped Halloween cake with gold buttercream pumpkins from start to finish, with the stripes and more details on the gold pumpkins, if you’re looking for step by step instructions.

Decorate the inside of your cake!
Pour Halloween coloured sprinkles into your cake batter before you bake it and the sprinkles will melt and dissolve, leaving splotches of colour in the cake.

You can do this for cakes and cupcakes, and add cookie dough filling made with Halloween candy for an even more festive touch! For cupcakes, cut out a hole in the middle with a sharp knife and then roll a spoonful of cookie dough into a ball.

Push the cookie dough ball into the hole and pipe frosting over the top for a delicious surprise when you bite into the cupcake! Click here for my recipe for edible cookie dough and 4 desserts to make with it.

You can stack this cookie dough in discs between layers of cake too, using a bit of buttercream above and below the cookie dough to make it stick to the cake. The layers of cake and cough dough filling look delicious and this is cake flavour is the most popular I’ve made for people – everyone loves cookie dough!

I hope I’ve given you some ideas for decorating your Halloween cakes and I’d love to see what you make! Please tag @britishgirlbakes in your photos on Instagram so I can see your creations!
Here’s the video version of this tutorial:
This edible cookie dough is just as indulgent as raw cookie dough but you can eat it safely straight out of the bowl!
This recipe makes enough cookie dough to fill a 3 layer, 6 inch cake. For 4 desserts to make with edible cookie dough, click here!
Ingredients
1 cup plain (all-purpose) flour
1 stick (1/2 cup or 110g) unsalted butter at room temperature
1/3 cup sugar
1/3 cup brown sugar
1 teaspoon vanilla extract
1/2 teaspoon salt (omit if using salted butter)
2 tablespoons milk
1/2 cup chocolate chips or chopped up candy or chocolate bars
Method
Gather all of your ingredients. The butter needs to be at room temperature so take it out of the fridge a few hours before you use it.

Before mixing the ingredients, bake the flour to kill any germs. Dump it onto a baking tray and shake the tray to spread it out into a thin layer. Put it into the oven at 350F or 175C for 5 minutes and then leave it to cool.

Meanwhile, beat the butter and sugars in a bowl or mixer until the mixture is smooth and creamy. Your butter needs to be very soft so make sure you take it out of the fridge a few hours before doing this.

Stir in the vanilla and then add the flour, mixing until the mixture is crumbly. Add the milk, stirring to bring the mixture together to form a dough that resembles raw cookies.

Add chocolate chips or try chopped up candy or chocolate bars or even sprinkles! For 4 ideas of desserts to make with this cookie dough, click here.

In this tutorial I’m going to show you how to create perfectly striped frosting in bright Halloween colours and how to create these elegant gold pumpkins with buttercream! If you prefer to watch a video of this tutorial, scroll to the bottom of the page.
To make the striped frosting you’ll need a crumb coated cake that’s either at room temperature or chilled in the fridge. Spread a thick layer of frosting all over the cake

The colour you choose will be the colour that’s in between every other colour of stripes, so for me this is black and it means my stripes with be black, orange, black, purple, black, green… so black will be the main colour of the cake. I’m using my black buttercream that won’t stain your teeth.

Scrape around the frosting with a frosting smoother, making sure you have straight sides and spread more buttercream over any air pockets in the frosting to fill them in and then scrape again with your frosting smoother.

The frosting doesn’t need to be perfect but the neater it is, the fewer touch ups you’ll need to do later and it’s easier to do touch ups on smooth frosting than on striped frosting. If your cake is sliding around on the

Now use a striped cake comb and rest the bottom of the comb down on the cake board to line it up straight against the side of the cake, then press it gently into the frosting and hold it still while you spin the

Do this a few times and then spread more buttercream over any air pockets you can see in the stripes. If you don’t fill these holes in with black buttercream now, then later when you add the other colours, those colours will get into the holes and you’ll get splotches of green or orange or purple within your black stripes.

Scrape around again with your striped cake comb to smooth the stripes and you can repeat this process of spreading buttercream over air pockets and then smoothing again and again until the black stripes on your cake are fairly smooth.

The stripes don’t need to be perfect because you’re going to scrape the outer layer of frosting off later, but you don’t want any air pockets in the middle of the stripes. It’s important that the edges of the stripes are smooth so that you’ll have neat divisions between the colours. If there are air pockets along the edges of the stripes you’ll have blurry edges on your stripes.
Tidy up the top edge by pushing any frosting sticking up over the top edge of the cake, over into the middle of the cake using your

If your top stripe is really thin, like mine is here, it’s difficult to get it neat so if you like you can just scrape off that top stripe with your frosting smoother and then tidy up the top edge. Put the cake in the fridge for 30 minutes or the freezer for 15 minutes and set a timer and I’ll explain why in a minute.

Meanwhile, make the colours for the rest of your stripes. To make really bright, almost neon colours, start with your basic colour like orange or green and then add a brightener, which for orange and green is yellow. You can see how bright these colours become! I go into this in much more detail in my online course on the Basics of Buttercream.

To add the coloured stripes to your cake you’ll need three piping bags, or however many colours you’re using for the stripes. Cut the tips off the piping bags so that they’re about as wide as the stripe grooves you imprinted into the frosting with your cake comb. Put a colour of buttercream in each bag.

Take your cake out of the fridge or freezer when your timer goes off and the frosting will be just cold enough so that the black stripes hold their shape and don’t squish into the stripe grooves to blend with the other colours. If you touch it, you shouldn’t be able to indent it with light pressure from your finger.

Pipe your coloured buttercream into the grooves, making sure you push the buttercream all the way into the grooves and that the colours go up to the edges of the grooves, otherwise you’ll get air pockets when you smooth the frosting.

Don’t worry if you pipe the colours over the top of the black stripes because they’ll scrape off easily in the next step. When you’ve filled in all of the grooves with colours, use you frosting smoother to scrape around the cake just like you would if you were doing smooth frosting.

You’ll scrape off some of the colours but also smear them all over the sides of the cake and that’s fine! The frosting that comes off on your frosting smoother will be all of the colours that you piped into the grooves, because you’re just taking off all of the excess right now.

Wipe any buttercream off from your frosting smoother into a bowl and scrape again. Although the cake looks messy, with coloured frosting smeared all over it and nothing that resembles stripes, don’t worry! Trust the process. With each scrape you’ll take off more of the excess of coloured buttercream.

Then you’ll start taking off the top layer of the black frosting too, so you’ll see all of the colours of buttercream come off on your frosting smoother with each scrape. At this point your frosting will be fairly smooth, and your stripes will begin to look neater.

You’ll probably have some gaps or air pockets in your frosting where the stripe grooves weren’t completely filled in with the other colours of buttercream. Fill those holes in by spreading one some more of that colour of buttercream and don’t worry if this colour spread over the surrounding stripe colours because you’re going to scrape all of that off and just leave the buttercream that’s filling in the hole.

Scrape around with your frosting smoother, and now the frosting that comes off on your frosting smoother should be in even stripes like the ones on your cake!

The reason for setting the timer when you put the cake into the fridge or freezer after using the striped cake comb on the first colour of frosting, is to make sure your frosting doesn’t get too cold.

If it’s very cold and hard, it will be difficult to smooth now and instead of coming off easily with the other colours you’ve just piped, making the frosting smoother with each scrape and also making the stripes neater and more defined, if the frosting is too cold you’ll struggle to scrape off that top layer and you’ll leave jagged texture in the cold frosting.

When you’re happy with your stripes you can either tidy up the top edge as normal, or you can put the cake back in the fridge or freezer for about 30 minutes to set the frosting and then use a sharp knife to trim around the top edge of the cake to take that excess frosting off from around the top and leave a nice sharp angle around the top edge.

When the cake is cold, wipe around the cake board with a paper towel to take off any smudges of frosting and now we’re going to make this cake even more Halloweeny!

To make some elegant gold pumpkins you’ll need two piping bags of buttercream, one fitted with a 1M star tip and the other with a smaller open star tip like this #199. I use my 4 Minute Buttercream because it sets firm when it’s cold, which makes it possible to turn it gold later.

Spread out a piece of parchment or wax paper big enough to fit however many pumpkins you’ll need for your cake, plus an extra one to be safe! Use the piping bag with the smaller piping tip to pipe a stem, starting at the top of the stem because where you start is the neatest part, and the top is the part that will be visible at the end.

Switch to your 1M tip to pipe the pumpkin, piping two curved lines for the middle and two more curved lines around the outside, always piping from the top down because where you start piping is the neatest and we’re not going to see the messier parts at the bottom when we’re finished.

The beauty of piping these onto paper instead of straight onto the cake is two-fold. Firstly, it’s easier to pipe downwards that onto the side of a cake, so your lines will be smoother and neater this way.

But also, you can practice and experiment as much as you like until you’ve made enough pumpkins that you’re happy with, and use only those on your cake. You can scrape any ugly pumpkins off the paper and put the buttercream back in your bowl to re-use for something else.

Slide a cutting board or baking tray under the paper and put them in the freezer for at least an hour to set. Just before you take them out, make some gold paint using gust luster dust and a few drops of clear alcohol like vodka, or this is almond extract and any clear coloured, alcohol based flavor extract will work.

You want a fairly thick paste to get a strong golden colour. If you add too much liquid, it will evaporate and the paint will get thicker or you can add a bit more powder to thicken it up straight away. Take your pumpkins out of the freezer and brush them with the gold paint.

A large paintbrush will be quicker but it’s useful to have a fairly small tip to be able to get into all of the creases within the piping, so if you like you can use two different brushes for this.

Spin the paper around to check the pumpkin from different angles to make sure you’ve covered all of the buttercream with gold paint but don’t worry about the very bottom of the pumpkin because that’s going to be pressed down on the cake board so you won’t see it.

If you notice the buttercream getting soft while you’re painting, and the paintbrush is sticking to the pumpkins or texturing them as you paint, put them back in the freezer for a few minutes.

When you’ve painted all of your pumpkins, save your leftover paint for later. Put the pumpkins into the freezer for about an hour so that the gold paint dries and so that the buttercream firms up again, because it will have warmed up and softened while you paint.

Now pipe or spread a bit of buttercream onto the frosting on your cake wherever you want to place a pumpkin. The buttercream will act as glue to attach the pumpkin to the frosting on the cake, which has set and is no longer sticky.

Lift a pumpkin up with your

After you’ve arranged your pumpkins, wrap a strip of parchment or wax paper around them and press gently to curve the pumpkins to wrap them more tightly around the cake. They will have softened a bit at room temperature so they should curve easily but if they crack, don’t worry, we’re about to touch them up.

Add a drop of alcohol or extract to your leftover gold paint if it’s dried up and paint any areas of the pumpkins where the white buttercream is showing through, where you pressed them onto the cake and wiped off the gold paint.

If the pumpkins have cracked anywhere, paint over the cracks and you’ll disguise them. You can use your paintbrush to manipulate the buttercream too, pushing sections of piping back towards the cake if they’re still sticking out.

I’m piping some swirls of buttercream onto top of the cake using a 1M star tip and I’m using a clock method to space them equally around the cake. To do this, pipe the first two swirls opposite each other at 12 o’clock and 6 o’clock and then the next two at 3 o’clock and 9 o’clock.

Look at the other swirls as you pipe to make sure you finish each one at the same height. Then adding another swirl in the gaps in between those swirls. For each swirl, aim to get right up to the edge of the cake without piping over the edge.

As a finishing touch I’m pressing a few sprinkles into the frosting, and although the frosting has set because I chilled it to make the stripes, with just a little bit of pressure I can push the sprinkles into the frosting and they’ll stick.

And there it is! A colorful cake with elegant gold pumpkins, all made with buttercream frosting! If you make this cake, please tag @britishgirlbakes in your photos on instagram so I can see your version! If you’re looking for more ideas, check out my tutorial on 20 Ways to Decorate Gold Cakes.

Here’s the video version of this tutorial:
