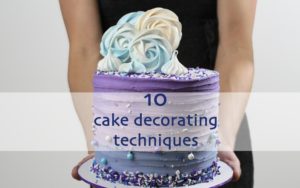
I’m going to show you how to make 10 EPIC rainbow cakes! If you prefer to watch a video of this tutorial, scroll to the bottom of the page.
1. Rainbow Stencil Cake
I’ll start with this dramatic black cake with a rainbow stencil design and it has a rainbow on the inside as well!
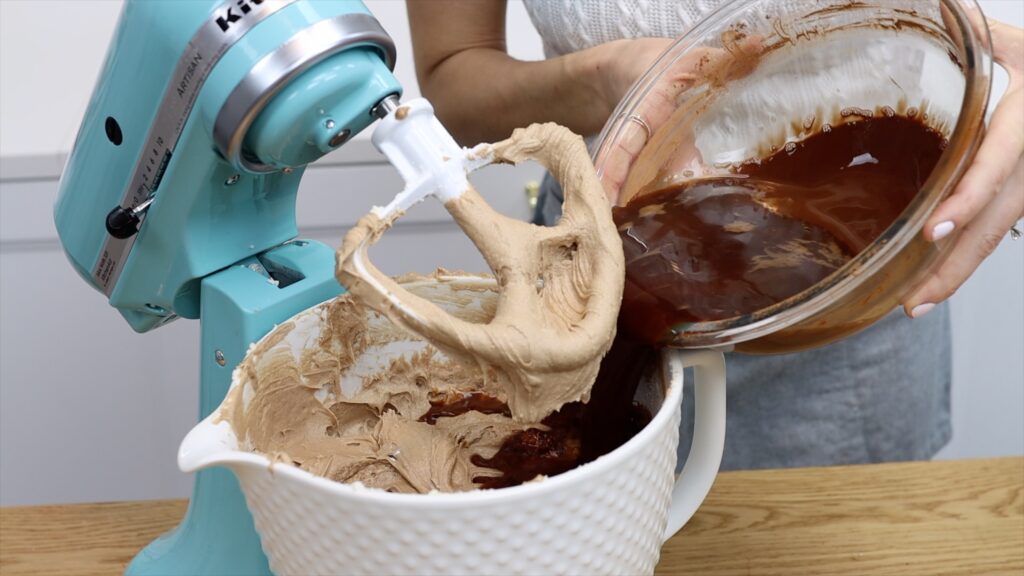
To assemble the cake I’m dividing 4 cake layers in half to make 8 layers, which will make space for 7 layers of filling – one for each colour of the rainbow!
Spread or pipe rainbow coloured filling onto each layer. I’m using a 1M star tip but you can use a piping bag with no tip for this, or spread on the filling onto the cake layers with an offset spatula instead.
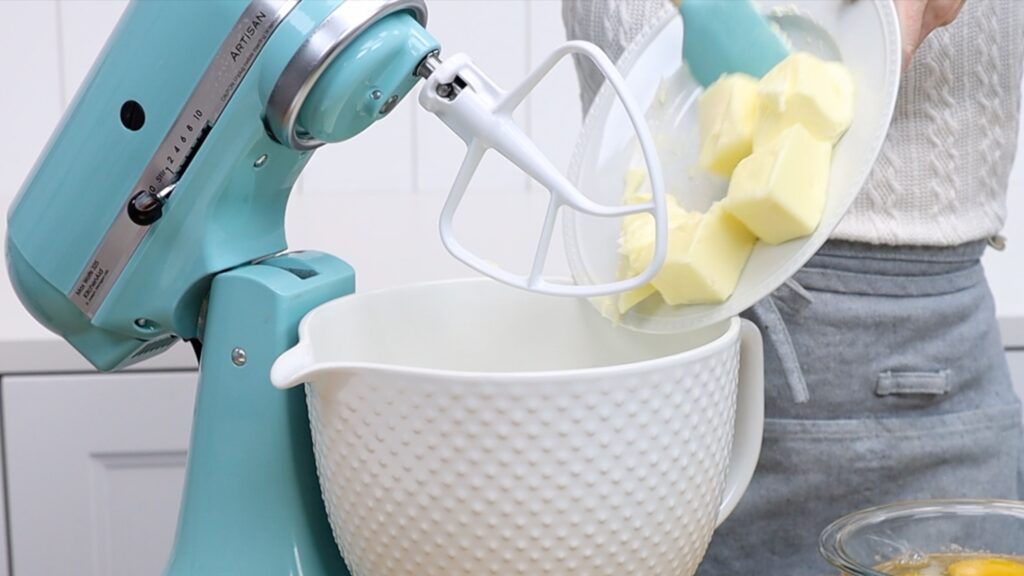
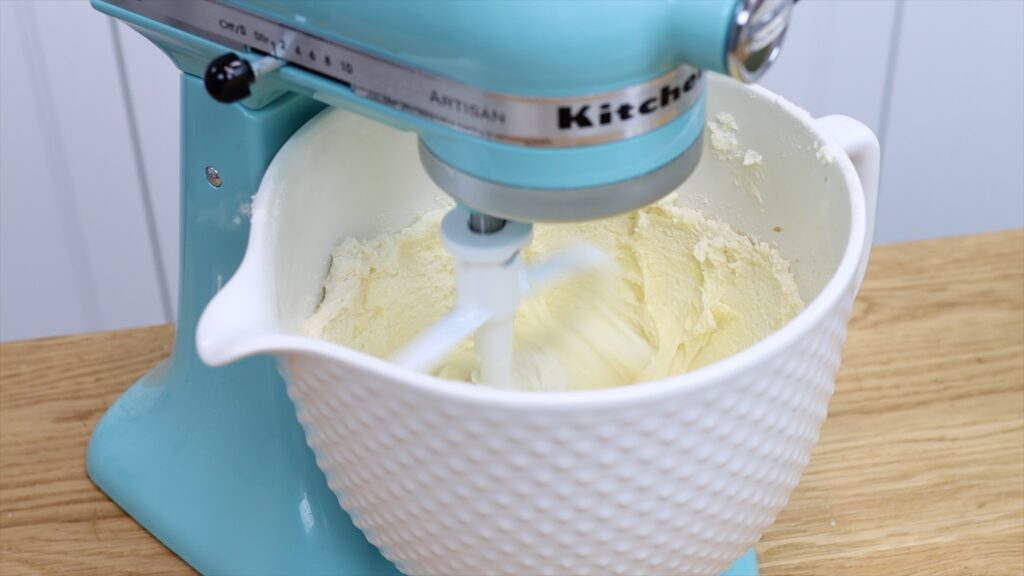
This is my 4 Minute Buttercream and I’ve used gel colours to tint small batches of each colour. Save any leftover buttercream of each colour to use for the rainbow cake decorations later.
I’m using my black buttercream to frost the cake, which I love because it’s a deep black colour but won’t stain your teeth when you eat it!
After giving the cake a crumb coat and letting it set, add a final coat of frosting. If you’re struggling with smooth frosting, check out my tutorial on how to get perfectly smooth frosting with sharp edges. You can use any colour for this but I love how the rainbow colours stand out on black frosting.
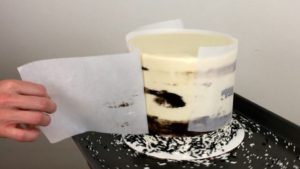
Chill the cake to set the frosting before using the stencil. You need to it be very firm so leave it in the fridge for at least an hour.
You can use any design of stencil and if you want the design to go all the way down to the bottom of the cake you can cut the bottom section off.
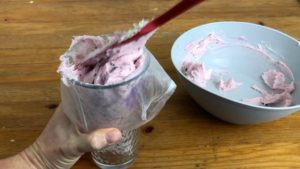
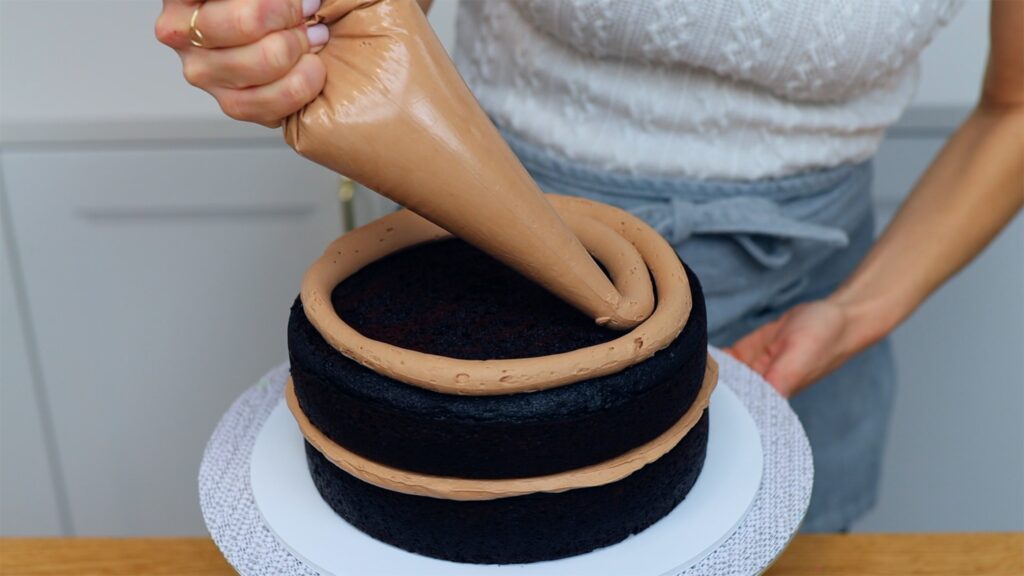
I’m going to use the leftover buttercream from filling my cake, to apply onto the stencil. If you do this, cover the frosting with cling film or saran wrap until you’re ready to use it so that it doesn’t crust.
Place your chilled cake on a nonslip mat on a turntable and line the stencil up so it’s resting on the cake board, to make sure the design goes all the way down to the bottom of the cake, and then wrap the stencil around the cake and pin it into the cake to secure it.
Now spread your first colour onto the stencil with your offset spatula, covering the entire width of the stencil. Don’t worry about the buttercream being smooth yet.
Use all of your buttercream colours to spread rows of buttercream onto the stencil. The rows don’t have to be perfectly even or straight because they’re going to blend together in a minute, so it doesn’t need to be precise.
When the stencil is covered with buttercream, scrape off any excess buttercream to leave a smooth layer, which should be as thin as possible for the neatest results. You can use an offset spatula for this but I find it easier to get a smooth finish with a frosting smoother.
Pull out the pins and peel the stencil off, being careful not to let any part of the stencil brush against the cake again after you’ve lifted it because that will smudge the design.
Chill the cake again to set this part of the design and then wrap the stencil around the next part of the cake, pinning it in place again. It’s essential to let the first section of the design set before doing this, otherwise you’ll smudge it when you press the edge of the stencil over the first section.
You’ll need to wash and dry the stencil and your frosting smoother after doing each section. Repeat the process until you’ve covered the whole cake with a beautiful rainbow coloured stencil design!
Tidy up the top edge by scraping off any buttercream sticking up, using your offset spatula, and because the frosting on the cake is chilled and set, you’ll be able to scrape the buttercream of the stencil design off easily without damaging the frosting on the cake.
If there are any areas where the design didn’t go through the stencil you can chill the cake again and then carefully line the stencil up over that area and spread more buttercream over it to fill in that part of the design.
It’s a bit tricky to line it up perfectly but with a busy pattern like this you won’t really notice if the design isn’t perfectly lined up.
2. Rainbow Number Cake
If you hate smoothing frosting, this rainbow number cake is for you! Start by making rainbow coloured meringues, and I cover the recipe and all of the steps for this in my full tutorial on how to make this Rainbow Number Cake from start to finish.
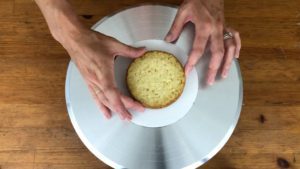
Then optionally, carve your cake layers. You can create this rainbow cake with numbers or letters or shapes or just use plain round or square cakes right out of the baking pan.
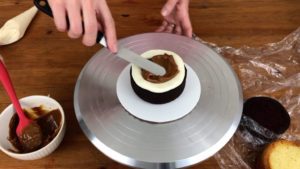
Attach the cakes to a cake board using dollops of buttercream wherever you want them to go and the buttercream will act as a glue to secure the cake layers.
Pipe buttercream onto each cake using a piping bag fitted with whatever tip you like. Here I’m using a 1A round tip, but you can pipe swirls or rosettes or open stars if you prefer.
After covering the first layer of cake with piped buttercream, carefully lower the next layer of cake on top. If you’re nervous about needing to adjust the cake to shift the position, which would smudge the piped buttercream below, you can chill the whole cake on the cake board to set the piped buttercream before adding the next layer of cake.
Pipe another layer of buttercream onto the cake. For naked cakes like this I use simple syrup to keep my cake layers moist and I store them in an airtight container overnight so that they don’t dry out by the next day.
Immediately after piping on the final layer of buttercream, arrange your rainbow meringues on top of the buttercream. Since the buttercream is fresh and sticky they’ll attach easily.
I added rainbow macarons as decorations as well – you can get creative with rainbow coloured candies or flowers, or if you want a touch of gold you can use chocolates with gold wrappers. This is such a simple cake to put together but it’s a real showstopper!
3. Rainbow Sprinkled Frosting Cake with Rainbow Sprinkled Oreos
This is a really fun way to incorporate sprinkles into your cake!
Set aside a little bit of frosting for touchups and piping swirls later and then pour a generous amount of sprinkles into the rest of your frosting. I find that these little rods, or jimmie sprinkles, work the best. You probably won’t notice the shape of shaped sprinkles (unicorns, hearts etc) because they’re unlikely to end up facing outwards.
Give your cake a crumb coat, let it set, and then frost your cake as normal with the sprinkled buttercream.
You’ll notice that when you smooth the frosting, some of the sprinkles will get caught by your frosting smoother and dragged around the cake and they’ll leave a trail behind, an indent in the side of your cake.
Before using your frosting smoother to scrape around the cake again, spread on some of the frosting without sprinkles that you set aside at the beginning.
When you scrape around the cake with your frosting smoother again, the plain buttercream will fill in any indents made by the sprinkles and your frosting will be smooth! Tidy up the top edge and spoon the rest of your buttercream without sprinkles into a piping bag with a 1M star tip, for later.
Chill your cake for the next step and now we’re ready for some really fun sprinkled decorations! To make a very neat sprinkle border around the bottom of the cake, place your cake on a baking tray to catch any sprinkles that fall and pour your sprinkles around the cake board.
Wrap a strip of parchment paper around the cake, leaving the bottom inch or two exposed and that’s where the sprinkles will stick to the frosting. The cake needs to be chilled otherwise the parchment will texture and damage the freshly-applied frosting. You can use pins to attach the parchment paper to the cake or just hold it in place. Press the sprinkles into the frosting using your hands or an offset spatula or a spoon.
You’ll have to use quite a bit of pressure to get the sprinkles to stick because the frosting has set, but the advantage of this is that you won’t damage the frosting, which you might do if it was still soft. If you like, you can spread fresh buttercream onto the frosting that’s exposed below the parchment and press the sprinkles onto that instead. Peel the parchment paper off to reveal your sprinkle border!
Separate Oreos or any other sandwich cookies. We want the halves with no filling, and the most effective way to separate them neatly is to pull the two halves apart, rather than twisting them, because if you twist them you usually end up with half of the filling on one cookie and half for the other.
Use the halves with no filling, or if you want you can scrape the filling off the other halves and use those too. I need 16 cookies to make 8 cookie sandwiches, because I’m going to pipe 8 swirls on top of my cake and I need a cookie sandwich for each swirl. You’ll also need buttercream in a piping bag with a round tip and a bowl of sprinkles.
If you want more of the Oreo filling flavour you can stir the scraped cookie filling into your buttercream! Pipe a ring of buttercream onto a cookie, not going right up to the edges because you don’t want it to bulge out later, and then gently press another cookie on top to make a cookie sandwich.
Now roll the cookie in the bowl of sprinkles so that the sprinkles stick to the buttercream you’ve just piped on, spinning the cookie between your fingers so that the whole ring of buttercream is coated with sprinkles.
Do this for all of your cookies. If the sprinkles are sticking out in every direction you can roll the cookie along a cutting board or a baking tray to push them in so they’re a bit tidier.
Now take your piping bag and your Oreos and we’re going to decorate the top of the cake! Pipe a dab of buttercream at 8 places around the outer edge of the cake, piping opposite each one to space them evenly around the cake.
This fresh buttercream will act as a glue to attach the cookies. Press a rainbow Oreo into each dab of buttercream, pushing firmly down to secure it.
Hold your piping bag in between two cookies and pipe a swirl, going right up to the sides of the cookies and stopping the swirl when you get to the top of the cookies.
By placing the Oreos first, you’re making sure that the swirls and Oreos are spaced evenly around the cake and that the swirls are the same width and height.
As a sidenote, this is one of my favourite rainbow cakes, with sparkly stripes of rainbow colours and a shiny sugar topper. I teach how to make this step by step in an online class on my online cake school.
4. Rainbow Cake Layers
This is another cake with rainbow layers on the inside, this time with rainbow coloured sprinkles baked into the cake layers.
Tiny non-pareil sprinkles work really well for this because they dissolve as they bake, leaving their colour in speckles throughout the cake without adding any texture to the cake.
Divide your batter between your greased cake pans. Pour the sprinkles into the pans and then gently swirl them in using the end of a spatula or spoon. You can do this in bowls instead and then pour the batter into pans, but this makes less mess!
You’ll need quite thin layers of cake for this because you’re going to have lot of layers – I’m using six but you can do more or less if you like. Bake the layers as normal and you’ll see the pretty specks of colour in them.
Let them cool and then assemble your cake by layering the cakes with filling. I’m going in the order of the colours of the rainbow with purple at the bottom and red at the top.
Give your cake a crumb coat and since the cake is so tall it’s essential to secure the cake properly to the cake board. I teach how to do that along with mixing, baking, leveling, dividing, assembling, crumb coating, frosting, storing, transporting and serving cakes in my online course, the Basics of Cake.
When you cut into the cake, the inside is just as colorful as the outside!
5. One Bag Piped Rainbow Cake
Now for a very very easy technique! Tint small bowls of buttercream with gel colours and the beauty of this technique is that you only need ONE piping bag! You can use whatever star shaped tip you like – I’m using a Wilton 199 open star tip.
Spread out some cling film and along the middle, place a dab of buttercream of each of the colours you’re going to use. It’s possible to spoon the colours straight into a piping bag but much easier this way!
Roll the cling film up and twist the ends and then cut off one end, the end you’re going to start with. Place this end down into your piping bag.
Place a crumb coated cake on a turntable and rest the piping bag on the cake board to start at the very bottom of the cake and squeeze out a little rosette of buttercream from the bag. Continue around the bottom of the cake, piping the rosettes right next to each other so that there aren’t any gaps in between them.
Then move the piping bag up a little bit so that you can pipe another row of rosettes immediately above the previous row. It works well to pipe each rosette of this row in between the two rosettes beneath it, so that it covers up the dip in the frosting and that makes sure the crumb coat is completely covered.
As you continue up the cake you’ll notice new colours slowly start to appear in the rosette you’re piping, as the colours higher up in the bag start to push through the middle of the colors lower down. This makes a really pretty blended effect over the cake as the colours gradually blend from the first colour in the piping bag, all the way through the other colours.
If you run out of buttercream, pull the cling film out of the piping bag and then add more buttercream to the bag. Go all the way to the top of the sides of the cake with your rows of rosettes, and keep piping until your final row sticks up over the top edge of the cake. Then pipe rings of rosettes within that top row, continuing towards the center of the top of the cake to cover the entire surface.
And there it is! Dramatic, colourful texture!
6. Rainbow Russian Tips Tray Bake Cake
This stunning rainbow flower cake is a tray bake cake, which is the quickest kind cake to make and decorate!
Pour your cake batter or brownie batter or cookie dough into a casserole dish or a baking tray and bake it and then decorate it within that dish or tray, so you don’t have to level and divide and layer your cake, or cover it with smooth frosting.
I’m using Russian tips or flower nozzles for this cake with a different bag of coloured buttercream for each row of flowers, some them plain colours, some of them randomly blended, and some of them prepared with one colour for the inner part of the flower and another colour for the outer petals.
This is just a snapshot of how I decorated this cake but I have a very detailed tutorial on 5 Tricks For Russian Tips showing how to get the right consistency for your buttercream and how to prepare the buttercream and use the tips, and another tutorial on how to make and decorate and store tray bake cakes.
Fit a piping bag with a coupler so that you can use different tips without emptying the bag, and then fill it with a very small amount of purple buttercream and pipe whatever design you like in a small section of the bottom of the cake.
I’m starting with a small petal tip, a Wilton 104, piping little ruffles and then unscrewing the coupler, taking the tip off, and replacing it with a Wilton 199 tip, an open star, to pipe some rosettes. My final tip is a drop flower tip to pipe little stars to fill in any gaps.
I’m following the same steps for blue with my next piping bag, also using a coupler and using the same three tips, washed first of course, or you could use different tips for each colour if you wanted to.
I’m working my way up in a diagonal and I love how the colours and textures stand out against the black and white icing sheet!
Before frosting your cake, pipe or spread small strips of rainbow coloured buttercream onto a piece of parchment paper placed on a cutting board.
Spread the buttercream as thin and smooth as you can with your offset spatula. Then put the cutting board in the fridge with the parchment paper to chill and set the buttercream for at least 30 minutes.
Take it out and use a cookie cutter to cut out shapes. If they pull up with the cutter, gently push them back through the cutter and place them on the parchment paper for later.
Work your way through all of the colours, wiping the cookie cutter clean with a paper towel after each colour so you don’t smudge the stars of the next colour with that previous colour.
If the stars stay behind on the parchment paper, use a sharp knife to lift them up. If the buttercream starts to warm up and soften as you’re doing this, put the cutting board back with the parchment paper back in the fridge for a few minutes until the buttercream chills and firms up and then continue.
When you’ve set all of the stars to one side, put them back in the fridge while you frost your cake. I’ve used my black cocoa buttercream for this cake. As soon as you’ve smoothed the frosting, while it’s still sticky, take the stars out of the fridge and press them against the frosting so that they stick.
You can create whatever pattern or design you like and these buttercream cut-out shapes have the effect of fondant with the taste of buttercream!
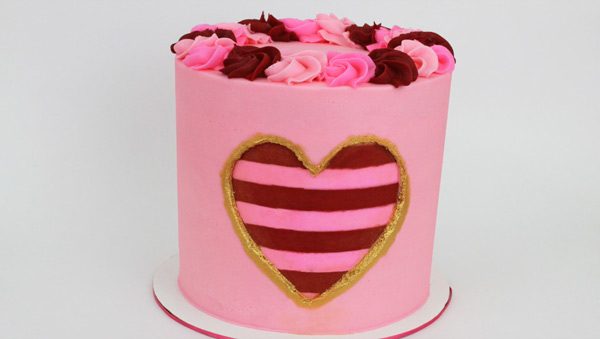
9. Piped Rainbow Heart Cake
The combination of colours and texture on this cake are eye-catching and good news: it’s much easier to decorate than it looks!
Start by frosting the cake however you like. I’m using a textured cake comb to make textured frosting for this one, This texture is really useful as a guide for how many lines of each colour to pipe. I’m going to use 8 colours so I’ll pipe each colour just between two of the grooves of the texture.
Draw a heart or any other shape onto your cake as an outline for your design. I’ve cut this heart out of parchment paper to trace around but to do this you have to the frosting set before you press the shape against it. I left this cake in the fridge for an hour before doing this.
Use a petal tip (I’m using a Wilton 104) and pipe your first colour of buttercream at the bottom of the shape, piping lines that start at one edge of the outline and finish at the other. It’s best to start at the bottom and work your way up because it’s easier to see what you’re doing, and also to hold your piping bag so that you’re piping on top of each ruffle, instead of trying to angle it to pipe underneath the previous ruffle.
If you want to tidy up any of your lines you can use an offset spatula or a toothpick to manipulate them now, while the buttercream is still soft and pliable.
Hold the piping bag with the narrow end of the tip pointing away from the cake and the wider end pressed against the cake and that makes the outer edge of the line really thin and creates a bit of movement, like a ruffle.
If only have one piping tip then having several piping bags and a coupler is really useful so that you can take the tip off, wash it, and use it in another piping bag the next colour, without first having to squeeze out all of the buttercream from the first bag and wash and dry and refill it with the next colour.
This top section of the heart is a bit different, only because you’re piping two separate lines across each ruffle to leave that indent in the top of the heart.
I’ve piped the ruffles a bit too far apart from each other, so you can see the frosting showing in between some of the ruffles. I’m going back in to fill those areas in with some short little ruffles to cover up the frosting, and because the ruffles are so unique and random, you don’t really notice.
Of course, you can use whatever colours you like for this, so you can stick to the 7 traditional colours of the rainbow or vary it, like here where I’ve added teal green and lime green to the spectrum.
If you want to add a gold outline to the heart, chill the cake in the fridge for about an hour to set the ruffles and then use a paintbrush to lift gold sheets from their baking and transfer them onto the edge of the frosting.
Gold sheets stick to anything they touch so you don’t need a lot of pressure at all for this, just gently guide where you want it to go.
I love how versatile this design is because it makes it so simple to pipe a shape, and the texture and colours are really eyecatching! A pretty topper finishes it off nicely.
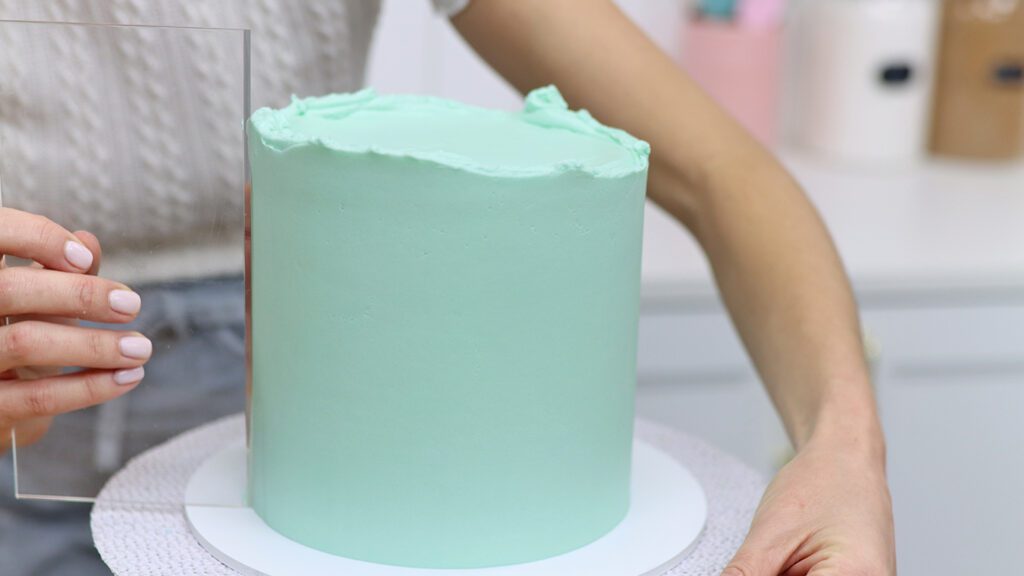
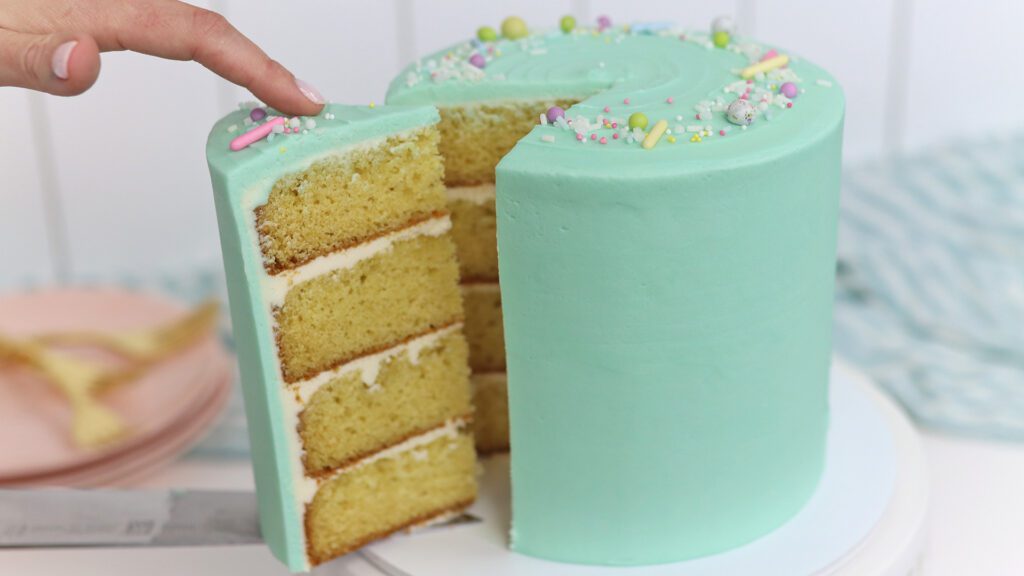
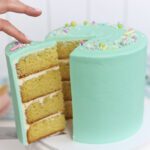
10. Vertical rainbow stripes
This last one is a technique I’m really excited about: vertical stripes!
Tape a piece of acetate onto a cutting board and cover it with buttercream. The acetate needs to be at least as tall as the cake and wide enough to wrap around the cake, plus an inch or two. Spread the buttercream so that it’s flat and the same thickness all over. You need to push the buttercream down to fill in the grooves indented in the buttercream, otherwise you’ll have air pockets later.
Scrape the buttercream with a striped cake comb to imprint grooves in the buttercream. I have a very detailed tutorial on this technique with more details about how to imprint really neat stripes and some troubleshooting tips for tidying up the stripes at the end. Chill the buttercream until the buttercream sets, about 15 minutes in the fridge,
While the stripes are chilling, fill piping bags with the colours you’re going to use for your stripes. The piping bags can have no tips or you can use round or open star tips – anything approximately the same width as the stripe grooves will work.
Fill in the stripe grooves with your colours. You need to push the buttercream down to completely fill in the stripe grooves, otherwise you’ll have air pockets later. Don’t worry that you’re smearing the colours together – this is the inside of the cake and this side won’t be visible.
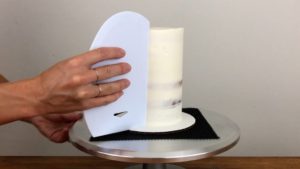
Lift the acetate up, resting the bottom of the acetate on the cake board, and wrap it around a crumb coated cake. Press it to attach it to the crumb coat of the cake but don’t use so much pressure that you warp the stripes.
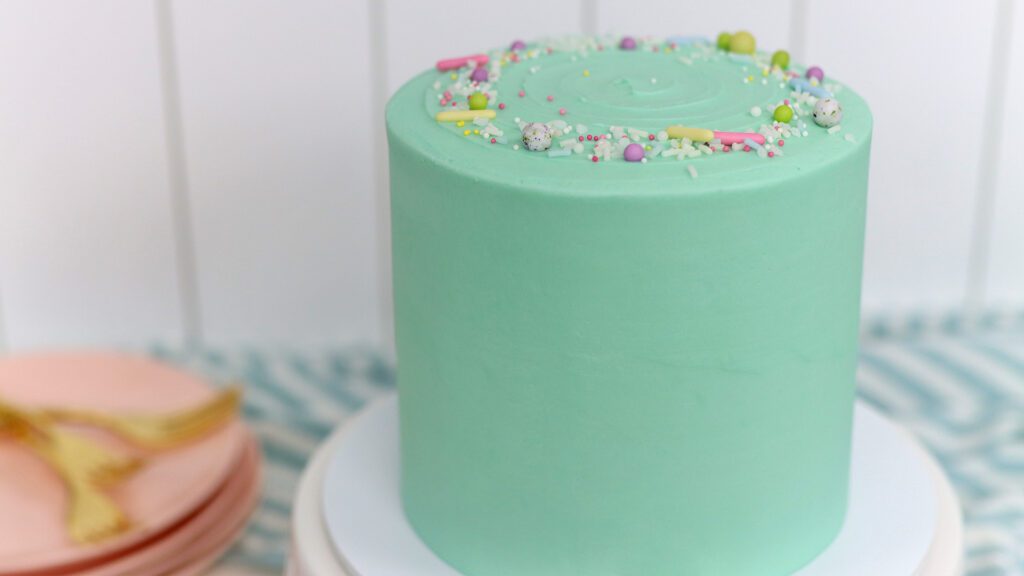
Chill the cake to set the striped frosting, which will take about 30 minutes in the fridge. Peel the acetate off to reveal the vertical stripes underneath!
You can trim the buttercream if you need to, if the acetate is taller than your cake. Then spread buttercream onto the top of the cake so that it’s the same height as the sides of the cake and smooth it with an offset spatula or frosting smoother.
Do any touchups (I cover those in my full tutorial on vertical stripes) and then decorate the cake however you like! I’m using cling film to prepare buttercream to pipe rainbow swirls on top of my cake, piping on all of the colours into the middle of a piece of cling film.
Wrap the cling film around the buttercream to make a log and then cut off one end and drop it with that end down into a piping bag. I’m using 1M star tip but any closed or open star tip would work.
Pipe swirls onto the top of the cake, holding the bag in the same position around the cake so that the colours stay the same direction all around the cake.
I hope you’ve found some fun rainbow ideas to try and I’d love to see your creations so please tag me (@britishgirlbakes) in your cake photos on instagram!
Here’s the video version of this tutorial:
If you travel to visit friends or family, I’m sure you’ve been tempted to take them a cake but the logistics of taking it on a flight or in a fully packed car seem too daunting. In this tutorial I’m going to share the steps and essential packing list to transport a cake in your suitcase, and also how to do this with cupcakes. If you’d prefer to watch a video version of this tutorial, scroll to the bottom of the page.
Of course, you could bake, frost and decorate your cake, put it in a cake caddy or cake box, and fly with it on your lap or under the seat in front of you. But if your trips look anything like my family trips, with enough suitcases to move countries even though you’re only going somewhere for a weekend, that’s probably not a realistic option.
If you do choose to travel with a fully decorated cake, use a box at least 4 inches bigger than your cake. This provides there’s enough space around the cake so it doesn’t get damaged if you knock the box or you have to put it through a security scanner at the airport. Use masking tape or a non-slip mat to secure the cake board in place inside the box.
For my method to travel with a cake in your suitcase, the first step is to bake your cake. Bake the cake as normal up to a month before you travel.
Level and divide the cake layers it if you want more layers of cake (and filling!). I strongly suggest drizzling the cake layers with simple syrup to keep them moist, since you’re going to be freezing them and because the cake probably won’t be eaten on the same day you take the layers out of the freezer. Make simple syrup by simmering equal parts of water and sugar until the sugar dissolves and once it cools, brush or drizzle it over your cake layers.
Next, make your frosting. If you’re using my 4 Minute Buttercream as a filling, assemble your cake now by spreading buttercream onto each cake layer and lining the next layer of cake up evenly on top. This ensures a straight cake.
I don’t recommend assembling before travelling if you’re using fillings that need to be refrigerated (like lemon curd or whipped cream, because they’ll be out of the fridge for several hours while you travel) or if your filling isn’t as stiff as buttercream (for example, pudding or custard or fresh fruit or other unstable or slippery fillings) because your cake won’t be as stable when you travel.
For those fillings, don’t assemble the cake and instead, wrap your cake layers individually in two layers of cling film or saran wrap. You’ll assemble the cake when you get to your destination, where you can buy fresh whipped cream or fruit or whatever else you’re using for the filling.
If you’ve assembled your cake, wrap the entire thing in cling film or Saran Wrap, using 2 layers to make sure it’s airtight and that nothing will leak later.
The cake will be fine in the freezer for up to a month. Individual cake layers will also freeze well for up to a month. Freezing the cake or layers makes them more stable to transport and also means you can prepare ahead of time.
Put your buttercream into a ziploc bag and press it flat, squeezing the air out of the bag before you seal it. The bag will need to fit inside your coolbox (explained later!) so if the ziploc bag is too big, fold it in half before you freeze it.
On the day you travel, take the cake and frosting out of the freezer and place them in a cool box or lunchbox with an icepack, or several icepacks if you can fit them. The cake and frosting will defrost on your journey, so by the time you get there they’ll be thawed and ready for the final steps, but you want this to happen as slowly as possible and that’s the reason for the icepacks.
Prepare the cool box just before you leave the house and place it in your suitcase. This way, the contents will stay cold for as long as possible.
You’ll also need an offset spatula and if you’re going somewhere with no kitchen utensils, you’ll need to pack a plate, which can just be a plastic plate, and ideally a rubber or silicone spatula as well. If you’re going to someone’s house they’ll probably have these things for you to use.
Optionally, you can pack any decorating supplies, like a piping bag and piping tip and sprinkles.
For cupcakes, the steps are very similar. Bake the cupcakes as normal and after they cool, arrange them in a tupperware container.
It’s important that the cupcakes fit snugly in the tupperware so they don’t move around when you travel. If you have space in between the cupcakes you can use scrunched up paper towels to fill the spaces.
This way, even if the tupperware gets shaken around or flipped upside down while you’re travelling, the cupcakes won’t get knocked against the sides of the tupperware or squished against each other.
Make your buttercream and freeze it in a ziploc bag. Freeze your tupperware of cupcakes as well. You could use a large ziplock bag instead but a tupperware will protect them better for travel. Freezing everything keeps them stable, cool and undamaged during transport.
On the day you travel you can either put the cupcakes and frosting in a cool box in your suitcase, like I did with my cake, or if they don’t fit you can wrap them in a plastic bag. I recommend wrapping the plastic bag in a towel so that if there’s any condensation as they defrost, they won’t wet anything in your suitcase. Also pack a piping bag and your favourite piping tip – mine is a Wilton 1M.
When you get to your destination, take the coolbox out of your suitcase and remove the cake and frosting. I’m squeezing my buttercream out of the ziploc bag into a bowl but you can use it straight out of the ziplock bag to minimize tools and the number of dishes to wash up!
If you decided to travel with a cake in your suitcase, put a dollop of frosting onto the middle of your plate and press the cake on top so that it sticks to the frosting.
Now cover the whole cake in frosting using your offset spatula, trying to get an even coating over the cake that’s thicken enough to cover up the cake so you can’t see it through the frosting.
I have a tutorial on how to get perfectly smooth frosting but it’s not realistic when you’re working without a turntable and on a plate with these raised edges, which means that even if you took a frosting smoother with you, you wouldn’t be able to line it up straight against the sides of the cake.
Instead of attempting to smooth the frosting, I like to apply texture with a piping bag or with my offset spatula. For this cake I’m making swooshes by swiping my offset spatula up along the frosting from the bottom to the top of the cake, going all around the sides of the cake.
Wipe the offset spatula off on a bowl whenever the frosting starts to build up so that it doesn’t drag dregs of buttercream back onto the cake for the next swoosh. You can try using the back of a spoon for this same technique to get a slightly different shaped texture. Check out my tutorial on easy ways to frost a cake with different textures that don’t need a turntable or any special tools, just an offset spatula and a piping bag and tip.
I’m adding some sprinkles as a final touch and voila!
A delicious, homemade cake made with love and easily transported, in this case to Seattle!
If you chose to travel with cupcakes in your suitcase, when you get to your destination the cupcakes and frosting will have thawed.
Squeeze the frosting into your piping bag and pipe swirls of frosting onto the cupcakes.
To make the cupcakes more celebratory, add some sprinkles straight after piping on the buttercream, while it’s still sticky.
You won’t believe how moist and fluffy the cupcakes are after defrosting – I honestly can’t taste the difference between freshly baked cupcakes and ones that have been frozen!
I hope this tutorial was helpful and that you can take a cake or cupcakes with you next time you travel. I took these cupcakes and cake to Seattle, Washington! I’d love to see your experiences… please tag @britishgirlbakes in your photos on Instagram or Facebook!
If you’d prefer to watch a video of this tutorial, click the play button below:
This first one is the easiest cake you could possibly decorate! Bake your cake in a deep baking tray or casserole dish and you can even use other desserts like brownies or cheesecake for this. Use a sharp knife to score a design on the top, like the heart I’m drawing on this one, and you can trace around a printed image if you’re not confident about drawing your own shape.
Fill few piping bags with different piping tips and different colours of buttercream and then cover the shape with swirls, wiggles, and rosettes! I piping these rosettes and swirls with a 1M star tip, 8B open star tip and 199 tip, and the ruffles with a 104 petal tip, holding the tip with the wider end facing downwards, towards the cake, and the narrow end pointing upwards to create some movement the ruffle.
I like to chill the cake at this point to set the pinks and reds so that when I continue, the coloured buttercream doesn’t smudge onto the rest of my piping around the shape. Meanwhile, I wash the piping bags and tips to re-use with plain white buttercream. I used my 4 Minute Buttercream for this cake. For the outline of the shape, I start with the corners of the cake to get into the trickier spaces while I still have lots of room the maneuver, and gradually working my way in towards the heart.
You’ll notice that the shape gets much darker after refrigerating it, and that’s because red tones get darker when they get cold but they’ll lighten up again when the cake comes back to room temperature.
It’s a good idea to check the cake from different angles when you think you’ve finished, or even as you go along, to check that the cake underneath the frosting isn’t visible anywhere through the piping.
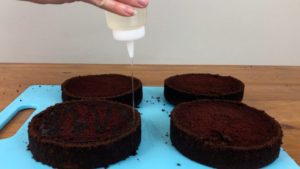
Almost as easy to decorate as a tray bake cake is this naked heart-shaped cake with piped buttercream filling. Start by drizzling your cake layers with simple syrup to keep them moist, since they won’t be covered in frosting which normally locks the moisture into the cake. I cover this step in detail in my tutorial on 10 Hacks For Decorating Cakes Like A Pro. Wrap the cake layers in cling film or saran wrap and chill them in the fridge for at least an hour or in the freezer for 30 minutes, because they’re much easier to carve in the next step if they’re cold.
While the cake layers are in the fridge, trace around your cake pan onto paper so that you have a guide of the size of your layers, and then draw a heart within that outline.
Cut the shape out and place it on a chilled cake layer and cut around it using a serrated knife, cutting the general outline first with lots of little straight cuts and then smoothing out any angular parts next by trimming them with even smaller cuts. Repeat this for all of your layers.
Tint buttercream with gel food colours. I used my 4 Minute Buttercream with different amounts of Rose Pink gel to make different shades of pink, and put the buttercream in piping bags fitted with any star shaped piping tip (I used 1M tips). Now use a plate or a cake board and pipe a dollop of buttercream in the middle, which will secure your first layer of cake in place.
Pipe swirls around the edge of the heart, piping a small spiral and as you lift the piping bag slowly, continue to pipe a smaller spiral on top and then release your pressure on the piping bag as you lift it up and away from the cake to leave a nice neat peak on your buttercream swirl. Do the outline of the heart first so that the swirls line up nicely, and then fill in the middle and these swirls are less important because they won’t be visible after you add the next layer of cake, so they don’t have to be as neat.
Add another layer of cake and another layer of swirls, and I’m using my darker pink for these ones. Another layer of cake, and walk around your cake to check it from different angles and adjust the layer so that it’s lined up straight on top of the rest of the cake, and then pipe on the top layer of swirls. Scatter some sprinkles on top immediately, before the buttercream sets because then the sprinkles won’t stick to it anymore.
To store the cake you can place it in the fridge for 30 minutes or the freezer for 15 minutes to set the swirls, and then take it out and wrap the cake and plate or cake board in cling film or plastic wrap to prevent it from drying out. Put it back in the fridge and when you’re ready to serve it, take it out and take the cling film off immediately, before the buttercream softens, so that you don’t damage the piping while you’re unwrapping it. Leave it for about an hour to come to room temperature and then enjoy!
This sprinkled heart can be added to any cake, like this pink and red striped beauty. If you’re interested in how to do these stripes, I have a very detailed free YouTube tutorial on 4 Secrets For Perfect Stripes.
Chill your frosted cake in the fridge for at least an hour to set the frosting and meanwhile, draw a heart on parchment paper and cut it out, making a cut in the middle of the heart to get the scissor blades in and cutting it out while leaving the paper around it intact, and this will be your stencil.
Prepare your sprinkle mix using a pre-made mix or create your own by pouring different colours, shapes and sizes of sprinkles into a bowl and mixing them up. I recommend using a baking tray for this next part, so that you don’t get sprinkles all over the place.
When you can press gently against the frosting on your cake without indenting it, it’s ready for the stencil. Place your chilled cake on the baking tray and hold your stencil up against the side of the cake. If there are any imperfections in the frosting on your cake, this is a great opportunity to hide them by placing the heart on top of them! Line the stencil up so that it’s straight and spread buttercream over the heart shape to completely cover it.
Spread from the parchment surround the heart, towards the middle of the cutout heart shape, because if you go the other way you might push buttercream underneath the parchment paper and mess up the outline of your heart. The stencil will be very flimsy because parchment paper is so thin and the frosting on the cake has set so the parchment won’t stick to it, so only your hand is holding it in place. If the stencil moves around, line it up again and continue spreading on the buttercream. Ideally you should use the same colour as the frosting on the cake or the colour of the sprinkles you’re going to use to fill it. It doesn’t need to be thick, just enough to cover the whole heart shape and you should smooth it out with your offset spatula or a frosting smoother so that it’s an even thickness.
Immediately press your sprinkles into the fresh buttercream so that they stick, working your way around the whole shape to make sure it’s all covered with sprinkles. If you’re not going to add a sprinkle border around the bottom of the cake, it’s a good idea to make sure your parchment stencil goes all the way to the bottom of the cake to prevent any sprinkles accidentally sticking to the cake as they fall down. When you’ve covered up as much of the shape as possible with your sprinkles, carefully peel off the parchment to reveal your sprinkled shape!
If there are any parts without sprinkles, probably around the outline of the shape, you can add sprinkles individually to cover up that buttercream and complete the shape.
For my tutorial on 6 Ways To Decorate Cakes With Parchment Paper click here. To finish off this cake I piped some buttercream swirls with piping bags fitted with 1M tips and filled with pink and red buttercream, the two colours of my frosting stripes, alternating colours as I worked around the cake.
If you’re looking for more Valentines Day cake designs, I have a tutorial on this stunning carved buttercream cake, which is one of the 18 cakes I teach how to decorate in my online course on Buttercream Carving, on my online cake school.
I also have an online class on how to decorate this fun peekaboo cake:
You can watch the video of this tutorial here:
In this cake decorating tutorial I share 10 hacks for decorating cakes like a pro, used by professional cake decorators to make cakes look and taste amazing! I opened and ran my own cake shop and have managed several others and these are tricks I’ve picked up along the way. I hope you find them useful!
Hack #1: Bake even layers
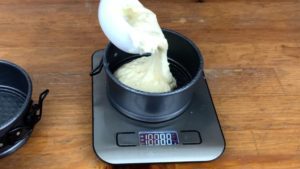
This first hack is a bit mathematical, but none of the rest are. When you’ve made your cake batter, prepare even cake layers by weighing your batter as you divide it between pans. Place each pan on your scale, reset the weight to zero, and then weigh the batter as you spoon it into the pan.
My recipes include the total batter weight, which you can divide by the number of pans you’re using, or if your recipe doesn’t include a weight you can weigh the mixing bowl before you start and then subtract that number from the weight of the bowl with the batter, to get the weight of just the batter, and divide that by the number of pans you’re using. Here, I’m making 6 layers of 80 grams each, so I keep spooning batter into the pans until I reach that weight, or take out a bit if I go over that weight. A few grams on each side of your target weight is fine. Then spread your batter flat in the pans, tap them a few times on the counter to get rid of air bubbles, and bake them. You’ll probably need to level your layers after baking, and optionally divide them, and I cover those techniques in my online course on The Basics Of Cake.
Hack #2: Keep cakes moist
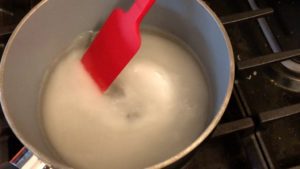
After baking your layers but before assembling your cake, you can drizzle them with simple syrup to keep them moist. Simple syrup is ridiculously easy to make… just put equal amounts of water and sugar into a saucepan – I usually do 1 cup of each – and turn the heat to medium and stir occasionally until all of the sugar has dissolved, which will happen by the time the mixture starts bubbling.
Let it cool and then drizzle your cake layers, going right up to the edges because that’s where they’re most likely to dry out.
Hack #3: Fill piping bags neatly and without “squirting”
If you pipe buttercream onto your cake, either as a filling or for the frosting on the outside of the cake, you’ll need to put your buttercream into a piping bag. An easy way to do this that avoids mess is to fold the top of your piping bag over a glass and then spoon the buttercream into the bag, pushing it all the way down to the bottom.
Then you can unfold the piping bag and you’ll have space to twist the bag, to stop the buttercream oozing out of the top of the bag and making a mess on the bag and your hands. If you need to refill the bag, you’ll get air pockets between the old buttercream at the bottom of the bag and the new buttercream at the top of the bag, so before you start piping, squeeze the bag into a bowl, pushing the old buttercream out and wait for the squirt of air, which will spray out some buttercream with it, before you use the piping bag again.
Hack #4: Stop cakes sliding on their cake boards
When you assemble your cake on a cake board, start by spreading or piping a dollop of buttercream onto the middle of the cake board to secure the first layer of cake, pressing the cake firmly down so it sticks onto the buttercream.
This will prevent the cake from sliding around while you assemble it, but before you frost it you should chill the cake in the fridge for 30 minutes or in the freezer for 15 minutes, which will chill and set the buttercream dollop on the cake board, causing it to stick more securely to that first layer of cake so it doesn’t move when you spread frosting onto the outside of the cake.
Hack #5: Prevent bulges in the sides of your frosting
If your fillings are more liquid than buttercream, like fruit sauces or dulce de leche, you should use a buttercream dam on each layer of cake to contain the filling. This is just a ring of buttercream piped around the outer edge of the cake, and then you can spoon the filling into the middle and spread it right up to the dam.
The filling shouldn’t go any higher than the dam. Place your next layer on top and push down to make sure that the filling doesn’t ooze out. This will prevent a bulge in the frosting on the side of your cake, where filling oozes out under the weight of the cake and fillings and frosting on top of it.
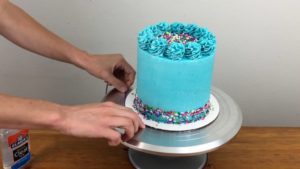
Hack #6: Keep cakes steady on the turntable
Before placing your cake board onto a turntable, place a ring of masking tape in the center and press your cake board down onto it, to secure it in the middle of the turntable so that it doesn’t slide around while you’re frosting or decorating it. You can use masking tape or a non-slip mat for this, and you can buy these non-slip mats as drawer liners on Amazon or grocery stores.
You can see that even though this cake is really tall, with a non-clip mat underneath the cake board and a dollop of buttercream securing the bottom layer of cake to the cake board, it isn’t wobbling around as I frost it.
Hack #7: Prevent crumbs in your frosting
This frosting is called a crumb coat and it’s a thin layer of frosting that completely covers the cake, from the very tp of the sides all the way down to the cake board at the bottom, and the top surface of the cake as well.
Its purpose is exactly what the name suggests – a crumb coat is a coat of frosting to trap any crumbs that come off the cake. It doesn’t need to be pretty – it’s fine if you can see the cake layers through it and it will probably have visible crumbs in it, but you’re going to let it set before applying the final coat of frosting, which will sit on top of this, and the crumb coat will act as a barrier between the cake and the final coat so that crumbs can’t get into the final coat of frosting. Click here for my tutorial on how to get perfectly smooth frosting with sharp edges.
Hack #8: Create neat, even borders
A quick, easy, and therefore popular way to add a border to the bottom of a cake is to use sprinkles. Place your cake on a tray for this, to catch any falling sprinkles so they don’t go all over your kitchen, and you’ll need parchment paper for this hack. Fold a piece of parchment paper in half and cut along the seam to make 2 strips of parchment paper and tape them together to make one long strip. Wrap the strip around a chilled cake, covering up the top section of cake but leaving the bottom exposed where you want the sprinkles to go. It’s fine if the parchment strip doesn’t go all the way up to the top of the cake – just a few inches above the exposed area where you’re going to press the sprinkles is fine. The cake needs to be chilled so that the frosting sets and gets cold and hard, so it holds its shape and doesn’t get damaged by the parchment paper wrapped around it.
Now just press your sprinkles into the exposed frosting below the parchment strip, using an offset spatula or a spoon or your hands, and when you peel the parchment paper away you’ll leave a perfectly neat sprinkle border around the base of the cake!
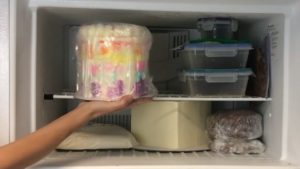
Hack #9: Decorate cakes a month in advance!
After you frost and decorate your cake, you can refrigerate it until the next day or if you want to store it for longer, you can freeze it, fully decorated! To do this, place your cake in the freezer for 30 minutes to an hour to set the frosting and decorations, so that they get hard and hold their shape for the next step. Then take the cake out and wrap the whole thing – the cake and the cake board and any decorations on top – in cling film or Saran Wrap. You’ll need at least 2 layers to completely cover the cake and the point of this is to prevent any condensation in the freezer getting to the cake, because any droplets of condensation will stick to the outside of the cake and can damage the decorations.
Then put the wrapped cake back in the freezer for up to a month, moving it to the fridge 24 hours before serving to defrost gradually. Unwrap the cake as soon as you take it out of the fridge, while the frosting is still cold and hard and won’t get damaged while unwrapping it.
Hack #10: Beautify cardboard cake boards
A quick hack to make even these cheap cardboard cake boards look pretty is to wrap them in fabric ribbon. Squeeze clear craft glue all around the edge of the cake board, and the easiest way to do this is to hold your hand still with the tip of the glue bottle against the side of the cake board and then spin the turntable to apply the glue all the way around, and then choose where the back of your cake will be and press the end of the ribbon into that point on the cake board. Spin the turntable again, pressing your finger against the ribbon as you go to keep it taught and to stick it to the glue.
Fabric ribbon works best for this because it’s flexible and sticks easily and it also looks pretty, especially if you choose a colour that matches or complements the colours of the frosting or decorations on the cake. Make sure the width the ribbon is the same as the height of the cake board, so that it completely covers the cardboard edging but doesn’t stick up above the top of the cake board. When you get to the end, cut the ribbon so that it will overlap the beginning of the ribbon by a little bit, maybe half a centimeter, and then squeeze a dot of glue onto the beginning of the ribbon and press the end against it. Don’t move the cake from the surface you did this on for about half an hour, until the glue has dried and the ribbon has stuck to the cake board, so if the cake is on a turntable and you want to to refrigerate it, put it in the fridge on the turntable.
If you prefer to watch the video of this tutorial you can do that here:
Going into 2020, the trends for cake decorating showcase generous use of texture and colour and, a welcome factor for most of us, simplicity! I’m going to walk you through the top 10 trends that I anticipate highlighting the cake decorating world this year, which I’ve divided into styles featuring texture, colour, and simplicity.
The easiest way to incorporate texture in your cakes is to use a textured frosting comb, and the speed and ease of this technique is one of the reasons it’s gaining so much popularity! Crumb coat and frost your cake as normal, making sure the sides are straight and that you have quite a thick layer of frosting all over the cake since you’re going to take a lot of it off when you use the comb. After smoothing the frosting, immediately use the textured comb, applying consistent pressure against the side of the cake as your spin the cake on a turntable, going around several times and touching up any gaps in the frosting with more buttercream, keeping going until you have a defined texture with no air pockets. Frosting combs are available in lots of different patterns, made of plastic or metal or acrylic, and all of them work well but it’s easiest if the comb you choose is at least as tall as your cake. You can play around with the colours of your frosting, like the ombre design on the cake above, and add drips or piped frosting details or cake toppers as you would with any other design.
A more time consuming but very forgiving way to add texture is with piping tips. Even if you haven’t been decorating cakes for long, you’ve probably experimented with piping tips or at least the standard star tip, also called a 1M tip, which is the typical tip used to pipe a cupcake swirl. But you can do SO much more with this tip than just that! Pipe easy roses onto a cake by covering a cake with swirls, or make frosting “fur” for animal cakes, and I share more ideas in my tutorial on 8 Ways To Use a 1M Piping Tip.
Other piping tip textures include the ribbon-style frosting in the photo above, piped with a petal tip like a number 104 or 125. For more ideas check out my tutorial on 8 Ways To Use A Petal Tip. Scallops are beautiful too – they can be piped with a round tip or even a piping bag with no tip, and smoothed out with an offset spatula or the back of a spoon.
The beauty of using piping tips to frost a cake is that you don’t need to cover it in perfectly smooth frosting, just a simple crumb coat to lock in the crumbs and the moisture, so if smooth frosting isn’t your strongest skill then frosting a cake with piping tip texture is a great alternative, so you can still make a cake that looks professionally decorated.
One of the big trends in 2019 was the fault line cake, which is still going strong and definitely worth trying before the trend dies out. We’ve seen several variations of it, starting with simple spreading a second coat of frosting with a gap in the middle, hence the name “fault line” cake, and optionally painting the edges with metallic paint. I have a step by step tutorial on this technique here. To achieve the design, apply your first coat of frosting and let it set completely by chilling it in the fridge for at least an hour before applying the second coat to the top of the cake, and on the sides cover just the top and bottom, leaving the middle section without a second coat so you can see the first colour. Smooth the frosting as normal, leaving an uneven, jagged edge above and below the gap in the middle. If you want to paint the edges of the fault line, chill the cake for another hour to set the frosting and then mix gold or silver luster dust with vodka or any other clear alcohol or lemon extract and then paint along the edge of the fault line. This is how the fault line cake originated, but the trend has already evolved in several ways.
The first variation was filling the fault line with sprinkles, which you achieve by pressing sprinkles onto the middle section of the crumb coat, letting them set, and then piping or spreading frosting over the rest of the cake and smoothing it to leave the sprinkled gap in the middle. Another fun evolution is to decorate the fault line with stripes, and I’ll cover stripes in more detail as a trend on its own later. Other emerging variations include adding that second layer of frosting to only the bottom of the cake, and you can spread it on or use parchment paper to have more control over the placement of the frosting. Jazz up the edge of the fault line by adding sprinkles to it, or edible glitter, instead of the original style of metallic paint. Try adding texture to the second layer of frosting with a textured frosting comb or an impression mat, and take it even further by painting the second layer of frosting or adding details like the brick wall cracks on this Halloween cake.
My favourite new trend is the carved buttercream trend, which has endless possibilities for texture and colour on your cakes. This trend uses clay modeling tools, which are very cheap and easy to find on amazon or in arts and crafts shops, and you can use the tools to carve out patterns, images, shapes, textures… carving is an incredibly versatile technique and I spent a few months experimenting with it and created an online course teaching the techniques and several styles of carved designs, including 4 themed cakes showing step by step from start to finish how to create the design. If you’re interested in that course click here.
Another trend that adds colour and texture to cakes is to use sprinkles to create or highlight your design. This can be as simple as pressing sprinkles onto the sides of the cake, which is easiest if you dip your finger in water and tap off any excess before pressing it into a sprinkle, so that the sprinkle sticks to your finger and then when you press it onto the frosting of the cake, it transfers to the cake for perfectly accurate placement. Hide sprinkles in the middle of your cake for a sprinkle explosion, also called a piñata cake, buy cutting a circle out of the middle of all of your cake layers except the top one, which creates a chamber that you can pour sprinkles into and after sealing the chamber with the top layer of cake without a hole in it, you frost and decorate the cake as normal and when you cut into it, a cascade of sprinkles explodes out for a fun surprise! You can buy or make your own sprinkle mix, and I cover a lot more ways to use them on your cakes in my online course on 10 Cake Decorating Techniques.
With all of the fun sprinkle mixes you can buy, which incorporate every colour and lots of metallics, I think cake colour schemes will continue to be inspired by sprinkles and we’ll be seeing a lot of metallics on cakes. This will include edible gold leaf, which is bought in sheets and sticks easily onto buttercream by pressing it gently against the cake on the sheet it come on, or using a paintbrush to carefully lift it off the sheet and transfer it to the cake. Edible gold paint will be popular too, which is made easily by mixing gold luster dust with vodka or any other clear alcohol or lemon extract, To get the strongest, most opaque shade of gold use high proof alcohol like Everclear 190, which makes a thick gold paint like on this unicorn cake:
Another way to incorporate gold is a gold drip, which is most easily achieved by applying a ganache drip using white chocolate or semisweet chocolate, letting it set, and then painting the drips with edible gold paint. This is a lot easier than it sounds if the drip is the right consistency, and I have a full tutorial on gold drips here.
This next trend uses acetate or parchment paper to apply colourful designs to cakes. Wrap the acetate or parchment around the cake and add a few inches to leave space for the design you’re going to apply to it, and then cut the acetate and cover it with a design. You can use Candy Melts, melted chocolate, or even buttercream to pipe your design. Then take your chilled cake and wrap the acetate tightly around it, pressing the design against the cake and then putting it back into the fridge to set against the sides of the cake. When you peel the acetate off you’ll leave the design behind, attached to the frosting, and this lets you to create designs that gravity wouldn’t normally allow. In my tutorial on How To Make A Cake With Wrapping Paper I show step by step how to trace over a pattern or design, like wrapping paper or a gift bag, and after pressing it against the cake, chilling it and then peeling it off, use a frosting smoother dipped in hot water to smooth the design. Then you can add details like buttercream borders, shadowing with more buttercream applied with a palette knife, and sprinkles for some texture or to cover up any air pockets. Apart from being simple, this technique is great because you don’t need any special tools or materials, just some acetate or you can do this with parchment paper instead. I’ve started to see more cake designs appearing with this technique, to I think the trend will grow this year and we’ll be seeing lots of creative designs using this simple material.
A trend that became huge in 2019 is striped buttercream created with a striped frosting comb, and although these have been popular for over a year now, I don’t see the trend going away any time soon. You can buy a striped cake comb for a few dollars and get these stunning designs which make beautiful cakes on their own or with very little extra decoration. I have a VERY detailed tutorial on Four Secrets for Perfect Stripes which I highly suggest watching before you start!
Now for the trends featuring simplicity… firstly, if you haven’t made one yet, jump on the number cake bandwagon! These are great because you don’t need to be confident with smooth frosting, since you layer cakes with piped buttercream and don’t frost the sides. You can show off the flavours of the cake because they aren’t hidden by covering the cake in frosting, and they’re easily personalized with the birthday boy or girl’s favourite chocolate, candies, flowers, or even toy figures! The most eye catching designs have a colour scheme, even if it’s just brown from the chocolates placed on top. I have a tutorial for How To Make A Number Cake and also for the rainbow number cake in the photo above.
Finally, another ridiculously simple cake to make is a tray bake cake! These are baked in a deep baking tray or casserole dish or disposable cake pan and decorated and served within the same pan, so there’s no need for layering or crumb coating or anything complicated or time consuming. All you need are a few piping bags with different tips and different colours of frosting and you can cover the top of the cake with whatever piped patterns or textures you like for a fun, unique design that only takes a few minutes! I have a full tutorial on Tray Bake Cakes if you’re interested in some ideas for piping styles like rosettes, ruffles and piped flowers using Russian tips.
These are the 10 trends I think we’ll see in the cakes of 2020 and as a side note, if you want to show off your cake decorating skills, why not travel with your cake when you visit friends or family? You can travel with a cake in a car or even on an airplane following a very simple method which I’ve explained in my tutorial on How to Travel with a Cake in your Suitcase, which you can watch here. Which of these techniques are you excited to try this year? Or is there another trend you’re curious about? Tell me in the comments below!
If you prefer, you can watch my video tutorial on 10 Cake Decorating Trends to Try in 2020 below:
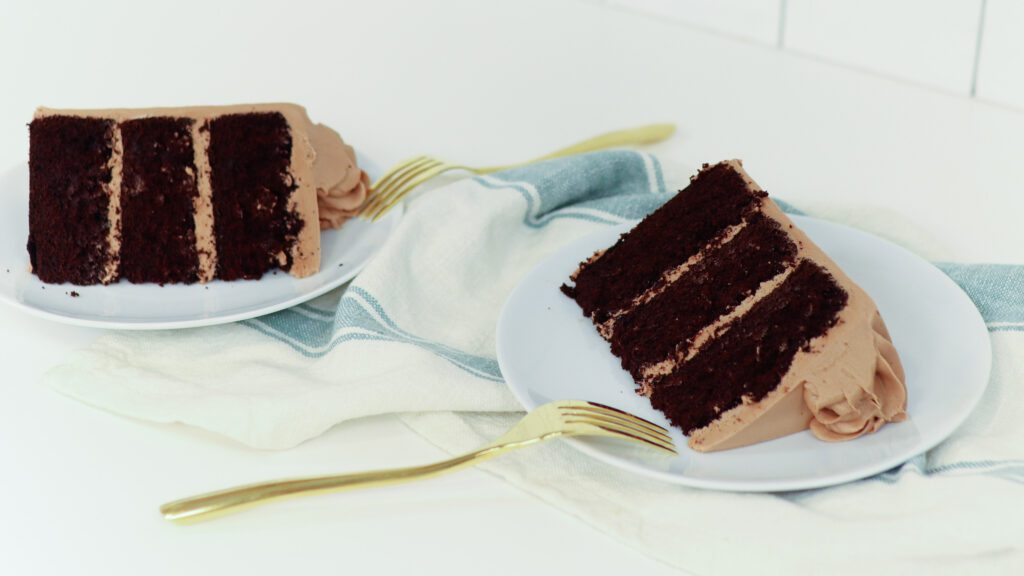
This is my absolute favourite chocolate cake recipe. The cake is incredibly moist and not too sweet. It’s light and springy to the touch but it holds up wonderfully under frosting and even fondant.
I’ve listed the ingredients with both measuring cup and weight measurements. Personally, I use measuring cups for this recipe. It's a fairly forgiving recipe and the small difference in each person’s level cup (including the difference between US and UK measuring cups) doesn’t affect the end result.
How to make this Perfect Chocolate Cake
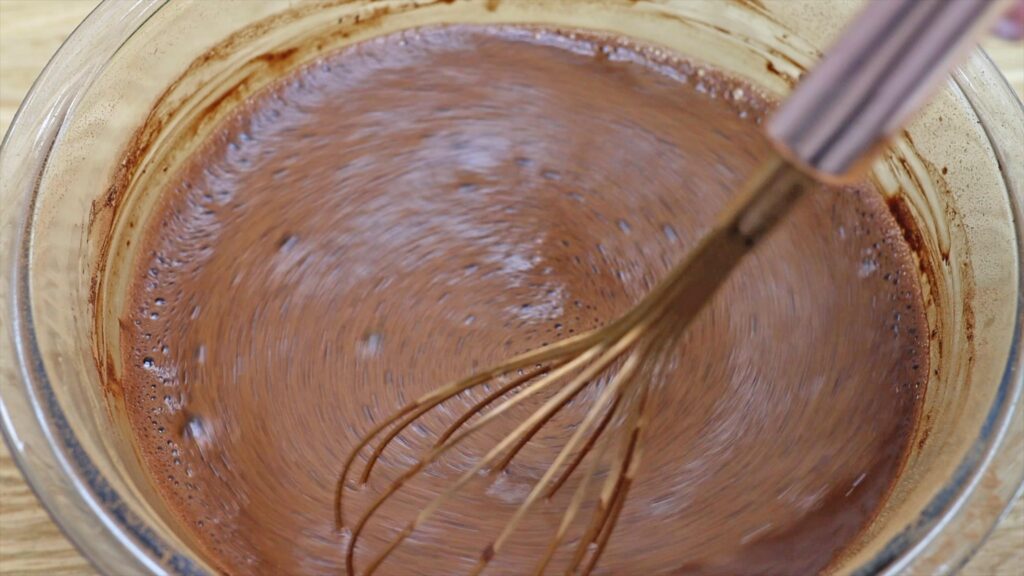
I recommend making this with an electric mixer of some sort - a stand mixer or a handheld mixer. Before mixing anything, the first step is to prepare the liquid for this recipe. This is a combination of cocoa powder and hot water. Measure the cocoa powder into a bowl and add the hot water and whisk together. Using hot water helps the cocoa powder dissolves when you whisk it. Since everything should be at room temperature when you add it to the cake batter, this will then need time to cool. That's why you should prepare the cocoa powder mixture first.
As with almost all baking recipes, it's important that al ingredients are at room temperature so that they combine easily. Butter should be taken out of the fridge at least two hours before you use it and to check that it's ready, you should be able to slice through it easily with a spatula.
Mixing the Perfect Chocolate Cake batter
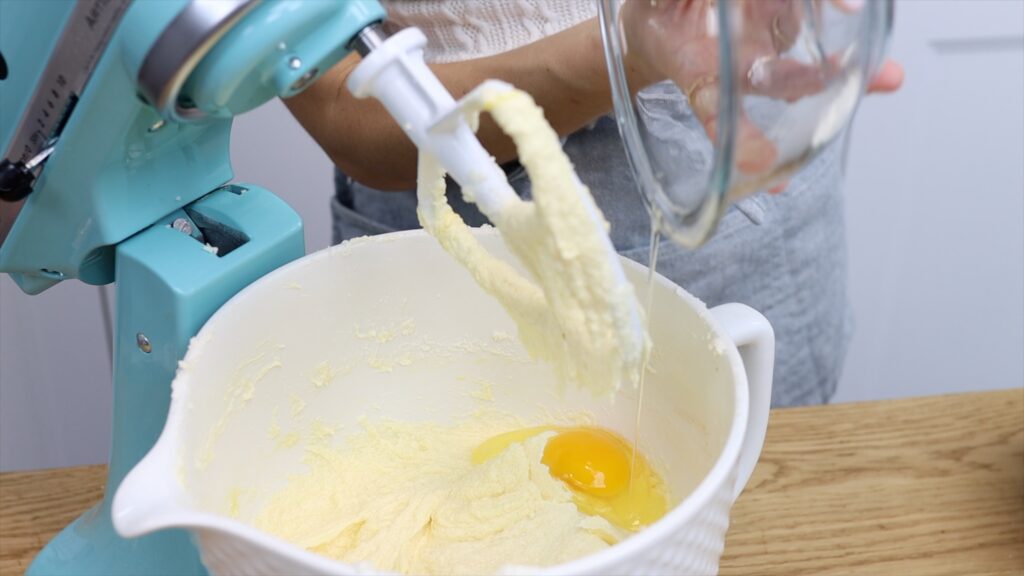
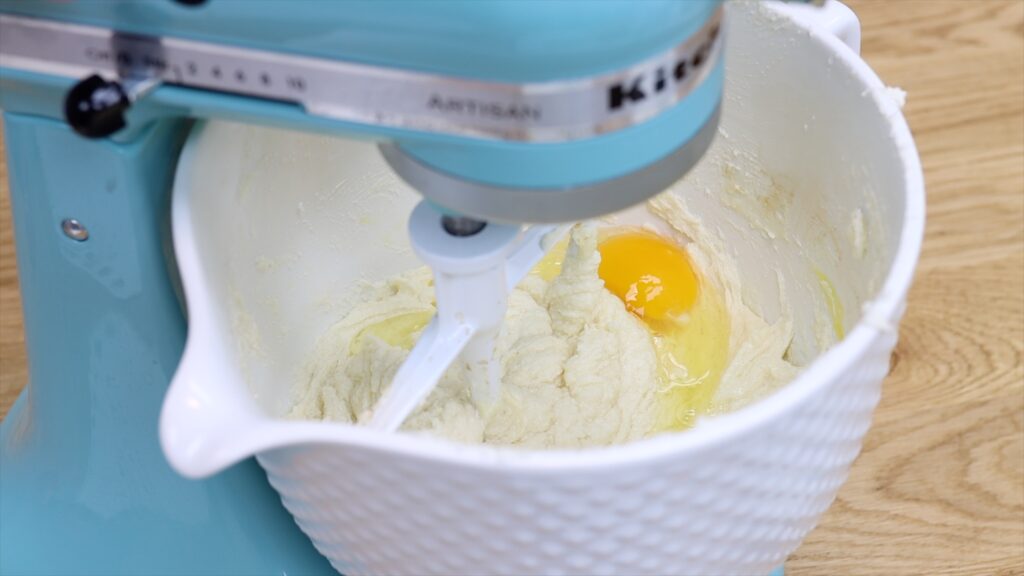
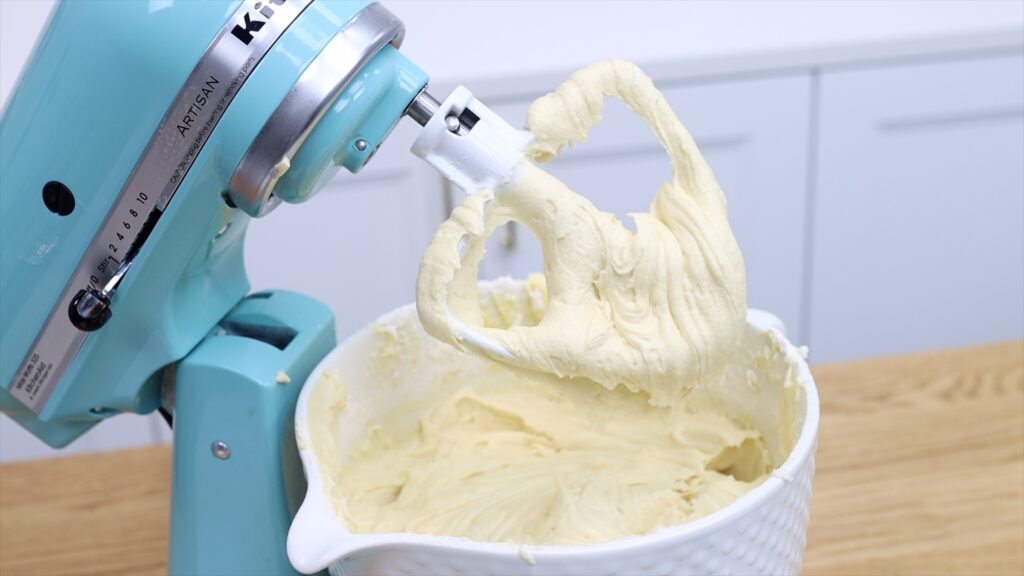
In a mixer with a beater or paddle attachment, mix the butter with the sugar on medium speed until pale and creamy. It will take about 2 minutes of your butter is at room temperature. You'll notice the mixture get lighter in colour and also fluffier. Scrape down to the bottom of the bowl once during mixing to make sure no butter is stuck at the bottom.
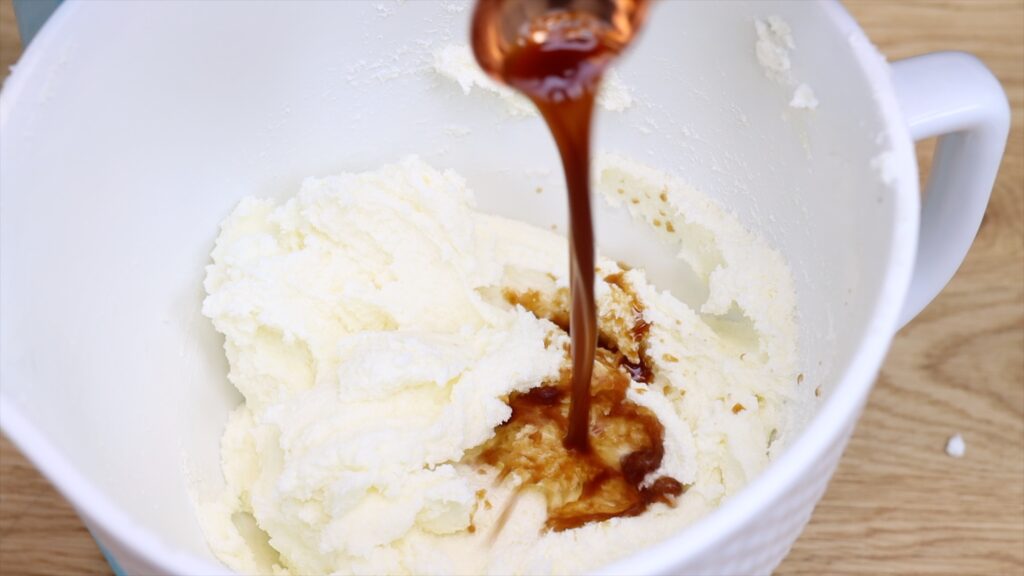
Add the eggs one at a time, mixing on the lowest speed after each one until it's incorporated into the batter, which will take about 30 seconds. Next, add the vanilla and mix on lowest speed for about another 30 seconds.
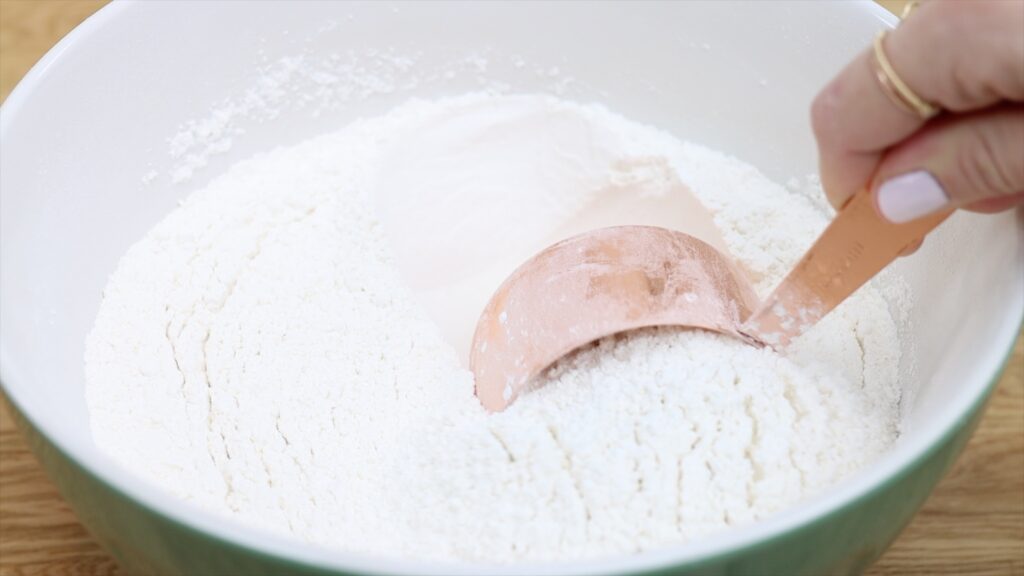
In a bowl sift the flour, baking soda, baking powder and salt. Add a third of the flour mixture to the mixing bowl and mix on lowest speed until you can't see any clumps of flour in the batter.
Add half of the cocoa mixture to the mixing bowl and mix on lowest speed to incorporate. The cocoa powder mixture will sit on top of the batter until you turn the mixer on. Then it will gradually mix into the rest of the batter. As soon as you don't see streaks of the dark brown cocoa powder mixture anymore, turn the mixer off.
Add the remaining flour mixture and mix to combine. Then add the remaining cocoa powder mixture, mixing until the batter is smooth.
This is a runny batter, which makes it easy to pour or spoon into pans to bake. The recipe (listed in a printable and Pinnable format below) is for an 8" cake with three layers. I've also included two tables below converting the recipe to different size cakes.
To go more in depth in perfecting the foundation of your cakes, take my online course The Basics of Cake, where you'll learn with video modules showing every step of the process of making a cake: mixing, baking, levelling and dividing layers, making fillings and frostings, assembling, frosting, decorating, storing, transporting and serving!
Bake the Perfect Chocolate Cake layers
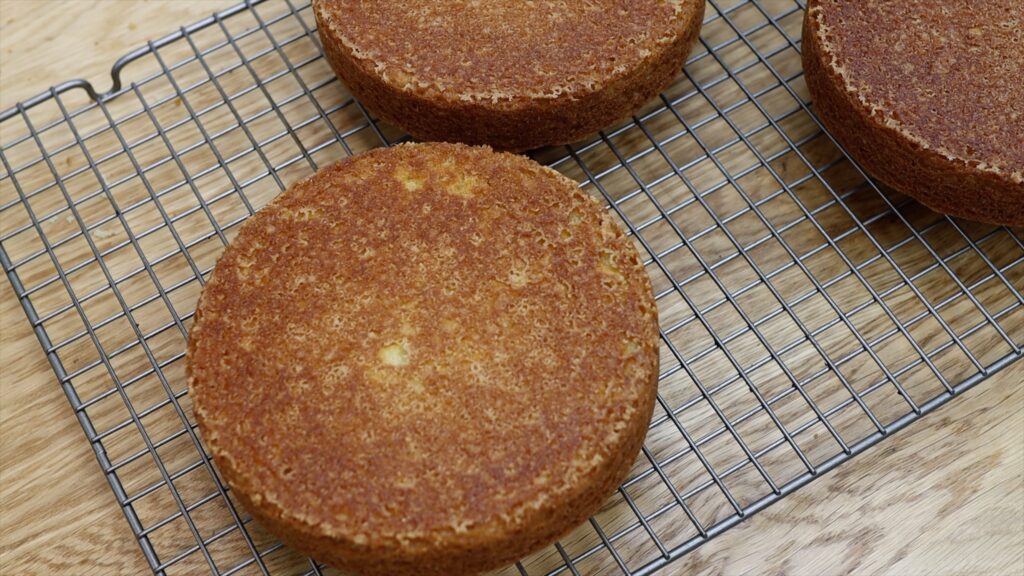
Grease the inside base and sides of three 8" pans with butter, oil, or non-stick spray. (Or see below for a table converting this recipe into different sizes!) Divide the batter between three cake pans and bake at 175ºC or 350ºF for 38 minutes, or until a toothpick inserted into the middle of the cake comes out clean.
Leave the cakes to cool in their pans for ten minutes. Use a spatula to loosen cake from the edges of the cake pan and then, as soon as you can touch the pans with your bare hands without burning yourself, turn the cakes onto a wire cooling rack. Leave then to cool completely before assembling your cake.
Make a cake with these Perfect Chocolate Cake layers
After assembling and frosting this cake you can leave it at room temperature for 3 days or in the fridge for up to a week. If you do refrigerate the cake, leave it at room temperature for at least 2 hours before serving it so that it comes to room temperature, when it tastes the best!
After slicing it, to prevent the cake drying out you can cover the cut side of the cake tightly with cling film or Saran Wrap.
Print or pin the recipe below or scroll down for a table with conversions into different sizes of cakes. Watch the video at the bottom of the page for more visual, step-by-step instructions!
This is my absolute favourite chocolate cake recipe. The cake is incredibly moist and not
too sweet. It’s light, not dense, but it holds up wonderfully under frosting and even
fondant.
Ingredients
Units
2 1/2cups hot water
1 1/4cups cocoa powder
1 1/4cups unsalted butter
3cups white sugar
5 eggs
2 1/2 teaspoons vanilla extract
3 1/3cups plain flour
1/2 teaspoon baking powder
2 1/2 teaspoons baking soda
1/4 teaspoon salt
Instructions
1. In a bowl, whisk together hot water and cocoa powder until the cocoa has dissolved. Set aside to come to room temperature.
2. In a mixer with a beater attachment, mix butter with sugar on medium speed until pale and creamy, about two minutes. Scrape down to the bottom of the bowl once during mixing to make sure no butter is stuck at the bottom.
3. Add eggs one at a time, mixing on the lowest speed after each addition until incorporated, about 30 seconds.
4. Add vanilla and mix on lowest speed for about 30 seconds to combine.
5. In a bowl sift flour, baking soda, baking powder and salt. Add a third of the flour mixture to the mixing bowl and mix on lowest speed to incorporate.
6. Add half of the cocoa mixture to the mixing bowl and mix on lowest speed to incorporate. Repeat with another third of the flour mixture, then the remaining cocoa powder mixture, and then the remaining flour mixture. Mix just until the ingredients are combined.
7. Grease the inside (base and sides) of three 8" pans with non-stick spray, butter or oil. Divide batter between the cake pans.
8. Bake at 175ºC or 350ºF for 38 minutes, or until a toothpick inserted into the middle of the cake comes out clean.
9. Let cakes cool in their pans for 10 minutes. Use a spatula to loosen cake from the edges of the cake pan and then turn onto a wire cooling rack. Leave to cool completely.
Notes
You can use salted instead of unsalted butter but if you do, omit the salt.
This recipe works best with plain flour, also called all-purpose flour.
How to Convert Perfect Chocolate Cake Batter
My Perfect Chocolate Cake recipe can be converted into lots of sizes of cakes by adjusting the quantities of the ingredients.
I like to divide my cake batter between three cake pans to make three layers for tall cakes, which are about six inches high. You'll see those tall cakes in any of my tutorials, like Parchment Paper Cake Decorating Hacks or 4 Ways To Write On Cakes. In case you prefer standard height cakes of around 4 inches high, I've also listed the quantities for the standard height version of each size of cake.
Whatever size of cake you're making, follow the same steps in this Perfect Chocolate Cake recipe but use the quantities of ingredients listed below.
Standard Height Cakes
For standard height cakes of about 4 inches tall, use the ingredients in the quantities listed below and divide the batter into two cake pans.
Ingredients
2-layer 6" cake
2-layer 8" cake
2-layer 10" cake
Hot water
1 cup 235ml
2 cups 475ml
3 cups 710ml
Cocoa powder
1/2 cup 45g
1 cup 85g
1 1/2 cups 130g
Unsalted butter
1/2 cup 114g
1 cup 227g
1 1/2 cups 341g
Sugar (white, granulated or caster)
1 cup and 2 tablespoons 225g
2 1/4 cups 450g
3 1/2 cups 675g
Eggs
2
4
6
Vanilla extract
1 teaspoon
2 teaspoons
1 tablespoon
All purpose flour (plain flour)
1 1/3 cups 167g
2 2/3 cups 333g
4 cups 500g
Baking soda
1 teaspoon
2 teaspoons
1 tablespoon
Baking powder
1/8 teaspoon
1/4 teaspoon
1/2 teaspoon
Salt
Pinch
1/8 teaspoon
1/4 teaspoon
Total weight of batter
924g
1848g
2776g
Weight of batter per pan for 2 pans
462g
924g
1338g
Baking time
38 minutes
50 minutes
48 minutes
Tall Cakes
For tall cakes of about 6 inches tall, use the ingredients in the quantities listed below and divide the batter into three cake pans. I find that this makes for the perfect ratio of cake to filling and frosting and it also provides lots of space on the sides of the cake for decorations.
Ingredients
3-layer 6" cake
3-layer 8" cake
3-layer 10" cake*
Hot water
1 1/2 cups 355ml
3 cups 710ml
4 1/2 cups 1065g
Cocoa powder
3/4 cup 65g
1 1/2 cups 130g
2 1/4 cups 195g
Unsalted butter
3/4 cup 170g
1 1/2 cups 341g
2 1/4 cups 511g
Sugar (white, granulated or caster)
1 3/4 cups 338g
3 1/2 cups 675g
5 1/4 cups 1013g
Eggs
3
6
9
Vanilla extract
1 1/2 teaspoons
1 tablespoon
1 tablespoon and 1 teaspoon
All purpose flour (plain flour)
2 cups 250g
4 cups 500g
6 cups 750g
Baking soda
1 1/2 teaspoons
1 tablespoon
1 tablespoon and 1 1/2 teaspoons
Baking powder
1/4 teaspoon
1/2 teaspoon
3/4 teaspoon
Salt
1/8 teaspoon
1/4 teaspoon
1/2 teaspoon
Total weight of batter
1388g
2776g
4164g
Weight of batter per pan for 3 pans
462g
925g
1388g
Baking timeat 350F
38 minutes
50 minutes
48 minutes
*PLEASE NOTE: this 10" batter will not fit into a home mixer! Instead, I suggest mixing the 6" cake batter and baking that in one 10" pan and then mix the 8" cake batter and divide that into two 10" pans and bake those two together.
Here's a video of how to make my Perfect Chocolate Cake, step-by-step. Please ask me any questions in the comments below!
This is a rich, buttery, easy vanilla cake and it’s a great starting point for loads of flavours of fillings and frostings.
How to make this easy vanilla cake
As with almost any baking recipe, take your ingredients out of the fridge a few hours before you start so that they come to room temperature. This will allow them to combine better and give you the best results!
In a mixer with a beater or paddle attachment, beat the butter and sugar together using medium speed for about two minutes. They should become pale and look "fluffier" or creamier. Use a spatula to scrape down to the bottom of the bowl once during mixing to make sure no butter or sugar is stuck at the bottom.
Now add the eggs one at a time. Mix on the lowest speed after adding each egg for about 30 seconds until everything is incorporated.
Using real vanilla extract instead of artificial vanilla essence will give you the richest tasting cake. Mix the vanilla into the batter for about 30 seconds.
In a small bowl or measuring jug, mix buttermilk and oil. If you don't have buttermilk, try this substitution: use milk instead of buttermilk but after measuring it, remove one tablespoon of milk and add one tablespoon of lemon juice or white vinegar. Leave the milk for 5 minutes to curdle.
Add half of the buttermilk and oil mixture to the butter mixture and mix on lowest speed to incorporate.
Sift the dry ingredients together: flour, baking soda, baking powder and salt. By whisking them together to combine them, the rising agents will spread evenly throughout your cakes.
Add half of the flour mixture to the mixing bowl and mix on lowest speed to incorporate. Scrape down to the bottom of the mixing bowl to check that the batter is evenly mixed. Over-mixing the batter will make the cake dense and tough. Stop mixing as soon as the ingredients are combined to make a moist vanilla cake. Add the remaining buttermilk and oil mixture, mix together, and then add the remaining flour mixture. This easy vanilla cake batter is quite thick, which makes it easy to spoon into cake pans next.
How to bake this easy vanilla cake
Grease the inside base and sides of three 8" cake pans with butter or non-stick oil spray. Divide the cake batter between the pans. Use a spatula to spread the batter so that it's level and tap the pans on the counter a few times to knock out any air bubbles.
Bake the cake layers at 160ºC or 325ºF for 38 minutes. To check that they're baked you can shake the pans and the middle shouldn't wiggle. You can also poke a toothpick into the middle of the cake to check it comes out clean.
Leave the cakes to cool in their pans for 10 minutes. Then slide a spatula around the edges to loosen them from the pans. Turn the cakes oven onto a wire cooling rack and leave them to cool completely, which will take about three hours.
You’ll notice a golden caramelized exterior on the cakes after baking, which seals the cake’s moistness.
How to fill and frost this easy vanilla cake
Once the cakes have cooled completely, assemble and frost your cake! I love filling and frosting this cake with my 4 Minute Buttercream but it pairs well with SO many flavours: strawberry, lemon, caramel, chocolate...
If you struggle to frost your cakes smoothly check out my Basics of Cake online course, where I teach every step of the cake-making process. You'll learn how to mix, bake, make fillings and frostings, level and divide cake layers, assemble, frost, decorate, store, transport and serve cakes!
Here's the printable, Pinnable recipe. Switch between ingredient measurements using cups or grams to use whichever you prefer. I usually measure my ingredients out in cups rather than weighing them. This recipe is flexible enough that any minor differences in quantities won't affect the end result.
This is a rich, buttery cake and it’s a great starting point for loads of flavours of fillings and frostings.
Ingredients
Units
1 1/2cups unsalted butter
2cups white sugar (granulated sugar)
6 eggs
1 tablespoon vanilla extract
3/4cup buttermilk
3 tablespoons vegetable oil
3 1/2cups plain flour (all-purpose flour)
1 tablespoon baking powder
1/2 tablespoon baking soda
1/2 teaspoon salt
Instructions
Using a mixer with a beater/paddle attachment (not a whisk), beat room temperature butter and sugar on medium speed until pale and creamy, about 2 minutes. Scrape down to the bottom of the bowl once during mixing to make sure no butter or sugar is stuck at the bottom.
Add eggs one at a time, mixing on the lowest speed after each addition for 30 seconds. Scrape down to the bottom of the bowl to make sure everything is incorporated before adding the next egg.
Add vanilla and mix for about 30 seconds to combine.
In a small bowl or measuring jug, mix room temperature buttermilk and oil. Add half to the butter mixture and mix on lowest speed to incorporate.
In a bowl, sift flour, baking soda, baking powder and salt. Add half of the flour mixture to the mixing bowl and mix on lowest speed to incorporate, scraping down to the bottom of the mixing bowl to check that batter is evenly mixed. Repeat with the remaining buttermilk mixture and then finish with the remaining flour mixture.
Grease three 8" baking pans with non-stick oil spray or butter. Divide batter equally between the cake pans.
Bake at 160ºC or 325ºF for 38 minutes, or until a toothpick inserted into the middle of the cake comes out clean.
Leave cakes to cool in their pans for 10 minutes. Use a spatula to loosen the cakes from the edges of the pans and then turn onto a wire cooling rack. Leave to cool completely.
Notes
You can use salted instead of unsalted butter but if you do, omit the salt.
This recipe works best with plain flour, also called all-purpose flour.
I’m going to show you how to make these beautiful little doughnuts, which are ridiculously easy to make and a great way to use up any extra cake batter you have! You’ll need a silicon doughnut mold, which you can find on Amazon, and you can make these with any butter-based cake batter, like my vanilla cake or chocolate cake. You can make a batch especially for these if you want to make quite a few or if you have a bit of batter left over after filling your cake pans, this it a fun way to use it up!
The easiest way to do this is to spoon your batter into a piping bag without a piping tip, just with the end of the bag cut out so there’s a hole. Squeeze the batter in a ring around the doughnut mold, making sure you don’t overfill the mold.
Every cake recipe is different as far as how much it rises, so for example my chocolate cake doesn’t rise as much as my vanilla cake so I can use more chocolate batter but know I need to be quite stingy with how much vanilla batter I pipe into the mold. I’ve overfilled the final doughnut to show you what happens… the batter will come up out of the mold when it bakes so instead of your doughnut being nice and rounded and it will overflow to make a big blob like a muffin top and can also close that signature hole in the middle of the doughnut.
Depending on your cake batter, you may or may not choose to grease the mold. My vanilla batter doesn’t stick to the mold so I don’t need to grease it and you can see how easily these came out of the mold.
My chocolate batter does stick, so if I don’t grease the mold, when I turn the doughnuts out they break apart like this.
If you spray cooking oil into the mold and then bake the doughnuts, they don’t stick to the pan but they come out of the oven with little holes, where the oil pooled in the mold. This will mostly be covered with a glaze so it doesn’t matter aesthetically but it can also create slightly darker, and slightly crispy doughnuts because the oil burns the edges of the donuts, and you can see that here: the darker doughnut on the left was cooked in a greased mold but the lighter doughnut on the right was not.
So if you need to grease the mold I recommend either rubbing the molds with just a little bit of butter or spraying them with oil and then using a paper towel to dab the mold gently to mop up any excess oil, and this is how the chocolate doughnuts baked when I did that.
The baking time for these will be a bit less than it would be for cupcakes, partly because of the hole in the middle so the cake part of the doughnuts is thinner than a cupcake, and partly because silicon heats up more quickly than a metal cupcake mold. You can tell when they’re ready because when you poke them gently, they should spring back.
Take the mold out of the oven, let it cool for about a minute to give the doughnuts a chance to set, and then flip the mold out over a cooling rack, peeling the mold carefully off the doughnuts to leave them behind as you lift the mold up. When the doughnuts are completely cool it’s time to decorate!
My favourite topping for these is chocolate ganache. I’ve shared my recipe for ganache here and also have a tutorial on 4 ways to use ganache. Pour your ganache into a bowl a bit bigger than your doughtnuts. Pick a doughnut up, flip it over, and dunk it in the ganache to cover it about halfway up. Flip it back over and leave it to set on the cooling rack.
Before they set you can add any sprinkles or other ingredients, but you have to be quick because once the ganache hardens any topping will bounce straight off.
You can use coloured ganache as well and I cover how to make dark chocolate and white chocolate ganache and how to colour it in my online course on 10 Cake Decorating Techniques.
For a candy melt ganache I’ve used a 4:1 ratio of 40g of candy melts and 10g of heavy whipping cream or double cream, microwaving it at 50% power for 2 minutes and stirring it until it’s smooth.
Now I’m pouring one color of ganache into the other, stirring it gently to mix them together just a little bit, and then dipping the doughnuts to cover half in the ganache, angling the doughnuts and re-dipping to get the coverage I want.
You can leave them like this or add some sprinkles before the ganache sets.
Instead of ganache you can make a glaze for your doughnuts, but this isn’t my favourite way of decorating them because glazes are very sweet and to get the right consistency to dip the doughnuts, the coverage isn’t as good as it is with ganache.
To make enough glaze for 6 doughnuts, sift 1 cup of powdered sugar into a bowl and whisk in 2 tablespoons of whole or full fat milk. Add 1 teaspoon of vanilla and pour it into a wide, shallow bowl. Dip your doughnuts and you can spoon more glaze onto them to get better coverage.
You can add colour to your glaze, either mixing completely or just stirring slightly to marble the colours together, and then dip the doughnuts or spoon the glaze over the top.
You can add toppings like Oreo crumbs, sliced almonds, sprinkles, or whatever you like! Store the doughnuts in an airtight container for a day or two or decorate a cake with them!
If you prefer to watch the video of this tutorial you can do that here:
Black cakes are dramatic and can be either elegant or festive (perfect for Halloween!) but the frosting usually gives everyone a black mouth. This is my recipe for a rich, decadent buttercream that is truly jet black but won’t stain your teeth!
Makes 6 cups (enough to fill and frost an 8″ or 9″ cake)
Ingredients 2 1/2 cups (5 x 113g or 4oz sticks) unsalted butter* 907g or 32oz (about 7 cups) powdered sugar 1/2 teaspoon salt 1/2 tablespoon vanilla extract 1/3 cup black cocoa powder (35g or 1.2oz) 1/4 cup hot water (60ml) 3/4 cup semi-sweet chocolate (130g or 4.6oz) 2 teaspoons black gel food colour
*If you use salted butter instead, omit the salt in the recipe
Method
1. Prepare ingredients: whisk together the black cocoa powder with the hot water and leave to cool. Melt chocolate for 1 minute at a time in the microwave, stirring until smooth and then leave to cool. The powdered sugar should be sifted to remove any lumps and the butter should be at room temperature. If the butter is cold, bring it to room temperature quickly by popping it in the microwave for 10 seconds and then flipping it over and microwaving it for another 10 seconds.
2. In a mixer with a paddle attachment, mix butter with 1/4 of the powdered sugar and salt (if using) on the lowest speed until incorporated, about 1 minute. Scrape down to the bottom of the mixing bowl with a spatula to loosen any butter and sugar and add the rest of the powdered sugar 1/4 at a time, mixing in between each addition until incorporated.
3. Add vanilla extract, black cocoa mixture, cooled melted chocolate and black gel colour to the buttercream and mix to combine. Cover the buttercream with a lid or cling film and leave for at least 30 minutes for the colour to deepen. Optionally, if the buttercream isn’t as black as you want it to be, add more black gel colour.
Watch my video tutorial above for step by step instructions on how to make a black cake with black cake batter and this black buttercream.
If you’re looking for more tips on how to colour buttercream and how to make it, how to troubleshoot issues like graininess, lumps, air bubbles, or a yellow colour, how to store it, and how to use it to frost and decorate cakes, check out my online course on The Basics of Cake.
British Girl Bakes is a participant in the Amazon Services LLC Associates Program, an affiliate advertising program designed to provide a means for sites to earn advertising fees by advertising and linking to products on www.amazon.com. If you buy any of the products I’ve linked out to, the price you pay won’t change but I will make a small commission on anything you buy. Thank you for helping to keep the British Girl Bakes tutorials FREE!
Even if you’re just beginning to decorate cakes, you’re probably familiar with a 1M star tip, most often used to pipe cupcakes swirls. In this tutorial I’m going to show you 8 ways to use a 1M piping tip, which is my favourite piping tip. If you prefer to watch a video of this tutorial, scroll to the bottom of the page.
I’ll start with probably my favourite way to use a 1M tip, by piping easy roses onto a cake. You need a thin coat of frosting on the cake first, partly because it provides a flat, not-crumbly surface for your roses to stick to, but also because if there are any gaps between your roses it won’t be as noticeable when there’s frosting underneath instead of naked cake.
For each rose, hold your tip against the side of the cake and pipe a tight spiral, working your way out, and then releasing your pressure on the piping bag as you pull the bag away from the cake. Start at the bottom and pipe a row of roses around the cake, and then another row on top, and then another row. I like to pipe each rose in between the 2 below, so that they’re slightly offset.
This is a really quick and easy way to cover a cake with decorative frosting and the color possibilities are endless.. you can use just one color, or pipe the roses on by alternating colors, or make it ombre by using a light shade of the color for the first row, and then get darker as you work your way up or down the cake.
When you’ve finished the sides you can leave the top as it is, or you can pipe roses on top as well.
Then if there are any gaps between roses you can squeeze a bit of frosting out of the piping bag, still using the 1M tip, to pipe little star blossoms.
For this next technique you’ll need piping bags for every colour of frosting, unless you want to wash the bag in between each colour. Build your cake and give it a crumb coat.
I like to start at the top of the cake and work my way down for this one, to make sure the join between the top and the sides is neat. Pipe a rose onto the top by starting in the middle and spiralling outwards until you’ve covered the entire top surface of the cake.
Around the sides, hold your tip against the cake and spin the cake, holding your hand still, which will ensure your frosting is piped in a straight line.
You can change colours as you go down the cake if you want, or use the same colour for the whole cake.
You can either start piping in the same place for each row, and where the frosting row starts and ends will cause a little seam which can then be the back of your cake, or you can start in a different place for each row and by the time you’ve piped all of the rows of frosting, the seams in different places around the cake won’t be noticeable anymore.
The 1M tip is a useful one to use for texture, like the fur or hair on an animal cake. For this dog cake I’ve carved my Perfect Chocolate Cake using a sketch to guide me as I trim the cakes with a serrated knife.
I’m covering the cake with a crumb coat, which is easiest after chilling the cake so that it’s less crumbly.
Before adding fur to the cake, I’ve piped the collar onto the neck and added eyes and a nose, so that the fur sticks out around those details.
With my 1M tip I’m squeezing just enough frosting out of the bag to make a little star of frosting
I’m doing this all over the cake, changing colours to make some of the fur white and some brown.
On its own, a single squeeze of frosting through the 1M tip looks like a star bu when you cover a cake with it, it looks like shaggy fur or hair, which is perfect for dog cakes or any other animal with slightly shaggy fur.
A fun way to add some detail to the top of your cake is to pipe frosting around the top. These are wiggles or ruffles of frosting using a 1M tip.
To make the wiggles or ruffles, hold the tip just above the cake and as you lift the bag up slowly, wiggle your wrist back and forth slightly to make the frosting fold over itself to make these pretty ruffles.
You can place things in between the ruffles, like macarons or cookies or truffles or candies. To space them out evenly it’s easiest to place the macarons or other decorations first.
Then pipe in between them afterwards, wiggling the piping bag left and right until it touches a macaron so that the buttercream fills the gaps between the macarons.
Another way to pipe frosting on top of a cake is to pipe little swirls, the same as you would pipe onto a cupcake. Hold your 1M tip in the center of wherever you want the swirl to be and pipe spiral, lifting your bag slowly as you pipe so that the spiral layers on top of itself.
I’m spacing the swirls around the cake by imagining that the cake is a clock and piping the swirls at opposites, so 12 o’clock and 6 o’clock, 9 o’clock and 3 o’clock, and then another swirl in the middle of each.
You can use a single colour, or alternate bags with different colours of frosting inside, or blend a few colours together inside the piping bag. I go over this in a lot more detail in my online course on The Basics Of Cake.
A final fun border for the top of your cake is a rope border, which you pipe with little overlapping circles of frosting. Go around the outer edge of the cake and when you get to the end of each circle, immediately start the next circle.
Each circle of frosting will overlap half of the previous circle. Continue all the way around the cake, finishing with a complete circle and then if you like you can add some sprinkles on top.
For the base of the cake, you can use your 1M tip to pipe this wave-like border to cover up the join of the cake and the cake board. Hold your piping bag vertically and squeeze the frosting out as you move your wrist away from you, and then pull it back towards you to finish the wave.
Release your pressure on the bag for a moment and then as you pipe the next wave, moving the bag away from you, start squeezing the bag again to push out more frosting. This is a nice way to add some detail at the bottom of the cake.
If you’re going to put something on top of your cake, like macarons or sugar art or chocolate shapes or other decorations, a fun way to attach them is to pipe frosting onto the top with your 1M tip and then, while the frosting is still sticky, press the decorations into it.
When the frosting sets after about 30 minutes at room temperature or 15 minutes in the fridge, it will secure the decorations in place on top of your cake so you can move it around without worrying about the decorations fall over or falling off the cake.
I hope you’ve seen a fun new technique to try – please tag @britishgirlbakes in your photos on Instagram if you try any of these so I can see what you make!