I’m going to use these 3 cakes to show you step by step how to use cake combs for texture, with a few tricks for super smooth texture. After that I’ll show you some fun variations like double textures! If you prefer to watch a video of this tutorial, scroll to the bottom of the page.
1. Choose the right textured cake comb. It should be at least as tall as the cake so you can scrape the entire surface of the side of the cake wither each stroke, and it can be any material – plastic, acrylic, metal… try them all and see which you like best and which works best with your frosting.

I’ve used all three materials with my buttercream and I don’t have a preference, but you might find one more effective or easier to use than others.

2. Prepare your cake before using a textured cake comb. Your cake needs to be straight so that the comb only removes excess frosting, not part of the skeleton of your cake as well. Make sure as you’re assembling your cake than each layer is sitting directly on top of the layer below it.

As you assemble your cake with layers of cake and filling, check that the sides of the cake are nicely vertical, not leaning over to one side. I find that the cake is easier to assemble and frost when the layers are cold, because they’re firmer and less crumbly than when they’re at room temperature. I like to chill my layers in the fridge for an hour before I start.

You’ll definitely need a crumb coat before the final coat of frosting, and this first thin coat of frosting traps any crumbs that come off the cake, so later, if you accidentally go too deep with your cake comb, you’ll see the crumb coat as a warning instead of gouging straight into the actual cake and digging out crumbs that will then get into your final coat of frosting.

Ideally, this crumb coat should be a different color to the final coat, so you notice if you expose it, and it should be a lighter color than the final coat so it doesn’t show through.

3. Apply a thick, even final coat of frosting. This layer of frosting will probably be thicker than you’re used to. It needs to be at least as thick as the grooves on your cake comb, so that the entire depth of the texture on the comb can be imprinted into the frosting. This is my 4 Minute Buttercream Frosting.

After applying buttercream to the top and sides of the cake, smooth it with a frosting smoother and then fill in any air pockets and indents by spreading on more buttercream and then smoothing again.

This frosting doesn’t need to be perfect because you’re going use use a textured cake comb over the top, but you need to make sure it’s applied evenly all over the cake so that it’s straight. You’ll get used to judging whether the frosting is thick enough but you’ll also find out in the next step if it is, or if you need more frosting.

It’s important that the frosting goes all the way up over the top of the sides of the cake, so that there aren’t any air pockets there later. After smoothing out the top to tidy up the top edge of frosting, if there are any gaps in the frosting you should fill those in and smooth over them before starting with your textured comb.

4. Position your textured cake comb correctly. Line it up straight vertically, so that it’s flush with the sides of the cake. Rest the bottom of the comb on the cake board to help you get it straight.

5. Scrape, touch up, and repeat! The process of imprinting the texture is simple and very repetitive but it’s essential that you do repeat it again and again until your texture is neat and smooth.

Scrape until you get a lot of buildup of frosting on the comb, wipe off that frosting from the comb, and then repeat. Your texture will probably be messy at the beginning but as you go around the cake again and again it will get smoother and the texture will become more defined.

After several goes, touch up any big indents or air pockets in the frosting by filling them in with more buttercream and then repeat the process with the cake comb. This also works if you scrape through the frosting to reveal the crumb coat, which means your frosting is too thin so you need to spread some more over that area.

It might work best if you slant the side of the comb towards you at a 45 degree angle against the side of the cake instead of pressing it straight into the sides of the cake, because depending on the consistency of your buttercream, when the grooves of the comb are at an angle they might scrape the cake more smoothly and create fewer air pockets.

Don’t worry if your texture looks messy at the beginning. It took about 10 minutes of scraping, touching up, and scraping again to texture this cake neatly so be patient! Go around the cake with your textured cake comb again and again, touching up any gaps in the texture with more frosting, until the texture is nice and smooth.

Now I’ll show you a few variations with textured cake combs.
This first cake is going to be a striped cake. Follow the same process by starting with a thick coat of frosting with straight sides.

Now use a striped cake comb, scraping a section of the cake at a time with your comb pressed down against the cake board and held at a 45 degree angle against the side of the cake. Scrape around the cake several times, wiping off the comb in between each scrape to take off any excess buttercream.

If your cake looks messy at the beginning don’t panic, it’ll come together after a few minutes of scraping. The 45 degree angle is really essential for a striped cake comb and you’ll notice much smoother grooves when you hold it at this angle.

Touch up any air pockets within the stripes that are sticking out from the cake, spreading buttercream over them and scraping again with your comb to get a smooth coat of frosting imprinted by the texture on the comb.

Here’s what my final scrape with the striped cake comb looked like, after several minutes of scraping, touching up, and scraping again. If you’re looking for more detail on striped cakes, check out my tutorial 4 Secrets To Perfect Stripes On Cakes.

Chill the cake in the fridge for 30 minutes or in the freezer for 15 minutes and meanwhile, mix some colours of buttercream for the filling. I’m using gel colours to get bright shades of fuschia, sunset orange and burgundy.

Now fill in the stripe grooves you made with the comb, spreading a single colour of buttercream all over the cake to fill in all of the grooves or if you’re using more than one colour you can pipe them into the grooves.

Don’t worry about how neat the piping is but it’s important that the buttercream completely fills in the grooves, otherwise you’ll have air pockets later on. I’m using a large round tip (a Wilton #1A) for fuchsia and for the thinner stripes for the orange buttercream I’m using a small ribbon tip (a Wilton #104).

When you’ve filled in the grooves, use a frosting smoother to scrape around the cake several times. With the first few scrapes you’ll smudge the buttercream as it spreads out over the edges of the grooves but keep going, scraping more and more buttercream off each time.

If you notice any air pockets, where the buttercream you spread or piped into the grooves didn’t completely fill the groove, spread on a bit more of that colour to fill int he gaps. After several scrapes with your frosting smoother, you will have taken off all of the excess buttercream, leaving neat stripes behind.

Smooth out the top as normal and decorate the cake however you like!

I have an online class on decorating this cake from start to finish on my online cake school.

Another fun variation once you’re confident with textured cake combs is to use different textures for different parts of a cake. For this cake I’m going to add a layer of textured frosting to the bottom section of the cake. To do this, start by frosting the top and sides as normal.

After frosting your cake, chill it to set this first layer of frosting, which will take about an hour in the fridge or 30 minutes in the freezer.

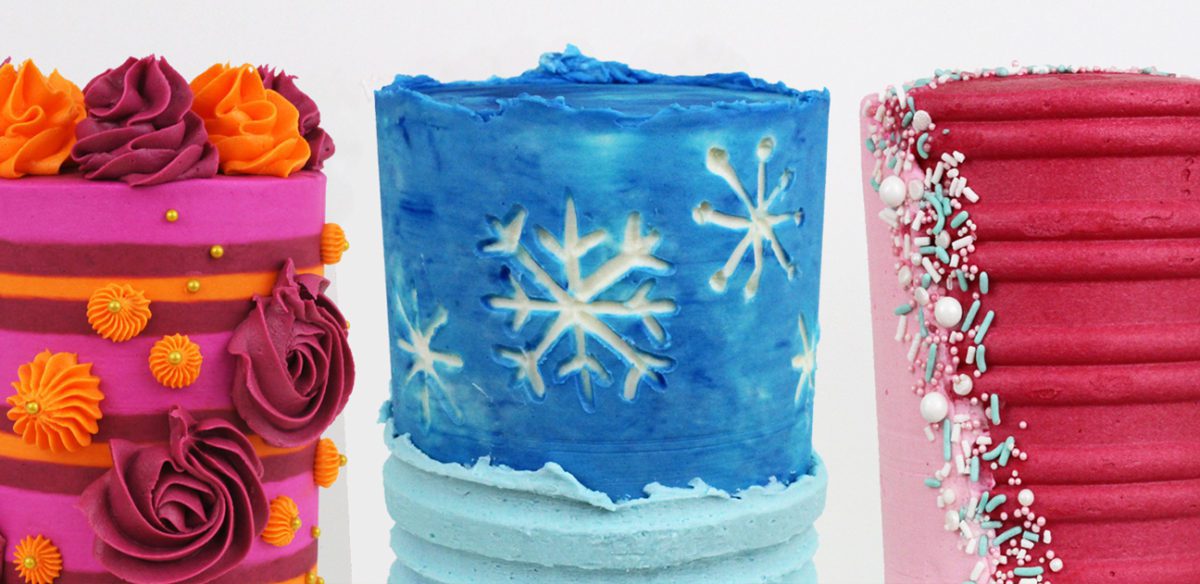
I’ve decorated the sides of my cake with some buttercream carving and I cover various techniques and styles for carving images, patterns, and designs in my online course on Buttercream Carving.

When the frosting has set and is firm to the touch, apply a second layer of buttercream to the bottom of the cake. You can spread it on randomly with your

Smooth this second layer of frosting to expose any gaps (where the frosting isn’t thick enough) and fill those in by spreading on some more buttercream and scraping again to get a smooth layer of frosting of an even thickness.

Now use a textured frosting comb to imprint texture into the second layer of frosting.

Scrape around the cake with the textured comb several times, touching up any gaps along the way, until you’re happy with how neat the texture is.

This cake has different sections of textured frosting on the top and bottom halves of the cake, but you can also divide a cake down the middle and use different textures for each side.

To divide the frosting vertically requires a few more steps but I use a very straightforward technique and I share all of the details in my online class on Textured Half and Half Cakes on my online cake school.

Here’s the video version of this tutorial:


