10 delicious cake decorations that taste as good as they look! Use buttercream, chocolate, fruit, cookies and marshmallows to make these.
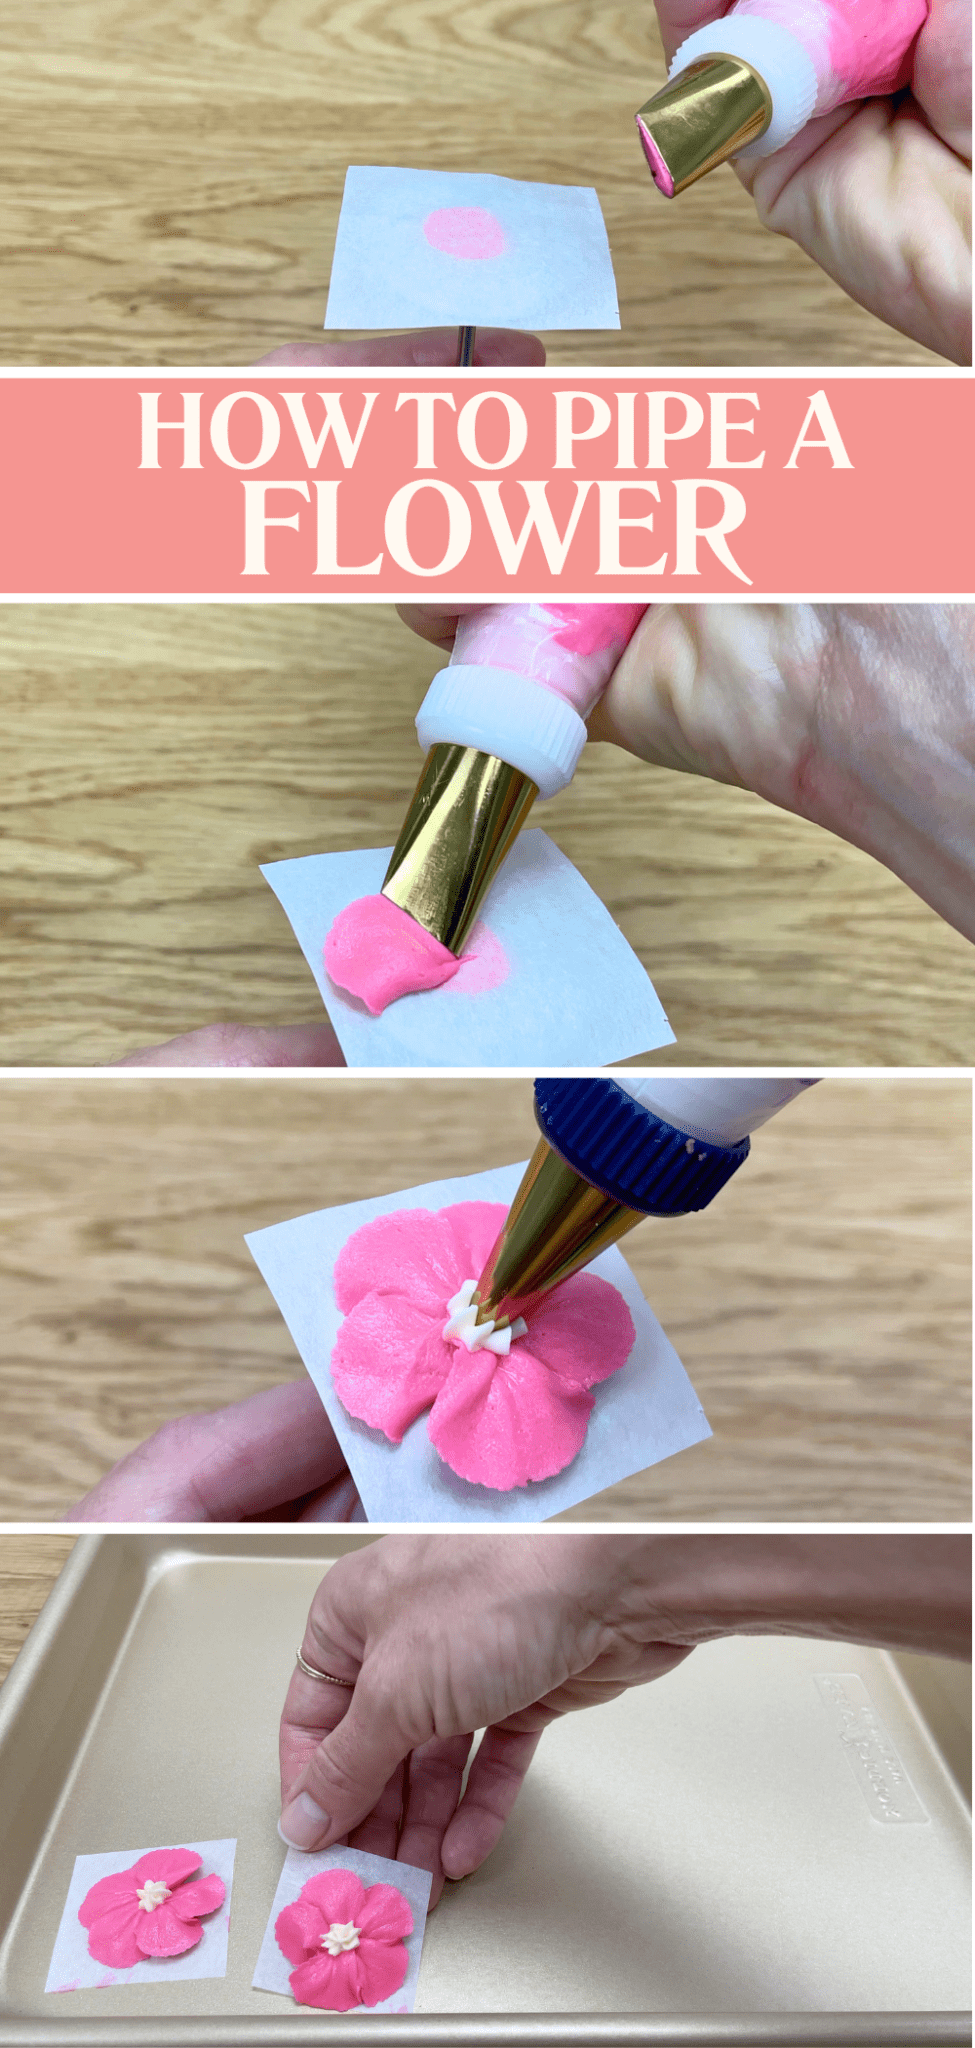
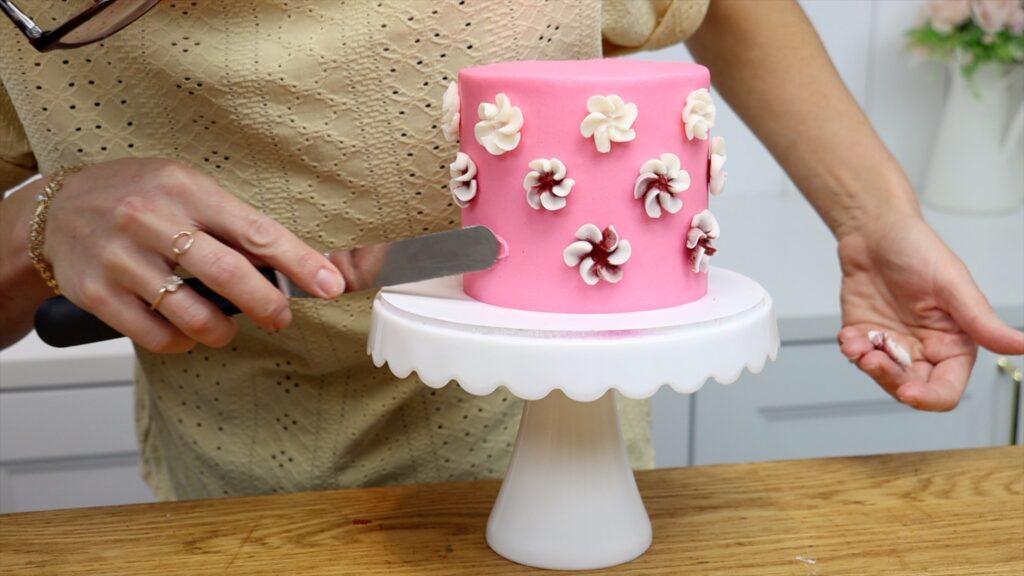
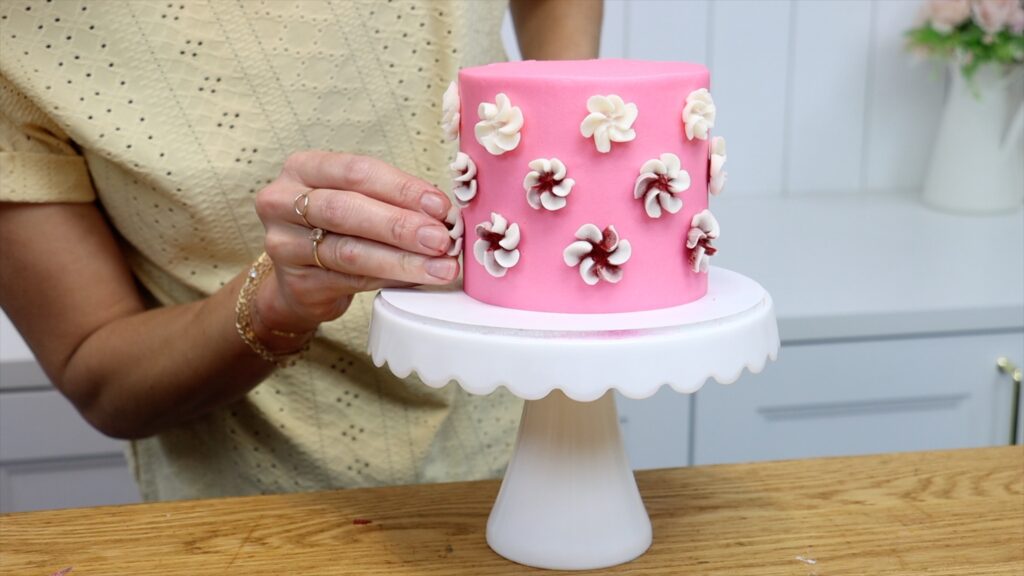
1. Buttercream flowers
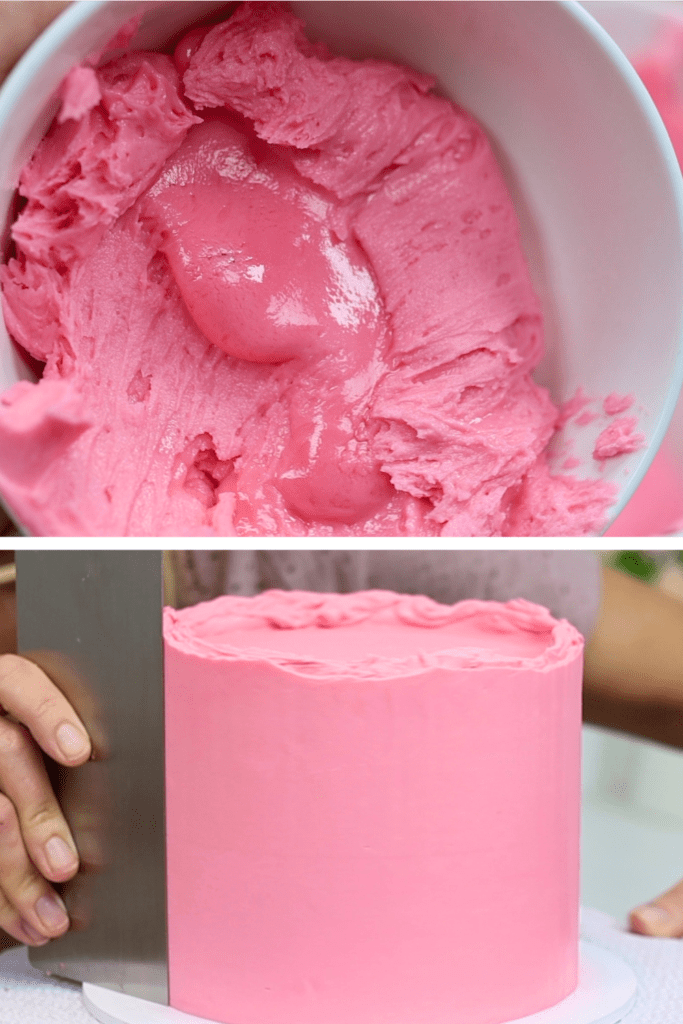
First of all, buttercream makes delicious cake decorations. This is one of the easiest decorations because you can just use what’s leftover after frosting your cake. I always use my 4 Minute Buttercream because it's quick, easy, and delicious!
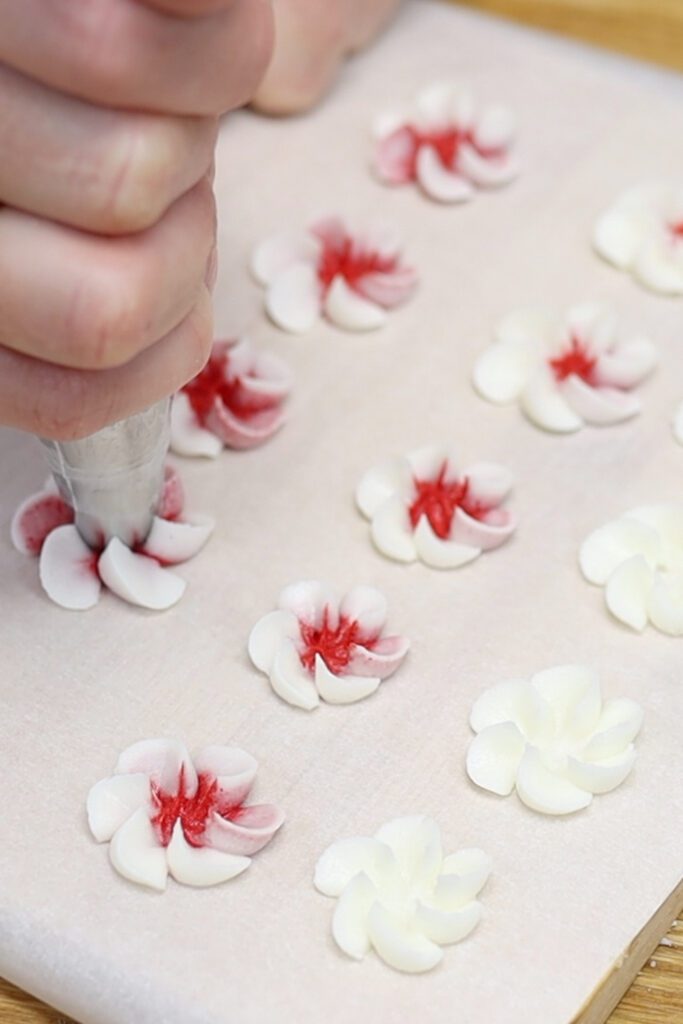
Make buttercream flowers by piping them onto parchment or wax paper before attaching them to your cake. You'll need a flower nail for this, which you can spine between your fingers as you pipe. To use a flower nail, pipe a dot of buttercream to attach a square of parchment or wax paper. The paper square should be about the same width as the flower nail.
To pipe a simple flower use a petal tip like a # 104 or a #125 for bigger flowers. Hold the piping tip with the narrow end facing outwards and squeeze the piping bag to pipe a petal. While you're piping, spin the flower nail between your finger and thumb as you work your way around the flower.
Pipe a dot or a star in the middle with a small round piping tip or a star shaped tip. You could use sprinkles instead but they’re crunchy to bite into!
Carefully slide the paper off the nail and place it on a tray or plate. Put the tray into the freezer for 5 minutes to set the flowers so that they're very firm. Then lift them up, peel them off the paper, and press them onto your cake.
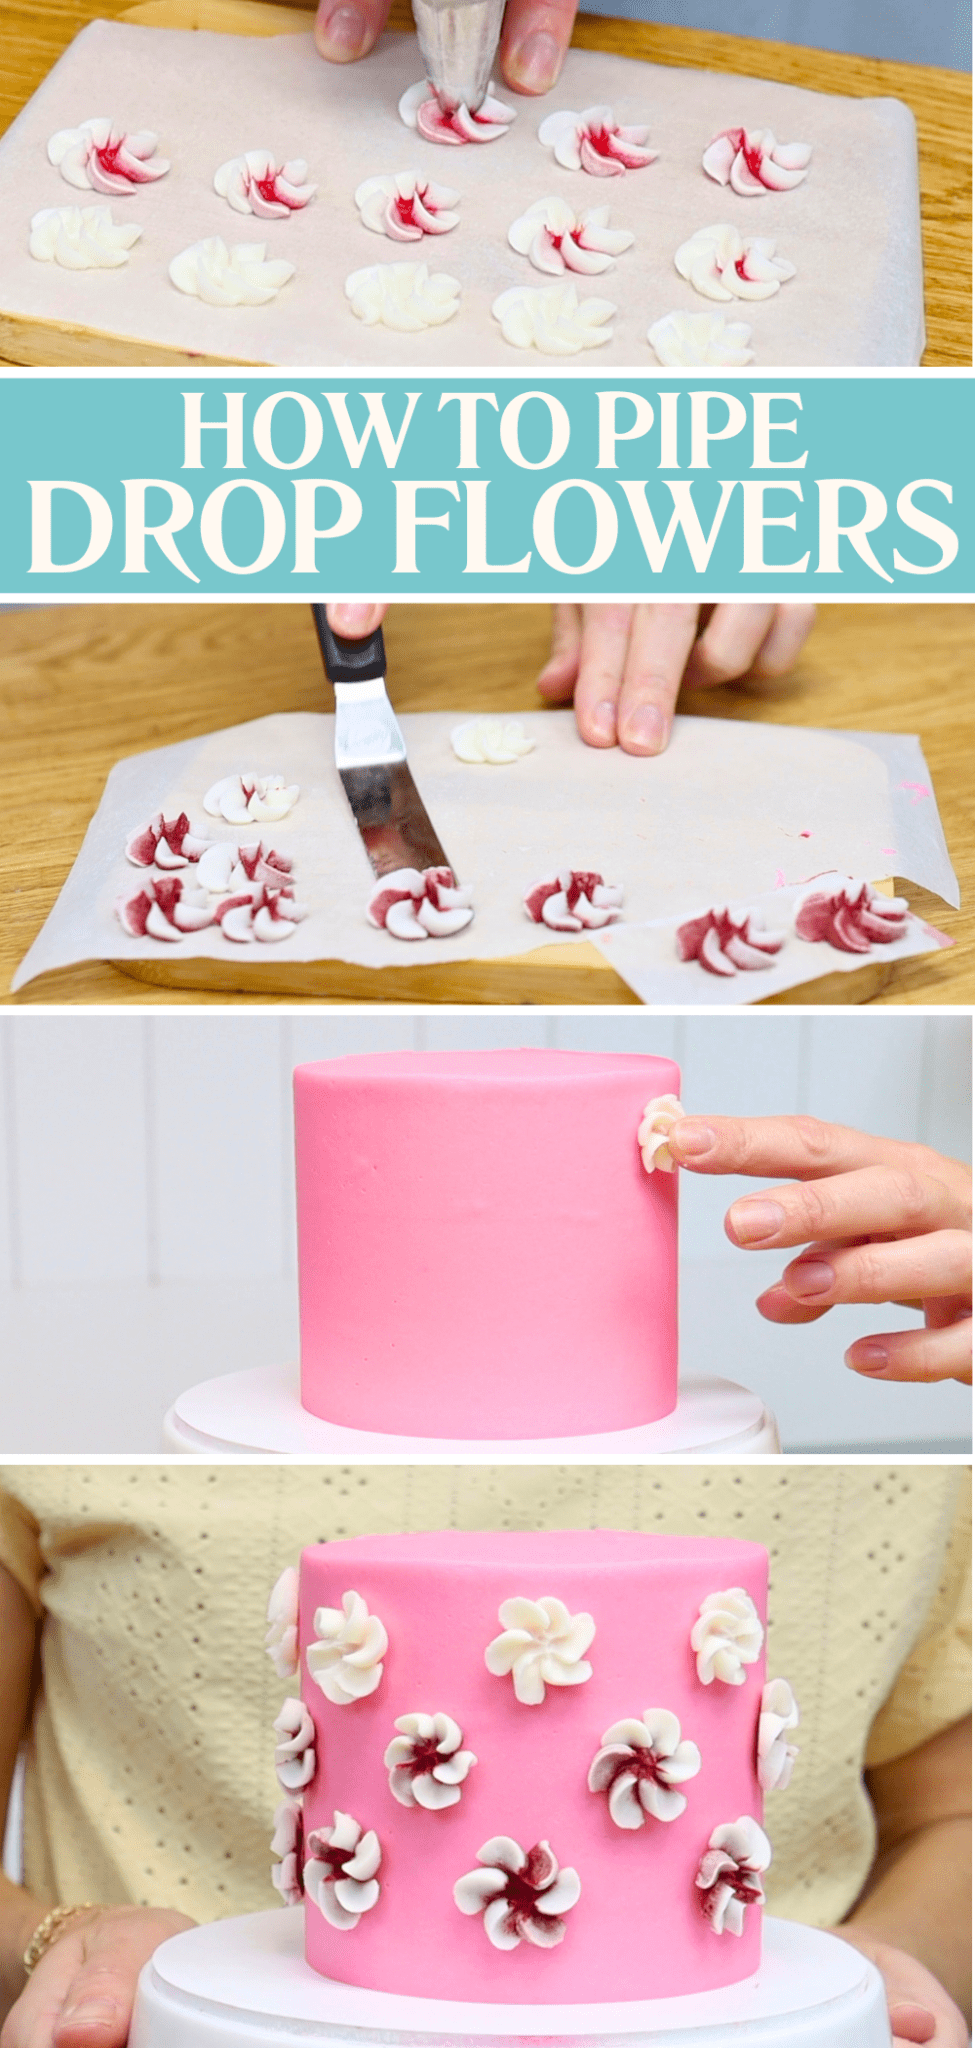
For even easier flowers, use a rounded star tip like a 2D. Rest the tip down on parchment or wax paper and twist your wrist as you pipe. The petals will fan out sideways from the piping tip, all at the same time. Chill these in the freezer before picking them up and pressing them against a cake. If the frosting on the cake has set and isn’t sticky anymore, you'll need some edible glue. Buttercream is perfect for this! Pipe or spread some fresh buttercream onto the cake and push a flower into that. These flowers are gorgeous and will be delicious to eat with the cake!
2. Ganache for drips and mirror glazes
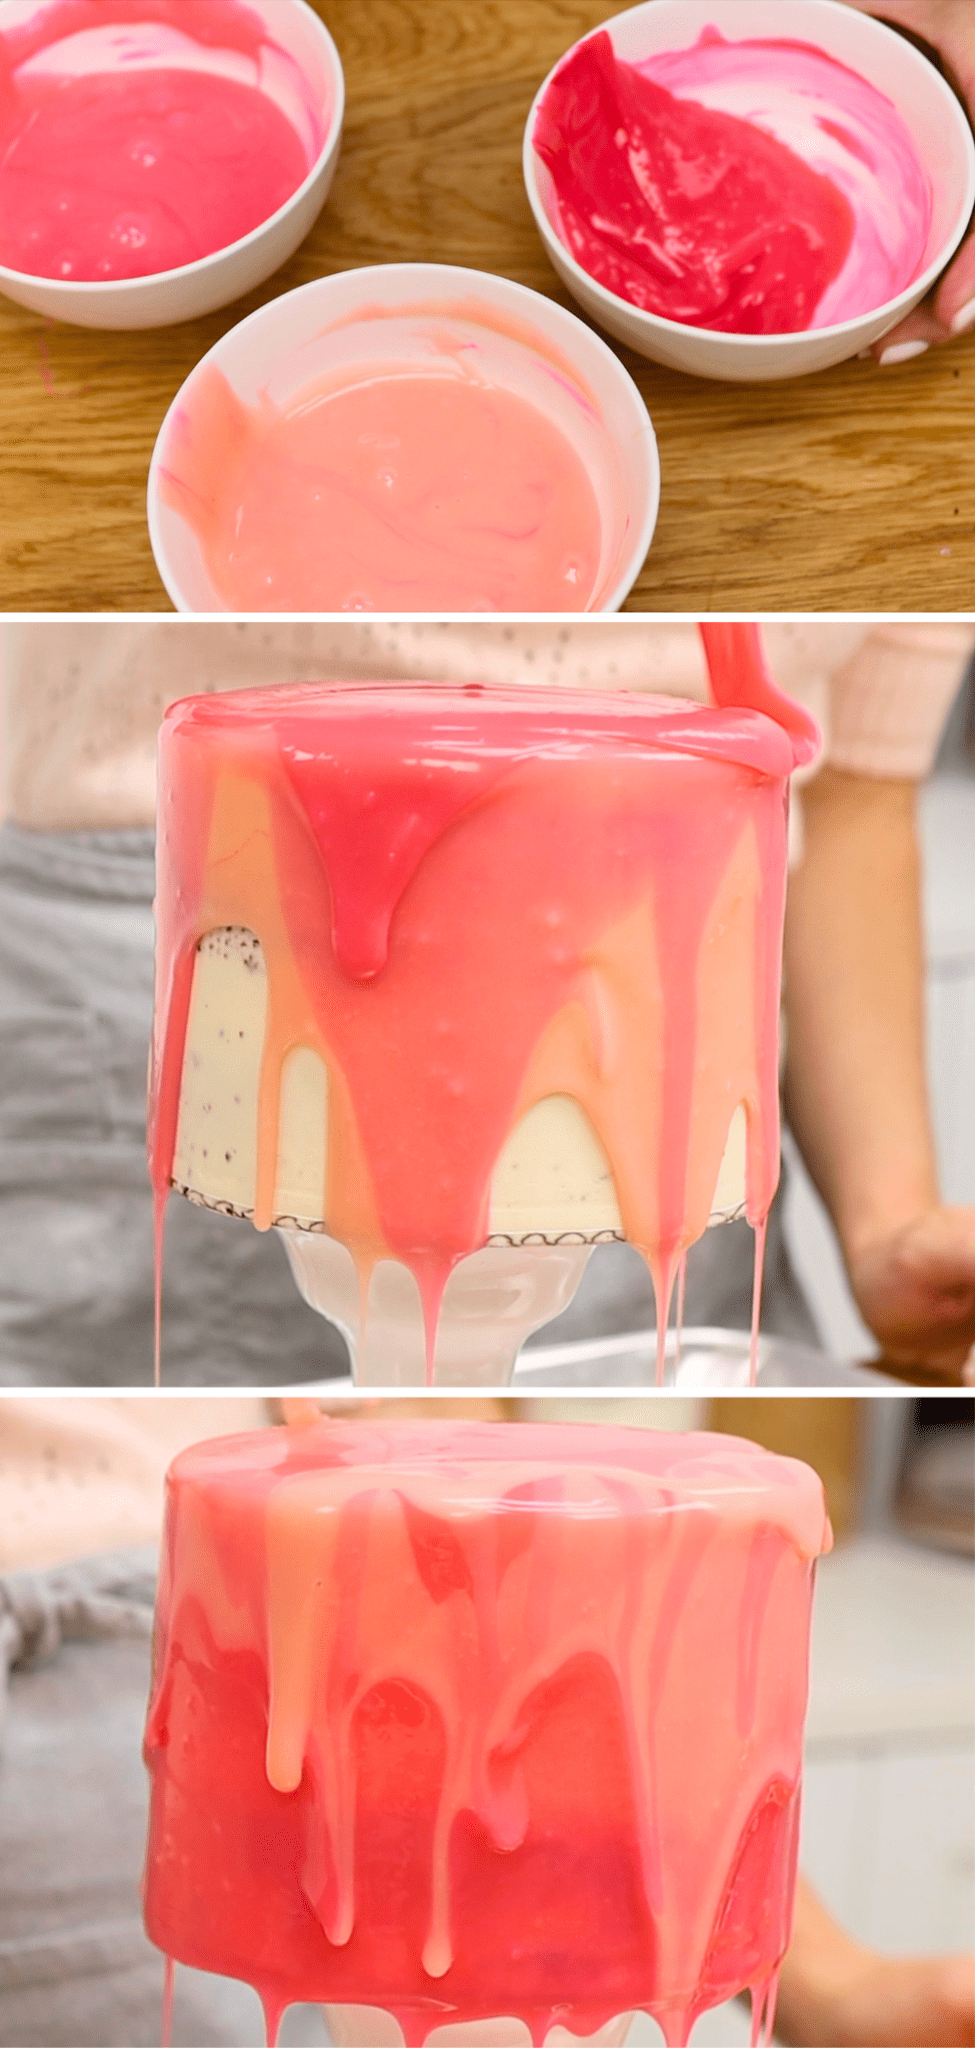
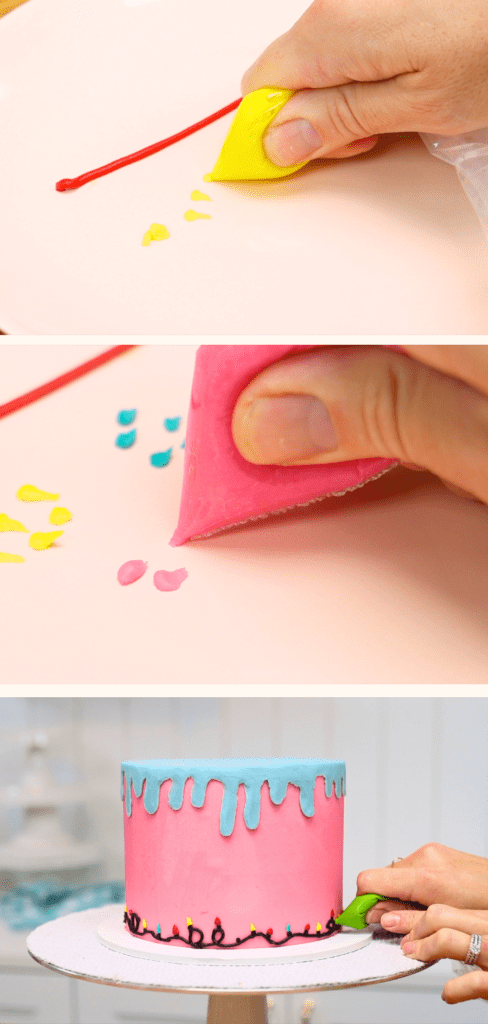
Drips and mirror glazes made with melted chocolate and cream are eye catching and colourful and also delicious! You’ll need cream and white chocolate to make ganache and the cream should be hot but not bubbling. Pour the hot cream over the chocolate chips and leave for five minutes before stirring until smooth. To make ganache for the drip or glaze, use a ratio of 3 parts chocolate to 1 part cream. This means you'll need 3 times as much white chocolate as cream. Add gel colours if you want to tint the chocolate because liquid colours can make it too watery.
To make a drip with dark or semi-sweet chocolate use a ratio of 2:1. Weighing the chocolate and cream is the most accurate way to get the correct ratio.
When the ganache has cooled almost to room temperature, spoon it onto a cake. Nudge it over the sides with a spoon or offset spatula or use a squeezy bottle. Having a cold cake that’s been in the fridge is essential to stop these drips from dripping!
Instead of drips, use ganache to make an easy mirror glaze. Divide the ganache between small bowls and add colouring to each bowl. Then pour the coloured ganache over a cake, alternating between colours and letting them run down the sides. Mirror glaze is a fun, colourful effect that also tastes incredible!
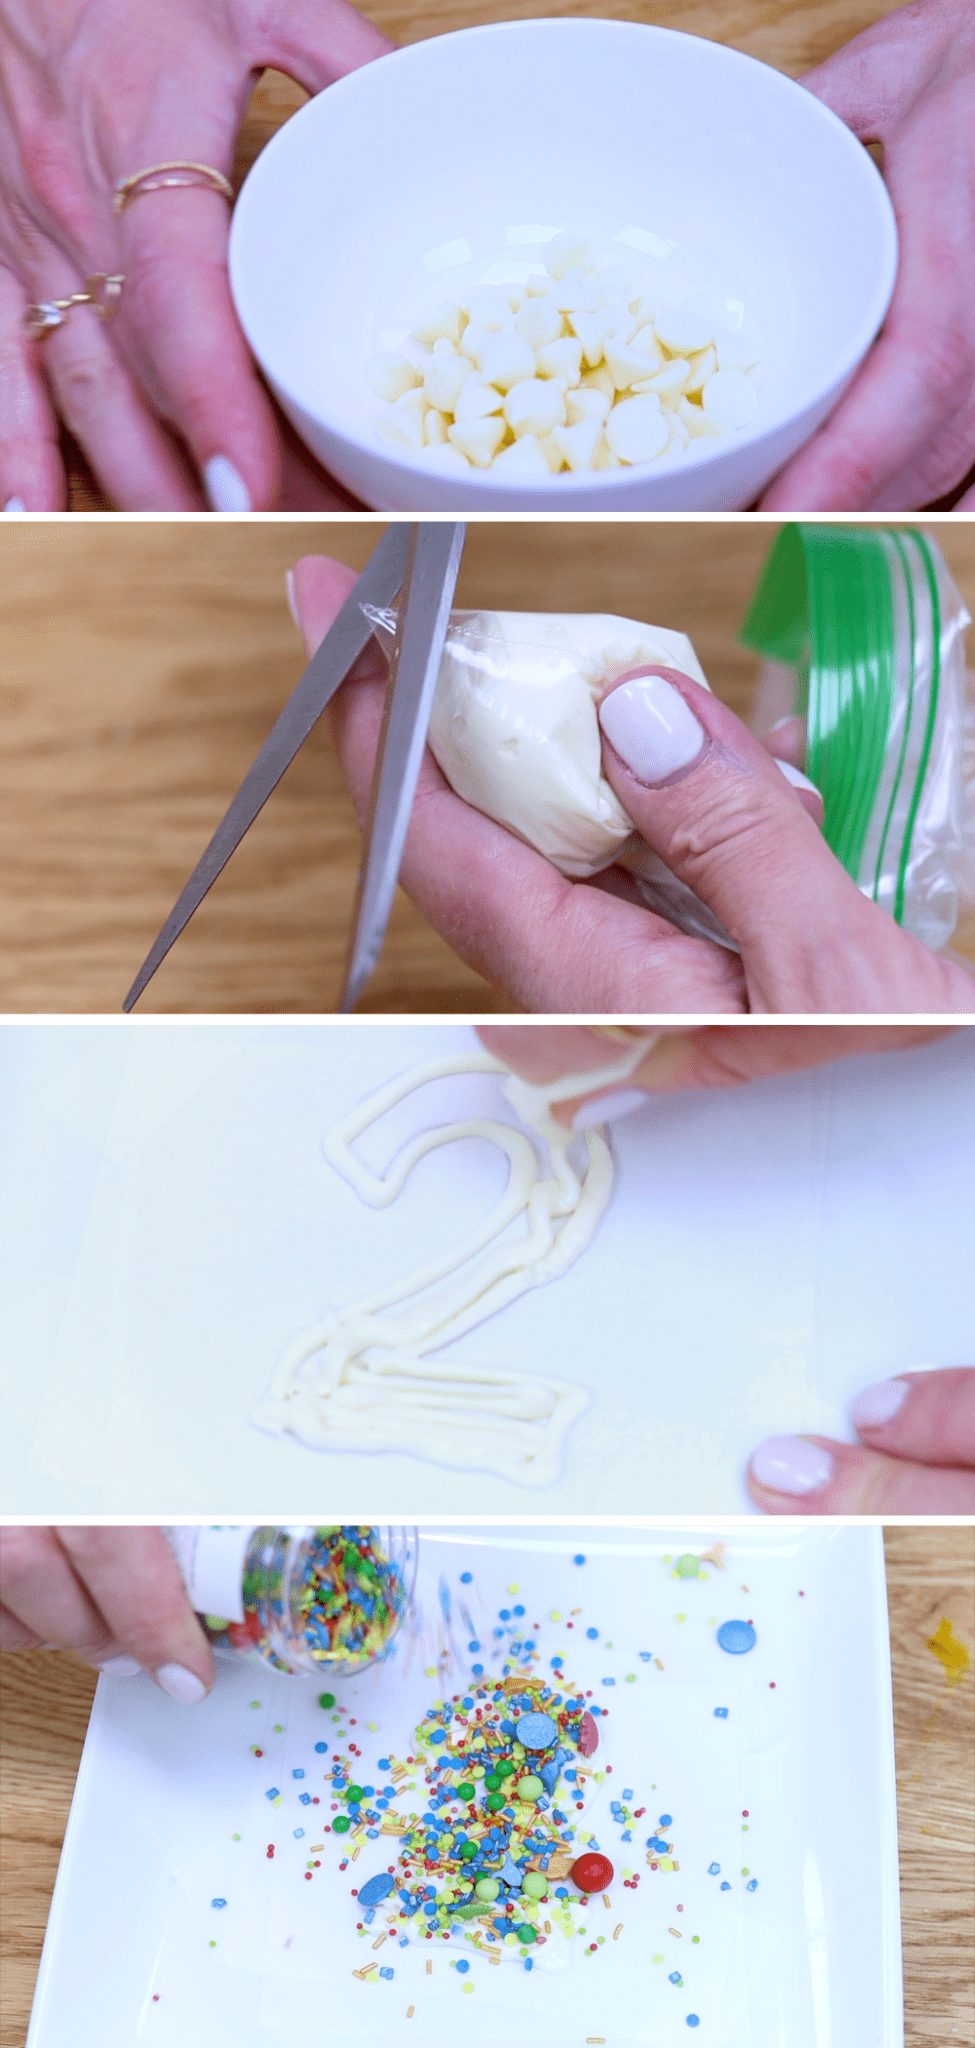
3. Sprinkled chocolate number toppers
Another chocolate cake decoration you can make is a number topper. Melt chocolate at 50% power in the microwave for 30 seconds at a time. Stir it until it's smooth and then spoon it into a sandwich bag and cut off a corner. Write or trace a number onto parchment or wax paper, fill it in and then pour sprinkles on top. They’ll stick to the chocolate.
The chocolate will set after about 10 minutes in the freezer or 20 minutes in the fridge. Now you'll be able to pick the chocolate number up. Flip it over, squeeze some more melted chocolate onto the back and press a paper straw against it. Chill and set this in the fridge or freezer and then push it into a cake.
Sprinkled chocolate number toppers are colourful, fun and delicious cake toppers!
4. Fresh fruit
Here’s a much quicker and easier idea: fresh fruit looks beautiful on cakes and tastes great, too. Fresh berries are my favourite for two reasons. Firstly, since they’re so small and light they’re easy to attach to a cake with a dot of fresh buttercream. Secondly, they stay fresh-looking overnight so you can decorate your cake in advance.
5. Use cake ingredients as delicious cake decorations
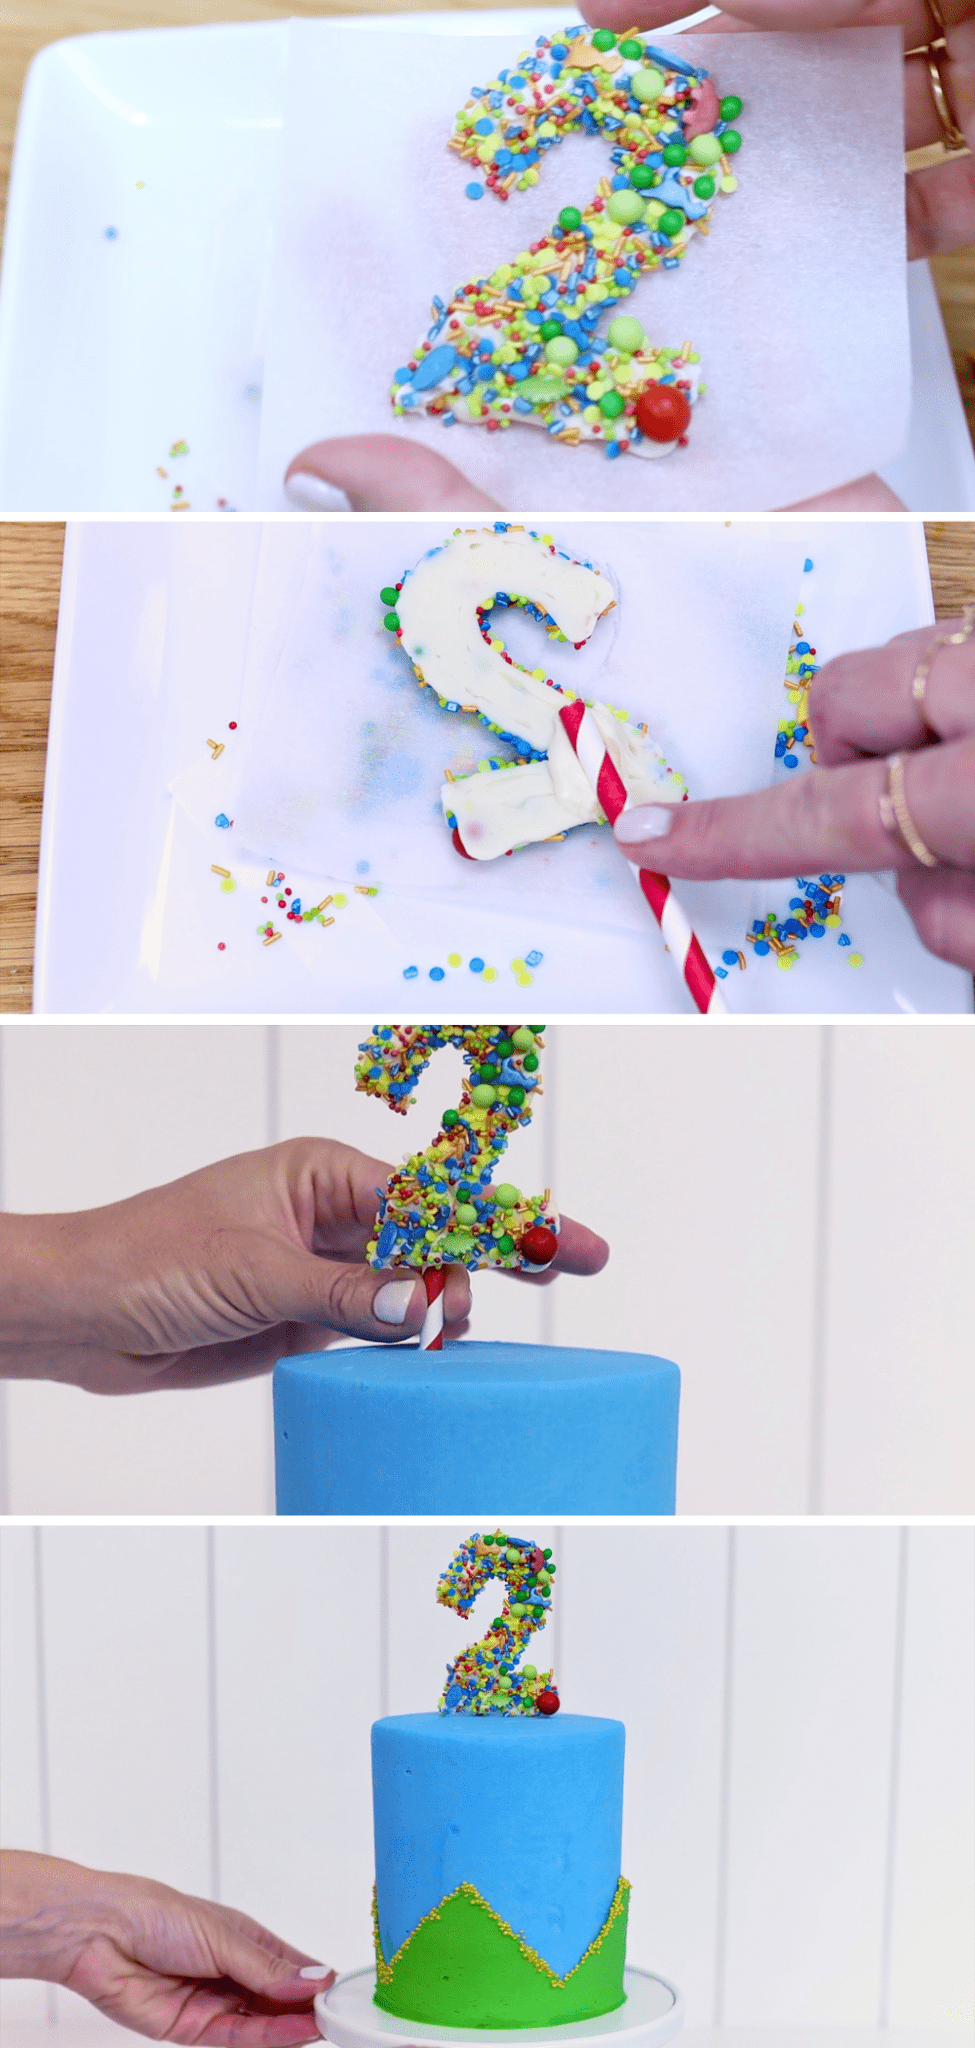
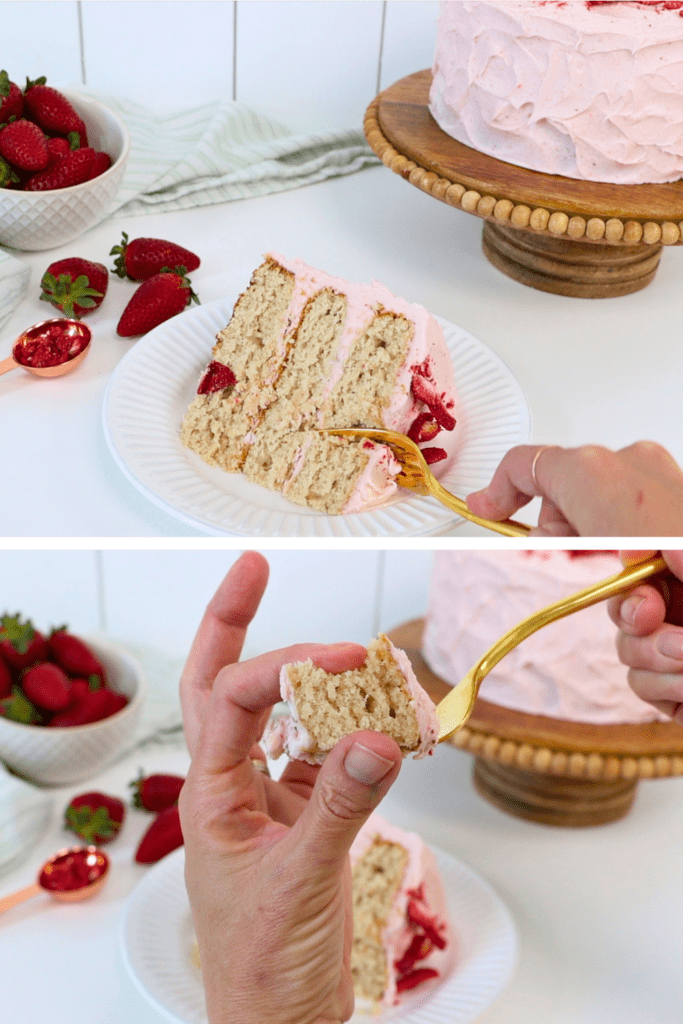
Another easy way to make delicious cake decorations is to use an ingredient for the cake. For example, the cookie dough filling in my Cookie Dough Cake can be rolled into balls to decorate the cake. Freeze dried strawberries are a bright decoration on my Strawberry Cake and Oreo cookies look delicious on an Oreo cake. As well as making cakes look pretty, using ingredients as decorations gives you a clue of what the flavour is!
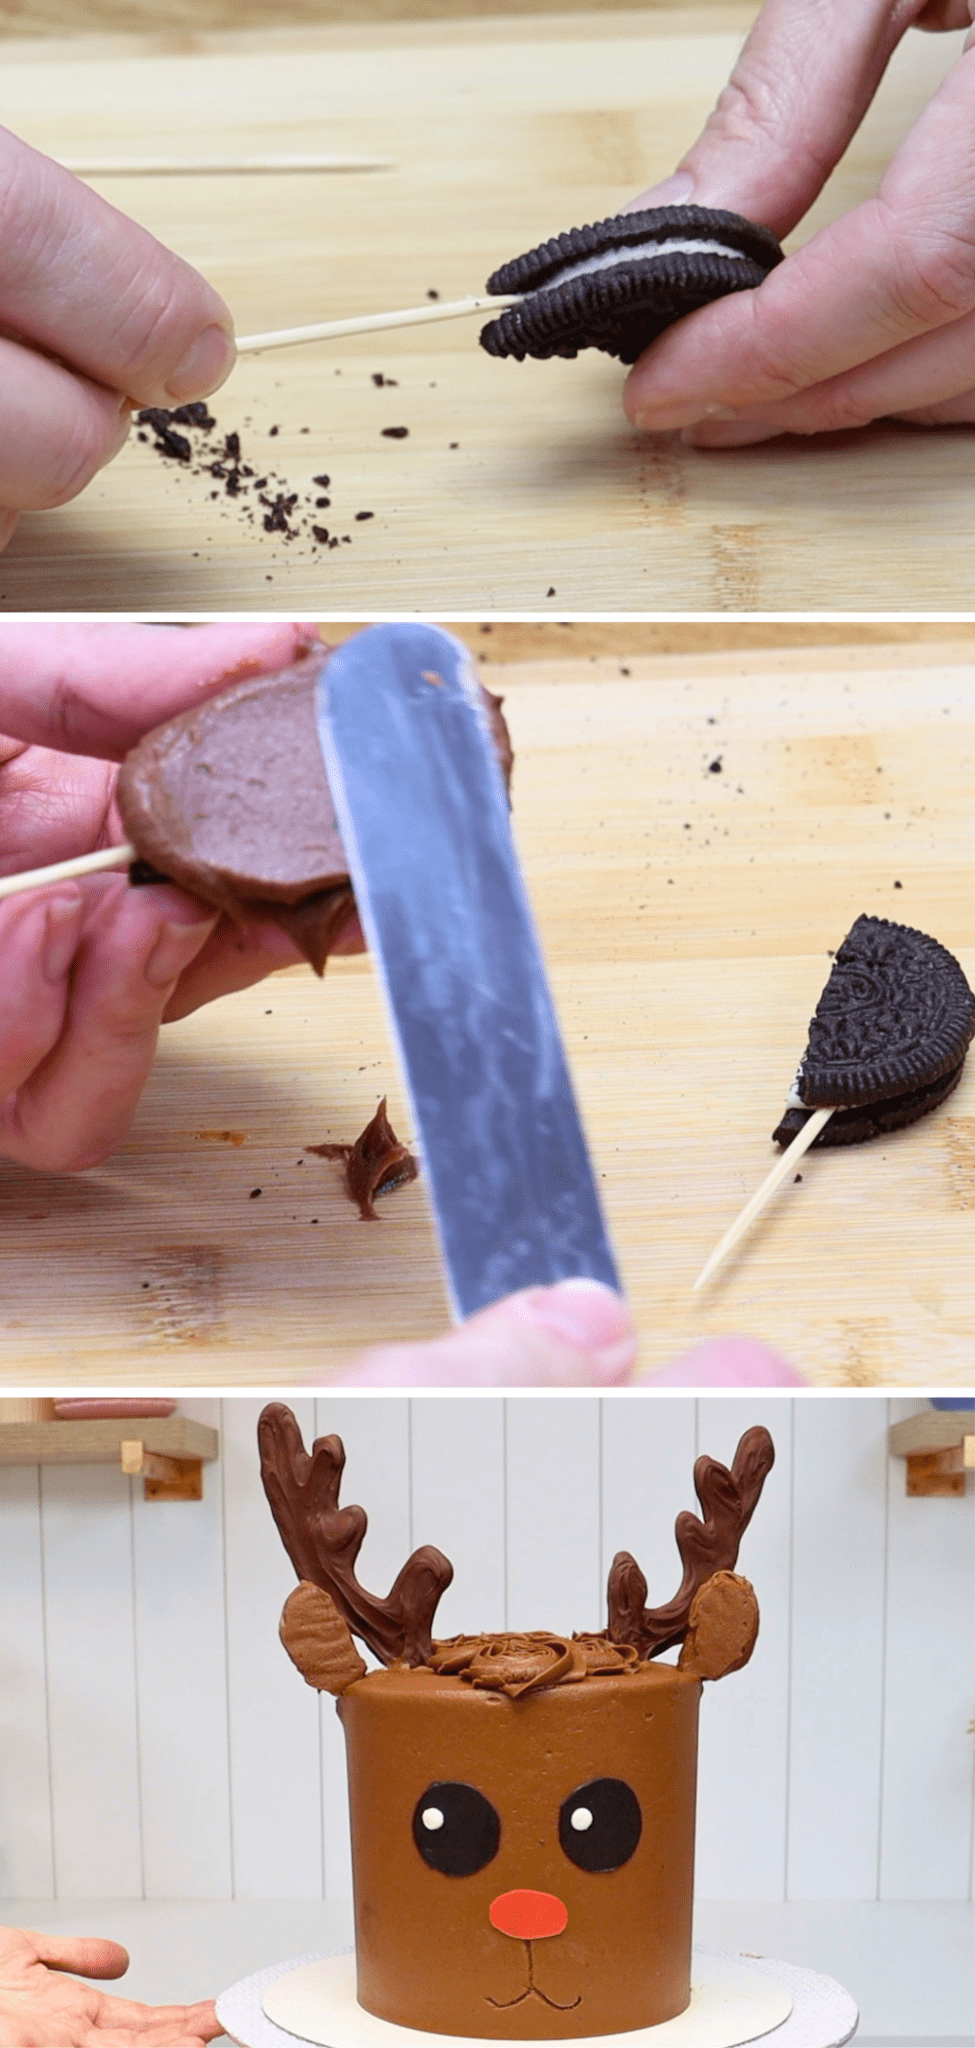
6. Cookies as ears
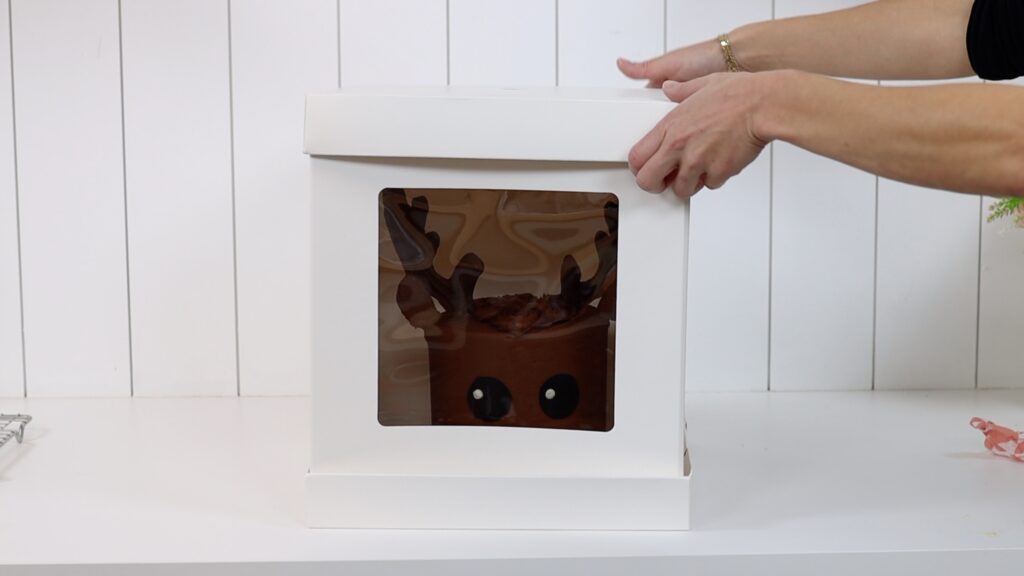
Cookies can make perfect ears on cakes. I know this sounds strange out of context because of course cakes don’t have ears! But for animal cakes you usually need ears like on the cat and reindeer cakes below.
Cut Oreos into triangles for cat ears, covering them with buttercream by spreading or piping the buttercream on. Scrape the buttercream with a toothpick to make fur texture.
Or for more rounded ears cut Oreos in half before covering with buttercream. Poke a toothpick into the Oreo filling to make these ears easy to attach to the cake. The toothpicks will keep them standing upright.
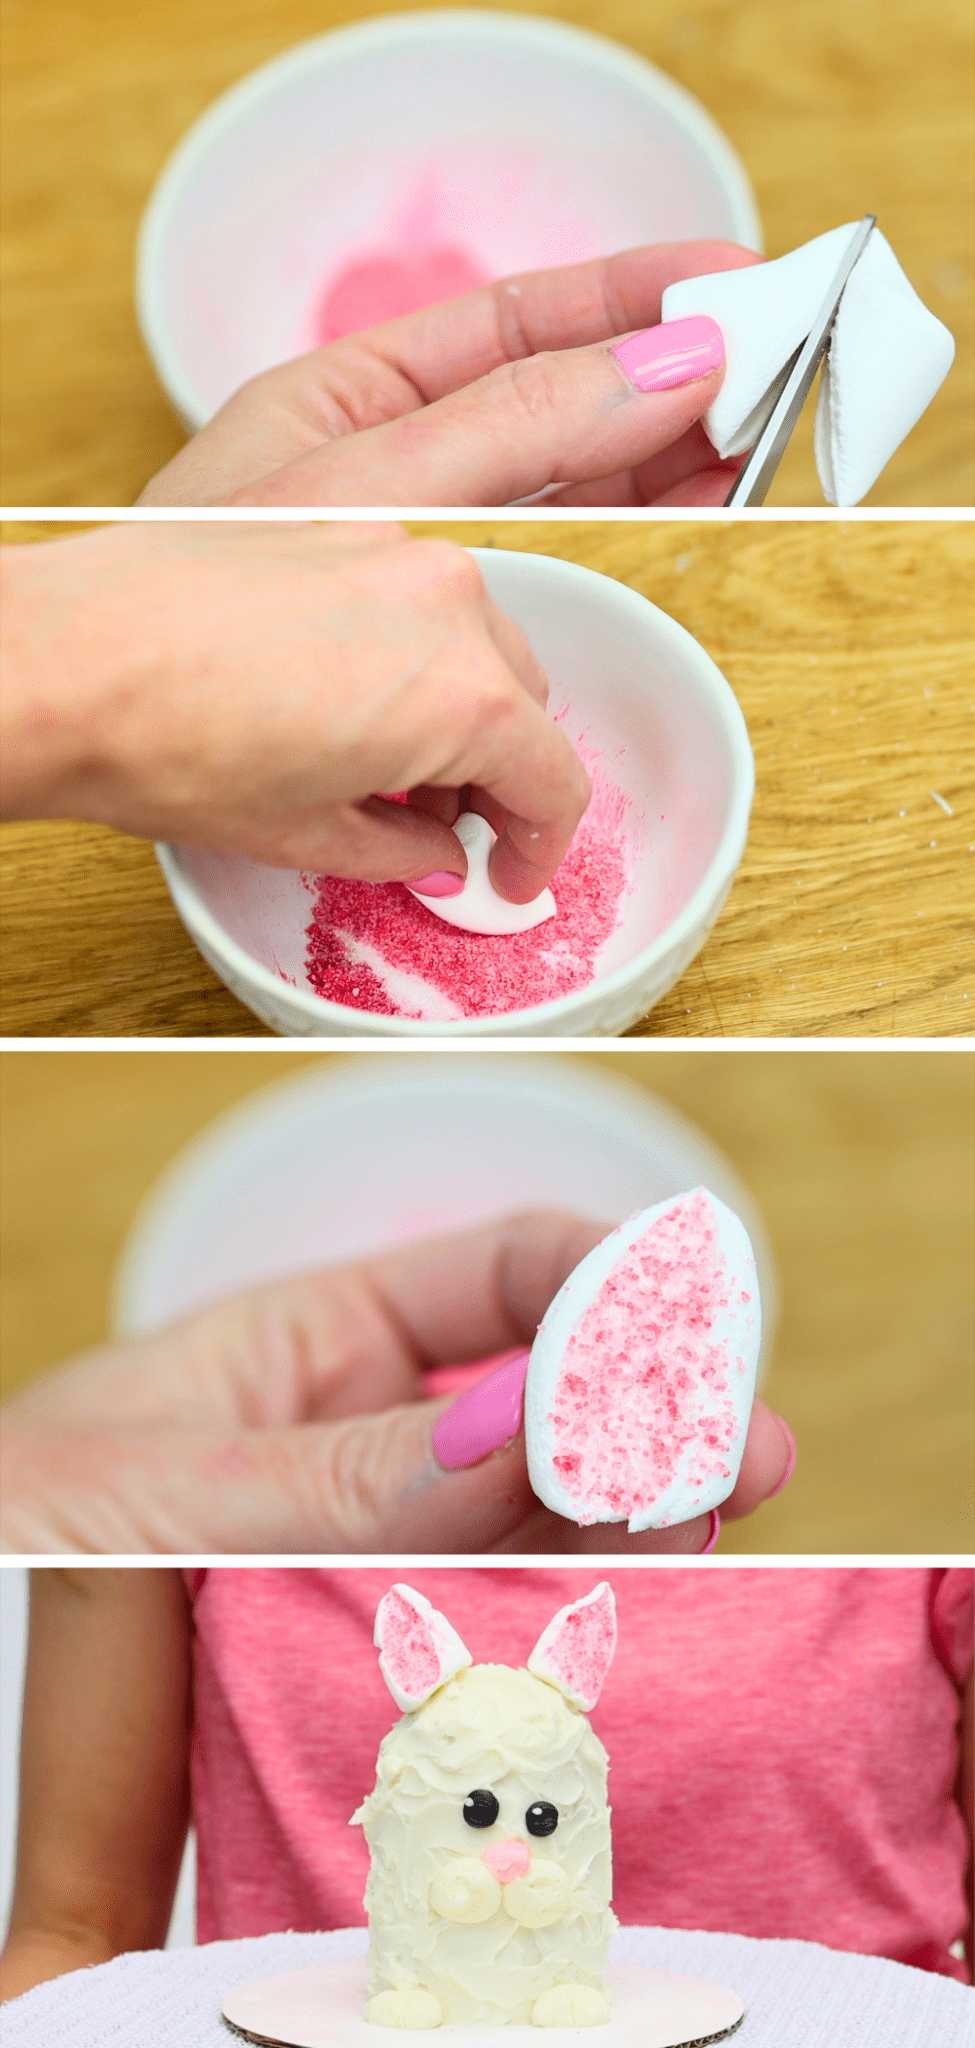
7. Marshmallows as ears or eyes
Marshmallows are also great for ears! Cut each marshmallow diagonally to make an ear shape. Then press the sticky, cut side into sugar tinted with pink colouring.
Poke a toothpick into the bottom of the ear and then push that into a cake. The marshmallow ears will stand upright, making cute and delicious ears!
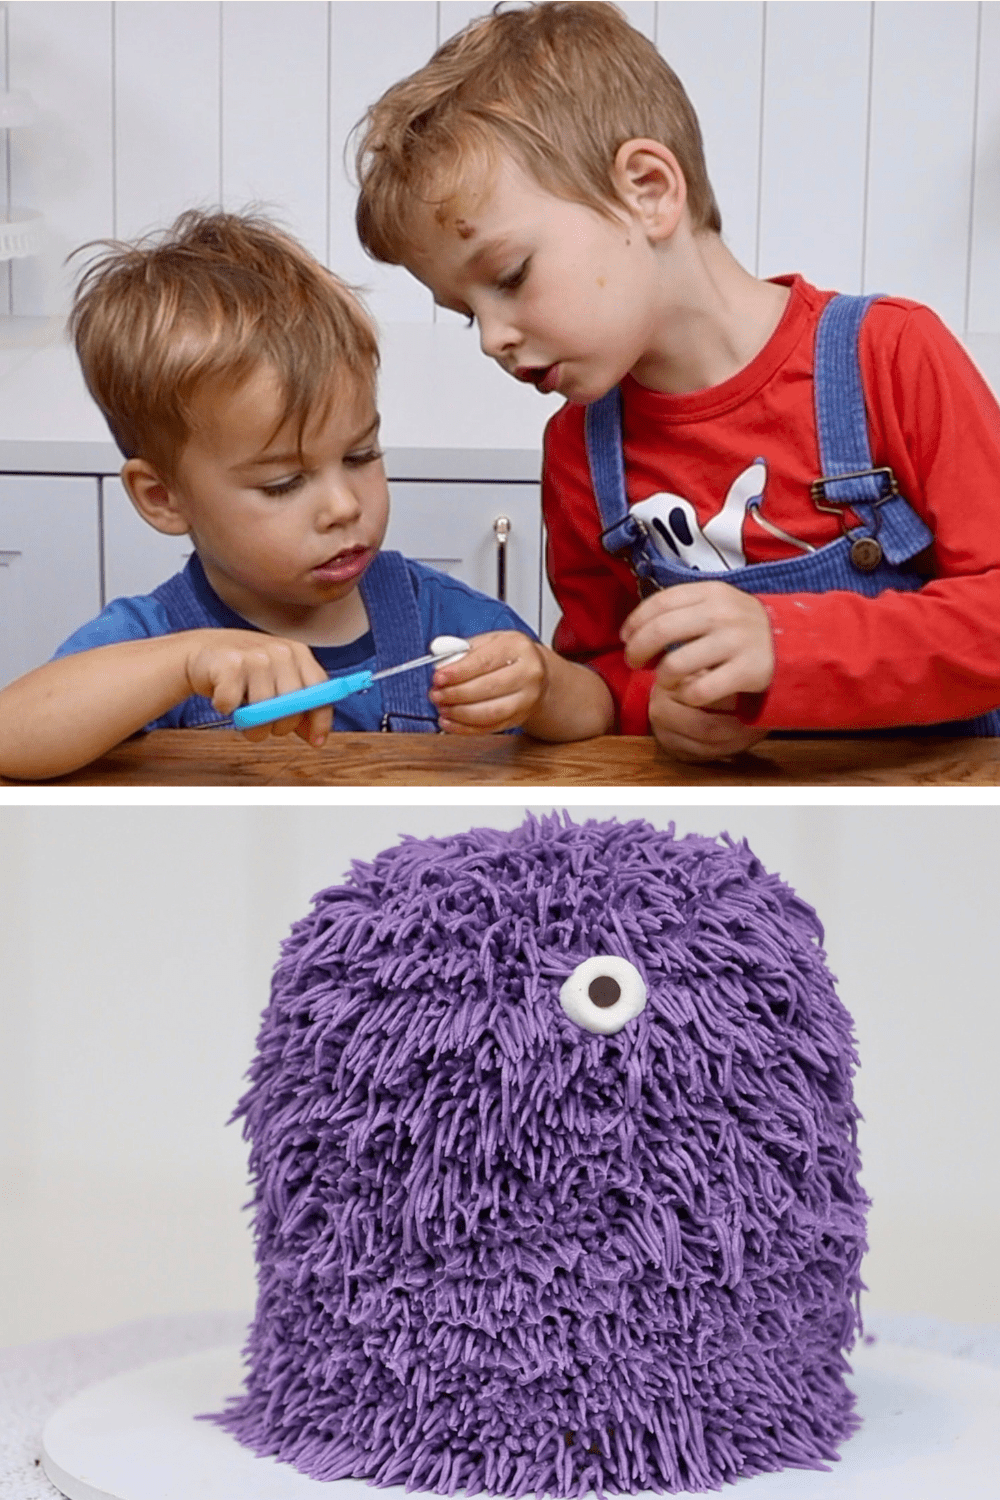
Marshmallows can also be eyes for animal cakes. Cut a marshmallow or mini marshmallow in half to make two round pieces. Then poke a chocolate chip into the middle of the sticky side. Press this against sticky buttercream frosting to attach it to a cake. Kids can do this one too - they’re fun and delicious cake decorations for a kid-friendly project.
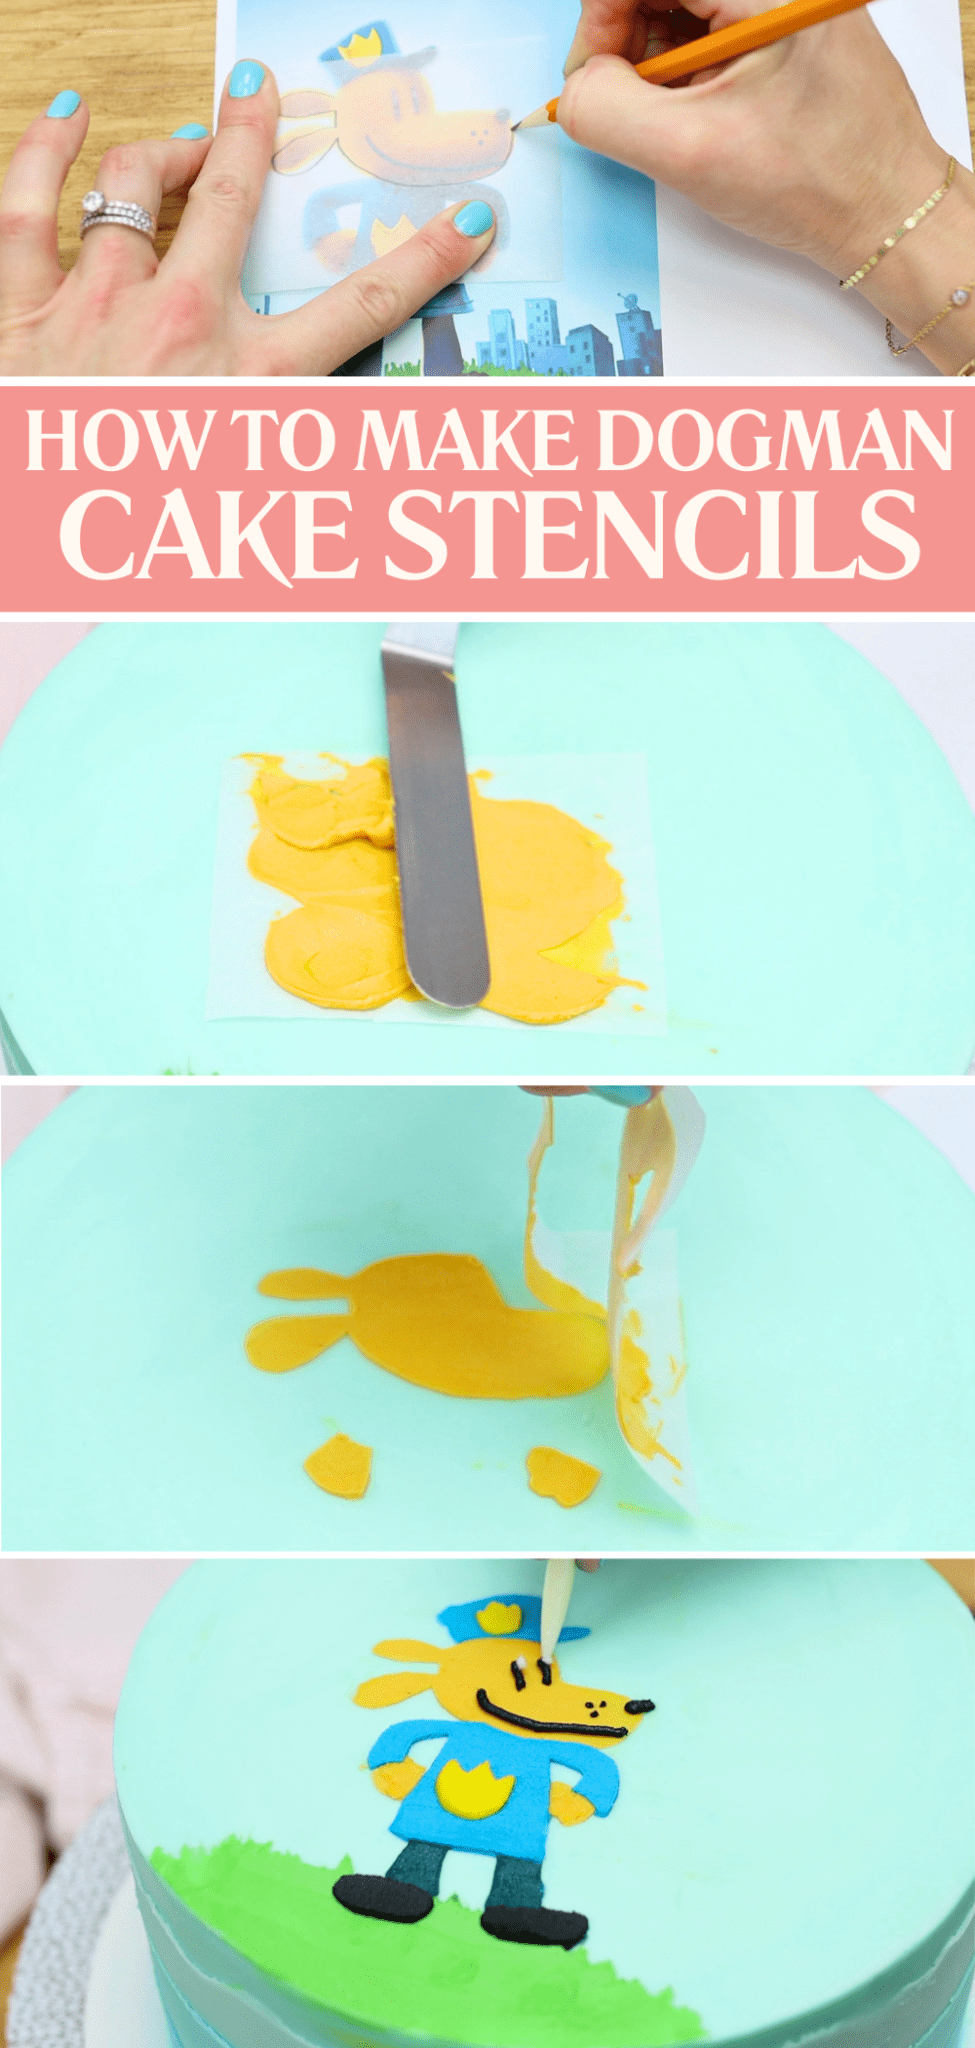
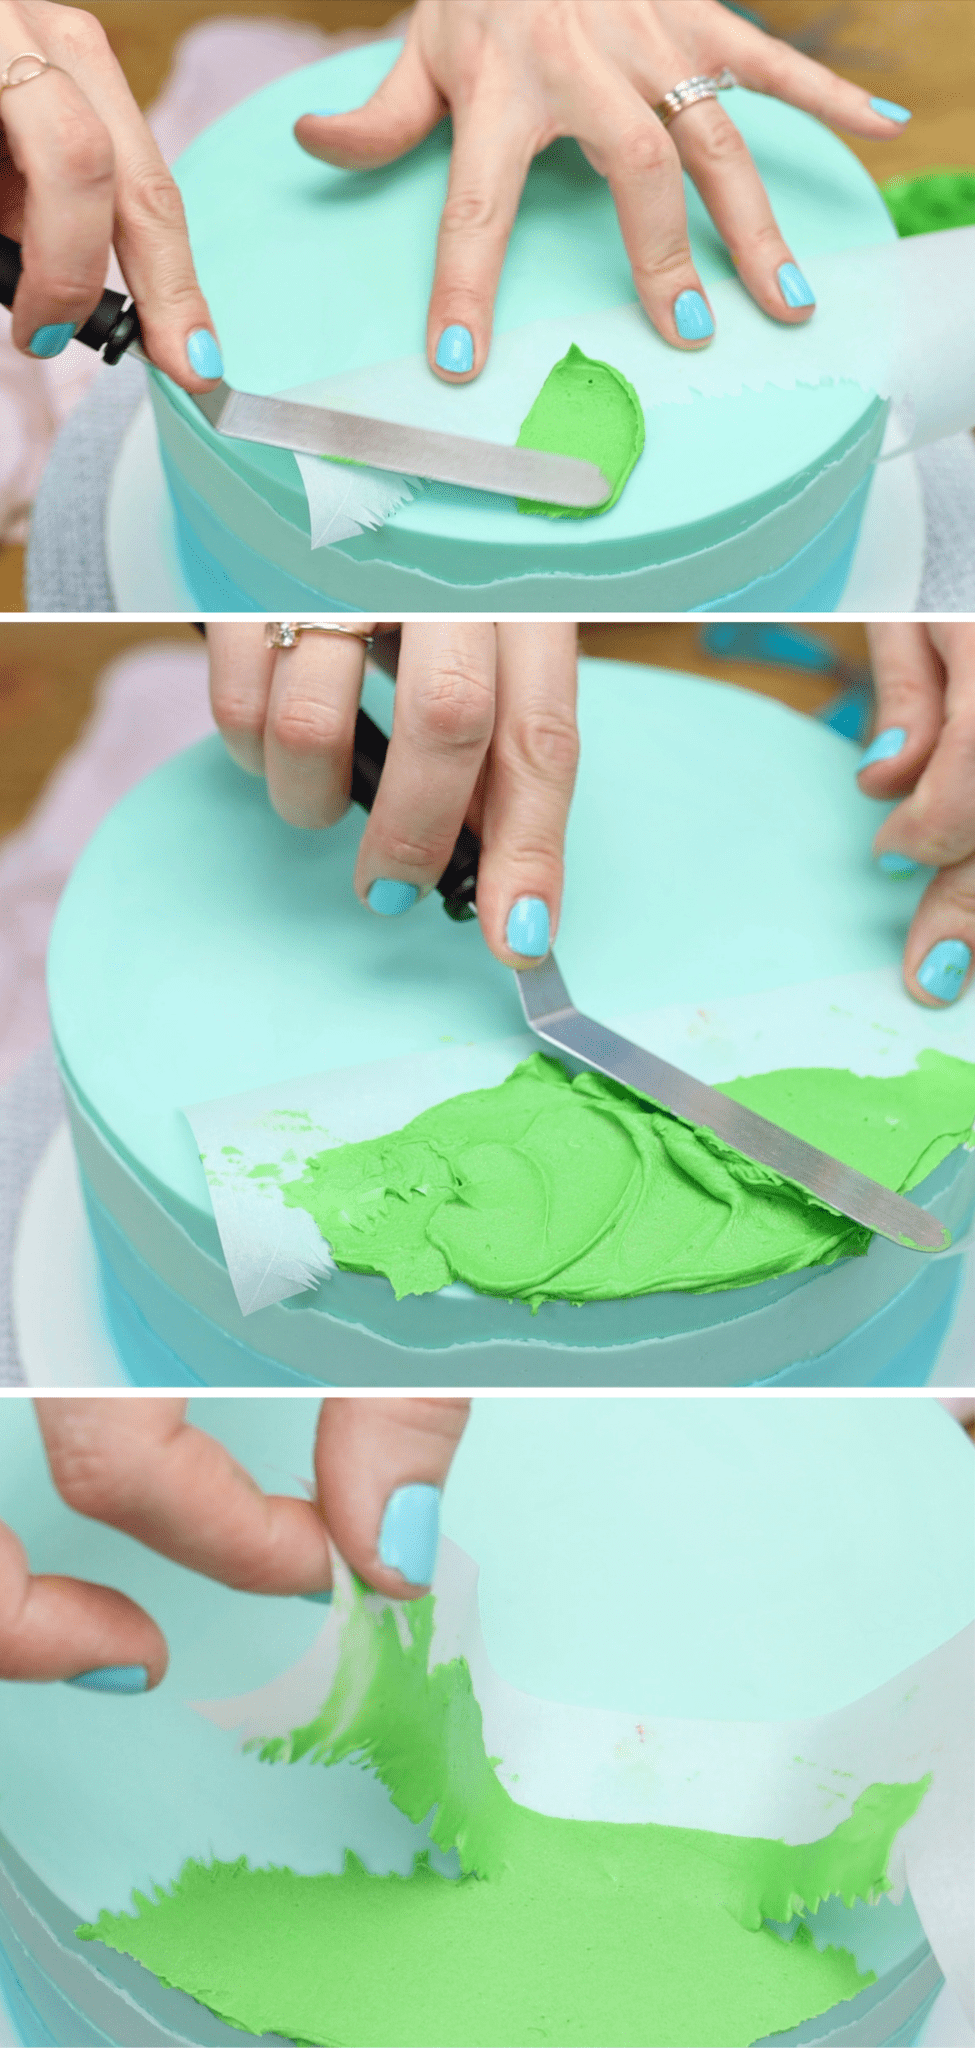
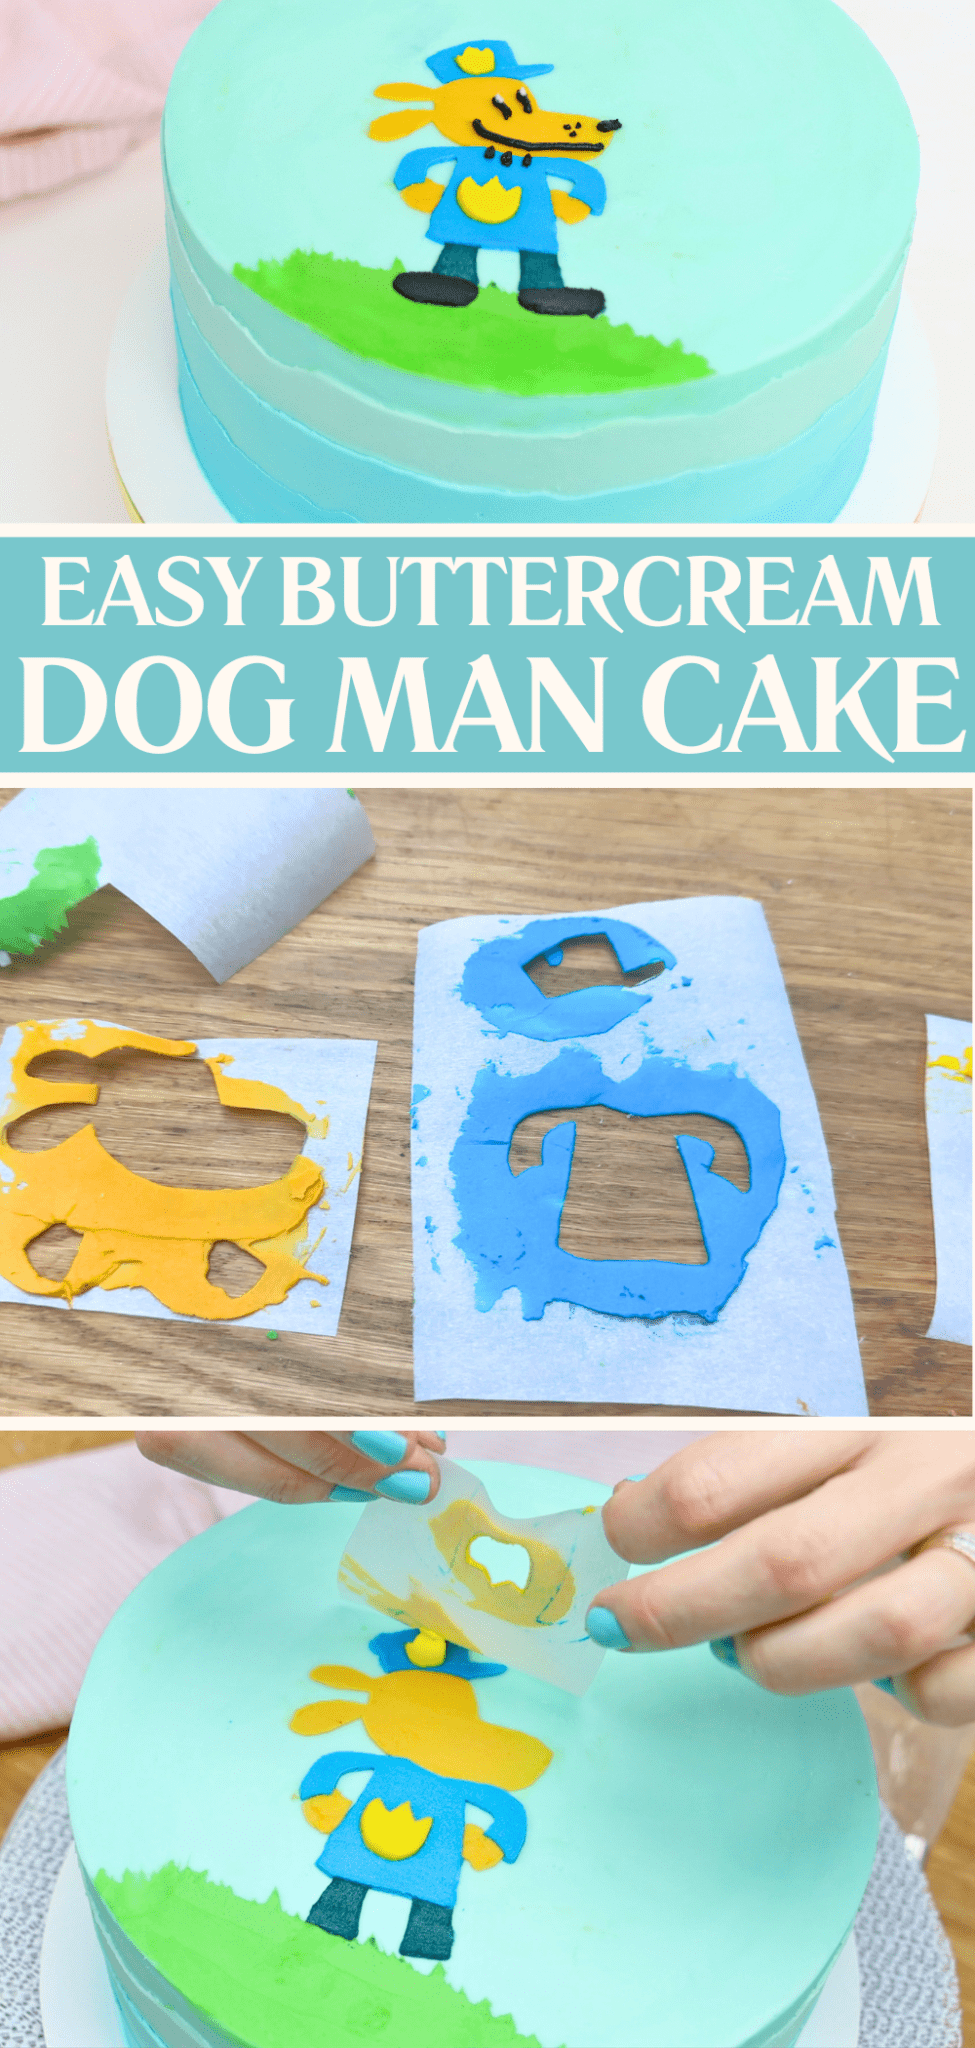
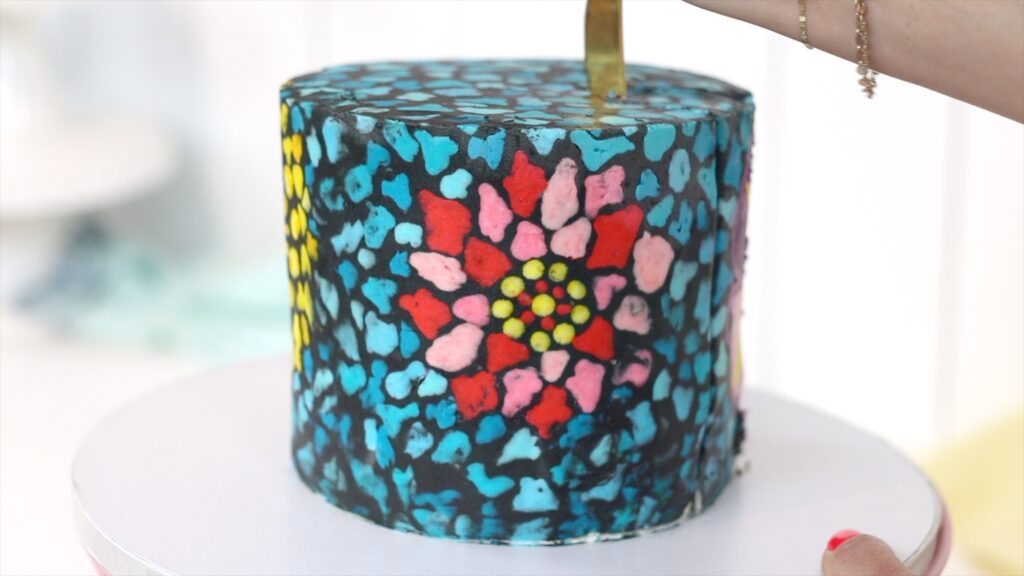
8. Layered stencil characters
To create delicious characters on cakes, make your own stencils on parchment paper or wax paper. Trace each colour onto a different stencil until you can layer the stencils to see the complete character. Cut the shapes out to leave the surrounding paper intact and these pieces of paper will be your stencils.
Start with one of the colours at the back of the character. In the cake above, that means the grass. Other parts will be layered on top of this, which will be more in the foreground. Let this chill in the fridge for 10 minutes to set and then position the next stencil on top. Spread buttercream over it and scrape off the excess to leave a thin, smooth layer behind. And repeat! You can add outlines and small details like the eyes at the end.
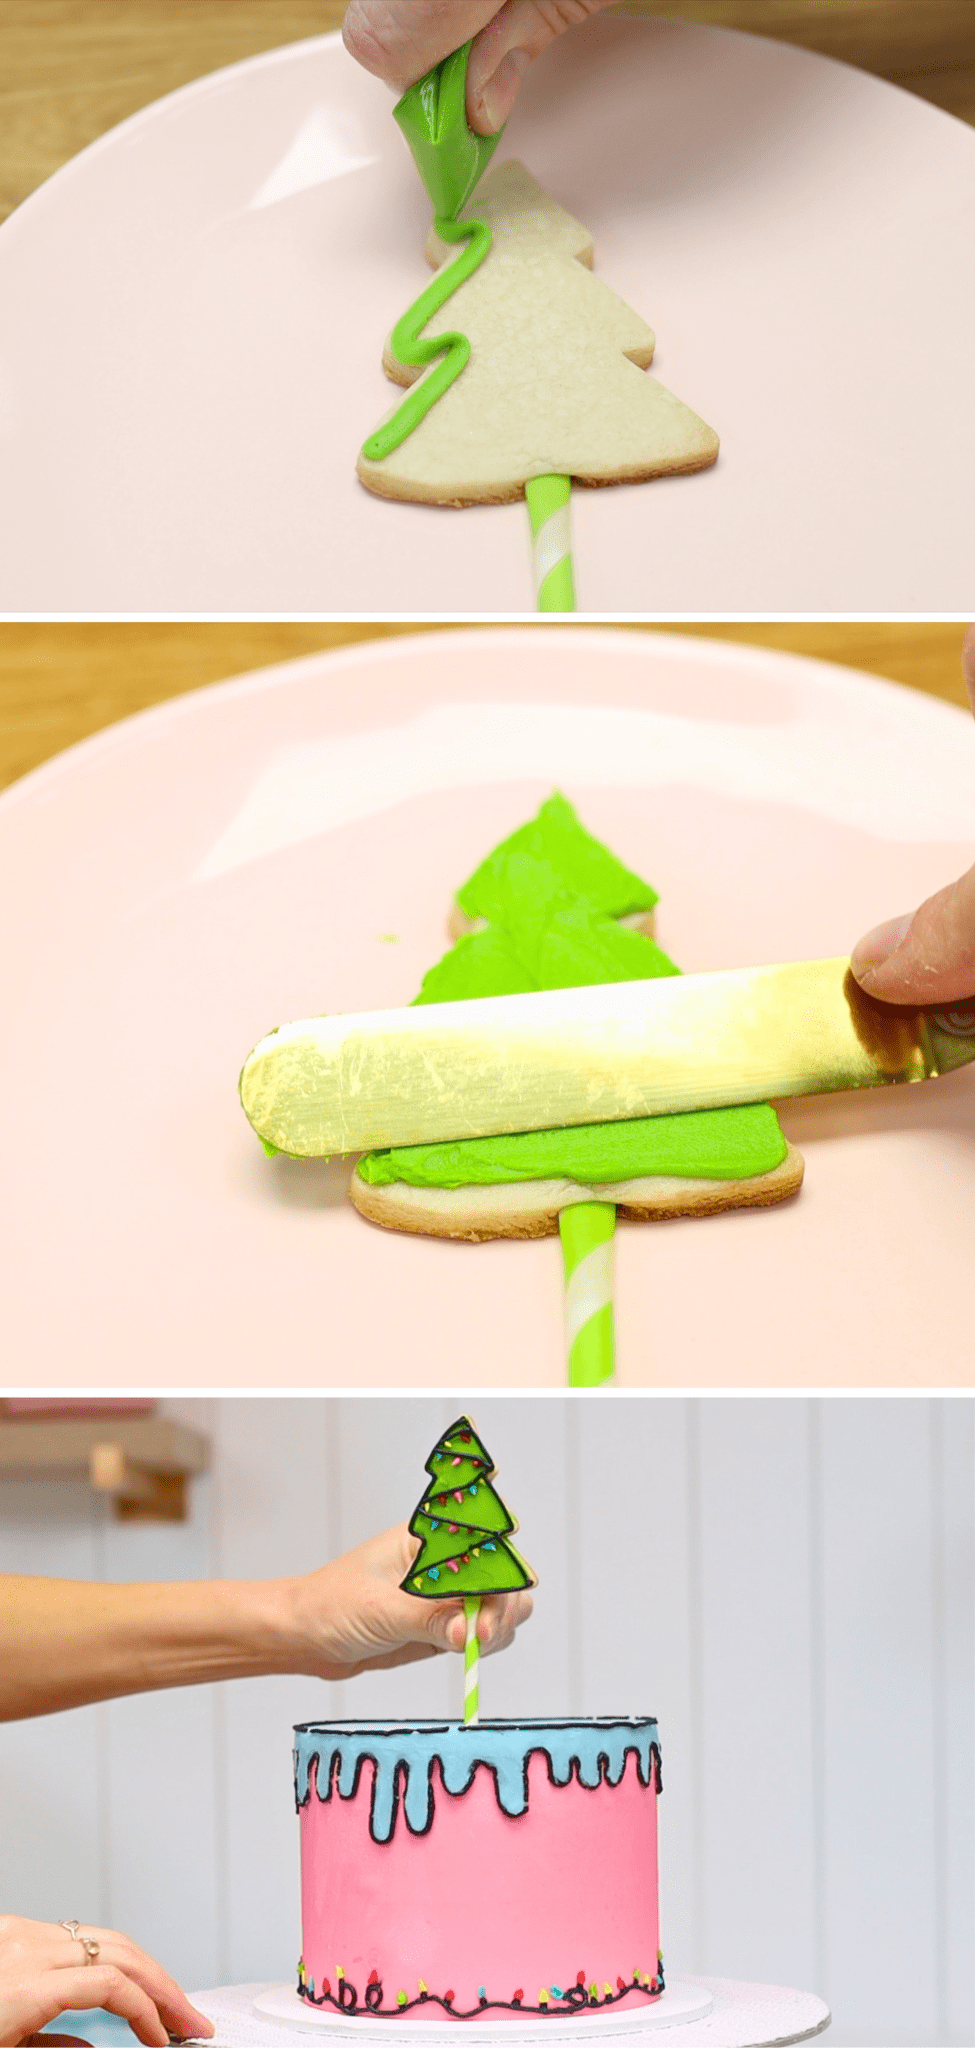
9. Cookie cake toppers
Add height to your cake with this next delicious cake decorating idea. Cut a shape out of sugar cookie dough and push a paper straw into it before you bake it. When it cools, decorate it with buttercream or whatever icing you like. I like buttercream because it’s so creamy and easy! When I make buttercream to frost my cake I just set aside a little bit to decorate my cookie. Push the straw into your cake and you have a cookie cake topper!
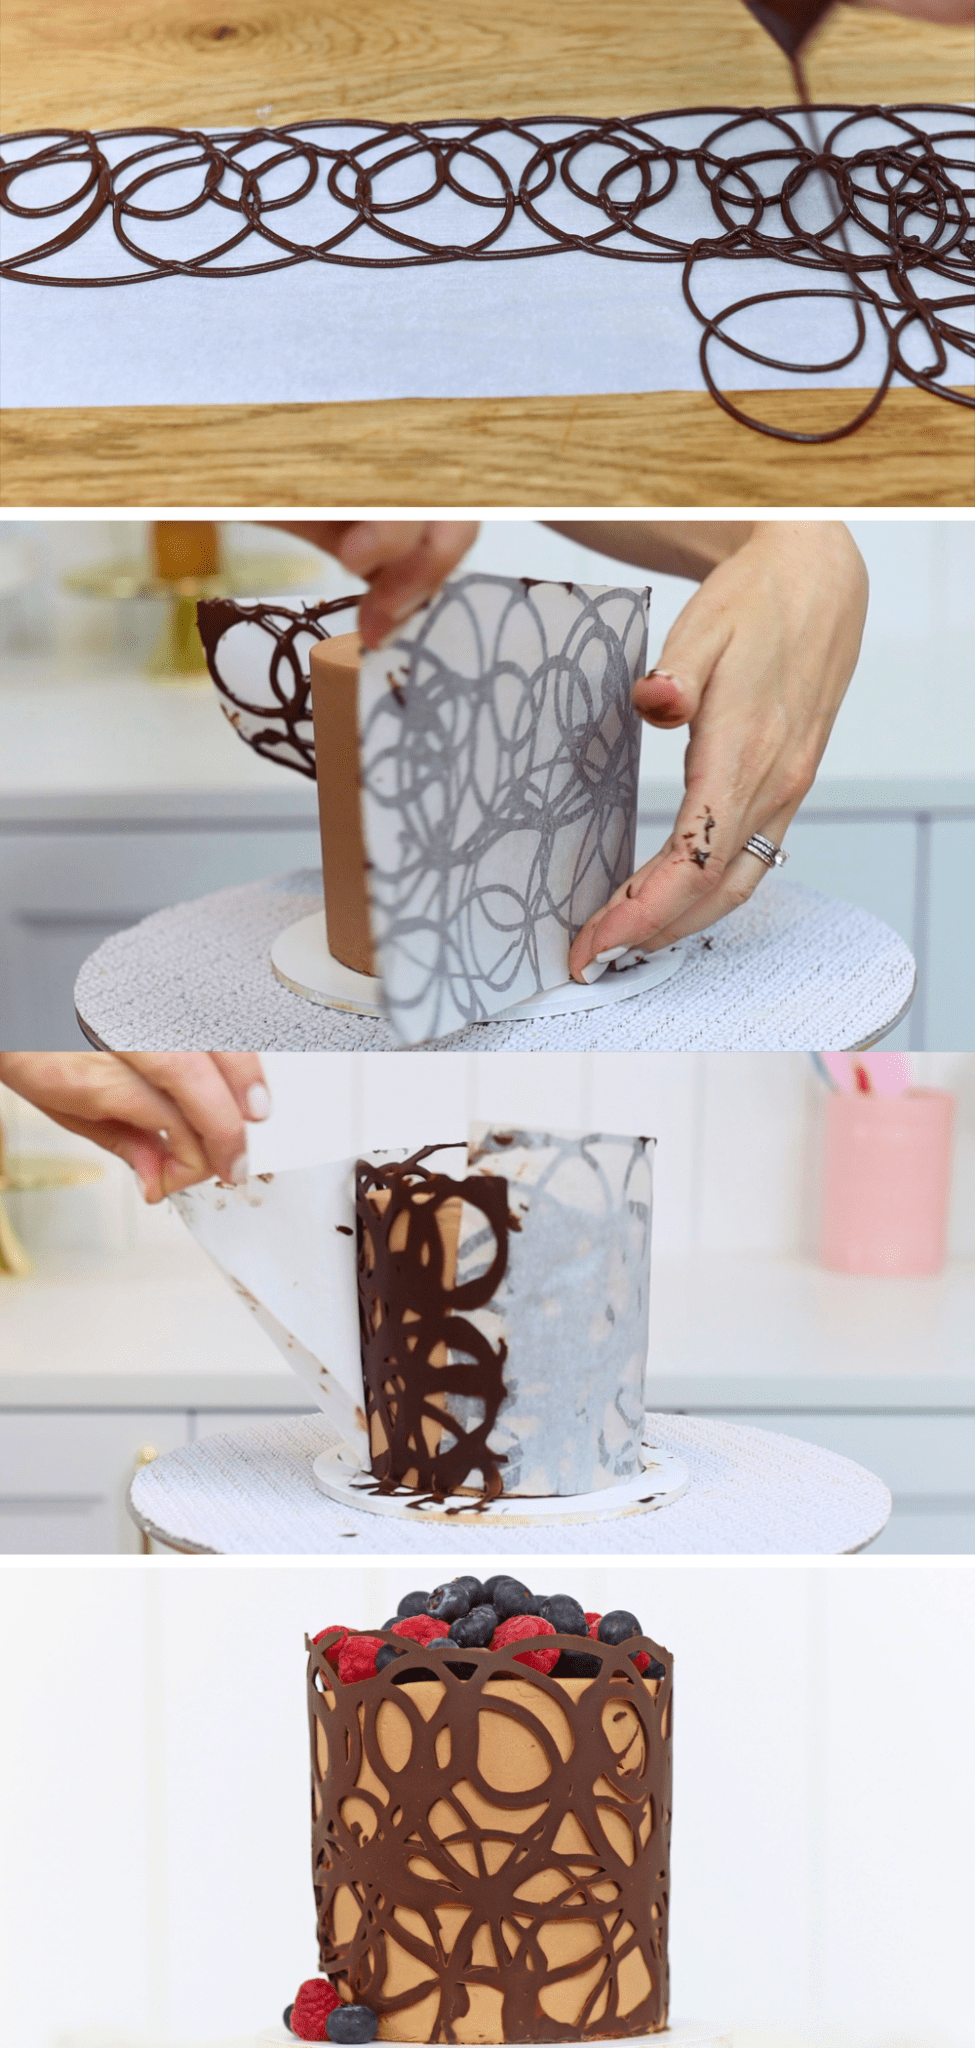
10. Chocolate collars
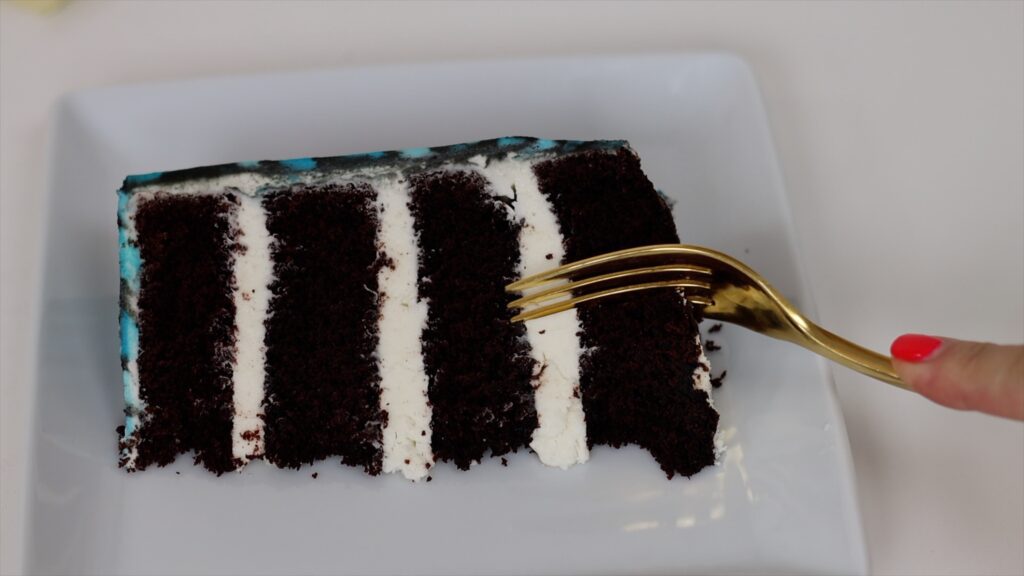
Wrap chocolate around a cake to decorate it with this decadent, gravity-defying technique. Start by drizzling or spreading melted chocolate onto a piece of parchment or wax paper. The paper needs to be wide enough to wrap around your cake. Lift the paper up and push it gently to flatten it against the cake all the way around. Then put the cake into the fridge for 30 minutes or the freezer for 15 minutes to chill and set the chocolate. Peel the paper off to reveal your chocolate collar, also called a chocolate cage or chocolate wrap. Everyone will ask how you piped chocolate onto the sidesof the cake and how you got it to stand up! Run a knife under warm water before serving this for the neatest slices.
I hope you’ve seen some ideas you’d like to try. Visit my cake school to learn hundreds more cake decorating techniques and designs with my online courses. Start a FREE trial of my All You Can Cake membership for access to all of my courses so you can try them out risk free! See you there!
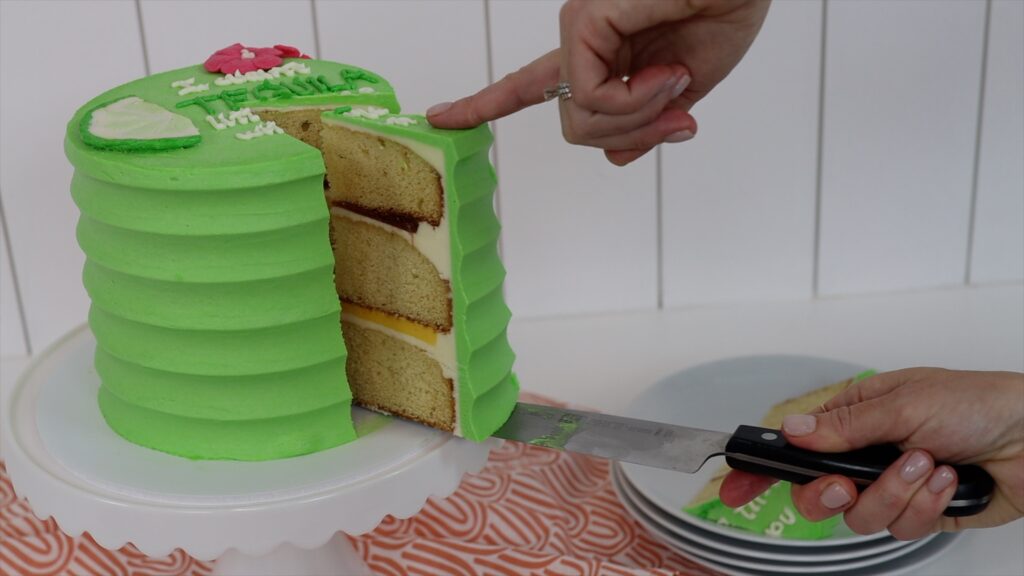
If you want your Dog Man cake character on top of the cake, any size is fine. To put it on the side, choose a tall cake with at least three layers.
Fill and frost your Dog Man cake
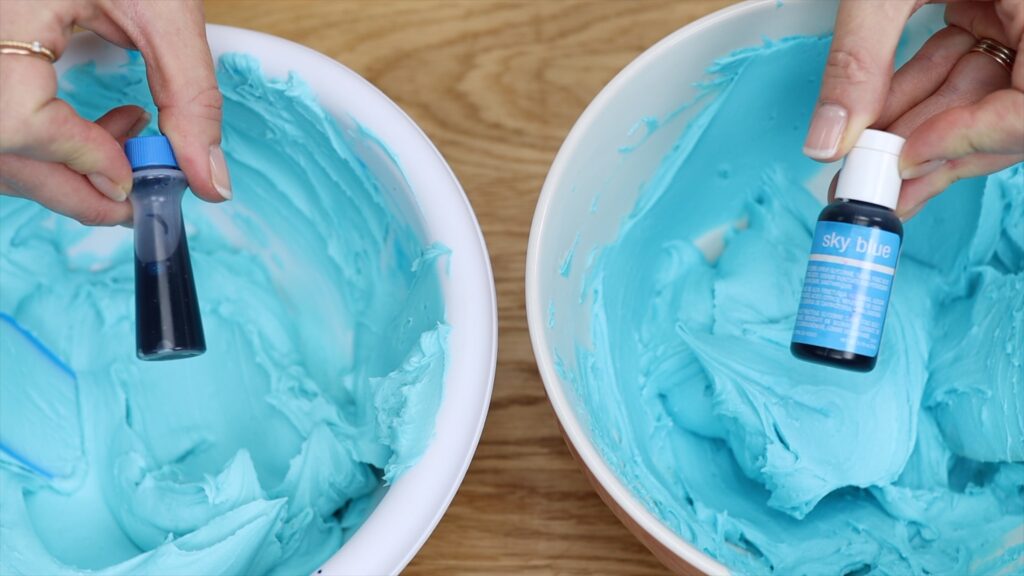
One batch of my 4 Minute Buttercream is the perfect about to fill, frost and decorate an 8 inch cake. Set aside about half a cup of the buttercream to make Dog Man later. Cover the bowl with plastic wrap so it doesn’t dry out and crust. Then use the rest to fill and frost the cake. I’m tinting mine with sky blue gel since that’s the background colour of my design.
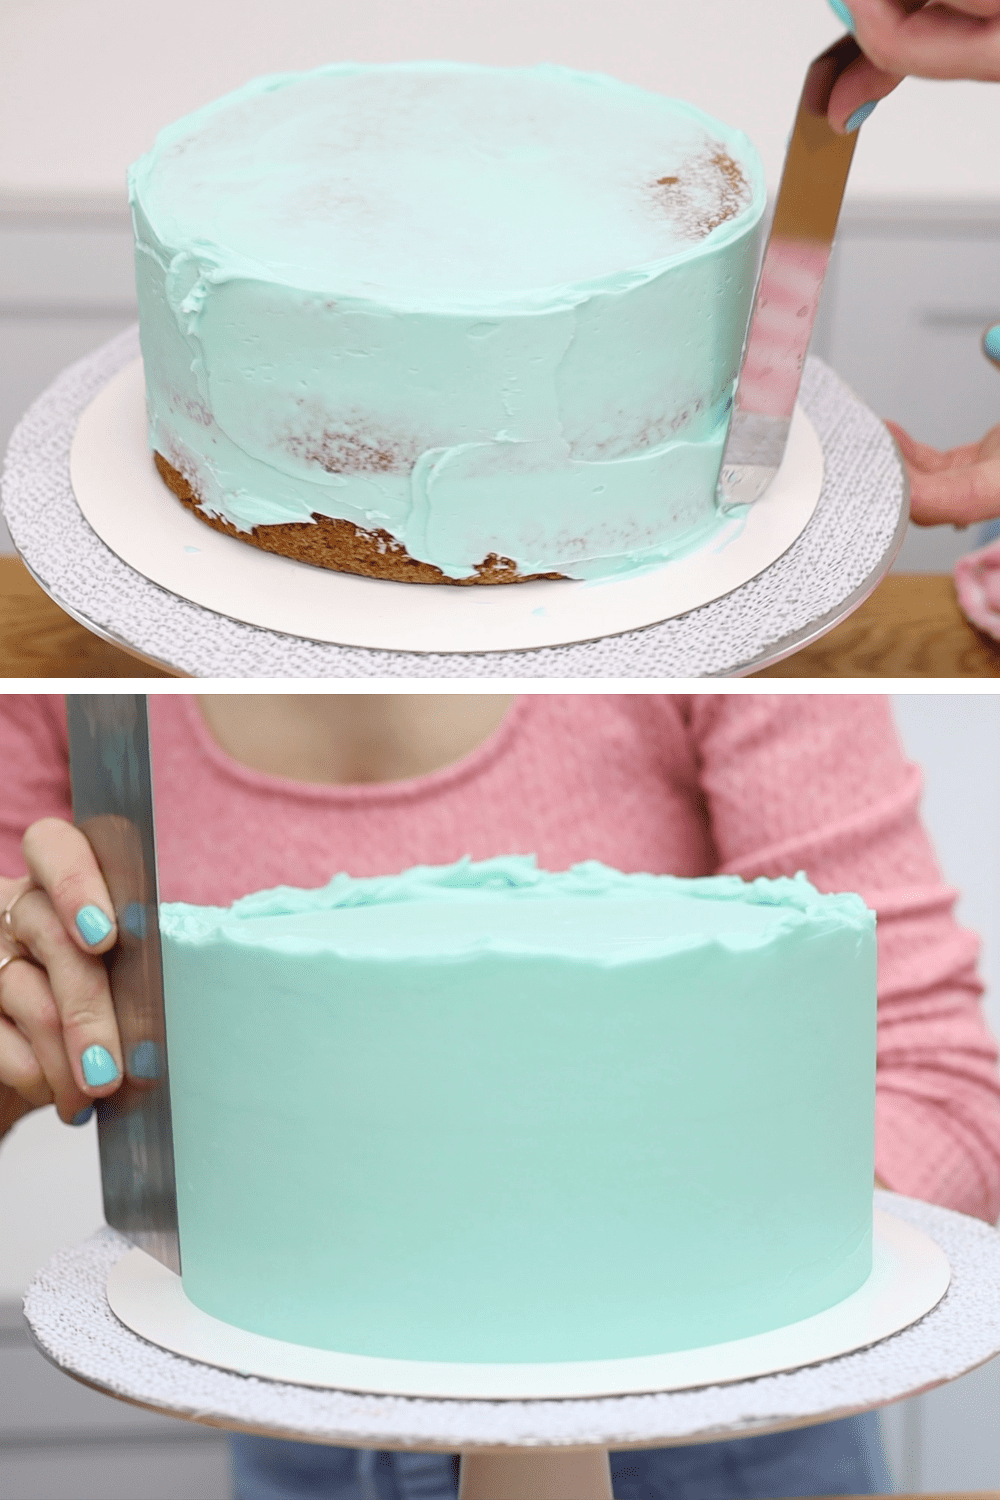
I always recommend applying a crumb coat if frosting first. In case you’re new to cake decorating, a crumb coat is a thin layer of frosting to catch any crumbs that come off the cake. They’ll get trapped in this first layer of frosting. It doesn’t need to be smooth, it just needs to cover the whole cake to trap all of the crumbs. It’s easiest to frost a cold cake so put it into the fridge for 30 minutes before you do this.
When the crumb coat is fairly smooth, put the cake back into the fridge for 15-30 minutes. When you take it out, the crumb coat should be cold and firm, not sticky. Now when you spread on your final layer of frosting it will sit on topof the crumb coat instead of the mixing into it. Any crumbs will be trapped in the crumb coat so you’ll have no visible crumbs on your frosted cake.
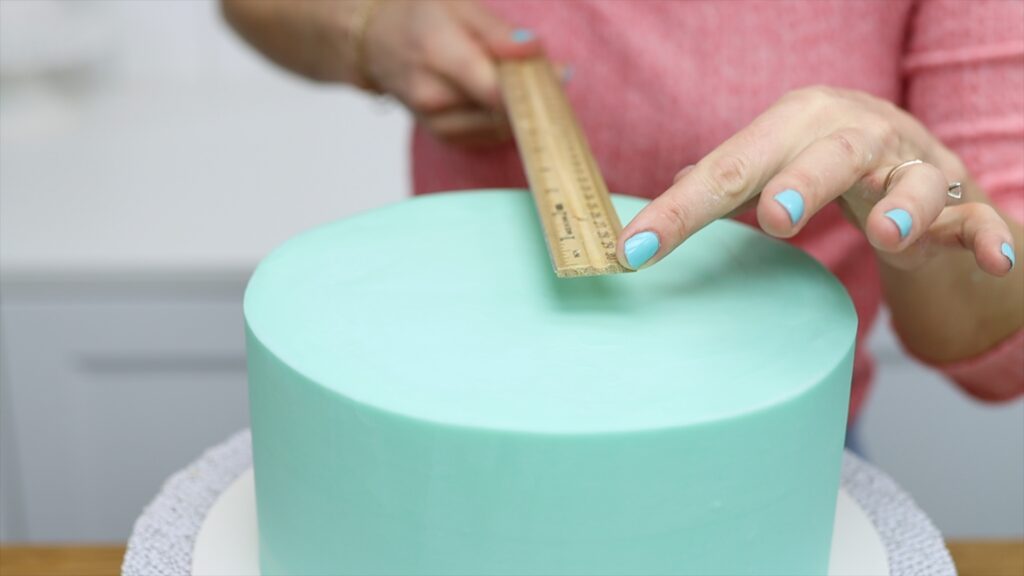
Put the frosted cake back in the fridge to set the frosting. Before you do this, measure how big you want your Dog Man character to be. Mine will be 5 inches tall to leave room for candles and a name.
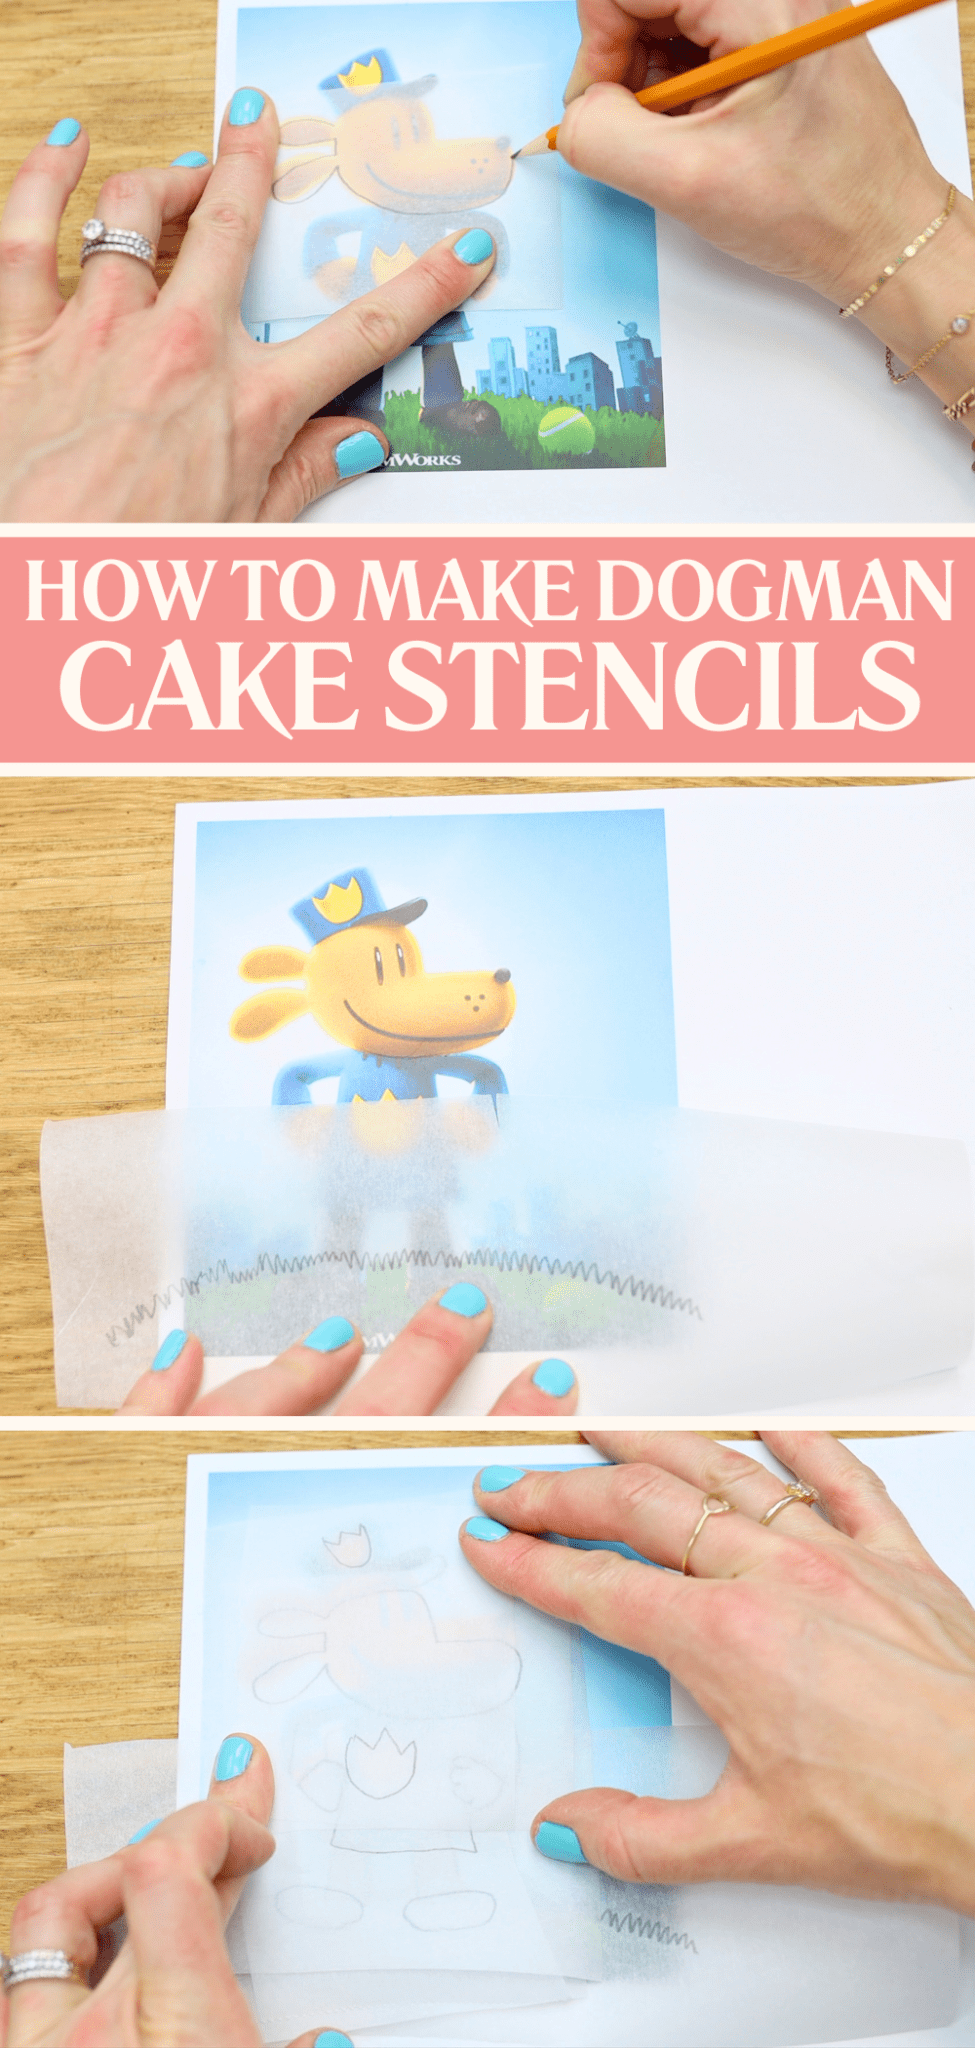
Step 2: Make Dog Man cake stencils
Make Dog Man cake stencils is simple and will create an accurate replica of the character. It's a very affordable techniques that requires no special tools. Start by tracing all of the details of the character onto pieces of parchment or wax paper. Use one piece of paper for each colour. For example, the yellow parts of the hat and shirt will be on the same piece.
You’ll need a stencil for every detail except lines and dots, like the facial features. Even the backgrounds scenery needs a stencil, like the grass at the bottom. I’m not going to include the buildings on the skyline but if you do, you’ll need separate stencils for those.
When you layer the stencils over each other, you should have every detail of the character there.
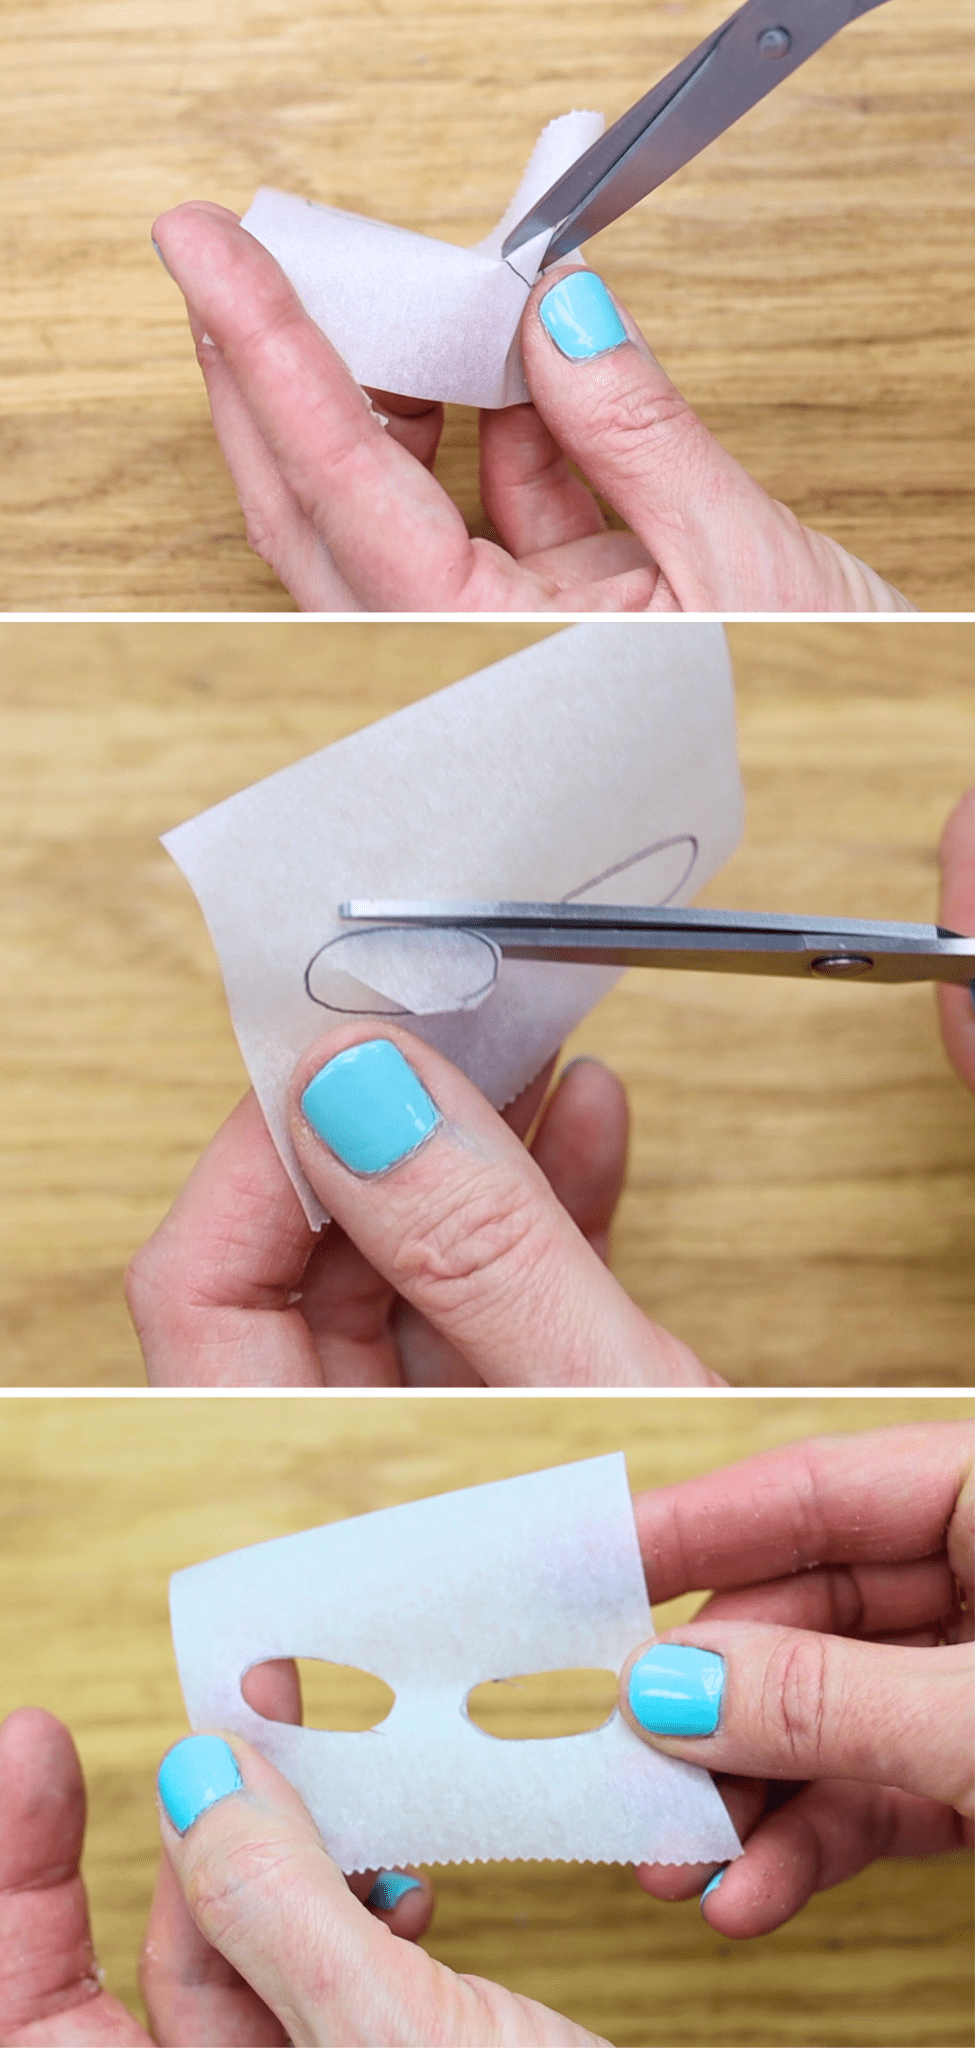
Now the details need to be cut out. You’re only going to use the paper around them, not the actual details. So cut a little slit in the middle of each shape and poke a scissor blade through, cutting around the shape. This will leave the paper around the shape intact, which will be your stencil. The more neatly you cut out the shapes, the neater those shapes will be on the character on your cake.
Step 3: Use Dog Man cake stencils on a chilled cake
How to use homemade cake stencils
To apply the Dog Man cake stencils, your cake needs to be cold and the frosting should be firm. It's best to leave the cake in the fridge for at least an hour. Then it’s time to layer the stencils. Start with the background, which is the grass for me or the buildings if you’re including those. After positioning the stencil on the cake, press it down while you spread buttercream over it. This is leftover blue frosting with a drop of leaf green gel and a drop of yellow.
Spread away from the stencil to seal it against the cake. If you spread towards the stencil you’ll push buttercream underneath it and cause smudges on the cake.
Smooth the frosting over the stencil, scraping a few times with an offset spatula or palette knife. You're looking for a smooth, thin layer of buttercream over the stencil. Then peel off the stencil. Scrape around the side of the cake to take off the excess green buttercream and leave a smooth edge around the cake.
Now the cake needs to go into the fridge for about 15 minutes to set the green buttercream, before positioning the next stencil.
How to use layered stencils with buttercream
The order of your stencils is really important. You need to start with the background details and layer them with details that get closer and closer to the foreground. I’m doing the head and hands next, since those are going to be covered with clothes.
To make this dog fur colored buttercream I used yellow and added a tiny amount of brown. I dipped a toothpick into the brown bottle and then dragged it through the yellow.
The stencils should have about an inch or 2 cm of paper around the edges of each shape. This prevents any buttercream spreading over the edge of the stencil by mistake. If you do get buttercream smudges onto the cake, it’s easy to fix since the cake is cold. Just scrape off any smudges with a toothpick and you won’t damage the cold, firm frosting underneath.
Repeat the process with the rest of your stencils. Chill the cake after each stencil to set the buttercream so you don’t damage it with the next stencil.
Tips for using homemade cake stencils
The thinner the layer of buttercream you spread over each stencil, the neater the edges of those shapes will be. However, to layer light colours like yellow over dark colours like blue, you'll need a thicker layer to cover up the dark colour.
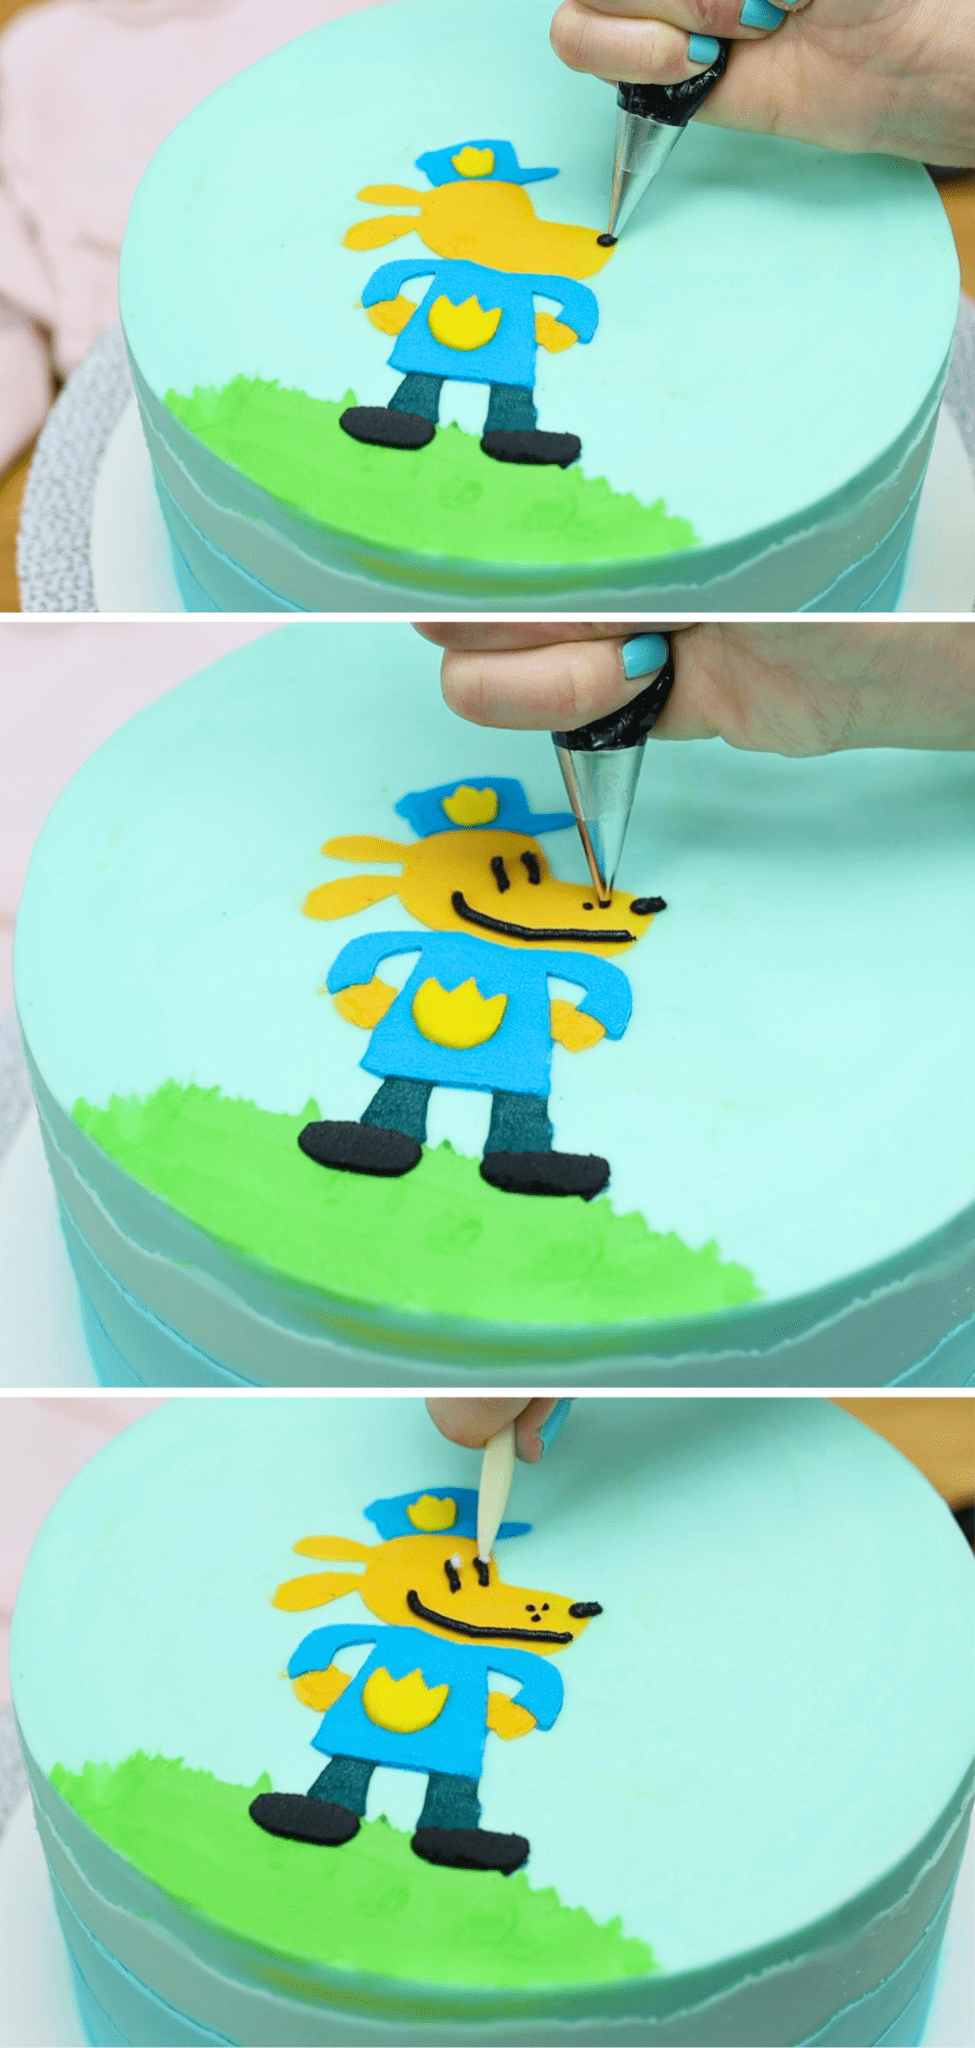
Add piped details to stencils
Leave any tiny details for the end and pipe them on, using a piping bag with a small round piping tip piping tip like a #3. If you don't have a piping bag or the right piping tip, use a sandwich bag instead! Cut a tiny piece off one corner to pipe through just like a piping bag.
My hands are really shaky so piping if the hardest part of cake decorating for me. Luckily this is a cartoon figure so the lines don’t have to be perfectly smooth and steady.
For the white fleck in each eye use a piping bag with a piece cut off the end to make a tiny hole to pipe through.
If you’re making the book version of Dog Man, pipe outlines around all of the details. For the movie version you don’t need them, which is lucky since piping is such a challenge for me!
So, a buttercream version of Dog Man, traced onto paper and then transferred onto the cake by layering stencils. What do you think? I’d love to hear in the comments! And for more cake decorating techniques and designs visit my cake school!
Save this tutorial to Pinterest for later with one of these pins:
Make one of these fun Valentine’s Day mini cakes with delicious cake and filling, dreamy buttercream frosting, and easy decorations! This tutorial starts with three steps to make each mini cake and then shows how to make 3 different designs. Watch the video and get the recipe at the bottom of the page.
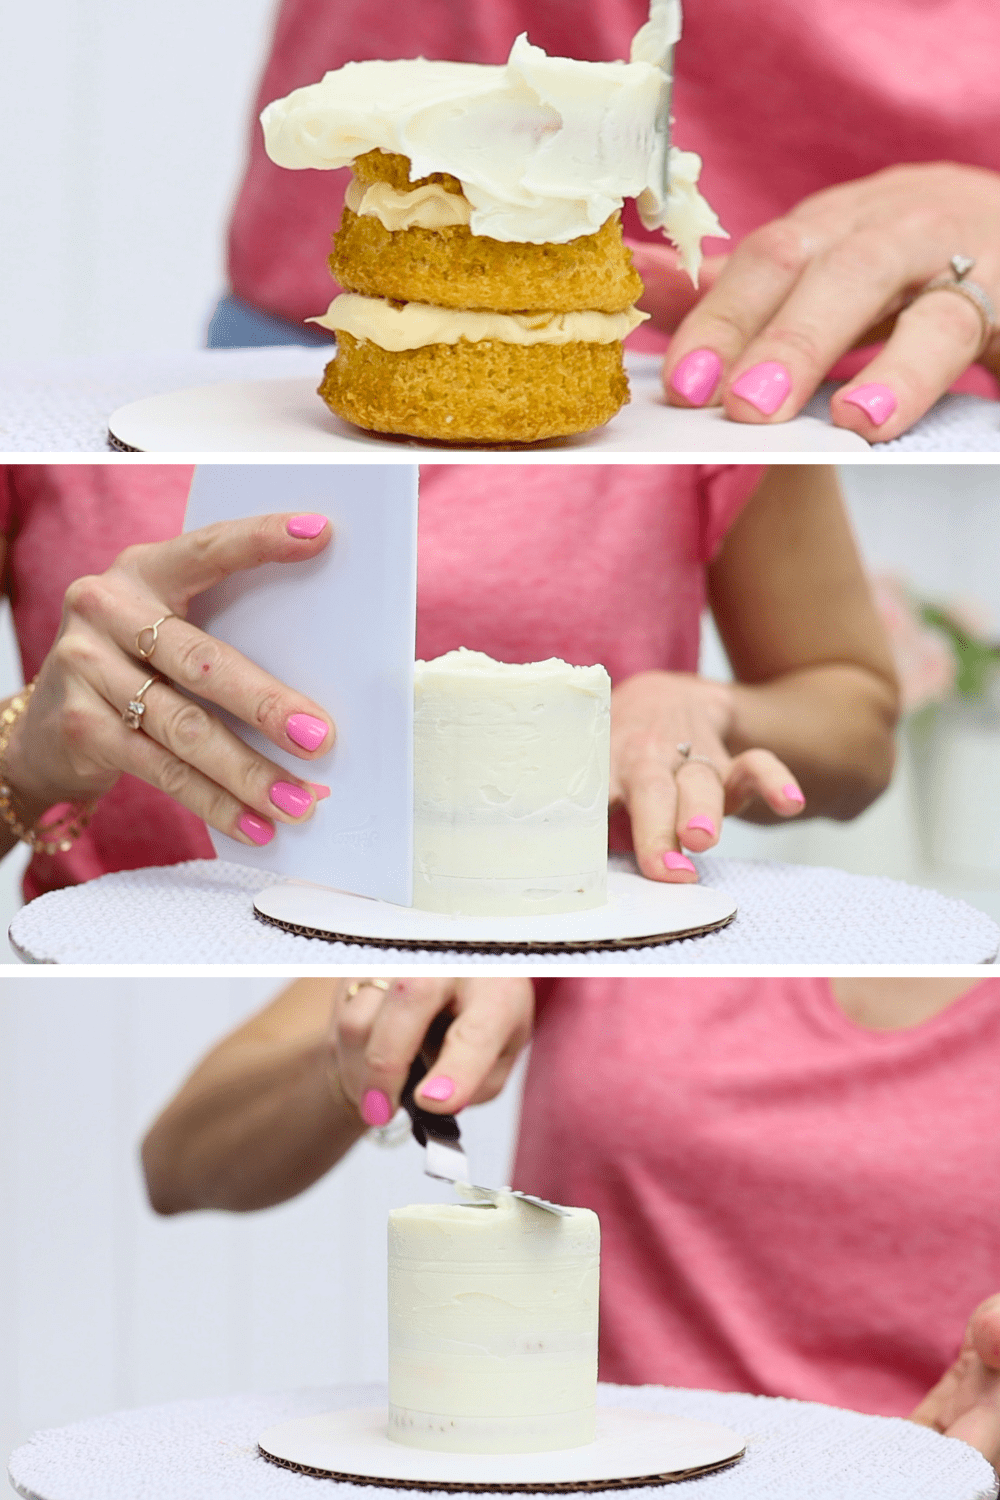
Step 1: Prepare the cake, filling and frosting
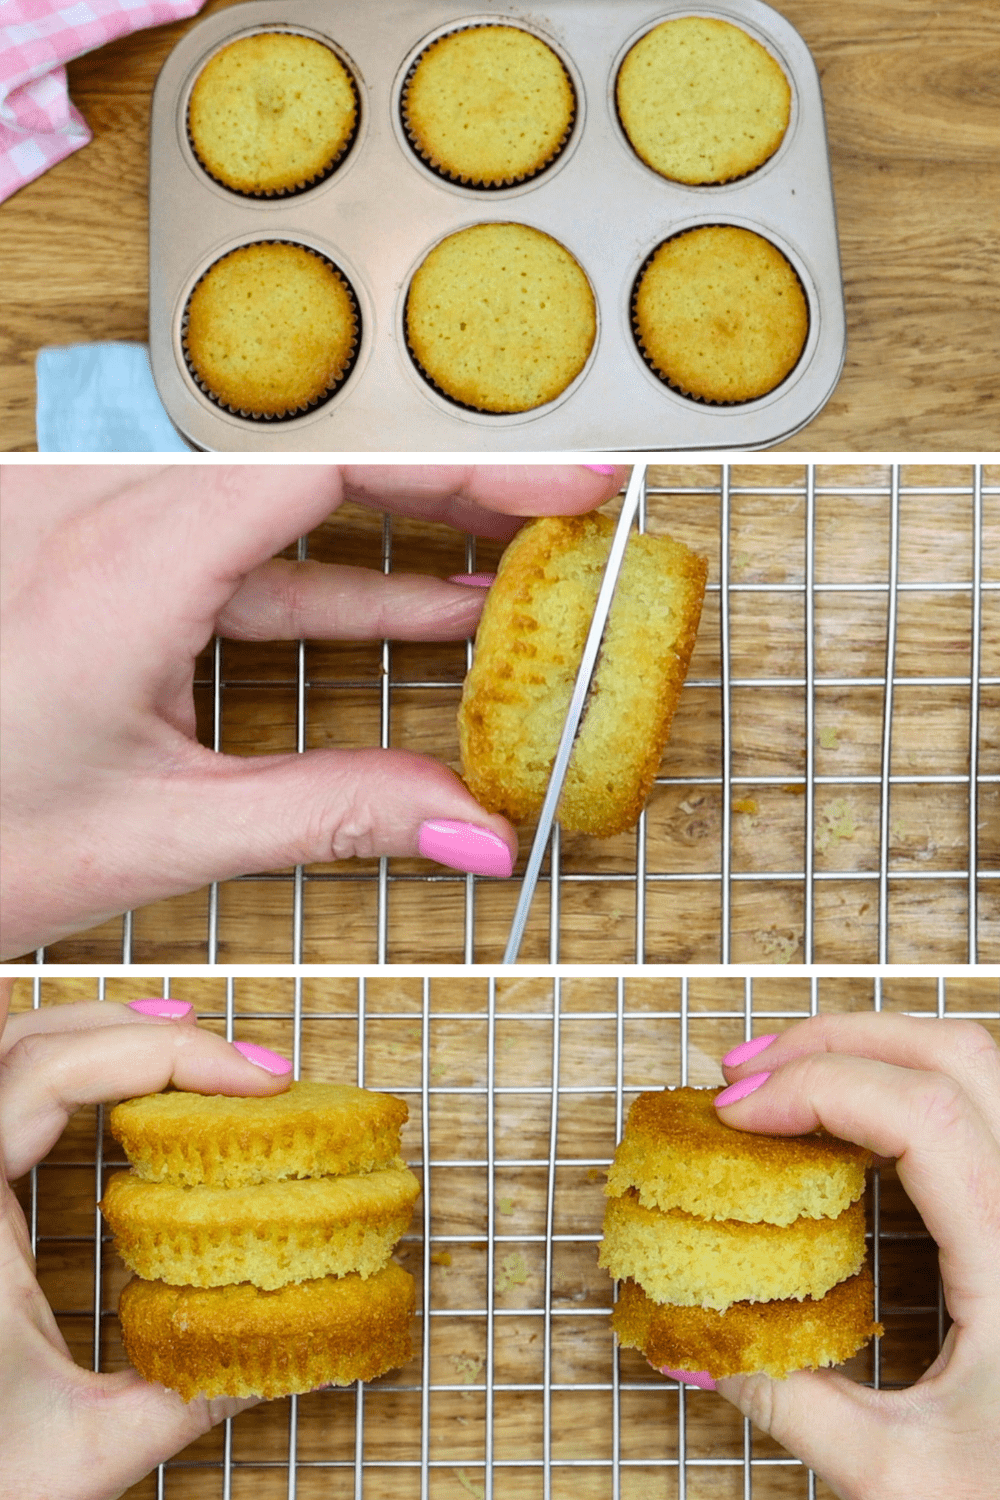
I’m using cupcakes to make these mini cakes. Unwrap them and cut each one in half horizontally to make two cake layers. I like tall cakes so I use three layers, which means one and a half cupcakes for each mini cake. With 6 cupcakes you can make 4 mini cakes. Or just make one or two or three and freeze the rest for another occasion!
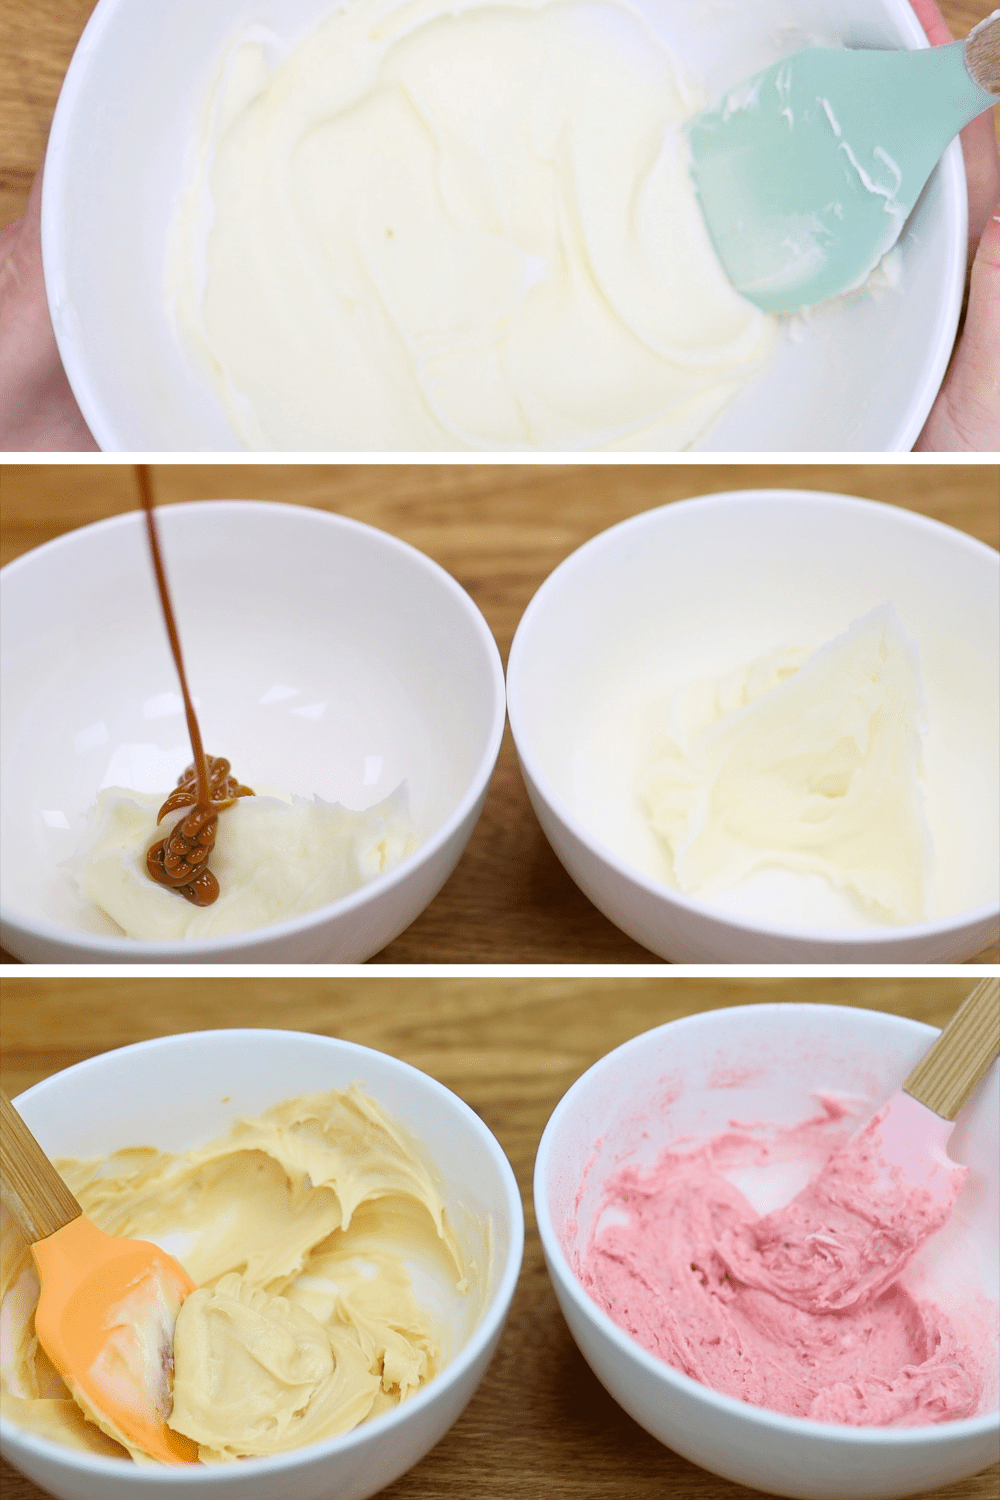
For the filling and frosting I’m using a mini batch of my 4 Minute Buttercream. That recipe is at the end of this tutorial as well.
You can add any ingredients you like to flavour buttercream. It’s soversatile! I'm using is dulce de leche, a thick caramel, and freeze dried strawberries, crushed to make a powder. Add a bit of milk if the buttercream gets too thick or more sugar if it gets too thin.
Step 2: Assemble the Valentine's Day mini cakes
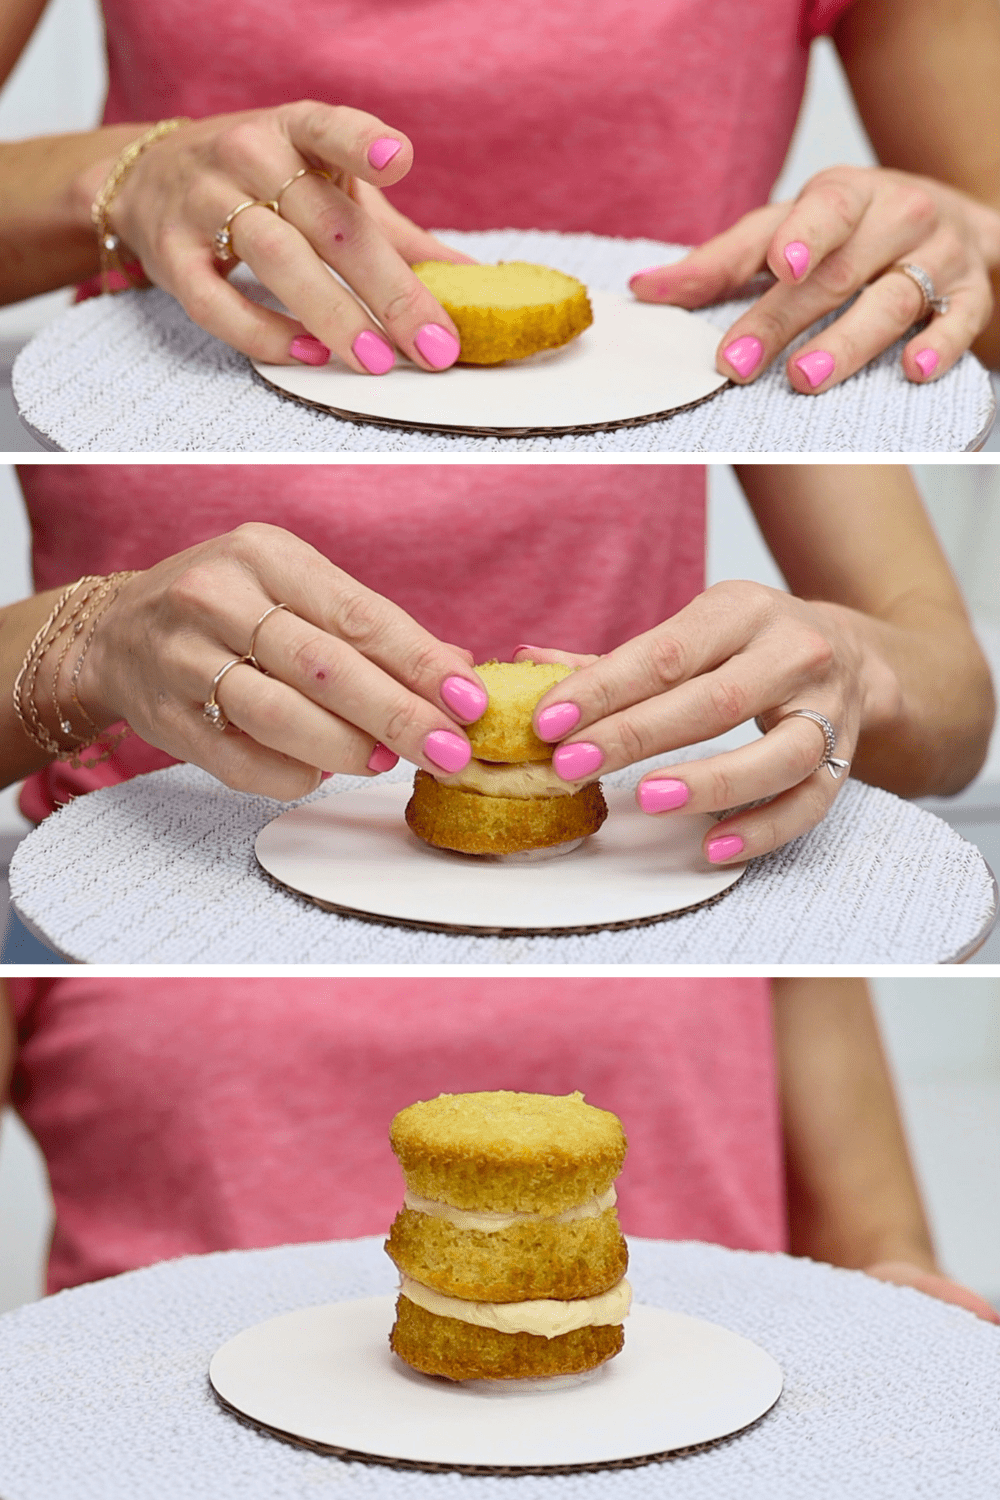
Now let’s assemble these Valentine’s Day mini cakes! Spread a bit of buttercream onto a cake board and press your first layer onto it. The buttercream will act as glue to attach it to the cake board. Now add your filling and alternate between cake layers and filling to assemble your mini cake. Chill in the fridge for 30 minutes or the freezer for 15 minutes.
Step 3: Crumb coat
is the CRUMB COAT. Every cake needs a crumb coat. It’s a thin layer of frosting to trap any crumbs that come off the cake. It doesn’t need to be neat but it does need to completely cover the cake. It’s easiest to do this when the cake is cold, which is why you chill it first. When the crumb coat is fairly smooth, put the cake in the fridge for 30 minutes to set. Now you’re ready to frost and decorate!
Step 4: How to decorate Valentine's Day mini cakes
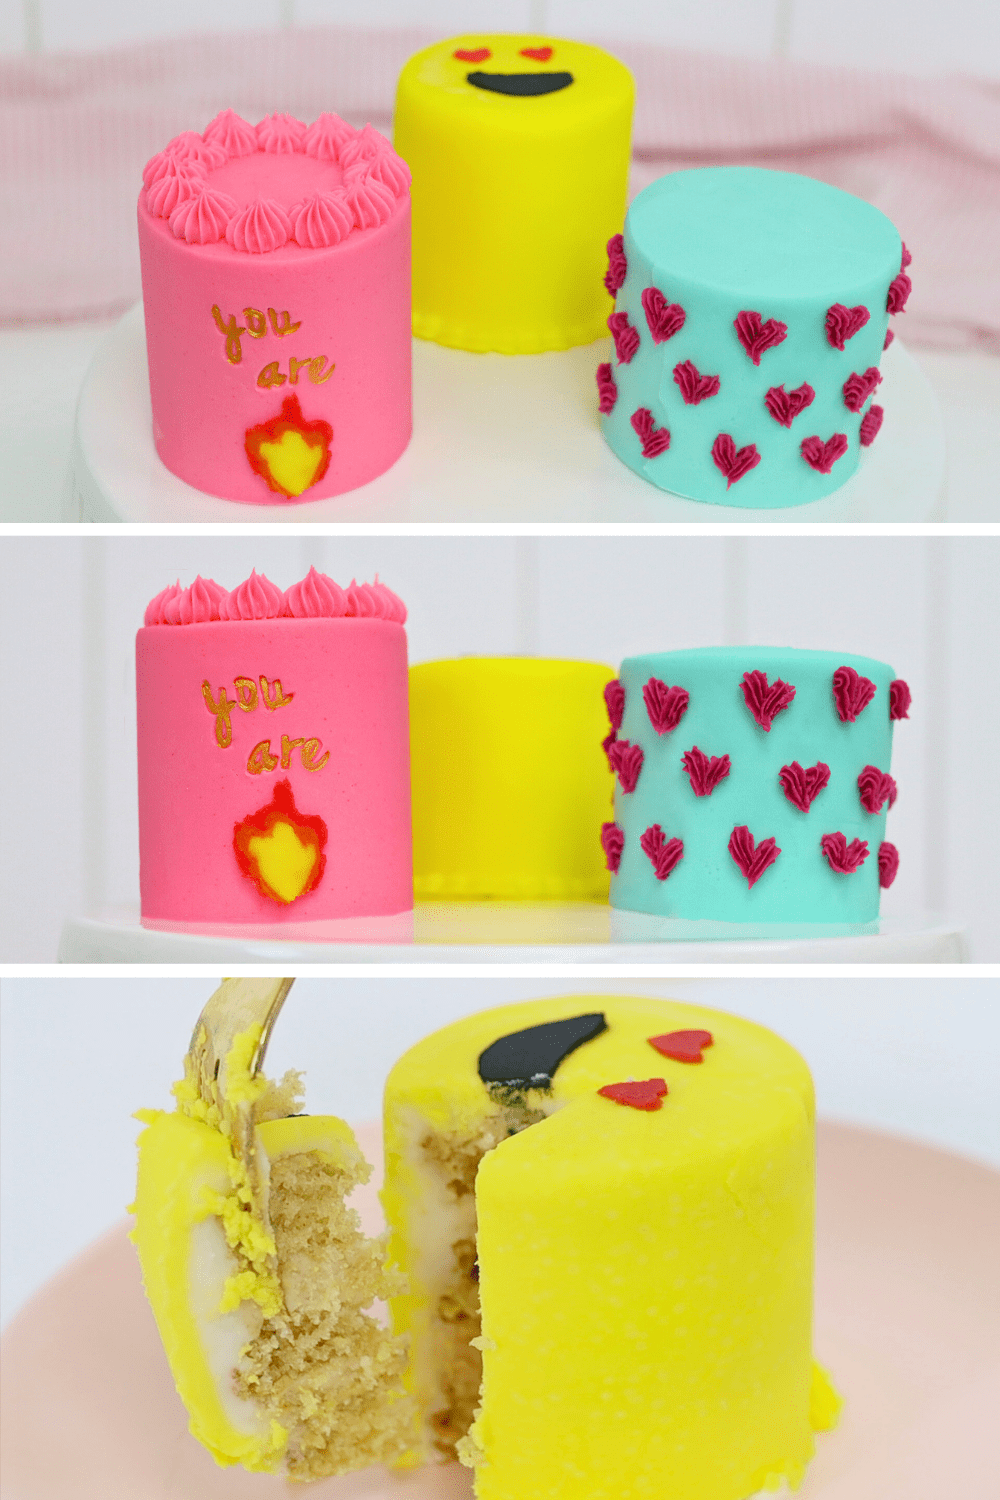
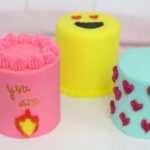
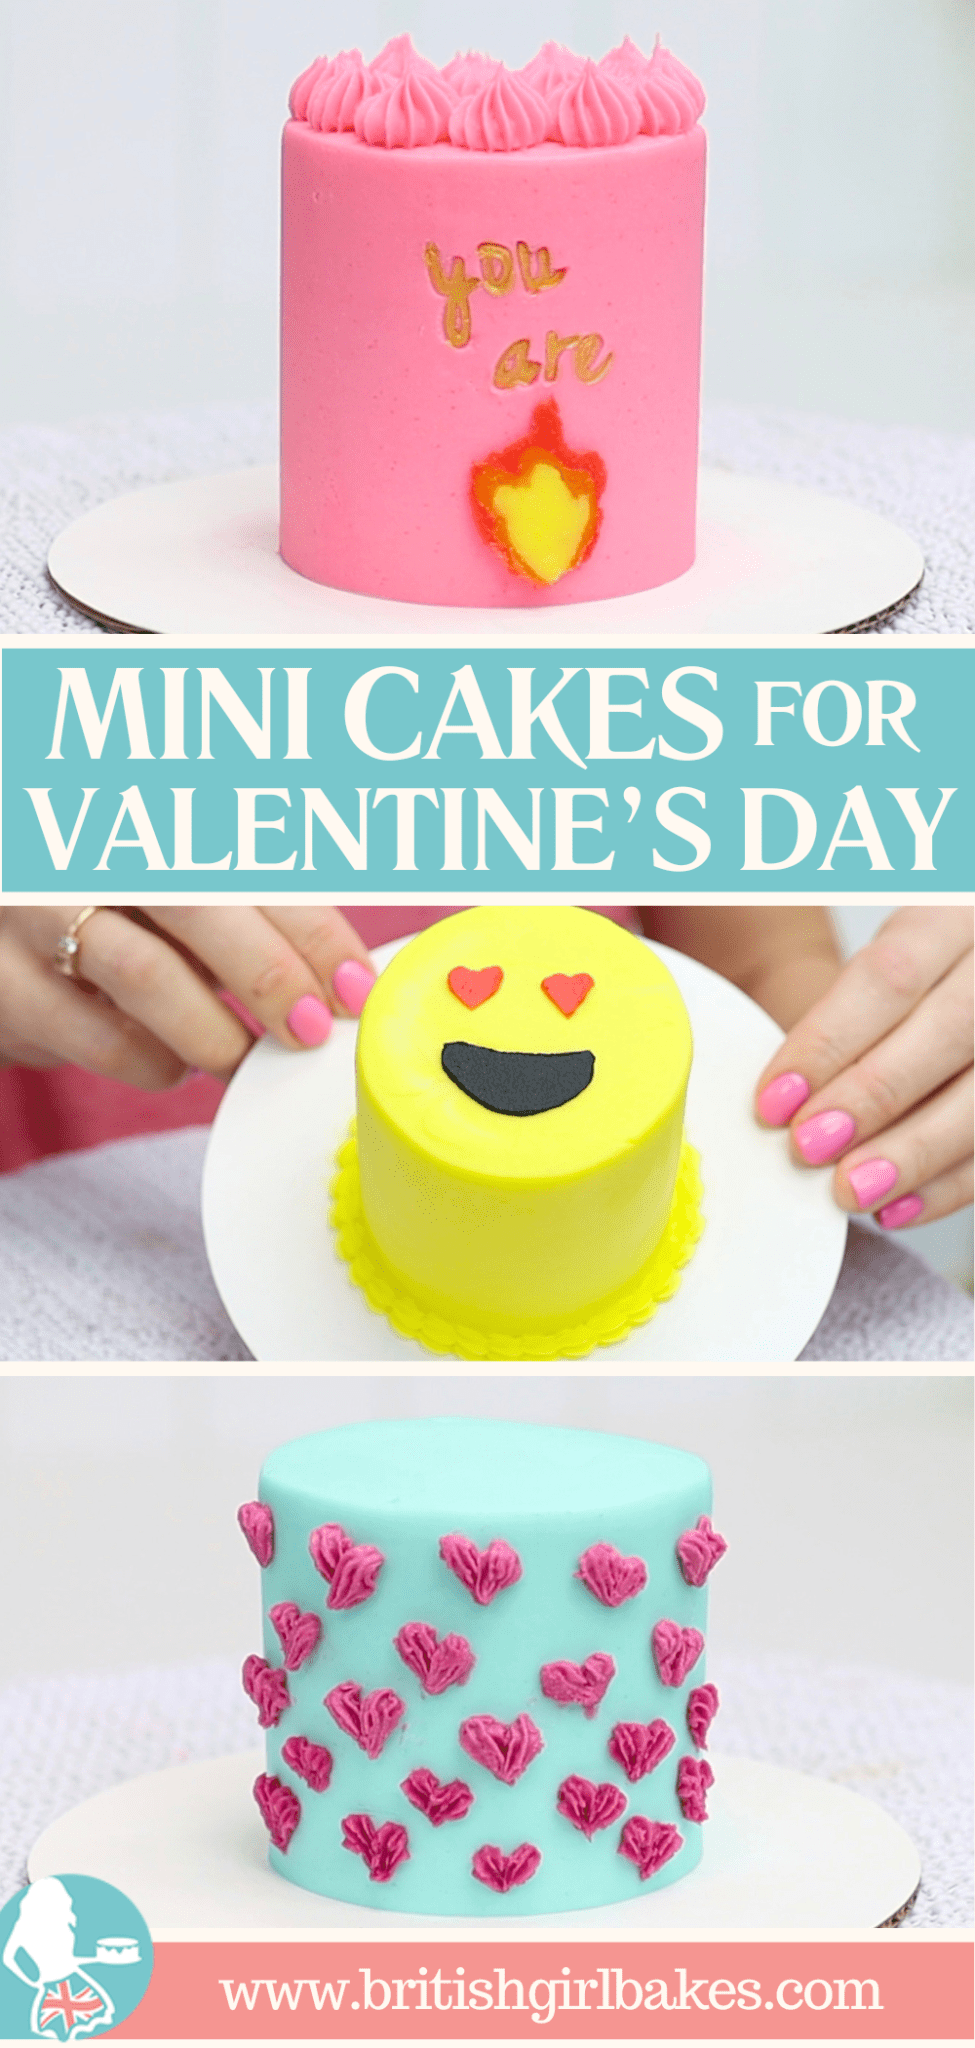
YOU ARE FIRE mini cake
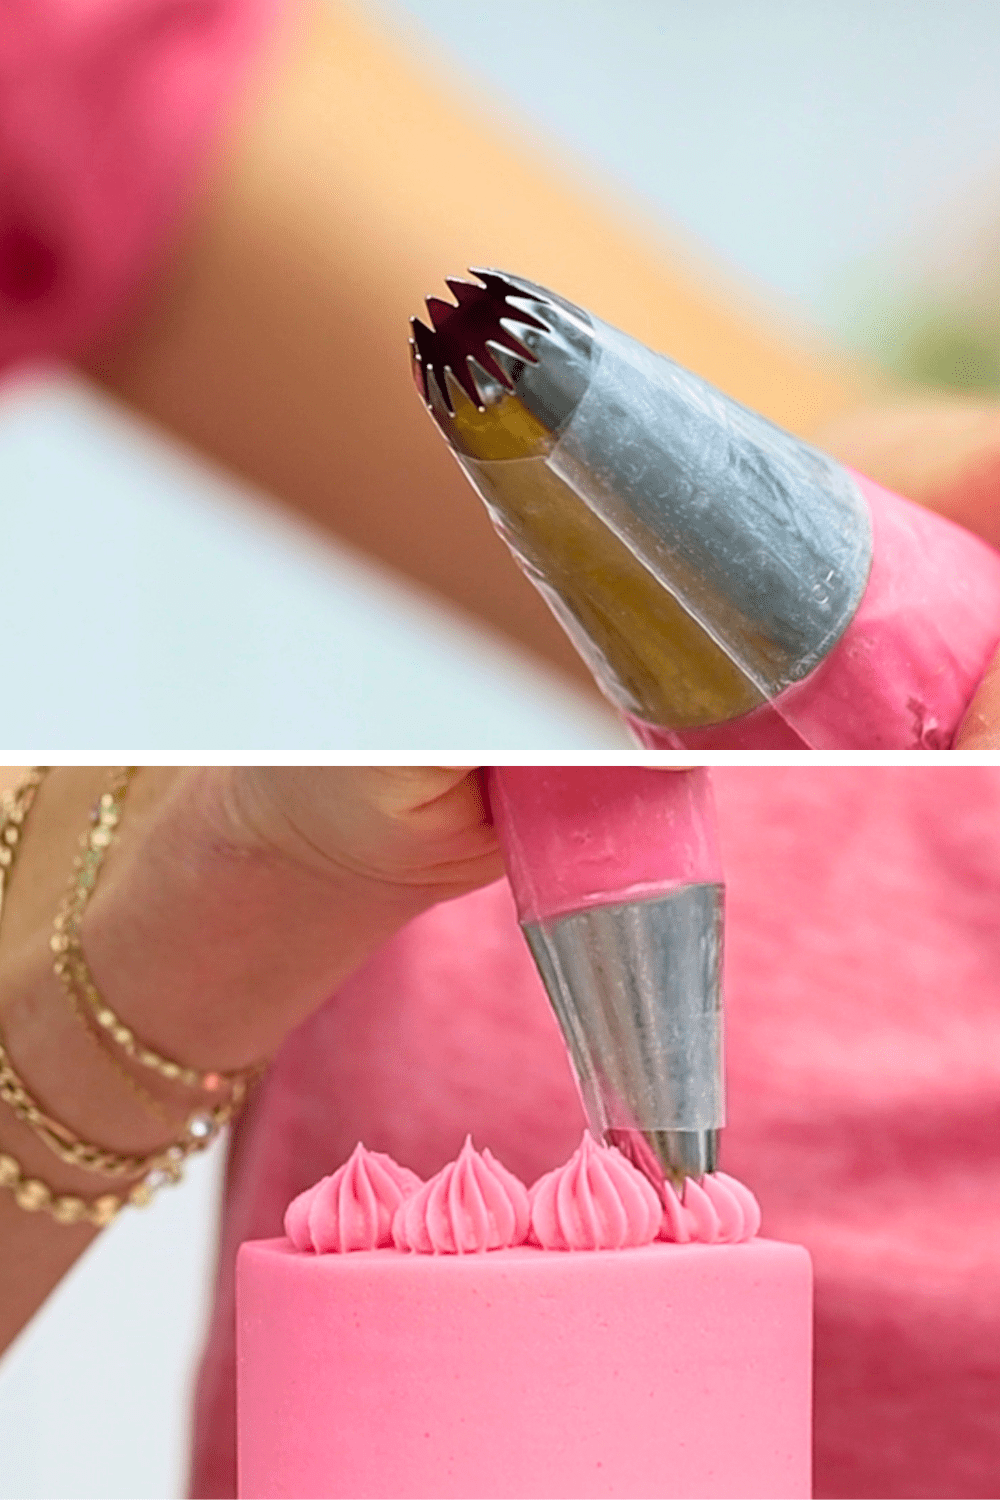
For this first Valentine’s mini cake, tint a third of the remaining buttercream pink. Use this to frost the cake. To smooth the frosting, scrape around the cake a few times and then spread more buttercream over any gaps. Scrape again and again until the frosting is smooth. Towards the end I like to switch to a metal cake comb and warm up the edge with warm water or a blow torch. This gives me the smoothest frosting! For the top, swipe sideways with an offset spatula, all the way around, wiping the blade clean in between.
Next you’ll need piping bag with any open star tip. I'm using a 4B, which has lots of short prongs all close together. Spoon the leftover pink buttercream into the piping bag and push it down to the end. To pipe a border around the top of the cake, hold the piping tip a little bitabove the cake. Squeeze to push the buttercream through the piping tip, letting it bulge a little bit over the edge of the cake. Then stop squeezing and pull the bag up. The piping will pull up a bit, pulling away from the edge of the cake so it’s perfectly positioned.
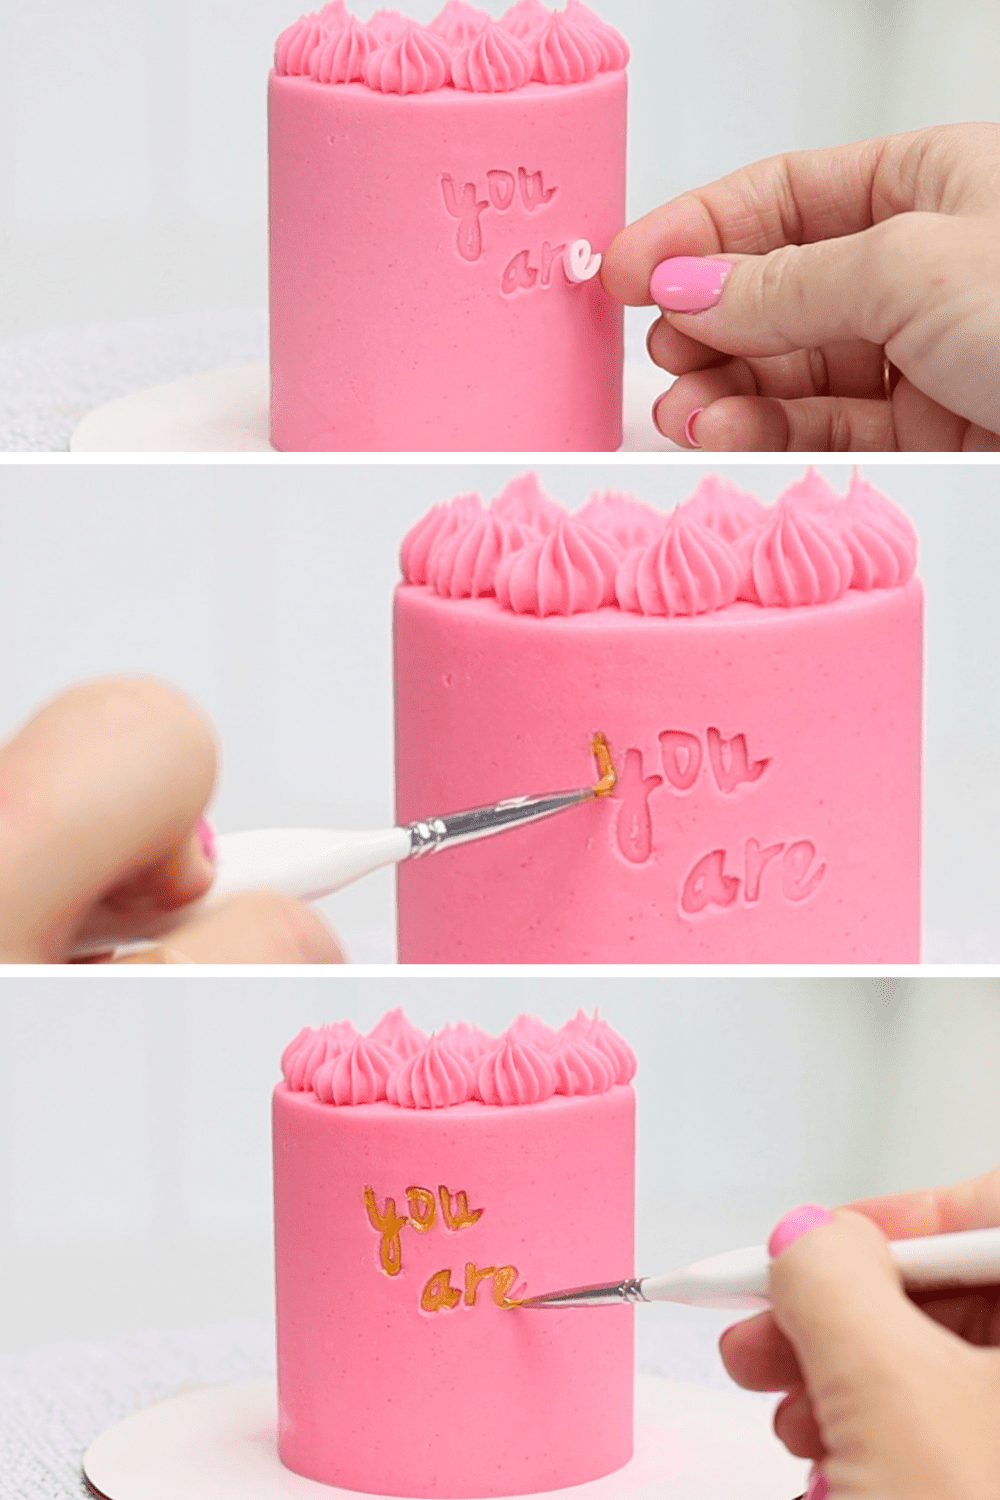
Before adding lettering, the cake needs to be in the fridge for at least an hour to set the frosting. After that, leave it at room temperature for at least 30 minutes so the frosting is firm but not cold. I'm using Sweet Stamp letters for my message, pushing them into the frosting to leave an imprint. Push each letter gently into the frosting and push it at the top and bottom, left and right. This ensures all of it has imprinted into the buttercream. Then pinch the letter and pull it away. You’re aiming for a shallow imprint, just deep enough to see all parts of the letter clearly.
You can colour in the letters with any edible paint. I’m using edible gold paint, which you can make with edible gold luster dust and a drop of any clear alcohol like vodka. To make it without alcohol, use a clear flavor extract like clear vanilla or lemon. A small paintbrush that’s quite stiff is ideal for painting these little letters.
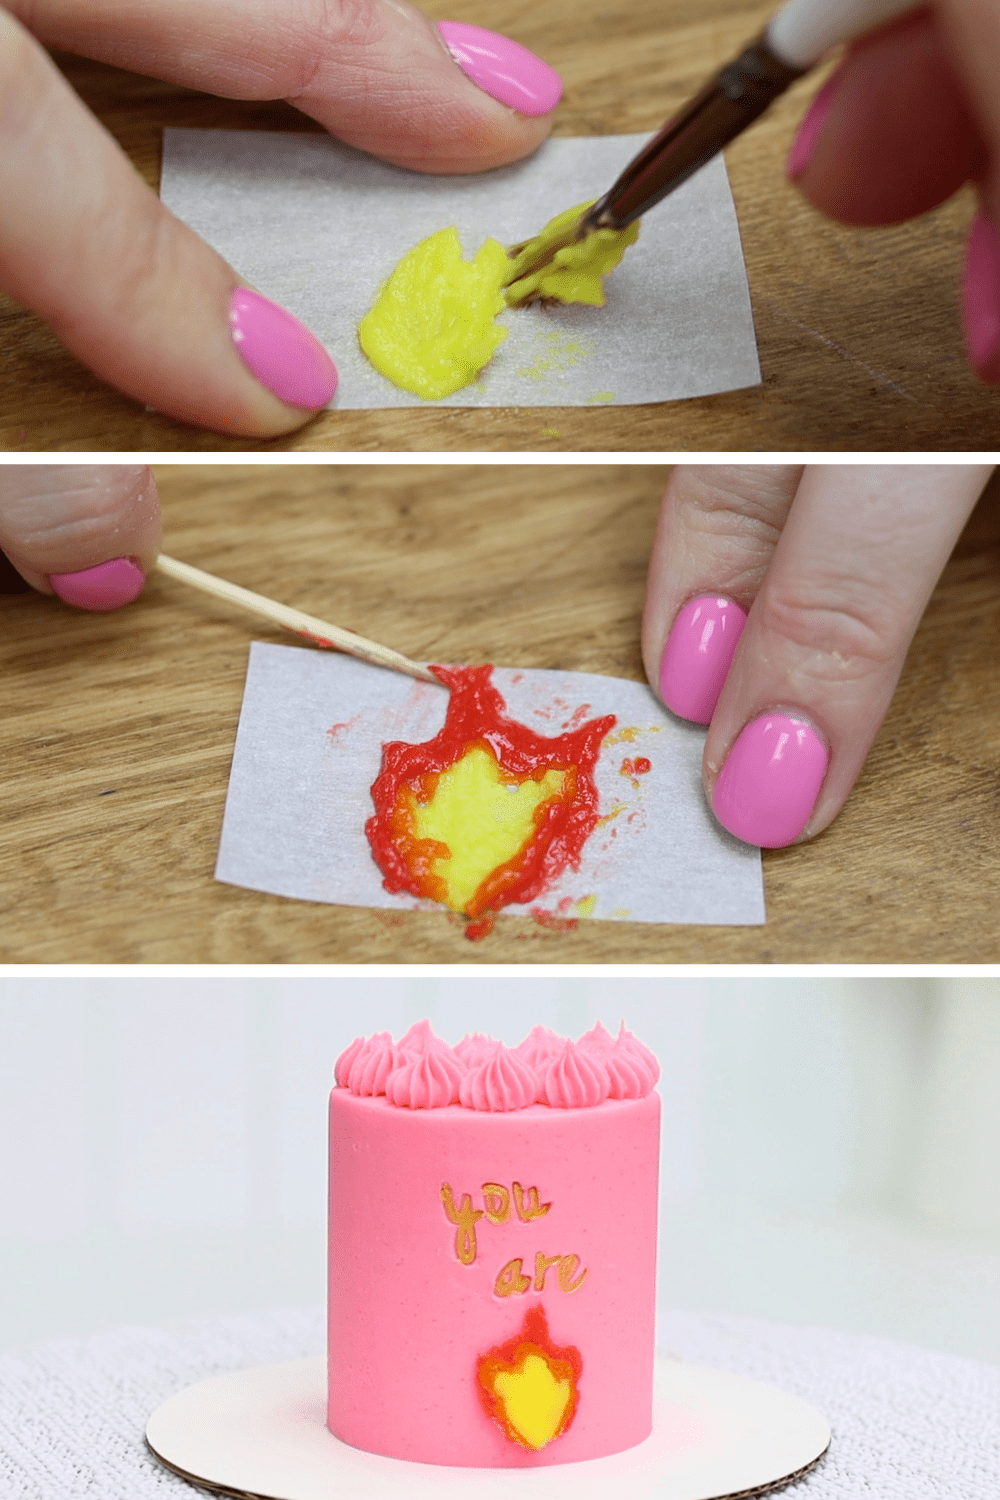
For the fire emoji I’m using yellow buttercream, microwaving it for 5 seconds to melt it slightly. When it's runnier like this you can paint with it! Dab it onto a piece of parchment paper, shaping it to make the inner part of a flame.
Do the same with a small spoonful of orange and red buttercream, painting these around the yellow flame. This is a buttercream transfer, and you can make any nonstick paper like parchment or wax paper or baking paper. Wipe off any smudges with a toothpick or clean paintbrush so that only the flame is left on the paper. Then press the flame against the cake, pushing gently to attach it. Put the cake into the freezer for 10 minutes or the fridge for 30 minutes to set the flame against the cake. Then peel the paper off and voila! You are fire!
HEART EYE EMOJI Valentine's Day mini cakes
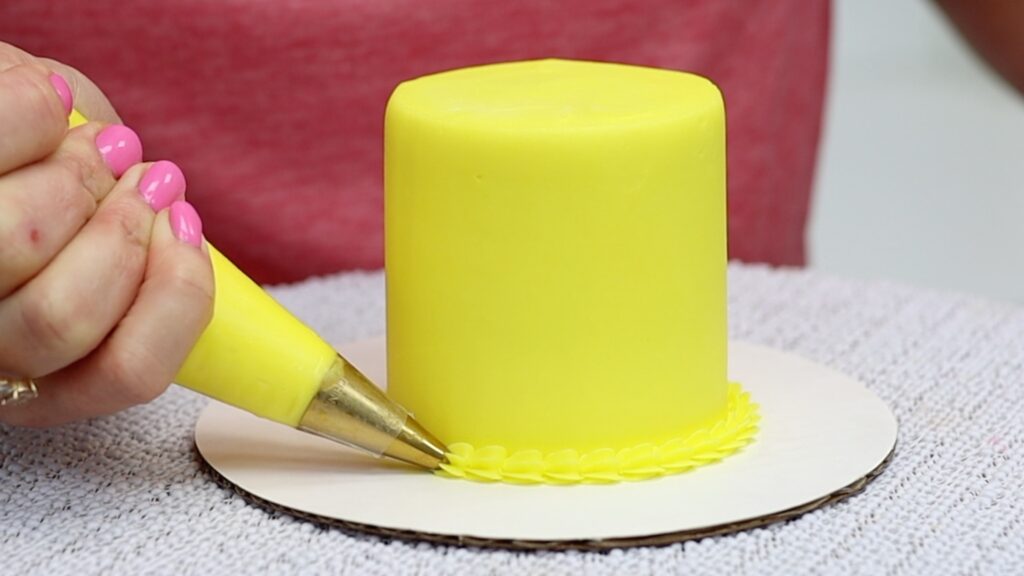
Let's make another emoji cake next: a heart eye emoji Valentine's Day mini cake. Start by tinting half of the remaining buttercream yellow to frost the cake. Once that’s smooth, put the rest of the yellow buttercream into a piping bag with a small star shaped tip. I'm using is a tiny # 16 but any small star is fine like a #32 or a #199. To pipe a border, hold the tip just beside the cake, resting it on the cake board. Squeeze the buttercream out and then release your pressure on the piping bag as you swipe the bag away from the cake. You’ll make a textured bead, leaving a little tail behind it, which you’ll cover up with the next bead.
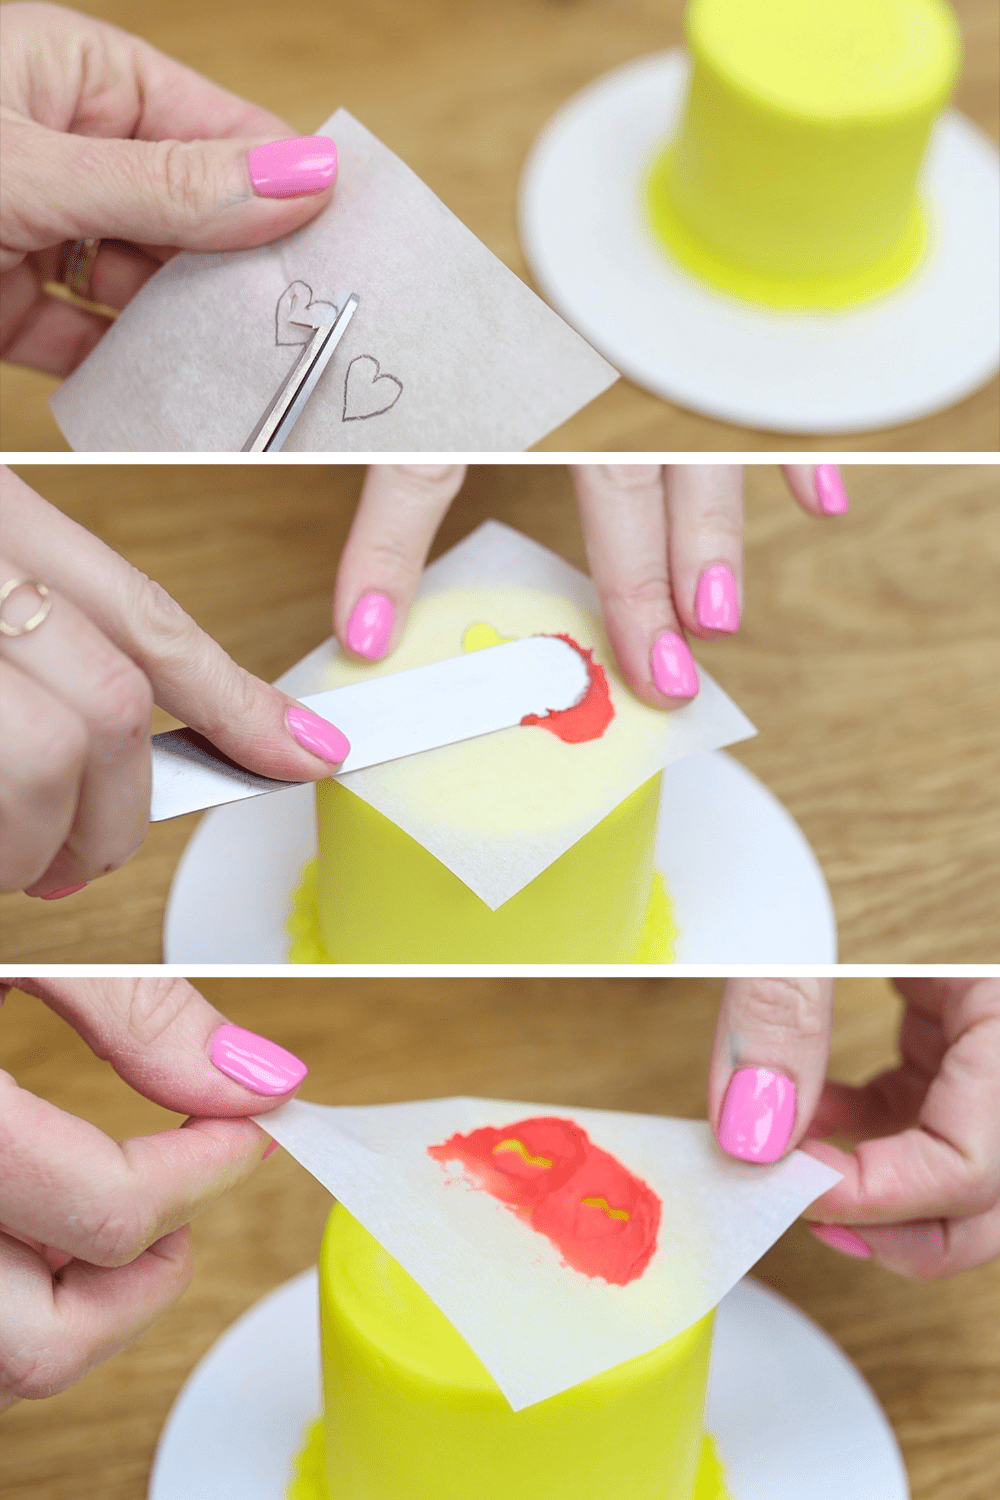
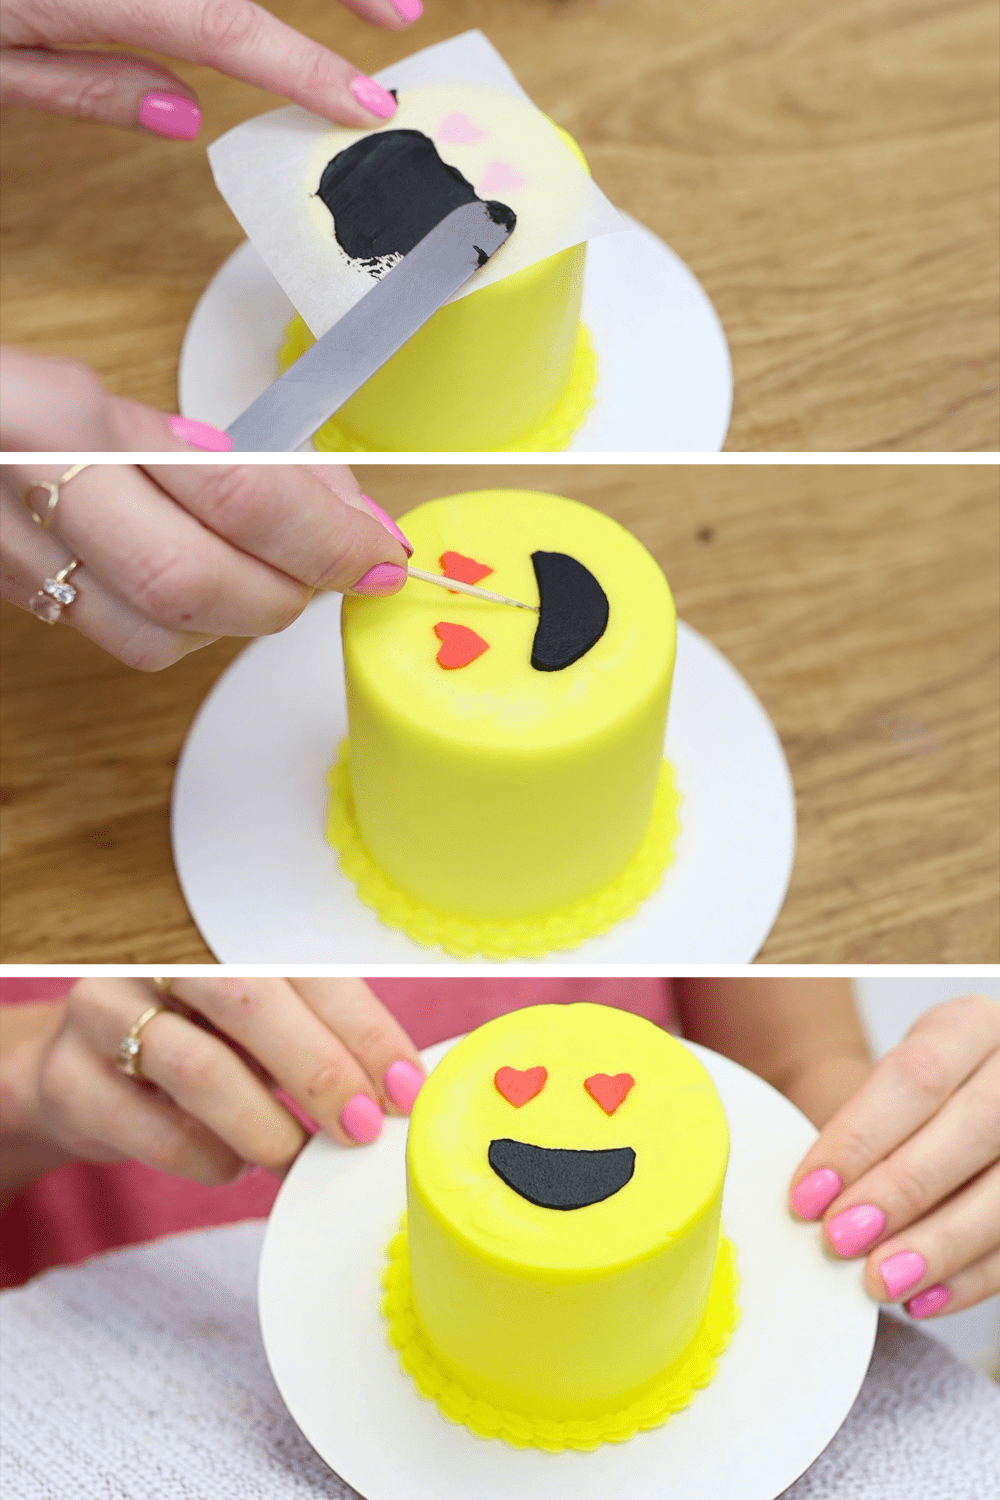
Put the cake into the fridge for at least an hour to set the frosting. Then make two stencils using parchment or wax paper, drawing two hearts for the eyes and a smiling open mouth. The mouth should be on one piece of paper and the eyes on another. It’s best to do this with the cake beside you so you can check the size and the spacing.
Cut the shapes out of the paper, leaving the paper around the shapes intact. These pieces of paper will be your stencils! Position the first one on the cake, pressing it down and then spread buttercream over it. Smooth it a few times to take off the excess and leave a thin, smooth layer behind. Then peel off the stencil.
Put the cake in the freezer for 5 minutes or the fridge for 15 minutes before you do the next stencil. This way the first details will set, so you don't damage them with the next stencil. If the buttercream smudges as you pull a stencil away, use a toothpick to gently scrape off any smudges. Tadaa! A heart eye emoji cake for Valentine’s Day!
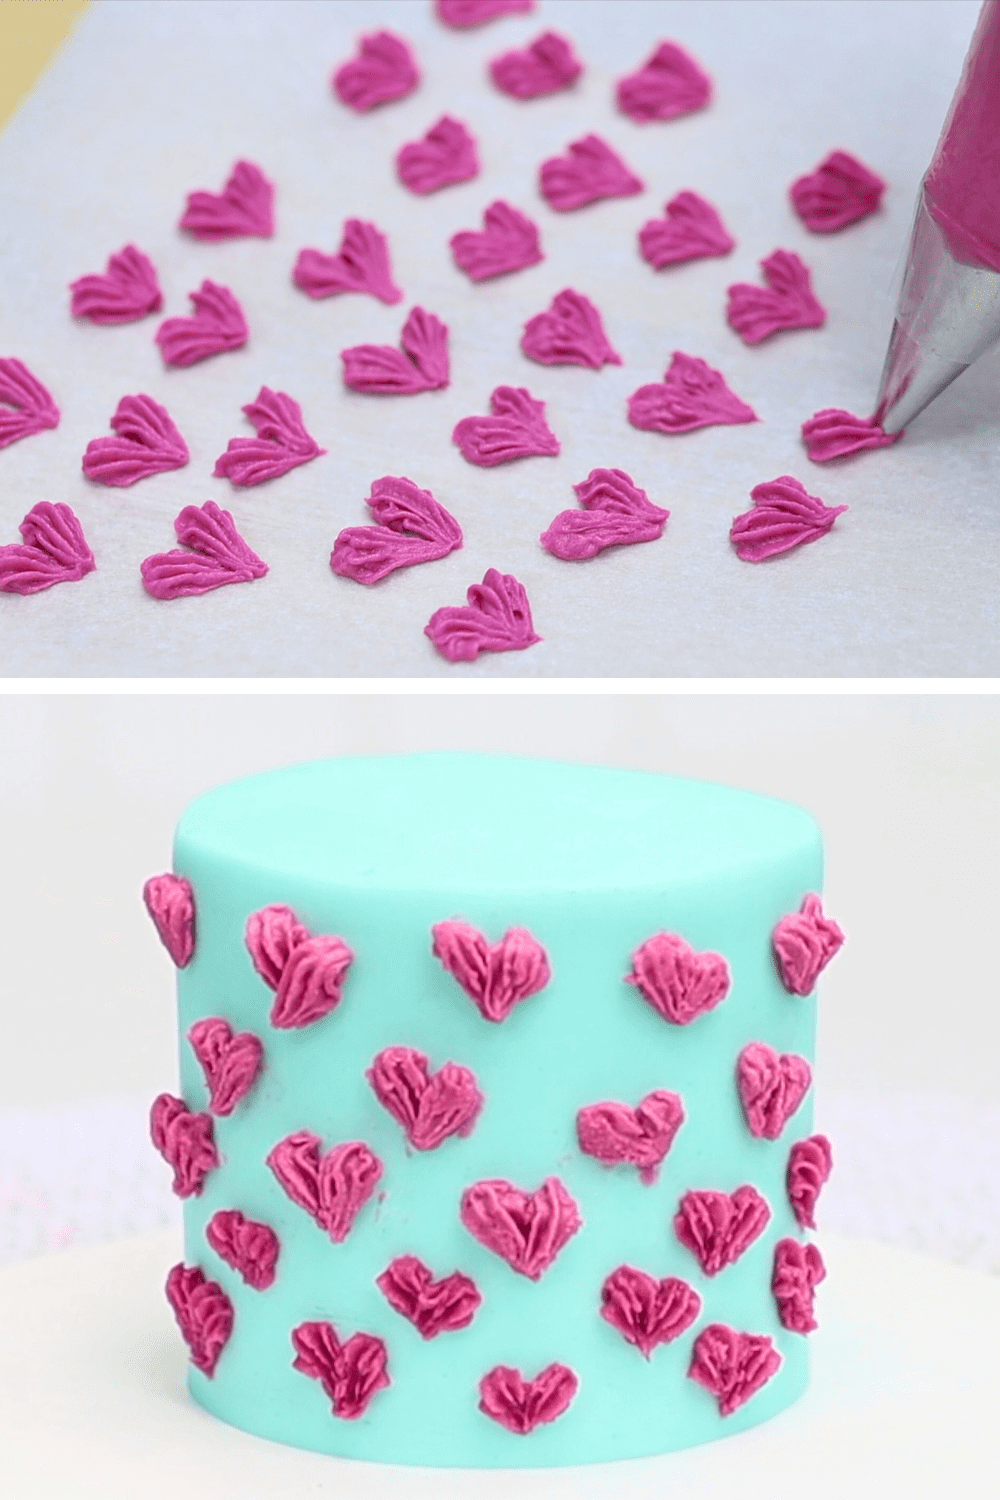
PIPED HEARTS mini cake
This next one is really fun. Pipe little hearts onto a piece of parchment or wax paper on a cutting board or tray. Use a small star shaped tip like this # 16. Lift the tray or board up with the hearts on it and put them into the freezer for 10 minutes. Meanwhile, frost your cake. When the hearts are frozen you can pick them up and press gently them into the frosting on your cake! To skip the freezer step you canpipe these straight onto the cake but it's trickier to pipe them sideways rather than down onto the paper.
These Valentine's Day mini cakes are the perfect size to share! They’re best enjoyed at room temperature so if you make them in advance and keep them in the fridge for a few days, take them out about 2 hours before you serve them. This give the cake and buttercream time to warm up and soften and they’ll taste their best!
Make a Valentine’s Day mini cake with delicious cake and filling, dreamy buttercream frosting, and easy decorations!
Ingredients
UnitsScale
For the cake layers:
1/4cupunsalted butter
1/3cupwhite sugar
1 egg
1/2 teaspoon vanilla
2 tablespoons buttermilk
1/2 tablespoon vegetable oil
2/3cupflour
1/2 teaspoon baking powder
1/4 teaspoon baking soda
pinch of salt
For the buttercream:
1/2cupunsalted butter at room temperature
1 1/2cupspowdered sugar
pinch of salt
1/4 teaspoon vanilla extract
2 teaspoons cream or milk
optional for fillings: dulce de leche or caramel, crushed freeze dried strawberries, lemon curd, jam, or crushed Oreo cookies (1/2 tablespoon of each)
Instructions
To make the cake layers:
Using an electric mixer (ideally handheld, since the quantities are so small), beat room temperature butter and sugar on medium speed until pale and creamy, about 2 minutes. Scrape down to the bottom of the bowl once during mixing to make sure no butter or sugar is stuck at the bottom.
Add egg and vanilla, mixing on the lowest speed for about 30 seconds, until incorporated.
Add room temperature buttermilk and oil and mix on low speed to incorporate.
In a bowl sift flour, baking soda, baking powder and salt. Pour into the mixing bowl and mix on lowest speed to incorporate, scraping down to the bottom of the mixing bowl to check that batter is evenly mixed.
Line 6 cups of a cupcake pan with wrappers and divide batter between them. I like to use a cupcake scoop for this!
Bake at 175ºC or 350ºF for 15 minutes or until the cupcakes spring back up when you poke them.
Leave cupcakes to cool in the pan for 10 minutes before lifting them out.
Unwrap the cupcakes and cut each cupcake in half horizontally to make two layers. You'll need five cupcakes to make 10 cake layers, of which you'll use 9 to make three 3-layer mini cakes.
To make the buttercream:
Sift the sugar to remove any lumps and check that the butter is at room temperature - you should be able to slice through it easily with a spatula.
With an electric mixer (preferably handheld, since the quantities are too small to reach effectively with a stand mixer), mix butter for a few seconds until smooth. Add the powdered sugar and salt and mix on the lowest speed until incorporated, about two minutes.
Add vanilla and mix until it's combined with the buttercream.
To make flavoured fillings, scoop up about half a cup of buttercream and divide between three small bowls. Add 1/2 a tablespoon of any filling to each bowl (e.g. dulce de leche or caramel, crushed freeze dried strawberries, lemon curd, jam, or crushed Oreo cookies). Stir to check the consistency and if it's too stiff, add a few drops of milk until it's easy to stir. Note: if you're using liquid filling ingredients e.g. caramel, the consistency will probably be perfect without adding milk! For dry ingredients e.g. cookie crumbs or crushed freeze dried strawberries you'll probably need to add milk.
Check the consistency of your main bowl of frosting and add more milk or cream a tablespoon at a time until the buttercream is smooth and easily stirred.
To make a mini cake:
Spread or pipe a blob of buttercream onto the middle of a cake board at least 4 inches wide and press the first cake layer down onto it to attach it.
Add a layer of flavoured buttercream as filling, spreading it over the top of the cake layer.
Repeat with the next cake layer and filling and then place the final cake layer on top.
Put the cake into the freezer for 15 minutes or the fridge for 30 minutes to set the buttercream.
Cover the cake with a thin layer of buttercream as a crumb coat. This is easiest to do by piping it onto the cake (I like to do zig zags around the cake) and then spreading it. When it's fairly smooth put the cake back into the fridge or freezer for 15-20 minutes.
Decorate the mini cakes following the steps in the tutorial!
These 10 viral Valentine's Day cakes have exploded on social media because they're unique, delicious, easy and fun!
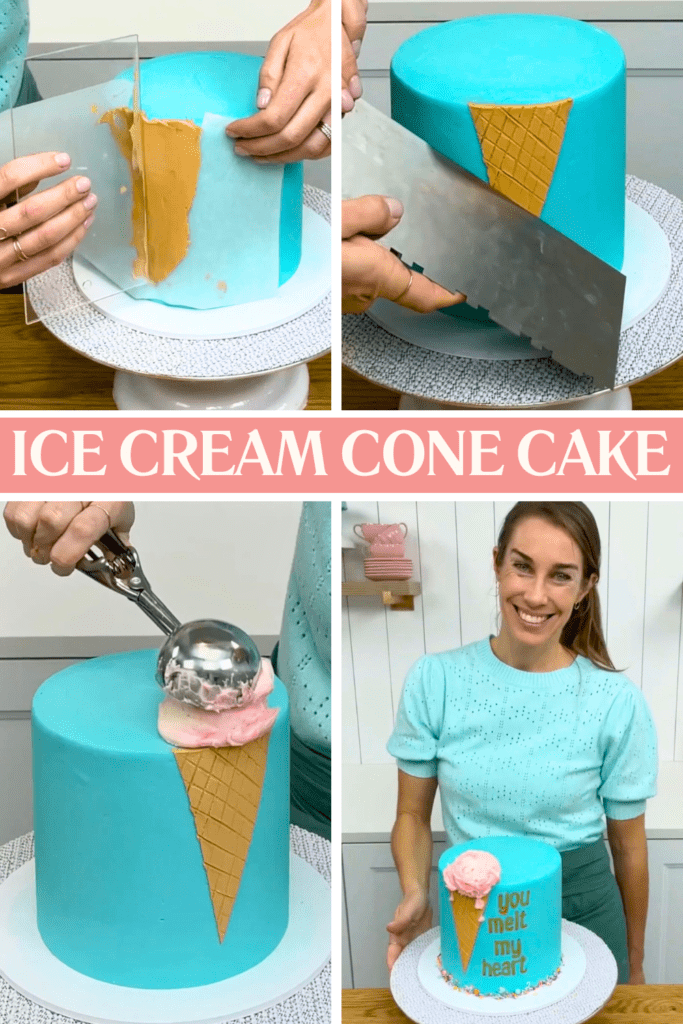
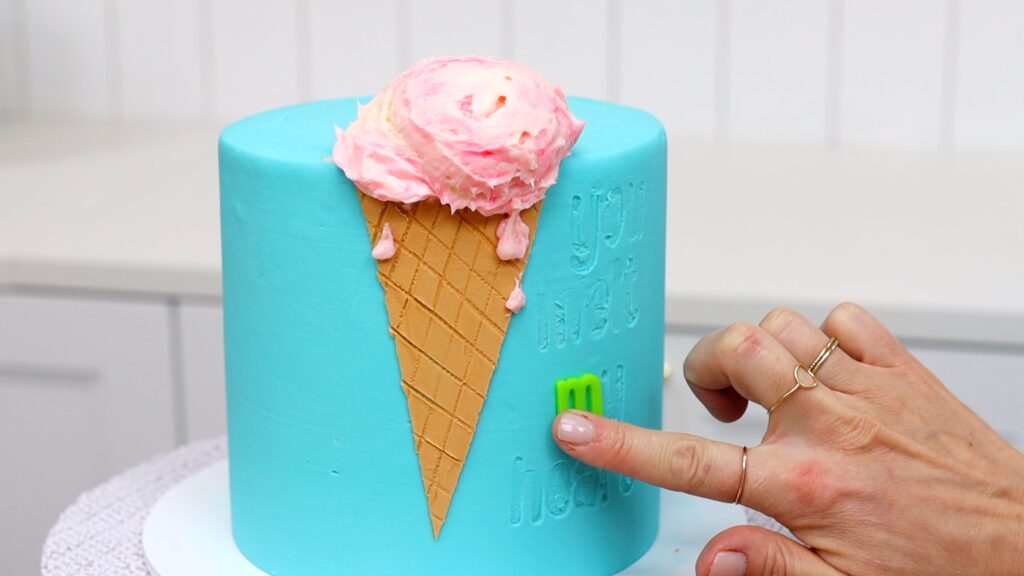
1. Ice Cream Cone Cake
Let's start with this cake that has almost 12 million views on Instagram, for a cake! It's a simple design made with a triangle cut out of parchment paper as a stencil for a cone, scored with the edge of a cake comb to make grid marks, with marbled pink buttercream scooped on top.
Don't you love the fun Valentine's Day pun?! To write it I used Sweet Stamp letters. These have the best results on buttercream that's firm but not too cold. I put the cake into the fridge for an hour but then let it sit out at room temperature for another hour. This way the buttercream softens just enough for the perfect imprint of the letters.
Press the letters one by one into the cake and then paint the letters with edible gold paint. You can buy this or make it yourself using vodka or clear vanilla extract mixed with edible gold luster dust. This number one of these viral Valentine's Day cakes is so eye-catching and fun!
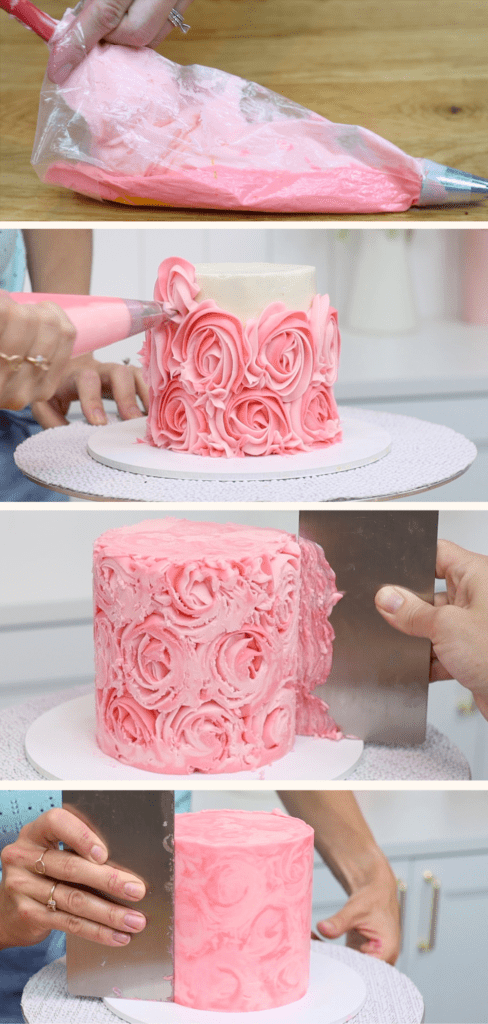
2. Viral Valentine's Day Cake with Roses
This next cake with over a million views is such a unique way to make a floral cake. Pipe rosettes and then put the cake in the freezer for 30 minutes before its transformation. When the roses are firm, scrape around the cake with a warm metal cake comb. The warmth will melt the piping sticking out and then drag it to fill in the gaps in the piping. You'll create a flat design that looks like it's been printed onto the cake. I call it 'facelift frosting'. The key here is to use at least two colours of buttercream. I used two shades of pink and the variation is what creates the details in the design.
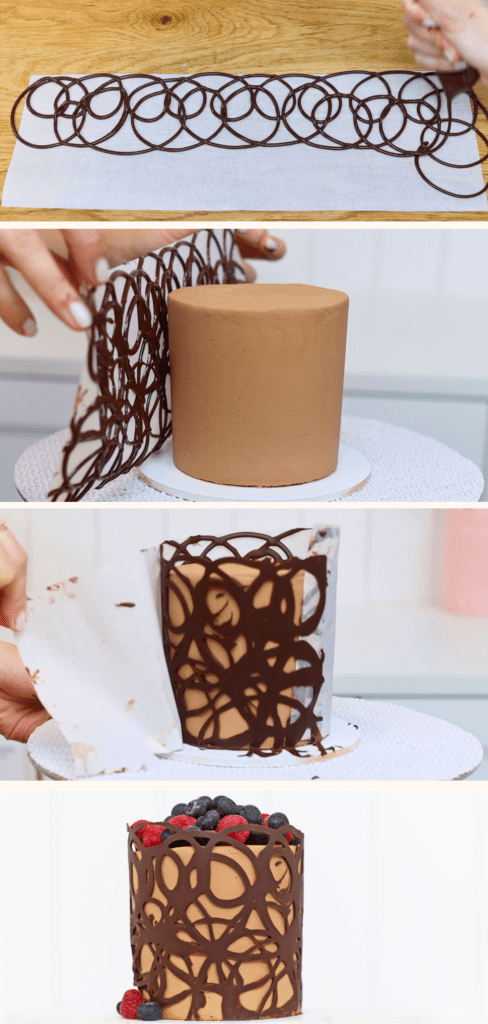
3. Wrapped Chocolate Cake
The next of these viral Valentine's Day cakes is for chocolate lovers. Spoon melted chocolate into a ziplock bag and cut a small piece off one corner to make a hole. Squeeze the chocolate through the hole onto a piece of parchment or wax paper. The paper needs to be wide enough to wrap around your cake and a little bit taller. Lift the paper up and wrap it around your frosted cake. Chill in the fridge to set the chocolate and then peel off the paper. You'll leave the chocolate design behind on the cake. Run a knife under hot water before slicing for the neatest results. This cake is so decadent!
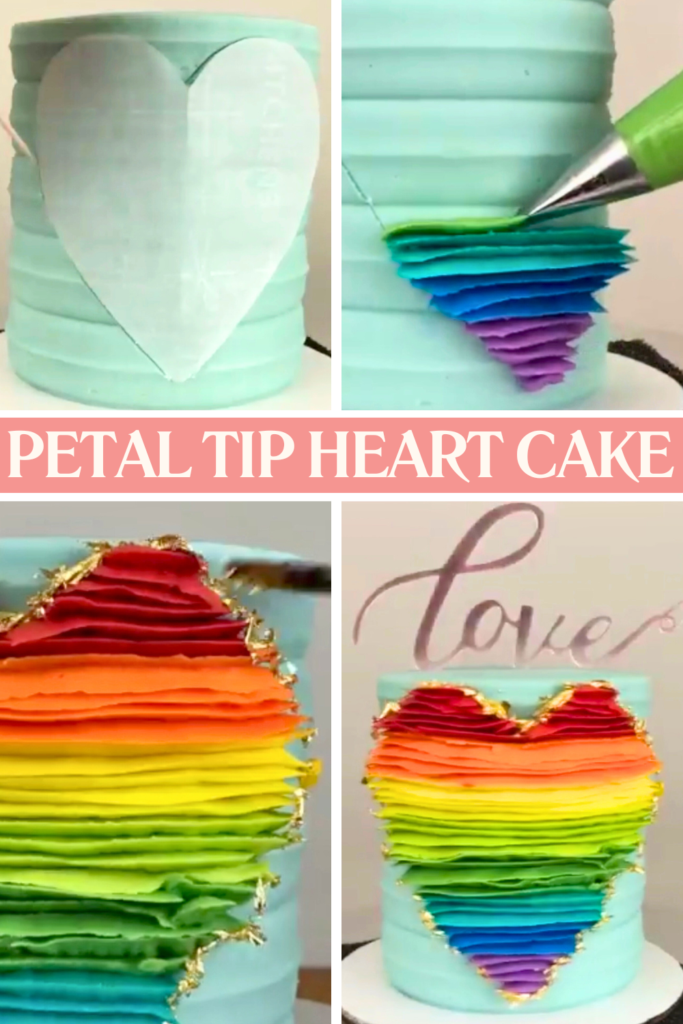
4. Viral Valentine's Day Cake with Rainbow Heart
Filmed back in 2020 so please excuse the video quality of my iPhone 8! This cake was spotted by Wilton and featured on their page. The frosted cake has been in the fridge for about an hour before this so that it's firm. This is important, otherwise the frosting can droop with the weight of the rainbow piping.
I'm using a #104 petal piping tip to make lines that create a heart shape. Hold the tip with the wide part pressed against the cake and the narrow end pointing outwards. By scoring the heart shape onto the cake with a toothpick first, it's easy to start and stop each line in the right place. This means the final shape is easily recognizable.
An optional finishing touch is to place edible gold leaf around the edges of the piped heart. Do this after chilling the cake so you don't mess it up if you knock it by mistake.
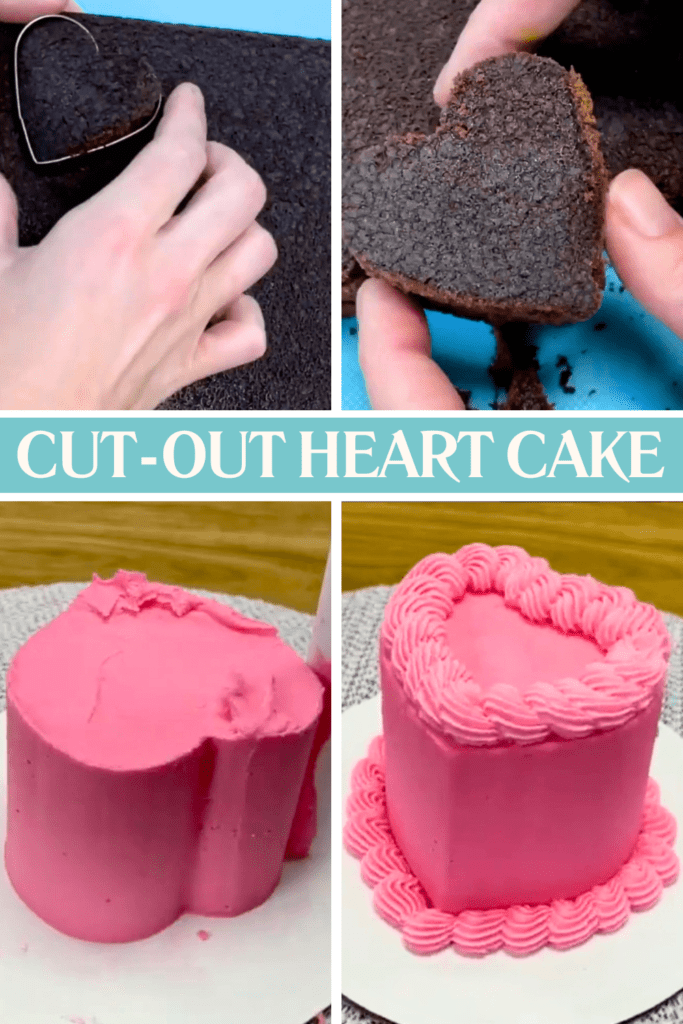
5. Heart Shaped Mini Valentine's Day Cakes
If you're celebrating as a couple you can make viral Valentine's Day cakes for two like this. Bake a cake using whatever pan you have. I used my Perfect Chocolate Cake recipe. Cut out hearts with a cookie cutter which will be the layers of your cake. To make a naked heart-shaped cake, pipe swirls as the filling between the layers. Or to frost the cake, put it in the freezer for 15 minutes to firm up first. This mini heart cake is the perfect size for a couple to share!
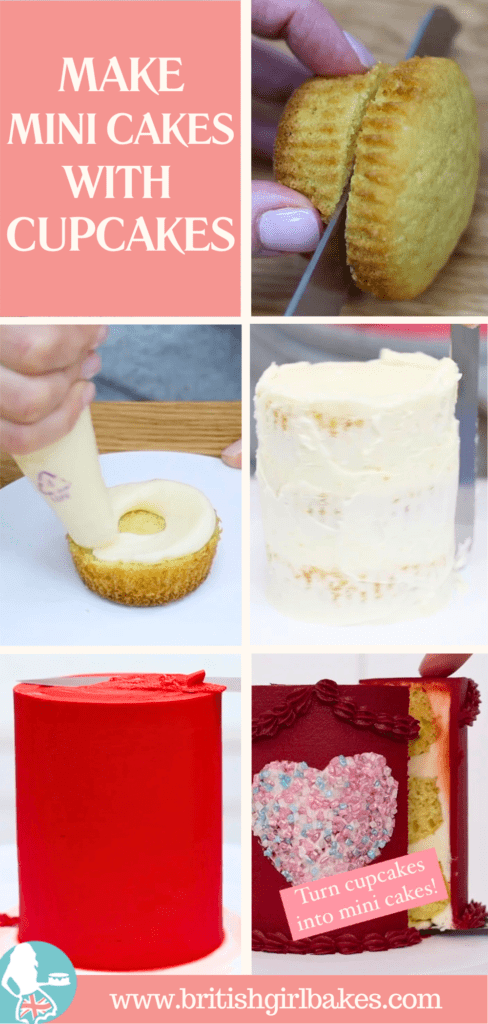
6. Mini Cakes made with Cupcakes
Another shortcut to make a mini cake is with cupcakes. Cut them in half and then layer them using buttercream to stick the bottom layer down onto the cake board. This will hold the cake still as you frost it. Just like with the cookie cutter layers, chilling this cupcake cake in the freezer for 15 minutes will make it much easier to frost. I have a very detailed tutorial on making mini cakes for Valentine's Day for more details!
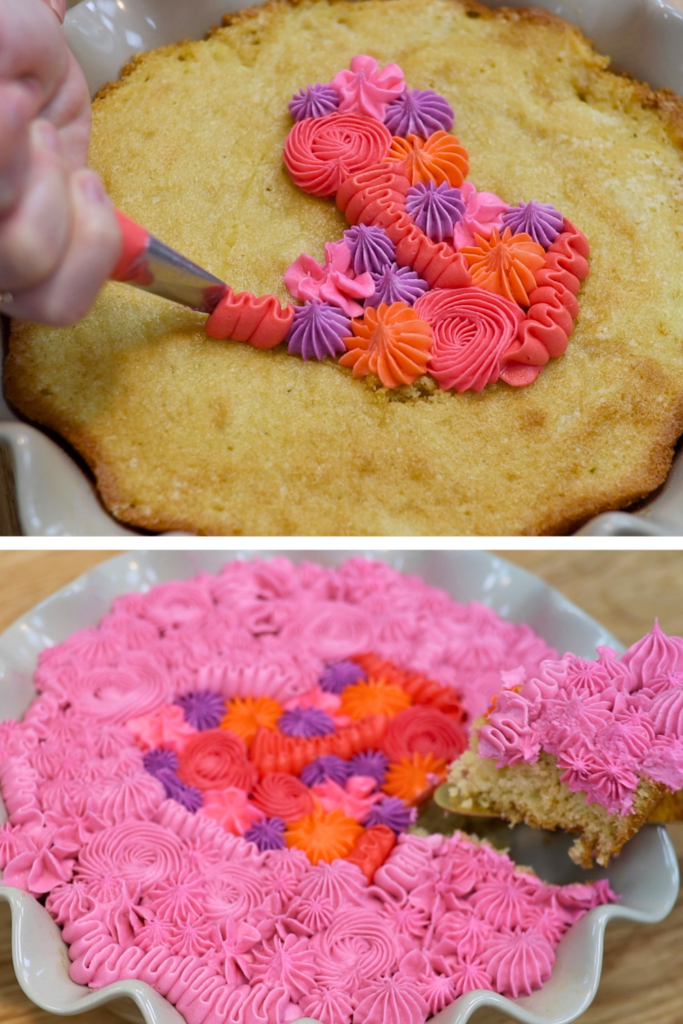
7. Tray Bake Cake
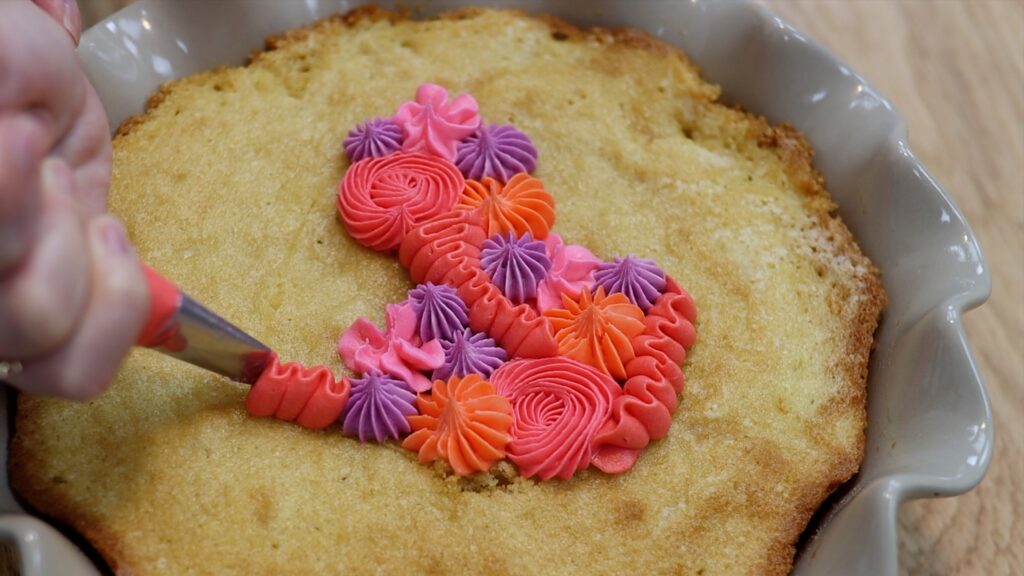
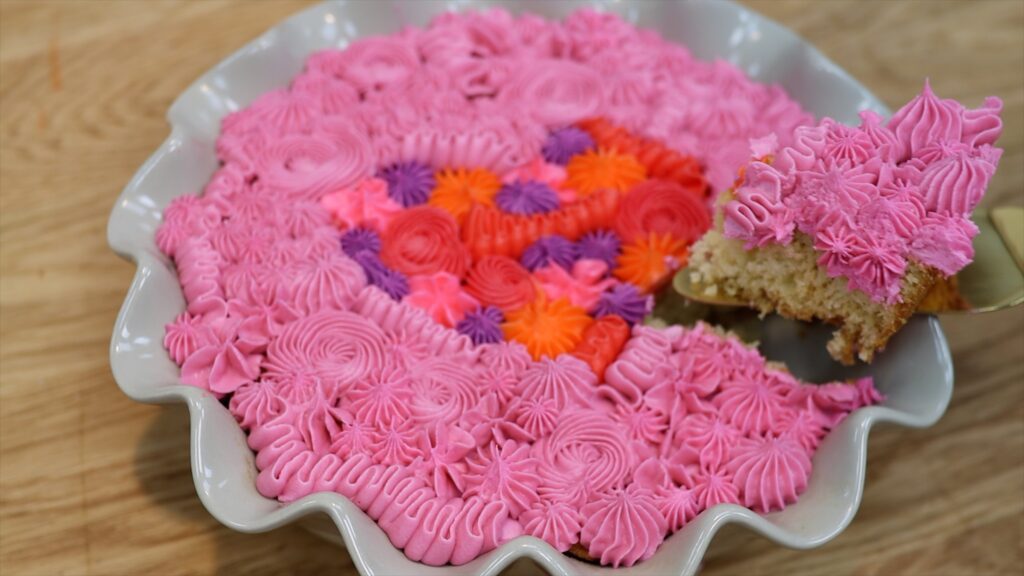
This cake is maybe the easiest cake in the world to make. Tint a few colours of buttercream and then bake and decorate the cake in the same dish. There's no need to layer the cake or to frost the sides, which are the time consuming parts! Put the coloured buttercream into piping bags with any piping tips. Pipe randomly onto the cake or create a heart, outlining it with a toothpick first as a piping guide. And serving this cake is just as easy as baking and decorating it! Just pick up the dish and take it wherever you're going. Then serve the cake right there in the dish!
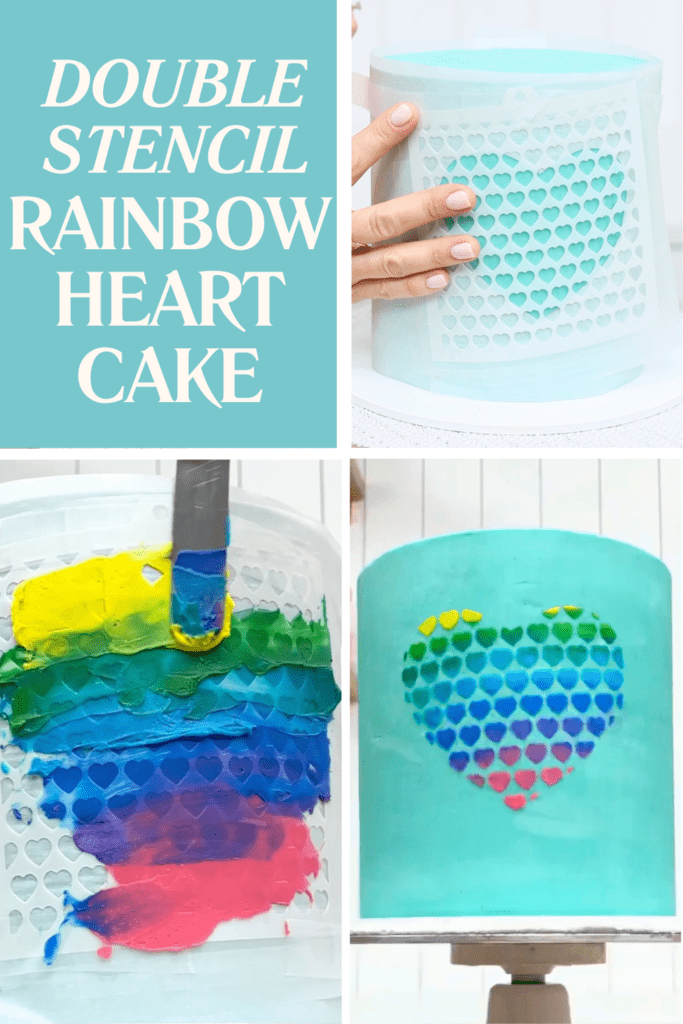
8. Heart Stencil Cake
Here's another one of my easy viral Valentine's Day cakes. Tint spoonfuls of different coloured buttercream and then spread them over a heart-shaped stencil. When you peel the stencil off you'll have a gorgeous rainbow heart cake! To make the double stencil like mine, cut a heart out of parchment or wax paper to make your first stencil. Layer this over any patterned stencil to create a pattern within the heart shape. To use the stencil on a cake you'll need to hold it in place with one of these methods. The first option is to tape the two stencils together around a cake. This can be tricky because tape doesn't stick well to parchment or wax paper. The other option is to push pins through the corners of the stencils into the cake.
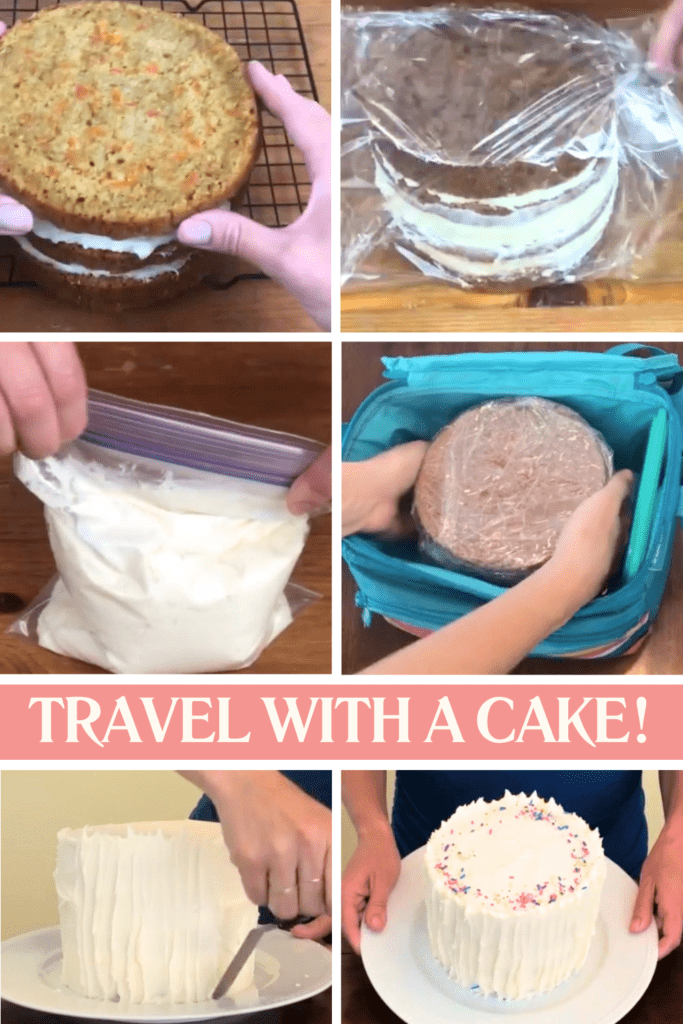
9. How to Travel with a Cake for Valentine's Day
If you're traveling for Valentine's Day, make a cake before you go and take it with you. Bake the layers, make the filling and assemble the cake at home. Then wrap it in plastic wrap and freeze it for at least an hour or for a few days. Make buttercream to frost the cake and freeze that in a big ziploc bag, pressing it flat.
Just before you travel, take the cake and frosting out of the freezer. Put them into a cooler with an ice pack and then put this into your suitcase. The cake and frosting will thaw gradually while you travel so that when you arrive, they're ready to use. Squeeze the buttercream out of the bag and use it to frost the cake. Instead of traveling with a turntable, use a plate and one of these 7 frosting techniques that don't require smooth frosting!
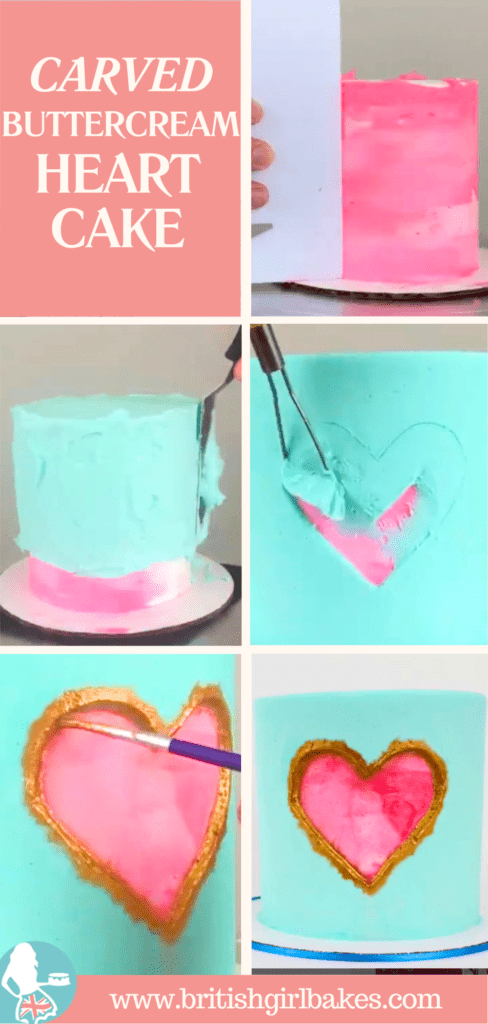
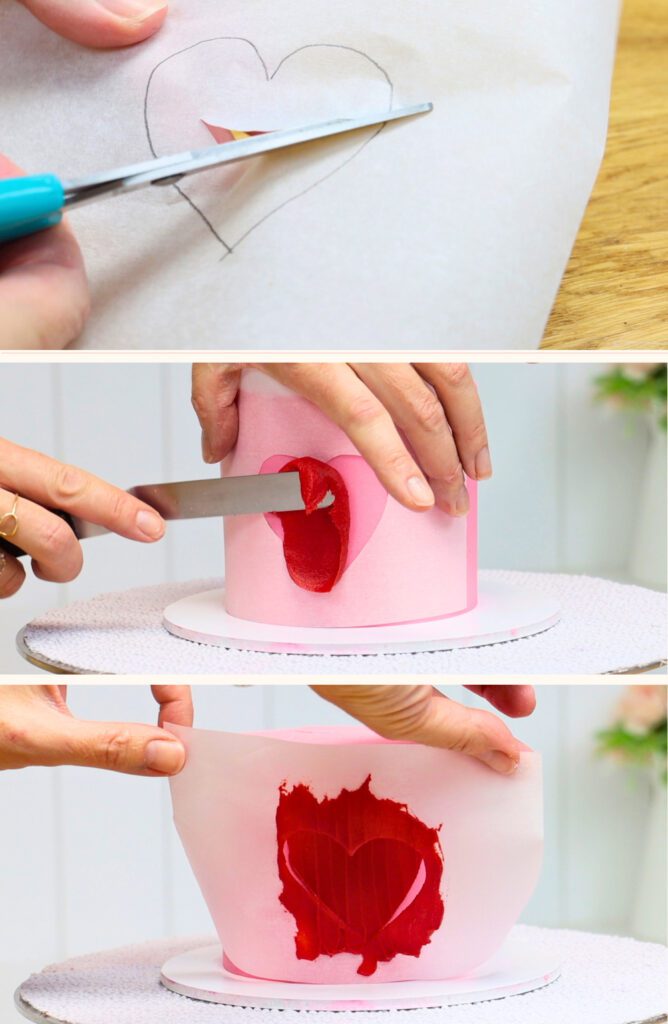
10. Viral Valentine's Day Cake with Carved Buttercream Heart
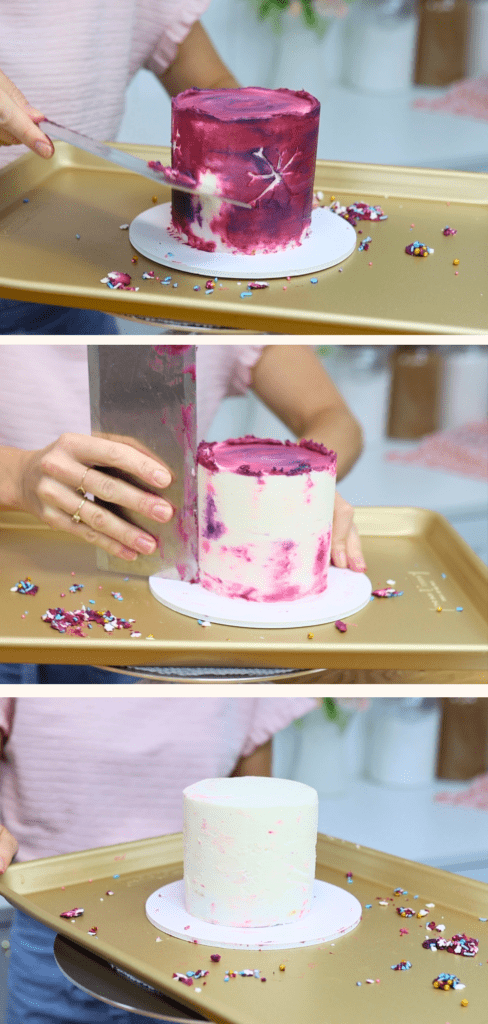
The last of these viral Valentine's Day cakes is another oldie but goodie from 2020. By covering a cake with two layers of frosting you can carve out colourful shapes and patterns! Chill the cake in the fridge after the first layer of frosting for at least an hour. Then spread on the next layer and it won't mix with the first layer. Chill again and then use clay modeling tools to carve out a heart or any shape you like. You'll scraping off the outer layer of frosting to reveal the colour or colours underneath.
I painted around the edge of my heart using edible gold paint to make it really pop. Carved buttercream cakes are very satisfying to make and they always get the best reaction!
So, which one of these viral Valentine's Day cakes are you going to make? Or which one would you like someone to make for you? Tell me in the comments and visit my cake school to learn hundreds of cake decorating techniques and designs!
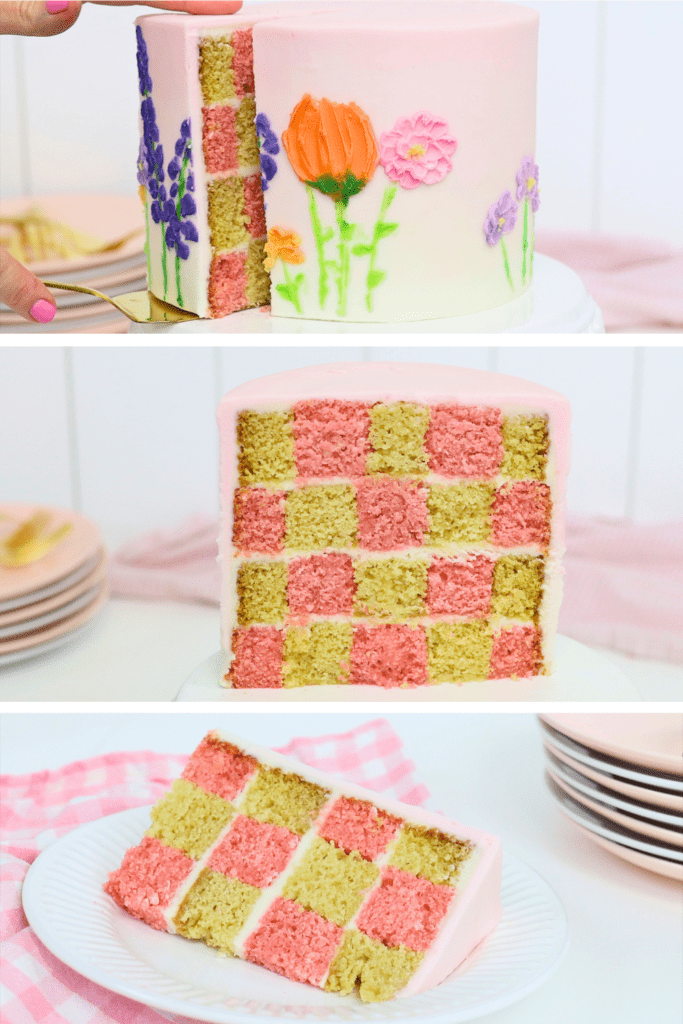
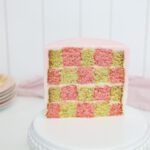
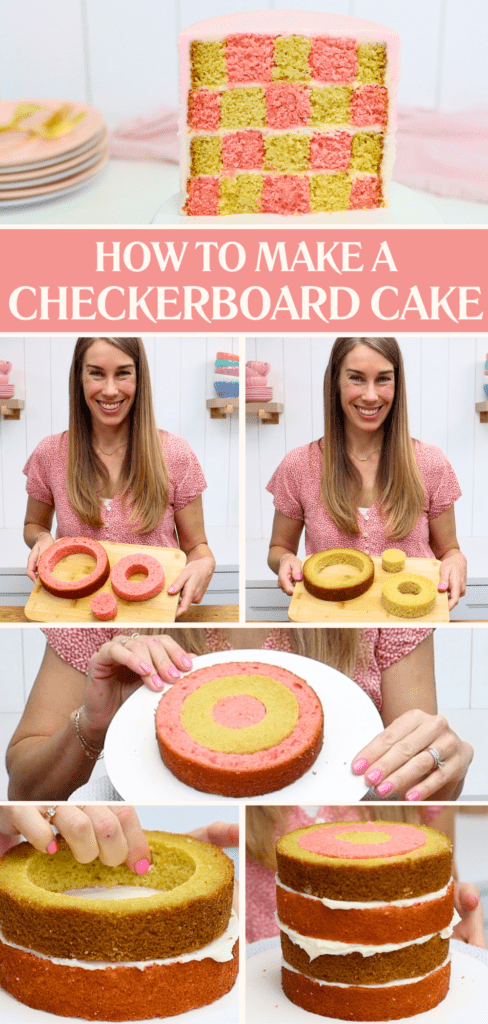
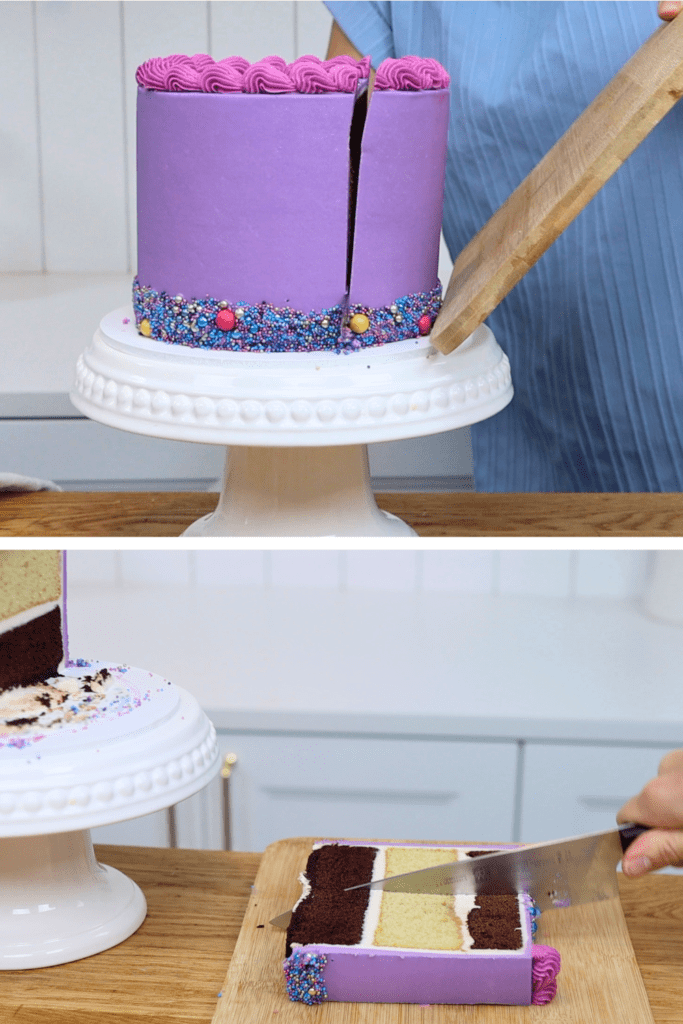
A checkerboard cake is the most fun to cut into! I'll show you how to make the square pattern along with every other step to make the cake.
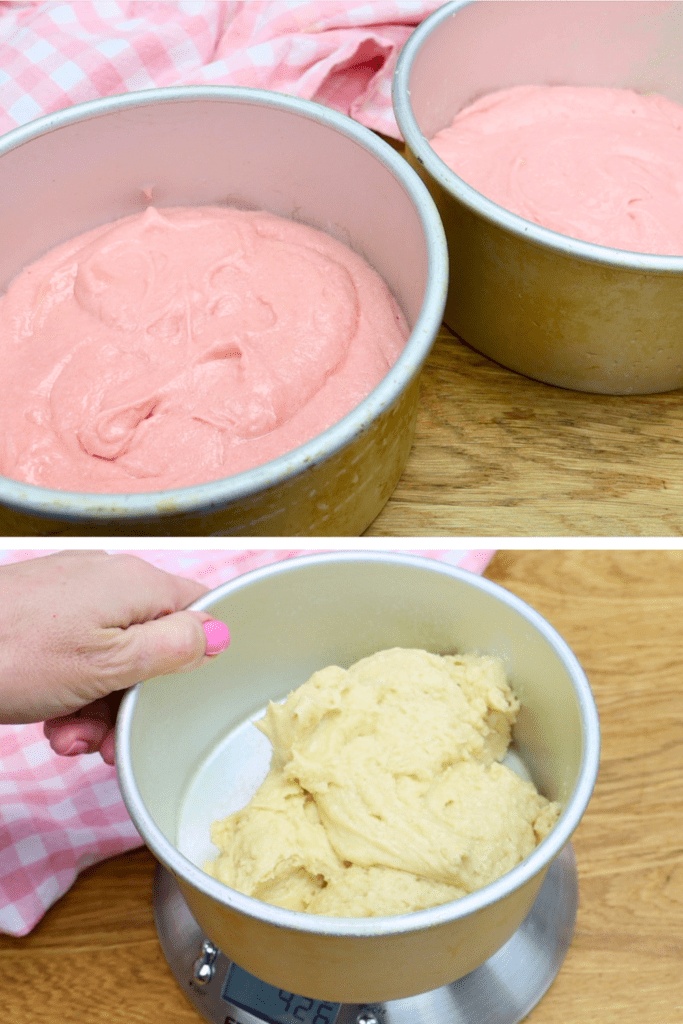
Bake the checkerboard cake layers
Start by making the cake batter, following gate intrusions in the recipe at the end of this tutorial. Divide the batter in half and add a few drops of food colouring to tint one or both halves. Then bake the batter in four 6 inch pans. It's best to weigh each pan as you scoop the batter in so that the layers are all the same height. If you don't have a scale, use the same number of scoops of batter in each pan. Bake the layers and let them cool for ten minutes before turning them out of the pans.
Prepare the checkerboard cake layers
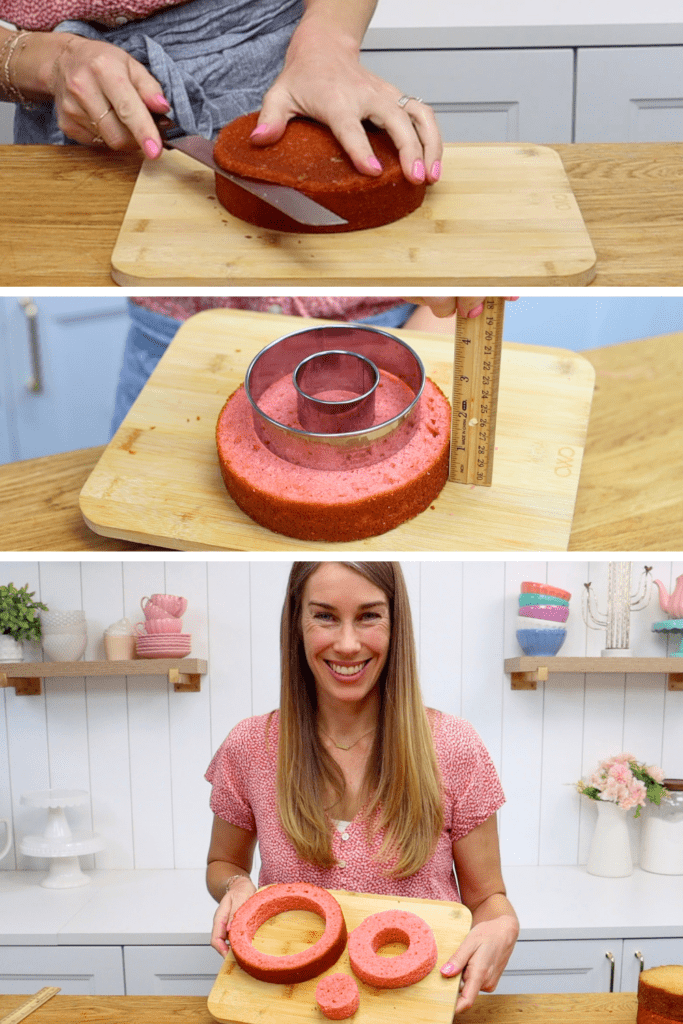
When the cakes have cooled, use a serrated knife to trim the tops off to level them. Use little sawing motions as you spin the cake to score a line around the cake. When you've gone all the way around the cake, slice through it, following along the line you scored. I like to flip the cakes over and do the same for the bottom. The cake is darker there, where it touched the bottom of the cake pan. By trimming the darker edge off, the cake slices will look neater when you cut them.
Next you'll cut the cake into rings that are one inch wide. For a neat checkerboard design you want the width of each square to be the same as the height. That means the cake should be about one inch tall as well. If they're taller, trim a little bit more off the top or bottom.
To cut the cake into rings it's best to use round cookie cutters. For a 6 inch cake you'll need two and they should be two and four inches wide. If you make an 8 inch cake you'll need a 6 inch cookie cutter as well.
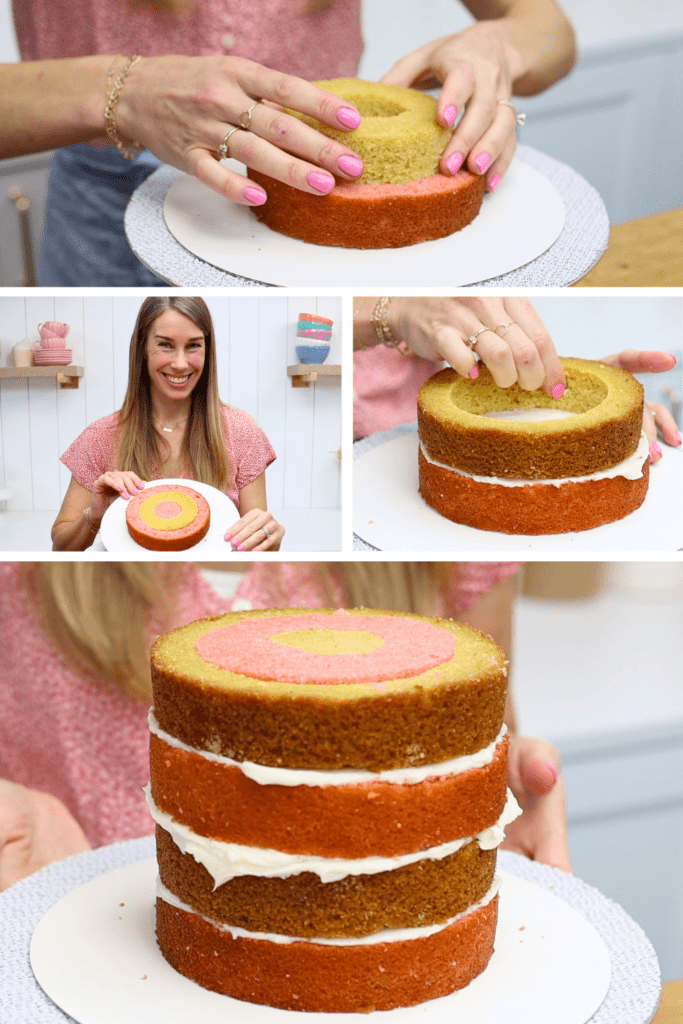
For each cake layer, start with the biggest cookie cutter to cut the outer ring. Position it so there's the same amount of cake all around it and then push down. Do the same with the smaller cookie cutter. You'll end up with two rings of cake and also a round piece that's two inches wide.
Repeat this with the cookie cutters for all of the cake layers. Next we'll alternate between the two colours to make the checkerboard cake pattern.
Assemble the checkerboard cake
You don't have to have a turntable for the next part but it makes it a bit easier. You will need a cake board which is at least 2 inches bigger than your cake. My cake is 6 inches and the cake board is 10 inches.
Spread some buttercream across the cake board where the cake is going to sit. Then place one of the outer rings of cake on the board, pressing down to attach it to the buttercream. Now use the other colour of cake for the next ring, pushing it down inside the outer ring. Switch back to the first colour for the middle piece of cake. It will look like target rings at the moment.
Spread your filling on top of this first layer of cake. I'm using my 4 Minute Buttercream as the filling as well as the frosting because it's delicious but also plain white, so it doesn't distract from the checkerboard cake pattern.
Repeat with the rest of your cake. As you position the outer ring of each layer, adjust it to sit directly on top of the cake below. Spin the cake to check it's straight and then alternate colours as you work your way in to the middle.
Take your time to make sure each outer ring is centered. If it sticks out on any side, the inner rings won't line up above the ones below. This will make your checkerboard cake pattern lopsided. Also, the sides of your cake won't be straight and the cake will lean to one side.
If the filling is sticking out anywhere smooth that now with your offset spatula or palette knife. Before the next step I recommend chilling the cake. Put it into the fridge for 30 minutes or the freezer for 15 minutes to set the buttercream between the layers. This will stop the cake layers from sliding as you frost it. It will also set the buttercream you spread onto the cake board below the cake. This will stop the whole cake from moving around on the cake board.
Frost the cake
It's best to start with a crumb coat as a first layer of frosting. This is just a thin layer to trap any crumbs that come off the cake. Let that set in the fridge for 15 to 30 minutes before spreading a final layer of frosting on top.
I uses different shades of pink to make ombre frosting. Use a cake comb to smooth the frosting and add any decorations you like. This will be such a fun cake to cut into!
Store and serve
If you make this cake in advance, keep it in the fridge for up to 3 days. Take it out of the fridge at least 2 hours before you serve it. It will taste best at room temperature when the cake and buttercream are soft.
This tall 6 inch cake will serve 12 to 20 people depending on how you slice it. The recipe is below. Look at this gorgeous checkerboard pattern!
Choose any two colours or flavours to make this checkerboard cake pattern, which is so much fun to cut into!
Ingredients
UnitsScale
For the cake:
1 1/2cupsunsalted butter
2cupswhite sugar (granulated sugar)
6 eggs
1 tablespoon vanilla extract
3/4cupbuttermilk
3 tablespoons vegetable oil
3 1/2cupsplain flour (all-purpose flour)
1 tablespoon baking powder
1/2 tablespoon baking soda
1/2 teaspoon salt
a few drops of food colouring
For the buttercream:
2 1/2cupsunsalted butter at room temperature
2lbpowdered sugar
1/2 teaspoon salt
1/2 tablespoon vanilla extract
3 tablespoons cream or milk
Instructions
Make the cake layers:
Using a mixer with a beater/paddle attachment (not a whisk), beat room temperature butter and sugar on medium speed until pale and creamy, about 2 minutes. Scrape down to the bottom of the bowl once during mixing to make sure no butter or sugar is stuck at the bottom.
Add eggs one at a time, mixing on the lowest speed after each addition for 30 seconds. Scrape down to the bottom of the bowl to make sure everything is incorporated before adding the next egg.
Add vanilla and mix for about 30 seconds to combine.
In a small bowl or measuring jug, mix room temperature buttermilk and oil. Add half to the butter mixture and mix on lowest speed to incorporate.
In a bowl, sift flour, baking soda, baking powder and salt. Add half of the flour mixture to the mixing bowl and mix on lowest speed to incorporate, scraping down to the bottom of the mixing bowl to check that batter is evenly mixed. Repeat with the remaining buttermilk mixture and then finish with the remaining flour mixture.
Pour half of the batter into another bowl and add a few drops of food colouring, folding it in gently with a spatula. Optionally, add a different colour to the other half of the batter or just leave it plain.
Grease four 6" baking pans with non-stick oil spray or butter. Divide each colour of the batter equally between two cake pans to make two cake layers of each colour.
Bake at 160ºC or 325ºF for 38 minutes, or until a toothpick inserted into the middle of the cake comes out clean.
Leave cakes to cool in their pans for 10 minutes. Use a spatula to loosen the cakes from the edges of the pans and then turn onto a wire cooling rack. Leave to cool completely.
Make the buttercream:
Sift the sugar to remove any lumps and check that the butter is at room temperature - you should be able to slice through it easily with a spatula.
In a mixer with a beater (paddle) attachment, mix butter for a few seconds until smooth. Add a quarterof the powdered sugar and salt (if using) and mix on the lowest speed until incorporated, about one minute.
Scrape down to the bottom of the mixing bowl with a spatula to loosen any butter and sugar and add the next quarter of powdered sugar and mix for another minute on low.
Scrape down to the bottom of the bowl, add another quarter of the powdered sugar, mix for one minute on low, scrape, and add the final quarter of the powdered sugar. Mix for one more minute on low, adding the vanilla once everything is mixed together and continuing to mix until it's incorporated.
Add the milk or cream and mix for about 30 seconds until it's combined with the buttercream. Check the consistency and add more milk or cream a tablespoon at a time until the buttercream is smooth and easily stirred.
Assemble the cake:
When the cake layers are cool, trim the tops and bottoms to make layers that are one inch tall/high. Use a two and four inch cookie cutter to cut each layer into three rings.
Spread some buttercream across the middle of the cake board. Position an outer ring of cake on the board, centering it and attaching it to the buttercream you spread. Alternate colours of cake rings to work your way in to the middle, for example pink, yellow, pink.
Spread a thin layer of buttercream on top of the cake as filling. Arrange the opposite colours of cake rings on top, for example yellow, pink, yellow.
Add another layer of filling, another layer of alternating coloured cake rings, another layer of filling, and a final layer of alternating coloured cake rings.
Chill the cake in the fridge for 30 minutes to set the filling and then spread a thin layer of buttercream over the cake as a crumb coat of frosting. Put the cake back into the fridge for 30 minutes to set this.
Frost and decorate the cake however you like!
Notes
You can keep this cake in the fridge for 3 days. Take it out of the fridge 2 hours before serving to let the cake and buttercream come to room temperature, when it tastes the best!
Save this recipe tutorial to Pinterest for later:
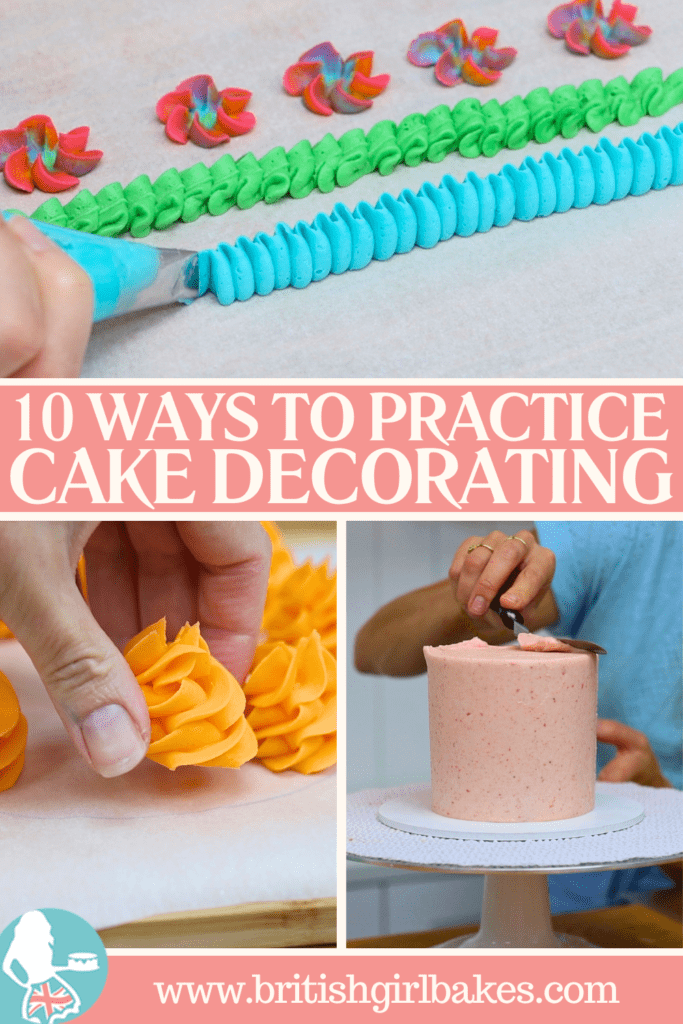
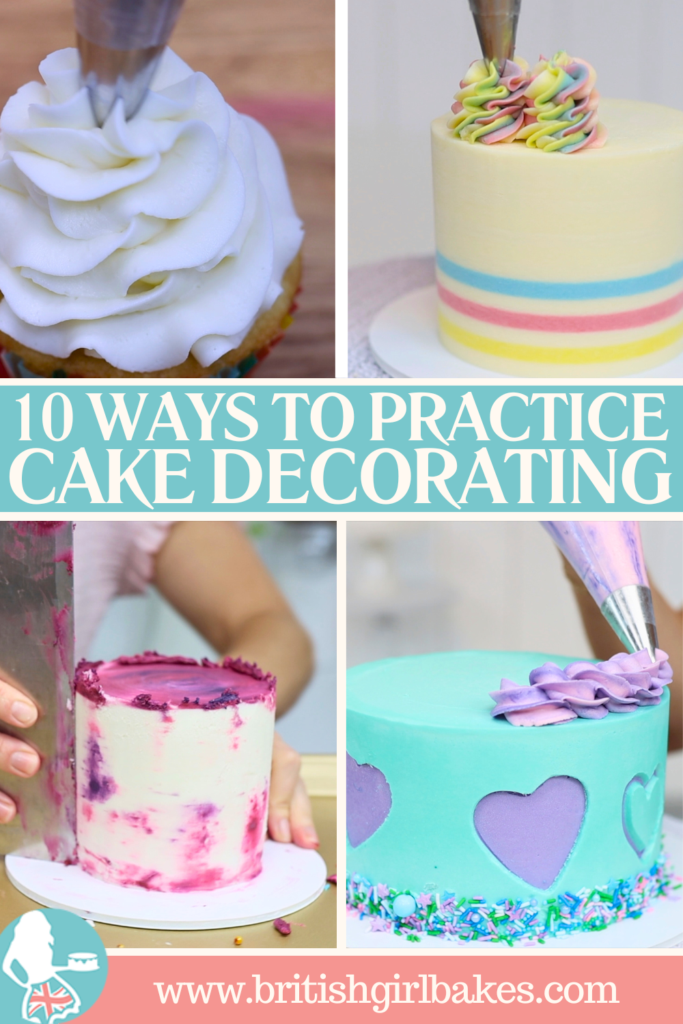
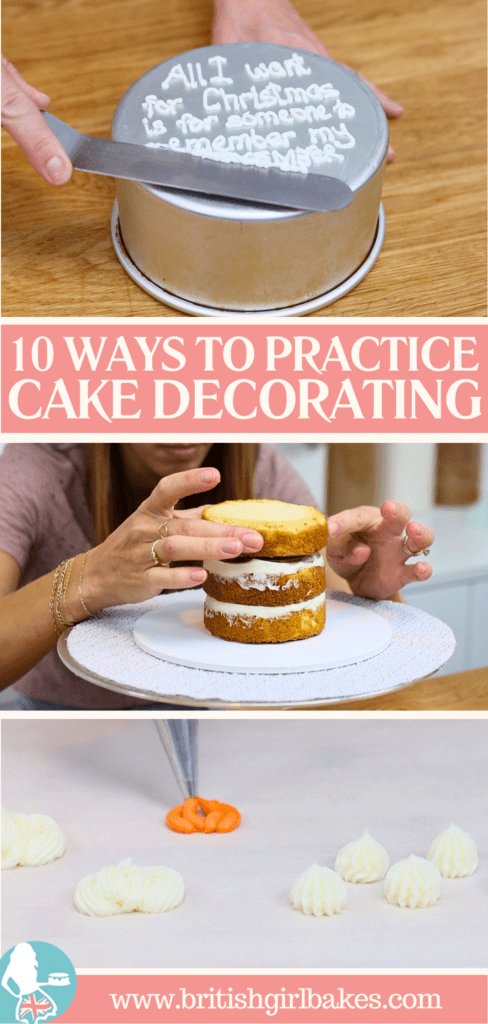
Here are 10 hacks to help you practice cake decorating without wasting time, ingredients or money!
Practice piping onto parchment paper
There are SO many different piping techniques and to master each one you’ll need to practice. Pipe onto parchment paper or wax paper or a silicone mat and then scrape the piping back into the piping bag to use for practicing again and again. You’ll save money on ingredients by re-using the frosting.
Even for simple techniques like piping these pointed dots, to make Christmas tree lights on a cake, it’s a good idea to practice them on paper or a plate before moving on to your cake, to get used to the consistency of the buttercream and the pressure you need to use when you squeeze the bag.
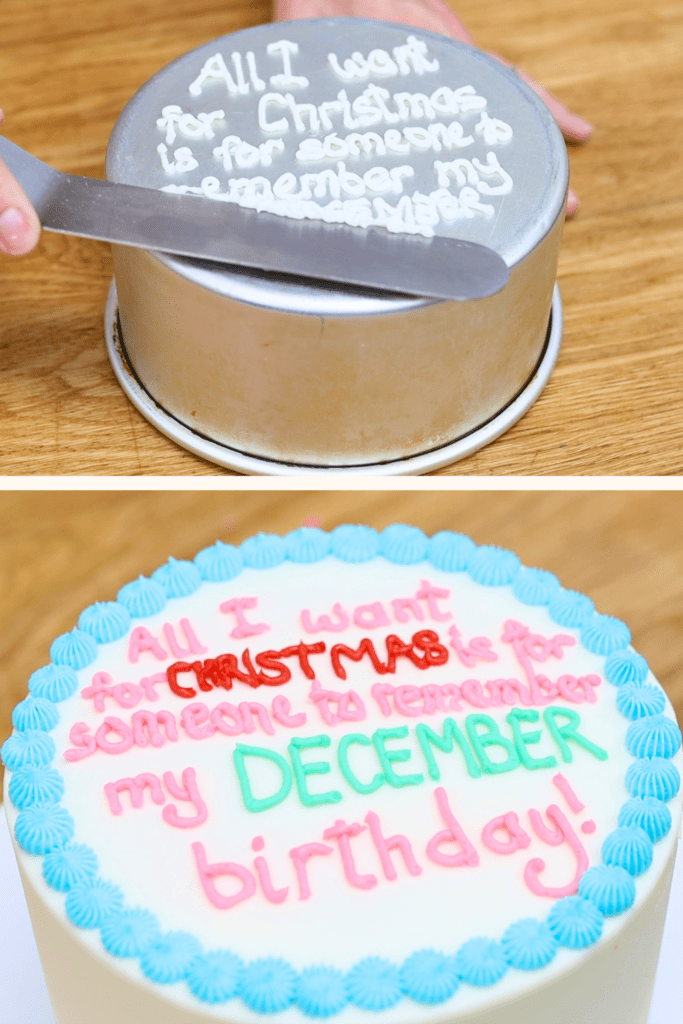
For writing message on cakes, it’s not just the technique you might want to practice, it’s also the spacing and positioning on a cake, which I think is the trickiest part! Choose a cake pan the same size as your cake, or the same size as the available space on the cake, if you’ve already piped a border onto it. Pipe your message onto the pan before the cake, to practice your lettering but also to practice centering it on the pan, scraping and repiping the message until you feel comfortable so that when you then pipe it onto the cake, you won’t make any mistakes and have to scrape it off and try again.
Practice cake decorating all over a cake!
When you make a practice cake, try out as many techniques as you can on the same cake! I often do one design on the front of the cake and another on the back, like with these two Valnetines Day designs:
After practicing a technique on the side of a cake I might practice something else on the top of the cake. And maybe try a border around the bottom of the cake and another style of border on top, too!
Use cake zombies to practice cake decorating
Another great hack for practicing is to use a cake zombie, which is a cake that you use again and again for practice. This is especially useful if you have kids at home, so maybe it takes you several days to get around to frosting and decorating the cake, and by then it’s gone stale. Instead of throwing it away, scrape it and try another frosting or decorating technique on top, or several different techniques, and then repeat by scraping again and decorating again!
Make cakes for every occasion
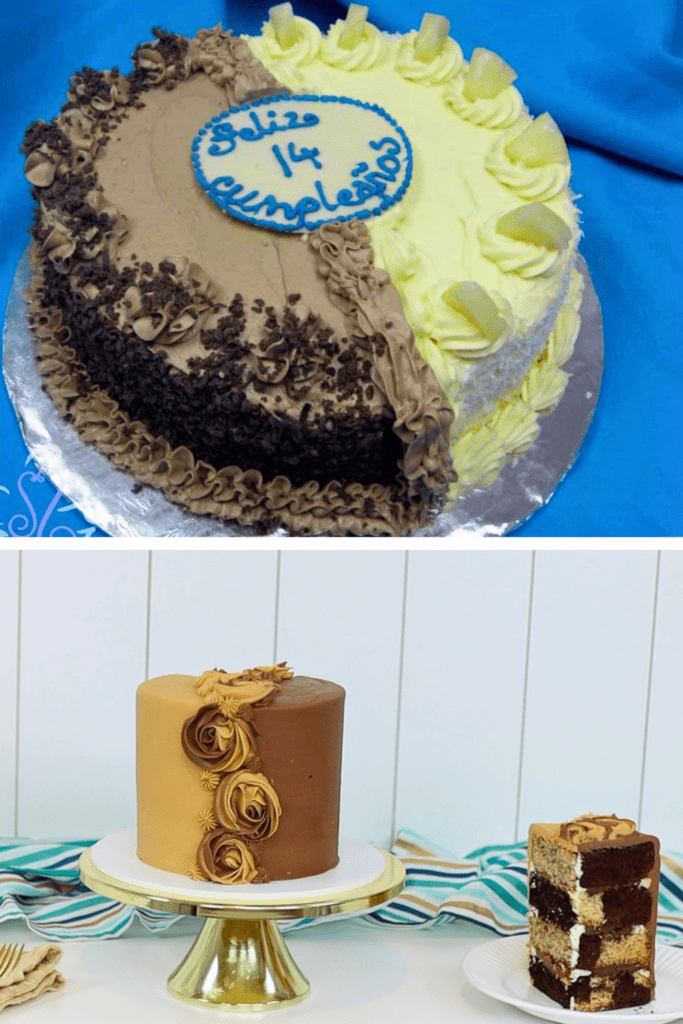
When I first started making cakes back in 2009 I was teaching English in Costa Rica and I made cakes for all of my students’ and friends’ birthdays, for every party I went to, and little by little my cakes got better and better until I ended up opening a cake shop and selling them! Make cakes for your neighbors, your kid’s teachers, school functions or community events, and of course your friends and family! Look at this half and half cake I made recently, with half banana cake and half chocolate vanilla marble cake, covered with half and half frosting and some piping, compared to my first half and half cake before LOTS of practice, back in 2012!
Use cake dummies to practice cake decorating
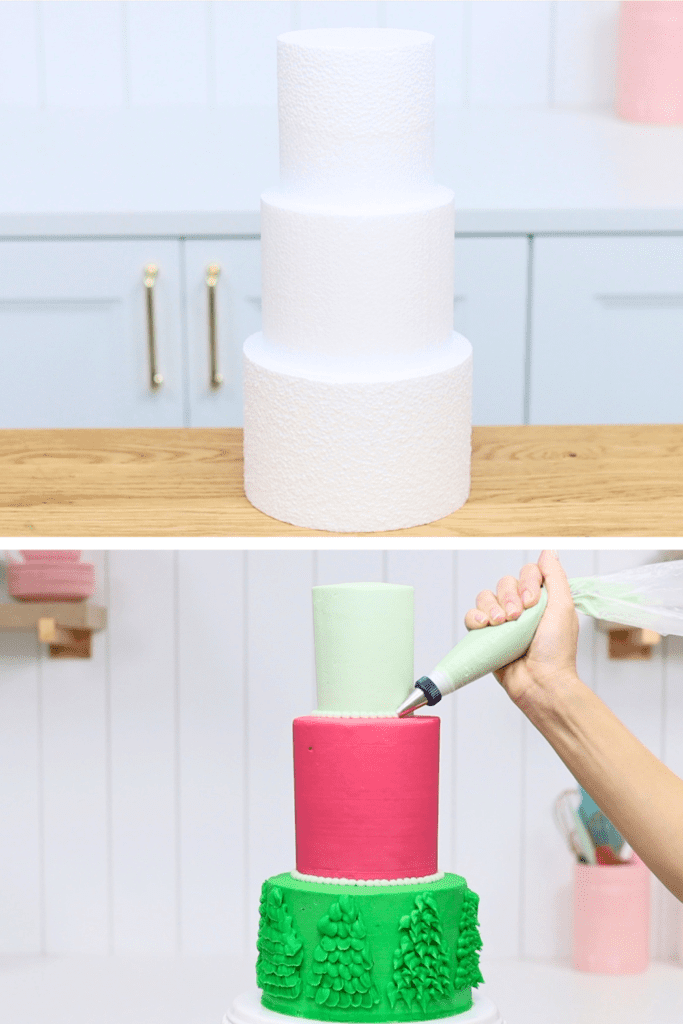
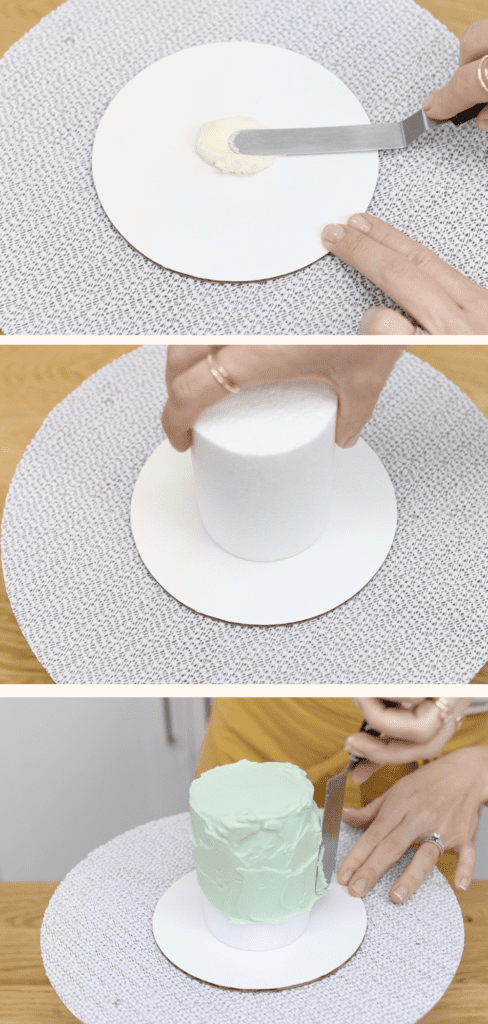
Styrofoam cakes, often called cake dummies, can be used to practice all sorts of techniques without having to bake a cake first.
The trickiest thing about these is that they’re so lightweight. They’ll slip all over the cake board if you don’t attach them. To attach styrofoam to a cake board use a blob of buttercream as glue. Then leave it to set for a few hours at room temperature or 30 minutes in the fridge. Now the cake dummy will be stuck securely in place and won’t move around.
Then you can frost it just like you would frost an actual cake. Now you can practice whatever techniques you like!
Practice cake decorating on mini cakes
Make mini cakes instead of large ones when you want to practice a technique. You’ll save time because the cake layers will bake quicker. You’ll spend less on ingredients for smaller cake and frosting recipes. You can practice the same designs as you’d use on larger cakes, trying out new tools or techniques or whatever you want to practice, but for a fraction of the cost!
Practice cake decorating on cupcakes
Take this even further and practice on cupcakes instead of cakes! Pipe swirls, the kind you would pipe on top of a cake, or try out a homemade stencil or drop flowers.
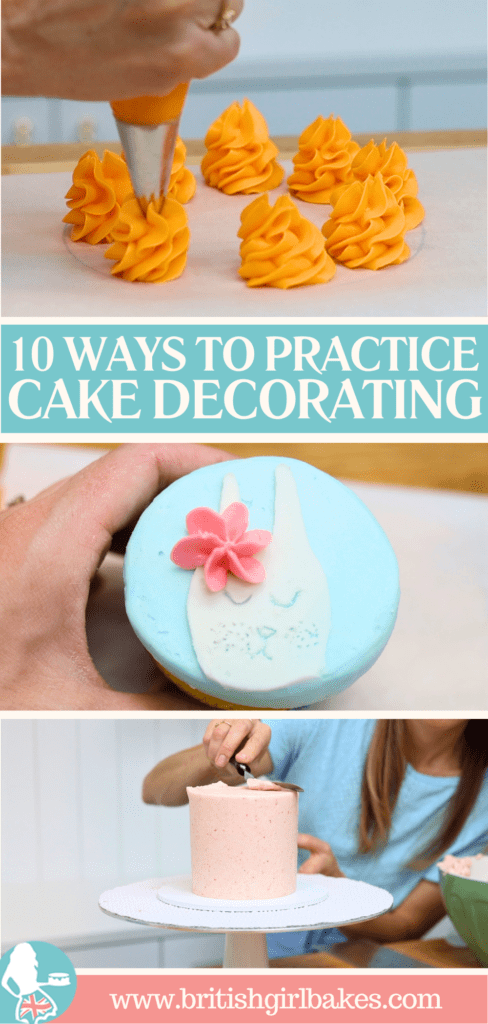
Freeze piping and then transfer it onto a cake
I think piping is one of the trickiest parts of cake decorating. You need to have the right consistency of buttercream and also the right amount pressure on the piping bag. And you’ll need to movethe piping bag not just with the right motion but also at the right speed.
Here’s a hack: Pipe your decorations onto parchment paper and the freeze them to make them hard. It’s easier to pipe down onto paper than sideways onto a cake. If you don’t like any of your piping, just don’t use them. If you pipe them straight onto a cake, if you don’t like them you’ll have to scrape them off which is messier.
When the piped details are frozen, lift them up and place them on your cake! Use a dot of fresh buttercream to attach them, like glue.
This way you can choose which decorations are the prettiest and only use those!
For the top of the cake, trace around the baking pan onto a piece of parchment or wax paper, and then pipe within the circle. If you don’t like any of the piping, it’s easier to scrape it off this paper than an actual cake! Put them into the freezer to chill and set so that they’re firm and then pick them up and place them onto your cake!
Practice cake decorating with my online courses
My favourite hack to practice cake decorating is to take my online courses! You’ll find hundreds of cake decorating ideas and designs to watch and instead of figuring them out yourself by watching hundreds of YT videos until you find the one that answers your questions, find EVERYTHING in one place on my cake school, and ask your questions below each video and they’ll come directly to me so I can answer them straight away! Start your FREE 7 day trial by going to BGB.com and click on CAKE SCHOOL. See you there!
Choose one of these pins to save this tutorial to Pinterest for later:
Here are all of my tips for how to serve a cake: tall cakes, tier cakes, shaped cakes, and more!
Serve cakes at room temperature
Cakes should be at room temperature when you serve them. They're easier to cut into when the cake, filling and frosting aren't cold and hard. Also, both cake and buttercream taste best when they’re not cold. Ideally, take cakes out of the fridge two to four hours before you cut into them.
When you finish making a cake you can serve it straight away at room temperature. However, it will be the most crumbly this way, since the filling and frosting haven’t set in the fridge. Your knife will drag through the slice and leave crumbs in the filling. It will still taste delicious though, which is the most important thing!
How to serve a cake with warm water
For the neatest slices, use a warm knife to cut the cake. Hold a knife under warm running water or fill a glass with warm water and dip your knife into it. Then dry the knife on a towel or paper towel. Do this in between each cut. The warm metal will slice cleanly through the cake, filling and frosting.
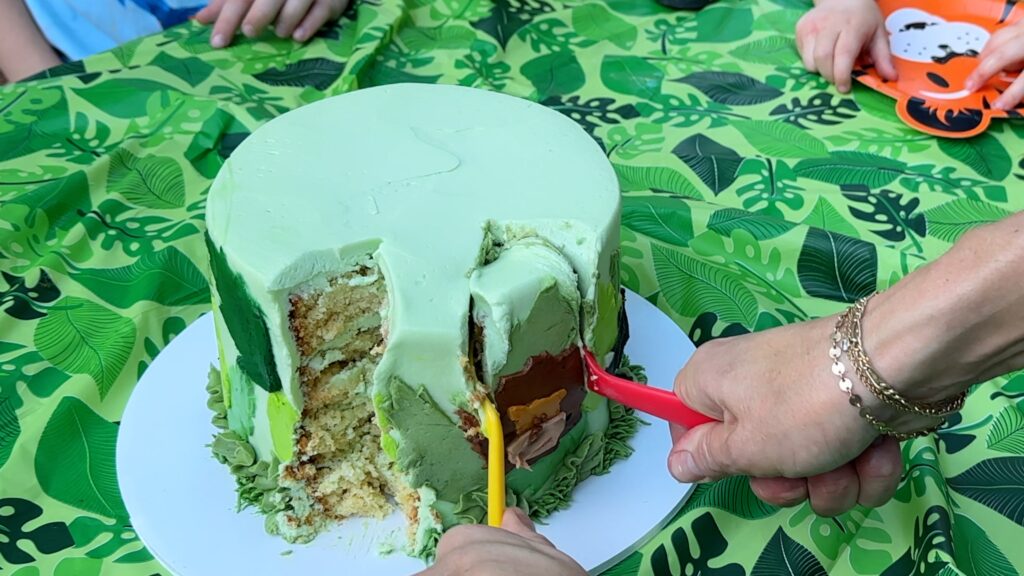
Cut sideways for the neatest slices
I saw this tip on Instagram, on Baked by Dan’s account. He shows that cutting sidewayswill prevent crumbs dragging through your filling. It's a bit awkward but look at the neat slice this makes, with no crumbs in the filling:
How to cut a tall cake
For tall cakes, avoid traditional wedge-style slices that make very large portions. Instead, use this cutting board technique. It’s less tricky than cutting wedges, where the middle part tends to get left behind as you lift each slice out.
Slice all the way across the cake, an inch or two from the edge. Tip the slice over onto a cutting board and then cut it in half and in half again. This makes four long, thin portions.
This is my preferred method because everyone can choose how much frosting they want on their slice. Frosting lovers can choose the edge pieces and people with less of a sweet tooth can choose a middle piece. With this method, even the final slices are easy to cut, compared to wedges where the final few tend to topple over!
How to save leftover cake
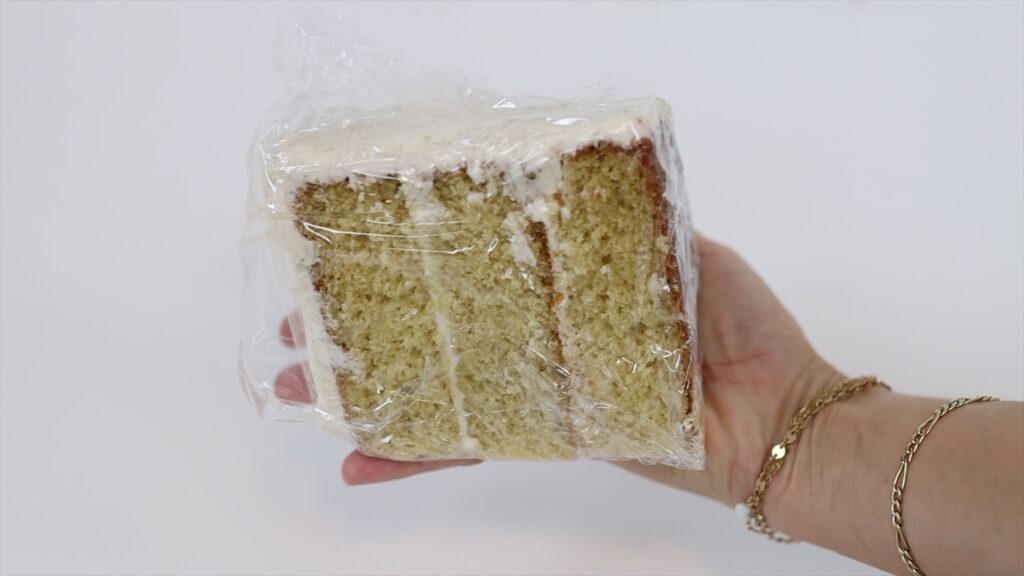
If you don’t finish a cake you can save the leftovers. Press cling film against the cut sides, pushing it flat against the cake. Use pressure along the cut edge of the frosting to attach it. This will stop the cake from drying out. Now you can refrigerate the cake for a week and enjoy the leftovers!
How to store leftover cake slices
To save leftover slices of cake, first put them in the freezer for 5 minutes to set the frosting. Then wrap them in cling film or saran wrap. The plastic won’t mess up the frosting because the frosting has already set in the freezer. Now freeze the wrapped slices until you have a craving for something sweet. It's also a great option when you need a last minute dessert for an unexpected guest! After freezing, take the slice out and leave it on the counter for about 4 hours to come to room temperature before eating.
How to serve a cake with supports
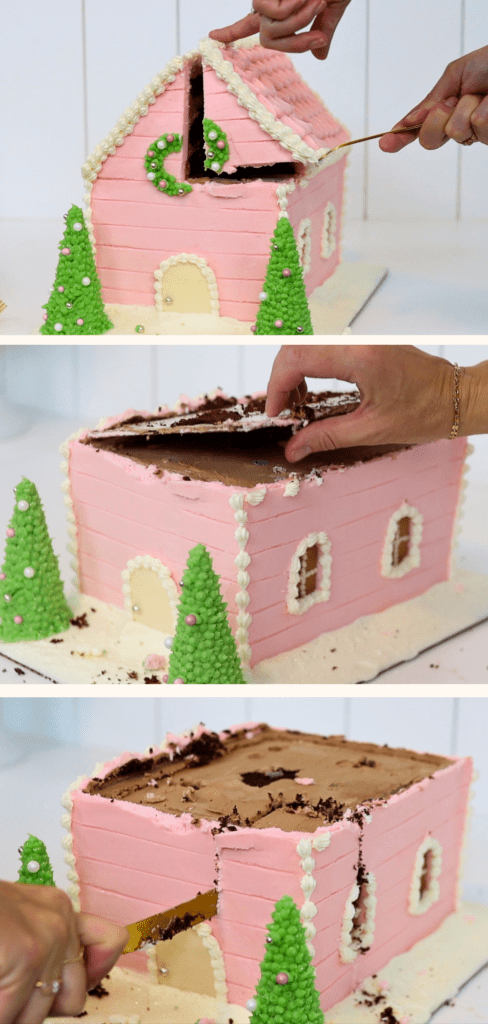
Tier cakes, double barrel cakes and shaped cakes may have an internal support structure. This just means there are support straws or dowels holding up a cake board in the middle of the cake for stability. In case you're wondering how to serve a cake with supports, it's easier than you think! Slice the top tier while it’s still on top on the cake. You'll feel your knife hit the cake board at the bottom of this cake. When you’ve cut all of the top cake into slices, lift up the board below. You'll see the bottom half of the cake underneath. Cut the bottom part of the cake as normal!
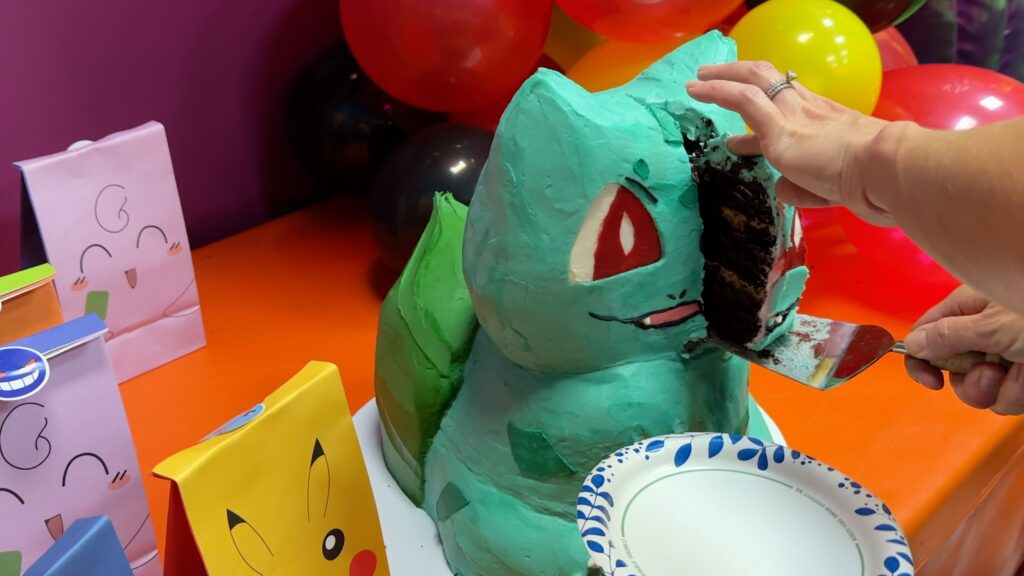
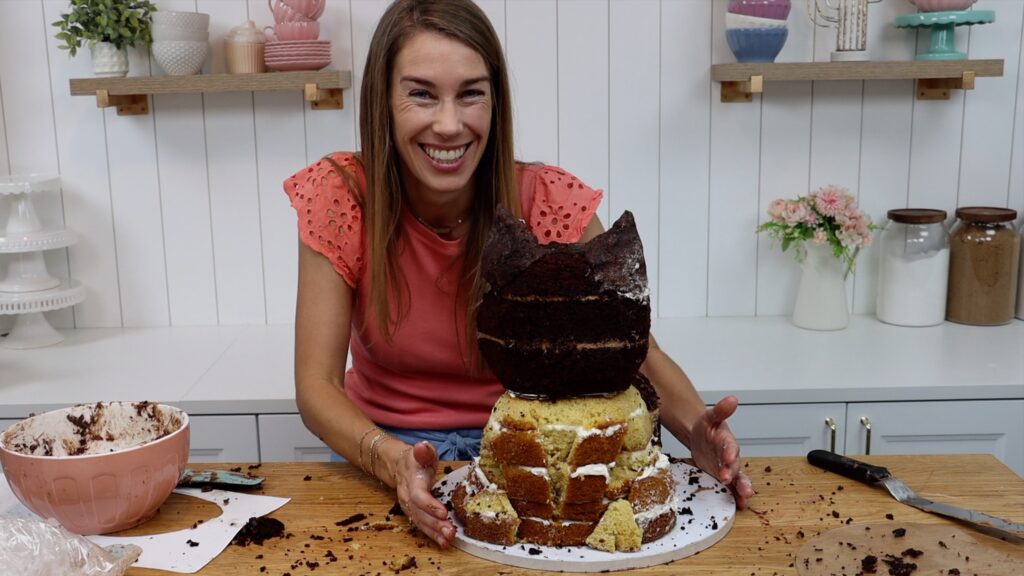
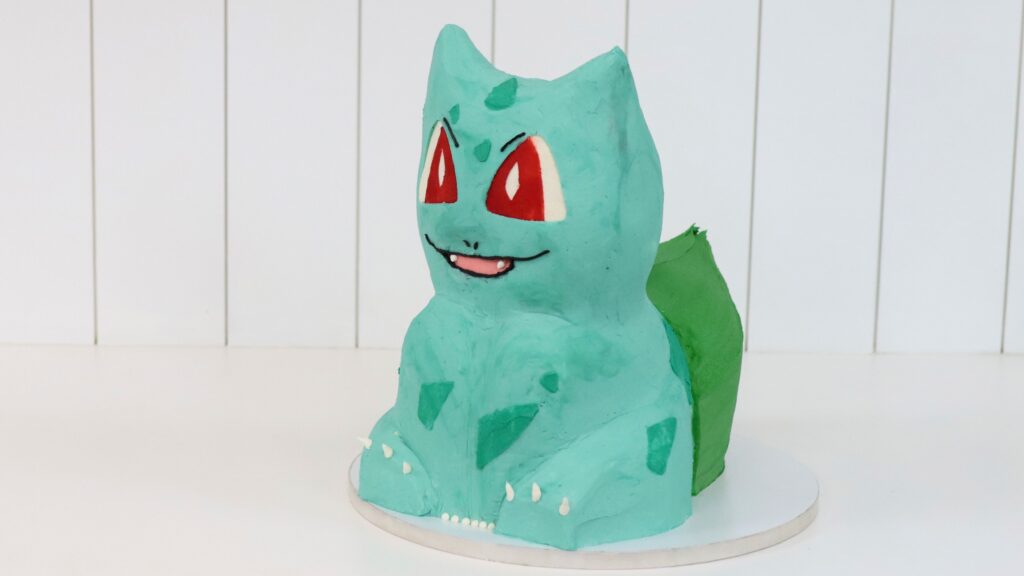
This is how to serve most sculpted or carved cakes, like this Bulbasaur Pokemon cake. They look intimidating but they’re just as simple to serve as a regular round cake!
How to serve a cake without a knife
If you forget to pack a knife, like on this camping trip, two forks work to cut slices. They’re not the neatest but in situations like this, no one will care!
Save this tutorial to Pinterest for later with one of these pins:
You'll love these 10 cake hacks to save money if you're on a budget! Avoid expensive tools, minimize waste, choose techniques wisely, use what you already have at home, and more!
#1 Avoid specialty pans
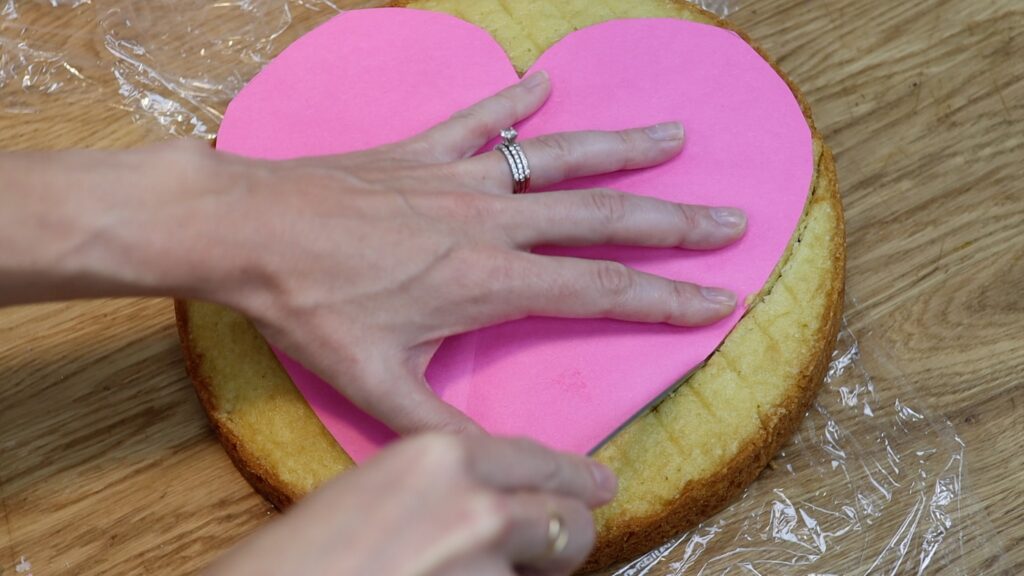
Instead of buying expensive pans for every shape of cake, use whatever you already have. Bake your cakes in pans you already have and then cut them out or attach them, or both! Drawing the shape onto a piece of paper first will help you get exactly the shape you want. Cut out squares or numbers from sheet cakes or hearts from round cakes:
You can also attach different shapes and sizes of cakes to make any shape you want. For example, I made this heart cake by attaching a square cake to a round cake cut in half:
You can make any shape you like with the pans you have and a serrated knife like a bread knife. To attach different shapes together, use buttercream as glue between the shapes. This cake is about to turn into a Pokemon Bulbasaur cake:
When you frost it, you'll cover up any seams or joins between different pieces of cake. And when you serve it, no one will know about the cake surgery you performed on the inside!
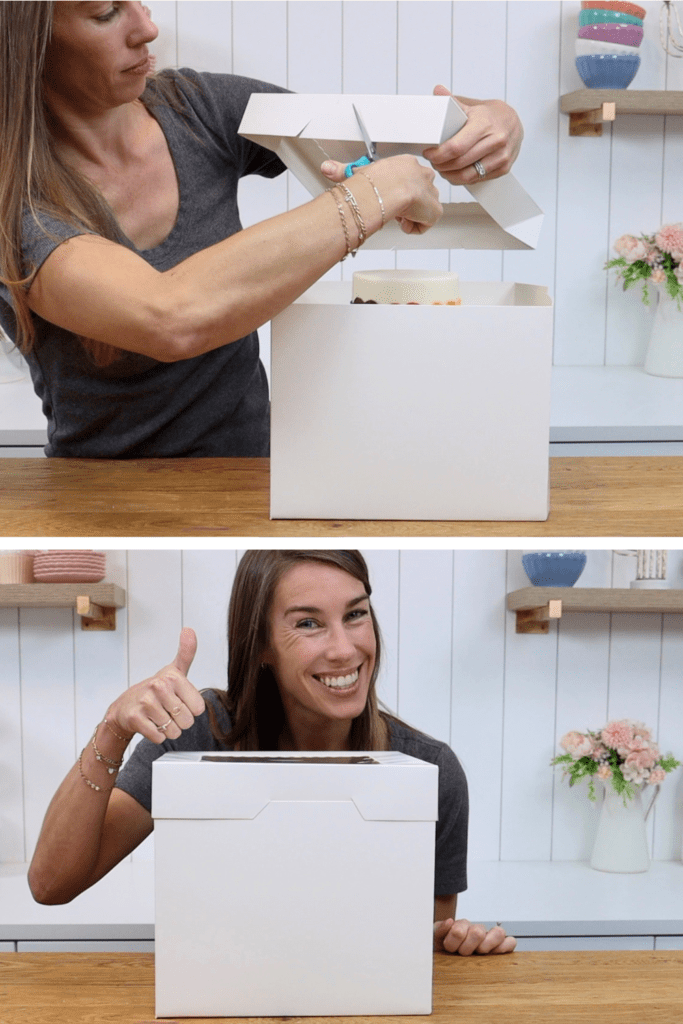
#2 Skip the cake boards and boxes
Don’t want to spend money on cake boards and cake boxes? Here are more cake hacks to save money and also time! Bake your cake in a pretty dish that’s oven safe and after it cools, decorate it in the dish!
Carry it to your event and slice it in the dish for maximum ease and minimum effort. Then take the dish home with you afterwards to re-use again and again!
#3 Make smaller cakes
One of the best cake hacks to save money is to downsize your cakes. You’ll use less of expensive ingredients like butter and eggs, and you won’t end up with lots of leftover cake! Did you know a 6 inch cake can serve 12-20 people? It’s all about how you serve it.
Large, traditional wedge slices are difficult to cut thinly. You'll end up with huge portions that hardly anyone will finish. Also, the last few slices will be really tricky to slice!
Instead, try the cutting board method. Slice your cake into strips, letting them fall over onto a cutting board.
Cut those pieces in half and in half again, to make perfectly size portions. The edge pieces will have more than the middle pieces so everyone can choose just how much frosting they like.
#4 Use cake dummies
Sometimes cakes need to be bigger than necessary, for example a tier cake that’s for just 6 people. To achieve the size without waste, use cake dummies or fake cakes for the additional tiers. Frost and decorate them just like you would for a real cake.
No one will know the difference when they see the cake. You can scrape and wash the dummies to re-use again and again, saving money each time!
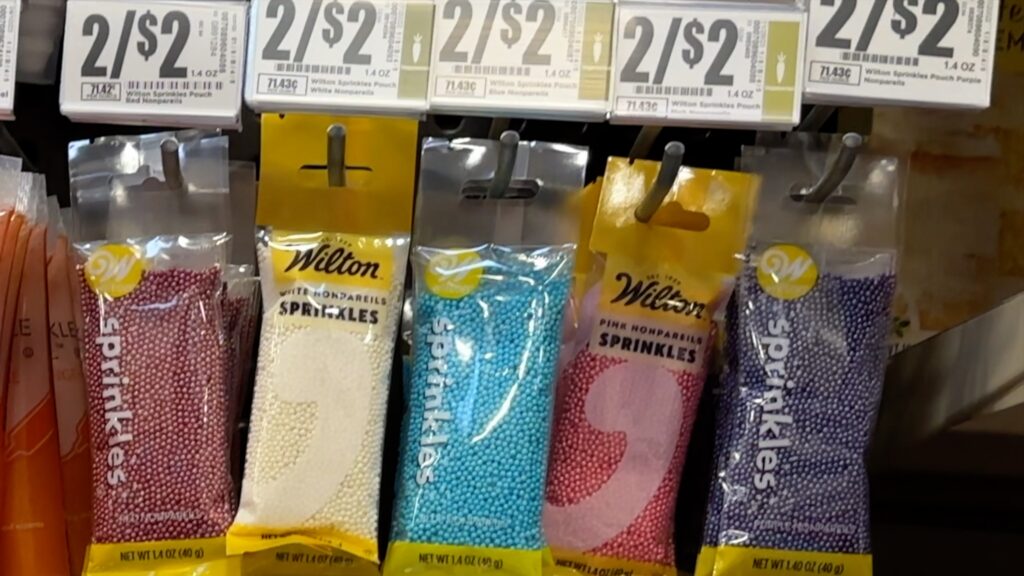
#5 Make your own sprinkles
Yes, you can make your own sprinkles if you have a lot of time and patience. But realistically, simple sprinkles are very affordable to buy.
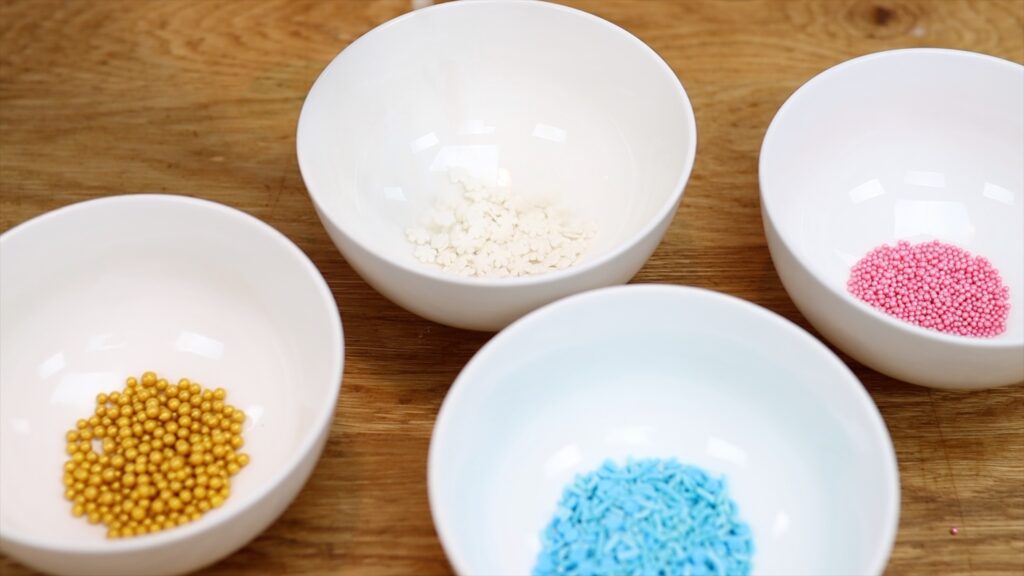
What’s not as affordable are sprinkles mixes. Good news: you can mix your own! Choose a few different sprinkle packets of different colours and sizes and shapes.
Mix them together and voila! Fancy sprinkle mixes, but homemade!
#6 Choose valuable tools and materials
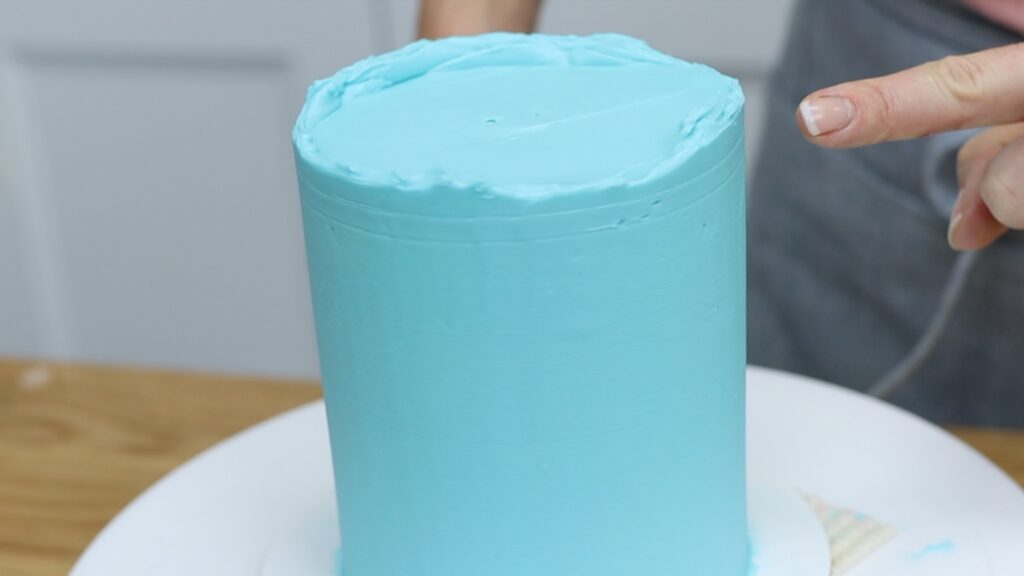
The cheapest tools and materials won’t necessarily save you money. For example, a cheap plastic cake comb will get dinged after a few uses. Those dings will cause these trails or indents in your frosting:
You’ll have to replace that cheap cake comb almost as soon as you buy it! A more expensive metal cake comb can last years without a single ding. You’ll really get your money’s worth out of that investment.
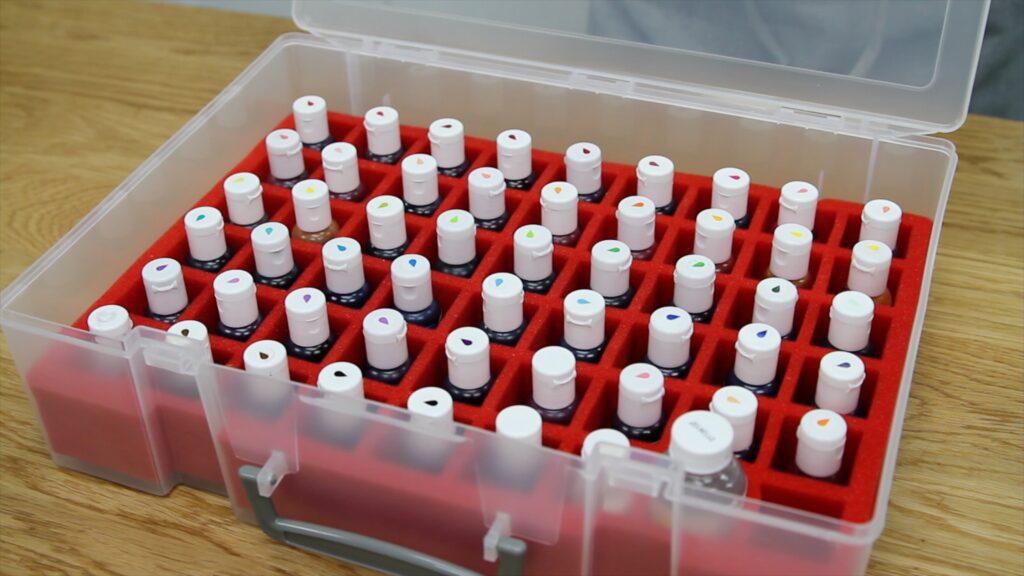
The same goes for food colouring. Yes, liquid colours form the grocery store or supermarket might be cheaper than gel colours. But gel colours will last you years and years - I haven’t replaced any since I got this set in 2020! And the storage case for gel bottles has been one of my best purchases ever!
Gel colours are really concentrated so you don’t need much to tint buttercream. I made this same colour using half a bottle of liquid colour and just a drop of gel colour:
So, before choosing the cheapest tools and materials, think about how often you'll use them and how long they'll last.
#7 Cake hacks to save money on gel colours
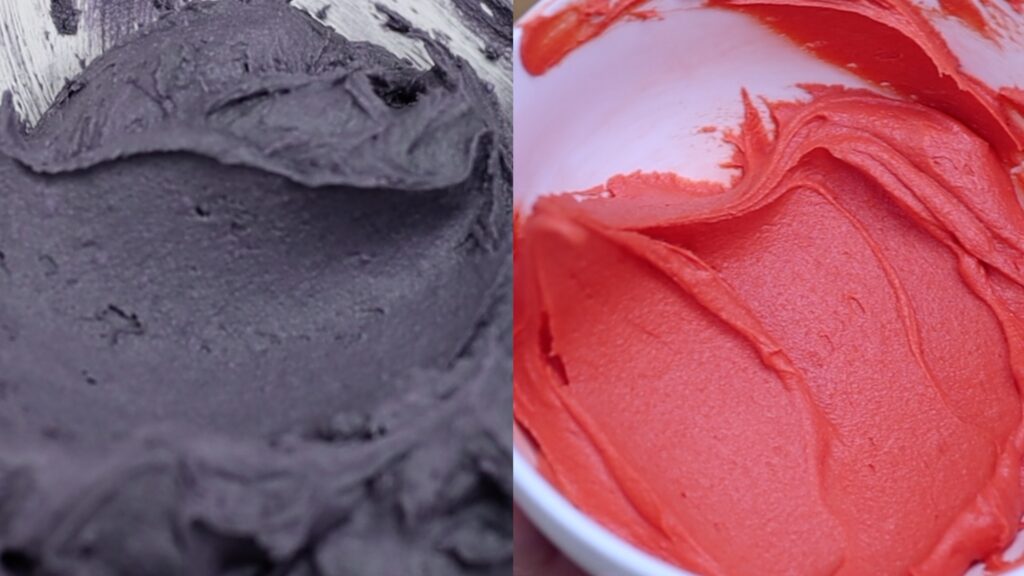
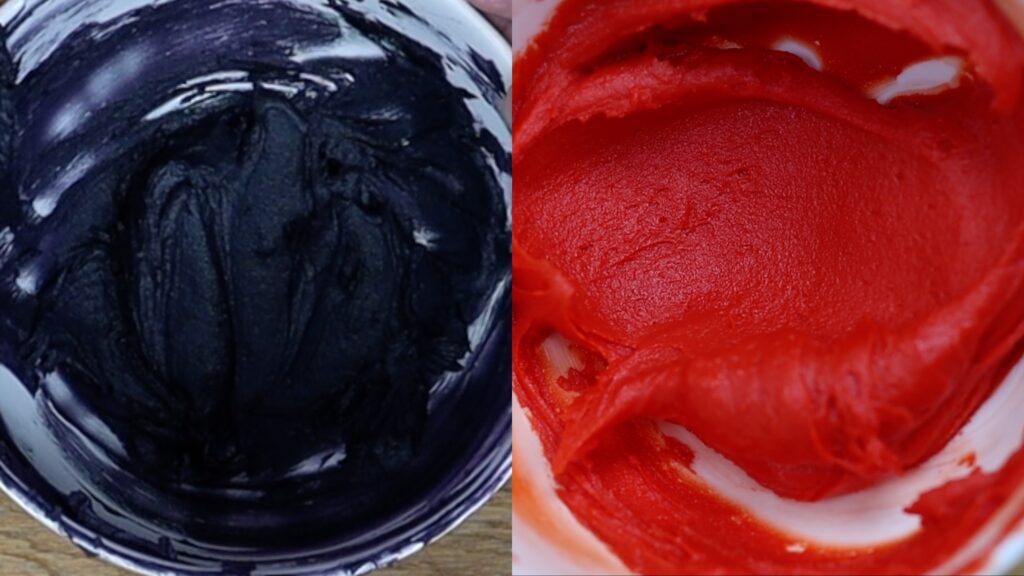
For dark colours like black and red you need a lot of gel to make a bold colour. Gels are expensive so instead, use these cake hacks to save money. First, tint buttercream several shades lighter than you want. For example, make grey instead of black and coral instead of red.
Secondly, microwave the bowl for 5 seconds and the heat will darken the buttercream. Finally, cover the bowl and put it into the freezer for 5 minutes. This will bring the melted buttercream back to room temperature. The cold will darken it, too!
Stir it and optionally, cover it again and leave it to rest for an hour or two. You’ll notice dark grey turn to black and coral turn into a deep, bold red. Look at the difference in the colour between a few hours ago, and now!
#8 Toy characters
For character cakes you could buy fondant in every colour and roll out each shape individually. Making figures this way is time consuming and expensive. But the person you’re making the cake for probably has toy figures of that character. Clean the figures and use them on the cake for free! And honestly, the toy topper will probably have the best resemblance to the character anyway!
#9 Limit your tools
There are endlesstools you can buy for cake decorating. But there are also endless substitutes that you already have in your drawers and cabinets. Instead of textured cake combs, use a spoon or a fork or a spatula to create gorgeous textured frosting.
Instead of piping bags and tips for writing or drawing dots or lines, use a sandwich bag like a ziploc bag. Spoon your buttercream in and push it down to one of the bottom corners. Cut a small piece of the corner off and you have a homemade piping bag with a round piping tip!
When you’re learning how to make cakes, there are so many techniques and tools to try out. Trial and error is an expensive process! Instead, learn all of the techniques you like in concise, informative, clear videos that show you how to use minimal tools to create stunning cakes. As well as cake hacks to save money, you'll learn shortcuts and all the tips and tricks to decorate cakes like a pro! Find all of this on my cake school. I’m offering a FREE 7 day trial of my All You Can Cake membership, which includes EVERYTHING on my cake school, so you can try it out, risk free! See you there!
Now tell me in the comments which tip will save YOU money when you’re making cakes!
Improve cake decorating skills and take your cakes to the next level in 2025 with these 10 cake decorating tips!
#1 Practice makes perfect
You know the expression: practice makes perfect. With every cake you make you’ll improve cake decorating basics like smoothing frosting, but also cake decorating techniques. For example, look at the district bands of colour on the ombre cake on the left. Now compare those to the gradual blending on the cake on the right. The difference is five years of practice!
You’ll get better at every technique with practice, from smooth frosting to elaborate cake decorating techniques. So take every opportunity to make a cake for get togethers, events and occasions. Each time, practice a skill or technique you’d like to improve.
#2 Experiment to improve cake decorating
Experimentingis another way to improve cake decorating skills. Instead of practicing the same technique over and over again, try different ways to do something. For example, instead of filling different piping bags with different colours for a design, layer those colours within the same piping bag. This creates the easiest ombre effect!
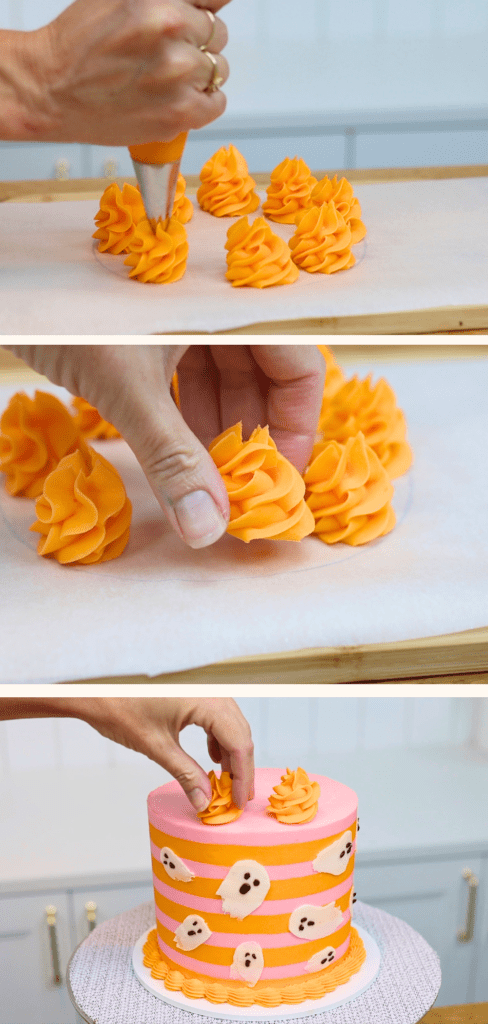
And instead of piping flowers straight onto a cake like above, pipe them down. Line a tray or baking sheet with parchment paper or a non-stick mat. This is a much easier angle than piping onto the side of a cake. (This is my 4 Minute Buttercream, by the way!) After freezing them you can choose only your favourites to pick up and press onto your cake. By tweaking the method you create a very different cake design!
If you’ve tried carving buttercream, you might have found the result messy with little crumbs of buttercream along the edges. Experiment with different temperatures and yo'll be pleasantly surprised! You’ll find that dipping your tool into warm water before carving will give you much neater results.
Experiment with different tools like a metal or acrylic cake comb instead a plastic one. You'll see which tool works best for you for smoother frosting and for other techniques, too. Small changes in the way you do things can cause big improvements on your cake!
#3 Perfect smooth frosting
As far as WHICH techniques to improve, to improve your cakes the most, I would definitely choose smooth frosting. It’s the foundation of almost every cake design, so it’s worth really focussing on until you’re happy with the results. I have lots of tutorials to help with smooth frosting but also, here are 2 hacks to help you.
The first is the microwave hack. Scoop up a third of the buttercream and microwave it for 10 seconds. Then pour this melted buttercream back into the bowl. Stir it together and you’ll have silky smooth frosting without air bubbles, perfect for frosting a cake!
The second hack is to use a warm metal cake comb. Run it under hot water or dip it into a pan of hot water and dry it with a towel. Or use a hairdryer or blowtorch to heat it and wait a moment so that it’s warm, not hot. Scrape around the cake and the warm metal will glide over it, filling in shallow indents or air bubbles, leaving it super smooth!
#4 Get the right consistency
To improve your frosting but also your piping you’ll need the right buttercream consistency. Use room temperature butter to see the true consistency of your buttercream because temperature will change it. If your butter is cold, your buttercream will seem stiffer than it really is!
When you stir the buttercream, stiff peaks and lots of texture within the buttercream mean your buttercream is stiff. With this consistency it will hold its shape, which is perfect for piping.
To make buttercream less stiff, add some milk and stir it in. When the peaks droop over, the consistency is looser or softer. A loose consistency is perfect for frosting a cake.
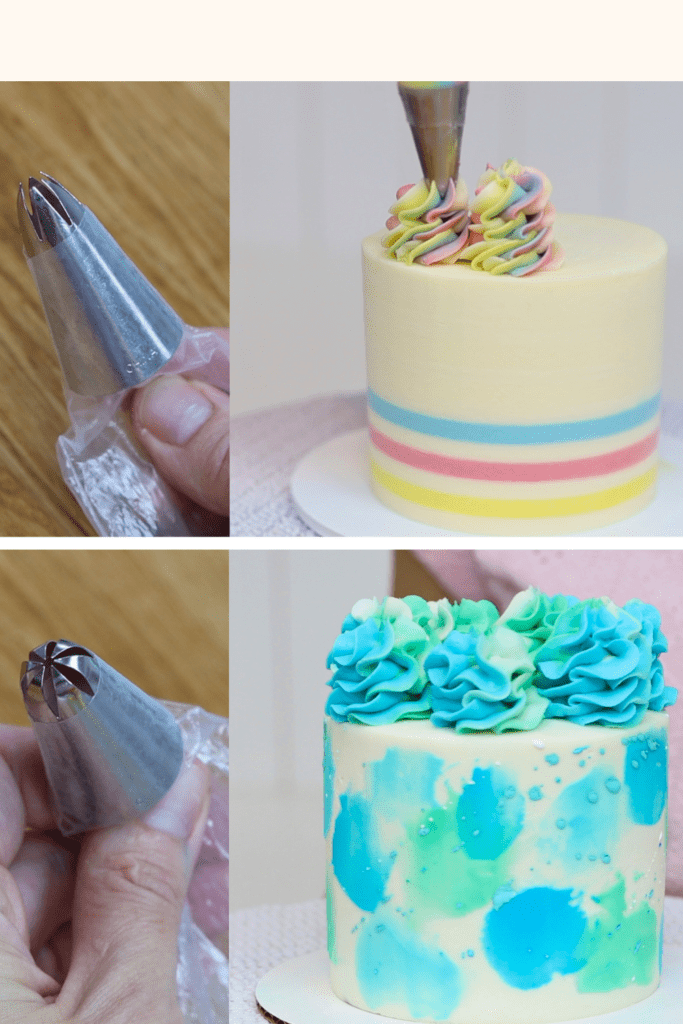
#5 Vary your piping tips
To improve your cakes, try different piping tips. Almost everyone starts off with a 1M star tip, which is typically used for piping swirls on cakes and cupcakes. For variety try a 2D for softer, wavier ruffles.
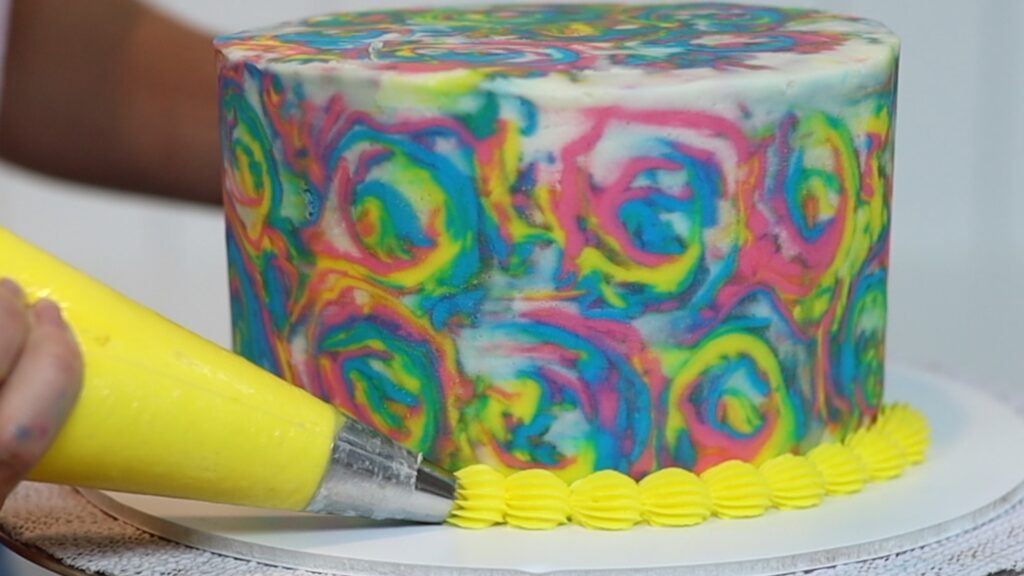
And a 1M is fine for borders but use different piping tips for difference effects. Try a star tip with more prongs, shorter and closer together, like the 4B in the tie die cake photo below.Switching up your piping tips will add more variety to your cakes.
Also, choosing a smaller or larger size to match the size of your cake will make a big difference to the overall design. A small size makes the border a subtle extra detail whereas a large size makes it an eye-catching attention-grabber.
For easy variety, use the same technique with a different tip. You'll create a different effect without needing to master a new skill.
#6 Choose pretty packaging
Make your cakes look more professional with pretty packaging. Buying in bulk is cheapest or on Amazon they're only a few dollars each when you buy 10 or 20. These make your cakes look SO much better!
To use the same cake box for tier cakes, use this tall cake box hack! Cut two diagonal slits on opposite sides of the box lid. The shorter the slits, the higher the lid will sit. Then push the middle section (between the slits) into the box. You'll still be able to fit the lid on and keep your packaging looking professional.
#7 Use guidelines for piping
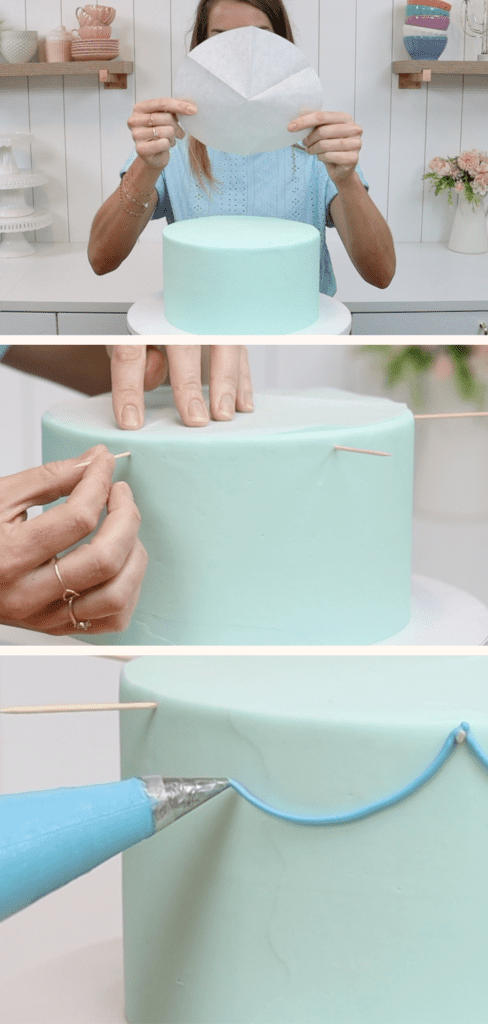
To space out patterns evenly on your cakes, create your own easy guidelines. Draw around your cake pan and cut out the circle and then fold it in half or thirds. Look at the outer edge of the circle to choose however wide you want the sections of your pattern to be. Unfold the circle and place it on top of your cake after the frosting has set, so it doesn’t stick. Now use the creases on the paper circle as guidelines for your pattern. Optionally, can poke toothpicks into the cake below each crease to make the guidelines more visible.
Now when you pipe you’ll have clear start and end points for each section of the design. This is especially useful for Lambeth or vintage cakes!
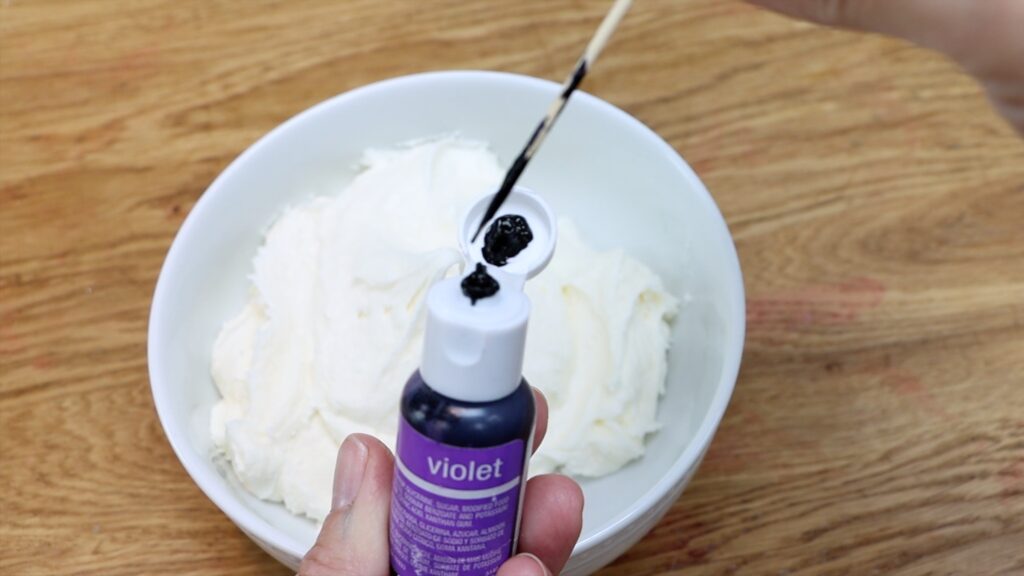
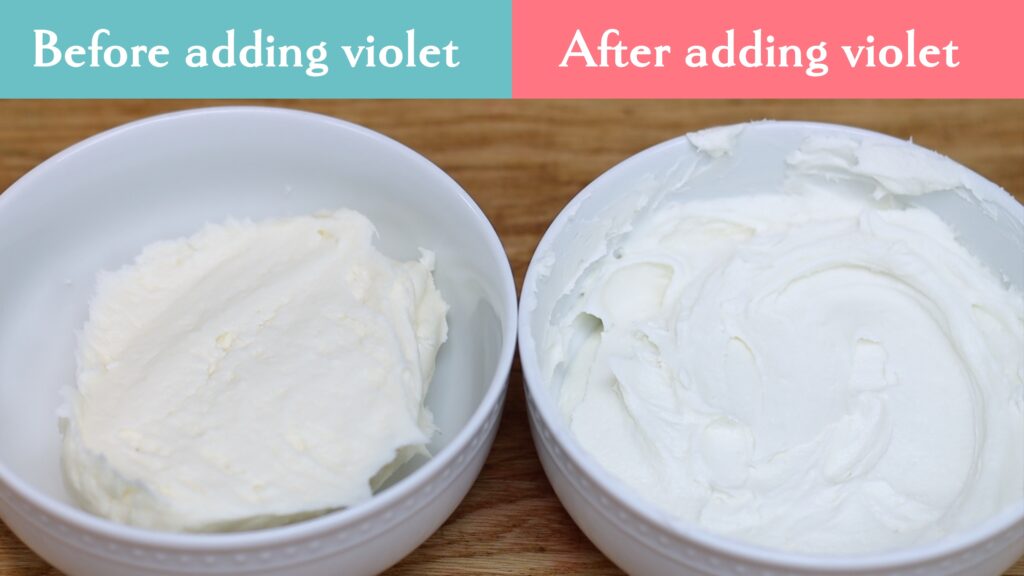
#8 Make really white frosting
Make your white cakes really white with this trick. Make yellow butter much lighter by beating it for several minutes before adding any sugar. After mixing in the sugar, add a tiny amount of violet gel, which will cancel out the yellow. Dip a toothpick into the bottle to get just a tiny bit, rather than trying to squeeze a small drop and accidentally ending up with purple buttercream!
Look at the difference in this buttercream before adding violet and after - it gets so much whiter!
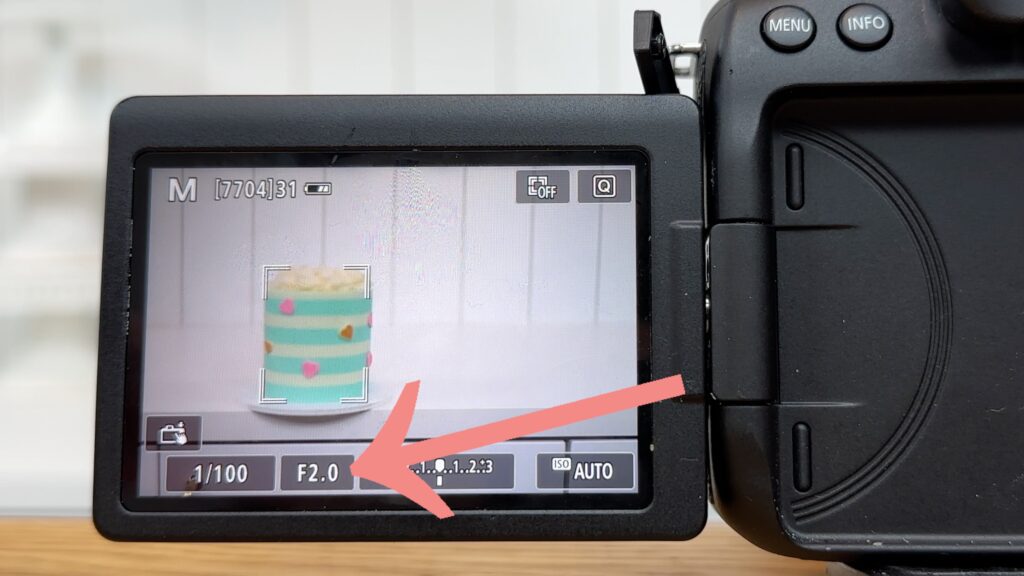
#9 Improve your cake photos
As you improve your cakes in 2025, document them by improving your cake photos. The easiest improvement to draw attention to the cake will minimize any distractions. To do this, adjust the focus. On an iPhone, choose Portrait mode and tap the F at the top left of the screen. Drag the bar up and down to make the background more and less blurry.
You can do this on a camera, too! Adjust the Fstop or F number to make the background more or less in focus.
I have an online course on Cake Photography Like a Pro which will show you EVERYTHING about lighting, backdrops, props, taking photos with a phone and a camera, and editing. And while we’re talking about my courses, move on to the final tip to improve cake decorating!
#10 Take a cake decorating course
To really improve your cakes, start a FREE 7 day trial of my All You Can Cake membership. It gives you access to ALL of my online courses so you can take a deep dive into whatever you’re interested in: baking cakes, getting your frosting super smooth, piping flowers and borders, decorating with chocolate, colouring buttercream, growing your cake accounts on social media, designing custom cakes… And you can ask me any questions directly so I can answer them straight away! I hope to see you there!
Everything on social media looks like it's an easy cake decorating idea but they’re usually trickier in reality. In this tutorial I’ll show you 10 techniques that really are easy no matter how much experience you have!
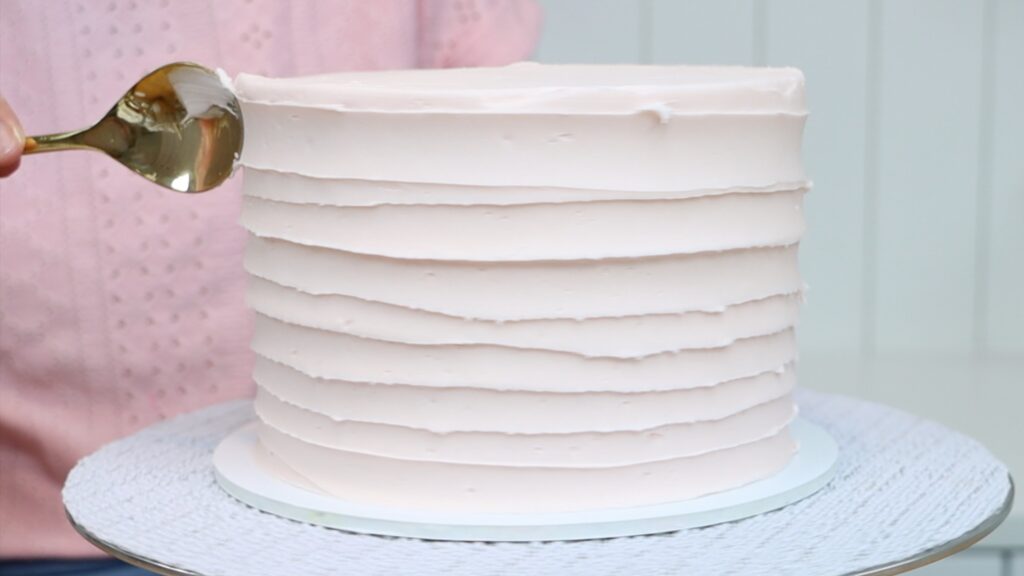
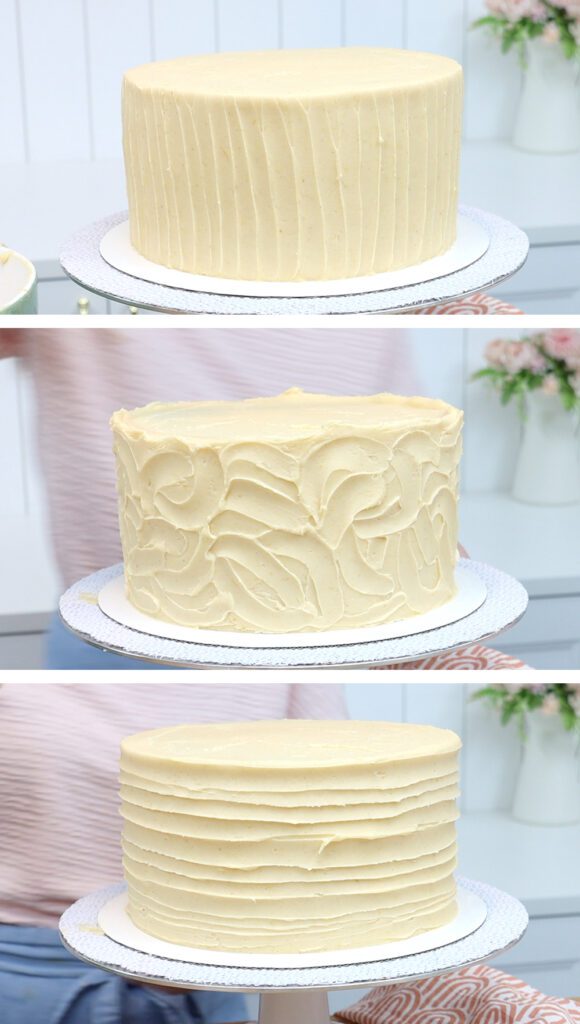
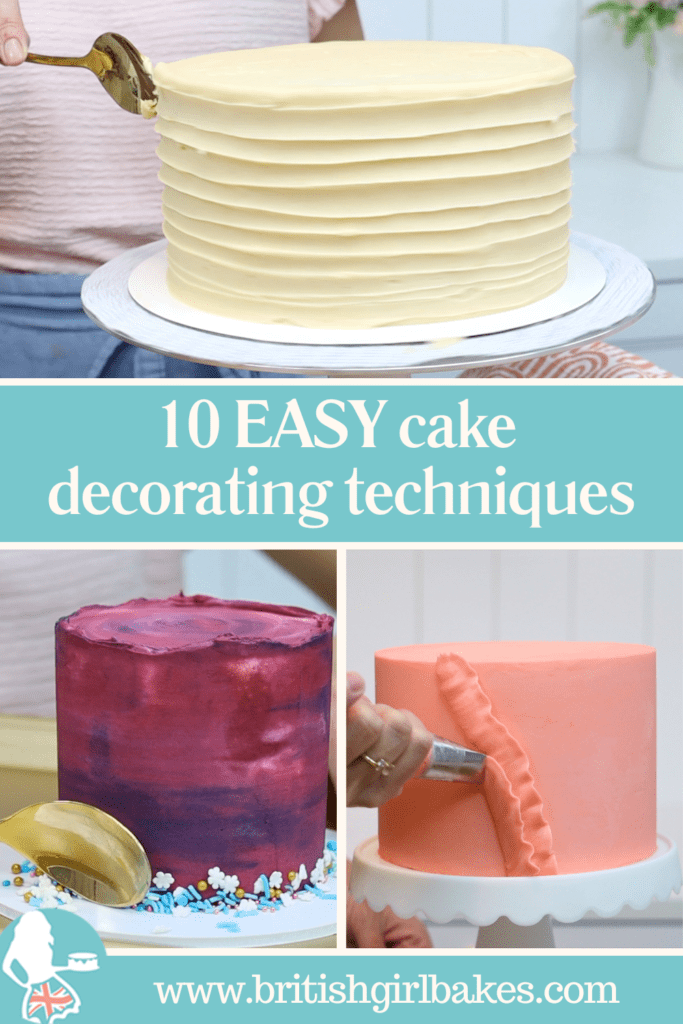
#1 Textured frosting with a spoon
This first easy cake decorating technique uses a spoon and you could even do this without a turntable. Spread frosting to cover your cake, ideally doing two layers. This way any crumbs get stuck in the first layer. Then put the cake into the fridge for 30 minutes to set the first layer before adding another layer. Don’t worry about getting this frosting smooth because you’re about to add texture!
If you don’t have a turntable, try one of these two options. Point the spoon downwards and drag from the bottom of the cake upwards to make vertical grooves. Or curve the spoon in arc shapes, going in different directions for random, rustic texture. You can leave the texture at the top or flatten it by pushing sideways with an offset spatula.
If you have a turntable, try holding the spoon sideways and spin the cake to make horizontal grooves. As you spin, drag the spoon slowly up the cake to cover the sides with texture.
All of these textures make the cake look more interesting and mean that you don't need to perfect smooth fro
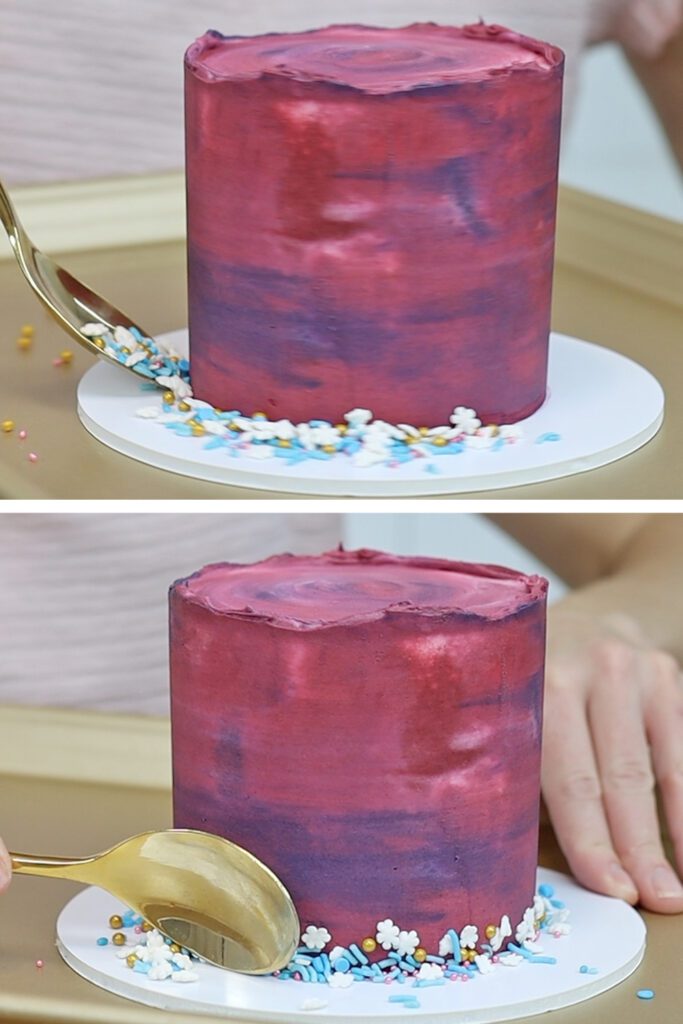
#2 Sprinkle border
For quick and easy colour, choose a few different sprinkles: different shapes, colours, sizes… and mix them together. Put your frosted cake on a tray and spoon or pour your sprinkles around the cake. The ray will catch any sprinkles that roll off the cake board so they don't fall onto the floor. Push the sprinkles into the bottom of the cake with the back of your spoon to make a pretty border!
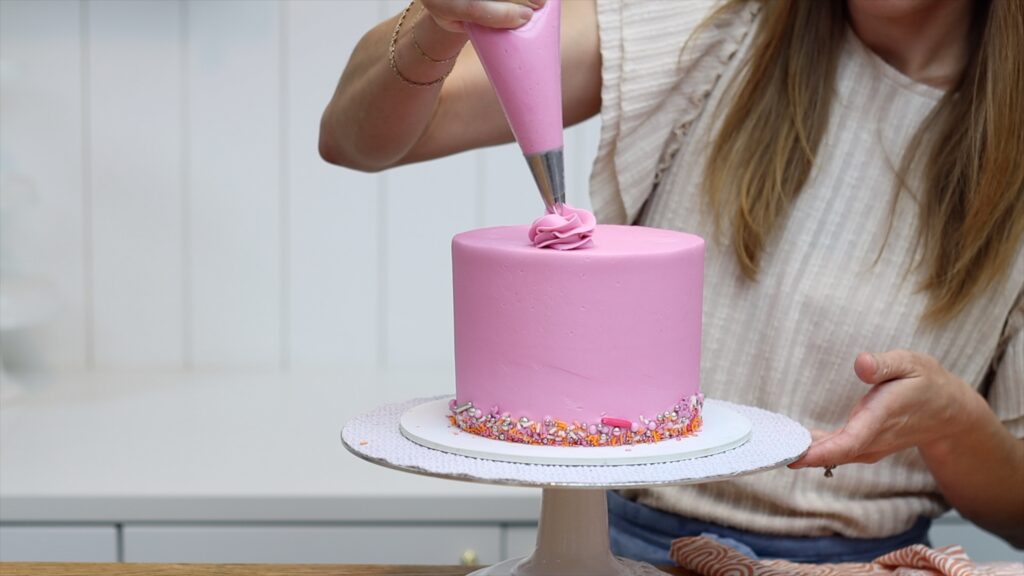
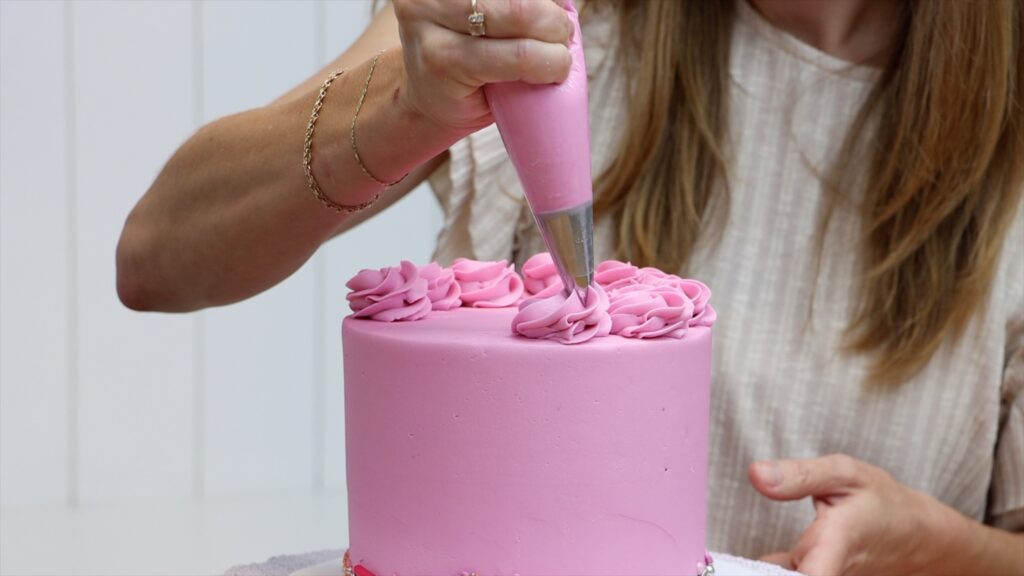
#3 The easiest, neatest swirls
Here's the easiest way to pipe neat swirls onto the top of a cake! Drop a star shaped tip like a 1M or 2D into a piping bag and spoon buttercream into the bag. Twist the top of the bag so that it’s pushed tight against the buttercream. This means you don’t need to squeeze as hard to pipe so your hand won’t get tired or crampy! Pipe a ring of buttercream and then overlap that ring with another one right on top. Then stop squeezing the bag and pull away. Pipe the next swirl in the same direction (I always go anti-clockwise or counter-clockwise) and then pull away in the same direction as the previous swirl. This way all of your swirls will be uniform.
It’s much easier to make these short swirls look neat than taller swirls. Tall swirls tend to lean to one side and be different heights to each other. Also, these short swirls give the cake some height without adding a huge amount of buttercream to each slice!
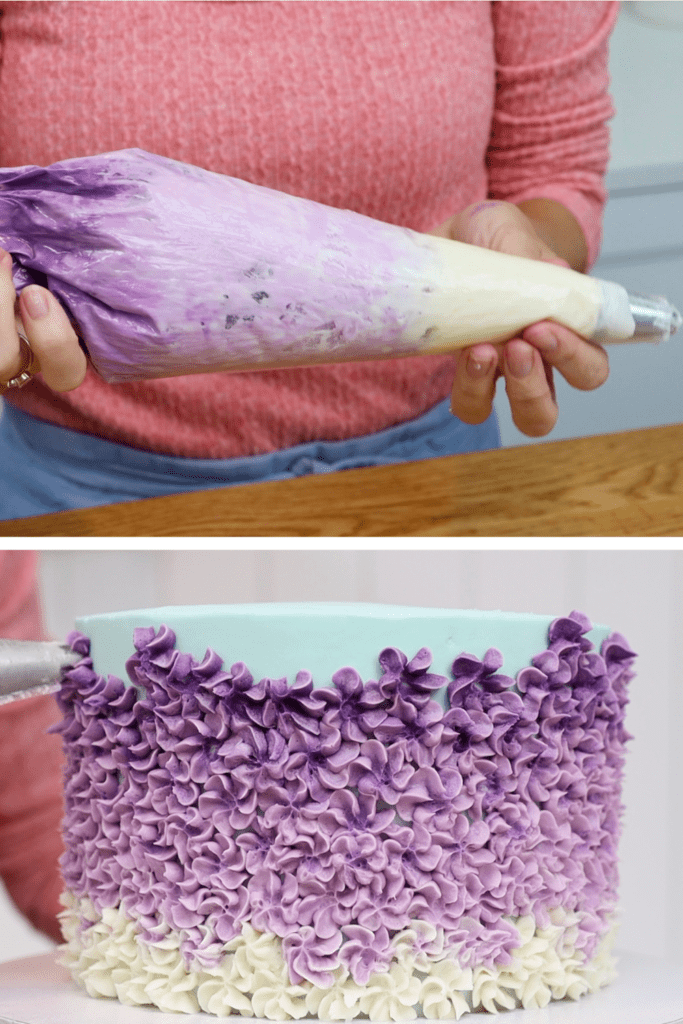
#4 My favourite buttercream flowers
For the easiest flowers that also happen to be my favourite, use a closed star tip like a 2D. Layer different colours of buttercream in the piping bag to make multicolored flowers that will change colour. Line a cutting board with a piece of parchment or wax paper. Hold the piping bag down with the tip of the piping tip resting down on the paper. As you squeeze the bag to pipe, twist your wrist to make the buttercream fan out sideways to make petals. Piping down onto this flat surface is much easier than piping straight onto the curved side of a round cake.
As you pipe, the higher up colours will push through the lower down colours in the piping bag. You’ll see the colours of your flowers gradually change!
Put the flowers into the freezer for 5 minutes to get cold and hard. Then pick them up and press them onto your cake. If the frosting on the cake has set, spread buttercream or melted chocolate as glue to attach the flowers.
Since you’ve piped the flowers onto paper, you can choose only your favourites to add to your cake. I love the way the red comes through the flowers more and more as you go down the cake!
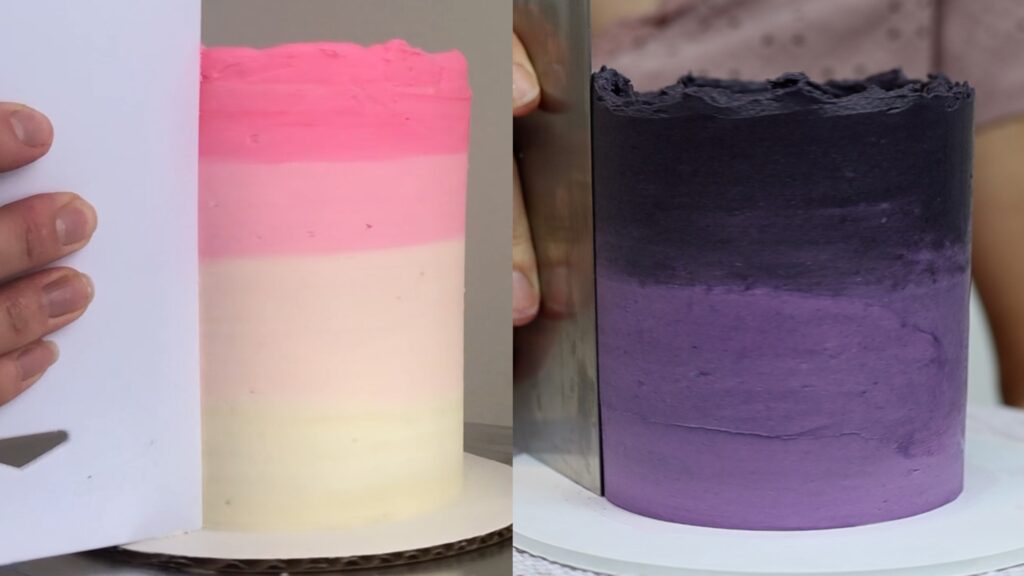
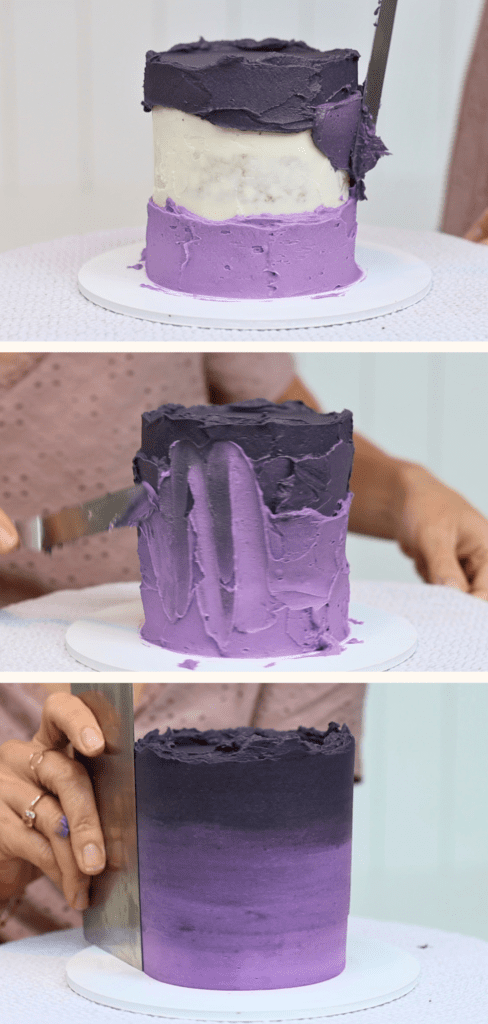
#5 Ombre frosting
Ombre frosting starts with a single bowl of coloured buttercream. Add more colour or some plain white buttercream to make a few darker or lighter shades. You’ll blend these together on the cake. Spread the colours around the cake with the darkest on top and the lightest at the bottom, or the other way around. This is one of the techniques I teach in my FREE online course 10 Frosting Techniques.
Wiggle your offset spatula to make zig zags in the frosting to blend the colours together slightly. This will create a gradual ombre instead of distinct bands of colour like stripes. There result is so simple but stunning!
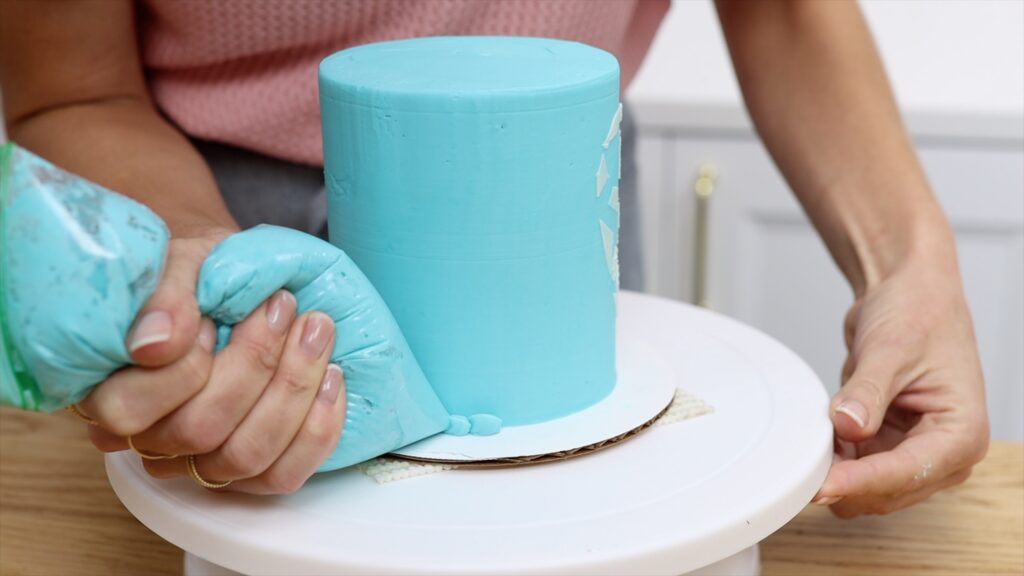
#6 Easy cake decorating with homemade stencils
Make your own cake stencils by drawing a shape onto parchment or wax paper. Use a pencil because pen doesn’t write well on the surface of this paper. Cut the shape out by snipping the middle, poking one scissor blade through that hole and then cutting around the shape. Keep the paper around the shape intact because that will be your stencil.
Chill your cake in the fridge for at least an hour so that the frosting is cold and firm, not sticky. Then wrap the stencil around the cake. Spread buttercream over the stencil, pressing against the stencil to hold it in place. Smooth this frosting with your offset spatula or a cake comb. Or add some texture by pressing gently and dragging your spatula or a spoon upwards. Then peel the stencil off and voila!
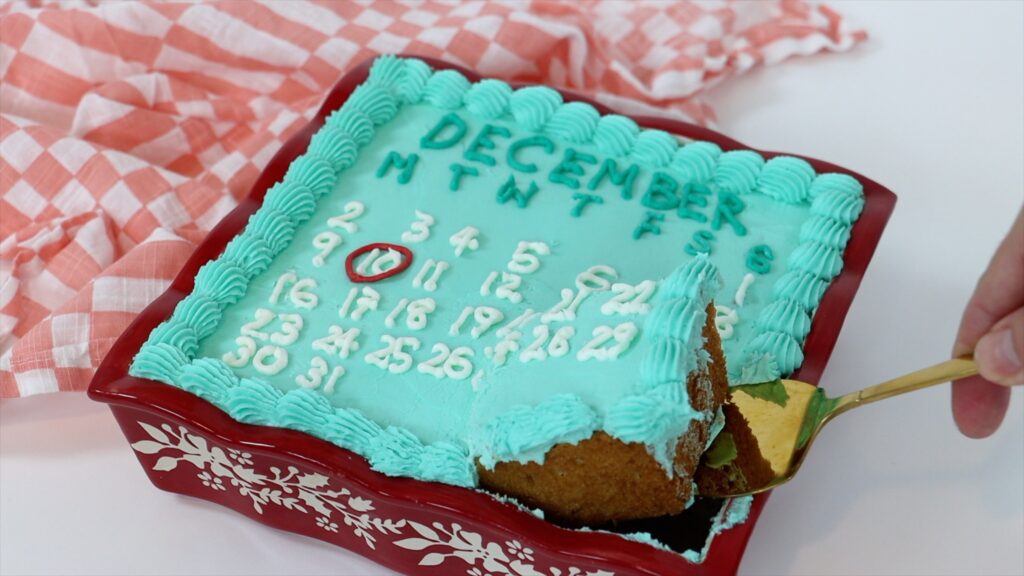
#7 Tray bake cake
For the quickest cake, bake the cake in an ovenproof dish and then frost and decorate it in the dish. The easiest way to decorate these is to cover them with lots of texture using different piping tips and colours. If you don’t have piping tips you can just spread frosting onto the cake instead, smoothing it with the side of your offset spatula or palette knife. Leave it simple or add whatever design you like on top. I love this fun calendar design for a birthday cake!
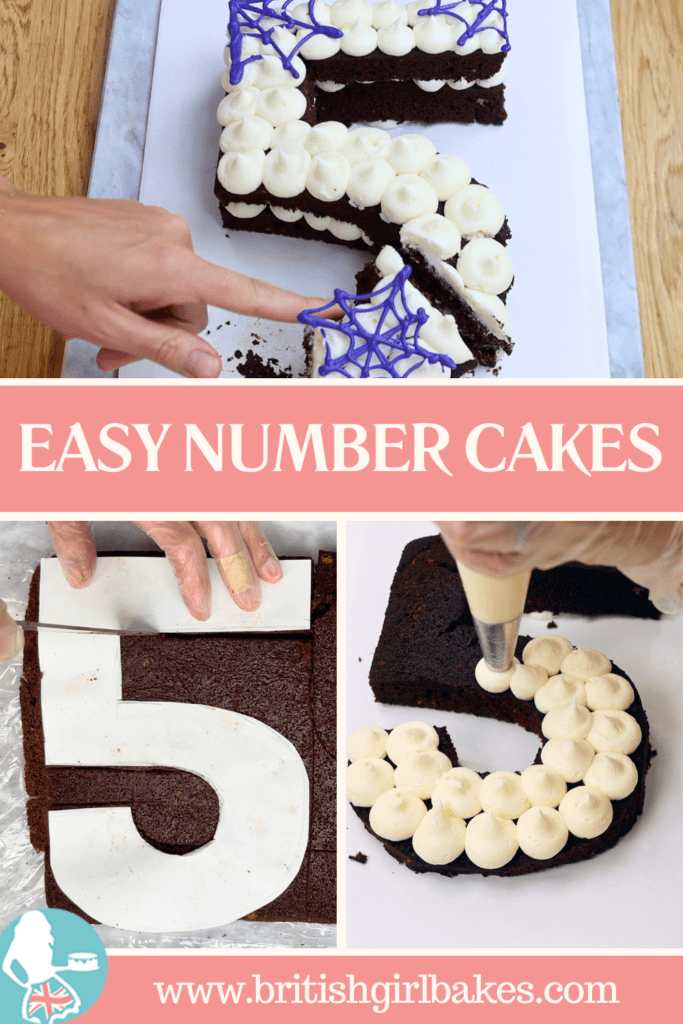
#8 Number cakes for birthdays
One of my favourite easy cake decorating ideas for a birthday cake is a number cake. Cut the birthday number out of a sheet cake twice so you have two identical numbers. Use blobs of buttercream to attach one of the numbers to a cake board or plate or platter. Then pipe buttercream on top. I'm using a 1A round tip for this cake but you could pipe rosettes or swirls using a star shaped tip instead. And of course you could use coloured buttercream instead of plain white.
Lower your next cake layer down, positioning it on top, and then add another layer of piping. Buttercream is best because softer frostings like whipped cream will get squashed by the top number cake. Decorate this with flowers or chocolates or candies or cookies or fruit or whatever you like!
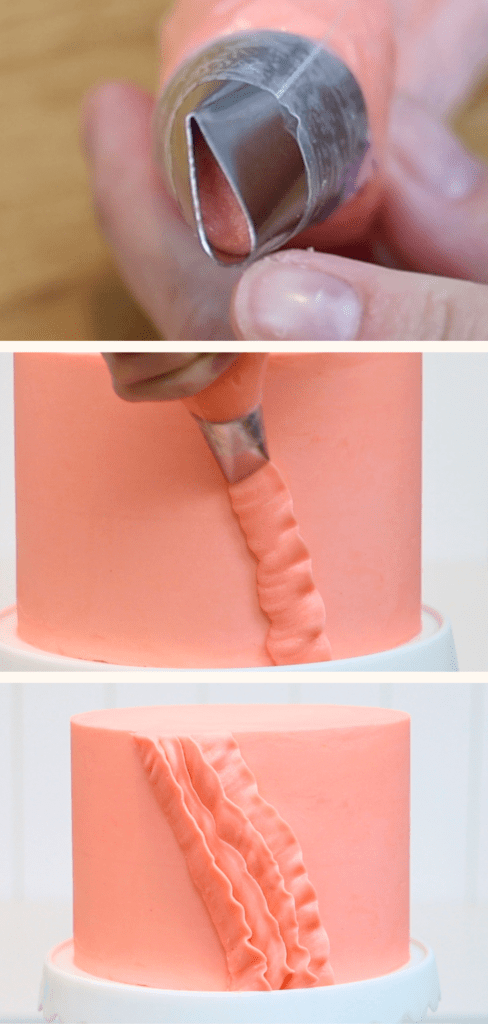
#9 Easy cake decorating with a petal piping tip
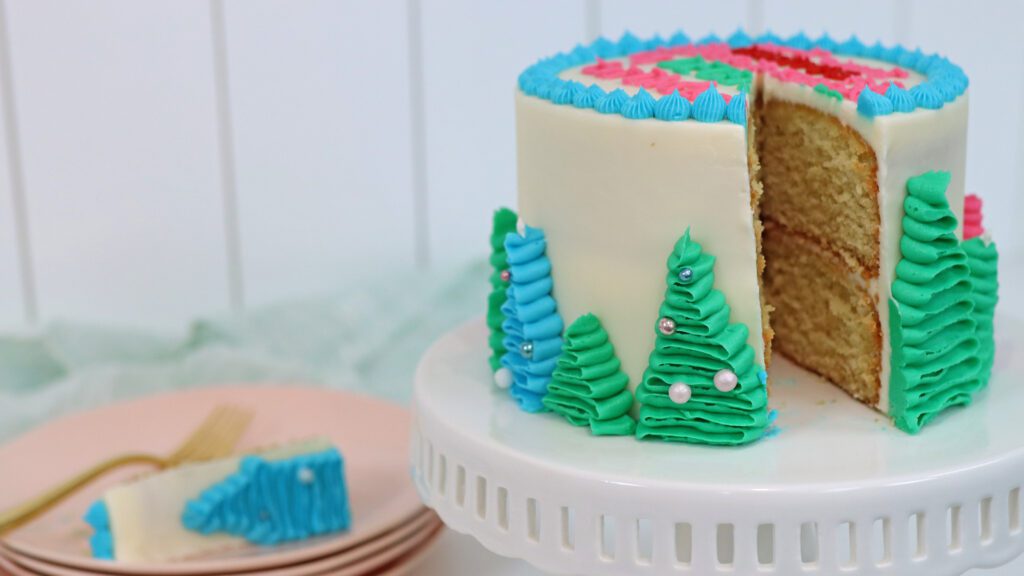
For pretty textured details in seconds, use a petal piping tip and any buttercream left after frosting your cake. Press the wide end of the piping tip against the cake with the pointed end facing away from the cake. Start at the bottom of the cake, squeezing the bag to push the buttercream out. Pull slowly upwards, wiggling a little bit to make these ruffles.
These ruffles are quick and easy and look so pretty. Overlap a few of these to make a little accent, or cover the whole cake with layers of ruffles! This is another technique I teach in more detail in my FREE online course 10 Frosting Techniques, which over 20,000 people have taken!
#10 Easy cake decorating with kids
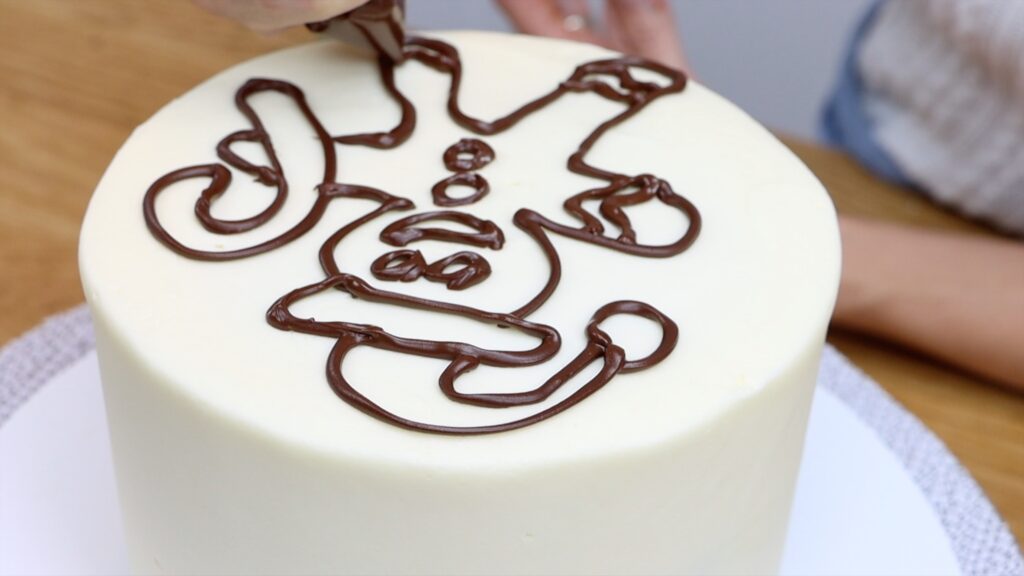
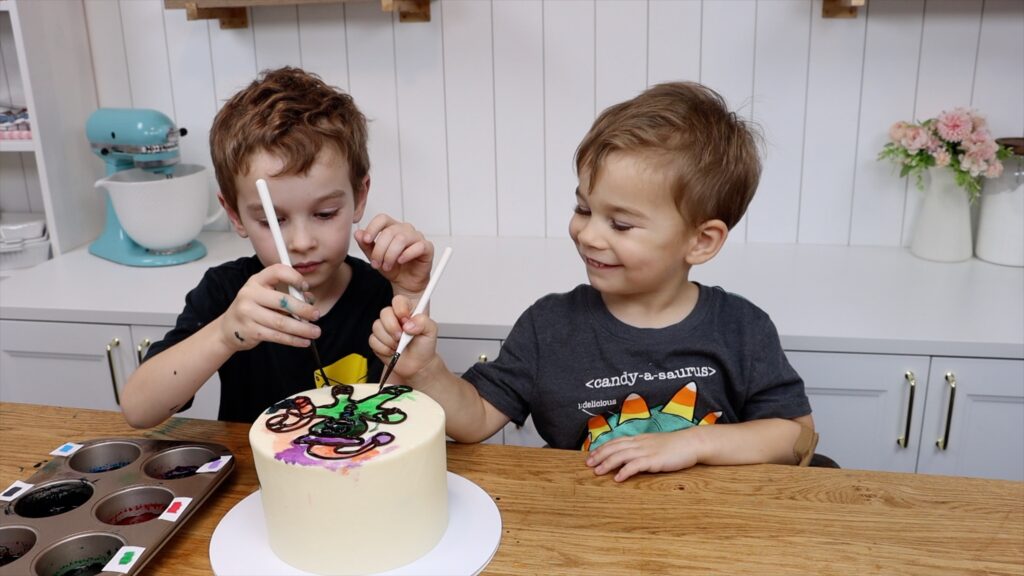
For the easiest cake decorating - Let your kids decorate the cake for you! Frost the cake and then optionally, melt some chocolate chips and spoon them into a ziplock bag and cut a little piece off one of the corners. Squeeze the bag to draw a simple design with the melted chocolate, like something you’d see in a children’s coloring book.
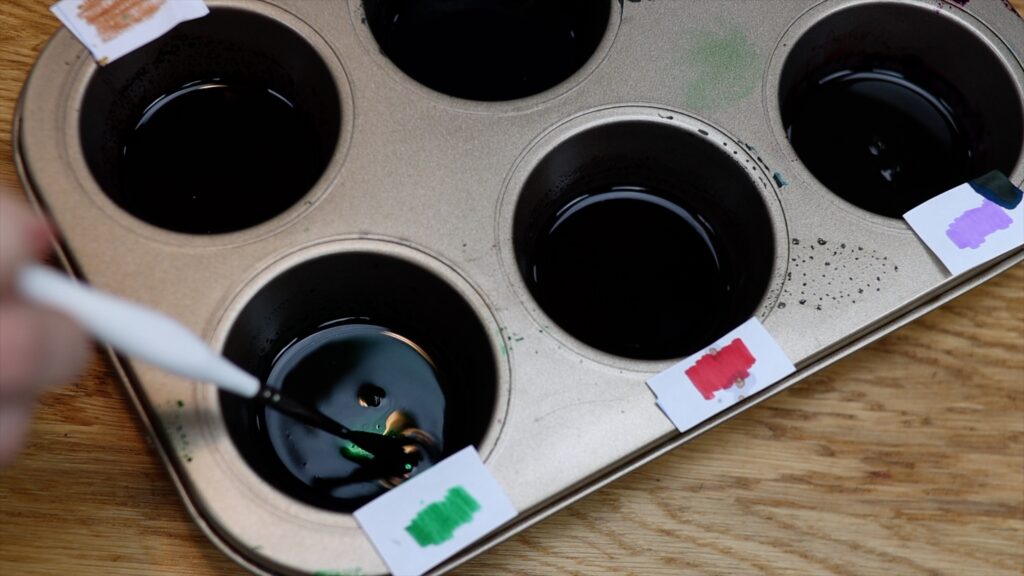
Make a colour palette in a cupcake pan, using labels because it’ll be difficult to see what the colours are in the dark pan. You can use liquid or gel colours but if you use gels you’ll need other water them down to make a liquid.
Give your kids a paintbrush and let them paint the cake! They’ll love the activity and have extra fun eating their masterpiece.
I hope you’ve seen some easy cake decorating ideas you’d like to try! Ask me any questions in the comments and remember to take my free course or check out my cake school to learn hundreds of cake decorating techniques and designs.