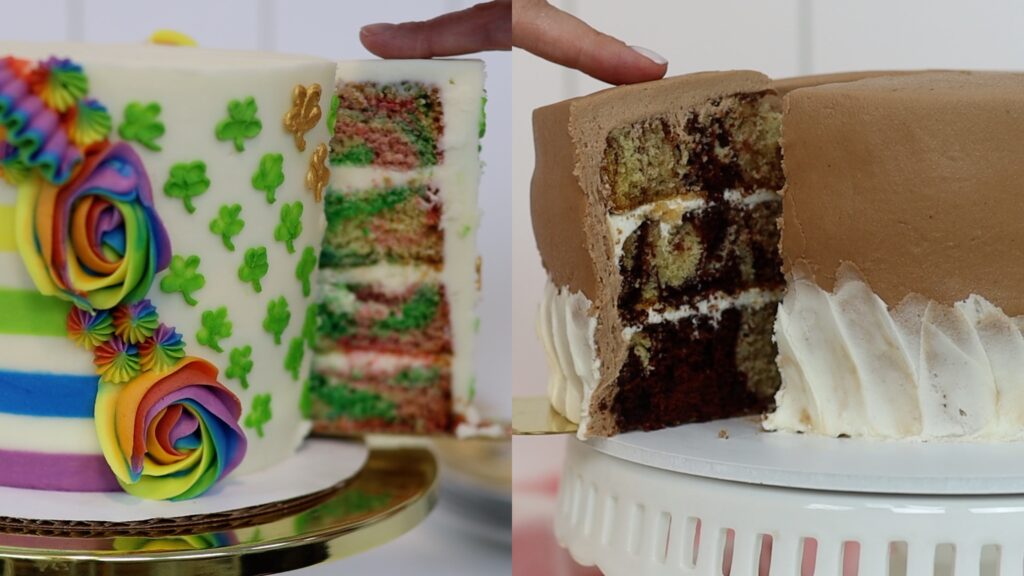
Wondering how to decorate a cake without tools? I'm going to show you five items you already have in your kitchen and how to use them to decorate stunning cakes instead of buying expensive cake decorating tools.
Rubber or silicon spatula
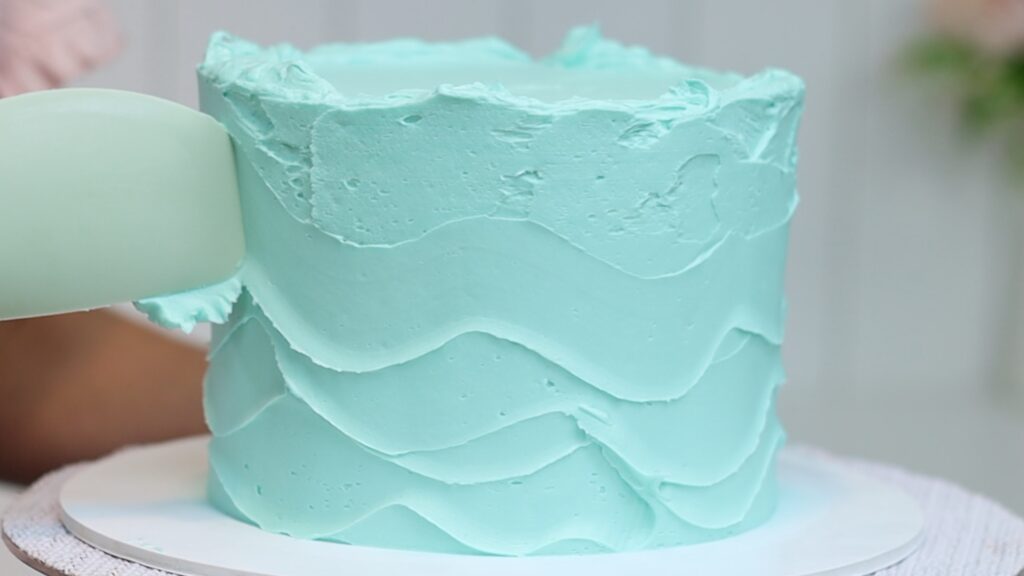
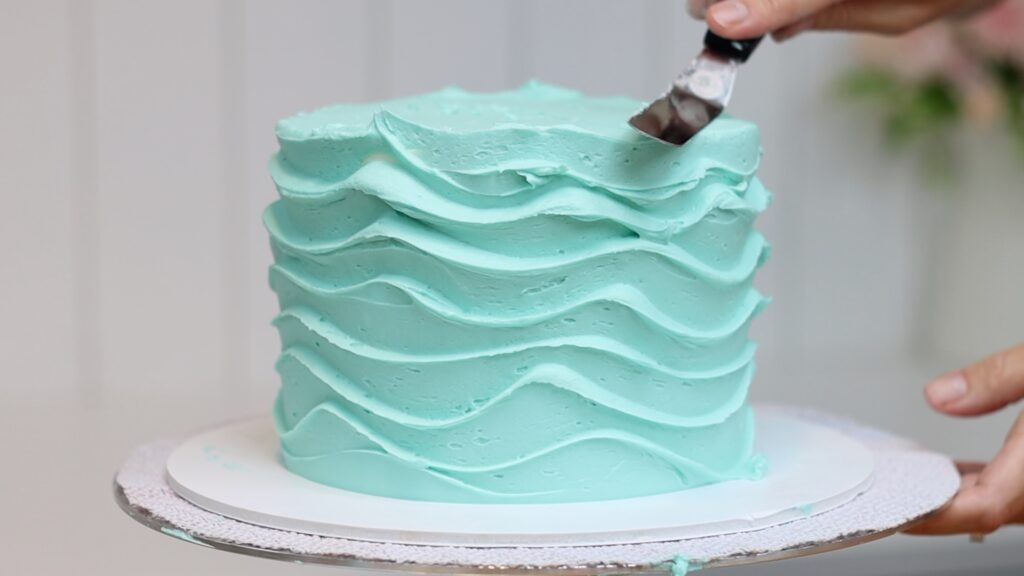
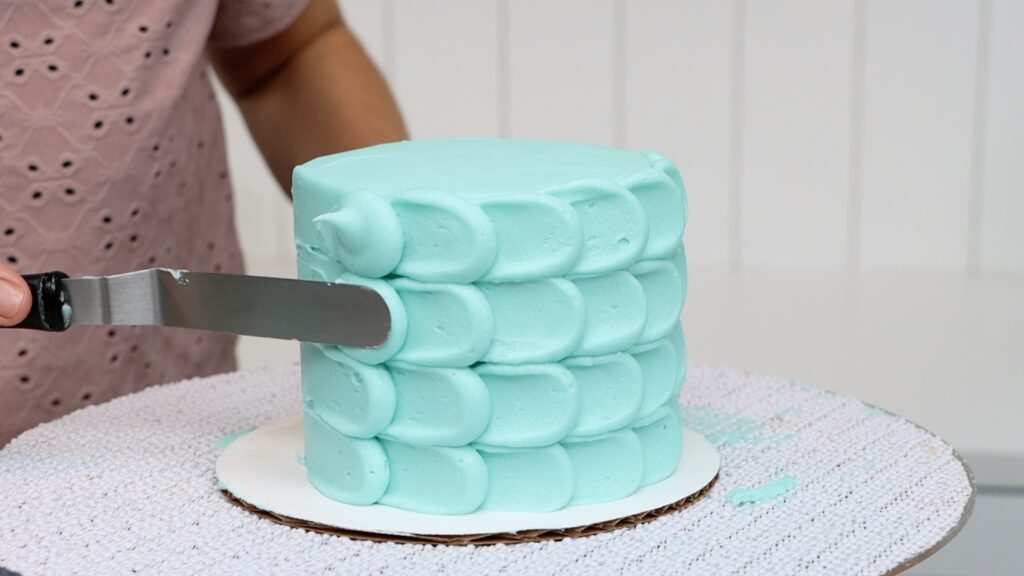
With one of these rubber or silicon spatulas you can make trendy wave frosting. Hold sideways so the top edge is pressed into the frosting as you spin the cake. Move the spatula up and down to create these beautiful waves giving the frosting lots of movement.
Bonus: if you struggle with getting your frosting smooth, it doesn't matter! While the spatula creates this wave texture it's also smoothing the frosting within the waves.
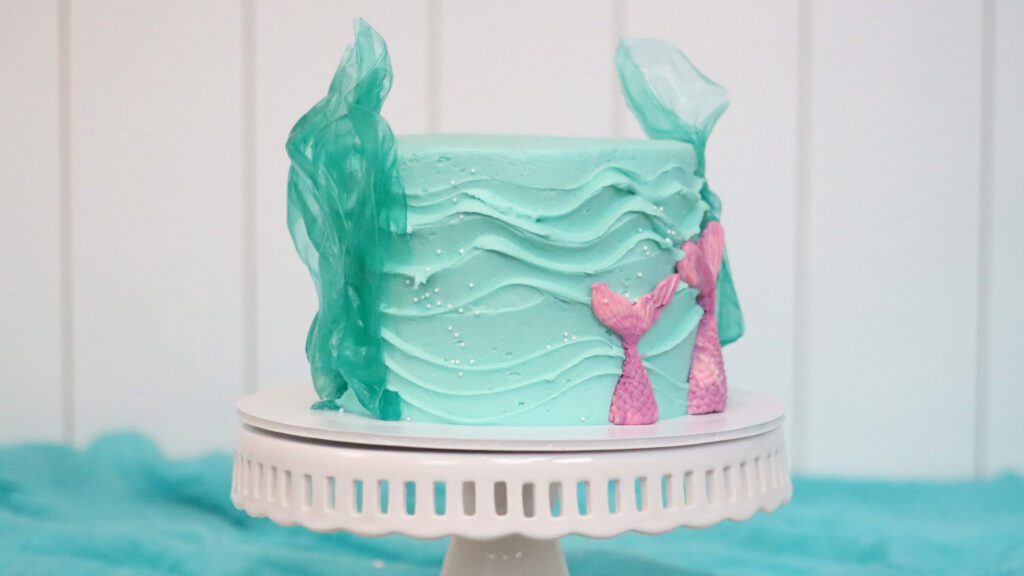
This effect is stunning for an ocean or under the sea or mermaid theme.
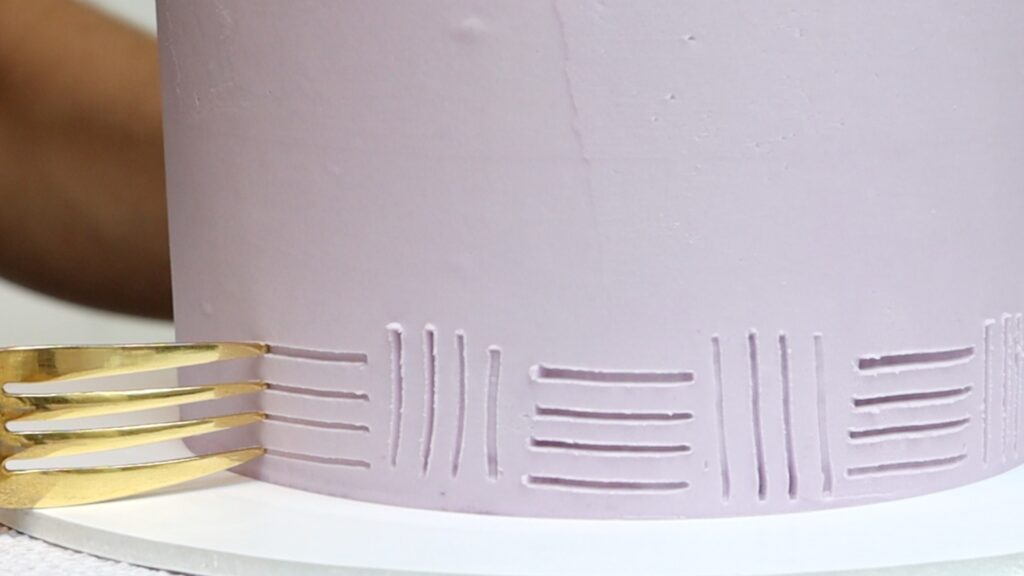
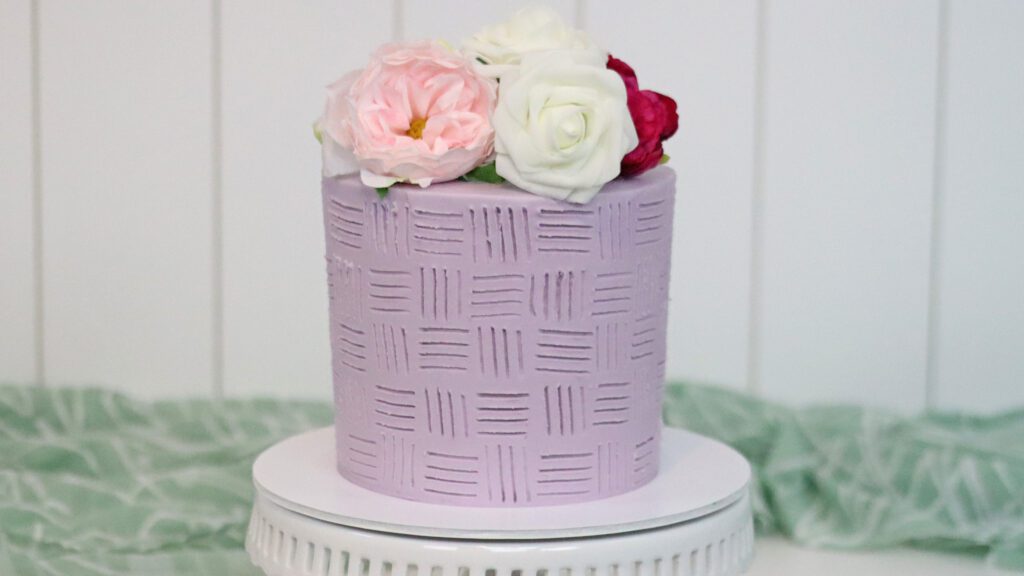
Use a fork to decorate a cake without tools
To add lots of detail without taking lots of time, use a fork with just two movements: up and sideways. The prongs of the fork will drag evenly spaced lines across the frosting. When the lines have made a square, pull the fork out and change direction.
For vertical lines, pulling the fork up rather than down will let you see what you're doing! Here's my top tip for this technique: dip your fork into warm water for the best results. The warm metal will drag much more easily through the frosting. Offset the design for each row so that the sideways lines are above the up and down lines. This will create a simple patchwork design.
The fork texture makes the cake much more detailed and interesting than just plain smooth frosting.
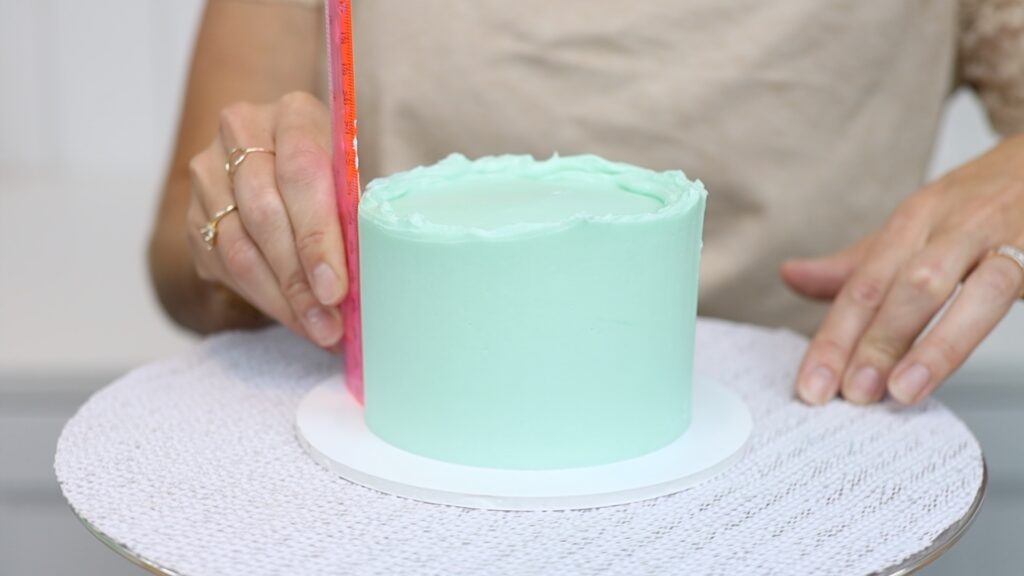
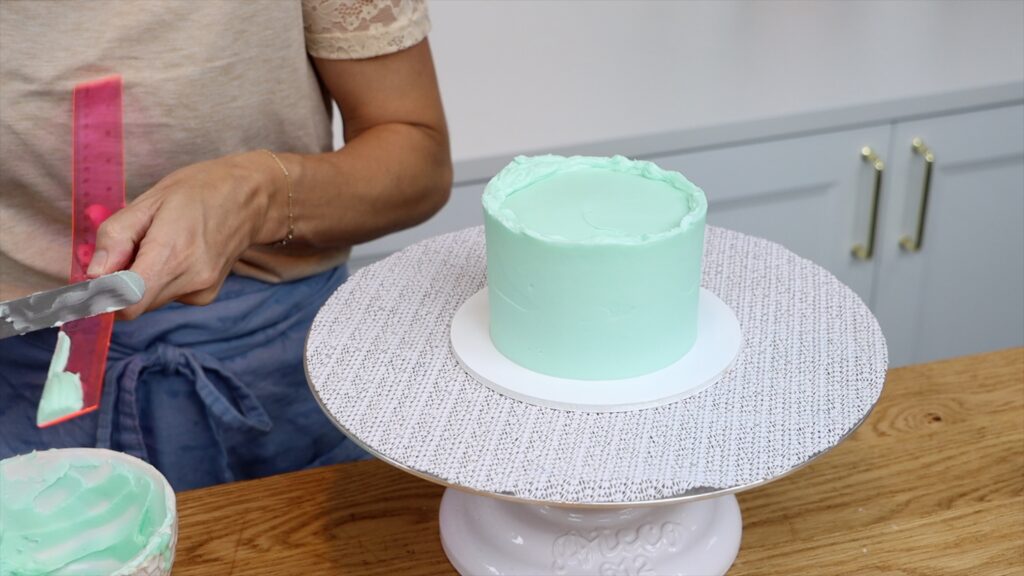
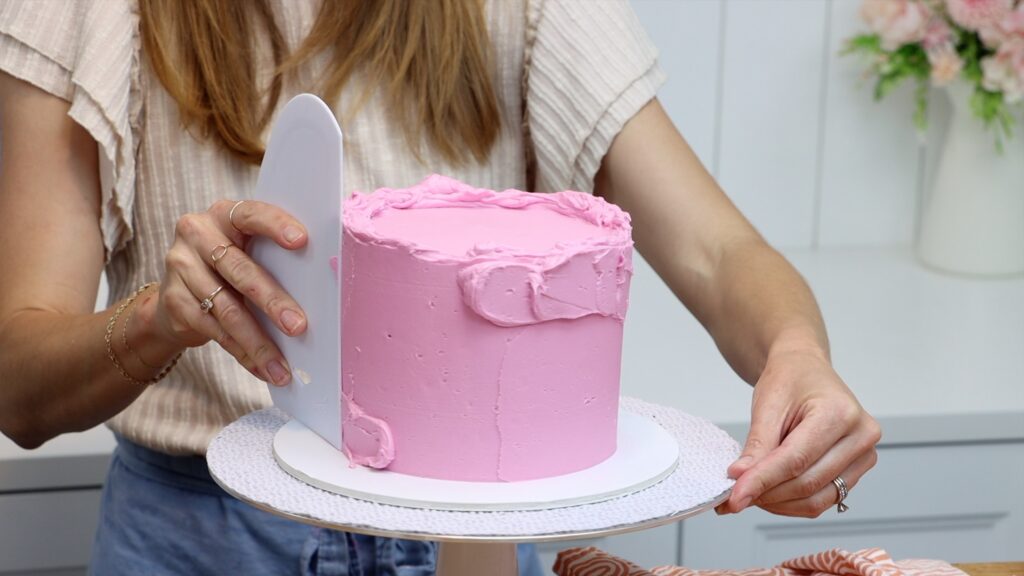
Smooth frosting with a ruler
Speaking of smooth frosting, you can do that without a cake comb, using a ruler instead. Press one of the ends down on the cake board against the side of the cake. Then spin the cake on a turntable, holding the ruler still. Your spinning hand should move the cake so that you don't need to move the ruler.
Do this again and again to get the frosting smoother and smoother. After each spin, pull the ruler away from the cake and wipe the buttercream off it into your bowl.
For the top edge, swipe sideways with your ruler. You'll push that buttercream that's sticking up over the top edge and lift it away on your ruler.
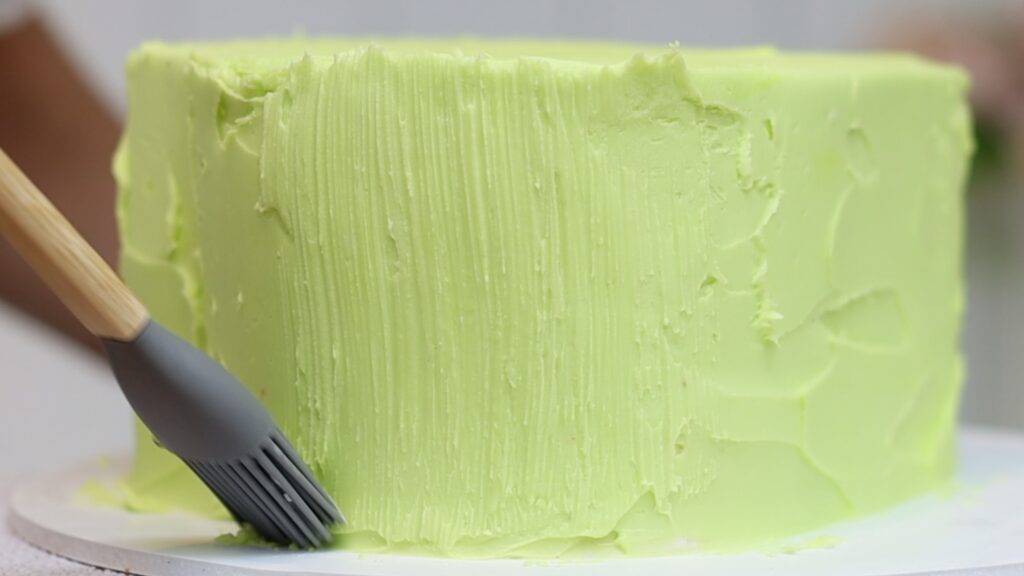
Textured frosting with a pastry brush
This is a pastry brush or a basting brush and it's another way to create unusual texture on cakes. Hold the brush at the bottom of the cake and press it against the cake. Pull it upwards to leave these pretty lines in the frosting.
For the best results, dip the brush in water so it will slide more easily through the frosting. Also, the frosting should still be soft so do this straight away, not after it sets.
Pastry brushes are useful for floral cakes because they create stems on green frosting. Make a bouquet of flowers on top of the cake with fresh or artificial flowers or pipe them. Or make wafer paper flowers, which I teach in my Layer Up program on my cake school. Start a free 7-Day trial to try it risk-free!
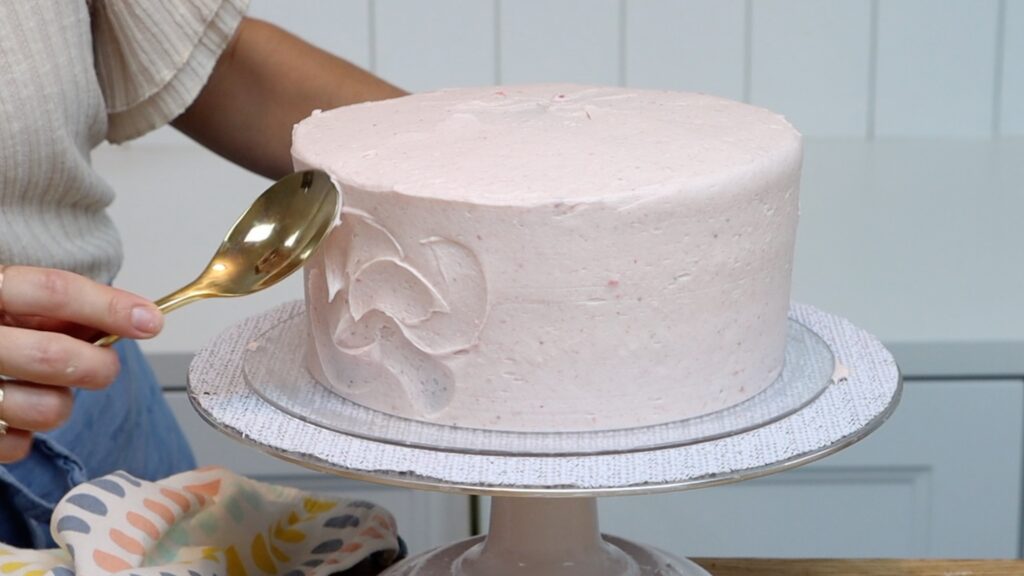
Use a spoon to decorate a cake without tools
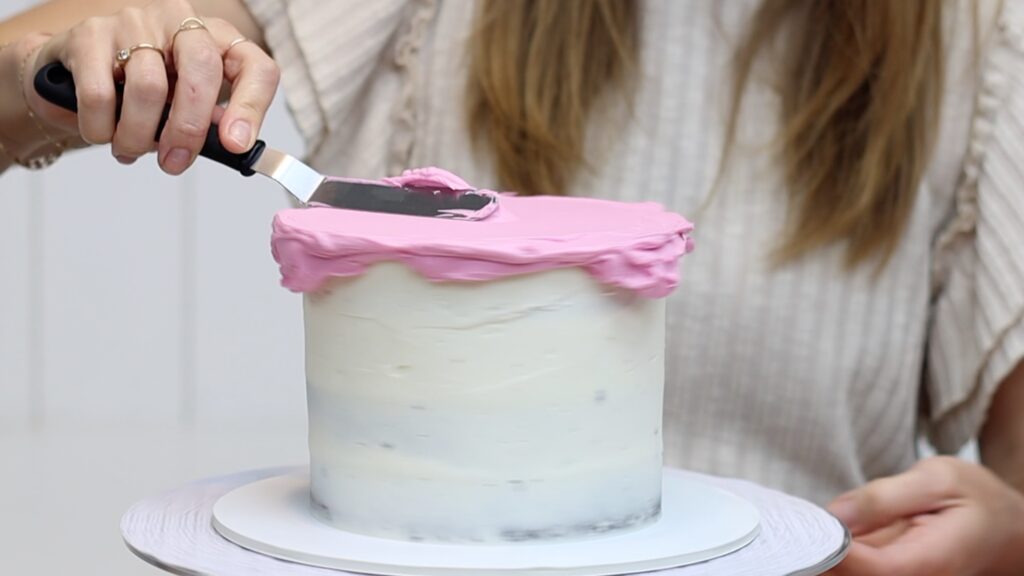
Next up, a spoon? Yes! Ditch the textured cake combs and instead hold the back of a spoon against the frosting on your cake. Press it gently into it and then drag it in an arc to make curves or swirls in the frosting. You can do this on the sides and also on the top of the cake. This is my strawberry cake with strawberry buttercream:
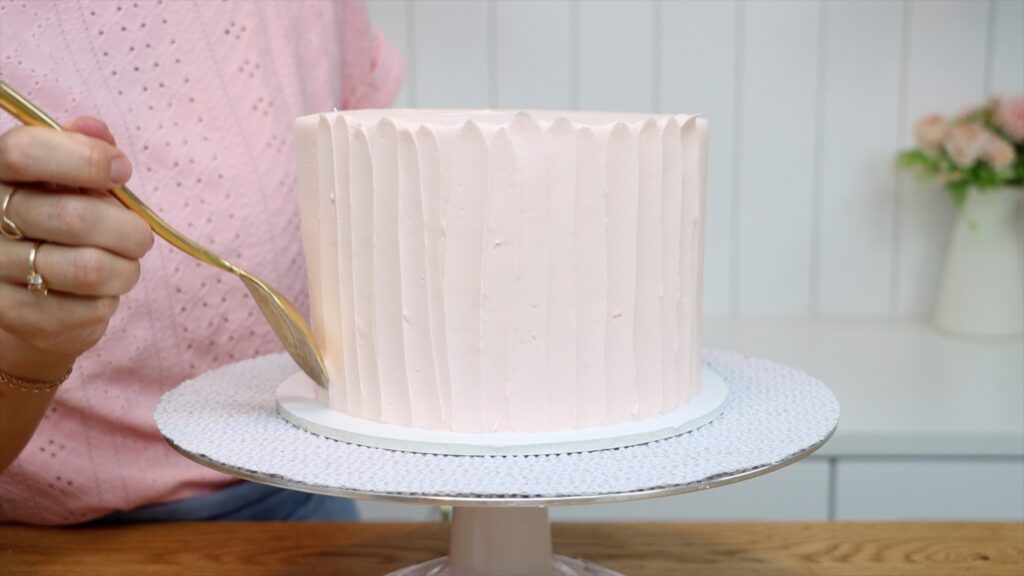
Another way to use a spoon is to create grooves in the cake. Drag the spoon slowly upwards to pull the texture all the way up the cake. Let the grooves overlap each other so there aren't any gaps.
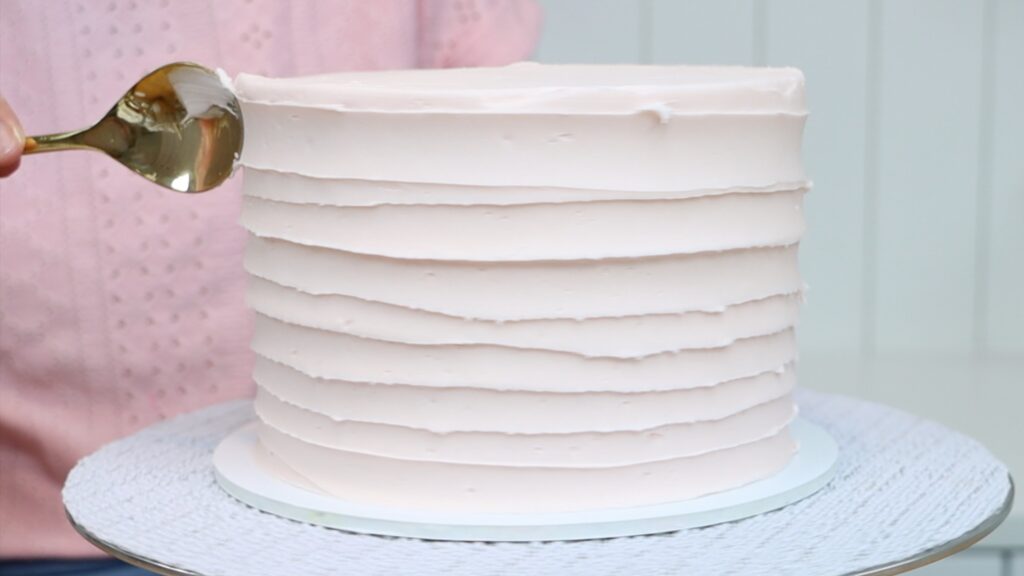
You can do this horizontally as well, holding the spoon sideways. Press against the frosting as you spin the cake, pulling the spoon slowly upwards to pull the texture all the way up the sides of the cake.
Five ways to decorate a cake without tools
So, five ways to decorate cakes using items you already have at home: a spoon, a fork, pastry brush or basting brush, a spatula and a ruler! Which of these will you try first?
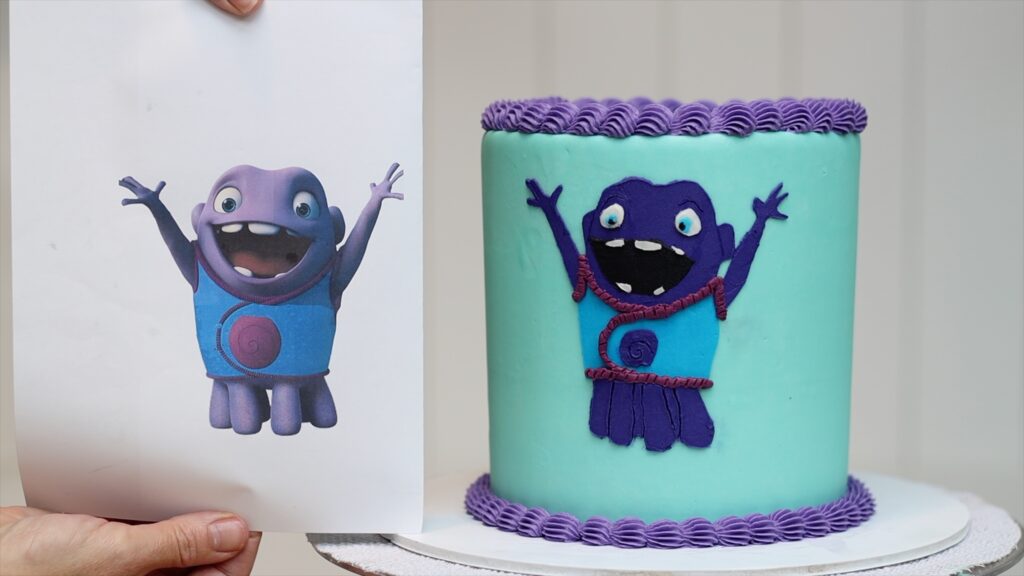
Use homemade layered stencils to make edible versions of your favourite characters with this easy, inexpensive cake decorating technique!
Why use layered stencils for character cakes?
Stencils allow you to create almost flat patterns and designs on cakes. For characters, by layering stencils you can create all of the details to scale. The technique is cheap because you can make the stencils yourself using parchment paper or wax paper. The steps are easy to follow and can be used for any character design! The cake does need to be chilled in between stencils, which adds to the total time required.
Buttercream transfers can be used for character cakes too. The details tend to warp when you press the transfer against a cake, whereas stenciling is more accurate. Also, with buttercream transfers small air bubbles are common on the surface of the character.
How to make layered stencils for character cakes
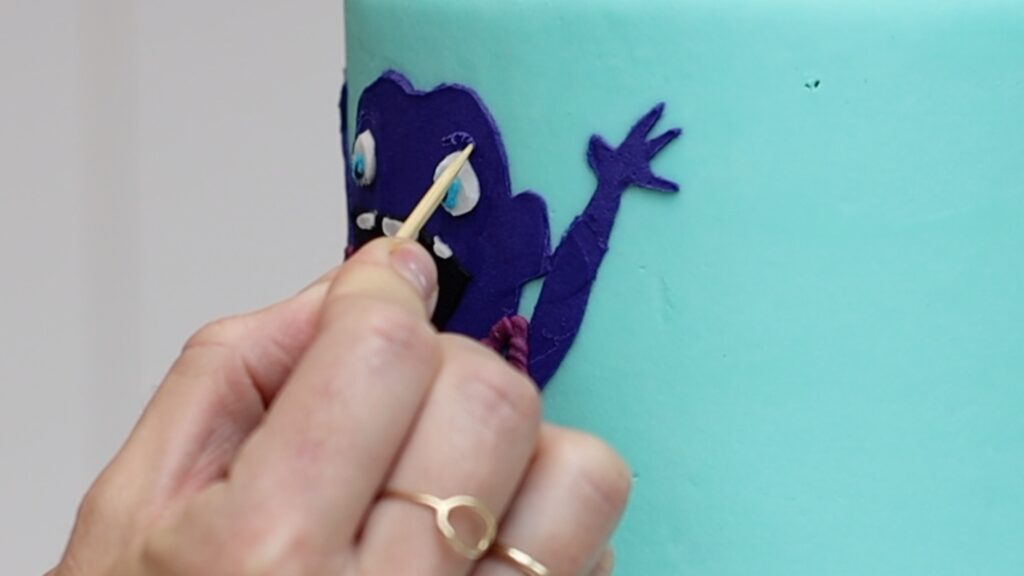
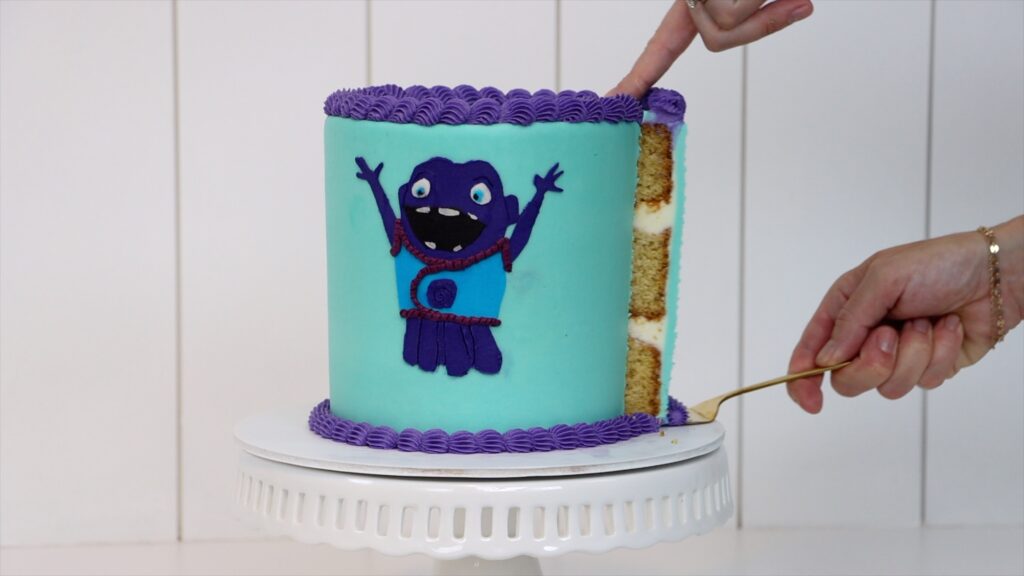
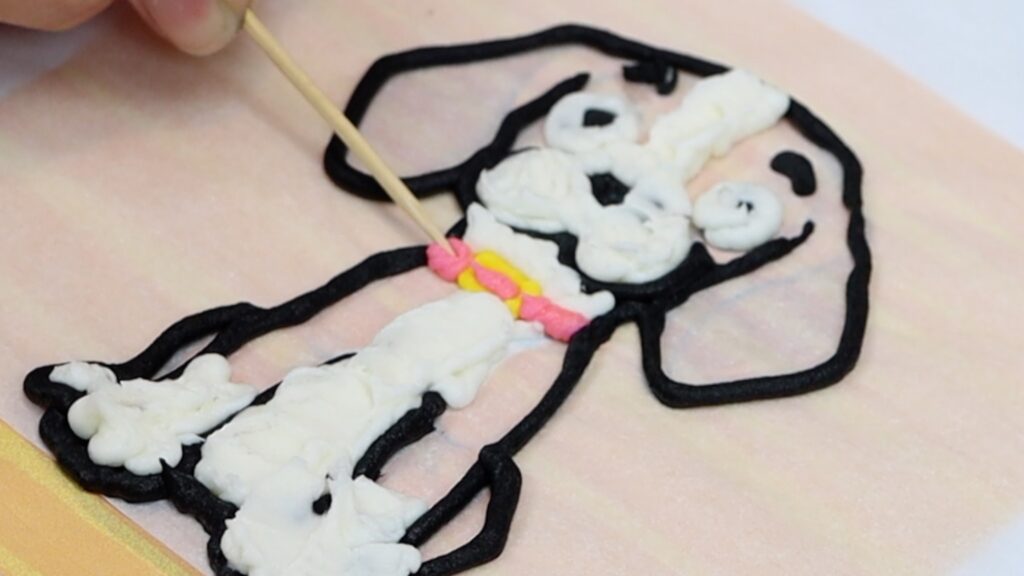
I’ll use the alien Oh for this tutorial, from the movie Home. Print your character out whatever size you want for your cake. This is a tall 6 inch cake and my character is about 5 inches tall. Spoiler alert: here's the finished cake!
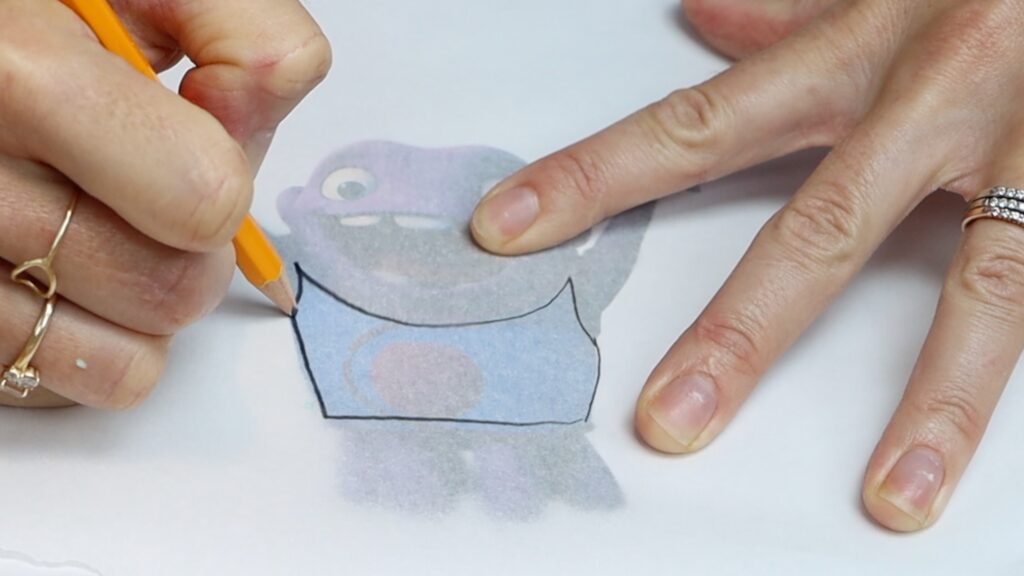
To replicate the character on the cake, you’ll need stencils for each colour of the character. I’m starting with the blue vest, outlining it with a pencil onto parchment paper. You can use wax paper instead - anything non-stick that you can see through.
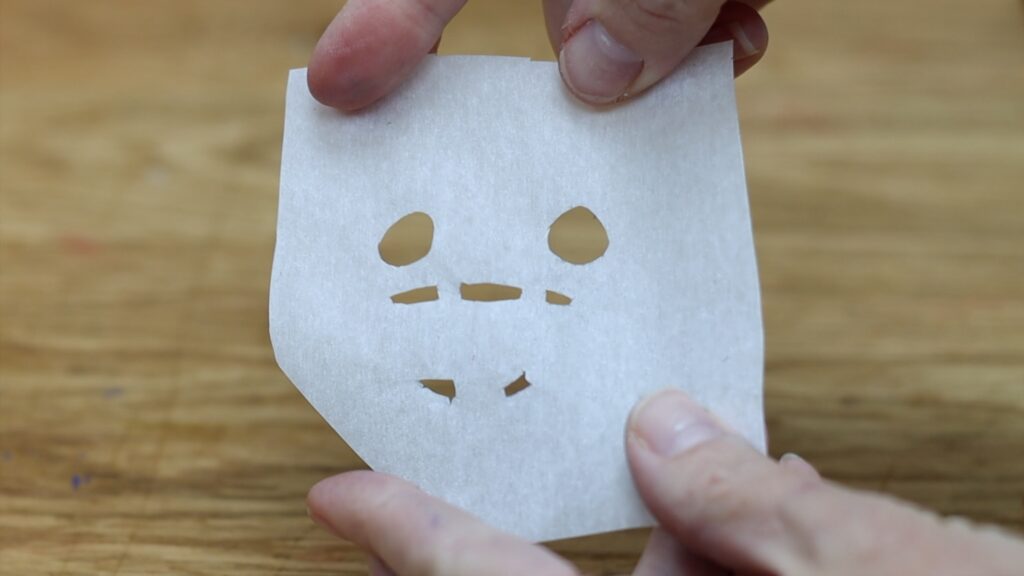
On another piece of paper, or a different part of it, outline all the parts of the next colour. I'm outing the purple parts: the legs, arms, head, and circle on the vest. You only need to draw around the outer edge of each part, ignoring any details within it.
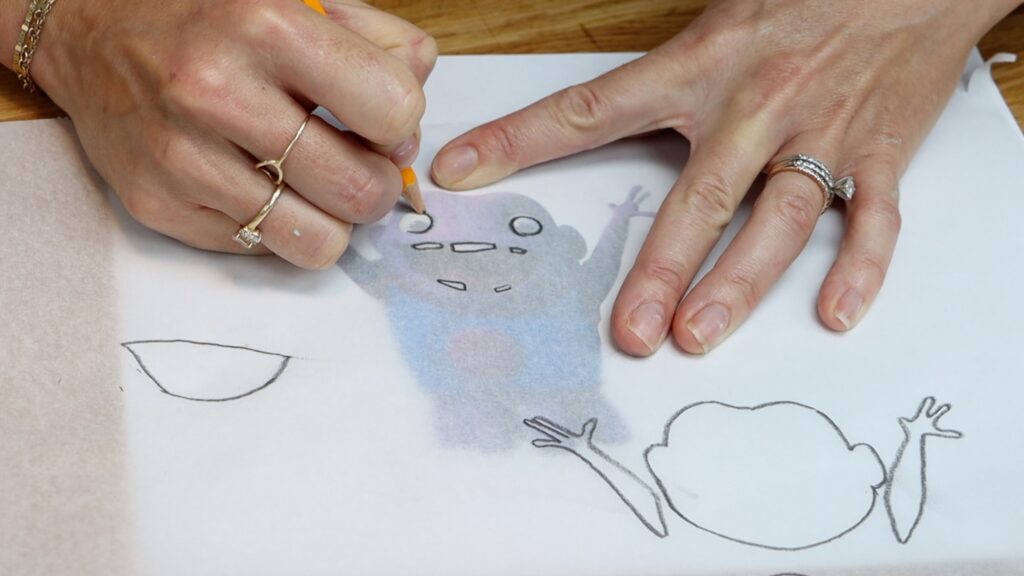
Continue with the rest of the details, making a separate stencil for the details of each colour. For my character, the grey mouth is one stencil and the white eyes and teeth are another.
When you finish, you'll have a different stencil for each of the colours. If you’ve traced everything onto the same piece of paper, cut them into separate stencils now. Leave at least an inch of paper around the details of each stencil so that you have room to spread your buttercream without going over the edges of the stencil.
Cut all of the details out, leaving the surrounding paper intact. I snip the middle of each shape and push one scissor blade through that and then cut around the outline.
How to use layered stencils to make characters on cakes
Your cake needs to be in the fridge for at least an hour before the next step. The frosting should be cold a firm. This technique only works with frosting that sets when it gets cold, like my 4 Minute Buttercream. Your first stencil should be one of the background colours that’s going to have smaller details on top of it.
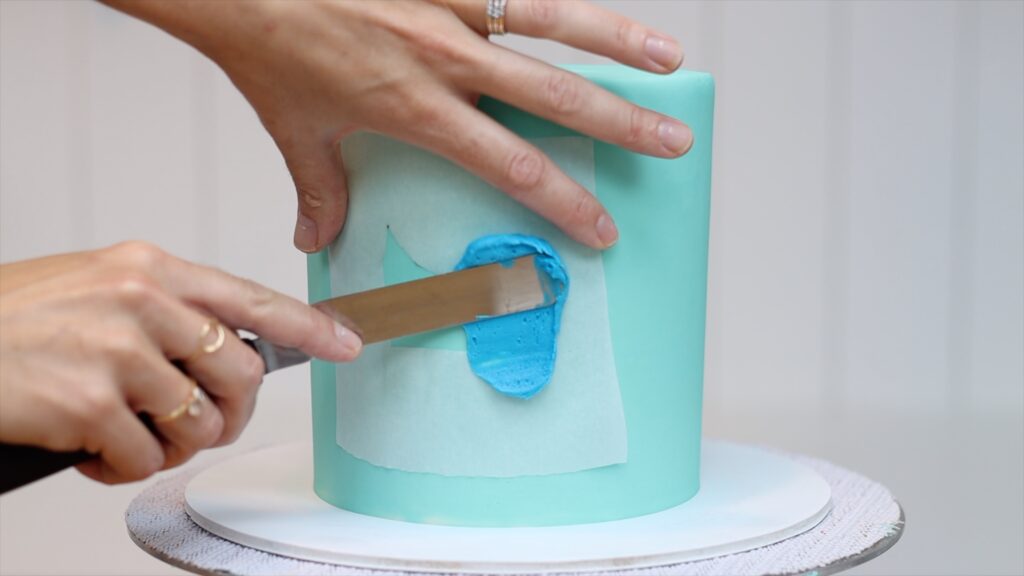
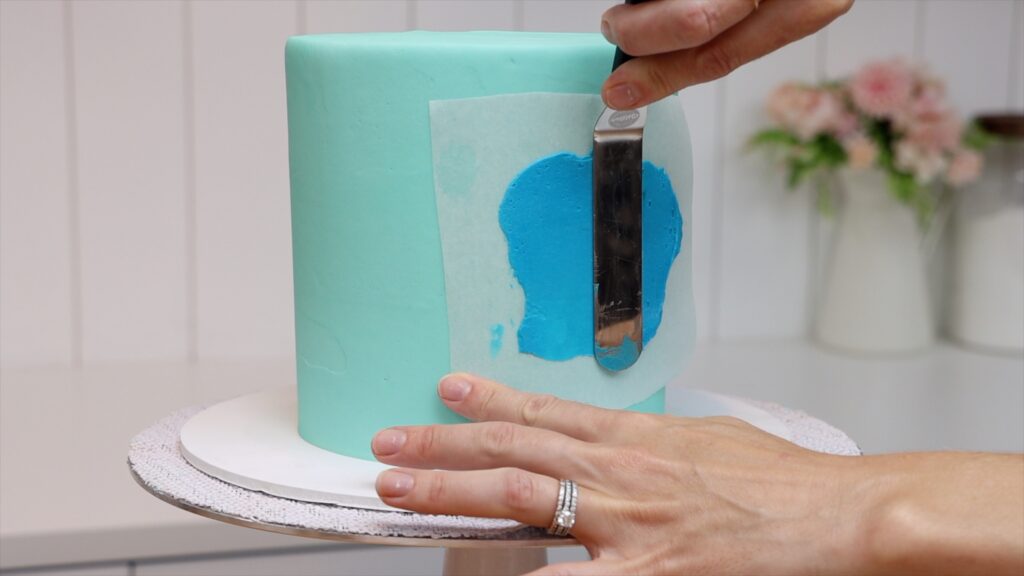
For simple stencils with just one shape, press the stencil against the cake with your fingers. Hold it in place while you spread frosting over it. The frosting you spread will hold the stencil in place while you cover the shape.
Then scrape sideways to take off the excess frosting to leave a thin, smooth layer behind.
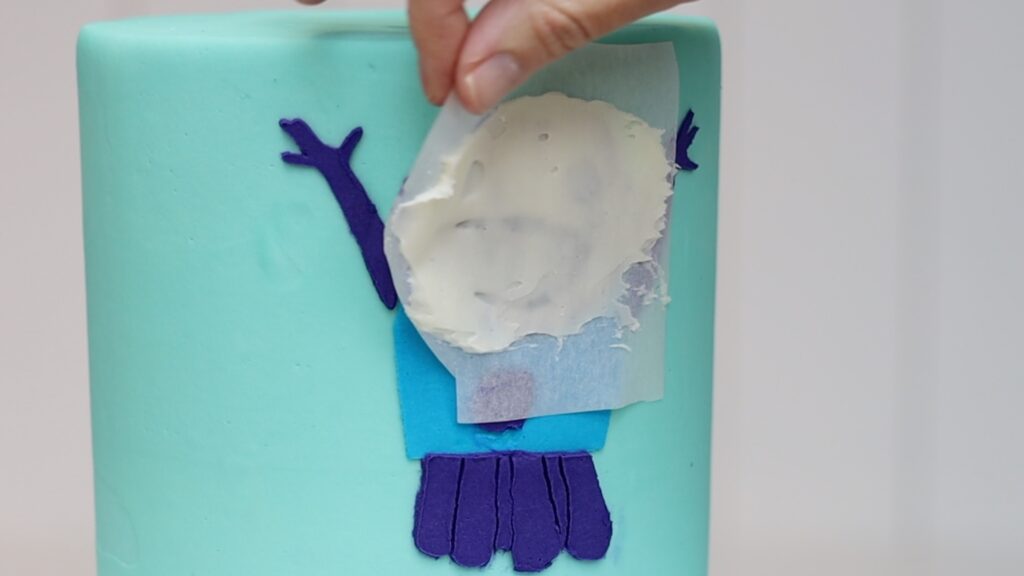
Peel the stencil off straight away and you’ll have that shape on your cake! Now put the cake in the fridge for about 15 minutes to set this shape. Then wrap your next stencil around the cake, lining it up over the details already on the cake.
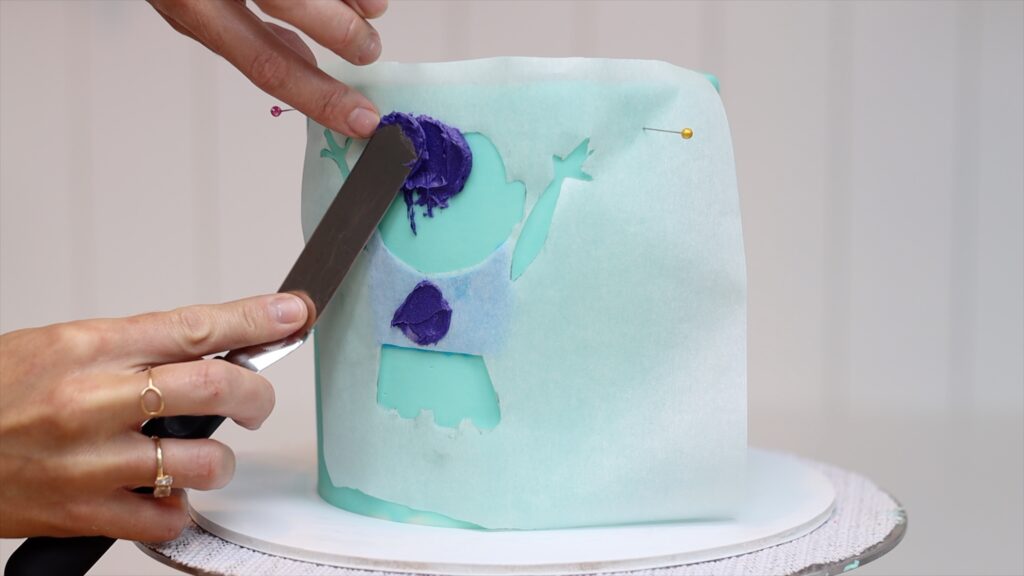
For stencils with several shapes, it’s best to pin the corners of the stencil against the cake. It will take longer to spread buttercream over multiple details and using pins gives you more time to do this. If you press the stencil with your fingers instead, the warmth of your fingers will melt the frosting and you'll leave fingerprints behind.
The stencil needs to be pulled tight so that it’s pressed flat against the frosted cake. It it's loose, it will move around as you spreading frosting over it. Those movements will cause smudges of colour on your cake.
Scrape over the stencil a few times with a spatula to smooth and flatten the frosting you spread on. Spread more frosting over any indents or shallower areas and then scrape again. For the best results, you need the frosted details to be really smooth.
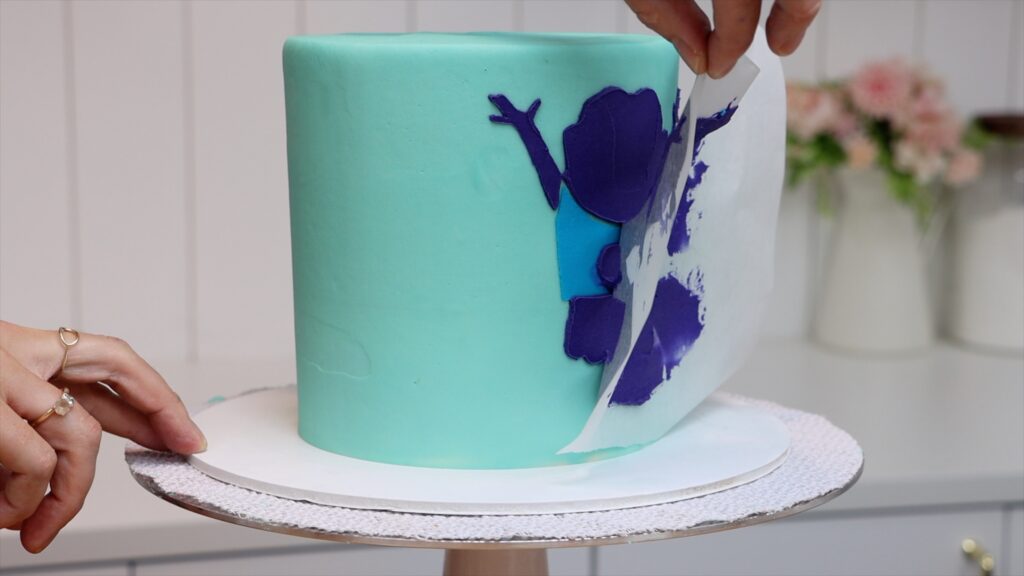
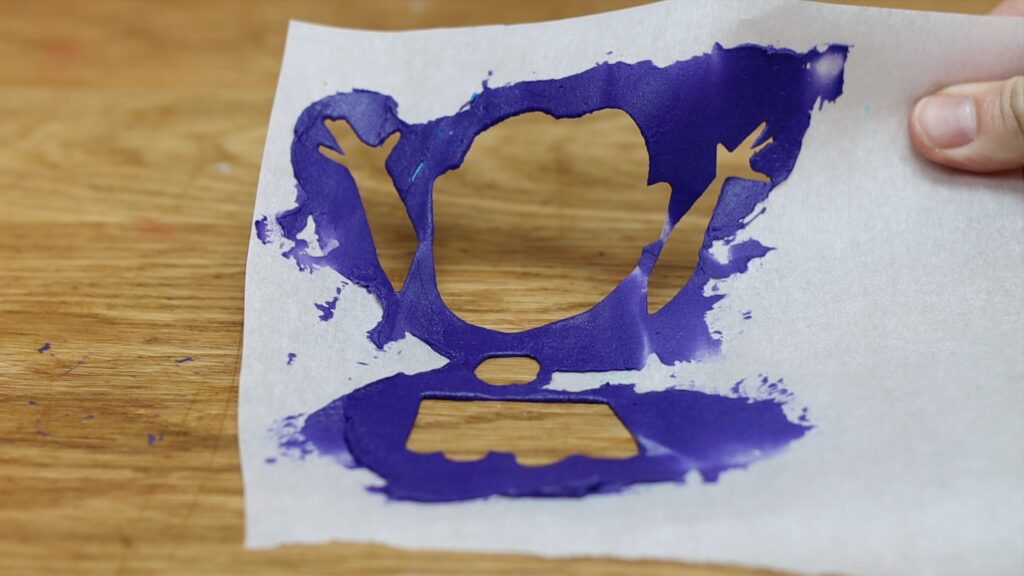
When you peel the stencil off you’ll have another layer of details of the character on your cake. The stencils look quite fun after using them! You could wipe the buttercream off and re-use the stencils if you wanted to make this character again.
Tips for the neatest results with layered stencils
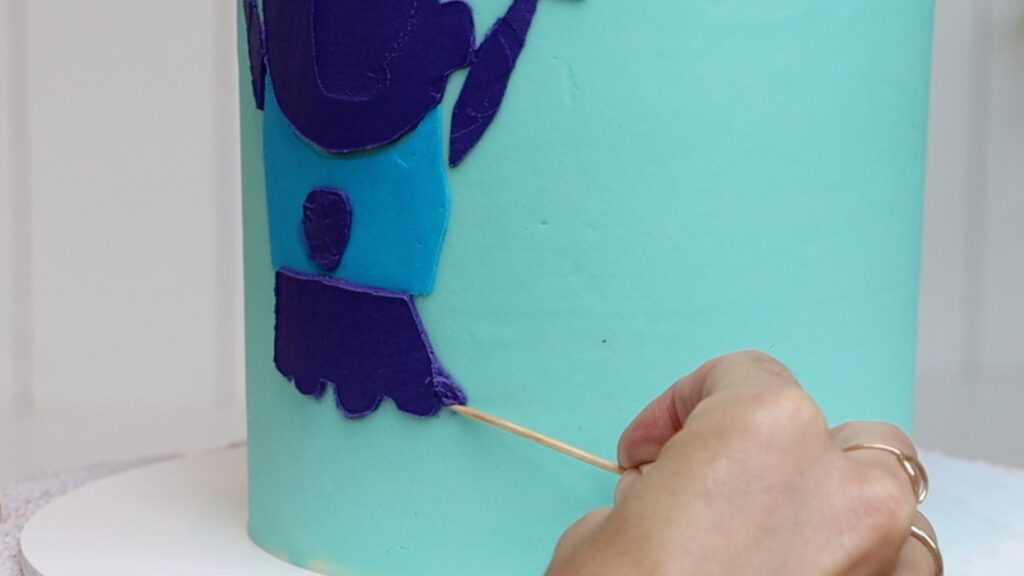
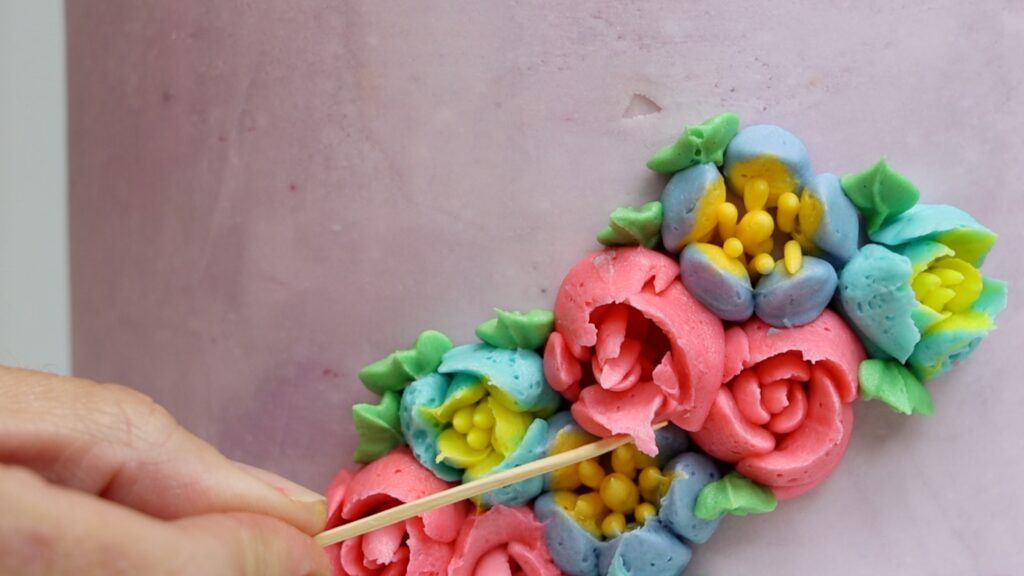
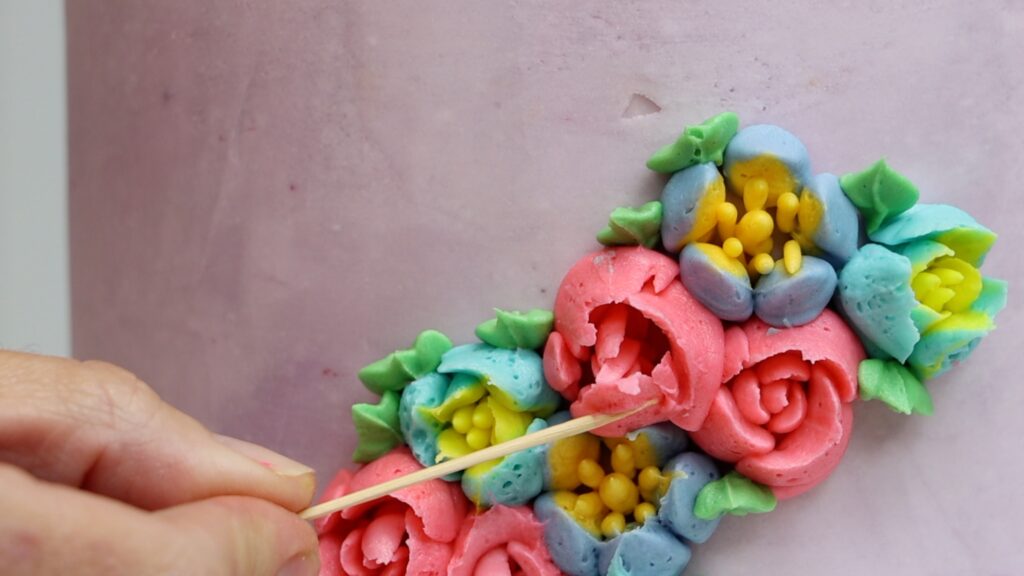
Use a toothpick for touch-ups
If any of the layered stencils move while you're spreading frosting over it, it will smudge onto the cake. The circle on the alien's blue vest has smudged on my cake and so has one of the legs. These smudges are easy to touch up with a toothpick by scraping off the smudged colour.
Leave a thin layer of frosting on each of the layered stencils
The thinner the layer of frosting you leave behind on the stencil, the neater it will be. Peeling the stencil away from a thick layer of frosting is almost always messy! Thick buttercream will pull away with the stencil and leave uneven texture around the edges of each shape.
Use small scissors to cut small shapes in your stencils
It can be tricky to cut out small shapes like these eyes and teeth. It’s useful to have a really small pair of scissors, like sewing scissors, to angle the blades around the curves. If curved shapes like circles are cut with little jagged lines, that jagged shape will transfer onto your cake. Taking your time to cut the shapes out neatly is really worth it for this technique.
White details need to be thick
For white shapes, the frosting might need to be thicker than normal. You’ll see any darker colours underneath through a thin layer of white frosting. If the thick buttercream pulls away with the stencil, use a toothpick to smooth those edges.
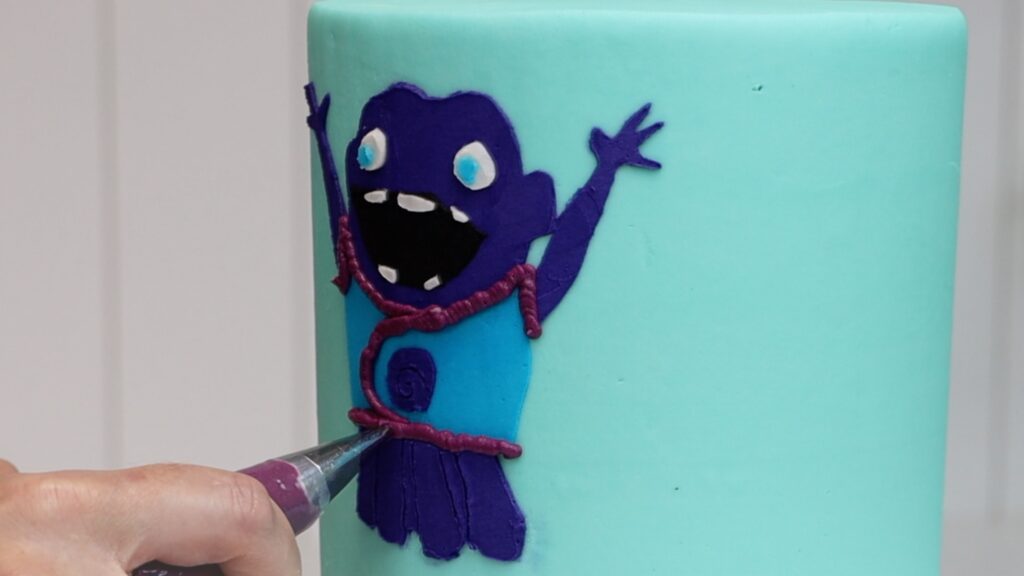
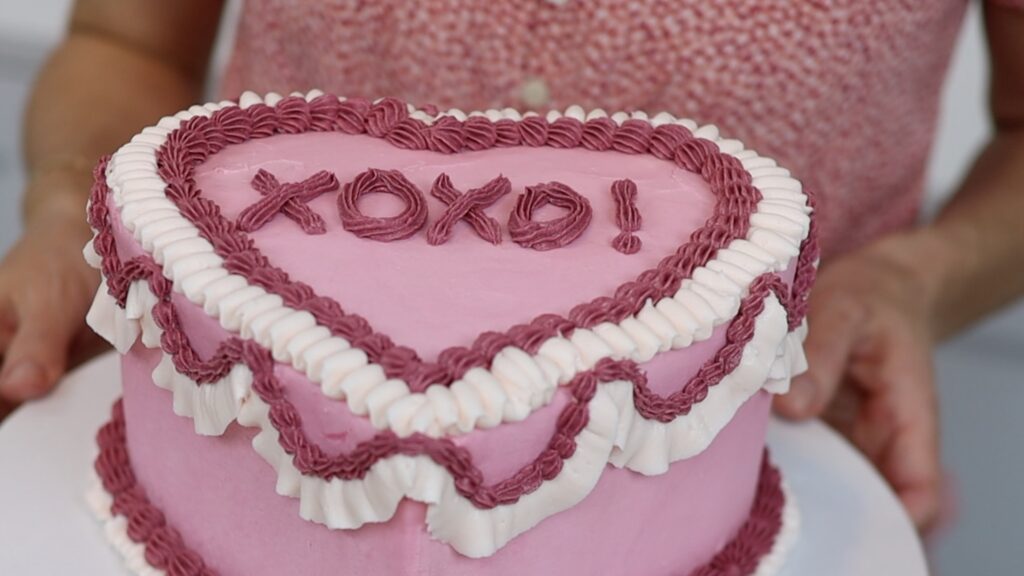
Combine layered stencils with piped details
Layered stencils are excellent for creating smooth, flat details. For texture and dimension, pipe some details onto the cake too. This works well for fabrics like the ribbing around this vest.
I don’t recommend piping on details like the eyes or teeth. Those look better when they lie flat against the cake.
For very thin details like eyebrows, use a toothpick to scratch them into the buttercream. You can also use toothpick to add texture to buttercream, like on the purple ribbing on the vest.
How to decorate the rest of the cake
Add characters made with layered stencils on top of any flat frosting, for example ombre frosting or buttercream stripes.
If you plan on piping onto the cake, for example a buttercream border, do that after creating the character. If you pipe first, you might knock the piping with your stencils and damage it.
I used a 4B open star piping tip to pipe the borders on this cake:
By using layered stencils you'll have a delicious edible character that looks exactly like the original!
Tell me in the comments which character you’d like me to do next!
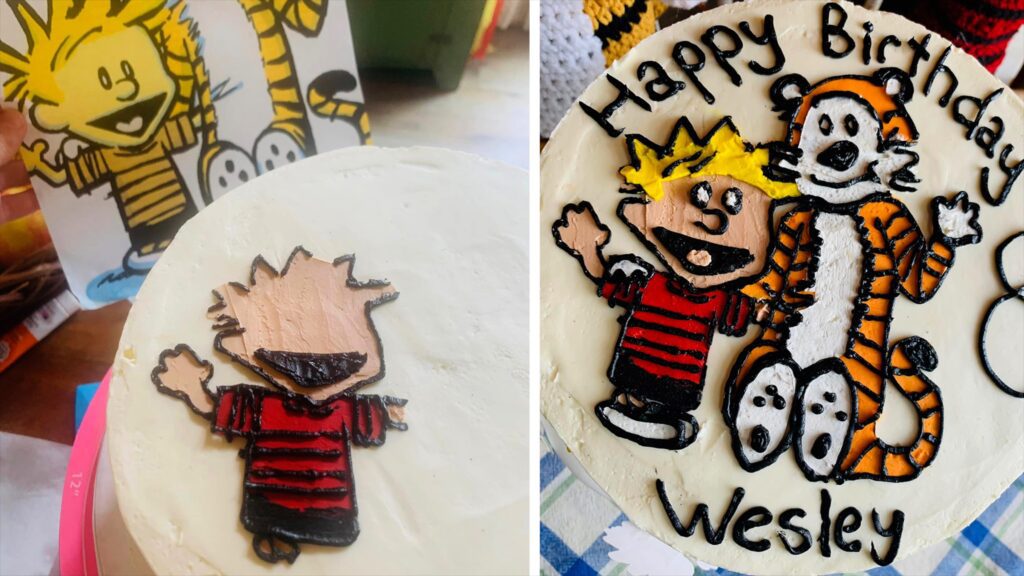
Here’s a Calvin and Hobbes cake made by Chelsea of Generation Bakes, one of my cake school members, using this same layered stencil technique. This is one of the many techniques in my online program called Layer Up, where you work through three layers (or levels) of video modules to take your cake decorating skills from beginner to professional. Start your 7 day FREE trial of my All You Can Cake membership, which includes access to everything on my cake school, to try it out with no risk!
Every cake design looks better with smooth frosting so in this tutorial I'll show you five hacks to get super smooth frosting on your cakes.
What tools do you need for smooth frosting?
Ideally, you'll need a turntable, an offset spatula, a cake comb and whatever frosting you're using. I use my 4 Minute Buttercream for all of my cakes - it's delicious, quick to make and easy to get smooth. If you don't have a turntable, try this turntable hack!
Smooth frosting on the top of the cake
First, generously spooning frosting onto the top of the cake. Spread it to push it out over the edges of the cake. This will give you sharp angles later from the top to the sides of the cake.
Now here's the hack: hold your offset spatula at a 45° angle as you spin the cake on the turntable. This will collect the excess frosting which you'll then whisk away on your spatula. You'll leave a smooth surface on top of the cake.
Build a wall or lip of frosting
For the sides, the most important hack is to build a wall or lip around the top edge. If your frosting is already sticking out sideways this will naturally push upwards as you spread from side to side.
If not, you'll need to push diagonally upwards as you spread the frosting. You need it to stick up above the top of the cake all the way around. Without this wall or lip you'll get gaps or air pockets or indents around the top edge.
The white frosting you can see already on the cake is the crumb coat. If you're not sure how to get up to this point, see my tutorial on How to Crumb Coat a Cake. Spread the frosting all the way down the sides of the cake to the cake board.
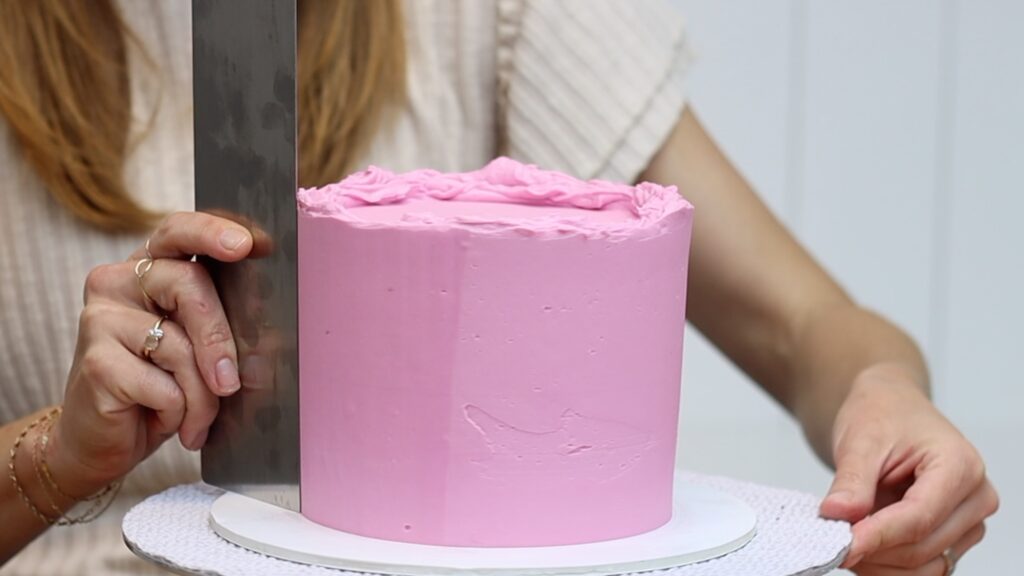
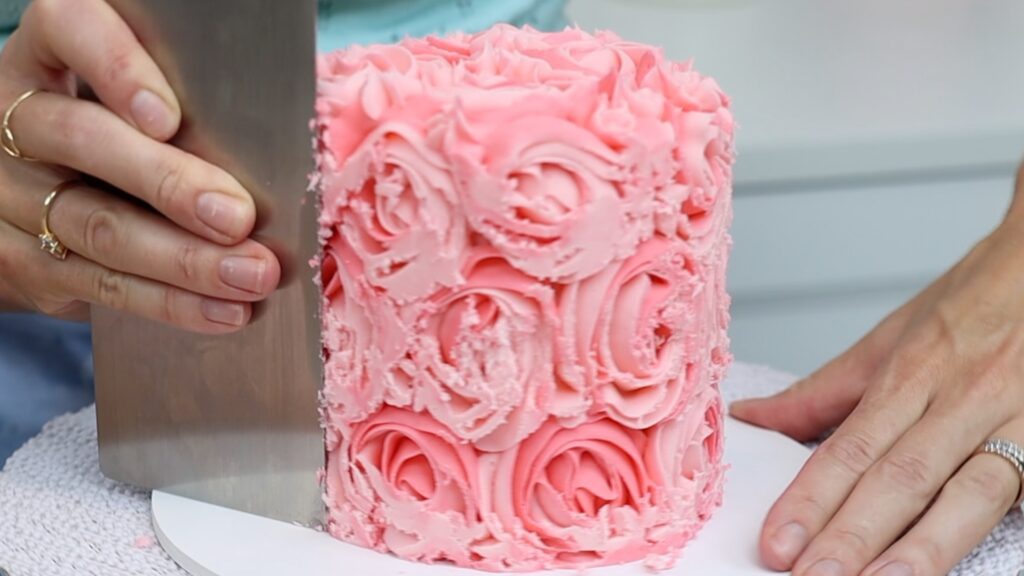
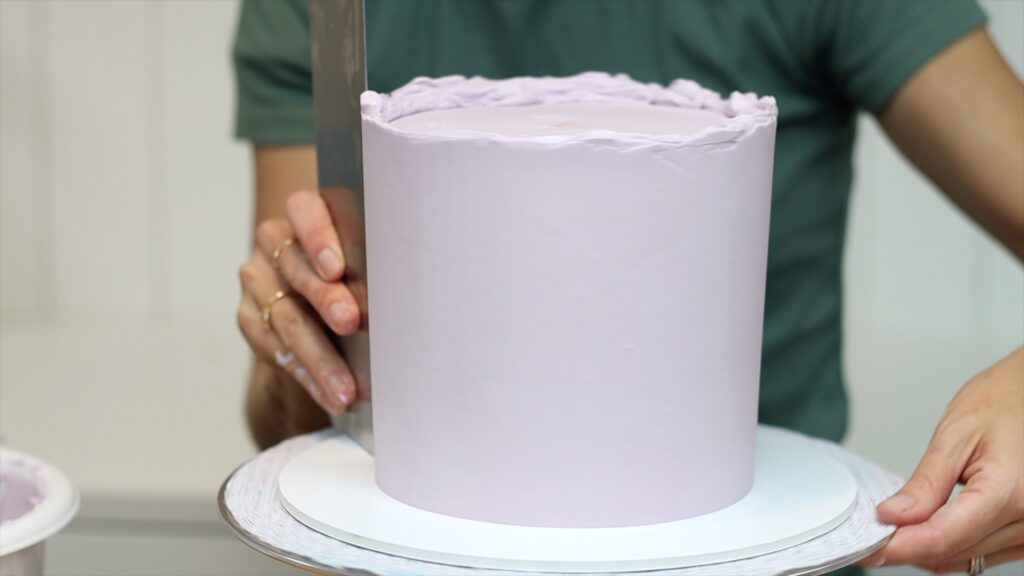
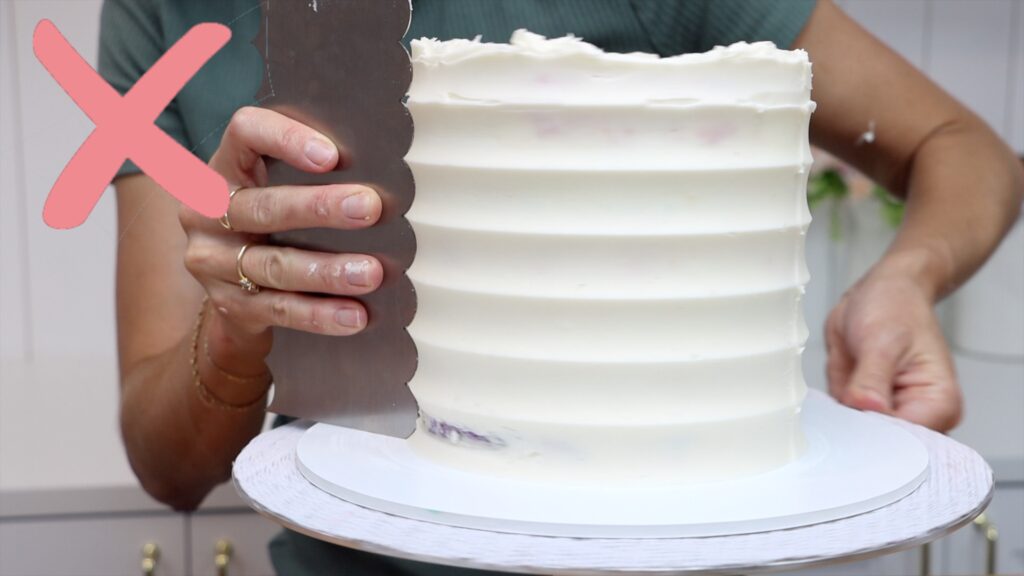
How to hold your cake comb for smooth frosting
When the frosting covers the cake from top to bottom, you shouldn't be able to see the crumb coat anywhere. Now switch to a cake comb to scrape around the cake to smooth the frosting. The hack here is how to hold the cake comb. Push down on the cake board with your cake comb to line it up straight against the sides of the cake. This will give you straight sides instead of sloping or slanting or leaning sides. Notice that I'm holding the cake comb at an angle against the cake. The edge of the comb isn't pointing directly towards it.
After each scrape, use your offset spatula to take any frosting off your cake comb. Use this frosting fill in any gaps or indents on the cake.
Then scrape around the cake again with a cake comb to smooth those parts. Do this a few times until the frosting is not perfect but fairly level and straight.
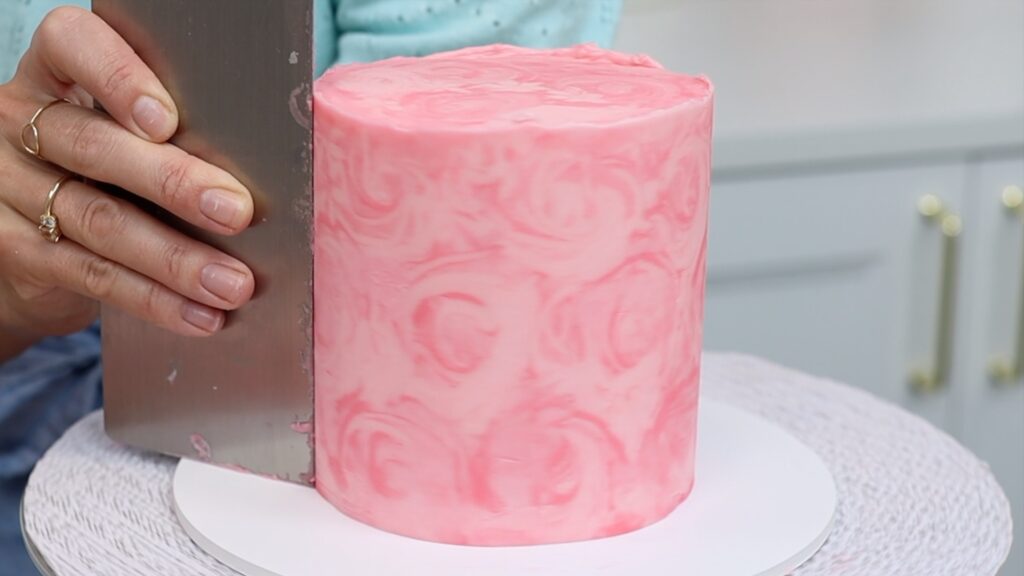
Using a metal cake comb for smooth frosting
Once you have almost smooth frosting, with only shallow imperfections, you're ready for the fourth hack. Use a warm metal cake comb. You can dip it into a pan of hot water or hold it under hot running water. Or run a blowtorch along the edge, which is my favourite method. Rub the comb with a towel to dry it off and cool it down slightly. You want it to be warm, not hot.
Then scrape around the cake with it. The warm metal will glide over the frosting, dragging it around the cake to fill in any tiny air bubbles in the frosting. Do this a few times, making sure the metal is never hot because heat changes the colour of the frosting. The warm metal cake comb will leave a perfectly smooth surface behind.
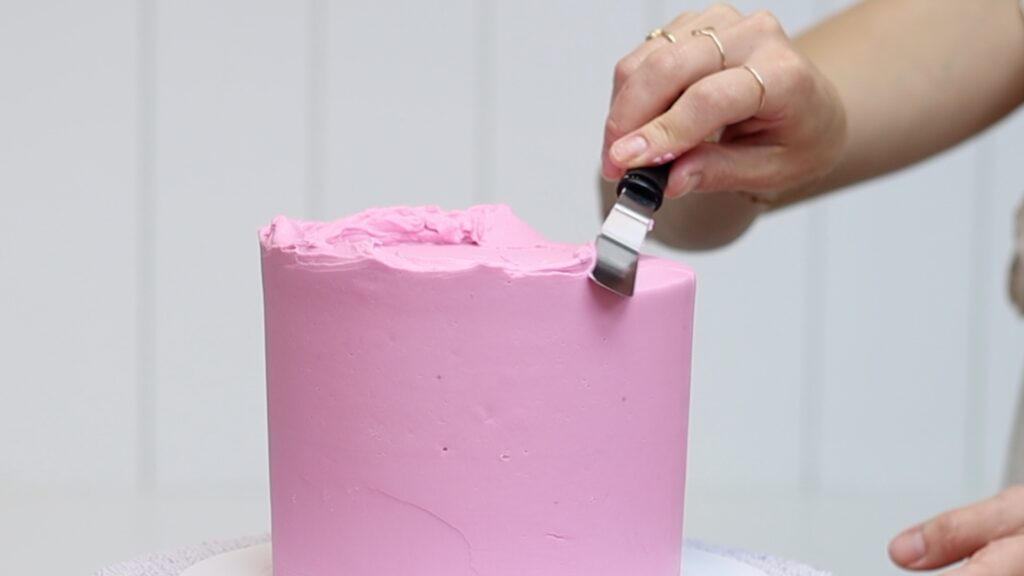
How to get a sharp top edge around the cake
Lastly, it's time to level the top edge, where the buttercream wall or lip is sticking up. I like to do this with my offset spatula, swiping and wiping. What does that mean? Hold your offset spatula level with the top of the cake and push sideways. You'll push that wall or lip of frosting over the edge and then swipe it away on your offset spatula.
Afterwards, scrape the frosting from your offset spatula into your bowl. Then wipe the spatula clean on a towel or paper towel. If you don't wipe before you use it again, you'll drag dregs of buttercream back onto the top edge. This will leave little lines of texture along the edge.
The natural reaction is to push down to get rid of this buttercream that's sticking up but don't do it! Push sideways because if you push down you'll cause a bulge in the frosting on the sides of the cake.
Work your way around the top edge of the cake, swiping and wiping, to flatten and level the frosting. With these motions against a frosting lip or wall, you'll create sharp angles from the side to the top of the cake.
Five hacks for smooth frosting on cakes
So, here are the five hacks for smooth frosting on cakes:
Hold your offset spatula at a 45° angle to smooth the top of the cake
Spread upwards to make a wall or lip of frosting above the top edge of the cake,
Push your cake comb down on the cake board to line it up for straight sides on your cakes
Use a warm metal cake comb to remove air bubbles and leave a super smooth surface on the sides
Push sideways and then wipe your offset spatula as you work your way around the top edge of the cake.
I hope this has been useful! Ask me any questions in the comments and if you want to dive deeper into how to make and frost and decorate cakes using buttercream, visit my cake school to start your 7-Day FREE trial of my All You Can Cake membership, which gives you access to everything on my cake school. You can start wherever you need to and learn the skills and techniques to take your cakes to the next level. I hope to see you there!
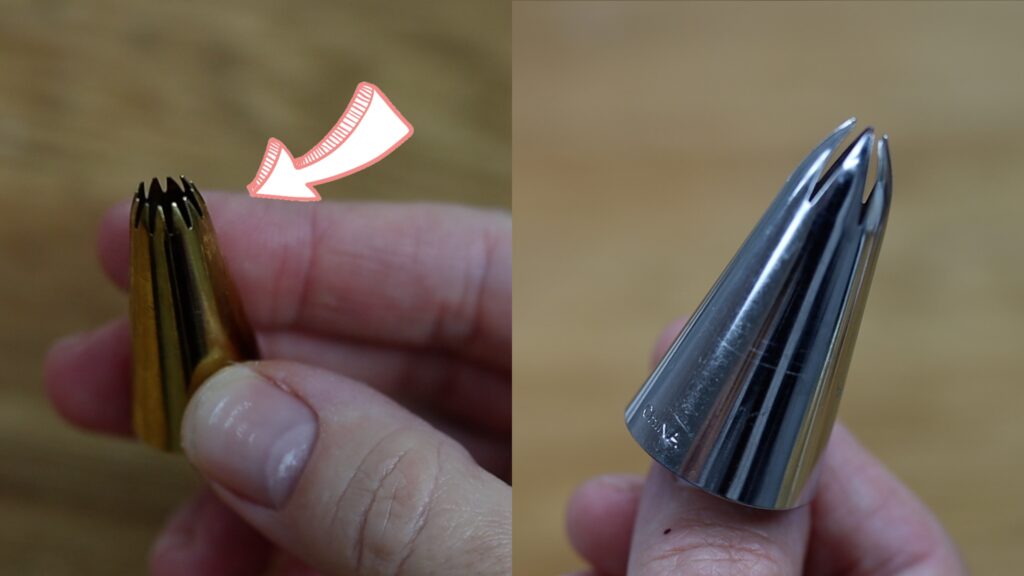
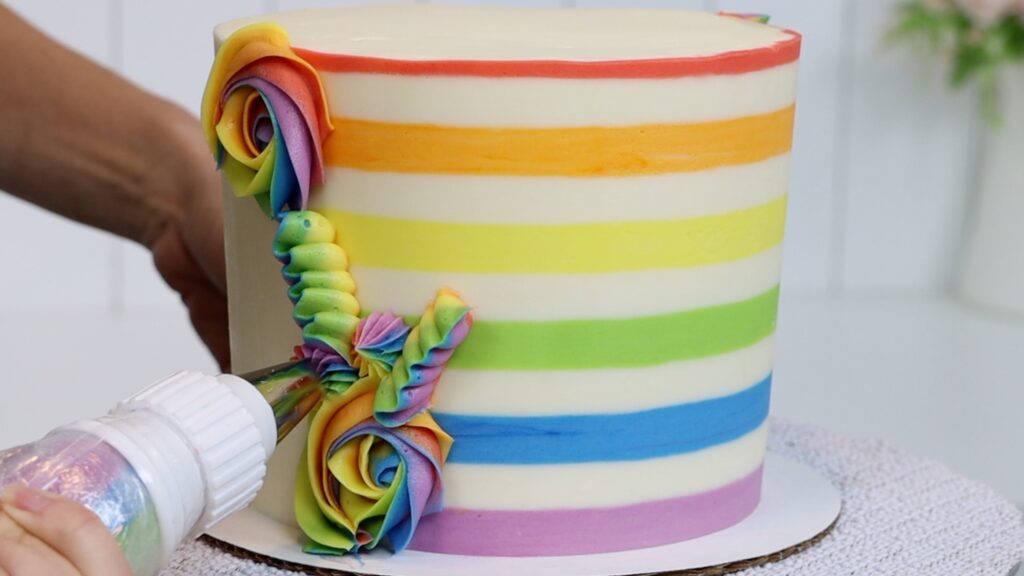
Which are the best piping tips to buy? There are so many piping tips available but some are more useful and more versatile than others. In this tutorial I’ll show you my best 10 piping tips and also how to use them!
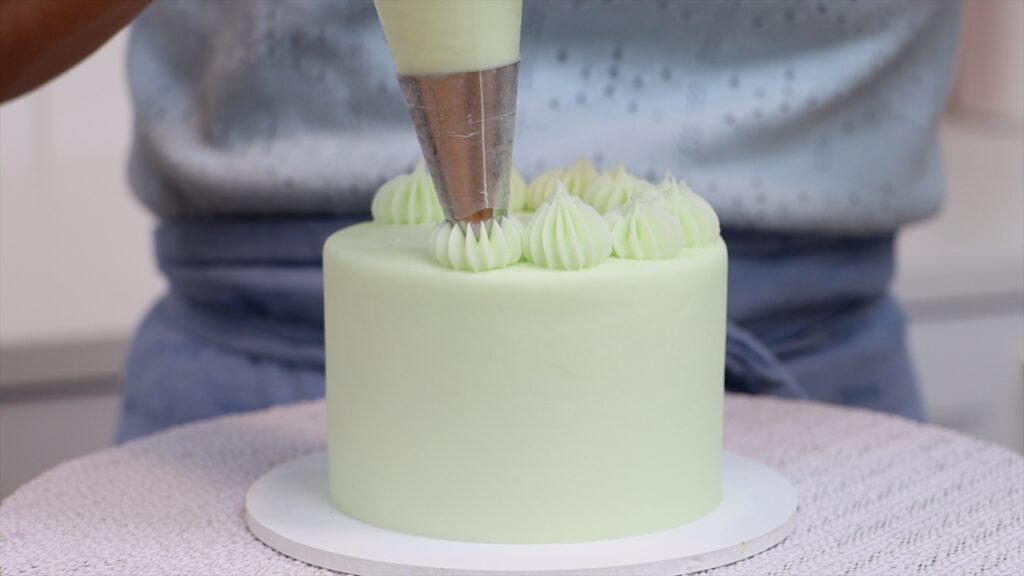
1M star tip
A 1M tip is usually the first one you buy, to pipe swirls onto cupcakes. It has long prongs that come together to make a star shape at the end. You can pipe these same cupcake-style swirls onto the top of cakes, too.
Instead of these tall swirls, try piping two circles, spiraling upwards so that one is on top of the other. Pull your piping tip away from the swirl in the same direction, at the same point for each swirl.
These short swirls work really well on naked cakes like number cakes too. The pretty texture is visible around the sides since there is no frosting to cover them up. And short swirls hold their shape well under the weight of the cake layer on top.
You can use the swirl technique in reverse to pipe rosettes on cakes. Start in the middle and spiral outwards, swiping away when your rosette is as big as you'd like it. This is a quick but pretty way to cover a cake using piping tips. Fill in any gaps with a little squeeze through the same 1M piping tip to make pretty star blossoms.
For a unique effect, freeze these piped rosettes and then scrape around the cake with a hot metal cake comb. You'll reveal a cross section of the piping that looks like fondant or a printed icing sheet.
Pipe rope borders with a 1M tip, making links of buttercream with overlapping circles around the top of a cake. Rope borders are a quick way to add height and texture.
2D star tip
If you already have a 1M tip but want to branch out, I recommend a 2D tip. It pipes a softer swirl than a 1M tip, with more wavy folds. This is considered a closed star tip because of the way the prongs close in around the tip.
You can also use a 2D tip for drop flowers. Squeeze the bag to push the buttercream out and then twist your wrist to let the petals fan out sideways.
You can pipe these straight onto a cake or onto a silicon mat or parchment paper. After piping them you’ll need to chill them in the freezer for 10 minutes so that they firm up.
Pick them up and press them onto a frosted cake. These are beautiful and so easy to pipe, with just a single squeeze through a 2D piping tip! You might also like my tutorial on 15 piping hacks for cake decorating.
Other star piping tips
Continuing with star shapes, do you see how there are more, shorter prongs on this star tip than the 1M?
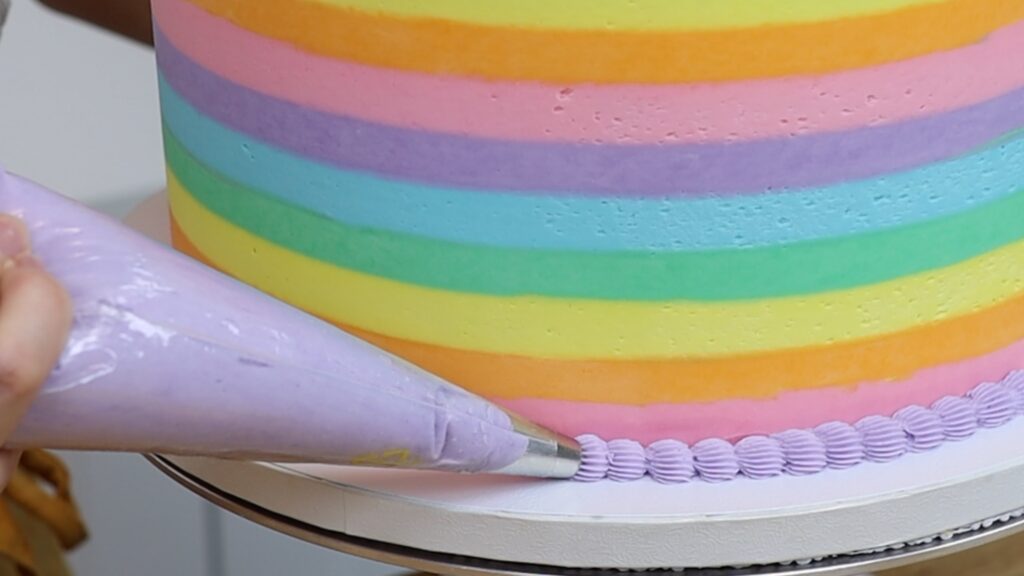
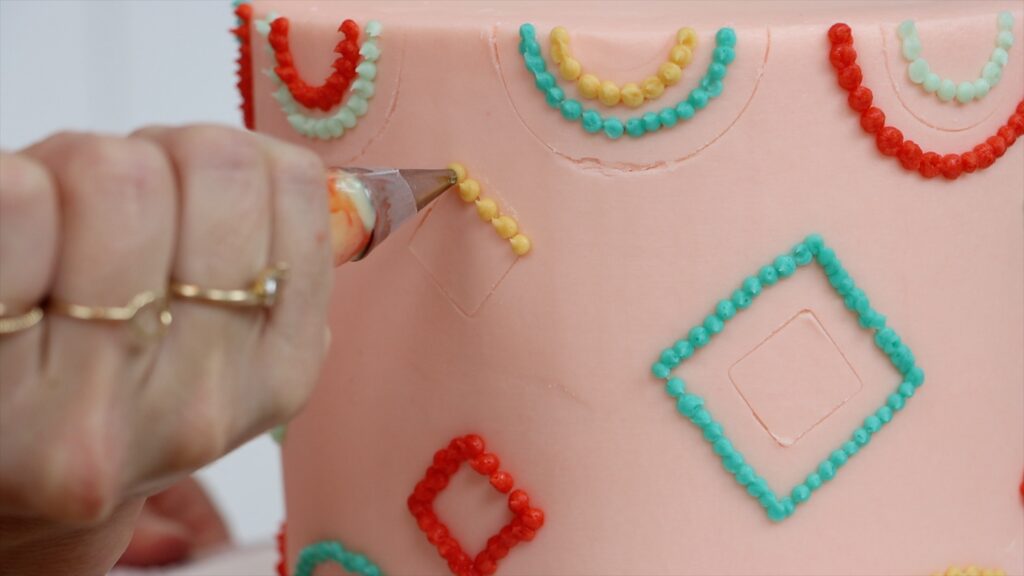
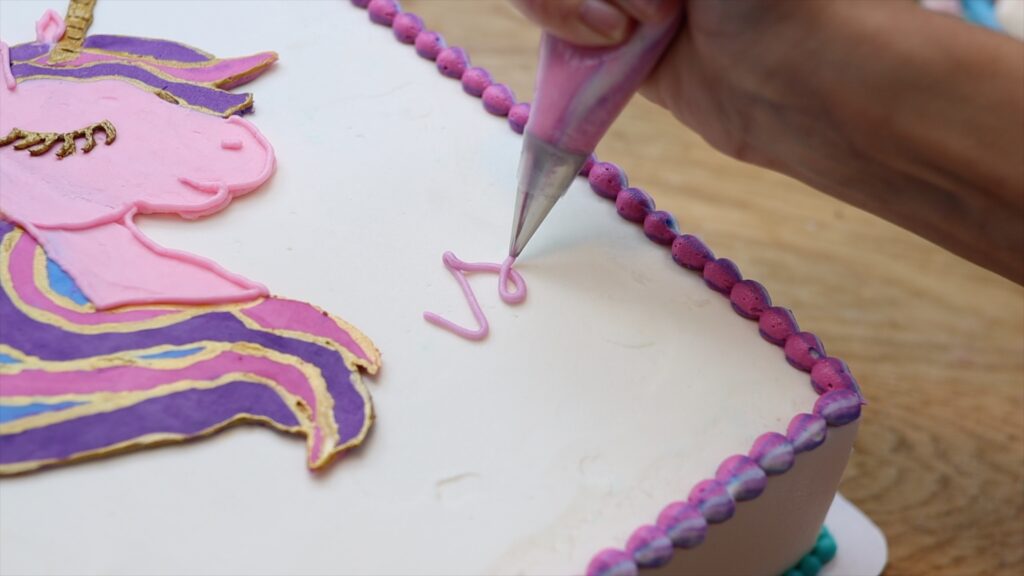
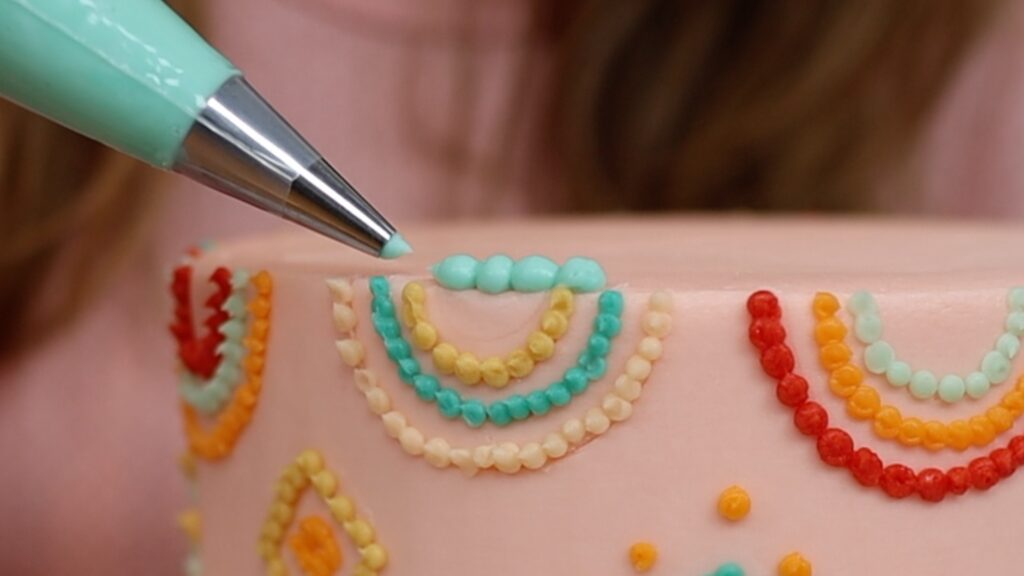
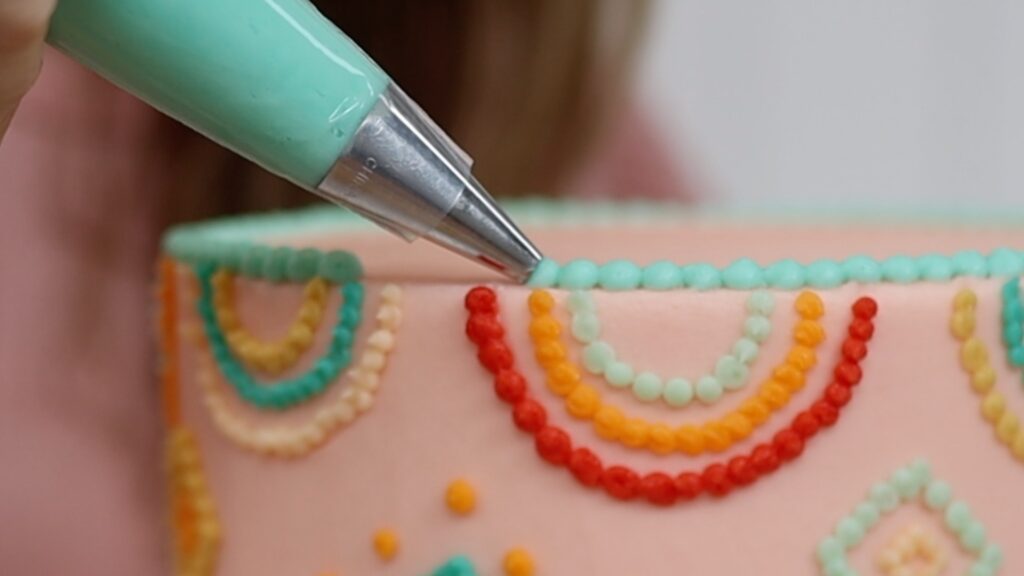
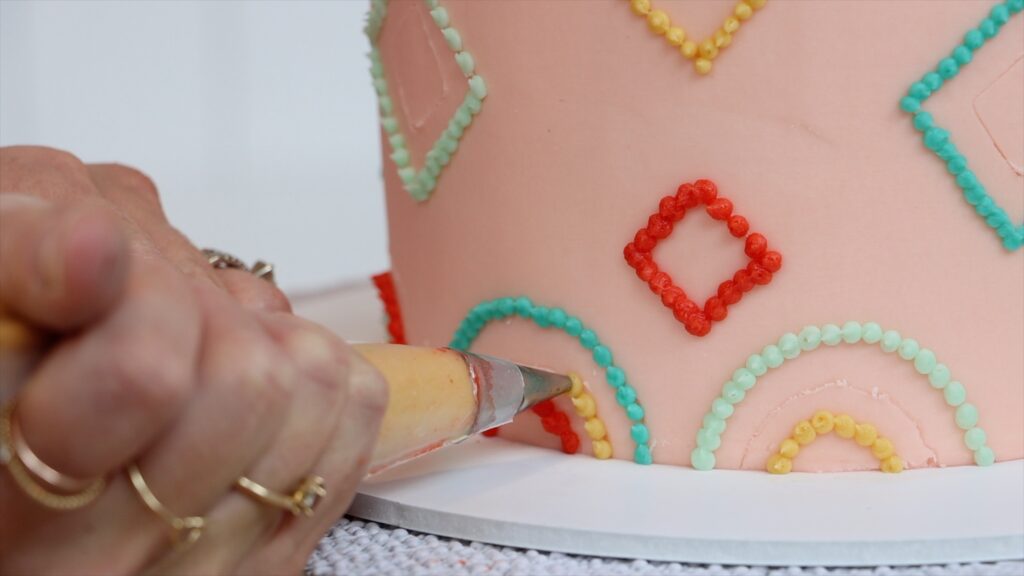
Small star tips like this #32 or a #199 are great for borders. They cover up the join between the cake and the cake board, and also add texture. Squeeze, let the frosting bulge out to form a dot, and then pull away, leaving a tail on the bead.
Repeat to overlap the tail of the previous bead, continuing all around the cake to make a textured beaded border. You can do this around the bottom or the top of a cake, or both!
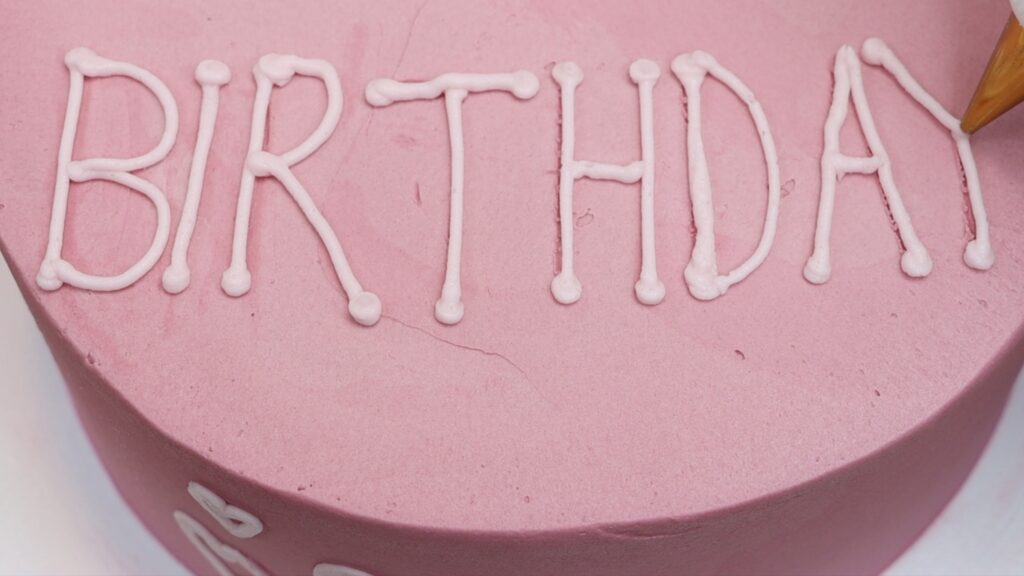
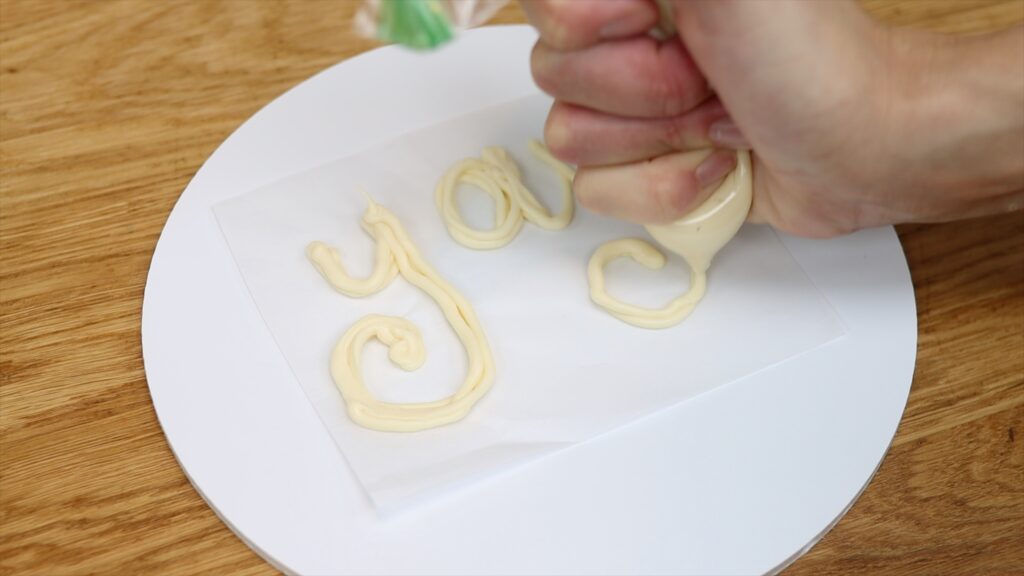
You can also use star piping tips for writing messages. The texture in these letters makes piping them much more forgiving than using a round tip, where every little wobble of your wrist will cause a wiggle in the line that’s really noticeable when the line is smooth instead of textured.
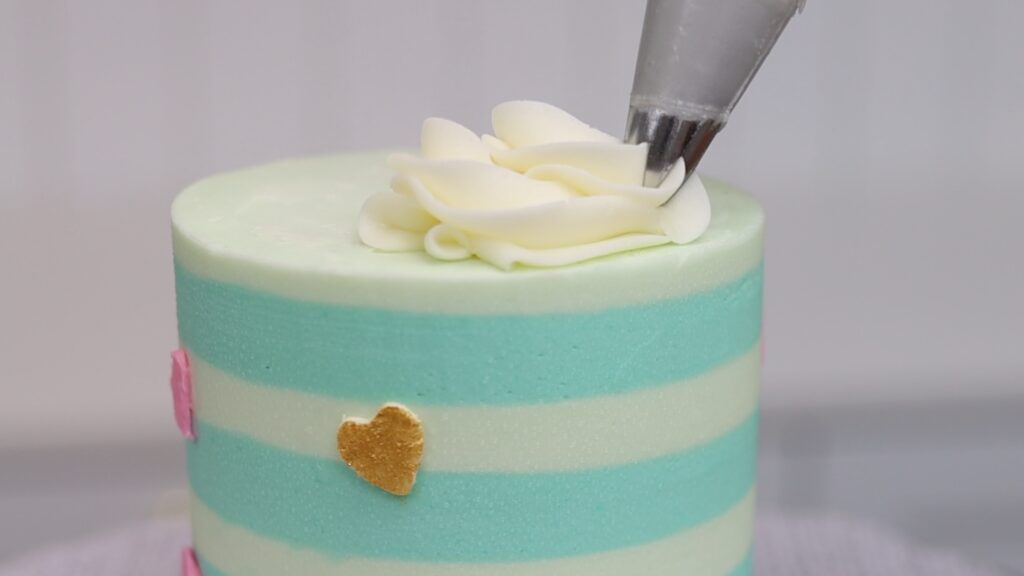
Large star piping tips
Large star tips like a 4B or 6B are great for piping accents and borders on top of a cake. With just a squeeze and pull-away you’ll create quite dramatic texture. The right consistency of buttercream will help make the peaks of these neat. For tips on consistency, check out my 4 Minute Buttercream recipe.
These work well to add detail to the side of a cake, too!
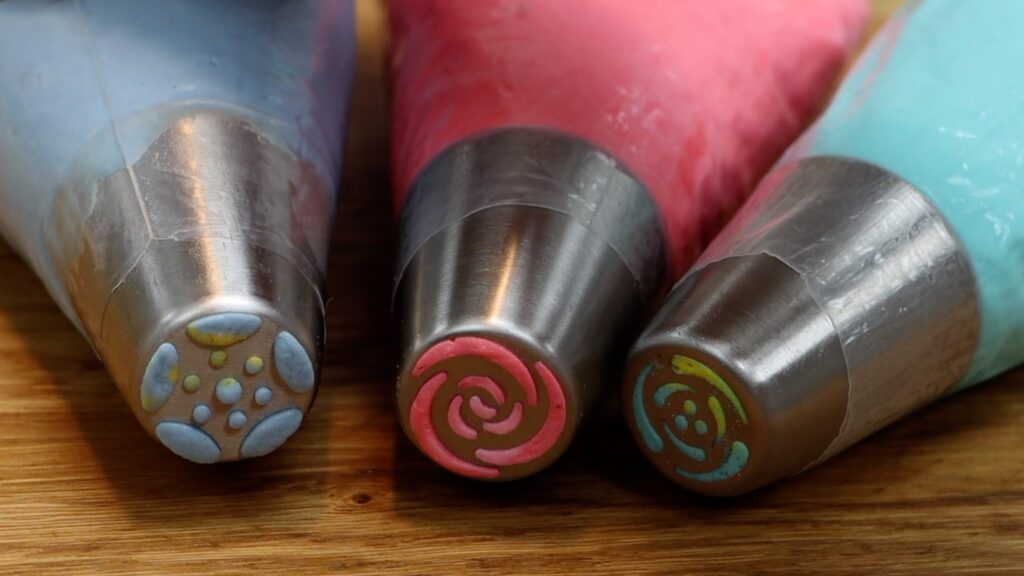
Russian tips or flower nozzles
Russian tips or flower nozzles are very different to the tips you’ve seen so far. Each tip will pipe several different shapes and different colours, too!
Layer different colours within a piping bag, using a different colour around the middle and the outer edge. I like to put the piping bag in a glass, folding it over the rim to hold it open.
As you push the frosting through the tip you’ll create every part of the flower with just a single squeeze! Russian piping tips with several curved lines will make petals that wrap around like on a rose. Any dots in the center will make stamens, which will be the colour in the middle of your piping bag.
The only part of the flower these tips don't make are the leaves. Don’t worry, coming up next there’s a tip for those, too!
Leaf piping tips
A leaf piping tip looks like jaws from the side. As you squeeze the piping bag you’ll push the frosting out sideways to make a leaf. Then when you stop squeezing and pull away you’ll leave a point on the leaf.
You can use this same technique for succulents, piping a ring of these leaves that point outwards. Then pipe another ring overlapping them, adding a few more little leaves in the middle. Squeezing for less time will make shorter leaves.
Small round piping tips
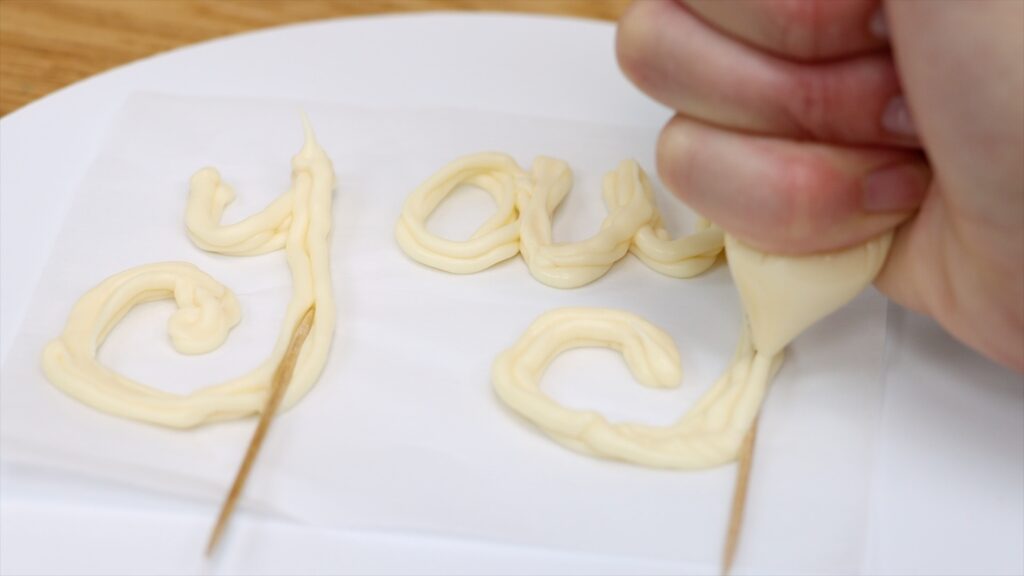
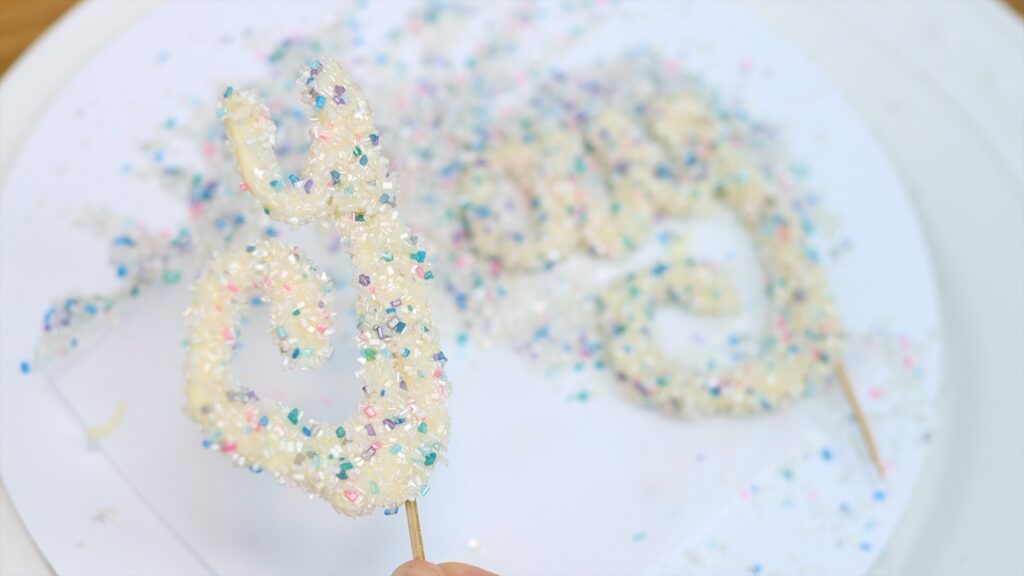
Small round tips include a #1, #2, #3 or #4. These can be used for pointillist designs, where you make shapes with hundreds or thousands of tiny piped dots. Even simple shapes, marked on the cake with cookie cutters or a toothpick, look elaborate when covered with tiny dots.
You can use tiny dots to make messages too, which is great if your handwriting is terrible like mine is! Scoring the letters into the frosting with a toothpick first will help keep your letters the same size and the words straight.
You can write messages with lines too, by squeezing and pulling the piping bag to make letters and numbers.
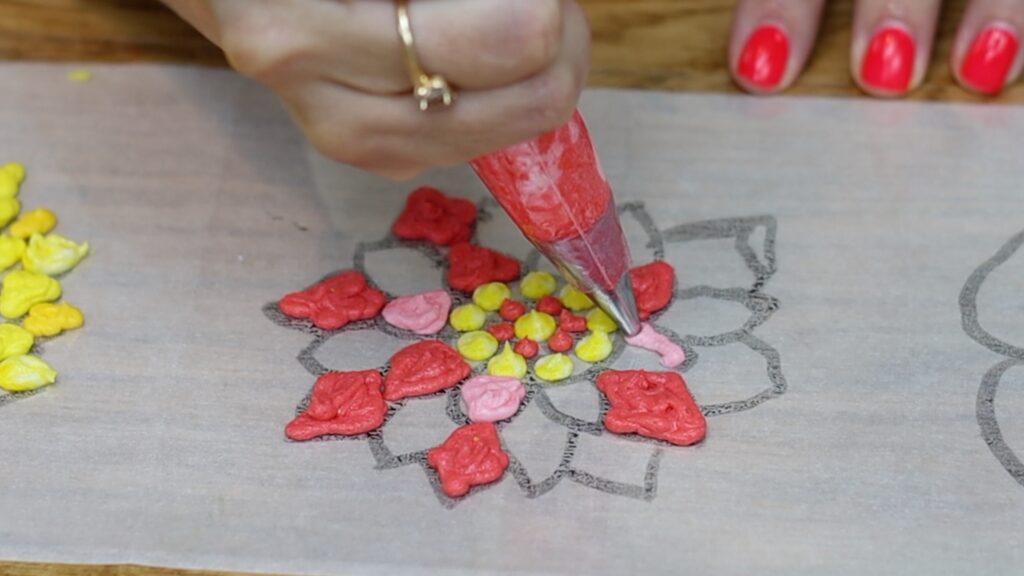
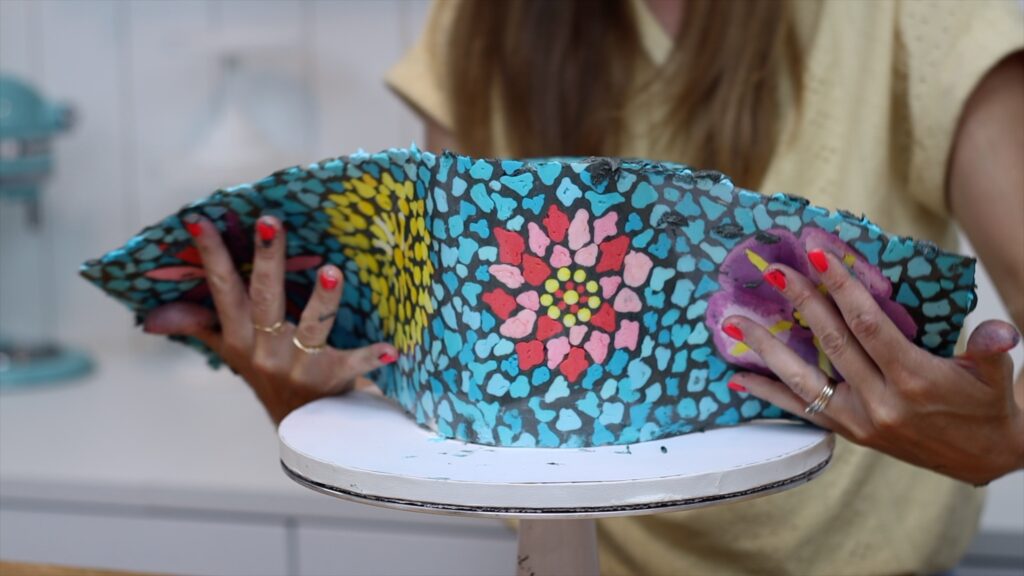
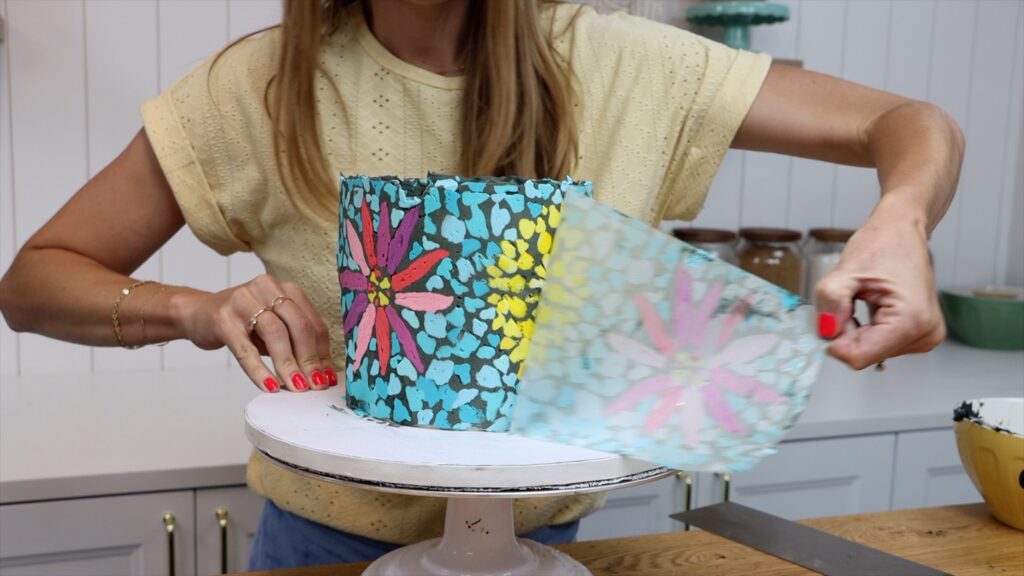
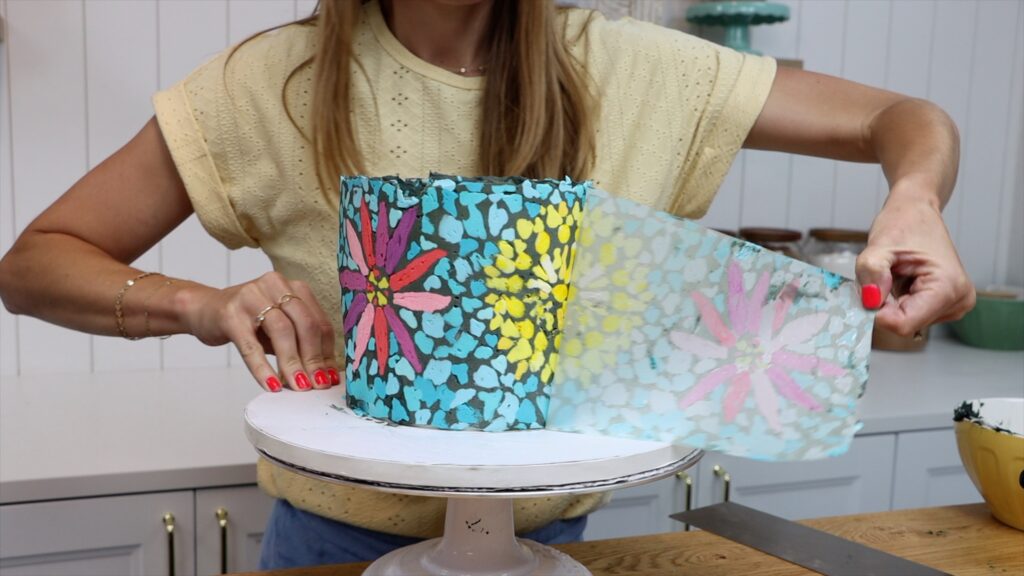
Small round piping tips can create stunning designs by tracing an image using buttercream onto acetate or parchment paper. Then lift it up and wrap it around a cake.
Chill the cake and then unwrap it to reveal a gorgeous design frosted onto the cake! I have a full tutorial on this mosaic cake using piping tips or, alternatively, ziploc bags!
Medium round tips
With a medium round tip you can pipe beaded borders using the same technique as with the star tip shown earlier. Squeeze, hold for a moment and then pull away as you stop squeezing the bag. You'll leave a tail on the dot. Cover up that tail with the next dot, continuing around the cake to make this pretty, dainty border!
Large round tips
A large round tip like a 1A can also be used for borders on top of a cake. Pipe a dot and then release your pressure on the piping bag as you pull upwards. This will leave a peak on each dot.
A large round tip can be used to pipe scallops on a cake, too. Pipe a dot and then swoosh it sideways with an offset spatula or the back of a spoon. This is a quick way to add texture and a great way to avoid smooth frosting, in case you struggle with that!
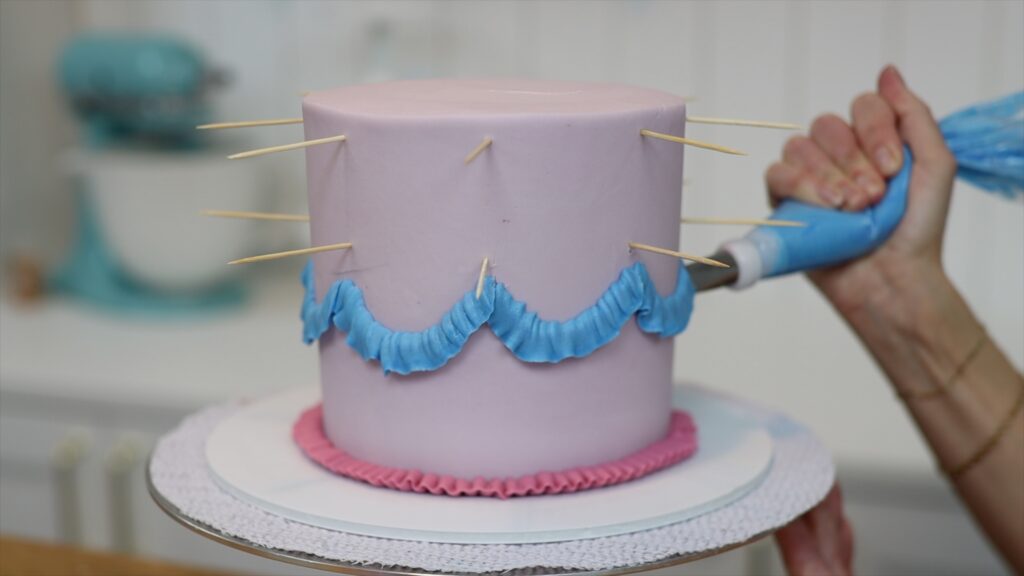
Petal piping tips
Petal piping tips are (of course!) great for piping petals, for example pansies and roses. The narrow end of the teardrop shape creates movement around the outer edge of each petal.
Petal piping tips are also used for piping ruffled frosting in layers going up or down a cake. This is another way to avoid smooth frosting on cakes!
Vintage cakes or Lambeth cakes are covered with layered piping and usually rely heavily on petal piping tips. They can be used for swags or drapes and also for ruffling ribbons.
Tell me in the comments which piping tips you’re going to buy next! Learn hundreds of ways to use piping tips to decorate cakes on my cake school, where you’ll find online courses and memberships to take your cake decorating skills to the next level. You’ll find a free course on 10 frosting techniques there, too!
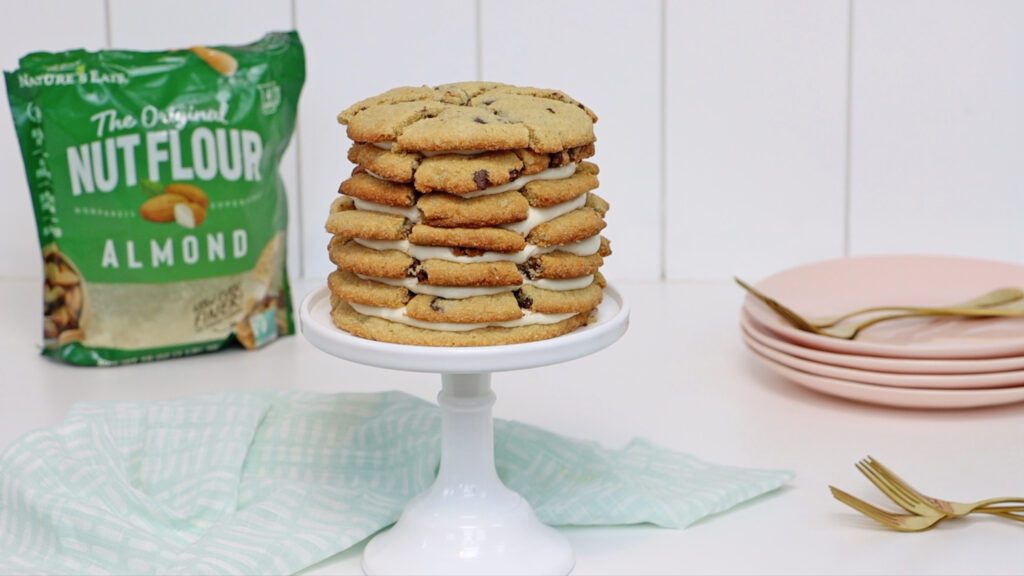
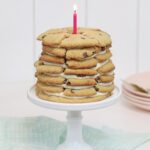
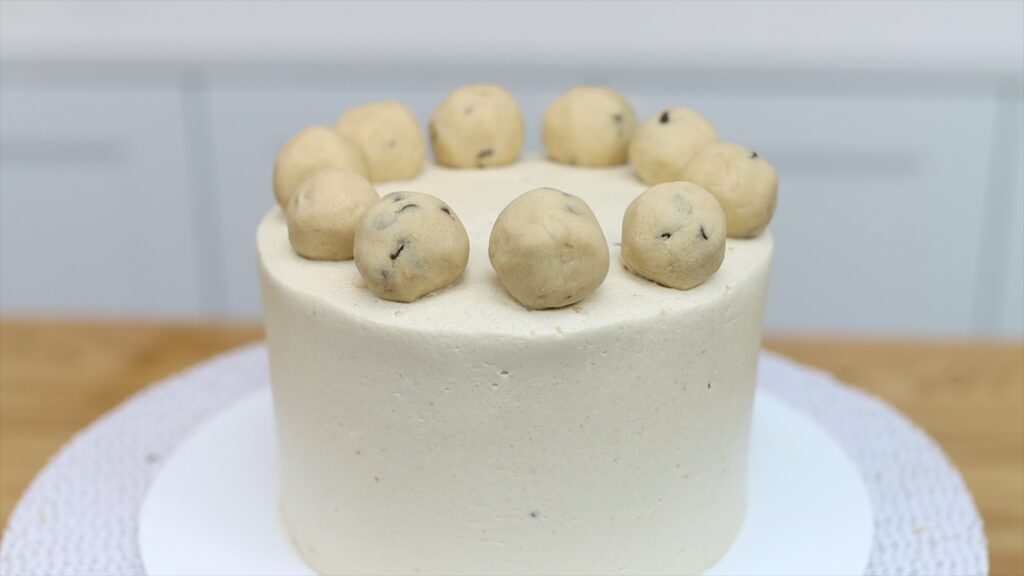
Soft and chewy, gluten-free chocolate chip cookies with crispy edges are layered with creamy buttercream filling for a chocolate chip cookie cake to celebrate any occasion!
Make cookies for the chocolate chip cookie cake
Start by making the cookies with a method to make them perfectly stackable AND easy to serve! I’m using my gluten free chocolate chip cookie recipe but you can use your favourite recipe instead.
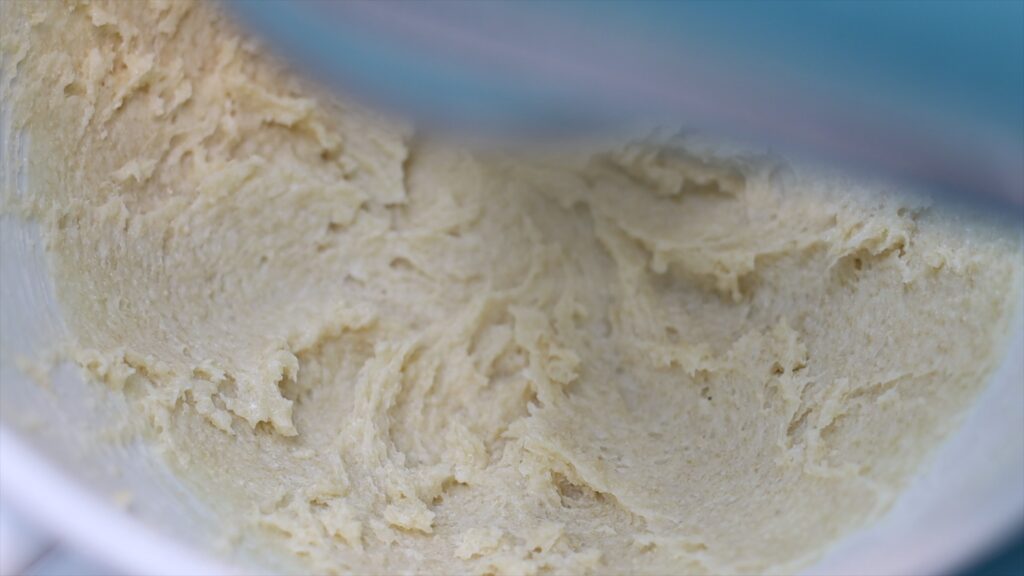
For my gluten free chocolate chip cookies you'll need an electric mixer. Mix butter, sugar and brown sugar at medium speed until it’s creamy, which takes about two minutes.
By the way, the ingredients are listed in grams and measuring cups in the recipe box below.
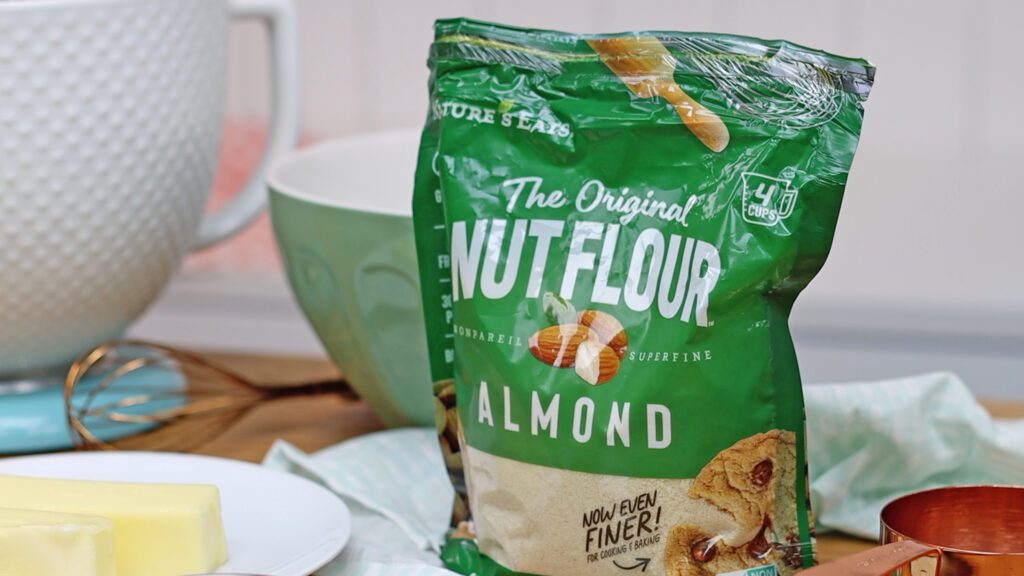
Add vanilla and an egg, mixing at a low speed until everything’s incorporated. Next you'll need the star ingredient, almond flour, which makes this cookie cake gluten free. I'm using Nature's Eats Almond Flour. It’s blanched and superfine, so it’s great for baking. It’s also vegan, low carb, and gluten free, wheat free, grain free and dairy free!
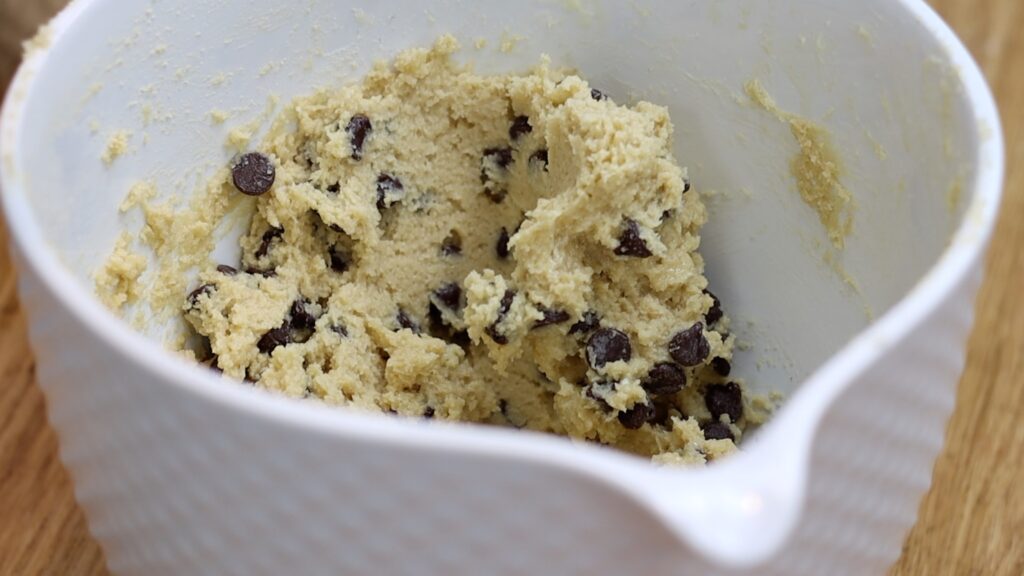
Whisk it together with baking soda and salt in a bowl and then add these dry ingredients to the mixer. Mix on the lowest speed until just combined. It will look like damp sand. Add chocolate chips and stir them in by lifting up the dough and folding it overthe chocolate chips.
Bake the cookies
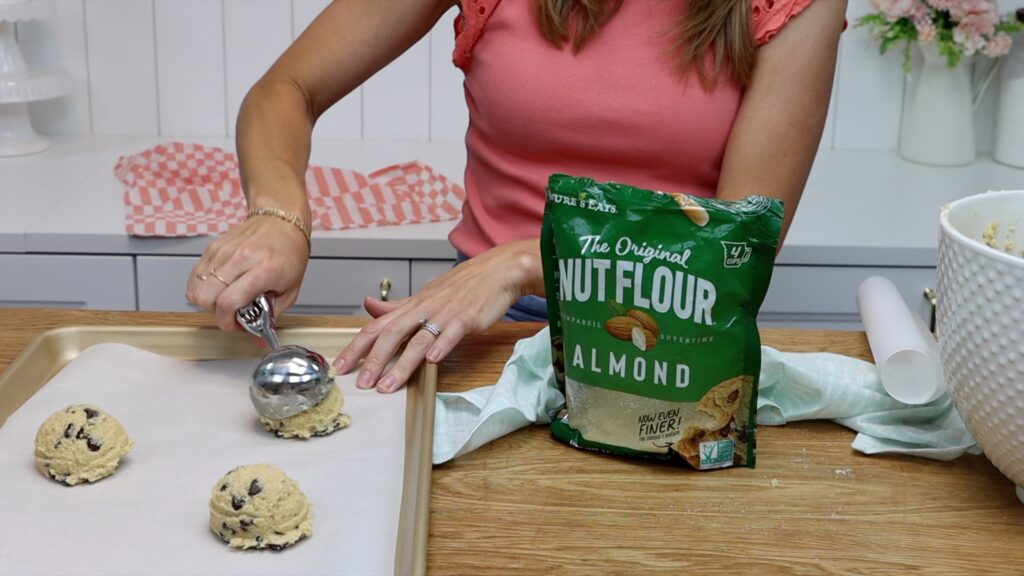
Don’t bake these like normal chocolate chip cookies! Instead, to make them stackable, use this method. Line a baking tray with parchment paper or a silicone mat and use an ice cream scoop to scoop the cookies onto the tray. This will make them all the same size.
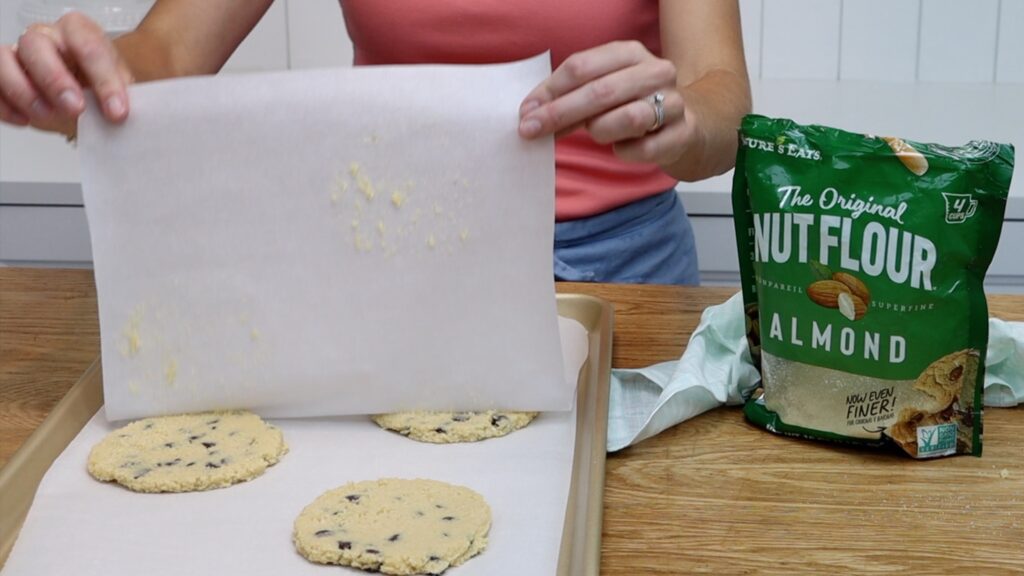
To make them flat, cover them with another piece of parchment paper or a silicon mat. Then press another baking tray down until you feel the resistance of the chocolate chips. Remove the additional tray and the paper or mat to reveal flat cookies!
Repeat with the rest of the cookie dough. You'll have six cookies in total - three for each tray.
If you want to make a larger cookie cake, double the recipe. Use two ice cream scoops of cookie dough for each cookie to make six cookies that will be about eight inches wide. Double the buttercream recipe below, too.
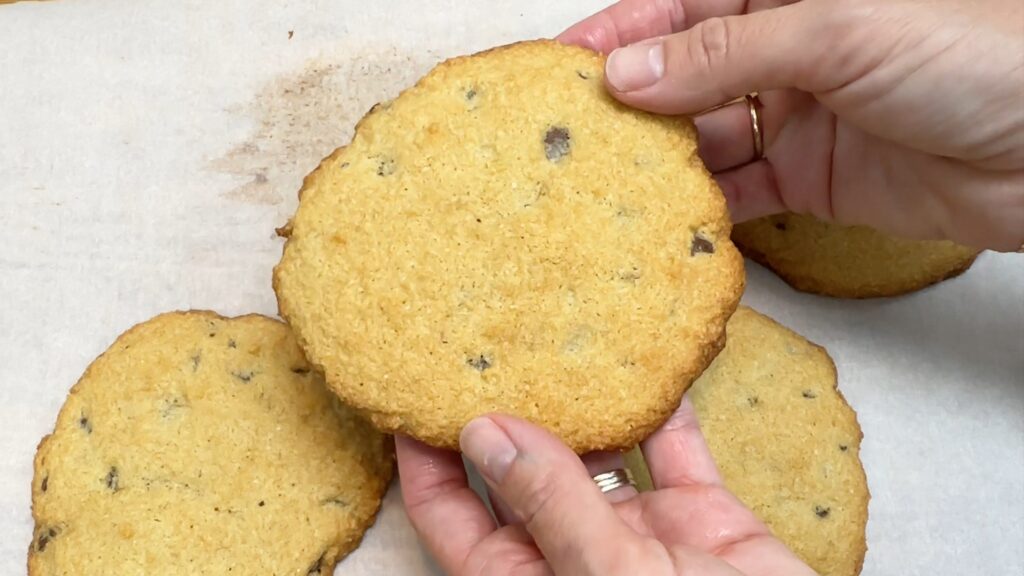
Bake at 350 degrees for 12 minutes. They'll spread out slightly on the tray and turn golden with darker, crispier edges. Yum!
Let the cookies cool completely and meanwhile, make the filling.
Make the buttercream filling
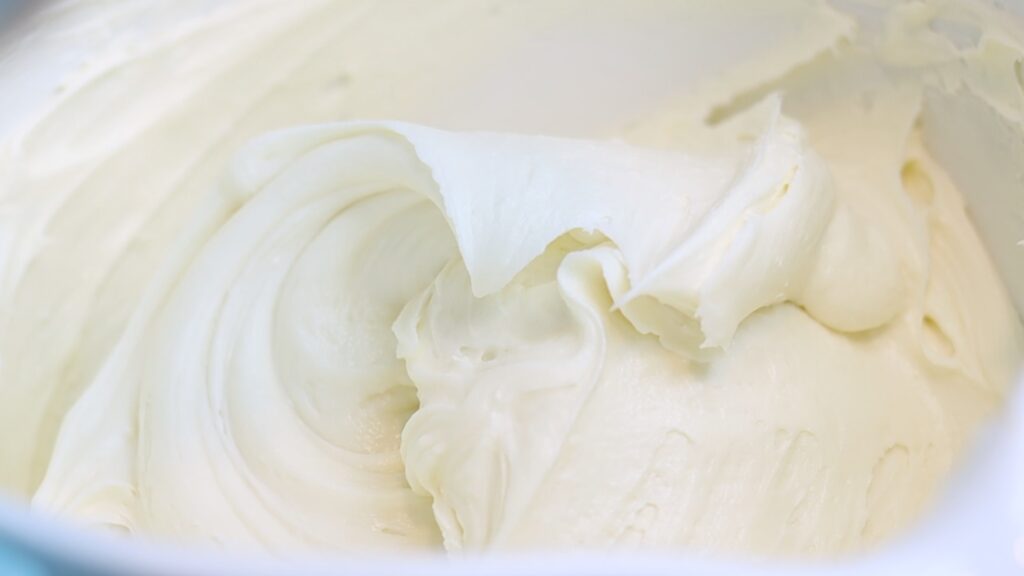
I use a small batch version of my 4 Minute Buttercream for this chocolate chip cookie cake. You could use chocolate ganache instead for a richer, less sweet version. I don't recommend using whipped cream because it's not firm enough to support the weight of the layered cookies.
To make the buttercream, mix room temperature butter with powdered sugar or icing sugar on the lowest speed. When it's smooth add vanilla, salt and milk. It's that easy!
Spoon this into a piping bag for the neatest results but if you don’t have one, don't worry! It’s not essential.
Assemble the chocolate chip cookie cake
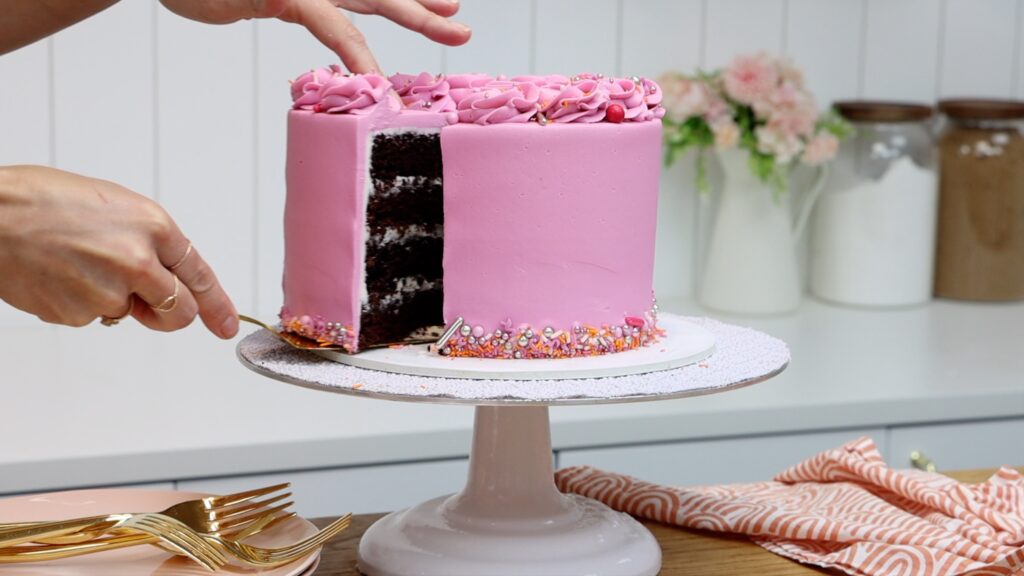
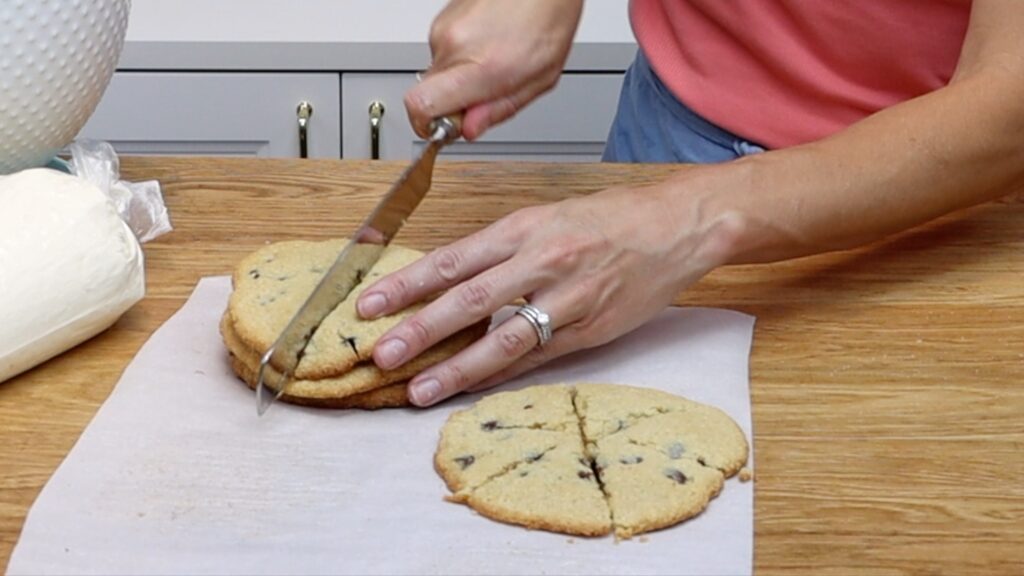
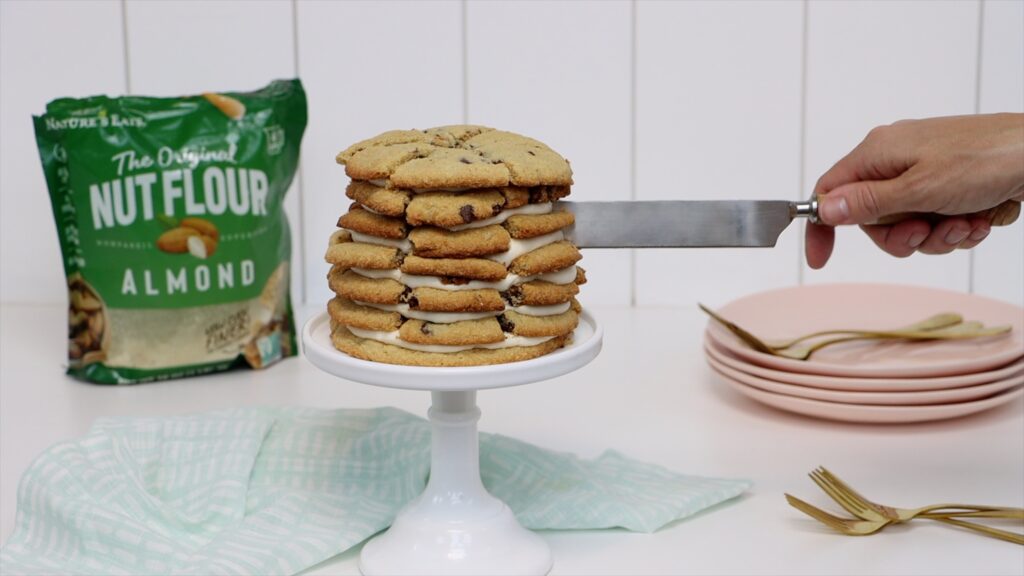
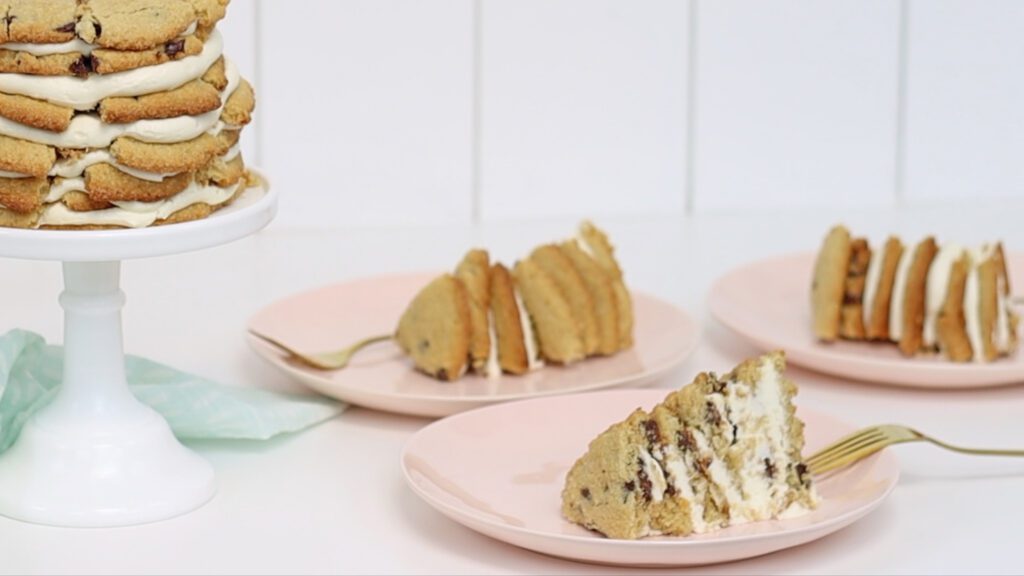
Prepare the cookies for the cake by pre-cutting them, a trick I saw Baked By Dan do on instagram. Leave the bottom cookie intact but cut the rest into slices. I cut mine into six portions. You can cut them one by one or stack them and cut together. The edges will be neatest if you cut them one by one and clean the knife in between cookies.
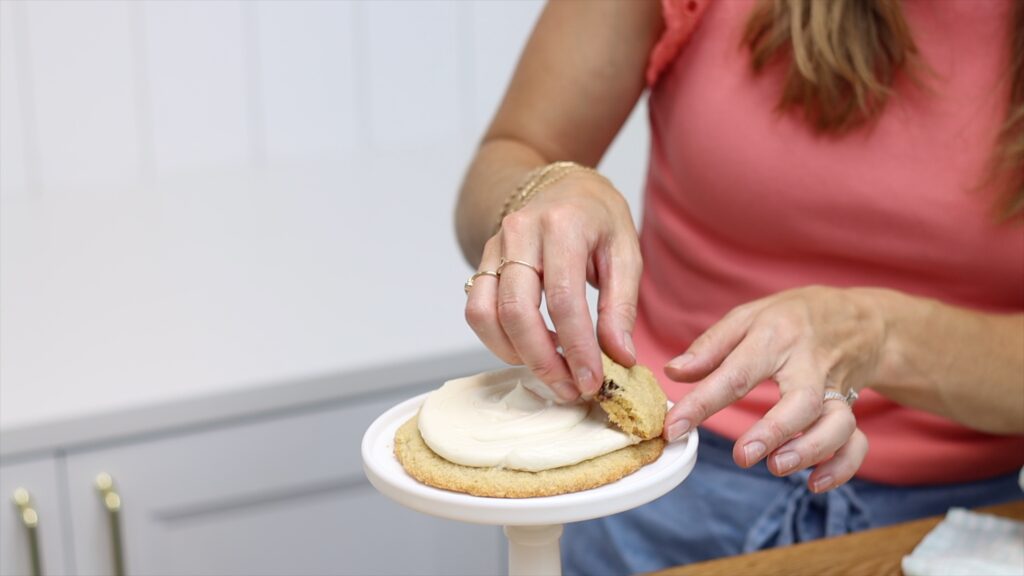
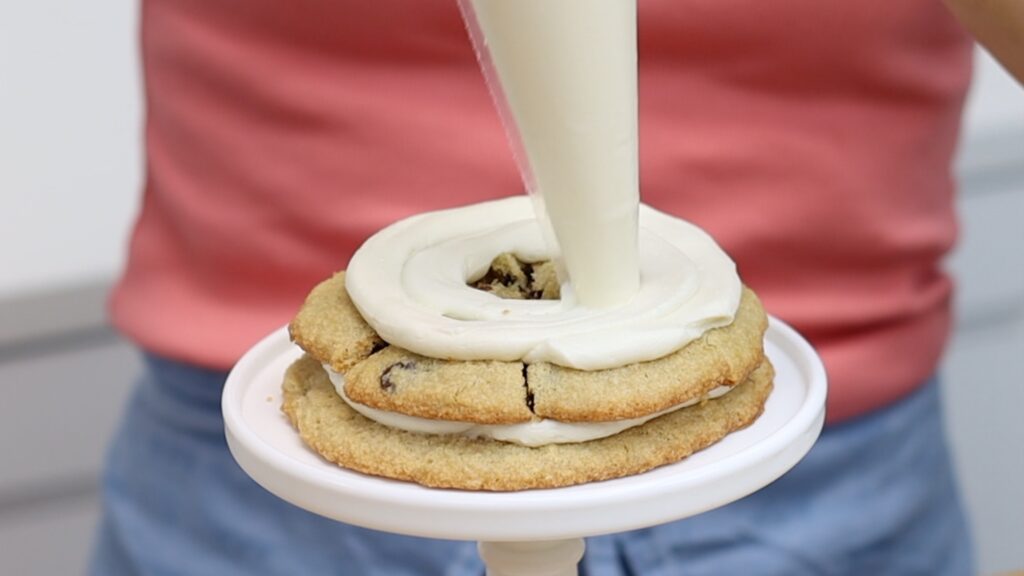
To layer the cookie cake, use a dot of buttercream to attach the first cookie to a platter or plate or cake stand. This will hold it still so it doesn’t slide around when you move it. Pipe or spread a thin layer of buttercream on top. Then press another cookie on top, piece by piece.
Pipe or spread more buttercream on top of this cookie. It’s best not to go right up to the edges of the cookie so it doesn’t ooze out when you stack more cookies on top.
Pre-cutting the cookies makes this SO easy to slice into and serve. It’s a fun birthday surprise for a cookie lover and absolutely delicious! Tell me in the comments if you’re going to make this!
How to store a chocolate chip cookie cake
You can leave this on the counter overnight in an airtight container or covered with a clean dish towel. This cake actually tastes BETTER the next day because the almond flour keeps the cookies moist and the buttercream starts to soak into them. This means you can make it in advance without worrying about it drying out.
If there are any leftovers, which I doubt, wrap each slice in cling film or Saran Wrap. Pop them in the freezer until your next cookie craving!
Soft and chewy, gluten free chocolate chip cookies with crispy edges are layered with creamy buttercream filling for a chocolate chip cookie cake that’s the perfect way to celebrate any occasion!
Ingredients
For the gluten free chocolate chip cookies: 6 tablespoons unsalted butter 1/4 cup brown sugar 2 tablespoons white sugar 1 teaspoon vanilla 1 egg 1/4 teaspoon baking soda 1/8 teaspoon salt 1 1/2 cups Nature’s Eats almond flour 1/2 cup chocolate chips
For the buttercream filling: 1/2 cup unsalted butter 1 1/2 cups powdered sugar 1/2 teaspoon vanilla pinch of salt 1 teaspoon milk
Instructions
For the gluten free chocolate chip cookies:
Mix butter, brown sugar and white sugar with a mixer at medium speed until creamy, about 3 minutes. Add vanilla and eggs, mixing at low speed until incorporated, about 1 minute.
In a bowl, whisk together baking soda, salt, and almond flour. Pour into mixer and mix on low speed until just combined. Stir in chocolate chips.
Line two baking trays with parchment paper or baking paper. Use an ice cream scoop to scoop three cookies onto the first tray. Cover with another piece of parchment paper and press the second baking tray down onto it, until you feel the resistance of the chocolate chips. Remove the additional tray and paper. Repeat with the rest of the cookie dough to make a total of six flattened cookies.
Bake cookies at 350 F or 175 C for 12 minutes. Let the cookies cool completely while you make the buttercream.
For the buttercream filling:
In a mixer, mix 1/2 cup butter and powdered sugar at the lowest speed until smooth. Add vanilla, salt and milk and mix to combine. Optionally, spoon into a piping bag.
To make the chocolate chip cookie cake:
Spread or pipe a dot of buttercream onto a plate or cake stand. Press the first cookie onto it to attach it.
Cut each of the remaining cookies into 6 equal portions.
Pipe or spread buttercream onto the first cookie and press the next pre-cut cookie pieces onto it. Continue alternating buttercream and cookie pieces, lining the pieces up above each other to make the cookie cake easy to cut.
Store, covered, at room temperature for up to 2 days or in the fridge for up to a week.
Notes
If you use salted butter instead of unsalted, skip the salt in the recipe
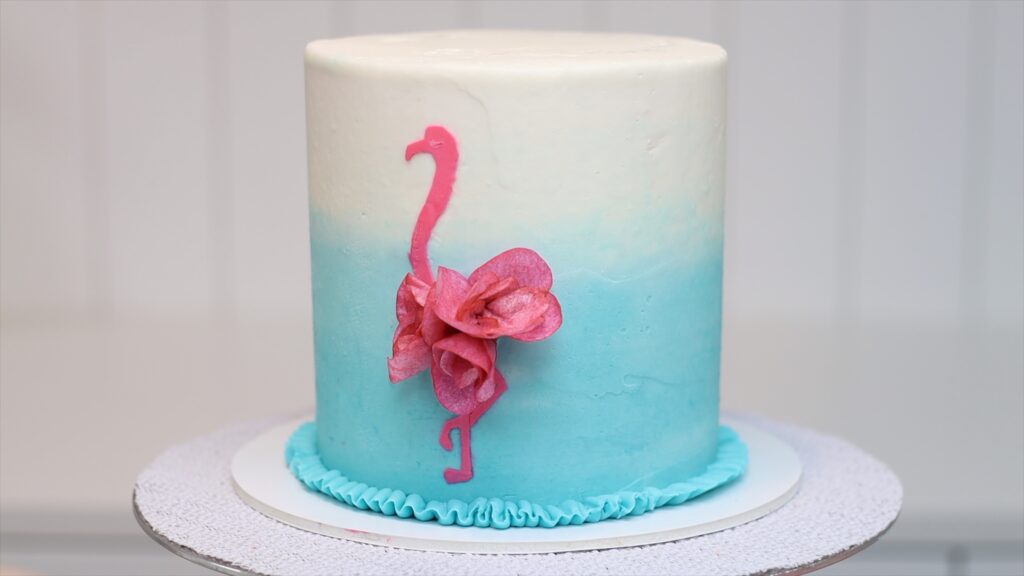
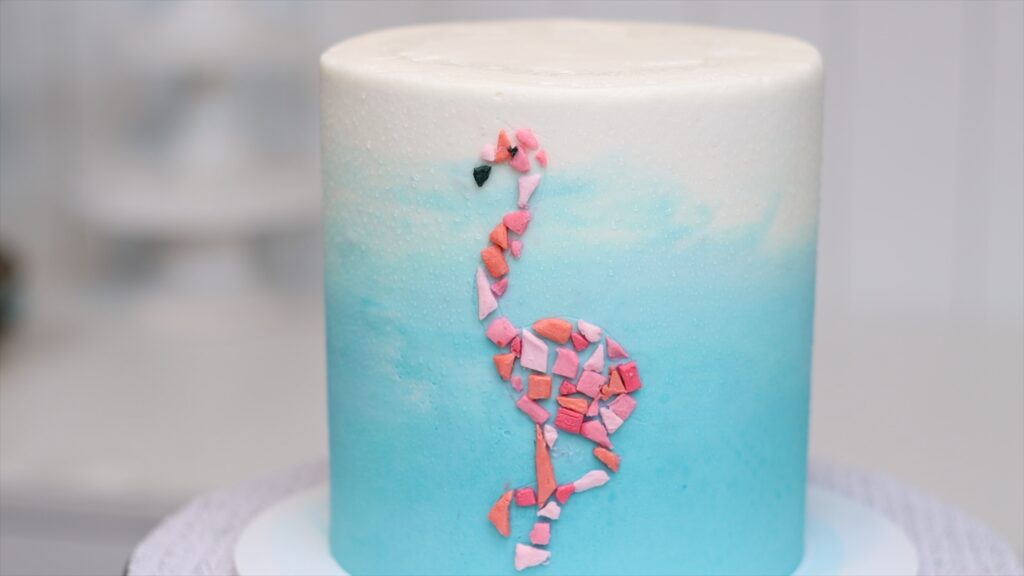
Flamingos are trending and in this tutorial I’ll show you two simple techniques to make stunning, unique flamingo cakes!
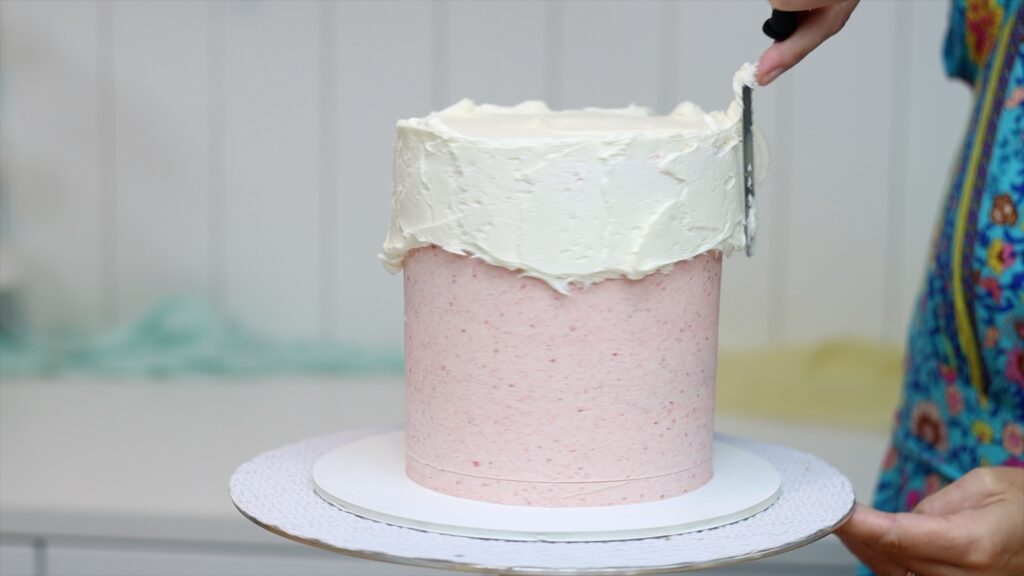
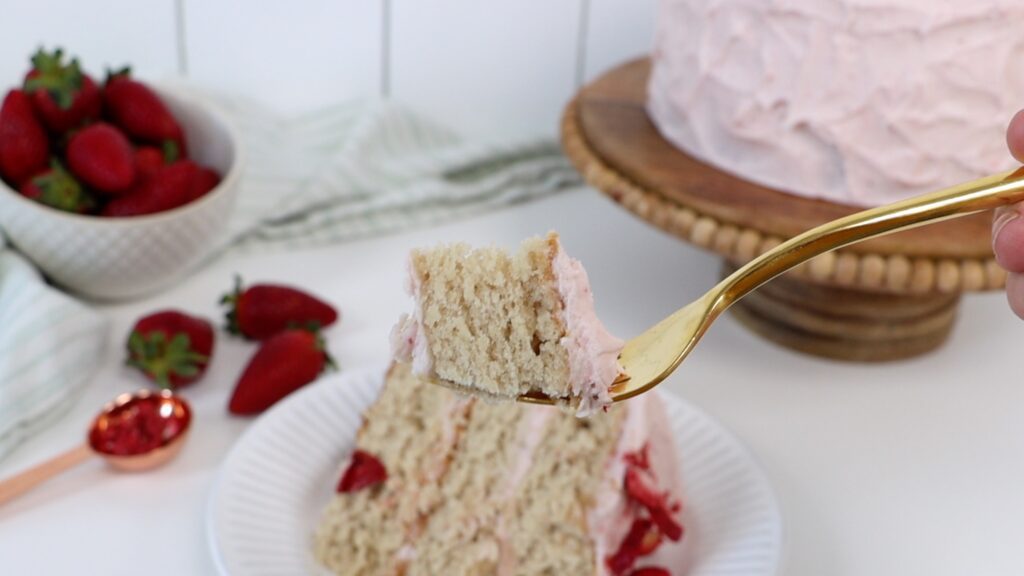
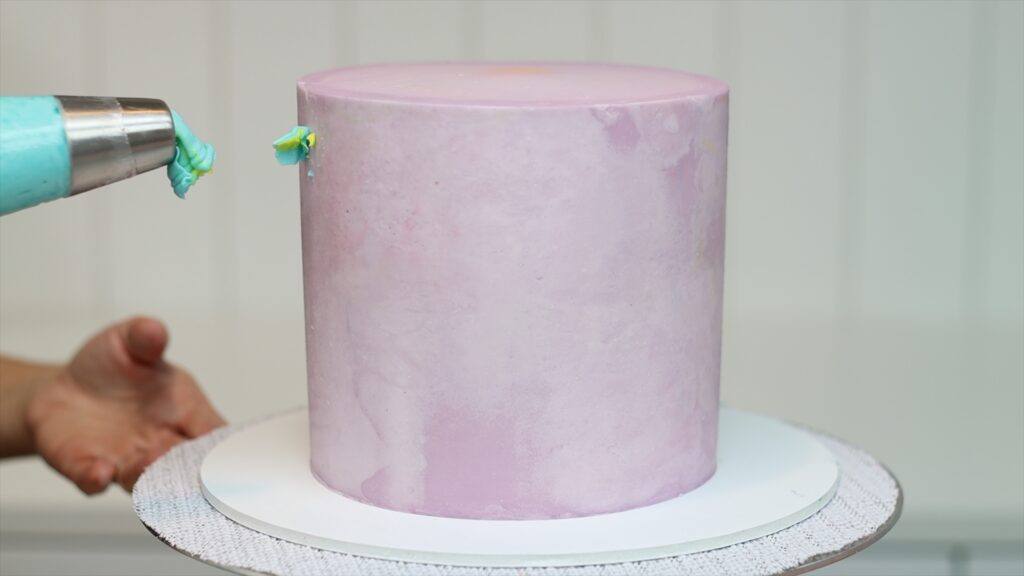
Make a pink cake
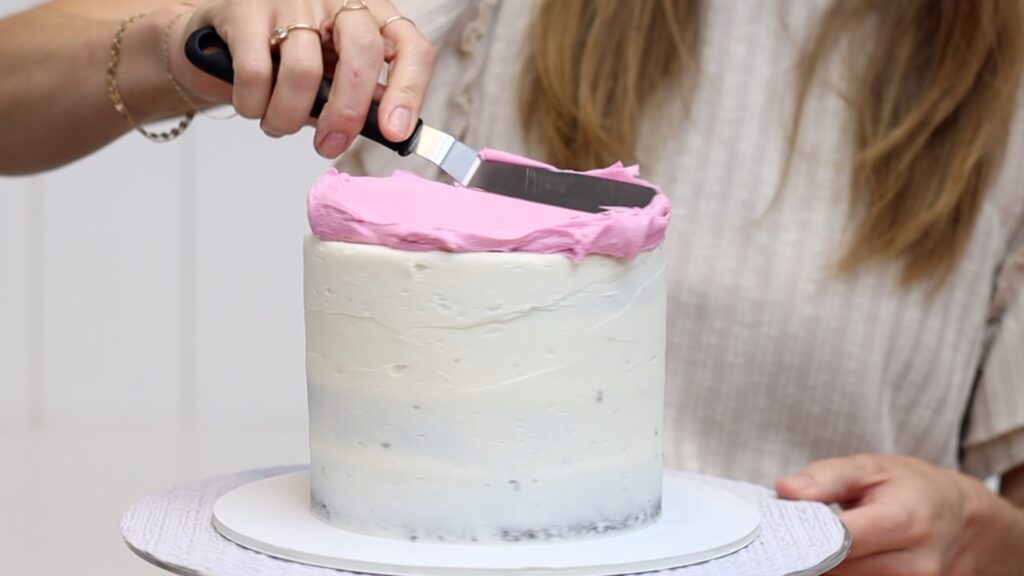
I’m using my strawberry cake recipe so that the insidewill be pink just like the flamingos on the outside. For the maximum strawberry flavour I’m using the strawberry buttercream from the recipe as my crumb coat. After refrigerating it for 30 minutes it’s firm and I can add a gorgeous ombre frosting on top.
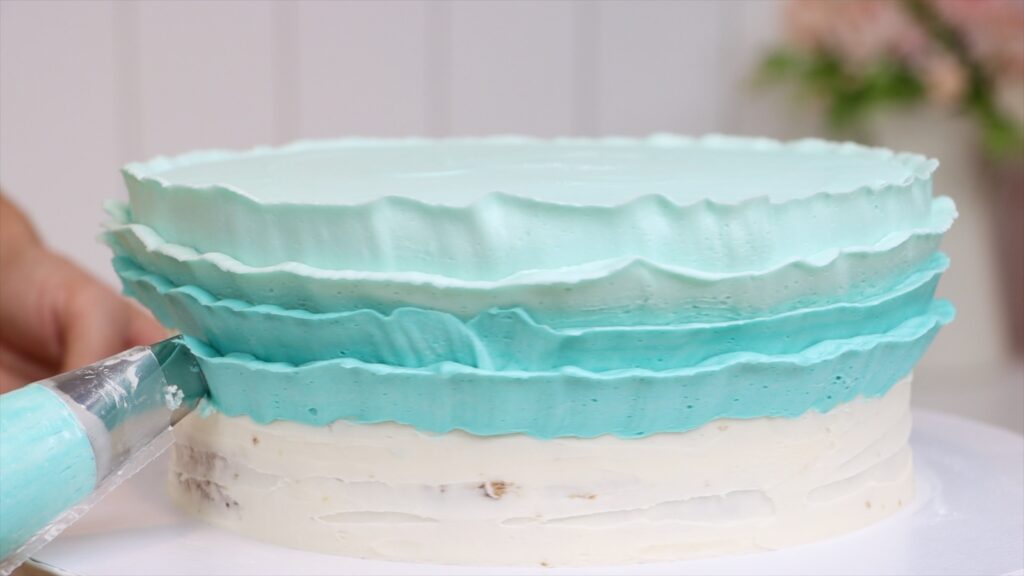
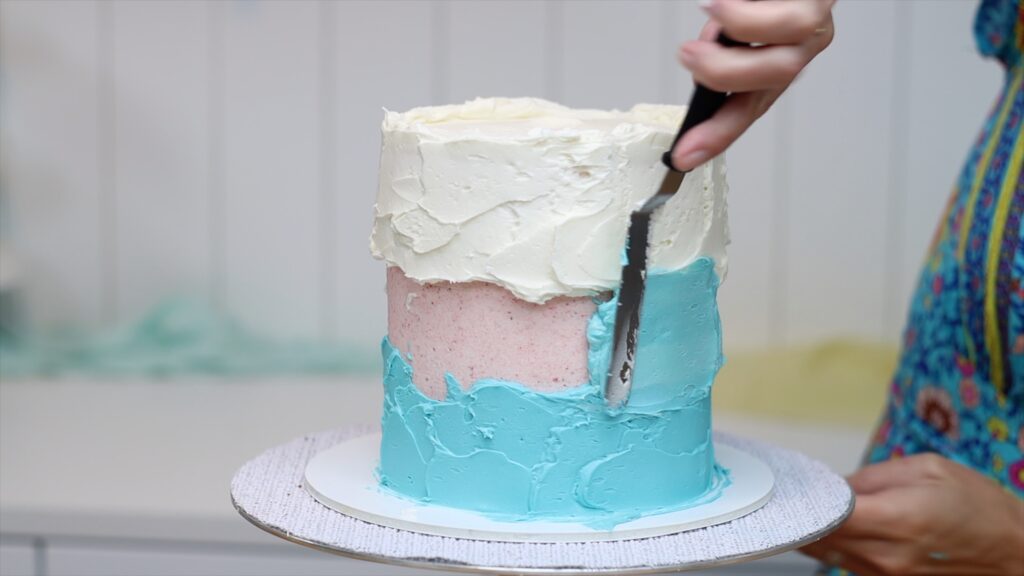
Add turquoise ombre frosting
Ombre is secretly very easy to do. Use the lightest colour on top of the cake, spreading it around the top of the sides, too. Then use the darkest colour at the very bottom of the cake, spreading it right down to the cake board. Of course, you can do the opposite instead, with the darkest colour at the top and the lightest at the bottom. Now mix the lightest and darkest colour together to make a middle shade. Spread thisaround the middleof the cake, between the other two.
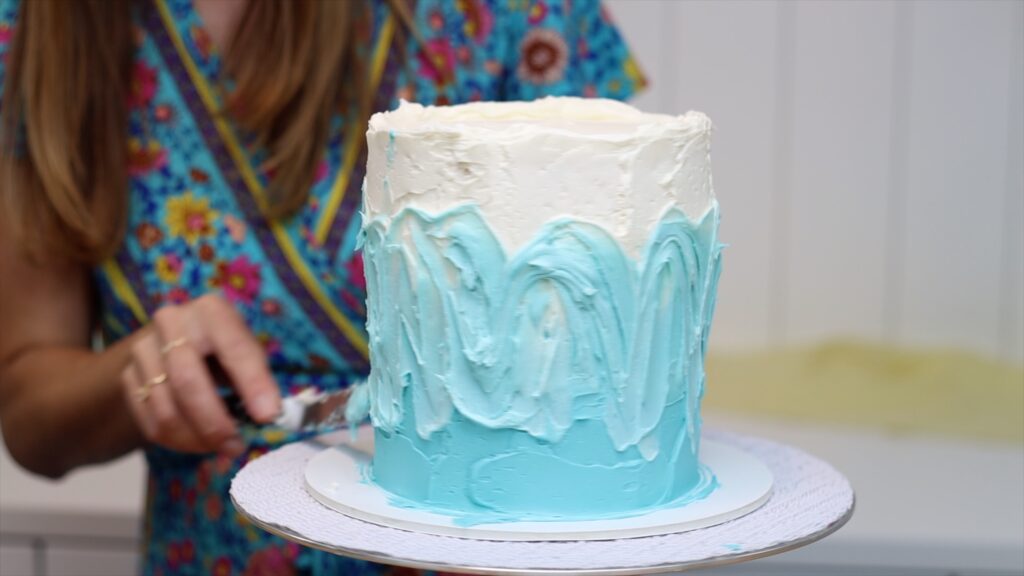
Wiggle your spatula up and down in zig zags around the cake to blend all of the shades together slightly. This will make a gradual gradient of the colours.
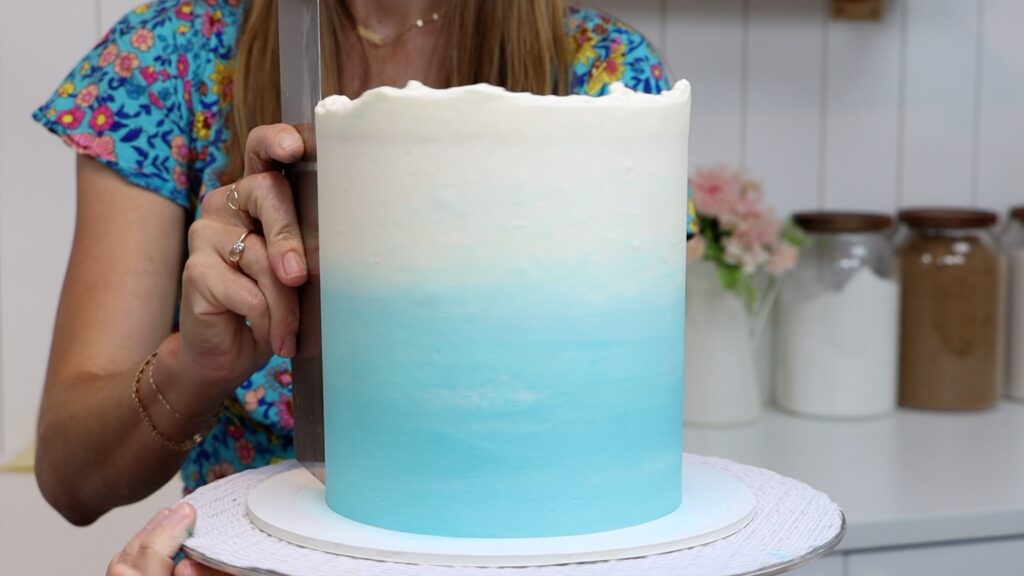
Then scrape around the cake with a cake comb to smooth the frosting. It’s simple but such a stunning background to make any cake design a bit more detailed and interesting.
Tidy up the top edge and then put the cake into the fridge to chill and set the frosting. Both of the flamingo techniques in this tutorial need the frosting to be firm before you decorate it.
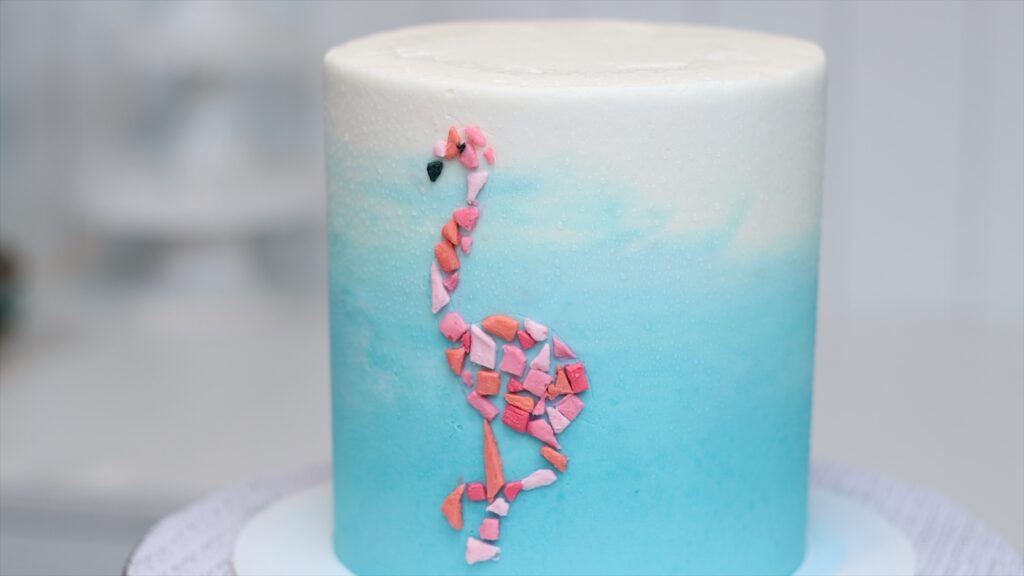
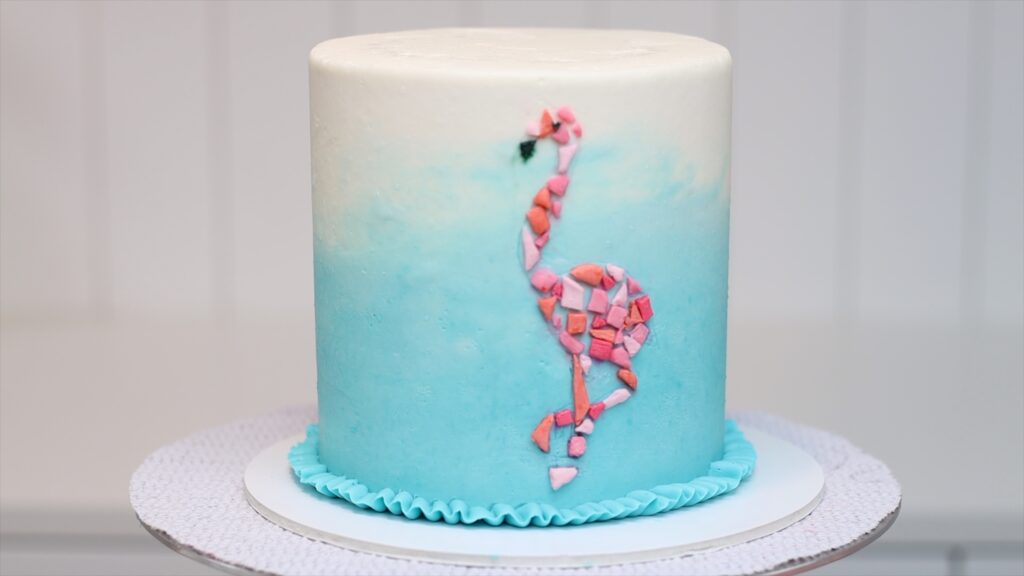
How to make a mosaic flamingo cake
Prepare buttercream mosaic tiles
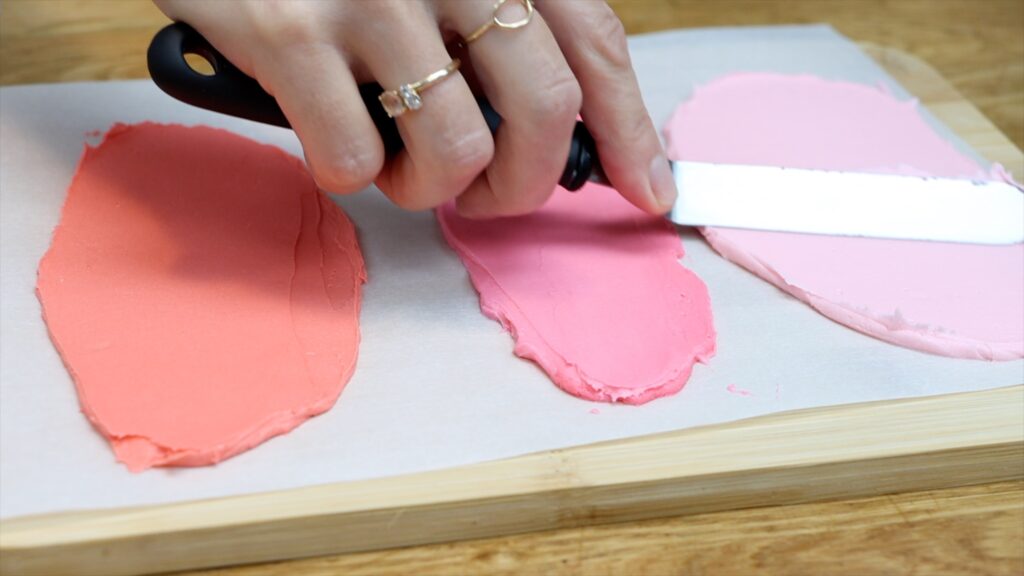
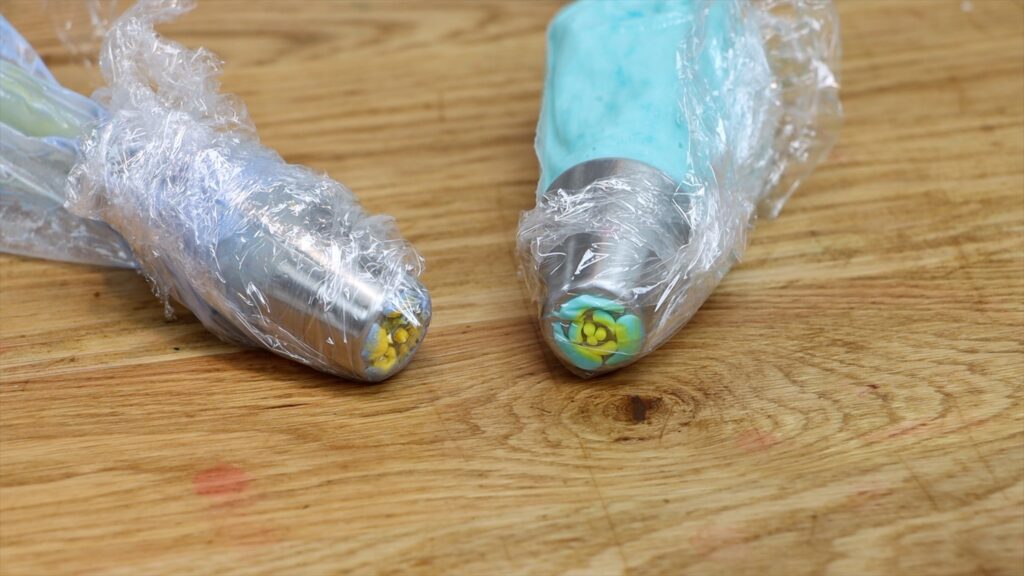
For the first technique, which is my favorite, we’re going to make a flamingo mosaic. Spread coloured buttercream onto parchment paper on top of a small, flat surface. This could be a cutting board, cake board, upside down tray or a baking sheet. You need to be able to fit it in your freezer later.
You’re aiming for thin, smooth patches of colour. Ideally, all of the colours will be the same thickness. It’s best to do this on at least two separate pieces of paper so that you can chill them separately. You’ll see why later.
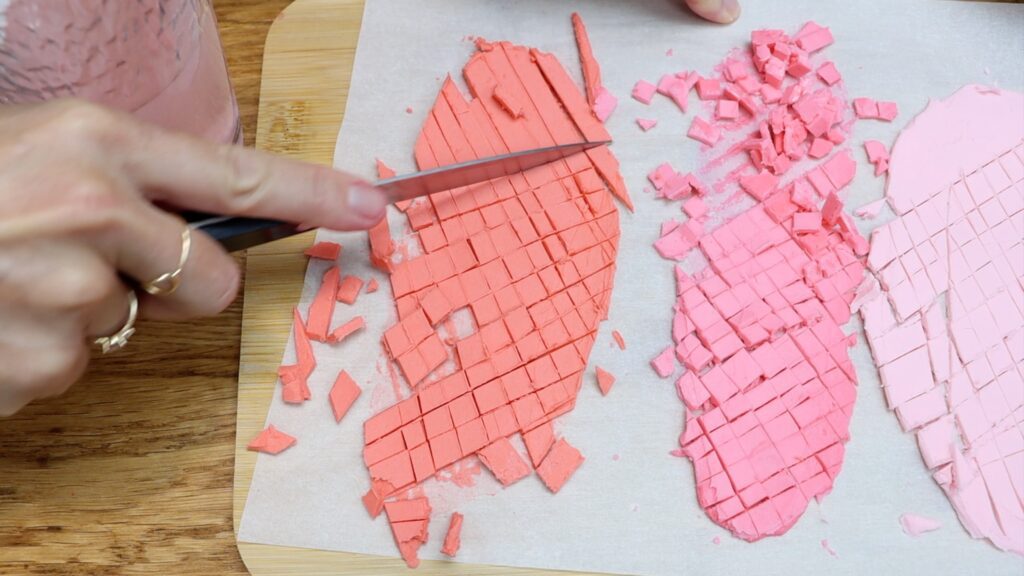
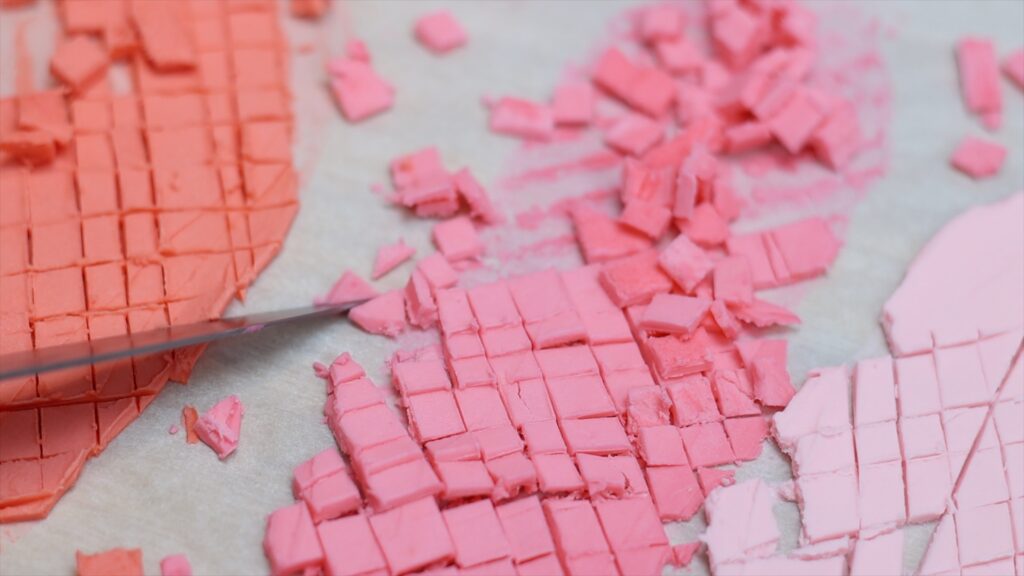
Put the coloured buttercream into the freezer for about 15 minutes to chill and firm up. Then use a sharp knife dipped in warm water to slice through the frozen buttercream, cutting it into little tiles of different shapes and sizes.
After a few minutes at room temperature the buttercream will soften and get sticky. You need it to stay firm so work quickly to slice it. Dip your knife into the warm water in between cuts to clean it and then wipe it dry on a towel or paper towel before you cut again. This will give you the neatest edges on your tiles.
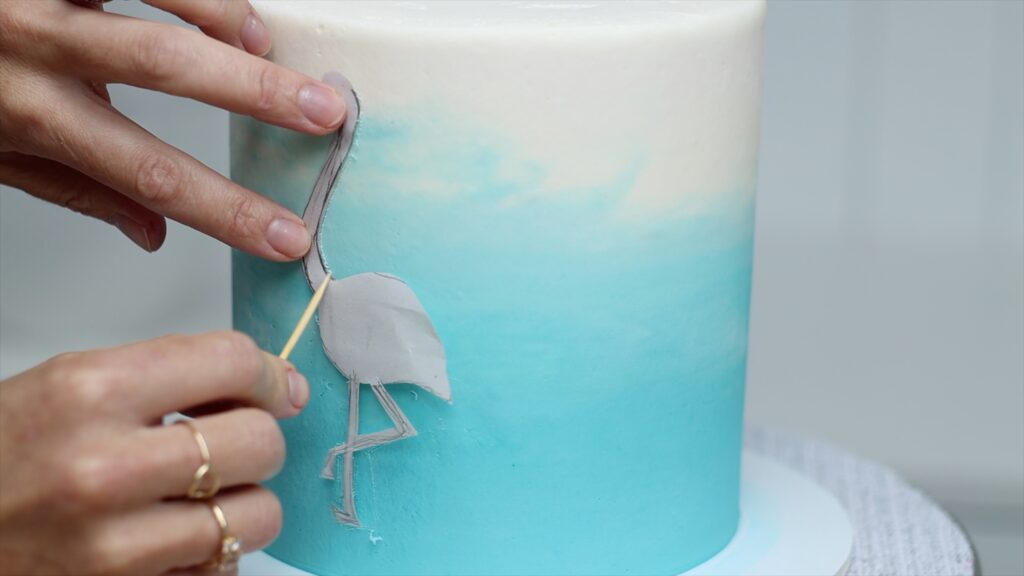
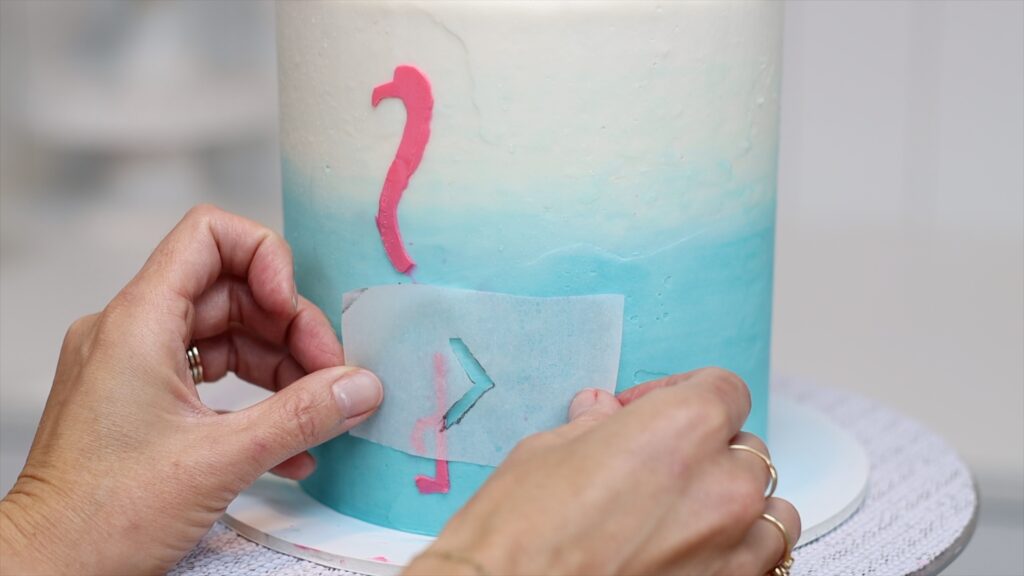
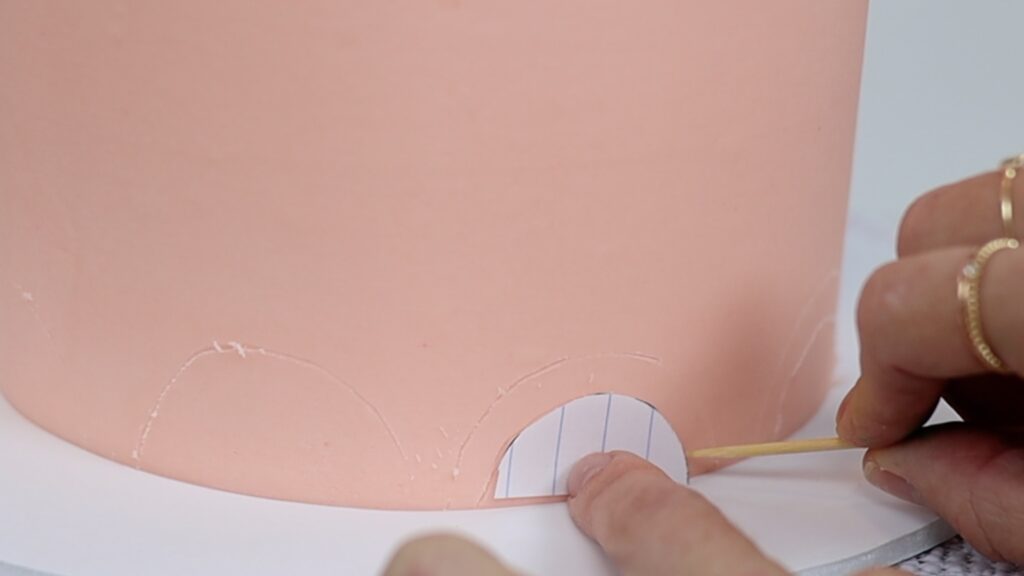
Outline a flamingo on the cake
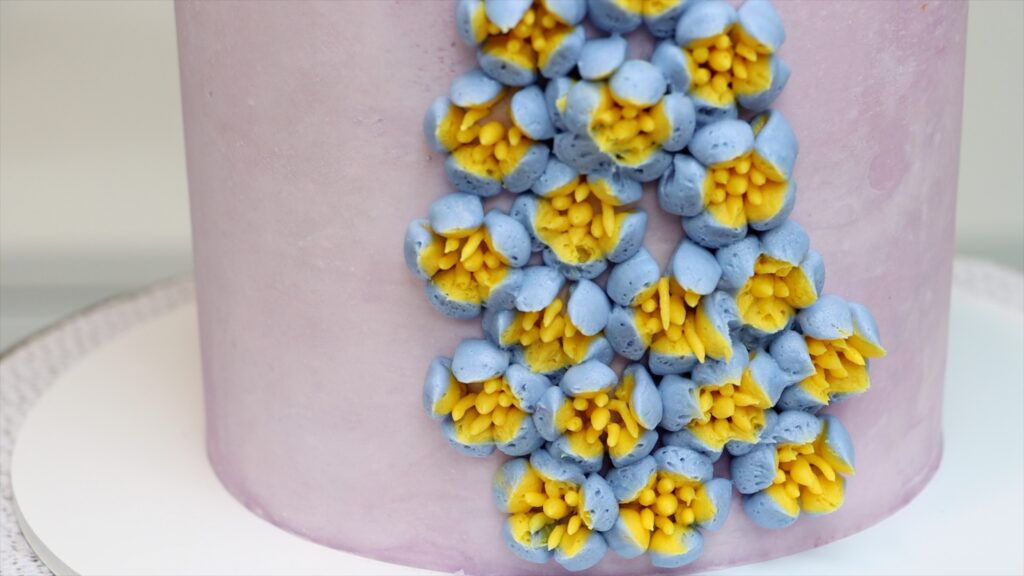
Draw a flamingo or trace one, making sure it will fit on your cake. I used four 6 inch layers to make my cake so it's tall! I used my strawberry cake recipe which can also be used for a three layer 8 inch cake but by making 4 smaller layers I have a taller cake with more space on the sides for my flamingo. Of course, you could do this on the top of the cake instead. However, since the sides of a cake are more visible, I like to put my decorations there.
Cut the flamingo out and then take your cold cake out of the fridge and position the paper flamingo on it. Trace around it using a toothpick to draw a very faint outline. Since the frosting on the cake has set, it’s firm and won’t get damaged by the paper. Brush off any buttercream crumbs along the outline using a paintbrush.
Attach buttercream mosaic tiles to the cake
Brush the entire flamingo shape with a paintbrush dipped in water and then blotted on a towel or paper towel. You want it to be damp, not dripping wet. The moisture will help the frozen buttercream stick to the frosting.
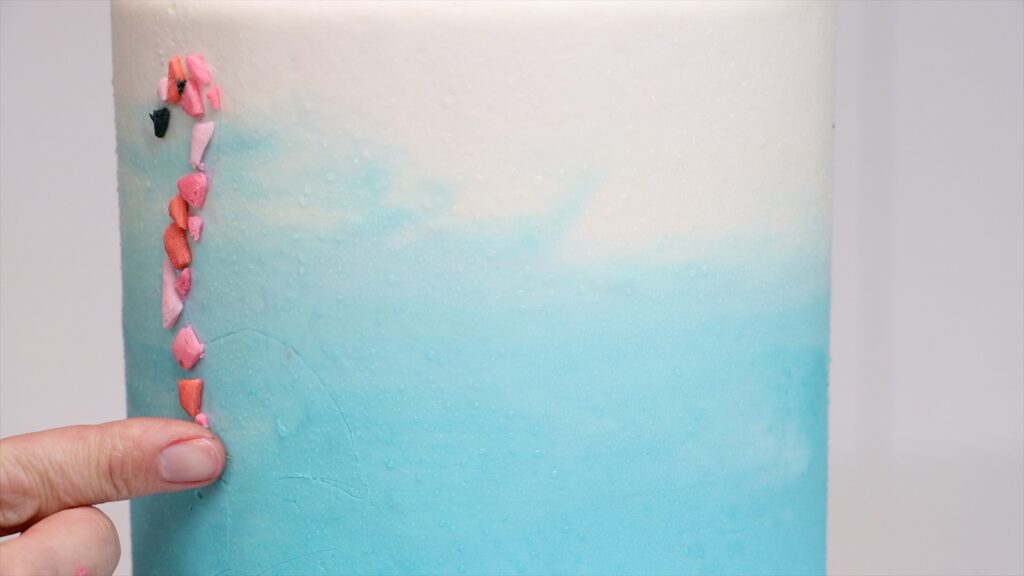
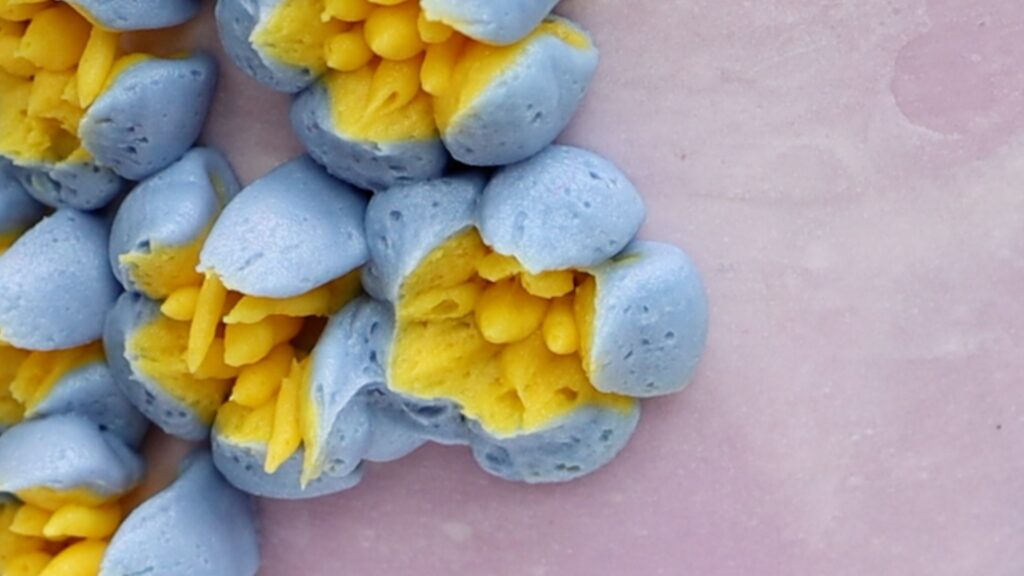
Take your buttercream tiles out of the freezer and pick one up. Press it against the cake, within the outline you scored with your toothpick. Continue with more tiles, using different colours and shapes and sizes for lots of variety. Make sure you’re going right up to the outline so that your shape is recognizable.
I used a little black buttercream triangle for the beak and a tiny black triangle for the eye. You can cut the tiles now into smaller pieces or different shapes to fit into little spaces between other tiles.
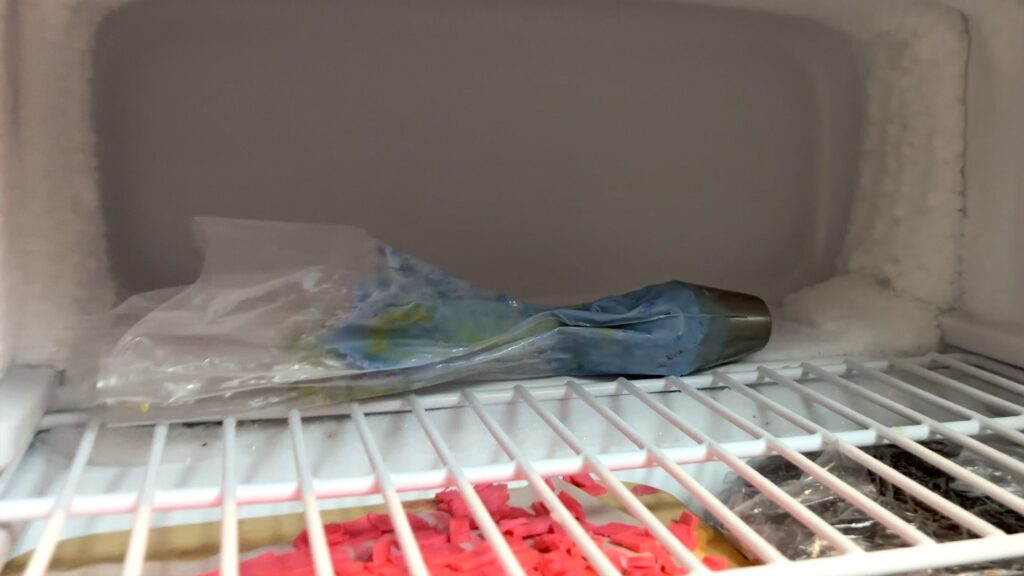
The buttercream tiles will get soft as they warm up to room temperature. You’ll notice because they’ll start to stick to your finger instead of the cake. The tiles will also warp and droop because the buttercream isn’t firm anymore. When that happens, put these colours back into the freezer to chill and firm up again. Take out another colour and use those tiles instead. That’s why it’s a good idea to spread the colours onto at least two different pieces of paper. You can move them around separately and don't waste time waiting for any buttercream to chill.
Minimize condensation
Since the cake has been in the fridge it will be cold. If the room is warm, you might notice beads of condensation forming on the cake. It’s important to dab those with a paper towel to absorb them and leave the frosting dry. If you don’t, the colours of the buttercream tiles can run, especially dark colours like the beak and the eye. I recommend adding the beak and eye last for that reason, so that the back colour doesn’t run. If the room is warm, blot the condensation droplets and then put the cake in the fridge for 15 minutes before continuing.
The mosaic flamingo is the first technique of this tutorial and I’ll show you the end result in a minute. Keep reading for the second technique!
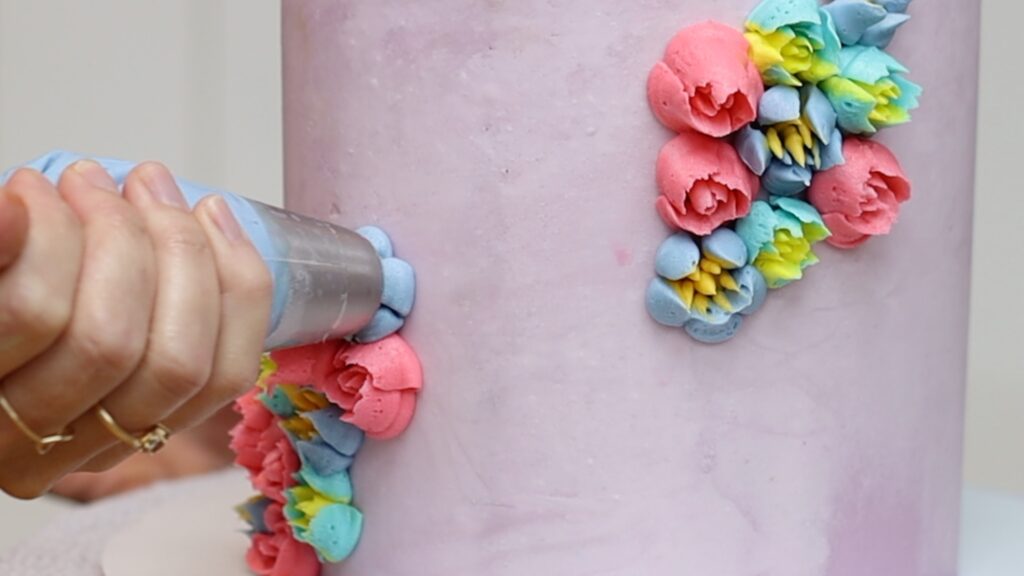
How to make a floral flamingo cake
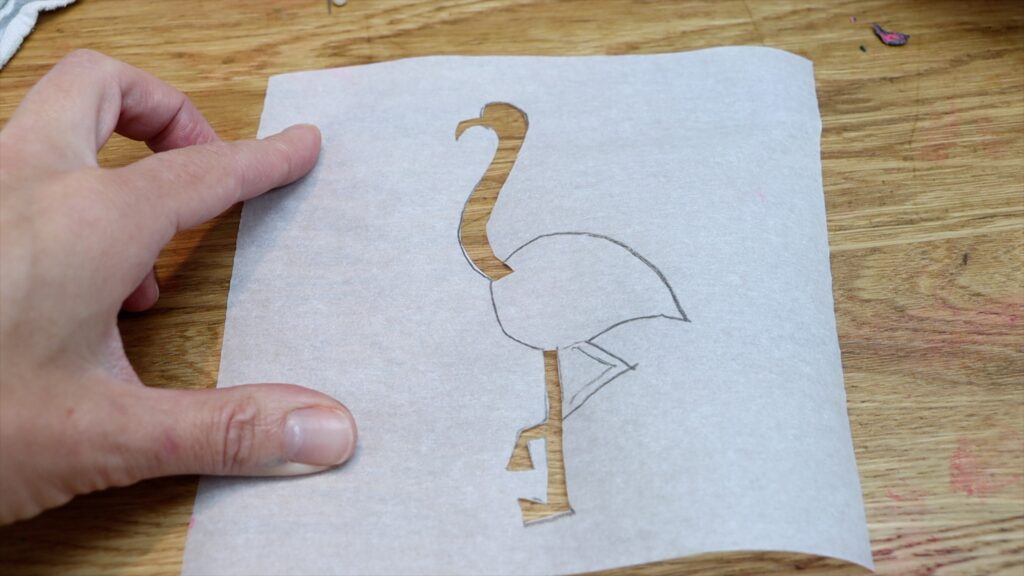
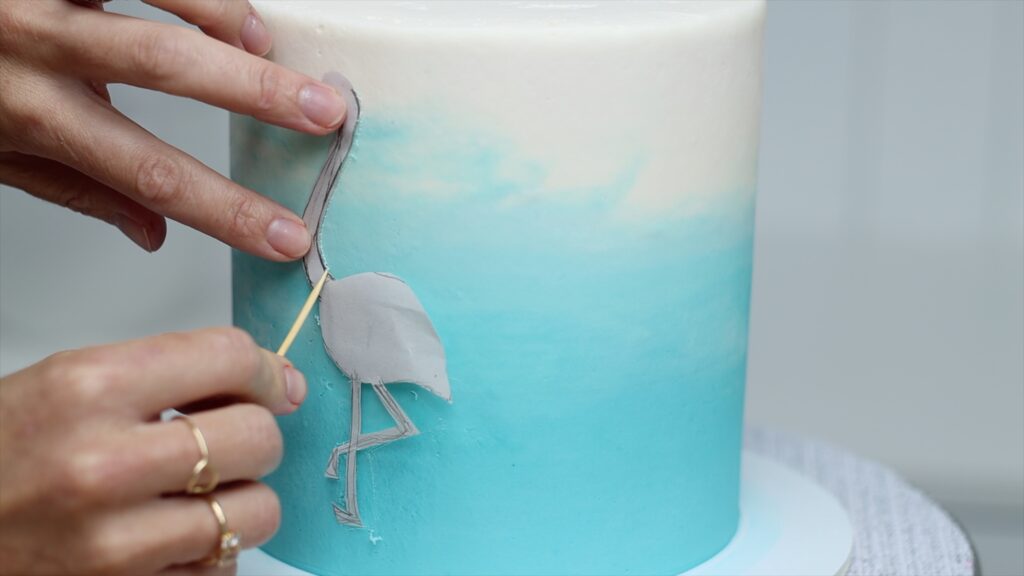
Make a flamingo stencil
For the second technique, make your own flamingo stencil. Trace your drawing or an image of a flamingo onto parchment paper or wax paper and then cut it out. Leave the paper around the shape intact to use as your stencil.
I’m going to cut a separate stencil for the other leg because if I cut the second legs out now, I'd have a big triangle instead of two dainty legs!
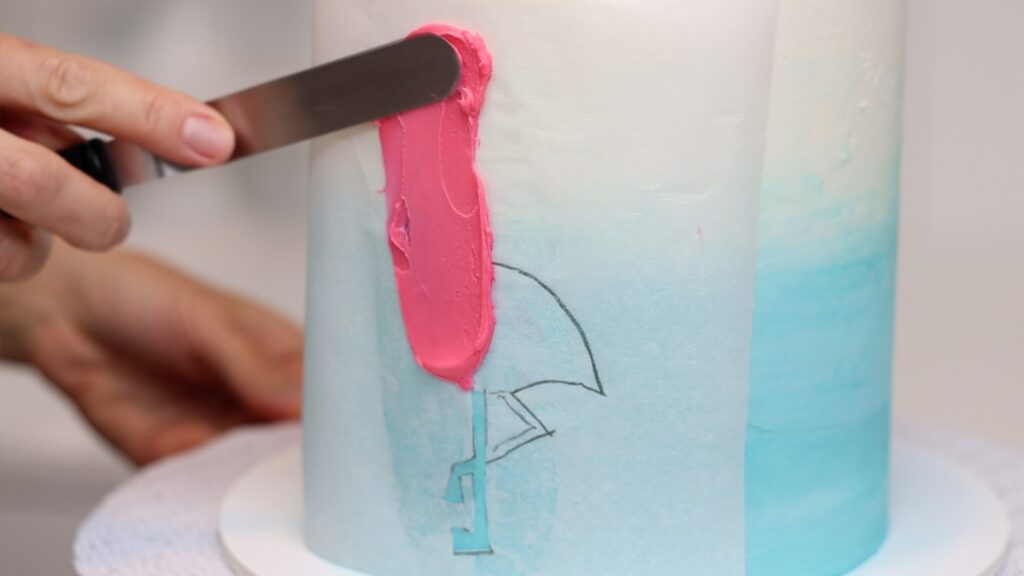
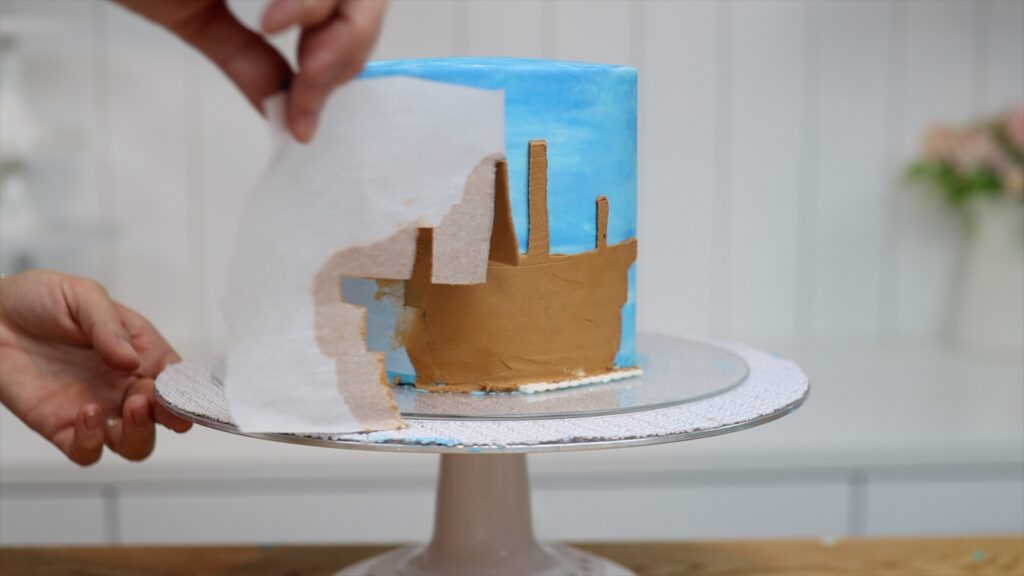
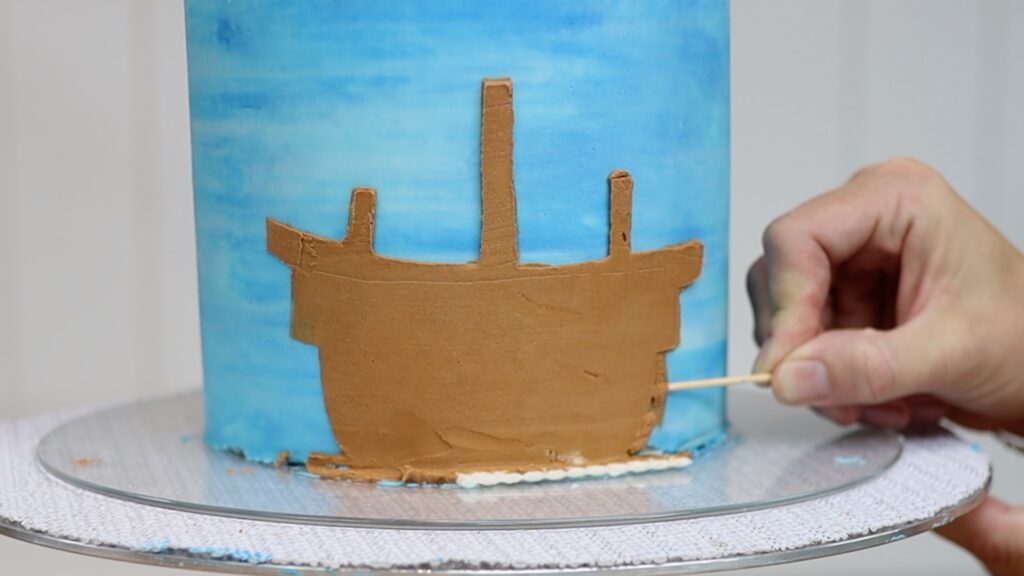
Wrap your stencil tightly around the cake and use pins to attach it so it doesn’t move. Spread frosting over it to cover the parts you cut out of the paper.
Then use an offset spatula or cake comb to scrape over the frosting. You'll take off the excess to leave a thin, flat layer. Peel the stencil off and a smooth flamingo will be left behind on the cake!
For the bent leg, put the cake back into the fridge for 30 minutes. You need to set the first part of the design so that it's firm. Then press on another piece of paper with just the bent leg. Spread buttercream over it, smooth it, and peel the stencil off.
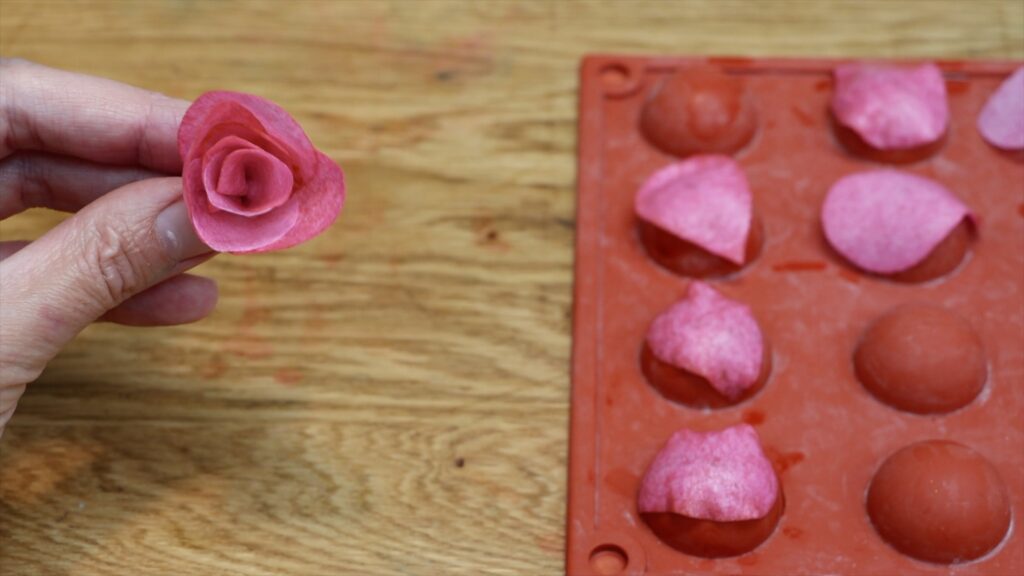
Make a floral flamingo body
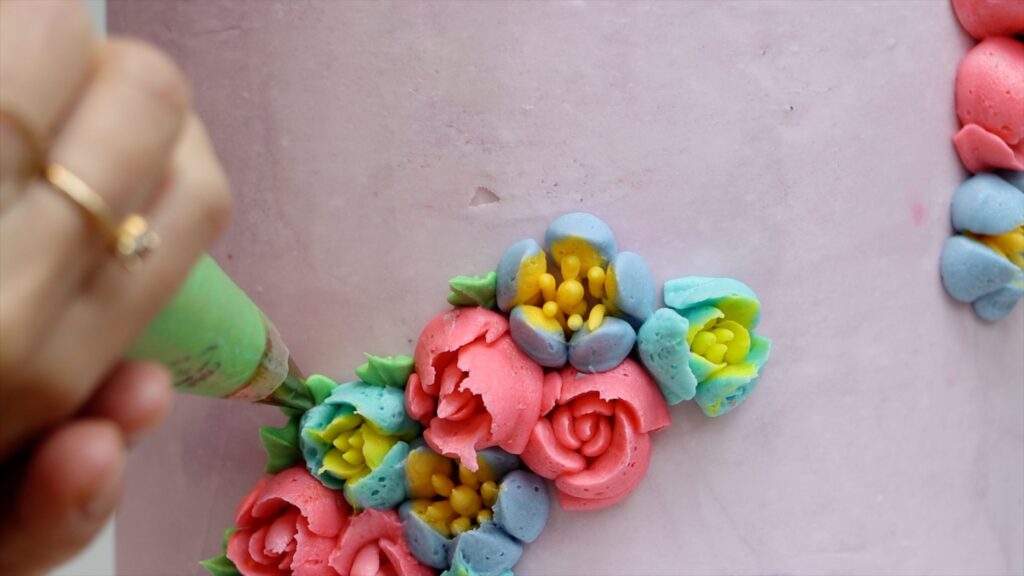
Now, what about the body? To give it some texture and depth I’m making pink wafer paper flowers. I teach how to do this in my Layer Up program on my cake school. You could use real or artificial flowers instead or pipe rosettes with a 1M tip and pink buttercream.
Add details to the flamingo cake
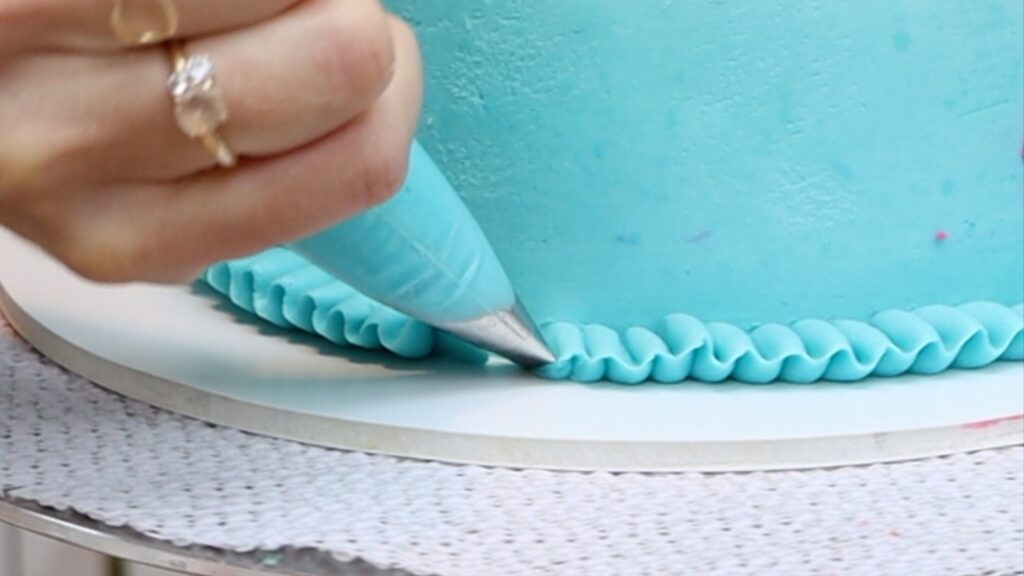
I’m adding a wave border around the bottom of the cake with the leftover turquoise frosting from the ombre. This is a #104 petal piping tip and the way you hold it is important. The narrow end of the teardrop shape of the petal is pointing away from the cake to make the thin edge of the piping:
Meanwhile, the wider end of the tip is pressed against the cake to make a thicker edge. This thick edge will attach to the cake to secure the piped border.
So, which flamingo do you prefer? Stenciled with a floral body or a mosaic version? Tell me in the comments!
Here are the most common cake fails and what to do to prevent or fix them!
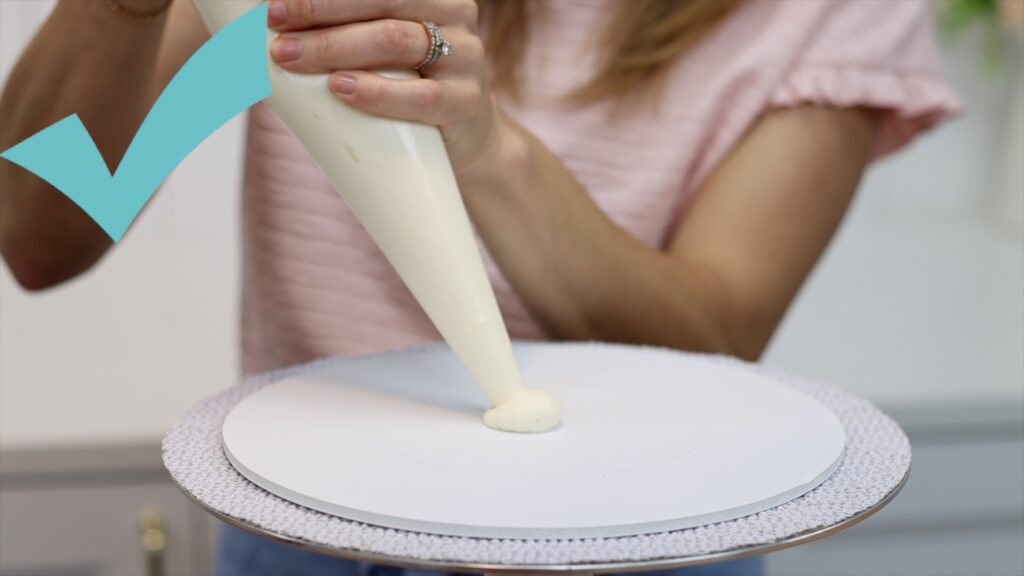
#1 Sliding cake fails
What cake fails are possible if cakes aren't attached to their cake boards? When you frost the cake, your offset spatula and cake comb can push the cake around. If the cake doesn't stay still it's really difficult to frost.
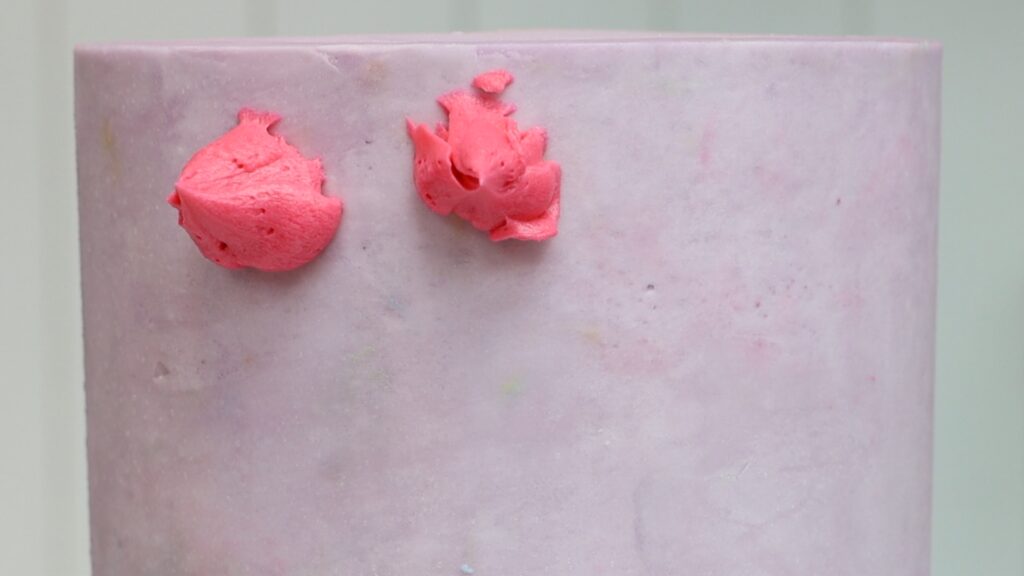
So, before you start layering cake and fillings, pipe or spread a dot of buttercream in the middle of your cake board.
Press your first cake layer down onto that dot. When it sets later, it will attach the cake to the cake board. Put the cake in the fridge for 30 minutes to chill, which will make it set more quickly. Then you can do any cake decorating you like without needing to chase your cake around on the turntable!
#2 Cake fails because of buttercream consistency
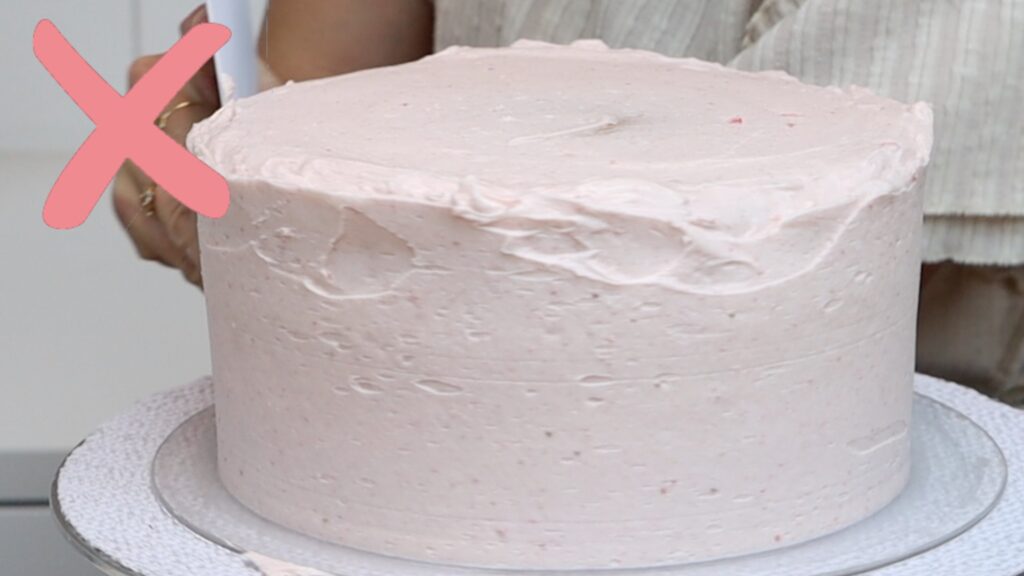
The biggest cake fails are caused by the wrong consistency of buttercream. You'll know if it’s too runny because it will slide down the cake. Even if you spread it up to the top of the cake, as you smooth the frosting it will sink down. You’ll have these big indents around the top edge:
If the buttercream is too stiff it will be difficult to spread over the cake. The buttercream will tear apart from itself, leaving these holes all over the surface of your frosting.
To achieve the right consistency and prevent air bubbles, use this easy hack. Scoop up a third of the buttercream and microwave it for 10 seconds to melt it.
Stir it back into your bowl of buttercream and after a few stirs you’ll have silky smooth buttercream. This method also gets rid of any air bubbles in the buttercream! The buttercream will spread effortlessly onto your cake and will be quick and easy to smooth.
The right consistency is key to smooth frosting, neat piping, stenciling, and really any cake decorating technique.
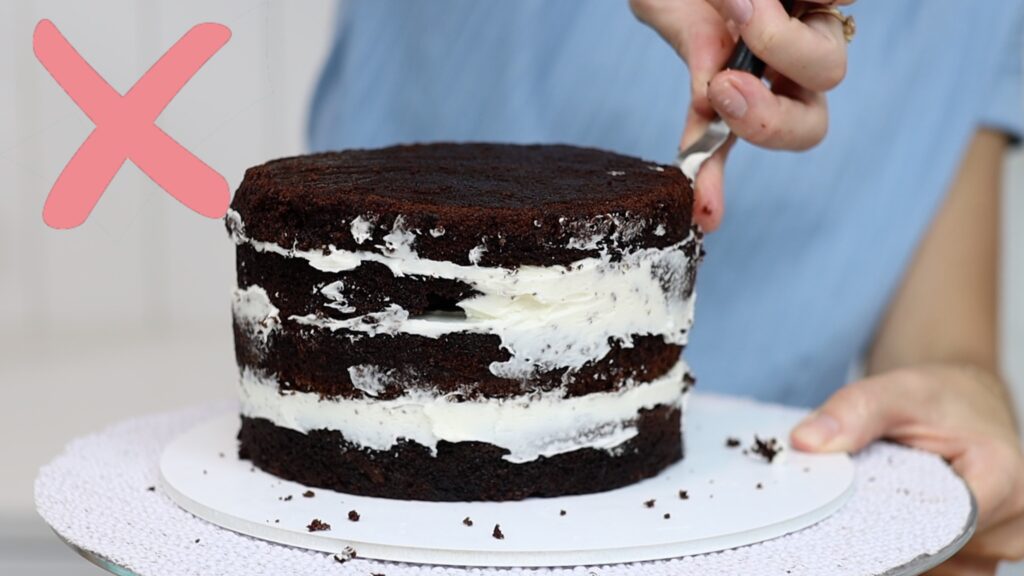
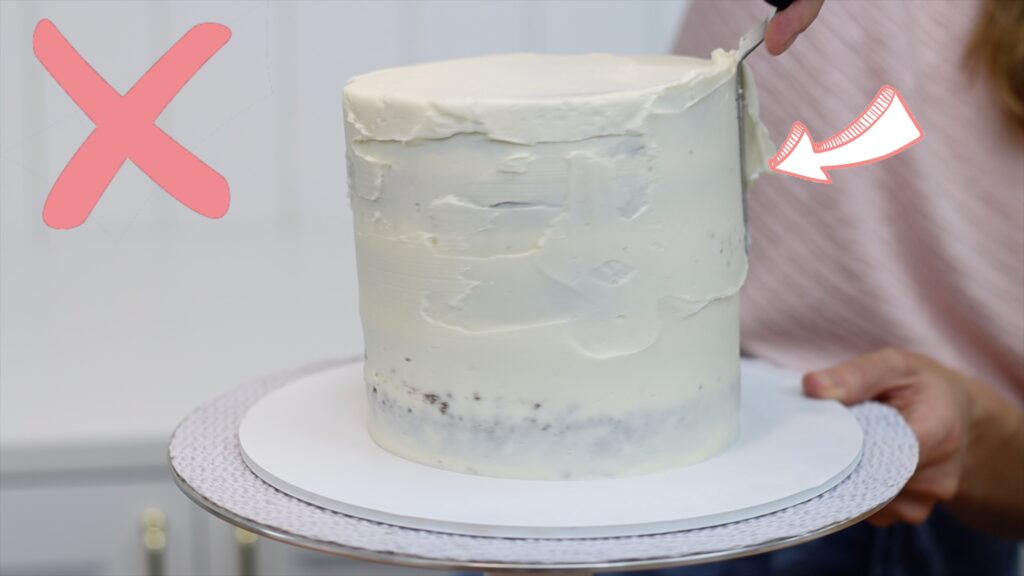
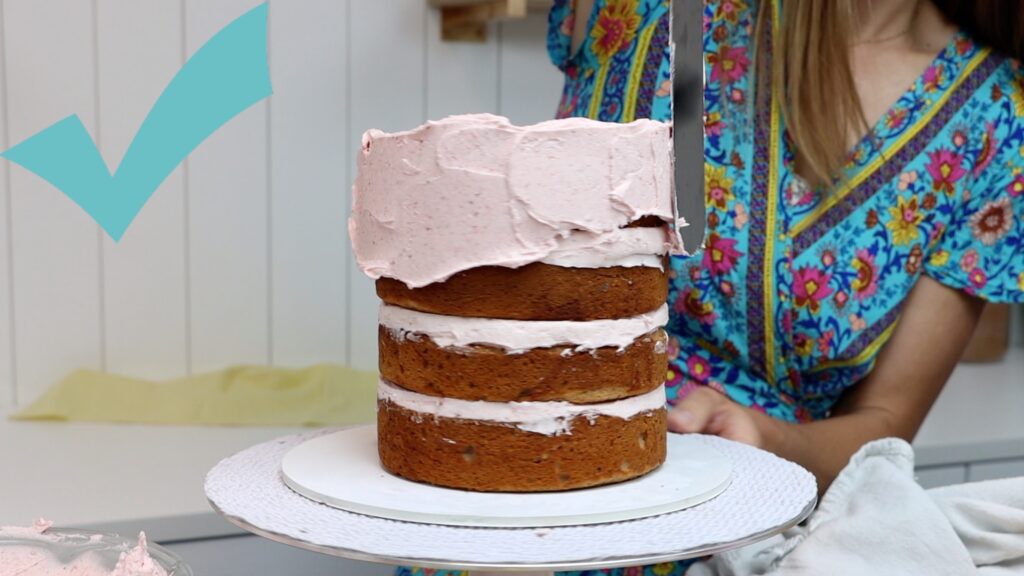
#3 Don't use room temperature cake layers
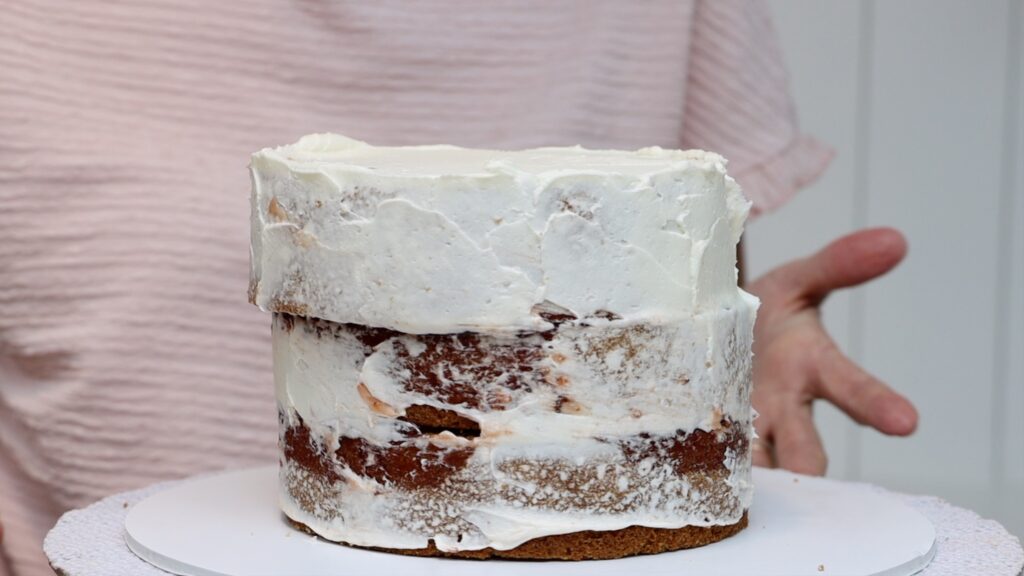
The temperature of your cake layers really matters when you’re assembling and frosting your cake. If you don't let cakes cool after baking they'll be delicate and crumbly. When you spread filling onto the layers it will pull up crumbs from the cake, which will get into your filling. Your crumb coat will be filled with crumbs, too!
But the bigger problem is that as you frost the cake, the pressure from your spatula and cake comb will push the cake layers sideways. This will make the cake lean, like this:
Instead, put your cake layers in the fridge for 30 minutes or the freezer for 15 minutes before you assemble and frost your cake. When they’re cold they’ll be less crumbly and much firmer and easy to frost. Even this tall, four layer cake is standing straight as I spread buttercream onto it:
Don't worry - when cakes warm back up to warm temperature they’ll soften again. They'll be just as delicious as before they went into the fridge!
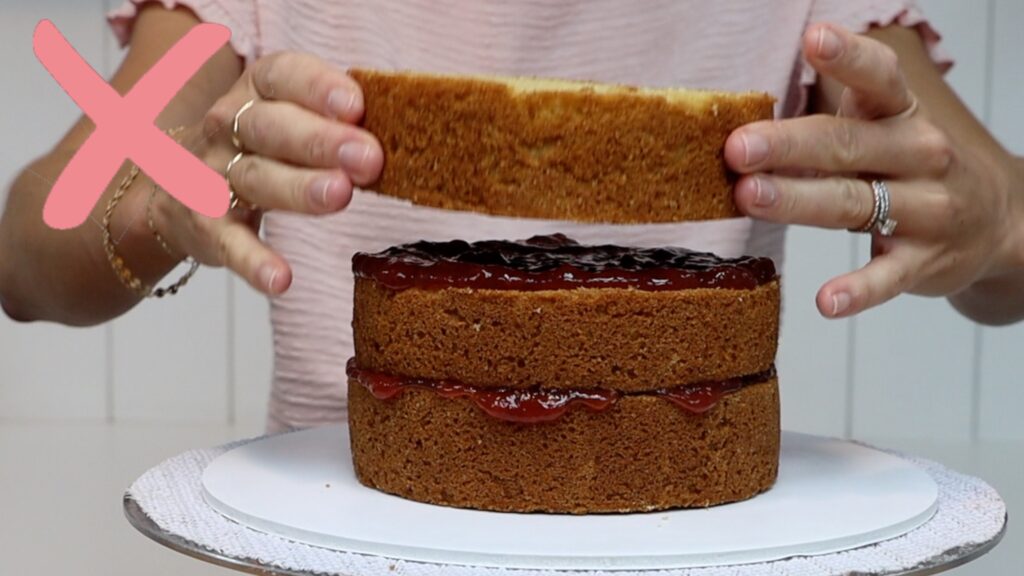
#4 Runny fillings
Runny fillings like jam or caramel are delicious but tricky for two reasons. The first is that the weight of the upper cake layers will push down on the filling. They'll squeeze it out of the sides of the cake, which can cause bulges in your frosting. Look at the jam oozing out here.
The second is that these fillings are slippery. They don't attach to the cake layers like buttercream does. When you frost the cake your spatula or cake comb can push the layers off-center, making the cake lean.
Now, this doesn't mean you can’t use runny fillings! You just need to add an extra step: a buttercream dam. These are rings of buttercream piped around the edge of each cake layer, like a dam or wall. They'll hold the runny filling in so that it doesn't ooze out.
Now spoon your next filling into the middle of this and spread it up to the edges of the buttercream dam. Optionally, spread a thin layer of buttercream onto the cake first to stop the filling absorbing into the cake. Then put the cake into the fridge for about 30 minutes to chill and set these buttercream dams. When you frost the cold cake, the cake layers and the filling will both stay in place.
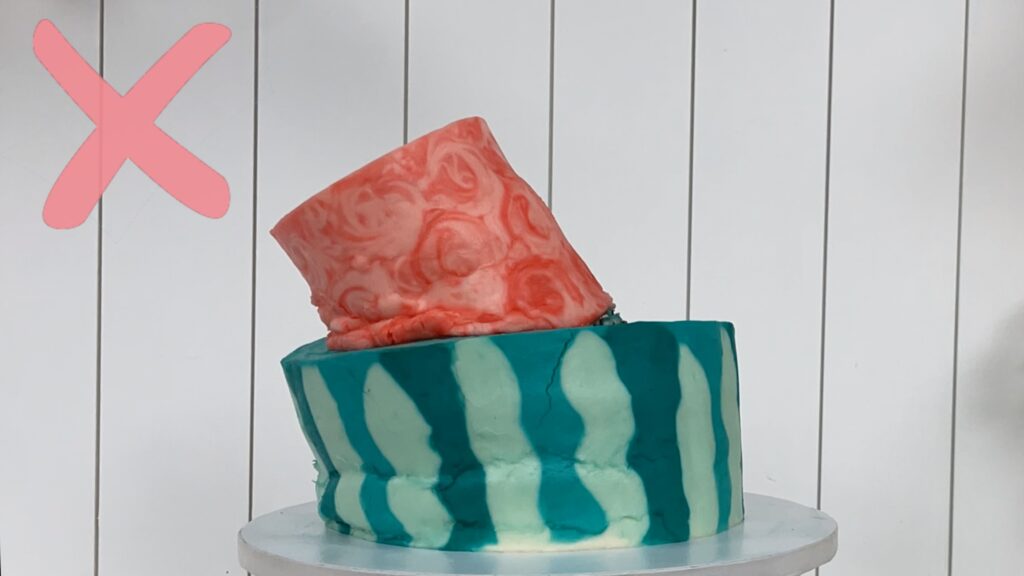
#5 Support for tier cakes
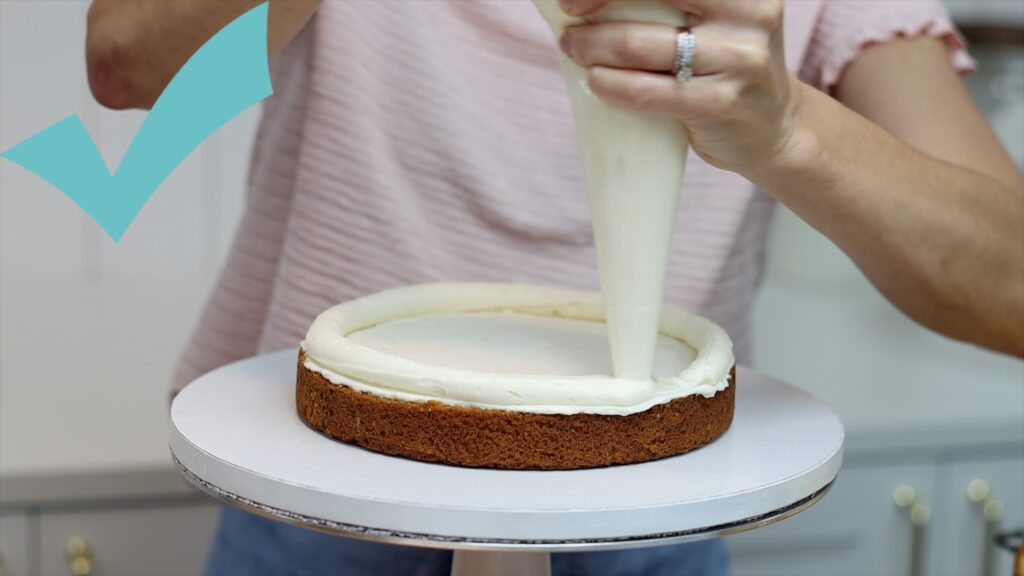
If you stack cakes without support, within a few hours the top cake will sink down into the bottom cake. This will happen even faster if the cake’s haven’t been chilled!
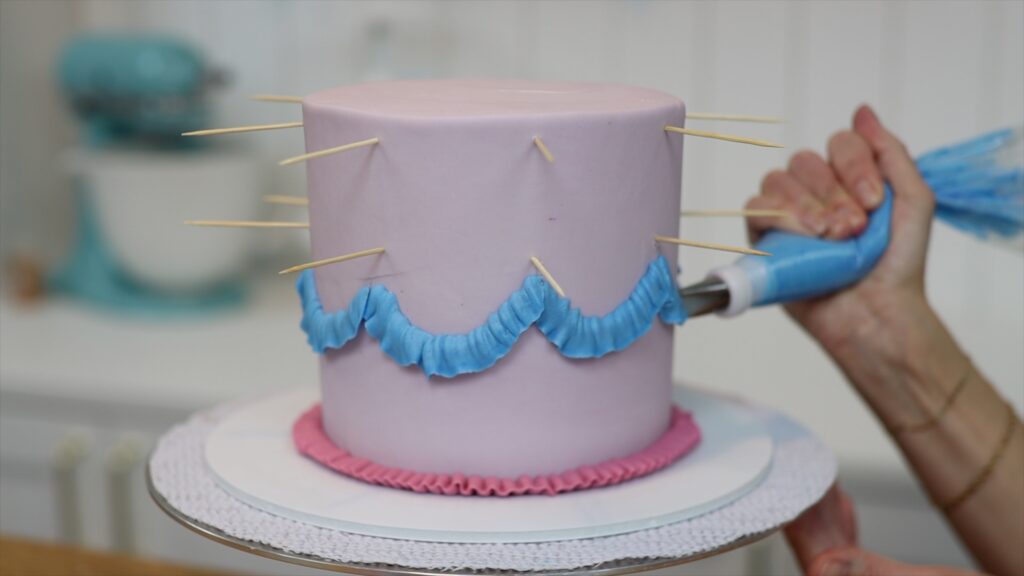
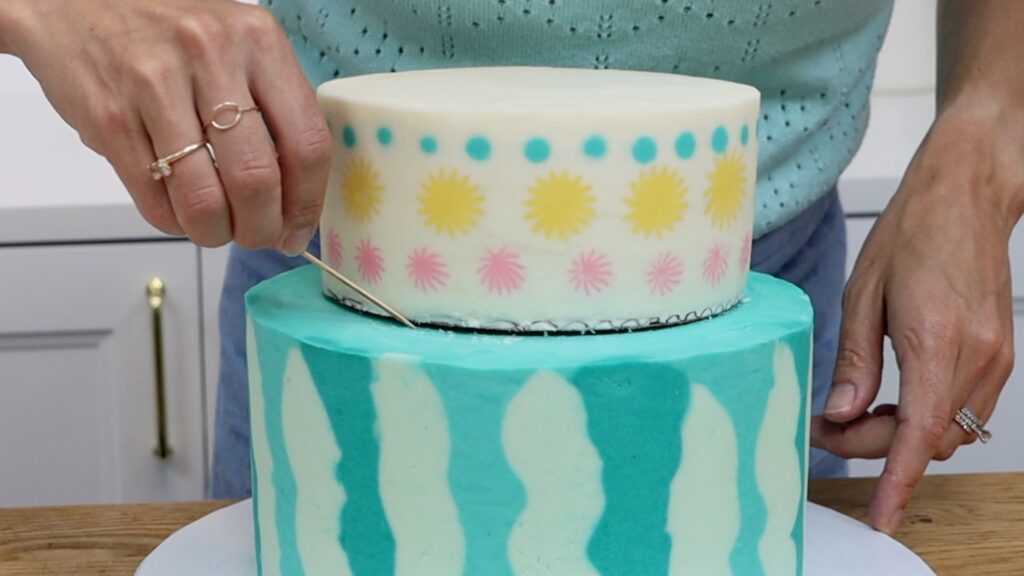
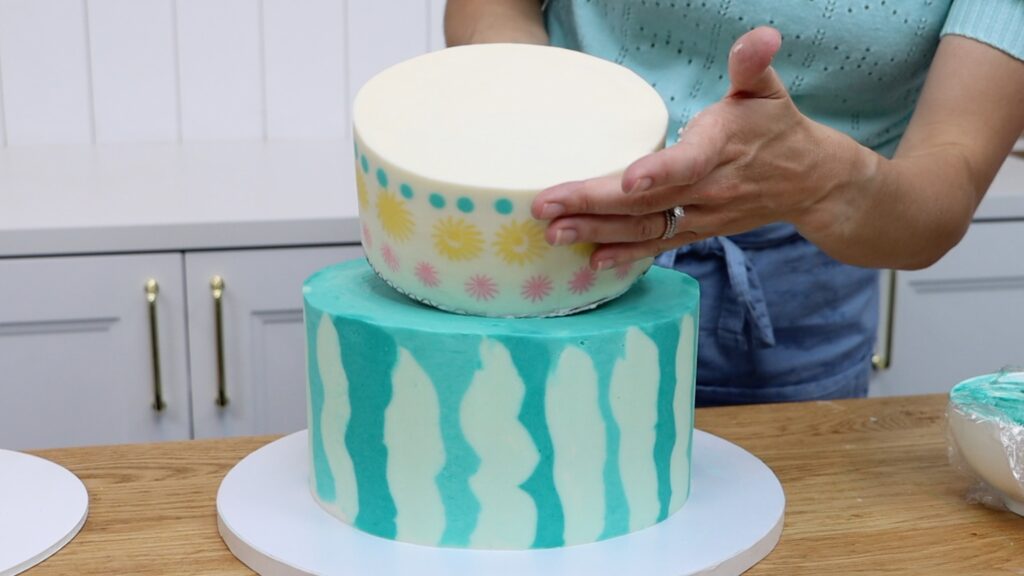
Here's how to stack a tier cake so that this won't happen. First, chill both cakes in the fridge for a few hours to set the frosting. This is necessary so you don’t damage them as you stack them. The top cake needs to be on a cake board that’s the same size as the cake so that you don’t see the board after you stack the cakes.
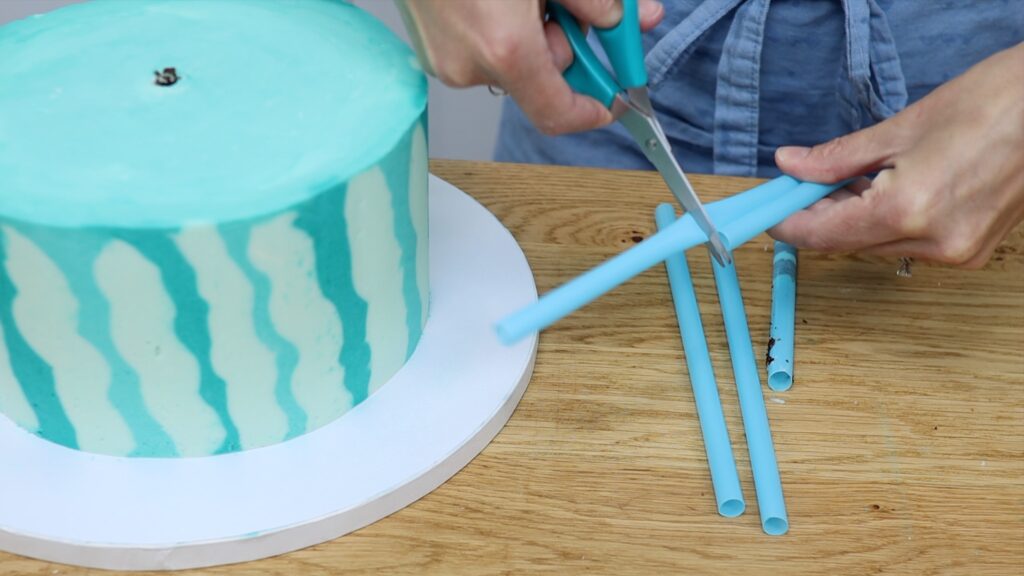
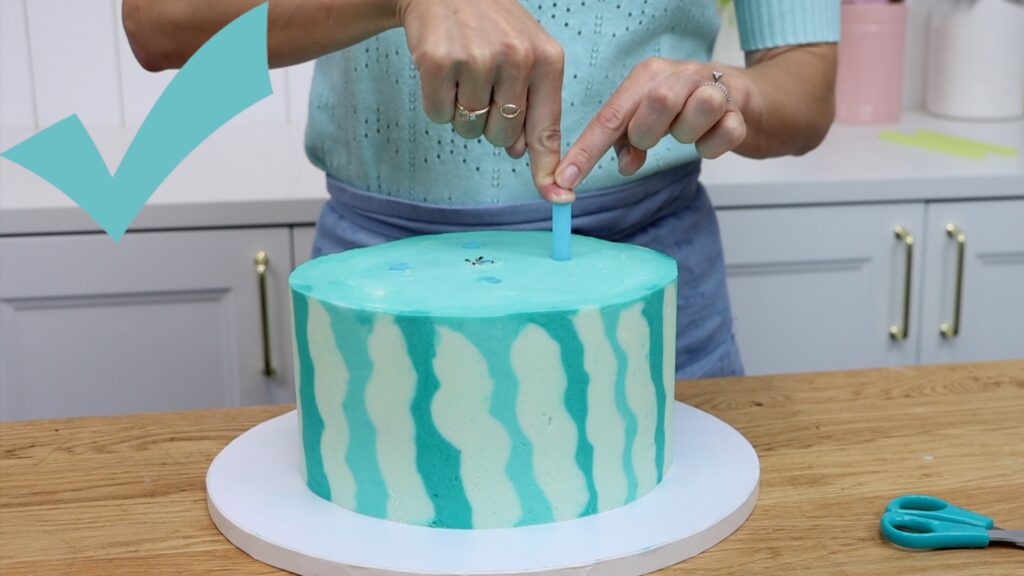
Lift the top cake and center it on the bottom cake. Use a toothpick to outline the cake and then take it off. Cut five straws or wooden dowels to be the same height as the bottom cake. Use the first straw or dowel to measure the others to be the same height.
Push the straws or dowels within the circle you scored onto the cake with your toothpick. I use a square formation with one more in the middle.
Spread some buttercream within the circle you scored to act as glue. Then put your next cake on top, still on it’s cake board. You can cover up the join of the two cakes with a piped border if you like.
For a three tier cake, repeat the process for your second tier. The supports will hold the cakes upright and the buttercream glue will stop the top cake from sliding around when you move it.
#6 Leaning cake fails
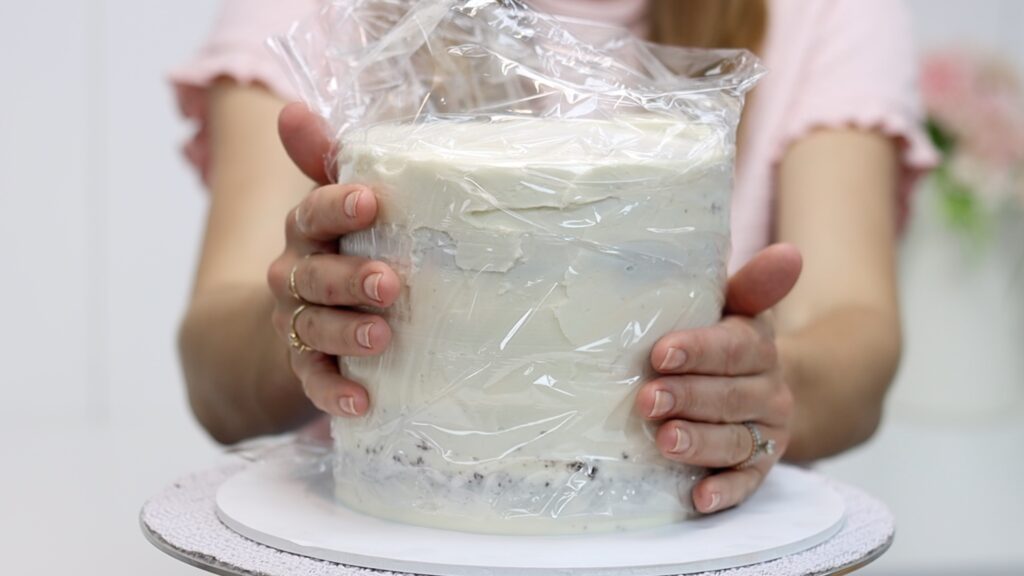
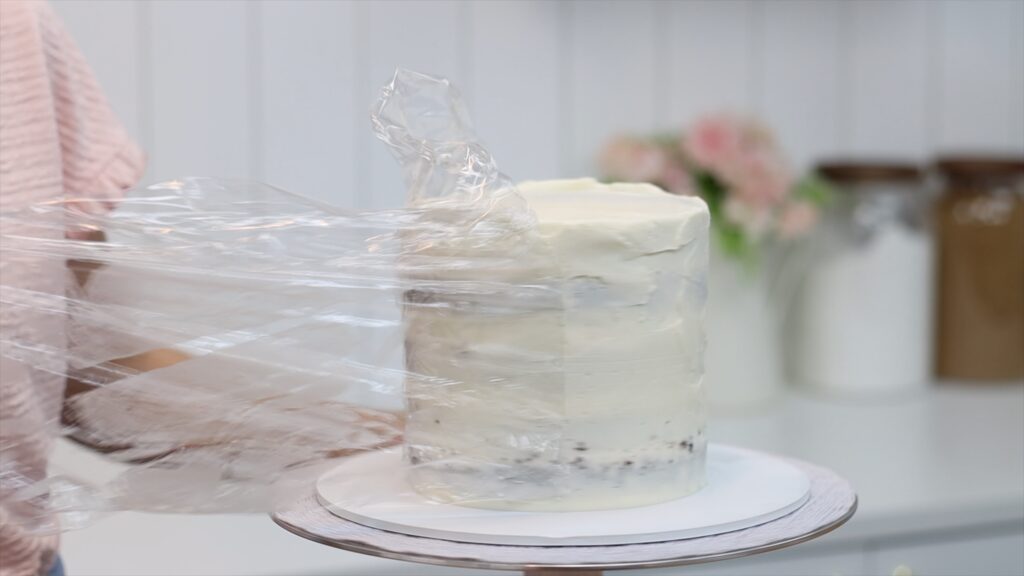
Remember this leaning cake from earlier in this tutorial? Here’s a quick fix for leaning cakes that haven't been chilled yet. It works when the filling hasn't set so the layers aren't fixed in place. While you’re frosting the cake, as you notice it leaning, wrap the cake in cling film or Saran Wrap. Then push it to straighten it.
Put it into the fridge to set the filling and frosting so that the cake is stable, which will take about 30 minutes. Then take the cake out and unwrap it. Since the frosting has set, you won't damage it as you unwrap it.
Now that the cake isn'tleaning and it’s firm, add another layer of frosting on top. You'll have a neat, straight cake!
#7 Textured frosting
When you smooth the frosting on a cake you only need a very thin layer to cover the crumb coat. However, that’s not true for textured frosting. With a textured cake comb the frosting needs to be at least as thick as the texture on the comb. If it's not, as you scrape around the cake to imprint the texture in the frosting, the comb will go too deep. The widest parts of the texture will push through the final layer of frosting an into the crumb coat underneath.
So for textured frosting, making sure you spread the frosting at least as thick as the texture in the comb.
#8 Cake toppers
After all the effort of getting your frosting smooth, don’t ruin it by rushing into the decorations! This is especially true for heavy cake toppers or piping. Their weight will cause bulges in the frosting since the frosting is still so soft, which you can see here:
Chill the cake after frosting it for at least 30 minutes in the fridge so that the frosting gets firm. After that you can add piping, cake toppers, or any other heavy decorations.
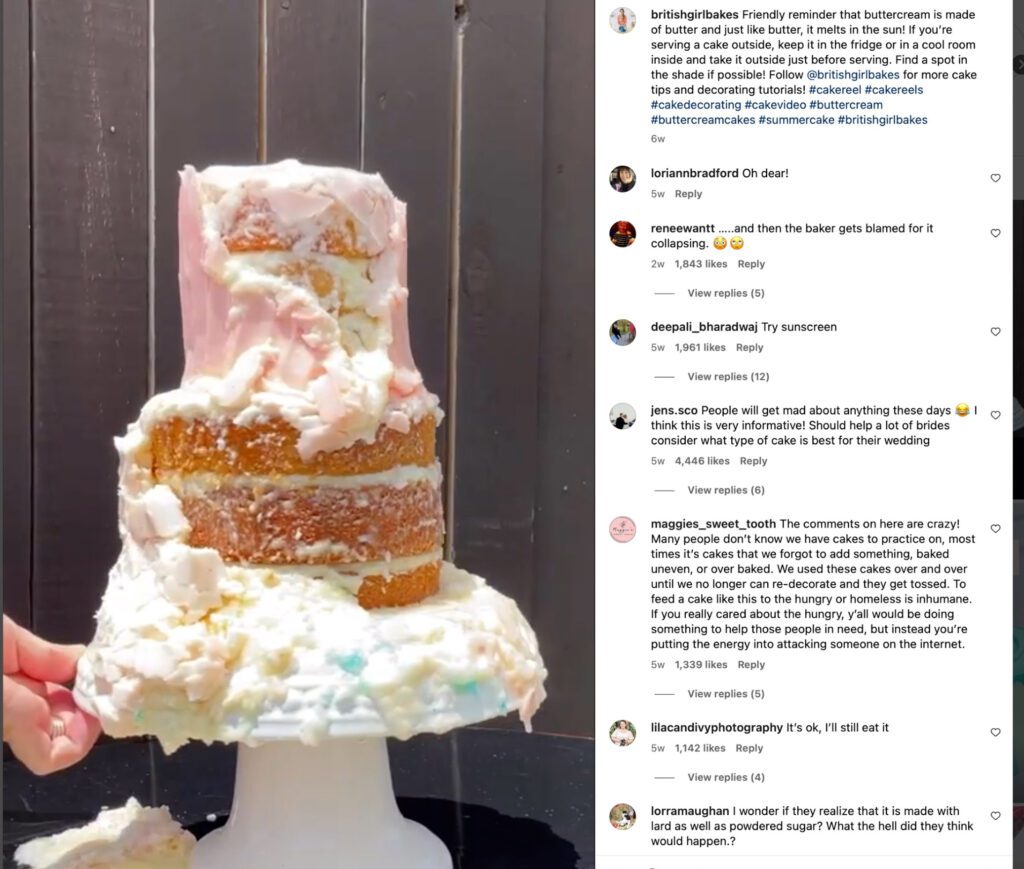
#9 Melting cake fails
You might have seen this video I shared on instagram that went viral. It shows what happens when a cake is left in the sun on a cool day at 70F or 22C:
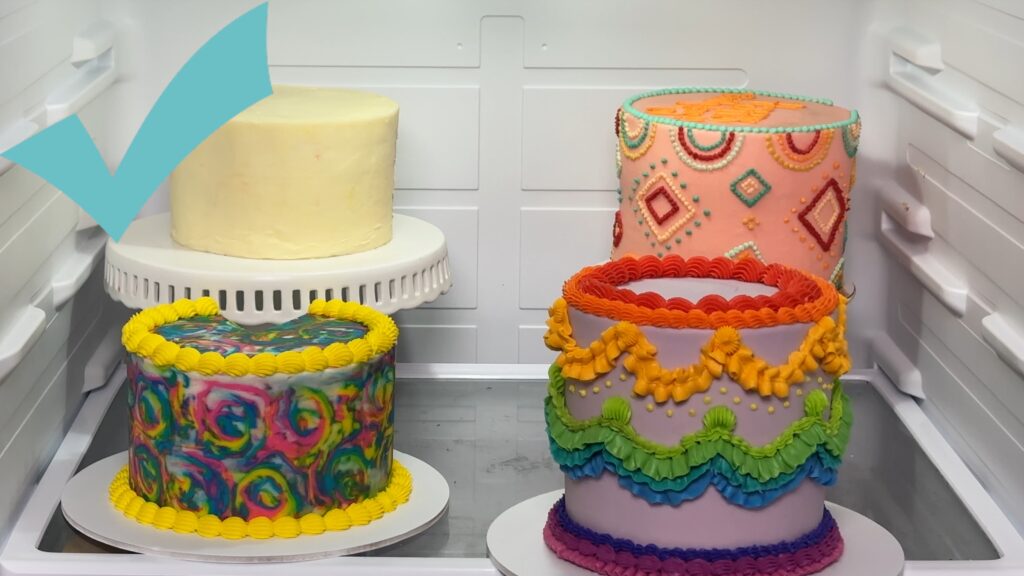
I keep my cakes in the fridge if they’re not going to be eaten within a few hours. It keeps the frosting and decorating stable and also keeps the cake fresh for longer. The frosting seals in the moisture of the cake so the cake doesn't dry out. For more than a few hours in the fridge, put it in a box or cake caddy so it doesn’t absorb any flavours in the fridge.
Keep cakes in the fridge until you transport them. Cold cakes are firmer are more resistant to vehicle vibrations or sudden braking. If you transport cakes at room temperature they're more likely to develop leans or bulges in the frosting.
#10 Servings cakes
Although I recommend storing cakes in the fridge, I don't recommend eating them cold! Cold cakes taste hard and dry. Take cakes out of the fridge 2-4 hours before serving and leave them on the counter to room temperature. When the cake and buttercream warm up they'll be soft and moist and delicious!
Russian piping tips pipe all of the petals of a flower, in several colours, with just one squeeze! They’re easy to use once you know how so in this tutorial I’ll share 6 hacks for Russian piping tips!
How do you use Russian piping tips?
Russian tips are bigger than standard piping tips so you’ll need to cut larger holes in your piping bags. I like to cut a little bit less than half way up the tip. With the tip pushed to the end of the bag, score a line about a third of the way up. Push the tip out of the way and cut along that line. Now it should fit snugly and won't pop out while you're piping.
The technique for piping with Russian piping tips isn't complicated. However, you won't be successful unless you use these six hacks before and after you pipe.
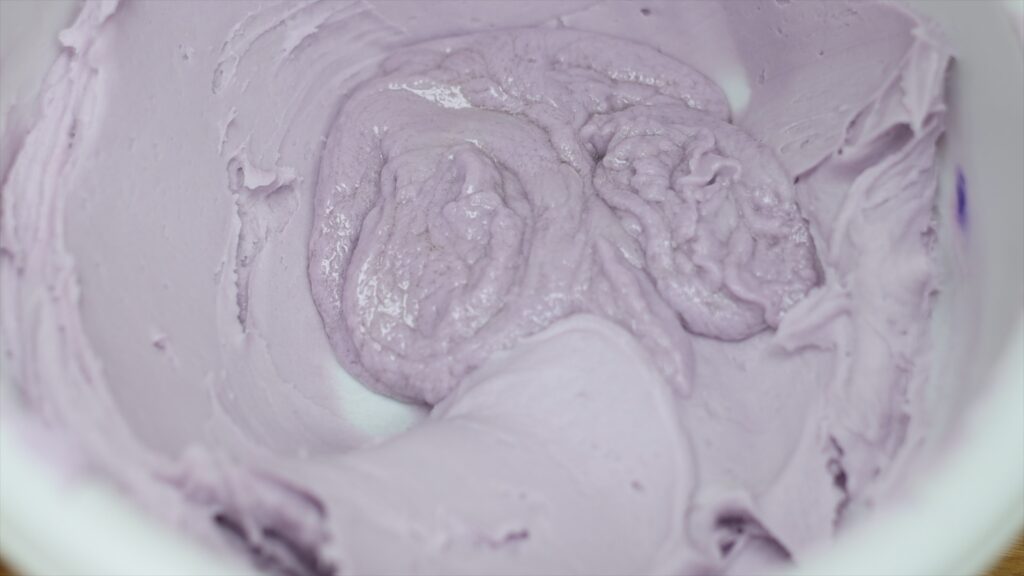
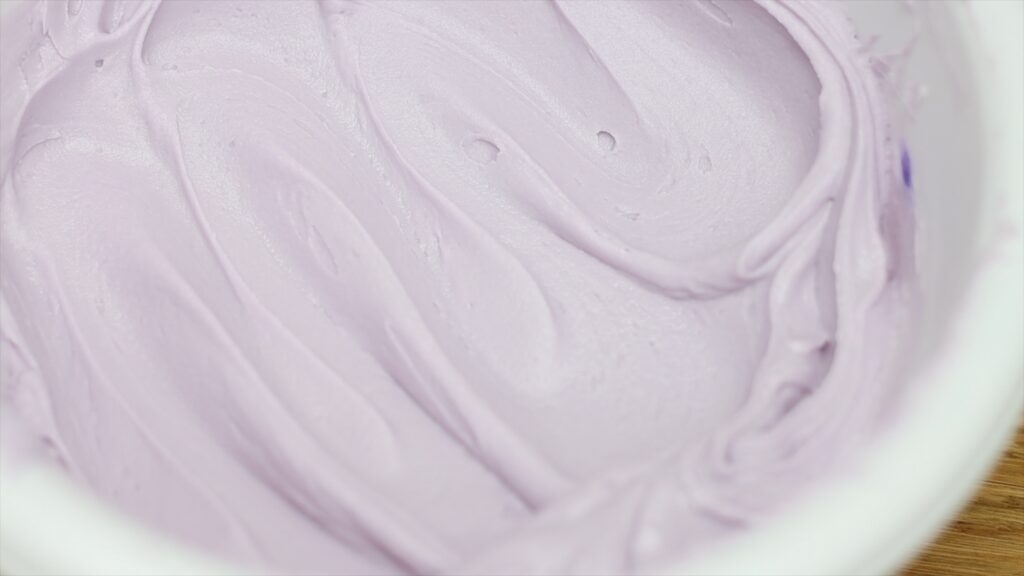
#1 The right buttercream consistency for Russian piping tips
Maybe the most important hack is to get the right consistency of your frosting. This is my 4 Minute Buttercream and you should be able pull a spatula through it easily to stir it. You'll leave texture behind that holds its shape and doesn’t sink back down into the buttercream.
This is what a flower looks like when buttercream has the right consistency.
Buttercream will be too stiff when it’s too cold or there’s too much sugar in it. It will be difficult to squeeze through the tip and the petals might pull away with the tip instead of sticking to the cake. You'll notice jagged edges on your petals.
Buttercream will be too runny when it’s too warm or there’s not enough sugar or too much milk in it. The petals will lose their definition and blob together.
Fix buttercream consistency by adding more milk to stiff buttercream or more sugar to runny buttercream.
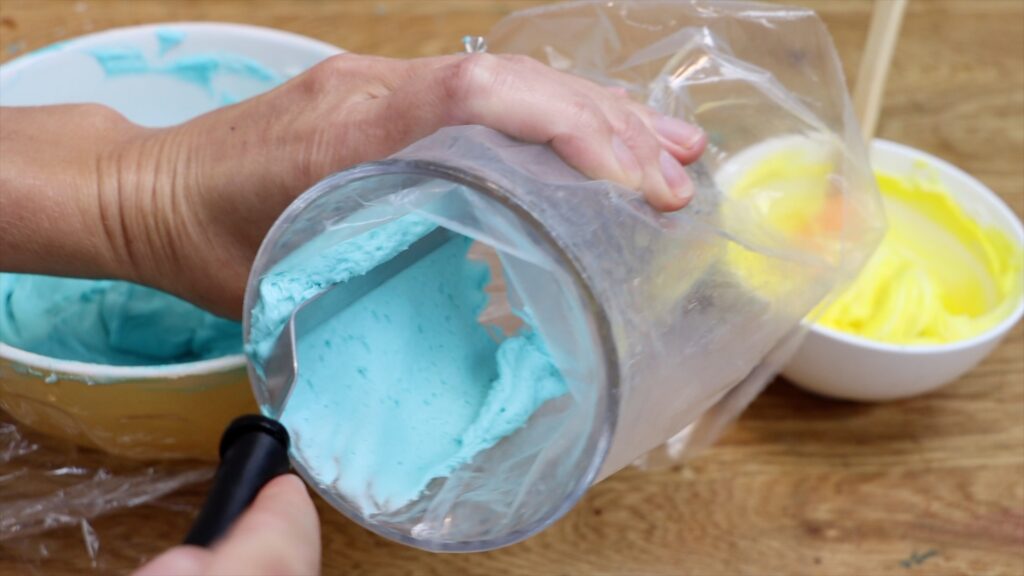
#2 Using Russian piping tips with several colours
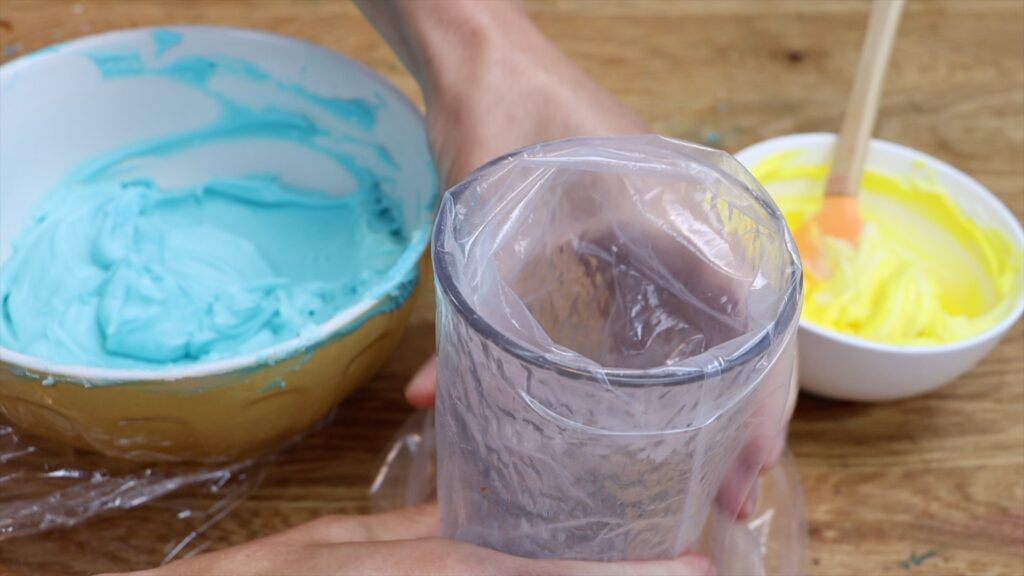
One of the biggest advantages of Russian piping tips is that they pipe different petals in different colours. But how do you get different colours into a piping bag? I like to drop the piping bag into a tall glass or cup. Fold the top over the rim to hold it open. It’s easiest if the bag is pulled tight, with the tip visible at the bottom of the glass.
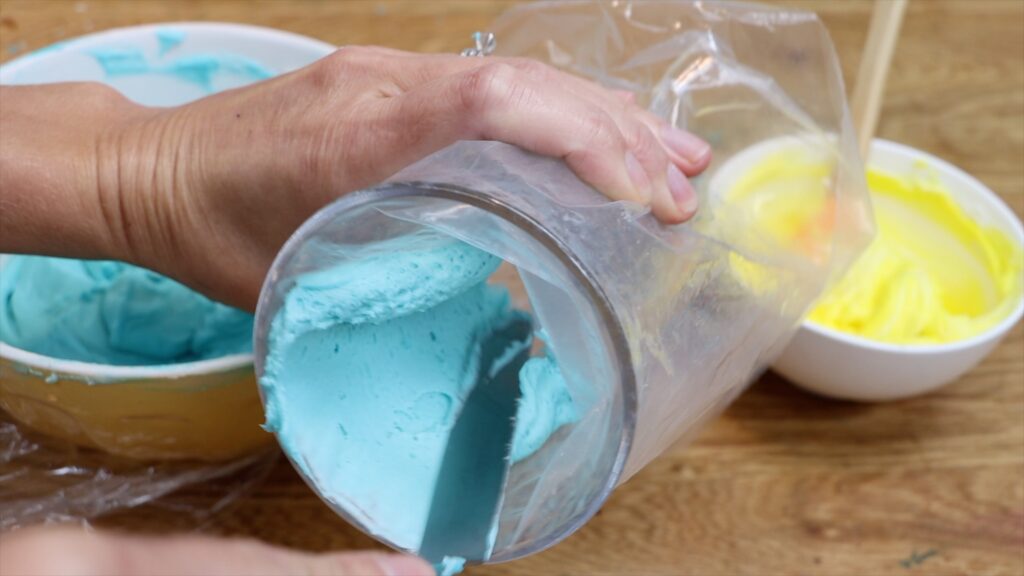
Spread your first colour around the piping bag, pushing it against the glass to cover the bag all the way around. Spread it all the way down to the piping tip. You want a fairly thick layer so that the outer petals will all be this colour.
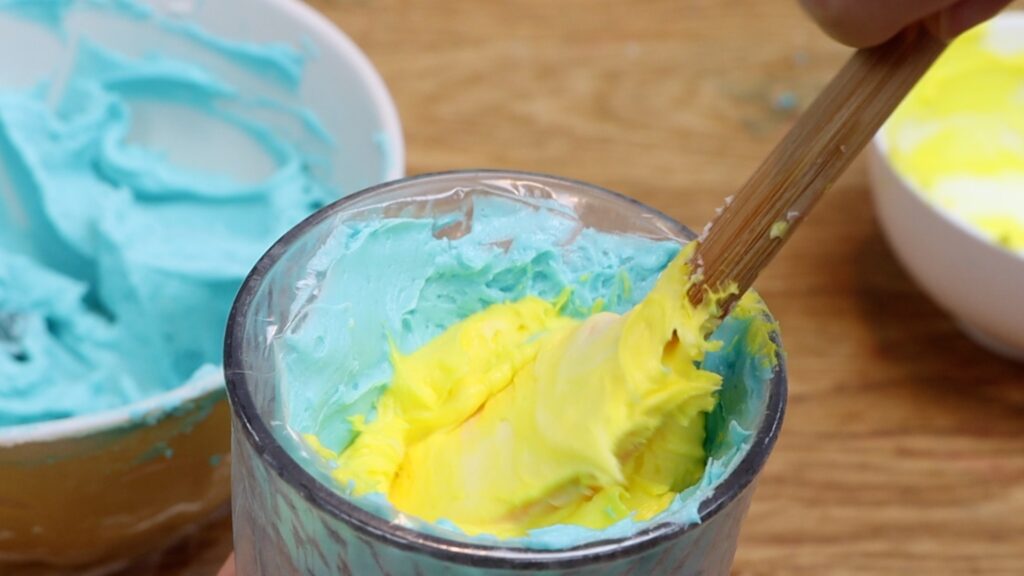
You can layer another colour or two on top of this using the same spreading tehcnique. For a quicker option, spoon your next colour in and push it down to the bottom of the the bag. You want it to go all the way down to reach the piping tip.
Now pull the bag out of the glass and twist it to push the buttercream down. When you squeeze the bag you should see the colours coming through the piping tip.
If you don't push any colours down to the piping tip, they won't come through the tip when you pipe. This is most common with the middle colour. If this happens, squeeze the bag until you see all the colours coming through and now you’re ready to pipe!
#3 How to pipe onto cakes with Russian piping tips
Before you pipe with Russian tips onto a cake, the frosting should have set. Put the cake into the fridge for about an hour and it will get cold and firm. Now when you pipe onto the cake you won’t cause any bulges in the frosting.
#4 Prevent buttercream crusting
After chilling the cake, the frosting won't be sticky anymore. That means you really need the frosting in the piping bags to be sticky. Otherwise, the flowers you pipe won’t stick to the cake because they'll pull away with the piping bag.
This happens when you leave piping bags out for about 30 minutes. The exposed buttercream at the tip crusts. which means it gets hard and loses its stickiness. Squeeze the bag to push the crusted buttercream out through the piping tip. The buttercream left in the piping bag will be soft and sticky and ready to pipe!
To prevent crusting, cover Russian piping tips with plastic wrap when you’re not using them for long periods of time.
#5 Don't let buttercream get too warm for Russian piping tips
Piping with Russian tips is very straightforward - it’s the consistency and that seems to cause the most problems. When the consistency is right, the flowers will stick to the cake and the petals will pull out and break away neatly from the piping tip, leaving gorgeous flowers behind on the cake.
But as you keep piping flowers, you might notice the petals getting less defined as the details merge together. This happens when your buttercream gets too warm, usually from the warmth of your hands as you pipe.
Put the whole piping bag into the freezer and set a timer for 1 minute. This is enough time for the buttercream to cool back down and firm up.
Then pipe and notice how much more defined your flowers are!
#6 Fix messy petals
Sometimes petals will be too long if you squeeze the bag with a bit too much enthusiasm. There’s a hack to fix drooping petals and it’s simple: Use a toothpick!
Hold it where you want the petal to end and spin it as you push up. You’ll lift away the extra part of the petal, leaving a neat edge behind on the remaining petal.
I hope these hacks for Russian piping tips have been useful! Ask me any questions in the comments and visit my cake school to learn hundreds of cake decorating techniques and designs.
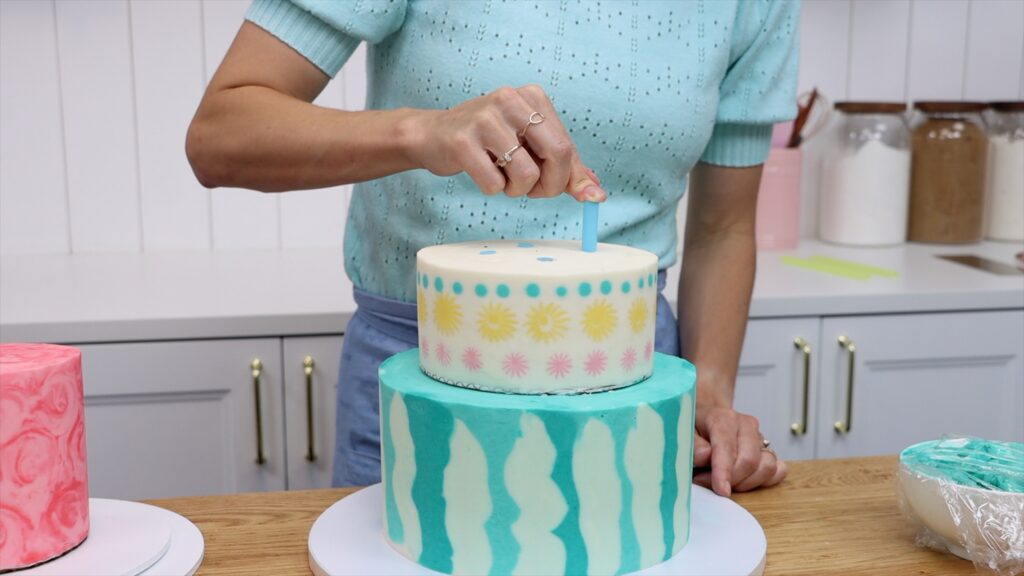
There are so many tricks with toothpicks for cake decorating! Make neat patterns on cakes, smooth stenciling, stable tier cakes, really white buttercream and more! In this tutorial I'll share 10 ways to use toothpicks for cake decorating.
#1 Create guides for piping
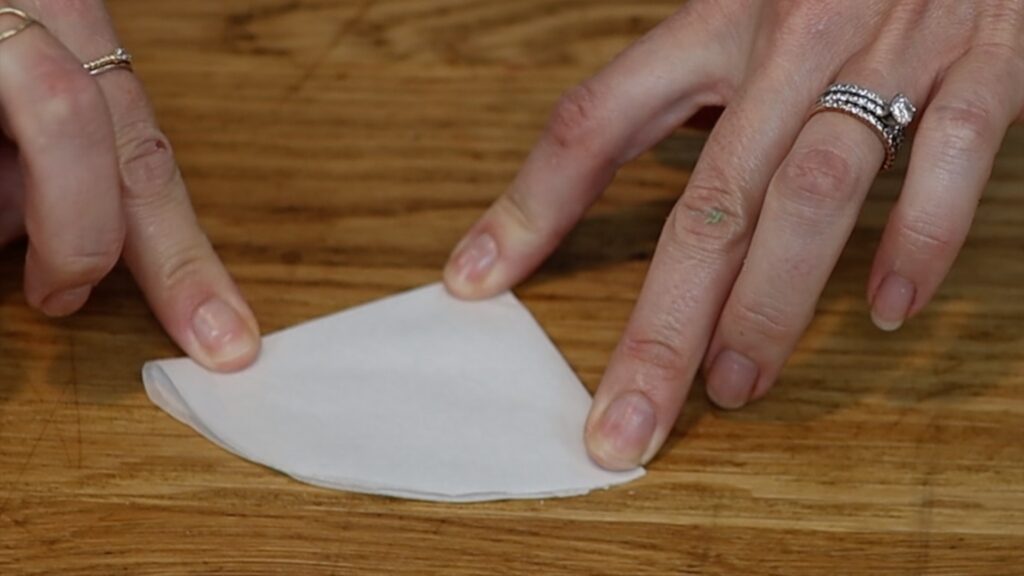
Toothpicks can guide you as you're piping, showing you where to move your piping bag. Start by cutting a circle of parchment paper that's the same size as your cake. You can use wax paper or baking paper or even normal paper instead. The quickest way to measure the paper is to trace around the cake pan you baked the cake in.
Cut the circle out and fold it in half three or four times or more for really big cakes. Unfold it and place it on top of your cake.
Use the creases in the paper as your guidelines, poking toothpicks into the side of the cake below each crease. Now when you pipe, the toothpicks will keep your designs spaced evenly around the cake.
#2 Mark outlines for cake designs
Take this a step further by using toothpicks to create outlines for your cake designs. Score your design onto a frosted cake, drawing freehand or tracing around objects or cut-out paper shapes.
Outlining a shape with a toothpick gives you a subtle guide that helps you create the right proportions.
Once it's covered up, in this case with buttercream mosaic tiles, you really don't notice the toothpick outline. You can outline messages, too, to make sure the letters fit before you pipe them.
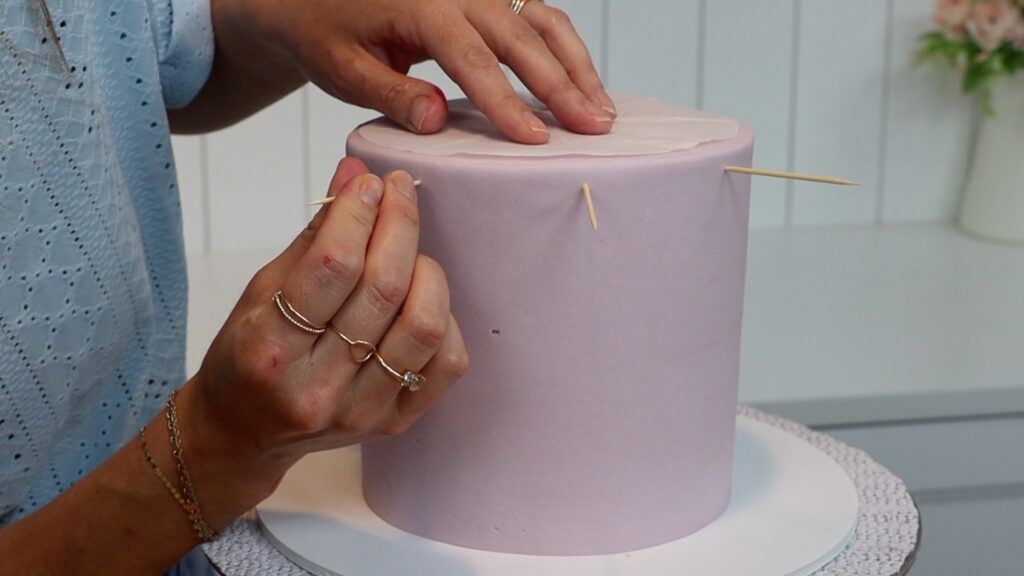
#3 Stack tier cakes using toothpicks
To stack a tier cake, outline where the top tier will go before adding support straws or dowels below. The cakes need to be cold and firm so put them in the fridge for a few hours first.
Push support straws or dowels within the circle you scored onto the cake with your toothpick. This way you'll know they'll be positioned underneath the cake above, to support it. Doing this for every tier will make sure your cakes are centered and won't sink.
#4 Toothpicks for cake decorating marble cakes
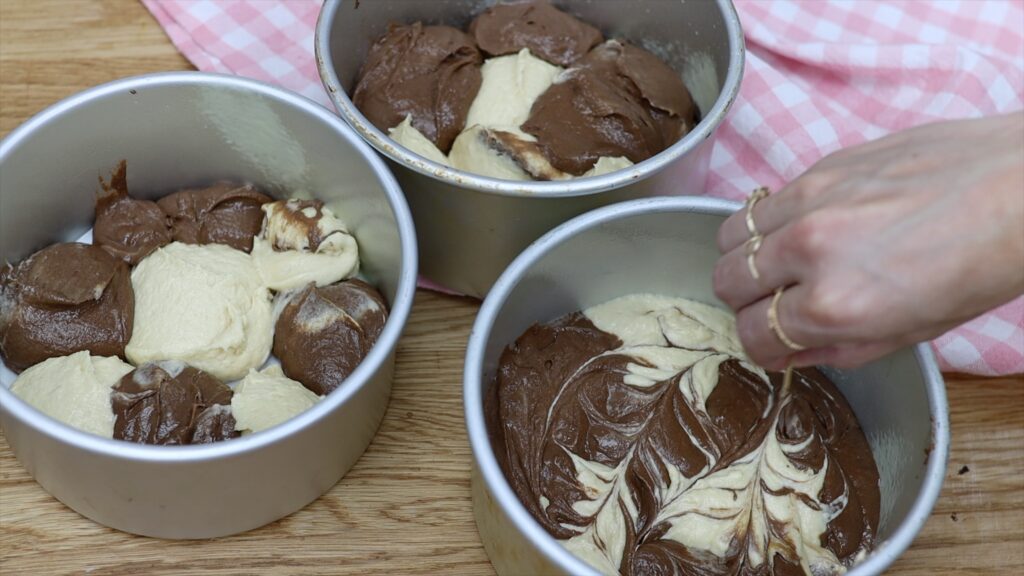
To make marbled cake batter spoon different flavours into a pan, alternating between them. You can do this with different colours instead, spooning or piping them into the pans.
The key to making this marbled is to use a toothpick, dragging it through the cake batter. You'll mix the colours together just enough to create this fun, marbled effect.
#5 Toothpicks for cake decorating with smooth transfer designs
Make designs really smooth with a toothpick when you pipe them to later transfer to a cake. Use dabbing motions to push the buttercream downwards towards the paper or acetate underneath. This will prevent trapped air pockets that later become holes or indents in the surface of the frosting.
This works for character cakes made with buttercream transfers, like this cake:
Use toothpicks to create 3D designs on cakes by making your own edible cake toppers. Melt chocolate and spoon it into a sandwich bag, cutting off one of the corners to pipe through. Next, write a message or draw a shape onto parchment or wax or baking paper.
Then push a toothpick into the bottom of each section, piping some more chocolate to cover it up.
Pour sprinkles or coloured sugar on top, pressing it gently into the melted chocolate. The chocolate will set after about an hour at room temperature or 30 minutes in the fridge.
Then you'll be able to pick them up and push them into the cake so that they stand upright. So pretty!
#7 Toothpicks for cake decorating mistakes
Toothpicks are ideal for tidying up messy frosting. For example, stenciling can be tricky but with a toothpick you can make smooth, neat, stenciled designs.
If the stencil moves while you're spreading and smoothing the frosting over it, you'll have smudges around the outline. A toothpick is perfect for scraping those off.
Also, as you peel a stencil away from your cake the frosting you've just spread over it might try to pull away with it. Nudge it with your toothpick straight away before the frosting sets. With straight, smooth edges around stencil shapes the design will look much neater.
Use toothpicks to tidy up piping, too by taking off any part you don't like.
You can also nudge details into the right position with toothpicks to make your piping look much better.
#8 Toothpicks for cake decorating patterns
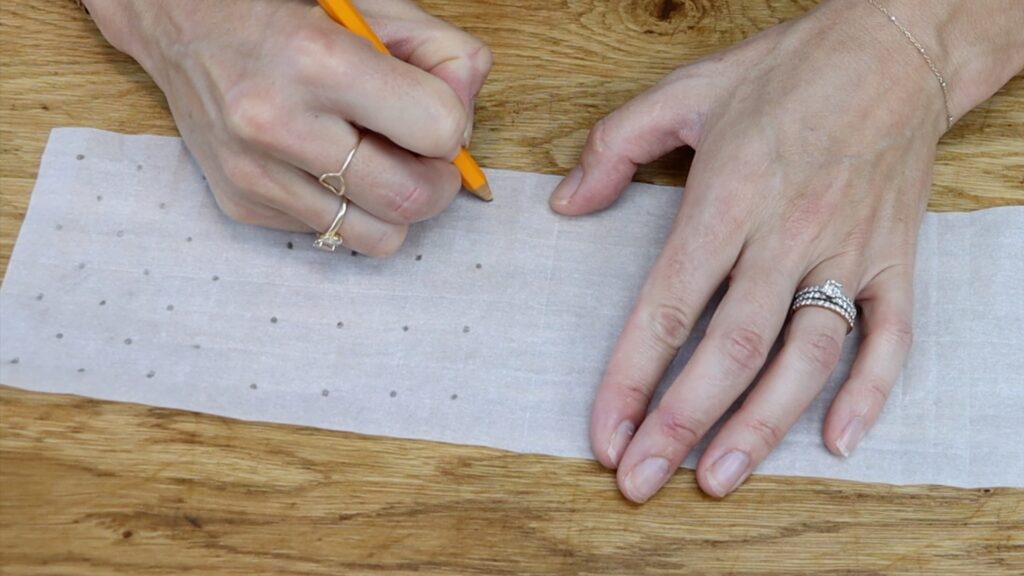
To create a symmetrical pattern, measure a piece of parchment or wax paper so it will wrap around your cake. Then fold it in half and half and half again in both directions if you need a grid. It's useful to mark the places you want to pipe your pattern with a pencil like these polka dots here.
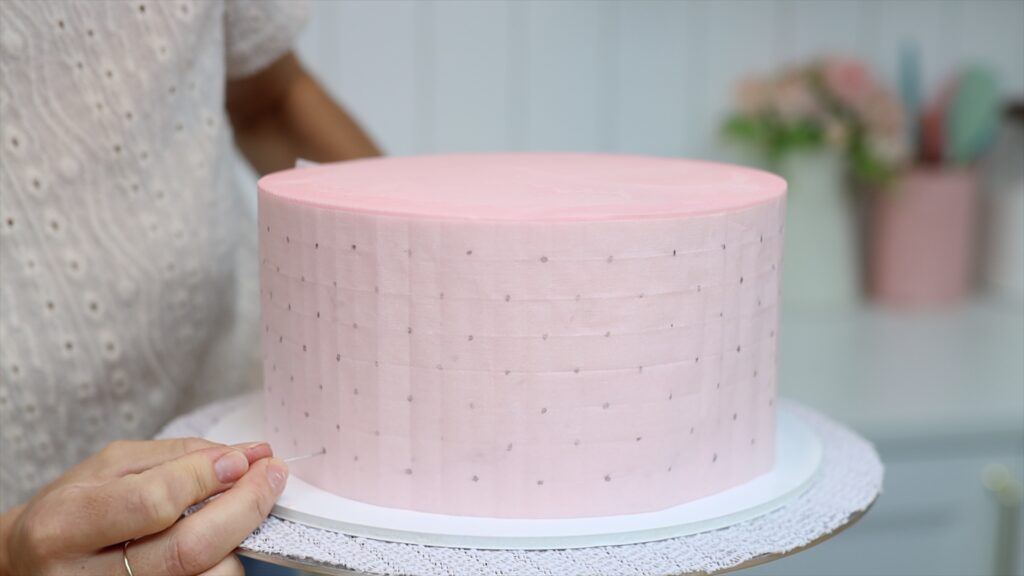
Wrap the grid around your cake and use a toothpick to poke through each point. You'll need to chill the cake first so the frosting has set and it's firm.
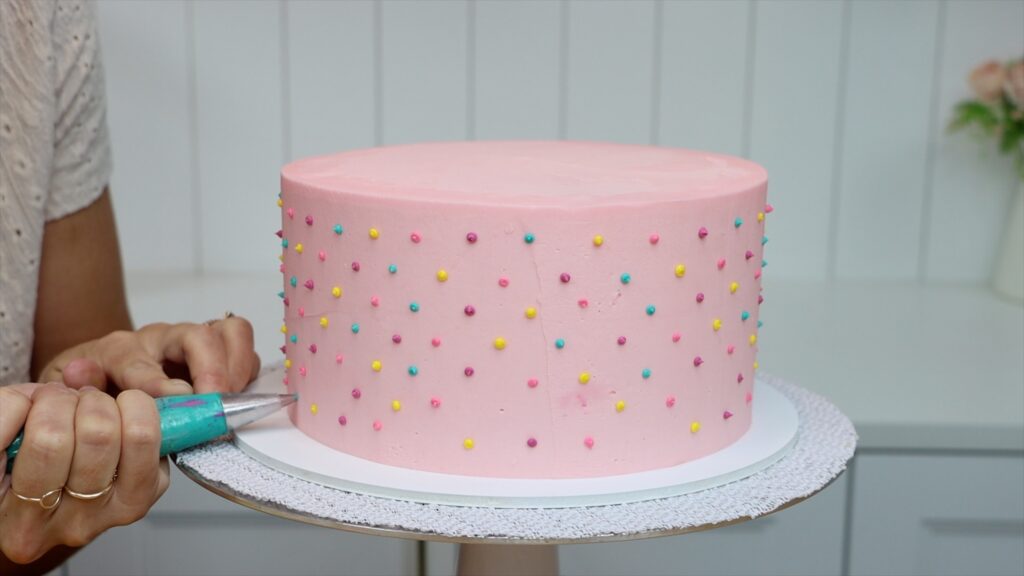
Peel the paper away and then pipe over the points you marked on the cake, making a neat symmetrical pattern.
#9 Carve details with toothpicks
Use toothpicks to add tiny details to designs like facial features that would look messy with thick piping instead. Chill the cupcake or cake before you do this so that the frosting is firm. Your toothpick will carve through the buttercream, leaving neat lines and dots behind.
#10 Make white buttercream
Toothpicks are a game changer to make really white buttercream even if you're using yellow butter. Dip a toothpick into violet gel so that you can add just a tiny amount to your buttercream. The blueish tint of the violet will offset the yellow in the buttercream to make a brighter white.
I hope you've seen some tricks you'd like to try! Tell me in the comments which is your favourite and visit my cake school to learn hundreds of cake decorating techniques and designs to make stunning cakes. There's a 7 day FREE trial for my All You Can Cake membership, which includes access to everything on my cake school so you can try it out risk free. I hope to see you there!
In this bubble wrap cake tutorial I'll show you how to make bubble wrap frosting and how to fill the dots with rainbow colours.
Make a rainbow checkerboard cake
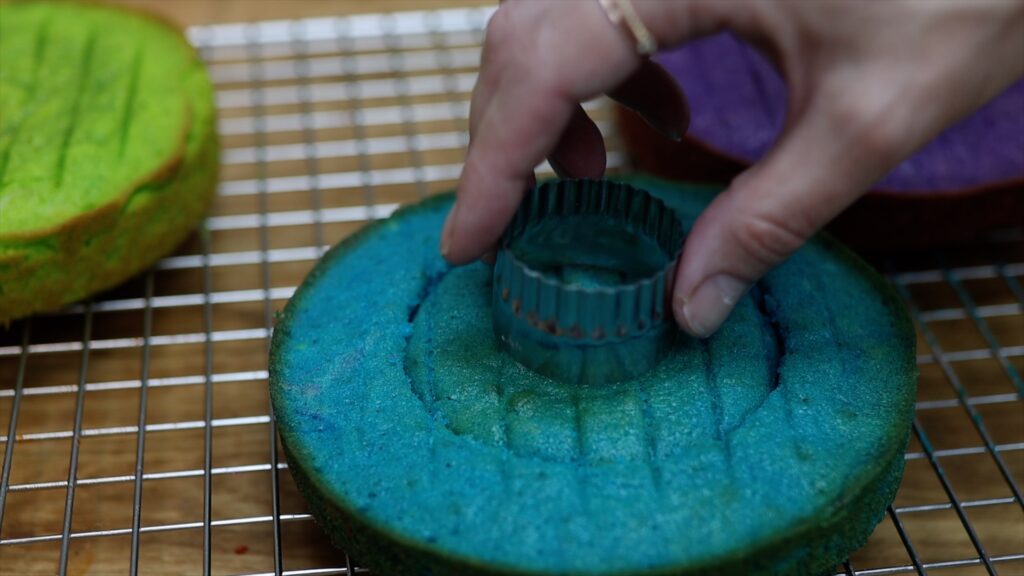
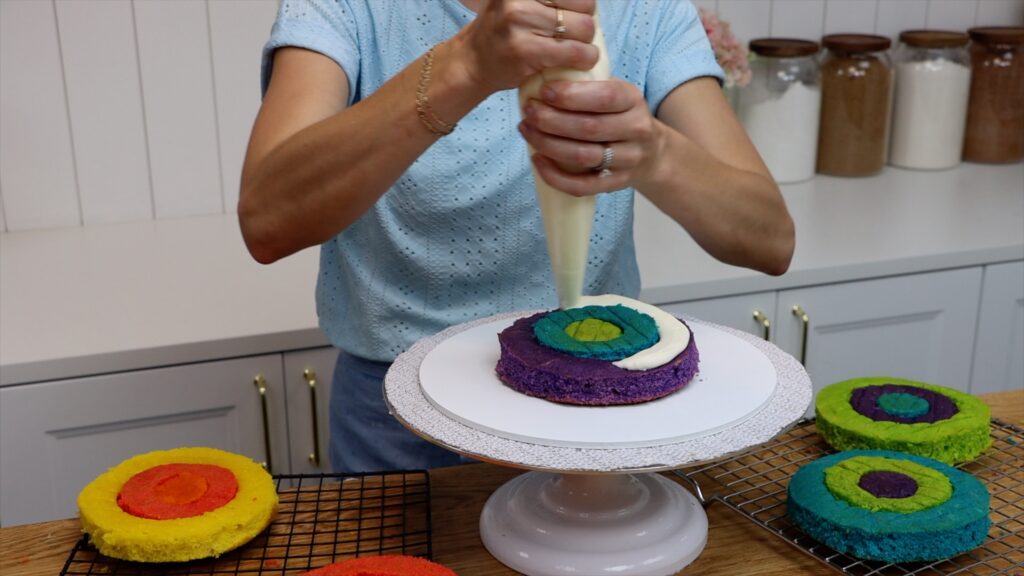
To make rainbow cake layers, weigh the cake batter to divide it into six equal portions. Then add gel colours to each one. To use just one bowl, mix the colours in this order: yellow, orange, red, purple, blue, green. This way you don't need to wash the bowl in between colours.
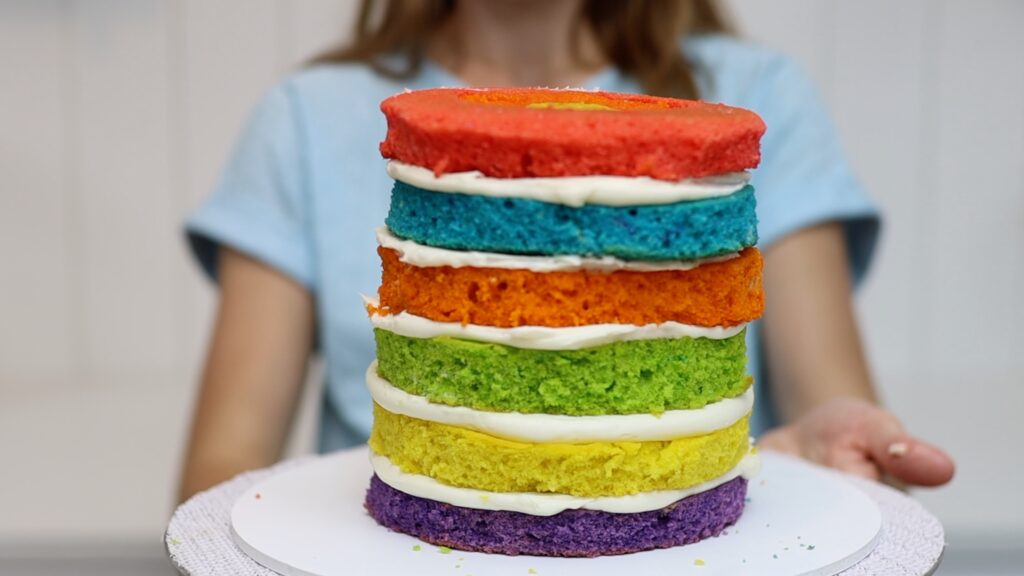
After baking and cooling the cake layers, make a checkerboard pattern by cutting discs out of each layer. Choose objects with the same difference in size, for example for these 6 inch cake layers I'm using a 4 inch plastic cup and a 2 inch cookie cutter.
Since the cakes darken around the edges I'm trimming those parts off. Now mix and match to make colourful rings of cake and layer the cake with filling.
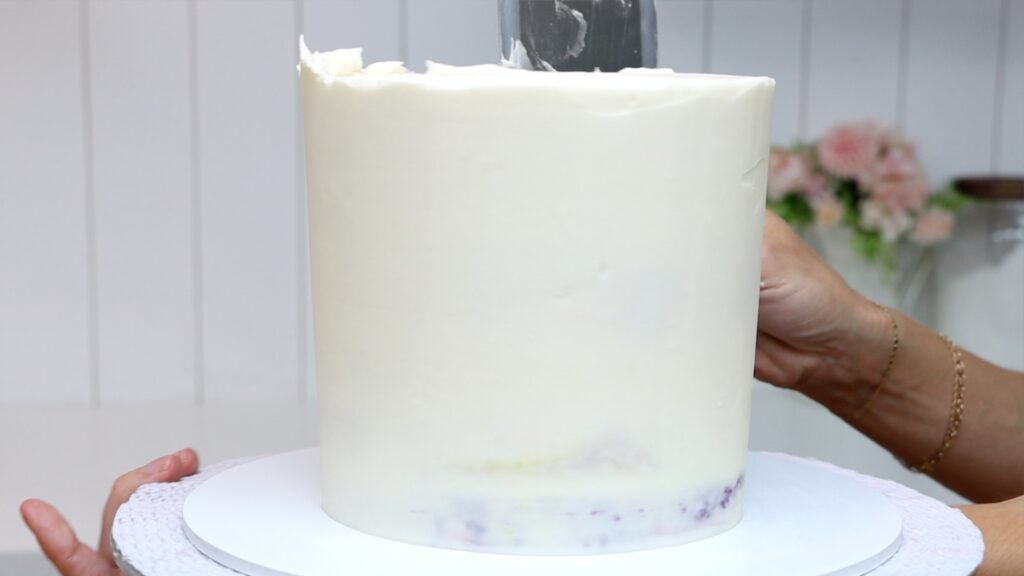
The bubble wrap design needs a smooth surface to attach to so start by frosting the cake. If you'll have white frosting in the design, cover the cake in two layers of frosting. Otherwise, you might see the colored cake layers through the white parts of the design.
Make bubble wrap frosting
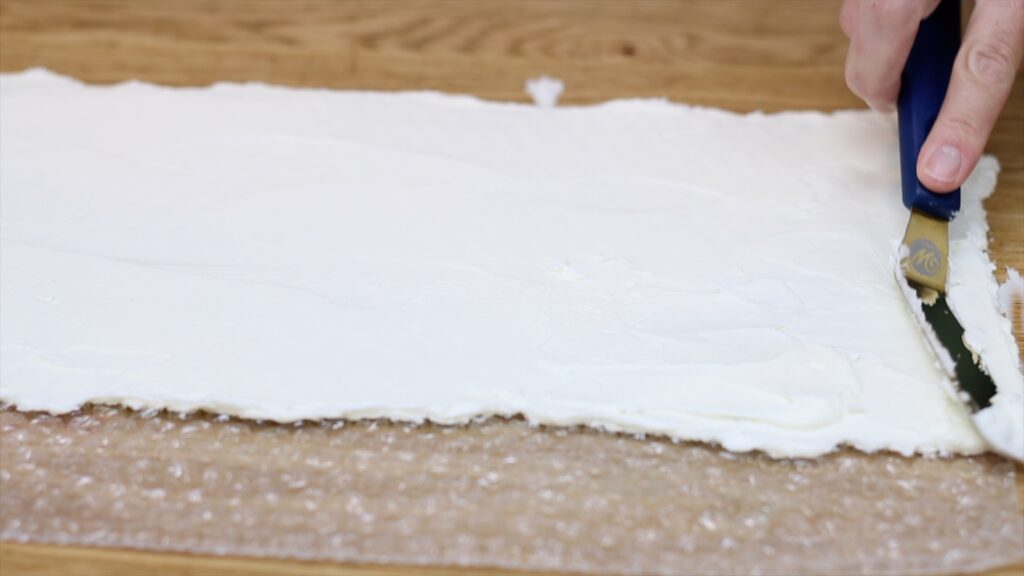
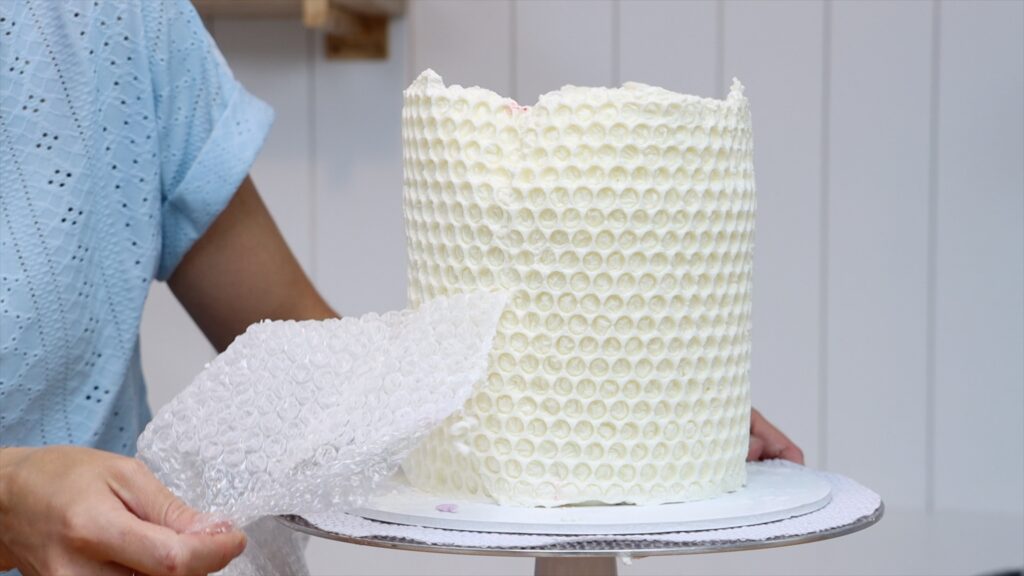
Now spread frosting onto a piece of bubble wrap that you've washed and dried so it's clean. You'll need a piece at least as tall as the cake and wide enough to wrap around it. You can tape separate pieces together if you don't have a piece big enough. I'm spreading the frosting about a centimeter higher than the cake and a few centimeters wider to make sure it completely covers the cake.
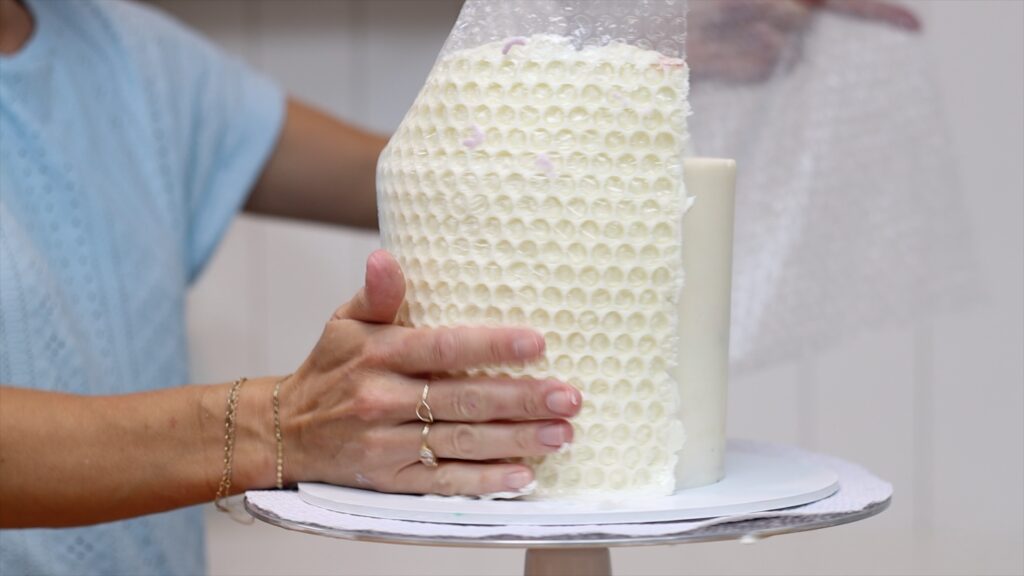
If you can see any shadowing of the bubble wrap through the frosting, that means the frosting is too thin. Smooth it a few times to make it flat and level. Then pick it up and wrap it around your cake. It's best to chill the cake in the fridge for about an hour first so the cake and frosting are firm. This way they'll hold their shape even as you push the bubble wrap against the cake.
Push along the join where the bubble wrap overlaps and then put the cake in the fridge for an hour. When you peel the bubble wrap off you'll have this gorgeous unique bubble wrap texture in the frosting!
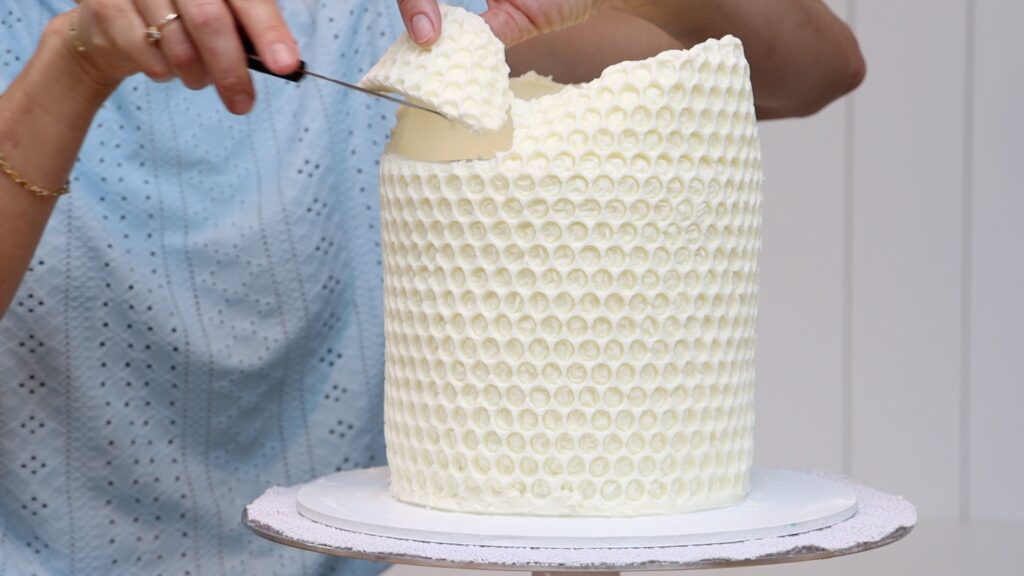
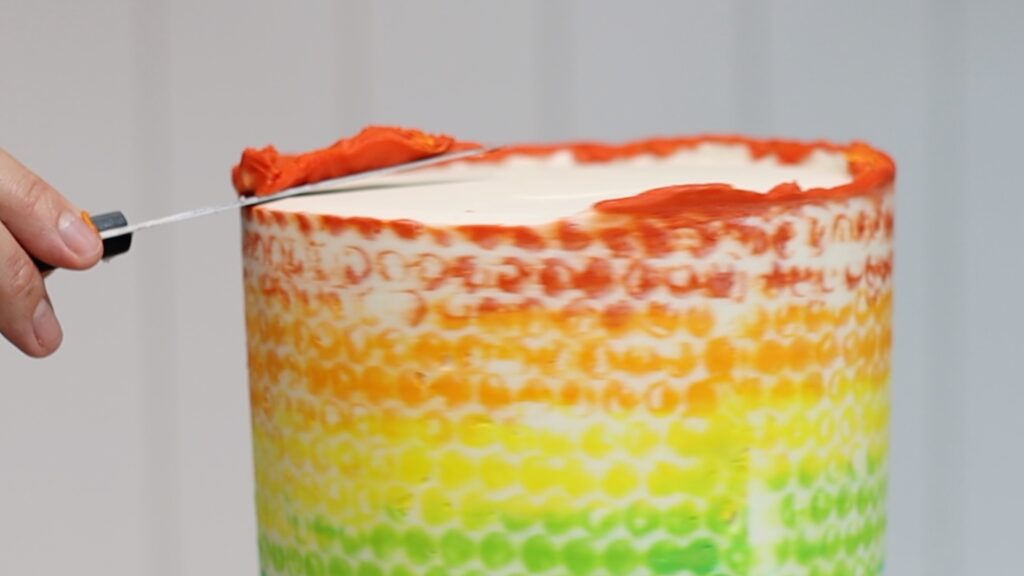
Use a sharp knife to trim off the extra buttercream from the seam to leave it smooth. Also trim off the frosting that's sticking up above the top edge of the cake.
I'm using the end of a paintbrush to push in some bubble wrap holes that haven't imprinted the frosting properly. You could leave the cake like this or fill in the bubble wrap holes with colour. Put the cake into the fridge until you're ready to add more decorations.
Make a rainbow bubble wrap cake
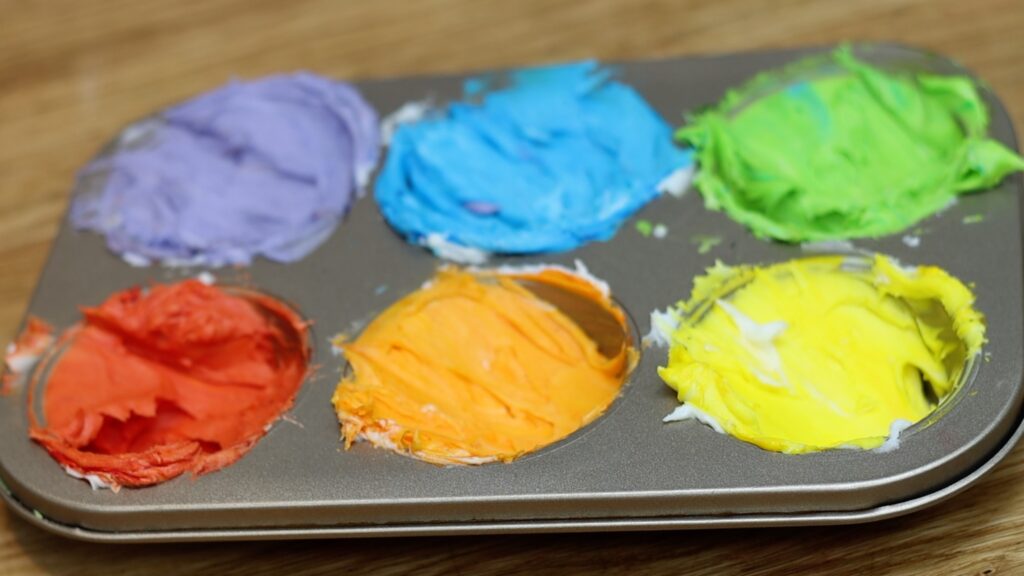
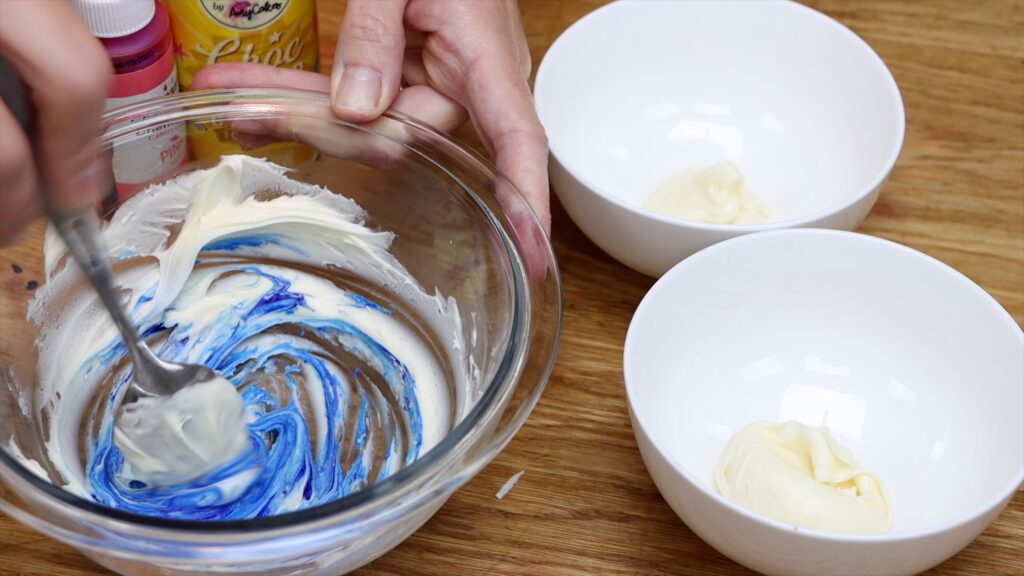
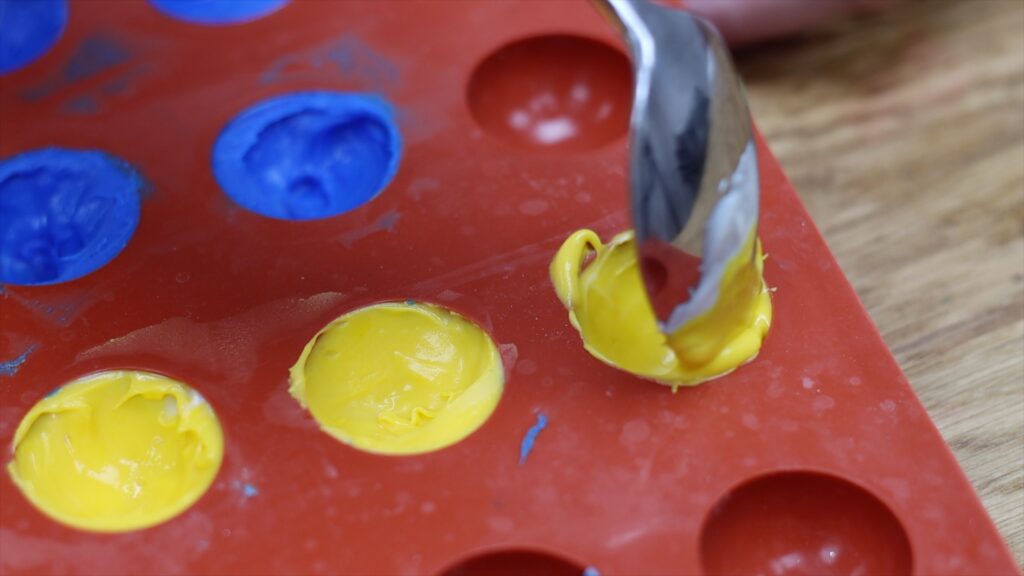
For these small amounts of frosting I like to mix the colours in a cupcake or muffin pan. It's an easy way to make cleanup time quicker instead of washing lots of little bowls. Tint the frosting in the same order as the cake batter: yellow, orange, red, purple, blue, green. This way you don't have to wash your spatula in between colours.
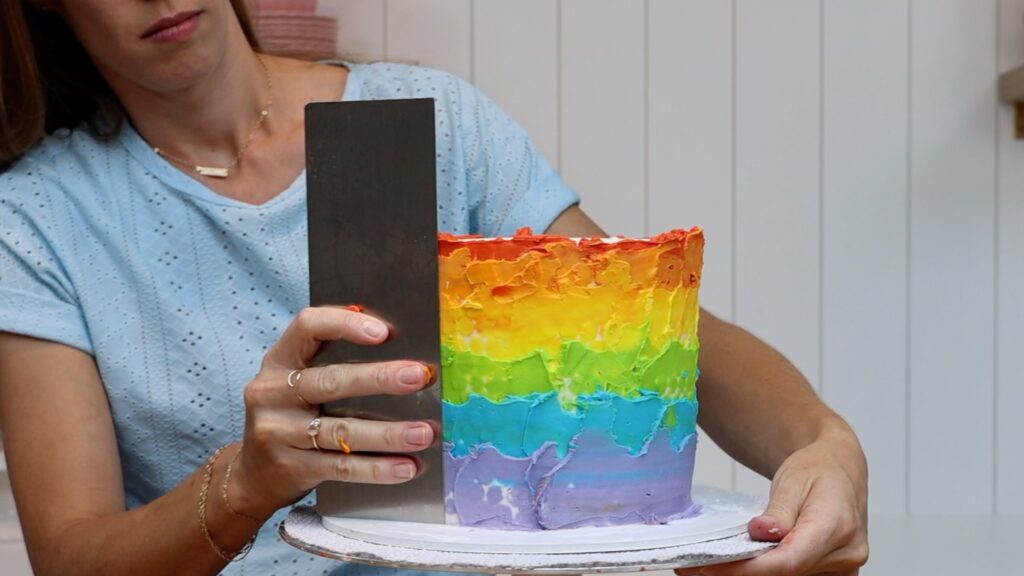
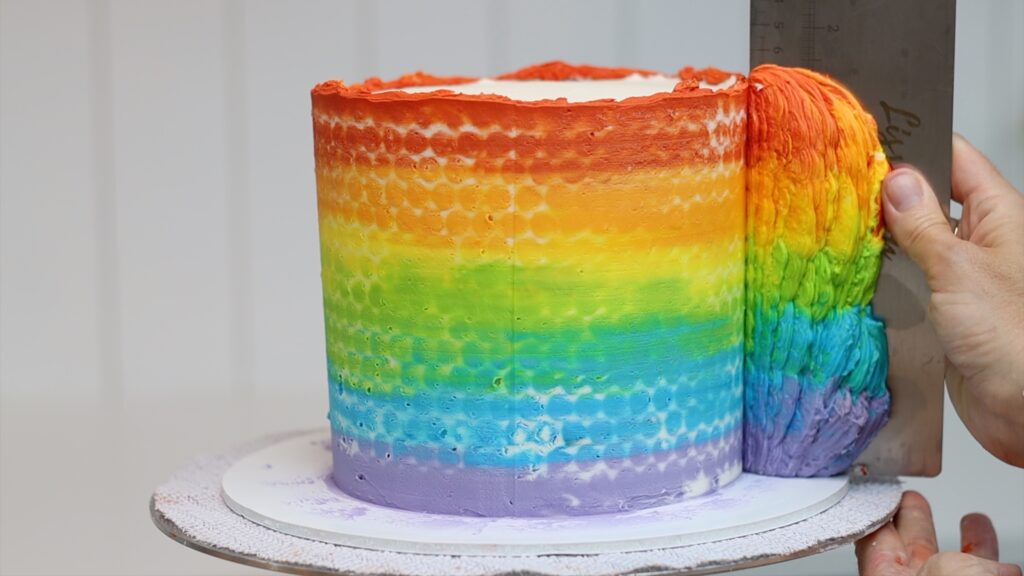
When you're ready to add the colours to the cake, take the cake out of the fridge. Count the number of rows of bubble wrap dots and divide that by your number of colours. This way you'll cover the same number of rows for each colour to space them evenly down the cake.
The cake will warm up after a few minutes out of the fridge so the bubble wrap pattern will get softer. But you need it to be firm so that these colours fill the holes instead of squashing them. So spread the colours over the bubble wrap frosting as quickly as you can. I've overlapped the colours to make a rainbow gradient rather than distinct stripes of colour.
Scrape around the cake with a cake comb until you like the effect. I love the way the colours look on my cake comb as I scrape them off!
A metal cake comb is ideal because you can heat it with hot water or a blow torch. Then it will scrape off the excess buttercream really easily without needing to use much pressure. The more you scrape the colours off, the more white you'll have in the design.
To get the top edge of the cake sharp use a knife to cut off any frosting that's sticking up. This way you won't smear streaks of red onto the top of the cake.
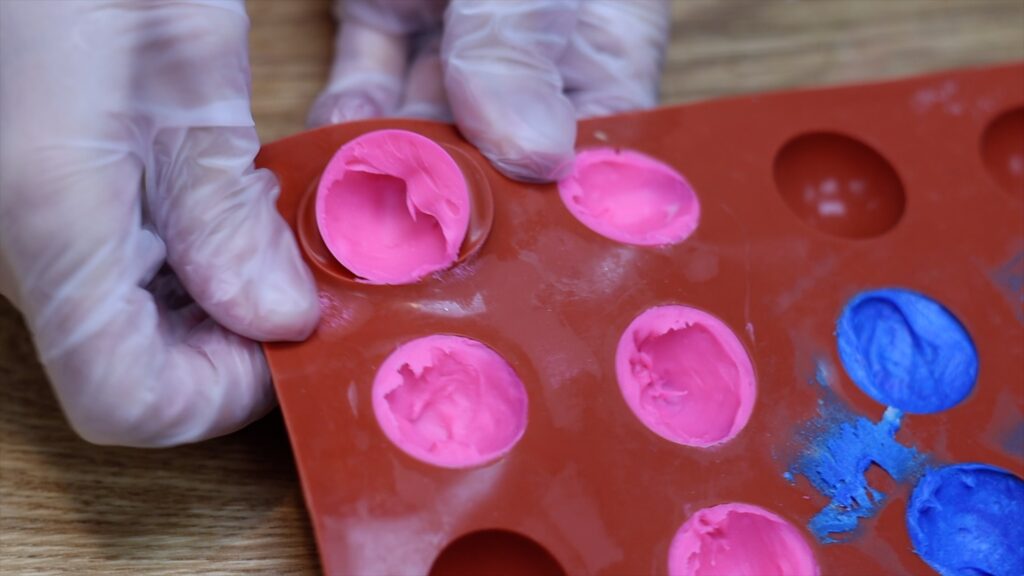
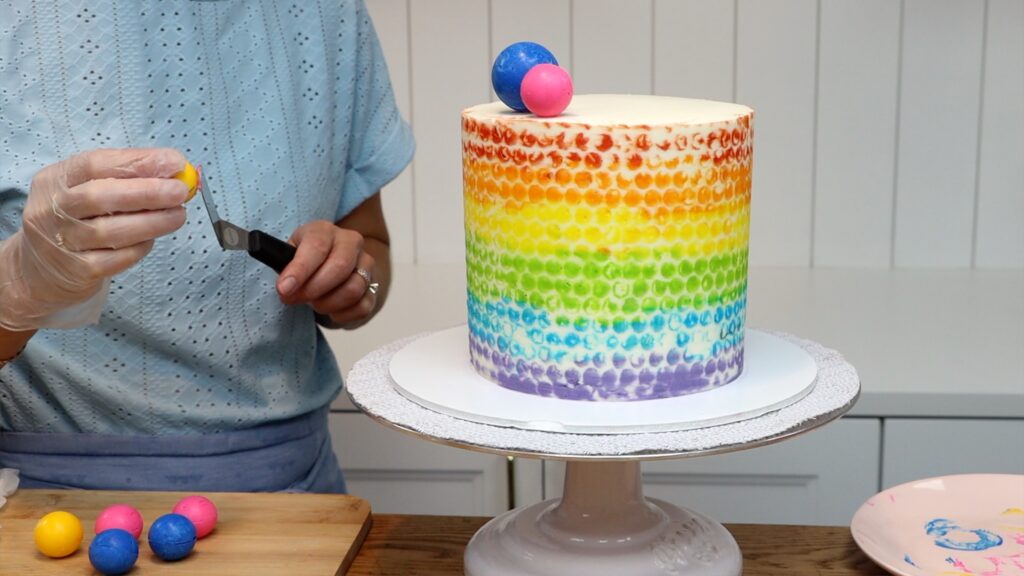
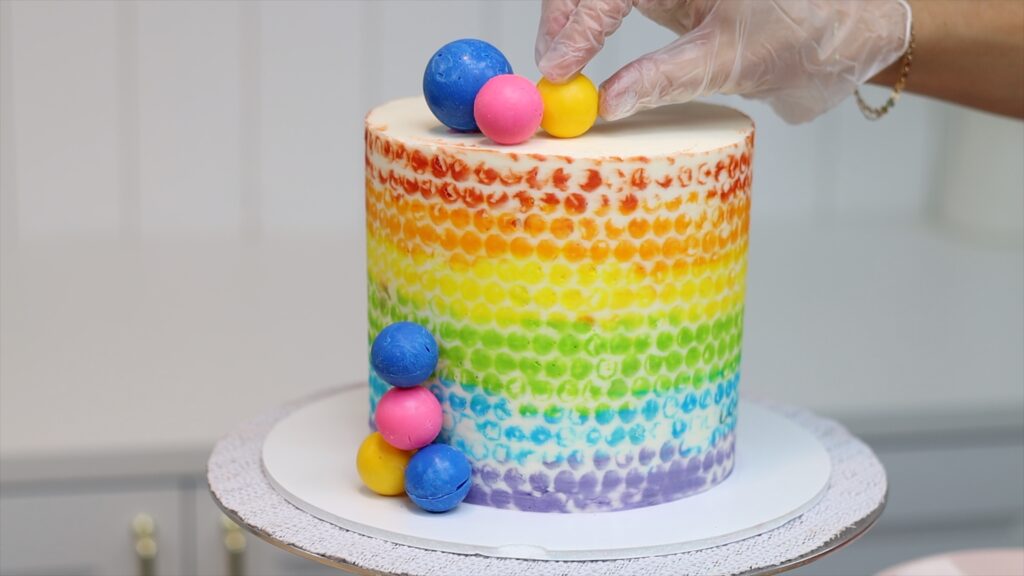
Make rainbow chocolate spheres
To make colourful spheres to decorate this cake, use white chocolate. Heat it in a microwave safe bowl for 1 minute at 50% power so that it doesn't seize. Divide it into bowls and tint each one using oil-based colours. Buttercream colours won't work because the water in them will make the chocolate stiff and grainy.
Use the back of your spoon to coat a silicon mold with the coloured chocolate. Of course, you'll need two hemispheres for each sphere. Try to nudge the chocolate up to the top edge so it's thick there, which will help you attach them together next.
Use an offset spatula or cake comb to scrape any chocolate off the rest of the mold.
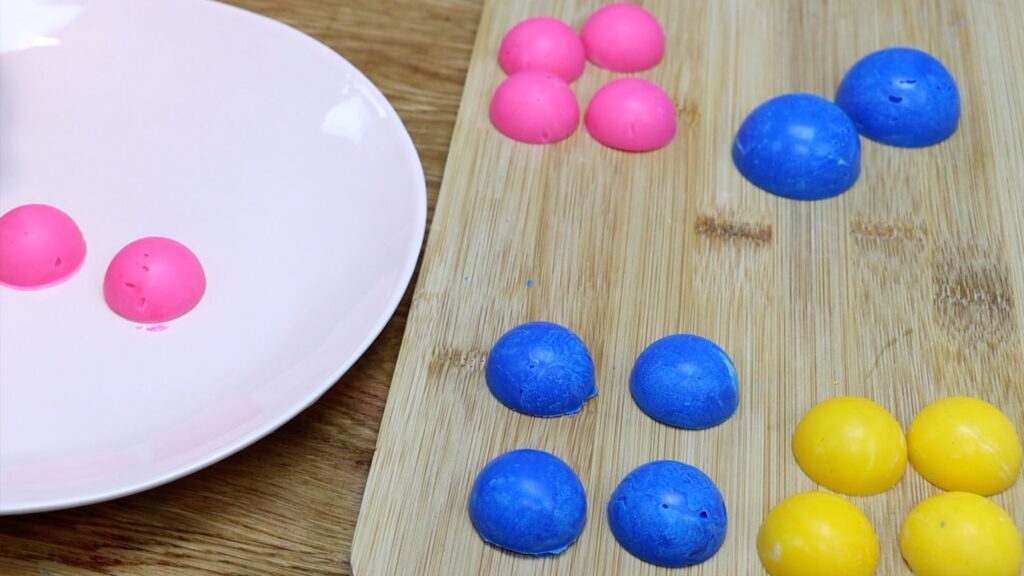
Put the molds in the fridge to chill the chocolate so that it hardens. Then pop the chocolate out of the mold by pulling the sides away from each hemisphere.
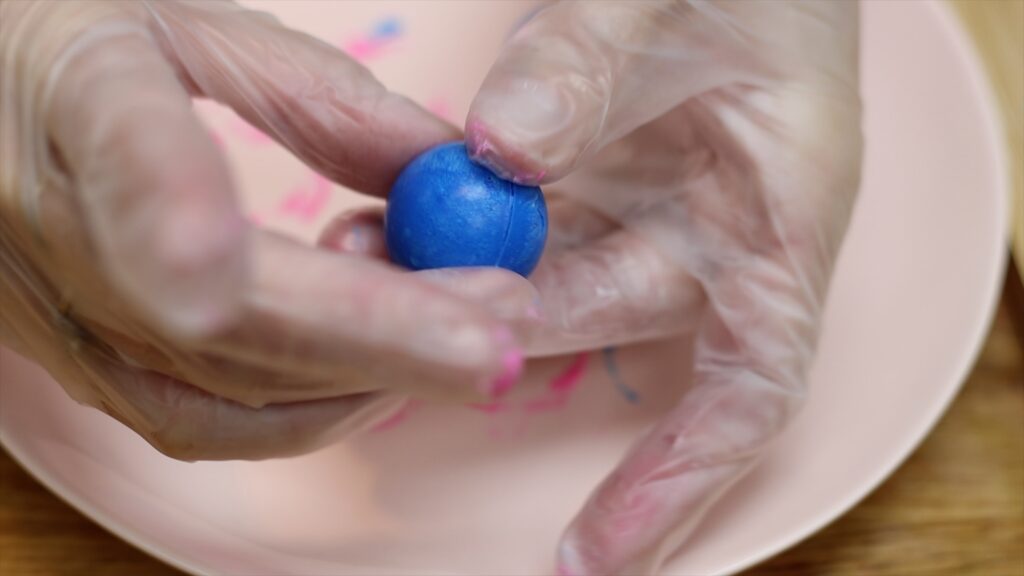
Hold a plate under hot running water to heat it and then dry it off. Place the chocolates on the plate to melt the edges.
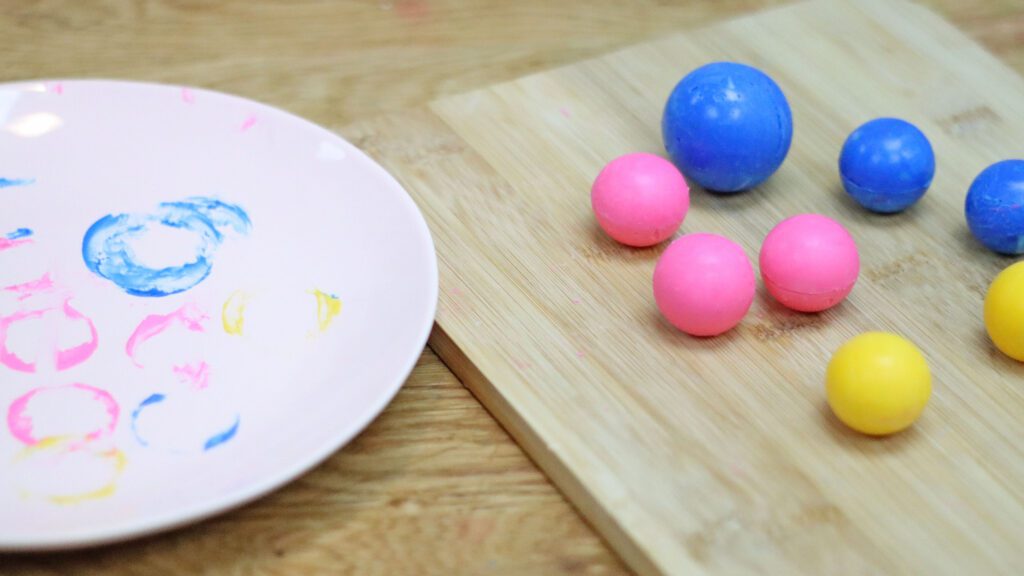
Then press them together to make spheres. It's best to wear gloves for this so that you don't leave fingerprints on the chocolate, which will dull it.
Decorate the rainbow bubble wrap cake
To attach the chocolates to the cake you can either use a dot of buttercream or melted chocolate. Both will set onto the cold cake and act as glue to stick the chocolates in place. Buttercream will be the most secure when it's cold so if the cake is going to be out of the fridge for more than 1 or 2 hours I would use chocolate instead.
This would look great with the chocolate spheres in all of the colours of the rainbow frosting. I only have these oil-based colours so here they are!
This cake is so colourful and unique, both on the outside and the inside.
I hope you've learned some tips and techniques. Visit my cake school to learn more with courses and memberships to take your cakes to the next level.