In this tutorial I’m going to show you how to make your own stencils easily and cheaply and how use them to create gorgeous cake designs! If you prefer to watch a video of this tutorial, scroll to the bottom of the page.
1. Choose a material
Parchment paper is cheap and easy to find and it’s easy to cut into whatever shape you like. However, it’s flimsy so it’s only effective for very basic outlines like a heart or a star.

Acetate is more expensive than parchment and not as easy to find -you’ll have to look in an arts and crafts shop or on Amazon to find it. It’s a bit trickier to cut into a shape than parchment papers is but it’s thicker and stronger, so you can use it for more intricate designs.

2. Choose your design
This will need to be simple for parchment, which is delicate and will smudge very detailed shapes. You can create more intricate designs with acetate.
If your design is complicated you might to choose to print it and then transfer it onto your stencil. Before you print it, resize it on the computer so it will fit nicely onto your cake.

You can use a cookie cutter instead, if you have one that’s the right shape and size.

3. Create your stencil
How you create your stencil depends on the material you’re using. For parchment you can sketch your shape straight onto the paper. Fold it and snip the fold anywhere within the shape and that will provide a place to fit your scissor blade into. Skewer the middle of the shape with your scissors and then cut around the outline of the shape.

It doesn’t matter that you’re damaging the shape because you’re going to throw that part away. Be careful to cut along the outline of the shape smoothly and to leave the parchment beyond the outline intact because this will become your stencil.

If you’re using a cookie cutter for your design, trace around the shape and then cut that out the same way, skewering the middle with your scissors and trimming around the outline. Again, it’s only the outer part that you’ll need for your stencil, not the actual shape.

To trace your shape, place parchment over your design, taping it down or holding it steady, and draw over the outline. You can simplify the design if you want to.

Then cut the design out with scissors. It’s quite fast to cut a design out of parchment paper compared to acetate because it’s thin and easy to move around.

For acetate you’ll need scissors for basic designs or for intricate designs, a cutting, some tape, and a boxcutter or Stanley knife are helpful.
For a simple design like a heart, you can just cut the shape straight out of the acetate, just like you would do with parchment paper.

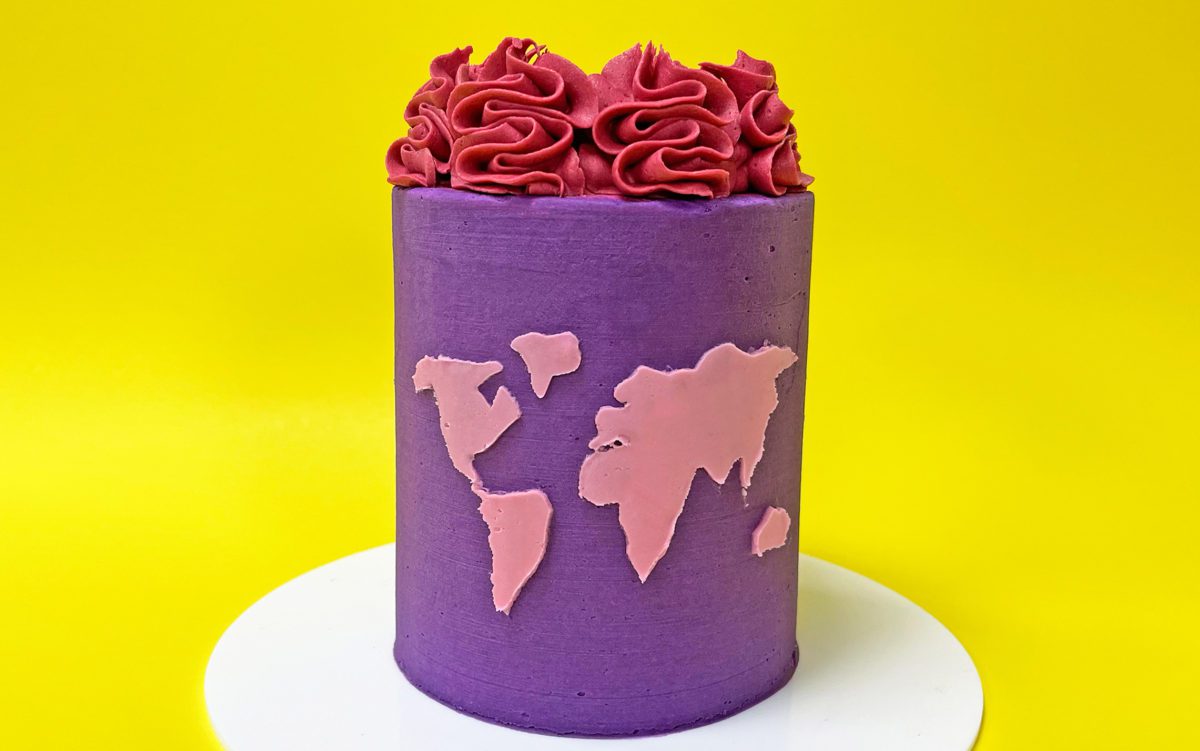
But for an intricate design like this map, tape the acetate onto the design, place it on a surface like a cutting board that you can cut onto, and then use a sharp blade to cut a line in the middle of each large shape. This makes it easier to insert your scissors to cut around the outline of the design.

Because acetate is thicker than parchment, cutting out the shape is more time consuming than using parchment paper. But for intricate designs it’s worth the effort and you’ll see the benefits of acetate later on in the process.

Now that you’ve made your stencil, it’s almost time to use it on your cake. But before applying your stencil, leave your cake in the fridge for at least an hour or ideally overnight, so the frosting gets very cold and really hard.

I made some fun animations for my video version of this tutorial, which you can watch at the bottom of the page. I took a few animation classes on Skillshare to learn how to create these, and I’m excited to partner with Skillshare to offer you a FREE trial of Premium membership so that you can take any of their thousands of inspiring classes for creative and curious people. Explore new skills, deepen existing passions, and get lost in creativity! There are classes on lots of different skills you can use in your cake designs, like illustration and painting. Click here for your free trial!

4. Attach your stencil to your cake
You can hold your stencil against the cake, pressing firmly to make sure it doesn’t slide around. This works better with simple shapes than very detailed shapes.

For more security, pin the stencil onto your cake by wrapping it tightly around the cake and then pressing a pin into each side, to hold it still while leaving both of your hands free.

If you don’t want to push pins into the cake you can wrap the stencil around the cake and then use another piece of parchment or acetate to overlap the stencil, taping the two pieces together. Make sure you pull the parchment or acetate tightly before taping it, so that the stencil is wrapped tightly around the cake.

5. Add colour to your design
Spread buttercream over the shape onto the exposed cake within the shape you cut out of the stencil. Spread from the stencil over onto the shape, not from the shape out over the stencil, because that might push buttercream underneath the outline of the stencil and that will smudge your design.

This is especially important for parchment because it’s very thin and flimsy, so buttercream can easily be pushed under it.

When you’ve covered up the whole design with buttercream you can either smooth it or add texture. To smooth it, scrape across the design with the edge of your

To add texture to the shape, scrape in any direction with your

6. Peel off the stencil
Peel the stencil off straight away, before the buttercream sets, for the neatest outline.

If there are any smudges in your outline you can scrape them off with a toothpick or

7. Add finishing touches
Sprinkles can be a nice finishing touch for an otherwise simple stencil design. Press them into the outline of the shape either one by one, or by scooping up a handful and angling your hand to press the whole handful of sprinkles into the edge of the shape.

Because the base frosting on the cake has set, it isn’t sticky so that sprinkles won’t stick to that, only to the fresh buttercream you’ve just spread onto the stencil. For more ways to use sprinkles check out my tutorial on 5 sprinkle cake hacks.

I can’t wait to see what you create! Please tag @britishgirlbakes on instagram so I can see the photos of your beautifully stenciled cakes!
If you’re looking for inspiration, join my Club for access to ALL of my online classes as well as live online classes and Q&A sessions for members only!

Here’s the video version of this tutorial:


Beautiful
hank you!