After six years of filming and editing cake videos for Youtube, Instagram, Facebook and TikTok, I'm sharing my filming and editing tricks for 3 styles of cake video. I can't wait for you to use them for your own cakes!
The rest of this tutorial will be up soon! I'm finishing up my Layer Up program, which will be ready for signups this week. Check it out and join the waitlist!
For now, you can watch a video of this tutorial on how to make cake videos for social media:
You can double or triple cake recipes to make a larger cake but it's not quite as easy as that. Avoid over-baking, domed tops, crumbling cake layers and cracked frosting with these tips and tricks!
With such big layers it's common for the cake to be overbaked around the edges and still raw in the middle. To prevent that you can do three things:
Divide the cake batter between more pans so that each layer is thinner. That way, they'll cook more quickly and more evenly. For example, if you double my two-layer 8" Perfect Chocolate Cake recipe to bake a 12" cake, you might choose to bake the batter in three pans to make a three-layer cake instead of a two-layer cake.
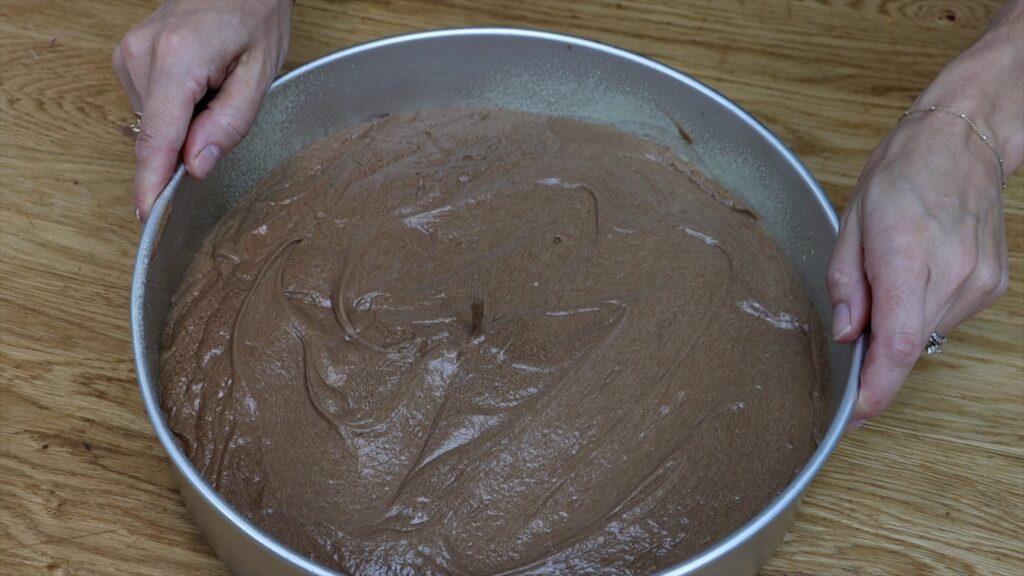
Place a flower nail in the middle of large cake pans. Flower nails are usually used for piping flowers but they're a great hack for big cakes! Turn the nail upside down so that the flat head is resting on the pan. The pin should be pointing upwards. You can put the nail in before or after adding the batter, pushing it down to the bottom of the pan.
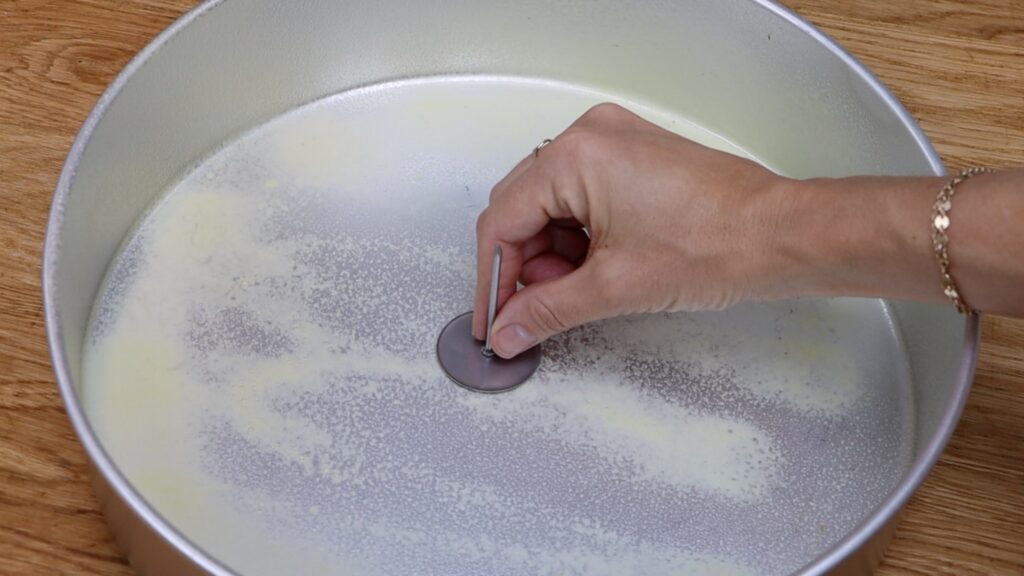
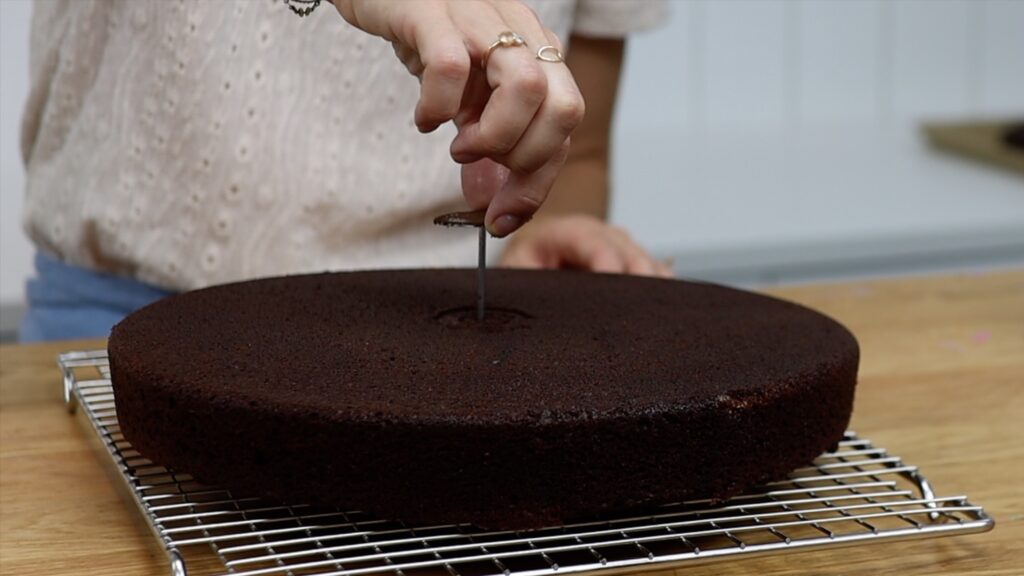
As the oven heats up the pan, that heat will pass through the flower nail up through the pin. This will help the middle of the cake bake as quickly as the outside of the cake. After baking and turning out the cake, just lift the flower nail out.
For big cakes, reduce your baking temperature by 10 or 25°. This will bake the cake more slowly and that way, it will bake more evenly.
If your cakes don't rise evenly as they bake, they'll have domed tops. When your cakes are big, levelling them means wasting a lot of cake! Prevent domes with baking strips.
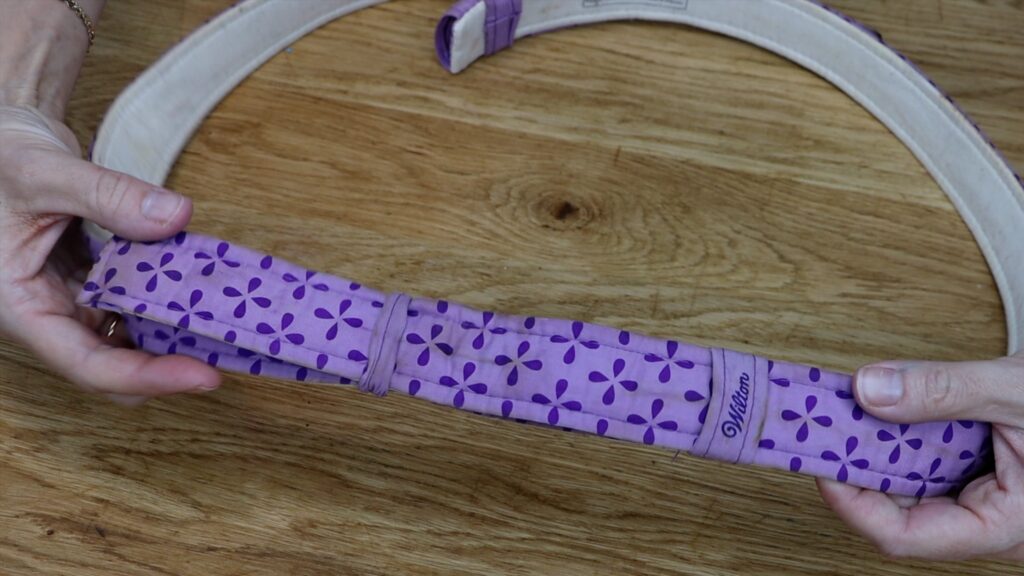
For large pans you'll need to attach two strips together, looping the end of one through one of the tabs of the other. Adjust them to fit the pan and then soak them in water for 10 minutes. Then squeeze out most of the water.
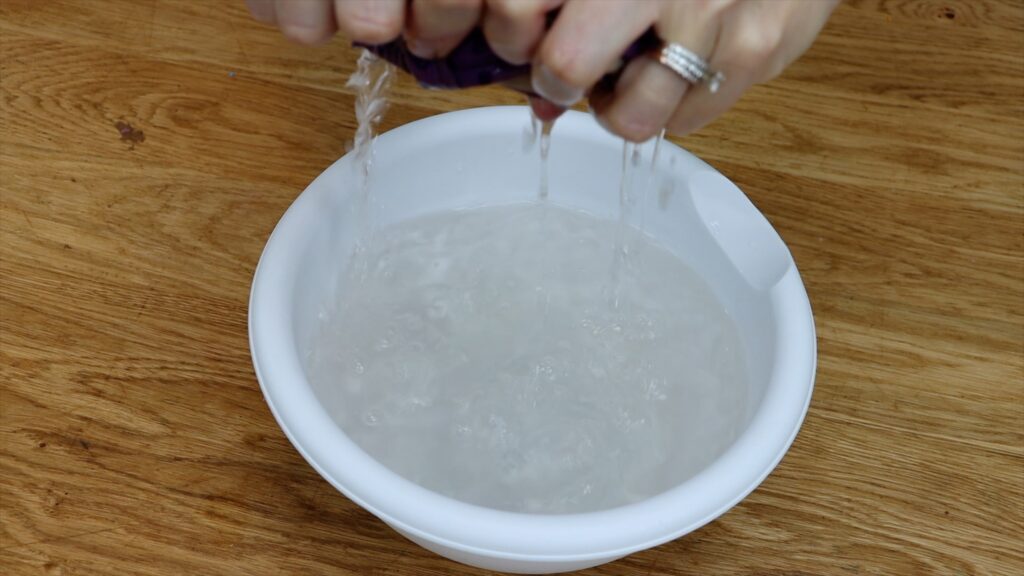
Wrap the strips around your cake pan before you put it into the oven. Baking will take about 10 minutes longer with baking strips so you'll need to adjust your baking time. The cake will rise higher and it will be evenly baked without burnt edges. For more cake tools that are worth buying, check out my tutorial on cake decorating tools that really work.
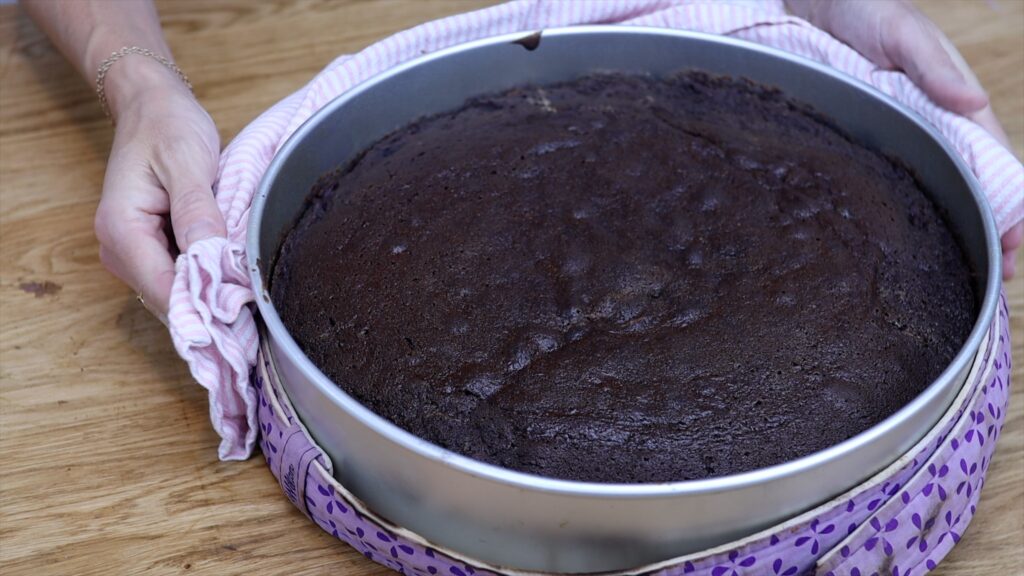
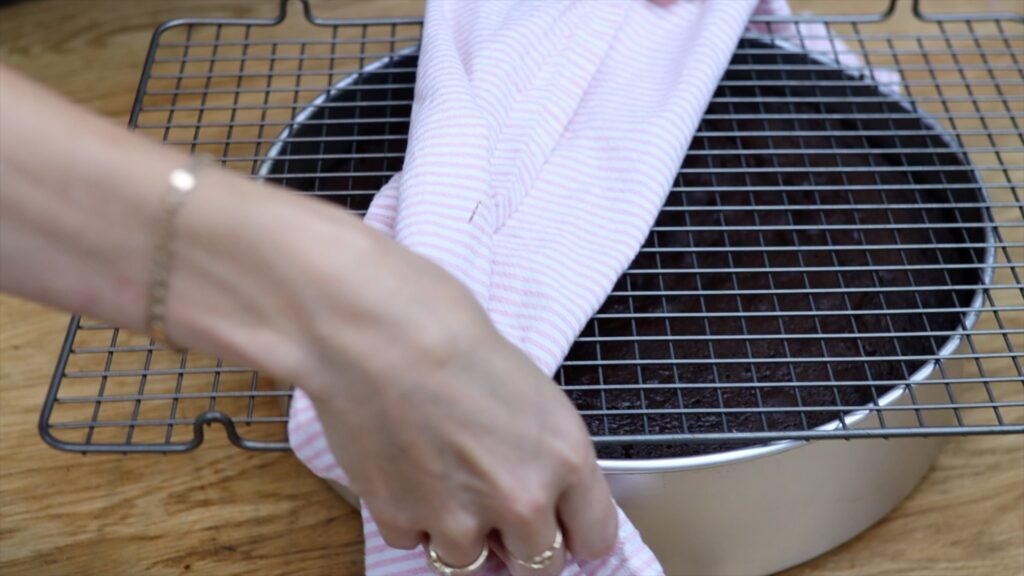
After baking small cakes it makes sense to flip the pans upside down onto a cooling rack. That would be brave (or foolish) with big cakes so instead, try this! Place the cooling rack on top of the cake pan when it's on the table or countertop. Then grip onto the rack and the pan and flip them over together. Lift the pan up and voila!
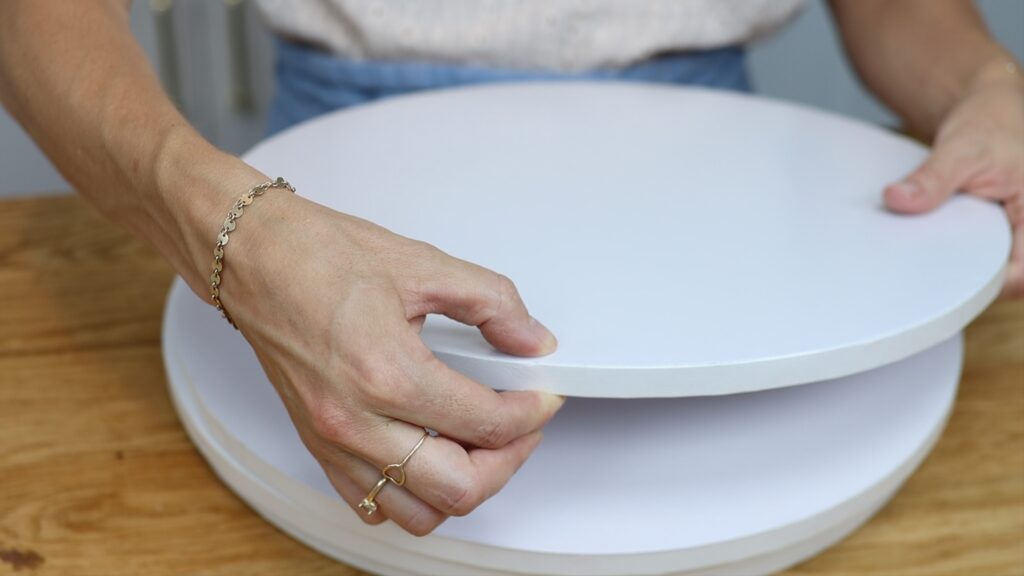
Cake boards for big cakes will have to be wider but also thicker. Use a cake drum for 10 inch cakes and bigger. Cake drums are thicker and stronger which is important because big cakes are much heavier than smaller cakes. If the cake board bends or buckles under the weight of the cake, that movement will cause the frosting to crack.
Cake layers are much more delicate at room temperature than when they're cold. When you move them from the cooling rack they'll be at room temperature so it's a good idea to use a cake lifter. These are large squares of metal that provide a big surface to support a big cake.
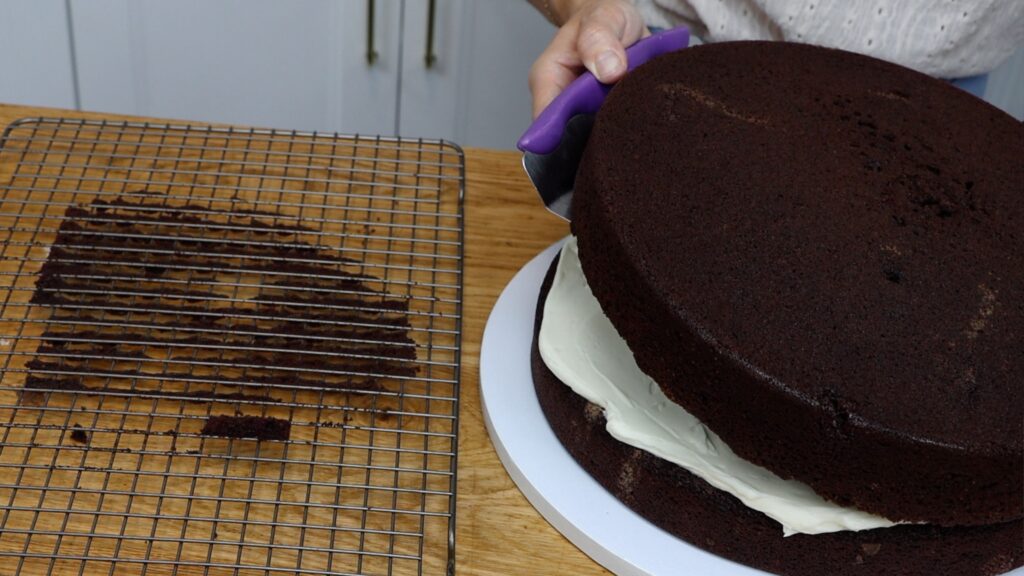
When you're spreading on your filling and later your frosting, use a long
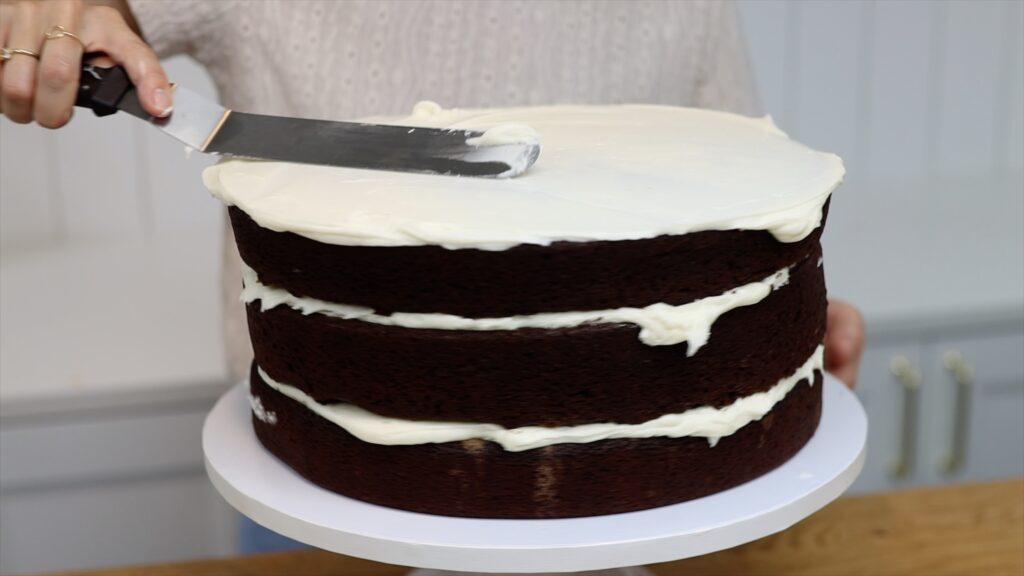
Wider cakes are usually taller, too. When frosting a big cake, make sure that your cake comb is tall enough. It needs to be at least as tall as the cake so that you can get straight smooth frosting. If you use a shorter cake comb you'll need to scrape around both the bottom and top of the sides, meaning twice as many scrapes around the cake. Another reason this isn't ideal is that when scraping around the top of the sides, it's difficult to maintain a straight angle because you can't rest your cake comb on the cake board.
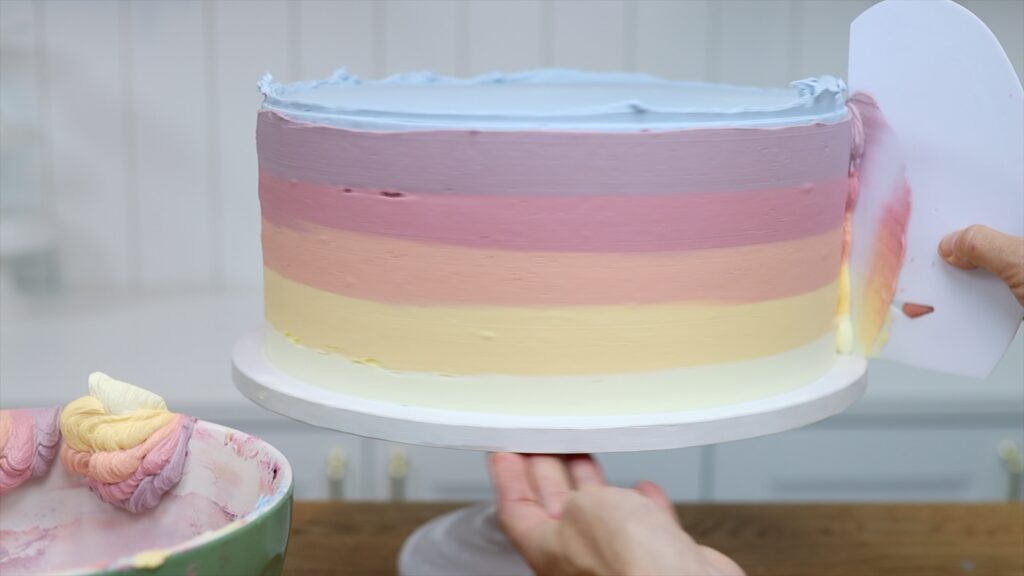
After frosting the cake make sure any decorations are to scale. For example, buttercream transfers for characters will need to be much larger on larger cakes than on smaller cakes.
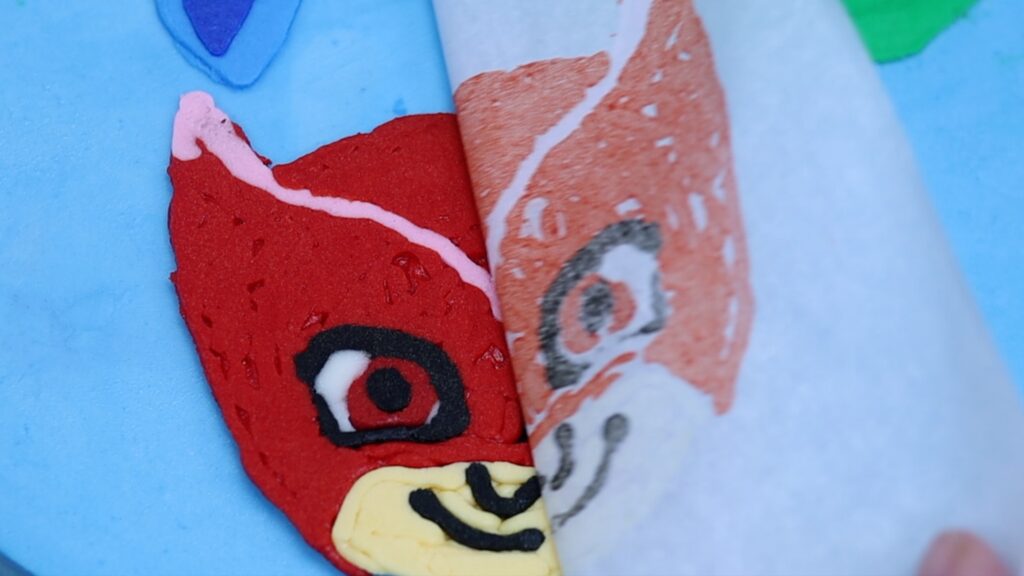
You'll need to prepare about three times as much drip for a 12 inch cake compared to a 6 inch cake. You'll need more filling and more frosting but you'll also need more buttercream for stencils and piping.
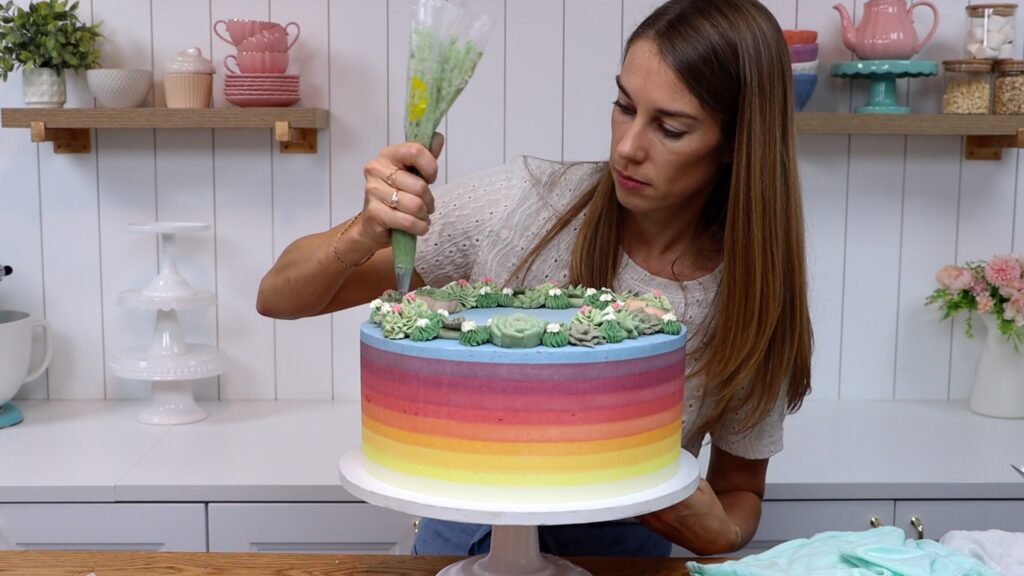
How much do you think this cake weighs? Let's have a competition! You might already know that I have an online cake school where I teach how to decorate cakes. I'm excited to share a brand new program called Layer Up, where you work through three layers to go from beginner cake decorating like perfecting smooth frosting, getting more advanced like mastering piping and stenciling and learning how to work with chocolate and wafer paper and acetate until you can make professional-looking cakes that will blow people away and if you sell your cakes, you'll be able to charge a lot more for them. So, what's the competition? Guess how much the striped cake above cake weighs! Hint: it was too heavy for my kitchen scale to handle so I used a bathroom scale instead! Put your guess in the comments and the closest guess (either on this tutorial or on the YouTube video version) will win an annual membership to my Layer Up program.
Watch a video of this tutorial on 10 Big Cake Hacks:
A sheet pan is a rectangular pan and of course, you can use it to make a rectangular cake but you can also do so much more with it! In this tutorial I’ll show you 6 ways to use your sheet pan to make different shaped cakes!
One of the quickest cakes to make is a tray bake. After baking a sheet cake, let it cool in the pan and then spoon your frosting on top. Spread it around while the cake is still in the pan. This way you don't have to worry about frosting the sides of the cake! You also don't need a cake board or platter big enough to put the cake on.
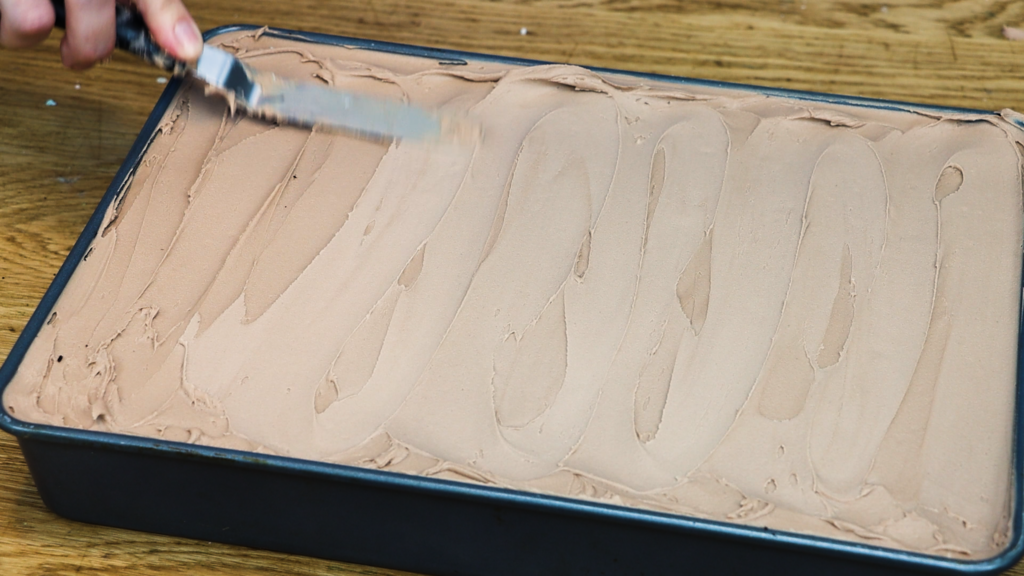
Wiggle your spatula back and forth to add some texture or scrape from side to side to smooth the frosting. Then decorate it with sprinkles or piping or a buttercream transfer or whatever you like.
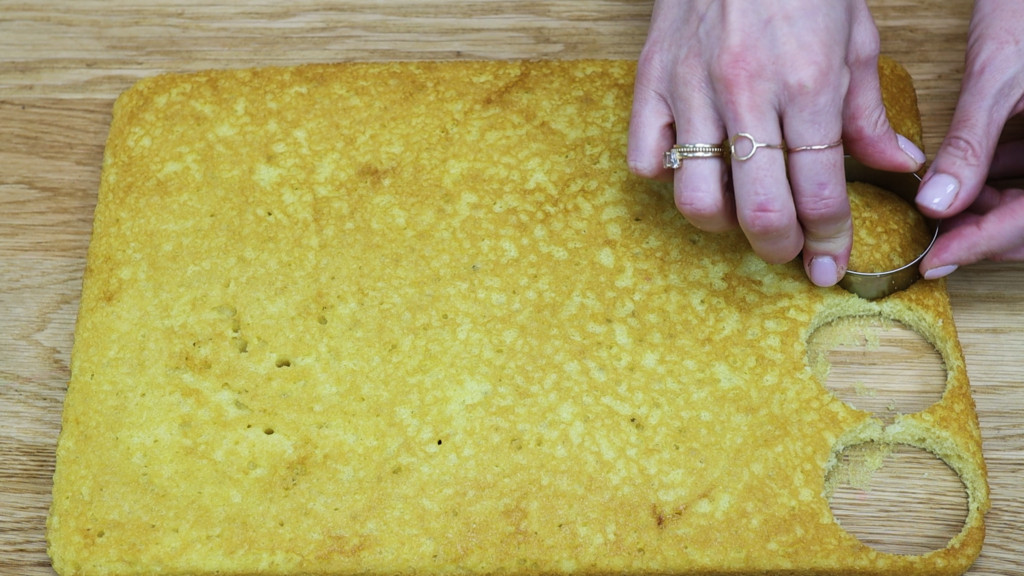
Make mini cakes using a sheet cake by using a round cookie cutter to cut out circular cake layers. This is perfect if you don't have lots of small cake pans. Even if you do, cutting the cake layers out of a sheet cake is much quicker than baking a few layers at a time and you won't have to wash lots of cake pans this way.
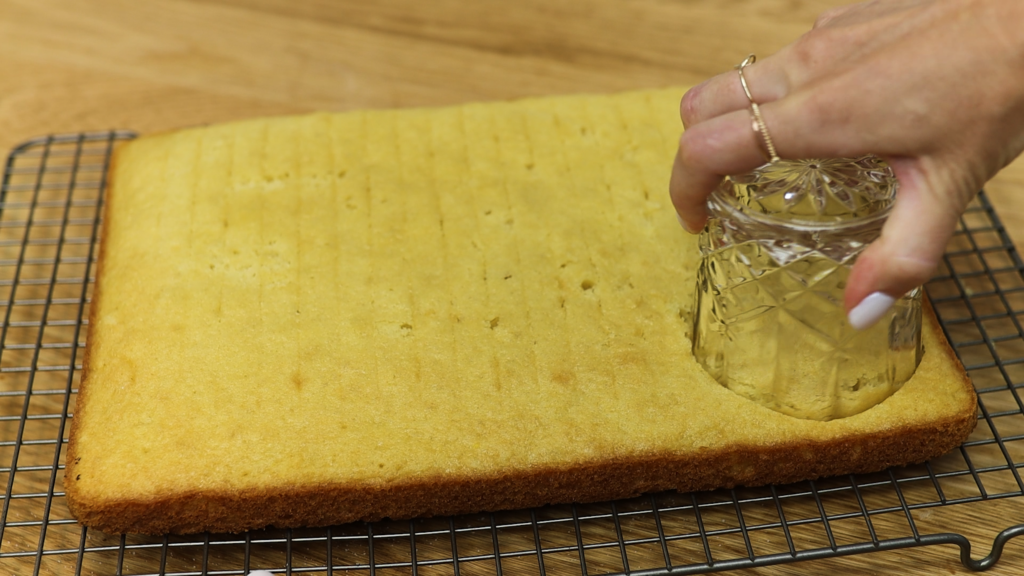
If you don't have a round cookie cutter you can use the rim of a glass instead. Although the edges won't be as neat, the frosting will cover them up soon!
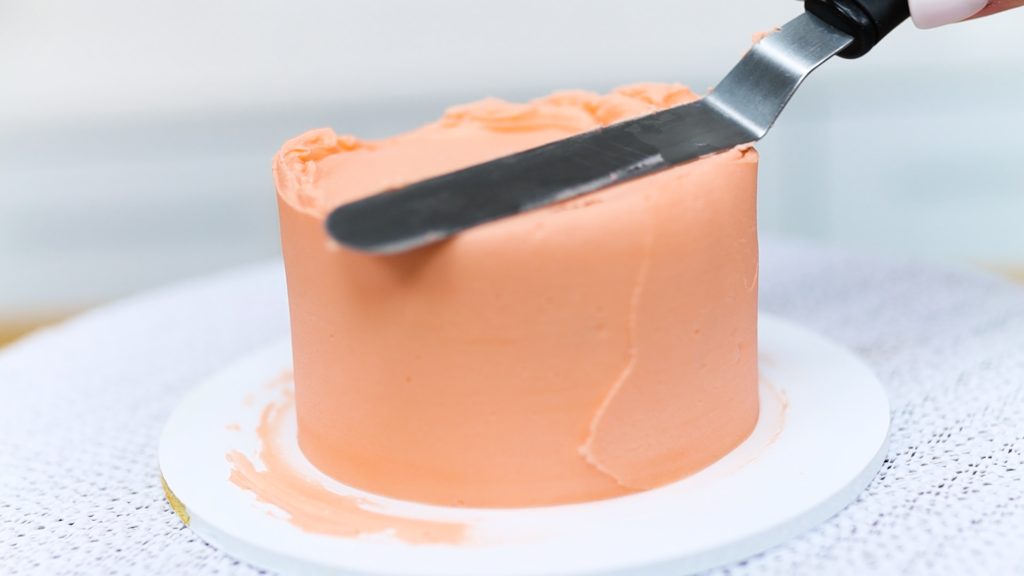
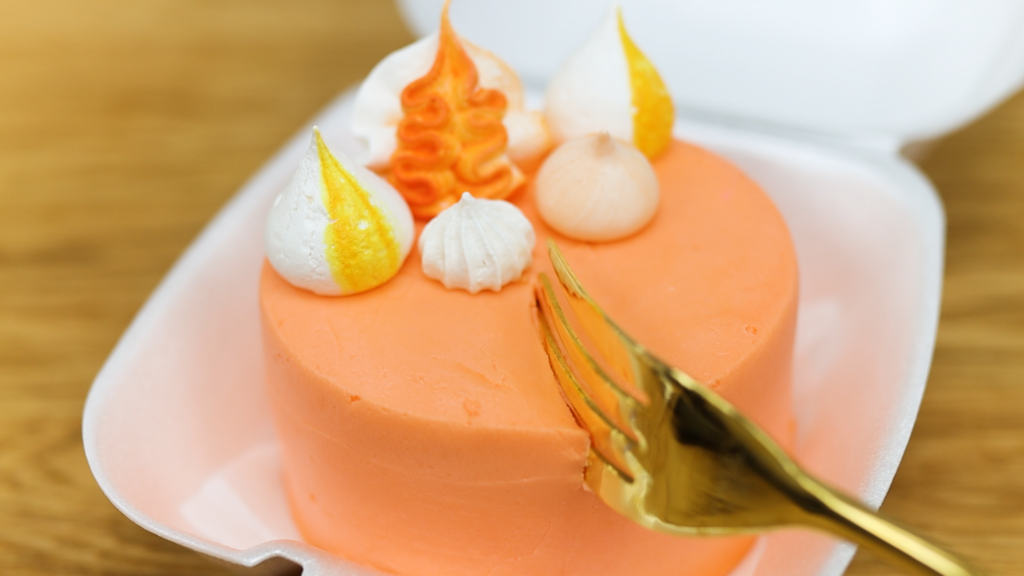
These mini cakes can be turned into lunchbox cakes to take to school or work. Share them with a loved one for a small celebration or just because!
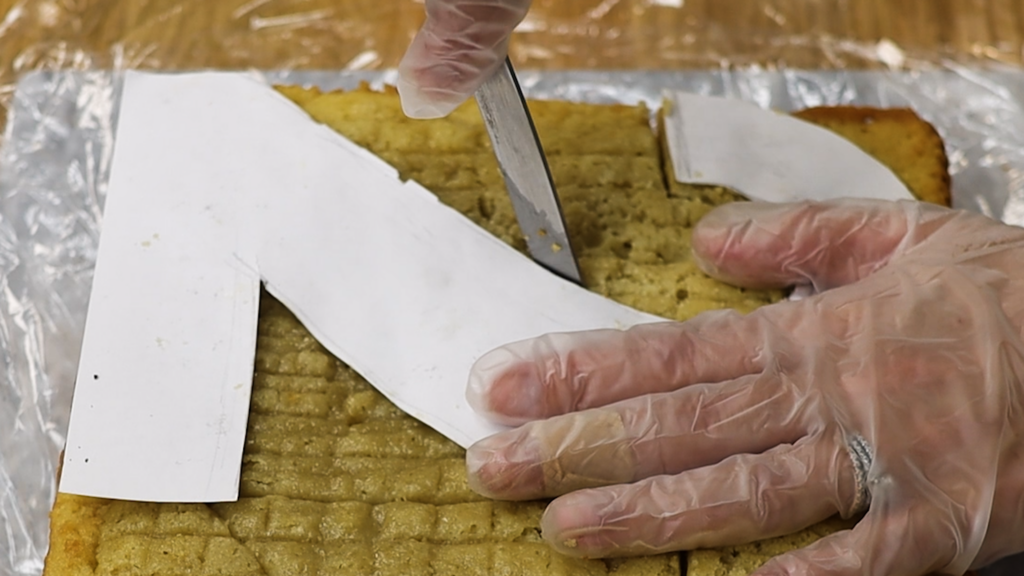
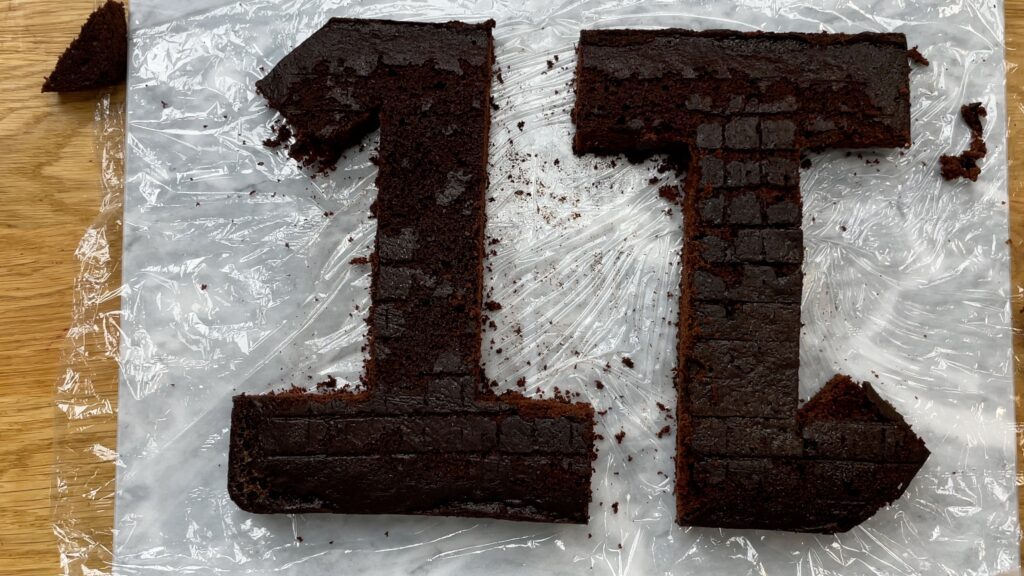
Number cakes can be cut out of sheet cakes instead of buying special pans for each individual number. Cut a piece of paper the same size as the cake. To make a single layer cake, draw your number onto that piece of paper. For two layers, fold the paper in half and then draw the number onto it. Cut it out and place it on the cake to cut around.
I like to use two layers for piping in the middle and also on top of the cake. I'm using a 1M star tip to pipe these rosettes.
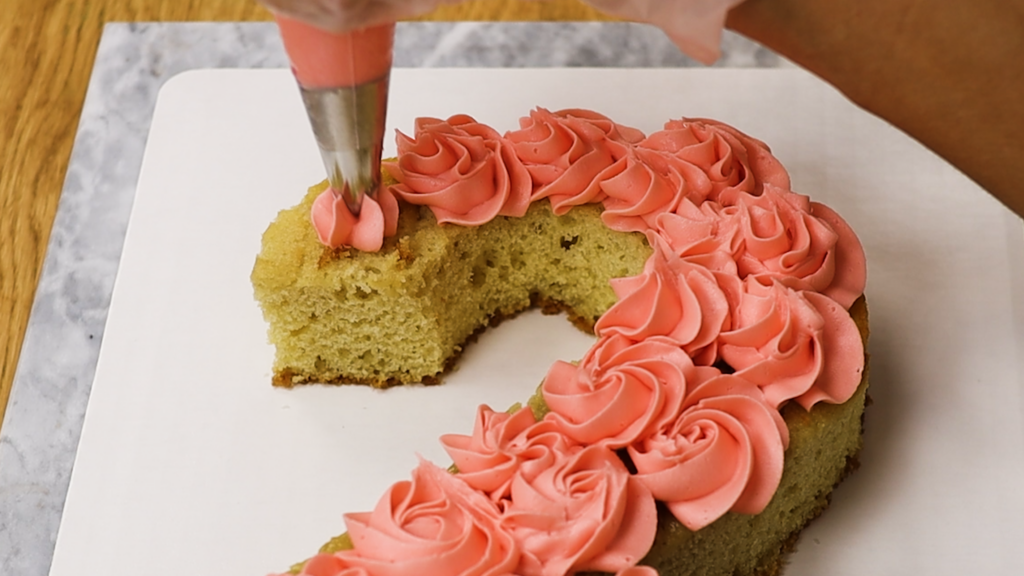
While the frosting is still soft and sticky you can add decorations on top and they'll attach easily.
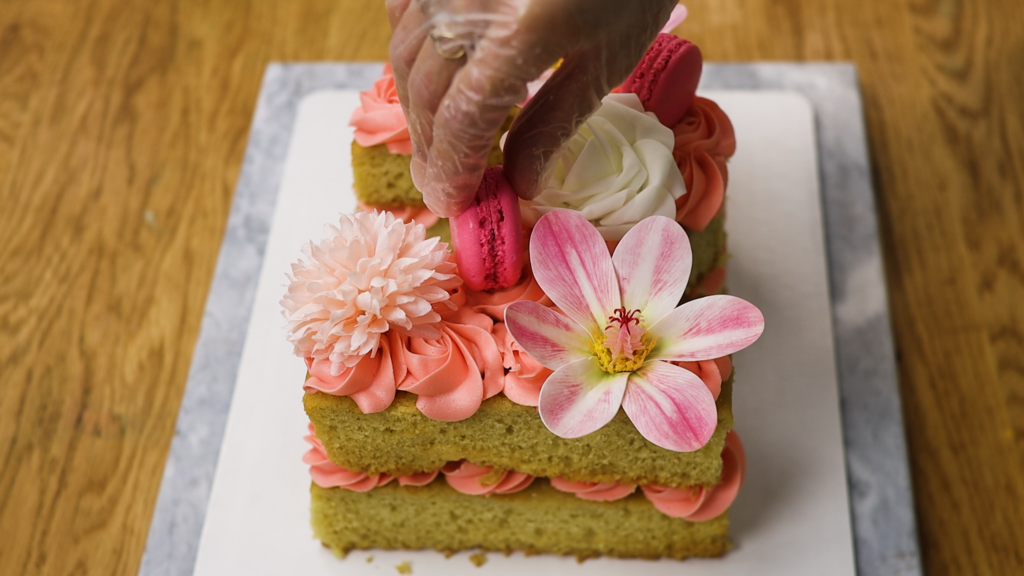
Number cakes are quick to make and don't need smooth frosted sides, which is great if you struggle with that! They do dry out quickly though, because there's no frosting to seal in the moisture around the sides. Because of this I don't make these more than a day in advance. Store them in an airtight container like a tupperware or in a cake box with a lid. See my tutorial on 10 number cake hacks for more tips!
You can make round layer cakes out of sheet cakes using a cake ring. With a 6 inch cake ring you can get two circles out of a 9 by 13 inch sheet cake. You'll also get two semicircles as well as some cake scraps, which you'll need in a minute.
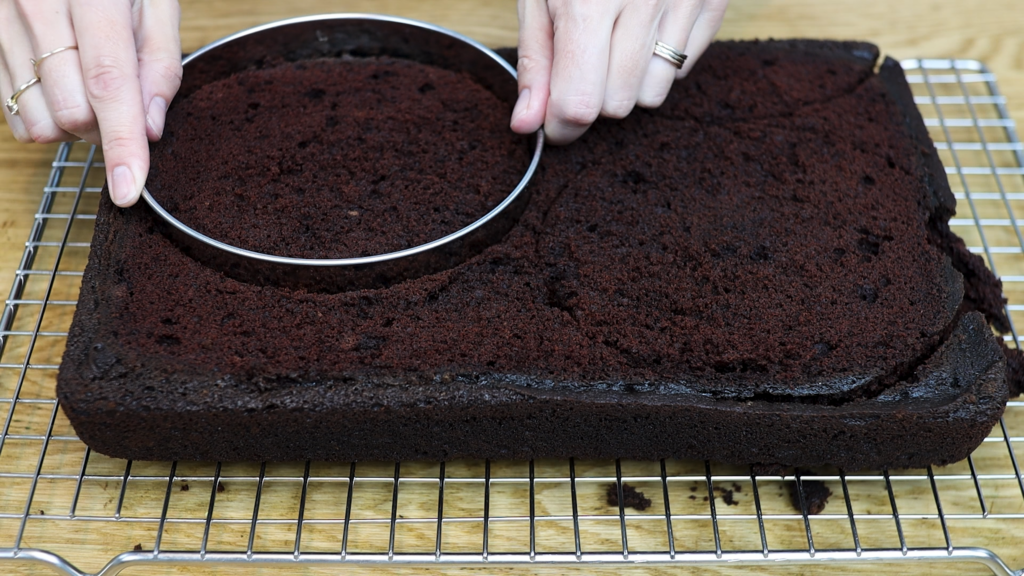
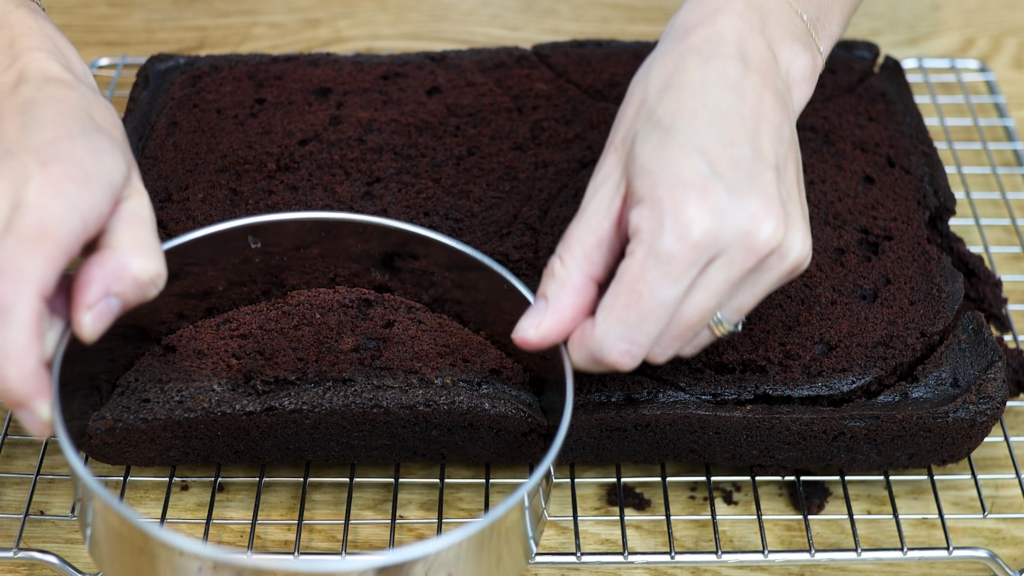
You can divide the cake layers in half if you like. Now alternate cake and filling to assemble your cake. I'm using room temperature cake layers which I almost never do and you can see why! When cakes are at room temperature they're really crumbly and messy to work with. Refrigerating them for an hour firms them up so that they hold together much better.
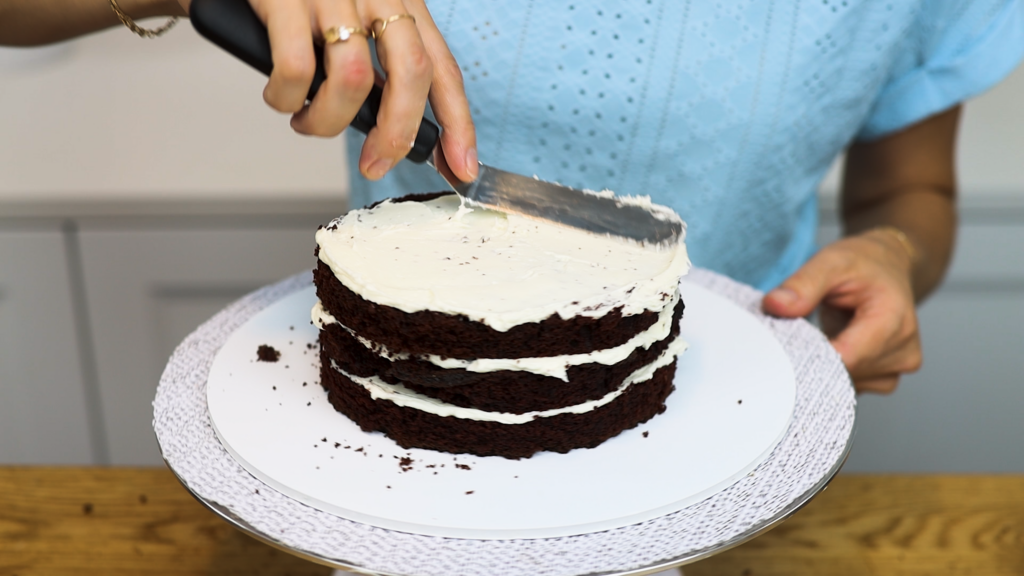
When you place the semicircle layers on the cake you'll see a big gap in between them. This is where the cake scraps come in, to fill the gap. Spread frosting along the straight edges of the semicircles to attach the scraps so that they stay in place.
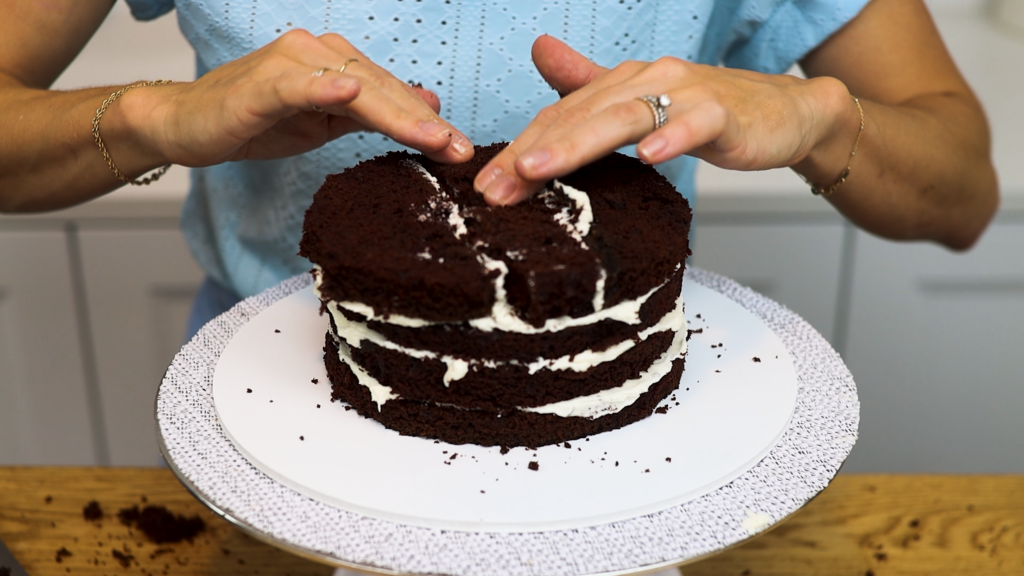
Add another layer of filling, another layer of cake, and tadaa! Frost and decorate this cake and when you slice into it and serve it the layers will look perfect.
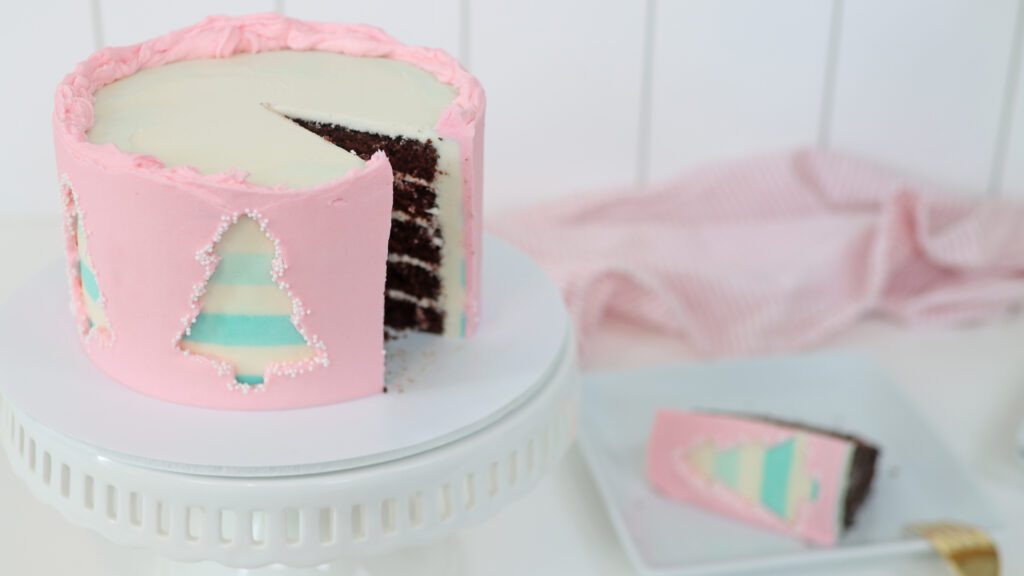
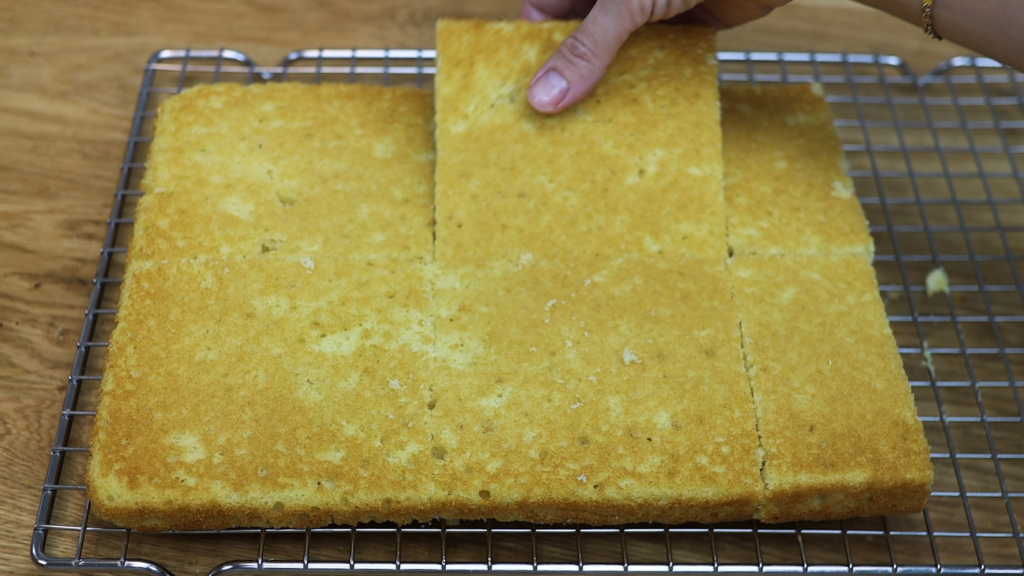
Cut your sheet cake into squares to make a square cake without needing a square cake pan. Alternate the cake layers with filling to assemble your cake. With a 9 by 13 inch cake you'll have four square layers and two pieces to make an extra layer.
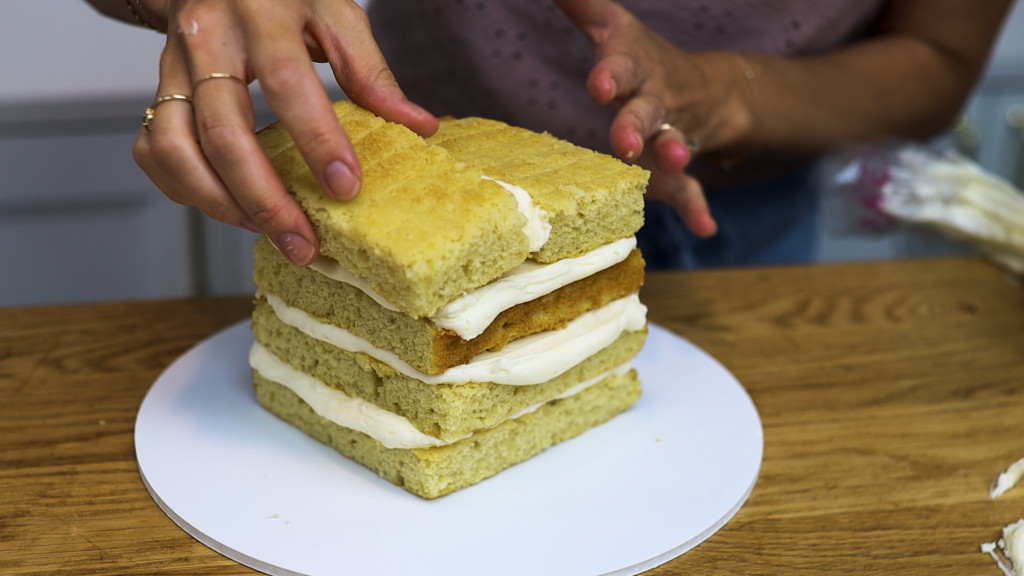
Crumb coat the cake and then chill it for at least an hour.
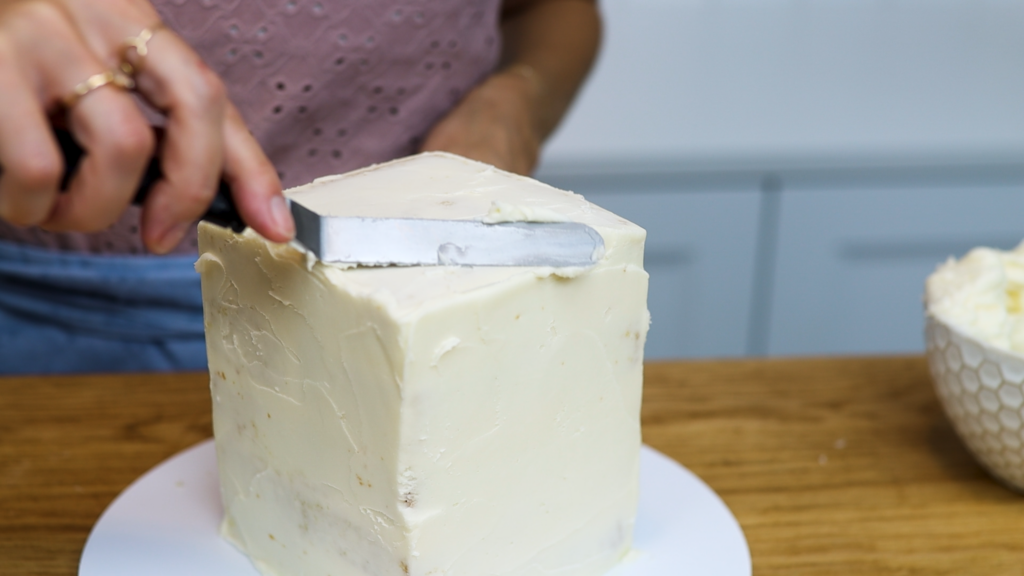
Meanwhile, cut out a square of cardboard that's half an inch bigger than the cake. You can use an Amazon box or any cardboard you have. Next, wrap the cardboard square tightly with parchment paper to make it food safe and non-stick.
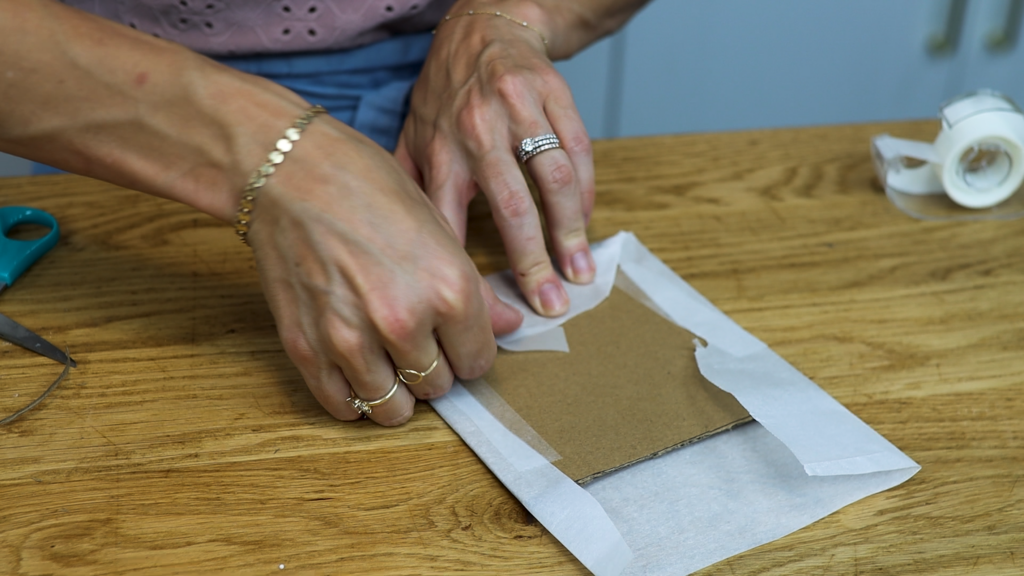
Now spread frosting onto the top of the cake only. Push the wrapped cardboard square down onto it, adjusting it so it's centered on the cake.
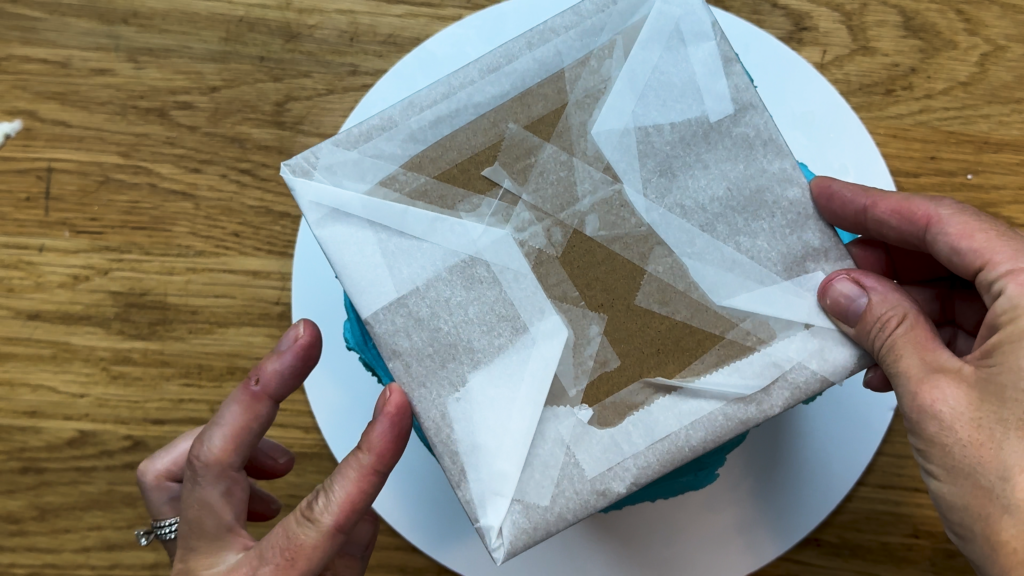
Spread frosting around the sides of the cake so that it's at least as thick as the edges of the cardboard square. By cutting the cardboard square half an inch bigger than the cake you'll have 1/4" of frosting on each side.
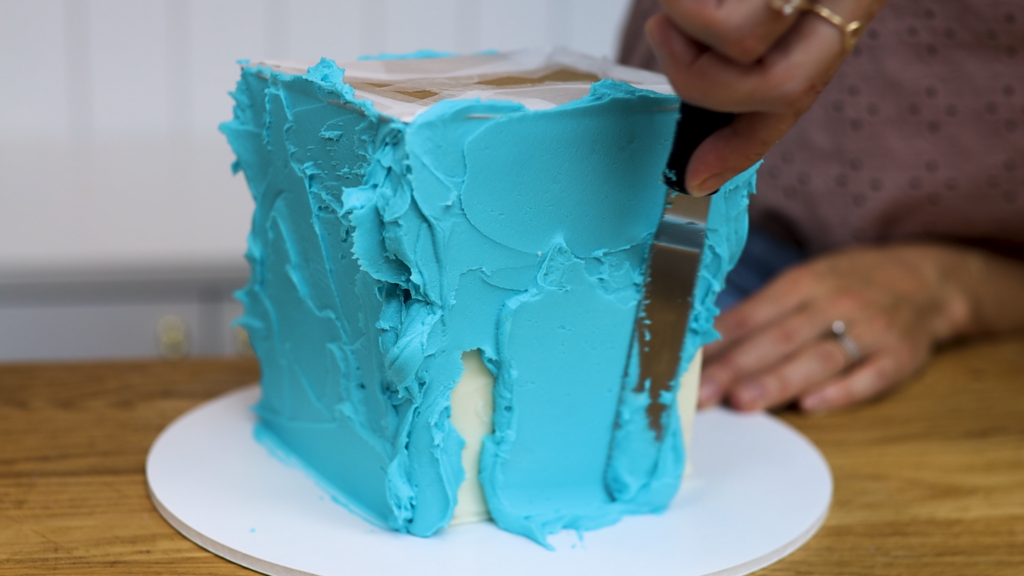
Scrape around the cake with a cake comb to smooth the frosting. Then spread more frosting to fill in any shallow areas and scrape again and again. Try scraping sideways and also upwards, pushing your cake comb against the cardboard to keep it straight.
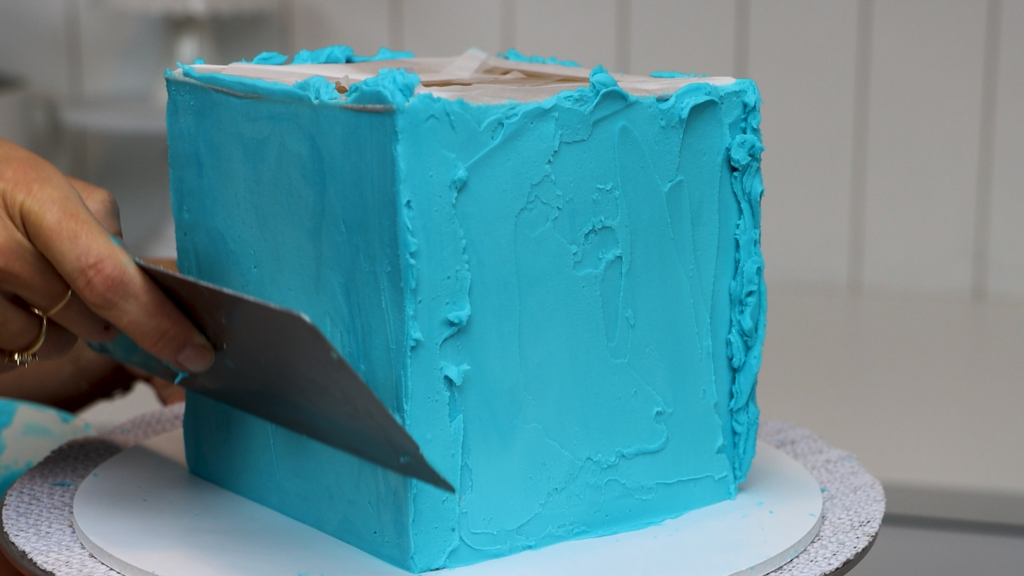
The cardboard square will guide your cake comb to create smooth sides and sharp edges.
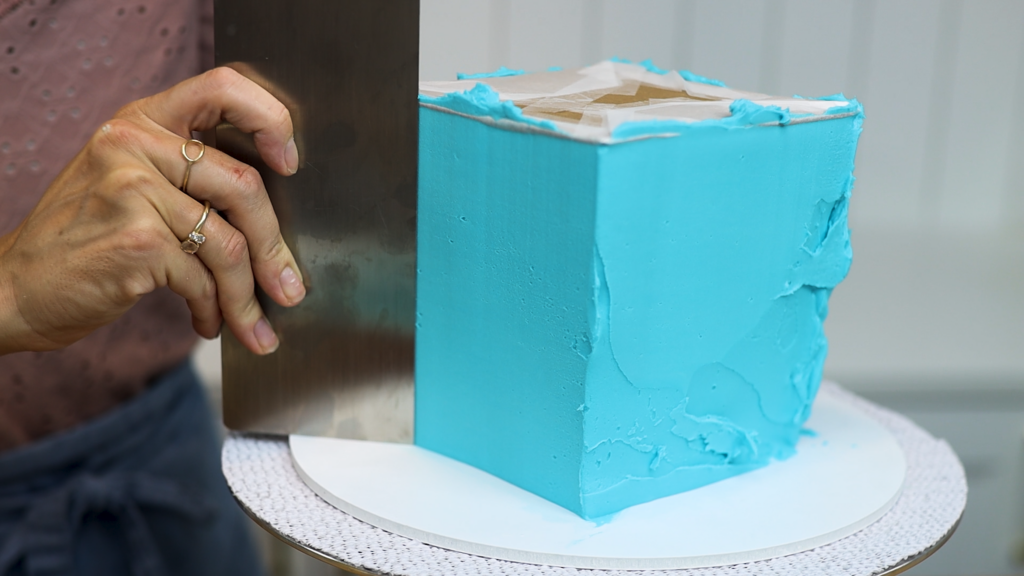
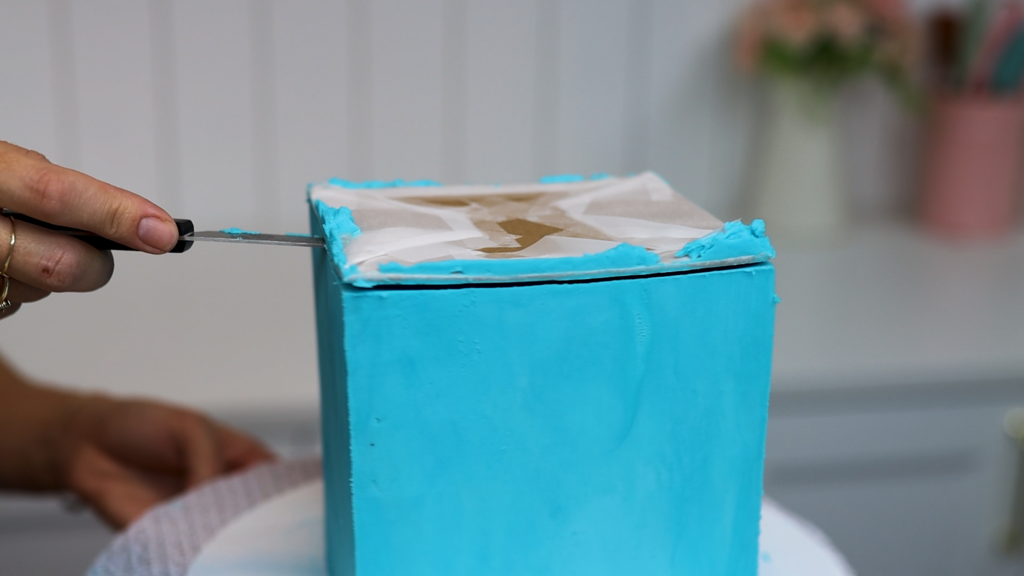
Put the cake in the freezer for 15 minutes or the fridge for 30 minutes before lifting the cardboard square off. To remove it, slice underneath the parchment with a sharp knife.
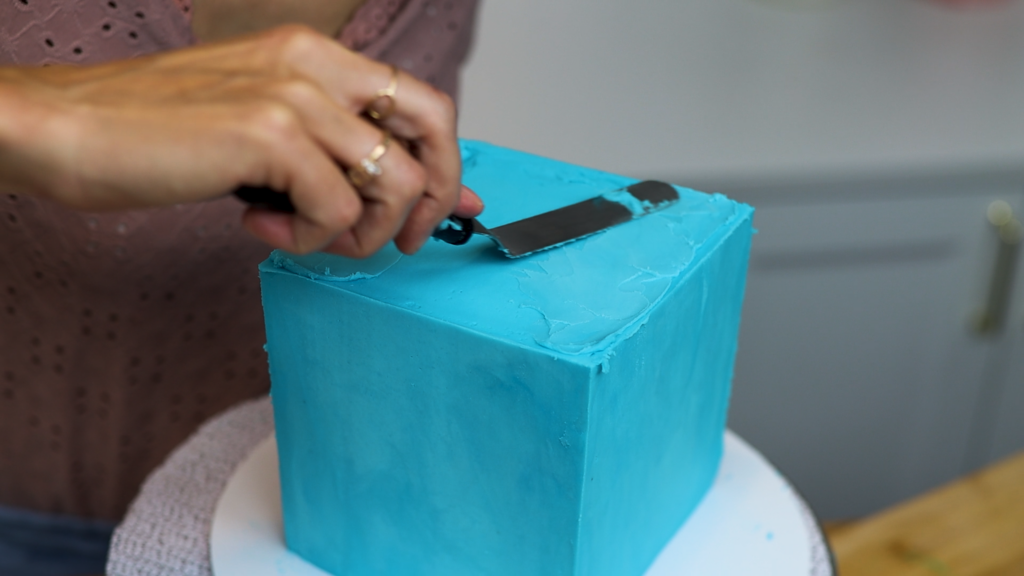
Spread more frosting over the top to fill in any gaps, scrape off the excess and voila!
And then of course you can use a sheet cake to make a frosted sheet cake. The trick for this is to use cold cake layers, which will stay firm and keep their position on the cake board. Cold layers will also help you get sharp angles around the corners.
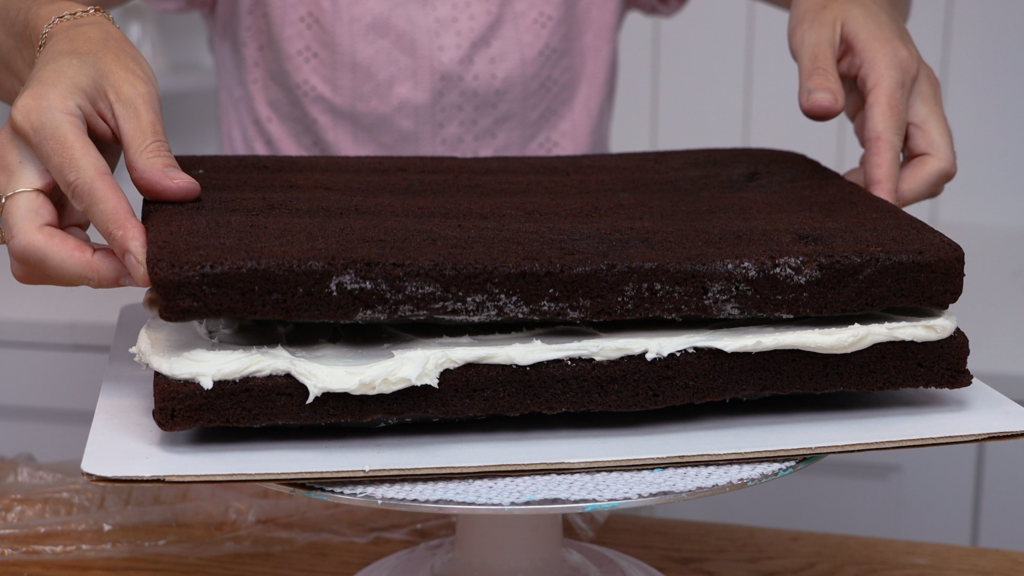
Make the crumb coat as angular as you can since that forms the shape for the final layer of frosting. Push the frosting on top all the way over the edges of the cake and around the sides. Make sure it sticks up above the top edge of the cake, too.
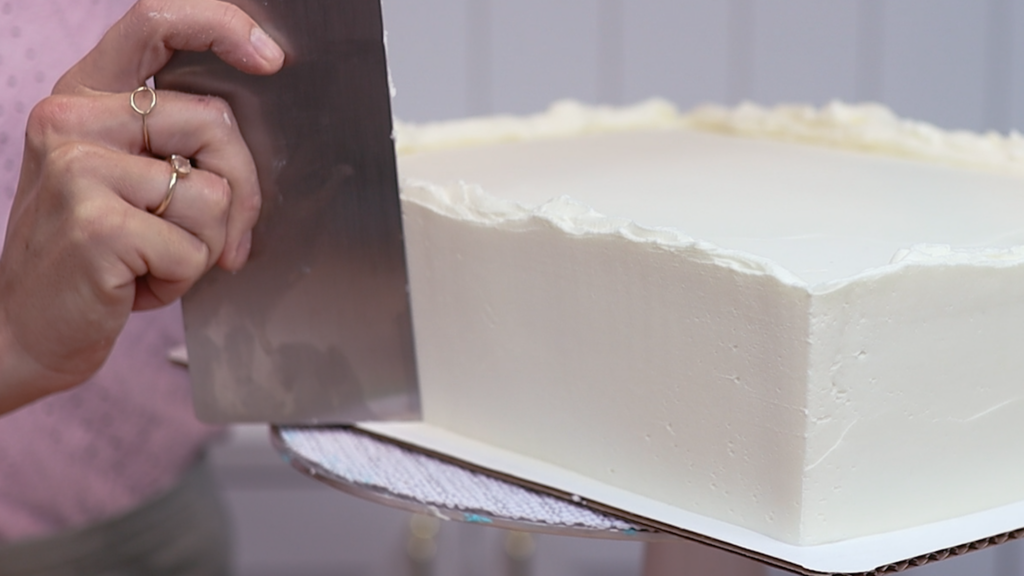
Push the frosting sideways beyond the edges so that you create sharp angles around the corners.
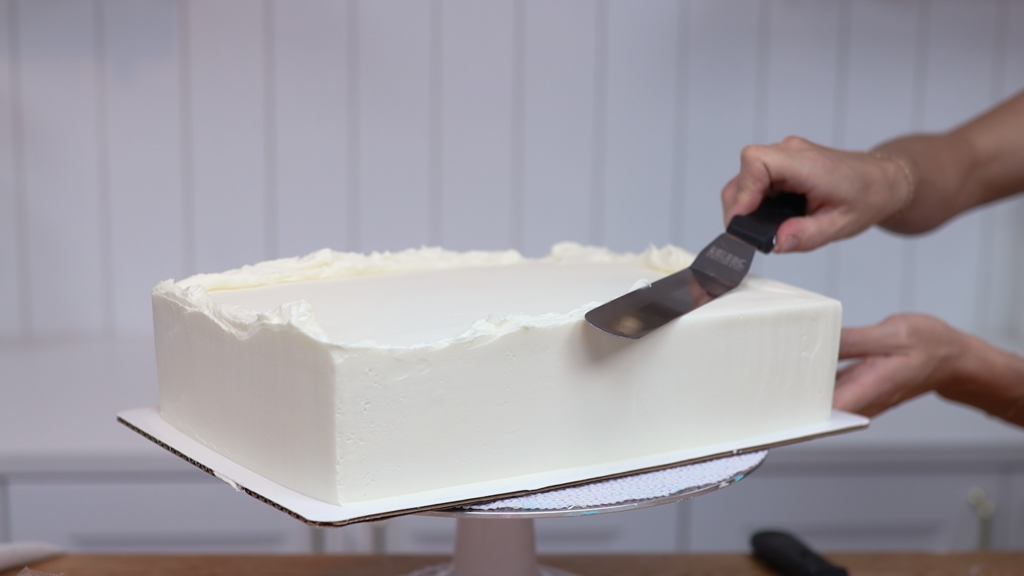
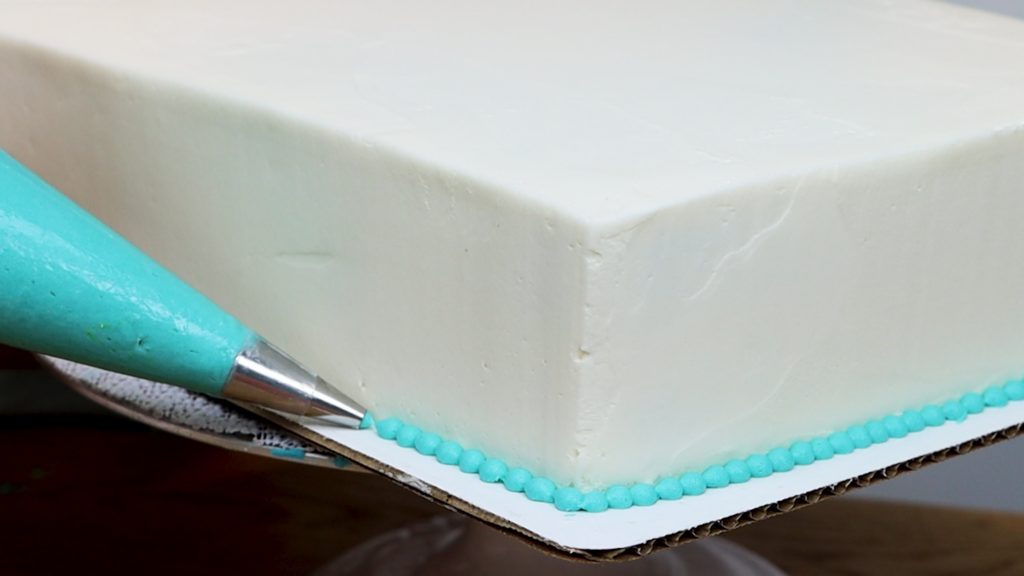
Add a border and then decorate the top for your celebration. These are so easy to serve and a 9x13 inch cake like this can serve 30 people!
I hope this tutorial has been useful. Visit my cake school to learn more with my online courses on cake decorating!
Watch a video of this tutorial on 6 sheet pan cake transformations:
Here are 10 birthday cake ideas that everyone will love!
Whatever age you’re celebrating, number cakes feel personal and they’re very easy to make. Cut out the number twice, which you can do using a sheet cake or rectangular cake. Chilling the cake in the fridge before cutting it will make it less crumbly. Cold cakes are also less likely to break when you move them.
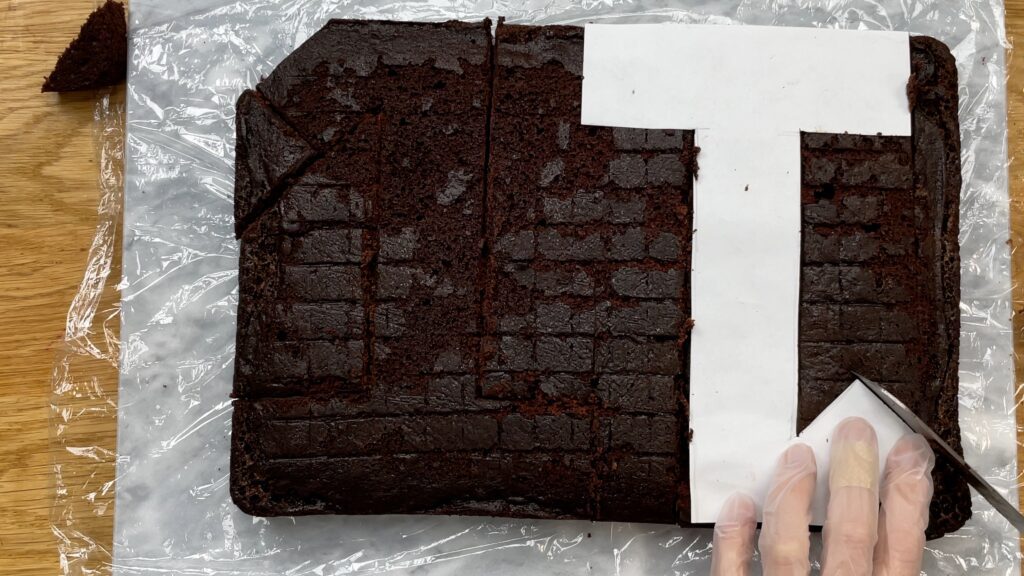
The reason for cutting out two of your number is so that you can layer them with filling in between.
I recommend using a stable buttercream like my 4 Minute Buttercream as the filling because the top cake won't crush it. You can spread or pipe it onto the bottom number cake.
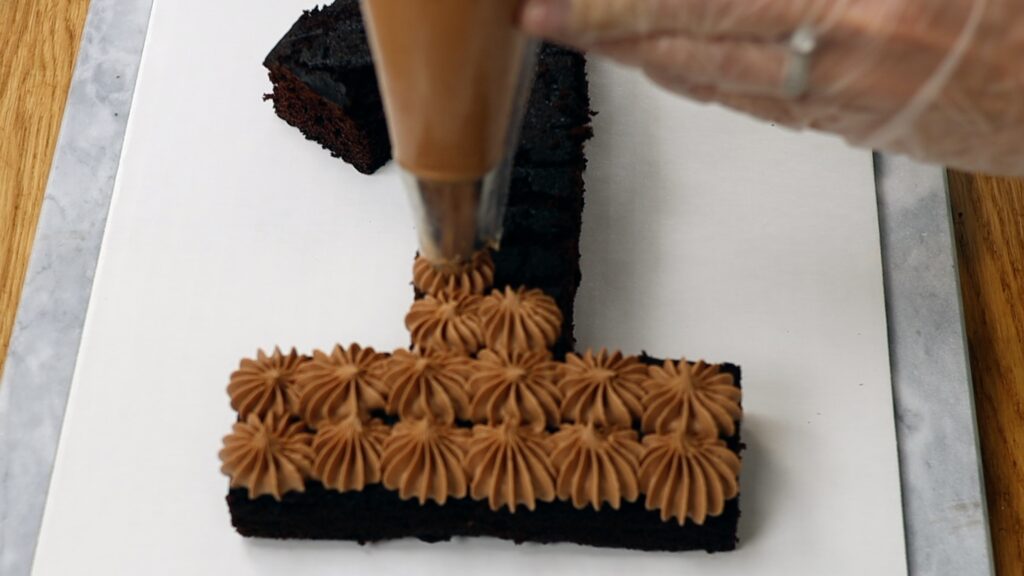
The easiest way to decorate a number cake is to cover the top with piping too. Then add candies or chocolates or flowers or any other toppers.
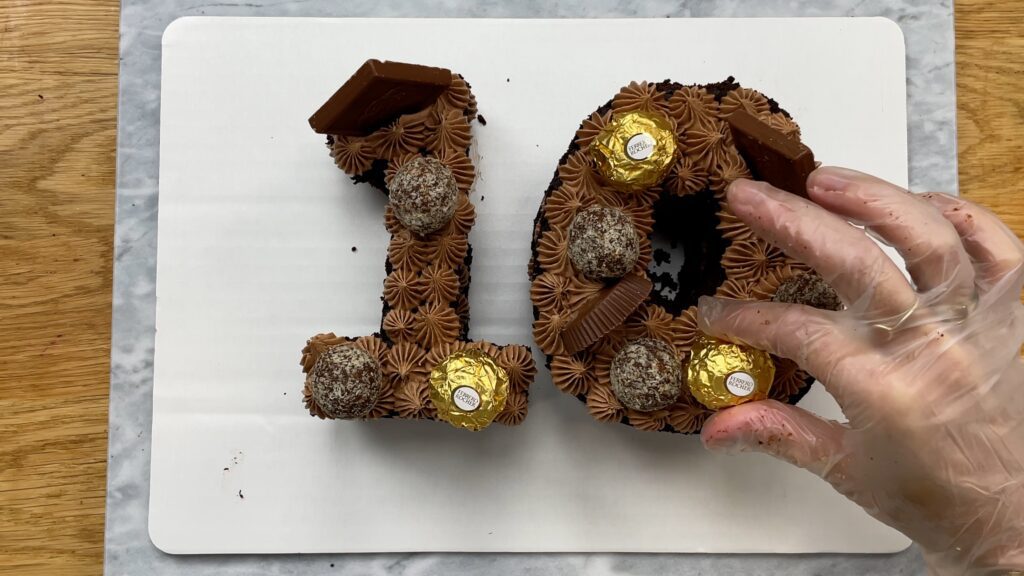
Alternatively, frost the cake with smooth frosting, cover it with sprinkles, or choose a theme.
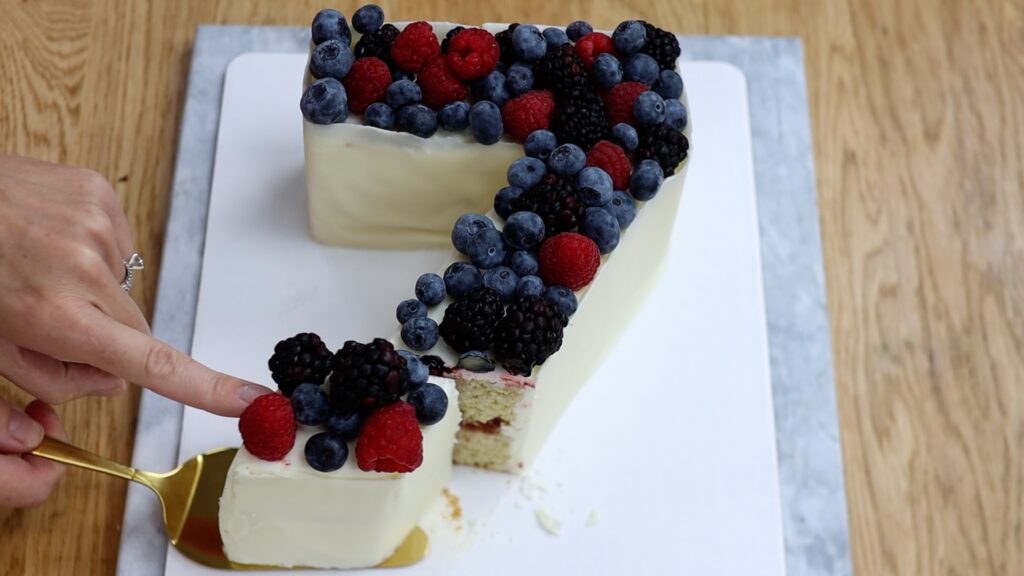
And of course if age is a sensitive issue you can make a humorous 21st birthday cake! For more tips on number cakes check out my tutorial on 10 number cake hacks.
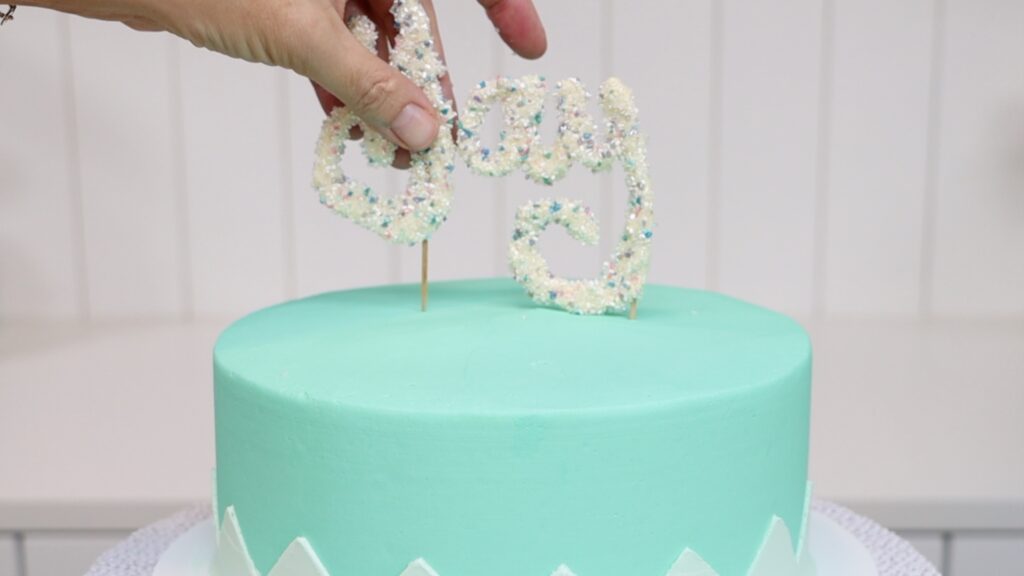
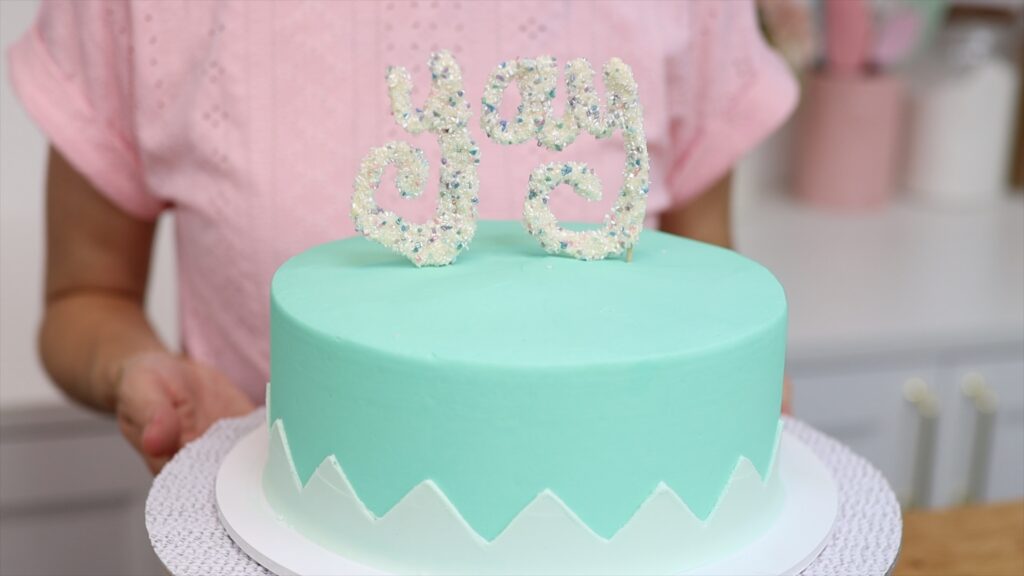
With a few chocolate chips you can make your own birthday cake toppers. Melt the chocolate in the microwave at 80% power for 30 seconds at a time so it doesn’t burn. Then use a sandwich bag to pipe the chocolate into whatever shape you like. Try a number, Happy Birthday, or a celebratory message like 'yay'!
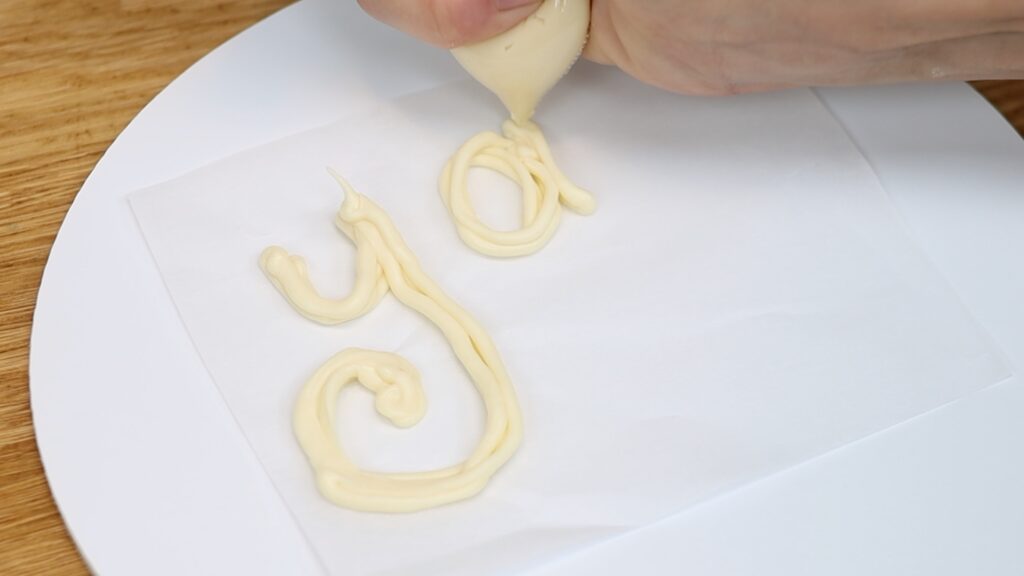
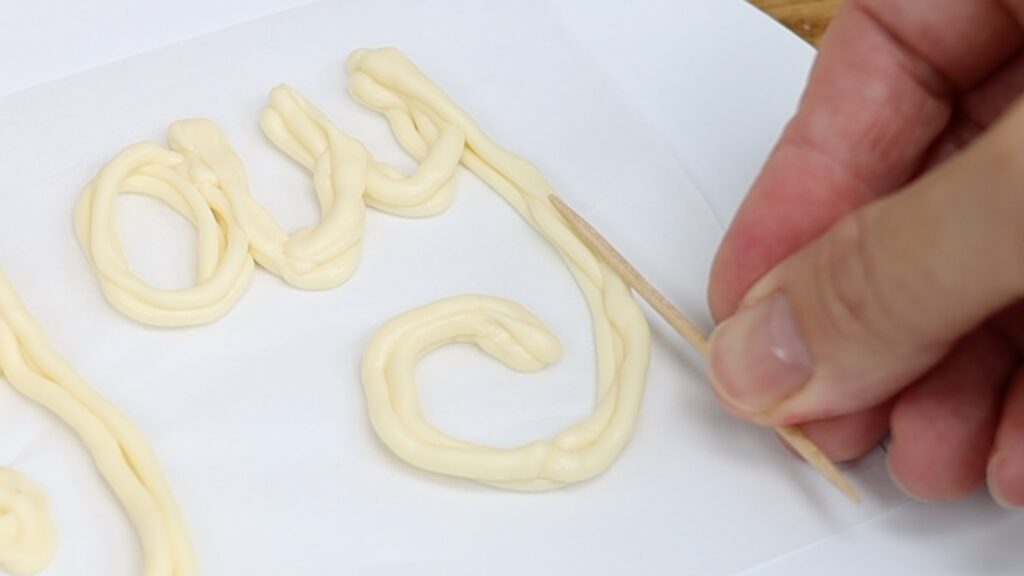
Pipe onto parchment paper or wax paper or baking paper so the chocolate doesn’t stick. Push toothpicks or paper straws into the chocolate before it sets, which you’ll poke into the cake later.
You can pour sprinkles over the top to make it colourful. Do this straight after piping the chocolate, while it's still soft and sticky.
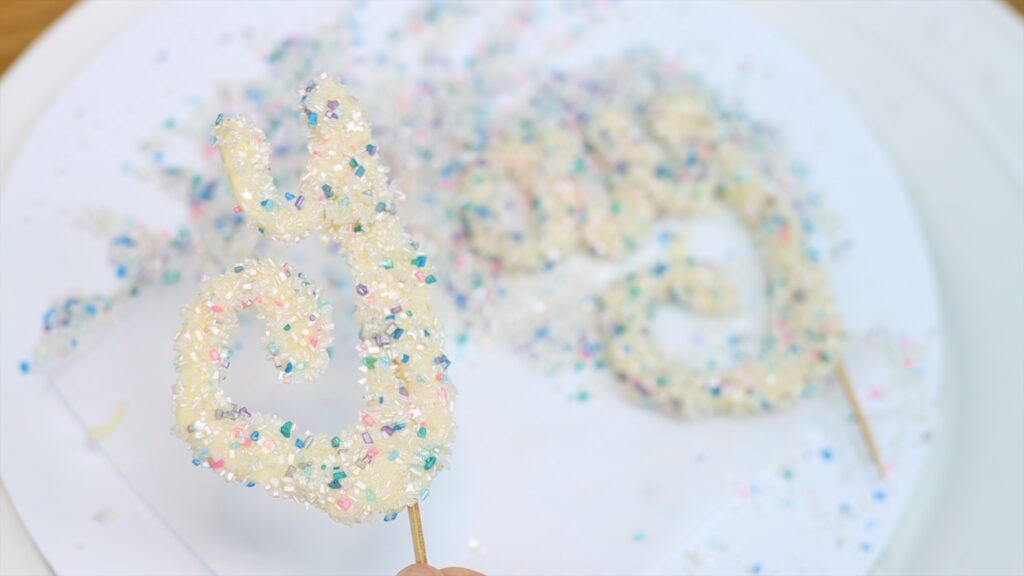
When the chocolate sets, after about 10 minutes in the freezer, pick the topper up and push the toothpicks down into a frosted cake.
For a small celebration, make a mini cake. These are the perfect size to enjoy with a partner. I use 4 inch pans for my mini cake layers.
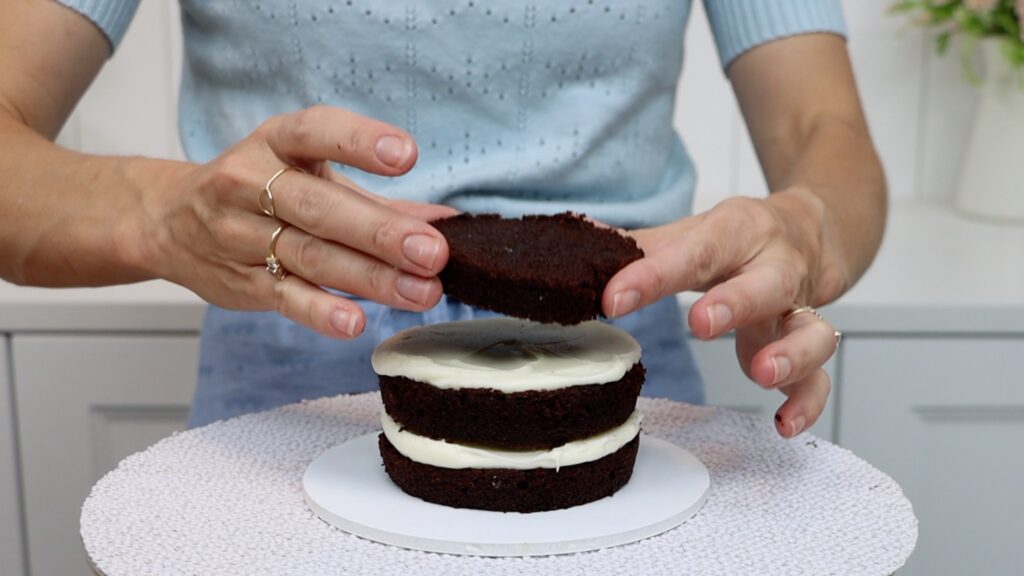
If you don't have small pans you can use a round cookie cutter instead. Push it into a larger cake to cut circles out and use those as your layers. There are lots of tricks to frosting mini cakes and I share all of those in my tutorial on how to frost mini cakes.
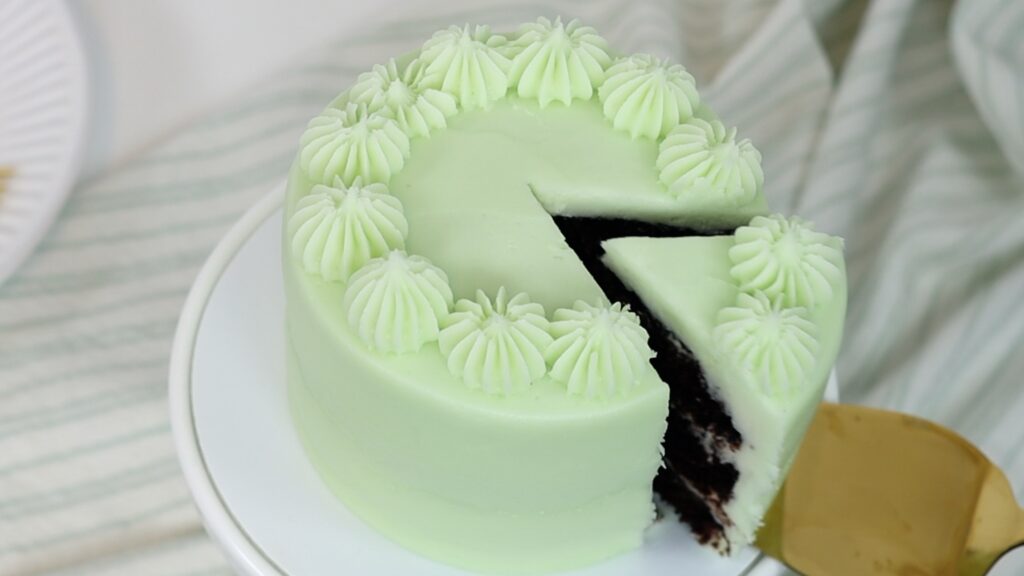
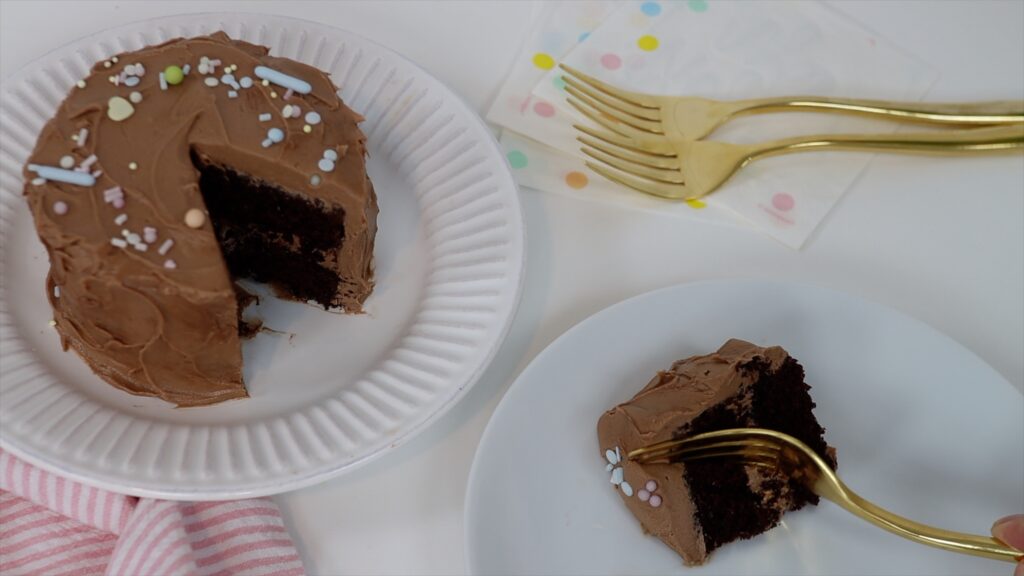
You can cut these just like a full size cake, or dig straight into them with a fork. If you're looking for a mini cake recipe, try my small batch chocolate cake!
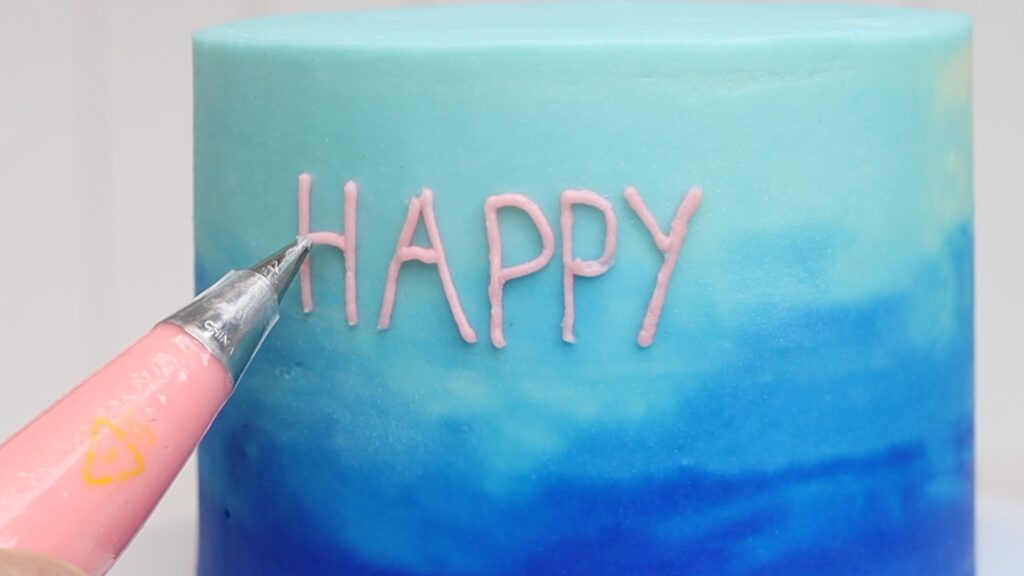
Turn any cake into a birthday cake by simply writing Happy Birthday on it! You’ll need a small round piping tip like a #3, with a piping bag. You can pipe the words with straight lines, which I find the trickiest because my hands are so shaky.
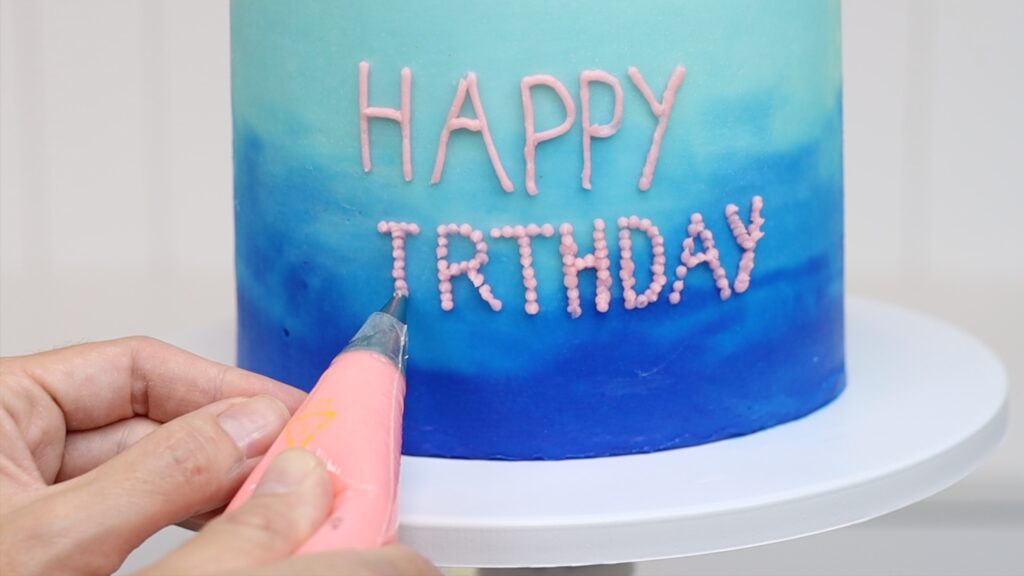
Or pipe lots of little dots to form the letters of the words, which is much more forgiving. You can do this on the top of the cake or on tall cakes you may have more space on the sides.
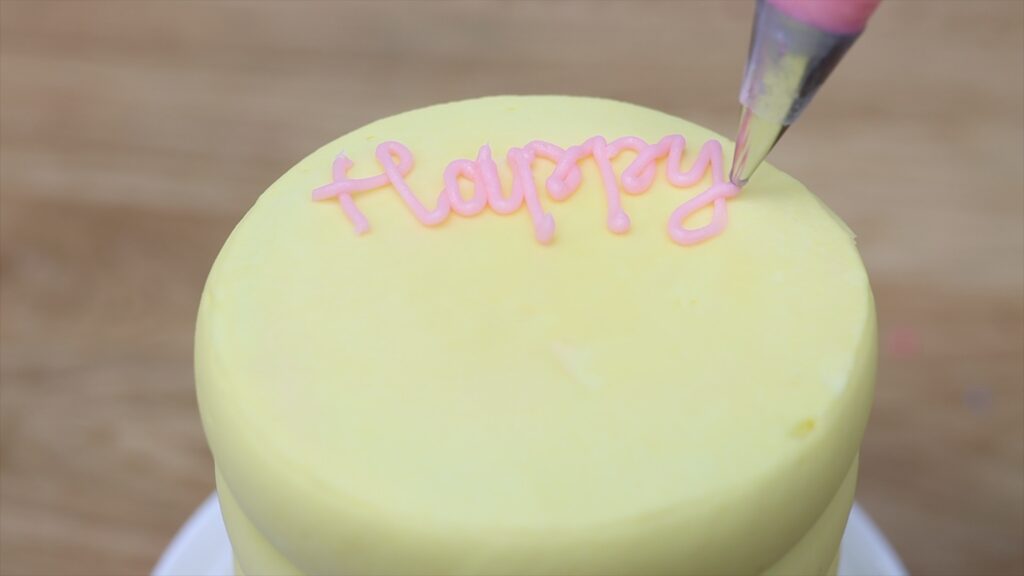
For cursive writing, the top of the cake is definitely easier! I suggest writing or printing your message first so that you can hold it beside your cake as you pipe the letters. This way you'll make sure the letters are all the right size and that the whole message will fit, centered, on the cake.
If you’re not confident piping a message onto a cake, you can buy letter embossers instead. Push them into frosting after it's set to leave an imprint of the message.
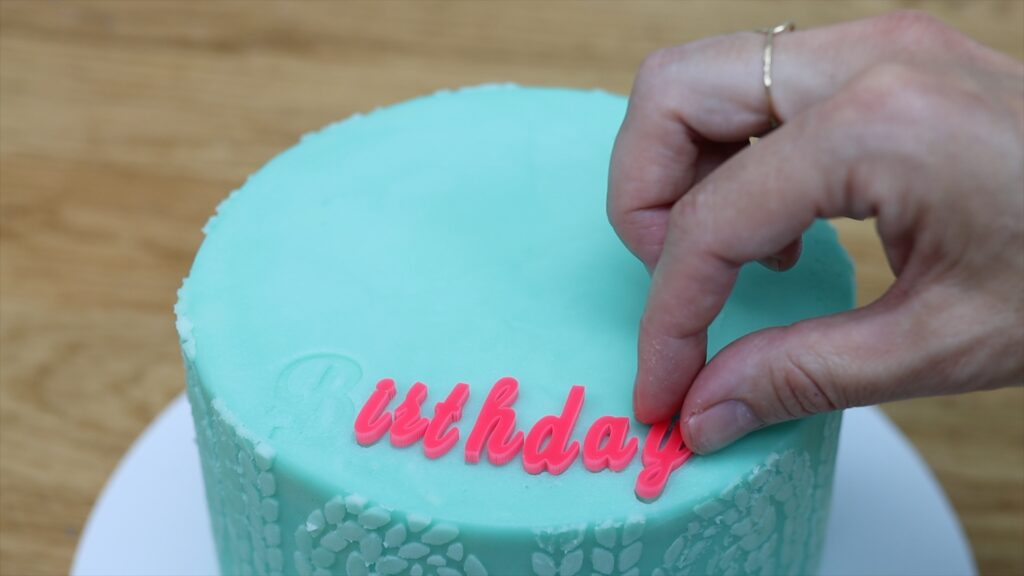
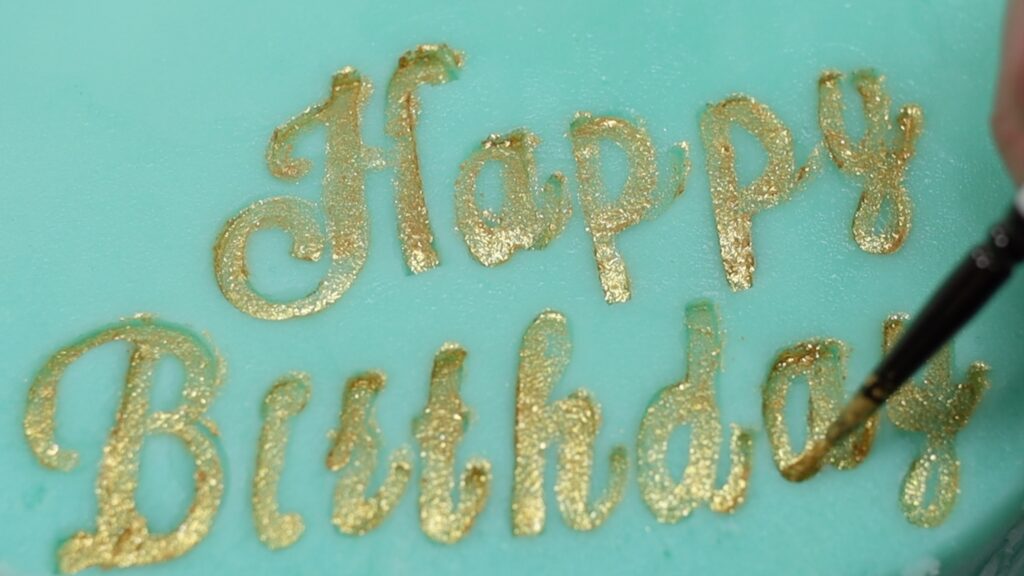
Then you can paint the letters with metallic paints to make them stand out. These are made by Sweet Stamp and you can use my code BGB10 for a discount!
If you don’t have enough celebrations in your year, add a half birthday to them! Half birthday cakes are easy to make by cutting round cakes in half and layering them to make a semi-circular cake.
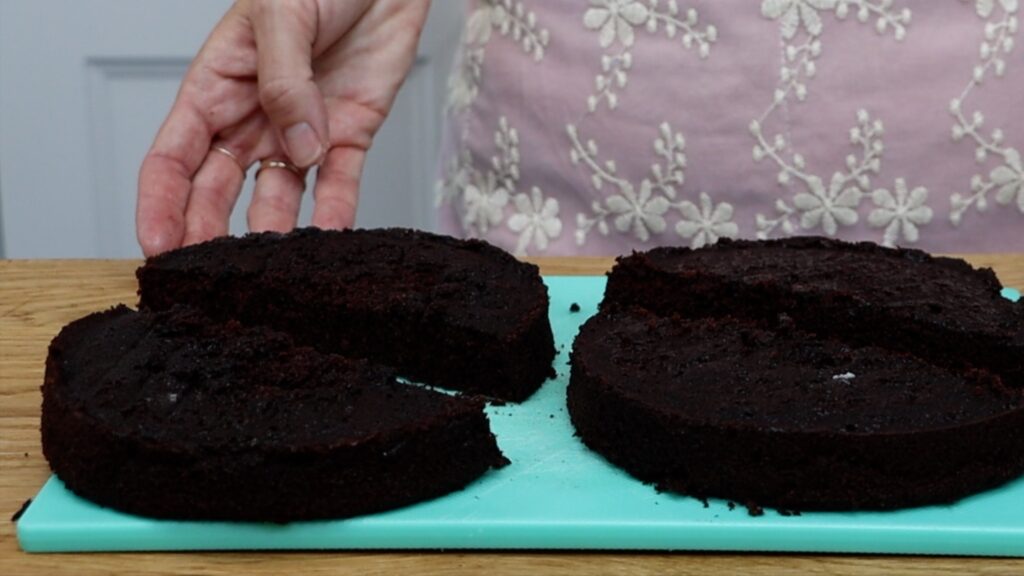
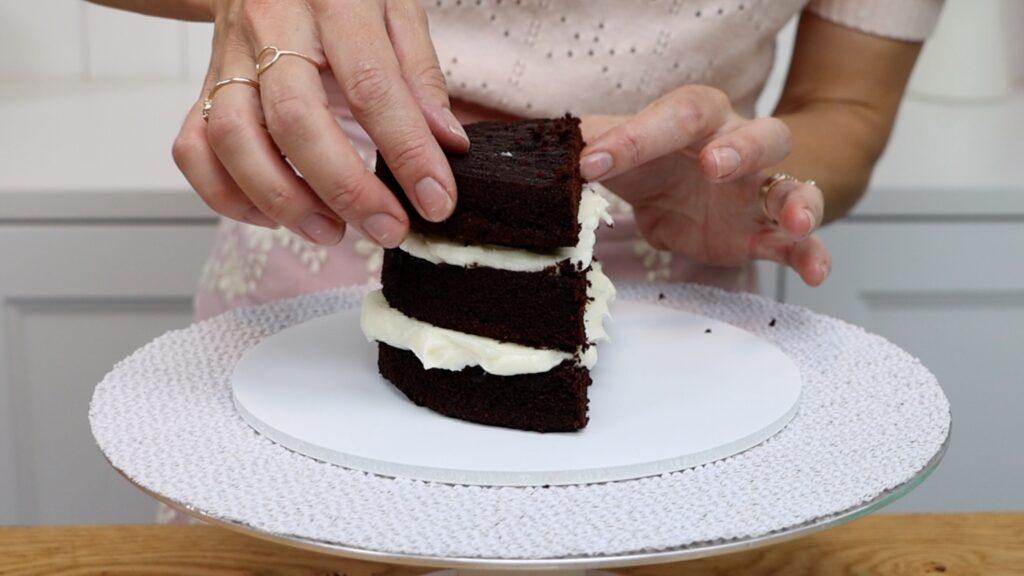
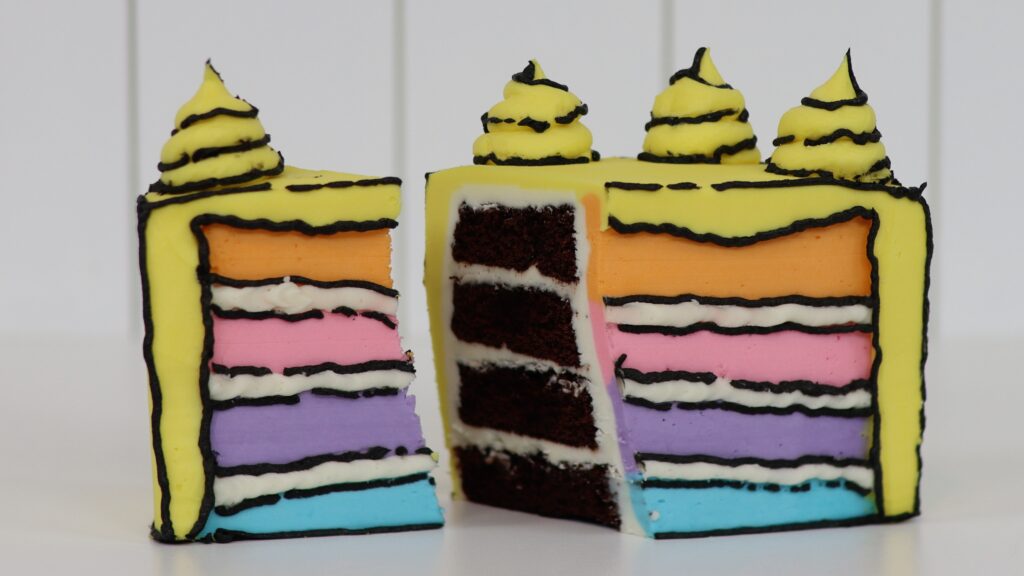
Then you can frost and decorate them however you like. Cartoon cakes are fun and trendy at the moment. The idea is to make all of the details on your cake flat to create a 2D effect.
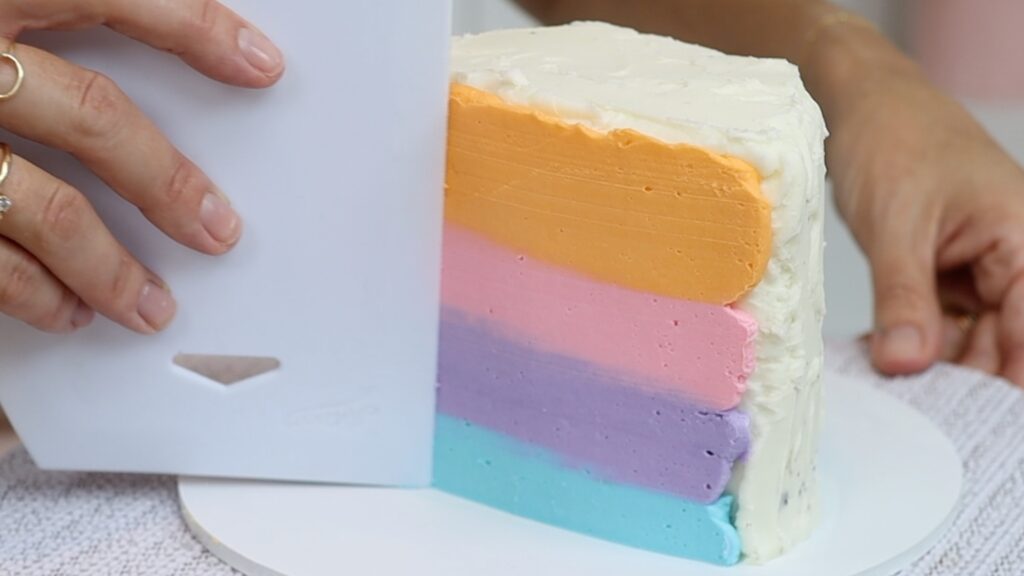
Then give them a thin black outline, breaking the line ocassionally to give make it look like a cartoon drawing.
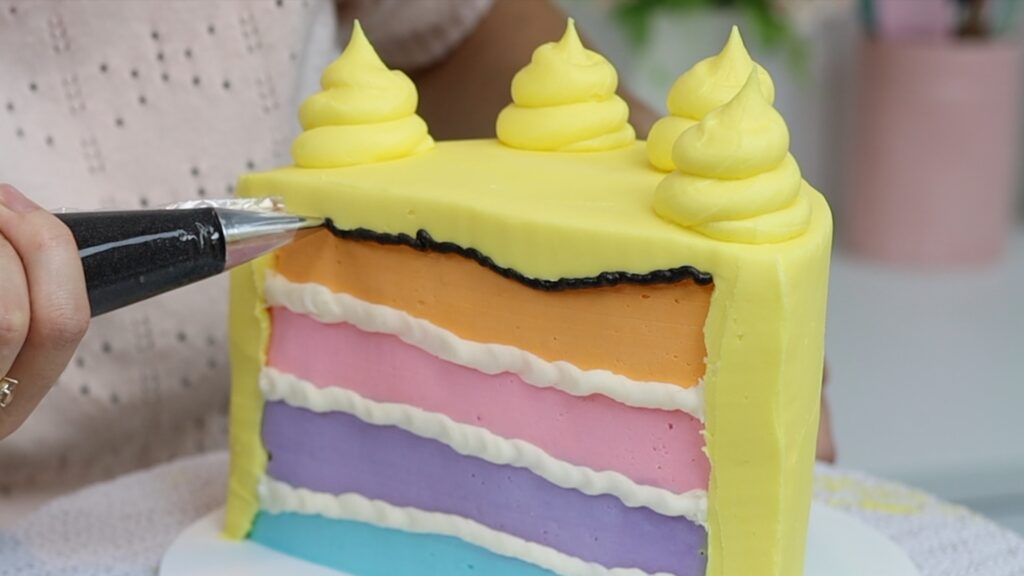
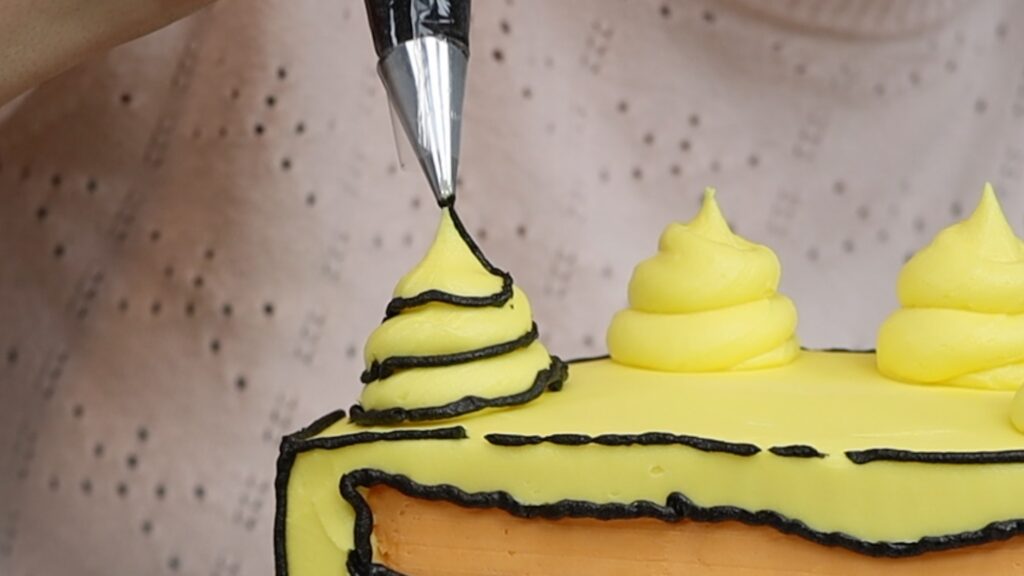
When the cake is finished, it will look superimposed or like it’s been drawn onto your background! For step by step instructions on how to make this cake, see my tutorial on how to make a cartoon half birthday cake.
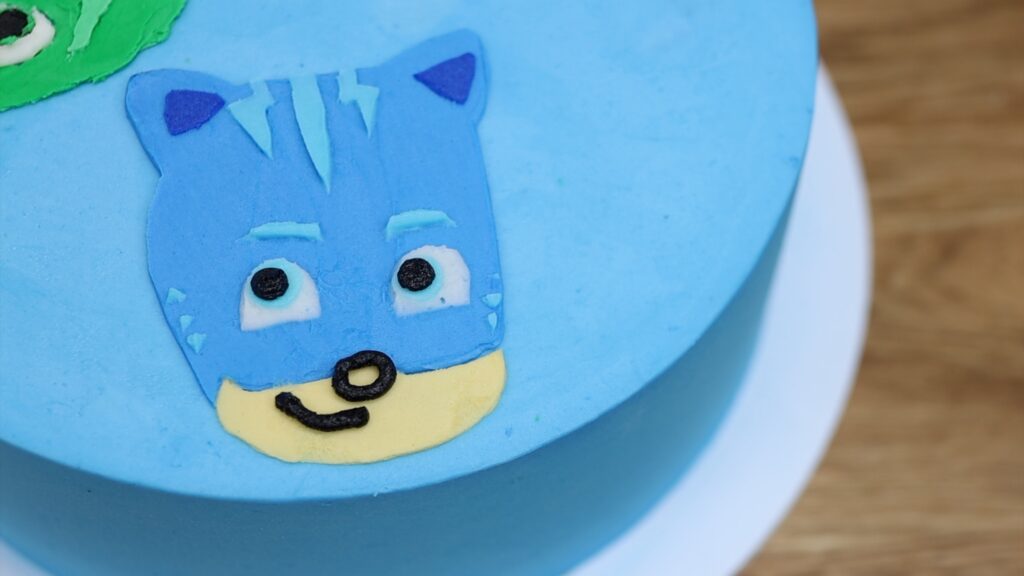
For children’s birthdays or really at any age, you can create a character on your cake using homemade stencils. For the most accurate characters, print out your character the size you want it to be on your cake. Trace the details of each colour onto a different piece of parchment paper or wax paper.
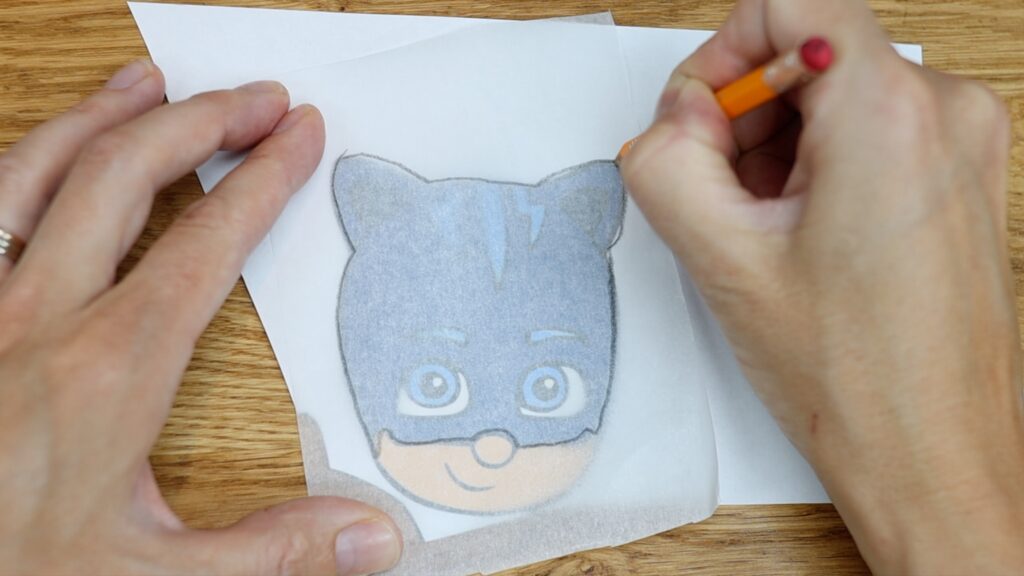
Then cut the details out to leave the surrounding paper intact, which you’ll use as stencils on your cake. The frosting on your cake needs to be cold and firm so put it in the fridge for at least an hour before you start.
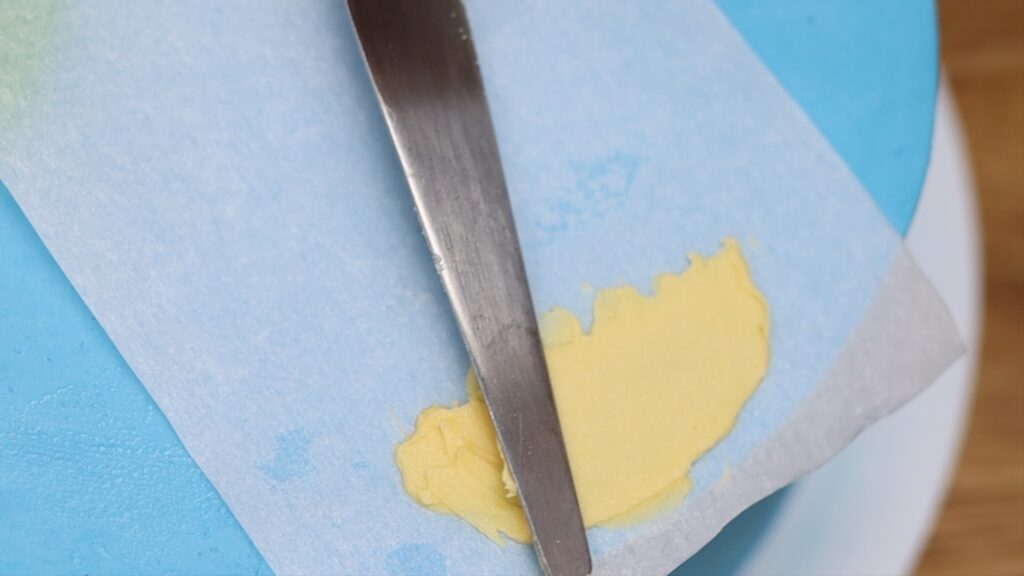
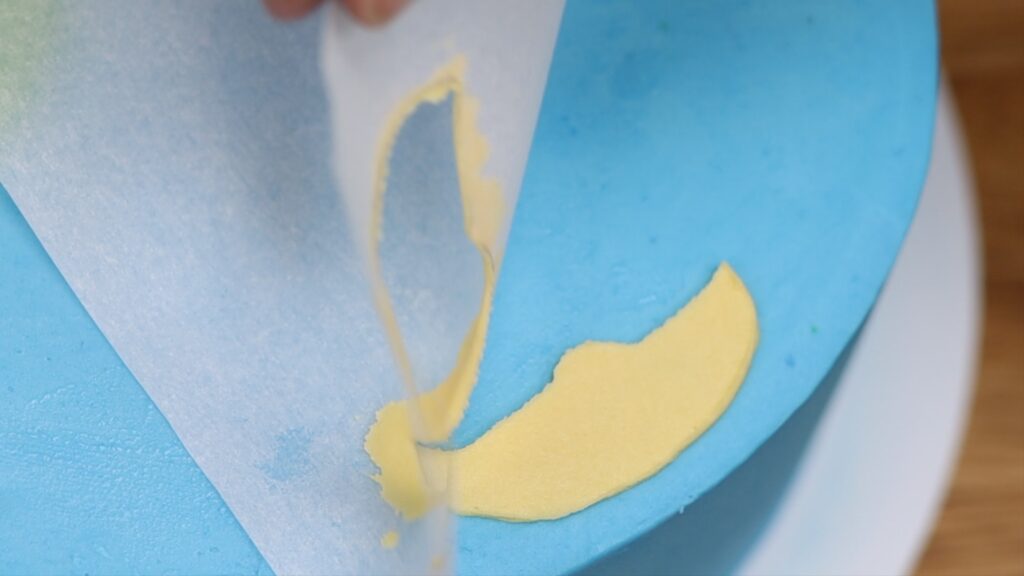
After each colour you stencil onto the cake, put the cake in the fridge for 30 minutes or the freezer for 15 minutes. This will set that colour before placing the next stencil on top. Because the details are cold, you won’t damage them with the parchment.
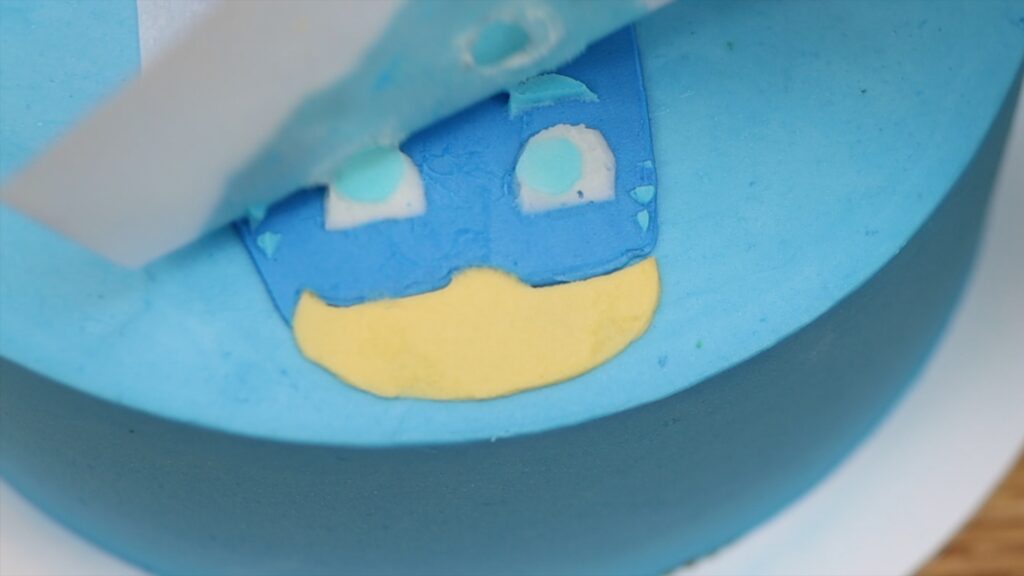
You can add small details like the facial expressions by piping them on at the end. This is such a simple and effective AND affordable way to create any character you like on a cake!
If you don’t have any cake tools at all, you can make a cake with super smooth frosting by using just a plate, a ruler, and the wheel from your microwave! Check out my tutorial on how to make a cake with no tools to see how!
How can you make a cake if you have no time to bake? Try a cake makeover! Buy a cake from a grocery store or supermarket and then jazz it up.
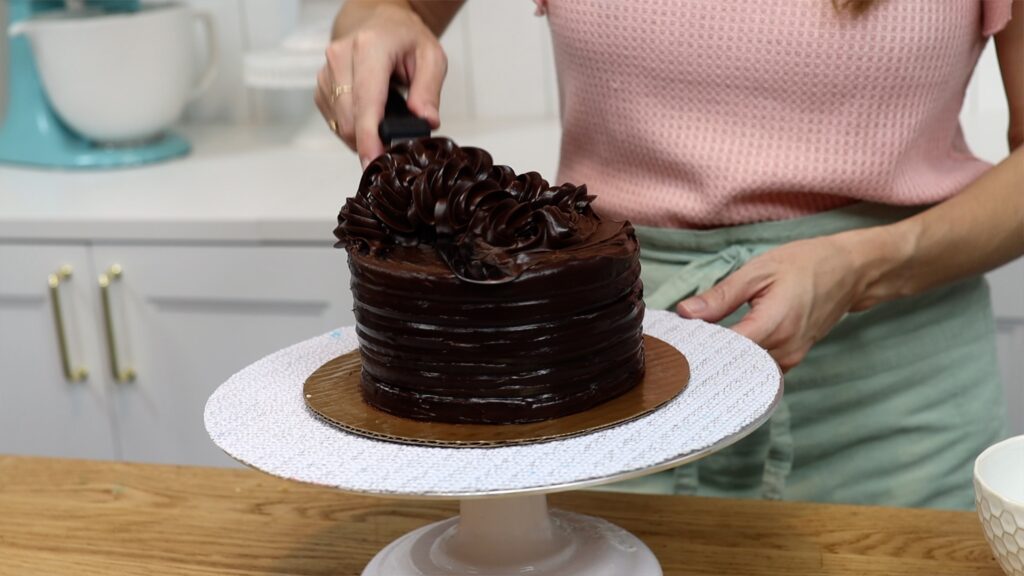
Scrape off any of the decorations you don’t like and if you want the cake to be taller you can stack two on top of each other. Use a straw or dowel through the middle to keep it standing straight, so it doesn’t lean.
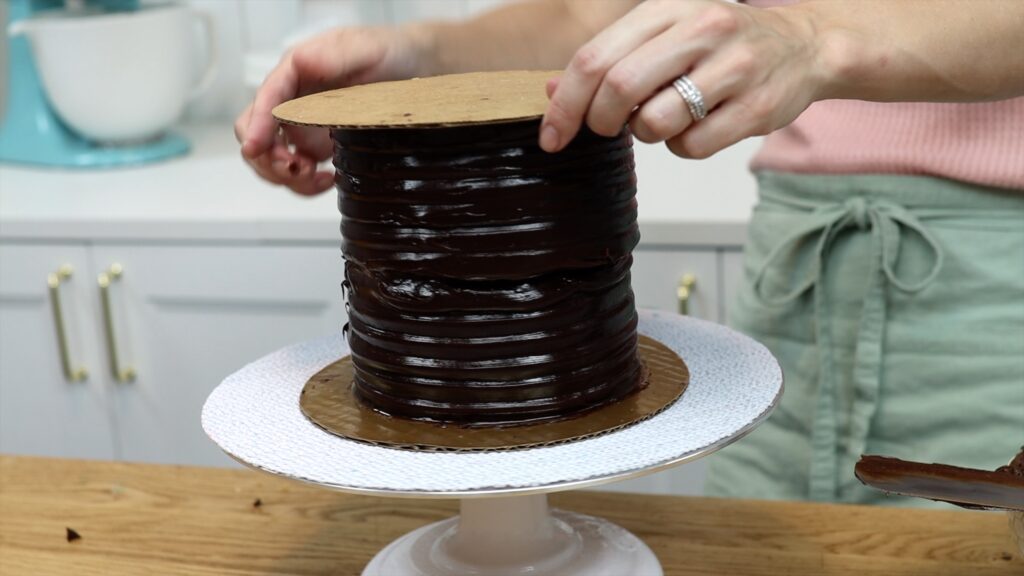
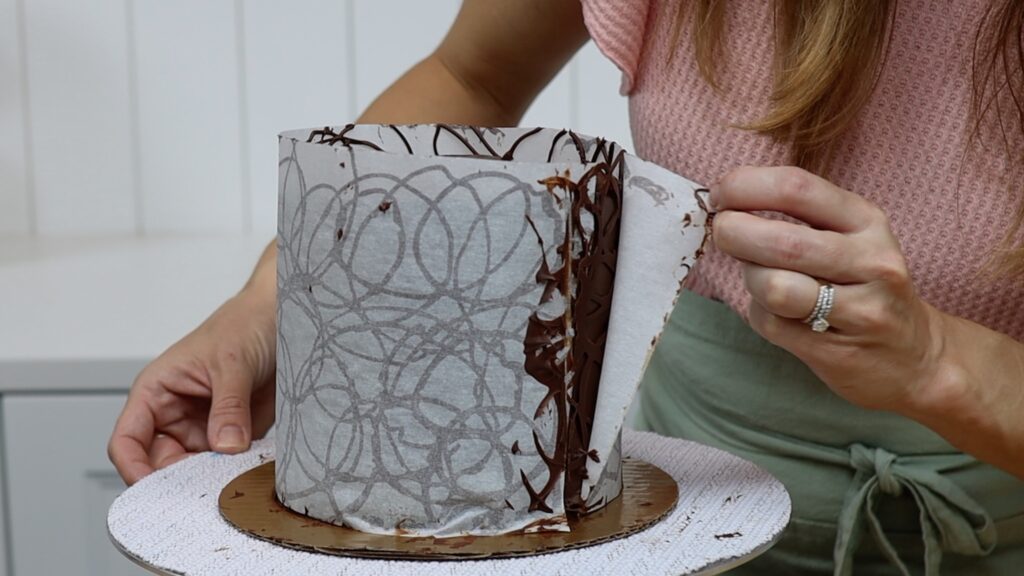
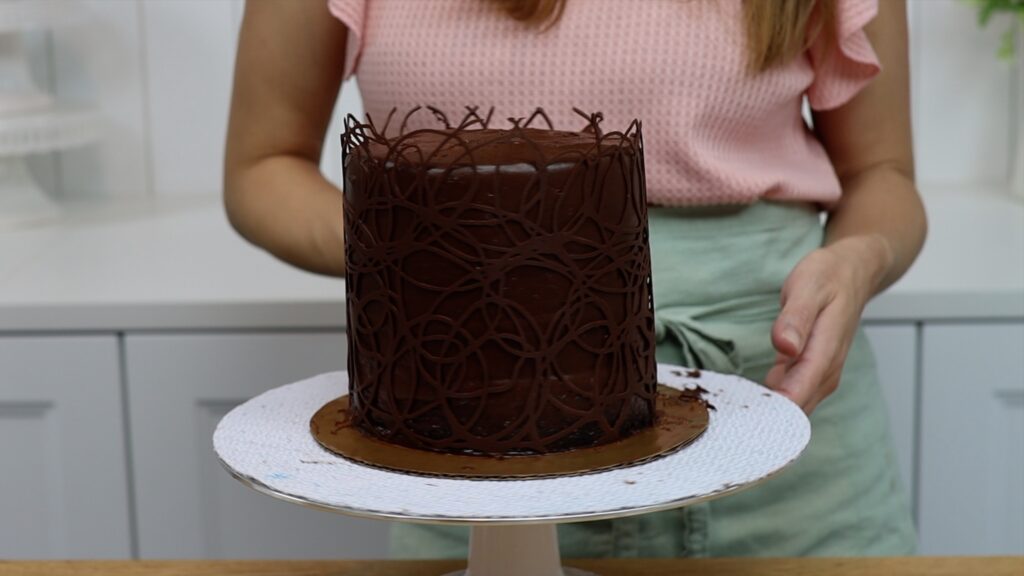
You can scrape off the frosting and re-frost it if you like. Add your own decorations like this easy chocolate wrap or chocolate collar.
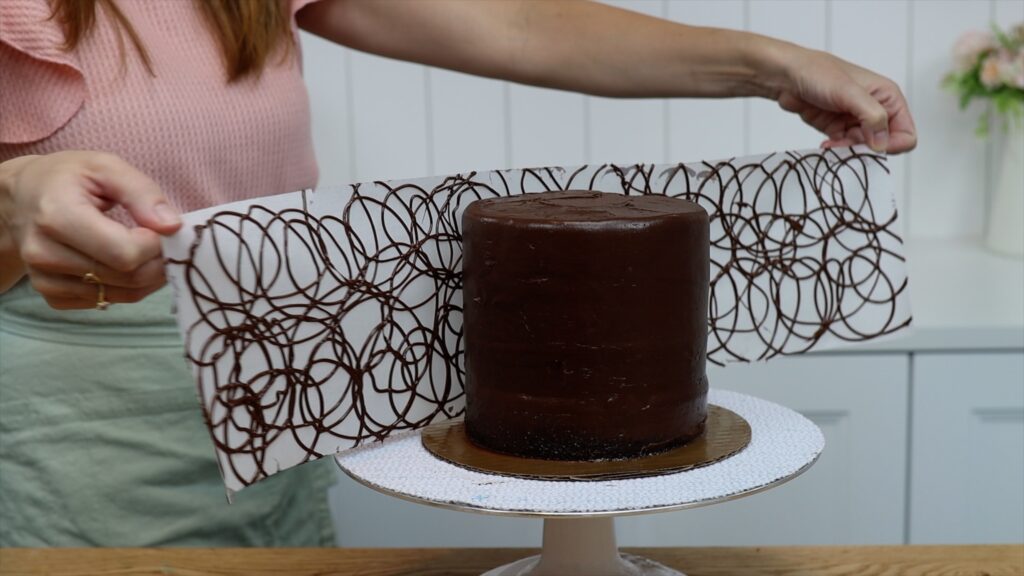
The trick here is to put the cake in the fridge for an hour to set the chocolate before you peel off the paper.
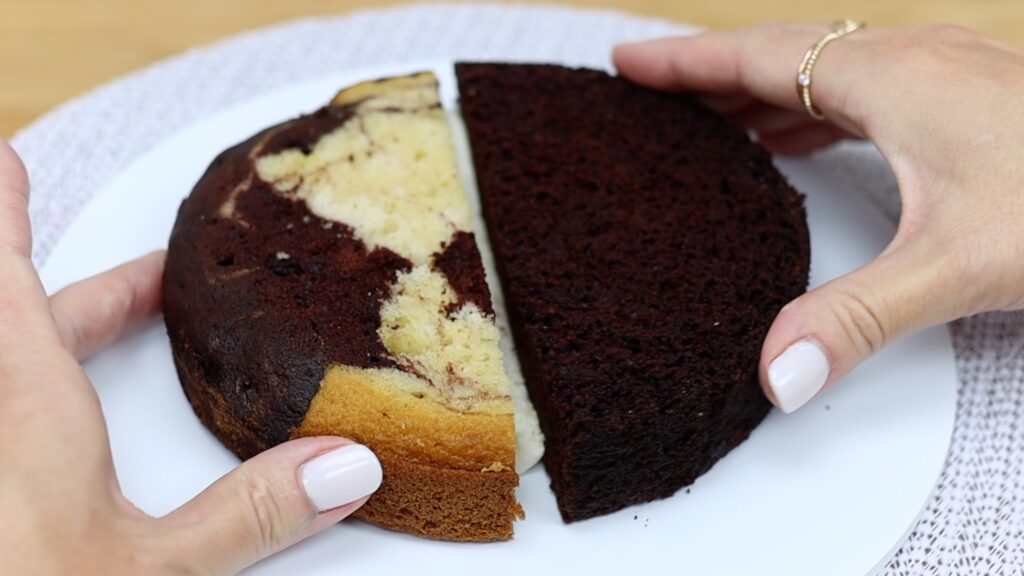
Offer 2 flavours with just one cake, which is great for joint birthday celebrations. Cut your cake layers in half and attach two halves, one of each flavour, by piping or spreading buttercream down the middle.
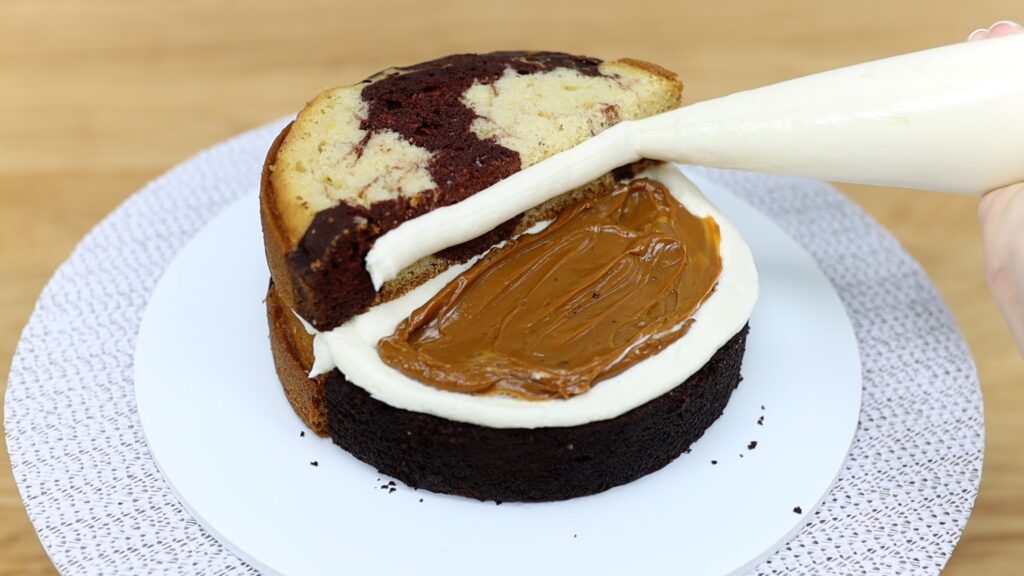
Add different fillings, piping a dam around each half of cake to keep the fillings separate.
Use different flavored frostings as well, which is easier than it might seem! Cover up one half of the cake at a time with parchment paper and then frost the other half. This will keep each flavour on just one half.
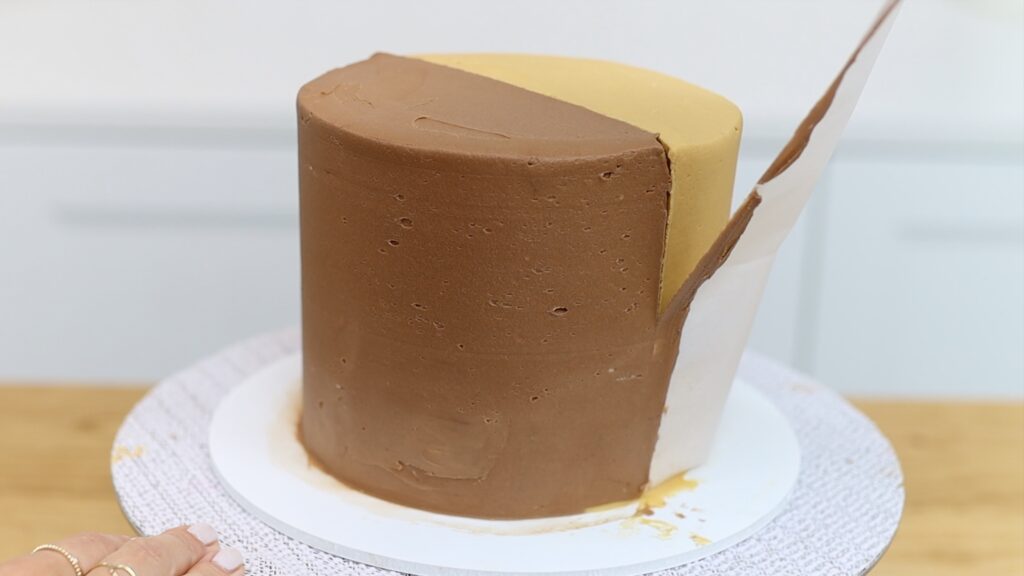
Remember the crumb coat, so that you don’t get any crumbs in your final coat of frosting. Use the leftover frosting of both flavors to pipe swirls down the middle to cover up the join between the two flavours.
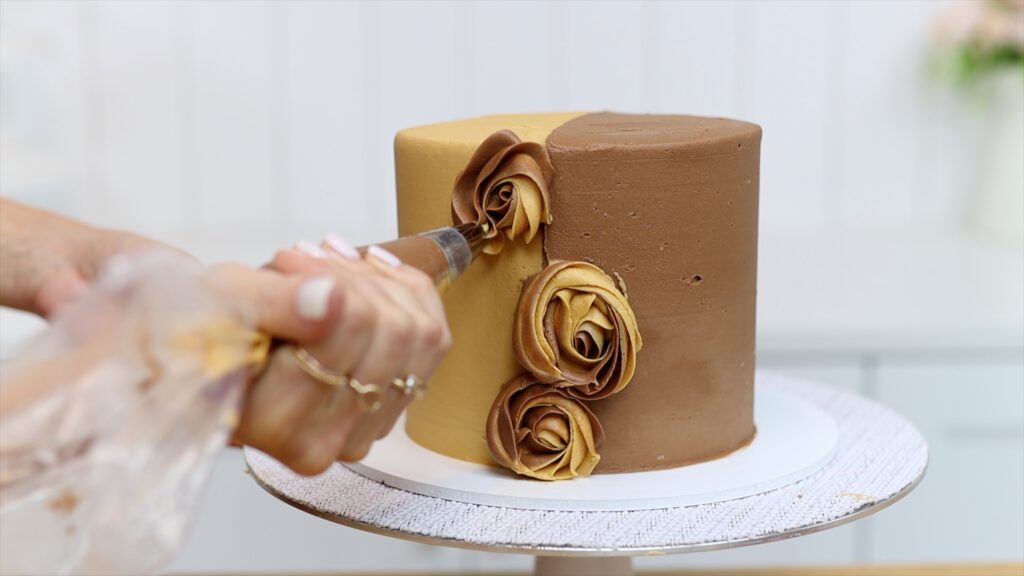
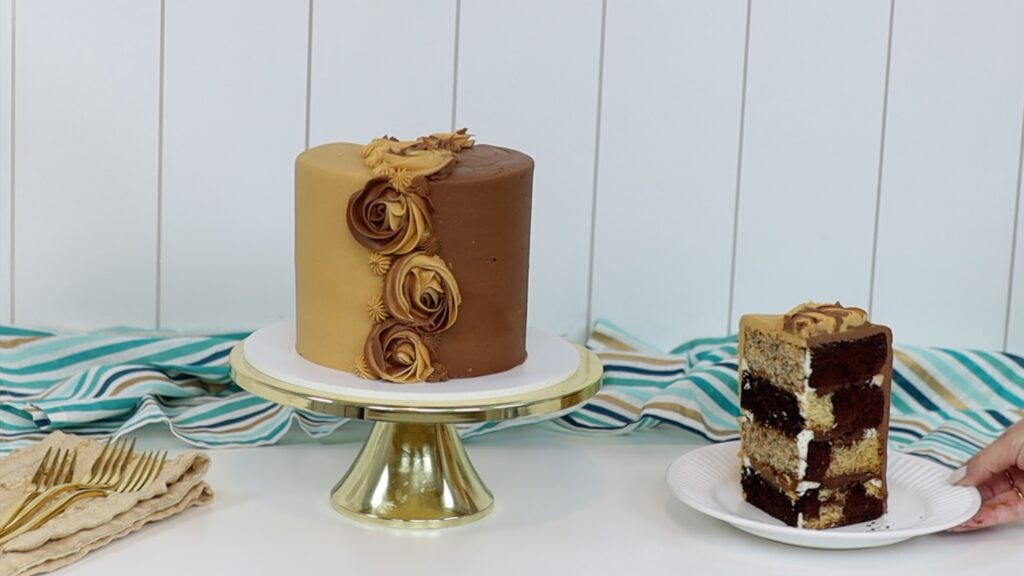
You'll find step by step instructions in my tutorial on Half and Half Cakes. With this technqiue you'll make a unique cake with two flavors for everyone to choose between, or of course they can try both!
Just because you’re travelling somewhere for a birthday, doesn’t mean you can’t take a cake with you! Bake and assemble your cake at home, using fillings that don't need to be refrigerated.
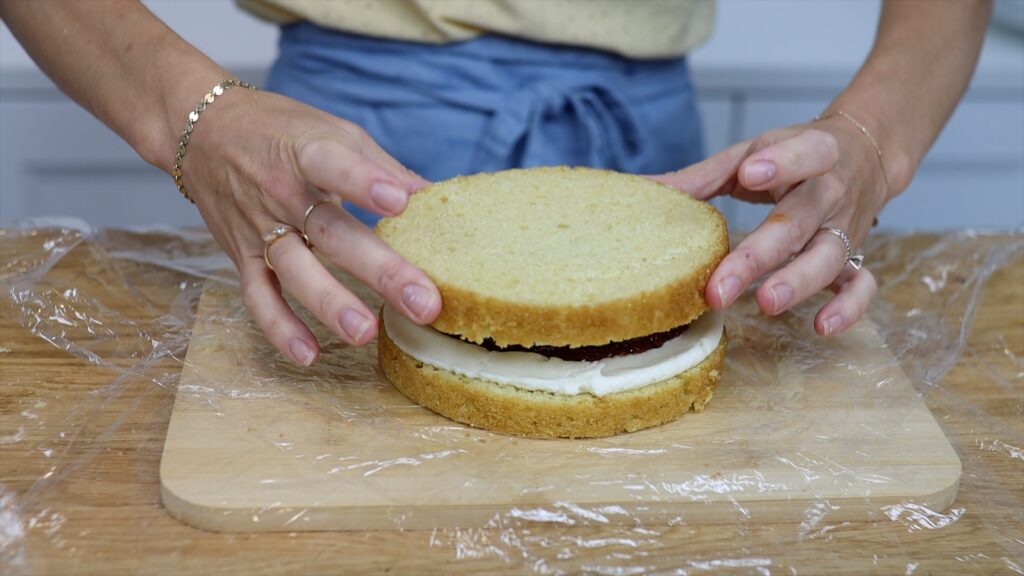
It's quickest to assemble the cake on a piece of plastic wrap. Then wrap the plastic around the cake and put it into the pan you baked it in.
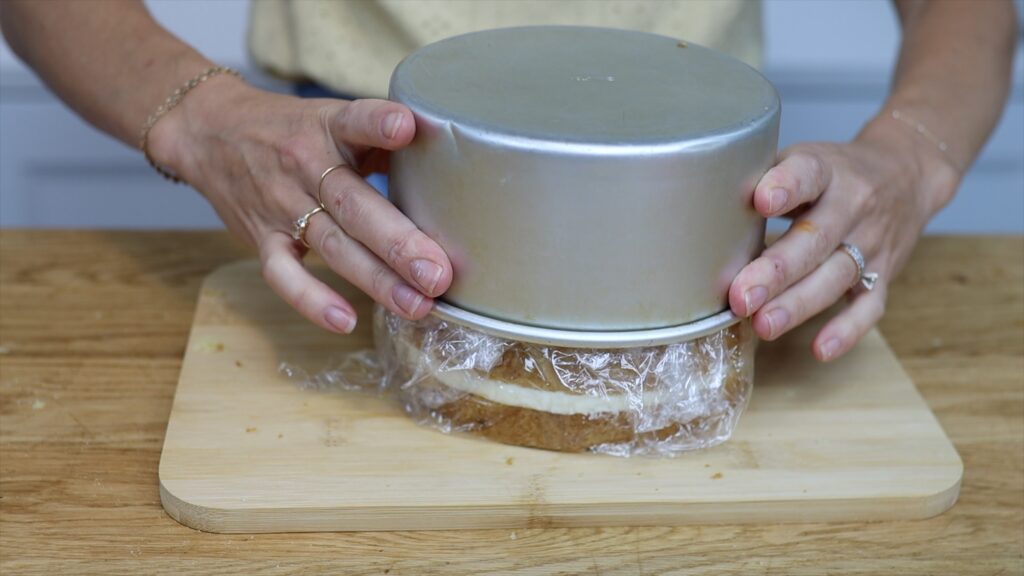
You might need to use two pans if it's a tall cake like this one. Fill any empty space in the pan with a piping bag of frosting and a kitchen towel.
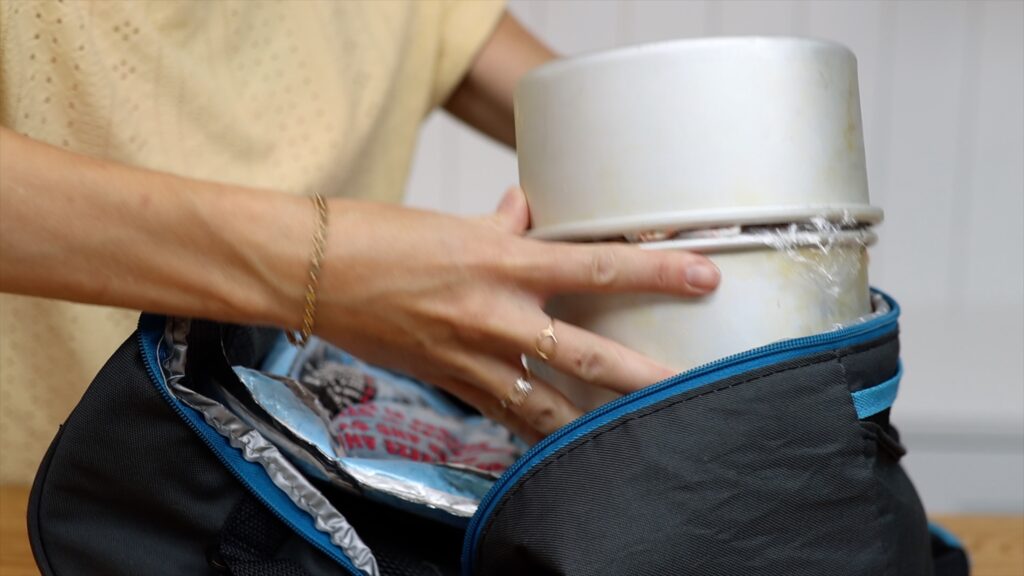
Put this into the freezer for up to 2 months, until you travel. Then put it into a cool box with an ice pack so that it thaws gradually while you travel. I’ve taken cakes like this on airplanes and cars across the country!
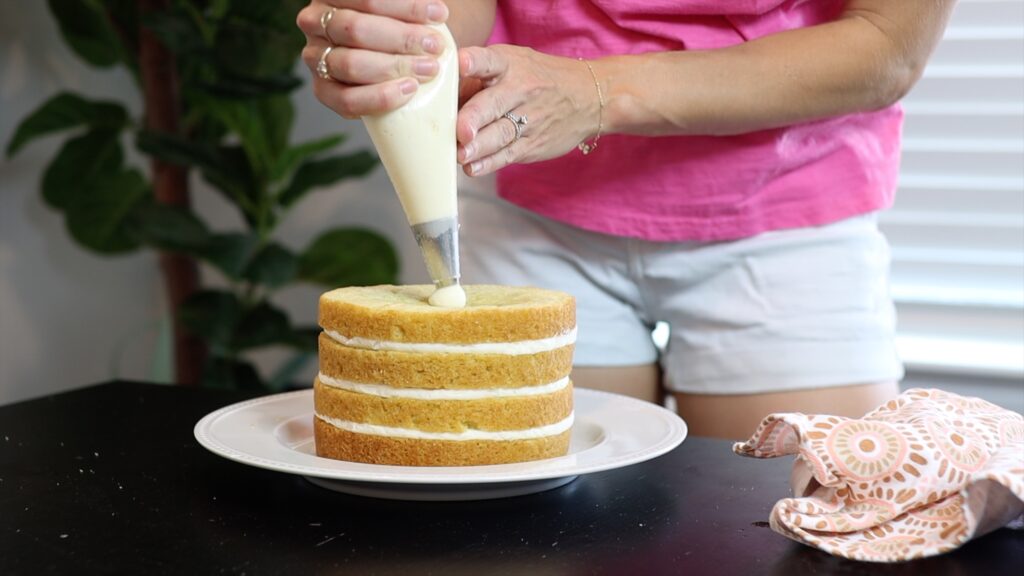
At your destination, take the cake out of the pans and put it on a plate. Now add any details you like using your piping bag.
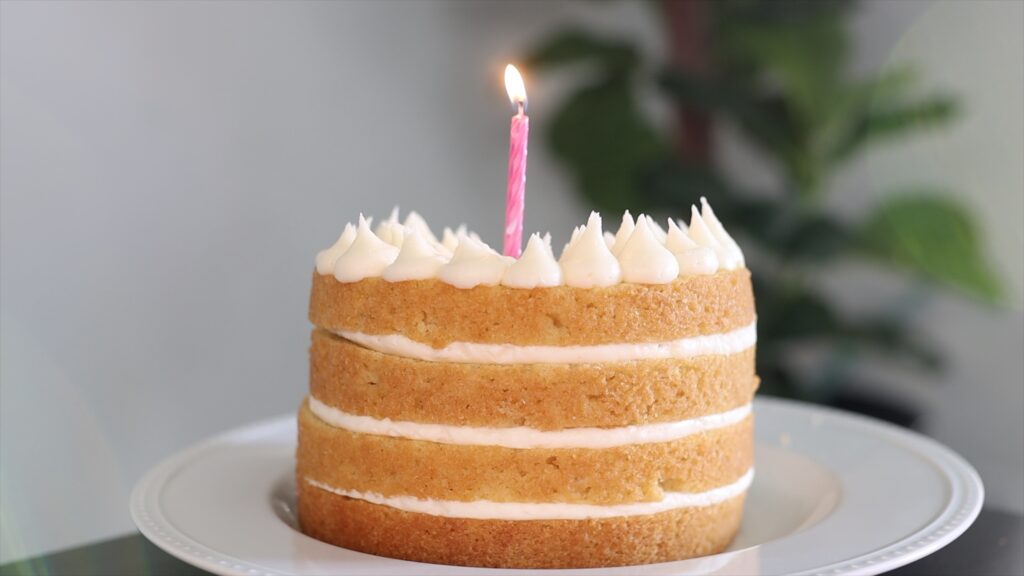
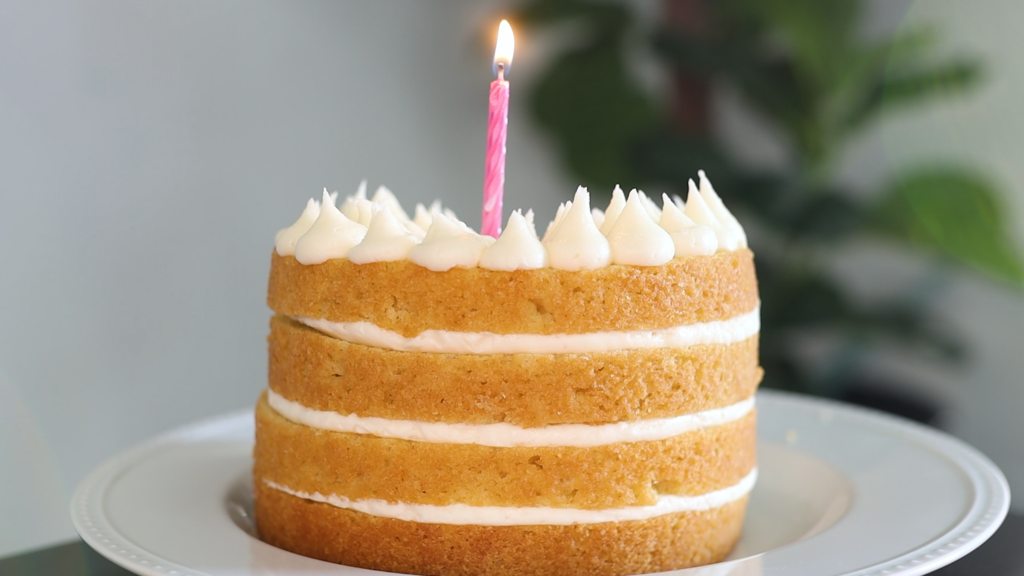
Add a candle and you have a very well-travelled birthday cake!
I hope you’ve seen some ideas you’d like to try! For more cake decorating designs and techniques visit my cake school.
You can also watch a video of this tutorial on 10 birthday cake ideas for everyone:
In this tutorial I'll show you how to travel with a cake and how to prepare that cake in advance. I'll also show you how to add finishing touches at your destination with minimal tools and effort. Travelling with a birthday cake is much easier than you might expect!
Baking a cake in your own kitchen is much more convenient than anywhere else. Also, doing this time consuming part in advance gets it out of the way before you travel. I've baked my Very Vanilla cake, scaling the recipe down to make two 6" rounds. After you bake your cake layers, turn them out onto a cooling rack and let them cool completely.
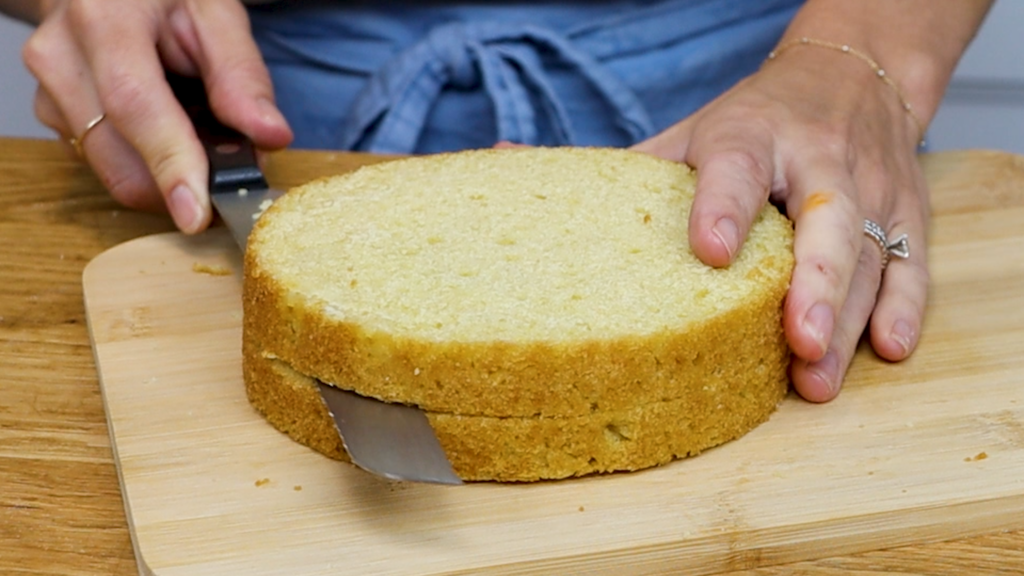
Level the tops of your cake if they're domed or if you don't want that caramelized crust. I'm dividing each cake layer in half across the middle using a serrated knife like a bread knife. This way I'll have four layers instead of two, which will give me more layers of filling as well.
Assemble your cake with whatever filling you've chosen. You can use buttercream like my 4 Minute Buttercream or anything else that's fine at room temperature for a few hours. I wouldn't use things like cream cheese frosting or lemon curd because those need to be refrigerated.
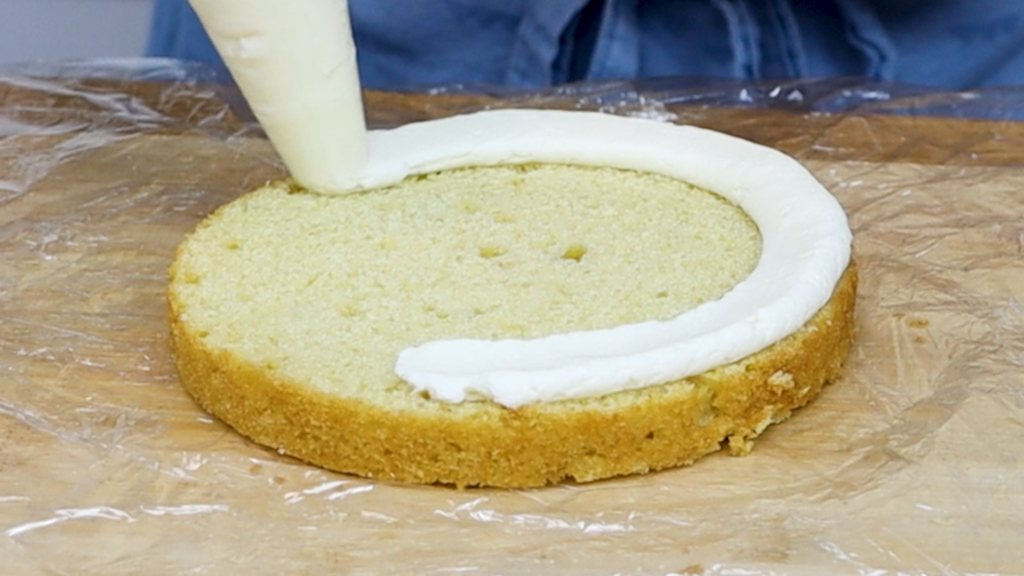
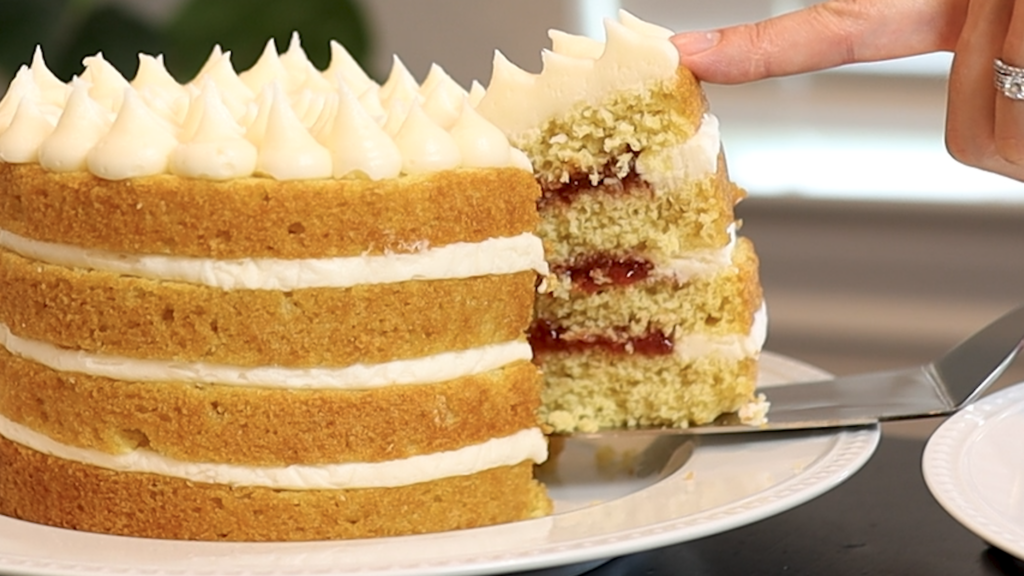
For any runny filling like this strawberry jam, pipe a dam first. A dam is a ring of buttercream around the outer edge of the cake that holds in your filling. After layering the cake, the weight of the upper layers won't push down on that filling and cause it to ooze out from between your cake layers.
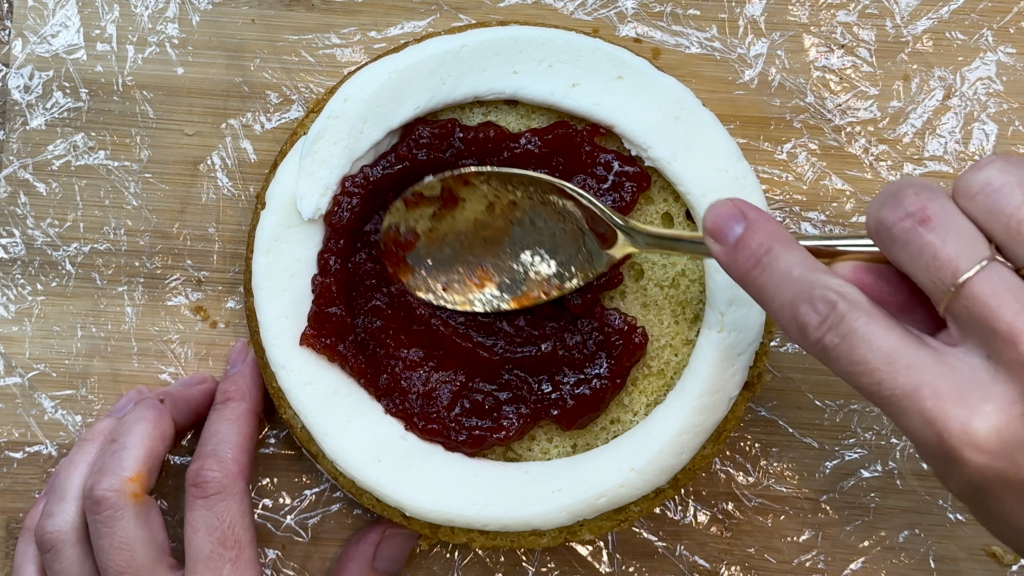
After assembling your cake, wrap the whole thing in cling film or Saran Wrap. Drop it down into one of the cake pans you used to bake the cake. It's fine if the cake sticks up above the top edge.
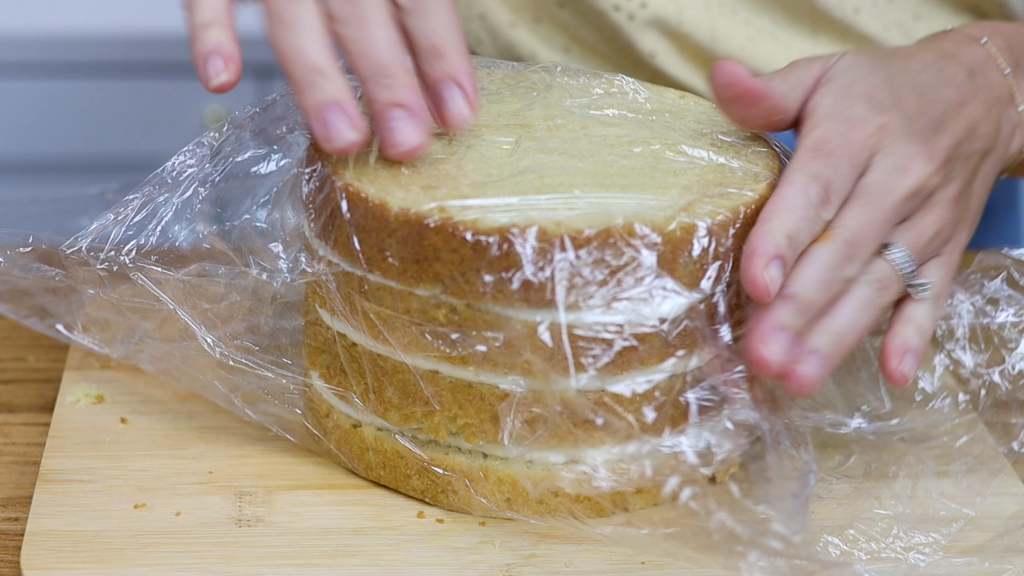
Turn your other cake pan over and put it over the top of the cake. This will protect it as you travel. If you want to take anything to decorate the cake at your destination, for example a piping bag of frosting ,put that on top of the cake before you lower on the top cake pan. Pad out any extra space with a kitchen towel so that the cake doesnt move around within the cake pans.
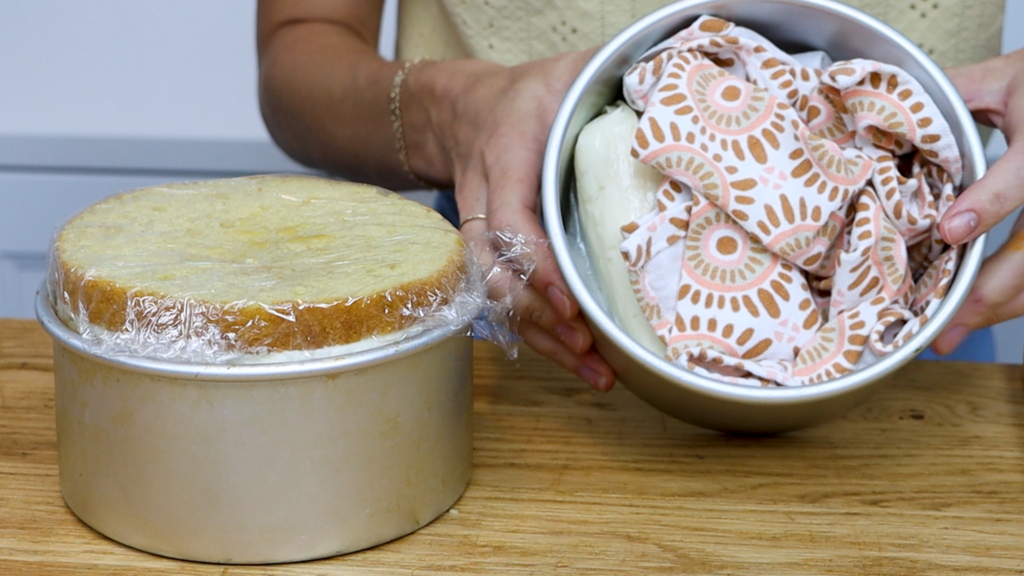
Now put the pans into the freezer until you travel. This will keep the cake fresh for up to two months so you can do this well in advance.
When you're ready to travel, put the cake (still within the cake pans) into a cool box with an ice pack. The cool box will prevent condensation getting over anything else in your suitcase or your car. It will also allow the cake to thaw gradually. By the time you get to your destination it will be ready to decorate and serve. You can take it in a car, on a boat, on a plane or on a train!
When you get to your destination the cool box will have allowed your cake to thaw gradually. It will be ready to add finishing touches and serve. At this point you can refrigerate it overnight if you like. Then unwrap the cling film or plastic wrap and put your cake onto a plate. If you've traveled with a piping bag of frosting, it will have also frozen and then thawed by the time you get to your destination. Now you can add some simple piping to the top of the cake to make it look a bit more elegant. I'm using a large round 1A tip to pipe these peaks on top.
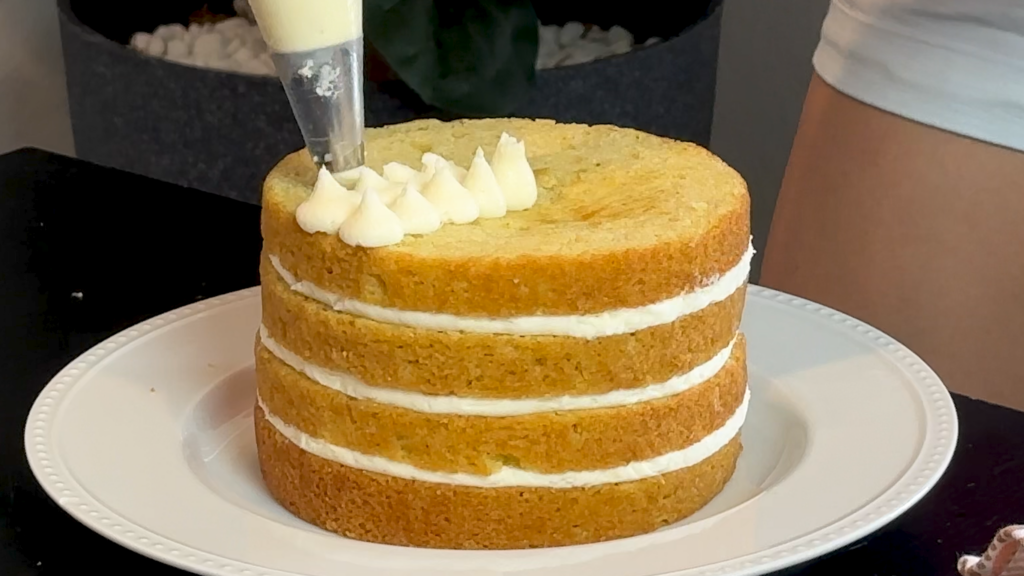
You could scatter some sprinkles on top or add berries, fresh fruit or flowers. If you want to frost the sides of your cake, check out this tutorial on how to get smooth frosting using no tools: no cake comb, no
For more cake decorating techniques and designs, visit my cake school!
You can also watch a video of this tutorial on how to travel with a cake:
There are so many ways to make wafer paper cake decorations if you know a few tricks! In this tutorial I'll show you how to shape wafer paper, how to colour it and how to attach it to cakes.
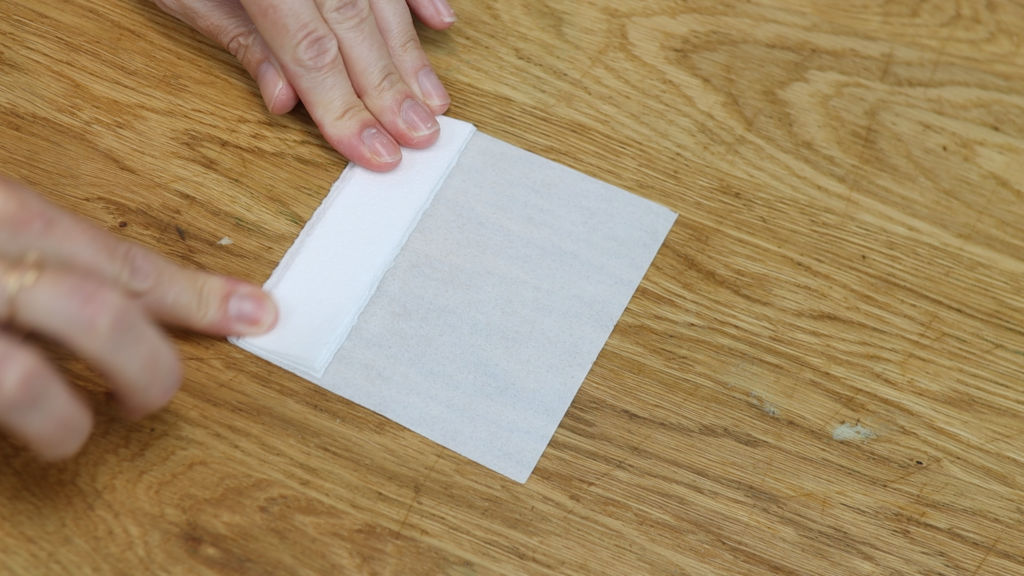
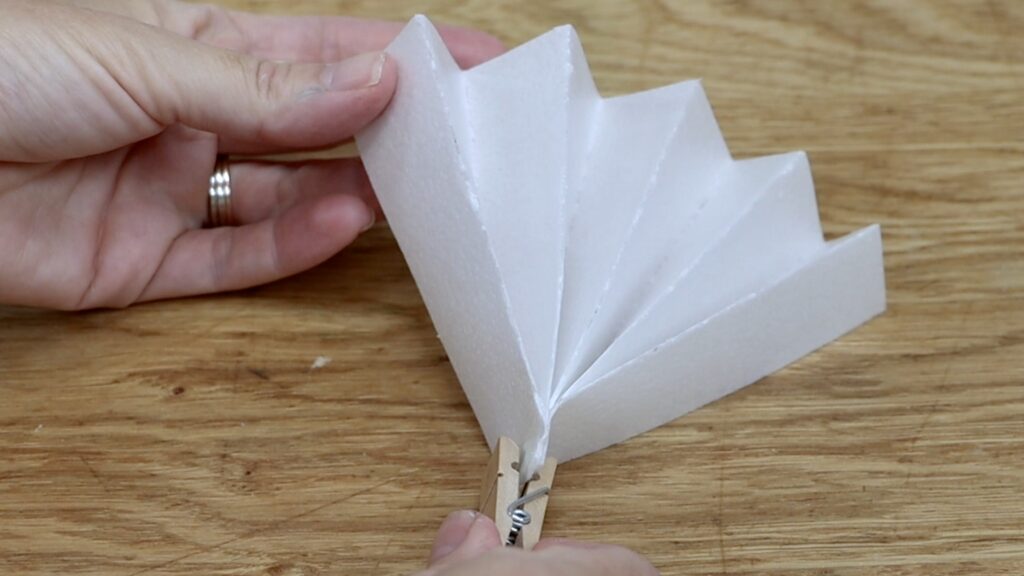
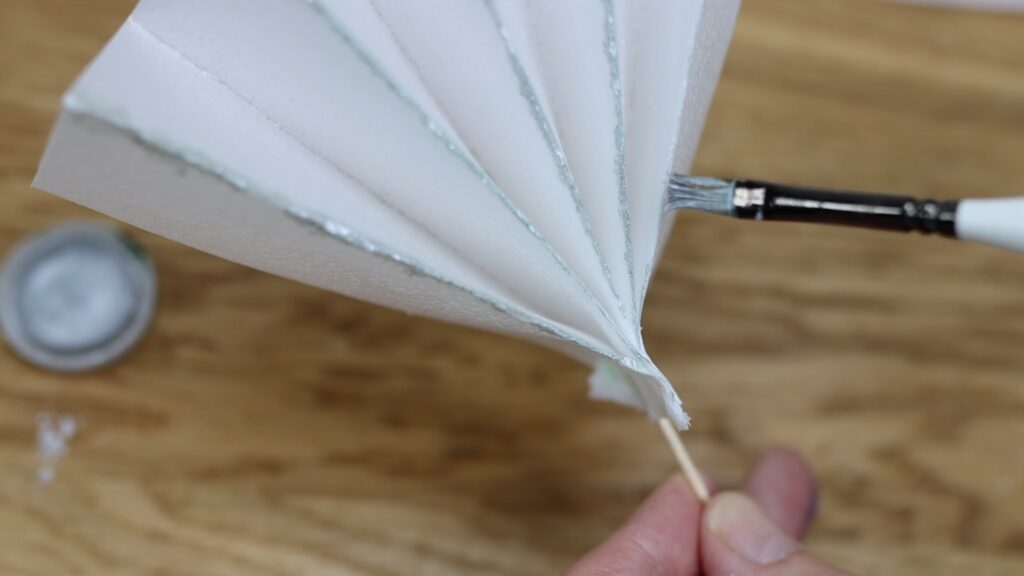
You can shape wafer paper by folding it, cutting it, or molding it. To fold it, use elaborate origami techniques or try something simple. For a fan, fold it back and forth in an accordion style.
To attach the base of the fan, brush it with water to make the wafer paper sticky. Then pinch it together or clip it with a clothes peg and leave it to dry for about an hour.
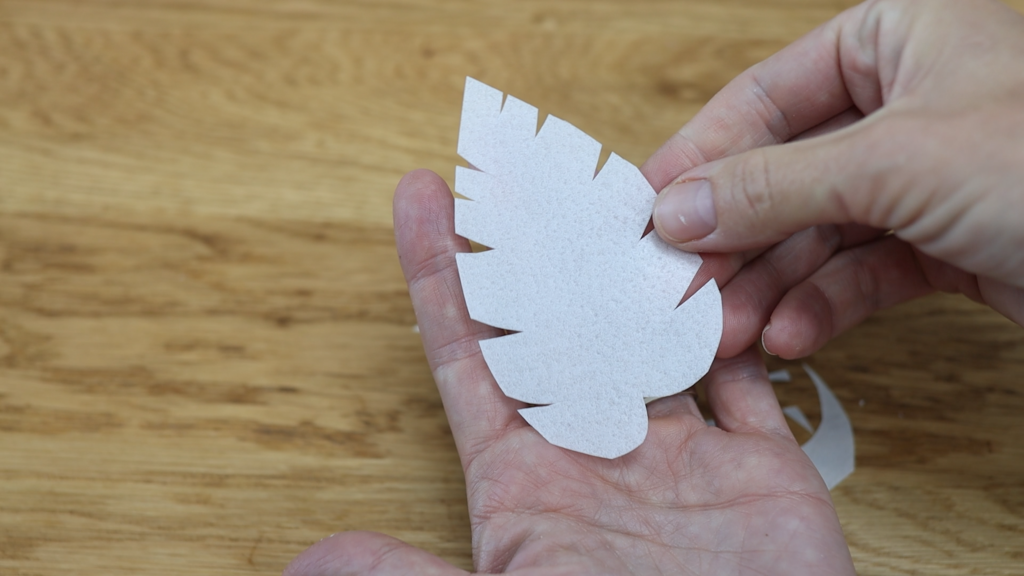
Alternatively, cut wafer paper into whatever shape you like. I'm cutting out some simple leaves here or you can make flowers by cutting out each petal individually.
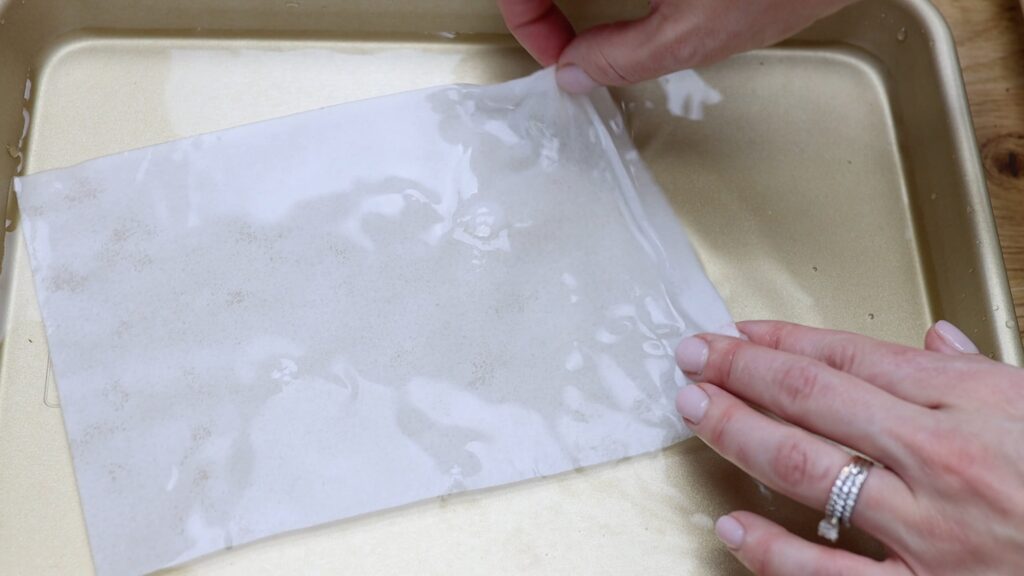
For really fun, artistic results you can mold or drape wafer paper into sails. Dip the paper into a tray of water, letting it sit there for about 30 seconds to get very supple. Then lift it up and put it onto a non-stick surface like parchment paper or a silicon mat.
You can manipulate it by twisting it with your fingers to shape it. Leave it to dry overnight to set the shape.
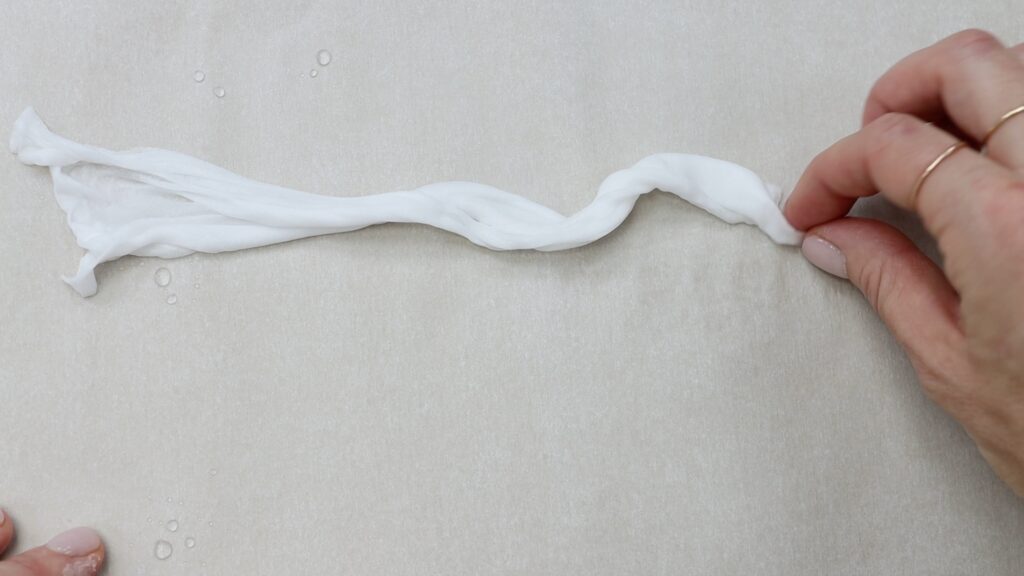
There are lots of different ways to colour wafer paper using gel colours. These are the ones that you would use to tint your buttercream. For sails, add gel colour to the water before you dip the wafer paper into it. The colour will look different in the tray of water compared to the final colour on your wafer paper. The benefit of colouring your wafer paper this way is that you'll get perfectly even coverage all over.
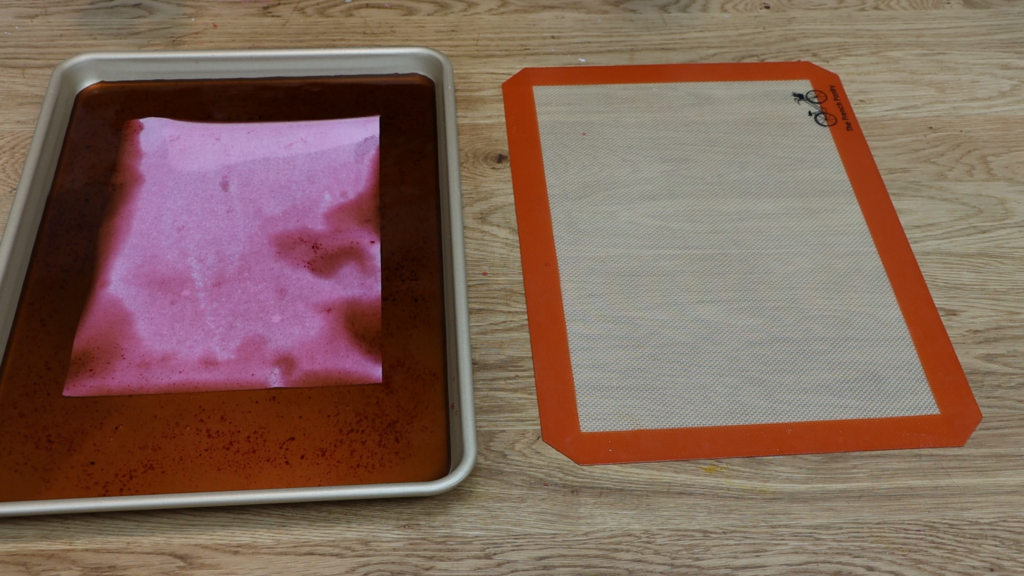
You can also paint colour onto your wafer paper. The most affordable way of doing this is by mixing a gel with either water or alcohol. However, this is not ideal because the gel tends to clump within the water so it's doesn't provide even coverage. The wafer paper will be brittle so it's likely to snap while you paint or move it.
To prevent snapping and to make a more even colour, mix the gel with glycerin. This will make a much thicker paint which you can brush onto your shapes but it won't absorb very well. The colour will sit on top of the wafer paper rather than sinking in.
For the best results use both glycerin and either water or alcohol. This will make the wafer paper very supple so it doesn't snap and you'll get a beautiful coverage of colour. The benefit of alcohol over water is that it evaporates more quickly so your shape will dry more quickly.
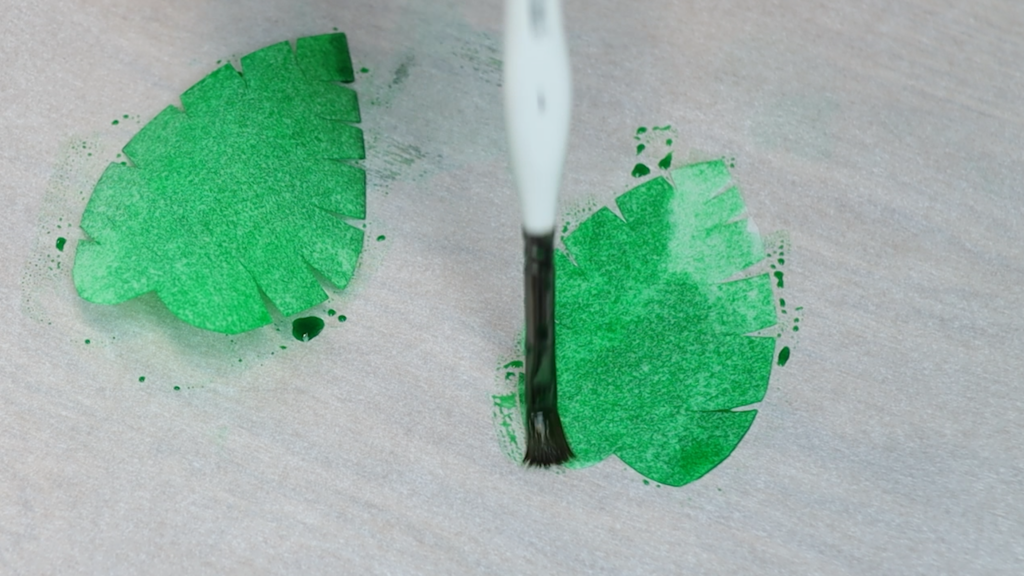
Instead of painting onto your shape after cutting it out, you can paint the wafer paper before shaping it. This is navy gel colour with glycerin and vodka:
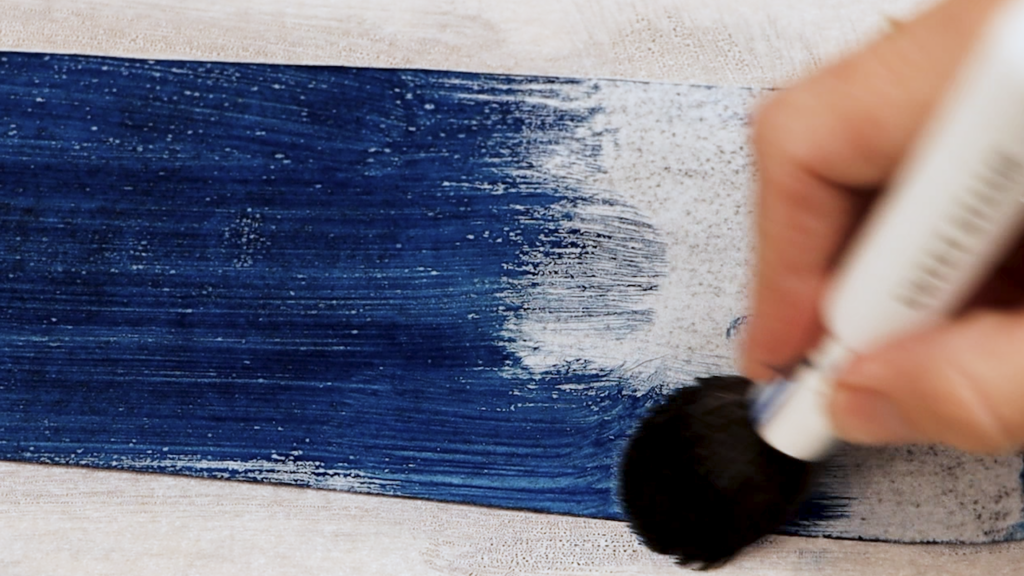
Brushing back and forth over the wafer paper gives fairly consistent coverage. Brush both sides of the wafer paper if both sides will be visible on your decoration. If you notice it gets quite sticky you can use cornstarch to take that away. A powder brush is best for this to spread the cornstarch evenly without leaving big clumps on the paper. To make wafer paper to be shimmery or glittery, use luster dust or disco dust or edible glitter. Brush it onto the sheet also using a wide powder brush for even coverage.
For metallics, mix a luster dust like gold or silver with alcohol. Instead of alcohol you can use a clear extract like lemon extract or clear vanilla extract. If you use too much liquid the paint won't be bold so aim for a thin paste consistency. Dip a thin paintbrush into it and then paint onto your wafer paper. For metallic accents paint along creases or around the edges.
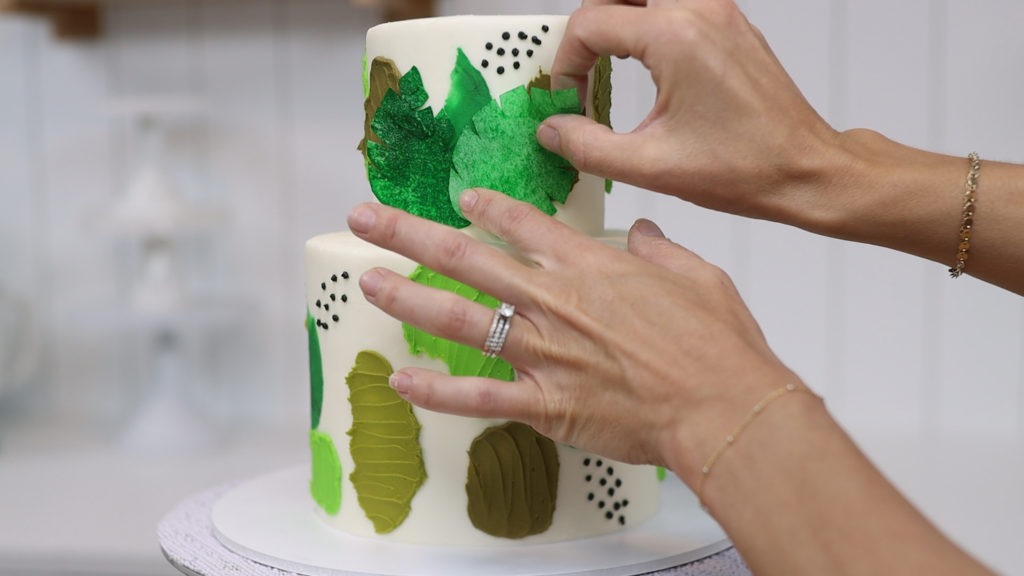
How do you attach wafer paper to cakes? If the frosting on your cake has set, push the wafer paper decorations firmly into the frosting. This works for flexible decorations like ones that have been painted with glycerin.
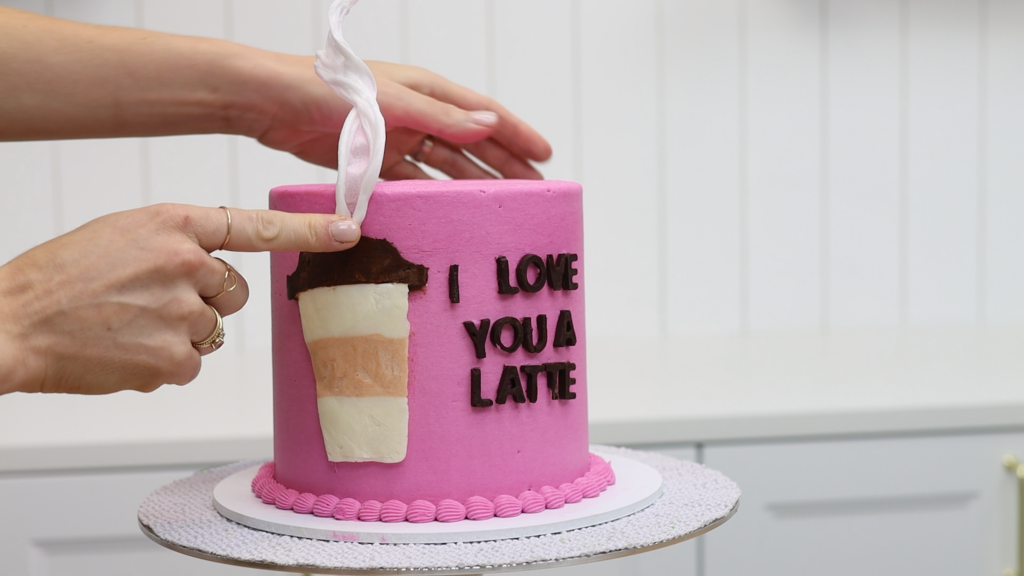
It also works for very firm decorations that have been soaked in water and dried to become hard. The wafer paper steam for this latte attaches to the firm frosting with gentle pressure.
If the decorations don't stick because the frosting has set, spread some fresh frosting as glue to attach them.
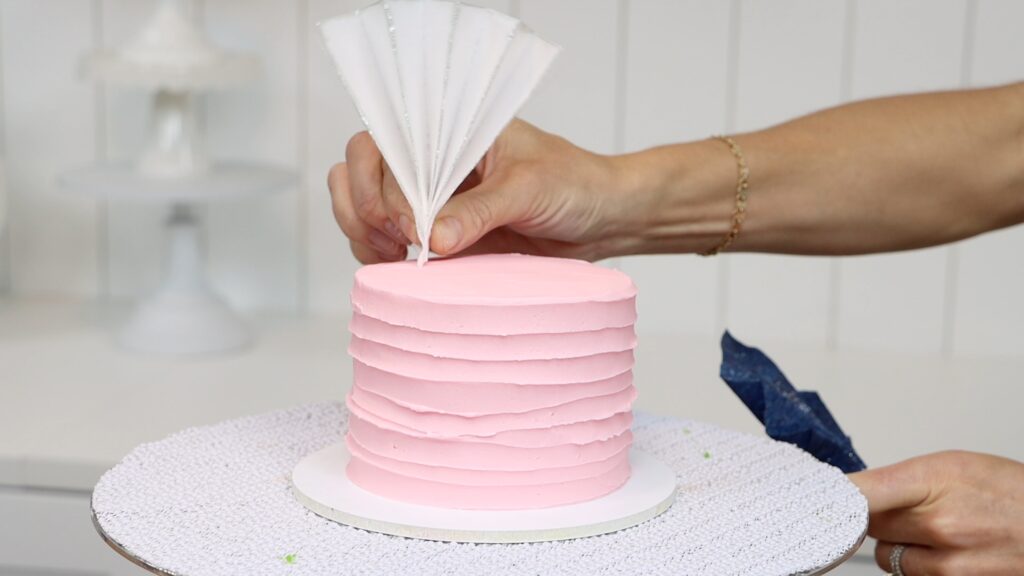
You can also attach wafer paper decorations so that they stick out from a cake for a gravity defying effect! Poke a toothpick into the decoration while the wafer paper is sticky. For sails, place the toothpick after dipping the wafer paper, while shaping it.
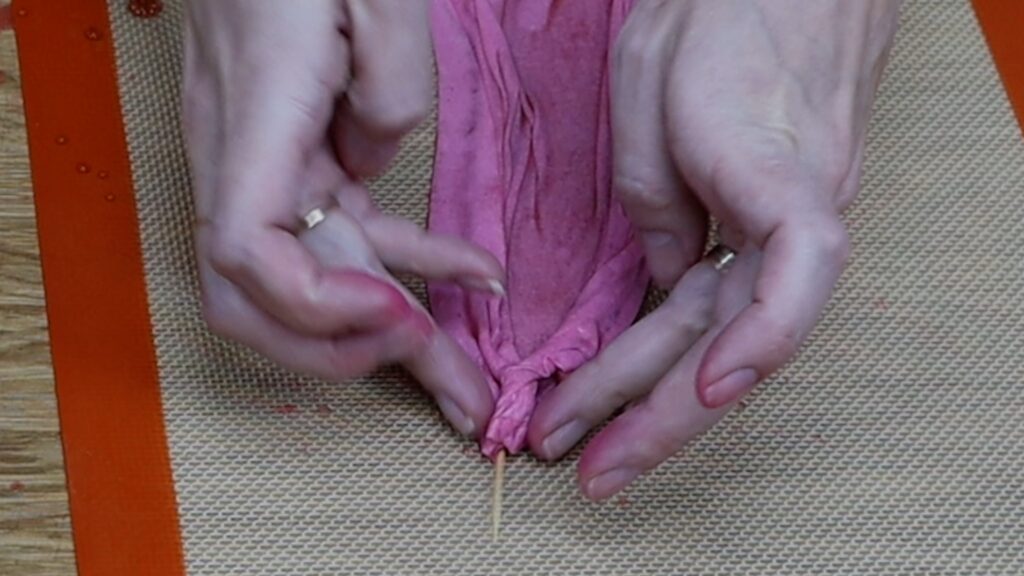
For folded wafer paper decorations, use water to make the wafer paper sticky and push a toothpick into that crease.
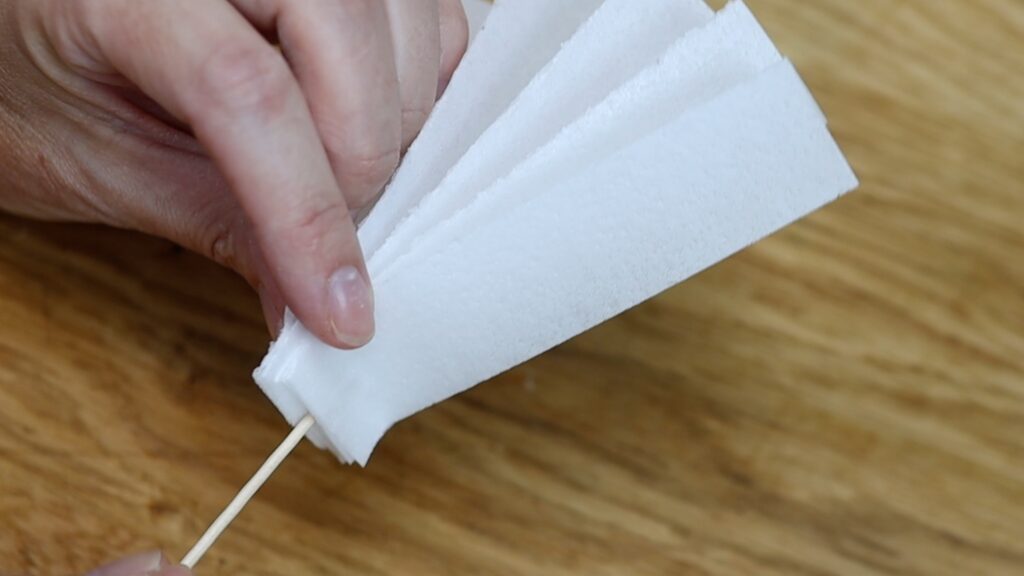
When the wafer paper dries, the toothpick will be held in place. Then poke the toothpick into your cake to attach your decoration.
I hope this tutorial has been useful! Visit my cake school to learn hundreds of cake decorating techniques and designs!
You can also watch a video of this tutorial on wafer paper cake decorating:
No
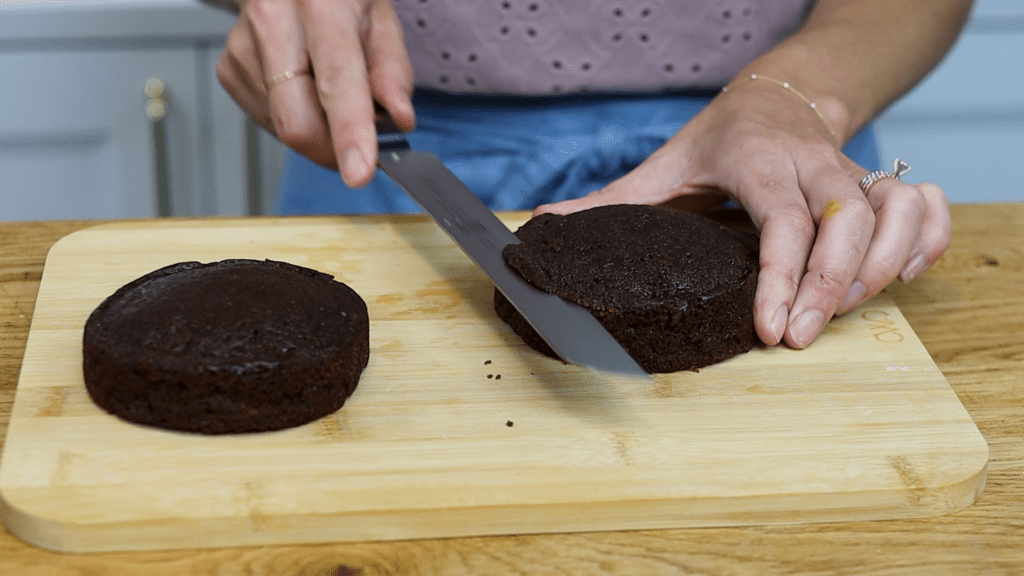
It's best to use cold cake layers because they're less crumbly and wobbly. I wrapped my Perfect Chocolate Cake layers in plastic wrap and put them in the fridge for an hour. Use a serrated knife like a bread knife to trim off any domed tops. This makes the cake level, which will help you make a straight cake that doesn't lean to one side.
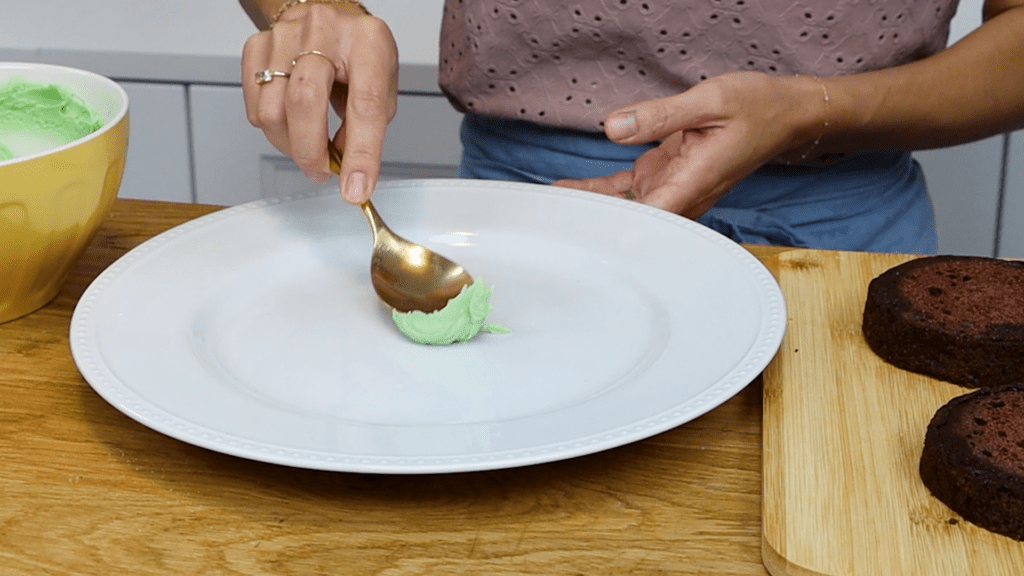
Now you'll need a plate. To attach the first cake, spoon some buttercream onto the middle of the plate. This will act as glue to secure the cake and hold it still. You can use any filling and frosting for this. This is my 4 Minute Buttercream and I've used gel colours to tint it to make a soft green.
Then add your filling with a spoon or a palette knife or
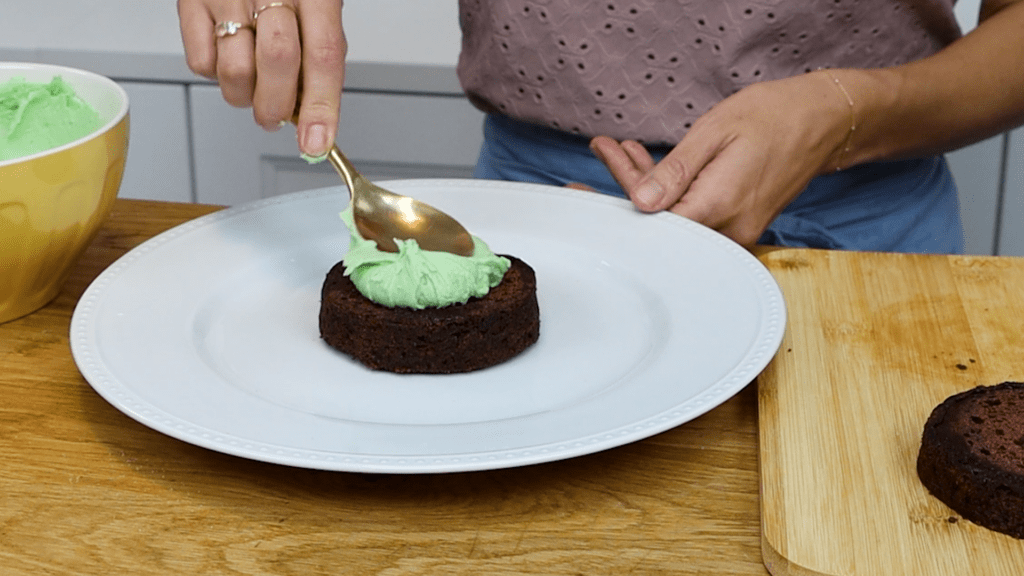
Then put your next cake layer on top. If you have more cake layers, repeat with more filling and more cake. Make sure each cake is centered on top of the cake layer below so that the sides of the cake are straight.
Now use a spoon or knife to put more buttercream on the cake and to spread it around. The best way to do this is to use little arc motions, swiping in circles around the cake. This will spread the buttercream without pulling crumbs off the cake. Using cold cake really minimizes how many crumbs come off the cake as well, compared to trying to frost a cake at room temperature. Your goal here is to completely cover the cake with frosting so you can't see any of the cake sticking out. It doesn't matter how neat this is now because smoothing comes next.
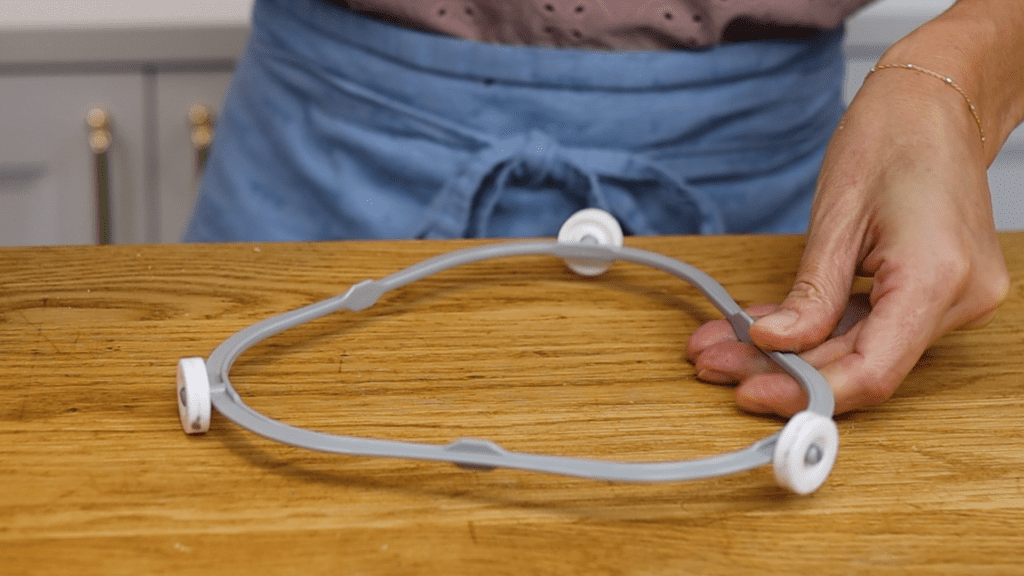
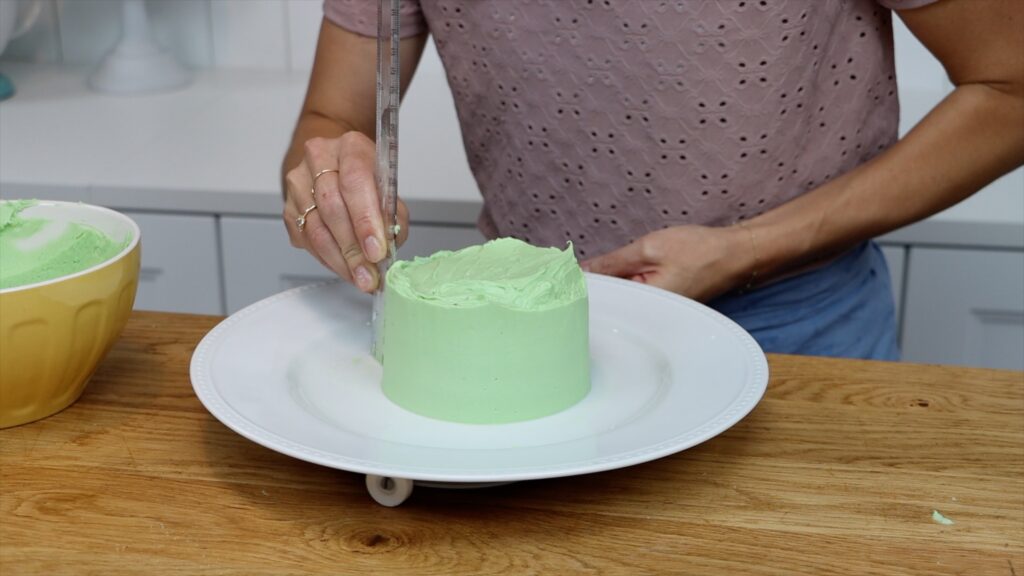
Here's a really useful hack: use the wheel from your microwave as a
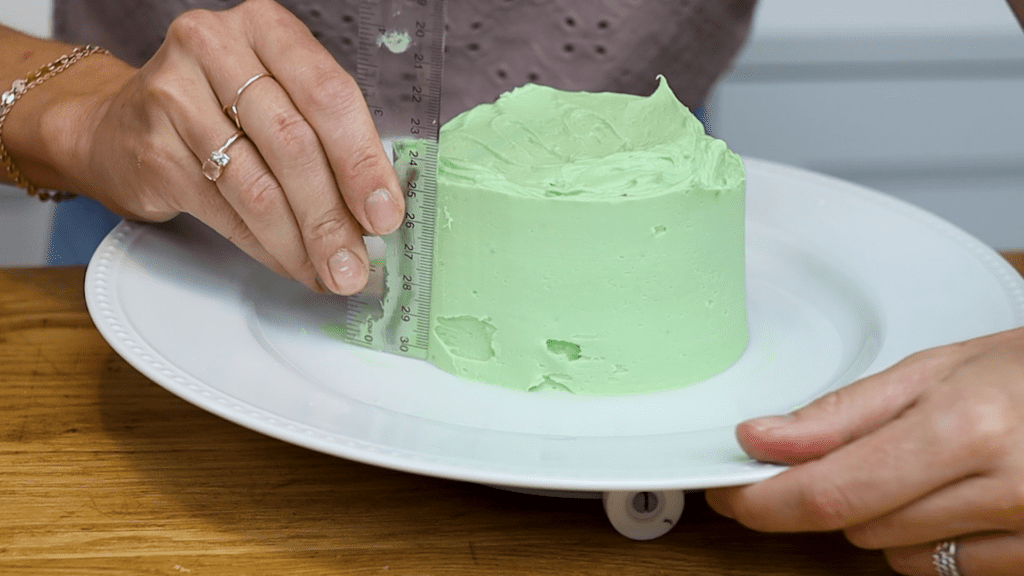
Pull the ruler away, wipe the buttercream off it into your bowl and then do this again and again. THe frosting will get smoother and smoother.
When you choose your plate, choose one with enough room to fit your ruler next to the cake before the plate starts to slant upwards.
If there are any big gaps or indents in the frosting, spread some more buttercream over them. Then scrape over that part of the cake with your ruler.
For the top edge, swipe sideways with your ruler to push that buttercream that's sticking up over the top edge and lift it away on your ruler. Scrape it into your bowl, wipe the ruler clean and repeat all around the top edge of the cake.
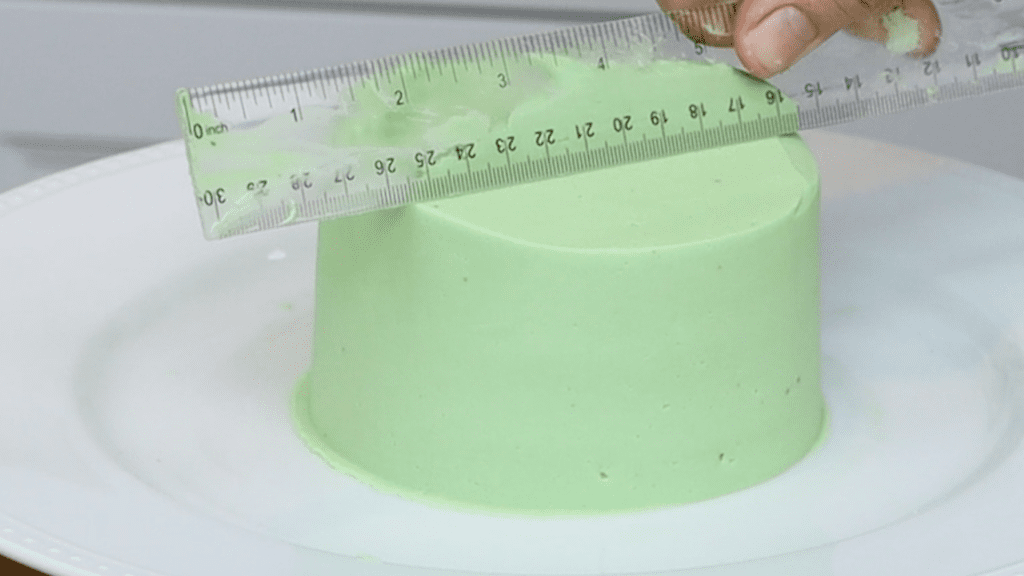
Pushing sideways only, not down will give you sharp edges without creating a bulge in the side of the frosting.
Wrap your finger in a towel or paper towel and wipe the plate around the edges of the cake to take off any buttercream smudges.
Here are some quick decorating ideas that don't require any fancy tools.
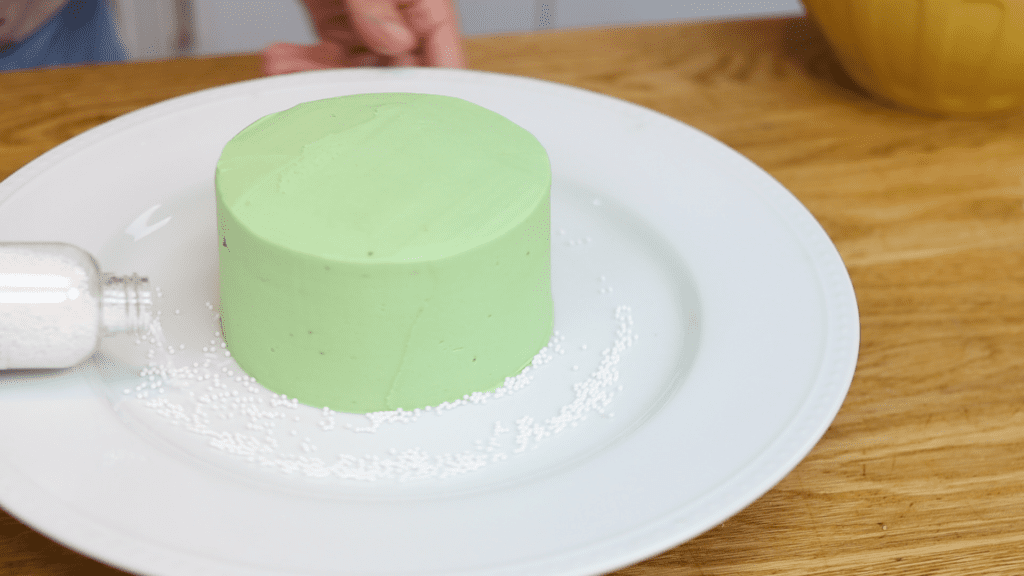
Pour sprinkles onto the plate and push them into the bottom of the frosting. Before the frosting sets it's still sticky so the sprinkles will attach easily. You'll make a pretty border around the bottom of the cake. Then pour the extra sprinkles off the plate and into a bowl or the jar or bottle or wherever.
To make a custom cake topper, measure a paper straw a centimeter or half an inch taller than the cake. Cut it there. Draw a design or a letter or a number and place a piece of parchment or wax paper on top of the drawing. Trace over it with melted chocolate, which is easiest to melt in a microwave at 60% power for 30 seconds at a time so that you don't overheat it. Spoon the melted chocolate into a sandwich bag and push it down to one of the bottom borders. Cut a little piece off that corner and then follow the outline of the shape through the parchment paper.
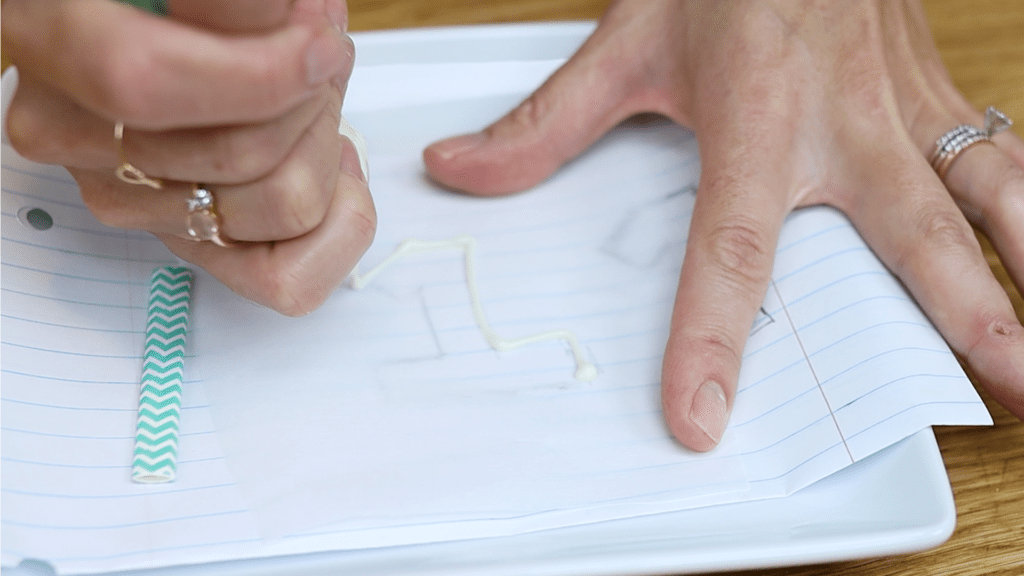
Fill it in with zig zags to cover the shape and then smooth the chocolate with a toothpick. Press your paper straw into the bottom and cover that with chocolate, too. Then pour sprinkles over the top. Press them gently into the chocolate to attach them.
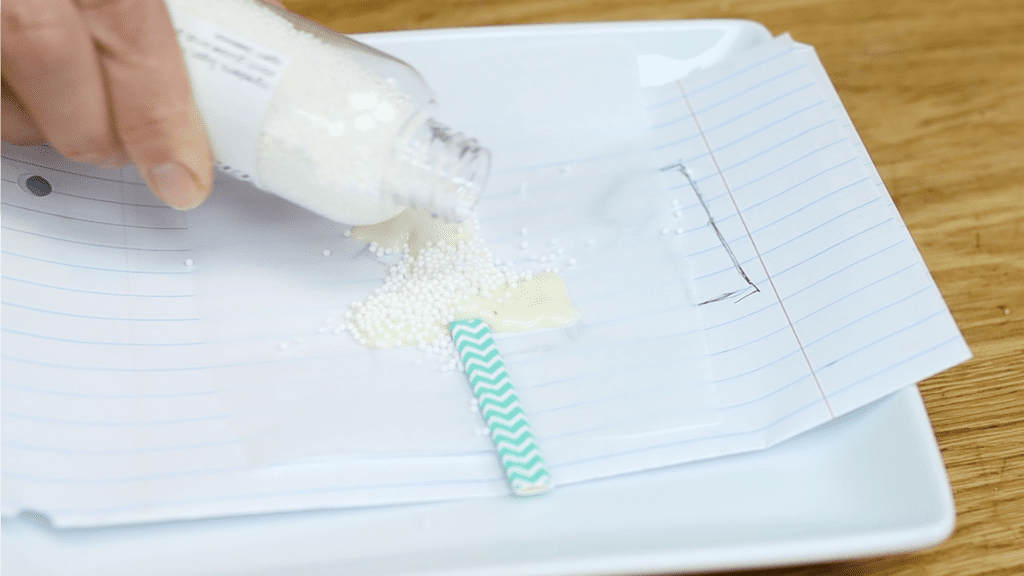
Leave the chocolate to set or put it into the freezer for five minutes. Lift the chocolate up and now you have a homemade cake topper! You can brush this with edible glitter or luster dust if you like. Push a plain straw into your cake to make a hole and then pull it out. Now when you push your cake topper in you'll need minimal pressure so you won't snap the chocolate as you push.
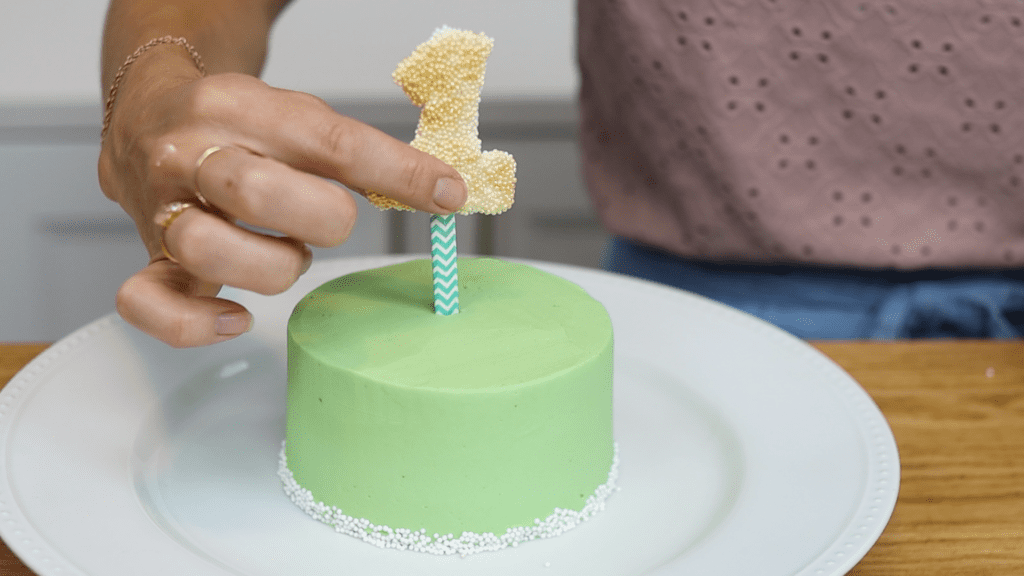
Tadaa! A simple cake that's pretty enough for any occasion and only takes a few minutes to make!
I hope this tutorial has been useful. Visit my cake school to learn hundreds of cake decorating techniques and designs! You can also watch a video of this tutorial on how to frost a cake without tools:
Stop buying expensive cake tools, reduce your waste, save time cake decorating and have more fun doing it with these game-changing DIY cake hacks!
No couplers? No problem! Colourful patterns don't require lots of piping tips or couplers with this DIY cake hack. Colour your frosting and put each colour in a piping bag with no piping tip. Put a piping tip into another piping bag and then drop different colour bags inside that one.
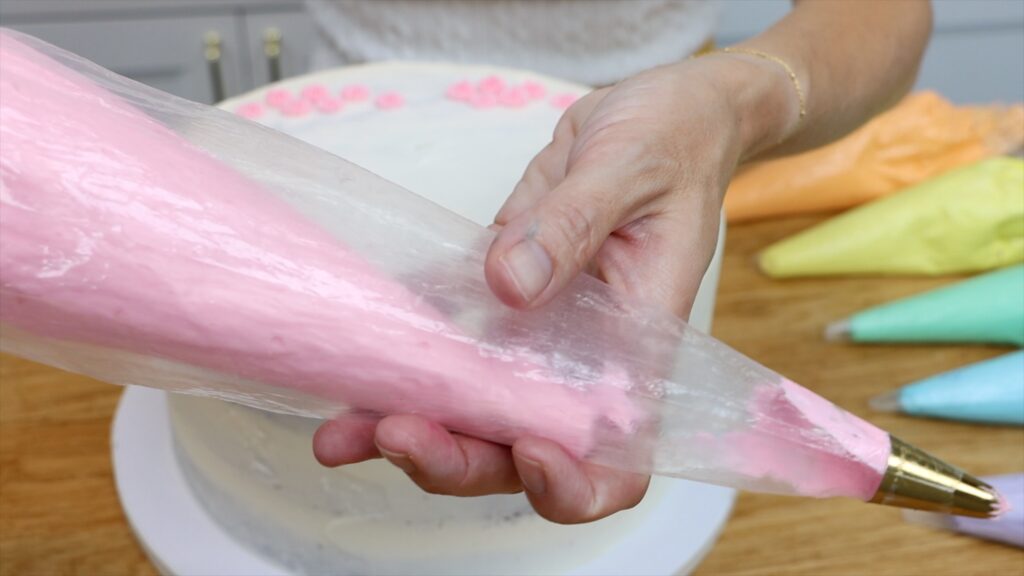
After using each colour, pull the coloured bag out of the bag with the tip. Drop another colour in and squeeze the frosting into a bowl. Stop when you get the last of the old colour out and only the new colour comes through.
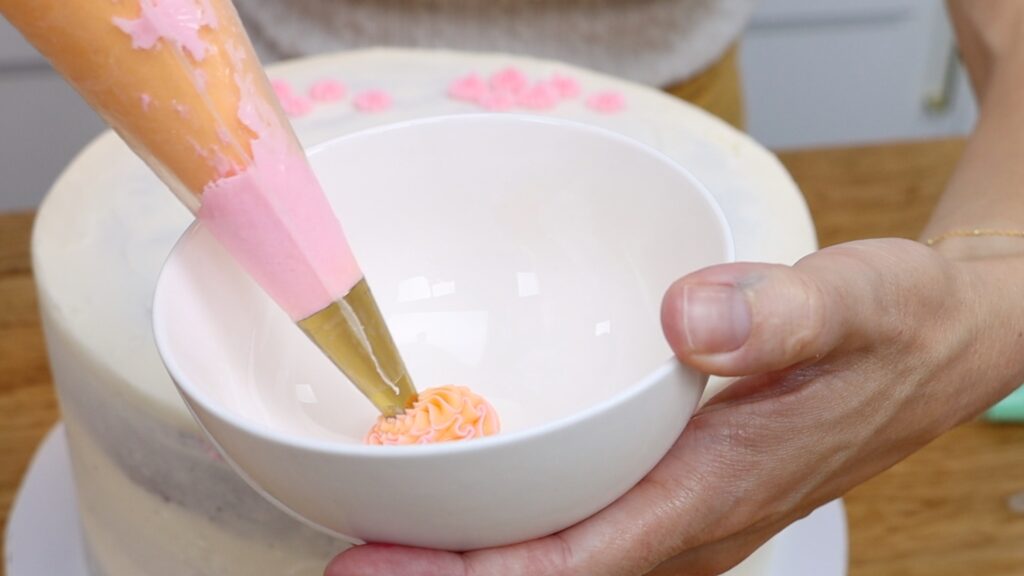
Pipe, pull the bag out, put the next bag in, squeeze and repeat! With this method you can make colourful patterns quickly without having to wash piping tips and piping bags in between.
Instead of buying expensive stencils that you might never use again, make your own! Cut a piece of parchment or baking paper or wax paper that wraps snugly around your cake.
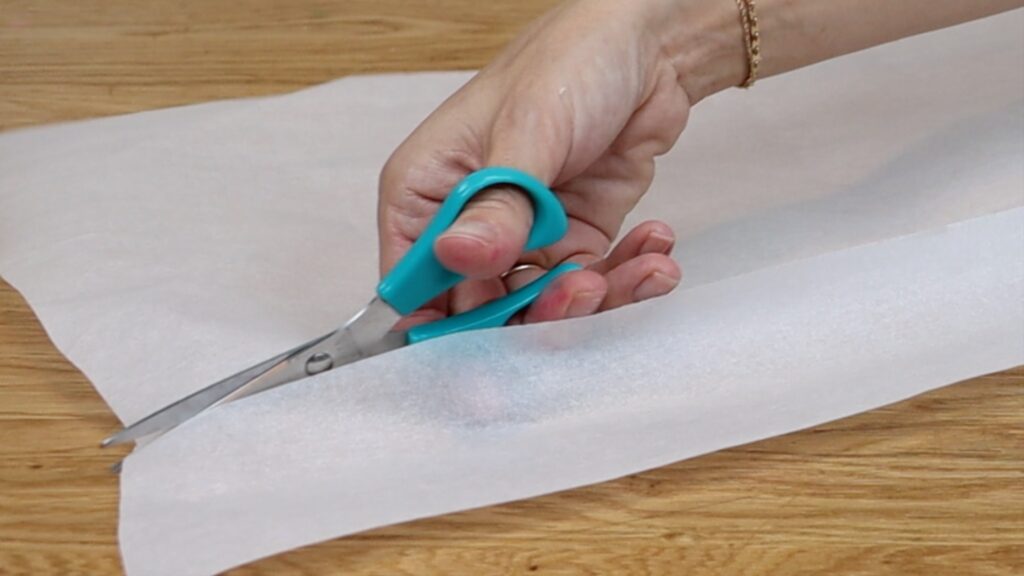
Then cut it into the shape you want. For zigzags fold in half again and again and again and then cut diagonally up from one of the corners.
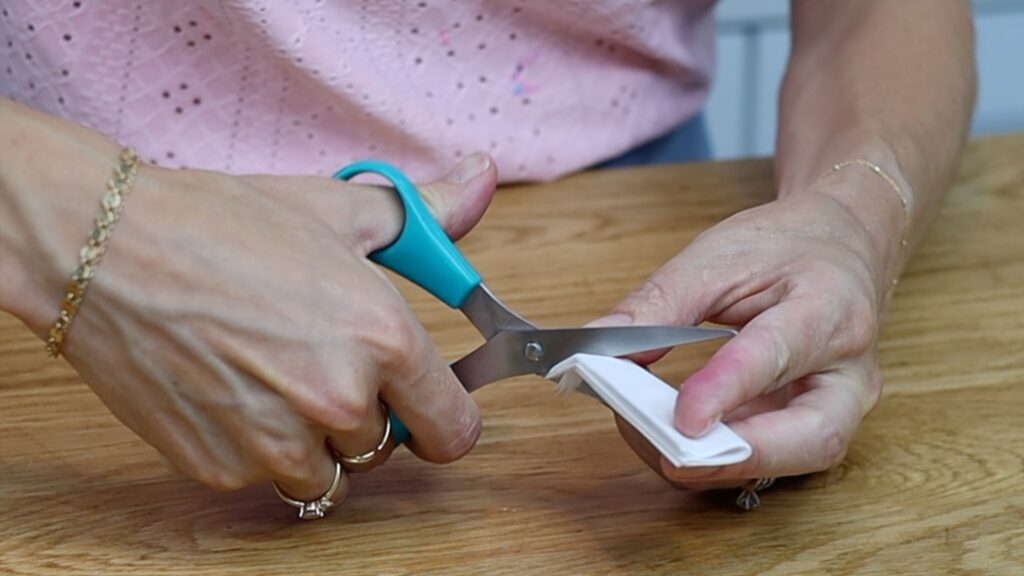
Unfold and voila! A symmetrical stencil that took just a few seconds to DIY. Wrap this tightly around your cake after the frosting has set, which takes about an hour in the fridge.
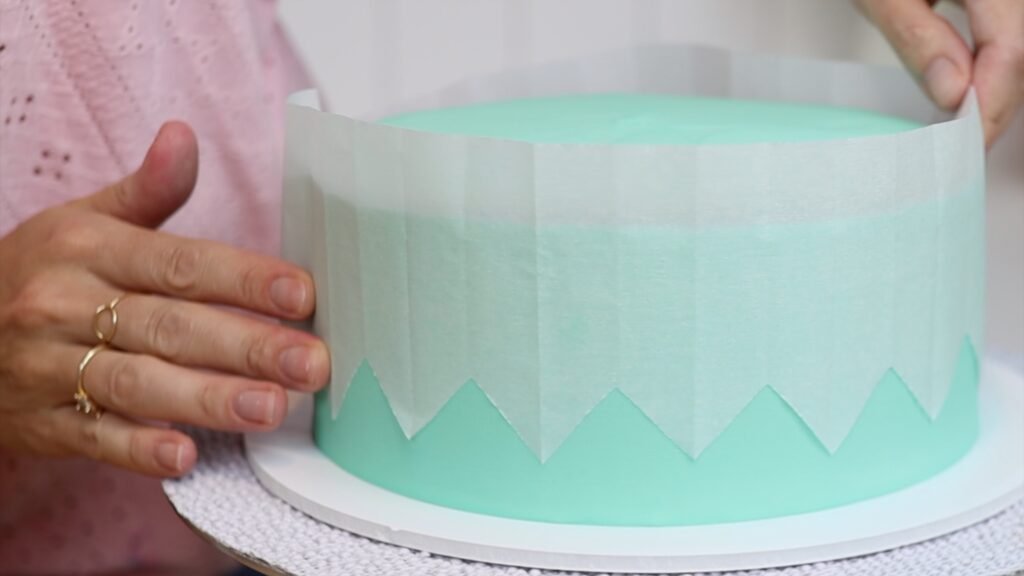
Spread frosting over the cake that's exposed below the stencil, scraping over it with an
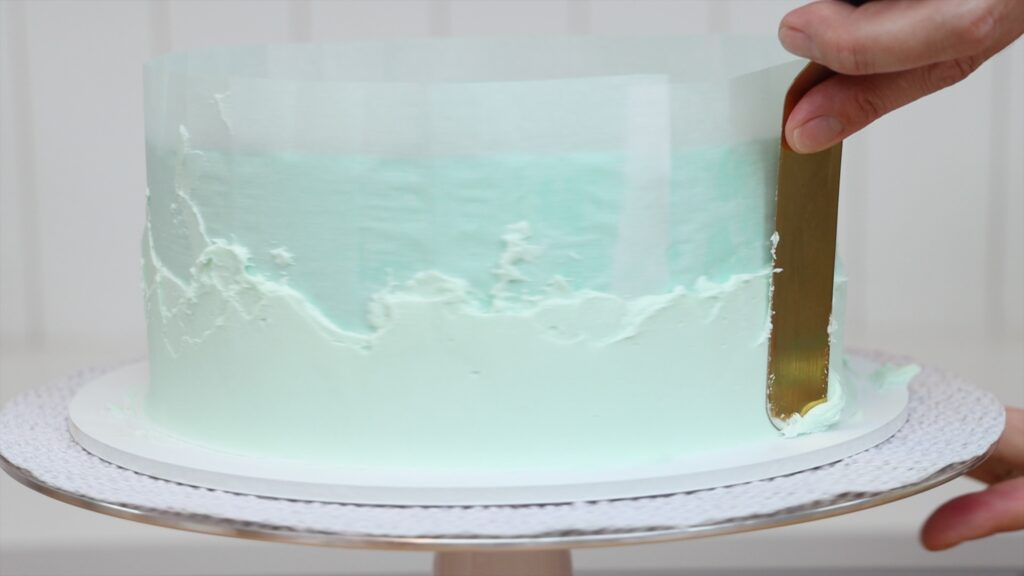
Peel the stencil off to reveal your pretty cake design! This is one of the cakes in my tutorial on 8 ways to decorate cakes without fancy tools.
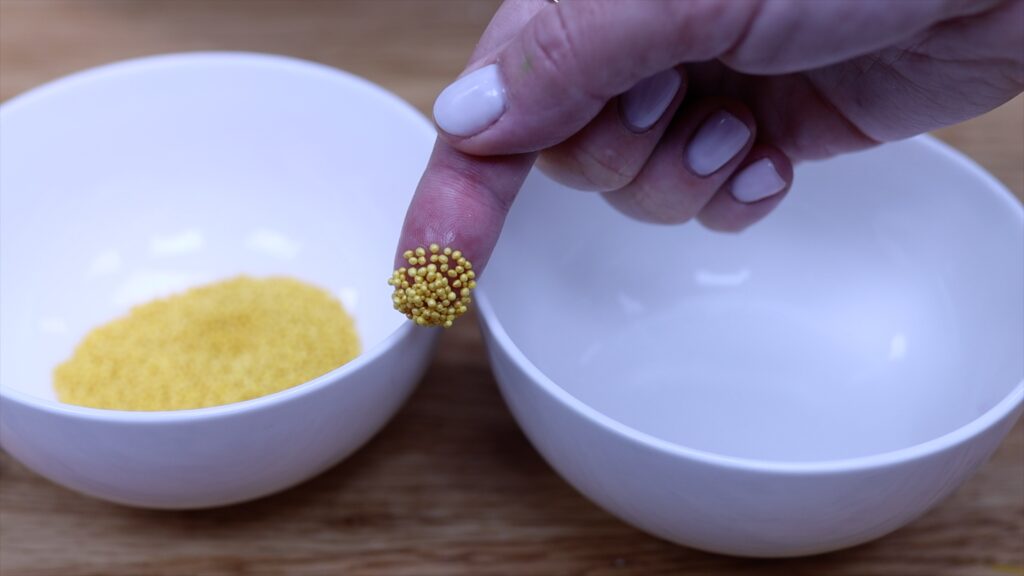
You can buy sprinkle pens to attach sprinkles to a cake but using water is quicker and just as easy. Dip your finger into a bowl of water and press it into the sprinkles and they'll stick to your finger.
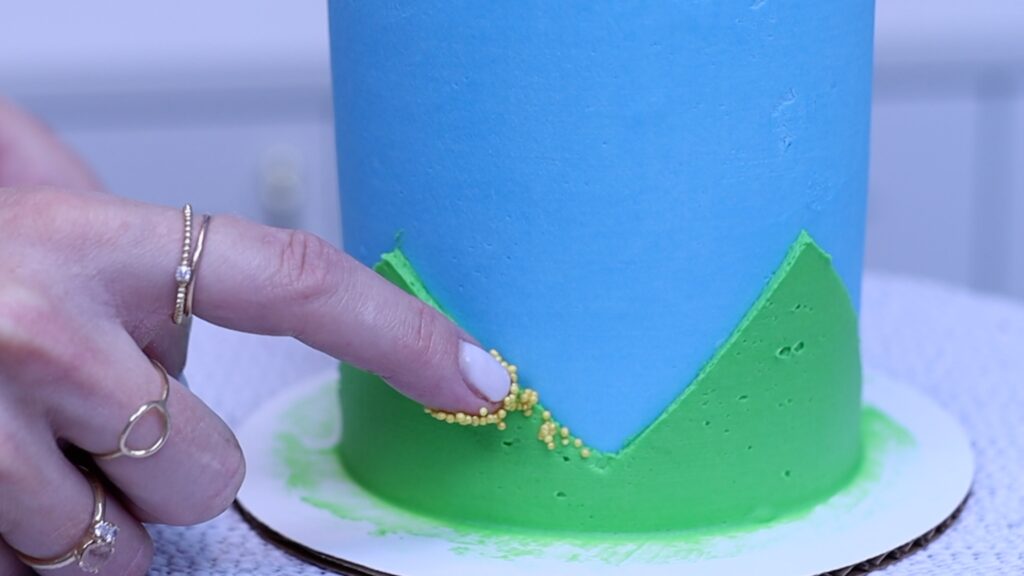
Then press your finger against a frosted cake and the sprinkles will stick to the cake instead. You can do this immediately after frosting a cake while it's still sticky and easy for the sprinkles to attach. Alternatively, chill the cake first. You'll need a bit more pressure to transfer the sprinkles but it's safer this way because the frosting is firm so you won't damage it.
You can buy icing or frosting that's pre-made but to make your own only takes four minutes with my 4 Minute Buttercream recipe. Make a double batch and you'll have leftovers, which you can freeze in a tupperware or Ziploc bag in the freezer for up to two months. This makes it just as quick and easy to use your own buttercream as buying it!
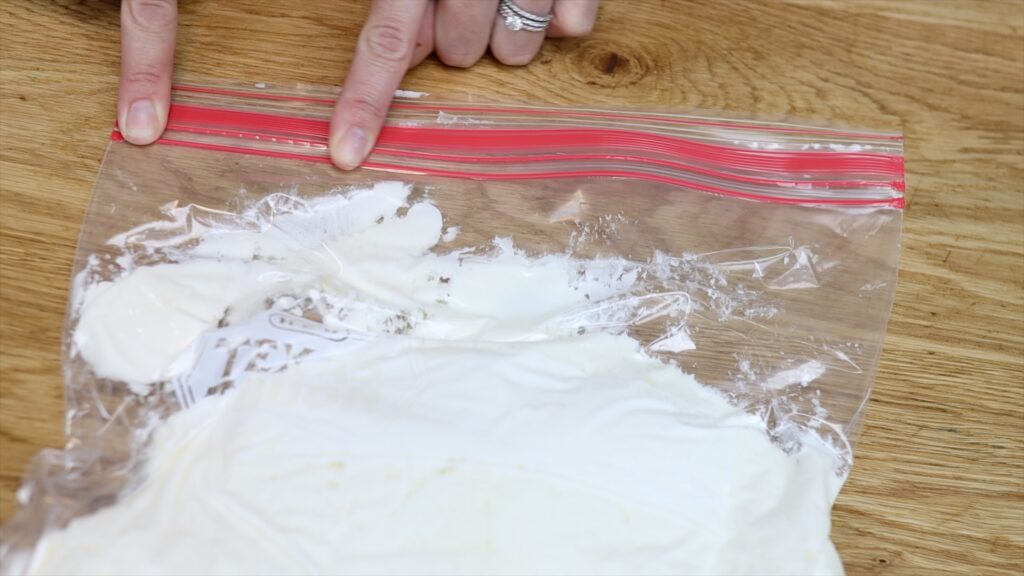
Take the buttercream out of the freezer the night before you need it. It will thaw overnight and be soft and creamy the next day. If it's in a Ziploc bag you can cut a corner off and squeeze it into a bowl easily. Then re-colour for another cake!
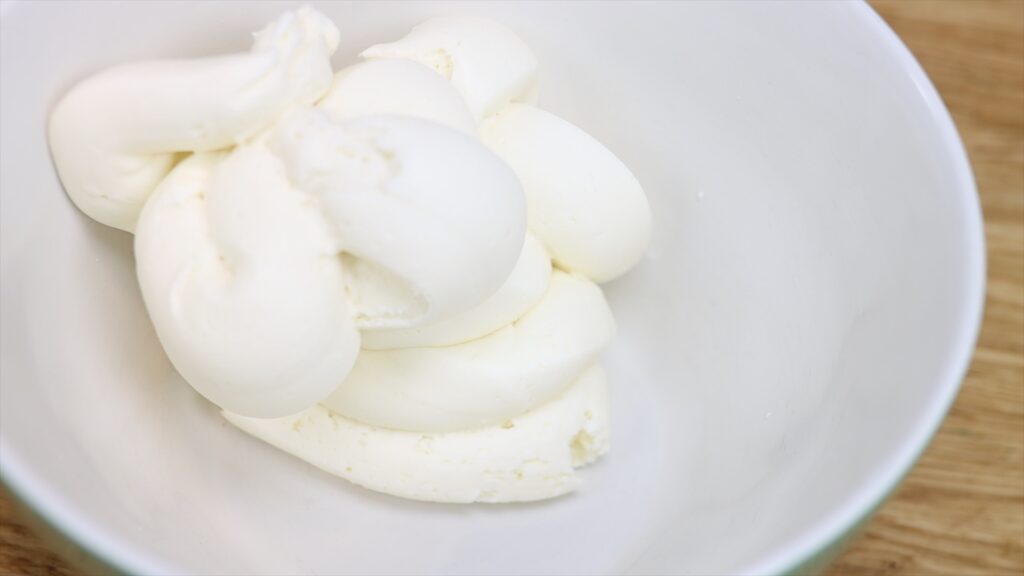
For a DIY cheat hack for smooth frosting that's quicker and easier than using a Profroster or acrylic discs or fondant, use a hot metal cake comb. Hold the edge of your cake comb under hot running water or dip it into a tray of hot water. If you have one, you can heat the edge with a blowtorch. Then scrape around the cake and the hot metal will melt the outer layer of frosting, leaving it perfectly smooth. It will take away any air bubbles or imperfections, too! Look at the difference on the part that the hot metal has touched:
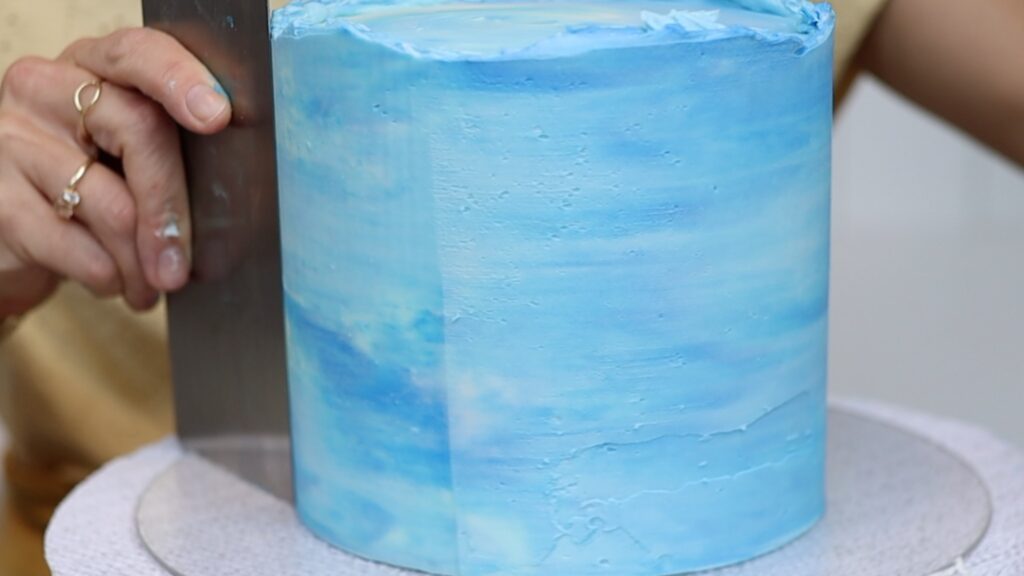
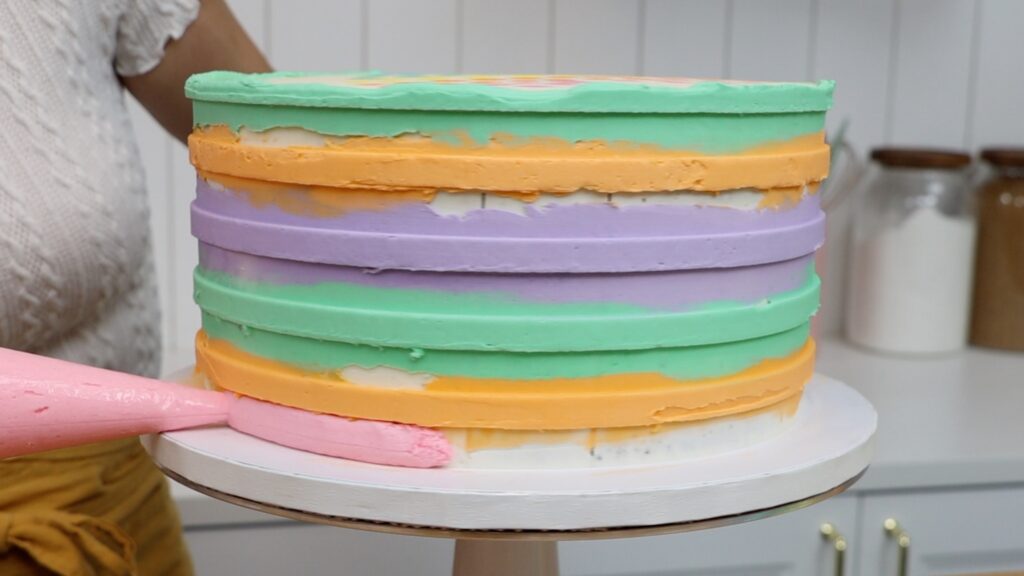
Instead of fondant stripes with cutting wheels and other tools, you can achieve this with your regular striped cake comb. First press the comb into the cake a few times around the sides. This will show you where the stripes will sit.
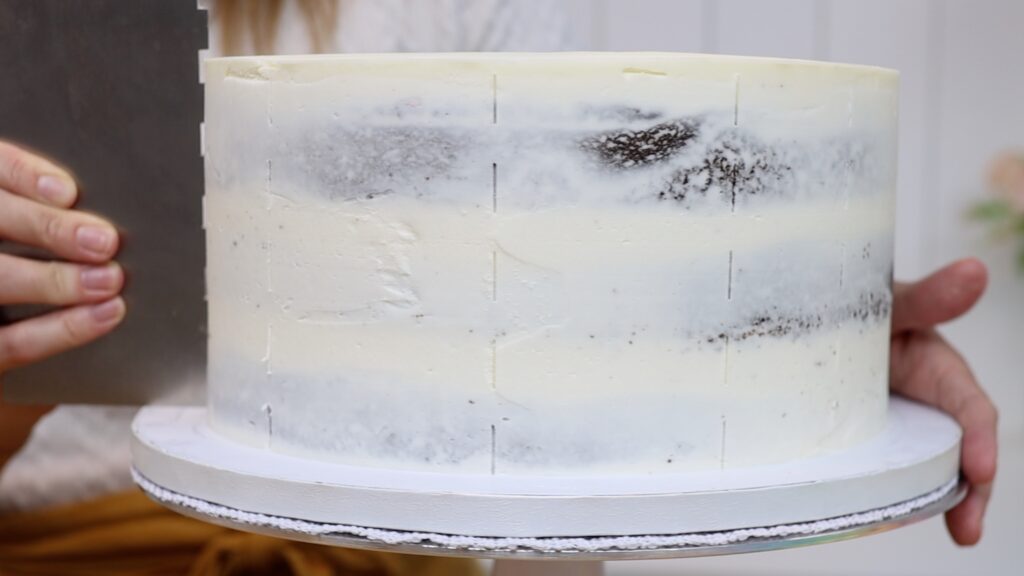
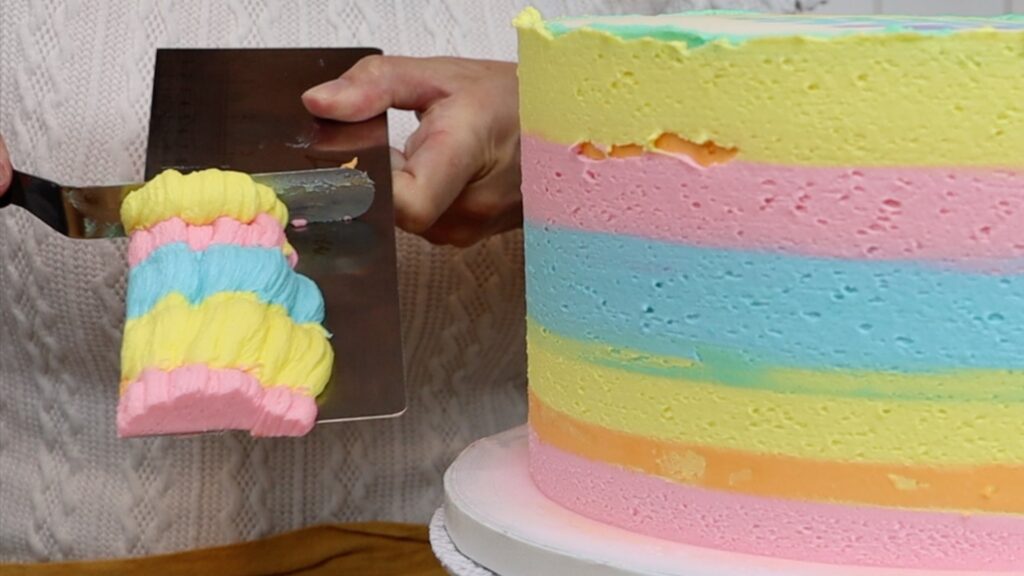
Then pipe coloured buttercream in between the lines you marked onto the cake. Scrape around the cake with your striped cake comb. Scrape two or three times and then fill in any indents or shallow areas within those stripes and scrape again.
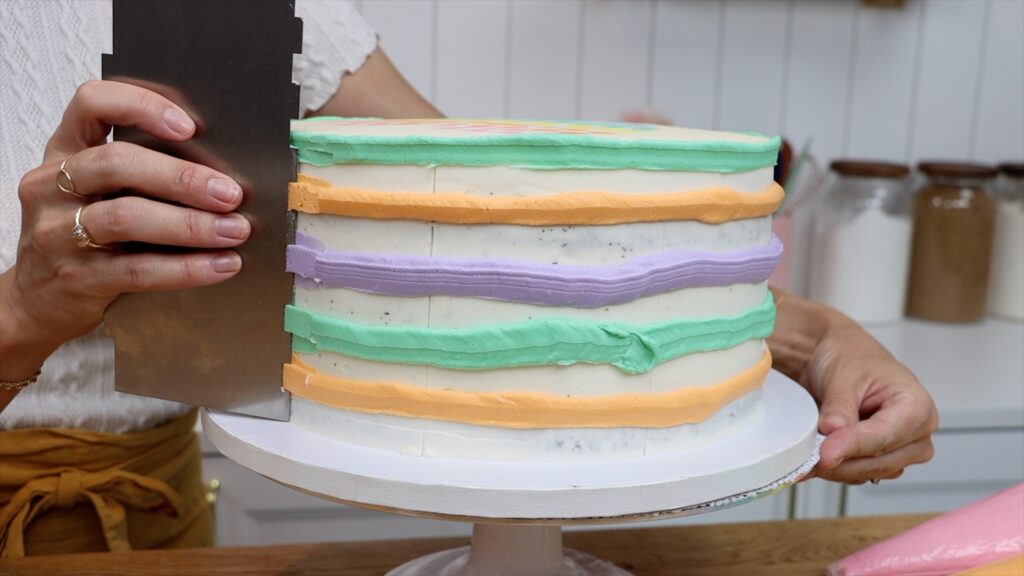
Now put the cake in the freezer for 15 minutes to set these stripes. Then pipe different colours into the gaps in between.
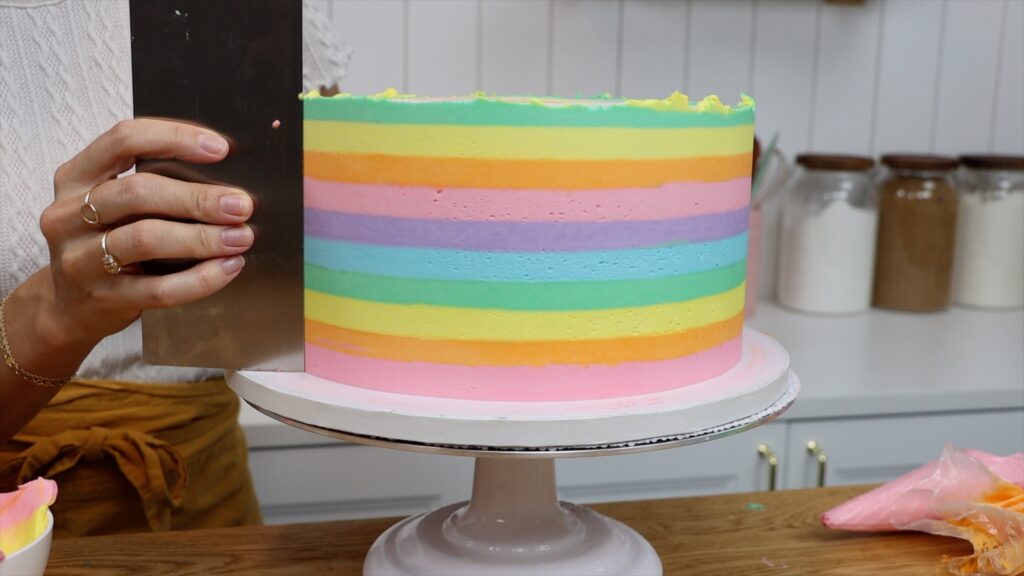
Switch to a straight edged cake comb and scrape around the cake again and again to smooth these new stripes. You'll take off all of the excess frosting to reveal perfectly neat stripes underneath.
For step by step instructions for this cake design check out my tutorial for this rainbow striped cake.
Instead of buying printed icing sheets, which are expensive and can be tricky to attach to a cake, use the facelift frosting technique. First, pipe whatever details you like onto a crumb coated cake. Then put it into the freezer for 20 to 30 minutes.
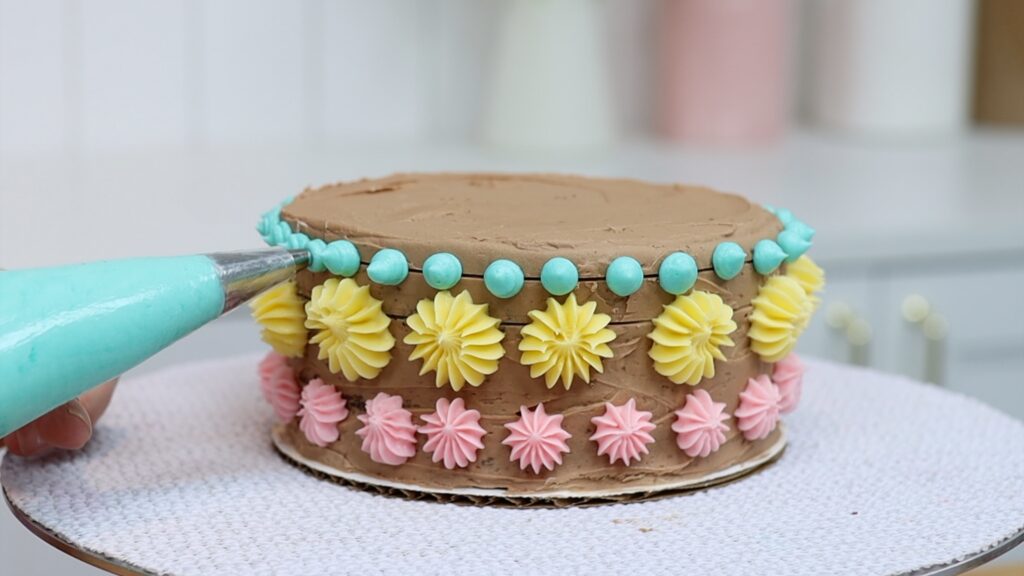
Now spread frosting all over the cake to cover up those piped details.
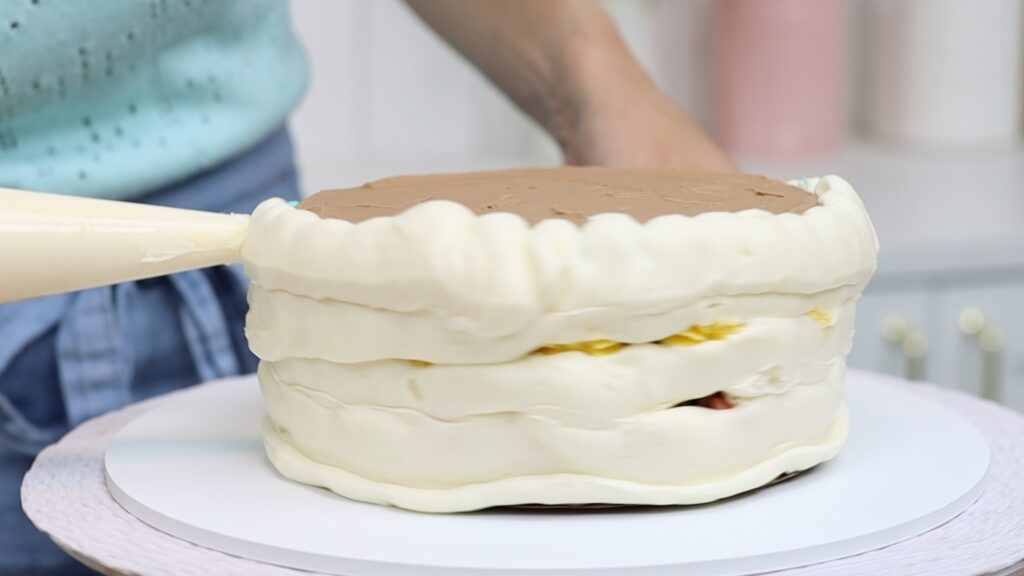
Freeze for another 20 minutes to set this layer of frosting. Then use a hot metal cake comb to scrape off the outer layers of frosting. You'll reveal a cross section of your piping underneath!
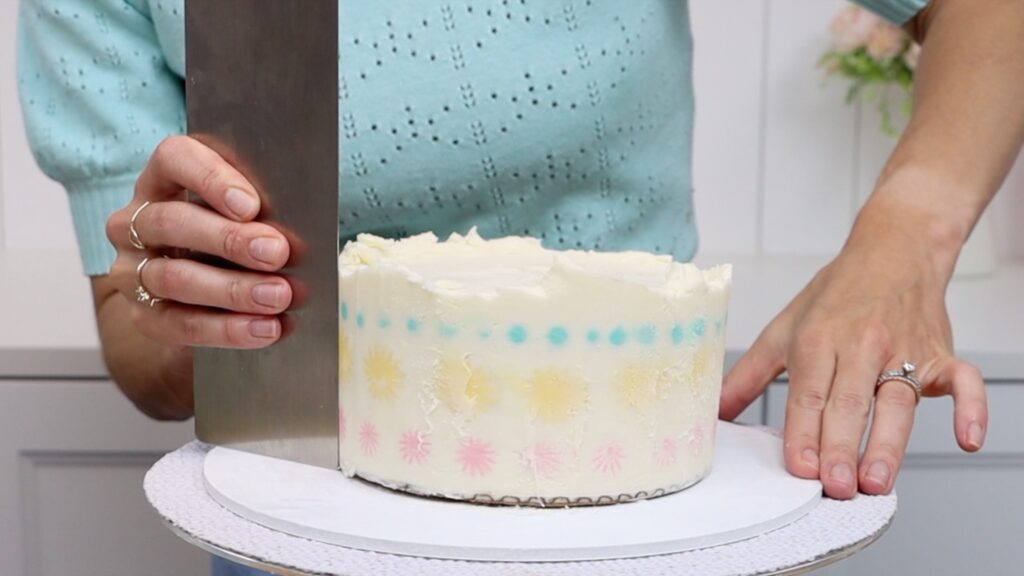
These flat buttercream patterns are so unusual and eye-catching!
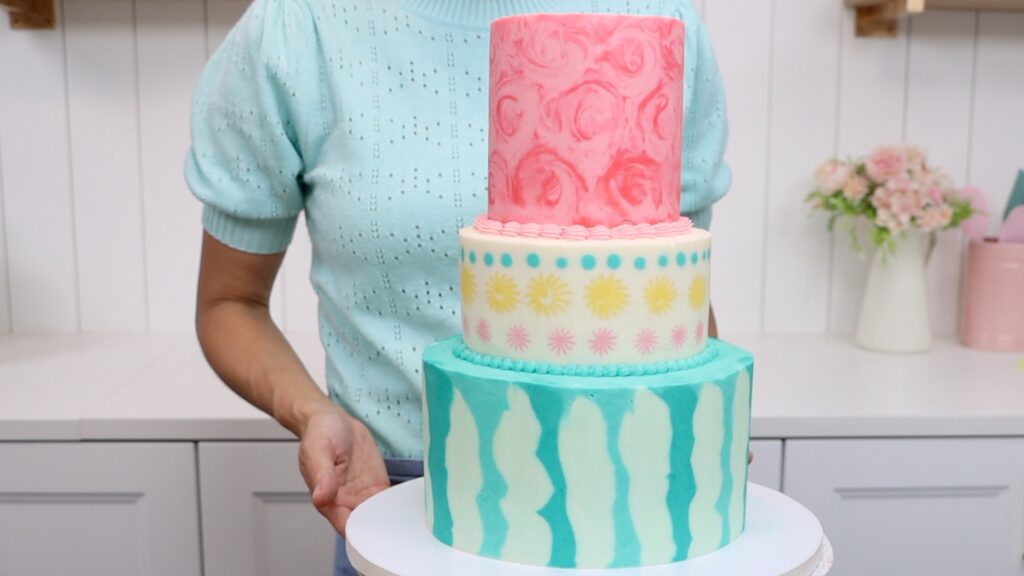
If you've found these cake hacks useful you'll love my cake school where you'll learn hundreds of cake decorating techniques and designs and my tips and tricks for creating stunning cakes that don't take all day to make.
You can also watch a video of this tutorial on 7 DIY cake hacks:
Why would you want to know how to freeze a cake? Well, there are several steps to making a cake: baking, assembling, frosting, and decorating. Sometimes it’s not possible to fit all of that into the day before an occasion or event. In this tutorial I’m going to show you how to make a cake in advance and how to freeze a cakefor months without sacrificing the flavour or the appearance.
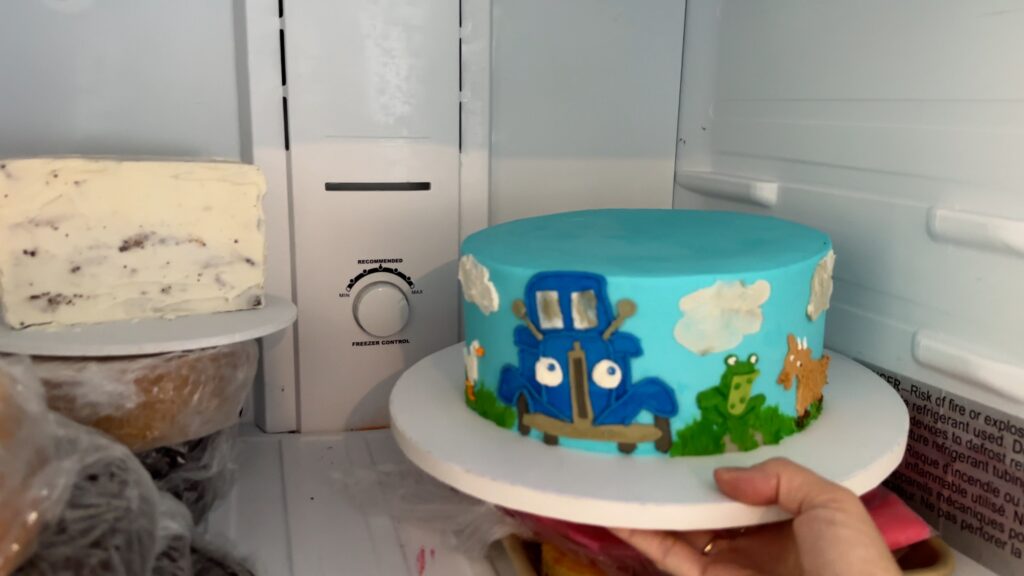
After finishing your cake, put the whole thing into the freezer. Make sure there’s a big enough flat space so that the cake is level. Also check that there's nothing touching it around the sides. Leave it in the freezer for one hour like this.
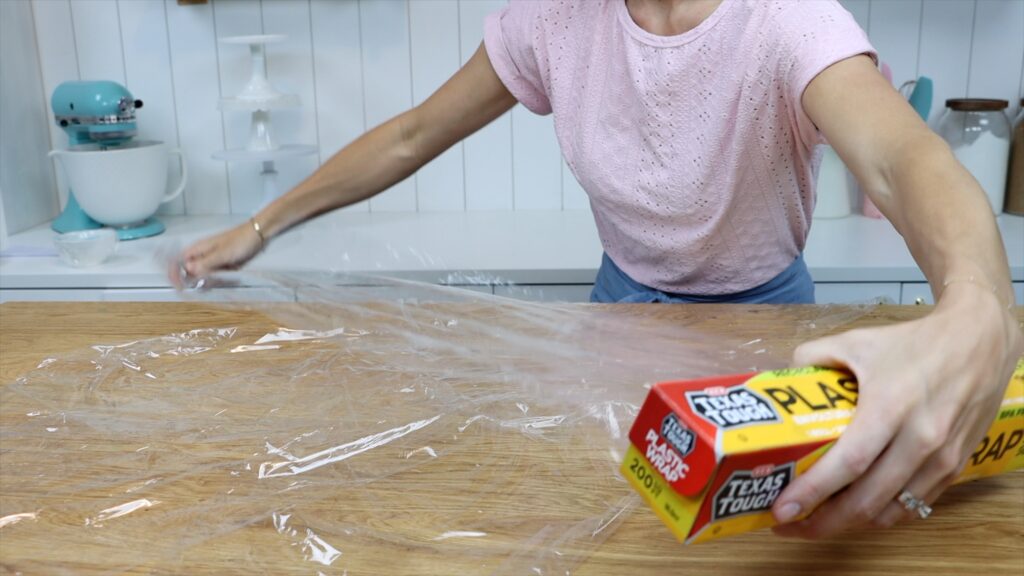
Meanwhile, lay out four pieces of plastic wrap like saran wrap or cling film. Make an asterisk shape, crossing the pieces over opposite each other so that they all overlap in the middle. The pieces need to be about three times longer than the width of your cake. If your cake is 8 inches like mine, you’ll need each piece of plastic wrap to be about 24 inches or 6cm long.
After an hour, take your cake out of the freezer and place it in the middle of this plastic wrap. If you touch the frosting it should be very firm, not sticky, and this coldness will protect the frosted cake. I use my 4 Minute Buttercream for all of my cakes and it freezes wonderfully!
Fold each piece of the plastic wrap over the cake. The reason for using so many pieces is because the cake needs to be completely sealed. This way none of the moisture of the freezer can get to it.
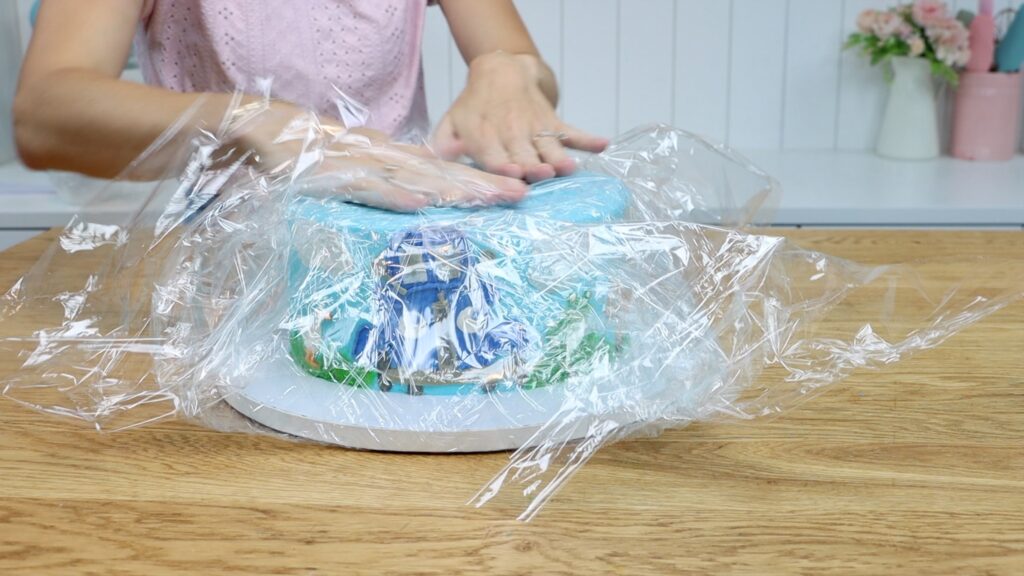
If the cake isn’t sealed properly, condensation droplets will form on the outside of the frosting which will make the colours of the frosting and decorations run. It can also change the flavour of your frosting.
The hour that you left the cake unwrapped in the freezer isn’t long enough for any moisture in the freezer to cling to the cake or affect it. However, it is long enough to make the frosting very firm. Now it won't get damaged by the pressure of the plastic wrap being wrapped around it. The wrapped cake can go back into the freezer for up to two months!
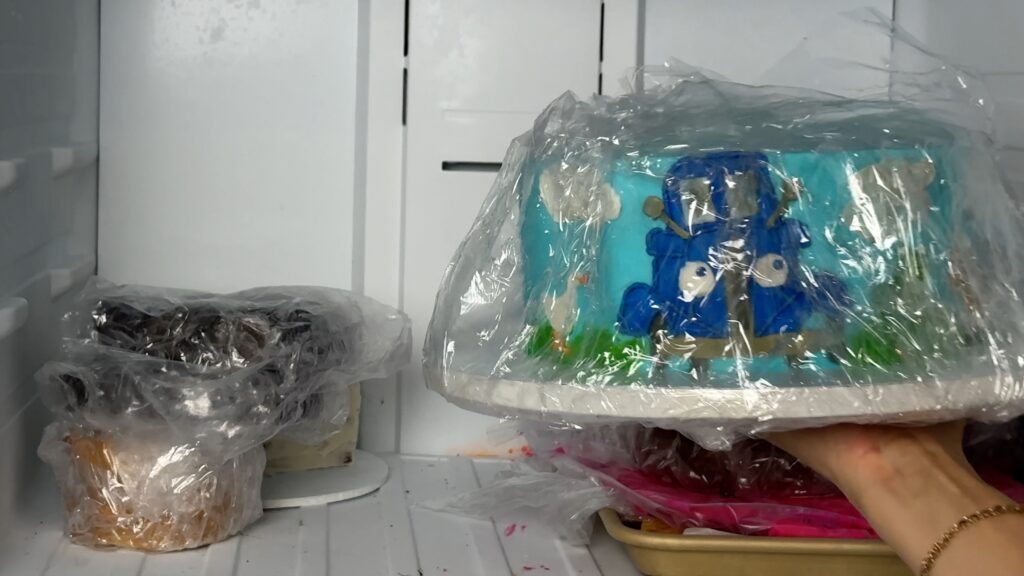
24 hours before serving the cake, take it out of the freezer. This next step is very important: move it to the fridge. Then 2-4 hours before serving it, take it out and put it on the counter or table.
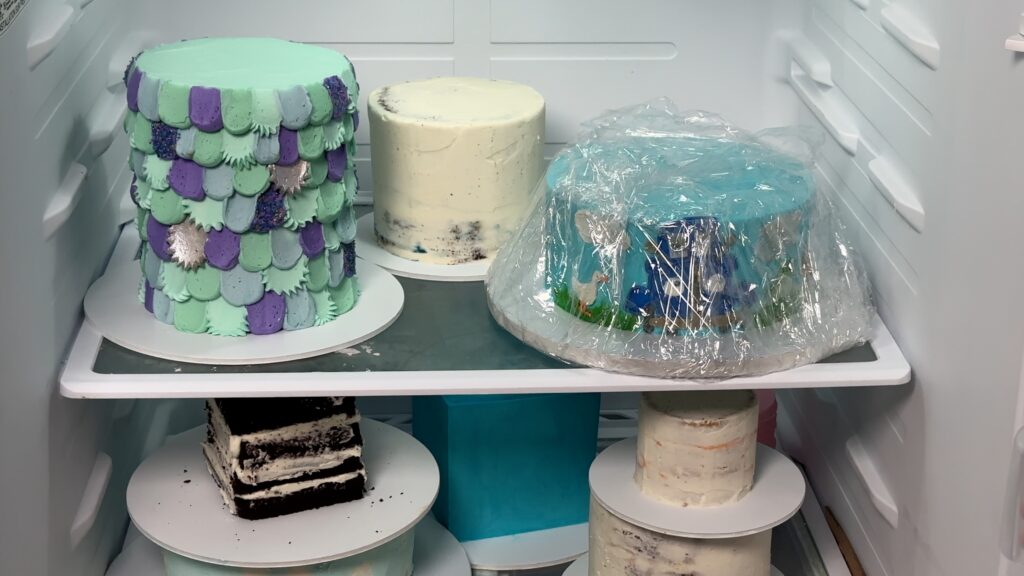
Putting the cake in the fridge is ESSENTIAL. If you move a cake straight from the freezer to room temperature, the drastic change in temperature will cause condensation all over the frosting. Any colour you’ve used in the decorations will run down the cake and stain it. That's what happened after moving this cake from the freezer to room temperature without the fridge step in the middle to let the cake thaw gradually:
Leave the plastic wrap on the cake for 30 minutes to an hour after talking it out of the fridge. This will prevent condensation as the cake warms up to room temperature. After 30 minutes to an hour the frosting will still be firm. That means that when you unwrap the cake, you won’t damage it as you peel the plastic wrap off.
At this point you can add any final details, like anything metallic which would lose its shine in the freezer. You can also do any touchups, like this piped line up here which I must have knocked in the freezer. Now the cake is ready to transport or serve!
I hope this tutorial has been useful! For more tips and tricks and HUNDREDS of cake decorating techniques and designs, visit my cake school on www.BGB.com.
You can also watch a video of this tutorial on how to freeze a cake:
Let's make a buttercream pirate ship cake with no special tools!
You can make this pirate ship design on a single cake or on a two-tier cake. I'm alternating layers of my Very Vanilla and Perfect Chocolate Cake for a two tier cake. The bottom tier is an 8 inch cake and then on top is a six inch cake.
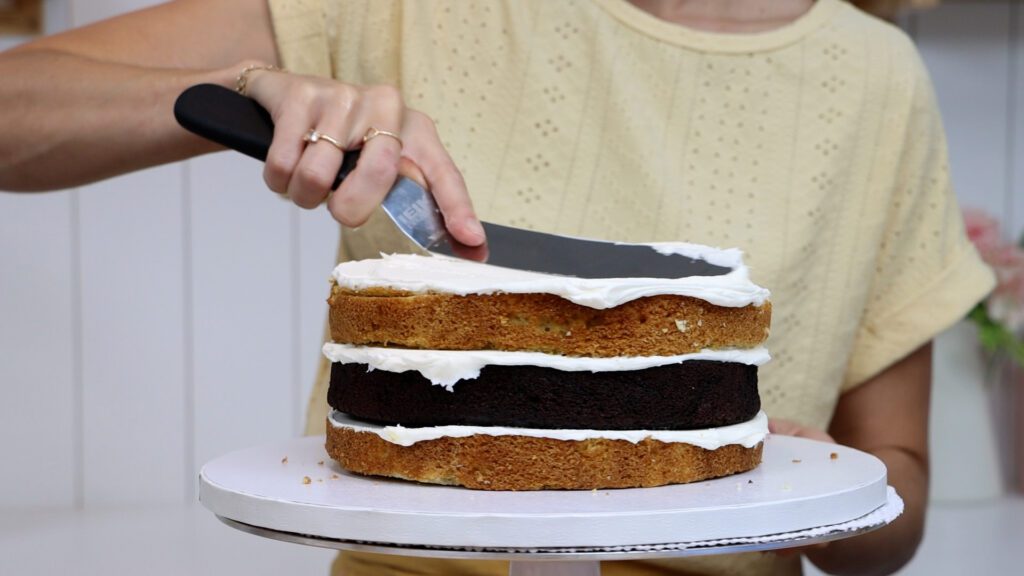
For a tier cake, the top cake needs to be on a cake board the same size as that cake. The purpose of this is to support the cake so it doesn't sink into the bottom cake. The reason for it being the same size is so that it's invisible after you frost the cake.
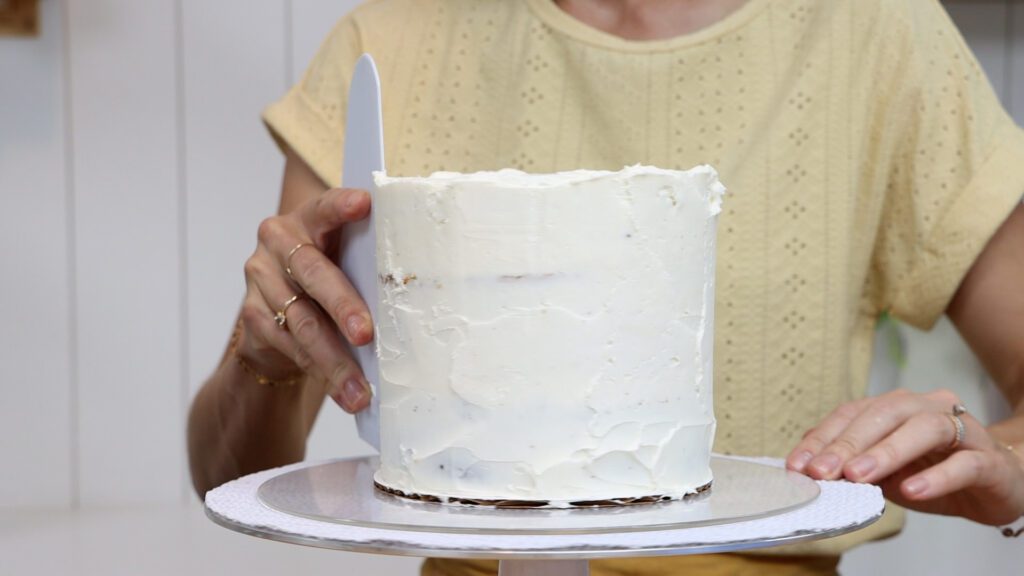
The taller this cake is the more room you'll have so the bigger you can make your pirate ship. Start by covering both cakes with a crumb coat. This is a thin layer of frosting to trap any crumbs that come off the cake so that they don't get into your final layer of frosting. I'm using my 4 Minute Buttercream to fill and frost these cakes.
I'm turning the bottom cake into an ocean with a very easy and very quick technique. Frost the top of the cake with a light shade of teal or turquoise. To tint buttercream I use gels, which are very concentrated so you only need a drop to make bold colours.
Put this same colour into a piping bag with a petal piping tip. Pipe a ruffle around the top of the cake so that it sticks up above the tope edge. If you don't have a petal piping tip you can just spread this colour straight onto the cake. You'll get all of the beautiful ocean colours, just without the texture.
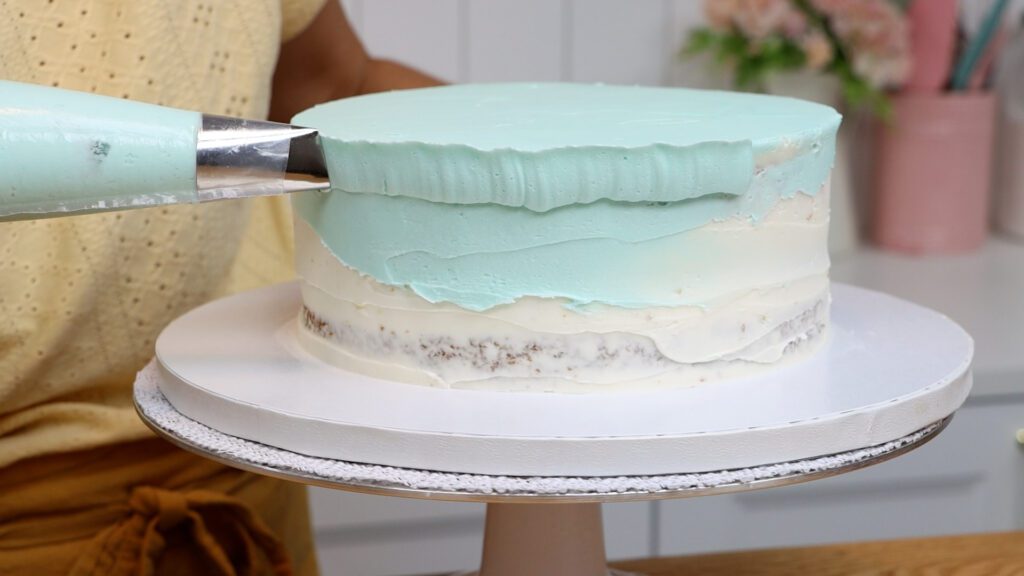
Petal tips look like teardrops and when you pipe through them. The narrow part makes ruffles but the wider part doesn't. For this cake you'll want the wide part of the petal tip or teardrop to point downwards, angled slightly towards the cake. This way, the wider piping will stick to the cake. Point the narrow part upwards and slightly away from the cake, which makes ruffles that look like waves.
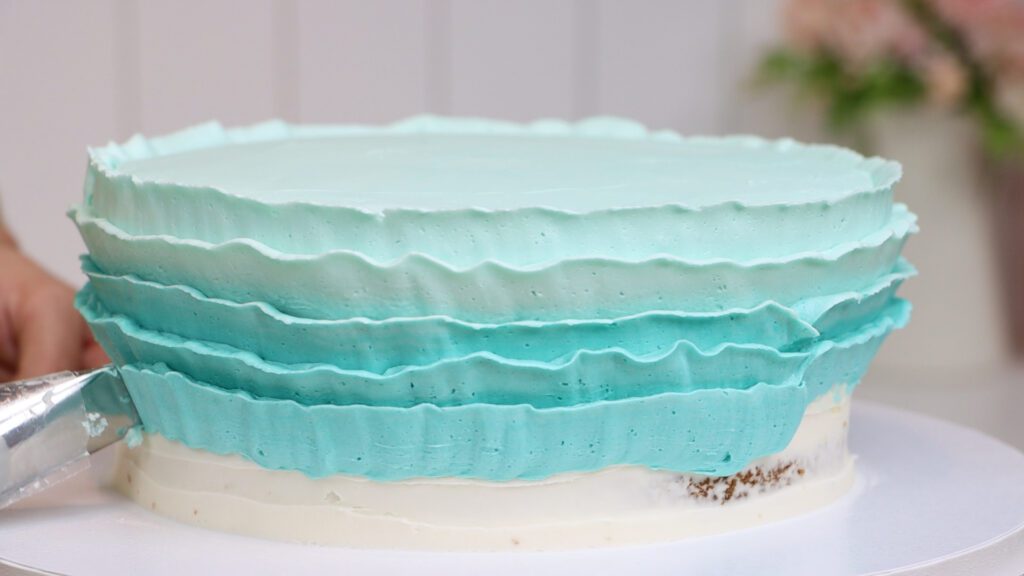
I'm adding another drop of gel to my bowl of buttercream and putting that darker colour into the piping bag. Now the waves get darker as the ocean gets deeper, lower down on the cake. The slower you pull the bag and the more you wiggle your wrist, the wavier the piping will be.
This technique is very forgiving! If you need to pause to push the buttercream lower down into the piping bag, when you start piping again the join of the ruffles will disappear into the texture on the cake. It's not a precise technique so have fun with it to create this whimsical effect. You can smooth any messy parts of the piping with an
To hold up the next cake tier you'll need some supports. Use a cake board the same size as the next cake to draw around. This circle will show you where the next cake will sit eventually. Then poke boba straws or dowels into the bottom cake, cutting them to be the same height as that cake. I'm using four straws for this eight inch cake, spaced equally around the cake. Make sure they're at least an inch within the circle you drew so that they're underneath the top cake.
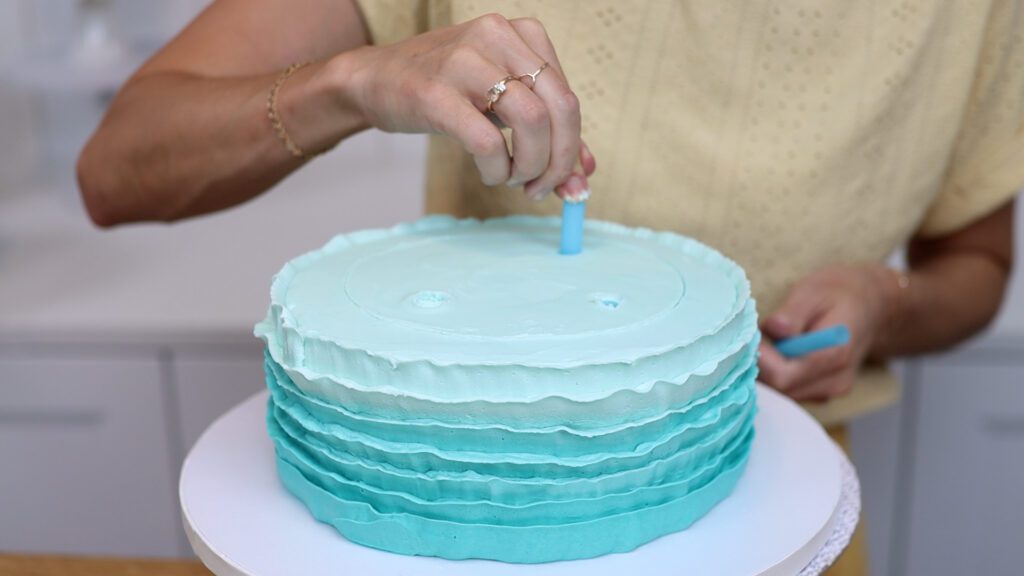
Put this cake in the fridge while you frost the top cake, the one that will have the pirate ship on it.
To create a sky effect use white and blue buttercream. Ideally, you'll have three shades. Spread dollops of those colours onto the cake to almost cover the sides.
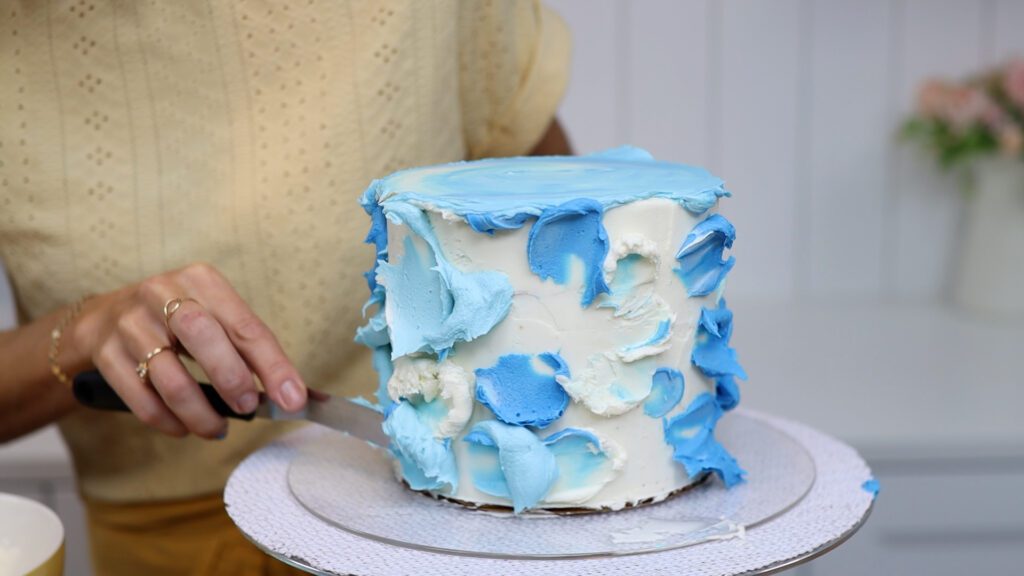
The crumb coat needs to have set so that these colours don't mix into it. I set my crumb coats by putting the cake into the fridge for 30 minutes. Keep in mind that if the cake is cold from the fridge, you'll need to frost it quite quickly. Otherwise, these blobs of buttercream will chill and set and be difficult to spread. Scrape around the cake with a cake comb or frosting smoother or icing scraper. The colours will blend together and look like a cloudy sky.
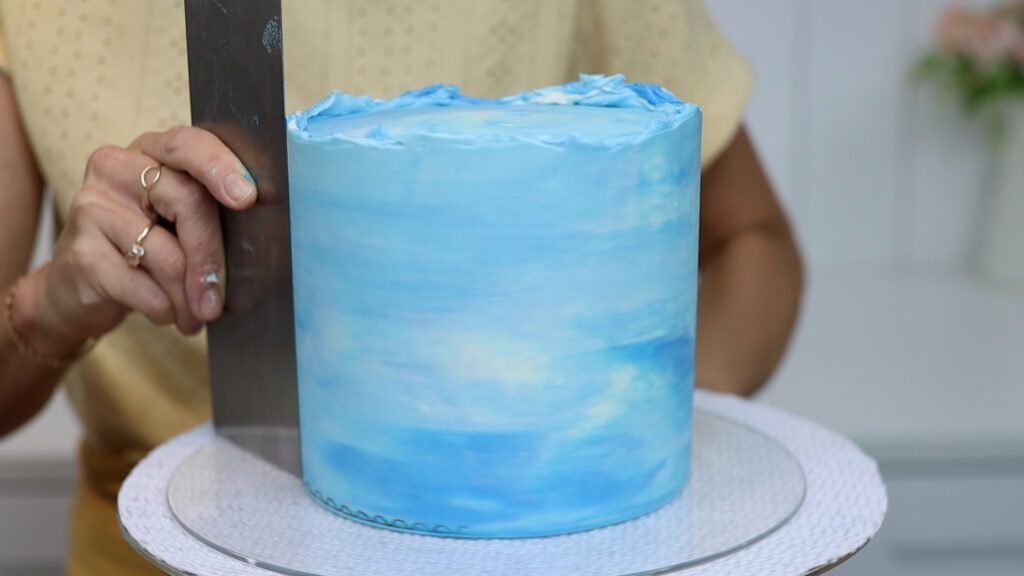
After a few scrapes, spread more buttercream to fill in any indents, where the frosting isn't as thick as on the rest of the cake. Then scrape again until the frosting is smooth. You can leave the top edge uneven or level it with your
Draw or trace or print out a pirate ship on a piece of paper. Keep it to a simple outline for the best results. Then put a piece of parchment or wax paper on top and trace the brown details only. This will be the hull (the curved part at the bottom!) and the masts. Pencil works best for drawing onto parchment paper because of the non-stick surface.
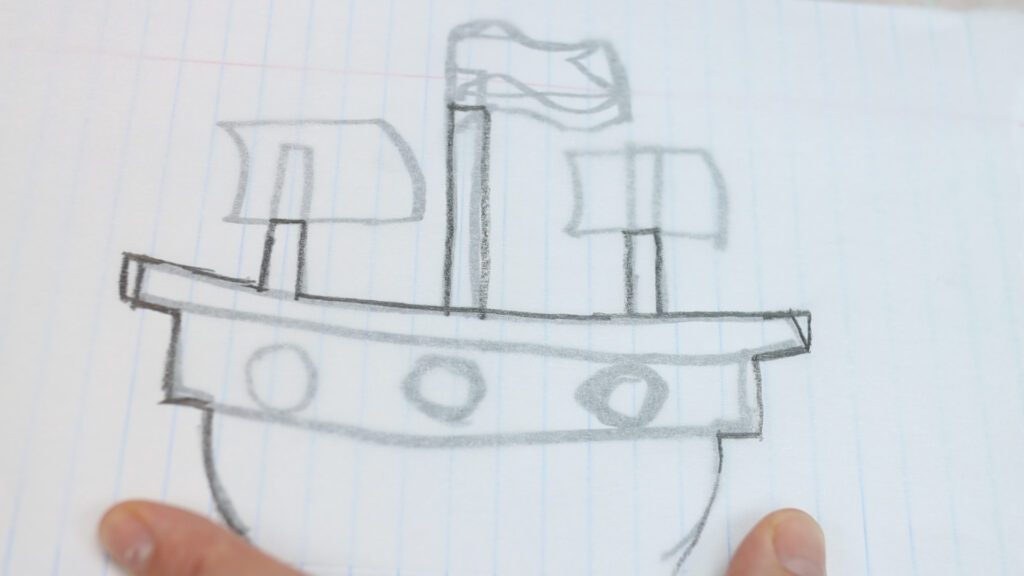
Then on another piece trace the white details, which are the sails. Onto another piece, trace the black details, which are the pirate flag and the porthole. Finally, trace the skull and crossbones onto another piece.
Now cut out the shapes from each of your pieces of parchment paper. Cut along the outline to leave the outer part intact, which you'll use as a stencil next. Take your time to cut a neat outline because if you cut a jagged line or a wonky shape, that's what you'll end up with on your pirate ship cake.
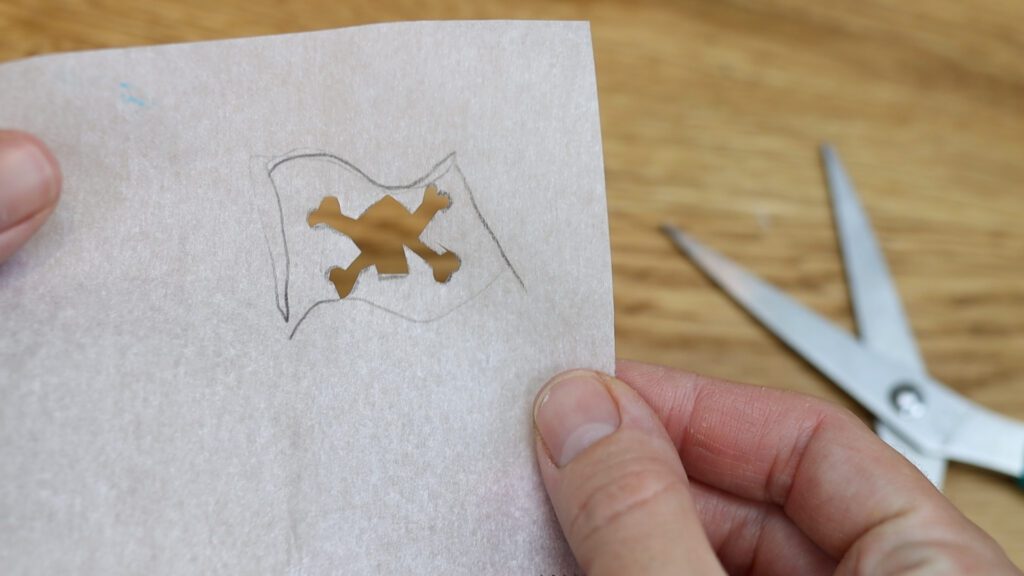
Each piece of parchment should have an inch or two of paper all around the cut out part of the design. This border will protect the rest of the cake from unwanted smudges of buttercream. The exception is the pirate ship because the boat will sit right at the bottom of the cake so you don't need any paper below it.
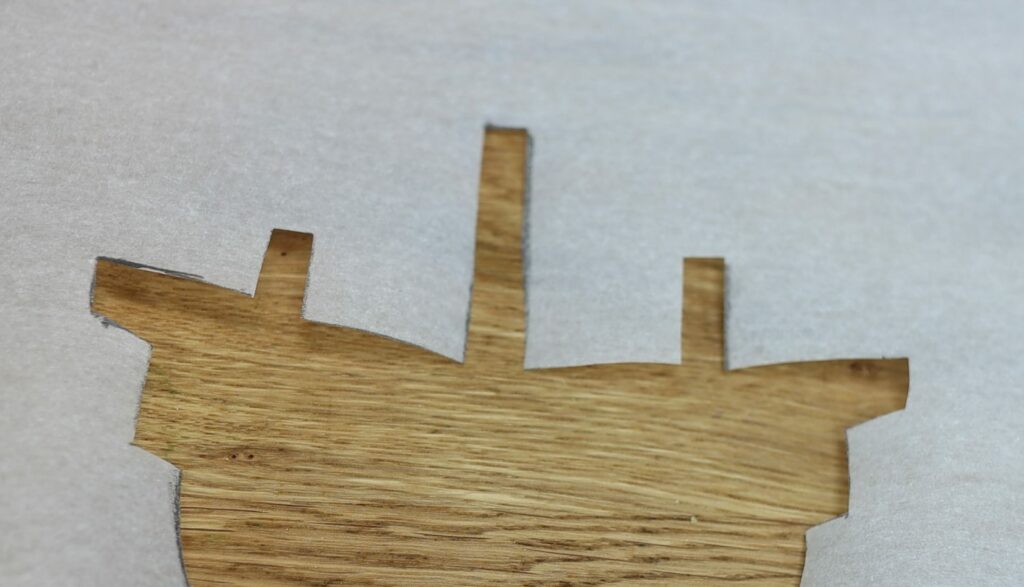
Take your cake out of the fridge or freezer and press the biggest boat stencil against it. After about a minute some tiny drops of condensation will form on the cake because it's warmer out of the fridge or freezer. Those droplets will help the stencil to stick to the cake. Spread brown buttercream all over the boat shape that you cut out. Spread inwards towards the middle of the cutout shape rather than outwards because that might spread buttercream underneath the parchment paper, causing smudges around the outside of the outline of the shape.
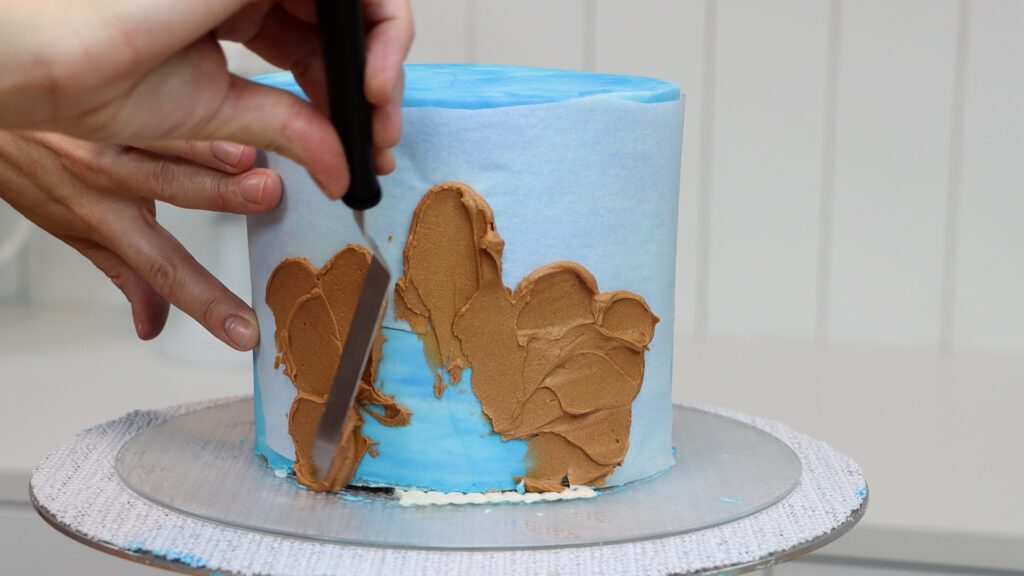
Smooth the brown frosting with an
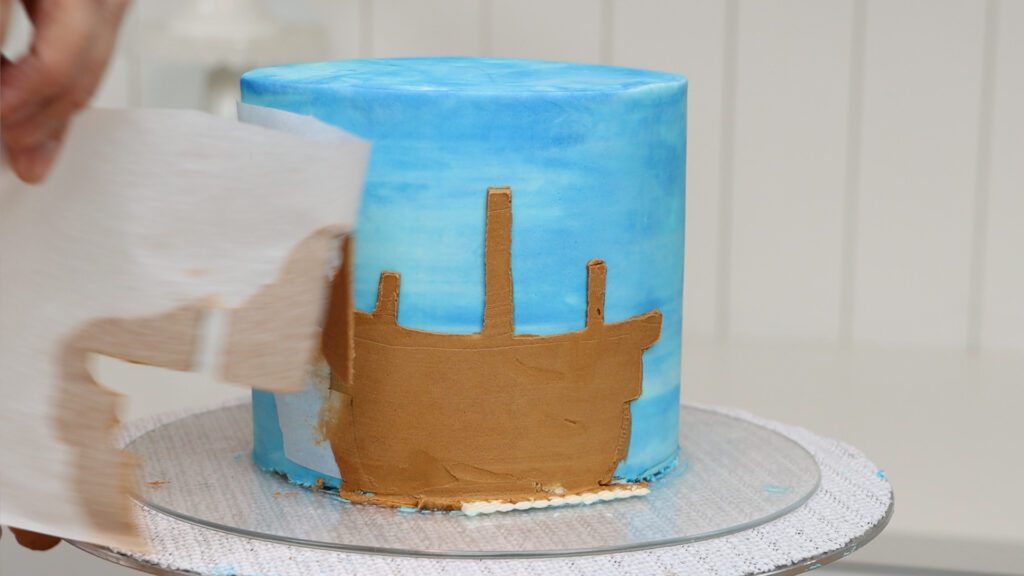
Peel the stencil off to leave your shape behind. Use a toothpick to gently scrape off any smudges, which works because the blue frosting on the cake has chilled and set so you won't damage it.
Use the edge of your cake comb to score some lines in the buttercream to mark out different sections of the boat and planks of wood. A toothpick is a great tool to mark the shorter ends of the planks and to draw little nails that you see in shiplap. Now put the cake into the fridge for 30 minutes or the freezer for 15 minutes to set this brown frosting.
Press another stencil onto the cake and spread buttercream over that, scraping off the excess to leave a thin layer behind. For portholes, a thin layer looks best because you don't want the windows to look like they're sticking out from the wooden boat. For some shapes like the sails, a thicker layer of buttercream is better because the blue frosting underneath would show through a thin layer of such a light colour of frosting.
Keep your toothpick handy for touch-ups after each stencil.
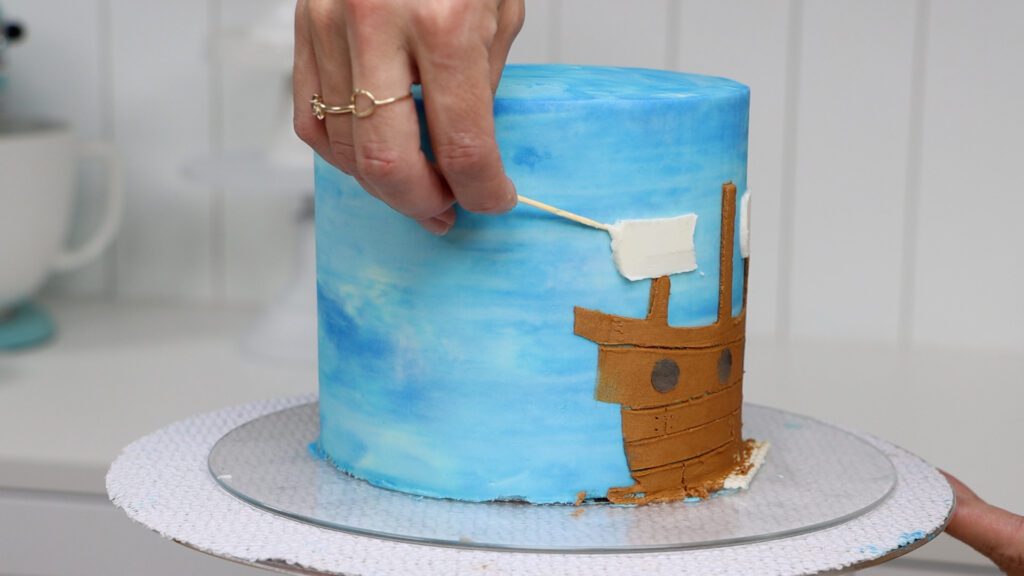
Put the cake back into the fridge or freezer after each stencil to set that colour before pressing on the next stencil.
Any time after stenciling on the big brown boat you can stack your cakes if you're making a tier cake. Both cakes need to be cold so that the frosting is firm. Spread some fresh frosting onto the bottom cake within the circle you drew. Then slide an
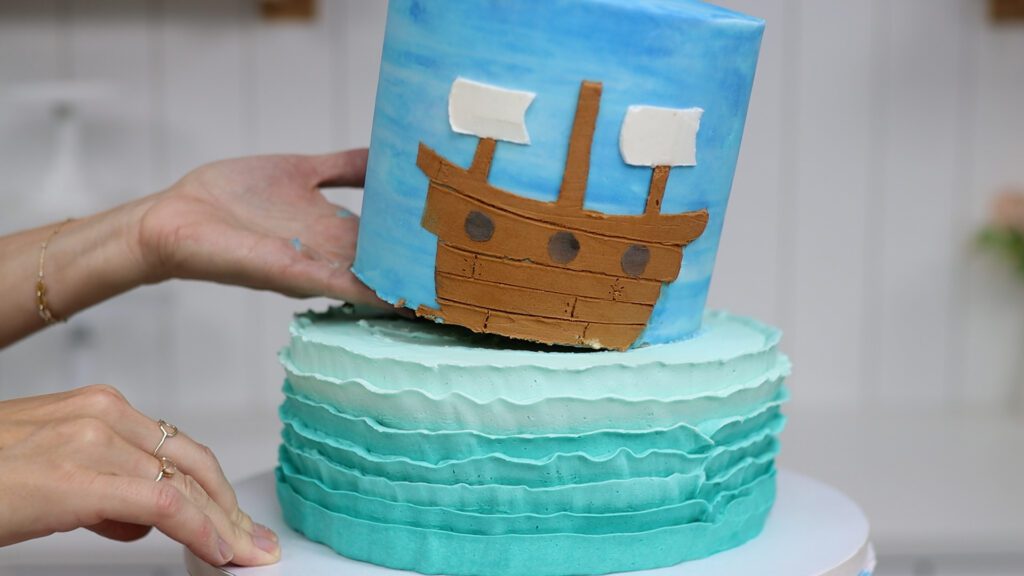
The cakes need to be cold so that you can touch the frosting without damaging it. Now it's time to cover up the join between the two tiers. Use some of that lightest shade of turquoise from the ocean part of the cake with your petal tip. Hold the wider part of the tip against the bottom of the cake to pipe a wave. You can pipe a few more if there's space on top of the bottom cake.
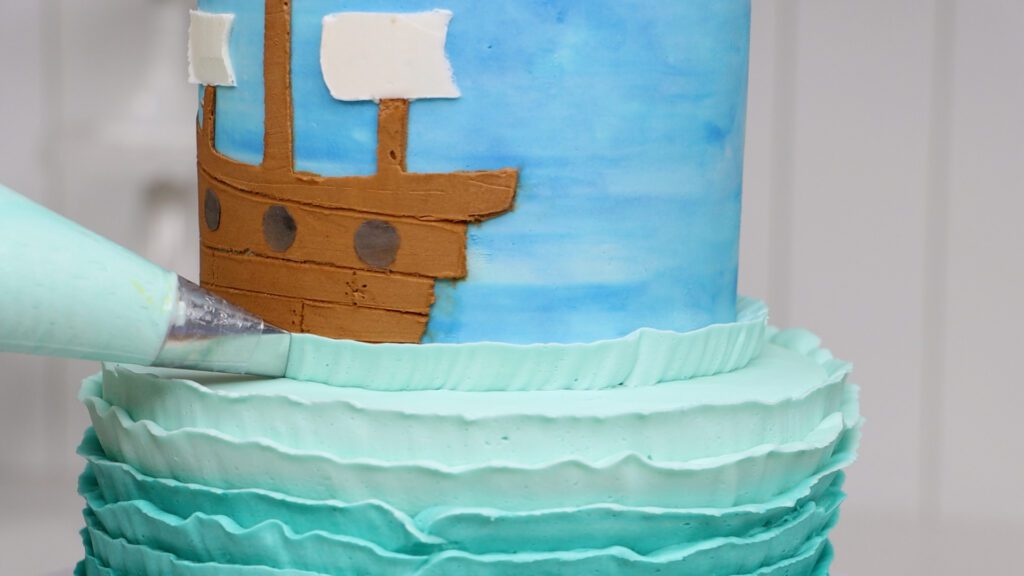
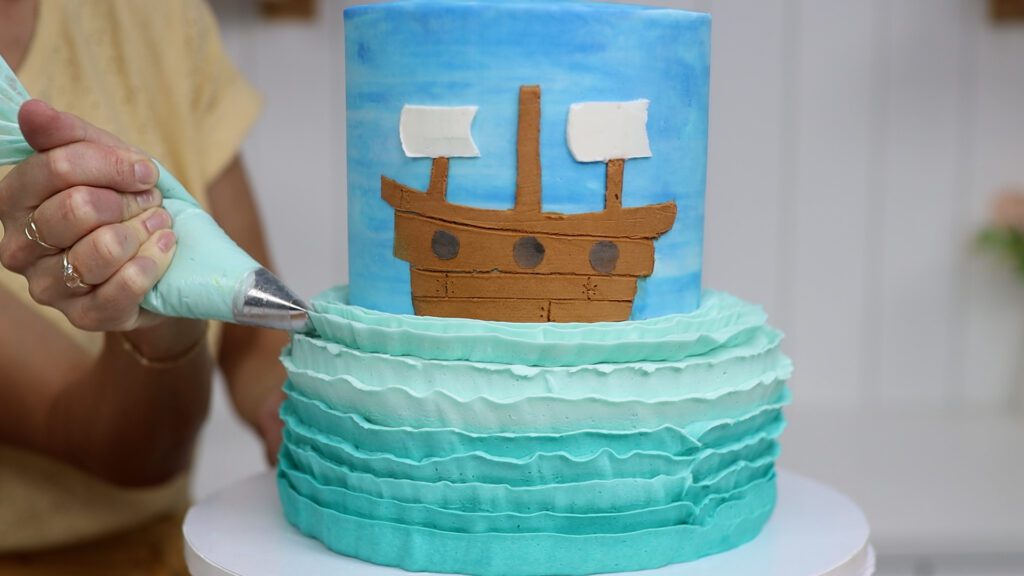
Just like with the other ruffles, the more you wiggle your wrist, the wavier your piping will be. I like to start piping at the side of the cake because that's typically the most subtle place to hide the start and finish of each row of piping. Everyone looks at the front of the cake and if you're singing happy birthday and letting someone blow out a candle on the cake, everyone gathered around will be looking at the back of the cake but no one really stares at the side side of a cake!
You only need a tiny bit of buttercream for the pirate flag and a few drops of black gel. Making a dark gray is fine because the gel will develop and the colour will darken a few shades. Let that set in the fridge before using your final stencil, the skull and crossbones.
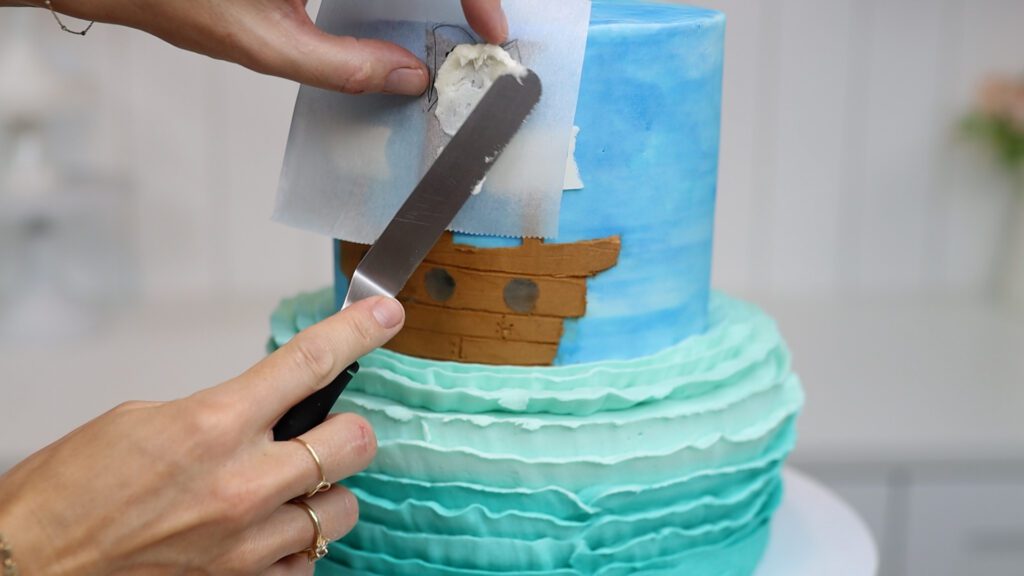
Just like with the white sails, it's a good idea to spread this thickly so it doesn't end up looking gray over the black buttercream underneath. With a thicker layer of frosting the stencil edges do tend to be messier so smooth them with a toothpick.
I forgot to mark the masts on the ship but it's fine to do this either immediately after stenciling, while the buttercream is still soft or after chilling the cake, when the buttercream has set.
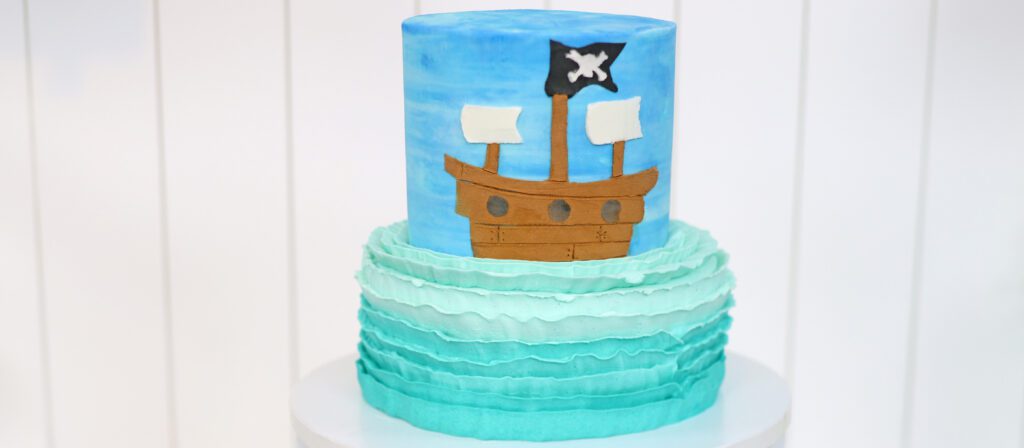
And there it is! A pirate cake made with no fancy cake tools, just some paper stencils that you can make yourself very easily quickly and affordably.
I hope this tutorial has been useful. Visit my cake school to learn hundreds more cake decorating techniques and designs.
You can also watch a video of this pirate ship cake tutorial: