Air pockets, indents, uneven top edges, and weird texture lines that just won't go away! In this tutorial I'll show you the most common frosting mistakes I see and what causes them. Most importantly, I'll show you how to fix them!
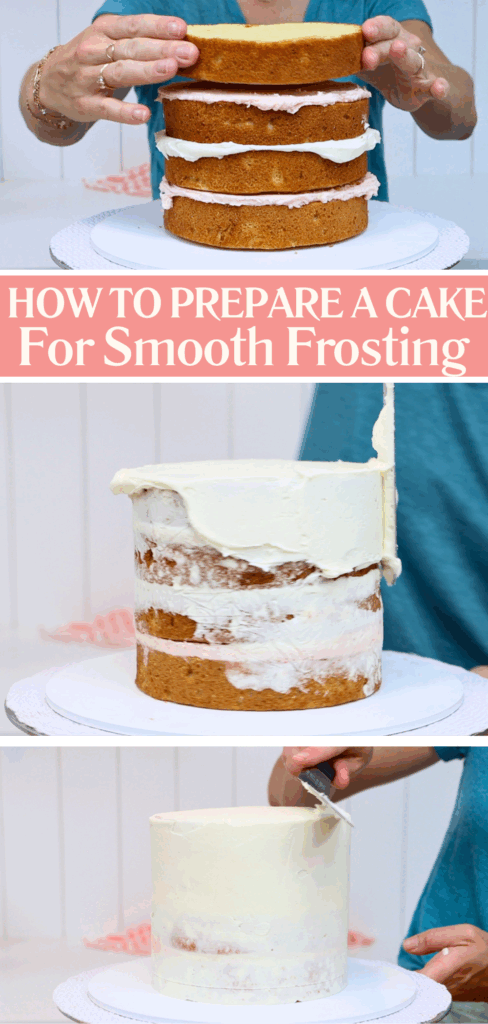
Before we get into the smoothing part, let’s do a quick recap of how to prepare your cake. Start by layering your cake and fillings on a cake board at least 2 inches bigger than your cake. Attach the bottom layer to the cake board with a dab of buttercream to hold it in place. Give it a crumb coat and let that set so it's firm. If you need a refresher on how to layer and crumb coat a cake, see my in-depth tutorials on those steps.
Now let’s move on to the final coat of buttercream, where the frosting mistakes can start.
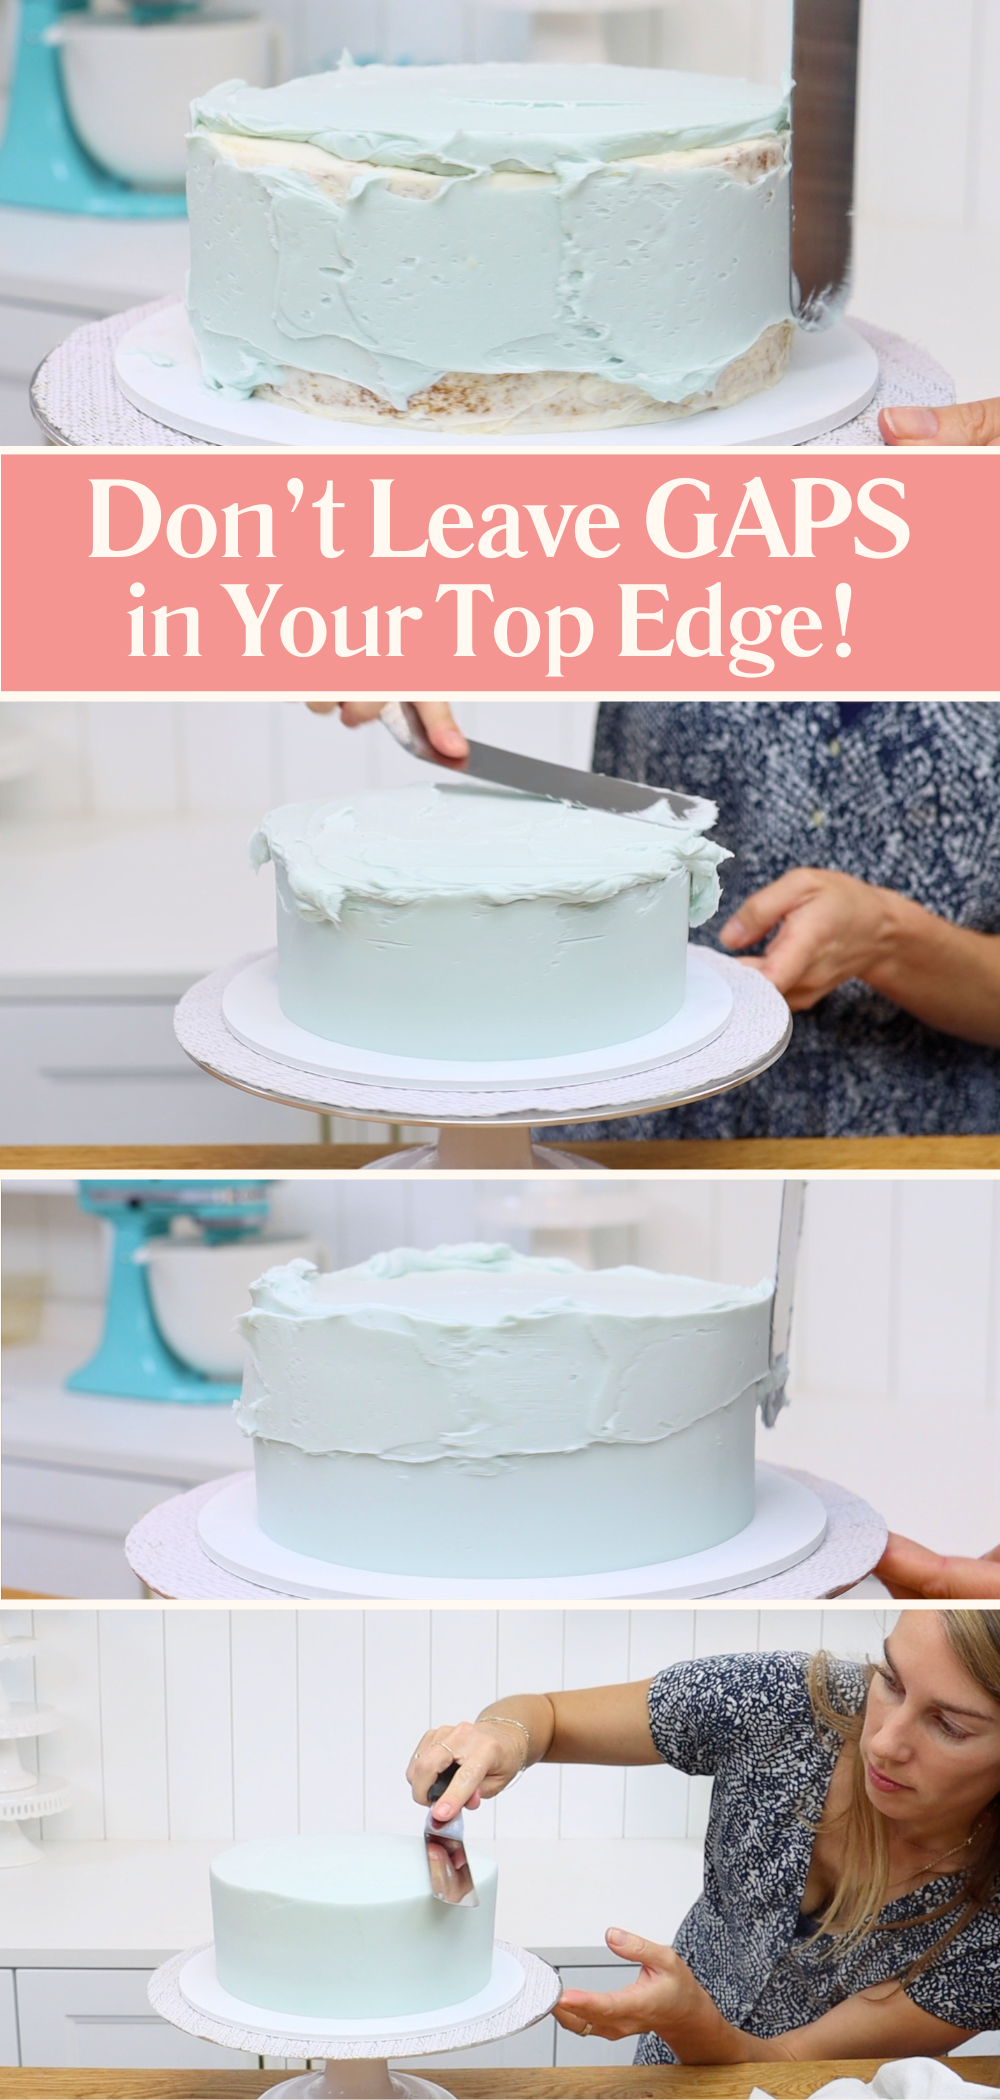
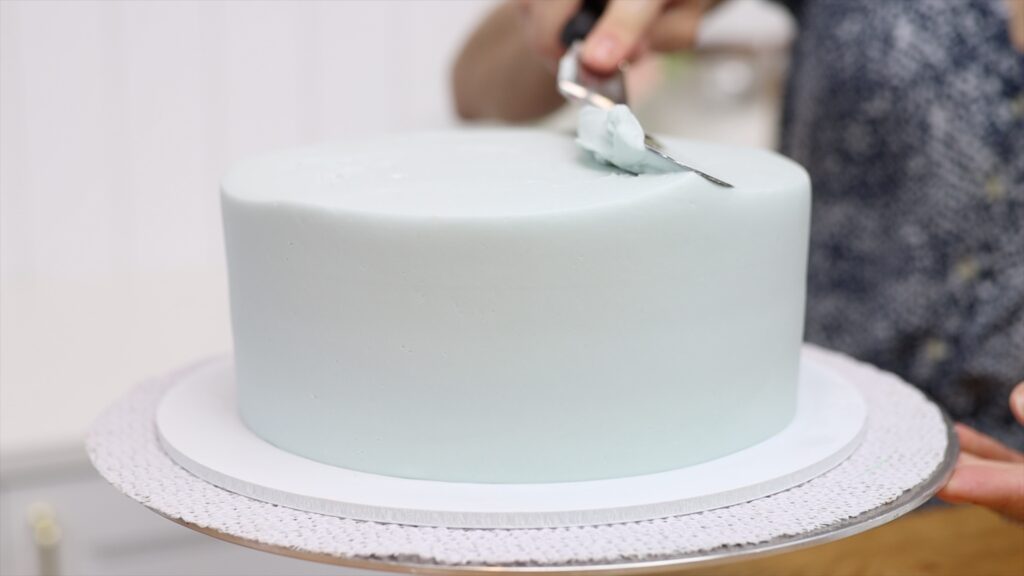
The first mistake is not spreading buttercream all the way to the edges of the cake. On the top of the cake this creates gaps around the edges. Around the sides, if the buttercream isn't high enough you’ll have shallow patches near the top and that top edge won’t look sharp or straight.
So once you've spread buttercream to cover to top of the cake, push it beyond the edges. Around the sides, push the buttercream up to form a lip or wall around the top edge of the cake. This is essential for creating a sharp top edge later.
The top cake in the image below doesn't have enough buttercream on the top or around the sides. Lower down you'll see that I’ve added more buttercream and spread it beyond the top edge. That gives me enough to work with when it’s time to smooth the frosting.
The next mistake is using short, jerky turns of the
You may have noticed two frosting mistakes in the image above. As well as vertical dents, there's a horizontal line going all the way around the cake. This is caused by a cake scraper that has been damaged by dropping or knocking against something hard. When the straight edge is dented or dinged, that bump will leave a line or trail in the buttercream.
Run your finger along the edge of your comb to feel for a sharp piece sticking out. If you have one, switch to a different cake comb, one that’s smooth and undamaged. Metal combs are generally more durable than acrylic or plastic, so they’re less likely to get damaged like this.

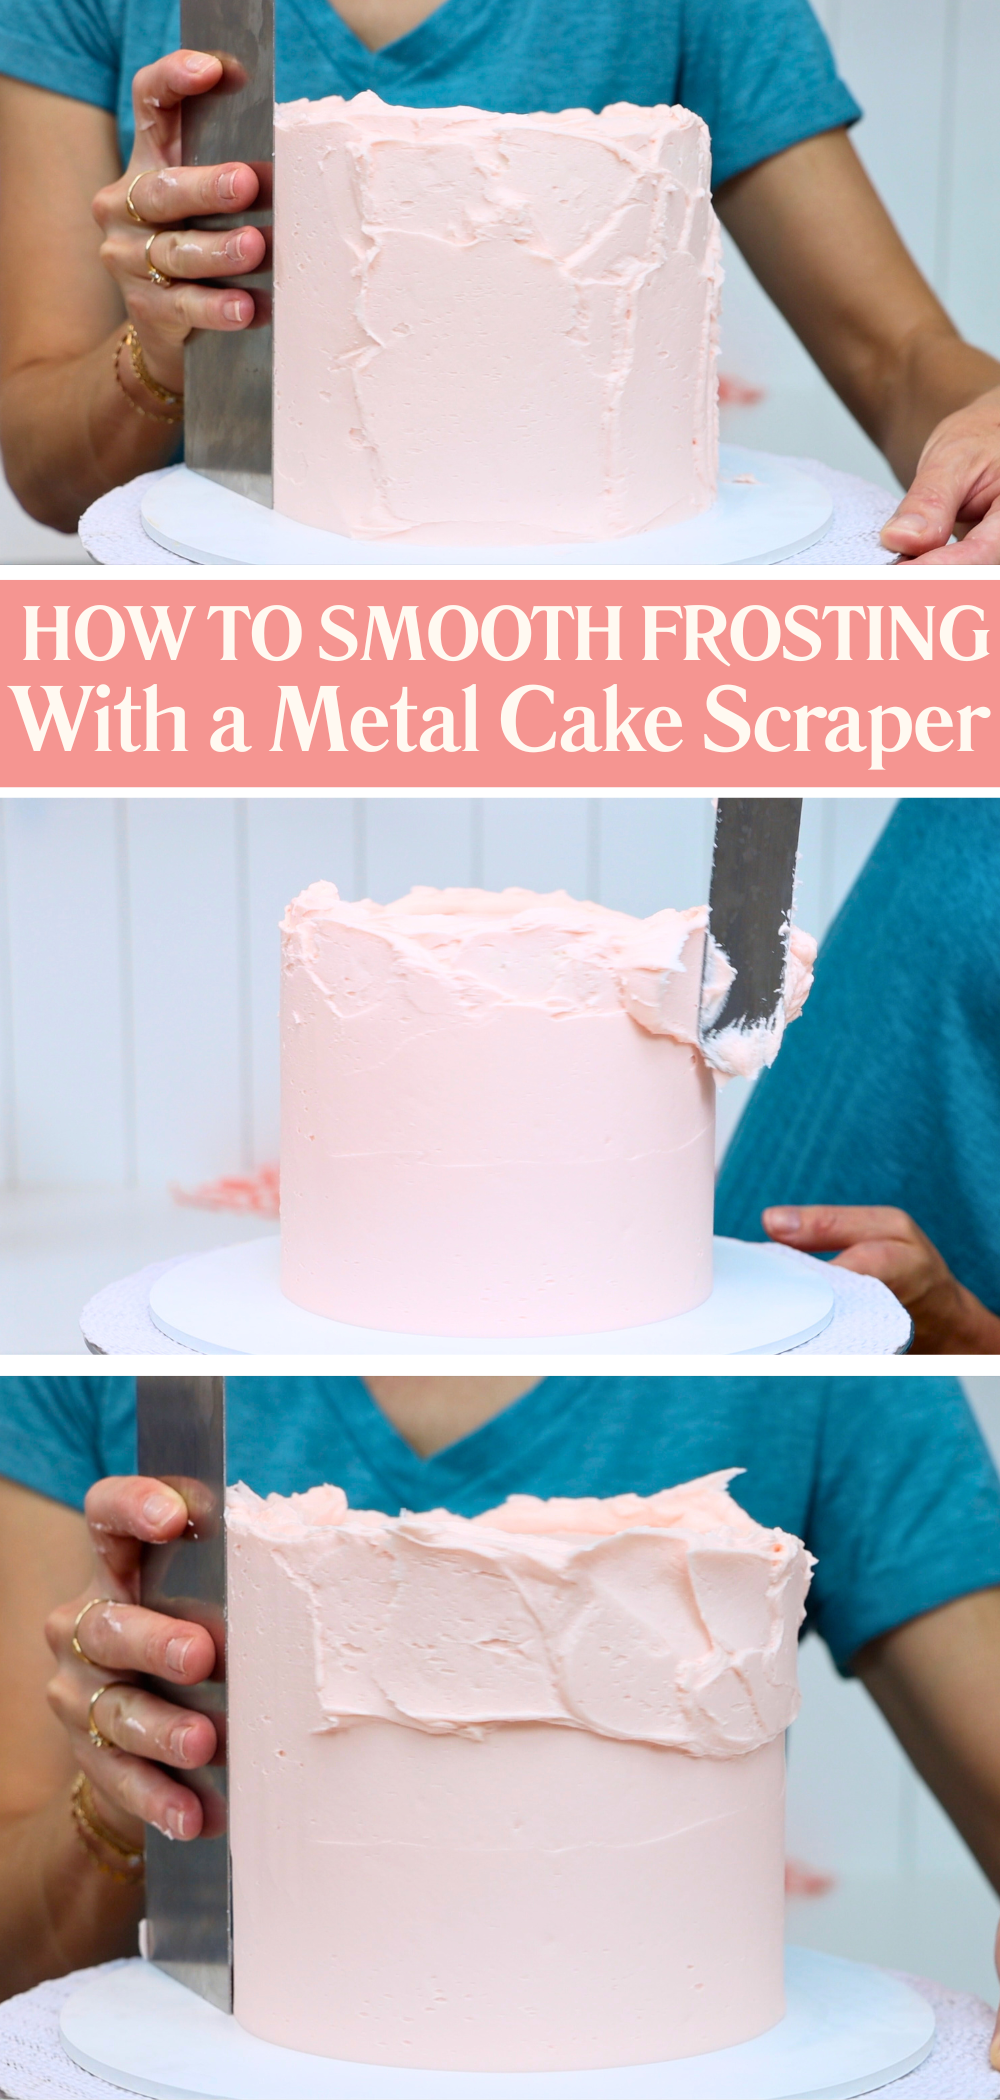
Before using a cake comb or cake scraper, you'll need to spread buttercream to cover your cake. If you apply it unevenly, some areas won’t have as much frosting. When you scrape around your cake to smooth the frosting, those shallow areas show up as gaps or patches. Fix these by scraping more times around the cake to remove the thicker layers until everything levels out.
There are several frosting mistakes you can make with your cake scraper and the most common is using too much pressure. This creates tiny air bubbles or tears in the buttercream, especially if your frosting is a bit stiff. You can see little pockmarks in the photo below, leaving the surface looking textured instead of smooth. To avoid this, use very light pressure as you scrape and let the
A quick fix for the little tears is to warm up your cake comb to help it glide more smoothly. I like to use a blowtorch or hair dryer to warm the metal slightly, or you can dip the comb in hot water and dry it off. Just make sure the comb is warm, not hot, so you don’t melt the buttercream or cause it to bulge. You’ll feel the difference as it glides over the cake and fills in any tiny air bubbles.

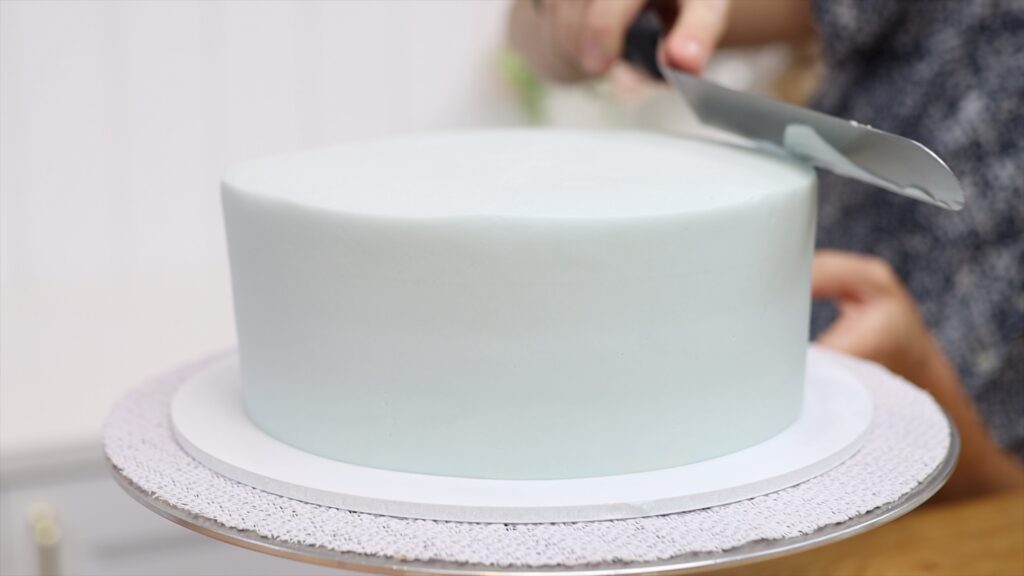
When you get to the top edge of the cake, swipe across the top edge to leave it. One of the common frosting mistakes here is pressing downwards. This causes bulges underneath the surface and makes the edge look wobbly. Instead of pushing down, swipe sideways across the top, pushing the excess buttercream away from the edge and then lifting it off.
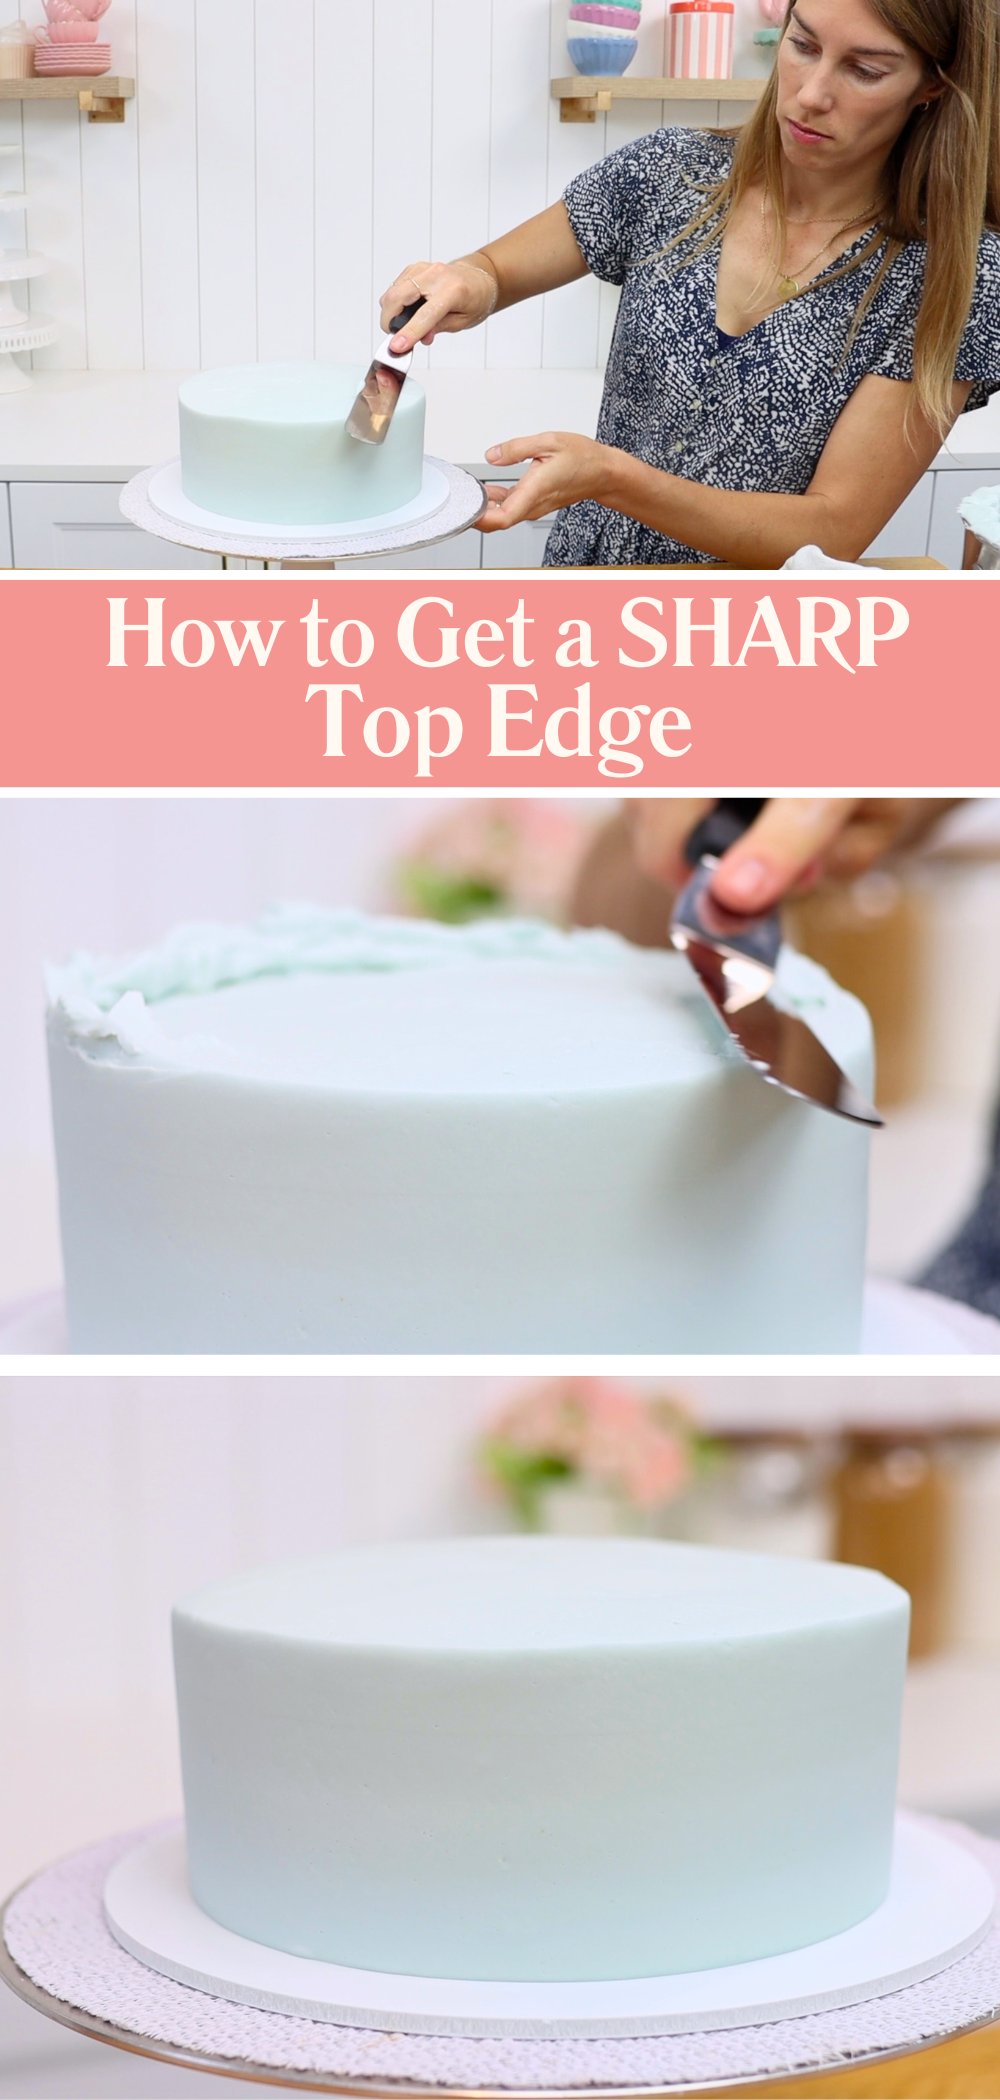
The next issue is swiping the top of the cake with a messy tool. This happens when you don’t wipe your
After each swipe, take a second to clean your tool before swiping again. If you forget and drag buttercream back onto the edge, just clean your tool and swipe again!
And finally, one of the most common frosting mistakes is... stopping too soon! When you've worked your way around the top edge of the cake, you might assume it's level but look closely! Get down to eye level and spin the cake, staring at the top edge as it spins. When you look closely you’ll see little bumps or dips, usually in between two swipes. You need to keep swiping over those dip or blips, wiping your tool clean after each time. Spin the cake again until the entire top edge is straight all the way around.
It takes a bit of time and patience to get super smooth frosting on a cake. Once you know what to look for and what to avoid, it becomes a lot easier. These 8 frosting mistakes are incredibly common but now you know how to fix them, your cakes will look smoother and more professional.
Tell me in the comments what part of smooth frosting you struggle with! And visit my cake school to learn hundreds of cake decorating techniques and designs with my online courses and memberships!
You can also watch a video of this tutorial on 8 Smooth Frosting Mistakes:
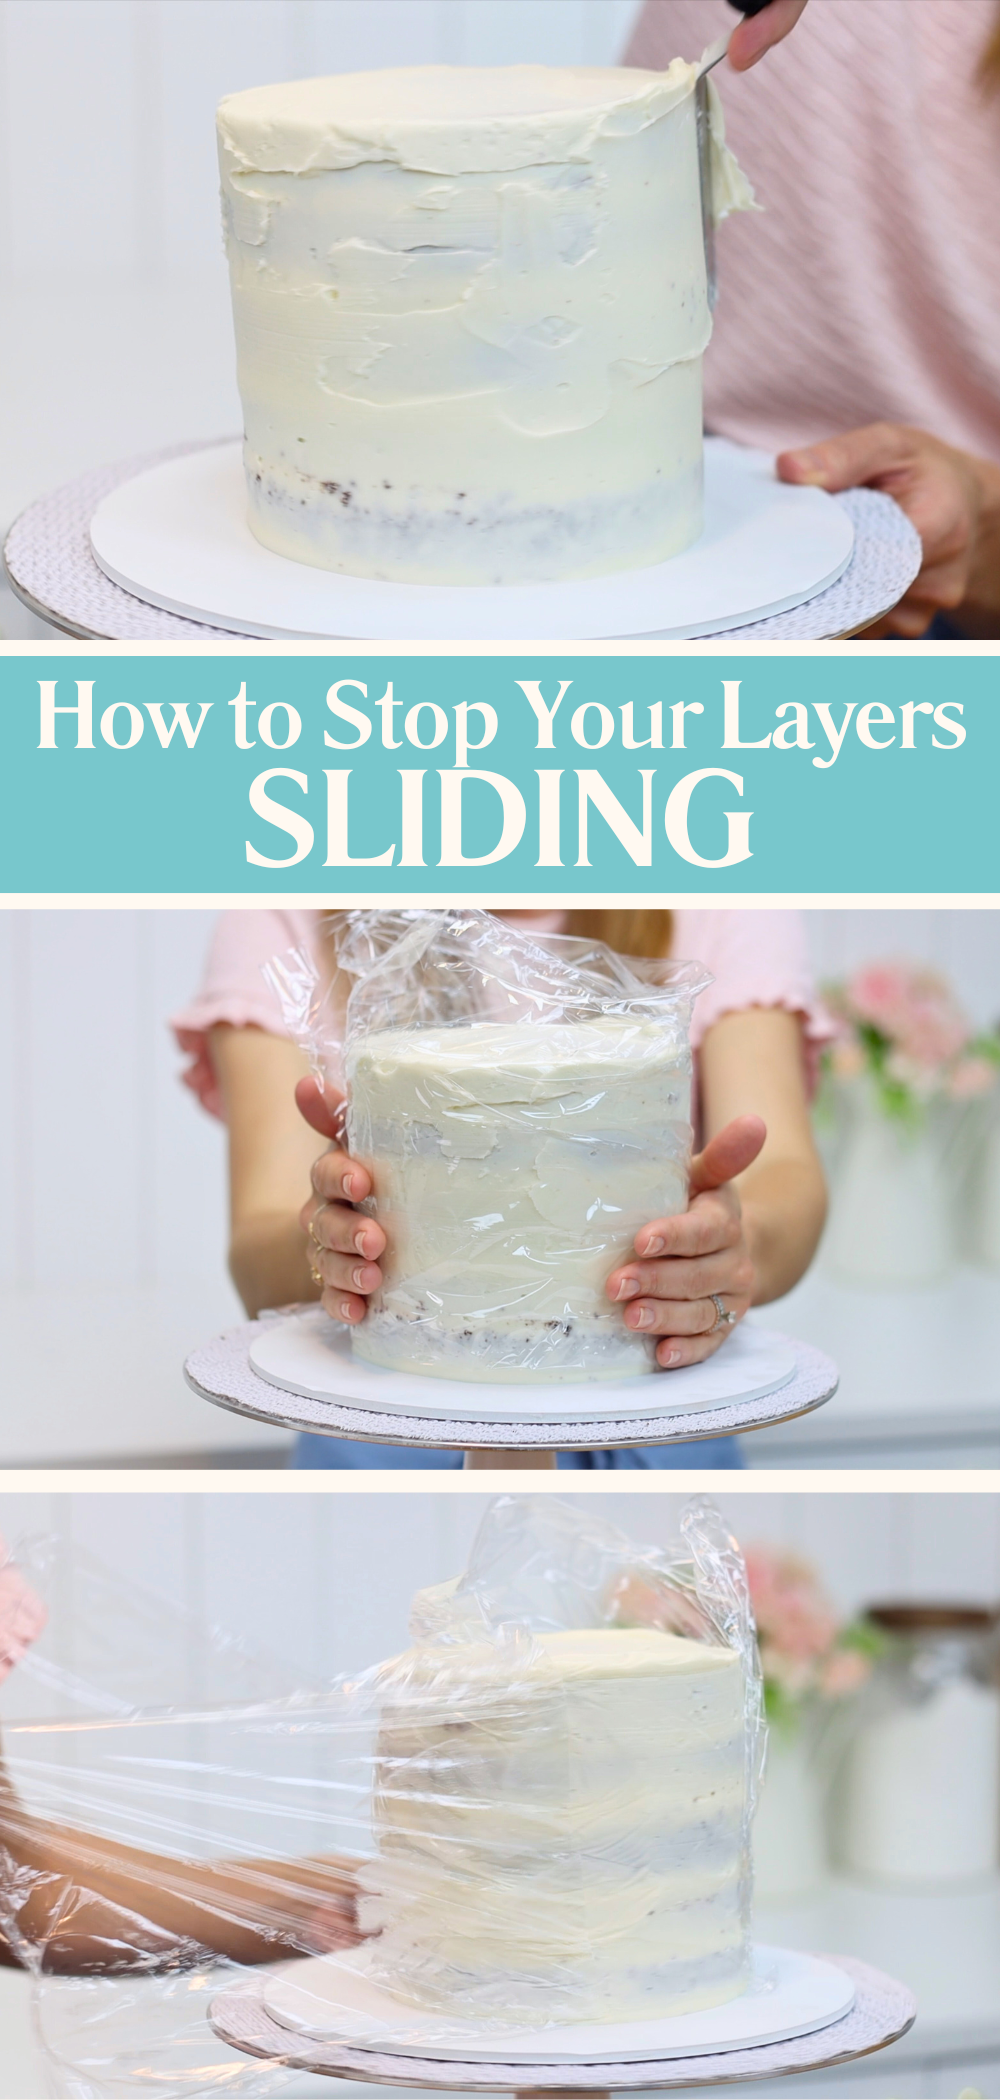
There’s nothing more frustrating than a cake that keeps shifting while you’re trying to frost it. Sometimes the whole cake moves on the board or the layers start sliding apart to make the cake lean. Either way, it makes decorating messy and stressful. If you're wondering how to stop cakes from sliding, you’re in the right place! In this tutorial I’ll show you why cakes slide and how to prevent it from happening!
One of the main reasons cakes slide happens right at the start, when you’re layering your cake. When you stack your cake layers with filling in between, it might look sturdy but if the bottom layer isn’t attached to the cake board, the whole cake can shift around. This happens because as you spread or smooth frosting, you’re pushing against the cake. Without anything securing it to the board, the pressure nudges it sideways. This makes it much harder to get neat, smooth frosting.
The solution is simple: use buttercream to “glue” the cake to the board. Spread a small amount of buttercream in the centre of your cake board before you layer your cake. Then place your first cake layer on top and press down gently. Now alternate between cake layers and filling to assemble the cake. Once the buttercream sets, it will hold the cake in place so it won’t move while you frost and decorate.

To speed up the setting of the buttercream "glue", put the cake in the freezer for 15 minutes before you frost it. If you prefer, you can put it into the fridge instead for 30 minutes. Chilling the cake will also make it less crumbly. Now frosting it will be much easier! I love to use my 4 Minute Buttercream to frost my cakes because it's easy to make, delicious, stable, and gets super smooth!
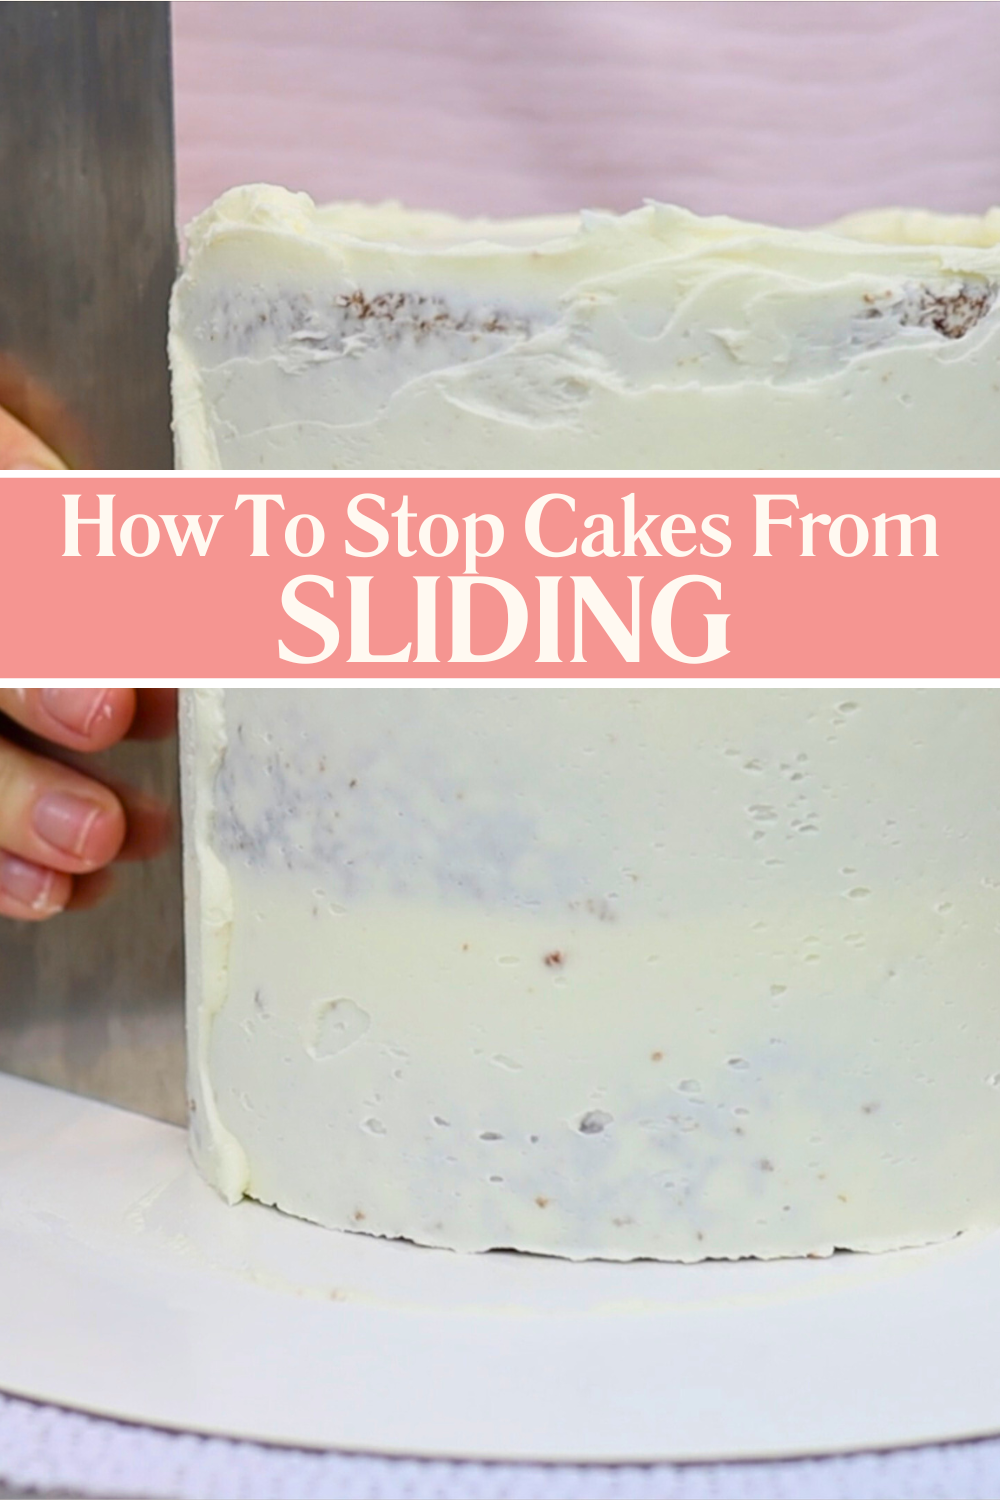
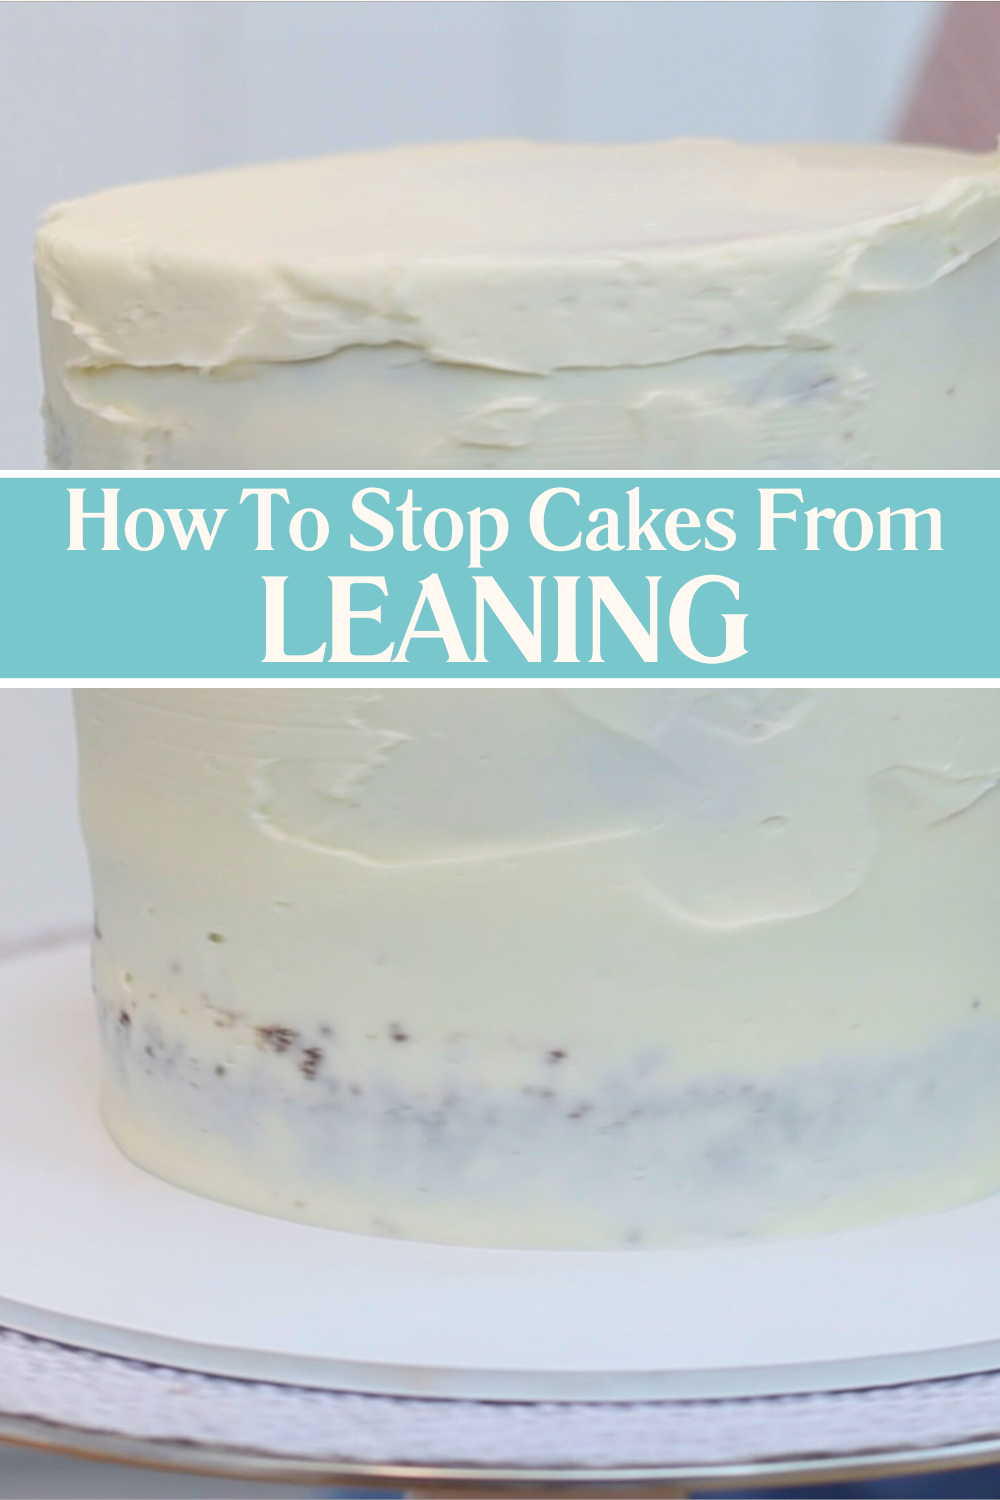
Maybe you’ve attached the cake to the board and it’s still sliding. In that case, the filling between the cake layers could be the problem. If the filling is soft, like fresh buttercream, it will allow the cake layers above and below to move. The pressure of spreading frosting around the outside can nudge the upper layers sideways. This happens even if the bottom layer is secure. As the layers shift, the cake starts to lean. If you keep scraping with your frosting smoother, it will never look straight.

To fix this, wrap the cake in cling film or Saran Wrap and gently push the layers back to the middle of the board. Now your cake will be straight. Then put it in the fridge for about 30 minutes. Once chilled, the filling will firm up and hold the layers in place. Then you can safely unwrap it and apply your final coat of frosting without worrying about the layers moving.
The best ways to stop cake layers from moving is to secure the bottom layer to the board and let your cake chill at key points. Here’s the sequence I use:
The extra step of chilling might feel like it slows you down but it actually saves time in the long run! With a secure cake, you won’t have to keep stopping to fix leaning or sliding.
Check out my tutorials to help with other common decorating issues like buttercream cracking and frosting bulges. And to improve your cake decorating skills, visit my cake school to learn hundreds of cake decorating techniques and designs!
You can also watch a video of this tutorial on how to stop cakes from sliding:
Save this tutorial to Pinterest for later with one of these pins:
From fitting tall cakes into short boxes to piping perfect decorations without any fancy tools, these 10 cake decorating skills will save you time and make your cakes look more professional.
Each of these cake decorating skills is simple to learn and uses tools or materials you probably already have at home. These techniques will help you build confidence and improve your results right away.
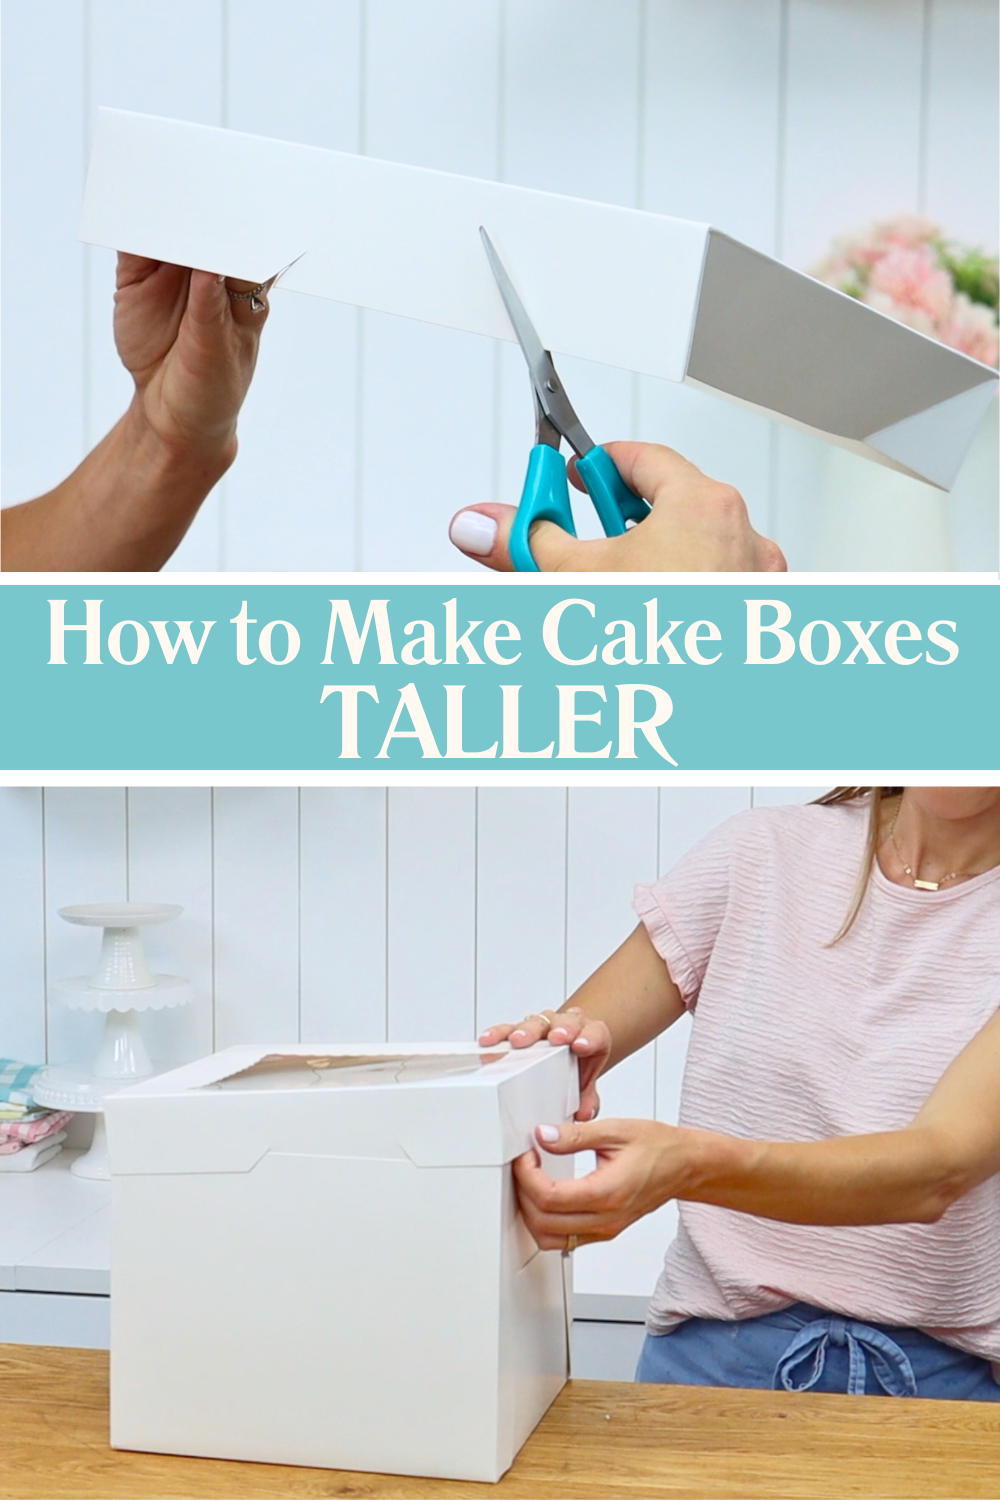
If your cake is too tall for your box, here’s the hack you need! Don't buy extra tall cake boxes just for an occasional tall or tier cake. Instead, use the boxes you already have! To make the cake fit, cut two diagonal slits into opposite sides of the lid. The shorter the slits, the taller the box will become. Push the middle flap (between the slits) inside the box, leaving the outer flaps on the outside. This raises the lid enough to cover your tall cakes neatly without crushing your decorations.
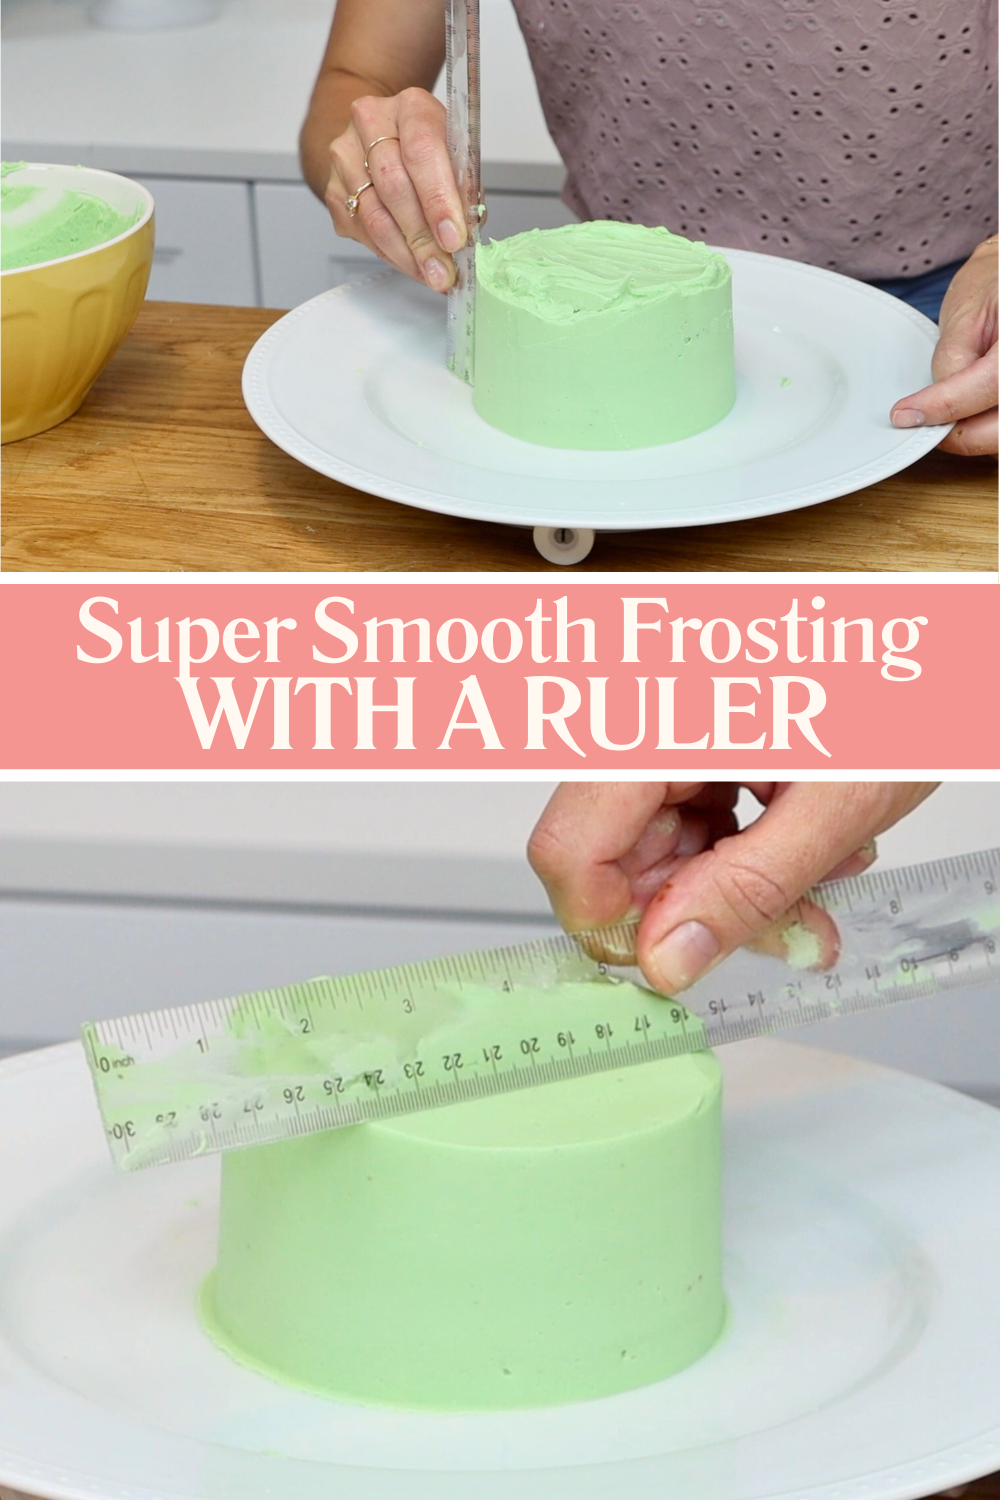
No tools? No problem! You can still achieve smooth, professional-looking frosting and piping.
Use a ruler instead of a cake scraper by resting the short end on your
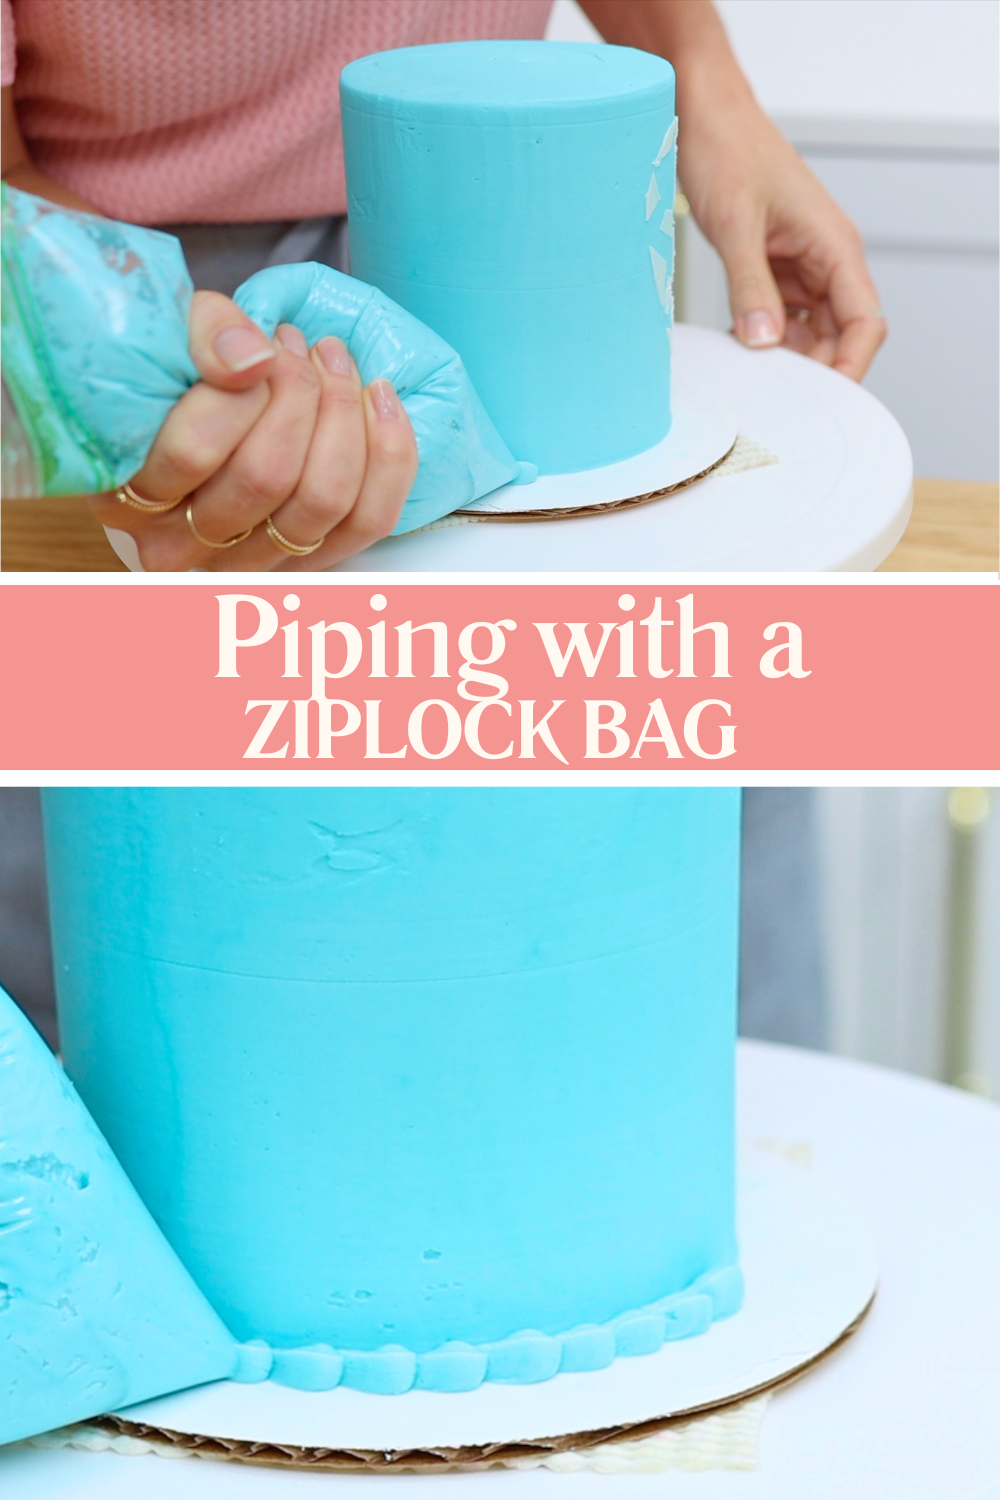
And to add piped details even if you don’t have piping bags or tips, fill a ziplock bag with buttercream. Snip off one corner and pipe dots, lines, or messages!
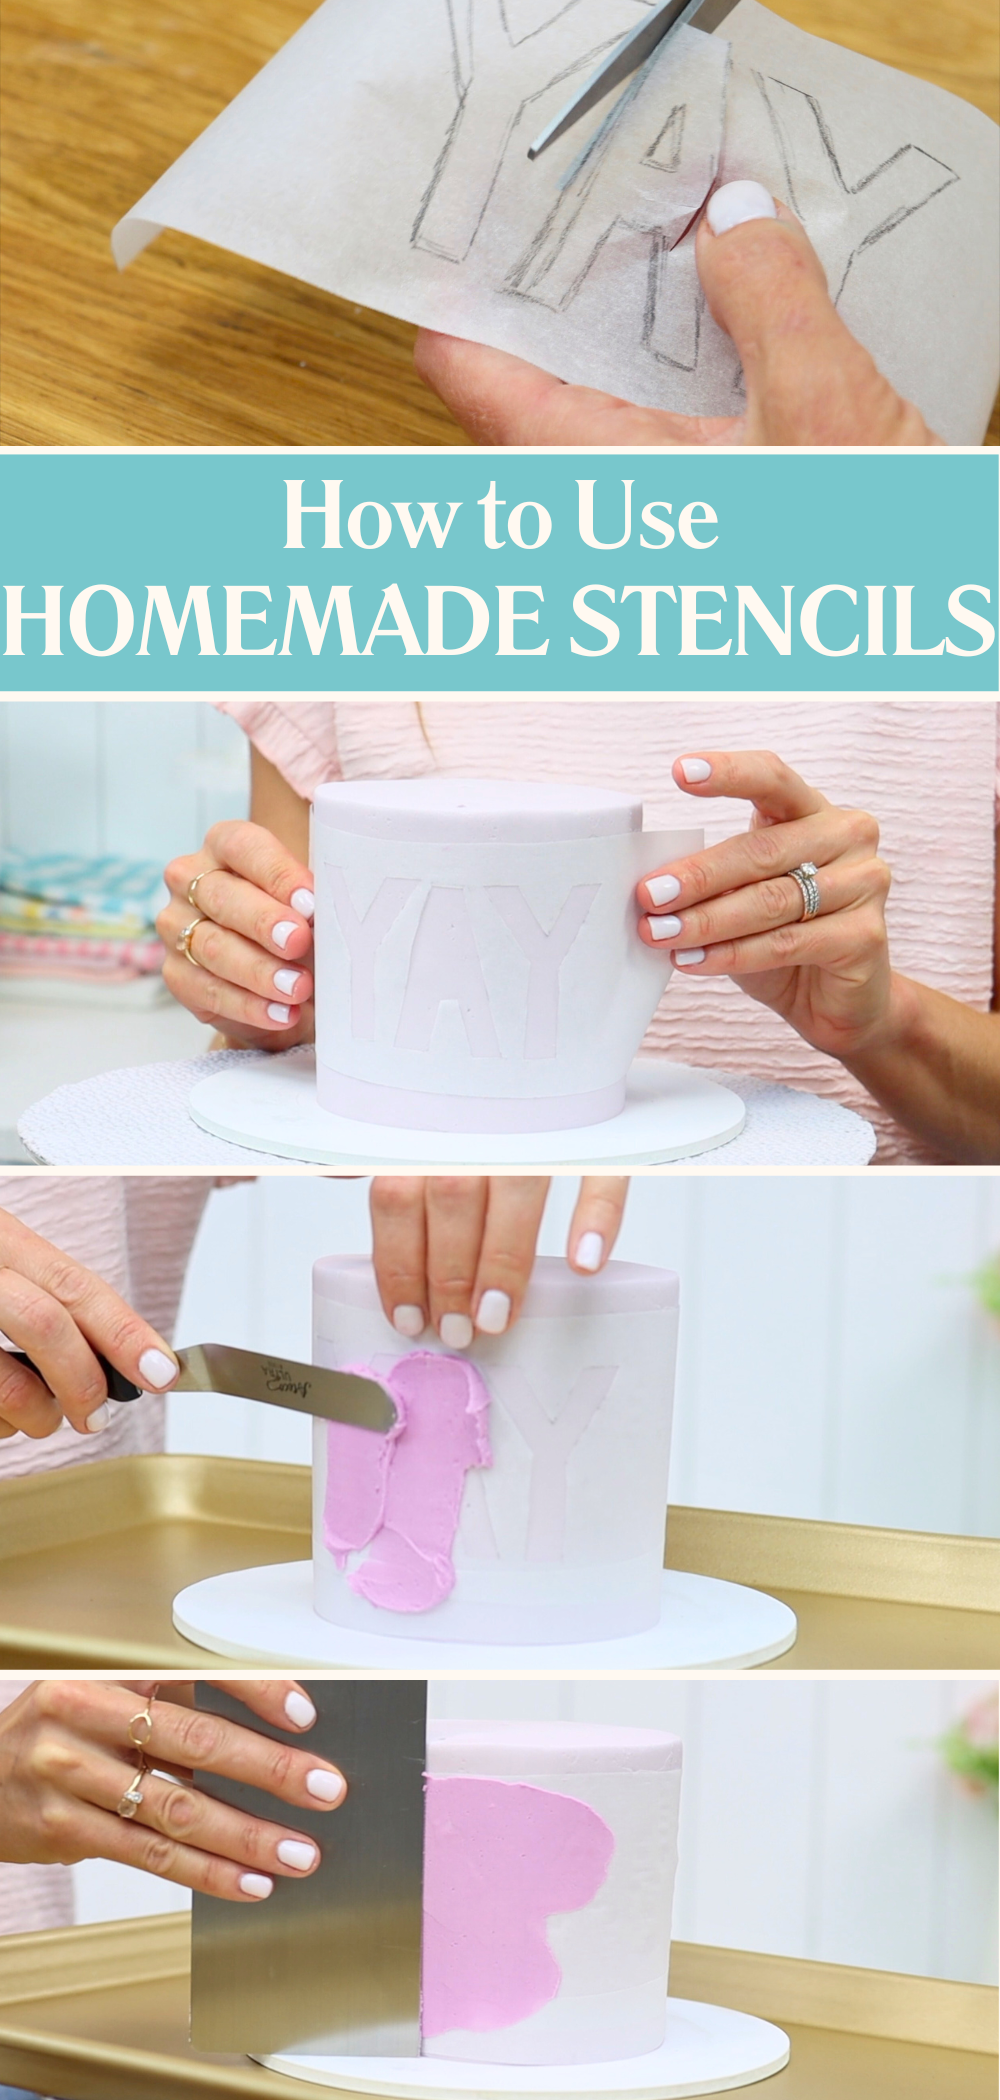
Instead of buying expensive cake stencils that you’ll probably only use once, make your own!
Draw your design or message onto parchment or wax paper and cut it out, keeping the paper around it in one piece. This will become your stencil.
To use stencils on cakes you'll need a 'crusting' buttercream, like my 4 Minute Buttercream. Chill the frosted cake for at least an hour before using your stencil. Wrap it around the chilled cake and then spread frosting over it, working from the outer edges towards the middle. This stops frosting from sneaking underneath.
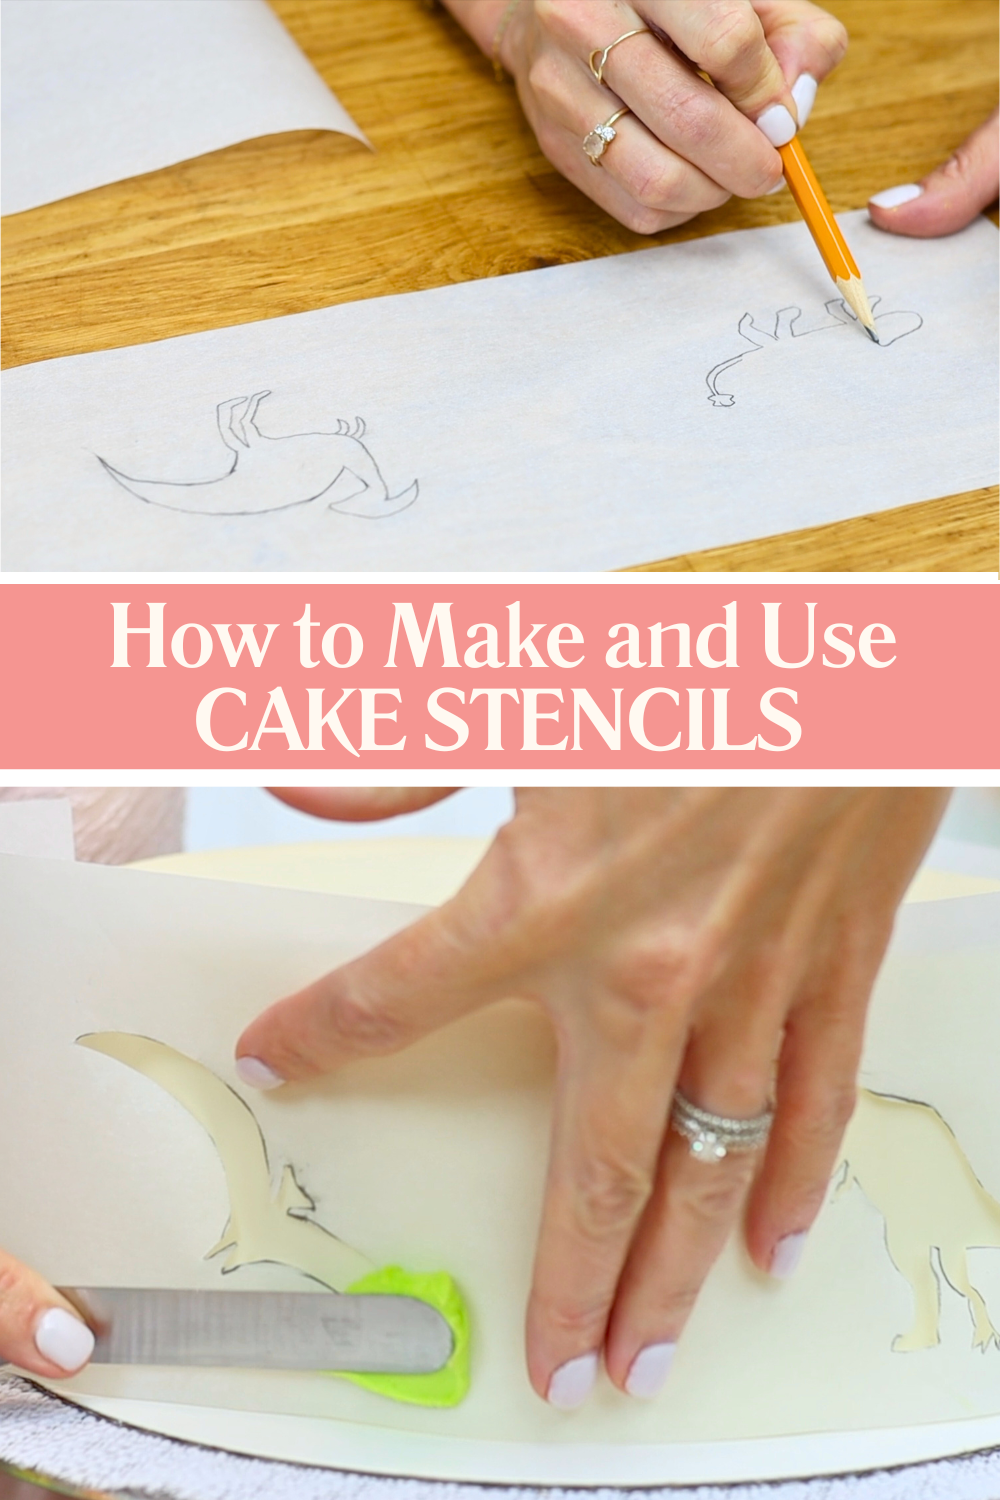
Scrape off the excess frosting with an

Mini cakes are trendy, fun, and easy to make without buying special pans. Just bake cupcakes and peel off the wrappers to make easy mini cake layers! Optionally, slice them in half to create extra layers for more layers of filling in between.
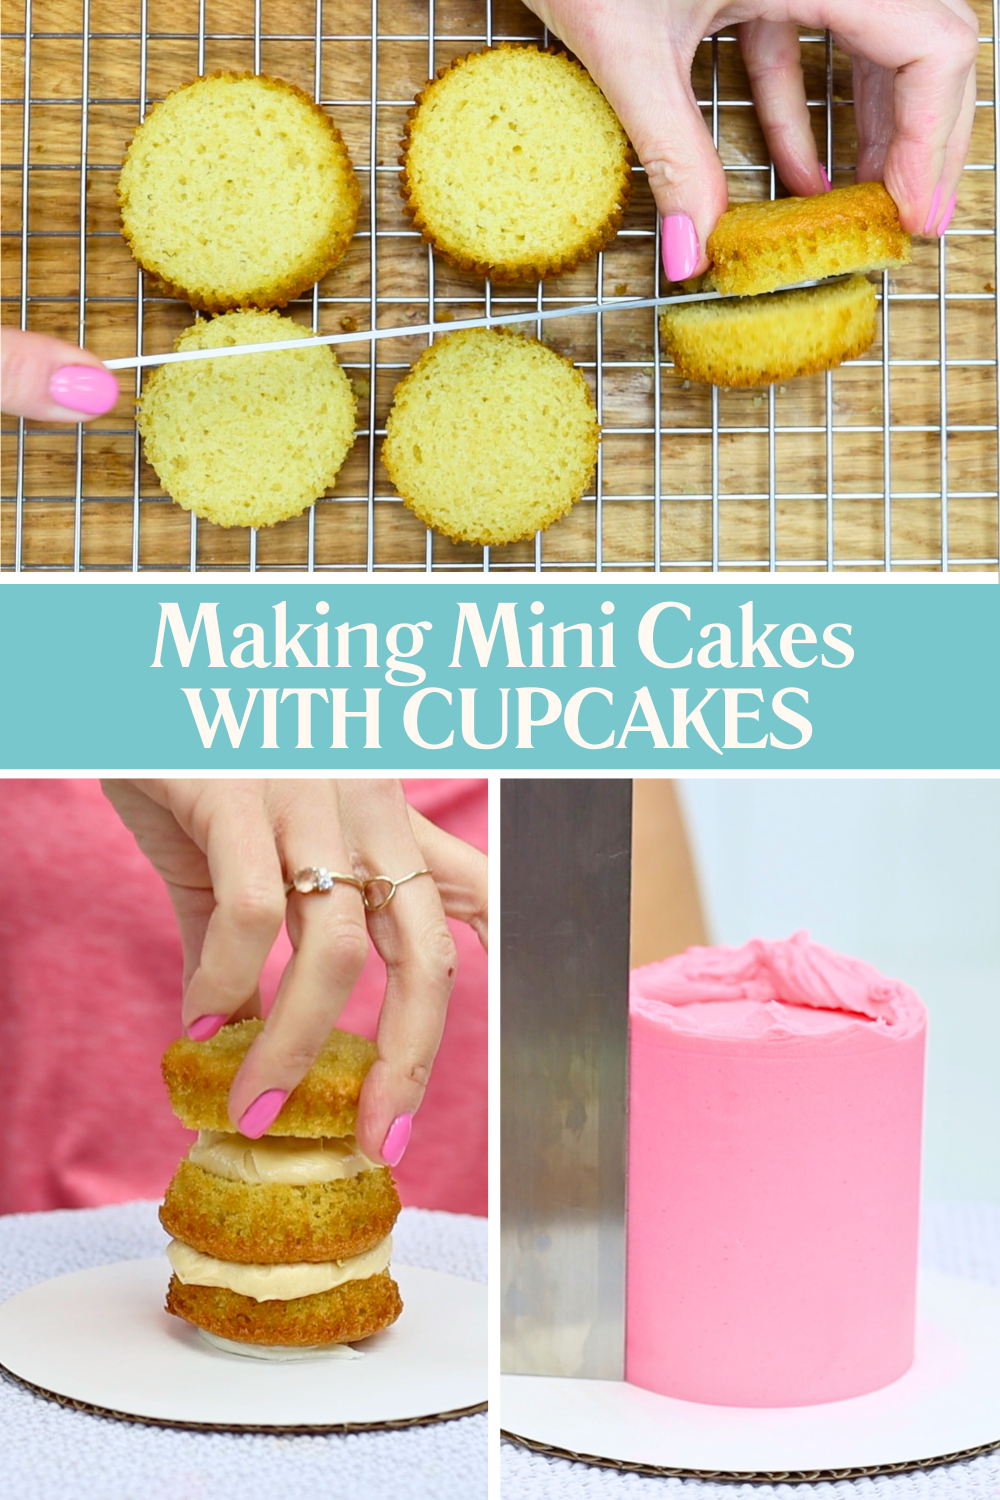
Spread some buttercream onto your cake board as glue to hold the first cupcake in place. Assemble the cake and then chill it in the fridge for 30 minutes (or the freezer for 15) before frosting. The cold, firm buttercream stops the cake sliding around or tipping over while you decorate.
We’ve all added too much milk or cream cheese to buttercream and ended up with frosting that’s too runny to smooth. Instead of starting again, skip the smooth frosting and choose texture instead! Try twisting the back of a spoon gently over the surface of your frosting to create soft arcs:
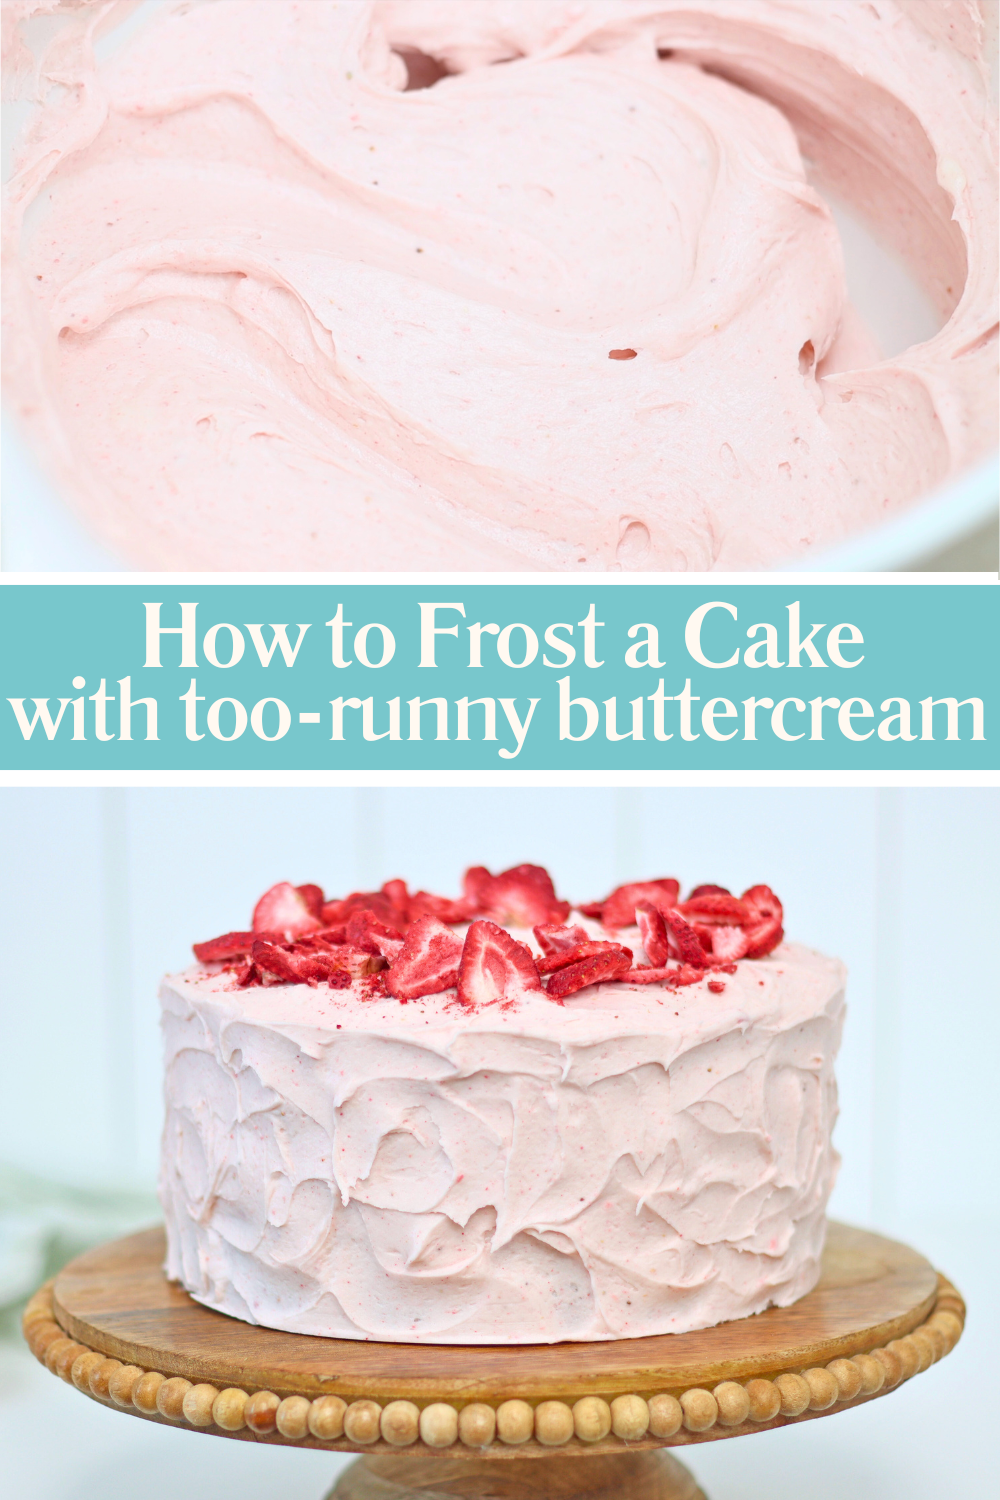
Another option is to press it lightly against the cake while spinning to imprint horizontal grooves, like eon my Banana Layer Cake. These rustic, textured designs are just as beautiful as smooth frosting.
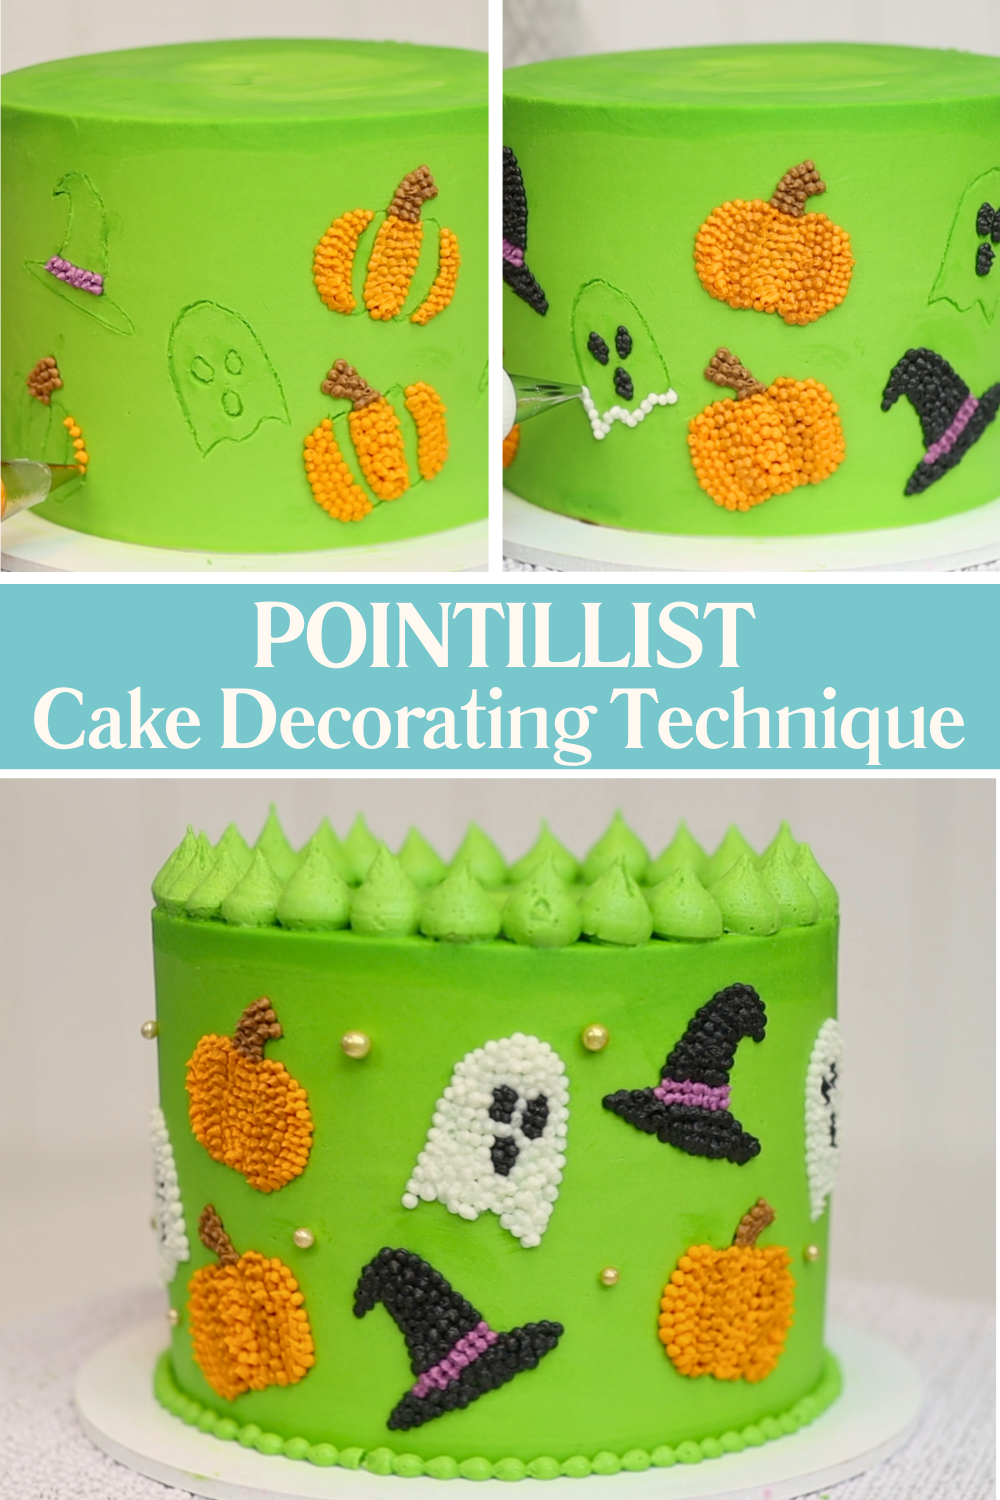
A toothpick is one of the most underrated cake decorating skills you can learn. Use it to sketch outlines before filling with piping, using the pointillist technique. Or fill the outline with frozen buttercream tiles to create a mosaic cake design.
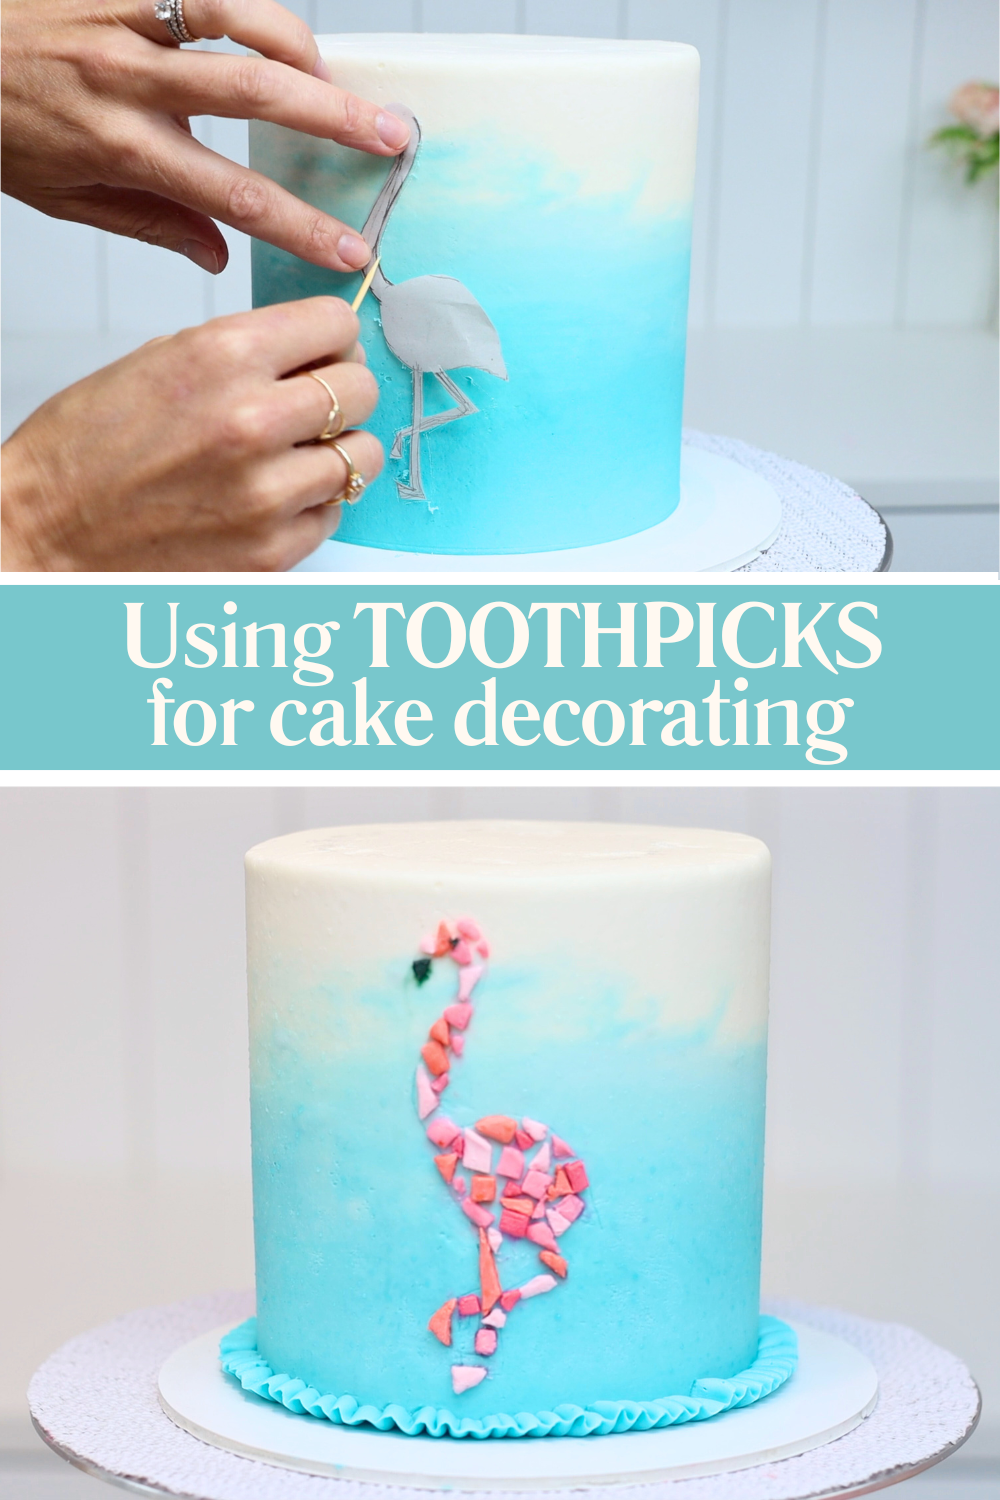
For messages, trace the letters with a toothpick first to make sure they’re centered on the cake. It’s a small step that makes a big difference in how neat your message looks.
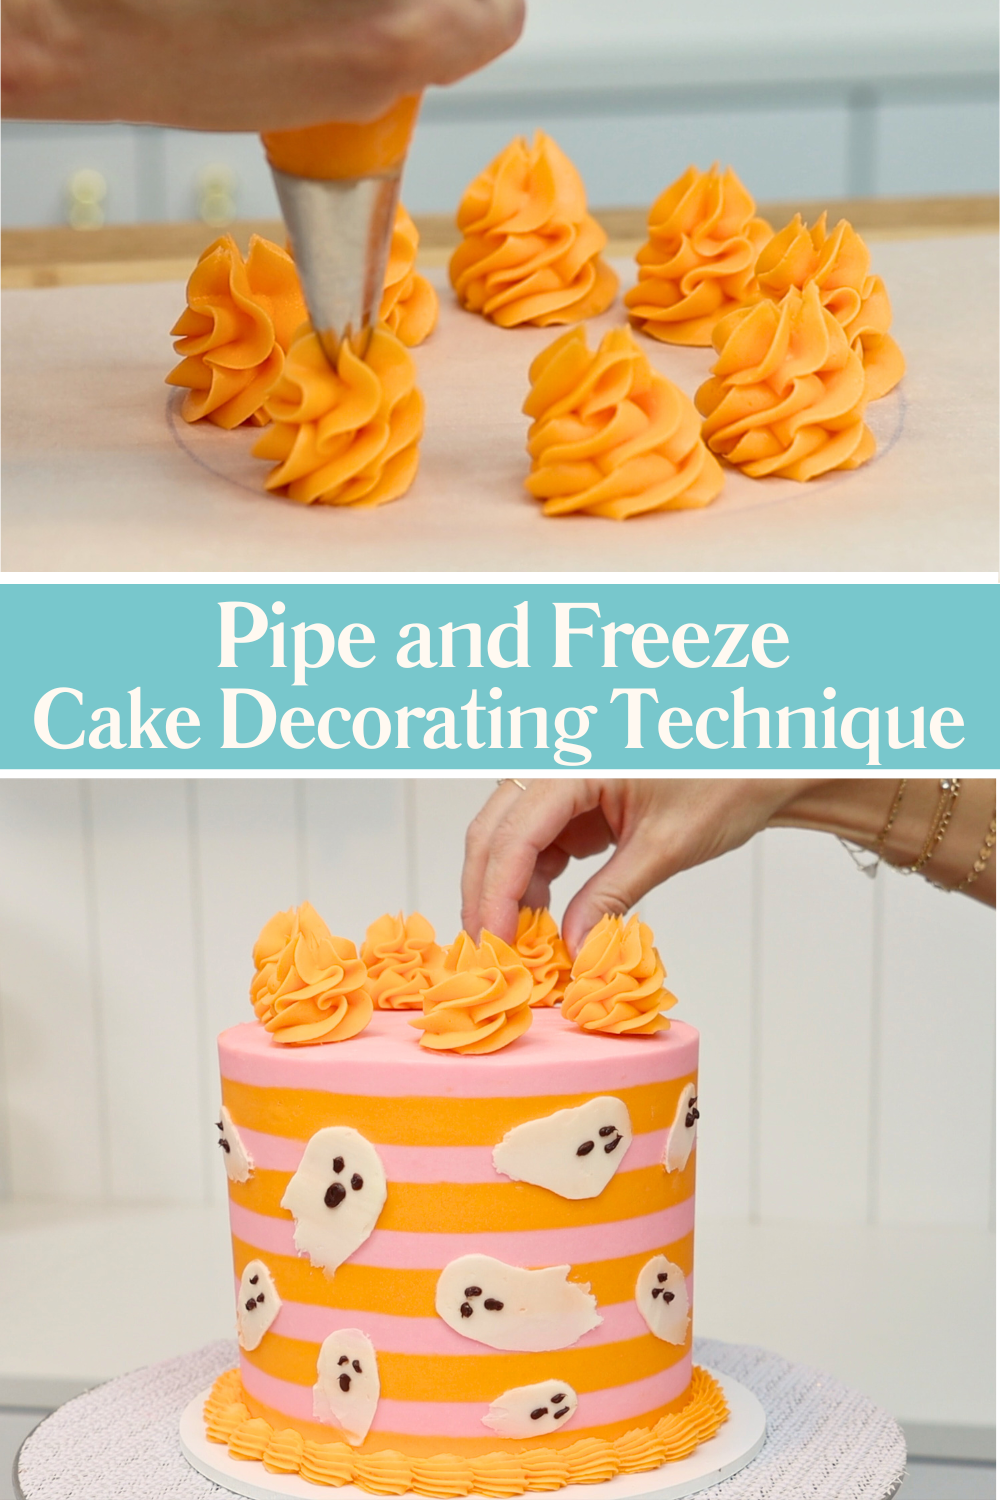
If you’re nervous about piping directly onto a cake, pipe your decorations onto parchment paper or wax paper first. Swirls, rosettes, or flowers can be piped, frozen for 10 minutes, and then transferred to your cake once they’re firm. This way, you can choose the best-looking ones and place them exactly where you want them. No pressure, no mess, no wasted buttercream.
Lunchbox cakes are an easy and affordable way to package and transport individual portions of cake. They're perfect for a gift or a surprise school or work lunchtime treat. You could also sell these single portions at a bake sale without needing extra packaging supplies.
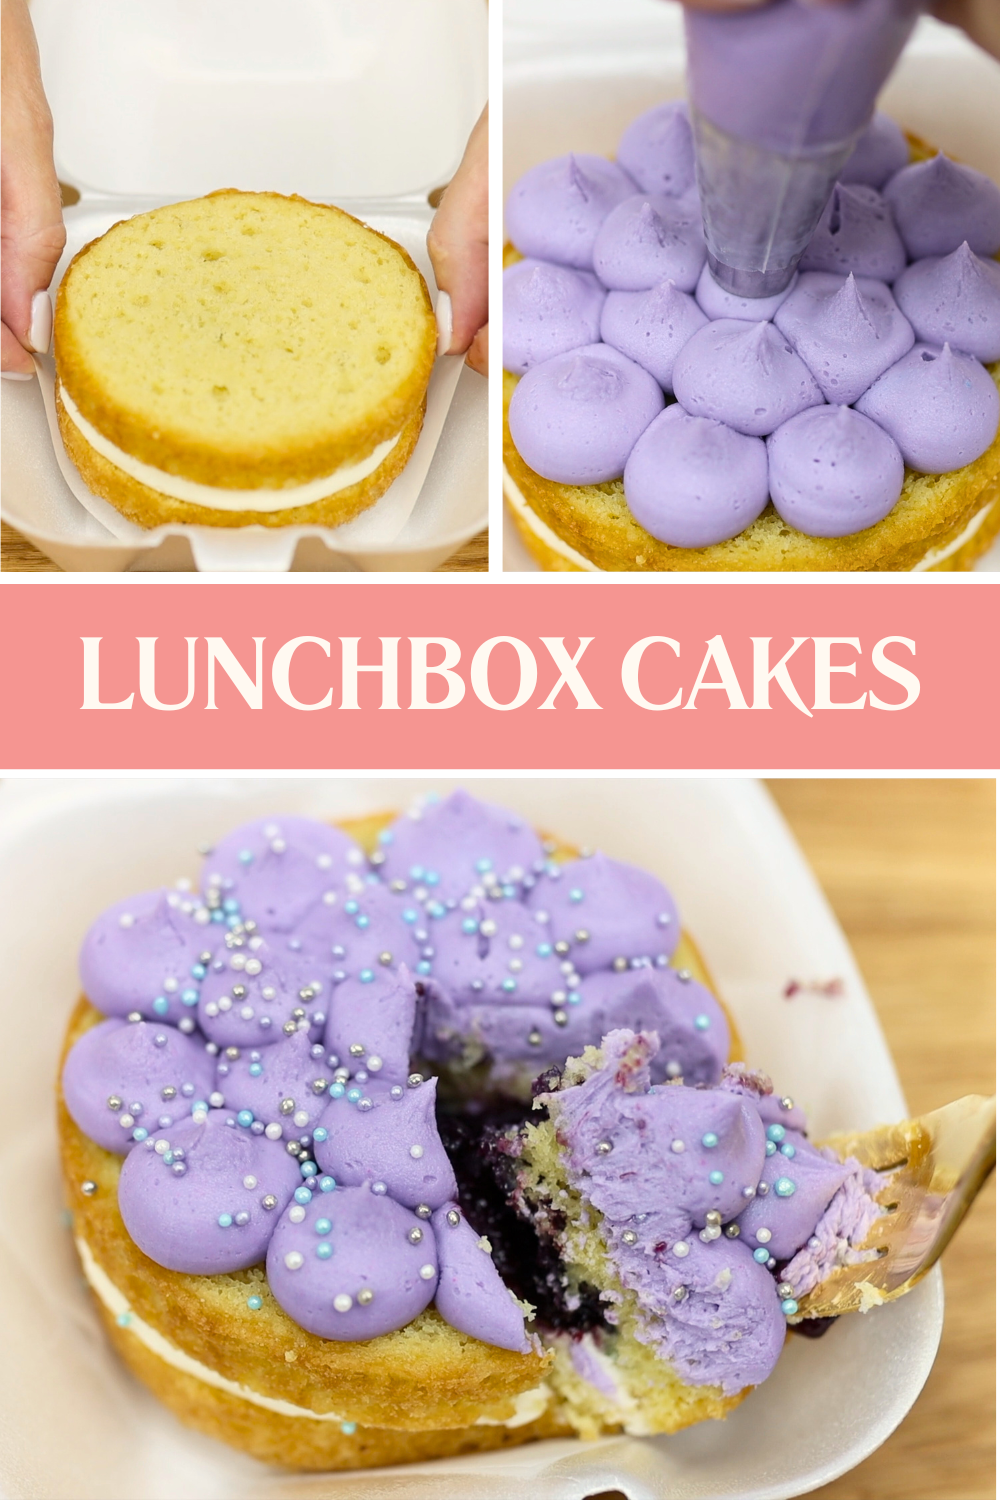
Start by assembling your mini cake on a small square of parchment or wax paper. Then lift and lower it into a takeout container. Add some piping on top, close the lid, and you’ve got a portable dessert!
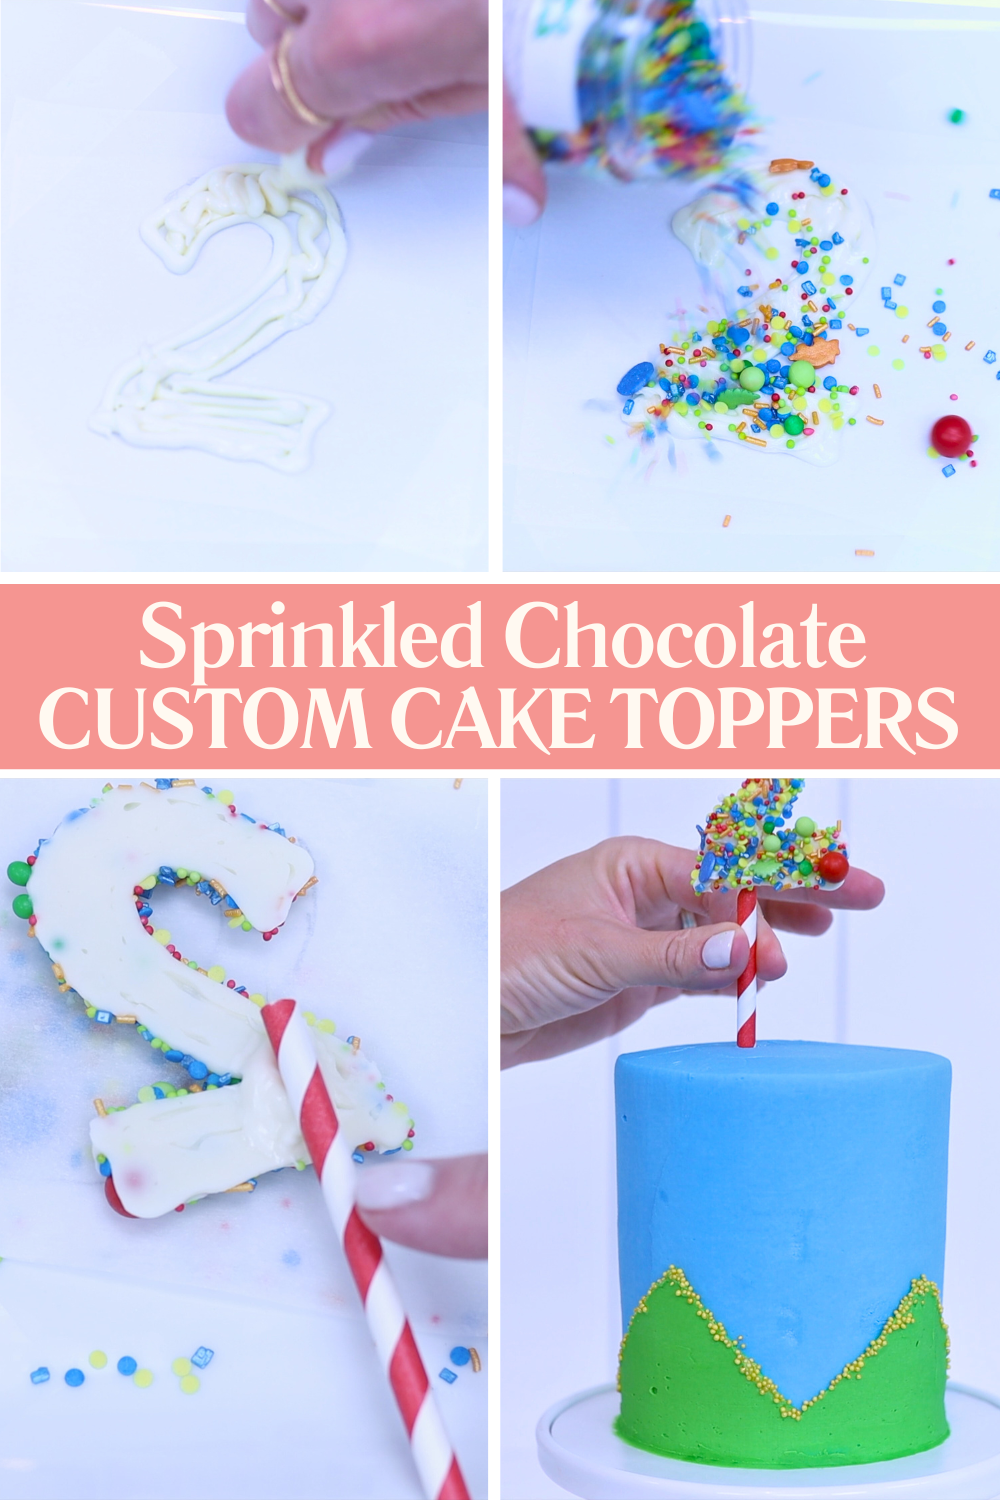
Make your own edible cake toppers using just melted chocolate! Spoon melted chocolate into a sandwich bag and snip off a small corner. Now pipe a number or letter onto parchment or wax paper. Add a toothpick to the base and pipe a little more chocolate over it to secure it. Sprinkle coloured sugar or sprinkles over the top while it’s still wet. Once it sets, peel it off the paper and push it into your cake. These are fun, colourful, custom toppers that stand upright beautifully.
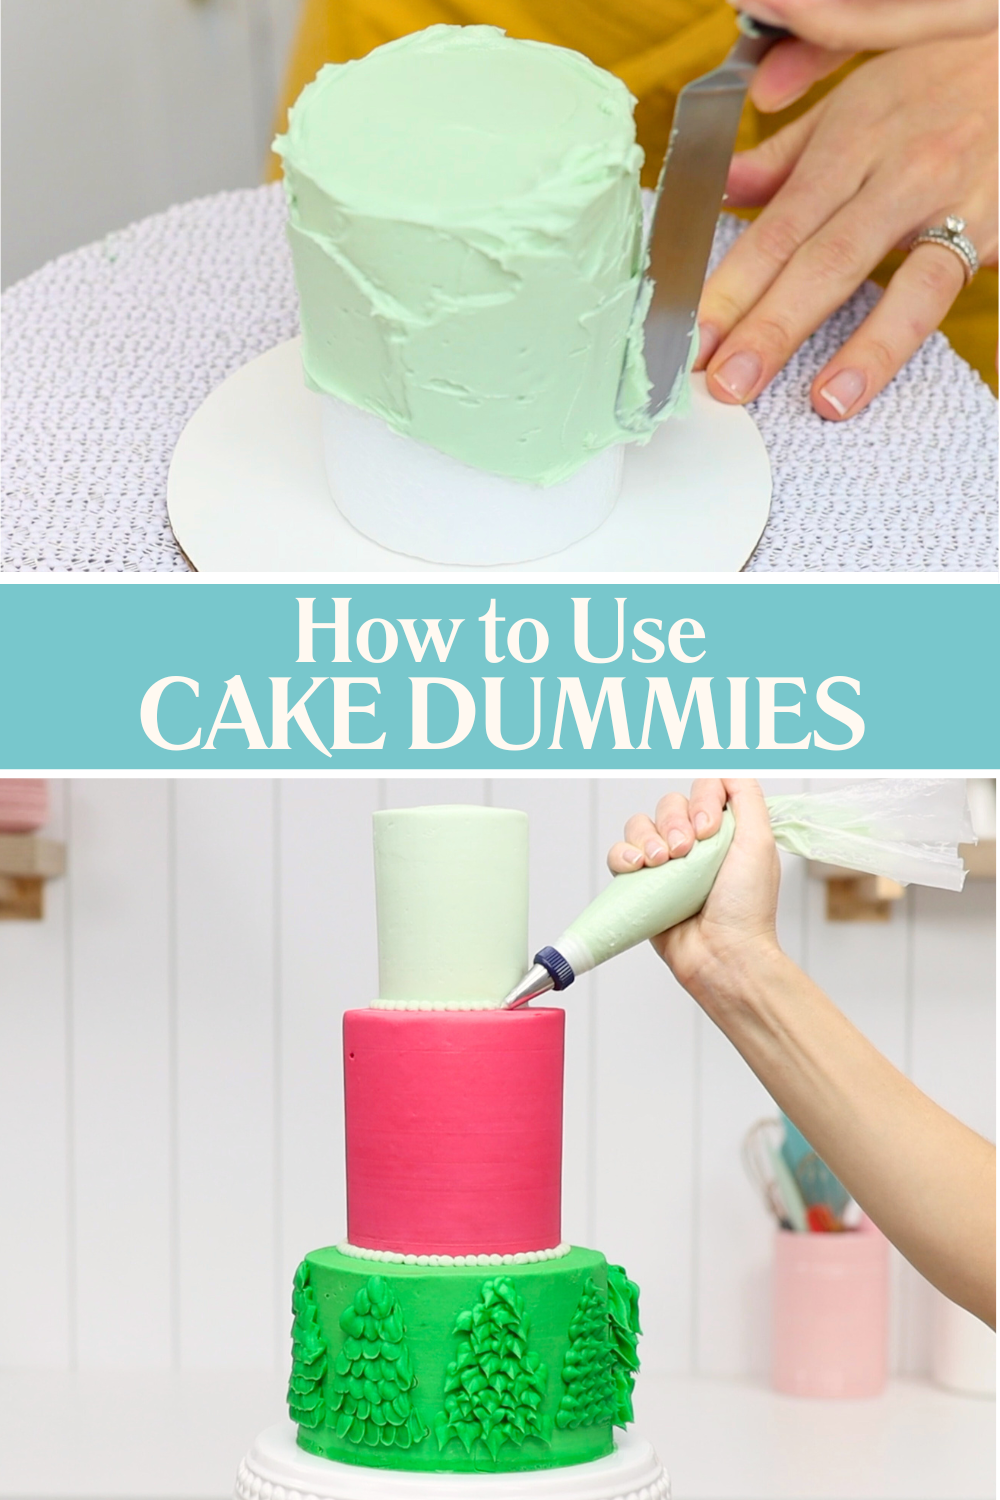
Tiered cakes look elegant but aren’t always practical if you don’t need the extra portions. To save money and prevent waste, use a styrofoam cake dummy to fake any of the tiers. Attach it to a cake board with a dab of buttercream and chill it to set that 'glue'. Then frost and decorate it just like a real cake. You’ll get all the height and style of a tiered cake without the cost or leftovers. And you can scrape and reuse the dummy as many times as you like!
I hope you've enjoyed these 10 cake decorating skills that make your life easier and your cakes look better. Tell me in the comments which one you’re going to try next and visit my cake school to learn hundreds more cake-decorating techniques and designs. See you there!
You can also watch a video of this tutorial on 10 cake decorating skills:
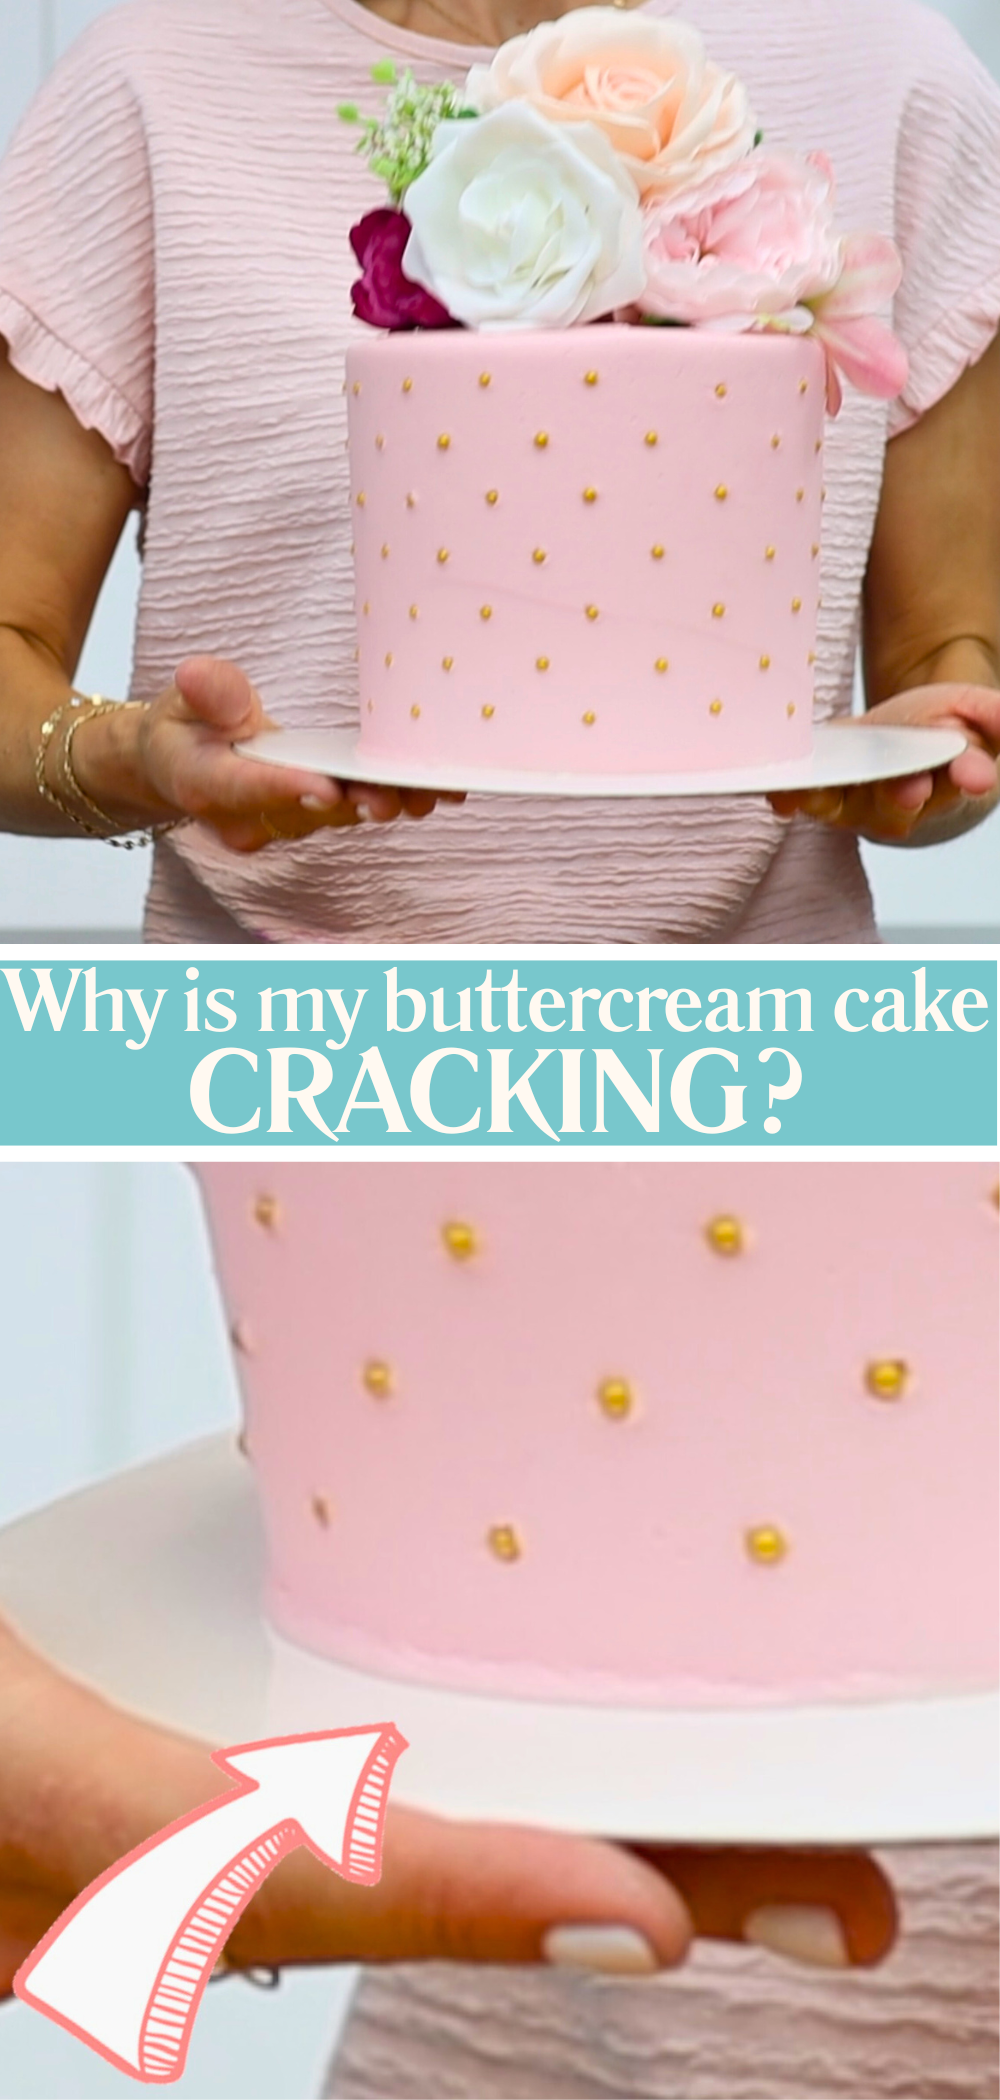
You’ve spent hours frosting and decorating your cake, only to check on it later and discover cracks in the frosting. If you’re dealing with buttercream cracking, the good news is it’s completely preventable once you understand what’s causing it.
In this tutorial I’ll walk you through three reasons buttercream cracking happens. I'll also show you exactly how to stop it from ruining your cakes.
When you first spread buttercream onto your cake it’s soft. I love my 4 Minute Buttercream and use it for all of my cakes! But after about 30 minutes in the fridge or a few hours at room temperature, the surface firms up. This is called crusting. Buttercream loses that slightly sticky texture and sets into a firm outer layer that feels dry when you touch it.
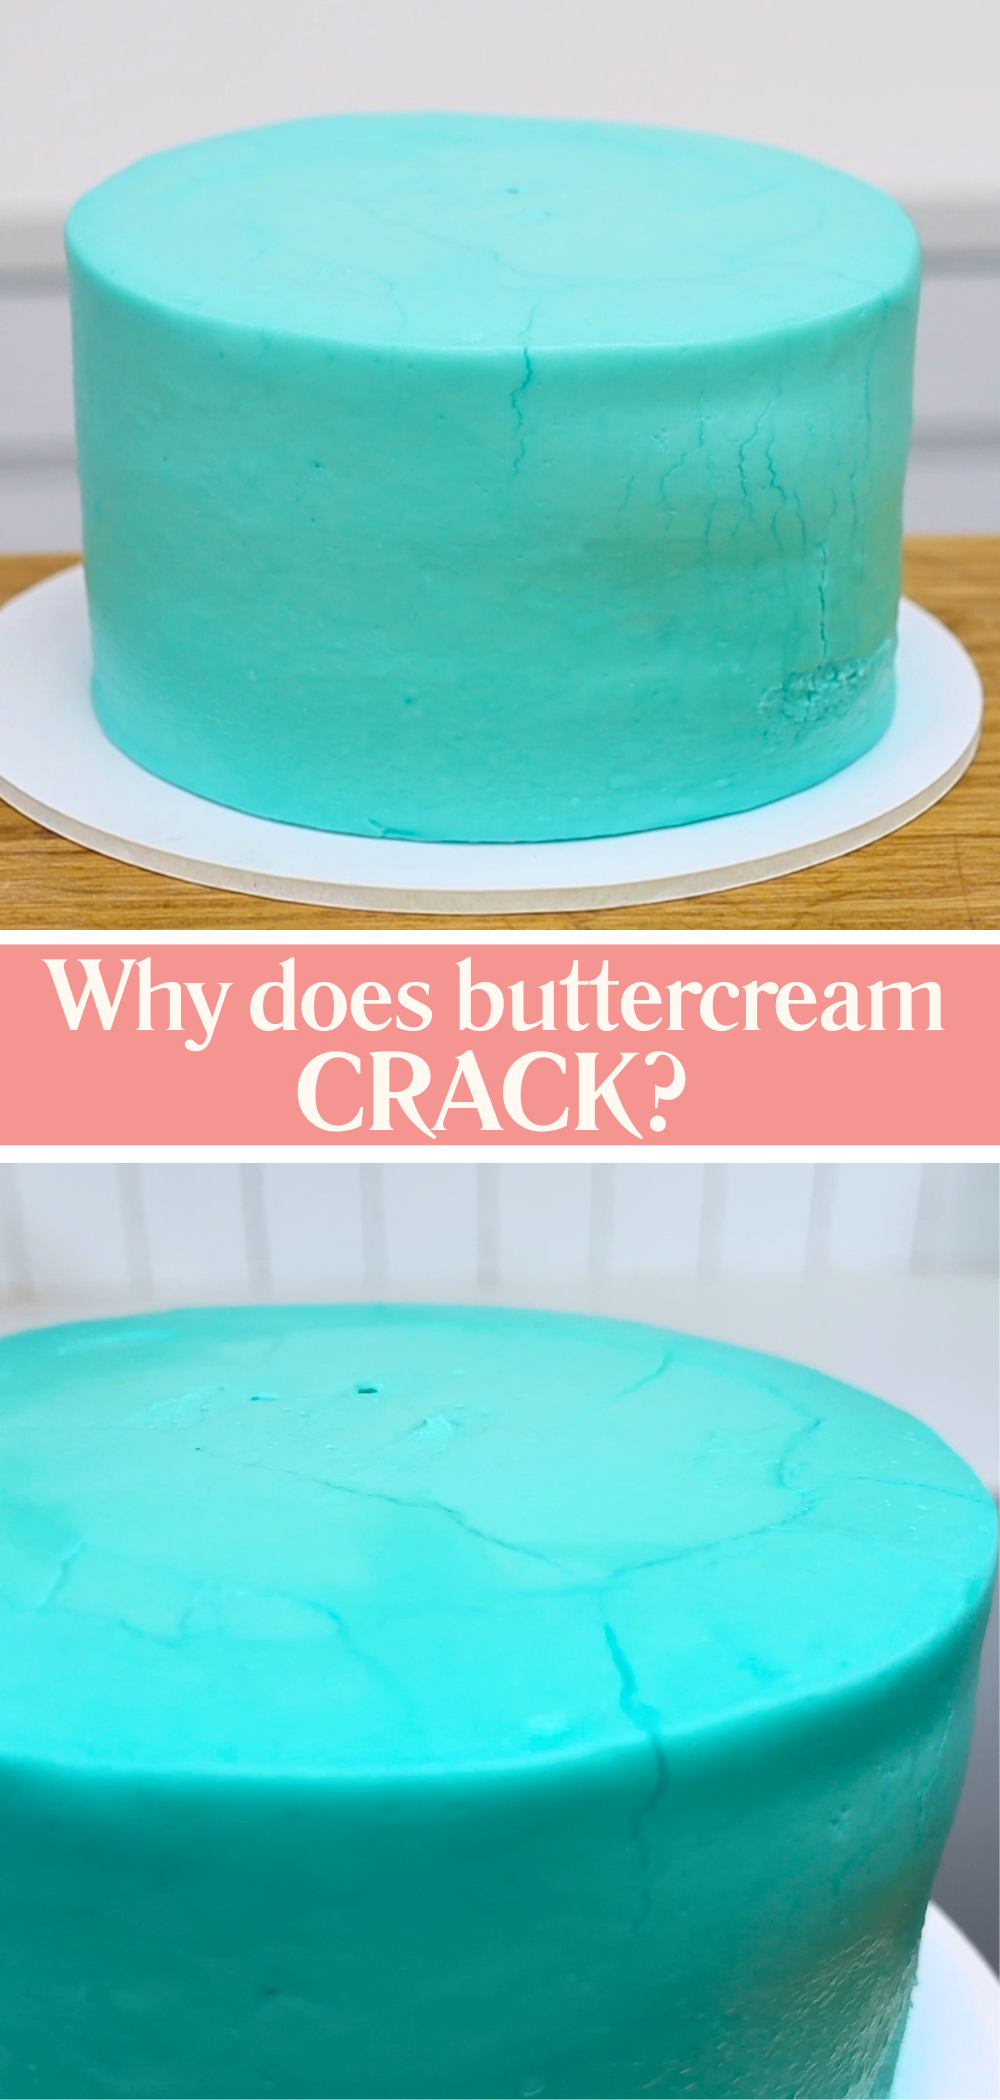
If the buttercream moves after it’s crusted, it can crack. And one of the most common causes of that movement is a bending cakeboard. Thin cakeboards can flex under the weight of the cake, especially when you're carrying it. Even a slight bend can shift the buttercream just enough to cause hairline cracks around the base of the cake.
How to prevent this: The easiest fix is to support your cakeboard properly. For a thin cakeboard, hold it with one hand underneath the middle to support the weight of the cake. Even better, use a thicker, sturdier board that doesn’t bend at all. That simple change will prevent the movement that causes buttercream cracking.
Another cause of buttercream cracking is temperature shock. Many cake decorating techniques require a cold cake, meaning it needs to sit in the fridge or freezer. When you take the cake back out, it moves from cold to warm suddenly. At room temperature the buttercream and the cake itself expand, but not at the same rate. That difference in how they warm up can lead to cracks forming hours later.
Cracks don’t affect the taste but are really frustrating when you've spent time and effort making your cake look pretty.
How to prevent buttercream cracking: Avoid moving your cake straight from the fridge or freezer into a warm room. Instead, transition it gradually. Start by moving the cake to a cool room or part of the room, away from direct sunlight. Let it sit there for a couple of hours before moving it into a warmer environment. The slower the change in temperature, the less likely you are to see cracks form in your buttercream.
The final reason for buttercream cracking happens when you stack cakes but forget to add supports.
For tier cakes, each upper tier needs two things:
Without those supports, the top cake will gradually sink into the one below it. After a few hours or during transport, the weight will cause pressure that pushes down through the buttercream, creating visible cracks in buttercream frosting.
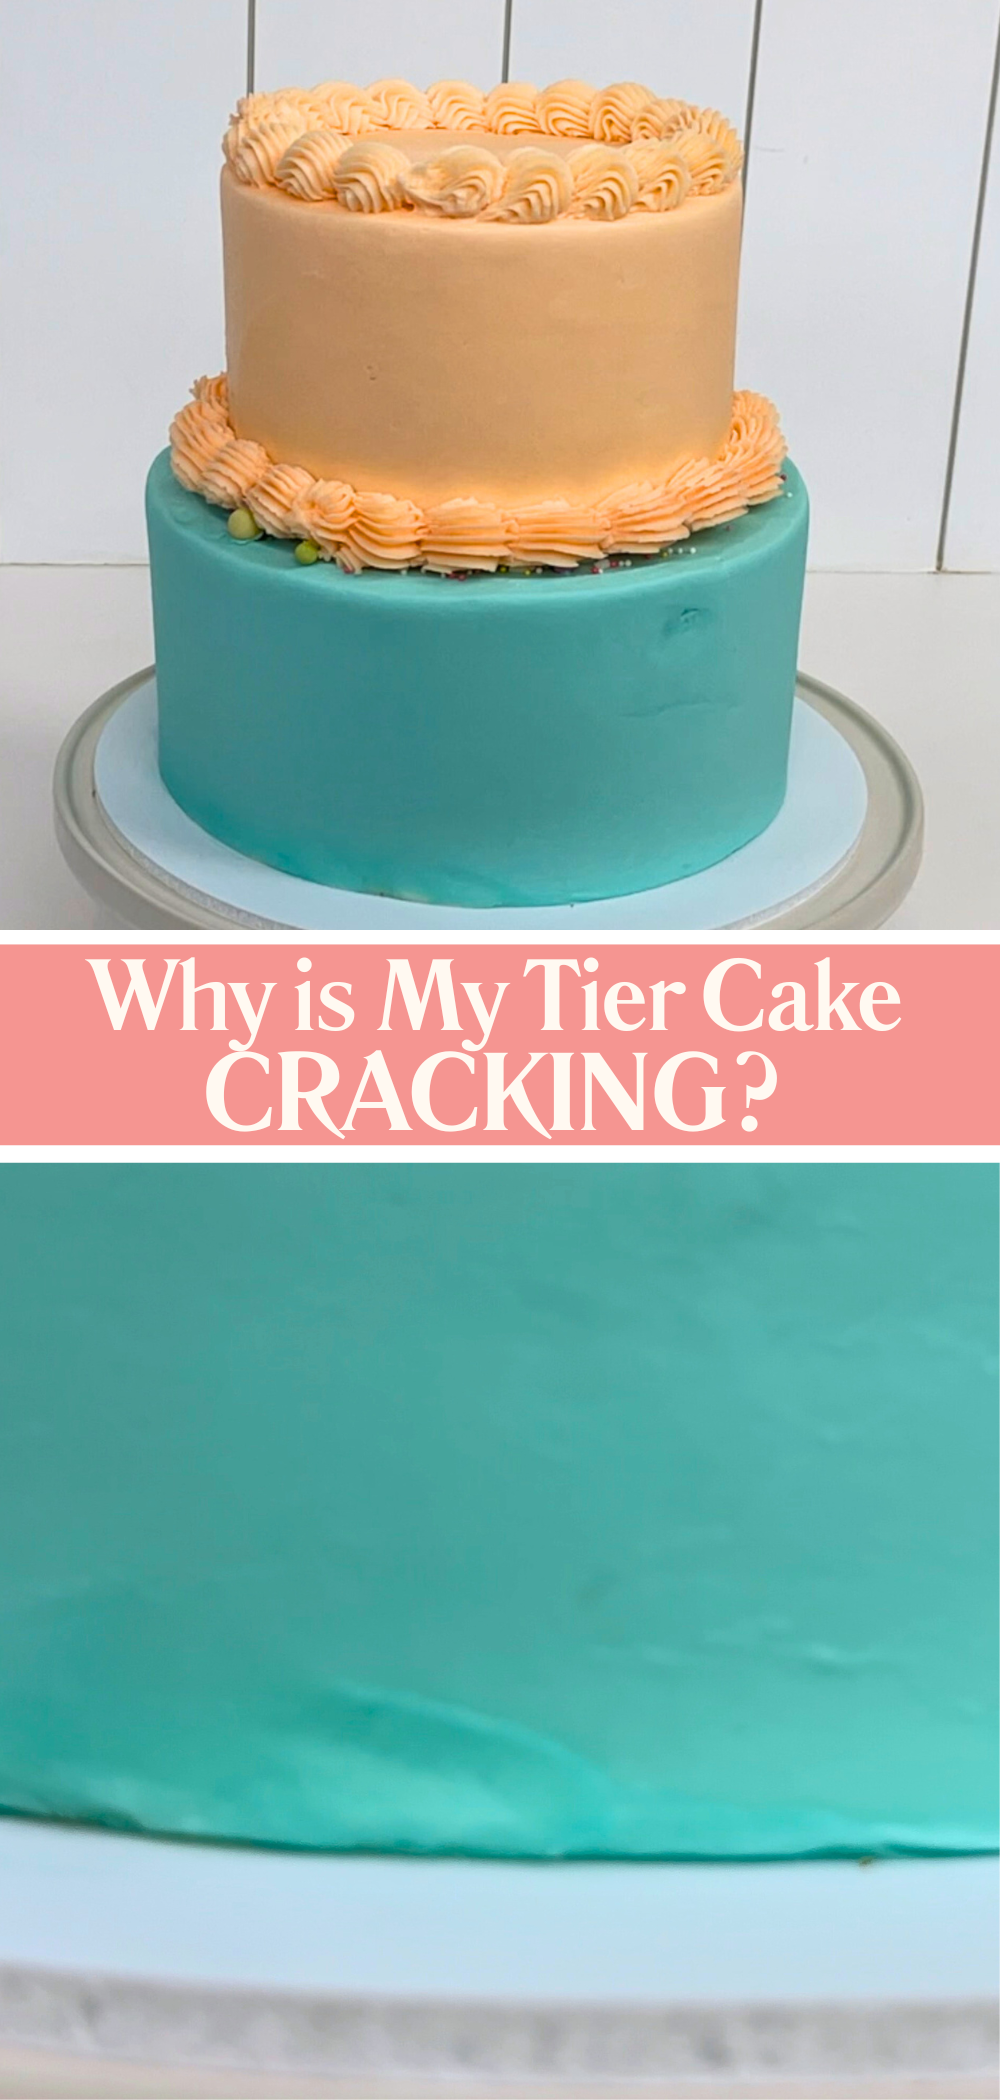
How to prevent this: Use dowels or boba straws as internal supports. Place four or five in the bottom cake in a circle where the top tier will sit. These supports act like legs under the top cakeboard, keeping the weight from pressing directly into the frosting below. As a result, your buttercream stays smooth and crack-free. Check out my tutorial on how to make a tiered cake for more details!
Cracks in buttercream are frustratingly common but preventable once you understand what causes them: movement, temperature changes, and lack of support. Plan ahead by choosing a strong cakeboard, managing your temperature changes carefully, and always supporting stacked cakes properly.
If you’ve got questions or want to share your own cake disasters and successes, leave a comment! I’d love to hear from you!
Now that you know how to avoid buttercream cracking, your cake designs can shine! Visit my cake school to learn hundreds of cake decorating techniques and designs with my online courses and memberships!
You can also watch a video of this tutorial on why cakes crack:
Use these colorful cake ideas to brighten up your cakes for any occasion! In this tutorial I’ll walk you through 8 fun and creative ways to decorate cakes with colour to make eye-catching showstoppers.
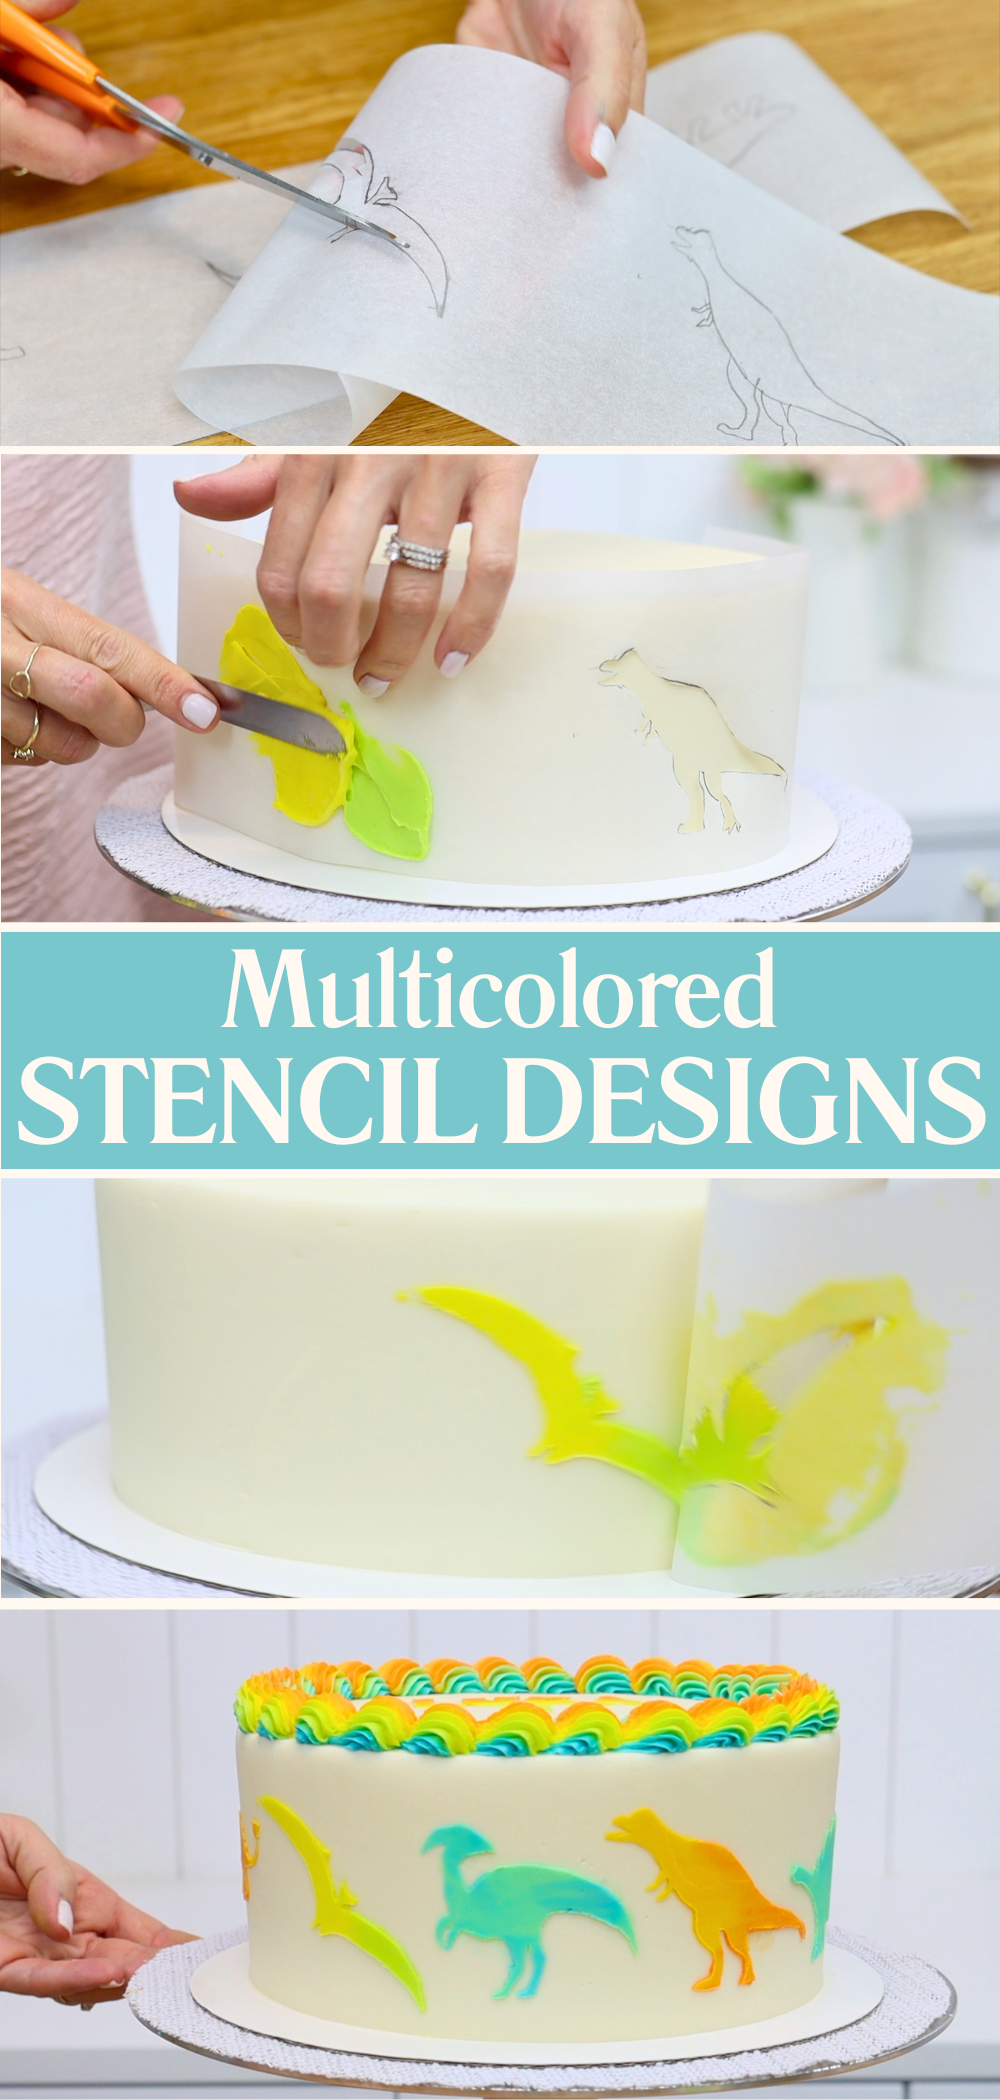
Homemade stencils are easy, cheap, and so versatile! To create your stencil, write a message or number on parchment or wax paper and then carefully cut it out. Leave the surrounding paper intact, which will be your stencil.
Chill your cake in the fridge for at least an hour to firm up the frosting so it's not soft or sticky. Then wrap the stencil around the cake. Spread buttercream over the stencil, using the same colour or any other colour, and place your cake onto a tray. Then press edible glitter or colourful sanding sugar into the buttercream. The tray will catch any falling sparkles.
When you peel the stencil off, you’re left with a fabulous, glittery message! Tip: Make sure your stencil covers up the cake all the way own to the cake board or wrap a second strip around the base to protect the frosting from stray sprinkles.
Watercolour frosting is one of the quickest and easiest ways to create striking, colorful cake ideas. Start by dabbing different colours of buttercream randomly around your cake. Make sure they blend nicely, since they will mix together. Scrape around the cake a few times to smooth and blend the colours. Then use any leftover frosting you scraped off to fill in gaps. The more you scrape, the more the colours will merge into a dreamy watercolour effect.
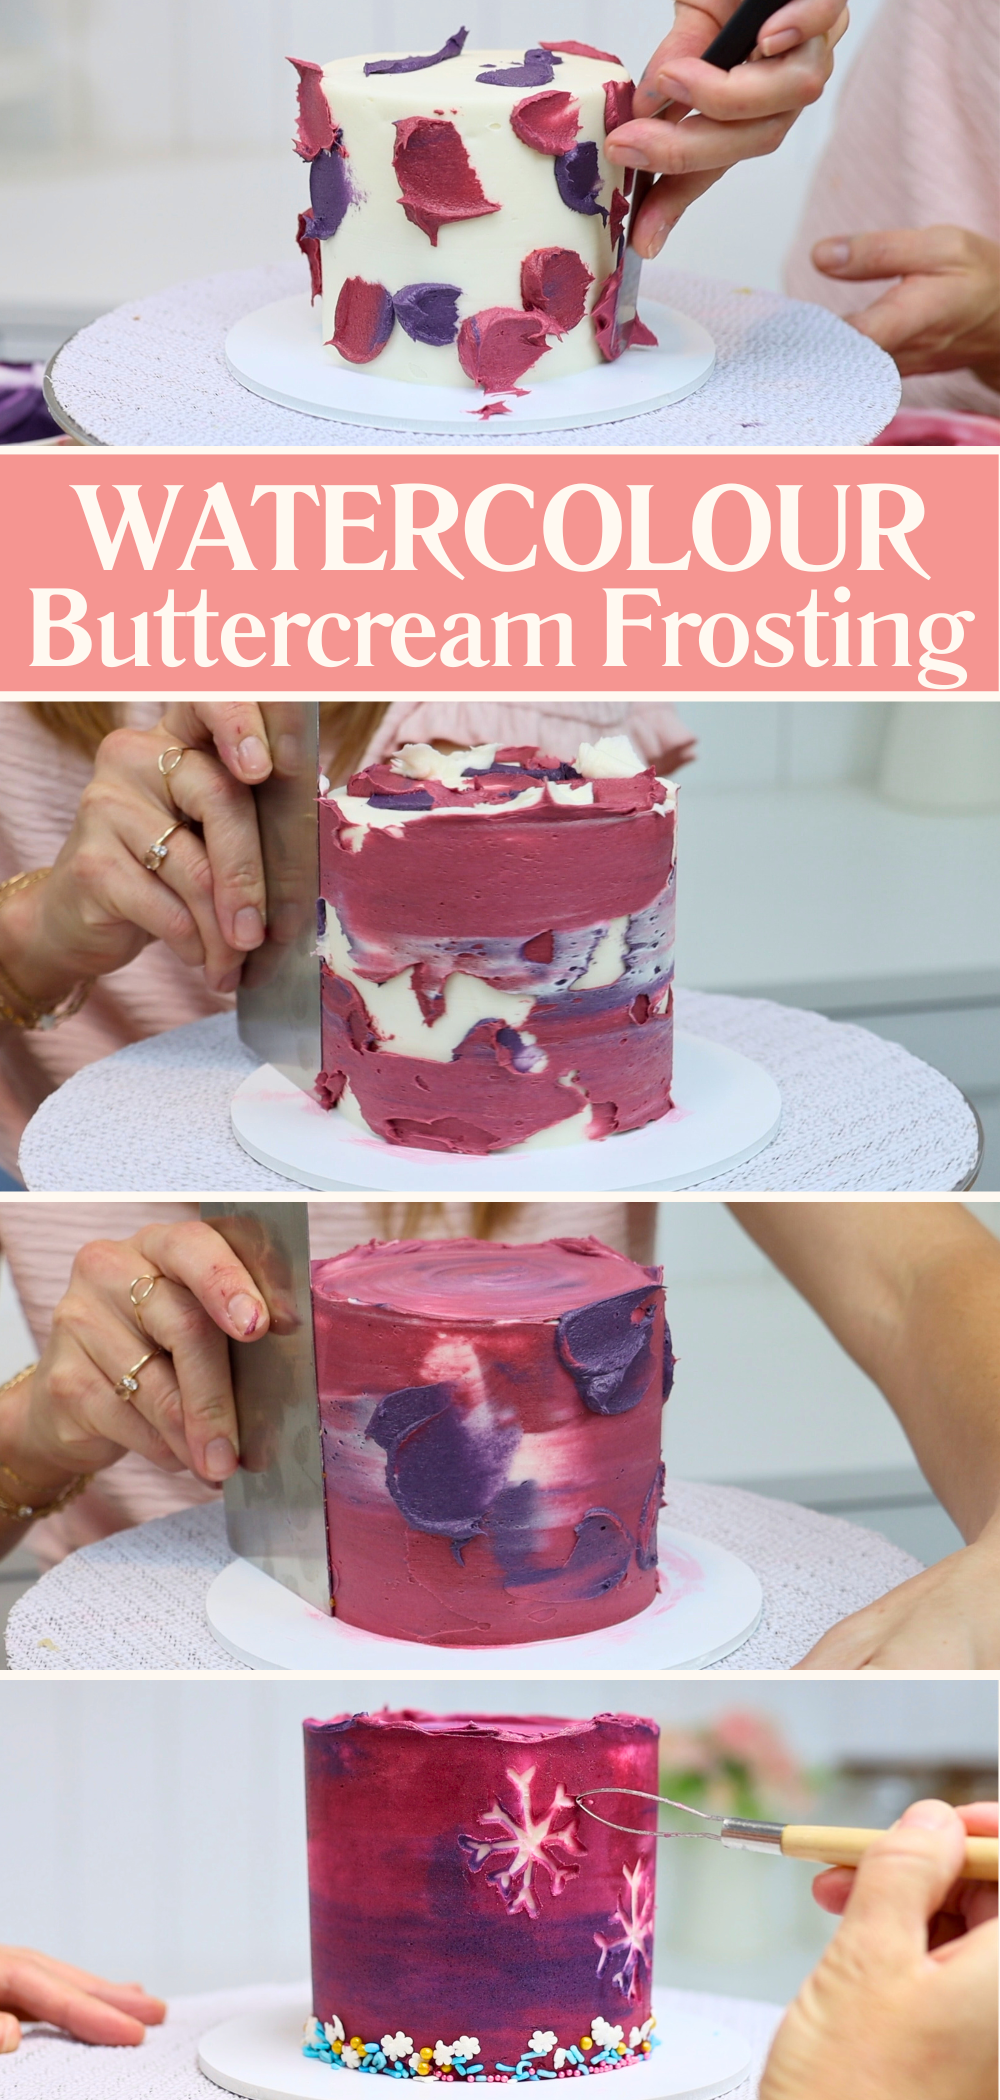
To take it up a notch, try carving into the buttercream to reveal layers of colour beneath. I teach this technique in my free course on 10 frosting techniques.
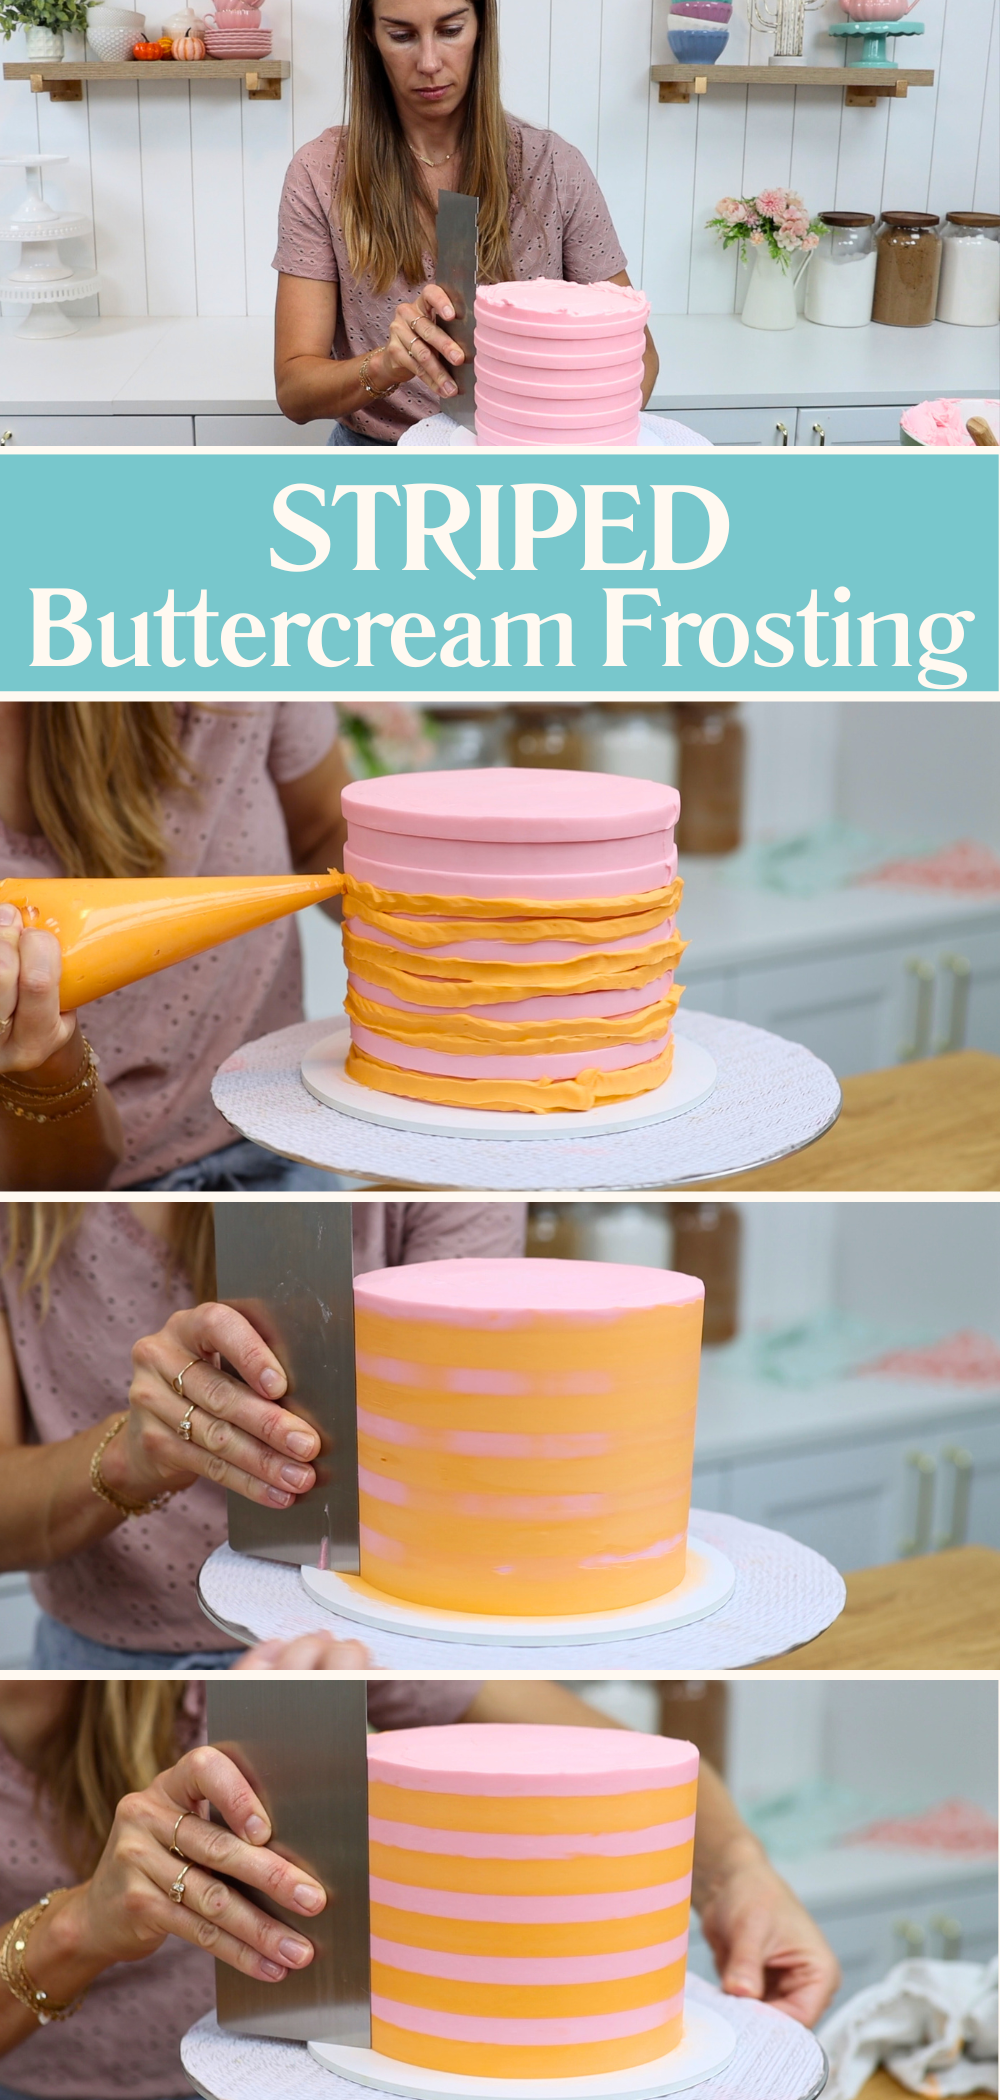
Incorporate multiple colours without blending with buttercream stripes. Start by covering your cake in your first colour and then use a striped cake comb to carve out grooves. Chill the cake in the fridge for 30 minutes (or 15 in the freezer) so the first layer sets. Then pipe or spread your second colour into the grooves.
Use a cake scraper to smooth the frosting but remember to trust the process! It’s fine if you smear the second colour everywhere before you've scraped all of the excess off. Keep going and you'll reveal perfect, clean stripes by the end.
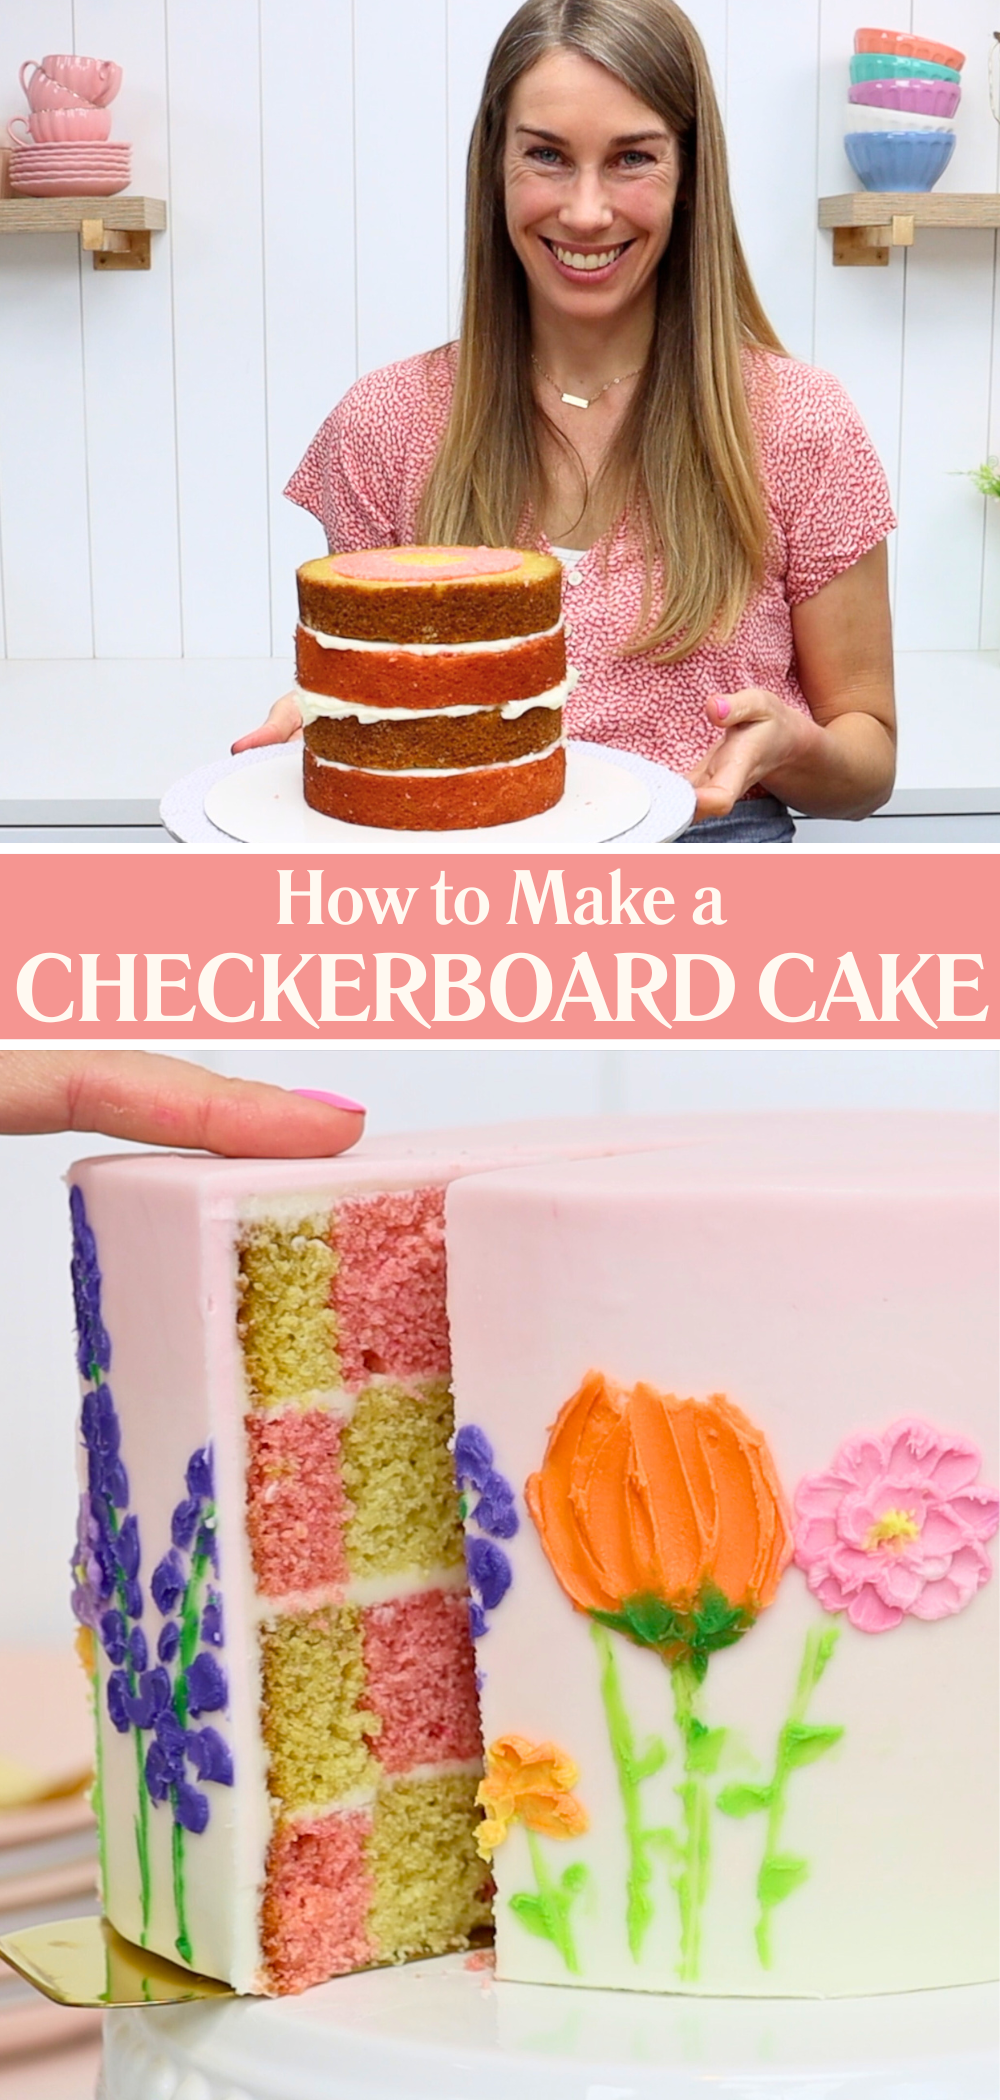
Don't forget the inside of the cake! A checkerboard cake adds a burst of colour with every slice. Use a light-coloured recipe you can tint like my Very Vanilla cake, which you can bake in four 6 inch pans for even checkerboard squares.

First, level the layers. Then use cookie cutters (2" and 4") to cut concentric rings from each cake layer. Alternate the rings to create a checkerboard pattern, for example a pink outside, white middle, and pink center. Then for the next layer, reverse the colours:
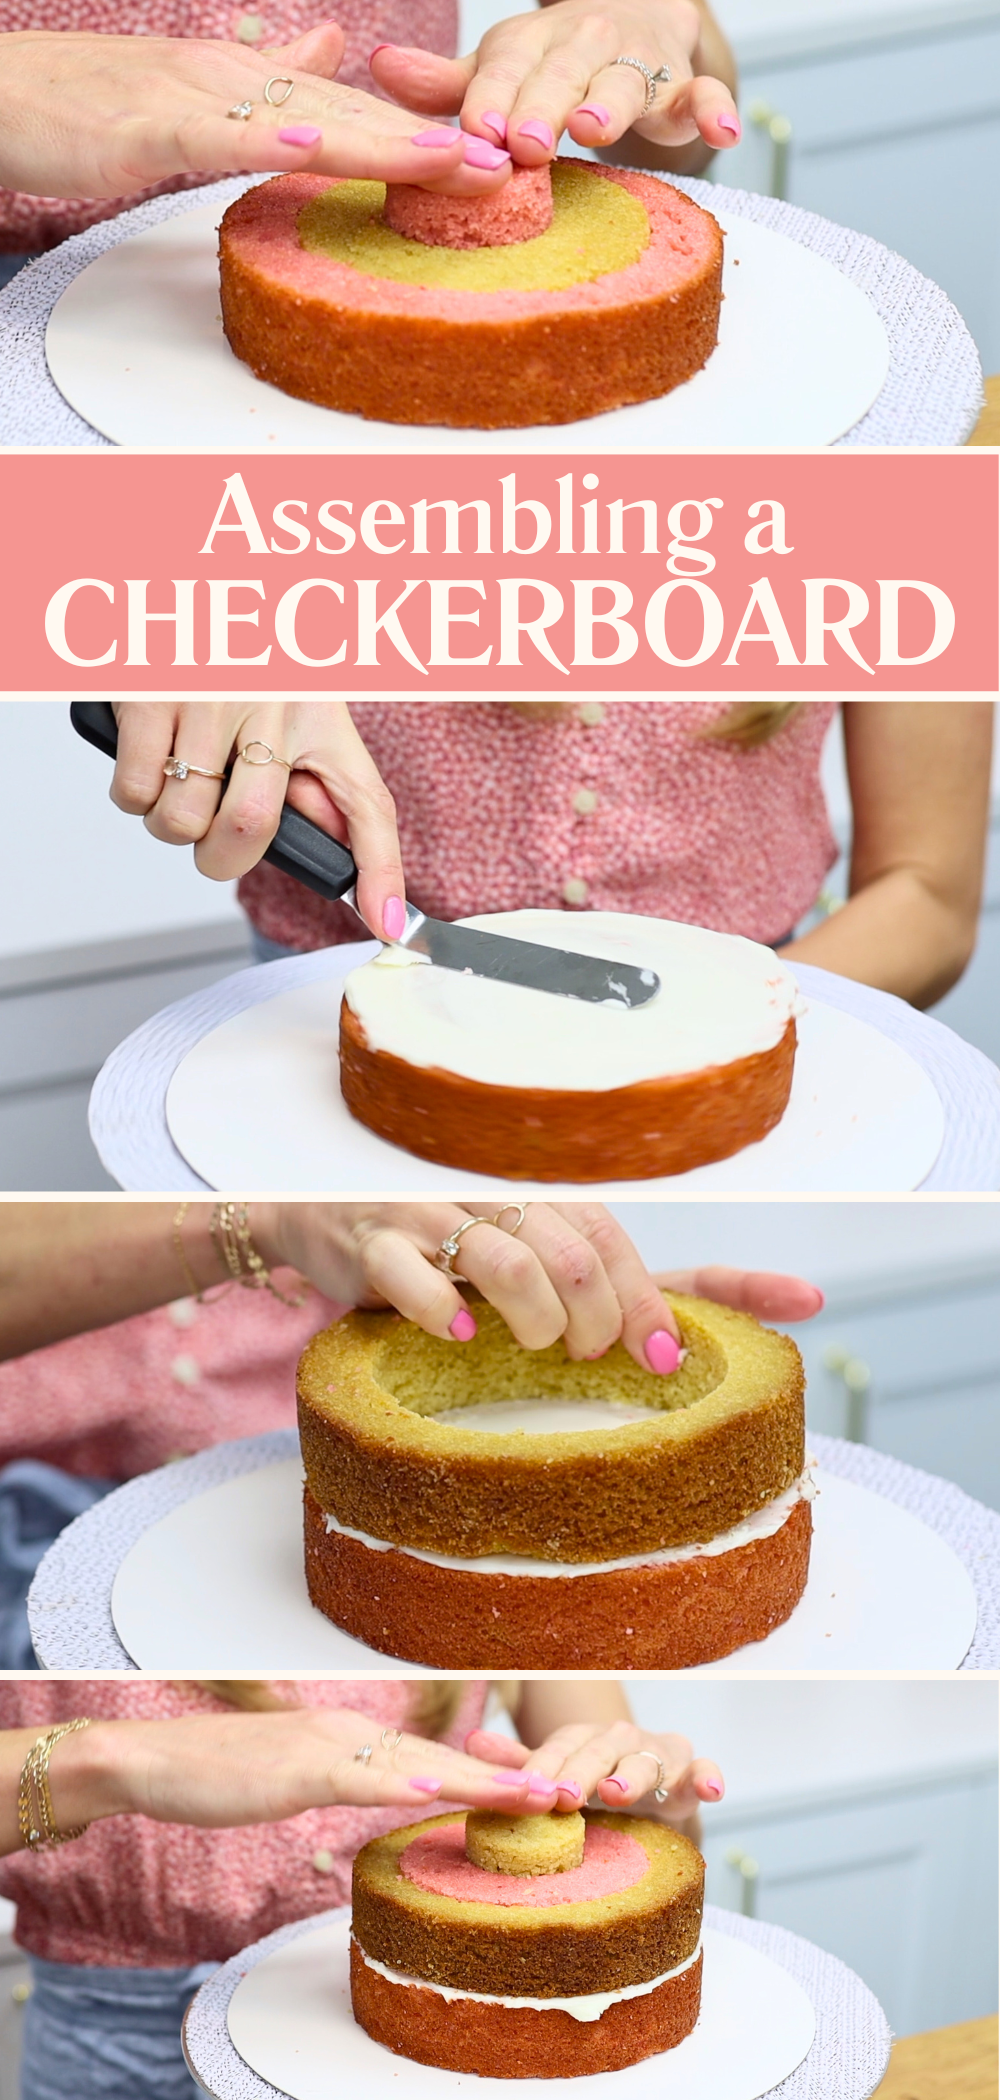
Stack the layers so the colours alternate all the way up. It’s a stunning surprise when you serve the cake!
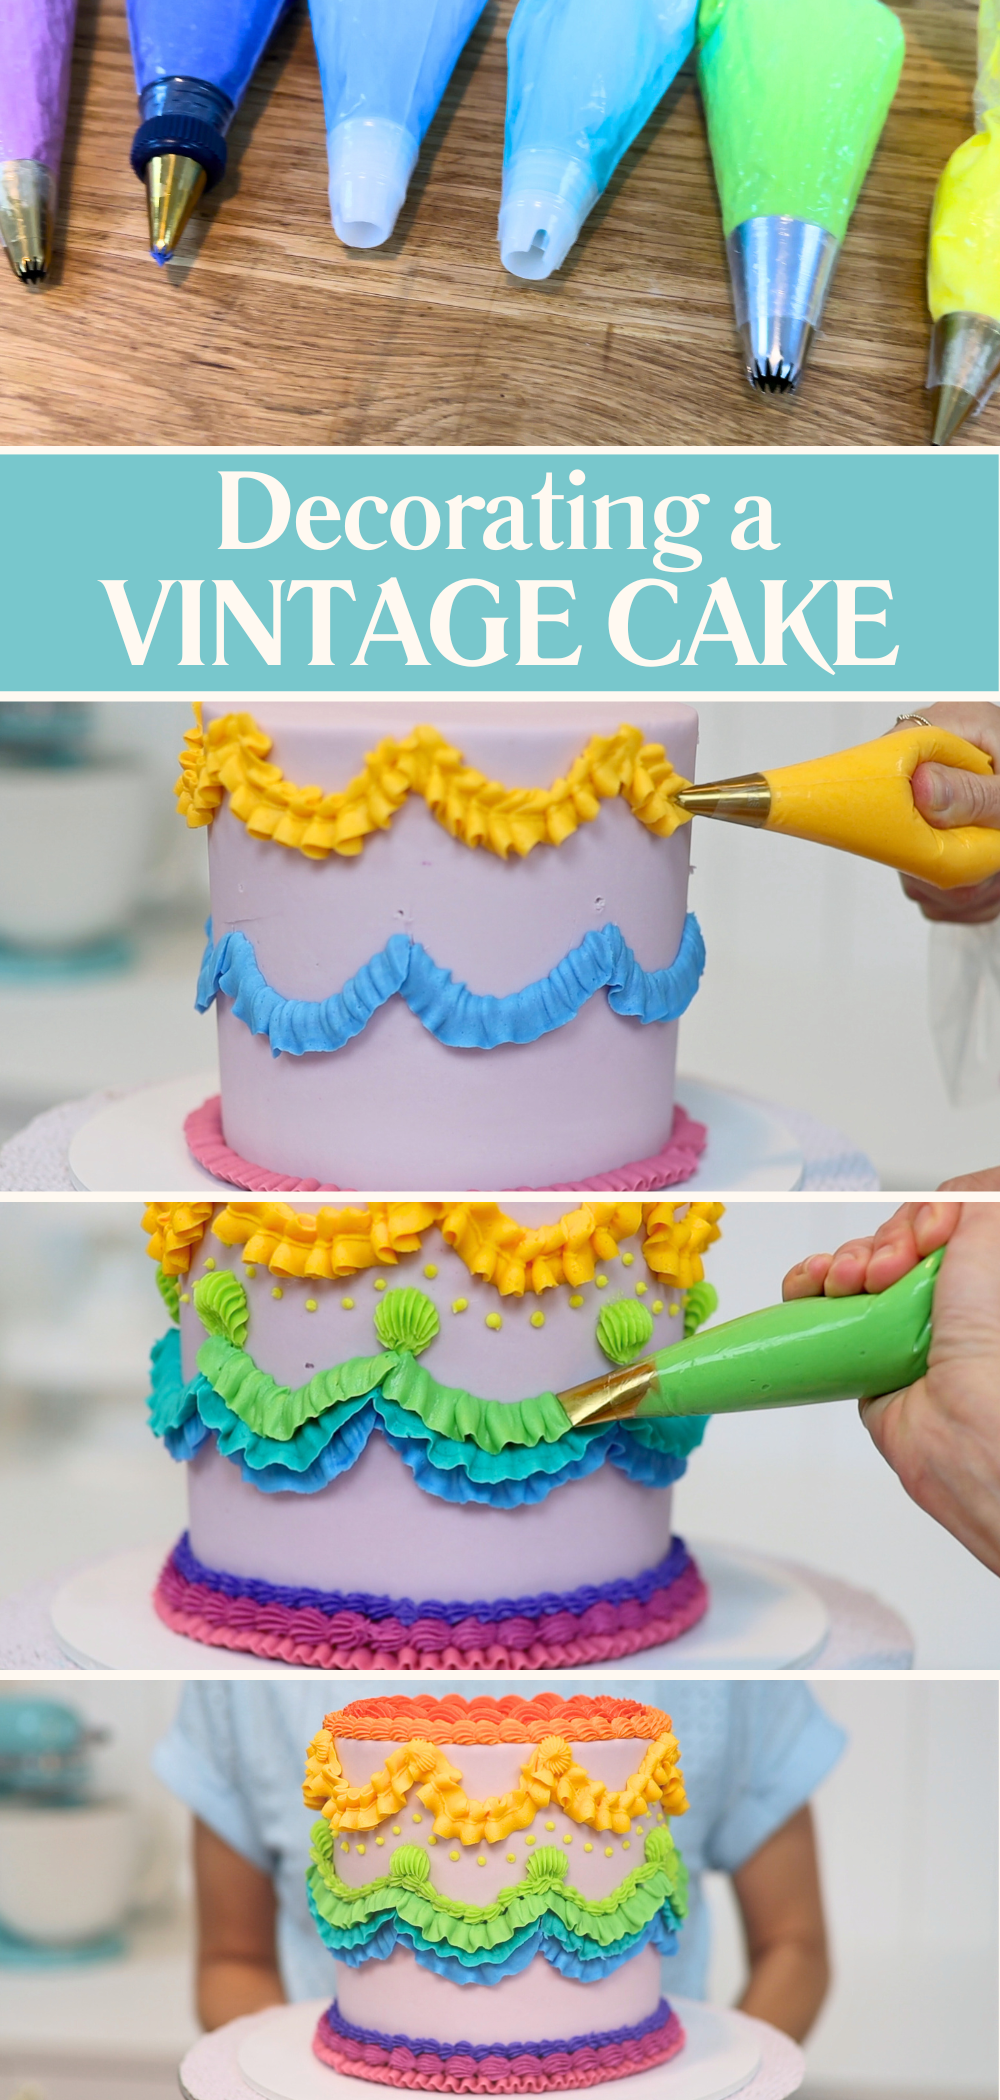
If you love piping or want to practice, vintage cakes are perfect for packing in colour. Choose a rainbow palette or any other colour scheme and experiment with different piping tips to build up layers of ruffles, shells, beads, and scrolls. I go into much more detail in my vintage piping tutorial 🙂
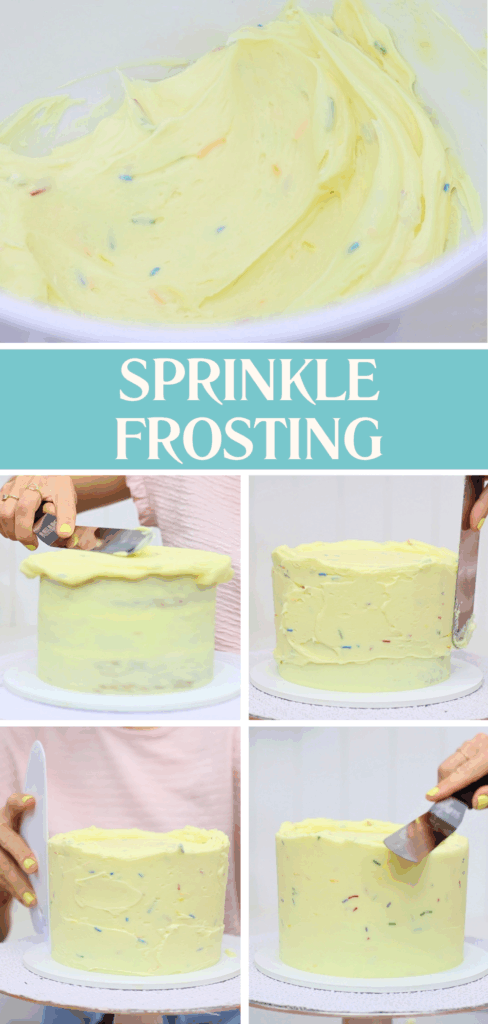
This next technique is quick but stunning. Pour multicoloured sprinkles into your buttercream but be sure to set aside a few spoonfuls of plain buttercream first. Spread the sprinkled frosting onto your cake as usual. When you smooth it with a cake comb, some sprinkles may drag and leave trails and that’s what the plain buttercream is for. Just spread it over the trails and scrape again until the surface is smooth. The embedded sprinkles create a fun, festive effect.
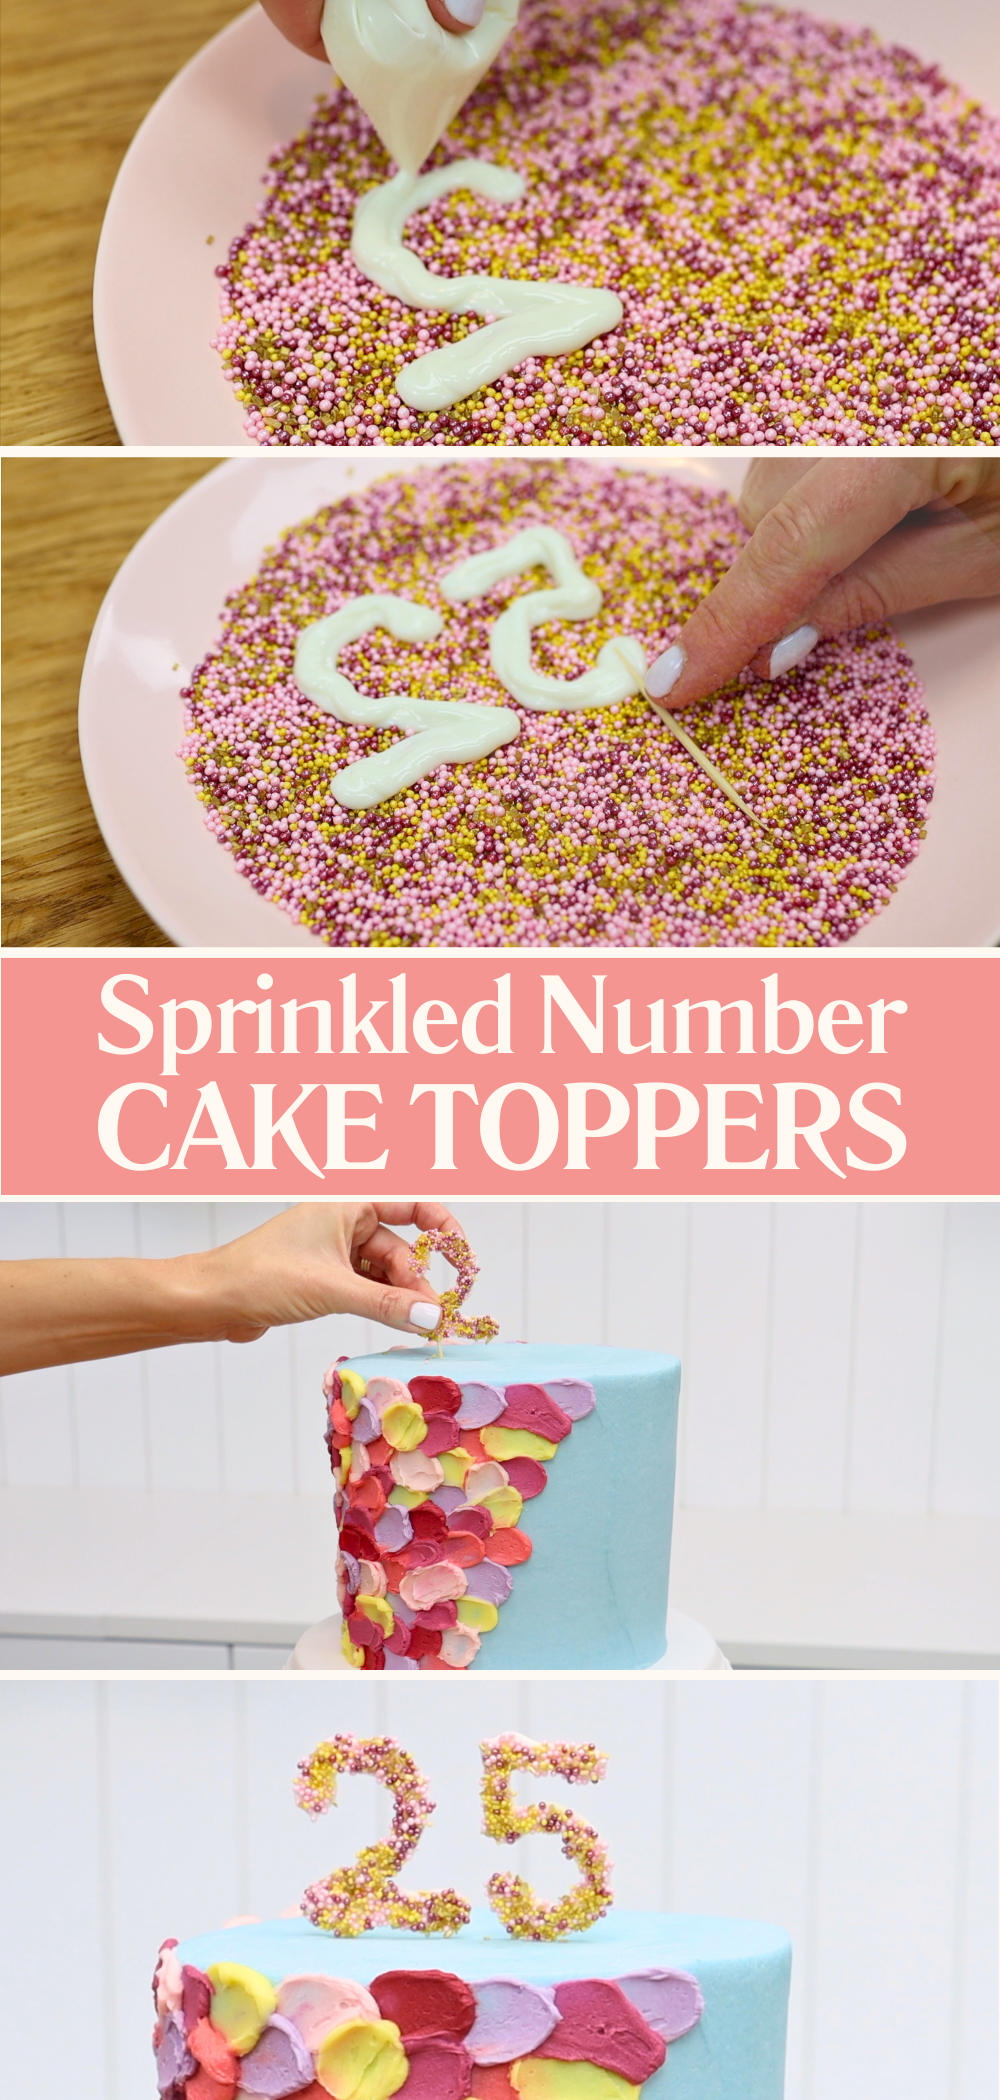
For an eye-catching cake topper try this sprinkled chocolate trick. Melt chocolate chips in the microwave at 50% power in 30 second intervals, stirring between each. Spoon the melted chocolate into a ziplock bag, snip the tip, and pipe letters or numbers directly onto a plate of sprinkles. Remember to pipe them in mirror image, since you’re working from the back.
For the neatest results, outline each letter or number first and then build up the shape to make it thicker. While the chocolate is still soft, press in a toothpick at the base so it’ll stand upright on your cake. Leave it to set, either at room temp for an hour or about 15 minutes in the fridge. Lift the toothpicks up and press them into your cake for sprinkle-covered chocolate toppers!
Stencils are one of my favourite cake decorating techniques and using multiple colours makes them even better. Cut out your own stencil from parchment paper or wax paper and wrap it around a chilled cake. Tint small amounts of buttercream (a cupcake pan is perfect for this!) and spread two or three colours across your stencil. Scrape gently to blend and remove excess buttercream. Peel off the stencil to reveal a smooth, vibrant design that really pops!
Whether you love sparkly stencils, textured piping, or whimsical sprinkles, there’s something here for everyone. These colorful cake ideas are perfect for birthdays, parties, or anytime you want a cake that really stands out. Leave a comment to tell me your favourite colourful cake ideas or ask any questions you have! And don’t forget to check out my cake school with my free frosting course or explore more courses and membership options.
You can also watch a video of this tutorial on 8 colorful cake ideas:
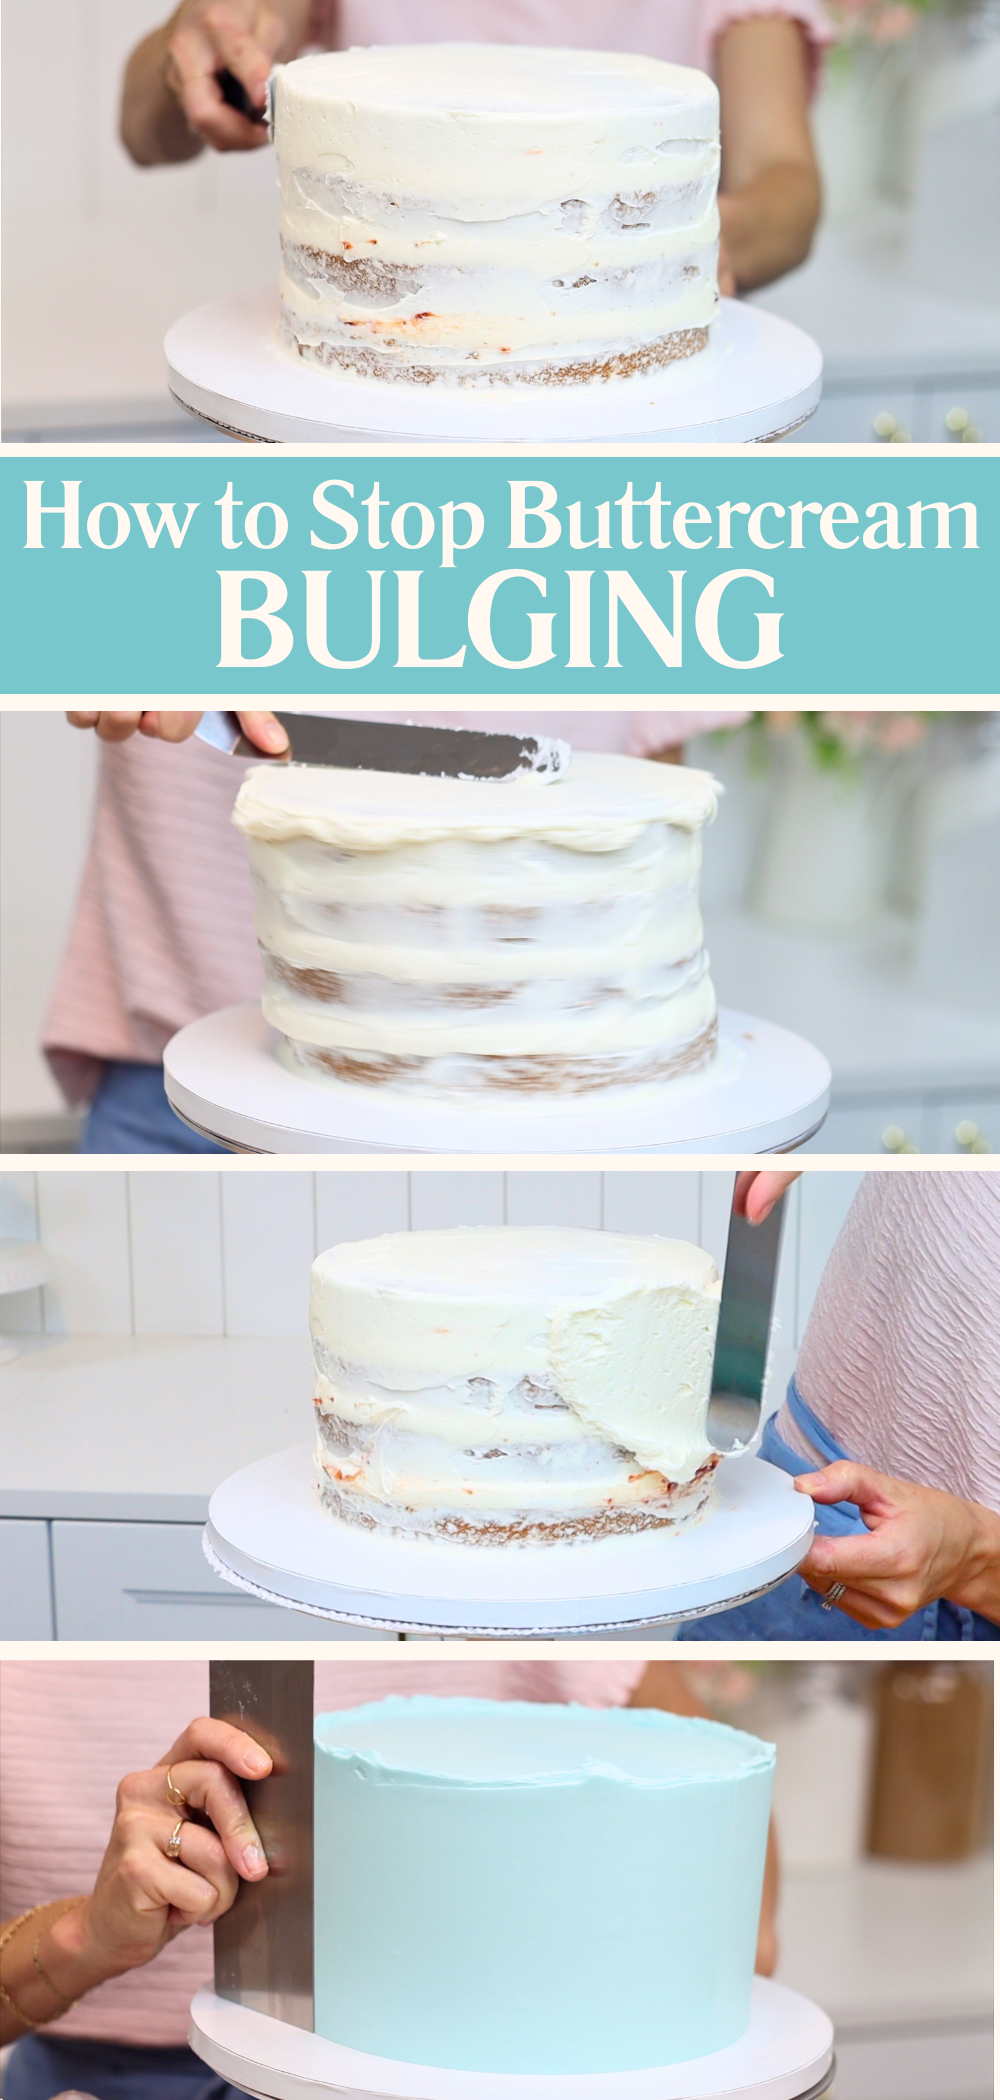
After teaching thousands of cake decorators, the most common struggle I've seen is with getting perfectly smooth frosting. So let me introduce your new best friend: a metal cake scraper! This tool is everything you need for smooth, professional-looking cakes.
Cake combs (also known as scrapers or frosting smoothers) come in plastic, acrylic, and metal. While plastic and acrylic can smooth frosting well, dropping or knocking them will easily create dings that leave trails on your cake. Metal scrapers, on the other hand, stay perfectly smooth and with my tricks they'll give you perfectly smooth frosting every time!
Before you even reach for your scraper, follow these steps to set yourself up for success:
Stack your cake layers carefully, ensuring each sits directly on top of the one below. This will give your cake straight sides. Then chill the cake for 30 minutes in the fridge or 15 in the freezer. This will firm the filling and make the cake less crumbly. Next, apply a crumb coat, which is a thin layer of frosting to trap any crumbs that come off the cake. And finally, chill the cake again to set the crumb coat before adding the final layer of frosting. Again, 30 minutes in the fridge or 15 minutes in the freezer is perfect!
These steps give your final layer of frosting a smooth foundation and prevent any crumbs from ruining it.
With the right technique, your metal cake scraper will leave a super smooth surface on your frosting.
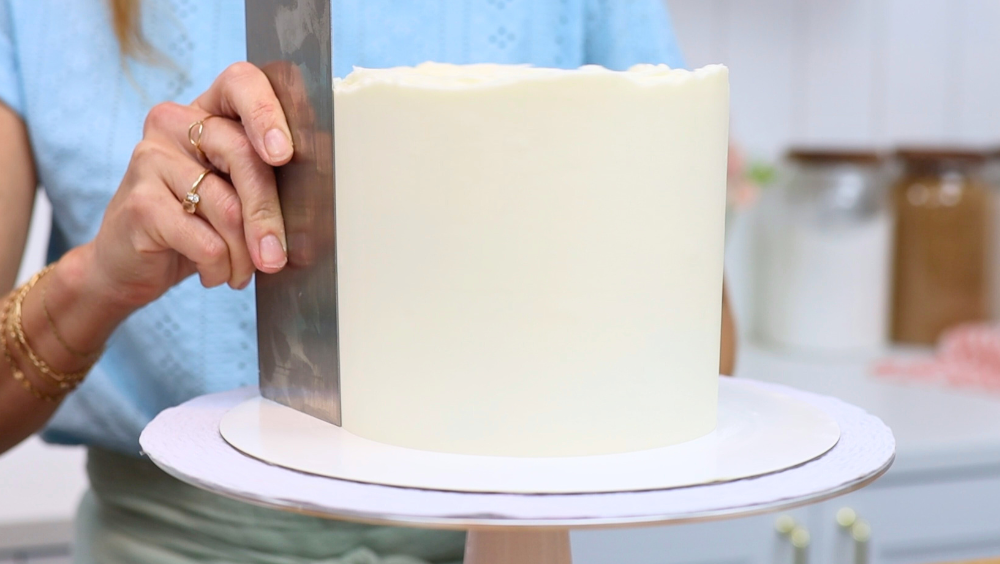
Start by spreading a generous layer of buttercream onto your cake. Make sure it sticks up above the top edge and goes all the way down to the cake board.
Now line the bottom of the cake board with your scraper at an angle, so it's at a diagonal, not pointing straight at the cake. Use very gentle pressure and let the
Don’t expect perfection after the first scrape! Go around several times and if you see any shallow areas, spread on more frosting and scrape again. If the buttercream has little air bubbles in it or isn't as smooth as you'd like it, use the heat hack below!
To warm a metal cake scraper there are three easy methods. The first is using a blowtorch by briefly passing the flame up and down the straight edge of the scraper. Then rub with a towel to cool it down and pinch to check it's only warm, not hot.
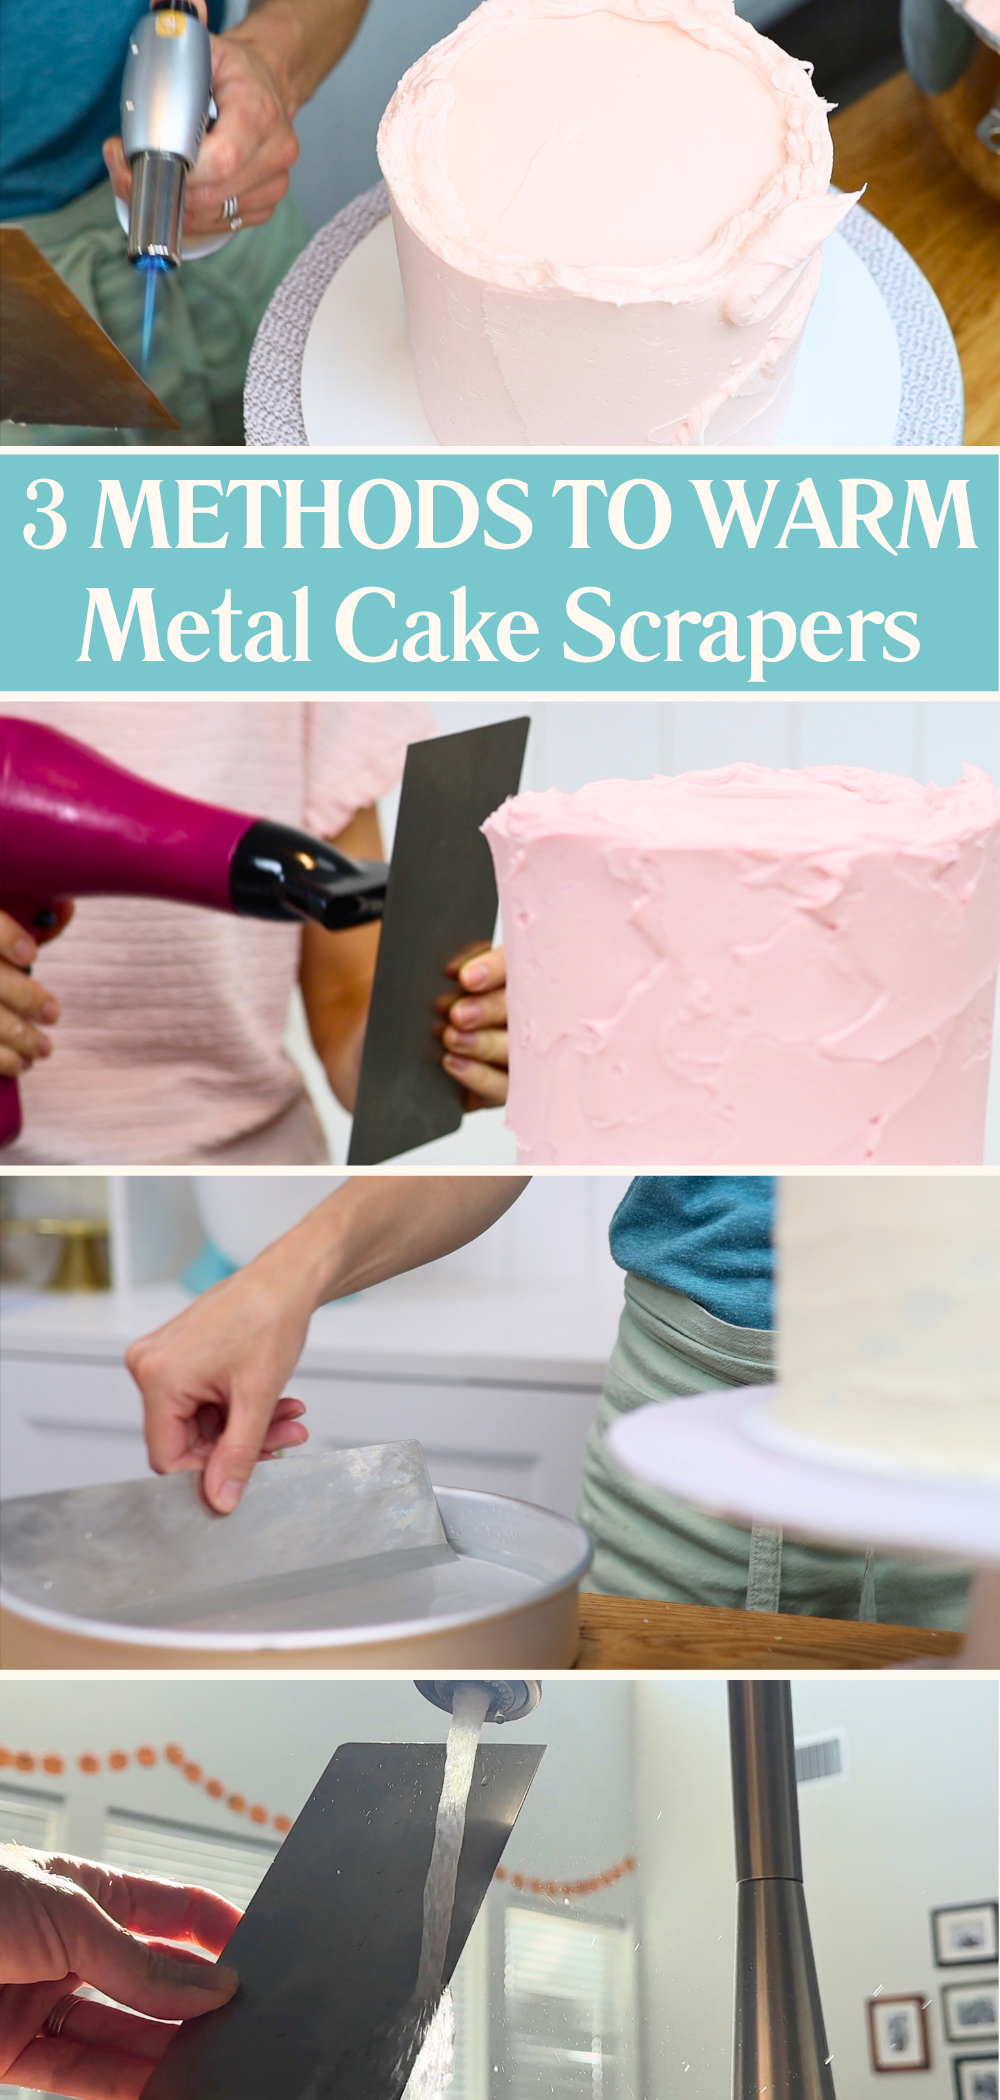
The second method uses a hairdryer. This heat is slower but gentler and it distributes heat more evenly. You should still pinch the metal to check the temperature and make sure it's just warm.
The third method is to use hot water. Hold your metal cake scraper under hot running water or pour some into a pan or tray and top your comb into it. Rub the metal with a towel to dry it off and then test the temperature with your fingertips before using.
Now use the warm metal to scrape around the cake and you'll see it leave perfectly smooth frosting behind!
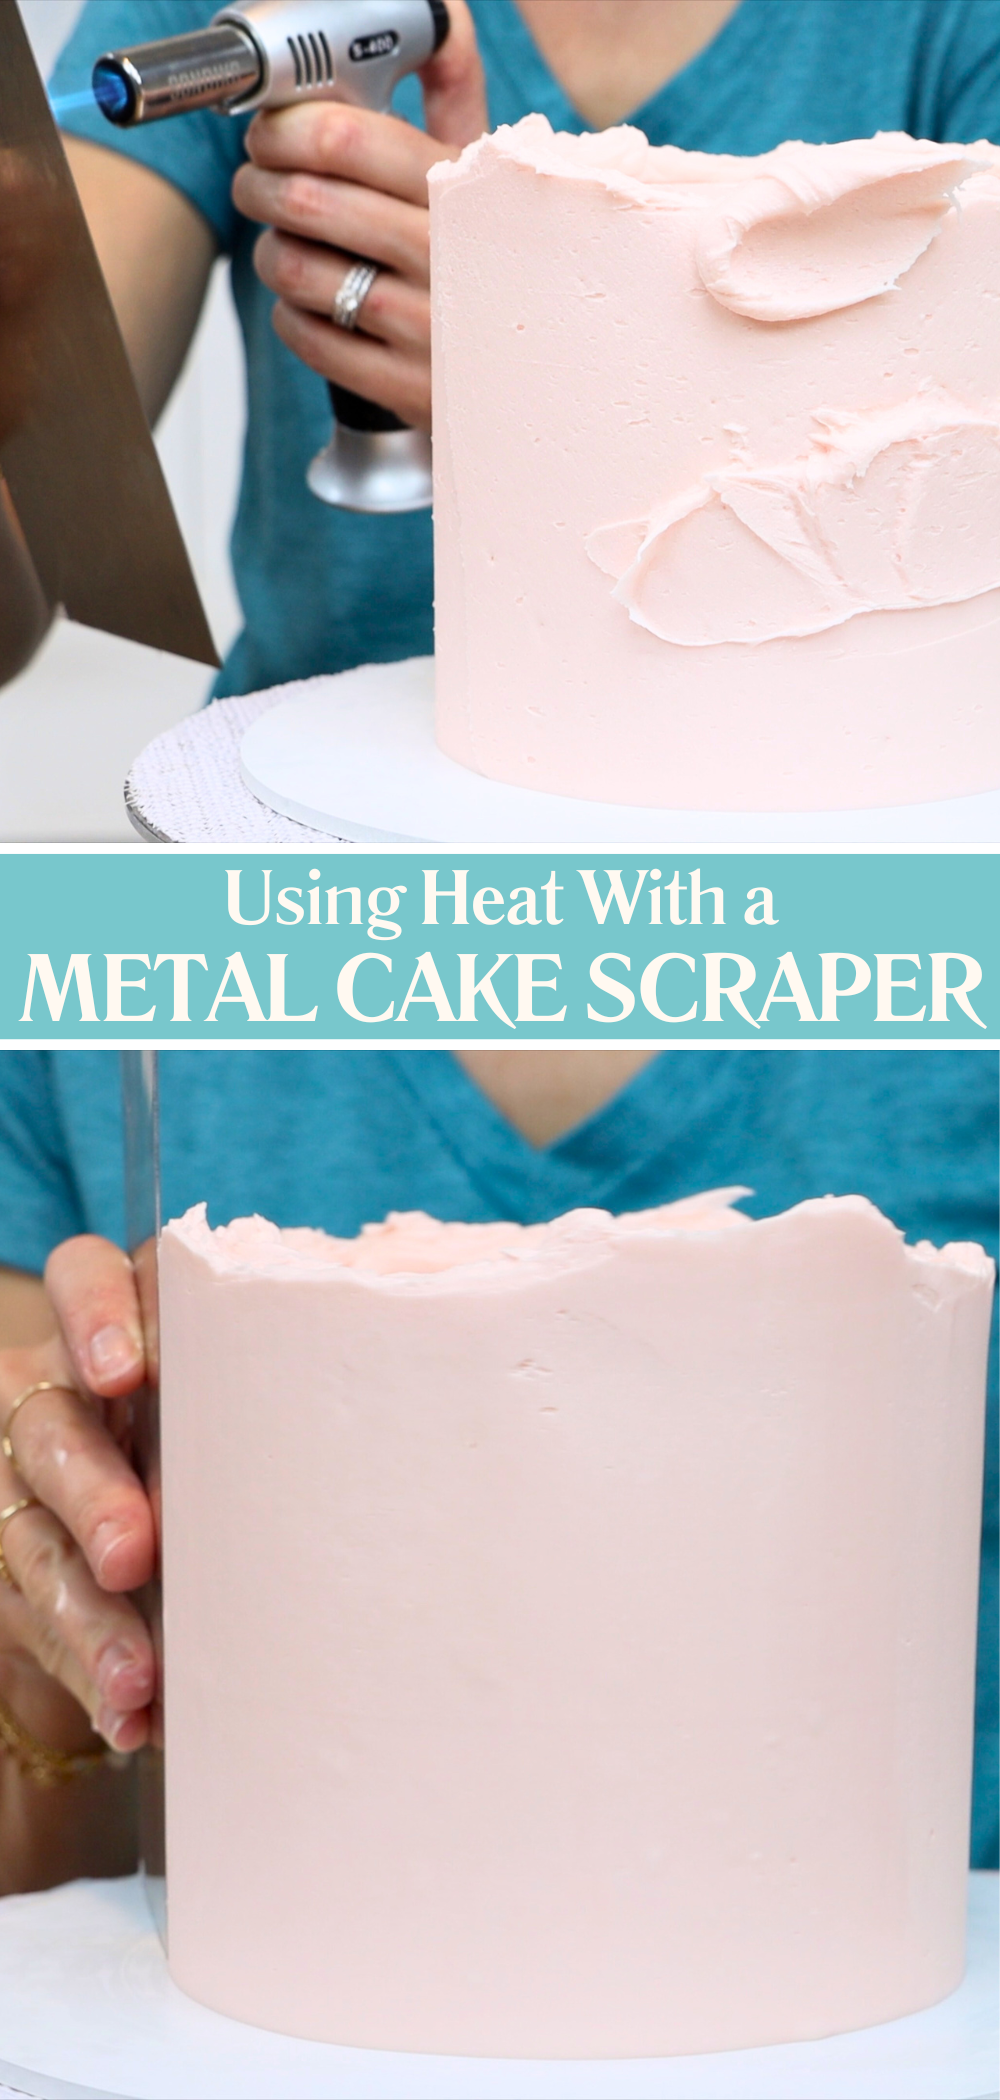
An important note: hot metal can discolour your buttercream and cause bubbles under the surface. Always double check you're working with just-warm metal that isn't hot!
I love using tools for multiple tasks to make the investment worthwhile so here's some good news! A metal cake scraper isn’t just for frosting. It scrapes dried buttercream or chocolate from your surfaces without smearing and it's also great for transferring cakes! It slices easily underneath the cake and is wide and sturdy enough to lift cakes up. This makes it possible to transfer cakes from a cake board to a platter or cake stand.
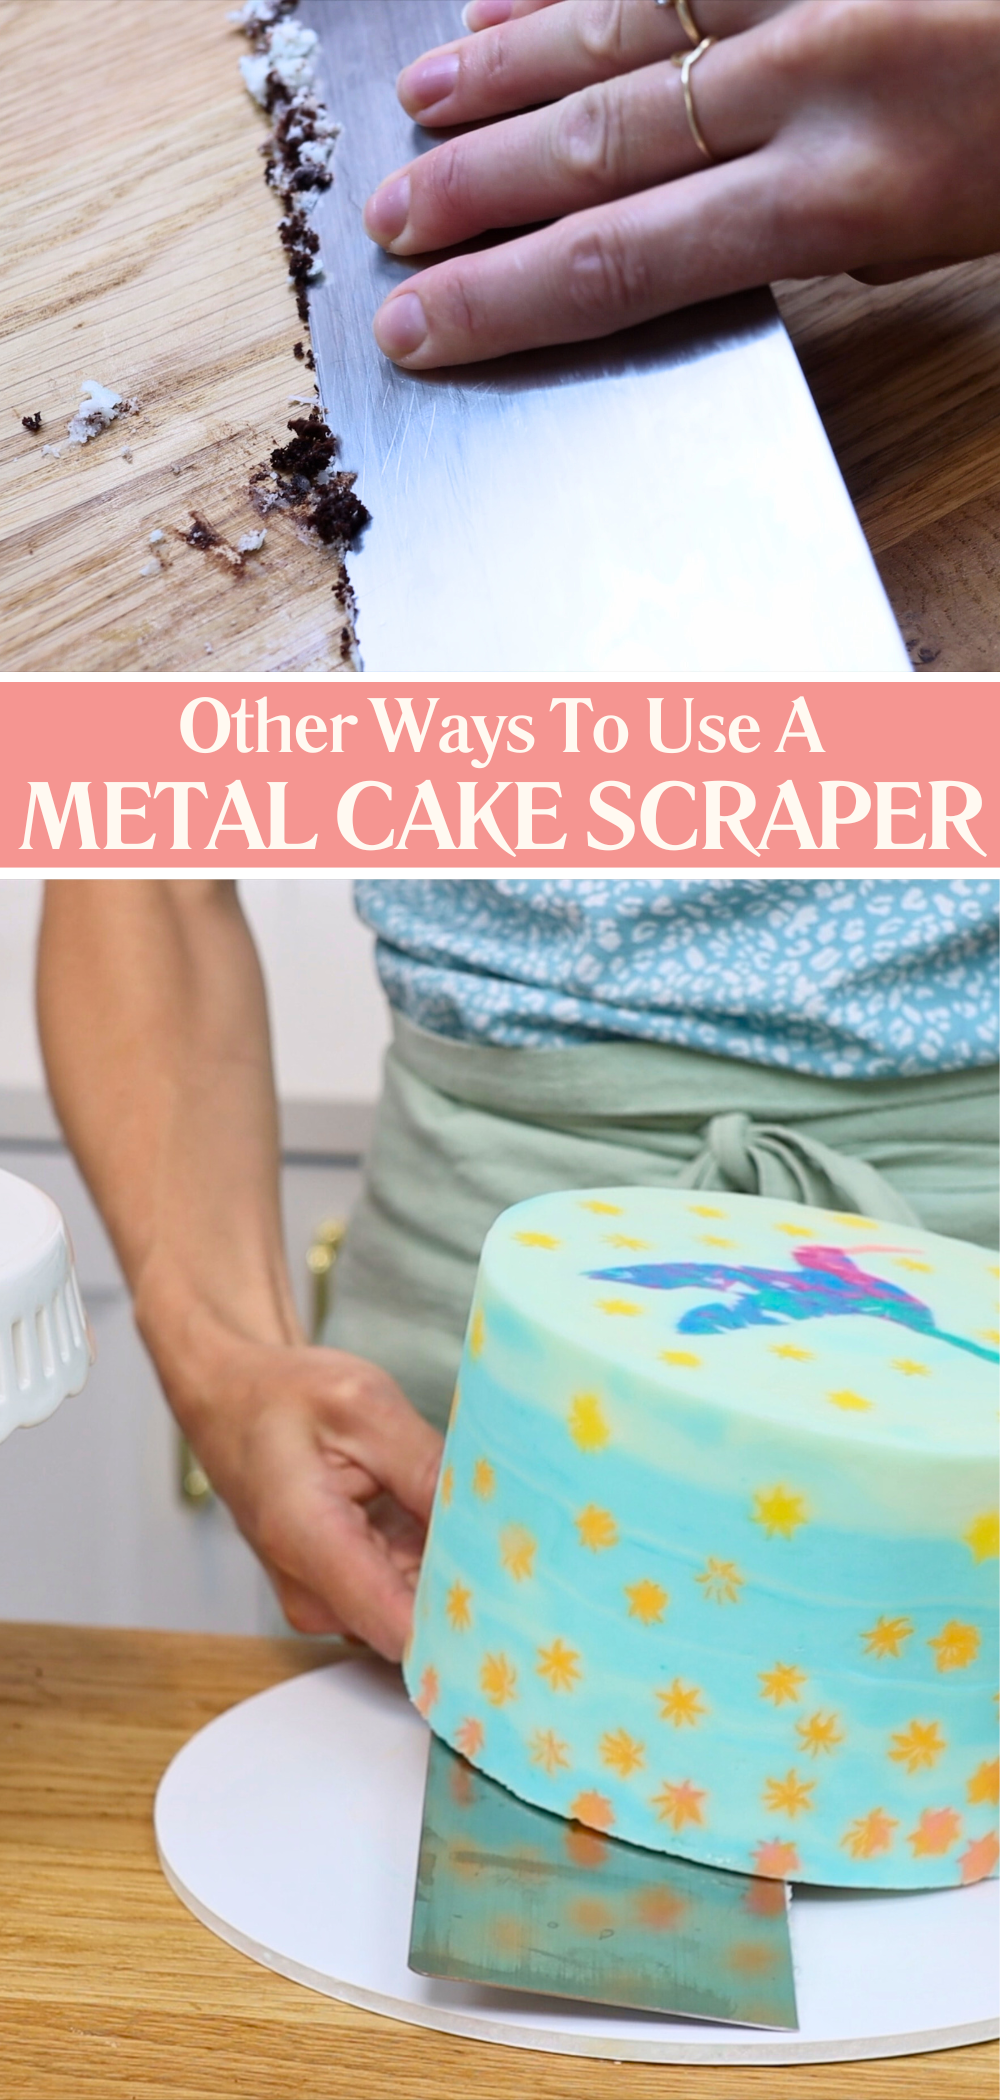
For professional-looking cakes, a metal cake scraper is a cake decorator's dream tool. It creates a smooth finish, withstands wear better than plastic or acrylic, and doubles as both a cleanup and lifting aid. If you aren't happy with the results, chances are you're missing one of the earlier steps in prepping your cake for smooth frosting. Get help with that in my tutorial on how to make layer cakes!
Have questions about angle, temperature, or anything else to do with metal cake scrapers? Ask them in the comments! And please check out my cake school for more decorating techniques and designs!
You can also watch a video of this tutorial on how to use a metal cake scraper:
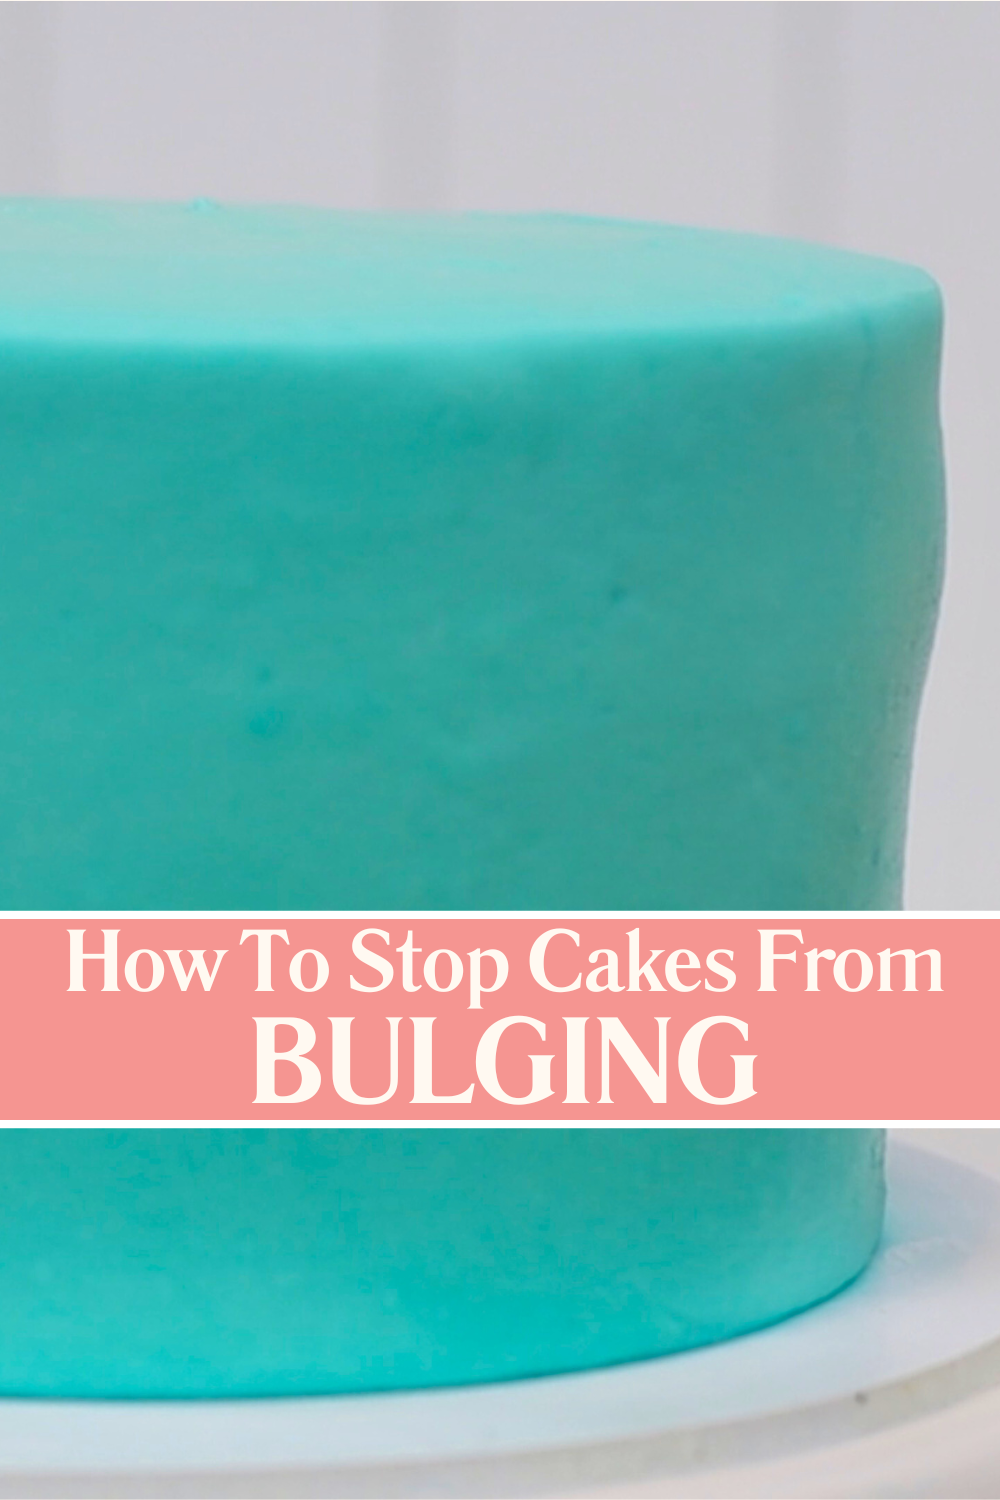
Buttercream bulging can spoil even the neatest frosting, leaving visible bumps between your layers and pushing out through the frosting. It’s a common issue in cake decorating but with some simple tips and tricks it’s easy to prevent bulges under frosting. In this tutorial I’ll explain what causes these bulges, when they’re most likely to appear, and the simple steps you can take to avoid them.
Buttercream bulges usually show up as rounded bumps around the sides of your cake, just underneath the frosting. These are most common after stacking cake layers with soft or runny fillings like jam, caramel, or lemon curd. As you continue to assemble your cake, the weight from the upper layers pushes down and the filling has nowhere to go except sideways. That’s how you end up with those unwanted cake bulges under frosting.
The best way to stop filling from oozing out of your cake is to start with a buttercream dam. This is a ring of stiff buttercream piped around the edge of each cake layer before adding the filling. It acts as a wall to hold your filling securely in place. This is especially helpful when using looser fillings like curds or sauces that don’t hold their shape well. A buttercream dam keeps everything contained so it doesn’t leak out and cause bulges.
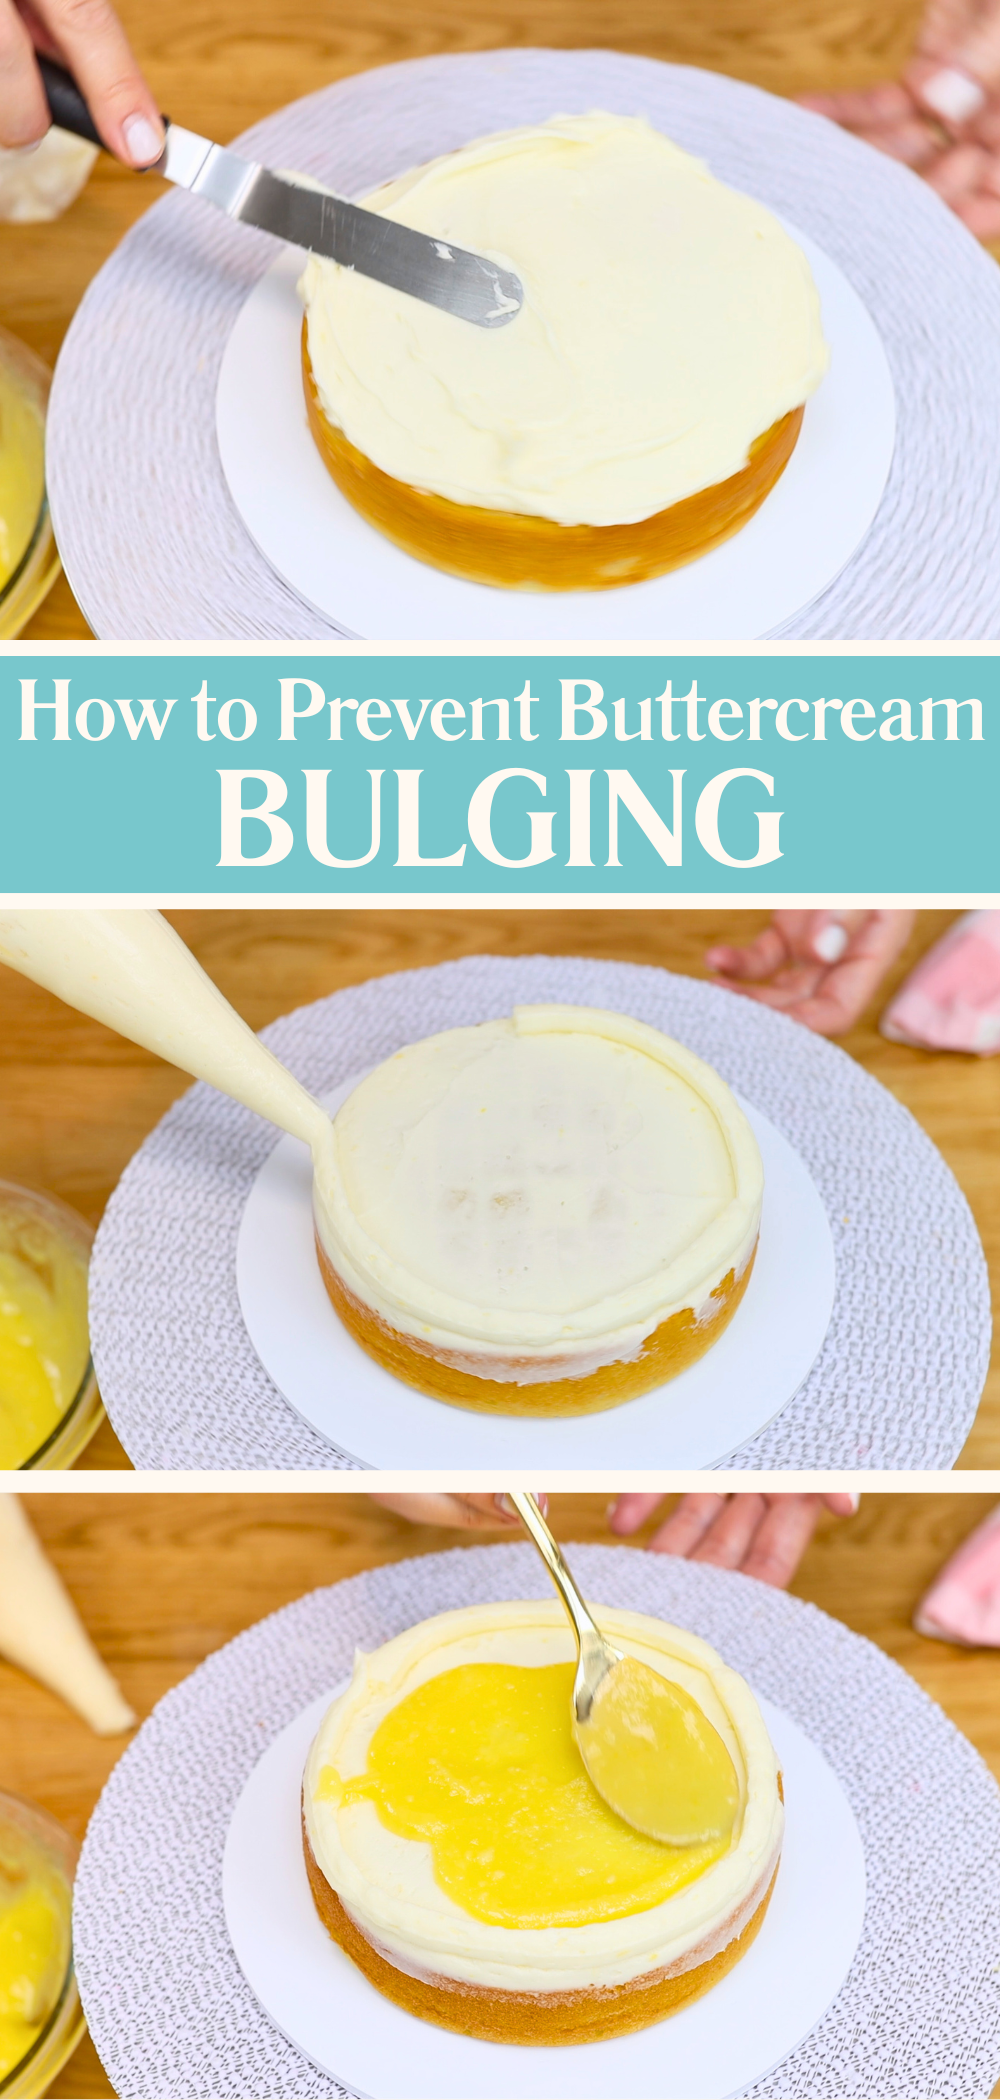
Here are my tips for successful buttercream dams that prevent buttercream bulging. First, your dam needs to be taller than your filling. If the filling comes right up to the top of the dam then as soon as you press the next cake layer down, it’ll squeeze the filling over the top of the wall. Once that happens, the filling starts creeping outward and eventually forms bulges under the frosting.

Secondly, make sure the buttercream you use for the dam is firm enough. If it’s soft like whipped cream or mousse, it won’t hold up under the weight of the cake. A stiff consistency is key here – check out my tutorial on buttercream consistency for more details on this.
As you build your cake, take your time with each step to make sure each layer is level and straight. This helps avoid extra pressure in certain spots that could cause bulges later. Pipe your buttercream dam around the edge of each cake layer and spoon in your filling so it stays well below the height of the dam. Gently press down on the next cake layer to check that the filling doesn’t spill out. Repeat until your cake is fully stacked.
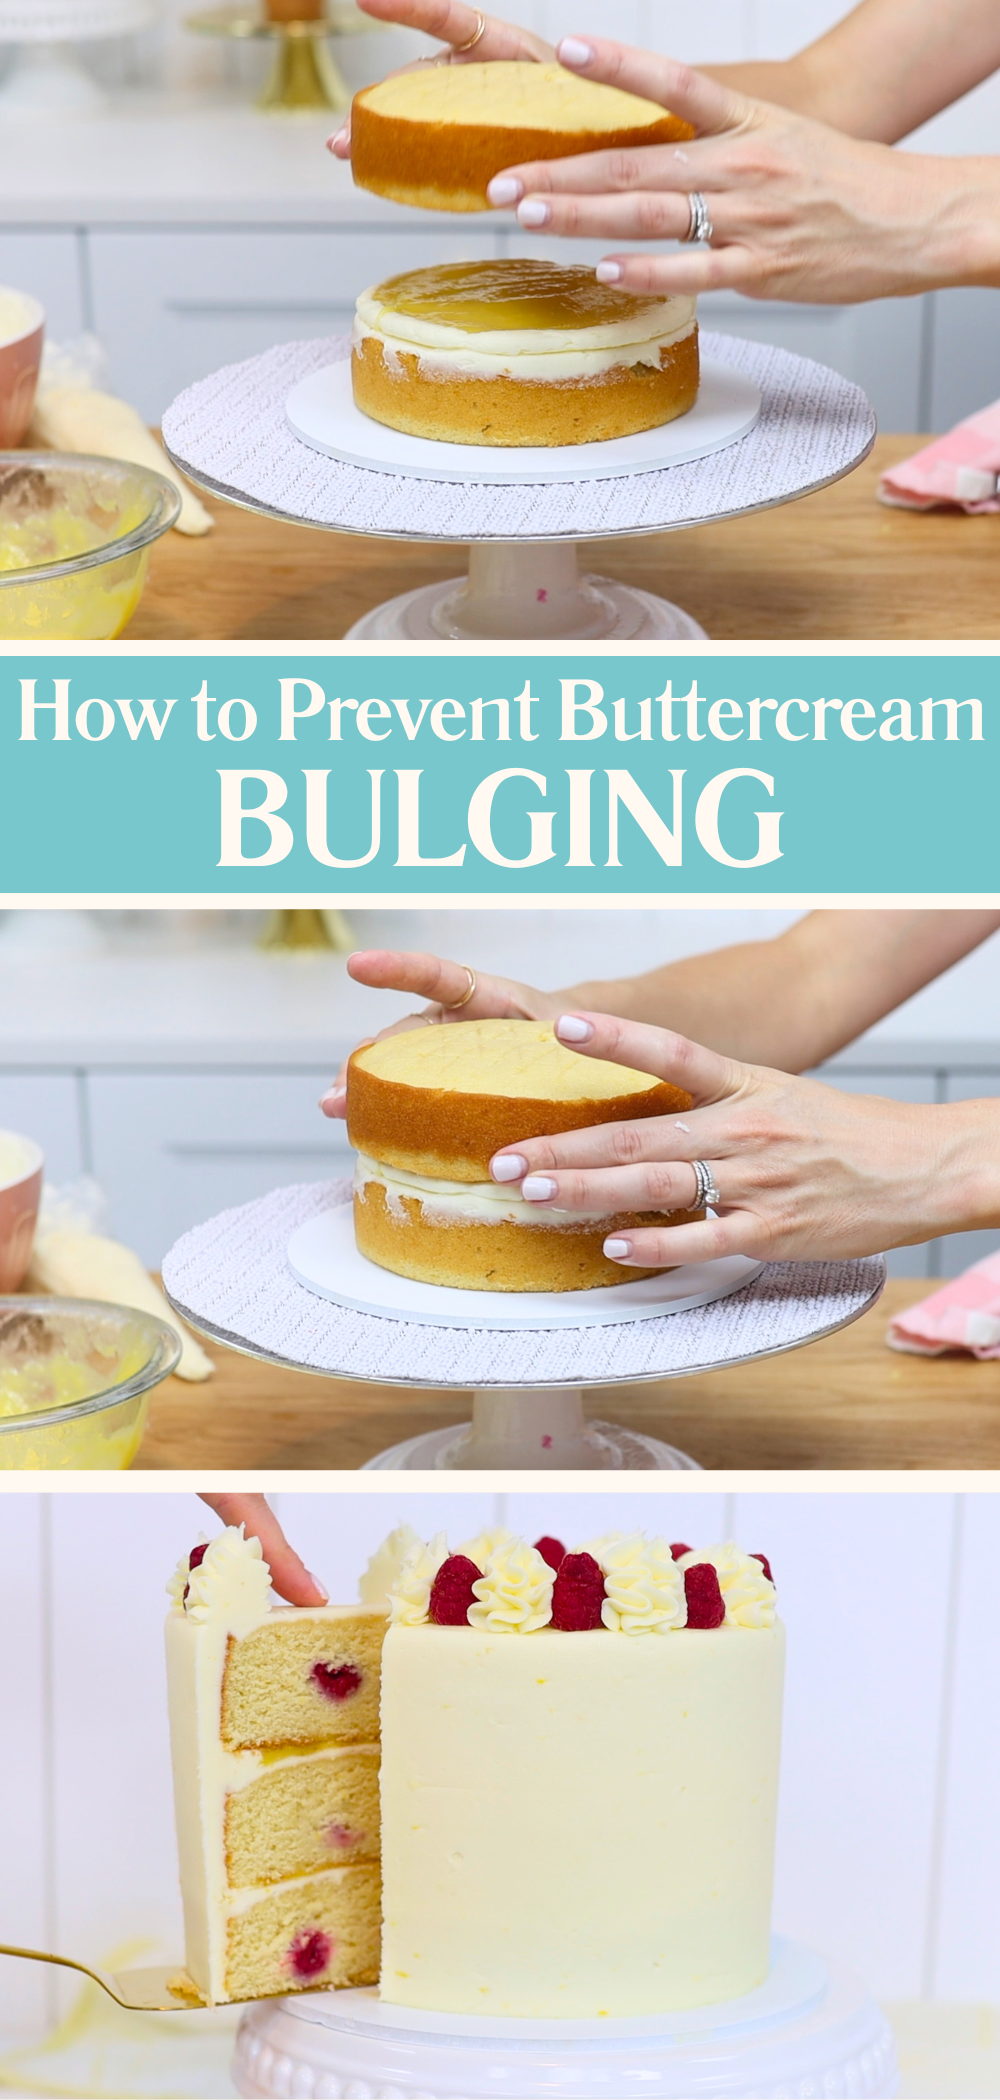
Even if your buttercream dams are tall and strong, they’re still soft when freshly piped. Don't move straight on to frosting your cake while everything is still at room temperature. If you do, the pressure of smoothing your crumb coat or final coat can nudge the cake layers sideways, leaving gaps where the filling can creep out.
That’s why chilling your cake before frosting is such an important step to prevent bulging. Once your cake is stacked, place it in the fridge for about an hour or the freezer for 30 minutes. This firms up the buttercream dams and the cake layers so that everything stays in place when you start frosting.
Sometimes no matter how careful you are, you’ll still spot a bulge sneaking out. Don’t worry! It's not too late to fix it. First, spin the cake to check that it's still stacked straight. If it’s leaning to one side, gently nudge it back into place with a spatula or palette knife. This can realign the layers and reduce some of the pressure that’s forcing the filling out.
Next, put the cake in the fridge or freezer again. Give it time to set so the buttercream dam and filling firm up and stay in place. Then, spread on the crumb coat. Or, if you had already done the crumb coat when you noticed the bulges, add another layer of frosting now that the cake is chilled. This layer of buttercream helps trap any filling that may have escaped and gives you a clean base to work from. After chilling the crumb coat for about 15 minutes you can move on to your final coat of frosting.
With just a few simple techniques – using a buttercream dam, keeping your filling low, stacking cake layers evenly, and chilling the cake at key points – you can avoid frosting bulges and keep your cakes smooth. So next time you find yourself wondering, “Why is my buttercream bulging?”, you’ll not only know the answer, but exactly how to fix and prevent it.
When you're ready to take your cakes to the next level, visit my online cake school. You'll find courses to learn step-by-step techniques and designs made for cake decorators with any level of experience!
You can also watch a video of this tutorial on Why Is My Buttercream Bulging:
Have you ever found the perfect cake recipe but it’s written for the wrong size pan? Maybe it’s a 6 inch cake recipe and you want to make an 8 inch cake, a batch of cupcakes, a sheet cake or even cute little mini cakes instead. That’s where cake recipe conversions come in. Once you know how to scale recipes up or down, you can bake any size cake you like without wasting ingredients or ending up with too much batter.
In this guide I’ll walk you through how to convert cake recipes for different pan sizes, how to adjust baking times, and how to work out exactly how much buttercream you’ll need, too.
Let’s start with an example. Imagine you’ve got a recipe for a 6 inch cake with three layers. That same recipe can be used to make other sizes of cake:
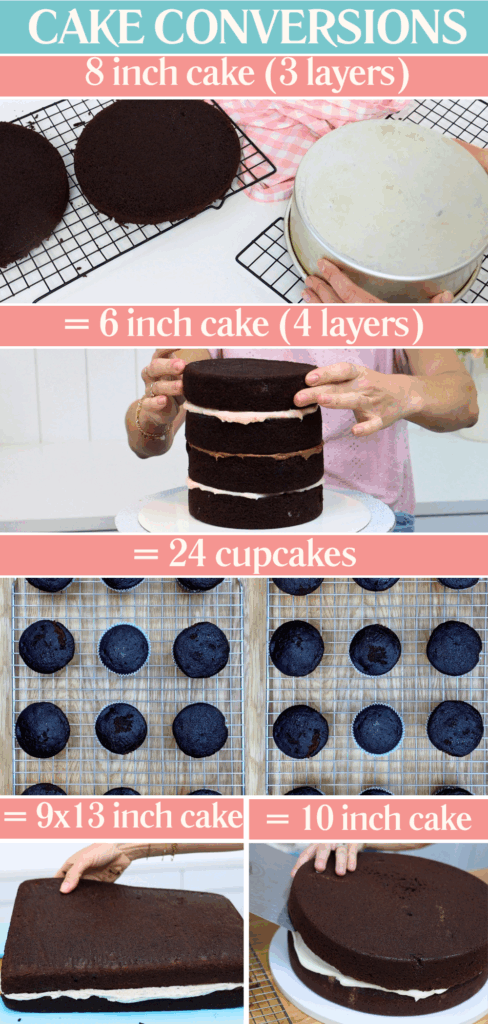
The secret to cake recipe conversions is understanding the volume of the different pans. You don’t need to do complicated equations yourself though – I’ve put together a simple chart that shows how many cupcakes are equivalent to different sizes of cake. Keep this handy and you’ll be able to adjust any recipe without any guesswork.
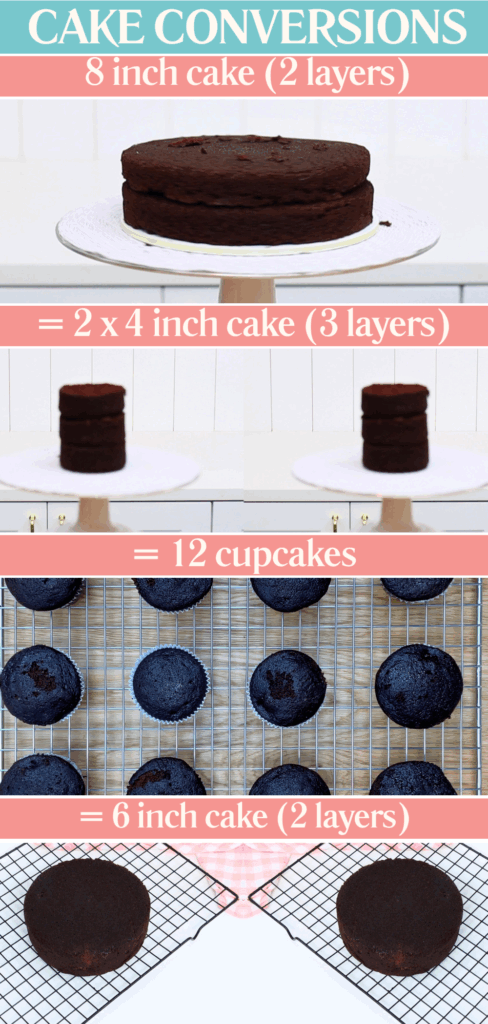
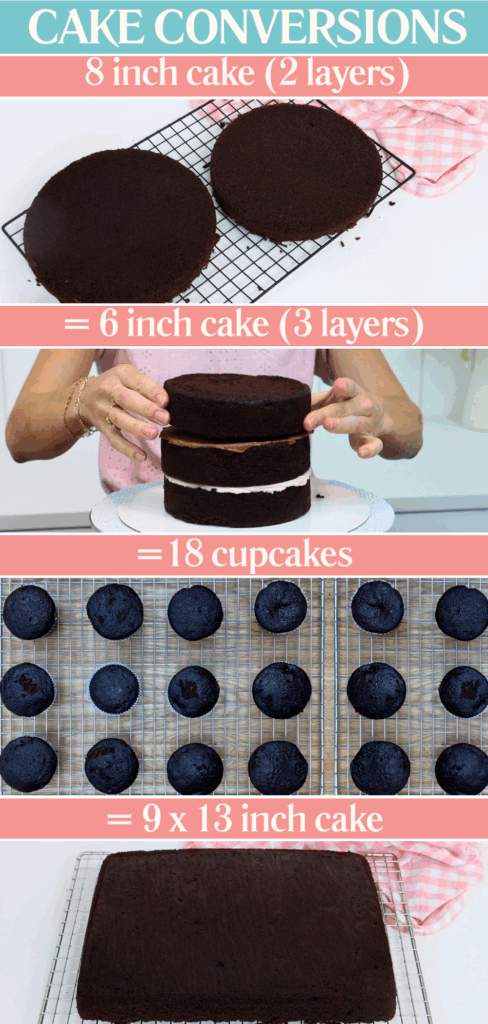
| Cupcakes | 4 inch cake(s) | 6 inch cake | 8 inch cake | Other | |
| 12 cupcakes | x 2 (3 layers) | x 1 (2 layers) | x 1 (2 layers) | 6x9 inch* | |
| 18 cupcakes | x 3 (3 layers) | x 1 (3 layers) | x 1 (2-3 layers) | 9x13 inch sheet cake | |
| 24 cupcakes | x 4 (3 layers) | x 1 (4 layers) | x 1 (3 layers) | 9x13 inch (2 layers) or 1 x 10" cake |
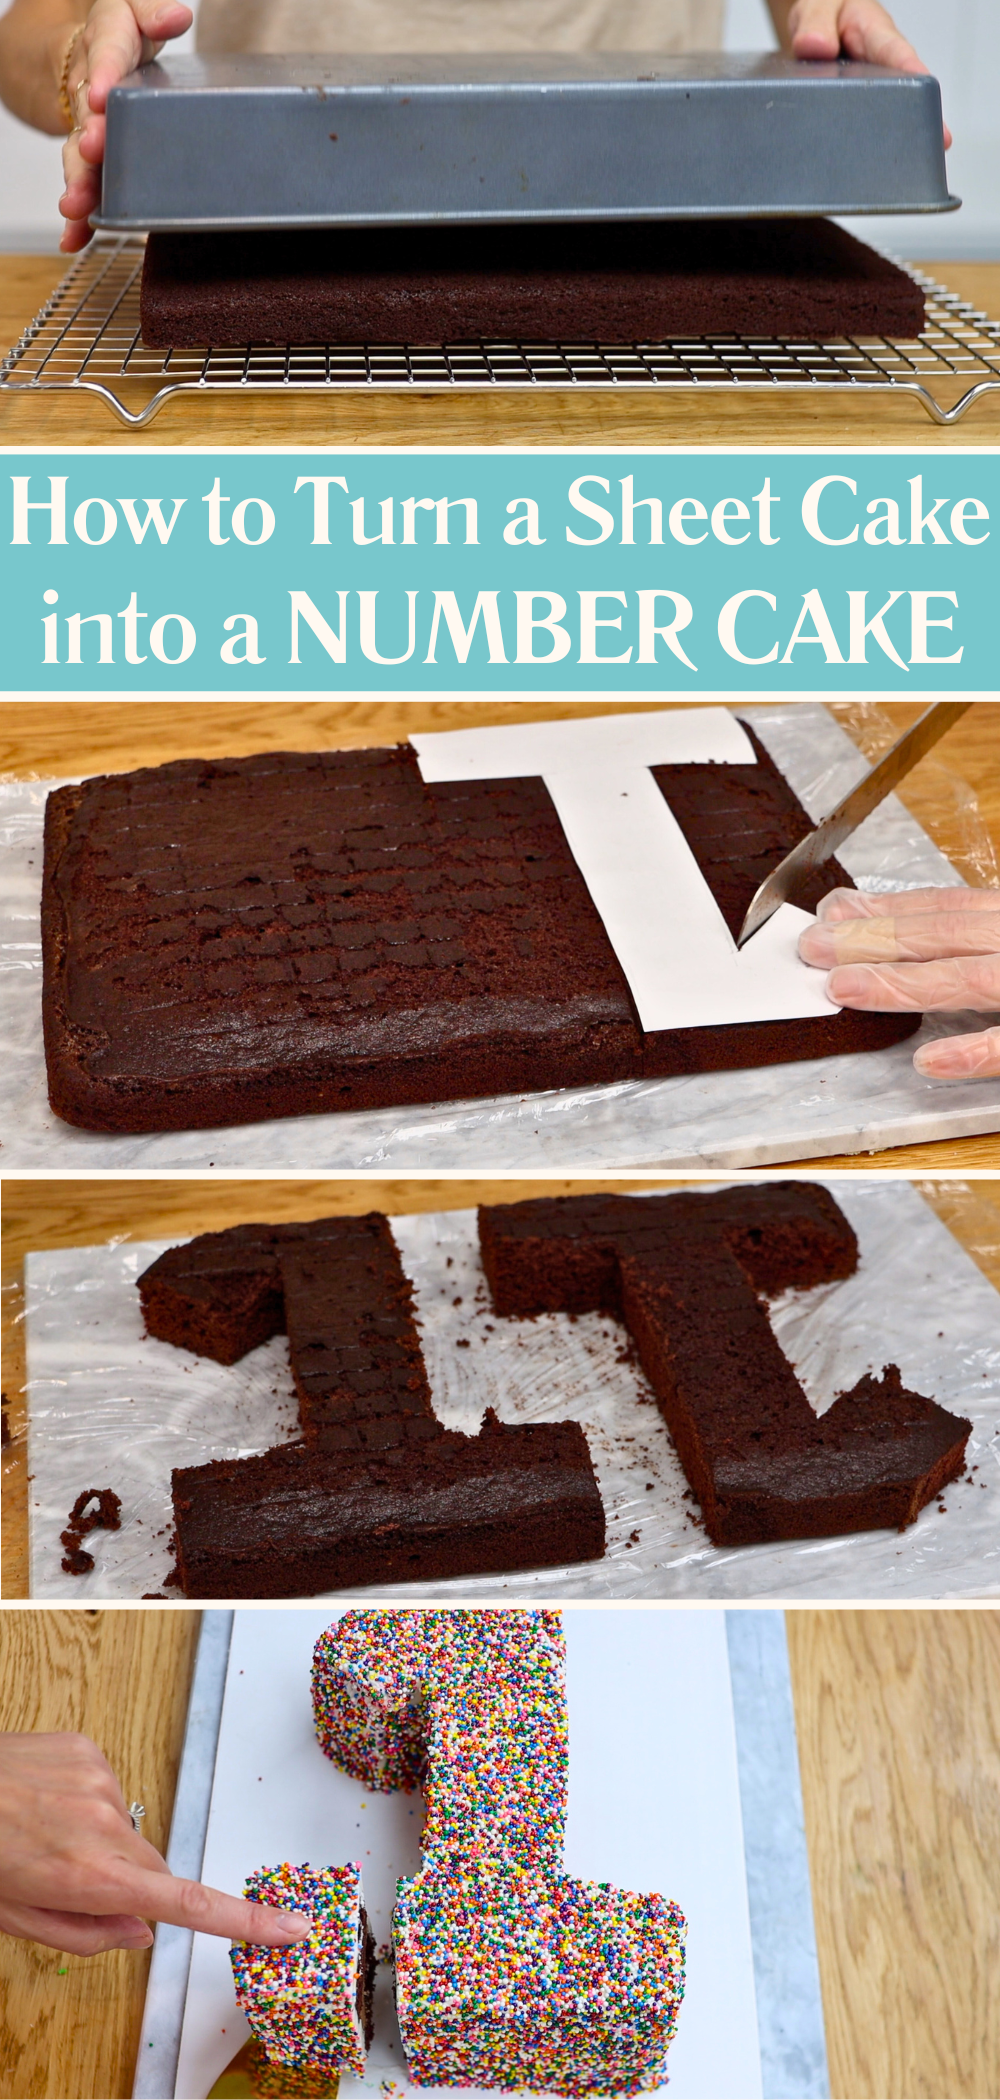
* You can use this batter to make a mini sheet cake or for a very thin 9x13 inch quarter sheet cake. Turn a thin sheet cake into a layered cake by cutting it in half and stacking, or cut out two identical numbers to make a number cake like this:
Once you’ve worked out which pan you’re using, you’ll need to tweak your baking time. This part is simple:
For deeper cakes, it’s also a good idea to lower your oven temperature to 10°C or 15°F less than the original recipe. This helps the cake bake evenly all the way through without the outside burning.
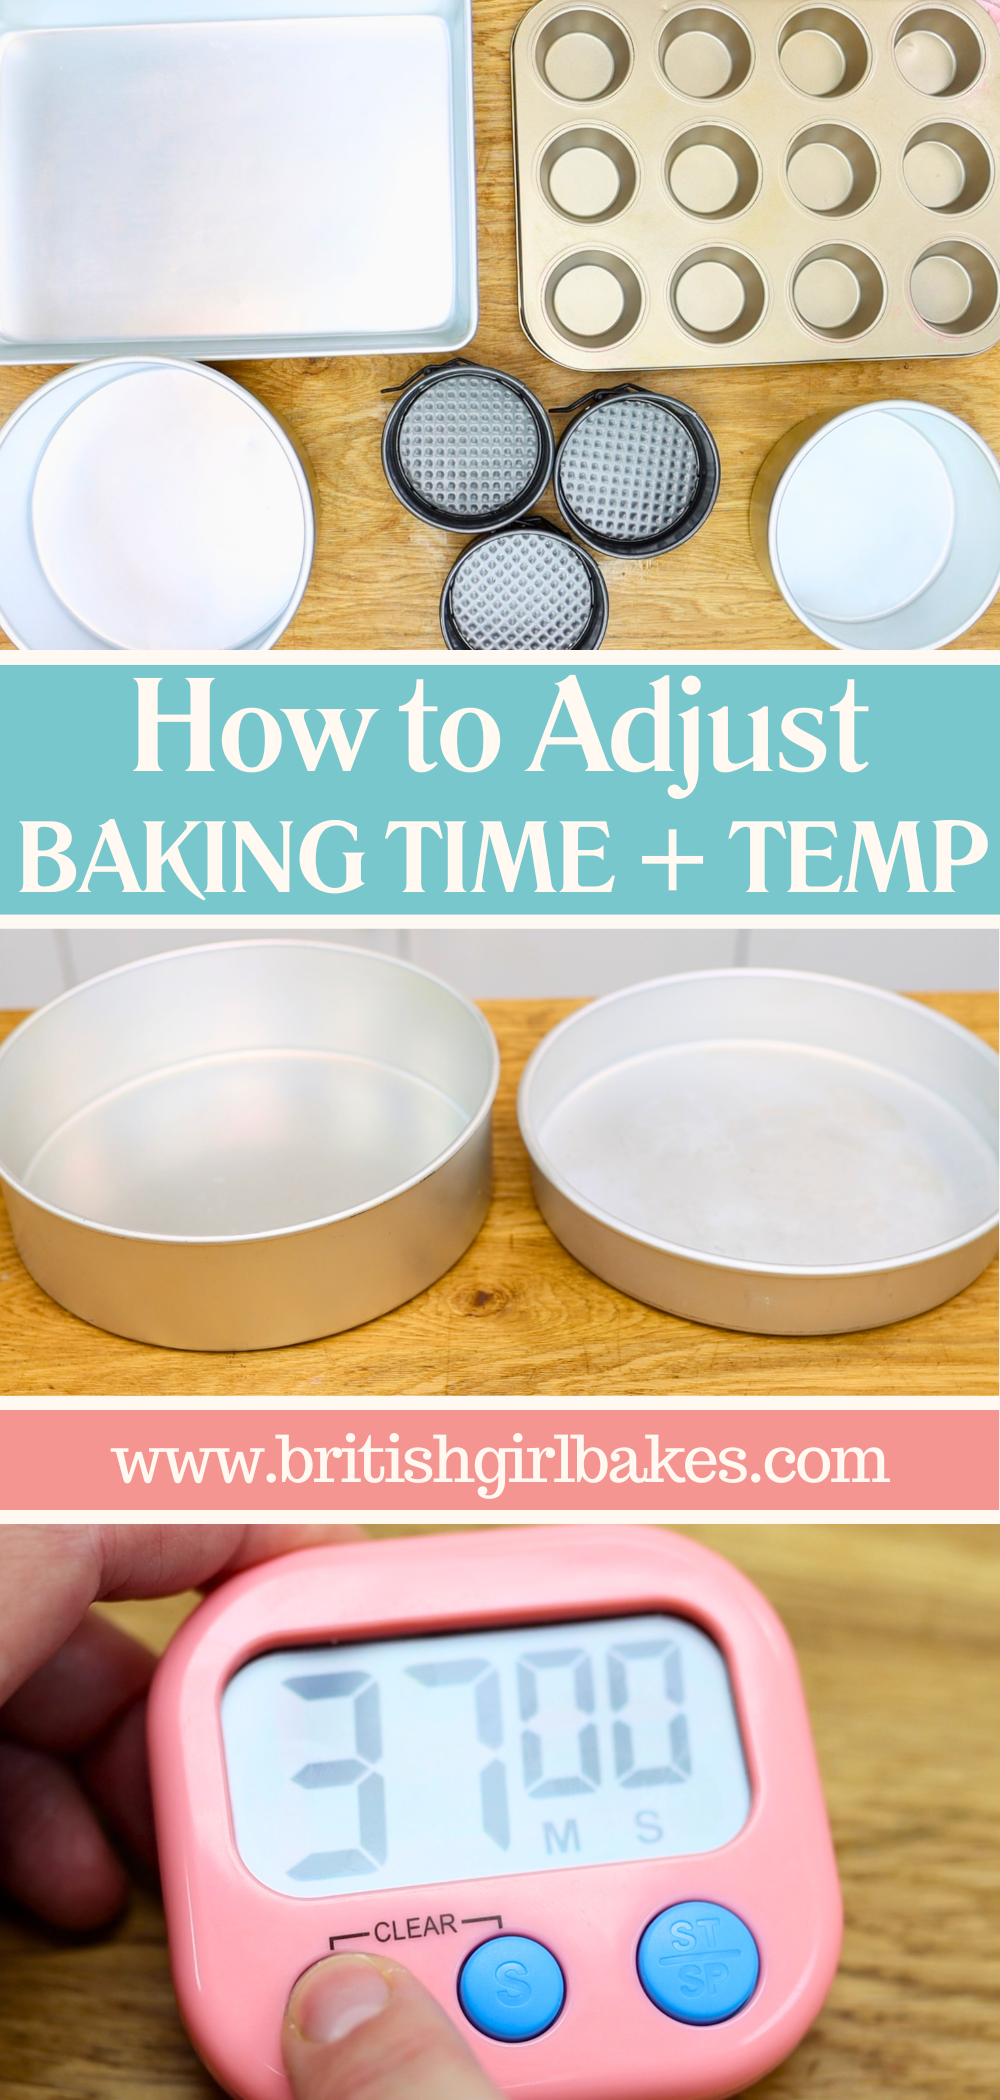
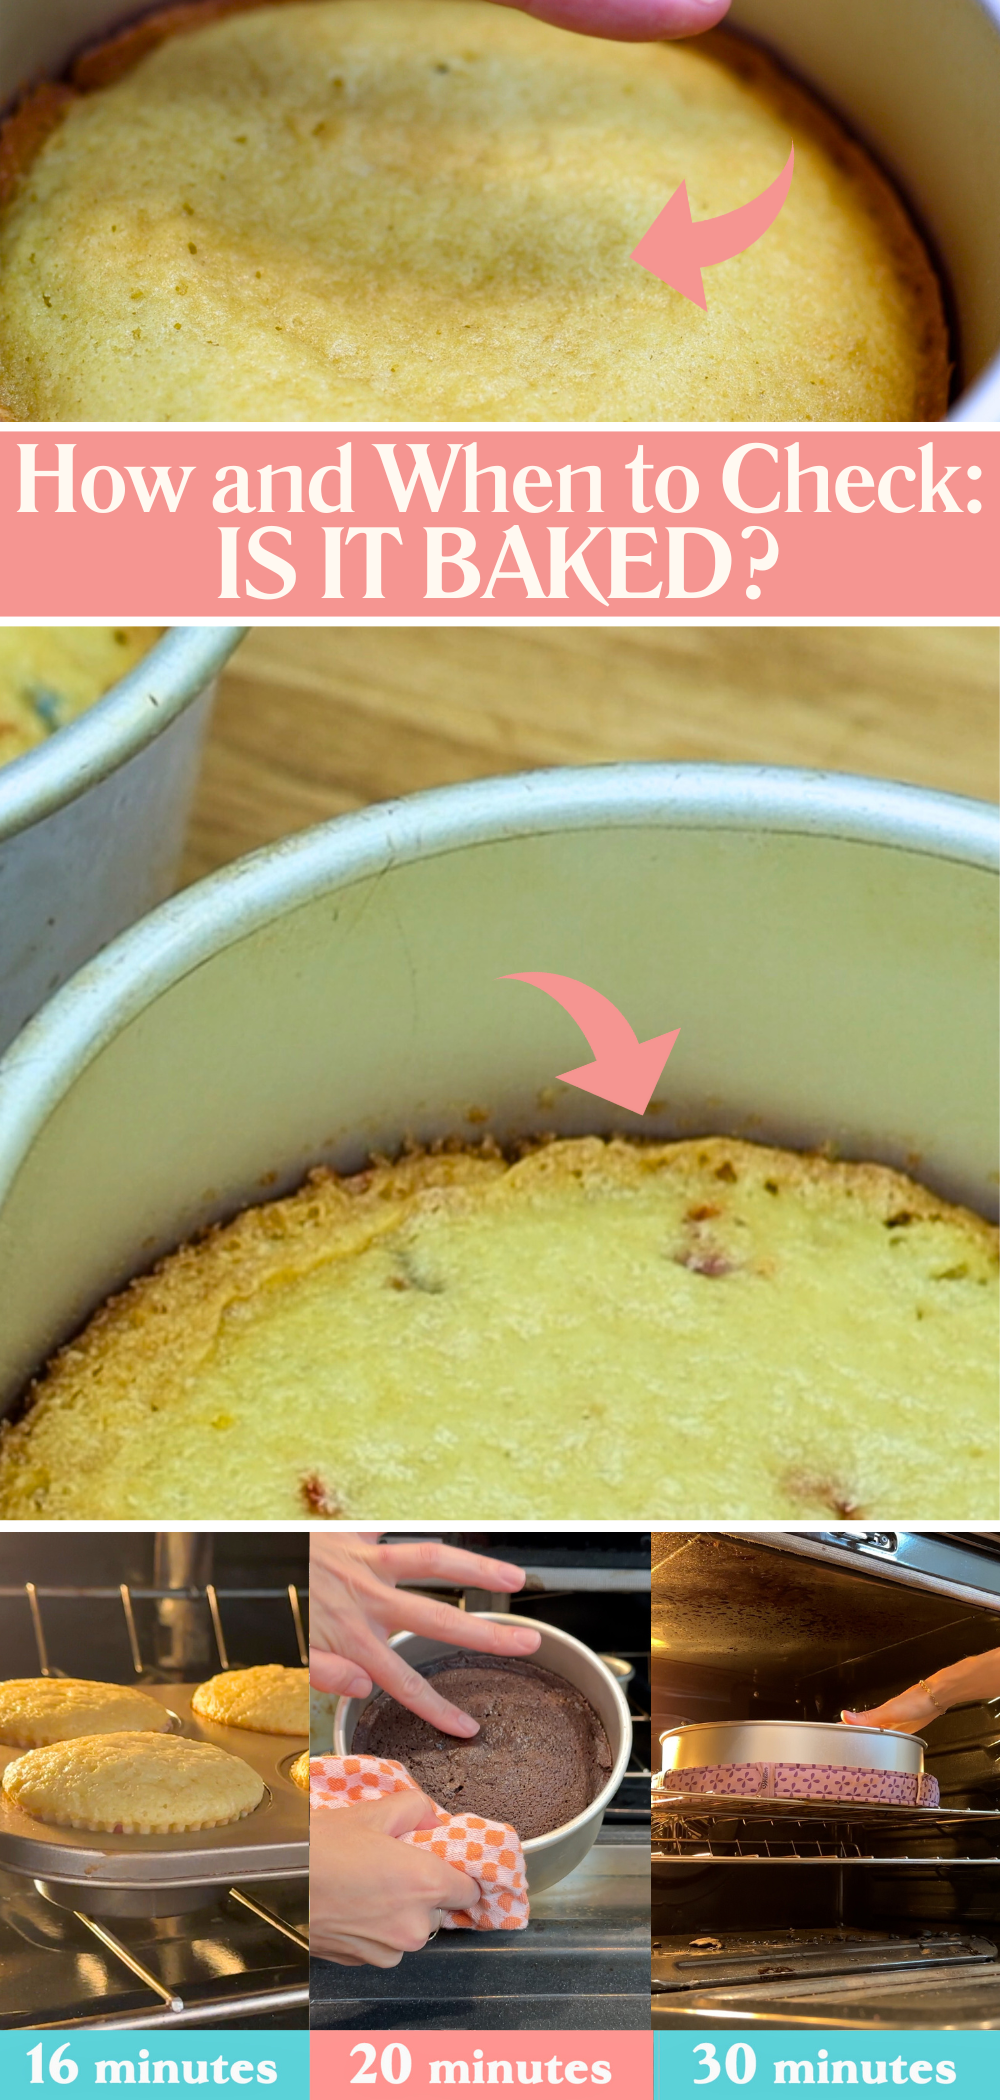
It’s always better to check early rather than risk an overbaked cake. For cupcakes, I start checking at around 16 minutes. For small or shallow cakes, I check from 20 minutes, and for wide or tall cakes I start checking from about 30 minutes. Press the top of the cake gently: if it springs back, it’s ready, but if your fingerprint stays, give it a few more minutes. The edges should also just start to pull away from the pan when it’s fully baked.
Running out of buttercream halfway through decorating is incredibly frustrating. Cake recipe conversions aren’t just about the cake batter – you’ll need to scale your buttercream too.
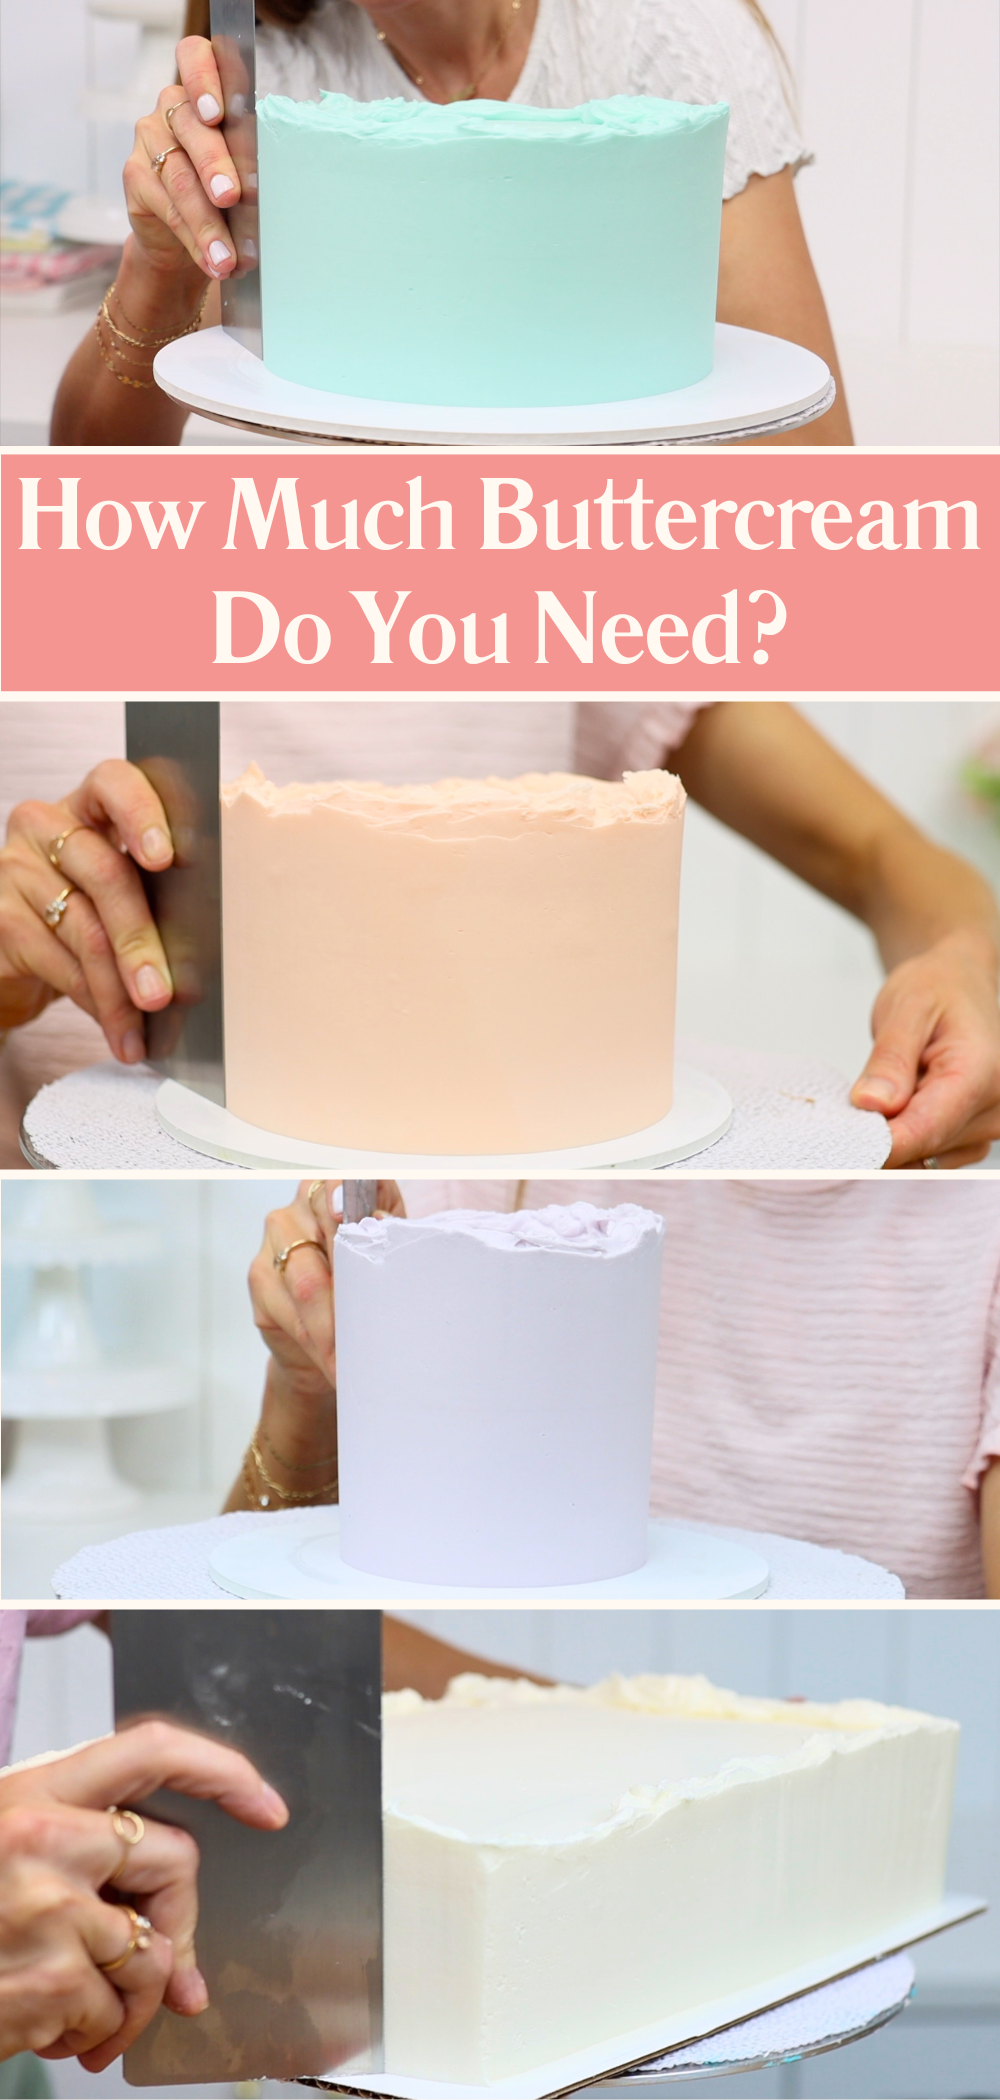
Here’s a simple guide based on my 4 Minute Buttercream, which makes about 6 cups of frosting (1.5kg). That’s enough to fill and frost an 8 inch cake with three layers. You'll see the ingredient measurements listed for each batch and below that, what you can frost with that buttercream.
| 6 cups of buttercream (1 batch) | approx. 3 1/2 cups of buttercream | approx. 1 3/4 cups of buttercream | ||
| Butter | 2 1/2 cups 5 sticks 568 g | 1 1/2 cups 3 sticks 339 g | 3/4 cup 1 1/2 sticks 170 g | |
| Powdered Sugar | 7 1/2 cups 2 lb 907 g | 4 1/2 cups 1 lb 3 oz 545 g | 2 1/4 cups 9 1/2 oz 272g | |
| Salt | 1/2 teaspoon | 1/4 teaspoon | 1/8 teaspoon | |
| Vanilla | 1/2 tablespoon | 1 teaspoon | 1/2 teaspoon | |
| Cream / Milk | 3 tablespoons | 2 tablespoons | 1 tablespoon | |
| Frosts which cake? | 8 inch (2-3 layers) or 9x13 inch (2 layers) | 6 inch (2-3 layers) or 9x13 inch (1 layer) | 4 inch (2-3 layers) | |
| Frosts how many cupcakes? | 24-36 cupcakes | approx. 18 cupcakes | approx. 9 cupcakes |
Cake recipe conversions open up so many possibilities! You can now make your favourite recipe in any size or shape of cake and with the right amount of buttercream, too. Whether you’re scaling up for a big party cake, scaling down for a smaller gathering, or turning a layered cake recipe into cupcakes, you’ll have the confidence to get it right every time.
I’d love to know what you’re converting next! Please share it in the comments below. And if you want to take your baking and decorating even further, visit my cake school for online courses and memberships where you can learn hundreds of cake decorating techniques and designs.
You can also watch a video of this tutorial on cake recipe conversions:
Buttercream is a dream to work with, until it isn’t. In this tutorial I'll cover 10 common buttercream problems including cracking, melting, turning yellow, and bursting out of piping bags. With my tips and tricks you'll learn how to troubleshoot every single one and how to fix it so your buttercream is smooth, stable, and perfect for frosting, piping, flavouring, or freezing. I'll be using my 4 Minute Buttercream for all of my examples 🙂
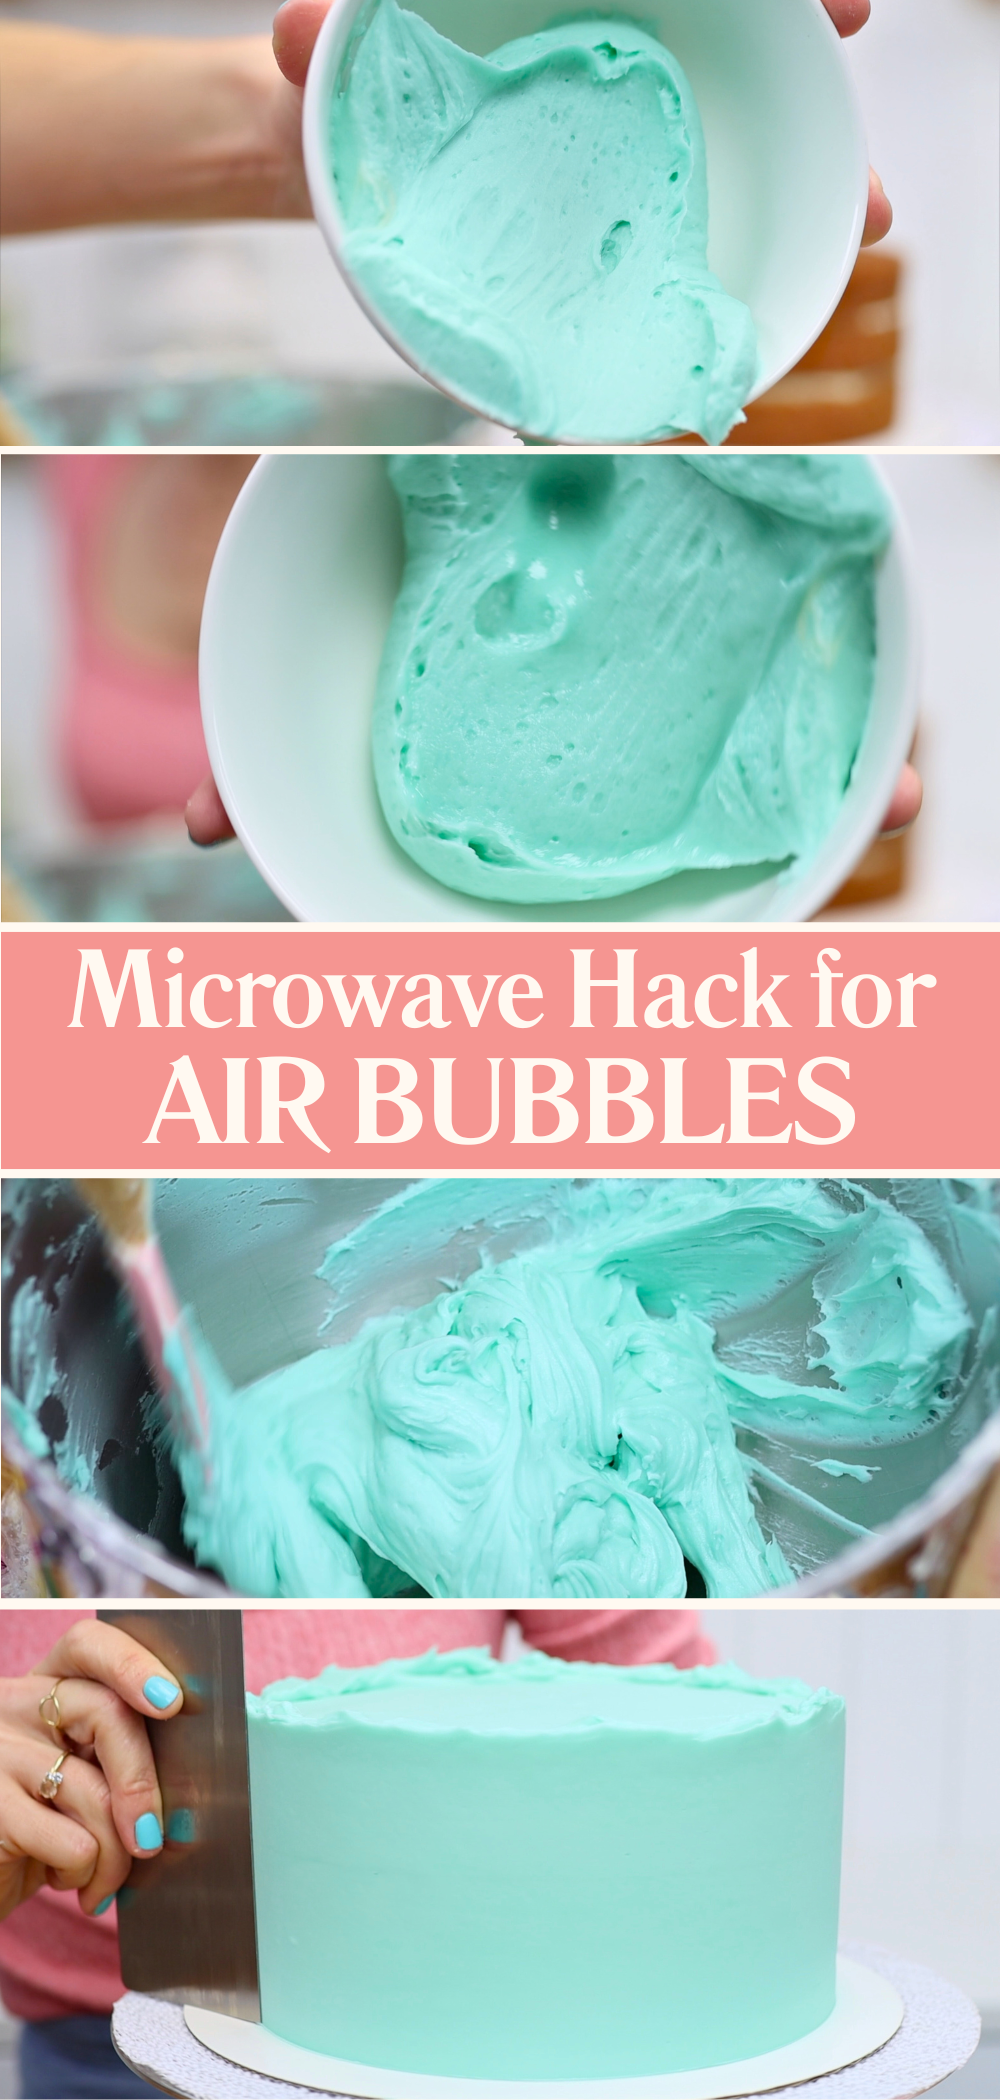
Air bubbles happen when too much air gets mixed into your buttercream. This usually happens when mixing on high speed or if your buttercream rests for too long. Air bubbles also appear after chilling buttercream, when it returns to room temperature. If your buttercream looks spongey, it probably has air bubbles trapped inside.
To avoid this, always mix your buttercream on the lowest speed possible. Use a paddle attachment or beater instead of a whisk, since a whisk will beat in more air. But if the bubbles are already there you can stir them out. Use a spatula to stir aggressively, knocking the buttercream against the sides of the bowl to knock the air out. This really helps if your buttercream has been sitting for a while or has just come out of the fridge.
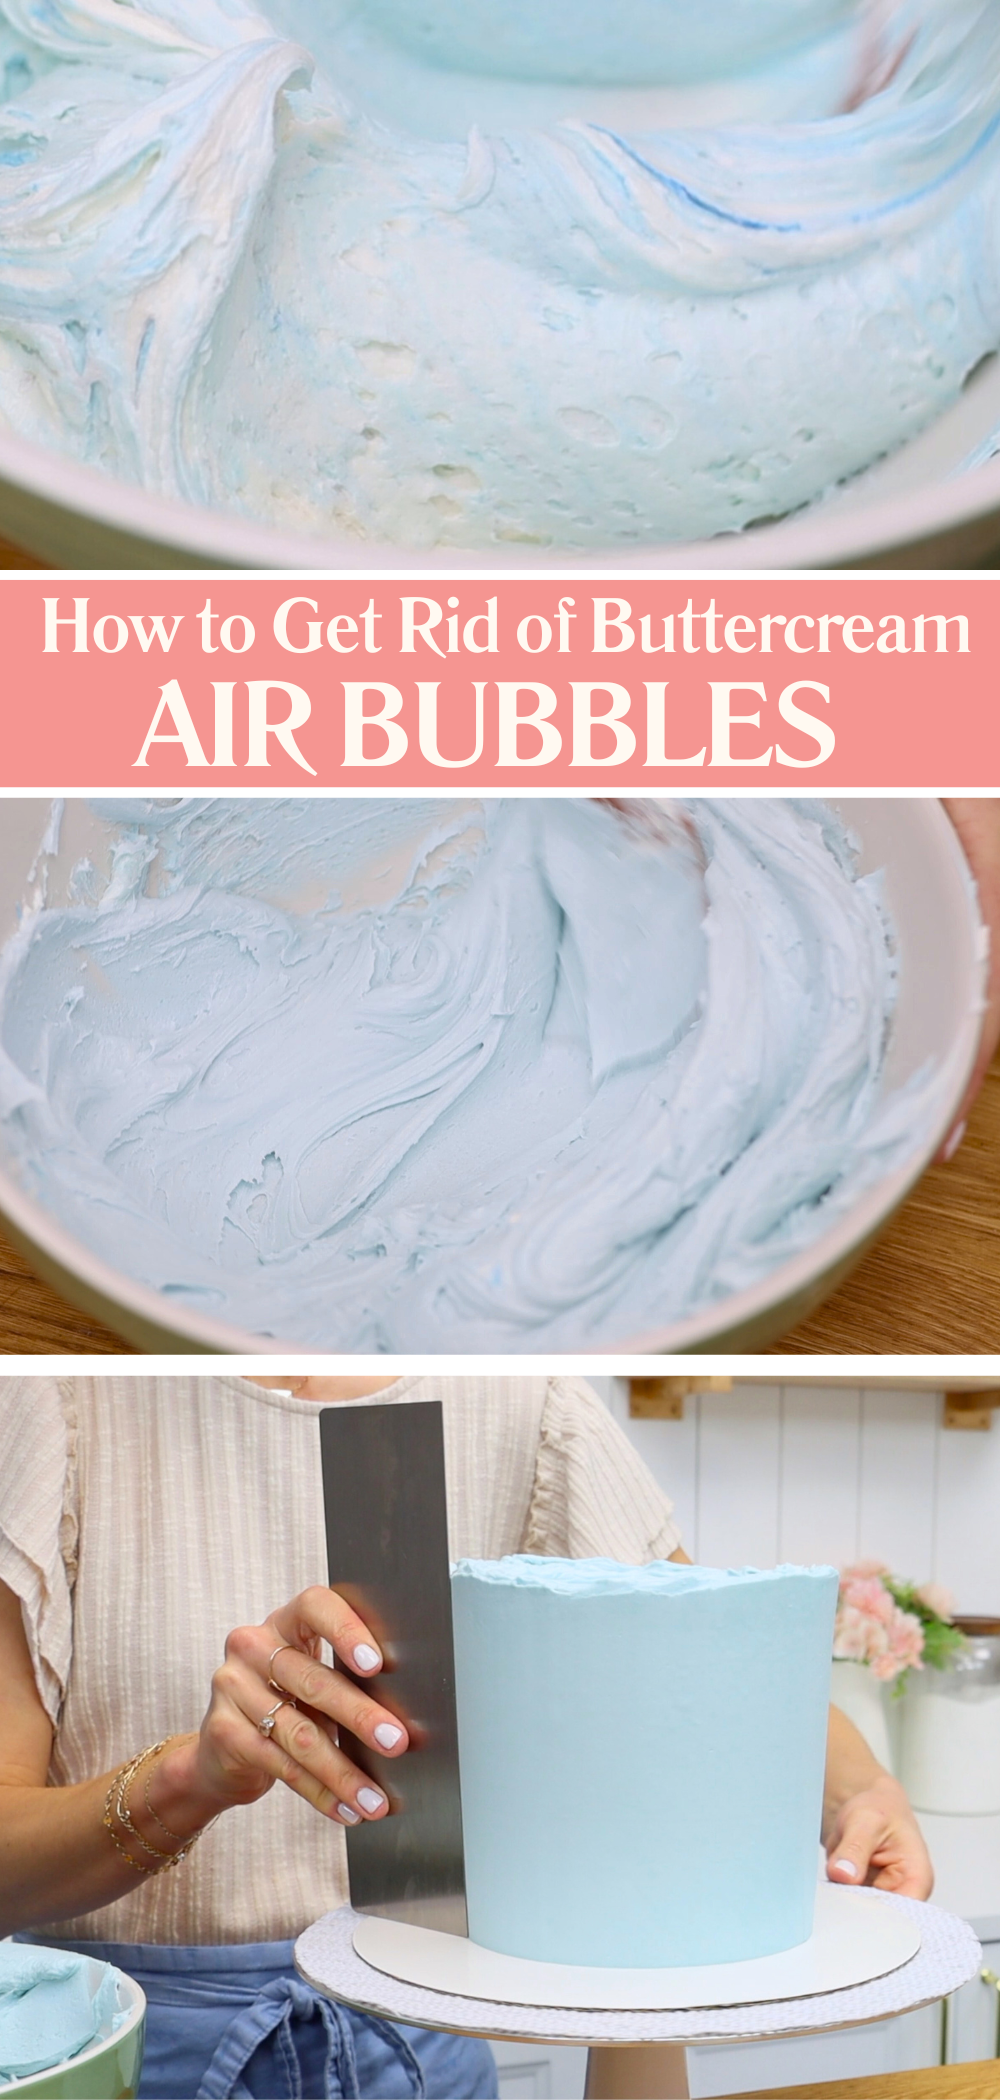
Use one of my favourite buttercream hacks for really stubborn air bubbles. Scoop out about a third of your buttercream and microwave it for just 10 seconds. Then stir it back into the rest. This melts just enough of the buttercream to mix everything together smoothly, giving you the perfect texture with no air bubbles.
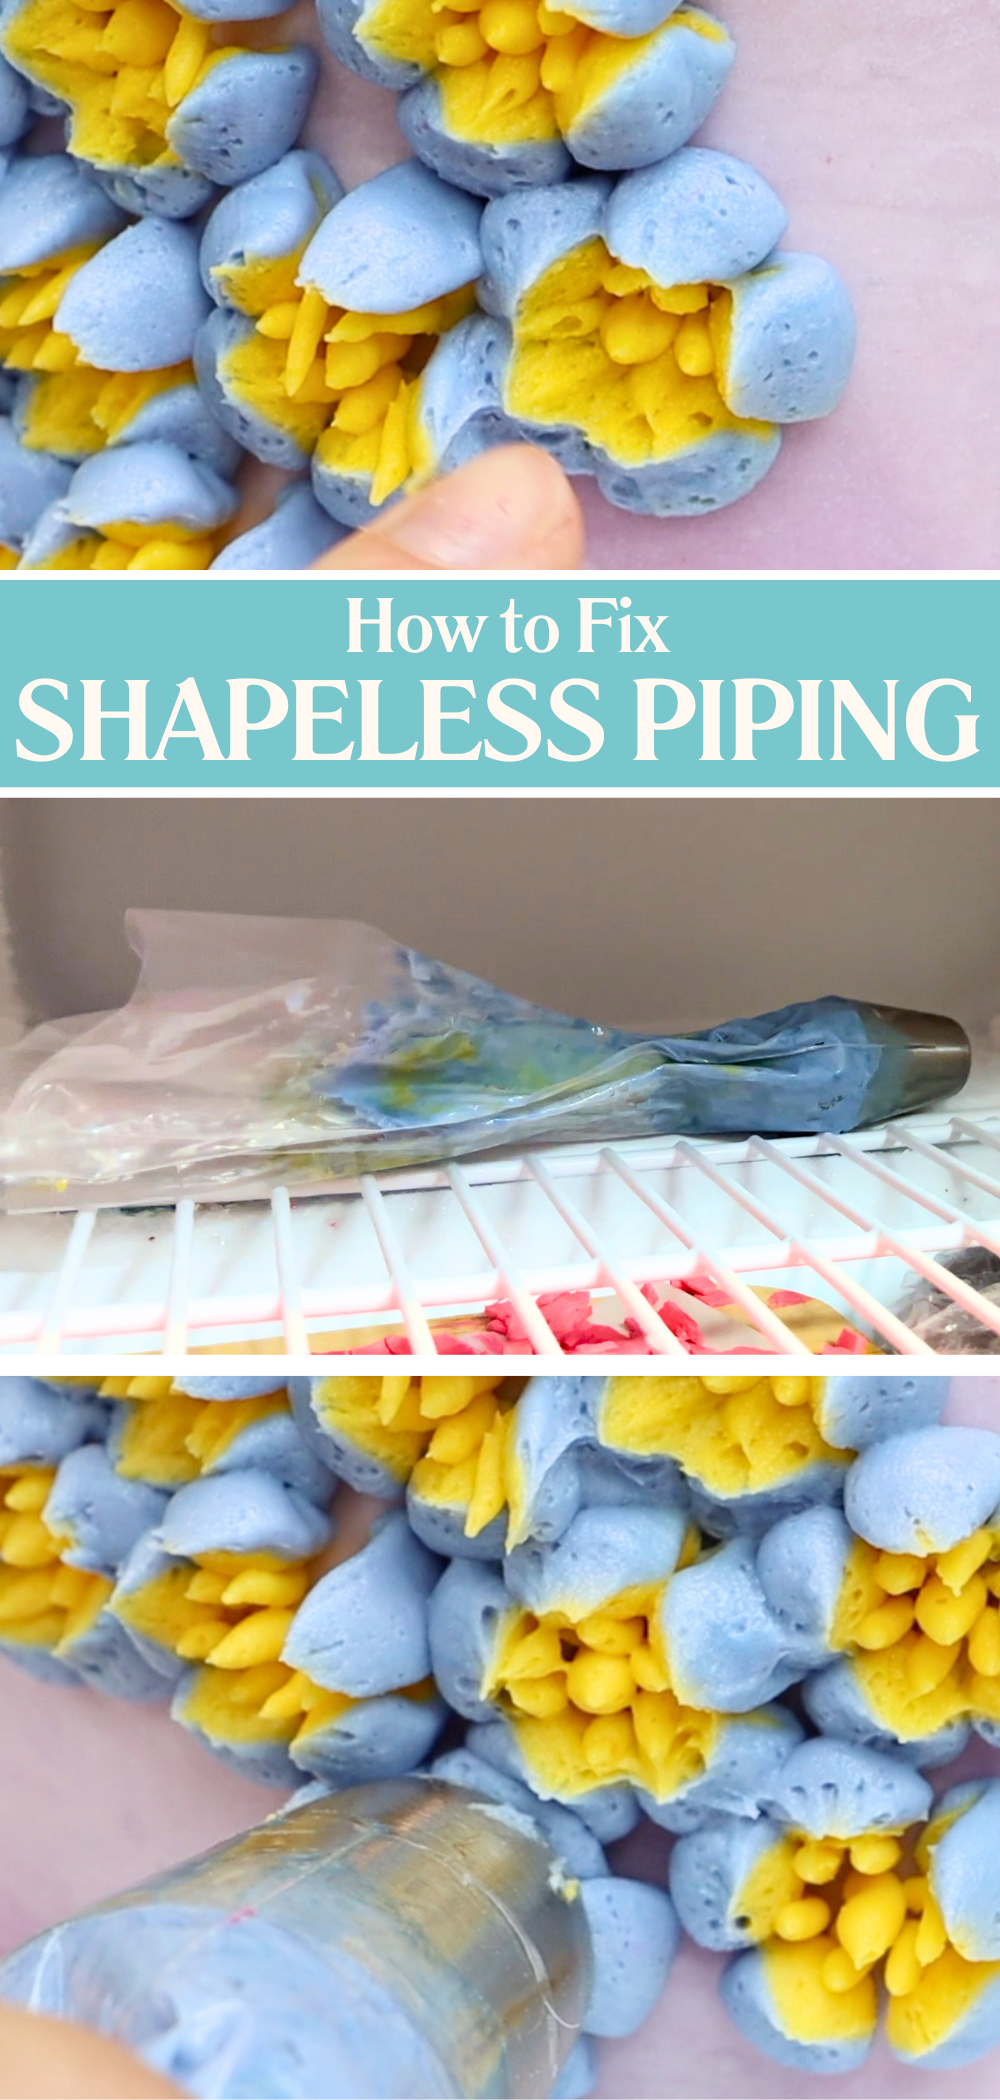
If your piping looked great at first but then starts to droop or lose its shape, it’s probably because of your hands. Their warmth while you're squeezing the piping bag can soften the buttercream as it starts to melt. This is especially common with flowers and detailed decorations that take a while to pipe and really need to hold their shape!
The fix is simple: put your piping bag in the freezer for one minute. Just one. Any longer and the buttercream will freeze against the metal piping tip, making it too hard to pipe. After a minute, your buttercream will be firmer and you’ll get clean, crisp piping again. Use it with any piping tips, even Russian Tips - get my tips for those in this tutorial.
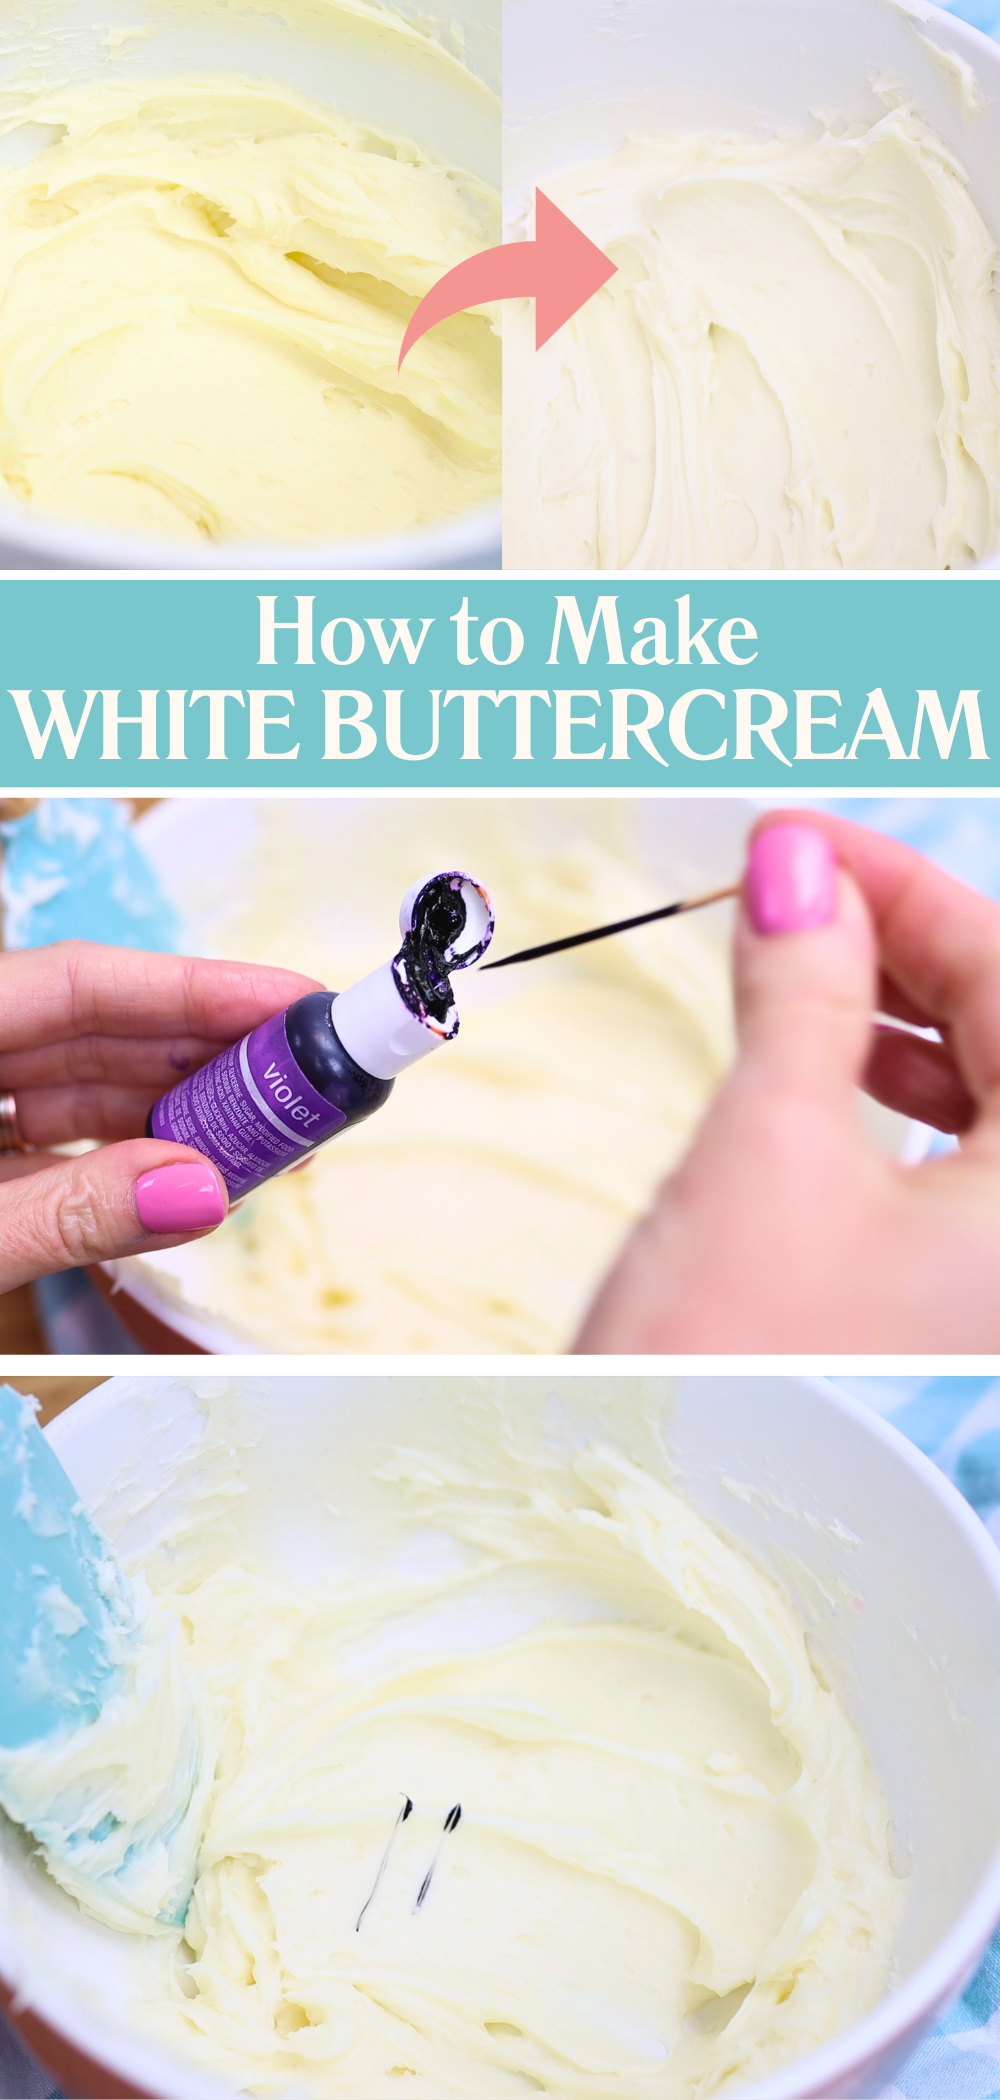
Butter is naturally yellow so if you’re making an all-butter buttercream, it will have a yellow tint. That’s fine for some cakes but not if you’re aiming for a bright white frosting.
Here’s a clever colour trick: add violet! Take a toothpick, dip it into violet gel food colouring, and swipe just a tiny amount through your buttercream. Violet cancels out yellow and when you've mixed it in, you’ll end up with a bright white buttercream. This is so useful for wedding cakes! Make sure you use a toothpick instead of adding a full drop of violet to prevent turning the buttercream purple.
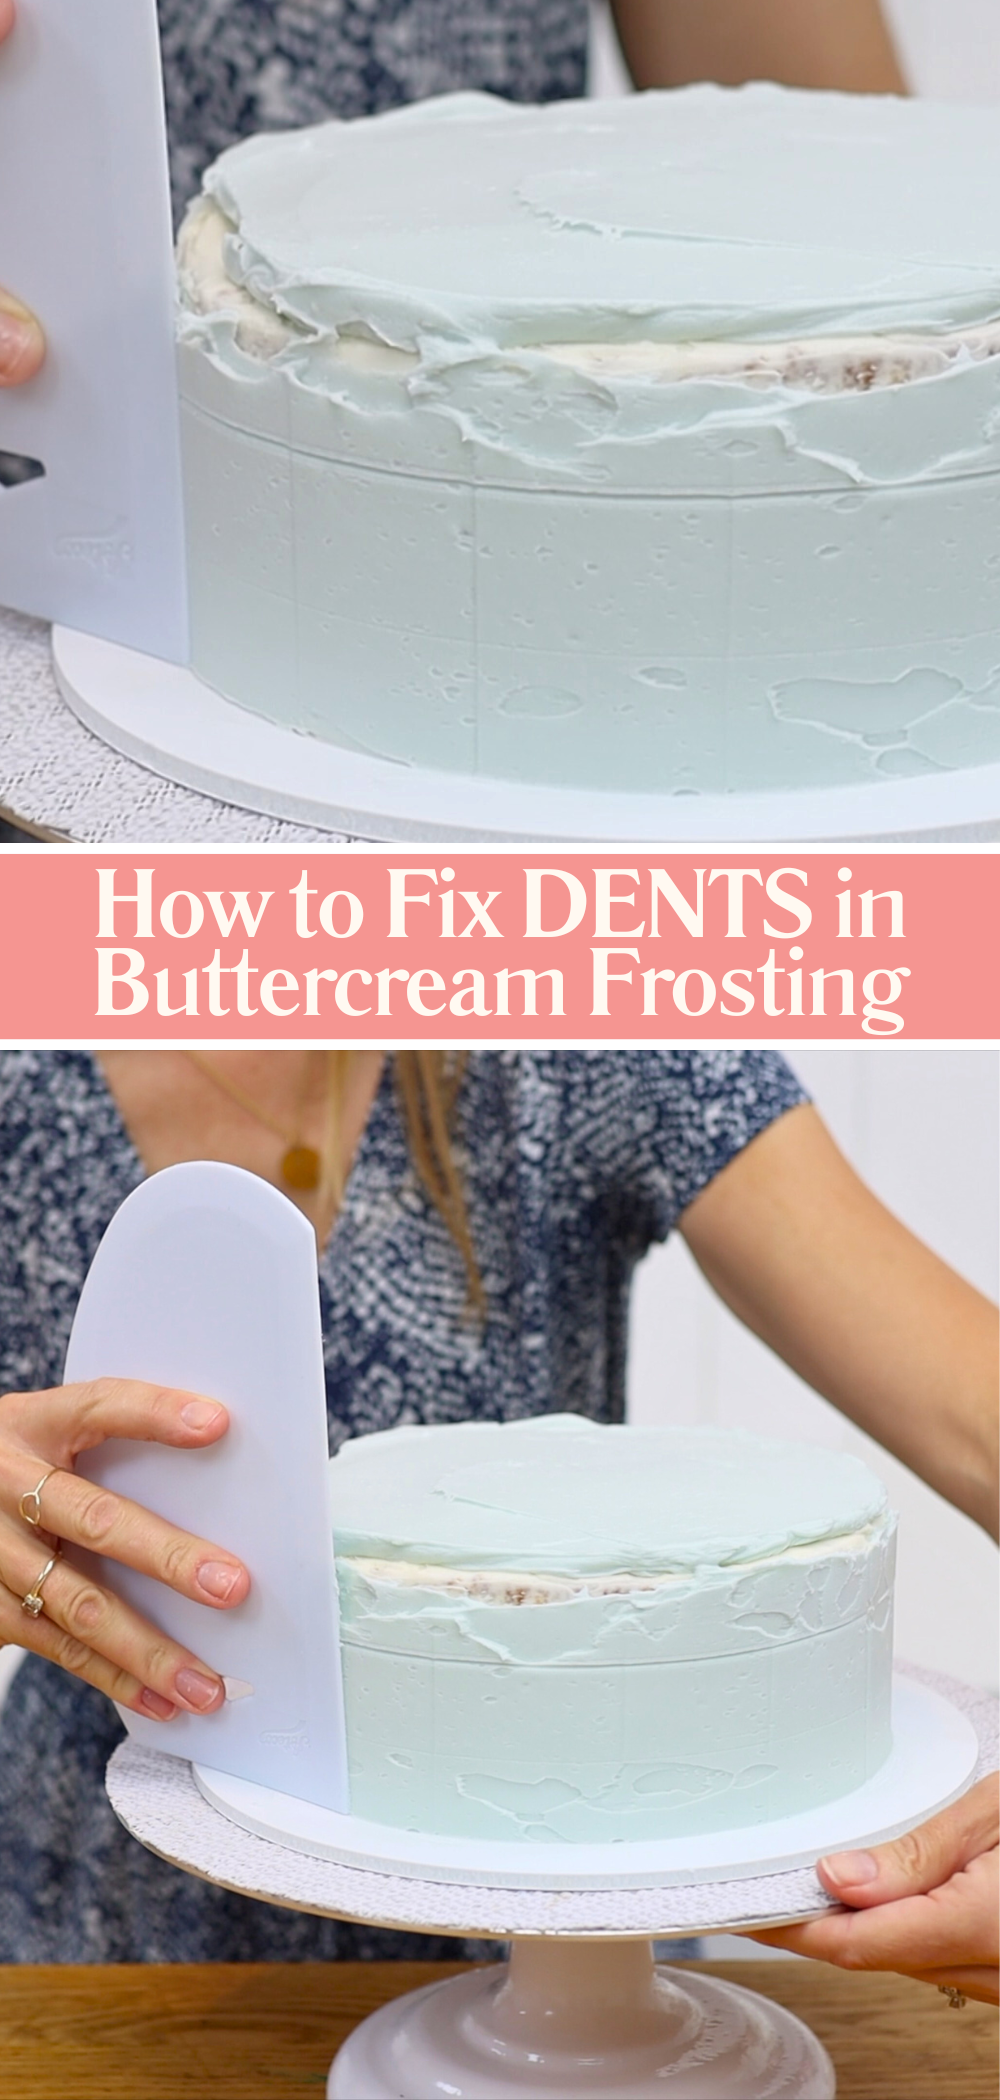
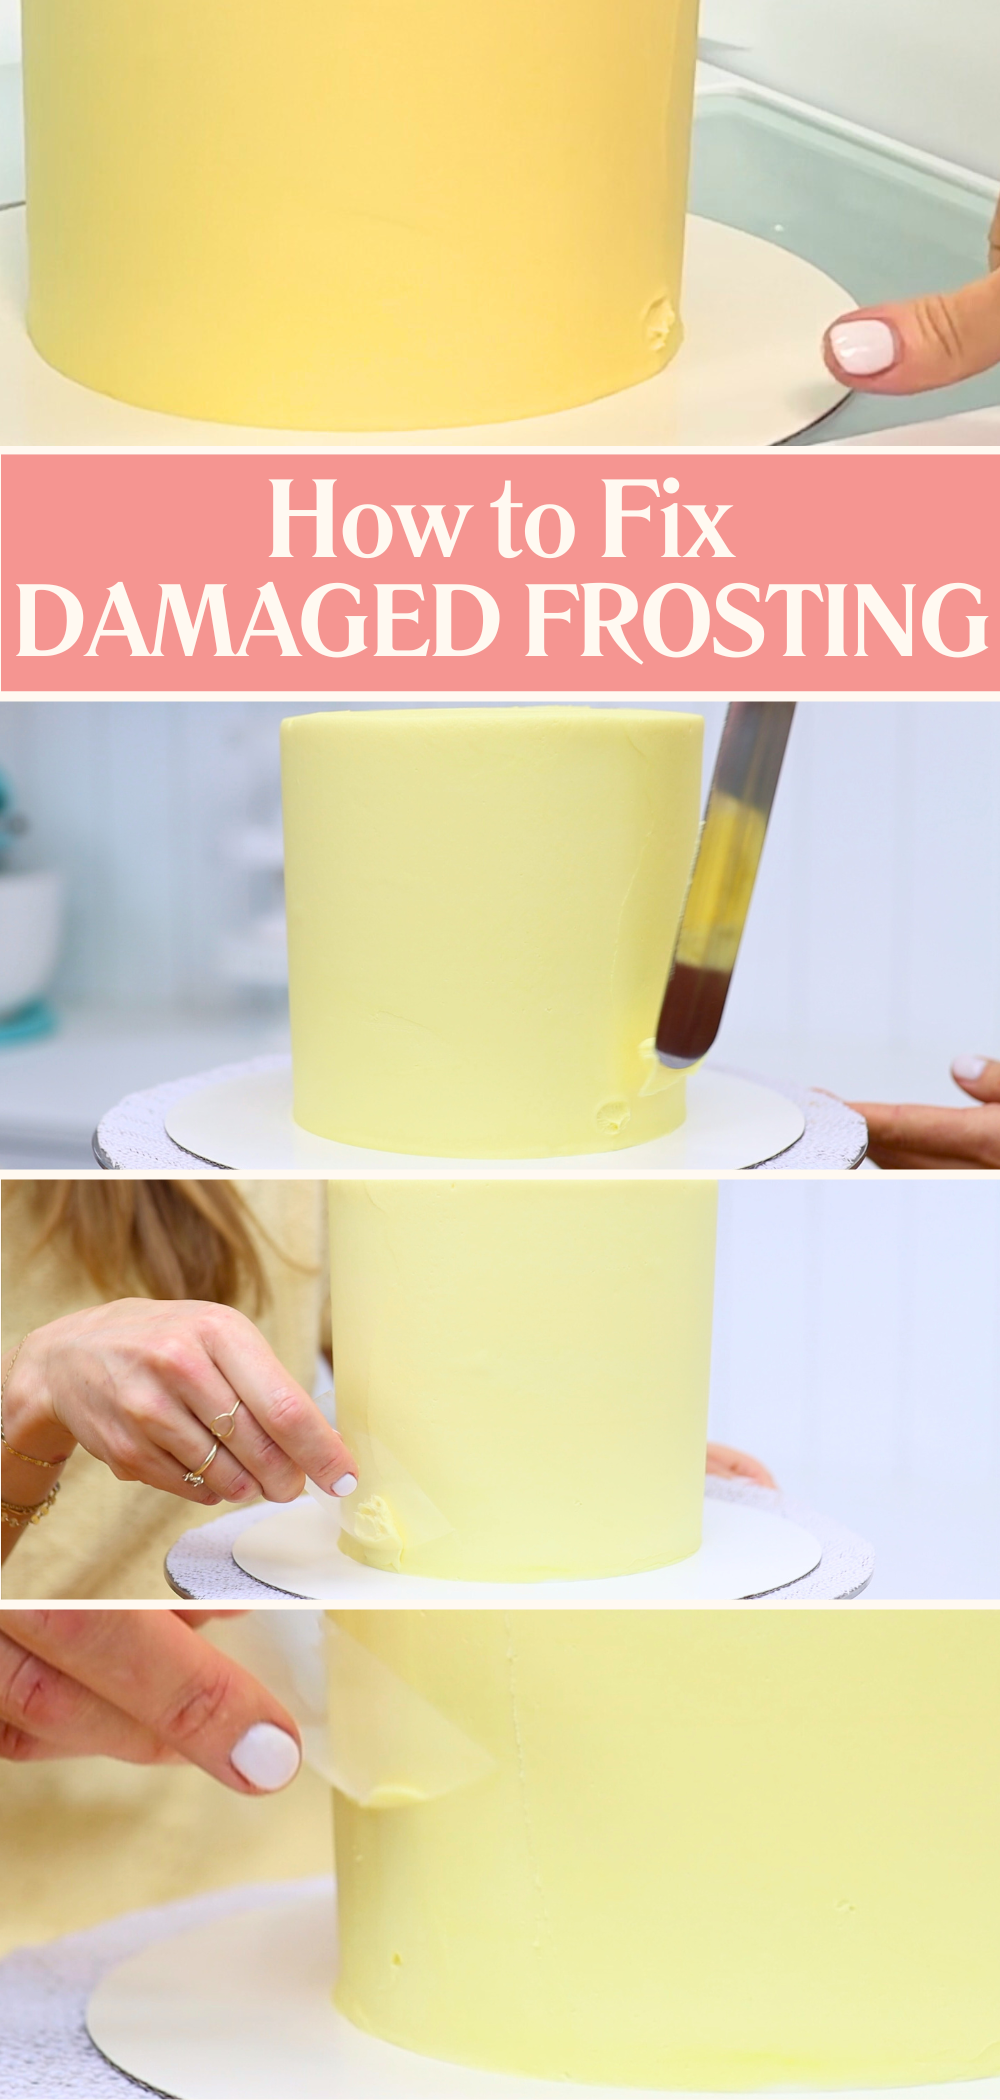
You’ve spent ages smoothing your cake and it’s looking flawless… until someone (maybe you!) accidentally pokes it. It’s one of the most annoying buttercream problems but it’s surprisingly easy to fix.
Whether the frosting is still soft or it's already set, spread a small amount of fresh buttercream over the dent. To smooth it, use a small piece of acetate. This is flexible plastic used for cake decorating and it comes in sheets or rolls. Cut a small square, about 3 inches or 10cm, and gently scrape over the damaged area. It’ll follow the curve of the cake and blend the repair seamlessly into the rest of the frosting. The dent will disappear like it never happened.
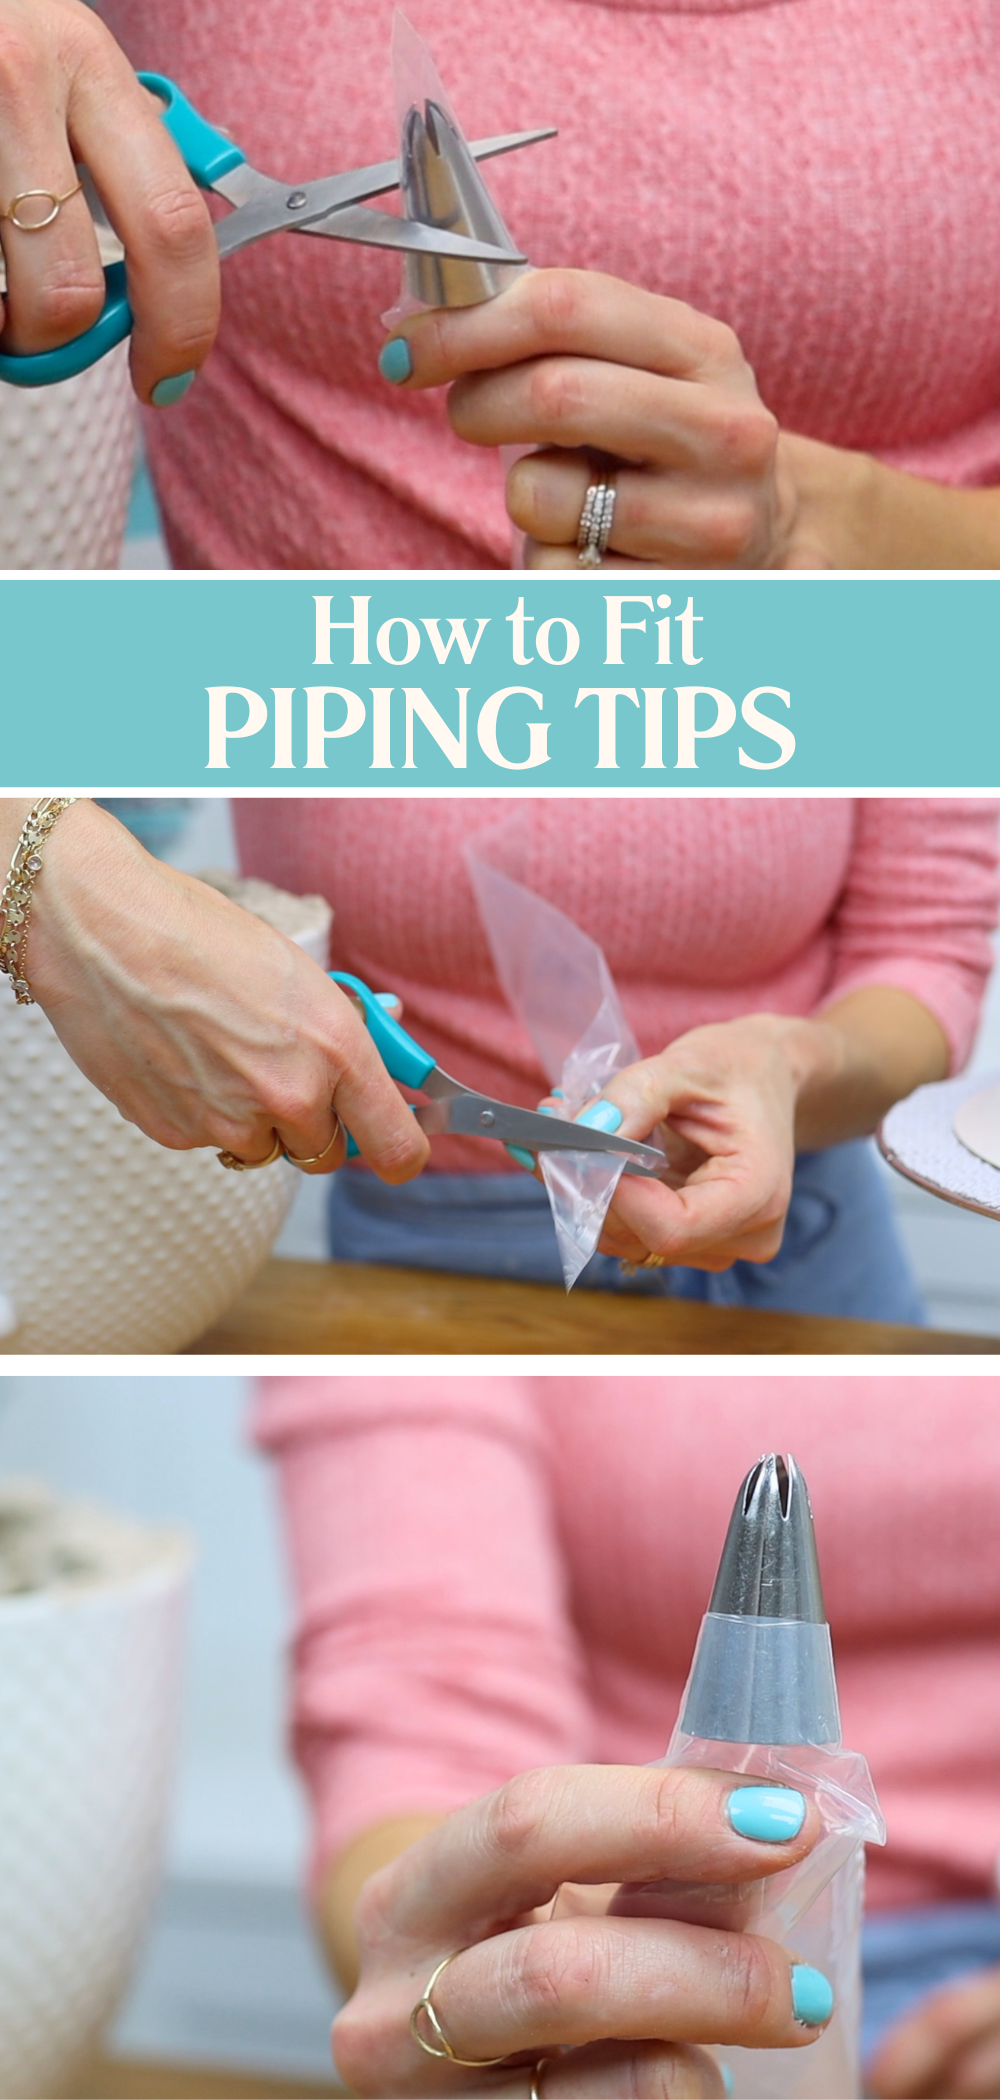
If your piping bag bursts or the tip pops out mid-way through decorating, it’s probably because of how the piping tip was fitted. Disposable piping bags are sealed at the tip so they need to be cut properly to hold piping tips securely.
To prevent bursting bags, drop your piping tip into the bag and push it down to the end. Then score a line halfway up the piping tip with scissors and slide the tip out. Cut along the line you just made and then push the piping tip back down into place. Now the bag will hold it snugly and the tip won’t pop out no matter how much pressure you apply.
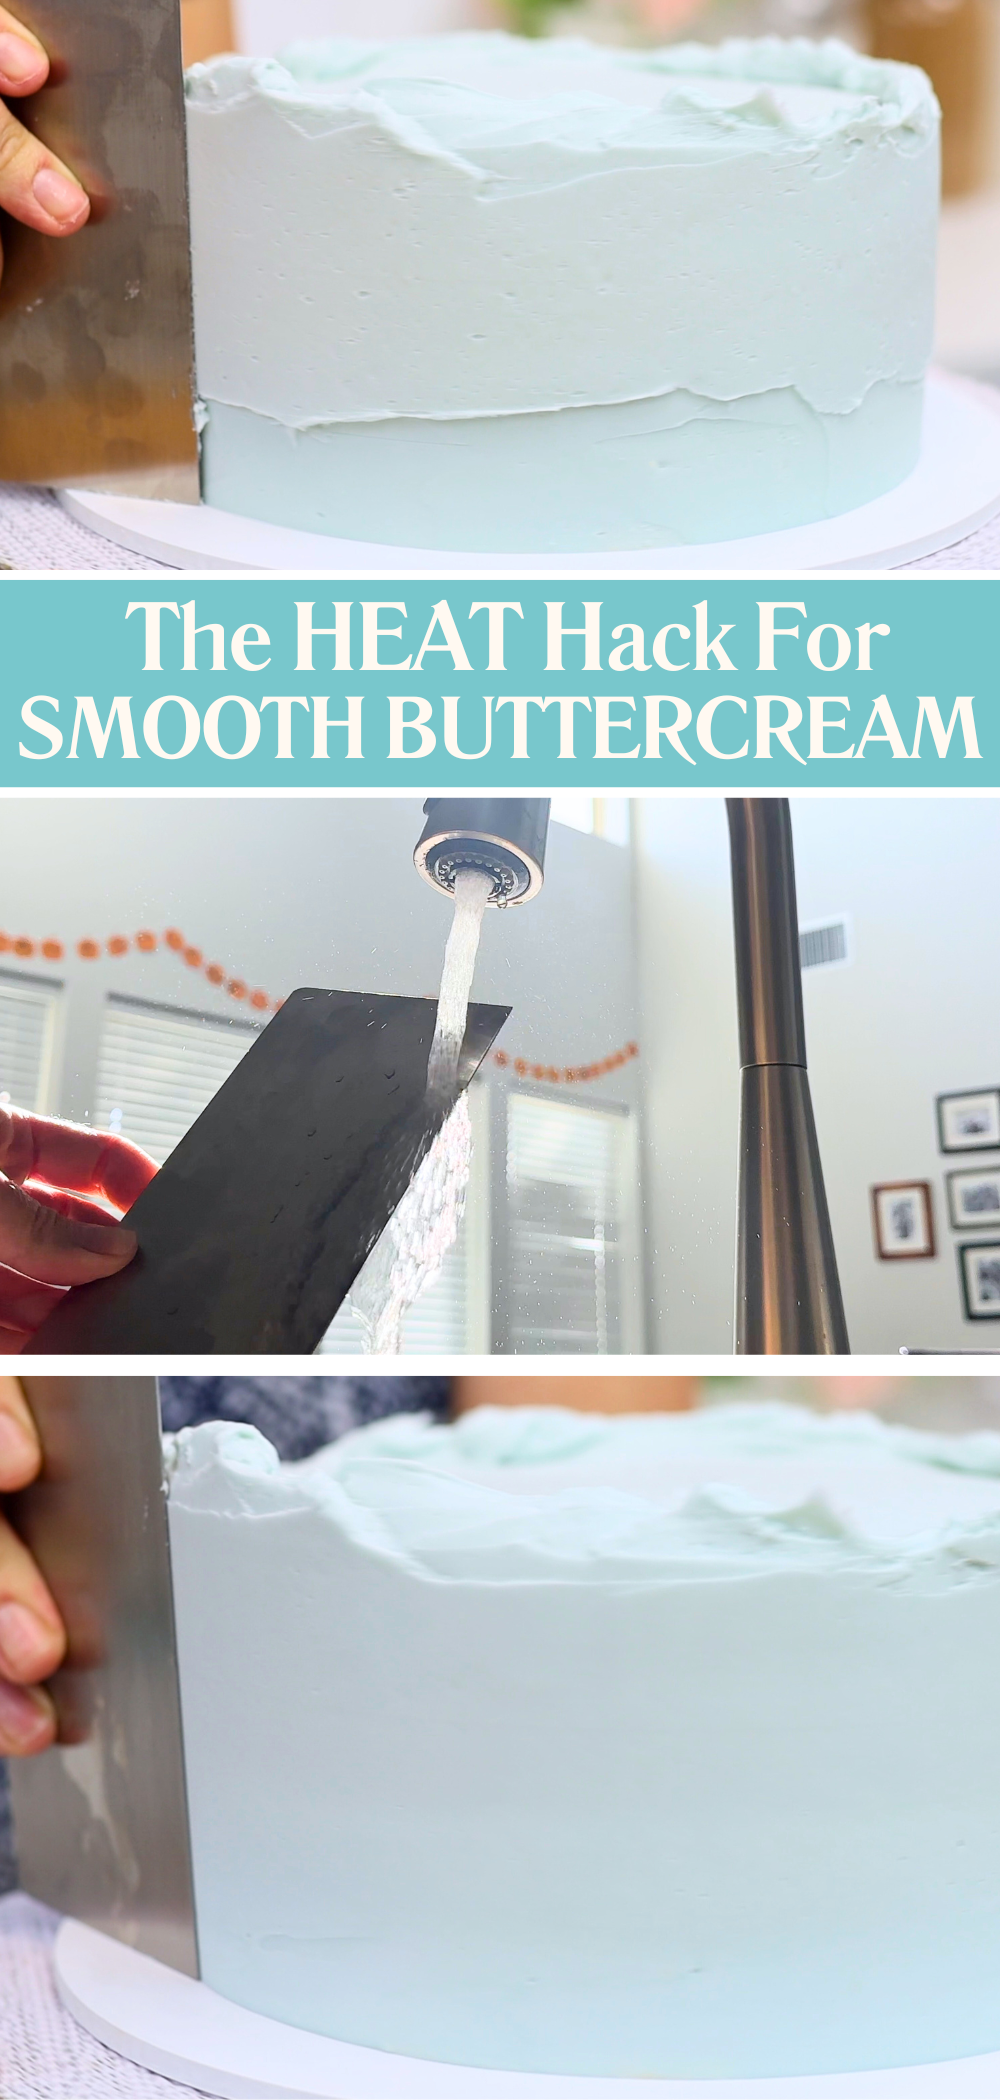
Sometimes buttercream just refuses to get smooth, no matter how many times you scrape around the cake. If your frosting has shallow imperfections or little ridges that won’t go away, use heat to fix it!
Switch to a metal cake scraper and warm it up using a blowtorch, hairdryer, or hot water. Dry it completely so it’s warm and dry, not hot or wet. Now scrape gently around the cake. The warmth will melt the outer surface of the buttercream as you go, filling in imperfections and leaving behind a super smooth finish.
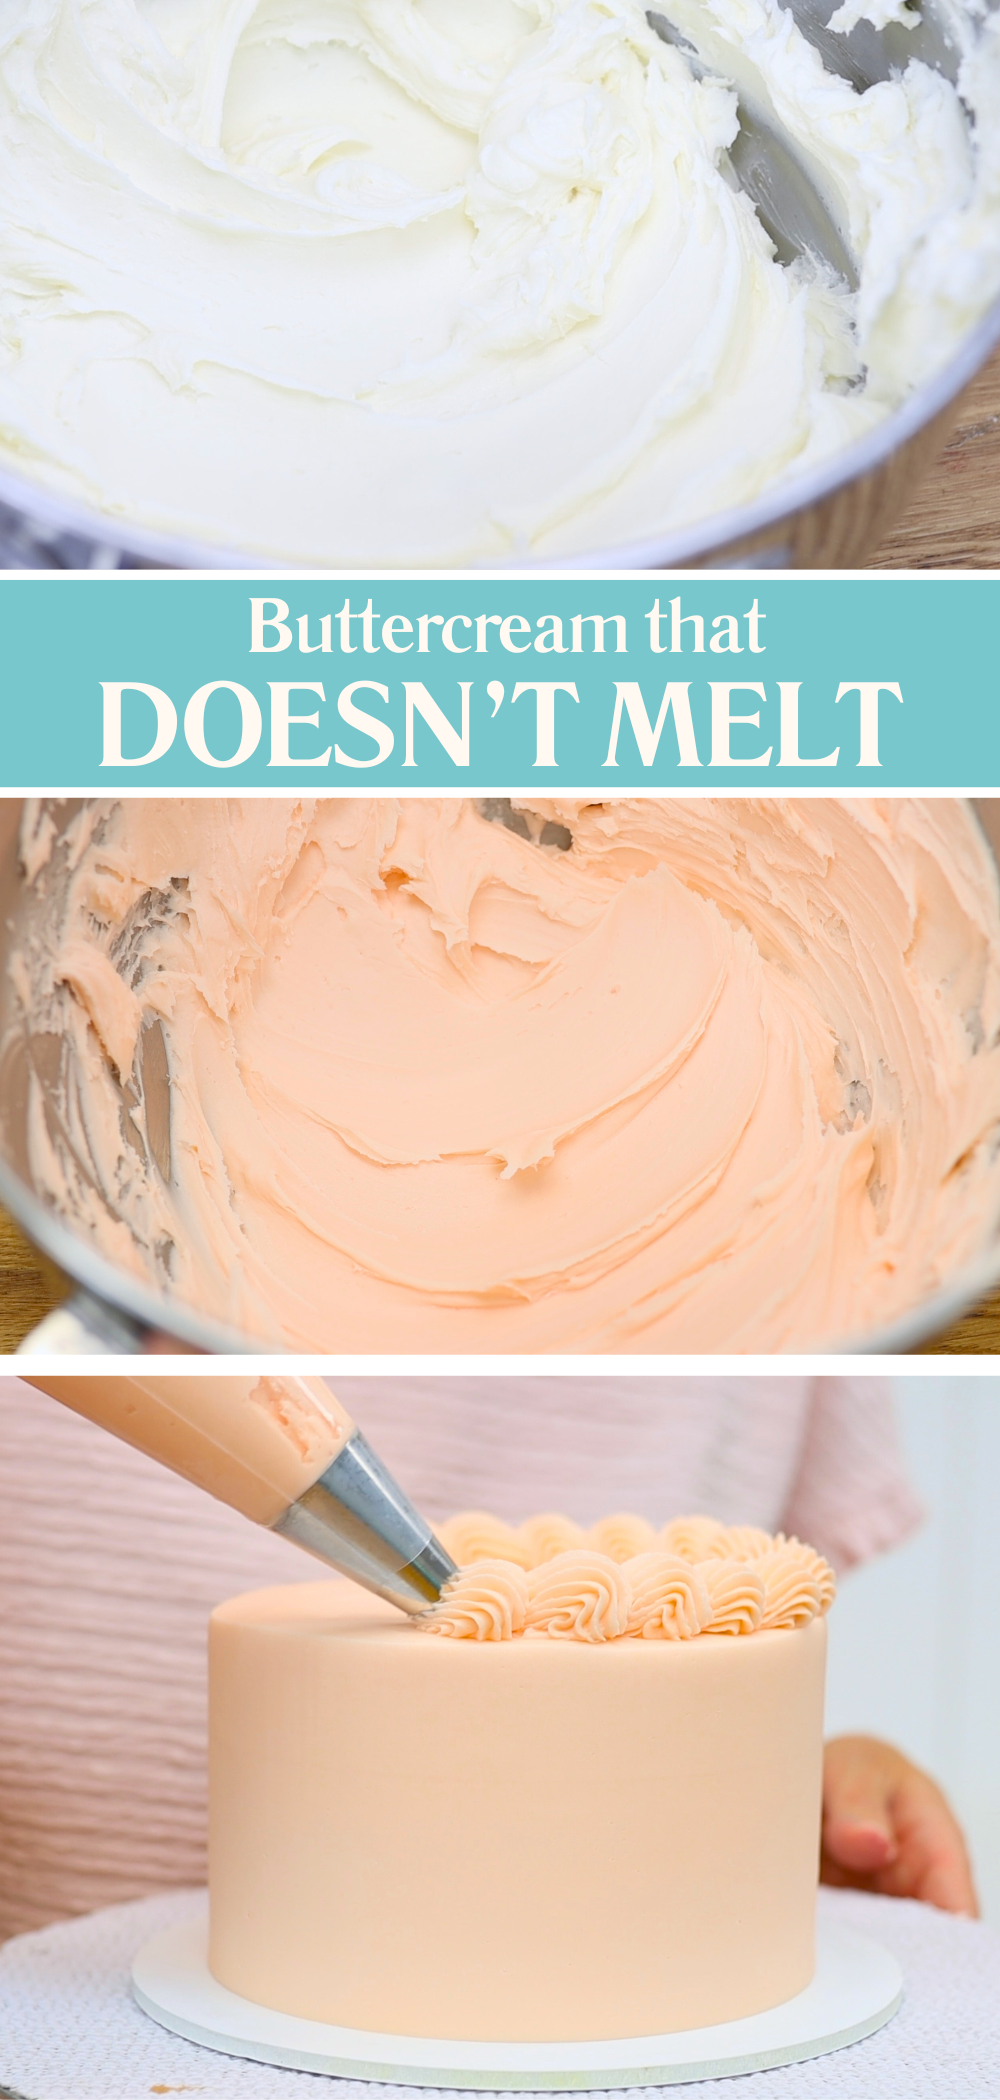
If your buttercream melts or slides off the cake, you’re probably working in a hot kitchen or the cake is outside in warm weather. Just like butter melts, all-butter buttercream melts quickly in the heat.
A great way to prevent buttercream from melting is to swap half the butter in your recipe for vegetable shortening. This has different brand names in different countries, like Crisco or Trex. It’s much more stable than butter and won’t melt as quickly.
To keep the same buttery flavour, add half a teaspoon of clear vanilla extract, which gives your buttercream that rich, buttery taste without the sharpness of shortening. You can still tint it, pipe it, and smooth it just like you would with traditional buttercream but it’ll hold up much better outdoors.
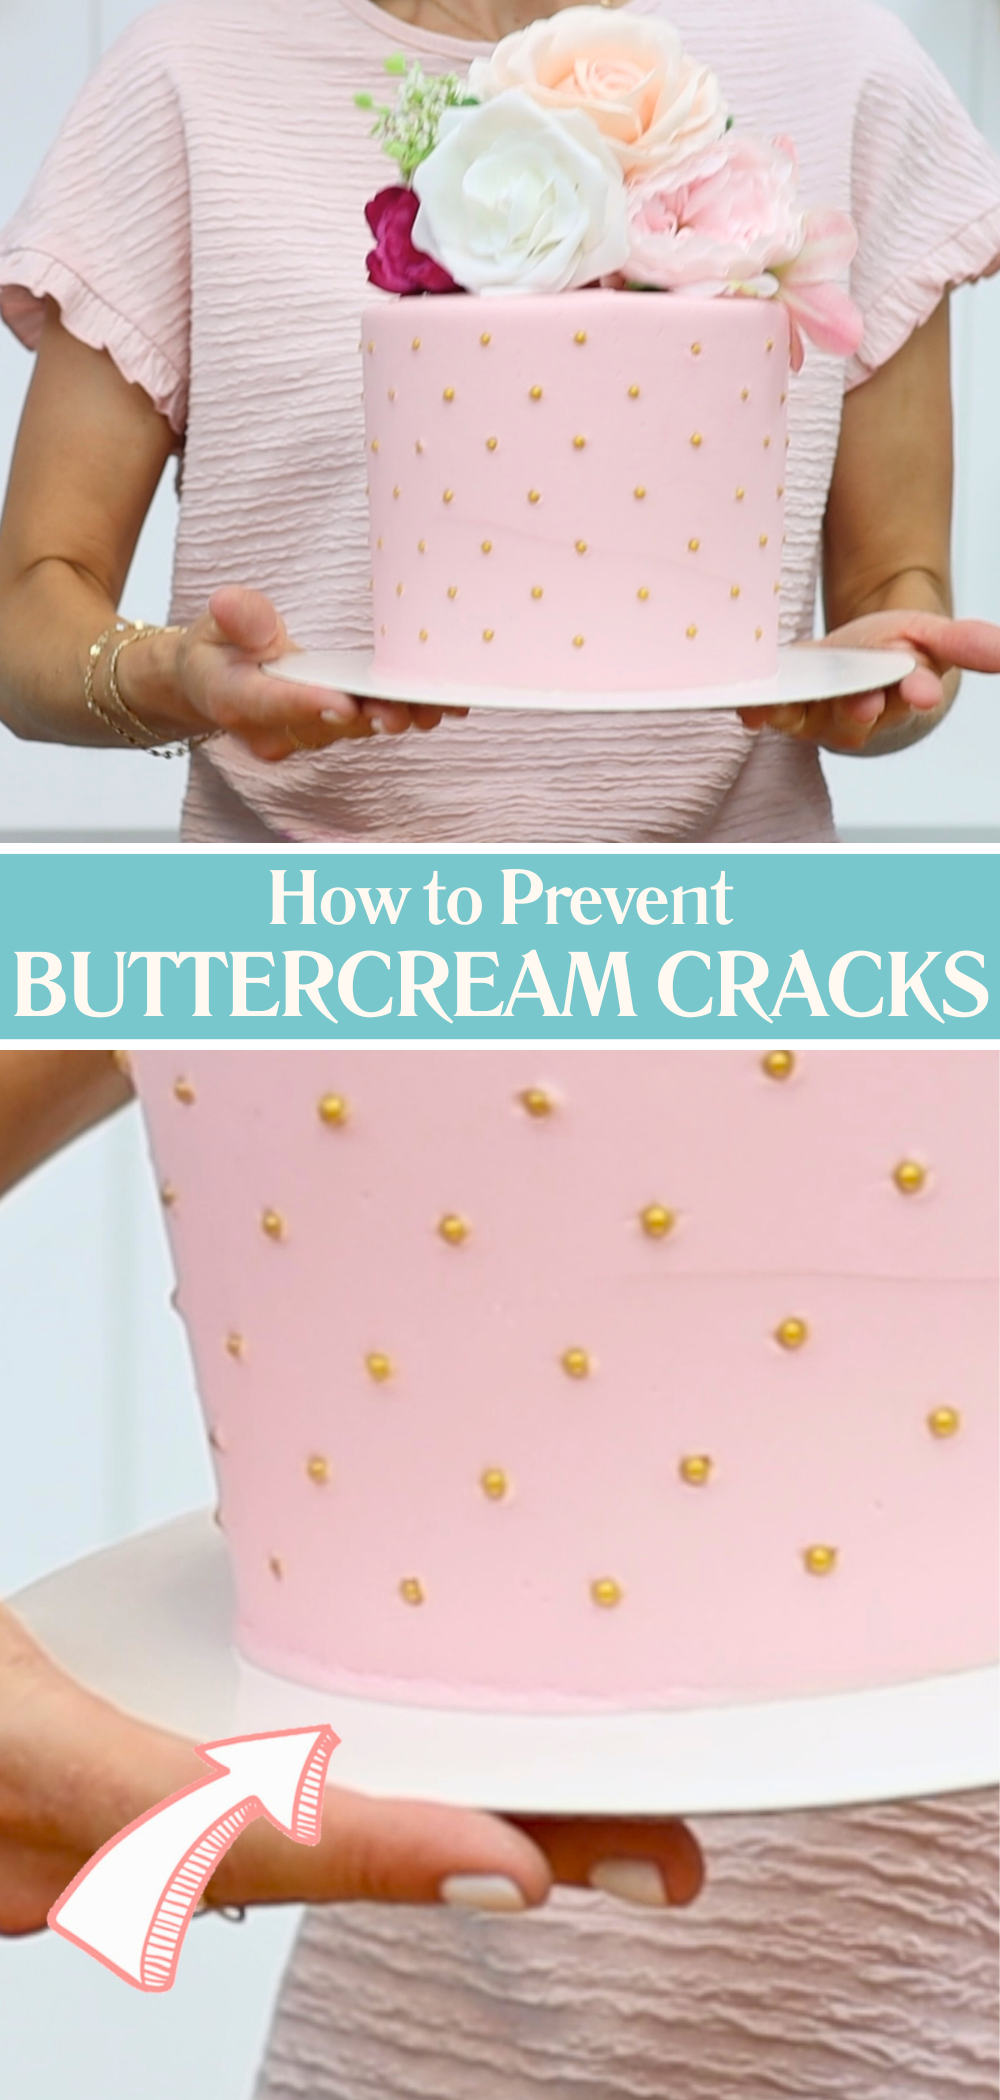
Buttercream cracks when it sets and then gets moved. You’ll often see small cracks appear around the bottom edge of the cake, which are caused by the board bending under the cake’s weight. This can be especially noticeable if you’re using a thin cake board.
To prevent cracks, always support your cake board by holding it underneath with one hand, especially if it’s a large or heavy cake. Even better, use a thicker, sturdy cake board that won’t flex. Once your frosting is set, you want the whole cake to stay still to avoid any shifting or cracking.
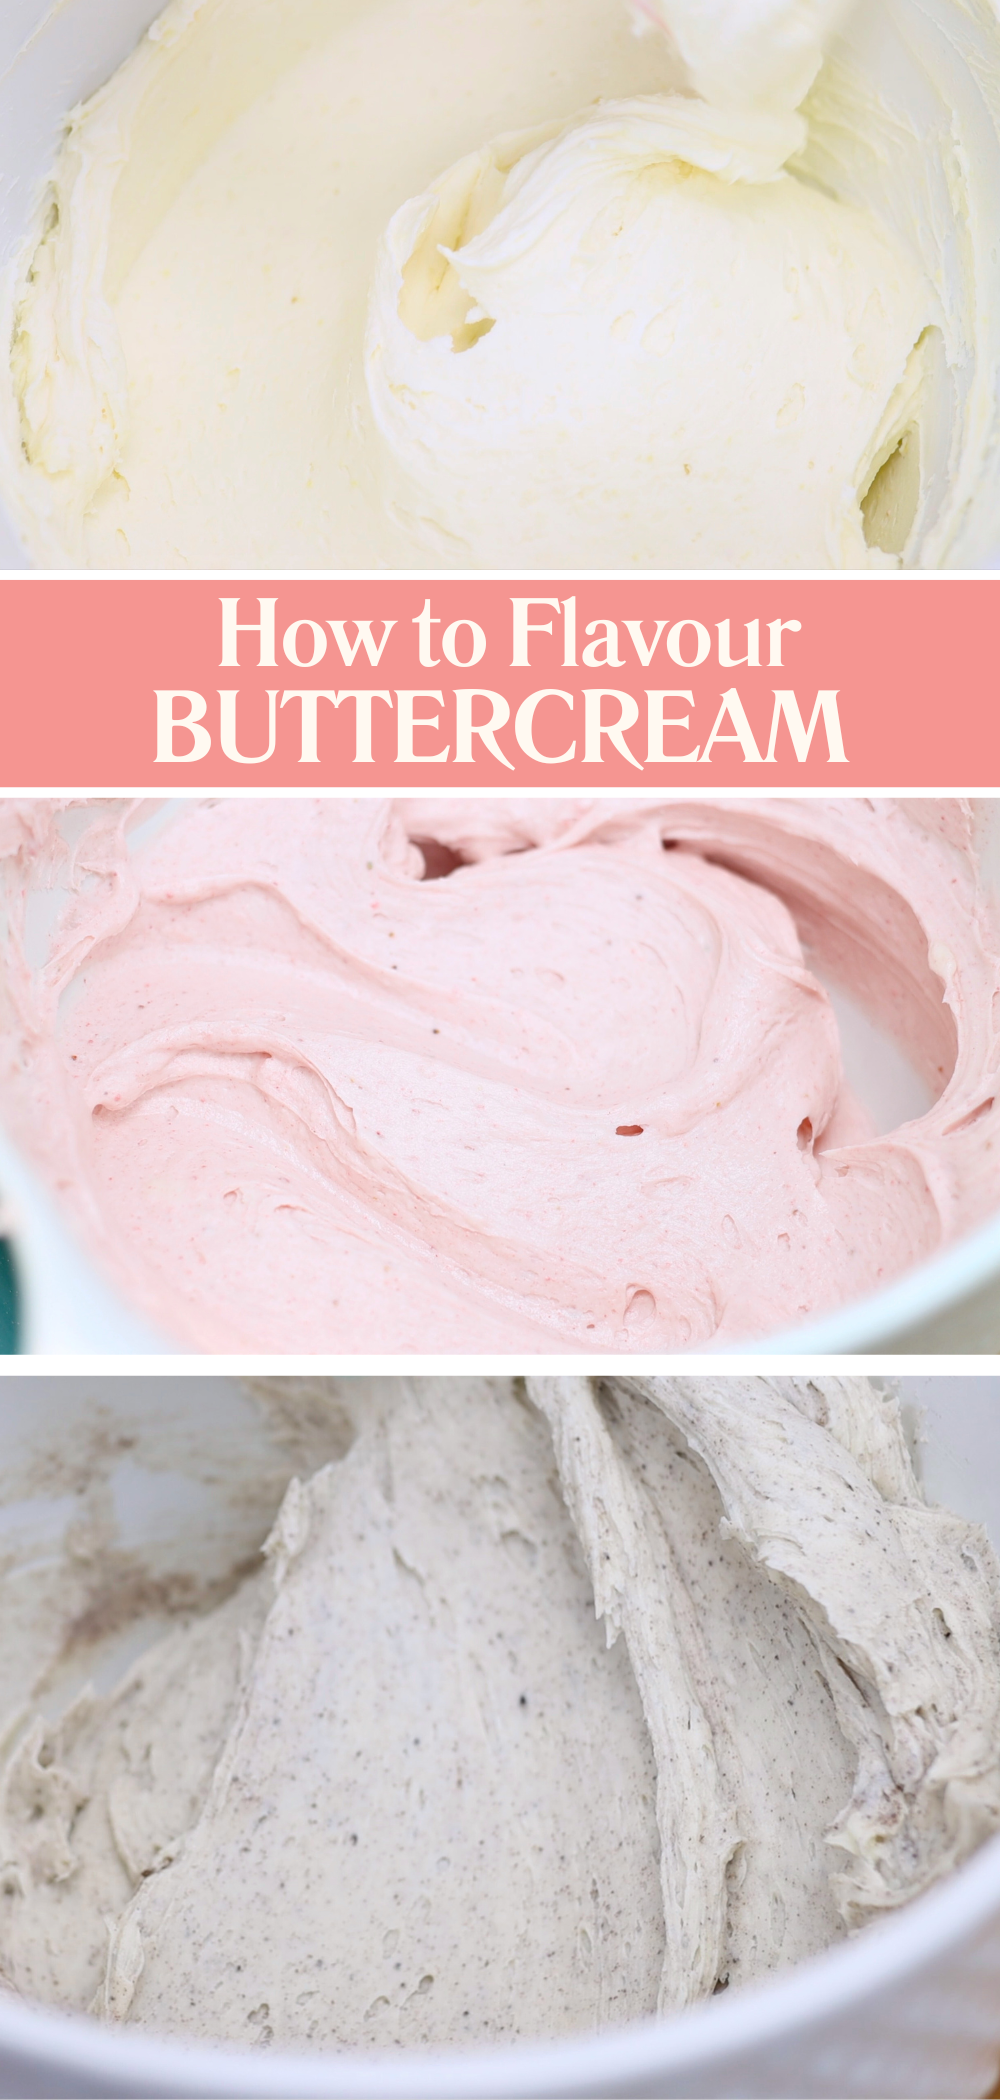
You can absolutely flavour buttercream with all sorts of ingredients! The key is to balance the amount of liquid you add. For anything runnier than buttercream like lemon curd, Nutella, peanut butter or cream cheese, add it one spoonful at a time. Stir and check the consistency after each spoonful so your buttercream doesn’t get too runny.
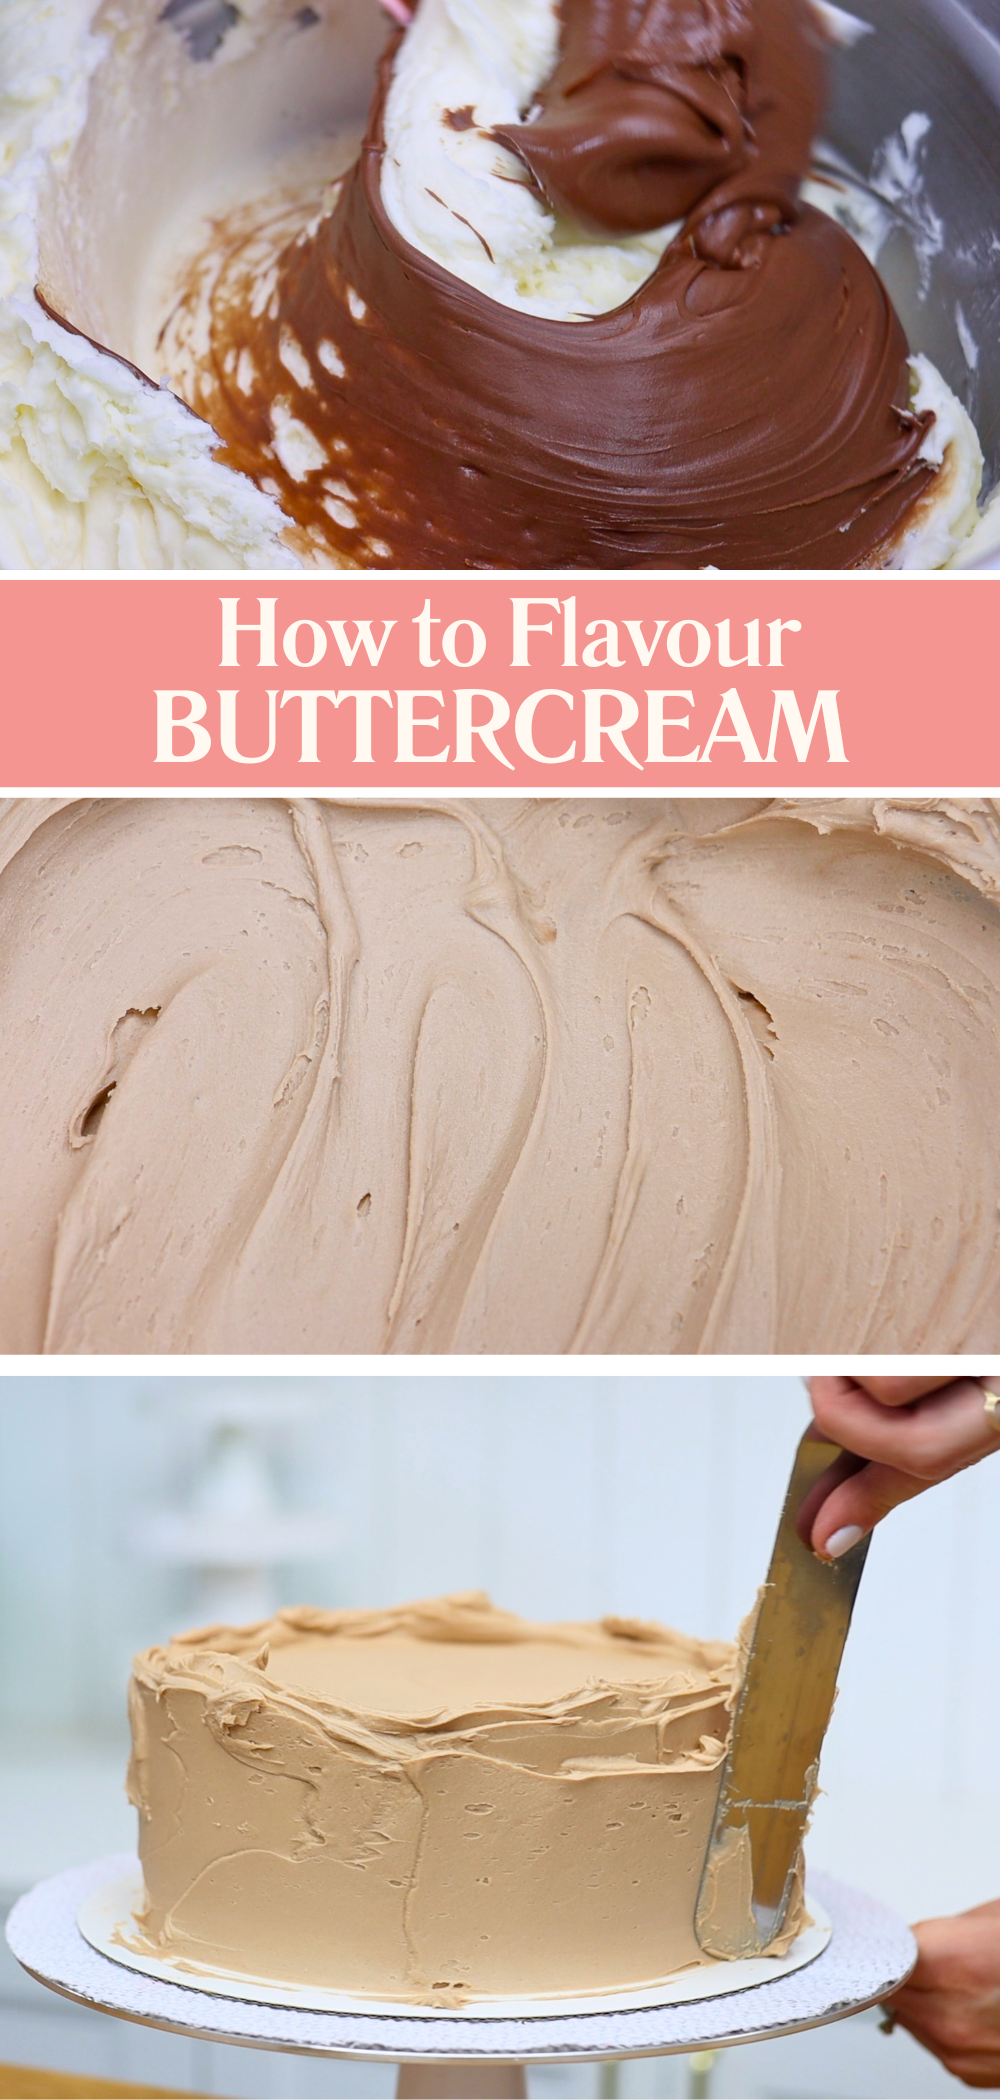
You're looking for a texture that’s still firm enough to hold its shape but soft enough to spread easily. If you want intense flavour without adding moisture, try using freeze-dried fruit powders like strawberry or pineapple instead of purées or juices. They add a lot of flavour without affecting the texture at all.
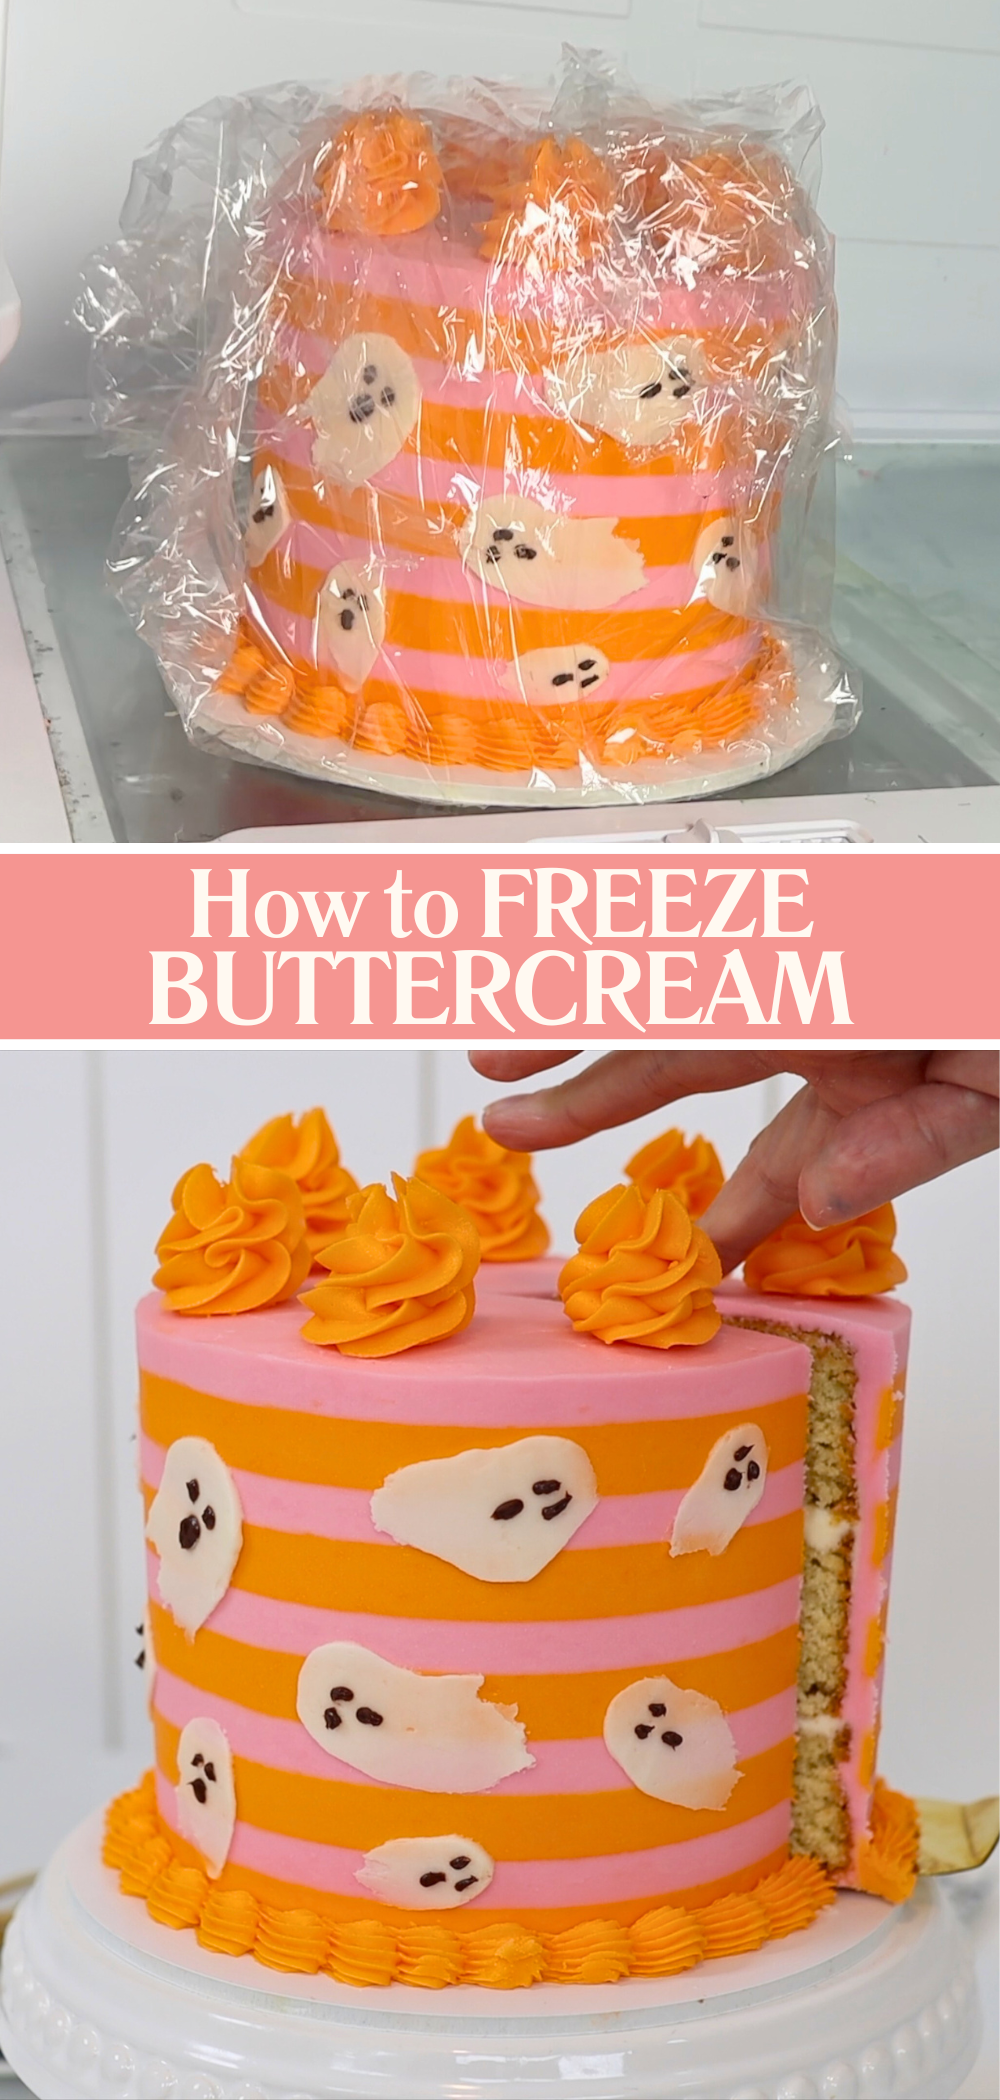
I wish I had known earlier in my cake career that you can freeze buttercream in multiple ways. Whether you’ve got leftovers or you're planning ahead for a cake order, freezing is a great option.
You can freeze buttercream on its own in an airtight container or ziplock bag. Or freeze it already spread between cake layers by wrapping the whole cake tightly in cling film (plastic wrap). You can even freeze an entire frosted cake or even a cake decorated with piping or other buttercream details! To do this, place the cake in the freezer uncovered for about an hour until the buttercream is firm. Then wrap it securely in two layers of plastic wrap and return it to the freezer.
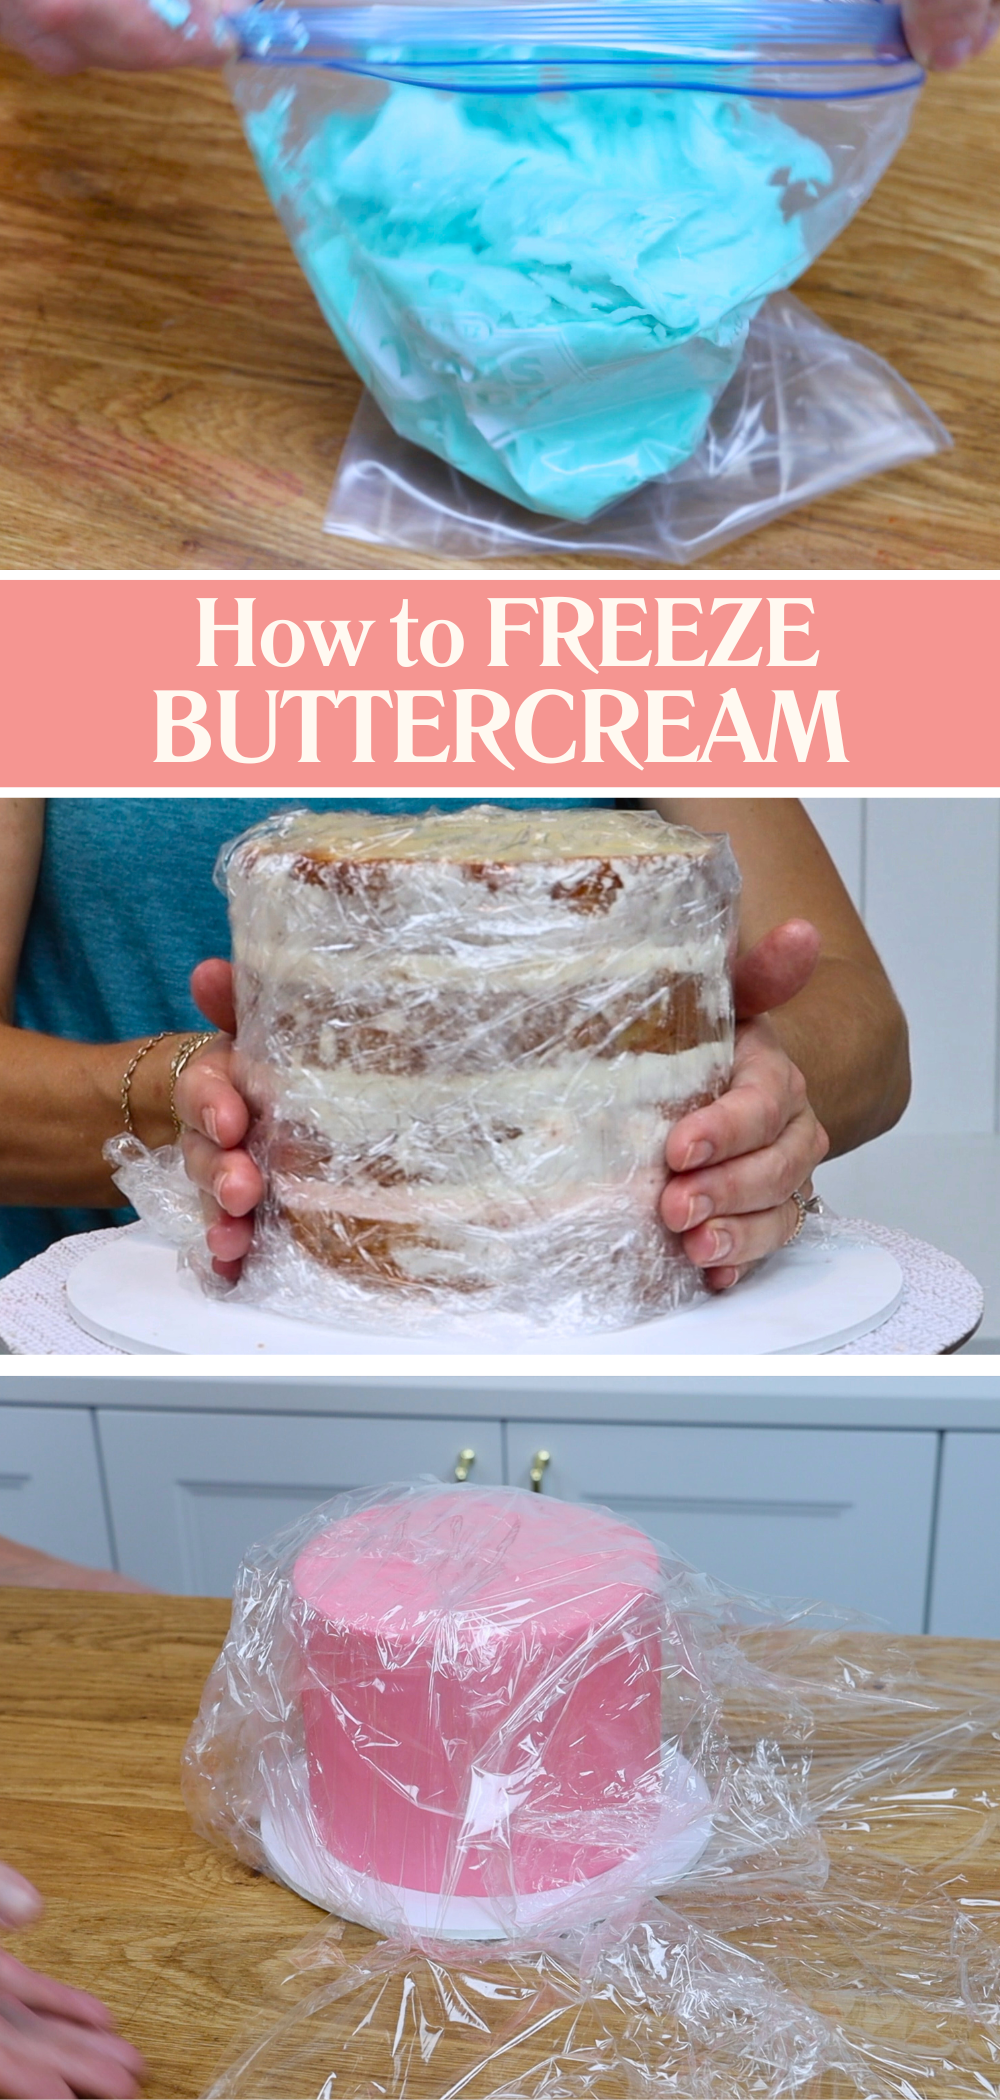
When you’re ready to use or serve your buttercream cake, transfer it to the fridge the night before and then to room temperature a few hours before serving. Unwrap it as soon as you take it out of the fridge, before the buttercream softens so the plastic doesn’t damage your decorations. Cakes always taste best at room temperature so after taking it out of the fridge, wait at least 2 hours before serving.
Buttercream can be tricky but with these quick fixes you’ll be able to troubleshoot any issue that comes your way.
To learn even more about buttercream (including how to make it flawlessly, colour it, flavour it, pipe it, frost with it and more) check out my online course The Basics of Buttercream. You'll find that and all of my other online courses on my cake school. I hope to see you there!
You can also watch a video of this tutorial on how to fix 10 buttercream problems:
Whether you're selling cakes from home or running a full bakery, of course you'd like to earn more for the time, energy and love you pour into every cake. The good news? You don’t need to work twice as hard to make twice as much. Here are 10 simple ways to make more money selling cakes without burning out and I’ve used all of these strategies myself throughout my cake career, from baking in my kitchen at home to running a busy storefront and helping others grow their cake businesses.
Ready to grow your cake business? Here are 10 tried-and-tested cake business tips to help you increase your prices, sell more cakes, and create extra income streams with your cake skills.
Let’s start with how to make more money for what you’re already doing. To raise your prices strategically, increase the value of what you offer.
One of the easiest ways to do this is through customization. You can charge more when you offer personalized cakes, from names or messages on the cake to specific colour themes or designs for birthdays, baby showers, weddings and other special occasions. As your skills improve, you can offer more advanced styles like sculpted or 3D cakes, double barrel tiers, fondant designs or on-trend looks like vintage piping or comic-style cakes. These extra touches let you increase cake prices compared to offering standard menu options.

Next, set yourself apart with something unique. When your cakes look and taste just like everyone else’s, you have to compete on price and that often means lowering it. But if you can offer something others can’t, like rare flavour combinations, fast delivery, or early adoption of trending styles, your prices can go up instead of down. For example, remember the striped cakes of 2019, comic cakes in 2022, or the recent wave of zodiac-themed vintage cakes? Being the only person in your area to offer something unique gives you a huge advantage.
Of course, if you want to start offering more detailed or elaborate designs, that might mean improving your cake decorating skills. My online cake school is here to help with that! I teach hundreds of cake decorating techniques and designs in my online courses and you can try everything with a free 7-day trial of my AYCC membership. It’s the easiest way to gain confidence and watch your cakes (and your cake prices) improve.
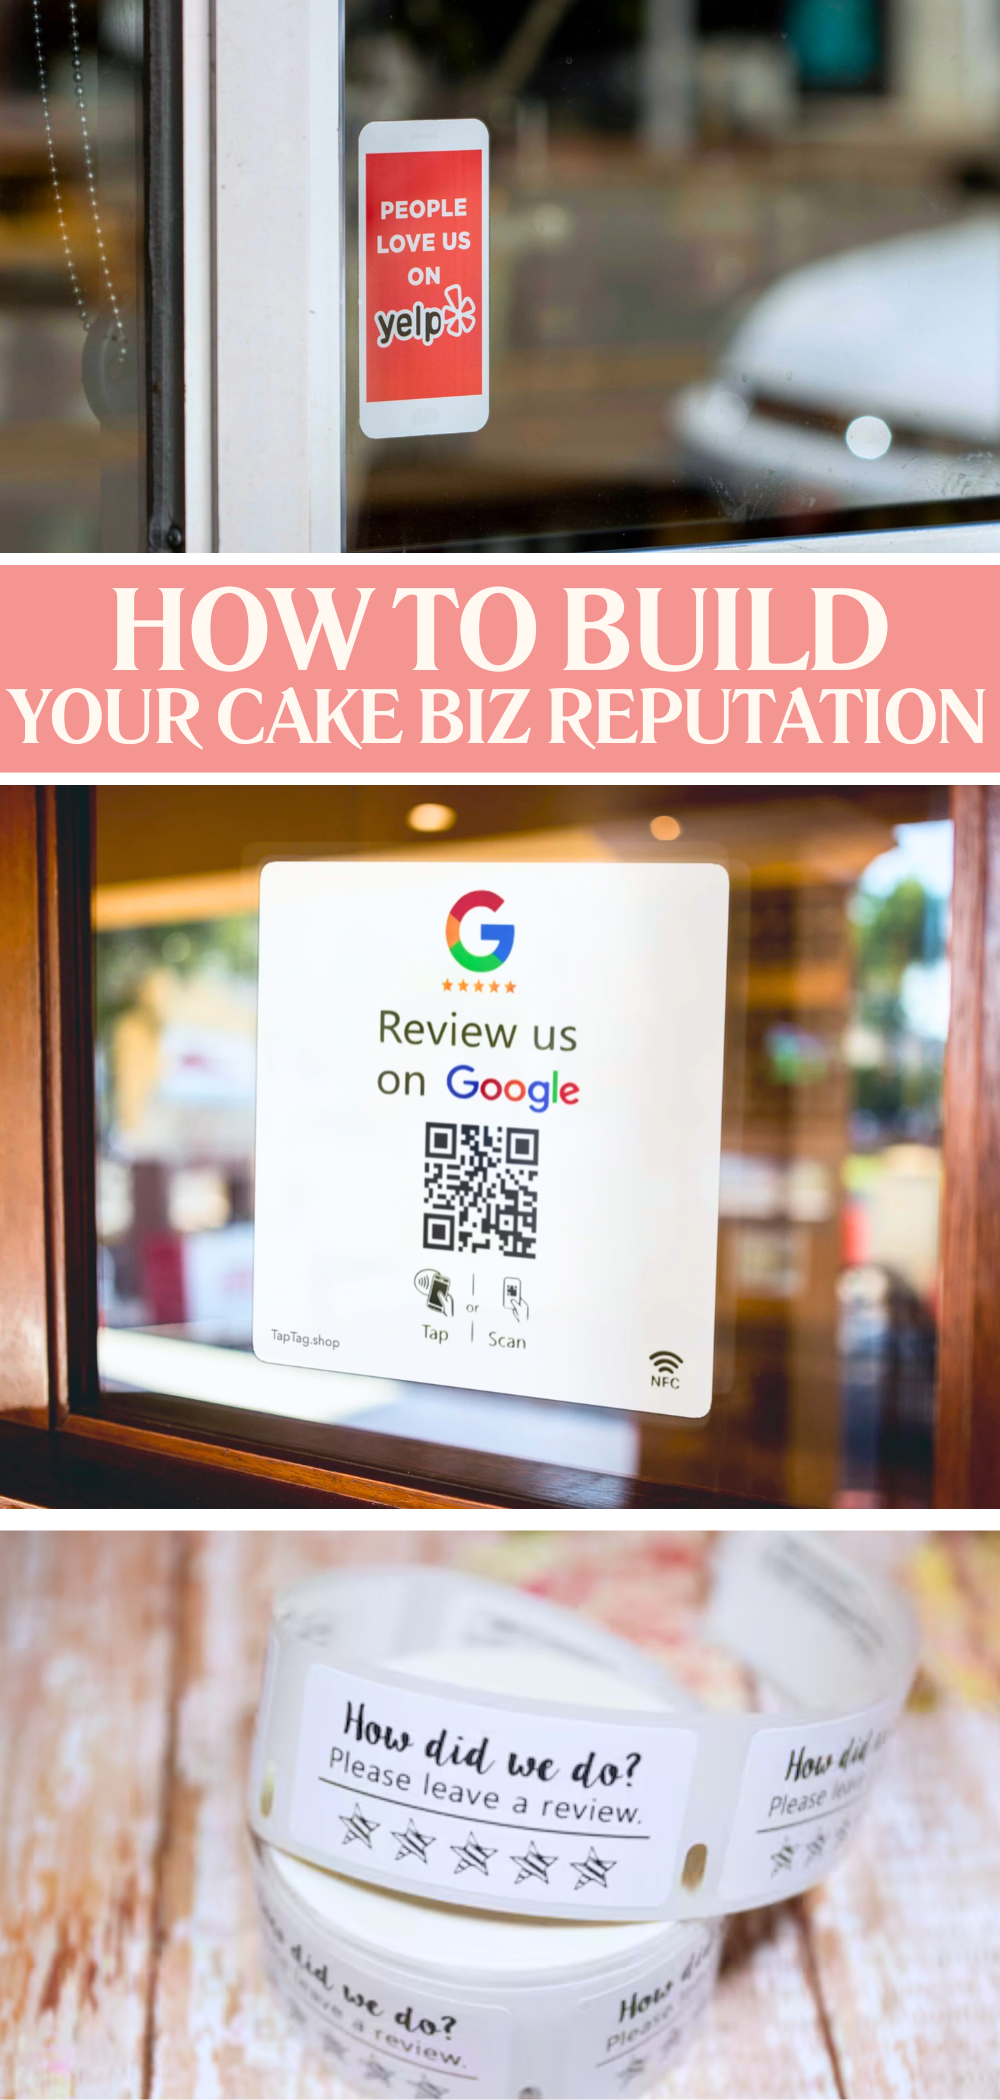
Don’t underestimate the power of your reputation. Encourage reviews on platforms like Google and Yelp with signs in your shop or stickers on your boxes. Be quick, helpful, and friendly when replying to messages and grow a presence on social media to show potential customers that others already love your cakes. Social proof builds trust and people are willing to pay more when they feel confident in what they’re buying.
Let’s talk about how to sell more cakes without lowering your prices. Yes, dropping your prices could bring in more orders but that just means working harder for the same money. Instead, try these strategies to bring in more sales without reducing prices.
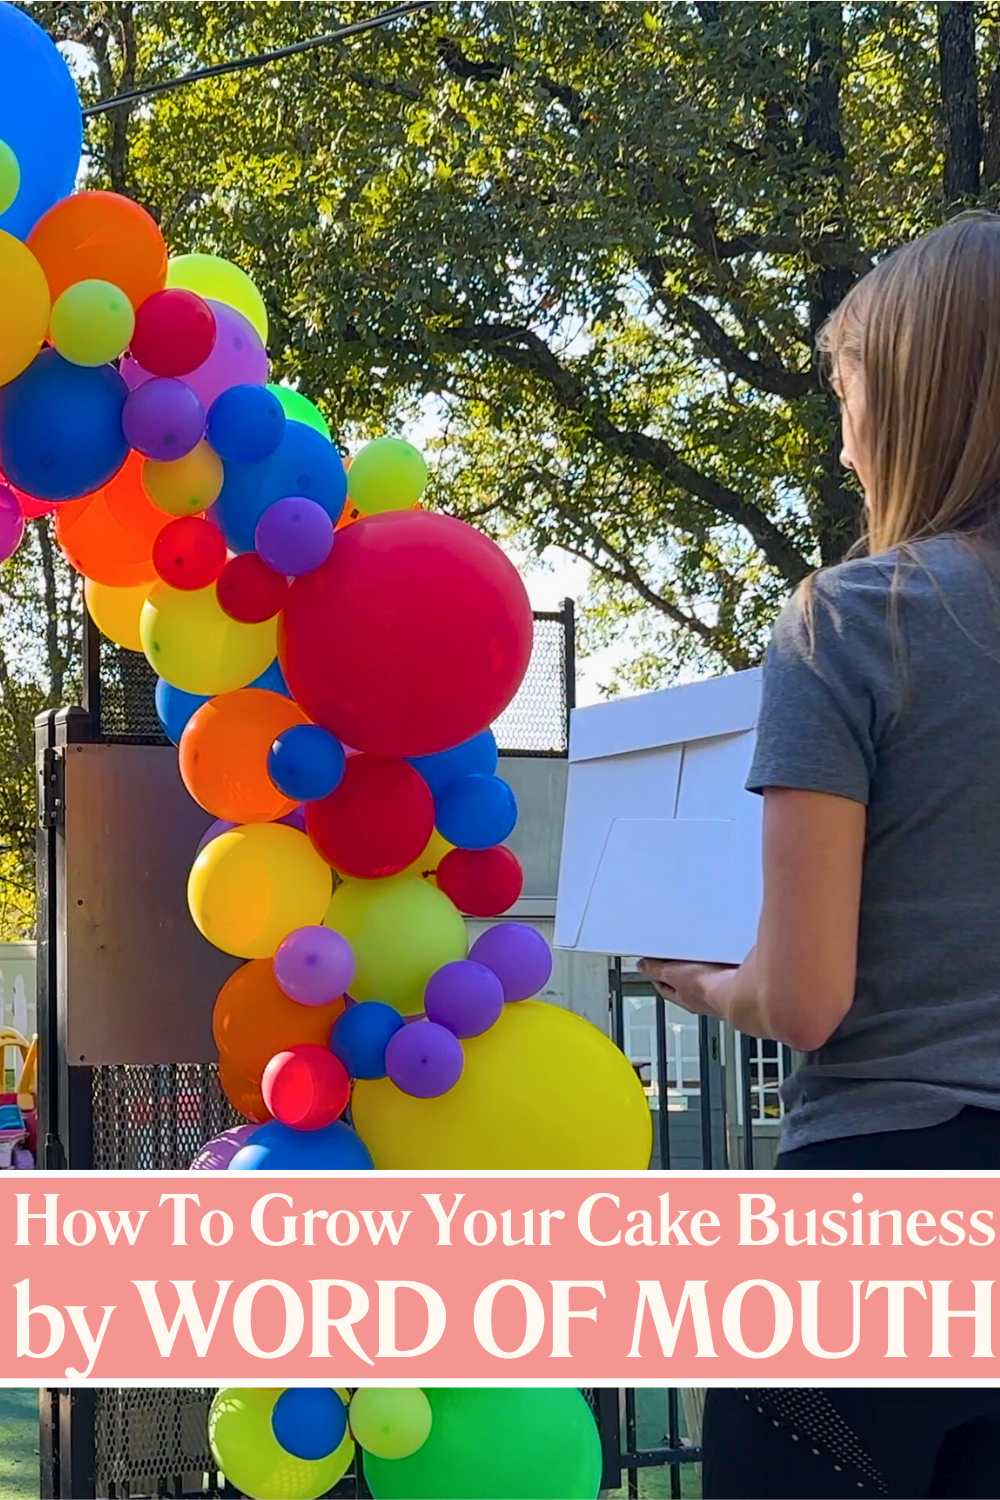
Word of mouth is free and incredibly effective. Take cakes to events, give them as gifts, or offer one as a prize for a local competition. Reach out to newspapers, magazines, blogs or local online communities to share your story or see if they’d feature your work. I started this way when I ran my home cake business and it really worked! Within a year I had more orders than I could handle and opened a storefront. Check out this tutorial on 10 things I wish I'd known when I first started making cakes!
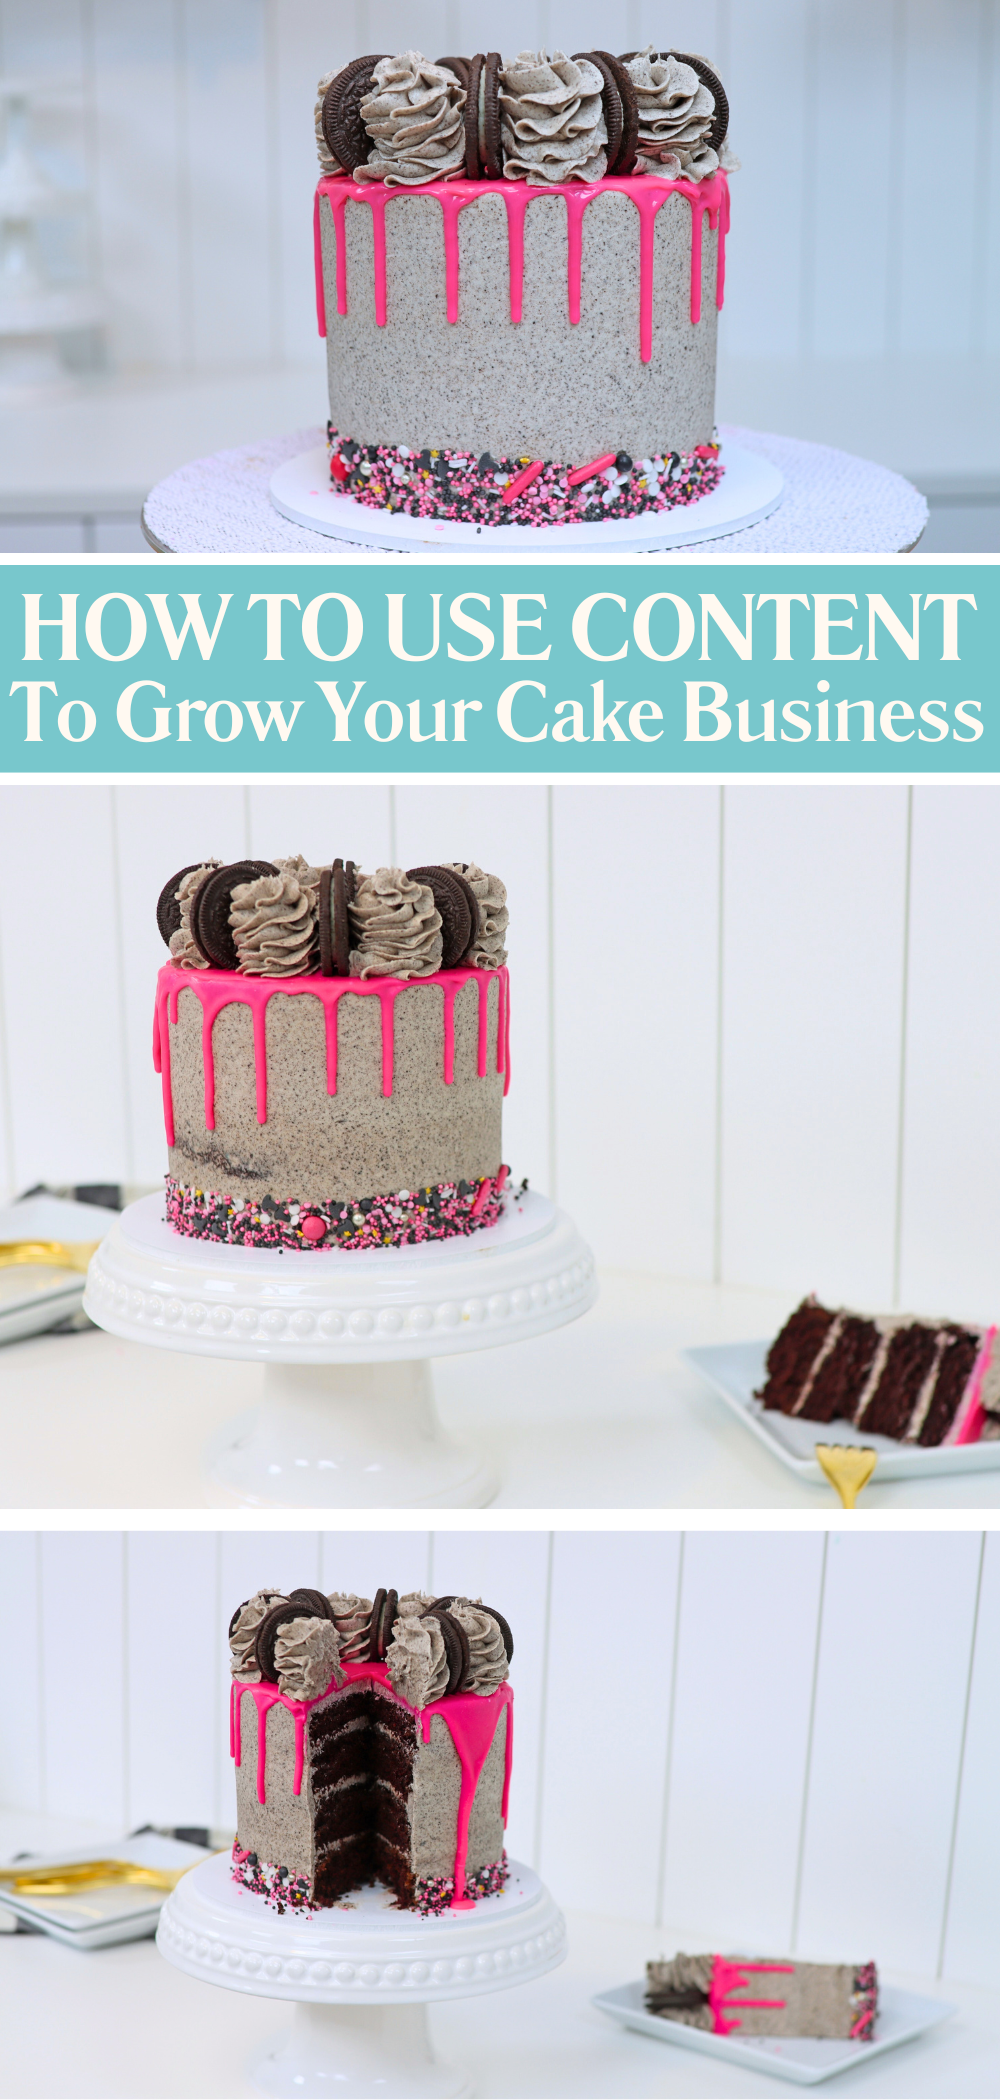
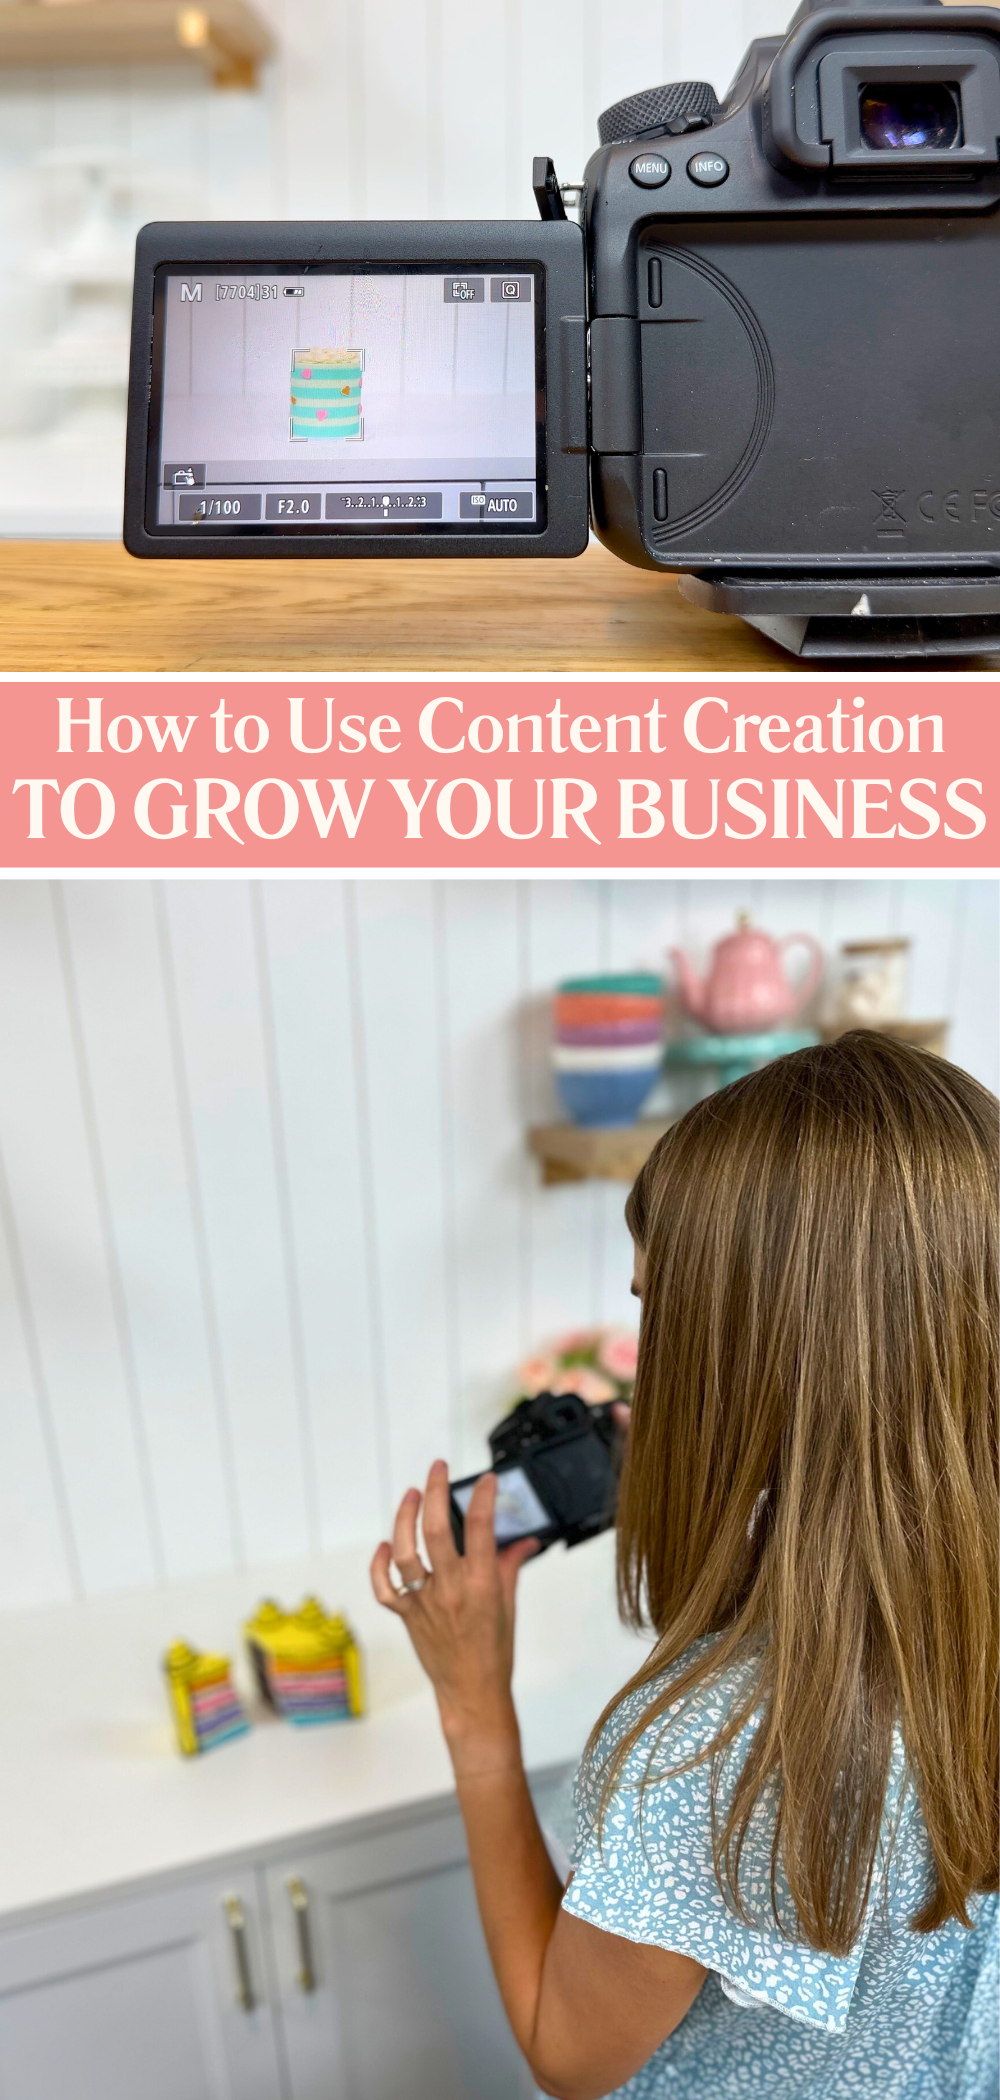
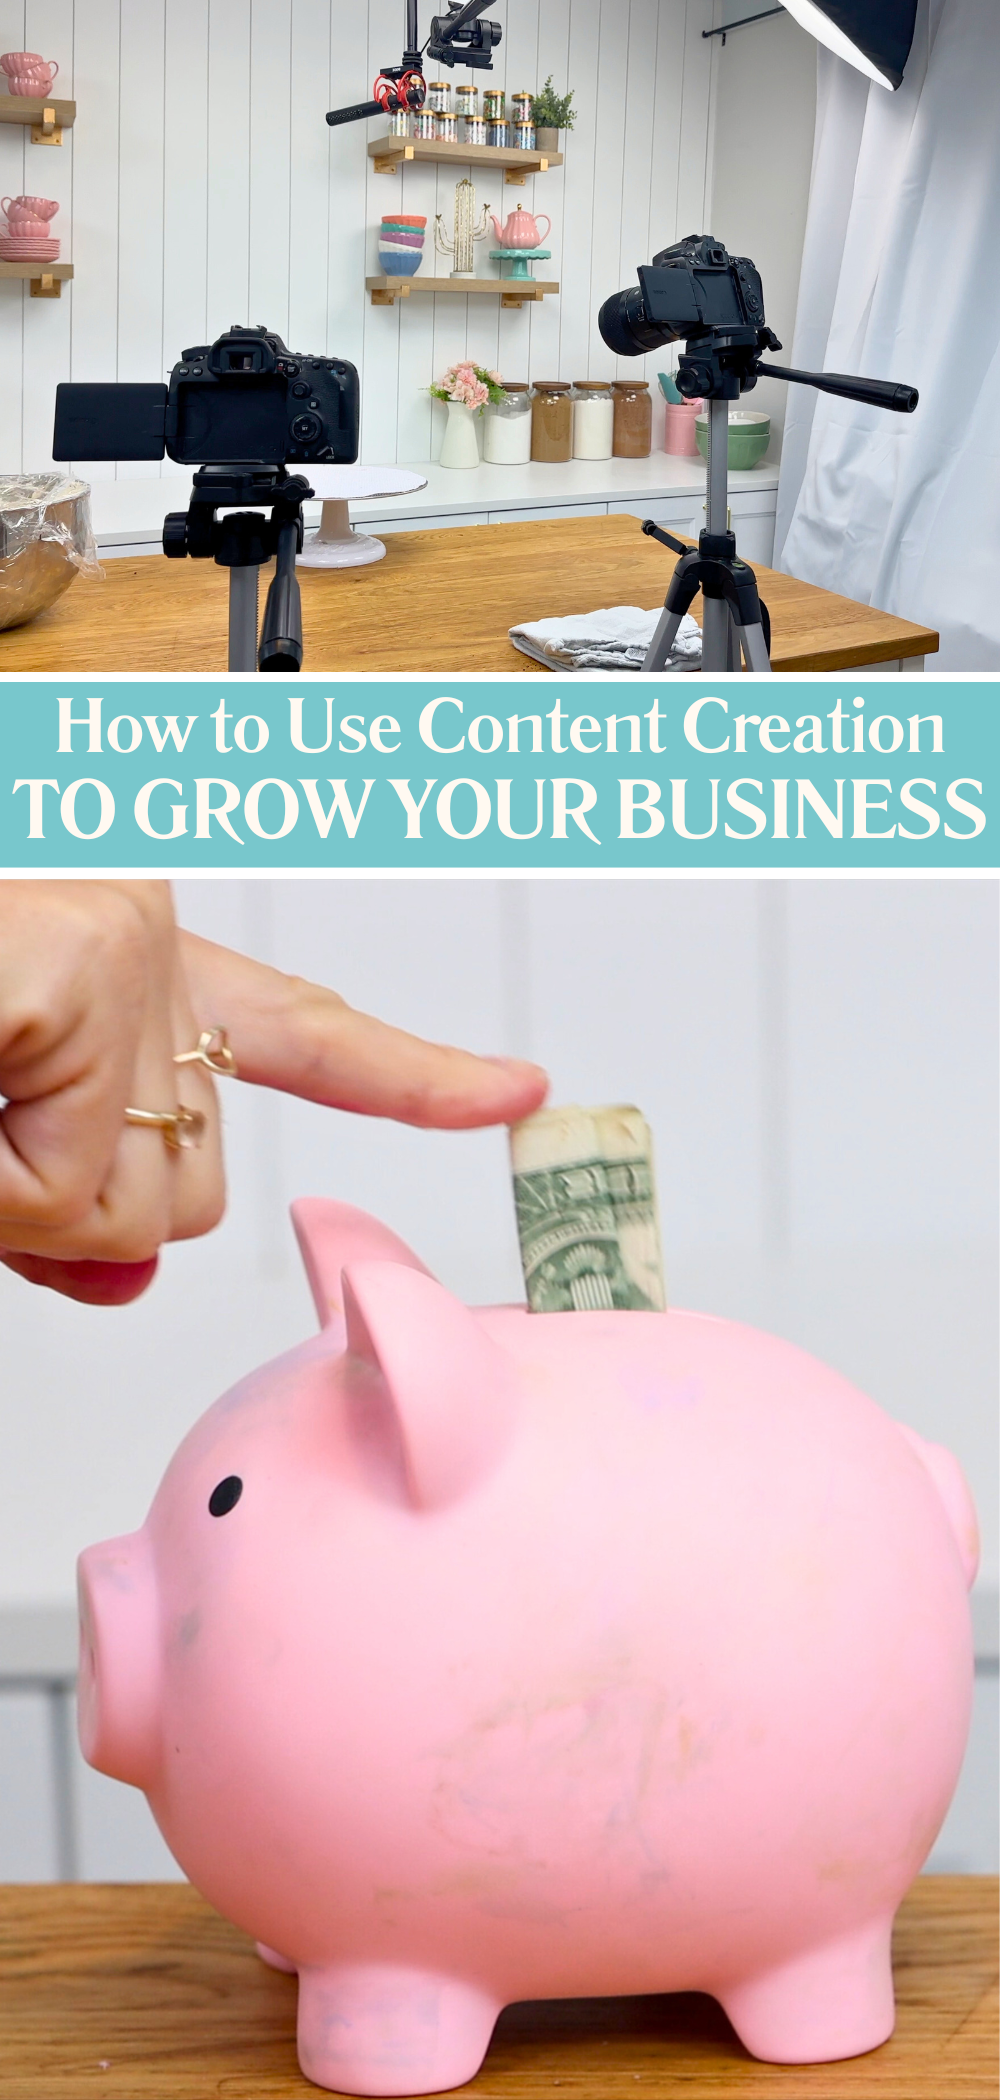
If you’re into social media, start thinking about content creation. Sharing photos and videos of your cakes can bring in new customers while also growing your audience. Use location tags so locals can find you and post popular themes like Minnie Mouse or Mario cakes so potential customers see something they’d love to order. This is just scratching the surface! Content creation for bakers involves lighting, setup, strategy, editing, and much more. I teach all of this inside Creator Academy - join the waitlist now if you’re curious about building a cake business through content.
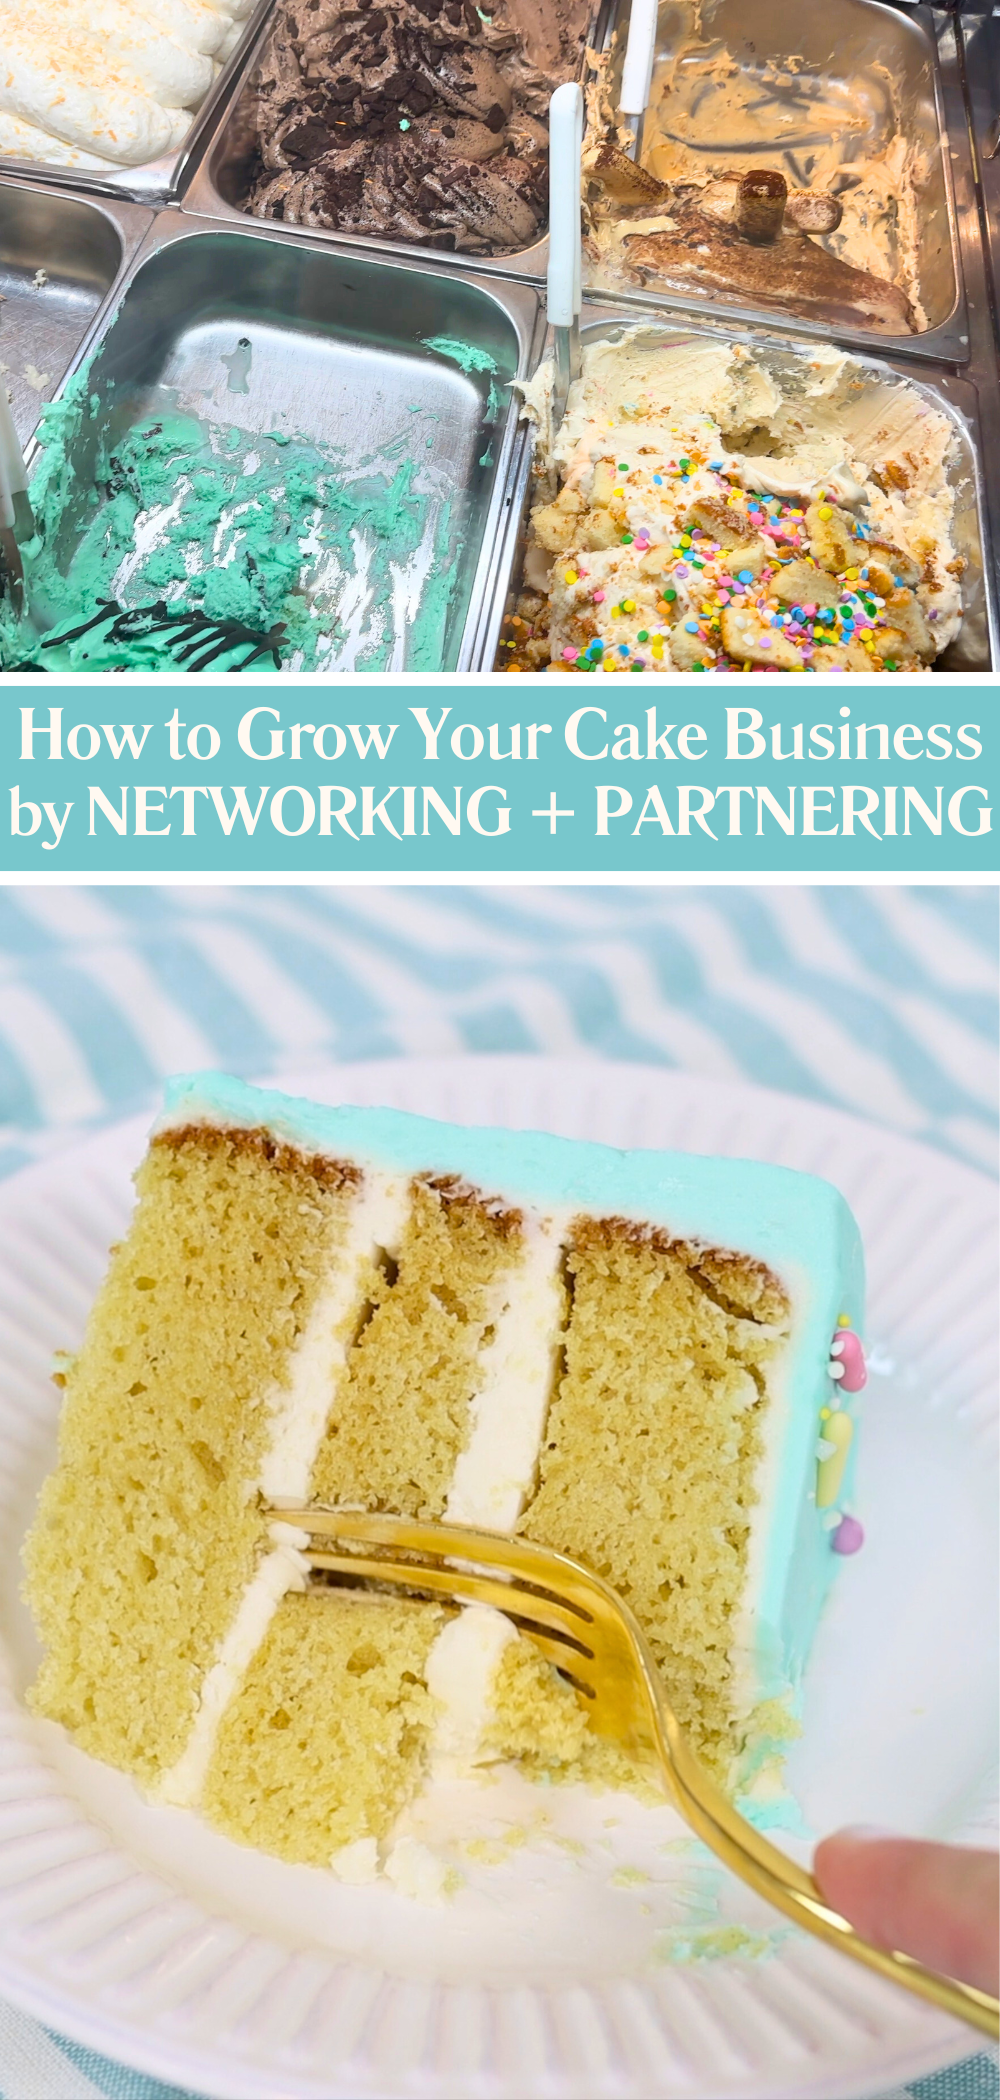
Networking is another brilliant way to grow. Partner with non-competing businesses like an ice cream shop, florist, or balloon decorator. Recommend each other to customers and create packages or cross-promotions to boost each other’s sales. You’ll be surprised how fast this kind of collaboration can grow your customer base.
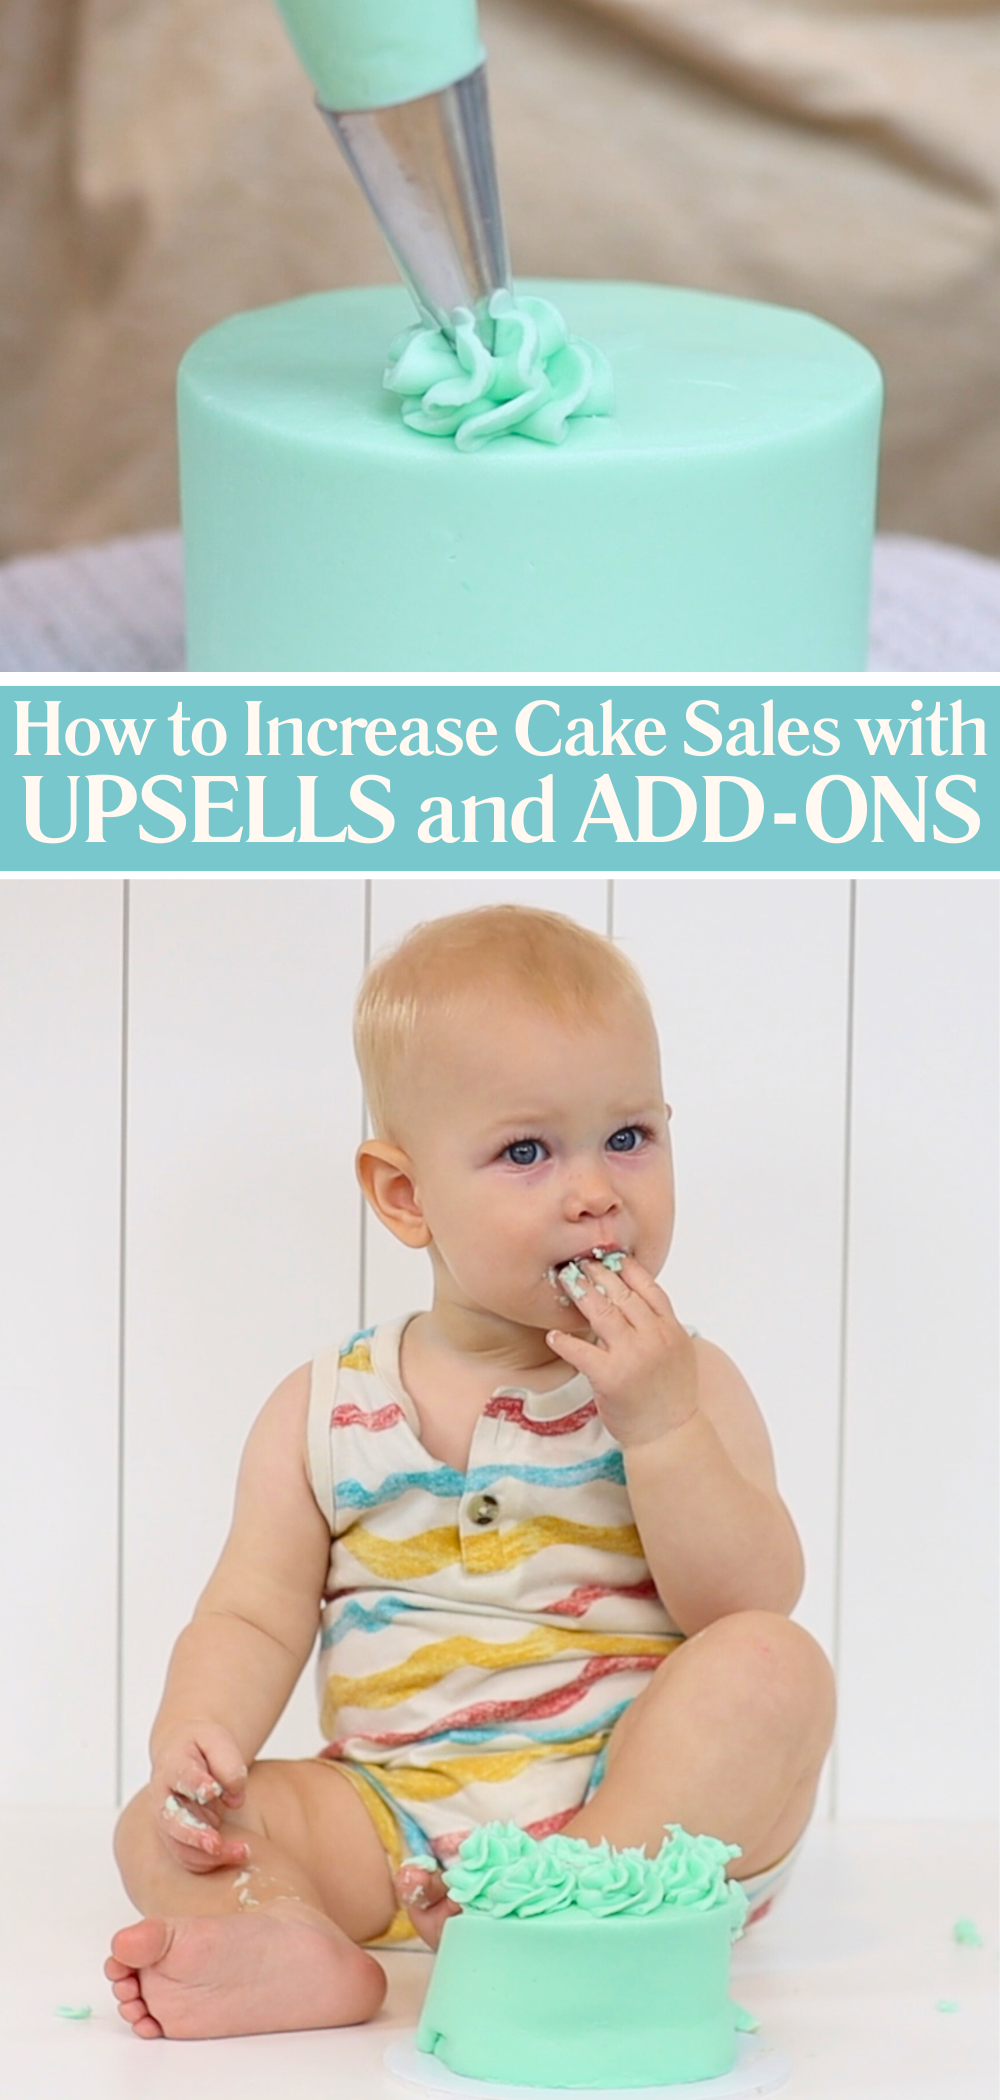
Upselling is a quick way to make more from each customer. Offer matching cupcakes at a discount when someone orders a cake. Suggest a birthday smash cake alongside an order of cupcakes. And you can upsell decorations on cakes like cake toppers, custom characters, or adding an extra tier. The more you offer, the more you can earn from each order without finding a brand new customer every time.
Selling cakes isn’t the only way to make money as a baker. If you’ve built up skills decorating cakes, you can use those in other ways to create income streams that complement your business.
Teaching is one of my favourite examples of how to make more money selling cakes. Host in-person cake decorating classes in your kitchen or at a local venue. Offer online classes on platforms like Zoom. You can teach a specific technique, recipe or full cake design. People love learning from someone with hands-on experience, especially if they've eaten your cakes or seen them on social media.
Photos, videos and blogs can all bring in money if you share them in the right places. You can earn through platforms like YouTube, Instagram, Facebook or even your own website. If you’re already decorating cakes and sharing photos, why not turn those posts into profit? It can be more lucrative than cake sales and you don’t have to choose between the two, you can do both!
I teach everything you need to know to turn your cakes into content in my content creator course. Join the waitlist now and get notified when it becomes available later this year!
There are so many ways to grow a cake business, from increasing cake prices to upselling, marketing, teaching and content creation. You don’t have to do all of them at once but each one will take you closer to the income and lifestyle you want from your baking. I hope these cake business tips help you earn more from your cakes while doing what you love. Ask me any questions in the comments!
You can also watch a video of this tutorial on how to make more money selling cakes:
