Meringues are beautiful and delicious and so easy to make! I’ll show you how to make meringues that are crispy on the outside but soft on the inside. In this tutorial you'll learn how to:
make meringues: every step from mixing to baking
flavour and colour meringues
make 5 different shapes like kisses, animals and roses
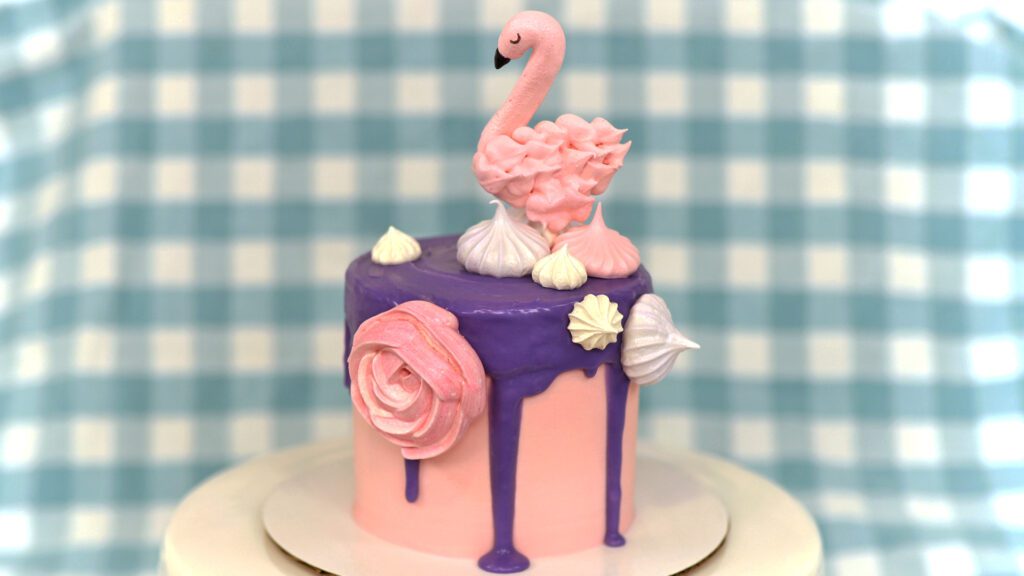
attach meringues to cakes
store meringues so they don’t get sticky or soggy.
How to make meringues
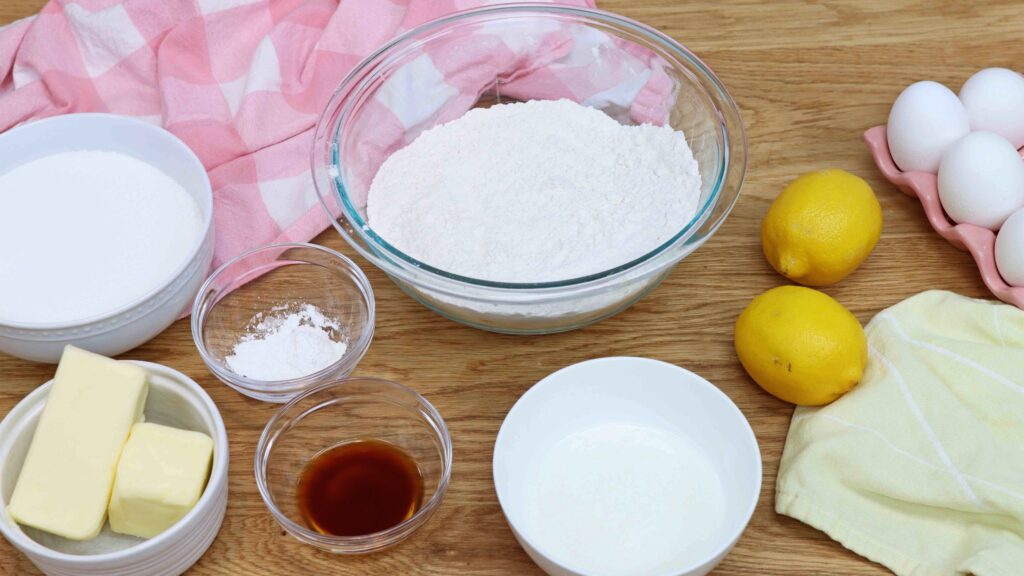
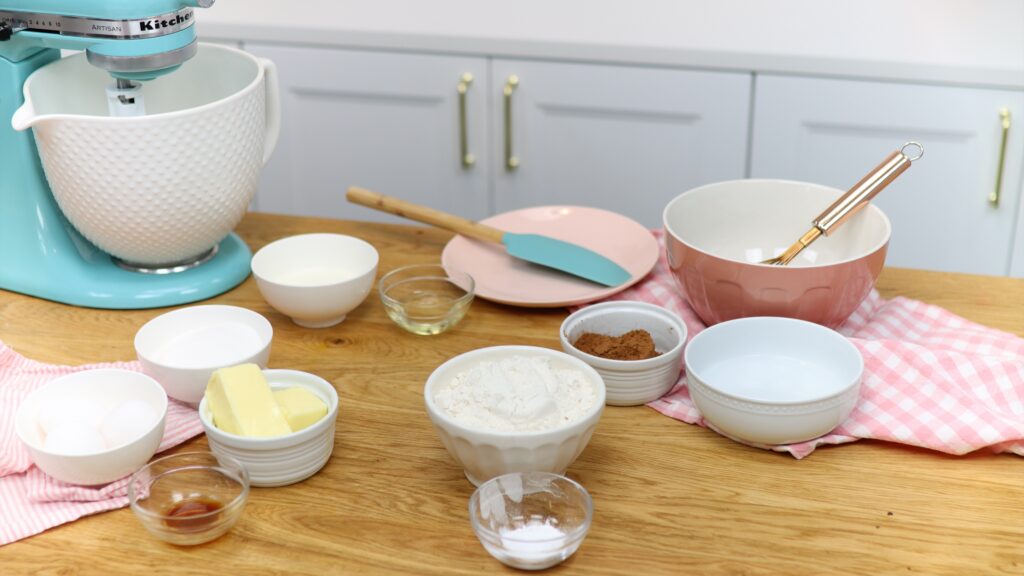
To make meringues you’ll need a whisk, salt, sugar, and egg whites. The full recipe in cups and also in grams is at the bottom of this tutorial.
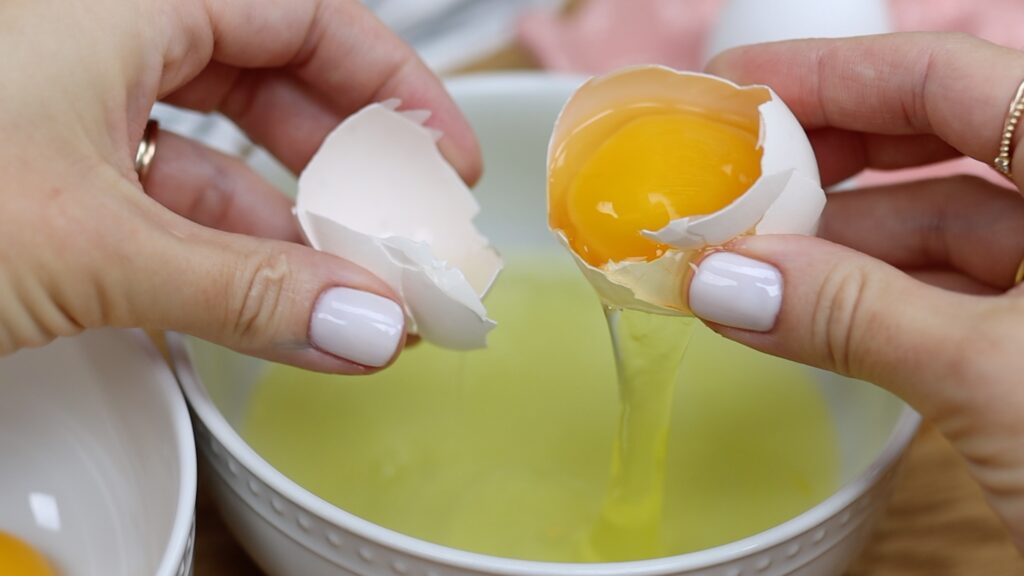
Start by cracking the eggs and separating them. Pass the yolks back and forth between the shells, letting the egg whites fall down into a bowl. Drop the yolks into a separate bowl or a Tupperware. You can use these for lemon curd or custard or another dessert.
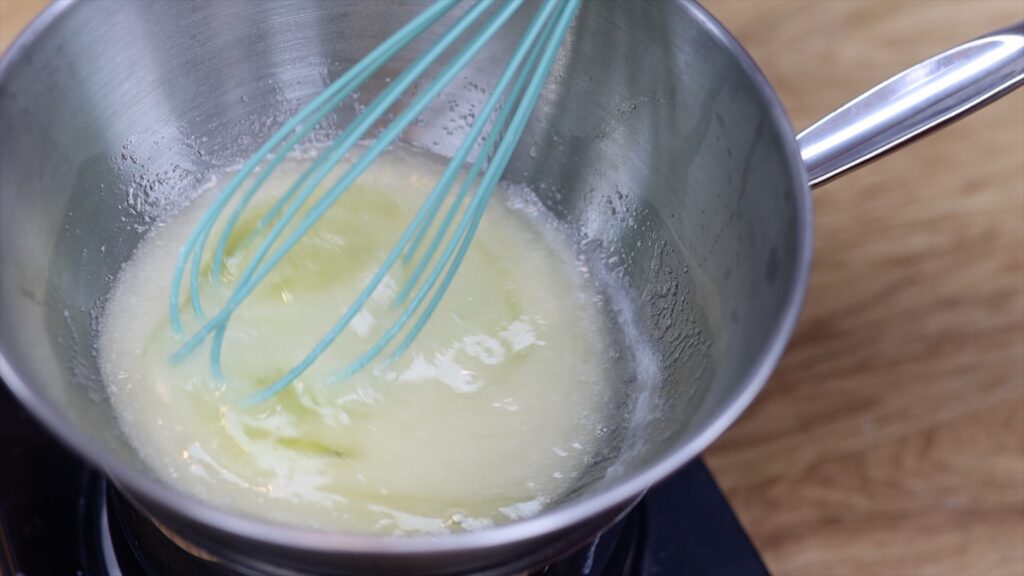
Bring about two inches of water to a boil in a saucepan.
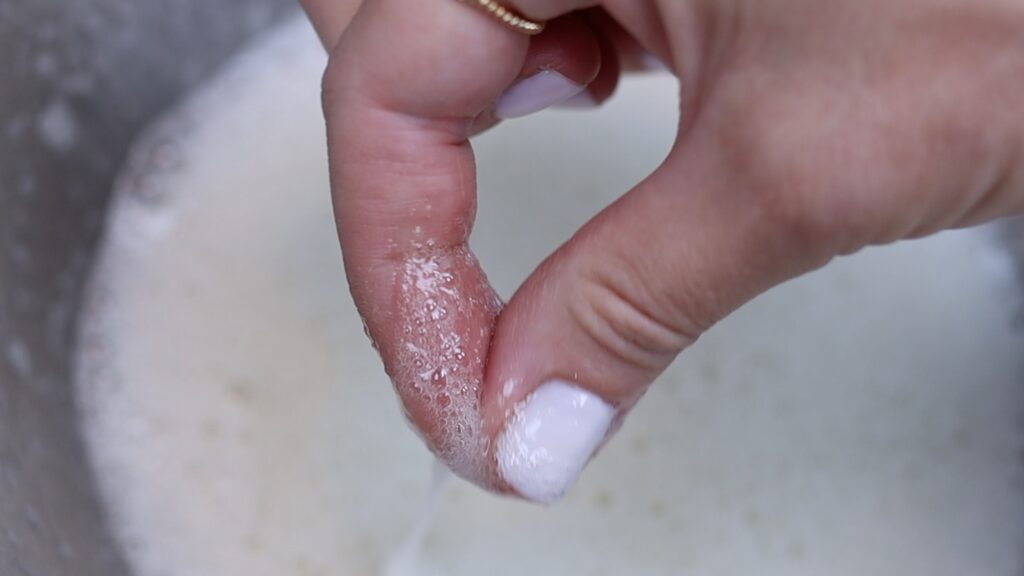
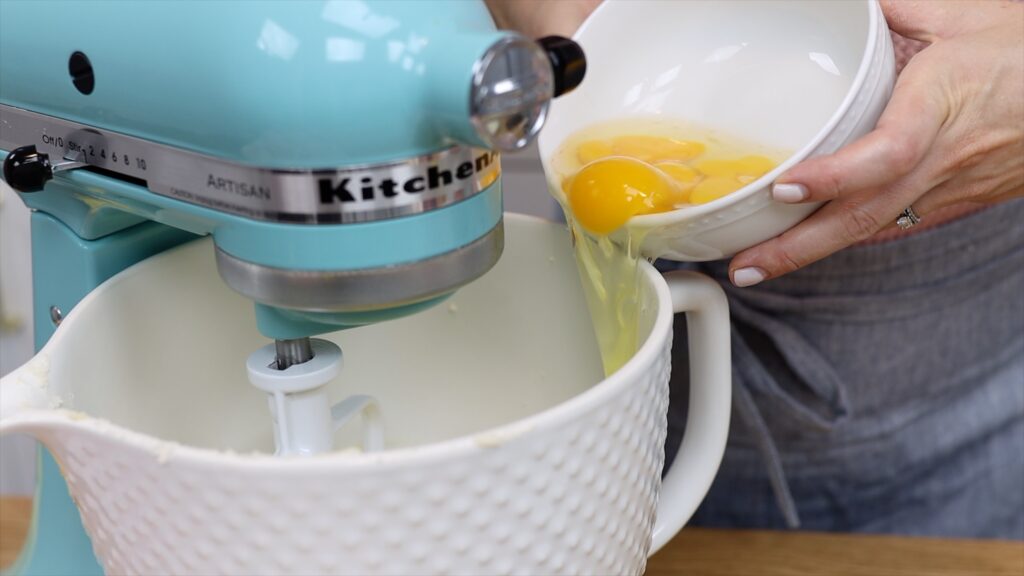
Pour the egg whites, sugar, and salt into a metal bowl. If the bowl of your mixer is metal, use that to reduce clean-up. Lower the bowl onto the pan of water, making sure the bottom doesn't touch the surface of the water. Turn the heat off and whisk the mixture together for two minutes. It will get frothy and after two minutes, pinch a bit between your fingers. If it’s smooth, it’s ready. If not, whisk it for another 30 seconds.
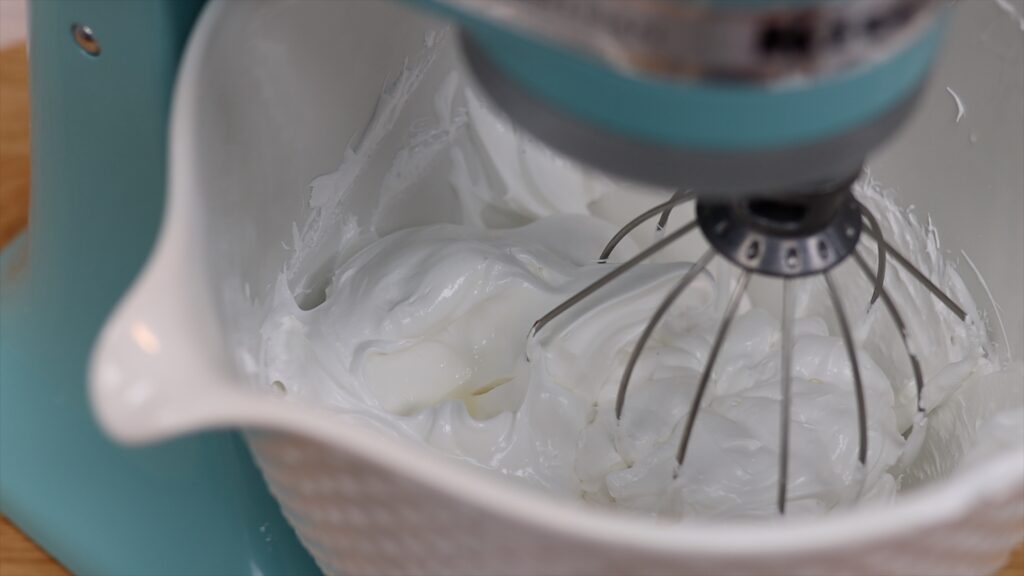
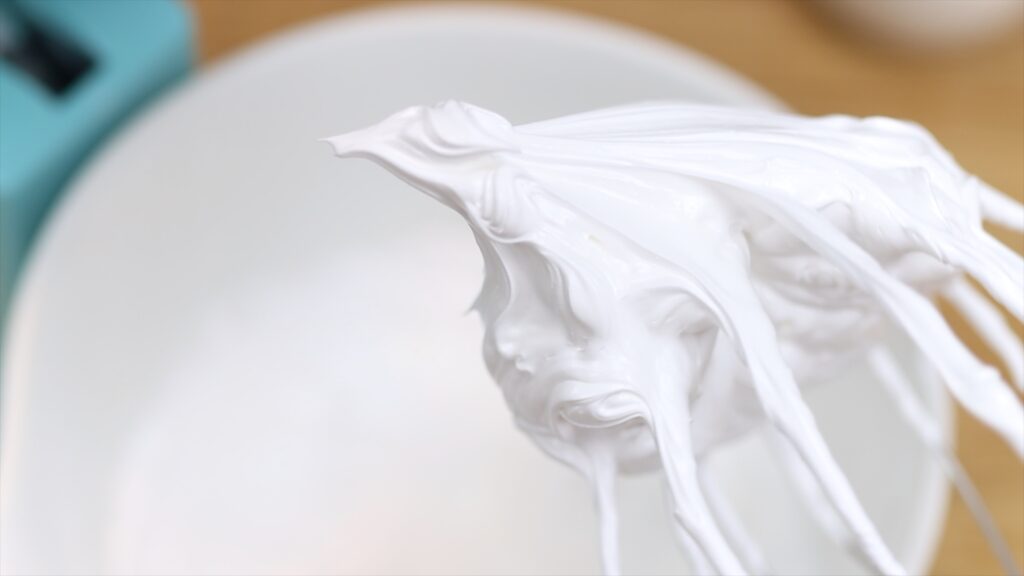
Take the bowl off the heat and now you’ll need a whisk or the whisk attachment for your mixer. Whisk the egg white mixture for 9 minutes on high speed. You’ll notice them go from yellow and frothy to bright white and silky. They’ll expand with all of the air you’re incorporating into them.
You’ll see lots of texture left behind in the meringues by the whisk. When you lift up the whisk, the meringue will hold its shape. These are called stiff peaks. Once you whip the meringues to this stage they'll hold their shape when you pipe.
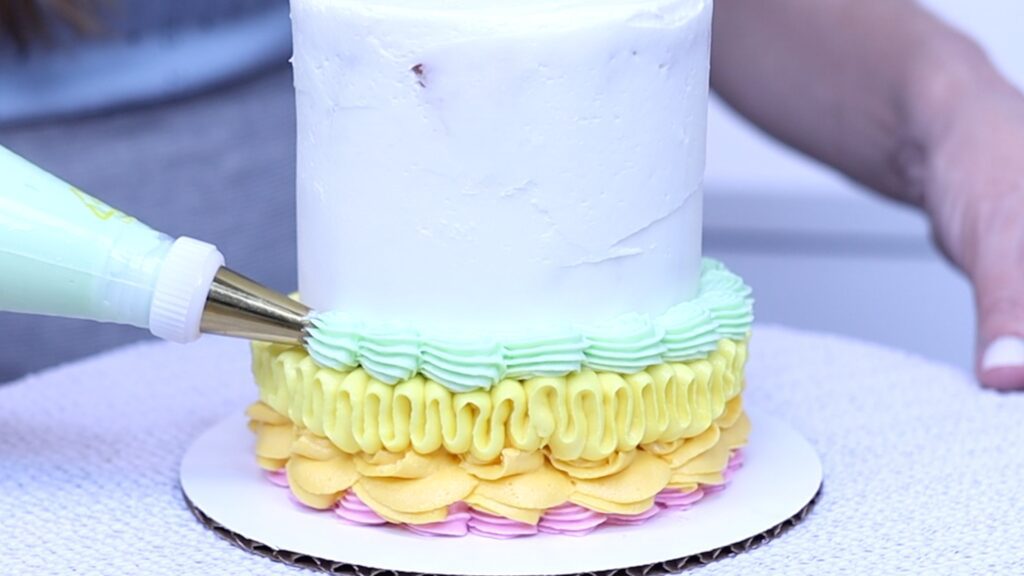
How to flavour and colour meringues
When your meringue mixture reaches the stiff peak stage, add whatever flavour you like. My favorites are vanilla or almond or lemon extract. Mix the meringue just enough to incorporate the flavour extract.
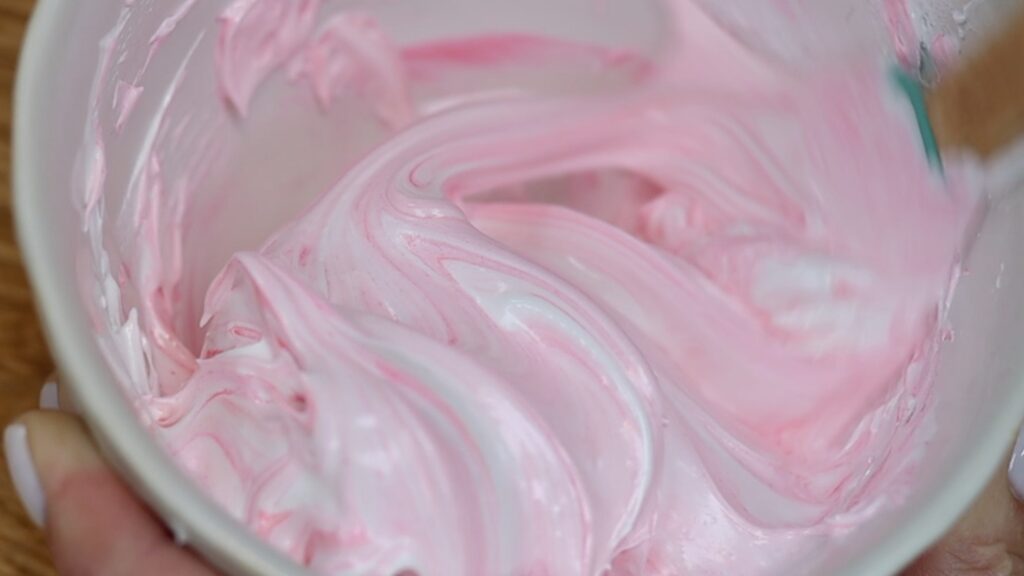
Add colour to the meringue now if you want to tint the entire batch. To tint it different colours divide the meringue into separate bowls. Gel colours are more concentrated than liquid colours so I recommend using those to tint meringue so that you don’t water it down and make it runny. Fold the colour in, mixing as little as possible so you don’t knock the air out of the meringue.
How to pipe meringues
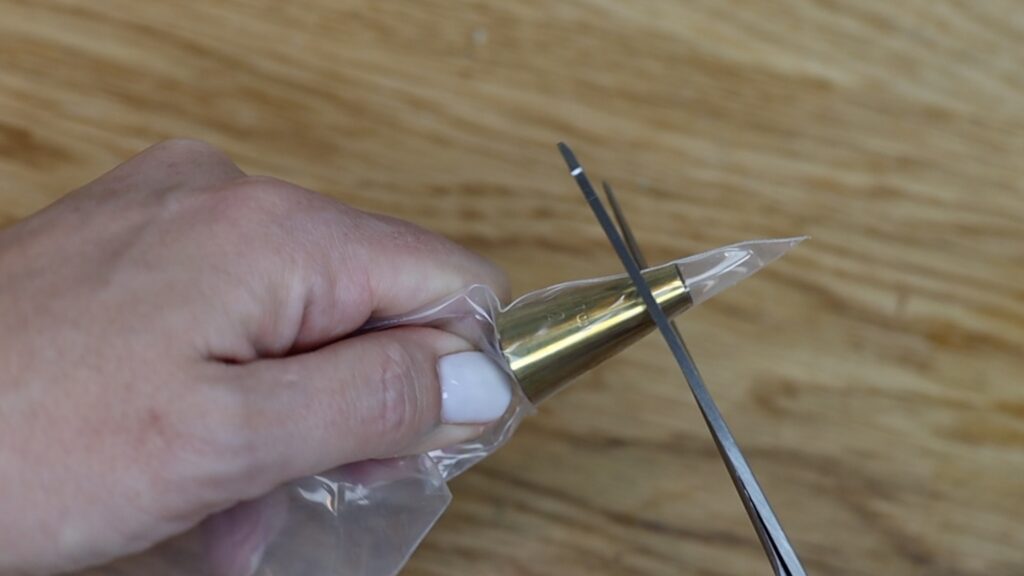
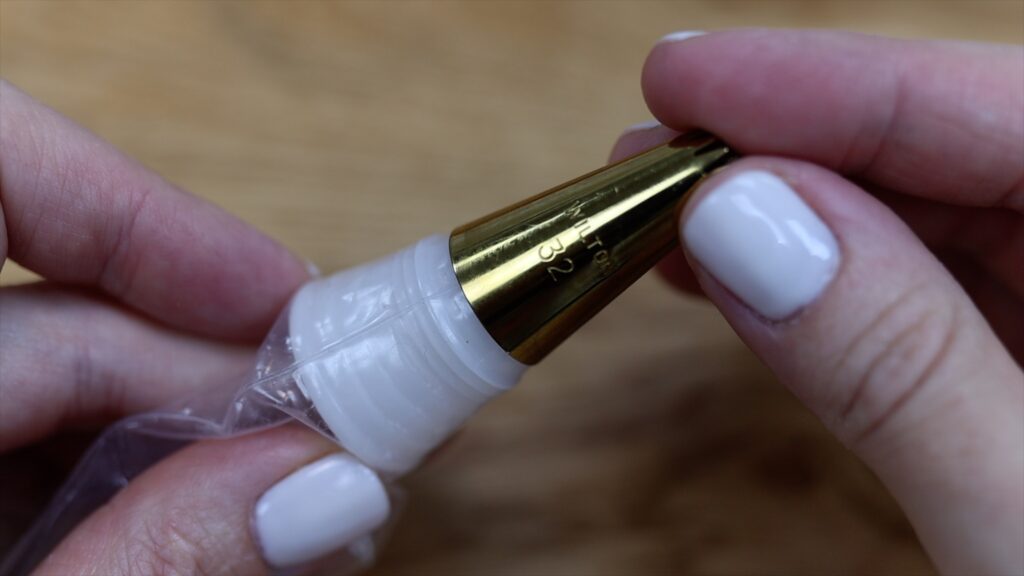
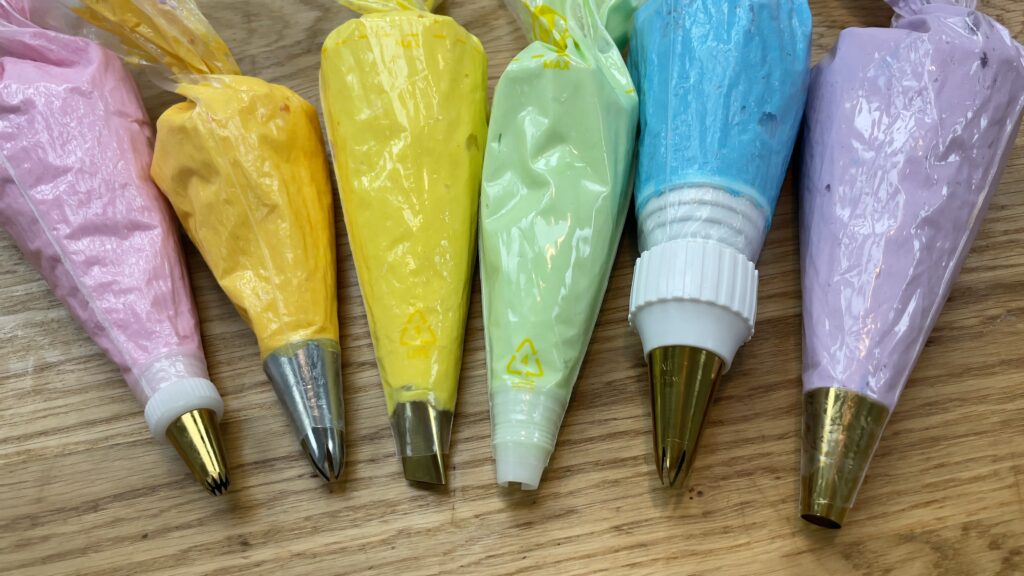
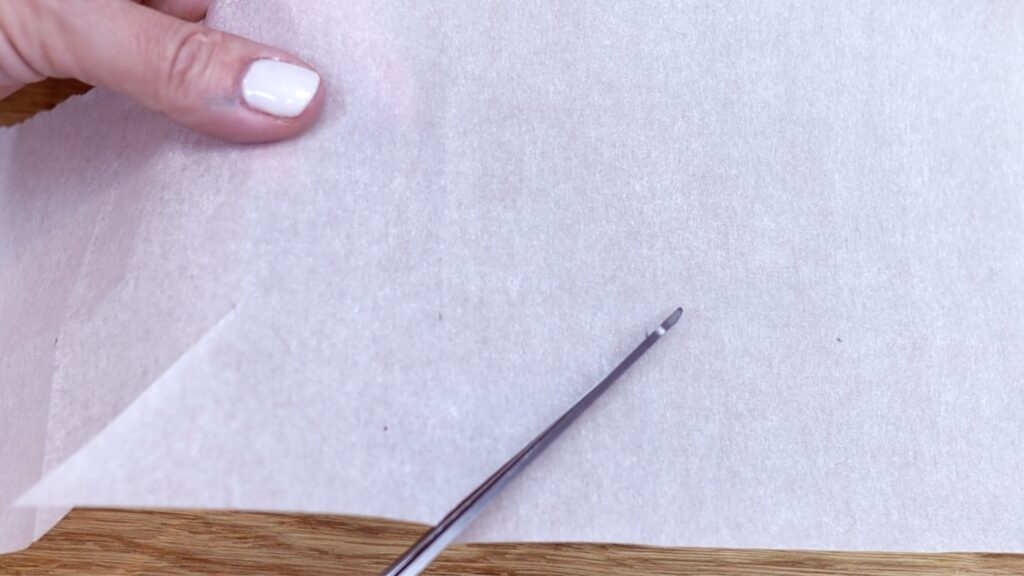
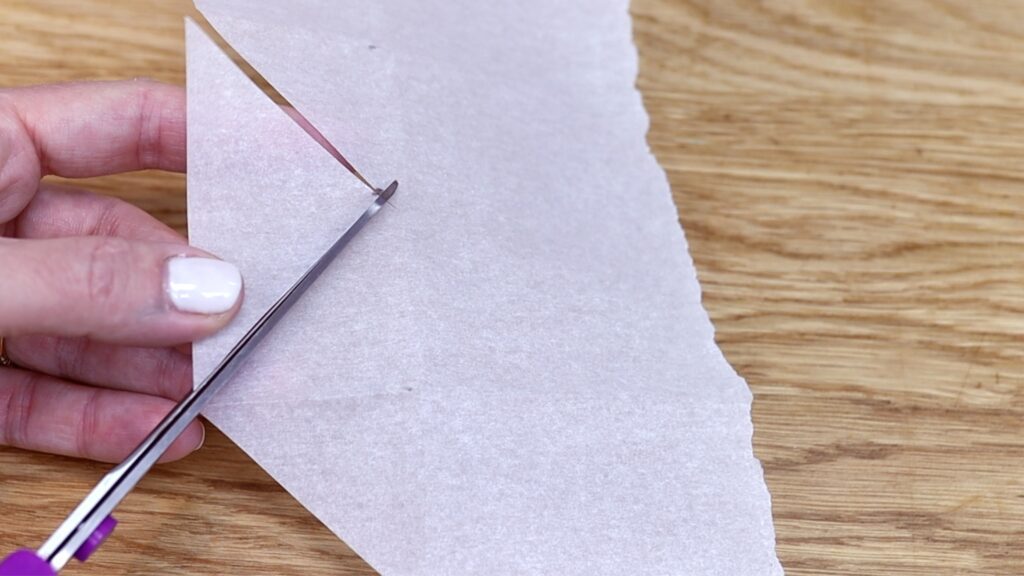
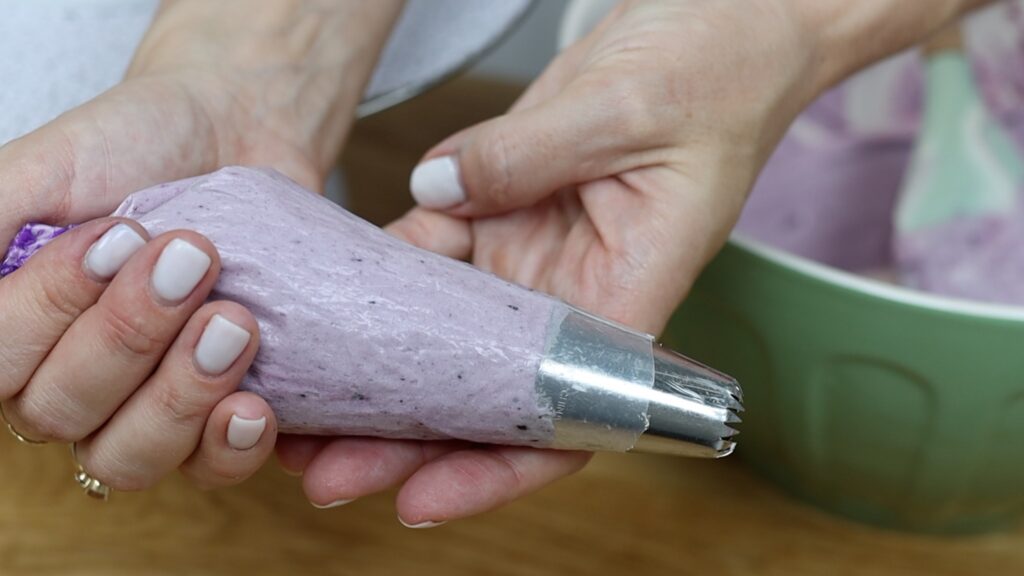
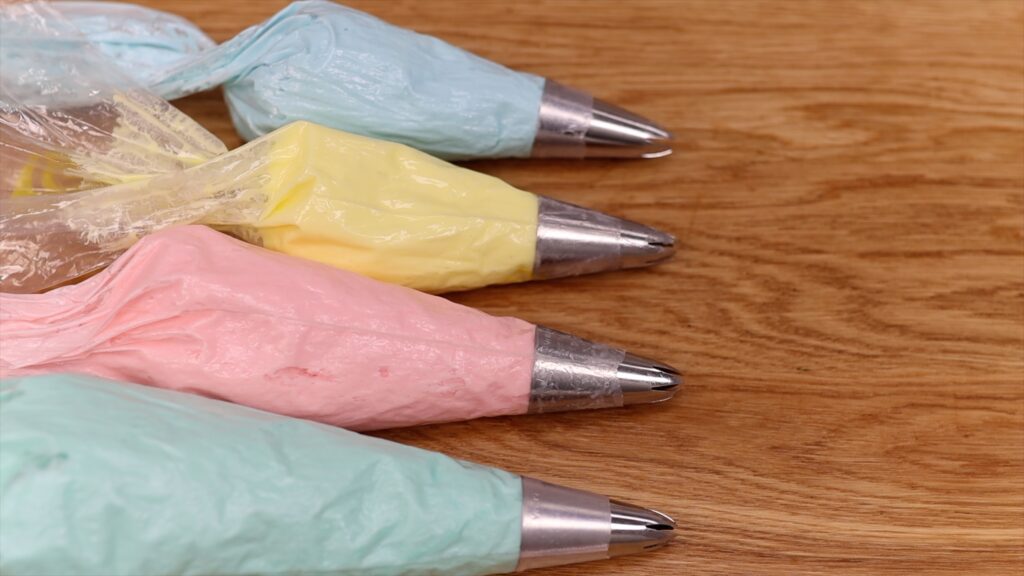
Drop a tip into a piping bag and push it down to the end. If it's a new piping bag, score a line around the midpoint of the tip. Push the tip up out of the way and then cut along the line you scored. Then push the tip back down and it will be snugly inside the piping bag, ready to use! Check out this tutorial for 15 piping hacks for cake decorating!
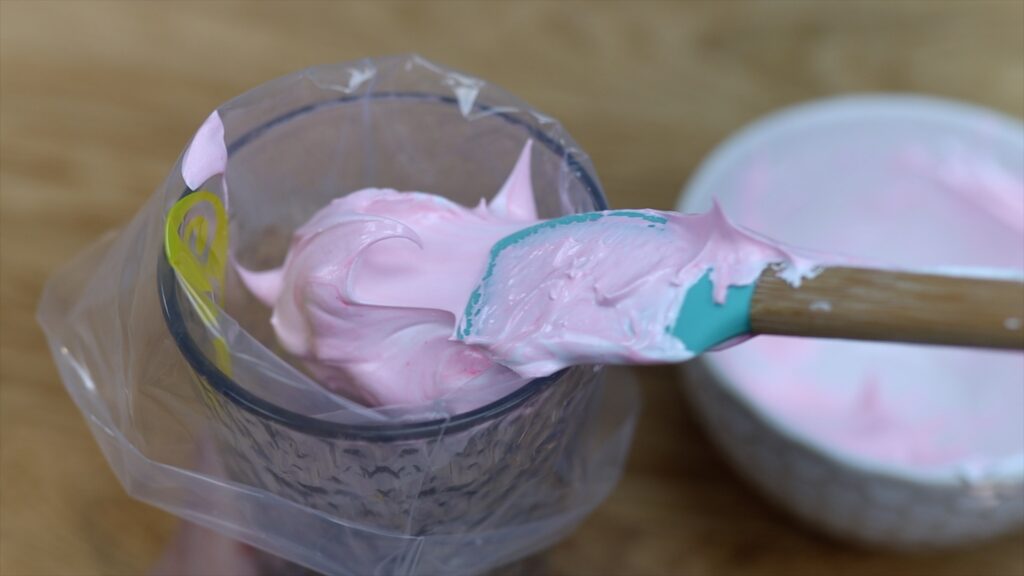
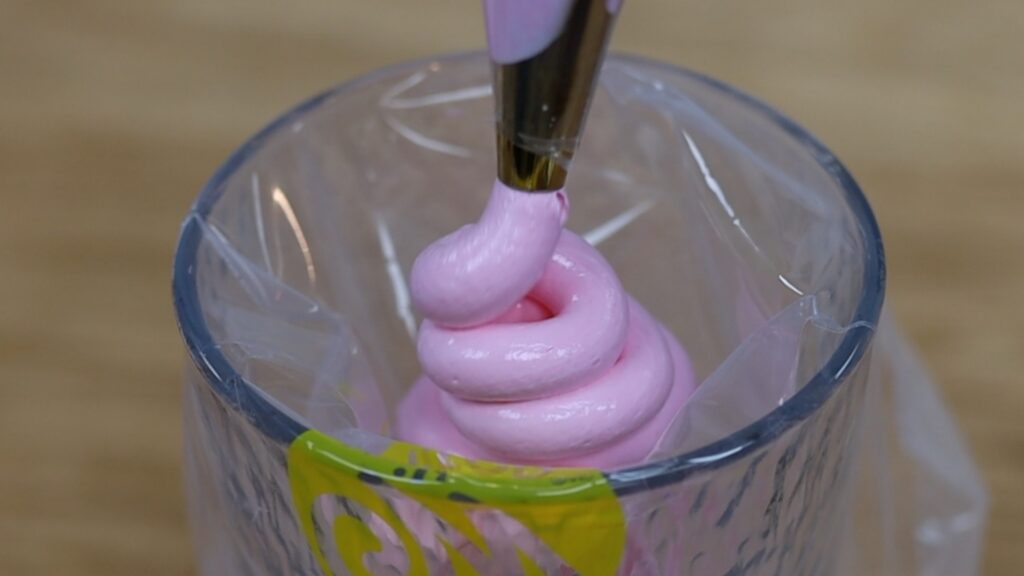
Meringue is very sticky but try this method to avoid mess! Fold the piping bag over a glass to hold it open and then spoon the meringue into it. When you unfold the bag and pipe with it, you won’t get any of that meringue on your hands.
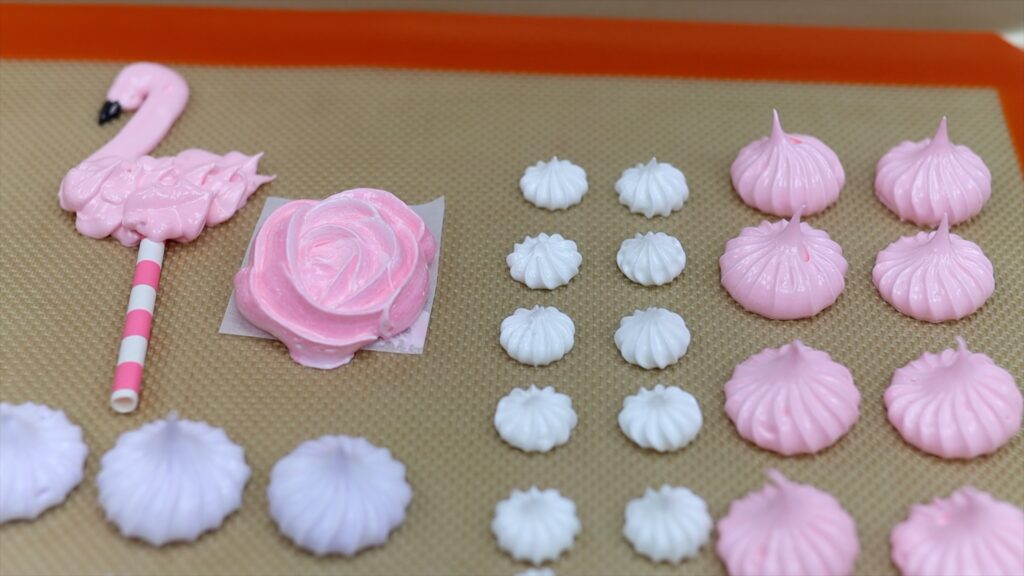
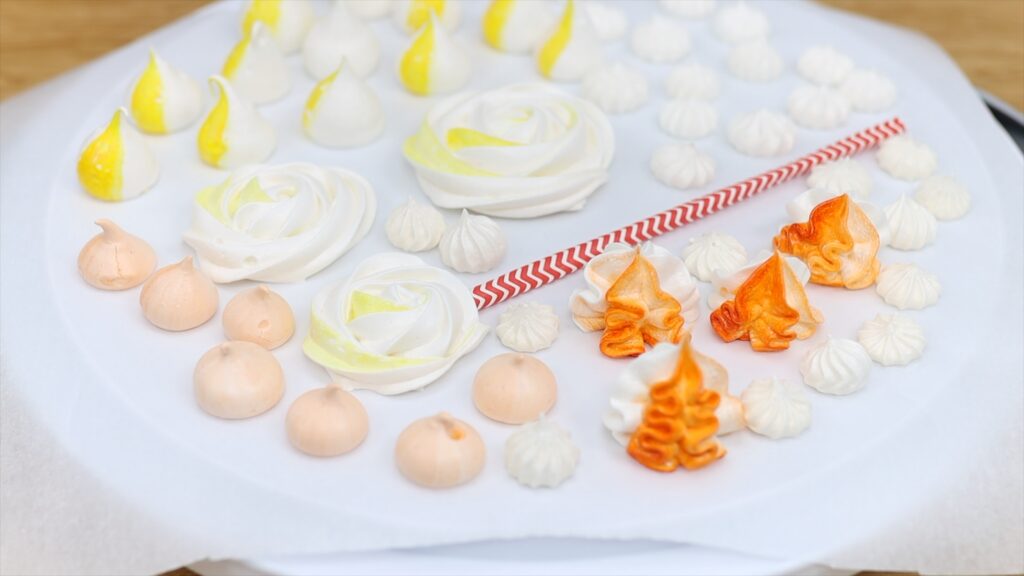
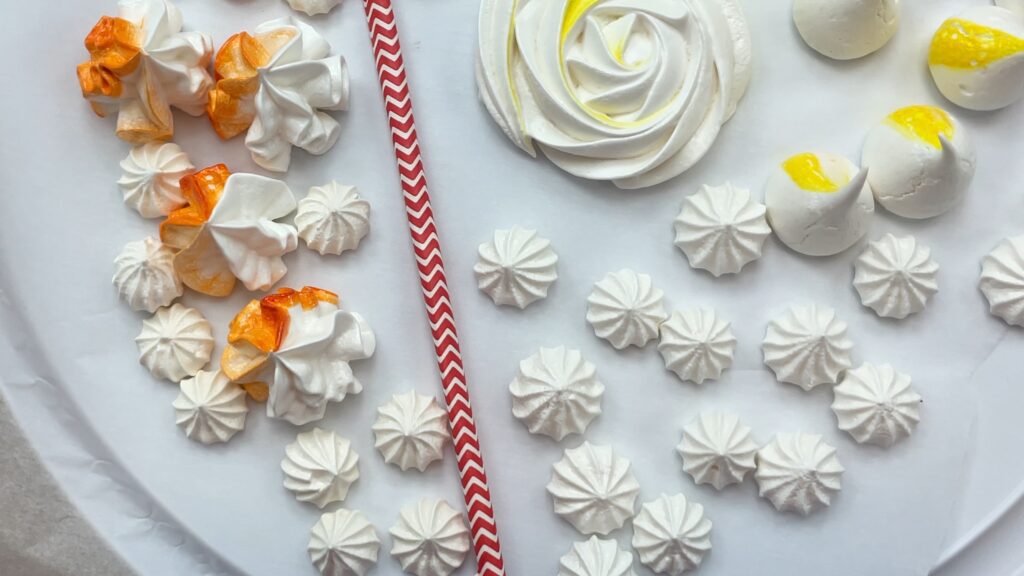
Line a baking tray or sheet with parchment paper or a silicone mat and now let’s pipe some meringues! I'll show you how to make meringues in five different ways, which you can use for cake decorating or to serve as a snack, treat, party favour or dessert!
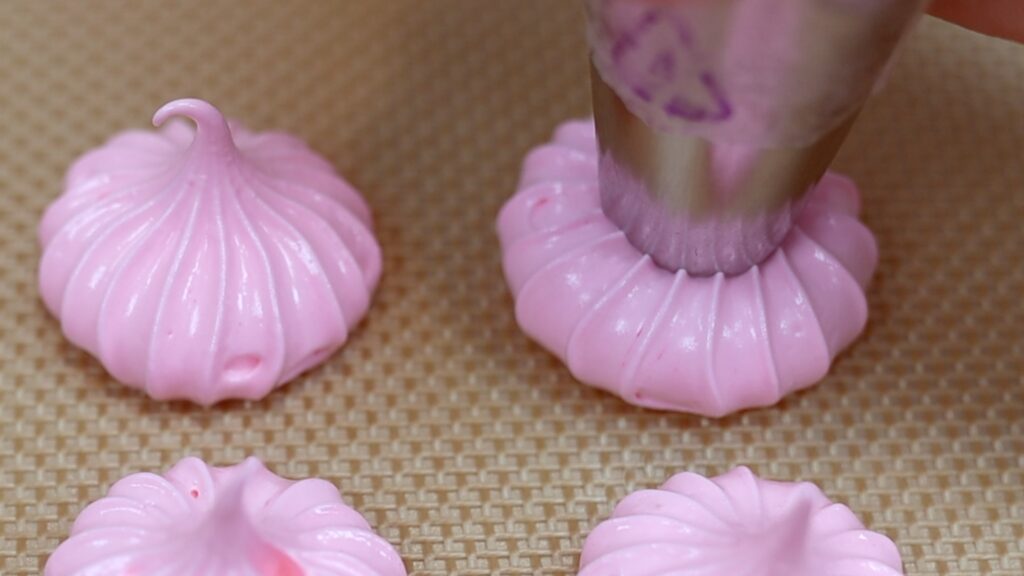
#1 Meringue rosettes
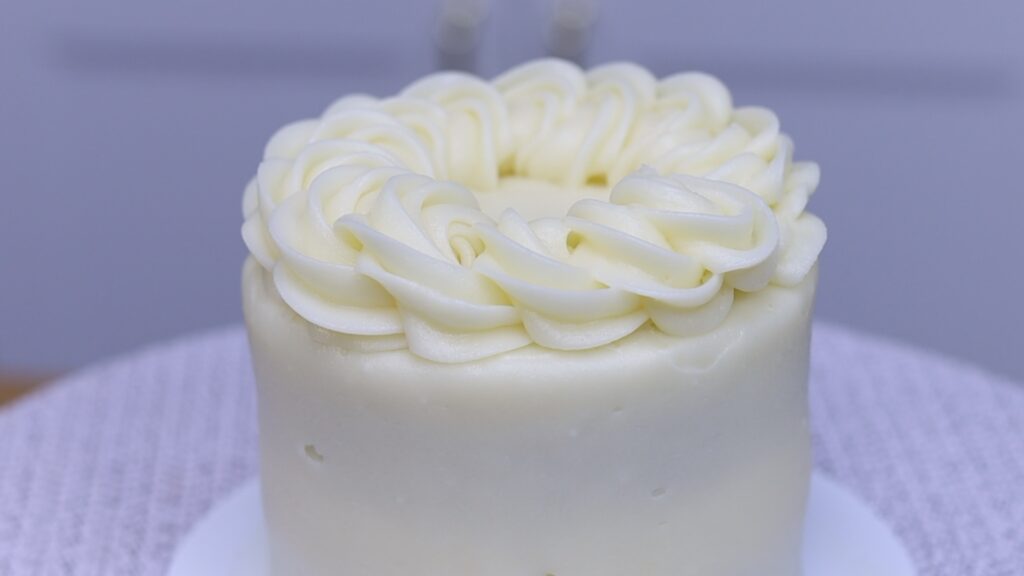
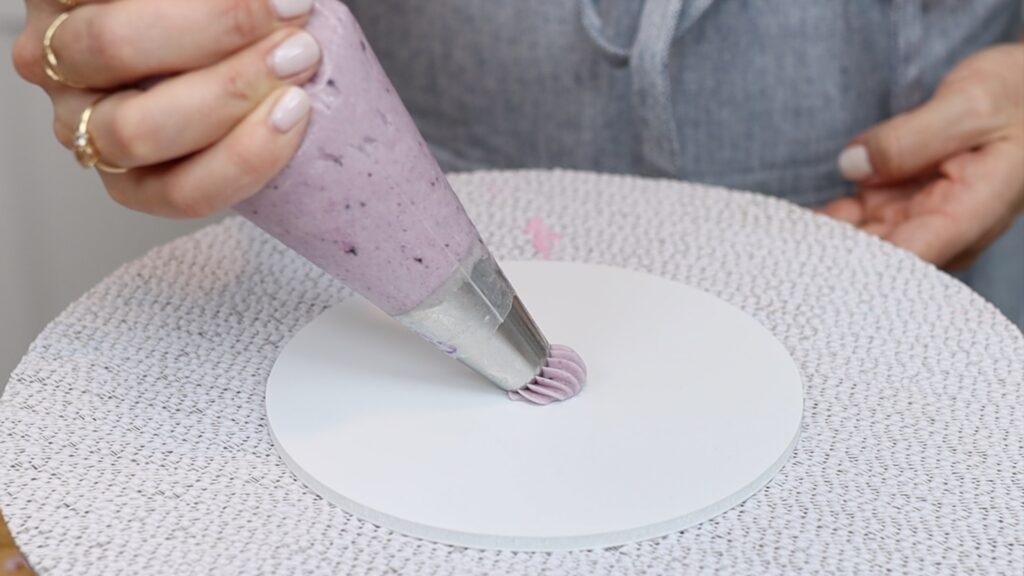
I’m starting with a large, open star tip called an 8B to pipe some rosettes. Hold the tip so it’s slightly above the tray and squeeze the piping bag to make the meringue bulge out. Stop squeezing at the same time as lifting the bag and that will leave a neat peak on the rosette.
To use the same piping tip with another colour, squeeze the first colour out of the bag. Push the piping tip out and wash and dry it. Then put it in another bag that you fill with the second colour.
Couplers are a much quicker and easier method to use the same colour of meringue with different piping tips. You can switch between colours effortlessly and you won’t have nearly as much to clean up at the end! Drop a coupler into a piping bag and place a piping tip on it on the outside of the bag. Then screw the coupler ring on to hold the piping tip in place.
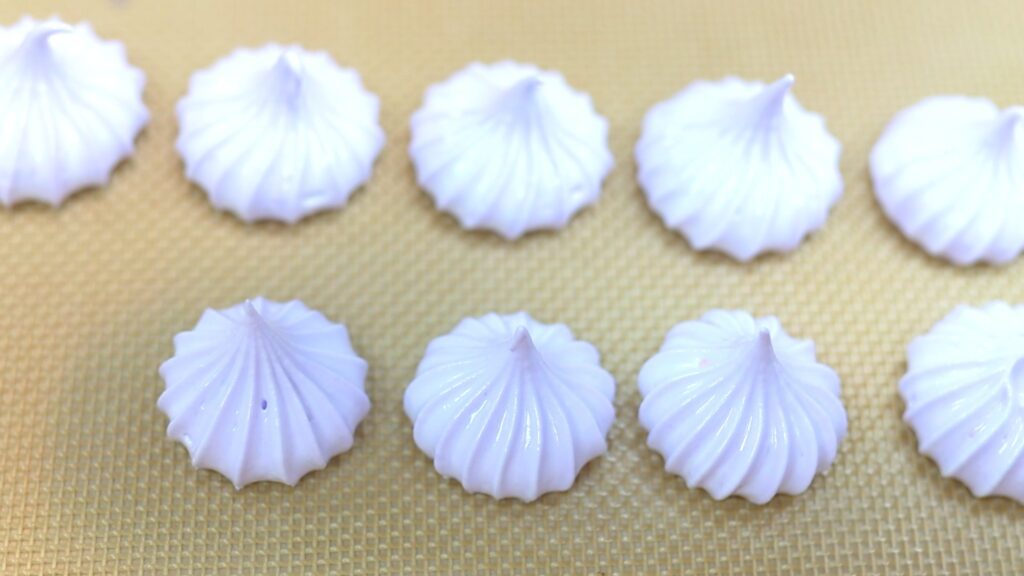
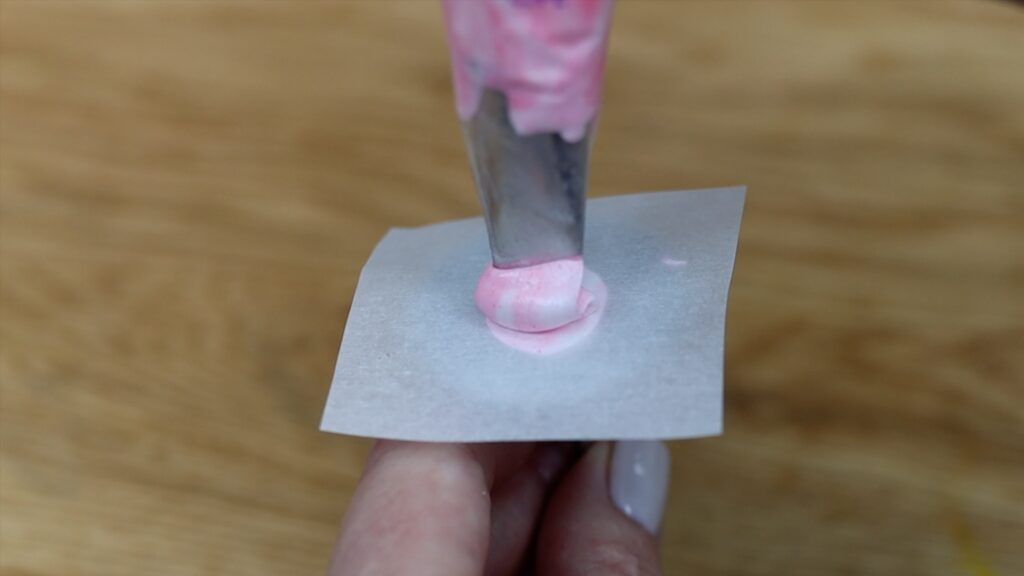
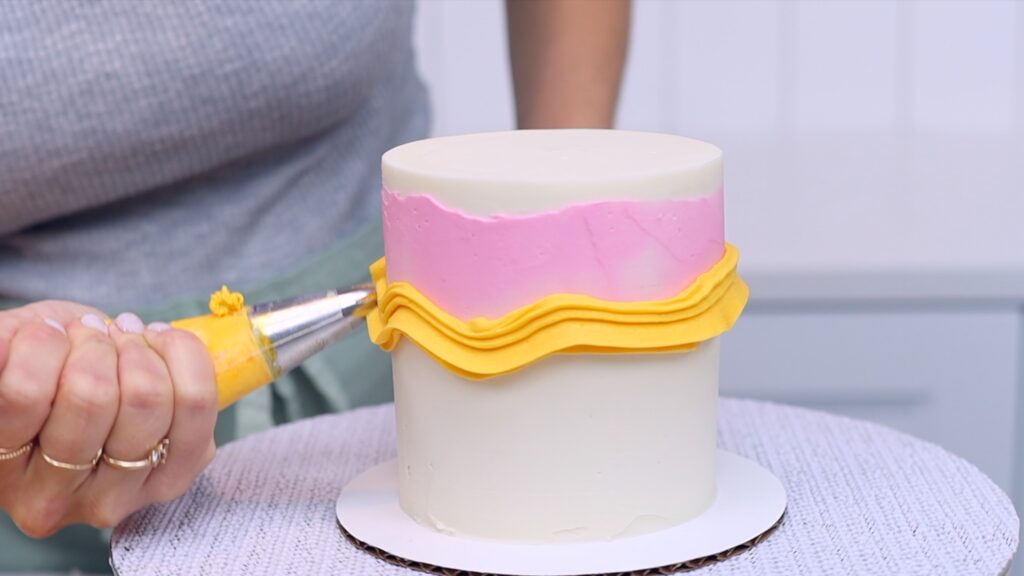
#2 Striped meringue kisses
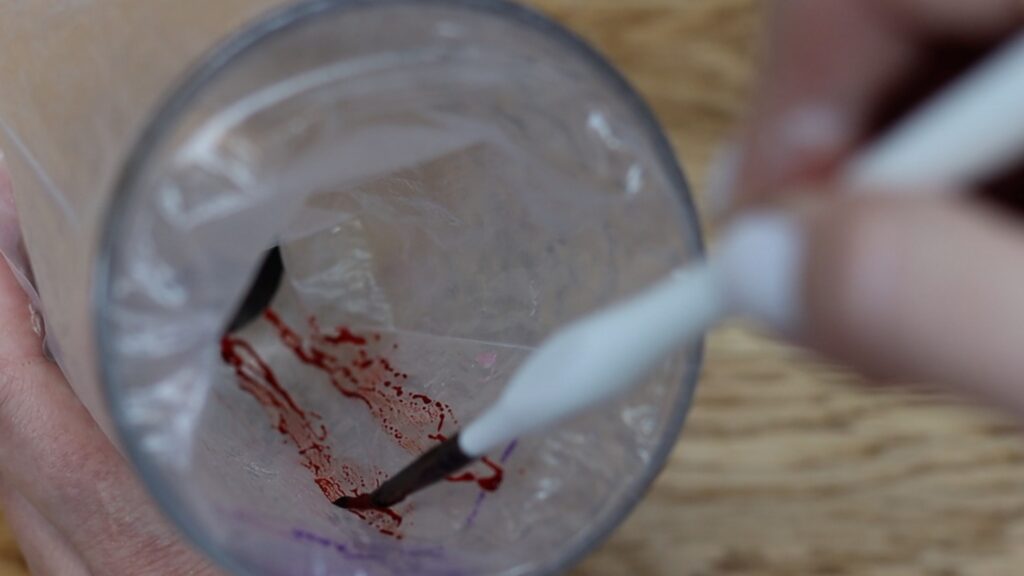
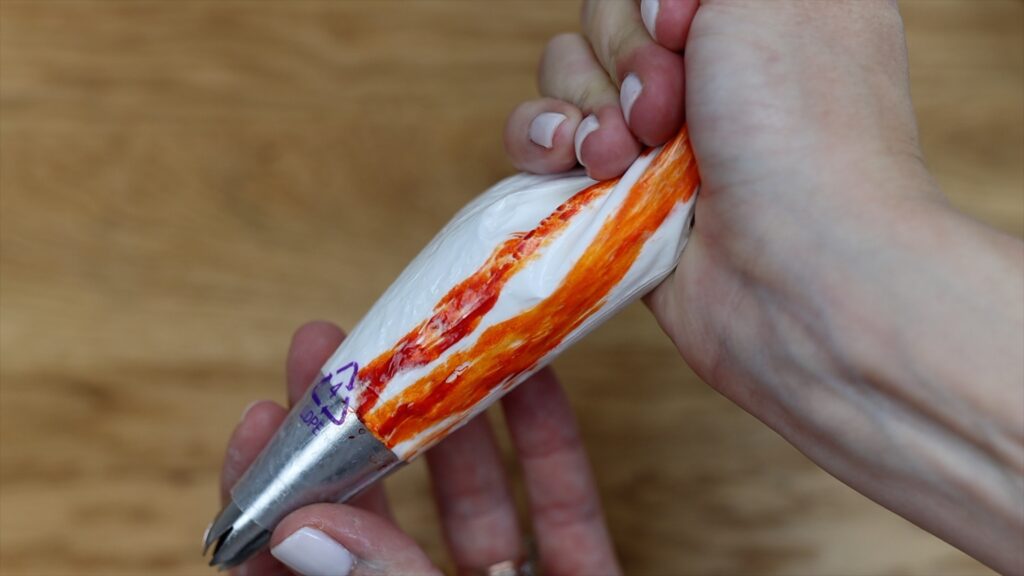
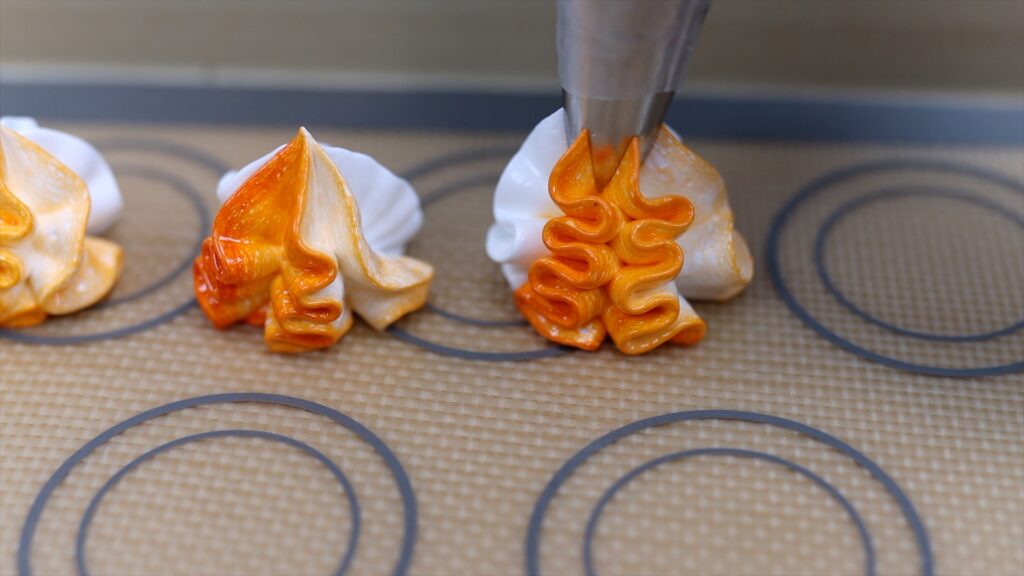
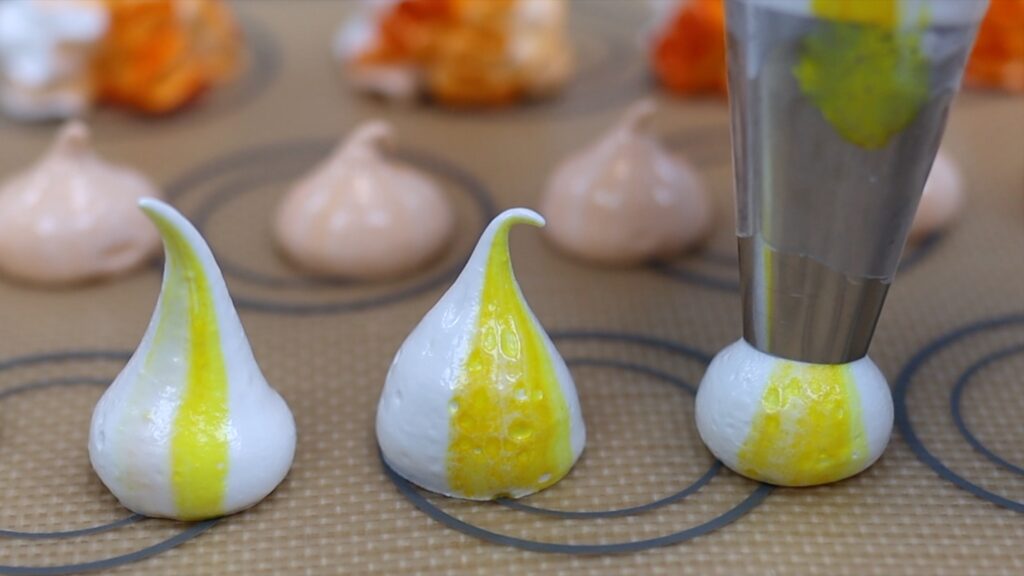
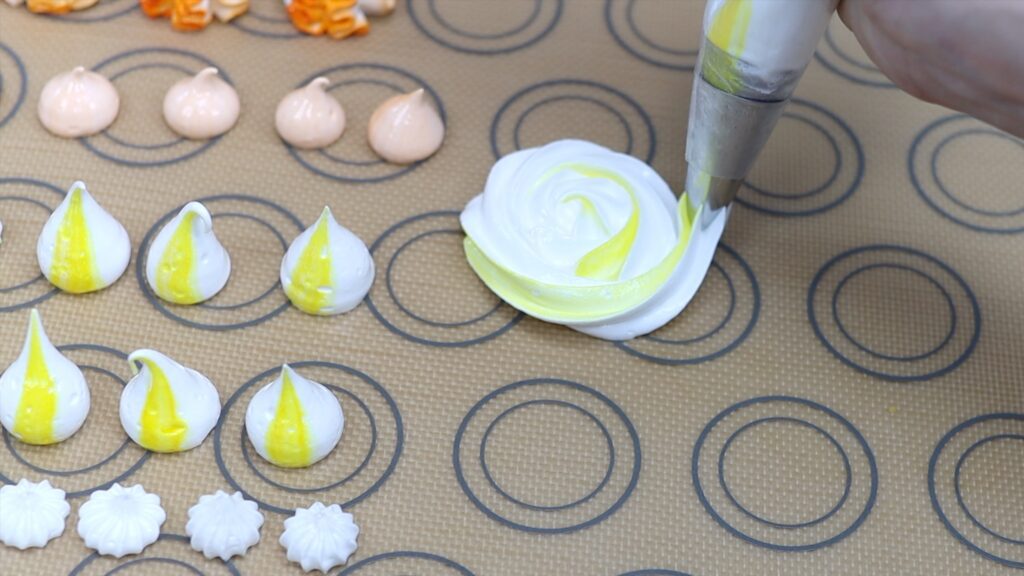
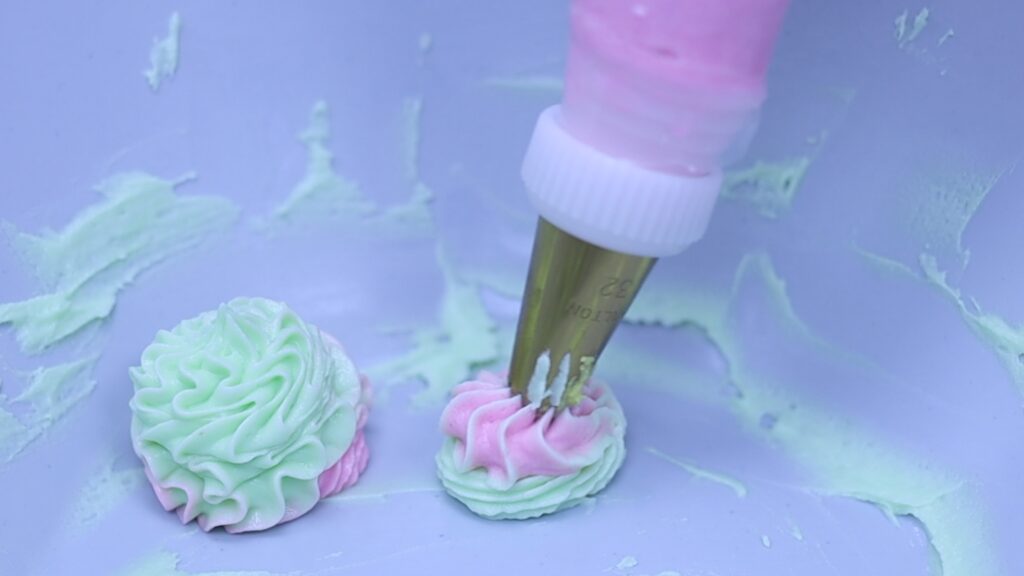
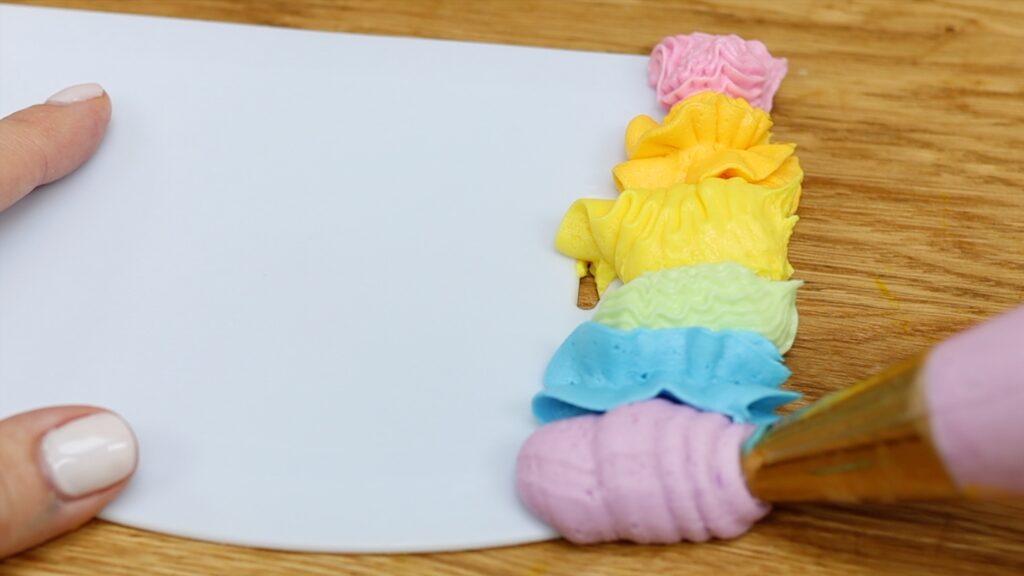
I love gel colours to tint my 4 Minute Buttercream and also for meringues. You can mix gels into meringue to tint it but try this for really bright striped meringues. Hold the piping bag open and use a paintbrush to paint stripes of colour along inside of the bag. You only need a tiny amount because gels are so concentrated.
Fill the piping bag with meringue and then pipe whatever shapes you like. The ruffly rosettes above are piped with a 1M star tip. For meringue kisses or dollops like the ones below you can use any round tip. I used a 1A.
The colours are much more vivid than if you mix them into the meringue. For example, compare the bright orange to the pale orange you can see in the second row of meringues on the tray above. That orange was made by mixing gel into a bowl of meringue before piping.
#3 Meringue pops
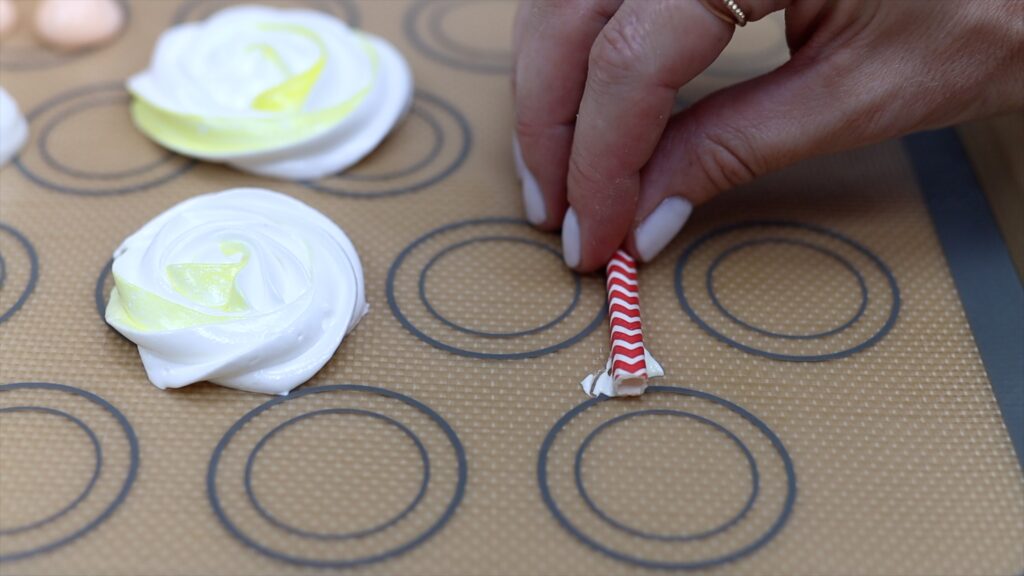
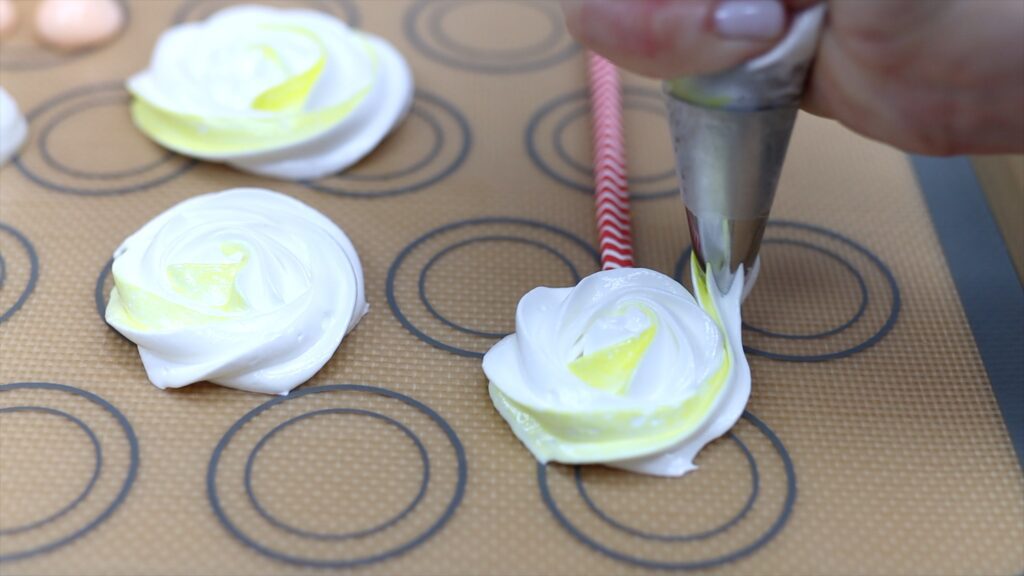
Another way to use a 1M tip is to pipe these swirls, spiraling outwards. You can place these straight onto a cake or prepare them on straws.
Wondering how to make meringues that can be used as cake toppers? Pipe a tiny bit of meringue onto the tray and press a paper straw into it. The meringue will hold the straw in place. Then pipe over the top of the straw. After baking these you can use the straw to push the meringue into the cake as a cake topper.
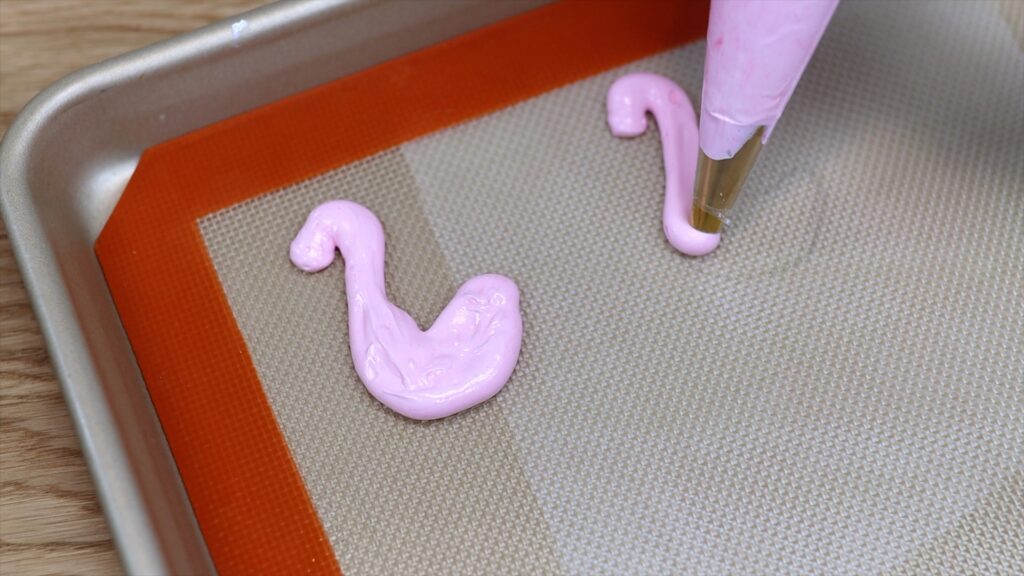
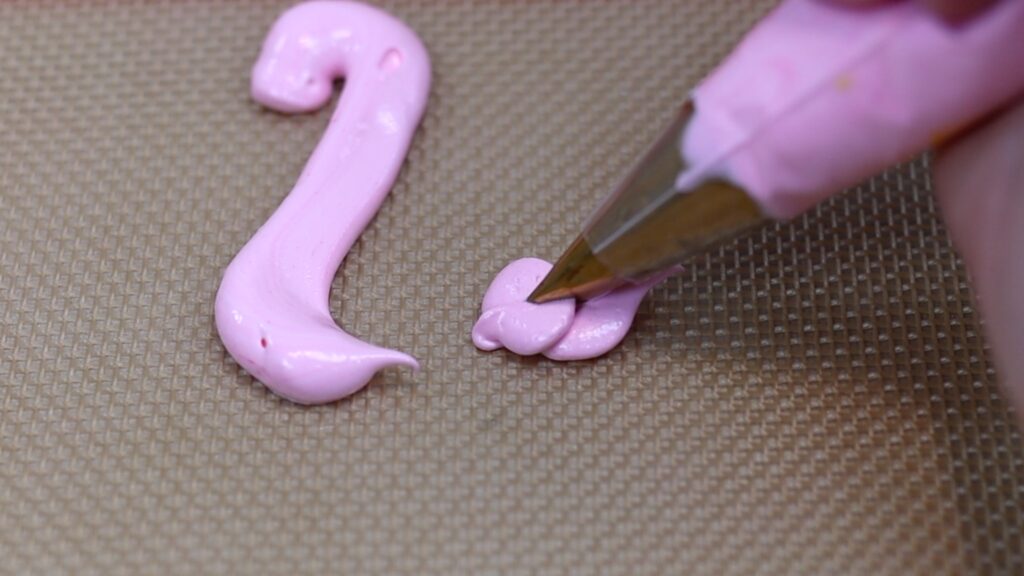
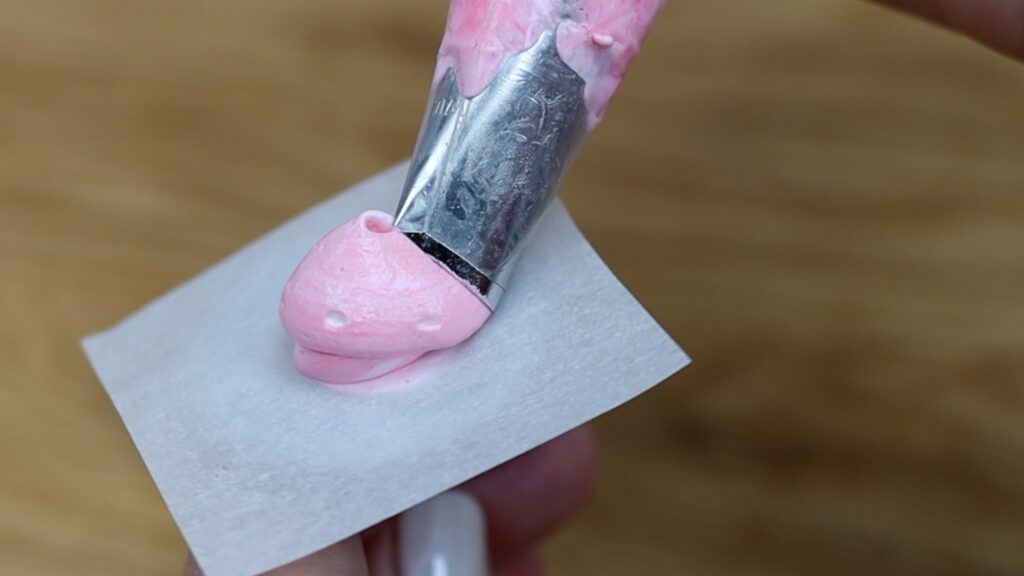
#4 Meringue animals
Intricate and adorable, a fun technique is how to make meringues shaped like animals! Draw or trace or print an outline or design and put it under parchment paper or a clear silicone mat. Then trace it with meringue. This is a medium round tip, a #12, and this is going to be a flamingo. Use a toothpick to smooth out any textured markings.
I don’t recommend using just a round tip because with stiff meringue it’s difficult to get a neat, smooth surface. You can add lots of amazing textures using different piping tips. If you're not using couplers, squeeze the leftover meringue from one piping bag into another piping bag with a different tip.
This is a leaf tip called a #352, which I’m using to pipe feathers onto this flamingo. Hold the two points of the tip above each other, like jaws, and squeeze to form a bulge. Pull the tip away to leave a point on the feather.
If you’re piping a shape for the first time, it’s a good idea to make more than one. Try different techniques to make different versions. It only adds a few seconds now, compared to having to start all over again after baking one that you don’t need up liking.
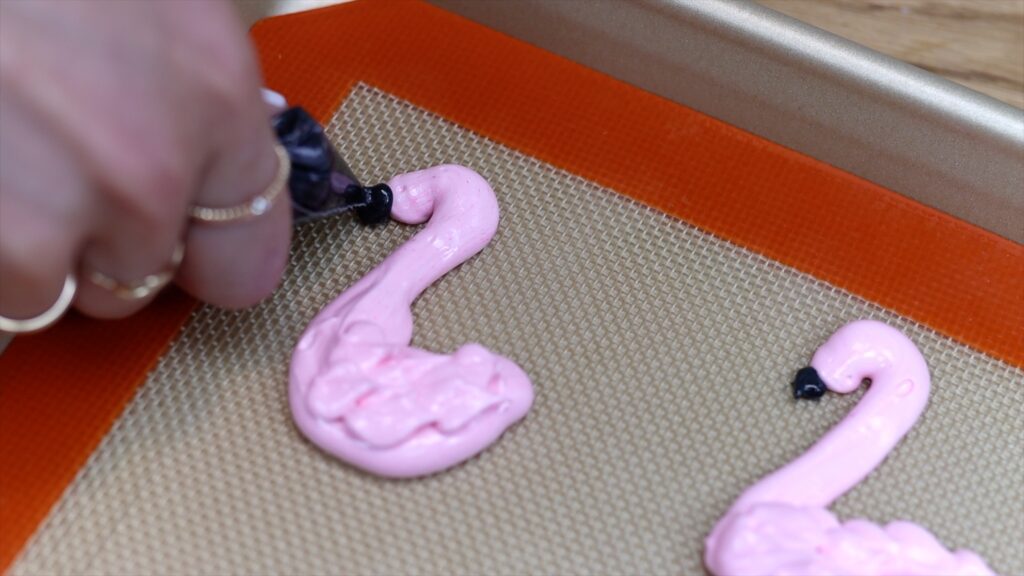
To make black meringue you'll need black gel. Since it's very concentrated you won't need more than a few drops to make jet black meringue. For tiny details like flamingo beaks, a sandwich bag works really well. Push the meringue down to a bottom corner of the bag and cut a tiny piece off the corner. Squeeze the bag to pipe the meringue. I’m making two flamingos so I can choose my favourite after they bake.
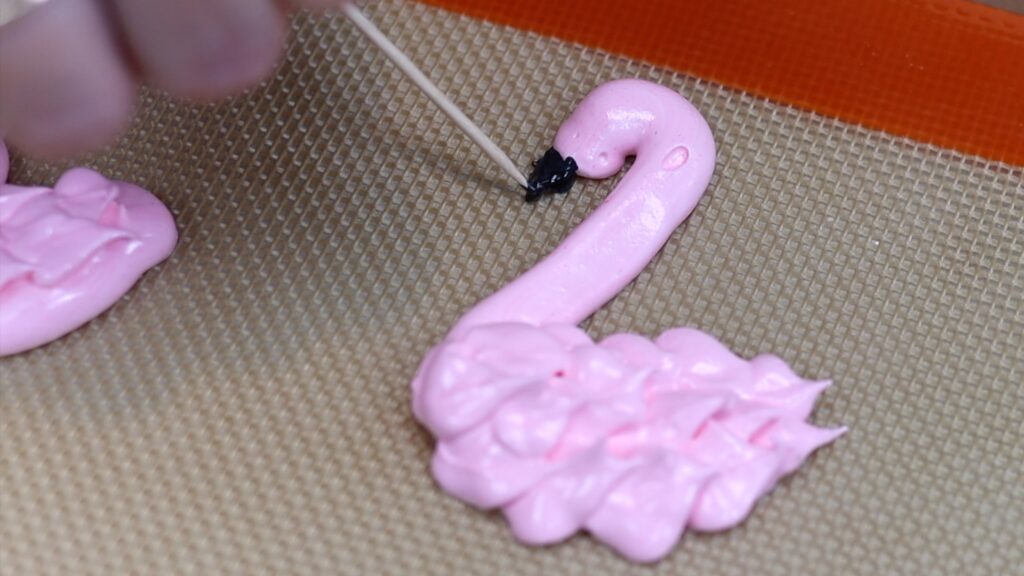
Use a toothpick to manipulate the meringue to make the shape you want and to smooth the texture in the piped meringue.
To draw lines for the eyes you can dip a toothpick into meringue and draw with that. The other way is to wait until the meringues are baked. Then you can use an edible marker to draw the line. I find this way to be a bit neater than the toothpick method. To use meringue designs as cake toppers, pipe them onto a straw or poke a straw in carefully after piping but before baking.
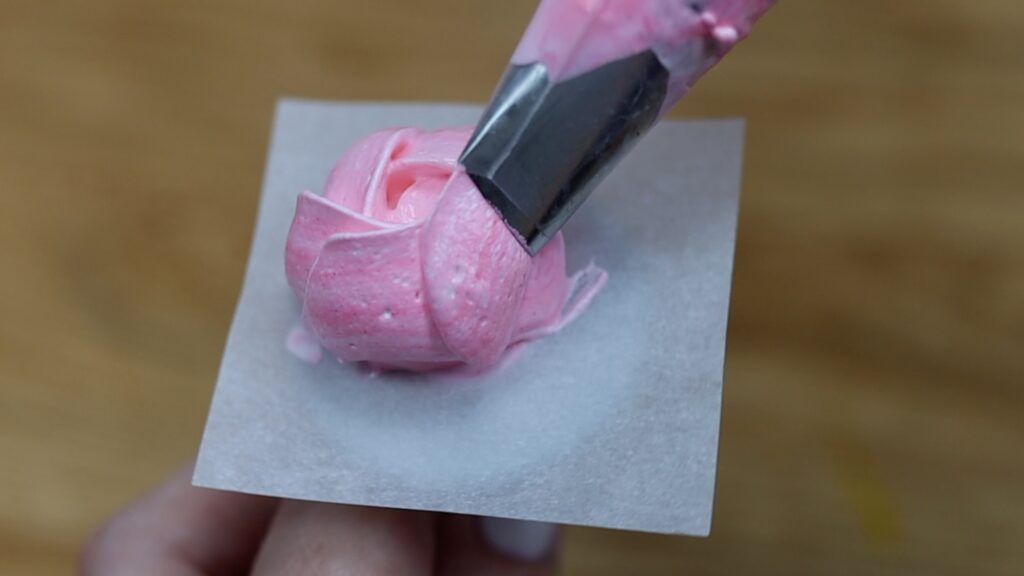
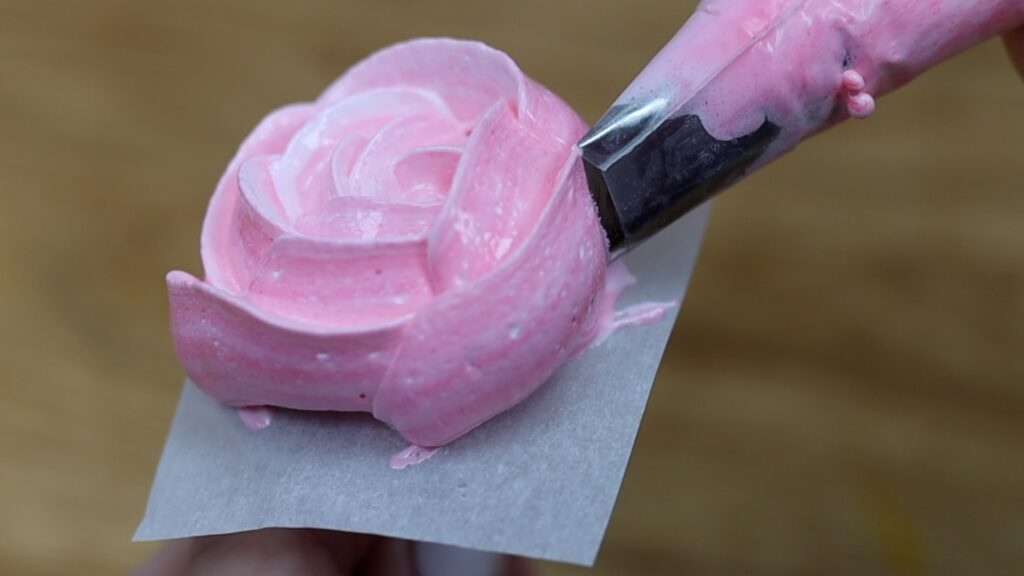
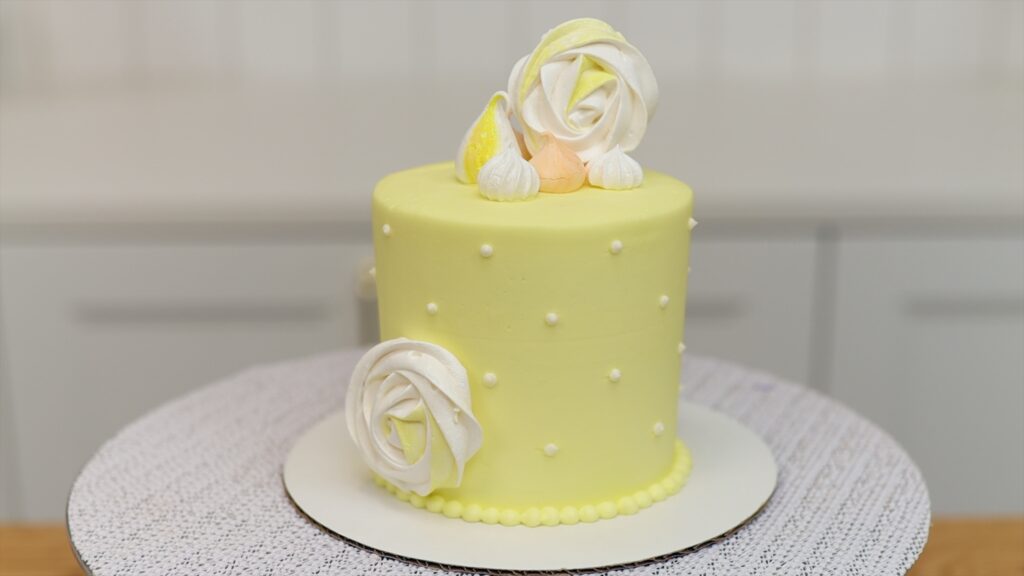
#5 Meringue roses
You can pipe flowers with meringue just like you would with buttercream. You’ll need a petal shaped piping tip, a little square of parchment paper and a flower nail. Squeeze some meringue onto the head of the nail and press the parchment onto that to attach it. Pipe a blob of meringue onto the middle of the parchment to start the rosebud.
Then hold the narrow end of the teardrop shape of the petal tip pointing upwards. Squeeze the bag and spin the nail to pipe a spiral of meringue that wraps around the blob you just piped.
Now pipe petals around the rosebud, overlapping each one. Angle the top of the tip inwards to keep the petals tight.
Continue wrapping the petals around the flower. Gradually angle the top of the tip further out so that the petals start to fan out. When the rose is as big as you want it, pinch the parchment and slide it off the flower nail. Balance it on your fingers underneath the parchment and lower it onto the baking tray.
How to bake meringues
Bake meringues at 200F or 95C for 85 minutes. Then turn the oven off but leave the tray in for an hour before you take it out. The gradual heating and cooling will prevent the colours from yellowing and also prevent cracking of the meringues.
These meringues are crispy on the outside but when you bite into them, the centers are soft and slightly chewy. In a second I’ll show you how to store them to keep them like this!
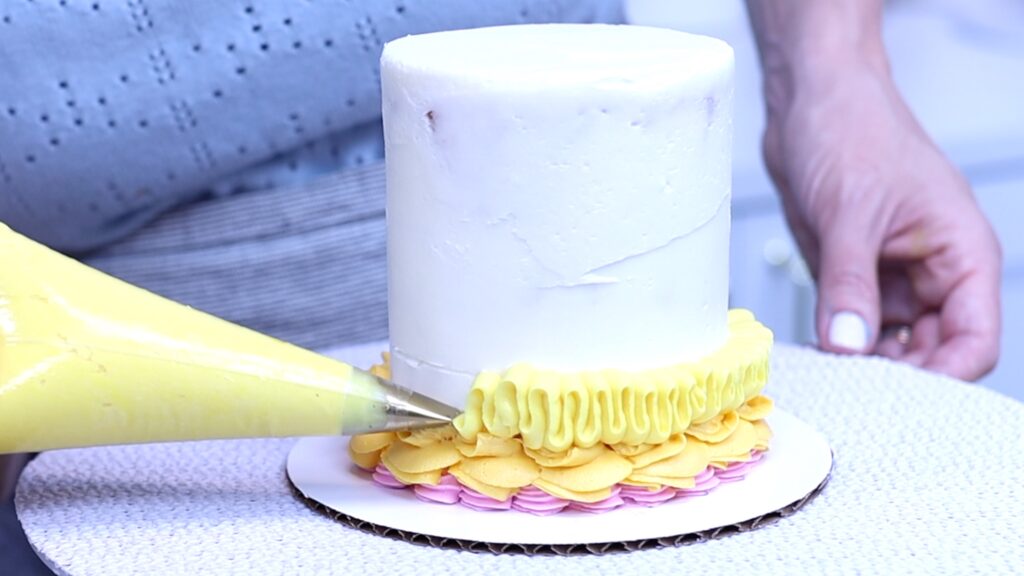
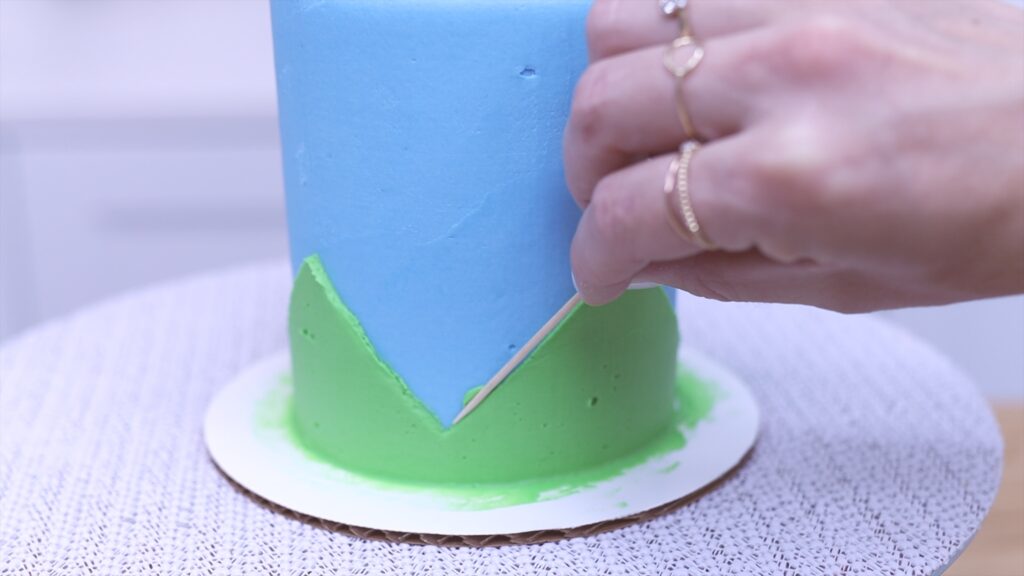
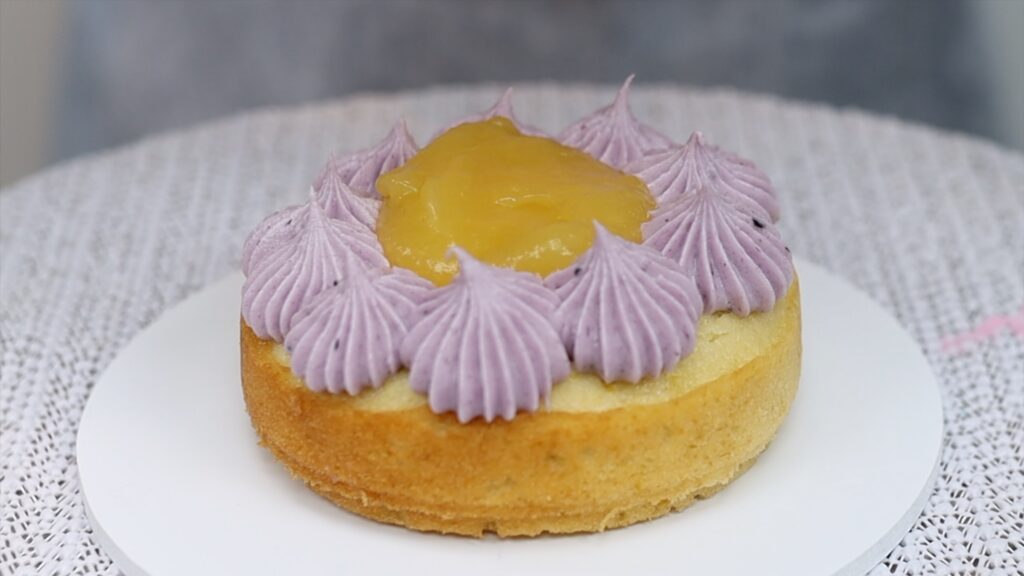
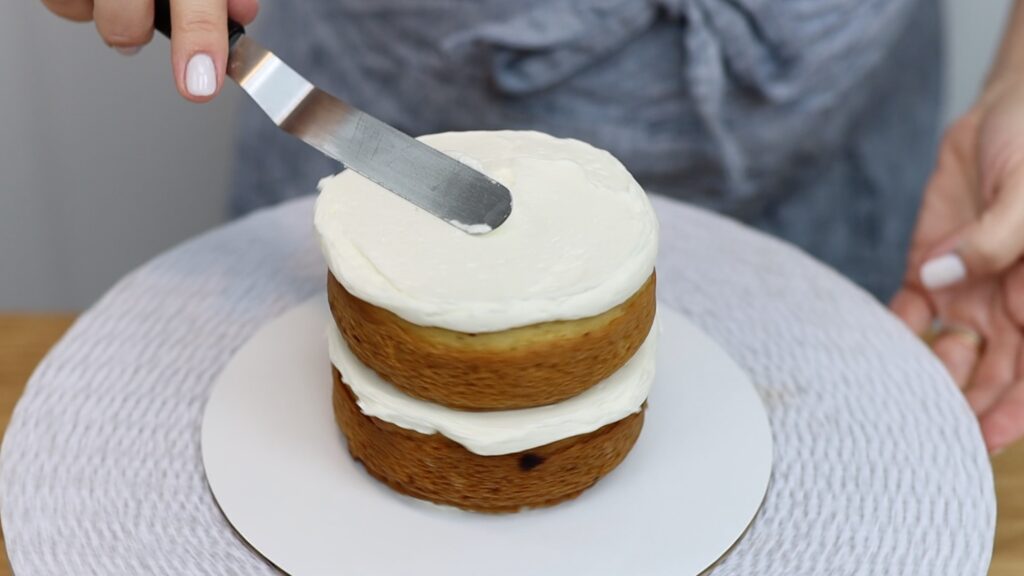
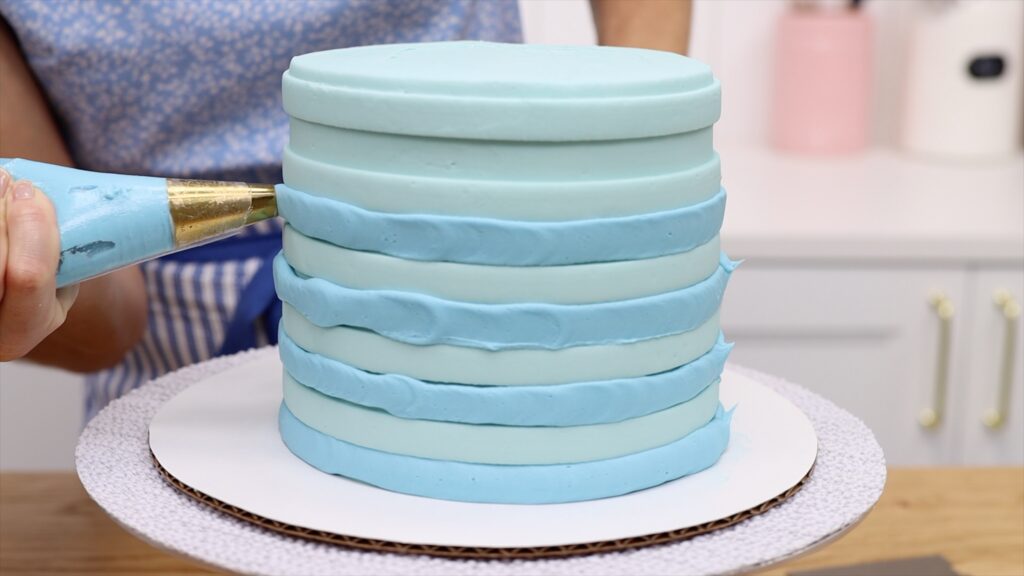
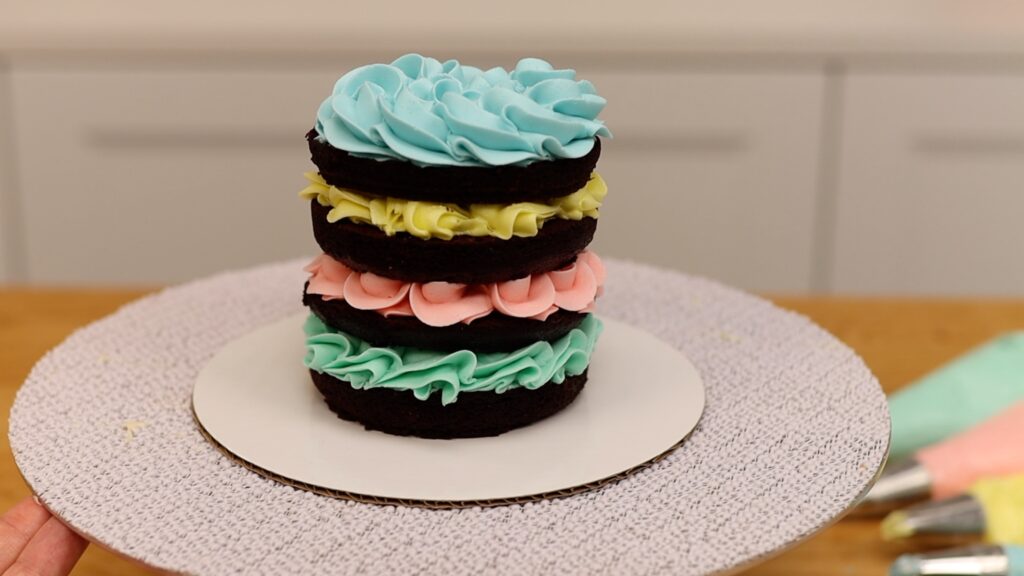
How to make meringues stick to a cake
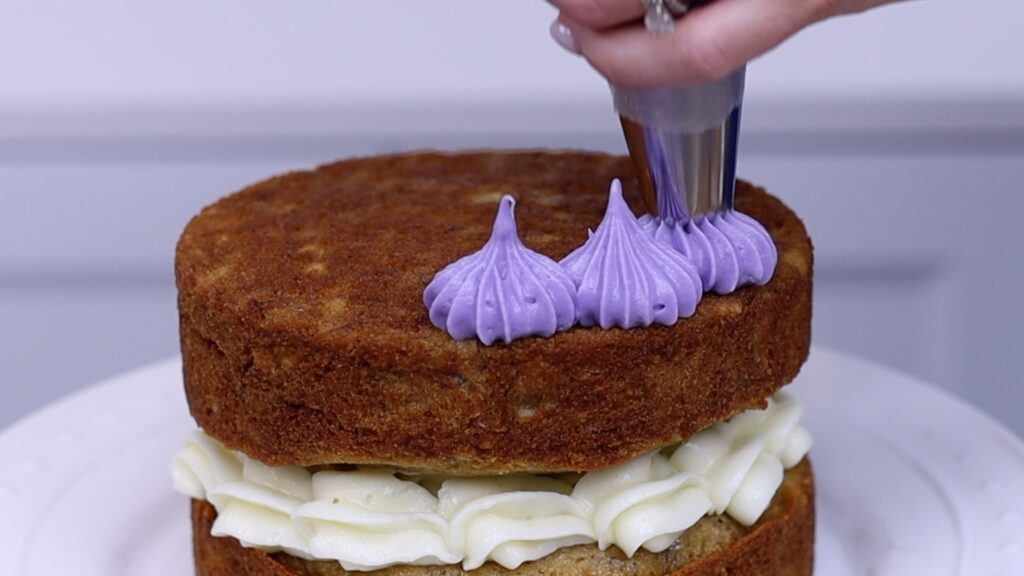
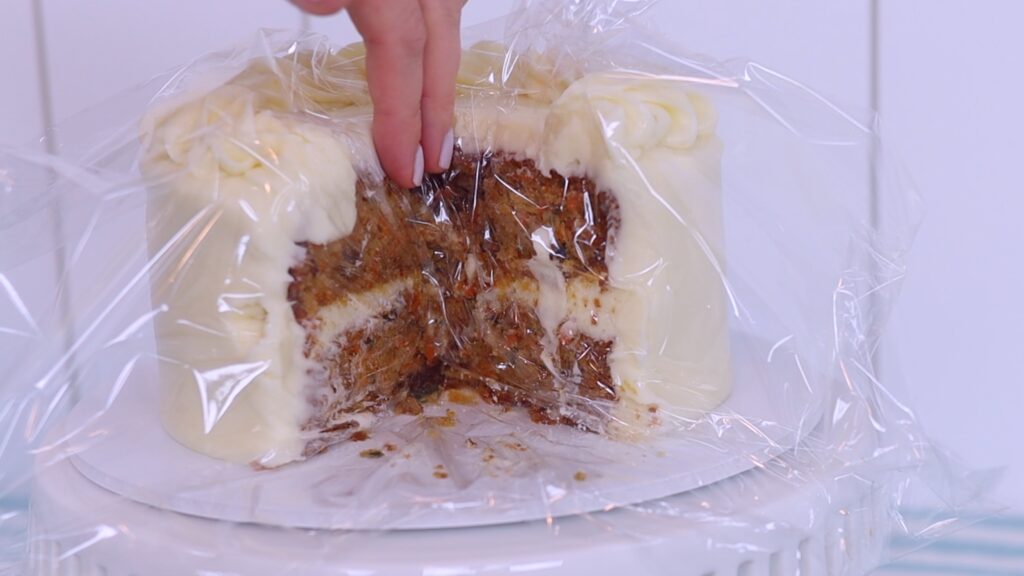
Here are three ways to attach meringues to a cake. You can push them into a drip while the drip is still sticky, before it sets, and they’ll attach easily.
If you baked a meringue on a paper straw you can push the straw into the cake. This makes the meringue stand up on top of the cake, like this flamingo. Leave some of the straw visible or cover it up with more meringues. To hide the straw, push the meringue all the way down into the cake. Don't push directly on the meringue because it will crack. Instead, use scissors or tweezers to grip onto the straw and push it down.
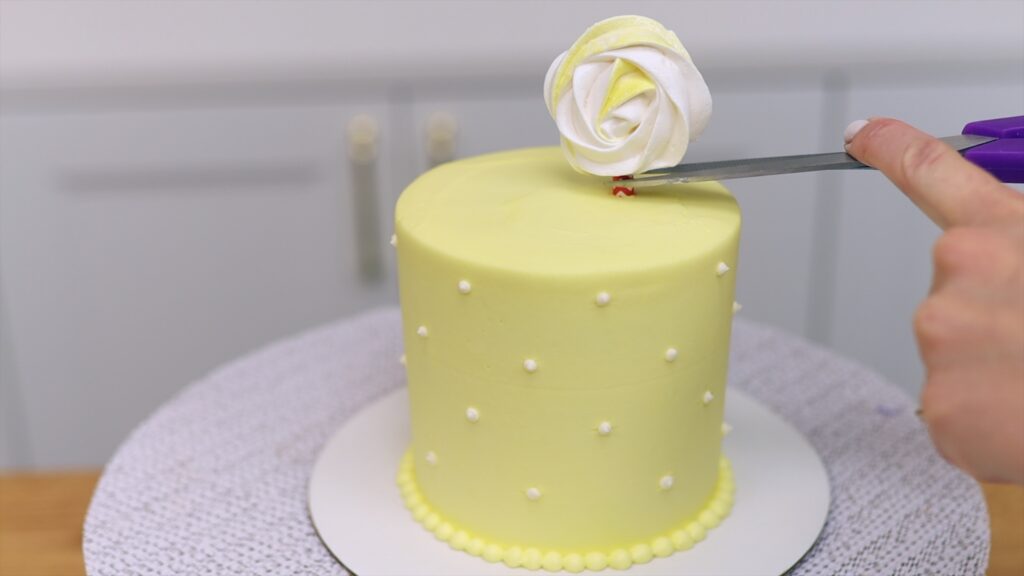
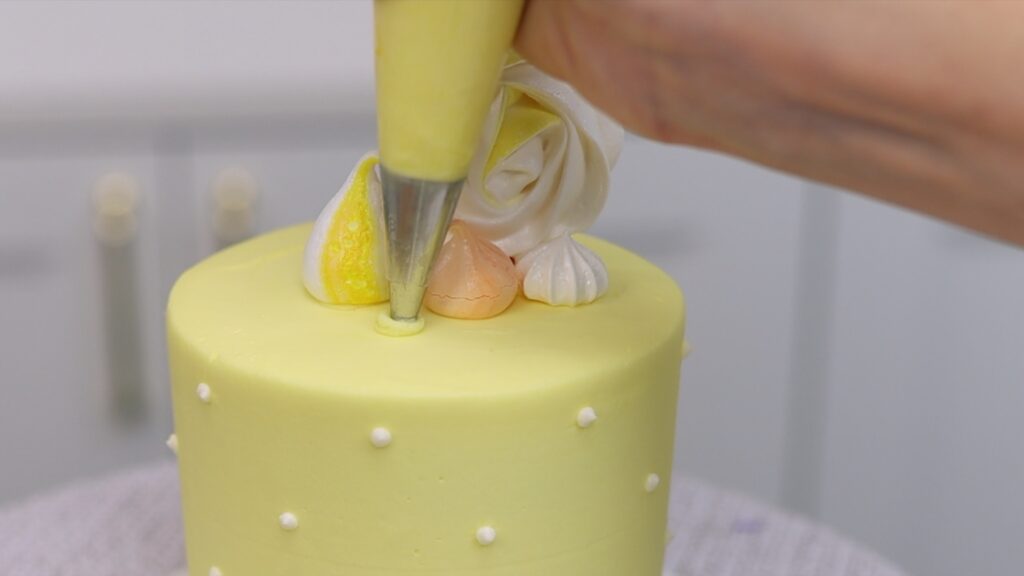
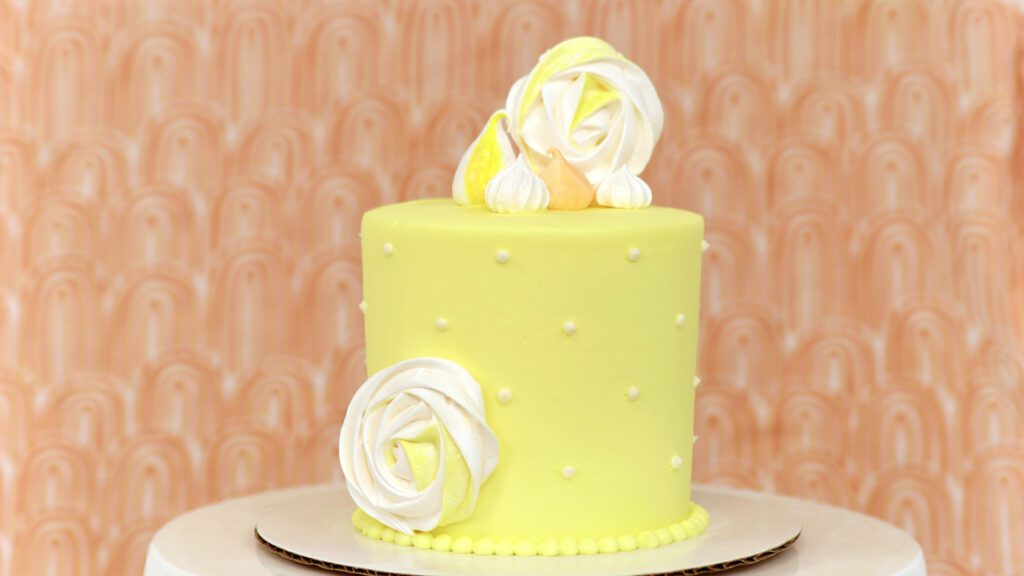
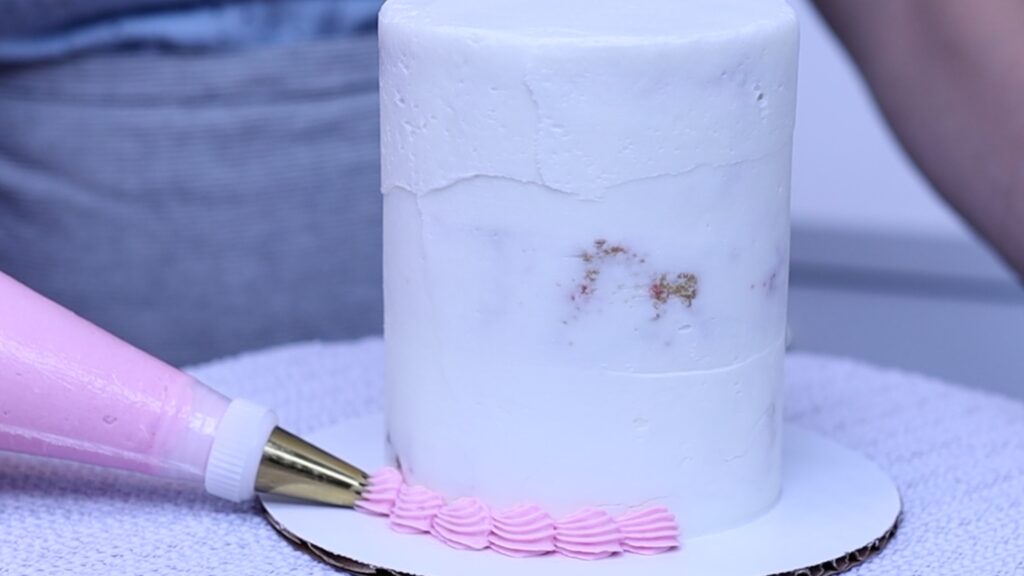
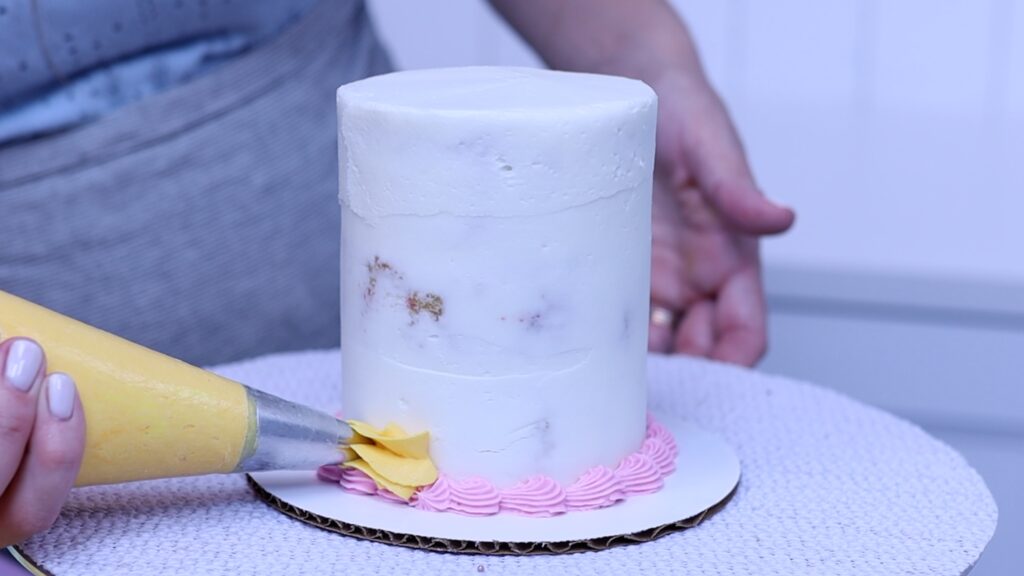
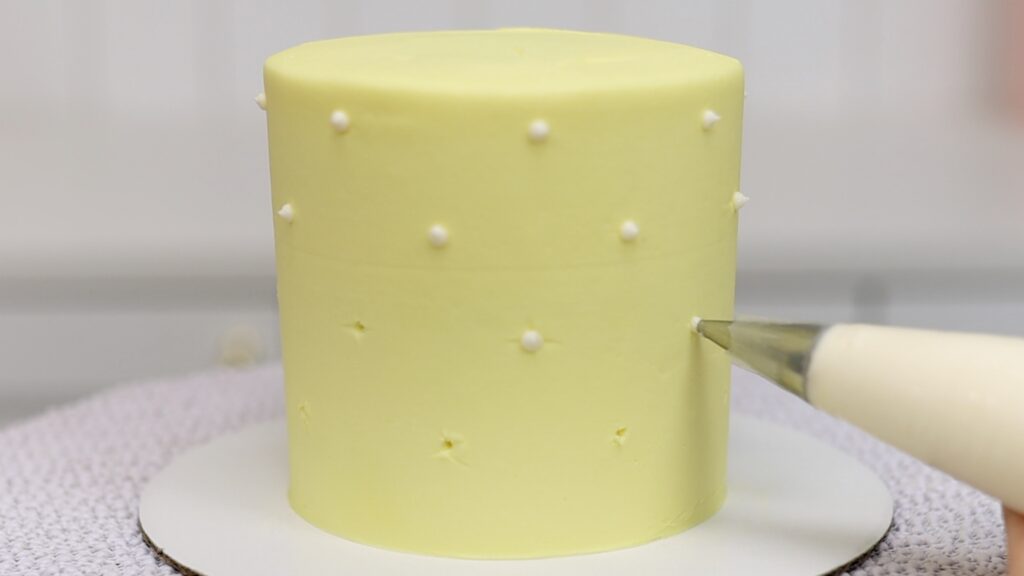
To attach meringues to a cake after the frosting has set you'll need someone to act as glue. I like to pipe or spread a tiny bit of fresh frosting onto the cake wherever I want to place a meringue. You can pipe or spread it onto the bottom of each meringue instead. Then push the meringue gently onto the frosted cake to attach it.
This works on the top of the cake but also on the sides! When the frosting dot sets it will keep the meringue securely in place. Isn't this cake gorgeous? Visit my cake school for online courses on hundreds of cake designs and techniques and sign up for my free course in the menu at the top of this bar!
How to store meringues
You can make meringues ahead of time and store them at room temperature or in the fridge or freezer. They should be separated by wax paper or parchment paper so that they don’t stick to each other. Use an airtight container like a Tupperware, which keeps them crispy. This way they won’t get soggy or sticky. You can store meringues at room temperature or in the fridge for two weeks or in the freezer for a month.
I can’t wait for you to try these meringues! Here's the recipe and you can convert between US measurements (cups) and Metric (grams and ml) by clicking at the top right of the recipe.
Meringues are beautiful and delicious and easy to make! They make yummy treats and gorgeous cake decorations.
Ingredients
UnitsScale
4 egg whites (160g)
1cupgranulated white sugar
a pinch of salt
1/4 teaspoon flavour extract
optional: gel colours
Instructions
Bring about an inch of water to a boil in a small saucepan.
Pour egg whites, sugar and salt into a metal mixing bowl. Place the bowl on top of the saucepan and turn off the heat. Whisk for two minutes, until the mixture feels smooth when you pinch some between your thumb and finger.
Whisk the mixture on high speed for nine minutes, until it turns bright white and shiny. The whisk will leave texture behind in the meringue as it whisks and when you lift the whisk up, the meringue will hold its shape and make stiff peaks.
To tint the entire batch, add gel colour now. Add flavour and mix until combined.
To make different colours of meringue, divide the meringue into separate bowls and add gel colours to each bowl. Gently fold the colour in using a spatula.
Spoon the meringue into piping bags and pipe shapes onto a baking tray lined with a silicone mat or parchment paper.
Bake at 200F or 95C for 85 minutes. Turn the oven off and leave the meringues inside for one hour to cool gradually.
Store meringues in an airtight container for two weeks at room temperature or in the fridge or you can freeze them for one month.
Notes
To make meringue pops you'll need a paper straw for each meringue. Pipe a dot of meringue onto the parchment or silicone mat, press the top of the straw into the dot, and pipe over it.
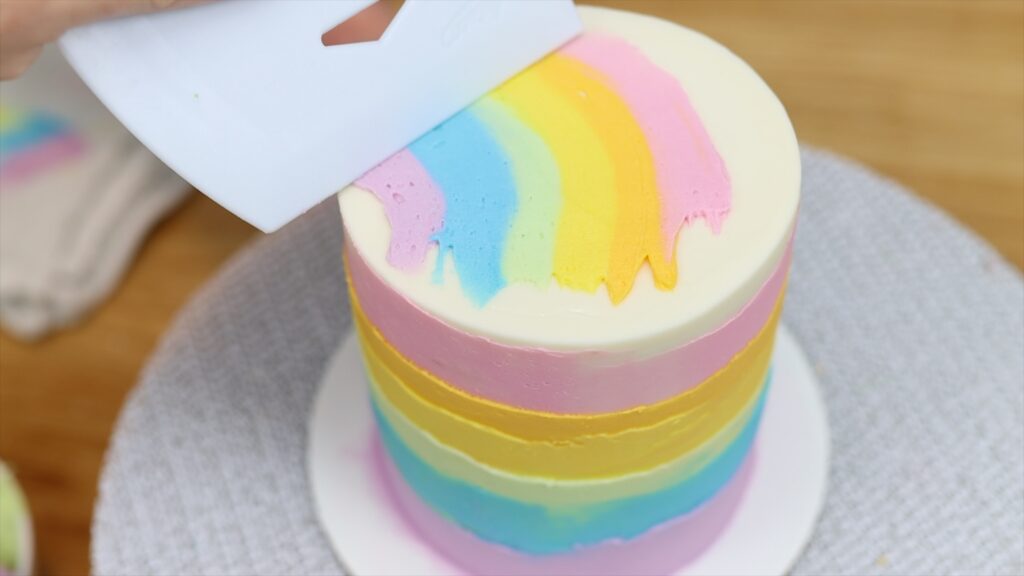
Here are 3 easy rainbow cake designs that are quick to decorate but stunning to look at!
#1 Piped rainbow cake
For this first easy rainbow cake design I’m using sprinkled cake layers for an extra burst of colour. This is my Very Vanilla cake with pink nonpareil sprinkles, called hundreds and thousands in the UK. You could use rainbow sprinkles to make the cake rainbow coloured inside and out!
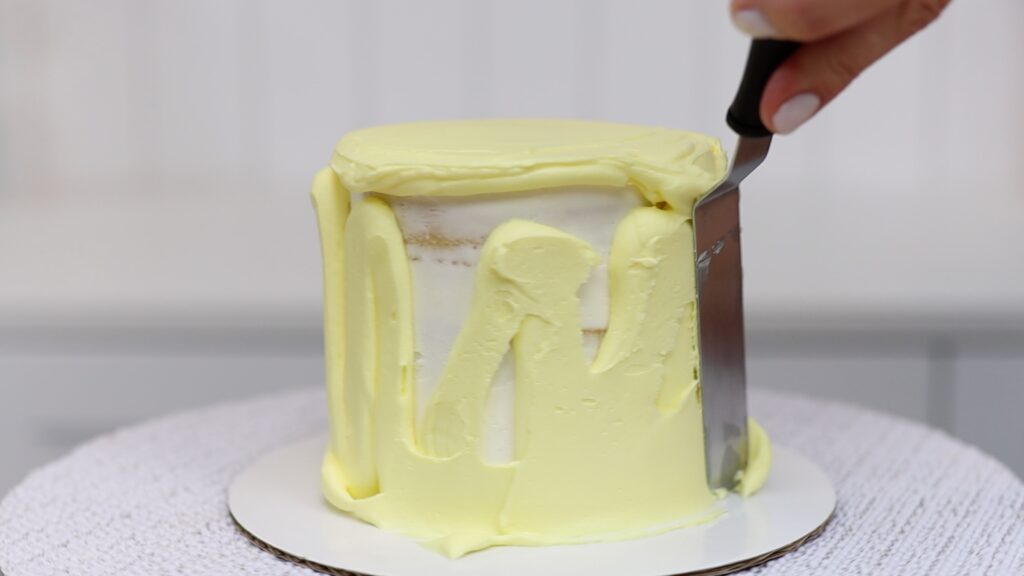
After assembling your cake, cover it with a thin layer of frosting called a crumb coat. This doesn’t need to be perfect because it’s going to be covered up in a minute. However, getting it nice and smooth will make the rest of the decorating easier and neater. Let the frosting set while you prepare your colours.
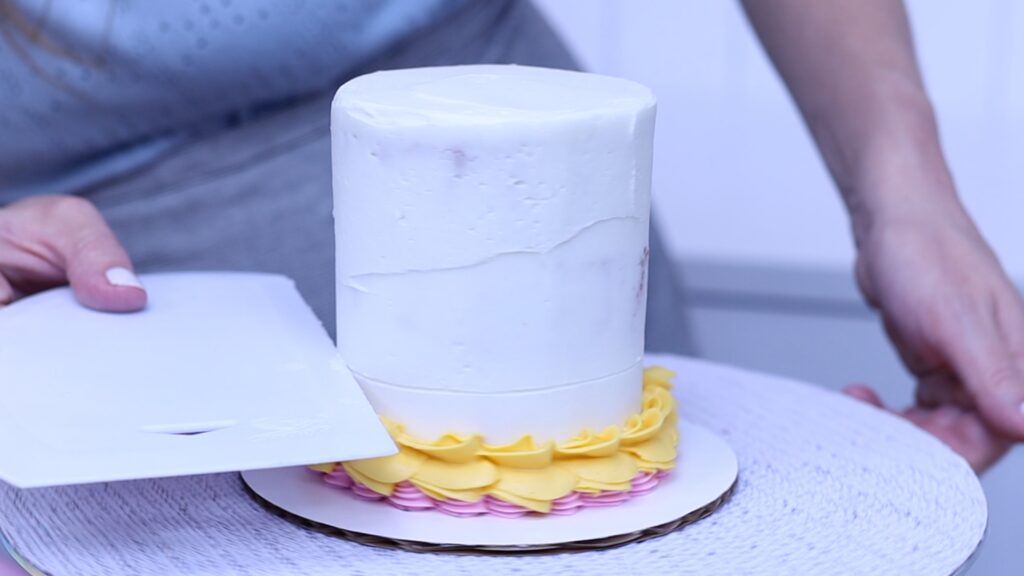
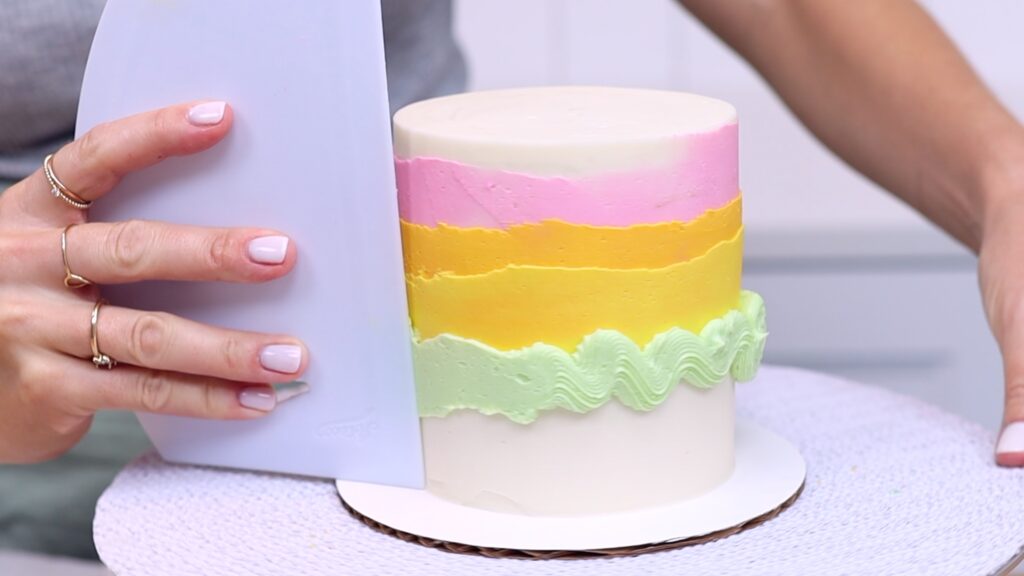
After the crumb coat sets, spread more frosting onto the top of the cake and smooth it. The top of the cake is going to be visible at the end so you want it to be neat. After smoothing the frosting on top, use a cake comb to flatten it around the sides.
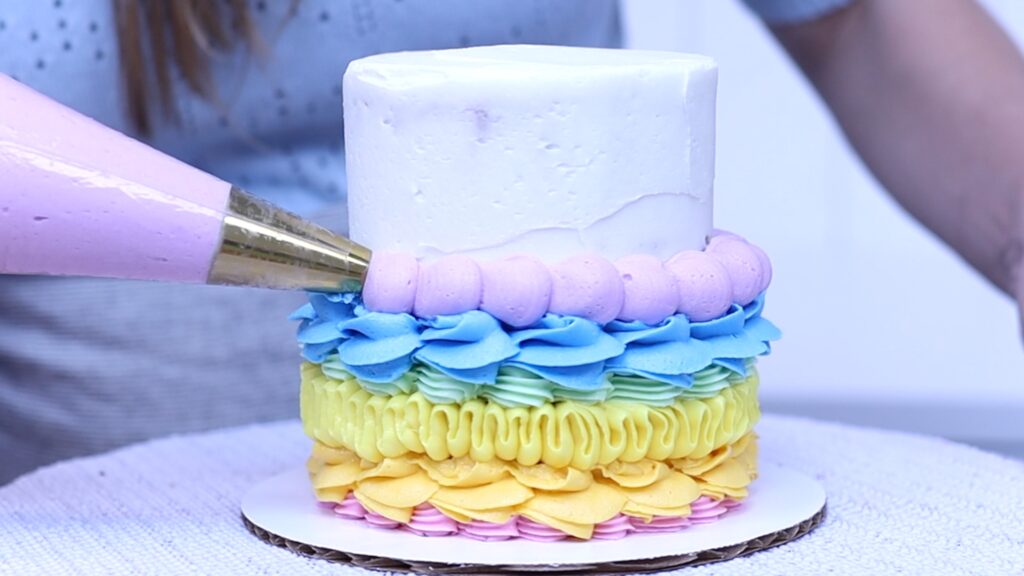
How to pipe rainbow colours onto the cake
For the most eye-catching results choose several different piping tips. My favorites are star tips like a 1M, #32, #4B, #199 and petal tips like a #104 or #125.
Choose a colour to start with. This is a #32 open star tip with my 4 Minute Buttercream tinted pink with gel colours. To pipe a shell border like this, hold the piping bag on its side and squeeze the buttercream out. Hold still for a moment to let the buttercream bulge out. Then pull away to leave a tail on the dot. Overlap each dot all around the cake to pipe a row of these shells or waves.
Where you start and finish there will be a join that looks different to the rest of the texture. If you start above that with your next colour, all of the joins line up over each other. This can be the back of your cake.
This is a 1M star tip and I’m using the same technique to pipe a shell border with it. This piping tip is much bigger than the others so the piped details are bigger, too. It looks really big now but once the rest of the details are added, I think the variation looks nice.
Sometimes it’s useful to have a guideline to mark the top of the row of piping. You can use the straight edge of a cake comb to indent one into the crumb coat.
To pipe ruffles with a petal tip, hold the tip with the narrow end of the teardrop shape pointing outwards and the wide end pressed against the cake. Squeeze the bag as you move it slowly up and down around the cake. Pause for a split second at the top and bottom to allow the buttercream to curve softly around.
The bottom of the piping tip should touch the piping underneath it every time you go down. That way you’ll make sure you cover up the crumb coat completely with no gaps in between the different colours of piping.
There’s no “right” way to create the join between the beginning and end of piping. Create whatever texture you can and as long as you’re lining up your joins above each other, that side can face the wall when you display the cake so no one will see it anyway!
Couplers are useful if you want to be able to use the same piping tip with different colours. After piping with one colour, unscrew the ring to remove the piping tip and then place it on another coupler on another piping bag. Squeeze the bag to push out the previous colour until you see the new colour come through. For 4 reasons to use couplers, check out my tutorial on how to use couplers.
Being able to switch between piping tips by using couplers really saves a lot of time when you’re piping. And by re-using piping tips with different colours, you’re limiting the number of tools you need to buy. You're also reducing clean up afterwards! Since the same texture on the cake has different colours, it still adds lots of variety in your design.
I’m using pale rainbow colours but you can use bright colours instead. To make darker buttercream you’ll need to add a few more drops of colour when you tint your frosting. I’m using my 4 Minute Buttercream which takes on colour very easily so with just a few drops you can create really bright and bold colours.
Round tips like this 2A pipe dots or beads. The bigger the tip, the bigger the beads. Use the same shell border technique to pipe beads with tails and overlap each one.
When you get to the top of the cake and you’re tempted to stop, keep in mind that the cake will look neatest if your final row of piping sticks up above the top edge of the cake.
Voila! Beautiful colours and textures that make a quick and easy but stunning cake design!
#2 Rainbow layer cake
Skip the texture and create flat layers of your rainbow colours around a cake with this next technique.
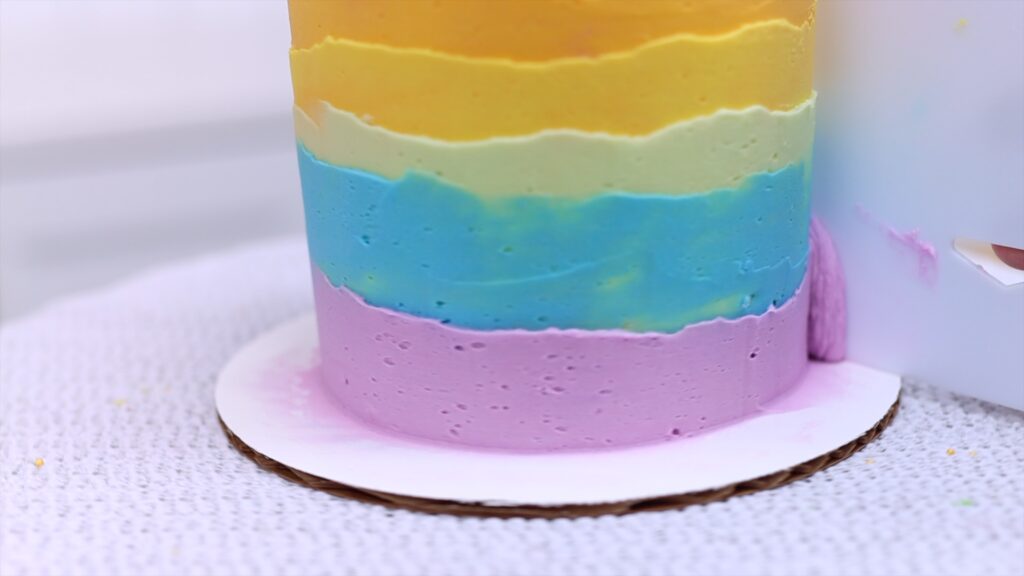
You can either spread or pipe the colours onto the cake. Since I already have my colours in piping bags I'm piping them on but if you don't, it's quicker to spread them on. Start at the top of the cake, creating a ring of colour all around it. Then scrape around the cake gently with a cake comb to leave a thin, smooth layer of colour on the cake.
After each time you go around the cake, scrape the excess frosting off your cake comb into a bowl. If you take off more frosting than you want you might be able to see the frosting on the cake through the band of colour. Spread some of the scraped-off coloured frosting back onto the cake and then smooth it again.
Pipe or spread your next colour underneath, overlapping the first colour so that there’s no gap in between the two colours.
Three tricks to this rainbow layer cake design
First, use a crusting buttercream like my 4 Minute Buttercream. It gets really firm when it sets and makes this layering effect possible. With soft frostings like whipped cream, the colours blend into the frosting on the cake instead.
Second, take your time to get the frosting really smooth. These colourful layers won’t completely cover the cake and they won’t disguise messy frosting.
Third, chill the cake in the fridge for at least two hours before you do this. That way, the frosting will be very firm and you can pipe or spread and scrape the colours without damaging it. Also, the colours will set very quickly when they’re on top of very cold frosting so the colours will create layers over each other instead of blending together.
Make a rainbow on top of the cake
To add some detail to the top of this cake, squeeze a little bit of each colour of frosting onto the straight edge of a cake comb. My cake is tiny, it’s only 4 inches wide, so I’m using the bottom edge of the comb instead of the side.
Then lower the comb onto the top of the cake and pull it in a curved, arc shape over the top surface of the cake to leave a rainbow behind! You might need to spread on a bit more of some of the colours and scrape again to get good coverage.
You can use a piping tip or a toothpick to draw a design in the rainbow as well, if you like!
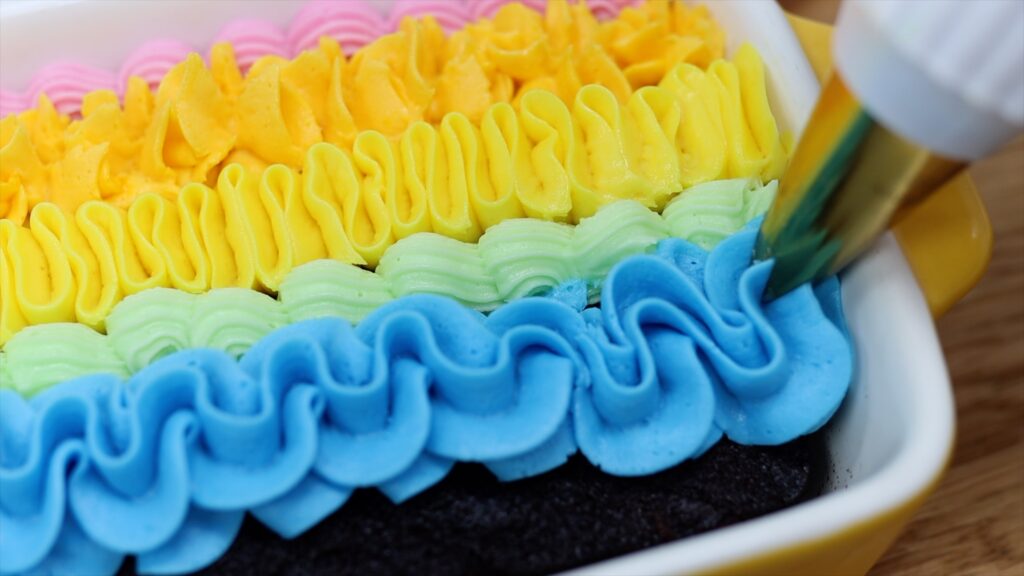
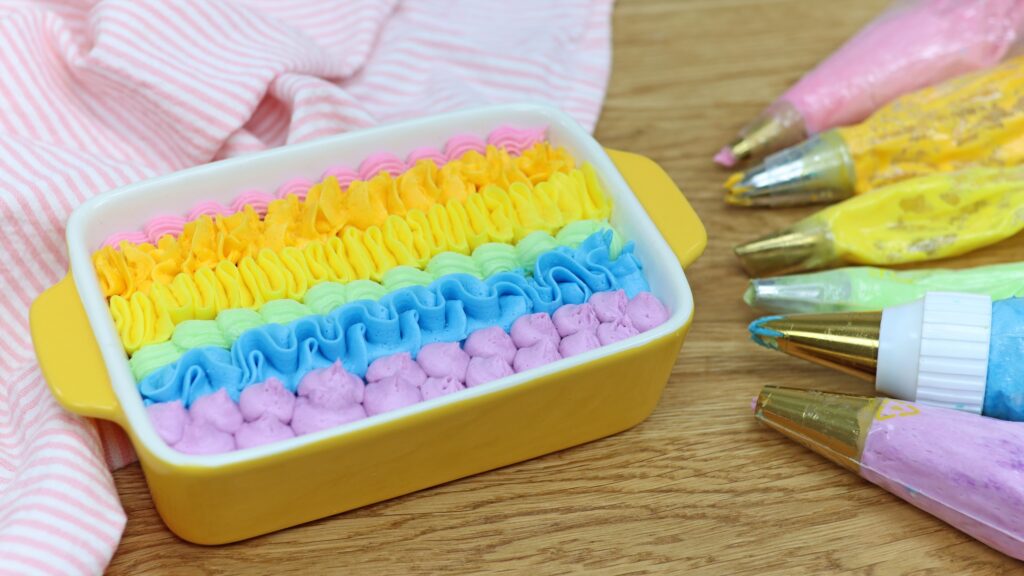
#3 Rainbow Tray Bake
If you want rainbow cake that’s very quick to decorate, this one’s for you! Pour your cake batter into a baking dish or casserole dish and bake it in that. Let it cool completely and then decorate your cake in the dish, so you don’t need to assemble and frost it first!
You can spread frosting onto the cake or use piping tips to create colourful texture like on the first cake. Piping down onto this cake is easier and quicker than piping onto the side of a cake!
The best bit about this rainbow tray bake cake is that transporting and serving it in a dish is so simple!
You can achieve endless cake designs without buying expensive tools! In this tutorial I’m going to show you five ways to use parchment paper for cake decorating.
#1 Patterned borders
Use this technique to create perfectly symmetrical patterns like zig zags. Wrap a strip of parchment paper around a cake and draw a line where the two ends overlap. Don’t worry about the top edge yet.
Fold the paper in half and half again until it's the width you want for each section of the zig zag. Create another fold to mark where you want the top of the zig zags to be. You can draw dots where the creases going up meet the crease along the top so that you can see them better. Then cut diagonally up from the bottom of one crease, to the top of the next. Go in one direction like left to right for now, and skipping every other dot.
Then cut in the other direction, from the bottom of one crease up to the next dot. This will create the other side of your zig zags. This is going to be your stencil.
Wrap the zig zag stencil around your cake after the cake has been in the fridge for at least an hour so the frosting is cold and firm. After a few minutes at room temperature there will be tiny beads of condensation on the cake. These will make the parchment stick to the cake and stay in place.
Spread another colour of buttercream over the exposed cake that’s showing underneath the stencil. Once that’s covered up, scrape around the cake with a straight cake comb or frosting smoother to flatten this buttercream.
Spread more buttercream over any indents and scrape until until it’s completely smooth. Then peel away the zig zag stencil to leave the zig zag pattern behind on the cake!
If there are any smudges of buttercream on the cake you can scrape them off with a toothpick. Since the frosted cake is cold, that frosting will be so firm that you won’t damage it with the pressure of the toothpick.
As an optional finishing touch, pour some sprinkles into a bowl and water into another bowl. Dip your finger into the water and then into the sprinkles so that they stick. Then push gently into the top of the zig zag. The sprinkles will stick to the soft sticky buttercream instead of your finger.
Chill the cake in the fridge for about an hour to set the zig zag buttercream. Then you can wipe the smudges off the cake board with a paper towel wrapped around your finger. Since the cake is cold you can brush right up against the frosting without damaging it.
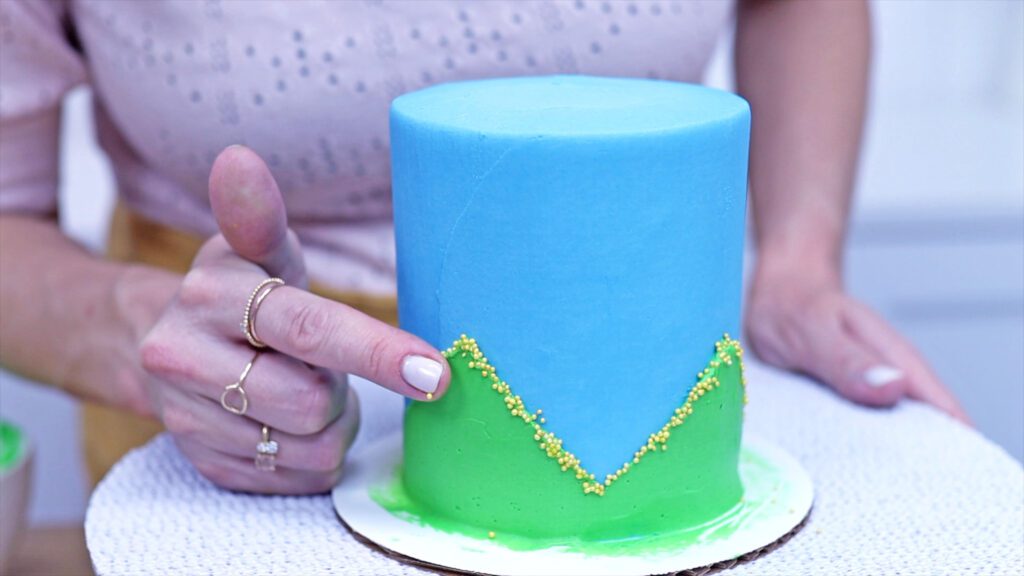
#2 Dotted pattern
Another fun cake design to create with parchment paper is a dotted pattern. Just like the previous pattern, wrap a piece of parchment paper around the cake to measure it. Then fold it in half as many times as you like, horizontally and vertically, to form a grid pattern.
The vertical creases will meet the horizontal creases and form points, or I’ll call them joins in this tutorial. Wrap the parchment around the cake and push a pin or a toothpick through one of the joins to hold it in place.
Then continue to poke a pin or toothpick through every join. Make sure you push through the parchment and into the frosting on the cake underneath. When you peel the parchment off you’ll have an even grid of dots that covers the cake.
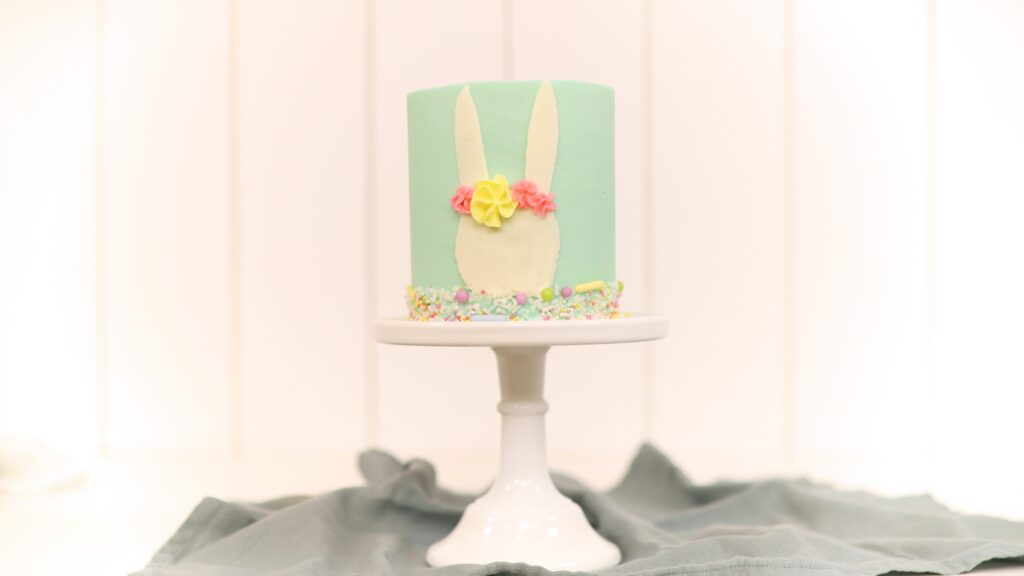
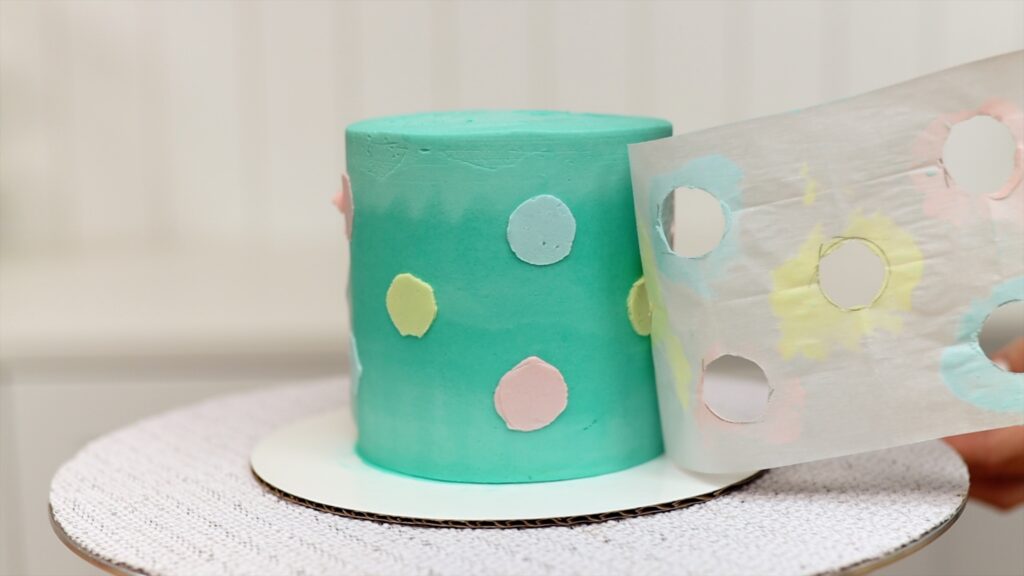
Now use a piping bag with a small round tip to squeeze little dots of buttercream onto the dots. This makes a dainty, subtle pattern that compliments any other decorations without distracting from them. I have a recipe and tutorial for these meringues for cake decorating in case you want to make your own!
#3 Silhoette stencil
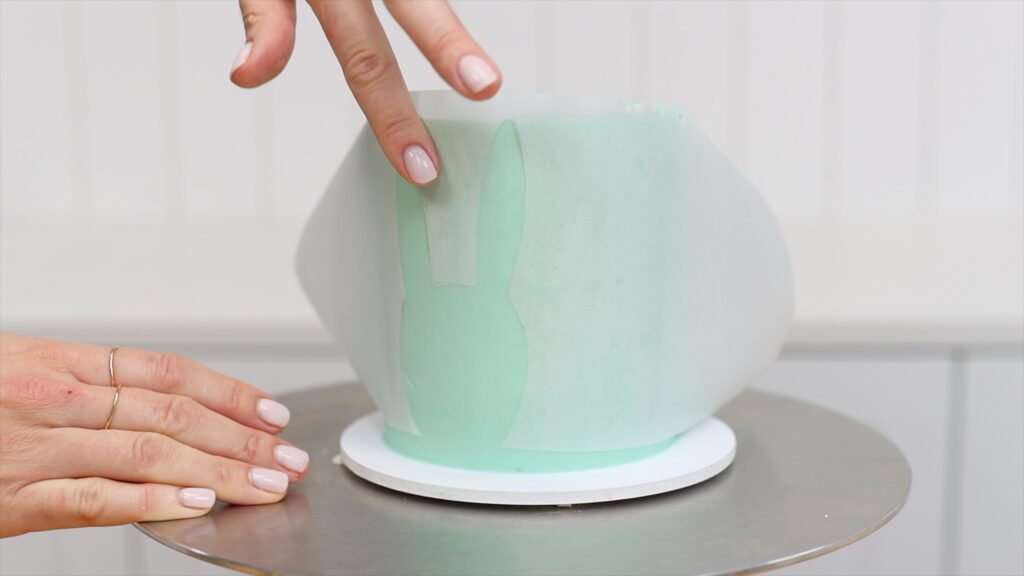
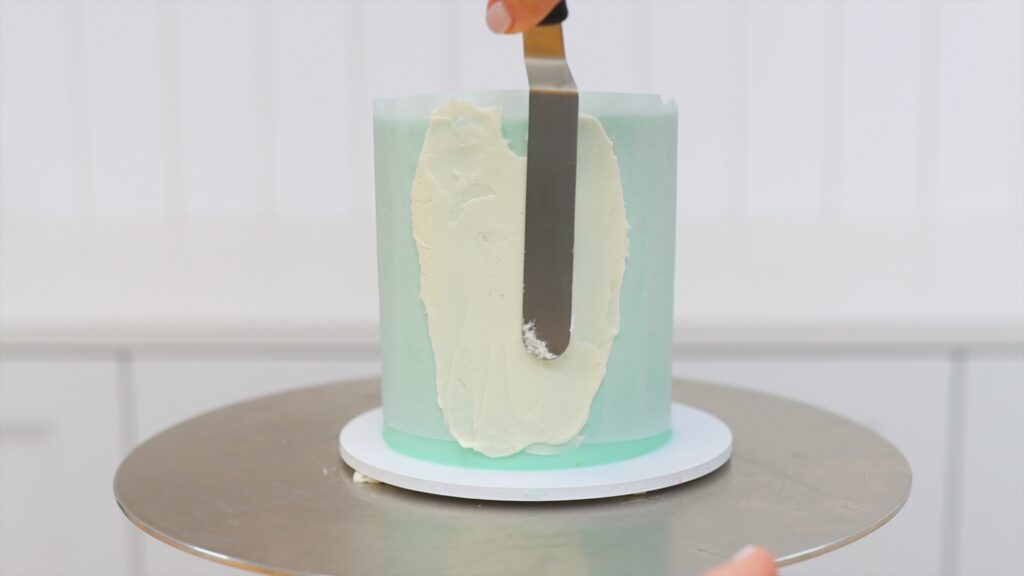
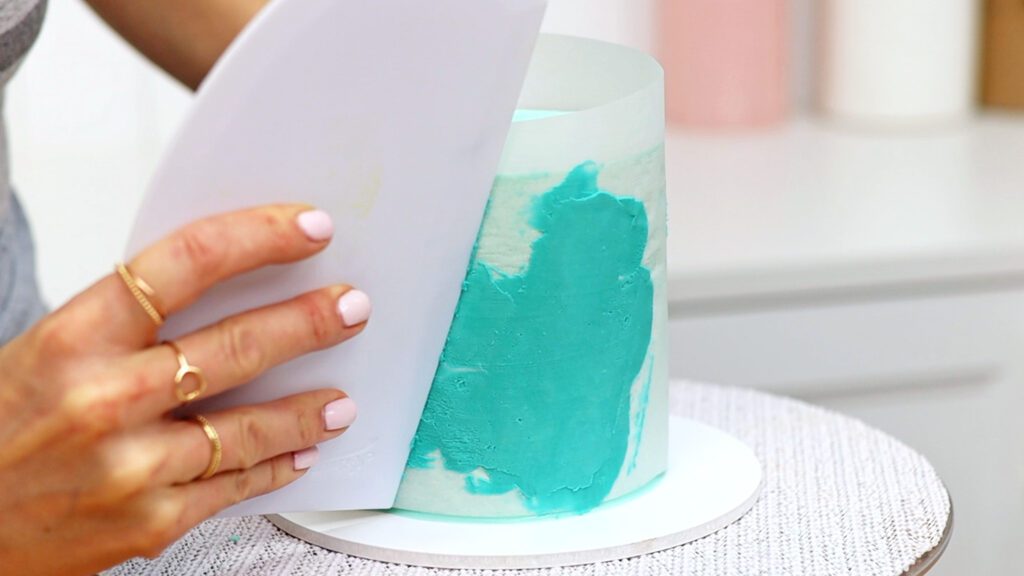
As well as patterns, you can use parchment paper for cake designs like animals. Use this technique for simple silhouettes or I’ll show you a much more detailed character in a moment. Draw or trace the outline of your shape onto parchment paper and cut it out. Wrap the parchment around the cake to use the cut-out shape as a stencil.
Spread buttercream over the stencil, pushing towards the middle of the shape instead of out towards the edges. This will give you the neatest outline because you won't push buttercream underneath the edges of the stencil. Scrape off the excess with an offset spatula or cake comb leaving a thin, smooth layer of buttercream behind.
Peel the parchment off straight away, before the buttercream on the stencil sets. You'll leave a silhouette of your shape behind! To add some colour and texture you can pipe added details like these flowers.
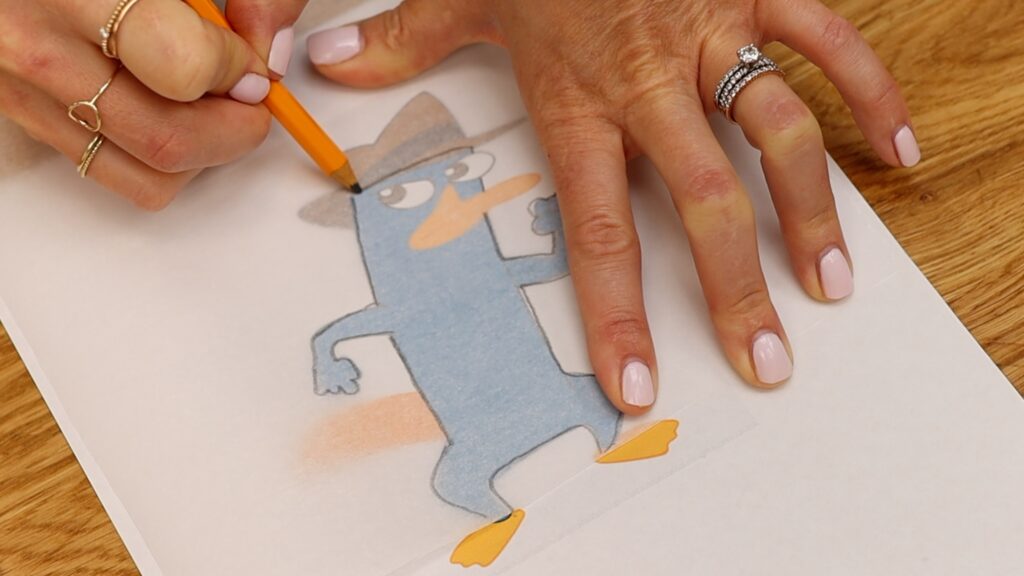
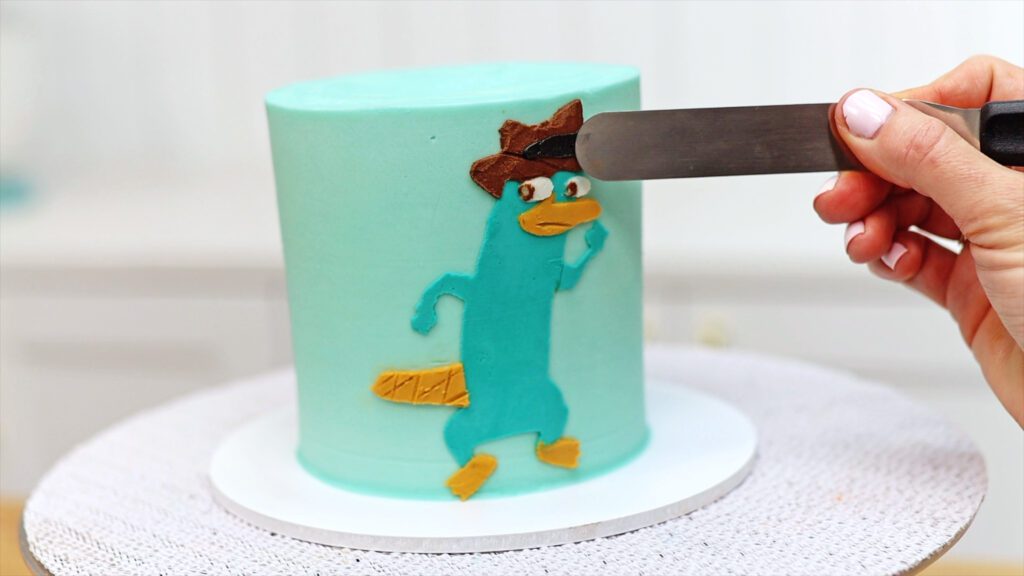
#4 Character stencil
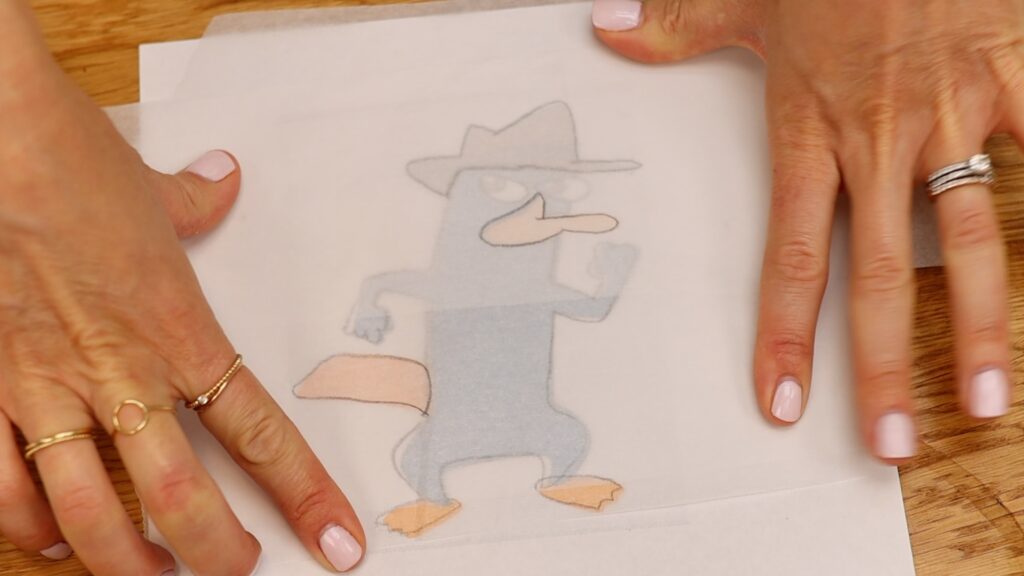
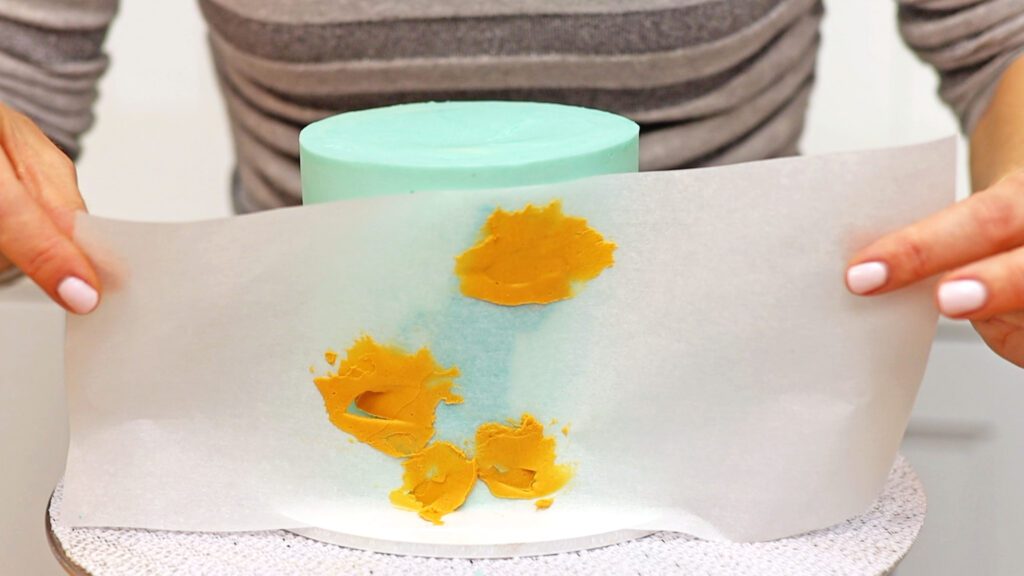
To add much more detail for character cakes, use several pieces of parchment paper to trace an image. Only outline the details of one colour at a time. For this platypus I’m starting with the turquoise body.
Then use a different piece of parchment to outline the details of the next colour. Repeat for all of the coloured details in your design. When you lay the parchment pieces over each other you'll see outlines of all of the details of the image.
Cut out all of the details to make stencils, which you’ll use for each colour separately. Then tint your colours to create the design. I use gel colours because they're very concentrated so they make very bright and bold colours. My 4 Minute Buttercream works really well for parchment paper designs because it gets so firm when it sets.
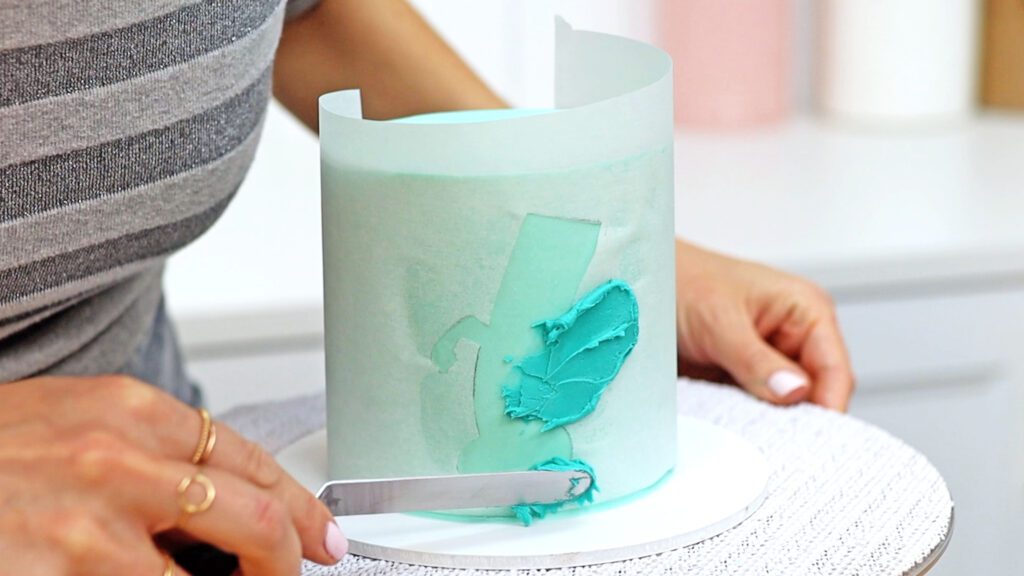
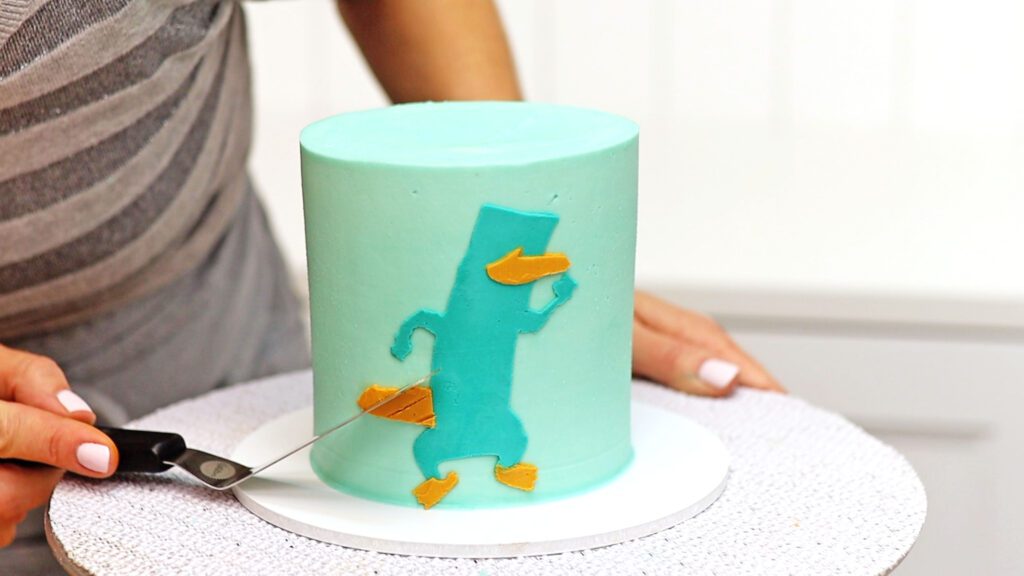
Start with the stencil for the background colour, which is the largest block of colour. Wrap the parchment around the cake and spread buttercream over the stencil to cover the shape you cut out.
Then scrape around the cake with a cake comb to take off excess frosting. Scrape a few times to leave a thin, smooth layer of frosting behind.
Peel the parchment away from the cake to leave your first details on the cake. Use a toothpick to touch up any smudges of buttercream around the edges of the shape. Then put the cake in the freezer for 10 minutes or the fridge for 30 minutes. Next, line up another parchment stencil on the cake. Chilling the cake sets the first stencil details so that this next stencil doesn’t damage them.
Use your toothpick or the edge of your offset spatula to create texture like the waffle grid on this tail. Do this straight after applying the stencil, while the buttercream is still soft.
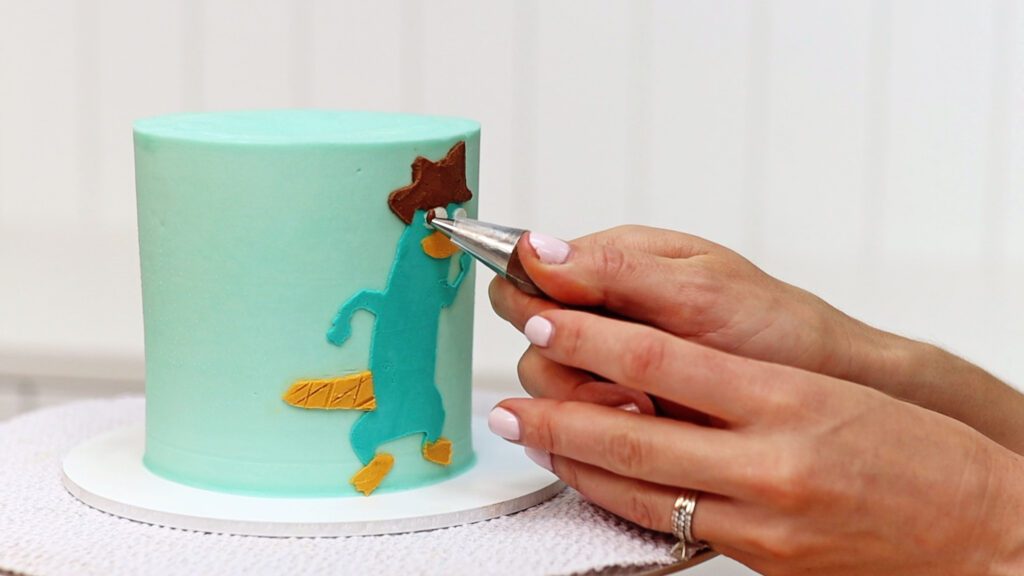
Continue with the rest of your stencils and coloured buttercream to add all of the details to your character. You'll need to chill the cake to set the buttercream between each stencil. For tiny details you might choose to use a piping tip instead of a stencil, like tiny eyeballs. I poked the piped eyes with my toothpick to expose tiny white dots in the centers.
You can use your offset spatula for thin lines like the mouth and the brim of this hat. Thin lines like the band around the hat could be done with a stencil. For a quicker option you can pipe the lines and then flatten the buttercream with an offset spatula.
And there it is! A detailed character made with homemade parchment paper stencils!
#5 Wrapped chocolate cake
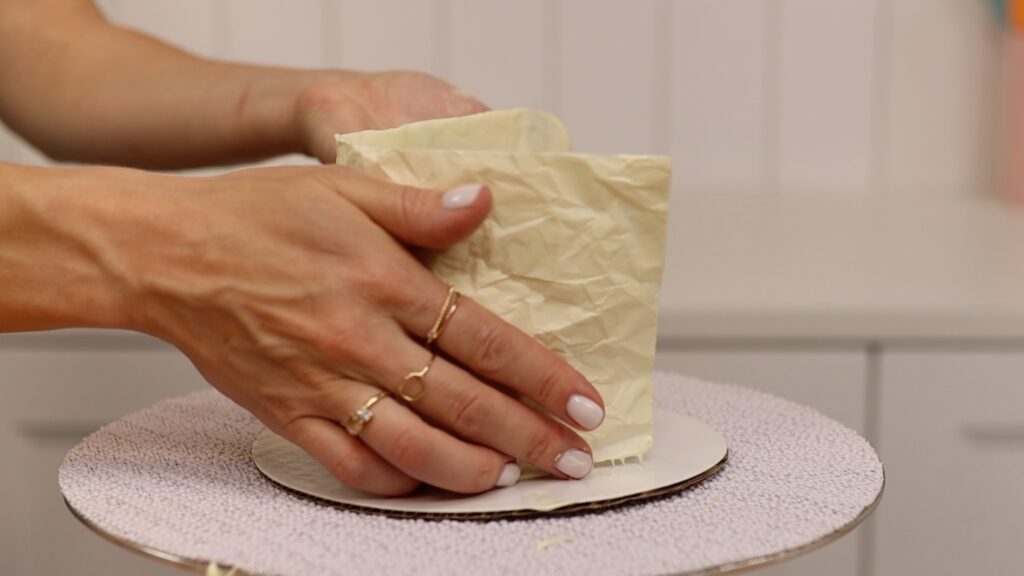
To wrap a cake in chocolate start by cutting parchment to wrap around the cake. You can scrunch it up if you want to add extra texture. Melt any kind of chocolate chips and then pour the melted chocolate onto the parchment paper. Spread it around with an offset spatula or the back of a spoon to level it. Go right up to the edges to completely cover the parchment.
Slide your hands underneath the parchment straight away, before the chocolate sets, and lift it up. Rest the bottom edge on the cake board and wrap it around your cake. It’s easiest if the cake has been in the fridge so it’s firm and less wobbly than when it’s at room temperature.
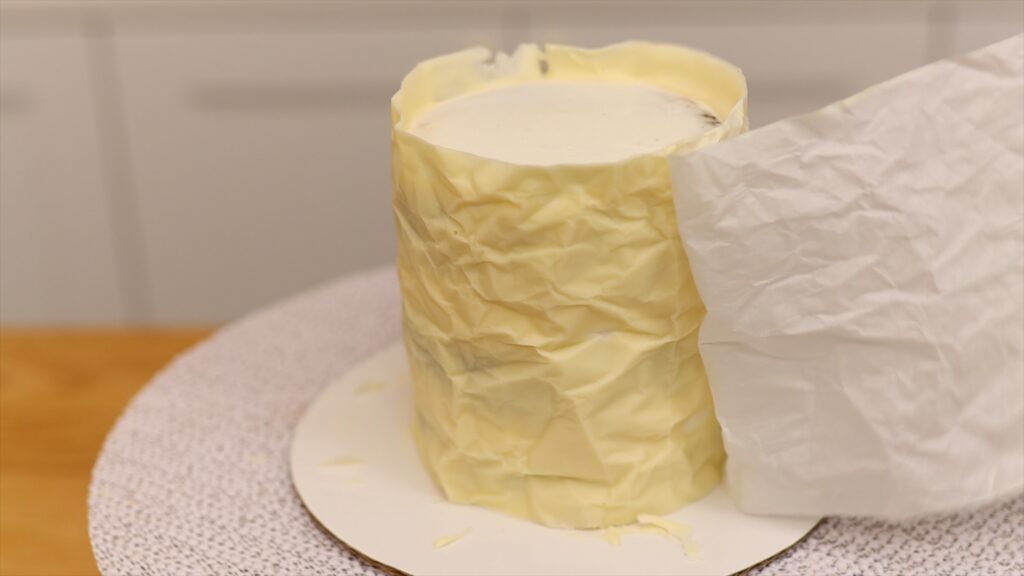
Put the cake wrapped in parchment into the fridge for an hour or the freezer for twenty minutes. This will set the chocolate and make it stronger than when it's a room temperature. Then peel the parchment off to leave the chocolate wrap behind.
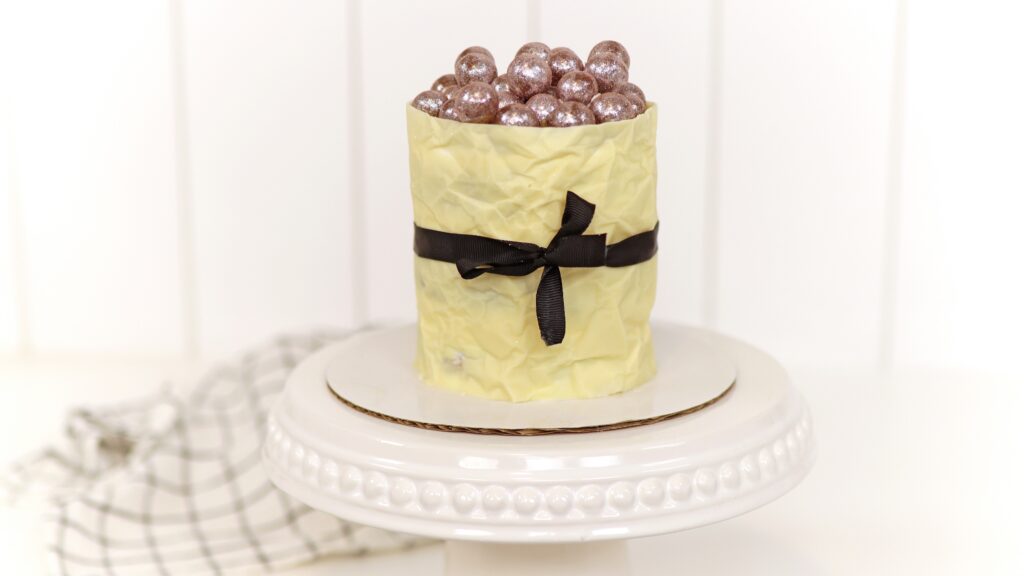
If you cut your parchment a little bit taller than the cake, you’ll have a wall to hold in any decorations like these glittery chocolate malt balls. So pretty!
I hope you’ve seen some ways you can save money on expensive cake decorating tools by using parchment paper instead! Check out my cake school for online courses on hundreds of cake decorating techniques and designs and join my ClubPLUS for access to every MasterCourse, MiniCourse and Live Workshop!
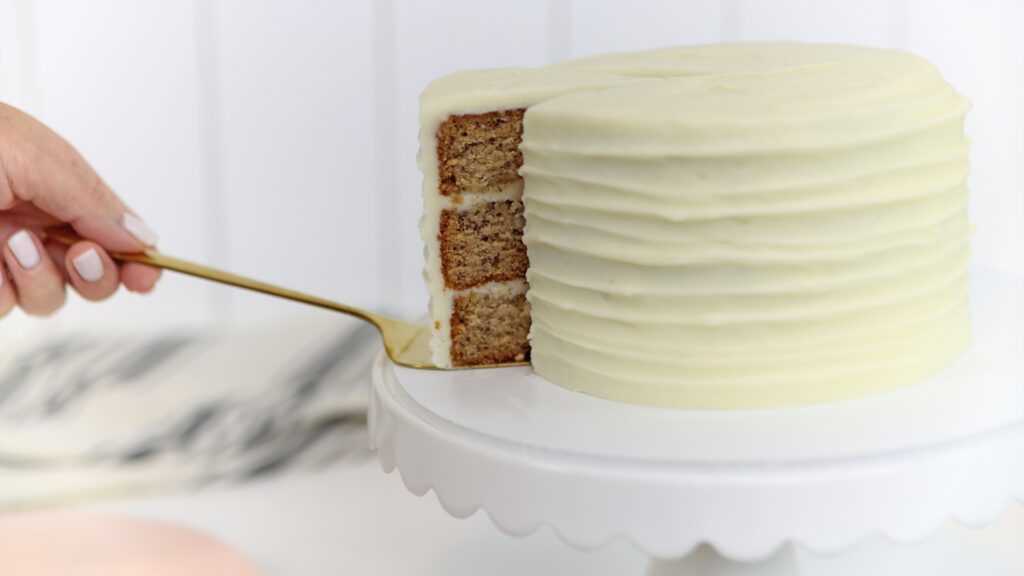
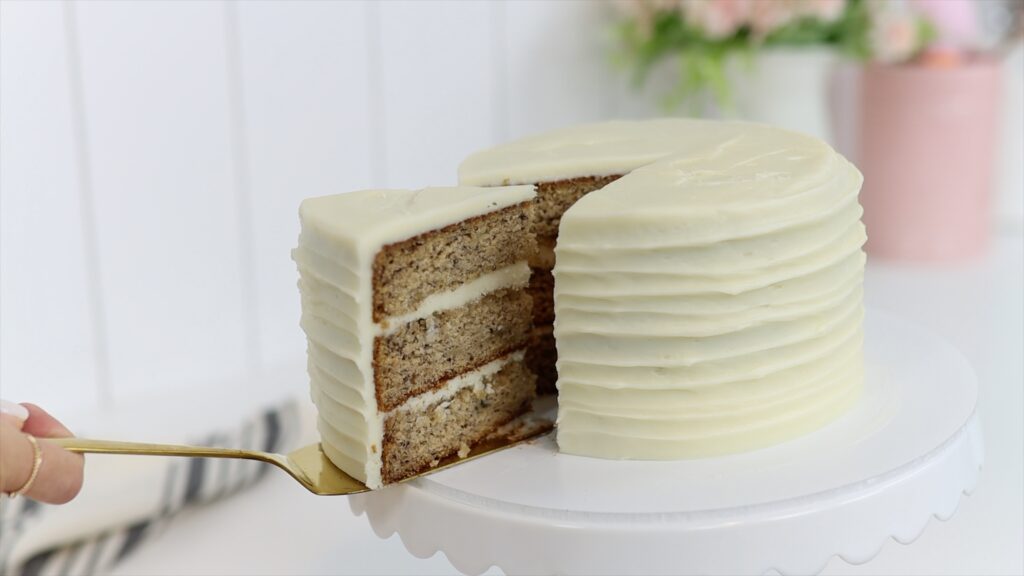
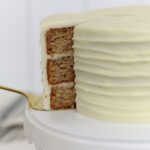
This banana layer cake is full of banana flavour and it’s incredibly moist without being overly sweet.
How to make this banana layer cake
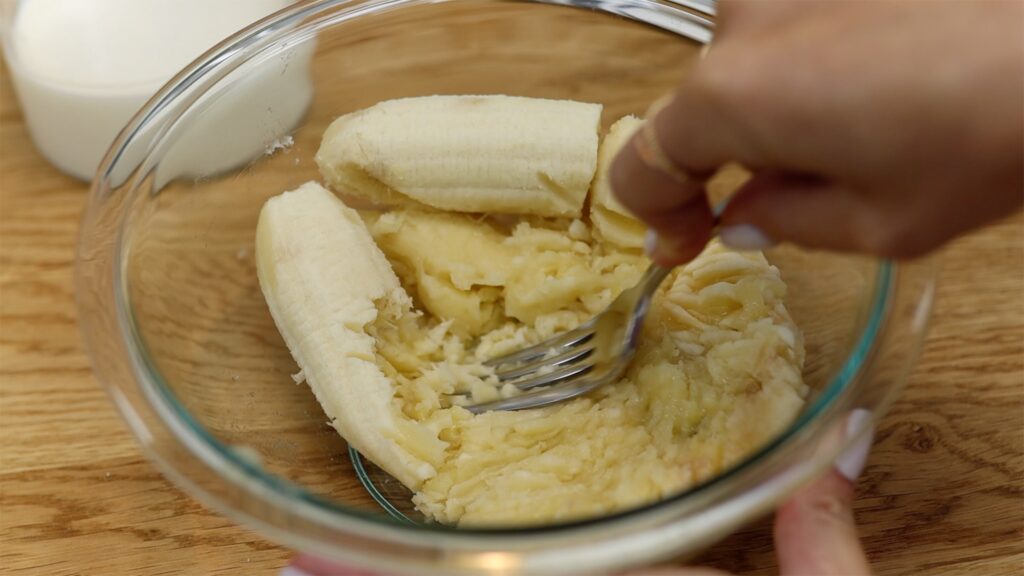
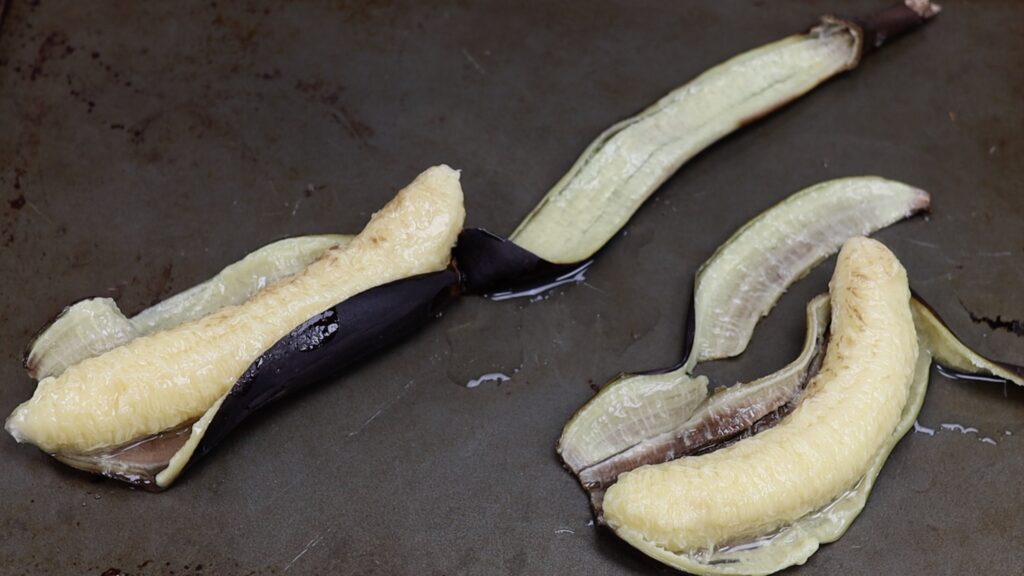
To make this banana layer cake you'll need... bananas! Mash two bananas or use a blender or food processor to blitz them. Use very ripe bananas for the most flavour and sweetness. If the skins don't have brown specks on yet, they're not ripe enough. Try this hack below to ripen them in ten minutes!
Put the bananas on a baking tray in the oven at 350F or 190C for 10 minutes. You’ll see the skins turn black but don't worry! They're still edible! Leave them to cool and then peel them over the tray to catch any liquid that oozes out. The bananas will be soft and you’ll notice their sweet smell straight away. Now they're ready for this banana layer cake recipe!
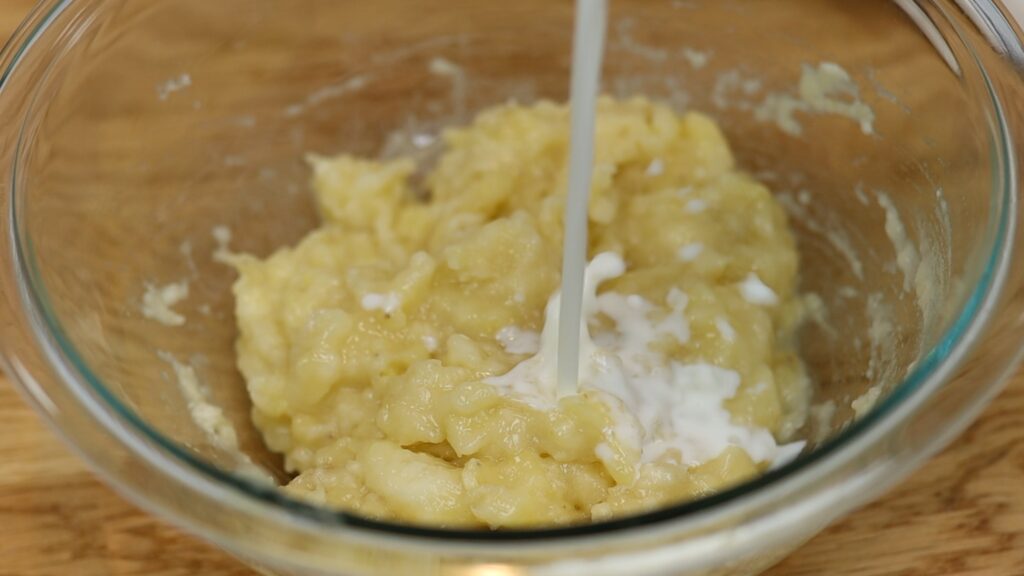
Once the bananas are mashed, add milk that’s been out of the fridge for at least 2 hours. All of your ingredients need to be at room temperature for your cake to rise properly. If you've used a blender or food processor you can just add the milk to that. Set these liquid ingredients aside for later.
The other ingredients to prepare for this banana layer cake are your dry ingredients: all purpose or plain flour, cinnamon, and baking soda. Whisk these together so that they’ll all mix evenly into the cake batter later.
Your eggs should should also be at room temperature so take these out of the fridge at least two hours before baking, too. Now you’re ready to mix the batter!
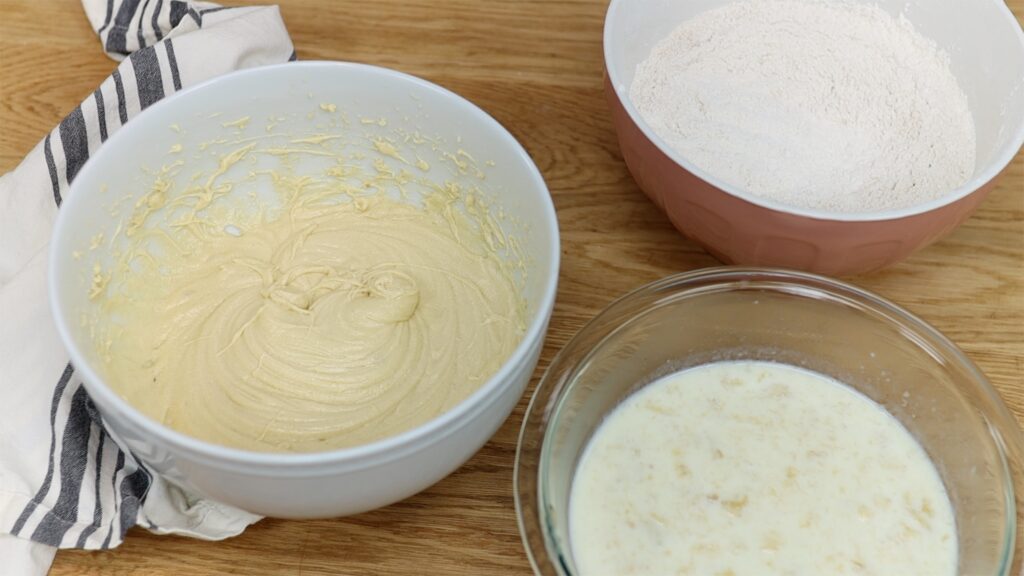
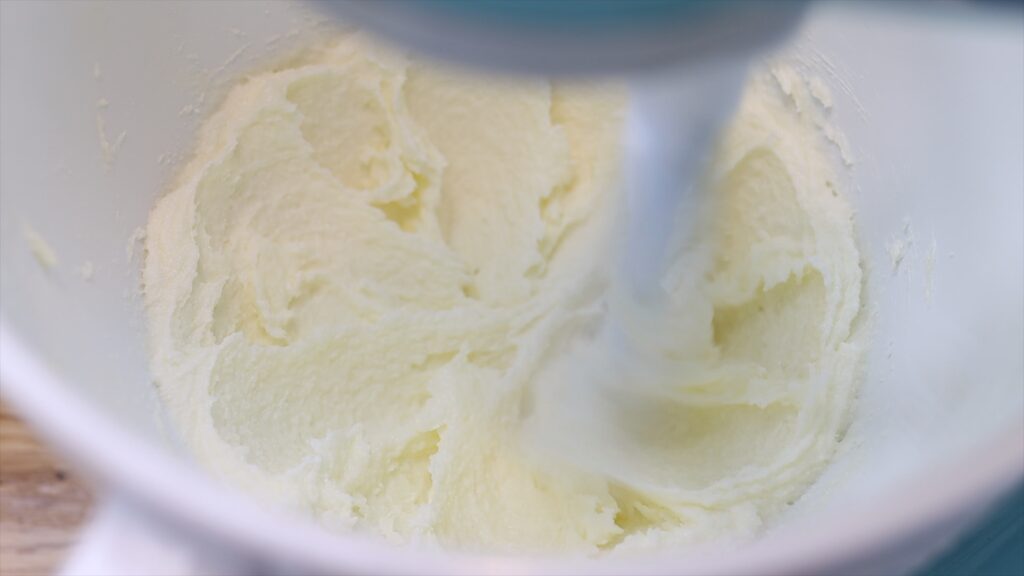
Mix butter, brown sugar, white sugar and vanilla with an electric mixer. This can be either handheld or a stand mixer. You can do this by hand but to make a light cake that rises well you need to really cream the butter and sugars together. This takes about three minutes with an electric mixer but a lot longer if you’re using a spoon or spatula.
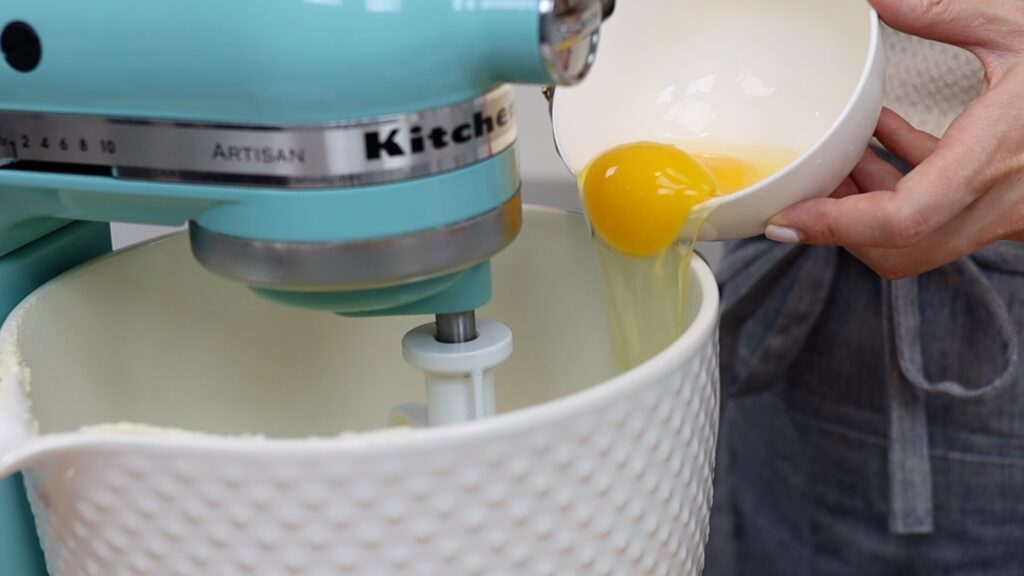
When the butter and sugar mixture gets lighter in colour and looks creamy instead of chunky or grainy, add the eggs. Mix them in until the batter becomes smooth and now we’re going to alternate between the dry and wet ingredients.
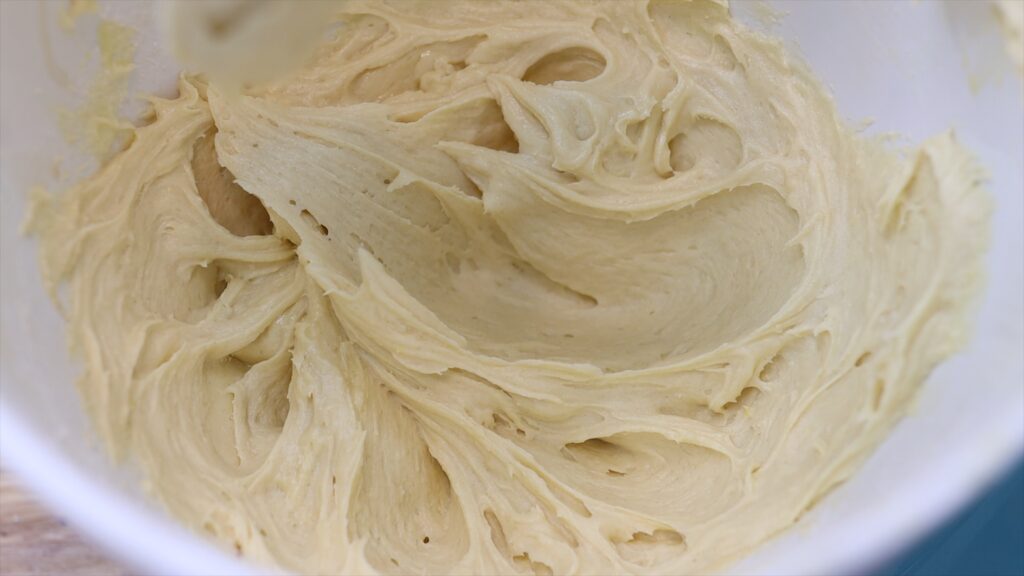
Start by adding about half of the dry ingredients and mixing those into the batter just until you can’t see any flour anymore. Then add the wet ingredients. Only mix until everything is incorporated because over-mixing will make the cake tough and dense. Add the rest of the dry ingredients and mix to combine. I like to use a spatula to scrape down to the bottom of the mixing bowl to check that everything has mixed together and there aren’t any clumps of flour stuck down there.
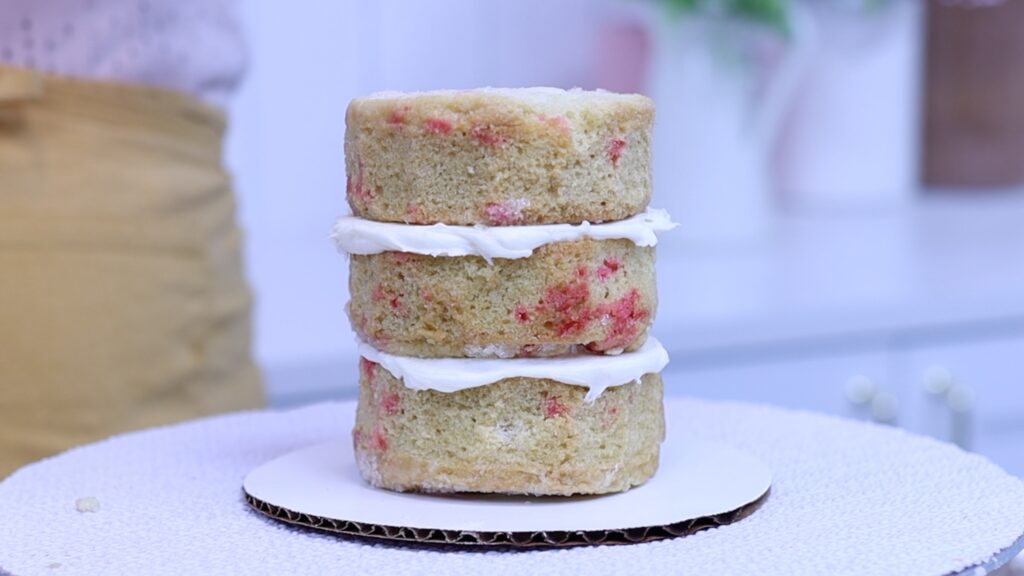
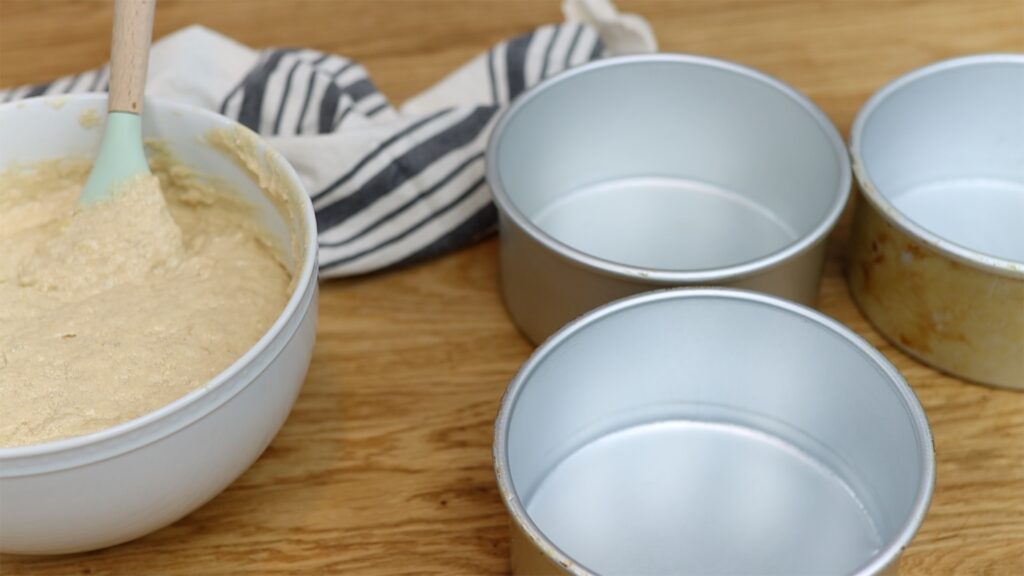
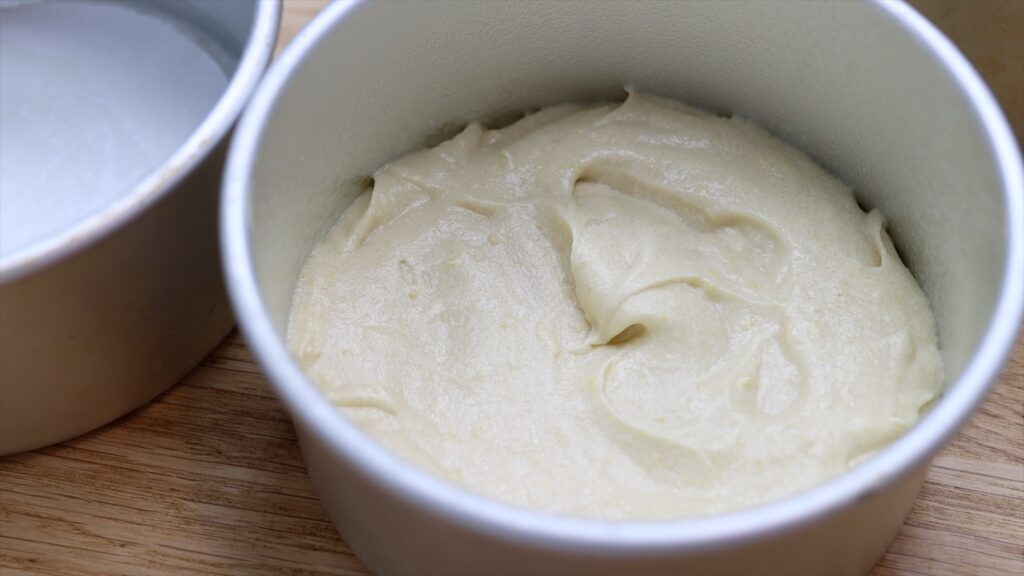
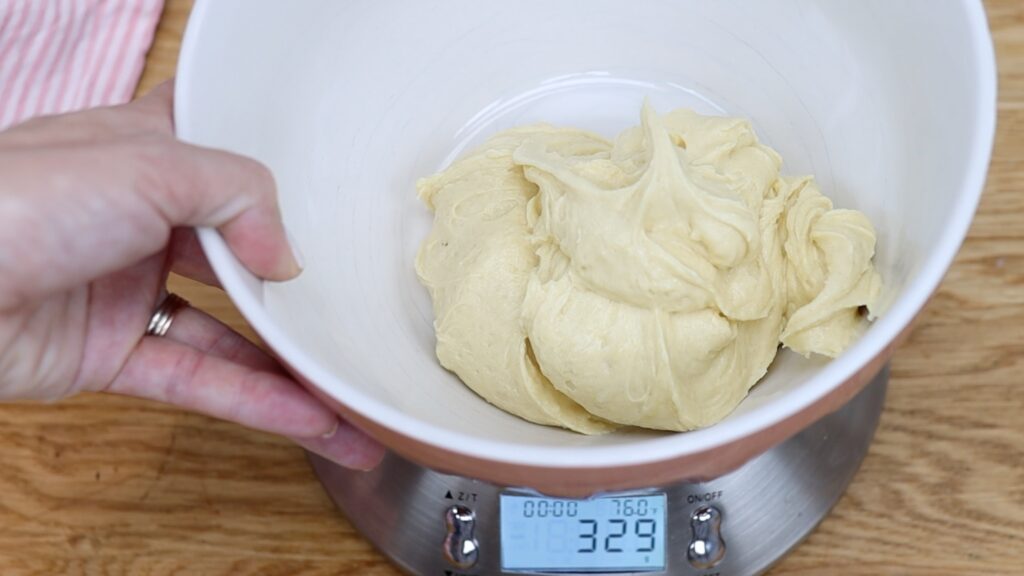
Now it's time to prepare the layers for this banana layer cake! Divide the batter between three greased pans. The recipe listed below is for a three-layer 6" cake but you can click the "X2" button to double it and make a three-layer 8" cake.
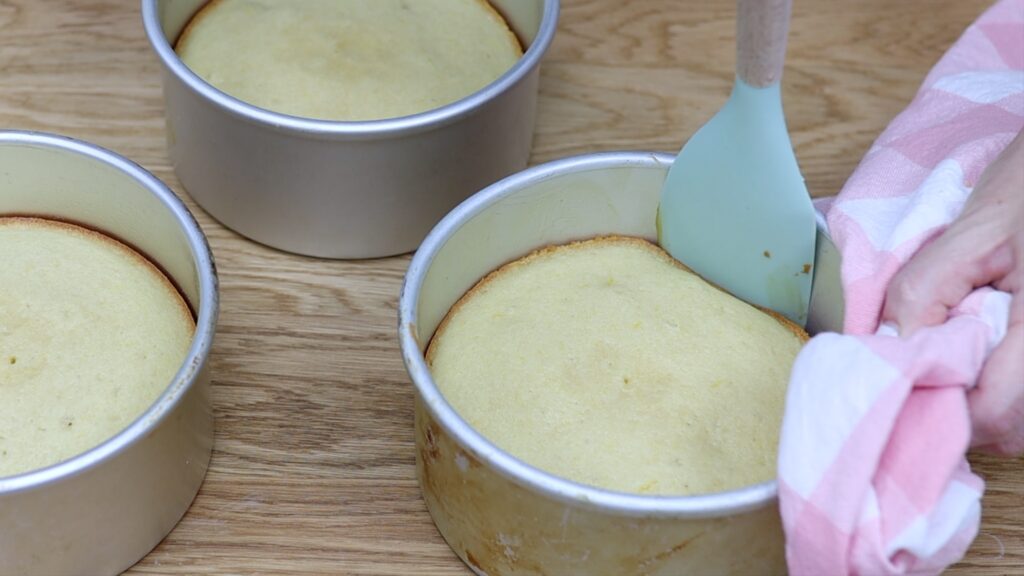
Bake the cakes at 325F or 160C for 35 minutes. Tryto resist that rich banana scent when they come out of the oven! Let the cakes cool slightly in the pans for five minutes before you turn them over onto a wire rack. This gives them a chance to firm up slightly so they don’t crumble. When they’ve cooled completely you can trim any domes with a serrated knife to make perfectly flat cake layers. Then assemble your cake!
How to assemble this banana layer cake
My favourite filling and frosting for this banana layer cake is my cream cheese frosting. My 4 Minute Buttercream pairs well with it too, either plain or after adding caramel or melted chocolate.
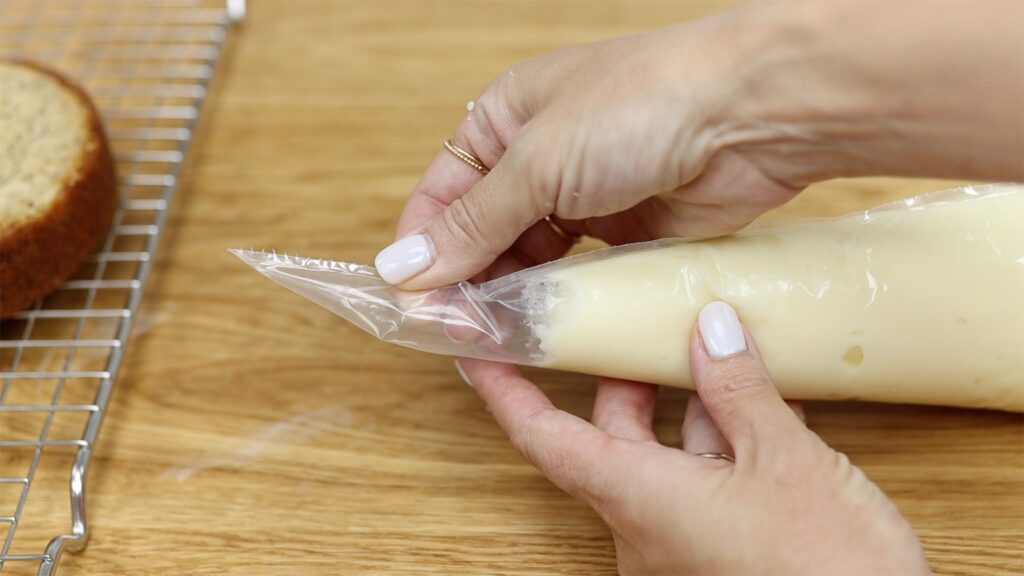
I like to pipe filling and frosting to save time. You don't need a piping tip to do this, just spoon the frosting into a piping bag and cut the tip off.
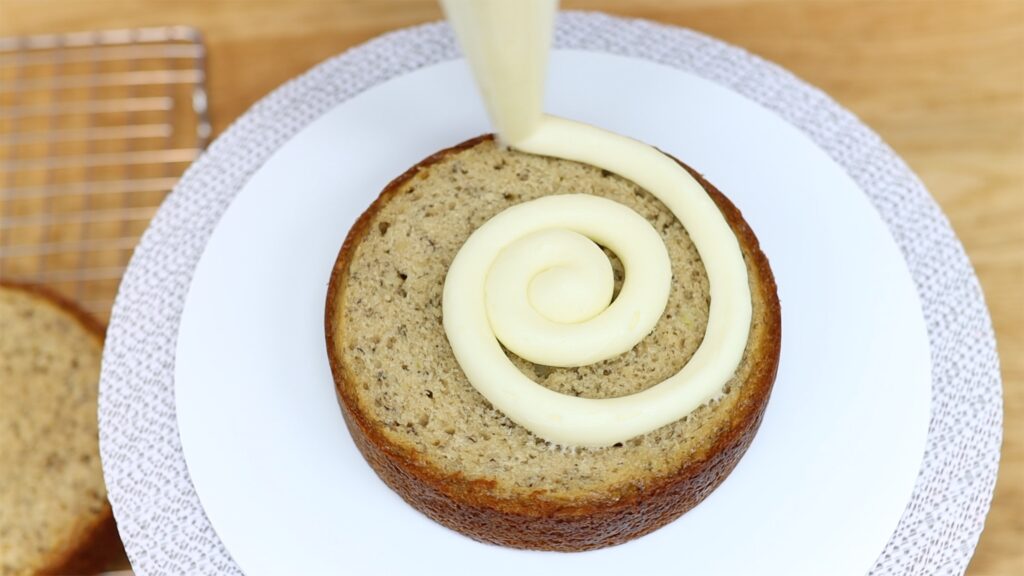
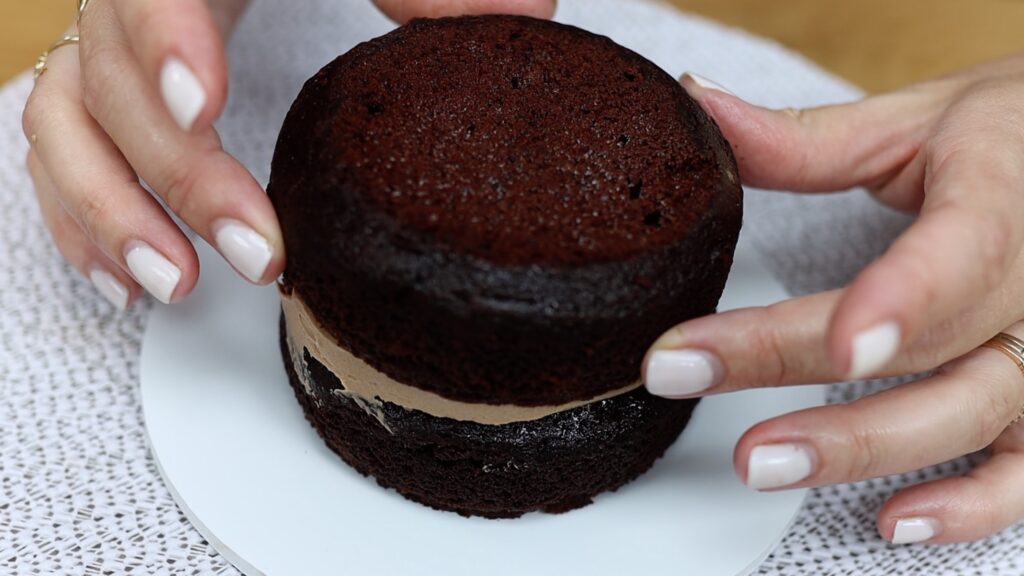
Pipe a dot of frosting onto a cake board and press the first layer of cake onto it. Pipe or spread filling onto it and then place another cake layer on top.
For the neatest frosting chill your cake in the freezer for 15 minutes before frosting it. This will make it less wobbly so you can spread and smooth the frosting more easily.
How to frost this banana layer cake
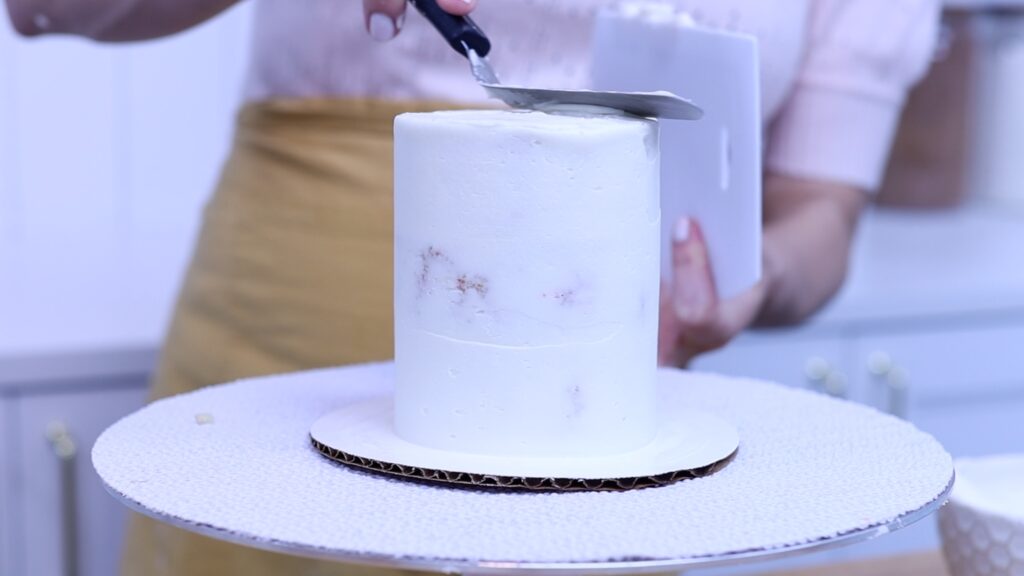
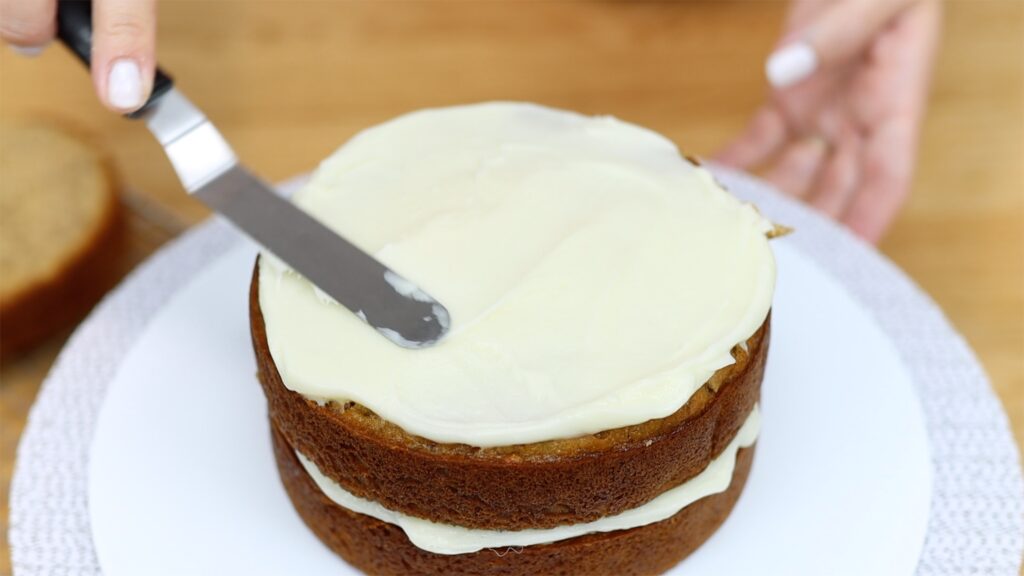
I always recommend doing two layers of frosting. Start with a very thin layer called a crumb coat, which traps any crumbs that come off the cake.
Then spread on a final coat, which sits on top of the crumb coat so no crumbs get into it. This layer of frosting will be thicker and since it will be visible, it’s worth taking the time to get the frosting smooth. I share all of my tips and tricks for frosting and piping with cream cheese in my cream cheese frosting recipe.
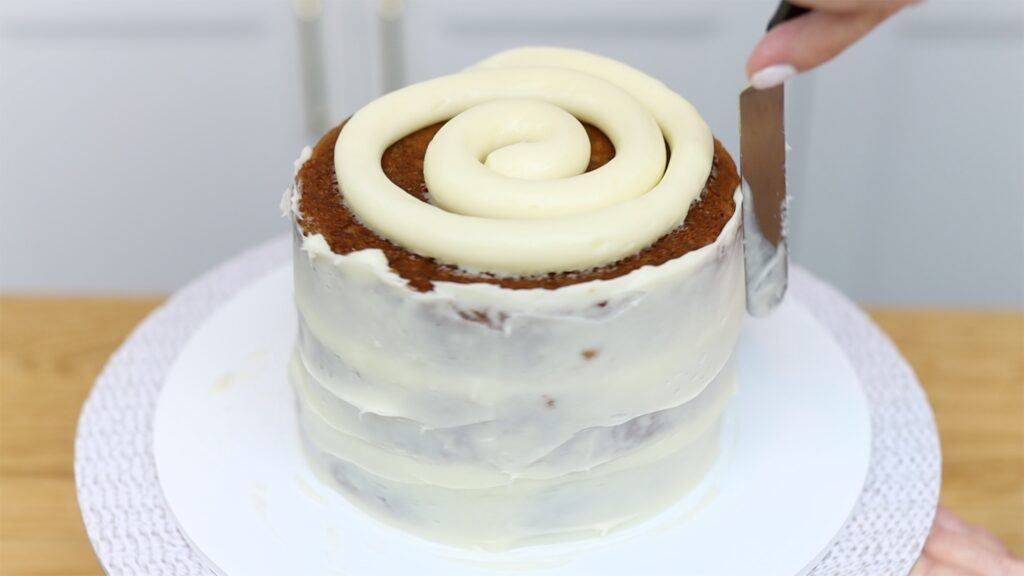
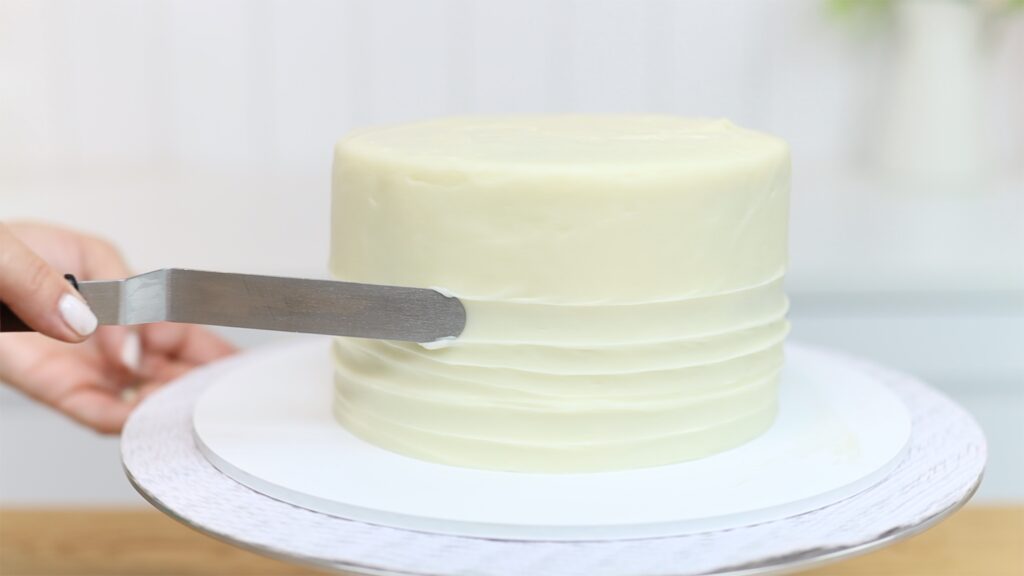
How to decorate this banana layer cake
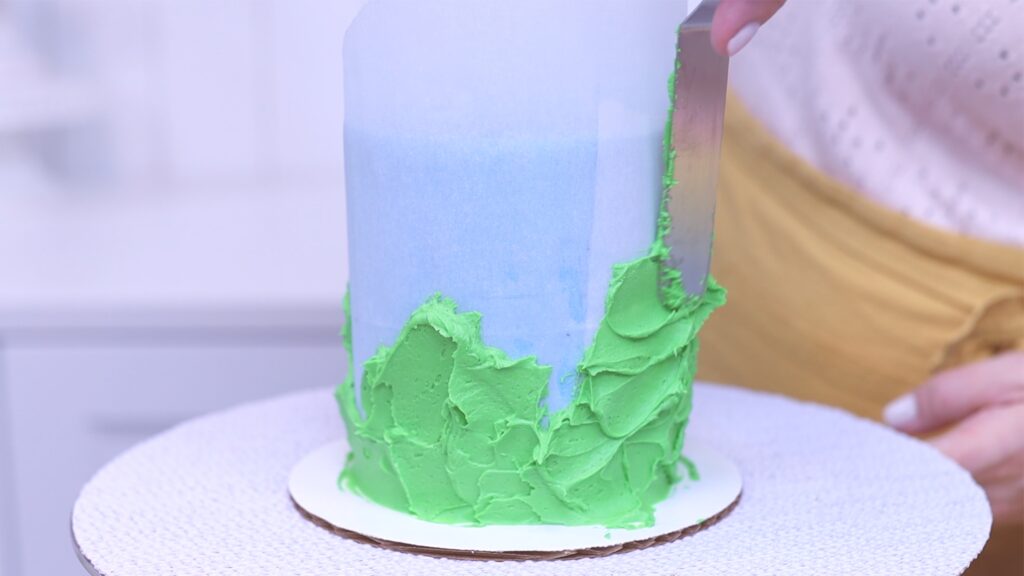
To decorate this cake really quickly I like to add texture. Spin the cake on a turntable as you slowly drag an offset spatula or the back of a spoon up the sides of the cake. You'll leave grooves in the frosting that look simple but stunning!
This banana cake can be stored in the fridge for a week. It tastes best at room temperature so take it out 2-4 hours before you serve it so the cake and frosting warm up and soften. For the neatest slices, run your knife under hot water before cutting into this. Yum yum yum!
This banana layer cake is full of banana flavour and it’s incredibly moist without being overly sweet.
Ingredients
UnitsScale
1/2cupunsalted butter at room temperature
1/2cupwhite sugar
1/2cupbrown sugar
1 teaspoon vanilla
2 eggs at room temperature
2cupsflour
1 teaspoon baking soda
1/2 teaspoon cinnamon
1/4 teaspoon salt
1cupmashed bananas (about 2 bananas)
1cupmilk at room temperature
Instructions
Take all of the refrigerated ingredients out of the fridge two hours before baking. Ingredients will mix together best at room temperature, preventing the cake from being dense and dry.
Mix the butter, sugars and vanilla at medium speed until light and creamy. This will take about three minutes with an electric mixer.
Add the eggs and mix until combined.
In a large bowl, whisk the flour, baking soda, cinnamon and salt together. Add half of this mixture to the batter and mix to combine, only until the flour is no longer visible.
In another bowl, mash the bananas and add the milk. Pour into the batter and mix to combine.
Add the rest of the flour mixture to the batter and mix to combine.
Divide the batter between three greased pans and bake at 325F or 160C for 35 minutes, until you can poke the cakes without leaving an imprint in the top.
Leave to cool and then assemble with the filling and frosting of your choice!
Notes
To make a three-layer 8" cake, double the recipe by clicking "X2" at the top right of this printable recipe
If you use salted butter, leave out the salt in the recipe
Use this cream cheese frosting for piping, smooth frosting and glazes. It's not too sweet and pairs perfectly with loads of cake and cupcake recipes, like my Banana Layer Cake and One Bowl Carrot Cake. In this tutorial I'll show you everything you need to know about making it, colouring it and storing it, too!
How to make cream cheese frosting
To make cream cheese frosting, the key is to use room temperature ingredients. This will prevent a lumpy bumpy mess.
It’s important to use cream cheese from a block, not a tub. Avoid whipped cream cheese because that will be too soft and since it’s whipped and aerated, it will create air bubbles in your frosting.
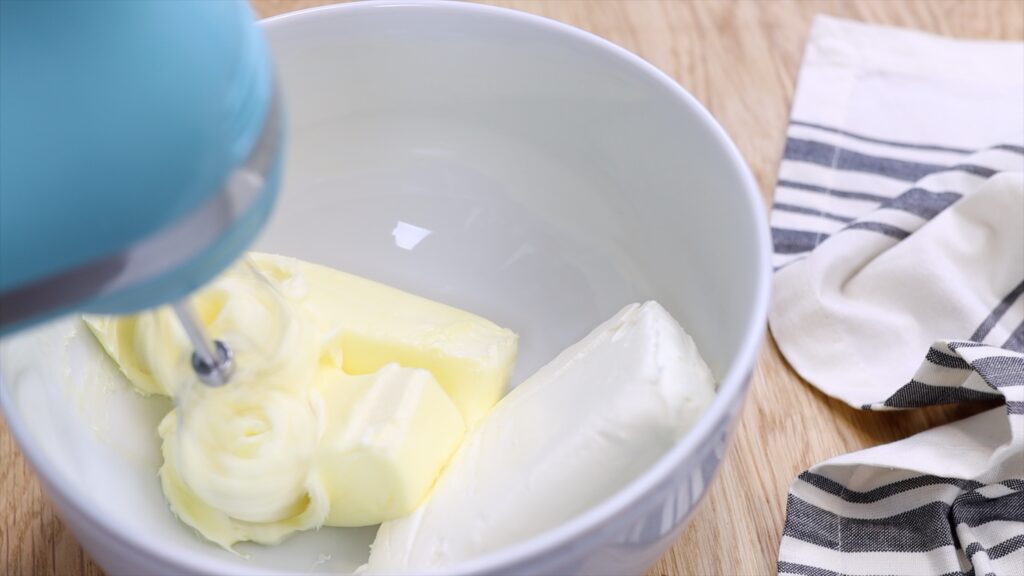
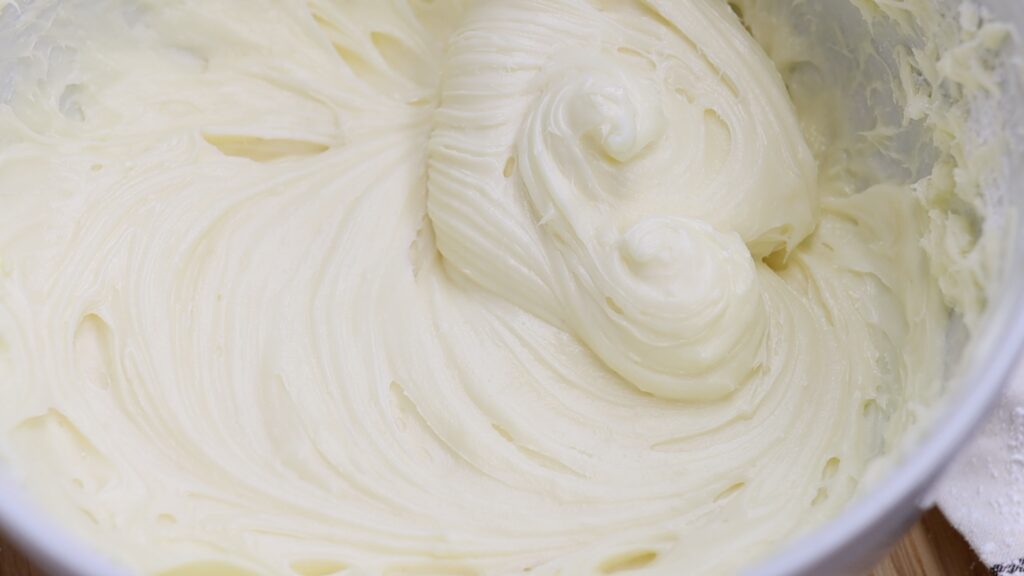
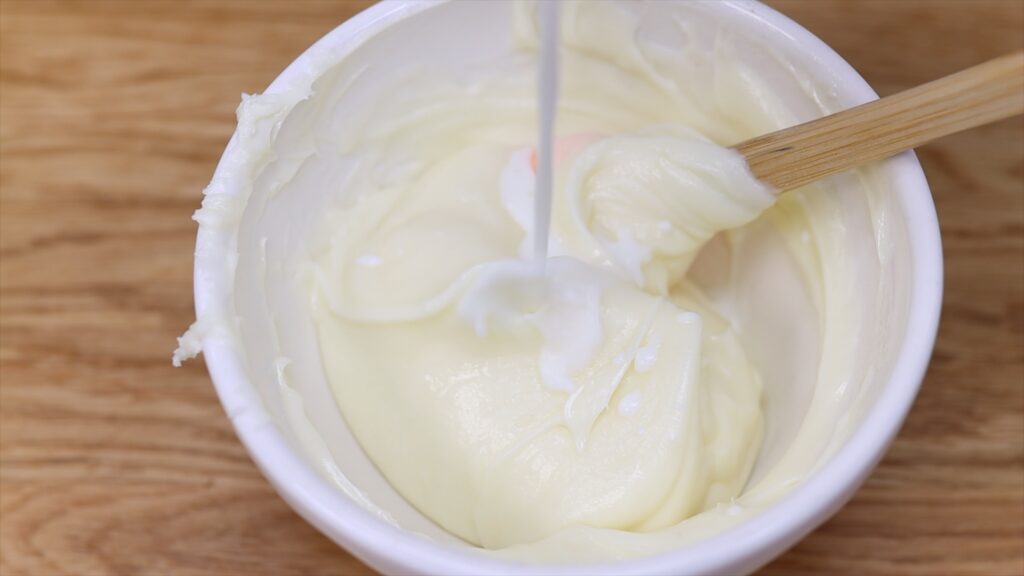
Take your butter and cream cheese out of the fridge four hours before you use them so they soften. This prevents lumps in your cream cheese frosting. The first step is to mix them together until they’re combined into a pale, smooth mixture.
Add icing sugar or powdered sugar, which needs to be sifted so there are no lumps in that either. Don’t over-mix because you’ll break the cream cheese down and make the frosting too runny. Stop when its smooth and add vanilla and salt. Mix those until they’re combined, and now it’s ready to use!
The quantity of sugar in this recipe is perfect for frosting a cake or to pipe a swirl on a cupcake. To adjust the stiffness of this cream cheese frosting just adjust the amount of sugar. If you want it to be less sweet you can use less sugar or use more sugar to make it sweeter. Be aware that with less sugar, the consistency will be runnier. The result will be much softer and less textured piping. With less sugar it will be difficult to frost a cake with smooth sides and sharp edges.
How to use cream cheese frosting to frost a cake
For really smooth frosting, follow the recipe as written to make your frosting. Then chill your cake in the freezer for 15 minutes before you frost it. Apply a crumb coat first, which is a very thin layer of frosting that catches and traps any crumbs that come off the cake so that they don’t get into your final coat of frosting. It’s especially important to use a crumb coat before your final coat of frosting if you’re using cream cheese frosting, which is more translucent or less opaque than regular buttercream frosting.
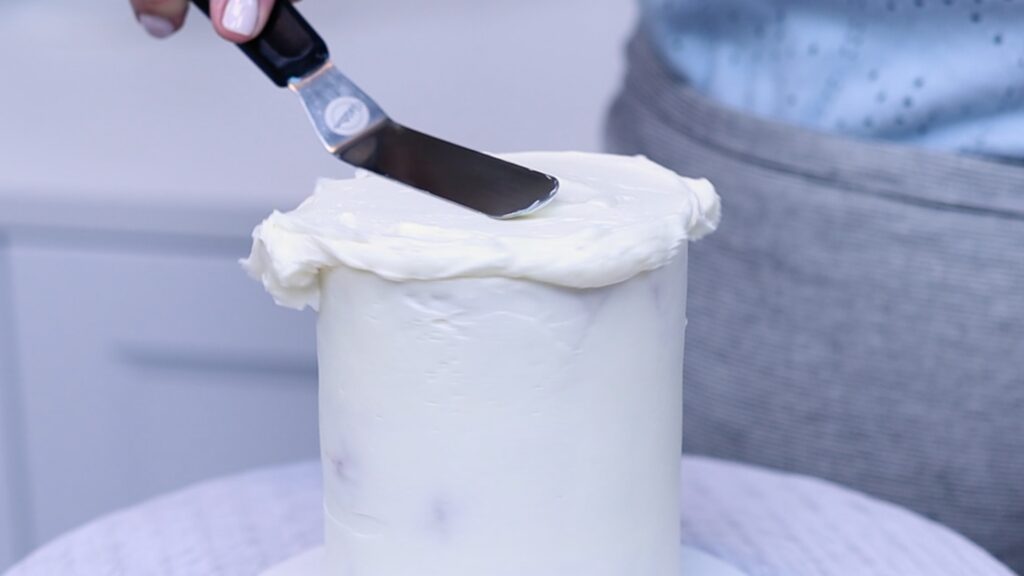
For the final coat, spread your frosting on generously. Push it up above the top edge of the cake and that will help you get sharp edges. Smooth the frosting with a cake comb, scraping around the cake several times. Touch up any indents by spreading more frosting over those and then smooth again until you’re happy with the sides. For the top, push sideways with an offset spatula. Don't push down because that will cause a bulge in the frosting around the top of the cake.
How to use cream cheese frosting for piping
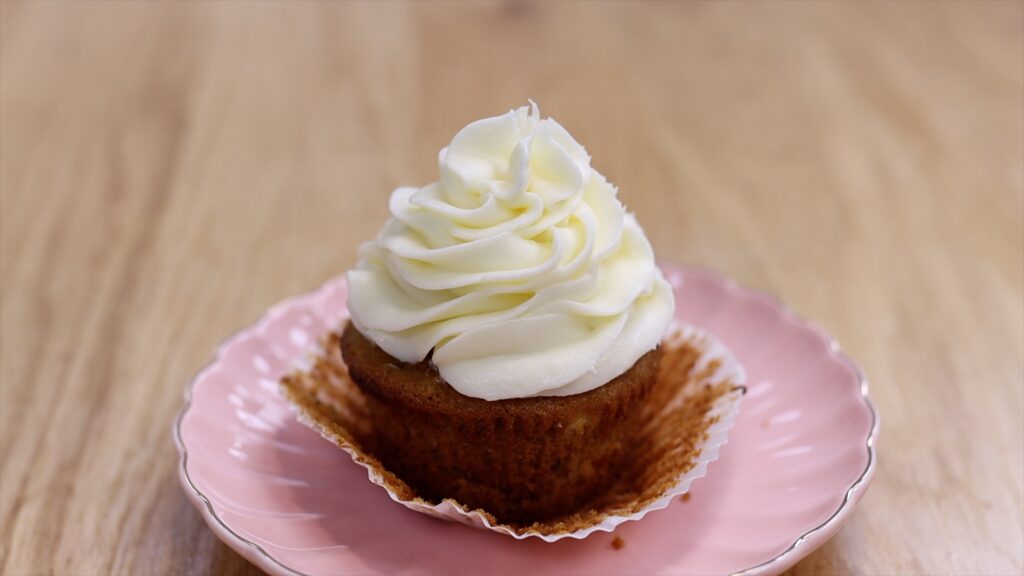
You can pipe borders or swirls with this frosting and the texture will hold its shape. If the frosting gets softer as you pipe, it's from the warmth of your hands on the piping bag or the warmth of the room. Put the piping bag or bowl of frosting into the fridge for 5 minutes to chill it slightly. That will make the frosting stiffer so it will hold its shape better. You'll notice more texture and definition in your piping.
Cream cheese frosting isn’t as stiff as regular buttercream but it’s stable enough to support another layer of cake onto top. This means you can use it as filling for cakes, even for naked cakes!
How to colour cream cheese frosting
You can colour cream cheese frosting just like buttercream. I recommend gels over liquid colours because they’re much more concentrated so they’ll give you bright and bold colours without making the frosting too watery. As you tint cream cheese frosting, try to fold in the colour instead of stirring aggressively. As I mentioned before, if you over-mix cream cheese frosting you’ll break down the cream cheese and the frosting will become less stiff, or more runny. If that happens as you’re colouring it you can either put the bowl in the fridge for 5 minutes to chill it so that it firms up a bit or you can add more sugar, which will stiffen it. Cream cheese frosting pipes beautifully and has a gorgeous shine to it, too.
How to make a cream cheese glaze
To use this cream cheese frosting as a glaze, microwave it for 30 seconds. Then add milk a spoonful at a time until you can drizzle it with a spoon. Spoon it onto your loaf or cake and it will run down the sides.
Although this will never set or crust to be firm, it’s thick enough that it won’t absorb into your cake and disappear! It’s just as tangy and rich and delicious as when it’s thicker and stiffer so it’s a very decadent topping for any dessert.
How to store cream cheese frosting
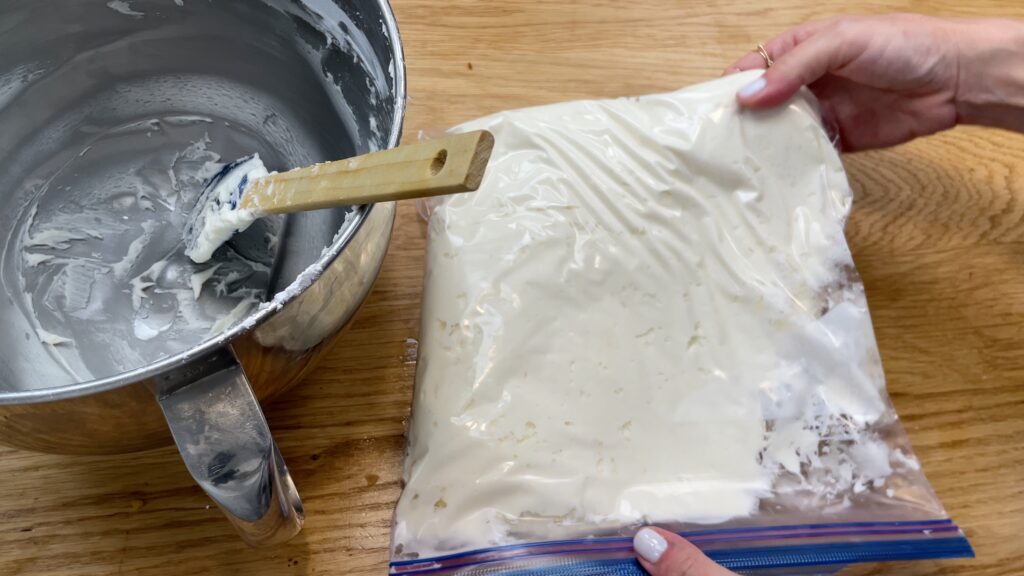
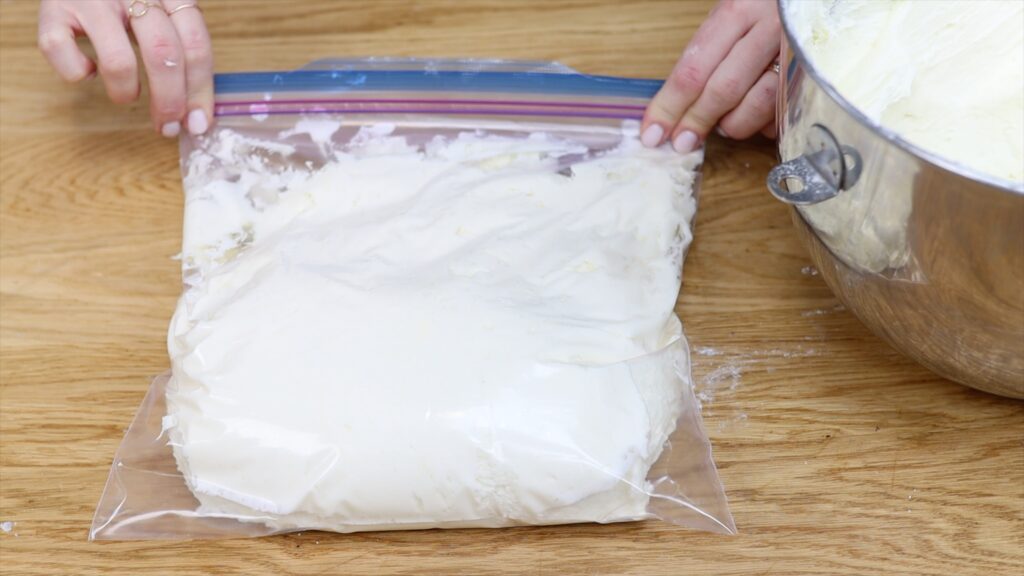
You can leave cream cheese frosting at room temperature for four hours. If you need to store it overnight, cover the bowl with plastic wrap and put it in the fridge. You can leave cream cheese frosting in the fridge for up two weeks or in the freezer for two months! I like to store cream cheese frosting in a ziplock bag so it doesn't take up much space.
When you take cream cheese frosting out of the fridge or freezer it will be very firm. Let it sit on the counter for about an hour before stirring it to knock out any air bubbles.
If you use cream cheese frosting on a cake, store that cake in the fridge. Take it out between two and four hours before serving to let it come to room temperature, when it will taste the best!
To save cake leftovers, cover any cut sides with plastic wrap to keep the cake moist. Put the cake in the fridge and take it out an hour before eating it.
Did I miss anything? Ask me in the comments below!
Here's the recipe for this cream cheese frosting for piping, frosting and glazes. You can adjust the quantities to use US (cups) or metric measurements. You can also scale the recipe up by using the buttons at the top of the recipe.
If you try this cream cheese frosting recipe, I’d love to hear what you think of it! Please leave a rating and comment below.
This is a cream cheese frosting for piping, frosting and glazes. It's not too sweet and it pairs perfectly with loads of cake and cupcake recipes.
Ingredients
UnitsScale
1cupbutter, room temperature
8ozcream cheese, room temperature
1lbpowdered sugar
1/4 teaspoon salt
1/2 teaspoon vanilla extract
Instructions
Put room temperature butter and cream cheese in a bowl and use an electric mixer to mix until smooth.
Sift powdered sugar and add to the bowl, mixing until incorporated.
Add vanilla and salt and mix to combine. The cream cheese frosting should be smooth and easy to stir. You mixer or spatula should leave soft peaks in it.
Notes
To fill and frost a three-layer 8" or 9" cake, double this recipe (click X2 at the top).
To make a glaze, microwave the cream cheese frosting for 30 seconds. Add milk a spoonful at a time until you can drizzle the cream cheese frosting as a glaze.
Store cream cheese frosting in an airtight container or a bowl covered with plastic wrap. You can leave it at room temperature for up to 4 hours or in an airtight container in the fridge for 2 weeks or in the freezer for 2 months.
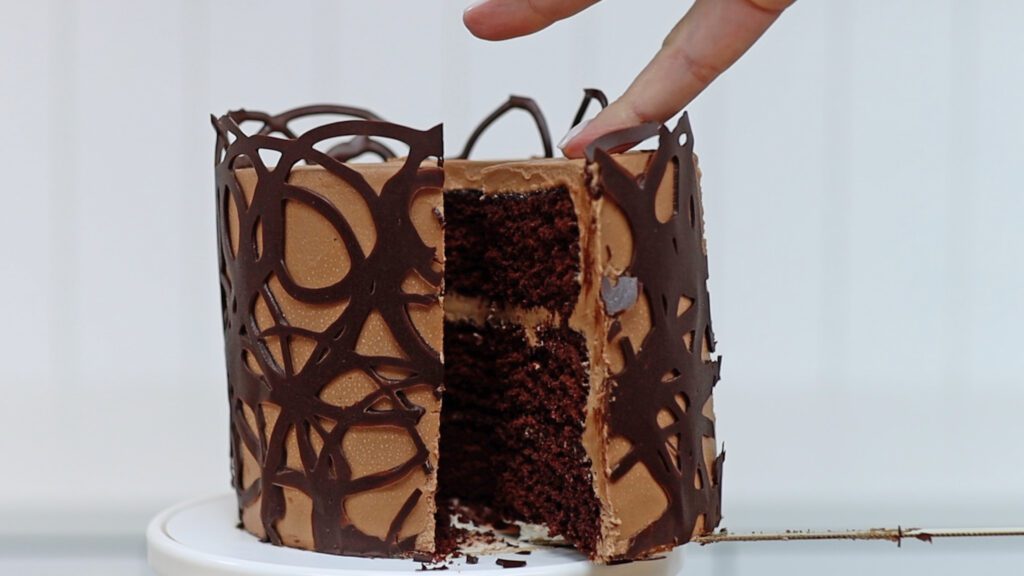
This chocolate collar cake design will make everyone ask how you did it and the secret is surprisingly simple, once you know a few tricks!
Let’s break the technique down into four steps.
STEP 1: Prepare the cake
Starting with the basics, assembling a straight cake with give you the best results with this technique. Take your time to line each cake lay directly over the layer below so that the cake doesn't lean. Chilling the cake for fifteen minutes in the freezer or thirty minutes in the fridge will set the filling to hold the layers in place while you frost them. This way, they won’t slide or wobble around when you spread and smooth the frosting.
STEP 2: Prepare the collar
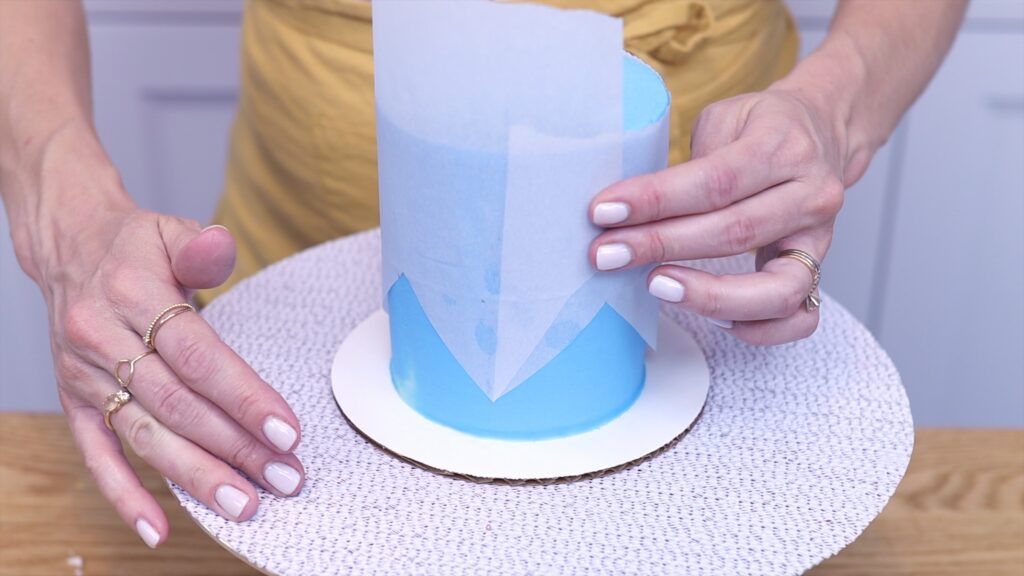
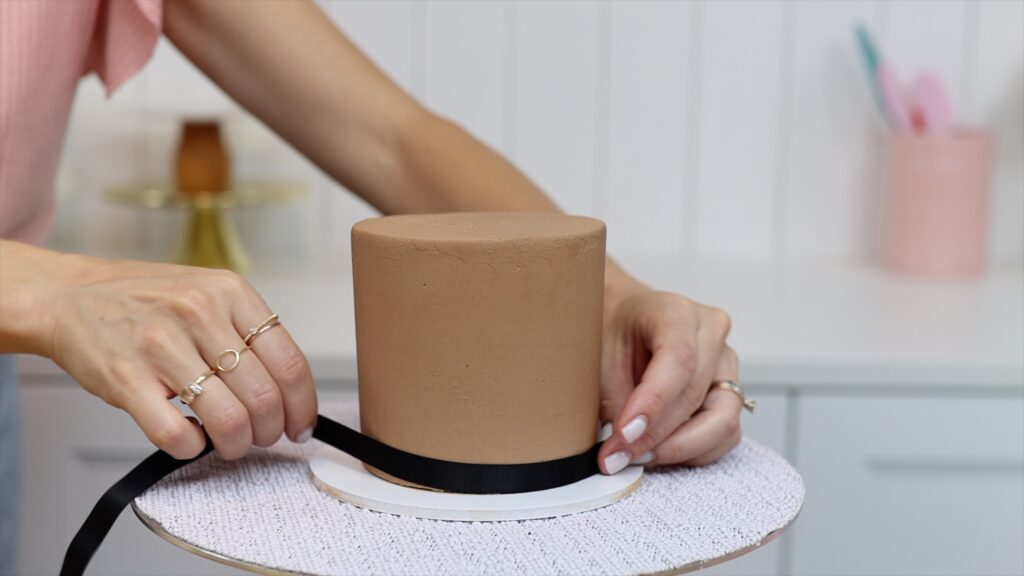
Chill the cake to set the frosting, which takes about an hour in the fridge. Wrap a ribbon or string around the cake to measure the circumference and also the height of the cake. Then place that on a piece of parchment or wax or baking paper and cut the paper so it’s the same length as the ribbon. For the height, about an inch taller than the cake is ideal. Now put the cake back in the fridge.
To make a design you’ll need melted chocolate. Melting chocolate is something people tend to struggle with but here are two tricks. First, only heat the chocolate for thirty seconds at a time in a microwave. Secondly, adjust the power to 80% to heat it gently so that it doesn’t burn or seize. When you take it out of the microwave, stir the chocolate to spread the heat since microwaves tend to create hot spots. Then heat for another thirty seconds, also at 80% power. Stir until the chocolate is smooth with no lumps.
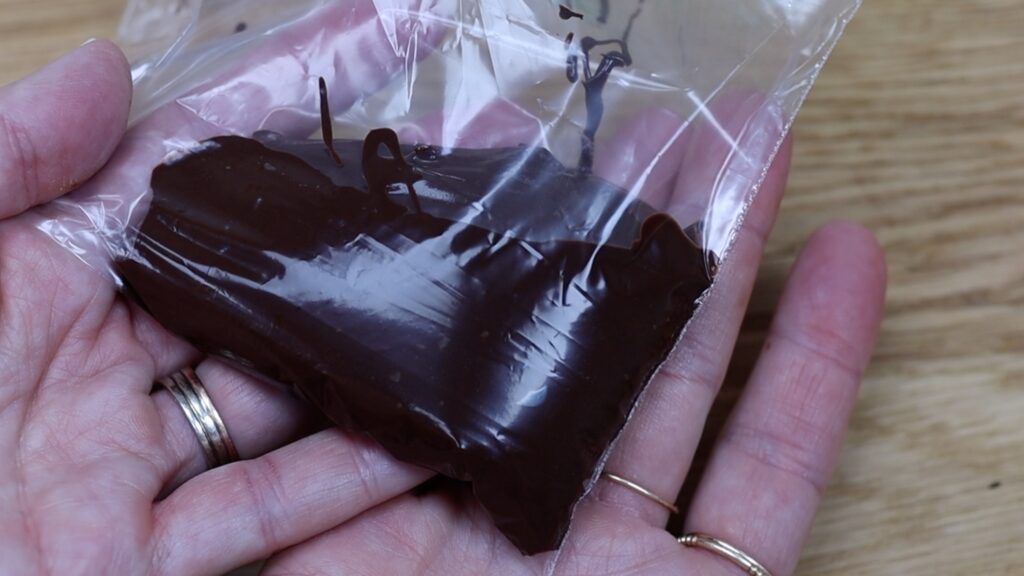
Pour it into a sandwich bag and cut a tiny piece off one of the bottom corners of the bag. You'll squeeze the chocolate through this hole. If the hole is too small your chocolate won’t pipe in smooth lines, like the chocolate on the right in the photo below. Also, the lines will be so thin that they’ll be very fragile. Look at the difference between that and the chocolate on the left. I cut a little bit more off the corner for those and the lines are thicker and smoother and neater.
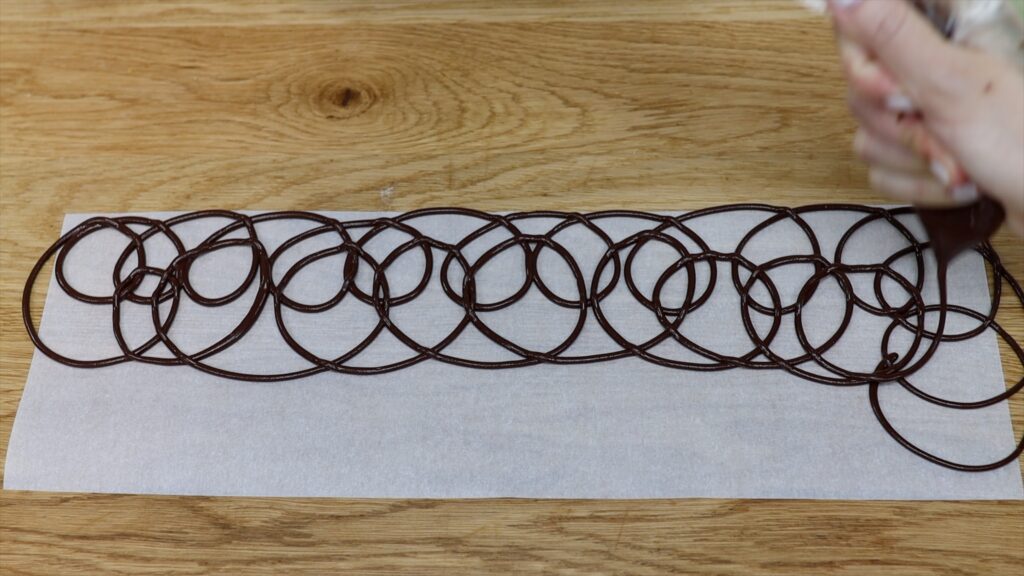
Cover your paper with loops or whatever design you want to create, keeping in mind that the closer the lines or loops or squiggles are to each other, the stronger the chocolate collar is going to be.
STEP 3: Wrap the cake
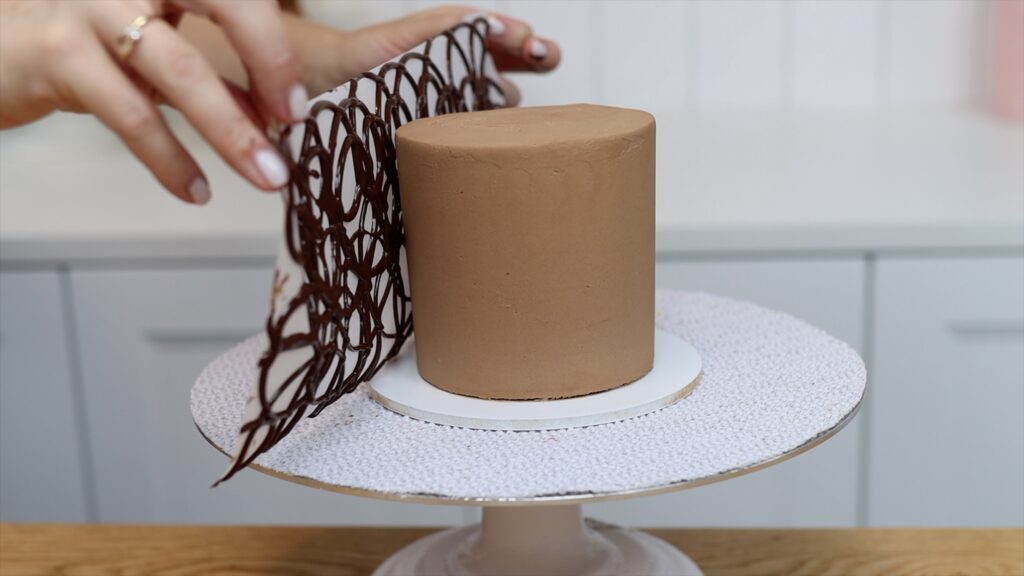
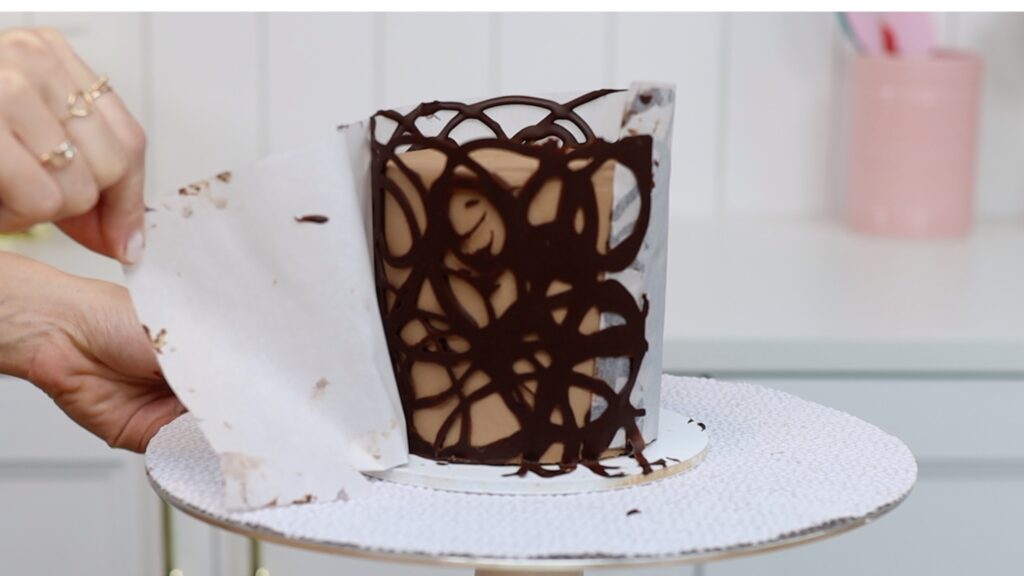
Take your cake out of the fridge and lift the chocolate design up straight away, before the chocolate sets. Lower it down to the cake, resting the bottom edge of the paper on the cake board so that the design goes all the way to the bottom of the cake, and wrap it around the cake to attach it to the frosting.
If you can do this without getting chocolate all over your hands, please tell me your secret in the comments! The paper will overlap itself where the beginning meets the end and that’s fine. Put the whole cake back in the fridge for an hour to set the chocolate.
STEP 4: Unwrap the chocolate collar cake
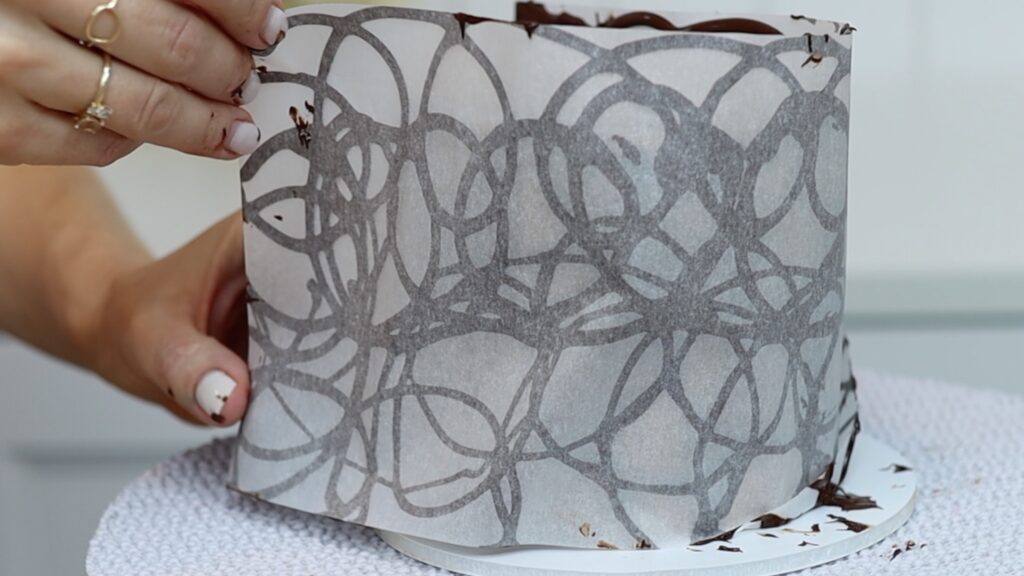
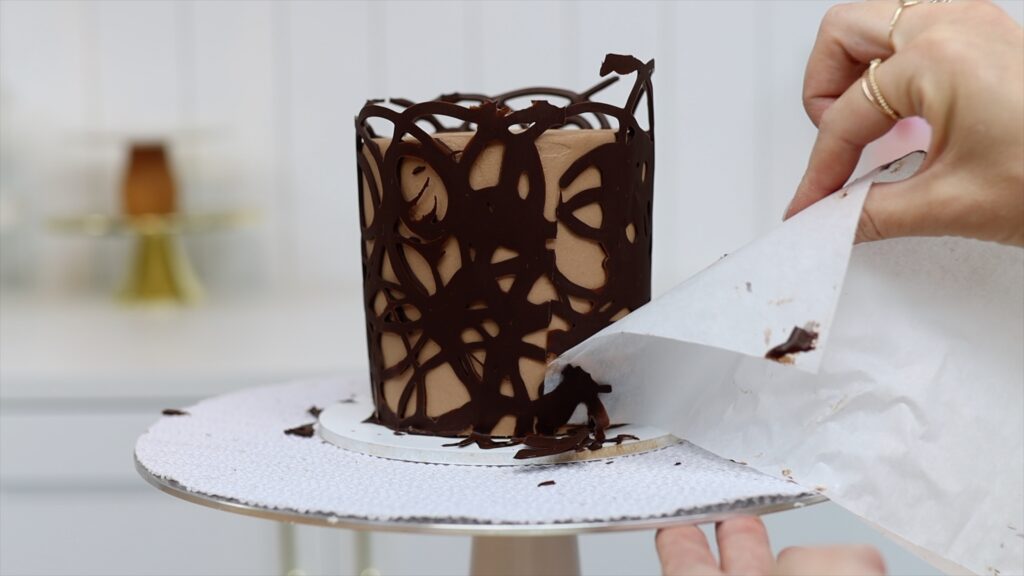
After the chocolate sets, pinch the top corner and slowly peel the paper away from the cake. I love unwrapping and exposing the chocolate collar cake underneath!
The paper will stick where the overlap was so for that, peel downwards to snap off the excess chocolate and leave a neat seam along the join of the design.
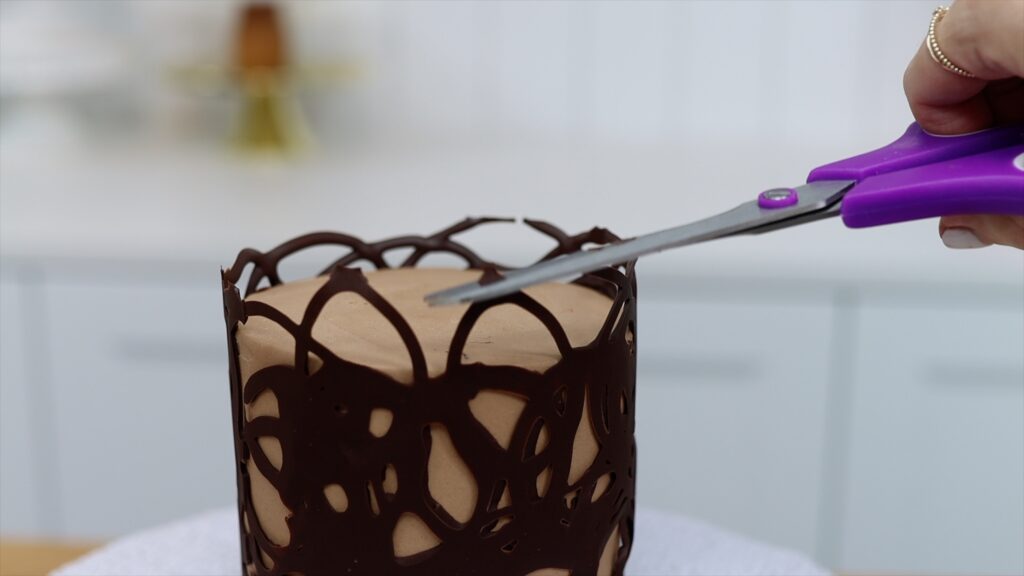
To tidy up the cake board, use a sharp knife or the edge of your offset spatula to scrape off any chocolate stuck to the board. You can wipe any smudges off the board with a paper towel wrapped around your finger. The chocolate will soften at room temperature so after a few minutes you can trim around the top edge of the design with scissors to tidy that up, too.
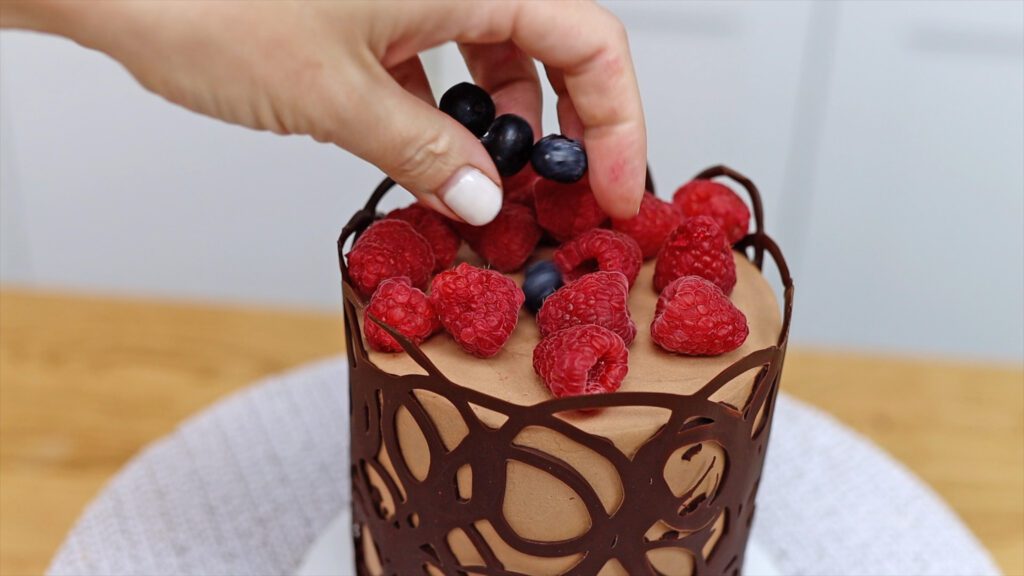
I don’t recommend wrapping a design any more than an inch above the top of the cake because the chocolate can droop at room temperature. The chocolate sticking up creates a wall which you can fill with fruit, chocolate truffles, flowers, or any other decorations you like!
If it’s hot, it’s best to store the cake in the fridge to keep the chocolate design stable.
How to serve a chocolate collar cake
It's easiest to serve a chocolate collar cake when it's at room temperature. If the cake has been in the fridge, take it out an hour or two before you serve it so that the chocolate collar softens. The cake and frosting will taste better at room temperature, too. Run your knife under hot water before you cut into the cake for the neatest slices.
Here are nine ideas of ways to decorate a cake with berries, making it beautiful and delicious!
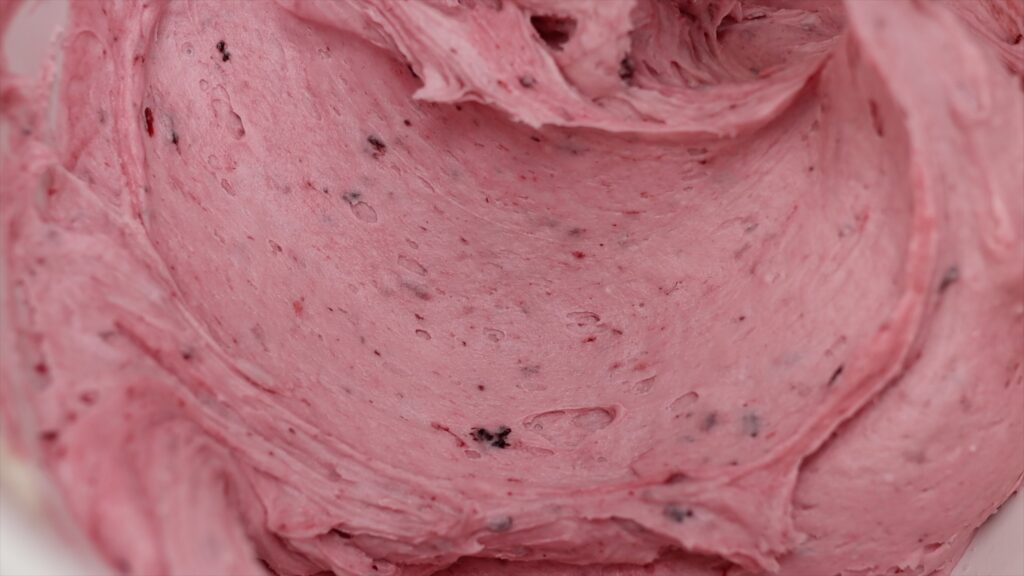
#1 Mix berries into frosting
To mix berries into your frosting, simmer fresh or frozen berries with a bit of sugar. Use medium low heat to cook them gently until they soften and thicken.
Blitz the cooked berries in a food processor or blender unit smooth. You can strain them through a sieve if you want to remove the seeds. Let the mixture cool completely and then stir it into your frosting.
This is my 4 Minute Buttercream mixed with cooked berries. Add the cooked berries instead of the milk in the recipe to give the frosting amazing colour and flavour without making it too runny. I think the flecks of berry make it look delicious, too!
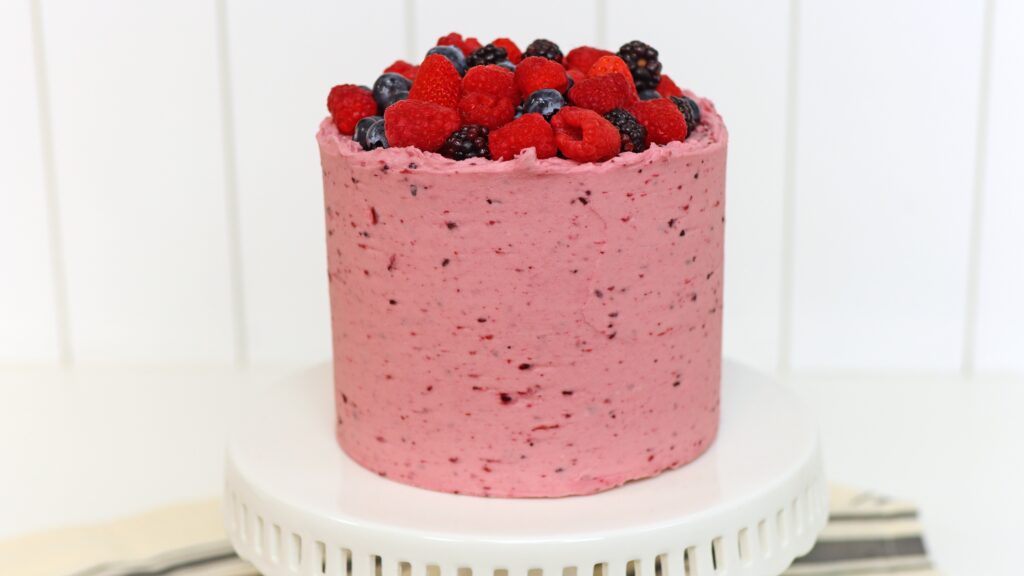
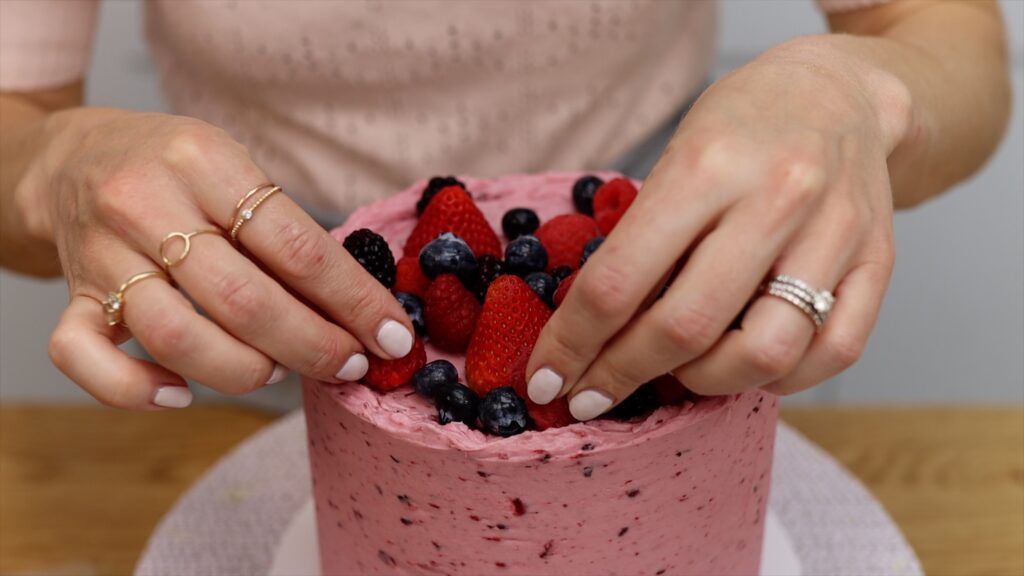
#2 Pile berries on top of a cake
There are lots of ways to decorate a cake fresh berries. If you don’t smooth the top edge of the frosting you’ll leave a wall around the cake. This will hold a pile of berries in place.
If the frosting has set it won't be sticky anymore so the berries may move if you move the cake. To attach the berries, spread some fresh frosting onto the top of the cake to act as glue.
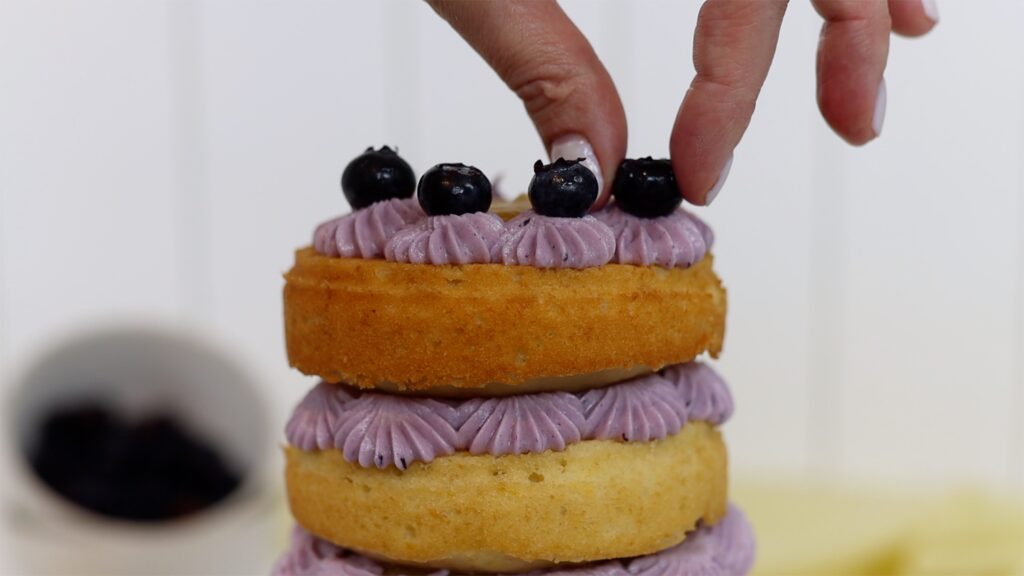
#3 Add berries to piping
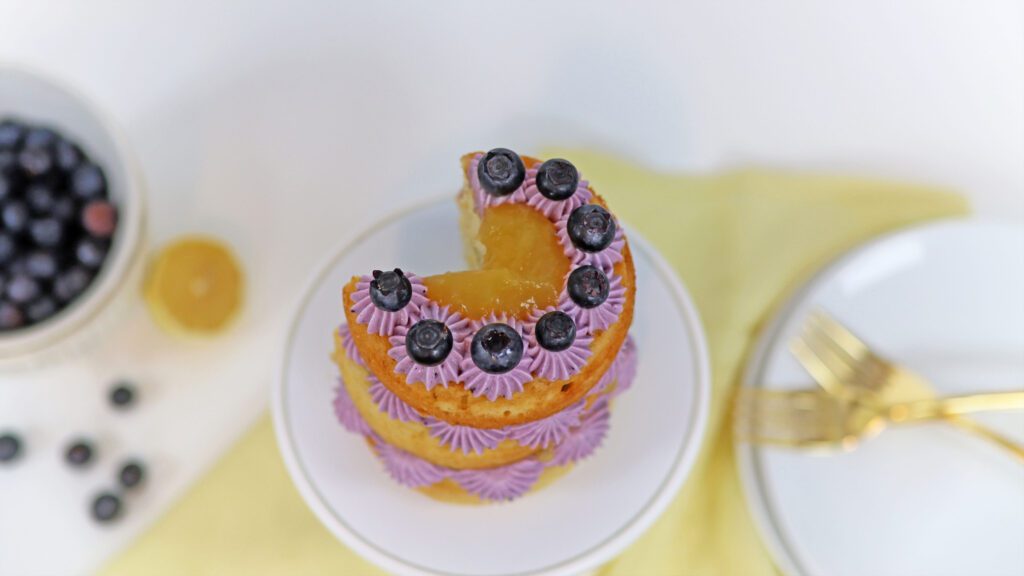
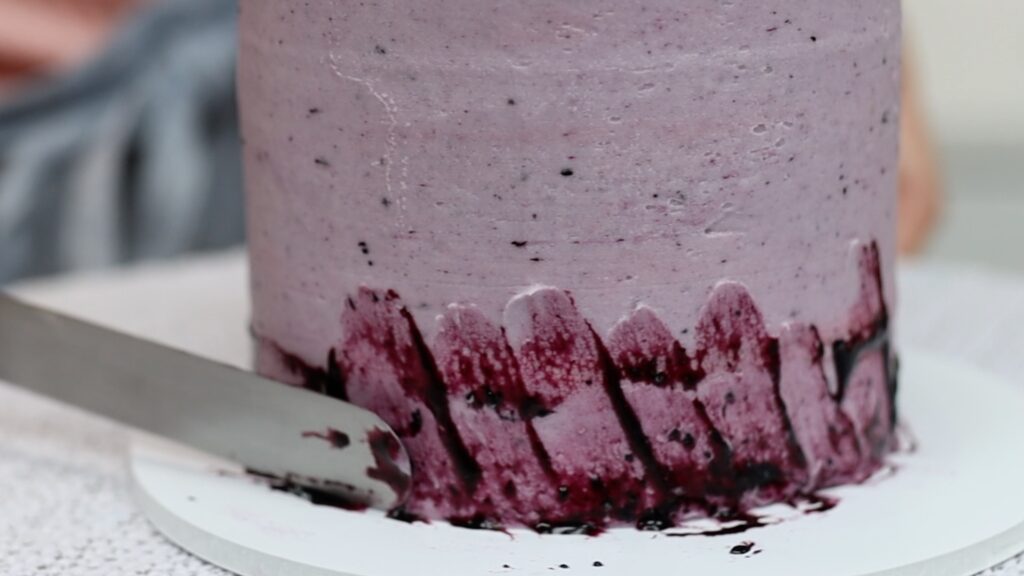
Add berries to piping for some extra height and colour. If you’re using buttercream, make sure you do this immediately after piping. If you wait too long and the buttercream sets, it will crack when you push the berries down. This is my Lemon and Blueberry Cake and it's heavenly!
#4 Place berries between frosting swirls
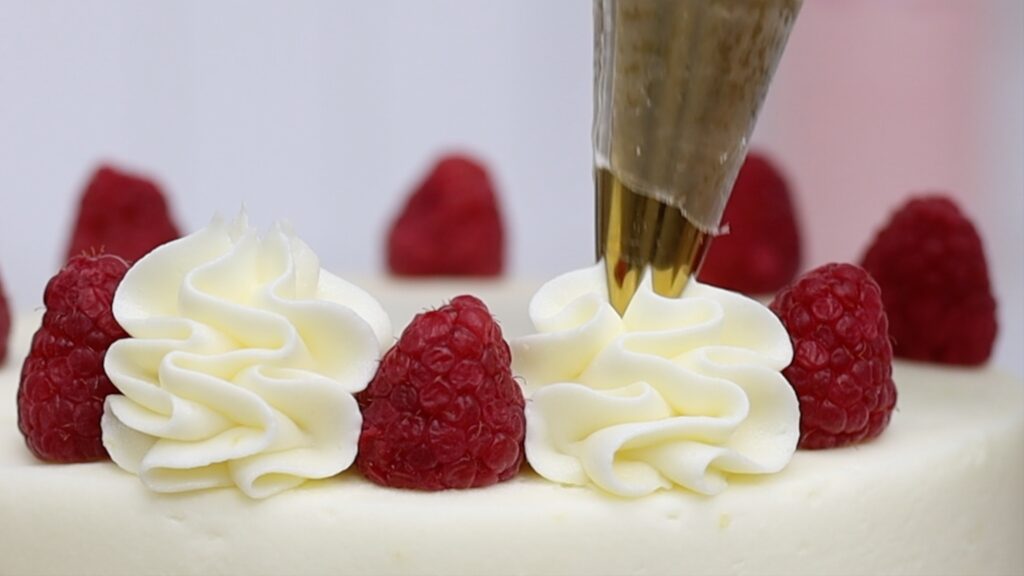
Another fun way to use berries on top of a cake is to place them between swirls of frosting. For even spacing around the cake, start by pushing the berries into the frosting on the top of the cake. Arrange them opposite each other to guide you so that there’s the same distance between each berry. Then pipe your swirls or ruffles or whatever in between the berries.
If you count as you pipe back and forth, all of your piping will be the same height. The berries add a burst of colour to this lemon cake.
#5 Make a border with berries
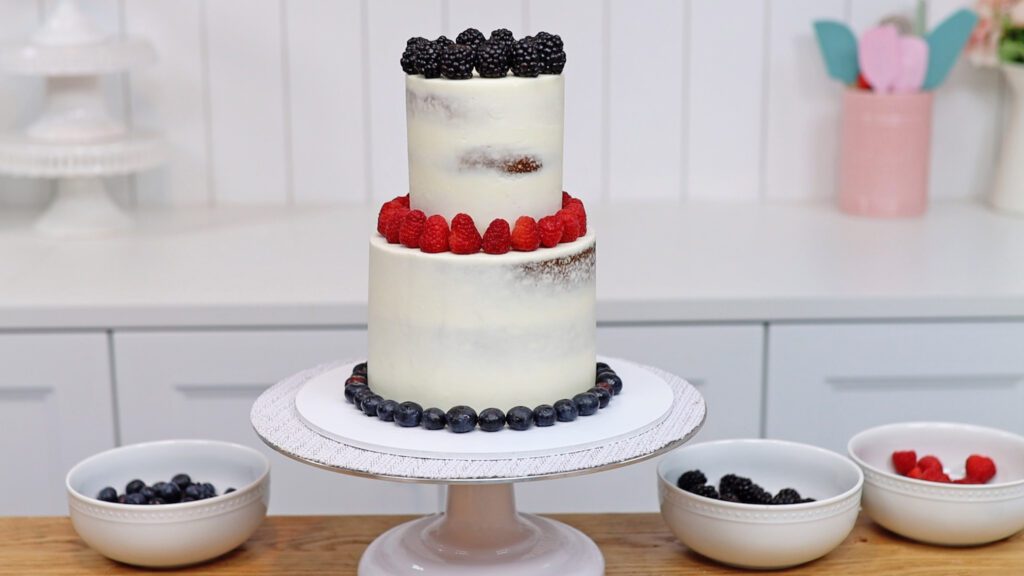
Berries make a nice border around the bottom of a cake. If your cake is a tier cake you can place berries around the bottom of each tier to decorate them.
I teach every step of preparing, assembling, frosting, decorating, storing and transporting tier cakes in a MiniCourse. If you join my Club you'll get access to every MiniCourse on my cake school!
#6 Use berries as cake toppers
Use berries as cake toppers instead, spacing them around the top of a cake. Using a bit of fresh frosting to attach each one if the frosting on the cake has already set.
You might choose to use the berries to mark slices, so that each slice has a berry on top!
#7 Cover a cake in berries
This one is the most time consuming but also the most dramatic! Press berries into the sides of the cake, starting at the very bottom and working your way up. Place the berries in the same order, for example: blueberry, blackberry, raspberry. Then offset each berry by one berry in the next row. You'll end up with diagonals going all the way up the cake.
#8 Add berry accents
If that last one seemed a bit over the top, try placing berries as accents on the cake. Make clusters or groups of different types of berries to create a variety of colours and shapes and sizes. You may need to pipe or spread fresh frosting to stick the berries to the cake.
#9 Spread cooked berries around the cake
To create some bright texture on your cake, spread some jam or cooked berries around the bottom of your cake. I like to do this straight after frosting the cake, before the frosting sets. Use your offset spatula to spread the jam upwards in diagonal strokes around the cake. Overlap each stroke slightly so that there aren’t any gaps between them. You can use the back of a spoon for even more texture!
I hope you've seen some ideas you like! Tell me in the comments which is your favourite!
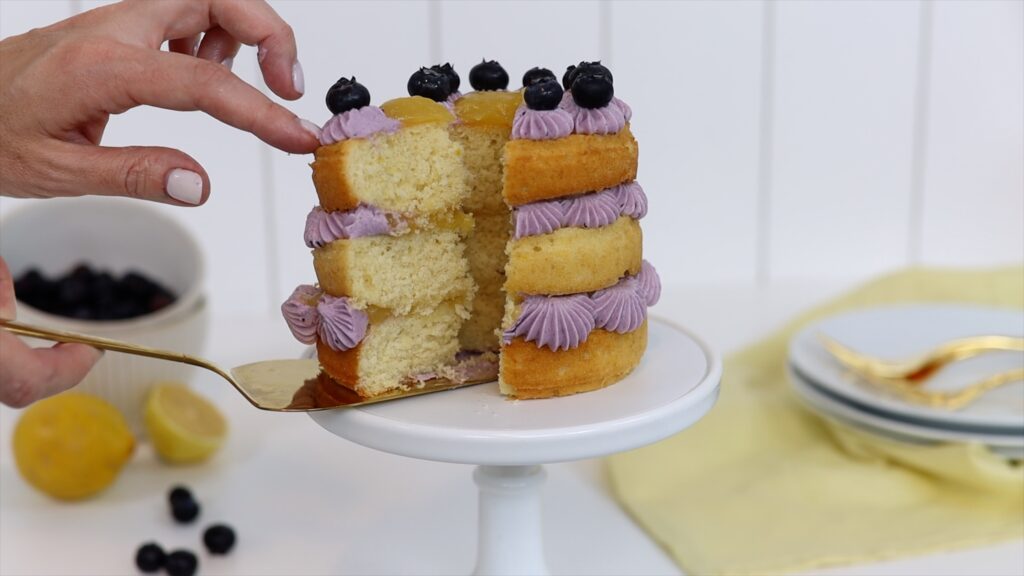
This lemon and blueberry cake has four mouthwatering elements:
zesty lemon cake
tangy lemon curd filling
sweet blueberry buttercream
juicy fresh blueberries
The combination is irresistible!
How to make this Lemon and Blueberry Cake
Make sure all of your refrigerated ingredients are at room temperature before you begin.
Start by creaming the butter and sugar together, which takes about three minutes. Meanwhile, zest your lemons. Using a lemon zester is ideal because it only takes off the fragrant outer peel instead of the bitter white pith underneath. If you don’t have a zester you can use the fine side of a grater.
By now the butter and sugar should be pale and creamy. Add the lemon zest and mix it in and then crack your eggs and add these one by one. Mix for about 30 seconds after each one so that they incorporate properly.
Now add the vanilla and mix that in. In a bowl, whisk together the flour and baking powder. Add half of this to the mixing bowl, mixing only until it’s just combined. As soon as you don't see any flour in the batter anymore, turn the mixer off. Avoiding over-mixing prevents a tough, dense cake. Then add the milk and sour cream and mix those in. If you need a substitute, instead of milk and sour cream you can use the same amount of buttermilk. Finally, mix in the rest of the flour mixture. Your batter should be quite runny and pale in colour with little flecks of yellow lemon zest.
Divide the lemon cake batter between three greased baking pans. Don't worry - we'll add the blueberry soon! Tap the pans to level them or spread the batter flat with a spatula. The recipe listed below makes a three-layer 6" cake or you can double it for a three-layer 8" cake. For mini cakes, use the 6" batter to make four 4" cakes. Or of course, you can divide the recipe by four to make just one 4" cake.
Bake the cake layers at 325F or 160C for 30 minutes. The cakes are baked when they don’t wiggle in the middle when you jiggle the pan. A toothpick poked into the middle of each cake will come out clean.
Run a spatula gently around the edges of each pan to loosen the cakes. Let the cakes cool completely before you assemble your cake.
A quick side note on substitutions. As I mentioned earlier you can use buttermilk instead of the milk and sour cream. For example, instead of 1/2 cup sour cream and 1/2 cup of milk, use 1 cup of buttermilk. Although I prefer the flavour and texture of this cake with sour cream, the buttermilk version is very similar! Both are soft and light but rich and buttery, too.
How to make lemon curd for this Lemon and Blueberry Cake
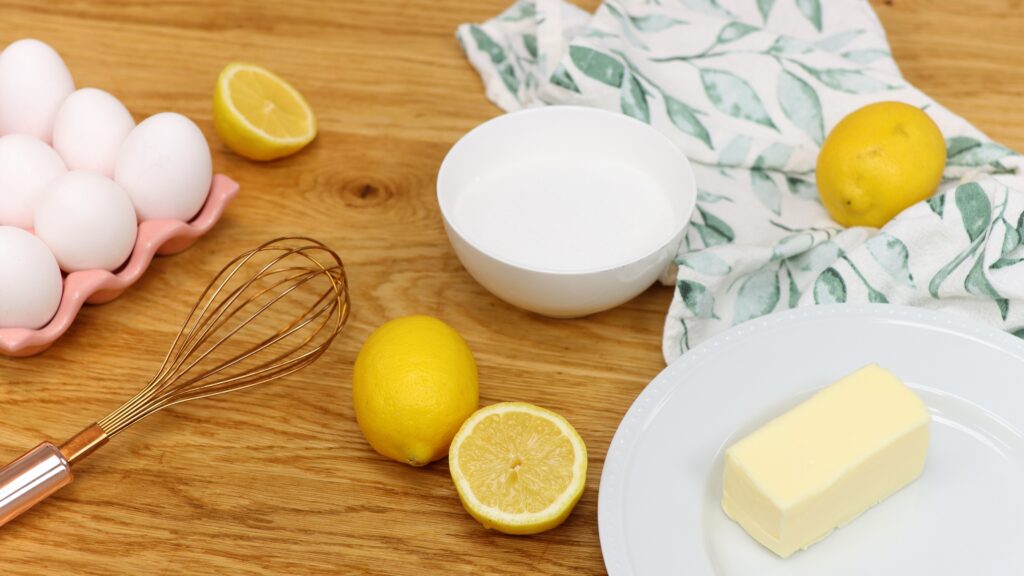
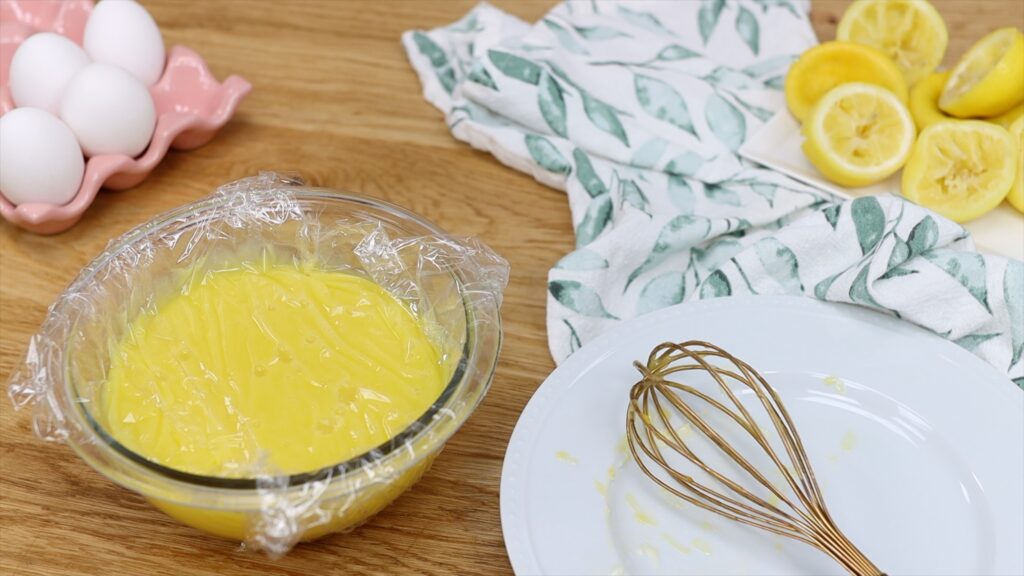
To make this cake even more lemony we’re going to make lemon curd. You’ll need lemon juice, lemon zest, butter, sugar, and eggs.
To prepare the ingredients, crack the eggs and cut your butter into small pieces so that it will melt easily. Zest your lemons and then squeeze them to measure out the lemon juice.
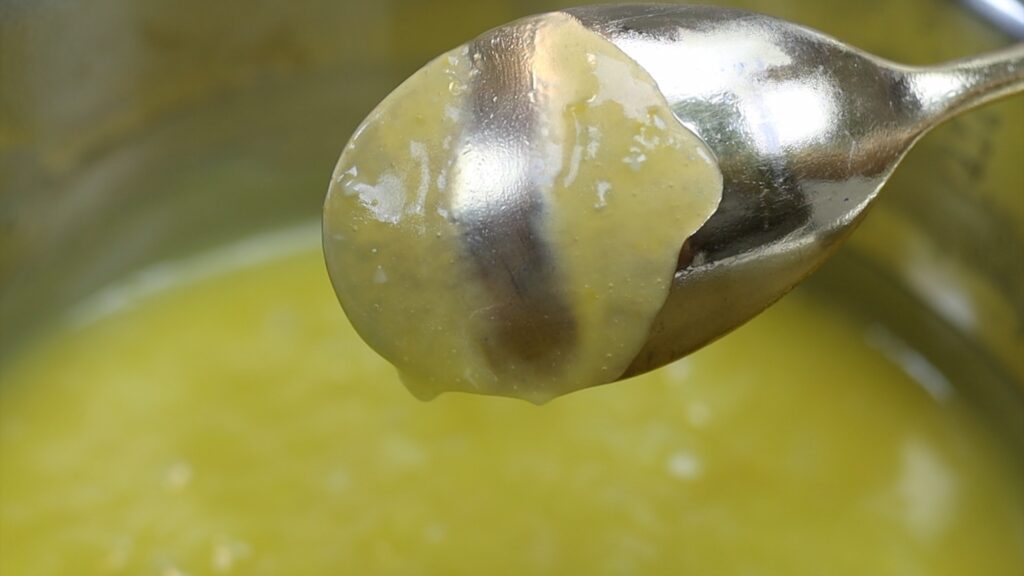
Put all of the ingredients into a small saucepan and heat over a low heat. The key to smooth lemon curd is to heat it very very gently so that the eggs don’t cook too fast and make the curd lumpy. It will take about 30 minutes to cook this and you need to whisk it as it cooks. Listen to a good playlist or podcast and don’t turn that heat up! You’ll notice the curd thicken as it cooks. To test if it's ready, dip a spoon into it and check the back of the spoon. It should be covered in a layer of curd that doesn't run off the spoon. If you wipe your finger through it, it will leave a clear trail.
Pour the curd through a sieve and then cover it with plastic wrap. Push the plastic down onto the surface to prevent a skin forming on the curd.
Put it in the fridge and it will thicken as it cools.
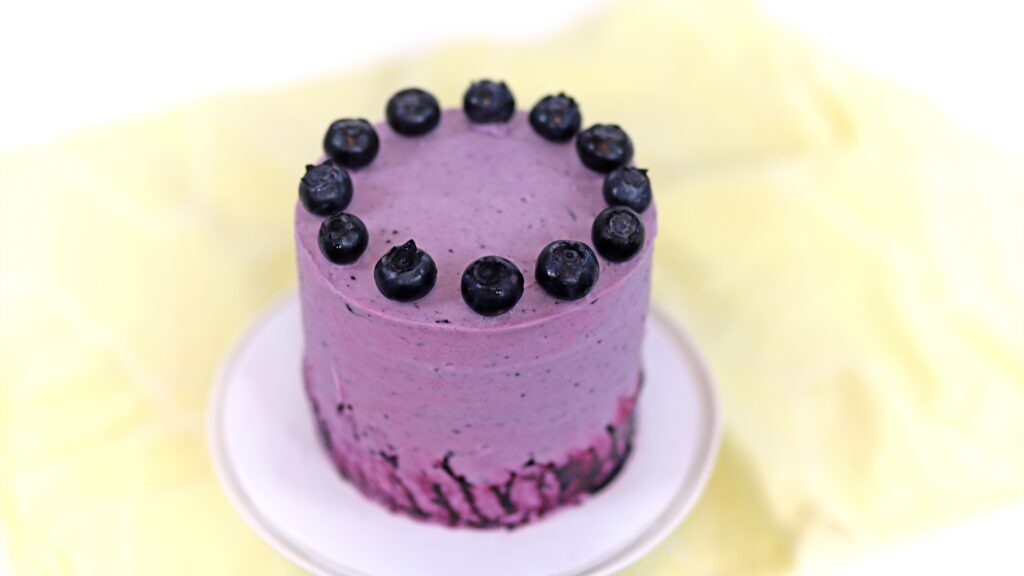
How to make blueberry buttercream
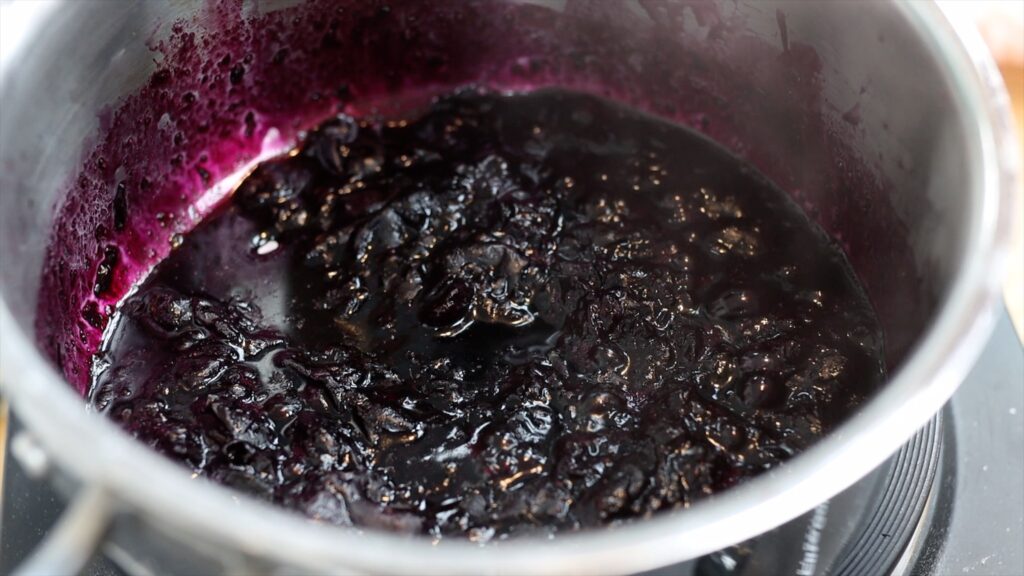
To make blueberry buttercream you can use fresh or frozen blueberries. Pour the blueberries in a saucepan with 1 tablespoon of water and 1 teaspoon of sugar. Simmer over medium heat, breaking down the berries with a potato masher or a fork. When the blueberry liquid starts to thicken, it’s ready.
Use a spatula or spoon to push the berry mixture through a sieve. You only want the liquid puree, not the blueberry skins. Leave the blueberry puree to cool and make your buttercream.
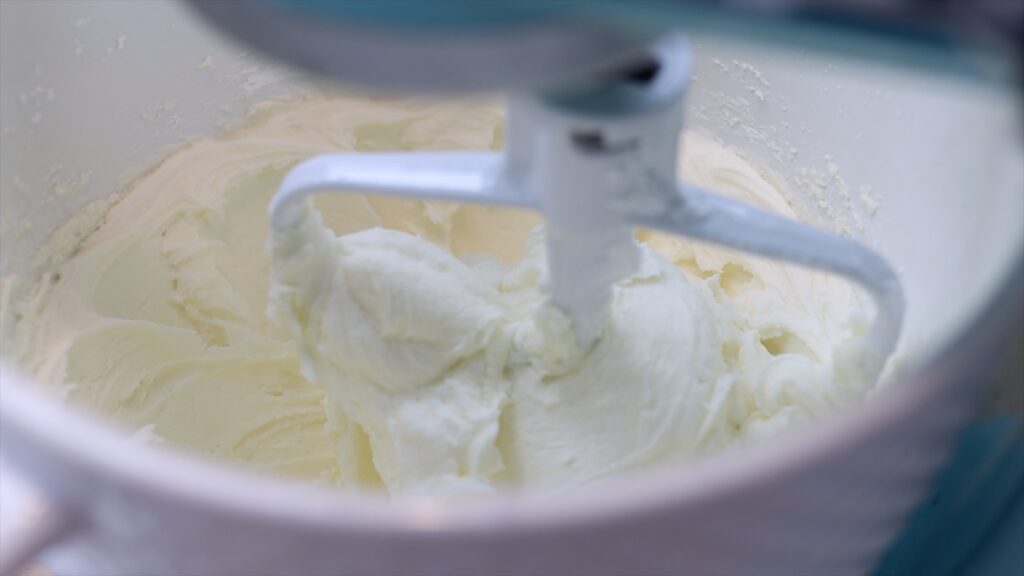
This recipe uses my 4 Minute Buttercream and it's very simple to make. Mix together room temperature butter and powdered sugar or icing sugar until it’s smooth and then add vanilla.
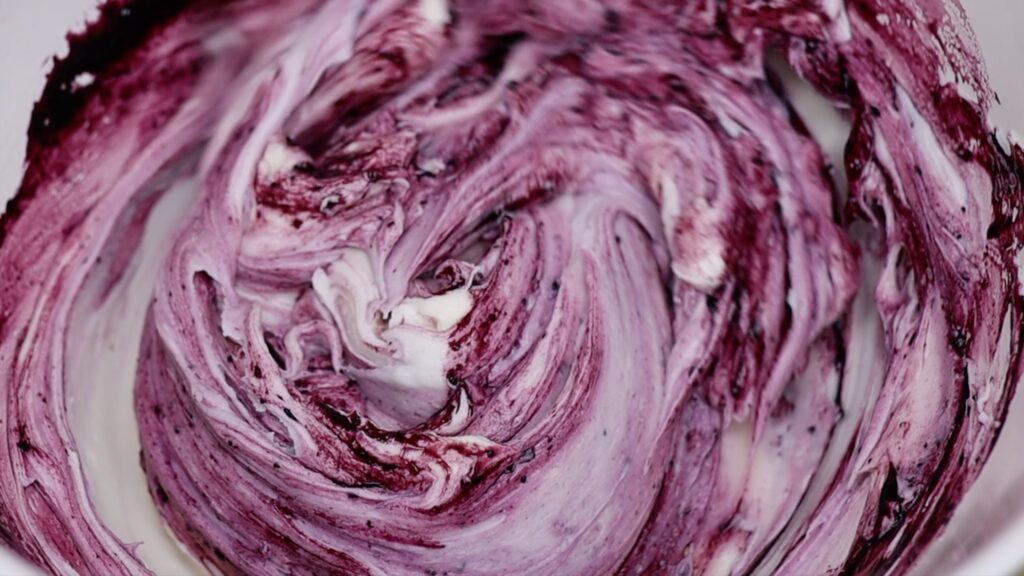
Normally you’d add milk or cream to thin it out but not for this recipe. Instead, add the cooled blueberry puree a teaspoon at a time to flavour and colour the buttercream. Stop adding it when the consistency is easy to stir and your spatula leaves smooth trails in it. If you add too much liquid you’ll make the buttercream runny and it won’t hold its shape. Look at this gorgeous colour!
Put a large star tip like an 8B into a piping bag. Fill the bag about 3/4 full with the blueberry buttercream. I love the little flecks of berry in this! The reason for straining the puree to keep the skins out is that the skins will clog the piping tip.
To assemble your lemon and blueberry cake, pipe a dot of blueberry buttercream on the middle of a plate or cake board. Press your first lemon cake layer into that. This will hold it in place. Note: a turntable is useful but not essential for this recipe!
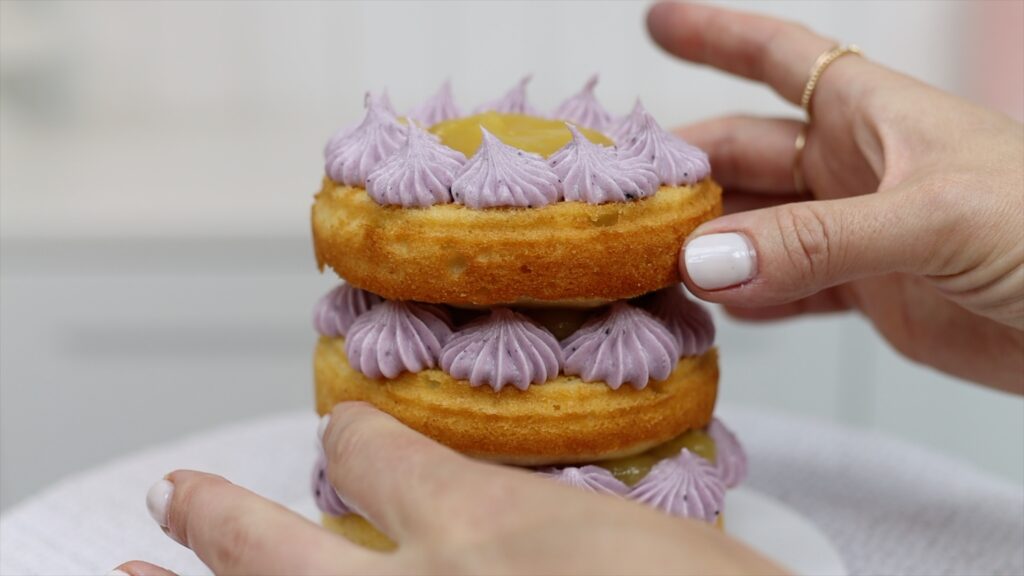
Pipe rosettes all around the outer edge of the cake, squeezing the piping bag to let the buttercream bulge out. Then pull up and away to make a peak on each rosette. Let the rosettes touch each other to form a wall around the edge of the cake and then spoon lemon curd into the middle.
For naked cakes like this with piped filling, I like to leave a slight dome on each layer. Also, I flip the layers over for the second and third layer. That way, the middle of each cake layer rests on the filling below it but the edges are slightly raised. This leaves more of the pretty colour and texture of the piped filling visible.
Make sure each layer is centered so it’s directly above the precious layer. This ensures a straight cake that doesn't lean.
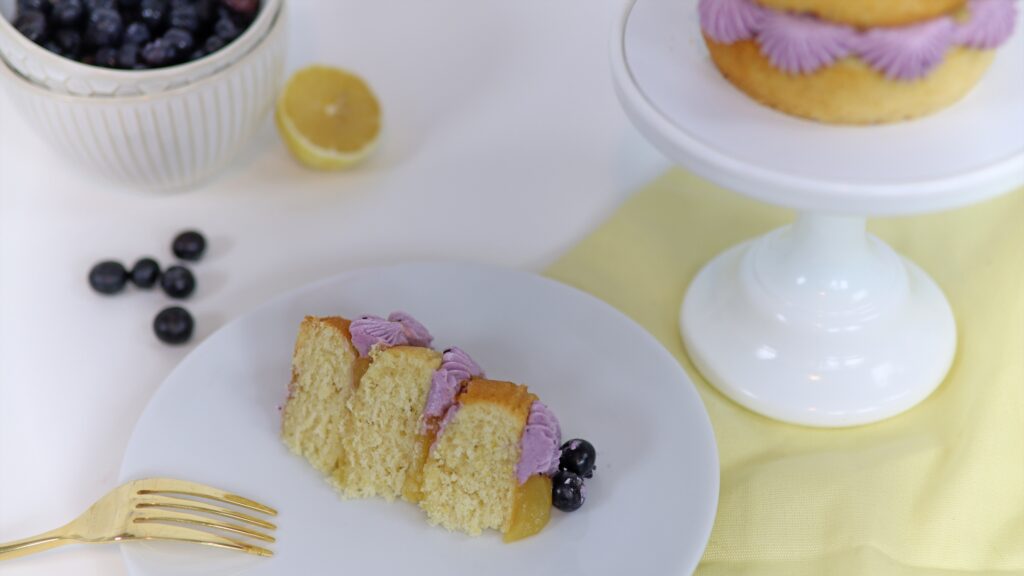
Top the cake with blueberries, which give you that burst of juice when you bite into fresh fruit. The piping and blueberries also help you cut your cake into equal portions by including one or two or three rosettes and blueberries in each slice.
Store the leftovers of this lemon and blueberry cake in an airtight container like a Tupperware in the fridge for a week. I’m confident it will all be eaten before then! The cake tastes best at room temperature so take it out of the fridge about two hours before you serve it.
Here's the recipe for a three-layer 6" Lemon Blueberry Cake. The same quantities will make four 4" cakes (also three layers each) or of course you can divide the recipe by 4 to make just one 4" cake. For a three-layer 8" cake you can double the recipe.
An irresistible combination of zesty lemon cake, tangy lemon curd filling, sweet blueberry buttercream and juicy fresh blueberries! Double this recipe to make a three-layer 8" cake.
Ingredients
UnitsScale
For the lemon cake layers:
1cupbutter
1 1/2cupswhite sugar
2 lemons
4 eggs
2 teaspoons vanilla
2cupsall-purpose (plain) flour
2 teaspoons baking powder
1/2cupsour cream
1/2cup whole milk (full fat)
For the lemon curd:
1 tablespoon lemon zest
1/3cup lemon juice (from about 4 lemons)
1/3cupgranulated white sugar
1/4cupunsalted butter, cut into small pieces
2 eggs
For the blueberry buttercream:
1/2cup fresh or frozen blueberries
1 tablespoon water
1 teaspoon white sugar
1cupbutter, room temperature
2 2/3cupspowdered sugar
1/2 teaspoon vanilla extract
For the garnish:
9-16 fresh blueberries
Instructions
To make the lemon cake layers:
In a mixer with a beater attachment, mix butter with sugar on medium speed until pale and creamy, about three minutes. Scrape down to the bottom of the bowl once during mixing to make sure no butter or sugar is stuck at the bottom.
Meanwhile, zest the lemons using a zester or the fine side of a grater. Add to the butter and sugar mixture and mix to combine. Add the eggs one at a time, mixing on the lowest speed after each egg until incorporated, about 30 seconds.
Add vanilla and mix on lowest speed for about 30 seconds to combine.
In a bowl sift and whisk together flour and baking powder. Add half of the mixture to the mixing bowl and mix on the lowest speed to incorporate.
Add milk and sour cream and mix into the batter. Add the rest of the flour mixture and mix only until just combined. The batter will be runny and pale in colour.
Grease three 6" pans and divide the batter between them. Tap the pans to flatten the batter or use a spatula to spread it flat.
Bake at 160ºC or 325ºF for 30 minutes or until a toothpick inserted into the middle of the cake comes out clean.
Let cakes cool in their pans for 5 minutes. Use a spatula to loosen cake from the edges of the cake pan and then turn onto a wire cooling rack. Leave to cool completely.
To make the lemon curd:
Put all of the lemon curd ingredients in a small saucepan over low or medium-low heat (depending on your stovetop). Bring to a simmer, whisking constantly until it thickens, which will take about 30 minutes. To test it, dip a spoon into it and it should coat the back of the spoon. Run your finger through that coating and you should leave a clear trail behind in the curd.
Pour the lemon curd through a sieve into a bowl, pushing through the sieve with a spoon if necessary.
Cover the bowl with plastic wrap, pushing it down to sit on the surface of the curd. Refrigerate for at least two hours and the curd will thicken more.
To make the blueberry buttercream:
Put the blueberries, water and white sugar in a small saucepan. Bring to a simmer over medium heat and mash the blueberries with a potato masher or fork. Simmer until the liquid thickens, about 5 minutes.
Pour the cooked blueberries into a sieve placed over a bowl and push the berries against the sieve using a spoon or spatula. Discard the blueberry skins and leave the blueberry puree in the bowl to cool.
Using an electric mixer, mix butter and powdered sugar on the lowest speed until smooth, about 4 minutes. Add vanilla and mix to combine.
Add the cooled blueberry puree a teaspoon at a time, mixing until the buttercream is easy to stir but still holds its shape.
Fit a piping bag with an open star piping tip like an 8B. Fill the bag no more than 3/4 full with blueberry buttercream.
To put it all together:
Pipe a dot of buttercream onto the middle of a plate or cake board and press your first layer of cake onto it. Pipe rosettes of the blueberry buttercream around the outer edge of the cake and spoon lemon curd into the middle.
Flip your next cake layer upside down and lower it onto the piping. Repeat the lemon and blueberry filling on this layer and then place the final layer on top, also upside down. Repeat the lemon and blueberry filling and gently press a fresh blueberry into the middle of each rosette.
Notes
If you don't have sour cream or milk you can omit both and substitute them with buttermilk.
You can refrigerate this cake for a week in an airtight container like a tupperware.
This cake is best served at room temperature! If you refrigerate it, take it out of the fridge two hours before serving it.
For a three-layer 8" cake, double this recipe (click "2X" at the top of the recipe).
Here are 14 useful time saving cake hacks to make you more efficient and productive, whether you’re making one cake or several at the same time. It doesn’t need to take all day to decorate a cake!
#1 Chill your cake
Before you frost a cake, put it in the freezer for 15 minutes. You can do this with the layers before you assemble the cake or with the entire cake after assembling it. Cold cake layers are firmer than when they're at room temperature. This means you’ll find it much easier and quicker to frost the cake when it’s cold than when it’s at room temperature. With this small time saving cake hacks you'll spend less time assembling, crumb coating and frosting your cakes. You’ll notice that when you spread frosting onto cold cake layers, the cake doesn’t wobble from side to side or slide around on the cake board. Also, fewer crumbs will come off the cake into the frosting than when the cake layers are at room temperature.
You can even put the cake in the fridge or freezer the day before, if you want to space out the cake making process. Wrap the layers in cling film or saran wrap before chilling so that they don’t dry out.
#2 Pipe your frosting
Instead of spreading filling and frosting onto a cake, try piping it on. Piping is much faster and will save you a few minutes for each cake you fill, crumb coat, and frost. You don’t even need any piping tips to do this! Just use the hole cut off the end of the piping bag to squeeze the frosting through straight onto the cake. I used my 4 Minute Buttercream for all of the cakes in this tutorial but piping works with any kind of frosting.
#3 Organize your tools
Organizing your tools will save you lots of time for every cake you decorate because you’ll know exactly where everything is. Try putting bottles of colour in a case with dividers that keep the bottles upright so that they don’t fall over and leak and then stain your hands. If you have lots of bottles, lining them up in rainbow order will make it even quicker to find the one you’re looking for.
Stand your cake combs upright in a divider intended for lids of pots and pans or Tupperwares. This way you can see what you have and quickly pick up the one you want. Stencils are easy to find when they’re in a folder with clear plastic wallets, so you can flick through them effortlessly before choosing one. Piping tips are also easier to see and choose when they’re separated instead of tossed into a large box, so you don’t have to dig around to find the right one. I have a full tutorial with more hacks for storage and organization of cake decorating supplies.
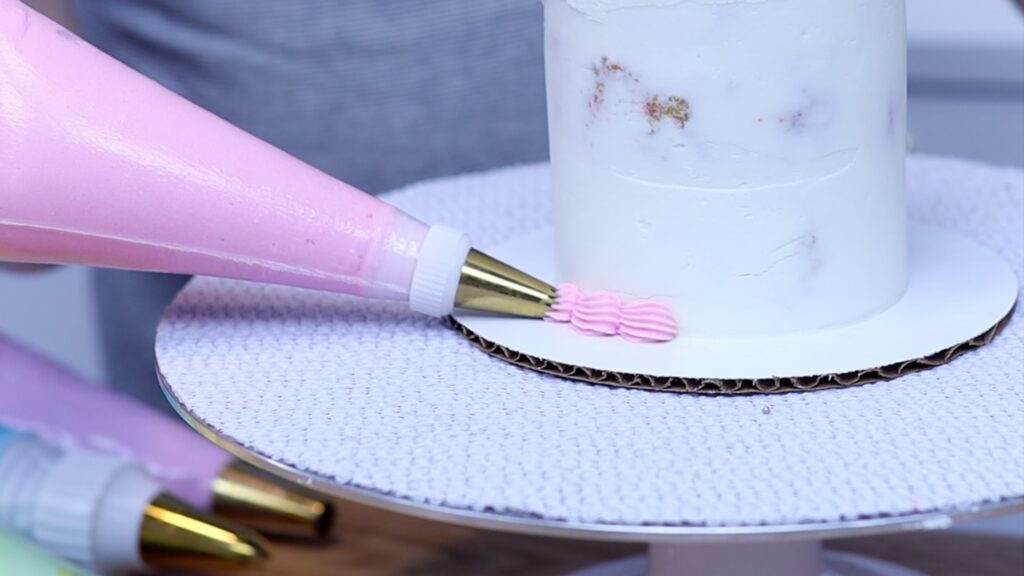
#4 Re-tint leftover frosting
When you’ve finished using frosting for a cake, add more colour to tint to for the next frosting or decorative detail. For the cake above I used light blue buttercream to frost the cake and then added more blue gel to the leftovers to make the darker blue filling between the stripes. By using leftover frosting you’ll save time because you’ll need to make less frosting and also wash fewer bowls and spatulas!
#5 Make buttercream in advance
Did you know that you can freezebuttercream? That means you can make double or triple batches in advance and store them for up to two months! I like to use a large ziploc bag, which lies flat in the freezer and hardly takes up any space. Take it out of the freezer a few hours before you’re ready to use it to let it thaw and then stir it until it's smooth.
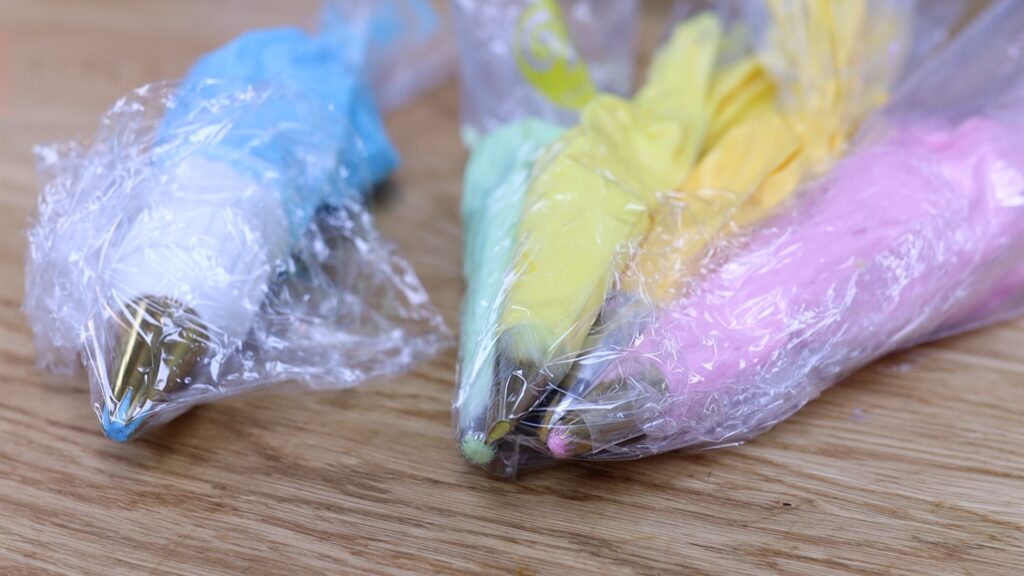
#6 Prepare piping bags ahead of time
You can also prepare piping bags in advance if you’re using buttercream because buttercream can be stored at room temperature for two days. Twist the tops of the bags and cover the tips with cling film or Saran Wrap so that the buttercream doesn’t dry out and crust.
#7 Use couplers
If you’re not using couplers in your piping bags, you’re wasting a lot of time! Drop a coupler into a piping bag and put a piping tip over the outside of the bag. Screw it on using the coupler ring. Fill the piping bag with frosting as normal and now you can switch easily between different piping tips and different colours! Just unscrew the piping tip instead of having to empty out the whole piping bag to get to it. Here’s a hack for super speedy switching of piping tips between piping bags: don’t bother cleaning the piping tip! Squeeze the new piping bag to push the old colour through the tip and when the new colour comes through the bag, it’s ready! Couplers make things much quicker for rainbow cakes and any designs with lots of colours or textures or both! For 4 reasons to use couplers, check out my tutorial on how to use couplers.
#8 Multiple tips
For any piping tips you use often, like the 1M star tip above, buy several of them. Now you can move onto the next colour or stage of your design or the next cake without having to wash and dry the piping tip first.
These tips are really cheap to buy so it’s not a big investment to buy several but it will save you a significant amount of time.
#9 One bag piping
Have you heard of one bag piping? I made up the name so probably not but it’ll make sense in a moment. For ombre or watercolor frosting, where different colours or shades bend together, you can save time by putting all of those colour or shades into the same piping bag.
The layered look is pretty in the piping bag and also on a cake, creating effortless blended frosting that looks like it took much longer to achieve. Use the same technique for blending colours in swirls piped onto the top of a cake or for piping borders around the bottom of the cake. With this technique you'll add lots of detail in seconds.
#10 Prepare decorations
If you’re making more than one cake using the same technique or ingredients, make those ahead of time together. For example, measure and cut out all of your parchment paper stencils for upcoming cakes at the same time.
If you need to make meringues as cake toppers for several cakes, make them all together so that you only have to mix, pipe, and clean up once. Then freeze the meringues in an airtight container until you’re ready to decorate the next cake or cakes.
#11 Dirty tools
While you’re frosting and decorating, keep a container next to you where you can toss dirty tools when you’re finished with them. This keeps your workspace clear and makes cleaning up and washing up much quicker.
#12 Bulk baking and frosting
This is one of my favourite time saving cake hacks! Making cakes in bulk means you can mix and bake big batches of cake batter, which is more efficient than doing different batches on different days. Then wrap the layers in cling film or Saran Wrap and freeze them for up to two months.
If I’m decorating several cakes in a week, I like to divide my schedule so that I assemble and crumb coat cakes on one day. On a different day I frost and decorate cakes. This way, you’re using the same tools and materials for the same task and that makes everything much quicker. You'll also keep cleaning up to a minimum.
#13 Music for speed
Lastly, find something that works for you to make you more productive. I like to have fast music playing in the background to make me move faster!
#14 Challenge yourself with goals
I like to set a timer for each stage of my day as an incentive to finish the task within a deadline. This makes me work faster and I enjoy the challenge, too!
For hundreds more tips, cake designs and decorating techniques, check out my online cake school and join my ClubPLUS for access to every MiniCourse, MasterCourse and Live Workshop!
With just one batter to make, this easy marble cake is exactly that - easy! Chocolate and vanilla cake are marbled together and sandwiched between layers of vanilla buttercream. Then it's all covered up with chocolate buttercream. Yum!
How to mix this easy marble cake batter
Start by gathering your ingredients. Everything should be at room temperature which means taking your butter, eggs, and buttermilk out of the fridge at least two hours before you use them.
Mix the butter and sugar together on medium speed for about three minutes, until it gets much lighter in colour. It should look creamy and fluffy. Scrape down to the bottom of the mixing bowl to scoop up any sugar that the mixer hasn’t caught. Otherwise,you'll have lumps of gritty sugar in your batter.
Next add the room temperature eggs one by one, mixing for 30 seconds after each egg. Being at room temperature and adding them one at a time will help them incorporate easily into your batter. This makes the cake light and fluffy.
After the eggs comes the vanilla. Real vanilla instead of artificial vanilla will give you the richest flavour in your cake. Once that’s mixed in, you’ll need half of all of the dry ingredients. These are all-purpose flour, baking powder and baking soda. Pour this portion of the dry ingredients into the mixing bowl and mix at the lowest speed until you can’t see flour in the batter anymore. Scrape around the sides and bottom of the mixing bowl to mix in any flour clinging there. Then mix for a few more seconds, still using the lowest speed.
How to turn this batter into chocolate and vanilla
Now we’re going to divide the batter and there are three ways of doing this. You can weigh the batter, measure it with measuring cups, or guess/eyeball it! The most precise is to weigh the batterusing a scale until you get exactly half of the total amount. Set this batter aside to make the chocolate batter later, after you finish preparing the vanilla batter in the mixer.
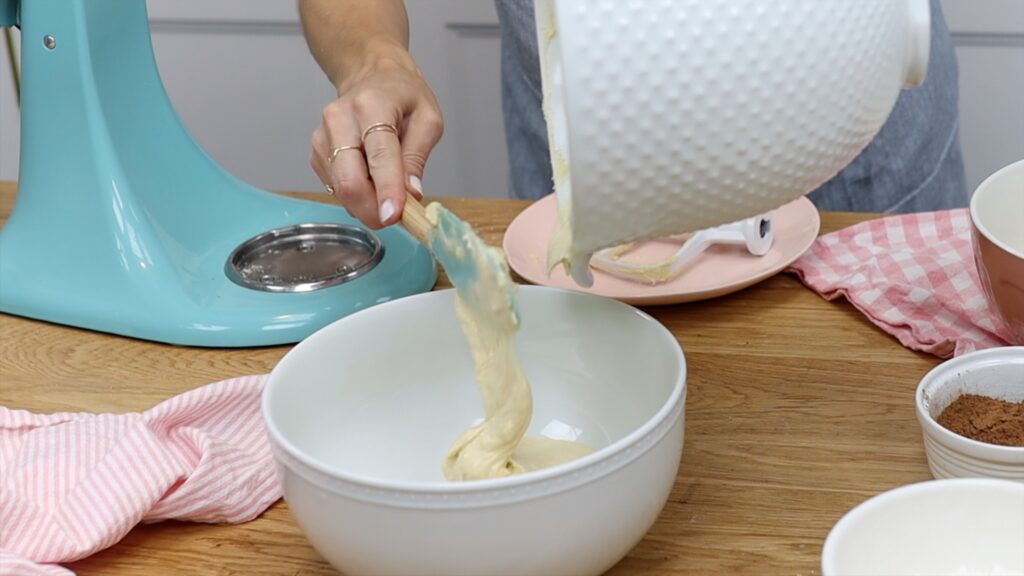
Add buttermilk and oil to the vanilla batter in the mixer, mixing until everything’s incorporated. You really don’t want to overmix the batter after you’ve added any flour. Overmixing makes the cake dense and tough. Add a quarter of the dry ingredients, also mixing that only until it’s all incorporated. Now the vanilla batter is ready! Pour it into another bowl and then transfer the other half of the batter back into the mixer. This will be the chocolate batter.
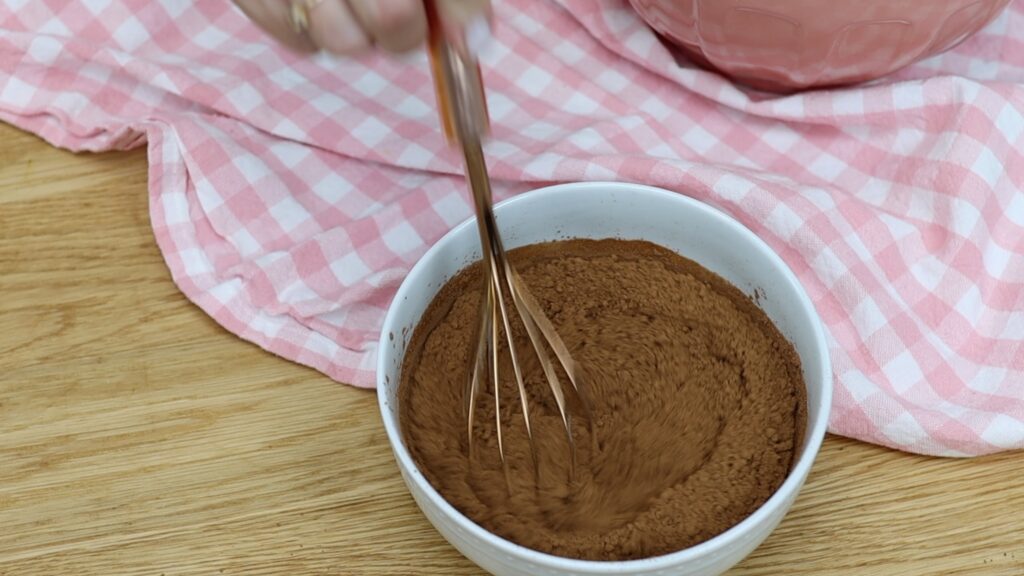
To make the batter chocolatey we need cocoa powder, mixed with water to make quite a thick liquid. Whisk it together or use a fork to stir until the cocoa powder dissolves completely. The liquid should be smooth with no lumps.
It’s easiest for the cocoa powder to dissolve if the water is hot. If you do use hot water, wait for the mixture to cool before you add it to the batter.
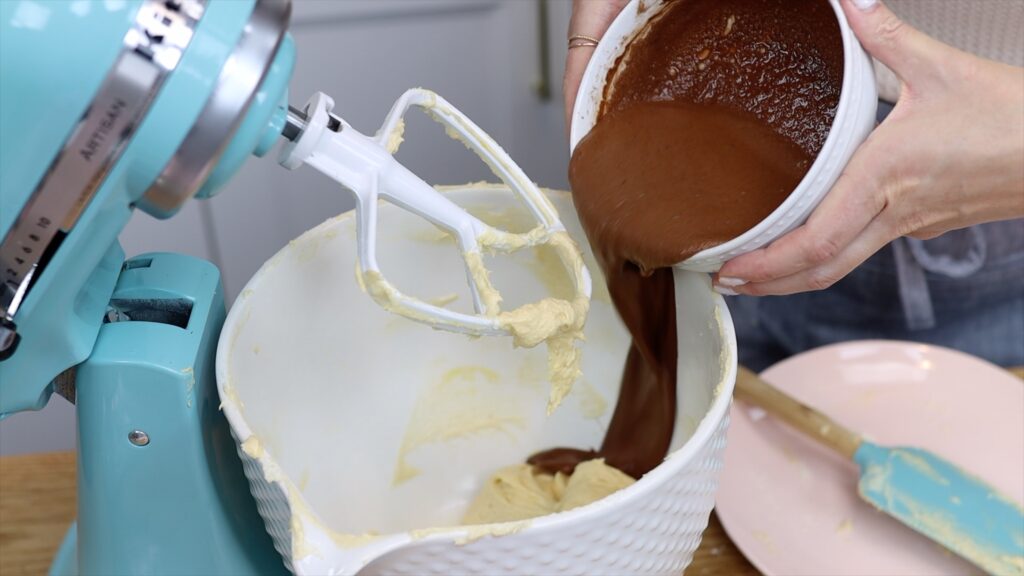
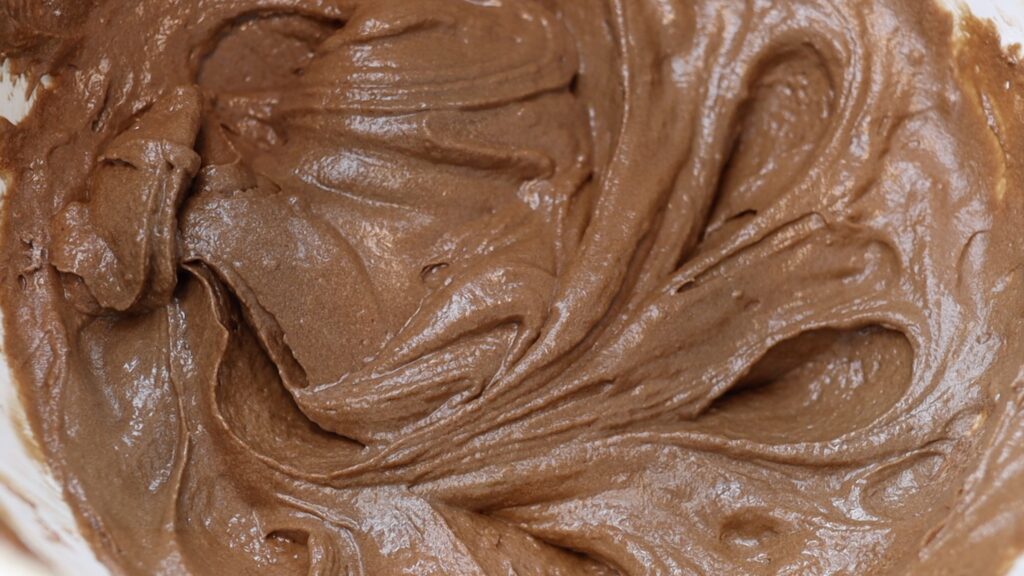
Mix on the lowest speed until the cocoa mixture is incorporated. Then add the rest of the dry ingredients and mix on the lowest speed until those are incorporated. You’ll probably have to scrape down to the bottom of the bowl to gather up the flour stuck down there. Just like with the vanilla part of the batter, don't overmix after adding the flour. As soon as you don’t see any white specks of flour in the batter, turn the mixer off.
Marble the cake layers
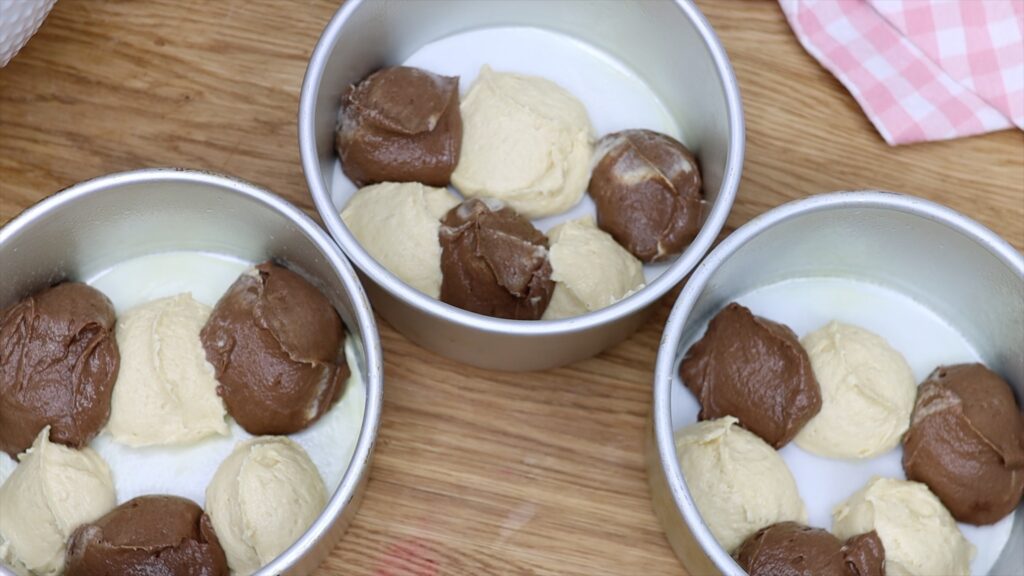
Now that we have the vanilla and chocolate batter, let’s get this party started! Divide the batter between three cake pans which you’ve greased with an oil spray or butter. Alternate between the vanilla and chocolate batter in each pan. I like to use an ice cream scoop for this part.
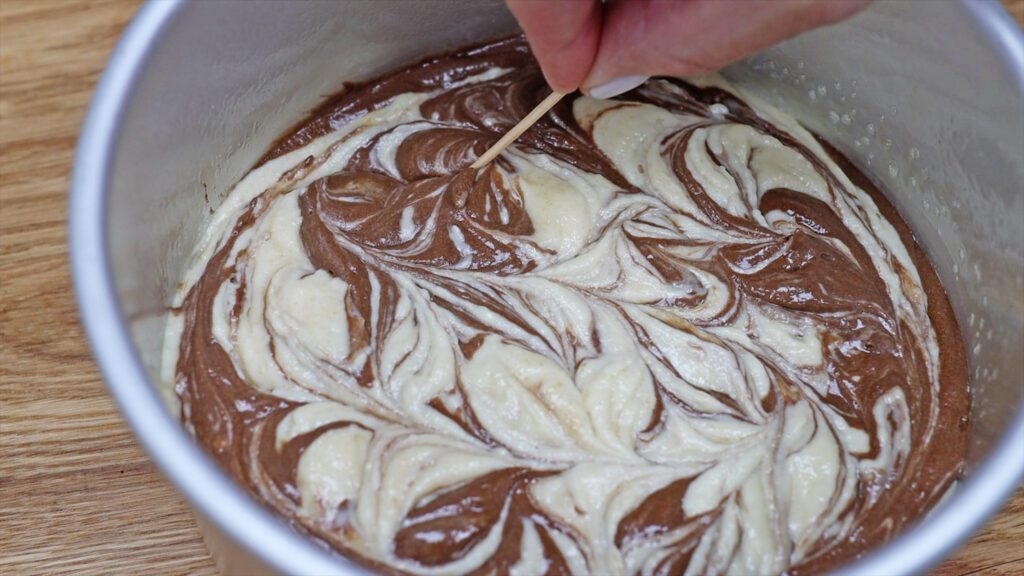
To marble the batter, drag a toothpick or the end of a spatula back and forth through the batter. Make sure you push down to the bottom of the pan so the marbling goes all the way through the cake layers. If you’re using a toothpick or anything else really thin you’ll need to go back and forth in several directions to get a good marble effect. This will look stunning when we cut into it!
Bake the easy marble cake layers
Bake the cakes at 350F or 175C until the middle doesn't wobble when you shake the pans. To double check, stick a toothpick into the middle of each layer. f it comes out clean, the cakes are baked. If there are smears of raw batter on the toothpick, bake them for two more minutes before checking again.
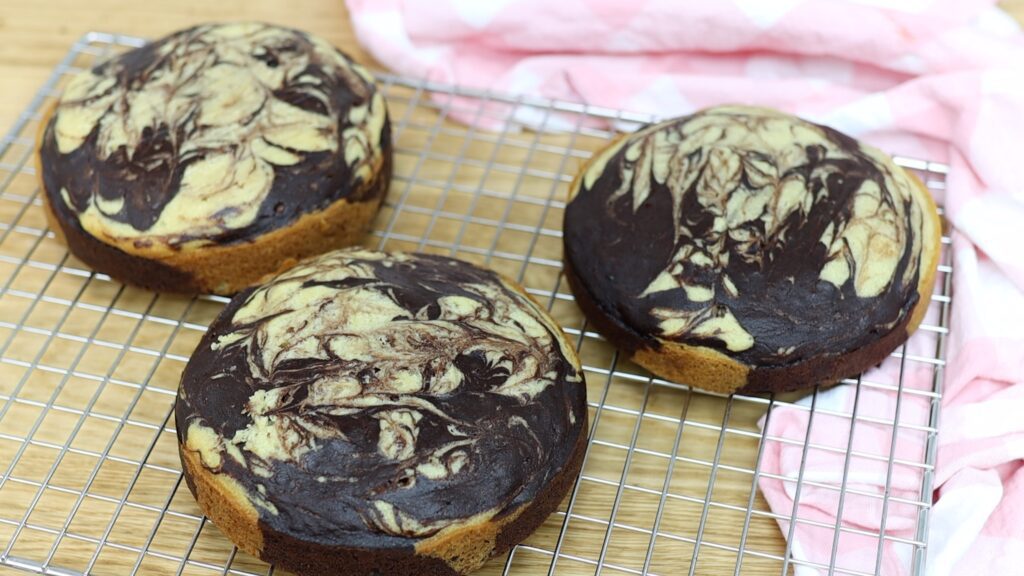
When you take the pans out of the oven, let them rest in the pans for five minutes. This way they'll firm up slightly and won't crack when you turn them out of the pans. Turn the pans over to flip the cakes onto a wire rack to cool. If you leave them in the pans for too long the cakes will continue to bake and might stick to the pans as they cool. By turning them onto a wire rack they’ll cool more quickly because the rack allows air to go underneath them.
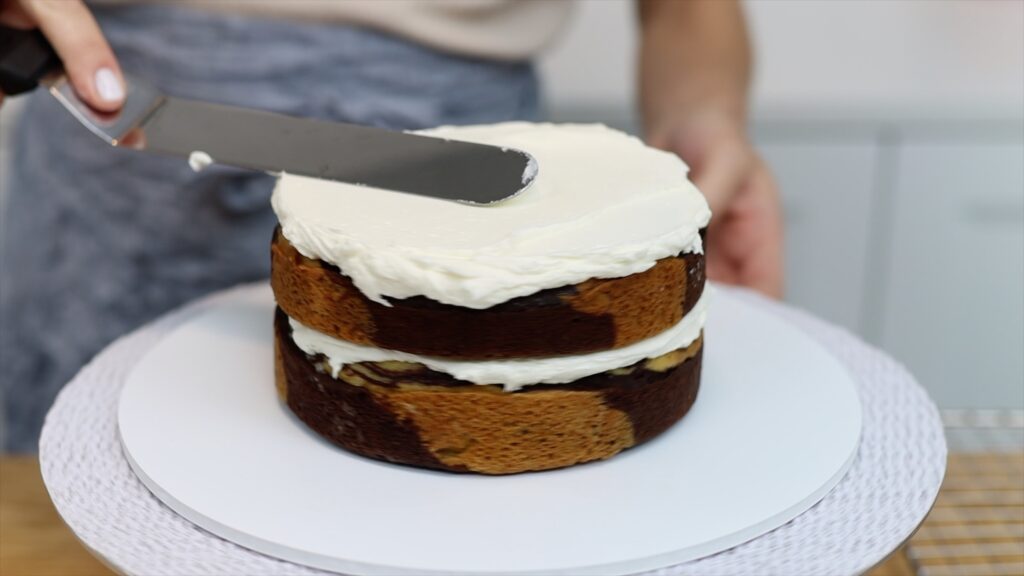
How to assemble this easy marble cake
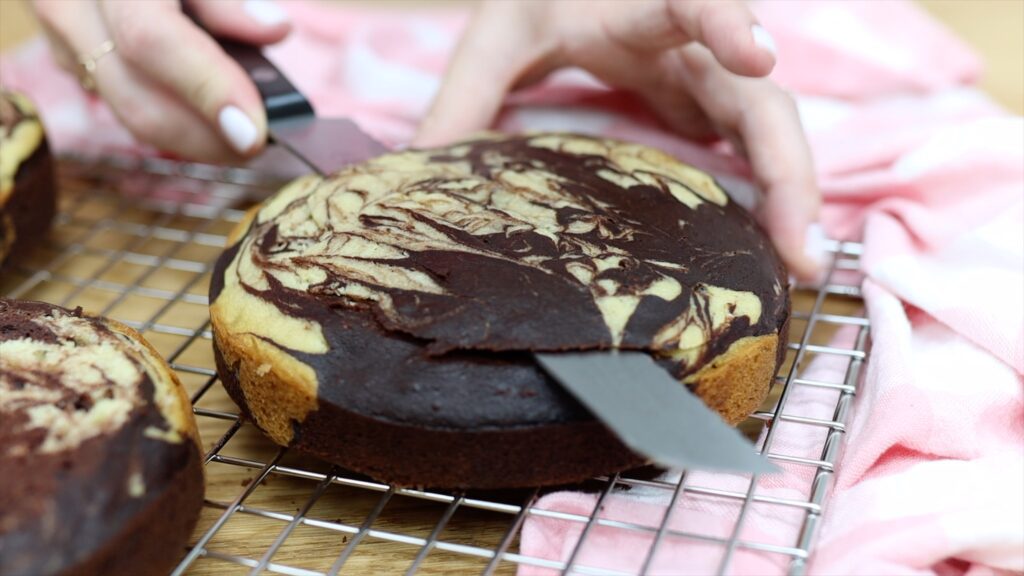
After the cake layers cool you can level them if you like. This will make them completely flat and that will make for a prettier slice when you cut into the cake. To level the cake layers, slice around the top with a serrated knife like a bread knife.
As long as you don't overbake this cake, it is incredibly moist. It's not very sweet so you can use any filling and frosting without making it overly sweet. My favourite combination is vanilla buttercream for the filling between the cake layers and chocolate buttercream as the frosting. To make the buttercream, mix butter and powdered sugar together until smooth. Then add vanilla to flavour it and milk to thin it out slightly. Use about a quarter of it to fill the cake, saving about half a cup for decorations at the end.
To assemble the cake, spread or pipe a dot of buttercream onto a cake board. Press your first layer of cake into the dot. Spread or pipe vanilla buttercream onto the cake layer and then place another layer of cake on top. Repeat with another layer of filling and the third cake layer.
How to frost this easy marble cake
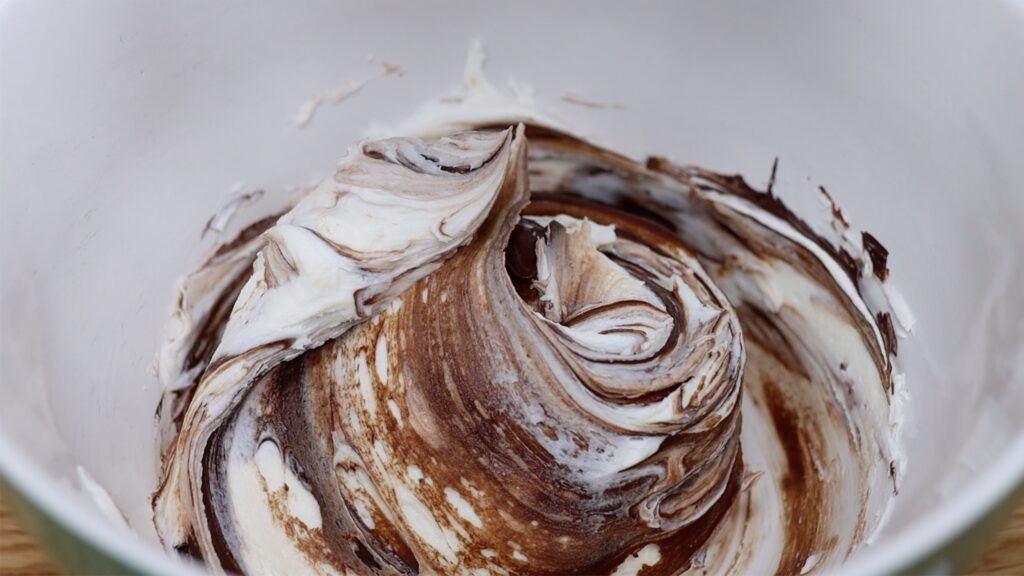
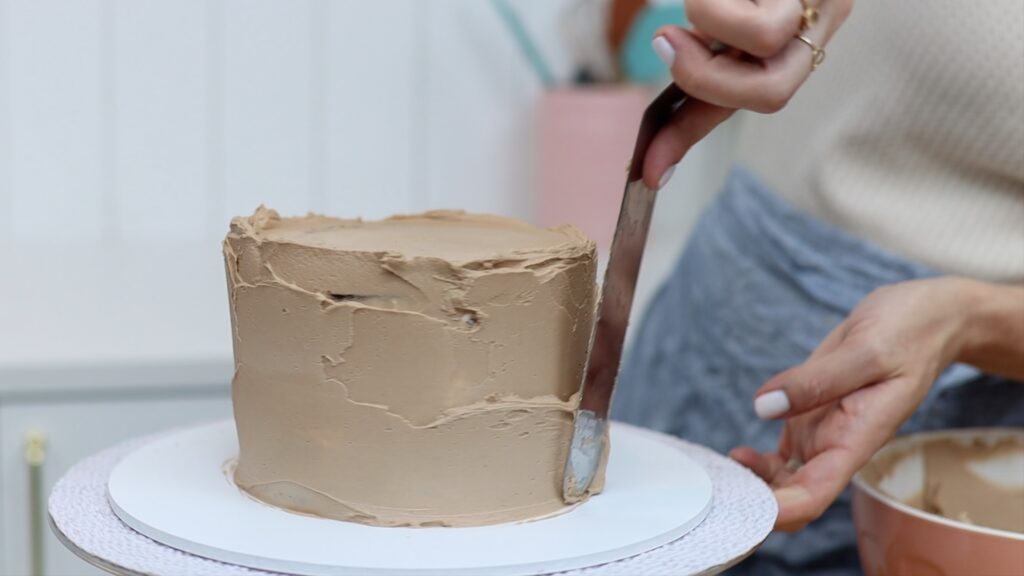
To make chocolate buttercream to frost the cake, melt chocolate chips in the microwave. Use 80% power for 30 seconds at a time so that the chocolate doesn't overheat and seize. Stir the melted chocolate until it's smooth and then let it cool before adding it to the remaining buttercream. Keep stirring until there are no streaks of melted chocolate in the buttercream.
To prevent crumbs in your frosting you can chill your cake layers in the freezer for 15 minutes before frosting them. This makes them firmer and less crumbly. I always recommend applying a crumb coat, which is a really thin layer of frosting to trap any the crumbs that come off the cake. By doing this before applying your final layer of frosting, no crumbs will get into the visible outer layer of frosting on the cake.
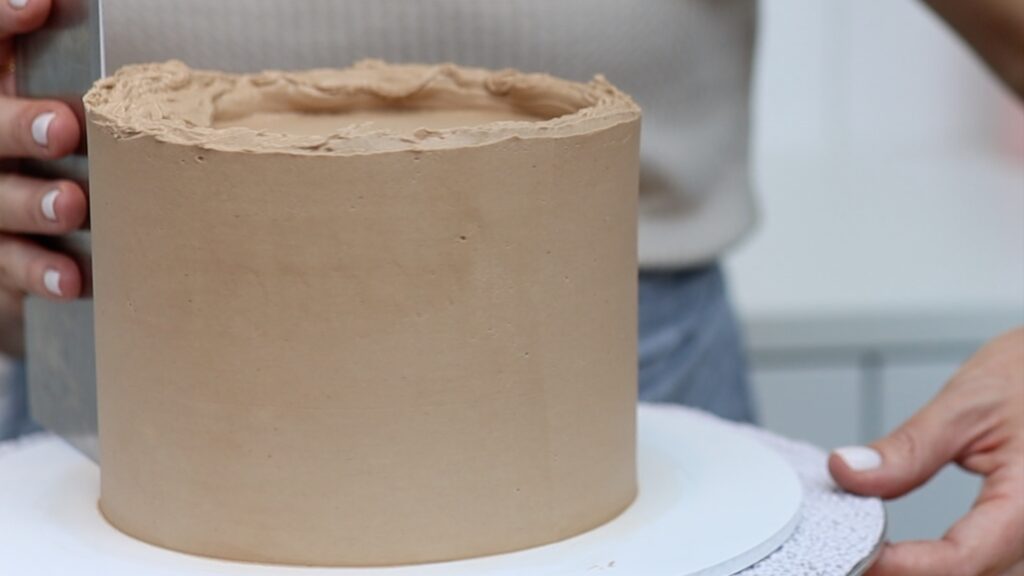
How to decorate the cake
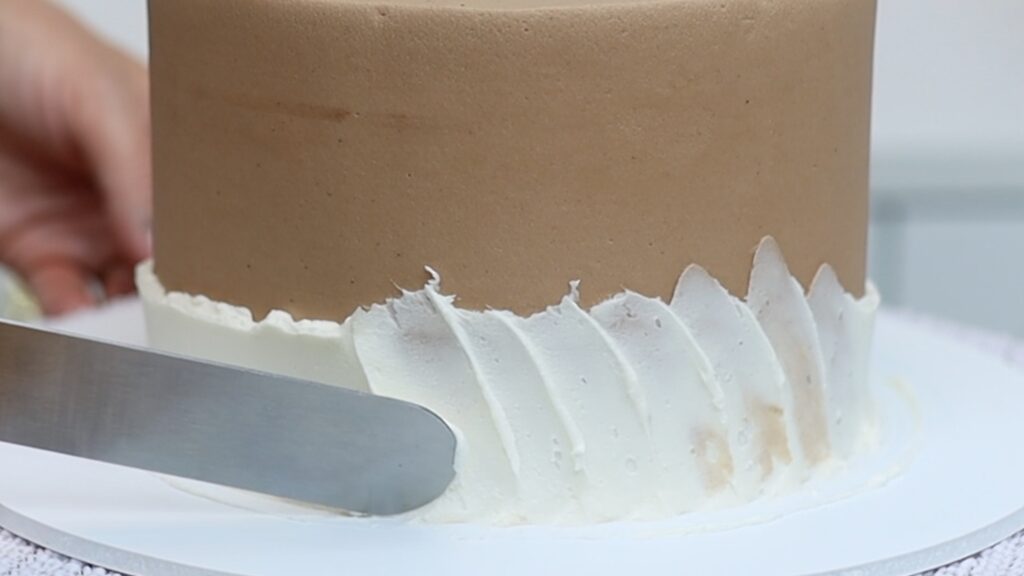
As a finishing touch, show that there is both vanilla and chocolate inside this cake. Using the vanilla buttercream you set aside earlier,spread or pipe a thin layer around the bottom of the cake. Use the tip of your offset spatula to swipe the vanilla buttercream upwards in a diagonal all around the cake.
When you notice the frosting building up on your offset spatula, scrape it off into a bowl before you continue. You only need light pressure for this.I f you push so hard that you expose the chocolate frosting through the vanilla, just go over that area again and any buttercream on your spatula will cover it up.
Storing and serving this Easy Marble Cake
You can store this cake for two days in the fridge but it tastes best at room temperature. If you refrigerate it, I recommend taking it out of the fridge 2-4 hours before serving.
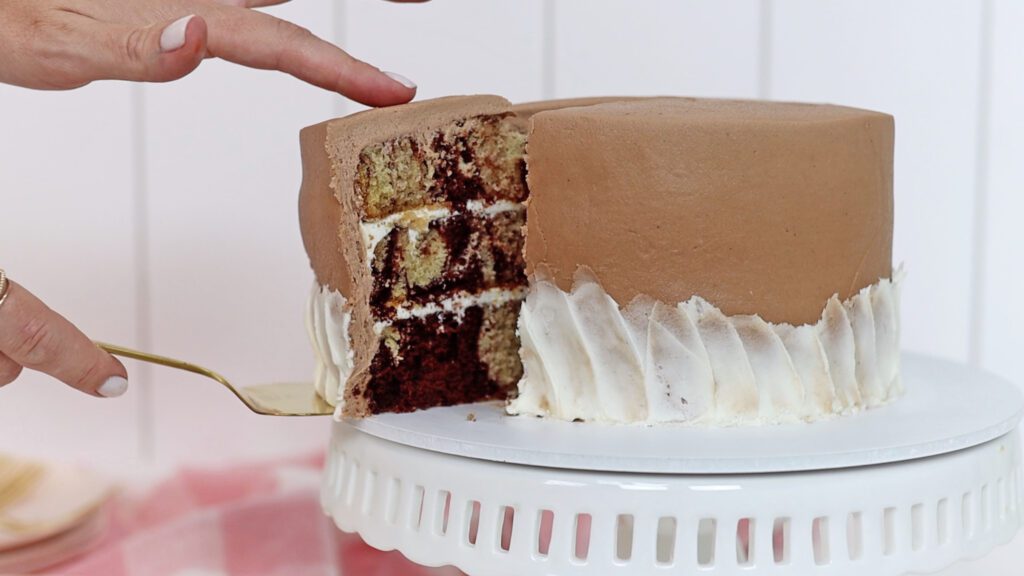
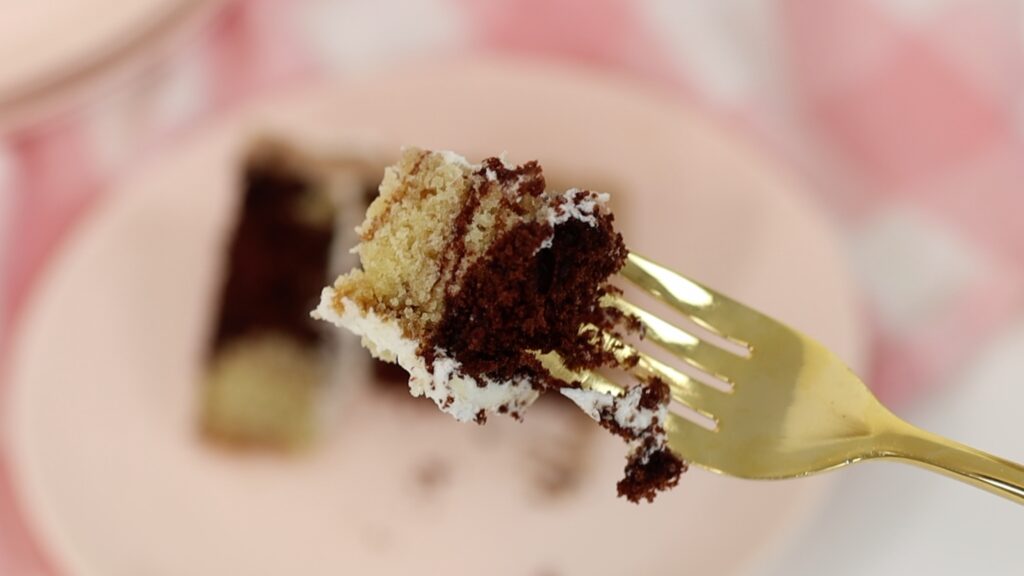
Now let’s cut into this beauty! Look at that beautiful marbling!
I hope you love this Easy Marble Cake as much as I do! If you make it, please leave a review and tell me what you think in the comments!
You'll find the recipe for this Easy Marble Cake below, with measurements for the ingredients in cups and also in grams. Switch between units of measurement by clicking the "US" (for cups) and "M" (for metric grams and ml) at the top of the recipe. You can adjust the recipe to make larger cakes by clicking the "1X" for a six inch cake or "2X" for an 8 inch cake.
In this one-batter recipe, chocolate and vanilla cake are marbled together and sandwiched between layers of vanilla buttercream, covered with chocolate buttercream. Yum!
Ingredients
UnitsScale
For the cake batter:
3/4cupbutter
1 1/2cupsgranulated sugar
3 eggs
1 tablespoon vanilla
1cupall-purpose flour
1 1/2 teaspoons baking soda
1/2 teaspoon baking powder
1/8 teaspoon salt
For the vanilla batter:
1/3cupbuttermilk
2 tablespoons vegetable oil
1/2cupall-purpose flour
For the chocolate batter:
1/3cupcocoa powder
3/4cup hot water
1/2cupall-purpose flour
For the filling and frosting:
1 1/2cupsunsalted butter at room temperature
4cupspowdered sugar
1 teaspoon vanilla extract
1/2 teaspoon salt
1-2 tablespoons milk or cream
1/3cupchocolate chips
Instructions
To make the marble cake layers:
In a bowl, whisk together hot water and cocoa powder until the cocoa powder has dissolved. Set aside to come to room temperature.
In a mixer with a beater attachment, mix butter with sugar on medium speed until pale and creamy, about three minutes. Scrape down to the bottom of the bowl once during mixing to make sure no butter or sugar is stuck at the bottom.
Add eggs one at a time, mixing on the lowest speed after each egg until incorporated, about 30 seconds.
Add vanilla and mix on lowest speed for about 30 seconds to combine.
In a bowl sift and whisk together 1 cup flour with baking soda, baking powder and salt. Add to the mixing bowl and mix on the lowest speed to incorporate.
Pour or scoop half of the batter into a separate bowl. You can pour it straight into a measuring jug (it will be be 1 1/3 cups batter) or into a bowl on a scale (it will weigh 325g). Set this aside to make the chocolate batter later.
Add the buttermilk and oil to the mixing bowl and mix on the lowest speed to combine. Add 1/2 cup flour and mix on the lowest speed until you can't see flour in the batter, about 30 seconds.
Grease three cake pans and divide the vanilla batter between them, using an ice cream scoop or spooning it into blobs spread out around each pan.
Pour the set-aside batter back into the mixing bowl and add the cocoa powder mixture. Mix on the lowest speed to combine. Add 1/2 cup flour and mix until batter is smooth, about 30 seconds.
Using a measuring cup or ice cream scoop, divide the chocolate batter between the pans by adding it in blobs in between the vanilla batter. Use the handle of your spatula or a toothpick to swirl the batter, going all the way down to the bottom of each pan. Tap each pan on the counter to knock any air bubbles out of the batter.
Bake at 175ºC or 350ºF for 26 minutes or until a toothpick inserted into the middle of the cake comes out clean.
Let cakes cool in their pans for 5 minutes. Use a spatula to loosen cake from the edges of the cake pan and then turn onto a wire cooling rack. Leave to cool completely.
To make the frosting:
Mix butter and powdered sugar on the lowest speed until smooth. Add vanilla, salt and milk and mix to combine.
Heat the chocolate chips in the microwave at 80% power for 30 seconds at a time, stirring after each time, until smooth. Set aside to cool.
To put it all together:
Spread a dot of buttercream onto the middle of a cake board and press your first layer of cake onto it. Spread vanilla buttercream onto the first layer of cake and place the next layer on top. Repeat with another layer of filling and the final cake layer.
Set aside 1/2 cup of vanilla buttercream. Add the cooled melted chocolate to the rest of the buttercream, stirring until there are no streaks of melted chocolate in the buttercream.
Frost the cake with chocolate buttercream, applying a thin layer first (a crumb coat) and letting it set at room temperature for 30 minutes or in the fridge for 15 minutes before applying a final layer.
As soon as you've finished frosting the cake, use the remaining vanilla buttercream to spread or pipe a thin layer around the bottom of the sides of the cake. Using gentle pressure, rest an offset spatula or the back of a spoon on the cake board and drag it diagonally upwards to create texture in the vanilla buttercream, repeating the motion all around the cake.
Notes
You can refrigerate this cake for two days after making it.
This cake is best served at room temperature! If you refrigerate it, take it out of the fridge 2-4 hours before serving it.