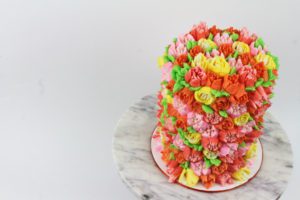
I’m going to show you 6 piping techniques to frost a cake with gorgeous texture and you don’t need a
I’ll be using a petal tip for all of these techniques. A petal tip looks like a teardrop with a narrow and a wide end. They come in lots of different sizes – I used a #104 for this 6” cake but for an 8” cake I would use a #125.

To use it, drop it into a piping bag and score a line around the middle of the piping tip with a pair of scissors.

Push the piping tip back up and out of the way and then cut along the line to snip off the end of the piping bag. Push the piping tip back down to the end of the bag and you should see about a third of the piping tip sticking out. Now it’s ready!

Fold over the top of the piping bag and spoon your frosting into it, and this keeps the top of the piping bag clean so you don’t get frosting on your hands when you pipe.

To colour your frosting I recommend using gels, which are more concentrated than liquid colours so you can make really bright and bold colours with just a few drops of colour.

If you’re using several colours of frosting you can prepare them all now if you have several piping tips, or clean the piping tip after each colour and re-use it with the next colour. If you have couplers you can switch the piping tip between different piping bags and I cover that in lots of detail in the module on Piping Bag Basics in my online course on 50 Easy Cake Decorating Techniques for ANY Skill Level.

You’ll need a crumb coated cake and if you’re going to use several textures on the cake, score guidelines into the frosting to divide it into sections for each texture.

Don’t forget the top of the cake! Connect the lines that are opposite each other on the cake to divide the top of the cake into pie-shaped sections.

This first technique creates rows of ribbons going up the cake. Your petal tip will have a narrow end and a wide end. Hold it with the narrow end pointing away from the cake and the wide end pressed against the cake and rest it down on the cake board. Squeeze the bag to push the frosting out and slowly wiggle the bag upwards and downwards as you pull it gradually away from where you started, around the side of the cake.

Try to make each ribbon the same height as the previous one and hold your bag steady for a split second at the top and bottom of each ribbon to give it time to curve over before you wiggle back down or up. If you like you can score some horizontal lines in the cake to use as guidelines. You don’t have to pipe all the way up to them, but it’s helpful to have a line to focus on as you pipe, so that you can make each ribbon the same distance away from that line.

Press the tip right against the crumb coat so that this frosting has something to cling onto, otherwise it will fall down. If that happens you can scoop it off with a frosting smoother or

It’s fine if the line where you start piping isn’t perfectly straight going up the cake – we’ll fix that in a moment. It’s much easier to make the second edge neat, where you finish each piped ribbon.

For the starting edge, use an

For the next section I’m changing colours but using the same petal piping tip, again with the wide end pressed against the cake and the narrow end pointing outwards, wiggling all over this section of the cake in random directions to cover the entire surface.

It’s easiest to start at the bottom on one side and work your way across and up the cake, so that you have the most room to maneuver your hand holding the piping bag. Pipe squiggles going sideways, diagonally, up, and down, keeping the piping close together so that you can’t see the crumb coat of frosting through the piping.

I’m using my 4 Minute Buttercream for this cake but you can use any kind of frosting you like. Make sure you go all the way up to the top of the cake, and I’ll show you how to do the very top in a moment.

Now we’re going to pipe ribbons going up the cake. These ribbons weigh a lot so they really need to stick to the frosting on the side of the cake for support, otherwise they’ll fall down.

So if your crumb coat has set, like mine has, spread some frosting onto the cake just before you pipe these, which will be soft and sticky and act like a glue to attach the piping to the cake. Guidelines are very useful for this technique so you can use an

Hold the piping bag down, with the wide end of the tip pressed against the cake, and wiggle the bag back and forth just like you did for the first technique, except going up the cake instead of around it. Pause for a tiny moment at each side of the ribbon before going back in the opposite direction and that allows the ribbon to fold over itself.

You can make these ribbons as loose or tight as you like – the more slowly you lift your piping bag upwards, the closer the ribbon will be packed down but the quicker you move the piping bag upwards, the more space there will be in between the folds of the ribbon.

Keep the ribbons within the guidelines you scored onto the cake so that they’re all the same width, so they go straight up the cake without leaning to one side. It looks neatest if all of the ribbons finish with the end of the ribbon pointing in the same direction.

This next technique is one of my favorites. Hold the piping bag with the narrow end of the piping tip pointing upwards and sticking above the top of the cake. Squeeze the frosting out and pull the bag slowly across the cake to pipe a ruffle of frosting.

Pipe the next ruffle so that it overlaps the first ruffle, so that the frosting completely covers up the crumb coat and you can’t see any of it in between the ruffles. The more slowly you pipe and the harder you squeeze the piping bag to push the frosting out, the more wavy the top edge of your ruffle will be. You can wiggle your wrist to give the ruffles even more movement.

Here, I’m piping the ruffles horizontally, so that they go across or around the cake, but you can do these in any direction and I’ll show you other options in a minute. Rest the piping tip down on the cake board for the final ruffle to make sure it goes all the way to the bottom of the cake to cover up the crumb coat.

Remember the top of your cake! You can replicate any technique onto the top. For the yellow squiggles I’m doing exactly the same random movements to cover up the top section of the cake. The only difference on top of the cake if you’re piping sections of different textures is that you’re piping onto a pie shaped area instead of a rectangular section on the side of a cake, so you’ll have to make your piping very narrow as you get towards the middle of the cake.

You’ll probably find it much easier to pipe downwards onto a flat surface than onto the upright sides of a cake. The ruffles are very quick to pipe onto the top of the cake, curving each ruffle around to mimic the shape of the outer edge of the cake and overlapping the ruffles to cover up the crumb coat.

Repeat each piping texture onto the top of the cake, starting at the very outer edge of the cake to make sure the texture covers up the entire crumb coat so that you don’t see it sticking out around the top edge of the cake.

If you smudge any of your piping you can use a toothpick to tidy it up, or just scrape that section of piping off the cake and pipe over that area again. If the crumb coat has set before you pipe, it’s very easy to scrape off any messy piping because you won’t damage the crumb coat as you scrape because the crumb coat will be firm and it will hold its shape.

Adjust the texture to fit within the pie shaped sections, for example with these ribbons I’m making each one narrower as I get closer to the middle of the cake and IO’m only piping 3 ruffles on top of the cake, instead of 4 on the side of the cake where there’s more space.

You can go away and do something else and come back to this if you don’t have enough time to do all of the piping at once – it’s fine to do it in stages. For this texture, hold the wide side against the cake and the narrow side should point outwards. That’s ALWAYS how you should pipe with a petal tip, because the frosting comes out easily through the wide end to form a thick line which provides a large surface to stick to the cake, and then it struggles to squeeze through the narrow end of the piping tip and as it squeezes through, the pressure causes it to wiggle and wave and that’s what creates this nice movement in the ruffles.

You can exaggerate it by moving the piping bag, wiggling it slightly back and forth, which happens naturally if you have shaky hands like I do! These ruffles are sticking straight out so it’s important to pipe them close together if you don’t want to see the crumb coat in between them.
To pipe these onto the top of the cake it’s easier to pipe from the middle of the cake towards the outer edge of the cake, so you have a more room to swipe the piping bag away at the end of each ruffle.

If you cut the holes in the end of your piping bags too big, the pressure on the frosting as you squeeze the piping bag you can push the piping tip right out! If that happens, scrape that section of piping off the cake and start again.

This is the third way to pipe these ruffles – you can do them horizontally, like I did with the teal frosting, or going straight up the cake like I did with orange frosting, or pipe them like this: going up the cake but flat against the cake, overlapping the previous ruffle.

If you can see the crumb coat through any ruffles you can go back and pipe another ruffle in between to cover it up.

Any there they are: 6 beautiful textures all piped with a piping bag and a petal tip with no
If you’re looking for inspiration, join my Club+ for access to ALL of my online classes and courses as well as live online classes and Q&A sessions for members only!

Here’s the video version of this tutorial:
Meringue pops are my favourite cake toppers because it’s easy to pipe any shape and to create lots of colour and texture, AND they’re delicious! My recipe makes about 24 meringue pops, depending on their size, but you can easily halve or double the recipe depending on how many you need. If you prefer to watch a video of this tutorial, scroll to the bottom of the page.
Start by separating 4 eggs by cracking the eggs and then passing the yolk back and forth between the eggshells, letting the whites fall down into a bowl underneath. Make sure you don’t get any of the yolk into the egg whites! To be safe you can transfer the egg whites one at a time into the bowl of your mixer, so that if you do spill any egg yolk into the bowl you’ll only be contaminating one egg white.

You can use the yolks to make lemon curd or any flavour of curd, which makes a delicious filling for cakes or you can fold it into your frosting for a strong fruity flavour. If you’re weighing your egg whites, maybe because you bought egg whites in a carton, you’ll need about 160g or 5 1/2 oz.

Pour the egg whites into the bowl of your mixer and add 1 cup of sugar, which is 225g or 8oz, and add a pinch of salt.

Heat a small saucepan of water over high heat until it’s boiling. Turn the heat off and place your mixing bowl on top of the saucepan. Whisk the egg white mixture together for 2 minutes,

Pinch some of the egg white mixture and rub your thumb and finger together. If you feel any grains of sugar, whisk for another minute. When the mixture is smooth, move the bowl to your mixer and use a whisk attachment to whisk on the highest speed until stiff peaks form, which takes about 7 minutes.

While the egg whites are thickening, prepare your piping bags by fitting them with whatever piping tips you’d like to use. I like using any star shapes, like the typical 1M tip and open star tips like an 8B or 4B or #32 or #199 work really well too.

Fold the tops of your piping bags over so that they’ll be easier to fill, with less mess.
These meringue pops are one of the fifty ways to decorate cakes that I teach in my online course on 50 Easy Cake Decorating Techniques for ANY Skill Level.

Now check on your egg whites. This is the texture you’re looking for: while the whisk is whisking, you’ll see texture in the egg whites that stays there, it doesn’t sink back into the egg whites by the time the whisk gets back around to that part of the bowl again.

Lift the whisk out of the bowl and the whisk should leave a peak in the egg whites that stays upright even after removing the whisk. It’s fine if the peak droops slightly.

Now look at the egg white on the whisk. There should be a peak at the top of the whisk that might fold over slightly at the end, but if you hold the whisk upright the peak of egg whites should hold its shape.

The egg whites should look thick and glossy. Spoon the mixture into your piping bags or into bowls, which you can tint using gel colours. Try to fold the colour in gently instead of stirring aggressively. Spoon all of your colours of meringue into piping bags and now you’re ready to pipe!

Line a baking tray or two with parchment paper or a non-slip mat. Place a paper straw down and hold it steady with one hand while you pipe with the piping bag in the other hand.

I’m piping hearts with an 8B piping tip, squeezing the piping bag and moving the bag slightly away from me to make a bulge at the top and then pulling the bag back towards me and releasing my pressure on the bag as I swipe away to make the tip at the bottom of the heart.

You can use a toothpick to pull off any stray strands of meringue to tidy up the shape. If you want to, you can place sprinkles on the shape now and they’ll bake into the meringue pops. You can make these on parchment paper instead of a silicone mat and the process is exactly the same.

If you pipe a shape you don’t like you can wipe it off with a paper towel and pipe something else instead. Toothpicks are really useful to pop any air bubbles in the meringues or to tidy up any imperfections.

For a swirl, use any star tip but a 1M or 2D are my favourites. Start piping at the top of a straw and as you spiral outwards you’ll cover up more of the straw, which the meringue will attach to.

If you don’t want to hold the straw as you pipe, to stop it from moving, you can pipe a dot of meringue onto the baking tray first and push the straw into that to hold it steady, and then pipe your swirl or whatever shape you’re piping.

I like to add sprinkles to match the colour scheme of my cake, or if I’m going to use a certain sprinkle mix to make a sprinkle boarder around the bottom of a cake I’ll use that same sprinkle mix to decorate my meringue pops. It takes a bit of planning ahead but I think it’s worth the effort because it really brings everything on the cake together.

You can alternate the direction of the meringue pops to fit more on each tray. Pipe half of them upside down, to fit a meringue pop at the bottom in between two other meringue pops.

If you use a round tip you won’t create texture on the meringue. If you over-mix the meringue when you add colour you’ll make the meringue runny and it won’t hold the texture of the piping tip as well as meringue that isn’t over-mixed. If that happens you can use a toothpick to flatten any unwanted texture to make a smooth shape with no texture.

To make a shape with LOTS of texture and as much colour as you like, draw or trace a shape onto the parchment paper and place a straw down so that it stops at the mid point of the shape. The pencil WILL transfer onto the back of your shape so it’s a good idea to flip the parchment paper over before you start piping.

Use a variety of piping tips and techniques to fill the shape, piping swirls and rosettes and whatever other textures you like. I’m using a few shades of pale pink for this heart but you can make it as colorful as you like!

This would be a fun way to create numbers to use as cake toppers for a birthday cake. When I make meringue pops I try to make them for several cakes at a time to make the most of the batch, since it takes a few minutes to prepare the meringue mixture so I like to maximize that time spent by sharing it amongst several cakes!

You can also make these meringue pops as treats on their own, and you can skip the straws if you like. You can pipe little meringue kisses with a 1M tip or any other star tip and press them into the frosting on top or on the side of a cake, or they work really well on top of number cakes to add a bit of colour.

After piping all of your meringues, bake them at 200 degrees Fahrenheit or 90 degrees Celsius for 90 minutes. By cooking them at a low temperature you’ll prevent the meringue discoloring. Also, at this temperature my paper straws don’t burn and I’ve also used cookie pop sticks and those don’t burn either. If you don’t have either of those, you can even use toothpicks or wooden skewers!

After 90 minutes, when you touch a meringue pop it should be firm, not soft or sticky. If it’s still sticky, cook them for another 15 minutes and then try again. When the meringue pops are cooked, turn the oven off but leave the meringue pops in the oven for another 2 hours. After 1 hour of cooling I crack the oven door open so that the pops cool completely. By letting the meringue pops cool this gradually, you’re preventing them from cracking.

When they’re cool you’ll be able to lift them easily off the parchment paper or silicon mat. Most sprinkles stay shiny when you bake them and the paper straws don’t burn because the baking temperature is so low.

After they cool, I store my meringue pops in a large Tupperware like a cake caddy so that they stay crispy. I put a piece of parchment paper in between each layer of meringues to male sure they don’t stick to each other. They’ll be fine like this for a week. If you don’t store them in an airtight container they’ll get soggy.

I push the pops into the cake as close to serving as possible, so that they stay crispy. If the straws are too long you can cut them so that they don’t stick up as high out of the cake, and it’s really easy to cut paper straws so I like using them instead of cookie pops. They also come in every colour imaginable so you can match the colour scheme of your cake! I like to vary the height of each of the meringue pops.

These meringue pops add so much texture and colour to cakes that they make even a very simple, frosted cake look fancy!

Here’s the video version of this tutorial:
These top 10 cake hacks will make baking and decorating cakes easier, they’ll save you time, AND you’ll learn some techniques to create stunning cake designs. If you prefer to watch a video of this tutorial, scroll to the bottom of the page.
1. Bake efficiently
To be super efficient, bake cakes in batches even if you’re not going to decorate or serve some of these cakes for the next month. By following this hack and baking in bulk, you’re maximizing the time you spend taking out ingredients, preparing cake batters and pans and washing everything afterwards.

Let the cakes cool completely and then for any layers you aren’t going to need straight away, wrap them in two layers cling film or Saran Wrap and freeze them until you’re ready to use them. The plastic wrap will prevent them from drying out and they’ll be just as moist and delicious when you defrost them up to a month later!

2. Make easy mini or shaped cakes
To make mini cakes or shaped cakes, if you don’t have the right size or shape cake pan, bake a sheet cake or use whatever pan you have.

After the cake cools, use a cookie cutter to cut our your cake layers. You can do this with round cookie cutters or any shape you like, like these little heart cake layers.

It’s easiest to cut the shapes out when the cake is cold because then it’s less crumbly, so I chill my cakes in the fridge for 30 minutes to an hour before doing this.

Assemble your mini cake by alternating these layers with the filling of your choice and you’ll probably find it easier to pipe on your filling using a piping bag, instead of spreading it on, since the cakes is so small and lightweight.

Attach your cake to a cake board using a dollop of frosting to secure it and then frost and decorate!

3. Get smooth frosting
The hack for super smooth frosting is to control the temperature of your cake. Chill your cake layers in the fridge before assembling your cake so that they firm up and don’t crumble. Then pipe or spread a dot of buttercream onto the cake board to attach your first layer of cake to the cake board.

As you assemble your cake, you’ll find that the cake layers are easier to move around when they’re cold than when they’re at room temperature. You’ll even be able to adjust them after placing them on top of a layer of filling, so you’ll be able to assemble a straight cake that doesn’t lean to one side.

After assembling your cake, put it back in the fridge to chill the cake again for 30 minutes AND to chill that dot of buttercream, which will set and secure the cake in place. Cover your cake in a crumb coat, which is a very thin layer of frosting that catches any crumbs that come off the cake as you frost it. Having a cold cake will make the layers much sturdier, so it won’t wobble around.

Chill the cake for another 30 minutes in the fridge to set the crumb coat so that any crumbs get trapped in that layer of frosting. Now your final coat of frosting won’t have any crumbs in it. Frosting your cake when it’s cold means you can spread on your frosting easily, and apply as much pressure as you need to with your frosting smoother without worrying about knocking the cake over.

4. Make homemade stencil designs
For very easy but stunning stencil designs, draw a shape onto parchment paper or trace over a picture or around a cookie cutter. Cut out the shape, keeping the outline intact and that will be your stencil.

Wrap the stencil around a cake that’s been chilled in the fridge for an hour so that the frosting is cold and firm and then spread more frosting over the stencil. This is one of the 50 techniques I teach in my online course on 50 Easy Cake Decorating Techniques for ANY Skill Level.

Spreading from the outside of the shape towards the middle makes the neatest shape because this way, you won’t accidentally push any frosting underneath the stencil to smudge the outline of the shape. Smooth the frosting and then peel off the parchment paper to reveal a neat shape on your cake!

Another way to use these homemade parchment paper stencils is to press sprinkles into the frosting you spread over the stencil and when you peel the parchment off, you’ll leave a gorgeous sprinkled design behind on the cake!

5. Create detailed designs you can’t freehand
To create intricately detailed designs you can’t freehand, especially onto the upright sides of a cake, draw or print an image and tape parchment paper on top.

Put buttercream in piping bags fitted with small round tips like a #2 or #3. If you don’t have any small round piping tips, cut a small bit off the end of a new piping bag to make a small hole. Pipe the details onto your design one colour at a time, chilling the design in the fridge for 15 minutes before moving onto the next colour.

You can tape the parchment and printed image onto a tray to make lifting it up easier. Use your final colour of frosting to fill in the background colour of the design, like the yellow body of this giraffe.

Spread this last colour of frosting over the rest of the design to make it flat and also sticky, since the previously piped details will be hard from chilling them. Lift the parchment up immediately, before the frosting sets.

Press the parchment paper against the side of a frosted cake. frosting on the cake needs to have set before doing this. The piped design should be in between the parchment paper and the cake, so that it can attach to the frosted cake.

Put the cake with the parchment still pressed against it back into the fridge and after an hour, when everything is cold and firm, take the cake out and peel off the parchment to reveal your detailed design, which will be perfectly flat and smooth!

6. Frost cakes with wrapping paper
Take this a step further by covering an entire cake in an intricate design like wrapping paper or a gift bag! Cut a piece of acetate or parchment paper so it’s as tall as the cake and a few inches longer, so you can wrap it around the cake with some room to spare.

Tape the acetate over your wrapping paper or whatever design you want to use and if the acetate curves because it’s from a roll, place it so that the ends are curving upwards, which is important for later. Trace your design using piping bags just like in the previous hack, chilling the details before spreading your final colour of frosting all over the acetate, right up to the edges.

Lift the parchment up and wrap it around a cake with a crumb coat. Piping the design on the inner part of the curve means the acetate or parchment will wrap itself easily around the cake.

The frosting on the acetate will stick to the frosting on the cake. Press it with your hand or a fondant smoother so that it lies flat against the cake and put the cake in the fridge for an hour before peeling the acetate off.

Use a sharp knife to trim any frosting sticking up over the top edge of the cake. You can tidy up the frosting with a frosting smoother and add any details you like, like piped borders or some shading with more frosting, or sprinkles!

7. Create fondant designs with buttercream!
Avoid fondant and stencils by adding simple colourful shapes to the sides of your cake with buttercream that looks just like fondant! Tape parchment onto a tray or cutting board and spread buttercream thinly onto it, getting it as smooth as you can. Place the board in the freezer for 10 minutes and then use cookie cutters to cut out shapes.

Lift the frozen buttercream shapes up with an

To curve the shapes around the cake, wrap parchment paper around them and leave them for a few minutes to thaw before pressing them gently. The parchment paper will prevent any stickiness and texture from your fingers. Put the cake in the fridge or freezer for a few minutes to set the buttercream shapes and then peel the parchment paper off. This achieves the effect of fondant with the taste of buttercream!

8. Frost square cakes without tools
Square cakes can be really time consuming and tricky to frost but with this simple hack you can frost square cakes quickly and neatly, with super sharp edges and corners, with no special tools! All you need is a cardboard box. Measure your cake layers and cut out three squares from your cardboard box: 1 that’s the same size as your cake layers and 2 that are 2cm or 3/4 of an inch bigger than your cake layers.

Wrap the cardboard in parchment paper so it’s clean and pull it tightly before you tape it down, so the edges are very smooth.

Assemble your cake on the smaller square and then cover the cake with a crumb coat, placing it on a larger cake board to catch any smudges of frosting.

Assemble your cake on the smaller square and then cover the cake with a crumb coat, placing it on a larger cake board to catch any smudges of frosting.
Now place a non-slip mat or tape on a cake board, put one of your large squares on top, and then tape your cake on the small square onto it.

Spread frosting thickly on top of the cake and place the other large square on top, lining it up with the large square at the bottom, and push down firmly to flatten the frosting on top of the cake.

Spread frosting around the sides of the cake and as you scrape with your frosting smoother, the cardboard with keep the sides straight!

Spread from one edge towards the middle, and then from the other edge back towards the middle in the opposite direction, to keep the corners sharp.

Chill the cake for an hour to set the frosting and then use a sharp knife to cut off the square on top of the cake.

9. Quick cake toppers
For quick cake toppers of any shape, draw your shape or number and place a piece of parchment paper on top of it. Spoon melted chocolate into a ziplock bag and cut a piece off one corner and then trace the shape, filling it in with the chocolate, too.

Press a toothpick into the shape, going half way up, or flatten the top part of a paper straw and push that in. This will secure the cake topper into a cake eventually.

Pipe more chocolate over the top to cover it and to make the shape thicker and stronger. You can use a toothpick to smooth the chocolate.

Then pour sprinkles on top, pressing them gently into the chocolate. When the chocolate sets, lift the shape up and push it into your cake!

10. Write on cakes
To write on cakes with beautiful letters even if you have shaky hands and ugly handwriting, like I do, outline capital letters in the frosting on your cake and then use a piping bag fitted with a small round tip like a #2 or #3 tip to pipe tiny dots along the letters you outlined to form neat, easy, letters!

For more cake ideas and inspiration, join my Club for access to ALL of the classes on my online cake school, both current and future classes, as well as exclusive members-only live demonstrations and Q&A sessions!

Here’s the video version of this tutorial:
I’m going to share seven secrets to get perfectly smooth frosting on your cakes. The process begins much earlier than when you use your frosting smoother, so we’ll start at the very beginning. If you prefer to watch a video of this tutorial, scroll to the bottom of the page.
#1. Chill your cake layers
After I bake my cakes and let them cool, I level them and then wrap them in cling film or Saran Wrap. I put them in the fridge for at least 1 hour or in the freezer for at least 30 minutes. Now the layers will be firm and more stable as you assemble your cake.

#2. Attach your cake to a cake board
Pipe or spread a little bit of frosting on the middle of the cake board, which will act as glue to secure the cake there. This means it won’t slide around as you’re frosting it, which makes it impossible to smooth the frosting!

#3. Assemble a straight and level cake
As you alternate between your cake and filling, assemble a straight cake by placing each layer directly above the previous layer, so the cake isn’t leaning to one side. By cutting any domed tops off your cake layers first, your layers will be level so your cake will be level. Your cake layers don’t have to be perfect because you’re going to cover them up with frosting but the sides of the cake do need to be straight.

#4. Have the right consistency of buttercream
Before you start frosting your cake, make sure you have the right consistency of frosting. For buttercream, like my 4 minute buttercream, it needs to be easy to stir and a spatula dragged through it should leave a smooth trail behind with no air pockets, which is what happens when buttercream is too stiff and it pulls away from itself.

To learn how to make perfect buttercream every time and how to troubleshoot any issues like air bubbles, graininess, lumps, yellow buttercream, or melting buttercream, take my online course on the Basics of Buttercream, where you’ll also learn how to create absolutely any colour of buttercream!

#5. Apply a crumb coat
For smooth frosting with no crumbs in it, start frosting your cake by applying a crumb coat. This is a thin layer of frosting that completely covers the cake from top to bottom to catch any crumbs that come off the cake and trap them in that layer of frosting, so that they don’t get into your final layer of frosting.

You need to let the crumb coat set before moving on to your final coat of frosting. Chilling your cake layers earlier makes them less wobbly and less crumbly, which is helpful when you’re frosting the cake.

#6. Be generous with your frosting
The more frosting you spread onto the cake now, the easier it will be to smooth it next. You’re going to scrape a lot of it off, which you can use for touchups and for decorating like piping borders or swirls, or you can freeze it and use it for another cake.

#7. Perfect your technique
Everyone’s technique is slightly different and yours will develop with practice. Personally, to scrape around the cake I reach as far as I can around the cake with one hand to spin the

Then I spread more frosting over air pockets or indents in the frosting and smooth again and I do this several times until the frosting is nearly smooth. Then I move onto the top of the cake, using my

I wipe the

I switch to my acrylic frosting smoother for this final stage because it gives me the smoothest results – use the code BRITISHGIRLBAKES to get a discount on yours here! I finish by tidying up the top edge one last time, and then my frosting is smooth and ready to decorate!

If you’re looking for cake inspiration I have a free online course on 10 Frosting Techniques and LOTS of other courses on my online cake school. Join my Club for access to all of my online classes and live cake demonstrations for members only!

Here’s the video version of this tutorial:
These geometric hearts are delicious gifts for Valentine’s Day, anniversaries, or just because! Although they look stunning and stylish, they’re surprisingly simple to make and there’s no limit to the ways to decorate them. If you prefer to watch a video of this tutorial, scroll to the bottom of the page.
You’ll need a geometric heart mold, which you can buy on Amazon. I found it easier to work with the hearts individually so I ended up cutting the hearts out so they were separate.

Melt chocolate (I’ll give you tips for doing that at the end of this video) and add oil based colors to tint the chocolate whatever colour you like. White chocolate can be tinted any colour and what’s great about oil based colours is that you can use a LOT of gel to make very bright colours without causing the chocolate to seize.

Then spoon the chocolate into a mold, using the back of the spoon to push it up the sides of the hearts to completely cover the shape of the mold. Pay attention to the top of the sides, resting your spoon there for a moment to let the chocolate build up, otherwise the chocolate will be very thin there.

You can get really creative with this part! Try brushing edible glitter into the mold before adding the chocolate to make the heart sparkle.

If you want to make brown or black chocolate I recommend using semisweet or dark chocolate and adding colour to that instead, since you’ll need to use a lot less colour when you start with a dark base that if you start with white.

Another way to make these more decorative is to spoon in different colours of chocolate and then swirl them for a marbled effect. A paintbrush is useful for details like this since it’s so much smaller than a spoon.

My favourite way to decorate these is with leopard print spots. To do this, paint spots onto the mold using a paintbrush and let those set either at room temperature for about 30 minutes or in the fridge for about 5 minutes.

Then use a darker colour to paint two lines around the spots, not completely outlining the spots. I’m using semisweet chocolate tinted with black gel for these.

Let this chocolate set and then fill the molds with your third colour of chocolate, typically the lightest colour. If you’re using a light coloured chocolate it’s a good idea to let this layer of chocolate set and then add another layer around the sides to make it a bit thicker so you don’t see the filling through the chocolate.

However you choose to decorate your hearts, after you’ve coated the mold the chocolate needs to set, which takes about 15 minutes in the fridge. Now it’s time to fill them in! This edible cookie dough is my favourite filling for these geometric hearts (and anything, really!).

Cake pop mixture works well too and it’s very quick and easy to make: just crumble up some cake scraps like the domes you’ve trimmed to level cake layers and then add a little bit of frosting. I’m using my Perfect Chocolate Cake and my 4 Minute Buttercream. Add the frosting to the cake crumbs a small spoonful at a time because you need enough so that the cake crumbs come together but not so much that all you can taste is the frosting and not the cake!

Push the filling firmly into the molds because if it’s not packed tightly, the chocolate backing we’re going to add next will seep down through any air pockets in the filling. Leave about 1/4 of an inch of space above the filling so that there’s room for that next layer of chocolate.

If you have time, put these back in the fridge so that the filling firms up and then you won’t get crumbs in the chocolate you’re about to spread on. Melt some more chocolate, spoon it over the hearts and spread it to cover the hearts. Use an

If you leave any chocolate around the top of the mold you’ll have uneven pieces of chocolate sticking out from the edges of your heart, which you’ll see in a moment. Put these back in the fridge for 15 minutes to set and then push the hearts out of the mold.

Hold the mold with both hands and pull from opposite sides to loosen the chocolate from the sides of the mold. Then push with your fingers from underneath to pop the chocolates up. For dark or semisweet chocolate it’s a good idea to wear gloves so that you don’t leave fingerprints on the geometric hearts when you touch them.

Black chocolate makes these angular geometric hearts look very dramatic and using edible glitter on the mold first gives it some sparkle to make them really glitzy. If you want to add more glitter after removing the chocolates from the mold you can brush on some more now.

I LOVE how the leopard print looks! If you don’t scrape off the excess chocolate around the mold you’ll see it now and you can snap it off to tidy it up.

For a finishing touch, spoon some melted chocolate into a ziplock bag and cut a tiny bit off one corner. Squeeze the chocolate out through it as you wiggle your wrist back and forth to drizzle the chocolate over a section of a heart.

The chocolate drizzle adds detail and also to covers up any imperfections like air pockets or dents or areas where you can see the filling through the chocolate. You can press sprinkles onto this chocolate drizzle while it’s still melted and sticky.

The more you cut off the corner of your ziplock bag, the thicker the chocolate drizzle. If you cut off a tiny amount and squeeze with a lot of pressure you’ll create wavy lines which look really pretty.

If you’re going to give these away as presents you should definitely make an extra one for yourself to try – the crunch of the chocolate is really satisfying and chocolate pairs really well with edible cookie dough or the cake and frosting mixture!

Now for a few more tips I wanted to share – first, if you melt your chocolate in the microwave you should use 80% power and melt it for 30 seconds at a time to prevent the chocolate from overheating and seizing, and to make your hearts shiny. Overheated chocolate will be dull and might have patchy stains on it where the chocolate got too hot.

I used one of these candy melting pots for one batch of my geometric hearts and it worked really well – it melts the chocolate without burning it and there’s a setting to keep it warm so it doesn’t set while you’re still busy decorating.

If you’re not sure how much chocolate to melt, fill your molds with chocolate chips or chopped up chocolate and that will be how much you need because it will melt down to be much less than this, which leaves room for the filling.

This is a great project to do if you only have short amounts of free time (for example, while your baby naps!) because you can do it in stages – you don’t need a large chunk of time to complete the process from start to finish in one go.

I hope you make these and enjoy them or surprise someone else with them! Please tag @britishgirlbakes in your photos on instagram so I can see how you decorate yours!

Here’s the video version of this tutorial:
With simple steps you can create bright and bold colours with buttercream and in this tutorial I’ll show you how! If you prefer to watch a video of this tutorial, scroll to the bottom of the page.
I use gel colours to colour my buttercream because they’re very concentrated, much more concentrated than the liquid colours you can buy at the supermarket or grocery store. You only need a few drops to get a bright colour. I’m using my 4 Minute Buttercream for this tutorial but the same principles will apply to whipped cream or meringue buttercream.

Start slow with just a drop or two – it’s easy to adjust the darkness of the colour by adding a few more drops but not as easy to make the colour lighter after you’ve added too much colour. I used 3 drops of teal for this buttercream.

If you make your buttercream too dark by adding too much gel, to lighten it just add some plain white buttercream to it. This also works if you have a colour you like, and you want a tint another bowl of buttercream to be a lighter version of the same colour.

Put a little bit of your first colour into a bowl and then add some plain white buttercream to keep the exact same colour but lighten it.

This is really useful if you’ve used lots of different colours to create your first colour, say, royal blue and sky blue and leaf green, and instead of using half the amount of each of those gels to create a lighter version of the colour from scratch, you can lighten it very easily by adding white buttercream.

Alternatively, to make this colour from scratch you could add just 1 drop of gel instead of the 3 drops I added to make the darker shade. This is easy if you paid attention to exactly how many drops of each gel you added to your buttercream, but if you added more and more gel as you mixed and lost track of the numbers it will probably be easier to add white buttercream to lighten it.

To make a specific colour, start with the colour that’s closest to that colour. So for a raspberry colour I’m starting with pink.

If there’s another colour that’s obviously part of the colour you’re trying to make, add that next, just a tiny amount at a time. I’m adding a drop of red.

Then think about whether you want the colour to be warmer or colder. Warm colours are yellow, orange, red and pink, and cool colors are green, blue, purple.

I want to add a teeny tiny bit of blue, much less than a full drop, and to do that just take the lid off that bottle of colour of gel and dip a toothpick inside.

Then pull the toothpick through the buttercream to leave a little bit behind. You can add the rest of the gel on the toothpick later it you need to add more.

Don’t panic if you don’t get the right colour straight away because you can keep tweaking it until you’re happy with it. I’m adding a few more squeezes of pink until I make the colour I want, but a lighter version of it.

Colours develop and darken with time and exposure to air so expect the colours you make to be a little bit darker by the time you’ve frosted and decorated you cake. I know this colour is going to darken by the time I use it…

… After finishing the other decorations on my cake, this raspberry buttercream has developed to become not quite red but close to it, a deep raspberry pinky red. You can see the difference about 30 minutes makes, from the pinky raspberry colour in the bowl in the photo above to this shade I’m piping with which is closer to a raspberry red.

You can mix colours to create every shade imaginable with different numbers of drops of each colour and I share the drop counts for 43 different colours in my online course on The Basics of Buttercream, with exactly how many drop so each of the basic colours you need to use to create particular colours like olive, slate, copper, lavender, salmon, and neon green.
Black and red are the two colours that people find the most challenging to make and I’ll show you how much gel you need and two ways to make the colours even darker without using more gel in my online course on The Basics of Buttercream.

I also teach how to make buttercream, store it, and use it for lots of unique techniques – click here to find out more about the online course.

Here’s the video version of this tutorial:
In this tutorial I show how to make 3 different mini heart cakes so that whatever tools and cake decorating experience and time you have, there will be a style that works for you! These mini cakes are just the right size for a single person or to share with someone special on Valentine’s Day, an anniversary, or just because! If you prefer to watch a video of this tutorial, scroll to the bottom of the page.
For all three styles you’ll need heart shaped cake layers, which you can cut out of any shaped cake using a cookie cutter. This is my Perfect Chocolate Cake baked in a 9 x 13” rectangular sheet pan but round cake layers will work just as well.

It’s easiest to cut cakes when they’re cold so after this cake cooled I put it in the fridge for an hour and now it’s sturdier and less crumbly. After pushing your cookie cutter all the way through the cake, lift it up and push the cake out of the cookie cutter.

If the large cake layer you cut your hearts out of is quite thick, like mine is, you can flip the hearts on their sides and cut through them with a serrated knife to make two cake layers out of each one. You’ll need two or three heart shaped cake layers for each mini cake so you won’t need this many if you’re only making one cake!

To assemble your cake, pipe or spread a dot of frosting onto the middle of a plate or platter or cake board. Place your cake layer on the frosting, pressing down to attach it.

This first style of cake is a naked cake and it’s the easiest and quickest to make. You can use any piping tip and I’m going to show you a few ways to use a star shaped piping tip like this 1M tip.

For this first naked mini heart cake I’m piping little star shapes as the filling in between the cake layers. I’ll demonstrate some other textures on the next cakes.

After each layer of filling, line the next layer of cake up to make sure it’s directly above the previous layer, before pressing down gently to secure it to the frosting below. I’m using my 4 Minute Buttercream for all of these cakes but any frosting will work, like whipped cream or meringue buttercream or ganache.

Assemble your cake by continuing to layer cake and piped filling, finishing with your final layer of cake. You can pipe another layer of frosting on the very top of the cake but I like to leave it plain so the heart shape is really clear.

An even quicker way to pipe filling onto a naked cake with a 1M tip is to pipe the shape of the heart like this. The piping tip gives the filling some nice texture without adding any time at all to the decorating process!

After assembling the cake, the texture of the piped filling add an interesting detail to the cake.

These little waves of frosting are another pretty way to use a 1M piping tip for the filling between the layers of a naked cake. I’ll explain this technique in detail for the final cake in this tutorial.

When you pipe the filling, start with the outer edge of the heart because that’s the part you want to be the neatest, since it’s the only part that will be visible once the cake is assembled. Then fill in the part in the middle and place the next layer of cake on top.

If you’re going to make several cakes, it’s easiest to pipe the filling for each cake on it’s own plate so that you won’t risk knocking into another cake. To place them all on the same plate or platter after piping, secure each one with a little dot of buttercream. Place these in a Tupperware (or any box with a tight fitting lid) in the fridge until an hour before serving.

If you want to frost your mini heart cake, here’s a way to do that without a

Assemble your cake so the layers are straight above each other and it’s not leaning to one side. Now put this in the freezer for 15 minutes to firm up and then it will be MUCH easier to frost.

Meanwhile, prepare your frosting for the outside of the cake. If you’re using buttercream, having a loose consistency is essential to your success with mini cakes. You can see this is very easy to stir and has soft peaks. I’ve added more milk than usual to this batch.

Once your cake is chilled, spoon a dollop of frosting onto the top and spread it all the way over the edges to prevent air pockets later. Smooth it with an

This frosting doesn’t have to be perfectly smooth and neat but it does need to completely cover the cake to trap any crumbs that might come off the cake, so that those stay in this coat of frosting, which is called a crumb coat, and they don’t get into your final coat of frosting. Smooth the frosting as well as you can and follow the shape of the heart, indenting the dip between the two bulges of the heart and making a sharp point at the bottom of the heart.

Put the cake in the fridge or freezer while you tint your final coat of frosting. The crumb coat will only need about 5 minutes to set if you chilled the cake before frosting it, and once it’s firm to the touch you can spread on your final coat of frosting.

Completely cover the top of the cake and the sides so that there’s no crumb coat exposed. Get it as smooth as you can with your

Immediately after smoothing the frosting, while it’s still sticky and hasn’t set yet, use an

Start with the tip of your

You can leave the rugged texture at the top of the cake or tidy it up by scraping sideways with your

You can add some sprinkles on top to outline the shape if you like – these are made by Fancy Sprinkles and you can get 15% off your order with the code BRITISHGIRL15. Tidy up any frosting smudges on the plate by wrapping a finger in a paper towel and gently wiping around the cake.

You can add sprinkles around the bottom of the cake as well to make a border, pouring them onto the plate around the cake and then pressing them against the frosting with an

This cake is so quick and easy to decorate, it doesn’t break my heart that you can eat the entire thing in one minute flat!

For super smooth frosting you’ll need a cake board, a

Attach your first layer of cake to the cake board with a dot of buttercream, pipe or spread your filling between the layers, and then chill the cake in the freezer for 15 minutes.

The next step is identical to the previous cake: check the consistency of your frosting to make sure it’s not too stiff and spread the frosting all over the cake to give it a crumb coat to trap any crumbs that come off the cake so that your final coat of frosting doesn’t have any crumbs in it.

Let the crumb coat set for a few minutes in the fridge and then cover the top of the cake with frosting. Hold your

Now move down to the sides. Being generous with how much frosting you use makes it easier to smooth it next, using an

As you smooth, spread more frosting over any air pockets and scrape around the cake again with your frosting smoother until the sides are smooth.

Tidy up the top edge by swiping from the outside of the cake towards the middle with your

If you want to add some quick extra details, fit a piping bag with a small star shaped tip like this #32 open star tip. There are lots of things you can do with a star tip and I’m going to use it to pipe two different borders onto this cake.

For the bottom of the cake I’m piping little waves of frosting, squeezing the piping bag and letting the buttercream fold over itself before pulling the piping bag backwards to form the peak of the wave and then overlapping that part slightly with my next wave. This makes a simple cake suddenly look intricately detailed and it covers up any imperfections at the bottom of the cake.

You can do the same thing on top of the cake or try a rope style border. To do this, pipe circles frosting that overlap each other to make a border around the top edge of the cake. I cover buttercream borders in lots of detail in one of the modules in my online course on 10 Cake Decorating Techniques.

Spin the

Whatever cake decorating tools you have and however much time, patience, and experience you have, I hope you’ll incorporate one of these cake styles into your next Valentine’s Day or anniversary or make one for a friend or family member to show them how much you appreciate them!

Here’s the video version of this tutorial:
Chocolate whipped cream is a decadent, not-too-sweet frosting that pairs perfectly with cake! It’s easy to make (and has just two ingredients), it’s stable enough to frost a cake, and it smooths really easily. If you prefer to watch a video of this tutorial, scroll to the bottom of the page.
To make chocolate whipped cream, start by weighing equal amounts of whipping cream (called double cream in the UK) and chocolate.

I’m using semi-sweet chocolate chips but you can use a bar of chocolate instead, just chop it into roughly equal sized pieces. You’ll need about 200g of each to fill and frost a 4” cake or double that for a 6 inch cake.

Heat them in a bowl in the microwave for 30 seconds, stirring afterwards and if there are still lumps of chocolate, put the bowl back in the microwave for another 30 seconds. When all of the chocolate has melted it will be very runny, like chocolate sauce, but don’t panic! This is just the beginning of the process.

Put the bowl in the fridge fo 30 minutes to let the chocolate cream cool and start to thicken. Grab a whisk attachment for your mixer and whip the chocolate cream until peaks form, which will only take a minute or two. Watch it carefully because if you over whip it it will become grainy.

The chocolate whipped cream is ready when you lift the whisk out of the bowl and it leaves defined peaks behind, which don’t flop over.

You can use this chocolate whipped cream as filling between the layers of a cake. It pairs wonderfully with my Perfect Chocolate Cake! Start by spreading a dollop on a plate or cake board and pressing your first layer of cake down onto it to attach it and hold it in place. Then spread chocolate whipped cream on top of each layer to assemble your cake.

To frost the cake I like to start at the top. Spread chocolate whipped cream over the top of the cake, going over the edges to prevent air pockets later. Spinning the cake on the

Now spread the chocolate whipped cream over the sides of the cake, going all the way down to the cake board so there’s no exposed cake at the bottom. Spread it a little bit higher than the top of the cake so that you don’t have any gaps there and that will give you a nice sharp edge at the top of your cake later. It’s easiest to do this with cold cake layers so they don’t crumble or wobble around while you’re spreading.

Switch from your

If there are any gaps or indents in the frosting, or places where you can see the cake through it, spread on some more chocolate whipped cream and the scrape again with your frosting smoother.

Use your

Decorate the cake however you like and store it in the fridge until you’re ready to serve it. I teach how to use the same chocolate whipped cream to make this drip and the homemade donuts on my online cake school and for more cake ideas and inspiration, join my Club for access to ALL of the classes on my online cake school, both current and future classes, as well as exclusive members-only live demonstrations and Q&A sessions!

Here’s the video version of this tutorial:
Leopard print is trending and in this tutorial I’m going to show you step by step how to create this trendy neon leopard print cake with leopard print frosting AND how to decorate it with homemade leopard print chocolates. If you prefer to watch a video of this tutorial, scroll to the bottom of the page.
Start by assembling your cake. This design will work best on quite a tall cake, so ideally use at least 3 layers of cake. Give it a crumb coat and let it set for 30 minutes in the fridge or an hour at room temperature.

For the final coat of frosting I used neon green by mixing leaf green and yellow gel colours. The yellow is a brightener and makes the green really pop. I have an online course on the Basics of Buttercream and one of the modules teaches how to create any colour of buttercream.

When you’re frosting’s nice and smooth, put the cake it the fridge for at least an hour to set the frosting. When it’s firm, you’re ready for the next step.

For the leopard print part of the frosting you’ll need three colours of buttercream. We’ll start with two shades of brown for the spots. I’m using my 4 Minute Buttercream, adding melted chocolate to make brown buttercream.

To make some of the brown buttercream even darker you can add more chocolate or some brown gel. You’ll need a small round tip for this next part, ideally a #2, #3 or #4, and we’ll start with the lighter colour of brown.

Wrap a piece of acetate around the cake to measure it and cut it so that it’s an inch or two longer, so that you’ll be able to wrap it even when there’s extra frosting in between the acetate and the cake. Acetate is sold in sheets or rolls and this acetate is from a roll, which means it will curve easily around the cake when we wrap it. Put your cake back in the fridge to keep the frosting firm for later.

Lay the acetate out on the counter so that it’s curving upwards towards you, weighing it down with some objects like a pair of scissors or a bowl, and pipe little squiggles of the light brown buttercream all over the acetate.

Go all the way down to one of the long sides, which will be the bottom of the cake, and from one short side to the other but don’t pipe all the way across to the other long side – only go as far up as you want the leopard print frosting on the cake to go.

This side you’re piping on will eventually be pressed against the cake and that’s why this side should curve upwards, so it will eventually wrap around the cake easily.

Then use the darker brown buttercream to pipe around the light brown squiggles. You can use the same small round tip to manually trace around each squiggle or use a larger round piping tip like this one to pipe a dot over the top of each squiggle, not completely covering ups he squiggle, which will create the irregular darker brown markings around the lighter brown centers or the spots.

Put the acetate in the fridge for 30 minutes so that the buttercream spots set and mix your frosting colour. I’m using my leftover light brown buttercream mixed together with plan buttercream and some yellow gel and then adding a drop of orange to make the colour a bit warmer.

Spread the yellow buttercream all over the spots once they’ve set, going all the way down to the long sides of acetate which will be the bottom of the cake, and all the way to both of the short sides.

Stop where your spots stop, which will be the uneven top edge of the leopard print frosting. The spots will be hard from the fridge but be gentle as you spread so that you don’t knock and damage any of them.

Now straight away, while the buttercream is still sticky, take your cake out of the fridge. Lift the acetate up, lowering the bottom side down so that it rests on the cake board.

Wrap the acetate around the cake, always making sure that the bottom of the acetate is resting down on the cake board so that this leopard print frosting goes all the way down to the bottom of the cake.

Press the acetate firmly against the cake to stick the frosting to it, using your hand or a fondant smoother. For more trendy cake decorating ideas and instructions on how to achieve them, check out my tutorial on 10 cake decorating trends to try in 2021.

Where one end of the acetate overlaps the other, press on the overlap to squeeze out any excess buttercream and scrape it off with an

While the frosting is chilling we’re going to make leopard print chocolates to decorate the cake! Melt some white chocolate and some semisweet or dark chocolate at 80% power in the microwave for 30 seconds at a time so you don’t overheat the chocolate. Mix them together to make a light brown to match the light brown of the buttercream spots.

Use a paintbrush to brush little random spots into a sphere mold. I have a set of three different sizes of sphere molds, the same ones used to make hot chocolate bombs, and I’m using all three to make different sized chocolates. You can make however many you like, but remember you’ll need 2 of these hemispheres to make each sphere so you’ll need an even number, or you can make an extra half in case one breaks.

Put the molds in the fridge for about 10 minutes to set the light brown spots and then use melted semi-sweet or dark chocolate to paint around the spots to make the darker markings. Don’t paint complete circles around each spot, keep it random and irregular by painting two little curved lines around each spot, not connecting the lines so there is part of each dot that isn’t surrounded by dark brown.

Put the molds back in the fridge for another 10 minutes and melt some more white chocolate, again, using 80% power and 30 second intervals in the microwave so the chocolate doesn’t burn or seize and separate.

You can make snow leopard chocolates with plain white chocolate, or add yellow gel and a drop of orange and brown will make a more natural leopard print yellow colour. Candy colours which are oil based are ideal for this but you can use the gels you use to colour buttercream, just don’t add a lot of colour because that can cause the chocolate to seize.

Use the back of a spoon to spread the chocolate into the larger hemispheres, covering the spots and pushing the chocolate all the way up to the top edge of the mold so it’s nice and thick at the top, which is where the two halves will join so you want a solid rim for that.

For smaller spheres it will be easier to fill the mold instead of just painting the surface, but this would make the large chocolates REALLY heavy so I don’t recommend filling those.

If you fill the molds with melted chocolate, fill them all the way to the top and then scrape over the mold with the edge of the blade of your

Put the chocolates back into the fridge for about 30 minutes and then pop them out of the molds, gripping the mold on each side of a chocolate and pulling the mold apart with your thumbs while pushing up from the bottom with your fingers and the chocolates will pop out easily.

I tried to match the shade of yellow chocolate to the yellow of the leopard print frosting by using the same gel colours to tint both (mostly yellow with a tiny bit of brown and orange) and I’m really happy with how well they match.

To attach the halves, drop one half into a pan that’s been heated on the stove. Only leave it there for a second or two, until you see melted chocolate around the base of the chocolate.

Quickly lift the chocolate up and press it against another half. Don’t leave it in the pan for any longer when you see the chocolate starting to melt because you’ll melt too much of it and you’ll end up with a misshapen ball.

I love the combination of different colours of leopard print: white, yellow, and I also made some brown chocolates to experiment, and some plain white ones to make a gold chocolate ball. These are going to look fantastic on the leopard print cake! I made a few extras and I’ll show you another way to use them at the end of this tutorial.

For a gold ball, attach the two halves of a plain white chocolate sphere. Put a very small amount of gold luster dust in a ziplock bag and then drop the ball in and shake it around to coat it in gold powder. Don’t touch it until you place it on the cake so that you don’t wipe off the gold.

Now the exciting part – revealing the leopard print frosting! Take the cake out of the fridge and pinch the top corner of the acetate and peel it off the cake, leaving the leopard print frosting behind, attached to the cake.

I love my 4 Minute Buttercream because it firms up and sets well and makes SO many cake decorating techniques possible, like this one! For more cake ideas and inspiration, join my Club for access to ALL of the classes on my online cake school, both current and future classes, as well as exclusive members-only live demonstrations and Q&A sessions!

When you’ve peeled the acetate off, use a frosting smoother to scrape around the cake a few times, paying particular attention to the join where the two ends of acetate met, where you’ll have a ridge in the buttercream but you can flatten it with a bit of pressure on your frosting smoother.

Wipe any smudges of buttercream off the cake board and now it’s time to attach the leopard print chocolates! You can do this with leftover buttercream or with melted chocolate. Put a dot of either on the cake board wherever you want to place a chocolate.

Press the chocolate down onto the dot and also against the frosting on the cake. The melted chocolate or buttercream will set in a few minutes and will secure the chocolate in place. Use buttercream or chocolate dots to attach leopard print chocolates to the top of the cake, too.

For melted chocolate, spoon it into a ziplock bag and cut off a corner to squeeze the chocolate out. You can stack the balls on top of each other using a few dots of buttercream or melted chocolate to keep them in place.

Combine different shapes and colours of the leopard print chocolate to make a fascinating sculpture on top of the cake with a few balls down on the cake board to match! To raise the gold ball up I used an extra half I had of a brown ball, piping some melted chocolate around the rim to act as glue to attach the chocolate to the top of the cake.

I’m placing a final chocolate on top and there’s our stunning, classy neon leopard print cake! If you have any leftover chocolates you can make hot chocolate bombs with them and I’ll show you how next.
I have a very detailed tutorial showing how to make hot chocolate bombs but the gist of it is to fill half a chocolate with hot chocolate powder and mini marshmallows and whatever other fillings you like – I added Baileys to mine!

Then melt the rim of the other half by placing it in a hot pan for a second and attach the two halves to make a sphere. This makes a beautiful, unique gift – put it in a cellophane bag inside a mug for easy and secure packaging!

I hope this tutorial has give you some ideas and tips for cake decorating featuring leopard print frosting and chocolates! I’d love to see your versions of this cake – please tag @britishgirlbakes in your photos on Instagram to show me!
Here’s the video version of this tutorial:
Have you ever wondered how cake decorators on YouTube or Instagram get their inspiration? You can find inspiration everywhere: fridge magnets, rugs, packaging, landscapes, children’s books, clothes, party invitations, the weather… In this tutorial I’ll show you 50 ways to find and use inspiration for unique, show stopping cakes! Click on any of the cake photos to see how to make them! If you prefer to watch a video of this tutorial, scroll to the bottom of the page.
Let’s start with inspiration from things you can find in your house:
#1. Fridge magnets
Take a closer look at your fridge magnets for interesting designs or figures or colours.


#2. Wrapping paper
Wrapping paper, gift bags or gift boxes can have beautiful patterns that transfer well onto cakes. Stick with the same colour scheme or you can use the pattern but switch up the colours to give it your own twist. You can transfer a design from any flat surface onto a cake – see my wrapping paper cake tutorial for step by step instructions on how to do it.


#3. Mugs or teacups
These are a great source of inspiration, either the image or the messages written on them, or both!


#4. Cutlery
Don’t overlook ordinary items like knives, forks, spoons, or even chopsticks! These can be useful tools to inspire and create patterns. For more ideas, check out my tutorial on cake decorating with cutlery.


#5. Textured materials
Look out for interesting textures so instead of throwing away bubble wrap, wash and reuse it to create an unusual print on frosting.


#6. Decorative gadgets
For example, the design on this cake was inspired by this novelty bottle opener, in the shape of a golden pineapple!


#7. Pretty packaging
Boxes of chocolates and gifts can have beautiful packaging. Pick out shapes or colours that inspire you for your cake designs.


#8. Flowers or plants
If you have flowers in the house or potted plants, use them as a guide to paint or pipe flowers onto your cake.


#9. Your wardrobe
Don’t forget about clothing when you’re looking for ideas, The image of a cake on this t-shirt sparked the idea of a layered rainbow on both the outside and inside and this cake version of an ugly sweater was inspired by, you guessed it, an ugly sweater!


Consider the date or time of year when you’re decorating your cake:
#10. Seasons
You can use the time of year to inspire your cake, depicting a season or the weather. This “hello spring” cake with piped buttercream flowers was inspired by the first day of spring and the carved cake came into being in the depths of winter.


#11. Holidays
Look at a calendar and if there are any holidays coming up you can use that as a theme, even if it’s not a holiday you celebrate: the year of the rat from the Chinese zodiac calendar, Day of the Dead or Día de los Muertos, National Donut Day, Hanukah or Christmas.


#12. Nature
Get outside and look for inspiration in nature on a walk or hike, like autumn leaves for this cake.


Use photos on social media for inspiration, either you own or on the account of the person you’re making a cake for:
#13. Landscapes
Choose distinctive scenery or a landscape from somewhere they’ve visited.


#14. Events
Re-create a happy memory by decorating a cake to depict an event, such as the Bristol balloon festival.


#15. Cities
Cities can be shown off in endless ways on cakes! Using icons like well known buildings, food, or cultural behaviors or traditions, painting them onto the cake with buttercream or gel colours or using cake toppers.


#16. Experiences
Any experience can create a theme for a cake – my first trip with my husband was to a sloth sanctuary so one of the first birthday cakes I made for him was a life-size sloth!


Need inspiration for the colour scheme of your cake?
#17. Colour palettes
If you’re not sure which colour combinations will work well, get inspired by searching for colour palettes on Pinterest. You don’t have to use every colour (I used three of the five colours in the Cosmic Heartbeat pallete for this cake) but it will give you the confidence that any colours you use within that palette will look nice together. To learn how to colour buttercream, including the drop count for 43 colours as well as how to make, troubleshoot, store, and use buttercream, check out my online course on The Basics Of Buttercream.


If you don’t want to decorate a cake based on a theme or occasion, use the ingredients in the cake or in your house as inspiration:
#18. Ingredients in the cake
The stroopwafels on top of this cake are filled with caramel so I used caramel to decorate the bottom of the cake to match, and the filling between the layers of this cake is edible cookie dough so I’m using cookie dough balls to decorate the top of the cake.


#19. Cupboard contents
Look in your kitchen cupboards for snacks or treats that match the theme of your cake, like colorful lollipops. This purple cake was a Christmas cake and to make it more festive I made white chocolate balls with crushed candy canes inside.


#20. Fridge or freezer contents
Open your fridge or freezer and keep an open mind as you look at whatever’s inside… this ice made a mold for boiled sugar to create a fascinating sugar sculpture!


#21. Leftovers
If you have leftover ingredients from making your cake you can incorporate those into the design too. I had lemon curd leftover from the filling of a cake so I added gel colours to small amounts, put them in ziplock bags and squeezed them all over a cake, smoothing it all with a frosting smoother to create a glossy, colorful watercolour effect!


Think about the reason you’re making a cake and use that to inspire your design:
#22. Activities
Create a cake based on the type of activity or social event, like a poker chip cake for poker night, or a flamingo pool float for a pool party.


#23. Invitations
If you’re making a cake for a party and there’s an invitation you can use elements of that in your cake design, like the stripes on this cake.


#24. Paper plates
Get inspired by paper plates, napkins, balloons, or whatever else is going to be used at a party that matches its theme. Replicate those details on your cake!


If you’re struggling to think of a theme for a cake for someone, here are some ideas to consider.
#25. Age
The birthday boy or girl’s age is a popular theme, especially for milestone birthdays. As a bonus, number cakes are really easy to make! Click here for my tutorial on number cakes.

#26. TV
Pick a favourite TV show or cartoon as the theme, adding the characters or logo to your cake.

#27. Movies
Movies provide all kinds of inspiration! Decorate your cake with iconic items like the round glasses, golden snitch, wand, and colours of Gryffindor on this Harry Potter cake, or create one of the characters.

Choose a scene from the movie like this dinosaur eye poking out of the bushes for a Jurassic Park themed cake, or incorporate elements of the DVD cover. If the movie hasn’t come out yet you can get inspiration from the trailer or the movie poster.

For a more subtle movie theme, incorporate an element, for example this cake had a Frozen theme and the frosting was supposed to represent ice and snow, before fault line cakes became a huge trend!

#28. Food
Continuing with the birthday boy or girl’s favourite things as inspiration, decorate a cake with their favourite food: cookies like Oreos can be crushed and mixed into the frosting and also used as decorations to place on the top of a cake, candy can be melted to flavour frosting and even make a candy drip, or instead of flavoring your cake with their favourite food you can decorate the cake to look like it!


#29. Books
A favourite book works well as a theme for cakes for children, like this Hungry Caterpillar cake for a first birthday.


#30. Games
Computer or video games are great themes for teenagers, like Fornite with this Loot Llama cake. Don’t forget about traditional board games!

#31. Jobs
If the birthday boy or girl is passionate about their job or career, that can make an interesting theme. The flames on this cake were thematic for a firefighter.

#32. Hobbies
Hobbies are a good source of inspiration for any age: ballet, karate, singing, swimming, travelling, birdwatching… You can combine multiple hobbies for a single person or for a joint celebration, like surfing and skiing on this half and half cake.

#33. Sports
Favourite sports teams can be incorporated into cakes with elaborate mascots and uniforms or more simply by using the colours of that team.


#34. Flowers
If you know their favourite flower you can pipe or paint those onto a cake, like these bright frangipanis.


#35. Animals
A beloved pet or a favourite animal always make for adorable cakes – llamas, dogs, and owls are popular choices. Learn how to decorate this llama cake as part of my FREE online course on 10 Frosting Techniques!


Once you’ve chosen a theme, seek inspiration for precise graphics:
#36. Google
Google Images is an excellent resource. You can search for photos of something you haven’t personally seen, like the Disney castle at night, and then convert the photo into your own style of design for your cake.


If you want to trace, pipe, or transfer an image onto a cake, try searching for colouring pages to bring up simple line drawings.


For images to paint onto a cake with buttercream or food colours you can search for sketches, which are easier to replicate than photos because they’re already simplified.

#37. Artwork
Pottery, canvases, sketches, sculptures… any form of artwork can inspire your cake design. These metal animal sculptures I saw on Etsy gave me the idea to carve animals into the frosting on this cake.


#38. Rugs
If you’re looking for inspiration for a geometric pattern, a rug or carpet or even a doormat can look stunning when recreated on a cake.


#39. Picture frames
Wander through a gallery, cafe with artwork on the walls, or even you own home to seek inspiration in paintings, pictures, and wall-hangings, which can be the starting point of the decoration on a cake.


#40. Notebooks
Notebooks often have decorative covers which can translate well into a cake design. Pick out an element you like or use the whole image,


#41. Henna
The tiny details in henna are fascinating and while they may be too small to recreate entirely, simplified versions of henna designs can be piped or painted onto a cake to create intricate details.


Go through your cake decorating supplies and let them inspire you:
#42. Stencils
The pattern on a stencil can be the starting point of the whole cake, like this one which started with a simple stencil that reminded me of madras gras and inspired the bold colours of the cake and the whimsical placement of the stencil design.


#43. Piping tips
Piping tips, both traditional and Russian tips (also called flower nozzles) can be used in endless ways and experimenting with those can inspire unique designs. If you’re desperate to use your Russian tips but need help with getting the right consistency of frosting and incorporating several colours into each flower you might find my tutorial on 5 Tricks For Russian Tips useful.

#44. Repurposed tools
Try repurposing cake decorating tools you already have. By this I mean finding another use for them. First of all, you’ll get more use out of your tools by doing this but also, by finding another use for them you’ll try out a different technique to create new effects. A striped cake comb can be used to create vertical stripes as well as horizontal stripes, and to imprint grooves where you can them add other decorations like piped details or sprinkles, and you can also pull the striped cake comb in different directions to create zig zags instead of stripes!


#45. Cake decorating materials
Cake decorating materials can be the source of your inspiration, like colorful icing sheets or sugar sheets, or sprinkle mixes with colours or shapes that choose the theme of your cake for you!


#46. Cake trends
If you’re aware of current cake trends or even outdated trends, put a spin on them to create your own unique design, like using the style of the popular unicorn cakes to make an Easter bunny cake, or instead of a pretty fault line cake make a creepy Halloween cake using a fault line to create a gap between eroding bricks, or instead of hot chocolate bombs make spherical chocolate cake toppers.


#47. Your mistakes!
Find creative ways to cover up any imperfection in your cakes. I love how the pearl sprinkles look on this cake and I only thought to add them because there were dents and smudges in the stripes in this first attempt at vertical stripes, so I added the sprinkles as a distraction from the imperfections and I think the added texture detail looks lovely!


#48. Other cake decorators
Let others inspire you, scrolling through their photos on Instagram or Facebook or their videos on YouTube. You don’t have to copy their entire design, just pick out elements you love like borders or sprinkle placement or textures and use those to create your own design. Remember to tag them when you share photos, to give them credit and so that they can see your creations, and know they’ve inspired you! This striped cake with a sprinkle drip and buttercream border was inspired by @brittanymaycakes and the pointillist cake (where the pattern is made up of thousands of tiny dots of frosting) was inspired by @thepetitepudding.


Finally, really remarkable techniques and extraordinary designs are inspired by just being practical:
#49. Saving time
Come up with a way of doing something to save you time or effort, like putting all of your colours into the same piping bag instead of individual bags to save time cleaning up.


#50. Convenience
Think about how you can achieve an effect you like by using different materials, like creating shapes out of buttercream instead of fondant.

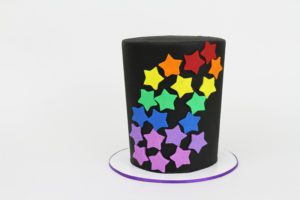
As we’ve seen, cakes can be inspired by literally anything! Objects, times of year, ingredients, events, hobbies, occasions, artwork, cake decorating tools and materials, and other cake designs! Tell me in the comments what quirky things have been your cake inspiration and which cake decorators have inspired you!
For more inspiration check out my online cake school and join my Club to get access to ALL of my online classes for monthly ideas, techniques, and designs to inspire you!
Here’s the video version of this tutorial:
