Trending cake styles going into 2021 feature bright and cheerful, hopeful colours, shrinking cakes with growing decorations, prints stolen from fashion trends, and techniques using just basic kitchen tools and pantry ingredients for surprisingly intricate designs. If you prefer to watch a video of this tutorial, scroll to the bottom of the page.
#1. Bright and bold colours
This is going to be a year for bright and bold colour combinations including neon colours and rainbows but not limited to them. Think happy, cheerful colours, moving away from the striking but quite ominous black cakes that were popular for a while in 2020.

To make rainbow swirls, pipe strips of each colour onto a piece of cling film or Saran Wrap and then roll in up into a log and cut one end off, dropping that end down into a piping bag fitted with a star tip like a 1M tip.

Then pipe your swirls and hold your bag in the same position for each swirl so that the colours face the same way all the way around the cake.

To achieve really bold colours use gels, which are very concentrated so with just a few drops you can get intense colours without affecting the consistency of your frosting.

I teach how to tint buttercream and share the drop count for 43 colours in my online course on the Basics of Buttercream, which also includes how to make silky smooth buttercream every time, troubleshooting, storing, and using it for various techniques.
#2. Jelly Cakes
Jelly can be used create an underwater effect and cakes can be partially or completely covered with jelly to create oceans or aquariums.
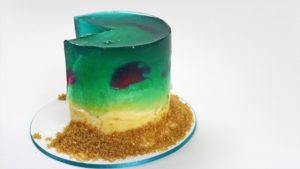
To create an under the sea cake, first carve and frost your cake using yellow buttercream to make it look like sand or you can use ganache if you prefer.

Create any creatures or plants or other decorations you want to put in the jelly. This is quickest with a silicone mold and you can spoon coloured jelly into the shapes or use melted white chocolate tinted with gel colours, brushing it into the shapes in the mold using a paintbrush.

Wrap your cake in acetate within a springform pan wrapped with cling film or Saran Wrap to stop the jelly leaking and then arrange your decorations and pour the jelly in.

Let it set and then peel off the acetate! I have a detailed tutorial on how to make an under the sea jelly cake if you want to try it.

Some jelly island cakes have started to emerge and since jelly is so easy to make and the transparent effect is so striking, I think we’ll see some stunning jelly cakes in 2021 and I think it will be used to mimic more than just water, like colourful stained glass cakes.
#3. Leopard print
Leopard print is already trending in fashion but it’s coming to the cake world! I think we’ll see all sorts of animal print but particularly leopard print cake designs incorporated into frosting, toppers, and other details.
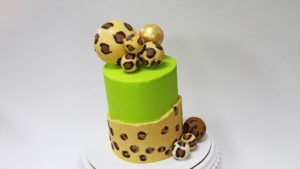
For quick leopard print frosting, cut a piece of acetate that’s long enough to wrap around your cake and pipe random squiggles of buttercream onto it for the leopard spots.

Pipe a darker colour around the dots or just use a larger round tip to pipe blobs of buttercream over the top of the first colour you piped, not completely covering the first colour so that the outline is random and irregular.

Put the acetate in the fridge for about 30 minutes to chill and set the dots. Spread your frosting colour on top, completely covering the acetate if you want to frost the whole cake with leopard print or just do a section of frosting as an accent.

Smooth the buttercream with your

Chill the cake in the fridge for another 30 minutes and then peel the acetate off to reveal neat and smooth leopard print frosting! You can scrape around the frosting with a frosting smoother to even out any imperfections.

You can do this with parchment paper instead but acetate is thicker and sturdier so it makes the frosting a bit smoother and neater.

#4. Textured frosting
Textured frosting was BIG in 2020 and cakes moved away from rustic, uneven texture created with an

Texture isn’t going anywhere in 2021 but expect to see it taken to the next level with double texture, which you can create by chilling your first layer of textured frosting before applying your second layer.

For neatly textured cakes, start with a smooth layer of frosting and make sure the sides of your cake and straight, so the grooves of the textured cake comb will imprint the cake evenly up and down the sides of the cake.

Go around the cake several times with your textured comb, pressing the comb down on the cake board to keep it straight and as you go, touch up any gaps in the texture by spreading on more frosting and then go over that area again with your comb.

I think we’ll see cakes with half and half texture, where the frosting is divided down the middle or at a diagonal. I teach how to create half and half cakes on my online cake school.
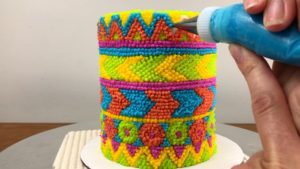
Another texture that’s growing in popularity is pointillism, where designs are piped onto cakes with hundreds or thousands of tiny dots of frosting. It’s a simple concept and fairly easy to execute but the result can be truly jaw-dropping!
#5. Square cakes
I’ve been seeing more and more square cakes, which are instantly eye-catching with their sharp angles and smooth flat sides.

They’re even more impressive to cake decorators, who know just how time consuming it can be to frost a square cake compared to a round one!

Having 4 distinct sides on a square cake allows you to easily divide your cake into different themes or techniques and having flat sides instead of the curved sides on a round cake make it easier to apply buttercream transfers, icing sheets, and stencils.

If you’re intimidated by these angular beauties, don’t be – try my cardboard box method for a free and stress-free method to get perfect results every time!

#6. Mini cakes
After social downsizing in 2020, cakes are downsizing too! Perfect for small gatherings or to sweeten up a quiet night at home, mini cakes are just enough cake AND they’re adorable!

To make these, use a mini cake pan or cut the layers out of bigger cake layers using a round cookie cutter, or you can even turn cupcakes into mini cakes!

There are a few secrets to frosting mini cakes frustration-free, without them toppling over or sliding around and I have a full tutorial covering the whole process but the most important parts are:
1) Use a dollop of frosting to secure the cake to a cake board

2) Chill your cake layers so they firm up before you attempt to frost them
3) Use a loose consistency of buttercream, less stiff than normal, so that it glides easily over the cake as you spread it on and smooth it.

As well as being the perfect size for one person or a couple, mini cakes are also a great way to experiment with cake decorating techniques without wasting large amounts of cake and frosting!

#7. Oversized cake toppers
Just because cakes are getting smaller, doesn’t mean the decorations have to. Expect to see larger than life cake toppers in 2021: top-heavy sails made with chocolate or sugar, cookie cutter chocolate shapes, or made with brownies or cookies, donuts!

To make a dramatic chocolate sail, melt chocolate or candy melts and then pour them onto parchment paper or a silicone mat, or you can drizzle different colours to create a marbled effect.

Drape it over a bottle or bowl and wait for it to set, or put it in the fridge or freezer to speed up the process. Peel the paper away from the chocolate and press the sail into the top of a cake.

For softer baked toppers like brownies or donuts you can push paper straws into them and use those to attach them to a cake. Make sure the straw goes all the way down to the bottom of the cake for the most stability.

For meringues or cookies, insert a paper straw or lollipop stick before baking and after cooling, trim the straw if necessary and then insert into your cake.

Another way to attach toppers is to pipe some swirls of frosting on top of the cake and press the topper into them, and when the frosting sets it will secure the topper in place.
#8. Spherical cake decorations
With the hot chocolate bomb trend of 2020, anyone who made them has a sphere mold or several of different sizes, and as the hot chocolate bomb trend inevitably dies I think we’ll be seeing those molds repurposed in lots of unique ways.

Forget about the marshmallow filling, you can just fill the mold with melted chocolate, attach two halves together by dropping one half onto a hot plate or pan to melt the surface, and you’ve got a pretty round chocolate!

Add a pattern or design by painting it onto the mold with coloured chocolate. Create different shades of brown chocolate by mixing different quantities of white and semisweet chocolate or add gel colours to white chocolate.

Let the design set for 30 minutes or put it in the fridge for 10 minutes and then add more melted chocolate over the top, spreading it with the back of a spoon or a paintbrush to cover the whole mold. Let it set again and pop it out of the mold!

I’m confident we’ll see a lot of spherical chocolate toppers on cakes, in all sorts of colours and patterns, placed on swirls of frosting or creating gravity defying sculptures on top of cakes.

Combine three trends with leopard print and an oversized topper made with a hot chocolate bomb mold!

I’m sure we’ll see the molds used to create balloons on cakes, planets on space themed cakes, and lots of other clever decorative ideas.

#9. Resourceful cake designs
People learned to be really resourceful in 2020, and I think we’ll see that reflected in 2021 with cake designs created without cake decorating tools, or at least very minimal tools.

With the rise of home bakers in 2020 who couldn’t, or didn’t want to, rush out and buy a bunch of tools for a new hobby, we’ve seen the popularity of makeshift turntables using microwave wheels and even cooking spatulas to smooth frosting!

I think people will be using basic materials like parchment paper to make homemade stencils as well as parchment paper cake wraps, and if you’re looking for ideas I have a tutorial with 6 ways to use parchment paper to decorate cakes.

Another example of a resourceful cake technique is creating texture with kitchen utensils like cutlery: forks, spoons, knives, even chopsticks!

As well as cakes made and decorated with the tools available, I think we’ll see an increase in cakes featuring pantry staple ingredients like marshmallows, cookies, and chocolate chips instead of special materials like icing sheets or isomalt.

Check out my tutorial on 10 ways to use chocolate chips to decorate cakes for ideas of all of the things you can do with a simple ingredient! You’d be surprised by how elaborate and intricate cakes can be using the most basic tools, materials and ingredients.

#10. Sprinkles
Sprinkle designs have been gaining momentum over the last 2 or 3 years and with the growing availability of colorful, metallic, and thematic sprinkle blends.

We’ve seen increasingly creative uses of them to decorate cakes that are shared on social media to inspire other sprinkle fanatics, so I think sprinkle cakes are here to stay!

Try pressing them into the bottom of a cake to make a colourful border, using a tray or baking sheet under your cake to catch any stray sprinkles so that they don’t go everywhere!

Spread buttercream over a stencil and before peeling the stencil off, while the buttercream on it is still sticky, press sprinkles into it and peel the stencil off to reveal a sprinkled shape.

Add sprinkles to your homemade lollipops or other cake toppers like frosted cookies, brownies, or donuts for some extra sparkle!

If you’d like to learn new techniques and cake decorating ideas, check out my free online course on 10 Frosting Techniques. I have LOTS of other courses and classes and if you join my Club you’ll get access to every class, including all future classes that I add, so you can keep on top of all of the cake trends, get inspired with new cake designs and learn new techniques!

You’ll also be able to join my members-only live cake demonstrations, where you can vote for the cake I demonstrate and you can ask me any questions you have! Visit my online cake school for more information – I hope to see you there!

Here’s the video version of this tutorial:
If you’re looking for a festive baking project or a fun activity for Christmas Day, these cookies are very simple to make but they look beautiful and since they’re decorated with creamy buttercream, they taste incredible, too!
Start by baking your cookies and making some buttercream. I’ll talk about my recipe and alternatives that will and won’t work, at the end of this tutorial.

Let’s begin with a glitzy Christmas tree cookie. Use a piping bag with a small round tip and squeeze the buttercream out of the bag, pulling the bag very slowly towards you. You’ll get the straightest lines if you hold the tip of the piping bag a little above the cookie.

When you get to the edge of the cookie, hold the bag still for a moment to give the buttercream a chance to curve around and the push your hand very slowly backwards in the opposite direction, piping a line immediately beside the previous line so you don’t see any of the cookie between the lines.

Continue zig zagging up the cake and if your hands are shaky like mine, it might help to hold your piping wrist with your other hand, to steady it. If your zig zags are starting to lean to one side instead of going straight across the cookie you can pipe a half line to build up the side that’s lower and if the line breaks anywhere, just continue where you left off. By the time the whole tree is covered in lines and the decorations we’ll add next, you won’t notice any tiny imperfections.
As soon as you finish piping, while the buttercream is still sticky, add some sprinkles! A lot of sprinkle mixes come with gold stars which are perfect for the top, and any round sprinkles will look like baubles or ornaments. You can use my code BRITISHGIRL15 to get 15% off these sprinkles and anything else from Fancy Sprinkles!

Now use some chocolate buttercream or tint your buttercream with brown colouring and use a round tip to pipe the trunk of the tree with zig zags too. I’m using a slightly bigger round tip but you can use the same tip as you used for the green part of the tree.

If you don’t have a small round piping tip you can put your buttercream in a ziplock bag and cut off a small piece from one corner and squeeze the buttercream through that. I piped the tree on the left with a ziplock bag and I really like the texture!

For a poinsettia cookie you’ll need a leaf tip (this is a #352 by Wilton) and a cookie in the shape of a star, a flower, or even a round cookie. Hold the tip so the two jaws are on top of each other and the buttercream comes out the sides of the tip.

Squeeze the buttercream out and hold your wrist still for a moment to pipe the wide base of the leaf and then pull the bag sideways, release your pressure on the bag and swipe the bag away to make the point of the petal.

Pipe the petals over each point of the star. Don’t worry about the middle of the cookie because we’re going to cover that up next. Pipe a second layer of petals, piping each petal between two of the previous petals so they fill in the gaps between the points of the star.

You can add a few more petals in the middle if you like, and then press a sprinkle into the middle or a few small sprinkles.

It’s not Christmas without a gingerbread man but this one is chocolatey! Put some chocolate buttercream in a piping bag with a small round tip and start by piping the outline of your gingerbread man, not going quite up to the edge of the cookie.

Then fill in the space inside the outline, so the whole cookie is covered with buttercream. The piping can be messy – we’re going to smooth it in the next step. What’s important is that the outline is neat because that will make the edges of the gingerbread man smooth.

Use an

Switch to some plain white buttercream also in a bag with a small round tip to pipe the details: a smiley face, some wiggles around the bases of the arms and legs, and three little buttons, which you can press coloured sprinkles onto if you like.

Pay attention to how high up the eyes and smile are because if they’re too high or too low your gingerbread man will look a bit like an alien!

A stacked Christmas tree cookie is another use for star cookie cutters! You’ll need different sizes for this so a nesting set is ideal because the stars will be different sizes but the same shape. We’ll start with the largest cookie.

Use an open star tip like this #32 tip to pipe rosettes of green buttercream all over the star. For each rosette, apply pressure to the piping bag to squeeze it out and then as you lift the piping bag up, release your pressure to make a neat peak on the rosette.

Starting with the points of the star so that the rosettes are lined up neatly on those parts, which will be exposed after stacking the cookies.

Work your way inwards towards the middle of the cookie, which won’t be visible at the end so it’s fine if the rosettes aren’t as tidy.

Place the next biggest star on top, angling it so that the points are sticking out between the points of the star below it. Pipe all over this one too, starting from the outside and working your way inwards.

Continue with the rest of your stars, getting smaller and smaller as you work your way upwards and piping the same rosettes onto each star until you’ve built a little Christmas tree!

You can add sprinkles if you want to decorate it but I think it looks beautiful just like this!
I used sugar cookies for all of these cookies but you can use anything that holds its when you bake it, like gingerbread.

If you want to use chocolate chip cookies or other cookies that expand when they bake so they won’t work with cookie cutters, you can pipe these decorations on top of those even though the cookie isn’t the same shape as the decoration. If you want to decorate cookies but don’t want to bake them, you can buy cookies and pipe the decorations on top of those!

For the buttercream, I recommend using my 4 Minute Buttercream, which is made with powdered sugar or icing sugar and butter, because it sets after an hour or two at room temperature so although it doesn’t get as hard as royal icing, it won’t get damaged when you lift a cookie up. It’s also deliciously creamy and has a lovely texture to eat with cookies.

For more Christmas baking inspiration, check out my tutorial on Christmas cake ideas using sprinkles.

I hope you try these techniques – please tag @britishgirlbakes in your photos on social media so I can see them!
Here’s the video version of this tutorial:
My top 25 gifts for Christmas, birthdays, thank yous, or “just because” presents, for anyone who’s a baker whether a professional, a hobby baker or a wannabe baker who’s thinking of starting to bake! There are gift ideas for all budgets, including some homemade DIY gifts and I’ve got some great discount codes for you to use to save some money, too! If you prefer to watch a video of this tutorial, scroll to the bottom of the page.
1. Copper measuring cups and spoons
They’re practical and useful but also rose gold so they’re trendy and classy!

2. Piping tips
There are endless decorating possibilities on cakes, cupcakes and cookies using piping tips. I recently found a beautiful gold set made by Wilton!

3. Russian tips
Pipe intricate and multi-coloured flowers on cakes or cupcakes with a single squeeze of a piping bag using these flower nozzles. Not sure how to use them? Check out my 5 Tricks for Russian Tips tutorial!

4. Sprinkles
Everyone loves sprinkles and my favourite are Fancy Sprinkles – they come in beautiful colours including metallics, generous size bottles and they have gift sets too, which are perfect for secret Santa! Save 15% on your Fancy Sprinkles order with my code BRITISHGIRL15

5. Edible Gold leaf or silver leaf
These are a nice luxury to have for decorating cakes, other baked goods and even fruit!

6.
Essential for frosting a cake and useful for most cake decorating techniques, turntables (also called spinning cake stands) come in plastic but for a really smooth spin choose a stainless steel turntable.

7. Acrylic frosting smoother
I get THE smoothest frosting on my cakes using my acrylic frosting smoother. My favourite is the OG Icing Scraper by Cake Safe with it’s bevelled edge and super sharp edge. Use my code BRITISHGIRLBAKES to get 10% off yours!

8. Hot chocolate bomb mold
Jumping on board the tik tok trend, hot chocolate bombs are fun to make and drink and a silicone mold to make them is a great gift idea. Click here for my printout instruction sheet to give with your gift, showing step by step how to make them.

9. Make your own hot chocolate bombs for a DIY gift!
Check out my tutorial on everything you need to know to make hot chocolate bombs: what kind of chocolate to use, how to melt it to get the shiniest bombs, how to fill and seal the bombs, and how to get the most dramatic explosion!

10. Mug
Give a mug with a homemade hot chocolate bomb inside, or a hot chocolate bomb mold so they can make their own, OR just a mug because bakers always need caffeine!

11. Apron
A practical gift but seasonal or thematic prints, patterns and catchy phrases make them fun!

12. Cake themed clothing
Purple Cow make tshirts and sweaters with colourful cake slice designs like this one and you can use my code EMILY10 to get 10% off!

13. Gel colours
Looking for something practical? Cake decorators get through gel colours quickly so it’s always useful to receive new bottles.

14. New cake pans
Also practical! Cake pans get scratched and dinged which makes them less non-stick so they need to be replaced occasionally.

15. Shaped baking pans or molds
For a more interested baking pan, try a shaped pan or mold like a donut mold.

16. Shaped silicone molds
Shapes like dinosaurs or mermaid tails are fun for making marshmallows, candy, or chocolates to eat or decorate a cake with. They double up as ice cube trays, too!

17. KitchenAid mixer
No explanation needed – it’s every baker’s dream to have a KitchenAid mixer!

18. KitchenAid accessories or attachments
Already have a Kitchen Aid mixer? There are some useful accessories like a lid to prevent sugar or liquid ingredients spraying out of the mixer, or a paddle attachment to scrape around the mixing bowl. Or try an attachment that clips onto the front of the mixer like a spiralizer.

19. Cookie cutters
Choose a set with a theme like the desert (cacti and llamas) or tie a ribbon around an individual cookie cutter as a stocking stuffer or hang it as a Christmas ornament!

20. Marble pastry board
Keep cookie dough, pastry or a pie crust nice and cold with a marble pastry board, or use it as a beautiful background for food photography!

21. Marble rolling pin
Complete the set with a matching marble rolling pin to roll out dough or pastry on a marble pastry board

22. Baking tray. 23. Cooling rack 24. Silicon mat
Not the most exciting gift, but very useful! A shiny new tray to bake cookies and macarons to perfection, a cooling rack, and a silicon mat for non-stick backing

25. Tiny baking
This adorable set of tiny baking tools and utensils is a fun activity at any age! Making tiny cookies, pies, pizzas, brownies, cakes… tiny recipe book included!

I hope I’ve given you some fun gift ideas for the bakers in your life! Tell me in the comments if you used any and what the reaction was!
Here’s the video version of this tutorial:
In this tutorial I’m going to show you 6 ways to decorate Christmas cakes using sprinkles for fun, colourful, textured designs! If you prefer to watch a video of this tutorial, scroll to the bottom of the page.
1. Sprinkle-filled stencils
Make your own stencil with parchment paper, cutting out a shape out of the middle but keeping the surrounding paper intact. You can use a cookie cutter to trace a shape or fold the parchment in half to cut a symmetrical design like a heart or Christmas tree.

Press the stencil against the side of a cake. The frosting (I used my 4 Minute Buttercream) needs to have set before you do this so I like to put my cakes in the fridge for at least an hour or preferably overnight. Spread some more frosting over the stencil and this frosting will be soft and sticky, which is what we need for the next step!

Choose your sprinkles and press them into the frosting you’ve just spread over the stencil, pushing gently to attach them to the side of the cake. It’s easiest to add bigger sprinkles individually but you can press handfuls of smaller sprinkles into the frosting and they’ll stick easily.

Once you’ve covered the whole shape with sprinkles, peel the stencil off and voila! If there are any gaps in the design you can add individual sprinkles, which will stick to any of the exposed frosting you’ve just spread onto the cake over the stencil.

For finishing touches, try pressing sprinkles into the bottom of the cake to make a sparkly border and you can scatter a few on top of the cake, too! I piped a border on top of this cake using a #32 open star tip.

Tadaa! Sprinkles make this plain brown chocolate cake look so festive! You can use my code BRITISHGIRL15 to get 15% off your Fancy Sprinkles order.

2. Stencil with sprinkle decorations
Another way to use a homemade stencil is to tape it onto a pre-made stencil with whatever pattern or design you like, to add a design within the shape you’re creating on the cake.

Spread frosting over the stencil and smooth it by scraping off the excess with your

You can scrape off any parts of the design you don’t want with an

You can pipe some swirls of frosting on top of the cake using a 1M star tip and these look a bit like Christmas trees, so you can add sprinkles to decorate these, too!

For more tips, techniques and recipes for baking and cake decorating, check out my new (free!) live series on Amazon, Kitchen Adventures with British Girl Bakes! Follow my Amazon page to join me every Thursday for a new episode!

3. Sprinkled flowers
Using a leaf tip you can pipe poinsettias, the traditional Christmas flower. The frosting comes out of the triangular gaps in the sides of the tip and if you hold the tip still as you start to squeeze the frosting out, you’ll get a nice wide base for each petal.

As you finish each petal, stop squeezing the piping bag at the same time as you swipe it off the cake and that will give you a pointed tip on the petal. After doing one ring of petals, pipe another ring on top, overlapping the petals by piping each petal between two of the petals on the previous ring.

Use some silver or gold sprinkles to make the middle of the flower!
If you’re struggling with buttercream stripes you might find my tutorial on 4 Secrets for Perfect Stripes on Cakes helpful!

4. Sprinkled chocolate
To make a sprinkled chocolate cake topper, melt any kind of chocolate and choose a cookie cutter shape and place it on a piece of parchment paper or a silicon mat. Spoon the chocolate into the shape, pushing it right up into the corners.

While the chocolate is still melted and sticky, pour sprinkles on top and press those gently into the chocolate using a spoon or your fingers so that they stick. Leave the chocolate to set for about an hour or put it in the fridge or freezer to speed up the process.

When the chocolate has set, carefully push it out of the cookie cutter, pressing all over the shape just a bit at a time to ease it out gradually so it doesn’t break.

Pipe some frosting on top of a cake and push the chocolate into it to secure it. When the piped frosting sets, the chocolate will be attached firmly in place on top of the cake.

Sprinkled chocolates make beautiful and delicious cake toppers! If you’re looking for more cake decorating ideas using chocolate chips, check out my tutorial on 10 Ways To Decorate Cakes With Chocolate Chips.

5. Sprinkled brownies
Another way to use cookie cutters is to make cake toppers out of brownies! My brownie cake topper recipe is stable enough to be able to cut out shapes that will stand up on a cake.

Cut out the shape you want from your brownie using a cookie cutter and push it gradually out of the cookie cutter, pushing one area at a time and just a little bit at a time so that it doesn’t break.

Push a paper straw into the brownie, pushing it at least half way up the brownie to support it when it’s standing upright on a cake later. It’s easiest to twist the straw around as you insert it.

You can scatter sprinkles over the brownies before baking them for a quick decoration or pipe frosting onto the brownie and then press sprinkles onto the frosting. Here I’m using a leaf tip, starting at the bottom of the tree and overlapping each row to completely cover up the brownie.

Add some shiny sprinkles and then push the straw into a cake and your cake topper is ready!

6. Sprinkled marshmallows
For a very quick decoration to add height and colour to your cake, poke a paper straw into a marshmallow and dip it into melted chocolate, twisting it around to cover the whole marshmallow in chocolate.

Let the excess chocolate drip off and then dip the marshmallow into a bowl of sprinkles, twisting it around to completely cover the marshmallow with sprinkles.

Frost and decorate your cake – try adding a sprinkle border around the bottom of the cake to match the marshmallows! Here I experimented with some non-traditional Christmas colours for a pastel, wintery feel.

Stick the straws into the cake, playing around with different positions on the cake and inserting them at different angles and you’ve got some glitzy marshmallow cake toppers!

Here’s the video version of this tutorial:
Usually an indulgent treat or comfort food, brownies can be jazzed up to make beautiful cake toppers for any occasion!
The trick to making brownies that are stable enough to shape, decorate, and stand up as cake toppers is to make brownies that aren’t too crumbly (sometimes called “cakey”) but also aren’t too fudgey or gooey.
This recipe makes an 8″ brownie, which I usually get 4 cake toppers out of as well as some cut-offs to eat while I work!
Ingredients
1/2 cup (1 stick or 113g) butter, melted
1/2 cup granulated sugar
1/2 cup brown sugar
1 teaspoon vanilla extract
2 eggs
1/3 cup unsweetened cocoa powder
3/4 cup all-purpose flour
1/4 teaspoon baking powder
pinch of salt
Method
In a large bowl, stir together melted butter and sugars. When the butter has cooled, stir in vanilla and egg. Finally, add the cocoa powder, flour, baking powder and salt.

Spray an 8″ pan with oil and pour the brownie batter into it, spreading it evenly around the pan with a spatula. If you’re using an air fryer, preheat it to 330F for 3 minutes and then cook the brownies for 16-18 minutes, until they don’t wiggle when you shake the pan. If you’re using an oven, preheat it to to 350F and bake the brownies for 22-25 minutes.

Leave the brownies to cool in the pan for 10 minutes and turn out onto a wire cooling rack to cool completely. Chill in the fridge for an hour or overnight before shaping.

Use cookie cutters to cut out shapes, pushing the brownies out through the cutters very gently by pressing all over the brownie to ease it out a little bit at a time so it doesn’t break. Decorate brownies by spreading or piping 4 Minute Buttercream and add sprinkles for some bling!

Push a straw into each shape, inserting it at least half way up the shape to support it when it’s standing upright on a cake later. Push another straw down into your cake, pinching it where it sticks out of the cake and then pulling it out. Hold it beside the brownie on the straw to measure the same distance, so the straw on the brownie cake topper is the same height as the cake. Trim the straw and this will make the cake topper more stable.

Insert the straw into the cake, pushing all the way down until the straw hits the cake board at the bottom of the cake.

Refrigerate the cake with the brownie cake topper until 2-4 hours before serving the cake. Keeping the cake and the cake topper cold will prevent it from crumbling.

I’d love to see your brownie cake toppers! Please tag @britishgirlbakes in your photos on instagram so I can see your creations!
Breaking down the hot chocolate bomb trend… How do you get the marshmallows inside the chocolate? Do you have to use expensive, high quality chocolate? How do you get it so shiny and how thick does it need to be? What are some fun ways to decorate the bombs? How do you get the most dramatic explosion? How can you gift wrap these? I’ll be answering these questions and showing every step of how to make them, in this tutorial! If you prefer to watch a video of this tutorial, scroll to the bottom of the page.
First, let’s fly through the basic technique. Melt chocolate, spread it over a mold, pop it out, fill it with treats, stick two halves together, add some decorations and then create an explosion! Now I’ll go step by step in a bit more detail and then show you the drastically different results with different kinds of chocolate.

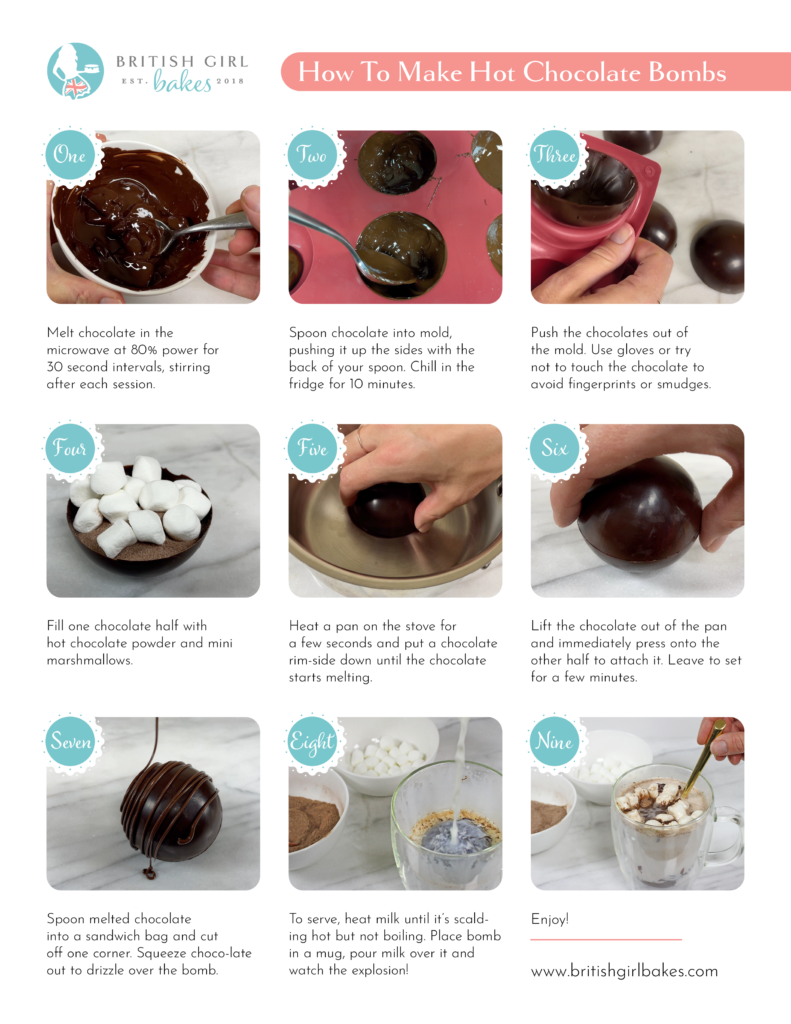
The first step is to melt your chocolate and how you do this is THE most important part of the process. If you’re using a bar of chocolate you should break or chop it into small pieces that are all around the same size because it will melt quicker and more evenly than if you use large blocks of chocolate like this.

A 4oz bar of chocolate or 113g is enough to make 3 bombs, by filling the mold to make 6 halves. Put the chocolate in a bowl and put the bowl in the microwave for 30 seconds at 80% power and then stir the chocolate around to spread the heat and to melt it a bit more as it touches the warm bowl.

Put the chocolate back in the microwave for another 30 seconds at 80% power and then stir again. If you overheat the chocolate you’ll get a dull finish or patchy stains all over your hot chocolate bombs and if that happens I’ll show you how to fix it later in this tutorial.

As you stir, any lumps will melt a bit more. How many times you do this depends on how much chocolate you’re using, how big the pieces are, and how hot your bowl gets in the microwave, but for me a bar of chocolate took 3 sessions in the microwave. Once the chocolate is completely smooth, it’s ready.

The process for white chocolate is exactly the same – melt the chocolate gently by using short intervals and 80% power in the microwave so you don’t overheat the chocolate. You can add sprinkles to the chocolate but I’d recommend using these tiny non-pareils instead of larger sprinkles because the fun variations of shapes and sizes in a sprinkle mix and any metallic colours won’t be noticeable once you’ve mixed them into the chocolate.

Now you’ll need a silicon hot chocolate bomb mold. Spoon some chocolate into one of the holes and use the back of your spoon to push it up the sides of the mold, all the way up to the top so you have a complete hemisphere. Pay special attention to the rim of the mold because if it’s too thin there it will snap when you take it out of the mold or when you attach the two halves later.

Make sure you don’t see the mold through the chocolate in any places because that will create holes or lighter coloured patches. I’ll explain more about the importance of the kind of chocolate you use later but for now, just note that for a semisweet chocolate with less than 60% cocoa solids you only need to do one layer of chocolate because even when it’s melted, it’s quite thick.

If you’re using very good quality chocolate with a high cocoa solids percentage of over 60%, like this 70% bar, the melted chocolate will be very runny so the coating will be thin so I recommend doing one layer, then putting it in the fridge for about 10 minutes until it’s set, and then repeating the process to add another layer to make the chocolate slightly thicker.

Use the same method to spread white chocolate into the molds, with or without sprinkles mixed into the chocolate.

Put the molds in the fridge for at least 10 minutes to set the chocolate and then hold the mold on two opposite sides of a hemisphere, and gently peel back the mold from the chocolate with both thumbs while pushing upwards on the bottom of the mold with your fingers.

The chocolate should pop out easily. It’s best to wear gloves while you do this so you don’t leave fingerprints on the chocolate. If you didn’t overheat your chocolate, it should be beautifully shiny.

Look at the difference between properly melted chocolate and overheated chocolate! I’ll show you how to fix overheated chocolate later.

Now we’re going to fill the bombs and then attach the two halves together. To fill the bombs, place one half of chocolate facing upwards, like a bowl, and pour some hot chocolate into it. I use between 1 and 2 tablespoons of powder.

Then sprinkle some marshmallows on top and add anything else you want in your hot chocolate, like brownie pieces or sprinkles. Make sure everything is within the edges of the chocolate so your next half will fit neatly on top.

I made some little chocolate dinosaurs for fun, pouring melted chocolate into silicon dinosaur molds and then adding those to the sprinkled white chocolate bombs.

Although the idea was cute, they melted in the hot chocolate so you didn’t notice the shapes in the end. I’ll show you a more effective way to use chocolate shapes like these in a minute.

Place a pan on the stove on high for a few seconds until the base warms up and then take it off the heat and place the other half of your bomb in the pan so that the edge starts to melt. As soon as you see the melted chocolate around the base of the bomb, lift it up, otherwise you’ll melt too much and you’ll have a lopsided sphere.

Press the melted edge down onto the other half, pushing gently to attach the edges together. Tadaa!

The process is the same for white chocolate hot chocolate bombs. You’ll notice that the hot chocolate is much sweeter when the bomb is made with white chocolate instead of semisweet or dark chocolate.

Another way to do this which I find trickier and messier is to put some melted chocolate in a ziplock bag and squeeze it around the rim on one of the halves of the bomb and then press the two halves together. You can try both and choose which way you prefer!

To disguise the seam between the two halves you can add decorations. Start with a chocolate drizzle, putting some melted chocolate in to a ziplock bag and snipping a corner off to squeeze the chocolate through.

Move your hand quickly back and forth over the bomb to drizzle the chocolate and you can leave it like that, which looks simple and classy, or add sprinkles! Use my code BRITISHGIRL15 to get 15% off your Fancy Sprinkles order ????

If you want to make chocolate shapes like the dinosaurs I showed you earlier, I suggest using them as decorations on the outside of the hot chocolate bomb instead of putting them inside, since they’re much more noticeable this way!

Now for the exciting part, the explosion! Warm milk until little bubbles form around the edges and it’s hot but not boiling. If it’s too hot, the bomb with melt immediately and there won’t be a dramatic explosion of the marshmallows and if it’s too warm, the bomb won’t melt and explode.

Pour the hot milk over the chocolate bomb and after a few seconds the chocolate will collapse and melt away and the marshmallows will bubble up dramatically to the surface!
I like to use a paper straw or a spoon placed in the mug to slowly lower a hot chocolate bomb into the mug, since it can be a bit tricky to lower in down into the mug with your fingers for these large bombs that are almost as wide as the mug.

You can gift wrap these for a thoughtful, unique present and I’ll show you how in a moment but first, the burning question: Which chocolate should you use? Whenever I read that you need good quality chocolate for a recipe, I roll my eyes and reach for a bag of chocolate chips. But for these hot chocolate bombs, there really is some truth to this as far as the shininess of the bomb and how dramatic the explosion is at the end.

I tested 3 types of chocolate: semisweet chocolate chips, a semisweet bar with 55% cocoa solids, and ghirardelli 70% chocolate and here are the results:
1) Semisweet chocolate with 55% cocoa solids was super shiny and beautiful but I did notice it melted quite quickly with any touch, especially if I tried to tidy up the join of the two halves of the bomb after attaching them together.

2) Dark chocolate with 70% cocoa solids (I used Ghirardelli) was the shiniest by just a little bit compared to the 55% chocolate but it was the most stable as far as staying solid when I pressed the halves together or picked it up.

3) Semisweet chocolate chips gave the least shiny result and were the most difficult to work with because even after setting, the chocolate melted as soon as I touched it so I left fingerprints all over it.

What should I do if my chocolate is stained? If you overheat your chocolate when you melt it at the beginning, you’ll get these stains or splotches on the surface or a dull finish instead of that nice shininess you saw on the chocolate that was melted properly, but don’t panic, you can fix it!

Break up the chocolate and put it back in the microwave at 80% power for 30 seconds at a time, spread it back into the molds, let it set and you’ll have nice shiny chocolate bombs!

Ok, a few ideas for displaying or serving these, or wrapping them up to give as gifts. First, if you want to give someone the mold as a gift so they can make their own, I’ve made a “how to” sheet you can print off and give them with the mold!
If you want to display a hot chocolate bomb on a plate or platter, cupcake wrappers hold them in place nicely and they’re just the right size for these large bombs – they fit perfectly!

For a gift, place a bomb in the middle of a square piece of cellophane and pull the corners up and tie them with a piece of string or ribbon. You can put the wrapped up bomb inside a mug and give both as a gift. Add a spoon or a paper straw or two for a nice touch.

These are a fun gift to unwrap and even more fun to drink! This was my three-year-old enjoying his first ever hot chocolate bomb!

Here’s the video version of this tutorial:
Give someone the gift of making their own hot chocolate bombs with this unique, thoughtful gift idea! Wrap up a silicone hot chocolate bomb mold and include this printout of how to make hot chocolate bombs, which will guide them step by step through the process!
For a more detailed tutorial on every step of the process of making, exploding and gift wrapping hot chocolate bombs, click here!
In this tutorial I’ll show you how to make an under the sea cake with jelly! I’ll show you a few variations as well as tips and tricks for the easiest and most successful way to create one of these eye-catching and delicious cakes. If you prefer to watch a video of this tutorial, scroll to the bottom of the page.
First, let’s make the cake part of the cake! You’ll need a springform pan for this, which is usually used for cheesecakes and they’re the ones you can clip and unclip to separate the base and the outer ring.

Take a few layers of whatever flavor cake you like and chill them in the fridge for an hour so they’re cold and film. Place your first cake layer on the base of the springform pan and level the cake with a serrated knife if necessary, so that the next layer of cake will sit flat on top of it.

Pipe or spread your filling onto the first layer of cake. I’m using my 4 Minute Buttercream to fill and frost my cake but you can use whatever you like. It’s easiest to use a firm filling rather than something runny like lemon curd or a fruit puree because even if you pipe a buttercream dam around the filling to hold it in place, when you carve the cake if you carve off that dam your filling will ooze out of the cake.

Now carve your cake into some form of a dome by trimming the top edge off with a serrated knife so that the cake is curved around the top. It can be simple, like this, with just a few cuts to create the dome, or you can be much more elaborate, carving nooks and crannies into the top and sides of your cake.

Three things are really important when you’re carving your cake. First, keep in mind that if you want the maximum amount of cake and filling, a domed shape is best because then the cake layers will fill the middle of the cake, with a thin layer of jelly completely covering it on top and around the sides to create the effect of being under the sea.

Secondly, cakes are easiest to carve when they’re cold because they’re less crumbly so they won’t fall apart when you cut into them. You can even freeze the cake for an hour if it’s falling apart as you carve it.

Thirdly, the MOST important thing when you’re carving the cake is that the sides of the cake are at least a centimeter or 1/2 an inch within the edge fo the base of the springform pan, so that there’s room for frosting and then for the jelly to fill in the space around the outside of the cake.

If you want to, you can frost the bottom part of the cake all the way up to the edge of the base of the pan so it looks like sand at the bottom of the sea, but you’ll still need to carve the cake smaller than the pan now, so there’s room for that frosting.

It’s fine for the cake to look messy as you carve it because this is just the beginning of the process! To make the shape of your cake more interesting you can use any cake you’ve cut off to build onto it. To do this, spread some buttercream wherever you want to attach another piece of cake.

Then press the section that you carved off the cake onto the fresh buttercream and push gently to secure it. You can carve it to make a smooth join onto the existing cake but you don’t have to because you’ll be covering it with frosting, so you can use that to fill in any gaps.

Cover the cake with a thin layer of frosting. This is called a crumb coat because if any crumbs come off the cake and get into the frosting, they’ll be trapped in this layer of frosting so when you spread more frosting on later, the crumbs won’t get into that layer. Put the cake in the fridge for about 30 minutes to set this crumb coat and now I’ll show you one of the ways to make fish to swim in the jelly part of this cake.

You’ll need a silicone mold for this and some white chocolate chips. Microwave the chocolate at 50% power in the microwave for a minute to melt it without burning it and stir it until it’s smooth. You can microwave it again it there are still lumps in the chocolate.

Once the chocolate is smooth, divide it into a few bowls and add a drop of gel color to each one. You can use oil based colours if you have them but the gels you use for frosting are fine if you don’t add a huge amount and don’t overstir the chocolate.

For this bowl I added a big drop of gel and there’s just a tiny bit of chocolate in the bowl so it seized up but for these other colours, with a smaller drop of colour and more chocolate in the bowl, the gels work perfectly.

Use a paintbrush to brush the coloured chocolate into the fish mold, using more than one colour within the same fish to make it look a bit more interesting and realistic. I’m using the purple chocolate that seized and since the fish is going to be within jelly on the cake, if there’s any texture or graininess in the chocolate you won’t be able to see it.

Wipe off any chocolate around the edges of the fish with an

Put the fish in the fridge for about 30 minutes to set and then flip them out of the mold and admire how pretty they look! The jelly will give them a shimmery, wet effect later. If some snap as you take them out of the mold, don’t throw them away, you can easily attach a broken tail or fin when you put the fish on the cake.

Now we’re going to frost the cake with sand. Make the colour of buttercream you want with yellow and brown gels and you can mix a few different shades if you want to create some variation. I’m going to use plain white buttercream and yellow. Spread the colours in patches onto the cake or scoop up a few colours at a time with your

You can use ganache if you prefer – it doesn’t have to be buttercream. Spread it all over the cake and smooth it a bit with your

If you’re using chocolate fish, press those into the frosting now, while the frosting is still sticky. If any of the fish broke when you took then out of the mold, just press both parts into the frosting to piece the fish back together. When you position your fish, choose the outermost parts of the cake because then the fish will be the most visible through the jelly.

The further in from the edges fo the cake, the more blurry the fish will be. They’ll look more like subtle blobs of colour than actual fish. You’ll hardly notice this fish up here because it’s so far in from the edge fo the cake.

If you’re going to leave the bottom part of the frosting visible, like this, after you frost the cake put it in the fridge for an hour to set the frosting and then scrunch up a piece of foil and wrap it around the cake, pressing to imprint some random texture in the frosting so it looks like grains of sand.

I pressed the crushed foil into the frosting all over this cake but when the cake is finished you really don’t notice the texture if there’s jelly over it, so it’s only worth doing the section of frosting that’s going to be exposed.

Now we’re going to make the jelly! You’ll need 3oz or 85g of gelatin and 1 cup of water and just to prepare you, if you’re using little packets of gelatine you’ll need a LOT of them!

Pour the gelatin and water into a bowl and leave it for 5 minutes for the gelatin to bloom, which make the jelly smooth and firm.

Put 1/2 a cup (or 100g) of sugar into a pan with 2 cups of water and bring it to a boil over a medium heat, so that all of the sugar dissolves. Take the pan off the stove or just turn the heat off and add the gelatin mixture to the pan, stirring until it’s all melted.

If there are any clumps of gelatin left, lift them out with a spoon. Add a teaspoon of whatever flavor you like. I’m using almond for this since I think it will pair nicely with a banana chocolate cake, but fruity flavors like lemon or any berry are maybe more… expected!

The second way to make fish for this cake is to use jelly instead of white chocolate. To do this, set aside a little bit of the jelly now and tint the rest blue with just a drop or two of blue gel. You can mix the colour in completely or leave it marbled for a different effect.

Use another colour to tint the little bowl of gelatin. Choose something that will show through the blue jelly so pink is a great option, or you can do a few bowls of different colours.

Use a measuring spoon or a dropper (a tiny turkey baster!) to fill in the fish shapes. If the gelatin overflows, dip a paper towel into it to mop it up. Put the mold in the fridge for an hour and then push the fish out!

The pros of gelatine fish are that they’re easier to cut through when you serve the cake than white chocolate fish, and you can use the gelatin you’re making anyway instead of needing another ingredient for the white chocolate fish.

The downside of gelatine fish is that the colours and texture aren’t as visible through the jelly ocean on the cake as on the white chocolate fish. When you see the finished cakes you can choose which ones you prefer.

Finally, we’re going to create the jelly ocean! Cut a piece of acetate so it’s long enough to wrap around your cake, and at least as high as you want the cake to be.

Spray the acetate with oil and wipe the oil with a paper towel so that there’s a thin coating all over the acetate. If you’re using a roll of acetate, spray the side that curves upwards, the side of the acetate that will touch the cake when the acetate wraps around it.

If you haven’t already, take the ring off your springform pan and place your cake on the base. The cake needs to be cold for this so that the frosting is firm and doesn’t get damaged when you move the cake around and wrap it with the acetate.

Make sure the cake is in the middle of the pan, with at least 1/2 a cm of a 1/4 of an inch all the way around if you want the entire sides of the cake to be jelly. I’ll show you the alternative next.

Wrap the acetate around the cake, around the base of the springform pan. Pull it tight and then tape the end of the acetate to make a tight seam from the top to the bottom, so that the jelly doesn’t leak out of the join of the two ends of the acetate.

Place the cake on the base onto a piece of cling film or Saran Wrap and lift the plastic up to wrap it around the acetate. Secure it tightly with a few pieces of tape. This will stop the jelly leaking out of the bottom of the acetate.

Then lower the ring of the springform pan down over the acetate and connect it to the base. The purpose of the cling film and tape is to make sure the jelly doesn’t leak out of the acetate but you can place your cake in a bowl just in case.

Once the jelly has cooled but before it sets, pour it slowly over the cake. Aim to hit the cake somewhere there isn’t a fish, so you don’t risk knocking it off the frosting where you placed it. If the jelly has cooled and the cake is chilled so the frosting is firm, the jelly won’t melt the frosting or blend with it, it will just sit on top of it.

You can see a bit of jelly leaking out here, so the bowl is a good idea just in case. If you wrap the acetate with cling film before you clip on the ring fo the springform pan and you tape it tightly enough, you shouldn’t have any leaking jelly.

For this cake, you can see that at the bottom of the dome, the frosting on the cake goes right up to the acetate wrapped around it, so there’s no room for jelly, so the sand frosting will on the outside of the cake at the bottom.

Place gelatin fish around the cake, keeping the fish on the edges of the cake so they’ll be the most visible. Pour the gelatine over the cake to fill in the area around the cake up to the acetate,

Put the cake in the fridge for an hour to set the jelly. Then take it out of the fridge and unclip the springform pan, lifting it up over the top of the acetate.

Peel the tape off the acetate and unwrap the acetate. If the jelly has set and the acetate was greased with oil, the acetate will peel off easily and the jelly will stay behind, creating a smooth coating all around the cake.

If the frosting on the cake went all the way up to the acetate at the bottom of the cake, that frosting will be exposed when you peel off the acetate and the jelly ocean will start higher up on the cake. If any jelly seeped below when you want the ocean to start you can carefully peel off those thin patches of jelly.

Lift the cake off the springform base and spread some buttercream on a cake board or a plate to secure the cake on it.

If there’s any stray gelatin at the top of the cake, above the top edge, you can trim it off with scissors. This happens when some jelly leaks out of the cling film and the jelly part of the cake sinks a little bit lower, leaving some residue behind, higher up on the acetate where the top level of the jelly used to be.

If you want to add some edible sand around the bottom of the cake, pipe frosting around the base and straight away pour some brown sugar or crushed graham crackers onto the cake board and push them gently into the frosting, up against the cake.

You can use any piping tip, it doesn’t have to be round, or just squeeze the frosting out of the hole at the end of the bag without a piping tip. You can flatten the piped frosting with an

Cut into the cake just like you’d cut into any other cake! You’ll have to use a bit of pressure to cut through white chocolate fish. It’s fun having two very different flavours and textures in the same slice of cake, and the cross section of the cake looks stunning!

Whether you completely cover the cake in jelly or leave some frosting “sand” exposed, and whether you use jelly or white chocolate fish, this cake will be both delicious AND beautiful!

If you aren’t happy with your cake after removing the acetate, pull the jelly parts away from the frosted cake and put them in the microwave at 50% power for 30 seconds at a time to melt the jelly again.

Make any changes you want to your cake and then wrap it in acetate again, tape it with cling film, re-attach the springform pan and once the jelly is cool, pour it over the cake!

I hope this video has given you the tips and confidence to make your own under the sea jelly cake! Please tag me (@britishgirlbakes) in your photos on instagram so I can see your creation!

Here’s the video version of this tutorial:
Square cakes are so time consuming to frost that I hardly ever used to make them, but with this simple technique using any cardboard box you can frost square cakes quickly and neatly, with super sharp edges and corners, with no special tools! If you prefer to watch a video of this tutorial, scroll to the bottom of the page.
1. Bake your cake
Bake your cake layers in square pans or if you don’t have those you can use a sheet pan and cut the rectangular cake into squares, like this. I used an 8″ x 12″ pan and divided the cake in half down the short side and in 3 along the long side.

The square cake layers don’t have to be exactly the same size – a difference of a few millimeters is fine because it will be filled in with frosting later. Measure the squares of cake, choosing the largest one if there’s a bit of a variation. Mine are 4 inches by 4 inches.

2. Choose a box
Any box will work for this as long as it’s made of cardboard so it doesn’t bend or droop because it needs to stay flat. Stickers or writing or packing tape on the box are fine because we’re going to wrap it up so it’s safe to use next to food.

You can use any part of the box but I like to side flaps because you have to do a minimal amount cutting. You’ll need to cut out three squares from the box and I’ll show you next how to measure them.

3. Measure and wrap your cardboard box squares
You’ll need to measure and cut three squares out of your cardboard box. Position a ruler so that the base is pressed against any straight edge of the box, which is any edge you haven’t yet cut. This will make sure the ruler is at right angles to that edge. Draw along the ruler to mark out the first edge of your square.

Now draw a line in the opposite direction for the next edge. If you have one of those triangular rulers to measure right angles, that will help you draw out a perfect square but if you don’t have one, a regular ruler is fine. The ridges along this cardboard are a helpful guide to make sure this line is at right angles to the first line.

Measure from one line the exact width of the cake layer (so 4” for this cake) and mark a little line on the cardboard. Move the ruler a bit further up and do the same again, and this will make sure the next line is at rightangles to make a perfect square. Draw a line connecting the two little lines.

For the last line, measure the same distance, drawing another two lines, and connect those to finish the square. Cut the square out carefully, making sure the sides are smooth and the corners are sharp, not rounded.

Follow the same steps to draw two more squares, and these both need to be the same size, which can be whatever you choose as long as it’s between 1/2 an inch and an inch bigger than the width of your cake. I recommend 3/4 of an inch and I’ll show you why when I frost the cake.

To make these cardboard box squares food safe and to give them even smoother edges we’re going to wrap them very tightly with parchment paper. Fold two opposite sides over the square and tape them down, pulling the parchment as tightly as you can so the snuggest fit so there are no wrinkles and that will give you the straightest sides and sharpest corners on your cake.

Trim the ends off the parchment if they’re really long, like mine are.

and then wrap up the square the same way as you’d wrap a present in a box, folding triangles at each side and then flipping the end section over the square, making sure the corners line up to make a sharp point, and tape them down. Now you’ll have a perfect square, wrapped up neatly so it’s clean and smooth.

Wrap all three cardboard box squares up like this, so you’ll have a square the same size as the cake, which the cake will sit on, and two slightly bigger squares which will be your guides around the edge of the cake of how much frosting you need, and will also guide your frosting smoother to get smooth sides on the frosting. The gap in between the cardboard box squares in the this photo is where the cake will go.

If you hold a cake layer up against one of the larger cardboard box squares, there should be at least 1/2 an inch of board visible all around the edge of the cake or ideally 3/4 of an inch. This will be filling in with frosting after you assemble your cake.

4. Assemble your cake
Starting with just the small square, spread or pipe a little bit of buttercream onto the square and press your first layer of cake onto it. The dot of buttercream on the cake board at the bottom of the cake is really important because it holds the entire cake in place while you frost it.

Spread or pipe buttercream (or whatever filling you’re using) on top of the first layer of cake and then continue layering cake and filling to assemble your cake. Line your cake layers up directly over each other so that the cake is straight and not leaning over sideways.

5. Frost your cake with a crumb coat
Chill the cake in the fridge for about an hour so that the cake firms up and is less crumbly, and then spread frosting all over it. This layer of frosting is called a crumb coat and it’s going to cover the cake completely to trap any crumbs that come off the cake now, so that they don’t get into the final coat of frosting.

I like to frost the cake on a larger cake board and I use a ring of tape or a non-slip mat to attach the cake on it’s smaller cake board to this larger cake board.

The frosting doesn’t need to be neat but it does need to cover the top of the cake and the sides all the way from the top down to the bottom where the cake is sitting on the cake board. There should be no exposed cake because that will allow crumbs to get into the final coat of frosting.

Smooth the crumb coat of frosting, scraping with your frosting smoother from one side to the middle and then from the other side to the middle, because if you scrape all the way across a side your frosting smoother can pull off the frosting off the second edge with it.

The crumb coat needs to be quite thin and without any lumps of frosting sticking out, because those might poke through the final coat of frosting later. Let the crumb coat set for 30 minutes in the fridge before you apply your final coat of frosting.

When the cake is cold and the frosting has set, take the cake out of the fridge and slide an

You’ll be able to touch the frosting on the cake because it will be firm, so if you need to you can press a finger or thumb against the side of the cake to balance it as you lift it up. Set the cake aside for a moment.

6. Attach cardboard box squares to the cake
Put one of the large squares down on the

Press the cake on its small square down onto the large cardboard box square at it will stick to the tape you placed there. Center the cake in the middle of the larger cardboard box square. If you’re going to use a different colour for the final coat of frosting, mix that now.

To frost the cake, start with the top and spread on a generous amount of frosting, making sure it goes all the way over the edges of the cake to prevent air bubbles later. Add some extra frosting to the corners since those are the areas where the frosting typically droops.

Don’t worry about getting this frosting smooth. Place your other large square on top of the frosting, lining it up as well as you can over the bottom square so that each corner of the cardboard box square on top of the cake is directly on top of the corner of the cardboard box square below the cake.

Use your frosting smoother to make sure the cardboard box squares are lined up by resting the base of the frosting smoother down on the cake board and then pushing it gently towards the cake so that it touches the edges of both the top and bottom square. Adjust the top square by pushing it slightly if necessary.

When you’re happy with the position of the square, push down firmly to secure the square to the frosting on the cake. There will probably be gaps of air around the corners and that’s fine for now.

Use the edge of your frosting smoother to press against the sides of the cardboard box square to check it’s still lined up over the bottom square.
Then do a double check that it is by scraping once around the cake. What you’re checking for here is that when your frosting smoother glides around the cake pressed against the edges of the cardboard squares, it isn’t knocking against the crumb coat of the cake, it’s only touching the cardboard squares. Adjust the top square if you need to.

7. Frost your cake
Now cover the sides of the cake with frosting. Be generous with the frosting – you want it to fill in the gap all the way from the sides the cake to the outer edge of the cardboard box squares.

Start smoothing the frosting the same way you did for the crumb coat, scraping from one edge of the cake towards the middle and then swiping your frosting smoother away instead of going all the way to the other edge of the cake. Scrape back in the opposite direction from the other edge, back into the middle.

We’re going to do a second round of frosting so this doesn’t need to be perfect but you don’t want any lumps of frosting sticking out. We’re going to chill this first round of frosting and those lumps will get hard and if they stick out beyond the cardboard box squares, your frosting smoother will bump against them and you’ll get bulges in your final coat of frosting.

You can see the white crumb coat through the blue frosting here and that means I haven’t spread enough blue frosting onto the cake. It’s fine for now because we’re going to add more frosting next, after chilling the cake for about 30 minutes.

Chilling the cake sets the frosting that’s on the cake, so when you spread more frosting on it will build on top of what’s already there, instead of weighing down on the existing frosting and dragging it down. This is especially important for large cakes, where the amount of frosting on the sides of the cake is quite heavy.

When you’ve already got a smoothish base of frosting on the cake, this final round is much easier to apply thickly enough and to get really smooth. Completely cover up the sides of the cake and then smooth with your frosting smoother, going from one edge to the middle and then the other edge to the middle.

I’m using my acrylic smoother for this final coat because it gives a smoother finish to buttercream than my thin, plastic smoother. Always go from one edge to the middle and then back the other way, never all the way over because if you go past the second edge, your frosting smoother might pull frosting off that corner.

The squares of the cardboard box that I’m using for this cake are 4 1/2 inches wide and the cake layers are 4 inches, so the cardboard is 1/2 inch bigger than the cake. I recommend cutting your squares 3/4 inch bigger than the cake because any less than that, if your cake layers aren’t exactly the same size and perfectly lined up the crumb coat might show through the frosting in areas. If you cut the squares much bigger, like a full inch bigger than the cake, you’ll have a LOT of frosting on your cake.

As you smooth, if you see any air pockets or bubbles in the frosting or you expose the crumb coat anywhere, just spread on some more frosting and smooth over that side again. Do as many touch ups as you need, spreading more frosting over any imperfections and scraping over them again until you’re happy with the sides. Pay special attention to the corners because I think sharp corners are what make square cakes look so impressive.

8. Remove cardboard box squares
When you’re happy with the sides, don’t lift the top square off yet! The frosting needs to be really cold and hard before you do, otherwise the square will pull up any soft frosting with it and ruin the smoothness. Put the cake back in the fridge one more time for about 30 minutes and then use a sharp knife to separate the top cardboard box square.

Push the tip of the knife just under the square and work your way around the whole cake to slice it free. Lift it up and the frosting won’t be perfect yet, but it will be very smooth except for maybe a few air pockets and some extra buttercream sticking up over the top edge.

You can trim any uneven buttercream sticking up with your knife and smooth over the top edges with your frosting smoother or

You can see the cardboard box square at the bottom of the cake, because its purpose is to be a guide for your frosting smoother so you scrape the frosting off right up to it and that leaves it visible. If you’re going to cover the bottom part cake with decorations, like a border piped with buttercream or pressing sprinkles into the frosting, you can leave the cake on the bottom square.

But if you’re not going to cover it up, you can take it off the same way you took off the square on top of the cake. Slide a knife under the visible square and cut all the way around the cake. Your knife will be in between the big square and the little square, which the cake is sitting on and because of that dot of buttercream you spread on right at the beginning, the cake is still attached to that little square.

Angle your knife sideways to lift the cake up so that you can reach underneath it and pull off the piece of tape that was sticking the small square to the large square. Then use your knife (or an

Slip your other hand underneath to cake to lift the cake off the cake board. Place a ring of tape on your final cake board that the cake is going to be served on, and lower the cake down onto that. The frosting will still be cold and hard from the fridge so it’s okay if you touch the sides of the cake while you’re doing this.

Tidy up the bottom edge by smoothing over it with your

You can save the cardboard box squares to use for another cake – just unwrap them and re-wrap them with clean parchment.

9. Tidy up any imperfections
If there are any air pockets in the frosting on top or your cake, probably near the corners, spread on a bit more frosting to fill the holes it and smooth over it with your

Now I’ll point out a few imperfections on this cake and how you can avoid or fix them. First of all, this little dot of dark blue here is gel food colour that I didn’t mix properly into the frosting.

Here there’s a dent in the frosting on the top right, an air pocket, where the frosting on the cake wasn’t as thick as it was over the rest of the cake. There are some little air bubbles on the bottom left, too. You can spread some more frosting over these parts and smooth over just that section again.

This white part here is where the crumb coat is showing through, so I probably could have used slightly bigger squares than I did. And the ridges you see in the frosting on this side, the faint lines, are caused by ridges in the cardboard cake board because it’s corrugated under the top lining, and to avoid this you can frost a cake on a smoother surface like an acrylic disc.

So you can avoid or fix all of these imperfection but even with them, I think this square cake looks stunning and I love the smooth sides and the sharpness of the angles at the edges and corners. Once you add decorations you won’t notice these little details and no one will know you use something as simple as a cardboard box to frost your cake!

I hope you’ve found this tutorial useful! I’d love to hear what you think in the comments below. If you want to try frosting a square cake without cardboard box squares, click here to watch how to do that!
Here’s the video version of this tutorial:
Can’t choose between a cookie or a cake? Enjoy both with this layered chocolate chip cookie cake!
This recipe makes a 6″ cake but you can easily double it for an 8″ or 9″ cake, or halve it for a 4″ cake
Ingredients
1 cup (2 sticks of 113g or 4oz each) butter
1/2 cup sugar
1 1/2 cups brown sugar
2 eggs
1 teaspoon vanilla extract
3 cups all-purpose flour
1 teaspoon baking soda
1/2 teaspoon salt (omit if using salted butter)
2 cups chocolate chips
1 cup 4 minute buttercream frosting
1/2 cup chocolate ganache (or use more buttercream)
Method
In a mixer, beat the butter and both kinds of sugar until the mixture is pale and creamy. Add the eggs and vanilla and mix on low until everything’s incorporated, which will take about 1 minute.

In a bowl, stir or whisk the dry ingredients (flour, baking soda and salt) together. Add them to the butter mixture and mix until just incorporated.

Add the chocolate chips and fold them into the dough with a spoon. Preheat oven to 325F (160C). Line three or four 6″ pans with circles of parchment paper but don’t grease them. Set aside 1/4 cup of dough and divide the remaining dough evenly between the pans, pressing the dough gently into the base of the pans and pushing it up to the edges of the pans.

Bake the chocolate chip cookie cake layers for about 45 minutes, checking regularly after 30 minutes. Cookies are ready when the centers don’t wobble when you shake the pans, and the edges are slightly darker but not burnt. Take them out of the oven but leave the oven on.
Run a knife or spatula around the sides of the pan to loosen the cookie layers and then turn them cookie layers onto a wire rack. Leave them to cool.

Line a baking tray with parchment paper. Use a 1/2 tablespoon measuring spoon to scoop the remaining 1/4 cup of dough into balls and place them on the baking tray to make 8 mini cookies. Bake at 350F (175C) for 8 minutes. (Please excuse my ancient baking tray!)

Prepare a batch of my 4 Minute Buttercream or for an even richer dessert try chocolate ganache. This will be the filling for your cake. Spoon the buttercream or ganache into a piping bag with whatever tip you like, or you can spread it onto the cake layers instead.

Now it’s time to assemble your cake! Pipe or spread a bit of buttercream or ganache onto th eplate or cake board you’re going to use. This will act as glue to secure your cake. Place the first cookie on top with the flat side facing down, which is the side that was on the bottom when you baked it. The flat base will make the cake more stable. Spread or pipe a layer of buttercream on top and then place the next cookie on top. Add another layer of buttercream filling and finish with the final cookie. You can turn this cookie upside down (so that the side that was on the bottom when you baked it, is now facing up) if you want the top of the cake to be flat.

Pipe swirls rosettes of frosting around the top of the cake. I used an 8B open star tip for my rosettes but any star shaped piping tip will look pretty. Straight away, while the frosting is still sticky, press a mini chocolate chip cookie into each one.

Store at room temperature for up to 3 days. Serve by slicing with a sharp knife and enoy!

If you’re looking for more ways to use chocolate chips to decorate cakes, click here!
I’d love to see your versions of this chocolate chip cookie cake! If you share any photos of them on instagram, please tag @britishgirlbakes so I can see your creations!
Here’s the video version of this tutorial:
